
Chapter 6. Building simplified installer images to provision a RHEL for Edge image
You can build a RHEL for Edge Simplified Installer image, which is optimized for unattended installation to a device, and provision the image to a RHEL for Edge image.
6.1. Simplified installer image build and deployment
Build a RHEL for Edge Simplified Installer image by using the edge-simplified-installer image type,.
To build a RHEL for Edge Simplified Installer image, provide an existing OSTree commit. The resulting simplified image contains a raw image that has the OSTree commit deployed. After you boot the Simplified installer ISO image, it provisions a RHEL for Edge system that you can use on a hard disk or as a boot image in a virtual machine. You can log in to the deployed system with the user name and password that you specified in the blueprint that you used to create the Simplified Installer image.
The RHEL for Edge Simplified Installer image is optimized for unattended installation to a device and supports both network-based deployment and non-network-based deployments. However, for network-based deployment, it supports only UEFI HTTP boot.
Composing and deploying a simplified RHEL for Edge image involves the following high-level steps:
- Install and register a RHEL system
- Install RHEL image builder
- Using RHEL image builder, create a blueprint with customizations for RHEL for Edge Container image
- Import the RHEL for Edge blueprint in RHEL image builder
- Create a RHEL for Edge image embed in an OCI container with a web server ready to deploy the commit as an OSTree repository
-
Create a blueprint for the
edge-simplified-installerimage - Build a simplified RHEL for Edge image
- Download the RHEL for Edge simplified image
-
Install the raw image with the
edge-simplified-installervirt-install
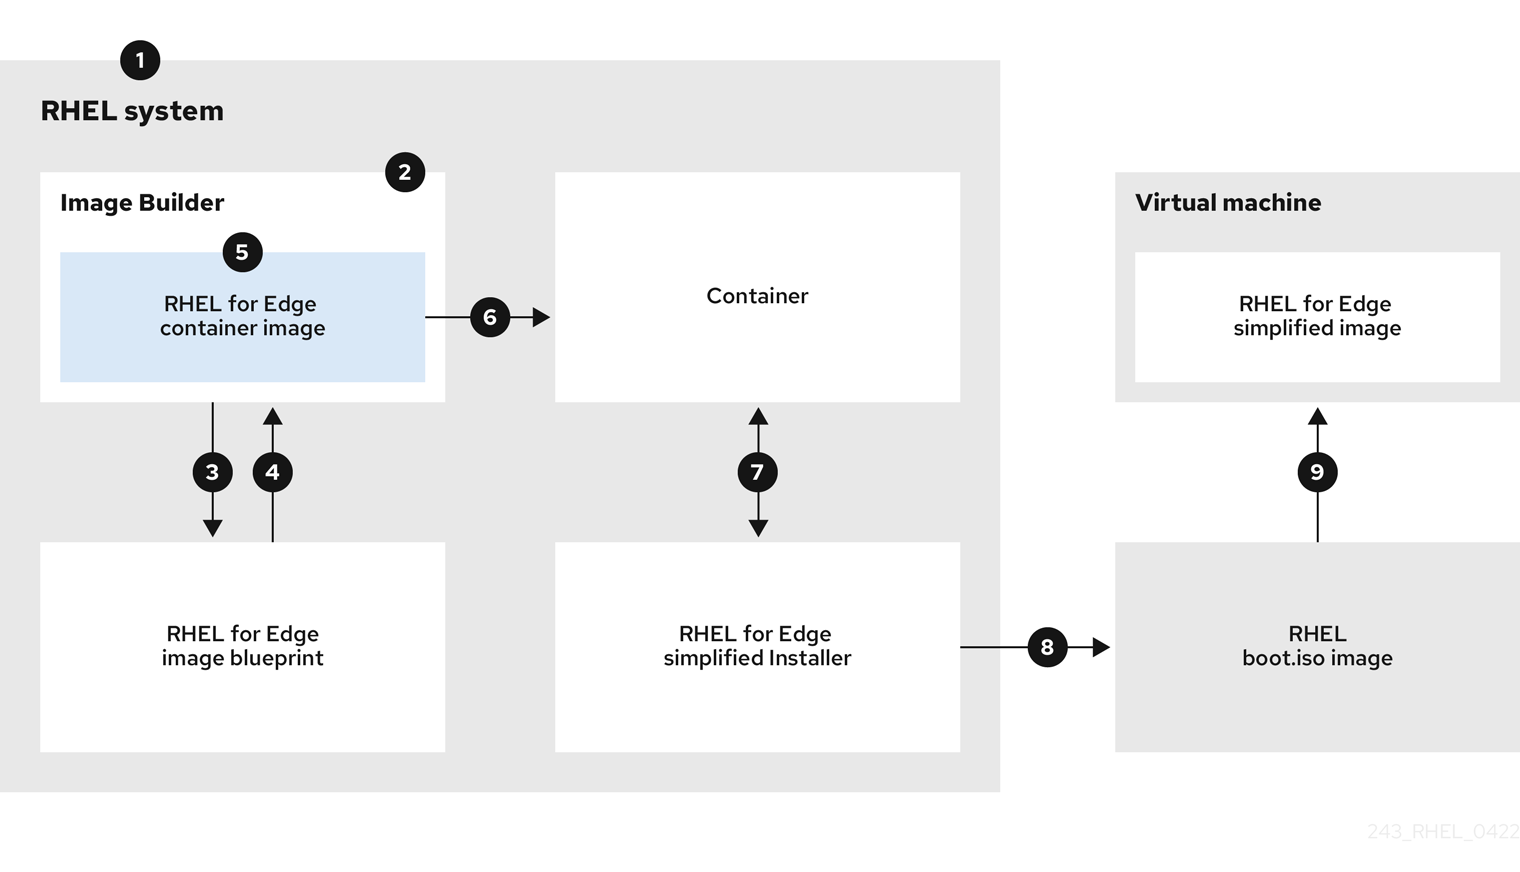
The following diagram represents the RHEL for Edge Simplified building and provisioning workflow:
Figure 6.1. Building and provisioning RHEL for Edge in network-based environment
6.2. Creating a blueprint for a Simplified image using RHEL image builder CLI
To create a blueprint for a simplified RHEL for Edge image, you must customize it with a device file location to enable an unattended installation to a device and a URL to perform the initial device credential exchange. You also must specify users and user groups in the blueprint. For that,follow the steps:
Procedure
Create a plain text file in the Tom’s Obvious, Minimal Language (TOML) format, with the following content:
name = "simplified-installer-blueprint"
description = "blueprint for the simplified installer image"
version = "0.0.1"
packages = []
modules = []
groups = []
distro = ""

[customizations]
installation_device = "/dev/vda"

[[customizations.user]]
name = "admin"
password = "admin"
groups = ["users", "wheel"]

[customizations.fdo]
manufacturing_server_url = "http://10.0.0.2:8080"
diun_pub_key_insecure = "true"
NoteThe FDO customization in the blueprints is optional, and you can build your RHEL for Edge Simplified Installer image with no errors.
- name is the name and description is the description for your blueprint.
- 0.0.1 is the version number according to the Semantic Versioning scheme.
- Modules describe the package name and matching version glob to be installed into the image, for example, the package name = "tmux" and the matching version glob is version = "2.9a". Notice that currently there are no differences between packages and modules.
-
Groups are packages groups to be installed into the image, for example the
anaconda-toolsgroup package. If you do not know the modules and groups, leave them empty. - installation-device is the customization to enable an unattended installation to your device.
- manufacturing_server_url is the URL to perform the initial device credential exchange.
- name is the user name to login to the image.
- password is a password of your choice.
- groups are any user groups, such as "widget".
Push (import) the blueprint to the RHEL image builder server:
# composer-cli blueprints push blueprint-name.tomlList the existing blueprints to check whether the created blueprint is successfully pushed and exists.
# composer-cli blueprints show blueprint-nameCheck whether the components and versions listed in the blueprint and their dependencies are valid:
# composer-cli blueprints depsolve blueprint-name
Additional resources
6.3. Creating a RHEL for Edge Simplified Installer image using image builder CLI
To create a RHEL for Edge Simplified image by using RHEL image builder command-line interface, ensure that you have met the following prerequisites and then follow the procedure.
Prerequisites
- You created a blueprint for the RHEL for Edge Simplified image.
- You served an OSTree repository of the commit to embed in the image. For example, http://10.0.2.2:8080/repo. See Setting up a web server to install RHEL for Edge image.
Procedure
Create the bootable ISO image.
# composer-cli compose start-ostree \
blueprint-name \
edge-simplified-installer \
--ref rhel/8/x86_64/edge \
--url URL-OSTree-repository \
Where,
-
blueprint-nameis the RHEL for Edge blueprint name. -
edge-simplified-installeris the image type . -
--refis the reference for where your commit is going to be created. --urlis the URL to the OSTree repository of the commit to embed in the image. For example, http://10.0.2.2:8080/repo/. You can either start a RHEL for Edge Container or set up a web server. See Creating a RHEL for Edge Container image for non-network-based deployments and Setting up a web server to install RHEL for Edge image.A confirmation that the composer process has been added to the queue appears. It also shows a Universally Unique Identifier (UUID) number for the image created. Use the UUID number to track your build. Also keep the UUID number handy for further tasks.
-
Check the image compose status.
# composer-cli compose status
The output displays the status in the following format:
<UUID> RUNNING date blueprint-name blueprint-version image-type
NoteThe image creation processes can take up to ten minutes to complete.
To interrupt the image creation process, run:
# composer-cli compose cancel <UUID>To delete an existing image, run:
# composer-cli compose delete <UUID>
Additional resources
6.4. Downloading a simplified RHEL for Edge image using the image builder command-line interface
To download a RHEL for Edge image by using RHEL image builder command line interface, ensure that you have met the following prerequisites and then follow the procedure.
Prerequisites
- You have created a RHEL for Edge image.
Procedure
Review the RHEL for Edge image status.
# composer-cli compose status
The output must display the following:
$ <UUID> FINISHED date blueprint-name blueprint-version image-type
Download the image.
# composer-cli compose image <UUID>
RHEL image builder downloads the image as an
.isofile at the current directory path where you run the command.The UUID number and the image size is displayed alongside.
$ <UUID>-simplified-installer.iso: size MB
As a result, you downloaded a RHEL for Edge Simplified Installer ISO image. You can use it directly as a boot ISO to install a RHEL for Edge system.
6.5. Creating a blueprint for a Simplified image RHEL using image builder GUI
To create a RHEL for Edge Simplified Installer image, you must create a blueprint and ensure that you customize it with:
- A device node location to enable an unattended installation to your device.
- A URL to perform the initial device credential exchange.
- A user or user group.
You can also add any other customizations that your image requires.
To create a blueprint for a simplified RHEL for Edge image in the RHEL image builder GUI, complete the following steps:
Prerequisites
- You have opened the image builder app from the web console in a browser. See Accessing the RHEL image builder GUI in the RHEL web console.
Procedure
Click Create Blueprint in the upper-right corner of the RHEL image builder app.
A dialog wizard with fields for the blueprint name and description opens.
On the
Detailspage:- Enter the name of the blueprint and, optionally, its description. Click .
Optional: On the Packages page, complete the following steps:
In the
Available packagessearch, enter the package name and click the button to move it to the Chosen packages field. Search and include as many packages as you want. Click .NoteThe customizations are all optional unless otherwise specified.
-
Optional: On the
Kernelpage, enter a kernel name and the command-line arguments. -
Optional: On the
File systempage, selectUse automatic partitioning.The filesystem customization is not supported for OSTree systems, because OSTree images have their own mount rule, such as read-only. Click . Optional: On the
Servicespage, you can enable or disable services:- Enter the service names you want to enable or disable, separating them by a comma, by space, or by pressing the key. Click .
Optional: On the
Firewallpage, set up your firewall setting:-
Enter the
Ports, and the firewall services you want to enable or disable. - Click the button to manage your firewall rules for each zone independently. Click .
-
Enter the
On the
Userspage, add a users by following the steps:- Click .
Enter a
Username, apassword, and aSSH key. You can also mark the user as a privileged user, by clicking theServer administratorcheckbox.NoteWhen you specify the user in the blueprint customization and then create an image from that blueprint, the blueprint creates the user under the
/usr/lib/passwddirectory and the password under the/usr/etc/shadowduring installation time. You can log in to the device with the username and password you created for the blueprint. After you access the system, you must create users, for example, using theuseraddcommand.Click .
Optional: On the
Groupspage, add groups by completing the following steps:Click the button:
-
Enter a
Group nameand aGroup ID. You can add more groups. Click .
-
Enter a
Optional: On the
SSH keyspage, add a key:Click the button.
- Enter the SSH key.
-
Enter a
User. Click .
Optional: On the
Timezonepage, set your timezone settings:On the
Timezonefield, enter the timezone you want to add to your system image. For example, add the following timezone format: "US/Eastern".If you do not set a timezone, the system uses Universal Time, Coordinated (UTC) as default.
-
Enter the
NTPservers. Click .
Optional: On the
Localepage, complete the following steps:-
On the
Keyboardsearch field, enter the package name you want to add to your system image. For example: ["en_US.UTF-8"]. -
On the
Languagessearch field, enter the package name you want to add to your system image. For example: "us". Click .
-
On the
Mandatory: On the
Otherspage, complete the following steps:-
In the
Hostnamefield, enter the hostname you want to add to your system image. If you do not add a hostname, the operating system determines the hostname. -
Mandatory: In the
Installation Devicesfield, enter a valid node for your system image to enable an unattended installation to your device. For example:dev/sda1. Click .
-
In the
Optional: On the
FIDO device onboardingpage, complete the following steps:-
On the
Manufacturing server URLfield, enter themanufacturing server URLto perform the initial device credential exchange, for example: "http://10.0.0.2:8080". The FDO customization in the blueprints is optional, and you can build your RHEL for Edge Simplified Installer image with no errors. -
On the
DIUN public key insecurefield, enter the certification public key hash to perform the initial device credential exchange. This field accepts "true" as value, which means this is an insecure connection to the manufacturing server. For example:manufacturing_server_url="http://${FDO_SERVER}:8080" diun_pub_key_insecure="true". You must use only one of these three options: "key insecure", "key hash" and "key root certs". On the
DIUN public key hashfield, enter the hashed version of your public key. For example:17BD05952222C421D6F1BB1256E0C925310CED4CE1C4FFD6E5CB968F4B73BF73. You can get the key hash by generating it based on the certificate of the manufacturing server. To generate the key hash, run the command:# openssl x509 -fingerprint -sha256 -noout -in /etc/fdo/aio/keys/diun_cert.pem | cut -d"=" -f2 | sed 's/://g'
The
/etc/fdo/aio/keys/diun_cert.pemis the certificate that is stored in the manufacturing server.On the
DIUN public key root certsfield, enter the public key root certs. This field accepts the content of the certification file that is stored in the manufacturing server. To get the content of certificate file, run the command:$ cat /etc/fdo/aio/keys/diun_cert.pem.
-
On the
- Click .
-
On the
Reviewpage, review the details about the blueprint. Click .
The RHEL image builder view opens, listing existing blueprints.
6.6. Creating a RHEL for Edge Simplified Installer image using image builder GUI
To create a RHEL for Edge Simplified image by using RHEL image builder GUI, ensure that you have met the following prerequisites and then follow the procedure.
Prerequisites
- You opened the RHEL image builder app from the web console in a browser.
- You created a blueprint for the RHEL for Edge Simplified image.
-
You served an OSTree repository of the commit to embed in the image, for example,
http://10.0.2.2:8080/repo. See Setting up a web server to install RHEL for Edge image. - The FDO manufacturing server is up and running.
Procedure
- Access mage builder dashboard.
- On the blueprint table, find the blueprint you want to build an image for.
-
Navigate to the
Imagestab and clickCreate Image. TheCreate imagewizard opens. On the
Image outputpage, complete the following steps:-
From the
Select a blueprintlist, select the blueprint you created for the RHEL for Edge Simplified image. -
From the
Image output typelist, selectRHEL for Edge Simplified Installer (.iso). -
In the
Image Sizefield, enter the image size. Minimum image size required for Simplified Installer image is:
-
From the
- Click .
In the
OSTree settingspage, complete the following steps:-
In the
Repository URLfield, enter the repository URL to where the parent OSTree commit will be pulled from. -
In the
Reffield, enter therefbranch name path. If you do not enter aref, the defaultreffor the distro is used.
-
In the
-
On the
Reviewpage, review the image customization and click .
The image build starts and takes up to 20 minutes to complete. To stop the building, click .
6.7. Downloading a simplified RHEL for Edge image using the image builder GUI
To download a RHEL for Edge image by using RHEL image builder GUI, ensure that you have met the following prerequisites and then follow the procedure.
Prerequisites
- You have successfully created a RHEL for Edge image. See link.
Procedure
- Access the RHEL image builder dashboard. The blueprint list dashboard opens.
- In the blueprint table, find the blueprint you built your RHEL for Edge Simplified Installer image for.
-
Navigate to the
Imagestab. Choose one of the options:
- Download the image.
- Download the logs of the image to inspect the elements and verify if any issue is found.
You can use the RHEL for Edge Simplified Installer ISO image that you downloaded directly as a boot ISO to install a RHEL for Edge system.
6.8. Setting up an UEFI HTTP Boot server
To set up an UEFI HTTP Boot server, so that you can start to provision a RHEL for Edge Virtual Machine over network by connecting to this UEFI HTTP Boot server, follow the steps:
Prerequisites
- You have created the ISO simplified installer image.
- An http server that serves the ISO content.
Procedure
Mount the ISO image to the directory of your choice:
# mkdir /mnt/rhel8-install/
# mount -o loop,ro -t iso9660 /path_directory/installer.iso /mnt/rhel8-install/
Replace
/path_directory/installer.isowith the path to the RHEL for Edge bootable ISO image.Copy the files from the mounted image to the HTTP server root. This command creates the
/var/www/html/rhel8-install/directory with the contents of the image.# mkdir /var/www/html/httpboot/ # cp -R /mnt/rhel8-install/* /var/www/html/httpboot/ # chmod -R +r /var/www/html/httpboot/*
NoteSome copying methods can skip the
.treeinfofile which is required for a valid installation source. Running thecpcommand for whole directories as shown in this procedure will copy.treeinfocorrectly.Update the
/var/www/html/EFI/BOOT/grub.cfgfile, by replacing:-
coreos.inst.install_dev=/dev/sdawithcoreos.inst.install_dev=/dev/vda -
linux /images/pxeboot/vmlinuzwithlinuxefi /images/pxeboot/vmlinuz -
initrd /images/pxeboot/initrd.imgwithinitrdefi /images/pxeboot/initrd.img coreos.inst.image_file=/run/media/iso/disk.img.xzwithcoreos.inst.image_url=http://{IP-ADDRESS}/disk.img.xzThe IP-ADDRESS is the ip address of this machine, which will serve as a http boot server.
-
Start the httpd service:
# systemctl start httpd.service
As a result, after you set up an UEFI HTTP Boot server, you can install your RHEL for Edge devices by using UEFI HTTP boot.
6.9. Deploying the Simplified ISO image in a Virtual Machine
Deploy the RHEL for Edge ISO image you generated by creating a RHEL for Edge Simplified image by using any the following installation sources:
- UEFI HTTP Boot
- virt-install
This example shows how to create a virt-install installation source from your ISO image for a network-based installation .
Prerequisites
- You have created an ISO image.
- You set up a network configuration to support UEFI HTTP boot.
Procedure
- Set up a network configuration to support UEFI HTTP boot. See Setting up UEFI HTTP boot with libvirt.
Use the
virt-installcommand to create a RHEL for Edge Virtual Machine from the UEFI HTTP Boot.# virt-install \ --name edge-install-image \ --disk path=” “, ,format=qcow2 --ram 3072 \ --memory 4096 \ --vcpus 2 \ --network network=integration,mac=mac_address \ --os-type linux --os-variant rhel8 \ --cdrom "/var/lib/libvirt/images/”ISO_FILENAME" --boot uefi,loader_ro=yes,loader_type=pflash,nvram_template=/usr/share/edk2/ovmf/OVMF_VARS.fd,loader_secure=no --virt-type kvm \ --graphics none \ --wait=-1 --noreboot
After you run the command, the Virtual Machine installation starts.
Verification
- Log in to the created Virtual Machine.
6.10. Deploying the Simplified ISO image from a USB flash drive
Deploy the RHEL for Edge ISO image you generated by creating a RHEL for Edge Simplified image by using an USB installation.
This example shows how to create a USB installation source from your ISO image.
Prerequisites
- You have created a simplified installer image, which is an ISO image.
- You have a 8 GB USB flash drive.
Procedure
- Copy the ISO image file to a USB flash drive.
- Connect the USB flash drive to the port of the computer you want to boot.
Boot the ISO image from the USB flash drive.The boot menu shows you the following options:
Install Red Hat Enterprise Linux 8
Test this media & install Red Hat Enterprise Linux 8
- Choose Install Red Hat Enterprise Linux 8. This starts the system installation.
Additional resources