
Chapter 7. Automatically provisioning and onboarding RHEL for Edge devices with FDO
You can build a RHEL for Edge Simplified Installer image, and provision it to a RHEL for Edge image. The FIDO Device Onboarding (FDO) process automatically provisions and onboards your Edge devices, and exchanges data with other devices and systems connected on the networks.
Red Hat provides the FDO process as a Technology Preview feature and should run on secure networks. Technology Preview features are not supported with Red Hat production service level agreements (SLAs) and might not be functionally complete. These features provide early access to upcoming product features, enabling customers to test functionality and provide feedback during the development process. See Technology Preview Features Support Scope on the Red Hat Customer Portal for information about the support scope for Technology Preview features.
7.1. The FIDO Device Onboarding (FDO) process
The FIDO Device Onboarding (FDO) is the process that:
- Provisions and onboards a device.
- Automatically configures credentials for this device. The FDO process is an automatic onboarding mechanism that is triggered by the installation of a new device.
- Enables this device to securely connect and interact on the network.
With FIDO Device Onboarding (FDO), you can perform a secure device onboarding by adding new devices into your IoT architecture. This includes the specified device configuration that needs to be trusted and integrated with the rest of the running systems. The FDO process is an automatic onboarding mechanism that is triggered by the installation of a new device.
The FDO protocol performs the following tasks:
- Solves the trust and chain of ownership along with the automation needed to securely onboard a device at scale.
- Performs device initialization at the manufacturing stage and late device binding for its actual use. This means that actual binding of the device to a management system happens on the first boot of the device without requiring manual configuration on the device.
- Supports automated secure devices onboarding, that is, zero touch installation and onboarding that does not need any specialized person at the edge location. After the device is onboarded, the management platform can connect to it and apply patches, updates, and rollbacks.
With FDO, you can benefit from the following:
- FDO is a secure and simple way to enroll a device to a management platform. Instead of embedding a Kickstart configuration to the image, FDO applies the device credentials during the device first boot directly to the ISO image.
- FDO solves the issue of late binding to a device, enabling any sensitive data to be shared over a secure FDO channel.
- FDO cryptographically identifies the system identity and ownership before enrolling and passing the configuration and other secrets to the system. That enables non-technical users to power-on the system.
To build a RHEL for Edge Simplified Installer image and automatically onboard it, provide an existing OSTree commit. The resulting simplified image contains a raw image that has the OSTree commit deployed. After you boot the Simplified installer ISO image, it provisions a RHEL for Edge system that you can use on a hard disk or as a boot image in a virtual machine.
The RHEL for Edge Simplified Installer image is optimized for unattended installation to a device and supports both network-based deployment and non-network-based deployments. However, for network-based deployment, it supports only UEFI HTTP boot.
The FDO protocol is based on the following servers:
- Manufacturing server
- Generates the device credentials.
- Creates an Ownership voucher that is used to set the ownership of the device, later in the process.
- Binds the device to a specific management platform.
- Owner management system
- Receives the Ownership voucher from the Manufacturing server and becomes the owner of the associated device.
- Later in the process, it creates a secure channel between the device and the Owner onboarding server after the device authentication.
- Uses the secure channel to send the required information, such as files and scripts for the onboarding automation to the device.
- Service-info API server
- Based on Service-info API server’s configuration and modules available on the client, it performs the final steps of onboarding on target client devices, such as copying SSH keys and files, executing commands, creating users, encrypting disks and so on
- Rendezvous server
- Gets the Ownership voucher from the Owner management system and makes a mapping of the device UUID to the Owner server IP. Then, the Rendezvous server matches the device UUID with a target platform and informs the device about which Owner onboarding server endpoint this device must use.
- During the first boot, the Rendezvous server will be the contact point for the device and it will direct the device to the owner, so that the device and the owner can establish a secure channel.
- Device client
This is installed on the device. The Device client performs the following actions:
- Starts the queries to the multiple servers where the onboarding automation will be executed.
- Uses TCP/IP protocols to communicate with the servers.
The following diagram represents the FIDO device onboarding workflow:
Figure 7.1. Deploying RHEL for Edge in non-network environment
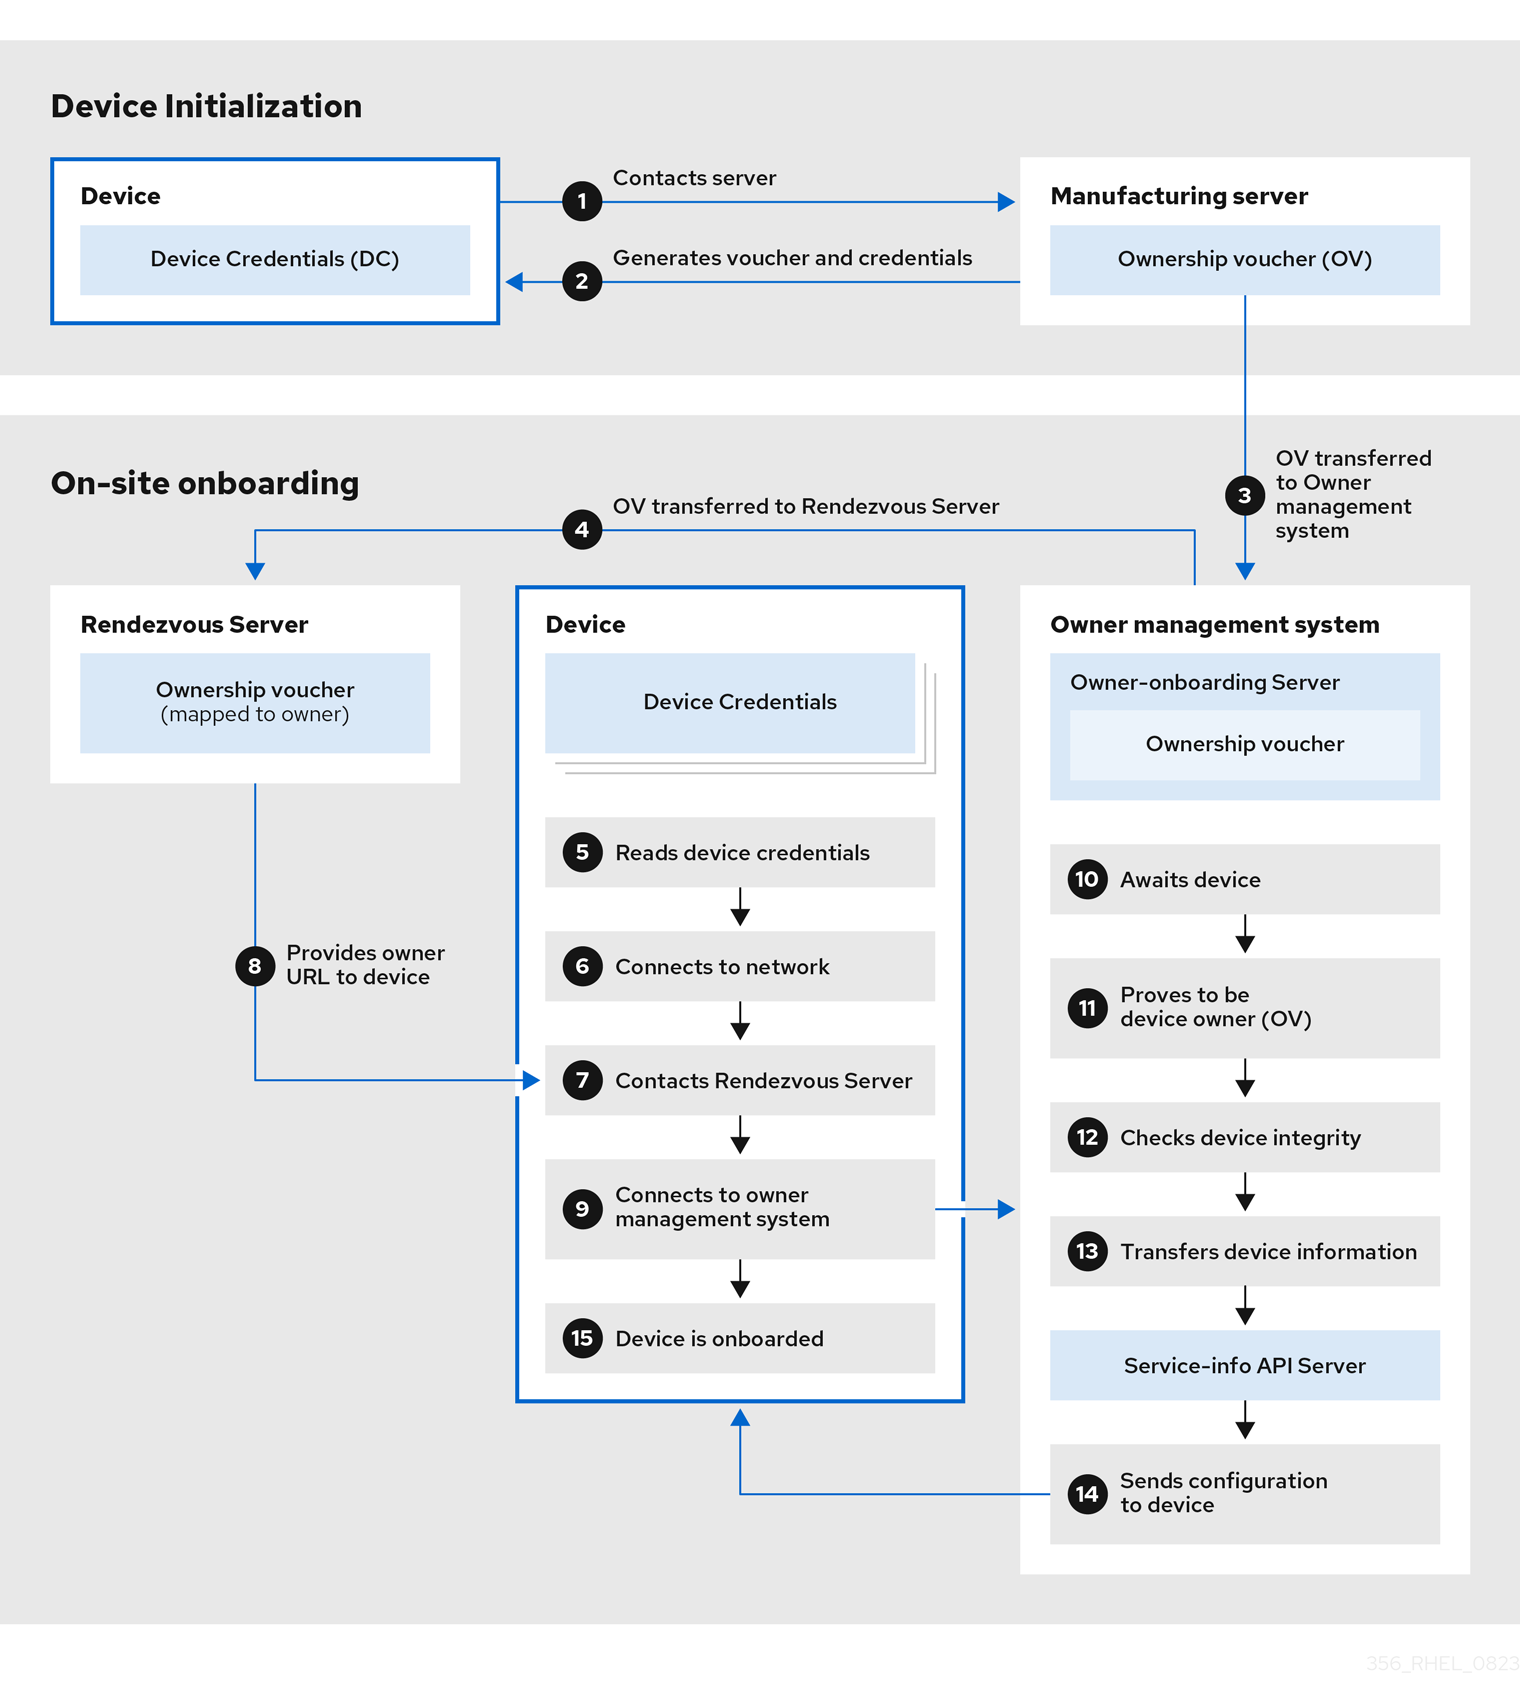
At the Device Initialization, the device contacts the Manufacturing server to get the FDO credentials, a set of certificates and keys to be installed on the operating system with the Rendezvous server endpoint (URL). It also gets the Ownership Voucher, that is maintained separately in case you need to change the owner assignment.
- The Device contacts the Manufacturing server
- The Manufacturing server generates an Ownership Voucher and the Device Credentials for the Device.
- The Ownership Voucher is transferred to the Owner onboarding server.
At the On-site onboarding, the Device gets the Rendezvous server endpoint (URL) from its device credentials and contacts Rendezvous server endpoint to start the onboarding process, which will redirect it to the Owner management system, that is formed by the Owner onboarding server and the Service Info API server.
- The Owner onboarding server transfers the Ownership Voucher to the Rendezvous server, which makes a mapping of the Ownership Voucher to the Owner.
- The device client reads device credentials.
- The device client connects to the network.
- After connecting to the network, the Device client contacts the Rendezvous server.
- The Rendezvous server sends the owner endpoint URL to the Device Client, and registers the device.
- The Device client connects to the Owner onboarding server shared by the Rendezvous server.
- The Device proves that it is the correct device by signing a statement with a device key.
- The Owner onboarding server proves itself correct by signing a statement with the last key of the Owner Voucher.
- The Owner onboarding server transfers the information of the Device to the Service Info API server.
- The Service info API server sends the configuration for the Device.
- The Device is onboarded.
7.2. Automatically provisioning and onboarding RHEL for Edge devices
To build a RHEL for Edge Simplified Installer image and automatically onboard it, provide an existing OSTree commit. The resulting simplified image contains a raw image that has the OSTree commit deployed. After you boot the Simplified installer ISO image, it provisions a RHEL for Edge system that you can use on a hard disk or as a boot image in a virtual machine.
The RHEL for Edge Simplified Installer image is optimized for unattended installation to a device and supports both network-based deployment and non-network-based deployments. However, for network-based deployment, it supports only UEFI HTTP boot.
Automatically provisioning and onboarding a RHEL for Edge device involves the following high-level steps:
- Install and register a RHEL system
- Install RHEL image builder
By using RHEL image builder, create a blueprint with customizations for RHEL for a
rhel-edge-containerimage type.name = "rhel-edge-container" description = "Minimal RHEL for Edge Container blueprint" version = "0.0.1"
- Import the RHEL for Edge Container blueprint in RHEL image builder
- Create a RHEL for Edge Container image
- Use the RHEL for Edge Container image to serve the OSTree commit, which will be later used when building the RHEL for Edge Simplified Installer image type
Create a blueprint for and
edge-simplified-installerimage type with customizations for storage device path and FDO customizationsname = "rhel-edge-simplified-installer-with-fdo" description = "Minimal RHEL for Edge Simplified Installer with FDO blueprint" version = "0.0.1" packages = [] modules = [] groups = [] distro = "" [customizations] installation_device = "/dev/vda" [customizations.fdo] manufacturing_server_url = "http://10.0.0.2:8080" diun_pub_key_insecure = "true"
- Build a simplified installer RHEL for Edge image
- Download the RHEL for Edge simplified installer image
-
At this point, the FDO server infrastructure should be up and running, and the specific onboarding details handled by the
service-info APIserver, that is part of the owner’s infrastructure, are configured - Install the simplified installer ISO image to a device. The FDO client runs on the Simplified Installer ISO and the UEFI directory structure makes the image bootable.
- The network configuration enables the device to reach out to the manufacturing server to perform the initial device credential exchange.
- After the system reaches the endpoint, the device credentials are created for the device.
- The device uses the device credentials to reach the Rendezvous server, where it checks the cryptographic credentials based on the vouchers that the Rendezvous server has, and then the Rendezvous server redirects the device to the Owner server.
- The device contacts the Owner server. They establish a mutual trust and the final steps of onboarding happen based on the configuration of the Service-info API server. For example, it installs the SSH keys in the device, transfer the files, create the users, run the commands, encrypt the filesystem, and so on.
Additional resources
7.3. Generating key and certificates
To run the FIDO Device Onboarding (FDO) infrastructure, you need to generate keys and certificates. FDO generates these keys and certificates to configure the manufacturing server. FDO automatically generates the certificates and .yaml configuration files when you install the services, and re-creating them is optional. After you install and start the services, it runs with the default settings.
Red Hat provides the fdo-admin-tool tool as a Technology Preview feature and should run on secure networks. Technology Preview features are not supported with Red Hat production service level agreements (SLAs) and might not be functionally complete. These features provide early access to upcoming product features, enabling customers to test functionality and provide feedback during the development process. See Technology Preview Features Support Scope on the Red Hat Customer Portal for information about the support scope for Technology Preview features.
Prerequisites
-
You installed the
fdo-admin-cliRPM package
Procedure
Generate the keys and certificates in the
/etc/fdodirectory:$ for i in "diun" "manufacturer" "device-ca" "owner"; do fdo-admin-tool generate-key-and-cert $i; done $ ls keys device_ca_cert.pem device_ca_key.der diun_cert.pem diun_key.der manufacturer_cert.pem manufacturer_key.der owner_cert.pem owner_key.der
Check the key and certificates that were created in the
/etc/fdo/keysdirectory:$ tree keys
You can see the following output:
– device_ca_cert.pem
– device_ca_key.der
– diun_cert.pem
– diun_key.dre
– manufacturer_cert.pem
– manufacturer_key.der
– owner_cert.pem
– owner_key.pem
Additional resources
-
See the
fdo-admin-tool generate-key-and-cert –-helpmanual page
7.4. Installing and running the manufacturing server
The fdo-manufacturing-server RPM package enables you to run the Manufacturing Server component of the FDO protocol. It also stores other components, such as the owner vouchers, the manufacturer keys, and information about the manufacturing sessions. During the device installation, the Manufacturing server generates the device credentials for the specific device, including its GUID, rendezvous information and other metadata. Later on in the process, the device uses this rendezvous information to contact the Rendezvous server.
Red Hat provides the fdo-manufacturing-server tool as a Technology Preview feature and should run on secure networks because Technology Preview features are not supported with Red Hat production service level agreements (SLAs) and might not be functionally complete. These features provide early access to upcoming product features, enabling customers to test functionality and provide feedback during the development process. See Technology Preview Features Support Scope on the Red Hat Customer Portal for information about the support scope for Technology Preview features.
To install the manufacturing server RPM package, complete the following steps:
Procedure
Install the
fdo-admin-clipackage:# yum install -y fdo-admin-cli
Check if the
fdo-manufacturing-serverRPM package is installed:$ rpm -qa | grep fdo-manufacturing-server --refresh
Check if the files were correctly installed:
$ ls /usr/share/doc/fdo
You can see the following output:
Output:
manufacturing-server.yml
owner-onboarding-server.yml
rendezvous-info.yml
rendezvous-server.yml
serviceinfo-api-server.yml
Optional: Check the content of each file, for example:
$ cat /usr/share/doc/fdo/manufacturing-server.yml
Configure the Manufacturing server. You must provide the following information:
- The Manufacturing server URL
- The IP address or DNS name for the Rendezvous server
The path to the keys and certificates you generated. See Generating key and certificates.
You can find an example of a Manufacturing server configuration file in the
/usr/share/doc/fdo/manufacturing-server.ymldirectory. The following is amanufacturing server.ymlexample that is created and saved in the/etc/fdodirectory. It contains paths to the directories, certificates, keys that you created, the Rendezvous server IP address and the default port.session_store_driver: Directory: path: /etc/fdo/stores/manufacturing_sessions/ ownership_voucher_store_driver: Directory: path: /etc/fdo/stores/owner_vouchers public_key_store_driver: Directory: path: /etc/fdo/stores/manufacturer_keys bind: "0.0.0.0:8080" protocols: plain_di: false diun: mfg_string_type: SerialNumber key_type: SECP384R1 allowed_key_storage_types: - Tpm - FileSystem key_path: /etc/fdo/keys/diun_key.der cert_path: /etc/fdo/keys/diun_cert.pem rendezvous_info: - deviceport: 8082 ip_address: 192.168.122.99 ownerport: 8082 protocol: http manufacturing: manufacturer_cert_path: /etc/fdo/keys/manufacturer_cert.pem device_cert_ca_private_key: /etc/fdo/keys/device_ca_key.der device_cert_ca_chain: /etc/fdo/keys/device_ca_cert.pem owner_cert_path: /etc/fdo/keys/owner_cert.pem manufacturer_private_key: /etc/fdo/keys/manufacturer_key.der
Start the Manufacturing server.
Check if the systemd unit file are in the server:
# systemctl list-unit-files | grep fdo | grep manufacturing
fdo-manufacturing-server.service disabled disabled
Enable and start the manufacturing server.
# systemctl enable --now fdo-manufacturing-server.service
Open the default ports in your firewall:
# firewall-cmd --add-port=8080/tcp --permanent
# systemctl restart firewalld
Ensure that the service is listening on the port 8080:
# ss -ltn
- Install RHEL for Edge onto your system using the simplified installer. See Building simplified installer images to provision a RHEL for Edge image.
Additional resources
7.5. Installing, configuring, and running the Rendezvous server
Install the fdo-rendezvous-server RPM package to enable the systems to receive the voucher generated by the Manufacturing server during the first device boot. The Rendezvous server then matches the device UUID with the target platform or cloud and informs the device about which Owner server endpoint the device must use.
Prerequisites
-
You created a
manufacturer_cert.pemcertificate. See Generating key and certificates. -
You copied the
manufacturer_cert.pemcertificate to the/etc/fdo/keysdirectory in the Rendezvous server.
Procedure
Install the
fdo-rendezvous-serverRPM packages:# yum install -y fdo-rendezvous-server
Create the
rendezvous-server.ymlconfiguration file, including the path to the manufacturer certificate. You can find an example in/usr/share/doc/fdo/rendezvous-server.yml. The following example shows a configuration file that is saved in/etc/fdo/rendezvous-server.yml.storage_driver: Directory: path: /etc/fdo/stores/rendezvous_registered session_store_driver: Directory: path: /etc/fdo/stores/rendezvous_sessions trusted_manufacturer_keys_path: /etc/fdo/keys/manufacturer_cert.pem max_wait_seconds: ~ bind: "0.0.0.0:8082"Check the Rendezvous server service status:
# systemctl list-unit-files | grep fdo | grep rende
fdo-rendezvous-server.service disabled disabled
If the service is stopped and disabled, enable and start it:
# systemctl enable --now fdo-rendezvous-server.service
Check that the server is listening on the default configured port 8082:
# ss -ltn
Open the port if you have a firewall configured on this server:
# firewall-cmd --add-port=8082/tcp --permanent
# systemctl restart firewalld
7.6. Installing, configuring, and running the Owner server
Install the fdo-owner-cli and fdo-owner-onboarding-server RPM package to enable the systems to receive the voucher generated by the Manufacturing server during the first device boot. The Rendezvous server then matches the device UUID with the target platform or cloud and informs the device about which Owner server endpoint the device must use.
Prerequisites
- The device where the server will be deployed has a Trusted Platform Module (TPM) device to encrypt the disk. If not, you will get an error when booting the RHEL for Edge device.
-
You created the
device_ca_cert.pem,owner_key.der, andowner_cert.pemwith keys and certificates and copied them into the/etc/fdo/keysdirectory.
Procedure
Install the required RPMs in this server:
# dnf install -y fdo-owner-cli fdo-owner-onboarding-server
Prepare the
owner-onboarding-server.ymlconfiguration file and save it to the/etc/fdo/directory. Include the path to the certificates you already copied and information about where to publish the Owner server service in this file.The following is an example available in
/usr/share/doc/fdo/owner-onboarding-server.yml. You can find references to the Service Info API, such as the URL or the authentication token.--- ownership_voucher_store_driver: Directory: path: /etc/fdo/stores/owner_vouchers session_store_driver: Directory: path: /etc/fdo/stores/owner_onboarding_sessions trusted_device_keys_path: /etc/fdo/keys/device_ca_cert.pem owner_private_key_path: /etc/fdo/keys/owner_key.der owner_public_key_path: /etc/fdo/keys/owner_cert.pem bind: "0.0.0.0:8081" service_info_api_url: "http://localhost:8083/device_info" service_info_api_authentication: BearerToken: token: Kpt5P/5flBkaiNSvDYS3cEdBQXJn2Zv9n1D50431/lo= owner_addresses: - transport: http addresses: - ip_address: 192.168.122.149Create and configure the Service Info API.
Add the automated information for onboarding, such as user creation, files to be copied or created, commands to be executed, disk to be encrypted, and so on. Use the Service Info API configuration file example in
/usr/share/doc/fdo/serviceinfo-api-server.ymlas a template to create the configuration file under/etc/fdo/.--- service_info: initial_user: username: admin sshkeys: - "ssh-rsa AAAA...." files: - path: /root/resolv.conf source_path: /etc/resolv.conf commands: - command: touch args: - /root/test return_stdout: true return_stderr: true diskencryption_clevis: - disk_label: /dev/vda4 binding: pin: tpm2 config: "{}" reencrypt: true additional_serviceinfo: ~ bind: "0.0.0.0:8083" device_specific_store_driver: Directory: path: /etc/fdo/stores/serviceinfo_api_devices service_info_auth_token: Kpt5P/5flBkaiNSvDYS3cEdBQXJn2Zv9n1D50431/lo= admin_auth_token: zJNoErq7aa0RusJ1w0tkTjdITdMCWYkndzVv7F0V42Q=
Check the status of the systemd units:
# systemctl list-unit-files | grep fdo
fdo-owner-onboarding-server.service        disabled        disabled
fdo-serviceinfo-api-server.service         disabled        disabled
If the service is stopped and disabled, enable and start it:
# systemctl enable --now fdo-owner-onboarding-server.service
# systemctl enable --now fdo-serviceinfo-api-server.service
NoteYou must restart the
systemdservices every time you change the configuration files.
Check that the server is listening on the default configured port 8083:
# ss -ltn
Open the port if you have a firewall configured on this server:
# firewall-cmd --add-port=8081/tcp --permanent
# firewall-cmd --add-port=8083/tcp --permanent
# systemctl restart firewalld
7.7. Automatically onboarding a RHEL for Edge device by using FDO authentication
To prepare your device to automatically onboard a RHEL for Edge device and provision it as part of the installation process, complete the following steps:
Prerequisites
-
You built an OSTree commit for RHEL for Edge and used that to generate an
edge-simplified-installerartifact. - Your device is assembled.
-
You installed the
fdo-manufacturing-serverRPM package. See Installing the manufacturing server package.
Procedure
- Start the installation process by booting the RHEL for Edge simplified installer image on your device. You can install it from a CD-ROM or from a USB flash drive, for example.
Verify through the terminal that the device has reached the manufacturing service to perform the initial device credential exchange and has produced an ownership voucher.
You can find the ownership voucher at the storage location configured by the
ownership_voucher_store_driver:parameter at themanufacturing-sever.ymlfile.The directory should have an
ownership_voucherfile with a name in the GUID format which indicates that the correct device credentials were added to the device.The onboarding server uses the device credential to authenticate against the onboarding server. It then passes the configuration to the device. After the device receives the configuration from the onboarding server, it receives an SSH key and installs the operating system on the device. Finally, the system automatically reboots, encrypts it with a strong key stored at TPM.
Verification
After the device automatically reboots, you can log in to the device with the credentials that you created as part of the FDO process.
- Log in to the device by providing the username and password you created in the Service Info API.
Additional resources