
Generating sos reports for technical support
Gathering troubleshooting information from RHEL servers with the sos utility
Abstract
Making open source more inclusive
Red Hat is committed to replacing problematic language in our code, documentation, and web properties. We are beginning with these four terms: master, slave, blacklist, and whitelist. Because of the enormity of this endeavor, these changes will be implemented gradually over several upcoming releases. For more details, see our CTO Chris Wright’s message.
Providing feedback on Red Hat documentation
We appreciate your feedback on our documentation. Let us know how we can improve it.
Submitting feedback through Jira (account required)
- Log in to the Jira website.
- Click Create in the top navigation bar.
- Enter a descriptive title in the Summary field.
- Enter your suggestion for improvement in the Description field. Include links to the relevant parts of the documentation.
- Click Create at the bottom of the dialogue.
Chapter 1. Generating an sos report for technical support
With the sos utility, you can collect configuration, diagnostic, and troubleshooting data, and provide those files to Red Hat Technical Support.
1.1. What the sos utility does
An sos report is a common starting point for Red Hat technical support engineers when performing analysis of a service request for a RHEL system. The sos utility (also known as sosreport) provides a standardized way to collect diagnostic information that Red Hat support engineers can reference throughout their investigation of issues reported in support cases. Using the sos utility helps to ensure that you are not repeatedly asked for data output.
The sos utility allows to collect various debugging information from one or more systems, optionally clean sensitive data, and upload it in a form of a report to Red Hat. More specifically, the three sos components do the following:
sos reportcollects debugging information from one system.NoteThis program was originally named
sosreport. Runningsosreportstill works assos reportis called instead, with the same arguments.-
sos collectallows to run and collect individualsosreports from a specified set of nodes. -
sos cleanobfuscates potentially sensitive information such as user names, host names, IP or MAC addresses, or other user-specified data.
The information collected in a report contains configuration details, system information, and diagnostic information from a RHEL system, such as:
- The running kernel version.
- Loaded kernel modules.
- System and service configuration files.
- Diagnostic command output.
- A list of installed packages.
The sos utility writes the data it collects to an archive named sosreport-<host_name>-<support_case_number>-<YYYY-MM-DD>-<unique_random_characters>.tar.xz.
The utility stores the archive and its MD5 checksum in the /var/tmp/ directory:
[root@server1 ~]# ll /var/tmp/sosreport*
total 18704
-rw-------. 1 root root 19136596 Jan 25 07:42 sosreport-server1-12345678-2022-01-25-tgictvu.tar.xz
-rw-r--r--. 1 root root       33 Jan 25 07:42 sosreport-server1-12345678-2022-01-25-tgictvu.tar.xz.md5
Additional resources
-
sosreport(1)man page
1.2. Installing the sos package from the command line
To use the sos utility, install the sos package.
Prerequisites
-
You need
rootprivileges.
Procedure
Install the
sospackage.[root@server ~]# yum install sos
Verification steps
Use the
rpmutility to verify that thesospackage is installed.[root@server ~]# rpm -q sos sos-4.2-15.el8.noarch
1.3. Generating an sos report from the command line
Use the sos report command to gather an sos report from a RHEL server.
Prerequisites
-
You have installed the
sospackage. -
You need
rootprivileges.
Procedure
Run the
sos reportcommand and follow the on-screen instructions. You can add the--uploadoption to transfer thesosreport to Red Hat immediately after generating it.[user@server1 ~]$ sudo sos report [sudo] password for user: sos report (version 4.2) This command will collect diagnostic and configuration information from this Red Hat Enterprise Linux system and installed applications. An archive containing the collected information will be generated in /var/tmp/sos.qkn_b7by and may be provided to a Red Hat support representative. ... Press ENTER to continue, or CTRL-C to quit.
(Optional) If you have already opened a Technical Support case with Red Hat, enter the case number to embed it in the
sosreport file name, and it will be uploaded to that case if you specified the--uploadoption. If you do not have a case number, leave this field blank. Entering a case number is optional and does not affect the operation of thesosutility.Please enter the case id that you are generating this report for []: <8-digit_case_number>Take note of the
sosreport file name displayed at the end of the console output.... Finished running plugins Creating compressed archive... Your sos report has been generated and saved in: /var/tmp/sosreport-server1-12345678-2022-04-17-qmtnqng.tar.xz Size 16.51MiB Owner root md5 bba955bbd9a434954e18da0c6778ba9a Please send this file to your support representative.
-
You can use the
--batchoption to generate ansosreport without prompting for interactive input.
[user@server1 ~]$ sudo sos report --batch --case-id <8-digit_case_number>
-
You can also use the
--cleanoption to obfuscate a just-collectedsosreport.
[user@server1 ~]$ sudo sos report --cleanVerification steps
Verify that the
sosutility created an archive in/var/tmp/matching the description from the command output.[user@server1 ~]$ sudo ls -l /var/tmp/sosreport* [sudo] password for user: -rw-------. 1 root root 17310544 Sep 17 19:11 /var/tmp/sosreport-server1-12345678-2022-04-17-qmtnqng.tar.xz
Additional resources
1.4. Generating and collecting sos reports on multiple systems concurrently
You can use the sos utility to trigger the sos report command on multiple systems. Wait for the report to terminate and collect all generated reports.
Prerequisites
- You know the cluster type or list of nodes to run on.
-
You have installed the
sospackage on all systems. -
You have
sshkeys for therootaccount on all the systems, or you can provide the root password via the--passwordoption.
Procedure
Run the
sos collectcommand and follow the on-screen instructions.NoteBy default,
sos collecttries to identify the type of cluster it runs on to automatically identify the nodes to collect reports from.-
You can set the cluster or nodes types manually with the
--clusteror--nodesoptions. -
You can also use the
--masteroption to point thesosutility at a remote node to determine the cluster type and the node lists. Thus, you do not have to be logged into one of the cluster nodes to collectsosreports; you can do it from your workstation. -
You can add the
--uploadoption to transfer thesos reportto Red Hat immediately after generating it. -
Any valid
sos reportoption can be further supplied and will be passed to allsosreports executions, such as the--batchand--cleanoptions.
[root@primary-rhel8 ~]# sos collect --nodes=sos-node1,sos-node2 -o process,apache --log-size=50

sos-collector (version 4.2)

This utility is used to collect sosreports from multiple nodes simultaneously.
It uses OpenSSH's ControlPersist feature to connect to nodes and run commands remotely. If your system installation of OpenSSH is older than 5.6, please upgrade.

An archive of sosreport tarballs collected from the nodes will be generated in /var/tmp/sos.o4l55n1s and may be provided to an appropriate support representative.

The generated archive may contain data considered sensitive and its content should be reviewed by the originating organization before being passed to any third party.

No configuration changes will be made to the system running this utility or remote systems that it connects to.


Press ENTER to continue, or CTRL-C to quit


Please enter the case id you are collecting reports for: <8-digit_case_number>

sos-collector ASSUMES that SSH keys are installed on all nodes unless the
--password option is provided.

The following is a list of nodes to collect from:
    primary-rhel8
    sos-node1
    sos-node2


Press ENTER to continue with these nodes, or press CTRL-C to quit


Connecting to nodes...

Beginning collection of sosreports from 3 nodes, collecting a maximum of 4 concurrently

primary-rhel8 : Generating sosreport...
sos-node1  : Generating sosreport...
sos-node2 : Generating sosreport...
primary-rhel8 : Retrieving sosreport...
sos-node1  : Retrieving sosreport...
primary-rhel8  : Successfully collected sosreport
sos-node1 : Successfully collected sosreport
sos-node2 : Retrieving sosreport...
sos-node2 : Successfully collected sosreport

The following archive has been created. Please provide it to your support team.
    /var/tmp/sos-collector-2022-04-15-pafsr.tar.xz

[root@primary-rhel8 ~]#
-
You can set the cluster or nodes types manually with the
Verification steps
Verify that the
sos collectcommand created an archive in the/var/tmp/directory matching the description from the command output.[root@primary-rhel8 ~]# ls -l /var/tmp/sos-collector* -rw-------. 1 root root 160492 May 15 13:35 /var/tmp/sos-collector-2022-05-15-pafsr.tar.xz
Additional resources
-
For examples on using the
--batchand--cleanoptions, see Generating ansosreport from the command line.
1.5. Cleaning an sos report
The sos utility offers a routine to obfuscate potentially sensitive data, such as user names, host names, IP or MAC addresses, or other user-specified keywords. The original sos report or sos collect stays unchanged, and a new *-obfuscated.tar.xz file is generated and intended to be shared with a third party.
You can append the cleaner functionality to the sos report or sos collect commands with the --clean option:
[user@server1 ~]$ sudo sos report --clean
Prerequisites
-
You have generated an
sos reportor ansos collecttarball. - (Optional) You have a list of specific keywords beyond the user names, host names, and other data you want to obfuscate.
Procedure
Run the
sos cleancommand on either ansos reportorsos collecttarball and follow the on-screen instructions.-
You can add the
--keywordsoption to additionally clean a given list of keywords. You can add the
--usernamesoption to obfuscate further sensitive user names.The automatic user name cleaning will automatically run for users reported through the
lastlogfile for users with an UID of 1000 and above. This option is used for LDAP users that may not appear as an actual login, but may occur in certain log files.[user@server1 ~]$ sudo sos clean /var/tmp/sos-collector-2022-05-15-pafsr.tar.xz [sudo] password for user: sos clean (version 4.2) This command will attempt to obfuscate information that is generally considered to be potentially sensitive. Such information includes IP addresses, MAC addresses, domain names, and any user-provided keywords. Note that this utility provides a best-effort approach to data obfuscation, but it does not guarantee that such obfuscation provides complete coverage of all such data in the archive, or that any obfuscation is provided to data that does not fit the description above. Users should review any resulting data and/or archives generated or processed by this utility for remaining sensitive content before being passed to a third party. Press ENTER to continue, or CTRL-C to quit. Found 4 total reports to obfuscate, processing up to 4 concurrently sosreport-primary-rhel8-2022-05-15-nchbdmd : Extracting... sosreport-sos-node1-2022-05-15-wmlomgu : Extracting... sosreport-sos-node2-2022-05-15-obsudzc : Extracting... sos-collector-2022-05-15-pafsr : Beginning obfuscation... sosreport-sos-node1-2022-05-15-wmlomgu : Beginning obfuscation... sos-collector-2022-05-15-pafsr : Obfuscation completed sosreport-primary-rhel8-2022-05-15-nchbdmd : Beginning obfuscation... sosreport-sos-node2-2022-05-15-obsudzc : Beginning obfuscation... sosreport-primary-rhel8-2022-05-15-nchbdmd : Re-compressing... sosreport-sos-node2-2022-05-15-obsudzc : Re-compressing... sosreport-sos-node1-2022-05-15-wmlomgu : Re-compressing... sosreport-primary-rhel8-2022-05-15-nchbdmd : Obfuscation completed sosreport-sos-node2-2022-05-15-obsudzc : Obfuscation completed sosreport-sos-node1-2022-05-15-wmlomgu : Obfuscation completed Successfully obfuscated 4 report(s) A mapping of obfuscated elements is available at /var/tmp/sos-collector-2022-05-15-pafsr-private_map The obfuscated archive is available at /var/tmp/sos-collector-2022-05-15-pafsr-obfuscated.tar.xz Size 157.10KiB Owner root Please send the obfuscated archive to your support representative and keep the mapping file private
-
You can add the
Verification steps
Verify that the
sos cleancommand created an obfuscated archive and an obfuscation mapping in the/var/tmp/directory matching the description from the command output.[user@server1 ~]$ sudo ls -l /var/tmp/sos-collector-2022-05-15-pafsr-private_map /var/tmp/sos-collector-2022-05-15-pafsr-obfuscated.tar.xz [sudo] password for user: -rw-------. 1 root root 160868 May 15 16:10 /var/tmp/sos-collector-2022-05-15-pafsr-obfuscated.tar.xz -rw-------. 1 root root 96622 May 15 16:10 /var/tmp/sos-collector-2022-05-15-pafsr-private_mapCheck the
*-private_mapfile for the obfuscation mapping:[user@server1 ~]$ sudo cat /var/tmp/sos-collector-2022-05-15-pafsr-private_map [sudo] password for user: { "hostname_map": { "pmoravec-rhel8": "host0" }, "ip_map": { "10.44.128.0/22": "100.0.0.0/22", .. "username_map": { "foobaruser": "obfuscateduser0", "jsmith": "obfuscateduser1", "johndoe": "obfuscateduser2" } }
Keep both the original unobfuscated archive and the *private_map files locally as Red Hat support might refer to the obfuscated terms that you will need to translate to the original values.
1.6. Generating an sos report and securing it with GPG passphrase encryption
This procedure describes how to generate an sos report and secure it with symmetric GPG2 encryption based on a passphrase. You might want to secure the contents of an sos report with a password if, for example, you need to transfer it over a public network to a third party.
Ensure you have sufficient space when creating an encrypted sos report, as it temporarily uses double the disk space:
-
The
sosutility creates an unencryptedsosreport. -
The utility encrypts the
sosreport as a new file. - The utility then removes the unencrypted archive.
Prerequisites
-
You have installed the
sospackage. -
You need
rootprivileges.
Procedure
Run the
sos reportcommand and specify a passphrase with the--encrypt-passoption. You can add the--uploadoption to transfer thesosreport to Red Hat immediately after generating it.[user@server1 ~]$ sudo sos report --encrypt-pass my-passphrase [sudo] password for user: sosreport (version 4.2) This command will collect diagnostic and configuration information from this Red Hat Enterprise Linux system and installed applications. An archive containing the collected information will be generated in /var/tmp/sos.6lck0myd and may be provided to a Red Hat support representative. ... Press ENTER to continue, or CTRL-C to quit.
(Optional) If you have already opened a Technical Support case with Red Hat, enter the case number to embed it in the
sosreport file name, and it will be uploaded to that case if you specified the--uploadoption. If you do not have a case number, leave this field blank. Entering a case number is optional and does not affect the operation of thesosutility.Please enter the case id that you are generating this report for []: <8-digit_case_number>Take note of the
sosreport file name displayed at the end of the console output.Finished running plugins Creating compressed archive... Your sosreport has been generated and saved in: /var/tmp/secured-sosreport-server1-12345678-2022-01-24-ueqijfm.tar.xz.gpg Size 17.53MiB Owner root md5 32e2bdb23a9ce3d35d59e1fc4c91fe54 Please send this file to your support representative.
Verification steps
Verify that the
sosutility created an archive meeting the following requirements:-
File name starts with
secured. -
File name ends with a
.gpgextension. Located in the
/var/tmp/directory.[user@server1 ~]$ sudo ls -l /var/tmp/sosreport* [sudo] password for user: -rw-------. 1 root root 18381537 Jan 24 17:55 /var/tmp/secured-sosreport-server1-12345678-2022-01-24-ueqijfm.tar.xz.gpg
-
File name starts with
Verify that you can decrypt the archive with the same passphrase you used to encrypt it.
Use the
gpgcommand to decrypt the archive.[user@server1 ~]$ sudo gpg --output decrypted-sosreport.tar.gz --decrypt /var/tmp/secured-sosreport-server1-12345678-2022-01-24-ueqijfm.tar.xz.gpgWhen prompted, enter the passphrase you used to encrypt the archive.
┌──────────────────────────────────────────────────────┐
│ Enter passphrase                                     │
│                                                      │
│                                                      │
│ Passphrase: <passphrase>                             │
│                                                      │
│       <OK>                              <Cancel>     │
└──────────────────────────────────────────────────────┘
Verify that the
gpgutility produced an unencrypted archive with a.tar.gzfile extension.[user@server1 ~]$ sudo ls -l decrypted-sosreport.tar.gz [sudo] password for user: -rw-r--r--. 1 root root 18381537 Jan 24 17:59 decrypted-sosreport.tar.gz
Additional resources
1.7. Generating an sos report and securing it with GPG encryption based on a keypair
This procedure describes how to generate an sos report and secure it with GPG2 encryption based on a keypair from a GPG keyring. You might want to secure the contents of an sos report with this type of encryption if, for example, you want to protect an sos report stored on a server.
Ensure you have sufficient space when creating an encrypted sos report, as it temporarily uses double the disk space:
-
The
sosutility creates an unencryptedsosreport. -
The utility encrypts the
sosreport as a new file. - The utility then removes the unencrypted archive.
Prerequisites
-
You have installed the
sospackage. -
You need
rootprivileges. - You have created a GPG2 key.
Procedure
Run the
sos reportcommand and specify the user name that owns the GPG keyring with the--encrypt-keyoption. You can add the--uploadoption to transfer thesosreport to Red Hat immediately after generating it.NoteThe user running the
sos reportcommand must be the same user that owns the GPG keyring used to encrypt and decrypt thesosreport. If the user usessudoto run thesos reportcommand, the keyring must also be set up usingsudo, or the user must have direct shell access to that account.[user@server1 ~]$ sudo sos report --encrypt-key root [sudo] password for user: sosreport (version 4.2) This command will collect diagnostic and configuration information from this Red Hat Enterprise Linux system and installed applications. An archive containing the collected information will be generated in /var/tmp/sos.6ucjclgf and may be provided to a Red Hat support representative. ... Press ENTER to continue, or CTRL-C to quit.
(Optional) If you have already opened a Technical Support case with Red Hat, enter the case number to embed it in the
sosreport file name, and it will be uploaded to that case if you specified the--uploadoption. If you do not have a case number, leave this field blank. Entering a case number is optional and does not affect the operation of thesosutility.Please enter the case id that you are generating this report for []: <8-digit_case_number>Take note of the
sosreport file name displayed at the end of the console output.... Finished running plugins Creating compressed archive... Your sosreport has been generated and saved in: /var/tmp/secured-sosreport-server1-23456789-2022-02-27-zhdqhdi.tar.xz.gpg Size 15.44MiB Owner root md5 ac62697e33f3271dbda92290583d1242 Please send this file to your support representative.
Verification steps
Verify that the
sosutility created an archive meeting the following requirements:-
File name starts with
secured. -
File name ends with a
.gpgextension. Located in the
/var/tmp/directory.[user@server1 ~]$ sudo ls -l /var/tmp/sosreport* [sudo] password for user: -rw-------. 1 root root 16190013 Jan 24 17:55 /var/tmp/secured-sosreport-server1-23456789-2022-01-27-zhdqhdi.tar.xz.gpg
-
File name starts with
Verify you can decrypt the archive with the same key you used to encrypt it.
Use the
gpgcommand to decrypt the archive.[user@server1 ~]$ sudo gpg --output decrypted-sosreport.tar.gz --decrypt /var/tmp/secured-sosreport-server1-23456789-2022-01-27-zhdqhdi.tar.xz.gpgWhen prompted, enter the passphrase you used when creating the GPG key.
┌────────────────────────────────────────────────────────────────┐
│ Please enter the passphrase to unlock the OpenPGP secret key:  │
│ "GPG User (first key) <root@example.com>"                      │
│ 2048-bit RSA key, ID BF28FFA302EF4557,                         │
│ created 2020-01-13.                                            │
│                                                                │
│                                                                │
│ Passphrase: <passphrase>                                       │
│                                                                │
│         <OK>                                    <Cancel>       │
└────────────────────────────────────────────────────────────────┘
Verify that the
gpgutility produced an unencrypted archive with a.tar.gzfile extension.[user@server1 ~]$ sudo ll decrypted-sosreport.tar.gz [sudo] password for user: -rw-r--r--. 1 root root 16190013 Jan 27 17:47 decrypted-sosreport.tar.gz
Additional resources
1.8. Creating a GPG2 key
The following procedure describes how to generate a GPG2 key to use with encryption utilities.
Prerequisites
-
You need
rootprivileges.
Procedure
Install and configure the
pinentryutility.[root@server ~]# yum install pinentry [root@server ~]# mkdir ~/.gnupg -m 700 [root@server ~]# echo "pinentry-program /usr/bin/pinentry-curses" >> ~/.gnupg/gpg-agent.conf
Create a
key-inputfile used for generating a GPG keypair with your preferred details. For example:[root@server ~]# cat >key-input <<EOF %echo Generating a standard key Key-Type: RSA Key-Length: 2048 Name-Real: GPG User Name-Comment: first key Name-Email: root@example.com Expire-Date: 0 %commit %echo Finished creating standard key EOF
(Optional) By default, GPG2 stores its keyring in the
~/.gnupgfile. To use a custom keyring location, set theGNUPGHOMEenvironment variable to a directory that is only accessible by root.[root@server ~]# export GNUPGHOME=/root/backup [root@server ~]# mkdir -p $GNUPGHOME -m 700
Generate a new GPG2 key based on the contents of the
key-inputfile.[root@server ~]# gpg2 --batch --gen-key key-inputEnter a passphrase to protect the GPG2 key. You use this passphrase to access the private key for decryption.
┌──────────────────────────────────────────────────────┐
│ Please enter the passphrase to                       │
│ protect your new key                                 │
│                                                      │
│ Passphrase: <passphrase>                             │
│                                                      │
│	 <OK>                             <Cancel>         │
└──────────────────────────────────────────────────────┘
Confirm the correct passphrase by entering it again.
┌──────────────────────────────────────────────────────┐
│ Please re-enter this passphrase                      │
│                                                      │
│ Passphrase: <passphrase>                             │
│                                                      │
│	 <OK>                             <Cancel>         │
└──────────────────────────────────────────────────────┘
Verify that the new GPG2 key was created successfully.
gpg: keybox '/root/backup/pubring.kbx' created
gpg: Generating a standard key
gpg: /root/backup/trustdb.gpg: trustdb created
gpg: key BF28FFA302EF4557 marked as ultimately trusted
gpg: directory '/root/backup/openpgp-revocs.d' created
gpg: revocation certificate stored as '/root/backup/openpgp-revocs.d/8F6FCF10C80359D5A05AED67BF28FFA302EF4557.rev'
gpg: Finished creating standard key
Verification Steps
List the GPG keys on the server.
[root@server ~]# gpg2 --list-secret-keys
gpg: checking the trustdb
gpg: marginals needed: 3  completes needed: 1  trust model: pgp
gpg: depth: 0  valid:   1  signed:   0  trust: 0-, 0q, 0n, 0m, 0f, 1u
/root/backup/pubring.kbx
------------------------
sec   rsa2048 2020-01-13 [SCEA]
      8F6FCF10C80359D5A05AED67BF28FFA302EF4557
uid           [ultimate] GPG User (first key) <root@example.com>
Additional resources
1.9. Generating an sos report from the rescue environment
If a Red Hat Enterprise Linux (RHEL) host does not boot properly, you can boot the host into a rescue environment to gather an sos report.
Using the rescue environment, you can mount the target system under /mnt/sysimage, access its contents, and run the sos report command.
Prerequisites
- If the host is a bare metal server, you need physical access to the machine.
- If the host is a virtual machine, you need access to the virtual machine’s settings in the hypervisor.
- A RHEL installation source, such as an ISO image file, an installation DVD, a netboot CD, or a Preboot Execution Environment (PXE) configuration providing a RHEL installation tree.
Procedure
- Boot the host from an installation source.
In the boot menu for the installation media, select the
Troubleshootingoption.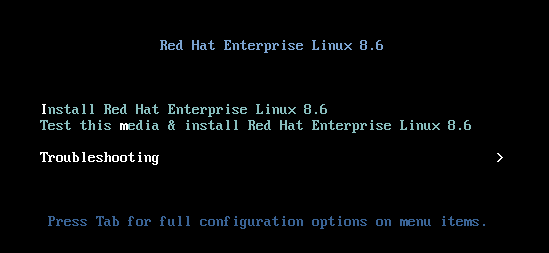
In the Troubleshooting menu, select the
Rescue a Red Hat Enterprise Linux systemoption.
At the Rescue menu, select
1and press the Enter key to continue and mount the system under the/mnt/sysimagedirectory.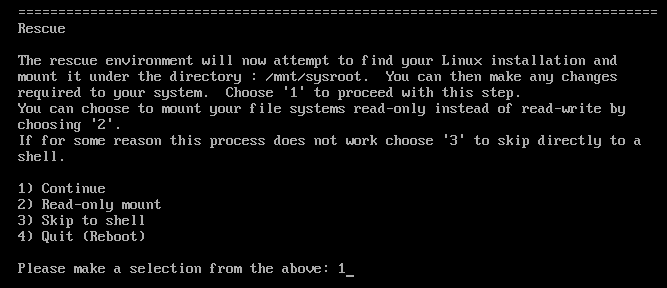
Press the Enter key to obtain a shell when prompted.
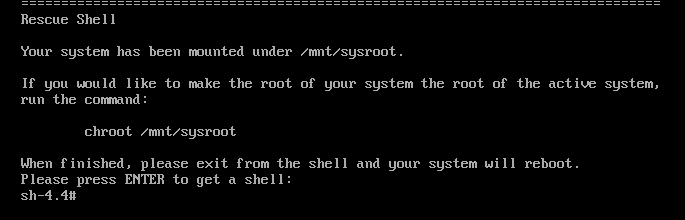
Use the
chrootcommand to change the apparent root directory of the rescue session to the/mnt/sysimagedirectory.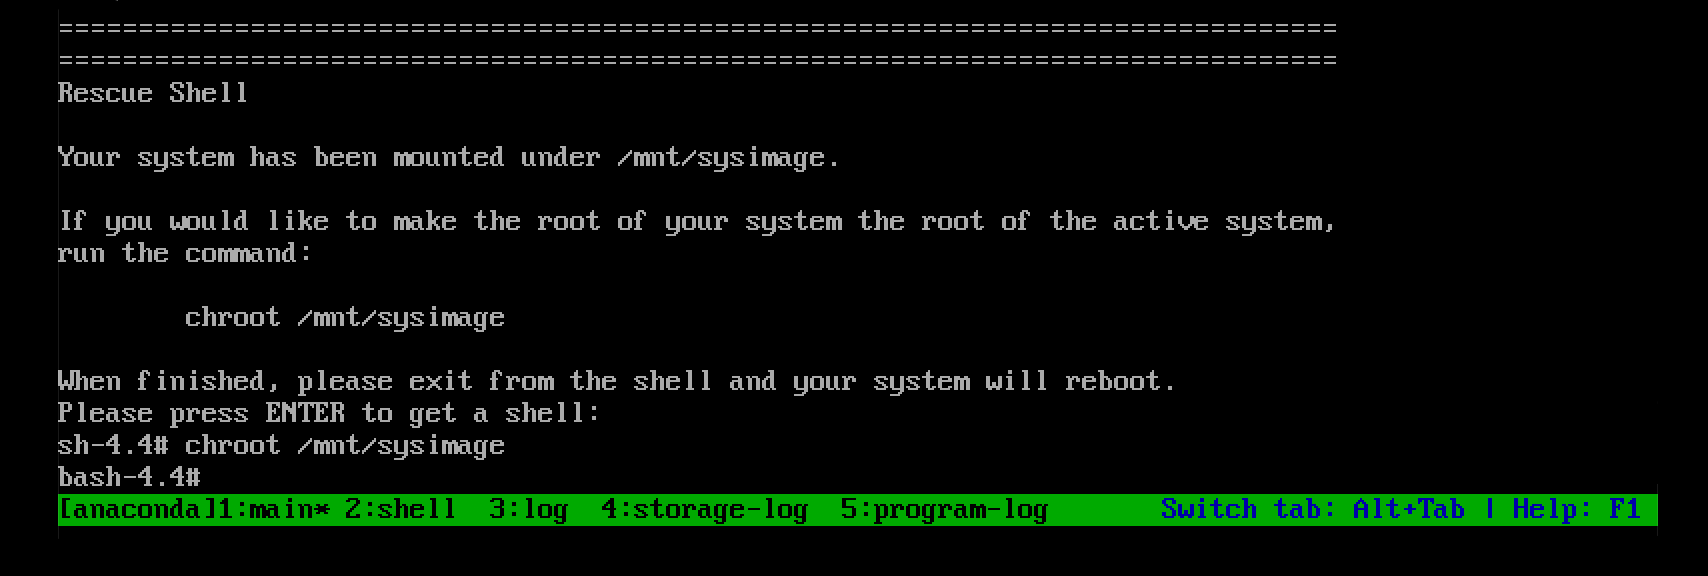
Optional: Your network will not be up in the inital Rescue Environment, so make sure you set it up first. For example, if the network requires static IP addresses, and you want to transfer the
sosreport over the network, configure the network:Identify the Ethernet device you want to use:
# ip link show … 2: enp1s0: <BROADCAST,MULTICAST,UP,LOWER_UP> mtu 1500 qdisc fq_codel state UP mode DEFAULT group default qlen 1000 link/ether 52:54:00:74:79:56 brd ff:ff:ff:ff:ff:ffAssign an IP address to the network interface, and set the default gateway. For example, if you wanted to add the IP address of 192.168.0.1 with a subnet of 255.255.255.0, which is a CIDR of 24, to device enp1s0, enter:
# ip address add <192.168.0.1/24> dev <enp1s0>
# ip route add default via <192.168.0.254>
Add a
nameserverentry to the/etc/resolv.conffile, for example:# nameserver <192.168.0.5>
Run the
sos reportcommand and follow the on-screen instructions. You can add the--uploadoption to transfer thesosreport to Red Hat immediately after generating it.
(Optional) If you have already opened a Technical Support case with Red Hat, enter the case number to embed it in the
sosreport file name, and it will be uploaded to that case if you specified the--uploadoption and your host is connected to the internet. If you do not have a case number, leave this field blank. Entering a case number is optional and does not affect the operation of thesosutility.
Take note of the
sosreport file name displayed at the end of the console output.
-
If your host does not have a connection to the internet, use a file transfer utility such as
scpto transfer thesosreport to another host on your network, then upload it to a Red Hat Technical Support case.
Verification steps
Verify that the
sosutility created an archive in the/var/tmp/directory.
Additional resources
- How to generate sosreport from the rescue environment.
- Enabling networking in rescue environment without chrooting.
- To download an ISO of the RHEL installation DVD, visit the downloads section of the Red Hat Customer Portal. See Product Downloads.
-
Methods for providing an
sosreport to Red Hat technical support.
1.10. Methods for providing an sos report to Red Hat technical support
You can use the following methods to upload your sos report to Red Hat Technical Support.
- Upload with the
sos reportcommand You can use the
--uploadoption to transfer thesosreport to Red Hat immediately after generating it.-
If you provide a case number when prompted, or use the
--case-idor--ticket-numberoptions, thesosutility uploads thesosreport to your case after you authenticate with your Red Hat Customer Portal account. If you do not provide a case number or you do not authenticate, the utility uploads the
sosreport to the Red Hat public SFTP site. Provide Red Hat Technical Support Engineers with the name of thesosreport archive so they can access it.[user@server1 ~]$ sudo sos report --upload [sudo] password for user: sosreport (version 4.2) This command will collect diagnostic and configuration information from this Red Hat Enterprise Linux system and installed applications. ... Please enter the case id that you are generating this report for []: <8-digit_case_number> Enter your Red Hat Customer Portal username (empty to use public dropbox): <Red_Hat_Customer_Portal_ID> Please provide the upload password for <user@domain.com>: ... Attempting upload to Red Hat Customer Portal Uploaded archive successfully
-
If you provide a case number when prompted, or use the
- Upload files via the Red Hat Customer Portal
Using your Red Hat user account, you can log into the
Support Casessection of the Red Hat Customer Portal website and upload ansosreport to a technical support case.To log in, visit Support Cases.
- Upload files using the Red Hat Support Tool
With the Red Hat Support Tool, you can upload a file directly from the command line to a Red Hat technical support case. The case number is required.
[user@server1 ~]$ redhat-support-tool addattachment -c <8-digit_case_number> </var/tmp/sosreport_filename>
Additional resources
-
For additional methods on how to provide Red Hat Technical Support with your
sosreport, such as SFTP andcurl, see the Red Hat Knowledgebase article How to provide files to Red Hat Support (vmcore, rhev logcollector, sosreports, heap dumps, log files, and so on)
Chapter 2. Generating and maintaining the diagnostic reports using the RHEL web console
Generate, download, and delete the diagnostic reports in the RHEL web console.
2.1. Generating diagnostic reports using the RHEL web console
Prerequisites
- The RHEL web console has been installed. For details, see Installing the web console.
-
The
cockpit-storagedpackage is installed on your system. - You have administrator privileges.
Procedure
- Log in to the RHEL web console. For details, see Logging in to the web console.
- In the left side menu, select Tools >> Diagnostic reports.
To generate a new diagnostic report, click the button.
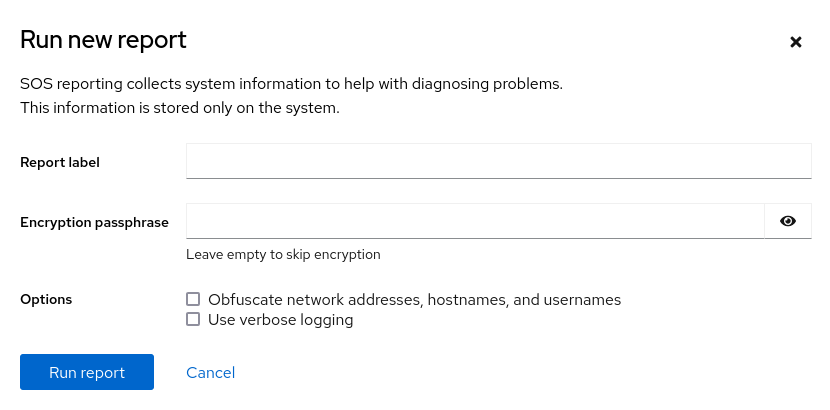
- Enter the label for the report you want to create.
(Optional) Customize your report.
- Enter the encryption passphrase to encrypt your report. If you want to skip the encryption of the report, leave the field empty.
- Check the checkbox Obfuscate network addresses, hostnames, and usernames to obfuscate certain data.
- Check the checkbox Use verbose logging to increase logging verbosity.
- Click the button to generate a report and wait for the process to complete. You can stop generating the report using the button.
2.2. Downloading diagnostic reports using the RHEL web console
Prerequisites
- The RHEL web console has been installed. For details, see Installing the web console.
- You have administrator privileges.
- One or more diagnostic reports have been generated.
Procedure
- Log in to the RHEL web console. For details, see Logging in to the web console.
- In the left side menu, select Tools >> Diagnostic reports.
- Click the button next to the report that you want to download. The download will start automatically.
Next steps
For the methods on how to provide Red Hat Technical Support team with your diagnostic report, see Methods for providing an sos report to Red Hat technical support.
2.3. Deleting diagnostic reports using the RHEL web console
Prerequisites
- The RHEL web console has been installed. For details, see Installing the web console.
- You have administrator privileges.
- One or more diagnostic reports have been generated.
Procedure
- Log in to the RHEL web console. For details, see Logging in to the web console.
- In the left side menu, select Tools >> Diagnostic reports.
- Click the vertical ellipsis by the button next to the report that you want to delete, then click on the button.
- In the Delete report permanently? window, click the button to delete the report.