
Deduplicating and compressing logical volumes on RHEL
Deploying VDO on LVM to increase the storage capacity
Abstract
Making open source more inclusive
Red Hat is committed to replacing problematic language in our code, documentation, and web properties. We are beginning with these four terms: master, slave, blacklist, and whitelist. Because of the enormity of this endeavor, these changes will be implemented gradually over several upcoming releases. For more details, see our CTO Chris Wright’s message.
Providing feedback on Red Hat documentation
We appreciate your feedback on our documentation. Let us know how we can improve it.
Submitting feedback through Jira (account required)
- Log in to the Jira website.
- Click Create in the top navigation bar.
- Enter a descriptive title in the Summary field.
- Enter your suggestion for improvement in the Description field. Include links to the relevant parts of the documentation.
- Click Create at the bottom of the dialogue.
Chapter 1. Introduction to VDO on LVM
The Virtual Data Optimizer (VDO) feature provides inline block-level deduplication, compression, and thin provisioning for storage. You can manage VDO as a type of Logical Volume Manager (LVM) Logical Volumes (LVs), similar to LVM thin-provisioned volumes.
VDO volumes on LVM (LVM-VDO) contain the following components:
- VDO pool LV
- This is the backing physical device that stores, deduplicates, and compresses data for the VDO LV. The VDO pool LV sets the physical size of the VDO volume, which is the amount of data that VDO can store on the disk.
- Currently, each VDO pool LV can hold only one VDO LV. As a result, VDO deduplicates and compresses each VDO LV separately. Duplicate data that is stored on separate LVs do not benefit from data optimization of the same VDO volume.
- VDO LV
- This is the virtual, provisioned device on top of the VDO pool LV. The VDO LV sets the provisioned, logical size of the VDO volume, which is the amount of data that applications can write to the volume before deduplication and compression occurs.
If you are already familiar with the structure of an LVM thin-provisioned implementation, you can refer to Table 1.1 to understand how the different aspects of VDO are presented to the system.
Table 1.1. A comparison of components in VDO on LVM and LVM thin provisioning
| Physical device | Provisioned device | |
|---|---|---|
| VDO on LVM | VDO pool LV | VDO LV |
| LVM thin provisioning | Thin pool | Thin volume |
Since the VDO is thin-provisioned, the file system and applications only see the logical space in use and not the actual available physical space. Use scripting to monitor the available physical space and generate an alert if use exceeds a threshold. For information about monitoring the available VDO space see the Monitoring VDO section.
Chapter 2. LVM-VDO requirements
VDO on LVM has certain requirements on its placement and your system resources.
2.1. VDO memory requirements
Each VDO volume has two distinct memory requirements:
- The VDO module
VDO requires a fixed 38 MB of RAM and several variable amounts:
- 1.15 MB of RAM for each 1 MB of configured block map cache size. The block map cache requires a minimum of 150MB RAM.
- 1.6 MB of RAM for each 1 TB of logical space.
- 268 MB of RAM for each 1 TB of physical storage managed by the volume.
- The UDS index
The Universal Deduplication Service (UDS) requires a minimum of 250 MB of RAM, which is also the default amount that deduplication uses. You can configure the value when formatting a VDO volume, because the value also affects the amount of storage that the index needs.
The memory required for the UDS index is determined by the index type and the required size of the deduplication window:
Index type Deduplication window Note Dense
1 TB per 1 GB of RAM
A 1 GB dense index is generally sufficient for up to 4 TB of physical storage.
Sparse
10 TB per 1 GB of RAM
A 1 GB sparse index is generally sufficient for up to 40 TB of physical storage.
NoteThe minimal disk usage for a VDO volume using default settings of 2 GB slab size and 0.25 dense index, requires approx 4.7 GB. This provides slightly less than 2 GB of physical data to write at 0% deduplication or compression.
Here, the minimal disk usage is the sum of the default slab size and dense index.
The UDS Sparse Indexing feature is the recommended mode for VDO. It relies on the temporal locality of data and attempts to retain only the most relevant index entries in memory. With the sparse index, UDS can maintain a deduplication window that is ten times larger than with dense, while using the same amount of memory.
Although the sparse index provides the greatest coverage, the dense index provides more deduplication advice. For most workloads, given the same amount of memory, the difference in deduplication rates between dense and sparse indexes is negligible.
Additional resources
2.2. VDO storage space requirements
You can configure a VDO volume to use up to 256 TB of physical storage. Only a certain part of the physical storage is usable to store data. This section provides the calculations to determine the usable size of a VDO-managed volume.
VDO requires storage for two types of VDO metadata and for the UDS index:
- The first type of VDO metadata uses approximately 1 MB for each 4 GB of physical storage plus an additional 1 MB per slab.
- The second type of VDO metadata consumes approximately 1.25 MB for each 1 GB of logical storage, rounded up to the nearest slab.
- The amount of storage required for the UDS index depends on the type of index and the amount of RAM allocated to the index. For each 1 GB of RAM, a dense UDS index uses 17 GB of storage, and a sparse UDS index will use 170 GB of storage.
Additional resources
2.3. Examples of VDO requirements by physical size
The following tables provide approximate system requirements of VDO based on the physical size of the underlying volume. Each table lists requirements appropriate to the intended deployment, such as primary storage or backup storage.
The exact numbers depend on your configuration of the VDO volume.
- Primary storage deployment
In the primary storage case, the UDS index is between 0.01% to 25% the size of the physical size.
Table 2.1. Storage and memory requirements for primary storage
Physical size RAM usage: UDS RAM usage: VDO Disk usage Index type 10GB–1TB
250MB
472MB
2.5GB
Dense
2–10TB
1GB
3GB
10GB
Dense
250MB
22GB
Sparse
11–50TB
2GB
14GB
170GB
Sparse
51–100TB
3GB
27GB
255GB
Sparse
101–256TB
12GB
69GB
1020GB
Sparse
- Backup storage deployment
In the backup storage case, the UDS index covers the size of the backup set but is not bigger than the physical size. If you expect the backup set or the physical size to grow in the future, factor this into the index size.
Table 2.2. Storage and memory requirements for backup storage
Physical size RAM usage: UDS RAM usage: VDO Disk usage Index type 10GB–1TB
250MB
472MB
2.5 GB
Dense
2–10TB
2GB
3GB
170GB
Sparse
11–50TB
10GB
14GB
850GB
Sparse
51–100TB
20GB
27GB
1700GB
Sparse
101–256TB
26GB
69GB
3400GB
Sparse
2.4. Placement of LVM-VDO in the storage stack
You must place certain storage layers under a VDO logical volume and others above it.
You can place thick-provisioned layers on top of VDO, but you cannot rely on the guarantees of thick provisioning in that case. Because the VDO layer is thin-provisioned, the effects of thin provisioning apply to all layers above it. If you do not monitor the VDO volume, you might run out of physical space on thick-provisioned volumes above VDO.
The supported placement of the following layers is under VDO. Do not place them above VDO:
- DM Multipath
- DM Crypt
- Software RAID (LVM or MD RAID)
The following configurations are not supported:
- VDO on top of a loopback device
- Encrypted volumes on top of VDO
- Partitions on a VDO volume
- RAID, such as LVM RAID, MD RAID, or any other type, on top of a VDO volume
- Deploying Ceph Storage on LVM-VDO
Additional resources
Chapter 3. Creating a deduplicated and compressed logical volume
You can create an LVM logical volume that uses the VDO feature to deduplicate and compress data.
3.1. LVM-VDO deployment scenarios
You can deploy VDO on LVM (LVM-VDO) in a variety of ways to provide deduplicated storage for:
- block access
- file access
- local storage
- remote storage
Because LVM-VDO exposes its deduplicated storage as a regular logical volume (LV), you can use it with standard file systems, iSCSI and FC target drivers, or as unified storage.
Deploying Ceph Storage on LVM-VDO is currently not supported.
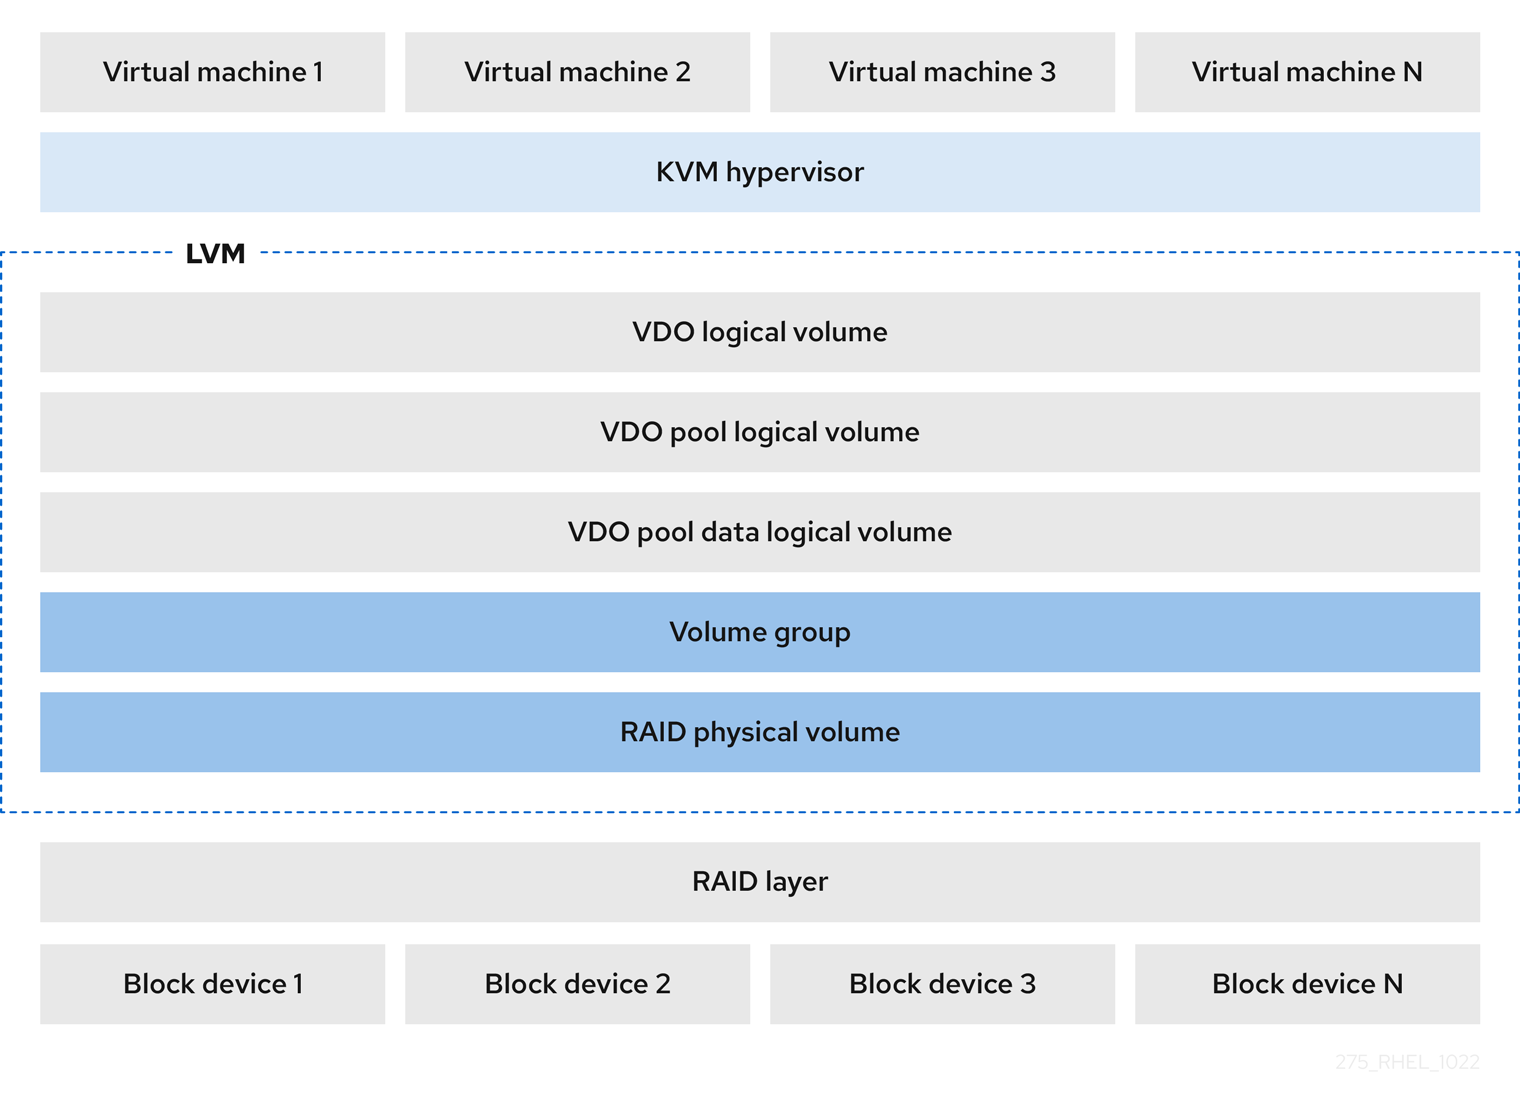
- KVM
You can deploy LVM-VDO on a KVM server configured with Direct Attached Storage.
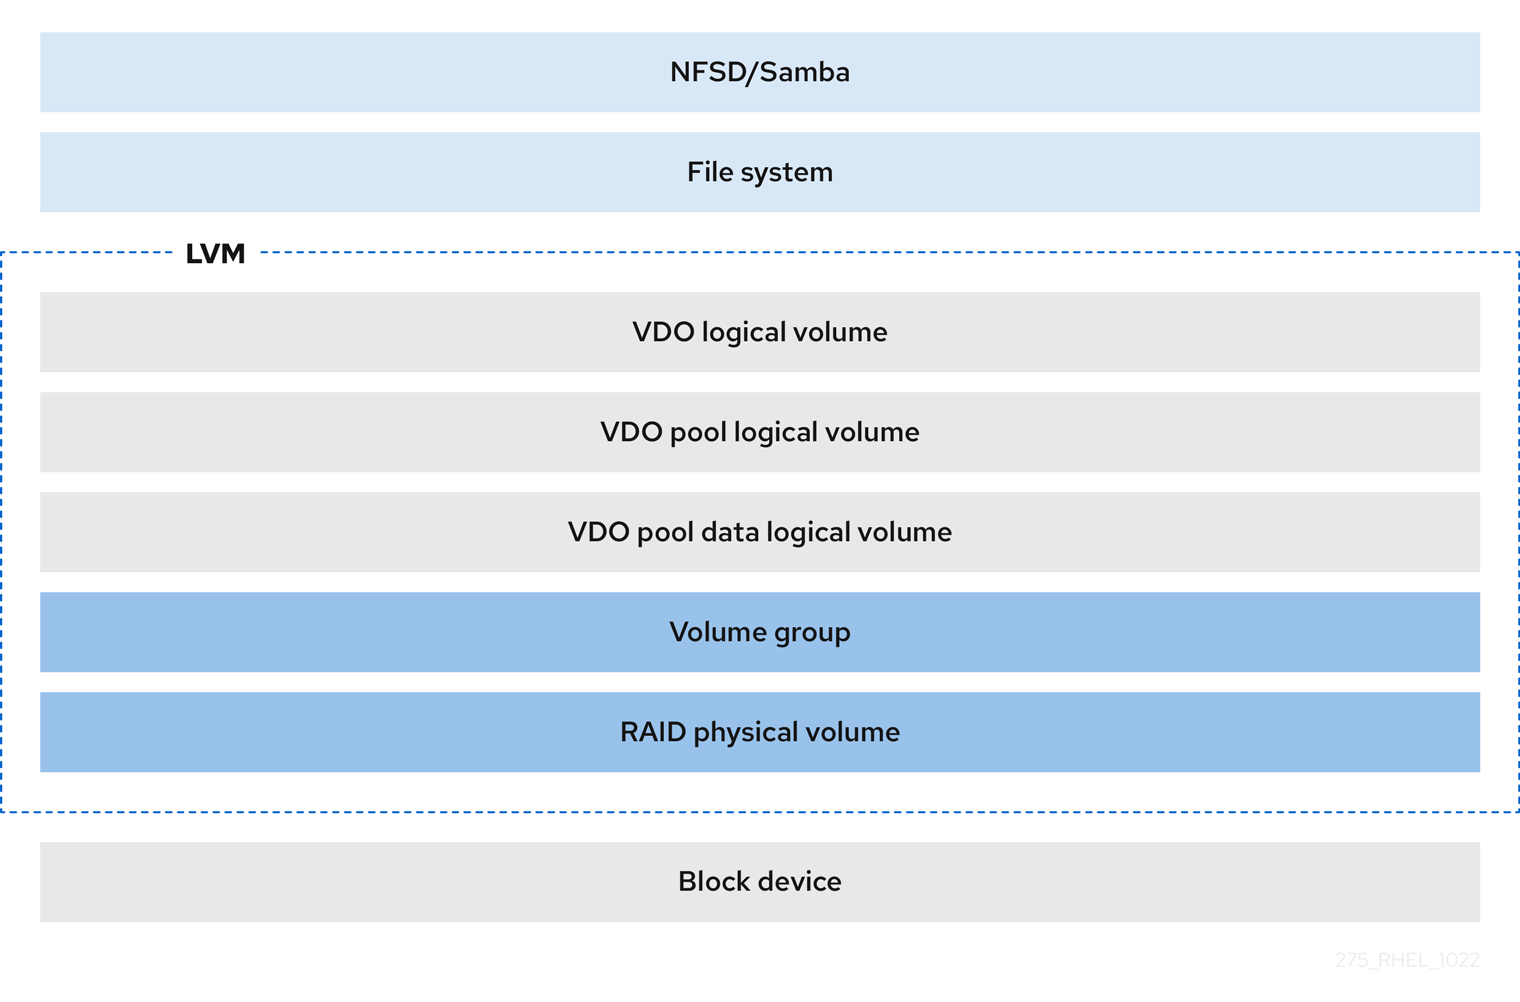
- File systems
You can create file systems on top of a VDO LV and expose them to NFS or CIFS users with the NFS server or Samba.
- iSCSI target
You can export the entirety of the VDO LV as an iSCSI target to remote iSCSI initiators.

- Encryption
Device Mapper (DM) mechanisms such as DM Crypt are compatible with VDO. Encrypting a VDO LV volumes helps ensure data security, and any file systems above the VDO LV are still deduplicated.
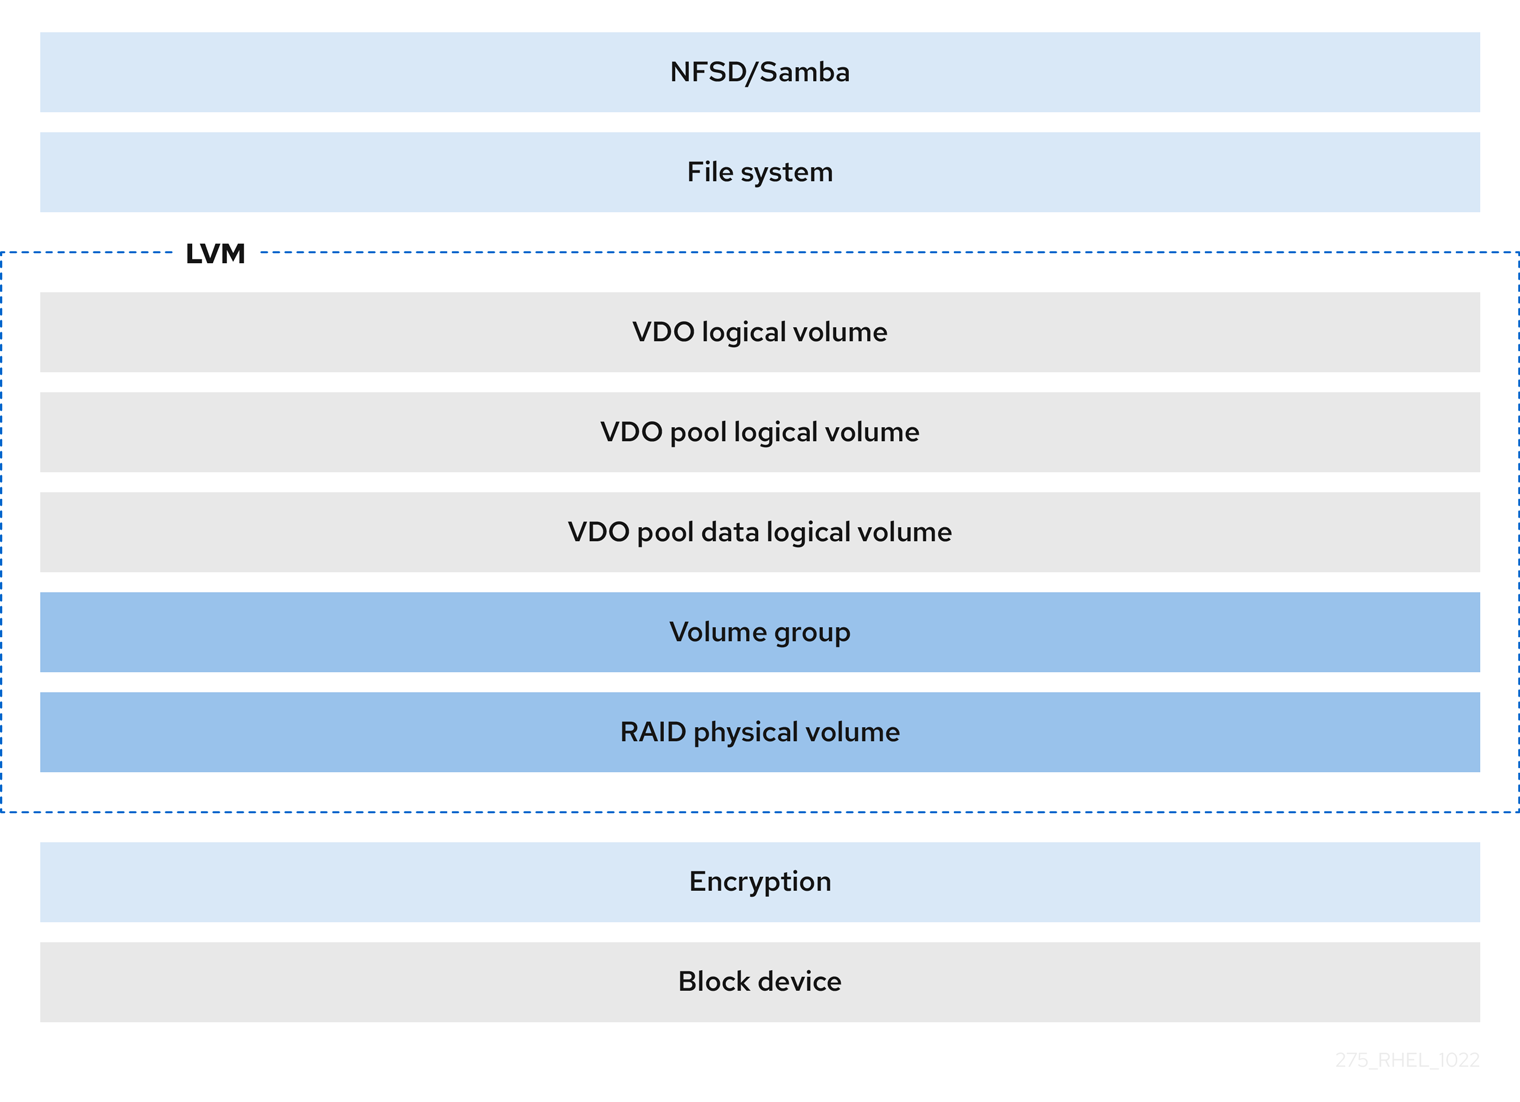 Important
Applying the encryption layer above the VDO LV results in little if any data deduplication. Encryption makes duplicate blocks different before VDO can deduplicate them.
Always place the encryption layer below the VDO LV.
3.2. The physical and logical size of an LVM-VDO volume
This section describes the physical size, available physical size, and logical size that VDO can utilize.
- Physical size
This is the same size as the physical extents allocated to the VDO pool LV. VDO uses this storage for:
- User data, which might be deduplicated and compressed
- VDO metadata, such as the UDS index
- Available physical size
This is the portion of the physical size that VDO is able to use for user data.
It is equivalent to the physical size minus the size of the metadata, rounded down to a multiple of the slab size.
- Logical Size
This is the provisioned size that the VDO LV presents to applications. It is usually larger than the available physical size. VDO currently supports any logical size up to 254 times the size of the physical volume with an absolute maximum logical size of 4 PB.
When you set up a VDO logical volume (LV), you specify the amount of logical storage that the VDO LV presents. When hosting active VMs or containers, Red Hat recommends provisioning storage at a 10:1 logical to physical ratio, that is, if you are utilizing 1 TB of physical storage, you would present it as 10 TB of logical storage.
If you do not specify the
--virtualsizeoption, VDO provisions the volume to a1:1ratio. For example, if you put a VDO LV on top of a 20 GB VDO pool LV, VDO reserves 2.5 GB for the UDS index, if the default index size is used. The remaining 17.5 GB is provided for the VDO metadata and user data. As a result, the available storage to consume is not more than 17.5 GB, and can be less due to metadata that makes up the actual VDO volume.
Additional resources
3.3. Slab size in VDO
The physical storage of the VDO volume is divided into a number of slabs. Each slab is a contiguous region of the physical space. All of the slabs for a given volume have the same size, which can be any power of 2 multiple of 128 MB up to 32 GB.
The default slab size is 2 GB to facilitate evaluating VDO on smaller test systems. A single VDO volume can have up to 8192 slabs. Therefore, in the default configuration with 2 GB slabs, the maximum allowed physical storage is 16 TB. When using 32 GB slabs, the maximum allowed physical storage is 256 TB. VDO always reserves at least one entire slab for metadata, and therefore, the reserved slab cannot be used for storing user data.
Slab size has no effect on the performance of the VDO volume.
Table 3.1. Recommended VDO slab sizes by physical volume size
| Physical volume size | Recommended slab size |
|---|---|
| 10–99 GB | 1 GB |
| 100 GB – 1 TB | 2 GB |
| 2–256 TB | 32 GB |
The minimal disk usage for a VDO volume using default settings of 2 GB slab size and 0.25 dense index, requires approx 4.7 GB. This provides slightly less than 2 GB of physical data to write at 0% deduplication or compression.
Here, the minimal disk usage is the sum of the default slab size and dense index.
You can control the slab size by providing the --config 'allocation/vdo_slab_size_mb=size-in-megabytes' option to the lvcreate command.
3.4. Installing VDO
This procedure installs software necessary to create, mount, and manage VDO volumes.
Procedure
Install the VDO software:
# yum install lvm2 kmod-kvdo vdo
3.5. Creating an LVM-VDO volume
This procedure creates an VDO logical volume (LV) on a VDO pool LV.
Prerequisites
- Install the VDO software. For more information, see Installing VDO.
- An LVM volume group with free storage capacity exists on your system.
Procedure
Pick a name for your VDO LV, such as
vdo1. You must use a different name and device for each VDO LV on the system.In all the following steps, replace vdo-name with the name.
Create the VDO LV:
# lvcreate --type vdo \ --name vdo-name --size physical-size --virtualsize logical-size \ vg-name- Replace vg-name with the name of an existing LVM volume group where you want to place the VDO LV.
- Replace logical-size with the amount of logical storage that the VDO LV will present.
If the physical size is larger than 16TiB, add the following option to increase the slab size on the volume to 32GiB:
--config 'allocation/vdo_slab_size_mb=32768'
If you use the default slab size of 2GiB on a physical size larger than 16TiB, the
lvcreatecommand fails with the following error:ERROR - vdoformat: formatVDO failed on '/dev/device': VDO Status: Exceeds maximum number of slabs supportedExample 3.1. Creating a VDO LV for container storage
For example, to create a VDO LV for container storage on a 1TB VDO pool LV, you can use:
# lvcreate --type vdo \ --name vdo1 --size 1T --virtualsize 10T \ vg-nameImportantIf a failure occurs when creating the VDO volume, remove the volume to clean up.
Create a file system on the VDO LV:
For the XFS file system:
# mkfs.xfs -K /dev/vg-name/vdo-name
For the ext4 file system:
# mkfs.ext4 -E nodiscard /dev/vg-name/vdo-name
Additional resources
-
lvmvdo(7)man page
3.6. Mounting an LVM-VDO volume
This procedure mounts a file system on an LVM-VDO volume, either manually or persistently.
Prerequisites
- An LVM-VDO volume exists on your system. For more information, see Creating an LVM-VDO volume.
Procedure
To mount the file system on the LVM-VDO volume manually, use:
# mount /dev/vg-name/vdo-name mount-point
To configure the file system to mount automatically at boot, add a line to the
/etc/fstabfile:For the XFS file system:
/dev/vg-name/vdo-name mount-point xfs defaults 0 0
For the ext4 file system:
/dev/vg-name/vdo-name mount-point ext4 defaults 0 0
If the LVM-VDO volume is located on a block device that requires network, such as iSCSI, add the
_netdevmount option. For iSCSI and other block devices requiring network, see thesystemd.mount(5)man page for information about the_netdevmount option.
Additional resources
-
systemd.mount(5)man page
3.7. Changing the compression and deduplication settings on an LVM-VDO volume
This procedure enables or disables the compression and deduplication of a VDO pool logical volume (LV).
Compression and deduplication are enabled by default.
Prerequisites
- An LVM-VDO volume exists on your system.
Procedure
To find out if the compression and deduplication is enabled or disabled on your logical volumes:
# lvs -o+vdo_compression,vdo_deduplication
Find out status of the compression and status of the deduplication index of your running active VDOPoolLV:
# lvs -o+vdo_compression_state,vdo_index_state
The
vdo_index_statecan show aserror,close,opening,closing,online, andoffline.To enable or disable the compression for VDOPoolLV:
# lvchange --compression y|n vg-name/vdopoolname
To enable or disable the deduplication for VDOPoolLV:
# lvchange --deduplication y|n vg-name/vdopoolname
Additional resources
-
lvmvdo(7)man page
3.8. Managing thin provisioning with Virtual Data Optimizer
It is possible to configure a thin-provisioned VDO volume to prepare for future expansion of the physical space, in order to address a condition where the physical space usage of the VDO volume is approaching 100%. Instead of using -l 100%FREE in the lvcreate operation, for example, use '95%FREE' to ensure that there is some reserved space for recovery later on if needed. This procedure describes how to resolve the following issues:
- The volume runs out of space
- The file system enters read-only mode
- ENOSPC reported by the volume
The best way to address high physical space usage on a VDO volume is to delete unused files, and discard the blocks used by these unused files either by using online discard or the fstrim program. The physical space of a VDO volume can only be grown to 8192 slabs that is 16 TB for a VDO volume with the default slab size of 2 GB, or 256 TB for a VDO volume with the maximal slab size of 32 GB.
In all of the following steps, replace myvg and myvdo with the volume group and VDO name respectively.
Prerequisites
- Install the VDO software. For more information, see Installing VDO.
- An LVM volume group with free storage capacity exists on your system.
-
A thin-provisioned VDO volume using the
lvcreate --type vdo --name myvdo myvg -L logical-size-of-pool --virtualsize virtual-size-of-vdocommand. For more information, see Creating an LVM-VDO volume.
Procedure
Determine the optimal logical size for a thin-provisioned VDO volume
# vdostats myvg-vpool0-vpool

Device               1K-blocks Used     Available  Use% Space saving%
myvg-vpool0-vpool   104856576  29664088 75192488   28%   69%
To calculate the space savings ratio, use the following formula:
Savings ratio = 1 / (1 - Space saving%)
In this example,
-
there is approximately a
3.22:1space savings ratio on a data set of about 80 GB. - Multiplying the data set size by the ratio would yield a potential logical size of 256 GB if more data with the same space savings were written to the VDO volume.
- Adjusting this number downward to 200 GB yields a logical size with a safe margin of free physical space, given the same space savings ratio.
-
there is approximately a
Monitor the free physical space in a VDO volume:
# vdostats myvg-vpool0-vpoolThis command can be executed periodically to provide monitoring of the used and free physical space of the VDO volume.
Optional: View the warnings on physical space usage on a VDO volume by using the available
/usr/share/doc/vdo/examples/monitor/monitor_check_vdostats_physicalSpace.plscript:# /usr/share/doc/vdo/examples/monitor/monitor_check_vdostats_physicalSpace.pl myvg-vpool0-vpoolWhen creating a VDO volume, the
dmeventdmonitoring service monitors the usage of physical space in a VDO volume. This is enabled by default when a VDO volume is created or started.Use the
journalctlcommand to view the output ofdmeventdin the logs while monitoring a VDO volume:lvm[8331]: Monitoring VDO pool myvg-vpool0-vpool. ... lvm[8331]: WARNING: VDO pool myvg-vpool0-vpool is now 84.63% full. lvm[8331]: WARNING: VDO pool myvg-vpool0-vpool is now 91.01% full. lvm[8331]: WARNING: VDO pool myvg-vpool0-vpool is now 97.34% full.
Remediate VDO volumes that are almost out of available physical space. When it is possible to add a physical space to a VDO volume, but the volume space is full before it can be grown, it may be necessary to temporarily stop I/O to the volume.
To temporarily stop I/O to the volume, execute the following steps, where VDO volume myvdo contains a file system mounted on the /users/homeDir path:
Freeze the filesystem:
# xfs_freeze -f /users/homeDir

# vgextend myvg /dev/vdc2

# lvextend -l new_size myvg/vpool0-name

# xfs_freeze -u /users/homeDir
Unmount the filesystem:
# umount /users/homeDir

# vgextend myvg /dev/vdc2

# lvextend -l new_size myvg/vpool0-name

# mount -o discard /dev/myvg/myvdo /users/homeDir
NoteUnmounting or freezing a filesystem with cached data will incur a write of the cached data, which may fill the physical space of the VDO volume. Consider the maximum amount of cached filesystem data when setting a monitoring threshold for free physical space on a VDO volume.
Blocks that are no longer used by a file system can be cleaned up by using the
fstrimutility. Executingfstrimagainst a mounted file system on top of a VDO volume may result in increased free physical space for that volume. Thefstrimutility will send discards to the VDO volume, which are then used to remove references to the previously used blocks. If any of those blocks are single-referenced, the physical space will be available to use.Check VDO stats to see what the current amount of free space is:
# vdostats --human-readable myvg-vpool0-vpool

 Device             Size  Used  Available Use%  Space saving%
myvg-vpool0-vpool  100.0G 95.0G 5.0G      95%   73%
Discard unused blocks:
# fstrim /users/homeDirView the free physical space of the VDO volume:
# vdostats --human-readable myvg-vpool0-vpool


 Device             Size    Used   Available Use%  Space saving%
myvg-vpool0-vpool  100.0G   30.0G  70.0G     30%    43%
In this example, after executing
fstrimon the file system, the discards were able to return 65G of physical space to use in the VDO volume.NoteDiscarding volumes with lower levels of deduplication and compression will have a possibility of reclaiming physical space than discarding volumes with higher levels of deduplication and compression. A volume that has high levels of deduplication and compression may potentially require a more extensive cleanup to reclaim physical space than just simply discarding already unused blocks.
Chapter 4. Importing existing VDO volumes to LVM
You can import a VDO volume that was created by the VDO manager into LVM. As a result, you can manage the volume as a logical volume using the LVM tools.
The import operation is not reversible. After converting an existing VDO volume to LVM, accessing the VDO data is only possible using the LVM commands and the VDO manager no longer controls the volume.
Prerequisites
- Install the VDO software. For more information, see Installing VDO.
Procedure
Convert an existing VDO volume created by the VDO manager into a logical volume. In the following command, replace vg-name with the volume group name, lv-name with the logical volume name, and /dev/sdg1 with the VDO device:
# lvm_import_vdo --name vg-name/lv-name /dev/sdg1


Convert VDO device "/dev/sdg1" to VDO LV "vg-name/lv-name"? [y|N]: Yes
Stopping VDO vdo-name
Converting VDO vdo-name
     Opening /dev/disk/by-id/scsi-36d094660575ece002291bd67517f677a-part1 exclusively
     Loading the VDO superblock and volume geometry
     Checking the VDO state
     Converting the UDS index
     Converting the VDO
     Conversion completed for '/dev/disk/by-id/scsi-36d094660575ece002291bd67517f677a-part1': VDO is now offset by 2097152 bytes
 Physical volume "/dev/sdg1" successfully created.
 Volume group "vg-name" successfully created
 WARNING: Logical volume vg-name/lv-name_vpool not zeroed.
 Logical volume "lv-name_vpool" created.
 WARNING: Converting logical volume vg-name/lv-name_vpool to VDO pool volume WITHOUT formating.
 WARNING: Using invalid VDO pool data MAY DESTROY YOUR DATA!
 Logical volume "lv-name" created.
 Converted vg-name/lv-name_vpool to VDO pool volume and created virtual vg-name/lv-name VDO volume.
- Optional: Create a file system on the VDO LV.
- Optional: Mount the LVM-VDO volume. For more information, see Mounting an LVM-VDO volume.
Verification
List your LVM devices to verify that importing the VDO volumes to LVM succeeded:
# lvs -a -o +devices
  LV                    VG      Attr       LSize  Pool          Origin Data%  Meta%  Move Log Cpy%Sync Convert Devices
  lv-name               vg-name vwi-a-v--- 25.00g lv-name_vpool        0.00                                    lv-name_vpool(0)
  lv-name_vpool         vg-name dwi------- <1.82t                      0.31                                    lv-name_vpool_vdata(0)
  [lv-name_vpool_vdata] vg-name Dwi-ao---- <1.82t                                                              /dev/sdg1(0)
Additional resources
-
lvm_import_vdo(8),lvmvdo(7), andsystemd.mount(5)man pages
Chapter 5. Trim options on an LVM-VDO volume
You can mount your file system with the discard option, which informs the VDO volume of the unused space. Another option is to use the fstrim application, which is an on-demand discarding, or mount -o discard command for immediate discarding.
When using the fstrim application, the admin needs to schedule and monitor an additional process, while using mount -o discard command allows for immediate recovery of space when possible.
Note that it is currently recommended to use fstrim application to discard unused blocks rather than the discard mount option because the performance impact of this option can be quite severe. For this reason, nodiscard is the default.
5.1. Enabling discard mount option on VDO
This procedure enables the discard option on your VDO volume.
Prerequisites
- An LVM-VDO volume exists on your system.
Procedure
Enable the
discardon your volume:# mount -o discard /dev/vg-name/vdo-name mount-point
Additional resources
-
xfs(5),mount(8), andlvmvdo(7)man pages
5.2. Setting up periodic TRIM operation
This procedure enables a scheduled TRIM operation on your system.
Prerequisites
- An LVM-VDO volume exists on your system.
Procedure
Enable and start the timer:
# systemctl enable --now fstrim.timer
Verification
Verify that the timer is enabled:
# systemctl list-timers fstrim.timer
Example 5.1. Possible output of the verification procedure
# systemctl list-timers fstrim.timer
NEXT                         LEFT         LAST  PASSED  UNIT         ACTIVATES
Mon 2021-05-10 00:00:00 EDT  5 days left  n/a   n/a     fstrim.timer fstrim.service
You will not see any reference to a VDO volume, because the fstrim.timer runs across all mounted filesystems.
Additional resources
-
fstrim(8)man page
Chapter 6. Optimizing VDO performance
The VDO kernel driver speeds up tasks by using multiple threads. Instead of one thread doing everything for an I/O request, it splits the work into smaller parts assigned to different threads. These threads talk to each other as they handle the request. This way, one thread can handle shared data without constant locking and unlocking.
When one thread finishes a task, VDO already has another task ready for it. This keeps the threads busy and reduces the time spent switching tasks. VDO also uses separate threads for slower tasks, such as adding I/O operations to the queue or handling messages to the deduplication index.
6.1. VDO thread types
VDO uses various thread types to handle specific operations:
- Logical zone threads (
kvdo:logQ) - Maintain the mapping between the logical block numbers (LBNs) presented to the user of the VDO device and the physical block numbers (PBNs) in the underlying storage system. They also prevent concurrent writes to the same block. Logical threads are active during both read and write operations. Processing is generally evenly distributed, however, specific access patterns may occasionally concentrate work in one thread. For example, frequent access to LBNs in a specific block map page might make one logical thread handle all those operations.
- Physical zone threads (
kvdo:physQ) - Handle data block allocation and reference counts during write operations.
- I/O submission threads (
kvdo:bioQ) -
Handle the transfer of block I/O (
bio) operations from VDO to the storage system. They handle I/O requests from other VDO threads and pass them to the underlying device driver. These threads interact with device-related data structures, create requests for device driver kernel threads, and prevent delays when I/O requests get blocked due to a full device request queue. - CPU-processing threads (
kvdo:cpuQ) - Handle CPU-intensive tasks that do not block or need exclusive access to data structures for to other thread types. These tasks include calculating hash values and compressing data blocks.
- I/O acknowledgement threads (
kvdo:ackQ) - Signal the completion of I/O requests to higher-level components, such as the kernel page cache or application threads performing direct I/O. Their CPU usage and impact on memory contention are influenced by kernel-level code.
- Hash zone threads (
kvdo:hashQ) - Coordinate I/O requests with matching hashes to handle potential deduplication tasks. Although they create and manage deduplication requests, they do not perform significant computations. A single hash zone thread is usually sufficient.
- Deduplication thread (
kvdo:dedupeQ) - Handles I/O requests and communicates with the deduplication index. This work is performed on a separate thread to prevent blocking. It also has a timeout mechanism to skip deduplication if the index does not respond quickly. There is only one deduplication thread per VDO device.
- Journal thread (
kvdo:journalQ) - Updates the recovery journal and schedules journal blocks for writing. This task cannot be divided among multiple threads. There is only one journal thread per VDO device.
- Packer thread (
kvdo:packerQ) - Works during write operations when the compression is enabled. It collects compressed data blocks from the CPU threads to reduce wasted space. There is only one packer thread per VDO device.
6.2. Identifying performance bottlenecks
Identifying bottlenecks in VDO performance is crucial for optimizing system efficiency. One of the primary steps you can take is to determine whether the bottleneck lies in the CPU, memory, or the speed of the backing storage. After pinpointing the slowest component, you can develop strategies for enhancing performance.
To ensure that the root cause of the low performance is not a hardware issue, run tests with and without VDO in the storage stack.
The journalQ thread in VDO is a natural bottleneck, especially when the VDO volume is handling write operations. If you notice that another thread type has higher utilization than the journalQ thread, you can remediate this by adding more threads of that type.
6.2.1. Analyzing VDO performance with top
You can examine the performance of VDO threads by using the top utility.
Procedure
Display the individual threads:
$ top -HNoteTools such as
topcannot differentiate between productive CPU cycles and cycles stalled due to cache or memory delays. These tools interpret cache contention and slow memory access as actual work. Moving threads between nodes can appear like reduced CPU utilization while increasing operations per second.- Press the f key to display the fields manager.
-
Use the (↓) key to navigate to the
P = Last Used Cpu (SMP)field. -
Press the spacebar to select the
P = Last Used Cpu (SMP)field. -
Press the q key to close the fields manager. The
toputility now displays the CPU load for individual cores and indicates which CPU each process or thread recently used. You can switch to per-CPU statistics by pressing 1.
Additional resources
-
top(1)man page - Interpreting top results
6.2.2. Interpreting top results
While analyzing the performance of VDO threads, use the following table to interpret results of the top utility.
Table 6.1. Interpreting top results
| Values | Description | Suggestions |
|---|---|---|
| Thread or CPU usage surpasses 70%. | The thread or CPU is overloaded. High usage can result from a VDO thread scheduled on a CPU with no actual work. This may happen due to excessive hardware interrupts, memory conflicts, or resource competition. | Increase the number of threads of the type running this core. |
|
Low | The core is actively handling tasks. | No action required. |
|
Low | The core is performing standard processing work. | Add more cores to improve the performance. Avoid NUMA conflicts. |
| The core is over-committed. | Reassign kernel threads and device interrupt handling to different cores. |
| VDO is consistently keeping the storage system busy with I/O requests. [b] | Reduce the number of I/O submission threads if the CPU utilization is very low. |
|
|
VDO has more |
Reduce the number of |
| High CPU utilization per I/O request. | CPU utilization per I/O request increases with more threads. | Check for CPU, memory, or lock contention. |
[a]
More than a few percent
[b]
This is good if the storage system can handle multiple requests or if request processing is efficient.
| ||
6.2.3. Analyzing VDO performance with perf
You can check the CPU performance of VDO by using the perf utility.
Prerequisites
-
The
perfpackage is installed.
Procedure
Display the performance profile:
# perf topAnalyze the CPU performance by interpreting
perfresults:Table 6.2. Interpreting
perfresultsValues Description Suggestions kvdo:bioQthreads spend excessive cycles acquiring spin locksToo much contention might be occurring in the device driver below VDO
Reduce the number of
kvdo:bioQthreadsHigh CPU usage
Contention between NUMA nodes.
Check counters such as
stalled-cycles-backend,cache-misses, andnode-load-missesif they are supported by your processor. High miss rates might cause stalls, resembling high CPU usage in other tools, indicating possible contention.Implement CPU affinity for the VDO kernel threads or IRQ affinity for interrupt handlers to restrict processing work to a single node.
Additional resources
-
perf-top(1)man page
6.2.4. Analyzing VDO performance with sar
You can create periodic reports on VDO performance by using the sar utility.
Not all block device drivers can provide the data needed by the sar utility. For example, devices such as MD RAID do not report the %util value.
Prerequisites
Install the
sysstatutility:# yum install sysstat
Procedure
Displays the disk I/O statistics at 1-second intervals:
$ sar -d 1Analyze the VDO performance by interpreting
sarresults:Table 6.3. Interpreting
sarresultsValues Description Suggestions -
The
%utilvalue for the underlying storage device is well under 100%. - VDO is busy at 100%.
-
bioQthreads are using a lot of CPU time.
VDO has too few
bioQthreads for a fast device.Add more
bioQthreads.Note that certain storage drivers might slow down when you add
bioQthreads due to spin lock contention.-
The
Additional resources
-
sar(1)man page
6.3. Redistributing VDO threads
VDO uses various thread pools for different tasks when handling requests. Optimal performance depends on setting the right number of threads in each pool, which varies based on available storage, CPU resources, and the type of workload. You can spread out VDO work across multiple threads to improve VDO performance.
VDO aims to maximize performance through parallelism. You can improve it by allocating more threads to a bottlenecked task, depending on factors such as available CPU resources and the root cause of the bottleneck. High thread utilization (above 70-80%) can lead to delays. Therefore, increasing thread count can help in such cases. However, excessive threads might hinder performance and incur extra costs.
For optimal performance, carry out these actions:
- Test VDO with various expected workloads to evaluate and optimize its performance.
- Increase thread count for pools with more than 50% utilization.
- Increase the number of cores available to VDO if the overall utilization is greater than 50%, even if the individual thread utilization is lower.
6.3.1. Grouping VDO threads across NUMA nodes
Accessing memory across NUMA nodes is slower than local memory access. On Intel processors where cores share the last-level cache within a node, cache problems are more significant when data is shared between nodes than when it is shared within a single node. While many VDO kernel threads manage exclusive data structures, they often exchange messages about I/O requests. VDO threads being spread across multiple nodes or the scheduler reassigning threads between nodes might cause contention, that is multiple nodes competing for the same resources.
You can enhance VDO performance by grouping certain threads on the same NUMA nodes.
- Group related threads together on one NUMA node
-
I/O acknowledgment (
ackQ) threads Higher-level I/O submission threads:
- User-mode threads handling direct I/O
- Kernel page cache flush thread
-
I/O acknowledgment (
- Optimize device access
-
If device access timing varies across NUMA nodes, run
bioQthreads on the node closest to the storage device controllers
-
If device access timing varies across NUMA nodes, run
- Minimize contention
-
Run I/O submissions and storage device interrupt processing on the same node as
logQorphysQthreads. - Run other VDO-related work on the same node.
-
If one node cannot handle all VDO work, consider memory contention when moving threads to other nodes. For example, move the device that interrupts handling and
bioQthreads to another node.
-
Run I/O submissions and storage device interrupt processing on the same node as
6.3.2. Configuring the CPU affinity
You can improve VDO performance on certain storage device drivers if you adjust the CPU affinity of VDO threads.
When the interrupt (IRQ) handler of the storage device driver does substantial work and the driver does not use a threaded IRQ handler, it could limit the ability of the system scheduler to optimize VDO performance.
For optimal performance, carry out these actions:
-
Dedicate specific cores to IRQ handling and adjust VDO thread affinity if the core is overloaded. The core is overloaded if the
%hivalue is more than a few percent higher than on other cores. -
Avoid running singleton VDO threads, like the
kvdo:journalQthread, on busy IRQ cores. - Keep other thread types off cores busy with IRQs only if the individual CPU use is high .
The configuration does not persist across system reboots.
Procedure
Set the CPU affinity:
# taskset -c <cpu-numbers> -p <process-id>Replace
<cpu-numbers>with a comma-separated list of CPU numbers to which you want to assign the process. Replace<process-id>with the ID of the running process to which you want to set CPU affinity.Example 6.1. Setting CPU Affinity for
kvdoprocesses on CPU cores 1 and 2# for pid in `ps -eo pid,comm | grep kvdo | awk '{ print $1 }'` do taskset -c "1,2" -p $pid done
Verification
Display the affinity set:
# taskset -p <cpu-numbers> -p <process-id>Replace
<cpu-numbers>with a comma-separated list of CPU numbers to which you want to assign the process. Replace<process-id>with the ID of the running process to which you want to set CPU affinity.
Additional resources
-
taskset(1)man page
6.4. Increasing block map cache size
You can enhance both read and write performance by increasing the overall cache size for your VDO volume.
If you encounter extended read and write latencies or observe a significant volume of data read from storage that does not align with application requirements, it may suggest that the cache size needs adjustment.
There is a 15% memory overhead. Larger cache consumes more RAM and can affect overall system stability.
Procedure
Add the following line to the
/etc/lvm/profile/<filename>configuration file:vdo_block_map_cache_size_mb=<cache_size>
Replace
<filename>with the name of the configuration file. Replace<cache_size>with the new size of your cache. If no suffix is supplied, for example10Gor1T, the value is interpreted as megabytes.NoteThe cache size must be a multiple of 4096, within the range of 128MB to 16TB, and at least 16MB per logical thread. Changes take effect the next time the VDO device is started. Already-running devices are not affected.
Stop the VDO volume:
# vdo stop --name=<volume_name>Replace
<volume_name>with the name of your VDO volume.Start the VDO volume:
# vdo start --name=<volume_name>Replace
<volume_name>with the name of your VDO volume.
Verification
Check the current VDO volume configuration:
# vdo status --name=<volume_name>Replace
<volume_name>with the name of your VDO volume.
Additional resources
-
vdo(8)man page
6.5. Speeding up discard operations
VDO sets a maximum allowed size of DISCARD (TRIM) sectors for all VDO devices on the system. The default size is 8 sectors, which corresponds to one 4-KiB block. Increasing the DISCARD size can significantly improve the speed of the discard operations. However, there is a tradeoff between improving discard performance and maintaining the speed of other write operations.
The optimal DISCARD size varies depending on the storage stack. Both very large and very small DISCARD sectors can potentially degrade the performance. Conduct experiments with different values to discover one that delivers satisfactory results.
For a VDO volume that stores a local file system, it is optimal to use a DISCARD size of 8 sectors, which is the default setting. For a VDO volume that serves as a SCSI target, a moderately large DISCARD size, such as 2048 sectors (corresponds to a 1MB discard), works best. It is recommended that the maximum DISCARD size does not exceed 10240 sectors, which translates to 5MB discard. When choosing the size, make sure it is a multiple of 8, because VDO may not handle discards effectively if they are smaller than 8 sectors.
Procedure
Set the new maximum size for the DISCARD sector:
# echo <number-of-sectors> > /sys/kvdo/max_discard_sectorsReplace
<number-of-sectors>with the number of sectors. This setting persists until reboot.Optional: To make the persistent change to the DISCARD sector across reboot, create a custom
systemdservice:Create a new
/etc/systemd/system/max_discard_sectors.servicefile with the following content:[Unit] Description=Set maximum DISCARD sector [Service] ExecStart=/usr/bin/echo <number-of-sectors> > /sys/kvdo/max_discard_sectors [Install] WantedBy=multi-user.target
Replace
<number-of-sectors>with the number of sectors.- Save the file and exit.
Reload the service file:
# systemctl daemon-reloadEnable the new service:
# systemctl enable max_discard_sectors.service
Verification
Optional: If you made the scaling governor change persistent, check if the
max_discard_sectors.serviceis enabled:# systemctl is-enabled max_discard_sectors.service
6.6. Optimizing CPU frequency scaling
By default, RHEL uses CPU frequency scaling to save power and reduce heat when the CPU is not under heavy load. To prioritize performance over power savings, you can configure the CPU to operate at its maximum clock speed. This ensures that the CPU can handle data deduplication and compression processes with maximum efficiency. By running the CPU at its highest frequency, resource-intensive operations can be executed more quickly, potentially improving the overall performance of VDO in terms of data reduction and storage optimization.
Tuning CPU frequency scaling for higher performance can increase power consumption and heat generation. In inadequately cooled systems, this can cause overheating and might result in thermal throttling, which limits the performance gains.
Procedure
Display available CPU governors:
$ cpupower frequency-info -gChange the scaling governor to prioritize performance:
# cpupower frequency-set -g performanceThis setting persists until reboot.
Optional: To make the persistent change in scaling governor across reboot, create a custom
systemdservice:Create a new
/etc/systemd/system/cpufreq.servicefile with the following content:[Unit] Description=Set CPU scaling governor to performance [Service] ExecStart=/usr/bin/cpupower frequency-set -g performance [Install] WantedBy=multi-user.target
- Save the file and exit.
Reload the service file:
# systemctl daemon-reloadEnable the new service:
# systemctl enable cpufreq.service
Verification
Display the currently used CPU frequency policy:
$ cpupower frequency-info -pOptional: If you made the scaling governor change persistent, check if the
cpufreq.serviceis enabled:# systemctl is-enabled cpufreq.service