
Red Hat Training
A Red Hat training course is available for RHEL 8
Configuring and managing virtualization
Setting up your host, creating and administering virtual machines, and understanding virtualization features in Red Hat Enterprise Linux 8
Abstract
- What the capabilities and use cases of virtualization are
- How to manage your host and your virtual machines by using command-line utilities, as well as by using the web console
- What the support limitations of virtualization are on various system architectures, such as Intel 64, AMD64, IBM POWER, and IBM Z
Making open source more inclusive
Red Hat is committed to replacing problematic language in our code, documentation, and web properties. We are beginning with these four terms: master, slave, blacklist, and whitelist. Because of the enormity of this endeavor, these changes will be implemented gradually over several upcoming releases. For more details, see our CTO Chris Wright’s message.
Providing feedback on Red Hat documentation
We appreciate your feedback on our documentation. Let us know how we can improve it.
Submitting feedback through Jira (account required)
- Log in to the Jira website.
- Click Create in the top navigation bar.
- Enter a descriptive title in the Summary field.
- Enter your suggestion for improvement in the Description field. Include links to the relevant parts of the documentation.
- Click Create at the bottom of the dialogue.
Chapter 1. Introducing virtualization in RHEL
If you are unfamiliar with the concept of virtualization or its implementation in Linux, the following sections provide a general overview of virtualization in RHEL 8: its basics, advantages, components, and other possible virtualization solutions provided by Red Hat.
1.1. What is virtualization?
RHEL 8 provides the virtualization functionality, which enables a machine running RHEL 8 to host multiple virtual machines (VMs), also referred to as guests. VMs use the host’s physical hardware and computing resources to run a separate, virtualized operating system (guest OS) as a user-space process on the host’s operating system.
In other words, virtualization makes it possible to have operating systems within operating systems.
VMs enable you to safely test software configurations and features, run legacy software, or optimize the workload efficiency of your hardware. For more information about the benefits, see Advantages of virtualization.
For more information about what virtualization is, see the Virtualization topic page.
Next steps
- To try out virtualization in Red Hat Enterprise Linux 8, see Getting started with virtualization.
- In addition to Red Hat Enterprise Linux 8 virtualization, Red Hat offers a number of specialized virtualization solutions, each with a different user focus and features. For more information, see Red Hat virtualization solutions.
1.2. Advantages of virtualization
Using virtual machines (VMs) has the following benefits in comparison to using physical machines:
Flexible and fine-grained allocation of resources
A VM runs on a host machine, which is usually physical, and physical hardware can also be assigned for the guest OS to use. However, the allocation of physical resources to the VM is done on the software level, and is therefore very flexible. A VM uses a configurable fraction of the host memory, CPUs, or storage space, and that configuration can specify very fine-grained resource requests.
For example, what the guest OS sees as its disk can be represented as a file on the host file system, and the size of that disk is less constrained than the available sizes for physical disks.
Software-controlled configurations
The entire configuration of a VM is saved as data on the host, and is under software control. Therefore, a VM can easily be created, removed, cloned, migrated, operated remotely, or connected to remote storage.
Separation from the host
A guest OS runs on a virtualized kernel, separate from the host OS. This means that any OS can be installed on a VM, and even if the guest OS becomes unstable or is compromised, the host is not affected in any way.
Space and cost efficiency
A single physical machine can host a large number of VMs. Therefore, it avoids the need for multiple physical machines to do the same tasks, and thus lowers the space, power, and maintenance requirements associated with physical hardware.
Software compatibility
Because a VM can use a different OS than its host, virtualization makes it possible to run applications that were not originally released for your host OS. For example, using a RHEL 7 guest OS, you can run applications released for RHEL 7 on a RHEL 8 host system.
NoteNot all operating systems are supported as a guest OS in a RHEL 8 host. For details, see Recommended features in RHEL 8 virtualization.
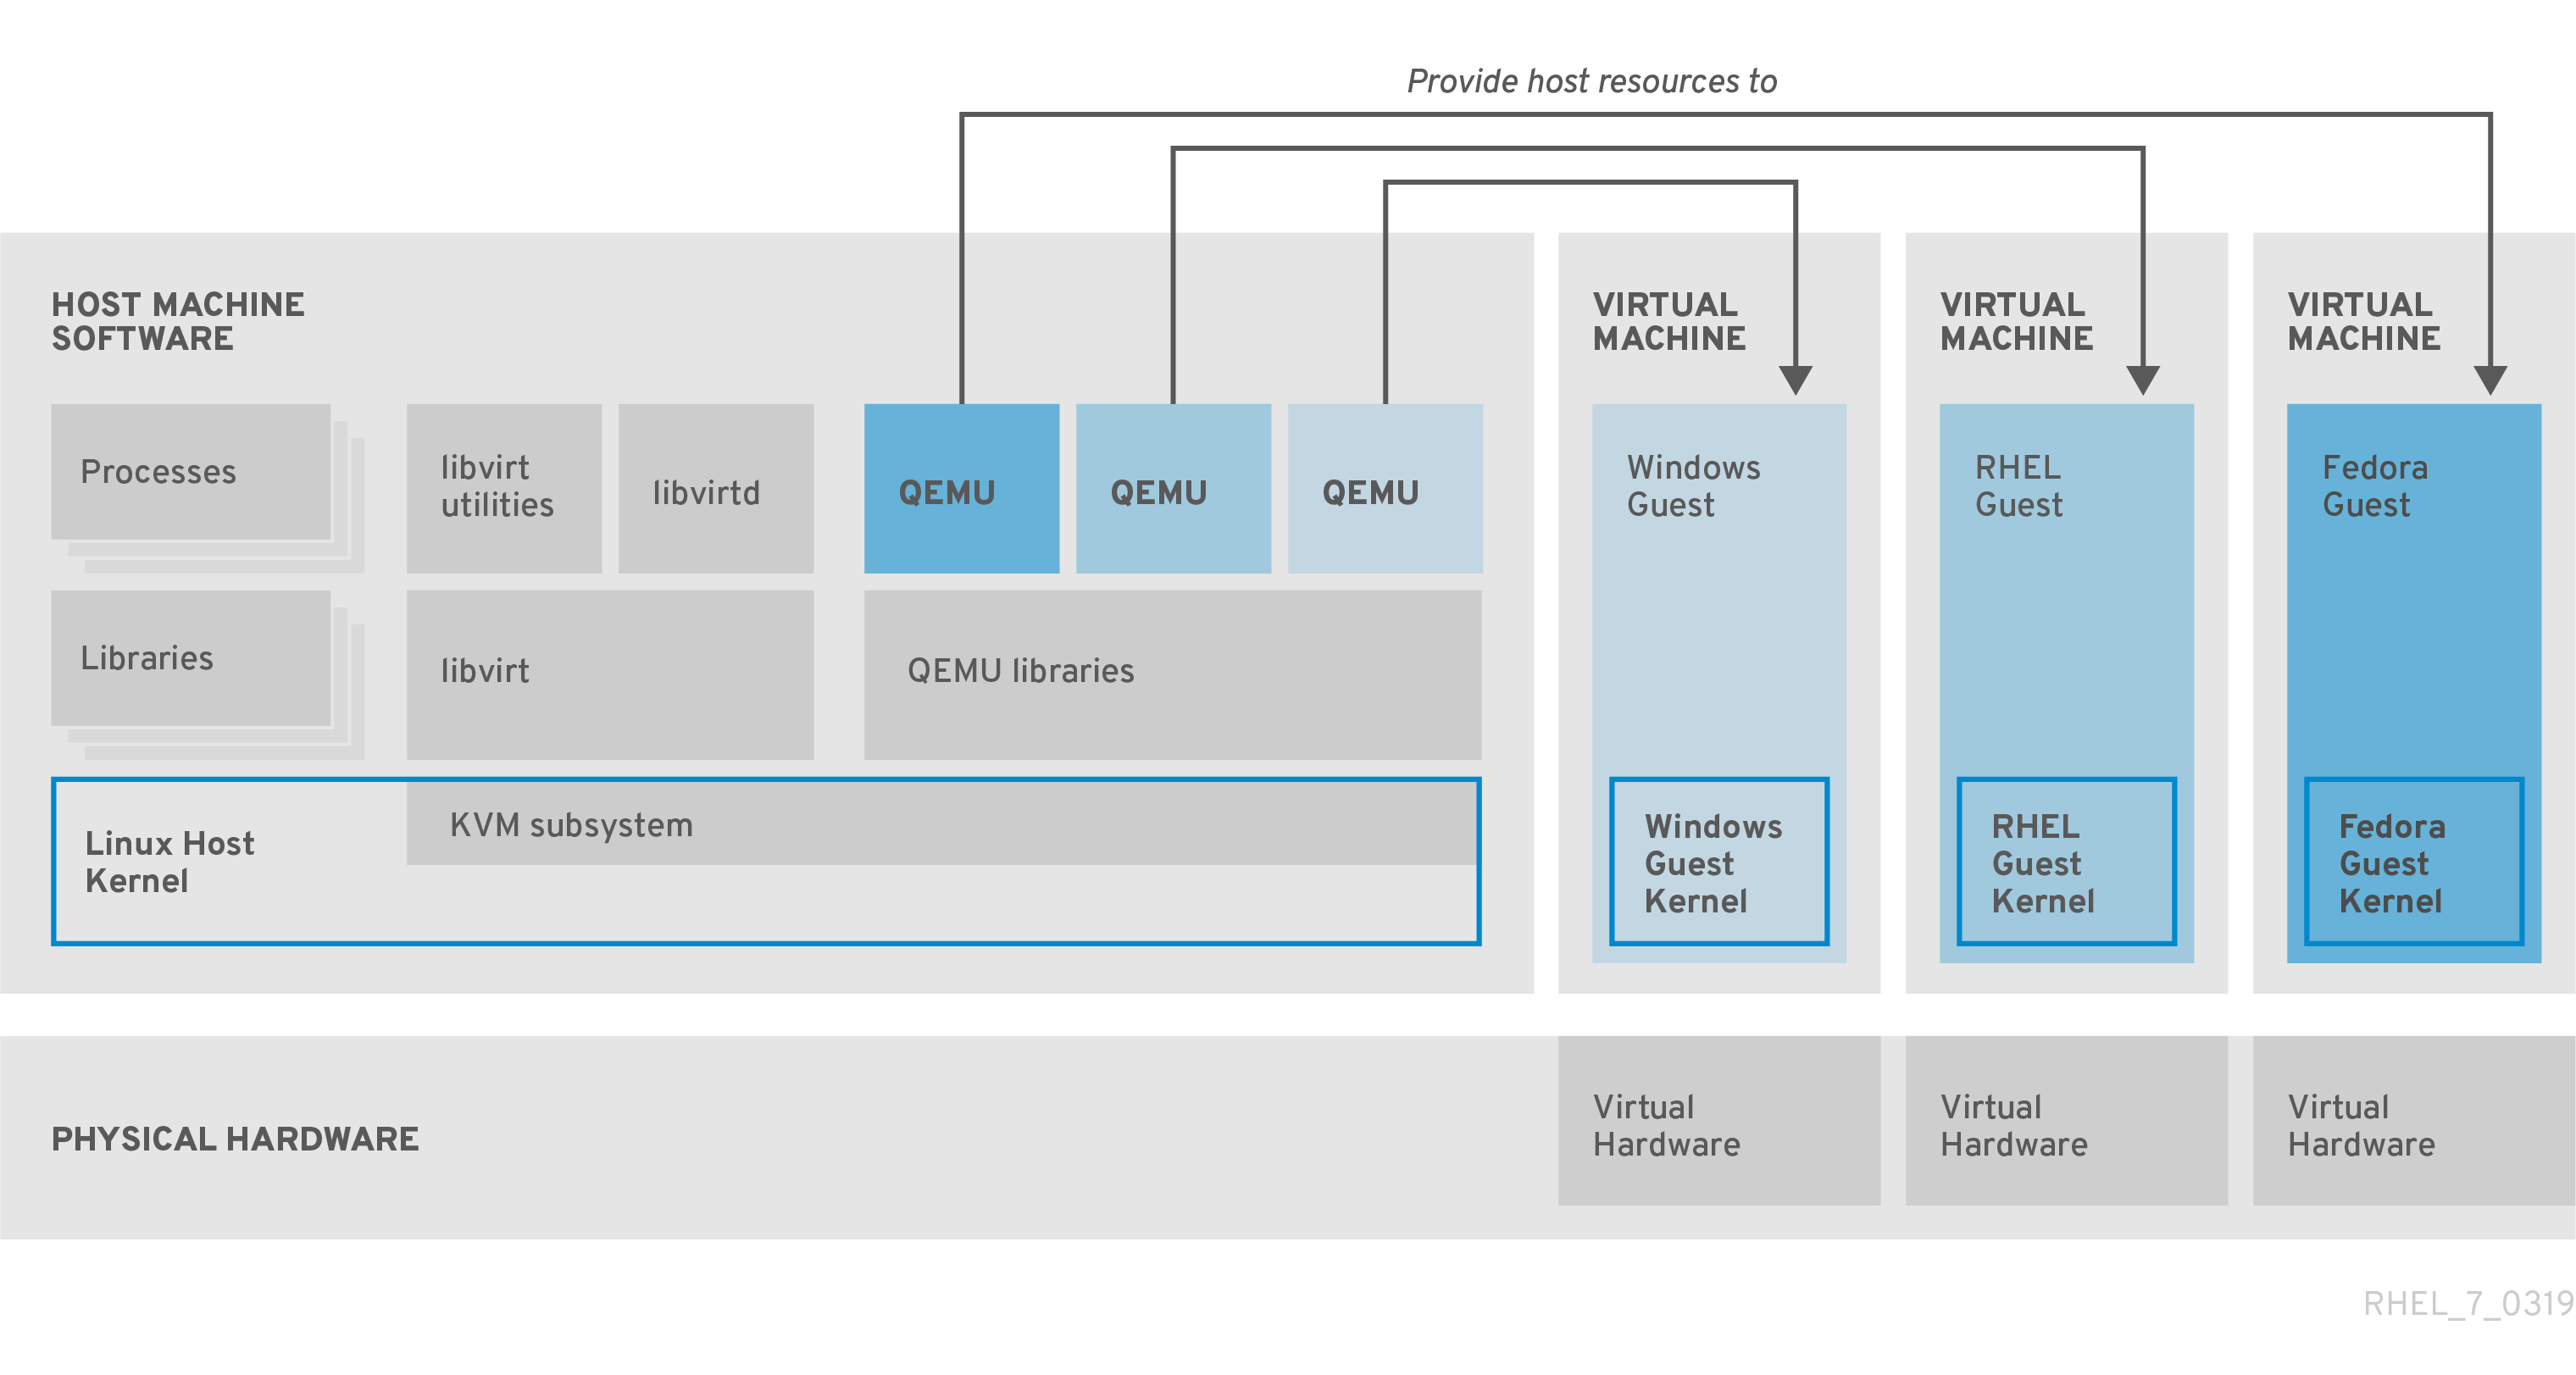
1.3. Virtual machine components and their interaction
Virtualization in RHEL 8 consists of the following principal software components:
Hypervisor
The basis of creating virtual machines (VMs) in RHEL 8 is the hypervisor, a software layer that controls hardware and enables running multiple operating systems on a host machine.
The hypervisor includes the Kernel-based Virtual Machine (KVM) module and virtualization kernel drivers. These components ensure that the Linux kernel on the host machine provides resources for virtualization to user-space software.
At the user-space level, the QEMU emulator simulates a complete virtualized hardware platform that the guest operating system can run in, and manages how resources are allocated on the host and presented to the guest.
In addition, the libvirt software suite serves as a management and communication layer, making QEMU easier to interact with, enforcing security rules, and providing a number of additional tools for configuring and running VMs.
XML configuration
A host-based XML configuration file (also known as a domain XML file) determines all settings and devices in a specific VM. The configuration includes:
- Metadata such as the name of the VM, time zone, and other information about the VM.
- A description of the devices in the VM, including virtual CPUs (vCPUS), storage devices, input/output devices, network interface cards, and other hardware, real and virtual.
- VM settings such as the maximum amount of memory it can use, restart settings, and other settings about the behavior of the VM.
For more information about the contents of an XML configuration, see Sample virtual machine XML configuration.
Component interaction
When a VM is started, the hypervisor uses the XML configuration to create an instance of the VM as a user-space process on the host. The hypervisor also makes the VM process accessible to the host-based interfaces, such as the virsh, virt-install, and guestfish utilities, or the web console GUI.
When these virtualization tools are used, libvirt translates their input into instructions for QEMU. QEMU communicates the instructions to KVM, which ensures that the kernel appropriately assigns the resources necessary to carry out the instructions. As a result, QEMU can execute the corresponding user-space changes, such as creating or modifying a VM, or performing an action in the VM’s guest operating system.
While QEMU is an essential component of the architecture, it is not intended to be used directly on RHEL 8 systems, due to security concerns. Therefore, qemu-* commands are not supported by Red Hat, and it is highly recommended to interact with QEMU by using libvirt.
For more information about the host-based interfaces, see Tools and interfaces for virtualization management.
Figure 1.1. RHEL 8 virtualization architecture
1.4. Tools and interfaces for virtualization management
You can manage virtualization in RHEL 8 by using the command-line interface (CLI) or several graphical user interfaces (GUIs).
Command-line interface
The CLI is the most powerful method of managing virtualization in RHEL 8. Prominent CLI commands for virtual machine (VM) management include:
virsh - A versatile virtualization command-line utility and shell with a great variety of purposes, depending on the provided arguments. For example:
-
Starting and shutting down a VM -
virsh startandvirsh shutdown -
Listing available VMs -
virsh list -
Creating a VM from a configuration file -
virsh create -
Entering a virtualization shell -
virsh
For more information, see the
virsh(1)man page.-
Starting and shutting down a VM -
-
virt-install- A CLI utility for creating new VMs. For more information, see thevirt-install(1)man page. -
virt-xml- A utility for editing the configuration of a VM. -
guestfish- A utility for examining and modifying VM disk images. For more information, see theguestfish(1)man page.
Graphical interfaces
You can use the following GUIs to manage virtualization in RHEL 8:
The RHEL 8 web console, also known as Cockpit, provides a remotely accessible and easy to use graphical user interface for managing VMs and virtualization hosts.
For instructions on basic virtualization management with the web console, see Managing virtual machines in the web console.
The Virtual Machine Manager (virt-manager) application provides a specialized GUI for managing VMs and virtualization hosts.
ImportantAlthough still supported in RHEL 8, virt-manager has been deprecated. The web console is intended to become its replacement in a subsequent release. It is, therefore, recommended that you get familiar with the web console for managing virtualization in a GUI.
However, in RHEL 8, some features may only be accessible from either virt-manager or the command line. For details, see Differences between virtualization features in Virtual Machine Manager and the web console.
The Gnome Boxes application is a lightweight graphical interface to view and access VMs and remote systems. Gnome Boxes is primarily designed for use on desktop systems.
ImportantGnome Boxes is provided as a part of the GNOME desktop environment and is supported on RHEL 8, but Red Hat recommends that you use the web console for managing virtualization in a GUI.
Additional resources
1.5. Red Hat virtualization solutions
The following Red Hat products are built on top of RHEL 8 virtualization features and expand the KVM virtualization capabilities available in RHEL 8. In addition, many limitations of RHEL 8 virtualization do not apply to these products:
- OpenShift Virtualization
Based on the KubeVirt technology, OpenShift Virtualization is a part of the Red Hat OpenShift Container Platform, and makes it possible to run virtual machines in containers.
For more information about OpenShift Virtualization see the Red Hat Hybrid Cloud pages.
- Red Hat OpenStack Platform (RHOSP)
Red Hat OpenStack Platform offers an integrated foundation to create, deploy, and scale a secure and reliable public or private OpenStack cloud.
For more information about Red Hat OpenStack Platform, see the Red Hat Customer Portal or the Red Hat OpenStack Platform documentation suite.
For details on virtualization features not supported in RHEL but supported in other Red Hat virtualization solutions, see: Unsupported features in RHEL 8 virtualization
Chapter 2. Getting started with virtualization
To start using virtualization in RHEL 8, follow the steps below. The default method for this is using the command-line interface (CLI), but for user convenience, some of the steps can be completed in the web console GUI.
- Enable the virtualization module and install the virtualization packages - see Enabling virtualization.
Create a virtual machine (VM):
Start the VM:
- For CLI, see Starting a virtual machine by using the command-line interface.
- For GUI, see Starting virtual machines by using the web console.
Connect to the VM:
The web console currently provides only a subset of VM management functions, so using the command line is recommended for advanced use of virtualization in RHEL 8.
2.1. Enabling virtualization
To use virtualization in RHEL 8, you must enable the virtualization module, install virtualization packages, and ensure your system is configured to host virtual machines (VMs).
Prerequisites
- RHEL 8 is installed and registered on your host machine.
Your system meets the following hardware requirements to work as a virtualization host:
The following minimum system resources are available:
- 6 GB free disk space for the host, plus another 6 GB for each intended VM.
- 2 GB of RAM for the host, plus another 2 GB for each intended VM.
- 4 CPUs on the host. VMs can generally run with a single assigned vCPU, but Red Hat recommends assigning 2 or more vCPUs per VM to avoid VMs becoming unresponsive during high load.
The architecture of your host machine supports KVM virtualization.
- Notably, RHEL 8 does not support virtualization on the 64-bit ARM architecture (ARM 64).
The procedure below applies to the AMD64 and Intel 64 architecture (x86_64). To enable virtualization on a host with a different supported architecture, see one of the following sections:
Procedure
Install the packages in the RHEL 8 virtualization module:
# yum module install virtInstall the
virt-installandvirt-viewerpackages:# yum install virt-install virt-viewerStart the
libvirtdservice:# systemctl start libvirtd
Verification
Verify that your system is prepared to be a virtualization host:
# virt-host-validate
[...]
QEMU: Checking for device assignment IOMMU support       : PASS
QEMU: Checking if IOMMU is enabled by kernel             : WARN (IOMMU appears to be disabled in kernel. Add intel_iommu=on to kernel cmdline arguments)
LXC: Checking for Linux >= 2.6.26                        : PASS
[...]
LXC: Checking for cgroup 'blkio' controller mount-point  : PASS
LXC: Checking if device /sys/fs/fuse/connections exists  : FAIL (Load the 'fuse' module to enable /proc/ overrides)
Review the return values of
virt-host-validatechecks and take appropriate actions:-
If all
virt-host-validatechecks return thePASSvalue, your system is prepared for creating VMs. -
If any of the checks return a
FAILvalue, follow the displayed instructions to fix the problem. -
If any of the checks return a
WARNvalue, consider following the displayed instructions to improve virtualization capabilities
-
If all
Troubleshooting
If KVM virtualization is not supported by your host CPU,
virt-host-validategenerates the following output:QEMU: Checking for hardware virtualization: FAIL (Only emulated CPUs are available, performance will be significantly limited)
However, VMs on such a host system will fail to boot, rather than have performance problems.
To work around this, you can change the
<domain type>value in the XML configuration of the VM toqemu. Note, however, that Red Hat does not support VMs that use theqemudomain type, and setting this is highly discouraged in production environments.
2.2. Creating virtual machines
To create a virtual machine (VM) in RHEL 8, use the command-line interface or the RHEL 8 web console.
2.2.1. Creating virtual machines by using the command-line interface
To create a virtual machine (VM) on your RHEL 8 host by using the virt-install utility, follow the instructions below.
Prerequisites
- Virtualization is enabled on your host system.
- You have a sufficient amount of system resources to allocate to your VMs, such as disk space, RAM, or CPUs. The recommended values may vary significantly depending on the intended tasks and workload of the VMs.
An operating system (OS) installation source is available locally or on a network. This can be one of the following:
- An ISO image of an installation medium
A disk image of an existing VM installation
WarningInstalling from a host CD-ROM or DVD-ROM device is not possible in RHEL 8. If you select a CD-ROM or DVD-ROM as the installation source when using any VM installation method available in RHEL 8, the installation will fail. For more information, see the Red Hat Knowledgebase.
Also note that Red Hat provides support only for a limited set of guest operating systems.
- Optional: A Kickstart file can be provided for faster and easier configuration of the installation.
Procedure
To create a VM and start its OS installation, use the virt-install command, along with the following mandatory arguments:
-
--name: the name of the new machine -
--memory: the amount of allocated memory -
--vcpus: the number of allocated virtual CPUs -
--disk: the type and size of the allocated storage -
--cdromor--location: the type and location of the OS installation source
Based on the chosen installation method, the necessary options and values can vary. See the commands below for examples:
The listed commands use the VNC remote display protocol instead of the default SPICE protocol. VNC currently does not have some of the features that SPICE does, but is fully supported on RHEL 9. As a result, VMs that use VNC will not stop working if you migrate your host to RHEL 9. For more information, see Considerations in adopting RHEL 9.
The following command creates a VM named demo-guest1 that installs the Windows 10 OS from an ISO image locally stored in the /home/username/Downloads/Win10install.iso file. This VM is also allocated with 2048 MiB of RAM and 2 vCPUs, and an 80 GiB qcow2 virtual disk is automatically configured for the VM.
# virt-install \
    --graphics vnc \
    --name demo-guest1 --memory 2048 \
    --vcpus 2 --disk size=80 --os-variant win10 \
    --cdrom /home/username/Downloads/Win10install.iso
The following command creates a VM named demo-guest2 that uses the /home/username/Downloads/rhel8.iso image to run a RHEL 8 OS from a live CD. No disk space is assigned to this VM, so changes made during the session will not be preserved. In addition, the VM is allocated with 4096 MiB of RAM and 4 vCPUs.
# virt-install \
    --graphics vnc \
    --name demo-guest2 --memory 4096 --vcpus 4 \
    --disk none --livecd --os-variant rhel8.0 \
    --cdrom /home/username/Downloads/rhel8.iso
The following command creates a RHEL 8 VM named demo-guest3 that connects to an existing disk image, /home/username/backup/disk.qcow2. This is similar to physically moving a hard drive between machines, so the OS and data available to demo-guest3 are determined by how the image was handled previously. In addition, this VM is allocated with 2048 MiB of RAM and 2 vCPUs.
# virt-install \
    --graphics vnc \
    --name demo-guest3 --memory 2048 --vcpus 2 \
    --os-variant rhel8.0 --import \
    --disk /home/username/backup/disk.qcow2
Note that the
--os-variantoption is highly recommended when importing a disk image. If it is not provided, the performance of the created VM will be negatively affected.The following command creates a VM named demo-guest4 that installs from the
http://example.com/OS-installURL. For the installation to start successfully, the URL must contain a working OS installation tree. In addition, the OS is automatically configured by using the /home/username/ks.cfg kickstart file. This VM is also allocated with 2048 MiB of RAM, 2 vCPUs, and a 160 GiB qcow2 virtual disk.# virt-install \ --graphics vnc \ --name demo-guest4 --memory 2048 --vcpus 2 --disk size=160 \ --os-variant rhel8.0 --location http://example.com/OS-install \ --initrd-inject /home/username/ks.cfg --extra-args="inst.ks=file:/ks.cfg console=tty0 console=ttyS0,115200n8"
The following command creates a VM named demo-guest5 that installs from a
RHEL8.isoimage file in text-only mode, without graphics. It connects the guest console to the serial console. The VM has 16384 MiB of memory, 16 vCPUs, and 280 GiB disk. This kind of installation is useful when connecting to a host over a slow network link.# virt-install \ --name demo-guest5 --memory 16384 --vcpus 16 --disk size=280 \ --os-variant rhel8.0 --location RHEL8.iso \ --graphics none --extra-args='console=ttyS0'
The following command creates a VM named demo-guest6, which has the same configuration as demo-guest5, but resides on the 192.0.2.1 remote host.
# virt-install \
    --connect qemu+ssh://root@192.0.2.1/system --name demo-guest6 --memory 16384 \
    --vcpus 16 --disk size=280 --os-variant rhel8.0 --location RHEL8.iso \
    --graphics none --extra-args='console=ttyS0'
Verification
- If the VM is created successfully, a virt-viewer window opens with a graphical console of the VM and starts the guest OS installation.
Troubleshooting
If
virt-installfails with acannot find default networkerror:Ensure that the
libvirt-daemon-config-networkpackage is installed:# {PackageManagerCommand} info libvirt-daemon-config-network Installed Packages Name : libvirt-daemon-config-network [...]Verify that the
libvirtdefault network is active and configured to start automatically:# virsh net-list --all Name State Autostart Persistent -------------------------------------------- default active yes yesIf it is not, activate the default network and set it to auto-start:
# virsh net-autostart default
Network default marked as autostarted

# virsh net-start default
Network default started
If activating the default network fails with the following error, the
libvirt-daemon-config-networkpackage has not been installed correctly.error: failed to get network 'default' error: Network not found: no network with matching name 'default'
To fix this, re-install
libvirt-daemon-config-network:# {PackageManagerCommand} reinstall libvirt-daemon-config-networkIf activating the default network fails with an error similar to the following, a conflict has occurred between the default network’s subnet and an existing interface on the host.
error: Failed to start network default
error: internal error: Network is already in use by interface ens2
To fix this, use the
virsh net-edit defaultcommand and change the192.0.2.*values in the configuration to a subnet not already in use on the host.
Additional resources
-
The
virt-install (1)man page - Creating virtual machines and installing guest operating systems by using the web console
- Cloning virtual machines
2.2.2. Creating virtual machines and installing guest operating systems by using the web console
To manage virtual machines (VMs) in a GUI on a RHEL 8 host, use the web console. The following sections provide information about how to use the RHEL 8 web console to create VMs and install guest operating systems on them.
VMs created by using the web console currently use the SPICE remote desktop protocol by default. However, SPICE is unsupported on RHEL 9, so if you upgrade your host to RHEL 9, the VM will stop working. For more information, see Considerations in adopting RHEL 9.
To create a VM that uses the VNC protocol, which will work correctly on RHEL 9, use the command-line interface.
2.2.2.1. Creating virtual machines by using the web console
To create a virtual machine (VM) on a host machine to which your RHEL 8 web console is connected, use the instructions below.
Prerequisites
- Virtualization is enabled on your host system.
- The web console VM plug-in is installed on your host system.
- You have a sufficient amount of system resources to allocate to your VMs, such as disk space, RAM, or CPUs. The recommended values might vary significantly depending on the intended tasks and workload of the VMs.
Procedure
In the Virtual Machines interface of the web console, click .
The Create new virtual machine dialog appears.

Enter the basic configuration of the VM you want to create.
- Name - The name of the VM.
- Connection - The level of privileges granted to the session. For more details, expand the associated dialog box in the web console.
- Installation type - The installation can use a local installation medium, a URL, a PXE network boot, a cloud base image, or download an operating system from a limited set of operating systems.
Operating system - The guest operating system running on the VM. Note that Red Hat provides support only for a limited set of guest operating systems.
NoteTo download and install Red Hat Enterprise Linux directly from web console, you must add an offline token in the Offline token field.
- Storage - The type of storage.
- Storage Limit - The amount of storage space.
- Memory - The amount of memory.
Create the VM:
- If you want the VM to automatically install the operating system, click .
- If you want to edit the VM before the operating system is installed, click .
Additional resources
2.2.2.2. Creating virtual machines by importing disk images by using the web console
You can create a virtual machine (VM) by importing a disk image of an existing VM installation in the RHEL 8 web console.
Prerequisites
- The web console VM plug-in is installed on your system.
- You have a sufficient amount of system resources to allocate to your VMs, such as disk space, RAM, or CPUs. The recommended values can vary significantly depending on the intended tasks and workload of the VMs.
- You have downloaded a disk image of an existing VM installation.
Procedure
In the Virtual Machines interface of the web console, click .
The Import a virtual machine dialog appears.

Enter the basic configuration of the VM you want to create:
- Name - The name of the VM.
- Disk image - The path to the existing disk image of a VM on the host system.
- Operating system - The operating system running on a VM disk. Note that Red Hat provides support only for a limited set of guest operating systems.
- Memory - The amount of memory to allocate for use by the VM.
Import the VM:
- To install the operating system on the VM without additional edits to the VM settings, click .
- To edit the VM settings before the installation of the operating system, click .
2.2.2.3. Installing guest operating systems by using the web console
When a virtual machine (VM) boots for the first time, you must install an operating system on the VM.
If you click or while creating a new VM, the installation routine for the operating system starts automatically when the VM is created.
Prerequisites
Procedure
In the Virtual Machines interface, click the VM on which you want to install a guest OS.
A new page opens with basic information about the selected VM and controls for managing various aspects of the VM.
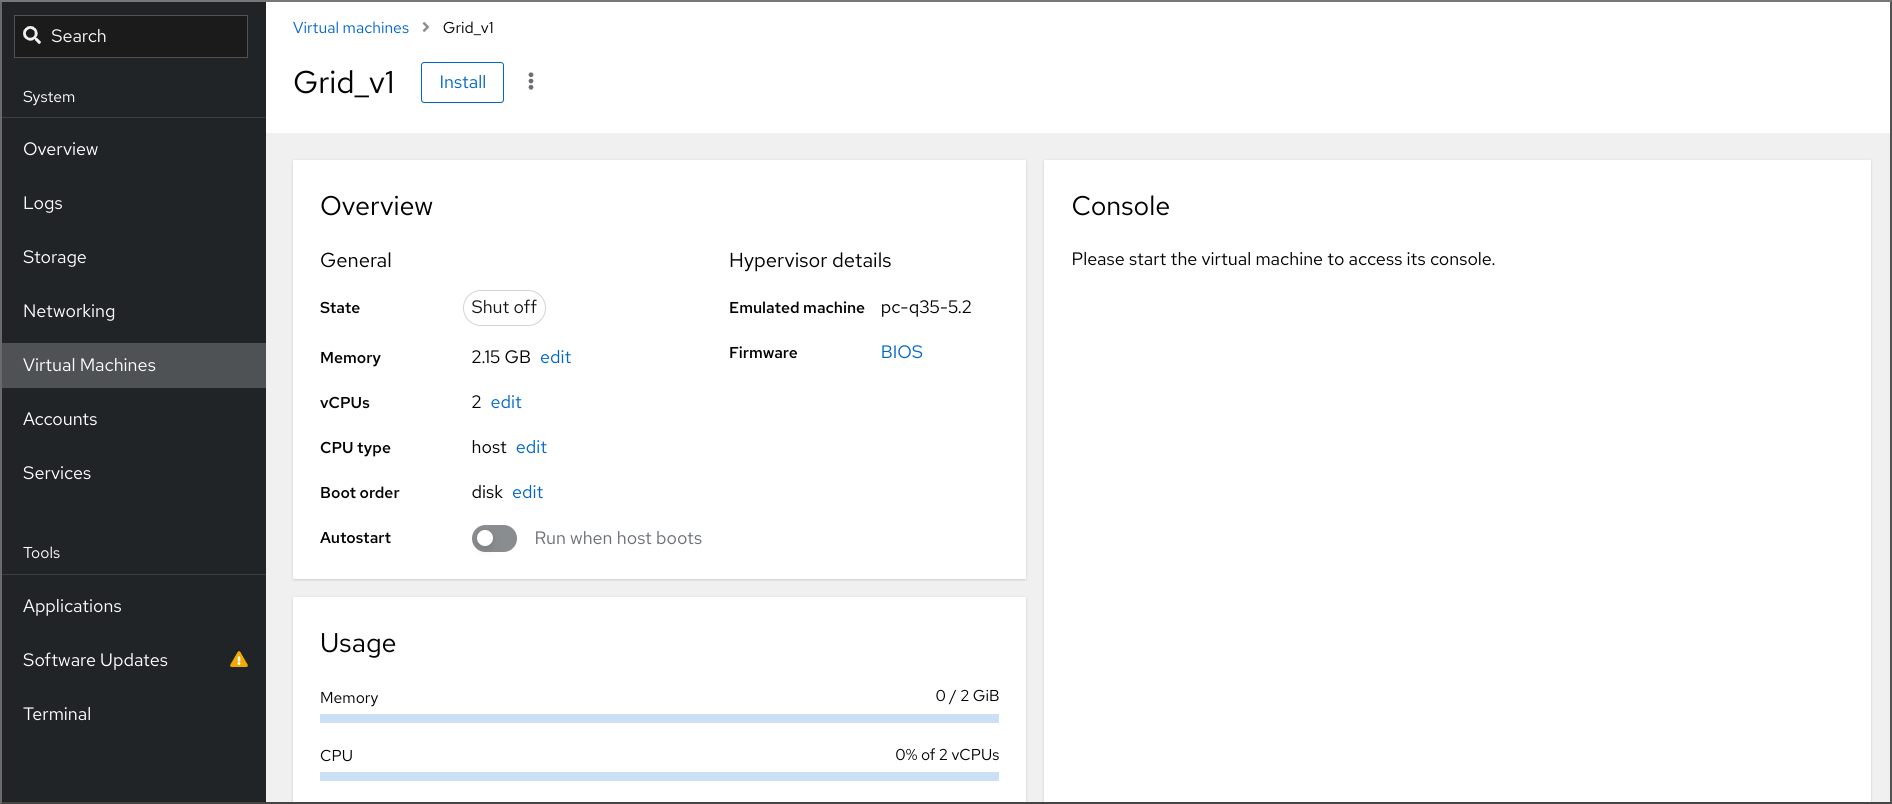
Optional: Change the firmware.
NoteYou can change the firmware only if you selected or while creating a new VM and if the OS is not already installed on the VM.
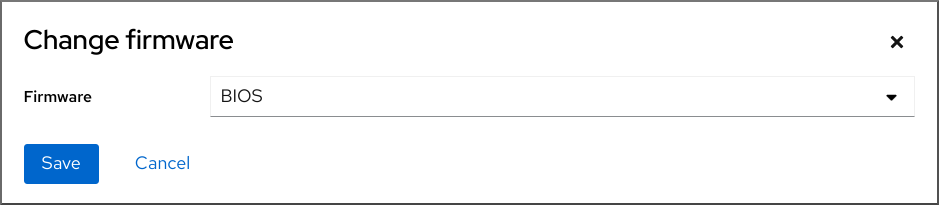
- Click the firmware.
- In the Change Firmware window, select the required firmware.
- Click .
Click .
The installation routine of the operating system runs in the VM console.
Troubleshooting
- If the installation routine fails, delete and recreate the VM before starting the installation again.
2.2.3. Creating virtual machines with cloud image authentication by using the web console
By default, distro cloud images have no login accounts. However, by using the RHEL web console, you can now create a virtual machine (VM) and specify the root and user account login credentials, which are then passed to cloud-init.
Prerequisites
- The web console VM plug-in is installed on your system.
- Virtualization is enabled on your host system.
- You have a sufficient amount of system resources to allocate to your VMs, such as disk space, RAM, or CPUs. The recommended values may vary significantly depending on the intended tasks and workload of the VMs.
Procedure
In the interface of the web console, click .
The Create new virtual machine dialog appears.
- In the Name field, enter a name for the VM.
On the Details tab, in the Installation type field, select Cloud base image.

- In the Installation source field, set the path to the image file on your host system.
Enter the configuration for the VM that you want to create.
- Operating system - The VM’s operating system. Note that Red Hat provides support only for a limited set of guest operating systems.
- Storage - The type of storage with which to configure the VM.
- Storage Limit - The amount of storage space with which to configure the VM.
- Memory - The amount of memory with which to configure the VM.
Click on the Automation tab.
Set your cloud authentication credentials.
- Root password - Enter a root password for your VM. Leave the field blank if you do not wish to set a root password.
- User login - Enter a cloud-init user login. Leave this field blank if you do not wish to create a user account.
User password - Enter a password. Leave this field blank if you do not wish to create a user account.
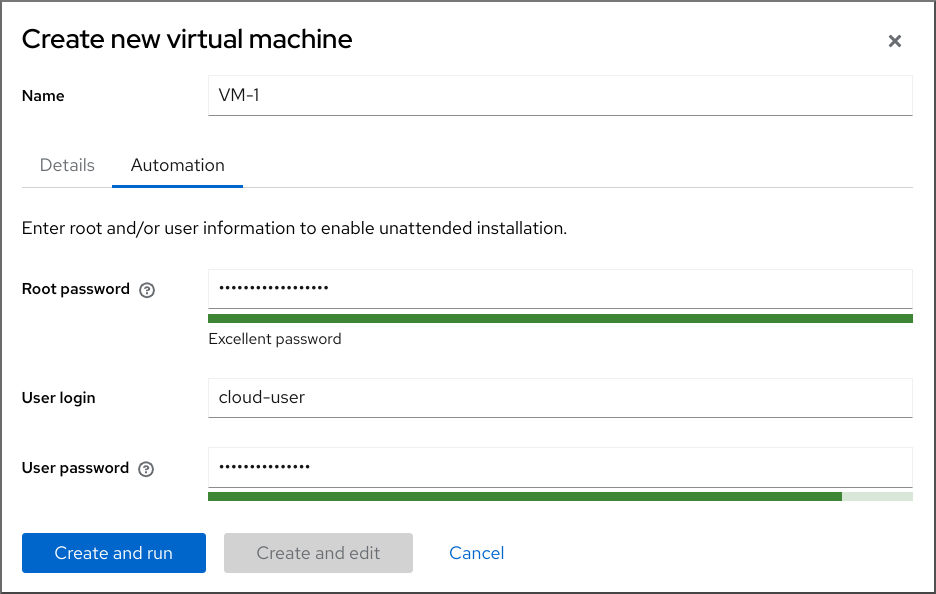
Click .
The VM is created.
Additional resources
2.3. Starting virtual machines
To start a virtual machine (VM) in RHEL 8, you can use the command line interface or the web console GUI.
Prerequisites
- Before a VM can be started, it must be created and, ideally, also installed with an OS. For instruction to do so, see Creating virtual machines.
2.3.1. Starting a virtual machine by using the command-line interface
You can use the command line interface (CLI) to start a shut-down virtual machine (VM) or restore a saved VM. By using the CLI, you can start both local and remote VMs.
Prerequisites
- An inactive VM that is already defined.
- The name of the VM.
For remote VMs:
- The IP address of the host where the VM is located.
- Root access privileges to the host.
Procedure
For a local VM, use the
virsh startutility.For example, the following command starts the demo-guest1 VM.
# virsh start demo-guest1
Domain 'demo-guest1' started
For a VM located on a remote host, use the
virsh startutility along with the QEMU+SSH connection to the host.For example, the following command starts the demo-guest1 VM on the 192.0.2.1 host.
# virsh -c qemu+ssh://root@192.0.2.1/system start demo-guest1

root@192.0.2.1's password:

Domain 'demo-guest1' started
Additional resources
-
The
virsh start --helpcommand - Setting up easy access to remote virtualization hosts
- Starting virtual machines automatically when the host starts
2.3.2. Starting virtual machines by using the web console
If a virtual machine (VM) is in the shut off state, you can start it by using the RHEL 8 web console. You can also configure the VM to be started automatically when the host starts.
Prerequisites
- The web console VM plug-in is installed on your system.
- An inactive VM that is already defined.
- The name of the VM.
Procedure
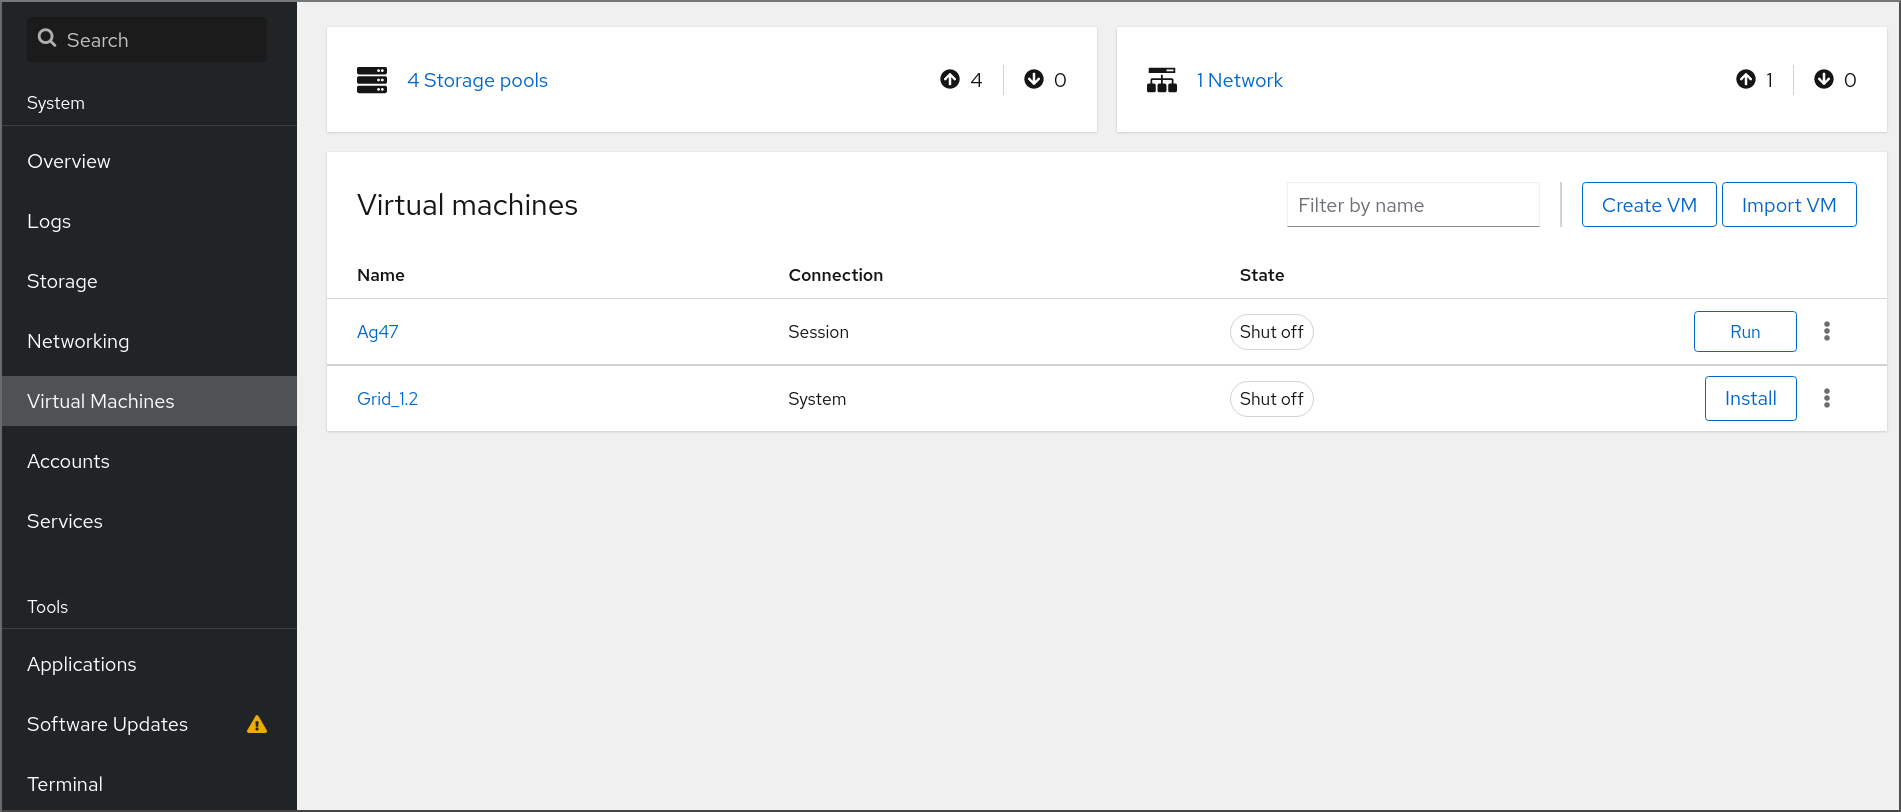
In the interface, click the VM you want to start.
A new page opens with detailed information about the selected VM and controls for shutting down and deleting the VM.
Click .
The VM starts, and you can connect to its console or graphical output.
Optional: To configure the VM to start automatically when the host starts, toggle the
Autostartcheckbox in the Overview section.If you use network interfaces that are not managed by libvirt, you must also make additional changes to the systemd configuration. Otherwise, the affected VMs might fail to start, see starting virtual machines automatically when the host starts.
2.3.3. Starting virtual machines automatically when the host starts
When a host with a running virtual machine (VM) restarts, the VM is shut down, and must be started again manually by default. To ensure a VM is active whenever its host is running, you can configure the VM to be started automatically.
Prerequisites
Procedure
Use the
virsh autostartutility to configure the VM to start automatically when the host starts.For example, the following command configures the demo-guest1 VM to start automatically.
# virsh autostart demo-guest1
Domain 'demo-guest1' marked as autostarted
If you use network interfaces that are not managed by
libvirt, you must also make additional changes to the systemd configuration. Otherwise, the affected VMs might fail to start.NoteThese interfaces include for example:
-
Bridge devices created by
NetworkManager -
Networks configured to use
<forward mode='bridge'/>
In the systemd configuration directory tree, create a
libvirtd.service.ddirectory if it does not exist yet.# mkdir -p /etc/systemd/system/libvirtd.service.d/Create a
10-network-online.confsystemd unit override file in the previously created directory. The content of this file overrides the default systemd configuration for the libvirtd service.# touch /etc/systemd/system/libvirtd.service.d/10-network-online.confAdd the following lines to the
10-network-online.conffile. This configuration change ensures systemd starts thelibvirtdservice only after the network on the host is ready.[Unit] After=network-online.target
-
Bridge devices created by
Verification
View the VM configuration, and check that the autostart option is enabled.
For example, the following command displays basic information about the demo-guest1 VM, including the autostart option.
# virsh dominfo demo-guest1
Id:             2
Name:           demo-guest1
UUID:           e46bc81c-74e2-406e-bd7a-67042bae80d1
OS Type:        hvm
State:          running
CPU(s):         2
CPU time:       385.9s
Max memory:     4194304 KiB
Used memory:    4194304 KiB
Persistent:     yes
Autostart:      enable
Managed save:   no
Security model: selinux
Security DOI:   0
Security label: system_u:system_r:svirt_t:s0:c873,c919 (enforcing)
If you use network interfaces that are not managed by libvirt, check if the content of the
10-network-online.conffile matches the following output.$ cat /etc/systemd/system/libvirtd.service.d/10-network-online.conf [Unit] After=network-online.target
Additional resources
-
The
virsh autostart --helpcommand - Starting virtual machines by using the web console.
2.4. Connecting to virtual machines
To interact with a virtual machine (VM) in RHEL 8, you need to connect to it by doing one of the following:
- When using the web console interface, use the Virtual Machines pane in the web console interface. For more information, see Interacting with virtual machines by using the web console.
- If you need to interact with a VM graphical display without using the web console, use the Virt Viewer application. For details, see Opening a virtual machine graphical console by using Virt Viewer.
- When a graphical display is not possible or not necessary, use an SSH terminal connection.
- When the virtual machine is not reachable from your system by using a network, use the virsh console.
If the VMs to which you are connecting are on a remote host rather than a local one, you can optionally configure your system for more convenient access to remote hosts.
2.4.1. Interacting with virtual machines by using the web console
To interact with a virtual machine (VM) in the RHEL 8 web console, you need to connect to the VM’s console. These include both graphical and serial consoles.
- To interact with the VM’s graphical interface in the web console, use the graphical console.
- To interact with the VM’s graphical interface in a remote viewer, use the graphical console in remote viewers.
- To interact with the VM’s CLI in the web console, use the serial console.
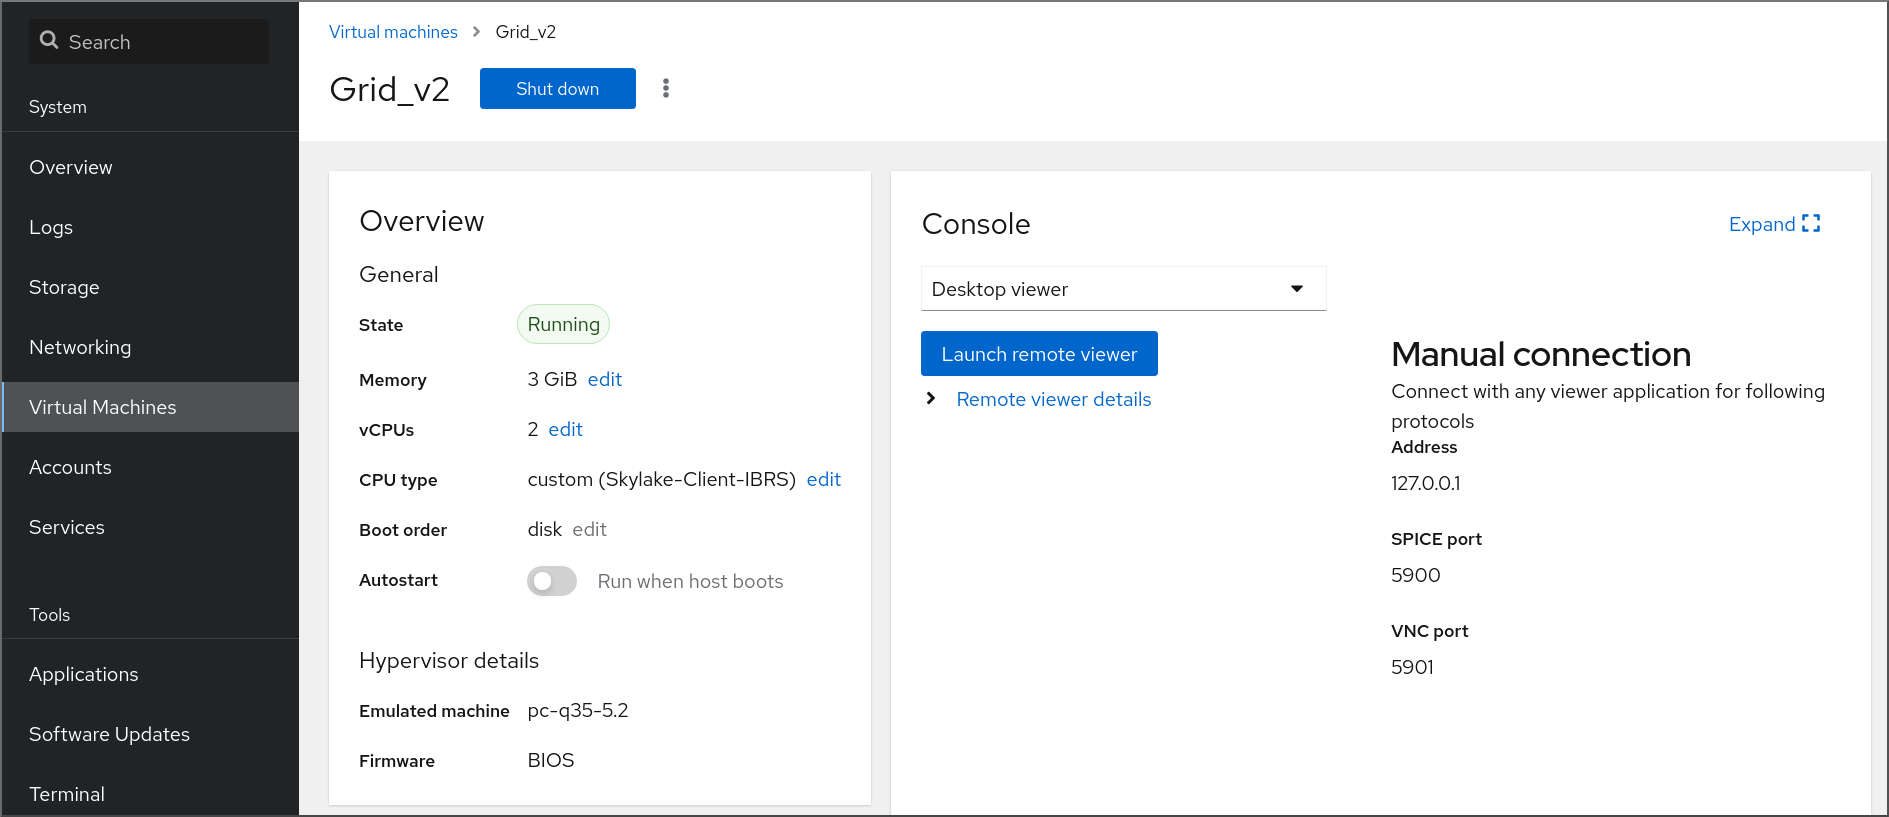
2.4.1.1. Viewing the virtual machine graphical console in the web console
By using the virtual machine (VM) console interface, you can view the graphical output of a selected VM in the RHEL 8 web console.
Prerequisites
- The web console VM plug-in is installed on your system.
- Ensure that both the host and the VM support a graphical interface.
Procedure
In the interface, click the VM whose graphical console you want to view.
A new page opens with an Overview and a Console section for the VM.
Select in the console drop down menu.
The VNC console appears below the menu in the web interface.
The graphical console appears in the web interface.

Click
You can now interact with the VM console by using the mouse and keyboard in the same manner you interact with a real machine. The display in the VM console reflects the activities being performed on the VM.
The host on which the web console is running may intercept specific key combinations, such as Ctrl+Alt+Del, preventing them from being sent to the VM.
To send such key combinations, click the menu and select the key sequence to send.
For example, to send the Ctrl+Alt+Del combination to the VM, click the and select the menu entry.
Troubleshooting
- If clicking in the graphical console does not have any effect, expand the console to full screen. This is a known issue with the mouse cursor offset.
2.4.1.2. Viewing the graphical console in a remote viewer by using the web console
By using the web console interface, you can display the graphical console of a selected virtual machine (VM) in a remote viewer, such as Virt Viewer.
You can launch Virt Viewer from within the web console. Other VNC and SPICE remote viewers can be launched manually.
Prerequisites
- The web console VM plug-in is installed on your system.
- Ensure that both the host and the VM support a graphical interface.
Before you can view the graphical console in Virt Viewer, you must install Virt Viewer on the machine to which the web console is connected.
Click .
The virt viewer,
.vv, file downloads.- Open the file to launch Virt Viewer.
Remote Viewer is available on most operating systems. However, some browser extensions and plug-ins do not allow the web console to open Virt Viewer.
Procedure
In the interface, click the VM whose graphical console you want to view.
A new page opens with an Overview and a Console section for the VM.
Select in the console drop down menu.
Click .
The graphical console opens in Virt Viewer.
You can interact with the VM console by using the mouse and keyboard in the same manner in which you interact with a real machine. The display in the VM console reflects the activities being performed on the VM.
The server on which the web console is running can intercept specific key combinations, such as Ctrl+Alt+Del, preventing them from being sent to the VM.
To send such key combinations, click the menu and select the key sequence to send.
For example, to send the Ctrl+Alt+Del combination to the VM, click the menu and select the menu entry.
Troubleshooting
- If clicking in the graphical console does not have any effect, expand the console to full screen. This is a known issue with the mouse cursor offset.
If launching the Remote Viewer in the web console does not work or is not optimal, you can manually connect with any viewer application by using the following protocols:
-
Address - The default address is
127.0.0.1. You can modify thevnc_listenor thespice_listenparameter in/etc/libvirt/qemu.confto change it to the host’s IP address. - SPICE port - 5900
- VNC port - 5901
-
Address - The default address is
2.4.1.3. Viewing the virtual machine serial console in the web console
You can view the serial console of a selected virtual machine (VM) in the RHEL 8 web console. This is useful when the host machine or the VM is not configured with a graphical interface.
For more information about the serial console, see Opening a virtual machine serial console.
Prerequisites
- The web console VM plug-in is installed on your system.
Procedure
In the pane, click the VM whose serial console you want to view.
A new page opens with an Overview and a Console section for the VM.
Select in the console drop down menu.
The graphical console appears in the web interface.
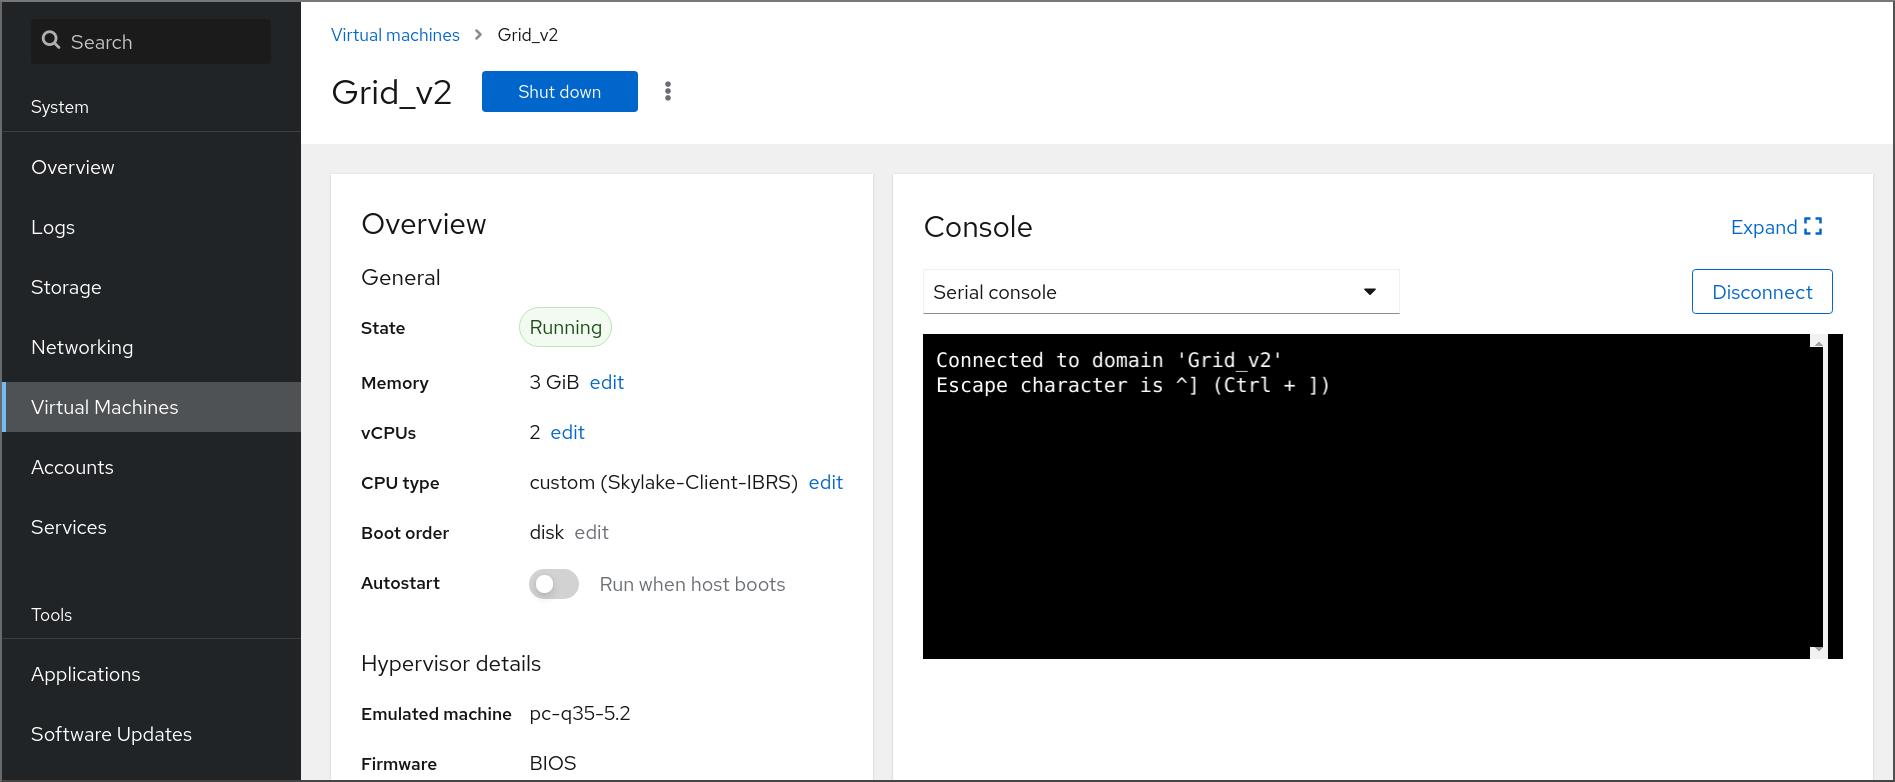
You can disconnect and reconnect the serial console from the VM.
- To disconnect the serial console from the VM, click .
- To reconnect the serial console to the VM, click .
2.4.2. Opening a virtual machine graphical console by using Virt Viewer
To connect to a graphical console of a KVM virtual machine (VM) and open it in the Virt Viewer desktop application, follow the procedure below.
Prerequisites
- Your system, as well as the VM you are connecting to, must support graphical displays.
- If the target VM is located on a remote host, connection and root access privileges to the host are needed.
- Optional: If the target VM is located on a remote host, set up your libvirt and SSH for more convenient access to remote hosts.
Procedure
To connect to a local VM, use the following command and replace guest-name with the name of the VM you want to connect to:
# virt-viewer guest-nameTo connect to a remote VM, use the
virt-viewercommand with the SSH protocol. For example, the following command connects as root to a VM called guest-name, located on remote system 192.0.2.1. The connection also requires root authentication for 192.0.2.1.# virt-viewer --direct --connect qemu+ssh://root@192.0.2.1/system guest-name root@192.0.2.1's password:
Verification
If the connection works correctly, the VM display is shown in the Virt Viewer window.
You can interact with the VM console by using the mouse and keyboard in the same manner you interact with a real machine. The display in the VM console reflects the activities being performed on the VM.
Troubleshooting
- If clicking in the graphical console does not have any effect, expand the console to full screen. This is a known issue with the mouse cursor offset.
Additional resources
2.4.3. Connecting to a virtual machine by using SSH
To interact with the terminal of a virtual machine (VM) by using the SSH connection protocol, follow the procedure below.
Prerequisites
- You have network connection and root access privileges to the target VM.
- If the target VM is located on a remote host, you also have connection and root access privileges to that host.
Your VM network assigns IP addresses by
dnsmasqgenerated bylibvirt. This is the case for example inlibvirtNAT networks.Notably, if your VM is using one of the following network configurations, you cannot connect to the VM by using SSH:
-
hostdevinterfaces - Direct interfaces
- Bridge interaces
-
The
libvirt-nsscomponent is installed and enabled on the VM’s host. If it is not, do the following:Install the
libvirt-nsspackage:# yum install libvirt-nssEdit the
/etc/nsswitch.conffile and addlibvirt_guestto thehostsline:... passwd: compat shadow: compat group: compat hosts: files libvirt_guest dns ...
Procedure
When connecting to a remote VM, SSH into its physical host first. The following example demonstrates connecting to a host machine
192.0.2.1by using its root credentials:# ssh root@192.0.2.1 root@192.0.2.1's password: Last login: Mon Sep 24 12:05:36 2021 root~#Use the VM’s name and user access credentials to connect to it. For example, the following connects to to the
testguest1VM by using its root credentials:# ssh root@testguest1 root@testguest1's password: Last login: Wed Sep 12 12:05:36 2018 root~]#
Troubleshooting
If you do not know the VM’s name, you can list all VMs available on the host by using the
virsh list --allcommand:# virsh list --all Id Name State ---------------------------------------------------- 2 testguest1 running - testguest2 shut off
Additional resources
2.4.4. Opening a virtual machine serial console
By using the virsh console command, it is possible to connect to the serial console of a virtual machine (VM).
This is useful when the VM:
- Does not provide VNC or SPICE protocols, and thus does not offer video display for GUI tools.
- Does not have a network connection, and thus cannot be interacted with using SSH.
Prerequisites
The VM must have a serial console device configured, such as
console type='pty'. To verify, do the following:# virsh dumpxml vm-name | grep console <console type='pty' tty='/dev/pts/2'> </console>The VM must have the serial console configured in its kernel command line. To verify this, the
cat /proc/cmdlinecommand output on the VM should include console=ttyS0. For example:# cat /proc/cmdline BOOT_IMAGE=/vmlinuz-3.10.0-948.el7.x86_64 root=/dev/mapper/rhel-root ro console=tty0 console=ttyS0,9600n8 rd.lvm.lv=rhel/root rd.lvm.lv=rhel/swap rhgbIf the serial console is not set up properly on a VM, using virsh console to connect to the VM connects you to an unresponsive guest console. However, you can still exit the unresponsive console by using the Ctrl+] shortcut.
To set up serial console on the VM, do the following:
On the VM, enable the
console=ttyS0kernel option:# grubby --update-kernel=ALL --args="console=ttyS0"Clear the kernel options that might prevent your changes from taking effect.
# grub2-editenv - unset kernelopts- Reboot the VM.
Procedure
On your host system, use the
virsh consolecommand. The following example connects to the guest1 VM, if the libvirt driver supports safe console handling:# virsh console guest1 --safe Connected to domain 'guest1' Escape character is ^] Subscription-name Kernel 3.10.0-948.el7.x86_64 on an x86_64 localhost login:
- You can interact with the virsh console in the same way as with a standard command-line interface.
Additional resources
-
The
virshman page
2.4.5. Setting up easy access to remote virtualization hosts
When managing VMs on a remote host system by using libvirt utilities, it is recommended to use the -c qemu+ssh://root@hostname/system syntax. For example, to use the virsh list command as root on the 192.0.2.1 host:
# virsh -c qemu+ssh://root@192.0.2.1/system list
root@192.0.2.1's password:

Id   Name              State
---------------------------------
1    remote-guest      running
However, you can remove the need to specify the connection details in full by modifying your SSH and libvirt configuration. For example:
# virsh -c remote-host list
root@192.0.2.1's password:

Id   Name              State
---------------------------------
1    remote-guest      running
To enable this improvement, follow the instructions below.
Procedure
Edit the
~/.ssh/configfile with the following details, where host-alias is a shortened name associated with a specific remote host and an alias for root@192.0.2.1, and hosturl is the URL address of the host :# vi ~/.ssh/config Host example-host-alias User root Hostname 192.0.2.1
Edit the
/etc/libvirt/libvirt.conffile with the following details, the example-qemu-host-alias is a host alias that QEMU and libvirt utilities will associate forqemu+ssh://192.0.2.1/systemwith the intended host example-host-alias :# vi /etc/libvirt/libvirt.conf uri_aliases = [ "example-qemu-host-alias=qemu+ssh://example-host-alias/system", ]
Verification
Confirm that you can manage remote VMs by using libvirt-based utilities on the local system with an added
-c qemu-host-aliasparameter. This automatically performs the commands over SSH on the remote host.For example, verify that the following lists VMs on the 192.0.2.1 remote host, the connection to which was set up as example-qemu-host-alias in the previous steps:
# virsh -c example-qemu-host-alias list root@192.0.2.1's password: Id Name State ---------------------------------------- 1 example-remote-guest runningNoteIn addition to
virsh, the-c(or--connect) option and the remote host access configuration described above can be used by the following utilities:
Next steps
If you want to use libvirt utilities exclusively on a single remote host, you can also set a specific connection as the default target for libvirt-based utilities. However, this is not recommended if you also want to manage VMs on your local host or on different remote hosts.
You can edit the
/etc/libvirt/libvirt.conffile and set the value of theuri_defaultparameter to example-qemu-host-alias as a default libvirt target.# These can be used in cases when no URI is supplied by the application # (@uri_default also prevents probing of the hypervisor driver). # uri_default = "example-qemu-host-alias"
As a result, all libvirt-based commands will automatically be performed on the specified remote host.
$ virsh list
root@192.0.2.1's password:

Id   Name              State
---------------------------------
1   example-remote-guest      running
When connecting to a remote host, you can avoid providing the root password to the remote system. To do so, use one or more of the following methods:
- Set up key-based SSH access to the remote host
- Use SSH connection multiplexing to connect to the remote system
- Kerberos authentication in Identity Management
-
The
-c(or--connect) option can be used to run thevirt-install,virt-viewer,virshandvirt-managercommands on a remote host.
2.5. Shutting down virtual machines
To shut down a running virtual machine hosted on RHEL 8, use the command line interface or the web console GUI.
2.5.1. Shutting down a virtual machine by using the command-line interface
To shut down a responsive virtual machine (VM), do one of the following:
- Use a shutdown command appropriate to the guest OS while connected to the guest.
Use the
virsh shutdowncommand on the host:If the VM is on a local host:
# virsh shutdown demo-guest1
Domain 'demo-guest1' is being shutdown
If the VM is on a remote host, in this example 192.0.2.1:
# virsh -c qemu+ssh://root@192.0.2.1/system shutdown demo-guest1

root@192.0.2.1's password:
Domain 'demo-guest1' is being shutdown
To force a VM to shut down, for example if it has become unresponsive, use the virsh destroy command on the host:
# virsh destroy demo-guest1
Domain 'demo-guest1' destroyed
The virsh destroy command does not actually delete or remove the VM configuration or disk images. It only terminates the running VM instance of the VM, similarly to pulling the power cord from a physical machine. As such, in rare cases, virsh destroy may cause corruption of the VM’s file system, so using this command is only recommended if all other shutdown methods have failed.
2.5.2. Shutting down and restarting virtual machines by using the web console
Using the RHEL 8 web console, you can shut down or restart running virtual machines. You can also send a non-maskable interrupt to an unresponsive virtual machine.
2.5.2.1. Shutting down virtual machines in the web console
If a virtual machine (VM) is in the running state, you can shut it down by using the RHEL 8 web console.
Prerequisites
- The web console VM plug-in is installed on your system.
Procedure
- In the interface, find the row of the VM you want to shut down.
On the right side of the row, click .
The VM shuts down.
Troubleshooting
- If the VM does not shut down, click the Menu button next to the button and select .
- To shut down an unresponsive VM, you can also send a non-maskable interrupt.
2.5.2.2. Restarting virtual machines by using the web console
If a virtual machine (VM) is in the running state, you can restart it by using the RHEL 8 web console.
Prerequisites
- The web console VM plug-in is installed on your system.
Procedure
- In the interface, find the row of the VM you want to restart.
On the right side of the row, click the Menu button .
A drop-down menu of actions appears.
In the drop-down menu, click .
The VM shuts down and restarts.
Troubleshooting
- If the VM does not restart, click the Menu button next to the button and select .
- To shut down an unresponsive VM, you can also send a non-maskable interrupt.
2.5.2.3. Sending non-maskable interrupts to VMs by using the web console
Sending a non-maskable interrupt (NMI) may cause an unresponsive running virtual machine (VM) to respond or shut down. For example, you can send the Ctrl+Alt+Del NMI to a VM that is not responding to standard input.
Prerequisites
- The web console VM plug-in is installed on your system.
Procedure
- In the interface, find the row of the VM to which you want to send an NMI.
On the right side of the row, click the Menu button .
A drop-down menu of actions appears.
In the drop-down menu, click .
An NMI is sent to the VM.
2.6. Deleting virtual machines
To delete virtual machines in RHEL 8, use the command line interface or the web console GUI.
2.6.1. Deleting virtual machines by using the command line interface
To delete a virtual machine (VM), you can remove its XML configuration and associated storage files from the host by using the command line. Follow the procedure below:
Prerequisites
- Back up important data from the VM.
- Shut down the VM.
- Make sure no other VMs use the same associated storage.
Procedure
Use the
virsh undefineutility.For example, the following command removes the guest1 VM, its associated storage volumes, and non-volatile RAM, if any.
# virsh undefine guest1 --remove-all-storage --nvram
Domain 'guest1' has been undefined
Volume 'vda'(/home/images/guest1.qcow2) removed.
Additional resources
-
The
virsh undefine --helpcommand -
The
virshman page
2.6.2. Deleting virtual machines by using the web console
To delete a virtual machine (VM) and its associated storage files from the host to which the RHEL 8 web console is connected with, follow the procedure below:
Prerequisites
- The web console VM plug-in is installed on your system.
- Back up important data from the VM.
- Make sure no other VM uses the same associated storage.
- Optional: Shut down the VM.
Procedure
In the interface, click the Menu button of the VM that you want to delete.
A drop down menu appears with controls for various VM operations.
Click .
A confirmation dialog appears.

- Optional: To delete all or some of the storage files associated with the VM, select the checkboxes next to the storage files you want to delete.
Click .
The VM and any selected storage files are deleted.
Chapter 3. Getting started with virtualization on IBM POWER
You can use KVM virtualization when using RHEL 8 on IBM POWER8 or POWER9 hardware. However, enabling the KVM hypervisor on your system requires extra steps compared to virtualization on AMD64 and Intel64 architectures. Certain RHEL 8 virtualization features also have different or restricted functionality on IBM POWER.
Apart from the information in the following sections, using virtualization on IBM POWER works the same as on AMD64 and Intel 64. Therefore, you can see other RHEL 8 virtualization documentation for more information when using virtualization on IBM POWER.
3.1. Enabling virtualization on IBM POWER
To set up a KVM hypervisor and create virtual machines (VMs) on an IBM POWER8 or IBM POWER9 system running RHEL 8, follow the instructions below.
Prerequisites
- RHEL 8 is installed and registered on your host machine.
The following minimum system resources are available:
- 6 GB free disk space for the host, plus another 6 GB for each intended VM.
- 2 GB of RAM for the host, plus another 2 GB for each intended VM.
- 4 CPUs on the host. VMs can generally run with a single assigned vCPU, but Red Hat recommends assigning 2 or more vCPUs per VM to avoid VMs becoming unresponsive during high load.
Your CPU machine type must support IBM POWER virtualization.
To verify this, query the platform information in your
/proc/cpuinfofile.# grep ^platform /proc/cpuinfo/ platform : PowerNVIf the output of this command includes the
PowerNVentry, you are running a PowerNV machine type and can use virtualization on IBM POWER.
Procedure
Load the KVM-HV kernel module
# modprobe kvm_hvVerify that the KVM kernel module is loaded
# lsmod | grep kvmIf KVM loaded successfully, the output of this command includes
kvm_hv.Install the packages in the virtualization module:
# yum module install virtInstall the
virt-installpackage:# yum install virt-installStart the
libvirtdservice.# systemctl start libvirtd
Verification
Verify that your system is prepared to be a virtualization host:
# virt-host-validate
[...]
QEMU: Checking if device /dev/vhost-net exists                : PASS
QEMU: Checking if device /dev/net/tun exists                  : PASS
QEMU: Checking for cgroup 'memory' controller support         : PASS
QEMU: Checking for cgroup 'memory' controller mount-point     : PASS
[...]
QEMU: Checking for cgroup 'blkio' controller support          : PASS
QEMU: Checking for cgroup 'blkio' controller mount-point      : PASS
QEMU: Checking if IOMMU is enabled by kernel                  : PASS
If all virt-host-validate checks return a
PASSvalue, your system is prepared for creating VMs.If any of the checks return a
FAILvalue, follow the displayed instructions to fix the problem.If any of the checks return a
WARNvalue, consider following the displayed instructions to improve virtualization capabilities.
Troubleshooting
If KVM virtualization is not supported by your host CPU, virt-host-validate generates the following output:
QEMU: Checking for hardware virtualization: FAIL (Only emulated CPUs are available, performance will be significantly limited)
However, VMs on such a host system will fail to boot, rather than have performance problems.
To work around this, you can change the
<domain type>value in the XML configuration of the VM toqemu. Note, however, that Red Hat does not support VMs that use theqemudomain type, and setting this is highly discouraged in production environments.
3.2. How virtualization on IBM POWER differs from AMD64 and Intel 64
KVM virtualization in RHEL 8 on IBM POWER systems is different from KVM on AMD64 and Intel 64 systems in a number of aspects, notably:
- Memory requirements
- VMs on IBM POWER consume more memory. Therefore, the recommended minimum memory allocation for a virtual machine (VM) on an IBM POWER host is 2GB RAM.
- Display protocols
The SPICE protocol is not supported on IBM POWER systems. To display the graphical output of a VM, use the
VNCprotocol. In addition, only the following virtual graphics card devices are supported:-
vga- only supported in-vga stdmode and not in-vga cirrusmode. -
virtio-vga -
virtio-gpu
-
- SMBIOS
- SMBIOS configuration is not available.
- Memory allocation errors
POWER8 VMs, including compatibility mode VMs, may fail with an error similar to:
qemu-kvm: Failed to allocate KVM HPT of order 33 (try smaller maxmem?): Cannot allocate memory
This is significantly more likely to occur on VMs that use RHEL 7.3 and prior as the guest OS.
To fix the problem, increase the CMA memory pool available for the guest’s hashed page table (HPT) by adding
kvm_cma_resv_ratio=memoryto the host’s kernel command line, where memory is the percentage of the host memory that should be reserved for the CMA pool (defaults to 5).- Huge pages
Transparent huge pages (THPs) do not provide any notable performance benefits on IBM POWER8 VMs. However, IBM POWER9 VMs can benefit from THPs as expected.
In addition, the size of static huge pages on IBM POWER8 systems are 16 MiB and 16 GiB, as opposed to 2 MiB and 1 GiB on AMD64, Intel 64, and IBM POWER9. As a consequence, to migrate a VM configured with static huge pages from an IBM POWER8 host to an IBM POWER9 host, you must first set up 1GiB huge pages on the VM.
- kvm-clock
-
The
kvm-clockservice does not have to be configured for time management in VMs on IBM POWER9. - pvpanic
IBM POWER9 systems do not support the
pvpanicdevice. However, an equivalent functionality is available and activated by default on this architecture. To enable it in a VM, use the<on_crash>XML configuration element with thepreservevalue.In addition, make sure to remove the
<panic>element from the<devices>section, as its presence can lead to the VM failing to boot on IBM POWER systems.- Single-threaded host
- On IBM POWER8 systems, the host machine must run in single-threaded mode to support VMs. This is automatically configured if the qemu-kvm packages are installed. However, VMs running on single-threaded hosts can still use multiple threads.
- Peripheral devices
A number of peripheral devices supported on AMD64 and Intel 64 systems are not supported on IBM POWER systems, or a different device is supported as a replacement.
-
Devices used for PCI-E hierarchy, including
ioh3420andxio3130-downstream, are not supported. This functionality is replaced by multiple independent PCI root bridges provided by thespapr-pci-host-bridgedevice. - UHCI and EHCI PCI controllers are not supported. Use OHCI and XHCI controllers instead.
-
IDE devices, including the virtual IDE CD-ROM (
ide-cd) and the virtual IDE disk (ide-hd), are not supported. Use thevirtio-scsiandvirtio-blkdevices instead. -
Emulated PCI NICs (
rtl8139) are not supported. Use thevirtio-netdevice instead. -
Sound devices, including
intel-hda,hda-output, andAC97, are not supported. -
USB redirection devices, including
usb-redirandusb-tablet, are not supported.
-
Devices used for PCI-E hierarchy, including
- v2v and p2v
-
The
virt-v2vandvirt-p2vutilities are only supported on the AMD64 and Intel 64 architecture, and are not provided on IBM POWER.
Additional sources
- For a comparison of selected supported and unsupported virtualization features across system architectures supported by Red Hat, see An overview of virtualization features support in RHEL 8.
Chapter 4. Getting started with virtualization on IBM Z
You can use KVM virtualization when using RHEL 8 on IBM Z hardware. However, enabling the KVM hypervisor on your system requires extra steps compared to virtualization on AMD64 and Intel 64 architectures. Certain RHEL 8 virtualization features also have different or restricted functionality on IBM Z.
Apart from the information in the following sections, using virtualization on IBM Z works the same as on AMD64 and Intel 64. Therefore, you can see other RHEL 8 virtualization documentation for more information when using virtualization on IBM Z.
Running KVM on the z/VM OS is not supported.
4.1. Enabling virtualization on IBM Z
To set up a KVM hypervisor and create virtual machines (VMs) on an IBM Z system running RHEL 8, follow the instructions below.
Prerequisites
RHEL 8.6 or later is installed and registered on your host machine.
ImportantIf you already enabled virtualization on an IBM Z machine by using RHEL 8.5 or earlier, you should instead reconfigure your virtualization module and update your system. For instructions, see How virtualization on IBM Z differs from AMD64 and Intel 64.
The following minimum system resources are available:
- 6 GB free disk space for the host, plus another 6 GB for each intended VM.
- 2 GB of RAM for the host, plus another 2 GB for each intended VM.
- 4 CPUs on the host. VMs can generally run with a single assigned vCPU, but Red Hat recommends assigning 2 or more vCPUs per VM to avoid VMs becoming unresponsive during high load.
- Your IBM Z host system is using a z13 CPU or later.
RHEL 8 is installed on a logical partition (LPAR). In addition, the LPAR supports the start-interpretive execution (SIE) virtualization functions.
To verify this, search for
siein your/proc/cpuinfofile.# grep sie /proc/cpuinfo features : esan3 zarch stfle msa ldisp eimm dfp edat etf3eh highgprs te sie
Procedure
Load the KVM kernel module:
# modprobe kvmVerify that the KVM kernel module is loaded:
# lsmod | grep kvmIf KVM loaded successfully, the output of this command includes
kvm.Install the packages in the
virt:rhel/commonmodule:# yum module install virt:rhel/commonStart the virtualization services:
# for drv in qemu network nodedev nwfilter secret storage interface; do systemctl start virt${drv}d{,-ro,-admin}.socket; done
Verification
Verify that your system is prepared to be a virtualization host.
# virt-host-validate
[...]
QEMU: Checking if device /dev/kvm is accessible             : PASS
QEMU: Checking if device /dev/vhost-net exists              : PASS
QEMU: Checking if device /dev/net/tun exists                : PASS
QEMU: Checking for cgroup 'memory' controller support       : PASS
QEMU: Checking for cgroup 'memory' controller mount-point   : PASS
[...]
If all virt-host-validate checks return a
PASSvalue, your system is prepared for creating VMs.If any of the checks return a
FAILvalue, follow the displayed instructions to fix the problem.If any of the checks return a
WARNvalue, consider following the displayed instructions to improve virtualization capabilities.
Troubleshooting
If KVM virtualization is not supported by your host CPU, virt-host-validate generates the following output:
QEMU: Checking for hardware virtualization: FAIL (Only emulated CPUs are available, performance will be significantly limited)
However, VMs on such a host system will fail to boot, rather than have performance problems.
To work around this, you can change the
<domain type>value in the XML configuration of the VM toqemu. Note, however, that Red Hat does not support VMs that use theqemudomain type, and setting this is highly discouraged in production environments.
4.2. Updating virtualization on IBM Z from RHEL 8.5 to RHEL 8.6 or later
If you installed RHEL 8 on IBM Z hardware prior to RHEL 8.6, you had to obtain virtualization RPMs from the AV stream, separate from the base RPM stream of RHEL 8. Starting with RHEL 8.6, virtualization RPMs previously available only from the AV stream are available on the base RHEL stream. In addition, the AV stream will be discontinued in a future minor release of RHEL 8. Therefore, using the AV stream is no longer recommended.
By following the instructions below, you will deactivate your AV stream and enable your access to virtualization RPMs available in RHEL 8.6 and later versions.
Prerequisites
You are using a RHEL 8.5 on IBM Z, with the
virt:avmodule installed. To confirm that this is the case:# hostnamectl | grep "Operating System" Operating System: Red Hat Enterprise Linux 8.5 (Ootpa) # yum module list --installed [...] Advanced Virtualization for RHEL 8 IBM Z Systems (RPMs) Name Stream Profiles Summary virt av [e] common [i] Virtualization module
Procedure
Disable the
virt:avmodule.# yum disable virt:avRemove the pre-existing virtualization packages and modules that your system already contains.
# yum module reset virt -yUpgrade your packages to their latest RHEL versions.
# yum updateThis also automatically enables the
virt:rhelmodule on your system.
Verification
Ensure the
virtmodule on your system is provided by therhelstream.# yum module info virt Name : virt Stream : rhel [d][e][a] Version : 8050020211203195115 [...]
Additional resources
4.3. How virtualization on IBM Z differs from AMD64 and Intel 64
KVM virtualization in RHEL 8 on IBM Z systems differs from KVM on AMD64 and Intel 64 systems in the following:
- PCI and USB devices
Virtual PCI and USB devices are not supported on IBM Z. This also means that
virtio-*-pcidevices are unsupported, andvirtio-*-ccwdevices should be used instead. For example, usevirtio-net-ccwinstead ofvirtio-net-pci.Note that direct attachment of PCI devices, also known as PCI passthrough, is supported.
- Supported guest operating system
- Red Hat only supports VMs hosted on IBM Z if they use RHEL 7, 8, or 9 as their guest operating system.
- Device boot order
IBM Z does not support the
<boot dev='device'>XML configuration element. To define device boot order, use the<boot order='number'>element in the<devices>section of the XML.In addition, you can select the required boot entry by using the architecture-specific
loadparmattribute in the<boot>element. For example, the following determines that the disk should be used first in the boot sequence and if a Linux distribution is available on that disk, it will select the second boot entry:<disk type='file' device='disk'> <driver name='qemu' type='qcow2'/> <source file='/path/to/qcow2'/> <target dev='vda' bus='virtio'/> <address type='ccw' cssid='0xfe' ssid='0x0' devno='0x0000'/> <boot order='1' loadparm='2'/> </disk>
NoteBy using
<boot order='number'>for boot order management is also preferred on AMD64 and Intel 64 hosts.- Memory hot plug
- Adding memory to a running VM is not possible on IBM Z. Note that removing memory from a running VM (memory hot unplug) is also not possible on IBM Z, as well as on AMD64 and Intel 64.
- NUMA topology
-
Non-Uniform Memory Access (NUMA) topology for CPUs is not supported by
libvirton IBM Z. Therefore, tuning vCPU performance by using NUMA is not possible on these systems. - vfio-ap
- VMs on an IBM Z host can use the vfio-ap cryptographic device passthrough, which is not supported on any other architecture.
- vfio-ccw
- VMs on an IBM Z host can use the vfio-ccw disk device passthrough, which is not supported on any other architecture.
- SMBIOS
- SMBIOS configuration is not available on IBM Z.
- Watchdog devices
If using watchdog devices in your VM on an IBM Z host, use the
diag288model. For example:<devices> <watchdog model='diag288' action='poweroff'/> </devices>
- kvm-clock
-
The
kvm-clockservice is specific to AMD64 and Intel 64 systems, and does not have to be configured for VM time management on IBM Z. - v2v and p2v
-
The
virt-v2vandvirt-p2vutilities are supported only on the AMD64 and Intel 64 architecture, and are not provided on IBM Z. - Nested virtualization
- Creating nested VMs requires different settings on IBM Z than on AMD64 and Intel 64. For details, see Creating nested virtual machines.
- No graphical output in earlier releases
-
When using RHEL 8.3 or an earlier minor version on your host, displaying the VM graphical output is not possible when connecting to the VM by using the VNC protocol. This is because the
gnome-desktoputility was not supported in earlier RHEL versions on IBM Z. In addition, the SPICE display protocol does not work on IBM Z. - Migrations
To successfully migrate to a later host model (for example from IBM z14 to z15), or to update the hypervisor, use the
host-modelCPU mode. Thehost-passthroughandmaximumCPU modes are not recommended, as they are generally not migration-safe.If you want to specify an explicit CPU model in the
customCPU mode, follow these guidelines:-
Do not use CPU models that end with
-base. -
Do not use the
qemu,maxorhostCPU model.
To successfully migrate to an older host model (such as from z15 to z14), or to an earlier version of QEMU, KVM, or the RHEL kernel, use the CPU type of the oldest available host model without
-baseat the end.-
If you have both the source host and the destination host running, you can instead use the
virsh hypervisor-cpu-baselinecommand on the destination host to obtain a suitable CPU model. For details, see Verifying host CPU compatibility for virtual machine migration. - For more information about supported machine types in RHEL 8, see Recommended features in RHEL 8 virtualization.
-
Do not use CPU models that end with
- PXE installation and booting
When using PXE to run a VM on IBM Z, a specific configuration is required for the
pxelinux.cfg/defaultfile. For example:# pxelinux default linux label linux kernel kernel.img initrd initrd.img append ip=dhcp inst.repo=example.com/redhat/BaseOS/s390x/os/
- Secure Execution
-
You can boot a VM with a prepared secure guest image by defining
<launchSecurity type="s390-pv"/>in the XML configuration of the VM. This encrypts the VM’s memory to protect it from unwanted access by the hypervisor.
Note that the following features are not supported when running a VM in secure execution mode:
-
Device passthrough by using
vfio -
Obtaining memory information by using
virsh domstatsandvirsh memstat -
The
memballoonandvirtio-rngvirtual devices - Memory backing by using huge pages
- Live and non-live VM migrations
- Saving and restoring VMs
-
VM snapshots, including memory snapshots (using the
--memspecoption) -
Full memory dumps. Instead, specify the
--memory-onlyoption for thevirsh dumpcommand. - 248 or more vCPUs. The vCPU limit for secure guests is 247.
- Nested virtualization
Additional resources
4.4. Next steps
When setting up a VM on an IBM Z system, it is recommended to protect the guest OS from the "Spectre" vulnerability. To do so, use the
virsh editcommand to modify the VM’s XML configuration and configure its CPU in one of the following ways:Use the host CPU model:
<cpu mode='host-model' check='partial'>
  <model fallback='allow'/>
</cpu>
This makes the
ppa15andbpbfeatures available to the guest if the host supports them.If using a specific host model, add the
ppa15andpbpfeatures. The following example uses the zEC12 CPU model:<cpu mode='custom' match='exact' check='partial'> <model fallback='allow'>zEC12</model> <feature policy='force' name='ppa15'/> <feature policy='force' name='bpb'/> </cpu>Note that when using the
ppa15feature with thez114andz196CPU models on a host machine that uses a z12 CPU, you also need to use the latest microcode level (bundle 95 or later).
Chapter 5. Managing virtual machines in the web console
To manage virtual machines in a graphical interface on a RHEL 8 host, you can use the Virtual Machines pane in the RHEL 8 web console.
5.1. Overview of virtual machine management by using the web console
The RHEL 8 web console is a web-based interface for system administration. As one of its features, the web console provides a graphical view of virtual machines (VMs) on the host system, and makes it possible to create, access, and configure these VMs.
Note that to use the web console to manage your VMs on RHEL 8, you must first install a web console plug-in for virtualization.
Next steps
- For instructions on enabling VMs management in your web console, see Setting up the web console to manage virtual machines.
- For a comprehensive list of VM management actions that the web console provides, see Virtual machine management features available in the web console.
- For a list of features that are currently not available in the web console but can be used in the virt-manager application, see Differences between virtualization features in Virtual Machine Manager and the web console.
5.2. Setting up the web console to manage virtual machines
Before using the RHEL 8 web console to manage virtual machines (VMs), you must install the web console virtual machine plug-in on the host.
Prerequisites
Ensure that the web console is installed and enabled on your machine.
# systemctl status cockpit.socket
cockpit.socket - Cockpit Web Service Socket
Loaded: loaded (/usr/lib/systemd/system/cockpit.socket
[...]
If this command returns
Unit cockpit.socket could not be found, follow the Installing the web console document to enable the web console.
Procedure
Install the
cockpit-machinesplug-in.# yum install cockpit-machines
Verification
-
Access the web console, for example by entering the
https://localhost:9090address in your browser. - Log in.
If the installation was successful, appears in the web console side menu.
Additional resources
5.3. Renaming virtual machines by using the web console
You might require renaming an existing virtual machine (VM) to avoid naming conflicts or assign a new unique name based on your use case. To rename the VM, you can use the RHEL web console.
Prerequisites
- The web console VM plug-in is installed on your system.
- The VM is shut down.
Procedure
In the interface, click the Menu button of the VM that you want to rename.
A drop-down menu appears with controls for various VM operations.
Click .
The Rename a VM dialog appears.
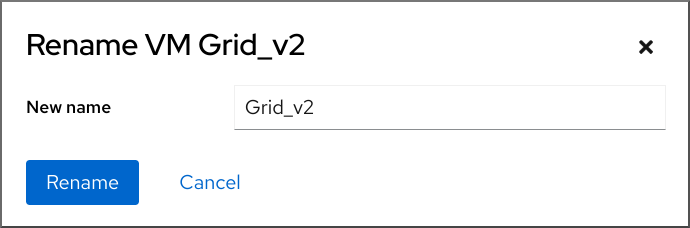
- In the New name field, enter a name for the VM.
- Click .
Verification
- Check that the new VM name has appeared in the interface.
5.4. Virtual machine management features available in the web console
By using the RHEL 8 web console, you can perform the following actions to manage the virtual machines (VMs) on your system.
Table 5.1. VM management tasks that you can perform in the RHEL 8 web console
5.5. Differences between virtualization features in Virtual Machine Manager and the web console
The Virtual Machine Manager (virt-manager) application is supported in RHEL 8, but has been deprecated. The web console is intended to become its replacement in a subsequent major release. It is, therefore, recommended that you get familiar with the web console for managing virtualization in a GUI.
However, in RHEL 8, some VM management tasks can only be performed in virt-manager or the command line. The following table highlights the features that are available in virt-manager but not available in the RHEL 8.0 web console.
If a feature is available in a later minor version of RHEL 8, the minimum RHEL 8 version appears in the Support in web console introduced column.
Table 5.2. VM managemennt tasks that cannot be performed using the web console in RHEL 8.0
| Task | Support in web console introduced | Alternative method by using CLI |
|---|---|---|
| Setting a virtual machine to start when the host boots | RHEL 8.1 |
|
| Suspending a virtual machine | RHEL 8.1 |
|
| Resuming a suspended virtual machine | RHEL 8.1 |
|
| Creating file-system directory storage pools | RHEL 8.1 |
|
| Creating NFS storage pools | RHEL 8.1 |
|
| Creating physical disk device storage pools | RHEL 8.1 |
|
| Creating LVM volume group storage pools | RHEL 8.1 |
|
| Creating partition-based storage pools | CURRENTLY UNAVAILABLE |
|
| Creating GlusterFS-based storage pools | CURRENTLY UNAVAILABLE |
|
| Creating vHBA-based storage pools with SCSI devices | CURRENTLY UNAVAILABLE |
|
| Creating Multipath-based storage pools | CURRENTLY UNAVAILABLE |
|
| Creating RBD-based storage pools | CURRENTLY UNAVAILABLE |
|
| Creating a new storage volume | RHEL 8.1 |
|
| Adding a new virtual network | RHEL 8.1 |
|
| Deleting a virtual network | RHEL 8.1 |
|
| Creating a bridge from a host machine’s interface to a virtual machine | CURRENTLY UNAVAILABLE |
|
| Creating a snapshot | CURRENTLY UNAVAILABLE |
|
| Reverting to a snapshot | CURRENTLY UNAVAILABLE |
|
| Deleting a snapshot | CURRENTLY UNAVAILABLE |
|
| Cloning a virtual machine | RHEL 8.4 |
|
| Migrating a virtual machine to another host machine | RHEL 8.5 |
|
| Attaching a host device to a VM | RHEL 8.5 |
|
| Removing a host device from a VM | RHEL 8.5 |
|
Chapter 6. Viewing information about virtual machines
When you need to adjust or troubleshoot any aspect of your virtualization deployment on RHEL 8, the first step you need to perform usually is to view information about the current state and configuration of your virtual machines. To do so, you can use the command-line interface or the web console. You can also view the information in the VM’s XML configuration.
6.1. Viewing virtual machine information by using the command-line interface
To retrieve information about virtual machines (VMs) on your host and their configurations, use one or more of the following commands.
Procedure
To obtain a list of VMs on your host:
# virsh list --all
Id   Name              State
----------------------------------
1    testguest1             running
-    testguest2             shut off
-    testguest3             shut off
-    testguest4             shut off
To obtain basic information about a specific VM:
# virsh dominfo testguest1
Id:             1
Name:           testguest1
UUID:           a973666f-2f6e-415a-8949-75a7a98569e1
OS Type:        hvm
State:          running
CPU(s):         2
CPU time:       188.3s
Max memory:     4194304 KiB
Used memory:    4194304 KiB
Persistent:     yes
Autostart:      disable
Managed save:   no
Security model: selinux
Security DOI:   0
Security label: system_u:system_r:svirt_t:s0:c486,c538 (enforcing)
To obtain the complete XML configuration of a specific VM:
# virsh dumpxml testguest2

<domain type='kvm' id='1'>
  <name>testguest2</name>
  <uuid>a973434f-2f6e-4ěša-8949-76a7a98569e1</uuid>
  <metadata>
[...]
For information about a VM’s disks and other block devices:
# virsh domblklist testguest3
 Target   Source
---------------------------------------------------------------
 vda      /var/lib/libvirt/images/testguest3.qcow2
 sda      -
 sdb      /home/username/Downloads/virt-p2v-1.36.10-1.el7.iso
For instructions on managing a VM’s storage, see Managing storage for virtual machines.
To obtain information about a VM’s file systems and their mountpoints:
# virsh domfsinfo testguest3
Mountpoint   Name   Type   Target
------------------------------------
 /            dm-0   xfs
 /boot        vda1   xfs
To obtain more details about the vCPUs of a specific VM:
# virsh vcpuinfo testguest4
VCPU:           0
CPU:            3
State:          running
CPU time:       103.1s
CPU Affinity:   yyyy

VCPU:           1
CPU:            0
State:          running
CPU time:       88.6s
CPU Affinity:   yyyy
To configure and optimize the vCPUs in your VM, see Optimizing virtual machine CPU performance.
To list all virtual network interfaces on your host:
# virsh net-list --all
 Name       State    Autostart   Persistent
---------------------------------------------
 default    active   yes         yes
 labnet     active   yes         yes
For information about a specific interface:
# virsh net-info default
Name:           default
UUID:           c699f9f6-9202-4ca8-91d0-6b8cb9024116
Active:         yes
Persistent:     yes
Autostart:      yes
Bridge:         virbr0
For details about network interfaces, VM networks, and instructions for configuring them, see Configuring virtual machine network connections.
- For instructions on viewing information about storage pools and storage volumes on your host, see Viewing virtual machine storage information by using the CLI.
6.2. Viewing virtual machine information by using the web console
By using the RHEL 8 web console, you can view information about all VMs and storage pools the web console session can access.
You can view information about a selected VM to which the web console session is connected. This includes information about its disks, virtual network interface and resource usage.
6.2.1. Viewing a virtualization overview in the web console
By using the web console, you can access a virtualization overview that contains summarized information about available virtual machines (VMs), storage pools, and networks.
Prerequisites
- The web console VM plug-in is installed on your system.
Procedure
Click in the web console’s side menu.
A dialog box appears with information about the available storage pools, available networks, and the VMs to which the web console is connected.
The information includes the following:
- Storage Pools - The number of storage pools, active or inactive, that can be accessed by the web console and their state.
- Networks - The number of networks, active or inactive, that can be accessed by the web console and their state.
- Name - The name of the VM.
- Connection - The type of libvirt connection, system or session.
- State - The state of the VM.
Additional resources
6.2.2. Viewing storage pool information by using the web console
By using the web console, you can view detailed information about storage pools available on your system. Storage pools can be used to create disk images for your virtual machines.
Prerequisites
- The web console VM plug-in is installed on your system.
Procedure
Click at the top of the interface.
The Storage pools window appears, showing a list of configured storage pools.

The information includes the following:
- Name - The name of the storage pool.
- Size - The current allocation and the total capacity of the storage pool.
- Connection - The connection used to access the storage pool.
- State - The state of the storage pool.
Click the arrow next to the storage pool whose information you want to see.
The row expands to reveal the Overview pane with detailed information about the selected storage pool.

The information includes:
-
Target path - The source for the types of storage pools backed by directories, such as
dirornetfs. - Persistent - Indicates whether or not the storage pool has a persistent configuration.
- Autostart - Indicates whether or not the storage pool starts automatically when the system boots up.
- Type - The type of the storage pool.
-
Target path - The source for the types of storage pools backed by directories, such as
To view a list of storage volumes associated with the storage pool, click .
The Storage Volumes pane appears, showing a list of configured storage volumes.

The information includes:
- Name - The name of the storage volume.
- Used by - The VM that is currently using the storage volume.
- Size - The size of the volume.
Additional resources
6.2.3. Viewing basic virtual machine information in the web console
By using the web console, you can view basic information, such as assigned resources or hypervisor details, about a selected virtual machine (VM).
Prerequisites
- The web console VM plug-in is installed on your system.
Procedure
- Click in the web console side menu.
Click the VM whose information you want to see.
A new page opens with an Overview section with basic information about the selected VM and a Console section to access the VM’s graphical interface.
The Overview section includes the following general VM details:
- State - The VM state, Running or Shut off.
- Memory - The amount of memory assigned to the VM.
- vCPUs - The number of virtual CPUs configured for the VM.
- CPU Type - The architecture of the virtual CPUs configured for the VM.
- Boot Order - The boot order configured for the VM.
- Autostart - Whether or not autostart is enabled for the VM.
The information also includes the following hypervisor details:
- Emulated Machine - The machine type emulated by the VM.
- Firmware - The firmware of the VM.
6.2.4. Viewing virtual machine resource usage in the web console
By using the web console, you can view memory and virtual CPU usage of a selected virtual machine (VM).
Prerequisites
- The web console VM plug-in is installed on your system.
Procedure
In the interface, click the VM whose information you want to see.
A new page opens with an Overview section with basic information about the selected VM and a Console section to access the VM’s graphical interface.
Scroll to .
The Usage section displays information about the memory and virtual CPU usage of the VM.
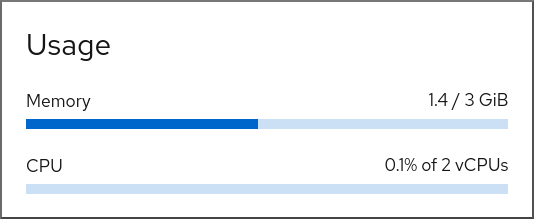
Additional resources
6.2.5. Viewing virtual machine disk information in the web console
By using the web console, you can view detailed information about disks assigned to a selected virtual machine (VM).
Prerequisites
- The web console VM plug-in is installed on your system.
Procedure
Click the VM whose information you want to see.
A new page opens with an Overview section with basic information about the selected VM and a Console section to access the VM’s graphical interface.
Scroll to .
The Disks section displays information about the disks assigned to the VM as well as options to Add, Remove, or Edit disks.

The information includes the following:
- Device - The device type of the disk.
- Used - The amount of disk currently allocated.
- Capacity - The maximum size of the storage volume.
- Bus - The type of disk device that is emulated.
-
Access - Whether the disk is Writeable or Read-only. For
rawdisks, you can also set the access to Writeable and shared. - Source - The disk device or file.
Additional resources
6.2.6. Viewing and editing virtual network interface information in the web console
By using the RHEL 8 web console, you can view and modify the virtual network interfaces on a selected virtual machine (VM):
Prerequisites
- The web console VM plug-in is installed on your system.
Procedure
In the interface, click the VM whose information you want to see.
A new page opens with an Overview section with basic information about the selected VM and a Console section to access the VM’s graphical interface.
Scroll to .
The Networks Interfaces section displays information about the virtual network interface configured for the VM as well as options to Add, Delete, Edit, or Unplug network interfaces.

The information includes the following:
Type - The type of network interface for the VM. The types include virtual network, bridge to LAN, and direct attachment.
NoteGeneric Ethernet connection is not supported in RHEL 8 and later.
- Model type - The model of the virtual network interface.
- MAC Address - The MAC address of the virtual network interface.
- IP Address - The IP address of the virtual network interface.
- Source - The source of the network interface. This is dependent on the network type.
- State - The state of the virtual network interface.
To edit the virtual network interface settings, Click . The Virtual Network Interface Settings dialog opens.
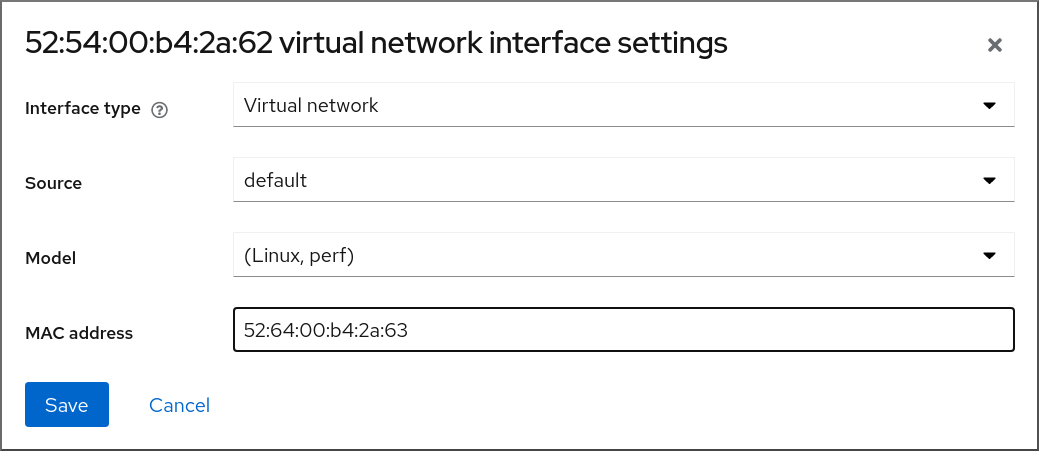
- Change the interface type, source, model, or MAC address.
Click . The network interface is modified.
NoteChanges to the virtual network interface settings take effect only after restarting the VM.
Additionally, MAC address can only be modified when the VM is shut off.
Additional resources
6.3. Sample virtual machine XML configuration
The XML configuration of a VM, also referred to as a domain XML, determines the VM’s settings and components. The following table shows sections of a sample XML configuration of a virtual machine (VM) and explains the contents.
To obtain the XML configuration of a VM, you can use the virsh dumpxml command followed by the VM’s name.
# virsh dumpxml testguest1Table 6.1. Sample XML configuration
| Domain XML Section | Description |
|---|---|
<domain type='kvm'> <name>Testguest1</name> <uuid>ec6fbaa1-3eb4-49da-bf61-bb02fbec4967</uuid> <memory unit='KiB'>1048576</memory> <currentMemory unit='KiB'>1048576</currentMemory> | This is a KVM virtual machine called Testguest1, with 1024 MiB allocated RAM. |
<vcpu placement='static'>1</vcpu> | The VM is allocated with a single virtual CPU (vCPU). For information about configuring vCPUs, see Optimizing virtual machine CPU performance. |
<os> <type arch='x86_64' machine='pc-q35-4.1'>hvm</type> <boot dev='hd'/> </os> | The machine architecture is set to the AMD64 and Intel 64 architecture, and uses the Intel Q35 machine type to determine feature compatibility. The OS is set to be booted from the hard disk drive. For information about creating a VM with an installed OS, see Creating virtual machines and installing guest operating systems by using the web console. |
<features> <acpi/> <apic/> </features> | The acpi and apic hypervisor features are disabled. |
<cpu mode='host-model' check='partial'/> |
The host CPU definitions from capabilities XML (obtainable with |
<clock offset='utc'> <timer name='rtc' tickpolicy='catchup'/> <timer name='pit' tickpolicy='delay'/> <timer name='hpet' present='no'/> </clock> | The VM’s virtual hardware clock uses the UTC time zone. In addition, three different timers are set up for synchronization with the QEMU hypervisor. |
<on_poweroff>destroy</on_poweroff> <on_reboot>restart</on_reboot> <on_crash>destroy</on_crash> |
When the VM powers off, or its OS terminates unexpectedly, |
<pm> <suspend-to-mem enabled='no'/> <suspend-to-disk enabled='no'/> </pm> | The S3 and S4 ACPI sleep states are disabled for this VM. |
<devices> <emulator>/usr/bin/qemu-kvm</emulator> <disk type='file' device='disk'> <driver name='qemu' type='qcow2'/> <source file='/var/lib/libvirt/images/Testguest.qcow2'/> <target dev='hda' bus='ide'/> </disk> <disk type='file' device='cdrom'> <driver name='qemu' type='raw'/> <target dev='hdb' bus='ide'/> <readonly/> </disk> |
The VM uses the
The first disk is a virtualized hard-drive based on the
The second disk is a virtualized CD-ROM and its logical device name is set to |
<controller type='usb' index='0' model='qemu-xhci' ports='15'/> <controller type='sata' index='0'/> <controller type='pci' index='0' model='pcie-root'/> <controller type='pci' index='1' model='pcie-root-port'> <model name='pcie-root-port'/> <target chassis='1' port='0x10'/> </controller> <controller type='pci' index='2' model='pcie-root-port'> <model name='pcie-root-port'/> <target chassis='2' port='0x11'/> </controller> <controller type='pci' index='3' model='pcie-root-port'> <model name='pcie-root-port'/> <target chassis='3' port='0x12'/> </controller> <controller type='pci' index='4' model='pcie-root-port'> <model name='pcie-root-port'/> <target chassis='4' port='0x13'/> </controller> <controller type='pci' index='5' model='pcie-root-port'> <model name='pcie-root-port'/> <target chassis='5' port='0x14'/> </controller> <controller type='pci' index='6' model='pcie-root-port'> <model name='pcie-root-port'/> <target chassis='6' port='0x15'/> </controller> <controller type='pci' index='7' model='pcie-root-port'> <model name='pcie-root-port'/> <target chassis='7' port='0x16'/> </controller> <controller type='virtio-serial' index='0'/> |
The VM uses a single controller for attaching USB devices, and a root controller for PCI-Express (PCIe) devices. In addition, a For more information about virtual devices, see Types of virtual devices. |
<interface type='network'> <mac address='52:54:00:65:29:21'/> <source network='default'/> <model type='rtl8139'/> </interface> |
A network interface is set up in the VM that uses the For information about configuring the network interface, see Optimizing virtual machine network performance. |
  <serial type='pty'>
   <target type='isa-serial' port='0'>
    <model name='isa-serial'/>
   </target>
  </serial>
  <console type='pty'>
   <target type='serial' port='0'/>
  </console>
  <channel type='unix'>
   <target type='virtio' name='org.qemu.guest_agent.0'/>
   <address type='virtio-serial' controller='0' bus='0' port='1'/>
  </channel>
  <channel type='spicevmc'>
   <target type='virtio' name='com.redhat.spice.0'/>
    <address type='virtio-serial' controller='0' bus='0' port='2'/>
  </channel>
|
A For more information about interacting with VMs, see Interacting with virtual machines by using the web console. |
<input type='tablet' bus='usb'> <address type='usb' bus='0' port='1'/> </input> <input type='mouse' bus='ps2'/> <input type='keyboard' bus='ps2'/> | The VM uses a virtual usb port, which is set up to receive tablet input, and a virtual ps2 port set up to receive mouse and keyboard input. This is set up automatically and changing these settings is not recommended. |
<graphics type='spice' autoport='yes' listen='127.0.0.1'> <listen type='address' address='127.0.0.1'/> <image compression='off'/> </graphics> <graphics type='vnc' port='-1' autoport='yes' listen='127.0.0.1'> <listen type='address' address='127.0.0.1'/> </graphics> |
The VM uses the |
<sound model='ich6'> <address type='pci' domain='0x0000' bus='0x00' slot='0x04' function='0x0'/> </sound> <video> <model type='qxl' ram='65536' vram='65536' vgamem='16384' heads='1' primary='yes'/> <address type='pci' domain='0x0000' bus='0x00' slot='0x02' function='0x0'/> </video> |
An |
<redirdev bus='usb' type='spicevmc'> <address type='usb' bus='0' port='1'/> </redirdev> <redirdev bus='usb' type='spicevmc'> <address type='usb' bus='0' port='2'/> </redirdev> <memballoon model='virtio'> <address type='pci' domain='0x0000' bus='0x00' slot='0x07' function='0x0'/> </memballoon> </devices> </domain> | The VM has two re-directors for attaching USB devices remotely, and memory ballooning is turned on. This is set up automatically and changing these settings is not recommended. |
Chapter 7. Saving and restoring virtual machines
To free up system resources, you can shut down a virtual machine (VM) running on that system. However, when you require the VM again, you must boot up the guest operating system (OS) and restart the applications, which may take a considerable amount of time. To reduce this downtime and enable the VM workload to start running sooner, you can use the save and restore feature to avoid the OS shutdown and boot sequence entirely.
This section provides information about saving VMs, as well as about restoring them to the same state without a full VM boot-up.
7.1. How saving and restoring virtual machines works
Saving a virtual machine (VM) saves its memory and device state to the host’s disk, and immediately stops the VM process. You can save a VM that is either in a running or paused state, and upon restoring, the VM will return to that state.
This process frees up RAM and CPU resources on the host system in exchange for disk space, which may improve the host system performance. When the VM is restored, because the guest OS does not need to be booted, the long boot-up period is avoided as well.
To save a VM, you can use the command-line interface (CLI). For instructions, see Saving virtual machines by using the command line interface.
To restore a VM you can use the CLI or the web console GUI.
7.2. Saving a virtual machine by using the command line interface
You can save a virtual machine (VM) and its current state to the host’s disk. This is useful, for example, when you need to use the host’s resources for some other purpose. The saved VM can then be quickly restored to its previous running state.
To save a VM by using the command line, follow the procedure below.
Prerequisites
- Ensure you have sufficient disk space to save the VM and its configuration. Note that the space occupied by the VM depends on the amount of RAM allocated to that VM.
- Ensure the VM is persistent.
- Optional: Back up important data from the VM if required.
Procedure
Use the
virsh managedsaveutility.For example, the following command stops the demo-guest1 VM and saves its configuration.
# virsh managedsave demo-guest1
Domain 'demo-guest1' saved by libvirt
The saved VM file is located by default in the /var/lib/libvirt/qemu/save directory as demo-guest1.save.
The next time the VM is started, it will automatically restore the saved state from the above file.
Verification
List the VMs that have managed save enabled. In the following example, the VMs listed as saved have their managed save enabled.
# virsh list --managed-save --all
Id    Name                           State
----------------------------------------------------
-     demo-guest1                    saved
-     demo-guest2                    shut off
To list the VMs that have a managed save image:
# virsh list --with-managed-save --all
Id    Name                           State
----------------------------------------------------
-     demo-guest1                    shut off
Note that to list the saved VMs that are in a shut off state, you must use the
--allor--inactiveoptions with the command.
Troubleshooting
- If the saved VM file becomes corrupted or unreadable, restoring the VM will initiate a standard VM boot instead.
Additional resources
-
The
virsh managedsave --helpcommand - Restoring a saved VM by using the command-line interface
- Restoring a saved VM by using the web console
7.3. Starting a virtual machine by using the command-line interface
You can use the command line interface (CLI) to start a shut-down virtual machine (VM) or restore a saved VM. By using the CLI, you can start both local and remote VMs.
Prerequisites
- An inactive VM that is already defined.
- The name of the VM.
For remote VMs:
- The IP address of the host where the VM is located.
- Root access privileges to the host.
Procedure
For a local VM, use the
virsh startutility.For example, the following command starts the demo-guest1 VM.
# virsh start demo-guest1
Domain 'demo-guest1' started
For a VM located on a remote host, use the
virsh startutility along with the QEMU+SSH connection to the host.For example, the following command starts the demo-guest1 VM on the 192.0.2.1 host.
# virsh -c qemu+ssh://root@192.0.2.1/system start demo-guest1

root@192.0.2.1's password:

Domain 'demo-guest1' started
Additional resources
-
The
virsh start --helpcommand - Setting up easy access to remote virtualization hosts
- Starting virtual machines automatically when the host starts
7.4. Starting virtual machines by using the web console
If a virtual machine (VM) is in the shut off state, you can start it by using the RHEL 8 web console. You can also configure the VM to be started automatically when the host starts.
Prerequisites
- The web console VM plug-in is installed on your system.
- An inactive VM that is already defined.
- The name of the VM.
Procedure
In the interface, click the VM you want to start.
A new page opens with detailed information about the selected VM and controls for shutting down and deleting the VM.
Click .
The VM starts, and you can connect to its console or graphical output.
Optional: To configure the VM to start automatically when the host starts, toggle the
Autostartcheckbox in the Overview section.If you use network interfaces that are not managed by libvirt, you must also make additional changes to the systemd configuration. Otherwise, the affected VMs might fail to start, see starting virtual machines automatically when the host starts.
Chapter 8. Cloning virtual machines
To quickly create a new virtual machine (VM) with a specific set of properties, you can clone an existing VM.
Cloning creates a new VM that uses its own disk image for storage, but most of the clone’s configuration and stored data is identical to the source VM. This makes it possible to prepare multiple VMs optimized for a certain task without the need to optimize each VM individually.
8.1. How cloning virtual machines works
Cloning a virtual machine (VM) copies the XML configuration of the source VM and its disk images, and makes adjustments to the configurations to ensure the uniqueness of the new VM. This includes changing the name of the VM and ensuring it uses the disk image clones. Nevertheless, the data stored on the clone’s virtual disks is identical to the source VM.
This process is faster than creating a new VM and installing it with a guest operating system, and can be used to rapidly generate VMs with a specific configuration and content.
If you are planning to create multiple clones of a VM, first create a VM template that does not contain:
- Unique settings, such as persistent network MAC configuration, which can prevent the clones from working correctly.
- Sensitive data, such as SSH keys and password files.
For instructions, see Creating virtual machines templates.
8.2. Creating virtual machine templates
To create multiple virtual machine (VM) clones that work correctly, you can remove information and configurations that are unique to a source VM, such as SSH keys or persistent network MAC configuration. This creates a VM template, which you can use to easily and safely create VM clones.
You can create VM templates using the virt-sysprep utility or you can create them manually based on your requirements.
8.2.1. Creating a virtual machine template by using virt-sysprep
To create a cloning template from an existing virtual machine (VM), you can use the virt-sysprep utility. This removes certain configurations that might cause the clone to work incorrectly, such as specific network settings or system registration metadata. As a result, virt-sysprep makes creating clones of the VM more efficient, and ensures that the clones work more reliably.
Prerequisites
The
libguestfs-tools-cpackage, which contains thevirt-syspreputility, is installed on your host:# yum install libguestfs-tools-c- The source VM intended as a template is shut down.
You know where the disk image for the source VM is located, and you are the owner of the VM’s disk image file.
Note that disk images for VMs created in the system connection of libvirt are located in the
/var/lib/libvirt/imagesdirectory and owned by the root user by default:# ls -la /var/lib/libvirt/images -rw-------. 1 root root 9665380352 Jul 23 14:50 a-really-important-vm.qcow2 -rw-------. 1 root root 8591507456 Jul 26 2017 an-actual-vm-that-i-use.qcow2 -rw-------. 1 root root 8591507456 Jul 26 2017 totally-not-a-fake-vm.qcow2 -rw-------. 1 root root 10739318784 Sep 20 17:57 another-vm-example.qcow2- Optional: Any important data on the source VM’s disk has been backed up. If you want to preserve the source VM intact, clone it first and turn the clone into a template.
Procedure
Ensure you are logged in as the owner of the VM’s disk image:
# whoami
root
Optional: Copy the disk image of the VM.
# cp /var/lib/libvirt/images/a-really-important-vm.qcow2 /var/lib/libvirt/images/a-really-important-vm-original.qcow2This is used later to verify that the VM was successfully turned into a template.
Use the following command, and replace /var/lib/libvirt/images/a-really-important-vm.qcow2 with the path to the disk image of the source VM.
# virt-sysprep -a /var/lib/libvirt/images/a-really-important-vm.qcow2
[   0.0] Examining the guest ...
[   7.3] Performing "abrt-data" ...
[   7.3] Performing "backup-files" ...
[   9.6] Performing "bash-history" ...
[   9.6] Performing "blkid-tab" ...
[...]
Verification
To confirm that the process was successful, compare the modified disk image to the original one. The following example shows a successful creation of a template:
# virt-diff -a /var/lib/libvirt/images/a-really-important-vm-orig.qcow2 -A /var/lib/libvirt/images/a-really-important-vm.qcow2
- - 0644       1001 /etc/group-
- - 0000        797 /etc/gshadow-
= - 0444         33 /etc/machine-id
[...]
- - 0600        409 /home/username/.bash_history
- d 0700          6 /home/username/.ssh
- - 0600        868 /root/.bash_history
[...]
Additional resources
-
The OPERATIONS section in the
virt-sysprepman page - Cloning a virtual machine by using the command-line interface
8.2.2. Creating a virtual machine template manually
To create a template from an existing virtual machine (VM), you can manually reset or unconfigure a guest VM to prepare it for cloning.
Prerequisites
Ensure that you know the location of the disk image for the source VM and are the owner of the VM’s disk image file.
Note that disk images for VMs created in the system connection of libvirt are by default located in the
/var/lib/libvirt/imagesdirectory and owned by the root user:# ls -la /var/lib/libvirt/images -rw-------. 1 root root 9665380352 Jul 23 14:50 a-really-important-vm.qcow2 -rw-------. 1 root root 8591507456 Jul 26 2017 an-actual-vm-that-i-use.qcow2 -rw-------. 1 root root 8591507456 Jul 26 2017 totally-not-a-fake-vm.qcow2 -rw-------. 1 root root 10739318784 Sep 20 17:57 another-vm-example.qcow2- Ensure that the VM is shut down.
- Optional: Any important data on the VM’s disk has been backed up. If you want to preserve the source VM intact, clone it first and edit the clone to create a template.
Procedure
Configure the VM for cloning:
- Install any software needed on the clone.
- Configure any non-unique settings for the operating system.
- Configure any non-unique application settings.
Remove the network configuration:
Remove any persistent udev rules by using the following command:
# rm -f /etc/udev/rules.d/70-persistent-net.rulesNoteIf udev rules are not removed, the name of the first NIC might be
eth1instead ofeth0.Remove unique network details from ifcfg scripts by editing
/etc/sysconfig/network-scripts/ifcfg-eth[x]as follows:Remove the HWADDR and Static lines:
NoteIf the HWADDR does not match the new guest’s MAC address, the
ifcfgwill be ignored.DEVICE=eth[x] BOOTPROTO=none ONBOOT=yes #NETWORK=192.0.2.0 <- REMOVE #NETMASK=255.255.255.0 <- REMOVE #IPADDR=192.0.2.1 <- REMOVE #HWADDR=xx:xx:xx:xx:xx <- REMOVE #USERCTL=no <- REMOVE # Remove any other *unique or non-desired settings, such as UUID.*Configure DHCP but do not include HWADDR or any other unique information:
DEVICE=eth[x] BOOTPROTO=dhcp ONBOOT=yes
Ensure the following files also contain the same content, if they exist on your system:
-
/etc/sysconfig/networking/devices/ifcfg-eth[x] /etc/sysconfig/networking/profiles/default/ifcfg-eth[x]NoteIf you had used
NetworkManageror any special settings with the VM, ensure that any additional unique information is removed from theifcfgscripts.
-
Remove registration details:
For VMs registered on the Red Hat Network (RHN):
# rm /etc/sysconfig/rhn/systemidFor VMs registered with Red Hat Subscription Manager (RHSM):
If you do not plan to use the original VM:
# subscription-manager unsubscribe --all # subscription-manager unregister # subscription-manager cleanIf you plan to use the original VM:
# subscription-manager cleanNoteThe original RHSM profile remains in the Portal along with your ID code. Use the following command to reactivate your RHSM registration on the VM after it is cloned:
# subscription-manager register --consumerid=71rd64fx-6216-4409-bf3a-e4b7c7bd8ac9
Remove other unique details:
Remove SSH public and private key pairs:
# rm -rf /etc/ssh/ssh_host_exampleRemove the configuration of LVM devices:
# rm /etc/lvm/devices/system.devices- Remove any other application-specific identifiers or configurations that might cause conflicts if running on multiple machines.
Remove the
gnome-initial-setup-donefile to configure the VM to run the configuration wizard on the next boot:# rm ~/.config/gnome-initial-setup-doneNoteThe wizard that runs on the next boot depends on the configurations that have been removed from the VM. In addition, on the first boot of the clone, it is recommended that you change the hostname.
8.3. Cloning a virtual machine by using the command-line interface
For testing, to create a new virtual machine (VM) with a specific set of properties, you can clone an existing VM by using CLI.
Prerequisites
- The source VM is shut down.
- Ensure that there is sufficient disk space to store the cloned disk images.
- Optional: When creating multiple VM clones, remove unique data and settings from the source VM to ensure the cloned VMs work properly. For instructions, see Creating virtual machine templates.
Procedure
Use the
virt-cloneutility with options that are appropriate for your environment and use case.Sample use cases
The following command clones a local VM named
example-VM-1and creates theexample-VM-1-cloneVM. It also creates and allocates theexample-VM-1-clone.qcow2disk image in the same location as the disk image of the original VM, and with the same data:# virt-clone --original example-VM-1 --auto-clone Allocating 'example-VM-1-clone.qcow2' | 50.0 GB 00:05:37 Clone 'example-VM-1-clone' created successfully.The following command clones a VM named
example-VM-2, and creates a local VM namedexample-VM-3, which uses only two out of multiple disks ofexample-VM-2:# virt-clone --original example-VM-2 --name example-VM-3 --file /var/lib/libvirt/images/disk-1-example-VM-2.qcow2 --file /var/lib/libvirt/images/disk-2-example-VM-2.qcow2 Allocating 'disk-1-example-VM-2-clone.qcow2' | 78.0 GB 00:05:37 Allocating 'disk-2-example-VM-2-clone.qcow2' | 80.0 GB 00:05:37 Clone 'example-VM-3' created successfully.To clone your VM to a different host, migrate the VM without undefining it on the local host. For example, the following commands clone the previously created
example-VM-3VM to the192.0.2.1remote system, including its local disks. Note that you require root privileges to run these commands for192.0.2.1:# virsh migrate --offline --persistent example-VM-3 qemu+ssh://root@192.0.2.1/system root@192.0.2.1's password: # scp /var/lib/libvirt/images/<disk-1-example-VM-2-clone>.qcow2 root@192.0.2.1/<user@remote_host.com>://var/lib/libvirt/images/ # scp /var/lib/libvirt/images/<disk-1-example-VM-2-clone>.qcow2 root@192.0.2.1/<user@remote_host.com>://var/lib/libvirt/images/
Verification
To verify the VM has been successfully cloned and is working correctly:
Confirm the clone has been added to the list of VMs on your host:
# virsh list --all
Id   Name                  State
---------------------------------------
-    example-VM-1          shut off
-    example-VM-1-clone    shut off
Start the clone and observe if it boots up:
# virsh start example-VM-1-clone
Domain 'example-VM-1-clone' started
Additional resources
-
virt-clone (1)man page - Migrating virtual machines
8.4. Cloning a virtual machine by using the web console
To create new virtual machines (VMs) with a specific set of properties, you can clone a VM that you had previously configured by using the web console.
Cloning a VM also clones the disks associated with that VM.
Prerequisites
- The web console VM plug-in is installed on your system.
- Ensure that the VM you want to clone is shut down.
Procedure
In the Virtual Machines interface of the web console, click the Menu button of the VM that you want to clone.
A drop down menu appears with controls for various VM operations.
Click .
The Create a clone VM dialog appears.
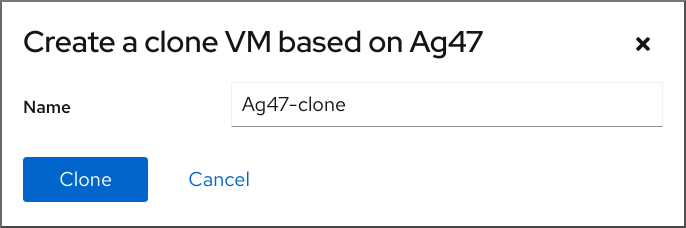
- Optional: Enter a new name for the VM clone.
Click .
A new VM is created based on the source VM.
Verification
- Confirm whether the cloned VM appears in the list of VMs available on your host.
Chapter 9. Migrating virtual machines
If the current host of a virtual machine (VM) becomes unsuitable or cannot be used anymore, or if you want to redistribute the hosting workload, you can migrate the VM to another KVM host.
9.1. How migrating virtual machines works
The essential part of virtual machine (VM) migration is copying the XML configuration of a VM to a different host machine. If the migrated VM is not shut down, the migration also transfers the state of the VM’s memory and any virtualized devices to a destination host machine. For the VM to remain functional on the destination host, the VM’s disk images must remain available to it.
By default, the migrated VM is transient on the destination host, and remains defined also on the source host.
You can migrate a running VM by using live or non-live migrations. To migrate a shut-off VM, you must use an offline migration. For details, see the following table.
Table 9.1. VM migration types
| Migration type | Description | Use case | Storage requirements |
|---|---|---|---|
| Live migration | The VM continues to run on the source host machine while KVM is transferring the VM’s memory pages to the destination host. When the migration is nearly complete, KVM very briefly suspends the VM, and resumes it on the destination host. | Useful for VMs that require constant uptime. However, VMs that modify memory pages faster than KVM can transfer them, such as VMs under heavy I/O load, cannot be live-migrated, and non-live migration must be used instead. | The VM’s disk images must be located on a shared network, accessible both to the source host and the destination host. |
| Non-live migration | Suspends the VM, copies its configuration and its memory to the destination host, and resumes the VM. | Creates downtime for the VM, but is generally more reliable than live migration. Recommended for VMs under heavy memory load. | The VM’s disk images must be located on a shared network, accessible both to the source host and the destination host. |
| Offline migration | Moves the VM’s configuration to the destination host | Recommended for shut-off VMs and in situations when shutting down the VM does not disrupt your workloads. | The VM’s disk images do not have to be available on a shared network, and can be copied or moved manually to the destination host instead. |
You can also combine live migration and non-live migration. This is recommended for example when live-migrating a VM that uses very many vCPUs or a large amount of memory, which prevents the migration from completing. In such a scenario, you can suspend the source VM. This prevents additional dirty memory pages from being generated, and thus makes it significantly more likely for the migration to complete. Based on guest workload and the number of static pages during migration, such a hybrid migration might cause significantly less downtime than a non-live migration.
9.2. Benefits of migrating virtual machines
Migrating virtual machines (VMs) can be useful for:
- Load balancing
- VMs can be moved to host machines with lower usage if their host becomes overloaded, or if another host is under-utilized.
- Hardware independence
- When you need to upgrade, add, or remove hardware devices on the host machine, you can safely relocate VMs to other hosts. This means that VMs do not experience any downtime for hardware improvements.
- Energy saving
- VMs can be redistributed to other hosts, and the unloaded host systems can thus be powered off to save energy and cut costs during low usage periods.
- Geographic migration
- VMs can be moved to another physical location for lower latency or when required for other reasons.
9.3. Limitations for migrating virtual machines
Before migrating virtual machines (VMs) in RHEL 8, ensure you are aware of the migration’s limitations.
- Live storage migration cannot be performed on RHEL 8, but you can migrate storage while the VM is powered down. Note that live storage migration is available on Red Hat Virtualization.
-
Migrating VMs from or to a session connection of
libvirtis unreliable and therefore not recommended. VMs that use certain features and configurations will not work correctly if migrated, or the migration will fail. Such features include:
- Device passthrough
- SR-IOV device assignment
- Mediated devices, such as vGPUs
- A migration between hosts that use Non-Uniform Memory Access (NUMA) pinning works only if the hosts have similar topology. However, the performance on running workloads might be negatively affected by the migration.
The emulated CPUs, both on the source VM and the destination VM, must be identical, otherwise the migration might fail. Any differences between the VMs in the following CPU related areas can cause problems with the migration:
CPU model
- Migrating between an Intel 64 host and an AMD64 host is unsupported, even though they share the x86-64 instruction set.
- For steps to ensure that a VM will work correctly after migrating to a host with a different CPU model, see Verifying host CPU compatibility for virtual machine migration.
- Firmware settings
- Microcode version
- BIOS version
- BIOS settings
- QEMU version
- Kernel version
- Live migrating a VM that uses more than 1 TB of memory might in some cases be unreliable. For instructions on how to prevent or fix this problem, see Live migration of a VM takes a long time without completing.
9.4. Verifying host CPU compatibility for virtual machine migration
For migrated virtual machines (VMs) to work correctly on the destination host, the CPUs on the source and the destination hosts must be compatible. To ensure that this is the case, calculate a common CPU baseline before you begin the migration.
The instructions in this section use an example migration scenario with the following host CPUs:
- Source host: Intel Core i7-8650U
- Destination hosts: Intel Xeon CPU E5-2620 v2
Prerequisites
- Virtualization is installed and enabled on your system.
- You have administrator access to the source host and the destination host for the migration.
Procedure
On the source host, obtain its CPU features and paste them into a new XML file, such as
domCaps-CPUs.xml.# virsh domcapabilities | xmllint --xpath "//cpu/mode[@name='host-model']" - > domCaps-CPUs.xml-
In the XML file, replace the
<mode> </mode>tags with<cpu> </cpu>. Optional: Verify that the content of the
domCaps-CPUs.xmlfile looks similar to the following:# cat domCaps-CPUs.xml <cpu> <model fallback="forbid">Skylake-Client-IBRS</model> <vendor>Intel</vendor> <feature policy="require" name="ss"/> <feature policy="require" name="vmx"/> <feature policy="require" name="pdcm"/> <feature policy="require" name="hypervisor"/> <feature policy="require" name="tsc_adjust"/> <feature policy="require" name="clflushopt"/> <feature policy="require" name="umip"/> <feature policy="require" name="md-clear"/> <feature policy="require" name="stibp"/> <feature policy="require" name="arch-capabilities"/> <feature policy="require" name="ssbd"/> <feature policy="require" name="xsaves"/> <feature policy="require" name="pdpe1gb"/> <feature policy="require" name="invtsc"/> <feature policy="require" name="ibpb"/> <feature policy="require" name="ibrs"/> <feature policy="require" name="amd-stibp"/> <feature policy="require" name="amd-ssbd"/> <feature policy="require" name="rsba"/> <feature policy="require" name="skip-l1dfl-vmentry"/> <feature policy="require" name="pschange-mc-no"/> <feature policy="disable" name="hle"/> <feature policy="disable" name="rtm"/> </cpu>On the destination host, use the following command to obtain its CPU features:
# virsh domcapabilities | xmllint --xpath "//cpu/mode[@name='host-model']" - <mode name="host-model" supported="yes"> <model fallback="forbid">IvyBridge-IBRS</model> <vendor>Intel</vendor> <feature policy="require" name="ss"/> <feature policy="require" name="vmx"/> <feature policy="require" name="pdcm"/> <feature policy="require" name="pcid"/> <feature policy="require" name="hypervisor"/> <feature policy="require" name="arat"/> <feature policy="require" name="tsc_adjust"/> <feature policy="require" name="umip"/> <feature policy="require" name="md-clear"/> <feature policy="require" name="stibp"/> <feature policy="require" name="arch-capabilities"/> <feature policy="require" name="ssbd"/> <feature policy="require" name="xsaveopt"/> <feature policy="require" name="pdpe1gb"/> <feature policy="require" name="invtsc"/> <feature policy="require" name="ibpb"/> <feature policy="require" name="amd-ssbd"/> <feature policy="require" name="skip-l1dfl-vmentry"/> <feature policy="require" name="pschange-mc-no"/> </mode>-
Add the obtained CPU features from the destination host to the
domCaps-CPUs.xmlfile on the source host. Again, replace the<mode> </mode>tags with<cpu> </cpu>and save the file. Optional: Verify that the XML file now contains the CPU features from both hosts.
# cat domCaps-CPUs.xml <cpu> <model fallback="forbid">Skylake-Client-IBRS</model> <vendor>Intel</vendor> <feature policy="require" name="ss"/> <feature policy="require" name="vmx"/> <feature policy="require" name="pdcm"/> <feature policy="require" name="hypervisor"/> <feature policy="require" name="tsc_adjust"/> <feature policy="require" name="clflushopt"/> <feature policy="require" name="umip"/> <feature policy="require" name="md-clear"/> <feature policy="require" name="stibp"/> <feature policy="require" name="arch-capabilities"/> <feature policy="require" name="ssbd"/> <feature policy="require" name="xsaves"/> <feature policy="require" name="pdpe1gb"/> <feature policy="require" name="invtsc"/> <feature policy="require" name="ibpb"/> <feature policy="require" name="ibrs"/> <feature policy="require" name="amd-stibp"/> <feature policy="require" name="amd-ssbd"/> <feature policy="require" name="rsba"/> <feature policy="require" name="skip-l1dfl-vmentry"/> <feature policy="require" name="pschange-mc-no"/> <feature policy="disable" name="hle"/> <feature policy="disable" name="rtm"/> </cpu> <cpu> <model fallback="forbid">IvyBridge-IBRS</model> <vendor>Intel</vendor> <feature policy="require" name="ss"/> <feature policy="require" name="vmx"/> <feature policy="require" name="pdcm"/> <feature policy="require" name="pcid"/> <feature policy="require" name="hypervisor"/> <feature policy="require" name="arat"/> <feature policy="require" name="tsc_adjust"/> <feature policy="require" name="umip"/> <feature policy="require" name="md-clear"/> <feature policy="require" name="stibp"/> <feature policy="require" name="arch-capabilities"/> <feature policy="require" name="ssbd"/> <feature policy="require" name="xsaveopt"/> <feature policy="require" name="pdpe1gb"/> <feature policy="require" name="invtsc"/> <feature policy="require" name="ibpb"/> <feature policy="require" name="amd-ssbd"/> <feature policy="require" name="skip-l1dfl-vmentry"/> <feature policy="require" name="pschange-mc-no"/> </cpu>Use the XML file to calculate the CPU feature baseline for the VM you intend to migrate.
# virsh hypervisor-cpu-baseline domCaps-CPUs.xml

    <cpu mode='custom' match='exact'>
      <model fallback='forbid'>IvyBridge-IBRS</model>
      <vendor>Intel</vendor>
      <feature policy='require' name='ss'/>
      <feature policy='require' name='vmx'/>
      <feature policy='require' name='pdcm'/>
      <feature policy='require' name='pcid'/>
      <feature policy='require' name='hypervisor'/>
      <feature policy='require' name='arat'/>
      <feature policy='require' name='tsc_adjust'/>
      <feature policy='require' name='umip'/>
      <feature policy='require' name='md-clear'/>
      <feature policy='require' name='stibp'/>
      <feature policy='require' name='arch-capabilities'/>
      <feature policy='require' name='ssbd'/>
      <feature policy='require' name='xsaveopt'/>
      <feature policy='require' name='pdpe1gb'/>
      <feature policy='require' name='invtsc'/>
      <feature policy='require' name='ibpb'/>
      <feature policy='require' name='amd-ssbd'/>
      <feature policy='require' name='skip-l1dfl-vmentry'/>
      <feature policy='require' name='pschange-mc-no'/>
    </cpu>
Open the XML configuration of the VM you intend to migrate, and replace the contents of the
<cpu>section with the settings obtained in the previous step.# virsh edit VM-nameIf the VM is running, restart it.
# virsh reboot VM-name
9.5. Sharing virtual machine disk images with other hosts
To perform a live migration of a virtual machine (VM) between supported KVM hosts, shared VM storage is required. The following procedure provides instructions for sharing a locally stored VM image with the source host and the destination host by using the NFS protocol.
Prerequisites
- The VM intended for migration is shut down.
- Optional: A host system is available for hosting the storage that is not the source or destination host, but both the source and the destination host can reach it through the network. This is the optimal solution for shared storage and is recommended by Red Hat.
- Make sure that NFS file locking is not used as it is not supported in KVM.
- The NFS is installed and enabled on the source and destination hosts. See
- Deploying an NFS server.
Procedure
Connect to the host that will provide shared storage. In this example, it is the
example-shared-storagehost:# ssh root@example-shared-storage root@example-shared-storage's password: Last login: Mon Sep 24 12:05:36 2019 root~#Create a directory on the source host that will hold the disk image and will be shared with the migration hosts:
# mkdir /var/lib/libvirt/shared-imagesCopy the disk image of the VM from the source host to the newly created directory. The following example copies the disk image
example-disk-1of the VM to the/var/lib/libvirt/shared-images/directory of theexample-shared-storagehost:# scp /var/lib/libvirt/images/example-disk-1.qcow2 root@example-shared-storage:/var/lib/libvirt/shared-images/example-disk-1.qcow2On the host that you want to use for sharing the storage, add the sharing directory to the
/etc/exportsfile. The following example shares the/var/lib/libvirt/shared-imagesdirectory with theexample-source-machineandexample-destination-machinehosts:# /var/lib/libvirt/shared-images example-source-machine(rw,no_root_squash) example-destination-machine(rw,no\_root_squash)On both the source and destination host, mount the shared directory in the
/var/lib/libvirt/imagesdirectory:# mount example-shared-storage:/var/lib/libvirt/shared-images /var/lib/libvirt/images
Verification
- Start the VM on the source host and observe if it boots successfully.
Additional resources
9.6. Migrating a virtual machine by using the command-line interface
If the current host of a virtual machine (VM) becomes unsuitable or cannot be used anymore, or if you want to redistribute the hosting workload, you can migrate the VM to another KVM host. The following procedure provides instructions and examples for various scenarios of such migrations.
Prerequisites
- The source host and the destination host both use the KVM hypervisor.
-
The source host and the destination host are able to reach each other over the network. Use the
pingutility to verify this. Ensure the following ports are open on the destination host.
- Port 22 is needed for connecting to the destination host by using SSH.
- Port 16509 is needed for connecting to the destination host by using TLS.
- Port 16514 is needed for connecting to the destination host by using TCP.
- Ports 49152-49215 are needed by QEMU for transfering the memory and disk migration data.
- For the migration to be supportable by Red Hat, the source host and destination host must be using specific operating systems and machine types. To ensure this is the case, see Supported hosts for virtual machine migration.
- The VM must be compatible with the CPU features of the destination host. To ensure this is the case, see Verifying host CPU compatibility for virtual machine migration.
The disk images of VMs that will be migrated are located on a separate networked location accessible to both the source host and the destination host. This is optional for offline migration, but required for migrating a running VM.
For instructions to set up such shared VM storage, see Sharing virtual machine disk images with other hosts.
When migrating a running VM, your network bandwidth must be higher than the rate in which the VM generates dirty memory pages.
To obtain the dirty page rate of your VM before you start the live migration, do the following:
Monitor the rate of dirty page generation of the VM for a short period of time.
# virsh domdirtyrate-calc example-VM 30After the monitoring finishes, obtain its results:
# virsh domstats example-VM --dirtyrate
Domain: 'example-VM'
  dirtyrate.calc_status=2
  dirtyrate.calc_start_time=200942
  dirtyrate.calc_period=30
  dirtyrate.megabytes_per_second=2
In this example, the VM is generating 2 MB of dirty memory pages per second. Attempting to live-migrate such a VM on a network with a bandwidth of 2 MB/s or less will cause the live migration not to progress if you do not pause the VM or lower its workload.
To ensure that the live migration finishes successfully, Red Hat recommends that your network bandwidth is significantly greater than the VM’s dirty page generation rate.
- When migrating an existing VM in a public bridge tap network, the source and destination hosts must be located on the same network. Otherwise, the VM network will not operate after migration.
The value of the calc_period option might differ based on the workload and dirty page rate. You can experiment with several calc_period values to determine the most suitable period that aligns with the dirty page rate in your environment.
Ensure that the
libvirtdservice is enabled and running.# systemctl enable --now libvirtd.service
Procedure
Use the
virsh migratecommand with options appropriate for your migration requirements.The following command migrates the
example-VM-1VM from your local host to the system connection of theexample-destinationhost by using an SSH tunnel. The VM keeps running during the migration.# virsh migrate --persistent --live example-VM-1 qemu+ssh://example-destination/systemThe following commands enable you to make manual adjustments to the configuration of the
example-VM-2VM running on your local host, and then migrate the VM to theexample-destinationhost. The migrated VM will automatically use the updated configuration.# virsh dumpxml --migratable example-VM-2 > example-VM-2.xml # vi example-VM-2.xml # virsh migrate --live --persistent --xml example-VM-2.xml example-VM-2 qemu+ssh://example-destination/system
This procedure can be useful for example when the destination host needs to use a different path to access the shared VM storage or when configuring a feature specific to the destination host.
The following command suspends the
example-VM-3VM from theexample-sourcehost, migrates it to theexample-destinationhost, and instructs it to use the adjusted XML configuration, provided by theexample-VM-3-alt.xmlfile. When the migration is completed,libvirtresumes the VM on the destination host.# virsh migrate example-VM-3 qemu+ssh://example-source/system qemu+ssh://example-destination/system --xml example-VM-3-alt.xmlAfter the migration, the VM is in the shut off state on the source host, and the migrated copy is deleted after it is shut down.
The following deletes the shut-down
example-VM-4VM from theexample-sourcehost, and moves its configuration to theexample-destinationhost.# virsh migrate --offline --persistent --undefinesource example-VM-4 qemu+ssh://example-source/system qemu+ssh://example-destination/systemNote that this type of migration does not require moving the VM’s disk image to shared storage. However, for the VM to be usable on the destination host, you also need to migrate the VM’s disk image. For example:
# scp root@example-source:/var/lib/libvirt/images/example-VM-4.qcow2 root@example-destination:/var/lib/libvirt/images/example-VM-4.qcow2
Wait for the migration to complete. The process may take some time depending on network bandwidth, system load, and the size of the VM. If the
--verboseoption is not used forvirsh migrate, the CLI does not display any progress indicators except errors.When the migration is in progress, you can use the
virsh domjobinfoutility to display the migration statistics.
Verification
On the destination host, list the available VMs to verify if the VM has been migrated:
# virsh list
Id      Name             State
----------------------------------
10    example-VM-1      running
If the migration is still running, this command will list the VM state as
paused.
Troubleshooting
-
In some cases, the target host will not be compatible with certain values of the migrated VM’s XML configuration, such as the network name or CPU type. As a result, the VM will fail to boot on the target host. To fix these problems, you can update the problematic values by using the
virsh editcommand. After updating the values, you must restart the VM for the changes to be applied. If a live migration is taking a long time to complete, this may be because the VM is under heavy load and too many memory pages are changing for live migration to be possible. To fix this problem, change the migration to a non-live one by suspending the VM.
# virsh suspend example-VM-1
Additional resources
-
virsh migrate --helpcommand -
virsh (1)man page
9.7. Live migrating a virtual machine by using the web console
If you wish to migrate a virtual machine (VM) that is performing tasks which require it to be constantly running, you can migrate that VM to another KVM host without shutting it down. This is also known as live migration. The following instructions explain how to do so by using the web console.
For tasks that modify memory pages faster than KVM can transfer them, such as heavy I/O load tasks, it is recommended that you do not live migrate the VM.
Prerequisites
- The web console VM plug-in is installed on your system.
- The source and destination hosts are running.
Ensure the following ports are open on the destination host.
- Port 22 is needed for connecting to the destination host by using SSH.
- Port 16509 is needed for connecting to the destination host by using TLS.
- Port 16514 is needed for connecting to the destination host by using TCP.
- Ports 49152-49215 are needed by QEMU for transfering the memory and disk migration data.
- The VM must be compatible with the CPU features of the destination host. To ensure this is the case, see Verifying host CPU compatibility for virtual machine migration.
- The VM’s disk images are located on a shared storage that is accessible to the source host as well as the destination host.
When migrating a running VM, your network bandwidth must be higher than the rate in which the VM generates dirty memory pages.
To obtain the dirty page rate of your VM before you start the live migration, do the following in your command-line interface:
Monitor the rate of dirty page generation of the VM for a short period of time.
# virsh domdirtyrate-calc vm-name 30After the monitoring finishes, obtain its results:
# virsh domstats vm-name --dirtyrate
Domain: 'vm-name'
  dirtyrate.calc_status=2
  dirtyrate.calc_start_time=200942
  dirtyrate.calc_period=30
  dirtyrate.megabytes_per_second=2
In this example, the VM is generating 2 MB of dirty memory pages per second. Attempting to live-migrate such a VM on a network with a bandwidth of 2 MB/s or less will cause the live migration not to progress if you do not pause the VM or lower its workload.
To ensure that the live migration finishes successfully, Red Hat recommends that your network bandwidth is significantly greater than the VM’s dirty page generation rate.
The value of the calc_period option might differ based on the workload and dirty page rate. You can experiment with several calc_period values to determine the most suitable period that aligns with the dirty page rate in your environment.
Procedure
In the Virtual Machines interface of the web console, click the Menu button of the VM that you want to migrate.
A drop down menu appears with controls for various VM operations.
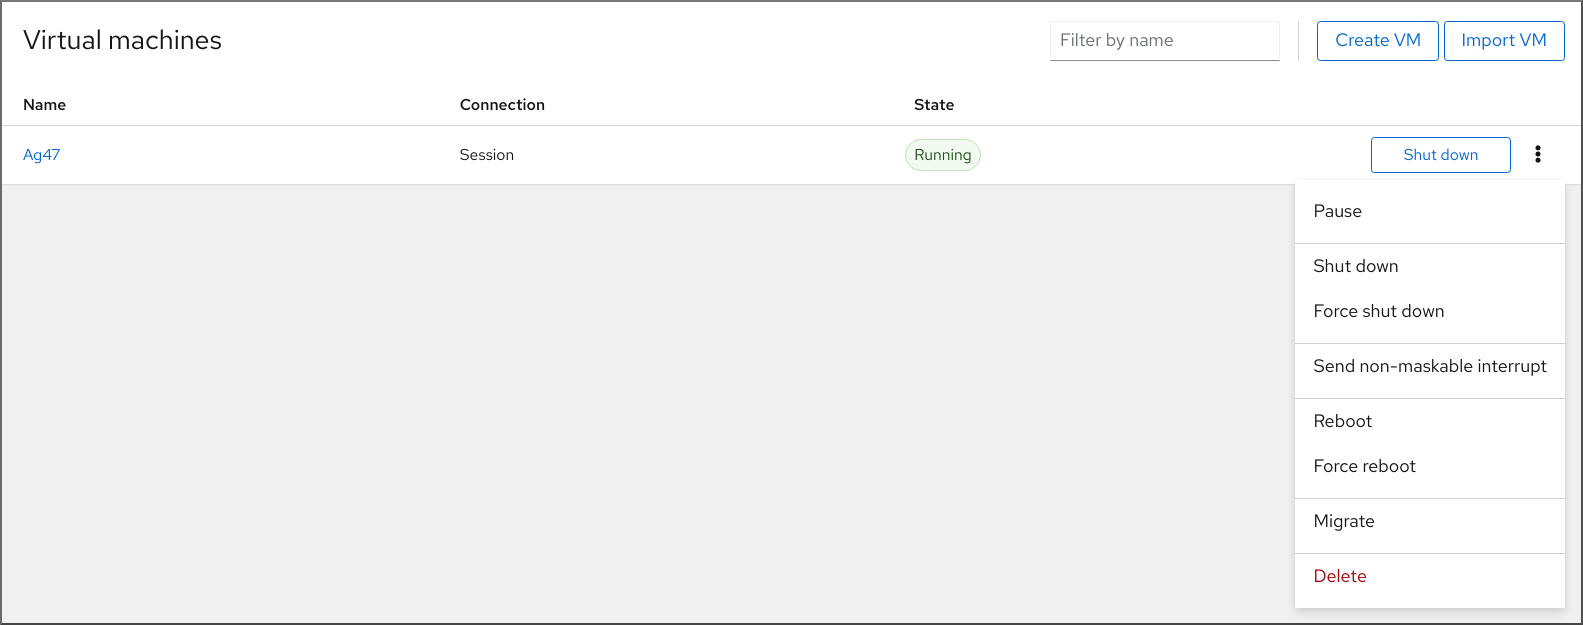
Click
The Migrate VM to another host dialog appears.
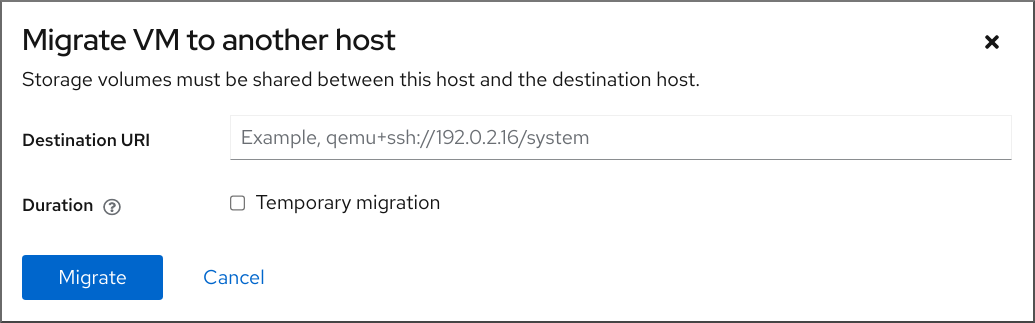
- Enter the URI of the destination host.
Configure the duration of the migration:
- Permanent - Do not check the box if you wish to migrate the VM permanently. Permanent migration completely removes the VM configuration from the source host.
- Temporary - Temporary migration migrates a copy of the VM to the destination host. This copy is deleted from the destination host when the VM is shut down. The original VM remains on the source host.
Click
Your VM is migrated to the destination host.
Verification
To verify whether the VM has been successfully migrated and is working correctly:
- Confirm whether the VM appears in the list of VMs available on the destination host.
- Start the migrated VM and observe if it boots up.
9.8. Troubleshooting virtual machine migrations
If you are facing one of the following problems when migrating virtual machines (VMs), see the provided instructions to fix or avoid the issue.
9.8.1. Live migration of a VM takes a long time without completing
Cause
In some cases, migrating a running VM might cause the the VM to generate dirty memory pages faster than they can be migrated. When this occurs, the migration cannot complete successfully.
The following scenarios frequently cause this problem:
- Live migrating a VM under a heavy load
Live migrating a VM that uses a large amount of memory, such as 1 TB or more
ImportantRed Hat has successfully tested live migration of VMs with up to 6 TB of memory. However, for live migration scenarios that involve VMs with more than 1 TB of memory, customers should reach out to Red Hat technical support.
Diagnosis
If your VM live migration is taking longer than expected, use the virsh domjobinfo command to obtain the memory page data for the VM:
# virsh domjobinfo vm-name

Job type:         Unbounded
Operation:        Outgoing migration
Time elapsed:     168286974    ms
Data processed:   26.106 TiB
Data remaining:   34.383 MiB
Data total:       10.586 TiB
Memory processed: 26.106 TiB
Memory remaining: 34.383 MiB
Memory total:     10.586 TiB
Memory bandwidth: 29.056 MiB/s
Dirty rate: 17225 pages/s
Page size: 4096 bytes
In this output, the multiplication of Dirty rate and Page size is greater than Memory bandwidth. This means that the VM is generating dirty memory pages faster than the network can migrate them. As a consequence, the state of the VM on the destination host cannot converge with the state of the VM on the source host, which prevents the migration from completing.
Fix
To improve the chances that a stalled live migration finishes successfully, you can do any of the following:
Reduce the workload of the VM, especially memory updates.
- To do this, stop or cancel non-essential processes in the guest operating system of the source VM.
Increase the downtime allowed for the live migration:
Display the current maximum downtime at the end of a live migration for the VM that is being migrated:
# virsh migrate-getmaxdowntime vm-nameSet a higher maximum downtime:
# virsh migrate-setmaxdowntime vm-name downtime-in-milisecondsThe higher you set the maximum downtime, the more likely it will be for the migration to complete.
Switch the live migration to post-copy mode.
# virsh migrate-start-postcopy vm-nameThis ensures that the memory pages of the VM can converge on the destination host, and that the migration can complete.
However, when post-copy mode is active, the VM might slow down significantly, due to remote page requests from the destination host to the source host. In addition, if the network connection between the source host and the destination host stops working during post-copy migration, some of the VM processes may halt due to missing memory pages.
Therefore, do not use post-copy migration if the VM availability is critical or if the migration network is unstable.
- If your workload allows it, suspend the VM and let the migration finish as a non-live migration. This increases the downtime of the VM, but in most cases ensures that the migration completes successfully.
Prevention
The probability of successfully completing a live migration of a VM depends on the following:
The workload of the VM during the migration
- Before starting the migration, stop or cancel non-essential processes in the guest operating system of the VM.
The network bandwidth that the host can use for migration
- For optimal results of a live migration, the bandwidth of the network used for the migration must be significantly higher than the dirty page generation of the VM. For instructions on obtaining the VM dirty page generation rate, see the Prerequisites in Migrating a virtual machine by using the command-line interface.
- Both the source host and the destination host must have a dedicated network interface controller (NIC) for the migration. For live migrating a VM with more than 1 TB of memory, Red Hat recommends a NIC with the speed of 25 Gb/s or more.
-
You can also specify the network bandwidth assigned to the live migration by using the
--bandwidthoption when initiating the migration. For migrating very large VMs, assign as much bandwidth as viable for your deployment.
The mode of live migration
- The default pre-copy migration mode copies memory pages repeatedly if they become dirty.
Post-copy migration copies memory pages only once.
To enable your live migration to switch to post-copy mode if the migration stalls, use the
--postcopyoption withvirsh migratewhen starting the migration.
The downtime specified for the deployment
-
You can adjust this during the migration by using
virsh migrate-setmaxdowntimeas described previously.
-
You can adjust this during the migration by using
9.9. Supported hosts for virtual machine migration
For the virtual machine (VM) migration to work properly and be supported by Red Hat, the source and destination hosts must be specific RHEL versions and machine types. The following table shows supported VM migration paths.
Table 9.2. Live migration compatibility
| Migration method | Release type | Example | Support status |
|---|---|---|---|
| Forward | Major release | 7.6+ → 8.1 | On supported RHEL 7 systems: machine types i440fx and q35 |
| Backward | Major release | 8.1 → 7.6+ | On supported RHEL 8 systems: machine types i440fx and q35 |
| Forward | Minor release | 8.0.1+ → 8.1+ | On supported RHEL 7 systems: machine types i440fx and q35 on RHEL 7.6.0 and later. On supported RHEL 8 systems: machine type q35. |
| Backward | Minor release | 8.1 → 8.0.1 | On supported RHEL 7 systems. Fully supported for machine types i440fx and q35. On supported RHEL 8 systems: machine type q35. |
Additional resources
9.10. Additional resources
Chapter 10. Managing virtual devices
One of the most effective ways to manage the functionality, features, and performance of a virtual machine (VM) is to adjust its virtual devices.
The following sections provide a general overview of what virtual devices are, and instructions on how to manage them using the CLI or the web console.
10.1. How virtual devices work
Just like physical machines, virtual machines (VMs) require specialized devices to provide functions to the system, such as processing power, memory, storage, networking, or graphics. Physical systems usually use hardware devices for these purposes. However, because VMs work as software implements, they need to use software abstractions of such devices instead, referred to as virtual devices.
The basics
Virtual devices attached to a VM can be configured when creating the VM, and can also be managed on an existing VM. Generally, virtual devices can be attached or detached from a VM only when the VM is shut off, but some can be added or removed when the VM is running. This feature is referred to as device hot plug and hot unplug.
When creating a new VM, libvirt automatically creates and configures a default set of essential virtual devices, unless specified otherwise by the user. These are based on the host system architecture and machine type, and usually include:
- the CPU
- memory
- a keyboard
- a network interface controller (NIC)
- various device controllers
- a video card
- a sound card
To manage virtual devices after the VM is created, use the command-line interface (CLI). However, to manage virtual storage devices and NICs, you can also use the RHEL 8 web console.
Performance or flexibility
For some types of devices, RHEL 8 supports multiple implementations, often with a trade-off between performance and flexibility.
For example, the physical storage used for virtual disks can be represented by files in various formats, such as qcow2 or raw, and presented to the VM by using a variety of controllers:
- an emulated controller
-
virtio-scsi -
virtio-blk
An emulated controller is slower than a virtio controller, because virtio devices are designed specifically for virtualization purposes. On the other hand, emulated controllers make it possible to run operating systems that have no drivers for virtio devices. Similarly, virtio-scsi offers a more complete support for SCSI commands, and makes it possible to attach a larger number of disks to the VM. Finally, virtio-blk provides better performance than both virtio-scsi and emulated controllers, but a more limited range of use-cases. For example, attaching a physical disk as a LUN device to a VM is not possible when using virtio-blk.
For more information about types of virtual devices, see Types of virtual devices.
10.2. Types of virtual devices
Virtualization in RHEL 8 can present several distinct types of virtual devices that you can attach to virtual machines (VMs):
- Emulated devices
Emulated devices are software implementations of widely used physical devices. Drivers designed for physical devices are also compatible with emulated devices. Therefore, emulated devices can be used very flexibly.
However, since they need to faithfully emulate a particular type of hardware, emulated devices may suffer a significant performance loss compared with the corresponding physical devices or more optimized virtual devices.
The following types of emulated devices are supported:
- Virtual CPUs (vCPUs), with a large choice of CPU models available. The performance impact of emulation depends significantly on the differences between the host CPU and the emulated vCPU.
- Emulated system components, such as PCI bus controllers.
- Emulated storage controllers, such as SATA, SCSI or even IDE.
- Emulated sound devices, such as ICH9, ICH6 or AC97.
- Emulated graphics cards, such as VGA or QXL cards.
- Emulated network devices, such as rtl8139.
- Paravirtualized devices
Paravirtualization provides a fast and efficient method for exposing virtual devices to VMs. Paravirtualized devices expose interfaces that are designed specifically for use in VMs, and thus significantly increase device performance. RHEL 8 provides paravirtualized devices to VMs by using the virtio API as a layer between the hypervisor and the VM. The drawback of this approach is that it requires a specific device driver in the guest operating system.
It is recommended to use paravirtualized devices instead of emulated devices for VM whenever possible, notably if they are running I/O intensive applications. Paravirtualized devices decrease I/O latency and increase I/O throughput, in some cases bringing them very close to bare-metal performance. Other paravirtualized devices also add functionality to VMs that is not otherwise available.
The following types of paravirtualized devices are supported:
-
The paravirtualized network device (
virtio-net). Paravirtualized storage controllers:
-
virtio-blk- provides block device emulation. -
virtio-scsi- provides more complete SCSI emulation.
-
- The paravirtualized clock.
-
The paravirtualized serial device (
virtio-serial). -
The balloon device (
virtio-balloon), used to dynamically distribute memory between a VM and its host. -
The paravirtualized random number generator (
virtio-rng). -
The paravirtualized graphics card (
QXL).
-
The paravirtualized network device (
- Physically shared devices
Certain hardware platforms enable VMs to directly access various hardware devices and components. This process is known as device assignment or passthrough.
When attached in this way, some aspects of the physical device are directly available to the VM as they would be to a physical machine. This provides superior performance for the device when used in the VM. However, devices physically attached to a VM become unavailable to the host, and also cannot be migrated.
Nevertheless, some devices can be shared across multiple VMs. For example, a single physical device can in certain cases provide multiple mediated devices, which can then be assigned to distinct VMs.
The following types of passthrough devices are supported:
- USB, PCI, and SCSI passthrough - expose common industry standard buses directly to VMs in order to make their specific features available to guest software.
- Single-root I/O virtualization (SR-IOV) - a specification that enables hardware-enforced isolation of PCI Express resources. This makes it safe and efficient to partition a single physical PCI resource into virtual PCI functions. It is commonly used for network interface cards (NICs).
- N_Port ID virtualization (NPIV) - a Fibre Channel technology to share a single physical host bus adapter (HBA) with multiple virtual ports.
- GPUs and vGPUs - accelerators for specific kinds of graphic or compute workloads. Some GPUs can be attached directly to a VM, while certain types also offer the ability to create virtual GPUs (vGPUs) that share the underlying physical hardware.
Some devices of these types might be unsupported or not compatible with RHEL. If you require assistance with setting up virtual devices, consult Red Hat support.
10.3. Managing devices attached to virtual machines by using the CLI
To modify the functionality of your virtual machine (VM), you can manage the devices attached to your VM by using the command-line interface (CLI).
You can use the CLI to:
10.3.1. Attaching devices to virtual machines
You can add a specific functionality to your virtual machines (VMs) by attaching a new virtual device.
The following procedure creates and attaches virtual devices to your virtual machines (VMs) by using the command-line interface (CLI). Some devices can also be attached to VMs using the RHEL web console.
For example, you can increase the storage capacity of a VM by attaching a new virtual disk device to it. This is also referred to as memory hot plug.
Removing a memory device from a VM, also known as memory hot unplug, is not supported in RHEL 8, and Red Hat highly discourages its use.
Prerequisites
Obtain the required options for the device you intend to attach to a VM. To see the available options for a specific device, use the
virt-xml --device=?command. For example:# virt-xml --network=? --network options: [...] address.unit boot_order clearxml driver_name [...]
Procedure
To attach a device to a VM, use the
virt-xml --add-devicecommand, including the definition of the device and the required options:For example, the following command creates a 20GB newdisk qcow2 disk image in the
/var/lib/libvirt/images/directory, and attaches it as a virtual disk to the running testguest VM on the next start-up of the VM:# virt-xml testguest --add-device --disk /var/lib/libvirt/images/newdisk.qcow2,format=qcow2,size=20 Domain 'testguest' defined successfully. Changes will take effect after the domain is fully powered off.The following attaches a USB flash drive, attached as device 004 on bus 002 on the host, to the testguest2 VM while the VM is running:
# virt-xml testguest2 --add-device --update --hostdev 002.004 Device hotplug successful. Domain 'testguest2' defined successfully.The bus-device combination for defining the USB can be obtained by using the
lsusbcommand.
Verification
To verify the device has been added, do any of the following:
Use the
virsh dumpxmlcommand and see if the device’s XML definition has been added to the<devices>section in the VM’s XML configuration.For example, the following output shows the configuration of the testguest VM and confirms that the 002.004 USB flash disk device has been added.
# virsh dumpxml testguest [...] <hostdev mode='subsystem' type='usb' managed='yes'> <source> <vendor id='0x4146'/> <product id='0x902e'/> <address bus='2' device='4'/> </source> <alias name='hostdev0'/> <address type='usb' bus='0' port='3'/> </hostdev> [...]- Run the VM and test if the device is present and works properly.
Additional resources
-
The
man virt-xmlcommand
10.3.2. Modifying devices attached to virtual machines
You can change the functionality of your virtual machines (VMs) by editing a configuration of the attached virtual devices. For example, if you want to optimize the performance of your VMs, you can change their virtual CPU models to better match the CPUs of the hosts.
The following procedure provides general instructions for modifying virtual devices by using the command-line interface (CLI). Some devices attached to your VM, such as disks and NICs, can also be modified using the RHEL 8 web console.
Prerequisites
-
Obtain the required options for the device you intend to attach to a VM. To see the available options for a specific device, use the
virt-xml --device=?command. For example:
# virt-xml --network=?
--network options:
[...]
address.unit
boot_order
clearxml
driver_name
[...]-
Optional: Back up the XML configuration of your VM by using
virsh dumpxml vm-nameand sending the output to a file. For example, the following backs up the configuration of your testguest1 VM as thetestguest1.xmlfile:
# virsh dumpxml testguest1 > testguest1.xml
# cat testguest1.xml
<domain type='kvm' xmlns:qemu='http://libvirt.org/schemas/domain/qemu/1.0'>
  <name>testguest1</name>
  <uuid>ede29304-fe0c-4ca4-abcd-d246481acd18</uuid>
  [...]
</domain>
Procedure
Use the
virt-xml --editcommand, including the definition of the device and the required options:For example, the following clears the <cpu> configuration of the shut-off testguest VM and sets it to host-model:
# virt-xml testguest --edit --cpu host-model,clearxml=yes
Domain 'testguest' defined successfully.
Verification
To verify the device has been modified, do any of the following:
- Run the VM and test if the device is present and reflects the modifications.
Use the
virsh dumpxmlcommand and see if the device’s XML definition has been modified in the VM’s XML configuration.For example, the following output shows the configuration of the testguest VM and confirms that the CPU mode has been configured as host-model.
# virsh dumpxml testguest
[...]
<cpu mode='host-model' check='partial'>
  <model fallback='allow'/>
</cpu>
[...]
Troubleshooting
If modifying a device causes your VM to become unbootable, use the
virsh defineutility to restore the XML configuration by reloading the XML configuration file you backed up previously.# virsh define testguest.xml
For small changes to the XML configuration of your VM, you can use the virsh edit command - for example virsh edit testguest. However, do not use this method for more extensive changes, as it is more likely to break the configuration in ways that could prevent the VM from booting.
Additional resources
-
The
man virt-xmlcommand
10.3.3. Removing devices from virtual machines
You can change the functionality of your virtual machines (VMs) by removing a virtual device. For example, you can remove a virtual disk device from one of your VMs if it is no longer needed.
The following procedure demonstrates how to remove virtual devices from your virtual machines (VMs) by using the command-line interface (CLI). Some devices, such as disks or NICs, can also be removed from VMs using the RHEL 8 web console.
Prerequisites
-
Optional: Back up the XML configuration of your VM by using
virsh dumpxml vm-nameand sending the output to a file. For example, the following backs up the configuration of your testguest1 VM as thetestguest1.xmlfile:
# virsh dumpxml testguest1 > testguest1.xml
# cat testguest1.xml
<domain type='kvm' xmlns:qemu='http://libvirt.org/schemas/domain/qemu/1.0'>
  <name>testguest1</name>
  <uuid>ede29304-fe0c-4ca4-abcd-d246481acd18</uuid>
  [...]
</domain>
Procedure
Use the
virt-xml --remove-devicecommand, including a definition of the device. For example:The following removes the storage device marked as vdb from the running testguest VM after it shuts down:
# virt-xml testguest --remove-device --disk target=vdb
Domain 'testguest' defined successfully.
Changes will take effect after the domain is fully powered off.
The following immediately removes a USB flash drive device from the running testguest2 VM:
# virt-xml testguest2 --remove-device --update --hostdev type=usb
Device hotunplug successful.
Domain 'testguest2' defined successfully.
Troubleshooting
If removing a device causes your VM to become unbootable, use the
virsh defineutility to restore the XML configuration by reloading the XML configuration file you backed up previously.# virsh define testguest.xml
Additional resources
-
The
man virt-xmlcommand
10.4. Managing host devices by using the web console
To modify the functionality of your virtual machine (VM), you can manage the host devices attached to your VM by using the RHEL 8 web console.
Host devices are physical devices that are attached to the host system. Based on your requirements, you can enable your VMs to directly access these hardware devices and components.
You can use the web console to:
10.4.1. Viewing devices attached to virtual machines by using the web console
Before adding or modifying the devices attached to your virtual machine (VM), you may want to view the devices that are already attached to your VM. The following procedure provides instructions for viewing such devices by using the web console.
Prerequisites
- The web console VM plug-in is installed on your system.
Procedure
In the interface, click the VM whose information you want to see.
A new page opens with detailed information about the VM.
Scroll to the Host devices section.

Additional resources
10.4.2. Attaching devices to virtual machines by using the web console
To add specific functionalities to your virtual machine (VM), you can use the web console to attach host devices to the VM.
Attaching multiple host devices at the same time does not work. You can attach only one device at a time.
For more information, see RHEL 8 Known Issues.
Prerequisites
If you are attaching PCI devices, ensure that the status of the
managedattribute of thehostdevelement is set toyes.NoteWhen attaching PCI devices to your VM, do not omit the
managedattribute of thehostdevelement, or set it tono. If you do so, PCI devices cannot automatically detach from the host when you pass them to the VM. They also cannot automatically reattach to the host when you turn off the VM.As a consequence, the host may become unresponsive or shut down unexpectedly.
You can find the status of the
managedattribute in your VM’s XML configuration. The following example opens the XML configuration of theexample-VM-1VM.# virsh edit example-VM-1- Back up important data from the VM.
Optional: Back up the XML configuration of your VM. For example, to back up the
example-VM-1VM:# virsh dumpxml example-VM-1 > example-VM-1.xml- The web console VM plug-in is installed on your system.
Procedure
In the interface, click the VM to which you want to attach a host device.
A new page opens with an Overview section with basic information about the selected VM and a Console section to access the VM’s graphical interface.
Scroll to .
The Host devices section displays information about the devices attached to the VM as well as options to Add or Remove devices.
Click .
The Add host device dialog appears.

- Select the device you wish to attach to the VM.
Click
The selected device is attached to the VM.
Verification
- Run the VM and check if the device appears in the Host devices section.
10.4.3. Removing devices from virtual machines by using the web console
To free up resources, modify the functionalities of your VM, or both, you can use the web console to modify the VM and remove host devices that are no longer required.
Removing attached USB host devices by using the web console may fail because of incorrect correlation between the device and bus numbers of the USB device.
For more information, see RHEL 8 Known Issues.
As a workaround, remove the <hostdev> part of the USB device, from the XML configuration of VM by using the virsh utility. The following example opens the XML configuration of the example-VM-1 VM:
# virsh edit <example-VM-1>Prerequisites
- The web console VM plug-in is installed on your system.
Optional: Back up the XML configuration of your VM by using
virsh dumpxml example-VM-1and sending the output to a file. For example, the following backs up the configuration of your testguest1 VM as thetestguest1.xmlfile:# virsh dumpxml testguest1 > testguest1.xml # cat testguest1.xml <domain type='kvm' xmlns:qemu='http://libvirt.org/schemas/domain/qemu/1.0'> <name>testguest1</name> <uuid>ede29304-fe0c-4ca4-abcd-d246481acd18</uuid> [...] </domain>
Procedure
In the interface, click the VM from which you want to remove a host device.
A new page opens with an Overview section with basic information about the selected VM and a Console section to access the VM’s graphical interface.
Scroll to .
The Host devices section displays information about the devices attached to the VM as well as options to Add or Remove devices.
Click the button next to the device you want to remove from the VM.
A remove device confirmation dialog appears.
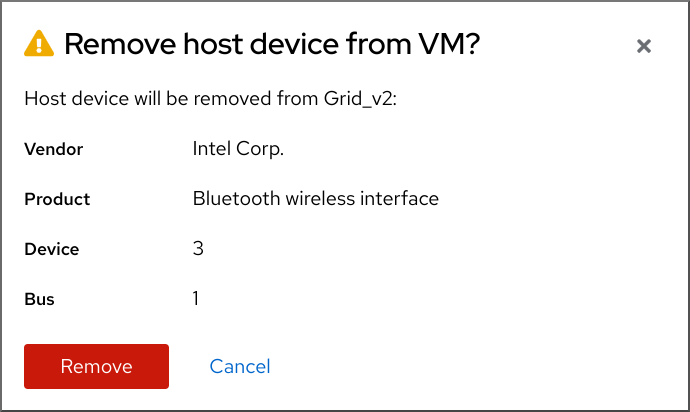
Click .
The device is removed from the VM.
Troubleshooting
If removing a host device causes your VM to become unbootable, use the
virsh defineutility to restore the XML configuration by reloading the XML configuration file you backed up previously.# virsh define testguest1.xml
10.5. Managing virtual USB devices
When using a virtual machine (VM), you can access and control a USB device, such as a flash drive or a web camera, that is attached to the host system. In this scenario, the host system passes control of the device to the VM. This is also known as a USB-passthrough.
The following sections provide information about using the command line to:
- Attach a USB device to a VM
- Remove a USB device from a VM
10.5.1. Attaching USB devices to virtual machines
To attach a USB device to a virtual machine (VM), you can include the USB device information in the XML configuration file of the VM.
Prerequisites
- Ensure the device you want to pass through to the VM is attached to the host.
Procedure
Locate the bus and device values of the USB that you want to attach to the VM.
For example, the following command displays a list of USB devices attached to the host. The device we will use in this example is attached on bus 001 as device 005.
# lsusb
[...]
Bus 001 Device 003: ID 2567:0a2b Intel Corp.
Bus 001 Device 005: ID 0407:6252 Kingston River 2.0
[...]
Use the
virt-xmlutility along with the--add-deviceargument.For example, the following command attaches a USB flash drive to the
example-VM-1VM.# virt-xml example-VM-1 --add-device --hostdev 001.005 Domain 'example-VM-1' defined successfully.
To attach a USB device to a running VM, add the --update argument to the previous command.
Verification
- Run the VM and test if the device is present and works as expected.
Use the
virsh dumpxmlcommand to see if the device’s XML definition has been added to the <devices> section in the VM’s XML configuration file.# virsh dumpxml example-VM-1 [...] <hostdev mode='subsystem' type='usb' managed='yes'> <source> <vendor id='0x0407'/> <product id='0x6252'/> <address bus='1' device='5'/> </source> <alias name='hostdev0'/> <address type='usb' bus='0' port='3'/> </hostdev> [...]
Additional resources
-
The
virt-xml (1)man page - Attaching devices to virtual machines
10.5.2. Removing USB devices from virtual machines
To remove a USB device from a virtual machine (VM), you can remove the USB device information from the XML configuration of the VM.
Procedure
Locate the bus and device values of the USB that you want to remove from the VM.
For example, the following command displays a list of USB devices attached to the host. The device we will use in this example is attached on bus 001 as device 005.
# lsusb
[...]
Bus 001 Device 003: ID 2567:0a2b Intel Corp.
Bus 001 Device 005: ID 0407:6252 Kingston River 2.0
[...]
Use the
virt-xmlutility along with the--remove-deviceargument.For example, the following command removes a USB flash drive, attached to the host as device 005 on bus 001, from the
example-VM-1VM.# virt-xml example-VM-1 --remove-device --hostdev 001.005 Domain 'example-VM-1' defined successfully.
To remove a USB device from a running VM, add the --update argument to the previous command.
Verification
- Run the VM and check if the device has been removed from the list of devices.
Additional resources
-
The
virt-xml (1)man page - Attaching devices to virtual machines
10.5.3. Attaching smart card readers to virtual machines
If you have a smart card reader attached to a host, you can also make it available to virtual machines (VMs) on that host. Libvirt provides a specialized virtual device that presents a smart card interface to the guest VM. It is recommended you only use the spicevmc device type, which utilizes the SPICE remote display protocol to tunnel authentication requests to the host.
Although it is possible to use standard device passthrough with smart card readers, this method does not make the device available on both the host and guest system. As a consequence, you could lock the host system when you attach the smart card reader to the VM.
The SPICE remote display protocol has become deprecated in RHEL 8. Since the only recommended way to attach smart card readers to VMs depends on the SPICE protocol, the usage of smart cards in guest VMs is also deprecated in RHEL 8.
In a future major version of RHEL, the functionality of attaching smart card readers to VMs will only be supported by third party remote visualization solutions.
Prerequisites
- Ensure the smart card reader you want to pass through to the VM is attached to the host.
- Ensure the smart card reader type is supported in RHEL 8.
Procedure
Create and attach a virtual smart card reader device to a VM. For example, to attach a smart card reader to the
testguestVM:# virt-xml testguest --add-device --smartcard mode=passthrough,type=spicevmc Domain 'testguest' defined successfully. Changes will take effect after the domain is fully powered off.NoteTo attach a virtual smart card reader device to a running VM, add the
--updateargument to the previous command.
Verification
View the XML configuration of the VM.
# virsh dumpxml testguestEnsure the XML configuration contains the following smart card device definition.
<smartcard mode='passthrough' type='spicevmc'/>
10.6. Managing virtual optical drives
When using a virtual machine (VM), you can access information stored in an ISO image on the host. To do so, attach the ISO image to the VM as a virtual optical drive, such as a CD drive or a DVD drive.
The following sections provide information about using the command line to:
- Attach a drive and an ISO image to a VM
- Attach a CD-ROM to a running VM
- Replace an ISO image in a virtual optical drive
- Remove an ISO image from a virtual optical drive
- Remove a drive from the VM
- Remove a CD-ROM from a running VM
10.6.1. Attaching optical drives to virtual machines
To attach an ISO image as a virtual optical drive, edit the XML configuration file of the virtual machine (VM) and add the new drive.
Prerequisites
- You must store and copy path of the ISO image on the host machine.
Procedure
Use the
virt-xmlutility with the--add-deviceargument:For example, the following command attaches the
example-ISO-nameISO image, stored in the/home/username/Downloadsdirectory, to theexample-VM-nameVM.# virt-xml example-VM-name --add-device --disk /home/username/Downloads/example-ISO-name.iso,device=cdrom Domain 'example-VM-name' defined successfully.
Verification
- Run the VM and test if the device is present and works as expected.
Additional resources
-
The
man virt-xmlcommand - Attaching devices to virtual machines
10.6.2. Adding a CD-ROM to a running virtual machine by using the web console
You can use the web console to insert a CD-ROM to a running virtual machine (VM) without specifying the media.
Prerequisites
Procedure
- Shut down the VM.
Attach a virtual CD-ROM device without specifying a source image.
# virt-xml vmname --add-device --disk target.dev=sda,device=cdrom- Run the VM.
- Open the web console and in the interface, click the VM to which you want to attach a CD-ROM.
Scroll to .
The Disks section displays information about the disks assigned to the VM as well as options to Add, Remove, or Edit disks.
Click the option for the cdrom device.

Choose a Source for the file you want to attach:
- Custom Path: The file is located in a custom directory on the host machine.
- Use existing: The file is located in the storage pools that you have created.
- Click .
Verification
- In the interface, the file will appear under the Disks section.
10.6.3. Replacing ISO images in virtual optical drives
To replace an ISO image attached as a virtual optical drive to a virtual machine (VM), edit the XML configuration file of the VM and specify the replacement.
Prerequisites
- You must store the ISO image on the host machine.
- You must know the path to the ISO image.
Procedure
Locate the target device where the CD-ROM is attached to the VM. You can find this information in the VM’s XML configuration file.
For example, the following command displays the
example-VM-nameVM’s XML configuration file, where the target device for CD-ROM issda.# virsh dumpxml example-VM-name ... <disk> ... <source file='$(/home/username/Downloads/example-ISO-name.iso)'/> <target dev='sda' bus='sata'/> ... </disk> ...
Use the
virt-xmlutility with the--editargument.For example, the following command replaces the
example-ISO-nameISO image, attached to theexample-VM-nameVM at targetsda, with theexample-ISO-name-2ISO image stored in the/dev/cdromdirectory.# virt-xml example-VM-name --edit target=sda --disk /dev/cdrom/example-ISO-name-2.iso Domain 'example-VM-name' defined successfully.
Verification
- Run the VM and test if the device is replaced and works as expected.
Additional resources
-
The
man virt-xmlcommand
10.6.4. Removing ISO images from virtual optical drives
To remove an ISO image from a virtual optical drive attached to a virtual machine (VM), edit the XML configuration file of the VM.
Procedure
Locate the target device where the CD-ROM is attached to the VM. You can find this information in the VM’s XML configuration file.
For example, the following command displays the
example-VM-nameVM’s XML configuration file, where the target device for CD-ROM issda.# virsh dumpxml example-VM-name ... <disk> ... <source file='$(/home/username/Downloads/example-ISO-name.iso)'/> <target dev='sda' bus='sata'/> ... </disk> ...
Use the
virt-xmlutility with the--editargument.For example, the following command removes the
example-ISO-nameISO image from the CD drive attached to theexample-VM-nameVM.# virt-xml example-VM-name --edit target=sda --disk path= Domain 'example-VM-name' defined successfully.
Verification
- Run the VM and check that image is no longer available.
Additional resources
-
The
man virt-xmlcommand
10.6.5. Removing optical drives from virtual machines
To remove an optical drive attached to a virtual machine (VM), edit the XML configuration file of the VM.
Procedure
Locate the target device where the CD-ROM is attached to the VM. You can find this information in the VM’s XML configuration file.
For example, the following command displays the
example-VM-nameVM’s XML configuration file, where the target device for CD-ROM issda.# virsh dumpxml example-VM-name ... <disk type='file' device='cdrom'> <driver name='qemu' type='raw'/> <target dev='sda' bus='sata'/> ... </disk> ...Use the
virt-xmlutility with the--remove-deviceargument.For example, the following command removes the optical drive attached as target
sdafrom theexample-VM-nameVM.# virt-xml example-VM-name --remove-device --disk target=sda Domain 'example-VM-name' defined successfully.
Verification
- Confirm that the device is no longer listed in the XML configuration file of the VM.
Additional resources
-
The
man virt-xmlcommand
10.6.6. Removing a CD-ROM from a running virtual machine by using the web console
You can use the web console to eject a CD-ROM device from a running virtual machine (VM).
Prerequisites
Procedure
- In the interface, click the VM from which you want to remove the CD-ROM.
Scroll to .
The Disks section displays information about the disks assigned to the VM as well as options to Add, Remove, or Edit disks.

Click the option for the cdrom device.
The Eject media from VM? dialog box opens.
- Click .
Verification
- In the interface, the attached file is no longer displayed under the Disks section.
10.7. Managing SR-IOV devices
An emulated virtual device often uses more CPU and memory than a hardware network device. This can limit the performance of a virtual machine (VM). However, if any devices on your virtualization host support Single Root I/O Virtualization (SR-IOV), you can use this feature to improve the device performance, and possibly also the overall performance of your VMs.
10.7.1. What is SR-IOV?
Single-root I/O virtualization (SR-IOV) is a specification that enables a single PCI Express (PCIe) device to present multiple separate PCI devices, called virtual functions (VFs), to the host system. Each of these devices:
- Is able to provide the same or similar service as the original PCIe device.
- Appears at a different address on the host PCI bus.
- Can be assigned to a different VM by using VFIO assignment.
For example, a single SR-IOV capable network device can present VFs to multiple VMs. While all of the VFs use the same physical card, the same network connection, and the same network cable, each of the VMs directly controls its own hardware network device, and uses no extra resources from the host.
How SR-IOV works
The SR-IOV functionality is possible thanks to the introduction of the following PCIe functions:
- Physical functions (PFs) - A PCIe function that provides the functionality of its device (for example networking) to the host, but can also create and manage a set of VFs. Each SR-IOV capable device has one or more PFs.
- Virtual functions (VFs) - Lightweight PCIe functions that behave as independent devices. Each VF is derived from a PF. The maximum number of VFs a device can have depends on the device hardware. Each VF can be assigned only to a single VM at a time, but a VM can have multiple VFs assigned to it.
VMs recognize VFs as virtual devices. For example, a VF created by an SR-IOV network device appears as a network card to a VM to which it is assigned, in the same way as a physical network card appears to the host system.
Figure 10.1. SR-IOV architecture

Advantages
The primary advantages of using SR-IOV VFs rather than emulated devices are:
- Improved performance
- Reduced use of host CPU and memory resources
For example, a VF attached to a VM as a vNIC performs at almost the same level as a physical NIC, and much better than paravirtualized or emulated NICs. In particular, when multiple VFs are used simultaneously on a single host, the performance benefits can be significant.
Disadvantages
- To modify the configuration of a PF, you must first change the number of VFs exposed by the PF to zero. Therefore, you also need to remove the devices provided by these VFs from the VM to which they are assigned.
- A VM with an VFIO-assigned devices attached, including SR-IOV VFs, cannot be migrated to another host. In some cases, you can work around this limitation by pairing the assigned device with an emulated device. For example, you can bond an assigned networking VF to an emulated vNIC, and remove the VF before the migration.
- In addition, VFIO-assigned devices require pinning of VM memory, which increases the memory consumption of the VM and prevents the use of memory ballooning on the VM.
Additional resources
10.7.2. Attaching SR-IOV networking devices to virtual machines
To attach an SR-IOV networking device to a virtual machine (VM) on an Intel or AMD host, you must create a virtual function (VF) from an SR-IOV capable network interface on the host and assign the VF as a device to a specified VM. For details, see the following instructions.
Prerequisites
The CPU and the firmware of your host support the I/O Memory Management Unit (IOMMU).
- If using an Intel CPU, it must support the Intel Virtualization Technology for Directed I/O (VT-d).
- If using an AMD CPU, it must support the AMD-Vi feature.
The host system uses Access Control Service (ACS) to provide direct memory access (DMA) isolation for PCIe topology. Verify this with the system vendor.
For additional information, see Hardware Considerations for Implementing SR-IOV.
The physical network device supports SR-IOV. To verify if any network devices on your system support SR-IOV, use the
lspci -vcommand and look forSingle Root I/O Virtualization (SR-IOV)in the output.# lspci -v [...] 02:00.0 Ethernet controller: Intel Corporation 82576 Gigabit Network Connection (rev 01) Subsystem: Intel Corporation Gigabit ET Dual Port Server Adapter Flags: bus master, fast devsel, latency 0, IRQ 16, NUMA node 0 Memory at fcba0000 (32-bit, non-prefetchable) [size=128K] [...] Capabilities: [150] Alternative Routing-ID Interpretation (ARI) Capabilities: [160] Single Root I/O Virtualization (SR-IOV) Kernel driver in use: igb Kernel modules: igb [...]
The host network interface you want to use for creating VFs is running. For example, to activate the eth1 interface and verify it is running:
# ip link set eth1 up
# ip link show eth1
8: eth1: <BROADCAST,MULTICAST,UP,LOWER_UP> mtu 1500 qdisc mq state UP mode DEFAULT qlen 1000
   link/ether a0:36:9f:8f:3f:b8 brd ff:ff:ff:ff:ff:ff
   vf 0 MAC 00:00:00:00:00:00, spoof checking on, link-state auto
   vf 1 MAC 00:00:00:00:00:00, spoof checking on, link-state auto
   vf 2 MAC 00:00:00:00:00:00, spoof checking on, link-state auto
   vf 3 MAC 00:00:00:00:00:00, spoof checking on, link-state auto
For SR-IOV device assignment to work, the IOMMU feature must be enabled in the host BIOS and kernel. To do so:
On an Intel host, enable VT-d:
Regenerate the GRUB configuration with the
intel_iommu=onandiommu=ptparameters:# grubby --args="intel_iommu=on iommu=pt" --update-kernel=ALL- Reboot the host.
On an AMD host, enable AMD-Vi:
Regenerate the GRUB configuration with the
iommu=ptparameter:# grubby --args="iommu=pt" --update-kernel=ALL- Reboot the host.
Procedure
Optional: Confirm the maximum number of VFs your network device can use. To do so, use the following command and replace eth1 with your SR-IOV compatible network device.
# cat /sys/class/net/eth1/device/sriov_totalvfs
7
Use the following command to create a virtual function (VF):
# echo VF-number > /sys/class/net/network-interface/device/sriov_numvfsIn the command, replace:
- VF-number with the number of VFs you want to create on the PF.
- network-interface with the name of the network interface for which the VFs will be created.
The following example creates 2 VFs from the eth1 network interface:
# echo 2 > /sys/class/net/eth1/device/sriov_numvfsVerify the VFs have been added:
# lspci | grep Ethernet
82:00.0 Ethernet controller: Intel Corporation 82599ES 10-Gigabit SFI/SFP+ Network Connection (rev 01)
82:00.1 Ethernet controller: Intel Corporation 82599ES 10-Gigabit SFI/SFP+ Network Connection (rev 01)
82:10.0 Ethernet controller: Intel Corporation 82599 Ethernet Controller Virtual Function (rev 01)
82:10.2 Ethernet controller: Intel Corporation 82599 Ethernet Controller Virtual Function (rev 01)
Make the created VFs persistent by creating a udev rule for the network interface you used to create the VFs. For example, for the eth1 interface, create the
/etc/udev/rules.d/eth1.rulesfile, and add the following line:ACTION=="add", SUBSYSTEM=="net", ENV{ID_NET_DRIVER}=="ixgbe", ATTR{device/sriov_numvfs}="2"This ensures that the two VFs that use the
ixgbedriver will automatically be available for theeth1interface when the host starts. If you do not require persistent SR-IOV devices, skip this step.WarningCurrently, the setting described above does not work correctly when attempting to make VFs persistent on Broadcom NetXtreme II BCM57810 adapters. In addition, attaching VFs based on these adapters to Windows VMs is currently not reliable.
Hot-plug one of the newly added VF interface devices to a running VM.
# virsh attach-interface testguest1 hostdev 0000:82:10.0 --managed --live --config
Verification
- If the procedure is successful, the guest operating system detects a new network interface card.
10.7.3. Supported devices for SR-IOV assignment
Not all devices can be used for SR-IOV. The following devices have been tested and verified as compatible with SR-IOV in RHEL 8.
Networking devices
-
Intel 82599ES 10 Gigabit Ethernet Controller - uses the
ixgbedriver -
Intel Ethernet Controller XL710 Series - uses the
i40edriver -
Mellanox ConnectX-5 Ethernet Adapter Cards - use the
mlx5_coredriver -
Intel Ethernet Network Adapter XXV710 - uses the
i40edriver -
Intel 82576 Gigabit Ethernet Controller - uses the
igbdriver -
Broadcom NetXtreme II BCM57810 - uses the
bnx2xdriver -
Ethernet Controller E810-C for QSFP - uses the
icedriver -
SFC9220 10/40G Ethernet Controller - uses the
sfcdriver -
FastLinQ QL41000 Series 10/25/40/50GbE Controller - uses the
qededriver -
MT2892 Family [ConnectX-6 Dx] - uses the
mlx5_coredriver
Storage devices
- Non-Volatile memory controller: Samsung Electronics Co Ltd NVMe SSD Controller 172Xa/172Xb (rev 01)
- Non-Volatile memory controller: Toshiba Corporation Cx5 NVMe SSD Controller (rev 01)
10.8. Attaching DASD devices to virtual machines on IBM Z
By using the vfio-ccw feature, you can assign direct-access storage devices (DASDs) as mediated devices to your virtual machines (VMs) on IBM Z hosts. This for example makes it possible for the VM to access a z/OS dataset, or to provide the assigned DASDs to a z/OS machine.
Prerequisites
- You have a system with IBM Z hardware architecture supported with the FICON protocol.
- You have a target VM of a Linux operating system.
The driverctl package is installed.
# yum install driverctlThe necessary
vfiokernel modules have been loaded on the host.# lsmod | grep vfioThe output of this command must contain the following modules:
-
vfio_ccw -
vfio_mdev -
vfio_iommu_type1
-
You have a spare DASD device for exclusive use by the VM, and you know the identifier of the device.
The following procedure uses
0.0.002cas an example. When performing the commands, replace0.0.002cwith the identifier of your DASD device.
Procedure
Obtain the subchannel identifier of the DASD device.
# lscss -d 0.0.002c
Device   Subchan.  DevType CU Type Use  PIM PAM POM  CHPIDs
----------------------------------------------------------------------
0.0.002c 0.0.29a8  3390/0c 3990/e9 yes  f0  f0  ff   02111221 00000000
In this example, the subchannel identifier is detected as
0.0.29a8. In the following commands of this procedure, replace0.0.29a8with the detected subchannel identifier of your device.If the
lscsscommand in the previous step only displayed the header output and no device information, perform the following steps:Remove the device from the
cio_ignorelist.# cio_ignore -r 0.0.002cIn the guest OS, edit the kernel command line of the VM and add the device identifier with a
!mark to the line that starts withcio_ignore=, if it is not present already.cio_ignore=all,!condev,!0.0.002c- Repeat step 1 on the host to obtain the subchannel identifier.
Bind the subchannel to the
vfio_ccwpassthrough driver.# driverctl -b css set-override 0.0.29a8 vfio_ccwNoteThis binds the 0.0.29a8 subchannel to
vfio_ccwpersistently, which means the DASD will not be usable on the host. If you need to use the device on the host, you must first remove the automatic binding to 'vfio_ccw' and rebind the subchannel to the default driver:# driverctl -b css unset-override 0.0.29a8
Define and start the DASD mediated device.
# cat nodedev.xml <device> <parent>css_0_0_29a8</parent> <capability type="mdev"> <type id="vfio_ccw-io"/> </capability> </device> # virsh nodedev-define nodedev.xml Node device 'mdev_30820a6f_b1a5_4503_91ca_0c10ba12345a_0_0_29a8' defined from 'nodedev.xml' # virsh nodedev-start mdev_30820a6f_b1a5_4503_91ca_0c10ba12345a_0_0_29a8 Device mdev_30820a6f_b1a5_4503_91ca_0c10ba12345a_0_0_29a8 started- Shut down the VM, if it is running.
Display the UUID of the previously defined device and save it for the next step.
# virsh nodedev-dumpxml mdev_30820a6f_b1a5_4503_91ca_0c10ba12345a_0_0_29a8

<device>
  <name>mdev_30820a6f_b1a5_4503_91ca_0c10ba12345a_0_0_29a8</name>
  <parent>css_0_0_29a8</parent>
  <capability type='mdev'>
    <type id='vfio_ccw-io'/>
    <uuid>30820a6f-b1a5-4503-91ca-0c10ba12345a</uuid>
    <iommuGroup number='0'/>
    <attr name='assign_adapter' value='0x02'/>
    <attr name='assign_domain' value='0x002b'/>
  </capability>
</device>
Attach the mediated device to the VM. To do so, use the
virsh editutility to edit the XML configuration of the VM, add the following section to the XML, and replace theuuidvalue with the UUID you obtained in the previous step.<hostdev mode='subsystem' type='mdev' model='vfio-ccw'> <source> <address uuid="30820a6f-b1a5-4503-91ca-0c10ba12345a"/> </source> </hostdev>Optional: Configure the mediated device to start automatically on host boot.
# virsh nodedev-autostart mdev_30820a6f_b1a5_4503_91ca_0c10ba12345a_0_0_29a8
Verification
Ensure that the mediated device is configured correctly.
# virsh nodedev-info mdev_30820a6f_b1a5_4503_91ca_0c10ba12345a_0_0_29a8
Name:           mdev_30820a6f_b1a5_4503_91ca_0c10ba12345a_0_0_29a8
Parent:         css_0_0_0121
Active:         yes
Persistent:     yes
Autostart:      yes
Obtain the identifier that
libvirtassigned to the mediated DASD device. To do so, display the XML configuration of the VM and look for avfio-ccwdevice.# virsh dumpxml vm-name <domain> [...] <hostdev mode='subsystem' type='mdev' managed='no' model='vfio-ccw'> <source> <address uuid='10620d2f-ed4d-437b-8aff-beda461541f9'/> </source> <alias name='hostdev0'/> <address type='ccw' cssid='0xfe' ssid='0x0' devno='0x0009'/> </hostdev> [...] </domain>
In this example, the assigned identifier of the device is
0.0.0009.- Start the VM and log in to its guest OS.
In the guest OS, confirm that the DASD device is listed. For example:
# lscss | grep 0.0.0009
0.0.0009 0.0.0007  3390/0c 3990/e9      f0  f0  ff   12212231 00000000
In the guest OS, set the device online. For example:
# chccwdev -e 0.0009
Setting device 0.0.0009 online
Done
Additional resources
10.9. Attaching a watchdog device to a virtual machine by using the web console
To force the virtual machine (VM) to perform a specified action when it stops responding, you can attach virtual watchdog devices to a VM.
Prerequisites
- You have installed the web console VM plug-in on your system. For more information, see Section 5.2, “Setting up the web console to manage virtual machines”.
Procedure
In the command line interface, install the watchdog service.
# yum install watchdog
- Shut down the VM.
Add the watchdog service to the VM.
# virt-xml vmname --add-device --watchdog action=reset --update
- Run the VM.
- Open the web console and in the interface of the web console, click on the VM to which you want to add the watchdog device.
Click next to the Watchdog field in the Overview pane.
The Add watchdog device type dialog appears.
Select the action that you want the watchdog device to perform if the VM stops responding.
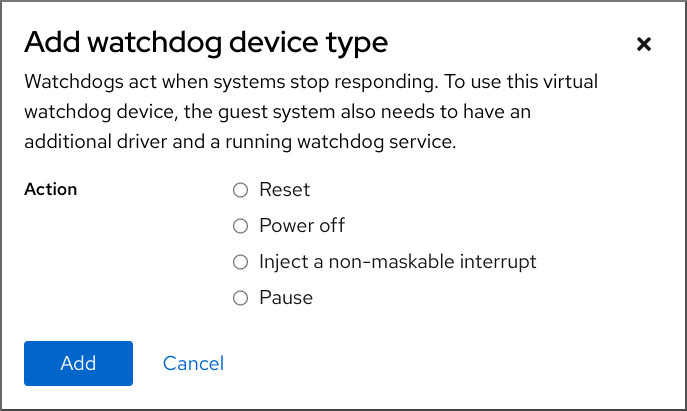
- Click .
Verification
- The action you selected is visible next to the Watchdog field in the Overview pane.
10.10. Attaching PCI devices to virtual machines on IBM Z
By using the vfio-pci device driver, you can assign PCI devices in pass-through mode to your virtual machines (VMs) on IBM Z hosts. This for example makes it possible for the VM to use NVMe flash disks for handling databases.
Prerequisites
- You have a host system with the IBM Z hardware architecture.
- You have a target VM of Linux operating system.
The necessary
vfiokernel modules have been loaded on the host.# lsmod | grep vfioThe output of this command must contain the following modules:
-
vfio_pci -
vfio_pci_core -
vfio_iommu_type1
-
Procedure
Obtain the PCI address identifier of the device that you want to use.
# lspci -nkD

0000:00:00.0 0000: 1014:04ed
	Kernel driver in use: ism
	Kernel modules: ism
0001:00:00.0 0000: 1014:04ed
	Kernel driver in use: ism
	Kernel modules: ism
0002:00:00.0 0200: 15b3:1016
	Subsystem: 15b3:0062
	Kernel driver in use: mlx5_core
	Kernel modules: mlx5_core
0003:00:00.0 0200: 15b3:1016
	Subsystem: 15b3:0062
	Kernel driver in use: mlx5_core
	Kernel modules: mlx5_core
Open the XML configuration of the VM to which you want to attach the PCI device.
# virsh edit vm-nameAdd the following
<hostdev>configuration to the<devices>section of the XML file.Replace the values on the
addressline with the PCI address of your device. For example, if the device address is0003:00:00.0, use the following configuration:<hostdev mode="subsystem" type="pci" managed="yes"> <driver name="vfio"/> <source> <address domain="0x0003" bus="0x00" slot="0x00" function="0x0"/> </source> <address type="pci"/> </hostdev>Optional: To modify how the guest operating system will detect the PCI device, you can also add a
<zpci>sub-element to the<address>element. In the<zpci>line, you can adjust theuidandfidvalues, which modifies the PCI address and function ID of the device in the guest operating system.<hostdev mode="subsystem" type="pci" managed="yes"> <driver name="vfio"/> <source> <address domain="0x0003" bus="0x00" slot="0x00" function="0x0"/> </source> <address type="pci"> <zpci uid="0x0008" fid="0x001807"/> </address> </hostdev>In this example:
-
uid="0x0008"sets the domain PCI address of the device in the VM to0008:00:00.0. fid="0x001807"sets the slot value of the device to0x001807. As a result, the device configuration in the file system of the VM is saved to/sys/bus/pci/slots/00001087/address.If these values are not specified,
libvirtconfigures them automatically.
-
- Save the XML configuration.
If the VM is running, shut it down.
# virsh shutdown vm-name
Verification
- Start the VM and log in to its guest operating system.
In the guest operating system, confirm that the PCI device is listed.
For example, if the device address is
0003:00:00.0, use the following command:# lspci -nkD | grep 0003:00:00.0 0003:00:00.0 8086:9a09 (rev 01)
Chapter 11. Managing storage for virtual machines
A virtual machine (VM), just like a physical machine, requires storage for data, program, and system files. As a VM administrator, you can assign physical or network-based storage to your VMs as virtual storage. You can also modify how the storage is presented to a VM regardless of the underlying hardware.
The following sections provide information about the different types of VM storage, how they work, and how you can manage them by using the CLI or the web console.
11.1. Understanding virtual machine storage
If you are new to virtual machine (VM) storage, or are unsure about how it works, the following sections provide a general overview about the various components of VM storage, how it works, management basics, and the supported solutions provided by Red Hat.
You can find information about:
11.1.1. Introduction to storage pools
A storage pool is a file, directory, or storage device, managed by libvirt to provide storage for virtual machines (VMs). You can divide storage pools into storage volumes, which store VM images or are attached to VMs as additional storage.
Furthermore, multiple VMs can share the same storage pool, allowing for better allocation of storage resources.
Storage pools can be persistent or transient:
-
A persistent storage pool survives a system restart of the host machine. You can use the
virsh pool-defineto create a persistent storage pool. -
A transient storage pool only exists until the host reboots. You can use the
virsh pool-createcommand to create a transient storage pool.
-
A persistent storage pool survives a system restart of the host machine. You can use the
Storage pool storage types
Storage pools can be either local or network-based (shared):
Local storage pools
Local storage pools are attached directly to the host server. They include local directories, directly attached disks, physical partitions, and Logical Volume Management (LVM) volume groups on local devices.
Local storage pools are useful for development, testing, and small deployments that do not require migration or have a large number of VMs.
Networked (shared) storage pools
Networked storage pools include storage devices shared over a network by using standard protocols.
11.1.2. Introduction to storage volumes
Storage pools are divided into storage volumes. Storage volumes are abstractions of physical partitions, LVM logical volumes, file-based disk images, and other storage types handled by libvirt. Storage volumes are presented to VMs as local storage devices, such as disks, regardless of the underlying hardware.
On the host machine, a storage volume is referred to by its name and an identifier for the storage pool from which it derives. On the virsh command line, this takes the form --pool storage_pool volume_name.
For example, to display information about a volume named firstimage in the guest_images pool.
# virsh vol-info --pool guest_images firstimage
  Name:             firstimage
  Type:             block
  Capacity:         20.00 GB
  Allocation:       20.00 GB
11.1.3. Storage management by using libvirt
By using the libvirt remote protocol, you can manage all aspects of VM storage. These operations can also be performed on a remote host. Consequently, a management application that uses libvirt, such as the RHEL web console, can be used to perform all the required tasks of configuring the storage of a VM.
You can use the libvirt API to query the list of volumes in a storage pool or to get information regarding the capacity, allocation, and available storage in that storage pool. For storage pools that support it, you can also use the libvirt API to create, clone, resize, and delete storage volumes. Furthermore, you can use the libvirt API to upload data to storage volumes, download data from storage volumes, or wipe data from storage volumes.
11.1.4. Overview of storage management
To illustrate the available options for managing storage, the following example talks about a sample NFS server that uses mount -t nfs nfs.example.com:/path/to/share /path/to/data.
As a storage administrator:
-
You can define an NFS storage pool on the virtualization host to describe the exported server path and the client target path. Consequently,
libvirtcan mount the storage either automatically whenlibvirtis started or as needed whilelibvirtis running. - You can simply add the storage pool and storage volume to a VM by name. You do not need to add the target path to the volume. Therefore, even if the target client path changes, it does not affect the VM.
-
You can configure storage pools to autostart. When you do so,
libvirtautomatically mounts the NFS shared disk on the directory which is specified whenlibvirtis started.libvirtmounts the share on the specified directory, similar to the commandmount nfs.example.com:/path/to/share /vmdata. -
You can query the storage volume paths by using the
libvirtAPI. These storage volumes are basically the files present in the NFS shared disk. You can then copy these paths into the section of a VM’s XML definition that describes the source storage for the VM’s block devices. In the case of NFS, you can use an application that uses the
libvirtAPI to create and delete storage volumes in the storage pool (files in the NFS share) up to the limit of the size of the pool (the storage capacity of the share).Note that, not all storage pool types support creating and deleting volumes.
-
You can stop a storage pool when no longer required. Stopping a storage pool (
pool-destroy) undoes the start operation, in this case, unmounting the NFS share. The data on the share is not modified by the destroy operation, despite what the name of the command suggests. For more information, seeman virsh.
11.1.5. Supported and unsupported storage pool types
Supported storage pool types
The following is a list of storage pool types supported by RHEL:
- Directory-based storage pools
- Disk-based storage pools
- Partition-based storage pools
- GlusterFS storage pools
- iSCSI-based storage pools
- LVM-based storage pools
- NFS-based storage pools
- SCSI-based storage pools with vHBA devices
- Multipath-based storage pools
- RBD-based storage pools
Unsupported storage pool types
The following is a list of libvirt storage pool types not supported by RHEL:
- Sheepdog-based storage pools
- Vstorage-based storage pools
- ZFS-based storage pools
11.2. Managing virtual machine storage pools by using the CLI
You can use the CLI to manage the following aspects of your storage pools to assign storage to your virtual machines (VMs):
- View storage pool information
Create storage pools
- Create directory-based storage pools by using the CLI
- Create disk-based storage pools by using the CLI
- Create filesystem-based storage pools by using the CLI
- Create GlusterFS-based storage pools by using the CLI
- Create iSCSI-based storage pools by using the CLI
- Create LVM-based storage pools by using the CLI
- Create NFS-based storage pools by using the CLI
- Create SCSI-based storage pools with vHBA devices by using the CLI
- Remove storage pools
11.2.1. Viewing storage pool information by using the CLI
By using the CLI, you can view a list of all storage pools with limited or full details about the storage pools. You can also filter the storage pools listed.
Procedure
Use the
virsh pool-listcommand to view storage pool information.# virsh pool-list --all --details Name State Autostart Persistent Capacity Allocation Available default running yes yes 48.97 GiB 23.93 GiB 25.03 GiB Downloads running yes yes 175.62 GiB 62.02 GiB 113.60 GiB RHEL-Storage-Pool running yes yes 214.62 GiB 93.02 GiB 168.60 GiB
Additional resources
-
The
virsh pool-list --helpcommand
11.2.2. Creating directory-based storage pools by using the CLI
A directory-based storage pool is based on a directory in an existing mounted file system. This is useful, for example, when you want to use the remaining space on the file system for other purposes. You can use the virsh utility to create directory-based storage pools.
Prerequisites
Ensure your hypervisor supports directory storage pools:
# virsh pool-capabilities | grep "'dir' supported='yes'"If the command displays any output, directory pools are supported.
Procedure
Create a storage pool
Use the
virsh pool-define-ascommand to define and create a directory-type storage pool. For example, to create a storage pool namedguest_images_dirthat uses the /guest_images directory:# virsh pool-define-as guest_images_dir dir --target "/guest_images" Pool guest_images_dir definedIf you already have an XML configuration of the storage pool you want to create, you can also define the pool based on the XML. For details, see Directory-based storage pool parameters.
Create the storage pool target path
Use the
virsh pool-buildcommand to create a storage pool target path for a pre-formatted file system storage pool, initialize the storage source device, and define the format of the data.# virsh pool-build guest_images_dir Pool guest_images_dir built # ls -la /guest_images total 8 drwx------. 2 root root 4096 May 31 19:38 . dr-xr-xr-x. 25 root root 4096 May 31 19:38 ..
Verify that the pool was created
Use the
virsh pool-listcommand to verify that the pool was created.# virsh pool-list --all Name State Autostart ----------------------------------------- default active yes guest_images_dir inactive noStart the storage pool
Use the
virsh pool-startcommand to mount the storage pool.# virsh pool-start guest_images_dir Pool guest_images_dir startedNoteThe
virsh pool-startcommand is only necessary for persistent storage pools. Transient storage pools are automatically started when they are created.[Optional] Turn on autostart
By default, a storage pool defined with the
virshcommand is not set to automatically start each time virtualization services start. Use thevirsh pool-autostartcommand to configure the storage pool to autostart.# virsh pool-autostart guest_images_dir Pool guest_images_dir marked as autostarted
Verification
Use the
virsh pool-infocommand to verify that the storage pool is in therunningstate. Check if the sizes reported are as expected and if autostart is configured correctly.# virsh pool-info guest_images_dir Name: guest_images_dir UUID: c7466869-e82a-a66c-2187-dc9d6f0877d0 State: running Persistent: yes Autostart: yes Capacity: 458.39 GB Allocation: 197.91 MB Available: 458.20 GB
11.2.3. Creating disk-based storage pools by using the CLI
In a disk-based storage pool, the pool is based on a disk partition. This is useful, for example, when you want to have an entire disk partition dedicated as virtual machine (VM) storage. You can use the virsh utility to create disk-based storage pools.
Prerequisites
Ensure your hypervisor supports disk-based storage pools:
# virsh pool-capabilities | grep "'disk' supported='yes'"If the command displays any output, disk-based pools are supported.
Prepare a device on which you will base the storage pool. For this purpose, prefer partitions (for example,
/dev/sdb1) or LVM volumes. If you provide a VM with write access to an entire disk or block device (for example,/dev/sdb), the VM will likely partition it or create its own LVM groups on it. This can result in system errors on the host.However, if you require using an entire block device for the storage pool, Red Hat recommends protecting any important partitions on the device from GRUB’s
os-proberfunction. To do so, edit the/etc/default/grubfile and apply one of the following configurations:Disable
os-prober.GRUB_DISABLE_OS_PROBER=true
Prevent
os-proberfrom discovering a specific partition. For example:GRUB_OS_PROBER_SKIP_LIST="5ef6313a-257c-4d43@/dev/sdb1"
-
Back up any data on the selected storage device before creating a storage pool. Depending on the version of
libvirtbeing used, dedicating a disk to a storage pool may reformat and erase all data currently stored on the disk device.
Procedure
Create a storage pool
Use the
virsh pool-define-ascommand to define and create a disk-type storage pool. The following example creates a storage pool namedguest_images_diskthat uses the /dev/sdb device and is mounted on the /dev directory.# virsh pool-define-as guest_images_disk disk --source-format=gpt --source-dev=/dev/sdb --target /dev Pool guest_images_disk definedIf you already have an XML configuration of the storage pool you want to create, you can also define the pool based on the XML. For details, see Disk-based storage pool parameters.
Create the storage pool target path
Use the
virsh pool-buildcommand to create a storage pool target path for a pre-formatted file-system storage pool, initialize the storage source device, and define the format of the data.# virsh pool-build guest_images_disk Pool guest_images_disk builtNoteBuilding the target path is only necessary for disk-based, file system-based, and logical storage pools. If
libvirtdetects that the source storage device’s data format differs from the selected storage pool type, the build fails, unless theoverwriteoption is specified.Verify that the pool was created
Use the
virsh pool-listcommand to verify that the pool was created.# virsh pool-list --all Name State Autostart ----------------------------------------- default active yes guest_images_disk inactive noStart the storage pool
Use the
virsh pool-startcommand to mount the storage pool.# virsh pool-start guest_images_disk Pool guest_images_disk startedNoteThe
virsh pool-startcommand is only necessary for persistent storage pools. Transient storage pools are automatically started when they are created.[Optional] Turn on autostart
By default, a storage pool defined with the
virshcommand is not set to automatically start each time virtualization services start. Use thevirsh pool-autostartcommand to configure the storage pool to autostart.# virsh pool-autostart guest_images_disk Pool guest_images_disk marked as autostarted
Verification
Use the
virsh pool-infocommand to verify that the storage pool is in therunningstate. Check if the sizes reported are as expected and if autostart is configured correctly.# virsh pool-info guest_images_disk Name: guest_images_disk UUID: c7466869-e82a-a66c-2187-dc9d6f0877d0 State: running Persistent: yes Autostart: yes Capacity: 458.39 GB Allocation: 197.91 MB Available: 458.20 GB
11.2.4. Creating filesystem-based storage pools by using the CLI
When you want to create a storage pool on a file system that is not mounted, use the filesystem-based storage pool. This storage pool is based on a given file-system mountpoint. You can use the virsh utility to create filesystem-based storage pools.
Prerequisites
Ensure your hypervisor supports filesystem-based storage pools:
# virsh pool-capabilities | grep "'fs' supported='yes'"If the command displays any output, file-based pools are supported.
Prepare a device on which you will base the storage pool. For this purpose, prefer partitions (for example,
/dev/sdb1) or LVM volumes. If you provide a VM with write access to an entire disk or block device (for example,/dev/sdb), the VM will likely partition it or create its own LVM groups on it. This can result in system errors on the host.However, if you require using an entire block device for the storage pool, Red Hat recommends protecting any important partitions on the device from GRUB’s
os-proberfunction. To do so, edit the/etc/default/grubfile and apply one of the following configurations:Disable
os-prober.GRUB_DISABLE_OS_PROBER=true
Prevent
os-proberfrom discovering a specific partition. For example:GRUB_OS_PROBER_SKIP_LIST="5ef6313a-257c-4d43@/dev/sdb1"
Procedure
Create a storage pool
Use the
virsh pool-define-ascommand to define and create a filesystem-type storage pool. For example, to create a storage pool namedguest_images_fsthat uses the /dev/sdc1 partition, and is mounted on the /guest_images directory:# virsh pool-define-as guest_images_fs fs --source-dev /dev/sdc1 --target /guest_images Pool guest_images_fs definedIf you already have an XML configuration of the storage pool you want to create, you can also define the pool based on the XML. For details, see Filesystem-based storage pool parameters.
Define the storage pool target path
Use the
virsh pool-buildcommand to create a storage pool target path for a pre-formatted file-system storage pool, initialize the storage source device, and define the format of the data.# virsh pool-build guest_images_fs Pool guest_images_fs built # ls -la /guest_images total 8 drwx------. 2 root root 4096 May 31 19:38 . dr-xr-xr-x. 25 root root 4096 May 31 19:38 ..
Verify that the pool was created
Use the
virsh pool-listcommand to verify that the pool was created.# virsh pool-list --all Name State Autostart ----------------------------------------- default active yes guest_images_fs inactive noStart the storage pool
Use the
virsh pool-startcommand to mount the storage pool.# virsh pool-start guest_images_fs Pool guest_images_fs startedNoteThe
virsh pool-startcommand is only necessary for persistent storage pools. Transient storage pools are automatically started when they are created.Optional: Turn on autostart
By default, a storage pool defined with the
virshcommand is not set to automatically start each time virtualization services start. Use thevirsh pool-autostartcommand to configure the storage pool to autostart.# virsh pool-autostart guest_images_fs Pool guest_images_fs marked as autostarted
Verification
Use the
virsh pool-infocommand to verify that the storage pool is in therunningstate. Check if the sizes reported are as expected and if autostart is configured correctly.# virsh pool-info guest_images_fs Name: guest_images_fs UUID: c7466869-e82a-a66c-2187-dc9d6f0877d0 State: running Persistent: yes Autostart: yes Capacity: 458.39 GB Allocation: 197.91 MB Available: 458.20 GBVerify there is a
lost+founddirectory in the target path on the file system, indicating that the device is mounted.# mount | grep /guest_images /dev/sdc1 on /guest_images type ext4 (rw) # ls -la /guest_images total 24 drwxr-xr-x. 3 root root 4096 May 31 19:47 . dr-xr-xr-x. 25 root root 4096 May 31 19:38 .. drwx------. 2 root root 16384 May 31 14:18 lost+found
11.2.5. Creating GlusterFS-based storage pools by using the CLI
GlusterFS is a user-space file system that uses the File System in Userspace (FUSE) software interface. If you want to have a storage pool on a Gluster server, you can use the virsh utility to create GlusterFS-based storage pools.
Prerequisites
Before you can create GlusterFS-based storage pool on a host, prepare a Gluster.
Obtain the IP address of the Gluster server by listing its status with the following command:
# gluster volume status Status of volume: gluster-vol1 Gluster process Port Online Pid ------------------------------------------------------------ Brick 222.111.222.111:/gluster-vol1 49155 Y 18634 Task Status of Volume gluster-vol1 ------------------------------------------------------------ There are no active volume tasks-
If not installed, install the
glusterfs-fusepackage. If not enabled, enable the
virt_use_fusefsboolean. Check that it is enabled.# setsebool virt_use_fusefs on # getsebool virt_use_fusefs virt_use_fusefs --> on
Ensure your hypervisor supports GlusterFS-based storage pools:
# virsh pool-capabilities | grep "'gluster' supported='yes'"If the command displays any output, GlusterFS-based pools are supported.
Procedure
Create a storage pool
Use the
virsh pool-define-ascommand to define and create a GlusterFS-based storage pool. For example, to create a storage pool namedguest_images_glusterfsthat uses a Gluster server namedgluster-vol1with IP111.222.111.222, and is mounted on the root directory of the Gluster server:# virsh pool-define-as --name guest_images_glusterfs --type gluster --source-host 111.222.111.222 --source-name gluster-vol1 --source-path / Pool guest_images_glusterfs definedIf you already have an XML configuration of the storage pool you want to create, you can also define the pool based on the XML. For details, see GlusterFS-based storage pool parameters.
Verify that the pool was created
Use the
virsh pool-listcommand to verify that the pool was created.# virsh pool-list --all Name State Autostart -------------------------------------------- default active yes guest_images_glusterfs inactive noStart the storage pool
Use the
virsh pool-startcommand to mount the storage pool.# virsh pool-start guest_images_glusterfs Pool guest_images_glusterfs startedNoteThe
virsh pool-startcommand is only necessary for persistent storage pools. Transient storage pools are automatically started when they are created.[Optional] Turn on autostart
By default, a storage pool defined with the
virshcommand is not set to automatically start each time virtualization services start. Use thevirsh pool-autostartcommand to configure the storage pool to autostart.# virsh pool-autostart guest_images_glusterfs Pool guest_images_glusterfs marked as autostarted
Verification
Use the
virsh pool-infocommand to verify that the storage pool is in therunningstate. Check if the sizes reported are as expected and if autostart is configured correctly.# virsh pool-info guest_images_glusterfs Name: guest_images_glusterfs UUID: c7466869-e82a-a66c-2187-dc9d6f0877d0 State: running Persistent: yes Autostart: yes Capacity: 458.39 GB Allocation: 197.91 MB Available: 458.20 GB
11.2.6. Creating iSCSI-based storage pools by using the CLI
Internet Small Computer Systems Interface (iSCSI) is an IP-based storage networking standard for linking data storage facilities. If you want to have a storage pool on an iSCSI server, you can use the virsh utility to create iSCSI-based storage pools.
Prerequisites
Ensure your hypervisor supports iSCSI-based storage pools:
# virsh pool-capabilities | grep "'iscsi' supported='yes'"If the command displays any output, iSCSI-based pools are supported.
Procedure
Create a storage pool
Use the
virsh pool-define-ascommand to define and create an iSCSI-type storage pool. For example, to create a storage pool namedguest_images_iscsithat uses theiqn.2010-05.com.example.server1:iscsirhel7guestIQN on theserver1.example.com, and is mounted on the/dev/disk/by-pathpath:# virsh pool-define-as --name guest_images_iscsi --type iscsi --source-host server1.example.com --source-dev iqn.2010-05.com.example.server1:iscsirhel7guest --target /dev/disk/by-path Pool guest_images_iscsi defined
If you already have an XML configuration of the storage pool you want to create, you can also define the pool based on the XML. For details, see iSCSI-based storage pool parameters.
Verify that the pool was created
Use the
virsh pool-listcommand to verify that the pool was created.# virsh pool-list --all Name State Autostart ----------------------------------------- default active yes guest_images_iscsi inactive noStart the storage pool
Use the
virsh pool-startcommand to mount the storage pool.# virsh pool-start guest_images_iscsi Pool guest_images_iscsi startedNoteThe
virsh pool-startcommand is only necessary for persistent storage pools. Transient storage pools are automatically started when they are created.[Optional] Turn on autostart
By default, a storage pool defined with the
virshcommand is not set to automatically start each time virtualization services start. Use thevirsh pool-autostartcommand to configure the storage pool to autostart.# virsh pool-autostart guest_images_iscsi Pool guest_images_iscsi marked as autostarted
Verification
Use the
virsh pool-infocommand to verify that the storage pool is in therunningstate. Check if the sizes reported are as expected and if autostart is configured correctly.# virsh pool-info guest_images_iscsi Name: guest_images_iscsi UUID: c7466869-e82a-a66c-2187-dc9d6f0877d0 State: running Persistent: yes Autostart: yes Capacity: 458.39 GB Allocation: 197.91 MB Available: 458.20 GB
11.2.7. Creating LVM-based storage pools by using the CLI
If you want to have a storage pool that is part of an LVM volume group, you can use the virsh utility to create LVM-based storage pools.
Recommendations
Be aware of the following before creating an LVM-based storage pool:
- LVM-based storage pools do not provide the full flexibility of LVM.
-
libvirtsupports thin logical volumes, but does not provide the features of thin storage pools. LVM-based storage pools are volume groups. You can create volume groups by using the
virshutility, but this way you can only have one device in the created volume group. To create a volume group with multiple devices, use the LVM utility instead, see How to create a volume group in Linux with LVM.For more detailed information about volume groups, refer to the Red Hat Enterprise Linux Logical Volume Manager Administration Guide.
-
LVM-based storage pools require a full disk partition. If you activate a new partition or device by using
virshcommands, the partition will be formatted and all data will be erased. If you are using a host’s existing volume group, as in these procedures, nothing will be erased.
Prerequisites
Ensure your hypervisor supports LVM-based storage pools:
# virsh pool-capabilities | grep "'logical' supported='yes'"If the command displays any output, LVM-based pools are supported.
Procedure
Create a storage pool
Use the
virsh pool-define-ascommand to define and create an LVM-type storage pool. For example, the following command creates a storage pool namedguest_images_lvmthat uses thelvm_vgvolume group and is mounted on the/dev/lvm_vgdirectory:# virsh pool-define-as guest_images_lvm logical --source-name lvm_vg --target /dev/lvm_vg Pool guest_images_lvm definedIf you already have an XML configuration of the storage pool you want to create, you can also define the pool based on the XML. For details, see LVM-based storage pool parameters.
Verify that the pool was created
Use the
virsh pool-listcommand to verify that the pool was created.# virsh pool-list --all Name State Autostart ------------------------------------------- default active yes guest_images_lvm inactive noStart the storage pool
Use the
virsh pool-startcommand to mount the storage pool.# virsh pool-start guest_images_lvm Pool guest_images_lvm startedNoteThe
virsh pool-startcommand is only necessary for persistent storage pools. Transient storage pools are automatically started when they are created.[Optional] Turn on autostart
By default, a storage pool defined with the
virshcommand is not set to automatically start each time virtualization services start. Use thevirsh pool-autostartcommand to configure the storage pool to autostart.# virsh pool-autostart guest_images_lvm Pool guest_images_lvm marked as autostarted
Verification
Use the
virsh pool-infocommand to verify that the storage pool is in therunningstate. Check if the sizes reported are as expected and if autostart is configured correctly.# virsh pool-info guest_images_lvm Name: guest_images_lvm UUID: c7466869-e82a-a66c-2187-dc9d6f0877d0 State: running Persistent: yes Autostart: yes Capacity: 458.39 GB Allocation: 197.91 MB Available: 458.20 GB
11.2.8. Creating NFS-based storage pools by using the CLI
If you want to have a storage pool on a Network File System (NFS) server, you can use the virsh utility to create NFS-based storage pools.
Prerequisites
Ensure your hypervisor supports NFS-based storage pools:
# virsh pool-capabilities | grep "<value>nfs</value>"If the command displays any output, NFS-based pools are supported.
Procedure
Create a storage pool
Use the virsh
pool-define-ascommand to define and create an NFS-type storage pool. For example, to create a storage pool namedguest_images_netfsthat uses a NFS server with IP111.222.111.222mounted on the server directory/home/net_mountby using the target directory/var/lib/libvirt/images/nfspool:# virsh pool-define-as --name guest_images_netfs --type netfs --source-host='111.222.111.222' --source-path='/home/net_mount' --source-format='nfs' --target='/var/lib/libvirt/images/nfspool'If you already have an XML configuration of the storage pool you want to create, you can also define the pool based on the XML. For details, see NFS-based storage pool parameters.
Verify that the pool was created
Use the
virsh pool-listcommand to verify that the pool was created.# virsh pool-list --all Name State Autostart ----------------------------------------- default active yes guest_images_netfs inactive noStart the storage pool
Use the
virsh pool-startcommand to mount the storage pool.# virsh pool-start guest_images_netfs Pool guest_images_netfs startedNoteThe
virsh pool-startcommand is only necessary for persistent storage pools. Transient storage pools are automatically started when they are created.[Optional] Turn on autostart
By default, a storage pool defined with the
virshcommand is not set to automatically start each time virtualization services start. Use thevirsh pool-autostartcommand to configure the storage pool to autostart.# virsh pool-autostart guest_images_netfs Pool guest_images_netfs marked as autostarted
Verification
Use the
virsh pool-infocommand to verify that the storage pool is in therunningstate. Check if the sizes reported are as expected and if autostart is configured correctly.# virsh pool-info guest_images_netfs Name: guest_images_netfs UUID: c7466869-e82a-a66c-2187-dc9d6f0877d0 State: running Persistent: yes Autostart: yes Capacity: 458.39 GB Allocation: 197.91 MB Available: 458.20 GB
11.2.9. Creating SCSI-based storage pools with vHBA devices by using the CLI
If you want to have a storage pool on a Small Computer System Interface (SCSI) device, your host must be able to connect to the SCSI device by using a virtual host bus adapter (vHBA). You can then use the virsh utility to create SCSI-based storage pools.
Prerequisites
Ensure your hypervisor supports SCSI-based storage pools:
# virsh pool-capabilities | grep "'scsi' supported='yes'"If the command displays any output, SCSI-based pools are supported.
- Before creating a SCSI-based storage pools with vHBA devices, create a vHBA. For more information, see Creating vHBAs.
Procedure
Create a storage pool
Use the
virsh pool-define-ascommand to define and create SCSI storage pool by using a vHBA. For example, the following creates a storage pool namedguest_images_vhbathat uses a vHBA identified by thescsi_host3parent adapter, world-wide port number5001a4ace3ee047d, and world-wide node number5001a4a93526d0a1. The storage pool is mounted on the/dev/disk/directory:# virsh pool-define-as guest_images_vhba scsi --adapter-parent scsi_host3 --adapter-wwnn 5001a4a93526d0a1 --adapter-wwpn 5001a4ace3ee047d --target /dev/disk/ Pool guest_images_vhba definedIf you already have an XML configuration of the storage pool you want to create, you can also define the pool based on the XML. For details, see Parameters for SCSI-based storage pools with vHBA devices.
Verify that the pool was created
Use the
virsh pool-listcommand to verify that the pool was created.# virsh pool-list --all Name State Autostart ----------------------------------------- default active yes guest_images_vhba inactive noStart the storage pool
Use the
virsh pool-startcommand to mount the storage pool.# virsh pool-start guest_images_vhba Pool guest_images_vhba startedNoteThe
virsh pool-startcommand is only necessary for persistent storage pools. Transient storage pools are automatically started when they are created.[Optional] Turn on autostart
By default, a storage pool defined with the
virshcommand is not set to automatically start each time virtualization services start. Use thevirsh pool-autostartcommand to configure the storage pool to autostart.# virsh pool-autostart guest_images_vhba Pool guest_images_vhba marked as autostarted
Verification
Use the
virsh pool-infocommand to verify that the storage pool is in therunningstate. Check if the sizes reported are as expected and if autostart is configured correctly.# virsh pool-info guest_images_vhba Name: guest_images_vhba UUID: c7466869-e82a-a66c-2187-dc9d6f0877d0 State: running Persistent: yes Autostart: yes Capacity: 458.39 GB Allocation: 197.91 MB Available: 458.20 GB
11.2.10. Deleting storage pools by using the CLI
To remove a storage pool from your host system, you must stop the pool and remove its XML definition.
Procedure
List the defined storage pools by using the
virsh pool-listcommand.# virsh pool-list --all Name State Autostart ------------------------------------------- default active yes Downloads active yes RHEL-Storage-Pool active yesStop the storage pool you want to delete by using the
virsh pool-destroycommand.# virsh pool-destroy Downloads Pool Downloads destroyedOptional: For some types of storage pools, you can remove the directory where the storage pool resides by using the
virsh pool-deletecommand. Note that to do so, the directory must be empty.# virsh pool-delete Downloads Pool Downloads deletedDelete the definition of the storage pool by using the
virsh pool-undefinecommand.# virsh pool-undefine Downloads Pool Downloads has been undefined
Verification
Confirm that the storage pool was deleted.
# virsh pool-list --all
Name                 State      Autostart
-------------------------------------------
default              active     yes
rhel-Storage-Pool   active     yes
11.3. Managing virtual machine storage pools by using the web console
By using the RHEL web console, you can manage the storage pools to assign storage to your virtual machines (VMs).
You can use the web console to:
- View storage pool information.
Create storage pools:
- Remove storage pools.
- Deactivate storage pools.
11.3.1. Viewing storage pool information by using the web console
By using the web console, you can view detailed information about storage pools available on your system. Storage pools can be used to create disk images for your virtual machines.
Prerequisites
- The web console VM plug-in is installed on your system.
Procedure
Click at the top of the interface.
The Storage pools window appears, showing a list of configured storage pools.
The information includes the following:
- Name - The name of the storage pool.
- Size - The current allocation and the total capacity of the storage pool.
- Connection - The connection used to access the storage pool.
- State - The state of the storage pool.
Click the arrow next to the storage pool whose information you want to see.
The row expands to reveal the Overview pane with detailed information about the selected storage pool.
The information includes:
-
Target path - The source for the types of storage pools backed by directories, such as
dirornetfs. - Persistent - Indicates whether or not the storage pool has a persistent configuration.
- Autostart - Indicates whether or not the storage pool starts automatically when the system boots up.
- Type - The type of the storage pool.
-
Target path - The source for the types of storage pools backed by directories, such as
To view a list of storage volumes associated with the storage pool, click .
The Storage Volumes pane appears, showing a list of configured storage volumes.
The information includes:
- Name - The name of the storage volume.
- Used by - The VM that is currently using the storage volume.
- Size - The size of the volume.
Additional resources
11.3.2. Creating directory-based storage pools by using the web console
A directory-based storage pool is based on a directory in an existing mounted file system. This is useful, for example, when you want to use the remaining space on the file system for other purposes.
Prerequisites
- The web console VM plug-in is installed on your system.
Procedure
In the RHEL web console, click in the Virtual Machines tab.
The Storage pools window appears, showing a list of configured storage pools, if any.
Click .
The Create storage pool dialog appears.
- Enter a name for the storage pool.
In the Type drop down menu, select Filesystem directory.
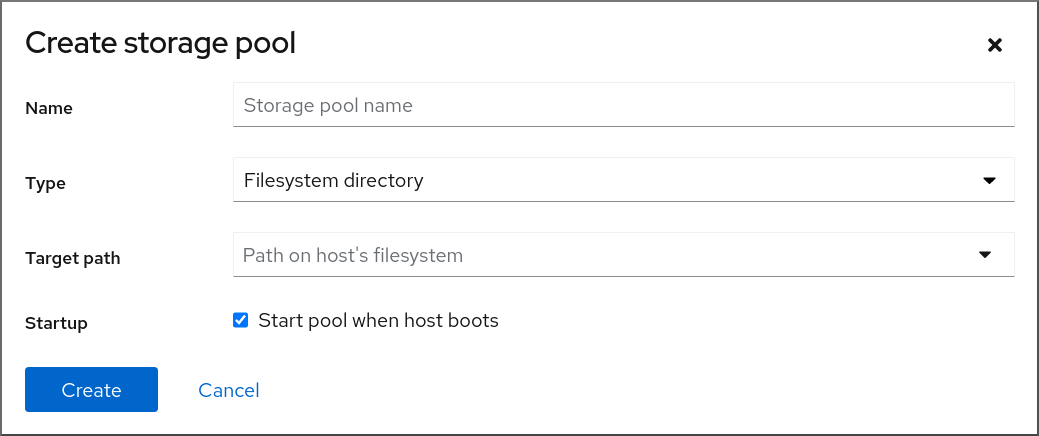 Note
NoteIf you do not see the Filesystem directory option in the drop down menu, then your hypervisor does not support directory-based storage pools.
Enter the following information:
-
Target path - The source for the types of storage pools backed by directories, such as
dirornetfs. - Startup - Whether or not the storage pool starts when the host boots.
-
Target path - The source for the types of storage pools backed by directories, such as
Click .
The storage pool is created, the Create Storage Pool dialog closes, and the new storage pool appears in the list of storage pools.
Additional resources
11.3.3. Creating NFS-based storage pools by using the web console
An NFS-based storage pool is based on a file system that is hosted on a server.
Prerequisites
- The web console VM plug-in is installed on your system.
Procedure
In the RHEL web console, click in the Virtual Machines tab.
The Storage pools window appears, showing a list of configured storage pools, if any.
Click .
The Create storage pool dialog appears.
- Enter a name for the storage pool.
In the Type drop down menu, select Network file system.
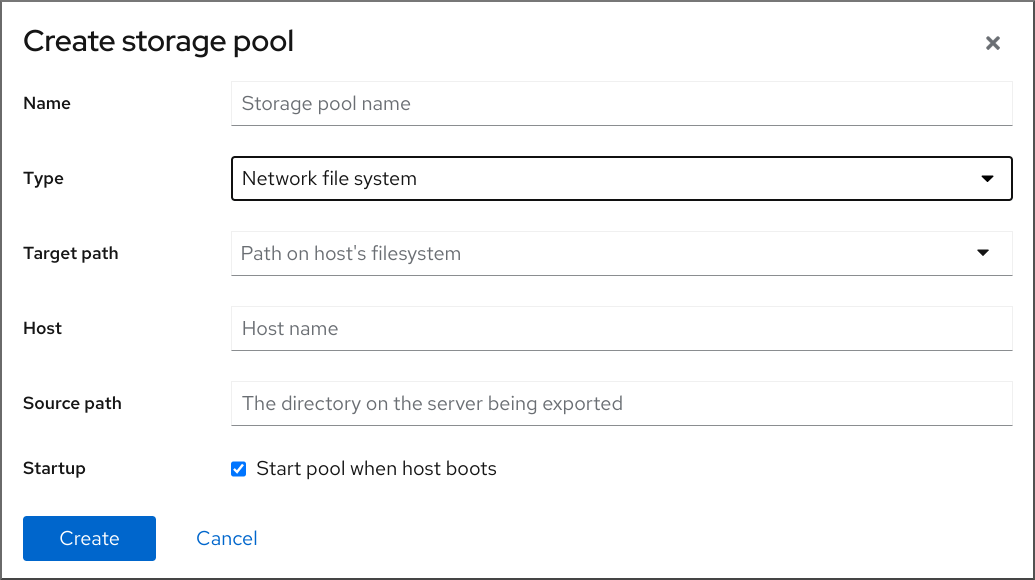 Note
NoteIf you do not see the Network file system option in the drop down menu, then your hypervisor does not support nfs-based storage pools.
Enter the rest of the information:
- Target path - The path specifying the target. This will be the path used for the storage pool.
- Host - The hostname of the network server where the mount point is located. This can be a hostname or an IP address.
- Source path - The directory used on the network server.
- Startup - Whether or not the storage pool starts when the host boots.
Click .
The storage pool is created. The Create storage pool dialog closes, and the new storage pool appears in the list of storage pools.
Additional resources
11.3.4. Creating iSCSI-based storage pools by using the web console
An iSCSI-based storage pool is based on the Internet Small Computer Systems Interface (iSCSI), an IP-based storage networking standard for linking data storage facilities.
Prerequisites
- The web console VM plug-in is installed on your system.
Procedure
In the RHEL web console, click in the Virtual Machines tab.
The Storage pools window appears, showing a list of configured storage pools, if any.
Click .
The Create storage pool dialog appears.
- Enter a name for the storage pool.
In the Type drop down menu, select iSCSI target.
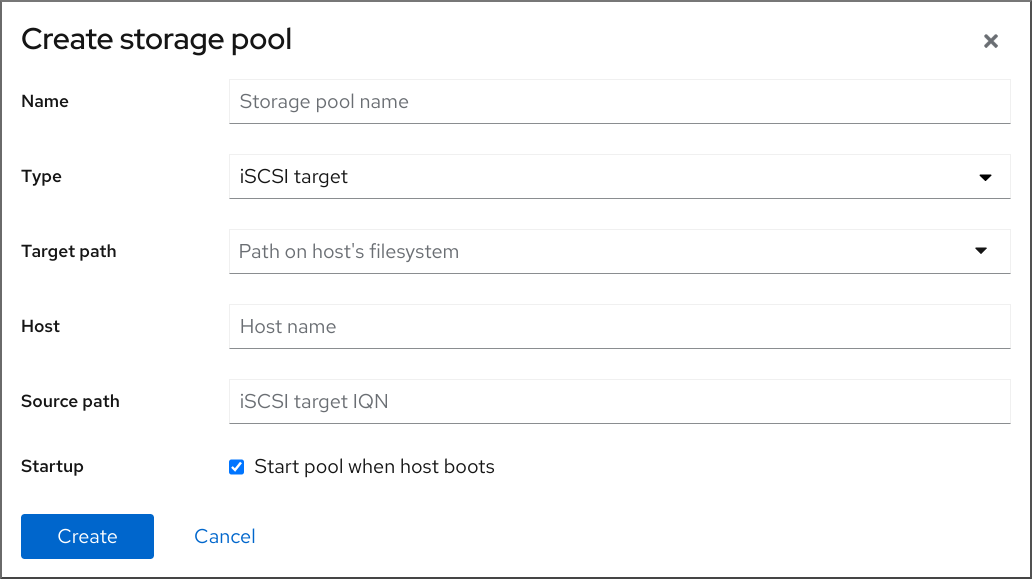
Enter the rest of the information:
- Target Path - The path specifying the target. This will be the path used for the storage pool.
- Host - The hostname or IP address of the ISCSI server.
- Source path - The unique iSCSI Qualified Name (IQN) of the iSCSI target.
- Startup - Whether or not the storage pool starts when the host boots.
Click .
The storage pool is created. The Create storage pool dialog closes, and the new storage pool appears in the list of storage pools.
Additional resources
11.3.5. Creating disk-based storage pools by using the web console
A disk-based storage pool uses entire disk partitions.
- Depending on the version of libvirt being used, dedicating a disk to a storage pool may reformat and erase all data currently stored on the disk device. It is strongly recommended that you back up the data on the storage device before creating a storage pool.
When whole disks or block devices are passed to the VM, the VM will likely partition it or create its own LVM groups on it. This can cause the host machine to detect these partitions or LVM groups and cause errors.
These errors can also occur when you manually create partitions or LVM groups and pass them to the VM.
To avoid theses errors, use file-based storage pools instead.
Prerequisites
- The web console VM plug-in is installed on your system.
Procedure
In the RHEL web console, click in the Virtual Machines tab.
The Storage pools window appears, showing a list of configured storage pools, if any.
Click .
The Create storage pool dialog appears.
- Enter a name for the storage pool.
In the Type drop down menu, select Physical disk device.
 Note
NoteIf you do not see the Physical disk device option in the drop down menu, then your hypervisor does not support disk-based storage pools.
Enter the rest of the information:
- Target Path - The path specifying the target device. This will be the path used for the storage pool.
-
Source path - The path specifying the storage device. For example,
/dev/sdb. - Format - The type of the partition table.
- Startup - Whether or not the storage pool starts when the host boots.
Click .
The storage pool is created. The Create storage pool dialog closes, and the new storage pool appears in the list of storage pools.
Additional resources
11.3.6. Creating LVM-based storage pools by using the web console
An LVM-based storage pool is based on volume groups, which you can manage by using the Logical Volume Manager (LVM). A volume group is a combination of multiple physical volumes that creates a single storage structure.
- LVM-based storage pools do not provide the full flexibility of LVM.
-
libvirtsupports thin logical volumes, but does not provide the features of thin storage pools. -
LVM-based storage pools require a full disk partition. If you activate a new partition or device by using
virshcommands, the partition will be formatted and all data will be erased. If you are using a host’s existing volume group, as in these procedures, nothing will be erased. To create a volume group with multiple devices, use the LVM utility instead, see How to create a volume group in Linux with LVM.
For more detailed information about volume groups, refer to the Red Hat Enterprise Linux Logical Volume Manager Administration Guide.
Prerequisites
- The web console VM plug-in is installed on your system.
Procedure
In the RHEL web console, click in the Virtual Machines tab.
The Storage pools window appears, showing a list of configured storage pools, if any.
Click .
The Create storage pool dialog appears.
- Enter a name for the storage pool.
In the Type drop down menu, select LVM volume group.
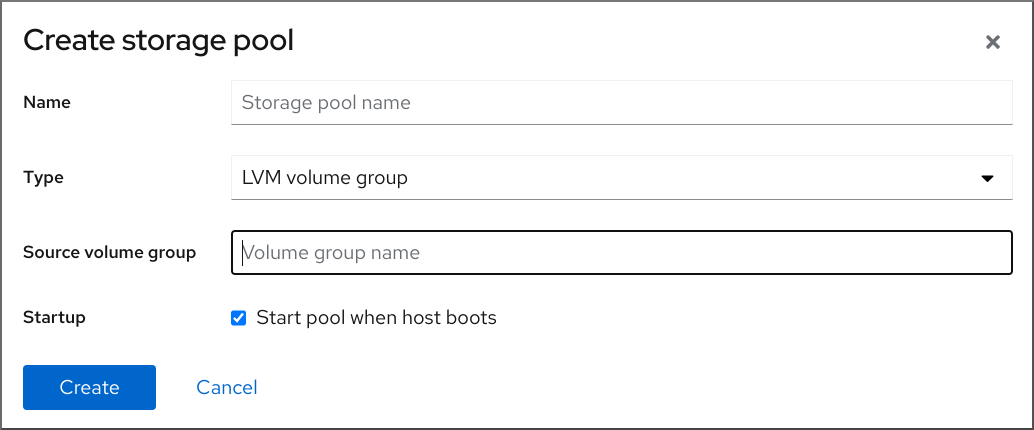 Note
NoteIf you do not see the LVM volume group option in the drop down menu, then your hypervisor does not support LVM-based storage pools.
Enter the rest of the information:
- Source volume group - The name of the LVM volume group that you wish to use.
- Startup - Whether or not the storage pool starts when the host boots.
Click .
The storage pool is created. The Create storage pool dialog closes, and the new storage pool appears in the list of storage pools.
Additional resources
11.3.7. Creating SCSI-based storage pools with vHBA devices by using the web console
An SCSI-based storage pool is based on a Small Computer System Interface (SCSI) device. In this configuration, your host must be able to connect to the SCSI device by using a virtual host bus adapter (vHBA).
Prerequisites
- Create a vHBA. For more information, see Creating vHBAs.
- The web console VM plug-in is installed on your system.
Procedure
In the RHEL web console, click in the Virtual Machines tab.
The Storage pools window appears, showing a list of configured storage pools, if any.
Click .
The Create storage pool dialog appears.
- Enter a name for the storage pool.
In the Type drop down menu, select iSCSI direct target.
 Note
NoteIf you do not see the iSCSI direct target option in the drop down menu, then your hypervisor does not support SCSI-based storage pools.
Enter the rest of the information:
- Host - The hostname of the network server where the mount point is located. This can be a hostname or an IP address.
- Source path - The unique iSCSI Qualified Name (IQN) of the iSCSI target.
- Initiator - The unique iSCSI Qualified Name (IQN) of the iSCSI initiator, the vHBA.
- Startup - Whether or not the storage pool starts when the host boots.
Click .
The storage pool is created. The Create storage pool dialog closes, and the new storage pool appears in the list of storage pools.
Additional resources
11.3.8. Removing storage pools by using the web console
You can remove storage pools to free up resources on the host or on the network to improve system performance. Deleting storage pools also frees up resources that can then be used by other virtual machines (VMs).
Unless explicitly specified, deleting a storage pool does not simultaneously delete the storage volumes inside that pool.
To temporarily deactivate a storage pool instead of deleting it, see Deactivating storage pools by using the web console
Prerequisites
- The web console VM plug-in is installed on your system.
- Detach the disk from the VM.
- If you want to delete the associated storage volumes along with the pool, activate the pool.
Procedure
Click on the Virtual Machines tab.
The Storage Pools window appears, showing a list of configured storage pools.
Click the Menu button of the storage pool you want to delete and click .
A confirmation dialog appears.

- Optional: To delete the storage volumes inside the pool, select the corresponding check boxes in the dialog.
Click .
The storage pool is deleted. If you had selected the checkbox in the previous step, the associated storage volumes are deleted as well.
Additional resources
11.3.9. Deactivating storage pools by using the web console
If you do not want to permanently delete a storage pool, you can temporarily deactivate it instead.
When you deactivate a storage pool, no new volumes can be created in that pool. However, any virtual machines (VMs) that have volumes in that pool will continue to run. This is useful for a number of reasons, for example, you can limit the number of volumes that can be created in a pool to increase system performance.
To deactivate a storage pool by using the RHEL web console, see the following procedure.
Prerequisites
- The web console VM plug-in is installed on your system.
Procedure
Click at the top of the Virtual Machines tab. The Storage Pools window appears, showing a list of configured storage pools.
Click on the storage pool row.
The storage pool is deactivated.
Additional resources
11.4. Parameters for creating storage pools
Based on the type of storage pool you require, you can modify its XML configuration file and define a specific type of storage pool. This section provides information about the XML parameters required for creating various types of storage pools along with examples.
11.4.1. Directory-based storage pool parameters
When you want to create or modify a directory-based storage pool by using an XML configuration file, you must include certain required parameters. See the following table for more information about these parameters.
You can use the virsh pool-define command to create a storage pool based on the XML configuration in a specified file. For example:
# virsh pool-define ~/guest_images.xml
  Pool defined from guest_images_dir
Parameters
The following table provides a list of required parameters for the XML file for a directory-based storage pool.
Table 11.1. Directory-based storage pool parameters
| Description | XML |
|---|---|
| The type of storage pool |
|
| The name of the storage pool |
|
| The path specifying the target. This will be the path used for the storage pool. |
|
Example
The following is an example of an XML file for a storage pool based on the /guest_images directory:
<pool type='dir'>
  <name>dirpool</name>
  <target>
    <path>/guest_images</path>
  </target>
</pool>
Additional resources
11.4.2. Disk-based storage pool parameters
When you want to create or modify a disk-based storage pool by using an XML configuration file, you must include certain required parameters. See the following table for more information about these parameters.
You can use the virsh pool-define command to create a storage pool based on the XML configuration in a specified file. For example:
# virsh pool-define ~/guest_images.xml
  Pool defined from guest_images_disk
Parameters
The following table provides a list of required parameters for the XML file for a disk-based storage pool.
Table 11.2. Disk-based storage pool parameters
| Description | XML |
|---|---|
| The type of storage pool |
|
| The name of the storage pool |
|
|
The path specifying the storage device. For example, |
|
| The path specifying the target device. This will be the path used for the storage pool. |
|
Example
The following is an example of an XML file for a disk-based storage pool:
<pool type='disk'>
  <name>phy_disk</name>
  <source>
    <device path='/dev/sdb'/>
    <format type='gpt'/>
  </source>
  <target>
    <path>/dev</path>
  </target>
</pool>
Additional resources
11.4.3. Filesystem-based storage pool parameters
When you want to create or modify a filesystem-based storage pool by using an XML configuration file, you must include certain required parameters. See the following table for more information about these parameters.
You can use the virsh pool-define command to create a storage pool based on the XML configuration in a specified file. For example:
# virsh pool-define ~/guest_images.xml
  Pool defined from guest_images_fs
Parameters
The following table provides a list of required parameters for the XML file for a filesystem-based storage pool.
Table 11.3. Filesystem-based storage pool parameters
| Description | XML |
|---|---|
| The type of storage pool |
|
| The name of the storage pool |
|
|
The path specifying the partition. For example, |
|
| The file system type, for example ext4. |
|
| The path specifying the target. This will be the path used for the storage pool. |
|
Example
The following is an example of an XML file for a storage pool based on the /dev/sdc1 partition:
<pool type='fs'>
<name>guest_images_fs</name>
<source>
<device path='/dev/sdc1'/>
<format type='auto'/>
</source>
<target>
<path>/guest_images</path>
</target>
</pool>Additional resources
11.4.4. GlusterFS-based storage pool parameters
When you want to create or modify a GlusterFS-based storage pool by using an XML configuration file, you must include certain required parameters. See the following table for more information about these parameters.
You can use the virsh pool-define command to create a storage pool based on the XML configuration in a specified file. For example:
# virsh pool-define ~/guest_images.xml
Pool defined from guest_images_glusterfsParameters
The following table provides a list of required parameters for the XML file for a GlusterFS-based storage pool.
Table 11.4. GlusterFS-based storage pool parameters
| Description | XML |
|---|---|
| The type of storage pool |
|
| The name of the storage pool |
|
| The hostname or IP address of the Gluster server |
|
| The path on the Gluster server used for the storage pool. |
|
Example
The following is an example of an XML file for a storage pool based on the Gluster file system at 111.222.111.222:
<pool type='gluster'>
<name>Gluster_pool</name>
<source>
<host name='111.222.111.222'/>
<dir path='/'/>
<name>gluster-vol1</name>
</source>
</pool>Additional resources
11.4.5. iSCSI-based storage pool parameters
When you want to create or modify an iSCSI-based storage pool by using an XML configuration file, you must include certain required parameters. See the following table for more information about these parameters.
You can use the virsh pool-define command to create a storage pool based on the XML configuration in a specified file. For example:
# virsh pool-define ~/guest_images.xml
Pool defined from guest_images_iscsiParameters
The following table provides a list of required parameters for the XML file for an iSCSI-based storage pool.
Table 11.5. iSCSI-based storage pool parameters
| Description | XML |
|---|---|
| The type of storage pool |
|
| The name of the storage pool |
|
| The name of the host |
|
| The iSCSI IQN |
|
| The path specifying the target. This will be the path used for the storage pool. |
|
| [Optional] The IQN of the iSCSI initiator. This is only needed when the ACL restricts the LUN to a particular initiator. |
|
The IQN of the iSCSI initiator can be determined by using the virsh find-storage-pool-sources-as iscsi command.
Example
The following is an example of an XML file for a storage pool based on the specified iSCSI device:
<pool type='iscsi'>
<name>iSCSI_pool</name>
<source>
<host name='server1.example.com'/>
<device path='iqn.2010-05.com.example.server1:iscsirhel7guest'/>
</source>
<target>
<path>/dev/disk/by-path</path>
</target>
</pool>Additional resources
11.4.6. LVM-based storage pool parameters
When you want to create or modify an LVM-based storage pool by using an XML configuration file, you must include certain required parameters. See the following table for more information about these parameters.
You can use the virsh pool-define command to create a storage pool based on the XML configuration in a specified file. For example:
# virsh pool-define ~/guest_images.xml
Pool defined from guest_images_logicalParameters
The following table provides a list of required parameters for the XML file for a LVM-based storage pool.
Table 11.6. LVM-based storage pool parameters
| Description | XML |
|---|---|
| The type of storage pool |
|
| The name of the storage pool |
|
| The path to the device for the storage pool |
|
| The name of the volume group |
|
| The virtual group format |
|
| The target path |
|
If the logical volume group is made of multiple disk partitions, there may be multiple source devices listed. For example:
<source> <device path='/dev/sda1'/> <device path='/dev/sdb3'/> <device path='/dev/sdc2'/> ... </source>
Example
The following is an example of an XML file for a storage pool based on the specified LVM:
<pool type='logical'>
<name>guest_images_lvm</name>
<source>
<device path='/dev/sdc'/>
<name>libvirt_lvm</name>
<format type='lvm2'/>
</source>
<target>
<path>/dev/libvirt_lvm</path>
</target>
</pool>Additional resources
11.4.7. NFS-based storage pool parameters
When you want to create or modify an NFS-based storage pool by using an XML configuration file, you must include certain required parameters. See the following table for more information about these parameters.
You can use the virsh pool-define command to create a storage pool based on the XML configuration in a specified file. For example:
# virsh pool-define ~/guest_images.xml
Pool defined from guest_images_netfsParameters
The following table provides a list of required parameters for the XML file for an NFS-based storage pool.
Table 11.7. NFS-based storage pool parameters
| Description | XML |
|---|---|
| The type of storage pool |
|
| The name of the storage pool |
|
| The hostname of the network server where the mount point is located. This can be a hostname or an IP address. |
|
| The format of the storage pool | One of the following:
|
| The directory used on the network server |
|
| The path specifying the target. This will be the path used for the storage pool. |
|
Example
The following is an example of an XML file for a storage pool based on the /home/net_mount directory of the file_server NFS server:
<pool type='netfs'>
<name>nfspool</name>
<source>
<host name='file_server'/>
<format type='nfs'/>
<dir path='/home/net_mount'/>
</source>
<target>
<path>/var/lib/libvirt/images/nfspool</path>
</target>
</pool>Additional resources
11.4.8. Parameters for SCSI-based storage pools with vHBA devices
To create or modify an XML configuration file for a SCSi-based storage pool that uses a virtual host adapter bus (vHBA) device, you must include certain required parameters in the XML configuration file. See the following table for more information about the required parameters.
You can use the virsh pool-define command to create a storage pool based on the XML configuration in a specified file. For example:
# virsh pool-define ~/guest_images.xml
Pool defined from guest_images_vhbaParameters
The following table provides a list of required parameters for the XML file for a SCSI-based storage pool with vHBA.
Table 11.8. Parameters for SCSI-based storage pools with vHBA devices
| Description | XML |
|---|---|
| The type of storage pool |
|
| The name of the storage pool |
|
|
The identifier of the vHBA. The |
|
| The target path. This will be the path used for the storage pool. |
|
When the <path> field is /dev/, libvirt generates a unique short device path for the volume device path. For example, /dev/sdc. Otherwise, the physical host path is used. For example, /dev/disk/by-path/pci-0000:10:00.0-fc-0x5006016044602198-lun-0. The unique short device path allows the same volume to be listed in multiple virtual machines (VMs) by multiple storage pools. If the physical host path is used by multiple VMs, duplicate device type warnings may occur.
The parent attribute can be used in the <adapter> field to identify the physical HBA parent from which the NPIV LUNs by varying paths can be used. This field, scsi_hostN, is combined with the vports and max_vports attributes to complete the parent identification. The parent, parent_wwnn, parent_wwpn, or parent_fabric_wwn attributes provide varying degrees of assurance that after the host reboots the same HBA is used.
-
If no
parentis specified,libvirtuses the firstscsi_hostNadapter that supports NPIV. -
If only the
parentis specified, problems can arise if additional SCSI host adapters are added to the configuration. -
If
parent_wwnnorparent_wwpnis specified, after the host reboots the same HBA is used. -
If
parent_fabric_wwnis used, after the host reboots an HBA on the same fabric is selected, regardless of thescsi_hostNused.
Examples
The following are examples of XML files for SCSI-based storage pools with vHBA.
A storage pool that is the only storage pool on the HBA:
<pool type='scsi'> <name>vhbapool_host3</name> <source> <adapter type='fc_host' wwnn='5001a4a93526d0a1' wwpn='5001a4ace3ee047d'/> </source> <target> <path>/dev/disk/by-path</path> </target> </pool>A storage pool that is one of several storage pools that use a single vHBA and uses the
parentattribute to identify the SCSI host device:<pool type='scsi'> <name>vhbapool_host3</name> <source> <adapter type='fc_host' parent='scsi_host3' wwnn='5001a4a93526d0a1' wwpn='5001a4ace3ee047d'/> </source> <target> <path>/dev/disk/by-path</path> </target> </pool>
Additional resources
11.5. Managing virtual machine storage volumes by using the CLI
You can use the CLI to manage the following aspects of your storage volumes to assign storage to your virtual machines (VMs):
11.5.1. Viewing storage volume information by using the CLI
By using the command line, you can view a list of all storage pools available on your host, as well as details about a specified storage pool
Procedure
Use the
virsh vol-listcommand to list the storage volumes in a specified storage pool.# virsh vol-list --pool RHEL-Storage-Pool --details Name Path Type Capacity Allocation --------------------------------------------------------------------------------------------- .bash_history /home/VirtualMachines/.bash_history file 18.70 KiB 20.00 KiB .bash_logout /home/VirtualMachines/.bash_logout file 18.00 B 4.00 KiB .bash_profile /home/VirtualMachines/.bash_profile file 193.00 B 4.00 KiB .bashrc /home/VirtualMachines/.bashrc file 1.29 KiB 4.00 KiB .git-prompt.sh /home/VirtualMachines/.git-prompt.sh file 15.84 KiB 16.00 KiB .gitconfig /home/VirtualMachines/.gitconfig file 167.00 B 4.00 KiB RHEL_Volume.qcow2 /home/VirtualMachines/RHEL8_Volume.qcow2 file 60.00 GiB 13.93 GiBUse the
virsh vol-infocommand to list the storage volumes in a specified storage pool.# vol-info --pool RHEL-Storage-Pool --vol RHEL_Volume.qcow2 Name: RHEL_Volume.qcow2 Type: file Capacity: 60.00 GiB Allocation: 13.93 GiB
11.5.2. Creating and assigning storage volumes by using the CLI
To obtain a disk image and attach it to a virtual machine (VM) as a virtual disk, create a storage volume and assign its XML configuration to a the VM.
Prerequisites
A storage pool with unallocated space is present on the host.
To verify, list the storage pools on the host:
# virsh pool-list --details Name State Autostart Persistent Capacity Allocation Available -------------------------------------------------------------------------------------------- default running yes yes 48.97 GiB 36.34 GiB 12.63 GiB Downloads running yes yes 175.92 GiB 121.20 GiB 54.72 GiB VM-disks running yes yes 175.92 GiB 121.20 GiB 54.72 GiB- If you do not have an existing storage pool, create one. For more information, see Managing storage for virtual machines.
Procedure
Create a storage volume by using the
virsh vol-create-ascommand. For example, to create a 20 GB qcow2 volume based on theguest-images-fsstorage pool:# virsh vol-create-as --pool guest-images-fs --name vm-disk1 --capacity 20 --format qcow2Important: Specific storage pool types do not support the
virsh vol-create-ascommand and instead require specific processes to create storage volumes:-
GlusterFS-based - Use the
qemu-imgcommand to create storage volumes. - iSCSI-based - Prepare the iSCSI LUNs in advance on the iSCSI server.
-
Multipath-based - Use the
multipathdcommand to prepare or manage the multipath. - vHBA-based - Prepare the fibre channel card in advance.
-
GlusterFS-based - Use the
Create an XML file, and add the following lines in it. This file will be used to add the storage volume as a disk to a VM.
<disk type='volume' device='disk'> <driver name='qemu' type='qcow2'/> <source pool='guest-images-fs' volume='vm-disk1'/> <target dev='hdk' bus='ide'/> </disk>This example specifies a virtual disk that uses the
vm-disk1volume, created in the previous step, and sets the volume to be set up as diskhdkon anidebus. Modify the respective parameters as appropriate for your environment.Important: With specific storage pool types, you must use different XML formats to describe a storage volume disk.
For GlusterFS-based pools:
<disk type='network' device='disk'> <driver name='qemu' type='raw'/> <source protocol='gluster' name='Volume1/Image'> <host name='example.org' port='6000'/> </source> <target dev='vda' bus='virtio'/> <address type='pci' domain='0x0000' bus='0x00' slot='0x03' function='0x0'/> </disk>For multipath-based pools:
<disk type='block' device='disk'> <driver name='qemu' type='raw'/> <source dev='/dev/mapper/mpatha' /> <target dev='sda' bus='scsi'/> </disk>
For RBD-based storage pools:
<disk type='network' device='disk'> <driver name='qemu' type='raw'/> <source protocol='rbd' name='pool/image'> <host name='mon1.example.org' port='6321'/> </source> <target dev='vdc' bus='virtio'/> </disk>
Use the XML file to assign the storage volume as a disk to a VM. For example, to assign a disk defined in
~/vm-disk1.xmlto thetestguest1VM, use the following command:# virsh attach-device --config testguest1 ~/vm-disk1.xml
Verification
- In the guest operating system of the VM, confirm that the disk image has become available as an un-formatted and un-allocated disk.
11.5.3. Deleting storage volumes by using the CLI
To remove a storage volume from your host system, you must stop the pool and remove its XML definition.
Prerequisites
- Any virtual machine that uses the storage volume you want to delete is shut down.
Procedure
Use the
virsh vol-listcommand to list the storage volumes in a specified storage pool.# virsh vol-list --pool RHEL-SP Name Path --------------------------------------------------------------- .bash_history /home/VirtualMachines/.bash_history .bash_logout /home/VirtualMachines/.bash_logout .bash_profile /home/VirtualMachines/.bash_profile .bashrc /home/VirtualMachines/.bashrc .git-prompt.sh /home/VirtualMachines/.git-prompt.sh .gitconfig /home/VirtualMachines/.gitconfig vm-disk1 /home/VirtualMachines/vm-disk1Optional: Use the
virsh vol-wipecommand to wipe a storage volume. For example, to wipe a storage volume namedvm-disk1associated with the storage poolRHEL-SP:# virsh vol-wipe --pool RHEL-SP vm-disk1 Vol vm-disk1 wipedUse the
virsh vol-deletecommand to delete a storage volume. For example, to delete a storage volume namedvm-disk1associated with the storage poolRHEL-SP:# virsh vol-delete --pool RHEL-SP vm-disk1 Vol vm-disk1 deleted
Verification
Use the
virsh vol-listcommand again to verify that the storage volume was deleted.# virsh vol-list --pool RHEL-SP Name Path --------------------------------------------------------------- .bash_history /home/VirtualMachines/.bash_history .bash_logout /home/VirtualMachines/.bash_logout .bash_profile /home/VirtualMachines/.bash_profile .bashrc /home/VirtualMachines/.bashrc .git-prompt.sh /home/VirtualMachines/.git-prompt.sh .gitconfig /home/VirtualMachines/.gitconfig
11.6. Managing virtual disk images by using the CLI
Virtual disk images are a type of virtual storage volumes and provide storage to virtual machines (VMs) in a similar way as hard drives provide storage for physical machines.
When creating a new VM , libvirt creates a new disk image automatically, unless you specify otherwise. However, depending on your use case, you might want to create and manage a disk image separately from the VM.
11.6.1. Creating a virtual disk image by using qemu-img
If you require creating a new virtual disk image separately from a new virtual machine (VM) and creating a storage volume is not viable for you, you can use the qemu-img command-line utility.
Procedure
Create a virtual disk image by using the
qemu-imgutility:# qemu-img create -f <format> <image-name> <size>For example, the following command creates a qcow2 disk image named test-image with the size of 30 gigabytes.
# qemu-img create -f qcow2 test-image 30G Formatting 'test-img', fmt=qcow2 cluster_size=65536 extended_l2=off compression_type=zlib size=32212254720 lazy_refcounts=off refcount_bits=16
Verification
Display the information about the image you created and check that it has the required size and does not have any corruption:
# qemu-img info <test-img> image: test-img file format: qcow2 virtual size: 30 GiB (32212254720 bytes) disk size: 196 KiB cluster_size: 65536 Format specific information: compat: 1.1 compression type: zlib lazy refcounts: false refcount bits: 16 corrupt: false extended l2: false
Additional resources
11.6.2. Checking the consistency of a virtual disk image
Before attaching a disk image to a virtual machine (VM), ensure that the disk image does not have problems, such as corruption or high fragmentation. To do so, you can use the qemu-img check command.
If needed, you can also use this command to attempt repairing the disk image.
Prerequisites
- Any virtual machines (VMs) that use the disk image must be shut down.
Procedure
Use the
qemu-img checkcommand on the image you want to test. For example:# qemu-img check <test-name.qcow2> No errors were found on the image. 327434/327680 = 99.92% allocated, 0.00% fragmented, 0.00% compressed clusters Image end offset: 21478375424If the check finds problems on the disk image, the output of the command looks similar to the following:
167 errors were found on the image. Data may be corrupted, or further writes to the image may corrupt it. 453368 leaked clusters were found on the image. This means waste of disk space, but no harm to data. 259 internal errors have occurred during the check. Image end offset: 21478375424
Repair them by using the
qemu-img checkcommand with the-r alloption. Note, however, that this might fix only some of the problems.WarningRepairing the disk image can cause data corruption or other issues. Back up the disk image before attempting the repair.
# qemu-img check -r all <test-name.qcow2> [...] 122 errors were found on the image. Data may be corrupted, or further writes to the image may corrupt it. 250 internal errors have occurred during the check. Image end offset: 27071414272This output indicates the number of problems found on the disk image after the repair.
-
If further disk image repairs are required, you can use various
libguestfstools in theguestfishshell.
Additional resources
-
The
qemu-imgman page -
The
guestfishman page
11.6.3. Resizing a virtual disk image
If an existing disk image requires additional space, you can use the qemu-img resize utility to change the size of the image to fit your use case.
Prerequisites
- You have created a back up of the disk image.
Any virtual machines (VMs) that use the disk image must be shutdown.
WarningResizing the disk image of a running VM can cause data corruption or other issues.
- The hard disk of the host has sufficient free space for the intended disk image size.
- Optional: You have ensured that the disk image does not have data corruption or similar problems. For instructions, see Checking the consistency of a virtual disk image.
Procedure
Determine the location of the disk image file for the VM you want to resize. For example:
# virsh domblklist <vm-name> Target Source ---------------------------------------------------------- vda /home/username/disk-images/example-image.qcow2
Optional: Back up the current disk image.
# cp <example-image.qcow2> <example-image-backup.qcow2>Use the
qemu-img resizeutility to resize the image.For example, to increase the <example-image.qcow2> size by 10 gigabytes:
# qemu-img resize <example-image.qcow2> +10G- Resize the file system, partitions, or physical volumes inside the disk image to use the additional space. To do so in a RHEL guest operating system, use the instructions in Managing storage devices and Managing file systems.
Verification
Display information about the resized image and see if it has the intended size:
# qemu-img info <converted-image.qcow2> image: converted-image.qcow2 file format: qcow2 virtual size: 30 GiB (32212254720 bytes) disk size: 196 KiB cluster_size: 65536 Format specific information: compat: 1.1 compression type: zlib lazy refcounts: false refcount bits: 16 corrupt: false extended l2: false
- Check the resized disk image for potential errors. For instructions, see Checking the consistency of a virtual disk image.
Additional resources
-
The
qemu-imgman page - Managing storage devices
- Managing file systems
11.6.4. Converting between virtual disk image formats
You can convert the virtual disk image to a different format by using the qemu-img convert command. For example, converting between virtual disk image formats might be necessary if you want to attach the disk image to a virtual machine (VM) running on a different hypervisor.
Prerequisites
- Any virtual machines (VMs) that use the disk image must be shut down.
Procedure
Use the
qemu-im convertcommand to convert an existing virtual disk image to a different format. For example, to convert a raw disk image to a QCOW2 disk image:# qemu-img convert -f raw <original-image.img> -O qcow2 <converted-image.qcow2>
Verification
Display information about the converted image and see if it has the intended format and size.
# qemu-img info <converted-image.qcow2> image: converted-image.qcow2 file format: qcow2 virtual size: 30 GiB (32212254720 bytes) disk size: 196 KiB cluster_size: 65536 Format specific information: compat: 1.1 compression type: zlib lazy refcounts: false refcount bits: 16 corrupt: false extended l2: false- Check the disk image for potential errors. for instructions, see Checking the consistency of a virtual disk image.
Additional resources
- Checking the consistency of a virtual disk image
-
The
qemu-imgman page
11.7. Managing virtual machine storage volumes by using the web console
By using the RHEL, you can manage the storage volumes used to allocate storage to your virtual machines (VMs).
You can use the RHEL web console to:
11.7.1. Creating storage volumes by using the web console
To create a functioning virtual machine (VM) you require a local storage device assigned to the VM that can store the VM image and VM-related data. You can create a storage volume in a storage pool and assign it to a VM as a storage disk.
To create storage volumes by using the web console, see the following procedure.
Prerequisites
- The web console VM plug-in is installed on your system.
Procedure
Click at the top of the Virtual Machines tab. The Storage Pools window appears, showing a list of configured storage pools.
In the window, click the storage pool from which you want to create a storage volume.
The row expands to reveal the Overview pane with basic information about the selected storage pool.
Click next to the Overview tab in the expanded row.
The Storage Volume tab appears with basic information about existing storage volumes, if any.

Click .
The Create storage volume dialog appears.

Enter the following information in the Create Storage Volume dialog:
- Name - The name of the storage volume.
- Size - The size of the storage volume in MiB or GiB.
-
Format - The format of the storage volume. The supported types are
qcow2andraw.
Click .
The storage volume is created, the Create Storage Volume dialog closes, and the new storage volume appears in the list of storage volumes.
11.7.2. Removing storage volumes by using the web console
You can remove storage volumes to free up space in the storage pool, or to remove storage items associated with defunct virtual machines (VMs).
To remove storage volumes by using the RHEL web console, see the following procedure.
Prerequisites
- The web console VM plug-in is installed on your system.
- Any virtual machine that uses the storage volume you want to delete is shut down.
Procedure
Click at the top of the Virtual Machines tab. The Storage Pools window appears, showing a list of configured storage pools.
In the window, click the storage pool from which you want to remove a storage volume.
The row expands to reveal the Overview pane with basic information about the selected storage pool.
Click next to the Overview tab in the expanded row.
The Storage Volume tab appears with basic information about existing storage volumes, if any.
Select the storage volume you want to remove.

- Click
Additional resources
11.8. Managing virtual machine storage disks by using the web console
By using RHEL, you can manage the storage disks that are attached to your virtual machines (VMs).
You can use the RHEL web console to:
11.8.1. Viewing virtual machine disk information in the web console
By using the web console, you can view detailed information about disks assigned to a selected virtual machine (VM).
Prerequisites
- The web console VM plug-in is installed on your system.
Procedure
Click the VM whose information you want to see.
A new page opens with an Overview section with basic information about the selected VM and a Console section to access the VM’s graphical interface.
Scroll to .
The Disks section displays information about the disks assigned to the VM as well as options to Add, Remove, or Edit disks.
The information includes the following:
- Device - The device type of the disk.
- Used - The amount of disk currently allocated.
- Capacity - The maximum size of the storage volume.
- Bus - The type of disk device that is emulated.
-
Access - Whether the disk is Writeable or Read-only. For
rawdisks, you can also set the access to Writeable and shared. - Source - The disk device or file.
Additional resources
11.8.2. Adding new disks to virtual machines by using the web console
You can add new disks to virtual machines (VMs) by creating a new storage volume and attaching it to a VM by using the RHEL 8 web console.
Prerequisites
- The web console VM plug-in is installed on your system.
Procedure
In the interface, click the VM for which you want to create and attach a new disk.
A new page opens with an Overview section with basic information about the selected VM and a Console section to access the VM’s graphical interface.
Scroll to .
The Disks section displays information about the disks assigned to the VM as well as options to Add, Remove, or Edit disks.
Click .
The Add Disk dialog appears.
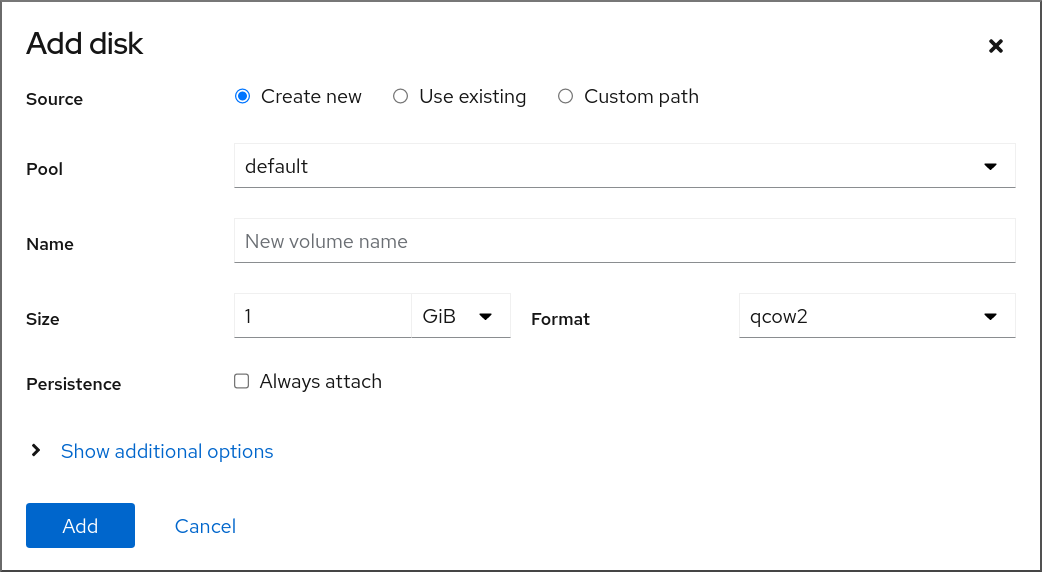
- Select the Create New option.
Configure the new disk.
- Pool - Select the storage pool from which the virtual disk will be created.
- Name - Enter a name for the virtual disk that will be created.
- Size - Enter the size and select the unit (MiB or GiB) of the virtual disk that will be created.
-
Format - Select the format for the virtual disk that will be created. The supported types are
qcow2andraw. Persistence - If checked, the virtual disk is persistent. If not checked, the virtual disk is transient.
NoteTransient disks can only be added to VMs that are running.
Additional Options - Set additional configurations for the virtual disk.
- Cache - Select the cache mechanism.
- Bus - Select the type of disk device to emulate.
Click .
The virtual disk is created and connected to the VM.
11.8.3. Attaching existing disks to virtual machines by using the web console
By using the web console, you can attach existing storage volumes as disks to a virtual machine (VM).
Prerequisites
- The web console VM plug-in is installed on your system.
Procedure
In the interface, click the VM for which you want to create and attach a new disk.
A new page opens with an Overview section with basic information about the selected VM and a Console section to access the VM’s graphical interface.
Scroll to .
The Disks section displays information about the disks assigned to the VM as well as options to Add, Remove, or Edit disks.
Click .
The Add Disk dialog appears.
Click the Use Existing radio button.
The appropriate configuration fields appear in the Add Disk dialog.

Configure the disk for the VM.
- Pool - Select the storage pool from which the virtual disk will be attached.
- Volume - Select the storage volume that will be attached.
- Persistence - Available when the VM is running. Select the Always attach checkbox to make the virtual disk persistent. Clear the checkbox to make the virtual disk transient.
Additional Options - Set additional configurations for the virtual disk.
- Cache - Select the cache mechanism.
- Bus - Select the type of disk device to emulate.
Click
The selected virtual disk is attached to the VM.
11.8.4. Detaching disks from virtual machines by using the web console
By using the web console, you can detach disks from virtual machines (VMs).
Prerequisites
- The web console VM plug-in is installed on your system.
Procedure
In the interface, click the VM from which you want to detach a disk.
A new page opens with an Overview section with basic information about the selected VM and a Console section to access the VM’s graphical interface.
Scroll to .
The Disks section displays information about the disks assigned to the VM as well as options to Add, Remove, or Edit disks.
-
Click the button next to the disk you want to detach from the VM. A
Remove Diskconfirmation dialog box appears. In the confirmation dialog box, click .
The virtual disk is detached from the VM.
11.9. Securing iSCSI storage pools with libvirt secrets
Username and password parameters can be configured with virsh to secure an iSCSI storage pool. You can configure this before or after you define the pool, but the pool must be started for the authentication settings to take effect.
The following provides instructions for securing iSCSI-based storage pools with libvirt secrets.
This procedure is required if a user_ID and password were defined when creating the iSCSI target.
Prerequisites
- Ensure that you have created an iSCSI-based storage pool. For more information, see Creating iSCSI-based storage pools by using the CLI.
Procedure
Create a libvirt secret file with a challenge-handshake authentication protocol (CHAP) user name. For example:
<secret ephemeral='no' private='yes'> <description>Passphrase for the iSCSI example.com server</description> <usage type='iscsi'> <target>iscsirhel7secret</target> </usage> </secret>Define the libvirt secret with the
virsh secret-definecommand:# virsh secret-define secret.xmlVerify the UUID with the
virsh secret-listcommand:# virsh secret-list UUID Usage -------------------------------------------------------------- 2d7891af-20be-4e5e-af83-190e8a922360 iscsi iscsirhel7secretAssign a secret to the UUID in the output of the previous step using the
virsh secret-set-valuecommand. This ensures that the CHAP username and password are in a libvirt-controlled secret list. For example:# virsh secret-set-value --interactive 2d7891af-20be-4e5e-af83-190e8a922360 Enter new value for secret: Secret value setAdd an authentication entry in the storage pool’s XML file using the
virsh editcommand, and add an<auth>element, specifyingauthentication type,username, andsecret usage. For example:<pool type='iscsi'> <name>iscsirhel7pool</name> <source> <host name='192.0.2.1'/> <device path='iqn.2010-05.com.example.server1:iscsirhel7guest'/> <auth type='chap' username='_example-user_'> <secret usage='iscsirhel7secret'/> </auth> </source> <target> <path>/dev/disk/by-path</path> </target> </pool>NoteThe
<auth>sub-element exists in different locations within the virtual machine’s<pool>and<disk>XML elements. For a<pool>,<auth>is specified within the<source>element, as this describes where to find the pool sources, since authentication is a property of some pool sources (iSCSI and RBD). For a<disk>, which is a sub-element of a domain, the authentication to the iSCSI or RBD disk is a property of the disk. In addition, the<auth>sub-element for a disk differs from that of a storage pool.<auth username='redhat'> <secret type='iscsi' usage='iscsirhel7secret'/> </auth>
To activate the changes, activate the storage pool. If the pool has already been started, stop and restart the storage pool:
# virsh pool-destroy iscsirhel7pool # virsh pool-start iscsirhel7pool
11.10. Creating vHBAs
A virtual host bus adapter (vHBA) device connects the host system to an SCSI device and is required for creating an SCSI-based storage pool.
You can create a vHBA device by defining it in an XML configuration file.
Procedure
Locate the HBAs on your host system, by using the
virsh nodedev-list --cap vportscommand.The following example shows a host that has two HBAs that support vHBA:
# virsh nodedev-list --cap vports scsi_host3 scsi_host4View the HBA’s details, by using the
virsh nodedev-dumpxml HBA_devicecommand.# virsh nodedev-dumpxml scsi_host3The output from the command lists the
<name>,<wwnn>, and<wwpn>fields, which are used to create a vHBA.<max_vports>shows the maximum number of supported vHBAs. For example:<device> <name>scsi_host3</name> <path>/sys/devices/pci0000:00/0000:00:04.0/0000:10:00.0/host3</path> <parent>pci_0000_10_00_0</parent> <capability type='scsi_host'> <host>3</host> <unique_id>0</unique_id> <capability type='fc_host'> <wwnn>20000000c9848140</wwnn> <wwpn>10000000c9848140</wwpn> <fabric_wwn>2002000573de9a81</fabric_wwn> </capability> <capability type='vport_ops'> <max_vports>127</max_vports> <vports>0</vports> </capability> </capability> </device>In this example, the
<max_vports>value shows there are a total 127 virtual ports available for use in the HBA configuration. The<vports>value shows the number of virtual ports currently being used. These values update after creating a vHBA.Create an XML file similar to one of the following for the vHBA host. In these examples, the file is named
vhba_host3.xml.This example uses
scsi_host3to describe the parent vHBA.<device> <parent>scsi_host3</parent> <capability type='scsi_host'> <capability type='fc_host'> </capability> </capability> </device>This example uses a WWNN/WWPN pair to describe the parent vHBA.
<device> <name>vhba</name> <parent wwnn='20000000c9848140' wwpn='10000000c9848140'/> <capability type='scsi_host'> <capability type='fc_host'> </capability> </capability> </device>NoteThe WWNN and WWPN values must match those in the HBA details seen in the previous step.
The
<parent>field specifies the HBA device to associate with this vHBA device. The details in the<device>tag are used in the next step to create a new vHBA device for the host. For more information about thenodedevXML format, see the libvirt upstream pages.NoteThe
virshcommand does not provide a way to define theparent_wwnn,parent_wwpn, orparent_fabric_wwnattributes.Create a VHBA based on the XML file created in the previous step by using the
virsh nodev-createcommand.# virsh nodedev-create vhba_host3 Node device scsi_host5 created from vhba_host3.xml
Verification
Verify the new vHBA’s details (scsi_host5) by using the
virsh nodedev-dumpxmlcommand:# virsh nodedev-dumpxml scsi_host5 <device> <name>scsi_host5</name> <path>/sys/devices/pci0000:00/0000:00:04.0/0000:10:00.0/host3/vport-3:0-0/host5</path> <parent>scsi_host3</parent> <capability type='scsi_host'> <host>5</host> <unique_id>2</unique_id> <capability type='fc_host'> <wwnn>5001a4a93526d0a1</wwnn> <wwpn>5001a4ace3ee047d</wwpn> <fabric_wwn>2002000573de9a81</fabric_wwn> </capability> </capability> </device>
Additional resources
Chapter 12. Managing GPU devices in virtual machines
To enhance the graphical performance of your virtual machine (VMs) on a RHEL 8 host, you can assign a host GPU to a VM.
- You can detach the GPU from the host and pass full control of the GPU directly to the VM.
- You can create multiple mediated devices from a physical GPU, and assign these devices as virtual GPUs (vGPUs) to multiple guests. This is currently only supported on selected NVIDIA GPUs, and only one mediated device can be assigned to a single guest.
12.1. Assigning a GPU to a virtual machine
To access and control GPUs that are attached to the host system, you must configure the host system to pass direct control of the GPU to the virtual machine (VM).
If you are looking for information about assigning a virtual GPU, see Managing NVIDIA vGPU devices.
Prerequisites
You must enable IOMMU support on the host machine kernel.
On an Intel host, you must enable VT-d:
Regenerate the GRUB configuration with the
intel_iommu=onandiommu=ptparameters:# grubby --args="intel_iommu=on iommu_pt" --update-kernel DEFAULT- Reboot the host.
On an AMD host, you must enable AMD-Vi.
Note that on AMD hosts, IOMMU is enabled by default, you can add
iommu=ptto switch it to pass-through mode:Regenerate the GRUB configuration with the
iommu=ptparameter:# grubby --args="iommu=pt" --update-kernel DEFAULTNoteThe
ptoption only enables IOMMU for devices used in pass-through mode and provides better host performance. However, not all hardware supports the option. You can still assign devices even when this option is not enabled.- Reboot the host.
Procedure
Prevent the driver from binding to the GPU.
Identify the PCI bus address to which the GPU is attached.
# lspci -Dnn | grep VGA 0000:02:00.0 VGA compatible controller [0300]: NVIDIA Corporation GK106GL [Quadro K4000] [10de:11fa] (rev a1)
Prevent the host’s graphics driver from using the GPU. To do so, use the GPU PCI ID with the pci-stub driver.
For example, the following command prevents the driver from binding to the GPU attached at the 10de:11fa bus:
# grubby --args="pci-stub.ids=10de:11fa" --update-kernel DEFAULT- Reboot the host.
Optional: If certain GPU functions, such as audio, cannot be passed through to the VM due to support limitations, you can modify the driver bindings of the endpoints within an IOMMU group to pass through only the necessary GPU functions.
Convert the GPU settings to XML and note the PCI address of the endpoints that you want to prevent from attaching to the host drivers.
To do so, convert the GPU’s PCI bus address to a libvirt-compatible format by adding the
pci_prefix to the address, and converting the delimiters to underscores.For example, the following command displays the XML configuration of the GPU attached at the
0000:02:00.0bus address.# virsh nodedev-dumpxml pci_0000_02_00_0<device> <name>pci_0000_02_00_0</name> <path>/sys/devices/pci0000:00/0000:00:03.0/0000:02:00.0</path> <parent>pci_0000_00_03_0</parent> <driver> <name>pci-stub</name> </driver> <capability type='pci'> <domain>0</domain> <bus>2</bus> <slot>0</slot> <function>0</function> <product id='0x11fa'>GK106GL [Quadro K4000]</product> <vendor id='0x10de'>NVIDIA Corporation</vendor> <iommuGroup number='13'> <address domain='0x0000' bus='0x02' slot='0x00' function='0x0'/> <address domain='0x0000' bus='0x02' slot='0x00' function='0x1'/> </iommuGroup> <pci-express> <link validity='cap' port='0' speed='8' width='16'/> <link validity='sta' speed='2.5' width='16'/> </pci-express> </capability> </device>
Prevent the endpoints from attaching to the host driver.
In this example, to assign the GPU to a VM, prevent the endpoints that correspond to the audio function,
<address domain='0x0000' bus='0x02' slot='0x00' function='0x1'/>, from attaching to the host audio driver, and instead attach the endpoints to VFIO-PCI.# driverctl set-override 0000:02:00.1 vfio-pci
Attach the GPU to the VM
Create an XML configuration file for the GPU by using the PCI bus address.
For example, you can create the following XML file, GPU-Assign.xml, by using parameters from the GPU’s bus address.
<hostdev mode='subsystem' type='pci' managed='yes'> <driver name='vfio'/> <source> <address domain='0x0000' bus='0x02' slot='0x00' function='0x0'/> </source> </hostdev>
- Save the file on the host system.
Merge the file with the VM’s XML configuration.
For example, the following command merges the GPU XML file, GPU-Assign.xml, with the XML configuration file of the
System1VM.# virsh attach-device System1 --file /home/GPU-Assign.xml --persistent Device attached successfully.NoteThe GPU is attached as a secondary graphics device to the VM. Assigning a GPU as the primary graphics device is not supported, and Red Hat does not recommend removing the primary emulated graphics device in the VM’s XML configuration.
Verification
-
The device appears under the
<devices>section in VM’s XML configuration. For more information, see Sample virtual machine XML configuration.
Known Issues
The number of GPUs that can be attached to a VM is limited by the maximum number of assigned PCI devices, which in RHEL 8 is currently 64. However, attaching multiple GPUs to a VM is likely to cause problems with memory-mapped I/O (MMIO) on the guest, which may result in the GPUs not being available to the VM.
To work around these problems, set a larger 64-bit MMIO space and configure the vCPU physical address bits to make the extended 64-bit MMIO space addressable.
- Attaching an NVIDIA GPU device to a VM that uses a RHEL 8 guest operating system currently disables the Wayland session on that VM, and loads an Xorg session instead. This is because of incompatibilities between NVIDIA drivers and Wayland.
12.2. Managing NVIDIA vGPU devices
The vGPU feature makes it possible to divide a physical NVIDIA GPU device into multiple virtual devices, referred to as mediated devices. These mediated devices can then be assigned to multiple virtual machines (VMs) as virtual GPUs. As a result, these VMs can share the performance of a single physical GPU.
Assigning a physical GPU to VMs, with or without using mediated devices, makes it impossible for the host to use the GPU.
12.2.1. Setting up NVIDIA vGPU devices
To set up the NVIDIA vGPU feature, you need to download NVIDIA vGPU drivers for your GPU device, create mediated devices, and assign them to the intended virtual machines. For detailed instructions, see below.
Prerequisites
Your GPU supports vGPU mediated devices. For an up-to-date list of NVIDIA GPUs that support creating vGPUs, see the NVIDIA vGPU software documentation.
If you do not know which GPU your host is using, install the lshw package and use the
lshw -C displaycommand. The following example shows the system is using an NVIDIA Tesla P4 GPU, compatible with vGPU.# lshw -C display *-display description: 3D controller product: GP104GL [Tesla P4] vendor: NVIDIA Corporation physical id: 0 bus info: pci@0000:01:00.0 version: a1 width: 64 bits clock: 33MHz capabilities: pm msi pciexpress cap_list configuration: driver=vfio-pci latency=0 resources: irq:16 memory:f6000000-f6ffffff memory:e0000000-efffffff memory:f0000000-f1ffffff
Procedure
- Download the NVIDIA vGPU drivers and install them on your system. For instructions, see the NVIDIA documentation.
If the NVIDIA software installer did not create the /etc/modprobe.d/nvidia-installer-disable-nouveau.conf file, create a
conffile of any name in /etc/modprobe.d/, and add the following lines in the file:blacklist nouveau options nouveau modeset=0
Regenerate the initial ramdisk for the current kernel, then reboot.
# dracut --force # reboot
Check that the kernel has loaded the
nvidia_vgpu_vfiomodule and that thenvidia-vgpu-mgr.serviceservice is running.# lsmod | grep nvidia_vgpu_vfio nvidia_vgpu_vfio 45011 0 nvidia 14333621 10 nvidia_vgpu_vfio mdev 20414 2 vfio_mdev,nvidia_vgpu_vfio vfio 32695 3 vfio_mdev,nvidia_vgpu_vfio,vfio_iommu_type1 # systemctl status nvidia-vgpu-mgr.service nvidia-vgpu-mgr.service - NVIDIA vGPU Manager Daemon Loaded: loaded (/usr/lib/systemd/system/nvidia-vgpu-mgr.service; enabled; vendor preset: disabled) Active: active (running) since Fri 2018-03-16 10:17:36 CET; 5h 8min ago Main PID: 1553 (nvidia-vgpu-mgr) [...]
In addition, if creating vGPU based on an NVIDIA Ampere GPU device, ensure that virtual functions are enable for the physical GPU. For instructions, see the NVIDIA documentation.
Generate a device UUID.
# uuidgen 30820a6f-b1a5-4503-91ca-0c10ba58692aPrepare an XML file with a configuration of the mediated device, based on the detected GPU hardware. For example, the following configures a mediated device of the
nvidia-63vGPU type on an NVIDIA Tesla P4 card that runs on the 0000:01:00.0 PCI bus and uses the UUID generated in the previous step.<device> <parent>pci_0000_01_00_0</parent> <capability type="mdev"> <type id="nvidia-63"/> <uuid>30820a6f-b1a5-4503-91ca-0c10ba58692a</uuid> </capability> </device>Define a vGPU mediated device based on the XML file you prepared. For example:
# virsh nodedev-define vgpu-test.xml Node device mdev_30820a6f_b1a5_4503_91ca_0c10ba58692a_0000_01_00_0 created from vgpu-test.xmlOptional: Verify that the mediated device is listed as inactive.
# virsh nodedev-list --cap mdev --inactive mdev_30820a6f_b1a5_4503_91ca_0c10ba58692a_0000_01_00_0Start the vGPU mediated device you created.
# virsh nodedev-start mdev_30820a6f_b1a5_4503_91ca_0c10ba58692a_0000_01_00_0 Device mdev_30820a6f_b1a5_4503_91ca_0c10ba58692a_0000_01_00_0 startedOptional: Ensure that the mediated device is listed as active.
# virsh nodedev-list --cap mdev mdev_30820a6f_b1a5_4503_91ca_0c10ba58692a_0000_01_00_0Set the vGPU device to start automatically after the host reboots
# virsh nodedev-autostart mdev_30820a6f_b1a5_4503_91ca_0c10ba58692a_0000_01_00_0 Device mdev_d196754e_d8ed_4f43_bf22_684ed698b08b_0000_9b_00_0 marked as autostartedAttach the mediated device to a VM that you want to share the vGPU resources. To do so, add the following lines, along with the previously genereated UUID, to the <devices/> sections in the XML configuration of the VM.
<hostdev mode='subsystem' type='mdev' managed='no' model='vfio-pci' display='on'> <source> <address uuid='30820a6f-b1a5-4503-91ca-0c10ba58692a'/> </source> </hostdev>Note that each UUID can only be assigned to one VM at a time. In addition, if the VM does not have QEMU video devices, such as
virtio-vga, add also theramfb='on'parameter on the<hostdev>line.- For full functionality of the vGPU mediated devices to be available on the assigned VMs, set up NVIDIA vGPU guest software licensing on the VMs. For further information and instructions, see the NVIDIA Virtual GPU Software License Server User Guide.
Verification
Query the capabilities of the vGPU you created, and ensure it is listed as active and persistent.
# virsh nodedev-info mdev_30820a6f_b1a5_4503_91ca_0c10ba58692a_0000_01_00_0 Name: virsh nodedev-autostart mdev_30820a6f_b1a5_4503_91ca_0c10ba58692a_0000_01_00_0 Parent: pci_0000_01_00_0 Active: yes Persistent: yes Autostart: yesStart the VM and verify that the guest operating system detects the mediated device as an NVIDIA GPU. For example, if the VM uses Linux:
# lspci -d 10de: -k 07:00.0 VGA compatible controller: NVIDIA Corporation GV100GL [Tesla V100 SXM2 32GB] (rev a1) Subsystem: NVIDIA Corporation Device 12ce Kernel driver in use: nvidia Kernel modules: nouveau, nvidia_drm, nvidia
Known Issues
- Assigning an NVIDIA vGPU mediated device to a VM that uses a RHEL 8 guest operating system currently disables the Wayland session on that VM, and loads an Xorg session instead. This is because of incompatibilities between NVIDIA drivers and Wayland.
Additional resources
- NVIDIA vGPU software documentation
-
The
man virshcommand
12.2.2. Removing NVIDIA vGPU devices
To change the configuration of assigned vGPU mediated devices, you need to remove the existing devices from the assigned VMs. For instructions, see below:
Prerequisites
- The VM from which you want to remove the device is shut down.
Procedure
Obtain the ID of the mediated device that you want to remove.
# virsh nodedev-list --cap mdev mdev_30820a6f_b1a5_4503_91ca_0c10ba58692a_0000_01_00_0Stop the running instance of the vGPU mediated device.
# virsh nodedev-destroy mdev_30820a6f_b1a5_4503_91ca_0c10ba58692a_0000_01_00_0 Destroyed node device 'mdev_30820a6f_b1a5_4503_91ca_0c10ba58692a_0000_01_00_0'Optional: Ensure the mediated device has been deactivated.
# virsh nodedev-info mdev_30820a6f_b1a5_4503_91ca_0c10ba58692a_0000_01_00_0 Name: virsh nodedev-autostart mdev_30820a6f_b1a5_4503_91ca_0c10ba58692a_0000_01_00_0 Parent: pci_0000_01_00_0 Active: no Persistent: yes Autostart: yesRemove the device from the XML configuration of the VM. To do so, use the
virsh editutility to edit the XML configuration of the VM, and remove the mdev’s configuration segment. The segment will look similar to the following:<hostdev mode='subsystem' type='mdev' managed='no' model='vfio-pci'> <source> <address uuid='30820a6f-b1a5-4503-91ca-0c10ba58692a'/> </source> </hostdev>Note that stopping and detaching the mediated device does not delete it, but rather keeps it as defined. As such, you can restart and attach the device to a different VM.
Optional: To delete the stopped mediated device, remove its definition.
# virsh nodedev-undefine mdev_30820a6f_b1a5_4503_91ca_0c10ba58692a_0000_01_00_0 Undefined node device 'mdev_30820a6f_b1a5_4503_91ca_0c10ba58692a_0000_01_00_0'
Verification
If you only stopped and detached the device, ensure the mediated device is listed as inactive.
# virsh nodedev-list --cap mdev --inactive mdev_30820a6f_b1a5_4503_91ca_0c10ba58692a_0000_01_00_0If you also deleted the device, ensure the following command does not display it.
# virsh nodedev-list --cap mdev
Additional resources
-
The
man virshcommand
12.2.3. Obtaining NVIDIA vGPU information about your system
To evaluate the capabilities of the vGPU features available to you, you can obtain additional information about the mediated devices on your system, such as:
- How many mediated devices of a given type can be created
- What mediated devices are already configured on your system.
Procedure
To see the available GPUs devices on your host that can support vGPU mediated devices, use the
virsh nodedev-list --cap mdev_typescommand. For example, the following shows a system with two NVIDIA Quadro RTX6000 devices.# virsh nodedev-list --cap mdev_types pci_0000_5b_00_0 pci_0000_9b_00_0To display vGPU types supported by a specific GPU device, as well as additional metadata, use the
virsh nodedev-dumpxmlcommand.# virsh nodedev-dumpxml pci_0000_9b_00_0 <device> <name>pci_0000_9b_00_0</name> <path>/sys/devices/pci0000:9a/0000:9a:00.0/0000:9b:00.0</path> <parent>pci_0000_9a_00_0</parent> <driver> <name>nvidia</name> </driver> <capability type='pci'> <class>0x030000</class> <domain>0</domain> <bus>155</bus> <slot>0</slot> <function>0</function> <product id='0x1e30'>TU102GL [Quadro RTX 6000/8000]</product> <vendor id='0x10de'>NVIDIA Corporation</vendor> <capability type='mdev_types'> <type id='nvidia-346'> <name>GRID RTX6000-12C</name> <deviceAPI>vfio-pci</deviceAPI> <availableInstances>2</availableInstances> </type> <type id='nvidia-439'> <name>GRID RTX6000-3A</name> <deviceAPI>vfio-pci</deviceAPI> <availableInstances>8</availableInstances> </type> [...] <type id='nvidia-440'> <name>GRID RTX6000-4A</name> <deviceAPI>vfio-pci</deviceAPI> <availableInstances>6</availableInstances> </type> <type id='nvidia-261'> <name>GRID RTX6000-8Q</name> <deviceAPI>vfio-pci</deviceAPI> <availableInstances>3</availableInstances> </type> </capability> <iommuGroup number='216'> <address domain='0x0000' bus='0x9b' slot='0x00' function='0x3'/> <address domain='0x0000' bus='0x9b' slot='0x00' function='0x1'/> <address domain='0x0000' bus='0x9b' slot='0x00' function='0x2'/> <address domain='0x0000' bus='0x9b' slot='0x00' function='0x0'/> </iommuGroup> <numa node='2'/> <pci-express> <link validity='cap' port='0' speed='8' width='16'/> <link validity='sta' speed='2.5' width='8'/> </pci-express> </capability> </device>
Additional resources
-
The
man virshcommand
12.2.4. Remote desktop streaming services for NVIDIA vGPU
The following remote desktop streaming services are supported on the RHEL 8 hypervisor with NVIDIA vGPU or NVIDIA GPU passthrough enabled:
- HP ZCentral Remote Boost/Teradici
- NICE DCV
- Mechdyne TGX
For support details, see the appropriate vendor support matrix.
Chapter 13. Configuring virtual machine network connections
For your virtual machines (VMs) to connect over a network to your host, to other VMs on your host, and to locations on an external network, the VM networking must be configured accordingly. To provide VM networking, the RHEL 8 hypervisor and newly created VMs have a default network configuration, which can also be modified further. For example:
- You can enable the VMs on your host to be discovered and connected to by locations outside the host, as if the VMs were on the same network as the host.
- You can partially or completely isolate a VM from inbound network traffic to increase its security and minimize the risk of any problems with the VM impacting the host.
The following sections explain the various types of VM network configuration and provide instructions for setting up selected VM network configurations.
13.1. Understanding virtual networking
The connection of virtual machines (VMs) to other devices and locations on a network has to be facilitated by the host hardware. The following sections explain the mechanisms of VM network connections and describe the default VM network setting.
13.1.1. How virtual networks work
Virtual networking uses the concept of a virtual network switch. A virtual network switch is a software construct that operates on a host machine. VMs connect to the network through the virtual network switch. Based on the configuration of the virtual switch, a VM can use an existing virtual network managed by the hypervisor, or a different network connection method.
The following figure shows a virtual network switch connecting two VMs to the network:
From the perspective of a guest operating system, a virtual network connection is the same as a physical network connection. Host machines view virtual network switches as network interfaces. When the libvirtd service is first installed and started, it creates virbr0, the default network interface for VMs.
To view information about this interface, use the ip utility on the host.
$ ip addr show virbr0
3: virbr0: <BROADCAST,MULTICAST,UP,LOWER_UP> mtu 1500 qdisc noqueue state
UNKNOWN link/ether 1b:c4:94:cf:fd:17 brd ff:ff:ff:ff:ff:ff
inet 192.0.2.1/24 brd 192.0.2.255 scope global virbr0By default, all VMs on a single host are connected to the same NAT-type virtual network, named default, which uses the virbr0 interface. For details, see Virtual networking default configuration.
For basic outbound-only network access from VMs, no additional network setup is usually needed, because the default network is installed along with the libvirt-daemon-config-network package, and is automatically started when the libvirtd service is started.
If a different VM network functionality is needed, you can create additional virtual networks and network interfaces and configure your VMs to use them. In addition to the default NAT, these networks and interfaces can be configured to use one of the following modes:
13.1.2. Virtual networking default configuration
When the libvirtd service is first installed on a virtualization host, it contains an initial virtual network configuration in network address translation (NAT) mode. By default, all VMs on the host are connected to the same libvirt virtual network, named default. VMs on this network can connect to locations both on the host and on the network beyond the host, but with the following limitations:
-
VMs on the network are visible to the host and other VMs on the host, but the network traffic is affected by the firewalls in the guest operating system’s network stack and by the
libvirtnetwork filtering rules attached to the guest interface. - VMs on the network can connect to locations outside the host but are not visible to them. Outbound traffic is affected by the NAT rules, as well as the host system’s firewall.
The following diagram illustrates the default VM network configuration:

13.2. Using the web console for managing virtual machine network interfaces
Using the RHEL 8 web console, you can manage the virtual network interfaces for the virtual machines to which the web console is connected. You can:
13.2.1. Viewing and editing virtual network interface information in the web console
By using the RHEL 8 web console, you can view and modify the virtual network interfaces on a selected virtual machine (VM):
Prerequisites
- The web console VM plug-in is installed on your system.
Procedure
In the interface, click the VM whose information you want to see.
A new page opens with an Overview section with basic information about the selected VM and a Console section to access the VM’s graphical interface.
Scroll to .
The Networks Interfaces section displays information about the virtual network interface configured for the VM as well as options to Add, Delete, Edit, or Unplug network interfaces.
The information includes the following:
Type - The type of network interface for the VM. The types include virtual network, bridge to LAN, and direct attachment.
NoteGeneric Ethernet connection is not supported in RHEL 8 and later.
- Model type - The model of the virtual network interface.
- MAC Address - The MAC address of the virtual network interface.
- IP Address - The IP address of the virtual network interface.
- Source - The source of the network interface. This is dependent on the network type.
- State - The state of the virtual network interface.
To edit the virtual network interface settings, Click . The Virtual Network Interface Settings dialog opens.
- Change the interface type, source, model, or MAC address.
Click . The network interface is modified.
NoteChanges to the virtual network interface settings take effect only after restarting the VM.
Additionally, MAC address can only be modified when the VM is shut off.
Additional resources
13.2.2. Adding and connecting virtual network interfaces in the web console
By using the RHEL 8 web console, you can create a virtual network interface and connect a virtual machine (VM) to it.
Prerequisites
- The web console VM plug-in is installed on your system.
Procedure
In the interface, click the VM whose information you want to see.
A new page opens with an Overview section with basic information about the selected VM and a Console section to access the VM’s graphical interface.
Scroll to .
The Networks Interfaces section displays information about the virtual network interface configured for the VM as well as options to Add, Delete, Edit, or Plug network interfaces.

Click in the row of the virtual network interface you want to connect.
The selected virtual network interface connects to the VM.
13.2.3. Disconnecting and removing virtual network interfaces in the web console
By using the RHEL 8 web console, you can disconnect the virtual network interfaces connected to a selected virtual machine (VM).
Prerequisites
- The web console VM plug-in is installed on your system.
Procedure
In the interface, click the VM whose information you want to see.
A new page opens with an Overview section with basic information about the selected VM and a Console section to access the VM’s graphical interface.
Scroll to .
The Networks Interfaces section displays information about the virtual network interface configured for the VM as well as options to Add, Delete, Edit, or Unplug network interfaces.
Click in the row of the virtual network interface you want to disconnect.
The selected virtual network interface disconnects from the VM.
13.3. Recommended virtual machine networking configurations
In many scenarios, the default VM networking configuration is sufficient. However, if adjusting the configuration is required, you can use the command-line interface (CLI) or the RHEL 8 web console to do so. The following sections describe selected VM network setups for such situations.
13.3.1. Configuring externally visible virtual machines by using the command-line interface
By default, a newly created VM connects to a NAT-type network that uses virbr0, the default virtual bridge on the host. This ensures that the VM can use the host’s network interface controller (NIC) for connecting to outside networks, but the VM is not reachable from external systems.
If you require a VM to appear on the same external network as the hypervisor, you must use bridged mode instead. To do so, attach the VM to a bridge device connected to the hypervisor’s physical network device. To use the command-line interface for this, follow the instructions below.
Prerequisites
- A shut-down existing VM with the default NAT setup.
The IP configuration of the hypervisor. This varies depending on the network connection of the host. As an example, this procedure uses a scenario where the host is connected to the network by using an ethernet cable, and the hosts' physical NIC MAC address is assigned to a static IP on a DHCP server. Therefore, the ethernet interface is treated as the hypervisor IP.
To obtain the IP configuration of the ethernet interface, use the
ip addrutility:# ip addr [...] enp0s25: <BROADCAST,MULTICAST,UP,LOWER_UP> mtu 1500 qdisc fq_codel state UP group default qlen 1000 link/ether 54:ee:75:49:dc:46 brd ff:ff:ff:ff:ff:ff inet 192.0.2.1/24 brd 192.0.2.255 scope global dynamic noprefixroute enp0s25
Procedure
Create and set up a bridge connection for the physical interface on the host. For instructions, see the Configuring a network bridge.
Note that in a scenario where static IP assignment is used, you must move the IPv4 setting of the physical ethernet interface to the bridge interface.
Modify the VM’s network to use the created bridged interface. For example, the following sets testguest to use bridge0.
# virt-xml testguest --edit --network bridge=bridge0 Domain 'testguest' defined successfully.Start the VM.
# virsh start testguestIn the guest operating system, adjust the IP and DHCP settings of the system’s network interface as if the VM was another physical system in the same network as the hypervisor.
The specific steps for this will differ depending on the guest OS used by the VM. For example, if the guest OS is RHEL 8, see Configuring an Ethernet connection.
Verification
Ensure the newly created bridge is running and contains both the host’s physical interface and the interface of the VM.
# ip link show master bridge0 2: enp0s25: <BROADCAST,MULTICAST,UP,LOWER_UP> mtu 1500 qdisc fq_codel master bridge0 state UP mode DEFAULT group default qlen 1000 link/ether 54:ee:75:49:dc:46 brd ff:ff:ff:ff:ff:ff 10: vnet0: <BROADCAST,MULTICAST,UP,LOWER_UP> mtu 1500 qdisc fq_codel master bridge0 state UNKNOWN mode DEFAULT group default qlen 1000 link/ether fe:54:00:89:15:40 brd ff:ff:ff:ff:ff:ffEnsure the VM appears on the same external network as the hypervisor:
In the guest operating system, obtain the network ID of the system. For example, if it is a Linux guest:
# ip addr [...] enp0s0: <BROADCAST,MULTICAST,UP,LOWER_UP> mtu 1500 qdisc fq_codel state UP group default qlen 1000 link/ether 52:54:00:09:15:46 brd ff:ff:ff:ff:ff:ff inet 192.0.2.1/24 brd 192.0.2.255 scope global dynamic noprefixroute enp0s0From an external system connected to the local network, connect to the VM by using the obtained ID.
# ssh root@192.0.2.1 root@192.0.2.1's password: Last login: Mon Sep 24 12:05:36 2019 root~#*If the connection works, the network has been configured successfully.
Troubleshooting
In certain situations, such as when using a client-to-site VPN while the VM is hosted on the client, using bridged mode for making your VMs available to external locations is not possible.
To work around this problem, you can set destination NAT by using
nftablesfor the VM.
13.3.2. Configuring externally visible virtual machines by using the web console
By default, a newly created VM connects to a NAT-type network that uses virbr0, the default virtual bridge on the host. This ensures that the VM can use the host’s network interface controller (NIC) for connecting to outside networks, but the VM is not reachable from external systems.
If you require a VM to appear on the same external network as the hypervisor, you must use bridged mode instead. To do so, attach the VM to a bridge device connected to the hypervisor’s physical network device. To use the RHEL 8 web console for this, follow the instructions below.
Prerequisites
- The web console VM plug-in is installed on your system.
- A shut-down existing VM with the default NAT setup.
The IP configuration of the hypervisor. This varies depending on the network connection of the host. As an example, this procedure uses a scenario where the host is connected to the network by using an ethernet cable, and the hosts' physical NIC MAC address is assigned to a static IP on a DHCP server. Therefore, the ethernet interface is treated as the hypervisor IP.
To obtain the IP configuration of the ethernet interface, go to the
Networkingtab in the web console, and see theInterfacessection.
Procedure
Create and set up a bridge connection for the physical interface on the host. For instructions, see Configuring network bridges in the web console.
Note that in a scenario where static IP assignment is used, you must move the IPv4 setting of the physical ethernet interface to the bridge interface.
Modify the VM’s network to use the bridged interface. In the Network Interfaces tab of the VM:
- Click
In the
Add Virtual Network Interfacedialog, set:-
Interface Type to
Bridge to LAN -
Source to the newly created bridge, for example
bridge0
-
Interface Type to
- Click
- Optional: Click for all the other interfaces connected to the VM.
- Click to start the VM.
In the guest operating system, adjust the IP and DHCP settings of the system’s network interface as if the VM was another physical system in the same network as the hypervisor.
The specific steps for this will differ depending on the guest OS used by the VM. For example, if the guest OS is RHEL 8, see Configuring an Ethernet connection.
Verification
In the Networking tab of the host’s web console, click the row with the newly created bridge to ensure it is running and contains both the host’s physical interface and the interface of the VM.
Ensure the VM appears on the same external network as the hypervisor.
In the guest operating system, obtain the network ID of the system. For example, if it is a Linux guest:
# ip addr [...] enp0s0: <BROADCAST,MULTICAST,UP,LOWER_UP> mtu 1500 qdisc fq_codel state UP group default qlen 1000 link/ether 52:54:00:09:15:46 brd ff:ff:ff:ff:ff:ff inet 192.0.2.1/24 brd 192.0.2.255 scope global dynamic noprefixroute enp0s0From an external system connected to the local network, connect to the VM by using the obtained ID.
# ssh root@192.0.2.1 root@192.0.2.1's password: Last login: Mon Sep 24 12:05:36 2019 root~#*If the connection works, the network has been configured successfully.
Troubleshooting
- In certain situations, such as when using a client-to-site VPN while the VM is hosted on the client, using bridged mode for making your VMs available to external locations is not possible.
To work around this problem, you can set destination NAT by using nftables for the VM.
13.4. Types of virtual machine network connections
To modify the networking properties and behavior of your VMs, change the type of virtual network or interface the VMs use. The following sections describe the connection types available to VMs in RHEL 8.
13.4.1. Virtual networking with network address translation
By default, virtual network switches operate in network address translation (NAT) mode. They use IP masquerading rather than Source-NAT (SNAT) or Destination-NAT (DNAT). IP masquerading enables connected VMs to use the host machine’s IP address for communication with any external network. When the virtual network switch is operating in NAT mode, computers external to the host cannot communicate with the VMs inside the host.
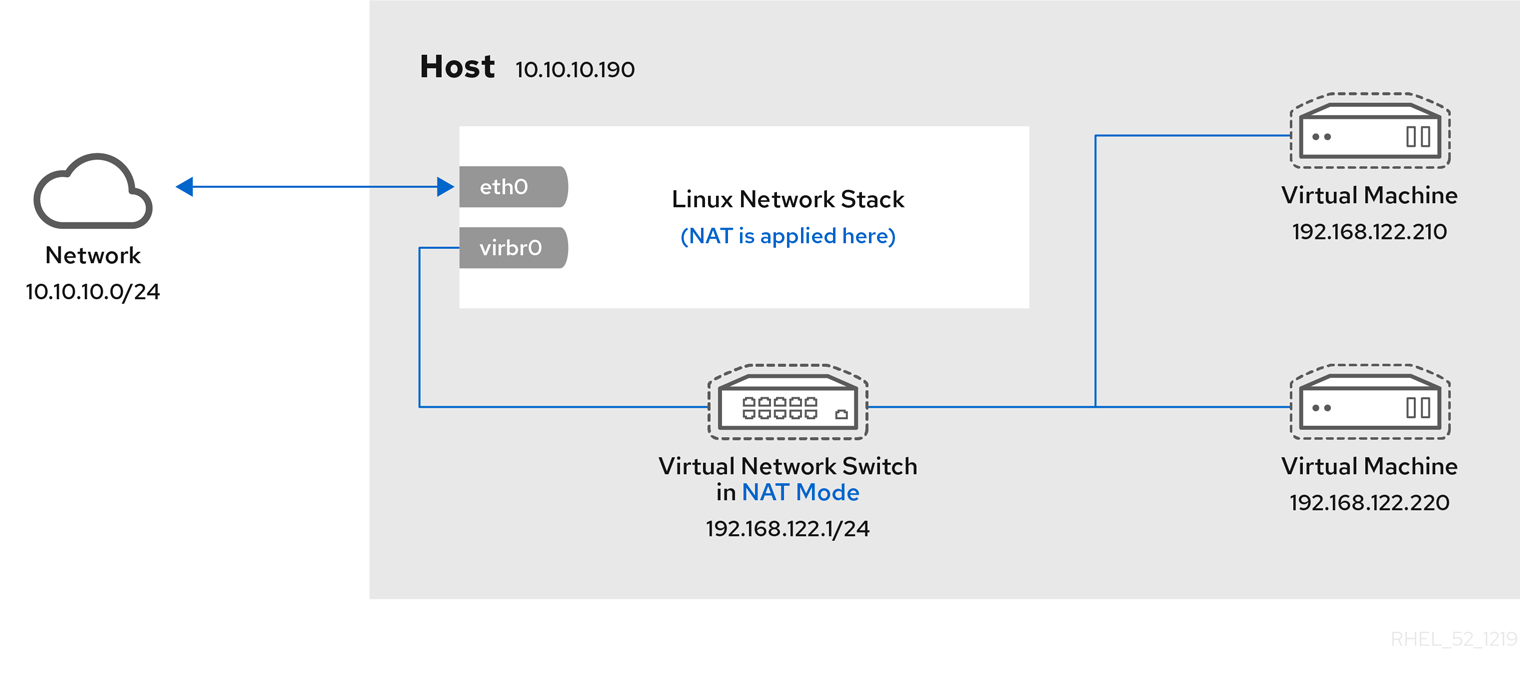
Virtual network switches use NAT configured by firewall rules. Editing these rules while the switch is running is not recommended, because incorrect rules may result in the switch being unable to communicate.
13.4.2. Virtual networking in routed mode
When using Routed mode, the virtual switch connects to the physical LAN connected to the host machine, passing traffic back and forth without the use of NAT. The virtual switch can examine all traffic and use the information contained within the network packets to make routing decisions. When using this mode, the virtual machines (VMs) are all in a single subnet, separate from the host machine. The VM subnet is routed through a virtual switch, which exists on the host machine. This enables incoming connections, but requires extra routing-table entries for systems on the external network.
Routed mode uses routing based on the IP address:

A common topology that uses routed mode is virtual server hosting (VSH). A VSH provider may have several host machines, each with two physical network connections. One interface is used for management and accounting, the other for the VMs to connect through. Each VM has its own public IP address, but the host machines use private IP addresses so that only internal administrators can manage the VMs.
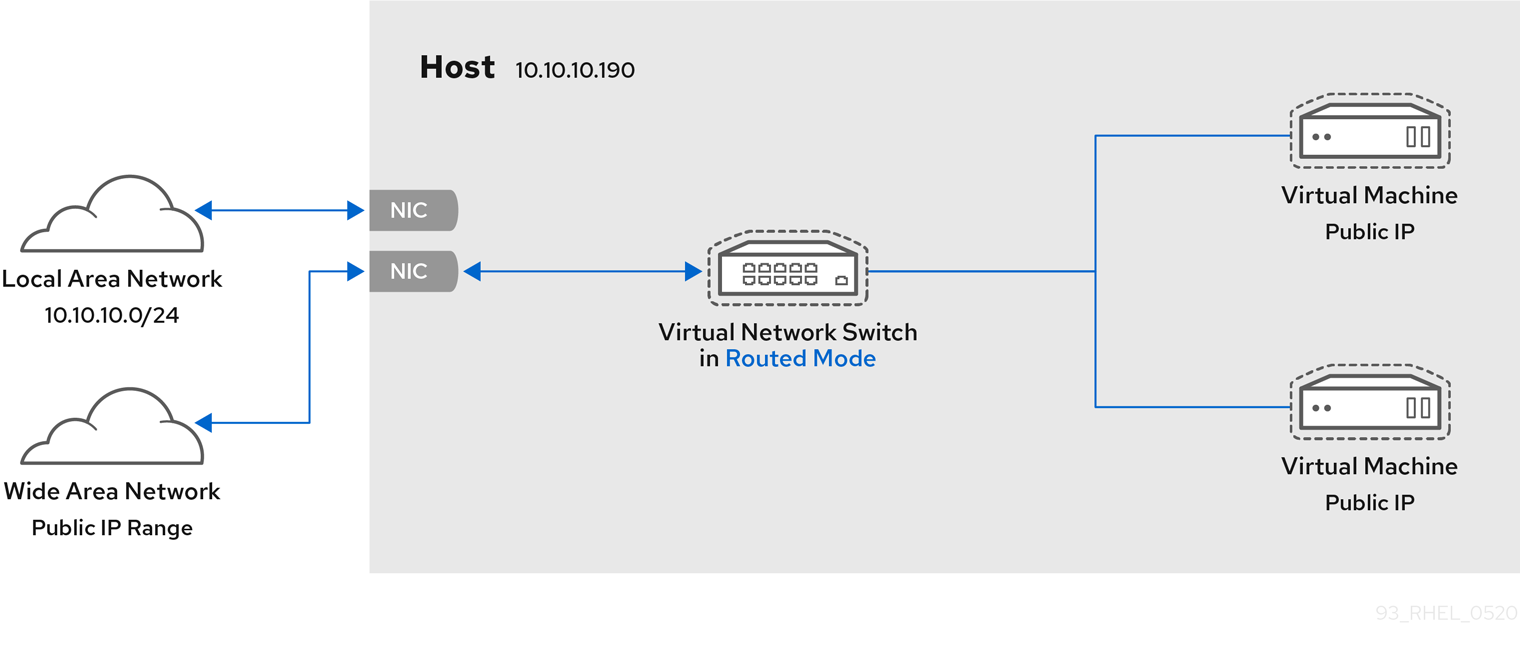
13.4.3. Virtual networking in bridged mode
In most VM networking modes, VMs automatically create and connect to the virbr0 virtual bridge. In contrast, in bridged mode, the VM connects to an existing Linux bridge on the host. As a result, the VM is directly visible on the physical network. This enables incoming connections, but does not require any extra routing-table entries.
Bridged mode uses connection switching based on the MAC address:
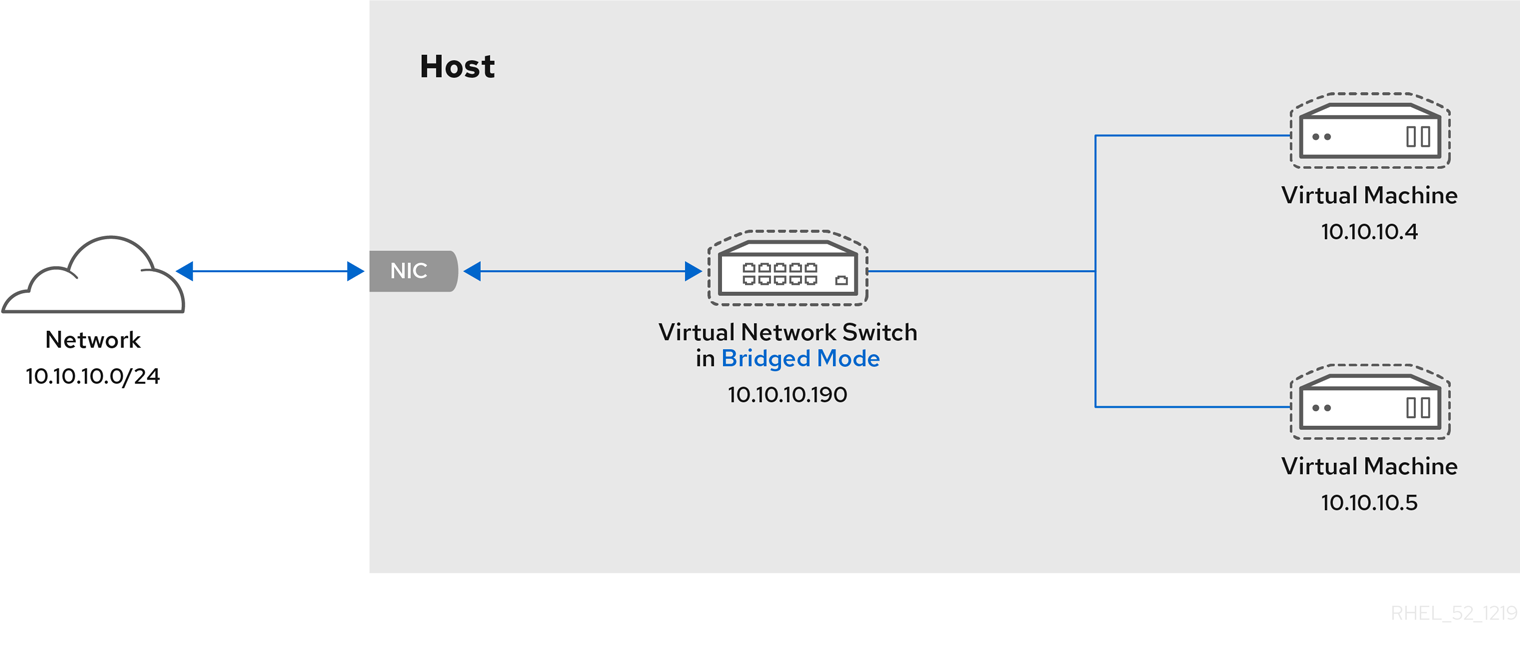
In bridged mode, the VM appear within the same subnet as the host machine. All other physical machines on the same physical network can detect the VM and access it.
Bridged network bonding
It is possible to use multiple physical bridge interfaces on the hypervisor by joining them together with a bond. The bond can then be added to a bridge, after which the VMs can be added to the bridge as well. However, the bonding driver has several modes of operation, and not all of these modes work with a bridge where VMs are in use.
The following bonding modes are usable:
- mode 1
- mode 2
- mode 4
In contrast, modes 0, 3, 5, or 6 is likely to cause the connection to fail. Also note that media-independent interface (MII) monitoring should be used to monitor bonding modes, as Address Resolution Protocol (ARP) monitoring does not work correctly.
For more information about bonding modes, refer to the Red Hat Knowledgebase.
Common scenarios
The most common use cases for bridged mode include:
- Deploying VMs in an existing network alongside host machines, making the difference between virtual and physical machines invisible to the end user.
- Deploying VMs without making any changes to existing physical network configuration settings.
- Deploying VMs that must be easily accessible to an existing physical network. Placing VMs on a physical network where they must access DHCP services.
- Connecting VMs to an existing network where virtual LANs (VLANs) are used.
- A demilitarized zone (DMZ) network. For a DMZ deployment with VMs, Red Hat recommends setting up the DMZ at the physical network router and switches, and connecting the VMs to the physical network by using bridged mode.
13.4.4. Virtual networking in isolated mode
By using isolated mode, virtual machines connected to the virtual switch can communicate with each other and with the host machine, but their traffic will not pass outside of the host machine, and they cannot receive traffic from outside the host machine. Using dnsmasq in this mode is required for basic functionality such as DHCP.

13.4.5. Virtual networking in open mode
When using open mode for networking, libvirt does not generate any firewall rules for the network. As a result, libvirt does not overwrite firewall rules provided by the host, and the user can therefore manually manage the VM’s firewall rules.
13.4.6. Comparison of virtual machine connection types
The following table provides information about the locations to which selected types of virtual machine (VM) network configurations can connect, and to which they are visible.
Table 13.1. Virtual machine connection types
| Connection to the host | Connection to other VMs on the host | Connection to outside locations | Visible to outside locations | |
|---|---|---|---|---|
| Bridged mode | YES | YES | YES | YES |
| NAT | YES | YES | YES | no |
| Routed mode | YES | YES | YES | YES |
| Isolated mode | YES | YES | no | no |
| Open mode | Depends on the host’s firewall rules | |||
13.5. Booting virtual machines from a PXE server
Virtual machines (VMs) that use Preboot Execution Environment (PXE) can boot and load their configuration from a network. This chapter describes how to use libvirt to boot VMs from a PXE server on a virtual or bridged network.
These procedures are provided only as an example. Ensure that you have sufficient backups before proceeding.
13.5.1. Setting up a PXE boot server on a virtual network
This procedure describes how to configure a libvirt virtual network to provide Preboot Execution Environment (PXE). This enables virtual machines on your host to be configured to boot from a boot image available on the virtual network.
Prerequisites
A local PXE server (DHCP and TFTP), such as:
- libvirt internal server
- manually configured dhcpd and tftpd
- dnsmasq
- Cobbler server
-
PXE boot images, such as
PXELINUXconfigured by Cobbler or manually.
Procedure
-
Place the PXE boot images and configuration in
/var/lib/tftpbootfolder. Set folder permissions:
# chmod -R a+r /var/lib/tftpbootSet folder ownership:
# chown -R nobody: /var/lib/tftpbootUpdate SELinux context:
# chcon -R --reference /usr/sbin/dnsmasq /var/lib/tftpboot # chcon -R --reference /usr/libexec/libvirt_leaseshelper /var/lib/tftpboot
Shut down the virtual network:
# virsh net-destroy defaultOpen the virtual network configuration file in your default editor:
# virsh net-edit defaultEdit the
<ip>element to include the appropriate address, network mask, DHCP address range, and boot file, where example-pxelinux is the name of the boot image file.<ip address='192.0.2.1' netmask='255.255.255.0'> <tftp root='/var/lib/tftpboot'/> <dhcp> <range start='192.0.2.2' end='192.0.2.254' /> <bootp file='example-pxelinux'/> </dhcp> </ip>Start the virtual network:
# virsh net-start default
Verification
Verify that the
defaultvirtual network is active:# virsh net-list Name State Autostart Persistent --------------------------------------------------- default active no no
Additional resources
13.5.2. Booting virtual machines by using PXE and a virtual network
To boot virtual machines (VMs) from a Preboot Execution Environment (PXE) server available on a virtual network, you must enable PXE booting.
Prerequisites
- A PXE boot server is set up on the virtual network as described in Setting up a PXE boot server on a virtual network.
Procedure
Create a new VM with PXE booting enabled. For example, to install from a PXE, available on the
defaultvirtual network, into a new 10 GB qcow2 image file:# virt-install --pxe --network network=default --memory 2048 --vcpus 2 --disk size=10Alternatively, you can manually edit the XML configuration file of an existing VM:
Ensure the
<os>element has a<boot dev='network'/>element inside:<os> <type arch='x86_64' machine='pc-i440fx-rhel7.0.0'>hvm</type> <boot dev='network'/> <boot dev='hd'/> </os>
Ensure the guest network is configured to use your virtual network:
<interface type='network'> <mac address='52:54:00:66:79:14'/> <source network='default'/> <target dev='vnet0'/> <alias name='net0'/> <address type='pci' domain='0x0000' bus='0x00' slot='0x03' function='0x0'/> </interface>
Verification
-
Start the VM by using the
virsh startcommand. If PXE is configured correctly, the VM boots from a boot image available on the PXE server.
13.5.3. Booting virtual machines by using PXE and a bridged network
To boot virtual machines (VMs) from a Preboot Execution Environment (PXE) server available on a bridged network, you must enable PXE booting.
Prerequisites
- Network bridging is enabled.
- A PXE boot server is available on the bridged network.
Procedure
Create a new VM with PXE booting enabled. For example, to install from a PXE, available on the
breth0bridged network, into a new 10 GB qcow2 image file:# virt-install --pxe --network bridge=breth0 --memory 2048 --vcpus 2 --disk size=10Alternatively, you can manually edit the XML configuration file of an existing VM:
Ensure the
<os>element has a<boot dev='network'/>element inside:<os> <type arch='x86_64' machine='pc-i440fx-rhel7.0.0'>hvm</type> <boot dev='network'/> <boot dev='hd'/> </os>
Ensure the VM is configured to use your bridged network:
<interface type='bridge'> <mac address='52:54:00:5a:ad:cb'/> <source bridge='breth0'/> <target dev='vnet0'/> <alias name='net0'/> <address type='pci' domain='0x0000' bus='0x00' slot='0x03' function='0x0'/> </interface>
Verification
-
Start the VM by using the
virsh startcommand. If PXE is configured correctly, the VM boots from a boot image available on the PXE server.
Additional resources
13.6. Additional resources
- Configuring and managing networking
- Attach specific network interface cards as SR-IOV devices to increase VM performance.
Chapter 14. Sharing files between the host and its virtual machines
You may frequently require to share data between your host system and the virtual machines (VMs) it runs. To do so quickly and efficiently, you can set up NFS file shares on your system.
14.1. Sharing files between the host and its virtual machines by using NFS
For efficient file sharing between the RHEL 8 host system and the virtual machines (VMs), you can export an NFS share that VMs can mount and access.
Prerequisites
The
nfs-utilspackage is installed on the host.# yum install nfs-utils -y-
Virtual network of
NATorbridgetype is configured to connect a host to VMs. - Optional: For improved security, ensure your VMs are compatible with NFS version 4 or later.
Procedure
On the host, export a directory with the files you want to share as a network file system (NFS):
Share an existing directory with VMs. If you do not want to share any of the existing directories, create a new one:
# mkdir shared-filesObtain the IP address of each VM to share files from the host, for example, testguest1 and testguest2 :
# virsh domifaddr testguest1 Name MAC address Protocol Address ---------------------------------------------------------------- vnet0 52:53:00:84:57:90 ipv4 192.0.2.2/24 # virsh domifaddr testguest2 Name MAC address Protocol Address ---------------------------------------------------------------- vnet1 52:53:00:65:29:21 ipv4 192.0.2.3/24
Edit the
/etc/exportsfile on the host and add a line that includes the directory you want to share, IPs of VMs to share, and additional options:/home/<username>/Downloads/<shared_directory>/ <VM1-IP(options)> <VM2-IP(options)> ...The following example shares the
/usr/local/shared-filesdirectory on the host with testguest1 and testguest2, and enables the VMs to edit the content of the directory:/usr/local/shared-files/ 192.0.2.2(rw,sync) 192.0.2.3(rw,sync)NoteTo share a directory with a Windows VM, you need to ensure the Windows NFS client has write permissions in the shared directory. You can use the
all_squash,anonuid, andanongidoptions in the/etc/exportsfile./usr/local/shared-files/ 192.0.2.2(rw,sync,all_squash,anonuid=<directory-owner-UID>,anongid=<directory-owner-GID>)The <directory-owner-UID> and <directory-owner-GID> are the UID and GID of the local user that owns the shared directory on the host.
For other options to manage NFS client permissions, follow the Securing the NFS service guide.
Export the updated file system:
# exportfs -aStart the
nfs-serverservice:# systemctl start nfs-serverObtain the IP address of the host system to mount the shared directory on the VMs:
# ip addr ... 5: virbr0: [BROADCAST,MULTICAST,UP,LOWER_UP] mtu 1500 qdisc noqueue state UP group default qlen 1000 link/ether 52:54:00:32:ff:a5 brd ff:ff:ff:ff:ff:ff inet 192.0.2.1/24 brd 192.0.2.255 scope global virbr0 valid_lft forever preferred_lft forever ...Note that the relevant network connects the host with VMs to share files. Usually, this is
virbr0.
Mount the shared directory on a Linux VM that is specified in the
/etc/exportsfile:# mount 192.0.2.1:/usr/local/shared-files /mnt/host-share-
192.0.2.1: The IP address of the host. -
/usr/local/shared-files: A file-system path to the exported directory on the host. /mnt/host-share: A mount point on the VMNoteThe mount point must be an empty directory.
-
To mount the shared directory on a Windows VM as mentioned in the
/etc/exportsfile:- Open a PowerShell shell prompt as an Administrator.
Install the
NFS-Clientpackage on the Windows.To install on a server version, enter:
# Install-WindowsFeature NFS-ClientTo install on a desktop version, enter:
# Enable-WindowsOptionalFeature -FeatureName ServicesForNFS-ClientOnly, ClientForNFS-Infrastructure -Online -NoRestart
Mount the directory exported by the host on a Windows VM:
# C:\Windows\system32\mount.exe -o anon \\192.0.2.1\usr\local\shared-files Z:In this example:
-
192.0.2.1: The IP address of the host. -
/usr/local/shared-files: A file system path to the exported directory on the host. Z:: The drive letter for a mount point.NoteYou must choose a drive letter that is not in use on the system.
-
Verification
List the contents of the shared directory on the VM so that you can share files between the host and the VM:
$ ls <mount_point> shared-file1 shared-file2 shared-file3In this example, replace <mount_point> with a file system path to the mounted shared directory.
Additional resources
Chapter 15. Securing virtual machines
As an administrator of a RHEL 8 system with virtual machines (VMs), ensuring that your VMs are as secure as possible significantly lowers the risk of your guest and host OSs being infected by malicious software.
This document outlines the mechanics of securing VMs on a RHEL 8 host and provides a list of methods to increase the security of your VMs.
15.1. How security works in virtual machines
When using virtual machines (VMs), multiple operating systems can be housed within a single host machine. These systems are connected with the host through the hypervisor, and usually also through a virtual network. As a consequence, each VM can be used as a vector for attacking the host with malicious software, and the host can be used as a vector for attacking any of the VMs.
Figure 15.1. A potential malware attack vector on a virtualization host
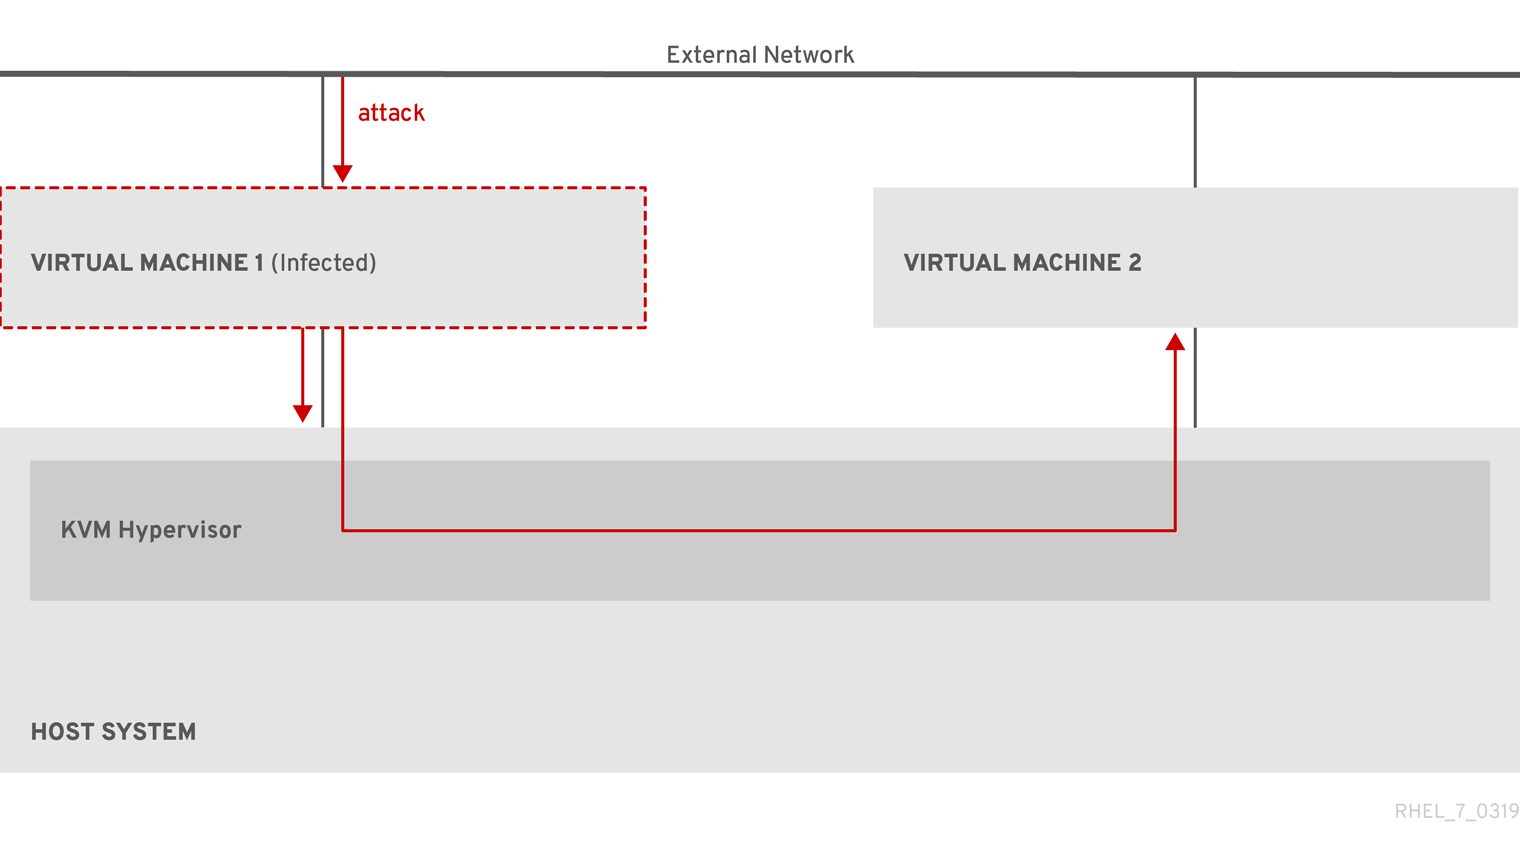
Because the hypervisor uses the host kernel to manage VMs, services running on the VM’s operating system are frequently used for injecting malicious code into the host system. However, you can protect your system against such security threats by using a number of security features on your host and your guest systems.
These features, such as SELinux or QEMU sandboxing, provide various measures that make it more difficult for malicious code to attack the hypervisor and transfer between your host and your VMs.
Figure 15.2. Prevented malware attacks on a virtualization host

Many of the features that RHEL 8 provides for VM security are always active and do not have to be enabled or configured. For details, see Automatic features for virtual machine security.
In addition, you can adhere to a variety of best practices to minimize the vulnerability of your VMs and your hypervisor. For more information, see Best practices for securing virtual machines.
15.2. Best practices for securing virtual machines
Following the instructions below significantly decreases the risk of your virtual machines being infected with malicious code and used as attack vectors to infect your host system.
On the guest side:
Secure the virtual machine as if it was a physical machine. The specific methods available to enhance security depend on the guest OS.
If your VM is running RHEL 8, see Securing Red Hat Enterprise Linux 8 for detailed instructions on improving the security of your guest system.
On the host side:
- When managing VMs remotely, use cryptographic utilities such as SSH and network protocols such as SSL for connecting to the VMs.
Ensure SELinux is in Enforcing mode:
# getenforce EnforcingIf SELinux is disabled or in Permissive mode, see the Using SELinux document for instructions on activating Enforcing mode.
NoteSELinux Enforcing mode also enables the sVirt RHEL 8 feature. This is a set of specialized SELinux booleans for virtualization, which can be manually adjusted for fine-grained VM security management.
Use VMs with SecureBoot:
SecureBoot is a feature that ensures that your VM is running a cryptographically signed OS. This prevents VMs whose OS has been altered by a malware attack from booting.
SecureBoot can only be applied when installing a Linux VM that uses OVMF firmware. For instructions, see Creating a SecureBoot virtual machine.
Do not use
qemu-*commands, such asqemu-kvm.QEMU is an essential component of the virtualization architecture in RHEL 8, but it is difficult to manage manually, and improper QEMU configurations may cause security vulnerabilities. Therefore, using most
qemu-*commands is not supported by Red Hat. Instead, use libvirt utilities, such asvirsh,virt-install, andvirt-xml, as these orchestrate QEMU according to the best practices.Note, however, that the
qemu-imgutility is supported for management of virtual disk images.
Additional resources
15.3. Creating a SecureBoot virtual machine
You can create a Linux virtual machine (VM) that uses the SecureBoot feature, which ensures that your VM is running a cryptographically signed OS. This can be useful if the guest OS of a VM has been altered by malware. In such a scenario, SecureBoot prevents the VM from booting, which stops the potential spread of the malware to your host machine.
Prerequisites
- The VM is the Q35 machine type.
The
edk2-OVMFpackages is installed:# yum install edk2-ovmfAn operating system (OS) installation source is available locally or on a network. This can be one of the following formats:
- An ISO image of an installation medium
A disk image of an existing VM installation
WarningInstalling from a host CD-ROM or DVD-ROM device is not possible in RHEL 8. If you select a CD-ROM or DVD-ROM as the installation source when using any VM installation method available in RHEL 8, the installation will fail. For more information, see the Red Hat Knowledgebase.
- Optional: A Kickstart file can be provided for faster and easier configuration of the installation.
Procedure
Use the
virt-installcommand to create a VM as detailed in Creating virtual machines by using the command-line interface. For the--bootoption, use theuefi,nvram_template=/usr/share/OVMF/OVMF_VARS.secboot.fdvalue. This uses theOVMF_VARS.secboot.fdandOVMF_CODE.secboot.fdfiles as templates for the VM’s non-volatile RAM (NVRAM) settings, which enables the SecureBoot feature.For example:
# virt-install --name rhel8sb --memory 4096 --vcpus 4 --os-variant rhel8.0 --boot uefi,nvram_template=/usr/share/OVMF/OVMF_VARS.secboot.fd --disk boot_order=2,size=10 --disk boot_order=1,device=cdrom,bus=scsi,path=/images/RHEL-8.0-installation.iso- Follow the OS installation procedure according to the instructions on the screen.
Verification
- After the guest OS is installed, access the VM’s command line by opening the terminal in the graphical guest console or connecting to the guest OS using SSH.
To confirm that SecureBoot has been enabled on the VM, use the
mokutil --sb-statecommand:# mokutil --sb-state SecureBoot enabled
Additional resources
15.4. Limiting what actions are available to virtual machine users
In some cases, actions that users of virtual machines (VMs) hosted on RHEL 8 can perform by default may pose a security risk. If that is the case, you can limit the actions available to VM users by configuring the libvirt daemons to use the polkit policy toolkit on the host machine.
Procedure
Optional: Ensure your system’s
polkitcontrol policies related tolibvirtare set up according to your preferences.Find all libvirt-related files in the
/usr/share/polkit-1/actions/and/usr/share/polkit-1/rules.d/directories.# ls /usr/share/polkit-1/actions | grep libvirt # ls /usr/share/polkit-1/rules.d | grep libvirt
Open the files and review the rule settings.
For information about reading the syntax of
polkitcontrol policies, useman polkit.Modify the
libvirtcontrol policies. To do so:-
Create a new
.rulesfile in the/etc/polkit-1/rules.d/directory. Add your custom policies to this file, and save it.
For further information and examples of
libvirtcontrol policies, see thelibvirtupstream documentation.
-
Create a new
Configure your VMs to use access policies determined by
polkit.To do so, uncomment the
access_drivers = [ "polkit" ]line in the/etc/libvirt/libvirtd.conffile.# sed -i 's/#access_drivers = \[ "polkit" \]/access_drivers = \[ "polkit" \]/' /etc/libvirt/libvirtd.confRestart the
libvirtdservice.# systemctl restart libvirtd
Verification
As a user whose VM actions you intended to limit, perform one of the restricted actions.
For example, if unprivileged users are restricted from viewing VMs created in the system session:
$ virsh -c qemu:///system list --all Id Name State -------------------------------If this command does not list any VMs even though one or more VMs exist on your system,
polkitsuccessfully restricts the action for unprivileged users.
Troubleshooting
Currently, configuring
libvirtto usepolkitmakes it impossible to connect to VMs using the RHEL 8 web console, due to an incompatibility with thelibvirt-dbusservice.If you require fine-grained access control of VMs in the web console, create a custom D-Bus policy. For instructions, see How to configure fine-grained control of Virtual Machines in Cockpit in the Red Hat Knowledgebase.
Additional resources
-
The
man polkitcommand -
The
libvirtupstream information about polkit access control policies
15.5. Automatic features for virtual machine security
In addition to manual means of improving the security of your virtual machines listed in Best practices for securing virtual machines, a number of security features are provided by the libvirt software suite and are automatically enabled when using virtualization in RHEL 8. These include:
- System and session connections
To access all the available utilities for virtual machine management in RHEL 8, you need to use the system connection of libvirt (
qemu:///system). To do so, you must have root privileges on the system or be a part of the libvirt user group.Non-root users that are not in the libvirt group can only access a session connection of libvirt (
qemu:///session), which has to respect the access rights of the local user when accessing resources. For example, using the session connection, you cannot detect or access VMs created in the system connection or by other users. Also, available VM networking configuration options are significantly limited.NoteThe RHEL 8 documentation assumes you have system connection privileges.
- Virtual machine separation
- Individual VMs run as isolated processes on the host, and rely on security enforced by the host kernel. Therefore, a VM cannot read or access the memory or storage of other VMs on the same host.
- QEMU sandboxing
- A feature that prevents QEMU code from executing system calls that can compromise the security of the host.
- Kernel Address Space Randomization (KASLR)
- Enables randomizing the physical and virtual addresses at which the kernel image is decompressed. Thus, KASLR prevents guest security exploits based on the location of kernel objects.
15.6. SELinux booleans for virtualization
For fine-grained configuration of virtual machines security on a RHEL 8 system, you can configure SELinux booleans on the host to ensure the hypervisor acts in a specific way.
To list all virtualization-related booleans and their statuses, use the getsebool -a | grep virt command:
$ getsebool -a | grep virt
[...]
virt_sandbox_use_netlink --> off
virt_sandbox_use_sys_admin --> off
virt_transition_userdomain --> off
virt_use_comm --> off
virt_use_execmem --> off
virt_use_fusefs --> off
[...]
To enable a specific boolean, use the setsebool -P boolean_name on command as root. To disable a boolean, use setsebool -P boolean_name off.
The following table lists virtualization-related booleans available in RHEL 8 and what they do when enabled:
Table 15.1. SELinux virtualization booleans
| SELinux Boolean | Description |
|---|---|
| staff_use_svirt | Enables non-root users to create and transition VMs to sVirt. |
| unprivuser_use_svirt | Enables unprivileged users to create and transition VMs to sVirt. |
| virt_sandbox_use_audit | Enables sandbox containers to send audit messages. |
| virt_sandbox_use_netlink | Enables sandbox containers to use netlink system calls. |
| virt_sandbox_use_sys_admin | Enables sandbox containers to use sys_admin system calls, such as mount. |
| virt_transition_userdomain | Enables virtual processes to run as user domains. |
| virt_use_comm | Enables virt to use serial/parallel communication ports. |
| virt_use_execmem | Enables confined virtual guests to use executable memory and executable stack. |
| virt_use_fusefs | Enables virt to read FUSE mounted files. |
| virt_use_nfs | Enables virt to manage NFS mounted files. |
| virt_use_rawip | Enables virt to interact with rawip sockets. |
| virt_use_samba | Enables virt to manage CIFS mounted files. |
| virt_use_sanlock | Enables confined virtual guests to interact with the sanlock. |
| virt_use_usb | Enables virt to use USB devices. |
| virt_use_xserver | Enables virtual machine to interact with the X Window System. |
15.7. Setting up IBM Secure Execution on IBM Z
When using IBM Z hardware to run a RHEL 8 host, you can improve the security of your virtual machines (VMs) by configuring IBM Secure Execution for the VMs.
IBM Secure Execution, also known as Protected Virtualization, prevents the host system from accessing a VM’s state and memory contents. As a result, even if the host is compromised, it cannot be used as a vector for attacking the guest operating system. In addition, Secure Execution can be used to prevent untrusted hosts from obtaining sensitive information from the VM.
The following procedure describes how to convert an existing VM on an IBM Z host into a secured VM.
Prerequisites
The system hardware is one of the following:
- IBM z15 or later
- IBM LinuxONE III or later
The Secure Execution feature is enabled for your system. To verify, use:
# grep facilities /proc/cpuinfo | grep 158If this command displays any output, your CPU is compatible with Secure Execution.
The kernel includes support for Secure Execution. To confirm, use:
# ls /sys/firmware | grep uvIf the command generates any output, your kernel supports Secure Execution.
The host CPU model contains the
unpackfacility. To confirm, use:# virsh domcapabilities | grep unpack <feature policy='require' name='unpack'/>If the command generates the above output, your CPU host model is compatible with Secure Execution.
The CPU mode of the VM is set to
host-model. To confirm this, use the following and replacevm-namewith the name of your VM.# virsh dumpxml vm-name | grep "<cpu mode='host-model'/>"If the command generates any output, the VM’s CPU mode is set correctly.
- You have obtained and verified the IBM Z host key document. For instructions to do so, see Verifying the host key document in IBM documentation.
Procedure
Do the following steps on your host:
Add the
prot_virt=1kernel parameter to the boot configuration of the host.# grubby --update-kernel=ALL --args="prot_virt=1"Update the boot menu:
# zipl
-
Use
virsh editto modify the XML configuration of the VM you want to secure. Add
<launchSecurity type="s390-pv"/>to the under the</devices>line. For example:[...] </memballoon> </devices> <launchSecurity type="s390-pv"/> </domain>-
If the
<devices>section of the configuration includes avirtio-rngdevice (<rng model="virtio">), remove all lines of the<rng> </rng>block.
Do the following steps in the guest operating system of the VM you want to secure.
Create a parameter file. For example:
# touch ~/secure-parametersIn the
/boot/loader/entriesdirectory, identify the boot loader entry with the latest version:# ls /boot/loader/entries -l [...] -rw-r--r--. 1 root root 281 Oct 9 15:51 3ab27a195c2849429927b00679db15c1-4.18.0-240.el8.s390x.confRetrieve the kernel options line of the boot loader entry:
# cat /boot/loader/entries/3ab27a195c2849429927b00679db15c1-4.18.0-240.el8.s390x.conf | grep options options root=/dev/mapper/rhel-root crashkernel=auto rd.lvm.lv=rhel/root rd.lvm.lv=rhel/swapAdd the content of the options line and
swiotlb=262144to the created parameters file.# echo "root=/dev/mapper/rhel-root crashkernel=auto rd.lvm.lv=rhel/root rd.lvm.lv=rhel/swap swiotlb=262144" > ~/secure-parametersGenerate an IBM Secure Execution image.
For example, the following creates a
/boot/secure-imagesecured image based on the/boot/vmlinuz-4.18.0-240.el8.s390ximage, using thesecure-parametersfile, the/boot/initramfs-4.18.0-240.el8.s390x.imginitial RAM disk file, and theHKD-8651-000201C048.crthost key document.# genprotimg -i /boot/vmlinuz-4.18.0-240.el8.s390x -r /boot/initramfs-4.18.0-240.el8.s390x.img -p ~/secure-parameters -k HKD-8651-00020089A8.crt -o /boot/secure-imageBy using the
genprotimgutility creates the secure image, which contains the kernel parameters, initial RAM disk, and boot image.Update the VM’s boot menu to boot from the secure image. In addition, remove the lines starting with
initrdandoptions, as they are not needed.For example, in a RHEL 8.3 VM, the boot menu can be edited in the
/boot/loader/entries/directory:# cat /boot/loader/entries/3ab27a195c2849429927b00679db15c1-4.18.0-240.el8.s390x.conf title Red Hat Enterprise Linux 8.3 version 4.18.0-240.el8.s390x linux /boot/secure-image [...]Create the bootable disk image:
# zipl -VSecurely remove the original unprotected files. For example:
# shred /boot/vmlinuz-4.18.0-240.el8.s390x # shred /boot/initramfs-4.18.0-240.el8.s390x.img # shred secure-parameters
The original boot image, the initial RAM image, and the kernel parameter file are unprotected, and if they are not removed, VMs with Secure Execution enabled can still be vulnerable to hacking attempts or sensitive data mining.
Verification
On the host, use the
virsh dumpxmlutility to confirm the XML configuration of the secured VM. The configuration must include the<launchSecurity type="s390-pv"/>element, and no <rng model="virtio"> lines.# virsh dumpxml vm-name [...] <cpu mode='host-model'/> <devices> <disk type='file' device='disk'> <driver name='qemu' type='qcow2' cache='none' io='native'> <source file='/var/lib/libvirt/images/secure-guest.qcow2'/> <target dev='vda' bus='virtio'/> </disk> <interface type='network'> <source network='default'/> <model type='virtio'/> </interface> <console type='pty'/> <memballoon model='none'/> </devices> <launchSecurity type="s390-pv"/> </domain>
15.8. Attaching cryptographic coprocessors to virtual machines on IBM Z
To use hardware encryption in your virtual machine (VM) on an IBM Z host, create mediated devices from a cryptographic coprocessor device and assign them to the intended VMs. For detailed instructions, see below.
Prerequisites
- Your host is running on IBM Z hardware.
The cryptographic coprocessor is compatible with device assignment. To confirm this, ensure that the
typeof your coprocessor is listed asCEX4or later.# lszcrypt -V CARD.DOMAIN TYPE MODE STATUS REQUESTS PENDING HWTYPE QDEPTH FUNCTIONS DRIVER -------------------------------------------------------------------------------------------- 05 CEX5C CCA-Coproc online 1 0 11 08 S--D--N-- cex4card 05.0004 CEX5C CCA-Coproc online 1 0 11 08 S--D--N-- cex4queue 05.00ab CEX5C CCA-Coproc online 1 0 11 08 S--D--N-- cex4queue
The
vfio_apkernel module is loaded. To verify, use:# lsmod | grep vfio_ap vfio_ap 24576 0 [...]To load the module, use:
# modprobe vfio_apThe
s390utilsversion supportsaphandling:# lszdev --list-types ... ap Cryptographic Adjunct Processor (AP) device ...
Procedure
Obtain the decimal values for the devices that you want to assign to the VM. For example, for the devices
05.0004and05.00ab:# echo "obase=10; ibase=16; 04" | bc 4 # echo "obase=10; ibase=16; AB" | bc 171
On the host, reassign the devices to the
vfio-apdrivers:# chzdev -t ap apmask=-5 aqmask=-4,-171NoteTo assign the devices persistently, use the
-pflag.Verify that the cryptographic devices have been reassigned correctly.
# lszcrypt -V CARD.DOMAIN TYPE MODE STATUS REQUESTS PENDING HWTYPE QDEPTH FUNCTIONS DRIVER -------------------------------------------------------------------------------------------- 05 CEX5C CCA-Coproc - 1 0 11 08 S--D--N-- cex4card 05.0004 CEX5C CCA-Coproc - 1 0 11 08 S--D--N-- vfio_ap 05.00ab CEX5C CCA-Coproc - 1 0 11 08 S--D--N-- vfio_ap
If the DRIVER values of the domain queues changed to
vfio_ap, the reassignment succeeded.Create an XML snippet that defines a new mediated device.
The following example shows defining a persistent mediated device and assigning queues to it. Specifically, the
vfio_ap.xmlXML snippet in this example assigns a domain adapter0x05, domain queues0x0004and0x00ab, and a control domain0x00abto the mediated device.# vim vfio_ap.xml <device> <parent>ap_matrix</parent> <capability type="mdev"> <type id="vfio_ap-passthrough"/> <attr name='assign_adapter' value='0x05'/> <attr name='assign_domain' value='0x0004'/> <attr name='assign_domain' value='0x00ab'/> <attr name='assign_control_domain' value='0x00ab'/> </capability> </device>Create a new mediated device from the
vfio_ap.xmlXML snippet.# virsh nodedev-define vfio_ap.xml Node device 'mdev_8f9c4a73_1411_48d2_895d_34db9ac18f85_matrix' defined from 'vfio_ap.xml'Start the mediated device that you created in the previous step, in this case
mdev_8f9c4a73_1411_48d2_895d_34db9ac18f85_matrix.# virsh nodedev-start mdev_8f9c4a73_1411_48d2_895d_34db9ac18f85_matrix Device mdev_8f9c4a73_1411_48d2_895d_34db9ac18f85_matrix startedCheck that the configuration has been applied correctly
# cat /sys/devices/vfio_ap/matrix/mdev_supported_types/vfio_ap-passthrough/devices/669d9b23-fe1b-4ecb-be08-a2fabca99b71/matrix 05.0004 05.00abIf the output contains the numerical values of queues that you have previously assigned to
vfio-ap, the process was successful.Attach the mediated device to the VM.
Display the UUID of the mediated device that you created and save it for the next step.
# virsh nodedev-dumpxml mdev_8f9c4a73_1411_48d2_895d_34db9ac18f85_matrix <device> <name>mdev_8f9c4a73_1411_48d2_895d_34db9ac18f85_matrix</name> <parent>ap_matrix</parent> <capability type='mdev'> <type id='vfio_ap-passthrough'/> <uuid>8f9c4a73-1411-48d2-895d-34db9ac18f85</uuid> <iommuGroup number='0'/> <attr name='assign_adapter' value='0x05'/> <attr name='assign_domain' value='0x0004'/> <attr name='assign_domain' value='0x00ab'/> <attr name='assign_control_domain' value='0x00ab'/> </capability> </device>
Create and open an XML file for the cryptographic card mediated device. For example:
# vim crypto-dev.xmlAdd the following lines to the file and save it. Replace the
uuidvalue with the UUID you obtained in step a.<hostdev mode='subsystem' type='mdev' managed='no' model='vfio-ap'> <source> <address uuid='8f9c4a73-1411-48d2-895d-34db9ac18f85'/> </source> </hostdev>Use the XML file to attach the mediated device to the VM. For example, to permanently attach a device defined in the
crypto-dev.xmlfile to the runningtestguest1VM:# virsh attach-device testguest1 crypto-dev.xml --live --configThe
--liveoption attaches the device to a running VM only, without persistence between boots. The--configoption makes the configuration changes persistent. You can use the--configoption alone to attach the device to a shut-down VM.Note that each UUID can only be assigned to one VM at a time.
Verification
Ensure that the guest operating system detects the assigned cryptographic devices.
# lszcrypt -V CARD.DOMAIN TYPE MODE STATUS REQUESTS PENDING HWTYPE QDEPTH FUNCTIONS DRIVER -------------------------------------------------------------------------------------------- 05 CEX5C CCA-Coproc online 1 0 11 08 S--D--N-- cex4card 05.0004 CEX5C CCA-Coproc online 1 0 11 08 S--D--N-- cex4queue 05.00ab CEX5C CCA-Coproc online 1 0 11 08 S--D--N-- cex4queueThe output of this command in the guest operating system will be identical to that on a host logical partition with the same cryptographic coprocessor devices available.
In the guest operating system, confirm that a control domain has been successfully assigned to the cryptographic devices.
# lszcrypt -d C DOMAIN 00 01 02 03 04 05 06 07 08 09 0a 0b 0c 0d 0e 0f ------------------------------------------------------ 00 . . . . U . . . . . . . . . . . 10 . . . . . . . . . . . . . . . . 20 . . . . . . . . . . . . . . . . 30 . . . . . . . . . . . . . . . . 40 . . . . . . . . . . . . . . . . 50 . . . . . . . . . . . . . . . . 60 . . . . . . . . . . . . . . . . 70 . . . . . . . . . . . . . . . . 80 . . . . . . . . . . . . . . . . 90 . . . . . . . . . . . . . . . . a0 . . . . . . . . . . . B . . . . b0 . . . . . . . . . . . . . . . . c0 . . . . . . . . . . . . . . . . d0 . . . . . . . . . . . . . . . . e0 . . . . . . . . . . . . . . . . f0 . . . . . . . . . . . . . . . . ------------------------------------------------------ C: Control domain U: Usage domain B: Both (Control + Usage domain)If
lszcrypt -d CdisplaysUandBintersections in the cryptographic device matrix, the control domain assignment was successful.
15.9. Enabling standard hardware security on Windows virtual machines
To secure Windows virtual machines (VMs), you can enable basic level security by using the standard hardware capabilities of the Windows device.
Prerequisites
- Make sure you have installed the latest WHQL certified VirtIO drivers.
- Make sure the VM’s firmware supports UEFI boot.
Install the
edk2-OVMFpackage on your host machine.# {PackageManagerCommand} install edk2-ovmfInstall the
vTPMpackages on your host machine.# {PackageManagerCommand} install swtpm libtpms- Make sure the VM is using the Q35 machine architecture.
- Make sure you have the Windows installation media.
Procedure
Enable TPM 2.0 by adding the following parameters to the
<devices>section in the VM’s XML configuration.<devices> [...] <tpm model='tpm-crb'> <backend type='emulator' version='2.0'/> </tpm> [...] </devices>- Install Windows in UEFI mode. For more information about how to do so, see Creating a SecureBoot virtual machine.
- Install the VirtIO drivers on the Windows VM. For more information about how to do so, see Installing virtio drivers on a Windows guest.
- In UEFI, enable Secure Boot. For more information about how to do so, see Secure Boot.
Verification
Ensure that the Device Security page on your Windows machine displays the following message:
Settings > Update & Security > Windows Security > Device Security
Your device meets the requirements for standard hardware security.
15.10. Enabling enhanced hardware security on Windows virtual machines
To further secure Windows virtual machines (VMs), you can enable virtualization-based protection of code integrity, also known as Hypervisor-Protected Code Integrity (HVCI).
Prerequisites
- Ensure that standard hardware security is enabled. For more information, see Enabling standard hardware security on Windows virtual machines.
- Ensure you have enabled Hyper-V enlightenments. For more information, see Enabling Hyper-V enlightenments.
Procedure
Open the XML configuration of the Windows VM. The following example opens the configuration of the Example-L1 VM:
# virsh edit Example-L1Under the
<cpu>section, specify the CPU mode and add the policy flag.Important-
For Intel CPUs, enable the
vmxpolicy flag. -
For AMD CPUs, enable the
svmpolicy flag. -
If you do not wish to specify a custom CPU, you can set the
<cpu mode>ashost-passthrough.
<cpu mode='custom' match='exact' check='partial'> <model fallback='allow'>Skylake-Client-IBRS</model> <topology sockets='1' dies='1' cores='4' threads='1'/> <feature policy='require' name='vmx'/> </cpu>-
For Intel CPUs, enable the
- Save the XML configuration and reboot the VM.
On the VMs operating system, navigate to the Core isolation details page:
Settings > Update & Security > Windows Security > Device Security > Core isolation details
- Toggle the switch to enable Memory Integrity.
- Reboot the VM.
For other methods of enabling HVCI, see the relevant Microsoft documentation.
Verification
Ensure that the Device Security page on your Windows VM displays the following message:
Settings > Update & Security > Windows Security > Device Security
Your device meets the requirements for enhanced hardware security.Alternatively, check System Information about the Windows VM:
-
Run
msinfo32.exein a command prompt. - Check if Credential Guard, Hypervisor enforced Code Integrity is listed under Virtualization-based security Services Running.
-
Run
Chapter 16. Optimizing virtual machine performance
Virtual machines (VMs) always experience some degree of performance deterioration in comparison to the host. The following sections explain the reasons for this deterioration and provide instructions on how to minimize the performance impact of virtualization in RHEL 8, so that your hardware infrastructure resources can be used as efficiently as possible.
16.1. What influences virtual machine performance
VMs are run as user-space processes on the host. The hypervisor therefore needs to convert the host’s system resources so that the VMs can use them. As a consequence, a portion of the resources is consumed by the conversion, and the VM therefore cannot achieve the same performance efficiency as the host.
The impact of virtualization on system performance
More specific reasons for VM performance loss include:
- Virtual CPUs (vCPUs) are implemented as threads on the host, handled by the Linux scheduler.
- VMs do not automatically inherit optimization features, such as NUMA or huge pages, from the host kernel.
- Disk and network I/O settings of the host might have a significant performance impact on the VM.
- Network traffic typically travels to a VM through a software-based bridge.
- Depending on the host devices and their models, there might be significant overhead due to emulation of particular hardware.
The severity of the virtualization impact on the VM performance is influenced by a variety factors, which include:
- The number of concurrently running VMs.
- The amount of virtual devices used by each VM.
- The device types used by the VMs.
Reducing VM performance loss
RHEL 8 provides a number of features you can use to reduce the negative performance effects of virtualization. Notably:
-
The
TuneDservice can automatically optimize the resource distribution and performance of your VMs. - Block I/O tuning can improve the performances of the VM’s block devices, such as disks.
- NUMA tuning can increase vCPU performance.
- Virtual networking can be optimized in various ways.
Tuning VM performance can have adverse effects on other virtualization functions. For example, it can make migrating the modified VM more difficult.
16.2. Optimizing virtual machine performance by using TuneD
The TuneD utility is a tuning profile delivery mechanism that adapts RHEL for certain workload characteristics, such as requirements for CPU-intensive tasks or storage-network throughput responsiveness. It provides a number of tuning profiles that are pre-configured to enhance performance and reduce power consumption in a number of specific use cases. You can edit these profiles or create new profiles to create performance solutions tailored to your environment, including virtualized environments.
To optimize RHEL 8 for virtualization, use the following profiles:
-
For RHEL 8 virtual machines, use the virtual-guest profile. It is based on the generally applicable
throughput-performanceprofile, but also decreases the swappiness of virtual memory. - For RHEL 8 virtualization hosts, use the virtual-host profile. This enables more aggressive writeback of dirty memory pages, which benefits the host performance.
Prerequisites
-
The
TuneDservice is installed and enabled.
Procedure
To enable a specific TuneD profile:
List the available
TuneDprofiles.# tuned-adm list Available profiles: - balanced - General non-specialized TuneD profile - desktop - Optimize for the desktop use-case [...] - virtual-guest - Optimize for running inside a virtual guest - virtual-host - Optimize for running KVM guests Current active profile: balanced
Optional: Create a new
TuneDprofile or edit an existingTuneDprofile.For more information, see Customizing TuneD profiles.
Activate a
TuneDprofile.# tuned-adm profile selected-profileTo optimize a virtualization host, use the virtual-host profile.
# tuned-adm profile virtual-hostOn a RHEL guest operating system, use the virtual-guest profile.
# tuned-adm profile virtual-guest
Additional resources
16.3. Configuring virtual machine memory
To improve the performance of a virtual machine (VM), you can assign additional host RAM to the VM. Similarly, you can decrease the amount of memory allocated to a VM so the host memory can be allocated to other VMs or tasks.
To perform these actions, you can use the web console or the command-line interface.
16.3.1. Adding and removing virtual machine memory by using the web console
To improve the performance of a virtual machine (VM) or to free up the host resources it is using, you can use the web console to adjust amount of memory allocated to the VM.
Prerequisites
The guest OS is running the memory balloon drivers. To verify this is the case:
Ensure the VM’s configuration includes the
memballoondevice:# virsh dumpxml testguest | grep memballoon <memballoon model='virtio'> </memballoon>If this commands displays any output and the model is not set to
none, thememballoondevice is present.Ensure the balloon drivers are running in the guest OS.
-
In Windows guests, the drivers are installed as a part of the
virtio-windriver package. For instructions, see Installing KVM paravirtualized drivers for Windows virtual machines. -
In Linux guests, the drivers are generally included by default and activate when the
memballoondevice is present.
-
In Windows guests, the drivers are installed as a part of the
- The web console VM plug-in is installed on your system.
Procedure
Optional: Obtain the information about the maximum memory and currently used memory for a VM. This will serve as a baseline for your changes, and also for verification.
# virsh dominfo testguest Max memory: 2097152 KiB Used memory: 2097152 KiBIn the interface, click the VM whose information you want to see.
A new page opens with an Overview section with basic information about the selected VM and a Console section to access the VM’s graphical interface.
Click next to the
Memoryline in the Overview pane.The
Memory Adjustmentdialog appears.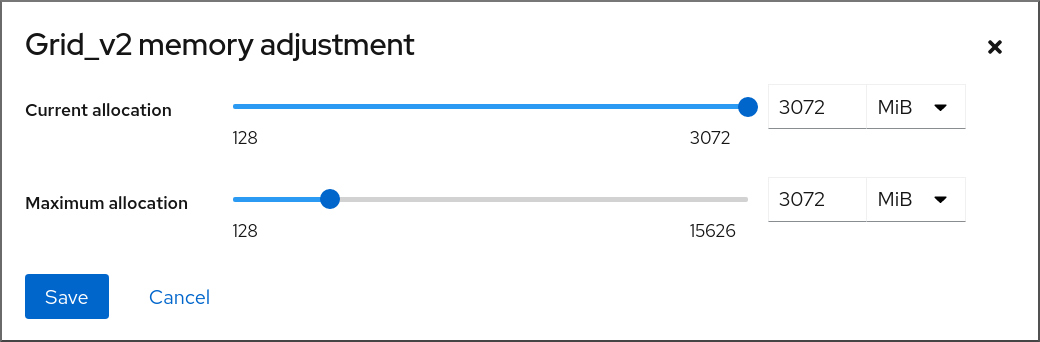
Configure the virtual CPUs for the selected VM.
Maximum allocation - Sets the maximum amount of host memory that the VM can use for its processes. You can specify the maximum memory when creating the VM or increase it later. You can specify memory as multiples of MiB or GiB.
Adjusting maximum memory allocation is only possible on a shut-off VM.
Current allocation - Sets the actual amount of memory allocated to the VM. This value can be less than the Maximum allocation but cannot exceed it. You can adjust the value to regulate the memory available to the VM for its processes. You can specify memory as multiples of MiB or GiB.
If you do not specify this value, the default allocation is the Maximum allocation value.
Click .
The memory allocation of the VM is adjusted.
16.3.2. Adding and removing virtual machine memory by using the command-line interface
To improve the performance of a virtual machine (VM) or to free up the host resources it is using, you can use the CLI to adjust amount of memory allocated to the VM.
Prerequisites
The guest OS is running the memory balloon drivers. To verify this is the case:
Ensure the VM’s configuration includes the
memballoondevice:# virsh dumpxml testguest | grep memballoon <memballoon model='virtio'> </memballoon>If this commands displays any output and the model is not set to
none, thememballoondevice is present.Ensure the ballon drivers are running in the guest OS.
-
In Windows guests, the drivers are installed as a part of the
virtio-windriver package. For instructions, see Installing KVM paravirtualized drivers for Windows virtual machines. -
In Linux guests, the drivers are generally included by default and activate when the
memballoondevice is present.
-
In Windows guests, the drivers are installed as a part of the
Procedure
Optional: Obtain the information about the maximum memory and currently used memory for a VM. This will serve as a baseline for your changes, and also for verification.
# virsh dominfo testguest Max memory: 2097152 KiB Used memory: 2097152 KiBAdjust the maximum memory allocated to a VM. Increasing this value improves the performance potential of the VM, and reducing the value lowers the performance footprint the VM has on your host. Note that this change can only be performed on a shut-off VM, so adjusting a running VM requires a reboot to take effect.
For example, to change the maximum memory that the testguest VM can use to 4096 MiB:
# virt-xml testguest --edit --memory memory=4096,currentMemory=4096 Domain 'testguest' defined successfully. Changes will take effect after the domain is fully powered off.To increase the maximum memory of a running VM, you can attach a memory device to the VM. This is also referred to as memory hot plug. For details, see Attaching devices to virtual machines.
WarningRemoving memory devices from a running VM (also referred as a memory hot unplug) is not supported, and highly discouraged by Red Hat.
Optional: You can also adjust the memory currently used by the VM, up to the maximum allocation. This regulates the memory load that the VM has on the host until the next reboot, without changing the maximum VM allocation.
# virsh setmem testguest --current 2048
Verification
Confirm that the memory used by the VM has been updated:
# virsh dominfo testguest Max memory: 4194304 KiB Used memory: 2097152 KiBOptional: If you adjusted the current VM memory, you can obtain the memory balloon statistics of the VM to evaluate how effectively it regulates its memory use.
# virsh domstats --balloon testguest Domain: 'testguest' balloon.current=365624 balloon.maximum=4194304 balloon.swap_in=0 balloon.swap_out=0 balloon.major_fault=306 balloon.minor_fault=156117 balloon.unused=3834448 balloon.available=4035008 balloon.usable=3746340 balloon.last-update=1587971682 balloon.disk_caches=75444 balloon.hugetlb_pgalloc=0 balloon.hugetlb_pgfail=0 balloon.rss=1005456
16.3.3. Additional resources
16.4. Optimizing virtual machine I/O performance
The input and output (I/O) capabilities of a virtual machine (VM) can significantly limit the VM’s overall efficiency. To address this, you can optimize a VM’s I/O by configuring block I/O parameters.
16.4.1. Tuning block I/O in virtual machines
When multiple block devices are being used by one or more VMs, it might be important to adjust the I/O priority of specific virtual devices by modifying their I/O weights.
Increasing the I/O weight of a device increases its priority for I/O bandwidth, and therefore provides it with more host resources. Similarly, reducing a device’s weight makes it consume less host resources.
Each device’s weight value must be within the 100 to 1000 range. Alternatively, the value can be 0, which removes that device from per-device listings.
Procedure
To display and set a VM’s block I/O parameters:
Display the current
<blkio>parameters for a VM:# virsh dumpxml VM-name<domain> [...] <blkiotune> <weight>800</weight> <device> <path>/dev/sda</path> <weight>1000</weight> </device> <device> <path>/dev/sdb</path> <weight>500</weight> </device> </blkiotune> [...] </domain>Edit the I/O weight of a specified device:
# virsh blkiotune VM-name --device-weights device, I/O-weightFor example, the following changes the weight of the /dev/sda device in the liftrul VM to 500.
# virsh blkiotune liftbrul --device-weights /dev/sda, 500
16.4.2. Disk I/O throttling in virtual machines
When several VMs are running simultaneously, they can interfere with system performance by using excessive disk I/O. Disk I/O throttling in KVM virtualization provides the ability to set a limit on disk I/O requests sent from the VMs to the host machine. This can prevent a VM from over-utilizing shared resources and impacting the performance of other VMs.
To enable disk I/O throttling, set a limit on disk I/O requests sent from each block device attached to VMs to the host machine.
Procedure
Use the
virsh domblklistcommand to list the names of all the disk devices on a specified VM.# virsh domblklist rollin-coal Target Source ------------------------------------------------ vda /var/lib/libvirt/images/rollin-coal.qcow2 sda - sdb /home/horridly-demanding-processes.isoFind the host block device where the virtual disk that you want to throttle is mounted.
For example, if you want to throttle the
sdbvirtual disk from the previous step, the following output shows that the disk is mounted on the/dev/nvme0n1p3partition.$ lsblk NAME MAJ:MIN RM SIZE RO TYPE MOUNTPOINT zram0 252:0 0 4G 0 disk [SWAP] nvme0n1 259:0 0 238.5G 0 disk ├─nvme0n1p1 259:1 0 600M 0 part /boot/efi ├─nvme0n1p2 259:2 0 1G 0 part /boot └─nvme0n1p3 259:3 0 236.9G 0 part └─luks-a1123911-6f37-463c-b4eb-fxzy1ac12fea 253:0 0 236.9G 0 crypt /homeSet I/O limits for the block device by using the
virsh blkiotunecommand.# virsh blkiotune VM-name --parameter device,limitThe following example throttles the
sdbdisk on therollin-coalVM to 1000 read and write I/O operations per second and to 50 MB per second read and write throughput.# virsh blkiotune rollin-coal --device-read-iops-sec /dev/nvme0n1p3,1000 --device-write-iops-sec /dev/nvme0n1p3,1000 --device-write-bytes-sec /dev/nvme0n1p3,52428800 --device-read-bytes-sec /dev/nvme0n1p3,52428800
Additional information
- Disk I/O throttling can be useful in various situations, for example when VMs belonging to different customers are running on the same host, or when quality of service guarantees are given for different VMs. Disk I/O throttling can also be used to simulate slower disks.
- I/O throttling can be applied independently to each block device attached to a VM and supports limits on throughput and I/O operations.
-
Red Hat does not support using the
virsh blkdeviotunecommand to configure I/O throttling in VMs. For more information about unsupported features when using RHEL 8 as a VM host, see Unsupported features in RHEL 8 virtualization.
16.4.3. Enabling multi-queue virtio-scsi
When using virtio-scsi storage devices in your virtual machines (VMs), the multi-queue virtio-scsi feature provides improved storage performance and scalability. It enables each virtual CPU (vCPU) to have a separate queue and interrupt to use without affecting other vCPUs.
Procedure
To enable multi-queue virtio-scsi support for a specific VM, add the following to the VM’s XML configuration, where N is the total number of vCPU queues:
<controller type='scsi' index='0' model='virtio-scsi'> <driver queues='N' /> </controller>
16.5. Optimizing virtual machine CPU performance
Much like physical CPUs in host machines, vCPUs are critical to virtual machine (VM) performance. As a result, optimizing vCPUs can have a significant impact on the resource efficiency of your VMs. To optimize your vCPU:
- Adjust how many host CPUs are assigned to the VM. You can do this using the CLI or the web console.
Ensure that the vCPU model is aligned with the CPU model of the host. For example, to set the testguest1 VM to use the CPU model of the host:
# virt-xml testguest1 --edit --cpu host-model- Deactivate kernel same-page merging (KSM).
If your host machine uses Non-Uniform Memory Access (NUMA), you can also configure NUMA for its VMs. This maps the host’s CPU and memory processes onto the CPU and memory processes of the VM as closely as possible. In effect, NUMA tuning provides the vCPU with a more streamlined access to the system memory allocated to the VM, which can improve the vCPU processing effectiveness.
For details, see Configuring NUMA in a virtual machine and Sample vCPU performance tuning scenario.
16.5.1. Adding and removing virtual CPUs by using the command-line interface
To increase or optimize the CPU performance of a virtual machine (VM), you can add or remove virtual CPUs (vCPUs) assigned to the VM.
When performed on a running VM, this is also referred to as vCPU hot plugging and hot unplugging. However, note that vCPU hot unplug is not supported in RHEL 8, and Red Hat highly discourages its use.
Prerequisites
Optional: View the current state of the vCPUs in the targeted VM. For example, to display the number of vCPUs on the testguest VM:
# virsh vcpucount testguest maximum config 4 maximum live 2 current config 2 current live 1This output indicates that testguest is currently using 1 vCPU, and 1 more vCPu can be hot plugged to it to increase the VM’s performance. However, after reboot, the number of vCPUs testguest uses will change to 2, and it will be possible to hot plug 2 more vCPUs.
Procedure
Adjust the maximum number of vCPUs that can be attached to a VM, which takes effect on the VM’s next boot.
For example, to increase the maximum vCPU count for the testguest VM to 8:
# virsh setvcpus testguest 8 --maximum --configNote that the maximum may be limited by the CPU topology, host hardware, the hypervisor, and other factors.
Adjust the current number of vCPUs attached to a VM, up to the maximum configured in the previous step. For example:
To increase the number of vCPUs attached to the running testguest VM to 4:
# virsh setvcpus testguest 4 --liveThis increases the VM’s performance and host load footprint of testguest until the VM’s next boot.
To permanently decrease the number of vCPUs attached to the testguest VM to 1:
# virsh setvcpus testguest 1 --configThis decreases the VM’s performance and host load footprint of testguest after the VM’s next boot. However, if needed, additional vCPUs can be hot plugged to the VM to temporarily increase its performance.
Verification
Confirm that the current state of vCPU for the VM reflects your changes.
# virsh vcpucount testguest maximum config 8 maximum live 4 current config 1 current live 4
Additional resources
16.5.2. Managing virtual CPUs by using the web console
By using the RHEL 8 web console, you can review and configure virtual CPUs used by virtual machines (VMs) to which the web console is connected.
Prerequisites
- The web console VM plug-in is installed on your system.
Procedure
In the interface, click the VM whose information you want to see.
A new page opens with an Overview section with basic information about the selected VM and a Console section to access the VM’s graphical interface.
Click next to the number of vCPUs in the Overview pane.
The vCPU details dialog appears.
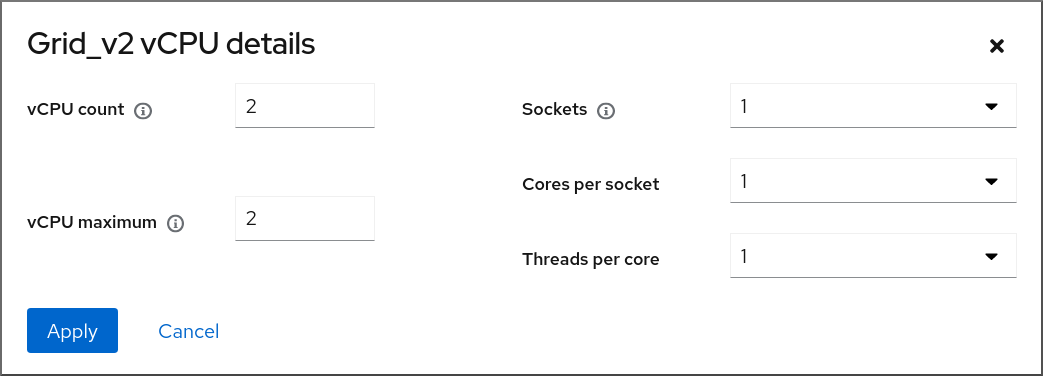
Configure the virtual CPUs for the selected VM.
vCPU Count - The number of vCPUs currently in use.
NoteThe vCPU count cannot be greater than the vCPU Maximum.
- vCPU Maximum - The maximum number of virtual CPUs that can be configured for the VM. If this value is higher than the vCPU Count, additional vCPUs can be attached to the VM.
- Sockets - The number of sockets to expose to the VM.
- Cores per socket - The number of cores for each socket to expose to the VM.
Threads per core - The number of threads for each core to expose to the VM.
Note that the Sockets, Cores per socket, and Threads per core options adjust the CPU topology of the VM. This may be beneficial for vCPU performance and may impact the functionality of certain software in the guest OS. If a different setting is not required by your deployment, keep the default values.
Click .
The virtual CPUs for the VM are configured.
NoteChanges to virtual CPU settings only take effect after the VM is restarted.
Additional resources
16.5.3. Configuring NUMA in a virtual machine
The following methods can be used to configure Non-Uniform Memory Access (NUMA) settings of a virtual machine (VM) on a RHEL 8 host.
Prerequisites
The host is a NUMA-compatible machine. To detect whether this is the case, use the
virsh nodeinfocommand and see theNUMA cell(s)line:# virsh nodeinfo CPU model: x86_64 CPU(s): 48 CPU frequency: 1200 MHz CPU socket(s): 1 Core(s) per socket: 12 Thread(s) per core: 2 NUMA cell(s): 2 Memory size: 67012964 KiB
If the value of the line is 2 or greater, the host is NUMA-compatible.
Procedure
For ease of use, you can set up a VM’s NUMA configuration by using automated utilities and services. However, manual NUMA setup is more likely to yield a significant performance improvement.
Automatic methods
Set the VM’s NUMA policy to
Preferred. For example, to do so for the testguest5 VM:# virt-xml testguest5 --edit --vcpus placement=auto # virt-xml testguest5 --edit --numatune mode=preferred
Enable automatic NUMA balancing on the host:
# echo 1 > /proc/sys/kernel/numa_balancingStart the
numadservice to automatically align the VM CPU with memory resources.# systemctl start numad
Manual methods
Pin specific vCPU threads to a specific host CPU or range of CPUs. This is also possible on non-NUMA hosts and VMs, and is recommended as a safe method of vCPU performance improvement.
For example, the following commands pin vCPU threads 0 to 5 of the testguest6 VM to host CPUs 1, 3, 5, 7, 9, and 11, respectively:
# virsh vcpupin testguest6 0 1 # virsh vcpupin testguest6 1 3 # virsh vcpupin testguest6 2 5 # virsh vcpupin testguest6 3 7 # virsh vcpupin testguest6 4 9 # virsh vcpupin testguest6 5 11
Afterwards, you can verify whether this was successful:
# virsh vcpupin testguest6 VCPU CPU Affinity ---------------------- 0 1 1 3 2 5 3 7 4 9 5 11After pinning vCPU threads, you can also pin QEMU process threads associated with a specified VM to a specific host CPU or range of CPUs. For example, the following commands pin the QEMU process thread of testguest6 to CPUs 13 and 15, and verify this was successful:
# virsh emulatorpin testguest6 13,15 # virsh emulatorpin testguest6 emulator: CPU Affinity ---------------------------------- *: 13,15
Finally, you can also specify which host NUMA nodes will be assigned specifically to a certain VM. This can improve the host memory usage by the VM’s vCPU. For example, the following commands set testguest6 to use host NUMA nodes 3 to 5, and verify this was successful:
# virsh numatune testguest6 --nodeset 3-5 # virsh numatune testguest6
For best performance results, it is recommended to use all of the manual tuning methods listed above
Additional resources
- Sample vCPU performance tuning scenario
-
View the current NUMA configuration of your system using the
numastatutility
16.5.4. Sample vCPU performance tuning scenario
To obtain the best vCPU performance possible, Red Hat recommends by using manual vcpupin, emulatorpin, and numatune settings together, for example like in the following scenario.
Starting scenario
Your host has the following hardware specifics:
- 2 NUMA nodes
- 3 CPU cores on each node
- 2 threads on each core
The output of
virsh nodeinfoof such a machine would look similar to:# virsh nodeinfo CPU model: x86_64 CPU(s): 12 CPU frequency: 3661 MHz CPU socket(s): 2 Core(s) per socket: 3 Thread(s) per core: 2 NUMA cell(s): 2 Memory size: 31248692 KiBYou intend to modify an existing VM to have 8 vCPUs, which means that it will not fit in a single NUMA node.
Therefore, you should distribute 4 vCPUs on each NUMA node and make the vCPU topology resemble the host topology as closely as possible. This means that vCPUs that run as sibling threads of a given physical CPU should be pinned to host threads on the same core. For details, see the Solution below:
Solution
Obtain the information about the host topology:
# virsh capabilitiesThe output should include a section that looks similar to the following:
<topology> <cells num="2"> <cell id="0"> <memory unit="KiB">15624346</memory> <pages unit="KiB" size="4">3906086</pages> <pages unit="KiB" size="2048">0</pages> <pages unit="KiB" size="1048576">0</pages> <distances> <sibling id="0" value="10" /> <sibling id="1" value="21" /> </distances> <cpus num="6"> <cpu id="0" socket_id="0" core_id="0" siblings="0,3" /> <cpu id="1" socket_id="0" core_id="1" siblings="1,4" /> <cpu id="2" socket_id="0" core_id="2" siblings="2,5" /> <cpu id="3" socket_id="0" core_id="0" siblings="0,3" /> <cpu id="4" socket_id="0" core_id="1" siblings="1,4" /> <cpu id="5" socket_id="0" core_id="2" siblings="2,5" /> </cpus> </cell> <cell id="1"> <memory unit="KiB">15624346</memory> <pages unit="KiB" size="4">3906086</pages> <pages unit="KiB" size="2048">0</pages> <pages unit="KiB" size="1048576">0</pages> <distances> <sibling id="0" value="21" /> <sibling id="1" value="10" /> </distances> <cpus num="6"> <cpu id="6" socket_id="1" core_id="3" siblings="6,9" /> <cpu id="7" socket_id="1" core_id="4" siblings="7,10" /> <cpu id="8" socket_id="1" core_id="5" siblings="8,11" /> <cpu id="9" socket_id="1" core_id="3" siblings="6,9" /> <cpu id="10" socket_id="1" core_id="4" siblings="7,10" /> <cpu id="11" socket_id="1" core_id="5" siblings="8,11" /> </cpus> </cell> </cells> </topology>- Optional: Test the performance of the VM by using the applicable tools and utilities.
Set up and mount 1 GiB huge pages on the host:
Add the following line to the host’s kernel command line:
default_hugepagesz=1G hugepagesz=1G
Create the
/etc/systemd/system/hugetlb-gigantic-pages.servicefile with the following content:[Unit] Description=HugeTLB Gigantic Pages Reservation DefaultDependencies=no Before=dev-hugepages.mount ConditionPathExists=/sys/devices/system/node ConditionKernelCommandLine=hugepagesz=1G [Service] Type=oneshot RemainAfterExit=yes ExecStart=/etc/systemd/hugetlb-reserve-pages.sh [Install] WantedBy=sysinit.target
Create the
/etc/systemd/hugetlb-reserve-pages.shfile with the following content:#!/bin/sh nodes_path=/sys/devices/system/node/ if [ ! -d $nodes_path ]; then echo "ERROR: $nodes_path does not exist" exit 1 fi reserve_pages() { echo $1 > $nodes_path/$2/hugepages/hugepages-1048576kB/nr_hugepages } reserve_pages 4 node1 reserve_pages 4 node2This reserves four 1GiB huge pages from node1 and four 1GiB huge pages from node2.
Make the script created in the previous step executable:
# chmod +x /etc/systemd/hugetlb-reserve-pages.shEnable huge page reservation on boot:
# systemctl enable hugetlb-gigantic-pages
Use the
virsh editcommand to edit the XML configuration of the VM you wish to optimize, in this example super-VM:# virsh edit super-vmAdjust the XML configuration of the VM in the following way:
-
Set the VM to use 8 static vCPUs. Use the
<vcpu/>element to do this. Pin each of the vCPU threads to the corresponding host CPU threads that it mirrors in the topology. To do so, use the
<vcpupin/>elements in the<cputune>section.Note that, as shown by the
virsh capabilitiesutility above, host CPU threads are not ordered sequentially in their respective cores. In addition, the vCPU threads should be pinned to the highest available set of host cores on the same NUMA node. For a table illustration, see the Sample topology section below.The XML configuration for steps a. and b. can look similar to:
<cputune> <vcpupin vcpu='0' cpuset='1'/> <vcpupin vcpu='1' cpuset='4'/> <vcpupin vcpu='2' cpuset='2'/> <vcpupin vcpu='3' cpuset='5'/> <vcpupin vcpu='4' cpuset='7'/> <vcpupin vcpu='5' cpuset='10'/> <vcpupin vcpu='6' cpuset='8'/> <vcpupin vcpu='7' cpuset='11'/> <emulatorpin cpuset='6,9'/> </cputune>
Set the VM to use 1 GiB huge pages:
<memoryBacking> <hugepages> <page size='1' unit='GiB'/> </hugepages> </memoryBacking>Configure the VM’s NUMA nodes to use memory from the corresponding NUMA nodes on the host. To do so, use the
<memnode/>elements in the<numatune/>section:<numatune> <memory mode="preferred" nodeset="1"/> <memnode cellid="0" mode="strict" nodeset="0"/> <memnode cellid="1" mode="strict" nodeset="1"/> </numatune>
Ensure the CPU mode is set to
host-passthrough, and that the CPU uses cache inpassthroughmode:<cpu mode="host-passthrough"> <topology sockets="2" cores="2" threads="2"/> <cache mode="passthrough"/>
-
Set the VM to use 8 static vCPUs. Use the
Verification
Confirm that the resulting XML configuration of the VM includes a section similar to the following:
[...] <memoryBacking> <hugepages> <page size='1' unit='GiB'/> </hugepages> </memoryBacking> <vcpu placement='static'>8</vcpu> <cputune> <vcpupin vcpu='0' cpuset='1'/> <vcpupin vcpu='1' cpuset='4'/> <vcpupin vcpu='2' cpuset='2'/> <vcpupin vcpu='3' cpuset='5'/> <vcpupin vcpu='4' cpuset='7'/> <vcpupin vcpu='5' cpuset='10'/> <vcpupin vcpu='6' cpuset='8'/> <vcpupin vcpu='7' cpuset='11'/> <emulatorpin cpuset='6,9'/> </cputune> <numatune> <memory mode="preferred" nodeset="1"/> <memnode cellid="0" mode="strict" nodeset="0"/> <memnode cellid="1" mode="strict" nodeset="1"/> </numatune> <cpu mode="host-passthrough"> <topology sockets="2" cores="2" threads="2"/> <cache mode="passthrough"/> <numa> <cell id="0" cpus="0-3" memory="2" unit="GiB"> <distances> <sibling id="0" value="10"/> <sibling id="1" value="21"/> </distances> </cell> <cell id="1" cpus="4-7" memory="2" unit="GiB"> <distances> <sibling id="0" value="21"/> <sibling id="1" value="10"/> </distances> </cell> </numa> </cpu> </domain>- Optional: Test the performance of the VM by using the applicable tools and utilities to evaluate the impact of the VM’s optimization.
Sample topology
The following tables illustrate the connections between the vCPUs and the host CPUs they should be pinned to:
Table 16.1. Host topology
CPU threads
0
3
1
4
2
5
6
9
7
10
8
11
Cores
0
1
2
3
4
5
Sockets
0
1
NUMA nodes
0
1
Table 16.2. VM topology
vCPU threads
0
1
2
3
4
5
6
7
Cores
0
1
2
3
Sockets
0
1
NUMA nodes
0
1
Table 16.3. Combined host and VM topology
vCPU threads
0
1
2
3
4
5
6
7
Host CPU threads
0
3
1
4
2
5
6
9
7
10
8
11
Cores
0
1
2
3
4
5
Sockets
0
1
NUMA nodes
0
1
In this scenario, there are 2 NUMA nodes and 8 vCPUs. Therefore, 4 vCPU threads should be pinned to each node.
In addition, Red Hat recommends leaving at least a single CPU thread available on each node for host system operations.
Because in this example, each NUMA node houses 3 cores, each with 2 host CPU threads, the set for node 0 translates as follows:
<vcpupin vcpu='0' cpuset='1'/> <vcpupin vcpu='1' cpuset='4'/> <vcpupin vcpu='2' cpuset='2'/> <vcpupin vcpu='3' cpuset='5'/>
16.5.5. Deactivating kernel same-page merging
Although kernel same-page merging (KSM) improves memory density, it increases CPU utilization, and might adversely affect overall performance depending on the workload. In such cases, you can improve the virtual machine (VM) performance by deactivating KSM.
Depending on your requirements, you can either deactivate KSM for a single session or persistently.
Procedure
To deactivate KSM for a single session, use the
systemctlutility to stopksmandksmtunedservices.# systemctl stop ksm # systemctl stop ksmtuned
To deactivate KSM persistently, use the
systemctlutility to disableksmandksmtunedservices.# systemctl disable ksm Removed /etc/systemd/system/multi-user.target.wants/ksm.service. # systemctl disable ksmtuned Removed /etc/systemd/system/multi-user.target.wants/ksmtuned.service.
Memory pages shared between VMs before deactivating KSM will remain shared. To stop sharing, delete all the PageKSM pages in the system by using the following command:
# echo 2 > /sys/kernel/mm/ksm/run
After anonymous pages replace the KSM pages, the khugepaged kernel service will rebuild transparent hugepages on the VM’s physical memory.
16.6. Optimizing virtual machine network performance
Due to the virtual nature of a VM’s network interface card (NIC), the VM loses a portion of its allocated host network bandwidth, which can reduce the overall workload efficiency of the VM. The following tips can minimize the negative impact of virtualization on the virtual NIC (vNIC) throughput.
Procedure
Use any of the following methods and observe if it has a beneficial effect on your VM network performance:
- Enable the vhost_net module
On the host, ensure the
vhost_netkernel feature is enabled:# lsmod | grep vhost vhost_net 32768 1 vhost 53248 1 vhost_net tap 24576 1 vhost_net tun 57344 6 vhost_netIf the output of this command is blank, enable the
vhost_netkernel module:# modprobe vhost_net- Set up multi-queue virtio-net
To set up the multi-queue virtio-net feature for a VM, use the
virsh editcommand to edit to the XML configuration of the VM. In the XML, add the following to the<devices>section, and replaceNwith the number of vCPUs in the VM, up to 16:<interface type='network'> <source network='default'/> <model type='virtio'/> <driver name='vhost' queues='N'/> </interface>If the VM is running, restart it for the changes to take effect.
- Batching network packets
In Linux VM configurations with a long transmission path, batching packets before submitting them to the kernel may improve cache utilization. To set up packet batching, use the following command on the host, and replace tap0 with the name of the network interface that the VMs use:
# ethtool -C tap0 rx-frames 64- SR-IOV
- If your host NIC supports SR-IOV, use SR-IOV device assignment for your vNICs. For more information, see Managing SR-IOV devices.
Additional resources
16.7. Virtual machine performance monitoring tools
To identify what consumes the most VM resources and which aspect of VM performance needs optimization, performance diagnostic tools, both general and VM-specific, can be used.
Default OS performance monitoring tools
For standard performance evaluation, you can use the utilities provided by default by your host and guest operating systems:
On your RHEL 8 host, as root, use the
toputility or the system monitor application, and look forqemuandvirtin the output. This shows how much host system resources your VMs are consuming.-
If the monitoring tool displays that any of the
qemuorvirtprocesses consume a large portion of the host CPU or memory capacity, use theperfutility to investigate. For details, see below. -
In addition, if a
vhost_netthread process, named for example vhost_net-1234, is displayed as consuming an excessive amount of host CPU capacity, consider using virtual network optimization features, such asmulti-queue virtio-net.
-
If the monitoring tool displays that any of the
On the guest operating system, use performance utilities and applications available on the system to evaluate which processes consume the most system resources.
-
On Linux systems, you can use the
toputility. - On Windows systems, you can use the Task Manager application.
-
On Linux systems, you can use the
perf kvm
You can use the perf utility to collect and analyze virtualization-specific statistics about the performance of your RHEL 8 host. To do so:
On the host, install the perf package:
# yum install perfUse one of the
perf kvm statcommands to display perf statistics for your virtualization host:-
For real-time monitoring of your hypervisor, use the
perf kvm stat livecommand. -
To log the perf data of your hypervisor over a period of time, activate the logging by using the
perf kvm stat recordcommand. After the command is canceled or interrupted, the data is saved in theperf.data.guestfile, which can be analyzed by using theperf kvm stat reportcommand.
-
For real-time monitoring of your hypervisor, use the
Analyze the
perfoutput for types ofVM-EXITevents and their distribution. For example, thePAUSE_INSTRUCTIONevents should be infrequent, but in the following output, the high occurrence of this event suggests that the host CPUs are not handling the running vCPUs well. In such a scenario, consider shutting down some of your active VMs, removing vCPUs from these VMs, or tuning the performance of the vCPUs.# perf kvm stat report Analyze events for all VMs, all VCPUs: VM-EXIT Samples Samples% Time% Min Time Max Time Avg time EXTERNAL_INTERRUPT 365634 31.59% 18.04% 0.42us 58780.59us 204.08us ( +- 0.99% ) MSR_WRITE 293428 25.35% 0.13% 0.59us 17873.02us 1.80us ( +- 4.63% ) PREEMPTION_TIMER 276162 23.86% 0.23% 0.51us 21396.03us 3.38us ( +- 5.19% ) PAUSE_INSTRUCTION 189375 16.36% 11.75% 0.72us 29655.25us 256.77us ( +- 0.70% ) HLT 20440 1.77% 69.83% 0.62us 79319.41us 14134.56us ( +- 0.79% ) VMCALL 12426 1.07% 0.03% 1.02us 5416.25us 8.77us ( +- 7.36% ) EXCEPTION_NMI 27 0.00% 0.00% 0.69us 1.34us 0.98us ( +- 3.50% ) EPT_MISCONFIG 5 0.00% 0.00% 5.15us 10.85us 7.88us ( +- 11.67% ) Total Samples:1157497, Total events handled time:413728274.66us.Other event types that can signal problems in the output of
perf kvm statinclude:-
INSN_EMULATION- suggests suboptimal VM I/O configuration.
-
For more information about using perf to monitor virtualization performance, see the perf-kvm man page.
numastat
To see the current NUMA configuration of your system, you can use the numastat utility, which is provided by installing the numactl package.
The following shows a host with 4 running VMs, each obtaining memory from multiple NUMA nodes. This is not optimal for vCPU performance, and warrants adjusting:
# numastat -c qemu-kvm
Per-node process memory usage (in MBs)
PID Node 0 Node 1 Node 2 Node 3 Node 4 Node 5 Node 6 Node 7 Total
--------------- ------ ------ ------ ------ ------ ------ ------ ------ -----
51722 (qemu-kvm) 68 16 357 6936 2 3 147 598 8128
51747 (qemu-kvm) 245 11 5 18 5172 2532 1 92 8076
53736 (qemu-kvm) 62 432 1661 506 4851 136 22 445 8116
53773 (qemu-kvm) 1393 3 1 2 12 0 0 6702 8114
--------------- ------ ------ ------ ------ ------ ------ ------ ------ -----
Total 1769 463 2024 7462 10037 2672 169 7837 32434In contrast, the following shows memory being provided to each VM by a single node, which is significantly more efficient.
# numastat -c qemu-kvm
Per-node process memory usage (in MBs)
PID Node 0 Node 1 Node 2 Node 3 Node 4 Node 5 Node 6 Node 7 Total
--------------- ------ ------ ------ ------ ------ ------ ------ ------ -----
51747 (qemu-kvm) 0 0 7 0 8072 0 1 0 8080
53736 (qemu-kvm) 0 0 7 0 0 0 8113 0 8120
53773 (qemu-kvm) 0 0 7 0 0 0 1 8110 8118
59065 (qemu-kvm) 0 0 8050 0 0 0 0 0 8051
--------------- ------ ------ ------ ------ ------ ------ ------ ------ -----
Total 0 0 8072 0 8072 0 8114 8110 32368Chapter 17. Installing and managing Windows virtual machines
To use Microsoft Windows as the guest operating system in your virtual machines (VMs) on a RHEL 8 host, Red Hat recommends taking extra steps to ensure these VMs run correctly.
For this purpose, the following sections provide information about installing and optimizing Windows VMs on the host, as well as installing and configuring drivers in these VMs.
17.1. Installing Windows virtual machines
You can create a fully-virtualized Windows machine on a RHEL 8 host, launch the graphical Windows installer inside the virtual machine (VM), and optimize the installed Windows guest operating system (OS).
To create the VM and to install the Windows guest OS, use the virt-install command or the RHEL 8 web console.
Prerequisites
A Windows OS installation source, which can be one of the following, and be available locally or on a network:
- An ISO image of an installation medium
- A disk image of an existing VM installation
A storage medium with the KVM
virtiodrivers.To create this medium, see Preparing virtio driver installation media on a host machine.
-
If you are installing Windows 11, the
edk2-ovmf,swtpmandlibtpmspackages must be installed on the host.
Procedure
Create the VM. For instructions, see Creating virtual machines, but keep in mind the following specifics.
If using the
virt-installutility to create the VM, add the following options to the command:The storage medium with the KVM
virtiodrivers. For example:--disk path=/usr/share/virtio-win/virtio-win.iso,device=cdromThe Windows version you will install. For example, for Windows 10 and 11:
--os-variant win10For a list of available Windows versions and the appropriate option, use the following command:
# osinfo-query osIf you are installing Windows 11, enable Unified Extensible Firmware Interface (UEFI) and virtual Trusted Platform Module (vTPM):
--boot uefi --tpm model=tpm-crb,backend.type=emulator,backend.version=2.0
If using the web console to create the VM, specify your version of Windows in the Operating system field of the Create new virtual machine window.
- If you are installing Windows versions prior to Windows 11 and Windows Server 2022, start the installation by clicking .
If you are installing Windows 11, or you want to use additional Windows Server 2022 features, confirm by clicking and enable UEFI and vTPM using the CLI:
Open the VM’s XML configuration:
# virsh edit windows-vmAdd the
firmware='efi'option to theoselement:<os firmware='efi'> <type arch='x86_64' machine='pc-q35-6.2'>hvm</type> <boot dev='hd'/> </os>Add the
tpmdevice inside thedeviceselement:<devices> <tpm model='tpm-crb'> <backend type='emulator' version='2.0'/> </tpm> </devices>
- Start the Windows installation by clicking in the Virtual machines table.
Install the Windows OS in the VM.
For information about how to install a Windows operating system, refer to the relevant Microsoft installation documentation.
- If using the web console to create the VM, attach the storage medium with virtio drivers to the VM by using the Disks interface. For instructions, see Attaching existing disks to virtual machines by using the web console.
-
Configure KVM
virtiodrivers in the Windows guest OS. For details, see Installing KVM paravirtualized drivers for Windows virtual machines.
17.2. Optimizing Windows virtual machines
When using Microsoft Windows as a guest operating system in a virtual machine (VM) hosted in RHEL 8, the performance of the guest may be negatively impacted.
Therefore, Red Hat recommends optimizing your Windows VMs by doing any combination of the following:
- Using paravirtualized drivers. For more information, see Installing KVM paravirtualized drivers for Windows virtual machines.
- Enabling Hyper-V enlightenments. For more information, see Enabling Hyper-V enlightenments.
- Configuring NetKVM driver parameters. For more information, see Configuring NetKVM driver parameters.
- Optimizing or disabling Windows background processes. For more information, see Optimizing background processes on Windows virtual machines.
17.2.1. Installing KVM paravirtualized drivers for Windows virtual machines
The primary method of improving the performance of your Windows virtual machines (VMs) is to install KVM paravirtualized (virtio) drivers for Windows on the guest operating system.
The virtio-win drivers are certified (WHQL) against the latest releases of Windows 10 and 11, available at the time of the respective virtio-win release. However, virtio-win drivers are generally tested and expected to function correctly on previous builds of Windows 10 and 11 as well.
To install the drivers on a Windows VM, perform the following actions:
- Prepare the install media on the host machine. For more information, see Preparing virtio driver installation media on a host machine.
- Attach the install media to an existing Windows VM, or attach it when creating a new Windows VM. For more information, see Installing Windows virtual machines on RHEL.
-
Install the
virtiodrivers on the Windows guest operating system. For more information, see Installing virtio drivers on a Windows guest. -
Install the
QEMU Guest Agenton the Windows guest operating system. For more information, see Installing QEMU Guest Agent on a Windows guest.
17.2.1.1. How Windows virtio drivers work
Paravirtualized drivers enhance the performance of virtual machines (VMs) by decreasing I/O latency and increasing throughput to almost bare-metal levels. Red Hat recommends that you use paravirtualized drivers for VMs that run I/O-heavy tasks and applications.
virtio drivers are KVM’s paravirtualized device drivers, available for Windows VMs running on KVM hosts. These drivers are provided by the virtio-win package, which includes drivers for:
- Block (storage) devices
- Network interface controllers
- Video controllers
- Memory ballooning device
- Paravirtual serial port device
- Entropy source device
- Paravirtual panic device
- Input devices, such as mice, keyboards, or tablets
- A small set of emulated devices
For additional information about emulated, virtio, and assigned devices, refer to Managing virtual devices.
By using KVM virtio drivers, the following Microsoft Windows versions are expected to run similarly to physical systems:
- Windows Server versions: See Certified guest operating systems for Red Hat Enterprise Linux with KVM in the Red Hat Knowledgebase.
Windows Desktop (non-server) versions:
- Windows 10 (32-bit and 64-bit versions)
17.2.1.2. Preparing virtio driver installation media on a host machine
To install or update KVM virtio drivers on a Windows virtual machine (VM), you must first prepare the virtio driver installation media on the host machine. To do so, attach the .iso file, provided by the virtio-win package, as a storage device to the Windows VM.
Prerequisites
- Ensure that virtualization is enabled in your RHEL 8 host system. For more information, see Enabling virtualization.
- Ensure that you have root access privileges to the VM.
Procedure
Refresh your subscription data:
# subscription-manager refresh All local data refreshedGet the latest version of the
virtio-winpackage.If
virtio-winis not installed:# yum install -y virtio-winIf
virtio-winis installed:# yum upgrade -y virtio-winIf the installation succeeds, the
virtio-windriver files are available in the/usr/share/virtio-win/directory. These includeISOfiles and adriversdirectory with the driver files in directories, one for each architecture and supported Windows version.# ls /usr/share/virtio-win/ drivers/ guest-agent/ virtio-win-1.9.9.iso virtio-win.iso
Attach the
virtio-win.isofile as a storage device to the Windows VM.-
When creating a new Windows VM, attach the file by using the
virt-installcommand options. When installing the drivers on an existing Windows VM, attach the file as a CD-ROM by using the
virt-xmlutility:# virt-xml WindowsVM --add-device --disk virtio-win.iso,device=cdrom Domain 'WindowsVM' defined successfully.
-
When creating a new Windows VM, attach the file by using the
Additional resources
17.2.1.3. Installing virtio drivers on a Windows guest
To install KVM virtio drivers on a Windows guest operating system, you must add a storage device that contains the drivers (either when creating the virtual machine (VM) or afterwards) and install the drivers in the Windows guest operating system.
This procedure provides instructions to install the drivers by using the graphical interface. You can also use the Microsoft Windows Installer (MSI) command line interface.
Prerequisites
-
An installation medium with the KVM
virtiodrivers must be attached to the VM. For instructions on preparing the medium, see Preparing virtio driver installation media on a host machine.
Procedure
-
In the Windows guest operating system, open the
File Explorerapplication. -
Click
This PC. -
In the
Devices and drivespane, open thevirtio-winmedium. Based on the operating system installed on the VM, run one of the installers:
-
If using a 32-bit operating system, run the
virtio-win-gt-x86.msiinstaller. -
If using a 64-bit operating system, run the
virtio-win-gt-x64.msiinstaller.
-
If using a 32-bit operating system, run the
In the
Virtio-win-driver-installersetup wizard that opens, follow the displayed instructions until you reach theCustom Setupstep.
- In the Custom Setup window, select the device drivers you want to install. The recommended driver set is selected automatically, and the descriptions of the drivers are displayed on the right of the list.
- Click , then click .
- After the installation completes, click .
- Reboot the VM to complete the driver installation.
Verification
On your Windows VM, navigate to the Device Manager:
- Click Start
- Search for Device Manager
Ensure that the devices are using the correct drivers:
- Click a device to open the Driver Properties window.
- Navigate to the Driver tab.
- Click Driver Details.
Next steps
- If you installed the NetKVM driver, you might also need to configure the Windows guest’s networking parameters. For more information, see Configuring NetKVM driver parameters.
17.2.1.4. Updating virtio drivers on a Windows guest
To update KVM virtio drivers on a Windows guest operating system (OS), you can use the Windows Update service, if the Windows OS version supports it. If it does not, reinstall the drivers from virtio driver installation media attached to the Windows virtual machine (VM).
Prerequisites
- A Windows guest OS with virtio drivers installed.
-
If not using
Windows Update, an installation medium with up-to-date KVMvirtiodrivers must be attached to the Windows VM. For instructions on preparing the medium, see Preparing virtio driver installation media on a host machine.
Procedure 1: Updating the drivers by using Windows Update
On Windows 10, Windows Server 2016 and later operating systems, check if the driver updates are available by using the Windows Update graphical interface:
- Start the Windows VM and log in to its guest OS.
Navigate to the Optional updates page:
Settings → Windows Update → Advanced options → Optional updates
- Install all updates from Red Hat, Inc.
Procedure 2: Updating the drivers by reinstalling them
On operating systems prior to Windows 10 and Windows Server 2016, or if the OS does not have access to Windows Update, reinstall the drivers. This restores the Windows guest OS network configuration to default (DHCP). If you want to preserve a customized network configuration, you also need to create a backup and restore it by using the netsh utility:
- Start the Windows VM and log in to its guest OS.
Open the Windows Command Prompt:
- Use the Super+R keyboard shortcut.
-
In the window that appears, type
cmdand press Ctrl+Shift+Enter to run as administrator.
Back up the OS network configuration by using the Windows Command Prompt:
C:\WINDOWS\system32\netsh dump > backup.txtReinstall KVM
virtiodrivers from the attached installation media. Do one of the following:Reinstall the drivers by using the Windows Command Prompt, where X is the installation media drive letter. The following commands install all
virtiodrivers.If using a 64-bit vCPU:
C:\WINDOWS\system32\msiexec.exe /i X:\virtio-win-gt-x64.msi /passive /norestartIf using a 32-bit vCPU:
C:\WINDOWS\system32\msiexec.exe /i X:\virtio-win-gt-x86.msi /passive /norestart
- Reinstall the drivers using the graphical interface without rebooting the VM.
Restore the OS network configuration using the Windows Command Prompt:
C:\WINDOWS\system32\netsh -f backup.txt- Reboot the VM to complete the driver installation.
Additional resources
17.2.1.5. Installing QEMU Guest Agent on Windows guests
To allow a host to perform various operations on a Windows virtual machine (VM), you can install the QEMU Guest Agent. To do so, add a storage device that contains the QEMU Guest Agent installer to an existing VM or when creating a new VM, and install the drivers on the Windows guest operating system.
This procedure provides instructions to install the guest agent by using the graphical interface. You can also use the Microsoft Windows Installer (MSI) command line interface.
Prerequisites
- An installation medium with the guest agent is attached to the VM. For instructions on preparing the medium, see Preparing virtio driver installation media on a host machine.
Procedure
-
In the Windows guest operating system, open the
File Explorerapplication. -
Click
This PC. -
In the
Devices and drivespane, open thevirtio-winmedium. -
Open the
guest-agentfolder. Based on the operating system installed on the VM, run one of the following installers:
-
If using a 32-bit operating system, run the
qemu-ga-i386.msiinstaller. -
If using a 64-bit operating system, run the
qemu-ga-x86_64.msiinstaller.
-
If using a 32-bit operating system, run the
Verification
On your Windows VM, navigate to the Services window.
Computer Management > Services
-
Ensure that the
Statusof the QEMU Guest Agent service isRunning.
17.2.2. Enabling Hyper-V enlightenments
Hyper-V enlightenments provide a method for KVM to emulate the Microsoft Hyper-V hypervisor. This improves the performance of Windows virtual machines.
The following sections provide information about the supported Hyper-V enlightenments and how to enable them.
17.2.2.1. Enabling Hyper-V enlightenments on a Windows virtual machine
Hyper-V enlightenments provide better performance in a Windows virtual machine (VM) running in a RHEL 8 host. For instructions on how to enable them, see the following.
Procedure
Use the
virsh editcommand to open the XML configuration of the VM. For example:# virsh edit windows-vmAdd the following
<hyperv>sub-section to the<features>section of the XML:<features> [...] <hyperv> <relaxed state='on'/> <vapic state='on'/> <spinlocks state='on' retries='8191'/> <vpindex state='on'/> <runtime state='on' /> <synic state='on'/> <stimer state='on'> <direct state='on'/> </stimer> <frequencies state='on'/> </hyperv> [...] </features>If the XML already contains a
<hyperv>sub-section, modify it as shown above.Change the
clocksection of the configuration as follows:<clock offset='localtime'> ... <timer name='hypervclock' present='yes'/> </clock>
- Save and exit the XML configuration.
- If the VM is running, restart it.
Verification
Use the
virsh dumpxmlcommand to display the XML configuration of the running VM. If it includes the following segments, the Hyper-V enlightenments are enabled on the VM.<hyperv> <relaxed state='on'/> <vapic state='on'/> <spinlocks state='on' retries='8191'/> <vpindex state='on'/> <runtime state='on' /> <synic state='on'/> <stimer state='on'> <direct state='on'/> </stimer> <frequencies state='on'/> </hyperv> <clock offset='localtime'> ... <timer name='hypervclock' present='yes'/> </clock>
17.2.2.2. Configurable Hyper-V enlightenments
You can configure certain Hyper-V features to optimize Windows VMs. The following table provides information about these configurable Hyper-V features and their values.
Table 17.1. Configurable Hyper-V features
| Enlightenment | Description | Values |
|---|---|---|
| crash | Provides MSRs to the VMs that can be used to store information and logs if a VM crashes. The information in available in the QEMU log. Note If hv_crash is enabled, Windows crash dumps are not created. | on, off |
| evmcs | Implements paravirtualized protocol between L0 (KVM) and L1 (Hyper-V) hypervisors, which enables faster L2 exits to the hypervisor. Note This feature is exclusive to Intel processors. | on, off |
| frequencies | Enables Hyper-V frequency Machine Specific Registers (MSRs). | on, off |
| ipi | Enables paravirtualized inter processor interrupts (IPI) support. | on, off |
| no-nonarch-coresharing | Notifies the guest OS that virtual processors will never share a physical core unless they are reported as sibling SMT threads. This information is required by Windows and Hyper-V guests to properly mitigate simultaneous multithreading (SMT) related CPU vulnerabilities. | on, off, auto |
| reenlightenment | Notifies when there is a time stamp counter (TSC) frequency change which only occurs during migration. It also allows the guest to keep using the old frequency until it is ready to switch to the new one. | on, off |
| relaxed | Disables a Windows sanity check that commonly results in a BSOD when the VM is running on a heavily loaded host. This is similar to the Linux kernel option no_timer_check, which is automatically enabled when Linux is running on KVM. | on, off |
| runtime | Sets processor time spent on running the guest code, and on behalf of the guest code. | on, off |
| spinlocks |
| on, off |
| stimer | Enables synthetic timers for virtual processors. Note that certain Windows versions revert to using HPET (or even RTC when HPET is unavailable) when this enlightenment is not provided, which can lead to significant CPU consumption, even when the virtual CPU is idle. | on, off |
| stimer-direct | Enables synthetic timers when an expiration event is delivered via a normal interrupt. | on, off. |
| synic | Together with stimer, activates the synthetic timer. Windows 8 uses this feature in periodic mode. | on, off |
| time | Enables the following Hyper-V-specific clock sources available to the VM,
| on, off |
| tlbflush | Flushes the TLB of the virtual processors. | on, off |
| vapic | Enables virtual APIC, which provides accelerated MSR access to the high-usage, memory-mapped Advanced Programmable Interrupt Controller (APIC) registers. | on, off |
| vendor_id | Sets the Hyper-V vendor id. |
|
| vpindex | Enables virtual processor index. | on, off |
17.2.3. Configuring NetKVM driver parameters
After the NetKVM driver is installed, you can configure it to better suit your environment. The parameters listed in the following procedure can be configured by using the Windows Device Manager (devmgmt.msc).
Modifying the driver’s parameters causes Windows to reload that driver. This interrupts existing network activity.
Prerequisites
The NetKVM driver is installed on the virtual machine.
For more information, see Installing KVM paravirtualized drivers for Windows virtual machines.
Procedure
Open Windows Device Manager.
For information about opening Device Manager, refer to the Windows documentation.
Locate the Red Hat VirtIO Ethernet Adapter.
- In the Device Manager window, click next to Network adapters.
Under the list of network adapters, double-click Red Hat VirtIO Ethernet Adapter.
The Properties window for the device opens.
View the device parameters.
In the Properties window, click the Advanced tab.
Modify the device parameters.
Click the parameter you want to modify.
Options for that parameter are displayed.
Modify the options as needed.
For information about the NetKVM parameter options, refer to NetKVM driver parameters.
- Click to save the changes.
17.2.4. NetKVM driver parameters
The following table provides information about the configurable NetKVM driver logging parameters.
Table 17.2. Logging parameters
| Parameter | Description 2 |
|---|---|
| Logging.Enable | A Boolean value that determines whether logging is enabled. The default value is Enabled. |
| Logging.Level | An integer that defines the logging level. As the integer increases, so does the verbosity of the log.
Note High logging levels will slow down your virtual machine. |
The following table provides information about the configurable NetKVM driver initial parameters.
Table 17.3. Initial parameters
| Parameter | Description |
|---|---|
| Assign MAC | A string that defines the locally-administered MAC address for the paravirtualized NIC. This is not set by default. |
| Init.Do802.1PQ | A Boolean value that enables Priority/VLAN tag population and removal support. The default value is Enabled. |
| Init.MaxTxBuffers | An integer that represents the number of TX ring descriptors that will be allocated. The value is limited by the size of Tx queue of QEMU. The default value is 1024. Valid values are: 16, 32, 64, 128, 256, 512, and 1024. |
| Init.MaxRxBuffers | An integer that represents the number of RX ring descriptors that will be allocated. The value is limited by the size of Tx queue of QEMU. The default value is 1024. Valid values are: 16, 32, 64, 128, 256, 512, 1024, 2048, and 4096. |
| Offload.Tx.Checksum | Specifies the TX checksum offloading capability. In Red Hat Enterprise Linux 8, the valid values for this parameter are:
|
| Offload.Rx.Checksum | Specifies the RX checksum offloading capability. In Red Hat Enterprise Linux 8, the valid values for this parameter are:
|
| Offload.Tx.LSO | Specifies the TX large segments offloading (LSO) capability. In Red Hat Enterprise Linux 8, the valid values for this parameter are:
|
| MinRxBufferPercent | Specifies minimal amount of available buffers in RX queue in percent of total amount of RX buffers. If the actual number of available buffers is lower than that value, the NetKVM driver indicates low resources condition to the operating system (requesting it to return the RX buffers as soon as possible)
Minimum value (default) -
Maximum value - |
Additional resources
17.2.5. Optimizing background processes on Windows virtual machines
To optimize the performance of a virtual machine (VM) running a Windows OS, you can configure or disable a variety of Windows processes.
Certain processes might not work as expected if you change their configuration.
Procedure
You can optimize your Windows VMs by performing any combination of the following:
- Remove unused devices, such as USBs or CD-ROMs, and disable the ports.
- Disable background services, such as SuperFetch and Windows Search. For more information about stopping services, see Disabling system services or Stop-Service.
Disable
useplatformclock. To do so, run the following command,# bcdedit /set useplatformclock No- Review and disable unnecessary scheduled tasks, such as scheduled disk defragmentation. For more information about how to do so, see Disable Scheduled Tasks.
- Make sure the disks are not encrypted.
- Reduce periodic activity of server applications. You can do so by editing the respective timers. For more information, see Multimedia Timers.
- Close the Server Manager application on the VM.
- Disable the antivirus software. Note that disabling the antivirus might compromise the security of the VM.
- Disable the screen saver.
- Keep the Windows OS on the sign-in screen when not in use.
17.3. Enabling standard hardware security on Windows virtual machines
To secure Windows virtual machines (VMs), you can enable basic level security by using the standard hardware capabilities of the Windows device.
Prerequisites
- Make sure you have installed the latest WHQL certified VirtIO drivers.
- Make sure the VM’s firmware supports UEFI boot.
Install the
edk2-OVMFpackage on your host machine.# {PackageManagerCommand} install edk2-ovmfInstall the
vTPMpackages on your host machine.# {PackageManagerCommand} install swtpm libtpms- Make sure the VM is using the Q35 machine architecture.
- Make sure you have the Windows installation media.
Procedure
Enable TPM 2.0 by adding the following parameters to the
<devices>section in the VM’s XML configuration.<devices> [...] <tpm model='tpm-crb'> <backend type='emulator' version='2.0'/> </tpm> [...] </devices>- Install Windows in UEFI mode. For more information about how to do so, see Creating a SecureBoot virtual machine.
- Install the VirtIO drivers on the Windows VM. For more information about how to do so, see Installing virtio drivers on a Windows guest.
- In UEFI, enable Secure Boot. For more information about how to do so, see Secure Boot.
Verification
Ensure that the Device Security page on your Windows machine displays the following message:
Settings > Update & Security > Windows Security > Device Security
Your device meets the requirements for standard hardware security.
17.4. Enabling enhanced hardware security on Windows virtual machines
To further secure Windows virtual machines (VMs), you can enable virtualization-based protection of code integrity, also known as Hypervisor-Protected Code Integrity (HVCI).
Prerequisites
- Ensure that standard hardware security is enabled. For more information, see Enabling standard hardware security on Windows virtual machines.
- Ensure you have enabled Hyper-V enlightenments. For more information, see Enabling Hyper-V enlightenments.
Procedure
Open the XML configuration of the Windows VM. The following example opens the configuration of the Example-L1 VM:
# virsh edit Example-L1Under the
<cpu>section, specify the CPU mode and add the policy flag.Important-
For Intel CPUs, enable the
vmxpolicy flag. -
For AMD CPUs, enable the
svmpolicy flag. -
If you do not wish to specify a custom CPU, you can set the
<cpu mode>ashost-passthrough.
<cpu mode='custom' match='exact' check='partial'> <model fallback='allow'>Skylake-Client-IBRS</model> <topology sockets='1' dies='1' cores='4' threads='1'/> <feature policy='require' name='vmx'/> </cpu>-
For Intel CPUs, enable the
- Save the XML configuration and reboot the VM.
On the VMs operating system, navigate to the Core isolation details page:
Settings > Update & Security > Windows Security > Device Security > Core isolation details
- Toggle the switch to enable Memory Integrity.
- Reboot the VM.
For other methods of enabling HVCI, see the relevant Microsoft documentation.
Verification
Ensure that the Device Security page on your Windows VM displays the following message:
Settings > Update & Security > Windows Security > Device Security
Your device meets the requirements for enhanced hardware security.Alternatively, check System Information about the Windows VM:
-
Run
msinfo32.exein a command prompt. - Check if Credential Guard, Hypervisor enforced Code Integrity is listed under Virtualization-based security Services Running.
-
Run
17.5. Next steps
- To share files between your RHEL 8 host and its Windows VMs, you can use NFS.
Chapter 18. Creating nested virtual machines
On RHEL 8 systems and later, it is possible to create nested virtual machines (VMs). This means that a RHEL 8 VM (also referred to as a level 1, or L1) that runs on a RHEL 8 physical host (level 0, or L0) can act as a hypervisor and create its own VMs (level 2 or L2).
In other words, an L0 host can run L1 virtual machines (VMs), and each of these L1 VMs can host their own L2 VMs. Note that, in such cases, both L0 and L1 hosts must be RHEL 8 systems, whereas the L2 guest can be any supported RHEL or Windows system.
Red Hat currently provides nested virtualization only as a Technology Preview, and is therefore unsupported.
In addition, Red Hat does not recommend using nested virtualization in production user environments, due to various limitations in functionality. Instead, nested virtualization is primarily intended for development and testing scenarios, such as:
- Debugging hypervisors in a constrained environment
- Testing larger virtual deployments on a limited amount of physical resources
It is also possible to create nested VMs on multiple architectures, such as Intel, AMD, IBM POWER9, and IBM Z. Note that on all these architectures, nesting VMs is a Technology Preview, and therefore not supported by Red Hat.
18.1. Creating a nested virtual machine on Intel
Follow the steps below to enable and configure nested virtualization on an Intel host.
Nested virtualization is currently provided only as a Technology Preview on the Intel architecture, and is therefore unsupported.
Prerequisites
- An L0 RHEL 8 host running an L1 virtual machine (VM).
-
The hypervisor CPU must support nested virtualization. To verify, use the
cat /proc/cpuinfocommand on the L0 hypervisor. If the output of the command includes thevmxandeptflags, creating L2 VMs is possible. This is generally the case on Intel Xeon v3 cores and later. Ensure that nested virtualization is enabled on the L0 host:
# cat /sys/module/kvm_intel/parameters/nested- If the command returns 1 or Y, the feature is enabled. Skip the remaining prerequisite steps, and continue with the Procedure section.
If the command returns 0 or N but your system supports nested virtualization, use the following steps to enable the feature.
Unload the
kvm_intelmodule:# modprobe -r kvm_intelActivate the nesting feature:
# modprobe kvm_intel nested=1The nesting feature is now enabled, but only until the next reboot of the L0 host. To enable it permanently, add the following line to the
/etc/modprobe.d/kvm.conffile:options kvm_intel nested=1
Procedure
Configure your L1 VM for nested virtualization.
Open the XML configuration of the VM. The following example opens the configuration of the Intel-L1 VM:
# virsh edit Intel-L1Configure the VM to use
host-passthroughCPU mode by editing the<cpu>element:<cpu mode='host-passthrough'/>If you require the VM to use a specific CPU model, configure the VM to use
customCPU mode. Inside the<cpu>element, add a<feature policy='require' name='vmx'/>element and a<model>element with the CPU model specified inside. For example:<cpu mode ='custom' match ='exact' check='partial'> <model fallback='allow'>Haswell-noTSX</model> <feature policy='require' name='vmx'/> ... </cpu>
- Create an L2 VM within the L1 VM. To do this, follow the same procedure as when creating the L1 VM.
18.2. Creating a nested virtual machine on AMD
Follow the steps below to enable and configure nested virtualization on an AMD host.
Nested virtualization is currently provided only as a Technology Preview on the AMD64 architecture, and is therefore unsupported.
Prerequisites
- An L0 RHEL 8 host running an L1 virtual machine (VM).
-
The hypervisor CPU must support nested virtualization. To verify, use the
cat /proc/cpuinfocommand on the L0 hypervisor. If the output of the command includes thesvmandnptflags, creating L2 VMs is possible. This is generally the case on AMD EPYC cores and later. Ensure that nested virtualization is enabled on the L0 host:
# cat /sys/module/kvm_amd/parameters/nested- If the command returns 1 or Y, the feature is enabled. Skip the remaining prerequisite steps, and continue with the Procedure section.
If the command returns 0 or N, use the following steps to enable the feature.
- Stop all running VMs on the L0 host.
Unload the
kvm_amdmodule:# modprobe -r kvm_amdActivate the nesting feature:
# modprobe kvm_amd nested=1The nesting feature is now enabled, but only until the next reboot of the L0 host. To enable it permanently, add the following to the
/etc/modprobe.d/kvm.conffile:options kvm_amd nested=1
Procedure
Configure your L1 VM for nested virtualization.
Open the XML configuration of the VM. The following example opens the configuration of the AMD-L1 VM:
# virsh edit AMD-L1Configure the VM to use
host-passthroughCPU mode by editing the<cpu>element:<cpu mode='host-passthrough'/>If you require the VM to use a specific CPU model, configure the VM to use
customCPU mode. Inside the<cpu>element, add a<feature policy='require' name='svm'/>element and a<model>element with the CPU model specified inside. For example:<cpu mode="custom" match="exact" check="none"> <model fallback="allow">EPYC-IBPB</model> <feature policy="require" name="svm"/> ... </cpu>
- Create an L2 VM within the L1 VM. To do this, follow the same procedure as when creating the L1 VM.
18.3. Creating a nested virtual machine on IBM Z
Follow the steps below to enable and configure nested virtualization on an IBM Z host.
Nested virtualization is currently provided only as a Technology Preview on the IBM Z architecture, and is therefore unsupported.
Prerequisites
- An L0 RHEL 8 host running an L1 virtual machine (VM).
-
The hypervisor CPU must support nested virtualization. To verify this is the case, use the
cat /proc/cpuinfocommand on the L0 hypervisor. If the output of the command includes thesieflag, creating L2 VMs is possible. Ensure that nested virtualization is enabled on the L0 host:
# cat /sys/module/kvm/parameters/nested- If the command returns 1 or Y, the feature is enabled. Skip the remaining prerequisite steps, and continue with the Procedure section.
If the command returns 0 or N, use the following steps to enable the feature.
- Stop all running VMs on the L0 host.
Unload the
kvmmodule:# modprobe -r kvmActivate the nesting feature:
# modprobe kvm nested=1The nesting feature is now enabled, but only until the next reboot of the L0 host. To enable it permanently, add the following line to the
/etc/modprobe.d/kvm.conffile:options kvm nested=1
Procedure
- Create an L2 VM within the L1 VM. To do this, follow the same procedure as when creating the L1 VM.
18.4. Creating a nested virtual machine on IBM POWER9
Follow the steps below to enable and configure nested virtualization on an IBM POWER9 host.
Nested virtualization is currently provided only as a Technology Preview on the IBM POWER9 architecture, and is therefore unsupported. In addition, creating nested virtual machines (VMs) is not possible on previous versions of IBM POWER systems, such as IBM POWER8.
Prerequisites
- An L0 RHEL 8 host is running an L1 VM. The L1 VM is using RHEL 8 as the guest operating system.
Nested virtualization is enabled on the L0 host:
# cat /sys/module/kvm_hv/parameters/nested- If the command returns 1 or Y, the feature is enabled. Skip the remaining prerequisite steps, and continue with the Procedure section.
If the command returns 0 or N, use the following steps to enable the feature:
- Stop all running VMs on the L0 host.
Unload the
kvmmodule:# modprobe -r kvm_hvActivate the nesting feature:
# modprobe kvm_hv nested=1The nesting feature is now enabled, but only until the next reboot of the L0 host. To enable it permanently, add the following line to the
/etc/modprobe.d/kvm.conffile:options kvm_hv nested=1
Procedure
To ensure that the L1 VM can create L2 VMs, add the
cap-nested-hvparameter to the machine type of the L1 VM. To do so, use thevirsh editcommand to modify the L1 VM’s XML configuration, and the following line to the<features>section:<nested-hv state='on'/>
Create an L2 VM within the L1 VM. To do this, follow the same procedure as when creating the L1 VM.
To significantly improve the performance of L2 VMs, Red Hat recommends adding the`cap-nested-hv` parameter to the XML configurations of L2 VMs as well. For instructions, see the previous step.
Additional information
-
Note that
IBM POWER8as the architecture for the L2 VM currently does not supported.
18.5. Restrictions and limitations for nested virtualization
Keep the following restrictions in mind when using nested virtualization.
Red Hat currently does not support nested virtualization, and only provides nesting as a Technology Preview.
Supported architectures
- The L0 host must be an Intel, AMD, IBM POWER9, or IBM Z system. Nested virtualization currently does not work on other architectures.
Supported guest operating systems
To create nested VMs, you must use the following guest operating systems (OSs):
- On the L0 host - RHEL 8.2 and later
On the L1 VMs - RHEL 7.8 and later, or RHEL 8.2 and later
NoteThis support does not apply to using virtualization offerings based on RHEL 7 and RHEL 8 in L1 VMs. These include:
- Red Hat Virtualization
- Red Hat OpenStack Platform
- OpenShift Virtualization
On the L2 VMs - you must use one of the following OSs:
- RHEL 7.8 and later
- RHEL 8.2 and later
- Microsoft Windows Server 2016
- Microsoft Windows Server 2019
In addition, on IBM POWER9, nested virtualization currently only works under the following circumstances:
- Both the L0 host and the L1 VM use RHEL 8
-
The L2 VM uses RHEL 8, or RHEL 7 with a
rhel-altkernel. - The L1 VM and L2 VM are not running in POWER8 compatibility mode.
Hypervisor limitations
- Currently, Red Hat supports nesting only on RHEL-KVM. When RHEL is used as the L0 hypervisor, you can use RHEL 8 or Windows for WSL 2 as the L1 hypervisor.
- When using an L1 RHEL 8 VM on a non-KVM L0 hypervisor, such as VMware ESXi or Amazon Web Services (AWS), creating L2 VMs in the RHEL 8 guest OS may work, but is not supported.
Feature limitations
- Use of L2 VMs as hypervisors and creating L3 guests has not been properly tested and is not expected to work.
- Migrating VMs currently does not work on AMD systems if nested virtualization has been enabled on the L0 host.
On an IBM Z system, huge-page backing storage and nested virtualization cannot be used at the same time.
# modprobe kvm hpage=1 nested=1 modprobe: ERROR: could not insert 'kvm': Invalid argument # dmesg |tail -1 [90226.508366] kvm-s390: A KVM host that supports nesting cannot back its KVM guests with huge pages
Some features available on the L0 host may be unavailable for the L1 hypervisor.
For example, on IBM POWER 9 hardware, the External Interrupt Virtualization Engine (XIVE) does not work. However, L1 VMs can use the emulated XIVE interrupt controller to launch L2 VMs.
Chapter 19. Diagnosing virtual machine problems
When working with virtual machines (VMs), you may encounter problems with varying levels of severity. Some problems may have a quick and easy fix, while for others, you may have to capture VM-related data and logs to report or diagnose the problems.
The following sections provide detailed information about generating logs and diagnosing some common VM problems, as well as about reporting these problems.
19.1. Generating libvirt debug logs
To diagnose virtual machine (VM) problems, it is helpful to generate and review libvirt debug logs. Attaching debug logs is also useful when asking for support to resolve VM-related problems.
The following sections explain what debug logs are, how you can set them to be persistent, enable them during runtime, and attach them when reporting problems.
19.1.1. Understanding libvirt debug logs
Debug logs are text files that contain data about events that occur during virtual machine (VM) runtime. The logs provide information about fundamental server-side functionalities, such as host libraries and the libvirt daemon. The log files also contain the standard error output (stderr) of all running VMs.
Debug logging is not enabled by default and has to be enabled when libvirt starts. You can enable logging for a single session or persistently. You can also enable logging when a libvirt daemon session is already running by modifying the daemon run-time settings.
Attaching the libvirt debug logs is also useful when requesting support with a VM problem.
19.1.2. Enabling persistent settings for libvirt debug logs
You can configure libvirt debug logging to be automatically enabled whenever libvirt starts. By default, libvirtd is the only libvirt daemon in RHEL 8. To make persistent changes in the libvirt configuration, you must edit the libvirtd.conf file, located in the /etc/libvirt directory.
Procedure
-
Open the
libvirtd.conffile in an editor. Replace or set the filters according to your requirements.
Table 19.1. Debugging filter values
1
logs all messages generated by libvirt.
2
logs all non-debugging information.
3
logs all warning and error messages. This is the default value.
4
logs only error messages.
Example 19.1. Sample daemon settings for logging filters
The following settings:
-
Log all error and warning messages from the
remote,util.json, andrpclayers -
Log only error messages from the
eventlayer. -
Save the filtered logs to
/var/log/libvirt/libvirt.log
log_filters="3:remote 4:event 3:util.json 3:rpc" log_outputs="1:file:/var/log/libvirt/libvirt.log"
-
Log all error and warning messages from the
- Save and exit.
Restart the libvirt daemon.
$ systemctl restart libvirtd.service
19.1.3. Enabling libvirt debug logs during runtime
You can modify the libvirt daemon’s runtime settings to enable debug logs and save them to an output file.
This is useful when restarting the libvirt daemon is not possible because restarting fixes the problem, or because there is another process, such as migration or backup, running at the same time. Modifying runtime settings is also useful if you want to try a command without editing the configuration files or restarting the daemon.
Prerequisites
-
Make sure the
libvirt-adminpackage is installed.
Procedure
Optional: Back up the active set of log filters.
# virt-admin daemon-log-filters >> virt-filters-backupNoteIt is recommended that you back up the active set of filters so that you can restore them after generating the logs. If you do not restore the filters, the messages will continue to be logged which may affect system performance.
Use the
virt-adminutility to enable debugging and set the filters according to your requirements.Table 19.2. Debugging filter values
1
logs all messages generated by libvirt.
2
logs all non-debugging information.
3
logs all warning and error messages. This is the default value.
4
logs only error messages.
Example 19.2. Sample virt-admin setting for logging filters
The following command:
-
Logs all error and warning messages from the
remote,util.json, andrpclayers -
Logs only error messages from the
eventlayer.
# virt-admin daemon-log-filters "3:remote 4:event 3:util.json 3:rpc"-
Logs all error and warning messages from the
Use the
virt-adminutility to save the logs to a specific file or directory.For example, the following command saves the log output to the
libvirt.logfile in the/var/log/libvirt/directory.# virt-admin daemon-log-outputs "1:file:/var/log/libvirt/libvirt.log"Optional: You can also remove the filters to generate a log file that contains all VM-related information. However, it is not recommended since this file may contain a large amount of redundant information produced by libvirt’s modules.
Use the
virt-adminutility to specify an empty set of filters.# virt-admin daemon-log-filters Logging filters:
-
Optional: Restore the filters to their original state using the backup file.
Perform the second step with the saved values to restore the filters.
19.1.4. Attaching libvirt debug logs to support requests
You may have to request additional support to diagnose and resolve virtual machine (VM) problems. Attaching the debug logs to the support request is highly recommended to ensure that the support team has access to all the information they need to provide a quick resolution of the VM-related problem.
Procedure
- To report a problem and request support, open a support case.
Based on the encountered problems, attach the following logs along with your report:
-
For problems with the libvirt service, attach the
/var/log/libvirt/libvirt.logfile from the host. For problems with a specific VM, attach its respective log file.
For example, for the testguest1 VM, attach the
testguest1.logfile, which can be found at/var/log/libvirt/qemu/testguest1.log.
-
For problems with the libvirt service, attach the
Additional resources
19.2. Dumping a virtual machine core
To analyze why a virtual machine (VM) crashed or malfunctioned, you can dump the VM core to a file on disk for later analysis and diagnostics.
This section provides a brief introduction to core dumping and explains how you can dump a VM core to a specific file.
19.2.1. How virtual machine core dumping works
A virtual machine (VM) requires numerous running processes to work accurately and efficiently. In some cases, a running VM may terminate unexpectedly or malfunction while you are using it. Restarting the VM may cause the data to be reset or lost, which makes it difficult to diagnose the exact problem that caused the VM to crash.
In such cases, you can use the virsh dump utility to save (or dump) the core of a VM to a file before you reboot the VM. The core dump file contains a raw physical memory image of the VM which contains detailed information about the VM. This information can be used to diagnose VM problems, either manually, or by using a tool such as the crash utility.
Additional resources
-
crashman page -
The
crashGithub repository
19.2.2. Creating a virtual machine core dump file
A virtual machine (VM) core dump contains detailed information about the state of a VM at any given time. This information, which is similar to a snapshot of the VM, can help you detect problems if a VM malfunctions or shuts down suddenly.
Prerequisites
- Make sure you have sufficient disk space to save the file. Note that the space occupied by the VM depends on the amount of RAM allocated to the VM.
Procedure
Use the
virsh dumputility.For example, the following command dumps the
lander1VM’s cores, its memory and the CPU common register file togargantua.filein the/core/filedirectory.# virsh dump lander1 /core/file/gargantua.file --memory-only Domain 'lander1' dumped to /core/file/gargantua.file
The crash utility no longer supports the default file format of the virsh dump command. To analyze a core dump file by using crash, you must create the file with the --memory-only option.
Additionally, you must use the --memory-only option when creating a core dump file to attach to a Red Hat Support Case.
Troubleshooting
If the virsh dump command fails with a System is deadlocked on memory error, ensure you are assigning sufficient memory for the core dump file. To do so, use the following crashkernel option value. Alternatively, do not use crashkernel at all, which assigns core dump memory automatically.
crashkernel=1G-4G:192M,4G-64G:256M,64G-:512M
Additional resources
-
The
virsh dump --helpcommand -
The
virshman page - Opening a Support Case
19.3. Backtracing virtual machine processes
When a process related to a virtual machine (VM) malfunctions, you can use the gstack command along with the process identifier (PID) to generate an execution stack trace of the malfunctioning process. If the process is a part of a thread group then all the threads are traced as well.
Prerequisites
Ensure that the
GDBpackage is installed.For details about installing
GDBand the available components, see Installing the GNU Debugger.Make sure you know the PID of the processes that you want to backtrace.
You can find the PID by using the
pgrepcommand followed by the name of the process. For example:# pgrep libvirt 22014 22025
Procedure
Use the
gstackutility followed by the PID of the process you wish to backtrace.For example, the following command backtraces the libvirt process with the PID 22014.
# gstack 22014 Thread 3 (Thread 0x7f33edaf7700 (LWP 22017)): #0 0x00007f33f81aef21 in poll () from /lib64/libc.so.6 #1 0x00007f33f89059b6 in g_main_context_iterate.isra () from /lib64/libglib-2.0.so.0 #2 0x00007f33f8905d72 in g_main_loop_run () from /lib64/libglib-2.0.so.0 ...
Additional resources
-
The
gstackman page - GNU Debugger (GDB)
Additional resources for reporting virtual machine problems and providing logs
To request additional help and support, you can:
Raise a service request by using the redhat-support-tool command line option, the Red Hat Portal UI, or several methods of FTP.
- To report problems and request support, see Open a Support Case.
Upload the SOS Report and the log files when you submit a service request.
This ensures that the Red Hat support engineer has all the necessary diagnostic information for reference.
- For more information about SOS reports, see What is an SOS Report and how to create one in Red Hat Enterprise Linux?
- For information about attaching log files, see How to provide files to Red Hat Support?
Chapter 20. Feature support and limitations in RHEL 8 virtualization
This document provides information about feature support and restrictions in Red Hat Enterprise Linux 8 (RHEL 8) virtualization.
20.1. How RHEL virtualization support works
A set of support limitations applies to virtualization in Red Hat Enterprise Linux 8 (RHEL 8). This means that when you use certain features or exceed a certain amount of allocated resources when using virtual machines in RHEL 8, Red Hat will not support these guests unless you have a specific subscription plan.
Features listed in Recommended features in RHEL 8 virtualization have been tested and certified by Red Hat to work with the KVM hypervisor on a RHEL 8 system. Therefore, they are fully supported and recommended for use in virtualization in RHEL 8.
Features listed in Unsupported features in RHEL 8 virtualization may work, but are not supported and not intended for use in RHEL 8. Therefore, Red Hat strongly recommends not using these features in RHEL 8 with KVM.
Resource allocation limits in RHEL 8 virtualization lists the maximum amount of specific resources supported on a KVM guest in RHEL 8. Guests that exceed these limits are not supported by Red Hat.
In addition, unless stated otherwise, all features and solutions used by the documentation for RHEL 8 virtualization are supported. However, some of these have not been completely tested and therefore may not be fully optimized.
Many of these limitations do not apply to other virtualization solutions provided by Red Hat, such as Red Hat Virtualization (RHV), OpenShift Virtualization or Red Hat OpenStack Platform (RHOSP).
20.2. Recommended features in RHEL 8 virtualization
The following features are recommended for use with the KVM hypervisor included with Red Hat Enterprise Linux 8 (RHEL 8):
Host system architectures
RHEL 8 with KVM is only supported on the following host architectures:
- AMD64 and Intel 64
- IBM Z - IBM z13 systems and later
- IBM POWER8
- IBM POWER9
Any other hardware architectures are not supported for using RHEL 8 as a KVM virtualization host, and Red Hat highly discourages doing so. Notably, this includes the 64-bit ARM architecture (ARM 64).
RHEL 8 documentation primarily describes AMD64 and Intel 64 features and usage. For information about the specific of using RHEL 8 virtualization on different architectures, see:
Guest operating systems
Red Hat provides support with KVM virtual machines that use specific guest operating systems (OSs). For a detailed list of supported guest OSs, see the Certified Guest Operating Systems in the Red Hat KnowledgeBase.
Note, however, that by default, your guest OS does not use the same subscription as your host. Therefore, you must activate a separate licence or subscription for the guest OS to work properly.
In addition, the pass-through devices that you attach to the VM must be supported by both the host OS and the guest OS.
Similarly, for optimal function of your deployment, Red Hat recommends that the CPU model and features that you define in the XML configuration of a VM are supported by both the host OS and the guest OS.
To view the certified CPUs and other hardware for various versions of RHEL, see the Red Hat Ecosystem Catalog.
Machine types
To ensure that your VM is compatible with your host architecture and that the guest OS runs optimally, the VM must use an appropriate machine type.
When Creating a VM by using the command line, the virt-install utility provides multiple methods of setting the machine type.
-
When you use the
--os-variantoption,virt-installautomatically selects the machine type recommended for your host CPU and supported by the guest OS. -
If you do not use
--os-variantor require a different machine type, use the--machineoption to specify the machine type explicitly. -
If you specify a
--machinevalue that is unsupported or not compatible with your host,virt-installfails and displays an error message.
The recommended machine types for KVM virtual machines on supported architectures, and the corresponding values for the --machine option, are as follows. Y stands for the latest minor version of RHEL 8.
-
On Intel 64 and AMD64 (x86_64):
pc-q35-rhel8.Y.0→--machine=q35 -
On IBM Z (s390x):
s390-ccw-virtio-rhel8.Y.0→--machine=s390-ccw-virtio -
On IBM POWER (PPC),
pseries-rhel8.Y.0→--machine=pseries
To obtain the machine type of an existing VM:
# virsh dumpxml VM-name | grep machine=To view the full list of machine types supported on your host:
# /usr/libexec/qemu-kvm -M help20.3. Unsupported features in RHEL 8 virtualization
The following features are not supported by the KVM hypervisor included with Red Hat Enterprise Linux 8 (RHEL 8):
Many of these limitations may not apply to other virtualization solutions provided by Red Hat, such as OpenShift Virtualization or Red Hat OpenStack Platform (RHOSP).
Features supported by RHV 4.2 and later, or RHOSP 13 and later, are described as such in the following paragraphs.
Host system architectures
RHEL 8 with KVM is not supported on any host architectures that are not listed in Recommended features in RHEL 8 virtualization.
Notably, Red Hat does not support using systems with the 64-bit ARM architecture (ARM 64) for KVM virtualization on RHEL 8.
Guest operating systems
KVM virtual machines (VMs) that use the following guest operating systems (OSs) are not supported on a RHEL 8 host:
- Microsoft Windows 8.1 and earlier
- Microsoft Windows Server 2008 R2 and earlier
- macOS
- Solaris for x86 systems
- Any OS released before 2009
For a list of guest OSs supported on RHEL hosts, Red Hat Virtualization (RHV), or other virtualization solutions, see Certified Guest Operating Systems in Red Hat OpenStack Platform, Red Hat Virtualization, OpenShift Virtualization and Red Hat Enterprise Linux with KVM.
Creating VMs in containers
Red Hat does not support creating KVM virtual machines in any type of container that includes the elements of the RHEL 8 hypervisor (such as the QEMU emulator or the libvirt package).
To create VMs in containers, Red Hat recommends using the OpenShift Virtualization offering.
The QEMU command line
QEMU is an essential component of the virtualization architecture in RHEL 8, but it is difficult to manage manually, and improper QEMU configurations may cause security vulnerabilities. Therefore, using qemu-* command-line utilities, such as qemu-kvm is not supported by Red Hat. Instead, use libvirt utilities, such as virsh, virt-install, and virt-xml, as these orchestrate QEMU according to the best practices.
Note, however, that the qemu-img utility is supported for management of virtual disk images.
vCPU hot unplug
Removing a virtual CPU (vCPU) from a running VM, also referred to as a vCPU hot unplug, is not supported in RHEL 8.
Memory hot unplug
Removing a memory device attached to a running VM, also referred to as a memory hot unplug, is unsupported in RHEL 8.
QEMU-side I/O throttling
By using the virsh blkdeviotune utility to configure maximum input and output levels for operations on virtual disk, also known as QEMU-side I/O throttling, is not supported in RHEL 8.
To set up I/O throttling in RHEL 8, use virsh blkiotune. This is also known as libvirt-side I/O throttling. For instructions, see Disk I/O throttling in virtual machines.
QEMU-side I/O throttling is also supported in RHOSP. For details, see Setting Resource Limitation on Disk and the Use Quality-of-Service Specifications section in the RHOSP Storage Guide.
In addition, OpenShift Virtualizaton supports QEMU-side I/O throttling as well.
Storage live migration
Migrating a disk image of a running VM between hosts is not supported in RHEL 8.
Other solutions:
- Storage live migration is supported in RHOSP, but with some limitations. For details, see Migrate a Volume.
Live snapshots
Creating or loading a snapshot of a running VM, also referred to as a live snapshot, is not supported in RHEL 8.
In addition, note that non-live VM snapshots are deprecated in RHEL 8. Therefore, creating or loading a snapshot of a shut-down VM is supported, but Red Hat recommends not using it.
Other solutions:
- Live snapshots are supported in RHOSP. For details, see Importing virtual machines into the overcloud.
- Live snapshots are also supported on OpenShift Virtualization.
vhost-user
RHEL 8 does not support the implementation of a user-space vHost interface.
Note that vhost-user is supported in RHOSP, but only for virtio-net interfaces. For details, see virtio-net implementation and vhost user ports.
S3 and S4 system power states
Suspending a VM to the Suspend to RAM (S3) or Suspend to disk (S4) system power states is not supported. Note that these features are disabled by default, and enabling them will make your VM not supportable by Red Hat.
Note that the S3 and S4 states are also currently not supported in any other virtualization solution provided by Red Hat.
S3-PR on a multipathed vDisk
SCSI3 persistent reservation (S3-PR) on a multipathed vDisk is not supported in RHEL 8. As a consequence, Windows Cluster is not supported in RHEL 8.
virtio-crypto
Using the virtio-crypto device in RHEL 8 is not supported and its use is therefore highly discouraged.
Note that virtio-crypto devices are also not supported in any other virtualization solution provided by Red Hat.
Incremental live backup
Configuring a VM backup that only saves VM changes since the last backup, also known as incremental live backup, is not supported in RHEL 8, and Red Hat highly discourages its use.
net_failover
Using the net_failover driver to set up an automated network device failover mechanism is not supported in RHEL 8.
Note that net_failover is also currently not supported in any other virtualization solution provided by Red Hat.
Multi-FD migration
Migrating VMs using multiple file descriptors (FDs), also known as multi-FD migration, is not supported in RHEL 8.
Note that multi-FD migrations are also currently not supported in any other virtualization solution provided by Red Hat.
TPM passthrough
Assigning a physical Trusted Platform Module (TPM) device by using the passthrough back end to a VM is unsupported on RHEL 8 hosts. Instead, use the vTPM functionality, which uses the emulator back end and is fully supported.
virtiofs
Sharing files between the host and its VMs by using the virtiofs file system is unsupported in RHEL 8.
Note, however, that using virtiofs is supported by RHEL 9. For more information, see Configuring and managing virtualization in RHEL 9.
TCG
QEMU and libvirt include a dynamic translation mode by using the QEMU Tiny Code Generator (TCG). This mode does not require hardware virtualization support. However, TCG is not supported by Red Hat.
TCG-based guests can be recognized by examining its XML configuration, for example using the "virsh dumpxml" command.
The configuration file of a TCG guest contains the following line:
<domain type='qemu'>
The configuration file of a KVM guest contains the following line:
<domain type='kvm'>
SR-IOV InfiniBand networking devices
Attaching InfiniBand networking devices to VMs by using Single-root I/O virtualization (SR-IOV) is not supported.
20.4. Resource allocation limits in RHEL 8 virtualization
The following limits apply to virtualized resources that can be allocated to a single KVM virtual machine (VM) on a Red Hat Enterprise Linux 8 (RHEL 8) host.
Many of these limitations do not apply to other virtualization solutions provided by Red Hat, such as Red Hat Virtualization (RHV), OpenShift Virtualization, or Red Hat OpenStack Platform (RHOSP).
Maximum vCPUs per VM
For the maximum amount of vCPUs and memory that is supported on a single VM running on a RHEL 8 host, see: Virtualization limits for Red Hat Enterprise Linux with KVM
PCI devices per VM
RHEL 8 supports 64 PCI device slots per VM bus, and 8 PCI functions per device slot. This gives a theoretical maximum of 512 PCI functions per bus when multi-function capabilities are enabled in the VM, and no PCI bridges are used.
Each PCI bridge adds a new bus, potentially enabling another 512 device addresses. However, some buses do not make all 512 device addresses available for the user; for example, the root bus has several built-in devices occupying slots.
Virtualized IDE devices
KVM is limited to a maximum of 4 virtualized IDE devices per VM.
20.5. An overview of virtualization features support in RHEL 8
The following tables provide comparative information about the support state of selected virtualization features in RHEL 8 across the supported system architectures.
Table 20.1. Device hot plug and hot unplug
| Intel 64 and AMD64 | IBM Z | IBM POWER | |
|---|---|---|---|
| CPU hot plug | Supported | Supported | Supported |
| CPU hot unplug | UNSUPPORTED | UNSUPPORTED | UNSUPPORTED |
| Memory hot plug | Supported | UNSUPPORTED | Supported |
| Memory hot unplug | UNSUPPORTED | UNSUPPORTED | UNSUPPORTED |
| PCI hot plug | Supported | Supported [a] | Supported |
| PCI hot unplug | Supported | Supported [b] | Supported |
Table 20.2. Other selected features
| Intel 64 and AMD64 | IBM Z | IBM POWER | |
|---|---|---|---|
| NUMA tuning | Supported | UNSUPPORTED | Supported |
| SR-IOV devices | Supported | UNSUPPORTED | Supported |
| virt-v2v and p2v | Supported | UNSUPPORTED | UNSUPPORTED |
Note that some of the unsupported features are supported on other Red Hat products, such as Red Hat Virtualization and Red Hat OpenStack platform. For more information, see Unsupported features in RHEL 8 virtualization.
Additional sources
- For a complete list of unsupported features of virtual machines in RHEL 8, see Unsupported features in RHEL 8 virtualization.
- For details on the specifics for virtualization on the IBM Z architecture, see How virtualization on IBM Z differs from AMD64 and Intel 64.
- For details on the specifics for virtualization on the IBM POWER architecture, see How virtualization on IBM POWER differs from AMD64 and Intel 64.