
Chapter 3. Assessing upgrade suitability
The Preupgrade Assistant assesses your system for any potential problems that might occur during an in-place upgrade before any changes to your system are made.
The Preupgrade Assistant does the following:
- Leaves your system unchanged except for storing information or logs. It does not modify the assessed system.
- Assesses the system for possible in-place upgrade limitations, such as package removals, incompatible obsoletes, name changes, or deficiencies in some configuration file compatibilities.
- Provides a report with the assessment result.
- Provides post-upgrade scripts to address more complex problems after the in-place upgrade.
You should run the Preupgrade Assistant multiple times. Always run the Preupgrade Assistant after you resolve problems identified by the pre-upgrade report to ensure that no critical problems remain before performing the upgrade.
You can review the system assessment results using one of the following methods:
- Locally on the assessed system using the command line.
- Remotely over the network using the web user interface (UI). You can use the web UI to view multiple reports at once.
The Preupgrade Assistant is a modular system. You can create your own custom modules to assess the possibility of performing an in-place upgrade. For more information, see How to create custom Preupgrade Assistant modules for upgrading from RHEL 6 to RHEL 7.
3.1. Assessing upgrade suitability from the command line
Viewing a Preupgrade Assistant report locally ensures that you do not expose the data about your system to the network. The pre-upgrade assessment results can be viewed locally using the following methods:
- As result codes in the standard output on the command line.
- As a detailed HTML file in a web browser.
When the preupg command is run without further options, it produces the result.html and preupg_results-*.tar.gz files in the /root/preupgrade/ directory.
Prerequisites
- You have completed the preparation steps described in Preparing a RHEL 6 system for the upgrade.
Procedure
Run the Preupgrade Assistant to perform an assessment of the system.
# preupg
Review each assessment result entry:
- Inspect result codes on the standard output For more information about assessment codes, see the Assessment result codes table.
View the assessment report in greater detail by opening the HTML file with results in a web browser:
# web_browser file:///root/preupgrade/result.html
-
View the README file in the
/root/preupgrade/directory for more information about the output directory structure, exit codes, and risk explanations associated with the Preupgrade Assistant utility. Resolve problems found by the Preupgrade Assistant during the assessment by following the Remediation text in the report.
ImportantThe assessment report might require you to perform certain tasks after you have completed the in-place upgrade to RHEL 7. Take note of these post-upgrade tasks and perform them after the upgrade.
- Run the Preupgrade Assistant again. If there are no new problems to be resolved, you can proceed with upgrading your system.
3.2. Assessing upgrade suitability from a web UI
The Preupgrade Assistant browser-based interface can collect assessment reports from multiple systems and provides convenient filtering of the results. Because the upgrade procedure does not support upgrading the GNOME desktop, this procedure gives you a way to display the Preupgrade Assistant results on a remote GUI desktop.
To use the Preupgrade Assistant web UI remotely, you must install and configure the Apache HTTP Server, add files to the /etc/httpd/conf.d/ directory and run the httpd service on the system to serve the content.
If you are concerned about exposing the data about your system to the network, or if you want to avoid adding content to the system you are upgrading, you can review the pre-upgrade assessment results using the following alternative methods:
- Locally using the Preupgrade Assistant web UI on localhost (127.0.0.1) without configuring the Apache HTTP Server.
-
Remotely following the procedure described in Assessing upgrade suitability from the command line, copying the
/root/preupgrade/result.htmlfile to a remote system, and opening the HTML file in a web browser in the remote system.
Prerequisites
- You have completed the preparation steps described in Preparing a RHEL 6 system for the upgrade.
Procedure
Install the Apache HTTP Server and the Preupgrade Assistant web UI:
# yum install httpd preupgrade-assistant-ui
To make the Preupgrade Assistant web UI available to all network interfaces on the local system through TCP port 8099 by default, change the default private httpd pre-upgrade configuration to the public configuration:
# cp /etc/httpd/conf.d/99-preup-httpd.conf.public /etc/httpd/conf.d/99-preup-httpd.conf
Optional: To access the Preupgrade Assistant using a host name instead of an IP address, for example,
preupg-ui.example.com:-
Ensure you have a DNS CNAME record pointing the
preupg-ui.example.comname to the system you are upgrading. -
Change the
NameVirtualHostline in the99-preup-httpd.conffile toNameVirtualHost preupg-ui.example.com:8099.
-
Ensure you have a DNS CNAME record pointing the
If you have a firewall running and SELinux in enforcing mode, allow access to the port needed by the Preupgrade Assistant web UI service:
# setsebool httpd_run_preupgrade on
# iptables -I INPUT -m state --state NEW -p tcp --dport 8099 -j ACCEPT
Restart the
httpdservice to load the new configuration.# service httpd restart
-
From a web browser on another system, access the Preupgrade Assistant web UI service by using either an IP address (for example,
http://192.168.122.159:8099) or a hostname (for example,http://preupg-ui.example.com:8099). When accessing the Preupgrade Assistant web UI for the first time, decide whether to access the UI with or without authentication.
- To access the UI with authentication, log in as an existing user or create a new one. When you select to create a new user, the authentication system is automatically enabled.
- To access the UI without authentication, select .
Return to the system you plan to upgrade and run the Preupgrade Assistant in the command line with an automatic submission to the Preupgrade Assistant web UI server:
# preupg -u http://hostname:port/submit/For example:
# preupg -u http://preupg-ui.example.com:8099/submit/
Return to your web browser on the remote server and reload the Preupgrade Assistant Web UI.
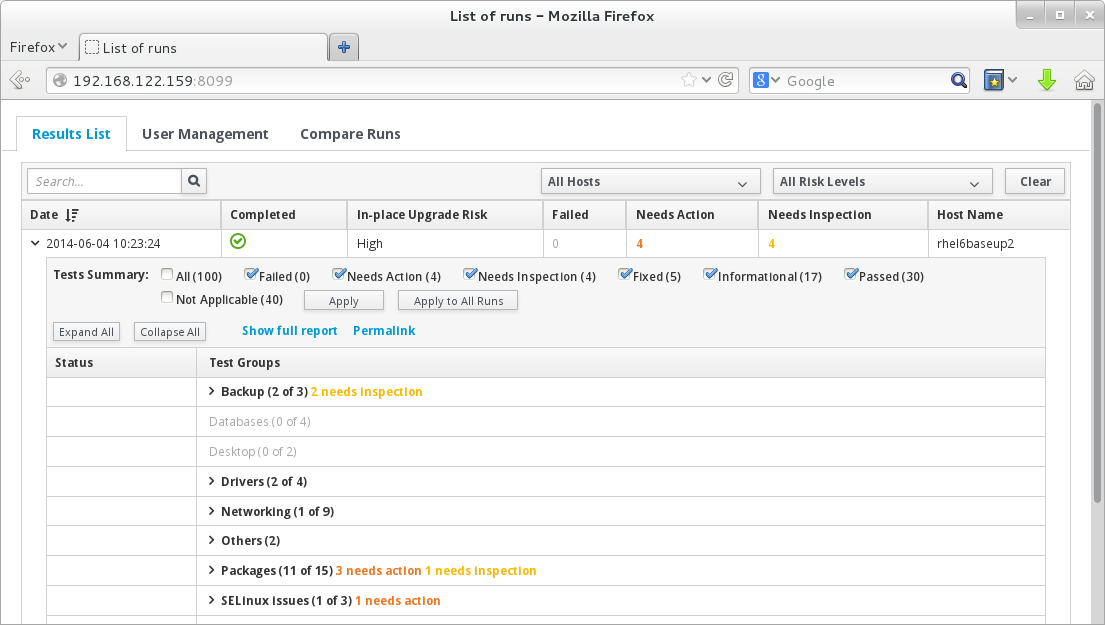
In the web UI, find and expand the assessment report that you generated by running the Preupgrade Assistant. Go through each item in the report and resolve the reported problems. For information about assessment result codes, see the Assessment result codes table.
ImportantThe assessment report might require you to perform certain tasks after you have completed the in-place upgrade to RHEL 7. Take note of these post-upgrade tasks and perform them after the upgrade.
- Run the Preupgrade Assistant again and upload the report to the web UI. If there are no new problems to be resolved, you can proceed with the upgrade.
3.3. Pre-upgrade assessment result codes
When you run the Preupgrade Assistant, an assessment result is generated. Each result in the assessment is assigned a code. Refer to the table below for an explanation of each code and a potential action to take.
Table 3.1. Pre-upgrade assessment result codes
| Result code | Explanation |
|---|---|
| PASS | No problems found. |
| FAIL | Extreme upgrade risk. In-place upgrade is impossible. |
| NEEDS_ACTION | High upgrade risk. You must resolve the problem before running the Red Hat Upgrade Tool. |
| NEEDS_INSPECTION | Medium or lower upgrade risks. The upgrade might not fail, but it might result in a system that is not fully operational. You must check certain parts of the system and, if needed, fix the problems. |
| FIXED | Changes required for the upgrade were applied automatically. You do not need to perform any action. |
| INFORMATIONAL | Useful, but not critical, information. |
| NOT_APPLICABLE | The assessed package is not installed on your system. |
| ERROR | An error occurred in the tooling. Report this type of problem to Red Hat Support. |
| notchecked | The respective module has not been checked. See Known issues for more details. |