
Upgrading from RHEL 6 to RHEL 7
Instructions for an in-place upgrade from Red Hat Enterprise Linux 6 to Red Hat Enterprise Linux 7
Abstract
Preface
This document describes steps for an in-place upgrade from RHEL 6 to RHEL 7. The supported in-place upgrade path is from RHEL 6.10 to RHEL 7.9.
If you are using SAP HANA, follow How do I upgrade from RHEL 6 to RHEL 7 with SAP HANA instead. Note that the upgrade path for RHEL with SAP HANA might differ.
The process of upgrading from the latest version of RHEL 6 to the latest version of RHEL 7 consists of the following steps:
- Check that Red Hat supports the upgrade of your system. See Chapter 1, Planning an upgrade for more information.
- Prepare your system for the upgrade by installing required repositories and packages and by removing unsupported packages. See Chapter 2, Preparing a RHEL 6 system for the upgrade got more information.
- Check your system for problems that might affect your upgrade using the Preupgrade Assistant. See Chapter 3, Assessing upgrade suitability for more information.
- Upgrade your system by running the Red Hat Upgrade Tool. See Chapter 4, Upgrading your system from RHEL 6 to RHEL 7 for more information.
Providing feedback on Red Hat documentation
We appreciate your input on our documentation. Please let us know how we could make it better. For submitting your feedback, create a Bugzilla ticket:
- Go to the Bugzilla website.
- As the Component, use Documentation.
- Fill in the Description field with your suggestion for improvement. Include a link to the relevant part(s) of documentation.
- Click Submit Bug.
Key migration terminology
While the following migration terms are commonly used in the software industry, these definitions are specific to Red Hat Enterprise Linux (RHEL).
Update
Sometimes called a software patch, an update is an addition to the current version of the application, operating system, or software that you are running. A software update addresses any issues or bugs to provide a better experience of working with the technology. In RHEL, an update relates to a minor release, for example, updating from RHEL 8.1 to 8.2.
Upgrade
An upgrade is when you replace the application, operating system, or software that you are currently running with a newer version. Typically, you first back up your data according to instructions from Red Hat. When you upgrade RHEL, you have two options:
- In-place upgrade: During an in-place upgrade, you replace the earlier version with the new version without removing the earlier version first. The installed applications and utilities, along with the configurations and preferences, are incorporated into the new version.
- Clean install: A clean install removes all traces of the previously installed operating system, system data, configurations, and applications and installs the latest version of the operating system. A clean install is ideal if you do not need any of the previous data or applications on your systems or if you are developing a new project that does not rely on prior builds.
Operating system conversion
A conversion is when you convert your operating system from a different Linux distribution to Red Hat Enterprise Linux. Typically, you first back up your data according to instructions from Red Hat.
Migration
Typically, a migration indicates a change of platform: software or hardware. Moving from Windows to Linux is a migration. Moving a user from one laptop to another or a company from one server to another is a migration. However, most migrations also involve upgrades, and sometimes the terms are used interchangeably.
- Migration to RHEL: Conversion of an existing operating system to RHEL
- Migration across RHEL: Upgrade from one version of RHEL to another
Chapter 1. Planning an upgrade
An in-place upgrade is the recommended way to upgrade your system to a later major version of RHEL.
To ensure that you are aware of all major changes between RHEL 6 and RHEL 7, consult the Migration Planning Guide before beginning the in-place upgrade process. You can also verify whether your system is supported for an in-place upgrade by running the Preupgrade Assistant. The Preupgrade Assistant assesses your system for potential problems that could interfere or inhibit the upgrade before any changes are made to your system. See also Known Issues.
Once you perform an in-place upgrade on your system, it is possible to get the previous working system back in limited configurations of the system by using the Red Hat Upgrade Tool integrated rollback capability or by using suitable custom backup and recovery solution, for example, by using the Relax-and-Recover (ReaR) utility. For more information, see Rolling back the upgrade.
This RHEL 6 to RHEL 7 upgrade procedure is fully supported if your RHEL system meets the following criteria:
- Red Hat Enterprise Linux 6.10: Your system must have the latest RHEL 6.10 packages installed.
Architecture and variant: Only the indicated combinations of architecture and variant from the following matrix are supported:
Product Variant Intel 64-bit architecture IBM POWER, big endian IBM Z 64-bit architecture Intel 32-bit architecture Server Edition
Supported
Supported
Supported
Unsupported
HPC Compute Node
Supported
N/A
N/A
Unsupported
Desktop Edition
Unsupported
N/A
N/A
Unsupported
Workstation Edition
Unsupported
N/A
N/A
Unsupported
Server running CloudForms software
Unsupported
N/A
N/A
N/A
Server running Satellite software
Unsupported. To upgrade Satellite environments from RHEL 6 to RHEL 7, see the Red Hat Satellite Installation Guide.
N/A
N/A
N/A
NoteUpgrades of 64-bit IBM Z systems are supported unless Direct Access Storage Device (DASD) with Linux Disk Layout (LDL) is used.
Supported packages: The in-place upgrade is supported for the following packages:
-
Packages installed from the base repository, for example, the
rhel-6-server-rpmsif the system is on the RHEL 6 Server for the Intel architecture. The Preupgrade Assistant, Red Hat Upgrade Tool, and any other packages that are required for the upgrade.
NoteIt is recommended to perform the upgrade with a minimum number of packages installed.
-
Packages installed from the base repository, for example, the
- File systems: File systems formats are intact. As a result, file systems have the same limitations as when they were originally created.
- Desktop: System upgrades with GNOME and KDE installs are unsupported. For more information, see Upgrading from RHEL 6 to RHEL 7 on Gnome Desktop Environment failed.
- Virtualization: Upgrades with KVM or VMware virtualization are supported. Upgrades of RHEL on Microsoft Hyper-V are unsupported.
- High Availability: Upgrades of systems using the High Availability add-on are unsupported.
- Public Clouds: The in-place upgrade is unsupported for on-demand instances on Public Clouds.
- Third-party packages: The in-place upgrade is unsupported on systems using third-party packages, especially packages with third-party drivers that are needed for booting.
-
The
/usrdirectory: The in-place upgrade is unsupported on systems where the/usrdirectory is on a separate partition. For more information, see Why does Red Hat Enterprise Linux 6 to 7 in-place upgrade fail if /usr is on separate partition?.
Chapter 2. Preparing a RHEL 6 system for the upgrade
This procedure describes the steps that are necessary before performing an in-place upgrade to RHEL 7.
Prerequisites
- You have verified that your system setup is supported for an upgrade from RHEL 6 to RHEL 7. See Planning an upgrade for more information.
Procedure
Ensure that your system is registered to Red Hat Subscription Management (RHSM).
If your RHEL 6 system is registered to Red Hat Network (RHN), you must migrate to RHSM. See Migrating from RHN to RHSM in Red Hat Enterprise Linux for details.
Ensure that you have access to the latest RHEL 6 content. If you use the
yum-plugin-versionlockplug-in to lock packages to a specific version, clear the lock:# yum versionlock clear
See How to restrict yum to install or upgrade a package to a fixed specific package version? for more information.
Enable the Extras repository, which contains necessary packages for a pre-upgrade assessment and an in-place upgrade.
For the Server variant on the 64-bit Intel architecture on server edition:
# subscription-manager repos --enable rhel-6-server-extras-rpms --enable rhel-6-server-optional-rpms
For IBM POWER, big endian systems:
# subscription-manager repos --enable rhel-6-for-power-extras-rpms --enable rhel-6-for-power-optional-rpms
For the IBM Z architecture:
# subscription-manager repos --enable rhel-6-for-system-z-extras-rpms --enable rhel-6-for-system-z-optional-rpms
For the HPC Compute Node variant on the 64-bit Intel architecture:
# subscription-manager repos --enable rhel-6-for-hpc-node-extras-rpms --enable rhel-6-for-hpc-node-optional-rpms
Install the Preupgrade Assistant and Red Hat Upgrade Tool:
# yum install preupgrade-assistant preupgrade-assistant-el6toel7 redhat-upgrade-tool
NoteIf your system does not have internet access, you can download the Preupgrade Assistant and Red Hat Upgrade Tool from the Red Hat Customer Portal. For more information, see How to install preupgrade assessment packages on an offline system for RHEL 6.10 to RHEL 7.9 upgrade.
Remove all unsupported package groups:
# yum groupremove group_nameReplace group_name with each unsupported group name. To locate a list of installed group names, run
yum grouplist.Check Known Issues and apply workarounds where applicable. Especially, on systems with multiple network interfaces:
- If the system has static routes configured, replace the static route file. See redhat-upgrade-tool fails to reconfigure the static routes on the network interfaces, preventing the upgrade to happen for more information.
- If the system runs NetworkManager, stop NetworkManager prior to running the upgrade tool. See redhat-upgrade-tool fails to reconfigure the network interfaces, preventing the upgrade to happen for more information.
Update all packages to their latest RHEL 6 version:
# yum update
Reboot the system:
# reboot
- Back up all your data before performing the upgrade to prevent potential data loss.
Verification steps
Verify that you are registered with the Red Hat Subscription Manager:
# yum update
The
Loaded plug-ins:entry must containsubscription-manager.Verify that only supported package groups are installed:
# yum grouplist
Chapter 3. Assessing upgrade suitability
The Preupgrade Assistant assesses your system for any potential problems that might occur during an in-place upgrade before any changes to your system are made.
The Preupgrade Assistant does the following:
- Leaves your system unchanged except for storing information or logs. It does not modify the assessed system.
- Assesses the system for possible in-place upgrade limitations, such as package removals, incompatible obsoletes, name changes, or deficiencies in some configuration file compatibilities.
- Provides a report with the assessment result.
- Provides post-upgrade scripts to address more complex problems after the in-place upgrade.
You should run the Preupgrade Assistant multiple times. Always run the Preupgrade Assistant after you resolve problems identified by the pre-upgrade report to ensure that no critical problems remain before performing the upgrade.
You can review the system assessment results using one of the following methods:
- Locally on the assessed system using the command line.
- Remotely over the network using the web user interface (UI). You can use the web UI to view multiple reports at once.
The Preupgrade Assistant is a modular system. You can create your own custom modules to assess the possibility of performing an in-place upgrade. For more information, see How to create custom Preupgrade Assistant modules for upgrading from RHEL 6 to RHEL 7.
3.1. Assessing upgrade suitability from the command line
Viewing a Preupgrade Assistant report locally ensures that you do not expose the data about your system to the network. The pre-upgrade assessment results can be viewed locally using the following methods:
- As result codes in the standard output on the command line.
- As a detailed HTML file in a web browser.
When the preupg command is run without further options, it produces the result.html and preupg_results-*.tar.gz files in the /root/preupgrade/ directory.
Prerequisites
- You have completed the preparation steps described in Preparing a RHEL 6 system for the upgrade.
Procedure
Run the Preupgrade Assistant to perform an assessment of the system.
# preupg
Review each assessment result entry:
- Inspect result codes on the standard output For more information about assessment codes, see the Assessment result codes table.
View the assessment report in greater detail by opening the HTML file with results in a web browser:
# web_browser file:///root/preupgrade/result.html
-
View the README file in the
/root/preupgrade/directory for more information about the output directory structure, exit codes, and risk explanations associated with the Preupgrade Assistant utility. Resolve problems found by the Preupgrade Assistant during the assessment by following the Remediation text in the report.
ImportantThe assessment report might require you to perform certain tasks after you have completed the in-place upgrade to RHEL 7. Take note of these post-upgrade tasks and perform them after the upgrade.
- Run the Preupgrade Assistant again. If there are no new problems to be resolved, you can proceed with upgrading your system.
3.2. Assessing upgrade suitability from a web UI
The Preupgrade Assistant browser-based interface can collect assessment reports from multiple systems and provides convenient filtering of the results. Because the upgrade procedure does not support upgrading the GNOME desktop, this procedure gives you a way to display the Preupgrade Assistant results on a remote GUI desktop.
To use the Preupgrade Assistant web UI remotely, you must install and configure the Apache HTTP Server, add files to the /etc/httpd/conf.d/ directory and run the httpd service on the system to serve the content.
If you are concerned about exposing the data about your system to the network, or if you want to avoid adding content to the system you are upgrading, you can review the pre-upgrade assessment results using the following alternative methods:
- Locally using the Preupgrade Assistant web UI on localhost (127.0.0.1) without configuring the Apache HTTP Server.
-
Remotely following the procedure described in Assessing upgrade suitability from the command line, copying the
/root/preupgrade/result.htmlfile to a remote system, and opening the HTML file in a web browser in the remote system.
Prerequisites
- You have completed the preparation steps described in Preparing a RHEL 6 system for the upgrade.
Procedure
Install the Apache HTTP Server and the Preupgrade Assistant web UI:
# yum install httpd preupgrade-assistant-ui
To make the Preupgrade Assistant web UI available to all network interfaces on the local system through TCP port 8099 by default, change the default private httpd pre-upgrade configuration to the public configuration:
# cp /etc/httpd/conf.d/99-preup-httpd.conf.public /etc/httpd/conf.d/99-preup-httpd.conf
Optional: To access the Preupgrade Assistant using a host name instead of an IP address, for example,
preupg-ui.example.com:-
Ensure you have a DNS CNAME record pointing the
preupg-ui.example.comname to the system you are upgrading. -
Change the
NameVirtualHostline in the99-preup-httpd.conffile toNameVirtualHost preupg-ui.example.com:8099.
-
Ensure you have a DNS CNAME record pointing the
If you have a firewall running and SELinux in enforcing mode, allow access to the port needed by the Preupgrade Assistant web UI service:
# setsebool httpd_run_preupgrade on
# iptables -I INPUT -m state --state NEW -p tcp --dport 8099 -j ACCEPT
Restart the
httpdservice to load the new configuration.# service httpd restart
-
From a web browser on another system, access the Preupgrade Assistant web UI service by using either an IP address (for example,
http://192.168.122.159:8099) or a hostname (for example,http://preupg-ui.example.com:8099). When accessing the Preupgrade Assistant web UI for the first time, decide whether to access the UI with or without authentication.
- To access the UI with authentication, log in as an existing user or create a new one. When you select to create a new user, the authentication system is automatically enabled.
- To access the UI without authentication, select .
Return to the system you plan to upgrade and run the Preupgrade Assistant in the command line with an automatic submission to the Preupgrade Assistant web UI server:
# preupg -u http://hostname:port/submit/For example:
# preupg -u http://preupg-ui.example.com:8099/submit/
Return to your web browser on the remote server and reload the Preupgrade Assistant Web UI.
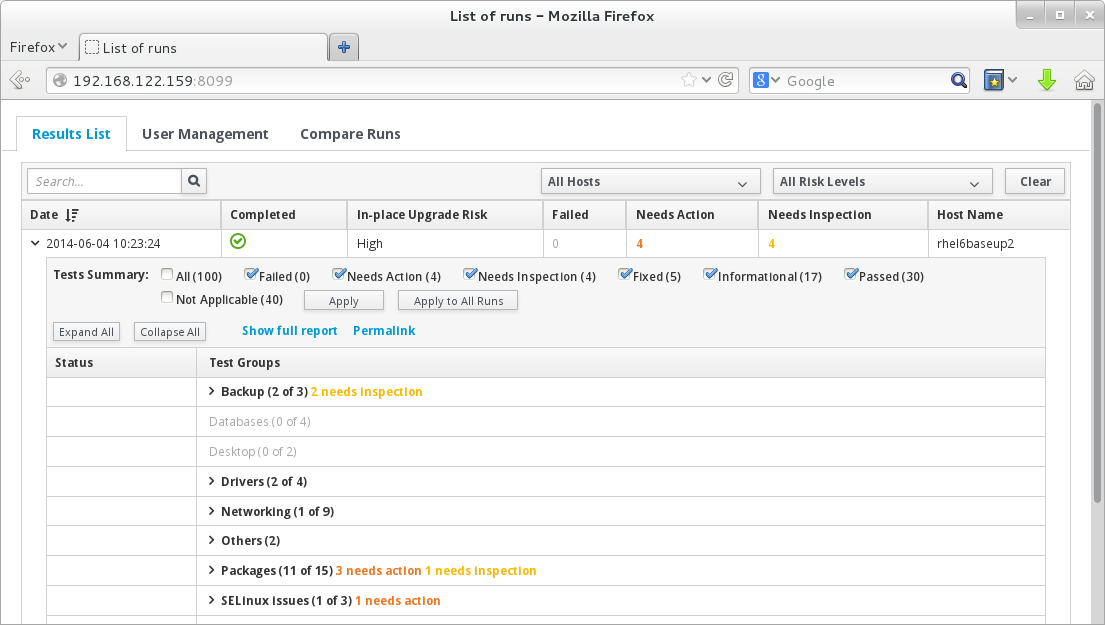
In the web UI, find and expand the assessment report that you generated by running the Preupgrade Assistant. Go through each item in the report and resolve the reported problems. For information about assessment result codes, see the Assessment result codes table.
ImportantThe assessment report might require you to perform certain tasks after you have completed the in-place upgrade to RHEL 7. Take note of these post-upgrade tasks and perform them after the upgrade.
- Run the Preupgrade Assistant again and upload the report to the web UI. If there are no new problems to be resolved, you can proceed with the upgrade.
3.3. Pre-upgrade assessment result codes
When you run the Preupgrade Assistant, an assessment result is generated. Each result in the assessment is assigned a code. Refer to the table below for an explanation of each code and a potential action to take.
Table 3.1. Pre-upgrade assessment result codes
| Result code | Explanation |
|---|---|
| PASS | No problems found. |
| FAIL | Extreme upgrade risk. In-place upgrade is impossible. |
| NEEDS_ACTION | High upgrade risk. You must resolve the problem before running the Red Hat Upgrade Tool. |
| NEEDS_INSPECTION | Medium or lower upgrade risks. The upgrade might not fail, but it might result in a system that is not fully operational. You must check certain parts of the system and, if needed, fix the problems. |
| FIXED | Changes required for the upgrade were applied automatically. You do not need to perform any action. |
| INFORMATIONAL | Useful, but not critical, information. |
| NOT_APPLICABLE | The assessed package is not installed on your system. |
| ERROR | An error occurred in the tooling. Report this type of problem to Red Hat Support. |
| notchecked | The respective module has not been checked. See Known issues for more details. |
Chapter 4. Upgrading your system from RHEL 6 to RHEL 7
After you have corrected all problems reported by the Preupgrade Assistant, use the Red Hat Upgrade Tool to upgrade your system from RHEL 6.10 to RHEL 7.9. Always perform any necessary post-install tasks to ensure your system is up-to-date and to prevent upgrade-related problems.
Test the upgrade process on a safe, non-production system before you perform it on any production system.
Prerequisites
- You have completed the preparation steps described in Preparing a RHEL 6 system for the upgrade, including a full system backup.
- You have performed the pre-upgrade system assessment and resolved all reported problems. For details, see Assessing system upgrade suitability.
Procedure
Prepare source repositories or media with RHEL 7 packages in one of the following locations:
- An installation repository created from a DVD ISO where you download RHEL 7 packages, for example, an FTP server or an HTTPS site that contains the RHEL 7.9 packages. For more information, see Preparing installation sources.
- Mounted installation media
An ISO image
In any of the above options, you can configure custom repositories and additional repositories provided by Red Hat. For example, certain packages available in the RHEL 6 Base system are provided in the RHEL 7 Extras repository and are not on a RHEL 7 DVD.
If you know that your system requires packages that are not in the RHEL 7 Base repository, you can install a separate RHEL 7 system to act as a
yumrepository that provides the required packages over FTP or HTTP.To set up an additional repository that you can use during the upgrade, follow instructions in How to create a local repository for updates. Then use the
--addrepo=REPOID=URLoption with theredhat-upgrade-toolcommand.ImportantImportant It is strongly recommended to use RHEL 7.9 GA source repositories to prevent booting issues after the upgrade. For more information, see Known Issues.
Disable active repositories to prevent problems with combining packages from different major releases of RHEL.
Install the
yum-utilspackage:# {PackageManagerCommand} install {PackageManagerCommand}-utilsDisable active repositories:
# {PackageManagerCommand}-config-manager --disable \*For more information, see Can I install packages from different versions of RHEL.
Run the Red Hat Upgrade Tool to download RHEL 7 packages and prepare the package installation. Specify the location of the Red Hat Enterprise Linux 7 packages:
Installation repository
# redhat-upgrade-tool --network 7.9 --instrepo ftp-or-http-url --cleanup-postMounted installation media
# redhat-upgrade-tool --device device_path --cleanup-postIf you do not specify the device path, the Red Hat Upgrade Tool scans all mounted removable devices.
ISO image
# redhat-upgrade-tool --iso iso_path --cleanup-postImportantYou can use the following options with the redhat-upgrade-tool command for all three locations:
-
--cleanup post: Automatically removes Red Hat-signed packages that do not have a RHEL 7 replacement. Recommended. If you do not use the
--cleanup-postoption, you must remove all remaining RHEL 6 packages after the in-place upgrade to ensure that your system is fully supported. - --snapshot-root-lv and --snapshot-lv: Creates snapshots of system volumes. Snapshots are required to perform a rollback of the RHEL system in case of upgrade failure. For more information, see Rollbacks and cleanup after upgrading RHEL 6 to RHEL 7.
-
--cleanup post: Automatically removes Red Hat-signed packages that do not have a RHEL 7 replacement. Recommended. If you do not use the
Reboot the system when prompted.
# reboot
Depending on the number of packages being upgraded, this process can take up to several hours to complete.
- Manually perform any post-upgrade tasks described in the pre-upgrade assessment result.
- If your system architecture is 64-bit Intel, upgrade from GRUB Legacy to GRUB 2. See the System Administrators Guide for more information.
-
If Samba is installed on the upgraded host, manually run the
testparmutility to verify the/etc/samba/smb.conffile. If the utility reports any configuration errors, you must fix them before you can start Samba. Optional: If you did not use the
--cleanup-postoption when running the Red Hat Upgrade Tool, clean up orphaned RHEL 6 packages:# rpm -qa | grep .el6 &> /tmp/el6.txt # rpm -e $(cat /tmp/el6.txt) --nodeps
WarningBe careful not to accidentally remove custom packages that are compatible with RHEL 7.
WarningUsing the
rpmcommand to remove orphaned packages might cause broken dependencies in some RHEL 7 packages. Refer to Fixing dependency errors for information about how to fix those dependency errors.Update your new RHEL 7 packages to their latest version.
# yum update
# reboot
Verification steps
Verify that the system was upgraded to the latest version of RHEL 7.
# cat /etc/redhat-release
Red Hat Enterprise Linux Server release 7.9 (Maipo)
Verify that the system is automatically resubscribed for RHEL 7.
# yum repolist
Loaded plugins: product-id, subscription-manager
repo id                             repo name                                  status
rhel-7-server-rpms/7Server/x86_64   Red Hat Enterprise Linux 7 Server (RPMs)   23,676
If the repository list does not contain RHEL repositories, run the following commands to unsubscribe the system, resubscribe the system as a RHEL 7 system, and add required repositories:
# subscription-manager remove --all
# subscription-manager unregister
# subscription-manager register
# subscription-manager attach --pool=poolID
# subscription-manager repos --enable=repoID
If any problems occur during or after the in-place upgrade, see Troubleshooting for assistance.
Chapter 5. Troubleshooting
Troubleshoot and solve package-related issues after the in-place upgrade from RHEL 6.10 to RHEL 7.9.
5.1. Troubleshooting resources
You can refer to the following troubleshooting resources.
Console Output
By default, only error and critical log level messages are printed to the console output by the Pre-upgrade Assistant. To also print debug, info, and warning messages, use the --debug option with the redhat-upgrade-tool command.
Logs
The /var/log/upgrade.log file lists issues found during the upgrade phase.
Reports
The /root/preupgrade/result.html file lists issues found during the pre-upgrade phase. This report is also available in the web console. For more information, see Assessing upgrade suitability from a web UI.
5.2. Fixing dependency errors
During an in-place upgrade, certain packages might be installed without some of their dependencies.
Procedure
Identify dependencies errors:
# yum check dependencies
If the command displays no output, no further actions are required.
-
To fix dependency errors, reinstall the affected packages. During this operation, the
yumutility automatically installs missing dependencies. If the required dependencies are not provided by repositories available on the system, install those packages manually.
5.3. Installing missing packages
Certain packages might be missing after the upgrade from RHEL 6 to RHEL 7. This problem can occur for several reasons:
- You did not provide a repository to the Red Hat Upgrade Tool that contained these packages. Install missing packages manually.
- Certain problems are preventing some RPMs from being installed. Resolve these problems before installing missing packages.
- You are missing NetworkManager because the service was not configured and running before the upgrade. Install and configure NetworkManager manually. For more information, see Getting started with NetworkManager.
Procedure
Review which packages are missing from your RHEL 7 system using one of the following methods:
- Review the pre-upgrade report.
Run the following command to generate a list of expected packages in RHEL 7 and compare with the packages that are currently installed to determine which packages are missing.
$ /root/preupgrade/kickstart/RHRHEL7rpmlist* | grep -v "#" | cut -d "|" -f 3 | sort | uniq
Install missing packages using one of the following methods:
Locate and install all missing packages at once. This is the quickest method of getting all missing packages.
# cd /root/preupgrade
# bash noauto_postupgrade.d/install_rpmlist.sh kickstart/RHRHEL7rpmlist_kept
If you know that you want to install only some of the missing packages, install each package individually.
# yum install package
For further details about other files with lists of packages you should install on the upgraded system, see the /root/preupgrade/kickstart/README file and the pre-upgrade report.
5.4. Known issues
The following are issues known to occur when upgrading from RHEL 6 to RHEL 7:
- In-place upgrade from a RHEL 6 system to RHEL 7 is impossible with FIPS mode enabled
- In-place upgrade on IBM Z fails and causes a data loss if the LDL format is used
- The Preupgrade Assistant reports notchecked if certain packages are missing on the system
- redhat-upgrade-tool fails to reconfigure the network interfaces, preventing the upgrade to happen
- redhat-upgrade-tool fails to reconfigure the static routes on the network interfaces, preventing the upgrade to happen
- Why does Red Hat Enterprise Linux 6 to 7 in-place upgrade fail if /usr is on separate partition?
- Systems on the IBM Power, big endian architecture that use multipath volumes might experience issues during the in-place upgrade, causing the upgraded system to fail to boot. To prevent this issue, do not perform the in-place upgrade on such systems. (BZ #1704283)
-
If the target RHEL 7 repository contains the
kernel-3.10.0-1160.62.1.el7package or newer, the upgrade fails. This results in a broken system in an unbootable state. To prevent this issue, use the RHEL 7.9 GA repository without z-stream updates or ensure that the RHEL 7.9 kernel inside the repository is older than thekernel-3.10.0-1160.62.1.el7package. (RHEL-3292)
5.5. Rolling back the upgrade
If the in-place upgrade to RHEL 7 is unsuccessful, it is possible to get the previous RHEL 6 working system back in limited configurations using one of the following methods:
- The rollback capability integrated in the Red Hat Upgrade Tool. For more information, see Rollbacks and cleanup after upgrading RHEL 6 to RHEL 7.
- A custom backup and recovery solution, for example, the Relax-and-Recover (ReaR) utility. For more information, see the ReaR documentation and What is Relax and Recover (ReaR) and how can I use it for disaster recovery?.
5.6. Obtaining support
If you experience problems during the in-place upgrade, notify Red Hat so that these problems can be addressed. There are several methods for obtaining support.
Open an
sosreportusing one of the following methods:-
Open a support case, select RHEL 7 as the product, and provide an
sosreportfrom your system. Generate an
sosreportdirectly on your system:# sosreportNote that you can leave the case ID empty.
-
Open a support case, select RHEL 7 as the product, and provide an
- Submit a bug report.
-
Submit a debug log in the upgraded system in the
/var/log/upgrade.logfile.
For details on generating a sosreport, see the solution What is an sosreport and how to create one in Red Hat Enterprise Linux?.
For more information about opening and managing a support case on the Customer Portal, see the article How do I open and manage a support case on the Customer Portal?.
Chapter 6. Additional resources
- Migration Planning Guide
- Upgrading from RHEL 7 to RHEL 8
- Upgrading from RHEL 6 to RHEL 8
- How do I upgrade from RHEL 6 to RHEL 7 with SAP HANA
- How to create custom Preupgrade Assistant modules for upgrading from RHEL 6 to RHEL 7
- Red Hat Upgrade Tool - rollbacks and cleanup after upgrading RHEL 6 to RHEL 7