
Red Hat Training
A Red Hat training course is available for Red Hat Enterprise Linux
Resource Management Guide
Using cgroups to manage system resources on RHEL 7
Abstract
Chapter 1. Introduction to Control Groups (Cgroups)
1.1. What are Control Groups
systemctl commands, or by modifying systemd unit files. See Chapter 2, Using Control Groups for details.
cgconfig command from the libcgroup package. This package is now deprecated, and it is not recommended to use it since it can easily create conflicts with the default cgroup hierarchy. However, libcgroup is still available to cover for certain specific cases, where systemd is not yet applicable, most notably for using the net-prio subsystem. See Chapter 3, Using libcgroup Tools.
1.2. Default Cgroup Hierarchies
systemctl command, you can further modify this structure by creating custom slices, as shown in Section 2.1, “Creating Control Groups”. Also, systemd automatically mounts hierarchies for important kernel resource controllers (see Available Controllers in Red Hat Enterprise Linux 7) in the /sys/fs/cgroup/ directory.
Warning
cgconfig tool from the libcgroup package is available to mount and handle hierarchies for controllers not yet supported by systemd (most notably the net-prio controller). Never use libcgropup tools to modify the default hierarchies mounted by systemd since it would lead to unexpected behavior. The libcgroup library will be removed in future versions of Red Hat Enterprise Linux. For more information on how to use cgconfig, see Chapter 3, Using libcgroup Tools.
Systemd Unit Types
systemd's unit types, see the chapter called Managing Services with systemd in Red Hat Enterprise Linux 7 System Administrator's Guide):
- Service — A process or a group of processes, which
systemdstarted based on a unit configuration file. Services encapsulate the specified processes so that they can be started and stopped as one set. Services are named in the following way:name.
serviceWhere name stands for the name of the service. - Scope — A group of externally created processes. Scopes encapsulate processes that are started and stopped by arbitrary processes through the
fork()function and then registered by systemd at runtime. For instance, user sessions, containers, and virtual machines are treated as scopes. Scopes are named as follows:name.
scopeHere, name stands for the name of the scope. - Slice — A group of hierarchically organized units. Slices do not contain processes, they organize a hierarchy in which scopes and services are placed. The actual processes are contained in scopes or in services. In this hierarchical tree, every name of a slice unit corresponds to the path to a location in the hierarchy. The dash ("
-") character acts as a separator of the path components. For example, if the name of a slice looks as follows:parent-name.
sliceit means that a slice called parent-name.sliceis a subslice of the parent.slice. This slice can have its own subslice named parent-name-name2.slice, and so on.There is one root slice denoted as:-.slice
test.slice/test-waldo.slice/ex.service/.
- -.slice — the root slice;
- system.slice — the default place for all system services;
- user.slice — the default place for all user sessions;
- machine.slice — the default place for all virtual machines and Linux containers.
systemd-cgls command described in Section 2.4, “Obtaining Information about Control Groups”:
├─1 /usr/lib/systemd/systemd --switched-root --system --deserialize 20
├─user.slice
│ └─user-1000.slice
│   └─session-1.scope
│     ├─11459 gdm-session-worker [pam/gdm-password]
│     ├─11471 gnome-session --session gnome-classic
│     ├─11479 dbus-launch --sh-syntax --exit-with-session
│     ├─11480 /bin/dbus-daemon --fork --print-pid 4 --print-address 6 --session
│     ...
│
└─system.slice
  ├─systemd-journald.service
  │ └─422 /usr/lib/systemd/systemd-journald
  ├─bluetooth.service
  │ └─11691 /usr/sbin/bluetoothd -n
  ├─systemd-localed.service
  │ └─5328 /usr/lib/systemd/systemd-localed
  ├─colord.service
  │ └─5001 /usr/libexec/colord
  ├─sshd.service
  │ └─1191 /usr/sbin/sshd -D
  │
  ...
1.3. Resource Controllers in Linux Kernel
/proc/cgroups, or use the lssubsys monitoring tool. In Red Hat Enterprise Linux 7, systemd mounts the following controllers by default:
Available Controllers in Red Hat Enterprise Linux 7
blkio— sets limits on input/output access to and from block devices;cpu— uses the CPU scheduler to provide cgroup tasks access to the CPU. It is mounted together with thecpuacctcontroller on the same mount;cpuacct— creates automatic reports on CPU resources used by tasks in a cgroup. It is mounted together with thecpucontroller on the same mount;cpuset— assigns individual CPUs (on a multicore system) and memory nodes to tasks in a cgroup;devices— allows or denies access to devices for tasks in a cgroup;freezer— suspends or resumes tasks in a cgroup;memory— sets limits on memory use by tasks in a cgroup and generates automatic reports on memory resources used by those tasks;net_cls— tags network packets with a class identifier (classid) that allows the Linux traffic controller (thetccommand) to identify packets originating from a particular cgroup task. A subsystem ofnet_cls, thenet_filter(iptables) can also use this tag to perform actions on such packets. Thenet_filtertags network sockets with a firewall identifier (fwid) that allows the Linux firewall (theiptablescommand) to identify packets (skb->sk) originating from a particular cgroup task;perf_event— enables monitoring cgroups with the perf tool;hugetlb— allows to use virtual memory pages of large sizes and to enforce resource limits on these pages.
1.4. Additional Resources
Installed Documentation
Cgroup-Related Systemd Documentation
systemd.resource-control(5) — describes the configuration options for resource control shared by system units.systemd.unit(5) — describes common options of all unit configuration files.systemd.slice(5) — provides general information about .slice units.systemd.scope(5) — provides general information about .scope units.systemd.service(5) — provides general information about .service units.
Controller-Specific Kernel Documentation
root:
~]# yum install kernel-doc/usr/share/doc/kernel-doc-<kernel_version>/Documentation/cgroups/ directory:
blkiosubsystem —blkio-controller.txtcpuacctsubsystem —cpuacct.txtcpusetsubsystem —cpusets.txtdevicessubsystem —devices.txtfreezersubsystem —freezer-subsystem.txtmemorysubsystem —memory.txtnet_clssubsystem —net_cls.txt
cpu subsystem:
- Real-Time scheduling —
/usr/share/doc/kernel-doc-<kernel_version>/Documentation/scheduler/sched-rt-group.txt - CFS scheduling —
/usr/share/doc/kernel-doc-<kernel_version>/Documentation/scheduler/sched-bwc.txt
Online Documentation
- Red Hat Enterprise Linux 7 System Administrator's Guide — The System Administrator's Guide documents relevant information regarding the deployment, configuration, and administration of Red Hat Enterprise Linux 7. This guide contains a detailed explanation of the systemd concepts as well as instructions for service management with systemd.
- The D-Bus API of systemd — The reference material for D-Bus API commands used to interact with systemd.
Chapter 2. Using Control Groups
2.1. Creating Control Groups
systemd-run command. This way, it is possible to set limits on resources consumed by the service during its runtime. Applications can create transient cgroups dynamically by using API calls to systemd. See the section called “Online Documentation” for API reference. Transient unit is removed automatically as soon as the service is stopped.
2.1.1. Creating Transient Cgroups with systemd-run
systemd-run command is used to create and start a transient service or scope unit and run a custom command in the unit. Commands executed in service units are started asynchronously in the background, where they are invoked from the systemd process. Commands run in scope units are started directly from the systemd-run process and thus inherit the execution environment of the caller. Execution in this case is synchronous.
root:
~]# systemd-run --unit=name --scope --slice=slice_name command- The name stands for the name you want the unit to be known under. If
--unitis not specified, a unit name will be generated automatically. It is recommended to choose a descriptive name, since it will represent the unit in thesystemctloutput. The name has to be unique during runtime of the unit. - Use the optional
--scopeparameter to create a transient scope unit instead of service unit that is created by default. - With the
--sliceoption, you can make your newly created service or scope unit a member of a specified slice. Replace slice_name with the name of an existing slice (as shown in the output ofsystemctl -t slice), or create a new slice by passing a unique name. By default, services and scopes are created as members of the system.slice. - Replace command with the command you wish to execute in the service unit. Place this command at the very end of the
systemd-runsyntax, so that the parameters of this command are not confused for parameters ofsystemd-run.
systemd-run. For example, --description creates a description of the unit, --remain-after-exit allows to collect runtime information after terminating the service's process. The --machine option executes the command in a confined container. See the systemd-run(1) manual page to learn more.
Example 2.1. Starting a New Service with systemd-run
test. Type as root:
~]# systemd-run --unit=toptest --slice=test top -bRunning as unit toptest.service
systemctl commands.
2.1.2. Creating Persistent Cgroups
systemctl enable command (see the chapter called Managing Services with systemd in Red Hat Enterprise Linux 7 System Administrators Guide). Running this command automatically creates a unit file in the /usr/lib/systemd/system/ directory. To make persistent changes to the cgroup, add or modify configuration parameters in its unit file. For more information, see Section 2.3.2, “Modifying Unit Files”.
2.2. Removing Control Groups
--remain‑after-exit option to systemd-run you can keep the unit running after its processes finished to collect runtime information. To stop the unit gracefully, type:
~]# systemctl stop name.serviceroot:
~]# systemctl kill name.service --kill-who=PID,... --signal=signal--kill-who to select which processes from the cgroup you wish to terminate. To kill multiple processes at the same time, pass a comma-separated list of PIDs. Replace signal with the type of POSIX signal you wish to send to specified processes. Default is SIGTERM. For more information, see the systemd.kill manual page.
~]# systemctl disable name.service2.3. Modifying Control Groups
systemd has a unit configuration file in the /usr/lib/systemd/system/ directory. To change parameters of a service unit, modify this configuration file. This can be done either manually or from the command-line interface by using the systemctl set-property command.
2.3.1. Setting Parameters from the Command-Line Interface
systemctl set-property command allows you to persistently change resource control settings during the application runtime. To do so, use the following syntax as root:
~]# systemctl set-property name parameter=valuesystemctl set-property allows you to change multiple properties at once, which is preferable over setting them individually.
--runtime option that makes your settings transient:
~]# systemctl set-property --runtime name property=valueExample 2.2. Using systemctl set-property
~]# systemctl set-property httpd.service CPUShares=600 MemoryLimit=500M--runtime option:
~]# systemctl set-property --runtime httpd.service CPUShares=600 MemoryLimit=500M2.3.2. Modifying Unit Files
Managing CPU
DefaultControllers parameter in the /etc/systemd/system.conf configuration file. To manage CPU allocation, use the following directive in the [Service] section of the unit configuration file:
CPUShares=value- Replace value with a number of CPU shares. The default value is 1024. By increasing the number, you assign more CPU time to the unit. Setting the value of the
CPUSharesparameter automatically turnsCPUAccountingon in the unit file. Users can thus monitor the usage of the processor with thesystemd-cgtopcommand.
CPUShares parameter controls the cpu.shares control group parameter. See the description of the cpu controller in Controller-Specific Kernel Documentation to see other CPU-related control parameters.
Example 2.3. Limiting CPU Consumption of a Unit
/etc/systemd/system/httpd.service.d/cpu.conf configuration file with the following content:
[Service]
CPUShares=1500
~]#systemctldaemon-reload~]#systemctlrestarthttpd.service
CPUQuota=value- Replace value with a value of CPU time quota to assign the specified CPU time quota to the processes executed. The value of the
CPUQuotaparameter, which is expressed in percentage, specifies how much CPU time the unit gets at maximum, relative to the total CPU time available on one CPU.Values higher than 100% indicate that more than one CPU is used.CPUQuotacontrols the cpu.max attribute on the unified control group hierarchy, and the legacy cpu.cfs_quota_us attribute. Setting the value of theCPUQuotaparameter automatically turnsCPUAccountingon in the unit file. Users can thus monitor the usage of the processor with thesystemd-cgtopcommand.
Example 2.4. Using CPUQuota
CPUQuota to 20% ensures that the executed processes never get more than 20% CPU time on a single CPU.
/etc/systemd/system/httpd.service.d/cpu.conf configuration file:
[Service]
CPUQuota=20%
~]#systemctldaemon-reload~]#systemctlrestarthttpd.service
Managing Memory
MemoryLimit=value- Replace value with a limit on maximum memory usage of the processes executed in the cgroup. Use suffixes K, M, G, or T to identify Kilobyte, Megabyte, Gigabyte, or Terabyte as the unit of measurement. Also, the
MemoryAccountingparameter has to be enabled for the unit.
MemoryLimit parameter controls the memory.limit_in_bytes control group parameter. For more information, see the description of the memory controller in Controller-Specific Kernel Documentation.
Example 2.5. Limiting Memory Consumption of a Unit
MemoryLimit setting in the /etc/systemd/system/httpd.service.d/cpu.conf unit file:
[Service]
MemoryLimit=1G
~]#systemctldaemon-reload~]#systemctlrestarthttpd.service
Managing Block IO
BlockIOAccounting parameter is enabled:
BlockIOWeight=value- Replace value with a new overall block IO weight for the executed processes. Choose a single value between 10 and 1000, the default setting is 1000.
BlockIODeviceWeight=device_name value- Replace value with a block IO weight for a device specified with device_name. Replace device_name either with a name or with a path to a device. As with
BlockIOWeight, it is possible to set a single weight value between 10 and 1000. BlockIOReadBandwidth=device_name value- This directive allows you to limit a specific bandwidth for a unit. Replace device_name with the name of a device or with a path to a block device node, value stands for a bandwidth rate. Use suffixes K, M, G, or T to specify units of measurement. A value with no suffix is interpreted as bytes per second.
BlockIOWriteBandwidth=device_name value- Limits the write bandwidth for a specified device. Accepts the same arguments as
BlockIOReadBandwidth.
blkio controller in Controller-Specific Kernel Documentation.
Note
blkio resource controller does not support buffered write operations. It is primarily targeted at direct I/O, so the services that use buffered write will ignore the limits set with BlockIOWriteBandwidth. On the other hand, buffered read operations are supported, and BlockIOReadBandwidth limits will be applied correctly both on direct and buffered read.
Example 2.6. Limiting Block IO of a Unit
/home/jdoe/ directory, add the following text into the /etc/systemd/system/httpd.service.d/cpu.conf unit file:
[Service]
BlockIODeviceWeight=/home/jdoe 750
/var/log/ directory to 5MB per second, use the following syntax:
[Service]
BlockIOReadBandwidth=/var/log 5M
~]#systemctldaemon-reload~]#systemctlrestarthttpd.service
Managing Other System Resources
DeviceAllow=device_name options- This option controls access to specific device nodes. Here, device_name stands for a path to a device node or a device group name as specified in
/proc/devices. Replaceoptionswith a combination ofr,w, andmto allow the unit to read, write, or create device nodes. DevicePolicy=value- Here, value is one of: strict (only allows the types of access explicitly specified with
DeviceAllow), closed (allows access to standard pseudo devices including /dev/null, /dev/zero, /dev/full, /dev/random, and /dev/urandom) or auto (allows access to all devices if no explicitDeviceAllowis present, which is the default behavior) Slice=slice_name- Replace slice_name with the name of the slice to place the unit in. The default is system.slice. Scope units cannot be arranged in this way, since they are tied to their parent slices.
ExecStartPost=command- Currently,
systemdsupports only a subset of cgroup features. However, as a workaround, you can use theExecStartPost=option along with setting thememory.memsw.limit_in_bytesparameter in order to prevent any swap usage for a service. For more information onExecStartPost=, see thesystemd.service(5)man page.
Example 2.7. Configuring Cgroup Options
memory.memsw.limit_in_bytes setting to the same value as the unit's MemoryLimit= in order to prevent any swap usage for a given example service.
ExecStartPost=/bin/bash -c "echo 1G > /sys/fs/cgroup/memory/system.slice/example.service/memory.memsw.limit_in_bytes"
systemd configuration and restart the service so that the modified setting is taken into account:
~]#systemctl daemon-reload~]#systemctl restart example.service
2.4. Obtaining Information about Control Groups
systemctl command to list system units and to view their status. Also, the systemd-cgls command is provided to view the hierarchy of control groups and systemd-cgtop to monitor their resource consumption in real time.
2.4.1. Listing Units
~]# systemctl list-unitslist-units option is executed by default, which means that you will receive the same output when you omit this option and execute just:
~]$systemctl
UNIT                     LOAD   ACTIVE SUB     DESCRIPTION
abrt-ccpp.service        loaded active exited  Install ABRT coredump hook
abrt-oops.service        loaded active running ABRT kernel log watcher
abrt-vmcore.service      loaded active exited  Harvest vmcores for ABRT
abrt-xorg.service        loaded active running ABRT Xorg log watcher
...
- UNIT — the name of the unit that also reflects the unit's position in the cgroup tree. As mentioned in the section called “Systemd Unit Types”, three unit types are relevant for resource control: slice, scope, and service. For a complete list of
systemd's unit types, see the chapter called Managing Services with systemd in Red Hat Enterprise Linux 7 System Administrators Guide. - LOAD — indicates whether the unit configuration file was properly loaded. If the unit file failed to load, the field contains the state error instead of loaded. Other unit load states are: stub, merged, and masked.
- ACTIVE — the high-level unit activation state, which is a generalization of SUB.
- SUB — the low-level unit activation state. The range of possible values depends on the unit type.
- DESCRIPTION — the description of the unit's content and functionality.
systemctl lists only active units (in terms of high-level activations state in the ACTIVE field). Use the --all option to see inactive units too. To limit the amount of information in the output list, use the --type (-t) parameter that requires a comma-separated list of unit types such as service and slice, or unit load states such as loaded and masked.
Example 2.8. Using systemctl list-units
~]$ systemctl -t slice ~]$ systemctl -t service,masked~]$ systemctl list-unit-files2.4.2. Viewing the Control Group Hierarchy
systemctl does not show the hierarchy of units. You can achieve both by using the systemd-cgls command that groups the running process according to cgroups. To display the whole cgroup hierarchy on your system, type:
~]$ systemd-cglssystemd-cgls is issued without parameters, it returns the entire cgroup hierarchy. The highest level of the cgroup tree is formed by slices and can look as follows:
├─system
│ ├─1 /usr/lib/systemd/systemd --switched-root --system --deserialize 20
│ ...
│
├─user
│ ├─user-1000
│ │ └─ ...
│ ├─user-2000
│ │ └─ ...
│ ...
│
└─machine
  ├─machine-1000
  │ └─ ...
  ...
systemd-cgls, and to view a specified part of the hierarchy, execute:
~]$ systemd-cgls namesystemctl status command to display detailed information about a system unit. A cgroup subtree is a part of the output of this command.
~]$ systemctl namesystemctl status, see the chapter called Managing Services with systemd in Red Hat Enterprise Linux 7 System Administrators Guide.
Example 2.9. Viewing the Control Group Hierarchy
memory resource controller, execute:
~]$systemd-cglsmemorymemory: ├─ 1 /usr/lib/systemd/systemd --switched-root --system --deserialize 23 ├─ 475 /usr/lib/systemd/systemd-journald ...
~]#systemctlstatushttpd.servicehttpd.service - The Apache HTTP Server Loaded: loaded (/usr/lib/systemd/system/httpd.service; enabled) Active: active (running) since Sun 2014-03-23 08:01:14 MDT; 33min ago Process: 3385 ExecReload=/usr/sbin/httpd $OPTIONS -k graceful (code=exited, status=0/SUCCESS) Main PID: 1205 (httpd) Status: "Total requests: 0; Current requests/sec: 0; Current traffic: 0 B/sec" CGroup: /system.slice/httpd.service ├─1205 /usr/sbin/httpd -DFOREGROUND ├─3387 /usr/sbin/httpd -DFOREGROUND ├─3388 /usr/sbin/httpd -DFOREGROUND ├─3389 /usr/sbin/httpd -DFOREGROUND ├─3390 /usr/sbin/httpd -DFOREGROUND └─3391 /usr/sbin/httpd -DFOREGROUND ...
machinectl command dedicated to monitoring Linux containers.
2.4.3. Viewing Resource Controllers
systemctl commands enable monitoring the higher-level unit hierarchy, but do not show which resource controllers in Linux kernel are actually used by which processes. This information is stored in dedicated process files, to view it, type as root:
~]# cat proc/PID/cgroup~]# cat proc/27/cgroup
10:hugetlb:/
9:perf_event:/
8:blkio:/
7:net_cls:/
6:freezer:/
5:devices:/
4:memory:/
3:cpuacct,cpu:/
2:cpuset:/
1:name=systemd:/
2.4.4. Monitoring Resource Consumption
systemd-cgls command provides a static snapshot of the cgroup hierarchy. To see a dynamic account of currently running cgroups ordered by their resource usage (CPU, Memory, and IO), use:
~]# systemd-cgtopsystemd-cgtop are akin of those of the top utility. See systemd-cgtop(1) manual page for more information.
2.5. Additional Resources
Installed Documentation
Man Pages of Cgroup-Related Systemd Tools
systemd-run(1) — The manual page lists all command-line options of thesystemd-runutility.systemctl(1) — The manual page of the systemctl utility that lists available options and commands.systemd-cgls(1) — This manual page lists all command-line options of thesystemd-cglsutility.systemd-cgtop(1) — The manual page contains the list of all command-line options of thesystemd-cgtoputility.machinectl(1) — This manual page lists all command-line options of themachinectlutility.systemd.kill(5) — This manual page provides an overview of kill configuration options for system units.
Controller-Specific Kernel Documentation
root:
~]# yum install kernel-doc/usr/share/doc/kernel-doc-<kernel_version>/Documentation/cgroups/ directory:
blkiosubsystem —blkio-controller.txtcpuacctsubsystem —cpuacct.txtcpusetsubsystem —cpusets.txtdevicessubsystem —devices.txtfreezersubsystem —freezer-subsystem.txtmemorysubsystem —memory.txtnet_clssubsystem —net_cls.txt
cpu subsystem:
- Real-Time scheduling —
/usr/share/doc/kernel-doc-<kernel_version>/Documentation/scheduler/sched-rt-group.txt - CFS scheduling —
/usr/share/doc/kernel-doc-<kernel_version>/Documentation/scheduler/sched-bwc.txt
Online Documentation
- Red Hat Enterprise Linux 7 System Administrators Guide — The System Administrator's Guide documents relevant information regarding the deployment, configuration and administration of Red Hat Enterprise Linux 7. It is oriented towards system administrators with a basic understanding of the system.
- The D-Bus API of systemd — The reference for D-Bus API commands for accessing systemd.
Chapter 3. Using libcgroup Tools
Note
root:
~]#yum install libcgroup~]#yum install libcgroup-tools
Note
net_prio controller is not compiled in the kernel like the rest of the controllers, rather it is a module that has to be loaded before attempting to mount it. To load this module, type as root:
~]# modprobe netprio_cgroup3.1. Mounting a Hierarchy
mount section of the /etc/cgconfig.conf configuration file. This method makes the controller attachment persistent, which means your settings will be preserved after system reboot. As an alternative, use the mount command to create a transient mount only for the current session.
Using the cgconfig Service
cgconfig service installed with the libcgroup-tools package provides a way to mount hierarchies for additional resource controllers. By default, this service is not started automatically. When you start cgconfig, it applies the settings from the /etc/cgconfig.conf configuration file. The configuration is therefore recreated from session to session and becomes persistent. Note that if you stop cgconfig, it unmounts all the hierarchies that it mounted.
/etc/cgconfig.conf file installed with the libcgroup package does not contain any configuration settings, only information that systemd mounts the main resource controllers automatically.
/etc/cgconfig.conf — mount, group, and template. Mount entries are used to create and mount hierarchies as virtual file systems, and attach controllers to those hierarchies. In Red Hat Enterprise Linux 7, default hierarchies are mounted automatically to the /sys/fs/cgroup/ directory, cgconfig is therefore used solely to attach non-default controllers. Mount entries are defined using the following syntax:
mount {
    controller_name = /sys/fs/cgroup/controller_name;
    …
}
Example 3.1. Creating a mount entry
net_prio controller to the default cgroup tree, add the following text to the /etc/cgconfig.conf configuration file:
mount {
    net_prio = /sys/fs/cgroup/net_prio;
}
cgconfig service to apply the setting:
~]# systemctl restart cgconfig.service/etc/cgconfig.conf can be used to set the parameters of resource controllers. See Section 3.5, “Setting Cgroup Parameters” for more information about group entries.
/etc/cgconfig.conf can be used to create a group definition applied to all processes.
Using the mount Command
mount command to temporarily mount a hierarchy. To do so, first create a mount point in the /sys/fs/cgroup/ directory where systemd mounts the main resource controllers. Type as root:
~]# mkdir /sys/fs/cgroup/namemount command to mount the hierarchy and simultaneously attach one or more subsystems. Type as root:
~]# mount -t cgroup -o controller_name none /sys/fs/cgroup/controller_name-t cgroup parameter specifies the type of mount.
Example 3.2. Using the mount command to attach controllers
net_prio controller with use of the mount command, first create the mount point:
~]# mkdir /sys/fs/cgroup/net_prionet_prio to the destination you created in the previous step:
~]# mount -t cgroup -o net_prio none /sys/fs/cgroup/net_priolssubsys command (see the section called “Listing Controllers”):
~]# lssubsys -am
cpuset /sys/fs/cgroup/cpuset
cpu,cpuacct /sys/fs/cgroup/cpu,cpuacct
memory /sys/fs/cgroup/memory
devices /sys/fs/cgroup/devices
freezer /sys/fs/cgroup/freezer
net_cls /sys/fs/cgroup/net_cls
blkio /sys/fs/cgroup/blkio
perf_event /sys/fs/cgroup/perf_event
hugetlb /sys/fs/cgroup/hugetlb
net_prio /sys/fs/cgroup/net_prio
3.2. Unmounting a Hierarchy
/etc/cgconfig.conf configuration file, you can unmount it simply by removing the configuration directive from the mount section of this configuration file. Then restart the service to apply the new configuration.
root:
~]#umount/sys/fs/cgroup/controller_name
Warning
umount to remove only hierarchies that you mounted yourself manually. Detaching a hierarchy that contains a default controller (listed in Available Controllers in Red Hat Enterprise Linux 7) will most probably lead to complications requiring a system reboot.
3.3. Creating Control Groups
cgcreate command to create transient cgroups in hierarchies you created yourself. The syntax for cgcreate is:
cgcreate-tuid:gid-auid:gid-gcontrollers:path
-t(optional) — specifies a user (by user ID, uid) and a group (by group ID, gid) to own thetaskspseudo-file for this cgroup. This user can add tasks to the cgroup.Note
Note that the only way to remove a process from a cgroup is to move it to a different cgroup. To be able to move a process, the user has to have write access to the destination cgroup; write access to the source cgroup is not necessary.-a(optional) — specifies a user (by user ID, uid) and a group (by group ID, gid) to own all pseudo-files other thantasksfor this cgroup. This user can modify the access to system resources for tasks in this cgroup.-g— specifies the hierarchy in which the cgroup should be created, as a comma-separated list of the controllers associated with hierarchies. The list of controllers is followed by a colon and the path to the child group relative to the hierarchy. Do not include the hierarchy mount point in the path.
mkdir command:
~]# mkdir /sys/fs/cgroup/controller/name/child_name~]# mkdir /sys/fs/cgroup/net_prio/lab1/group13.4. Removing Control Groups
cgdelete command that has syntax similar to that of cgcreate. Enter the following command as root:
~]# cgdelete controllers:path- controllers is a comma-separated list of controllers.
- path is the path to the cgroup relative to the root of the hierarchy.
~]# cgdelete net_prio:/test-subgroupcgdelete can also recursively remove all subgroups when the -r option is specified.
3.5. Setting Cgroup Parameters
/etc/cgconfig.conf configuration file, or by using the cgset command. Changes made to /etc/cgconfig.conf are preserved after reboot, while cgset changes the cgroup parameters only for the current session.
Modifying /etc/cgconfig.conf
/etc/cgconfig.conf. Group entries are defined using the following syntax:
group name {
[permissions]
    controller {
        param_name = param_value;
        …
    }
    …
}
permissions section is optional. To define permissions for a group entry, use the following syntax:
perm {
    task {
        uid = task_user;
        gid = task_group;
    }
    admin {
       uid = admin_name;
       gid = admin_group;
    }
}
Note
cgconfig service for the changes in the /etc/cgconfig.conf to take effect. Restarting this service rebuilds hierarchies specified in the configuration file but does not affect all mounted hierarchies. You can restart a service by executing the systemctl restart command, however, it is recommended to first stop the cgconfig service:
~]# systemctl stop cgconfigcgconfig again with the following command:
~]# systemctl start cgconfigUsing the cgset Command
cgset command from a user account with permission to modify the relevant cgroup. Use this only for controllers you mounted manually.
cgset is:
cgset-rparameter=value path_to_cgroup
- parameter is the parameter to be set, which corresponds to the file in the directory of the given cgroup;
- value is the value for the parameter;
- path_to_cgroup is the path to the cgroup relative to the root of the hierarchy.
cgset might depend on values set higher in a particular hierarchy. For example, if group1 is limited to use only CPU 0 on a system, you cannot set group1/subgroup1 to use CPUs 0 and 1, or to use only CPU 1.
cgset to copy the parameters of one cgroup into another, existing cgroup. The syntax to copy parameters with cgset is:
cgset--copy-frompath_to_source_cgroup path_to_target_cgroup
- path_to_source_cgroup is the path to the cgroup whose parameters are to be copied, relative to the root group of the hierarchy;
- path_to_target_cgroup is the path to the destination cgroup, relative to the root group of the hierarchy.
3.6. Moving a Process to a Control Group
cgclassify command:
~]# cgclassify -g controllers:path_to_cgroup pidlist- controllers is a comma-separated list of resource controllers, or
/*to launch the process in the hierarchies associated with all available subsystems. Note that if there are multiple cgroups of the same name, the-goption moves the processes in each of those groups. - path_to_cgroup is the path to the cgroup within the hierarchy;
- pidlist is a space-separated list of process identifier (PIDs).
-g option is not specified, cgclassify automatically searches /etc/cgrules.conf and uses the first applicable configuration line. According to this line, cgclassify determines the hierarchies and cgroups to move the process under. Note that for the move to be successful, the destination hierarchies have to exist. The subsystems specified in /etc/cgrules.conf has to be also properly configured for the corresponding hierarchy in /etc/cgconfig.conf.
--sticky option before the pid to keep any child processes in the same cgroup. If you do not set this option and the cgred service is running, child processes will be allocated to cgroups based on the settings found in /etc/cgrules.conf. The process itself, however, will remain in the cgroup in which you started it.
cgrulesengd service) that moves tasks into cgroups according to parameters set in the /etc/cgrules.conf file. Use cgred only to manage manually attached controllers. Entries in the /etc/cgrules.conf file can take one of the two forms:
- user subsystems control_group;
- user:command subsystems control_group.
maria net_prio /usergroup/staff
maria access the devices subsystem according to the parameters specified in the /usergroup/staff cgroup. To associate particular commands with particular cgroups, add the command parameter, as follows:
maria:ftp devices /usergroup/staff/ftp
maria uses the ftp command, the process is automatically moved to the /usergroup/staff/ftp cgroup in the hierarchy that contains the devices subsystem. Note, however, that the daemon moves the process to the cgroup only after the appropriate condition is fulfilled. Therefore, the ftp process can run for a short time in an incorrect group. Furthermore, if the process quickly spawns children while in the incorrect group, these children might not be moved.
/etc/cgrules.conf file can include the following extra notation:
@— when prefixed to user, indicates a group instead of an individual user. For example,@adminsare all users in theadminsgroup.\*— represents "all". For example,\*in thesubsystemfield represents all subsystems.%— represents an item the same as the item on the line above. For example:@adminstaff net_prio /admingroup @labstaff % %
3.7. Starting a Process in a Control Group
cgexec command. The syntax for cgexec is:
cgexec-gcontrollers:path_to_cgroup command arguments
- controllers is a comma-separated list of controllers, or
/*to launch the process in the hierarchies associated with all available subsystems. Note that, as with thecgsetcommand described in Section 3.5, “Setting Cgroup Parameters”, if cgroups of the same name exist, the-goption creates processes in each of those groups. - path_to_cgroup is the path to the cgroup relative to the hierarchy;
- command is the command to be executed in the cgroup;
- arguments are any arguments for the command.
--sticky option before the command to keep any child processes in the same cgroup. If you do not set this option and the cgred service is running, child processes will be allocated to cgroups based on the settings found in /etc/cgrules.conf. The process itself, however, will remain in the cgroup in which you started it.
3.8. Obtaining Information about Control Groups
Listing Controllers
~]$ cat /proc/cgroups~]$ lssubsys -m controllerslssubsys -m command returns only the top-level mount point per each hierarchy.
Finding Control Groups
root:
~]# lscgroupcontroller:path. For example:
~]$ lscgroup cpuset:adminusersadminusers cgroup in the hierarchy to which the cpuset controller is attached.
Displaying Parameters of Control Groups
~]$ cgget -r parameter list_of_cgroups~]$ cgget -g cpuset /3.9. Additional Resources
Installed Documentation
The libcgroup-related Man Pages
cgclassify(1) — thecgclassifycommand is used to move running tasks to one or more cgroups.cgclear(1) — thecgclearcommand is used to delete all cgroups in a hierarchy.cgconfig.conf(5) — cgroups are defined in thecgconfig.conffile.cgconfigparser(8) — thecgconfigparsercommand parses thecgconfig.conffile and mounts hierarchies.cgcreate(1) — thecgcreatecommand creates new cgroups in hierarchies.cgdelete(1) — thecgdeletecommand removes specified cgroups.cgexec(1) — thecgexeccommand runs tasks in specified cgroups.cgget(1) — thecggetcommand displays cgroup parameters.cgsnapshot(1) — thecgsnapshotcommand generates a configuration file from existing subsystems.cgred.conf(5) —cgred.confis the configuration file for thecgredservice.cgrules.conf(5) —cgrules.confcontains the rules used for determining when tasks belong to certain cgroups.cgrulesengd(8) — thecgrulesengdservice distributes tasks to cgroups.cgset(1) — thecgsetcommand sets parameters for a cgroup.lscgroup(1) — thelscgroupcommand lists the cgroups in a hierarchy.lssubsys(1) — thelssubsyscommand lists the hierarchies containing the specified subsystems.
Chapter 4. Control Group Application Examples
4.1. Prioritizing Database I/O

Figure 4.1. I/O throughput without resource allocation
Procedure 4.1. I/O Throughput Prioritization
- Make sure resource accounting is on for both services:
~]#
systemctlset-propertydb1.serviceBlockIOAccounting=true~]#systemctlset-propertydb2.serviceBlockIOAccounting=true - Set a ratio of 10:1 for the high and low priority services. Processes running in those service units will use only the resources made available to them
~]#
systemctlset-propertydb1.serviceBlockIOWeight=1000~]#systemctlset-propertydb2.serviceBlockIOWeight=100
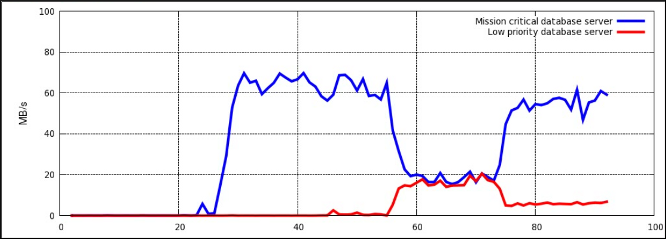
Figure 4.2. I/O throughput with resource allocation
blkio controller in Controller-Specific Kernel Documentation.
4.2. Prioritizing Network Traffic
net_prio controller can be used to set network priorities for processes in cgroups. These priorities are then translated into Type of Service (ToS) field bits and embedded into every packet. Follow the steps in Procedure 4.2, “Setting Network Priorities for File Sharing Services” to configure prioritization of two file sharing services (NFS and Samba).
Procedure 4.2. Setting Network Priorities for File Sharing Services
- Attach the
net_priosubsystem to the/cgroup/net_priocgroup:~]#
mkdir sys/fs/cgroup/net_prio~]#mount -t cgroup -o net_prio none sys/fs/cgroup/net_prio - Create two cgroups, one for each service:
~]#
mkdir sys/fs/cgroup/net_prio/nfs_high~]#mkdir sys/fs/cgroup/net_prio/samba_low - To automatically move the
nfsservices to thenfs_highcgroup, add the following line to the/etc/sysconfig/nfsfile:CGROUP_DAEMON="net_prio:nfs_high"
This configuration ensures thatnfsservice processes are moved to thenfs_highcgroup when thenfsservice is started or restarted. - The
smbdservice does not have a configuration file in the/etc/sysconfigdirectory. To automatically move thesmbdservice to thesamba_lowcgroup, add the following line to the/etc/cgrules.conffile:*:smbd net_prio samba_low
Note that this rule moves everysmbdservice, not only/usr/sbin/smbd, into thesamba_lowcgroup.You can define rules for thenmbdandwinbinddservices to be moved to thesamba_lowcgroup in a similar way. - Start the
cgredservice to load the configuration from the previous step:~]#
systemctl start cgredStarting CGroup Rules Engine Daemon: [ OK ] - For the purposes of this example, let us assume both services use the
eth1network interface. Define network priorities for each cgroup, where1denotes low priority and10denotes high priority:~]#
echo "eth1 1" > /sys/fs/cgroup/net_prio/samba_low/net_prio.ifpriomap~]#echo "eth1 10" > /sys/fs/cgroup/net_prio/nfs_high/net_prio.ifpriomap - Start the
nfsandsmbservices and check whether their processes have been moved into the correct cgroups:~]#
systemctl start smbStarting SMB services: [ OK ] ~]#cat /sys/fs/cgroup/net_prio/samba_low/tasks16122 16124 ~]#systemctl start nfsStarting NFS services: [ OK ] Starting NFS quotas: [ OK ] Starting NFS mountd: [ OK ] Stopping RPC idmapd: [ OK ] Starting RPC idmapd: [ OK ] Starting NFS daemon: [ OK ] ~]#cat sys/fs/cgroup/net_prio/nfs_high/tasks16321 16325 16376Network traffic originating from NFS now has higher priority than traffic originating from Samba.
net_prio subsystem can be used to set network priorities for client applications, for example, Firefox.
Appendix A. Revision History
| Revision History | |||
|---|---|---|---|
| Revision 0.0-1.10 | Mon Aug 05 2019 | ||
| |||
| Revision 0.0-1.6 | Wed Nov 11 2015 | ||
| |||
| Revision 0.0-1.4 | Thu Feb 19 2015 | ||
| |||
| Revision 0.0-1.0 | Mon Jul 21 2014 | ||
|
| |||
| Revision 0.0-0.14 | Mon May 13 2013 | ||
| |||