
Red Hat Training
A Red Hat training course is available for Red Hat Enterprise Linux
Chapter 5. Upgrading the para-virtualized drivers
Future updates for the para-virtualized Windows drivers package will be available as bugs are fixed and new features are developed. Follow the procedures documented in this section to update the drivers to newer versions when they become available.
To update the para-virtualized drivers to the latest supported version you require the Virtualization channel from the Red Hat Network. The list para-virtualized driver packages:
xenpv-win-32bit- The driver package for the 32 bit versions of Windows.
xenpv-win-32bit-debug- The package for debugging the drivers for the 32 bit versions of Windows.
xenpv-win-64bit- The driver package for the 64 bit versions of Windows.
xenpv-win-64bit-debug- The package for debugging the drivers for the 64 bit versions of Windows.
Warning
A bug in the drivers causes a Realtek network device to appear for each para-virtualized network device in the guest when the drivers are upgraded or new devices are added. This device can interfere with the para-virtualized network device, including preventing it from functioning.
It is advised to remove these devices before and after upgrading. To avoid this issue, remove the Realtek network devices from the Windows guests before upgrading. For instructions on removing the superfluous devices refer to Procedure 4.1, “Configuring additional para-virtualized network devices”.
Use
yum command to install the packaged .iso files to the /usr/share/xenpv-win directory. Modify xenpv-win-32bit with the package name you require from the list.
# yum update xenpv-win-32bit
Once
yum completes, create a virtualized CD-ROM device containing the updated .iso file for the guest.
Follow Procedure 5.1, “Attach the CD-ROM image with
virsh” to attach a CD-ROM image with virsh.
Procedure 5.1. Attach the CD-ROM image with virsh
- Use the
virshcommand with the parameters modified for your guest. Refer to Mounting the image with virsh for more information on this step.# virsh attach-disk
w2k3_32/usr/share/xenpv-win/xenpv-win-32bit.isohdc--driver file --type cdrom --mode readonly - Open on the guest and open the CD drive (
Ein the example below). Double click the executable file for your architecture on the CD-ROM drive. The installer may automatically start when the CD-ROM is detected. This starts the installer process which is described in Section 3.2, “Installing the para-virtualized drivers”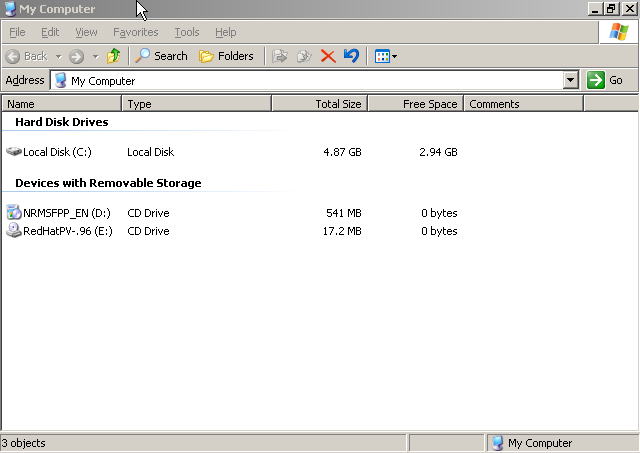
After upgrading to the latest driver superfluous Realtek network devices may appear on the guest. These devices are due to a bug in the driver and mused be removed to ensure your guests operate properly. To remove the superfluous devices refer to Procedure 4.1, “Configuring additional para-virtualized network devices”.
Alternate procedure: upgrade with
virt-managerYou can re-use existing virtualized CD-ROM devices to upgrading the drivers. To re-use a CD-ROM device with virt-manager:
Procedure 5.2. Re-using a CD-ROM device with virt-manager
- Select a CD-ROM device from the list that you no longer need and click the button.
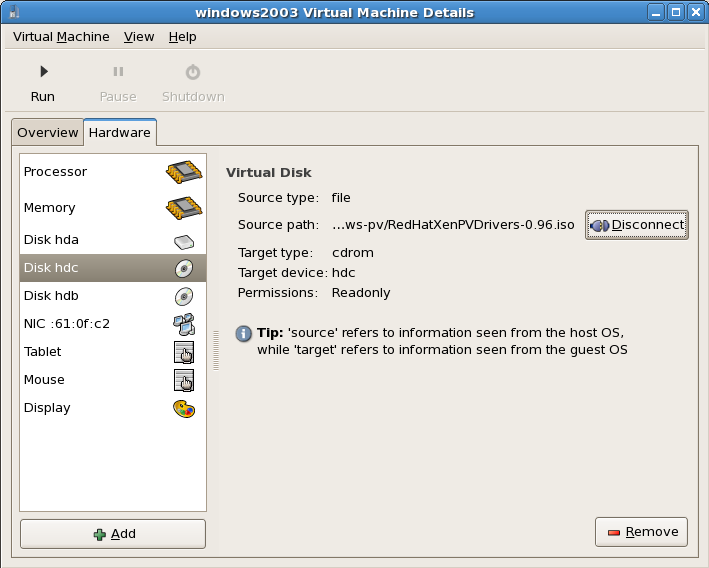
- Click to choose another disk path.

- In the pop up window, choose the location of the para-virtualized drivers .iso image and select to allow the guest access on the next boot.

A CD-ROM inserted message appears on the guest and the new CD-ROM image is available on the guest. The drivers can now be installed by running the setup on the CD-ROM. Refer to Section 3.2, “Installing the para-virtualized drivers” for information on using the installer.
After upgrading to the latest driver superfluous Realtek network devices may appear on the guest. These devices are due to a bug in the driver and mused be removed to ensure your guests operate properly. To remove the superfluous devices refer to Procedure 4.1, “Configuring additional para-virtualized network devices”.