
Chapter 1. Storing suffixes in separate databases
You can design distributed data storage logic in Directory Server by dividing data in an instance into several databases. You can use suffixes of directory trees as the method of data division.
You can create several directory trees and store them in separate databases by root suffixes. You can also divide a single directory tree into branches and store the branches in separate databases by sub-suffixes.
1.1. Role of a suffix in the data structure
Directory Server presents data in hierarchical structures called directory trees (DIT). The following is a simple directory tree:
Figure 1.1. Simple directory tree with a single root suffix

Each directory tree has a single root entry which defines the naming context of that directory tree, such as dc=example,dc=com.
You can store various pieces of a directory tree in different databases, and then distribute these databases across multiple servers.
You can use suffixes to define the distribution logic of your data storage. A suffix associates a branch (subtree) of the directory tree with a particular database.
This way you can have multiple databases in a single instance of the server. You are not confined to a single database.
1.2. Root suffix vs. sub-suffixes
A root suffix associates an entire directory tree (DIT) with a database. The root suffix does not have a parent suffix.
When you want to store a branch of a directory tree in a separate database, you create a sub-suffix, which associates the branch of the tree with a different database than ancestors of the branch. A sub-suffix must be attached to a parent suffix. The parent suffix can be the root suffix or a sub-suffix, which means that a branch of any subtree can be stored in a separate database.
Figure 1.2. Directory tree with a sub-suffix in a separate database

In this example, the ou=people,dc=example,dc=com sub-suffix is stored in one database and the rest of the directory tree under the root suffix is stored in a different database.
Advantages of using sub-suffixes:
- You can perform database maintenance (import/export/indexing) at a granular level.
- You can store sub-suffixes on separate disks, which resolves disk space concerns.
Disadvantages of using sub-suffixes:
- You need more management actions during setup time.
- Replication needs a separate configuration and replication agreement for each sub-suffix.
1.3. Several root suffixes
You can also have several directory trees (DIT) with different root suffixes in a single instance. For example, when you want to separate some portions of data from the user root.
Figure 1.3. Several directory trees defined by root suffixes
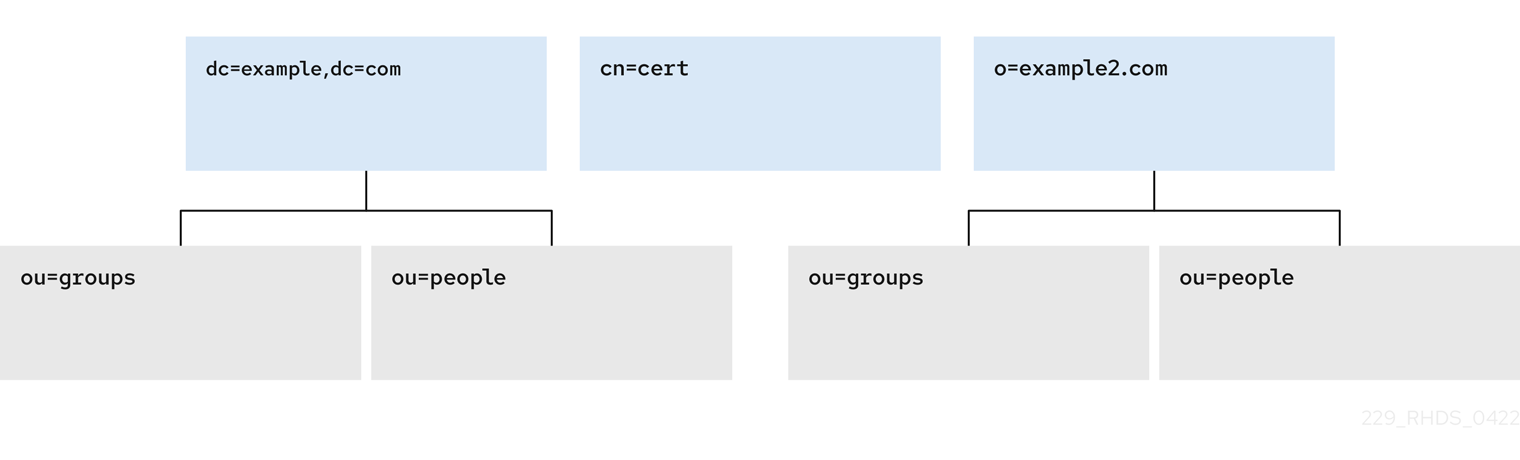
When clients search the dc=example,dc=com tree, the search does not return entries from the other trees, because they are off limits to the searching algorithm.
You can then choose which directory tree and naming context is default for your instance.
1.4. Creating a root suffix using the command line
This procedure instructs you how to create the root suffix of a directory tree on the command line.
Procedure
Optional: List the suffixes and back-end databases that are already in use:
#
dsconf -D "cn=Directory Manager" ldap://server.example.com backend suffix listdc=example,dc=com (userroot)The name in parentheses is the back-end database that stores the data of the corresponding suffix. You cannot use an existing database name when you create the root suffix in the next step.
Specify the DN of the root suffix in the
--suffixargument and associate it with a new database using the--be-nameargument:#
dsconf -D "cn=Directory Manager" ldap://server.example.com backend create --suffix="dc=example,dc=net" --be-name="example"
Verification
- List the suffixes and databases using the command from the first step of this procedure.
1.5. Creating a root suffix using the web console
This procedure instructs you how to create the root suffix of a directory tree in a browser.
Prerequisites
- You are logged in to the instance in the web console.
Procedure
-
Under
Database, click the button below the configuration tree. -
Fill in the
Suffix DNandDatabase Name. -
Select
Create The Top Suffix Entryand click .
Verification
- The new suffix should appear in the tree of suffixes.
1.6. Changing the default naming context
A naming context is an attribute of a directory tree (DIT) that defines the root namespace for entries in that DIT. When you structure data in your instance with multiple root suffixes, your instance has several DITs, each with a different naming context.
This procedure instructs you how to change the default naming context on the command line when you work with multiple root suffixes in your instance.
Clients that access your instance, may not know which naming context they need to use. The Directory Server signals to clients what the default naming context is, if they have no other configuration of a naming context known to them.
You set the default naming context in the nsslapd-defaultnamingcontext attribute in cn=config. Directory Server propagates this value over to the Directory Server Agent Service Entry (root DSE) and clients can query it anonymously.
Prerequisites
- You have created the root suffix that defines the default naming context of your instance.
Procedure
Optional: View the current default naming context:
#
dsconf -D "cn=Directory Manager" ldap://server.example.com config get nsslapd-defaultnamingcontextnsslapd-defaultnamingcontext: dc=example,dc=comReplace the value of the
nsslapd-defaultnamingcontextparameter with the required naming context:#
dsconf -D "cn=Directory Manager" ldap://server.example.com config replace nsslapd-defaultnamingcontext=dc=example,dc=net
Verification
- View the current default naming context. The value should be updated.
1.7. Creating a sub-suffix using the command line
You can create a sub-suffix of a directory tree using the command line.
Prerequisites
- You created the parent suffix for the sub-suffix.
Procedure
Optional: List the suffixes and back-end databases that are already in use:
#
dsconf -D "cn=Directory Manager" ldap://server.example.com backend suffix listdc=example,dc=com (userroot)The name in parentheses is the back-end database that stores the data of the corresponding suffix. You cannot use an existing database name when you create the sub-suffix in the next step.
Specify the full DN of the sub-suffix in the
--suffixargument, associate it with a new database using the--be-nameargument, and specify the parent suffix in the--parent-suffixargument:#
dsconf -D "cn=Directory Manager" ldap://server.example.com backend create --suffix="ou=People,dc=example,dc=com" --be-name="example" --parent-suffix="dc=example,dc=com" --create-suffixWith
--create-suffixargument, the command creates the configuration entry for the sub-suffix and the sub-suffix entryou=People,dc=example,dc=com.The
--create-suffixargument supports the creation of suffixes with the following RDN attribute types:c,cn,dc,o, andou. If you want to create a suffix with RDN such asl, you can use thedsconf backend createcommand without the--create-suffixoption and then add the suffix entry by using an LDAP add operation or importing the entry from an LDIF file.
Verification
- List the suffixes and databases using the command from the first step of this procedure.
1.8. Creating a sub-suffix using the web console
This procedure instructs you how to create a sub-suffix of a directory tree in a browser.
Prerequisites
- You are logged in to the instance in the web console.
- You created the parent suffix for the sub-suffix.
Procedure
-
Under
Database, select a suffix from the configuration tree that is the parent of the sub-suffix. - Click the and select .
-
Fill in the
Sub-Suffix DN, such asou=People, andDatabase Name. -
Select
Create The Top Suffix Entryand click .
Verification
- The new sub-suffix should appear among suffixes in the configuration tree.