
Managing access control
Configuring permissions by using access control instructions
Abstract
Providing feedback on Red Hat documentation
We appreciate your input on our documentation. Please let us know how we could make it better. To do so:
For submitting feedback through Jira (account required):
- Log in to the Jira website.
- Click Create in the top navigation bar
- Enter a descriptive title in the Summary field.
- Enter your suggestion for improvement in the Description field. Include links to the relevant parts of the documentation.
- Click Create at the bottom of the dialogue.
For submitting feedback through Bugzilla (account required):
- Go to the Bugzilla website.
- As the Component, use Documentation.
- Fill in the Description field with your suggestion for improvement. Include a link to the relevant part(s) of documentation.
- Click Submit Bug.
Chapter 1. Managing access control instructions
When Directory Server receives a request, it uses the authentication information provided by the user in the bind operation and the access control instructions (ACI) defined in the directory to allow or deny access to the requested entry or attribute. The server can allow or deny permissions for actions, such as read, write, search, and compare. The permission level granted to a user depends on the authentication information provided.
Access control in Directory Server enables you to set precise rules on when the ACIs are applicable:
- For the entire directory, a subtree, or specific entries
- For a specific user, all users belonging to a specific group or role, or all users in the directory
For a specific location, such as an IP address, an IP range, or a DNS name.
Note that load balancers can affect location-specific rules.
Complex ACIs are difficult to read and understand. Instead of one complex ACI, you can write multiple simple rules to achieve the same effect. However, a higher number of ACIs also increases the costs of ACI processing.
1.1. ACI placement
Directory Server stores access control instruction (ACI) in the multi-valued aci operational attribute in directory entries. To set an ACI, add the aci attribute to the corresponding directory entry. Directory Server applies the ACIs:
Only to the entry that contains the ACI, if it does not have any child entries. For example, if a client requires access to the
uid=user_name,ou=People,dc=example,dc=comobject, and an ACI is only set ondc=example,dc=comand not on any child entries, only this ACI is applied.NoteACIs with
addpermissions also apply to child entries created in future.To the entry that contains the ACI and to all entries below it, if it has child entries. As a direct consequence, when the server evaluates access permissions to any given entry, it verifies the ACIs for every entry between the one requested and the directory suffix, as well as the ACIs on the entry itself.
For example, ACIs are set on the
dc=example,dc=comand theou=People,dc=example,dc=comentry: If a client wants to access theuid=user_name,ou=People,dc=example,dc=comobject, which has no ACI set, Directory Server first validates the ACI on theou=People,dc=example,dc=comentry. If this ACI grants access, evaluation stops and grants access. If not, Directory Server verifies the ACI onou=People,dc=example,dc=com. If this ACI successfully authorizes the client, it can access the object.
ACIs set in the rootDSE entry apply only to this entry.
An ACI created on an entry can be set not to apply directly to that entry but rather to some or all of the entries in the subtree below. The advantage of this approach is that general ACIs can be placed higher in the directory tree to have effect on entries located lower in the tree. For example, an ACI that targets entries that include the inetOrgPerson object class can be created at the level of an organizationalUnit entry or a locality entry.
Minimize the number of ACIs in the directory tree by placing general rules at high level branch points. To limit the scope of more specific rules, place them to leaf entries as closely as possible.
1.2. The structure of an ACI
The aci attribute uses the following syntax:
(target_rule) (version 3.0; acl "ACL_name"; permission_rule bind_rules;)
-
target_rulespecifies the entry, attributes, or set of entries and attributes for which to control access. -
version 3.0is a required string which identifies the access control instructions (ACI) version. -
acl "ACL name"sets a name or string that describes the ACI. -
permission_rulesets what rights, such asreadorwrite, are allowed or denied. -
bind_rulesspecifies which rules must match during the bind to allow or deny access.
The permission and the bind rule pair are called an access control rule.
To efficiently set multiple access controls for a given target, you can set multiple access control rules for each target:
(target_rule)(version 3.0; acl "ACL_name"; permission_rule bind_rules; permission_rule bind_rules; ... ;)
1.3. ACI evaluation
To evaluate the access rights to a particular entry, the server creates a list of the access control instructions (ACI) present on the entry itself and on the parent entries back up to the top level entry stored in Directory Server. ACIs are evaluated across all databases for a particular instance but not across different instances.
Directory Server evaluates this list of ACIs based on the semantics of the ACIs, not on their placement in the directory tree. This means that ACIs that are close to the root of the directory tree do not take precedence over ACIs that are closer to the leaves of the directory tree.
In Directory Server, the deny permission in ACIs take precedence over the allow permission. For example, if you deny write permission at the directory’s root level, none of the users can write to the directory, regardless if an other ACI grants this permission. To grant a specific user write permissions to the directory, you have to add an exception to the original denying rule to allow the user to write in that directory.
For improved ACIs, use fine-grained allow rules instead of deny rules.
1.4. Limitations of ACIs
When you set access control instructions (ACI), the following restrictions apply:
If your directory database is distributed over multiple servers, the following restrictions apply to the keywords you can use in ACIs:
ACIs depending on group entries using the
groupdnkeyword must be located on the same server as the group entry.If the group is dynamic, all members of the group must have an entry on the server. Member entries of static groups can be located on the remote server.
-
ACIs depending on role definitions using the
rolednkeyword, must be located on the same server as the role definition entry. Every entry that is intended to have the role must also be located on the same server.
However, you can match values stored in the target entry with values stored in the entry of the bind user by, for example, using the
userattrkeyword. In this case, access is evaluated normally even if the bind user does not have an entry on the server that stores the ACI.You cannot use virtual attributes, such as Class of Service (CoS) attributes, in the following ACI keywords:
-
targetfilter -
targattrfilters -
userattr
-
- Access control rules are evaluated only on the local server. For example, if you specify the host name of a server in LDAP URLs in ACI keywords, the URL will be ignored.
1.5. How Directory Server handles ACIs in a replication topology
Access control instructions (ACI) are stored in aci attributes of entries. Therefore, if an entry containing ACIs is part of a replicated database, the ACIs are replicated.
ACIs are always evaluated on the server that resolves the incoming LDAP requests. When a consumer server receives an update request, it returns a referral to the supplier server before evaluating whether the request can be serviced on the supplier.
1.6. Displaying, adding, deleting, and updating ACIs
You can use the ldapsearch utility to search, and the ldapmodify utility to add, delete, and update Access Control Instructions (ACI).
Displaying ACIs:
For example, to display the ACIs set on dc=example,dc=com and sub-entries, enter:
# ldapsearch -D "cn=Directory Manager" -W -H ldap://server.example.com -x -b "dc=example,dc=com" -s sub '(aci=*)' aci
Adding an ACI
For example, to add an ACI to the ou=People,dc=example,dc=com entry, enter:
# ldapmodify -D "cn=Directory Manager" -W -H ldap://server.example.com -x

dn: ou=People,dc=example,dc=com
changetype: modify
add: aci
aci: (targetattr="userPassword") (version 3.0; acl
  "Allow users updating their password";
  allow (write) userdn= "ldap:///self";)
Deleting an ACI
To delete an ACI:
If only one
aciattribute is set on the entry or you want to remove all ACIs from the entry:#
ldapmodify -D "cn=Directory Manager" -W -H ldap://server.example.com -xdn: ou=People,dc=example,dc=com changetype: delete delete: aciIf multiple ACIs exist on the entry and you want to delete a specific ACI, specify the exact ACI:
#
ldapmodify -D "cn=Directory Manager" -W -H ldap://server.example.com -xdn: ou=People,dc=example,dc=com changetype: modify delete: aci aci: (targetattr="userPassword") (version 3.0; acl "Allow users updating their password"; allow (write) userdn= "ldap:///self";)
Updating an ACI
To update an ACI:
- Delete the existing ACI.
- Add a new ACI with the updated settings.
1.7. Defining ACI targets
Target rules in an access control instruction (ACI) define to which entries Directory Server applies the ACI. If you do not set a target, the ACI applies to the entry containing the aci attribute and to entries below.
In an ACI, the following highlighted part is the target rule:
(target_rule)(version 3.0; acl "ACL_name"; permission_rule bind_rules;)
For complex ACIs, Directory Server supports multiple target rules with different keywords in an ACI:
(target_rule_1)(target_rule_2)(...)(version 3.0; acl "ACL_name"; permission_rule bind_rules;)
If you specify multiple target rules, the order is not relevant. Note that you can use each of the following keywords only once in an ACI:
-
target -
targetattr -
targetattrfilters -
targetfilter -
target_from -
target_to
1.7.1. The syntax of target rules
The general syntax of a target rule is:
(keyword comparison_operator "expression")
-
keyword: Sets the type of the target. comparison_operator: Valid values are=and!=and indicate whether or not the target is the object specified in the expression.WarningFor security reasons, Red Hat recommends not using the
!=operator, because it allows the specified operation on all other entries or attributes. For example:(targetattr != "userPassword");(version 3.0; acl "example"); allow (write) ... );
The previous example allows users to set, update, or delete any attribute except the
userPasswordattribute under the Distinguished Name (DN) you set the ACI. However, also this enables users, for example, to add an additionalaciattribute that allows write access to this attribute as well.-
expression: Sets the target and must be surrounded by quotation marks. The expression itself depends on the keyword you use.
1.7.2. Targeting a directory entry
To control access based on a Distinguished Name (DN) and the entries below it, use the target keyword in the access control instruction (ACI). A target rule which uses the target keyword takes a DN as expression:
(target comparison_operator "ldap:///distinguished_name")
You must set the ACI with the target keyword on the DN you are targeting or a higher-level DN of it. For example, if you target ou=People,dc=example,dc=com, you must either set the ACI on ou=People,dc=example,dc=com or dc=example,dc=com.
Example 1.1. Using the target keyword
To enable users that are stored in the ou=People,dc=example,dc=com entry to search and display all attributes in their own entry:
# ldapmodify -D "cn=Directory Manager" -W -H ldap://server.example.com -x

dn: ou=People,dc=example,dc=com
changetype: modify
add: aci
aci: (target = "ldap:///ou=People,dc=example,dc=com") (version 3.0;
 acl "Allow users to read and search attributes of own entry"; allow (search, read)
 (userdn = "ldap:///self");)
Using wildcards with the target keyword
You can use the * wildcard character target multiple entries.
The following target rule example matches all entries in ou=People,dc=example,dc=com whose uid attribute is set to a value that starts with the letter a:
(target = "ldap:///uid=a*,ou=People,dc=example,dc=com")
Depending on the position of the wildcard, the rule not only applies to attribute values, but also to the full DN. Therefore, you can use the wildcard as a substitute for portions of the DN.
Example 1.2. Targeting a directory entries using wildcards
The following rule targets all entries in the dc=example,dc=com tree with a matching uid attribute and not only entries which are stored in the dc=example,dc=com entry itself:
(target = "ldap:///uid=user_name*,dc=example,dc=com")
The previous target rule matches multiple entries, such as:
-
uid=user_name,dc=example,dc=com -
uid=user_name,ou=People,dc=example,dc=com -
uid=user_name2,dc=example,dc=com
Directory Serverdoes not support wildcards in the suffix part of a DN. For example, if your directory’s suffix is dc=example,dc=com, you cannot use a target with a wildcard in this suffix, such as (target = "ldap:///dc=*.com").
1.7.3. Targeting attributes
To limit access in an access control instruction (ACI) to certain attributes, use the targetattr keyword. For example, this keyword defines:
- In a read operation, what attributes will be returned to a client
- In a search operation, what attributes will be searched
- In a write operation, what attributes can be written to an object
- In an add operation, what attributes can be added when creating a new object
In certain situations, you can use the targetattr keyword to secure ACIs by combining other target keywords with targetattr. See Advanced usage of target rules.
In read and search operations, the default targets no attribute. An ACI without a targetattr keyword is only useful for ACIs with rights affecting a complete entry, such as add or delete.
To separate multiple attributes in a target rule that uses the targetattr keyword, use ||:
(targetattr comparison_operator "attribute_1 || attribute_2 || ...")
The attributes set in the expression must be defined in the schema.
The attributes specified in the expression apply to the entry on which you create the ACI and to all entries below it if not restricted by further target rules.
Example 1.3. Using the targetattr keyword
To enable users stored in dc=example,dc=com and all subentries to update the userPassword attribute in their own entry, enter:
# ldapmodify -D "cn=Directory Manager" -W -H ldap::server.example.com -x

dn: dc=example,dc=com
changetype: modify
add: aci
aci: (targetattr = "userPassword") (version 3.0;
 acl "Allow users updating own userPassword";
 allow (write) (userdn = "ldap:///self");)
Using wildcards with the targetattr keyword
Using the * wildcard character, you can, for example, target all attributes:
(targetattr = "*")
For security reasons, do not use wildcards with the targetattr, because it allows access to all attributes, including operational attributes. For example, if users can add or modify all attributes, users might create additional ACIs and increase their own permissions.
1.7.4. Targeting entries and attributes using LDAP filters
To target a group of entries that match a certain criteria, use the targetfilter keyword with an LDAP filter:
(targetfilter comparison_operator "LDAP_filter")
The filter expression is a standard LDAP search filter.
Example 1.4. Using the targetfilter keyword
To grant permissions to members of the cn=Human Resources,dc=example,dc.com group to modify all entries having the department attribute set to Engineering or Sales:
# ldapmodify -D "cn=Directory Manager" -W -H ldap://server.example.com -x

dn: dc=example,dc=com
changetype: modify
add: aci
aci: (targetfilter = "(|(department=Engineering)(department=Sales)")
 (version 3.0; acl "Allow HR updating engineering and sales entries";
 allow (write) (groupdn = "ldap:///cn=Human Resources,dc=example,dc.com");)
The targetfilter keyword targets whole entries. If you combine it with the targetattr keyword, the access control instruction (ACI) applies only to a subset of attributes of the targeted entries. See Targeting certain attributes of entries matching a filter.
Using LDAP filters is useful when targeting entries and attributes that are spread across the directory. However, the results are sometimes unpredictable because filters do not directly name the object for which you are managing access. The set of entries targeted by a filtered ACI is likely to change as attributes are added or deleted. Therefore, if you use LDAP filters in ACIs, verify that they target the correct entries and attributes by using the same filter, for example, in an ldapsearch operation.
Using wildcards with the targetfilter keyword
The targetfilter keyword supports wildcards similarly to standard LDAP filters. For example, to target all uid attributes whose value starts with adm, use:
(targetfilter = "(uid=adm*) ...)
1.7.5. Targeting attribute values using LDAP filters
You can use access control to target specific values of attributes. This means that you can grant or deny permissions on an attribute if that attribute’s value meets the criteria that is defined in the access control instruction (ACI). An ACI that grants or denies access based on an attribute’s value is called a value-based ACI. This applies only to ADD and DEL operations. You cannot limit search rights by specific values.
To create a value-based ACI, use the targattrfilters keyword with the following syntax:
For one operation with one attribute and filter combination:
(targattrfilters="operation=attribute:filter")
For one operation with multiple attribute and filter combinations:
(targattrfilters="operation=attribute_1:filter_1 && attribute_2:filter_2 ... && attribute_m:filter_m")
For two operations, each with multiple attribute and filter combinations:
(targattrfilters="operation_1=attribute_1_1:filter_1_1 && attribute_1_2:filter_1_2 ... && attribute_1_m:filter_1_m , operation_2=attribute_2_1:filter_2_1 && attribute_2_2:filter_2_2 ... & attribute_2_n:filter_2_n ")
In the previous syntax examples, you can set the operations either to add or del. The attribute:filter combination sets the filter and the attribute the filter is applied to.
The following describes how filter must match:
- When creating an entry and a filter applies to an attribute in the new entry, then each instance of that attribute must match the filter.
- When deleting an entry and a filter applies to an attribute in the entry, then each instance of that attribute must also match the filter.
-
When modifying an entry and the operation adds an attribute, then the
addfilter that applies to that attribute must match. -
If the operation deletes an attribute, then the
delfilter that applies to that attribute must match. If the individual values of an attribute already present in the entry are replaced, then both theaddanddelfilters must match.
Example 1.5. Using the targattrfilters keyword
To create an ACI that enables users to add any role to their own entry, except the Admin role, and to add the telephone attribute, as long as the value begins with the 123 prefix, enter:
# ldapmodify -D "cn=Directory Manager" -W -H ldap::server.example.com -x

dn: dc=example,dc=com
changetype: modify
add: aci
aci: (targattrfilters="add=nsroledn:(!(nsroledn=cn=Admin)) &&
 telephoneNumber:(telephoneNumber=123*)") (version 3.0;
 acl "Allow adding roles and telephone";
 allow (add) (userdn = "ldap:///self");)
1.7.6. Targeting source and destination DNs
In certain situations, administrators want to allow users to move directory entries. Using the target_from and target_to keywords in an access control instruction (ACI), you can specify the source and destination of the operation, however, without enabling the user:
- To move entries from a different source as set in the ACI.
- To move entries to a different destination as set in the ACI.
- To delete existing entries from the source Distinguished Name (DN).
- To add new entries to the destination DN.
Example 1.6. Using the target_from and target_to keywords
To enable the uid=user,dc=example,dc=com account to move user accounts from the cn=staging,dc=example,dc=com entry to cn=people,dc=example,dc=com, enter:
# ldapmodify -D "cn=Directory Manager" -W -H ldap:server.example.com -x

dn: dc=example,dc=com
changetype: modify
add: aci
aci: (target_from="ldap:///uid=*,cn=staging,dc=example,dc=com")
 (target_to="ldap:///cn=People,dc=example,dc=com")
 (version 3.0; acl "MODDN from"; allow (moddn))
 userdn="ldap:///uid=user,dc=example,dc=com";)
ACIs apply only to the subtree where they are defined. In the previous example, the ACI is applied only to the dc=example,dc=com subtree.
If the target_from or target_to keyword is not set, the ACI matches any source or destination.
1.8. Advanced usage of target rules
By combining multiple keywords, you can create complex target rules. This section provides examples of the advanced usage of target rules.
1.8.1. Delegating permissions to create and maintain groups
In certain situations, administrators want to delegate permissions to other accounts or groups. By combining target keywords, you can create secure access control instructions (ACI) that solve this request.
Example 1.7. Delegating permissions to create and maintain groups
To enable the uid=user,ou=People,dc=example,dc=com" account to create and update groups in the ou=groups,dc=example,dc=com entry:
# ldapmodify -D "cn=Directory Manager" -W -H ldap://server.example.com -x

dn: dc=example,dc=com
changetype: modify
add: aci
aci: (target = "ldap:///cn=*,ou=Groups,dc=example,dc=com")
 (targattrfilters="add=objectclass:(|(objectclas=top)(objectclass=groupOfUniqueNames)))
 (targetattr="cn || uniqueMember || objectClass")
 (version 3.0; acl "example"; allow (read, search, write, add)
 (userdn = "ldap:///uid=test,ou=People,dc=example,dc=com");)
For security reasons, the previous example adds certain limitations. The uid=test,ou=People,dc=example,dc=com user:
-
Can create objects that must contain the
topandgroupOfUniqueNamesobject classes. -
Cannot add additional object classes, such as
account. For example, this prevents if you use Directory Server accounts for local authentication, to create new users with an invalid user ID, such as0for therootuser.
The targetfilter rule ensures that the ACI entry applies only to entries with the groupofuniquenames object class and the targetattrfilter rule ensures that no other object class can be added.
1.8.2. Targeting both an entry and attributes
The target controls access based on a distinguished name (DN). However, if you use it in combination with a wildcard and the targetattr keyword, you can target both entries and attributes.
Example 1.8. Targeting both an entry and attributes
To enable the uid=user,ou=People,dc=example,dc.com user to read and search members of groups in all organizational units in the dc=example,dc=com subtree:
# ldapmodify -D "cn=Directory Manager" -W -H ldap://server.example.com -x

dn: dc=example,dc=com
changetype: modify
add: aci
aci: (target="ldap:///cn=*,dc=example,dc=com")(targetattr="member" || "cn") (version 3.0;
 acl "Allow uid=user to search and read members of groups";
 allow (read, search) (userdn = "ldap:///uid=user,ou=People,dc=example,dc.com");)
1.8.3. Targeting certain attributes of entries matching a filter
If you combine the targetattr and targetfilter keywords in two target rules, you can target certain attributes in entries that match a filter.
Example 1.9. Targeting certain attributes of entries matching a filter
To allow members of the cn=Engineering Admins,dc=example,dc=com group to modify the jpegPhoto and manager attributes of all entries having the department attribute set to Engineering, enter:
# ldapmodify -D "cn=Directory Manager" -W -H ldap://server.example.com -x

dn: dc=example,dc=com
changetype: modify
add: aci
aci: (targetattr = "jpegPhoto || manager")
 (targetfilter = "(department=Engineering)") (version 3.0;
 acl "Allow engineering admins updating jpegPhoto and manager of department members";
 allow (write) (groupdn = "ldap:///cn=Engineering Admins,dc=example,dc.com");)
1.8.4. Targeting a single directory entry
To target a single directory entry, combine the targetattr and targetfilter keywords.
Example 1.10. Targeting a single directory entry
To enable the uid=user,ou=People,dc=example,dc=com user to read and search the ou and cn attributes in the ou=Engineering,dc=example,dc=com entry:
# ldapmodify -D "cn=Directory Manager" -W -H ldap://server.example.com -x

dn: ou=Engineering,dc=example,dc=com
changetype: modify
add: aci
aci: (targetattr = "ou || cn")
 (targetfilter = "(ou=Engineering)") (version 3.0;
 acl "Allow uid=user to search and read engineering attributes";
 allow (read, search) (userdn = "ldap:///uid=user,ou=People,dc=example,dc.com");)
To enable the previous example to target only the ou=Engineering,dc=example,dc=com entry, sub-entries in ou=Engineering,dc=example,dc=com must not have the ou attribute set to Engineering.
These kinds of ACIs can fail if the structure of your directory changes.
Alternatively, you can create a bind rule that matches the user input in the bind request with an attribute value that is stored in the targeted entry. See Defining access based on value matching.
1.9. Defining ACI permissions
Permission rules define the rights that are associated with the access control instruction (ACI) and whether access is allowed or denied.
In an ACI, the following highlighted part is the permission rule:
(target_rule) (version 3.0; acl "ACL_name"; permission_rule bind_rules;)
1.9.1. The syntax of permission rules
The general syntax of a permission rule is:
permission (rights)
-
permission: Sets if the access control instruction (ACI) allows or denies permission. -
rights: Sets the rights which the ACI allows or denies. See User rights in permission rules.
Example 1.11. Defining permissions
To enable users stored in the ou=People,dc=example,dc=com entry to search and display all attributes in their own entry:
# ldapmodify -D "cn=Directory Manager" -W -H ldap://server.example.com -x

dn: ou=People,dc=example,dc=com
changetype: modify
add: aci
aci: (target = "ldap:///ou=People,dc=example,dc=com") (version 3.0;
 acl "Allow users to read and search attributes of own entry"; allow (search, read)
 (userdn = "ldap:///self");)
1.9.2. User rights in permission rules
The rights in a permission rule define what operations are granted or denied. In an ACI, you can set one or multiple of the following rights:
Table 1.1. User rights
| Right | Description |
|---|---|
|
| Sets whether users can read directory data. This permission applies only to search operations in LDAP. |
|
|
Sets whether users can modify an entry by adding, modifying, or deleting attributes. This permission applies to the |
|
|
Sets whether users can create an entry. This permission applies only to the |
|
|
Sets whether users can delete an entry. This permission applies only to the |
|
|
Sets whether users can search for directory data. To view data returned as part of a search result, assign |
|
|
Sets whether the users can compare data they supply with data stored in the directory. With |
|
| Sets whether users can add or delete their own distinguished name (DN) from a group. This right is used only for group management. |
|
|
Sets whether the specified DN can access the target with the rights of another entry. The |
|
|
Sets all of the rights, except |
1.9.3. Rights required for LDAP operations
This section describes the rights you must grant to users depending on the type of LDAP operation you want to authorize them to perform.
Adding an entry:
-
Grant
addpermission on the entry that you want to add. -
Grant
writepermission on the value of each attribute in the entry. This right is granted by default but can be restricted using thetargattrfilterskeyword.
-
Grant
Deleting an entry:
-
Grant
deletepermission on the entry that you want to delete. -
Grant
writepermission on the value of each attribute in the entry. This right is granted by default but can be restricted using thetargattrfilterskeyword.
-
Grant
Modifying an attribute in an entry:
-
Grant
writepermission on the attribute type. -
Grant
writepermission on the value of each attribute type. This right is granted by default but can be restricted using thetargattrfilterskeyword.
-
Grant
Modifying the RDN of an entry:
-
Grant
writepermission on the entry. -
Grant
writepermission on the attribute type that is used in the new RDN. -
Grant
writepermission on the attribute type that is used in the old RDN, if you want to grant the right to delete the old RDN. -
Grant
writepermission on the value of attribute type that is used in the new RDN. This right is granted by default but can be restricted using thetargattrfilterskeyword.
-
Grant
Comparing the value of an attribute:
-
Grant
comparepermission on the attribute type.
-
Grant
Searching for entries:
-
Grant
searchpermission on each attribute type used in the search filter. -
Grant
readpermission on attribute types used in the entry.
-
Grant
1.10. Defining ACI bind rules
The bind rules in an access control instruction (ACI) define the required bind parameters that must meet so that Directory Server applies the ACI. For example, you can set bind rules based on:
- DNs
- Group memberships or assigned roles
- Locations from which an entry must bind
- Types of authentication that must be in use during the bind
- Times or days on which the bind occurs
In an ACI, the following highlighted part is the bind rule:
(target_rule) (version 3.0; acl "ACL_name"; permission_rule bind_rules;)
1.10.1. The syntax of bind rules
The general syntax of a bind rule is:
keyword comparison_operator "expression"
-
keyword: Sets the type of the bind operation. -
comparison_operator: Valid values are=and!=and indicate whether or not the target is the object specified in the expression. If a keyword supports additional comparison operators, it is mentioned in the corresponding section. -
expression: Sets the expression and must be surrounded by quotation marks. The expression itself depends on the keyword you use.
1.10.2. Defining user-based access
The userdn keyword enables you to grant or deny access based on one or multiple DNs and uses the following syntax:
userdn comparison_operator "ldap:///distinguished_name || ldap:///distinguished_name || ..."
Set the DN in the expression to:
- A DN: See Using a DN with the userdn keyword.
- An LDAP filter: See Using the userdn keyword with an LDAP filter.
-
The
anyonealias: See Granting anonymous access. -
The
allalias: See Granting access to authenticated users. -
The
selfalias: See Enabling users to access their own entries. -
The
parentalias: See Setting access for child entries of a user.
Do not specify a host name or port number within the LDAP URL. The URL always applies to the local server.
Using a DN with the userdn keyword
Set the userdn keyword to a distinguished name (DN) to apply the ACI only to the matching entry. To match multiple entries, use the * wildcard in the DN.
Using the userdn keyword with a DN must match the following syntax:
userdn comparison_operator ldap:///distinguished_name
Example 1.12. Using a DN with the userdn keyword
To enable the uid=admin,ou=People,dc=example,dc=com user to read the manager attribute of all other users in the ou=People,dc=example,dc=com entry:
# ldapmodify -D "cn=Directory Manager" -W -H ldap://server.example.com -x

dn: ou=People,dc=example,dc=com
changetype: modify
add: aci
aci: (targetattr="manager") (version 3.0; acl "Allow uid=admin reading manager attribute";
 allow (search, read) userdn = "ldap:///uid=admin,ou=People,dc=example,dc=com";)
Using the userdn keyword with an LDAP filter
If you want to dynamically allow or deny permissions to users, use the userdn keyword with an LDAP filter:
userdn comparison_operator "ldap:///distinguished_name??scope?(filter)"
The LDAP filter supports the * wildcard.
Example 1.13. Using the userdn keyword with an LDAP filter
To enable users who have the department attribute set to Human Resources to update the homePostalAddress attribute of users in the ou=People,dc=example,dc=com entry:
# ldapmodify -D "cn=Directory Manager" -W -H ldap://server.example.com -x

dn: ou=People,dc=example,dc=com
changetype: modify
add: aci
aci: (targetattr="homePostalAddress") (version 3.0;
 acl "Allow HR setting homePostalAddress"; allow (write)
 userdn = "ldap:///ou=People,dc=example,dc=com??sub?(department=Human Resources)";)
Granting anonymous access
In certain situations, administrators want to configure anonymous access to data in the directory. Anonymous access means that it is possible to bind to the directory by providing:
- No bind DN and password
- A valid bind DN and password
To configure anonymous access, use the ldap:///anyone expression with the userdn keyword in a bind rule:
userdn comparison_operator "ldap:///anyone"Example 1.14. Granting anonymous access
To enable anyone without authentication to read and search the sn, givenName, and telephoneNumber attributes in the ou=People,dc=example,dc=com entry:
# ldapmodify -D "cn=Directory Manager" -W -H __ldap://server.example.com -x`
dn: ou=People,dc=example,dc=com
changetype: modify
add: aci
aci: (targetattr="sn" || targetattr="givenName" || targetattr = "telephoneNumber")
 (version 3.0; acl "Anonymous read, search for names and phone numbers";
 allow (read, search) userdn = "ldap:///anyone")
Granting access to authenticated users
In certain situations, administrators want to grant permission to any user who is able to successfully bind to Directory Server, except anonymous binds. To configure this feature, use the ldap:///all expression with the userdn keyword in a bind rule:
userdn comparison_operator "ldap:///all"Example 1.15. Granting access to authenticated users
To enable authenticated users to add and remove themselves as a member to or from the ou=example,ou=groups,dc=example,dc=com group:
# ldapmodify -D "cn=Directory Manager" -W -H ldap://server.example.com -x

dn: ou=example,ou=Groups,dc=example,dc=com
changetype: modify
add: aci
aci: (targetattr="member") (version 3.0;
 acl "Allow users to add/remove themselves from example group";
 allow (selfwrite) userdn = "ldap:///all")
Enabling users to access their own entries
To set ACI which allow or deny access to users to their own entry, use the ldap:///self expression with the userdn keyword in a bind rule:
userdn comparison_operator "ldap:///self"Example 1.16. Enabling users to access their own entries
To enable users in the ou=People,dc=example,dc=com entry to update their own userPassword attribute:
# ldapmodify -D "cn=Directory Manager" -W -H ldap://server.example.com -x

dn: ou=People,dc=example,dc=com
changetype: modify
add: aci
aci: (targetattr="userPassword") (version 3.0;
 acl "Allow users updating their password";
 allow (write) userdn = "ldap:///self")
Setting access for child entries of a user
To specify that users are granted or denied access to an entry only if their bind DN is the parent of the targeted entry, use the self:///parent expression with the userdn keyword in a bind rule:
userdn comparison_operator "ldap:///parent"Example 1.17. Setting access for child entries of a user
To enable the cn=user,ou=People,dc=example,dc=com user to update the manager attribute of its own sub-entries, such as cn=example,cn=user,ou=People,dc=example,dc=com:
# ldapmodify -D "cn=Directory Manager" -W -H ldap://server.example.com -x
dn: cn=user,ou=People,dc=example,dc=com
changetype: modify
add: aci
aci: (targetattr="manager") (version 3.0;
 acl "Allow cn=user to update manager attributes";
 allow (write) userdn = "ldap:///parent")
1.10.3. Defining group-based access
Group-based access control instructions (ACI) enable you to manage access by adding or removing users to or from a group. To configure an ACI that is based on a group membership, use the groupdn keyword. If the user is a member of one or multiple of the specified groups, the ACI matches.
When using the groupdn keyword, Directory Server verifies the group membership based on the following attributes:
- member
- uniqueMember
- memberURL
- memberCertificateDescription
Bind rules with the groupdn keyword use the following syntax:
groupdn comparison_operator "ldap:///distinguished_name || ldap:///distinguished_name || ..."
Set the distinguished name (DN) in the expression to:
- A DN. See Using a DN with the groupdn keyword.
- An LDAP filter. See Using the groupdn keyword with an LDAP filter
If you set multiple DNs in one bind rule, Directory Server applies the ACI if the authenticated user is a member of one of these groups. To set the user as a member of multiple groups, use multiple groupdn keywords and combine them using the Boolean and operator. For details, see Combining Bind Rules Using Boolean Operators.
Do not specify a host name or port number within the LDAP URL. The URL always applies to the local server.
Using a DN with the groupdn keyword
To apply an ACI to members of a group, set the groupdn keyword to the group’s DN.
The groupdn keyword set to a DN uses the following syntax:
groupdn comparison_operator ldap:///distinguished_name
Example 1.18. Using a DN with the groupdn Keyword
To enable members of the cn=example,ou=Groups,dc=example,dc=com group to search and read the manager attribute of entries in ou=People,dc=example,dc=com:
# ldapmodify -D "cn=Directory Manager" -W -H ldap://server.example.com -x

dn: ou=People,dc=example,dc=com
changetype: modify
add: aci
aci: (targetattr="manager") (version 3.0;
 acl "Allow example group to read manager attribute";
 allow (search, read) groupdn = "ldap:///cn=example,ou=Groups,dc=example,dc=com";)
Using The groupdn keyword with an LDAP filter
Using an LDAP filter with the groupdn keyword, you can define that the authenticated user must be a member of at least one of the groups that the filter search returns, to match the ACI.
The groupdn keyword with an LDAP filter uses the following syntax:
groupdn comparison_operator "ldap:///distinguished_name??scope?(filter)"
The LDAP filter supports the * wildcard.
Example 1.19. Using the groupdn keyword with an LDAP filter
To enable members of groups in dc=example,dc=com and subtrees, which have the manager attribute set to example, update the homePostalAddress of entries in ou=People,dc=example,dc=com:
# ldapmodify -D "cn=Directory Manager" -W -H ldap://server.example.com -x
dn: ou=People,dc=example,dc=com
changetype: modify
add: aci
aci: (targetattr="homePostalAddress") (version 3.0;
 acl "Allow manager=example setting homePostalAddress"; allow (write)
 userdn = "ldap:///dc=example,dc=com??sub?(manager=example)";)
1.10.4. Defining access based on value matching
Use the userattr keyword in a bind rule to specify which attribute must match between the entry used to bind to the directory and the targeted entry.
The userattr keyword uses the following syntax:
userattr comparison_operator "attribute_name#bind_type_or_attribute_value
For further details, see:
By default, Directory Server evaluates access rights on the entry they are created. However, to prevent user objects on the same level, Directory Server does not grant add permissions to the entry where you set the access control instructions (ACI), when using the userattr keyword. To configure this behavior, use the userattr keyword in conjunction with the parent keyword and grant the permission additionally on level 0.
For details about inheritance, see Defining access based on value matching.
Using the USERDN bind type
To apply an ACI when the binding user distinguished name (DN) matches the DN stored in an attribute, use the USERDN bind type.
The userattr keyword with the USERDN bind type requires the following syntax:
userattr comparison_operator "attribute_name#USERDN"
Example 1.20. Using the USERDN bind type
To grant a manager all permissions to the telephoneNumber attribute of its own associates:
# ldapmodify -D "cn=Directory Manager" -W -H ldap://server.example.com -x

dn: ou=People,dc=example,dc=com
changetype: modify
add: aci
aci: (targetattr = "telephoneNumber")
 (version 3.0; acl "Manager: telephoneNumber";
 allow (all) userattr = "manager#USERDN";)
The previous ACI is evaluated to be true if the DN of the user who performs the operation on an entry in ou=People,dc=example,dc=com, matches the DN stored in the manager attribute of this entry.
Using the GROUPDN bind type
To apply an ACI when the binding user DN is a member of a group set in an attribute, use the GROUPDN bind type.
The userattr keyword with the GROUPDN bind type requires the following syntax:
userattr comparison_operator "attribute_name#GROUPDN"
Example 1.21. Using the GROUPDN bind type
To grant users the permission to delete a group entry which they own under the ou=Social Committee,ou=Groups,dc=example,dc=com entry:
# ldapmodify -D "cn=Directory Manager" -W -H ldap://server.example.com -x

dn: ou=Social Committee,ou=Groups,dc=example,dc=com
changetype: modify
add: aci
aci: (target="ou=Social Committee,ou=Groups,dc=example,dc=com)
 (targattrfilters="del=objectClass:(objectClass=groupOfNames)")
 (version 3.0; acl "Delete Group";
 allow (delete) userattr = "owner#GROUPDN";)
The previous ACI is evaluated to be true if the DN of the user who performs the operation is a member of the group specified in the owner attribute.
The specified group can be a dynamic group, and the DN of the group can be under any suffix in the database. However, the evaluation of this type of ACI by the server is very resource-intensive.
If you are using static groups that are under the same suffix as the targeted entry, use the following expression for better performance:
userattr comparison_operator "ldap:///distinguished_name?attribute_name#GROUPDN"
Using the ROLEDN bind type
To apply an ACI when the binding user belongs to a role specified in an attribute, use the ROLEDN bind type.
The userattr keyword with the ROLEDN bind type requires the following syntax:
userattr comparison_operator "attribute_name#ROLEDN"
Example 1.22. Using the ROLEDN bind type
To enable users with the cn=Administrators,dc=example,dc=com role to search and read the manager attribute of entries in ou=People,dc=example,dc=com:
# ldapmodify -D "cn=Directory Manager" -W -H ldap://server.example.com -x

dn: ou=People,dc=example,dc=com
changetype: modify
add: aci
aci: (version 3.0; acl "Allow example role owners to read manager attribute";
 allow (search, read) userattr = manager#ROLEDN;)
The specified role can be under any suffix in the database. If you are also using filtered roles, the evaluation of this type of ACI uses a lot of resources on the server.
If you are using a static role definition and the role entry is under the same suffix as the targeted entry, use the following expression for better performance:
Using the SELFDN bind type
The SELFDN bind type enables you to grant permissions, when the bound user’s DN is set in a single-value attribute of the entry.
The userattr keyword with the SELFDN bind type requires the following syntax:
userattr comparison_operator "attribute_name#SELFDN"
Example 1.23. Using the SELFDN bind type
To enable a user to add ipatokenuniqueid=*,cn=otp,dc=example,dc=com entries that have the bind user’s DN set in the ipatokenOwner attribute:
# ldapmodify -D "cn=Directory Manager" -W -H ldap://server.example.com -x

dn: ou=otp,dc=example,dc=com
changetype: modify
add: aci
aci: (target = "ldap:///ipatokenuniqueid=*,cn=otp,dc=example,dc=com")
 (targetfilter = "(objectClass=ipaToken)")(version 3.0;
 acl "token-add-delete"; allow (add) userattr = "ipatokenOwner#SELFDN";)
Using the LDAPURL bind type
To apply an ACL when the bind DN matches the filter specified in an attribute of the targeted entry, use the LDAPURL bind type.
The userattr keyword with the LDAPURL bind type requires the following syntax:
userattr comparison_operator "attribute_name#LDAPURL"
Example 1.24. Using the LDAPURL bind type
To grant read and search permissions to user objects which contain the aciurl attribute set to ldap:///ou=People,dc=example,dc=com??one?(uid=user*):
# ldapmodify -D "cn=Directory Manager" -W -H ldap://server.example.com -x
dn: ou=People,dc=example,dc=com
changetype: modify
add: aci
aci: (targetattr = "*")
 (version 3.0; acl "Allow read,search "; allow (read,search)
 (userattr = "aciurl#LDAPURL);)
Using the userattr keyword with inheritance
When you use the userattr keyword to associate the entry used to bind with the target entry, the ACI applies only to the target specified and not to the entries below it. In certain situations, administrators want to extend the application of the ACI several levels below the targeted entry. This is possible by using the parent keyword and specifying the number of levels below the target that should inherit the ACI.
When using the userattr keyword with the parent keyword, the syntax is as follows:
userattr comparison_operator "parent[inheritance_level].attribute_name#bind_type_or_attribute_value
-
inheritance_level: Comma-separated list that indicates how many levels below the target inherit the ACI. You can include five levels (0,1,2,3,4) below the targeted entry. Zero (0) indicates the targeted entry. -
attribute_name: The attribute targeted by theuserattrorgroupattrkeyword. -
bind_type_or_attribute_value: Sets the attribute value or a bind type, such asUSERDN.
For example:
userattr = "parent[0,1].manager#USERDN"
This bind rule is evaluated to be true if the bind DN matches the manager attribute of the targeted entry. The permissions granted when the bind rule is evaluated to be true apply to the target entry and to all entries immediately below it.
Example 1.25. Using the userattr keyword with inheritance
To enable a user to read and search the cn=Profiles,dc=example,dc=com entry where the user’s DN is set in the owner attribute, as well as the first level of child entries which includes cn=mail,cn=Profiles,dc=example,dc=com and cn=news,cn=Profiles,dc=example,dc=com:
# ldapmodify -D "cn=Directory Manager" -W -H ldap://server.example.com -x`

dn: cn=Profiles,dc=example,dc=com
changetype: modify
add: aci
aci: (targetattr="*") (version 3.0; acl "Profile access",
 allow (read,search) userattr="parent[0,1].owner#USERDN" ;)
1.10.5. Defining access from specific IP addresses or ranges
The ip keyword in a bind rule enables you to grant or deny access from a specific IP address or a range of IP addresses.
Bind rules with the ip keyword use the following syntax:
ip comparison_operator "IP_address_or_range"
Example 1.26. Using IPv4 address ranges in bind rules
To deny access from the 192.0.2.0/24 network to the dc=example,dc=com entry:
# ldapmodify -D "cn=Directory Manager" -W -H ldap://server.example.com -x

dn: dc=example,dc=com
changetype: modify
add: aci
aci: (targetattr = "*") (version 3.0;acl "Deny 192.0.2.0/24"; deny (all)
 (userdn = "ldap:///anyone") and (ip != "192.0.2.");)
Example 1.27. Using IPv6 address ranges in bind rules
To deny access from the 2001:db8::/64 network to the dc=example,dc=com entry:
# ldapmodify -D "cn=Directory Manager" -W -H ldap://server.example.com -x

dn: dc=example,dc=com
changetype: modify
add: aci
aci: (targetattr = "*") (version 3.0;acl "Deny 2001:db8::/64"; deny (all)
 (userdn = "ldap:///anyone") and (ip != "2001:db8::");)
1.10.6. Defining access from a specific host or domain
The dns keyword in a bind rule enables you to grant or deny access from a specific host or domain.
If Directory Server cannot resolve a connecting IP address to its fully qualified domain name (FQDN) using DNS, the server does not apply access control instructions (ACI) with the dns bind rule for this client.
If client IP addresses are not resolvable using DNS, use the ip keyword and IP addresses instead. See Defining access from specific IP addresses or ranges.
Bind rules with the dns keyword use the following syntax:
dns comparison_operator "host_name_or_domain_name"
Example 1.28. Defining access from a specific host
To deny access from the client.example.com host to the dc=example,dc=com entry:
# ldapmodify -D "cn=Directory Manager" -W -H ldap://server.example.com -x

dn: dc=example,dc=com
changetype: modify
add: aci
aci: (targetattr = "*") (version 3.0;acl "Deny client.example.com"; deny (all)
 (userdn = "ldap:///anyone") and (dns != "client.example.com");)
Example 1.29. Defining access from a specific domain
To deny access from all hosts within the example.com domain to the dc=example,dc=com entry:
# ldapmodify -D "cn=Directory Manager" -W -H ldap://server.example.com -x

dn: dc=example,dc=com
changetype: modify
add: aci
aci: (targetattr = "") (version 3.0;acl "Deny example.com"; deny (all) (userdn = "ldap:///anyone") and (dns != ".example.com");)
1.10.7. Requiring a certain level of security in connections
The security of a connection is determined by its security strength factor (SSF), which sets the minimum key strength required to process operations. Using the ssf keyword in a bind rule, you can set that a connection must use a certain level of security. This enables you to force operations, for example password changes, to be performed over an encrypted connection.
The value for the SSF for any operation is the higher of the values between a TLS connection and a SASL bind. This means that if a server is configured to run over TLS and a replication agreement is configured for SASL/GSSAPI, the SSF for the operation is whichever available encryption type is more secure.
Bind rules with the ssf keyword use the following syntax:
ssf comparison_operator key_strength
You can use the following comparison operators:
-
=(equal to) -
!(not equal to) -
<(less than) -
>(greater than) -
⇐(less than or equal to) -
>=(greater than or equal to)
If the key_strength parameter is set to 0, no secure operation is required for the LDAP operation.
Example 1.30. Requiring a certain level of security in connections
To configure that users in the dc=example,dc=com entry can only update their userPassword attribute when the SSF is 128 or higher:
# ldapmodify -D "cn=Directory Manager" -W -H ldap://server.example.com -x

dn: dc=example,dc=com
changetype: modify
add: aci
aci: (targetattr = "userPassword") (version 3.0;
 acl "Allow users updating own userPassword";
 allow (write) (userdn = "ldap:///self") and (ssf >= "128");)
1.10.8. Defining access at a specific day of the week
The dayofweek keyword in a bind rule enables you to grant or deny access based on the day of the week.
Directory Server uses the time on the server to evaluate the access control instruction (ACI); not the time on the client.
Bind rules with the dayofweek keyword use the following syntax:
dayofweek comparison_operator "comma-separated_list_of_days"
Example 1.31. Granting access on specific days of the week
To deny access for the uid=user,ou=People,dc=example,dc=com user entry to bind to the server on Saturdays and Sundays:
# ldapmodify -D "cn=Directory Manager" -W -H ldap://server.example.com -x

dn: ou=People,dc=example,dc=com
changetype: modify
add: aci
aci: (version 3.0; acl "Deny access on Saturdays and Sundays";
 deny (all)
 (userdn = "ldap:///uid=user,ou=People,dc=example,dc=com") and
 (dayofweek = "Sun,Sat");)
1.10.9. Defining access at a specific time of day
The timeofday keyword in a bind rule enables you to grant or deny access based on the time of day.
Directory Server uses the time on the server to evaluate the access control instructions (ACI); not the time on the client.
Bind rules with the timeofday keyword use the following syntax:
timeofday comparison_operator "time"
You can use the following comparison operators:
-
=(equal to) -
!(not equal to) -
<(less than) -
>(greater than) -
⇐(less than or equal to) -
>=(greater than or equal to)
The timeofday keyword requires that you specify the time in 24-hour format.
Example 1.32. Defining access at a specific time of a day
To deny access for the uid=user,ou=People,dc=example,dc=com user entry to bind to the server between 6pm and 0am:
# ldapmodify -D "cn=Directory Manager" -W -H ldap://server.example.com -x

dn: ou=People,dc=example,dc=com
changetype: modify
add: aci
 aci: (version 3.0; acl "Deny access between 6pm and 0am";
 deny (all)
 (userdn = "ldap:///uid=user,ou=People,dc=example,dc=com") and
 (timeofday >= "1800" and timeofday < "2400");)
1.10.10. Defining access based on the authentication method
The authmethod keyword in a bind rule sets what authentication method a client must use when connecting to the server, to apply the access control instruction (ACI).
Bind rules with the authmethod keyword use the following syntax:
authmethod comparison_operator "authentication_method"
You can set the following authentication methods:
-
none: Authentication is not required and represents anonymous access. This is the default. -
simple: The client must provide a user name and password to bind to the directory. -
SSL: The client must bind to the directory using a TLS certificate either in a database, smart card, or other device. For details about certificate-based authentication, see Defining access based on the authentication method. -
SASL: The client must bind to the directory over a Simple Authentication and Security Layer (SASL) connection. When you use this authentication method in a bind rule, additionally specify the SASL mechanism, such asEXTERNAL.
Example 1.33. Enabling access only for connections using the EXTERNAL SASL authentication method
To deny access to the server if the connection does not use a certificate-based authentication method or SASL:
# ldapmodify -D "cn=Directory Manager" -W -H ldap://server.example.com -x`

dn: ou=People,dc=example,dc=com
changetype: modify
add: aci
aci: (version 3.0; acl "Deny all access without certificate"; deny (all)
 (authmethod = "none" or authmethod = "simple");)
1.10.11. Defining access based on roles
The roledn keyword in a bind rule enables you to grant or deny access to users having one or multiple role sets.
Red Hat recommends using groups instead of roles.
Bind rules with the roledn keyword use the following syntax:
roledn comparison_operator "ldap:///distinguished_name || ldap:///distinguished_name || ..."
If a distinguished name (DN) contains a comma, escape the comma with a backslash.
Example 1.34. Defining access based on roles
To enable users that have the cn=Human Resources,ou=People,dc=example,dc=com role set in the nsRole attribute to search and read the manager attribute of entries in ou=People,dc=example,dc=com:
# ldapmodify -D "cn=Directory Manager" -W -H ldap://server.example.com -x

dn: ou=People,dc=example,dc=com
changetype: modify
add: aci
aci: (targetattr="manager") (version 3.0;
 acl "Allow manager role to update manager attribute";
 allow (search, read) roledn = "ldap:///cn=Human Resources,ou=People,dc=example,dc=com";)
1.10.12. Combining bind rules using Boolean operators
When creating complex bind rules, the AND, OR, and NOT Boolean operators enable you to combine multiple keywords.
Bind rules combined with Boolean operators have the following syntax:
bind_rule_1 boolean_operator bind_rule_2...
Example 1.35. Combining bind rules using Boolean operators
To configure that users which are member of both the cn=Administrators,ou=Groups,dc=example,com and cn=Operators,ou=Groups,dc=example,com] group can [command]`read, search, add, update, and delete entries in ou=People,dc=example,dc=com:
# ldapmodify -D "cn=Directory Manager" -W -H ldap://server.example.com -x

dn: ou=People,dc=example,dc=com
changetype: modify
add: aci
aci: (target="ldap:///ou=People,dc=example,dc=com") (version 3.0;
 acl "Allow members of administrators and operators group to manage users";
 allow (read, search, add, write, delete)
 groupdn = "ldap:///cn=Administrators,ou=Groups,dc=example,com" AND
 groupdn = "ldap:///cn=Operators,ou=Groups,dc=example,com";)
How Directory Server evaluates boolean operators
Directory Server evaluates Boolean operators by using the following rules:
All expressions from left to right.
In the following example,
bind_rule_1is evaluated first:(bind_rule_1) OR (bind_rule_2)
From innermost to outermost parenthetical expressions first.
In the following example,
bind_rule_2is evaluated first andbind_rule_3second:(bind_rule_1) OR ((bind_rule_2) AND (bind_rule_3))
NOTbeforeANDorORoperators.In the following example, bind_rule_2 is evaluated first:
(bind_rule_1) AND NOT (bind_rule_2)
The
ANDandORoperators have no order of precedence.
Chapter 2. Using macro access control instructions
Macro access control instructions (ACIs) provides you with the possibility to automate the tailored access to an LDAP entry distinguished name (DN) or to its part and reduce the number of ACIs.
2.1. Macro access control instruction example
The picture below shows a directory tree with suffixes dc=hostedCompany1,dc=example,dc=com and dc=hostedCompany2,dc=example,dc=com with the repetitive pattern of subdomains. Each subdomain has the same structure of ou=groups, ou=people entries. The directory tree uses macro access control instructions (ACIs) to reduce the total number of ACIs.
The ACIs that apply in the directory tree also have a repeating pattern. For example, the following ACI is located on the dc=hostedCompany1,dc=example,dc=com node and grants read and search rights to the DomainAdmins group to any entry in that tree:
aci: (targetattr="*")(targetfilter=(objectClass=nsManagedDomain))
     (version 3.0; acl "Domain access"; allow (read,search)
     groupdn="ldap:///cn=DomainAdmins,ou=Groups,dc=hostedCompany1,dc=example,dc=com";)
Figure 2.1. Directory tree for macro ACI example
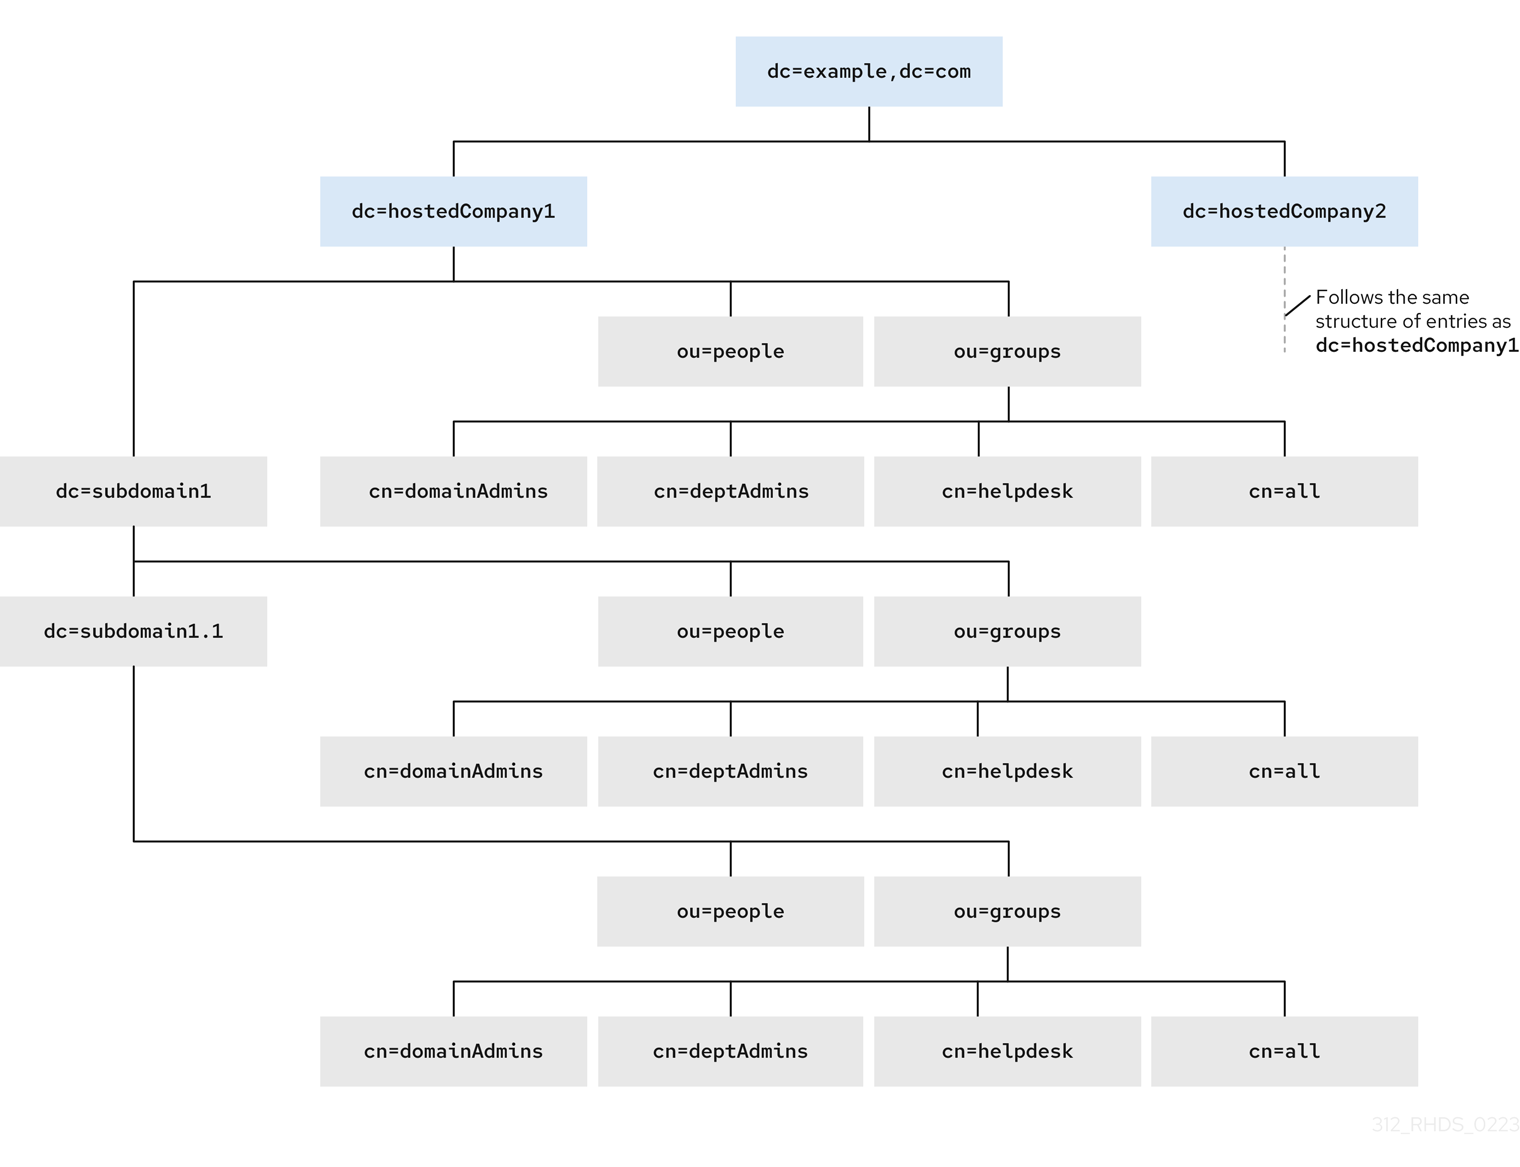
The ACIs below show the different part of DN in the groupdn keyword:
-
The
dc=hostedCompany1,dc=example,dc=comnode contains the following ACI:
aci: (targetattr="*")(targetfilter=(objectClass=nsManagedDomain))
    (version 3.0; acl "Domain access"; allow (read,search)
groupdn="ldap:///cn=DomainAdmins,ou=Groups,dc=hostedCompany1,dc=example,dc=com";)-
The
dc=subdomain1,dc=hostedCompany1,dc=example,dc=comnode contains the following ACI:
aci: (targetattr="*")(targetfilter=(objectClass=nsManagedDomain))
     (version 3.0; acl "Domain access"; allow (read,search)
groupdn="ldap:///cn=DomainAdmins,ou=Groups,dc=subdomain1,dc=hostedCompany1,dc=example,dc=com";)-
The
dc=hostedCompany2,dc=example,dc=comnode contains the following ACI:
aci: (targetattr="*")(targetfilter=(objectClass=nsManagedDomain))
     (version 3.0; acl "Domain access"; allow (read,search)
groupdn="ldap:///cn=DomainAdmins,ou=Groups,dc=hostedCompany2,dc=example,dc=com";)-
The
dc=subdomain1,dc=hostedCompany2,dc=example,dc=comnode contains the following ACI:
aci: (targetattr="*")(targetfilter=(objectClass=nsManagedDomain))
     (version 3.0; acl "Domain access"; allow (read,search)
     groupdn="ldap:///cn=DomainAdmins,ou=Groups,dc=subdomain1,dc=hostedCompany2,dc=example,dc=com";)
Use the macro to replace multiple ACIs for repetitive patterns. For example, to reduce the ACIs above to one, use the following macro:
aci: (target="ldap:///ou=Groups,($dn),dc=example,dc=com")
     (targetattr="*")(targetfilter=(objectClass=nsManagedDomain))
     (version 3.0; acl "Domain access"; allow (read,search)
     groupdn="ldap:///cn=DomainAdmins,ou=Groups,[$dn],dc=example,dc=com";)
2.2. Macro access control instruction syntax
Macro access control instructions (ACIs) include the following types of expressions to replace a DN or a part of a DN:
-
($dn), -
[$dn], -
($attr.attrName), where attrName represents an attribute which is the part of the target entry.
The ACI keywords provide bind credentials which are the subject of the ACI. The subject determines where the ACI applies.
Table 2.1. Macros for ACI keywords
| Macro | ACI keywords | Description |
|---|---|---|
|
|
|
Matching and direct substitution in the subject. It will match to |
|
|
| Substitution of multiple RDNs that work in subtrees of the subject. |
|
|
|
Substitution of the |
Note, if you use any macro, you must define the target that contains the ($dn) macro. You can combine ($dn) and ($attr.attrName) macros.
2.3. The ($dn) macro example
The ($dn) macro compares the substitution value to the entry from the LDAP request. For example, the LDAP request targets the entry:
cn=all,ou=groups,dc=subdomain1,dc=hostedCompany1,dc=example,dc=com
The ACI defines the following target:
(target="ldap:///ou=groups,($dn),dc=example,dc=com")
The ($dn) macro matches with dc=subdomain1,dc=hostedCompany1 in this example.
The substring that matches the target expands the subject when the subject of the ACI uses the ($dn) macro:
aci: (target="ldap:///ou=*,($dn),dc=example,dc=com")
     (targetattr = "*") (version 3.0; acl "Domain access"; allow (read,search)
     groupdn="ldap:///cn=domainAdmins,ou=groups,($dn),dc=example,dc=com";)
The ACI expands as follow:
aci: (target="ldap:///ou=groups,dc=subdomain1,dc=hostedCompany1,
     dc=example,dc=com") (targetattr = "*") (version 3.0; acl "Domain
     access"; allow (read,search) groupdn="ldap:///cn=domainAdmins,ou=groups,
     dc=subdomain1,dc=hostedCompany1,dc=example,dc=com";)
After the macro is expanded, Red Hat Directory Server evaluates the ACI following the normal process to determine if access is granted.
2.4. The [$dn] macro example
The [$dn] macro examines the DN of the targeted source multiple times. This macro drops the leftmost RDN component each iteration until it finds a match.
For example, you have an LDAP request with the target at the cn=all,ou=groups,dc=subdomain1,dc=hostedCompany1,dc=example,dc=com subtree and the following ACI:
aci: (target="ldap:///ou=groups,($dn),dc=example,dc=com")
     (targetattr = "*") (version 3.0; acl "Domain access"; allow (read,search)
     groupdn="ldap:///cn=domainAdmins,ou=groups,[$dn],dc=example,dc=com";)
The macro expands as follows:
-
The
($dn)in the target matchesdc=subdomain1,dc=hostedCompany1. The replacement for the
[$dn]in the subject isdc=subdomain1,dc=hostedCompany1.The result is
groupdn="ldap:///cn=domainAdmins,ou=Groups,dc=subdomain1,dc=hostedCompany1,dc=example,dc=com". If the bind DN is a member of that group, the matching process stops, and the ACI is evaluated. If the result does not match, the process continues and drops the leftmost part.The [$dn] in the subject is
dc=hostedCompany1.The result is
groupdn="ldap:///cn=domainAdmins,ou=Groups,dc=hostedCompany1,dc=example,dc=com". If the bind DN is not a member of that group, the ACI is not evaluated. If it is a member, the ACI is evaluated.
The [$dn] macro grants access to domain-level administrators to all the subdomains in the directory tree. It is useful for expressing a hierarchical relationship between domains. For example, consider the following ACI:
aci: (target="ldap:///ou=*, ($dn),dc=example,dc=com")
     (targetattr="*")(targetfilter=(objectClass=nsManagedDomain))
     (version 3.0; acl "Domain access"; allow (read,search)
     groupdn="ldap:///cn=domainAdmins,ou=groups,[$dn],dc=example,dc=com";)
This ACI grants access to the members of the cn=domainAdmins,ou=groups,dc=hostedCompany1,dc=example,dc=com to all of the subdomains under dc=hostedCompany1. An administrator that is a member of that group can access a subtree like ou=people,dc=subdomain1.1,dc=subdomain1. But members of cn=domainAdmins,ou=groups,dc=subdomain1.1 do not have an access to the ou=people,dc=hostedCompany1 and ou=people,dc=subdomain1,dc=hostedCompany1 nodes.
2.5. The ($attr.attrName) macro example
You always use the ($attr.attrName) macro as a part of a DN. For example, define the following roledn:
roledn = "ldap:///cn=DomainAdmins,($attr.ou),dc=HostedCompany1,dc=example,dc=com"
Assuming, that the server receives an LDAP operation that targets at the following entry:
dn: cn=Jane Doe,ou=People,dc=HostedCompany1,dc=example,dc=com
cn: Jane Doe
sn: Doe
ou: Engineering...
To evaluate the roledn part of the ACI, the server looks at the ou attribute in the targeted entry and uses the value of this attribute to expand the macro. The roledn expands as follows:
roledn = "ldap:///cn=DomainAdmins,ou=Engineering,dc=HostedCompany1,dc=example,dc=com"
Red Hat Directory Server evaluates the ACI according to the normal ACI evaluation algorithm.
If the attribute has multiple values, RHDS uses each value to expand the macro and uses the value that has a first successful match of the expanded macro. For example:
dn: cn=Jane Doe,ou=People,dc=HostedCompany1,dc=example,dc=com
cn: Jane Doe
sn: Doe
ou: Engineering
ou: People...
When the Red Hat Directory Server evaluates the ACI, it performs a logical OR on the following expanded expressions:
roledn = "ldap:///cn=DomainAdmins,ou=Engineering,dc=HostedCompany1,dc=example,dc=com"

roledn = "ldap:///cn=DomainAdmins,ou=People,dc=HostedCompany1,dc=example,dc=com"
Chapter 3. Managing access control instructions in LDAP browser
This set of instructions provides you with the basics of managing the access control instructions (ACIs) by using the LDAP browser wizard in the web console.
3.1. Creating an access control instruction in the LDAP browser
You can create and add an access control instruction (ACI) for a Red Hat Directory Server (RHDS) entry by using the LDAP Browser in the web console.
Prerequisites
- Access to the web console.
- A parent entry exists in the Red Hat Directory Server.
Procedure
-
Log in to the web console and click
Red Hat Directory Server. -
After the web console loads the
Red Hat Directory Serverinterface, clickLDAP browser. - Select an LDAP entry and click the Options menu.
-
From the drop-down menu, select
ACIs. To create an ACI by using the LDAP browser wizard, you have two options:
- Click to create the ACI using the wizard. Continue with the next step.
- Click , specify the instruction in the text field, and click .
- Follow the steps in the wizard and click the button after you complete each step.
- To create the ACI, review the data that the wizard generated, and click .
- To close the wizard window, click the button.
Verification
-
Verify the new ACI appears in the
Manage ACIswindow.
3.2. Editing access control instructions in the LDAP Browser
You can edit an access control instruction (ACI) for a Red Hat Directory Server entry by using the LDAP Browser Manage ACIs window in the web console.
Prerequisites
- Access to the web console.
- A parent entry exists in the Red Hat Directory Server.
Procedure
-
Log in to the web console and click
Red Hat Directory Server. -
After the web console loads the
Red Hat Directory Serverinterface, clickLDAP browser. - Select an LDAP entry and click the Options menu.
-
From the drop-down menu select
ACIs. -
Click the Options menu and select
Edit ACI. - Modify the instruction in the text field and click .
Verification
-
In the
Manage ACIswindow expand the ACI you modified and observe your changes.
3.3. Removing an access control instruction in the LDAP browser
You can remove an access control instruction (ACI) for a Red Hat Directory Server entry by using the LDAP Browser in the web console.
Prerequisites
- Access to the web console.
- A parent entry exists in the Red Hat Directory Server.
Procedure
-
Log in to the web console and click
Red Hat Directory Server. -
After the web console loads the
Red Hat Directory Serverinterface, clickLDAP Browser. - Select an LDAP entry and click the Options menu.
-
From the drop-down menu select
ACIsto open theManage ACIswindow. -
Click the Node options icon for the ACI you are removing and select
Remove ACI. -
Select the
Yes, I’m surecheckbox and click the button.
Verification
-
On the
Manage ACIswindow, verify the ACI you removed no longer appears on the list of ACIs.
Chapter 4. Configuring a password-based account lockout policy
A password-based account lockout policy prevents attackers from repeatedly trying to guess a user’s password. You can configure the account lockout policy to lock a user account after a specified number of failed attempts to bind.
If a password-based account lockout policy is configured, Directory Server maintains the lockout information in the following attributes of the user entries:
-
passwordRetryCount: Stores the number of failed bind attempts. Directory Server resets the value if the user successfully binds to the directory later than the time inretryCountResetTime. This attribute is present after a user fails to bind for the first time. -
retryCountResetTime: Stores the time after which thepasswordRetryCountattribute is reset. This attribute is present after a user fails to bind for the first time. -
accountUnlockTime: Stores the time after which the user account is unlocked. This attribute is present after the account was locked for the first time.
4.1. Configuring whether to lock accounts when reaching or exceeding the configured maximum attempts
Administrators can configure one of the following behaviors when Directory Server locks accounts on failed login attempts:
The server locks accounts if the limit has been exceeded. For example, if the limit is set to 3 attempts, the lockout happens after the fourth failed attempt (
n+1). This also means that, if the fourth attempt succeeds, Directory Server does not lock the account.By default, Directory Server uses this legacy password policy that is often expected by traditional LDAP clients.
The server locks accounts if the limit has been reached. For example, if the limit is set to 3 attempts, the server locks the account after the third failed attempt (
n).Modern LDAP clients often expect this behavior.
This procedure describes how to disable the legacy password policy. After changing the policy, Directory Server blocks login attempts for a user that reached the configured limit.
Prerequisites
- You configured an account lockout policy.
Procedure
To disable the legacy password policy and lock accounts if the limit has been reached, enter:
#
dsconf -D "cn=Directory Manager" ldap://server.example.com config replace passwordLegacyPolicy=off
Verification
Display the value of the
passwordmaxfailuresetting:#
dsconf -D "cn=Directory Manager" ldap://server.example.com pwpolicy get passwordmaxfailurepasswordmaxfailure: 2Attempt to bind using an invalid password one more time than the value set in
passwordmaxfailure:#
ldapsearch -H ldap://server.example.com -D "uid=example,ou=People,dc=example,dc=com" -w invalid-password -b "dc=example,dc=com" -xldap_bind: Invalid credentials (49) #ldapsearch -H ldap://server.example.com -D "uid=example,ou=People,dc=example,dc=com" -w invalid-password -b "dc=example,dc=com" -xldap_bind: Invalid credentials (49) #ldapsearch -H ldap://server.example.com -D "uid=example,ou=People,dc=example,dc=com" -w invalid-password -b "dc=example,dc=com" -xldap_bind: Constraint violation (19) additional info: Exceed password retry limit. Please try later.With legacy passwords disabled, Directory Server locked the account after the second attempt, and further tries are blocked with an
ldap_bind: Constraint violation (19)error.
Additional resources
4.2. Configuring a password-based account lockout policy using the command line
To block login recurring bind attempts with invalid passwords, configure a password-based account lockout policy.
The behavior whether Directory Server locks accounts when reaching or exceeding the configured maximum attempts depends on the legacy password policy setting.
Procedure
Optional: Identify whether the legacy password policy is enabled or disabled:
#
dsconf -D "cn=Directory Manager" ldap://server.example.com config get passwordLegacyPolicypasswordLegacyPolicy: onEnable the password lockout policy and set the maximum number of failures to
2:#
[command]`dsconf -D "cn=Directory Manager" ldap://server.example.com pwpolicy set --pwdlockout on --pwdmaxfailures=2With the legacy password policy enabled, Directory Server will lock accounts after the third failed attempt to bind (value of the
--pwdmaxfailuresparameter + 1).The
dsconf pwpolicy setcommand supports the following parameters:-
--pwdlockout: Enables or disables the account lockout feature. Default:off. --pwdmaxfailures: Sets the maximum number of allowed failed bind attempts before Directory Server locks the account. Default:3.Note that this lockout happens one attempt later if the legacy password policy setting is enabled. Default:
3.-
--pwdresetfailcount: Sets the time in seconds before Directory Server resets thepasswordRetryCountattribute in the user’s entry. Default:600seconds (10 minutes). -
--pwdlockoutduration: Sets the time of accounts being locked in seconds. This parameter is ignored if you set the--pwdunlockparameter tooff. Default:3600seconds (1 hour). -
--pwdunlock: Enables or disables whether locked accounts should be unlocked after a certain amount of time or stay disabled until an administrator manually unlocks them. Default:on.
-
Verification
Attempt to bind using an invalid password two more times than the value you set in the
--pwdmaxfailuresparameter:#
ldapsearch -H ldap://server.example.com -D "uid=example,ou=People,dc=example,dc=com" -w invalid-password -b "dc=example,dc=com" -xldap_bind: Invalid credentials (49) #ldapsearch -H ldap://server.example.com -D "uid=example,ou=People,dc=example,dc=com" -w invalid-password -b "dc=example,dc=com" -xldap_bind: Invalid credentials (49) #ldapsearch -H ldap://server.example.com -D "uid=example,ou=People,dc=example,dc=com" -w invalid-password -b "dc=example,dc=com" -xldap_bind: Invalid credentials (49) #ldapsearch -H ldap://server.example.com -D "uid=example,ou=People,dc=example,dc=com" -w invalid-password -b "dc=example,dc=com" -xldap_bind: Constraint violation (19) additional info: Exceed password retry limit. Please try later.With legacy passwords enabled, Directory Server locked the account after the limit has exceeded, and further tries are blocked with an
ldap_bind: Constraint violation (19)error.
Additional resources
4.3. Configuring a password-based account lockout policy using the web console
To block login recurring bind attempts with invalid passwords, configure a password-based account lockout policy.
The behavior whether Directory Server locks accounts when reaching or exceeding the configured maximum attempts depends on the legacy password policy setting.
Prerequisites
- You are logged in to the instance in the web console.
Procedure
Optional: Identify whether the legacy password policy is enabled or disabled:
#
dsconf -D "cn=Directory Manager" ldap://server.example.com config get passwordLegacyPolicypasswordLegacyPolicy: onThis setting is not available in the web console.
- Navigate to → → → .
-
Select
Enable Account Lockout. Configure the lockout settings:
-
Number of Failed Logins That Locks out Account: Sets the maximum number of allowed failed bind attempts before Directory Server locks the account. -
Time Until Failure Count Resets: Sets the time in seconds before Directory Server resets thepasswordRetryCountattribute in the user’s entry. -
Time Until Account Unlocked: Sets the time of accounts beging locked in seconds. This parameter is ignored if you disableDo Not Lockout Account Forever. -
Do Not Lockout Account Forever: Enables or disables whether locked accounts should be unlocked after a certain amount of time or stay disabled until an administrator manually unlocks them.
-
- Click .
Verification
Attempt to bind using an invalid password two more times than the value you set in
Number of Failed Logins That Locks out Account:#
ldapsearch -H ldap://server.example.com -D "uid=example,ou=People,dc=example,dc=com" -w invalid-password -b "dc=example,dc=com" -xldap_bind: Invalid credentials (49) #ldapsearch -H ldap://server.example.com -D "uid=example,ou=People,dc=example,dc=com" -w invalid-password -b "dc=example,dc=com" -xldap_bind: Invalid credentials (49) #ldapsearch -H ldap://server.example.com -D "uid=example,ou=People,dc=example,dc=com" -w invalid-password -b "dc=example,dc=com" -xldap_bind: Invalid credentials (49) #ldapsearch -H ldap://server.example.com -D "uid=example,ou=People,dc=example,dc=com" -w invalid-password -b "dc=example,dc=com" -xldap_bind: Constraint violation (19) additional info: Exceed password retry limit. Please try later.With legacy passwords enabled, Directory Server locked the account after the limit has exceeded, and further tries are blocked with an
ldap_bind: Constraint violation (19)error.
Additional resources
Chapter 5. Configuring time-based account lockout policies
You can use the Account Policy plug-in to configure different time-based lockout policies, such as:
- Automatically disabling accounts a certain amount of time the last successful login
- Automatically disabling accounts a certain amount of time after you created them
- Automatically disabling accounts a certain amount of time after password expiry
- Automatically disabling account on both account inactivity and password expiration
5.1. Automatically disabling accounts a certain amount of time the last successful login
Follow this procedure to configure a time-based lockout policy that inactivates users under the dc=example,dc=com entry who do not log in for more than 21 days.
This the account inactivity feature to ensure, for example if an employee left the company and the administrator forgets to delete the account, that Directory Server inactivates the account after a certain amount of time.
Procedure
Enable the Account Policy plug-in:
#
dsconf -D "cn=Directory Manager" ldap://server.example.com plugin account-policy enableConfigure the plug-in configuration entry:
#
dsconf -D "cn=Directory Manager" ldap://server.example.com plugin account-policy config-entry set "cn=config,cn=Account Policy Plugin,cn=plugins,cn=config" --always-record-login yes --state-attr lastLoginTime --alt-state-attr 1.1 --spec-attr acctPolicySubentry --limit-attr accountInactivityLimitThis command uses the following options:
-
--always-record-login yes: Enables logging of the login time. This is required to use Class of Service (CoS) or roles with account policies, even if it does not have theacctPolicySubentryattribute set. -
--state-attr lastLoginTime: Configures that the Account Policy plug-in stores the last login time in thelastLoginTimeattribute of users. -
--alt-state-attr 1.1: Disables using an alternative attribute to check if the primary one does not exist. By default, Directory Server uses thecreateTimestampattribute as alternative. However, this causes that Directory Server logs out existing users automatically if their account do not have thelastLoginTimeattribute set andcreateTimestampis older than the configured inactivity period. Disabling the alternative attribute causes that Directory Server automatically adds thelastLoginTimeattribute to user entries when they log in the next time. -
--spec-attr acctPolicySubentry: Configures Directory Server to apply the policy to entries that have theacctPolicySubentryattribute set. You configure this attribute in the CoS entry. -
--limit-attr accountInactivityLimit: Configures that theaccountInactivityLimitattribute in the account inactivation policy entry stores the inactivity time.
-
Restart the instance:
#
dsctl instance_name restartCreate the account inactivation policy entry:
#
ldapadd -D "cn=Directory Manager" -W -H ldap://server.example.com -xdn: cn=Account Inactivation Policy,dc=example,dc=com objectClass: top objectClass: ldapsubentry objectClass: extensibleObject objectClass: accountpolicy accountInactivityLimit: 1814400 cn: Account Inactivation PolicyThe value in the
accountInactivityLimitattribute configures that Directory Server inactivates accounts1814400seconds (21 days) after the last log in.Create the CoS template entry:
#
ldapadd -D "cn=Directory Manager" -W -H ldap://server.example.com -xdn: cn=TemplateCoS,dc=example,dc=com objectClass: top objectClass: ldapsubentry objectClass: extensibleObject objectClass: cosTemplate acctPolicySubentry: cn=Account Inactivation Policy,dc=example,dc=comThis template entry references the account inactivation policy.
Create the CoS definition entry:
#
ldapadd -D "cn=Directory Manager" -W -H ldap://server.example.com -xdn: cn=DefinitionCoS,dc=example,dc=com objectClass: top objectClass: ldapsubentry objectclass: cosSuperDefinition objectclass: cosPointerDefinition cosTemplateDn: cn=TemplateCoS,dc=example,dc=com cosAttribute: acctPolicySubentry default operational-defaultThis definition entry references the CoS template entry and causes that the
acctPolicySubentryattribute appears in each user entry with a value set tocn=Account Inactivation Policy,dc=example,dc=com.
Verification
Set the
lastLoginTimeattribute of a user to a value that is older than the inactivity time you configured:#
ldapmodify -H ldap://server.example.com -x -D "cn=Directory Manager" -Wdn: uid=example,ou=People,dc=example,dc=com changetype: modify replace: lastLoginTime lastLoginTime: 20210101000000ZTry to connect to the directory as a this user:
#
ldapsearch -H ldap://server.example.com -x -D "uid=example,ou=People,dc=example,dc=com" -W -b "dc=example,dc=com"ldap_bind: Constraint violation (19) additional info: Account inactivity limit exceeded. Contact system administrator to reset.If Directory Server denies access and returns this error, account inactivity works.
Additional resources
5.2. Automatically disabling accounts a certain amount of time after you created them
Follow this procedure to configure that accounts in the dc=example,dc=com entry expire 60 days after the administrator created them.
Use the account expiration feature, for example, to ensure that accounts for external workers are locked a certain amount of time after they have been created.
Procedure
Enable the Account Policy plug-in:
#
dsconf -D "cn=Directory Manager" ldap://server.example.com plugin account-policy enableConfigure the plug-in configuration entry:
#
dsconf -D "cn=Directory Manager" ldap://server.example.com plugin account-policy config-entry set "cn=config,cn=Account Policy Plugin,cn=plugins,cn=config" --always-record-login yes --state-attr createTimestamp --alt-state-attr 1.1 --spec-attr acctPolicySubentry --limit-attr accountInactivityLimitThis command uses the following options:
-
--always-record-login yes: Enables logging of the login time. This is required to use Class of Service (CoS) or roles with account policies, even if it does not have theacctPolicySubentryattribute set. -
--state-attr createTimestamp: Configures that the Account Policy plug-in uses the value of thecreateTimestampattribute to calculate whether an account is expired. -
--alt-state-attr 1.1: Disables using an alternative attribute to check if the primary one does not exist. -
--spec-attr acctPolicySubentry: Configures Directory Server to apply the policy to entries that have theacctPolicySubentryattribute set. You configure this attribute in the CoS entry. -
--limit-attr accountInactivityLimit: Configures that theaccountInactivityLimitattribute in the account expiration policy entry stores the maximum age.
-
Restart the instance:
#
dsctl instance_name restartCreate the account expiration policy entry:
#
ldapadd -D "cn=Directory Manager" -W -H ldap://server.example.com -xdn: cn=Account Expiration Policy,dc=example,dc=com objectClass: top objectClass: ldapsubentry objectClass: extensibleObject objectClass: accountpolicy accountInactivityLimit: 5184000 cn: Account Expiration PolicyThe value in the
accountInactivityLimitattribute configures that accounts expire5184000seconds (60 days) after they have been created.Create the CoS template entry:
#
ldapadd -D "cn=Directory Manager" -W -H ldap://server.example.com -xdn: cn=TemplateCoS,dc=example,dc=com objectClass: top objectClass: ldapsubentry objectClass: extensibleObject objectClass: cosTemplate acctPolicySubentry: cn=Account Expiration Policy,dc=example,dc=comThis template entry references the account expiration policy.
Create the CoS definition entry:
#
ldapadd -D "cn=Directory Manager" -W -H ldap://server.example.com -xdn: cn=DefinitionCoS,dc=example,dc=com objectClass: top objectClass: ldapsubentry objectclass: cosSuperDefinition objectclass: cosPointerDefinition cosTemplateDn: cn=TemplateCoS,dc=example,dc=com cosAttribute: acctPolicySubentry default operational-defaultThis definition entry references the CoS template entry and causes that the
acctPolicySubentryattribute appears in each user entry with a value set tocn=Account Expiration Policy,dc=example,dc=com.
Verification
Try to connect to the directory as a user stored in the
dc=example,dc=comentry whosecreateTimestampattribute is set to a value more than 60 days ago:#
ldapsearch -H ldap://server.example.com -x -D "uid=example,dc=example,dc=com" -W -b "dc=example,dc=com"ldap_bind: Constraint violation (19) additional info: Account inactivity limit exceeded. Contact system administrator to reset.If Directory Server denies access and returns this error, account expiration works.
Additional resources
5.3. Automatically disabling accounts a certain amount of time after password expiry
Follow this procedure to configure a time-based lockout policy that inactivates users under the dc=example,dc=com entry who do not change their password for more than 28 days.
Prerequisites
-
Users must have the
passwordExpirationTimeattribute set in their entry.
Procedure
Enable the password expiration feature:
#
dsconf -D "cn=Directory Manager" ldap://server.example.com config replace passwordExp=onEnable the Account Policy plug-in:
#
dsconf -D "cn=Directory Manager" ldap://server.example.com plugin account-policy enableConfigure the plug-in configuration entry:
#
dsconf -D "cn=Directory Manager" ldap://server.example.com plugin account-policy config-entry set "cn=config,cn=Account Policy Plugin,cn=plugins,cn=config" --always-record-login yes --always-record-login-attr lastLoginTime --state-attr non_existent_attribute --alt-state-attr passwordExpirationTime --spec-attr acctPolicySubentry --limit-attr accountInactivityLimitThis command uses the following options:
-
--always-record-login yes: Enables logging of the login time. This is required to use Class of Service (CoS) or roles with account policies, even if it does not have theacctPolicySubentryattribute set. -
--always-record-login-attr lastLoginTime: Configures that the Account Policy plug-in stores the last login time in thelastLoginTimeattribute of users. -
--state-attr non_existent_attribute: Sets the primary time attribute used to evaluate an account policy to a non-existent dummy attribute name. -
--alt-state-attr `passwordExpirationTime: Configures the plug-in to use thepasswordExpirationTimeattribute as the alternative attribute to check. -
--spec-attr acctPolicySubentry: Configures Directory Server to apply the policy to entries that have theacctPolicySubentryattribute set. You configure this attribute in the CoS entry. -
--limit-attr accountInactivityLimit: Configures that theaccountInactivityLimitattribute in the account policy entry stores the time when accounts are inactivated after their last password change.
-
Restart the instance:
#
dsctl instance_name restartCreate the account inactivation policy entry:
#
ldapadd -D "cn=Directory Manager" -W -H ldap://server.example.com -xdn: cn=Account Inactivation Policy,dc=example,dc=com objectClass: top objectClass: ldapsubentry objectClass: extensibleObject objectClass: accountpolicy accountInactivityLimit: 2419200 cn: Account Inactivation PolicyThe value in the
accountInactivityLimitattribute configures that Directory Server inactivates accounts2419200seconds (28 days) after the password was changed.Create the CoS template entry:
#
ldapadd -D "cn=Directory Manager" -W -H ldap://server.example.com -xdn: cn=TemplateCoS,dc=example,dc=com objectClass: top objectClass: ldapsubentry objectClass: extensibleObject objectClass: cosTemplate acctPolicySubentry: cn=Account Inactivation Policy,dc=example,dc=comThis template entry references the account inactivation policy.
Create the CoS definition entry:
#
ldapadd -D "cn=Directory Manager" -W -H ldap://server.example.com -xdn: cn=DefinitionCoS,dc=example,dc=com objectClass: top objectClass: ldapsubentry objectclass: cosSuperDefinition objectclass: cosPointerDefinition cosTemplateDn: cn=TemplateCoS,dc=example,dc=com cosAttribute: acctPolicySubentry default operational-defaultThis definition entry references the CoS template entry and causes that the
acctPolicySubentryattribute appears in each user entry with a value set tocn=Account Inactivation Policy,dc=example,dc=com.
Verification
Set the
passwordExpirationTimeattribute of a user to a value that is older than the inactivity time you configured:#
ldapmodify -H ldap://server.example.com -x -D "cn=Directory Manager" -Wdn: uid=example,ou=People,dc=example,dc=com changetype: modify replace: passwordExpirationTime passwordExpirationTime: 20210101000000ZTry to connect to the directory as a this user:
#
ldapsearch -H ldap://server.example.com -x -D "uid=example,ou=People,dc=example,dc=com" -W -b "dc=example,dc=com"ldap_bind: Constraint violation (19) additional info: Account inactivity limit exceeded. Contact system administrator to reset.If Directory Server denies access and returns this error, account inactivity works.
Additional resources
5.4. Automatically disabling account on both account inactivity and password expiration
You can apply both account inactivity and password expiration when a user authenticates by using the checkAllStateAttrs setting. By default, when checkAllStateAttrs is not present in the plug-in configuration entry, or when you set this parameter to no, the plug-in checks for the state attribute lastLoginTime. If the attribute is not present in the entry, the plug-in checks the alternate state attribute.
You can set the main state attribute to a non-existent attribute and set the alternate state attribute to passwordExpirationtime when you want the plug-in to handle expiration based on the passwordExpirationtime attribute. When you enable this parameter it check’s the main state attribute and if the account is fine it then check’s the alternate state attribute.
This differs from the password policy’s password expiration, in that the account policy plug-in completely disables the account if the passwordExpirationtime exceeds the inactivity limit. While with the password policy expiration the user can still log in and change their password. The account policy plug-in completely blocks the user from doing anything and an administrator must reset the account.
Procedure
Create the plug-in configuration entry and enable the setting:
#
dsconf -D "cn=Directory Manager" ldap://server.example.com plugin account-policy config-entry set "cn=config,cn=Account Policy Plugin,cn=plugins,cn=config" --always-record-login yes --state-attr lastLoginTime --alt-state-attr 1.1 --spec-attr acctPolicySubentry --limit-attr accountInactivityLimit --check-all-state-attrs yesRestart the server to load the new plug-in configuration:
#
dsctl instance_name restartWarningThe
checkAllStateAttrssetting is designed to only work when the alternate state attribute is set topasswordExpiratontime. Setting it tocreateTimestampcan cause undesired results and entries might get locked out.
Chapter 6. Re-enabling accounts that reached the inactivity limit
If Directory Server inactivated an account because it reached the inactivity limit, an administrator can re-enable the account.
6.1. Re-enabling accounts inactivated by the Account Policy plug-in
You can re-enable accounts using the dsconf account unlock command or by manually updating the lastLoginTime attribute of the inactivated user.
Prerequisites
- An inactivated user account.
Procedure
Reactivate the account using one of the following methods:
Using the
dsconf account unlockcommand:#
dsidm -D "cn=Directory manager" ldap://server.example.com -b "dc=example,dc=com" account unlock "uid=example,ou=People,dc=example,dc=com"By setting the
lastLoginTimeattribute of the user to a recent time stamp:#
ldapmodify -H ldap://server.example.com -x -D "cn=Directory Manager" -Wdn: uid=example,ou=People,dc=example,dc=com changetype: modify replace: lastLoginTime lastLoginTime: 20210901000000Z
Verification
Authenticate as the user that you have reactivated. For example, perform a search:
#
ldapsearch -H ldap://server.example.com -x -D "uid=example,ou=People,dc=example,dc=com" -W -b "dc=example,dc=com -s base"If the user can successfully authenticate, the account was reactivated.
Chapter 7. Tracking the last login time without setting a lockout policy
You can use the Account Policy plug-in to track user login times without setting an expiration time or inactivity period. In this case, the plug-in adds the lastLoginTime attribute to user entries.
7.1. Configuring the Account Policy plug-in to record the last login time
Follow this procedure to record the last login time of users in the lastLoginTime attribute of user entries.
Procedure
Enable the Account Policy plug-in:
#
dsconf -D "cn=Directory Manager" ldap://server.example.com plugin account-policy enableCreate the plug-in configuration entry to record login times:
#
dsconf -D "cn=Directory Manager" ldap://server.example.com plugin account-policy config-entry set "cn=config,cn=Account Policy Plugin,cn=plugins,cn=config" --always-record-login yes --state-attr lastLoginTimeThis command uses the following options:
-
--always-record-login yes: Enables logging of the log in time. -
--state-attr lastLoginTime: Configures that the Account Policy plug-in stores the last log in time in thelastLoginTimeattribute of users.
-
Restart the instance:
#
dsctl instance_name restart
Verification
Log in to Directory Server as a user. For example, run a search:
#
ldapsearch -H ldap://server.example.com -x -D "uid=example,ou=People,dc=example,dc=com" -W -b "dc=example,dc=com"Display the
lastLoginTimeattribute of the user you used in the previous step:#
ldapsearch -H ldap://server.example.com -x -D "cn=Directory Manager" -W -b "uid=example,ou=people,dc=example,dc=com" lastLoginTime... dn: uid=example,ou=People,dc=example,dc=com lastLoginTime: 20210913091435ZIf the
lastLoginTimeattribute exists and Directory Server updated its value, recording of the last login time works.
Chapter 8. Checking access rights on entries using Get Effective Rights search
As an administrator, you can find and control access rights that a user has on attributes within a specific entry.
Get effective rights (GER) is a way to extend directory searches to display what access rights a user has to a specified entry. You can specify the following rights:
- Read
- Write and self-write
- Search
- Add
- Delete
Checking effective rights on an entry is beneficial in the following situations:
-
You can use the GER commands to better organize access control instructions for the directory. It is often necessary to restrict what one group of users can view or edit compared to another group. For example, members of the
QA Managersgroup may have the right to search and read attributes likemanagerandsalarybut onlyHR Groupmembers have the right to modify or delete them. Checking effective rights for a user or group is one way to verify that an administrator sets the appropriate access controls. -
You can use the GER commands to see what attributes you can view or modify on your personal entry. For example, a user should have access to attributes such as
homePostalAddressandcnbut may only have read access tomanagerandsalaryattributes.
The getEffectiveRights search uses the following entities:
-
The requester. It is the authenticated entry when the
getEffectiveRightssearch issues an operation. -
The subject whose rights you will evaluate. It is defined as authorization
DNin the GER control. - The target. You define it by the search base, search filter, and attribute list of the request.
8.1. Get Effective Rights search permissions
Any Get Effective Rights (GER) search shows following access rights that any entry can have:
- The upper-level rights which are the rights on the entry. That access rights show what kind of operations the User A can perform on an entry of the User B.
- The second level rights show what rights for a given attribute the User A has. The User A may have different access permissions for different attributes in the same entry. Any access controls that a user has are the effective rights over that entry.
For example:
entryLevelRights: vadn
attributeLevelRights: givenName:rscWO, sn:rscW, objectClass:rsc, uid:rsc, cn:rscW
A GER search has the following access rights to entries and attributes:
Table 8.1. Entry Rights
| Permissions | Description |
|---|---|
| a | Add an entry. |
| d | Delete this entry. |
| n | Rename the DN. |
| v | View the entry. |
Table 8.2. Attribute Rights
| Permissions | Description |
|---|---|
| r | Read. |
| s | Search. |
| w |
Write ( |
| o |
Obliterate ( |
| c | Compare. |
| W | Self-write. |
| O | Self-delete. |
8.2. Get Effective Rights search format
The Get effective rights (GER) is an extended directory search. To use it you must pass an -E option to a Lightweight Directory Access Protocol (LDAP) control with the ldapsearch command. For example:
# ldapsearch -x -D bind_dn -W -p server_port -h server_hostname -b base_DN -E [!]1.3.6.1.4.1.42.2.27.9.5.2=:GER_subject (searchFilter) attributeList
The
-bis the base DN of the subtree or entry you can to search for the GER subject.If the search base is a specific entry DN or if the result returns only one entry, then the results show the rights the requester has over that specific entry. If multiple entries match the filter, then the search returns every matching entry with the rights for the requester over each entry.
The
1.3.6.1.4.1.42.2.27.9.5.2option is the object identifier for the GER control.An exclamation mark (
!) defines whether the search operation returns an error if the server does not support this control (!) or returns nothing.-
The GER_subject is the user whose rights you check. You can leave the GER_subject blank (
dn:) to get the result for the rights of an anonymous user. -
An optional attributeList limits the GER results to the specified attribute or object class, for example, a
mailattribute. -
Use the asterisk (
*) sign to return all attributes. -
Use the plus (
+) sign to return operational attributes.
The GER option adds extra information to the ldapsearch results, showing what rights a specific user has. That GER subject users can request rights on their own entries with the additional option -D.
If the requester is not a Directory Manager user, then the requester can only see the rights that a GER subject has on the entry of the requester. All the other entries return an insufficient access error for the effective rights.
The following scenarios for a regular user to run a GER search are common:
- User A checks the rights that he has over other directory entries.
- User A checks the rights that he has to his personal entry.
- User A checks the rights that User B has to the entry of User A.
8.3. Common scenarios for a Get Effective Rights search
The following examples show the common scenarios when and how you can use the Get Effective Rights search.
8.3.1. General examples of Get Effective Rights search
The most common scenarios when you need to use the Get Effective Rights (GER) search are:
Checking personal rights. When a User A is checking the rights on personal entry. For example, Ted Morris wants to check the rights he has to his entry:
Example 8.1. Checking personal rights (User A to User A)
# ldapsearch -x -p 389 -h server.example.com -D "uid=tmorris,ou=people,dc=example,dc=com" -W -b "uid=tmorris,ou=people,dc=example,dc=com" -E '!1.3.6.1.4.1.42.2.27.9.5.2=:dn:uid=tmorris,ou=people,dc=example,dc=com' "(objectClass=*)"

    dn: uid=tmorris,ou=People,dc=example,dc=com
    givenName: Ted
    sn: Morris
    ou: IT
    ou: People
    l: Santa Clara
    manager: uid=jsmith,ou=People,dc=example,dc=com
    roomNumber: 4117
    mail: tmorris@example.com
    facsimileTelephoneNumber: +1 408 555 5409
    objectClass: top
    objectClass: person
    objectClass: organizationalPerson
    objectClass: inetOrgPerson
    uid: tmorris
    cn: Ted Morris
    userPassword: {SSHA}bz0uCmHZM5b357zwrCUCJs1IOHtMD6yqPyhxBA==
    entryLevelRights: v
    attributeLevelRights: givenName:rsc, sn:rsc, ou:rsc, l:rsc, manager:rsc, roomNumber:rscwo, mail:rscwo, facsimileTelephoneNumber:rscwo, objectClass:rsc, uid:rsc, cn:rsc, userPassword:wo
In this example, the
-boption also has DN of the requester.Checking the rights over another user. For example, Ted Morris is a manager and needs to check entry for one of his subordinates Dave Miller:
Example 8.2. Checking the rights over another user (User A to User B)
# ldapsearch -p 389 -h server.example.com -D "uid=tmorris,ou=people,dc=example,dc=com" -W -b "uid=dmiller,ou=people,dc=example,dc=com" -E '!1.3.6.1.4.1.42.2.27.9.5.2=:dn:uid=tmorris,ou=people,dc=example,dc=com' "(objectClass=*)"

    dn: uid=dmiller,ou=People,dc=example,dc=com
    ...
    entryLevelRights: vad
    attributeLevelRights: givenName:rscwo, sn:rscwo, ou:rscwo, l:rscwo, manager:rsc, roomNumber:rscwo, mail:rscwo, facsimileTelephoneNumber:rscwo, objectClass:rscwo, uid:rscwo, cn:rscwo, userPassword:rswo
In this example, Ted Morris has read, search, compare, modify, and delete permissions for all attributes to the entry of Dave Miller.
As a Directory Manager, checking the rights of one user having over an entry of another user. For example, the Directory Manager is checking what rights Jane Smith as a manager has over the entry of her subordinate Ted Morris:
Example 8.3. Directory Manager checking the rights of one user over another user
# ldapsearch -p 389 -h server.example.com -D "cn=Directory Manager" -W -b "uid=tmorris,ou=people,dc=example,dc=com" -E '!1.3.6.1.4.1.42.2.27.9.5.2=:dn:uid=jsmith,ou=people,dc=example,dc=com' "(objectClass=*)"

dn: uid=tmorris,ou=People,dc=example,dc=com
...
entryLevelRights: vadn
attributeLevelRights: givenName:rscwo, sn:rscwo, ou:rscwo, l:rscwo, manager:rscwo, roomNumber:rscwo, mail:rscwo, facsimileTelephoneNumber:rscwo, objectClass:rscwo, uid:rscwo, cn:rscwo, userPassword:rscwo
If a user does not have permissions, the result shows an insufficient access error:
Example 8.4. No permission on the entry
# ldapsearch -p 389 -h server.example.com -D "uid=dmiller,ou=people,dc=example,dc=com" -W -b "uid=tmorris,ou=people,dc=example,dc=com" -E '!1.3.6.1.4.1.42.2.27.9.5.2=:dn:uid=tmorris,ou=people,dc=example,dc=com' "(objectClass=*)"

ldap_search: Insufficient access
ldap_search: additional info: get-effective-rights: requester has no g permission on the entry
Checking what rights another user has over your entry. For example, Ted Morris checks what rights Dave Miller has on an entry of Ted Morris:
Example 8.5. Checking what rights another user has over your entry
# ldapsearch -p 389 -h server.example.com -D "uid=tmorris,ou=people,dc=example,dc=com" -W -b "uid=tmorris,ou=people,dc=example,dc=com" -E '!1.3.6.1.4.1.42.2.27.9.5.2=:dn:uid=dmiller,ou=people,dc=example,dc=com' "(objectClass=*)"

dn: uid=tmorris,ou=people,dc=example,dc=com
...
entryLevelRights: v
attributeLevelRights: givenName:rsc, sn:rsc, ou:rsc, l:rsc,manager:rsc, roomNumber:rsc, mail:rsc, facsimileTelephoneNumber:rsc, objectClass:rsc, uid:rsc, cn:rsc, userPassword:none
In this example, Dave Miller has the right to view the DN of the entry and to read, search, and compare the
ou,givenName,l, and other attributes. He has no any rights to theuserPasswordattribute.
8.3.2. Example of Get Effective Rights search for non-existent attributes
By default the attributes in an entry have no values. Using an asterisk (*) with the Get Effective Rights (GER) search returns every attribute available for the entry, including attributes that are not set on the entry.
Example 8.6. Checking rights on every attribute of the entry
# ldapsearch -D "cn=Directory Manager" -W -b "uid=scarter,ou=people,dc=example,dc=com" -E '!1.3.6.1.4.1.42.2.27.9.5.2=:dn:uid=scarter,ou=people,dc=example,dc=com' "(objectclass=*)" "*"

dn: uid=scarter,ou=People,dc=example,dc=com
givenName: Sam
telephoneNumber: +1 408 555 4798
sn: Carter
ou: Accounting
ou: People
l: Sunnyvale
manager: uid=dmiller,ou=People,dc=example,dc=com
roomNumber: 4612
mail: scarter@example.com
facsimileTelephoneNumber: +1 408 555 9700
objectClass: top
objectClass: person
objectClass: organizationalPerson
objectClass: inetOrgPerson
uid: scarter
cn: Sam Carter
userPassword: {SSHA}Xd9Jt8g1UsHC8enNDrEmxj3iJPKQLItlDYdD9A==
entryLevelRights: vadn
attributeLevelRights: objectClass:rscwo, aci:rscwo, sn:rscwo, cn:rscwo, description:rscwo, seeAlso:rscwo, telephoneNumber:rscwo, userPassword:rscwo, destinationIndicator:rscwo, facsimileTelephoneNumber:rscwo, internationaliSDNNumber:rscwo, l:rscwo, ou:rscwo, physicalDeliveryOfficeName:rscwo, postOfficeBox:rscwo, postalAddress:rscwo, postalCode:rscwo, preferredDeliveryMethod:rscwo, registeredAddress:rscwo, st:rscwo, street:rscwo, teletexTerminalIdentifier:rscwo, telexNumber:rscwo, title:rscwo, x121Address:rscwo, audio:rscwo, businessCategory:rscwo, carLicense:rscwo, departmentNumber:rscwo, displayName:rscwo, employeeType:rscwo, employeeNumber:rscwo, givenName:rscwo, homePhone:rscwo, homePostalAddress:rscwo, initials:rscwo, jpegPhoto:rscwo, labeledUri:rscwo, manager:rscwo, mobile:rscwo, pager:rscwo, photo:rscwo, preferredLanguage:rscwo, mail:rscwo, o:rscwo, roomNumber:rscwo, secretary:rscwo, uid:rscwo,x500UniqueIdentifier:rscwo, userCertificate:rscwo, userSMIMECertificate:rscwo, userPKCS12:rscwo
In this example, the secretary attribute is not set, but you still can see it in the GER search results.
8.3.3. Examples of Get Effective Rights search for specific attribute or object class
The examples in this section show how to search for the rights to specific attribute, set of attributes, and all attributes that belong to an object class of the entry.
Get Effective Rights (GER) search results for specific attributes of an entry by listing them. For example:
Example 8.7. Get Effective Rights search results for specific attributes
# ldapsearch -D "cn=Directory Manager" -W -b "uid=scarter,ou=people,dc=example,dc=com" -E '!1.3.6.1.4.1.42.2.27.9.5.2=:dn:uid=scarter,ou=people,dc=example,dc=com' "(objectclass=*)" cn mail initials

dn: uid=scarter,ou=People,dc=example,dc=com
cn: Sam Carter
mail: scarter@example.com
entryLevelRights: vadn
attributeLevelRights: cn:rscwo, mail:rscwo, initials:rscwo
GER search for a specific attribute of an object class of an entry in a format attribute@objectClass. The requester must be a Directory Manager.
Example 8.8. Get Effective Rights search results for a specific attribute of an object class
# ldapsearch -D "cn=Directory Manager" -W -b "uid=scarter,ou=people,dc=example,dc=com" -E '!1.3.6.1.4.1.42.2.27.9.5.2=:dn:uid=scarter,ou=people,dc=example,dc=com' "(objectclass=*)" uidNumber@posixAccount
...
dn: cn=template_posixaccount_objectclass,uid=scarter,ou=people,dc=example,dc=com
uidnumber: (template_attribute)
entryLevelRights: v
attributeLevelRights: uidNumber:rsc
You can use an asterisk (
*) to return all attributes of an object class in a format *@objectClass. The search result also includes the non-existent attributes.
8.3.4. Examples of Get Effective Rights search for non-existent entries
This example shows how to check the rights of a specific user over the entries of a user, which does not exist yet. In this case the server generates the template entry within the subtree and you can use the Get Effective Rights (GER) search on it. For checking a non-existent entry, the Get Effective Rights (GER) search can use a specified object class to generate a template entry with all of the potential attributes of this entry.
When the server creates the template entry, it uses the first MUST attribute in the object class definition to create the RDN attribute. If the MUST attribute does not exist, the server uses MAY attribute. Specify the RDN value by passing it to the object class in a format @objectclass:rdn_attribute.
For example, to check the rights of scarter for a non-existent POSIX entry with uidNumber as its RDN:
Example 8.9. Checking rights on non-existent entry
# ldapsearch -D "cn=Directory Manager" -W -b "ou=people,dc=example,dc=com" -E '!1.3.6.1.4.1.42.2.27.9.5.2=:dn:uid=scarter,ou=people,dc=example,dc=com' "(objectclass=*)" @posixaccount:uidnumber

dn: uidNumber=template_posixaccount_objectclass,ou=people,dc=example,dc=com
entryLevelRights: v
attributeLevelRights: description:rsc, gecos:rsc, loginShell:rsc, userPassword:rsc, objectClass:rsc, homeDirectory:rsc, gidNumber:rsc, uidNumber:rsc, uid:rsc, cn:rsc
8.3.5. Examples of Get Effective Rights search for operational attributes
The ldapsearch command does not return the operational attributes. Use the plus sign (+) to search for them. Using the + returns only operational attributes which you can use on an entry.
Example 8.10. Searching for operational attributes
# ldapsearch -D "cn=Directory Manager" -W -x -b "uid=scarter,ou=people,dc=example,dc=com" -E '!1.3.6.1.4.1.42.2.27.9.5.2=:dn:uid=scarter,ou=people,dc=example,dc=com' "(objectclass=*)" "+"

dn: uid=scarter,ou=People,dc=example,dc=com
entryLevelRights: vadn
attributeLevelRights: nsICQStatusText:rscwo, passwordGraceUserTime:rscwo, pwdGraceUserTime:rscwo, nsYIMStatusText:rscwo, modifyTimestamp:rscwo, passwordExpWarned:rscwo, pwdExpirationWarned:rscwo, entrydn:rscwo, aci:rscwo, nsSizeLimit:rscwo, nsAccountLock:rscwo, passwordExpirationTime:rscwo, entryid:rscwo, nsSchemaCSN:rscwo, nsRole:rscwo, retryCountResetTime:rscwo, ldapSchemas:rscwo, nsAIMStatusText:rscwo, copiedFrom:rscwo, nsICQStatusGraphic:rscwo, nsUniqueId:rscwo, creatorsName:rscwo, passwordRetryCount:rscwo, dncomp:rscwo, nsTimeLimit:rscwo, passwordHistory:rscwo, pwdHistory:rscwo, nscpEntryDN:rscwo, subschemaSubentry:rscwo, nsYIMStatusGraphic:rscwo, hasSubordinates:rscwo, pwdpolicysubentry:rscwo, nsAIMStatusGraphic:rscwo, nsRoleDN:rscwo, createTimestamp:rscwo, accountUnlockTime:rscwo, copyingFrom:rscwo, nsLookThroughLimit:rscwo, nsds5ReplConflict:rscwo, modifiersName:rscwo, parentid:rscwo, passwordAllowChangeTime:rscwo, nsBackendSuffix:rscwo, nsIdleTimeout:rscwo, ldapSyntaxes:rscwo, numSubordinates:rscwo
8.3.6. Examples of Get Effective Rights results and Access Control rules
The effective Access Control Lists (ACL) define what Get Access Rights (GER) a user has.
Example 8.11. Access Control List
dn: dc=example,dc=com
objectClass: top
objectClass: domain
dc: example
aci: (target=ldap:///ou=Accounting,dc=example,dc=com)(targetattr="*")(version 3.0; acl "test acl"; allow (read,search,compare) (userdn = "ldap:///anyone") ;)

dn: ou=Accounting,dc=example,dc=com
objectClass: top
objectClass: organizationalUnit
ou: Accounting
In this example, the ACL does not include the dc=example,dc=com subtree. That causes the GER search result to show that the user does not have any right on the dc=example,dc=com entry:
Example 8.12. GER search results with unset ACL
# ldapsearch -D "cn=Directory Manager" -W -b "dc=example,dc=com" -E '!1.3.6.1.4.1.42.2.27.9.5.2=:dn:uid=scarter,ou=people,dc=example,dc=com' "(objectclass=*)" "*@person"

dn: cn=template_person_objectclass,uid=scarter,ou=people,dc=example,dc=com
objectClass: person
objectClass: top
cn: (template_attribute)
sn: (template_attribute)
description: (template_attribute)
seeAlso: (template_attribute)
telephoneNumber: (template_attribute)
userPassword: (template_attribute)
entryLevelRights: none
attributeLevelRights: sn:none, cn:none, objectClass:none, description:none, seeAlso:none, telephoneNumber:none, userPassword:none, aci:none
To see the result, you must be a Directory Manager, else the result is blank.
8.4. Get Effective Right return codes
The Get Effective Rights (GER) search result returns an error code if an error occurs. The following table describes the error codes:
Table 8.3. Error codes
| Code | Description |
|---|---|
| 0 | Successfully completed. |
| 1 | Operation error. |
| 12 |
The critical extension is unavailable. If the critical expression is set to |
| 16 | No such attribute. |
| 17 | Undefined attribute type. |
| 21 | Invalid attribute syntax. |
| 50 | Insufficient rights. |
| 52 | Unavailable. |
| 53 | Unwilling to perform. |
| 80 | Other. |