
Installing Red Hat Directory Server
Instructions for managing a Directory Server installation, update, and uninstallation. Basic tasks you need to start working with an instance
Abstract
Providing feedback on Red Hat documentation
We appreciate your input on our documentation. Please let us know how we could make it better. To do so:
For submitting feedback through Jira (account required):
- Log in to the Jira website.
- Click Create in the top navigation bar
- Enter a descriptive title in the Summary field.
- Enter your suggestion for improvement in the Description field. Include links to the relevant parts of the documentation.
- Click Create at the bottom of the dialogue.
For submitting feedback through Bugzilla (account required):
- Go to the Bugzilla website.
- As the Component, use Documentation.
- Fill in the Description field with your suggestion for improvement. Include a link to the relevant part(s) of documentation.
- Click Submit Bug.
Chapter 1. Setting up a new instance on the command line using a .inf file
When you set up Directory Server using a .inf file on the command line you can customize advanced settings. For example, you can customize in the .inf file the following settings:
-
The user and group the
ns-slapdDirectory Server process uses after the service has started. Note that, if you use a different user and group, you must manually create the user and group before you start the installation. - Paths, such as the configuration, backup, and data directory.
- Certificate validity.
1.1. Prerequisites
- The server meets the requirements of the latest Red Hat Directory Server version as described in the Red Hat Directory Server 12 Release Notes.
1.2. Installing the Directory Server packages
Use the following procedure to install the Directory Server packages.
Prerequisites
- You registered the system to the Red Hat subscription management service.
- You have a valid Red Hat Directory Server subscription in your Red Hat account.
-
The RHEL default repositories,
BaseOSandAppStream, are enabled.
Procedure
List the available subscriptions in your Red Hat account that provide a Red Hat Directory Server subscription, and note the pool ID:
# subscription-manager list --all --available --matches 'Red Hat Directory Server'
...
Subscription Name:   Example Subscription
Provides:            ...
                     Red Hat Directory Server
                     ...
Pool ID:             5ab6a8df96b03fd30aba9a9c58da57a1
Available:           1
...
Attach the Red Hat Directory Server subscription to the system using the its pool ID:
# subscription-manager attach --pool=5ab6a8df96b03fd30aba9a9c58da57a1
Successfully attached a subscription for: Example Subscription
Enable the
dirsrv-12-for-rhel-9-x86_64-rpmsrepository:# subscription-manager repos --enable=dirsrv-12-for-rhel-9-x86_64-rpms Repository 'dirsrv-12-for-rhel-9-x86_64-rpms' is enabled for this system.Install the
redhat-ds:12module:# dnf module install redhat-ds:12This command automatically installs all required dependencies.
Additional resources
1.3. Creating a .inf file for a Directory Server instance installation
Create a .inf file for the dscreate utility, and adjust the file to your environment. In a later step, you will use this file to create the new Directory Server instance.
Prerequisites
-
You installed the
redhat-ds:12module.
Procedure
Use the
dscreate create-templatecommand to create a template.inffile. For example, to store the template in the/root/instance_name.inffile, enter:# dscreate create-template /root/instance_name.infThe created file contains all available parameters including descriptions.
Edit the file that you created in the previous step:
Uncomment the parameters that you want to set to customize the installation.
All parameters have defaults. However, Red Hat recommends that you customize certain parameters for a production environment. For example, set at least the following parameters in the
[slapd]section:instance_name = instance_name root_password = password
To automatically create a suffix during instance creation, set the following parameters in the
[backend-userroot]section:create_suffix_entry = True suffix = dc=example,dc=com
ImportantIf you do not create a suffix during instance creation, you must create it later manually before you can store data in this instance.
Optional: Uncomment other parameters and set them to appropriate values for your environment. For example, use these parameters to specify replication options, such as authentication credentials and changelog trimming, or set different ports for the LDAP and LDAPS protocols.
NoteBy default, new instances that you create include a self-signed certificate and TLS enabled. For increased security, Red Hat recommends that you do not disable this feature. Note that you can replace the self-signed certificate with a certificate issued by a Certificate Authority (CA) at a later date.
Additional resources
1.4. Using a .inf file to set up a new Directory Server instance
This section describes how to use a .inf file to set up a new Directory Server instance using the command line.
Prerequisites
-
You created a
.inffile for the Directory Server instance.
Procedure
Pass the
.inffile to thedscreate from-filecommand to create the new instance:# dscreate from-file /root/instance_name.inf Starting installation ... Validate installation settings ... Create file system structures ... Create self-signed certificate database ... Perform SELinux labeling ... Perform post-installation tasks ... Completed installation for instance: slapd-instance_name
The
dscreateutility automatically starts the instance and configures RHEL to start the service when the system boots.Open the required ports in the firewall:
# firewall-cmd --permanent --add-port={389/tcp,636/tcp}Reload the firewall configuration:
# firewall-cmd --reload
Chapter 2. Setting up a new instance on the command line using the interactive installer
Administrators can use the Directory Server interactive installer to set up a new instance by answering questions about the configuration for the new instance.
If you want to customize additional settings during the installation, use a .inf file instead of the interactive installer. For details, see Chapter 1, Setting up a new instance on the command line using a .inf file.
2.1. Prerequisites
- The server meets the requirements of the latest Red Hat Directory Server version as described in the Red Hat Directory Server 12 Release Notes.
2.2. Installing the Directory Server packages
Use the following procedure to install the Directory Server packages.
Prerequisites
- You registered the system to the Red Hat subscription management service.
- You have a valid Red Hat Directory Server subscription in your Red Hat account.
-
The RHEL default repositories,
BaseOSandAppStream, are enabled.
Procedure
List the available subscriptions in your Red Hat account that provide a Red Hat Directory Server subscription, and note the pool ID:
# subscription-manager list --all --available --matches 'Red Hat Directory Server'
...
Subscription Name:   Example Subscription
Provides:            ...
                     Red Hat Directory Server
                     ...
Pool ID:             5ab6a8df96b03fd30aba9a9c58da57a1
Available:           1
...
Attach the Red Hat Directory Server subscription to the system using the its pool ID:
# subscription-manager attach --pool=5ab6a8df96b03fd30aba9a9c58da57a1
Successfully attached a subscription for: Example Subscription
Enable the
dirsrv-12-for-rhel-9-x86_64-rpmsrepository:# subscription-manager repos --enable=dirsrv-12-for-rhel-9-x86_64-rpms Repository 'dirsrv-12-for-rhel-9-x86_64-rpms' is enabled for this system.Install the
redhat-ds:12module:# dnf module install redhat-ds:12This command automatically installs all required dependencies.
Additional resources
2.3. Creating an instance using the interactive installer
This section explains how to use the interactive installer to create a new Directory Server instance.
Procedure
Start the interactive installer:
# dscreate interactiveAnswer the questions of the interactive installer.
To use the default values displayed in square brackets behind most questions in the installer, press Enter without entering a value.
Install Directory Server (interactive mode)
===========================================

Enter system's hostname [server.example.com]:

Enter the instance name [server]: instance_name

Enter port number [389]:

Create self-signed certificate database [yes]:

Enter secure port number [636]:

Enter Directory Manager DN [cn=Directory Manager]:

Enter the Directory Manager password: password
Confirm the Directory Manager Password: password

Enter the database suffix (or enter "none" to skip) [dc=server,dc=example,dc=com]: dc=example,dc=com

Create sample entries in the suffix [no]:

Create just the top suffix entry [no]: yes

Do you want to start the instance after the installation? [yes]:

Are you ready to install? [no]: yes
NoteInstead of setting a password in clear text you can set a
{algorithm}hashstring generated by thepwdhashutility.Open the required ports in the firewall:
# firewall-cmd --permanent --add-port={389/tcp,636/tcp}Reload the firewall configuration:
# firewall-cmd --reload
Chapter 3. Setting up a new instance using the web console
If you prefer a browser-based interface to set up Directory Server, you can use the Directory Server web console.
3.1. Prerequisites
- The server meets the requirements of the latest Red Hat Directory Server version as described in the Red Hat Directory Server 12 Release Notes.
3.2. Installing the Directory Server packages
Use the following procedure to install the Directory Server packages.
Prerequisites
- You registered the system to the Red Hat subscription management service.
- You have a valid Red Hat Directory Server subscription in your Red Hat account.
-
The RHEL default repositories,
BaseOSandAppStream, are enabled.
Procedure
List the available subscriptions in your Red Hat account that provide a Red Hat Directory Server subscription, and note the pool ID:
# subscription-manager list --all --available --matches 'Red Hat Directory Server'
...
Subscription Name:   Example Subscription
Provides:            ...
                     Red Hat Directory Server
                     ...
Pool ID:             5ab6a8df96b03fd30aba9a9c58da57a1
Available:           1
...
Attach the Red Hat Directory Server subscription to the system using the its pool ID:
# subscription-manager attach --pool=5ab6a8df96b03fd30aba9a9c58da57a1
Successfully attached a subscription for: Example Subscription
Enable the
dirsrv-12-for-rhel-9-x86_64-rpmsrepository:# subscription-manager repos --enable=dirsrv-12-for-rhel-9-x86_64-rpms Repository 'dirsrv-12-for-rhel-9-x86_64-rpms' is enabled for this system.Install the
redhat-ds:12module:# dnf module install redhat-ds:12This command automatically installs all required dependencies.
Additional resources
3.3. Using the web console to set up a new Directory Server instance
This section describes how to use the web console to set up a new Directory Server instance.
Prerequisites
-
The
cockpitweb console package is installed. -
The
cockpit.socketsystemd unit is enabled and started. -
You opened port
9090in the local firewall to allow accessing the web console.
Procedure
Use a browser to connect to the web console running on port 9090 on the Directory Server host:
https://server.example.com:9090-
Log in as the
rootuser or as a user with sudo privileges. - Select the Red Hat Directory Server entry.
Create a new instance:
- If no instance exists on the server, click the button.
- If the server already runs existing instances, select and click .
Complete the fields of the
Create New Server Instanceform:-
Instance Name: Sets the name of the instance. Note that you cannot change the name of an instance after it has been created. -
Port: Sets the port number of the LDAP protocol. The port must not be in use by another instance or service. The default port is 389. -
Secure Port: Sets the port number of the LDAPS protocol. The port must not be in use by another instance or service. The default port is 636. Create Self-Signed TLS Certificate DB: Enables TLS encryption in the instance, and creates a self-signed certificate.For increased security, Red Hat recommends that you create the new instance with the self-signed certificate and TLS enabled. Note that you can replace the self-signed certificate with a certificate issued by a Certificate Authority (CA) at a later date.
-
Directory Manager DN: Sets the distinguished name (DN) of the administrative user of the instance. The default value iscn=Directory Manager. -
Directory Manager Password: Sets the password of the administrative user of the instance. -
Confirm Password: Must be set to the same value as in theDirectory Manager Passwordfield. Create Database: Select this field to automatically create a suffix during instance creation.ImportantIf you do not create a suffix during instance creation, you must create it later manually before you can store data in this instance.
If you enabled this option, fill the addition fields:
-
Database Suffix: Sets the suffix for the back end. -
Database Name: Sets the name of the back end database. -
Database Initialization: Set this field toCreate Suffix Entry.
-
-
Click .
The new instance starts and is configured to start automatically when the system boots.
Open the required ports in the firewall:
#
firewall-cmd --permanent --add-port={389/tcp,636/tcp}Reload the firewall configuration:
#
firewall-cmd --reload
Additional resources
Chapter 4. Setting up a new instance as a non-root user
If you do not have root permissions, you can perform the Directory Server installation as a user. Use this method to test Directory Server and develop LDAP applications. However, note that instances running by a non-root user have limitations, such as:
- They do not support Simple Network Management Protocol (SNMP).
- They can use only ports higher or equal to 1024.
4.1. Preparing the environment to install Directory Server as a user
Without root permissions, before you can create and administer Directory Server instances, you need to prepare a proper environment using the dscreate ds-root command.
Prerequisites
-
You installed the Directory Server packages as a
rootuser.
Procedure
Ensure you have
$HOME/binin your PATH variable. If not:Append the following to the
~/.bash_profilefile:PATH="$HOME/bin:$PATH"
Re-read the
~/bash_profilefile:$ source ~/.bash_profile
Configure the environment for an instance creation to use the custom location:
$ dscreate ds-root $HOME/dsroot $HOME/bin
This command replaces the standard installation paths with
$HOME/dsroot/and creates a copy of the standard Directory Server administration utilities in the$HOME/bin/directory.To make the shell use new paths:
Clear the cache:
$ hash -r dscreate
Verify that the shell uses the correct path to the command:
$ which dscreate
~/bin/dscreate
For the dscreate command, the shell now uses the $HOME/bin/dscreate instead of /usr/bin/dscreate.
4.2. Installing a new instance as non-root user
To install Directory Server without root permissions, you can use the interactive installer. After the installation, Directory Server creates an instance in the custom location and a user can run dscreate, dsctl, dsconf utilities as usual.
Prerequisites
- You prepared the environment for non-root installation.
-
You have
sudopermissions to use thefirewall-cmdutility If you want to make the Directory Server instance available from the outside.
Procedure
Create an instance using the interactive installer
Start the interactive installer:
$ dscreate interactiveAnswer the questions of the interactive installer.
To use the default values displayed in square brackets behind most questions in the installer, press Enter without entering a value.
NoteDuring the installation, you must choose the instance port and secure port number higher than 1024 (for example, 1389 and 1636). Otherwise, a user does not have permissions to bind to a privileged port (1-1023).
Install Directory Server (interactive mode)
===========================================
Non privileged user cannot use semanage, will not relabel ports or files.

Selinux support will be disabled, continue? [yes]: yes

Enter system's hostname [server.example.com]:

Enter the instance name [server]: instance_name

Enter port number [389]: 1389

Create self-signed certificate database [yes]:

Enter secure port number [636]: 1636

Enter Directory Manager DN [cn=Directory Manager]:

Enter the Directory Manager password: password
Confirm the Directory Manager Password: password

Enter the database suffix (or enter "none" to skip) [dc=server,dc=example,dc=com]: dc=example,dc=com

Create sample entries in the suffix [no]:

Create just the top suffix entry [no]: yes

Do you want to start the instance after the installation? [yes]:

Are you ready to install? [no]: yes
NoteInstead of setting a password in clear text you can set a
{algorithm}hashstring generated by thepwdhashutility.
Optional: If you want to make the Directory Server instance available from the outside:
Open the ports in the firewall:
# sudo firewall-cmd --permanent --add-port={1389/tcp,1636/tcp}Reload the firewall configuration:
# sudo firewall-cmd --reload
Verification
Run
ldapsearchcommand to test that a user can connect to the instance:$ ldapsearch -D "cn=Directory Manager" -W -H ldap://server.example.com:1389 -b "dc=example,dc=com" -s sub -x "(objectclass=*)"
Chapter 5. Installing Directory Server with Kerberos authentication behind a load balancer
Installing Directory Server instances that work behind a load balancer and support Kerberos authentication require additional steps compared during the installation.
If a user accesses a service using Generic Security Services API (GSSAPI), the Kerberos principal includes the DNS name of the service’s host. In case the user connects to a load balancer, the principal contains the DNS name of the load balancer, for example: ldap/loadbalancer.example.com@EXAMPLE.COM, and not the DNS name of the Directory Server instance.
To facilitate successful connection, the Directory Server instance that receives the request must use the same name as the load balancer, even if the load balancer DNS name is different.
This section describes how to set up an Directory Server instance with Kerberos authentication support behind a load balancer.
5.1. Prerequisites
- The server meets the requirements of the latest Red Hat Directory Server version as described in the Red Hat Directory Server 12 Release Notes.
5.2. Installing the Directory Server packages
Use the following procedure to install the Directory Server packages.
Prerequisites
- You registered the system to the Red Hat subscription management service.
- You have a valid Red Hat Directory Server subscription in your Red Hat account.
-
The RHEL default repositories,
BaseOSandAppStream, are enabled.
Procedure
List the available subscriptions in your Red Hat account that provide a Red Hat Directory Server subscription, and note the pool ID:
# subscription-manager list --all --available --matches 'Red Hat Directory Server'
...
Subscription Name:   Example Subscription
Provides:            ...
                     Red Hat Directory Server
                     ...
Pool ID:             5ab6a8df96b03fd30aba9a9c58da57a1
Available:           1
...
Attach the Red Hat Directory Server subscription to the system using the its pool ID:
# subscription-manager attach --pool=5ab6a8df96b03fd30aba9a9c58da57a1
Successfully attached a subscription for: Example Subscription
Enable the
dirsrv-12-for-rhel-9-x86_64-rpmsrepository:# subscription-manager repos --enable=dirsrv-12-for-rhel-9-x86_64-rpms Repository 'dirsrv-12-for-rhel-9-x86_64-rpms' is enabled for this system.Install the
redhat-ds:12module:# dnf module install redhat-ds:12This command automatically installs all required dependencies.
Additional resources
5.3. Creating a .inf file for a Directory Server instance installation
Create a .inf file for the dscreate utility, and adjust the file to your environment. In a later step, you will use this file to create the new Directory Server instance.
Prerequisites
-
You installed the
redhat-ds:12module.
Procedure
Use the
dscreate create-templatecommand to create a template.inffile. For example, to store the template in the/root/instance_name.inffile, enter:# dscreate create-template /root/instance_name.infThe created file contains all available parameters including descriptions.
Edit the file that you created in the previous step:
Uncomment the parameters that you want to set to customize the installation.
All parameters have defaults. However, Red Hat recommends that you customize certain parameters for a production environment. For example, set at least the following parameters in the
[slapd]section:instance_name = instance_name root_password = password
To use the instance behind a load balancer with GSSAPI authentication, set the
full_machine_nameparameter in the[general]section to the fully-qualified domain name (FQDN) of the load balancer instead of the FQDN of the Directory Server host:full_machine_name = loadbalancer.example.comUncomment the
strict_host_checkingparameter in the[general]section and set it toFalse:strict_host_checking = FalseTo automatically create a suffix during instance creation, set the following parameters in the
[backend-userroot]section:create_suffix_entry = True suffix = dc=example,dc=com
ImportantIf you do not create a suffix during instance creation, you must create it later manually before you can store data in this instance.
Optional: Uncomment other parameters and set them to appropriate values for your environment. For example, use these parameters to specify replication options, such as authentication credentials and changelog trimming, or set different ports for the LDAP and LDAPS protocols.
NoteBy default, new instances that you create include a self-signed certificate and TLS enabled. For increased security, Red Hat recommends that you do not disable this feature. Note that you can replace the self-signed certificate with a certificate issued by a Certificate Authority (CA) at a later date.
Additional resources
5.4. Using a .inf file to set up a new Directory Server instance
This section describes how to use a .inf file to set up a new Directory Server instance using the command line.
Prerequisites
-
You created a
.inffile for the Directory Server instance.
Procedure
Pass the
.inffile to thedscreate from-filecommand to create the new instance:# dscreate from-file /root/instance_name.inf Starting installation ... Validate installation settings ... Create file system structures ... Create self-signed certificate database ... Perform SELinux labeling ... Perform post-installation tasks ... Completed installation for instance: slapd-instance_name
The
dscreateutility automatically starts the instance and configures RHEL to start the service when the system boots.Open the required ports in the firewall:
# firewall-cmd --permanent --add-port={389/tcp,636/tcp}Reload the firewall configuration:
# firewall-cmd --reload
5.5. Creating a keytab for the load balancer and configuring Directory Server to use the keytab
Before user can authenticate to Directory Server behind a load balancer using GSSAPI, you must create a Kerberos principal for the load balancer and configure Directory Server to use the Kerberos principal. This section describes this procedure.
Prerequisites
An instance that contains the following
.inffile configuration:-
The
full_machine_nameparameter set to the DNS name of the load balancer. -
The
strict_host_checkingparameter set toFalse.
-
The
Procedure
-
Create the Kerberos principal for the load balancer, for example
ldap/loadbalancer.example.com_@_EXAMPLE.COM. The procedure to create the service principal depends on your Kerberos installation. For details, see your Kerberos server’s documentation. -
Optional: You can add further principals to the keytab file. For example, to enable users to connect to the Directory Server instance behind the load balancer directly using Kerberos authentication, add additional principals for the Directory Server host. For example,
ldap/server1.example.com@EXAMPLE.COM. -
Copy the service keytab file to the Directory Server host, and store it, for example, in the
/etc/dirsrv/slapd-instance_name/ldap.keytabfile. Add the path to the service keytab to the
/etc/sysconfig/slapd-instance_namefile:KRB5_KTNAME=/etc/dirsrv/slapd-instance_name/ldap.keytabRestart the Directory Server instance:
# dsctl instance_name restart
Verification
Verify that you can connect to the load balancer using the GSSAPI protocol:
# ldapsearch -H ldap://loadbalancer.example.com -Y GSSAPIIf you added additional Kerberos principals to the keytab file, such as for the Directory Server host itself, also verify these connections:
# ldapsearch -H ldap://server1.example.com -Y GSSAPI
Chapter 6. Running Directory Server in FIPS mode
Directory Server fully supports the Federal Information Processing Standard (FIPS) 140-2. When you run Directory Server run in FIPS mode, security-related settings change. For example, SSL is automatically disabled and only TLS 1.2 and 1.3 encryption is used.
6.1. Enabling the FIPS mode
To use Directory Server in Federal Information Processing Standard (FIPS) mode, enable the mode in RHEL and Directory Server.
Prerequisites
- You enabled the FIPS mode in RHEL.
Procedure
Enable the FIPS mode for the network security services (NSS) database:
# modutil -dbdir /etc/dirsrv/slapd-instance_name/ -fips trueRestart the instance:
#
dsctl instance_name restart
Verification
Verify that FIPS mode is enabled for the NSS database:
# modutil -dbdir /etc/dirsrv/slapd-instance_name/ -chkfips true
FIPS mode enabled.
The command returns
FIPS mode enabled, if the module is in FIPS mode.
6.2. Additional resources
Chapter 7. Updating Directory Server to a new minor version
Red Hat frequently releases updated versions of Red Hat Directory Server 12. This section describes how to update the Directory Server packages.
If you instead want to migrate Red Hat Directory Server 11 to version 12, see Migrating Directory Server 11 to Directory Server 12.
7.1. Updating the Directory Server packages
You can use the dnf utility to update the module, which also automatically updates the related packages.
Prerequisites
- Red Hat Directory Server 12 is installed on the server.
- The system to update is registered to the Red Hat subscription management service.
- A valid Red Hat Directory Server subscription is attached to the server.
Procedure
Use the
dnf module update redhat-dscommand to check for new updates of Directory Server packages and their dependencies, and to install them:# dnf module update redhat-dsThe update process automatically restarts the
dirsrvservices for all instances on the server.
Chapter 8. Migrating Directory Server 11 to Directory Server 12
Learn about migrating from Red Hat Directory Server 11 to 12, including tasks that you must perform before the migration begins.
Red Hat supports migration only from Red Hat Directory Server 10 or 11 to version 12. To migrate Directory Server from earlier version, you must perform incremental migrations to Directory Server 10 or 11.
Red Hat does not support an in-place upgrade of Directory Server 10 or 11 servers to version 12 by using the leapp upgrade tool.
8.1. Prerequisites
- The existing Directory Server installation runs on version 11 and has all available updates installed.
8.2. Migrating to Directory Server 12 using the replication method
In a replication topology, use the replication method to migrate to Directory Server 12.
Procedure
- Install Directory Server 12.
- On the Directory Server 12 host, enable replication, but do not create a replication agreement. For details about enabling replication, see the Configuring and managing replication documentation for Red Hat Directory Server 12.
On the Directory Server 11 host, enable replication and create a replication agreement that points to the Directory Server 12 host. For more information, see the Multi-Supplier Replication section in the Red Hat Directory Server 11 Administrator Guide.
ImportantIf you used a custom configuration on the Directory Server 11 host, do not replace the
dse.ldifconfiguration file on the Directory Server 12 host with the file from the Directory Server 11 host, because thedse.ldiflayout changes between versions. Instead, use thedsconfutility or the web console to add the custom configuration for each parameter and plug-in that you require.- Optional: Set up further Directory Server 12 hosts with replication agreements between Directory Server 12 hosts.
- Configure your clients to use only Directory Server 12 hosts.
- Remove the replication agreements with Directory Server 11 hosts. See Removing a Directory Server Instance from the Replication Topology in the Red Hat Directory Server 11 Administrator Guide.
- Uninstall the Directory Server 11 hosts. See Uninstalling Directory Server in the Red Hat Directory Server 11 Installation Guide.
8.3. Migrating to Directory Server 12 using the export and import method
Use the export and import method to migrate small Directory Server environments, such as instances without replication.
Procedure
Perform the following steps on the existing Directory Server 11 host:
Stop and disable the
dirsrvservice:# dsctl instance_name stop # systemctl disable dirsrv@instance_name
Export the backend. For example, to export the
userRootbackend and store it in the/var/lib/dirsrv/slapd-instance_name/userRoot.ldiffile, run:# dsctl instance_name db2ldif userroot /var/lib/dirsrv/slapd-instance_name/userRoot.ldifCopy the following files to the new host where you want to install Directory Server 12:
-
The
/var/lib/dirsrv/slapd-instance_name/userRoot.ldiffile that you exported in the previous step. The
/etc/dirsrv/slapd-instance_name/dse.ldifconfiguration file.ImportantDo not replace the
dse.ldifconfiguration file on the Directory Server 12 host with the file from the Directory Server 11 host because thedse.ldiflayout changes different versions. Store thedse.ldiffile for the reference.-
/etc/dirsrv/slapd-instance_name/schema/99user.ldif, if you use a custom schema If you want to migrate an instance with TLS enabled and reuse the same host name for the Directory Server 12 installation, copy the following files to the new host:
-
/etc/dirsrv/slapd-instance_name/cert9.db -
/etc/dirsrv/slapd-instance_name/key4.db -
/etc/dirsrv/slapd-instance_name/pin.txt
-
-
The
- If you want to use the same host name and IP on the Directory Server 12 host, disconnect the old server from the network.
Perform the following steps on the new host:
- Install Directory Server 12.
Optional: Configure TLS encryption:
- If the new installation uses a different host name than the Directory Server 11 instance, see the Enabling TLS-encrypted connections to Directory Server section in the Securing Red Hat Directory Server documentation.
To use the same host name as the previous Directory Server 11 installation:
Stop the instance:
# dsctl instance_name stopRemove the Network Security Services (NSS) databases and the password file for Directory Server, if they already exist:
# rm /etc/dirsrv/slapd-instance_name/cert*.db /etc/dirsrv/slapd-instance_name/key*.db /etc/dirsrv/slapd-instance_name/pin.txt-
Place the
cert9.db,key4.db, andpin.txtfiles that you copied from the Directory Server 11 host to the/etc/dirsrv/slapd-instance_name/directory. Set the correct permissions for the NSS databases and the password file:
# chown dirsrv:root /etc/dirsrv/slapd-instance_name/cert9.db /etc/dirsrv/slapd-instance_name/key4.db /etc/dirsrv/slapd-instance_name/pin.txt

# chmod 600 /etc/dirsrv/slapd-instance_name/cert9.db /etc/dirsrv/slapd-instance_name/key4.db /etc/dirsrv/slapd-instance_name/pin.txt
Start the instance:
# dsctl instance_name start
If you used a custom schema, place the
99user.ldiffile into the/etc/dirsrv/slapd-instance_name/schema/directory, set appropriate permissions, and restart the instance:# cp /tmp/99user.ldif /etc/dirsrv/slapd-instance_name/schema/ # chmod 644 /etc/dirsrv/slapd-instance_name/schema/99user.ldif # chown root:root /etc/dirsrv/slapd-instance_name/schema/99user.ldif # dsctl instance_name restart
Import the LDIF file. For example, to import the
/var/lib/dirsrv/slapd-instance_name/ldif/migration.ldiffile into theuserRootdatabase:# dsconf -D 'cn=Directory Manager' ldap://server.example.com backend import userRoot /var/lib/dirsrv/slapd-instance_name/ldif/migration.ldifNote that Directory Server requires the LDIF file you want to import in the
/var/lib/dirsrv/slapd-instance_name/directory.ImportantIf you used a custom configuration on the Directory Server 11 host, do not replace the
dse.ldifconfiguration file on the Directory Server 12 host with the file from the Directory Server 11 host. Instead, use thedsconfutility or the web console to add the custom configuration manually for each parameter and plug-in that you require.
Chapter 9. Migrating Directory Server 10 to Directory Server 12
Learn about migration from Red Hat Directory Server 10 to 12, including tasks that you must perform before you start the migration.
Red Hat supports migration only from Red Hat Directory Server 10 or 11 to version 12. To migrate Directory Server from earlier version, you must perform incremental migrations to Directory Server 10 or 11.
Red Hat does not support an in-place upgrade of Directory Server 10 or 11 servers to version 12 by using the leapp upgrade tool.
9.1. Prerequisites
- The existing Directory Server installation runs on version 10 and has all available updates installed.
9.2. Migrating Directory Server 10 to version 12 using the replication method
In a replication topology, use the replication method to migrate to Directory Server 12.
Procedure
- Install Directory Server 12 on a new host.
- On the Directory Server 12 host, enable replication, but do not create a replication agreement. For details about enabling replication, see the Configuring and managing replication in the Red Hat Directory Server 12 documentation.
On the Directory Server 10 host, enable replication and create a replication agreement that points to the Directory Server 12 host. For details about enabling replication, see the corresponding section in the Red Hat Directory Server 10 Administrator Guide.
ImportantIf you used a custom configuration on the Directory Server 10 host, do not replace the
dse.ldifconfiguration file on the Directory Server 12 host with the file from previous versions, because thedse.ldiflayout changes between versions. Instead, use thedsconfutility or the web console to add the custom configuration for each parameter and plug-in that you require.- Optional: Set up further Directory Server 12 hosts with replication agreements between the Directory Server 12 hosts.
- Configure your clients to use only the Directory Server 12 hosts.
- On the Directory Server 12 host, remove the replication agreements that point to the Directory Server 10 host. See Removing an instance from a replication topology in the Red Hat Directory Server 12 Administrator Guide.
- Uninstall the Directory Server 10 hosts. See Uninstalling Directory Server in the Red Hat Directory Server 10 Installation Guide.
9.3. Migrating Directory Server 10 to version 12 using the export and import method
Use the export and import method to migrate large Directory Server environments.
Procedure
Perform the following steps on the existing Directory Server 10 host:
Stop and disable the
dirsrvservice:# dsctl instance_name stop # systemctl disable dirsrv@instance_name
Export the back end. For example, to export the
userRootback end and store it in the/tmp/userRoot.ldiffile:# db2ldif -Z instance_name -n userRoot -a /tmp/userRoot.ldifCopy the following files to the new host where you want to install Directory Server 12:
-
The LDIF file
userRoot.ldifthat you exported in the previous step. -
The
/etc/dirsrv/slapd-instance_name/schema/99user.ldiffile if you use a custom schema. The
/etc/dirsrv/slapd-instance_name/dse.ldifconfiguration file.ImportantDo not replace the
dse.ldifconfiguration file on the Directory Server 12 host with the file from the Directory Server 10 host because thedse.ldiflayout changes between versions. Store thedse.ldiffile for the reference.If you want to migrate an instance with TLS enabled and reuse the same host name for the Directory Server 12 installation, copy:
-
/etc/dirsrv/slapd-instance_name/cert8.db -
/etc/dirsrv/slapd-instance_name/key3.db -
/etc/dirsrv/slapd-instance_name/pin.txt
-
-
The LDIF file
- If you want to use the same host name and IP on the Directory Server 12 host, disconnect the old server from the network.
Perform the following steps on the new Directory Server 12 host:
- Install Directory Server 12.
Optional: Configure TLS encryption:
- If the new installation uses a different host name than the Directory Server 10 instance, see the Enabling TLS-encrypted connections to Directory Server section in the Securing Red Hat Directory Server documentation.
If you want to use the same host name as the previous Directory Server 10 installation:
Stop the instance:
# dsctl instance_name stopRemove the Network Security Services (NSS) databases and the password file for Directory Server, if they already exist:
# rm /etc/dirsrv/slapd-instance_name/cert*.db /etc/dirsrv/slapd-instance_name/key*.db /etc/dirsrv/slapd-instance_name/pin.txt-
Move the
cert8.db,key3.db, andpin.txtfiles that you copied from the Directory Server 10 host to the/etc/dirsrv/slapd-instance_name/directory. Set the correct permissions for the NSS databases and the password file:
# chown dirsrv:root /etc/dirsrv/slapd-instance_name/cert8.db /etc/dirsrv/slapd-instance_name/key3.db /etc/dirsrv/slapd-instance_name/pin.txt

# chmod 600 /etc/dirsrv/slapd-instance_name/cert8.db /etc/dirsrv/slapd-instance_name/key3.db /etc/dirsrv/slapd-instance_name/pin.txt
Start the instance:
# dsctl instance_name start
If you used a custom schema, restore the
99user.ldiffile into the/etc/dirsrv/slapd-instance_name/schema/directory, set appropriate permissions, and restart the instance:# cp /tmp/99user.ldif /etc/dirsrv/slapd-instance_name/schema/ # chmod 644 /etc/dirsrv/slapd-instance_name/schema/99user.ldif # chown root:root /etc/dirsrv/slapd-instance_name/schema/99user.ldif # dsctl instance_name restart
-
Place the
/tmp/userRoot.ldiffile you prepared on the Directory Server 10 host to/var/lib/dirsrv/slapd-instance_name/ldif/directory. Import the
userRoot.ldiffile to restore theuserRootback end with all entries:# dsconf -D 'cn=Directory Manager' ldap://server.example.com backend import userRoot /var/lib/dirsrv/slapd-instance_name/ldif/userRoot.ldifNote that Directory Server 12 can import LDIF files only from
/var/lib/dirsrv/slapd-instance_name/directory.ImportantIf you used a custom configuration on the Directory Server 10 host, do not replace the
dse.ldifconfiguration file on the Directory Server 12 host with the file from previous versions. Instead, use thedsconfutility or the web console to add the custom configuration manually for each parameter and plug-in that you require.
Chapter 10. Installing, updating, and uninstalling the password synchronization service
To synchronize passwords between Active Directory and Red Hat Directory Server, you use the password password synchronization service. You can install, update, and remove the password synchronization service.
10.1. The password synchronization service
When you set up password synchronization with Active Directory, Directory Server retrieves all attributes of user objects except the password. Active Directory stores only encrypted passwords, but Directory Server uses different encryption. As a result, Active Directory users passwords must be encrypted by Directory Server.
To enable password synchronization between Active Directory and Directory Server, the Red Hat Directory Password Sync service hooks up into the Windows password changing routine of a domain controller (DC). If a user or administrator sets or updates a password, the service retrieves the password in plain text before it is encrypted and stored in Active Directory. This process enables Red Hat Directory Password Sync to send the plain text password to Directory Server. To protect the password, the service supports only LDAPS connections to Directory Server. When Directory Server stores the password in the user’s entry, the password is automatically encrypted with the password storage scheme configured in Directory Server.
In an Active Directory, all writable DCs can process password actions. Therefore, you must install Red Hat Directory Password Sync on every writable DC in the Active Directory domain.
10.2. Downloading the password synchronization service installer
To install Red Hat Directory Password Sync service, download the installer from the Customer Portal.
Prerequisites
- You have a valid Red Hat Directory Server subscription.
- You have an account on the Red Hat Customer Portal.
Procedure
- Log into the Red Hat Customer Portal.
- Click at the top of the page.
-
Select
Red Hat Directory Serverfrom the product list. -
Select
12in theVersionfield. -
Download
PassSync Installer. - Copy the installer to every writable Active Directory domain controller (DC).
10.3. Installing the password synchronization service
This section describes how to install the Red Hat Directory Password Sync on Windows domain controllers (DC). Perform this procedure on every writable Windows DC.
Prerequisites
-
You downloaded the latest version of the
PassSync Installerto the Windows Active Directory domain controller (DC). - You enabled TLS encryption in Directory Server.
- You prepared the Active Directory domain.
- You created an account for synchronization in Directory Server.
Procedure
- Log in to the Active Directory DC with a user that has permissions to install software on the DC.
-
Double-click the
RedHat-PassSync-ds12.*-x86_64.msifile to install it. -
The
Red Hat Directory Password Sync Setupappears. Click . Fill the fields according to your Directory Server environment. For example:

Fill the following information of the Directory Server host into the fields:
-
Host Name: Sets the name of the Directory Server host. Alternatively, you can set the field to the IPv4 or IPv6 address of the Directory Server host. -
Port Number: Sets the LDAPS port number. -
User Name: Sets the distinguished name (DN) of the synchronization user account. -
Password: Sets the password of the synchronization user. -
Cert Token: Sets the password of the server certificate copied from the Directory Server host. -
Search Base: Sets the DN of the Directory Server entry that contains the synchronized user accounts.
-
- Click to start the installation.
- Click .
Reboot the Windows DC.
ImportantWithout rebooting the DC, the
PasswordHook.dlllibrary is not enabled and password synchronization fails.- Enable replication in Directory Server and create a WinSync agreement.
Additional resources
10.4. Updating the password synchronization service
This section describes how to update an existing Red Hat Directory Password Sync installation on a Windows domain controller (DC).
Perform this procedure on every writable Windows DC.
Prerequisites
- Red Hat Directory Password Sync is running on your Windows DC.
-
You downloaded the latest version of the
PassSync Installerto the Windows Active Directory DC.
Procedure
- Log in to the Active Directory domain controller with a user that has permissions to install software on the DC.
-
Double-click the
RedHat-PassSync-ds12.*-x86_64.msifile. - Click to begin installing.
-
Click the
button. - The setup displays the configuration set during the previous installation. Click to keep the existing settings.
- Click to start the installation.
- Click .
Reboot the Windows DC.
ImportantWithout rebooting the DC, the
PasswordHook.dlllibrary is not enabled and password synchronization will fail.
10.5. Uninstalling the password synchronization service
If you no longer require the Red Hat Directory Password Sync service, remove it from the Active Directory domain controller (DC).
Prerequisites
-
Red Hat Directory Password Syncis installed on the Windows DC.
Procedure
Log in to the Active Directory domain controller with a user that has permissions to remove software from the DC.
-
Open the
Control Panel - Click and then
Select the
Red Hat Directory Password Syncentry, and click the button.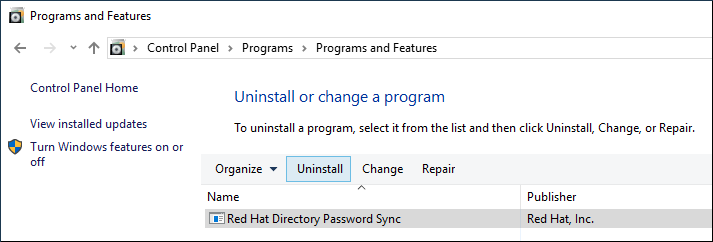
- Click to confirm.
Chapter 11. Removing a Directory Server instance
If you no longer require a Directory Server instance, you can remove it to regain disk space. If you run multiple instances on one server, removing a specific instance does not affect the other instances.
11.1. Removing an instance using the command line
You can remove a Directory Server instance using the command line.
Prerequisites
- The instance has been removed from a replication topology, if it was part of one.
Procedure
Optional: Create a backup of the Directory Server directories:
Stop the instance:
# dsctl instance_name stopCopy the
/var/lib/dirsrv/slapd-instance_name/directory:# cp -rp /var/lib/dirsrv/slapd-instance_name/ /root/var-lib-dirsrv-instance_name.bak/This directory contains the database, as well as the backup and export directory.
Copy the
/etc/dirsrv/slapd-instance_name/directory:# cp -rp /etc/dirsrv/slapd-instance_name/ /root/etc-dirsrv-instance_name.bak/
Remove the instance:
# dsctl instance_name remove --do-it
Removing instance ...
Completed instance removal
Verification
Verify that the
/var/lib/dirsrv/slapd-instance_name/and/etc/dirsrv/slapd-instance_name/directories have been removed:# ls /var/lib/dirsrv/slapd-instance_name /etc/dirsrv/slapd-instance_name/ ls: cannot access '/var/lib/dirsrv/slapd-instance_name': No such file or directory ls: cannot access '/etc/dirsrv/slapd-instance_name': No such file or directory
Additional resources
11.2. Removing an instance using the web console
You can remove a Directory Server instance using the web console. However, if you want to create a backup of the Directory Server directories which contain, for example, the databases and configuration files, you must copy these directories on the command line.
Prerequisites
- The instance has been removed from a replication topology, if it was part of one.
- You are logged in to the instance in the web console.
Procedure
Optional: Create a backup of the Directory Server directories.
-
Click the button, and select
Stop instance. Copy the
/var/lib/dirsrv/slapd-instance_name/directory:# cp -rp /var/lib/dirsrv/slapd-instance_name/ /root/var-lib-dirsrv-instance_name.bak/This directory contains the database, as well as the backup and export directory.
Copy the
/etc/dirsrv/slapd-instance_name/directory:# cp -rp /var/lib/dirsrv/slapd-instance_name/ /root/etc-dirsrv-instance_name.bak/
-
Click the button, and select
-
Click the button, and select
Remove this instance. -
Select
Yes, I am sure, and click to confirm.
Verification
Verify that the
/var/lib/dirsrv/slapd-instance_name/and/etc/dirsrv/slapd-instance_name/directories have been removed:# ls /var/lib/dirsrv/slapd-instance_name /etc/dirsrv/slapd-instance_name/ ls: cannot access '/var/lib/dirsrv/slapd-instance_name': No such file or directory ls: cannot access '/etc/dirsrv/slapd-instance_name': No such file or directory
Additional resources
Chapter 12. Uninstalling Directory Server
If you no longer need a Directory Server instance, you can uninstall it to reclaim space.
12.1. Uninstalling Directory Server
If you no longer require Directory Server running on a server, uninstall the packages as described in this section.
Procedure
- Remove all instances from the replication topology. If your instance is not a member of a replication topology skip this step.
Remove all instances from the server. For each instance, enter:
# dsctl instance_name remove --do-itRemove the Directory Server packages:
# dnf module remove redhat-dsOptional: Disable the
dirsrv-12-for-rhel-8-x86_64-rpmsrepository:# subscription-manager repos --disable=dirsrv-12-for-rhel-8-x86_64-rpms Repository 'dirsrv-12-for-rhel-8-x86_64-rpms' is disabled for this system.Optional: Remove the Red Hat Directory Server subscription from the system:
ImportantIf you remove a subscription that provides additional products than Directory Server, you will not be able to install or update packages for these products.
List the subscriptions attached to the host:
# subscription-manager list --consumed
Subscription Name:   Example Subscription
...
Pool-ID:             5ab6a8df96b03fd30aba9a9c58da57a1
...
Remove the subscription using the pool id from the previous step:
# subscription-manager remove --pool=5ab6a8df96b03fd30aba9a9c58da57a1
2 local certificates have been deleted.
The entitlement server successfully removed these pools:
   5ab6a8df96b03fd30aba9a9c58da57a1
The entitlement server successfully removed these serial numbers:
   1658239469356282126
Additional resources
Chapter 13. Logging in to the Directory Server by using the web console
The web console is a browser-based graphical user interface (GUI) that you can use for performing administrative tasks. The Directory Server package automatically installs the Directory Server user interface for the web console.
Prerequisites
- You have permissions to access the web console.
Procedure
Access the web console by using the following URL in your browser:
https://<directory_server_host>:9090
-
Log in as a user with
sudoprivileges. Select the
Red Hat Directory Serverentry.
Additional resources
Chapter 14. Starting and stopping a Directory Server instance
You can start, stop, and restart a Directory Server instance by using the command line or the web console.
14.1. Starting and stopping a Directory Server instance by using the command line
Use the dsctl utility to start, stop, or restart a Directory Server instance.
The dsctl utility is the only correct way to stop the Directory Server instances. Do not use the kill command to terminate the ns-slapd process to avoid any data loss and corruption.
Procedure
To start the instance, run:
# dsctl instance_name startTo stop the instance, run:
# dsctl instance_name stopTo restart the instance, run:
# dsctl instance_name restart
Optionally, you can enable Directory Server instances to automatically start when the system boots:
For a single instance, run:
# systemctl enable dirsrv@instance_nameFor all instances on a server, run:
# systemctl enable dirsrv.target
Verification
You can check the instance status by using the dsctl or systemctl utility:
To view the instance status by using the
dsctlutility, run:# dsctl instance_name statusTo view the instance status by using the
systemctlutility, run:# systemctl status dirsrv@instance_name
Additional resources
14.2. Starting and stopping a Directory Server instance by using the web console
You can use the web console to start, stop, or restart a Directory Server instance.
Prerequisites
- You are logged in to the web console. For more details, see Logging in to the Directory Server by using the web console.
Procedure
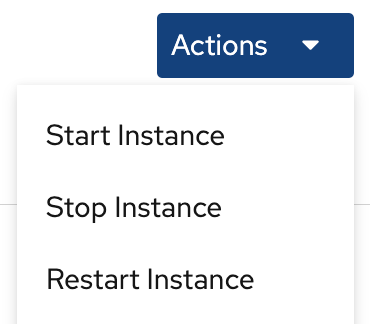
- Select the Directory Server instance.
Click the
Actionsbutton and select the action to execute:- Start Instance
- Stop Instance
Restart Instance
Verification
Ensure that the Directory Server instance is running. When the instance is not running, the web console displays the following message:
This server instance is not running, either start it from the Actions dropdown menu, or choose a different instance.
Chapter 15. Changing the LDAP and LDAPS port numbers
By default, Directory Server uses port 389 for the LDAP and, if you enabled, port 636 for the LDAPS protocol. You can change the port numbers, for example, to run multiple Directory Server instances on one host.
Other services must not use new ports that you assigned to the protocols for an instance.
15.1. Changing the port numbers using the command line
You can change the port numbers of the LDAP and LDAPS protocol using the command line. LDAP and LDAPs port change requires update of the nsslapd-port and nsslapd-securePort parameters.
Procedure
Optionally: Display the current port numbers for the instance:
# dsconf -D "cn=Directory Manager" ldap://server.example.com config get nsslapd-port nsslapd-securePortChange the LDAP port:
Set the new port for the LDAP protocol. For example, to set it to
1389, run:# dsconf -D "cn=Directory Manager" ldap://server.example.com config replace nsslapd-port=1389Set the
ldap_port_ttype for the LDAP port you assigned in the previous step:# semanage port -a -t ldap_port_t -p tcp 1389
Change the LDAPS port:
Set the new port for the LDAPS protocol. For example, to set it to
1636, run:# dsconf -D "cn=Directory Manager" ldap://server.example.com config replace nsslapd-securePort=1636Set the
ldap_port_ttype for the LDAPS port you assigned in the previous step:# semanage port -a -t ldap_port_t -p tcp 1636
Restart the instance:
# dsctl instance_name restart
Verification
Verify that Directory Server now uses the new LDAP port by the command:
# dsconf instance_name config get nsslapd-portVerify that Directory Server now uses the new LDAPS port number by the command:
# dsconf instance_name config get nsslapd-securePort
Additional resources
-
For more details on
nsslapd-securePortparameter, see Description of the nsslapd-securePort parameter -
For more details on
nsslapd-portparameter, see Description of the nsslapd-port parameter
15.2. Changing the port numbers using the web console
You can change the port numbers of the LDAP and LDAPS protocol using the web console.
Prerequisites
- You are logged in to the instance in the web console.
Procedure
Change the LDAP port:
- Open the menu.
-
On the
Server Settingtab, enter the new port number into the LDAP Port field.
- Click .
Change the LDAPS port:
- Open the menu.
-
On the
General Settingstab, enter the new port number into the LDAPS Port field. - Click .
- Restart the instance by clicking and selecting Restart Instance.
Verification
- Verify in the server setting that the changed port is reflected .
Additional resources
- For more details on restarting the instance, see Starting and Stopping a Directory Server instance using the web console
- For more information on logging into Directory Server using web console, see Logging into Directory Server using web console
Chapter 16. Managing default options for Directory Server command-line utilities using .dsrc file
A ~/.dsrc file simplifies commands that use the Directory Server command-line utilities. By default, you can pass information, for example, the LDAP URL or the bind distinguished name (DN) to the command for these utilities. You can store the settings in a ~/dsrc file to use the command-line utilities without specifying these settings each time.
16.1. How a .dsrc file simplifies commands
You can specify the LDAP URL of an instance and a bind DN in a ~/.dsrc file:
# server1
uri = ldap://server1.example.com
binddn = cn=Directory Manager
basedn = dc=example,dc=com
You can use shorter Directory Server commands with these settings. For example, to create a user account:
# dsidm server1 user create
Without the ~/.dsrc file, you must specify the bind DN, LDAP URL, and base DN in the command:
# dsidm -D cn=Directory Manager ldap://server1.example.com -b "dc=example,dc=com" user create16.2. Using the dsctl utility to create a .dsrc file
You can use the dsctl utility to create a ~/.dsrc file instead of creating it manually.
Procedure
- Run:
# dsctl instance_name dsrc create ...You can add these options in the command:
-
--uri
When using the --uri option, sets the URL to the instance in the format protocol://host_name_or_IP_address_or_socket
For example:
-
--uri ldap://server.example.com -
--uri = ldaps://server.example.com -
--uri = ldapi://%%2fvar%%2frun%%2fslapd-instance_name.socket
When you set the path to the Directory Server socket, use %%02 instead of slashes (/) in the path.
The server identifies the user ID (UID) and group ID (GID) of the user who runs the Directory Server command-line utility when you use the ldapi URL. If you run the command as the root user, both UID and GID are 0 and Directory Server automatically authenticates you as cn=Directory Manager without entering the corresponding password.
-
--starttls
When using the --starttls option, configures the utilities to connect to an LDAP port and then send the STARTTLS command to switch to an encrypted connection.
-
--basedn
When using the --basedn option, sets the base distinguished name (DN).
For example: --basedn dc=example,dc=com
-
--binddn
When using the --basedn option, sets the bind DN.
For example: --binddn cn=Directory Manager
-
--pwdfile
When using the --pwdfile, sets the path to a file that contains the password of bind DN.
For example: --pwdfile /root/rhds.pwd
-
--tls-cacertdir
When using the --tls-cacertdir option, sets the path in this parameter which defines the directory with the certificate authority (CA) certificate that is required to verify the server’s certificate if you use the LDAPS connection.
For example: --tls-cacertdir /etc/pki/CA/certs/
You can use the c_rehash /etc/pki/CA/certs/ command only when you copy the CA certificate to the specified directory.
-
--tls-cert
When using the --tls-certl option, sets the absolute path to the server’s certificate.
For example: --tls-cert /etc/dirsrv/slapd-instance_name/Server-Cert.crt
-
--tls-key
When using the --tls-key option, sets the absolute path to the server’s private key.
For example: --tls-key /etc/dirsrv/slapd-instance_name/Server-Cert.key
-
--tls-reqcert
When using the --tls-reqcert option, sets what checks the client utilities perform on server certificates in a TLS session.
For example: --tls-reqcert hard
These parameters are available:
-
never: The utilities do not request or check the server certificate. -
allow: The utilities ignore certificate errors and the connection is established anyway. hard: The utilities terminate the connection on certificate errors.-
--saslmech
-
When using the --saslmech option, sets the SASL mechanism to use to PLAIN or EXTERNAL.
For example: --saslmech PLAIN
16.3. Remote and local connection resolution when using directory server utilities
You can call Directory Server commands remotely and locally when securing the Directory Server connection. When you run a Directory Server command with an LDAP URL specified, the server considers it as a remote connection and checks the /etc/openldap/ldap.conf configuration file along with system-wide settings to proceed with the command.
When you run a Directory Server command with an instance name specified, the server checks if the ~/.dsrc file is present and applies the following logic to proceed:
-
The Directory Server considers the
~/.dsrcfile as a remote connection and checks whether the/etc/openldap/ldap.confconfiguration file and system-wide settings contain both the instance name and the LDAP URL. -
The Directory Server considers the
~/.dsrcfile as a local connection and uses thensslapd-certdirsetting from the localdse.ldiffile to secure the connection if the~/.dsrcfile contains only the specified instance name, or if the~/.dsrcfile does not exist. The server uses the default path/etc/dirsrv/slapd-instance_name/to store the Network Security Services (NSS) database of the instance ifnsslapd-certdiris not present.
Additional resources
Chapter 17. Creating test entries
The dsctl ldifgen command creates LDIF files with different types of test entries. For example, you can use this LDIF file to populate a test instance or a sub-tree to test the performance of Directory Server with the example entries.
17.1. Overview of testing entries you can create
You can pass one of the following entry type arguments to dsctl ldifgen:
-
users: Creates an LDIF file that contains user entries. -
groups: Creates an LDIF file that contains static group and member entries. -
cos-def: Creates an LDIF file that either contains a classic pointer or an indirect Class of Service (CoS) definition. -
cos-template: Creates an LDIF file that contains a CoS template. -
roles: Creates an LDIF file that contains managed, filtered, or indirect role entries. -
mod-load: Creates an LDIF file that contains modify operations. Use theldapmodifyutility to load the file into the directory. -
nested: Creates an LDIF file that contains heavily nested entries in a cascading or fractal tree design.
The dsctl ldifgen command creates only the LDIF file. To load the file into your Directory Server instance, use the:
-
ldapmodifyutility after you created an LDIF file using themod-loadoption -
ldapaddutility for all other options
Except for the nested entry type, if you do not provide any command line options, the dsctl ldifgen command uses an interactive mode:
# dsctl instance_name ldifgen entry_type17.2. Creating an LDIF file with example user entries
Use the dsctl ldifgen users command to create an LDIF file with example user entries.
Procedure
For example, to create an LDIF file named
/tmp/users.ldifthat adds 100,000 generic users to thedc=example,dc=comsuffix, enter:# dsctl instance_name ldifgen users --suffix "dc=example,dc=com" --number 100000 --generic --ldif-file=/tmp/users.ldifNote that the command creates the following organizational units (OU) and randomly assigns the users to these OUs:
-
ou=accounting -
ou=product development -
ou=product testing -
ou=human resources -
ou=payroll -
ou=people ou=groupsFor further details and other options you can use to create the LDIF file, enter:
# dsctl instance_name ldifgen users --help
-
Optional: Add the test entries to the directory:
# ldapadd -D "cn=Directory Manager" -W -H ldap://server.example.com -x -c -f /tmp/users.ldif
17.3. Creating an LDIF file with example group entries
Use the dsctl ldifgen groups command to create an LDIF file with example user entries.
Procedure
For example, to create an LDIF file named
/tmp/groups.ldifthat adds 500 groups to theou=groups,dc=example,dc=comentry, and each group has 100 members, enter:# dsctl instance_name ldifgen groups --number 500 --suffix "dc=example,dc=com" --parent "ou=groups,dc=example,dc=com" --num-members 100 --create-members --member-parent "ou=People,dc=example,dc=com" --ldif-file /tmp/groups.ldif example_group__Note that the command also creates LDIF statements to add the user entries in
ou=People,dc=example,dc=com.For further details and other options you can use to create the LDIF file, enter:
# dsctl instance_name ldifgen groups --helpOptional: Add the test entries to the directory:
# ldapadd -D "cn=Directory Manager" -W -H ldap://server.example.com -x -c -f /tmp/groups.ldif
17.4. Creating an LDIF file with an example CoS definition
Use the dsctl ldifgen cos-def command to create an LDIF file with a Class of Service (CoS) definition.
Procedure
For example, to create an LDIF file named
/tmp/cos-definition.ldifthat adds a classic CoS definition to theou=cos-definitions,dc=example,dc=comentry, enter:# dsctl instance_name ldifgen cos-def Postal_Def --type classic --parent "ou=cos definitions,dc=example,dc=com" --cos-specifier businessCatagory --cos-template "cn=sales,cn=classicCoS,dc=example,dc=com" --cos-attr postalcode telephonenumber --ldif-file /tmp/cos-definition.ldifFor further details and other options you can use to create the LDIF file, enter:
# dsctl instance_name ldifgen cos-def --helpOptional: Add the test entries to the directory:
# ldapadd -D "cn=Directory Manager" -W -H ldap://server.example.com -x -c -f /tmp/cos-definition.ldif
17.5. Creating an LDIF file with example modification statements
Use the dsctl ldifgen mod-load command to create an LDIF file that contains update operations.
Procedure
For example, to create an LDIF file named
/tmp/modifications.ldif:# dsctl instance_name ldifgen mod-load --num-users 1000 --create-users --parent="ou=People,dc=example,dc=com" --mod-attrs="sn" --add-users 10 --modrdn-users 100 --del-users 100 --delete-users --ldif-file=/tmp/modifications.ldifThis command creates a file named
/tmp/modifications.ldiffile with the statements that do the following:-
Create an LDIF file with 1000
ADDoperations to create user entries inou=People,dc=example,dc=com. -
Modify all entries by changing their
snattributes. - Add additional 10 user entries.
-
Perform 100
MODRDNoperations. - Delete 100 entries
Delete all remaining entries at the end
For further details and other options you can use to create the LDIF file, enter:
# dsctl instance_name ldifgen mod-load --help
-
Create an LDIF file with 1000
Optional: Add the test entries to the directory:
# ldapadd -D "cn=Directory Manager" -W -H ldap://server.example.com -x -c -f /tmp/modifications.ldif
17.6. Creating an LDIF file with nested example entries
Use the dsctl ldifgen nested command to create an LDIF file that contains a heavily nested cascading fractal structure.
Procedure
For example, to create an LDIF file named
/tmp/nested.ldifthat adds 600 users in total in different organizational units (OU) under thedc=example,dc=comentry, with each OU containing a maximum number of 100 users, enter:# dsctl instance_name ldifgen nested --num-users 600 --node-limit 100 --suffix "dc=example,dc=com" --ldif-file /tmp/nested.ldifFor further details and other options you can use to create the LDIF file, enter:
# dsctl instance_name ldifgen nested --helpOptional: Add the test entries to the directory:
# ldapadd -D "cn=Directory Manager" -W -H ldap://server.example.com -x -c -f /tmp/nested.ldif