-
Language:
English
-
Language:
English
Chapter 1. Developing Using Containers and the Cloud
1.1. Using Red Hat Container Development Kit tooling in Developer Studio
Red Hat Container Development Kit (CDK) is a pre-built container development environment based on Red Hat Enterprise Linux (RHEL). CDK helps you get started with developing container-based applications quickly. You can easily set up CDK and then use toolings, such as, OpenShift Container Platform and Docker, through Developer Studio (DevStudio), without spending additional time in setting up and configuring the supplementary tooling.
After it is installed, you can use the installed components with the Docker tooling.
1.1.1. Installing CDK in DevStudio
You can download and install CDK from whithin DevStudio. This option requires some additional configuration steps before the two products can be used together.
Prerequisites
- Ensure that hardware virtualization is enabled on your system.
Ensure that the following are installed on your system:
- Hypervisor such as VirtualBox, Linux KVM/libvirt, xhyve (macOS) or hyper-V (Windows) is installed and configured
- DevStudio 12.0
- Ensure that you have a Red Hat Developer account. For a new account, visit https://developers.redhat.com/.
For details about installing these prerequisites, see the Red Hat Container Development Kit Installation Guide.
1.1.1.1. Downloading and installing CDK in the IDE
Procedure
To download and install CDK in the IDE, take the following steps:
- Start the IDE.
- To open the Servers view, click Windows > Show View > Servers.
- Click the No servers are available. Click this link to create a new server link (or right-click an existing server and click New > Server.)
In the New Server window:
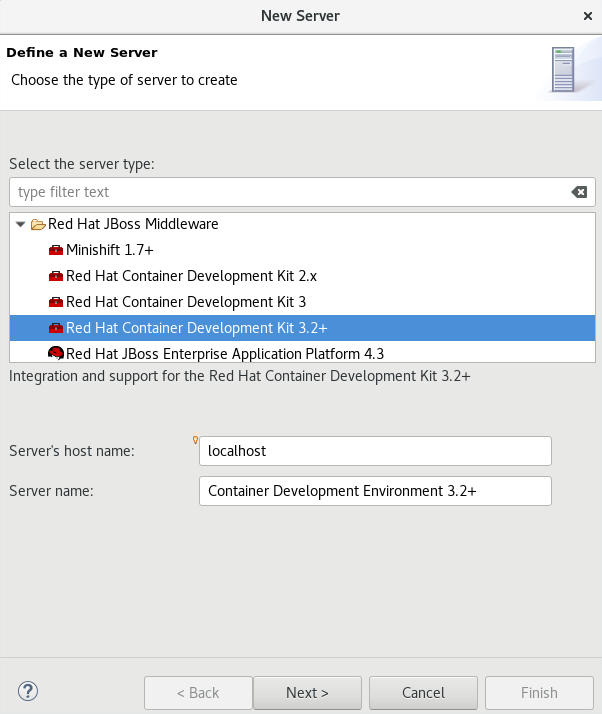
- Expand Red Hat JBoss Middleware and click Red Hat Container Development Kit 3.2+.
- Let the Server’s host name field be as is because it is not applicable to CDK.
- In the Server Name field, if desired, type a different server name (Container Development Environment 3.2+ is the default server name).
Click Next.
Figure 1.1. Selecting Red Hat Container Development Kit 3.2+

In the New Server - Red Hat Container Development Environment window:
- In the Username list, click your username. If you do not have the credentials set up, add the credentials for the access.redhat.com domain. If you do not have your credentials, sign up on developers.redhat.com.
- In the Hypervisor field, ensure that the relevant virtualization system for your operating system appears.
In the Minishift Binary field, click Browse to locate the minishift binary. If you do not have the CDK binary yet, follow the steps to download and install the CDK runtime:
- Click the Download and install runtime link to open the Download Runtimes window.
From the available Runtimes, click the CDK version that you want to download and click Next.
Figure 1.2. Selecting the CDK Version for Download

- In the JBoss.org Credentials window, in the Username list, click your username and in the Password field, enter your password. Click Next.
- In the next window, click I accept the terms of the license agreement and click Next.
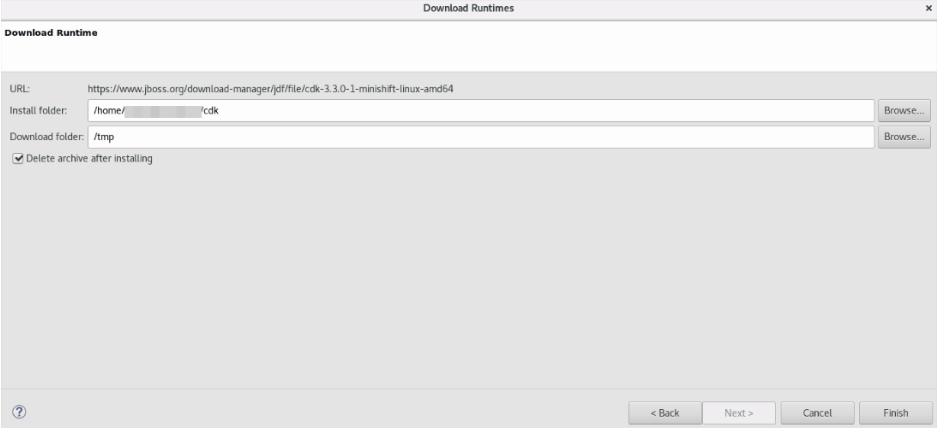
- In the Download Runtime window, ensure that the Install folder and the Download folder fields, show the desired location (or, if desired, change the locations).
Click Finish.
Figure 1.3. Downloading the CDK Runtime

The New Server window appears showing the progress of the download. The download takes a few minutes to complete.
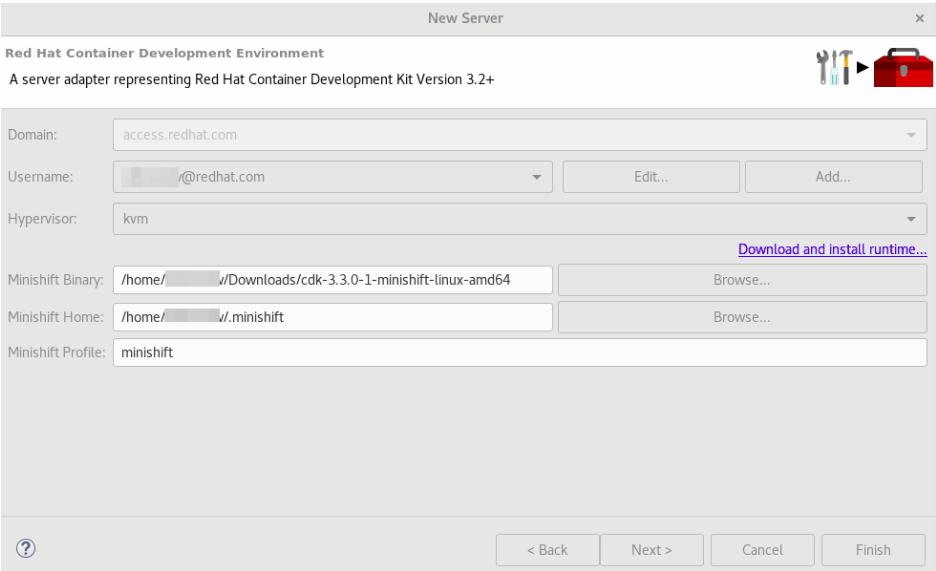
ImportantDo not close the New Server window because if you do so the runtime will be downloaded but will not be configured. Once the download is complete, the Minishift Binary field shows the path to the downloaded binary.
Figure 1.4. The Minishift Binary Field showing the Path to the Downloaded Binary

- The Minishift Home field contains path to the folder with the CDK configuration files; default is .minishift in the user’s home directory; you can change this to the desired location.
- The Minishift Profile field is set to minishift by default; you can change this to the desired value.
- Click Finish.
The Servers view will include a new server adapter: Container Development Environment 3.2+. Right-click it and click Start. The Console view shows the progress of starting CDK.
NoteIn case you did not setup CDK prior to starting the server adapter, you will see a warning dialog: Warning: CDK has not been properly initialized!. Confirm the dialog and continue with starting CDK. Note that the Setup CDK command is called in the background. This command will set up files in your Minishift Home directory. If there is any content in this directory you may need to confirm overwriting it. Check the directory content before confirming to avoid losing important data.
Figure 1.5. CDK has not been properly initialized Message

- When the server adapter is starting, you may be asked to enter your credentials for developers.redhat.com (associated with access.redhat.com). If so, enter the credentials and continue.
- At the end of starting CDK, if it appears, in the Untrusted SSL Certificate dialog box, click Yes. The OpenShift Explorer view opens showing the IP address and the port of the OpenShift Container Platform that you have connected to: developer {connection_IP} (example, developer https://10.1.2.2:8443). Expand the connection to see the sample projects.
- You can also open the Docker Explorer view to view the Container Development Environment 3.2+ connection and expand the connection to see the Containers and Images.
1.1.2. Using the Docker tooling
After starting the CDK server in the IDE, you can follow one of the two container development workflows to use the Docker tooling.
1.1.2.1. Using Docker for Container-based development
Procedure
Use Docker for Container-based Development as follows:
Create a new project with your Dockerfile.
- Click File > New > Project.
- Type java in the search field and from the results, select Java Project and click Next to continue.
- In the Project name field, type a name for the new project and click Finish. The Project Explorer view shows the project that you just created.
- Click File > New > File.
In the New File window:
- In the Enter or select the parent folder field, click the project that you created.
- In the File name field, type Dockerfile and click Finish.
Edit the Dockerfile as desired and then save it. For example, copy and paste the following content in the dockerfile and then save the file:
    # Use latest jboss/base-jdk:8 image as the base
FROM jboss/base-jdk:8

# Set the WILDFLY_VERSION env variable
ENV WILDFLY_VERSION 10.1.0.Final
ENV WILDFLY_SHA1 9ee3c0255e2e6007d502223916cefad2a1a5e333
ENV JBOSS_HOME /opt/jboss/wildfly

USER root

# Add the WildFly distribution to /opt, and make wildfly the owner of the extracted tar content
# Make sure the distribution is available from a well-known place
RUN cd $HOME \
    && curl -O https://download.jboss.org/wildfly/$WILDFLY_VERSION/wildfly-$WILDFLY_VERSION.tar.gz \
    && sha1sum wildfly-$WILDFLY_VERSION.tar.gz | grep $WILDFLY_SHA1 \
    && tar xf wildfly-$WILDFLY_VERSION.tar.gz \
    && mv $HOME/wildfly-$WILDFLY_VERSION $JBOSS_HOME \
    && rm wildfly-$WILDFLY_VERSION.tar.gz \
    && chown -R jboss:0 ${JBOSS_HOME} \
    && chmod -R g+rw ${JBOSS_HOME}

    # Ensure signals are forwarded to the JVM process correctly for graceful shutdown
    ENV LAUNCH_JBOSS_IN_BACKGROUND true

    USER jboss

    # Expose the ports we're interested in
    EXPOSE 8080

    # Set the default command to run on boot
    # This will boot WildFly in the standalone mode and bind to all interface
    CMD ["/opt/jboss/wildfly/bin/standalone.sh", "-b", "0.0.0.0"]
).
For additional information about the Dockerfile, see https://docs.docker.com/engine/reference/builder.
1.1.2.2. Building the Docker image Using the Container Development Environment
Procedure
To do a Docker image build using the Container Development Environment, take the following steps:
- In the Project Explorer view, expand the project and right-click the Dockerfile and select Run As > Docker Image Build.
In the Docker Image Build Configuration dialog box:
- In the Connection field, select your Container Development Environment server adapter.
- In the Image Name field, enter the desired name for the docker image and click OK. After the build is done, a new image with the given name is listed in the Docker Explorer view under CDK Docker connection under images and in the Docker Images view. Also, the Console view shows Successfully built <Docker_image_ID> message.
Run a Docker image using the Container Development Environment:
- Open the Docker Explorer view by typing Ctrl+3 in the quick access menu or using the Window > Perspective > Open Perspective > Docker Tooling menu option.
- Navigate to the Images node under the Docker connection.
- Right-click your image and click Run.
- In the Run a Docker Image window, fill in the necessary details and click Finish to run your image. The Console view shows the progress of execution of the Docker image. Optionally, give the container a name. This name helps locate the specific container in a list of containers in the future.
- In the Docker Explorer view, select the container that you named in the preceding step and expand its node and select the 8080 port and click Show In > Web Browser to access the application deployed in the Docker container. The application opens in the default web browser.
1.1.2.3. Next steps for the Docker tooling
For further information about the basics of Docker Tooling, see Using Docker Tooling in Developer Studio.
1.1.3. Using the OpenShift Container Platform tooling
Procedure
Use OpenShift Container Platform for Container-based development as follows:
Create a new OpenShift Container Platform project. These projects are like namespaces for OpenShift applications. They are different from how Eclipse projects relate to Eclipse applications. Additionally, Eclipse projects can be mapped to OpenShift applications.
In the OpenShift Explorer view, right-click the connection and click New > Project to create a new OpenShift Container Platform project.
NoteThe CDK server adapter creates the OpenShift Container Platform connection when you start the CDK server adapter in the preceding sections.
- Add the name and other relevant details for the new project and click Finish.
Create an application in your OpenShift Container Platform project using the templates:
- Right-click your new project name and click New > Application.
- In the New OpenShift Application window, search box, type the application type required. For example, for a node.js application, type nodejs and from the displayed list, select the relevant nodejs template and click Finish.
- Click OK to accept the results of the application creation process.
- In the Import OpenShift Application window, select a Git Clone Location and click Finish.
For additional tasks that you can do with the OpenShift Container Platform projects and application, rfer to Creating an OpenShift Container Platform Application in Developer Studio.
1.1.3.1. Next steps for the OpenShift tooling
For additional tasks to be performed using the OpenShift Container Platform tooling, see Developing for the Cloud with OpenShift 3.

