
Installation Guide
Installing Red Hat Developer Studio
Abstract
Part I. Installation Guide for Developer Studio
This guide details steps to install, uninstall, and upgrade Developer Studio that you may have installed using different methods.
Prerequisites
Developer Studio 12.0 is supported for use with a range of operating systems, architecture, and Java developer kit combinations; for a complete list, see https://access.redhat.com/documentation/en-us/red_hat_developer_studio/12.0/html/supported_configurations_and_components/index on the Red Hat Customer Portal.
Minimum hardware requirements
- 4 GB RAM (minimum 2 GB RAM)
- 2 GB hard disk space
Software requirements
- Install OpenJDK.
Red Hat OpenJDK is recommended.
To install OpenJDK 1.8.0 on Windows using the MSI-based installer:
- Download the MSI-based installer from: http://developers.redhat.com/products/openjdk/overview/.
- Run the installer and follow the on-screen instructions to install.
- To configure Developer Studio to use OpenJDK, follow the instructions at Working with JREs.
To install OpenJDK 1.8.0 on Red Hat Enterprise Linux:
All the commands in the following procedure must be run as the root user.
Register and subscribe the system by running the following command:
# subscription-manager register- When prompted, enter your Red Hat Customer Portal username and password.
To find a suitable subscription, such as Developer Subscription, run the following command:
# subscription-manager list --availableThis command lists the available subscriptions and details of the subscriptions. Note down the pool ID of the appropriate subscription.
To attach a subscription to your system, run the following command:
# subscription-manager attach --pool=<pool ID from previous command>To install OpenJDK RPMs:
# yum install java-1.8.0-openjdk-devel
Install the java-1.8.0-openjdk-demo package for examples of Java applications and the java-1.8.0-openjdk-src package to debug your applications. Both packages are available from the Optional repository. Use the following command to enable that repository on your system:
# subscription-manager repos --enable=rhel-7-server-optional-rpms
Substitute the version number in the above command with 6 if you use Red Hat Enterprise Linux 6.
Use the following command to install the packages:
# yum install java-1.8.0-openjdk-src java-1.8.0-openjdk-demoChapter 2. Installing Developer Studio in Eclipse
Developer Studio for Eclipse packages the Developer Studio plug-ins for your existing Eclipse instance. You can either install Developer Studio from the Eclipse Marketplace when you are online or use the Update Site Zip to install it when you are offline.
2.1. Installing Developer Studio in Eclipse when online
Developer Studio is available to install from Eclipse Marketplace when you are online.
If anytime before or during the installation, you are asked about selecting additional features to install, you may select Fuse Tooling to use the Fuse tooling features after the installation is complete.
Procedure
To install Developer Studio BYOE from Eclipse Marketplace, take the following steps:
- Start Eclipse 4.8 (Photon).
- Click Help > Eclipse Marketplace, locate Red Hat Developer Studio 12.0 GA, and click Install.
- Follow the on-screen instructions to complete the installation process.
During the installation process, if you receive warnings about installing unsigned content, review the details of the content and if satisfied, click OK to continue with the installation.
After the installation is complete, you are prompted to restart Eclipse. Click Yes to restart immediately and No if you need to save any unsaved changes to open projects. Note that the IDE changes do not take effect until Eclipse is restarted.
2.2. Installing Developer Studio in Eclipse when offline
You need the Update Site Zip to install Developer Studio in Eclipse in the offline mode. Alternatively, you can also use an installer downloaded on your system instead of the Update Site Zip to install Developer Studio in Eclipse when Offline. Note that the Target Platform Zip contains the features on which DevStudio depends. It also contains the sources of all the included plugins. You can download the Target Platform Zip from https://devstudio.redhat.com/12/stable/updates/.
- You must first be online to download the .zip file before proceeding to install Developer Studio in Eclipse in the offline mode.
- If anytime before or during the installation, you are asked about selecting additional features to install, you may select Fuse Tooling to use the Fuse tooling features after the installation is complete.
Procedure
To install Developer Studio in Eclipse in offline mode, take the following steps:
- Download the Red Hat Developer Studio 12.0 Update Site Zip from https://devstudio.redhat.com/12/stable/updates/.
- Start Eclipse 4.8 (Photon).
- Click Help > Install New Software.
-
In the Work with field, enter the path of the
Update Site Zipfile. Alternatively, click Add and click Archive to locate the file. - From the table of components, select Red Hat Developer Studio 12 - Bring Your Own Eclipse and click Next.
- Follow the on-screen instructions to complete the installation process.
During the installation process, you may receive warnings about installing unsigned content. If this is the case, review the details of the content and if satisfied, click OK to continue with the installation.
After the installation is complete, you are prompted to restart Eclipse. Click Yes to restart immediately and No to save any unsaved changes to open projects. Note that the IDE changes do not take effect until Eclipse is restarted.
Chapter 3. Installing Developer Studio stand-alone using the Installer
Developer Studio stand-alone packages the Developer Studio plug-ins with Eclipse and dependent third-party plug-ins in an installer for all operating systems.
The installer provided to install Developer Studio stand-alone is available from a variety of sources, including the Red Hat Customer Portal.
If anytime before or during the installation, you are asked about selecting additional features to install, you may select Fuse Tooling to use the Fuse tooling features after the installation is complete.
Procedure
To install Developer Studio stand-alone, take the following steps:
- Download Red Hat Developer Studio 12.0 Stand-alone Installer from Developer Studio Software Downloads.
Start the installer:
$ cd /path/to/.jar
$ java -jar devstudio-12.0.0.GA-installer-standalone.jar
Alternatively, you can start the installer by double-clicking the
.jarfile. On OS X systems, hold control and click the.jarfile, click Open, review the.jarfile details and if satisfied, click Open.- Follow the on-screen instructions to complete the installation process.
Chapter 4. Performing advanced installation tasks
This section describes steps to install Developer Studio using a script and to build the Red Hat Developer Studio installer from the source code.
4.1. Installing Red Hat Developer Studio using a script
Use the scripted method to install Developer Studio stand-alone using the GUI once and then a generated script for subsequent installations. This installation method enables simplified repeat installations or installations in bulk without stepping through the installer GUI for every installation.
The Developer Studio stand-alone installer is available from a variety of sources, including the Red Hat Customer Portal.
Procedure
To install Developer Studio by script, take the following steps:
- Download Red Hat Developer Studio 12.0 Stand-alone Installer from Developer Studio Software Downloads.
Start the installer:
$ cd /path/to/.jar
$ java -jar devstudio-12.0.0.GA-installer-standalone.jar
-
Follow the on-screen instructions to complete the installation process. After the installation is complete, an
InstallConfigRecord.xmlfile is generated in the Developer Studio installation directory. In the terminal window, enter the following command:
$ java -jar devstudio-12.0.0.GA-installer-standalone.jar \
  /path/to/devstudio/InstallConfigRecord.xml
The generated InstallConfigRecord.xml file is machine-specific and uses the Java Developer Kit and installation paths of your system. To use the InstallConfigRecord.xml file for other operating systems, Java Developer Kits, or paths, you must manually modify the file.
4.2. Building the Developer Studio stand-alone Installer from source
Prerequisites
- Maven 3.3 or later, with Java 8 must be installed to build the installer from the source code. To obtain and configure Maven, see http://maven.apache.org/.
Procedure
To build the Developer Studio stand-alone installer from source, take the following steps:
Clone the git repository by running the command:
$ git clone https://github.com/jbdevstudio/jbdevstudio-product.gitCheckout the master branch by running the command:
$ git checkout master- Build the installer by following the instructions in the jbdevstudio-product/README.adoc file.
The jbdevstudio-product/README.adoc file is located in the extracted current folder at the highest level.
Building takes some time to complete, after which the devstudio-[version]-installer-standalone.jar file will be located in the /path/to/jbdevstudio-product/installer/target directory.
Chapter 5. Uninstalling Developer Studio
You may want to uninstall a specific version of Developer Studio if you have concluded development in one version, say 11.x, and you now want to install a newer version, say 12.x. However, you can have more than one version of Installer-installed Developer Studio or Eclipse-installed Developer Studio on your system, provided you have these versions located in different directories.
5.1. Uninstalling Developer Studio installed using the Installer
Procedure
To uninstall Developer Studio, take the following steps:
- Ensure that Developer Studio is not running.
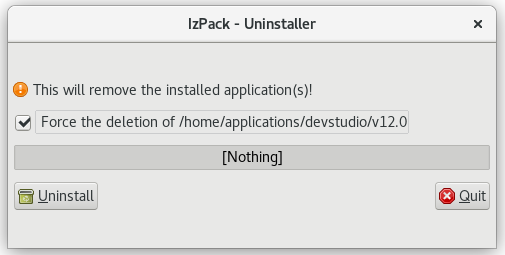
- On the command line, navigate to path/to/Developer Studio/Uninstaller.
On the command line, type:
$ java -jar uninstaller.jarIn the IzPack Uninstaller dialog box:
- Click the Force the deletion of <path_to_Developer Studio_directory> check box, to remove the entire Developer Studio installation directory. If this is not selected, Red Hat Developer Studio will be uninstalled but some files will be left as is in the installation directory.
- Click Uninstall.
- After the progress bar shows Finished, click Quit to close the Uninstaller dialog box.
Figure 5.1. Uninstall Developer Studio
5.2. Uninstalling Red Hat Developer Studio installed in Eclipse
Procedure
Developer Studio can be uninstalled using the following steps regardless of whether it was installed via Eclipse Marketplace or the update .zip file.
To uninstall Developer Studio, take the following steps:
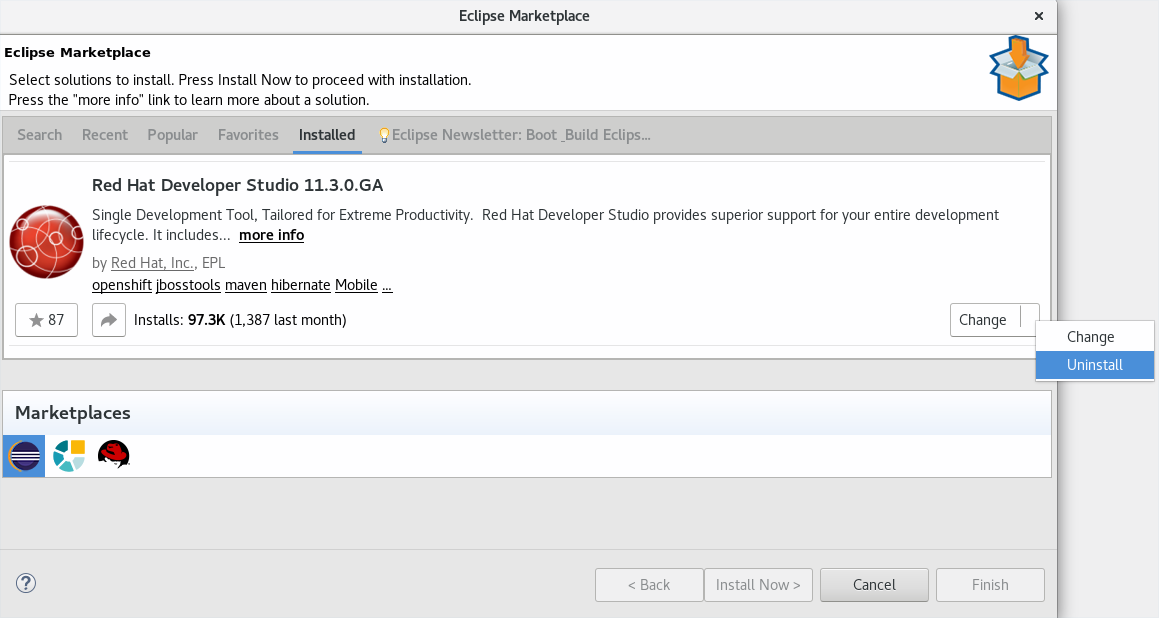
- Start Eclipse 4.8 (Photon).
- Click Help > Eclipse Marketplace.
- In the Eclipse Marketplace window, Find field, type Red Hat Developer Studio and then click Go.
- Click Installed in the Red Hat Developer Studio <version> section.
Click the Update drop-down list to view the options available. Click Uninstall.
Figure 5.2. Uninstall Button
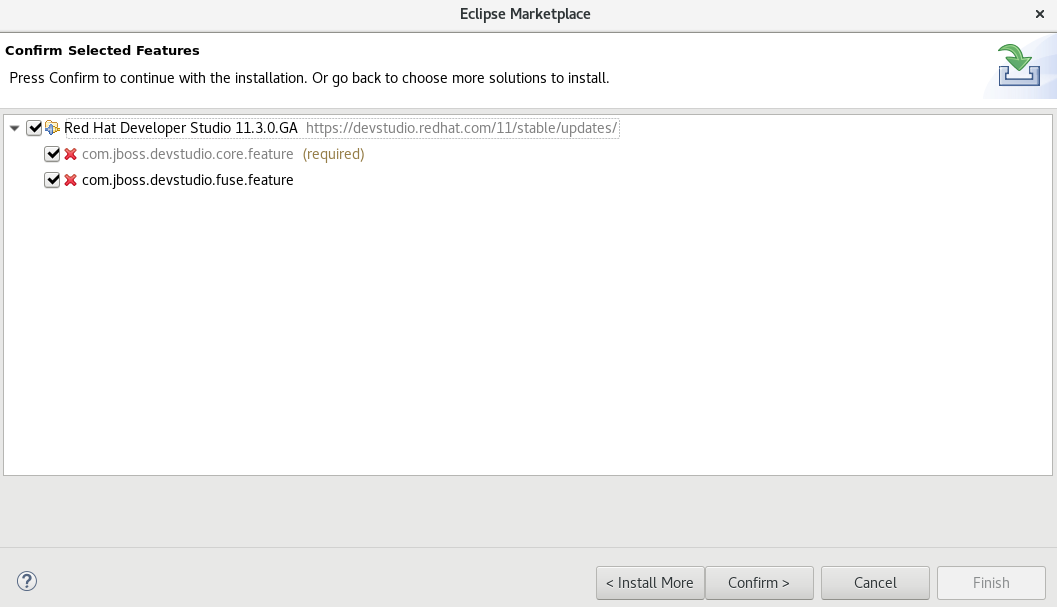
- In the Confirm Selected Features window, ensure that Red Hat Developer Studio <version> is selected and click Confirm.
Click Finish.
Figure 5.3. Confirm Selected Feature Deletion
- In the Software Updates dialog box, click Yes to restart Eclipse for the changes to take effect.
Chapter 6. Upgrading Developer Studio
Depending on your need, refer to the respective sections to upgrade Developer Studio.
6.1. Upgrading major versions of Developer Studio
Each major version of Developer Studio is based on a different version of Eclipse. As a result, it is not possible to update an older major version of Developer Studio to a newer major version. For example, it is not possible to update a devstudio 10.x installation to 11.x, nor is it possible to update a 11.x installation to 12.x. However, it is possible to use the workspaces created using Developer Studio 11.x with Developer Studio 12.x.
The following table details the version of Eclipse supported with each major version of Red Hat Developer Studio:
Table 6.1. Eclipse Version Support Matrix
| Red Hat Developer Studio Version | Base Eclipse Version |
|---|---|
| Developer Studio 12.x | Eclipse 4.8 (Photon) |
| Developer Studio 11.x | Eclipse 4.7 (Oxygen) |
| Red Hat Developer Studio 10.x | Eclipse 4.6 (Neon) |
| Red Hat Developer Studio 9.x | Eclipse 4.5 (Mars) |
6.2. Updating minor versions of Red Hat Developer Studio
You can update your Red Hat Developer Studio to the latest minor versions within the major release. For example, you can update your Red Hat Developer Studio 11.1 installation to 11.2.
Before updating, back up your workspace. In addition to your project files, your workspace contains metadata about customized settings and preferences for the IDE. To back up your workspace, either copy the workspace directory to a backup location, or save it as a compressed file.
You may be automatically notified by the IDE when the Red Hat Developer Studio 11.y update is available, depending on your IDE settings for automatic updates.
Procedure
Alternatively, use the following instructions to manually check for and apply the most recent Red Hat Developer Studio update:
- In the IDE, click Window > Preferences, expand Install/Update and click Available Software Sites.
- In the Available Software Sites table, ensure the URL https://devstudio.redhat.com/12/stable/updates/ is listed or, if not listed, add it.
- Close the Preferences window.
- Click Help > Check for Updates.
- For any Red Hat Developer Studio updates found, follow the on-screen instructions to apply the update.
During the update process, you may receive warnings about installing unsigned content. If this is the case, review the details of the content and if satisfied click OK to continue with the update.
After updating is complete, you are prompted to restart the IDE. Click Yes to restart immediately or No to save any unsaved changes to open projects. Note that IDE changes do not take effect until the IDE is restarted.
Chapter 7. Reporting issues from within Red Hat Developer Studio
Red Hat Developer Studio and JBoss Tools allow users to report issues as they are encountered from within the IDE . It is recommended that users report issues frequently and include as much detail as possible to help the development and testing teams replicate and fix the issue. The Report Problem wizard creates a zip file containing the relevant IDE log files. This zip file can be attached to the JIRAs submitted against each problem to provide context for the issue.
Procedure
To report an issue, take the following steps:
- Click Help and then click Report Problem.
- The Log file name field contains the zipped log files as a default. Click Browse to select a different log file to attach to the JIRA.
In the Problem Description field, outline details about the problem, such as:
- What you wanted to do with Red Hat Developer Studio?
- What steps you followed to arrive at the problem or error message?
- Any other noteworthy information about the environment or any unsupported add-ons or plug-ins in use.
- Optionally, in the E-Mail field, add your e-mail address to be potentially contacted in the future about the issue.
- Click OK to submit the problem report.
You can also enable error reporting from: Preferences > General > Error Reporting. If enabled, when you encounter a plugin related error, a pop-up notification describing the error will appear. The user can either dismiss or send the error directly, or provide more details about the error. You can optionally provide your e-mail ID to be contacted for more details on the error.