
Red Hat Training
A Red Hat training course is available for Red Hat Decision Manager
Testing a decision service using test scenarios
Abstract
Preface
As a business analyst or business rules developer, you can use test scenarios in Business Central to test a decision service before a project is deployed. You can test DMN-based and rules-based decision services to ensure these are functioning properly and as expected. Also, you can test a decision service at any time during project development.
Prerequisites
- The team and project for the decision service have been created in Business Central. For details, see Getting started with decision services.
- Business rules and their associated data objects have been defined for the rules-based decision service. For details, see Designing a decision service using guided decision tables.
- DMN decision logic and its associated custom data types have been defined for the DMN-based decision service. For details, see Designing a decision service using DMN models.
Having defined business rules is not a technical prerequisite for test scenarios, because the scenarios can test the defined data that constitutes the business rules. However, creating the rules first is helpful so that you can also test entire rules in test scenarios and so that the scenarios more closely match the intended decision service. For DMN-based test scenarios ensure that the DMN decision logic and its associated custom data types are defined for the decision service.
Chapter 1. Test scenarios
Test scenarios in Red Hat Decision Manager enable you to validate the functionality of business rules and business rule data (for rules-based test scenarios) or the DMN models (for DMN-based test scenarios) before deploying them into a production environment. With a test scenario, you use data from your project to set given conditions and expected results based on one or more defined business rules. When you run the scenario, the expected results and actual results of the rule instance are compared. If the expected results match the actual results, the test is successful. If the expected results do not match the actual results, then the test fails.
With the Test Scenarios designer, you execute all scenarios from the .scesim file at one time, whereas with the Test Scenarios (Legacy) designer, you can execute test scenarios one at a time or as a group. The group execution contains all the scenarios from one package. Test scenarios are independent, so one scenario cannot affect or modify the other. You can run test scenarios at any time during project development in Business Central. You do not have to compile or deploy your decision service to run test scenarios.
You can import data objects from different packages to the same project package as the test scenario. Assets in the same package are imported by default. After you create the necessary data objects and the test scenario, you can use the Data Objects tab of the test scenarios designer to verify that all required data objects are listed or to import other existing data objects by adding a New item.
Chapter 2. Data objects
Data objects are the building blocks for the rule assets that you create. Data objects are custom data types implemented as Java objects in specified packages of your project. For example, you might create a Person object with data fields Name, Address, and DateOfBirth to specify personal details for loan application rules. These custom data types determine what data your assets and your decision services are based on.
2.1. Creating data objects
The following procedure is a generic overview of creating data objects. It is not specific to a particular business asset.
Procedure
- In Business Central, go to Menu → Design → Projects and click the project name.
- Click Add Asset → Data Object.
Enter a unique Data Object name and select the Package where you want the data object to be available for other rule assets. Data objects with the same name cannot exist in the same package. In the specified DRL file, you can import a data object from any package.
Importing data objects from other packagesYou can import an existing data object from another package directly into the asset designer. Select the relevant rule asset within the project and in the asset designer, go to Data Objects → New item to select the object to be imported.
- To make your data object persistable, select the Persistable checkbox. Persistable data objects are able to be stored in a database according to the JPA specification. The default JPA is Hibernate.
- Click Ok.
In the data object designer, click add field to add a field to the object with the attributes Id, Label, and Type. Required attributes are marked with an asterisk (*).
- Id: Enter the unique ID of the field.
- Label: (Optional) Enter a label for the field.
- Type: Enter the data type of the field.
List: Select this check box to enable the field to hold multiple items for the specified type.
Figure 2.1. Add data fields to a data object
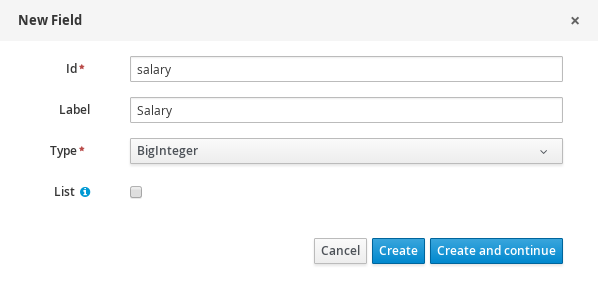
Click Create to add the new field, or click Create and continue to add the new field and continue adding other fields.
NoteTo edit a field, select the field row and use the general properties on the right side of the screen.
Chapter 3. Using the Test Scenario designer in Business Central
Red Hat Decision Manager ships with two designers for you to create and run test scenarios to validate your business rules and data. The difference between them is that by using the Test Scenario designer you can create and run both DMN-based test scenarios as well as rules-based test scenarios whereas by using the Test Scenario (Legacy) designer you can create and run only rules-based test scenarios. Both are supported by Red Hat for production use. The sections covered in this chapter will help you understand how to use the Test Scenario designer to create and run test scenarios.
Currently, the Test Scenario designer can only use the default KIE session.
3.1. Test Scenario designer
Red Hat Decision Manager now comes with a new Test Scenario designer that fully supports DMN model testing. This designer provides a new and enhanced user experience when you test or validate DMN-based test scenarios. The aim of the new designer is to help the user test the proper functioning of the created rules and knowledge bases.
3.1.1. Test Scenario designer layout
The designer introduces a tabular layout which helps you in defining a scenario template and all the associated test cases. The designer layout consists of a table which has a header and the individual rows. The header consists of three parts, the GIVEN and EXPECT row, a row with instances, and a row with corresponding fields. The header is also known as test scenario template and the individual rows are called test scenarios definitions.
The test scenario template or header has the following two parts:
- GIVEN data objects and their fields - represents the input information
- EXPECT data objects and their fields - represents the objects and their fields whose exact values are checked based on the given information and which also constitutes the expected result.
The test scenarios definitions represent the separate test cases of a template.
You can access the Project Explorer from the left panel of the designer whereas from the right panel you can access the Test Tools and the Test Report. You can use the Test Tools from the right panel to configure the data object mappings (Test Editor) or for accessing the cheat sheet (Scenario Cheatsheet) that contain notes which you can use as reference.
3.1.2. Importing data objects
Test Scenario designer loads all data objects that are located in the same package as the test scenario. You can view all the data objects from the Data Objects tab in the designer. The loaded data objects are also displayed in the Test Editor tab in the Test Tools panel.
You need to close and reopen the designer in case the data objects change (for example, when a new data object is created or when an existing one is deleted). Select a data object from the list to display its fields and the field types.
In case you want to use a data object located in a different package than the test scenario, you need to import the data object first. Follow the procedure below to import a data object for rules-based test scenarios.
You cannot import any data objects while creating DMN-based test scenarios. DMN-based test scenarios does not use any data objects from the project but uses the custom data types defined in the DMN file.
Procedure
- Go to Project Explorer panel in the Test Scenario designer.
- From Test Scenario, select a test scenario.
- Select Data Objects tab and click New Item.
- In the Add import window, choose the data object from the drop-down list.
- Click Ok and then Save.
- Close and reopen the Test Scenario designer to view the new data object from the data objects list.
3.1.3. Importing a test scenario
You can import an existing test scenario using the Import Asset button in the Asset tab from the project view.
Procedure
- In Business Central, go to Menu → Design → Projects and click the project name.
- From the project’s Asset tab, click Import Asset.
In the Create new Import Asset window,
- Enter the name of the import asset.
- Select the package from the Package drop-down list.
- From Please select a file to upload, click Choose File… to browse to test scenario file.
- Select the file and click Open.
- Click Ok and the test scenario opens in the review designer.
3.2. Basic operations using the Test Scenario designer
You can perform the following operations using the Test Scenario designer:
- Save a test scenario
- Delete a test scenario
- Rename a test scenario
- Copy a test scenario
- Run a test scenario
- Download a test scenario
- Switch between different versions of a test scenario
- View or Hide Alerts
3.2.1. Saving a test scenario
You can save a test scenario at any time while creating a test scenario template or defining the test scenarios.
Procedure
- From the Test Scenario designer toolbar on the upper-right, click Save.
On the Confirm Save window,
- If you wish to add a comment regarding the test scenario, click add a comment.
- Click Save again.
A message stating that the test scenario was saved successfully appears on the screen.
3.2.2. Deleting a test scenario
You can delete existing test scenarios that were created using the Test Scenario designer.
Procedure
- From the Test Scenario designer toolbar on the upper-right, click Delete.
In the Confirm Delete window,
- To add a comment regarding the deletion of the test scenario, click add a comment.
- Click Delete.
A message stating that the test scenario was deleted successfully appears on the screen.
3.2.3. Renaming a test scenario
You can rename existing test scenarios by using the Rename button from the upper-right toolbar in the designer.
Procedure
- From the Test Scenario designer toolbar on the upper-right, click Rename.
In the Rename Asset window,
- Enter a name in the Asset Name field.
- If you wish to add a comment, click add a comment.
Click Rename.
NoteClicking on Rename simply renames the test scenario file.
- From the Test Scenario designer toolbar on the upper-right, click Save.
In the Confirm Save window,
- If you wish to add a comment, click add a comment.
- Click Save again.
- Alternately, you could click Save and Rename to save and rename the scenario at the same time.
A message stating that the test scenario was renamed successfully appears on the screen.
3.2.4. Copying a test scenario
You can copy an existing test scenario to the same package or to some other package by using the Copy button from the upper-right toolbar.
Procedure
- From the Test Scenario designer toolbar on the upper-right, click Copy.
In the Make a Copy window,
- Enter a name in the New Name field.
- Select the package you want to copy the test scenario to.
- Optionally, to add a comment, click add a comment.
- Click Make a Copy.
A message stating that the test scenario was copied successfully appears on the screen.
3.2.5. Downloading a test scenario
You can download a copy of the test scenario to your local machine for future reference or as backup.
Procedure
- From the Test Scenario designer toolbar on the upper-right, click Download.
The .scesim file is downloaded to your local machine.
3.2.6. Switching between versions of a test scenario
Business Central provides you the ability to switch between the various versions of a test scenario. Every time you save the scenario, a new version of the scenario is listed under Latest Versions. To use this feature, you must save the test scenario file at least once.
Procedure
- From the Test Scenario designer toolbar on the upper-right, click Latest Version. All the versions of the file are listed under Latest Version, if they exist.
Click the version you want to work on.
The selected version of the test scenario opens in the Test Scenario designer.
- From the designer toolbar, click Restore.
In the Confirm Restore,
- To add a comment, click add a comment.
- Click Restore to confirm.
A message stating that the selected version has been reloaded successfully in the designer appears on the screen.
3.2.7. View/hide the alerts panel
In the Test Scenario designer, the message panel appears at the bottom of the designer with the test results and the Alert messages. From the designer’s toolbar on the upper-right, click Hide Alerts/View Alerts to enable or disable the reporting panel.
3.4. Test scenario template
Before specifying test scenario definitions, you need to create a test scenario template. The header of the test scenario table defines the template for each scenario. You need to set the types of the instance and property headers for both the GIVEN and EXPECT sections. Instance headers map to a particular data object (a fact), whereas the property headers map to a particular field of the corresponding data object.
Using the Test Scenario designer, you can create test scenario templates for both rule-based scenarios as well as DMN-based scenarios.
3.4.1. Creating a test scenario template for rule-based test scenarios
Create a test scenario template for rule-based scenarios by following the procedure below to validate your rules and data.
Procedure
- In Business Central, go to Menu → Design → Projects and click the project for which you want to create the test scenario.
- Click Add Asset → Test Scenario.
- Enter a Test Scenario name and select the appropriate Package. The package you select must contain all the required data objects and rule assets have been assigned or will be assigned.
- Select RULE as the Source type.
- Click Ok to create and open the test scenario in the Test Scenario designer.
To map the GIVEN column header to a data object,
- Click an instance header in the GIVEN section.
- Select the data object from the Test Editor tab.
- Click Add.
- To insert more properties of the data object, right-click the property header and select Insert column right or Insert column left as required.
To map a data object field to a property cell,
- Click a property cell.
- Select the data object field from the Test Editor tab.
- Click Add.
To map the EXPECT column header to a data object,
- Click an instance header in the EXPECT section.
- Select the data object from the Test Editor tab.
- Click Add.
- To insert more properties of the data object, right-click the property header and select Insert column right or Insert column left as required.
To map a data object field to a property cell,
- Click a property cell.
- Select the data object field from the Test Editor tab.
- Click Add.
Use the contextual menu to add or remove columns as needed.
After you have created and mapped both the GIVEN & EXPECT columns to a data object & its properties, you have to define the test scenario which comes next.
3.4.2. Concept of aliases (for rule-based scenarios only)
In the Test Scenario designer, once you map a header cell with a data object, the data object is removed from the Test Editor tab in the Test Tools panel. You can re-map a data object to another header cell by using the concept of Alias. Aliases enable you to specify multiple instances of the same data object. Ensure that the aliases are uniquely named. By doing so, the data object again becomes available in the Test Editor tab for remapping. To introduce an alias, double click on a corresponding header cell and manually change the name. You can create property aliases as well. This allows you to rename the used properties directly in the table.
3.5. Test template for DMN-based test scenarios
Business Central automatically generates the template for every DMN-based test scenario asset and it contains all the specified inputs and decisions of the related DMN model. For each input node in the DMN model, a GIVEN column is added, whereas each decision node is represented by an EXPECT column. You can modify the default template at any time as per your needs. Also, to test only a specific part of the whole DMN model, its possible to remove the generated columns as well as move decision nodes from the EXPECT to the GIVEN section.
3.5.1. Creating a test scenario template for DMN-based test scenarios
Create a test scenario template for DMN-based scenarios by following the procedure below to validate your DMN models.
Procedure
- In Business Central, go to Menu → Design → Projects and click the project that you want to create the test scenario for.
- Click Add Asset → Test Scenario.
- Enter a Test Scenario name and select the appropriate Package.
- Select DMN as the Source type.
- Select an existing DMN asset using the Choose DMN asset option.
- Click Ok to create and open the test scenario in the Test Scenario designer.
The template is automatically generated and you can modify it as per your needs.
3.6. Defining a test scenario
After creating a test scenario template you have to define the test scenario next. The rows of the test scenario table define the individual test scenarios. A test scenario has a unique index number, description, set of input values (the Given values), and a set of output values (the Expect values).
Prerequisite
Ensure that the test scenario template exists for the selected test scenario.
Procedure
- Open the test scenario in the Test Scenario designer.
- Enter a description of the test scenario and fill in required values in each cell of the row.
Use the contextual menu to add or remove rows as required.
Double click a cell to start inline editing. To skip a particular cell from test evaluation, leave it empty.
After defining the test scenario, you can run the test next.
3.7. List and map collections in Test Scenario designer
Test Scenario designer supports list and map collections for both DMN-based as well as rules-based test scenarios. You can define a collection like a list or a map as the value of a particular cell in both GIVEN and EXPECT columns.
Procedure
- Set the column type first (use a field whose type is a list or a map).
- Double click a cell in the column to input a value.
- In the collection editor popup, click Add new item.
-
Enter the required value and click the check icon
 to save each collection item that you add.
Click Save.
To delete an item from the collection, click the bin icon in the collection popup editor. Click Remove to delete the collection itself.
3.8. Expressions syntax
The test scenario designer supports different expression languages for both rule-based and DMN-based test scenarios. While rule-based test scenarios support a basic expression language, DMN-based test scenarios support the FEEL expression language.
3.8.1. Expression syntax in rule-based scenarios
The following rule-based test scenario definition expressions are supported by Test Scenario designer:
Table 3.3. Description of expressions syntax
| Operator | Description |
|---|---|
| = | Specifies equal to a value. This is default for all columns and is the only operator supported by the GIVEN column. |
| =, =!, <> | Specifies inequality of a value. This operator can be combined with other operators. |
| <, >, <=, >= | Specifies a comparison: less than, greater than, less or equals than, and greater or equals than. |
| [value1, value2, value3] | Specifies a list of values. If one or more values are valid, the scenario definition is evaluated as true. |
| expression1; expression2; expression3 | Specifies a list of expressions. If all expressions are valid, the scenario definition is evaluated as true. |
An empty cell is skipped from evaluation. To define an empty string, use =,[], or ;. To define a null value, use null.
Table 3.4. Example expressions
| Expression | Description |
|---|---|
| -1 | The actual value is equal to -1. |
| < 0 | The actual value is less than 0. |
| ! > 0 | The actual value is not greater than 0. |
| [-1, 0, 1] | The actual value is equal to either -1 or 0 or 1. |
| <> [1, -1] | The actual value is neither equal to 1 nor -1. |
| ! 100; 0 | The actual value is not equal to 100 but is equal to 0. |
| != < 0; <> > 1 | The actual value is neither less than 0 nor greater than 1. |
| <> <= 0; >= 1 | The actual value is neither less than 0 nor equal to 0 but is greater than or equal to 1. |
You can refer to the supported commands and syntax in the Scenario Cheatsheet tab on the Test Tools panel on the right of the Test Scenario designer.
3.8.2. Expression syntax in DMN-based scenarios
The following data types are supported by the DMN-based test scenarios in the Test Scenario designer:
Table 3.5. Data types supported by DMN-based scenarios
| Supported data types | Description |
|---|---|
| numbers & strings |
Strings must be delimited by quotation marks, for example, |
| boolean values |
|
| dates and time |
For example, |
| functions | |
| contexts |
For example, |
| ranges and lists |
For example, |
You can refer to the supported commands and syntax in the Scenario Cheatsheet tab on the Test Tools panel on the right side of the Test Scenario designer.
3.9. Running a test scenario
After creating a test scenario template and defining the test scenarios, you can run the tests to validate your business rules and data.
Procedure
-
At the top of the Test Scenario designer, click Run Test
 icon.
icon.
- The Test Report panel pops out from the right of the designer and displays the test result overview and the scenario status.
- After the tests are executed, click View Alerts to open the Alerts panel at the bottom of the designer for the error messages.
In case the tests fails, review the error messages. Messages with a red cross indicate test failures where as those with a green check mark indicate successful tests.
In the designer, erroneous rows or cells are highlighted in red.
- Make the necessary changes and run the test again till the scenario passes.
3.10. Running a test scenario locally
In Red Hat Decision Manager, you can run tests in two ways. One way is click the Run Test ![]() icon at the top of the Test Scenarios designer. The other way is to run the tests locally using the command line.
icon at the top of the Test Scenarios designer. The other way is to run the tests locally using the command line.
Procedure
- In Business Central, go to Menu → Design → Projects and click the project name.
- On the Project’s home page, select the Settings tab.
-
Select git URL and click the Clipboard
 to copy the git url.
- Open a command terminal and navigate to the directory where you want to clone the git project.
From your project’s directory run the following command:
git clone your_git_project_url
Replace
your_git_project_urlwith relevant data likegit://localhost:9418/MySpace/ProjectTestScenarios.Once the project is successfully cloned, navigate to the git project directory and execute the following command:
mvn clean test
Your project’s build information and the test results (such as, the number of tests run and whether the test run was a success or not) are displayed in the command terminal. In case of errors, correct them and run the command again.
3.11. Creating test scenario using the sample Mortgages project
This chapter illustrates creating and executing a test scenario from the sample Mortgages project shipped with Business Central using the Test Scenario designer. The test scenario example in this chapter is based on the Pricing loans guided decision table from the Mortgages project.
Procedure
- In Business Central, go to Menu → Design → Projects and click Mortgages.
-
If the project is not listed under Projects, from MySpace, click the three dots (
 ) in the upper-right corner of the page.
Click Try Samples → Mortgages → OK.
The Assets window appears.
- Click Add Asset → Test Scenario.
Enter
scenario_pricing_loansas the Test Scenario name and select the defaultmortgages.mortgagespackage from the Package drop-down list.The package you select must contain all the required rule assets.
- Click Ok to create and open the test scenario in the Test Scenario designer.
Expand Project Explorer and verify the following:
-
Applicant,Bankruptcy,IncomeSource, andLoanApplicationdata objects exist. -
Pricing loansguide decision table exists. - Verify that the new test scenario is listed under Test Scenario
-
After verifying that everything is in place, return to the Model tab of the test scenarios designer and define the GIVEN and EXPECT data for the scenario, based on the available data objects.
Figure 3.1. A blank Test Scenario designer
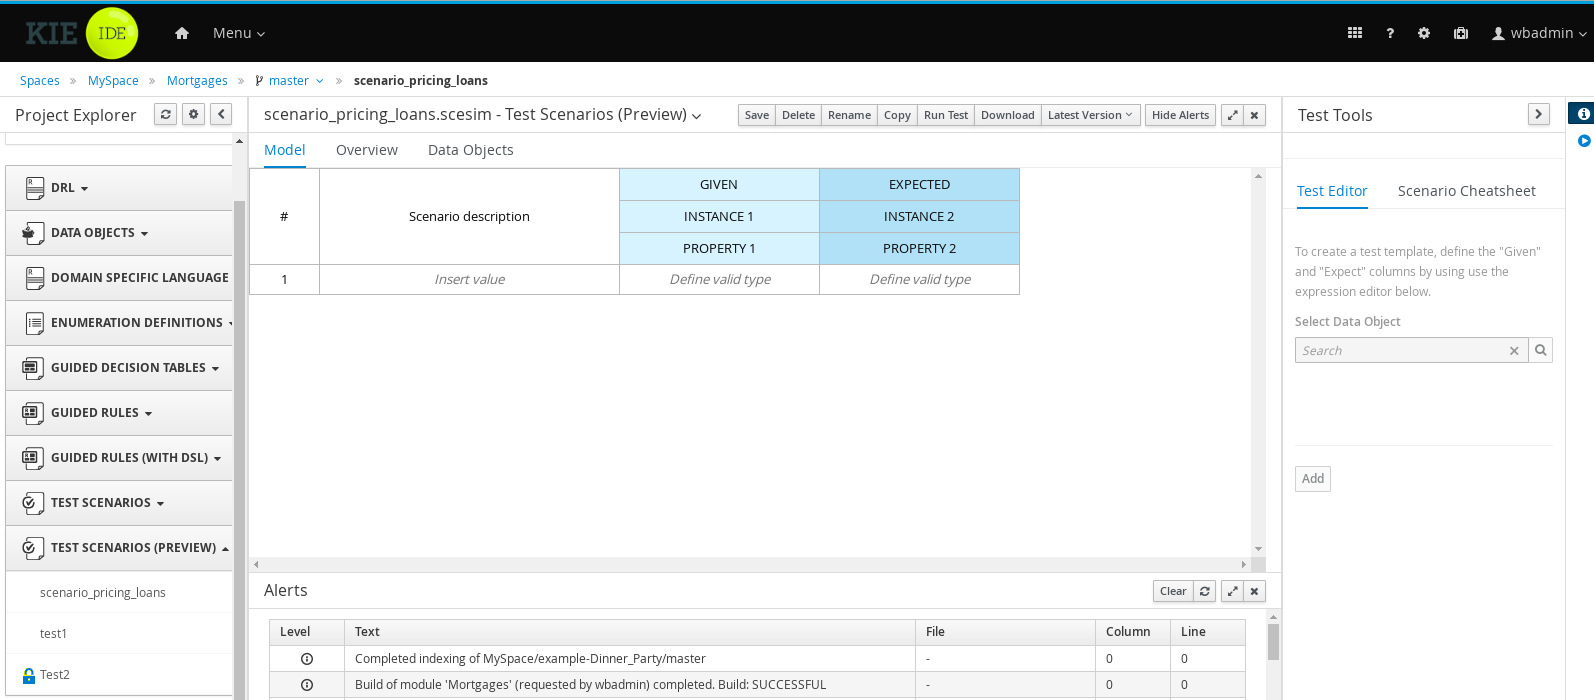
Define the GIVEN column details,
- Click the cell named INSTANCE 1 under the GIVEN column header.
- From Test Tools → Test Editor, select LoanApplication data object.
- Click Add.
- To create properties of the data object, right-click the property cell and select Insert column right or Insert column left as required. For this example, you need to create two more property cells under the GIVEN column.
Click the first property cell,
- From Test Tools → Test Editor, select and expand the LoanApplication data object.
- Click amount and then Add to map the data object field to the property cell.
Click the second property cell,
- From Test Tools → Test Editor, select and expand the LoanApplication data object.
- Click deposit and then Add.
Click the third property cell,
- From Test Tools → Test Editor, select and expand the LoanApplication data object.
- Click lengthYears and then Add.
- Right-click LoanApplication header cell and select Insert column right. A new GIVEN column to the right is created.
Click the new header cell,
- From Test Tools → Test Editor, select the IncomeSource data object.
- Click Add to map the data object to the header cell.
Click the property cell below IncomeSource,
- From Test Tools → Test Editor, select and expand the IncomeSource data object.
Click type and then Add to map the data object field to the property cell.
You have now defined all the GIVEN column cells.
Next, define the EXPECT column details,
- Click the cell named INSTANCE 2 under the EXPECT column header.
- From Test Tools → Test Editor, select LoanApplication data object.
- Click Add.
- To create properties of the data object, right-click the property cell and select Insert column right or Insert column left as required. Create two more property cells under the EXPECT column.
Click the first property cell,
- From Test Tools → Test Editor, select and expand the LoanApplication data object.
- Click approved and then Add to map the data object field to the property cell.
Click the second property cell,
- From Test Tools → Test Editor, select and expand the LoanApplication data object.
- Click insuranceCost and then Add.
Click the third property cell,
- From Test Tools → Test Editor, select and expand the LoanApplication data object.
- Click approvedRate and then Add.
Now for defining the test scenario, enter the following data in the first row:
-
Enter
Row 1 test scenarioas the Scenario Description,150000as the amount,19000as the deposit,30as the lenghtYears, andAssetas the type for the GIVEN column values. -
Enter
trueas approved and0as the insuranceCost for the EXPECT column values.
-
Enter
Next enter the following data in the second row:
-
Enter
Row 2 test scenarioas the Scenario Description,100002as the amount,2999as the deposit,20as the lenghtYears, andJobas the type for the GIVEN column values. -
Enter
trueas approved and10as the insuranceCost for the EXPECT column values.
-
Enter
- After you have defined all GIVEN, EXPECT, and other data for the scenario, click Save in the test scenarios designer to save your work.
Click Run Test in the upper-right corner to run the
.scesimfile.The test result is displayed in the Test Report panel. Click View Alerts to display messages from the Alerts section. If a test fails, refer to the messages in the Alerts section at the bottom of the window, review and correct all components in the scenario, and try again to validate the scenario until the scenario passes.
- Click Save in the test scenarios designer to save your work after you have made all necessary changes.
Chapter 4. Using the Test Scenario (Legacy) designer in Business Central
In Red Hat Decision Manager, there are two test scenarios designers. One is the Test Scenario designer and the other is Test Scenario (Legacy) designer. You can use either of them to test your business rules & data. The Test Scenario designer is the default designer and you can create and run DMN-based test scenarios using it. This chapters covers how to use the Test Scenario (Legacy) designer to create and run test scenarios. The Test Scenario (Legacy) designer runs test scenarios based on DRL files and Guided Decision Tables.
4.1. Creating and running a test scenario
You can create test scenarios in Business Central to test the functionality of business rule data before deployment. A basic test scenario must have at least the following data:
- Related data objects
- GIVEN facts
- EXPECT results
With this data, the test scenario can validate the expected and actual results for that rule instance based on the defined facts. You can also add a CALL METHOD and any available globals to a test scenario, but these scenario settings are optional.
Procedure
- In Business Central, go to Menu → Design → Projects and click the project name.
- Click Add Asset → Test Scenario (Legacy).
- Enter an informative Test Scenario name and select the appropriate Package. The package that you specify must be the same package where the required rule assets have been assigned or will be assigned. You can import data objects from any package into the asset’s designer.
Click Ok to create the test scenario.
The new test scenario is now listed in the Test Scenarios panel of the Project Explorer,
- Click the Data Objects tab to verify that all data objects required for the rules that you want to test are listed. If not, click New item to import the needed data objects from other packages, or create data objects within your package.
After all data objects are in place, return to the Model tab of the test scenarios designer and define the GIVEN and EXPECT data for the scenario, based on the available data objects.
Figure 4.1. The test scenarios designer
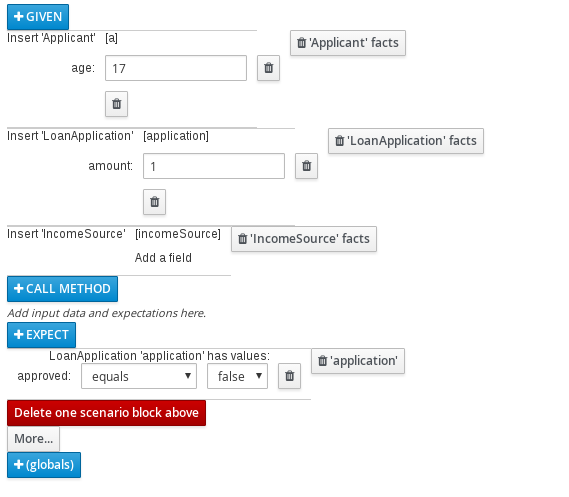
The GIVEN section defines the input facts for the test. For example, if an
Underagerule in the project declines loan applications for applicants under the age of 21, then the GIVEN facts in the test scenario could beApplicantwithageset to some integer less than 21.The EXPECT section defines the expected results based on the GIVEN input facts. That is, GIVEN the input facts, EXPECT these other facts to be valid or entire rules to be activated. For example, with the given facts of an applicant under the age of 21 in the scenario, the EXPECT results could be
LoanApplicationwithapprovedset tofalse(as a result of the underage applicant), or could be the activation of theUnderagerule as a whole.Optionally, add a CALL METHOD and any globals to the test scenario:
-
CALL METHOD: Use this to invoke a method from another fact when the rule execution is initiated. Click CALL METHOD, select a fact, and click
 to select the method to invoke. You can invoke any Java class methods (such as methods from an ArrayList) from the Java library or from a JAR that was imported for the project (if applicable).
- globals: Use this to add any global variables in the project that you want to validate in the test scenario. Click globals to select the variable to be validated, and then in the test scenarios designer, click the global name and define field values to be applied to the global variable. If no global variables are available, then they must be created as new assets in Business Central. Global variables are named objects that are visible to the decision engine but are different from the objects for facts. Changes in the object of a global do not trigger the re-evaluation of rules.
-
CALL METHOD: Use this to invoke a method from another fact when the rule execution is initiated. Click CALL METHOD, select a fact, and click
- Click More at the bottom of the test scenarios designer to add other data blocks to the same scenario file as needed.
- After you have defined all GIVEN, EXPECT, and other data for the scenario, click Save in the test scenarios designer to save your work.
Click Run scenario in the upper-right corner to run this
.scenariofile, or click Run all scenarios to run all saved.scenariofiles in the project package (if there are multiple). Although the Run scenario option does not require the individual.scenariofile to be saved, the Run all scenarios option does require all.scenariofiles to be saved.If the test fails, address any problems described in the Alerts message at the bottom of the window, review all components in the scenario, and try again to validate the scenario until the scenario passes.
- Click Save in the test scenarios designer to save your work after all changes are complete.
For more details about adding GIVEN facts to test scenarios, see Section 4.1.1, “Adding GIVEN facts in test scenarios”.
For more details about adding EXPECT results to test scenarios, see Section 4.1.2, “Adding EXPECT results in test scenarios”.
4.1.1. Adding GIVEN facts in test scenarios
The GIVEN section defines input facts for the test. For example, if an Underage rule in the project declines loan applications for applicants under the age of 21, then the GIVEN facts in the test scenario could be Applicant with age set to some integer less than 21.
Prerequisite
All data objects required for your test scenario have been created or imported and are listed in the Data Objects tab of the Test Scenario (Legacy) designer.
Procedure
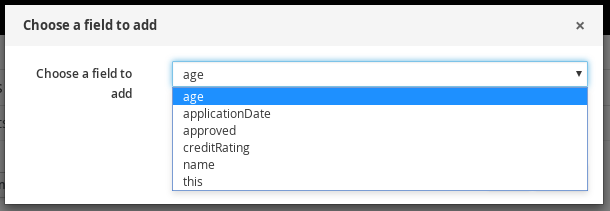
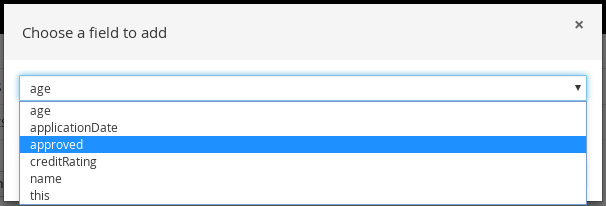
In the Test Scenario (Legacy) designer, click GIVEN to open the New input window with the available facts.
Figure 4.2. Add GIVEN input to the test scenario
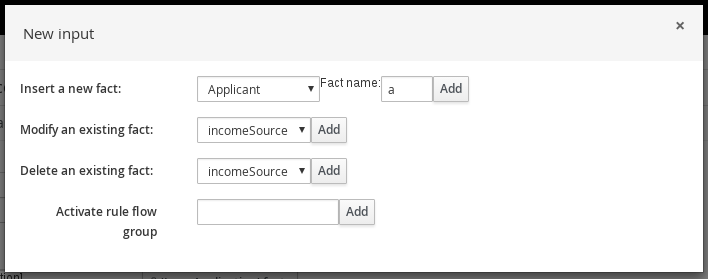
The list includes the following options, depending on the data objects available in the Data Objects tab of the test scenarios designer:
- Insert a new fact: Use this to add a fact and modify its field values. Enter a variable for the fact as the Fact name.
- Modify an existing fact: (Appears only after another fact has been added.) Use this to specify a previously inserted fact to be modified in the decision engine between executions of the scenario.
- Delete an existing fact: (Appears only after another fact has been added.) Use this to specify a previously inserted fact to be deleted from the decision engine between executions of the scenario.
- Activate rule flow group: Use this to specify a rule flow group to be activated so that all rules within that group can be tested.
-
Choose a fact for the desired input option and click Add. For example, set Insert a new fact: to Applicant and enter
aorappor any other variable for the Fact name. Click the fact in the test scenarios designer and select the field to be modified.
Figure 4.3. Modify a fact field
Click the edit icon (
 ) and select from the following field values:
- Literal value: Creates an open field in which you enter a specific literal value.
- Bound variable: Sets the value of the field to the fact bound to a selected variable. The field type must match the bound variable type.
- Create new fact: Enables you to create a new fact and assign it as a field value of the parent fact. Then you can click the child fact in the test scenarios designer and likewise assign field values or nest other facts similarly.
- Continue adding any other GIVEN input data for the scenario and click Save in the test scenarios designer to save your work.
4.1.2. Adding EXPECT results in test scenarios
The EXPECT section defines the expected results based on the GIVEN input facts. That is, GIVEN the input facts, EXPECT other specified facts to be valid or entire rules to be activated. For example, with the given facts of an applicant under the age of 21 in the scenario, the EXPECT results could be LoanApplication with approved set to false (as a result of the underage applicant), or could be the activation of the Underage rule as a whole.
Prerequisite
All data objects required for your test scenario have been created or imported and are listed in the Data Objects tab of the Test Scenario (Legacy) designer.
Procedure
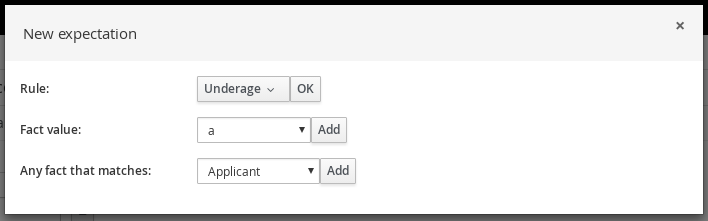
In the Test Scenario (Legacy) designer, click EXPECT to open the New expectation window with the available facts.
Figure 4.4. Add EXPECT results to the test scenario
The list includes the following options, depending on the data in the GIVEN section and the data objects available in the Data Objects tab of the test scenarios designer:
- Rule: Use this to specify a particular rule in the project that is expected to be activated as a result of the GIVEN input. Type the name of a rule that is expected to be activated or select it from the list of rules, and then in the test scenarios designer, specify the number of times the rule should be activated.
- Fact value: Use this to select a fact and define values for it that are expected to be valid as a result of the facts defined in the GIVEN section. The facts are listed by the Fact name previously defined for the GIVEN input.
- Any fact that matches: Use this to validate that at least one fact with the specified values exists as a result of the GIVEN input.
-
Choose a fact for the desired expectation (such as Fact value:
application) and click Add or OK. Click the fact in the test scenarios designer and select the field to be added and modified.
Figure 4.5. Modify a fact field
-
Set the field values to what is expected to be valid as a result of the GIVEN input (such as
approved|equals|false). - Continue adding any other EXPECT input data for the scenario and click Save in the test scenarios designer to save your work.
After you have defined and saved all GIVEN, EXPECT, and other data for the scenario, click Run scenario in the upper-right corner to run this
.scenariofile, or click Run all scenarios to run all saved.scenariofiles in the project package (if there are multiple). Although the Run scenario option does not require the individual.scenariofile to be saved, the Run all scenarios option does require all.scenariofiles to be saved.If the test fails, address any problems described in the Alerts message at the bottom of the window, review all components in the scenario, and try again to validate the scenario until the scenario passes.
- Click Save in the test scenarios designer to save your work after all changes are complete.
Chapter 5. Next steps
Appendix A. Versioning information
Documentation last updated on Wednesday, May 8, 2019.