
Getting started with Red Hat build of Kogito in Red Hat Decision Manager
Abstract
Preface
As a developer of business decisions, you can use Red Hat build of Kogito to build cloud-native applications that adapt your business domain and tooling.
Making open source more inclusive
Red Hat is committed to replacing problematic language in our code, documentation, and web properties. We are beginning with these four terms: master, slave, blacklist, and whitelist. Because of the enormity of this endeavor, these changes will be implemented gradually over several upcoming releases. For more details, see our CTO Chris Wright’s message.
Part I. Getting started with Red Hat build of Kogito microservices
As a developer of business decisions, you can use Red Hat build of Kogito business automation to develop decision services using Decision Model and Notation (DMN) models, Drools Rule Language (DRL) rules, Predictive Model Markup Language (PMML) or a combination of all three methods.
Prerequisites
- JDK 11 or later is installed.
- Apache Maven 3.6.2 or later is installed.
Chapter 1. Red Hat build of Kogito microservices in Red Hat Decision Manager
Red Hat build of Kogito is a cloud-native business automation technology for building cloud-ready business applications. The name Kogito derives from the Latin "Cogito", as in "Cogito, ergo sum" ("I think, therefore I am"), and is pronounced [ˈkoː.d͡ʒi.to] (KO-jee-to). The letter K refers to Kubernetes, the base for Red Hat OpenShift Container Platform as the target cloud platform for Red Hat Decision Manager, and to the Knowledge Is Everything (KIE) open source business automation project from which Red Hat build of Kogito originates.
Red Hat build of Kogito in Red Hat Decision Manager is optimized for a hybrid cloud environment and adapts to your domain and tooling needs. The core objective of Red Hat build of Kogito microservices is to help you mold a set of decisions into your own domain-specific cloud-native set of services.
In Red Hat Decision Manager 7.12 version, Red Hat build of Kogito support is limited to decision services, including Decision Model and Notation (DMN), Drools Rule Language (DRL), and Predictive Model Markup Language (PMML). This support will be improved and extended to Business Process Modeling Notation (BPMN) in a future release.
When you use Red Hat build of Kogito, you are building a cloud-native application as a set of independent domain-specific microservices to achieve some business value. The decisions that you use to describe the target behavior are executed as part of the microservices that you create. The resulting microservices are highly distributed and scalable with no centralized orchestration service, and the runtime that your microservice uses is optimized for what is required.
As a business rules developer, you can use Red Hat build of Kogito microservices in Red Hat Decision Manager to build cloud-native applications that adapt to your business domain and tooling.
1.1. Cloud-first priority
Red Hat build of Kogito microservices are designed to run and scale on a cloud infrastructure. You can use Red Hat build of Kogito microservices in Red Hat Decision Manager with the latest cloud-based technologies, such as Red Hat build of Quarkus, to increase start times and instant scaling on container application platforms, such as Red Hat OpenShift Container Platform.
For example, Red Hat build of Kogito microservices are compatible with the following technologies:
- Red Hat OpenShift Container Platform is based on Kubernetes, and is the target platform for building and managing containerized applications.
- Red Hat build of Quarkus is a native Java stack for Kubernetes that you can use to build applications, using the Red Hat build of Kogito microservices.
- Spring Boot is an application framework that you can use to configure Spring Framework with Red Hat Decision Manager.
1.2. Red Hat build of Kogito microservices on Red Hat build of Quarkus and Spring Boot
The primary Java frameworks that Red Hat build of Kogito microservices support are Red Hat build of Quarkus and Spring Boot.
Red Hat build of Quarkus is a Kubernetes-native Java framework with a container-first approach to building Java applications, especially for Java virtual machines (JVMs) such as OpenJDK HotSpot. Red Hat build of Quarkus optimizes Java specifically for Kubernetes by reducing the size of both the Java application and container image footprint, eliminating some of the Java programming workload from previous generations, and reducing the amount of memory required to run those images.
For Red Hat build of Kogito microservices, Red Hat build of Quarkus is the preferred framework for optimal Kubernetes compatibility and enhanced developer features, such as live reload in development mode for advanced debugging.
Spring Boot is a Java-based framework for building standalone production-ready Spring applications. Spring Boot enables you to develop Spring applications with minimal configurations and without an entire Spring configuration setup.
For Red Hat build of Kogito microservices, Spring Boot is supported for developers who need to use Red Hat Decision Manager in an existing Spring Framework environment.
Chapter 2. DMN modelers for Red Hat build of Kogito microservices
Red Hat Decision Manager provides extensions or applications that you can use to design Decision Model and Notation (DMN) decision models for your Red Hat build of Kogito microservices using graphical modelers.
The following DMN modelers are supported:
VS Code extension: Enables you to view and design DMN models in Visual Studio Code (VS Code). The VS Code extension requires VS Code 1.46.0 or later.
To install the VSCode extension directly in VS Code, select the Extensions menu option in VS Code and search for and install the Red Hat Business Automation Bundle extension.
-
Business Modeler standalone editors: Enable you to view and design DMN models embedded in your web applications. To download the necessary files, you can either use the NPM artifacts from the Kogito tooling repository or download the JavaScript files directly for the DMN standalone editor library at
https://kiegroup.github.io/kogito-online/standalone/dmn/index.js.
2.1. Installing the Red Hat Decision Manager VS Code extension bundle
Red Hat Decision Manager provides a Red Hat Business Automation Bundle VS Code extension that enables you to design Decision Model and Notation (DMN) decision models, Business Process Model and Notation (BPMN) 2.0 business processes, and test scenarios directly in VS Code. VS Code is the preferred integrated development environment (IDE) for developing new business applications. Red Hat Decision Manager also provides individual DMN Editor and BPMN Editor VS Code extensions for DMN or BPMN support only, if needed.
The editors in the VS Code are partially compatible with the editors in the Business Central, and several Business Central features are not supported in the VS Code.
Prerequisites
- The latest stable version of VS Code is installed.
Procedure
In your VS Code IDE, select the Extensions menu option and search for Red Hat Business Automation Bundle for DMN, BPMN, and test scenario file support.
For DMN or BPMN file support only, you can also search for the individual DMN Editor or BPMN Editor extensions.
- When the Red Hat Business Automation Bundle extension appears in VS Code, select it and click Install.
- For optimal VS Code editor behavior, after the extension installation is complete, reload or close and re-launch your instance of VS Code.
After you install the VS Code extension bundle, any .dmn, .bpmn, or .bpmn2 files that you open or create in VS Code are automatically displayed as graphical models. Additionally, any .scesim files that you open or create are automatically displayed as tabular test scenario models for testing the functionality of your business decisions.
If the DMN, BPMN, or test scenario modelers open only the XML source of a DMN, BPMN, or test scenario file and displays an error message, review the reported errors and the model file to ensure that all elements are correctly defined.
For new DMN or BPMN models, you can also enter dmn.new or bpmn.new in a web browser to design your DMN or BPMN model in the online modeler. When you finish creating your model, you can click Download in the online modeler page to import your DMN or BPMN file into your Red Hat Decision Manager project in VS Code.
2.2. Configuring the Red Hat Decision Manager standalone editors
Red Hat Decision Manager provides standalone editors that are distributed in a self-contained library providing an all-in-one JavaScript file for each editor. The JavaScript file uses a comprehensive API to set and control the editor.
You can install the standalone editors using the following methods:
- Download each JavaScript file manually
- Use the NPM package
Procedure
Install the standalone editors using one of the following methods:
Download each JavaScript file manually: For this method, follow these steps:
- Download the JavaScript files.
- Add the downloaded Javascript files to your hosted application.
Add the following
<script>tag to your HTML page:Script tag for your HTML page for the DMN editor
<script src="https://<YOUR_PAGE>/dmn/index.js"></script>
Script tag for your HTML page for the BPMN editor
<script src="https://<YOUR_PAGE>/bpmn/index.js"></script>
Use the NPM package: For this method, follow these steps:
Add the NPM package to your
package.jsonfile:Adding the NPM package
npm install @kogito-tooling/kie-editors-standalone
Import each editor library to your
TypeScriptfile:Importing each editor
import * as DmnEditor from "@kogito-tooling/kie-editors-standalone/dist/dmn"
import * as BpmnEditor from "@kogito-tooling/kie-editors-standalone/dist/bpmn"
After you install the standalone editors, open the required editor by using the provided editor API, as shown in the following example for opening a DMN editor. The API is the same for each editor.
Opening the DMN standalone editor
const editor = DmnEditor.open({
  container: document.getElementById("dmn-editor-container"),
  initialContent: Promise.resolve(""),
  readOnly: false,
  origin: "",
  resources: new Map([
    [
      "MyIncludedModel.dmn",
      {
        contentType: "text",
        content: Promise.resolve("")
      }
    ]
  ])
});
Use the following parameters with the editor API:
Table 2.1. Example parameters
Parameter Description containerHTML element in which the editor is appended.
initialContentPromise to a DMN model content. This parameter can be empty, as shown in the following examples:
-
Promise.resolve("") -
Promise.resolve("<DIAGRAM_CONTENT_DIRECTLY_HERE>") -
fetch("MyDmnModel.dmn").then(content ⇒ content.text())
readOnly(Optional)Enables you to allow changes in the editor. Set to
false(default) to allow content editing andtruefor read-only mode in editor.origin(Optional)Origin of the repository. The default value is
window.location.origin.resources(Optional)Map of resources for the editor. For example, this parameter is used to provide included models for the DMN editor or work item definitions for the BPMN editor. Each entry in the map contains a resource name and an object that consists of
content-type(textorbinary) andcontent(similar to theinitialContentparameter).The returned object contains the methods that are required to manipulate the editor.
Table 2.2. Returned object methods
Method Description getContent(): Promise<string>Returns a promise containing the editor content.
setContent(path: string, content: string): voidSets the content of the editor.
getPreview(): Promise<string>Returns a promise containing an SVG string of the current diagram.
subscribeToContentChanges(callback: (isDirty: boolean) ⇒ void): (isDirty: boolean) ⇒ voidSets a callback to be called when the content changes in the editor and returns the same callback to be used for unsubscription.
unsubscribeToContentChanges(callback: (isDirty: boolean) ⇒ void): voidUnsubscribes the passed callback when the content changes in the editor.
markAsSaved(): voidResets the editor state that indicates that the content in the editor is saved. Also, it activates the subscribed callbacks related to content change.
undo(): voidUndoes the last change in the editor. Also, it activates the subscribed callbacks related to content change.
redo(): voidRedoes the last undone change in the editor. Also, it activates the subscribed callbacks related to content change.
close(): voidCloses the editor.
getElementPosition(selector: string): Promise<Rect>Provides an alternative to extend the standard query selector when an element lives inside a canvas or a video component. The
selectorparameter must follow the<PROVIDER>:::<SELECT>format, such asCanvas:::MySquareorVideo:::PresenterHand. This method returns aRectrepresenting the element position.envelopeApi: MessageBusClientApi<KogitoEditorEnvelopeApi>This is an advanced editor API. For more information about advanced editor API, see MessageBusClientApi and KogitoEditorEnvelopeApi.
-
Chapter 3. Creating a Maven project for a Red Hat build of Kogito microservice
Before you can begin developing Red Hat build of Kogito microservices, you need to create a Maven project where you can build your assets and any other related resources for your application.
Procedure
- In a command terminal, navigate to a local folder where you want to store the new project.
Enter the following command to generate a project within a defined folder:
On Red Hat build of Quarkus
$ mvn io.quarkus:quarkus-maven-plugin:create \
    -DprojectGroupId=org.acme -DprojectArtifactId=sample-kogito \
    -DprojectVersion=1.0.0-SNAPSHOT -Dextensions=kogito-quarkus
On Spring Boot
$ mvn archetype:generate \
    -DarchetypeGroupId=org.kie.kogito \
    -DarchetypeArtifactId=kogito-spring-boot-archetype \
    -DgroupId=org.acme -DartifactId=sample-kogito \
    -DarchetypeVersion=1.11.0.Final \
    -Dversion=1.0-SNAPSHOT
This command generates a
sample-kogitoMaven project and imports the extension for all required dependencies and configurations to prepare your application for business automation.If you want to enable PMML execution for your project, add the following dependency to the
pom.xmlfile in the Maven project that contains your Red Hat build of Kogito microservices:Dependency to enable PMML execution
<dependency>
  <groupId>org.kie.kogito</groupId>
  <artifactId>kogito-pmml</artifactId>
</dependency>
<dependency>
  <groupId>org.jpmml</groupId>
  <artifactId>pmml-model</artifactId>
</dependency>
On Red Hat build of Quarkus, if you plan to run your application on OpenShift, you must also import the
smallrye-healthextension for the liveness and readiness probes, as shown in the following example:SmallRye Health extension for Red Hat build of Quarkus applications on OpenShift
$ mvn quarkus:add-extension -Dextensions="smallrye-health"
This command generates the following dependency in the
pom.xmlfile of your Red Hat Decision Manager project on Red Hat build of Quarkus:SmallRye Health dependency for Red Hat build of Quarkus applications on OpenShift
<dependency>
  <groupId>io.quarkus</groupId>
  <artifactId>quarkus-smallrye-health</artifactId>
</dependency>
- Open or import the project in your VS Code IDE to view the contents.
3.1. Creating a custom Spring Boot project for Red Hat build of Kogito microservices
You can create custom Maven projects using the Spring Boot archetype for your Red Hat build of Kogito microservices. The Spring Boot archetype enables you to add Spring Boot starters or add-ons to your project.
A Spring Boot starter is an all-in-one descriptor for your project and requires business automation engines provided by Red Hat build of Kogito. The Spring Boot starters include decisions, rules, and predictions.
When your project contains all the assets and you want a quick way to get started with Red Hat build of Kogito, you can use the kogito-spring-boot-starter starter. For a more granular approach, you can use a specific starter, such as kogito-decisions-spring-boot-starter for decisions, or a combination of starters.
Red Hat build of Kogito supports the following Spring Boot starters:
- Decisions Spring Boot starter
Starter for providing DMN support to your Spring Boot project. The following is an example of adding a decisions Spring boot starter to your project:
<dependencies> <dependency> <groupId>org.kie.kogito</groupId> <artifactId>kogito-decisions-spring-boot-starter</artifactId> </dependency> </dependencies>- Predictions Spring Boot starter
Starter for providing PMML support to your Spring Boot project. The following is an example of adding a predictions Spring boot starter to your project:
<dependencies> <dependency> <groupId>org.kie.kogito</groupId> <artifactId>kogito-predictions-spring-boot-starter</artifactId> </dependency> </dependencies>- Rules Spring Boot starter
Starter for providing DRL support to your Spring Boot project. The following is an example of adding a rules Spring boot starter to your project:
<dependencies>
  <dependency>
    <groupId>org.kie.kogito</groupId>
    <artifactId>kogito-rules-spring-boot-starter</artifactId>
  </dependency>
</dependencies>
Procedure
- In a command terminal, navigate to a local folder where you want to store the new project.
Enter one of the following commands to generate a project using the
startersoraddonsproperty:To generate a project using the
startersproperty, enter the following command:$ mvn archetype:generate \ -DarchetypeGroupId=org.kie.kogito \ -DarchetypeArtifactId=kogito-springboot-archetype \ -DgroupId=org.acme -DartifactId=sample-kogito \ -DarchetypeVersion=1.11.0.Final \ -Dversion=1.0-SNAPSHOT -Dstarters=decisionsThe new project includes the dependencies required to run the decision microservices. You can combine multiple Spring Boot starters using a comma-separated list, such as
starters=decisions,rules.To generate a project containing Prometheus monitoring using the
addonsproperty, enter the following command:$ mvn archetype:generate \ -DarchetypeGroupId=org.kie.kogito \ -DarchetypeArtifactId=kogito-springboot-archetype \ -DgroupId=org.acme -DartifactId=sample-kogito \ -DarchetypeVersion=1.11.0.Final \ -Dversion=1.0-SNAPSHOT -Dstarters=descisions -Daddons=monitoring-prometheus,persistence-infinispanNoteWhen you pass an add-on to the property, the add-on name does not require the
kogito-addons-springbootprefix. Also, you can combine theadd-onsandstartersproperties to customize the project.
- Open or import the project in your IDE to view the contents.
Chapter 4. Example applications with Red Hat build of Kogito microservices
Red Hat build of Kogito microservices include example applications in the rhdm-7.12.0-kogito-and-optaplanner-quickstarts.zip file. These example applications contain various types of services on Red Hat build of Quarkus or Spring Boot to help you develop your own applications. The services use one or more Decision Model and Notation (DMN) decision models, Drools Rule Language (DRL) rule units, Predictive Model Markup Language (PMML) models, or Java classes to define the service logic.
For information about each example application and instructions for using them, see the README file in the relevant application folder.
When you run examples in a local environment, ensure that the environment matches the requirements that are listed in the README file of the relevant application folder. Also, this might require making the necessary network ports available, as configured for Red Hat build of Quarkus, Spring Boot, and docker-compose where applicable.
The following list describes some of the examples provided with Red Hat build of Kogito microservices:
- Decision services
-
dmn-quarkus-exampleanddmn-springboot-example: A decision service (on Red Hat build of Quarkus or Spring Boot) that uses DMN to determine driver penalty and suspension based on traffic violations. -
rules-quarkus-helloworld: A Hello World decision service on Red Hat build of Quarkus with a single DRL rule unit. -
ruleunit-quarkus-exampleandruleunit-springboot-example: A decision service (on Red Hat build of Quarkus or Spring Boot) that uses DRL with rule units to validate a loan application and that exposes REST operations to view application status. -
dmn-pmml-quarkus-exampleanddmn-pmml-springboot-example: A decision service (on Red Hat build of Quarkus or Spring Boot) that uses DMN and PMML to determine driver penalty and suspension based on traffic violations. -
dmn-drools-quarkus-metricsanddmn-drools-springboot-metrics: A decision service (on Red Hat build of Quarkus or Spring Boot) that enables and consumes the runtime metrics monitoring feature in Red Hat build of Kogito. -
pmml-quarkus-exampleandpmml-springboot-example: A decision service (on Red Hat build of Quarkus or Spring Boot) that uses PMML.
-
For more information, see Designing a decision service using DMN models, Designing a decision service using DRL rules, and Designing a decision service using PMML models.
Chapter 5. Designing the application logic for a Red Hat build of Kogito microservice using DMN
After you create your project, you can create or import Decision Model and Notation (DMN) decision models and Drools Rule Language (DRL) business rules in the src/main/resources folder of your project. You can also include Java classes in the src/main/java folder of your project that act as Java services or provide implementations that you call from your decisions.
The example for this procedure is a basic Red Hat build of Kogito microservice that provides a REST endpoint /persons. This endpoint is automatically generated based on an example PersonDecisions.dmn DMN model to make decisions based on the data being processed.
The business decision contains the decision logic of the Red Hat Decision Manager service. You can define business rules and decisions in different ways, such as with DMN models or DRL rules. The example for this procedure uses a DMN model.
Prerequisites
- You have created a project. For more information about creating a Maven project, see Chapter 3, Creating a Maven project for a Red Hat build of Kogito microservice.
Procedure
In the Maven project that you generated for your Red Hat Decision Manager service, navigate to the
src/main/java/org/acmefolder and add the followingPerson.javafile:Example person Java object
package org.acme;

import java.io.Serializable;

public class Person {

	private String name;
	private int age;
	private boolean adult;

	public String getName() {
		return name;
	}

	public void setName(String name) {
		this.name = name;
	}

	public int getAge() {
		return age;
	}

	public void setAge(int age) {
		this.age = age;
	}

	public boolean isAdult() {
		return adult;
	}

	public void setAdult(boolean adult) {
		this.adult = adult;
	}

	@Override
	public String toString() {
		return "Person [name=" + name + ", age=" + age + ", adult=" + adult + "]";
	}

}
This example Java object sets and retrieves a person’s name, age, and adult status.
Navigate to the
src/main/resourcesfolder and add the followingPersonDecisions.dmnDMN decision model:Figure 5.1. Example
PersonDecisionsDMN decision requirements diagram (DRD)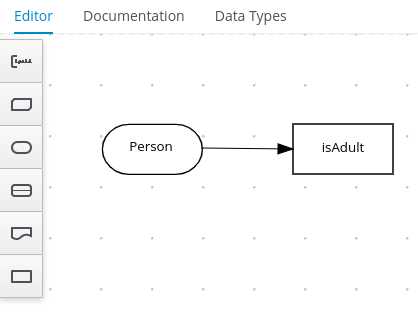
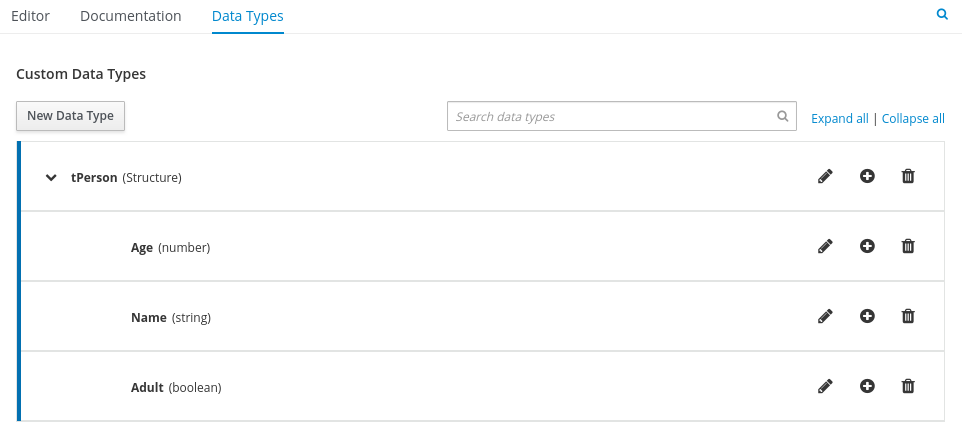
Figure 5.2. Example DMN boxed expression for
isAdultdecision
Figure 5.3. Example DMN data types
This example DMN model consists of a basic DMN input node and a decision node defined by a DMN decision table with a custom structured data type.
In VSCode, you can add the Red Hat Business Automation Bundle VSCode extension to design the decision requirements diagram (DRD), boxed expression, and data types with the DMN modeler.
To create this example DMN model quickly, you can copy the following
PersonDecisions.dmnfile content:Example DMN file
<dmn:definitions xmlns:dmn="http://www.omg.org/spec/DMN/20180521/MODEL/" xmlns="https://kiegroup.org/dmn/_52CEF9FD-9943-4A89-96D5-6F66810CA4C1" xmlns:di="http://www.omg.org/spec/DMN/20180521/DI/" xmlns:kie="http://www.drools.org/kie/dmn/1.2" xmlns:dmndi="http://www.omg.org/spec/DMN/20180521/DMNDI/" xmlns:dc="http://www.omg.org/spec/DMN/20180521/DC/" xmlns:feel="http://www.omg.org/spec/DMN/20180521/FEEL/" id="_84B432F5-87E7-43B1-9101-1BAFE3D18FC5" name="PersonDecisions" typeLanguage="http://www.omg.org/spec/DMN/20180521/FEEL/" namespace="https://kiegroup.org/dmn/_52CEF9FD-9943-4A89-96D5-6F66810CA4C1"> <dmn:extensionElements/> <dmn:itemDefinition id="_DEF2C3A7-F3A9-4ABA-8D0A-C823E4EB43AB" name="tPerson" isCollection="false"> <dmn:itemComponent id="_DB46DB27-0752-433F-ABE3-FC9E3BDECC97" name="Age" isCollection="false"> <dmn:typeRef>number</dmn:typeRef> </dmn:itemComponent> <dmn:itemComponent id="_8C6D865F-E9C8-43B0-AB4D-3F2075A4ECA6" name="Name" isCollection="false"> <dmn:typeRef>string</dmn:typeRef> </dmn:itemComponent> <dmn:itemComponent id="_9033704B-4E1C-42D3-AC5E-0D94107303A1" name="Adult" isCollection="false"> <dmn:typeRef>boolean</dmn:typeRef> </dmn:itemComponent> </dmn:itemDefinition> <dmn:inputData id="_F9685B74-0C69-4982-B3B6-B04A14D79EDB" name="Person"> <dmn:extensionElements/> <dmn:variable id="_0E345A3C-BB1F-4FB2-B00F-C5691FD1D36C" name="Person" typeRef="tPerson"/> </dmn:inputData> <dmn:decision id="_0D2BD7A9-ACA1-49BE-97AD-19699E0C9852" name="isAdult"> <dmn:extensionElements/> <dmn:variable id="_54CD509F-452F-40E5-941C-AFB2667D4D45" name="isAdult" typeRef="boolean"/> <dmn:informationRequirement id="_2F819B03-36B7-4DEB-AED6-2B46AE3ADB75"> <dmn:requiredInput href="#_F9685B74-0C69-4982-B3B6-B04A14D79EDB"/> </dmn:informationRequirement> <dmn:decisionTable id="_58370567-05DE-4EC0-AC2D-A23803C1EAAE" hitPolicy="UNIQUE" preferredOrientation="Rule-as-Row"> <dmn:input id="_ADEF36CD-286A-454A-ABD8-9CF96014021B"> <dmn:inputExpression id="_4930C2E5-7401-46DD-8329-EAC523BFA492" typeRef="number"> <dmn:text>Person.Age</dmn:text> </dmn:inputExpression> </dmn:input> <dmn:output id="_9867E9A3-CBF6-4D66-9804-D2206F6B4F86" typeRef="boolean"/> <dmn:rule id="_59D6BFF0-35B4-4B7E-8D7B-E31CB0DB8242"> <dmn:inputEntry id="_7DC55D63-234F-497B-A12A-93DA358C0136"> <dmn:text>> 18</dmn:text> </dmn:inputEntry> <dmn:outputEntry id="_B3BB5B97-05B9-464A-AB39-58A33A9C7C00"> <dmn:text>true</dmn:text> </dmn:outputEntry> </dmn:rule> <dmn:rule id="_8FCD63FE-8AD8-4F56-AD12-923E87AFD1B1"> <dmn:inputEntry id="_B4EF7F13-E486-46CB-B14E-1D21647258D9"> <dmn:text><= 18</dmn:text> </dmn:inputEntry> <dmn:outputEntry id="_F3A9EC8E-A96B-42A0-BF87-9FB1F2FDB15A"> <dmn:text>false</dmn:text> </dmn:outputEntry> </dmn:rule> </dmn:decisionTable> </dmn:decision> <dmndi:DMNDI> <dmndi:DMNDiagram> <di:extension> <kie:ComponentsWidthsExtension> <kie:ComponentWidths dmnElementRef="_58370567-05DE-4EC0-AC2D-A23803C1EAAE"> <kie:width>50</kie:width> <kie:width>100</kie:width> <kie:width>100</kie:width> <kie:width>100</kie:width> </kie:ComponentWidths> </kie:ComponentsWidthsExtension> </di:extension> <dmndi:DMNShape id="dmnshape-_F9685B74-0C69-4982-B3B6-B04A14D79EDB" dmnElementRef="_F9685B74-0C69-4982-B3B6-B04A14D79EDB" isCollapsed="false"> <dmndi:DMNStyle> <dmndi:FillColor red="255" green="255" blue="255"/> <dmndi:StrokeColor red="0" green="0" blue="0"/> <dmndi:FontColor red="0" green="0" blue="0"/> </dmndi:DMNStyle> <dc:Bounds x="404" y="464" width="100" height="50"/> <dmndi:DMNLabel/> </dmndi:DMNShape> <dmndi:DMNShape id="dmnshape-_0D2BD7A9-ACA1-49BE-97AD-19699E0C9852" dmnElementRef="_0D2BD7A9-ACA1-49BE-97AD-19699E0C9852" isCollapsed="false"> <dmndi:DMNStyle> <dmndi:FillColor red="255" green="255" blue="255"/> <dmndi:StrokeColor red="0" green="0" blue="0"/> <dmndi:FontColor red="0" green="0" blue="0"/> </dmndi:DMNStyle> <dc:Bounds x="404" y="311" width="100" height="50"/> <dmndi:DMNLabel/> </dmndi:DMNShape> <dmndi:DMNEdge id="dmnedge-_2F819B03-36B7-4DEB-AED6-2B46AE3ADB75" dmnElementRef="_2F819B03-36B7-4DEB-AED6-2B46AE3ADB75"> <di:waypoint x="504" y="489"/> <di:waypoint x="404" y="336"/> </dmndi:DMNEdge> </dmndi:DMNDiagram> </dmndi:DMNDI> </dmn:definitions>To create this example DMN model in VSCode using the DMN modeler, follow these steps:
-
Open the empty
PersonDecisions.dmnfile, click the Properties icon in the upper-right corner of the DMN modeler, and confirm that the DMN model Name is set toPersonDecisions. -
In the left palette, select DMN Input Data, drag the node to the canvas, and double-click the node to name it
Person. -
In the left palette, drag the DMN Decision node to the canvas, double-click the node to name it
isAdult, and link to it from the input node. - Select the decision node to display the node options and click the Edit icon to open the DMN boxed expression editor to define the decision logic for the node.
- Click the undefined expression field and select Decision Table.
- Click the upper-left corner of the decision table to set the hit policy to Unique.
Set the input and output columns so that the input source
Person.Agewith typenumberdetermines the age limit and the output targetisAdultwith typebooleandetermines adult status:Figure 5.4. Example DMN decision table for
isAdultdecisionIn the upper tab options, select the Data Types tab and add the following
tPersonstructured data type and nested data types:Figure 5.5. Example DMN data types
- After you define the data types, select the Editor tab to return to the DMN modeler canvas.
-
Select the Person input node, click the Properties icon, and under Information item, set the Data type to
tPerson. -
Select the isAdult decision node, click the Properties icon, and under Information item, confirm that the Data type is still set to
boolean. You previously set this data type when you created the decision table. - Save the DMN decision file.
-
Open the empty
5.1. Using DRL rule units as an alternative decision service
You can also use a Drools Rule Language (DRL) file implemented as a rule unit to define this example decision service, as an alternative to using Decision Model and Notation (DMN).
A DRL rule unit is a module for rules and a unit of execution. A rule unit collects a set of rules with the declaration of the type of facts that the rules act on. A rule unit also serves as a unique namespace for each group of rules. A single rule base can contain multiple rule units. You typically store all the rules for a unit in the same file as the unit declaration so that the unit is self-contained. For more information about rule units, see Designing a decision service using DRL rules.
Prerequisites
- You have created a project. For more information about creating a Maven project, see Chapter 3, Creating a Maven project for a Red Hat build of Kogito microservice.
Procedure
In the
src/main/resourcesfolder of your example project, instead of using a DMN file, add the followingPersonRules.drlfile:Example
PersonRulesDRL filepackage org.acme unit PersonRules; import org.acme.Person; rule isAdult when $person: /person[ age > 18 ] then modify($person) { setAdult(true) }; end query persons $p : /person[ adult ] endThis example rule determines that any person who is older than 18 is classified as an adult. The rule file also declares that the rule belongs to the rule unit
PersonRules. When you build the project, the rule unit is generated and associated with the DRL file.The rule also defines the condition using OOPath notation. OOPath is an object-oriented syntax extension to XPath for navigating through related elements while handling collections and filtering constraints.
You can also rewrite the same rule condition in a more explicit form using the traditional rule pattern syntax, as shown in the following example:
Example
PersonRulesDRL file using traditional notationpackage org.acme unit PersonRules; import org.acme.Person; rule isAdult when $person: Person(age > 18) from person then modify($person) { setAdult(true) }; end query persons $p : /person[ adult ] end
Chapter 6. Red Hat build of Kogito events add-on
The events add-on provides a default implementation in supported target platforms for EventEmitter and EventReceiver interfaces. You can use EventEmitter and EventReceiver interfaces to enable messaging by process, serverless workflow events, and event decision handling.
6.1. Implementing message payload decorator for Red Hat build of Kogito events add-on
Any dependent add-on can implement the MessagePayloadDecorator.
Prerequisites
- You have installed the Events add-on in Red Hat build of Kogito.
Procedure
-
Create a file named
META-INF/services/org.kie.kogito.add-on.cloudevents.message.MessagePayloadDecoratorin your class path. - Open the file.
- Enter the full name of your implementation class in the file.
Save the file.
The
MessagePayloadDecoratorProviderloads the file upon application start-up and adds the file to the decoration chain. When Red Hat build of Kogito calls theMessagePayloadDecoratorProvider#decorate, your implementation is part of the decoration algorithm.To use the events add-on, add the following code to the
pom.xmlfile of your project:Events smallrye add-on for {QAURKUS}
<dependency>
  <groupId>org.kie.kogito</groupId>
  <artifactId>kogito-addons-quarkus-events-smallrye</artifactId>
  <version>1.15</version>
</dependency>
Events decisions add-on for {QAURKUS}
<dependency>
  <groupId>org.kie.kogito</groupId>
  <artifactId>kogito-addons-events-decisions</artifactId>
  <version>1.15</version>
</dependency>
Events Kafka add-on for Spring Boot
<dependency>
  <groupId>org.kie.kogito</groupId>
  <artifactId>kogito-addons-springboot-events-kafka</artifactId>
  <version>1.15</version>
</dependency>
Events decisions add-on for Spring Boot
<dependency>
  <groupId>org.kie.kogito</groupId>
  <artifactId>kogito-addons-springboot-events-decisions</artifactId>
  <version>1.15</version>
</dependency>
Chapter 7. Running a Red Hat build of Kogito microservice
After you design the business decisions for your Red Hat build of Kogito microservice, you can run your Red Hat build of Quarkus or Spring Boot application in one of the following modes:
- Development mode: For local testing. On Red Hat build of Quarkus, development mode also offers live reload of your decisions in your running applications for advanced debugging.
- JVM mode: For compatibility with a Java virtual machine (JVM).
Procedure
In a command terminal, navigate to the project that contains your Red Hat build of Kogito microservice and enter one of the following commands, depending on your preferred run mode and application environment:
For development mode:
On Red Hat build of Quarkus
$ mvn clean compile quarkus:dev
On Sprint Boot
$ mvn clean compile spring-boot:run
For JVM mode:
On Red Hat build of Quarkus and Spring Boot
$ mvn clean package
$ java -jar target/sample-kogito-1.0-SNAPSHOT-runner.jar
Chapter 8. Interacting with a running Red Hat build of Kogito microservice
After your Red Hat build of Kogito microservice is running, you can send REST API requests to interact with your application and execute your microservices according to how you set up the application.
This example tests the /persons REST API endpoint that is automatically generated the decisions in the PersonDecisions.dmn file (or the rules in the PersonRules.drl file if you used a DRL rule unit).
For this example, use a REST client, curl utility, or the Swagger UI configured for the application (such as http://localhost:8080/q/swagger-ui or http://localhost:8080/swagger-ui.html) to send API requests with the following components:
-
URL:
http://localhost:8080/persons HTTP headers: For
POSTrequests only:-
accept:application/json -
content-type:application/json
-
-
HTTP methods:
GET,POST, orDELETE
Example POST request body to add an adult (JSON)
{
  "person": {
    "name": "John Quark",
    "age": 20
  }
}
Example curl command to add an adult
curl -X POST http://localhost:8080/persons -H 'content-type: application/json' -H 'accept: application/json' -d '{"person": {"name":"John Quark", "age": 20}}'
Example response (JSON)
{
  "id": "3af806dd-8819-4734-a934-728f4c819682",
  "person": {
    "name": "John Quark",
    "age": 20,
    "adult": false
  },
  "isAdult": true
}
This example procedure uses curl commands for convenience.
Procedure
In a command terminal window that is separate from your running application, navigate to the project that contains your Red Hat build of Kogito microservice and use any of the following curl commands with JSON requests to interact with your running microservice:
On Spring Boot, you might need to modify how your application exposes API endpoints in order for these example requests to function. For more information, see the README file included in the example Spring Boot project that you created for this tutorial.
Add an adult person:
Example request
curl -X POST http://localhost:8080/persons -H 'content-type: application/json' -H 'accept: application/json' -d '{"person": {"name":"John Quark", "age": 20}}'Example response
{"id":"3af806dd-8819-4734-a934-728f4c819682","person":{"name":"John Quark","age":20,"adult":false},"isAdult":true}Add an underage person:
Example request
curl -X POST http://localhost:8080/persons -H 'content-type: application/json' -H 'accept: application/json' -d '{"person": {"name":"Jenny Quark", "age": 15}}'Example response
{"id":"8eef502b-012b-4628-acb7-73418a089c08","person":{"name":"Jenny Quark","age":15,"adult":false},"isAdult":false}Complete the evaluation using the returned UUIDs:
Example request
curl -X POST http://localhost:8080/persons/8eef502b-012b-4628-acb7-73418a089c08/ChildrenHandling/cdec4241-d676-47de-8c55-4ee4f9598bac -H 'content-type: application/json' -H 'accept: application/json' -d '{}'
Part II. Deploying Red Hat build of Kogito microservices on Red Hat OpenShift Container Platform
As a developer of business decisions and processes, you can deploy Red Hat build of Kogito microservices on Red Hat OpenShift Container Platform for cloud implementation. The RHPAM Kogito Operator automates many of the deployment steps for you or guides you through the deployment process.
Prerequisites
- Red Hat OpenShift Container Platform 4.6 or 4.7 is installed.
- The OpenShift project for the deployment is created.
Chapter 9. Red Hat build of Kogito on Red Hat OpenShift Container Platform
You can deploy Red Hat build of Kogito microservices on Red Hat OpenShift Container Platform for cloud implementation. In this architecture, Red Hat build of Kogito microservices are deployed as OpenShift pods that you can scale up and down individually to provide as few or as many containers as required for a particular service.
To help you deploy your Red Hat build of Kogito microservices on OpenShift, Red Hat Decision Manager provides Red Hat Process Automation Manager Kogito Operator. This operator guides you through the deployment process. The operator is based on the Operator SDK and automates many of the deployment steps for you. For example, when you provide the operator with a link to the Git repository that contains your application, the operator automatically configures the components required to build your project from source and deploys the resulting services.
To install the Red Hat Process Automation Manager Kogito Operator in OpenShift web console, go to Operators → OperatorHub in the left menu, search for and select RHPAM Kogito Operator, and follow the on-screen instructions to install the latest operator version.
Chapter 10. OpenShift deployment options with the RHPAM Kogito Operator
After you create your Red Hat build of Kogito microservices as part of a business application, you can use the Red Hat OpenShift Container Platform web console to deploy your microservices. The RHPAM Kogito Operator page in the OpenShift web console guides you through the deployment process.
The RHPAM Kogito Operator supports the following options for building and deploying Red Hat build of Kogito microservices on Red Hat OpenShift Container Platform:
- Git source build and deployment
- Binary build and deployment
- Custom image build and deployment
- File build and deployment
10.1. Deploying Red Hat build of Kogito microservices on OpenShift using Git source build and OpenShift web console
The RHPAM Kogito Operator uses the following custom resources to deploy domain-specific microservices (the microservices that you develop):
-
KogitoBuildbuilds an application using the Git URL or other sources and produces a runtime image. -
KogitoRuntimestarts the runtime image and configures it as per your requirements.
In most use cases, you can use the standard runtime build and deployment method to deploy Red Hat build of Kogito microservices on OpenShift from a Git repository source, as shown in the following procedure.
If you are developing or testing your Red Hat build of Kogito microservice locally, you can use the binary build, custom image build, or file build option to build and deploy from a local source instead of from a Git repository.
Prerequisites
- The RHPAM Kogito Operator is installed.
- The application with your Red Hat build of Kogito microservices is in a Git repository that is reachable from your OpenShift environment.
-
You have access to the OpenShift web console with the necessary permissions to create and edit
KogitoBuildandKogitoRuntime. (Red Hat build of Quarkus only) The
pom.xmlfile of your project contains the following dependency for thequarkus-smallrye-healthextension. This extension enables the liveness and readiness probes that are required for Red Hat build of Quarkus projects on OpenShift.SmallRye Health dependency for Red Hat build of Quarkus applications on OpenShift
<dependency>
  <groupId>io.quarkus</groupId>
  <artifactId>quarkus-smallrye-health</artifactId>
</dependency>
Procedure
- Go to Operators → Installed Operators and select RHPAM Kogito Operator.
- To create the Red Hat build of Kogito build definition, on the operator page, select the Kogito Build tab and click Create KogitoBuild.
In the application window, use Form View or YAML View to configure the build definition.
At a minimum, define the application configurations shown in the following example YAML file:
Example YAML definition for a Red Hat build of Quarkus application with Red Hat build of Kogito build
apiVersion: rhpam.kiegroup.org/v1 # Red Hat build of Kogito API for this service
kind: KogitoBuild  # Application type
metadata:
  name: example-quarkus  # Application name
spec:
  type: RemoteSource
  gitSource:
    uri: 'https://github.com/kiegroup/kogito-examples'  # Git repository containing application (uses default branch)
    contextDir: dmn-quarkus-example  # Git folder location of application
Example YAML definition for a Spring Boot application with Red Hat build of Kogito build
apiVersion: rhpam.kiegroup.org/v1 # Red Hat build of Kogito API for this service kind: KogitoBuild # Application type metadata: name: example-springboot # Application name spec: runtime: springboot type: RemoteSource gitSource: uri: 'https://github.com/kiegroup/kogito-examples' # Git repository containing application (uses default branch) contextDir: dmn-springboot-example # Git folder location of applicationNoteIf you configured an internal Maven repository, you can use it as a Maven mirror service and specify the Maven mirror URL in your Red Hat build of Kogito build definition to shorten build time substantially:
spec:
  mavenMirrorURL: http://nexus3-nexus.apps-crc.testing/repository/maven-public/
For more information about internal Maven repositories, see the Apache Maven documentation.
After you define your application data, click Create to generate the Red Hat build of Kogito build.
Your application is listed in the Red Hat build of KogitoBuilds page. You can select the application name to view or modify application settings and YAML details.
- To create the Red Hat build of Kogito microservice definition, on the operator page, select the Kogito Runtime tab and click Create KogitoRuntime.
In the application window, use Form View or YAML View to configure the microservice definition.
At a minimum, define the application configurations shown in the following example YAML file:
Example YAML definition for a Red Hat build of Quarkus application with Red Hat build of Kogito microservices
apiVersion: rhpam.kiegroup.org/v1 # Red Hat build of Kogito API for this microservice
kind: KogitoRuntime  # Application type
metadata:
  name: example-quarkus  # Application name
Example YAML definition for a Spring Boot application with Red Hat build of Kogito microservices
apiVersion: rhpam.kiegroup.org/v1 # Red Hat build of Kogito API for this microservice
kind: KogitoRuntime  # Application type
metadata:
  name: example-springboot  # Application name
spec:
  runtime: springboot
NoteIn this case, the application is built from Git and deployed using KogitoRuntime. You must ensure that the application name is same in
KogitoBuildandKogitoRuntime.After you define your application data, click Create to generate the Red Hat build of Kogito microservice.
Your application is listed in the Red Hat build of Kogito microservice page. You can select the application name to view or modify application settings and the contents of the YAML file.
In the left menu of the web console, go to Builds → Builds to view the status of your application build.
You can select a specific build to view build details.
NoteFor every Red Hat build of Kogito microservice that you create for OpenShift deployment, two builds are generated and listed in the Builds page in the web console: a traditional runtime build and a Source-to-Image (S2I) build with the suffix
-builder. The S2I mechanism builds the application in an OpenShift build and then passes the built application to the next OpenShift build to be packaged into the runtime container image. The Red Hat build of Kogito S2I build configuration also enables you to build the project directly from a Git repository on the OpenShift platform.- After the application build is complete, go to Workloads → Deployments to view the application deployments, pod status, and other details.
After your Red Hat build of Kogito microservice is deployed, in the left menu of the web console, go to Networking → Routes to view the access link to the deployed application.
You can select the application name to view or modify route settings.
With the application route, you can integrate your Red Hat build of Kogito microservices with your business automation solutions as needed.
10.2. Deploying Red Hat build of Kogito microservices on OpenShift using binary build and OpenShift web console
OpenShift builds can require extensive amounts of time. As a faster alternative for building and deploying your Red Hat build of Kogito microservices on OpenShift, you can use a binary build.
The operator uses the following custom resources to deploy domain-specific microservices (the microservices that you develop):
-
KogitoBuildprocesses an uploaded application and produces a runtime image. -
KogitoRuntimestarts the runtime image and configures it as per your requirements.
Prerequisites
- The RHPAM Kogito Operator is installed.
-
The
ocOpenShift CLI is installed and you are logged in to the relevant OpenShift cluster. Forocinstallation and login instructions, see the OpenShift documentation. -
You have access to the OpenShift web console with the necessary permissions to create and edit
KogitoBuildandKogitoRuntime. (Red Hat build of Quarkus only) The
pom.xmlfile of your project contains the following dependency for thequarkus-smallrye-healthextension. This extension enables the liveness and readiness probes that are required for Red Hat build of Quarkus projects on OpenShift.SmallRye Health dependency for Red Hat build of Quarkus applications on OpenShift
<dependency>
  <groupId>io.quarkus</groupId>
  <artifactId>quarkus-smallrye-health</artifactId>
</dependency>
Procedure
- Build an application locally.
- Go to Operators → Installed Operators and select RHPAM Kogito Operator.
- To create the Red Hat build of Kogito build definition, on the operator page, select the Kogito Build tab and click Create KogitoBuild.
In the application window, use Form View or YAML View to configure the build definition.
At a minimum, define the application configurations shown in the following example YAML file:
Example YAML definition for a Red Hat build of Quarkus application with Red Hat build of Kogito build
apiVersion: rhpam.kiegroup.org/v1 # Red Hat build of Kogito API for this service
kind: KogitoBuild  # Application type
metadata:
  name: example-quarkus  # Application name
spec:
  type: Binary
Example YAML definition for a Spring Boot application with Red Hat build of Kogito build
apiVersion: rhpam.kiegroup.org/v1 # Red Hat build of Kogito API for this service
kind: KogitoBuild  # Application type
metadata:
  name: example-springboot  # Application name
spec:
  runtime: springboot
  type: Binary
After you define your application data, click Create to generate the Red Hat build of Kogito build.
Your application is listed in the Red Hat build of KogitoBuilds page. You can select the application name to view or modify application settings and YAML details.
Upload the built binary using the following command:
$ oc start-build example-quarkus --from-dir=target/ -n namespace
-
from-diris equals to thetargetfolder path of the built application. -
namespaceis the namespace whereKogitoBuildis created.
-
- To create the Red Hat build of Kogito microservice definition, on the operator page, select the Kogito Runtime tab and click Create KogitoRuntime.
In the application window, use Form View or YAML View to configure the microservice definition.
At a minimum, define the application configurations shown in the following example YAML file:
Example YAML definition for a Red Hat build of Quarkus application with Red Hat build of Kogito microservices
apiVersion: rhpam.kiegroup.org/v1 # Red Hat build of Kogito API for this microservice
kind: KogitoRuntime  # Application type
metadata:
  name: example-quarkus  # Application name
Example YAML definition for a Spring Boot application with Red Hat build of Kogito microservices
apiVersion: rhpam.kiegroup.org/v1 # Red Hat build of Kogito API for this microservice
kind: KogitoRuntime  # Application type
metadata:
  name: example-springboot  # Application name
spec:
  runtime: springboot
NoteIn this case, the application is built locally and deployed using KogitoRuntime. You must ensure that the application name is same in
KogitoBuildandKogitoRuntime.After you define your application data, click Create to generate the Red Hat build of Kogito microservice.
Your application is listed in the Red Hat build of Kogito microservice page. You can select the application name to view or modify application settings and the contents of the YAML file.
In the left menu of the web console, go to Builds → Builds to view the status of your application build.
You can select a specific build to view build details.
- After the application build is complete, go to Workloads → Deployments to view the application deployments, pod status, and other details.
After your Red Hat build of Kogito microservice is deployed, in the left menu of the web console, go to Networking → Routes to view the access link to the deployed application.
You can select the application name to view or modify route settings.
With the application route, you can integrate your Red Hat build of Kogito microservices with your business automation solutions as needed.
10.3. Deploying Red Hat build of Kogito microservices on OpenShift using custom image build and OpenShift web console
You can use custom image build as an alternative for building and deploying your Red Hat build of Kogito microservices on OpenShift.
The operator uses the following custom resources to deploy domain-specific microservices (the microservices that you develop):
-
KogitoRuntimestarts the runtime image and configures it as per your requirements.
Prerequisites
- The RHPAM Kogito Operator is installed.
-
You have access to the OpenShift web console with the necessary permissions to create and edit
KogitoRuntime. (Red Hat build of Quarkus only) The
pom.xmlfile of your project contains the following dependency for thequarkus-smallrye-healthextension. This extension enables the liveness and readiness probes that are required for Red Hat build of Quarkus projects on OpenShift.SmallRye Health dependency for Red Hat build of Quarkus applications on OpenShift
<dependency>
  <groupId>io.quarkus</groupId>
  <artifactId>quarkus-smallrye-health</artifactId>
</dependency>
Procedure
- Build an application locally.
Create
Containerfilein the project root folder with the following content:Example
Containerfilefor a Red Hat build of Quarkus applicationFROM registry.redhat.io/rhpam-7/rhpam-kogito-runtime-jvm-rhel8:7.11.0 ENV RUNTIME_TYPE quarkus COPY target/quarkus-app/lib/ $KOGITO_HOME/bin/lib/ COPY target/quarkus-app/*.jar $KOGITO_HOME/bin COPY target/quarkus-app/app/ $KOGITO_HOME/bin/app/ COPY target/quarkus-app/quarkus/ $KOGITO_HOME/bin/quarkus/
Example
Containerfilefor a Spring Boot applicationFROM registry.redhat.io/rhpam-7/rhpam-kogito-runtime-jvm-rhel8:7.11.0 ENV RUNTIME_TYPE springboot COPY target/<application-jar-file> $KOGITO_HOME/bin
-
application-jar-fileis the name of the JAR file of the application.
-
Build the Red Hat build of Kogito image using the following command:
podman build --tag <final-image-name> -f <Container-file>
In the previous command,
final-image-nameis the name of the Red Hat build of Kogito image andContainer-fileis name of theContainerfilethat you created in the previous step.Optionally, test the built image using the following command:
podman run --rm -it -p 8080:8080 <final-image-name>
Push the built Red Hat build of Kogito image to an image registry using the following command:
podman push <final-image-name>
- Go to Operators → Installed Operators and select RHPAM Kogito Operator.
- To create the Red Hat build of Kogito microservice definition, on the operator page, select the Kogito Runtime tab and click Create KogitoRuntime.
In the application window, use Form View or YAML View to configure the microservice definition.
At a minimum, define the application configurations shown in the following example YAML file:
Example YAML definition for a Red Hat build of Quarkus application with Red Hat build of Kogito microservices
apiVersion: rhpam.kiegroup.org/v1 # Red Hat build of Kogito API for this microservice
kind: KogitoRuntime # Application type
metadata:
  name: example-quarkus # Application name
spec:
  image: <final-image-name> # Kogito image name
  insecureImageRegistry: true # Can be omitted when image is pushed into secured registry with valid certificate
Example YAML definition for a Spring Boot application with Red Hat build of Kogito microservices
apiVersion: rhpam.kiegroup.org/v1 # Red Hat build of Kogito API for this microservice
kind: KogitoRuntime # Application type
metadata:
  name: example-springboot # Application name
spec:
  image: <final-image-name> # Kogito image name
  insecureImageRegistry: true # Can be omitted when image is pushed into secured registry with valid certificate
  runtime: springboot
After you define your application data, click Create to generate the Red Hat build of Kogito microservice.
Your application is listed in the Red Hat build of Kogito microservice page. You can select the application name to view or modify application settings and the contents of the YAML file.
- After the application build is complete, go to Workloads → Deployments to view the application deployments, pod status, and other details.
After your Red Hat build of Kogito microservice is deployed, in the left menu of the web console, go to Networking → Routes to view the access link to the deployed application.
You can select the application name to view or modify route settings.
With the application route, you can integrate your Red Hat build of Kogito microservices with your business automation solutions as needed.
10.4. Deploying Red Hat build of Kogito microservices on OpenShift using file build and OpenShift web console
You can build and deploy your Red Hat build of Kogito microservices from a single file, such as a Decision Model and Notation (DMN), Drools Rule Language (DRL), or properties file, or from a directory with multiple files. You can specify a single file from your local file system path or specify a file directory from a local file system path only. When you upload the file or directory to an OpenShift cluster, a new Source-to-Image (S2I) build is automatically triggered.
The operator uses the following custom resources to deploy domain-specific microservices (the microservices that you develop):
-
KogitoBuildgenerates an application from a file and produces a runtime image. -
KogitoRuntimestarts the runtime image and configures it as per your requirements.
Prerequisites
- The RHPAM Kogito Operator is installed.
-
The
ocOpenShift CLI is installed and you are logged in to the relevant OpenShift cluster. Forocinstallation and login instructions, see the OpenShift documentation. -
You have access to the OpenShift web console with the necessary permissions to create and edit
KogitoBuildandKogitoRuntime.
Procedure
- Go to Operators → Installed Operators and select RHPAM Kogito Operator.
- To create the Red Hat build of Kogito build definition, on the operator page, select the Kogito Build tab and click Create KogitoBuild.
In the application window, use Form View or YAML View to configure the build definition.
At a minimum, define the application configurations shown in the following example YAML file:
Example YAML definition for a Red Hat build of Quarkus application with Red Hat build of Kogito build
apiVersion: rhpam.kiegroup.org/v1 # Red Hat build of Kogito API for this service
kind: KogitoBuild  # Application type
metadata:
  name: example-quarkus  # Application name
spec:
  type: LocalSource
Example YAML definition for a Spring Boot application with Red Hat build of Kogito build
apiVersion: rhpam.kiegroup.org/v1 # Red Hat build of Kogito API for this service
kind: KogitoBuild  # Application type
metadata:
  name: example-springboot  # Application name
spec:
  runtime: springboot
  type: LocalSource
NoteIf you configured an internal Maven repository, you can use it as a Maven mirror service and specify the Maven mirror URL in your Red Hat build of Kogito build definition to shorten build time substantially:
spec:
  mavenMirrorURL: http://nexus3-nexus.apps-crc.testing/repository/maven-public/
For more information about internal Maven repositories, see the Apache Maven documentation.
After you define your application data, click Create to generate the Red Hat build of Kogito build.
Your application is listed in the Red Hat build of KogitoBuilds page. You can select the application name to view or modify application settings and YAML details.
Upload the file asset using the following command:
$ oc start-build example-quarkus-builder --from-file=<file-asset-path> -n namespace
-
file-asset-pathis the path of the file asset that you want to upload. -
namespaceis the namespace whereKogitoBuildis created.
-
- To create the Red Hat build of Kogito microservice definition, on the operator page, select the Kogito Runtime tab and click Create KogitoRuntime.
In the application window, use Form View or YAML View to configure the microservice definition.
At a minimum, define the application configurations shown in the following example YAML file:
Example YAML definition for a Red Hat build of Quarkus application with Red Hat build of Kogito microservices
apiVersion: rhpam.kiegroup.org/v1 # Red Hat build of Kogito API for this microservice
kind: KogitoRuntime  # Application type
metadata:
  name: example-quarkus  # Application name
Example YAML definition for a Spring Boot application with Red Hat build of Kogito microservices
apiVersion: rhpam.kiegroup.org/v1 # Red Hat build of Kogito API for this microservice
kind: KogitoRuntime  # Application type
metadata:
  name: example-springboot  # Application name
spec:
  runtime: springboot
NoteIn this case, the application is built from a file and deployed using KogitoRuntime. You must ensure that the application name is same in
KogitoBuildandKogitoRuntime.After you define your application data, click Create to generate the Red Hat build of Kogito microservice.
Your application is listed in the Red Hat build of Kogito microservice page. You can select the application name to view or modify application settings and the contents of the YAML file.
In the left menu of the web console, go to Builds → Builds to view the status of your application build.
You can select a specific build to view build details.
NoteFor every Red Hat build of Kogito microservice that you create for OpenShift deployment, two builds are generated and listed in the Builds page in the web console: a traditional runtime build and a Source-to-Image (S2I) build with the suffix
-builder. The S2I mechanism builds the application in an OpenShift build and then passes the built application to the next OpenShift build to be packaged into the runtime container image.- After the application build is complete, go to Workloads → Deployments to view the application deployments, pod status, and other details.
After your Red Hat build of Kogito microservice is deployed, in the left menu of the web console, go to Networking → Routes to view the access link to the deployed application.
You can select the application name to view or modify route settings.
With the application route, you can integrate your Red Hat build of Kogito microservices with your business automation solutions as needed.
Chapter 11. Red Hat build of Kogito service properties configuration
When a Red Hat build of Kogito microservice is deployed, a configMap resource is created for the application.properties configuration of the Red Hat build of Kogito microservice.
The name of the configMap resource consists of the name of the Red Hat build of Kogito microservice and the suffix -properties, as shown in the following example:
Example configMap resource generated during Red Hat build of Kogito microservice deployment
kind: ConfigMap
apiVersion: v1
metadata:
  name: kogito-travel-agency-properties
data:
  application.properties : |-
    property1=value1
    property2=value2
The application.properties data of the configMap resource is mounted in a volume to the container of the Red Hat build of Kogito microservice. Any runtime properties that you add to the application.properties section override the default application configuration properties of the Red Hat build of Kogito microservice.
When the application.properties data of the configMap is changed, a rolling update modifies the deployment and configuration of the Red Hat build of Kogito microservice.
Chapter 12. Probes for Red Hat build of Kogito microservices on Red Hat OpenShift Container Platform
The probes in Red Hat OpenShift Container Platform verify that an application is working or it needs to be restarted. For Red Hat build of Kogito microservices on Red Hat build of Quarkus and Spring Boot, probes interact with the application using an HTTP request, defaulting to the endpoints that are exposed by an extension. Therefore, to run your Red Hat build of Kogito microservices on Red Hat OpenShift Container Platform, you must import the extensions to provide application availability information for the liveness, readiness, and startup probes.
12.1. Adding health check extension for Red Hat build of Quarkus applications on Red Hat OpenShift Container Platform
You can add the health check extension for the Red Hat build of Kogito services that are based on Red Hat build of Quarkus on Red Hat OpenShift Container Platform.
Procedure
In a command terminal, navigate to the pom.xml file of your project and add the following dependency for the quarkus-smallrye-health extension:
SmallRye Health dependency for Red Hat build of Quarkus applications on Red Hat OpenShift Container Platform
<dependencies>
  <dependency>
    <groupId>io.quarkus</groupId>
    <artifactId>quarkus-smallrye-health</artifactId>
  </dependency>
</dependencies>
12.2. Adding health check extension for Spring Boot applications on Red Hat OpenShift Container Platform
You can add the health check extension for the Red Hat build of Kogito microservices that are based on Spring Boot on Red Hat OpenShift Container Platform.
Procedure
In a command terminal, navigate to the pom.xml file of your project and add the following Spring Boot actuator dependency:
Spring Boot actuator dependency for Spring Boot applications on Red Hat OpenShift Container Platform
<dependencies>
  <dependency>
    <groupId>org.springframework.boot</groupId>
    <artifactId>spring-boot-starter-actuator</artifactId>
  </dependency>
</dependencies>
12.3. Setting custom probes for Red Hat build of Kogito microservices on Red Hat OpenShift Container Platform
You can also configure the custom endpoints for the liveness, readiness, and startup probes.
Procedure
-
Define the probes in the
KogitoRuntimeYAML file of your project, as shown in the following example:
Example Red Hat build of Kogito microservice custom resource with custom probe endpoints
apiVersion: rhpam.kiegroup.org/v1 # Red Hat build of Kogito API for this service
kind: KogitoRuntime
metadata:
  name: process-quarkus-example # Application name
spec:
  replicas: 1
  probes:
    livenessProbe:
      httpGet:
        path: /probes/live # Liveness endpoint
        port: 8080
    readinessProbe:
      httpGet:
        path: /probes/ready # Readiness endpoint
        port: 8080
    startupProbe:
      tcpSocket:
        port: 8080
Chapter 13. Red Hat Process Automation Manager Kogito Operator interaction with Prometheus and Grafana
Red Hat build of Kogito in Red Hat Decision Manager provides a monitoring-prometheus-addon add-on that enables Prometheus metrics monitoring for Red Hat build of Kogito microservices and generates Grafana dashboards that consume the default metrics exported by the add-on. The RHPAM Kogito Operator uses the Prometheus Operator to expose the metrics from your project for Prometheus to scrape. Due to this dependency, the Prometheus Operator must be installed in the same namespace as your project.
If you want to enable the Prometheus metrics monitoring for your Red Hat build of Kogito microservices, add the following dependency to the pom.xml file in your project, depending on the framework you are using:
Dependency for Prometheus Red Hat build of Quarkus add-on
<dependency>
      <groupId>org.kie.kogito</groupId>
      <artifactId>monitoring-prometheus-quarkus-addon</artifactId>
</dependency>
Dependency for Prometheus Spring Boot add-on
<dependency>
      <groupId>org.kie.kogito</groupId>
      <artifactId>monitoring-prometheus-springboot-addon</artifactId>
</dependency>
When you deploy a Red Hat build of Kogito microservice that uses the monitoring-prometheus-addon add-on and the Prometheus Operator is installed, the Red Hat Process Automation Manager Kogito Operator creates a ServiceMonitor custom resource to expose the metrics for Prometheus, as shown in the following example:
Example ServiceMonitor resource for Prometheus
apiVersion: monitoring.coreos.com/v1
kind: ServiceMonitor
metadata:
  labels:
    app: onboarding-service
  name: onboarding-service
  namespace: kogito
spec:
  endpoints:
  - path: /metrics
    targetPort: 8080
    scheme: http
  namespaceSelector:
    matchNames:
    - kogito
  selector:
    matchLabels:
      app: onboarding-service
You must manually configure your Prometheus custom resource that is managed by the Prometheus Operator to select the ServiceMonitor resource:
Example Prometheus resource
apiVersion: monitoring.coreos.com/v1
kind: Prometheus
metadata:
  name: prometheus
spec:
  serviceAccountName: prometheus
  serviceMonitorSelector:
    matchLabels:
      app: dmn-drools-quarkus-metrics-service
After you configure your Prometheus resource with the ServiceMonitor resource, you can see the endpoint scraped by Prometheus in the Targets page in the Prometheus web console. The metrics exposed by the Red Hat Decision Manager service appear in the Graph view.
The RHPAM Kogito Operator also creates a GrafanaDashboard custom resource defined by the Grafana Operator for each of the Grafana dashboards generated by the add-on. The app label for the dashboards is the name of the deployed Red Hat build of Kogito microservice. You must set the dashboardLabelSelector property of the Grafana custom resource according to the relevant Red Hat build of Kogito microservice.
Example Grafana resource
apiVersion: integreatly.org/v1alpha1
kind: Grafana
metadata:
  name: example-grafana
spec:
  ingress:
    enabled: true
  config:
    auth:
      disable_signout_menu: true
    auth.anonymous:
      enabled: true
    log:
      level: warn
      mode: console
    security:
      admin_password: secret
      admin_user: root
  dashboardLabelSelector:
    - matchExpressions:
        - key: app
          operator: In
          values:
            - my-kogito-application
Chapter 14. Red Hat Decision Manager Red Hat build of Kogito Operator interaction with Kafka
The Red Hat Decision Manager Red Hat build of Kogito Operator uses the AMQ Streams Operator to automatically configure the Red Hat build of Kogito microservice with Kafka.
When you enable an infrastructure mechanism through KogitoInfra deployment, the Red Hat Decision Manager Red Hat build of Kogito Operator uses the relevant third-party operator to configure the infrastructure.
You must define your custom infrastructure resource and link it in the KogitoInfra file. You can specify your custom infrastructure resource in the spec.resource.name and spec.resource.namespace configurations.
Example Red Hat Decision Manager Red Hat build of Kogito infrastructure resource for custom messaging
apiVersion: rhpam.kiegroup.org/v1 # Red Hat build of Kogito API for this microservice
kind: KogitoInfra # Application type
metadata:
  name: my-kafka-infra
spec:
  resource:
    apiVersion: kafka.strimzi.io/v1beta2 # AMQ Streams API
    kind: Kafka	# AMQ Streams Application Type
    name: my-kafka-instance
    namespace: my-namespace
In this example, the KogitoInfra custom resource connects to the Kafka cluster my-kafka-instance from my-namespace for event messaging.
To connect Red Hat build of Kogito microservice to Kafka, you need to define the infra configuration to use the corresponding infrastructure.
Example of Red Hat build of Kogito microservice resource configuration with messaging
apiVersion: rhpam.kiegroup.org/v1 # Red Hat build of Kogito API for this microservice
kind: KogitoRuntime # Application type
metadata:
  name: example-quarkus # Application name
spec:
  image: <final-image-name> # Kogito image name
  insecureImageRegistry: true # Can be omitted when image is pushed into secured registry with valid certificate
  infra:
  - my-kafka-infra
The Red Hat Decision Manager Red Hat build of Kogito Operator configures the necessary properties so that your application can connect to the Kafka instance.
Chapter 15. Red Hat build of Kogito microservice deployment troubleshooting
Use the information in this section to troubleshoot issues that you might encounter when using the operator to deploy Red Hat build of Kogito microservices. The following information is updated as new issues and workarounds are discovered.
- No builds are running
If you do not see any builds running nor any resources created in the relevant namespace, enter the following commands to retrieve running pods and to view the operator log for the pod:
View RHPAM Kogito Operator log for a specified pod
// Retrieves running pods
$ oc get pods

NAME                                     READY   STATUS      RESTARTS   AGE
kogito-operator-6d7b6d4466-9ng8t   1/1     Running     0          26m

// Opens RHPAM Kogito Operator log for the pod
$ oc logs -f kogito-operator-6d7b6d4466-9ng8t
- Verify
KogitoRuntimestatus If you create, for example,
KogitoRuntimeapplication with a non-existing image using the following YAML definition:Example YAML definition for a
KogitoRuntimeapplicationapiVersion: rhpam.kiegroup.org/v1 # Red Hat build of Kogito API for this microservice kind: KogitoRuntime # Application type metadata: name: example # Application name spec: image: 'not-existing-image:latest' replicas: 1
You can verify the status of the
KogitoRuntimeapplication using theoc describe KogitoRuntime examplecommand in the bash console. When you run theoc describe KogitoRuntime examplecommand in the bash console, you receive the following output:Example
KogitoRuntimestatus[user@localhost ~]$ oc describe KogitoRuntime example Name: example Namespace: username-test Labels: <none> Annotations: <none> API Version: rhpam.kiegroup.org/v1 Kind: KogitoRuntime Metadata: Creation Timestamp: 2021-05-20T07:19:41Z Generation: 1 Managed Fields: API Version: rhpam.kiegroup.org/v1 Fields Type: FieldsV1 fieldsV1: f:spec: .: f:image: f:replicas: Manager: Mozilla Operation: Update Time: 2021-05-20T07:19:41Z API Version: rhpam.kiegroup.org/v1 Fields Type: FieldsV1 fieldsV1: f:spec: f:monitoring: f:probes: .: f:livenessProbe: f:readinessProbe: f:resources: f:runtime: f:status: .: f:cloudEvents: f:conditions: Manager: main Operation: Update Time: 2021-05-20T07:19:45Z Resource Version: 272185 Self Link: /apis/rhpam.kiegroup.org/v1/namespaces/ksuta-test/kogitoruntimes/example UID: edbe0bf1-554e-4523-9421-d074070df982 Spec: Image: not-existing-image:latest Replicas: 1 Status: Cloud Events: Conditions: Last Transition Time: 2021-05-20T07:19:44Z Message: Reason: NoPodAvailable Status: False Type: Deployed Last Transition Time: 2021-05-20T07:19:44Z Message: Reason: RequestedReplicasNotEqualToAvailableReplicas Status: True Type: Provisioning Last Transition Time: 2021-05-20T07:19:45Z Message: you may not have access to the container image "quay.io/kiegroup/not-existing-image:latest" Reason: ImageStreamNotReadyReason Status: True Type: FailedAt the end of the output, you can see the
KogitoRuntimestatus with a relevant message.
Part III. Migrating to Red Hat build of Kogito microservices
As a developer of business decisions and processes, you can migrate your decision services in Red Hat Decision Manager to Red Hat build of Kogito microservices. When performing migration, your existing business decisions become part of your own domain-specific cloud-native set of services. You can migrate Decision Model and Notation (DMN) models, Predictive Model Markup Language (PMML) models, or Drools Rule Language (DRL) rules.
Prerequisites
- JDK 11 or later is installed.
- Apache Maven 3.6.2 or later is installed.
Chapter 16. Overview of migration to Red Hat build of Kogito microservices
You can migrate the decision service artifacts that you developed in Business Central to Red Hat build of Kogito microservices. Red Hat build of Kogito currently supports migration for the following types of decision services:
- Decision Model and Notation (DMN) models: You migrate DMN-based decision services by moving the DMN resources from KJAR artifacts to the respective Red Hat build of Kogito archetype.
- Predictive Model Markup Language (PMML) models: You migrate PMML-based prediction and prediction services by moving the PMML resources from KJAR artifacts to the respective Red Hat build of Kogito archetype.
- Drools Rule Language (DRL) rules: You migrate the DRL-based decision services by enclosing them in a Red Hat build of Quarkus REST endpoint. This approach of migration enables you to use major Quarkus features, such as hot reload and native compilation. The Quarkus features and the programming model of Red Hat build of Kogito enable the automatic generation of the Quarkus REST endpoints for implementation in your applications and services.
Chapter 17. Migration of a DMN service to a Red Hat build of Kogito microservice
You can migrate DMN-based decision services to Red Hat build of Kogito microservices by moving the DMN resources from KJAR artifacts to the respective Red Hat build of Kogito project. In the Red Hat build of Kogito microservices, some of the KIE v7 features are no longer required.
17.1. Major changes and migration considerations
The following table describes the major changes and features that affect migration from the KIE Server API and KJAR to Red Hat build of Kogito deployments:
Table 17.1. DMN migration considerations
| Feature | In KIE Server API | In Red Hat build of Kogito artifact |
|---|---|---|
| DMN models |
stored in |
copy as is to |
| Object models (POJOs) required for KIE Server generic marshalling | managed using Data Model object editor in Business Central. | object model editing is no longer required. |
|
|
configured using a system property or |
must be configured using CDI, by annotating the |
| Other configuration options |
configured using system property or |
except |
| KIE Server Client API | used in conjunction with object models to interact with a KJAR that is deployed on the KIE Server. | for object models, this feature is no longer required. Note You can select your own choice of REST library. |
| REST API | when a KJAR is deployed on KIE Server, the applications interacting with specific DMN model endpoint, use the same API on Red Hat build of Kogito deployment. | advanced support for specific DMN model generation. For more information, see DMN model execution. |
| Test scenarios | run with a JUnit activator. | analogous JUnit activator is available on Red Hat build of Kogito. |
The features that are not mentioned in the previous table are either not supported or not required in a cloud-native Red Hat build of Kogito deployment.
17.2. Migration strategy
When migrating a DMN project to a Red Hat build of Kogito project, first you can migrate external applications that are interacting with decision services on the KIE Server. You can use the REST endpoints that are specific to DMN models. After using the REST endpoints, you can migrate the external applications from the KIE Server to a Red Hat build of Kogito deployment. For more information about specific REST endpoints to DMN models, see REST endpoints for specific DMN models.
The migration strategy includes the following steps:
- Migrate existing external applications from the generic KIE Server API to a specific DMN REST endpoint using the KIE Server.
- Migrate a KJAR that is deployed on the KIE Server to a Red Hat build of Kogito microservice.
- Deploy the Red Hat build of Kogito microservice using Red Hat OpenShift Container Platform.
- Reconnect the external application and migrate the REST API consumption from the specific DMN REST endpoint to the Red Hat build of Kogito deployment.
17.3. Migrating external applications to REST endpoints specific to DMN models
To migrate a DMN project to a Red Hat build of Kogito deployment, first you can migrate external applications that use specific DMN REST endpoints to interact with decision services on the KIE Server.
Procedure
If you are using the REST endpoints in your external application, retrieve the Swagger or OAS specification file of the KJAR using
GET /server/containers/{containerId}/dmn/openapi.json (|.yaml)endpoint.For more information about REST endpoints for specific DMN models, see REST endpoints for specific DMN models.
- In your external application, select the Java or JDK library to interact with the decision services. You can interact with the decision services using the REST endpoint for the specific KJAR.
The KIE Server Client Java API is not supported in the migration to a Red Hat build of Kogito deployment.
17.4. Migrating a DMN model KJAR to a Red Hat build of Kogito microservice
After migrating your external application, you need to migrate a KJAR that is specific to a DMN model to a Red Hat build of Kogito microservice.
Procedure
Create a Maven project for your Red Hat build of Kogito microservice.
For the procedure about creating a Maven project, see Creating a Maven project for a Red Hat build of Kogito microservice.
The Maven project creates Kogito artifacts.
-
Copy the DMN models from the
src/main/resourcesfolder of the KJAR to thesrc/main/resourcesfolder of the Kogito artifact. Copy the test scenarios from the
src/test/resourcesfolder of the KJAR to thesrc/test/resourcesfolder of the Kogito artifact.ImportantYou need to import the Red Hat build of Kogito dependency of test scenarios in the
pom.xmlfile of your project and create a JUnit activator using the KIE Server REST API. For more information, see Testing a decision service using test scenarios.Run the following command and ensure that the test scenario is running for the specified non-regression tests.
mvn clean install
After running the Red Hat build of Kogito application, you can retrieve the Swagger or OAS specification file. The Swagger or OAS specifications provide the same information as the REST endpoint along with the following implementation details:
- Base URL of the server where the API is available
- References Schemas names
You can use the provided implementation details when your external application is re-routed to the new URL.
After migrating a DMN model KJAR to a Red Hat build of Kogito microservice, you need to deploy the microservice using Red Hat OpenShift Container Platform. For deployment options with Openshift, see OpenShift deployment options with the RHPAM Kogito Operator.
17.4.1. Example of migrating a DMN model KJAR to a Red Hat build of Kogito microservice
The following is an example of migrating a DMN model KJAR to a Red Hat build of Kogito microservice:
Figure 17.1. Example decision service implemented using DMN model
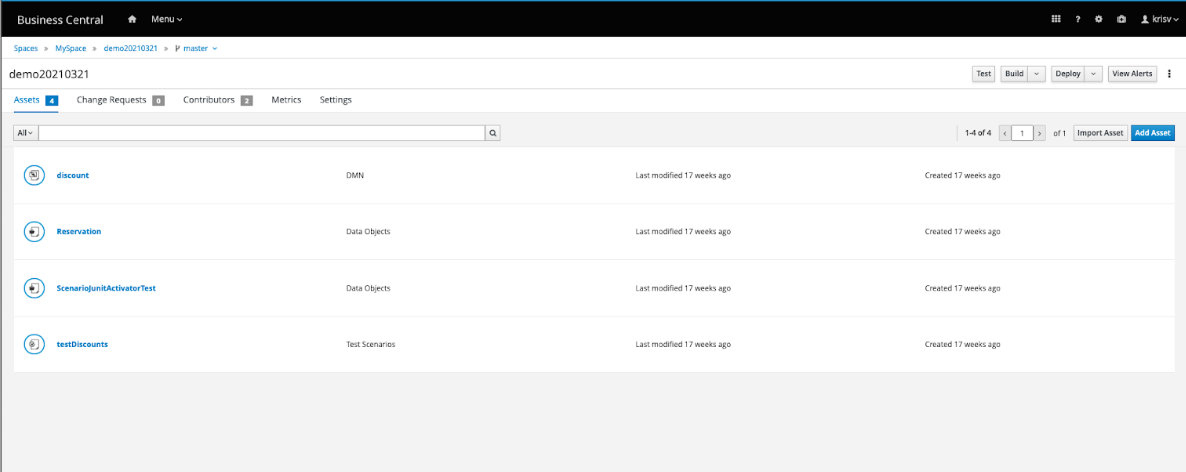
Figure 17.2. Example DMN model using specific ItemDefinition structure

You need to define the object model (POJO) as a DTO in an existing KJAR that is developed in Business Central.
Example of an object model defined as DTO in a KJAR
package com.myspace.demo20210321;

/**
 * This class was automatically generated by the data modeler tool.
 */

public class Reservation implements java.io.Serializable {

	static final long serialVersionUID = 1L;
	@com.fasterxml.jackson.annotation.JsonFormat(shape = com.fasterxml.jackson.annotation.JsonFormat.Shape.STRING, pattern = "yyyy-MM-dd")
    @com.fasterxml.jackson.databind.annotation.JsonSerialize(using = com.fasterxml.jackson.datatype.jsr310.ser.LocalDateSerializer.class)
	private java.time.LocalDate checkin;
	@com.fasterxml.jackson.annotation.JsonFormat(shape = com.fasterxml.jackson.annotation.JsonFormat.Shape.STRING, pattern = "yyyy-MM-dd")
    @com.fasterxml.jackson.databind.annotation.JsonSerialize(using = com.fasterxml.jackson.datatype.jsr310.ser.LocalDateSerializer.class)
	private java.time.LocalDate checkout;

	private java.util.List<java.lang.String> guests;

	public Reservation() {
	}

	public java.time.LocalDate getCheckin() {
		return this.checkin;
	}

	public void setCheckin(java.time.LocalDate checkin) {
		this.checkin = checkin;
	}

	public java.time.LocalDate getCheckout() {
		return this.checkout;
	}

	public void setCheckout(java.time.LocalDate checkout) {
		this.checkout = checkout;
	}

	public java.util.List<java.lang.String> getGuests() {
		return this.guests;
	}

	public void setGuests(java.util.List<java.lang.String> guests) {
		this.guests = guests;
	}

	public Reservation(java.time.LocalDate checkin,
			java.time.LocalDate checkout,
			java.util.List<java.lang.String> guests) {
		this.checkin = checkin;
		this.checkout = checkout;
		this.guests = guests;
	}

}
In the previous example, the defined DTO is used in conjunction with the KIE Server client Java API. Alternatively, you can specify the DTO in the payload, when a non-Java external application is interacting with the KJAR that is deployed on the KIE Server.
Example of using KIE Server client Java API
DMNServicesClient dmnClient = kieServicesClient.getServicesClient(DMNServicesClient.class);
 DMNContext dmnContext = dmnClient.newContext();
 dmnContext.set("reservation", new com.myspace.demo20210321.Reservation(LocalDate.of(2021, 3, 1),
                                                                         LocalDate.of(2021, 3, 8),
                                                                         Arrays.asList("John", "Alice")));
 run(dmnClient, dmnContext);
Figure 17.3. Example of manually specifying DTO in the payload
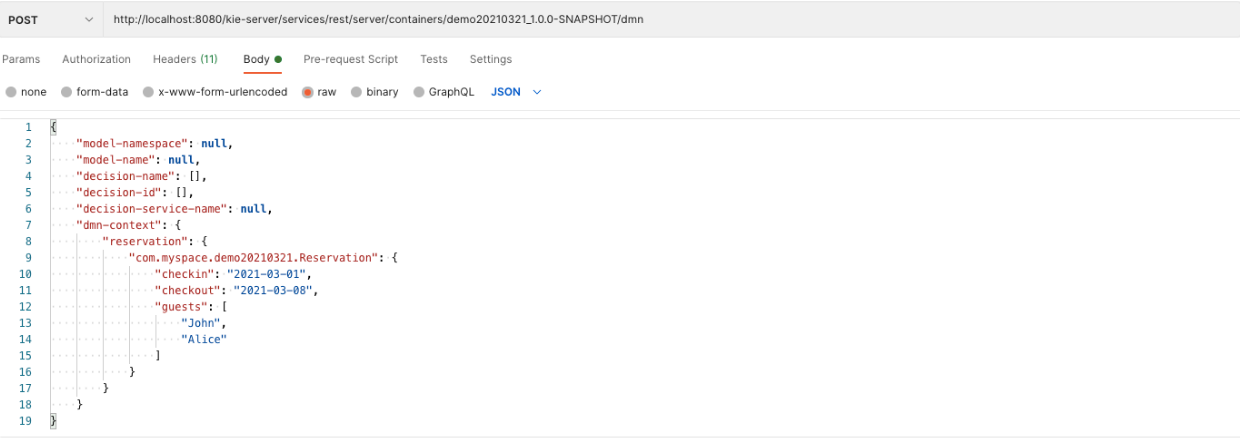
In the previous example, the FQCN of the object model in the REST API is used for the generic KIE Server marshalling.
17.5. Example of binding an external application to a Red Hat build of Kogito deployment
After deploying the Red Hat build of Kogito microservice, you need to bind your external application to the Red Hat build of Kogito microservice deployment.
Binding your external application includes re-routing the external application and binding the application to a new base URL of the server that is associated with the Red Hat build of Kogito application. For more information, see the following example:
Figure 17.4. Example /discount REST endpoint of KJAR on KIE Server
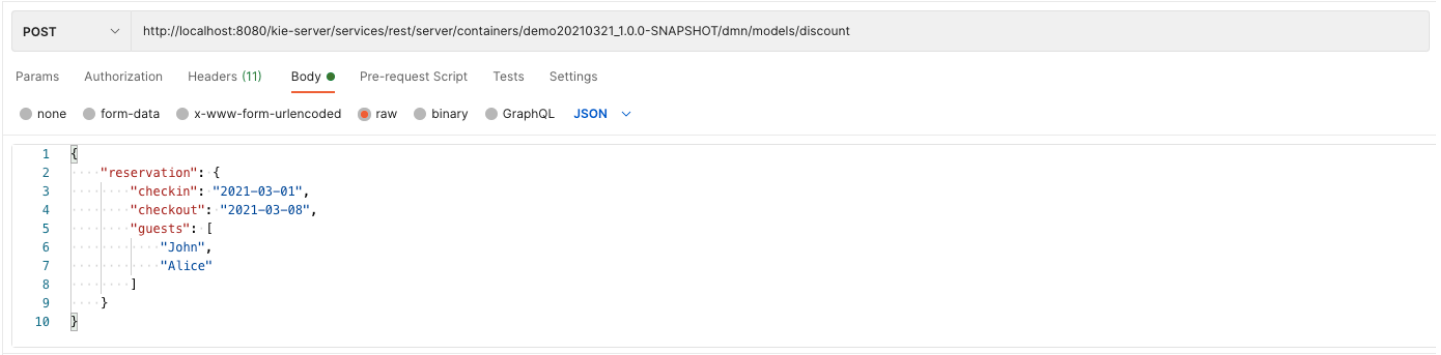
Figure 17.5. Example /discount REST endpoint on local Red Hat build of Kogito
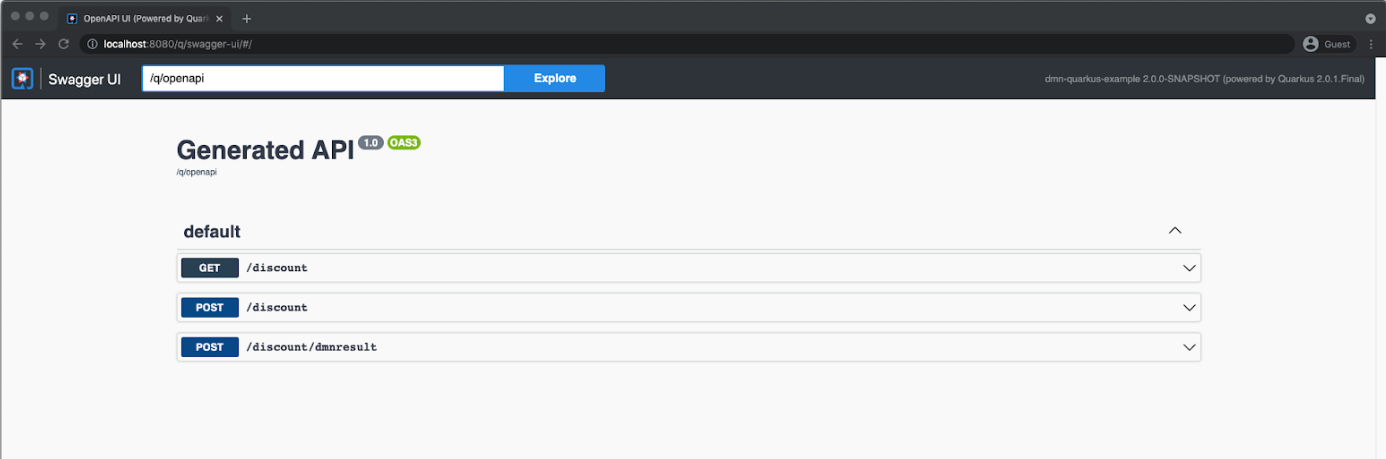
Figure 17.6. Example /discount REST endpoint bound to new base URL of Red Hat build of Kogito
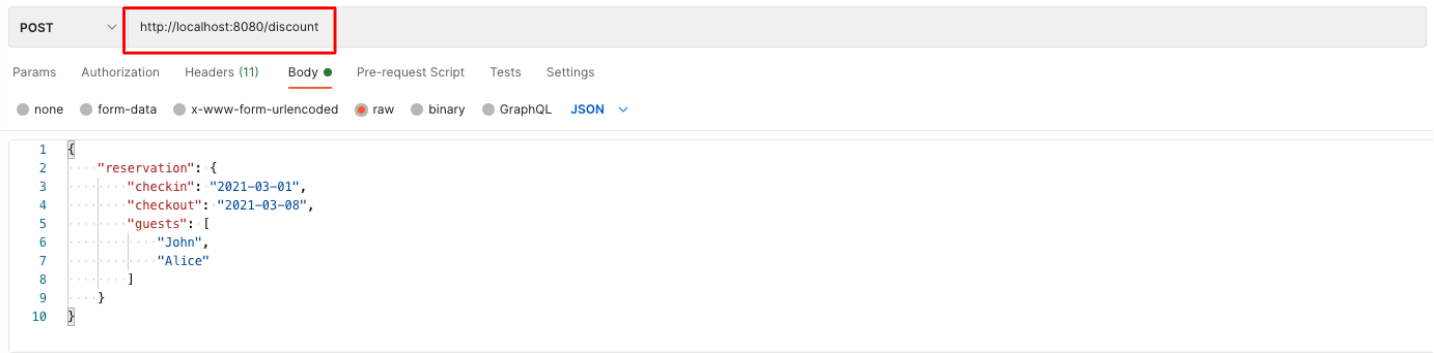
Chapter 18. Migration of a PMML service to a Red Hat build of Kogito microservice
You can migrate PMML-based services to Red Hat build of Kogito microservices by moving the PMML resources from KJAR artifacts to the respective Red Hat build of Kogito project.
18.1. Major changes and migration considerations
The following table describes the major changes and features that affect migration from the KIE Server API and KJAR to Red Hat build of Kogito deployments:
Table 18.1. PMML migration considerations
| Feature | In KIE Server API | In Red Hat build of Kogito artifact |
|---|---|---|
| PMML models |
stored in |
copy as is to |
| Other configuration options |
configured using a system property or | only default values are considered and no override of configuration is supported. |
| Command-based REST API |
use | not supported. |
| Domain-driven REST API | not supported. | advanced support for PMML model-specific generation. |
The features that are not mentioned in the previous table are either not supported or not required in a cloud-native Red Hat build of Kogito deployment.
18.2. Migration strategy
The migration strategy includes the following steps:
- Migrate a KJAR that is deployed on the KIE Server to a Red Hat build of Kogito microservice.
- Deploy the Red Hat build of Kogito microservice using Red Hat OpenShift Container Platform.
- Modify the external application from client PMML API on the KIE Server to the REST API of the Red Hat build of Kogito deployment.
18.3. Migrating a PMML model KJAR to a Red Hat build of Kogito microservice
You can migrate a KJAR that is implemented using PMML model to a Red Hat build of Kogito microservice.
Procedure
Create a Maven project for your Red Hat build of Kogito microservice.
For the procedure about creating a Maven project, see Creating a Maven project for a Red Hat build of Kogito microservice.
The Maven project creates Kogito artifacts.
-
Copy the PMML models from the
src/main/resourcesfolder of the KJAR to thesrc/main/resourcesfolder of the Kogito artifact. Run the following command to execute the Red Hat build of Kogito application:
mvn clean install
After running the Red Hat build of Kogito application, you can retrieve the Swagger or OAS specification file. The Swagger or OAS specifications provide the same information as the REST endpoint along with the following implementation details:
- Base URL of the server where the API is available
- References Schemas names
You can use the provided implementation details when your external application is re-routed to the new URL.
After migrating a PMML model KJAR to a Red Hat build of Kogito microservice, you need to deploy the microservice using Red Hat OpenShift Container Platform. For deployment options with Openshift, see OpenShift deployment options with the RHPAM Kogito Operator.
18.4. Modifying an external application to a Red Hat build of Kogito microservice
After deploying the PMML microservice, you need to modify the external application to a Red Hat build of Kogito deployment.
Prerequisites
The original external application must be implemented on the KIE Server client API.
Figure 18.1. Example external application implementation on KIE Server
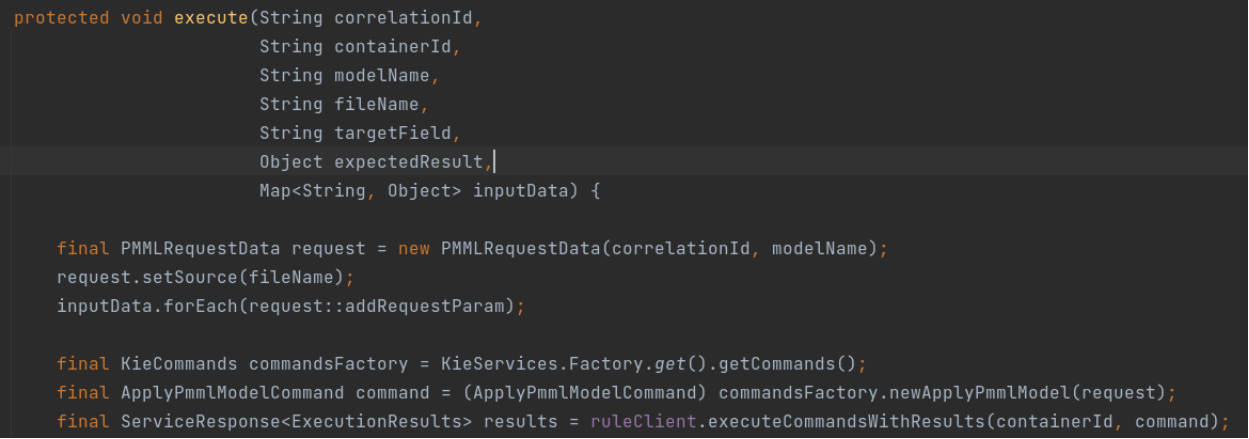
Procedure
Remove all the usage of the KIE Server client API and replace it with the HTTP communication. The following is an example of a non-Java request:
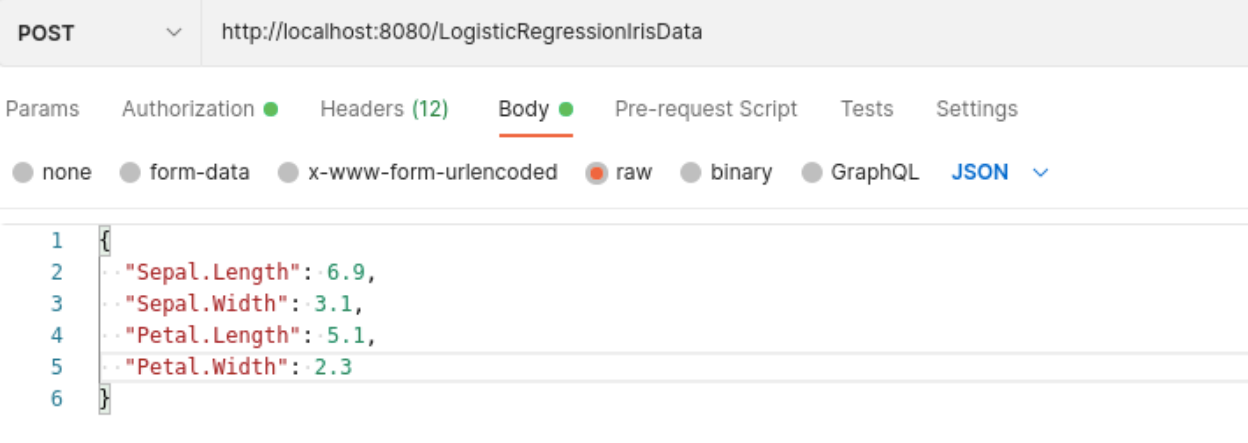
Ensure that any HTTP client Java library is used inside the external application to create a similar invocation and parse the result.
The following is an example of Java 11 HTTP client and Gson to convert the input data to JSON:
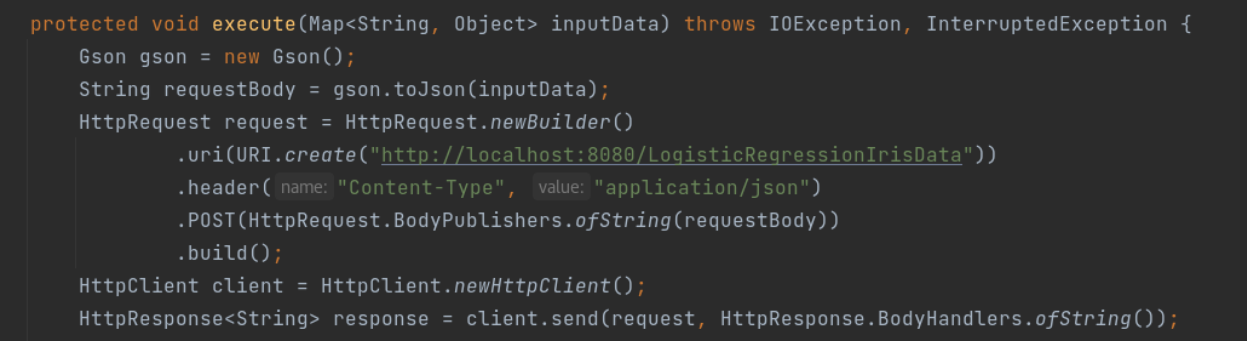 Note
NoteAll the parameters that are required as the values of the parameters are embedded in the URL that is called.
Chapter 19. Migration of a DRL service to a Red Hat build of Kogito microservice
You can build and deploy a sample project in Red Hat build of Kogito to expose a stateless rules evaluation of the decision engine in a Red Hat build of Quarkus REST endpoint, and migrate the REST endpoint to Red Hat build of Kogito.
The stateless rule evaluation is a single execution of a rule set in Red Hat Decision Manager and can be identified as a function invocation. In the invoked function, the output values are determined using the input values. Also, the invoked function uses the decision engine to perform the jobs. Therefore, in such cases, a function is exposed using a REST endpoint and converted into a microservice. After converting into a microservice, a function is deployed into a Function as a Service environment to eliminate the cost of JVM startup time.
19.1. Major changes and migration considerations
The following table describes the major changes and features that affect migration from the KIE Server API and KJAR to Red Hat build of Kogito deployments:
Table 19.1. DRL migration considerations
| Feature | In KIE Server API | In Red Hat build of Kogito with legacy API support | In Red Hat build of Kogito artifact |
|---|---|---|---|
| DRL files |
stored in |
copy as is to | rewrite using the rule units and OOPath. |
|
|
configured using a system property or |
replaced by | not required. |
|
|
configured using a system property or |
configured using a system property or | replaced by rule units. |
19.2. Migration strategy
In Red Hat Decision Manager, you can migrate a rule evaluation to a Red Hat build of Kogito deployment in the following two ways:
- Using legacy API in Red Hat build of Kogito
-
In Red Hat build of Kogito, the
kogito-legacy-apimodule makes the legacy API of Red Hat Decision Manager available; therefore, the DRL files remain unchanged. This approach of migrating rule evaluation requires minimal changes and enables you to use major Red Hat build of Quarkus features, such as hot reload and native image creation. - Migrating to Red Hat build of Kogito rule units
Migrating to Red Hat build of Kogito rule units include the programming model of Red Hat build of Kogito, which is based on the concept of rule units.
A rule unit in Red Hat build of Kogito includes both a set of rules and the facts, against which the rules are matched. Rule units in Red Hat build of Kogito also come with data sources. A rule unit data source is a source of the data processed by a given rule unit and represents the entry point, which is used to evaluate the rule unit. Rule units use two types of data sources:
-
DataStream: This is an append-only data source and the facts added into theDataStreamcannot be updated or removed. -
DataStore: This data source is for modifiable data. You can update or remove an object using theFactHandlethat is returned when the object is added into theDataStore.
Overall, a rule unit contains two parts: The definition of the fact to be evaluated and the set of rules evaluating the facts.
-
19.3. Example loan application project
In the following sections, a loan application project is used as an example to migrate a DRL project to Red Hat build of Kogito deployments. The domain model of the loan application project is made of two classes, the LoanApplication class and the Applicant class:
Example LoanApplication class
public class LoanApplication {

   private String id;
   private Applicant applicant;
   private int amount;
   private int deposit;
   private boolean approved = false;

   public LoanApplication(String id, Applicant applicant,
                      	int amount, int deposit) {
   	this.id = id;
   	this.applicant = applicant;
   	this.amount = amount;
   	this.deposit = deposit;
   }
}
Example Applicant class
public class Applicant {

   private String name;
   private int age;

   public Applicant(String name, int age) {
   	this.name = name;
   	this.age = age;
   }
}
The rule set is created using business decisions to approve or reject an application, along with the last rule of collecting all the approved applications in a list.
Example rule set in loan application
global Integer maxAmount;
global java.util.List approvedApplications;

rule LargeDepositApprove when
   $l: LoanApplication( applicant.age >= 20, deposit >= 1000, amount <= maxAmount )
then
   modify($l) { setApproved(true) }; // loan is approved
end

rule LargeDepositReject when
   $l: LoanApplication( applicant.age >= 20, deposit >= 1000, amount > maxAmount )
then
   modify($l) { setApproved(false) }; // loan is rejected
end

// ... more loans approval/rejections business rules ...

rule CollectApprovedApplication when
   $l: LoanApplication( approved )
then
   approvedApplications.add($l); // collect all approved loan applications
end
19.3.1. Exposing rule evaluation with a REST endpoint using Red Hat build of Quarkus
You can expose the rule evaluation that is developed in Business Central with a REST endpoint using Red Hat build of Quarkus.
Procedure
Create a new module based on the module that contains the rules and Quarkus libraries, providing the REST support:
Example dependencies for creating a new module
<dependencies>

 <dependency>
   <groupId>io.quarkus</groupId>
   <artifactId>quarkus-resteasy</artifactId>
 </dependency>
 <dependency>
   <groupId>io.quarkus</groupId>
   <artifactId>quarkus-resteasy-jackson</artifactId>
 </dependency>

 <dependency>
   <groupId>org.example</groupId>
   <artifactId>drools-project</artifactId>
   <version>1.0-SNAPSHOT</version>
 </dependency>

<dependencies>
Create a REST endpoint.
The following is an example setup for creating a REST endpoint:
Example
FindApprovedLoansEndpointendpoint setup@Path("/find-approved") public class FindApprovedLoansEndpoint { private static final KieContainer kContainer = KieServices.Factory.get().newKieClasspathContainer(); @POST() @Produces(MediaType.APPLICATION_JSON) @Consumes(MediaType.APPLICATION_JSON) public List<LoanApplication> executeQuery(LoanAppDto loanAppDto) { KieSession session = kContainer.newKieSession(); List<LoanApplication> approvedApplications = new ArrayList<>(); session.setGlobal("approvedApplications", approvedApplications); session.setGlobal("maxAmount", loanAppDto.getMaxAmount()); loanAppDto.getLoanApplications().forEach(session::insert); session.fireAllRules(); session.dispose(); return approvedApplications; } }In the previous example, a
KieContainercontaining the rules is created and added into a static field. The rules in theKieContainerare obtained from the other module in the class path. Using this approach, you can reuse the sameKieContainerfor subsequent invocations related to theFindApprovedLoansEndpointendpoint without recompiling the rules.NoteThe two modules are consolidated in the next process of migrating rule units to a Red Hat build of Kogito microservice using legacy API. For more information, see Migrating DRL rules units to Red Hat build of Kogito microservice using legacy API.
When the
FindApprovedLoansEndpointendpoint is invoked, a newKieSessionis created from theKieContainer. TheKieSessionis populated with the objects fromLoanAppDtoresulting from the unmarshalling of a JSON request.Example
LoanAppDtoclasspublic class LoanAppDto { private int maxAmount; private List<LoanApplication> loanApplications; public int getMaxAmount() { return maxAmount; } public void setMaxAmount(int maxAmount) { this.maxAmount = maxAmount; } public List<LoanApplication> getLoanApplications() { return loanApplications; } public void setLoanApplications(List<LoanApplication> loanApplications) { this.loanApplications = loanApplications; } }When the
fireAllRules()method is called,KieSessionis fired and the business logic is evaluated against the input data. After business logic evaluation, the last rule collects all the approved applications in a list and the same list is returned as an output.- Start the Red Hat build of Quarkus application.
Invoke the
FindApprovedLoansEndpointendpoint with a JSON request that contains the loan applications to be checked.The value of the
maxAmountis used in the rules as shown in the following example:Example curl request
curl -X POST -H 'Accept: application/json' -H 'Content-Type: application/json' -d '{"maxAmount":5000,
"loanApplications":[
{"id":"ABC10001","amount":2000,"deposit":1000,"applicant":{"age":45,"name":"John"}}, {"id":"ABC10002","amount":5000,"deposit":100,"applicant":{"age":25,"name":"Paul"}}, {"id":"ABC10015","amount":1000,"deposit":100,"applicant":{"age":12,"name":"George"}}
]}' http://localhost:8080/find-approved
Example JSON response
[
  {
    "id": "ABC10001",
    "applicant": {
      "name": "John",
      "age": 45
    },
    "amount": 2000,
    "deposit": 1000,
    "approved": true
  }
]
Using this approach, you cannot use the hot reload feature and cannot create a native image of the project. In the next steps, the missing Quarkus features are provided by the Kogito extension that enables Quarkus aware of the DRL files and implement the hot reload feature in a similar way.
19.3.2. Migrating a rule evaluation to a Red Hat build of Kogito microservice using legacy API
After exposing a rule evaluation with a REST endpoint, you can migrate the rule evaluation to a Red Hat build of Kogito microservice using legacy API.
Procedure
Add the following dependencies to the project
pom.xmlfile to enable the use of Red Hat build of Quarkus and legacy API:Example dependencies for using Quarkus and legacy API
<dependencies>
 <dependency>
  <groupId>org.kie.kogito</groupId>
  <artifactId>kogito-quarkus-rules</artifactId>
 </dependency>
 <dependency>
  <groupId>org.kie.kogito</groupId>
  <artifactId>kogito-legacy-api</artifactId>
 </dependency>
</dependencies>
Rewrite the REST endpoint implementation:
Example REST endpoint implementation
@Path("/find-approved")
public class FindApprovedLoansEndpoint {

   @Inject
   KieRuntimeBuilder kieRuntimeBuilder;

   @POST()
   @Produces(MediaType.APPLICATION_JSON)
   @Consumes(MediaType.APPLICATION_JSON)
   public List<LoanApplication> executeQuery(LoanAppDto loanAppDto) {
   	KieSession session = kieRuntimeBuilder.newKieSession();

   	List<LoanApplication> approvedApplications = new ArrayList<>();
   	session.setGlobal("approvedApplications", approvedApplications);
   	session.setGlobal("maxAmount", loanAppDto.getMaxAmount());

   	loanAppDto.getLoanApplications().forEach(session::insert);
   	session.fireAllRules();
   	session.dispose();

   	return approvedApplications;
   }
}
In the rewritten REST endpoint implementation, instead of creating the
KieSessionfrom theKieContainer, theKieSessionis created automatically using an integratedKieRuntimeBuilder.The
KieRuntimeBuilderis an interface provided by thekogito-legacy-apimodule that replaces theKieContainer. UsingKieRuntimeBuilder, you can createKieBasesandKieSessionsin a similar way you create inKieContainer. Red Hat build of Kogito automatically generates an implementation ofKieRuntimeBuilderinterface at compile time and integrates theKieRuntimeBuilderinto a class, which implements theFindApprovedLoansEndpointREST endpoint.Start your Red Hat build of Quarkus application in development mode.
You can also use the hot reload to make the changes to the rules files that are applied to the running application. Also, you can create a native image of your rule based application.
19.3.3. Implementing rule units and automatic REST endpoint generation
After migrating rule units to a Red Hat build of Kogito microservice, you can implement the rule units and automatic generation of the REST endpoint.
In Red Hat build of Kogito, a rule unit contains a set of rules and the facts, against which the rules are matched. Rule units in Red Hat build of Kogito also come with data sources. A rule unit data source is a source of the data processed by a given rule unit and represents the entry point, which is used to evaluate the rule unit. Rule units use two types of data sources:
-
DataStream: This is an append-only data source. InDataStream, subscribers receive new and past messages, stream can be hot or cold in the reactive streams. Also, the facts added into theDataStreamcannot be updated or removed. -
DataStore: This data source is for modifiable data. You can update or remove an object using theFactHandlethat is returned when the object is added into theDataStore.
Overall, a rule unit contains two parts: the definition of the fact to be evaluated and the set of rules evaluating the facts.
Procedure
Implement a fact definition using POJO:
Example implementation of a fact definition using POJO
package org.kie.kogito.queries;

import org.kie.kogito.rules.DataSource;
import org.kie.kogito.rules.DataStore;
import org.kie.kogito.rules.RuleUnitData;

public class LoanUnit implements RuleUnitData {

   private int maxAmount;
   private DataStore<LoanApplication> loanApplications;

   public LoanUnit() {
   	this(DataSource.createStore(), 0);
   }

   public LoanUnit(DataStore<LoanApplication> loanApplications, int maxAmount) {
   	this.loanApplications = loanApplications;
   	this.maxAmount = maxAmount;
   }

   public DataStore<LoanApplication> getLoanApplications() { return loanApplications; }

   public void setLoanApplications(DataStore<LoanApplication> loanApplications) {
   	this.loanApplications = loanApplications;
   }

   public int getMaxAmount() { return maxAmount; }
   public void setMaxAmount(int maxAmount) { this.maxAmount = maxAmount; }
}
In the previous example, instead of using
LoanAppDtotheLoanUnitclass is bound directly.LoanAppDtois used to marshall or unmarshall JSON requests. Also, the previous example implements theorg.kie.kogito.rules.RuleUnitDatainterface and uses aDataStoreto contain the loan applications to be approved.The
org.kie.kogito.rules.RuleUnitDatais a marker interface to notify the decision engine thatLoanUnitclass is part of a rule unit definition. In addition, theDataStoreis responsible to allow the rule engine to react on the changes by firing new rules and triggering other rules.Additionally, the consequences of the rules modify the
approvedproperty in the previous example. On the contrary, themaxAmountvalue is considered as a configuration parameter for the rule unit, which is not modified. ThemaxAmountis processed automatically during the rules evaluation and automatically set from the value passed in the JSON requests.Implement a DRL file:
Example implementation of a DRL file
package org.kie.kogito.queries;
unit LoanUnit; // no need to using globals, all variables and facts are stored in the rule unit

rule LargeDepositApprove when
   $l: /loanApplications[ applicant.age >= 20, deposit >= 1000, amount <= maxAmount ] // oopath style
then
   modify($l) { setApproved(true) };
end

rule LargeDepositReject when
   $l: /loanApplications[ applicant.age >= 20, deposit >= 1000, amount > maxAmount ]
then
   modify($l) { setApproved(false) };
end

// ... more loans approval/rejections business rules ...

// approved loan applications are now retrieved through a query
query FindApproved
   $l: /loanApplications[ approved ]
end
The DRL file that you create must declare the same package as fact definition implementation and a unit with the same name of the Java class. The Java class implements the
RuleUnitDatainterface to state that the interface belongs to the same rule unit.Also, the DRL file in the previous example is rewritten using the OOPath expressions. In the DRL file, the data source acts as an entry point and the OOPath expression contains the data source name as root. However, the constraints are added in square brackets as follows:
$l: /loanApplications[ applicant.age >= 20, deposit >= 1000, amount ⇐ maxAmount ]Alternatively, you can use the standard DRL syntax, in which you can specify the data source name as an entry point. However, you need to specify the type of the matched object again as shown in the following example, even if the decision engine can infer the type from the data source:
$l: LoanApplication( applicant.age >= 20, deposit >= 1000, amount ⇐ maxAmount ) from entry-point loanApplicationsIn the previous example, the last rule that collects all the approved loan applications is replaced by a query that retrieves the list. A rule unit defines the facts to be passed in input to evaluate the rules, and the query defines the expected output from the rule evaluation. Using this approach, Red Hat build of Kogito can automatically generate a class that executes the query and returns the output as shown in the following example:
Example
LoanUnitQueryFindApprovedclasspublic class LoanUnitQueryFindApproved implements org.kie.kogito.rules.RuleUnitQuery<List<org.kie.kogito.queries.LoanApplication>> { private final RuleUnitInstance<org.kie.kogito.queries.LoanUnit> instance; public LoanUnitQueryFindApproved(RuleUnitInstance<org.kie.kogito.queries.LoanUnit> instance) { this.instance = instance; } @Override public List<org.kie.kogito.queries.LoanApplication> execute() { return instance.executeQuery("FindApproved").stream().map(this::toResult).collect(toList()); } private org.kie.kogito.queries.LoanApplication toResult(Map<String, Object> tuple) { return (org.kie.kogito.queries.LoanApplication) tuple.get("$l"); } }The following is an example of a REST endpoint that takes a rule unit as input and passing the input to a query executor to return the output:
Example
LoanUnitQueryFindApprovedEndpointendpoint@Path("/find-approved") public class LoanUnitQueryFindApprovedEndpoint { @javax.inject.Inject RuleUnit<org.kie.kogito.queries.LoanUnit> ruleUnit; public LoanUnitQueryFindApprovedEndpoint() { } public LoanUnitQueryFindApprovedEndpoint(RuleUnit<org.kie.kogito.queries.LoanUnit> ruleUnit) { this.ruleUnit = ruleUnit; } @POST() @Produces(MediaType.APPLICATION_JSON) @Consumes(MediaType.APPLICATION_JSON) public List<org.kie.kogito.queries.LoanApplication> executeQuery(org.kie.kogito.queries.LoanUnit unit) { RuleUnitInstance<org.kie.kogito.queries.LoanUnit> instance = ruleUnit.createInstance(unit); return instance.executeQuery(LoanUnitQueryFindApproved.class); } }NoteYou can also add multiple queries and for each query, a different REST endpoint is generated. For example, the
FindApprovedREST endpoint is generated for find-approved.
Chapter 20. Additional resources
Appendix A. Versioning information
Documentation last updated on Wednesday, February 1, 2023.
Appendix B. Contact information
Red Hat Decision Manager documentation team: brms-docs@redhat.com