
Red Hat Training
A Red Hat training course is available for Red Hat Decision Manager
Installing and configuring Decision Server on IBM WebSphere Application Server
Abstract
Preface
As a system administrator, you can configure your IBM WebSphere Application Server for Red Hat Decision Server and install Decision Server on that IBM server instance.
Prerequisites
- An IBM WebSphere Application Server instance version 9.0 or later is installed. For complete installation instructions, see the IBM WebSphere Application Server product page.
-
You have access to the WebSphere Integrated Solutions Console, usually at
http://<HOST>:9060/ibm/console.
Chapter 1. Red Hat Decision Server
The Red Hat Decision Server is the server where the rules and other artifacts for Red Hat Decision Manager are stored. Decision Server is a standalone, built-in component that can be used to instantiate and execute rules through interfaces available for REST, Java Message Service (JMS), or Java client-side applications, and Red Hat Business Optimizer functionality through solvers.
Created as a web deployable WAR file, Decision Server can be deployed on any web container. The current version of the Decision Server is included with default extensions for both Red Hat Decision Manager and Red Hat Process Automation Manager.
Decision Server has a low footprint with minimal memory consumption and therefore can be deployed easily on a cloud instance. Each instance of this server can open and instantiate multiple containers, which enables you to execute multiple rule services in parallel.
Decision Server can be integrated with other application servers, such as Oracle WebLogic Server or IBM WebSphere Application Server, to streamline Red Hat Decision Manager application management.
Chapter 2. IBM WebSphere Application Server
IBM WebSphere Application Server is a flexible and secure web application server that hosts Java-based web applications and provides Java EE-certified run time environments. IBM WebSphere 9.0 supports Java SE 8 and is fully compliant with Java EE 7 since version 8.5.5.6.
Chapter 3. Installing and running IBM WebSphere Application Server
IBM WebSphere Application Server must be installed and running for you to apply many of the configurations that accommodate Decision Server. This section describes how to install and start IBM WebSphere.
For the most up-to-date and detailed installation instructions, see the IBM WebSphere Application Server product page.
Procedure
- Download IBM Installation Manager version 1.8.5 or later from the IBM Installation Manager and Packaging Utility download links page. IBM Installation Manager is required for installing IBM WebSphere.
Extract the downloaded archive and run the following command as the root user in the new directory:
sudo ./install
The IBM Installation Manager opens.
- Go to File → Preferences and click Add Repository.
In the Add Repository window, enter the repository URL for IBM WebSphere 9.0. You can find all the repository URLs in the Online product repositories for IBM WebSphere Application Server offerings page of the IBM Knowledge Center. For example:
http://www.ibm.com/software/repositorymanager/V9WASILAN
- In your command terminal, navigate to the IBM WebSphere Application Server folder location that you specified during the installation.
Change to the
/bindirectory and run a command similar to the following example to create an IBM WebSphere profile, user name, and password. A profile defines the run time environment. The profile includes all the files that the server processes in the runtime environment and that you can change. The user is required for login.sudo ./manageprofiles.sh -create -profileName testprofile -profilePath /profiles/testprofile -adminUserName websphere -adminPassword password123
In your command terminal, navigate to the
bindirectory within the profile that you created (for example,/profiles/testprofile/bin) and run the following command to start the IBM WebSphere Application Server instance:sudo ./startServer.sh <SERVER_NAME>
<SERVER_NAME>is the IBM WebSphere Application Server name defined in Servers → Server Types → IBM WebSphere Application Servers of the WebSphere Integrated Solutions Console.Open the following URL in a web browser:
http://<HOST>:9060/ibm/console
<HOST>is the system name or IP address of the target server.For example, to start the WebSphere Integrated Solutions Console for a local instance of IBM WebSphere running on your system, enter the following URL in a web browser:
http://localhost:9060/ibm/console
- When the login page of the WebSphere Integrated Solutions Console appears, enter your administrative credentials.
Chapter 4. Configuring IBM WebSphere Application Server for Decision Server
Before you deploy Decision Server with IBM WebSphere Application Server, you must configure system properties, security settings, JMS requirements, and other properties on IBM WebSphere. These configurations promote an optimal integration with Decision Server.
Prerequisites
- IBM WebSphere Application Server is installed and running.
- You are logged in to the WebSphere Integrated Solutions Console.
4.1. Enabling administrative security
You must enable administrative security in the WebSphere Integrated Solutions Console so that you have the required permissions to create users and groups.
Procedure
- In the WebSphere Integrated Solutions Console, click Security → Global Security and ensure that the option Enable Application Security is selected. This may already be selected and overridden at the server level.
- Click Security Configuration Wizard and click Next.
- Select the repository that contains the user information. For example, select Federated repositories for local configurations.
- Click Next
- Enter the Primary administrative user name and Password.
- Click Next and then click Finish.
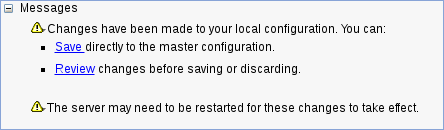
Click Save in the Messages window to save your changes to the master configuration.
Figure 4.1. Save security changes
In your command terminal, navigate to the IBM WebSphere Application Server
/bindirectory location that you specified during installation, and run the following commands to stop and restart IBM WebSphere to apply the security changes:sudo ./stopServer.sh <SERVER_NAME>
sudo ./startServer.sh <SERVER_NAME>
<SERVER_NAME>is the IBM WebSphere Application Server name defined in Servers → Server Types → IBM WebSphere Application Servers of the WebSphere Integrated Solutions Console.
4.2. Configuring Java Message Service (JMS)
The Java Message Service (JMS) is a Java API that Decision Server uses to exchange messages with other application servers such as Oracle WebLogic Server and IBM WebSphere Application Server. You must configure your application server to send and receive JMS messages through Decision Server to ensure proper collaboration between the two servers.
4.2.1. Create a service bus and add IBM WebSphere
You muse create a service bus and add the IBM WebSphere Application Server as a member of it in order to use JMS.
Procedure
- In the WebSphere Integrated Solutions Console, navigate to Service Integration → Buses → New.
- Enter a new bus name and clear the Bus Security option.
- Click Next and then Finish to create the service bus.
- Select the service bus that you have created.
- Under Topology, click Bus Members → Add.
- In the Add a New Bus Member wizard, choose the IBM WebSphere Application Server and the type of message store for persistence. You can also specify the properties of the message store.
- Click Finish to add the new bus member.
4.2.2. Create JMS connection factories
To enable messaging with Decision Server, you must create certain JMS connection factories for sending and receiving messages.
Prerequisite
You have created a service bus for IBM WebSphere Application Server.
Procedure
- In the WebSphere Integrated Solutions Console, navigate to Resources → JMS → Connection Factories.
- Select the correct scope and click New.
- Select the Default Messaging Provider option and click OK.
-
For each of the following required connection factories, enter the name of the connection factory (for example,
KIE.SERVER.REQUEST) and the JNDI name (for example,jms/cf/KIE.SERVER.REQUEST), and then select the service bus from the Bus Name drop-down list. Leave the default values for the remaining options. - Click Apply and Save to save the changes to the master configuration, and repeat for each required factory.
4.2.2.1. JMS connection factories for Decision Server
The following are the required Java Message Service (JMS) connection factories that enable JMS messaging with Decision Server:
Table 4.1. Required JMS connection factories for Decision Server
| Name | Default value | Used for |
|---|---|---|
|
|
| Sending all requests to Decision Server |
|
|
| Receiving all responses produced by Decision Server |
4.2.3. Create JMS queues
JMS queues are the destination end points for point-to-point messaging. You must create certain JMS queues to enable JMS messaging with Decision Server.
Prerequisite
You have created a service bus for IBM WebSphere Application Server.
Procedure
- In the WebSphere Integrated Solutions Console, navigate to Resources → JMS → Queues.
- Select the correct scope and click New.
- Select the Default Messaging Provider option and click OK.
-
For each of the following required queues, enter the name of the queue (for example,
KIE.SERVER.REQUEST) and the JNDI name (for example,jms/queue/KIE.SERVER.REQUEST), and then select the service bus from the Bus Name drop-down list. - From the Queue Name drop-down list, select the Create Service Integration Bus Destination, enter a unique identifier, and select the bus member that you created previously.
- Click Apply and Save to save the changes to the master configuration, and repeat for each required queue.
4.2.3.1. JMS queues for Decision Server
The following are the required Java Message Service (JMS) queues that enable JMS messaging with Decision Server:
Table 4.2. Required JMS queues for Decision Server
| Name | Default value | Used for |
|---|---|---|
|
|
| Sending all requests to Decision Server |
|
|
| Receiving all responses produced by Decision Server |
4.2.4. Create JMS activation specifications
A JMS activation specification is required in order to bridge the queue and the message-driven bean that enables JMS.
Prerequisites
- You have created a service bus for IBM WebSphere Application Server.
- You have created JMS queues.
Procedure
- In the WebSphere Integrated Solutions Console, navigate to Resources → JMS → Activation Specifications.
- Select the correct scope and click New.
- Select the Default Messaging Provider option and click OK.
-
For each of the following required activation specifications, enter the name of the activation specification (for example,
KIE.SERVER.REQUEST) and the JNDI name (for example,jms/activation/KIE.SERVER.REQUEST), and then select the service bus from the Bus Name drop-down list. -
From the Destination Type drop-down list, select Queue and enter the name of the corresponding queue as a Destination lookup (for example,
jms/queue/KIE.SERVER.REQUEST). - Click Apply and Save to save the changes to the master configuration, and repeat for each required activation specification.
4.2.4.1. JMS activation specifications for Decision Server
The following are the required Java Message Service (JMS) activation specifications that enable JMS messaging with Decision Server:
Table 4.3. Required JMS activation specifications for Decision Server
| Name | Default value | Used for |
|---|---|---|
|
|
| Sending all requests to Decision Server |
|
|
| Receiving all responses produced by Decision Server |
4.3. Setting system properties in IBM WebSphere Application Server
Set the system properties listed in this section on your IBM WebSphere Application Server before you deploy Decision Server.
Procedure
- In the WebSphere Integrated Solutions Console, navigate to Servers → Server Types → IBM WebSphere Application Servers.
- In the list of application servers, choose the server on which you are going to deploy Decision Server.
Under the Server Infrastructure, click Java and Process Management → Process Definition.
Figure 4.2. WebSphere configuration page
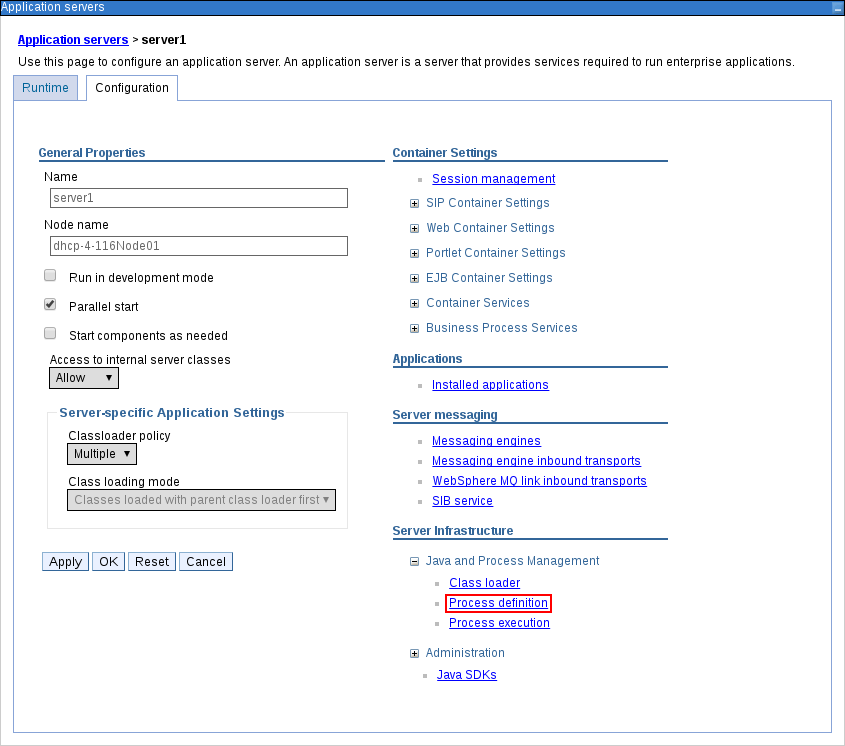
Under Additional Properties, click Java Virtual Machine.
Figure 4.3. Process definition configuration page
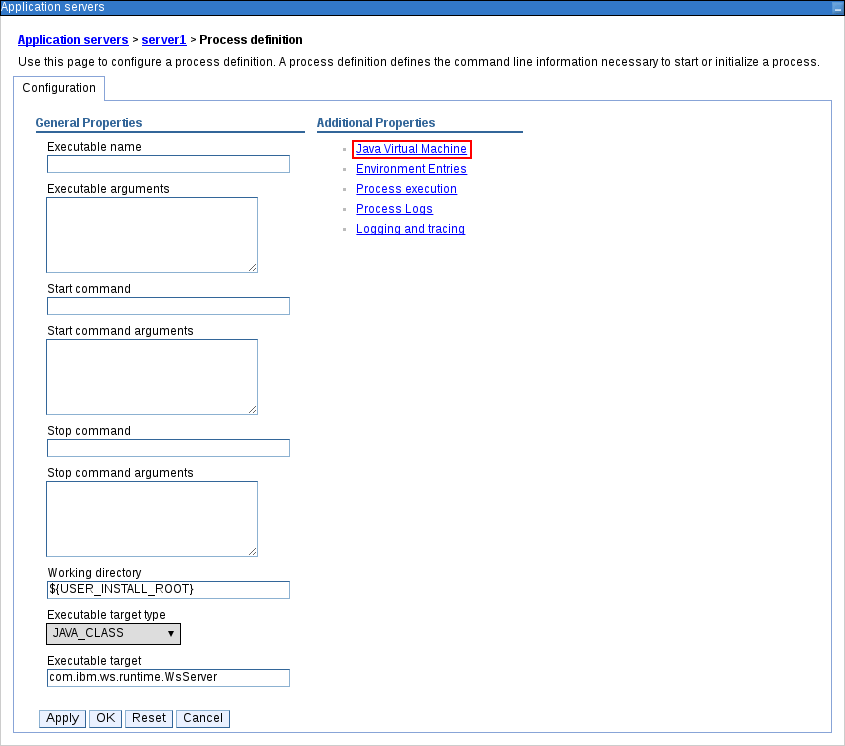
This opens the configuration properties for the JVM that is used to start IBM WebSphere.
-
Set both the Initial heap size and Maximum heap size to
2048and click Apply to increase the Java Virtual Machine (JVM) memory size. Decision Server has been tested with these values. If you do not increase the JVM memory size, IBM WebSphere Application Server freezes or causes deployment errors when deploying Decision Server. - Under Additional Properties, click Custom Properties.
Click New → Custom JVM Properties and add the following properties to IBM WebSphere:
Table 4.4. System properties for Decision Server
Name Value Description kie.server.jms.queues.responsejms/queue/KIE.SERVER.RESPONSEThe JNDI name of JMS queue for responses used by Decision Server.
org.kie.server.domainWSLoginJAAS
LoginContextdomain used to authenticate users when using JMS.org.jbpm.server.ext.disabledtrueDisables Decision Central features, which are not supported in RHDM. If not set, Decision Server will work, but will show error messages during start up.
org.jbpm.ui.server.ext.disabledtrueDisables Decision Central features, which are not supported in RHDM. If not set, Decision Server will work, but will show error messages during start up.
org.jbpm.case.server.ext.disabledtrueDisables Decision Central features, which are not supported in RHDM. If not set, Decision Server will work, but will show error messages during start up.
org.jboss.logging.providerjdkThis property is only required where a
CA SiteMinder TAI (SMTAI)is installed in the environment. Using this property forces Hibernate to useJDKinstead oflog4jfor logging within Dashbuilder.CA SiteMinder TAI (SMTAI)contains an old version oflog4j, which causes conflicts.- Click Save to save the changes to the master configuration.
4.4. Stopping and restarting IBM WebSphere Application Server
After you have configured all required system properties in IBM WebSphere Application Server, stop and restart the IBM server to ensure that the configurations are applied.
Procedure
In your command terminal, navigate to the IBM WebSphere Application Server /bin directory location that you specified during installation, and run the following commands to stop and restart IBM WebSphere to apply the configuration changes:
sudo ./stopServer.sh <SERVER_NAME>
sudo ./startServer.sh <SERVER_NAME>
<SERVER_NAME> is the IBM WebSphere Application Server name defined in Servers → Server Types → IBM WebSphere Application Servers of the WebSphere Integrated Solutions Console.
Chapter 5. Installing and running Decision Server with IBM WebSphere Application Server
After you have configured all required system properties in IBM WebSphere Application Server, you can install Decision Server with IBM WebSphere to streamline Red Hat Decision Manager application management.
Prerequisite
An IBM WebSphere Application Server instance is configured as described in Chapter 4, Configuring IBM WebSphere Application Server for Decision Server.
Procedure
Navigate to the Software Downloads page in the Red Hat Customer Portal (login required), and select the product and version from the drop-down options:
- Product: Decision Manager
- Version: 7.1
- Download Red Hat Decision Manager 7.1.0 Decision Server for All Supported EE7 Containers.
-
Extract the
rhdm-7.1.0-kie-server-ee7.ziparchive to a temporary directory. In the following examples this directory is calledTEMP_DIR. Repackage the
kie-server.wardirectory:-
Navigate to the
TEMP_DIR/rhdm-7.1.0-kie-server-ee7/kie-server.wardirectory. -
Select the contents of the
TEMP_DIR/rhdm-7.1.0-kie-server-ee7/kie-server.wardirectory and create thekie-server.zipfile. -
Rename
kie-server.ziptokie-server.war. This is the file that you will use to deploy Decision Server. -
If desired, copy the new
kie-server.warfile to a location that is more convenient to deploy from.
-
Navigate to the
- In the WebSphere Integrated Solutions Console, navigate to Applications → Application Types → WebSphere Enterprise Applications.
- Click Install.
-
Navigate to the
kie-server.warfile that you repackaged and select it to upload. Select Fast Path and click Next.
The Install New Application wizard opens.
-
Change the Application Name to
kie-serverand click Next. - Map the Decision Server modules to servers according to your specific requirements and click Next.
-
For Bind Listeners for Message-Driven Beans, select Activation Specification for both beans, enter
jms/activation/KIE.SERVER.REQUESTin the Target Resource JNDI Name field, and enter thejms/cf/KIE.SERVER.REQUESTJNDI name for theKIE.SERVER.REQUESTconnection factory. - In the Map Virtual Hosts for Web Modules section, keep the default values and click Next.
-
Set the context root to
kie-server. - In the Metadata for Modules section, keep the default values and click Next.
- Click Finish to install Decision Server and click Save to save the changes to the master configuration.
5.1. Creating the Decision Server group and role
After Decision Server is installed, you must create the kie-server group and a user.
Prerequisite
- Decision Server is installed on the IBM WebSphere Application Server instance.
Procedure
- In the WebSphere Integrated Solutions Console, click Users and Groups → Manage Groups.
- In the Manage Groups screen, click Create.
-
In the Create a Group screen, enter
kie-serverin the Group name box, then click Create. -
To create a user to add to the
kie-servergroup, click Users and Groups → Manage Users. - In the Create a User screen, complete the required information.
- Click Group Membership.
-
In the Group Membership screen, click
kie-server, move it to Mapped To, and click Close. - On the Create a User screen click Create.
5.2. Mapping the Decision Server group and role
After Decision Server is installed, you must map the kie-server role to the kie-server group in the WebSphere Integrated Solutions Console to run Decision Server.
Prerequisites
- Decision Server is installed on the IBM WebSphere Application Server instance.
-
IBM WebSphere Application Server has the
kie-servergroup with at least one user.
Procedure
-
In the WebSphere Integrated Solutions Console, navigate to Applications → Application Types → WebSphere Enterprise Applications and select the newly installed
kie-serverapplication. - Under Detail Properties, click Security Role to User/Group Mapping.
-
Select the
kie-serverrole and click Map Groups to search for thekie-servergroup. Move the
kie-servergroup from the Available list to the Selected list and click OK.This mapping gives users in the IBM WebSphere Application Server
kie-servergroup access to Decision Server.- Click Save to complete the mapping.
5.3. Configuring class loading for Decision Server
After Decision Server is installed, you must configure class loading to set parent classes to load last.
Procedure
-
Navigate to Applications → Application Types → WebSphere Enterprise Applications and click
kie-server. - Click Class Loading and Update Detection under the Detail Properties heading on the left.
- In the properties, change Class Loader Order to Classes loaded with local class loader first (parent last) and WAR Class Loader Policy to Single class loader for application.
- Save the changes to the master configuration.
5.4. Verifying the installation
After you install Decision Server and define the Decision Server group mapping, verify that the server is running.
Prerequisites
- Decision Server is installed on the IBM WebSphere Application Server instance.
- You have set all required system properties for the headless Decision Manager controller.
- You have defined the Decision Server group mapping in IBM WebSphere Application Server.
Procedure
Navigate to the Decision Server URL http://<HOST>:<PORT>/kie-server to verify that the server is running, or send a GET request to http://<HOST>:<PORT>/kie-server/services/rest/server to check whether the Decision Server REST API responds.
<HOST> is the ID or name of the Decision Server host, for example, localhost or 192.7.8.9.
<PORT> is the port of the Decision Server host, for example, 9060.
If Decision Server is not running, stop and restart the IBM WebSphere Application Server instance and try again to access the Decision Server URL or API.
Chapter 6. Installing and running the headless Decision Manager controller with IBM WebSphere Application Server
To use the Decision Server REST API or Java Client API to interact with Decision Server, install the headless Decision Manager controller with IBM WebSphere Application Server. The headless Decision Manager controller manages Decision Server configuration in a centralized way so that you can use the headless Decision Manager controller to create and maintain containers and perform other server-level tasks.
For optimal results, install Decision Server and the headless Decision Manager controller on different servers in production environments. In development environments, you can install Decision Server and the headless Decision Manager controller on the same server.
Prerequisites
- The IBM WebSphere Application Server instance is configured as described in Chapter 4, Configuring IBM WebSphere Application Server for Decision Server.
- Decision Server is installed on the IBM WebSphere Application Server instance.
- You have sufficient user permissions to complete the installation.
Procedure
Navigate to the Software Downloads page in the Red Hat Customer Portal (login required), and select the product and version from the drop-down options:
- Product: Decision Manager
- Version: 7.1
- Download Red Hat Decision Manager 7.1.0 Add-Ons.
-
Extract the downloaded
rhdm-7.1.0-add-ons.zipfile to a temporary directory. -
Extract the
rhdm-7.1.0-add-ons.zipfile to a temporary directory. In the following examples this directory is calledTEMP_DIR. -
Extract the
rhdm-7.1.0-add-ons/rhdm-7.1.0-controller-ee7.zipfile. Repackage the
controller.wardirectory:-
Navigate to the
TEMP_DIR/rhdm-7.1.0-add-ons/rhdm-7.1.0-controller-ee7/controller.wardirectory. -
Select the contents of the
TEMP_DIR/rhdm-7.1.0-add-ons/rhdm-7.1.0-controller-ee7/controller.wardirectory and create thecontroller.zipfile. -
Rename
controller.ziptocontroller.war. This is the file that you will use to deploy the headless Decision Manager controller. -
If desired, copy the new
controller.warfile to a location that is more convenient to deploy from.
-
Navigate to the
- In the WebSphere Integrated Solutions Console, navigate to Applications → Application Types → WebSphere Enterprise Applications.
- Click Install.
-
Navigate to the
controller.warfile that you repackaged and select it to upload. Select Fast Path and click Next.
The Install New Application wizard opens.
-
Change the Application Name to
controllerand click Next. - Map the headless Decision Manager controller modules to servers according to your specific requirements and click Next.
-
For Bind Listeners for Message-Driven Beans, select Activation Specification for both beans, enter
jms/activation/KIE.SERVER.REQUESTin the Target Resource JNDI Name field, and enter thejms/cf/KIE.SERVER.REQUESTJNDI name for theKIE.SERVER.REQUESTconnection factory. - In the Map Virtual Hosts for Web Modules section, keep the default values and click Next.
-
Set the context root to
controller. - In the Metadata for Modules section, keep the default values and click Next.
- Click Finish to install the headless Decision Manager controller and click Save to save the changes to the master configuration.
6.1. Configuring class loading for the headless Decision Manager controller
After the headless Decision Manager controller is installed, you must configure Decision Server class loading to set parent classes to load last.
Procedure
-
Navigate to Applications → Application Types → WebSphere Enterprise Applications and click
kie-server. - Click Class Loading and Update Detection under the Detail Properties heading on the left.
- In the properties, change Class Loader Order to Classes loaded with local class loader first (parent last) and WAR Class Loader Policy to Single class loader for application.
- Save the changes to the master configuration.
6.2. Setting system properties for the headless Decision Manager controller
After you install the headless Decision Manager controller, set the system properties listed in this section on your application server or servers to enable proper interaction with the headless Decision Manager controller.
For optimal results, install Decision Server and the headless Decision Manager controller on different servers in production environments. In development environments, you can install Decision Server and the headless Decision Manager controller on the same server. In either case, be sure to make these property changes on all application servers where the headless Decision Manager controller is installed.
Prerequisite
Decision Server and the headless Decision Manager controller are installed on the application server instance.
Procedure
Specify the following JVM property values on the application server instance where the headless Decision Manager controller is installed:
Table 6.1. Required properties for the headless Decision Manager controller
Name Requirement org.kie.server.userA user with the
kie-serverroleorg.kie.server.pwdThe password for the user specified in the
org.kie.server.userpropertySpecify the following JVM property values on the application server instance where Decision Server is installed:
Table 6.2. Required properties for Decision Server when headless Decision Manager controller is installed
Name Requirement org.kie.server.controller.userA user with the
kie-serverroleorg.kie.server.controller.pwdThe password for the user specified for the
org.kie.server.controller.userpropertyorg.kie.server.idThe ID or name of the Decision Server installation, such as
rhdm700-decision-server-1org.kie.server.locationThe URL of the Decision Server,
http://<HOST>:<PORT>/kie-server/services/rest/serverorg.kie.server.controllerThe URL of the headless Decision Manager controller,
http://<HOST>:<PORT>/controller/rest/controller<HOST>is the ID or name of the Decision Server host, for example,localhostor192.7.8.9.<PORT>is the port of the Decision Server host, for example,7001.
6.3. Mapping the headless Decision Manager controller group and role
After the headless Decision Manager controller is installed, in the WebSphere Integrated Solutions Console, you must create the kie-server group and then map the kie-server role to the kie-server group.
Prerequisite
- The headless Decision Manager controller is installed on the IBM WebSphere Application Server instance.
Procedure
-
In the WebSphere Integrated Solutions Console, create the
kie-servergroup and a user for that group, as described in Creating the Decision Server group and role. - Navigate to Applications → Application Types → WebSphere Enterprise Applications and select the newly installed headless Decision Manager controller.
- Under Detail Properties, click Security Role to User/Group Mapping.
-
Select the
kie-serverrole and click Map Groups to search for thekie-servergroup. Move the
kie-servergroup from the Available list to the Selected list and click OK.This mapping gives the previously created administrator user access to Decision Manager.
- Click Save to complete the mapping.
6.4. Verifying the installation
After you install the headless Decision Manager controller and define the required system properties and role requirements on the application server, verify that the headless Decision Manager controller works correctly.
Prerequisites
- Decision Server and the headless Decision Manager controller are installed on the application server instance.
- You have set all required system properties and role requirements for the headless Decision Manager controller on the application server.
Procedure
In your command terminal, enter the following command to verify that the headless Decision Manager controller is working:
curl -X GET "http://<HOST>:<PORT>/controller/rest/controller/management/servers" -H "accept: application/xml" -u '<CONTROLLER>:<CONTROLLER_PWD>'
<HOST> is the ID or name of the Decision Server host, for example, localhost or 192.7.8.9.
<PORT> is the port of the Decision Server host, for example, 7001.
<CONTROLLER> and <CONTROLLER_PWD> are the user credentials that you created in this section.
The command should return information about the Decision Server instance.
Alternatively, you can use the Decision Server Java API Client to access the headless Decision Manager controller.
If the headless Decision Manager controller is not running, stop and restart the application server instance and try again to access the headless Decision Manager controller URL or API.
Chapter 7. Next steps
Appendix A. Versioning information
Documentation last updated on Friday, May 22, 2020.