
Red Hat Training
A Red Hat training course is available for Red Hat Decision Manager
Installing Red Hat Decision Manager on premise
Abstract
Introduction
Red Hat Decision Manager is an open source decision management platform that combines business rules management and complex event processing. It includes decision management and business resource optimization capabilities. With Red Hat Decision Manager, you can automate business decisions and make that logic available to the entire business.
Red Hat Decision Manager uses a centralized repository for storing all resources. This ensures consistency, transparency, and the ability to audit across the business. Business users can modify business logic and business processes without requiring assistance from IT personnel.
Chapter 1. Planning the installation
Before you begin installing Red Hat Decision Manager, there are many options that you should consider. Review the information in this chapter for an overview of the installation options and components that work with Red Hat Decision Manager.
1.1. Red Hat Decision Manager components
Red Hat Decision Manager is made up of Decision Central, Decision Server, and Red Hat Business Optimizer.
- Decision Central is the graphical user interface where you create and manage business rules.
- Decision Server is the server where the rules and other artifacts are stored. Decision Server is used to instantiate and execute rules and solve planning problems.
- Red Hat Business Optimizer is a lightweight, embeddable planning engine that optimizes planning problems.
1.2. Installation options
Depending on your environment and project requirements, choose one of the following installation options:
- For information about installing Decision Server on IBM WebSphere Application Server, see Installing and configuring Decision Server on IBM WebSphere Application Server.
- For information about installing Decision Server on Oracle Weblogic Server, see Installing and configuring Decision Server on Oracle WebLogic Server.
- For information about installing Red Hat Business Optimizer, see Installing and configuring Red Hat Business Optimizer.
- Download and run the executable JAR installer for installation on Red Hat JBoss EAP 7.1 or Red Hat JBoss Web Server 3.1 with Tomcat 8. The installer graphical user interface steps you through the installation process.
Download one of the following ZIP file installations. The ZIP file installation does not require a graphical user interface so you can install Red Hat Decision Manager using SSH.
To install Red Hat Decision Manager on Red Hat JBoss EAP 7.1, download the following files:
-
rhdm-7.0.0.GA-decision-central-eap7-deployable.zip -
rhdm-7.0.0.GA-kie-server-ee7.zip
-
-
To install Decision Server on Red Hat JBoss Web Server 3.1 with Tomcat 8, download the
rhdm-7.0-kie-server-jws.zipfile.
For more information, see Red Hat Decision Manager 7 Supported Configurations.
For installation instructions, see Chapter 2, Installing Red Hat Decision Manager.
1.3. User roles
The following user roles are available with Red Hat Decision Manager:
-
admin: Users with theadminrole are the administrators of Red Hat Decision Manager. Administrators can manage users, manage, create, and clone the repositories, and have full access to make the required changes in the application. Users with theadminrole have access to all areas within the system. Before you can use Decision Central, you must create a user that has theadminrole. -
analyst: Users with theanalystrole have access to all high-level features to model projects. However, Authoring → Administration access is unavailable to these users. Certain lower-level features intended for developers, such as the Deployment → Artifact Repository view are not available to this role. However, the Build & Deploy button is available to users with the analyst role while they are using the Project Editor. -
kie-server: Users with thekie-serverrole can access Decision Server (KIE Server) REST capabilities. To log in to Decision Server, you must create a user that has thekie-serverrole. -
rest-all: Users with therest-allrole can access Decision Central REST capabilities.
For more information, see Section 2.3.3, “Creating users”.
1.4. Supporting tools
The asset repository, Apache Maven, Red Hat JBoss Developer Studio, and Red Hat Business Optimizer each perform an important function by integrating with Red Hat Decision Manager.
1.4.1. Asset repository
Business rules and other assets and resources created in Decision Central are stored in the asset repository, which is otherwise known as the knowledge store.
The knowledge store is a centralized repository for your business knowledge. The knowledge store connects to the Git repository to store various knowledge assets and artifacts at a single location. Decision Central provides a web front-end that enables you to view and update the stored content. You can access the content by using the Project Explorer from the unified environment of Red Hat Decision Manager.
All business assets are stored in repositories.
1.4.2. Apache Maven
Apache Maven is a distributed build automation tool used in Java application development to build and manage software projects. You can use Maven to build, publish, and deploy your Red Hat Decision Manager projects. Maven provides the following benefits:
- The build process is easy and a uniform build system is implemented across projects.
- All of the required JAR files for a project are made available at compile time.
- A proper project structure is configured.
- Dependencies and versions are well managed.
- The is no need for additional build processing because Maven builds output into a number of predefined types, such as JAR and WAR.
Maven uses repositories to store Java libraries, plug-ins, and other build artifacts. These repositories can be local or remote. Red Hat Decision Manager maintains local and remote maven repositories that you can add to your project for accessing the rules, processes, events, and other project dependencies. When building projects and archetypes, Maven dynamically retrieves Java libraries and Maven plug-ins from local or remote repositories. Doing this promotes sharing and reuse of dependencies across projects.
See Section 3.1, “Using the Maven repository in your project” for instructions on configuring Apache Maven.
1.4.3. Red Hat JBoss Developer Studio
Red Hat JBoss Developer Studio is an integrated development environment (IDE) based on Eclipse. It integrates tooling and runtime components by combining Eclipse, Eclipse Tooling, and Red Hat JBoss EAP. Red Hat JBoss Developer Studio provides plug-ins with tools and interfaces for Red Hat Decision Manager. These plug-ins are based on the community version of these products. For this reason, the Red Hat Decision Manager plug-in is called the Drools plug-in.
For more information about Red Hat JBoss Developer Studio, see Section 3.3, “Installing and setting up Red Hat JBoss Developer Studio”.
1.4.4. Red Hat Business Optimizer
Red Hat Business Optimizer is a lightweight, embeddable planning engine that optimizes planning problems. It helps Java programmers solve planning problems efficiently, and it combines optimization heuristics and metaheuristics with efficient score calculations.
Red Hat Business Optimizer helps solve various use cases, for example:
- Employee/Patient Rosters: It helps create timetables for nurses and keeps track of patient bed management.
- Educational Timetables: It helps schedule lessons, courses, exams, and conference presentations.
- Shop Schedules: It tracks car assembly lines, machine queue planning, and workforce task planning.
- Cutting Stock: It minimizes waste by reducing the consumption of resources such as paper and steel.
Every organization faces planning problems. They provide products and services with a limited set of constrained resources (employees, assets, time, and money). Red Hat Business Optimizer helps Java programmers solve constraint satisfaction problems efficiently. It combines optimization heuristics and metaheuristics with efficient score calculation.
For more information, see Installing and configuring Red Hat Business Optimizer.
1.5. High availability and clustering
High availability describes a system or component that is continuously operational, or available, for a desirably long length of time. You can measure availability relative to the unattainable value of 100% available, or never failing. A common but difficult-to-achieve standard of availability for a system or product is known as "five 9s" (99.999 percent) availability.
High-availability (HA) clusters are groups of services that can be used with a minimum or no down-time. Without clustering, if a service crashes or is too busy, the user asking for that service will not get a quick response. With high availability clustering, mulitple nodes provide copies of data and services. A service watchdog detects a failure on one node of the cluster, restarts the failed node, and simultaneously switches service to another node. In most cases the failure is not visible or noticeable to the user.
See Chapter 4, Clustering with Red Hat Decision Manager for design-time development environments for information on how to set up a high availability cluster with Red Hat Decision Manager.
Chapter 2. Installing Red Hat Decision Manager
Red Hat JBoss Enterprise Application Platform (Red Hat JBoss EAP) 7.1 is a certified implementation of the Java Enterprise Edition 7 (Java EE 7) full and web profile specifications. Red Hat JBoss EAP provides preconfigured options for features such as high availability, clustering, messaging, and distributed caching. It also enables users to write, deploy, and run applications using the various APIs and services that Red Hat JBoss EAP provides.
Red Hat JBoss Web Server is an enterprise ready web server designed for medium and large applications, based on Tomcat 8. Red Hat JBoss Web Server provides organizations with a single deployment platform for Java Server Pages (JSP) and Java Servlet technologies, PHP, and CGI.
Red Hat Decision Manager consists of Decision Central and Decision Server. You can install Decision Central on a Red Hat JBoss EAP 7.1 server installation. You can install Decision Server on a Red Hat JBoss EAP 7.1 or Red Hat JBoss Web Server installation.
You can also install Decision Server on IBM WebSphere Application Server and Oracle Weblogic Server. For more information, see:
The instructions in this document explain how to install Red Hat Decision Manager on Red Hat JBoss EAP 7.1 and Red Hat JBoss Web Server 3.1 on premise. For information about installing on the Red Hat OpenShift Container Platform, see Deploying Red Hat Decision Manager on Red Hat OpenShift Container Platform.
For information on supported components, see the following documents:
This section describes installing Decision Central and Decision Server on the same server. Red Hat recommends installing Decision Central and Decision Server on different servers in production environments.
2.1. Downloading the Red Hat Decision Manager installation files
Depending on your environment and installation requirements, download a Red Hat Decision Manager distribution.
Procedure
- Log in to the Red Hat Customer Portal.
- Click DOWNLOADS at the top of the page.
- On the Product Downloads page that opens, navigate to the JBOSS INTEGRATION AND AUTOMATION section, and click Red Hat Decision Manager.
- On the Software Downloads page, if necessary select BRMS from the Product menuand 7.0 from the Version menu.
Download one of the following product distributions:
-
To use the installer to install Red Hat Decision Manager on Red Hat JBoss EAP 7.1 or Decision Server on Red Hat JBoss Web Server 3.1, download Red Hat Decision Manager 7.0.0 Installer (
rhdm-installer-7.0.0.GA.jar). To install Red Hat Decision Manager on Red Hat JBoss EAP 7.1 using the deployable zip files, download:
-
Red Hat Decision Manager 7.0.0 Decision Server for All Supported EE7 Containers (
rhdm-7.0.0.GA-kie-server-ee7.zip) -
Red Hat Decision Manager 7.0.0 Decision Central Deployable for Red Hat JBoss EAP 7 (
rhdm-7.0.0.GA-kie-server-ee7.zip)
-
Red Hat Decision Manager 7.0.0 Decision Server for All Supported EE7 Containers (
-
To run Decision Central without needing to deploy it to an application server, download Red Hat Decision Manager 7.0.0 Decision Central Standalone (
rhdm-7.0.0.GA-decision-central-standalone.jar) -
To install Decision Server on Red Hat JBoss Web Server 3.1 using the deployable zip file, download Red Hat Decision Manager 7.0.0 Add Ons (
rhdm-7.0.0.GA-add-ons.zip)
-
To use the installer to install Red Hat Decision Manager on Red Hat JBoss EAP 7.1 or Decision Server on Red Hat JBoss Web Server 3.1, download Red Hat Decision Manager 7.0.0 Installer (
Next steps
Go to one of the following sections:
2.2. Using the installer to install Red Hat Decision Manager on Red Hat JBoss EAP or Red Hat JBoss Web Server
This section describes the steps required to install Red Hat Decision Manager using the installer JAR file. The JAR file is an executable file that installs Red Hat Decision Manager in an existing Red Hat JBoss EAP 7.1 or Red Hat JBoss Web Server 3.1 with Tomcat 8 server installation. You can run the installer in standard or command line interface (CLI) mode.
The Red Hat Decision Manager JAR file installer does not support the Red Hat JBoss EAP distribution installed by yum or RPM Package Manager. If you want to install Red Hat Decision Manager in this type of Red Hat JBoss EAP installation, download the Red Hat Decision Manager 7.0 Deployable for Red Hat JBoss EAP 7.1 file and follow the steps described in Section 2.3, “ZIP file installation for Red Hat Decision Manager on Red Hat JBoss EAP”.
Because IBM JDK cannot use keystores generated on other JDKs, it is not possible to install Red Hat Decision Manager into an existing Red Hat JBoss EAP installation running on IBM JDK with a keystore generated on another JDK.
Next steps:
Follow the instructions in one of the following sections:
2.2.1. Installing Red Hat Decision Manager using the installer in interactive mode
The installer for Red Hat Decision Manager is an executable JAR file. You can use it to install Red Hat Decision Manager in an existing Red Hat JBoss EAP 7.1 or Red Hat JBoss Server 3.1 with Tomcat 8 server installation.
For security reasons, you should run the installer as a non-root user.
Prerequisite
- A backed up Red Hat JBoss EAP 7.1 or higher or Red Hat JBoss Web Server 3.1 with Tomcat 8 or higher server installation
Sufficient user permissions to complete the installation
NoteIf you are installing Decision Server on Red Hat JBoss Web Server 3.1, ensure that you are logged in with a user that has write permission for Tomcat 8.
The JAR binary inlcuded in
$PATHenvironment variable. On Red Hat Enterprise Linux, it is included in thejava-$JAVA_VERSION-openjdk-develpackage.NoteRed Hat Decision Manager is designed to work with UTF-8 encoding. If a different encoding system is used by the underlying JVM, unexpected errors might occur. To ensure UTF-8 is used by the JVM, use the
"-Dfile.encoding=UTF-8"system property.
Procedure
In a terminal window, navigate to the directory where you downloaded the installer JAR file and enter the following command:
java -jar rhdm-installer-7.0.0.GA.jar
NoteWhen running the installer on Windows, you may be prompted to provide administrator credentials during the installation. To prevent this requirement, add the
izpack.mode=privilegedoption to the installation command:java -Dizpack.mode=privileged -jar rhdm-installer-7.0.0.GA.jar
Furthermore, when running the installer on a 32-bit Java virtual machine, you might encounter memory limitations. To prevent this issue, run this command:
java -XX:MaxHeapSize=4g -jar rhdm-installer-7.0.0.GA.jar
- The graphical installer displays a splash screen and a license agreement page.
- Click I accept the terms of this license agreement and click Next.
- Specify the Red Hat JBoss EAP 7.1 or Red Hat JBoss 3.1 Web Server with Tomcat 8 server home where you want to install Red Hat Decision Manager and click Next.
Select the components that you want to install and click Next.
You cannot install Decision Central on Red Hat JBoss 3.1 Web Server with Tomcat 8. You can only install it on Red Hat JBoss EAP. However, you can install the Decision Central controller on Red Hat JBoss 3.1 Web Server with Tomcat 8. The controller is used to manage Decision Server. Install it if you plan to manage multiple Decision Server instances.
NoteIt is possible to install Decision Central and Decision Server on the same server. However, Red Hat recommends installing Decision Central and Decision Server on different servers in production environments. To do this, run the installer twice.
Create the Decision Manager
adminuser and click Next.NoteMake sure that the selected user name is not the same as an existing user, role, or group. For example, do not create a user with the user name
admin.The password must have at least eight characters and must contain at least one number and one non-alphanumeric character, but not & (ampersand).
Make a note of the user name and password. You will need them to access Decision Central and Decision Server.
- On the Component Installation page, click Next to start the installation. The Component Installation page lists the components that you will install.
- When the installation has completed, click Next on the Processing Finished page. On the next page,you will see the message Installation has completed successfully.
If desired, click Generate Installation Script and Properties File to save the installation data in an XML file, then click Done. You can use this file to automatically install Red Hat Decision Manager on the same type of server. Note that you must change the
installpathparameter in the XML file to specify the path of new server that you want to install Red Hat Decision Manager on. Enter the following command to perform an installation with the XML file:java -jar rhdm-installer-7.0.0.GA.jar <path-to-file>
You have successfully installed Red Hat Decision Manager using the installer. On Red Hat JBoss EAP, if you installed only Decision Central, repeat these steps to install Decision Server on a separate server.
To start Red Hat Decision Manager, enter one of the following commands:
On Red Hat JBoss EAP 7.1, enter one of the following commands:
On Linux or UNIX-based systems:
$ EAP_HOME/bin/standalone.sh
On Windows:
EAP_HOME\bin\standalone.bat
On Red Hat JBoss Web Server 3.1 with Tomcat 8, enter one of the following commands:
On Linux or UNIX-based systems:
JWS_HOME/bin/startup.sh
On Windows:
JWS_HOME\bin\startup.sh
2.2.2. Installing Red Hat Decision Manager using the installer in CLI mode
You can run the installer for Red Hat Decision Manager through the command-line interface (CLI).
For security reasons, you should run the installer as a non-root user.
Prerequisite
- A backed up Red Hat JBoss EAP 7.1 or higher or Red Hat JBoss Web Server 3.1 with Tomcat 8 or higher server installation
Sufficient user permissions to complete the installation
NoteIf you are installing Decision Server on Red Hat JBoss Web Server 3.1, ensure that you are logged in with a user that has write permission for Tomcat 8.
The JAR binary inlcuded in
$PATHenvironment variable. On Red Hat Enterprise Linux, it is included in thejava-$JAVA_VERSION-openjdk-develpackage.NoteRed Hat Decision Manager is designed to work with UTF-8 encoding. If a different encoding system is used by the underlying JVM, unexpected errors might occur. To ensure UTF-8 is used by the JVM, use the
"-Dfile.encoding=UTF-8"system property.
Procedure
In a terminal window, navigate to the directory where you downloaded the installer file and enter the following command:
java -jar rhdm-installer-7.0.0.GA.jar -console
The command-line interactive process will start and display the End-User License Agreement.
press 1 to continue, 2 to quit, 3 to redisplay.
Read the license agreement then enter
1and press Enter to continue:Specify the home directory of one of the following servers: Red Hat JBoss EAP 7.1 or Tomcat 8 [/home/user/RHDM-7.0.0/jboss-eap-7.1]
Enter the parent directory of an existing Red Hat JBoss EAP 7.1 or Red Hat JBoss Web Server 3.1 with Tomcat 8 installation.
The installer will verify the location of the installation at the location provided. Enter
1to confirm and continue.NoteIt is possible to install Decision Manager and Decision Server on the same server. However, Red Hat recommends installing Decision Central and Decision Server on different servers in production environments.
Follow the instructions in the installer to complete the installation.
NoteWhen you create the user name and password, make sure that the specified user name does not conflict with any known title of a role or a group. For example, if there is a role called
admin, you should not create a user with the user nameadmin.The password must have at least eight characters and must contain at least one number and one non-alphanumeric character (not including the character
&).Make a note of the user name and password. You will need them to access Decision Central and Decision Server.
When the installation has completed, you will see this message:
Would you like to generate an automatic installation script and properties file?
-
Enter
yto create an XML file that contains the installation data, ornto complete the installation. If you entery, you are prompted to specify a path for the XML file. - Enter a path or press the Enter key to accept the suggested path.
You have successfully installed Red Hat Decision Manager. If you installed only Decision Central, repeat these steps to install Decision Server on a separate server.
2.3. ZIP file installation for Red Hat Decision Manager on Red Hat JBoss EAP
The deployable ZIP file installation of Red Hat Decision Manager 7.0 on Red Hat JBoss EAP consists of two ZIP files, one for Decision Central and one for Decision Server.
In a production environment, you should install Decision Central and Decision Server on separate servers.
2.3.1. Installing Decision Central using the deployable zip file
Decision Central is a web console that enables you to perform the following tasks over individual components in a unified web-based environment:
- Create, manage, and edit your rules and related assets.
- Manage connected Decision Servers and their containers.
Prerequisites
- A backed up Red Hat JBoss EAP installation, version 7.1 or higher
- Sufficient user permissions to complete the installation
The following file, downloaded by clicking Download next to Decision Central for EAP 7 on the Product Downloads page of the Red Hat Customer Portal:
rhdm-7.0.0.GA-decision-central-eap7-deployable.zip
Procedure
-
Extract the
rhdm-7.0.0.GA-decision-central-eap7-deployable.zipfile to a temporary directory. In the following examples this directory is calledTEMP_DIR. Copy the contents of the
TEMP_DIR/rhdm-7.0.0.GA-decision-central-eap7-deployable/jboss-eap-7.1directory toEAP_HOME. When asked to overwrite files or merge directories, select Yes.WarningEnsure the names of the Red Hat Decision Manager deployments you are copying do not conflict with your existing deployments in the Red Hat JBoss EAP instance.
2.3.2. Installing Decision Server using the deployable zip file
Decision Server provides the runtime environment for business assets and accesses the data stored in the assets repository (knowledge store).
Prerequisites
-
A backed up Red Hat JBoss EAP installation, version 7.1 or higher. The base directory of the Red Hat JBoss EAP installation is referred to as
EAP_HOME. - Sufficient user permissions to complete the installation.
The following file, downloaded by clicking Download next to Decision Server on the Product Downloads page of the Red Hat Customer Portal:
rhdm-7.0.0.GA-kie-server-ee7.zipProcedure
-
Extract the
rhdm-7.0.0.GA-kie-server-ee7.ziparchive to a temporary directory. In the following examples, this directory is calledTEMP_DIR. Copy the
TEMP_DIR/rhdm-7.0.0.GA-kie-server-ee7/rhdm-7.0.0.GA-kie-server-ee7/kie-server.wardirectory toEAP_HOME/standalone/deployments/.WarningEnsure the names of the Red Hat Decision Manager deployments you are copying do not conflict with your existing deployments in the Red Hat JBoss EAP instance.
-
Copy the contents of the
TEMP_DIR/rhdm-7.0.0.GA-kie-server-ee7/rhdm-7.0.0.GA-kie-server-ee7/SecurityPolicy/toEAP_HOME/bin. When asked to overwrite files, select Yes. -
In the
EAP_HOME/standalone/deployments/directory, create an empty file namedkie-server.war.dodeploy. This file ensures that Decision Server is automatically deployed when the server starts.
-
Extract the
2.3.3. Creating users
Before you can use Decision Central, you must create a user that has the admin role. To log in to Decision Server, you must create a user that has the kie-server role. You can create a single user that has both of these roles.
Prerequisites
Red Hat Decision Manager installed in an EAP_HOME as described in one of the following sections:
Procedure
-
In a terminal application, navigate to the
EAP_HOME/bindirectory. Create a user that you will use to log in to Decision Central and Decision Server. In the following command, replace
<username>and<password>with the user name and password of your choice.$ ./add-user.sh -a --user <USERNAME> --password <PASSWORD> --role kie-server,admin
NoteMake sure that the specified user name is not the same as an existing user, role, or group. For example, do not create a user with the user name
admin.The password must have at least eight characters and must contain at least one number and one non-alphanumeric character, but not & (ampersand).
- Make a note of your user name and password.
2.3.4. Configuring Decision Server
If Decision Server will be managed by Decision Central, you must edit the standalone.xml file in both the Decision Server and Decision Central installations, as described in this section.
Only make these changes if Decision Server will be managed by Decision Central.
Prerequisites
Red Hat Decision Manager installed in an
EAP_HOMEas described in one of the following sections:- Section 2.2.1, “Installing Red Hat Decision Manager using the installer in interactive mode”
- Section 2.2.2, “Installing Red Hat Decision Manager using the installer in CLI mode”
Section 2.3, “ZIP file installation for Red Hat Decision Manager on Red Hat JBoss EAP”
NoteRed Hat recommends that you install Decision Server and Decision Central on different servers in production environments. However, if you install Decision Server and Decision Central on the same server, for example in a development environment, make these changes in the shared
standalone.xmlfile.
-
On Decision Server nodes, a user with the
kie-serverrole On Decision Central server nodes, a user with the
rest-allroleFor more information, see Section 2.3.3, “Creating users”.
Procedure
In the Decision Central
EAP_HOME/standalone/configuration/standalone.xmlfile, uncomment the following properties in the<system-properties>section and replace<USERNAME>and<USER_PWD>with the credentials of a user with thekie-serverrole:<property name="org.kie.server.user" value="<USERNAME>"/> <property name="org.kie.server.pwd" value="<USER_PWD>"/>
In the Decision Server
EAP_HOME/standalone/configuration/standalone.xmlfile, uncomment the following properties in the<system-properties>section.<property name="org.kie.server.controller.user" value="<CONTROLLER_USER>"/> <property name="org.kie.server.controller.pwd" value="<CONTROLLER_PWD>"/> <property name="org.kie.server.id" value="<KIE_SERVER_ID>"/> <property name="org.kie.server.location" value="http://<HOST>:<PORT>/kie-server/services/rest/server"/> <property name="org.kie.server.controller" value="<CONTROLLER_URL>"/>
In this file, replace the following values:
-
Replace
<CONTROLLER_USER>and<CONTROLLER_PWD>with the credentials of a user with therest-allrole. -
Replace
<KIE_SERVER_ID>with the ID or name of the Decision Server installation, for example,rhdm700-decision-server-1. -
Replace
<HOST>with the ID or name of the Decision Server host, for example,localhostor192.7.8.9. Replace
<PORT>with the port of the Decision Server host, for example,8080.NoteThe
org.kie.server.locationproperty specifies the location of Decision Server.Replace
<DECISION_CENTRAL_URL>with the URL of Decision Central. Decision Server connects to this URL during startup.If you installed Decision Central using the installer or Red Hat JBoss EAP zip installations,
<DECISION_CENTRAL_URL>has this format:If you are running Decision Central using the
standalone.jarfile,<DECISION_CENTRAL_URL>has this format:
-
Replace
2.3.5. Running Red Hat Decision Manager
After you have installed Red Hat Decision Manager on Red Hat JBoss EAP, use this procedure to run the Red Hat Decision Manager in standalone mode.
Prerequisites
-
Red Hat Decision Manager installed in
EAP_HOMEas described in Section 2.3, “ZIP file installation for Red Hat Decision Manager on Red Hat JBoss EAP”. - Red Hat Decision Manager configured as described in Section 2.3.4, “Configuring Decision Server”.
Procedure
-
In a terminal application, navigate to
EAP_HOME/bin. Run the standalone configuration:
On Linux or UNIX-based systems:
$ ./standalone.sh
On Windows:
standalone.bat
NoteIf you deployed Decision Server without Decision Central on Red Hat JBoss EAP then you must use one of the following commands to start Red Hat JBoss EAP with the standalone-full profile.
On Linux or UNIX-based systems:
$ /standalone.sh -c standalone-full.xml
On Windows:
standalone.bat -c standalone-full.xml
-
In a web browser, open the URL
localhost:8080/decision-central. -
Log in using the user name
rhdmAdminand the passwordpassword@1.
2.4. Installing Decision Server on Red Hat JBoss Web Server ZIP installation
Decision Server provides the runtime environment for business assets and accesses the data stored in the assets repository (knowledge store). This section explains how to perform the ZIP file installation to install Decision Server on an existing Red Hat JBoss Web Server 3.1 instance.
To use the installer JAR file to install Decision Server, see Section 2.2, “Using the installer to install Red Hat Decision Manager on Red Hat JBoss EAP or Red Hat JBoss Web Server”.
Prerequisites
-
A backed up Red Hat JBoss Web Server 3.1 with Tomcat 8 or higher server installation. The base directory of the JBoss Web Server installation is referred to as
JWS_HOME. - Sufficient user permissions to complete the installation.
The
rhdm-7.0-kie-server-jws.zipfile. To download this file:- Click Download next to Red Hat Decision Manager 7.0.0 Add Ons on the Product Downloads page of the Red Hat Customer Portal.
-
Unzip the
rhdm-7.0.0.GA-add-ons.zipfile. Therhdm-7.0-kie-server-jws.zipfile is in the unzipped directory.
Procedure
-
Extract the
rhdm-7.0-kie-server-jws.ziparchive to a temporary directory. In the following examples, this directory is calledTEMP_DIR. Copy the
TEMP_DIR/rhdm-7.0-kie-server-jws/kie-server.wardirectory to theJWS_HOME/tomcat8/webappsdirectory.WarningEnsure the names of the Red Hat Decision Manager deployments you are copying do not conflict with your existing deployments in the Red Hat JBoss Web Server instance.
-
Remove the
.warextensions from thekie-server.warfolder. -
Open the
JWS_HOME/tomcat8/conf/tomcat-users.xmlfile in a text editor. Add users and roles to the
JWS_HOME/tomcat8/conf/tomcat-users.xmlfile. In the following example,<ROLE_NAME>is a role supported by Red Hat Decision Manager. For a list of supported roles, see Section 1.3, “User roles”.<USERNAME>and<PASSWORD>is a user and password combination of your choice:<role rolename="<ROLE_NAME>" <user username="<USER_NAME> password="<PASSWORD>" roles="<ROLE_NAME>"/>
If a user has more than one role, as shown in the following example, separate the roles with a comma:
<role rolename="admin"
<role rolename="kie-server"
<user username="rhdmUser" password="user1234" roles="admin,kie-server"/>
In the
JWS_HOME/tomcat8/bindirectory, create a readablesetenv.shfile with the following content:CATALINA_OPTS="-Xmx1024m -Dorg.jbpm.server.ext.disabled=true -Dorg.jbpm.ui.server.ext.disabled=true -Dorg.jbpm.case.server.ext.disabled=true"ImportantOn Microsoft Windows, add the following values to the
setenv.batfile:set "CATALINA_OPTS=-Xmx1024m -Dorg.jbpm.server.ext.disabled=true -Dorg.jbpm.ui.server.ext.disabled=true -Dorg.jbpm.case.server.ext.disabled=true"To start JBoss Web Server, enter one of the following commands in the
JWS_HOME/tomcat8/bindirectory:On Linux or UNIX-based systems:
$ ./startup.sh
On Windows:
startup.bat
-
After a few minutes, review the the
JWS_HOME/tomcat8/logsdirectory and correct any errors.
2.4.1. Verifying Decision Server on Red Hat JBoss Web Server
To verify that Decision Server is working on Red Hat JBoss Web Server, enter the following command:
curl -X GET "http://localhost:8080/kie-server/services/rest/server" -H "accept: application/xml" -u '<CONTROLLER>:<CONTROLLER_PWD>'
In this command, replace <CONTROLLER> and <CONTROLLER_PWD> with the values in the tomcat-users.xml file.
The output of this command provides information about the Decision Server instance.
2.5. Running standalone Decision Central
You can use the Decision Central standalone JAR file to run Decision Central without needing to deploy it to an application server such as Red Hat JBoss EAP.
Red Hat supports this installation type only when it is installed on premise, on Red Hat Enterprise Linux.
Procedure
- Download the Decision Central standalone JAR file from the Red Hat Customer Portal.
- In a terminal window, navigate to the directory where you downloaded the installer file.
Create the
application-config.yamlconfiguration file with the following contents:swarm: management: security-realms: ApplicationRealm: local-authentication: default-user: local allowed-users: local skip-group-loading: true properties-authentication: path: /path/to/application-users.properties plain-text: true properties-authorization: path: /path/to/application-roles.properties datasource: management: wildfly: admin: adminCreate the
application-users.propertiesfile. Include an administrative user and if this Decision Central instance will be a controller for Decision Server, include a controller user, for example:rhdmAdmin=password1 controllerUser=controllerUser1234
Create the
application-roles.propertiesfile to assign roles to the users that you included in theapplication-users.propertiesfile, for example:rhdmAdmin=admin controllerUser=kie-server
For more information, see Section 1.3, “User roles”.
Enter the following command:
java -jar rhdm-7.0.0.GA-decision-central-standalone.jar -s
application-config.yaml
In addition, you can set any properties supported by Decision Central by including the
-D<property>=<value>parameter in this command, for example:java -jar rhdm-7.0.0.GA-decision-central-standalone.jar -s application-config.yaml -D<property>=<value> -D<property>=<value>
See Section 2.5.1, “Supported properties” for more information.
2.5.1. Supported properties
When you install standalone Decision Central, you can use the properties listed in this section in the following command:
java -jar rhdm-7.0.0.GA-decision-central-standalone.jar -s
application-config.yaml -D<property>=<value> -D<property>=<value>
In this command, <property> is a property from the following list and <value> is a value that you assign to that property:
-
org.uberfire.nio.git.dir: Location of the directory.niogit. Default: working directory -
org.uberfire.nio.git.dirname: Name of the git directory. Default:.niogit -
org.uberfire.nio.git.daemon.enabled: Enables or disables the git daemon. Default:true -
org.uberfire.nio.git.daemon.host: If the git daemon is enabled, uses this property as the local host identifier. Default:localhost -
org.uberfire.nio.git.daemon.port: If the git daemon is enabled, uses this property as the port number. Default:9418 -
org.uberfire.nio.git.ssh.enabled: Enables or disables the SSH daemon. Default:true -
org.uberfire.nio.git.ssh.host: If the SSH daemon enabled, uses this property as the local host identifier. Default:localhost -
org.uberfire.nio.git.SSH.port: If the SSH daemon is enabled, uses this property as the port number. Default:8001 -
org.uberfire.nio.git.ssh.cert.dir: Location of the directory.securitywhere local certificates will be stored. Default: working directory -
org.uberfire.nio.git.ssh.passphrase: Pass phrase to access the public key store of your operating system when cloning git repositories with SCP style URLs. Example: git@github.com:user/repository.git. org.uberfire.nio.git.ssh.algorithm: Algorithm used by SSH. Default:DSANoteIf you plan to use RSA or any algorithm other than DSA, make sure you set up your application server to use the Bouncy Castle JCE library.
-
org.uberfire.metadata.index.dir: Place where Lucene .index folder will be stored. Default: working directory -
org.uberfire.ldap.regex.role_mapper: Regex pattern used to map LDAP principal names to application role name. Note that the variable role must be part of the pattern as it is substited by the application role name when matching a principal value to role name. Default: Not used. -
org.uberfire.sys.repo.monitor.disabled: Disable configuration monitor (do not disable unless you know what you’re doing). Default: false -
org.uberfire.secure.key: Secret password used by password encryption. Default`: org.uberfire.admin -
org.uberfire.secure.alg: Crypto algorithm used by password encryption. Default: PBEWithMD5AndDES -
org.uberfire.domain: security-domain name used by uberfire. Default: ApplicationRealm -
org.guvnor.m2repo.dir: Place where Maven repository folder will be stored. Default: working-directory/repositories/kie -
org.guvnor.project.gav.check.disabled: Disable GAV checks. Default: false -
org.kie.build.disable-project-explorer: Disable automatic build of selected Project in Project Explorer. Default: false -
org.kie.verification.disable-dtable-realtime-verification: Disables the realtime validation and verification of decision tables. Default: false -
org.kie.server.controller: URL for connecting with a Kie Server Controller, for example:ws://localhost:8080/decision-central/websocket/controller. -
org.kie.example: Enables external clone of a demo application from GitHub. -
org.kie.build.disable-project-explorer: Disable automatic build of selected Project in Project Explorer. Default: false -
org.kie.verification.disable-dtable-realtime-verification: Disables the realtime validation and verification of decision tables. Default: false -
org.kie.server.controller: URL for connecting with a Kie Server Controller, for example:ws://localhost:8080/decision-central/websocket/controller. -
org.kie.server.user: User name used to connect with the Decision Server nodes from the controller. This property is only required when using this Decision Central installation as a controller. -
org.kie.server.pwd: Password used to connect with the Decision Server nodes from the controller. This property is only required when using this Decision Central installation as a controller.
2.6. Installing and running the standalone Decision Server Controller
You can configure Decision Server to run in managed or unmanaged mode. If Decision Server is unmanaged, you must manually create and maintain containers. If Decision Server is managed, the standalone Decision Server Controller manages the Decision Server configuration and you interact with the Controller to create and maintain containers.
The standalone Decision Server Controller is integrated with Decision Central. If you install Decision Central, use the Exection Server page to create and maintain containers. However, if you do not install Decision Central, you can install the standalone Decision Server Controller and use the REST API or the Decision Server Java Client API to interact with it.
2.6.1. Installing the standalone Decision Server Controller on Red Hat JBoss EAP
You can install the standalone Decision Server Controller and use the REST API or the Decision Server Java Client API to interact with it.
Prerequisites
-
A backed up Red Hat JBoss EAP installation, version 7.1 or higher. The base directory of the Red Hat JBoss EAP installation is referred to as
EAP_HOME. - Sufficient user permissions to complete the installation. *
Procedure
-
Download the
rhdm-7.0-controller-ee7.zipfile by clicking Download next to Red Hat Decision Manager 7.0.0 Add Ons on the Product Downloads page of the Red Hat Customer Portal. -
Unzip the
rhdm-7.0.0.GA-add-ons.zipfile. Therhdm-7.0-controller-ee7.zipfile is in the unzipped directory. -
Extract the
rhdm-7.0-controller-ee7archive to a temporary directory. In the following examples, this directory is calledTEMP_DIR. Copy the
TEMP_DIR/rhdm-7.0-controller-ee7/controller.wardirectory toEAP_HOME/standalone/deployments/.WarningEnsure the names of the standalone Decision Server Controller deployments you are copying do not conflict with your existing deployments in the Red Hat JBoss EAP instance.
-
Copy the contents of the
TEMP_DIR/rhdm-7.0-controller-ee7/SecurityPolicy/directory toEAP_HOME/bin. When asked to overwrite files, select Yes. -
In the
EAP_HOME/standalone/deployments/directory, create an empty file namedcontroller.war.dodeploy. This file ensures that the standalone Decision Server Controller is automatically deployed when the server starts.
2.6.1.1. Creating users
Before you can use the standalone Decision Server Controller, you must create a user that has the kie-server role.
Prerequisite
The controller installed in an EAP_HOME home.
Procedure
-
In a terminal application, navigate to the
EAP_HOME/bindirectory. Enter the following command and replace
<USER_NAME>and<PASSWORD>with the user name and password of your choice.$ ./add-user.sh -a --user <username> --password <password> --role kie-server
NoteMake sure that the specified user name is not the same as an existing user, role, or group. For example, do not create a user with the user name
admin.The password must have at least eight characters and must contain at least one number and one non-alphanumeric character, but not & (ampersand).
- Make a note of your user name and password.
2.6.1.2. Configuring Decision Server and the standalone Decision Server Controller
If Decision Server will be managed by the standalone Decision Server Controller, you must edit the standalone.xml file in both the Decision Server and standalone Decision Server Controller installations, as described in this section.
Prerequisites
Decision Server installed in an
EAP_HOMEas described in one of the following sections:The Controller installed in an
EAP_HOMENoteRed Hat recommends that you install Decision Server and the standalone Decision Server Controller on different servers in production environments. However, if you install Decision Server and the standalone Decision Server Controller on the same server, for example in a development environment, make these changes in the shared
standalone.xmlfile.-
On Decision Server nodes, a user with the
kie-serverrole On the Controller server nodes, a user with the
kie-serverroleFor more information, see Section 2.3.3, “Creating users”.
Procedure
In the Controller
EAP_HOME/standalone/configuration/standalone.xmlfile, add the following properties to the<system-properties>section and replace<USERNAME>and<USER_PWD>with the credentials of a user with thekie-serverrole:<property name="org.kie.server.user" value="<USERNAME>"/> <property name="org.kie.server.pwd" value="<USER_PWD>"/>
In the Decision Server
EAP_HOME/standalone/configuration/standalone.xmlfile, add the following properties to the<system-properties>section:<property name="org.kie.server.controller.user" value="<CONTROLLER_USER>"/> <property name="org.kie.server.controller.pwd" value="<CONTROLLER_PWD>"/> <property name="org.kie.server.id" value="<KIE_SERVER_ID>"/> <property name="org.kie.server.location" value="http://<HOST>:<PORT>/kie-server/services/rest/server"/> <property name="org.kie.server.controller" value="<CONTROLLER_URL>"/>
In this file, replace the following values:
-
Replace
<CONTROLLER_USER>and<CONTROLLER_PWD>with the credentials of a user with thekie-serverrole. -
Replace
<KIE_SERVER_ID>with the ID or name of the Decision Server installation, for example,rhdm700-decision-server-1. -
Replace
<HOST>with the ID or name of the Decision Server host, for example,localhostor192.7.8.9. Replace
<PORT>with the port of the Decision Server host, for example,8080.NoteThe
org.kie.server.locationproperty specifies the location of Decision Server.Replace
<CONTROLLER_URL>with the URL of the standalone Decision Server Controller. Decision Server connects to this URL during startup, for example:
-
Replace
2.6.1.3. Running the standalone Decision Server Controller
After you have installed the standalone Decision Server Controller on Red Hat JBoss EAP, use this procedure to run the standalone Decision Server Controller.
Prerequisite
The standalone Decision Server Controller installed and configured in an EAP_HOME
Procedure
-
In a terminal application, navigate to
EAP_HOME/bin. Enter the following command:
On Linux or UNIX-based systems:
$ ./standalone.sh
On Windows:
standalone.bat
To verify that the Controller is working on Red Hat JBoss EAP, enter the following command where
<CONTROLLER>and<CONTROLLER_PWD>is the user name and password combination that you created in Section 2.6.1.1, “Creating users”. The output of this command provides information about the Decision Server instance.curl -X GET "http://<HOST>:<PORT>/controller/rest/controller/management/servers" -H "accept: application/xml" -u '<CONTROLLER>:<CONTROLLER_PWD>'
Alternatively, you can use the Decision Server Java API Client to access the standalone Decision Server Controller.
2.6.2. Installing the standalone Decision Server Controller on Red Hat JBoss Web Server
You can install the standalone Decision Server Controller and use the REST API or the Decision Server Java Client API to interact with it.
Prerequisites
-
A backed up Red Hat JBoss Web Server 3.1 with Tomcat 8 or higher server installation. The base directory of the JBoss Web Server installation is referred to as
JWS_HOME. - Sufficient user permissions to complete the installation.
The
rhdm-7.0-controller-jws.zipfile. To download this file:- Click Download next to Red Hat Decision Manager 7.0.0 Add Ons on the Product Downloads page of the Red Hat Customer Portal.
-
Unzip the
rhdm-7.0.0.GA-add-ons.zipfile. Therhdm-7.0-controller-jws.zipfile is in the unzipped directory.
Procedure
-
Extract the
rhdm-7.0-controller-jws.ziparchive to a temporary directory. In the following examples, this directory is calledTEMP_DIR. Copy the
TEMP_DIR/rhdm-7.0-controller-jws.zip/controller.wardirectory to theJWS_HOME/tomcat8/webappsdirectory.WarningEnsure the names of the Red Hat Decision Manager deployments you are copying do not conflict with your existing deployments in the Red Hat JBoss Web Server instance.
-
Remove the
.warextensions from thecontroller.warfolder. -
Copy the contents of the
TEMP_DIR/rhdm-7.0-controller-jws/SecurityPolicy/directory toJWS_HOME/bin. When asked to overwrite files, select Yes. -
In the
JWS_HOME/standalone/deployments/directory, create an empty file namedcontroller.war.dodeploy. This file ensures that the standalone Decision Server Controller is automatically deployed when the server starts. Add the
kie-serverrole and user to theJWS_HOME/tomcat8/conf/tomcat-users.xmlfile. In the following example,<USERNAME>and<PASSWORD>is a user and password combination of your choice:<role rolename="kie-server"/> <user username="<USER_NAME>" password="<PASSWORD>" roles="kie-server"/>
In the
JWS_HOME/tomcat8/bindirectory of the instance running Decision Server, create a readablesetenv.shfile with the following content:CATALINA_OPTS="-Xmx1024m -Dorg.jbpm.server.ext.disabled=true -Dorg.jbpm.ui.server.ext.disabled=true -Dorg.jbpm.case.server.ext.disabled=true -Dorg.kie.server.controller.user=<CONTROLLER_USER> -Dorg.kie.server.controller.pwd=<CONTROLLER_PWD> -Dorg.kie.server.id=<KIE_SERVER_ID> -Dorg.kie.server.location=http://<HOST>:<PORT>/kie-server/services/rest/server -Dorg.kie.server.controller=http://<HOST>:<PORT>/controller/rest/controller"In the
JWS_HOME/tomcat8/bindirectory of the instance running the standalone Decision Server Controller, create a readablesetenv.shfile with the following content:CATALINA_OPTS="-Dorg.kie.server.user=<USERNAME> -Dorg.kie.server.pwd=<USER_PWD>"To start the standalone Decision Server Controller, enter one of the following commands in the
JWS_HOME/tomcat8/bindirectory:On Linux or UNIX-based systems:
$ ./startup.sh
On Windows:
startup.bat
-
After a few minutes, review the the
JWS_HOME/tomcat8/logsdirectory and correct any errors. To verify that the Controller is working on Red Hat JBoss Web Server, enter the following command. In this command, replace
<CONTROLLER>and<CONTROLLER_PWD>with the values in thetomcat-users.xmlfile. The output of this command provides information about the Decision Server instance.curl -X GET "http://<HOST>:<PORT>/controller/rest/controller/management/servers" -H "accept: application/xml" -u '<CONTROLLER>:<CONTROLLER_PWD>'
Alternatively, you can use the Decision Server Java API Client to access the standalone Decision Server Controller.
Chapter 3. Installing supporting tools
3.1. Using the Maven repository in your project
Red Hat Decision Manager is designed to be used in combination with the Red Hat Decision Manager Maven repository. You can direct Maven to use the Red Hat Decision Manager Maven repository in your project in one of the following ways:
- Configure the Project Object Model (POM) file (pom.xml).
-
Modify the Maven
settings.xmlfile. This file is included with Maven repository available for download from the Red Hat Customer Portal.
Red Hat recommends directing Maven to use the Red Hat Decision Manager Maven repository across all projects by using the Maven global or user settings.
3.1.1. Configuring Maven using the project configuration file (pom.xml)
To use Maven for building and managing your Red Hat Decision Manager projects, you must configure your projects to be built with Maven. Maven requires the POM file (pom.xml) that holds configuration details for your project. For more information, see Apache Maven Project.
Procedure
-
Generate a Maven project. A
pom.xmlfile is automatically generated when you create a Maven project. Edit
pom.xmlto add more dependencies and new repositories.Maven downloads all of the JAR files and the dependent JAR files from the Maven repository when you compile and package your project.
Find the schema for the pom.xml file at http://maven.apache.org/maven-v4_0_0.xsd. For more information about POM files, see Apache Maven Project POM.
3.1.2. Configure Maven using the settings file
The Maven settings file (settings.xml) is used to configure Maven execution. You can locate this file in the following locations:
-
In the Maven install directory at
$M2_HOME/conf/settings.xml. These settings are called global settings. -
In the user’s install directory at
$USER_HOME/.m2/settings.xml. These settings are called user settings. -
A custom location specified by the system property
kie.maven.settings.custom.
The settings used is a merge of the files located in these locations. For more information, see Apache Maven Project.
3.1.3. Managing Maven dependencies
Prerequisite
To use the correct Maven dependencies in your Red Hat Decision Manager project, you must add relevant bill of materials (BOM) files to the project’s pom.xml file. When you add the BOM files, the correct versions of transitive dependencies from the provided Maven repositories are included in the project.
For information, see What is the mapping between RHDM product and maven library version?
Procedure
Declare the BOM in
pom.xml. For example:Example 3.1. BOM for Red Hat Decision Manager 7.0.0
<dependencyManagement>
 <dependencies>
  <dependency>
   <groupId>org.jboss.bom.rhdm</groupId>
   <artifactId>rhdm-platform-bom</artifactId>
   <version>7.0.0.Final-redhat-4</version>
   <type>pom</type>
   <scope>import</scope>
  </dependency>
 </dependencies>
</dependencyManagement>
<dependencies>
<!-- Your dependencies -->
</dependencies>
Declare dependencies needed for your project in the
<dependencies>tag.For a basic Red Hat Business Automation project, declare the following dependencies:
Embedded jBPM Engine Dependencies
<dependency>
  <groupId>org.jbpm</groupId>
  <artifactId>jbpm-kie-services</artifactId>
</dependency>

<!-- Dependency needed for default WorkItemHandler implementations. -->
<dependency>
  <groupId>org.jbpm</groupId>
  <artifactId>jbpm-workitems-core</artifactId>
</dependency>

<!-- Logging dependency. You can use any logging framework compatible with slf4j. -->
<dependency>
  <groupId>ch.qos.logback</groupId>
  <artifactId>logback-classic</artifactId>
  <version>${logback.version}</version>
</dependency>

<dependency>
  <groupId>org.kie</groupId>
  <artifactId>kie-api</artifactId>
</dependency>
For a Red Hat Business Automation project that uses CDI, declare the following dependencies:
CDI-Enabled jBPM Engine dependencies
<dependency>
  <groupId>org.kie</groupId>
  <artifactId>kie-api</artifactId>
</dependency>

<dependency>
  <groupId>org.jbpm</groupId>
  <artifactId>jbpm-kie-services</artifactId>
</dependency>

<dependency>
  <groupId>org.jbpm</groupId>
  <artifactId>jbpm-services-cdi</artifactId>
</dependency>
For a basic Red Hat Decision Manager project, declare the following dependencies:
Embedded Drools Engine Dependencies
<dependency>
  <groupId>org.drools</groupId>
  <artifactId>drools-compiler</artifactId>
</dependency>

<!-- Dependency for persistence support. -->
<dependency>
  <groupId>org.drools</groupId>
  <artifactId>drools-persistence-jpa</artifactId>
</dependency>

<!-- Dependencies for decision tables, templates, and scorecards.
For other assets, declare org.drools:drools-workbench-models-* dependencies. -->
<dependency>
  <groupId>org.drools</groupId>
  <artifactId>drools-decisiontables</artifactId>
</dependency>
<dependency>
  <groupId>org.drools</groupId>
  <artifactId>drools-templates</artifactId>
</dependency>
<dependency>
  <groupId>org.drools</groupId>
  <artifactId>drools-scorecards</artifactId>
</dependency>

<!-- Dependency for loading KJARs from a Maven repository using KieScanner. -->
<dependency>
  <groupId>org.kie</groupId>
  <artifactId>kie-ci</artifactId>
</dependency>
To use the Decision Server, declare the following dependencies:
Client Application Decision Server Dependencies
<dependency>
  <groupId>org.kie.server</groupId>
  <artifactId>kie-server-client</artifactId>
</dependency>
<dependency>
    <groupId>org.kie.server</groupId>
    <artifactId>kie-server-api</artifactId>
</dependency>

<!-- Dependency for Red Hat JBoss BRMS functionality. -->
<dependency>
  <groupId>org.drools</groupId>
  <artifactId>drools-core</artifactId>
</dependency>

<dependency>
  <groupId>org.kie</groupId>
  <artifactId>kie-api</artifactId>
</dependency>
To create a remote client for Red Hat Business Automation or Red Hat Decision Manager, declare the following dependencies:
Client Dependencies
<dependency>
  <groupId>org.uberfire</groupId>
  <artifactId>uberfire-rest-client</artifactId>
</dependency>
To use assets in
KJARpackaging, the recommended way is to includekie-maven-plugin:Kie Maven Plugin
<packaging>kjar</packaging>
<build>
 <plugins>
  <plugin>
   <groupId>org.kie</groupId>
   <artifactId>kie-maven-plugin</artifactId>
   <version>7.0.0.Final-redhat-4</version>
   <extensions>true</extensions>
  </plugin>
 </plugins>
</build>
3.2. Importing projects from Git repositories
Git is a distributed version control system. It implements revisions as commit objects. When you commit your changes into a repository, a new commit object in the Git repository is created. When you create a project in Decision Central it is added to the Git repository connected to Decision Central.
If you have projects in other Git repositories, you can import them into Decision Central spaces.
Prerequisite
Red Hat Decision Manager projects in an external Git repository
Procedure
- In Decision Central, click Menu → Design → Projects.
- Select or create the space into which you want to import the projects. The default space is myteam.
- Click the three verticle dots on the right side of the screen and select Import Project.
- In the Import Project window, enter the URL and credentials for the Git repository that contains the projects that you want to import and click Import. The projects are added to the current space.
3.3. Installing and setting up Red Hat JBoss Developer Studio
Red Hat JBoss Developer Studio is the JBoss Integrated Development Environment (IDE) based on Eclipse. Red Hat JBoss Developer Studio provides plug-ins with tools and interfaces for Red Hat Decision Manager.
Procedure
- Download the latest Red Hat JBoss Developer Studio from the Red Hat Customer Portal.
- Follow the setup and installation instructions in the Red Hat JBoss Developer Studio documentation.
- Install the Red Hat JBoss Developer Studio plug-ins, as described in the next section.
Because of an issue in the way multi-byte rule names are handled, you must ensure that the instance of Red Hat JBoss Developer Studio is started with the file encoding set to UTF-8. You can do this by editing the $JBDS_HOME/studio/devstudio.ini file and adding the following property: "-Dfile.encoding=UTF-8".
3.3.1. Installing Red Hat JBoss Developer Studio plug-ins
Red Hat JBoss Developer Studio provides plug-ins with tools and interfaces for Red Hat Decision Manager. These plug-ins are based on the community version of these products. For this reason, the Red Hat Decision Manager plug-in is called the Drools plug-in.
Get the latest Red Hat JBoss Developer Studio from the Red Hat Customer Portal. The Red Hat Decision Manager plug-ins for Red Hat JBoss Developer Studio are available using the update site.
Procedure
- Start Red Hat JBoss Developer Studio.
- Click Help → Install New Software.
- Click Add to enter the Add Repository menu.
-
Provide a name next to the Name field and add the following URL in the Location field:
https://devstudio.jboss.com/11/stable/updates/integration-stack/. - Click OK.
- Select the JBoss Business Process and Rule Development feature from the available options, click Next, and then click Next again.
- Read the license and accept it by selecting the appropriate radio button, and click Finish.
- Restart Red Hat JBoss Developer Studio after the installation process finishes.
3.3.2. Configuring the Red Hat Decision Manager server
You can configure Red Hat JBoss Developer Studio to run the Red Hat Decision Manager server.
Prerequisite
- Red Hat JBoss Developer Studio
- Red Hat Decision Manager installed with the Red Hat JBoss Developer Studio plug-ins
Procedure
- Start Red Hat JBoss Developer Studio.
- To open the Drools view, click Window → Open Perspective → Other, select Drools, select specific views, and click OK.
- Click Window → Show View → Other… and select Server → Servers to add the server view.
- Right click the Servers panel and select New → Server to open the server menu.
- Click JBoss Enterprise Middleware → JBoss Enterprise Application Platform 7.1+ and click Next to define the server.
Set the home directory by clicking the Browse button. Navigate to theRed Hat JBoss EAP directory where Red Hat Decision Manager is installed.
To configure the Red Hat Decision Manager server, select the Red Hat JBoss EAP directory where Red Hat Decision Manager is installed.
- Provide a name for the server in the Name field, ensure that the configuration file is set, and click Finish.
3.3.3. Importing projects from a Git repository into Red Hat JBoss Developer Studio
You can configure Red Hat JBoss Developer Studio to connect to a central Git asset repository. The repository stores rules, models, functions, and processes.
You can either clone a remote Git repository or import a local Git repository.
3.3.4. Cloning a remote Git repository
You can clone a git repository to use with Red Hat JBoss Developer Studio.
Prerequisite
Access permission for the remote Git repository that you want to clone
Procedure
- In Red Hat JBoss Developer Studio, select the server from the Server tab and click the start icon to start your server.
Enter the following command in a terminal to start the Secure Shell server, if it is not running already.
/sbin/service sshd start
NoteThis command is specific to Linux and Apple Macintosh. On these platforms, if
sshdhas already been started, this command fails. If this happens, you may safely ignore this step.- In Red Hat JBoss Developer Studio , select File → Import… and navigate to the Git folder. Open the Git folder to select Projects from Git and click Next.
- Select the repository source as Clone URI and click Next.
- Enter the details of the Git repository in the next window and click Next.
- Select the branch you wish to import in the following window and click Next.
- To define the local storage for this project, enter (or select) a non-empty directory, make any configuration changes and click Next.
- Import the project as a general project in the following window and click Next.
- Name the project and click Finish.
3.3.5. Importing a local Git repository
You can import a local git repository to use with Red Hat JBoss Developer Studio.
Procedure
- Select your server from the Server tab and click the start icon to start the server.
- In Red Hat JBoss Developer Studio, select File → Import… and navigate to the Git folder. Open the Git folder to select Projects from Git and click Next.
- Select the repository source as Existing local repository and click Next.
- Select the repository that is to be configured from the list of available repositories and click Next.
- In the dialog window that opens, select the Import as general project radio button from the Wizard for project import group and click Next.
- Name the project and click Finish.
Chapter 4. Clustering with Red Hat Decision Manager for design-time development environments
This section is specifically intended for Decision Central development environments where you want to cluster the Git repository. It is not necessary to create a clustered environment for Decision Server production environments.
Red Hat recommends that you consider clustering two or more computers to create a high availability clustered environment for design-time development environments. Doing this enhances collaboration and provides high availability.
For example, if clustering is configured and Developer X is authoring rules on Decision Central Node1 then Developer Y, who is working on Decision Central Node2, can see the rules authored by Developer X as they are created. Furthermore, all of the developers working on individual nodes of the cluster will see the same synchronized content.
In addition, clustering provides high availability in the rules development environment. If Developer X is working on Node1 and that node fails, Developer X’s work is preserved and visible on any other node of the cluster.
The following sections describe how to create a clustered Red Hat Decision Manager environment.
4.1. Setting up Elasticsearch
Elasticsearch is a highly scalable open source full-text search and analytics engine. It enables you to store, search, and analyze high volumes of data quickly and in near real time. In a Red Hat Decision Manager clustered environment, it enables you to perform complex and efficient searches across nodes. Set up Elasticsearch on the main node of the cluster.
Procedure
- Download and unzip the Elasticsearch installation file.
Replace the contents of the
elasticsearch/config/elasticsearch.ymlfile as follows, where<MAIN_NODE_IP>is the IP address of the main node of the cluster:cluster.name: kie-cluster transport.host: <MAIN_NODE_IP> http.host: <MAIN_NODE_IP> transport.tcp.port: 9300 xpack.security.enabled: false discovery.zen.minimum_master_nodes: 1
Install the following plug-in:
On Linux or UNIX-based systems, enter:
./bin/elasticsearch-plugin install x-pack
On Windows, enter:
bin\elasticsearch-plugin.bat install x-pack
Run Elasticsearch on the main node:
On Linux or UNIX-based systems, enter:
./bin/elasticsearch
On Windows, enter:
bin\elasticsearch.bat
4.2. Activating ActiveMQ JMS broker
After you install Elasticsearch, you must activate ActiveMQ JMS broker on the main node of the cluster.
Prerequisite
Elasticsearch installed on the main node of the cluster
Procedure
Add the following properties to the
EAP_HOME/standalone/configuration/standalone.xmlfile:-
Add
<socket-binding name="activemq" port="61616"/>to the socket-binding-group element. -
Add
<remote-acceptor name="activemq-acceptor" socket-binding="activemq"/>in<server name="default">of the messaging-activemq subsytem element.
-
Add
- Complete the steps in Section 4.3, “Installing Decision Central on cluster nodes” on each node of the cluster.
4.3. Installing Decision Central on cluster nodes
Complete the steps in this section to install and run Decision Central on each node of the cluster.
Prerequisites
- An NFS-mounted directory available which all Red Hat Decision Manager nodes can access
- Elasticsearch installed on the main node of the cluster
- ActiveMQ JMS broker activated on the main node of the cluster
Procedure
- Install Decision Central on each node of the cluster. See Chapter 2, Installing Red Hat Decision Manager for information about installing Decision Central.
Edit the following properties in the
./standalone.xmlfile, where:-
<MAIN_NODE>is the IP address of the main node of the cluster -
<JMS_BROKER_USER>is a username for the JMS broker <JMS_BROKER_PASSWORD>is a password for the JMS broker<system-properties> <property name="org.uberfire.nio.git.dir" value=" <niogit_dir_on_shared_nfs>"/> <property name="appformer-cluster" value="true"/> <property name="appformer-jms-url" value="tcp://<MAIN_NODE_IP>:61616"/> <property name="appformer-jms-username" value="<JMS_BROKER_USER>"/> <property name="appformer-jms-password" value="<JMS_BROKER_PASSWORD>"/> <property name="org.appformer.ext.metadata.index" value="elastic"/> <property name="org.appformer.ext.metadata.elastic.port" value="9300"/> <property name="org.appformer.ext.metadata.elastic.host" value="<MAIN_NODE_IP>"/> <property name="org.appformer.ext.metadata.elastic.cluster" value="kie-cluster"/> <property name="org.appformer.ext.metadata.elastic.retries" value="10"/> </system-properties>
-
On the main node of the cluster, in Red Hat JBoss EAP create a user with the
adminrole and a username and password that matches the values of <JMS_BROKER_USER> and <JMS_BROKER_PASSWORD> that you created in the previous step:$ <MAIN_NODE_EAP_HOME>/bin/./add-user.sh -a --user <JMS_BROKER_USER> --password <JMS_BROKER_USER> --role admin
To start Decision Central, enter one of the following commands on each node of the cluster:
On Linux or UNIX-based systems:
EAP_HOME/bin/standalone.sh
On Windows:
EAP_HOME\bin\standalone.bat
Chapter 5. Verifying the Red Hat Decision Manager installation
After you have installed Red Hat Decision Manager, create an asset to verify that the installation is working.
Procedure
Enter the following command to start Decision Server:
EAP_HOME/bin/standalone.sh
In a web browser, enter
localhost:8080/decision-central. If Red Hat Decision Manager has been configured to run from a domain name, substitutelocalhostfor the domain name, for example:http://www.example.com:8080/decision-central
If Red Hat Decision Manager has been configured to run in a cluster, substitute
localhostfor the IP address of a particular node, for example:- Enter the admin user credentials that you created during installation. The Decision Central home page appears.
- Select Menu → Design → Projects.
- Click Try Samples.
- Click mortages. The Assets window appears.
- Click Create New Asset.
- Select Data Object.
- Enter MyDataObject in the Name field and click OK.
- Click Spaces → myteam → mortgages and confirm that MyDataObject is in the list of assets.
If you are verifying a clustered installation, enter the following URL, where
<node_IP_address>is the address of different node. Enter same credentials that you used with the Decision Central where you created the MyDataObject asset.- Select Menu→ Design → Projects.
- Select the mortgages project.
- Verify that MyDataObject is in the asset list.
- Delete MyDataObject.
Chapter 6. Customizing Decision Central
6.1. Customizing the Decision Central login page
You can customize the Decision Central login page to meet your specific business needs. This includes the company logo and the project logo.
Procedure
- Start Red Hat JBoss EAP and open Decision Central in a web browser.
-
Navigate to the
EAP_HOME/standalone/deployments/decision-central.war/img/directory in your Red Hat Decision Manager installation. -
To change the company logo that appears at the upper right hand corner of the login page, replace the default image
login-screen-logo.pngwith a new image in the PNG format. -
To change the project logo that appears above the User name and Password fields, replace the default image
RHDM_Logo.svgwith a new SVG file. - Force a full reload of the login page, bypassing the cache, to view the changes. For example, in most Linux and Windows web browsers, press btn:[Ctrl]+btn:[F5].
6.2. Customizing Decision Central application header
You can customize the Decision Central application header to meet your specific business needs.
- Start Red Hat JBoss EAP, open Decision Central in a web browser, and log in with your user credentials.
-
Copy your new application header image in the SVG format to the
EAP_HOME/standalone/deployments/decision-central.war/banner/directory in your Red Hat Decision Manager installation. -
Open the
EAP_HOME/standalone/deployments/decision-central.war/banner/banner.htmlfile in a text editor. In the
banner.htmlfile, edit the following<img>tag to provide the name of your new header image:<img src="banner/logo.svg"/>
- Force a full reload of the login page, bypassing the cache, to view the changes. For example, in most Linux and Windows web browsers, press btn:[Ctrl]+btn:[F5].
Chapter 7. Integrating Red Hat Decision Manager with Red Hat Single Sign-On
Red Hat Single Sign-On (RH-SSO) is a single sign-on solution that you can use to secure your browser applications with your REST web services and Git access. This chapter describes how you can integrate RH-SSO with Red Hat Decision Manager and leverage its features.
Integrating with RH-SSO brings an integrated SSO and identity management (IDM) environment for Red Hat Decision Manager. The session management feature of RH-SSO enables you to use different Red Hat Decision Manager environments on the web by authenticating only once.
For more information on RH-SSO, see the RH-SSO documentation.
RH-SSO integration points
You can integrate RH-SSO with Decision Servers using the following integration points:
Red Hat Decision Manager authentication through an RH-SSO server
Authenticating Red Hat Decision Manager Red Hat Decision Manager through RH-SSO involves securing both Red Hat Decision Manager web client and remote services through RH-SSO. This integration enables you to connect to Red Hat Decision Manager using either the web interface or a remote service consumer through RH-SSO.
Decision Server authentication through an RH-SSO server
Authenticating Red Hat Decision Manager Decision Server through RH-SSO involves securing the remote services provided by Decision Server because it does not provide a web interface for server authentication. This enables any remote Red Hat Decision Manager service consumer (user or a service) to authenticate through RH-SSO.
Third-party client authentication through an RH-SSO server
Authenticating a third-party client through an RH-SSO server requires third-party clients to authenticate themselves using RH-SSO to consume the remote service endpoints provided by Red Hat Decision Manager and Decision Server, such as the REST API or remote file system services.
The following sections describe how to achieve RH-SSO integration through these integration points:
7.1. Red Hat Decision Manager authentication through RH-SSO
To authenticate Red Hat Decision Manager through RH-SSO:
- Set up and run an RH-SSO server with a realm client for Red Hat Decision Manager.
- Install and set up the RH-SSO client adapter for Red Hat JBoss EAP.
- Secure Red Hat Decision Manager remote service using RH-SSO.
7.1.1. Setting up RH-SSO with the realm client for Red Hat Decision Manager
Security realms are used to restrict access for different application resources. You should create a new realm whether your RH-SSO instance is private or shared with other products. You can keep the master realm as a place for super administrators to create and manage the realms in your system. If you are integrating with an RH-SSO instance that is shared with other product installations to achieve single sign-on with those applications, all of those applications must use the same realm.
Procedure
- Download RH-SSO from the Downloads section of the Red Hat Customer Portal.
Install and configure a basic RH-SSO standalone server. To do this, follow the instructions in the "Install and Boot" chapter of the Red Hat Single Sign On Getting Started Guide. For production environment settings, consult the Red Hat Single Sign On Server Administration Guide.
NoteIf you want to run both RH-SSO and Red Hat Decision Manager servers on the same system, ensure that you avoid port conflicts. by doing one of the following:
Update the
RHSSO_HOME/standalone/configuration/standalone.xmlfile and set a port offset to 100. For example:<socket-binding-group name="standard-sockets" default-interface="public" port-offset="${jboss.socket.binding.port-offset:100}">Use an environment variable to run the server:
bin/standalone.sh -Djboss.socket.binding.port-offset=100
Start the RH-SSO server to configure RH-SSO from
RHSSO_HOME/bin:./standalone.sh
After the RH-SSO server starts, open http://localhost:8180/auth/admin in a web browser and log in using the admin credentials that you created while installing RH-SSO. When you login for the first time, you can set up the initial user on the new user registration form.
- In the RH-SSO Admin Console, click the Realm Settings menu item.
On the Realm Settings page, click Add Realm.
The Add realm page opens.
- On the Add realm page, provide a name for the realm and click Create.
Click the Clients menu item and click Create.
The Add Client page opens.
On the Add Client page, provide the required information to create a new client for your realm. For example:
- Client ID: kie
- Client protocol: openid-connect
- Root URL: http://localhost:8080/decision-central
Click Save to save your changes.
After you create a new client, its Access Type is set to
publicby default. Change it toconfidential.At this point, the RH-SSO server is configured with a realm with a client for Red Hat Decision Manager applications and running and listening for HTTP connections at
localhost:8180. This realm provides different users, roles, and sessions for Red Hat Decision Manager applications.
7.1.2. Setting up the RH-SSO client adapter for Red Hat JBoss EAP
To set up the RH-SSO client adapter for Red Hat JBoss EAP, install the RH-SSO adapter for Red Hat JBoss EAP then configure Red Hat Decision Manager application and the RH-SSO client adapter.
Procedure
Install Red Hat JBoss EAP 7.1.
See chapter Installing Red Hat JBoss EAP in the Red Hat JBoss Enterprise Application Platform Installation Guide.
Install Red Hat Decision Manager in the freshly installed Red Hat JBoss EAP home.
If you configure the RH-SSO adapter by making changes to the
standalone.xmlfile, and then unzip Red Hat Decision Manager, you may overwrite and lose the RH-SSO adapter configuration.- Download the Red Hat JBoss EAP adapter from the Red Hat Customer Portal.
- Unzip and install the adapter. For installation instructions, see the JBoss EAP Adapter section of the Red Hat Single Sign On Securing Applications and Services Guide.
-
Go to
EAP_HOME/standalone/configurationand open thestandalone.xmlandstandalone-full.xmlfiles. Delete the<single-sign-on/>element from both of the files.
Procedure
Navigate to
EAP_HOME/standalone/configurationdirectory in your Red Hat JBoss EAP installation and edit thestandalone.xmlfile to add the RH-SSO subsystem configuration. For example:<subsystem xmlns="urn:jboss:domain:keycloak:1.1"> <secure-deployment name="decision-central.war"> <realm>demo</realm> <realm-public-key>MIGfMA0GCSqGSIb3DQEBAQUAA4GNADCBiQKBgQCrVrCuTtArbgaZzL1hvh0xtL5mc7o0NqPVnYXkLvgcwiC3BjLGw1tGEGoJaXDuSaRllobm53JBhjx33UNv+5z/UMG4kytBWxheNVKnL6GgqlNabMaFfPLPCF8kAgKnsi79NMo+n6KnSY8YeUmec/p2vjO2NjsSAVcWEQMVhJ31LwIDAQAB</realm-public-key> <auth-server-url>http://localhost:8180/auth</auth-server-url> <ssl-required>external</ssl-required> <enable-basic-auth>true</enable-basic-auth> <resource>kie</resource> <credential name="secret">759514d0-dbb1-46ba-b7e7-ff76e63c6891</credential> <principal-attribute>preferred_username</principal-attribute> </secure-deployment> </subsystem>
In this example:
-
secure-deployment nameis the name of your application’s WAR file. -
realmis the name of the realm that you created for the applications to use. -
realm-public-keyis the public key of the realm you created. You can find the key in the Keys tab in the Realm settings page of the realm you created in the RH-SSO Admin Console. If you do not provide a value forrealm-public-key, the server retrieves it automatically. -
auth-server-urlis the URL for the RH-SSO authentication server. -
enable-basic-authis the setting to enable basic authentication mechanism, so that the clients can use both token-based and basic authentication approaches to perform the requests. -
resourceis the name for the client that you created. -
credential nameis the secret key for the client you created. You can find the key in the Credentials tab on the Clients page of the RH-SSO Admin Console. principal-attributeis the login name of the user. If you do not provide this value, your User Id is displayed in the application instead of your user name.NoteThe RH-SSO server converts the user names to lowe rcase. Therefore, after integration with RH-SSO, your user name will appear in lowe rcase in Red Hat Decision Manager. If you have user names in upper case hard coded in business processes, the application may not be able to identify the upper case user.
-
Navigate to
EAP_HOME/bin/and enter the following command to start the Red Hat JBoss EAP server:./standalone.sh
You can also configure the RH-SSO adapter for Red Hat JBoss EAP by updating your application’s WAR file to use the RH-SSO security subsystem. However, Red Hat recommends that you configure the adapter through the RH-SSO subsystem. Doing this updates the Red Hat JBoss EAP configuration instead of applying the configuration on each WAR file.
7.1.3. Adding a new user
To add new users and assign them a role to access Red Hat Decision Manager:
- Log in to the RH-SSO Admin Console and open the realm to which you wish to add a user.
Click the Users menu item under the Manage section.
An empty user list page called Users opens.
Click the Add User button on the empty user list to start creating your new user.
The Add user page opens.
- Provide user information on the Add user page and click Save.
- Set a new password under the Credentials tab.
Assign the new user one of the roles that allow access to Red Hat Decision Manager. For example, the
adminoranalystrole.Define the roles as realm roles in the Realm Roles tab under the Roles section.
- Click Role Mappings tab on the Users page to assign roles.
You can now log in to Decision Central after you start Decision Server.
7.1.4. Securing Red Hat Decision Manager remote service using RH-SSO
Red Hat Decision Manager provides different remote service endpoints that can be consumed by third-party clients using remote API. To authenticate those services through RH-SSO, you must disable a security filter called BasicAuthSecurityFilter.
Procedure
Open your application deployment descriptor file (
WEB-INF/web.xml) and apply the following changes to it:Remove the following lines to remove the servlet filter and its mapping for class
org.uberfire.ext.security.server.BasicAuthSecurityFilter:<filter> <filter-name>HTTP Basic Auth Filter</filter-name> <filter-class>org.uberfire.ext.security.server.BasicAuthSecurityFilter</filter-class> <init-param> <param-name>realmName</param-name> <param-value>KIE Workbench Realm</param-value> </init-param> </filter> <filter-mapping> <filter-name>HTTP Basic Auth Filter</filter-name> <url-pattern>/rest/*</url-pattern> <url-pattern>/maven2/*</url-pattern> <url-pattern>/ws/*</url-pattern> </filter-mapping>Add the following lines to add the
security-constraintfor the url-patterns that you have removed from the filter mapping:<security-constraint> <web-resource-collection> <web-resource-name>remote-services</web-resource-name> <url-pattern>/rest/*</url-pattern> <url-pattern>/maven2/*</url-pattern> <url-pattern>/ws/*</url-pattern> </web-resource-collection> <auth-constraint> <role-name>rest-all</role-name> <role-name>rest-project</role-name> <role-name>rest-deployment</role-name> <role-name>rest-process</role-name> <role-name>rest-process-read-only</role-name> <role-name>rest-task</role-name> <role-name>rest-task-read-only</role-name> <role-name>rest-query</role-name> <role-name>rest-client</role-name> </auth-constraint> </security-constraint>
- Save your changes.
7.1.5. Securing Red Hat Decision Manager file system services using RH-SSO
To consume other remote services, such as file systems (for example, a remote GIT service), you must specify a correct RH-SSO login module. First, generate a JSON configuration file.
Procedure
- Navigate to the RH-SSO Admin Console located at http://localhost:8080/auth/admin.
- Click Clients.
Create a new client with the following settings:
-
Set Client ID as
kie-git. -
Set Access Type as
confidential. - Disable the Standard Flow Enabled option.
- Enable the Direct Access Grants Enabled option.
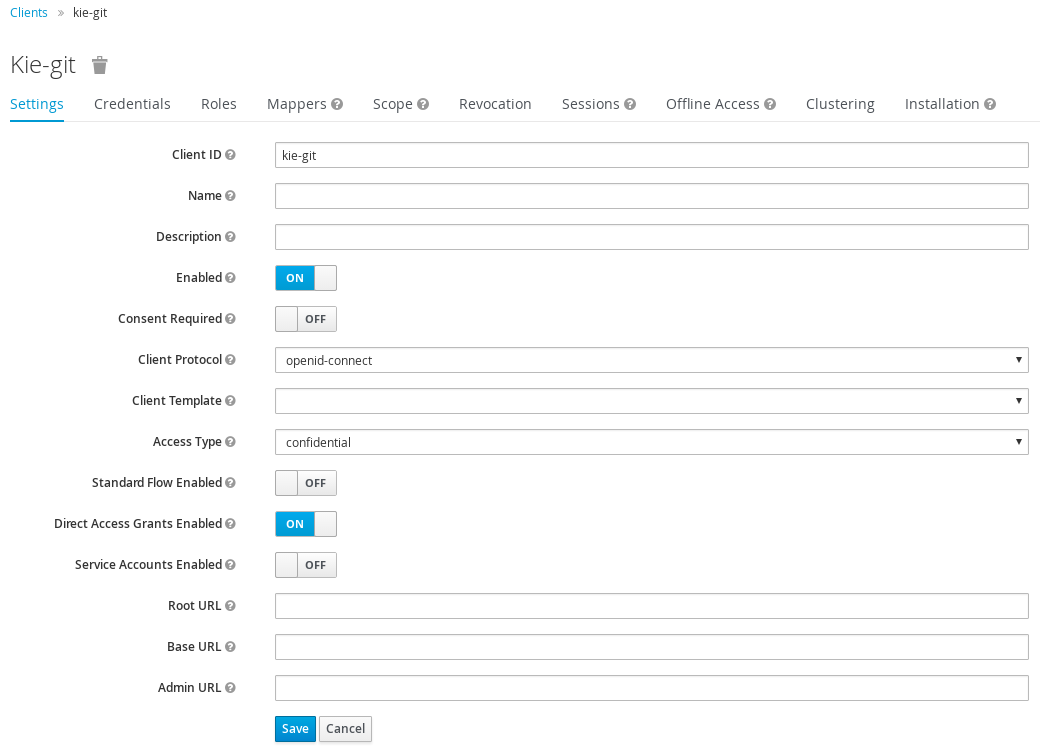
-
Set Client ID as
- Click Save.
- Click the Installation tab at the top of the client configuration screen and choose Keycloak OIDC JSON as a Format Option.
- Click Download.
Move the downloaded JSON file to an accessible directory in the server’s file system or add it to the application class path.
For more information, see the JAAS plugin chapter of the Keycloak Securing Applications and Services Guide.
After you successfully generate and download the JSON configuration file, specify the correct RH-SSO login module in the EAP_HOME/standalone/configuration/standalone.xml file. By default, the security domain in Red Hat Decision Manager is set to other. Replace the default values of the login-module in this security domain with the values in the following example:
<security-domain name="other" cache-type="default">
  <authentication>
    <login-module code="org.keycloak.adapters.jaas.DirectAccessGrantsLoginModule" flag="required">
      <module-option name="keycloak-config-file" value="$EAP_HOME/kie-git.json"/>
    </login-module>
  </authentication>
</security-domain>
The JSON file specified in the module-option element contains a client used for securing the remote services. Replace the $EAP_HOME/kie-git.json value of the module-option element with the absolute path or the class path (classpath:/EXAMPLE_PATH/kie-git.json) to this JSON configuration file.
At this point, all users authenticated through the RH-SSO server can clone internal GIT repositories. In the following command, change USER_NAME to a RH-SSO user, for example admin:
git clone ssh://USER_NAME@localhost:8001/system
7.1.6. Enabling user and group management for RH-SSO
This section describes how you can use Decision Central to manage users and groups stored in RH-SSO.
Procedure
Ensure that the following libraries are in the
WEB-INF/libdirectory:uberfire-security-management-api-<latest_artifact_version>.jar uberfire-security-management-backend-<latest_artifact_version>.jar uberfire-security-management-keycloak-<latest_artifact_version>.jar keycloak-core-<latest_artifact_version>.jar keycloak-common-<latest_artifact_version>.jar
Remove third-party security JAR files, for example:
uberfire-security-management-wildfly-<latest_artifact_version>.jar
uberfire-security-management-tomcat-<latest_artifact_version>.jar
Replace the entire contents of the
WEB-INF/classes/security-management.propertiesfile with the following content:org.uberfire.ext.security.management.api.userManagementServices=KCCredentialsUserManagementService org.uberfire.ext.security.management.keycloak.authServer=http://localhost:8081/auth org.uberfire.ext.security.management.keycloak.realm=demo org.uberfire.ext.security.management.keycloak.user=admin org.uberfire.ext.security.management.keycloak.password=admin org.uberfire.ext.security.management.keycloak.clientId=kie org.uberfire.ext.security.management.keycloak.clientSecret=759514d0-dbb1-46ba-b7e7-ff76e63c6891
NoteIf the
WEB-INF/classes/security-management.propertiesfile does not exist, create it.Edit the following dependencies and exclusions in the
/META-INF/jboss-deployment-structure.xmlfile:<dependencies> <module name="org.jboss.resteasy.resteasy-jackson-provider" services="import"/> </dependencies> <exclusions> <module name="org.jboss.resteasy.resteasy-jackson2-provider"/> </exclusions>
7.2. Decision Server authentication through RH-SSO
The Red Hat Decision Manager Decision Server provides a REST API for third-party clients. You can integrate Decision Server with RH-SSO to delegate the third-party clients identity management to the RH-SSO server.
After you have created a realm client for Red Hat Decision Manager and set up the RH-SSO client adapter for Red Hat JBoss EAP, you can repeat the same steps to integrate Decision Server with RH-SSO.
7.2.1. Creating a client for Decision Server on RH-SSO
You can use the RH-SSO Admin Console to create a new client in an exiting realm.
Procedure
- In the RH-SSO Admin Console, open the security realm that you created.
Click the Clients menu item and click Create.
The Add Client page opens.
On the Add Client page, provide the required information to create a new client for your realm. For example:
- Client ID: kie-execution-server
- Root URL: http://localhost:8080/kie-server
- Client protocol: openid-connect
Click Save to save your changes.
The new client Access Type is set to
publicby default. Change it toconfidentialand click Save again.- Navigate to the Credentials tab and copy the secret key. The secret key is necessary to configure the kie-execution-server client in the next section.
7.2.2. Installing and setting up Decision Server with the client adapter
To consume the Decision Server remote service endpoints, you must first create and assign the kie-server role in the RH-SSO Admin Console.
If you deployed Decision Server to a different application server than Red Hat Decision Manager, install and configure RH-SSO on your second server as well.
Procedure
Navigate to
EAP_HOME/standalone/configurationin your Red Hat JBoss EAP installation and edit thestandalone.xmlfile to add the RH-SSO subsystem configuration. For example:<subsystem xmlns="urn:jboss:domain:keycloak:1.1"> <secure-deployment name="kie-execution-server.war"> <realm>demo</realm> <realm-public-key>MIGfMA0GCSqGSIb3DQEBAQUAA4GNADCBiQKBgQCrVrCuTtArbgaZzL1hvh0xtL5mc7o0NqPVnYXkLvgcwiC3BjLGw1tGEGoJaXDuSaRllobm53JBhjx33UNv+5z/UMG4kytBWxheNVKnL6GgqlNabMaFfPLPCF8kAgKnsi79NMo+n6KnSY8YeUmec/p2vjO2NjsSAVcWEQMVhJ31LwIDAQAB</realm-public-key> <auth-server-url>http://localhost:8180/auth</auth-server-url> <ssl-required>external</ssl-required> <resource>kie-execution-server</resource> <enable-basic-auth>true</enable-basic-auth> <credential name="secret">03c2b267-7f64-4647-8566-572be673f5fa</credential> <principal-attribute>preferred_username</principal-attribute> </secure-deployment> </subsystem> <system-properties> <property name="org.kie.server.sync.deploy" value="false"/> </system-properties>In this example:
-
secure-deployment nameis the name of your application WAR file. -
realmis the name of the realm that you created for the applications to use. -
realm-public-keyis the public key of the realm you created. You can find the key in the Keys tab in the Realm settings page of the realm you created in the RH-SSO Admin Console. If you do not provide a value for this public key, the server retrieves it automatically. -
auth-server-urlis the URL for the RH-SSO authentication server. -
resourceis the name for the server client that you created. -
enable-basic-authis the setting to enable basic authentication mechanism, so that the clients can use both token-based and basic authentication approaches to perform the requests. -
credential nameis the secret key of the server client you created. You can find the key in the Credentials tab on the Clients page of the RH-SSO Admin Console. -
principal-attributeis the login name of the user. If you do not provide this value, your User Id is displayed in the application instead of your user name.
-
-
Save your configuration changes in the
standalone.xmlfile. Use the following command to restart the Red Hat JBoss EAP server and run Decision Server.
EXEC_SERVER_HOME/bin/standalone.sh -Dorg.kie.server.id=<ID> -Dorg.kie.server.user=<USER> -Dorg.kie.server.pwd=<PWD> -Dorg.kie.server.location=<LOCATION_URL> -Dorg.kie.server.controller=<CONTROLLER_URL> -Dorg.kie.server.controller.user=<CONTROLLER_USER> -Dorg.kie.server.controller.pwd=<CONTOLLER_PASSWORD>
Here is an example:
EXEC_SERVER_HOME/bin/standalone.sh -Dorg.kie.server.id=kieserver1 -Dorg.kie.server.user=kieserver -Dorg.kie.server.pwd=password -Dorg.kie.server.location=http://localhost:8080/kie-execution-server/services/rest/server -Dorg.kie.server.controller=http://localhost:8080/decision-central/rest/controller -Dorg.kie.server.controller.user=kiecontroller -Dorg.kie.server.controller.pwd=password
After Decision Server is running, you can check the server status. In the following command,
kieserveris a user name with thekie-serverrole and passwordpassword:curl http://kieserver:password@localhost:8080/kie-execution-server/services/rest/server/
You can also use token-based authorization for communication between Red Hat Decision Manager and Decision Server. You can use the complete token as a system property of your application server, instead of the user name and password, for your applications. However, you must ensure that the token will not expire while the applications are interacting because the token is not automatically refreshed. To get the token, see Section 7.3.2, “Token-based authentication”.
Procedure
-
To configure Red Hat Decision Manager to manage Decision Server using the tokens set the
org.kie.server.tokenproperty. -
Make sure that the
org.kie.server.userandorg.kie.server.pwdproperties are not set. Red Hat Decision Manager will then use theAuthorization: Bearer $TOKENauthentication method.
Procedure
-
If you want to use the REST API using the token-based authentication, set the
org.kie.server.controller.tokenproperty. -
Make sure that the
org.kie.server.controller.userandorg.kie.server.controller.pwdproperties are not set.
Because Decision Server is unable to refresh the token, use a high-lifespan token. A token’s lifespan must not exceed January 19 2038. Check with your security best practices to see whether this is a suitable solution for your environment.
7.3. Third-party client authentication through RH-SSO
To use the different remote services provided by Red Hat Decision Manager or by Decision Server, your client, such as curl, wget, web browser, or a custom REST client, must authenticate through the RH-SSO server and have a valid token to perform the requests. To use the remote services, the authenticated user must have assigned the following roles:
-
rest-allfor using Red Hat Decision Manager remote services. -
kie-serverfor using the Decision Server remote services.
Use the RH-SSO Admin Console to create these roles and assign them to the users that will consume the remote services.
Your client can authenticate through RH-SSO using one of these options:
- Basic authentication, if it is supported by the client.
- Token-based authentication.
7.3.1. Basic authentication
If you have enabled the basic authentication in the RH-SSO client adapter configuration for both Red Hat Decision Manager and Decision Server, you can avoid the token grant/refresh calls and call the services as shown in the examples below:
For web based remote repositories endpoint:
curl http://admin:password@localhost:8080/decision-central/rest/repositories
For Decision Server:
curl http://admin:password@localhost:8080/kie-execution-server/services/rest/server/
7.3.2. Token-based authentication
If you want to opt for a more secure option of authentication, you can consume the remote services from both Red Hat Decision Manager and Decision Server using a granted token provided by RH-SSO.
Procedure
In the RH-SSO Admin Console, click the Clients menu item and click Create to create a new client.
The Add Client page opens.
On the Add Client page, provide the required information to create a new client for your realm. For example:
- Client ID: kie-remote
- Client protocol: openid-connect
- Click Save to save your changes.
Change the token settings in Realm Settings:
- In the RH-SSO Admin Console, click the Realm Settings menu item.
- Click the Tokens tab.
Change the value for Access Token Lifespan to
15minutes.This gives you enough time to get a token and invoke the service before it expires.
- Click Save to save your changes.
After a public client for your remote clients is created, you can now obtain the token by making an HTTP request to the RH-SSO server’s token endpoint using:
RESULT=`curl --data "grant_type=password&client_id=kie-remote&username=admin&password=password" http://localhost:8180/auth/realms/demo/protocol/openid-connect/token`
The user used in the command above is an RH-SSO user. For further information, see Section 7.1.3, “Adding a new user”.
To view the token obtained from the RH-SSO server, use the following command:
TOKEN=`echo $RESULT | sed 's/.*access_token":"//g' | sed 's/".*//g'`
You can now use this token to authorize the remote calls. For example, if you want to check the internal Red Hat Decision Manager repositories, use the token as shown below:
curl -H "Authorization: bearer $TOKEN" http://localhost:8080/decision-central/rest/repositories
7.4. Integrating LDAP and SSL with Red Hat Decision Manager
With Red Hat Decision Manager you can integrate LDAP and SSL through RH-SSO. For information about configuring LDAP and SSL with RH-SSO, see the Red Hat Single Sign-On Server Administration Guide.
Appendix A. Versioning information
Documentation last updated on: Monday, October 1, 2018.