
Data Grid Operator Guide
Create Data Grid clusters on OpenShift
Abstract
Red Hat Data Grid
Data Grid is a high-performance, distributed in-memory data store.
- Schemaless data structure
- Flexibility to store different objects as key-value pairs.
- Grid-based data storage
- Designed to distribute and replicate data across clusters.
- Elastic scaling
- Dynamically adjust the number of nodes to meet demand without service disruption.
- Data interoperability
- Store, retrieve, and query data in the grid from different endpoints.
Data Grid documentation
Documentation for Data Grid is available on the Red Hat customer portal.
Data Grid downloads
Access the Data Grid Software Downloads on the Red Hat customer portal.
You must have a Red Hat account to access and download Data Grid software.
Making open source more inclusive
Red Hat is committed to replacing problematic language in our code, documentation, and web properties. We are beginning with these four terms: master, slave, blacklist, and whitelist. Because of the enormity of this endeavor, these changes will be implemented gradually over several upcoming releases. For more details, see our CTO Chris Wright’s message.
Chapter 1. Data Grid Operator
Data Grid Operator provides operational intelligence and reduces management complexity for deploying Data Grid on Kubernetes and Red Hat OpenShift.
1.1. Data Grid Operator deployments
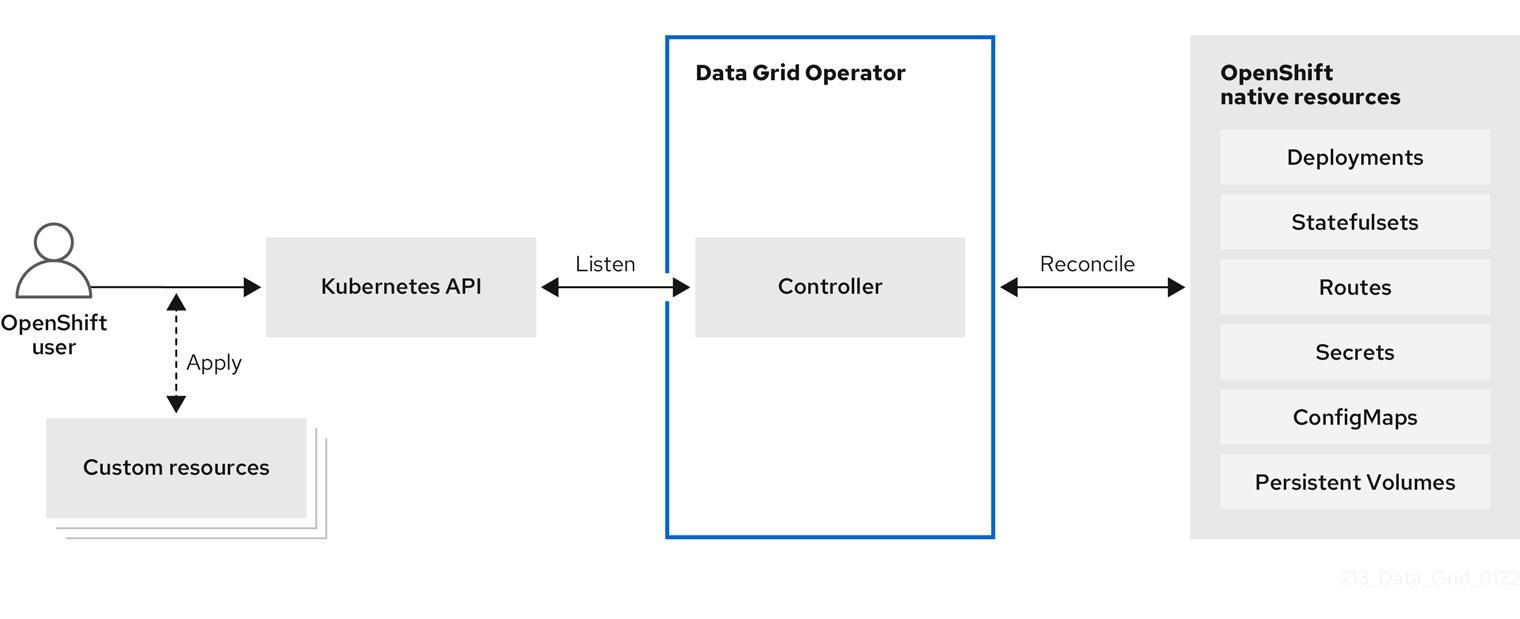
When you install Data Grid Operator, it extends the Kubernetes API with Custom Resource Definitions (CRDs) for deploying and managing Data Grid clusters on Red Hat OpenShift.
To interact with Data Grid Operator, OpenShift users apply Custom Resources (CRs) through the OpenShift Web Console or oc client. Data Grid Operator listens for Infinispan CRs and automatically provisions native resources, such as StatefulSets and Secrets, that your Data Grid deployment requires. Data Grid Operator also configures Data Grid services according to the specifications in Infinispan CRs, including the number of pods for the cluster and backup locations for cross-site replication.
Figure 1.1. Custom resources
1.2. Cluster management
A single Data Grid Operator installation can manage multiple Data Grid clusters in separate namespaces. Each time a user applies CRs to modify the deployment, Data Grid Operator applies the changes globally to all Data Grid clusters.
Figure 1.2. Operator-managed clusters

1.3. Resource reconciliation
Data Grid Operator reconciles custom resources such as the Cache CR with resources on your Data Grid cluster.
Bidirectional reconciliation synchronizes your CRs with changes that you make to Data Grid resources through the Data Grid Console, command line interface (CLI), or other client application and vice versa. For example if you create a cache through the Data Grid Console then Data Grid Operator adds a declarative Kubernetes representation.
To perform reconciliation Data Grid Operator creates a listener pod for each Data Grid cluster that detects modifications for Infinispan resources.
Notes about reconciliation
-
When you create a cache through the Data Grid Console, CLI, or other client application, Data Grid Operator creates a corresponding
CacheCR with a unique name that conforms to the Kubernetes naming policy. -
Declarative Kubernetes representations of Data Grid resources that Data Grid Operator creates with the
listenerpod are linked toInfinispanCRs.
DeletingInfinispanCRs removes any associated resource declarations.
Chapter 2. Installing the native Data Grid CLI as a client plugin
Data Grid provides a command line interface (CLI) compiled to a native executable that you can install as a plugin for oc clients. You can then use your oc client to:
- Create Data Grid Operator subscriptions and remove Data Grid Operator installations.
- Set up Data Grid clusters and configure services.
- Work with Data Grid resources via remote shells.
2.1. Installing the native Data Grid CLI plugin
Install the native Data Grid Command Line Interface (CLI) as a plugin for oc clients.
Prerequisites
-
Have an
occlient. - Download the native Data Grid CLI distribution from the Data Grid software downloads.
Procedure
-
Extract the
.ziparchive for the native Data Grid CLI distribution. Copy the native executable, or create a hard link, to a file named "kubectl-infinispan", for example:
cp redhat-datagrid-cli kubectl-infinispan
-
Add
kubectl-infinispanto yourPATH. Verify that the CLI is installed.
oc plugin list

The following compatible plugins are available:
/path/to/kubectl-infinispan
Use the
infinispan --helpcommand to view available commands.oc infinispan --help
Additional resources
2.2. kubectl-infinispan command reference
This topic provides some details about the kubectl-infinispan plugin for clients.
Use the --help argument to view the complete list of available options and descriptions for each command.
For example, oc infinispan create cluster --help prints all command options for creating Data Grid clusters.
| Command | Description |
|
| Creates Data Grid Operator subscriptions and installs into the global namespace by default. |
|
| Creates Data Grid clusters. |
|
| Displays running Data Grid clusters. |
|
| Starts an interactive remote shell session on a Data Grid cluster. |
|
| Removes Data Grid clusters. |
|
| Removes Data Grid Operator installations and all managed resources. |
Chapter 3. Installing Data Grid Operator
Install Data Grid Operator into a OpenShift namespace to create and manage Data Grid clusters.
3.1. Installing Data Grid Operator on Red Hat OpenShift
Create subscriptions to Data Grid Operator on OpenShift so you can install different Data Grid versions and receive automatic updates.
Automatic updates apply to Data Grid Operator first and then for each Data Grid node. Data Grid Operator updates clusters one node at a time, gracefully shutting down each node and then bringing it back online with the updated version before going on to the next node.
Prerequisites
- Access to OperatorHub running on OpenShift. Some OpenShift environments, such as OpenShift Container Platform, can require administrator credentials.
- Have an OpenShift project for Data Grid Operator if you plan to install it into a specific namespace.
Procedure
- Log in to the OpenShift Web Console.
- Navigate to OperatorHub.
- Find and select Data Grid Operator.
- Select Install and continue to Create Operator Subscription.
Specify options for your subscription.
- Installation Mode
- You can install Data Grid Operator into a Specific namespace or All namespaces.
- Update Channel
- Get updates for Data Grid Operator 8.3.x.
- Approval Strategies
- Automatically install updates from the 8.3.x channel or require approval before installation.
- Select Subscribe to install Data Grid Operator.
- Navigate to Installed Operators to verify the Data Grid Operator installation.
3.2. Installing Data Grid Operator with the native CLI plugin
Install Data Grid Operator with the native Data Grid CLI plugin, kubectl-infinispan.
Prerequisites
-
Have
kubectl-infinispanon yourPATH.
Procedure
Run the
oc infinispan installcommand to create Data Grid Operator subscriptions, for example:oc infinispan install --channel=8.3.x --source=redhat-operators --source-namespace=openshift-marketplaceVerify the installation.
oc get pods -n openshift-operators | grep infinispan-operator
NAME                                   READY   STATUS
infinispan-operator-<id>               1/1     Running
Use oc infinispan install --help for command options and descriptions.
3.3. Installing Data Grid Operator with an OpenShift client
You can use the oc client to create Data Grid Operator subscriptions as an alternative to installing through the OperatorHub or with the native Data Grid CLI.
Prerequisites
-
Have an
occlient.
Procedure
Set up projects.
- Create a project for Data Grid Operator.
If you want Data Grid Operator to control a specific Data Grid cluster only, create a project for that cluster.
oc new-project ${INSTALL_NAMESPACE} 1
oc new-project ${WATCH_NAMESPACE} 2
Create an
OperatorGroupresource.Control all Data Grid clusters
oc apply -f - << EOF
apiVersion: operators.coreos.com/v1
kind: OperatorGroup
metadata:
 name: datagrid
 namespace: ${INSTALL_NAMESPACE}
EOF
Control a specific Data Grid cluster
oc apply -f - << EOF
apiVersion: operators.coreos.com/v1
kind: OperatorGroup
metadata:
 name: datagrid
 namespace: ${INSTALL_NAMESPACE}
spec:
 targetNamespaces:
 - ${WATCH_NAMESPACE}
EOF
Create a subscription for Data Grid Operator.
oc apply -f - << EOF apiVersion: operators.coreos.com/v1alpha1 kind: Subscription metadata: name: datagrid-operator namespace: ${INSTALL_NAMESPACE} spec: channel: 8.3.x installPlanApproval: Automatic name: datagrid source: redhat-operators sourceNamespace: openshift-marketplace EOFNoteIf you want to manually approve updates from the 8.3.x channel, change the value of the
spec.installPlanApprovalfield toManual.Verify the installation.
oc get pods -n ${INSTALL_NAMESPACE}
NAME                                   READY   STATUS
infinispan-operator-<id>               1/1     Running
Chapter 4. Creating Data Grid clusters
Create Data Grid clusters running on OpenShift with the Infinispan CR or with the native Data Grid CLI plugin for oc clients.
4.1. Infinispan custom resource (CR)
Data Grid Operator adds a new Custom Resource (CR) of type Infinispan that lets you handle Data Grid clusters as complex units on OpenShift.
Data Grid Operator listens for Infinispan Custom Resources (CR) that you use to instantiate and configure Data Grid clusters and manage OpenShift resources, such as StatefulSets and Services.
Infinispan CR
apiVersion: infinispan.org/v1
kind: Infinispan
metadata:
  name: infinispan
spec:
  replicas: 2
  service:
    type: DataGrid
| Field | Description |
|---|---|
|
|
Declares the version of the |
|
|
Declares the |
|
| Specifies a name for your Data Grid cluster. |
|
| Specifies the number of pods in your Data Grid cluster. |
|
| Specifies the type of Data Grid service to create. |
4.2. Creating Data Grid clusters
Create Data Grid clusters with the native CLI plugin, kubectl-infinispan.
Prerequisites
- Install Data Grid Operator.
-
Have
kubectl-infinispanon yourPATH.
Procedure
Run the
infinispan create clustercommand.For example, create a Data Grid cluster with two pods as follows:
oc infinispan create cluster --replicas=3 -Pservice.type=DataGrid infinispan
Watch Data Grid Operator create the Data Grid pods.
oc get pods -w
Next steps
After you create a Data Grid cluster, use the oc to apply changes to Infinispan CR and configure your Data Grid service.
You can also delete Data Grid clusters with kubectl-infinispan and re-create them as required.
oc infinispan delete cluster infinispan
Additional resources
4.3. Verifying Data Grid cluster views
Confirm that Data Grid pods have successfully formed clusters.
Prerequisites
- Create at least one Data Grid cluster.
Procedure
Retrieve the
InfinispanCR for Data Grid Operator.oc get infinispan -o yaml
The response indicates that Data Grid pods have received clustered views, as in the following example:
conditions:
  - message: 'View: [infinispan-0, infinispan-1]'
    status: "True"
    type: wellFormed
Do the following for automated scripts:
oc wait --for condition=wellFormed --timeout=240s infinispan/infinispan
Retrieving cluster view from logs
You can also get the cluster view from Data Grid logs as follows:
oc logs infinispan-0 | grep ISPN000094
INFO  [org.infinispan.CLUSTER] (MSC service thread 1-2) \
ISPN000094: Received new cluster view for channel infinispan: \
[infinispan-0|0] (1) [infinispan-0]

INFO  [org.infinispan.CLUSTER] (jgroups-3,infinispan-0) \
ISPN000094: Received new cluster view for channel infinispan: \
[infinispan-0|1] (2) [infinispan-0, infinispan-1]
4.4. Modifying Data Grid clusters
Configure Data Grid clusters by providing Data Grid Operator with a custom Infinispan CR.
Prerequisites
- Install Data Grid Operator.
- Create at least one Data Grid cluster.
-
Have an
occlient.
Procedure
Create a YAML file that defines your
InfinispanCR.For example, create a
my_infinispan.yamlfile that changes the number of Data Grid pods to two:cat > cr_minimal.yaml<<EOF apiVersion: infinispan.org/v1 kind: Infinispan metadata: name: infinispan spec: replicas: 2 service: type: DataGrid EOFApply your
InfinispanCR.oc apply -f my_infinispan.yaml
Watch Data Grid Operator scale the Data Grid pods.
oc get pods -w
4.5. Stopping and starting Data Grid clusters
Stop and start Data Grid pods in a graceful, ordered fashion to correctly preserve cluster state.
Clusters of Data Grid service pods must restart with the same number of pods that existed before shutdown. This allows Data Grid to restore the distribution of data across the cluster. After Data Grid Operator fully restarts the cluster you can safely add and remove pods.
Procedure
Change the
spec.replicasfield to0to stop the Data Grid cluster.spec: replicas: 0
Ensure you have the correct number of pods before you restart the cluster.
oc get infinispan infinispan -o=jsonpath='{.status.replicasWantedAtRestart}'Change the
spec.replicasfield to the same number of pods to restart the Data Grid cluster.spec: replicas: 6
Chapter 5. Configuring Data Grid clusters
Apply custom Data Grid configuration to clusters that Data Grid Operator manages.
5.1. Applying custom configuration to Data Grid clusters
Add Data Grid configuration to a ConfigMap and make it available to Data Grid Operator. Data Grid Operator can then apply the custom configuration to your Data Grid cluster.
Data Grid Operator applies default configuration on top of your custom configuration to ensure it can continue to manage your Data Grid clusters.
Be careful when applying custom configuration outside the cache-container element or field. You can apply custom configuration to underlying Data Grid Server mechanisms such as endpoints, security realms, and cluster transport. Changing this configuration can result in error and result in service downtime for your Data Grid deployment.
Use the Data Grid Helm chart to deploy clusters of fully configurable Data Grid Server instances on OpenShift.
Prerequisites
- Have valid Data Grid configuration in XML, YAML, or JSON format.
Procedure
Add Data Grid configuration to a
infinispan-config.[xml|yaml|json]key in thedatafield of yourConfigMap.XML
apiVersion: v1 kind: ConfigMap metadata: name: cluster-config namespace: rhdg-namespace data: infinispan-config.xml: > <infinispan> <!-- Custom configuration goes here. --> </infinispan>YAML
apiVersion: v1 kind: ConfigMap metadata: name: cluster-config namespace: rhdg-namespace data: infinispan-config.yaml: > infinispan: # Custom configuration goes here.JSON
apiVersion: v1 kind: ConfigMap metadata: name: cluster-config namespace: rhdg-namespace data: infinispan-config.json: > { "infinispan": { } }Create the
ConfigMapfrom your YAML file.oc apply -f cluster-config.yaml
Specify the name of the
ConfigMapwith thespec.configMapNamefield in yourInfinispanCR and then apply the changes.spec: configMapName: "cluster-config"
Next steps
If your cluster is already running Data Grid Operator restarts it to apply the configuration. Each time you modify the Data Grid configuration in the ConfigMap, Data Grid Operator detects the updates and restarts the cluster to apply the changes.
Additional resources
5.2. Custom Data Grid configuration
You can add Data Grid configuration to a ConfigMap in XML, YAML, or JSON format.
Cache template
XML
<infinispan>
<cache-container>
<distributed-cache-configuration name="base-template">
<expiration lifespan="5000"/>
</distributed-cache-configuration>
<distributed-cache-configuration name="extended-template"
configuration="base-template">
<encoding media-type="application/x-protostream"/>
<expiration lifespan="10000"
max-idle="1000"/>
</distributed-cache-configuration>
</cache-container>
</infinispan>
YAML
infinispan:
cacheContainer:
caches:
base-template:
distributedCacheConfiguration:
expiration:
lifespan: "5000"
extended-template:
distributedCacheConfiguration:
configuration: "base-template"
encoding:
mediaType: "application/x-protostream"
expiration:
lifespan: "10000"
maxIdle: "1000"
JSON
{
"infinispan" : {
"cache-container" : {
"caches" : {
"base-template" : {
"distributed-cache-configuration" : {
"expiration" : {
"lifespan" : "5000"
}
}
},
"extended-template" : {
"distributed-cache-configuration" : {
"configuration" : "base-template",
"encoding": {
"media-type": "application/x-protostream"
},
"expiration" : {
"lifespan" : "10000",
"max-idle" : "1000"
}
}
}
}
}
}
}
Multiple caches
XML
<infinispan
xmlns:xsi="http://www.w3.org/2001/XMLSchema-instance"
xsi:schemaLocation="urn:infinispan:config:13.0 https://infinispan.org/schemas/infinispan-config-13.0.xsd
urn:infinispan:server:13.0 https://infinispan.org/schemas/infinispan-server-13.0.xsd"
xmlns="urn:infinispan:config:13.0"
xmlns:server="urn:infinispan:server:13.0">
<cache-container name="default"
statistics="true">
<distributed-cache name="mycacheone"
mode="ASYNC"
statistics="true">
<encoding media-type="application/x-protostream"/>
<expiration lifespan="300000"/>
<memory max-size="400MB"
when-full="REMOVE"/>
</distributed-cache>
<distributed-cache name="mycachetwo"
mode="SYNC"
statistics="true">
<encoding media-type="application/x-protostream"/>
<expiration lifespan="300000"/>
<memory max-size="400MB"
when-full="REMOVE"/>
</distributed-cache>
</cache-container>
</infinispan>
YAML
infinispan:
cacheContainer:
name: "default"
statistics: "true"
caches:
mycacheone:
distributedCache:
mode: "ASYNC"
statistics: "true"
encoding:
mediaType: "application/x-protostream"
expiration:
lifespan: "300000"
memory:
maxSize: "400MB"
whenFull: "REMOVE"
mycachetwo:
distributedCache:
mode: "SYNC"
statistics: "true"
encoding:
mediaType: "application/x-protostream"
expiration:
lifespan: "300000"
memory:
maxSize: "400MB"
whenFull: "REMOVE"
JSON
{
"infinispan" : {
"cache-container" : {
"name" : "default",
"statistics" : "true",
"caches" : {
"mycacheone" : {
"distributed-cache" : {
"mode": "ASYNC",
"statistics": "true",
"encoding": {
"media-type": "application/x-protostream"
},
"expiration" : {
"lifespan" : "300000"
},
"memory": {
"max-size": "400MB",
"when-full": "REMOVE"
}
}
},
"mycachetwo" : {
"distributed-cache" : {
"mode": "SYNC",
"statistics": "true",
"encoding": {
"media-type": "application/x-protostream"
},
"expiration" : {
"lifespan" : "300000"
},
"memory": {
"max-size": "400MB",
"when-full": "REMOVE"
}
}
}
}
}
}
}
Logging configuration
You can also include Apache Log4j configuration in XML format as part of your ConfigMap.
Use the spec.logging.categories field in your Infinispan CR to adjust logging levels for Data Grid clusters. Add Apache Log4j configuration only if you require advanced file-based logging capabilities.
apiVersion: v1
kind: ConfigMap
metadata:
name: logging-config
namespace: rhdg-namespace
data:
infinispan-config.xml: >
<infinispan>
<!-- Add custom Data Grid configuration if required. -->
<!-- You can provide either Data Grid configuration, logging configuration, or both. -->
</infinispan>
log4j.xml: >
<?xml version="1.0" encoding="UTF-8"?>
<Configuration name="ServerConfig" monitorInterval="60" shutdownHook="disable">
<Appenders>
<!-- Colored output on the console -->
<Console name="STDOUT">
<PatternLayout pattern="%d{HH:mm:ss,SSS} %-5p (%t) [%c] %m%throwable%n"/>
</Console>
</Appenders>
<Loggers>
<Root level="INFO">
<AppenderRef ref="STDOUT" level="TRACE"/>
</Root>
<Logger name="org.infinispan" level="TRACE"/>
</Loggers>
</Configuration>Chapter 6. Upgrading Data Grid clusters
Data Grid Operator handles Data Grid cluster upgrades when new versions become available.
Hot Rod rolling upgrades are available as a technology preview feature.
6.1. Technology preview features
Technology preview features or capabilities are not supported with Red Hat production service-level agreements (SLAs) and might not be functionally complete.
Red Hat does not recommend using technology preview features or capabilities for production. These features provide early access to upcoming product features, which enables you to test functionality and provide feedback during the development process.
For more information, see Red Hat Technology Preview Features Support Scope.
6.2. Data Grid cluster upgrades
The spec.upgrades.type field controls how Data Grid Operator upgrades your Data Grid cluster when new versions become available. There are two types of cluster upgrade:
Shutdown- Upgrades Data Grid clusters with service downtime. This is the default upgrade type.
HotRodRolling- Upgrades Data Grid clusters without service downtime.
Shutdown upgrades
To perform a shutdown upgrade, Data Grid Operator does the following:
- Gracefully shuts down the existing cluster.
- Removes the existing cluster.
- Creates a new cluster with the target version.
Hot Rod rolling upgrades
To perform a Hot Rod rolling upgrade, Data Grid Operator does the following:
- Creates a new Data Grid cluster with the target version that runs alongside your existing cluster.
- Creates a remote cache store to transfer data from the existing cluster to the new cluster.
- Redirects all clients to the new cluster.
- Removes the existing cluster when all data and client connections are transferred to the new cluster.
You should not perform Hot Rod rolling upgrades with caches that enable passivation with persistent cache stores. In the event that the upgrade does not complete successfully, passivation can result in data loss when Data Grid Operator rolls back the target cluster.
If your cache configuration enables passivation you should perform a shutdown upgrade.
6.3. Upgrading Data Grid clusters with downtime
Upgrading Data Grid clusters with downtime results in service disruption but does not require any additional capacity.
Prerequisites
If required, configure a persistent cache store to preserve your data during the upgrade.
ImportantAt the start of the upgrade process Data Grid Operator shuts down your existing cluster. This results in data loss if you do not configure a persistent cache store.
Procedure
Ensure that
Shutdownis set as the value for thespec.upgrades.typefield, which is the default.spec: upgrades: type: Shutdown- Apply your changes, if necessary.
When it detects a new Data Grid version, Data Grid Operator automatically upgrades your cluster or prompts you to manually approve the upgrade before proceeding.
6.4. Performing Hot Rod rolling upgrades for Data Grid clusters
Performing Hot Rod rolling upgrades lets you move to a new Data Grid version without service disruption. However, this upgrade type requires additional capacity and temporarily results in two Data Grid clusters with different versions running concurrently.
Procedure
Specify
HotRodRollingas the value for thespec.upgrades.typefield.spec: upgrades: type: HotRodRolling- Apply your changes.
When it detects a new Data Grid version, Data Grid Operator automatically upgrades your cluster or prompts you to manually approve the upgrade before proceeding.
Chapter 7. Setting up Data Grid services
Use Data Grid Operator to create clusters of either Cache service or Data Grid service pods.
7.1. Service types
Services are stateful applications, based on the Data Grid Server image, that provide flexible and robust in-memory data storage. When you create Data Grid clusters you specify either DataGrid or Cache as the service type with the spec.service.type field.
DataGridservice type- Deploy Data Grid clusters with full configuration and capabilities.
Cacheservice type- Deploy Data Grid clusters with minimal configuration.
Red Hat recommends recommends the DataGrid service type for clusters because it lets you:
- Back up data across global clusters with cross-site replication.
- Create caches with any valid configuration.
- Add file-based cache stores to save data in a persistent volume.
- Query values across caches using the Data Grid Query API.
- Use advanced Data Grid features and capabilities.
The Cache service type was designed to provide a convenient way to create a low-latency data store with minimal configuration. Additional development on the Infinispan CRD has shown that the Cache CR offers a better approach to achieving this goal, ultimately giving users more choice and less deployment overhead. For this reason, the Cache service type is planned for removal in the next version of the Infinispan CRD and is no longer under active development.
The DataGrid service type continues to benefit from new features and improved tooling to automate complex operations such as cluster upgrades and data migration.
7.2. Creating Data Grid service pods
To use custom cache definitions along with Data Grid capabilities such as cross-site replication, create clusters of Data Grid service pods.
Procedure
Create an
InfinispanCR that setsspec.service.type: DataGridand configures any other Data Grid service resources.apiVersion: infinispan.org/v1 kind: Infinispan metadata: name: infinispan spec: replicas: 2 service: type: DataGridImportantYou cannot change the
spec.service.typefield after you create pods. To change the service type, you must delete the existing pods and create new ones.-
Apply your
InfinispanCR to create the cluster.
7.2.1. Data Grid service CR
This topic describes the Infinispan CR for Data Grid service pods.
apiVersion: infinispan.org/v1
kind: Infinispan
metadata:
name: infinispan
annotations:
infinispan.org/monitoring: 'true'
spec:
  replicas: 6
upgrades:
type: Shutdown
service:
type: DataGrid
container:
storage: 2Gi
# The ephemeralStorage and storageClassName fields are mutually exclusive.
ephemeralStorage: false
storageClassName: my-storage-class
sites:
local:
name: azure
expose:
type: LoadBalancer
locations:
- name: azure
url: openshift://api.azure.host:6443
secretName: azure-token
- name: aws
clusterName: infinispan
namespace: rhdg-namespace
url: openshift://api.aws.host:6443
secretName: aws-token
security:
endpointSecretName: endpoint-identities
endpointEncryption:
type: Secret
certSecretName: tls-secret
container:
extraJvmOpts: "-XX:NativeMemoryTracking=summary"
cpu: "2000m:1000m"
memory: "2Gi:1Gi"
logging:
categories:
org.infinispan: debug
org.jgroups: debug
org.jgroups.protocols.TCP: error
org.jgroups.protocols.relay.RELAY2: error
expose:
type: LoadBalancer
configMapName: "my-cluster-config"
configListener:
enabled: true
affinity:
podAntiAffinity:
preferredDuringSchedulingIgnoredDuringExecution:
- weight: 100
podAffinityTerm:
labelSelector:
matchLabels:
app: infinispan-pod
clusterName: infinispan
infinispan_cr: infinispan
topologyKey: "kubernetes.io/hostname"| Field | Description |
|---|---|
|
| Names your Data Grid cluster. |
|
|
Automatically creates a |
|
| Specifies the number of pods in your cluster. |
|
| Controls how Data Grid Operator upgrades your Data Grid cluster when new versions become available. |
|
|
Configures the type Data Grid service. A value of |
|
| Configures the storage resources for Data Grid service pods. |
|
| Configures cross-site replication. |
|
| Specifies an authentication secret that contains Data Grid user credentials. |
|
| Specifies TLS certificates and keystores to encrypt client connections. |
|
| Specifies JVM, CPU, and memory resources for Data Grid pods. |
|
| Configures Data Grid logging categories. |
|
| Controls how Data Grid endpoints are exposed on the network. |
|
|
Specifies a |
|
|
Creates a
The |
|
| Configures anti-affinity strategies that guarantee Data Grid availability. |
7.3. Allocating storage resources
You can allocate storage for Data Grid service pods but not Cache service pods.
By default, Data Grid Operator allocates 1Gi for the persistent volume claim. However you should adjust the amount of storage available to Data Grid service pods so that Data Grid can preserve cluster state during shutdown.
If available container storage is less than the amount of available memory, data loss can occur.
Procedure
-
Allocate storage resources with the
spec.service.container.storagefield. Configure either the
ephemeralStoragefield or thestorageClassNamefield as required.NoteThese fields are mutually exclusive. Add only one of them to your
InfinispanCR.- Apply the changes.
Ephemeral storage
spec:
service:
type: DataGrid
container:
storage: 2Gi
ephemeralStorage: true
Name of a StorageClass object
spec:
service:
type: DataGrid
container:
storage: 2Gi
storageClassName: my-storage-class
| Field | Description |
|---|---|
|
| Specifies the amount of storage for Data Grid service pods. |
|
|
Defines whether storage is ephemeral or permanent. Set the value to |
|
|
Specifies the name of a |
7.3.1. Persistent volume claims
Data Grid Operator creates a persistent volume claim (PVC) and mounts container storage at:/opt/infinispan/server/data
Caches
When you create caches, Data Grid permanently stores their configuration so your caches are available after cluster restarts. This applies to both Cache service and Data Grid service pods.
Data
Data is always volatile in clusters of Cache service pods. When you shutdown the cluster, you permanently lose the data.
Use a file-based cache store, by adding the <file-store/> element to your Data Grid cache configuration, if you want Data Grid service pods to persist data during cluster shutdown.
7.4. Allocating CPU and memory
Allocate CPU and memory resources to Data Grid pods with the Infinispan CR.
Data Grid Operator requests 1Gi of memory from the OpenShift scheduler when creating Data Grid pods. CPU requests are unbounded by default.
Procedure
-
Allocate the number of CPU units with the
spec.container.cpufield. Allocate the amount of memory, in bytes, with the
spec.container.memoryfield.The
cpuandmemoryfields have values in the format of<limit>:<requests>. For example,cpu: "2000m:1000m"limits pods to a maximum of2000mof CPU and requests1000mof CPU for each pod at startup. Specifying a single value sets both the limit and request.Apply your
InfinispanCR.If your cluster is running, Data Grid Operator restarts the Data Grid pods so changes take effect.
spec:
container:
cpu: "2000m:1000m"
memory: "2Gi:1Gi"7.5. Setting JVM options
Pass additional JVM options to Data Grid pods at startup.
Procedure
-
Configure JVM options with the
spec.containerfiled in yourInfinispanCR. Apply your
InfinispanCR.If your cluster is running, Data Grid Operator restarts the Data Grid pods so changes take effect.
JVM options
spec:
container:
extraJvmOpts: "-<option>=<value>"
routerExtraJvmOpts: "-<option>=<value>"
cliExtraJvmOpts: "-<option>=<value>"
| Field | Description |
|---|---|
|
| Specifies additional JVM options for the Data Grid Server. |
|
| Specifies additional JVM options for the Gossip router. |
|
| Specifies additional JVM options for the Data Grid CLI. |
7.6. Disabling FIPS mode in your Infinispan CR
The Red Hat OpenShift Container Platform can use certain Federal Information Processing Standards (FIPS) components that ensure OpenShift clusters meet the requirements of a FIPS compliance audit. This might cause issues when you want your Data Grid instance to run on any OpenShift cluster that has FIPS mode enabled. Data Grid 8.3 does not support FIPS mode, so you must disable FIPS mode in your Infinispan CR.
After you disable FIPS mode in your Infinispan CR, any component that uses a JVM, such as Data Grid Server, Data Grid CLI, or Gossip router, ignores FIPS mode. This happens, because the JVM no longer loads FIPS-related cryptographic libraries on implementation startup.
You need to explicitly disable FIPS mode in your Infinispan CR configuration only if FIPS mode is enabled for an OpenShift cluster.
Prerequisites
-
Created
InfinispanCR on OpenShift, so that your Data Grid Operator can interact with OpenShift.
Procedure
Configure JVM options with the
spec.containerfield in yourInfinispanCR.spec: container: extraJvmOpts: "-Dcom.redhat.fips=false" cliExtraJvmOpts: "-Dcom.redhat.fips=false" routerExtraJvmOpts: "-Dcom.redhat.fips=false"-
Apply your
InfinispanCR.
Additional resources
7.7. Adjusting log levels
Change levels for different Data Grid logging categories when you need to debug issues. You can also adjust log levels to reduce the number of messages for certain categories to minimize the use of container resources.
Procedure
Configure Data Grid logging with the
spec.logging.categoriesfield in yourInfinispanCR.spec: logging: categories: org.infinispan: debug org.jgroups: debug- Apply the changes.
Retrieve logs from Data Grid pods as required.
oc logs -f $POD_NAME
7.7.1. Logging reference
Find information about log categories and levels.
Table 7.1. Log categories
| Root category | Description | Default level |
|---|---|---|
|
| Data Grid messages |
|
|
| Cluster transport messages |
|
Table 7.2. Log levels
| Log level | Description |
|---|---|
|
| Provides detailed information about running state of applications. This is the most verbose log level. |
|
| Indicates the progress of individual requests or activities. |
|
| Indicates overall progress of applications, including lifecycle events. |
|
| Indicates circumstances that can lead to error or degrade performance. |
|
| Indicates error conditions that might prevent operations or activities from being successful but do not prevent applications from running. |
Garbage collection (GC) messages
Data Grid Operator does not log GC messages by default. You can direct GC messages to stdout with the following JVM options:
extraJvmOpts: "-Xlog:gc*:stdout:time,level,tags"
7.8. Creating Cache service pods
Create Data Grid clusters with Cache service pods for a volatile, low-latency data store with minimal configuration.
Cache service pods provide volatile storage only, which means you lose all data when you modify your Infinispan CR or update the version of your Data Grid cluster.
Procedure
Create an
InfinispanCR that setsspec.service.type: Cacheand configures any other Cache service resources.apiVersion: infinispan.org/v1 kind: Infinispan metadata: name: infinispan spec: replicas: 2 service: type: Cache-
Apply your
InfinispanCR to create the cluster.
7.8.1. Cache service CR
This topic describes the Infinispan CR for Cache service pods.
apiVersion: infinispan.org/v1
kind: Infinispan
metadata:
name: infinispan
annotations:
infinispan.org/monitoring: 'true'
spec:
replicas: 2
upgrades:
type: Shutdown
service:
type: Cache
replicationFactor: 2
autoscale:
maxMemUsagePercent: 70
maxReplicas: 5
minMemUsagePercent: 30
minReplicas: 2
security:
endpointSecretName: endpoint-identities
endpointEncryption:
type: Secret
certSecretName: tls-secret
container:
extraJvmOpts: "-XX:NativeMemoryTracking=summary"
cpu: "2000m:1000m"
memory: "2Gi:1Gi"
logging:
categories:
org.infinispan: trace
org.jgroups: trace
expose:
type: LoadBalancer
affinity:
podAntiAffinity:
preferredDuringSchedulingIgnoredDuringExecution:
- weight: 100
podAffinityTerm:
labelSelector:
matchLabels:
app: infinispan-pod
clusterName: infinispan
infinispan_cr: infinispan
topologyKey: "kubernetes.io/hostname"| Field | Description |
|---|---|
|
| Names your Data Grid cluster. |
|
|
Automatically creates a |
|
| Specifies the number of pods in your cluster. If you enable autoscaling capabilities, this field specifies the initial number of pods. |
|
| Controls how Data Grid Operator upgrades your Data Grid cluster when new versions become available. |
|
|
Configures the type Data Grid service. A value of |
|
| Sets the number of copies for each entry across the cluster. The default for Cache service pods is two, which replicates each cache entry to avoid data loss. |
|
| Enables and configures automatic scaling. |
|
| Specifies an authentication secret that contains Data Grid user credentials. |
|
| Specifies TLS certificates and keystores to encrypt client connections. |
|
| Specifies JVM, CPU, and memory resources for Data Grid pods. |
|
| Configures Data Grid logging categories. |
|
| Controls how Data Grid endpoints are exposed on the network. |
|
| Configures anti-affinity strategies that guarantee Data Grid availability. |
7.9. Automatic scaling
Data Grid Operator can monitor the default cache on Cache service pods to automatically scale clusters up or down, by creating or deleting pods based on memory usage.
Automatic scaling is available for clusters of Cache service pods only. Data Grid Operator does not perform automatic scaling for clusters of Data Grid service pods.
When you enable automatic scaling, you define memory usage thresholds that let Data Grid Operator determine when it needs to create or delete pods. Data Grid Operator monitors statistics for the default cache and, when memory usage reaches the configured thresholds, scales your clusters up or down.
Maximum threshold
This threshold sets an upper boundary for the amount of memory that pods in your cluster can use before scaling up or performing eviction. When Data Grid Operator detects that any node reaches the maximum amount of memory that you configure, it creates a new node if possible. If Data Grid Operator cannot create a new node then it performs eviction when memory usage reaches 100 percent.
Minimum threshold
This threshold sets a lower boundary for memory usage across your Data Grid cluster. When Data Grid Operator detects that memory usage falls below the minimum, it shuts down pods.
Default cache only
Autoscaling capabilities work with the default cache only. If you plan to add other caches to your cluster, you should not include the autoscale field in your Infinispan CR. In this case you should use eviction to control the size of the data container on each node.
7.9.1. Configuring automatic scaling
If you create clusters with Cache service pods, you can configure Data Grid Operator to automatically scale clusters.
Procedure
Add the
spec.autoscaleresource to yourInfinispanCR to enable automatic scaling.NoteSet a value of
truefor theautoscale.disabledfield to disable automatic scaling.Configure thresholds for automatic scaling with the following fields:
Field Description spec.autoscale.maxMemUsagePercentSpecifies a maximum threshold, as a percentage, for memory usage on each node.
spec.autoscale.maxReplicasSpecifies the maximum number of Cache service pods for the cluster.
spec.autoscale.minMemUsagePercentSpecifies a minimum threshold, as a percentage, for cluster memory usage.
spec.autoscale.minReplicasSpecifies the minimum number of Cache service pods for the cluster.
For example, add the following to your
InfinispanCR:spec: service: type: Cache autoscale: disabled: false maxMemUsagePercent: 70 maxReplicas: 5 minMemUsagePercent: 30 minReplicas: 2- Apply the changes.
7.10. Adding labels and annotations to Data Grid resources
Attach key/value labels and annotations to pods and services that Data Grid Operator creates and manages. Labels help you identify relationships between objects to better organize and monitor Data Grid resources. Annotations are arbitrary non-identifying metadata for client applications or deployment and management tooling.
Red Hat subscription labels are automatically applied to Data Grid resources.
Procedure
-
Open your
InfinispanCR for editing. Attach labels and annotations to Data Grid resources in the
metadata.annotationssection.-
Define values for annotations directly in the
metadata.annotationssection. -
Define values for labels with the
metadata.labelsfield.
-
Define values for annotations directly in the
-
Apply your
InfinispanCR.
Custom annotations
apiVersion: infinispan.org/v1
kind: Infinispan
metadata:
annotations:
infinispan.org/targetAnnotations: service-annotation1, service-annotation2
infinispan.org/podTargetAnnotations: pod-annotation1, pod-annotation2
service-annotation1: value
service-annotation2: value
pod-annotation1: value
pod-annotation2: value
Custom labels
apiVersion: infinispan.org/v1
kind: Infinispan
metadata:
annotations:
infinispan.org/targetLabels: service-label1, service-label2
infinispan.org/podTargetLabels: pod-label1, pod-label2
labels:
service-label1: value
service-label2: value
pod-label1: value
pod-label2: value
# The operator does not attach these labels to resources.
my-label: my-value
environment: development
7.11. Adding labels and annotations with environment variables
Set environment variables for Data Grid Operator to add labels and annotations that automatically propagate to all Data Grid pods and services.
Procedure
Add labels and annotations to your Data Grid Operator subscription with the spec.config.env field in one of the following ways:
Use the
oc edit subscriptioncommand.oc edit subscription {subscription_name} -n openshift-operatorsUse the Red Hat OpenShift Console.
- Navigate to Operators > Installed Operators > Subscription.
- Select Edit Subscription from the Actions menu.
Labels and annotations with environment variables
spec:
config:
env:
- name: INFINISPAN_OPERATOR_TARGET_LABELS
value: |
{"service-label1":"value",
service-label1":"value"}
- name: INFINISPAN_OPERATOR_POD_TARGET_LABELS
value: |
{"pod-label1":"value",
"pod-label2":"value"}
- name: INFINISPAN_OPERATOR_TARGET_ANNOTATIONS
value: |
{"service-annotation1":"value",
"service-annotation2":"value"}
- name: INFINISPAN_OPERATOR_POD_TARGET_ANNOTATIONS
value: |
{"pod-annotation1":"value",
"pod-annotation2":"value"}
Chapter 8. Configuring authentication
Application users need credentials to access Data Grid clusters. You can use default, generated credentials or add your own.
8.1. Default credentials
Data Grid Operator generates base64-encoded credentials for the following users:
| User | Secret name | Description |
|---|---|---|
|
|
| Credentials for the default application user. |
|
|
| Credentials that Data Grid Operator uses to interact with Data Grid resources. |
8.2. Retrieving credentials
Get credentials from authentication secrets to access Data Grid clusters.
Procedure
Retrieve credentials from authentication secrets.
oc get secret infinispan-generated-secret
Base64-decode credentials.
oc get secret infinispan-generated-secret -o jsonpath="{.data.identities\.yaml}" | base64 --decode
8.3. Adding custom user credentials
Configure access to Data Grid cluster endpoints with custom credentials.
Modifying spec.security.endpointSecretName triggers a cluster restart.
Procedure
Create an
identities.yamlfile with the credentials that you want to add.credentials: - username: myfirstusername password: changeme-one - username: mysecondusername password: changeme-two
Create an authentication secret from
identities.yaml.oc create secret generic --from-file=identities.yaml connect-secret
Specify the authentication secret with
spec.security.endpointSecretNamein yourInfinispanCR and then apply the changes.spec: security: endpointSecretName: connect-secret
8.4. Changing the operator password
You can change the password for the operator user if you do not want to use the automatically generated password.
Procedure
Update the
passwordkey in theinfinispan-generated-operator-secretsecret as follows:oc patch secret infinispan-generated-operator-secret -p='{"stringData":{"password": "supersecretoperatorpassword"}}'NoteYou should update only the
passwordkey in thegenerated-operator-secretsecret. When you update the password, Data Grid Operator automatically refreshes other keys in that secret.
8.5. Disabling user authentication
Allow users to access Data Grid clusters and manipulate data without providing credentials.
Do not disable authentication if endpoints are accessible from outside the OpenShift cluster via spec.expose.type. You should disable authentication for development environments only.
Procedure
Set
falseas the value for thespec.security.endpointAuthenticationfield in yourInfinispanCR.spec: security: endpointAuthentication: false- Apply the changes.
Chapter 9. Configuring client certificate authentication
Add client trust stores to your project and configure Data Grid to allow connections only from clients that present valid certificates. This increases security of your deployment by ensuring that clients are trusted by a public certificate authority (CA).
9.1. Client certificate authentication
Client certificate authentication restricts in-bound connections based on the certificates that clients present.
You can configure Data Grid to use trust stores with either of the following strategies:
Validate
To validate client certificates, Data Grid requires a trust store that contains any part of the certificate chain for the signing authority, typically the root CA certificate. Any client that presents a certificate signed by the CA can connect to Data Grid.
If you use the Validate strategy for verifying client certificates, you must also configure clients to provide valid Data Grid credentials if you enable authentication.
Authenticate
Requires a trust store that contains all public client certificates in addition to the root CA certificate. Only clients that present a signed certificate can connect to Data Grid.
If you use the Authenticate strategy for verifying client certificates, you must ensure that certificates contain valid Data Grid credentials as part of the distinguished name (DN).
9.2. Enabling client certificate authentication
To enable client certificate authentication, you configure Data Grid to use trust stores with either the Validate or Authenticate strategy.
Procedure
Set either
ValidateorAuthenticateas the value for thespec.security.endpointEncryption.clientCertfield in yourInfinispanCR.NoteThe default value is
None.Specify the secret that contains the client trust store with the
spec.security.endpointEncryption.clientCertSecretNamefield.By default Data Grid Operator expects a trust store secret named
<cluster-name>-client-cert-secret.NoteThe secret must be unique to each
InfinispanCR instance in the OpenShift cluster. When you delete theInfinispanCR, OpenShift also automatically deletes the associated secret.spec: security: endpointEncryption: type: Secret certSecretName: tls-secret clientCert: Validate clientCertSecretName: infinispan-client-cert-secret- Apply the changes.
Next steps
Provide Data Grid Operator with a trust store that contains all client certificates. Alternatively you can provide certificates in PEM format and let Data Grid generate a client trust store.
9.3. Providing client truststores
If you have a trust store that contains the required certificates you can make it available to Data Grid Operator.
Data Grid supports trust stores in PKCS12 format only.
Procedure
Specify the name of the secret that contains the client trust store as the value of the
metadata.namefield.NoteThe name must match the value of the
spec.security.endpointEncryption.clientCertSecretNamefield.-
Provide the password for the trust store with the
stringData.truststore-passwordfield. Specify the trust store with the
data.truststore.p12field.apiVersion: v1 kind: Secret metadata: name: infinispan-client-cert-secret type: Opaque stringData: truststore-password: changme data: truststore.p12: "<base64_encoded_PKCS12_trust_store>"- Apply the changes.
9.4. Providing client certificates
Data Grid Operator can generate a trust store from certificates in PEM format.
Procedure
Specify the name of the secret that contains the client trust store as the value of the
metadata.namefield.NoteThe name must match the value of the
spec.security.endpointEncryption.clientCertSecretNamefield.-
Specify the signing certificate, or CA certificate bundle, as the value of the
data.trust.cafield. If you use the
Authenticatestrategy to verify client identities, add the certificate for each client that can connect to Data Grid endpoints with thedata.trust.cert.<name>field.NoteData Grid Operator uses the
<name>value as the alias for the certificate when it generates the trust store.Optionally provide a password for the trust store with the
stringData.truststore-passwordfield.If you do not provide one, Data Grid Operator sets "password" as the trust store password.
apiVersion: v1 kind: Secret metadata: name: infinispan-client-cert-secret type: Opaque stringData: truststore-password: changme data: trust.ca: "<base64_encoded_CA_certificate>" trust.cert.client1: "<base64_encoded_client_certificate>" trust.cert.client2: "<base64_encoded_client_certificate>"- Apply the changes.
Chapter 10. Configuring encryption
Encrypt connections between clients and Data Grid pods with Red Hat OpenShift service certificates or custom TLS certificates.
10.1. Encryption with Red Hat OpenShift service certificates
Data Grid Operator automatically generates TLS certificates that are signed by the Red Hat OpenShift service CA. Data Grid Operator then stores the certificates and keys in a secret so you can retrieve them and use with remote clients.
If the Red Hat OpenShift service CA is available, Data Grid Operator adds the following spec.security.endpointEncryption configuration to the Infinispan CR:
spec:
security:
endpointEncryption:
type: Service
certServiceName: service.beta.openshift.io
certSecretName: infinispan-cert-secret| Field | Description |
|---|---|
|
| Specifies the service that provides TLS certificates. |
|
|
Specifies a secret with a service certificate and key in PEM format. Defaults to |
Service certificates use the internal DNS name of the Data Grid cluster as the common name (CN), for example:
Subject: CN = example-infinispan.mynamespace.svc
For this reason, service certificates can be fully trusted only inside OpenShift. If you want to encrypt connections with clients running outside OpenShift, you should use custom TLS certificates.
Service certificates are valid for one year and are automatically replaced before they expire.
10.2. Retrieving TLS certificates
Get TLS certificates from encryption secrets to create client trust stores.
Procedure
Retrieve
tls.crtfrom encryption secrets as follows:oc get secret infinispan-cert-secret -o jsonpath='{.data.tls\.crt}' | base64 --decode > tls.crt
10.3. Disabling encryption
You can disable encryption so clients do not need TLS certificates to establish connections with Data Grid.
Do not disable encryption if endpoints are accessible from outside the OpenShift cluster via spec.expose.type. You should disable encryption for development environments only.
Procedure
Set
Noneas the value for thespec.security.endpointEncryption.typefield in yourInfinispanCR.spec: security: endpointEncryption: type: None- Apply the changes.
10.4. Using custom TLS certificates
Use custom PKCS12 keystore or TLS certificate/key pairs to encrypt connections between clients and Data Grid clusters.
Prerequisites
Create either a keystore or certificate secret.
NoteThe secret must be unique to each
InfinispanCR instance in the OpenShift cluster. When you delete theInfinispanCR, OpenShift also automatically deletes the associated secret.
Procedure
Add the encryption secret to your OpenShift namespace, for example:
oc apply -f tls_secret.yaml
Specify the encryption secret with the
spec.security.endpointEncryption.certSecretNamefield in yourInfinispanCR.spec: security: endpointEncryption: type: Secret certSecretName: tls-secret- Apply the changes.
10.4.1. Custom encryption secrets
Custom encryption secrets that add keystores or certificate/key pairs to secure Data Grid connections must contain specific fields.
Keystore secrets
apiVersion: v1 kind: Secret metadata: name: tls-secret type: Opaque stringData: alias: server password: changeme data: keystore.p12: "MIIKDgIBAzCCCdQGCSqGSIb3DQEHA..."
| Field | Description |
|---|---|
|
| Specifies an alias for the keystore. |
|
| Specifies the keystore password. |
|
| Adds a base64-encoded keystore. |
Certificate secrets
apiVersion: v1 kind: Secret metadata: name: tls-secret type: Opaque data: tls.key: "LS0tLS1CRUdJTiBQUk ..." tls.crt: "LS0tLS1CRUdJTiBDRVl ..."
| Field | Description |
|---|---|
|
| Adds a base64-encoded TLS key. |
|
| Adds a base64-encoded TLS certificate. |
Chapter 11. Configuring user roles and permissions
Secure access to Data Grid services by configuring role-based access control (RBAC) for users. This requires you to assign roles to users so that they have permission to access caches and Data Grid resources.
11.1. Enabling security authorization
By default authorization is disabled to ensure backwards compatibility with Infinispan CR instances. Complete the following procedure to enable authorization and use role-based access control (RBAC) for Data Grid users.
Procedure
Set
trueas the value for thespec.security.authorization.enabledfield in yourInfinispanCR.spec: security: authorization: enabled: true- Apply the changes.
11.2. User roles and permissions
Data Grid Operator provides a set of default roles that are associated with different permissions.
Table 11.1. Default roles and permissions
| Role | Permissions | Description |
|---|---|---|
|
| ALL | Superuser with all permissions including control of the Cache Manager lifecycle. |
|
| ALL_READ, ALL_WRITE, LISTEN, EXEC, MONITOR, CREATE |
Can create and delete Data Grid resources in addition to |
|
| ALL_READ, ALL_WRITE, LISTEN, EXEC, MONITOR |
Has read and write access to Data Grid resources in addition to |
|
| ALL_READ, MONITOR |
Has read access to Data Grid resources in addition to |
|
| MONITOR | Can view statistics for Data Grid clusters. |
Data Grid Operator credentials
Data Grid Operator generates credentials that it uses to authenticate with Data Grid clusters to perform internal operations. By default Data Grid Operator credentials are automatically assigned the admin role when you enable security authorization.
Additional resources
- How security authorization works (Data Grid Security Guide).
11.3. Assigning roles and permissions to users
Assign users with roles that control whether users are authorized to access Data Grid cluster resources. Roles can have different permission levels, from read-only to unrestricted access.
Users gain authorization implicitly. For example, "admin" gets admin permissions automatically. A user named "deployer" has the deployer role automatically, and so on.
Procedure
Create an
identities.yamlfile that assigns roles to users.credentials: - username: admin password: changeme - username: my-user-1 password: changeme roles: - admin - username: my-user-2 password: changeme roles: - monitorCreate an authentication secret from
identities.yaml.If necessary, delete the existing secret first.
oc delete secret connect-secret --ignore-not-found oc create secret generic --from-file=identities.yaml connect-secret
Specify the authentication secret with
spec.security.endpointSecretNamein yourInfinispanCR and then apply the changes.spec: security: endpointSecretName: connect-secret
11.4. Adding custom roles and permissions
You can define custom roles with different combinations of permissions.
Procedure
-
Open your
InfinispanCR for editing. Specify custom roles and their associated permissions with the
spec.security.authorization.rolesfield.spec: security: authorization: enabled: true roles: - name: my-role-1 permissions: - ALL - name: my-role-2 permissions: - READ - WRITE- Apply the changes.
Chapter 12. Configuring network access to Data Grid
Expose Data Grid clusters so you can access Data Grid Console, the Data Grid command line interface (CLI), REST API, and Hot Rod endpoint.
12.1. Getting the service for internal connections
By default, Data Grid Operator creates a service that provides access to Data Grid clusters from clients running on OpenShift.
This internal service has the same name as your Data Grid cluster, for example:
metadata: name: infinispan
Procedure
Check that the internal service is available as follows:
oc get services
12.2. Exposing Data Grid through a LoadBalancer service
Use a LoadBalancer service to make Data Grid clusters available to clients running outside OpenShift.
To access Data Grid with unencrypted Hot Rod client connections you must use a LoadBalancer service.
Procedure
-
Include
spec.exposein yourInfinispanCR. -
Specify
LoadBalanceras the service type with thespec.expose.typefield. Optionally specify the network port where the service is exposed with the
spec.expose.portfield.spec: expose: type: LoadBalancer port: 65535- Apply the changes.
Verify that the
-externalservice is available.oc get services | grep external
12.3. Exposing Data Grid through a NodePort service
Use a NodePort service to expose Data Grid clusters on the network.
Procedure
-
Include
spec.exposein yourInfinispanCR. -
Specify
NodePortas the service type with thespec.expose.typefield. Configure the port where Data Grid is exposed with the
spec.expose.nodePortfield.spec: expose: type: NodePort nodePort: 30000- Apply the changes.
Verify that the
-externalservice is available.oc get services | grep external
12.4. Exposing Data Grid through a Route
Use an OpenShift Route with passthrough encryption to make Data Grid clusters available on the network.
Procedure
-
Include
spec.exposein yourInfinispanCR. -
Specify
Routeas the service type with thespec.expose.typefield. Optionally add a hostname with the
spec.expose.hostfield.spec: expose: type: Route host: www.example.org- Apply the changes.
Verify that the route is available.
oc get routes
Route ports
When you create a Route, it exposes a port on the network that accepts client connections and redirects traffic to Data Grid services that listen on port 11222.
The port where the Route is available depends on whether you use encryption or not.
| Port | Description |
|---|---|
|
| Encryption is disabled. |
|
| Encryption is enabled. |
12.5. Network services
Reference information for network services that Data Grid Operator creates and manages.
| Service | Port | Protocol | Description |
|---|---|---|---|
|
|
| TCP |
Access to Data Grid endpoints within the OpenShift cluster or from an OpenShift |
|
|
| TCP | Cluster discovery for Data Grid pods. |
|
|
| TCP |
Access to Data Grid endpoints from a |
|
|
| TCP | JGroups RELAY2 channel for cross-site communication. |
Chapter 13. Setting up cross-site replication
Ensure availability with Data Grid Operator by configuring geographically distributed clusters as a unified service.
You can configure clusters to perform cross-site replication with:
- Connections that Data Grid Operator manages.
- Connections that you configure and manage.
You can use both managed and manual connections for Data Grid clusters in the same Infinispan CR. You must ensure that Data Grid clusters establish connections in the same way at each site.
13.1. Cross-site replication expose types
You can use a NodePort service, a LoadBalancer service, or an OpenShift Route to handle network traffic for backup operations between Data Grid clusters. Before you start setting up cross-site replication you should determine what expose type is available for your Red Hat OpenShift cluster. In some cases you may require an administrator to provision services before you can configure an expose type.
NodePort
A NodePort is a service that accepts network traffic at a static port, in the 30000 to 32767 range, on an IP address that is available externally to the OpenShift cluster.
To use a NodePort as the expose type for cross-site replication, an administrator must provision external IP addresses for each OpenShift node. In most cases, an administrator must also configure DNS routing for those external IP addresses.
LoadBalancer
A LoadBalancer is a service that directs network traffic to the correct node in the OpenShift cluster.
Whether you can use a LoadBalancer as the expose type for cross-site replication depends on the host platform. AWS supports network load balancers (NLB) while some other cloud platforms do not. To use a LoadBalancer service, an administrator must first create an ingress controller backed by an NLB.
Route
An OpenShift Route allows Data Grid clusters to connect with each other through a public secure URL.
Data Grid uses TLS with the SNI header to send backup requests between clusters through an OpenShift Route. To do this you must add a keystore with TLS certificates so that Data Grid can encrypt network traffic for cross-site replication.
When you specify Route as the expose type for cross-site replication, Data Grid Operator creates a route with TLS passthrough encryption for each Data Grid cluster that it manages. You can specify a hostname for the Route but you cannot specify a Route that you have already created.
Additional resources
13.2. Managed cross-site replication
Data Grid Operator can discover Data Grid clusters running in different data centers to form global clusters.
When you configure managed cross-site connections, Data Grid Operator creates router pods in each Data Grid cluster. Data Grid pods use the <cluster_name>-site service to connect to these router pods and send backup requests.
Router pods maintain a record of all pod IP addresses and parse RELAY message headers to forward backup requests to the correct Data Grid cluster. If a router pod crashes then all Data Grid pods start using any other available router pod until OpenShift restores it.
To manage cross-site connections, Data Grid Operator uses the Kubernetes API. Each OpenShift cluster must have network access to the remote Kubernetes API and a service account token for each backup cluster.
Data Grid clusters do not start running until Data Grid Operator discovers all backup locations that you configure.
13.2.1. Creating service account tokens for managed cross-site connections
Generate service account tokens on OpenShift clusters that allow Data Grid Operator to automatically discover Data Grid clusters and manage cross-site connections.
Prerequisites
Ensure all OpenShift clusters have access to the Kubernetes API.
Data Grid Operator uses this API to manage cross-site connections.NoteData Grid Operator does not modify remote Data Grid clusters. The service account tokens provide read only access through the Kubernetes API.
Procedure
- Log in to an OpenShift cluster.
Create a service account.
For example, create a service account at LON:
oc create sa lon serviceaccount/lon created
Add the view role to the service account with the following command:
oc policy add-role-to-user view system:serviceaccount:<namespace>:lon
If you use a
NodePortservice to expose Data Grid clusters on the network, you must also add thecluster-readerrole to the service account:oc adm policy add-cluster-role-to-user cluster-reader -z <service-account-name> -n <namespace>
- Repeat the preceding steps on your other OpenShift clusters.
- Exchange service account tokens on each OpenShift cluster.
Additional resources
13.2.2. Exchanging service account tokens
After you create service account tokens on your OpenShift clusters, you add them to secrets on each backup location. For example, at LON you add the service account token for NYC. At NYC you add the service account token for LON.
Prerequisites
Get tokens from each service account.
Use the following command or get the token from the OpenShift Web Console:
oc sa get-token lon eyJhbGciOiJSUzI1NiIsImtpZCI6IiJ9...
Procedure
- Log in to an OpenShift cluster.
Add the service account token for a backup location with the following command:
oc create secret generic <token-name> --from-literal=token=<token>
For example, log in to the OpenShift cluster at NYC and create a
lon-tokensecret as follows:oc create secret generic lon-token --from-literal=token=eyJhbGciOiJSUzI1NiIsImtpZCI6IiJ9...
- Repeat the preceding steps on your other OpenShift clusters.
13.2.3. Configuring managed cross-site connections
Configure Data Grid Operator to establish cross-site views with Data Grid clusters.
Prerequisites
-
Determine a suitable expose type for cross-site replication.
If you use an OpenShiftRouteyou must add a keystore with TLS certificates and secure cross-site connections. - Create and exchange Red Hat OpenShift service account tokens for each Data Grid cluster.
Procedure
-
Create an
InfinispanCR for each Data Grid cluster. -
Specify the name of the local site with
spec.service.sites.local.name. Configure the expose type for cross-site replication.
Set the value of the
spec.service.sites.local.expose.typefield to one of the following:-
NodePort -
LoadBalancer -
Route
-
Optionally specify a port or custom hostname with the following fields:
-
spec.service.sites.local.expose.nodePortif you use aNodePortservice. -
spec.service.sites.local.expose.portif you use aLoadBalancerservice. -
spec.service.sites.local.expose.routeHostNameif you use an OpenShiftRoute.
-
Specify the number of pods that can send RELAY messages with the
service.sites.local.maxRelayNodesfield.TipConfigure all pods in your cluster to send
RELAYmessages for better performance. If all pods send backup requests directly, then no pods need to forward backup requests.-
Provide the name, URL, and secret for each Data Grid cluster that acts as a backup location with
spec.service.sites.locations. If Data Grid cluster names or namespaces at the remote site do not match the local site, specify those values with the
clusterNameandnamespacefields.The following are example
InfinispanCR definitions for LON and NYC:LON
apiVersion: infinispan.org/v1 kind: Infinispan metadata: name: infinispan spec: replicas: 3 service: type: DataGrid sites: local: name: LON expose: type: LoadBalancer port: 65535 maxRelayNodes: 1 locations: - name: NYC clusterName: <nyc_cluster_name> namespace: <nyc_cluster_namespace> url: openshift://api.rhdg-nyc.openshift-aws.myhost.com:6443 secretName: nyc-token logging: categories: org.jgroups.protocols.TCP: error org.jgroups.protocols.relay.RELAY2: errorNYC
apiVersion: infinispan.org/v1 kind: Infinispan metadata: name: nyc-cluster spec: replicas: 2 service: type: DataGrid sites: local: name: NYC expose: type: LoadBalancer port: 65535 maxRelayNodes: 1 locations: - name: LON clusterName: infinispan namespace: rhdg-namespace url: openshift://api.rhdg-lon.openshift-aws.myhost.com:6443 secretName: lon-token logging: categories: org.jgroups.protocols.TCP: error org.jgroups.protocols.relay.RELAY2: errorImportantBe sure to adjust logging categories in your
InfinispanCR to decrease log levels for JGroups TCP and RELAY2 protocols. This prevents a large number of log files from uses container storage.spec: logging: categories: org.jgroups.protocols.TCP: error org.jgroups.protocols.relay.RELAY2: error
-
Configure your
InfinispanCRs with any other Data Grid service resources and then apply the changes. Verify that Data Grid clusters form a cross-site view.
Retrieve the
InfinispanCR.oc get infinispan -o yaml
-
Check for the
type: CrossSiteViewFormedcondition.
Next steps
If your clusters have formed a cross-site view, you can start adding backup locations to caches.
Additional resources
13.3. Manually configuring cross-site connections
You can specify static network connection details to perform cross-site replication with Data Grid clusters running outside OpenShift. Manual cross-site connections are necessary in any scenario where access to the Kubernetes API is not available outside the OpenShift cluster where Data Grid runs.
Prerequisites
-
Determine a suitable expose type for cross-site replication.
If you use an OpenShiftRouteyou must add a keystore with TLS certificates and secure cross-site connections. Ensure you have the correct host names and ports for each Data Grid cluster and each
<cluster-name>-siteservice.Manually connecting Data Grid clusters to form cross-site views requires predictable network locations for Data Grid services, which means you need to know the network locations before they are created.
Procedure
-
Create an
InfinispanCR for each Data Grid cluster. -
Specify the name of the local site with
spec.service.sites.local.name. Configure the expose type for cross-site replication.
Set the value of the
spec.service.sites.local.expose.typefield to one of the following:-
NodePort -
LoadBalancer -
Route
-
Optionally specify a port or custom hostname with the following fields:
-
spec.service.sites.local.expose.nodePortif you use aNodePortservice. -
spec.service.sites.local.expose.portif you use aLoadBalancerservice. -
spec.service.sites.local.expose.routeHostNameif you use an OpenShiftRoute.
-
Provide the name and static URL for each Data Grid cluster that acts as a backup location with
spec.service.sites.locations, for example:LON
apiVersion: infinispan.org/v1 kind: Infinispan metadata: name: infinispan spec: replicas: 3 service: type: DataGrid sites: local: name: LON expose: type: LoadBalancer port: 65535 maxRelayNodes: 1 locations: - name: NYC url: infinispan+xsite://infinispan-nyc.myhost.com:7900 logging: categories: org.jgroups.protocols.TCP: error org.jgroups.protocols.relay.RELAY2: errorNYC
apiVersion: infinispan.org/v1 kind: Infinispan metadata: name: infinispan spec: replicas: 2 service: type: DataGrid sites: local: name: NYC expose: type: LoadBalancer port: 65535 maxRelayNodes: 1 locations: - name: LON url: infinispan+xsite://infinispan-lon.myhost.com logging: categories: org.jgroups.protocols.TCP: error org.jgroups.protocols.relay.RELAY2: errorImportantBe sure to adjust logging categories in your
InfinispanCR to decrease log levels for JGroups TCP and RELAY2 protocols. This prevents a large number of log files from uses container storage.spec: logging: categories: org.jgroups.protocols.TCP: error org.jgroups.protocols.relay.RELAY2: error
-
Configure your
InfinispanCRs with any other Data Grid service resources and then apply the changes. Verify that Data Grid clusters form a cross-site view.
Retrieve the
InfinispanCR.oc get infinispan -o yaml
-
Check for the
type: CrossSiteViewFormedcondition.
Next steps
If your clusters have formed a cross-site view, you can start adding backup locations to caches.
Additional resources
13.4. Resources for configuring cross-site replication
The following tables provides fields and descriptions for cross-site resources.
Table 13.1. service.type
| Field | Description |
|---|---|
|
| Data Grid supports cross-site replication with Data Grid service clusters only. |
Table 13.2. service.sites.local
| Field | Description |
|---|---|
|
| Names the local site where a Data Grid cluster runs. |
|
|
Specifies the network service for cross-site replication. Data Grid clusters use this service to communicate and perform backup operations. You can set the value to |
|
|
Specifies a static port within the default range of |
|
|
Specifies the network port for the service if you expose Data Grid through a |
|
|
Specifies a custom hostname if you expose Data Grid through an OpenShift |
|
|
Specifies the maximum number of pods that can send RELAY messages for cross-site replication. The default value is |
Table 13.3. service.sites.locations
| Field | Description |
|---|---|
|
| Provides connection information for all backup locations. |
|
|
Specifies a backup location that matches |
|
| Specifies the URL of the Kubernetes API for managed connections or a static URL for manual connections.
Use
Note that the
Use the |
|
| Specifies the secret that contains the service account token for the backup site. |
|
| Specifies the cluster name at the backup location if it is different to the cluster name at the local site. |
|
| Specifies the namespace of the Data Grid cluster at the backup location if it does not match the namespace at the local site. |
Managed cross-site connections
spec:
service:
type: DataGrid
sites:
local:
name: LON
expose:
type: LoadBalancer
maxRelayNodes: 1
locations:
- name: NYC
clusterName: <nyc_cluster_name>
namespace: <nyc_cluster_namespace>
url: openshift://api.site-b.devcluster.openshift.com:6443
secretName: nyc-tokenManual cross-site connections
spec:
service:
type: DataGrid
sites:
local:
name: LON
expose:
type: LoadBalancer
port: 65535
maxRelayNodes: 1
locations:
- name: NYC
url: infinispan+xsite://infinispan-nyc.myhost.com:790013.5. Securing cross-site connections
Add keystores and trust stores so that Data Grid clusters can secure cross-site replication traffic.
You must add a keystore to use an OpenShift Route as the expose type for cross-site replication. Securing cross-site connections is optional if you use a NodePort or LoadBalancer as the expose type.
Prerequisites
Have a PKCS12 keystore that Data Grid can use to encrypt and decrypt RELAY messages.
You must provide a keystore for relay pods and router pods to secure cross-site connections.
The keystore can be the same for relay pods and router pods or you can provide separate keystores for each.
You can also use the same keystore for each Data Grid cluster or a unique keystore for each cluster.Optionally have a trust store that contains part of the certificate chain or root CA certificate that verifies public certificates for Data Grid relay pods and router pods.
By default, Data Grid uses the Java trust store to verify public certificates.
Procedure
Create cross-site encryption secrets.
- Create keystore secrets.
- Create trust store secrets if you do not want to use the default Java trust store.
-
Modify the
InfinispanCR for each Data Grid cluster to specify the secret name for theencryption.transportKeyStore.secretNameandencryption.routerKeyStore.secretNamefields. Configure any other fields to encrypt RELAY messages as required and then apply the changes.
apiVersion: infinispan.org/v1 kind: Infinispan metadata: name: infinispan spec: replicas: 2 expose: type: LoadBalancer service: type: DataGrid sites: local: name: SiteA # ... encryption: protocol: TLSv1.3 transportKeyStore: secretName: transport-tls-secret alias: transport filename: keystore.p12 routerKeyStore: secretName: router-tls-secret alias: router filename: keystore.p12 trustStore: secretName: truststore-tls-secret filename: truststore.p12 locations: # ...
13.5.1. Resources for configuring cross-site encryption
The following tables provides fields and descriptions for encrypting cross-site connections.
Table 13.4. service.type.sites.local.encryption
| Field | Description |
|---|---|
|
|
Specifies the TLS protocol to use for cross-site connections. The default value is |
|
| Configures a keystore secret for relay pods. |
|
| Configures a keystore secret for router pods. |
|
| Configures an optional trust store secret for relay pods and router pods. |
Table 13.5. service.type.sites.local.encryption.transportKeyStore
| Field | Description |
|---|---|
|
| Specifies the secret that contains a keystore that relay pods can use to encrypt and decrypt RELAY messages. This field is required. |
|
|
Optionally specifies the alias of the certificate in the keystore. The default value is |
|
|
Optionally specifies the filename of the keystore. The default value is |
Table 13.6. service.type.sites.local.encryption.routerKeyStore
| Field | Description |
|---|---|
|
| Specifies the secret that contains a keystore that router pods can use to encrypt and decrypt RELAY messages. This field is required. |
|
|
Optionally specifies the alias of the certificate in the keystore. The default value is |
|
|
Optionally specifies the filename of the keystore. The default value is |
Table 13.7. service.type.sites.local.encryption.trustStore
| Field | Description |
|---|---|
|
|
Optionally specifies the secret that contains a trust store to verify public certificates for relay pods and router pods. The default value is |
|
|
Optionally specifies the filename of the trust store. The default value is |
13.5.2. Cross-site encryption secrets
Cross-site replication encryption secrets add keystores and optional trust stores for securing cross-site connections.
Cross-site encryption secrets
apiVersion: v1 kind: Secret metadata: name: tls-secret type: Opaque stringData: password: changeme type: pkcs12 data: <file-name>: "MIIKDgIBAzCCCdQGCSqGSIb3DQEHA..."
| Field | Description |
|---|---|
|
| Specifies the password for the keystore or trust store. |
|
|
Optionally specifies the keystore or trust store type. The default value is |
|
| Adds a base64-encoded keystore or trust store. |
13.6. Configuring sites in the same OpenShift cluster
For evaluation and demonstration purposes, you can configure Data Grid to back up between pods in the same OpenShift cluster.
Using ClusterIP as the expose type for cross-site replication is intended for demonstration purposes only. It would be appropriate to use this expose type only to perform a temporary proof-of-concept deployment on a laptop or something of that nature.
Procedure
-
Create an
InfinispanCR for each Data Grid cluster. -
Specify the name of the local site with
spec.service.sites.local.name. -
Set
ClusterIPas the value of thespec.service.sites.local.expose.typefield. -
Provide the name of the Data Grid cluster that acts as a backup location with
spec.service.sites.locations.clusterName. If both Data Grid clusters have the same name, specify the namespace of the backup location with
spec.service.sites.locations.namespace.apiVersion: infinispan.org/v1 kind: Infinispan metadata: name: example-clustera spec: replicas: 1 expose: type: LoadBalancer service: type: DataGrid sites: local: name: SiteA expose: type: ClusterIP maxRelayNodes: 1 locations: - name: SiteB clusterName: example-clusterb namespace: cluster-namespace-
Configure your
InfinispanCRs with any other Data Grid service resources and then apply the changes. Verify that Data Grid clusters form a cross-site view.
Retrieve the
InfinispanCR.oc get infinispan -o yaml
-
Check for the
type: CrossSiteViewFormedcondition.
Chapter 14. Monitoring Data Grid services
Data Grid exposes metrics that can be used by Prometheus and Grafana for monitoring and visualizing the cluster state.
This documentation explains how to set up monitoring on OpenShift Container Platform. If you’re working with community Prometheus deployments, you might find these instructions useful as a general guide. However you should refer to the Prometheus documentation for installation and usage instructions.
See the Prometheus Operator documentation.
14.1. Creating a Prometheus service monitor
Data Grid Operator automatically creates a Prometheus ServiceMonitor that scrapes metrics from your Data Grid cluster.
Procedure
Enable monitoring for user-defined projects on OpenShift Container Platform.
When the Operator detects an Infinispan CR with the monitoring annotation set to true, which is the default, Data Grid Operator does the following:
-
Creates a
ServiceMonitornamed<cluster_name>-monitor. Adds the
infinispan.org/monitoring: 'true'annotation to yourInfinispanCR metadata, if the value is not already explicitly set:apiVersion: infinispan.org/v1 kind: Infinispan metadata: name: infinispan annotations: infinispan.org/monitoring: 'true'
To authenticate with Data Grid, Prometheus uses the operator credentials.
Verification
You can check that Prometheus is scraping Data Grid metrics as follows:
- In the OpenShift Web Console, select the </> Developer perspective and then select Monitoring.
- Open the Dashboard tab for the namespace where your Data Grid cluster runs.
Open the Metrics tab and confirm that you can query Data Grid metrics such as:
vendor_cache_manager_default_cluster_size
Additional resources
14.1.1. Disabling the Prometheus service monitor
You can disable the ServiceMonitor if you do not want Prometheus to scrape metrics for your Data Grid cluster.
Procedure
Set
'false'as the value for theinfinispan.org/monitoringannotation in yourInfinispanCR.apiVersion: infinispan.org/v1 kind: Infinispan metadata: name: infinispan annotations: infinispan.org/monitoring: 'false'- Apply the changes.
14.2. Installing the Grafana Operator
To support various needs, Data Grid Operator integrates with the community version of the Grafana Operator to create dashboards for Data Grid services.
Until Grafana is integrated with OpenShift user workload monitoring, the only option is to rely on the community version. You can install the Grafana Operator on OpenShift from the OperatorHub and should create a subscription for the alpha channel.
However, as is the policy for all Community Operators, Red Hat does not certify the Grafana Operator and does not provide support for it in combination with Data Grid. When you install the Grafana Operator you are prompted to acknowledge a warning about the community version before you can continue.
14.3. Creating Grafana data sources
Create a GrafanaDatasource CR so you can visualize Data Grid metrics in Grafana dashboards.
Prerequisites
-
Have an
occlient. -
Have
cluster-adminaccess to OpenShift Container Platform. - Enable monitoring for user-defined projects on OpenShift Container Platform.
-
Install the Grafana Operator from the alpha channel and create a
GrafanaCR.
Procedure
Create a
ServiceAccountthat lets Grafana read Data Grid metrics from Prometheus.apiVersion: v1 kind: ServiceAccount metadata: name: infinispan-monitoring
Apply the
ServiceAccount.oc apply -f service-account.yaml
Grant
cluster-monitoring-viewpermissions to theServiceAccount.oc adm policy add-cluster-role-to-user cluster-monitoring-view -z infinispan-monitoring
Create a Grafana data source.
Retrieve the token for the
ServiceAccount.oc serviceaccounts get-token infinispan-monitoring
Define a
GrafanaDataSourcethat includes the token in thespec.datasources.secureJsonData.httpHeaderValue1field, as in the following example:apiVersion: integreatly.org/v1alpha1 kind: GrafanaDataSource metadata: name: grafanadatasource spec: name: datasource.yaml datasources: - access: proxy editable: true isDefault: true jsonData: httpHeaderName1: Authorization timeInterval: 5s tlsSkipVerify: true name: Prometheus secureJsonData: httpHeaderValue1: >- Bearer eyJhbGciOiJSUzI1NiIsImtpZCI6Imc4O... type: prometheus url: 'https://thanos-querier.openshift-monitoring.svc.cluster.local:9091'
Apply the
GrafanaDataSource.oc apply -f grafana-datasource.yaml
Next steps
Enable Grafana dashboards with the Data Grid Operator configuration properties.
14.4. Configuring Data Grid dashboards
Data Grid Operator provides global configuration properties that let you configure Grafana dashboards for Data Grid clusters.
You can modify global configuration properties while Data Grid Operator is running.
Prerequisites
- Data Grid Operator must watch the namespace where the Grafana Operator is running.
Procedure
Create a
ConfigMapnamedinfinispan-operator-configin the Data Grid Operator namespace.apiVersion: v1 kind: ConfigMap metadata: name: infinispan-operator-config data: grafana.dashboard.namespace: infinispan grafana.dashboard.name: infinispan grafana.dashboard.monitoring.key: middleware
Specify the namespace of your Data Grid cluster with the
data.grafana.dashboard.namespaceproperty.NoteDeleting the value for this property removes the dashboard. Changing the value moves the dashboard to that namespace.
-
Specify a name for the dashboard with the
data.grafana.dashboard.nameproperty. -
If necessary, specify a monitoring key with the
data.grafana.dashboard.monitoring.keyproperty. Create
infinispan-operator-configor update the configuration.oc apply -f infinispan-operator-config.yaml
Open the Grafana UI, which is available at:
oc get routes grafana-route -o jsonpath=https://"{.spec.host}"
Chapter 15. Guaranteeing availability with anti-affinity
Kubernetes includes anti-affinity capabilities that protect workloads from single points of failure.
15.1. Anti-affinity strategies
Each Data Grid node in a cluster runs in a pod that runs on an OpenShift node in a cluster. Each Red Hat OpenShift node runs on a physical host system. Anti-affinity works by distributing Data Grid nodes across OpenShift nodes, ensuring that your Data Grid clusters remain available even if hardware failures occur.
Data Grid Operator offers two anti-affinity strategies:
kubernetes.io/hostname- Data Grid replica pods are scheduled on different OpenShift nodes.
topology.kubernetes.io/zone- Data Grid replica pods are scheduled across multiple zones.
Fault tolerance
Anti-affinity strategies guarantee cluster availability in different ways.
The equations in the following section apply only if the number of OpenShift nodes or zones is greater than the number of Data Grid nodes.
Scheduling pods on different OpenShift nodes
Provides tolerance of x node failures for the following types of cache:
-
Replicated:
x = spec.replicas - 1 -
Distributed:
x = num_owners - 1
Scheduling pods across multiple zones
Provides tolerance of x zone failures when x zones exist for the following types of cache:
-
Replicated:
x = spec.replicas - 1 -
Distributed:
x = num_owners - 1
spec.replicas- Defines the number of pods in each Data Grid cluster.
num_owners- Is the cache configuration attribute that defines the number of replicas for each entry in the cache.
15.2. Configuring anti-affinity
Specify where OpenShift schedules pods for your Data Grid clusters to ensure availability.
Procedure
-
Add the
spec.affinityblock to yourInfinispanCR. - Configure anti-affinity strategies as necessary.
-
Apply your
InfinispanCR.
15.2.1. Anti-affinity strategy configurations
Configure anti-affinity strategies in your Infinispan CR to control where OpenShift schedules Data Grid replica pods.
| Topology keys | Description |
|---|---|
|
| Schedules Data Grid replica pods across multiple zones. |
|
| Schedules Data Grid replica pods on different OpenShift nodes. |
Schedule pods on different OpenShift nodes
The following is the anti-affinity strategy that Data Grid Operator uses if you do not configure the spec.affinity field in your Infinispan CR:
spec:
affinity:
podAntiAffinity:
preferredDuringSchedulingIgnoredDuringExecution:
- weight: 100
podAffinityTerm:
labelSelector:
matchLabels:
app: infinispan-pod
clusterName: <cluster_name>
infinispan_cr: <cluster_name>
topologyKey: "kubernetes.io/hostname"Requiring different nodes
In the following example, OpenShift does not schedule Data Grid pods if different nodes are not available:
spec:
affinity:
podAntiAffinity:
requiredDuringSchedulingIgnoredDuringExecution:
- labelSelector:
matchLabels:
app: infinispan-pod
clusterName: <cluster_name>
infinispan_cr: <cluster_name>
topologyKey: "topology.kubernetes.io/hostname"
To ensure that you can schedule Data Grid replica pods on different OpenShift nodes, the number of OpenShift nodes available must be greater than the value of spec.replicas.
Schedule pods across multiple OpenShift zones
The following example prefers multiple zones when scheduling pods but schedules Data Grid replica pods on different OpenShift nodes if it is not possible to schedule across zones:
spec:
affinity:
podAntiAffinity:
preferredDuringSchedulingIgnoredDuringExecution:
- weight: 100
podAffinityTerm:
labelSelector:
matchLabels:
app: infinispan-pod
clusterName: <cluster_name>
infinispan_cr: <cluster_name>
topologyKey: "topology.kubernetes.io/zone"
- weight: 90
podAffinityTerm:
labelSelector:
matchLabels:
app: infinispan-pod
clusterName: <cluster_name>
infinispan_cr: <cluster_name>
topologyKey: "kubernetes.io/hostname"Requiring multiple zones
The following example uses the zone strategy only when scheduling Data Grid replica pods:
spec:
affinity:
podAntiAffinity:
requiredDuringSchedulingIgnoredDuringExecution:
- labelSelector:
matchLabels:
app: infinispan-pod
clusterName: <cluster_name>
infinispan_cr: <cluster_name>
topologyKey: "topology.kubernetes.io/zone"Chapter 16. Creating caches with Data Grid Operator
Use Cache CRs to add cache configuration with Data Grid Operator and control how Data Grid stores your data.
16.1. Data Grid caches
Cache configuration defines the characteristics and features of the data store and must be valid with the Data Grid schema. Data Grid recommends creating standalone files in XML or JSON format that define your cache configuration. You should separate Data Grid configuration from application code for easier validation and to avoid the situation where you need to maintain XML snippets in Java or some other client language.
To create caches with Data Grid clusters running on OpenShift, you should:
-
Use
CacheCR as the mechanism for creating caches through the OpenShift front end. -
Use
BatchCR to create multiple caches at a time from standalone configuration files. - Access Data Grid Console and create caches in XML or JSON format.
You can use Hot Rod or HTTP clients but Data Grid recommends Cache CR or Batch CR unless your specific use case requires programmatic remote cache creation.
Cache CRs
-
CacheCRs apply to Data Grid service pods only. -
Each
CacheCR corresponds to a single cache on the Data Grid cluster.
16.2. Creating caches with the Cache CR
Complete the following steps to create caches on Data Grid service clusters using valid configuration in XML or YAML format.
Procedure
-
Create a
CacheCR with a unique value in themetadata.namefield. -
Specify the target Data Grid cluster with the
spec.clusterNamefield. Name your cache with the
spec.namefield.NoteThe
nameattribute in the cache configuration does not take effect. If you do not specify a name with thespec.namefield then the cache uses the value of themetadata.namefield.-
Add a cache configuration with the
spec.templatefield. Apply the
CacheCR, for example:oc apply -f mycache.yaml cache.infinispan.org/mycachedefinition created
Cache CR examples
XML
apiVersion: infinispan.org/v2alpha1 kind: Cache metadata: name: mycachedefinition spec: clusterName: infinispan name: myXMLcache template: <distributed-cache mode="SYNC" statistics="true"><encoding media-type="application/x-protostream"/><persistence><file-store/></persistence></distributed-cache>
YAML
apiVersion: infinispan.org/v2alpha1
kind: Cache
metadata:
name: mycachedefinition
spec:
clusterName: infinispan
name: myYAMLcache
template: |-
distributedCache:
mode: "SYNC"
owners: "2"
statistics: "true"
encoding:
mediaType: "application/x-protostream"
persistence:
fileStore: ~
16.3. Adding persistent cache stores
You can add persistent cache stores to Data Grid service pods to save data to the persistent volume.
Data Grid creates a Single File cache store, .dat file, in the /opt/infinispan/server/data directory.
Procedure
Add the
<file-store/>element to thepersistenceconfiguration in your Data Grid cache, as in the following example:<distributed-cache name="persistent-cache" mode="SYNC"> <encoding media-type="application/x-protostream"/> <persistence> <file-store/> </persistence> </distributed-cache>
16.4. Adding caches to Cache service pods
Cache service pods include a default cache configuration with recommended settings. This default cache lets you start using Data Grid without the need to create caches.
Because the default cache provides recommended settings, you should create caches only as copies of the default. If you want multiple custom caches you should create Data Grid service pods instead of Cache service pods.
Procedure
- Access the Data Grid Console and provide a copy of the default configuration in XML or JSON format.
Use the Data Grid CLI to create a copy from the default cache as follows:
[//containers/default]> create cache --template=default mycache
16.4.1. Default cache configuration
This topic describes default cache configuration for Cache service pods.
<distributed-cache name="default"
mode="SYNC"
owners="2">
<memory storage="OFF_HEAP"
max-size="<maximum_size_in_bytes>"
when-full="REMOVE" />
<partition-handling when-split="ALLOW_READ_WRITES"
merge-policy="REMOVE_ALL"/>
</distributed-cache>Default caches:
- Use synchronous distribution to store data across the cluster.
- Create two replicas of each entry on the cluster.
- Store cache entries as bytes in native memory (off-heap).
- Define the maximum size for the data container in bytes. Data Grid Operator calculates the maximum size when it creates pods.
- Evict cache entries to control the size of the data container. You can enable automatic scaling so that Data Grid Operator adds pods when memory usage increases instead of removing entries.
- Use a conflict resolution strategy that allows read and write operations for cache entries, even if segment owners are in different partitions.
- Specify a merge policy that removes entries from the cache when Data Grid detects conflicts.
Chapter 17. Running batch operations
Data Grid Operator provides a Batch CR that lets you create Data Grid resources in bulk. Batch CR uses the Data Grid command line interface (CLI) in batch mode to carry out sequences of operations.
Modifying a Batch CR instance has no effect. Batch operations are "one-time" events that modify Data Grid resources. To update .spec fields for the CR, or when a batch operation fails, you must create a new instance of the Batch CR.
17.1. Running inline batch operations
Include your batch operations directly in a Batch CR if they do not require separate configuration artifacts.
Procedure
Create a
BatchCR.-
Specify the name of the Data Grid cluster where you want the batch operations to run as the value of the
spec.clusterfield. Add each CLI command to run on a line in the
spec.configfield.apiVersion: infinispan.org/v2alpha1 kind: Batch metadata: name: mybatch spec: cluster: infinispan config: | create cache --template=org.infinispan.DIST_SYNC mycache put --cache=mycache hello world put --cache=mycache hola mundo
-
Specify the name of the Data Grid cluster where you want the batch operations to run as the value of the
Apply your
BatchCR.oc apply -f mybatch.yaml
-
Check the
status.Phasefield in theBatchCR to verify the operations completed successfully.
17.2. Creating ConfigMaps for batch operations
Create a ConfigMap so that additional files, such as Data Grid cache configuration, are available for batch operations.
Prerequisites
For demonstration purposes, you should add some configuration artifacts to your host filesystem before you start the procedure:
Create a
/tmp/mybatchdirectory where you can add some files.mkdir -p /tmp/mybatch
Create a Data Grid cache configuration.
cat > /tmp/mybatch/mycache.xml<<EOF <distributed-cache name="mycache" mode="SYNC"> <encoding media-type="application/x-protostream"/> <memory max-count="1000000" when-full="REMOVE"/> </distributed-cache> EOF
Procedure
Create a
batchfile that contains all commands you want to run.For example, the following
batchfile creates a cache named "mycache" and adds two entries to it:create cache mycache --file=/etc/batch/mycache.xml put --cache=mycache hello world put --cache=mycache hola mundo
ImportantThe
ConfigMapis mounted in Data Grid pods at/etc/batch. You must prepend all--file=directives in your batch operations with that path.Ensure all configuration artifacts that your batch operations require are in the same directory as the
batchfile.ls /tmp/mybatch batch mycache.xml
Create a
ConfigMapfrom the directory.oc create configmap mybatch-config-map --from-file=/tmp/mybatch
17.3. Running batch operations with ConfigMaps
Run batch operations that include configuration artifacts.
Prerequisites
-
Create a
ConfigMapthat contains any files your batch operations require.
Procedure
-
Create a
BatchCR that specifies the name of a Data Grid cluster as the value of thespec.clusterfield. Set the name of the
ConfigMapthat contains yourbatchfile and configuration artifacts with thespec.configMapfield.cat > mybatch.yaml<<EOF apiVersion: infinispan.org/v2alpha1 kind: Batch metadata: name: mybatch spec: cluster: infinispan configMap: mybatch-config-map EOF
Apply your
BatchCR.oc apply -f mybatch.yaml
-
Check the
status.Phasefield in theBatchCR to verify the operations completed successfully.
17.4. Batch status messages
Verify and troubleshoot batch operations with the status.Phase field in the Batch CR.
| Phase | Description |
|---|---|
|
| All batch operations have completed successfully. |
|
| Batch operations are queued and resources are initializing. |
|
| Batch operations are ready to start. |
|
| Batch operations are in progress. |
|
| One or more batch operations were not successful. |
Failed operations
Batch operations are not atomic. If a command in a batch script fails, it does not affect the other operations or cause them to rollback.
If your batch operations have any server or syntax errors, you can view log messages in the Batch CR in the status.Reason field.
17.5. Example batch operations
Use these example batch operations as starting points for creating and modifying Data Grid resources with the Batch CR.
You can pass configuration files to Data Grid Operator only via a ConfigMap.
The ConfigMap is mounted in Data Grid pods at /etc/batch so you must prepend all --file= directives with that path.
17.5.1. Caches
- Create multiple caches from configuration files.
echo "creating caches..." create cache sessions --file=/etc/batch/infinispan-prod-sessions.xml create cache tokens --file=/etc/batch/infinispan-prod-tokens.xml create cache people --file=/etc/batch/infinispan-prod-people.xml create cache books --file=/etc/batch/infinispan-prod-books.xml create cache authors --file=/etc/batch/infinispan-prod-authors.xml echo "list caches in the cluster" ls caches
- Create a template from a file and then create caches from the template.
echo "creating caches..." create cache mytemplate --file=/etc/batch/mycache.xml create cache sessions --template=mytemplate create cache tokens --template=mytemplate echo "list caches in the cluster" ls caches
17.5.2. Counters
Use the Batch CR to create multiple counters that can increment and decrement to record the count of objects.
You can use counters to generate identifiers, act as rate limiters, or track the number of times a resource is accessed.
echo "creating counters..." create counter --concurrency-level=1 --initial-value=5 --storage=PERSISTENT --type=weak mycounter1 create counter --initial-value=3 --storage=PERSISTENT --type=strong mycounter2 create counter --initial-value=13 --storage=PERSISTENT --type=strong --upper-bound=10 mycounter3 echo "list counters in the cluster" ls counters
17.5.3. Protobuf schema
Register Protobuf schema to query values in caches. Protobuf schema (.proto files) provide metadata about custom entities and controls field indexing.
echo "creating schema..." schema --upload=person.proto person.proto schema --upload=book.proto book.proto schema --upload=author.proto book.proto echo "list Protobuf schema" ls schemas
17.5.4. Tasks
Upload tasks that implement org.infinispan.tasks.ServerTask or scripts that are compatible with the javax.script scripting API.
echo "creating tasks..." task upload --file=/etc/batch/myfirstscript.js myfirstscript task upload --file=/etc/batch/mysecondscript.js mysecondscript task upload --file=/etc/batch/mythirdscript.js mythirdscript echo "list tasks" ls tasks
Additional resources
Chapter 18. Backing up and restoring Data Grid clusters
Data Grid Operator lets you back up and restore Data Grid cluster state for disaster recovery and to migrate Data Grid resources between clusters.
18.1. Backup and Restore CRs
Backup and Restore CRs save in-memory data at runtime so you can easily recreate Data Grid clusters.
Applying a Backup or Restore CR creates a new pod that joins the Data Grid cluster as a zero-capacity member, which means it does not require cluster rebalancing or state transfer to join.
For backup operations, the pod iterates over cache entries and other resources and creates an archive, a .zip file, in the /opt/infinispan/backups directory on the persistent volume (PV).
Performing backups does not significantly impact performance because the other pods in the Data Grid cluster only need to respond to the backup pod as it iterates over cache entries.
For restore operations, the pod retrieves Data Grid resources from the archive on the PV and applies them to the Data Grid cluster.
When either the backup or restore operation completes, the pod leaves the cluster and is terminated.
Reconciliation
Data Grid Operator does not reconcile Backup and Restore CRs which mean that backup and restore operations are "one-time" events.
Modifying an existing Backup or Restore CR instance does not perform an operation or have any effect. If you want to update .spec fields, you must create a new instance of the Backup or Restore CR.
18.2. Backing up Data Grid clusters
Create a backup file that stores Data Grid cluster state to a persistent volume.
Prerequisites
-
Create an
InfinispanCR withspec.service.type: DataGrid. Ensure there are no active client connections to the Data Grid cluster.
Data Grid backups do not provide snapshot isolation and data modifications are not written to the archive after the cache is backed up.
To archive the exact state of the cluster, you should always disconnect any clients before you back it up.
Procedure
-
Name the
BackupCR with themetadata.namefield. -
Specify the Data Grid cluster to backup with the
spec.clusterfield. Configure the persistent volume claim (PVC) that adds the backup archive to the persistent volume (PV) with the
spec.volume.storageandspec.volume.storage.storageClassNamefields.apiVersion: infinispan.org/v2alpha1 kind: Backup metadata: name: my-backup spec: cluster: source-cluster volume: storage: 1Gi storageClassName: my-storage-classOptionally include
spec.resourcesfields to specify which Data Grid resources you want to back up.If you do not include any
spec.resourcesfields, theBackupCR creates an archive that contains all Data Grid resources. If you do specifyspec.resourcesfields, theBackupCR creates an archive that contains those resources only.spec: ... resources: templates: - distributed-sync-prod - distributed-sync-dev caches: - cache-one - cache-two counters: - counter-name protoSchemas: - authors.proto - books.proto tasks: - wordStream.jsYou can also use the
*wildcard character as in the following example:spec: ... resources: caches: - "*" protoSchemas: - "*"Apply your
BackupCR.oc apply -f my-backup.yaml
Verification
Check that the
status.phasefield has a status ofSucceededin theBackupCR and that Data Grid logs have the following message:ISPN005044: Backup file created 'my-backup.zip'
Run the following command to check that the backup is successfully created:
oc describe Backup my-backup
18.3. Restoring Data Grid clusters
Restore Data Grid cluster state from a backup archive.
Prerequisites
-
Create a
BackupCR on a source cluster. Create a target Data Grid cluster of Data Grid service pods.
NoteIf you restore an existing cache, the operation overwrites the data in the cache but not the cache configuration.
For example, you back up a distributed cache named
mycacheon the source cluster. You then restoremycacheon a target cluster where it already exists as a replicated cache. In this case, the data from the source cluster is restored andmycachecontinues to have a replicated configuration on the target cluster.Ensure there are no active client connections to the target Data Grid cluster you want to restore.
Cache entries that you restore from a backup can overwrite more recent cache entries.
For example, a client performs acache.put(k=2)operation and you then restore a backup that containsk=1.
Procedure
-
Name the
RestoreCR with themetadata.namefield. -
Specify a
BackupCR to use with thespec.backupfield. Specify the Data Grid cluster to restore with the
spec.clusterfield.apiVersion: infinispan.org/v2alpha1 kind: Restore metadata: name: my-restore spec: backup: my-backup cluster: target-cluster
Optionally add the
spec.resourcesfield to restore specific resources only.spec: ... resources: templates: - distributed-sync-prod - distributed-sync-dev caches: - cache-one - cache-two counters: - counter-name protoSchemas: - authors.proto - books.proto tasks: - wordStream.jsApply your
RestoreCR.oc apply -f my-restore.yaml
Verification
Check that the
status.phasefield has a status ofSucceededin theRestoreCR and that Data Grid logs have the following message:ISPN005045: Restore 'my-backup' complete
You should then open the Data Grid Console or establish a CLI connection to verify data and Data Grid resources are restored as expected.
18.4. Backup and restore status
Backup and Restore CRs include a status.phase field that provides the status for each phase of the operation.
| Status | Description |
|---|---|
|
| The system has accepted the request and the controller is preparing the underlying resources to create the pod. |
|
| The controller has prepared all underlying resources successfully. |
|
| The pod is created and the operation is in progress on the Data Grid cluster. |
|
| The operation has completed successfully on the Data Grid cluster and the pod is terminated. |
|
| The operation did not successfully complete and the pod is terminated. |
|
| The controller cannot obtain the status of the pod or determine the state of the operation. This condition typically indicates a temporary communication error with the pod. |
18.4.1. Handling failed backup and restore operations
If the status.phase field of the Backup or Restore CR is Failed, you should examine pod logs to determine the root cause before you attempt the operation again.
Procedure
Examine the logs for the pod that performed the failed operation.
Pods are terminated but remain available until you delete the
BackuporRestoreCR.oc logs <backup|restore_pod_name>
- Resolve any error conditions or other causes of failure as indicated by the pod logs.
-
Create a new instance of the
BackuporRestoreCR and attempt the operation again.
Chapter 19. Deploying custom code to Data Grid
Add custom code, such as scripts and event listeners, to your Data Grid clusters.
Before you can deploy custom code to Data Grid clusters, you need to make it available. To do this you can copy artifacts from a persistent volume (PV), download artifacts from an HTTP or FTP server, or use both methods.
19.1. Copying code artifacts to Data Grid clusters
Adding your artifacts to a persistent volume (PV) and then copy them to Data Grid pods.
This procedure explains how to use a temporary pod that mounts a persistent volume claim (PVC) that:
- Lets you add code artifacts to the PV (perform a write operation).
- Allows Data Grid pods to load code artifacts from the PV (perform a read operation).
To perform these read and write operations, you need certain PV access modes. However, support for different PVC access modes is platform dependent.
It is beyond the scope of this document to provide instructions for creating PVCs with different platforms. For simplicity, the following procedure shows a PVC with the ReadWriteMany access mode.
In some cases only the ReadOnlyMany or ReadWriteOnce access modes are available. You can use a combination of those access modes by reclaiming and reusing PVCs with the same spec.volumeName.
Using ReadWriteOnce access mode results in all Data Grid pods in a cluster being scheduled on the same OpenShift node.
Procedure
Change to the namespace for your Data Grid cluster.
oc project rhdg-namespace
Create a PVC for your custom code artifacts, for example:
apiVersion: v1 kind: PersistentVolumeClaim metadata: name: datagrid-libs spec: accessModes: - ReadWriteMany resources: requests: storage: 100MiApply your PVC.
oc apply -f datagrid-libs.yaml
Create a pod that mounts the PVC, for example:
apiVersion: v1 kind: Pod metadata: name: datagrid-libs-pod spec: securityContext: fsGroup: 2000 volumes: - name: lib-pv-storage persistentVolumeClaim: claimName: datagrid-libs containers: - name: lib-pv-container image: registry.redhat.io/datagrid/datagrid-8-rhel8:8.3 volumeMounts: - mountPath: /tmp/libs name: lib-pv-storageAdd the pod to the Data Grid namespace and wait for it to be ready.
oc apply -f datagrid-libs-pod.yaml oc wait --for=condition=ready --timeout=2m pod/datagrid-libs-pod
Copy your code artifacts to the pod so that they are loaded into the PVC.
For example to copy code artifacts from a local
libsdirectory, do the following:oc cp --no-preserve=true libs datagrid-libs-pod:/tmp/
Delete the pod.
oc delete pod datagrid-libs-pod
Specify the persistent volume with
spec.dependencies.volumeClaimNamein yourInfinispanCR and then apply the changes.apiVersion: infinispan.org/v1 kind: Infinispan metadata: name: infinispan spec: replicas: 2 dependencies: volumeClaimName: datagrid-libs service: type: DataGrid
If you update your custom code on the persistent volume, you must restart the Data Grid cluster so it can load the changes.
Additional resources
19.2. Downloading code artifacts
Add your artifacts to an HTTP or FTP server so that Data Grid Operator downloads them to the {lib_path} directory on each Data Grid node.
When downloading files, Data Grid Operator can automatically detect the file type. Data Grid Operator also extracts archived files, such as zip or tgz, to the filesystem after the download completes.
Each time Data Grid Operator creates a Data Grid node it downloads the artifacts to the node. The download also occurs when Data Grid Operator recreates pods after terminating them.
Prerequisites
- Host your code artifacts on an HTTP or FTP server.
Procedure
Add the
spec.dependencies.artifactsfield to yourInfinispanCR.-
Specify the location of the file to download via
HTTPorFTPas the value of thespec.dependencies.artifacts.urlfield. Optionally specify a checksum to verify the integrity of the download with the
spec.dependencies.artifacts.hashfield.The
hashfield requires a value is in the format of<algorithm>:<checksum>where<algorithm>issha1|sha224|sha256|sha384|sha512|md5.Set the file type, if necessary, with the
spec.dependencies.artifacts.typefield.You should explicitly set the file type if it is not included in the URL or if the file type is actually different to the extension in the URL.
NoteIf you set
type: file, Data Grid Operator downloads the file as-is without extracting it to the filesystem.apiVersion: infinispan.org/v1 kind: Infinispan metadata: name: infinispan spec: replicas: 2 dependencies: artifacts: - url: http://example.com:8080/path hash: sha256:596408848b56b5a23096baa110cd8b633c9a9aef2edd6b38943ade5b4edcd686 type: zip service: type: DataGrid
-
Specify the location of the file to download via
- Apply the changes.
Chapter 20. Sending cloud events from Data Grid clusters
Configure Data Grid as a Knative source by sending CloudEvents to Apache Kafka topics.
Sending cloud events with Red Hat OpenShift Serverless is available as a technology preview feature.
20.1. Technology preview features
Technology preview features or capabilities are not supported with Red Hat production service-level agreements (SLAs) and might not be functionally complete.
Red Hat does not recommend using technology preview features or capabilities for production. These features provide early access to upcoming product features, which enables you to test functionality and provide feedback during the development process.
For more information, see Red Hat Technology Preview Features Support Scope.
20.2. Cloud events
You can send CloudEvents from Data Grid clusters when entries in caches are created, updated, removed, or expired.
Data Grid sends structured events to Kafka in JSON format, as in the following example:
{
"specversion": "1.0",
"source": "/infinispan/<cluster_name>/<cache_name>",
"type": "org.infinispan.entry.created",
"time": "<timestamp>",
"subject": "<key-name>",
"id": "key-name:CommandInvocation:node-name:0",
"data": {
"property": "value"
}
}| Field | Description |
|---|---|
|
|
Prefixes events for Data Grid cache entries with |
|
| Entry value. |
|
| Entry key, converted to string. |
|
| Generated identifier for the event. |
20.3. Enabling cloud events
Configure Data Grid to send CloudEvents.
Prerequisites
- Set up an Kafka cluster that listens for Data Grid topics.
Procedure
Add
spec.cloudEventsto yourInfinispanCR.-
Configure the number of acknowledgements with the
spec.cloudEvents.acksfield. Values are "0", "1", or "all". -
List Kafka servers to which Data Grid sends events with the
spec.cloudEvents.bootstrapServersfield. Specify the Kafka topic for Data Grid events with the
spec.cloudEvents.cacheEntriesTopicfield.spec: cloudEvents: acks: "1" bootstrapServers: my-cluster-kafka-bootstrap_1.<namespace_1>.svc:9092,my-cluster-kafka-bootstrap_2.<namespace_2>.svc:9092 cacheEntriesTopic: target-topic
-
Configure the number of acknowledgements with the
- Apply your changes.
Chapter 21. Establishing remote client connections
Connect to Data Grid clusters from the Data Grid Console, Command Line Interface (CLI), and remote clients.
21.1. Client connection details
Client connections to Data Grid require the following information:
- Hostname
- Port
- Authentication credentials, if required
- TLS certificate, if you use encryption
Hostnames
The hostname you use depends on whether clients are running on the same OpenShift cluster as Data Grid.
Client applications running on the same OpenShift cluster use the internal service name for the Data Grid cluster.
metadata:
  name: infinispan
Client applications running on a different OpenShift, or outside OpenShift, use a hostname that depends on how Data Grid is exposed on the network.
A LoadBalancer service uses the URL for the load balancer. A NodePort service uses the node hostname. An Red Hat OpenShift Route uses either a custom hostname that you define or a hostname that the system generates.
Ports
Client connections on OpenShift and a through LoadBalancer service use port 11222.
NodePort services use a port in the range of 30000 to 60000. Routes use either port 80 (unencrypted) or 443 (encrypted).
Additional resources
21.2. Connecting to Data Grid clusters with remote shells
Start a remote shell session to Data Grid clusters and use the command line interface (CLI) to work with Data Grid resources and perform administrative operations.
Prerequisites
-
Have
kubectl-infinispanon yourPATH. - Have valid Data Grid credentials.
Procedure
Run the
infinispan shellcommand to connect to your Data Grid cluster.oc infinispan shell <cluster_name>
NoteIf you have access to authentication secrets and there is only one Data Grid user the
kubectl-infinispanplugin automatically detects your credentials and authenticates to Data Grid. If your deployment has multiple Data Grid credentials, specify a user with the--usernameargument and enter the corresponding password when prompted.Perform CLI operations as required.
TipPress the tab key or use the
--helpargument to view available options and help text.-
Use the
quitcommand to end the remote shell session.
Additional resources
21.3. Accessing Data Grid Console
Access the console to create caches, perform adminstrative operations, and monitor your Data Grid clusters.
Prerequisites
-
Expose Data Grid on the network so you can access the console through a browser.
For example, configure aLoadBalancerservice or create aRoute.
Procedure
Access the console from any browser at
$HOSTNAME:$PORT.Replace
$HOSTNAME:$PORTwith the network location where Data Grid is available.
21.4. Hot Rod clients
Hot Rod is a binary TCP protocol that Data Grid provides for high-performance data transfer capabilities with remote clients.
Client intelligence
The Hot Rod protocol includes a mechanism that provides clients with an up-to-date view of the cache topology. Client intelligence improves performance by reducing the number of network hops for read and write operations.
Clients running in the same OpenShift cluster can access internal IP addresses for Data Grid pods so you can use any client intelligence.
HASH_DISTRIBUTION_AWARE is the default intelligence mechanism and enables clients to route requests to primary owners, which provides the best performance for Hot Rod clients.
BASIC intelligence
Hot Rod clients must use BASIC intelligence in the following situations:
-
Connecting to Data Grid through a
LoadBalancer,NodePort, or OpenShiftRoute. - Failing over to a different OpenShift cluster when using cross-site replication.
OpenShift cluster administrators can define network policies that restrict traffic to Data Grid. In some cases network isolation policies can require you to use BASIC intelligence even when clients are running in the same OpenShift cluster but a different namespace.
21.4.1. Hot Rod client configuration API
You can programmatically configure Hot Rod client connections with the ConfigurationBuilder interface.
Replace $SERVICE_HOSTNAME in the following examples with the internal service name of your Data Grid cluster.
metadata:
  name: infinispan
On OpenShift
ConfigurationBuilder
import org.infinispan.client.hotrod.configuration.ConfigurationBuilder;
import org.infinispan.client.hotrod.configuration.SaslQop;
import org.infinispan.client.hotrod.impl.ConfigurationProperties;
...

ConfigurationBuilder builder = new ConfigurationBuilder();
      builder.addServer()
               .host("$HOSTNAME")
               .port(ConfigurationProperties.DEFAULT_HOTROD_PORT)
             .security().authentication()
               .username("username")
               .password("changeme")
               .realm("default")
               .saslQop(SaslQop.AUTH)
               .saslMechanism("SCRAM-SHA-512")
             .ssl()
               .sniHostName("$SERVICE_HOSTNAME")
               .trustStoreFileName("/var/run/secrets/kubernetes.io/serviceaccount/service-ca.crt")
               .trustStoreType("pem");
hotrod-client.properties
# Connection
infinispan.client.hotrod.server_list=$HOSTNAME:$PORT

# Authentication
infinispan.client.hotrod.use_auth=true
infinispan.client.hotrod.auth_username=developer
infinispan.client.hotrod.auth_password=$PASSWORD
infinispan.client.hotrod.auth_server_name=$CLUSTER_NAME
infinispan.client.hotrod.sasl_properties.javax.security.sasl.qop=auth
infinispan.client.hotrod.sasl_mechanism=SCRAM-SHA-512

# Encryption
infinispan.client.hotrod.sni_host_name=$SERVICE_HOSTNAME
infinispan.client.hotrod.trust_store_file_name=/var/run/secrets/kubernetes.io/serviceaccount/service-ca.crt
infinispan.client.hotrod.trust_store_type=pem
Outside OpenShift
ConfigurationBuilder
import org.infinispan.client.hotrod.configuration.ClientIntelligence;
import org.infinispan.client.hotrod.configuration.ConfigurationBuilder;
import org.infinispan.client.hotrod.configuration.SaslQop;
...

ConfigurationBuilder builder = new ConfigurationBuilder();
      builder.addServer()
               .host("$HOSTNAME")
               .port("$PORT")
             .security().authentication()
               .username("username")
               .password("changeme")
               .realm("default")
               .saslQop(SaslQop.AUTH)
               .saslMechanism("SCRAM-SHA-512")
             .ssl()
               .sniHostName("$SERVICE_HOSTNAME")
               //Create a client trust store with tls.crt from your project.
               .trustStoreFileName("/path/to/truststore.pkcs12")
               .trustStorePassword("trust_store_password")
               .trustStoreType("PCKS12");
      builder.clientIntelligence(ClientIntelligence.BASIC);
hotrod-client.properties
# Connection
infinispan.client.hotrod.server_list=$HOSTNAME:$PORT

# Client intelligence
infinispan.client.hotrod.client_intelligence=BASIC

# Authentication
infinispan.client.hotrod.use_auth=true
infinispan.client.hotrod.auth_username=developer
infinispan.client.hotrod.auth_password=$PASSWORD
infinispan.client.hotrod.auth_server_name=$CLUSTER_NAME
infinispan.client.hotrod.sasl_properties.javax.security.sasl.qop=auth
infinispan.client.hotrod.sasl_mechanism=SCRAM-SHA-512

# Encryption
infinispan.client.hotrod.sni_host_name=$SERVICE_HOSTNAME
# Create a client trust store with tls.crt from your project.
infinispan.client.hotrod.trust_store_file_name=/path/to/truststore.pkcs12
infinispan.client.hotrod.trust_store_password=trust_store_password
infinispan.client.hotrod.trust_store_type=PCKS12
21.4.2. Configuring Hot Rod clients for certificate authentication
If you enable client certificate authentication, clients must present valid certificates when negotiating connections with Data Grid.
Validate strategy
If you use the Validate strategy, you must configure clients with a keystore so they can present signed certificates. You must also configure clients with Data Grid credentials and any suitable authentication mechanism.
Authenticate strategy
If you use the Authenticate strategy, you must configure clients with a keystore that contains signed certificates and valid Data Grid credentials as part of the distinguished name (DN). Hot Rod clients must also use the EXTERNAL authentication mechanism.
If you enable security authorization, you should assign the Common Name (CN) from the client certificate a role with the appropriate permissions.
The following example shows a Hot Rod client configuration for client certificate authentication with the Authenticate strategy:
import org.infinispan.client.hotrod.configuration.ConfigurationBuilder;
...

ConfigurationBuilder builder = new ConfigurationBuilder();
      builder.security()
             .authentication()
               .saslMechanism("EXTERNAL")
             .ssl()
               .keyStoreFileName("/path/to/keystore")
               .keyStorePassword("keystorepassword".toCharArray())
               .keyStoreType("PCKS12");
21.4.3. Creating caches from Hot Rod clients
You can remotely create caches on Data Grid clusters running on OpenShift with Hot Rod clients. However, Data Grid recommends that you create caches using Data Grid Console, the CLI, or with Cache CRs instead of with Hot Rod clients.
Programmatically creating caches
The following example shows how to add cache configurations to the ConfigurationBuilder and then create them with the RemoteCacheManager:
import org.infinispan.client.hotrod.DefaultTemplate;
import org.infinispan.client.hotrod.RemoteCache;
import org.infinispan.client.hotrod.RemoteCacheManager;
...

      builder.remoteCache("my-cache")
             .templateName(DefaultTemplate.DIST_SYNC);
      builder.remoteCache("another-cache")
             .configuration("<infinispan><cache-container><distributed-cache name=\"another-cache\"><encoding media-type=\"application/x-protostream\"/></distributed-cache></cache-container></infinispan>");
      try (RemoteCacheManager cacheManager = new RemoteCacheManager(builder.build())) {
      // Get a remote cache that does not exist.
      // Rather than return null, create the cache from a template.
      RemoteCache<String, String> cache = cacheManager.getCache("my-cache");
      // Store a value.
      cache.put("hello", "world");
      // Retrieve the value and print it.
      System.out.printf("key = %s\n", cache.get("hello"));
This example shows how to create a cache named CacheWithXMLConfiguration using the XMLStringConfiguration() method to pass the cache configuration as XML:
import org.infinispan.client.hotrod.RemoteCacheManager;
import org.infinispan.commons.configuration.XMLStringConfiguration;
...

private void createCacheWithXMLConfiguration() {
    String cacheName = "CacheWithXMLConfiguration";
    String xml = String.format("<distributed-cache name=\"%s\">" +
                                  "<encoding media-type=\"application/x-protostream\"/>" +
                                  "<locking isolation=\"READ_COMMITTED\"/>" +
                                  "<transaction mode=\"NON_XA\"/>" +
                                  "<expiration lifespan=\"60000\" interval=\"20000\"/>" +
                                "</distributed-cache>"
                                , cacheName);
    manager.administration().getOrCreateCache(cacheName, new XMLStringConfiguration(xml));
    System.out.println("Cache with configuration exists or is created.");
}
Using Hot Rod client properties
When you invoke cacheManager.getCache() calls for named caches that do not exist, Data Grid creates them from the Hot Rod client properties instead of returning null.
Add cache configuration to hotrod-client.properties as in the following example:
# Add cache configuration
infinispan.client.hotrod.cache.my-cache.template_name=org.infinispan.DIST_SYNC
infinispan.client.hotrod.cache.another-cache.configuration=<infinispan><cache-container><distributed-cache name=\"another-cache\"/></cache-container></infinispan>
infinispan.client.hotrod.cache.my-other-cache.configuration_uri=file:/path/to/configuration.xml
21.5. Accessing the REST API
Data Grid provides a RESTful interface that you can interact with using HTTP clients.
Prerequisites
-
Expose Data Grid on the network so you can access the REST API.
For example, configure aLoadBalancerservice or create aRoute.
Procedure
Access the REST API with any HTTP client at
$HOSTNAME:$PORT/rest/v2.Replace
$HOSTNAME:$PORTwith the network location where Data Grid listens for client connections.
Additional resources