
Data Grid Cross-Site Replication
Back up data between Data Grid clusters
Abstract
Red Hat Data Grid
Data Grid is a high-performance, distributed in-memory data store.
- Schemaless data structure
- Flexibility to store different objects as key-value pairs.
- Grid-based data storage
- Designed to distribute and replicate data across clusters.
- Elastic scaling
- Dynamically adjust the number of nodes to meet demand without service disruption.
- Data interoperability
- Store, retrieve, and query data in the grid from different endpoints.
Data Grid documentation
Documentation for Data Grid is available on the Red Hat customer portal.
Data Grid downloads
Access the Data Grid Software Downloads on the Red Hat customer portal.
You must have a Red Hat account to access and download Data Grid software.
Making open source more inclusive
Red Hat is committed to replacing problematic language in our code, documentation, and web properties. We are beginning with these four terms: master, slave, blacklist, and whitelist. Because of the enormity of this endeavor, these changes will be implemented gradually over several upcoming releases. For more details, see our CTO Chris Wright’s message.
Chapter 1. Cross-site replication
This section explains Data Grid cross-site replication capabilities, including details about relay nodes, state transfer, and client connections for remote caches.
1.1. Cross-site replication
Data Grid can back up data between clusters running in geographically dispersed data centers and across different cloud providers. Cross-site replication provides Data Grid with a global cluster view and:
- Guarantees service continuity in the event of outages or disasters.
- Presents client applications with a single point of access to data in globally distributed caches.
Figure 1.1. Cross-site replication
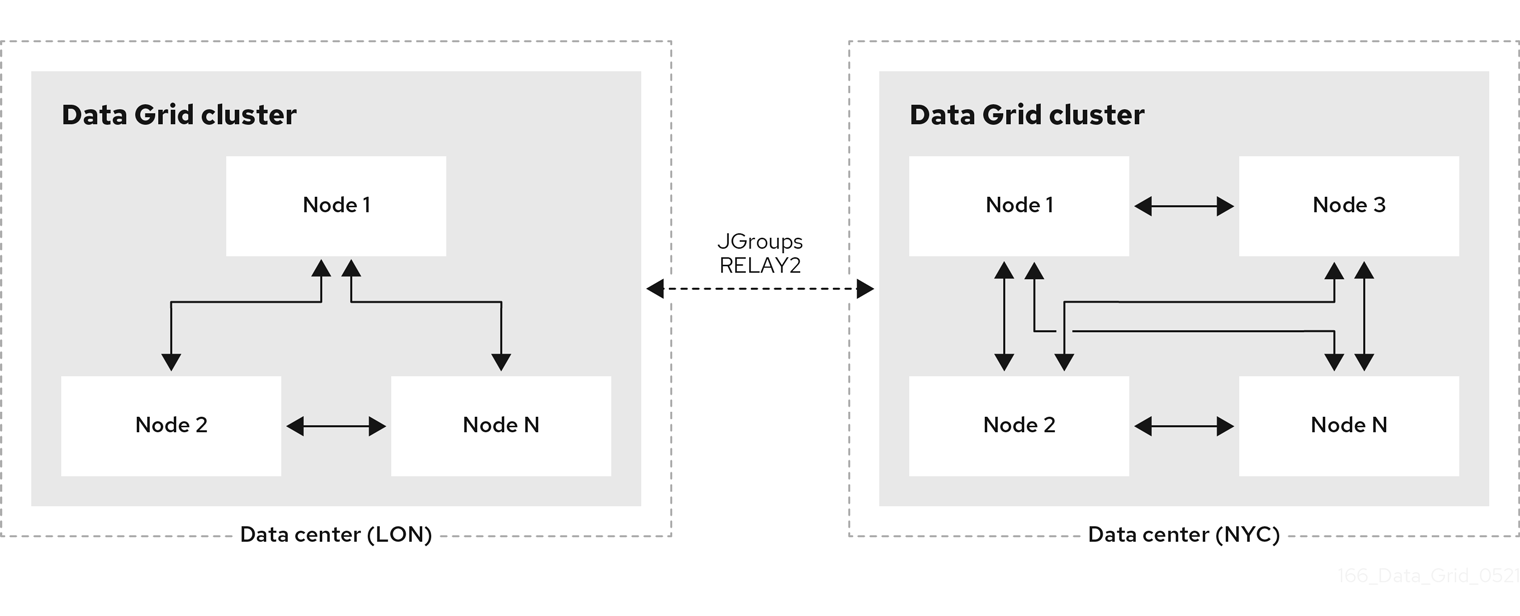
1.2. Relay nodes
Relay nodes are the nodes in Data Grid clusters that are responsible for sending and receiving requests from backup locations.
If a node is not a relay node, it must forward backup requests to a local relay node. Only relay nodes can send requests to backup locations.
For optimal performance, you should configure all nodes as relay nodes. This increases the speed of backup requests because each node in the cluster can backup to remote sites directly without having to forward backup requests to local relay nodes.
Diagrams in this document illustrate Data Grid clusters with one relay node because this is the default for the JGroups RELAY2 protocol. Likewise, a single relay node is easier to illustrate because each relay node in a cluster communicates with each relay node in the remote cluster.
JGroups configuration refers to relay nodes as "site master" nodes. Data Grid uses relay node instead because it is more descriptive and presents a more intuitive choice for our users.
1.3. Data Grid cache backups
Data Grid caches include a backups configuration that let you name remote sites as backup locations.
For example, the following diagram shows three caches, "customers", "eu-orders", and "us-orders":
- In LON, "customers" names NYC as a backup location.
- In NYC, "customers" names LON as a backup location.
- "eu-orders" and "us-orders" do not have backups and are local to the respective cluster.
1.4. Backup strategies
Data Grid replicates data between clusters at the same time that writes to caches occur. For example, if a client writes "k1" to LON, Data Grid backs up "k1" to NYC at the same time.
To back up data to a different cluster, Data Grid can use either a synchronous or asynchronous strategy.
Synchronous strategy
When Data Grid replicates data to backup locations, it writes to the cache on the local cluster and the cache on the remote cluster concurrently. With the synchronous strategy, Data Grid waits for both write operations to complete before returning.
You can control how Data Grid handles writes to the cache on the local cluster if backup operations fail. Data Grid can do the following:
- Ignore the failed backup and silently continue the write to the local cluster.
- Log a warning message or throw an exception and continue the write to the local cluster.
- Handle failed backup operations with custom logic.
Synchronous backups also support two-phase commits with caches that participate in optimistic transactions. The first phase of the backup acquires a lock. The second phase commits the modification.
Two-phase commit with cross-site replication has a significant performance impact because it requires two round-trips across the network.
Asynchronous strategy
When Data Grid replicates data to backup locations, it does not wait until the operation completes before writing to the local cache.
Asynchronous backup operations and writes to the local cache are independent of each other. If backup operations fail, write operations to the local cache continue and no exceptions occur. When this happens Data Grid also retries the write operation until the remote cluster disconnects from the cross-site view.
Synchronous vs asynchronous backups
Synchronous backups offer the strongest guarantee of data consistency across sites. If strategy=sync, when cache.put() calls return you know the value is up to date in the local cache and in the backup locations.
The trade-off for this consistency is performance. Synchronous backups have much greater latency in comparison to asynchronous backups.
Asynchronous backups, on the other hand, do not add latency to client requests so they have no performance impact. However, if strategy=async, when cache.put() calls return you cannot be sure of that the value in the backup location is the same as in the local cache.
1.5. Automatic offline parameters for backup locations
Operations to replicate data across clusters are resource intensive, using excessive RAM and CPU. To avoid wasting resources Data Grid can take backup locations offline when they stop accepting requests after a specific period of time.
Data Grid takes remote sites offline based on the number of failed sequential requests and the time interval since the first failure. Requests are failed when the target cluster does not have any nodes in the cross-site view (JGroups bridge) or when a timeout expires before the target cluster acknowledges the request.
Backup timeouts
Backup configurations include timeout values for operations to replicate data between clusters. If operations do not complete before the timeout expires, Data Grid records them as failures.
In the following example, operations to replicate data to NYC are recorded as failures if they do not complete after 10 seconds:
XML
<distributed-cache>
  <backups>
    <backup site="NYC"
            strategy="ASYNC"
            timeout="10000" />
  </backups>
</distributed-cache>
JSON
{
  "distributed-cache": {
    "backups": {
      "NYC" : {
        "backup" : {
          "strategy" : "ASYNC",
          "timeout" : "10000"
        }
      }
    }
  }
}
YAML
distributedCache:
  backups:
    NYC:
      backup:
        strategy: "ASYNC"
        timeout: "10000"
Number of failures
You can specify the number of consecutive failures that can occur before backup locations go offline.
In the following example, if a cluster attempts to replicate data to NYC and five consecutive operations fail, NYC automatically goes offline:
XML
<distributed-cache>
  <backups>
    <backup site="NYC"
            strategy="ASYNC"
            timeout="10000">
      <take-offline after-failures="5"/>
    </backup>
  </backups>
</distributed-cache>
JSON
{
  "distributed-cache": {
    "backups": {
      "NYC" : {
        "backup" : {
          "strategy" : "ASYNC",
          "timeout" : "10000",
          "take-offline" : {
            "after-failures" : "5"
          }
        }
      }
    }
  }
}
YAML
distributedCache:
  backups:
    NYC:
      backup:
        strategy: "ASYNC"
        timeout: "10000"
        takeOffline:
          afterFailures: "5"
Time to wait
You can also specify how long to wait before taking sites offline when backup operations fail. If a backup request succeeds before the wait time runs out, Data Grid does not take the site offline.
One or two minutes is generally a suitable time to wait before automatically taking backup locations offline. If the wait period is too short then backup locations go offline too soon. You then need to bring clusters back online and perform state transfer operations to ensure data is in sync between the clusters.
A negative or zero value for the number of failures is equivalent to a value of 1. Data Grid uses only a minimum time to wait to take backup locations offline after a failure occurs, for example:
<take-offline after-failures="-1"
              min-wait="10000"/>
In the following example, if a cluster attempts to replicate data to NYC and there are more than five consecutive failures and 15 seconds elapse after the first failed operation, NYC automatically goes offline:
XML
<distributed-cache>
  <backups>
    <backup site="NYC"
            strategy="ASYNC"
            timeout="10000">
      <take-offline after-failures="5" min-wait="15000"/>
    </backup>
  </backups>
</distributed-cache>
JSON
{
  "distributed-cache": {
    "backups": {
      "NYC" : {
        "backup" : {
          "strategy" : "ASYNC",
          "timeout" : "10000",
          "take-offline" : {
            "after-failures" : "5",
            "min-wait" : "15000"
          }
        }
      }
    }
  }
}
YAML
distributedCache:
  backups:
    NYC:
      backup:
        strategy: "ASYNC"
        timeout: "10000"
        takeOffline:
          afterFailures: "5"
          minWait: "15000"
1.6. State transfer
State transfer is an administrative operation that synchronizes data between sites.
For example, LON goes offline and NYC starts handling client requests. When you bring LON back online, the Data Grid cluster in LON does not have the same data as the cluster in NYC.
To ensure the data is consistent between LON and NYC, you can push state from NYC to LON.
- State transfer is bidirectional. For example, you can push state from NYC to LON or from LON to NYC.
- Pushing state to offline sites brings them back online.
State transfer overwrites only data that exists on both sites, the originating site and the receiving site. Data Grid does not delete data.
For example, "k2" exists on LON and NYC. "k2" is removed from NYC while LON is offline. When you bring LON back online, "k2" still exists at that location. If you push state from NYC to LON, the transfer does not affect "k2" on LON.
To ensure contents of the cache are identical after state transfer, remove all data from the cache on the receiving site before pushing state.
Use the clear() method or the clearcache command from the CLI.
State transfer does not overwrite updates to data that occur after you initiate the push.
For example, "k1,v1" exists on LON and NYC. LON goes offline so you push state transfer to LON from NYC, which brings LON back online. Before state transfer completes, a client puts "k1,v2" on LON.
In this case the state transfer from NYC does not overwrite "k1,v2" because that modification happened after you initiated the push.
Automatic state transfer
By default you must manually perform cross-site state transfer operations with the CLI or via JMX or REST.
However, when using the asynchronous backup strategy, Data Grid can automatically perform cross-site state transfer operations. When it detects that a backup location has come back online, and the network connection is stable, Data Grid initiates bi-directional state transfer between backup locations. For example, Data Grid simultaneously transfers state from LON to NYC and NYC to LON.
To avoid temporary network disconnects triggering state transfer operations, there are two conditions that backup locations must meet to go offline. The status of a backup location must be offline and it must not be included in the cross-site view with JGroups RELAY2.
Additional resources
1.7. Client connections across sites
Clients can write to Data Grid clusters in either an Active/Passive or Active/Active configuration.
Active/Passive
The following diagram illustrates Active/Passive where Data Grid handles client requests from one site only:
In the preceding image:
- Client connects to the Data Grid cluster at LON.
- Client writes "k1" to the cache.
- The relay node at LON, "n1", sends the request to replicate "k1" to the relay node at NYC, "nA".
With Active/Passive, NYC provides data redundancy. If the Data Grid cluster at LON goes offline for any reason, clients can start sending requests to NYC. When you bring LON back online you can synchronize data with NYC and then switch clients back to LON.
Active/Active
The following diagram illustrates Active/Active where Data Grid handles client requests at two sites:
In the preceding image:
- Client A connects to the Data Grid cluster at LON.
- Client A writes "k1" to the cache.
- Client B connects to the Data Grid cluster at NYC.
- Client B writes "k2" to the cache.
- Relay nodes at LON and NYC send requests so that "k1" is replicated to NYC and "k2" is replicated to LON.
With Active/Active both NYC and LON replicate data to remote caches while handling client requests. If either NYC or LON go offline, clients can start sending requests to the online site. You can then bring offline sites back online, push state to synchronize data, and switch clients as required.
Backup strategies and client connections
An asynchronous backup strategy (strategy=async) is recommended with Active/Active configurations.
If multiple clients attempt to write to the same entry concurrently, and the backup strategy is synchronous (strategy=sync), then deadlocks occur. However you can use the synchronous backup strategy with an Active/Passive configuration if both sites access different data sets, in which case there is no risk of deadlocks from concurrent writes.
1.7.1. Concurrent writes and conflicting entries
Conflicting entries can occur with Active/Active site configurations if clients write to the same entries at the same time but at different sites.
For example, client A writes to "k1" in LON at the same time that client B writes to "k1" in NYC. In this case, "k1" has a different value in LON than in NYC. After replication occurs, there is no guarantee which value for "k1" exists at which site.
To ensure data consistency, Data Grid uses a vector clock algorithm to detect conflicting entries during backup operations, as in the following illustration:
            LON       NYC

k1=(n/a)    0,0       0,0

k1=2        1,0  -->  1,0   k1=2

k1=3        1,1  <--  1,1   k1=3

k1=5        2,1       1,2   k1=8

                 -->  2,1 (conflict)
(conflict)  1,2  <--
Vector clocks are timestamp metadata that increment with each write to an entry. In the preceding example, 0,0 represents the initial value for the vector clock on "k1".
A client puts "k1=2" in LON and the vector clock is 1,0, which Data Grid replicates to NYC. A client then puts "k1=3" in NYC and the vector clock updates to 1,1, which Data Grid replicates to LON.
However if a client puts "k1=5" in LON at the same time that a client puts "k1=8" in NYC, Data Grid detects a conflicting entry because the vector value for "k1" is not strictly greater or less between LON and NYC.
When it finds conflicting entries, Data Grid uses the Java compareTo(String anotherString) method to compare site names. To determine which key takes priority, Data Grid selects the site name that is lexicographically less than the other. Keys from a site named AAA take priority over keys from a site named AAB and so on.
Following the same example, to resolve the conflict for "k1", Data Grid uses the value for "k1" that originates from LON. This results in "k1=5" in both LON and NYC after Data Grid resolves the conflict and replicates the value.
Prepend site names with numbers as a simple way to represent the order of priority for resolving conflicting entries; for example, 1LON and 2NYC.
Backup strategies
Data Grid performs conflict resolution with the asynchronous backup strategy (strategy=async) only.
You should never use the synchronous backup strategy with an Active/Active configuration. In this configuration concurrent writes result in deadlocks and you lose data. However you can use the synchronous backup strategy with an Active/Active configuration if both sites access different data sets, in which case there is no risk of deadlocks from concurrent writes.
Cross-site merge policies
Data Grid provides an XSiteEntryMergePolicy SPI in addition to cross-site merge policies that configure Data Grid to do the following:
- Always remove conflicting entries.
- Apply write operations when write/remove conflicts occur.
- Remove entries when write/remove conflicts occur.
1.8. Expiration with cross-site replication
Expiration removes cache entries based on time. Data Grid provides two ways to configure expiration for entries:
Lifespan
The lifespan attribute sets the maximum amount of time that entries can exist. When you set lifespan with cross-site replication, Data Grid clusters expire entries independently of remote sites.
Maximum idle
The max-idle attribute specifies how long entries can exist based on read or write operations in a given time period. When you set a max-idle with cross-site replication, Data Grid clusters send touch commands to coordinate idle timeout values with remote sites.
Using maximum idle expiration in cross-site deployments can impact performance because the additional processing to keep max-idle values synchronized means some operations take longer to complete.
Chapter 2. Configuring Data Grid cross-site replication
Set up cluster transport so Data Grid clusters can discover each other and relay nodes can send messages for cross-site replication. You can then add backup locations to Data Grid caches.
2.1. Configuring cluster transport for cross-site replication
Add JGroups RELAY2 to your transport layer so that Data Grid can replicate caches to backup locations.
Procedure
- Open your Data Grid configuration for editing.
- Add the RELAY2 protocol to a JGroups stack.
-
Specify the stack name with the
stackattribute for the transport configuration so the Data Grid cluster uses it. - Save and close your Data Grid configuration.
JGroups RELAY2 stacks
The following configuration shows a JGroups RELAY2 stack that:
- Uses the default JGroups UDP stack for inter-cluster transport, which refers to communication between nodes at the local site.
- Uses the default JGroups TCP stack for cross-site replication traffic.
- Names the local site as LON.
- Specifies a maximum of 1000 nodes in the cluster that can send cross-site replication requests.
- Specifies the names of all backup locations that participate in cross-site replication.
<infinispan>
  <jgroups>
    <stack name="xsite" extends="udp">
      <relay.RELAY2 xmlns="urn:org:jgroups"
                    site="LON"
                    max_site_masters="1000"/>
      <remote-sites default-stack="tcp">
        <remote-site name="LON"/>
        <remote-site name="NYC"/>
      </remote-sites>
    </stack>
  </jgroups>
  <cache-container>
    <transport cluster="${cluster.name}" stack="xsite"/>
  </cache-container>
</infinispan>
Additional resources
- JGroups RELAY2 Stacks
- Data Grid configuration schema reference
2.1.1. Custom JGroups RELAY2 stacks
You can add custom JGroups RELAY2 stacks to Data Grid clusters to use different transport properties for cross-site replication. For example, the following configuration uses TCPPING instead of MPING for discovery and extends the default TCP stack:
<infinispan>
  <jgroups>
    <stack name="relay-global" extends="tcp">
      <TCPPING initial_hosts="192.0.2.0[7800]"
               stack.combine="REPLACE"
               stack.position="MPING"/>
    </stack>
    <stack name="xsite" extends="udp">
      <relay.RELAY2 site="LON" xmlns="urn:org:jgroups"
                    max_site_masters="10"
                    can_become_site_master="true"/>
      <remote-sites default-stack="relay-global">
        <remote-site name="LON"/>
        <remote-site name="NYC"/>
      </remote-sites>
    </stack>
  </jgroups>
</infinispan>
Additional resources
2.2. Adding backup locations to caches
Specify the names of remote sites so Data Grid can replicate data to caches on those clusters.
Procedure
- Open your Data Grid configuration for editing.
-
Add the
backupselement to your cache configuration. -
Specify the name of the remote site as the backup location.
For example, in the LON configuration, specify NYC as the backup. -
Repeat the preceding steps on each cluster so that each site is a backup for other sites.
For example, if you add LON as a backup for NYC you should also add NYC as a backup for LON. - Save and close your Data Grid configuration.
Backup configuration
The following example shows the "customers" cache configuration for the LON cluster:
XML
<replicated-cache name="customers">
  <backups>
    <backup site="NYC"
            strategy="ASYNC" />
  </backups>
</replicated-cache>
JSON
{
  "replicated-cache": {
    "name": "customers",
    "backups": {
      "NYC": {
        "backup" : {
          "strategy" : "ASYNC"
        }
      }
    }
  }
}
YAML
replicatedCache:
  name: "customers"
  backups:
    NYC:
      backup:
        strategy: "ASYNC"
The following example shows the "customers" cache configuration for the NYC cluster:
XML
<distributed-cache name="customers">
  <backups>
    <backup site="LON"
            strategy="ASYNC" />
  </backups>
</distributed-cache>
JSON
{
  "distributed-cache": {
    "name": "customers",
    "backups": {
      "LON": {
        "backup": {
          "strategy": "ASYNC"
        }
      }
    }
  }
}
YAML
distributedCache:
  name: "customers"
  backups:
    LON:
      backup:
        strategy: "ASYNC"
Additional resources
2.3. Backing up to caches with different names
Data Grid replicates data between caches that have the same name by default. If you want Data Grid to replicate between caches with different names, you can explicitly declare the backup for each cache.
Procedure
- Open your Data Grid configuration for editing.
-
Use
backup-fororbackupForto replicate data from a remote site into a cache with a different name on the local site. - Save and close your Data Grid configuration.
Backup for configuration
The following example configures the "eu-customers" cache to receive updates from the "customers" cache on the LON cluster:
XML
<distributed-cache name="eu-customers">
  <backups>
    <backup site="LON"
            strategy="ASYNC" />
  </backups>
  <backup-for remote-cache="customers"
              remote-site="LON" />
</distributed-cache>
JSON
{
  "distributed-cache": {
    "name": "eu-customers",
    "backups": {
      "LON": {
        "backup": {
          "strategy": "ASYNC"
        }
      }
    },
    "backup-for" : {
      "remote-cache" : "customers",
      "remote-site" : "LON"
    }
  }
}
YAML
distributedCache:
  name: "eu-customers"
  backups:
    LON:
      backup:
        strategy: "ASYNC"
  backupFor:
    remoteCache: "customers"
    remoteSite: "LON"
2.4. Configuring cross-site state transfer
Change cross-site state transfer settings to optimize performance and specify whether operations happen manually or automatically.
Procedure
- Open your Data Grid configuration for editing.
Configure state transfer operations as appropriate.
-
Specify the number of entries to include in each state transfer operation with
chunk-sizeorchunkSize. -
Specify the time to wait, in milliseconds, for state transfer operations to complete with
timeout. -
Set the maximum number of attempts for Data Grid to retry failed state transfers with
max-retriesormaxRetries. -
Specify the time to wait, in milliseconds, between retry attempts with
wait-timeorwaitTime. -
Specify if state transfer operations happen automatically or manually with
mode.
-
Specify the number of entries to include in each state transfer operation with
- Open your Data Grid configuration for editing.
State transfer configuration
XML
<distributed-cache name="eu-customers">
  <backups>
    <backup site="LON"
            strategy="ASYNC">
      <state-transfer chunk-size="600"
                      timeout="2400000"
                      max-retries="30"
                      wait-time="2000"
                      mode="AUTO"/>
    </backup>
  </backups>
</distributed-cache>
JSON
{
  "distributed-cache": {
    "name": "eu-customers",
    "backups": {
      "LON": {
        "backup": {
          "strategy": "ASYNC",
          "state-transfer": {
            "chunk-size": "600",
            "timeout": "2400000",
            "max-retries": "30",
            "wait-time": "2000",
            "mode": "AUTO"
          }
        }
      }
    }
  }
}
YAML
distributedCache:
  name: "eu-customers"
  backups:
    LON:
      backup:
        strategy: "ASYNC"
        stateTransfer:
          chunkSize: "600"
          timeout: "2400000"
          maxRetries: "30"
          waitTime: "2000"
          mode: "AUTO"
2.5. Configuring conflict resolution algorithms
Configure Data Grid to use a different algorithm to resolve conflicting entries between backup locations.
Procedure
- Open your Data Grid configuration for editing.
- Specify one of the Data Grid algorithms or a custom implementation as the merge policy to resolve conflicting entries.
- Save and close your Data Grid configuration for editing.
Data Grid algorithms
Find all Data Grid algorithms and their descriptions in the org.infinispan.xsite.spi.XSiteMergePolicy enum.
The following example configuration uses the ALWAYS_REMOVE algorithm that deletes conflicting entries from both sites:
XML
<distributed-cache>
   <backups merge-policy="ALWAYS_REMOVE">
      <backup site="LON" strategy="ASYNC"/>
   </backups>
</distributed-cache>
JSON
{
  "distributed-cache": {
    "backups": {
      "merge-policy": "ALWAYS_REMOVE",
      "LON": {
        "backup": {
          "strategy": "ASYNC"
        }
      }
    }
  }
}
YAML
distributedCache:
  backups:
    mergePolicy: "ALWAYS_REMOVE"
    LON:
      backup:
        strategy: "ASYNC"
Custom conflict resolution algorithms
If you create a custom XSiteEntryMergePolicy implementation, you can specify the fully qualified class name as the merge policy.
XML
<distributed-cache>
   <backups merge-policy="org.mycompany.MyCustomXSiteEntryMergePolicy">
      <backup site="LON" strategy="ASYNC"/>
   </backups>
</distributed-cache>
JSON
{
  "distributed-cache": {
    "backups": {
      "merge-policy": "org.mycompany.MyCustomXSiteEntryMergePolicy",
      "LON": {
        "backup": {
          "strategy": "ASYNC"
        }
      }
    }
  }
}
YAML
distributedCache:
  backups:
    mergePolicy: "org.mycompany.MyCustomXSiteEntryMergePolicy"
    LON:
      backup:
        strategy: "ASYNC"
2.6. Cleaning tombstones for asynchronous backups
With the asynchronous backup strategy Data Grid stores metadata, known as tombstones, when it removes keys. Data Grid periodically runs a task to remove these tombstones and reduce excessive memory usage when backup locations no longer require the metadata. You can configure the frequency for this task by defining a target size for tombstone maps as well as the maximum delay between task runs.
Procedure
- Open your Data Grid configuration for editing.
Specify the number of tombstones to store with the
tombstone-map-sizeattribute.If the number of tombstones increases beyond this number then Data Grid runs the cleanup task more frequently. Likewise, if the number of tombstones is less than this number then Data Grid does not run the cleanup task as frequently.
-
Add the
max-cleanup-delayattribute and specify the maximum delay, in milliseconds, between tombstone cleanup tasks. - Save the changes to your configuration.
Tombstone cleanup task configuration
XML
<distributed-cache>
   <backups tombstone-map-size="512000" max-cleanup-delay="30000">
      <backup site="LON" strategy="ASYNC"/>
   </backups>
</distributed-cache>
JSON
{
  "distributed-cache": {
    "backups": {
      "tombstone-map-size": 512000,
      "max-cleanup-delay": 30000,
      "LON": {
        "backup": {
          "strategy": "ASYNC"
        }
      }
    }
  }
}
YAML
distributedCache:
  backups:
    tombstoneMapSize: 512000
    maxCleanupDelay: 30000
    LON:
      backup:
        strategy: "ASYNC"
Additional resources
2.7. Verifying cross-site views
When you set up Data Grid to perform cross-site replication, you should check log files to ensure that Data Grid clusters have successfully formed cross-site views.
Procedure
- Open Data Grid log files with any appropriate editor.
-
Check for
ISPN000439: Received new x-site viewmessages.
For example, if a Data Grid cluster in LON has formed a cross-site view with a Data Grid cluster in NYC, logs include the following messages:
INFO  [org.infinispan.XSITE] (jgroups-5,<server-hostname>) ISPN000439: Received new x-site view: [NYC]
INFO  [org.infinispan.XSITE] (jgroups-7,<server-hostname>) ISPN000439: Received new x-site view: [LON, NYC]
2.8. Configuring Hot Rod clients for cross-site replication
Configure Hot Rod clients to use Data Grid clusters at different sites.
hotrod-client.properties
# Servers at the active site
infinispan.client.hotrod.server_list = LON_host1:11222,LON_host2:11222,LON_host3:11222

# Servers at the backup site
infinispan.client.hotrod.cluster.NYC = NYC_hostA:11222,NYC_hostB:11222,NYC_hostC:11222,NYC_hostD:11222
ConfigurationBuilder
ConfigurationBuilder builder = new ConfigurationBuilder();
builder.addServers("LON_host1:11222;LON_host2:11222;LON_host3:11222")
       .addCluster("NYC")
       .addClusterNodes("NYC_hostA:11222;NYC_hostB:11222;NYC_hostC:11222;NYC_hostD:11222")
Use the following methods to switch Hot Rod clients to the default cluster or to a cluster at a different site:
-
RemoteCacheManager.switchToDefaultCluster() -
RemoteCacheManager.switchToCluster(${site.name})
Chapter 3. Performing cross-site operations with the CLI
Use the Data Grid command line interface (CLI) to connect to Data Grid Server clusters, manage sites, and push state transfer to backup locations.
3.1. Bringing backup locations offline and online
Take backup locations offline manually and bring them back online.
Prerequisites
- Create a CLI connection to Data Grid.
Procedure
Check if backup locations are online or offline with the
site statuscommand:site status --cache=cacheName --site=NYC
Note--siteis an optional argument. If not set, the CLI returns all backup locations.TipUse the
--all-cachesoption to get the backup location status for all caches.Manage backup locations as follows:
Bring backup locations online with the
bring-onlinecommand:site bring-online --cache=customers --site=NYC
Take backup locations offline with the
take-offlinecommand:site take-offline --cache=customers --site=NYC
Use the --all-caches option to bring a backup location online, or take a backup location offline, for all caches.
For more information and examples, run the help site command.
3.2. Configuring cross-site state transfer modes
You can configure cross-site state transfer operations to happen automatically when Data Grid detects that backup locations come online. Alternatively you can use the default mode, which is to manually perform state transfer.
Prerequisites
- Create a CLI connection to Data Grid.
Procedure
Use the
sitecommand to configure state transfer modes, as in the following examples:Retrieve the current state transfer mode.
site state-transfer-mode get --cache=cacheName --site=NYC
Configure automatic state transfer operations for a cache and backup location.
site state-transfer-mode set --cache=cacheName --site=NYC --mode=AUTO
Run the help site command for more information and examples.
3.3. Pushing state to backup locations
Transfer cache state to backup locations.
Prerequisites
- Create a CLI connection to Data Grid.
Procedure
Use the
site push-site-statecommand to push state transfer, as in the following example:site push-site-state --cache=cacheName --site=NYC
Use the --all-caches option to push state transfer for all caches.
For more information and examples, run the help site command.
Chapter 4. Performing cross-site operations with the REST API
Data Grid Server provides a REST endpoint that exposes methods for performing cross-site operations.
4.1. Getting status of all backup locations
Retrieve the status of all backup locations with GET requests.
GET /rest/v2/caches/{cacheName}/x-site/backups/Data Grid responds with the status of each backup location in JSON format, as in the following example:
{
  "NYC": {
    "status": "online"
  },
  "LON": {
    "status": "mixed",
    "online": [
      "NodeA"
    ],
    "offline": [
      "NodeB"
    ]
  }
}
Table 4.1. Returned Status
| Value | Description |
|---|---|
|
| All nodes in the local cluster have a cross-site view with the backup location. |
|
| No nodes in the local cluster have a cross-site view with the backup location. |
|
| Some nodes in the local cluster have a cross-site view with the backup location, other nodes in the local cluster do not have a cross-site view. The response indicates status for each node. |
4.2. Getting status of specific backup locations
Retrieve the status of a backup location with GET requests.
GET /rest/v2/caches/{cacheName}/x-site/backups/{siteName}Data Grid responds with the status of each node in the site in JSON format, as in the following example:
{
  "NodeA":"offline",
  "NodeB":"online"
}
Table 4.2. Returned Status
| Value | Description |
|---|---|
|
| The node is online. |
|
| The node is offline. |
|
| Not possible to retrieve status. The remote cache could be shutting down or a network error occurred during the request. |
4.3. Taking backup locations offline
Take backup locations offline with POST requests and the ?action=take-offline parameter.
POST /rest/v2/caches/{cacheName}/x-site/backups/{siteName}?action=take-offline4.4. Bringing backup locations online
Bring backup locations online with the ?action=bring-online parameter.
POST /rest/v2/caches/{cacheName}/x-site/backups/{siteName}?action=bring-online4.5. Pushing state to backup locations
Push cache state to a backup location with the ?action=start-push-state parameter.
POST /rest/v2/caches/{cacheName}/x-site/backups/{siteName}?action=start-push-state4.6. Canceling state transfer
Cancel state transfer operations with the ?action=cancel-push-state parameter.
POST /rest/v2/caches/{cacheName}/x-site/backups/{siteName}?action=cancel-push-state4.7. Getting state transfer status
Retrieve status of state transfer operations with the ?action=push-state-status parameter.
GET /rest/v2/caches/{cacheName}/x-site/backups?action=push-state-statusData Grid responds with the status of state transfer for each backup location in JSON format, as in the following example:
{
   "NYC":"CANCELED",
   "LON":"OK"
}
Table 4.3. Returned status
| Value | Description |
|---|---|
|
| State transfer to the backup location is in progress. |
|
| State transfer completed successfully. |
|
| An error occurred with state transfer. Check log files. |
|
| State transfer cancellation is in progress. |
4.8. Clearing state transfer status
Clear state transfer status for sending sites with the ?action=clear-push-state-status parameter.
POST /rest/v2/caches/{cacheName}/x-site/local?action=clear-push-state-status4.9. Modifying take offline conditions
Sites go offline if certain conditions are met. Modify the take offline parameters to control when backup locations automatically go offline.
Procedure
Check configured take offline parameters with
GETrequests and thetake-offline-configparameter.GET /rest/v2/caches/{cacheName}/x-site/backups/{siteName}/take-offline-configThe Data Grid response includes
after_failuresandmin_waitfields as follows:{ "after_failures": 2, "min_wait": 1000 }Modify take offline parameters in the body of
PUTrequests.PUT /rest/v2/caches/{cacheName}/x-site/backups/{siteName}/take-offline-configIf the operation successfully completes, the service returns
204 (No Content).
4.10. Canceling state transfer from receiving sites
If the connection between two backup locations breaks, you can cancel state transfer on the site that is receiving the push.
Cancel state transfer from a remote site and keep the current state of the local cache with the ?action=cancel-receive-state parameter.
POST /rest/v2/caches/{cacheName}/x-site/backups/{siteName}?action=cancel-receive-state4.11. Getting status of backup locations
Retrieve the status of all backup locations from Cache Managers with GET requests.
GET /rest/v2/cache-managers/{cacheManagerName}/x-site/backups/Data Grid responds with status in JSON format, as in the following example:
{
   "SFO-3":{
      "status":"online"
   },
   "NYC-2":{
      "status":"mixed",
      "online":[
         "CACHE_1"
      ],
      "offline":[
         "CACHE_2"
      ],
      "mixed": [
         "CACHE_3"
      ]
   }
}
Table 4.4. Returned status
| Value | Description |
|---|---|
|
| All nodes in the local cluster have a cross-site view with the backup location. |
|
| No nodes in the local cluster have a cross-site view with the backup location. |
|
| Some nodes in the local cluster have a cross-site view with the backup location, other nodes in the local cluster do not have a cross-site view. The response indicates status for each node. |
GET /rest/v2/cache-managers/{cacheManagerName}/x-site/backups/{site}Returns the status for a single backup location.
4.12. Taking backup locations offline
Take backup locations offline with the ?action=take-offline parameter.
POST /rest/v2/cache-managers/{cacheManagerName}/x-site/backups/{siteName}?action=take-offline4.13. Bringing backup locations online
Bring backup locations online with the ?action=bring-online parameter.
POST /rest/v2/cache-managers/{cacheManagerName}/x-site/backups/{siteName}?action=bring-online4.14. Retrieving the state transfer mode
Check the state transfer mode with GET requests.
GET /rest/v2/caches/{cacheName}/x-site/backups/{site}/state-transfer-mode4.15. Setting the state transfer mode
Configure the state transfer mode with the ?action=set parameter.
POST /rest/v2/caches/{cacheName}/x-site/backups/{site}/state-transfer-mode?action=set&mode={mode}4.16. Starting state transfer
Push state of all caches to remote sites with the ?action=start-push-state parameter.
POST /rest/v2/cache-managers/{cacheManagerName}/x-site/backups/{siteName}?action=start-push-state4.17. Canceling state transfer
Cancel ongoing state transfer operations with the ?action=cancel-push-state parameter.
POST /rest/v2/cache-managers/{cacheManagerName}/x-site/backups/{siteName}?action=cancel-push-stateChapter 5. Performing cross-site operations via JMX
Perform cross-site operations such as pushing state transfer and bringing sites online via JMX.
5.1. Registering JMX MBeans
Data Grid can register JMX MBeans that you can use to collect statistics and perform administrative operations. You must also enable statistics otherwise Data Grid provides 0 values for all statistic attributes in JMX MBeans.
Procedure
- Open your Data Grid configuration for editing.
-
Add the
jmxelement or object to the cache container and specifytrueas the value for theenabledattribute or field. -
Add the
domainattribute or field and specify the domain where JMX MBeans are exposed, if required. - Save and close your client configuration.
JMX configuration
XML
<infinispan>
  <cache-container statistics="true">
    <jmx enabled="true"
         domain="example.com"/>
  </cache-container>
</infinispan>
JSON
{
  "infinispan" : {
    "cache-container" : {
      "statistics" : "true",
      "jmx" : {
        "enabled" : "true",
        "domain" : "example.com"
      }
    }
  }
}
YAML
infinispan:
  cacheContainer:
    statistics: "true"
    jmx:
      enabled: "true"
      domain: "example.com"
5.2. Performing cross-site operations with JMX clients
Perform cross-site operations with JMX clients.
Prerequisites
- Configure Data Grid to register JMX MBeans
Procedure
- Connect to Data Grid with any JMX client.
Invoke operations from the following MBeans:
-
XSiteAdminprovides cross-site operations for caches. GlobalXSiteAdminOperationsprovides cross-site operations for Cache Managers.For example, to bring sites back online, invoke
bringSiteOnline(siteName).
-
Additional resources
5.3. JMX MBeans for cross-site replication
Data Grid provides JMX MBeans for cross-site replication that let you gather statistics and perform remote operations.
The org.infinispan:type=Cache component provides the following JMX MBeans:
-
XSiteAdminexposes cross-site operations that apply to specific cache instances. -
RpcManagerprovides statistics about network requests for cross-site replication. -
AsyncXSiteStatisticsprovides statistics for asynchronous cross-site replication, including queue size and number of conflicts.
The org.infinispan:type=CacheManager component includes the following JMX MBean:
-
GlobalXSiteAdminOperationsexposes cross-site operations that apply to all caches in a cache container.
For details about JMX MBeans along with descriptions of available operations and statistics, see the Data Grid JMX Components documentation.
Additional resources
Chapter 6. Cross-site replication log messages
Data Grid includes an org.infinispan.XSITE log category to help you troubleshoot cross-site replication operations.
6.1. Data Grid log messages for cross-site replication
Find user actions for log messages related to cross-site replication.
| Log level | Identifier | Message | Description |
|---|---|---|---|
| DEBUG | ISPN000400 | Node <site-name> was suspected | Data Grid prints this message when it cannot reach backup locations. Ensure that sites are online and check network status. |
| INFO | ISPN000439 | Received new x-site view: <site-name> | Data Grid prints this message when sites join and leave the global cluster. |
| INFO | ISPN100005 | Site <site-name> is online. | Data Grid prints this message when a site comes online. |
| INFO | ISPN100006 | Site <site-name> is offline. | Data Grid prints this message when a site goes offline. If you did not take the site offline manually, this message could indicate a failure has occurred. Check network status and try to bring the site back online. |
| WARN | ISPN000202 | Problems backing up data for cache <cache-name> to site <site-name>: | Data Grid prints this message when issues occur with state transfer operations along with the exception. If necessary adjust Data Grid logging to get more fine-grained logging messages. |
| WARN | ISPN000289 | Unable to send X-Site state chunk to <site-name>. | Indicates that Data Grid cannot transfer a batch of cache entries during a state transfer operation. Ensure that sites are online and check network status. |
| WARN | ISPN000291 | Unable to apply X-Site state chunk. | Indicates that Data Grid cannot apply a batch of cache entries during a state transfer operation. Ensure that sites are online and check network status. |
| WARN | ISPN000322 | Unable to re-start x-site state transfer to site <site-name> | Indicates that Data Grid cannot resume a state transfer operation to a backup location. Ensure that sites are online and check network status. |
| ERROR | ISPN000477 | Unable to perform operation <operation-name> for site <site-name> | Indicates that Data Grid cannot successfully complete an operation on a backup location. If necessary adjust Data Grid logging to get more fine-grained logging messages. |
| FATAL | ISPN000449 | XSite state transfer timeout must be higher or equals than 1 (one). |
Results when the value of the |
| FATAL | ISPN000450 | XSite state transfer waiting time between retries must be higher or equals than 1 (one). |
Results when the value of the |
| FATAL | ISPN000576 | Cross-site Replication not available for local cache. | Cross-site replication does not work with the local cache mode. Either remove the backup configuration from the local cache definition or use a distributed or replicated cache mode. |