
Data Grid Developer Guide
Data Grid Documentation
Abstract
Chapter 1. Red Hat Data Grid
Data Grid is a high-performance, distributed in-memory data store.
- Schemaless data structure
- Flexibility to store different objects as key-value pairs.
- Grid-based data storage
- Designed to distribute and replicate data across clusters.
- Elastic scaling
- Dynamically adjust the number of nodes to meet demand without service disruption.
- Data interoperability
- Store, retrieve, and query data in the grid from different endpoints.
1.1. Data Grid Documentation
Documentation for Data Grid is available on the Red Hat customer portal.
1.2. Data Grid Downloads
Access the Data Grid Software Downloads on the Red Hat customer portal.
You must have a Red Hat account to access and download Data Grid software.
Chapter 2. Configuring the Data Grid Maven Repository
Data Grid Java distributions are available from Maven.
You can download the Data Grid Maven repository from the customer portal or pull Data Grid dependencies from the public Red Hat Enterprise Maven repository.
2.1. Downloading the Data Grid Maven Repository
Download and install the Data Grid Maven repository to a local file system, Apache HTTP server, or Maven repository manager if you do not want to use the public Red Hat Enterprise Maven repository.
Procedure
- Log in to the Red Hat customer portal.
- Navigate to the Software Downloads for Data Grid.
- Download the Red Hat Data Grid 8.0 Maven Repository.
- Extract the archived Maven repository to your local file system.
-
Open the
README.mdfile and follow the appropriate installation instructions.
2.2. Adding the Red Hat GA Maven Repository
Configure your Maven settings file, typically ~/.m2/settings.xml, to include the Red Hat GA repository. Alternatively, include the repository directly in your project pom.xml file.
The following configuration uses the public Red Hat Enterprise Maven repository. To use the Data Grid Maven repository that you downloaded from the Red Hat customer portal, change the value of url elements to the correct location.
<repositories>
  <repository>
    <id>redhat-ga</id>
    <name>Red Hat GA Repository</name>
    <url>https://maven.repository.redhat.com/ga/</url>
  </repository>
</repositories>
<pluginRepositories>
  <pluginRepository>
    <id>redhat-ga</id>
    <name>Red Hat GA Repository</name>
    <url>https://maven.repository.redhat.com/ga/</url>
  </pluginRepository>
</pluginRepositories>
Reference
2.3. Configuring Your Data Grid POM
Maven uses configuration files called Project Object Model (POM) files to define projects and manage builds. POM files are in XML format and describe the module and component dependencies, build order, and targets for the resulting project packaging and output.
Procedure
-
Open your project
pom.xmlfor editing. -
Define the
version.infinispanproperty with the correct Data Grid version. Include the
infinispan-bomin adependencyManagementsection.The Bill Of Materials (BOM) controls dependency versions, which avoids version conflicts and means you do not need to set the version for each Data Grid artifact you add as a dependency to your project.
-
Save and close
pom.xml.
The following example shows the Data Grid version and BOM:
<properties>
  <version.infinispan>10.1.8.Final-redhat-00001</version.infinispan>
</properties>

<dependencyManagement>
  <dependencies>
    <dependency>
      <groupId>org.infinispan</groupId>
      <artifactId>infinispan-bom</artifactId>
      <version>${version.infinispan}</version>
      <type>pom</type>
      <scope>import</scope>
    </dependency>
  </dependencies>
</dependencyManagement>
Next Steps
Add Data Grid artifacts as dependencies to your pom.xml as required.
Chapter 3. Cache Manager
The CacheManager interface is the main entry point to Data Grid and lets you:
- configure and obtain caches
- manage and monitor your nodes
- execute code across a cluster
- more…
Depending on whether you embed Data Grid in applications or run it as a remote server, you use either an EmbeddedCacheManager or a RemoteCacheManager. While they share some methods and properties, be aware that there are semantic differences between them. The following chapters focus mostly on the embedded implementation.
CacheManagers are heavyweight objects, and we foresee no more than one CacheManager being used per JVM (unless specific setups require more than one; but either way, this would be a minimal and finite number of instances).
The simplest way to create a CacheManager is:
EmbeddedCacheManager manager = new DefaultCacheManager();
which starts the most basic, local mode, non-clustered cache manager with no caches. CacheManagers have a lifecycle and the default constructors also call Lifecycle.start(). Overloaded versions of the constructors are available, that do not start the CacheManager, although keep in mind that CacheManagers need to be started before they can be used to create Cache instances.
Once constructed, CacheManagers should be made available to any component that require to interact with it via some form of application-wide scope such as JNDI, a ServletContext or via some other mechanism such as an IoC container.
When you are done with a CacheManager, you must stop it so that it can release its resources: manager.stop();
This will ensure all caches within its scope are properly stopped, thread pools are shutdown. If the CacheManager was clustered it will also leave the cluster gracefully.
3.1. Obtaining caches
After you configure the CacheManager, you can obtain and control caches.
Invoke the getCache(String) method to obtain caches, as follows:
Cache<String, String> myCache = manager.getCache("myCache");
The preceding operation creates a cache named myCache, if it does not already exist, and returns it.
Using the getCache() method creates the cache only on the node where you invoke the method. In other words, it performs a local operation that must be invoked on each node across the cluster. Typically, applications deployed across multiple nodes obtain caches during initialization to ensure that caches are symmetric and exist on each node.
Invoke the createCache() method to create caches dynamically across the entire cluster, as follows:
Cache<String, String> myCache = manager.administration().createCache("myCache", "myTemplate");The preceding operation also automatically creates caches on any nodes that subsequently join the cluster.
Caches that you create with the createCache() method are ephemeral by default. If the entire cluster shuts down, the cache is not automatically created again when it restarts.
Use the PERMANENT flag to ensure that caches can survive restarts, as follows:
Cache<String, String> myCache = manager.administration().withFlags(AdminFlag.PERMANENT).createCache("myCache", "myTemplate");For the PERMANENT flag to take effect, you must enable global state and set a configuration storage provider.
For more information about configuration storage providers, see GlobalStateConfigurationBuilder#configurationStorage().
3.2. Clustering Information
The EmbeddedCacheManager has quite a few methods to provide information as to how the cluster is operating. The following methods only really make sense when being used in a clustered environment (that is when a Transport is configured).
3.3. Member Information
When you are using a cluster it is very important to be able to find information about membership in the cluster including who is the owner of the cluster.
The getMembers() method returns all of the nodes in the current cluster.
The getCoordinator() method will tell you which one of the members is the coordinator of the cluster. For most intents you shouldn’t need to care who the coordinator is. You can use isCoordinator() method directly to see if the local node is the coordinator as well.
Chapter 4. Data Grid Cache Interface
Data Grid provides a Cache interface that exposes simple methods for adding, retrieving and removing entries, including atomic mechanisms exposed by the JDK’s ConcurrentMap interface. Based on the cache mode used, invoking these methods will trigger a number of things to happen, potentially even including replicating an entry to a remote node or looking up an entry from a remote node, or potentially a cache store.
4.1. Cache API
For simple usage, using the Cache API should be no different from using the JDK Map API, and hence migrating from simple in-memory caches based on a Map to Data Grid’s Cache should be trivial.
4.1.1. Performance Concerns of Certain Map Methods
Certain methods exposed in Map have certain performance consequences when used with Data Grid, such as size() , values() , keySet() and entrySet() . Specific methods on the keySet, values and entrySet are fine for use please see their Javadoc for further details.
Attempting to perform these operations globally would have large performance impact as well as become a scalability bottleneck. As such, these methods should only be used for informational or debugging purposes only.
It should be noted that using certain flags with the withFlags() method can mitigate some of these concerns, please check each method’s documentation for more details.
4.1.2. Mortal and Immortal Data
Further to simply storing entries, Data Grid’s cache API allows you to attach mortality information to data. For example, simply using put(key, value) would create an immortal entry, i.e., an entry that lives in the cache forever, until it is removed (or evicted from memory to prevent running out of memory). If, however, you put data in the cache using put(key, value, lifespan, timeunit) , this creates a mortal entry, i.e., an entry that has a fixed lifespan and expires after that lifespan.
In addition to lifespan , Data Grid also supports maxIdle as an additional metric with which to determine expiration. Any combination of lifespans or maxIdles can be used.
4.1.3. putForExternalRead operation
Data Grid’s Cache class contains a different 'put' operation called putForExternalRead . This operation is particularly useful when Data Grid is used as a temporary cache for data that is persisted elsewhere. Under heavy read scenarios, contention in the cache should not delay the real transactions at hand, since caching should just be an optimization and not something that gets in the way.
To achieve this, putForExternalRead() acts as a put call that only operates if the key is not present in the cache, and fails fast and silently if another thread is trying to store the same key at the same time. In this particular scenario, caching data is a way to optimise the system and it’s not desirable that a failure in caching affects the on-going transaction, hence why failure is handled differently. putForExternalRead() is considered to be a fast operation because regardless of whether it’s successful or not, it doesn’t wait for any locks, and so returns to the caller promptly.
To understand how to use this operation, let’s look at basic example. Imagine a cache of Person instances, each keyed by a PersonId , whose data originates in a separate data store. The following code shows the most common pattern of using putForExternalRead within the context of this example:
// Id of the person to look up, provided by the application
PersonId id = ...;

// Get a reference to the cache where person instances will be stored
Cache<PersonId, Person> cache = ...;

// First, check whether the cache contains the person instance
// associated with with the given id
Person cachedPerson = cache.get(id);

if (cachedPerson == null) {
   // The person is not cached yet, so query the data store with the id
   Person person = dataStore.lookup(id);

   // Cache the person along with the id so that future requests can
   // retrieve it from memory rather than going to the data store
   cache.putForExternalRead(id, person);
} else {
   // The person was found in the cache, so return it to the application
   return cachedPerson;
}
Note that putForExternalRead should never be used as a mechanism to update the cache with a new Person instance originating from application execution (i.e. from a transaction that modifies a Person’s address). When updating cached values, please use the standard put operation, otherwise the possibility of caching corrupt data is likely.
4.2. AdvancedCache API
In addition to the simple Cache interface, Data Grid offers an AdvancedCache interface, geared towards extension authors. The AdvancedCache offers the ability to access certain internal components and to apply flags to alter the default behavior of certain cache methods. The following code snippet depicts how an AdvancedCache can be obtained:
AdvancedCache advancedCache = cache.getAdvancedCache();
4.2.1. Flags
Flags are applied to regular cache methods to alter the behavior of certain methods. For a list of all available flags, and their effects, see the Flag enumeration. Flags are applied using AdvancedCache.withFlags() . This builder method can be used to apply any number of flags to a cache invocation, for example:
advancedCache.withFlags(Flag.CACHE_MODE_LOCAL, Flag.SKIP_LOCKING)
   .withFlags(Flag.FORCE_SYNCHRONOUS)
   .put("hello", "world");
4.3. Listeners and Notifications
Data Grid offers a listener API, where clients can register for and get notified when events take place. This annotation-driven API applies to 2 different levels: cache level events and cache manager level events.
Events trigger a notification which is dispatched to listeners. Listeners are simple POJOs annotated with @Listener and registered using the methods defined in the Listenable interface.
Both Cache and CacheManager implement Listenable, which means you can attach listeners to either a cache or a cache manager, to receive either cache-level or cache manager-level notifications.
For example, the following class defines a listener to print out some information every time a new entry is added to the cache, in a non blocking fashion:
@Listener
public class PrintWhenAdded {
  Queue<CacheEntryCreatedEvent> events = new ConcurrentLinkedQueue<>();

  @CacheEntryCreated
  public CompletionStage<Void> print(CacheEntryCreatedEvent event) {
    events.add(event);
    return null;
  }

}
For more comprehensive examples, please see the Javadocs for @Listener.
4.3.1. Cache-level notifications
Cache-level events occur on a per-cache basis, and by default are only raised on nodes where the events occur. Note in a distributed cache these events are only raised on the owners of data being affected. Examples of cache-level events are entries being added, removed, modified, etc. These events trigger notifications to listeners registered to a specific cache.
Please see the Javadocs on the org.infinispan.notifications.cachelistener.annotation package for a comprehensive list of all cache-level notifications, and their respective method-level annotations.
Please refer to the Javadocs on the org.infinispan.notifications.cachelistener.annotation package for the list of cache-level notifications available in Data Grid.
4.3.1.1. Cluster Listeners
The cluster listeners should be used when it is desirable to listen to the cache events on a single node.
To do so all that is required is set to annotate your listener as being clustered.
@Listener (clustered = true)
public class MyClusterListener { .... }
There are some limitations to cluster listeners from a non clustered listener.
-
A cluster listener can only listen to
@CacheEntryModified,@CacheEntryCreated,@CacheEntryRemovedand@CacheEntryExpiredevents. Note this means any other type of event will not be listened to for this listener. - Only the post event is sent to a cluster listener, the pre event is ignored.
4.3.1.2. Event filtering and conversion
All applicable events on the node where the listener is installed will be raised to the listener. It is possible to dynamically filter what events are raised by using a KeyFilter (only allows filtering on keys) or CacheEventFilter (used to filter for keys, old value, old metadata, new value, new metadata, whether command was retried, if the event is before the event (ie. isPre) and also the command type).
The example here shows a simple KeyFilter that will only allow events to be raised when an event modified the entry for the key Only Me.
public class SpecificKeyFilter implements KeyFilter<String> {
    private final String keyToAccept;

    public SpecificKeyFilter(String keyToAccept) {
      if (keyToAccept == null) {
        throw new NullPointerException();
      }
      this.keyToAccept = keyToAccept;
    }

    public boolean accept(String key) {
      return keyToAccept.equals(key);
    }
}

...
cache.addListener(listener, new SpecificKeyFilter("Only Me"));
...
This can be useful when you want to limit what events you receive in a more efficient manner.
There is also a CacheEventConverter that can be supplied that allows for converting a value to another before raising the event. This can be nice to modularize any code that does value conversions.
The mentioned filters and converters are especially beneficial when used in conjunction with a Cluster Listener. This is because the filtering and conversion is done on the node where the event originated and not on the node where event is listened to. This can provide benefits of not having to replicate events across the cluster (filter) or even have reduced payloads (converter).
4.3.1.3. Initial State Events
When a listener is installed it will only be notified of events after it is fully installed.
It may be desirable to get the current state of the cache contents upon first registration of listener by having an event generated of type @CacheEntryCreated for each element in the cache. Any additionally generated events during this initial phase will be queued until appropriate events have been raised.
This only works for clustered listeners at this time. ISPN-4608 covers adding this for non clustered listeners.
4.3.1.4. Duplicate Events
It is possible in a non transactional cache to receive duplicate events. This is possible when the primary owner of a key goes down while trying to perform a write operation such as a put.
Data Grid internally will rectify the put operation by sending it to the new primary owner for the given key automatically, however there are no guarantees in regards to if the write was first replicated to backups. Thus more than 1 of the following write events (CacheEntryCreatedEvent, CacheEntryModifiedEvent & CacheEntryRemovedEvent) may be sent on a single operation.
If more than one event is generated Data Grid will mark the event that it was generated by a retried command to help the user to know when this occurs without having to pay attention to view changes.
@Listener
public class MyRetryListener {
  @CacheEntryModified
  public void entryModified(CacheEntryModifiedEvent event) {
    if (event.isCommandRetried()) {
      // Do something
    }
  }
}
Also when using a CacheEventFilter or CacheEventConverter the EventType contains a method isRetry to tell if the event was generated due to retry.
4.3.2. Cache manager-level notifications
Cache manager-level events occur on a cache manager. These too are global and cluster-wide, but involve events that affect all caches created by a single cache manager. Examples of cache manager-level events are nodes joining or leaving a cluster, or caches starting or stopping.
See the org.infinispan.notifications.cachemanagerlistener.annotation package for a comprehensive list of all cache manager-level notifications, and their respective method-level annotations.
4.3.3. Synchronicity of events
By default, all async notifications are dispatched in the notification thread pool. Sync notifications will delay the operation from continuing until the listener method completes or the CompletionStage completes (the former causing the thread to block). Alternatively, you could annotate your listener as asynchronous in which case the operation will continue immediately, while the notification is completed asynchronously on the notification thread pool. To do this, simply annotate your listener such:
Asynchronous Listener
@Listener (sync = false)
public class MyAsyncListener {
   @CacheEntryCreated
   void listen(CacheEntryCreatedEvent event) { }
}
Blocking Synchronous Listener
@Listener
public class MySyncListener {
   @CacheEntryCreated
   void listen(CacheEntryCreatedEvent event) { }
}
Non-Blocking Listener
@Listener
public class MyNonBlockingListener {
   @CacheEntryCreated
   CompletionStage<Void> listen(CacheEntryCreatedEvent event) { }
}
4.3.3.1. Asynchronous thread pool
To tune the thread pool used to dispatch such asynchronous notifications, use the <listener-executor /> XML element in your configuration file.
4.4. Asynchronous API
In addition to synchronous API methods like Cache.put() , Cache.remove() , etc., Data Grid also has an asynchronous, non-blocking API where you can achieve the same results in a non-blocking fashion.
These methods are named in a similar fashion to their blocking counterparts, with "Async" appended. E.g., Cache.putAsync() , Cache.removeAsync() , etc. These asynchronous counterparts return a CompletableFuture that contains the actual result of the operation.
For example, in a cache parameterized as Cache<String, String>, Cache.put(String key, String value) returns String while Cache.putAsync(String key, String value) returns CompletableFuture<String>.
4.4.1. Why use such an API?
Non-blocking APIs are powerful in that they provide all of the guarantees of synchronous communications - with the ability to handle communication failures and exceptions - with the ease of not having to block until a call completes. This allows you to better harness parallelism in your system. For example:
Set<CompletableFuture<?>> futures = new HashSet<>();
futures.add(cache.putAsync(key1, value1)); // does not block
futures.add(cache.putAsync(key2, value2)); // does not block
futures.add(cache.putAsync(key3, value3)); // does not block

// the remote calls for the 3 puts will effectively be executed
// in parallel, particularly useful if running in distributed mode
// and the 3 keys would typically be pushed to 3 different nodes
// in the cluster

// check that the puts completed successfully
for (CompletableFuture<?> f: futures) f.get();
4.4.2. Which processes actually happen asynchronously?
There are 4 things in Data Grid that can be considered to be on the critical path of a typical write operation. These are, in order of cost:
- network calls
- marshalling
- writing to a cache store (optional)
- locking
Using the async methods will take the network calls and marshalling off the critical path. For various technical reasons, writing to a cache store and acquiring locks, however, still happens in the caller’s thread.
Chapter 5. Data Encoding and MediaTypes
Encoding is the data conversion operation done by Data Grid caches before storing data, and when reading back from storage.
5.1. Overview
Encoding allows dealing with a certain data format during API calls (map, listeners, stream, etc) while the format effectively stored is different.
The data conversions are handled by instances of org.infinispan.commons.dataconversion.Encoder :
public interface Encoder {

   /**
    * Convert data in the read/write format to the storage format.
    *
    * @param content data to be converted, never null.
    * @return Object in the storage format.
    */
   Object toStorage(Object content);

   /**
    * Convert from storage format to the read/write format.
    *
    * @param content data as stored in the cache, never null.
    * @return data in the read/write format
    */
   Object fromStorage(Object content);

   /**
     * Returns the {@link MediaType} produced by this encoder or null if the storage format is not known.
     */
   MediaType getStorageFormat();
}
5.2. Default encoders
Data Grid automatically picks the Encoder depending on the cache configuration. The table below shows which internal Encoder is used for several configurations:
| Mode | Configuration | Encoder | Description |
|---|---|---|---|
| Embedded/Server | Default | IdentityEncoder | Passthrough encoder, no conversion done |
| Embedded | StorageType.OFF_HEAP | GlobalMarshallerEncoder | Use the Data Grid internal marshaller to convert to byte[]. May delegate to the configured marshaller in the cache manager. |
| Embedded | StorageType.BINARY | BinaryEncoder | Use the Data Grid internal marshaller to convert to byte[], except for primitives and String. |
| Server | StorageType.OFF_HEAP | IdentityEncoder | Store byte[]s directly as received by remote clients |
5.3. Overriding programmatically
It is possible to override programmatically the encoding used for both keys and values, by calling the .withEncoding() method variants from AdvancedCache.
Example, consider the following cache configured as OFF_HEAP:
// Read and write POJO, storage will be byte[] since for
// OFF_HEAP the GlobalMarshallerEncoder is used internally:
cache.put(1, new Pojo())
Pojo value = cache.get(1)

// Get the content in its stored format by overriding
// the internal encoder with a no-op encoder (IdentityEncoder)
Cache<?,?> rawContent = cache.getAdvancedCache().withEncoding(IdentityEncoder.class);
byte[] marshalled = (byte[]) rawContent.get(1);
The override can be useful if any operation in the cache does not require decoding, such as counting number of entries, or calculating the size of byte[] of an OFF_HEAP cache.
5.4. Defining custom Encoders
A custom encoder can be registered in the EncoderRegistry.
Ensure that the registration is done in every node of the cluster, before starting the caches.
Consider a custom encoder used to compress/decompress with gzip:
public class GzipEncoder implements Encoder {

   @Override
   public Object toStorage(Object content) {
      assert content instanceof String;
      return compress(content.toString());
   }

   @Override
   public Object fromStorage(Object content) {
      assert content instanceof byte[];
      return decompress((byte[]) content);
   }

   private byte[] compress(String str) {
      try (ByteArrayOutputStream baos = new ByteArrayOutputStream();
           GZIPOutputStream gis = new GZIPOutputStream(baos)) {
         gis.write(str.getBytes("UTF-8"));
         gis.close();
         return baos.toByteArray();
      } catch (IOException e) {
         throw new RuntimeException("Unabled to compress", e);
      }
   }

   private String decompress(byte[] compressed) {
      try (GZIPInputStream gis = new GZIPInputStream(new ByteArrayInputStream(compressed));
           BufferedReader bf = new BufferedReader(new InputStreamReader(gis, "UTF-8"))) {
         StringBuilder result = new StringBuilder();
         String line;
         while ((line = bf.readLine()) != null) {
            result.append(line);
         }
         return result.toString();
      } catch (IOException e) {
         throw new RuntimeException("Unable to decompress", e);
      }
   }

   @Override
   public MediaType getStorageFormat() {
      return MediaType.parse("application/gzip");
   }

   @Override
   public boolean isStorageFormatFilterable() {
      return false;
   }

   @Override
   public short id() {
      return 10000;
   }
}
It can be registered by:
GlobalComponentRegistry registry = cacheManager.getGlobalComponentRegistry();
EncoderRegistry encoderRegistry = registry.getComponent(EncoderRegistry.class);
encoderRegistry.registerEncoder(new GzipEncoder());
And then be used to write and read data from a cache:
AdvancedCache<String, String> cache = ...

// Decorate cache with the newly registered encoder, without encoding keys (IdentityEncoder)
// but compressing values
AdvancedCache<String, String> compressingCache = (AdvancedCache<String, String>) cache.withEncoding(IdentityEncoder.class, GzipEncoder.class);

// All values will be stored compressed...
compressingCache.put("297931749", "0412c789a37f5086f743255cfa693dd5");

// ... but API calls deals with String
String stringValue = compressingCache.get("297931749");

// Bypassing the value encoder to obtain the value as it is stored
Object value = compressingCache.withEncoding(IdentityEncoder.class).get("297931749");

// value is a byte[] which is the compressed value
5.5. MediaType
A Cache can optionally be configured with a org.infinispan.commons.dataconversion.MediaType for keys and values. By describing the data format of the cache, Data Grid is able to convert data on the fly during cache operations.
The MediaType configuration is more suitable when storing binary data. When using server mode, it’s common to have a MediaType configured and clients such as REST or Hot Rod reading and writing in different formats.
The data conversion between MediaType formats are handled by instances of org.infinispan.commons.dataconversion.Transcoder
public interface Transcoder {

   /**
    * Transcodes content between two different {@link MediaType}.
    *
    * @param content         Content to transcode.
    * @param contentType     The {@link MediaType} of the content.
    * @param destinationType The target {@link MediaType} to convert.
    * @return the transcoded content.
    */
   Object transcode(Object content, MediaType contentType, MediaType destinationType);

   /**
    * @return all the {@link MediaType} handled by this Transcoder.
    */
   Set<MediaType> getSupportedMediaTypes();
}
5.5.1. Configuration
Declarative:
<cache>
   <encoding>
      <key media-type="application/x-java-object; type=java.lang.Integer"/>
      <value media-type="application/xml; charset=UTF-8"/>
   </encoding>
</cache>
Programmatic:
ConfigurationBuilder cfg = new ConfigurationBuilder();

cfg.encoding().key().mediaType("text/plain");
cfg.encoding().value().mediaType("application/json");
5.5.2. Overriding the MediaType Programmatically
It’s possible to decorate the Cache with a different MediaType, allowing cache operations to be executed sending and receiving different data formats.
Example:
DefaultCacheManager cacheManager = new DefaultCacheManager();

// The cache will store POJO for keys and values
ConfigurationBuilder cfg = new ConfigurationBuilder();
cfg.encoding().key().mediaType("application/x-java-object");
cfg.encoding().value().mediaType("application/x-java-object");

cacheManager.defineConfiguration("mycache", cfg.build());

Cache<Integer, Person> cache = cacheManager.getCache("mycache");

cache.put(1, new Person("John","Doe"));

// Wraps cache using 'application/x-java-object' for keys but JSON for values
Cache<Integer, byte[]> jsonValuesCache = (Cache<Integer, byte[]>) cache.getAdvancedCache().withMediaType("application/x-java-object", "application/json");

byte[] json = jsonValuesCache.get(1);
Will return the value in JSON format:
{
   "_type":"org.infinispan.sample.Person",
   "name":"John",
   "surname":"Doe"
}Most Transcoders are installed when server mode is used; when using library mode, an extra dependency, org.infinispan:infinispan-server-core should be added to the project.
5.5.3. Transcoders and Encoders
Usually there will be none or only one data conversion involved in a cache operation:
- No conversion by default on caches using in embedded or server mode;
- Encoder based conversion for embedded caches without MediaType configured, but using OFF_HEAP or BINARY;
- Transcoder based conversion for caches used in server mode with multiple REST and Hot Rod clients sending and receiving data in different formats. Those caches will have MediaType configured describing the storage.
But it’s possible to have both encoders and transcoders being used simultaneously for advanced use cases.
Consider an example, a cache that stores marshalled objects (with jboss marshaller) content but for security reasons a transparent encryption layer should be added in order to avoid storing "plain" data to an external store. Clients should be able to read and write data in multiple formats.
This can be achieved by configuring the cache with the the MediaType that describes the storage regardless of the encoding layer:
ConfigurationBuilder cfg = new ConfigurationBuilder();
cfg.encoding().key().mediaType("application/x-jboss-marshalling");
cfg.encoding().key().mediaType("application/x-jboss-marshalling");
The transparent encryption can be added by decorating the cache with a special Encoder that encrypts/decrypts with storing/retrieving, for example:
class Scrambler implements Encoder {

   public Object toStorage(Object content) {
   // Encrypt data
   }

   public Object fromStorage(Object content) {
   // Decrypt data
   }

   @Override
   public boolean isStorageFormatFilterable() {

   }

   public MediaType getStorageFormat() {
   return new MediaType("application", "scrambled");
   }

   @Override
   public short id() {
   //return id
   }
}
To make sure all data written to the cache will be stored encrypted, it’s necessary to decorate the cache with the Encoder above and perform all cache operations in this decorated cache:
Cache<?,?> secureStorageCache = cache.getAdvancedCache().withEncoding(Scrambler.class).put(k,v);
The capability of reading data in multiple formats can be added by decorating the cache with the desired MediaType:
// Obtain a stream of values in XML format from the secure cache
secureStorageCache.getAdvancedCache().withMediaType("application/xml","application/xml").values().stream();
Internally, Data Grid will first apply the encoder fromStorage operation to obtain the entries, that will be in "application/x-jboss-marshalling" format and then apply a successive conversion to "application/xml" by using the adequate Transcoder.
Chapter 6. Protocol Interoperability
Clients exchange data with Data Grid through endpoints such as REST or Hot Rod.
Each endpoint uses a different protocol so that clients can read and write data in a suitable format. Because Data Grid can interoperate with multiple clients at the same time, it must convert data between client formats and the storage formats.
To configure Data Grid endpoint interoperability, you should define the MediaType that sets the format for data stored in the cache.
6.1. Considerations with Media Types and Endpoint Interoperability
Configuring Data Grid to store data with a specific media type affects client interoperability.
Although REST clients do support sending and receiving encoded binary data, they are better at handling text formats such as JSON, XML, or plain text.
Memcached text clients can handle String-based keys and byte[] values but cannot negotiate data types with the server. These clients do not offer much flexibility when handling data formats because of the protocol definition.
Java Hot Rod clients are suitable for handling Java objects that represent entities that reside in the cache. Java Hot Rod clients use marshalling operations to serialize and deserialize those objects into byte arrays.
Similarly, non-Java Hot Rod clients, such as the C++, C#, and Javascript clients, are suitable for handling objects in the respective languages. However, non-Java Hot Rod clients can interoperate with Java Hot Rod clients using platform independent data formats.
6.2. REST, Hot Rod, and Memcached Interoperability with Text-Based Storage
You can configure key and values with a text-based storage format.
For example, specify text/plain; charset=UTF-8, or any other character set, to set plain text as the media type. You can also specify a media type for other text-based formats such as JSON (application/json) or XML (application/xml) with an optional character set.
The following example configures the cache to store entries with the text/plain; charset=UTF-8 media type:
<cache>
   <encoding>
      <key media-type="text/plain; charset=UTF-8"/>
      <value media-type="text/plain; charset=UTF-8"/>
   </encoding>
</cache>
To handle the exchange of data in a text-based format, you must configure Hot Rod clients with the org.infinispan.commons.marshall.StringMarshaller marshaller.
REST clients must also send the correct headers when writing and reading from the cache, as follows:
-
Write:
Content-Type: text/plain; charset=UTF-8 -
Read:
Accept: text/plain; charset=UTF-8
Memcached clients do not require any configuration to handle text-based formats.
| This configuration is compatible with… | |
|---|---|
| REST clients | Yes |
| Java Hot Rod clients | Yes |
| Memcached clients | Yes |
| Non-Java Hot Rod clients | No |
| Querying and Indexing | No |
| Custom Java objects | No |
6.3. REST, Hot Rod, and Memcached Interoperability with Custom Java Objects
If you store entries in the cache as marshalled, custom Java objects, you should configure the cache with the MediaType of the marshalled storage.
Java Hot Rod clients use the JBoss marshalling storage format as the default to store entries in the cache as custom Java objects.
The following example configures the cache to store entries with the application/x-jboss-marshalling media type:
<distributed-cache name="my-cache">
   <encoding>
      <key media-type="application/x-jboss-marshalling"/>
      <value media-type="application/x-jboss-marshalling"/>
   </encoding>
</distributed-cache>
If you use the Protostream marshaller, configure the MediaType as application/x-protostream. For UTF8Marshaller, configure the MediaType as text/plain.
If only Hot Rod clients interact with the cache, you do not need to configure the MediaType.
Because REST clients are most suitable for handling text formats, you should use primitives such as java.lang.String for keys. Otherwise, REST clients must handle keys as bytes[] using a supported binary encoding.
REST clients can read values for cache entries in XML or JSON format. However, the classes must be available in the server.
To read and write data from Memcached clients, you must use java.lang.String for keys. Values are stored and returned as marshalled objects.
Some Java Memcached clients allow data transformers that marshall and unmarshall objects. You can also configure the Memcached server module to encode responses in different formats, such as 'JSON' which is language neutral. This allows non-Java clients to interact with the data even if the storage format for the cache is Java-specific.
Storing Java objects in the cache requires you to deploy entity classes to Data Grid. See Deploying Entity Classes.
| This configuration is compatible with… | |
|---|---|
| REST clients | Yes |
| Java Hot Rod clients | Yes |
| Memcached clients | Yes |
| Non-Java Hot Rod clients | No |
| Querying and Indexing | No |
| Custom Java objects | Yes |
6.4. Java and Non-Java Client Interoperability with Protobuf
Storing data in the cache as Protobuf encoded entries provides a platform independent configuration that enables Java and Non-Java clients to access and query the cache from any endpoint.
If indexing is configured for the cache, Data Grid automatically stores keys and values with the application/x-protostream media type.
If indexing is not configured for the cache, you can configure it to store entries with the application/x-protostream media type as follows:
<distributed-cache name="my-cache">
   <encoding>
      <key media-type="application/x-protostream"/>
      <value media-type="application/x-protostream"/>
   </encoding>
</distributed-cache>
Data Grid converts between application/x-protostream and application/json, which allows REST clients to read and write JSON formatted data. However REST clients must send the correct headers, as follows:
- Read Header
Read: Accept: application/json
- Write Header
Write: Content-Type: application/json
The application/x-protostream media type uses Protobuf encoding, which requires you to register a Protocol Buffers schema definition that describes the entities and marshallers that the clients use.
| This configuration is compatible with… | |
|---|---|
| REST clients | Yes |
| Java Hot Rod clients | Yes |
| Non-Java Hot Rod clients | Yes |
| Querying and Indexing | Yes |
| Custom Java objects | Yes |
6.5. Custom Code Interoperability
You can deploy custom code with Data Grid. For example, you can deploy scripts, tasks, listeners, converters, and merge policies. Because your custom code can access data directly in the cache, it must interoperate with clients that access data in the cache through different endpoints.
For example, you might create a remote task to handle custom objects stored in the cache while other clients store data in binary format.
To handle interoperability with custom code you can either convert data on demand or store data as Plain Old Java Objects (POJOs).
6.5.1. Converting Data On Demand
If the cache is configured to store data in a binary format such as application/x-protostream or application/x-jboss-marshalling, you can configure your deployed code to perform cache operations using Java objects as the media type. See Overriding the MediaType Programmatically.
This approach allows remote clients to use a binary format for storing cache entries, which is optimal. However, you must make entity classes available to the server so that it can convert between binary format and Java objects.
Additionally, if the cache uses Protobuf (application/x-protostream) as the binary format, you must deploy protostream marshallers so that Data Grid can unmarshall data from your custom code.
6.5.2. Storing Data as POJOs
Storing unmarshalled Java objects in the server is not recommended. Doing so requires Data Grid to serialize data when remote clients read from the cache and then deserialize data when remote clients write to the cache.
The following example configures the cache to store entries with the application/x-java-object media type:
<distributed-cache name="my-cache">
   <encoding>
      <key media-type="application/x-java-object"/>
      <value media-type="application/x-java-object"/>
   </encoding>
</distributed-cache>
Hot Rod clients must use a supported marshaller when data is stored as POJOs in the cache, either the JBoss marshaller or the default Java serialization mechanism. You must also deploy the classes must be deployed in the server.
REST clients must use a storage format that Data Grid can convert to and from Java objects, currently JSON or XML.
Storing Java objects in the cache requires you to deploy entity classes to Data Grid. See Deploying Entity Classes.
Memcached clients must send and receive a serialized version of the stored POJO, which is a JBoss marshalled payload by default. However if you configure the client encoding in the appropriate Memcached connector, you change the storage format so that Memcached clients use a platform neutral format such as JSON.
| This configuration is compatible with… | |
|---|---|
| REST clients | Yes |
| Java Hot Rod clients | Yes |
| Non-Java Hot Rod clients | No |
| Querying and Indexing | Yes. However, querying and indexing works with POJOs only if the entities are annotated. |
| Custom Java objects | Yes |
6.6. Deploying Entity Classes
If you plan to store entries in the cache as custom Java objects or POJOs, you must deploy entity classes to Data Grid. Clients always exchange objects as bytes[]. The entity classes represent those custom objects so that Data Grid can serialize and deserialize them.
To make entity classes available to the server, do the following:
- Create a JAR file that contains the entities and dependencies.
- Stop Data Grid if it is running. Data Grid only loads entity classes at boot time.
Copy the JAR to the
server/libdirectory of your Data Grid server installation.├── server │ ├── lib │ ├── deployment.my-entities.jar
Chapter 7. Marshalling Java Objects
Marshalling converts Java objects into binary format so they can be transferred over the wire or stored to disk. The reverse process, unmarshalling, transforms data from binary format into Java objects.
Data Grid performs marshalling and unmarshalling to:
- Send data to other Data Grid nodes in a cluster.
- Store data in persistent cache stores.
- Store data in binary format to provide lazy deserialization capabilities.
Data Grid handles marshalling for all internal types. You need to configure marshalling only for the Java objects that you want to store.
Data Grid uses ProtoStream as the default for marshalling Java objects to binary format. Data Grid also provides other Marshaller implementations you can use.
7.1. Using the ProtoStream Marshaller
Data Grid integrates with the ProtoStream API to encode and decode Java objects into Protocol Buffers (Protobuf); a language-neutral, backwards compatible format.
Procedure
-
Create implementations of the ProtoStream
SerializationContextInitializerinterface so that Data Grid can marshall your Java objects. Configure Data Grid to use the implementations.
Programmatically:
GlobalConfigurationBuilder builder = new GlobalConfigurationBuilder();
builder.serialization()
       .addContextInitializers(new LibraryInitializerImpl(), new SCIImpl());
Declaratively
<serialization>
    <context-initializer class="org.infinispan.example.LibraryInitializerImpl"/>
    <context-initializer class="org.infinispan.example.another.SCIImpl"/>
</serialization>
7.2. Using JBoss Marshalling
JBoss Marshalling is a serialization-based marshalling library and was the default marshaller in previous Data Grid versions.
- You should not use serialization-based marshalling with Data Grid. Instead you should use Protostream, which is a high-performance binary wire format that ensures backwards compatibility.
-
JBoss Marshalling and the
AdvancedExternalizerinterface are deprecated and will be removed in a future release. However, Data Grid ignoresAdvancedExternalizerimplementations when persisting data unless you use JBoss Marshalling.
Procedure
-
Add the
infinispan-jboss-marshallingdependency to your classpath. Configure Data Grid to use the
JBossUserMarshaller.Programmatically:
GlobalConfigurationBuilder builder = new GlobalConfigurationBuilder();
builder.serialization().marshaller(new JBossUserMarshaller());
Declaratively:
<serialization marshaller="org.infinispan.jboss.marshalling.core.JBossUserMarshaller"/>
7.3. Using Java Serialization
You can use Java serialization with Data Grid to marshall your objects, but only if your Java objects implement Java’s Serializable interface.
Procedure
-
Configure Data Grid to use
JavaSerializationMarshalleras the marshaller. Add your Java classes to the deserialization white list.
Programmatically:
GlobalConfigurationBuilder builder = new GlobalConfigurationBuilder();
builder.serialization()
       .marshaller(new JavaSerializationMarshaller())
       .whiteList()
       .addRegexps("org.infinispan.example.", "org.infinispan.concrete.SomeClass");
Declaratively:
<serialization marshaller="org.infinispan.commons.marshall.JavaSerializationMarshaller">
    <white-list>
        <class>org.infinispan.concrete.SomeClass</class>
        <regex>org.infinispan.example.*</regex>
    </white-list>
</serialization>
7.4. Using the Kryo Marshaller
Data Grid provides a marshalling implementation that uses Kryo libraries.
Prerequisites for Data Grid Servers
To use Kryo marshalling with Data Grid servers, add a JAR that includes the runtime class files for the Kryo marshalling implementation as follows:
-
Copy
infinispan-marshaller-kryo-bundle.jarfrom the Data Grid Maven repository. -
Add the JAR file to the
server/libdirectory in your Data Grid server installation directory.
Prerequisites for Data Grid Library Mode
To use Kryo marshalling with Data Grid as an embedded library in your application, do the following:
Add the
infinispan-marshaller-kryodependency to yourpom.xml.<dependency> <groupId>org.infinispan</groupId> <artifactId>infinispan-marshaller-kryo</artifactId> <version>${version.infinispan}</version> </dependency>Specify the
org.infinispan.marshaller.kryo.KryoMarshallerclass as the marshaller.GlobalConfigurationBuilder builder = new GlobalConfigurationBuilder(); builder.serialization() .marshaller(new org.infinispan.marshaller.kryo.KryoMarshaller());
Procedure
-
Implement a service provider for the
SerializerRegistryService.javainterface. Place all serializer registrations in the
register(Kryo)method; where serializers are registered with the suppliedKryoobject using the Kryo API, for example:kryo.register(ExampleObject.class, new ExampleObjectSerializer())
Specify the full path of implementing classes in your deployment JAR file within:
META-INF/services/org/infinispan/marshaller/kryo/SerializerRegistryService
Reference
7.5. Using the Protostuff Marshaller
Data Grid provides a marshalling implementation that uses Protostuff libraries.
Prerequisites for Data Grid Servers
To use Protostuff marshalling with Data Grid servers, add a JAR that includes the runtime class files for the Protostuff marshalling implementation as follows:
-
Copy
infinispan-marshaller-protostuff-bundle.jarfrom the Data Grid Maven repository. -
Add the JAR file to the
server/libdirectory in your Data Grid server installation directory.
Prerequisites for Data Grid Library Mode
To use Protostuff marshalling with Data Grid as an embedded library in your application, do the following:
Add the
infinispan-marshaller-protostuffdependency to yourpom.xml.<dependency> <groupId>org.infinispan</groupId> <artifactId>infinispan-marshaller-protostuff</artifactId> <version>${version.infinispan}</version> </dependency>Specify the
org.infinispan.marshaller.protostuff.ProtostuffMarshallerclass as the marshaller.GlobalConfigurationBuilder builder = new GlobalConfigurationBuilder(); builder.serialization() .marshaller(new org.infinispan.marshaller.protostuff.ProtostuffMarshaller());
Procedure
Do one of the following to register custom Protostuff schemas for object marshalling:
Call the
register()method.RuntimeSchema.register(ExampleObject.class, new ExampleObjectSchema());
Implement a service provider for the
SerializerRegistryService.javainterface that places all schema registrations in theregister()method.You should then specify the full path of implementing classes in your deployment JAR file within:
META-INF/services/org/infinispan/marshaller/protostuff/SchemaRegistryService
Reference
7.6. Using Custom Marshallers
Data Grid provides a Marshaller interface for custom marshallers.
Programmatic procedure
GlobalConfigurationBuilder builder = new GlobalConfigurationBuilder();
builder.serialization()
      .marshaller(new org.infinispan.example.marshall.CustomMarshaller())
      .whiteList().addRegexp("org.infinispan.example.*");
Declarative procedure
<serialization marshaller="org.infinispan.example.marshall.CustomMarshaller">
    <white-list>
        <class>org.infinispan.concrete.SomeClass</class>
        <regex>org.infinispan.example.*</regex>
    </white-list>
</serialization>
Custom marshaller implementations can access a configured white list via the initialize() method, which is called during startup.
7.7. Adding Java Classes to Deserialization White Lists
Data Grid does not allow deserialization of arbritrary Java classes for security reasons, which applies to JSON, XML, and marshalled byte[] content.
You must add Java classes to a deserialization white list, either using system properties or specifying them in the Data Grid configuration.
System properties
// Specify a comma-separated list of fully qualified class names
-Dinfinispan.deserialization.whitelist.classes=java.time.Instant,com.myclass.Entity

// Specify a regular expression to match classes
-Dinfinispan.deserialization.whitelist.regexps=.*
Declarative
<cache-container>
   <serialization version="1.0" marshaller="org.infinispan.marshall.TestObjectStreamMarshaller">
      <white-list>
         <class>org.infinispan.test.data.Person</class>
         <regex>org.infinispan.test.data.*</regex>
       </white-list>
   </serialization>
</cache-container>
Java classes that you add to the deserialization whitelist apply to the Data Grid CacheContainer and can be deserialized by all caches that the CacheContainer controls.
7.8. Storing Deserialized Objects in Data Grid Servers
You can configure Data Grid to use the application/x-java-object MediaType as the format for your data. In other words, Data Grid stores your data as Plain Old Java Objects (POJOs) instead of binary content.
If you store POJOs, you must put class files for all custom objects on the Data Grid server classpath.
Procedure
-
Add JAR files that contain custom classes and/or service providers for marshaller implementations in the
server/libdirectory.
├── server
│   ├── lib
│   │   ├── UserObjects.jar
│       └── README.txt
7.9. Storing Data in Binary Format
Data Grid can store data in its serialized form, in binary format, and then either serialize or deserialize Java objects as needed. This behavior is also referred to as lazy deserialization.
Programmatic procedure
ConfigurationBuilder builder = ...
builder.memory().storageType(StorageType.BINARY);
Declarative procedure
<memory>
   <binary />
</memory>
Equality Considerations
When storing data in binary format, Data Grid uses the WrappedBytes interface for keys and values. This wrapper class transparently takes care of serialization and deserialization on demand, and internally may have a reference to the object itself being wrapped, or the serialized, byte array representation of the object. This has an effect on the behavior of equality, which is important to note if you implement an equals() methods on keys.
The equals() method of the wrapper class either compares binary representations (byte arrays) or delegates to the wrapped object instance’s equals() method, depending on whether both instances being compared are in serialized or deserialized form at the time of comparison. If one of the instances being compared is in one form and the other in another form, then one instance is either serialized or deserialized.
Reference
Chapter 8. Marshalling Custom Java Objects with ProtoStream
Data Grid uses a ProtoStream API to encode and decode Java objects into Protocol Buffers (Protobuf); a language-neutral, backwards compatible format.
8.1. Protobuf Schemas
Protocol Buffers, Protobuf, schemas provide structured representations of your Java objects.
You define Protobuf message types .proto schema files as in the following example:
package book_sample;

message Book {
    optional string title = 1;
    optional string description = 2;
    optional int32 publicationYear = 3; // no native Date type available in Protobuf

    repeated Author authors = 4;
}

message Author {
    optional string name = 1;
    optional string surname = 2;
}
The preceding .library.proto file defines an entity (Protobuf message type) named Book that is contained in the book_sample package. Book declares several fields of primitive types and an array (Protobuf repeatable field) named authors, which is the Author message type.
Protobuf Messages
- You can nest messages but the resulting structure is strictly a tree, never a graph.
- Type inheritance is not possible.
- Collections are not supported but you can emulate arrays with repeated fields.
Reference
8.2. ProtoStream Serialization Contexts
A ProtoStream SerializationContext contains Protobuf type definitions for custom Java objects, loaded from .proto schema files, and the accompanying Marshallers for the objects.
The SerializationContextInitializer interface registers Java objects and marshallers so that the ProtoStream library can encode your custom objects to Protobuf format, which then enables Data Grid to transmit and store your data.
8.3. ProtoStream Types
ProtoStream can handle the following types, as well as the unboxed equivalents in the case of primitive types, without any additional configuration:
-
String -
Integer -
Long -
Double -
Float -
Boolean -
byte[] -
Byte -
Short -
Character -
java.util.Date -
java.time.Instant
To marshall any other Java objects, you must generate, or manually create, SerializationContextInitializer implementations that register .proto schemas and marshallers with a SerializationContext.
8.4. Generating Serialization Context Initializers
Data Grid provides an protostream-processor artifact that can generate .proto schemas and SerializationContextInitializer implementations from annotated Java classes.
Procedure
Add the
protostream-processordependency to yourpom.xml.<dependencyManagement> <dependencies> <dependency> <groupId>org.infinispan</groupId> <artifactId>infinispan-bom</artifactId> <version>${version.infinispan}</version> <type>pom</type> </dependency> <dependency> <groupId>org.infinispan.protostream</groupId> <artifactId>protostream-processor</artifactId> <scope>provided</scope> </dependency> </dependencies> </dependencyManagement>Annotate the Java objects that you want to marshall with
@ProtoFieldand@ProtoFactory.Book.java
import org.infinispan.protostream.annotations.ProtoFactory;
import org.infinispan.protostream.annotations.ProtoField;
...

public class Book {
   @ProtoField(number = 1)
   final String title;

   @ProtoField(number = 2)
   final String description;

   @ProtoField(number = 3, defaultValue = "0")
   final int publicationYear;

   @ProtoField(number = 4, collectionImplementation = ArrayList.class)
   final List<Author> authors;

   @ProtoFactory
   Book(String title, String description, int publicationYear, List<Author> authors) {
      this.title = title;
      this.description = description;
      this.publicationYear = publicationYear;
      this.authors = authors;
   }
   // public Getter methods omitted for brevity
}
Author.java
import org.infinispan.protostream.annotations.ProtoFactory;
import org.infinispan.protostream.annotations.ProtoField;

public class Author {
   @ProtoField(number = 1)
   final String name;

   @ProtoField(number = 2)
   final String surname;

   @ProtoFactory
   Author(String name, String surname) {
      this.name = name;
      this.surname = surname;
   }
   // public Getter methods omitted for brevity
}
Define an interface that extends
SerializationContextInitializerand is annotated with@AutoProtoSchemaBuilder.@AutoProtoSchemaBuilder( includeClasses = { Book.class, Author.class, }, schemaFileName = "library.proto", 1 schemaFilePath = "proto/", 2 schemaPackageName = "book_sample") interface LibraryInitializer extends SerializationContextInitializer { }
During compile-time, protostream-processor generates a concrete implementation of the interface that you can use to initialize a ProtoStream SerializationContext. By default, implementation names are the annotated class name with an "Impl" suffix.
Examples
The following are examples of a generated schema file and implementation:
target/classes/proto/library.proto
// File name: library.proto
// Generated from : org.infinispan.commons.marshall.LibraryInitializer

syntax = "proto2";

package book_sample;


message Book {

    optional string title = 1;

    optional string description = 2;

    optional int32 publicationYear = 3 [default = 0];

    repeated Author authors = 4;
}


message Author {

    optional string name = 1;

    optional string surname = 2;
}
LibraryInitializerImpl.java
/*
 Generated by org.infinispan.protostream.annotations.impl.processor.AutoProtoSchemaBuilderAnnotationProcessor
 for class org.infinispan.commons.marshall.LibraryInitializer
 annotated with @org.infinispan.protostream.annotations.AutoProtoSchemaBuilder(dependsOn=, service=false, autoImportClasses=false, excludeClasses=, includeClasses=org.infinispan.commons.marshall.Book,org.infinispan.commons.marshall.Author, basePackages={}, value={}, schemaPackageName="book_sample", schemaFilePath="proto/", schemaFileName="library.proto", className="")
 */

package org.infinispan.commons.marshall;

/**
 * WARNING: Generated code!
 */
@javax.annotation.Generated(value = "org.infinispan.protostream.annotations.impl.processor.AutoProtoSchemaBuilderAnnotationProcessor",
      comments = "Please do not edit this file!")
@org.infinispan.protostream.annotations.impl.OriginatingClasses({
      "org.infinispan.commons.marshall.Author",
      "org.infinispan.commons.marshall.Book"
})
/*@org.infinispan.protostream.annotations.AutoProtoSchemaBuilder(
   className = "LibraryInitializerImpl",
   schemaFileName = "library.proto",
   schemaFilePath = "proto/",
   schemaPackageName = "book_sample",
   service = false,
   autoImportClasses = false,
   classes = {
      org.infinispan.commons.marshall.Author.class,
      org.infinispan.commons.marshall.Book.class
   }
)*/
public class LibraryInitializerImpl implements org.infinispan.commons.marshall.LibraryInitializer {

   @Override
   public String getProtoFileName() { return "library.proto"; }

   @Override
   public String getProtoFile() { return org.infinispan.protostream.FileDescriptorSource.getResourceAsString(getClass(), "/proto/library.proto"); }

   @Override
   public void registerSchema(org.infinispan.protostream.SerializationContext serCtx) {
      serCtx.registerProtoFiles(org.infinispan.protostream.FileDescriptorSource.fromString(getProtoFileName(), getProtoFile()));
   }

   @Override
   public void registerMarshallers(org.infinispan.protostream.SerializationContext serCtx) {
      serCtx.registerMarshaller(new org.infinispan.commons.marshall.Book$___Marshaller_cdc76a682a43643e6e1d7e43ba6d1ef6f794949a45e1a8bc961046cda44c9a85());
      serCtx.registerMarshaller(new org.infinispan.commons.marshall.Author$___Marshaller_9b67e1c1ecea213b4207541b411fb9af2ae6f658610d2a4ca9126484d57786d1());
   }
}
8.5. Manually Implementing Serialization Context Initializers
In some cases you might need to manually define .proto schema files and implement ProtoStream marshallers. For example, if you cannot modify Java object classes to add annotations.
Procedure
Create a
.protoschema with Protobuf messages.package book_sample; message Book { optional string title = 1; optional string description = 2; optional int32 publicationYear = 3; // no native Date type available in Protobuf repeated Author authors = 4; } message Author { optional string name = 1; optional string surname = 2; }Use the
org.infinispan.protostream.MessageMarshallerinterface to implement marshallers for your classes.BookMarshaller.java
import org.infinispan.protostream.MessageMarshaller;

public class BookMarshaller implements MessageMarshaller<Book> {

   @Override
   public String getTypeName() {
      return "book_sample.Book";
   }

   @Override
   public Class<? extends Book> getJavaClass() {
      return Book.class;
   }

   @Override
   public void writeTo(MessageMarshaller.ProtoStreamWriter writer, Book book) throws IOException {
      writer.writeString("title", book.getTitle());
      writer.writeString("description", book.getDescription());
      writer.writeInt("publicationYear", book.getPublicationYear());
      writer.writeCollection("authors", book.getAuthors(), Author.class);
   }

   @Override
   public Book readFrom(MessageMarshaller.ProtoStreamReader reader) throws IOException {
      String title = reader.readString("title");
      String description = reader.readString("description");
      int publicationYear = reader.readInt("publicationYear");
      List<Author> authors = reader.readCollection("authors", new ArrayList<>(), Author.class);
      return new Book(title, description, publicationYear, authors);
   }
}
AuthorMarshaller.java
import org.infinispan.protostream.MessageMarshaller;

public class AuthorMarshaller implements MessageMarshaller<Author> {

   @Override
   public String getTypeName() {
      return "book_sample.Author";
   }

   @Override
   public Class<? extends Author> getJavaClass() {
      return Author.class;
   }

   @Override
   public void writeTo(MessageMarshaller.ProtoStreamWriter writer, Author author) throws IOException {
      writer.writeString("name", author.getName());
      writer.writeString("surname", author.getSurname());
   }

   @Override
   public Author readFrom(MessageMarshaller.ProtoStreamReader reader) throws IOException {
      String name = reader.readString("name");
      String surname = reader.readString("surname");
      return new Author(name, surname);
   }
}
Create a
SerializationContextInitializerimplementation that registers the.protoschema and the ProtoStream marshaller implementations with aSerializationContext.ManualSerializationContextInitializer.java
import org.infinispan.protostream.FileDescriptorSource;
import org.infinispan.protostream.SerializationContext;
import org.infinispan.protostream.SerializationContextInitializer;
...

public class ManualSerializationContextInitializer implements SerializationContextInitializer {
   @Override
   public String getProtoFileName() {
      return "library.proto";
   }

   @Override
   public String getProtoFile() throws UncheckedIOException {
      // Assumes that the file is located in a Jar's resources, we must provide the path to the library.proto file
      return FileDescriptorSource.getResourceAsString(getClass(), "/" + getProtoFileName());
   }

   @Override
   public void registerSchema(SerializationContext serCtx) {
      serCtx.registerProtoFiles(FileDescriptorSource.fromString(getProtoFileName(), getProtoFile()));
   }

   @Override
   public void registerMarshallers(SerializationContext serCtx) {
      serCtx.registerMarshaller(new AuthorMarshaller());
      serCtx.registerMarshaller(new BookMarshaller());
   }
}
Chapter 9. Clustered Locks
A clustered lock is a lock which is distributed and shared among all nodes in the Data Grid cluster and currently provides a way to execute code that will be synchronized between the nodes in a given cluster.
9.1. Installation
In order to start using the clustered locks, you needs to add the dependency in your Maven pom.xml file:
pom.xml
<dependency>
  <groupId>org.infinispan</groupId>
  <artifactId>infinispan-clustered-lock</artifactId>
</dependency>
9.2. ClusteredLock Configuration
Currently there is a single type of ClusteredLock supported : non reentrant, NODE ownership lock.
9.2.1. Ownership
-
NODEWhen aClusteredLockis defined, this lock can be used from all the nodes in the Data Grid cluster. When the ownership is NODE type, this means that the owner of the lock is the Data Grid node that acquired the lock at a given time. This means that each time we get aClusteredLockinstance with theClusteredCacheManager, this instance will be the same instance for each Data Grid node. This lock can be used to synchronize code between Data Grid nodes. The advantage of this lock is that any thread in the node can release the lock at a given time. -
INSTANCE- not yet supported
When a ClusteredLock is defined, this lock can be used from all the nodes in the Data Grid cluster. When the ownership is INSTANCE type, this means that the owner of the lock is the actual instance we acquired when ClusteredLockManager.get("lockName") is called.
This means that each time we get a ClusteredLock instance with the ClusteredCacheManager, this instance will be a new instance. This lock can be used to synchronize code between Data Grid nodes and inside each Data Grid node. The advantage of this lock is that only the instance that called 'lock' can release the lock.
9.2.2. Reentrancy
When a ClusteredLock is configured reentrant, the owner of the lock can reacquire the lock as many consecutive times as it wants while holding the lock.
Currently, only non reentrant locks are supported. This means that when two consecutive lock calls are sent for the same owner, the first call will acquire the lock if it’s available, and the second call will block.
9.3. ClusteredLockManager Interface
The ClusteredLockManager interface, marked as experimental, is the entry point to define, retrieve and remove a lock. It automatically listen to the creation of EmbeddedCacheManager and proceeds with the registration of an instance of it per EmbeddedCacheManager. It starts the internal caches needed to store the lock state.
Retrieving the ClusteredLockManager is as simple as invoking the EmbeddedClusteredLockManagerFactory.from(EmbeddedCacheManager) as shown in the example below:
// create or obtain your EmbeddedCacheManager
EmbeddedCacheManager manager = ...;

// retrieve the ClusteredLockManager
ClusteredLockManager clusteredLockManager = EmbeddedClusteredLockManagerFactory.from(manager);
@Experimental
public interface ClusteredLockManager {

   boolean defineLock(String name);

   boolean defineLock(String name, ClusteredLockConfiguration configuration);

   ClusteredLock get(String name);

   ClusteredLockConfiguration getConfiguration(String name);

   boolean isDefined(String name);

   CompletableFuture<Boolean> remove(String name);

   CompletableFuture<Boolean> forceRelease(String name);
}-
defineLock: Defines a lock with the specified name and the defaultClusteredLockConfiguration. It does not overwrite existing configurations. -
defineLock(String name, ClusteredLockConfiguration configuration): Defines a lock with the specified name andClusteredLockConfiguration. It does not overwrite existing configurations. -
ClusteredLock get(String name): Get’s aClusteredLockby it’s name. A call ofdefineLockmust be done at least once in the cluster. See ownership level section to understand the implications ofgetmethod call.
Currently, the only ownership level supported is NODE.
-
ClusteredLockConfiguration getConfiguration(String name):
Returns the configuration of a ClusteredLock, if such exists.
-
boolean isDefined(String name): Checks if a lock is already defined. -
CompletableFuture<Boolean> remove(String name): Removes aClusteredLockif such exists. -
CompletableFuture<Boolean> forceRelease(String name): Releases - or unlocks - aClusteredLock, if such exists, no matter who is holding it at a given time. Calling this method may cause concurrency issues and has to be used in exceptional situations.
9.4. ClusteredLock Interface
ClusteredLock interface, marked as experimental, is the interface that implements the clustered locks.
@Experimental
public interface ClusteredLock {

   CompletableFuture<Void> lock();

   CompletableFuture<Boolean> tryLock();

   CompletableFuture<Boolean> tryLock(long time, TimeUnit unit);

   CompletableFuture<Void> unlock();

   CompletableFuture<Boolean> isLocked();

   CompletableFuture<Boolean> isLockedByMe();
}-
lock: Acquires the lock. If the lock is not available then call blocks until the lock is acquired. Currently, there is no maximum time specified for a lock request to fail, so this could cause thread starvation. -
tryLockAcquires the lock only if it is free at the time of invocation, and returnstruein that case. This method does not block (or wait) for any lock acquisition. tryLock(long time, TimeUnit unit)If the lock is available this method returns immediately withtrue. If the lock is not available then the call waits until :- The lock is acquired
- The specified waiting time elapses
If the time is less than or equal to zero, the method will not wait at all.
-
unlock
Releases the lock. Only the holder of the lock may release the lock.
-
isLockedReturnstruewhen the lock is locked andfalsewhen the lock is released. -
isLockedByMeReturnstruewhen the lock is owned by the caller andfalsewhen the lock is owned by someone else or it’s released.
9.4.1. Usage Examples
EmbeddedCache cm = ...;
ClusteredLockManager cclm = EmbeddedClusteredLockManagerFactory.from(cm);

lock.tryLock()
  .thenCompose(result -> {
     if (result) {
      try {
          // manipulate protected state
          } finally {
             return lock.unlock();
          }
     } else {
        // Do something else
     }
  });
}
9.4.2. ClusteredLockManager Configuration
You can configure ClusteredLockManager to use different strategies for locks, either declaratively or programmatically, with the following attributes:
num-owners-
Defines the total number of nodes in each cluster that store the states of clustered locks. The default value is
-1, which replicates the value to all nodes. reliabilityControls how clustered locks behave when clusters split into partitions or multiple nodes leave a cluster. You can set the following values:
-
AVAILABLE: Nodes in any partition can concurrently operate on locks. -
CONSISTENT: Only nodes that belong to the majority partition can operate on locks. This is the default value.
-
The following is an example declarative configuration for ClusteredLockManager:
<?xml version="1.0" encoding="UTF-8"?>
<infinispan
        xmlns="urn:infinispan:config:10.1">
    ...
    <cache-container default-cache="default">
        <transport/>
        <local-cache name="default">
            <locking concurrency-level="100" acquire-timeout="1000"/>
        </local-cache>

        <clustered-locks xmlns="urn:infinispan:config:clustered-locks:10.1"
                         num-owners = "3"
                         reliability="AVAILABLE">
            <clustered-lock name="lock1" />
            <clustered-lock name="lock2" />
        </clustered-locks>
    </cache-container>
    ...
</infinispan>
Chapter 10. Clustered Counters
Clustered counters are counters which are distributed and shared among all nodes in the Data Grid cluster. Counters can have different consistency levels: strong and weak.
Although a strong/weak consistent counter has separate interfaces, both support updating its value, return the current value and they provide events when its value is updated. Details are provided below in this document to help you choose which one fits best your uses-case.
10.1. Installation and Configuration
In order to start using the counters, you needs to add the dependency in your Maven pom.xml file:
pom.xml
<dependency>
  <groupId>org.infinispan</groupId>
  <artifactId>infinispan-clustered-counter</artifactId>
</dependency>
The counters can be configured Data Grid configuration file or on-demand via the CounterManager interface detailed later in this document. A counters configured in Data Grid configuration file is created at boot time when the EmbeddedCacheManager is starting. Theses counters are started eagerly and they are available in all the cluster’s nodes.
configuration.xml
<?xml version="1.0" encoding="UTF-8"?>
<infinispan>
    <cache-container ...>
        <!-- if needed to persist counter, global state needs to be configured -->
        <global-state>
            ...
        </global-state>
        <!-- your caches configuration goes here -->
         <counters xmlns="urn:infinispan:config:counters:10.1" num-owners="3" reliability="CONSISTENT">
             <strong-counter name="c1" initial-value="1" storage="PERSISTENT"/>
             <strong-counter name="c2" initial-value="2" storage="VOLATILE">
                 <lower-bound value="0"/>
             </strong-counter>
             <strong-counter name="c3" initial-value="3" storage="PERSISTENT">
                 <upper-bound value="5"/>
             </strong-counter>
             <strong-counter name="c4" initial-value="4" storage="VOLATILE">
                 <lower-bound value="0"/>
                 <upper-bound value="10"/>
             </strong-counter>
             <weak-counter name="c5" initial-value="5" storage="PERSISTENT" concurrency-level="1"/>
         </counters>
    </cache-container>
</infinispan>
or programmatically, in the GlobalConfigurationBuilder:
GlobalConfigurationBuilder globalConfigurationBuilder = ...;
CounterManagerConfigurationBuilder builder = globalConfigurationBuilder.addModule(CounterManagerConfigurationBuilder.class);
builder.numOwner(3).reliability(Reliability.CONSISTENT);
builder.addStrongCounter().name("c1").initialValue(1).storage(Storage.PERSISTENT);
builder.addStrongCounter().name("c2").initialValue(2).lowerBound(0).storage(Storage.VOLATILE);
builder.addStrongCounter().name("c3").initialValue(3).upperBound(5).storage(Storage.PERSISTENT);
builder.addStrongCounter().name("c4").initialValue(4).lowerBound(0).upperBound(10).storage(Storage.VOLATILE);
builder.addWeakCounter().name("c5").initialValue(5).concurrencyLevel(1).storage(Storage.PERSISTENT);
On other hand, the counters can be configured on-demand, at any time after the EmbeddedCacheManager is initialized.
CounterManager manager = ...;
manager.defineCounter("c1", CounterConfiguration.builder(CounterType.UNBOUNDED_STRONG).initialValue(1).storage(Storage.PERSISTENT).build());
manager.defineCounter("c2", CounterConfiguration.builder(CounterType.BOUNDED_STRONG).initialValue(2).lowerBound(0).storage(Storage.VOLATILE).build());
manager.defineCounter("c3", CounterConfiguration.builder(CounterType.BOUNDED_STRONG).initialValue(3).upperBound(5).storage(Storage.PERSISTENT).build());
manager.defineCounter("c4", CounterConfiguration.builder(CounterType.BOUNDED_STRONG).initialValue(4).lowerBound(0).upperBound(10).storage(Storage.VOLATILE).build());
manager.defineCounter("c2", CounterConfiguration.builder(CounterType.WEAK).initialValue(5).concurrencyLevel(1).storage(Storage.PERSISTENT).build());
CounterConfiguration is immutable and can be reused.
The method defineCounter() will return true if the counter is successful configured or false otherwise. However, if the configuration is invalid, the method will throw a CounterConfigurationException. To find out if a counter is already defined, use the method isDefined().
CounterManager manager = ...
if (!manager.isDefined("someCounter")) {
    manager.define("someCounter", ...);
}
Per cluster attributes:
-
num-owners: Sets the number of counter’s copies to keep cluster-wide. A smaller number will make update operations faster but will support a lower number of server crashes. It must be positive and its default value is2. reliability: Sets the counter’s update behavior in a network partition. Default value isAVAILABLEand valid values are:-
AVAILABLE: all partitions are able to read and update the counter’s value. -
CONSISTENT: only the primary partition (majority of nodes) will be able to read and update the counter’s value. The remaining partitions can only read its value.
-
Per counter attributes:
-
initial-value[common]: Sets the counter’s initial value. Default is0(zero). storage[common]: Sets the counter’s behavior when the cluster is shutdown and restarted. Default value isVOLATILEand valid values are:-
VOLATILE: the counter’s value is only available in memory. The value will be lost when a cluster is shutdown. -
PERSISTENT: the counter’s value is stored in a private and local persistent store. The value is kept when the cluster is shutdown and restored after a restart.
-
On-demand and VOLATILE counters will lose its value and configuration after a cluster shutdown. They must be defined again after the restart.
-
lower-bound[strong]: Sets the strong consistent counter’s lower bound. Default value isLong.MIN_VALUE. -
upper-bound[strong]: Sets the strong consistent counter’s upper bound. Default value isLong.MAX_VALUE.
If neither the lower-bound or upper-bound are configured, the strong counter is set as unbounded.
The initial-value must be between lower-bound and upper-bound inclusive.
-
concurrency-level[weak]: Sets the number of concurrent updates. Its value must be positive and the default value is16.
10.1.1. List counter names
To list all the counters defined, the method CounterManager.getCounterNames() returns a collection of all counter names created cluster-wide.
10.2. The CounterManager interface.
The CounterManager interface is the entry point to define, retrieve and remove a counter. It automatically listen to the creation of EmbeddedCacheManager and proceeds with the registration of an instance of it per EmbeddedCacheManager. It starts the caches needed to store the counter state and configures the default counters.
Retrieving the CounterManager is as simple as invoke the EmbeddedCounterManagerFactory.asCounterManager(EmbeddedCacheManager) as shown in the example below:
// create or obtain your EmbeddedCacheManager
EmbeddedCacheManager manager = ...;

// retrieve the CounterManager
CounterManager counterManager = EmbeddedCounterManagerFactory.asCounterManager(manager);
For Hot Rod client, the CounterManager is registered in the RemoteCacheManager and it can be retrieved like:
// create or obtain your RemoteCacheManager
RemoteCacheManager manager = ...;

// retrieve the CounterManager
CounterManager counterManager = RemoteCounterManagerFactory.asCounterManager(manager);
10.2.1. Remove a counter via CounterManager
use with caution.
There is a difference between remove a counter via the Strong/WeakCounter interfaces and the CounterManager. The CounterManager.remove(String) removes the counter value from the cluster and removes all the listeners registered in the counter in the local counter instance. In addition, the counter instance is no longer reusable and it may return an invalid results.
On the other side, the Strong/WeakCounter removal only removes the counter value. The instance can still be reused and the listeners still works.
The counter is re-created if it is accessed after a removal.
10.3. The Counter
A counter can be strong (StrongCounter) or weakly consistent (WeakCounter) and both is identified by a name. They have a specific interface but they share some logic, namely, both of them are asynchronous ( a CompletableFuture is returned by each operation), provide an update event and can be reset to its initial value.
If you don’t want to use the async API, it is possible to return a synchronous counter via sync() method. The API is the same but without the CompletableFuture return value.
The following methods are common to both interfaces:
String getName();
CompletableFuture<Long> getValue();
CompletableFuture<Void> reset();
<T extends CounterListener> Handle<T> addListener(T listener);
CounterConfiguration getConfiguration();
CompletableFuture<Void> remove();
SyncStrongCounter sync(); //SyncWeakCounter for WeakCounter
-
getName()returns the counter name (identifier). -
getValue()returns the current counter’s value. -
reset()allows to reset the counter’s value to its initial value. -
addListener()register a listener to receive update events. More details about it in the Notification and Events section. -
getConfiguration()returns the configuration used by the counter. -
remove()removes the counter value from the cluster. The instance can still be used and the listeners are kept. -
sync()creates a synchronous counter.
The counter is re-created if it is accessed after a removal.
10.3.1. The StrongCounter interface: when the consistency or bounds matters.
The strong counter provides uses a single key stored in Data Grid cache to provide the consistency needed. All the updates are performed under the key lock to updates its values. On other hand, the reads don’t acquire any locks and reads the current value. Also, with this scheme, it allows to bound the counter value and provide atomic operations like compare-and-set/swap.
A StrongCounter can be retrieved from the CounterManager by using the getStrongCounter() method. As an example:
CounterManager counterManager = ...
StrongCounter aCounter = counterManager.getStrongCounter("my-counter");
Since every operation will hit a single key, the StrongCounter has a higher contention rate.
The StrongCounter interface adds the following method:
default CompletableFuture<Long> incrementAndGet() {
   return addAndGet(1L);
}

default CompletableFuture<Long> decrementAndGet() {
   return addAndGet(-1L);
}

CompletableFuture<Long> addAndGet(long delta);

CompletableFuture<Boolean> compareAndSet(long expect, long update);

CompletableFuture<Long> compareAndSwap(long expect, long update);-
incrementAndGet()increments the counter by one and returns the new value. -
decrementAndGet()decrements the counter by one and returns the new value. -
addAndGet()adds a delta to the counter’s value and returns the new value. -
compareAndSet()andcompareAndSwap()atomically set the counter’s value if the current value is the expected.
A operation is considered completed when the CompletableFuture is completed.
The difference between compare-and-set and compare-and-swap is that the former returns true if the operation succeeds while the later returns the previous value. The compare-and-swap is successful if the return value is the same as the expected.
10.3.1.1. Bounded StrongCounter
When bounded, all the update method above will throw a CounterOutOfBoundsException when they reached the lower or upper bound. The exception has the following methods to check which side bound has been reached:
public boolean isUpperBoundReached();
public boolean isLowerBoundReached();
10.3.1.2. Uses cases
The strong counter fits better in the following uses cases:
- When counter’s value is needed after each update (example, cluster-wise ids generator or sequences)
- When a bounded counter is needed (example, rate limiter)
10.3.1.3. Usage Examples
StrongCounter counter = counterManager.getStrongCounter("unbounded_counter");

// incrementing the counter
System.out.println("new value is " + counter.incrementAndGet().get());

// decrement the counter's value by 100 using the functional API
counter.addAndGet(-100).thenApply(v -> {
   System.out.println("new value is " + v);
   return null;
}).get();

// alternative, you can do some work while the counter is updated
CompletableFuture<Long> f = counter.addAndGet(10);
// ... do some work ...
System.out.println("new value is " + f.get());

// and then, check the current value
System.out.println("current value is " + counter.getValue().get());

// finally, reset to initial value
counter.reset().get();
System.out.println("current value is " + counter.getValue().get());

// or set to a new value if zero
System.out.println("compare and set succeeded? " + counter.compareAndSet(0, 1));
And below, there is another example using a bounded counter:
StrongCounter counter = counterManager.getStrongCounter("bounded_counter");

// incrementing the counter
try {
    System.out.println("new value is " + counter.addAndGet(100).get());
} catch (ExecutionException e) {
    Throwable cause = e.getCause();
    if (cause instanceof CounterOutOfBoundsException) {
       if (((CounterOutOfBoundsException) cause).isUpperBoundReached()) {
          System.out.println("ops, upper bound reached.");
       } else if (((CounterOutOfBoundsException) cause).isLowerBoundReached()) {
          System.out.println("ops, lower bound reached.");
       }
    }
}

// now using the functional API
counter.addAndGet(-100).handle((v, throwable) -> {
   if (throwable != null) {
      Throwable cause = throwable.getCause();
      if (cause instanceof CounterOutOfBoundsException) {
         if (((CounterOutOfBoundsException) cause).isUpperBoundReached()) {
            System.out.println("ops, upper bound reached.");
         } else if (((CounterOutOfBoundsException) cause).isLowerBoundReached()) {
            System.out.println("ops, lower bound reached.");
         }
      }
      return null;
   }
   System.out.println("new value is " + v);
   return null;
}).get();
Compare-and-set vs Compare-and-swap examples:
StrongCounter counter = counterManager.getStrongCounter("my-counter");
long oldValue, newValue;
do {
   oldValue = counter.getValue().get();
   newValue = someLogic(oldValue);
} while (!counter.compareAndSet(oldValue, newValue).get());
With compare-and-swap, it saves one invocation counter invocation (counter.getValue())
StrongCounter counter = counterManager.getStrongCounter("my-counter");
long oldValue = counter.getValue().get();
long currentValue, newValue;
do {
   currentValue = oldValue;
   newValue = someLogic(oldValue);
} while ((oldValue = counter.compareAndSwap(oldValue, newValue).get()) != currentValue);
10.3.2. The WeakCounter interface: when speed is needed
The WeakCounter stores the counter’s value in multiple keys in Data Grid cache. The number of keys created is configured by the concurrency-level attribute. Each key stores a partial state of the counter’s value and it can be updated concurrently. It main advantage over the StrongCounter is the lower contention in the cache. On other hand, the read of its value is more expensive and bounds are not allowed.
The reset operation should be handled with caution. It is not atomic and it produces intermediates values. These value may be seen by a read operation and by any listener registered.
A WeakCounter can be retrieved from the CounterManager by using the getWeakCounter() method. As an example:
CounterManager counterManager = ...
StrongCounter aCounter = counterManager.getWeakCounter("my-counter);
10.3.2.1. Weak Counter Interface
The WeakCounter adds the following methods:
default CompletableFuture<Void> increment() {
   return add(1L);
}

default CompletableFuture<Void> decrement() {
   return add(-1L);
}

CompletableFuture<Void> add(long delta);
They are similar to the `StrongCounter’s methods but they don’t return the new value.
10.3.2.2. Uses cases
The weak counter fits best in uses cases where the result of the update operation is not needed or the counter’s value is not required too often. Collecting statistics is a good example of such an use case.
10.3.2.3. Examples
Below, there is an example of the weak counter usage.
WeakCounter counter = counterManager.getWeakCounter("my_counter");

// increment the counter and check its result
counter.increment().get();
System.out.println("current value is " + counter.getValue());

CompletableFuture<Void> f = counter.add(-100);
//do some work
f.get(); //wait until finished
System.out.println("current value is " + counter.getValue().get());

//using the functional API
counter.reset().whenComplete((aVoid, throwable) -> System.out.println("Reset done " + (throwable == null ? "successfully" : "unsuccessfully"))).get();
System.out.println("current value is " + counter.getValue().get());
10.4. Notifications and Events
Both strong and weak counter supports a listener to receive its updates events. The listener must implement CounterListener and it can be registered by the following method:
<T extends CounterListener> Handle<T> addListener(T listener);
The CounterListener has the following interface:
public interface CounterListener {
   void onUpdate(CounterEvent entry);
}
The Handle object returned has the main goal to remove the CounterListener when it is not longer needed. Also, it allows to have access to the CounterListener instance that is it handling. It has the following interface:
public interface Handle<T extends CounterListener> {
   T getCounterListener();
   void remove();
}
Finally, the CounterEvent has the previous and current value and state. It has the following interface:
public interface CounterEvent {
   long getOldValue();
   State getOldState();
   long getNewValue();
   State getNewState();
}
The state is always State.VALID for unbounded strong counter and weak counter. State.LOWER_BOUND_REACHED and State.UPPER_BOUND_REACHED are only valid for bounded strong counters.
The weak counter reset() operation will trigger multiple notification with intermediate values.
Chapter 11. Locking and Concurrency
Data Grid makes use of multi-versioned concurrency control (MVCC) - a concurrency scheme popular with relational databases and other data stores. MVCC offers many advantages over coarse-grained Java synchronization and even JDK Locks for access to shared data, including:
- allowing concurrent readers and writers
- readers and writers do not block one another
- write skews can be detected and handled
- internal locks can be striped
11.1. Locking implementation details
Data Grid’s MVCC implementation makes use of minimal locks and synchronizations, leaning heavily towards lock-free techniques such as compare-and-swap and lock-free data structures wherever possible, which helps optimize for multi-CPU and multi-core environments.
In particular, Data Grid’s MVCC implementation is heavily optimized for readers. Reader threads do not acquire explicit locks for entries, and instead directly read the entry in question.
Writers, on the other hand, need to acquire a write lock. This ensures only one concurrent writer per entry, causing concurrent writers to queue up to change an entry.
To allow concurrent reads, writers make a copy of the entry they intend to modify, by wrapping the entry in an MVCCEntry. This copy isolates concurrent readers from seeing partially modified state. Once a write has completed, MVCCEntry.commit() will flush changes to the data container and subsequent readers will see the changes written.
11.1.1. How does it work in clustered caches?
In clustered caches, each key has a node responsible to lock the key. This node is called primary owner.
11.1.1.1. Non Transactional caches
- The write operation is sent to the primary owner of the key.
The primary owner tries to lock the key.
- If it succeeds, it forwards the operation to the other owners;
- Otherwise, an exception is thrown.
If the operation is conditional and it fails on the primary owner, it is not forwarded to the other owners.
If the operation is executed locally in the primary owner, the first step is skipped.
11.1.2. Transactional caches
The transactional cache supports optimistic and pessimistic locking mode. Refer to Transaction Locking for more information.
11.1.3. Isolation levels
Isolation level affects what transactions can read when running concurrently with other transaction. Refer to Isolation Levels for more information.
11.1.4. The LockManager
The LockManager is a component that is responsible for locking an entry for writing. The LockManager makes use of a LockContainer to locate/hold/create locks. LockContainers come in two broad flavours, with support for lock striping and with support for one lock per entry.
11.1.5. Lock striping
Lock striping entails the use of a fixed-size, shared collection of locks for the entire cache, with locks being allocated to entries based on the entry’s key’s hash code. Similar to the way the JDK’s ConcurrentHashMap allocates locks, this allows for a highly scalable, fixed-overhead locking mechanism in exchange for potentially unrelated entries being blocked by the same lock.
The alternative is to disable lock striping - which would mean a new lock is created per entry. This approach may give you greater concurrent throughput, but it will be at the cost of additional memory usage, garbage collection churn, etc.
lock striping is disabled by default, due to potential deadlocks that can happen if locks for different keys end up in the same lock stripe.
The size of the shared lock collection used by lock striping can be tuned using the concurrencyLevel attribute of the <locking /> configuration element.
Configuration example:
<locking striping="false|true"/>
Or
new ConfigurationBuilder().locking().useLockStriping(false|true);
11.1.6. Concurrency levels
In addition to determining the size of the striped lock container, this concurrency level is also used to tune any JDK ConcurrentHashMap based collections where related, such as internal to DataContainers. Please refer to the JDK ConcurrentHashMap Javadocs for a detailed discussion of concurrency levels, as this parameter is used in exactly the same way in Data Grid.
Configuration example:
<locking concurrency-level="32"/>
Or
new ConfigurationBuilder().locking().concurrencyLevel(32);
11.1.7. Lock timeout
The lock timeout specifies the amount of time, in milliseconds, to wait for a contented lock.
Configuration example:
<locking acquire-timeout="10000"/>
Or
new ConfigurationBuilder().locking().lockAcquisitionTimeout(10000);
//alternatively
new ConfigurationBuilder().locking().lockAcquisitionTimeout(10, TimeUnit.SECONDS);
11.1.8. Consistency
The fact that a single owner is locked (as opposed to all owners being locked) does not break the following consistency guarantee: if key K is hashed to nodes {A, B} and transaction TX1 acquires a lock for K, let’s say on A. If another transaction, TX2, is started on B (or any other node) and TX2 tries to lock K then it will fail with a timeout as the lock is already held by TX1. The reason for this is the that the lock for a key K is always, deterministically, acquired on the same node of the cluster, regardless of where the transaction originates.
11.2. Data Versioning
Data Grid supports two forms of data versioning: simple and external. The simple versioning is used in transactional caches for write skew check.
The external versioning is used to encapsulate an external source of data versioning within Data Grid, such as when using Data Grid with Hibernate which in turn gets its data version information directly from a database.
In this scheme, a mechanism to pass in the version becomes necessary, and overloaded versions of put() and putForExternalRead() will be provided in AdvancedCache to take in an external data version. This is then stored on the InvocationContext and applied to the entry at commit time.
Write skew checks cannot and will not be performed in the case of external data versioning.
Chapter 12. Using the Data Grid CDI Extension
Data Grid provides an extension that integrates with the CDI (Contexts and Dependency Injection) programming model and allows you to:
- Configure and inject caches into CDI Beans and Java EE components.
- Configure cache managers.
- Receive cache and cache manager level events.
- Control data storage and retrieval using JCache annotations.
12.1. CDI Dependencies
Update your pom.xml with one of the following dependencies to include the Data Grid CDI extension in your project:
Embedded (Library) Mode
<dependency>
  <groupId>org.infinispan</groupId>
  <artifactId>infinispan-cdi-embedded</artifactId>
</dependency>
Server Mode
<dependency>
  <groupId>org.infinispan</groupId>
  <artifactId>infinispan-cdi-remote</artifactId>
</dependency>
12.2. Injecting Embedded Caches
Set up CDI beans to inject embedded caches.
Procedure
Create a cache qualifier annotation.
... import javax.inject.Qualifier; @Qualifier @Target({ElementType.FIELD, ElementType.PARAMETER, ElementType.METHOD}) @Retention(RetentionPolicy.RUNTIME) @Documented public @interface GreetingCache { 1 }- 1
- creates a
@GreetingCachequalifier.
Add a producer method that defines the cache configuration.
... import org.infinispan.configuration.cache.Configuration; import org.infinispan.configuration.cache.ConfigurationBuilder; import org.infinispan.cdi.ConfigureCache; import javax.enterprise.inject.Produces; public class Config { @ConfigureCache("mygreetingcache") 1 @GreetingCache 2 @Produces public Configuration greetingCacheConfiguration() { return new ConfigurationBuilder() .memory() .size(1000) .build(); } }Add a producer method that creates a clustered cache manager, if required
... package org.infinispan.configuration.global.GlobalConfigurationBuilder; public class Config { @GreetingCache 1 @Produces @ApplicationScoped 2 public EmbeddedCacheManager defaultClusteredCacheManager() { 3 return new DefaultCacheManager( new GlobalConfigurationBuilder().transport().defaultTransport().build(); } }- 1
- adds the cache qualifier.
- 2
- creates the bean once for the application. Producers that create cache managers should always include the
@ApplicationScopedannotation to avoid creating multiple cache managers. - 3
- creates a new
DefaultCacheManagerinstance that is bound to the@GreetingCachequalifier.
NoteCache managers are heavy weight objects. Having more than one cache manager running in your application can degrade performance. When injecting multiple caches, either add the qualifier of each cache to the cache manager producer method or do not add any qualifier.
Add the
@GreetingCachequalifier to your cache injection point.... import javax.inject.Inject; public class GreetingService { @Inject @GreetingCache private Cache<String, String> cache; public String greet(String user) { String cachedValue = cache.get(user); if (cachedValue == null) { cachedValue = "Hello " + user; cache.put(user, cachedValue); } return cachedValue; } }
12.3. Injecting Remote Caches
Set up CDI beans to inject remote caches.
Procedure
Create a cache qualifier annotation.
@Remote("mygreetingcache") 1 @Qualifier @Target({ElementType.FIELD, ElementType.PARAMETER, ElementType.METHOD}) @Retention(RetentionPolicy.RUNTIME) @Documented public @interface RemoteGreetingCache { 2 }Add the
@RemoteGreetingCachequalifier to your cache injection point.public class GreetingService { @Inject @RemoteGreetingCache private RemoteCache<String, String> cache; public String greet(String user) { String cachedValue = cache.get(user); if (cachedValue == null) { cachedValue = "Hello " + user; cache.put(user, cachedValue); } return cachedValue; } }
Tips for injecting remote caches
You can inject remote caches without using qualifiers.
   ...
   @Inject
   @Remote("greetingCache")
   private RemoteCache<String, String> cache;
If you have more than one Data Grid cluster, you can create separate remote cache manager producers for each cluster.
... import javax.enterprise.context.ApplicationScoped; public class Config { @RemoteGreetingCache @Produces @ApplicationScoped 1 public ConfigurationBuilder builder = new ConfigurationBuilder(); 2 builder.addServer().host("localhost").port(11222); return new RemoteCacheManager(builder.build()); } }- 1
- creates the bean once for the application. Producers that create cache managers should always include the
@ApplicationScopedannotation to avoid creating multiple cache managers, which are heavy weight objects. - 2
- creates a new
RemoteCacheManagerinstance that is bound to the@RemoteGreetingCachequalifier.
12.4. JCache Caching Annotations
You can use the following JCache caching annotations with CDI managed beans when JCache artifacts are on the classpath:
@CacheResult- caches the results of method calls.
@CachePut- caches method parameters.
@CacheRemoveEntry- removes entries from a cache.
@CacheRemoveAll- removes all entries from a cache.
Target type: You can use these JCache caching annotations on methods only.
To use JCache caching annotations, declare interceptors in the beans.xml file for your application.
Managed Environments (Application Server)
<?xml version="1.0" encoding="UTF-8"?>
<beans xmlns="http://xmlns.jcp.org/xml/ns/javaee"
   xmlns:xsi="http://www.w3.org/2001/XMLSchema-instance"
   xsi:schemaLocation="http://xmlns.jcp.org/xml/ns/javaee http://xmlns.jcp.org/xml/ns/javaee/beans_1_1.xsd"
   version="1.2" bean-discovery-mode="annotated">

  <interceptors>
    <class>org.infinispan.jcache.annotation.InjectedCacheResultInterceptor</class>
    <class>org.infinispan.jcache.annotation.InjectedCachePutInterceptor</class>
    <class>org.infinispan.jcache.annotation.InjectedCacheRemoveEntryInterceptor</class>
    <class>org.infinispan.jcache.annotation.InjectedCacheRemoveAllInterceptor</class>
  </interceptors>
</beans>
Non-managed Environments (Standalone)
<?xml version="1.0" encoding="UTF-8"?>
<beans xmlns="http://xmlns.jcp.org/xml/ns/javaee"
   xmlns:xsi="http://www.w3.org/2001/XMLSchema-instance"
   xsi:schemaLocation="http://xmlns.jcp.org/xml/ns/javaee http://xmlns.jcp.org/xml/ns/javaee/beans_1_1.xsd"
   version="1.2" bean-discovery-mode="annotated">

  <interceptors>
    <class>org.infinispan.jcache.annotation.CacheResultInterceptor</class>
    <class>org.infinispan.jcache.annotation.CachePutInterceptor</class>
    <class>org.infinispan.jcache.annotation.CacheRemoveEntryInterceptor</class>
    <class>org.infinispan.jcache.annotation.CacheRemoveAllInterceptor</class>
  </interceptors>
</beans>
JCache Caching Annotation Examples
The following example shows how the @CacheResult annotation caches the results of the GreetingService.greet() method:
import javax.cache.interceptor.CacheResult;

public class GreetingService {

    @CacheResult
    public String greet(String user) {
        return "Hello" + user;
    }
}
With JCache annotations, the default cache uses the fully qualified name of the annotated method with its parameter types, for example:org.infinispan.example.GreetingService.greet(java.lang.String)
To use caches other than the default, use the cacheName attribute to specify the cache name as in the following example:
@CacheResult(cacheName = "greeting-cache")
12.5. Receiving Cache and Cache Manager Events
You can use CDI Events to receive Cache and cache manager level events.
-
Use the
@Observesannotation as in the following example:
import javax.enterprise.event.Observes;
import org.infinispan.notifications.cachemanagerlistener.event.CacheStartedEvent;
import org.infinispan.notifications.cachelistener.event.*;

public class GreetingService {

    // Cache level events
    private void entryRemovedFromCache(@Observes CacheEntryCreatedEvent event) {
        ...
    }

    // Cache manager level events
    private void cacheStarted(@Observes CacheStartedEvent event) {
        ...
    }
}
Chapter 13. Data Grid Transactions
Data Grid can be configured to use and to participate in JTA compliant transactions.
Alternatively, if transaction support is disabled, it is equivalent to using autocommit in JDBC calls, where modifications are potentially replicated after every change (if replication is enabled).
On every cache operation Data Grid does the following:
- Retrieves the current Transaction associated with the thread
- If not already done, registers XAResource with the transaction manager to be notified when a transaction commits or is rolled back.
In order to do this, the cache has to be provided with a reference to the environment’s TransactionManager. This is usually done by configuring the cache with the class name of an implementation of the TransactionManagerLookup interface. When the cache starts, it will create an instance of this class and invoke its getTransactionManager() method, which returns a reference to the TransactionManager.
Data Grid ships with several transaction manager lookup classes:
Transaction manager lookup implementations
- EmbeddedTransactionManagerLookup: This provides with a basic transaction manager which should only be used for embedded mode when no other implementation is available. This implementation has some severe limitations to do with concurrent transactions and recovery.
-
JBossStandaloneJTAManagerLookup: If you’re running Data Grid in a standalone environment, or in JBoss AS 7 and earlier, and WildFly 8, 9, and 10, this should be your default choice for transaction manager. It’s a fully fledged transaction manager based on JBoss Transactions which overcomes all the deficiencies of the
EmbeddedTransactionManager. - WildflyTransactionManagerLookup: If you’re running Data Grid in WildFly 11 or later, this should be your default choice for transaction manager.
-
GenericTransactionManagerLookup: This is a lookup class that locate transaction managers in the most popular Java EE application servers. If no transaction manager can be found, it defaults on the
EmbeddedTransactionManager.
WARN: DummyTransactionManagerLookup has been deprecated in 9.0 and it will be removed in the future. Use EmbeddedTransactionManagerLookup instead.
Once initialized, the TransactionManager can also be obtained from the Cache itself:
//the cache must have a transactionManagerLookupClass defined
Cache cache = cacheManager.getCache();

//equivalent with calling TransactionManagerLookup.getTransactionManager();
TransactionManager tm = cache.getAdvancedCache().getTransactionManager();
13.1. Configuring transactions
Transactions are configured at cache level. Below is the configuration that affects a transaction behaviour and a small description of each configuration attribute.
<locking
   isolation="READ_COMMITTED"/>
<transaction
   locking="OPTIMISTIC"
   auto-commit="true"
   complete-timeout="60000"
   mode="NONE"
   notifications="true"
   protocol="DEFAULT"
   reaper-interval="30000"
   recovery-cache="__recoveryInfoCacheName__"
   stop-timeout="30000"
   transaction-manager-lookup="org.infinispan.transaction.lookup.GenericTransactionManagerLookup"/>
or programmatically:
ConfigurationBuilder builder = new ConfigurationBuilder();
builder.locking()
    .isolationLevel(IsolationLevel.READ_COMMITTED);
builder.transaction()
    .lockingMode(LockingMode.OPTIMISTIC)
    .autoCommit(true)
    .completedTxTimeout(60000)
    .transactionMode(TransactionMode.NON_TRANSACTIONAL)
    .useSynchronization(false)
    .notifications(true)
    .transactionProtocol(TransactionProtocol.DEFAULT)
    .reaperWakeUpInterval(30000)
    .cacheStopTimeout(30000)
    .transactionManagerLookup(new GenericTransactionManagerLookup())
    .recovery()
    .enabled(false)
.recoveryInfoCacheName("__recoveryInfoCacheName__");-
isolation- configures the isolation level. Check section Isolation Levels for more details. Default isREPEATABLE_READ. -
locking- configures whether the cache uses optimistic or pessimistic locking. Check section Transaction Locking for more details. Default isOPTIMISTIC. -
auto-commit- if enable, the user does not need to start a transaction manually for a single operation. The transaction is automatically started and committed. Default istrue. -
complete-timeout- the duration in milliseconds to keep information about completed transactions. Default is60000. mode- configures whether the cache is transactional or not. Default isNONE. The available options are:-
NONE- non transactional cache -
FULL_XA- XA transactional cache with recovery enabled. Check section Transaction recovery for more details about recovery. -
NON_DURABLE_XA- XA transactional cache with recovery disabled. -
NON_XA- transactional cache with integration via Synchronization instead of XA. Check section Enlisting Synchronizations for details. -
BATCH- transactional cache using batch to group operations. Check section Batching for details.
-
-
notifications- enables/disables triggering transactional events in cache listeners. Default istrue. protocol- configures the protocol uses. Default isDEFAULT. Values available are:-
DEFAULT- uses the traditional Two-Phase-Commit protocol. It is described below. -
TOTAL_ORDER- uses total order ensured by theTransportto commit transactions. Check section Total Order based commit protocol for details.
-
-
reaper-interval- the time interval in millisecond at which the thread that cleans up transaction completion information kicks in. Defaults is30000. -
recovery-cache- configures the cache name to store the recovery information. Check section Transaction recovery for more details about recovery. Default isrecoveryInfoCacheName. -
stop-timeout- the time in millisecond to wait for ongoing transaction when the cache is stopping. Default is30000. -
transaction-manager-lookup- configures the fully qualified class name of a class that looks up a reference to ajavax.transaction.TransactionManager. Default isorg.infinispan.transaction.lookup.GenericTransactionManagerLookup.
For more details on how Two-Phase-Commit (2PC) is implemented in Data Grid and how locks are being acquired see the section below. More details about the configuration settings are available in Configuration reference.
13.2. Isolation levels
Data Grid offers two isolation levels - READ_COMMITTED and REPEATABLE_READ.
These isolation levels determine when readers see a concurrent write, and are internally implemented using different subclasses of MVCCEntry, which have different behaviour in how state is committed back to the data container.
Here’s a more detailed example that should help understand the difference between READ_COMMITTED and REPEATABLE_READ in the context of Data Grid. With READ_COMMITTED, if between two consecutive read calls on the same key, the key has been updated by another transaction, the second read may return the new updated value:
Thread1: tx1.begin()
Thread1: cache.get(k) // returns v
Thread2:                                       tx2.begin()
Thread2:                                       cache.get(k) // returns v
Thread2:                                       cache.put(k, v2)
Thread2:                                       tx2.commit()
Thread1: cache.get(k) // returns v2!
Thread1: tx1.commit()
With REPEATABLE_READ, the final get will still return v. So, if you’re going to retrieve the same key multiple times within a transaction, you should use REPEATABLE_READ.
However, as read-locks are not acquired even for REPEATABLE_READ, this phenomena can occur:
cache.get("A") // returns 1
cache.get("B") // returns 1

Thread1: tx1.begin()
Thread1: cache.put("A", 2)
Thread1: cache.put("B", 2)
Thread2:                                       tx2.begin()
Thread2:                                       cache.get("A") // returns 1
Thread1: tx1.commit()
Thread2:                                       cache.get("B") // returns 2
Thread2:                                       tx2.commit()
13.3. Transaction locking
13.3.1. Pessimistic transactional cache
From a lock acquisition perspective, pessimistic transactions obtain locks on keys at the time the key is written.
- A lock request is sent to the primary owner (can be an explicit lock request or an operation)
The primary owner tries to acquire the lock:
- If it succeed, it sends back a positive reply;
- Otherwise, a negative reply is sent and the transaction is rollback.
As an example:
transactionManager.begin();
cache.put(k1,v1); //k1 is locked.
cache.remove(k2); //k2 is locked when this returns
transactionManager.commit();
When cache.put(k1,v1) returns, k1 is locked and no other transaction running anywhere in the cluster can write to it. Reading k1 is still possible. The lock on k1 is released when the transaction completes (commits or rollbacks).
For conditional operations, the validation is performed in the originator.
13.3.2. Optimistic transactional cache
With optimistic transactions locks are being acquired at transaction prepare time and are only being held up to the point the transaction commits (or rollbacks). This is different from the 5.0 default locking model where local locks are being acquire on writes and cluster locks are being acquired during prepare time.
- The prepare is sent to all the owners.
The primary owners try to acquire the locks needed:
- If locking succeeds, it performs the write skew check.
- If the write skew check succeeds (or is disabled), send a positive reply.
- Otherwise, a negative reply is sent and the transaction is rolled back.
As an example:
transactionManager.begin();
cache.put(k1,v1);
cache.remove(k2);
transactionManager.commit(); //at prepare time, K1 and K2 is locked until committed/rolled back.
For conditional commands, the validation still happens on the originator.
13.3.3. What do I need - pessimistic or optimistic transactions?
From a use case perspective, optimistic transactions should be used when there is not a lot of contention between multiple transactions running at the same time. That is because the optimistic transactions rollback if data has changed between the time it was read and the time it was committed (with write skew check enabled).
On the other hand, pessimistic transactions might be a better fit when there is high contention on the keys and transaction rollbacks are less desirable. Pessimistic transactions are more costly by their nature: each write operation potentially involves a RPC for lock acquisition.
13.4. Write Skews
Write skews occur when two transactions independently and simultaneously read and write to the same key. The result of a write skew is that both transactions successfully commit updates to the same key but with different values.
Data Grid automatically performs write skew checks to ensure data consistency for REPEATABLE_READ isolation levels in optimistic transactions. This allows Data Grid to detect and roll back one of the transactions.
When operating in LOCAL mode, write skew checks rely on Java object references to compare differences, which provides a reliable technique for checking for write skews.
13.4.1. Forcing write locks on keys in pessimitic transactions
To avoid write skews with pessimistic transactions, lock keys at read-time with Flag.FORCE_WRITE_LOCK.
-
In non-transactional caches,
Flag.FORCE_WRITE_LOCKdoes not work. Theget()call reads the key value but does not acquire locks remotely. -
You should use
Flag.FORCE_WRITE_LOCKwith transactions in which the entity is updated later in the same transaction.
Compare the following code snippets for an example of Flag.FORCE_WRITE_LOCK:
// begin the transaction
if (!cache.getAdvancedCache().lock(key)) {
   // abort the transaction because the key was not locked
} else {
   cache.get(key);
   cache.put(key, value);
   // commit the transaction
}
// begin the transaction
try {
// throws an exception if the key is not locked.
cache.getAdvancedCache().withFlags(Flag.FORCE_WRITE_LOCK).get(key);
cache.put(key, value);
} catch (CacheException e) {
// mark the transaction rollback-only
}
// commit or rollback the transaction13.5. Dealing with exceptions
If a CacheException (or a subclass of it) is thrown by a cache method within the scope of a JTA transaction, then the transaction is automatically marked for rollback.
13.6. Enlisting Synchronizations
By default Data Grid registers itself as a first class participant in distributed transactions through XAResource. There are situations where Data Grid is not required to be a participant in the transaction, but only to be notified by its lifecycle (prepare, complete): e.g. in the case Data Grid is used as a 2nd level cache in Hibernate.
Data Grid allows transaction enlistment through Synchronization. To enable it just use NON_XA transaction mode.
Synchronizations have the advantage that they allow TransactionManager to optimize 2PC with a 1PC where only one other resource is enlisted with that transaction (last resource commit optimization). E.g. Hibernate second level cache: if Data Grid registers itself with the TransactionManager as a XAResource than at commit time, the TransactionManager sees two XAResource (cache and database) and does not make this optimization. Having to coordinate between two resources it needs to write the tx log to disk. On the other hand, registering Data Grid as a Synchronization makes the TransactionManager skip writing the log to the disk (performance improvement).
13.7. Batching
Batching allows atomicity and some characteristics of a transaction, but not full-blown JTA or XA capabilities. Batching is often a lot lighter and cheaper than a full-blown transaction.
Generally speaking, one should use batching API whenever the only participant in the transaction is an Data Grid cluster. On the other hand, JTA transactions (involving TransactionManager) should be used whenever the transactions involves multiple systems. E.g. considering the "Hello world!" of transactions: transferring money from one bank account to the other. If both accounts are stored within Data Grid, then batching can be used. If one account is in a database and the other is Data Grid, then distributed transactions are required.
You do not have to have a transaction manager defined to use batching.
13.7.1. API
Once you have configured your cache to use batching, you use it by calling startBatch() and endBatch() on Cache. E.g.,
Cache cache = cacheManager.getCache();
// not using a batch
cache.put("key", "value"); // will replicate immediately

// using a batch
cache.startBatch();
cache.put("k1", "value");
cache.put("k2", "value");
cache.put("k2", "value");
cache.endBatch(true); // This will now replicate the modifications since the batch was started.

// a new batch
cache.startBatch();
cache.put("k1", "value");
cache.put("k2", "value");
cache.put("k3", "value");
cache.endBatch(false); // This will "discard" changes made in the batch
13.7.2. Batching and JTA
Behind the scenes, the batching functionality starts a JTA transaction, and all the invocations in that scope are associated with it. For this it uses a very simple (e.g. no recovery) internal TransactionManager implementation. With batching, you get:
- Locks you acquire during an invocation are held until the batch completes
- Changes are all replicated around the cluster in a batch as part of the batch completion process. Reduces replication chatter for each update in the batch.
- If synchronous replication or invalidation are used, a failure in replication/invalidation will cause the batch to roll back.
- All the transaction related configurations apply for batching as well.
13.8. Transaction recovery
Recovery is a feature of XA transactions, which deal with the eventuality of a resource or possibly even the transaction manager failing, and recovering accordingly from such a situation.
13.8.1. When to use recovery
Consider a distributed transaction in which money is transferred from an account stored in an external database to an account stored in Data Grid. When TransactionManager.commit() is invoked, both resources prepare successfully (1st phase). During the commit (2nd) phase, the database successfully applies the changes whilst Data Grid fails before receiving the commit request from the transaction manager. At this point the system is in an inconsistent state: money is taken from the account in the external database but not visible yet in Data Grid (since locks are only released during 2nd phase of a two-phase commit protocol). Recovery deals with this situation to make sure data in both the database and Data Grid ends up in a consistent state.
13.8.2. How does it work
Recovery is coordinated by the transaction manager. The transaction manager works with Data Grid to determine the list of in-doubt transactions that require manual intervention and informs the system administrator (via email, log alerts, etc). This process is transaction manager specific, but generally requires some configuration on the transaction manager.
Knowing the in-doubt transaction ids, the system administrator can now connect to the Data Grid cluster and replay the commit of transactions or force the rollback. Data Grid provides JMX tooling for this - this is explained extensively in the Transaction recovery and reconciliation section.
13.8.3. Configuring recovery
Recovery is not enabled by default in Data Grid. If disabled, the TransactionManager won’t be able to work with Data Grid to determine the in-doubt transactions. The Transaction configuration section shows how to enable it.
NOTE: recovery-cache attribute is not mandatory and it is configured per-cache.
For recovery to work, mode must be set to FULL_XA, since full-blown XA transactions are needed.
13.8.3.1. Enable JMX support
In order to be able to use JMX for managing recovery JMX support must be explicitly enabled.
13.8.4. Recovery cache
In order to track in-doubt transactions and be able to reply them, Data Grid caches all transaction state for future use. This state is held only for in-doubt transaction, being removed for successfully completed transactions after when the commit/rollback phase completed.
This in-doubt transaction data is held within a local cache: this allows one to configure swapping this info to disk through cache loader in the case it gets too big. This cache can be specified through the recovery-cache configuration attribute. If not specified Data Grid will configure a local cache for you.
It is possible (though not mandated) to share same recovery cache between all the Data Grid caches that have recovery enabled. If the default recovery cache is overridden, then the specified recovery cache must use a TransactionManagerLookup that returns a different transaction manager than the one used by the cache itself.
13.8.5. Integration with the transaction manager
Even though this is transaction manager specific, generally a transaction manager would need a reference to a XAResource implementation in order to invoke XAResource.recover() on it. In order to obtain a reference to an Data Grid XAResource following API can be used:
XAResource xar = cache.getAdvancedCache().getXAResource();
It is a common practice to run the recovery in a different process from the one running the transaction.
13.8.6. Reconciliation
The transaction manager informs the system administrator on in-doubt transaction in a proprietary way. At this stage it is assumed that the system administrator knows transaction’s XID (a byte array).
A normal recovery flow is:
- STEP 1: The system administrator connects to an Data Grid server through JMX, and lists the in doubt transactions. The image below demonstrates JConsole connecting to an Data Grid node that has an in doubt transaction.
Figure 13.1. Show in-doubt transactions
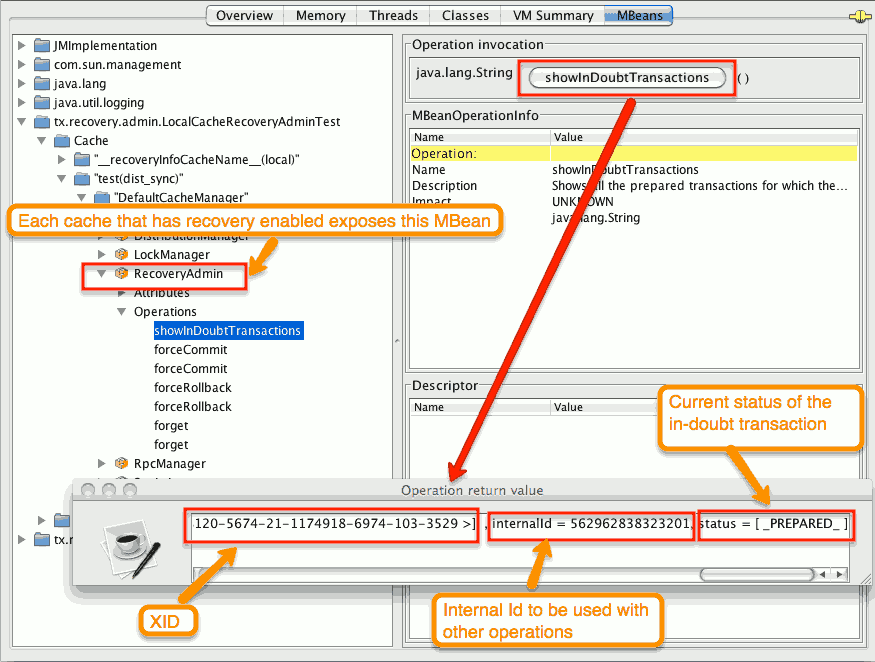
The status of each in-doubt transaction is displayed(in this example " PREPARED "). There might be multiple elements in the status field, e.g. "PREPARED" and "COMMITTED" in the case the transaction committed on certain nodes but not on all of them.
- STEP 2: The system administrator visually maps the XID received from the transaction manager to an Data Grid internal id, represented as a number. This step is needed because the XID, a byte array, cannot conveniently be passed to the JMX tool (e.g. JConsole) and then re-assembled on Data Grid’s side.
- STEP 3: The system administrator forces the transaction’s commit/rollback through the corresponding jmx operation, based on the internal id. The image below is obtained by forcing the commit of the transaction based on its internal id.
Figure 13.2. Force commit
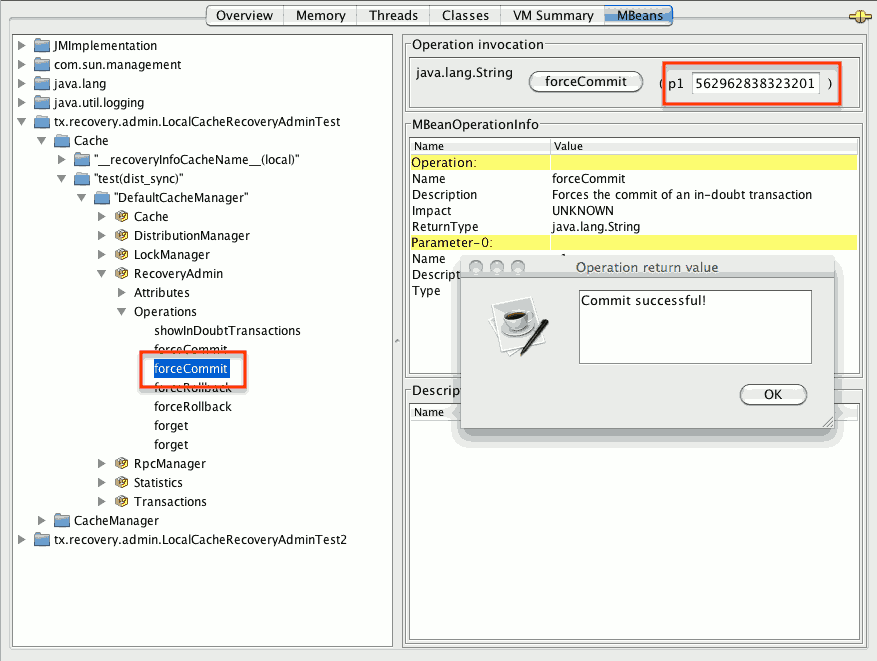
All JMX operations described above can be executed on any node, regardless of where the transaction originated.
13.8.6.1. Force commit/rollback based on XID
XID-based JMX operations for forcing in-doubt transactions' commit/rollback are available as well: these methods receive byte[] arrays describing the XID instead of the number associated with the transactions (as previously described at step 2). These can be useful e.g. if one wants to set up an automatic completion job for certain in-doubt transactions. This process is plugged into transaction manager’s recovery and has access to the transaction manager’s XID objects.
13.8.7. Want to know more?
The recovery design document describes in more detail the insides of transaction recovery implementation.
13.9. Total Order based commit protocol
The Total Order based protocol is a multi-master scheme (in this context, multi-master scheme means that all nodes can update all the data) as the (optimistic/pessimist) locking mode implemented in Data Grid. This commit protocol relies on the concept of totally ordered delivery of messages which, informally, implies that each node which delivers a set of messages, delivers them in the same order.
This protocol comes with this advantages.
- transactions can be committed in one phase, as they are delivered in the same order by the nodes that receive them.
- it mitigates distributed deadlocks.
The weaknesses of this approach are the fact that its implementation relies on a single thread per node which delivers the transaction and its modification, and the slightly cost of total ordering the messages in Transport.
Thus, this protocol delivers best performance in scenarios of high contention , in which it can benefit from the single-phase commit and the deliver thread is not the bottleneck.
Currently, the Total Order based protocol is available only in transactional caches for replicated and distributed modes.
13.9.1. Overview
The Total Order based commit protocol only affects how transactions are committed by Data Grid and the isolation level and write skew affects it behaviour.
When write skew is disabled, the transaction can be committed/rolled back in single phase. The data consistency is guaranteed by the Transport that ensures that all owners of a key will deliver the same transactions set by the same order.
On other hand, when write skew is enabled, the protocol adapts and uses one phase commit when it is safe. In XaResource enlistment, we can use one phase if the TransactionManager request a commit in one phase (last resource commit optimization) and the Data Grid cache is configured in replicated mode. This optimization is not safe in distributed mode because each node performs the write skew check validation in different keys subset. When in Synchronization enlistment, the TransactionManager does not provide any information if Data Grid is the only resource enlisted (last resource commit optimization), so it is not possible to commit in a single phase.
13.9.1.1. Commit in one phase
When the transaction ends, Data Grid sends the transaction (and its modification) in total order. This ensures all the transactions are deliver in the same order in all the involved Data Grid nodes. As a result, when a transaction is delivered, it performs a deterministic write skew check over the same state (if enabled), leading to the same outcome (transaction commit or rollback).
Figure 13.3. 1-phase commit
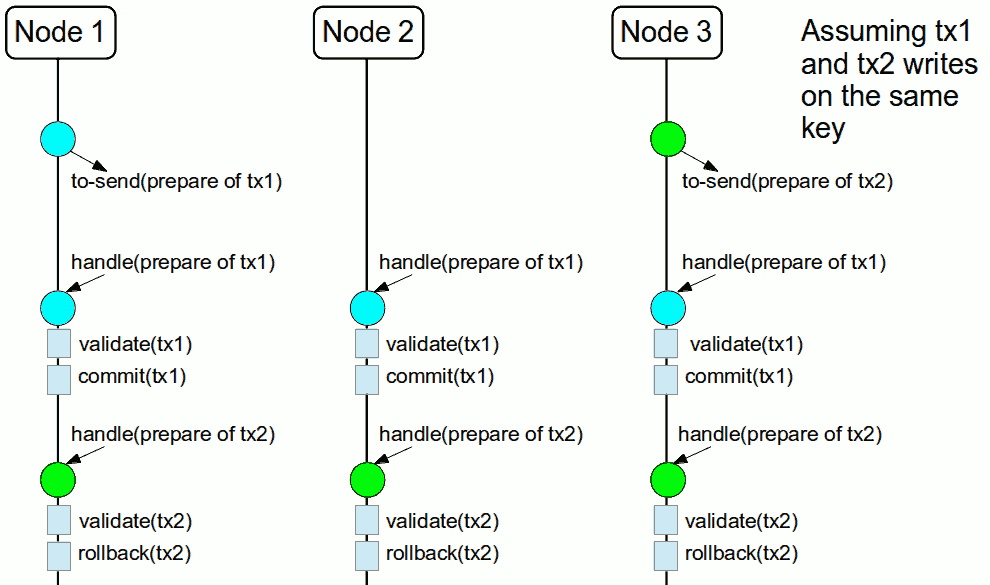
The figure above demonstrates a high level example with 3 nodes. Node1 and Node3 are running one transaction each and lets assume that both transaction writes on the same key. To make it more interesting, lets assume that both nodes tries to commit at the same time, represented by the first colored circle in the figure. The blue circle represents the transaction tx1 and the green the transaction tx2 . Both nodes do a remote invocation in total order (to-send) with the transaction’s modifications. At this moment, all the nodes will agree in the same deliver order, for example, tx1 followed by tx2 . Then, each node delivers tx1 , perform the validation and commits the modifications. The same steps are performed for tx2 but, in this case, the validation will fail and the transaction is rollback in all the involved nodes.
13.9.1.2. Commit in two phases
In the first phase, it sends the modification in total order and the write skew check is performed. The result of the write skew check is sent back to the originator. As soon as it has the confirmation that all keys are successfully validated, it give a positive response to the TransactionManager. On other hand, if it receives a negative reply, it returns a negative response to the TransactionManager. Finally, the transaction is committed or aborted in the second phase depending of the TransactionManager request.
Figure 13.4. 2-phase commit
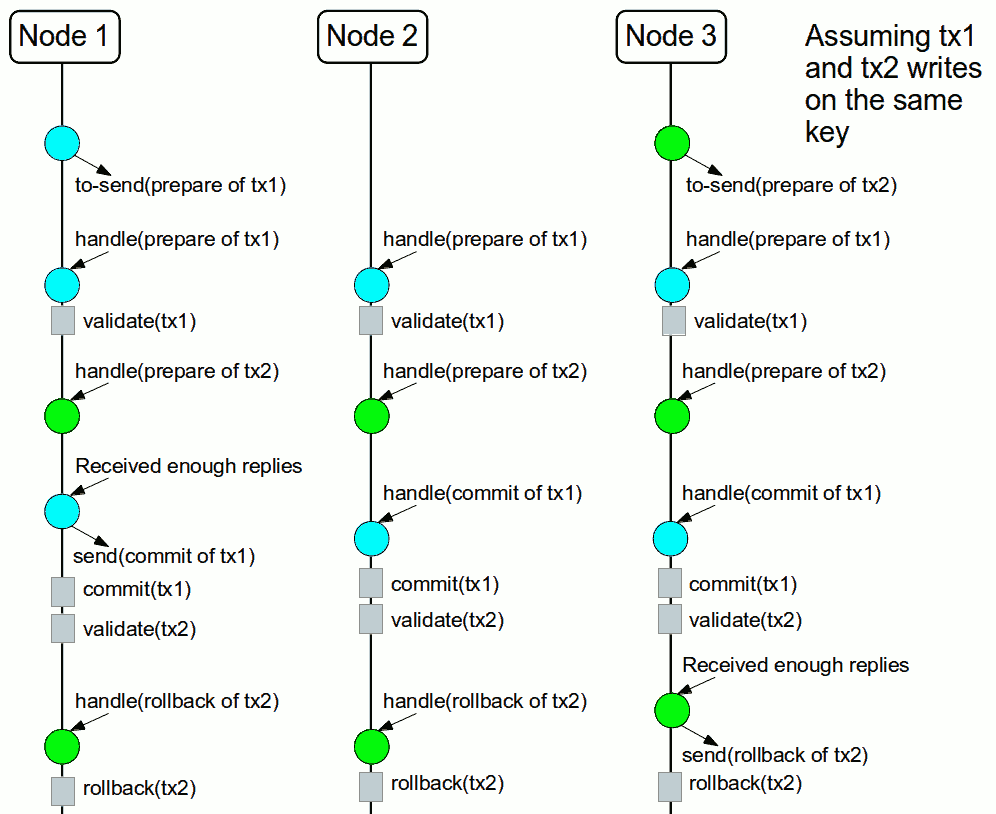
The figure above shows the scenario described in the first figure but now committing the transactions using two phases. When tx1 is deliver, it performs the validation and it replies to the TransactionManager. Next, lets assume that tx2 is deliver before the TransactionManager request the second phase for tx1. In this case, tx2 will be enqueued and it will be validated only when tx1 is completed. Eventually, the TransactionManager for tx1 will request the second phase (the commit) and all the nodes are free to perform the validation of tx2 .
13.9.1.3. Transaction Recovery
Transaction recovery is currently not available for Total Order based commit protocol.
13.9.1.4. State Transfer
For simplicity reasons, the total order based commit protocol uses a blocking version of the current state transfer. The main differences are:
- enqueue the transaction deliver while the state transfer is in progress;
-
the state transfer control messages (
CacheTopologyControlCommand) are sent in total order.
This way, it provides a synchronization between the state transfer and the transactions deliver that is the same all the nodes. Although, the transactions caught in the middle of state transfer (i.e. sent before the state transfer start and deliver after it) needs to be re-sent to find a new total order involving the new joiners.
Figure 13.5. Node joining during transaction
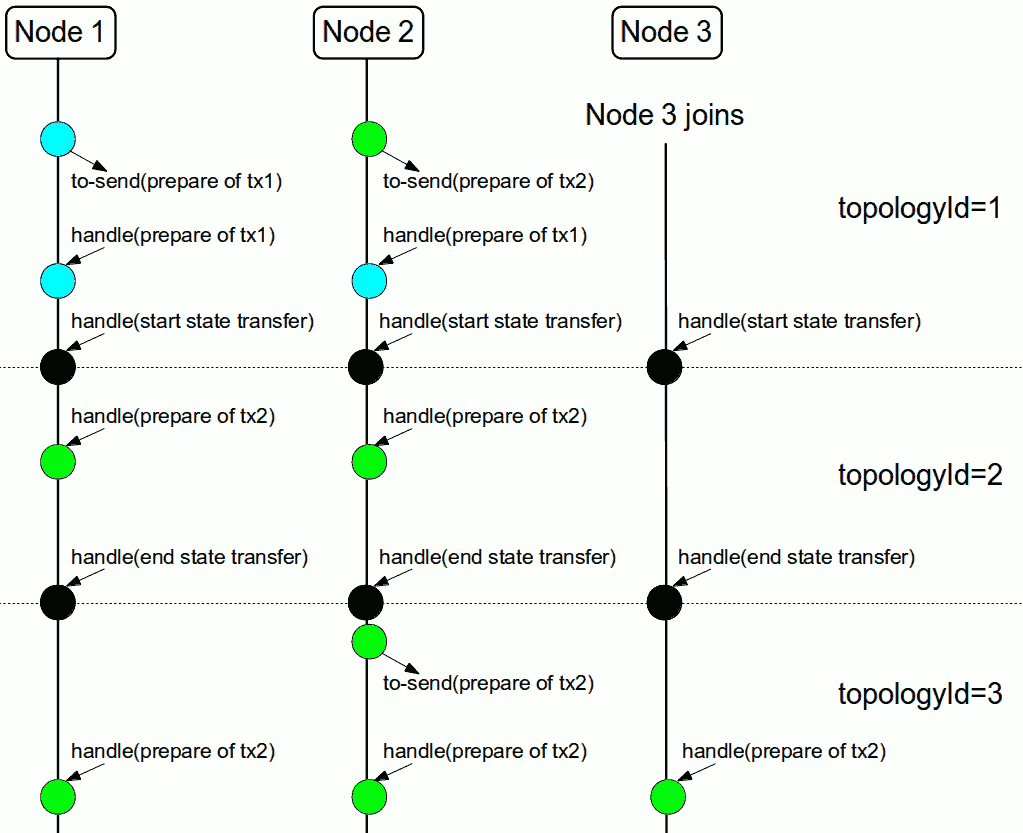
The figure above describes a node joining. In the scenario, the tx2 is sent in topologyId=1 but when it is received, it is in topologyId=2 . So, the transaction is re-sent involving the new nodes.
13.9.2. Configuration
To use total order in your cache, you need to add the TOA protocol in your jgroups.xml configuration file.
jgroups.xml
<tom.TOA />
Check the JGroups Manual for more details.
If you are interested in detail how JGroups guarantees total order, check the link::http://jgroups.org/manual/index.html#TOA[TOA manual].
Also, you need to set the protocol=TOTAL_ORDER in the <transaction> element, as shown in Transaction configuration.
13.9.3. When to use it?
Total order shows benefits when used in write intensive and high contented workloads. It avoids contention in the lock keys.
Chapter 14. Indexing and Querying
14.1. Overview
Data Grid supports indexing and searching of Java Pojo(s) or objects encoded via Protocol Buffers stored in the grid using powerful search APIs which complement its main Map-like API.
Querying is possible both in library and client/server mode (for Java, C#, Node.js and other clients), and Data Grid can index data using Apache Lucene, offering an efficient full-text capable search engine in order to cover a wide range of data retrieval use cases.
Indexing configuration relies on a schema definition, and for that Data Grid can use annotated Java classes when in library mode, and protobuf schemas for remote clients written in other languages. By standardizing on protobuf, Data Grid allows full interoperability between Java and non-Java clients.
Apart from indexed queries, Data Grid can run queries over non-indexed or partially indexed data.
In terms of Search APIs, Data Grid has its own query language called Ickle, which is string-based and adds support for full-text querying. The Query DSL can be used for both embedded and remote java clients when full-text is not required; for Java embedded clients Data Grid offers the Hibernate Search Query API which supports running Lucene queries in the grid, apart from advanced search capabilities like Faceted and Spatial search.
Finally, Data Grid has support for Continuous Queries, which works in a reverse manner to the other APIs: instead of creating, executing a query and obtain results, it allows a client to register queries that will be evaluated continuously as data in the cluster changes, generating notifications whenever the changed data matches the queries.
14.2. Embedded Querying
Embedded querying is available when Data Grid is used as a library. No protobuf mapping is required, and both indexing and searching are done on top of Java objects. When in library mode, it is possible to run Lucene queries directly and use all the available Query APIs and it also allows flexible indexing configurations to keep latency to a minimal.
14.2.1. Quick example
We’re going to store Book instances in an Data Grid cache called "books". Book instances will be indexed, so we enable indexing for the cache, letting Data Grid configure the indexing automatically:
Data Grid configuration:
infinispan.xml
<infinispan>
    <cache-container>
        <transport cluster="infinispan-cluster"/>
        <distributed-cache name="books">
            <indexing index="PRIMARY_OWNER" auto-config="true"/>
        </distributed-cache>
    </cache-container>
</infinispan>
Obtaining the cache:
import org.infinispan.Cache;
import org.infinispan.manager.DefaultCacheManager;
import org.infinispan.manager.EmbeddedCacheManager;

EmbeddedCacheManager manager = new DefaultCacheManager("infinispan.xml");
Cache<String, Book> cache = manager.getCache("books");
Each Book will be defined as in the following example; we have to choose which properties are indexed, and for each property we can optionally choose advanced indexing options using the annotations defined in the Hibernate Search project.
Book.java
import org.hibernate.search.annotations.*;
import java.util.Date;
import java.util.HashSet;
import java.util.Set;

//Values you want to index need to be annotated with @Indexed, then you pick which fields and how they are to be indexed:
@Indexed
public class Book {
   @Field String title;
   @Field String description;
   @Field @DateBridge(resolution=Resolution.YEAR) Date publicationYear;
   @IndexedEmbedded Set<Author> authors = new HashSet<Author>();
}
Author.java
public class Author {
   @Field String name;
   @Field String surname;
   // hashCode() and equals() omitted
}
Now assuming we stored several Book instances in our Data Grid Cache , we can search them for any matching field as in the following example.
Using a Lucene Query:
// get the search manager from the cache:
SearchManager searchManager = org.infinispan.query.Search.getSearchManager(cache);

// create any standard Lucene query, via Lucene's QueryParser or any other means:
org.apache.lucene.search.Query fullTextQuery = //any Apache Lucene Query

// convert the Lucene query to a CacheQuery:
CacheQuery cacheQuery = searchManager.getQuery( fullTextQuery );

// get the results:
List<Object> found = cacheQuery.list();
A Lucene Query is often created by parsing a query in text format such as "title:infinispan AND authors.name:sanne", or by using the query builder provided by Hibernate Search.
// get the search manager from the cache:
SearchManager searchManager = org.infinispan.query.Search.getSearchManager( cache );

// you could make the queries via Lucene APIs, or use some helpers:
QueryBuilder queryBuilder = searchManager.buildQueryBuilderForClass(Book.class).get();

// the queryBuilder has a nice fluent API which guides you through all options.
// this has some knowledge about your object, for example which Analyzers
// need to be applied, but the output is a fairly standard Lucene Query.
org.apache.lucene.search.Query luceneQuery = queryBuilder.phrase()
                  .onField("description")
                  .andField("title")
                  .sentence("a book on highly scalable query engines")
                  .createQuery();

// the query API itself accepts any Lucene Query, and on top of that
// you can restrict the result to selected class types:
CacheQuery query = searchManager.getQuery(luceneQuery, Book.class);

// and there are your results!
List objectList = query.list();

for (Object book : objectList) {
      System.out.println(book);
}
Apart from list() you have the option for streaming results, or use pagination.
For searches that do not require Lucene or full-text capabilities and are mostly about aggregation and exact matches, we can use the Data Grid Query DSL API:
import org.infinispan.query.dsl.QueryFactory;
import org.infinispan.query.dsl.Query;
import org.infinispan.query.Search;

// get the query factory:
QueryFactory queryFactory = Search.getQueryFactory(cache);

Query q = queryFactory.from(Book.class)
            .having("author.surname").eq("King")
            .build();

List<Book> list = q.list();
Finally, we can use an Ickle query directly, allowing for Lucene syntax in one or more predicates:
import org.infinispan.query.dsl.QueryFactory;
import org.infinispan.query.dsl.Query;

// get the query factory:
QueryFactory queryFactory = Search.getQueryFactory(cache);


Query q = queryFactory.create("from Book b where b.author.name = 'Stephen' and " +
                "b.description : (+'dark' -'tower')");

List<Book> list = q.list();
14.2.2. Indexing
Indexing in Data Grid happens on a per-cache basis and by default a cache is not indexed. Enabling indexing is not mandatory but queries using an index will have a vastly superior performance. On the other hand, enabling indexing can impact negatively the write throughput of a cluster, so make sure to check the query performance guide for some strategies to minimize this impact depending on the cache type and use case.
14.2.2.1. Configuration
14.2.2.1.1. General format
To enable indexing via XML, you need to add the <indexing> element plus the index (index mode) to your cache configuration, and optionally pass additional properties.
<infinispan>
   <cache-container default-cache="default">
      <replicated-cache name="default">
         <indexing index="ALL">
            <property name="property.name">some value</property>
         </indexing>
      </replicated-cache>
   </cache-container>
</infinispan>
Programmatic:
import org.infinispan.configuration.cache.*;

ConfigurationBuilder cacheCfg = ...
cacheCfg.indexing().index(Index.ALL)
      .addProperty("property name", "propery value")
14.2.2.1.2. Index names
Each property inside the index element is prefixed with the index name, for the index named org.infinispan.sample.Car the directory_provider is local-heap:
  ...
  <indexing index="ALL">
      <property name="org.infinispan.sample.Car.directory_provider">local-heap</property>
  </indexing>
...
</infinispan>
cacheCfg.indexing()
.index(Index.ALL)
.addProperty("org.infinispan.sample.Car.directory_provider", "local-heap")
Data Grid creates an index for each entity existent in a cache, and it allows to configure those indexes independently. For a class annotated with @Indexed, the index name is the fully qualified class name, unless overridden with the name argument in the annotation.
In the snippet below, the default storage for all entities is infinispan, but Boat instances will be stored on local-heap in an index named boatIndex. Airplane entities will also be stored in local-heap. Any other entity’s index will be configured with the property prefixed by default.
package org.infinispan.sample;

@Indexed(name = "boatIndex")
public class Boat {

}

@Indexed
public class Airplane {

}
...
<indexing index="ALL">
<property name="default.directory_provider">infinispan</property>
<property name="boatIndex.directory_provider">local-heap</property>
<property name="org.infinispan.sample.Airplane.directory_provider">
ram
</property>
</indexing>
...
</infinispan>14.2.2.1.3. Specifying indexed Entities
Data Grid can automatically recognize and manage indexes for different entity types in a cache. Future versions of Data Grid will remove this capability so it’s recommended to declare upfront which types are going to be indexed (list them by their fully qualified class name). This can be done via xml:
<infinispan>
   <cache-container default-cache="default">
      <replicated-cache name="default">
         <indexing index="ALL">
            <indexed-entities>
                <indexed-entity>com.acme.query.test.Car</indexed-entity>
                <indexed-entity>com.acme.query.test.Truck</indexed-entity>
            </indexed-entities>
         </indexing>
      </replicated-cache>
   </cache-container>
</infinispan>
or programmatically:
 cacheCfg.indexing()
      .index(Index.ALL)
       .addIndexedEntity(Car.class)
       .addIndexedEntity(Truck.class)
In server mode, the class names listed under the 'indexed-entities' element must use the 'extended' class name format which is composed of a JBoss Modules module identifier, a slot name, and the fully qualified class name, these three components being separated by the ':' character, (eg. "com.acme.my-module-with-entity-classes:my-slot:com.acme.query.test.Car"). The entity classes must be located in the referenced module, which can be either a user supplied module deployed in the 'modules' folder of your server or a plain jar deployed in the 'deployments' folder. The module in question will become an automatic dependency of your Cache, so its eventual redeployment will cause the cache to be restarted.
Only for server, if you fail to follow the requirement of using 'extended' class names and use a plain class name its resolution will fail due to missing class because the wrong ClassLoader is being used (the Data Grid’s internal class path is being used).
14.2.2.2. Index mode
An Data Grid node typically receives data from two sources: local and remote. Local translates to clients manipulating data using the map API in the same JVM; remote data comes from other Data Grid nodes during replication or rebalancing.
The index mode configuration defines, from a node in the cluster point of view, which data gets indexed.
Possible values:
- ALL: all data is indexed, local and remote.
- LOCAL: only local data is indexed.
- PRIMARY_OWNER: Only entries containing keys that the node is primary owner will be indexed, regardless of local or remote origin.
- NONE: no data is indexed. Equivalent to not configure indexing at all.
14.2.2.3. Index Managers
Index managers are central components in Data Grid Querying responsible for the indexing configuration, distribution and internal lifecycle of several query components such as Lucene’s IndexReader and IndexWriter. Each Index Manager is associated with a Directory Provider, which defines the physical storage of the index.
Regarding index distribution, Data Grid can be configured with shared or non-shared indexes.
14.2.2.6. External indexes
Apart from having shared and non-shared indexes managed by Data Grid itself, it is possible to offload indexing to a third party search engine: currently Data Grid supports Elasticsearch as a external index storage.
14.2.2.6.1. Elasticsearch IndexManager (experimental)
This index manager forwards all indexes to an external Elasticsearch server. This is an experimental integration and some features may not be available, for example indexNullAs for @IndexedEmbedded annotations is not currently supported.
Configuration:
<indexing index="PRIMARY_OWNER">
    <property name="default.indexmanager">elasticsearch</property>
    <property name="default.elasticsearch.host">link:http://elasticHost:9200</property>
    <!-- other elasticsearch configurations -->
</indexing>
The index mode should be set to LOCAL, since Data Grid considers Elasticsearch as a single shared index. More information about Elasticsearch integration, including the full description of the configuration properties can be found at the Hibernate Search manual.
14.2.2.7. Automatic configuration
The attribute auto-config provides a simple way of configuring indexing based on the cache type. For replicated and local caches, the indexing is configured to be persisted on disk and not shared with any other processes. Also, it is configured so that minimum delay exists between the moment an object is indexed and the moment it is available for searches (near real time).
<local-cache name="default">
    <indexing index="PRIMARY_OWNER" auto-config="true"/>
</local-cache>it is possible to redefine any property added via auto-config, and also add new properties, allowing for advanced tuning.
The auto config adds the following properties for replicated and local caches:
| Property name | value | description |
|---|---|---|
| default.directory_provider | filesystem | Filesystem based index. More details at Hibernate Search documentation |
| default.exclusive_index_use | true | indexing operation in exclusive mode, allowing Hibernate Search to optimize writes |
| default.indexmanager | near-real-time | make use of Lucene near real time feature, meaning indexed objects are promptly available to searches |
| default.reader.strategy | shared | Reuse index reader across several queries, thus avoiding reopening it |
For distributed caches, the auto-config configure indexes in Data Grid itself, internally handled as a master-slave mechanism where indexing operations are sent to a single node which is responsible to write to the index.
The auto config properties for distributed caches are:
| Property name | value | description |
|---|---|---|
| default.directory_provider | infinispan | Indexes stored in Data Grid. More details at Hibernate Search documentation |
| default.exclusive_index_use | true | indexing operation in exclusive mode, allowing Hibernate Search to optimize writes |
| default.indexmanager | org.infinispan.query.indexmanager.InfinispanIndexManager | Delegates index writing to a single node in the Data Grid cluster |
| default.reader.strategy | shared | Reuse index reader across several queries, avoiding reopening it |
14.2.2.8. Re-indexing
Occasionally you might need to rebuild the Lucene index by reconstructing it from the data stored in the Cache. You need to rebuild the index if you change the definition of what is indexed on your types, or if you change for example some Analyzer parameter, as Analyzers affect how the index is written. Also, you might need to rebuild the index if you had it destroyed by some system administration mistake. To rebuild the index just get a reference to the MassIndexer and start it; beware it might take some time as it needs to reprocess all data in the grid!
// Blocking execution
SearchManager searchManager = Search.getSearchManager(cache);
searchManager.getMassIndexer().start();

// Non blocking execution
CompletableFuture<Void> future = searchManager.getMassIndexer().startAsync();
This is also available as a start JMX operation on the MassIndexer MBean registered under the name org.infinispan:type=Query,manager="{name-of-cache-manager}",cache="{name-of-cache}",component=MassIndexer.
14.2.2.9. Mapping Entities
Data Grid relies on the rich API of Hibernate Search in order to define fine grained configuration for indexing at entity level. This configuration includes which fields are annotated, which analyzers should be used, how to map nested objects and so on. Detailed documentation is available at the Hibernate Search manual.
14.2.2.9.1. @DocumentId
Unlike Hibernate Search, using @DocumentId to mark a field as identifier does not apply to Data Grid values; in Data Grid the identifier for all @Indexed objects is the key used to store the value. You can still customize how the key is indexed using a combination of @Transformable , custom types and custom FieldBridge implementations.
14.2.2.9.2. @Transformable keys
The key for each value needs to be indexed as well, and the key instance must be transformed in a String. Data Grid includes some default transformation routines to encode common primitives, but to use a custom key you must provide an implementation of org.infinispan.query.Transformer .
Registering a key Transformer via annotations
You can annotate your key class with org.infinispan.query.Transformable and your custom transformer implementation will be picked up automatically:
@Transformable(transformer = CustomTransformer.class)
public class CustomKey {
   ...
}

public class CustomTransformer implements Transformer {
   @Override
   public Object fromString(String s) {
      ...
      return new CustomKey(...);
   }

   @Override
   public String toString(Object customType) {
      CustomKey ck = (CustomKey) customType;
      return ...
   }
}
Registering a key Transformer via the cache indexing configuration
You can use the key-transformers xml element in both embedded and server config:
<replicated-cache name="test">
    <indexing index="ALL" auto-config="true">
        <key-transformers>
            <key-transformer key="com.mycompany.CustomKey" transformer="com.mycompany.CustomTransformer"/>
        </key-transformers>
    </indexing>
</replicated-cache>
or alternatively, you can achieve the same effect by using the Java configuration API (embedded mode):
   ConfigurationBuilder builder = ...
   builder.indexing().autoConfig(true)
         .addKeyTransformer(CustomKey.class, CustomTransformer.class);
Registering a Transformer programmatically at runtime
Using this technique, you don’t have to annotate your custom key type and you also do not add the transformer to the, cache indexing configuration, instead, you can add it to the SearchManagerImplementor dynamically at runtime by invoking org.infinispan.query.spi.SearchManagerImplementor.registerKeyTransformer(Class<?>, Class<? extends Transformer>):
org.infinispan.query.spi.SearchManagerImplementor manager = Search.getSearchManager(cache).unwrap(SearchManagerImplementor.class);
manager.registerKeyTransformer(keyClass, keyTransformerClass);
This approach is deprecated since 10.0 because it can lead to situations when a newly started node receives cache entries via initial state transfer and is not able to index them because the needed key transformers are not yet registered (and can only be registered after the Cache has been fully started). This undesirable situation is avoided if you register your key transformers using the other available approaches (configuration and annotation).
14.2.2.9.3. Programmatic mapping
Instead of using annotations to map an entity to the index, it’s also possible to configure it programmatically.
In the following example we map an object Author which is to be stored in the grid and made searchable on two properties but without annotating the class.
import org.apache.lucene.search.Query;
import org.hibernate.search.cfg.Environment;
import org.hibernate.search.cfg.SearchMapping;
import org.hibernate.search.query.dsl.QueryBuilder;
import org.infinispan.Cache;
import org.infinispan.configuration.cache.Configuration;
import org.infinispan.configuration.cache.ConfigurationBuilder;
import org.infinispan.configuration.cache.Index;
import org.infinispan.manager.DefaultCacheManager;
import org.infinispan.query.CacheQuery;
import org.infinispan.query.Search;
import org.infinispan.query.SearchManager;

import java.io.IOException;
import java.lang.annotation.ElementType;
import java.util.Properties;

SearchMapping mapping = new SearchMapping();
mapping.entity(Author.class).indexed()
       .property("name", ElementType.METHOD).field()
       .property("surname", ElementType.METHOD).field();

Properties properties = new Properties();
properties.put(Environment.MODEL_MAPPING, mapping);
properties.put("hibernate.search.[other options]", "[...]");

Configuration infinispanConfiguration = new ConfigurationBuilder()
        .indexing().index(Index.NONE)
        .withProperties(properties)
        .build();

DefaultCacheManager cacheManager = new DefaultCacheManager(infinispanConfiguration);

Cache<Long, Author> cache = cacheManager.getCache();
SearchManager sm = Search.getSearchManager(cache);

Author author = new Author(1, "Manik", "Surtani");
cache.put(author.getId(), author);

QueryBuilder qb = sm.buildQueryBuilderForClass(Author.class).get();
Query q = qb.keyword().onField("name").matching("Manik").createQuery();
CacheQuery cq = sm.getQuery(q, Author.class);
assert cq.getResultSize() == 1;
14.2.3. Querying APIs
You can query Data Grid using:
- Lucene or Hibernate Search Queries. Data Grid exposes the Hibernate Search DSL, which produces Lucene queries. You can run Lucene queries on single nodes or broadcast queries to multiple nodes in an Data Grid cluster.
- Ickle queries, a custom string-based query language with full-text extensions.
14.2.3.1. Hibernate Search
Apart from supporting Hibernate Search annotations to configure indexing, it’s also possible to query the cache using other Hibernate Search APIs
14.2.3.1.1. Running Lucene queries
To run a Lucene query directly, simply create and wrap it in a CacheQuery:
import org.apache.lucene.search.Query;
import org.infinispan.query.CacheQuery;
import org.infinispan.query.Search;
import org.infinispan.query.SearchManager;


SearchManager searchManager = Search.getSearchManager(cache);
Query query = searchManager.buildQueryBuilderForClass(Book.class).get()
            .keyword().wildcard().onField("description").matching("*test*").createQuery();
CacheQuery<Book> cacheQuery = searchManager.getQuery(query);
14.2.3.1.2. Using the Hibernate Search DSL
The Hibernate Search DSL can be used to create the Lucene Query, example:
import org.infinispan.query.Search;
import org.infinispan.query.SearchManager;
import org.apache.lucene.search.Query;

Cache<String, Book> cache = ...

SearchManager searchManager = Search.getSearchManager(cache);

Query luceneQuery = searchManager
                         .buildQueryBuilderForClass(Book.class).get()
                         .range().onField("year").from(2005).to(2010)
                         .createQuery();

List<Object> results = searchManager.getQuery(luceneQuery).list();
For a detailed description of the query capabilities of this DSL, see the relevant section of the Hibernate Search manual.
14.2.3.1.3. Faceted Search
Data Grid support Faceted Searches by using the Hibernate Search FacetManager:
// Cache is indexed
Cache<Integer, Book> cache = ...

// Obtain the Search Manager
SearchManager searchManager = Search.getSearchManager(cache);

// Create the query builder
QueryBuilder queryBuilder = searchManager.buildQueryBuilderForClass(Book.class).get();

// Build any Lucene Query. Here it's using the DSL to do a Lucene term query on a book name
Query luceneQuery = queryBuilder.keyword().wildcard().onField("name").matching("bitcoin").createQuery();

// Wrap into a cache Query
CacheQuery<Book> query = searchManager.getQuery(luceneQuery);

// Define the Facet characteristics
FacetingRequest request = queryBuilder.facet()
                .name("year_facet")
                .onField("year")
                .discrete()
                .orderedBy(FacetSortOrder.COUNT_ASC)
                .createFacetingRequest();

// Associated the FacetRequest with the query
FacetManager facetManager = query.getFacetManager().enableFaceting(request);

// Obtain the facets
List<Facet> facetList = facetManager.getFacets("year_facet");
A Faceted search like above will return the number books that match 'bitcoin' released on a yearly basis, for example:
AbstractFacet{facetingName='year_facet', fieldName='year', value='2008', count=1}
AbstractFacet{facetingName='year_facet', fieldName='year', value='2009', count=1}
AbstractFacet{facetingName='year_facet', fieldName='year', value='2010', count=1}
AbstractFacet{facetingName='year_facet', fieldName='year', value='2011', count=1}
AbstractFacet{facetingName='year_facet', fieldName='year', value='2012', count=1}
AbstractFacet{facetingName='year_facet', fieldName='year', value='2016', count=1}
AbstractFacet{facetingName='year_facet', fieldName='year', value='2015', count=2}
AbstractFacet{facetingName='year_facet', fieldName='year', value='2013', count=3}
For more info about Faceted Search, see Hibernate Search Faceting
14.2.3.1.4. Spatial Queries
Data Grid also supports Spatial Queries, allowing to combining full-text with restrictions based on distances, geometries or geographic coordinates.
Example, we start by using the @Spatial annotation in our entity that will be searched, together with @Latitude and @Longitude:
@Indexed
@Spatial
public class Restaurant {

      @Latitude
      private Double latitude;

      @Longitude
      private Double longitude;

      @Field(store = Store.YES)
      String name;

      // Getters, Setters and other members omitted

   }
to run spatial queries, the Hibernate Search DSL can be used:
// Cache is configured as indexed
Cache<String, Restaurant> cache = ...

// Obtain the SearchManager
Searchmanager searchManager = Search.getSearchManager(cache);

// Build the Lucene Spatial Query
Query query = Search.getSearchManager(cache).buildQueryBuilderForClass(Restaurant.class).get()
          .spatial()
            .within( 2, Unit.KM )
              .ofLatitude( centerLatitude )
              .andLongitude( centerLongitude )
            .createQuery();

// Wrap in a cache Query
CacheQuery<Restaurant> cacheQuery = searchManager.getQuery(query);

List<Restaurant> nearBy = cacheQuery.list();
More info on Hibernate Search manual
14.2.3.1.5. IndexedQueryMode
It’s possible to specify a query mode for indexed queries. IndexedQueryMode.BROADCAST allows to broadcast a query to each node of the cluster, retrieve the results and combine them before returning to the caller. It is suitable for use in conjunction with non-shared indexes, since each node’s local index will have only a subset of the data indexed.
IndexedQueryMode.FETCH will execute the query in the caller. If all the indexes for the cluster wide data are available locally, performance will be optimal, otherwise this query mode may involve fetching indexes data from remote nodes.
The IndexedQueryMode is supported for Ickle queries and Lucene Queries (but not for Query DSL).
Example:
CacheQuery<Person> broadcastQuery = Search.getSearchManager(cache).getQuery(new MatchAllDocsQuery(), IndexedQueryMode.BROADCAST);

List<Person> result = broadcastQuery.list();
14.2.3.2. Data Grid Query DSL
The Query DSL (QueryBuilder and related interfaces) are deprecated and will be removed in next major version. Please use Ickle queries instead.
Data Grid provides its own query DSL, independent of Lucene and Hibernate Search. Decoupling the query API from the underlying query and indexing mechanism makes it possible to introduce new alternative engines in the future, besides Lucene, and still being able to use the same uniform query API. The current implementation of indexing and searching is still based on Hibernate Search and Lucene so all indexing related aspects presented in this chapter still apply.
The new API simplifies the writing of queries by not exposing the user to the low level details of constructing Lucene query objects and also has the advantage of being available to remote Hot Rod clients. But before delving into further details, let’s examine first a simple example of writing a query for the Book entity from the previous example.
Query example using Data Grid's query DSL
import org.infinispan.query.dsl.*;

// get the DSL query factory from the cache, to be used for constructing the Query object:
QueryFactory qf = org.infinispan.query.Search.getQueryFactory(cache);

// create a query for all the books that have a title which contains "engine":
org.infinispan.query.dsl.Query query = qf.from(Book.class)
      .having("title").like("%engine%")
      .build();

// get the results:
List<Book> list = query.list();
The API is located in the org.infinispan.query.dsl package. A query is created with the help of the QueryFactory instance which is obtained from the per-cache SearchManager. Each QueryFactory instance is bound to the same Cache instance as the SearchManager, but it is otherwise a stateless and thread-safe object that can be used for creating multiple queries in parallel.
Query creation starts with the invocation of the from(Class entityType) method which returns a QueryBuilder object that is further responsible for creating queries targeted to the specified entity class from the given cache.
A query will always target a single entity type and is evaluated over the contents of a single cache. Running a query over multiple caches or creating queries that target several entity types (joins) is not supported.
The QueryBuilder accumulates search criteria and configuration specified through the invocation of its DSL methods and is ultimately used to build a Query object by the invocation of the QueryBuilder.build() method that completes the construction. Being a stateful object, it cannot be used for constructing multiple queries at the same time (except for nested queries) but can be reused afterwards.
This QueryBuilder is different from the one from Hibernate Search but has a somewhat similar purpose, hence the same name. We are considering renaming it in near future to prevent ambiguity.
Executing the query and fetching the results is as simple as invoking the list() method of the Query object. Once executed the Query object is not reusable. If you need to re-execute it in order to obtain fresh results then a new instance must be obtained by calling QueryBuilder.build().
14.2.3.2.1. Filtering operators
Constructing a query is a hierarchical process of composing multiple criteria and is best explained following this hierarchy.
The simplest possible form of a query criteria is a restriction on the values of an entity attribute according to a filtering operator that accepts zero or more arguments. The entity attribute is specified by invoking the having(String attributePath) method of the query builder which returns an intermediate context object (FilterConditionEndContext) that exposes all the available operators. Each of the methods defined by FilterConditionEndContext is an operator that accepts an argument, except for between which has two arguments and isNull which has no arguments. The arguments are statically evaluated at the time the query is constructed, so if you’re looking for a feature similar to SQL’s correlated sub-queries, that is not currently available.
// a single query criterion
QueryBuilder qb = ...
qb.having("title").eq("Hibernate Search in Action");
Table 14.1. FilterConditionEndContext exposes the following filtering operators:
| Filter | Arguments | Description |
|---|---|---|
| in | Collection values | Checks that the left operand is equal to one of the elements from the Collection of values given as argument. |
| in | Object… values | Checks that the left operand is equal to one of the (fixed) list of values given as argument. |
| contains | Object value | Checks that the left argument (which is expected to be an array or a Collection) contains the given element. |
| containsAll | Collection values | Checks that the left argument (which is expected to be an array or a Collection) contains all the elements of the given collection, in any order. |
| containsAll | Object… values | Checks that the left argument (which is expected to be an array or a Collection) contains all of the the given elements, in any order. |
| containsAny | Collection values | Checks that the left argument (which is expected to be an array or a Collection) contains any of the elements of the given collection. |
| containsAny | Object… values | Checks that the left argument (which is expected to be an array or a Collection) contains any of the the given elements. |
| isNull | Checks that the left argument is null. | |
| like | String pattern | Checks that the left argument (which is expected to be a String) matches a wildcard pattern that follows the JPA rules. |
| eq | Object value | Checks that the left argument is equal to the given value. |
| equal | Object value | Alias for eq. |
| gt | Object value | Checks that the left argument is greater than the given value. |
| gte | Object value | Checks that the left argument is greater than or equal to the given value. |
| lt | Object value | Checks that the left argument is less than the given value. |
| lte | Object value | Checks that the left argument is less than or equal to the given value. |
| between | Object from, Object to | Checks that the left argument is between the given range limits. |
It’s important to note that query construction requires a multi-step chaining of method invocation that must be done in the proper sequence, must be properly completed exactly once and must not be done twice, or it will result in an error. The following examples are invalid, and depending on each case they lead to criteria being ignored (in benign cases) or an exception being thrown (in more serious ones).
// Incomplete construction. This query does not have any filter on "title" attribute yet,
// although the author may have intended to add one.
QueryBuilder qb1 = ...
qb1.having("title");
Query q1 = qb1.build(); // consequently, this query matches all Book instances regardless of title!

// Duplicated completion. This results in an exception at run-time.
// Maybe the author intended to connect two conditions with a boolean operator,
// but this does NOT actually happen here.
QueryBuilder qb2 = ...
qb2.having("title").like("%Data Grid%");
qb2.having("description").like("%clustering%");   // will throw java.lang.IllegalStateException: Sentence already started. Cannot use 'having(..)' again.
Query q2 = qb2.build();
14.2.3.2.2. Filtering based on attributes of embedded entities
The having method also accepts dot separated attribute paths for referring to embedded entity attributes, so the following is a valid query:
// match all books that have an author named "Manik"
Query query = queryFactory.from(Book.class)
      .having("author.name").eq("Manik")
      .build();
Each part of the attribute path must refer to an existing indexed attribute in the corresponding entity or embedded entity class respectively. It’s possible to have multiple levels of embedding.
14.2.3.2.3. Boolean conditions
Combining multiple attribute conditions with logical conjunction (and) and disjunction (or) operators in order to create more complex conditions is demonstrated in the following example. The well known operator precedence rule for boolean operators applies here, so the order of DSL method invocations during construction is irrelevant. Here and operator still has higher priority than or even though or was invoked first.
// match all books that have "Data Grid" in their title
// or have an author named "Manik" and their description contains "clustering"
Query query = queryFactory.from(Book.class)
  .having("title").like("%Data Grid%")
  .or().having("author.name").eq("Manik")
  .and().having("description").like("%clustering%")
  .build();
Boolean negation is achieved with the not operator, which has highest precedence among logical operators and applies only to the next simple attribute condition.
// match all books that do not have "Data Grid" in their title and are authored by "Manik"
Query query = queryFactory.from(Book.class)
  .not().having("title").like("%Data Grid%")
  .and().having("author.name").eq("Manik")
  .build();
14.2.3.2.4. Nested conditions
Changing the precedence of logical operators is achieved with nested filter conditions. Logical operators can be used to connect two simple attribute conditions as presented before, but can also connect a simple attribute condition with the subsequent complex condition created with the same query factory.
// match all books that have an author named "Manik" and their title contains
// "Data Grid" or their description contains "clustering"
Query query = queryFactory.from(Book.class)
  .having("author.name").eq("Manik")
  .and(queryFactory.having("title").like("%Data Grid%")
          .or().having("description").like("%clustering%"))
  .build();
14.2.3.2.5. Projections
In some use cases returning the whole domain object is overkill if only a small subset of the attributes are actually used by the application, especially if the domain entity has embedded entities. The query language allows you to specify a subset of attributes (or attribute paths) to return - the projection. If projections are used then the Query.list() will not return the whole domain entity but will return a List of Object[], each slot in the array corresponding to a projected attribute.
// match all books that have "Data Grid" in their title or description
// and return only their title and publication year
Query query = queryFactory.from(Book.class)
  .select("title", "publicationYear")
  .having("title").like("%Data Grid%")
  .or().having("description").like("%Data Grid%"))
  .build();
14.2.3.2.6. Sorting
Ordering the results based on one or more attributes or attribute paths is done with the QueryBuilder.orderBy( ) method which accepts an attribute path and a sorting direction. If multiple sorting criteria are specified, then the order of invocation of orderBy method will dictate their precedence. But you have to think of the multiple sorting criteria as acting together on the tuple of specified attributes rather than in a sequence of individual sorting operations on each attribute.
// match all books that have "Data Grid" in their title or description
// and return them sorted by the publication year and title
Query query = queryFactory.from(Book.class)
  .orderBy("publicationYear", SortOrder.DESC)
  .orderBy("title", SortOrder.ASC)
  .having("title").like("%Data Grid%")
  .or().having("description").like("%Data Grid%"))
  .build();
14.2.3.2.7. Pagination
You can limit the number of returned results by setting the maxResults property of QueryBuilder. This can be used in conjunction with setting the startOffset in order to achieve pagination of the result set.
// match all books that have "clustering" in their title
// sorted by publication year and title
// and return 3'rd page of 10 results
Query query = queryFactory.from(Book.class)
  .orderBy("publicationYear", SortOrder.DESC)
  .orderBy("title", SortOrder.ASC)
  .startOffset(20)
  .maxResults(10)
  .having("title").like("%clustering%")
  .build();
Even if the results being fetched are limited to maxResults you can still find the total number of matching results by calling Query.getResultSize().
14.2.3.2.8. Grouping and Aggregation
Data Grid has the ability to group query results according to a set of grouping fields and construct aggregations of the results from each group by applying an aggregation function to the set of values that fall into each group. Grouping and aggregation can only be applied to projection queries. The supported aggregations are: avg, sum, count, max, min. The set of grouping fields is specified with the groupBy(field) method, which can be invoked multiple times. The order used for defining grouping fields is not relevant. All fields selected in the projection must either be grouping fields or else they must be aggregated using one of the grouping functions described below. A projection field can be aggregated and used for grouping at the same time. A query that selects only grouping fields but no aggregation fields is legal.
Example: Grouping Books by author and counting them.
Query query = queryFactory.from(Book.class)
    .select(Expression.property("author"), Expression.count("title"))
    .having("title").like("%engine%")
    .groupBy("author")
.build();A projection query in which all selected fields have an aggregation function applied and no fields are used for grouping is allowed. In this case the aggregations will be computed globally as if there was a single global group.
14.2.3.2.9. Aggregations
The following aggregation functions may be applied to a field: avg, sum, count, max, min
- avg() - Computes the average of a set of numbers. Accepted values are primitive numbers and instances of java.lang.Number. The result is represented as java.lang.Double. If there are no non-null values the result is null instead.
- count() - Counts the number of non-null rows and returns a java.lang.Long. If there are no non-null values the result is 0 instead.
- max() - Returns the greatest value found. Accepted values must be instances of java.lang.Comparable. If there are no non-null values the result is null instead.
- min() - Returns the smallest value found. Accepted values must be instances of java.lang.Comparable. If there are no non-null values the result is null instead.
- sum() - Computes the sum of a set of Numbers. If there are no non-null values the result is null instead. The following table indicates the return type based on the specified field.
Table 14.2. Table sum return type
| Field Type | Return Type |
|---|---|
| Integral (other than BigInteger) | Long |
| Float or Double | Double |
| BigInteger | BigInteger |
| BigDecimal | BigDecimal |
14.2.3.2.10. Evaluation of queries with grouping and aggregation
Aggregation queries can include filtering conditions, like usual queries. Filtering can be performed in two stages: before and after the grouping operation. All filter conditions defined before invoking the groupBy method will be applied before the grouping operation is performed, directly to the cache entries (not to the final projection). These filter conditions may reference any fields of the queried entity type, and are meant to restrict the data set that is going to be the input for the grouping stage. All filter conditions defined after invoking the groupBy method will be applied to the projection that results from the projection and grouping operation. These filter conditions can either reference any of the groupBy fields or aggregated fields. Referencing aggregated fields that are not specified in the select clause is allowed; however, referencing non-aggregated and non-grouping fields is forbidden. Filtering in this phase will reduce the amount of groups based on their properties. Sorting may also be specified similar to usual queries. The ordering operation is performed after the grouping operation and can reference any of the groupBy fields or aggregated fields.
14.2.3.2.11. Using Named Query Parameters
Instead of building a new Query object for every execution it is possible to include named parameters in the query which can be substituted with actual values before execution. This allows a query to be defined once and be efficiently executed many times. Parameters can only be used on the right-hand side of an operator and are defined when the query is created by supplying an object produced by the org.infinispan.query.dsl.Expression.param(String paramName) method to the operator instead of the usual constant value. Once the parameters have been defined they can be set by invoking either Query.setParameter(parameterName, value) or Query.setParameters(parameterMap) as shown in the examples below.
import org.infinispan.query.Search;
import org.infinispan.query.dsl.*;
[...]

QueryFactory queryFactory = Search.getQueryFactory(cache);
// Defining a query to search for various authors and publication years
Query query = queryFactory.from(Book.class)
    .select("title")
    .having("author").eq(Expression.param("authorName"))
    .and()
    .having("publicationYear").eq(Expression.param("publicationYear"))
    .build();

// Set actual parameter values
query.setParameter("authorName", "Doe");
query.setParameter("publicationYear", 2010);

// Execute the query
List<Book> found = query.list();
Alternatively, multiple parameters may be set at once by supplying a map of actual parameter values:
Setting multiple named parameters at once
import java.util.Map;
import java.util.HashMap;

[...]

Map<String, Object> parameterMap = new HashMap<>();
parameterMap.put("authorName", "Doe");
parameterMap.put("publicationYear", 2010);

query.setParameters(parameterMap);
A significant portion of the query parsing, validation and execution planning effort is performed during the first execution of a query with parameters. This effort is not repeated during subsequent executions leading to better performance compared to a similar query using constant values instead of query parameters.
14.2.3.2.12. More Query DSL samples
Probably the best way to explore using the Query DSL API is to have a look at our tests suite. QueryDslConditionsTest is a fine example.
14.2.3.3. Ickle
Create relational and full-text queries in both Library and Remote Client-Server mode with the Ickle query language.
Ickle is string-based and has the following characteristics:
- Query Java classes and supports Protocol Buffers.
- Queries can target a single entity type.
- Queries can filter on properties of embedded objects, including collections.
- Supports projections, aggregations, sorting, named parameters.
- Supports indexed and non-indexed execution.
- Supports complex boolean expressions.
- Supports full-text queries.
-
Does not support computations in expressions, such as
user.age > sqrt(user.shoeSize+3). - Does not support joins.
- Does not support subqueries.
- Is supported across various Data Grid APIs. Whenever a Query is produced by the QueryBuilder is accepted, including continuous queries or in event filters for listeners.
To use the API, first obtain a QueryFactory to the cache and then call the .create() method, passing in the string to use in the query. For instance:
QueryFactory qf = Search.getQueryFactory(remoteCache);
Query q = qf.create("from sample_bank_account.Transaction where amount > 20");
When using Ickle all fields used with full-text operators must be both Indexed and Analysed.
14.2.3.3.1. Ickle Query Language Parser Syntax
The parser syntax for the Ickle query language has some notable rules:
- Whitespace is not significant.
- Wildcards are not supported in field names.
- A field name or path must always be specified, as there is no default field.
-
&&and||are accepted instead ofANDorORin both full-text and JPA predicates. -
!may be used instead ofNOT. -
A missing boolean operator is interpreted as
OR. - String terms must be enclosed with either single or double quotes.
- Fuzziness and boosting are not accepted in arbitrary order; fuzziness always comes first.
-
!=is accepted instead of<>. -
Boosting cannot be applied to
>,>=,<,⇐operators. Ranges may be used to achieve the same result.
14.2.3.3.2. Fuzzy Queries
To execute a fuzzy query add ~ along with an integer, representing the distance from the term used, after the term. For instance
Query fuzzyQuery = qf.create("from sample_bank_account.Transaction where description : 'cofee'~2");14.2.3.3.3. Range Queries
To execute a range query define the given boundaries within a pair of braces, as seen in the following example:
Query rangeQuery = qf.create("from sample_bank_account.Transaction where amount : [20 to 50]");14.2.3.3.4. Phrase Queries
A group of words may be searched by surrounding them in quotation marks, as seen in the following example:
Query q = qf.create("from sample_bank_account.Transaction where description : 'bus fare'");14.2.3.3.5. Proximity Queries
To execute a proximity query, finding two terms within a specific distance, add a ~ along with the distance after the phrase. For instance, the following example will find the words canceling and fee provided they are not more than 3 words apart:
Query proximityQuery = qf.create("from sample_bank_account.Transaction where description : 'canceling fee'~3 ");14.2.3.3.6. Wildcard Queries
Both single-character and multi-character wildcard searches may be performed:
- A single-character wildcard search may be used with the ? character.
- A multi-character wildcard search may be used with the * character.
To search for text or test the following single-character wildcard search would be used:
Query wildcardQuery = qf.create("from sample_bank_account.Transaction where description : 'te?t'");To search for test, tests, or tester the following multi-character wildcard search would be useD:
Query wildcardQuery = qf.create("from sample_bank_account.Transaction where description : 'test*'");14.2.3.3.7. Regular Expression Queries
Regular expression queries may be performed by specifing a pattern between /. Ickle uses Lucene’s regular expression syntax, so to search for the words moat or boat the following could be used:
Query regExpQuery = qf.create("from sample_library.Book where title : /[mb]oat/");14.2.3.3.8. Boosting Queries
Terms may be boosted by adding a ^ after the term to increase their relevance in a given query, the higher the boost factor the more relevant the term will be. For instance to search for titles containing beer and wine with a higher relevance on beer, by a factor of 3, the following could be used:
Query boostedQuery = qf.create("from sample_library.Book where title : beer^3 OR wine");14.2.3.4. Continuous Query
Continuous Queries allow an application to register a listener which will receive the entries that currently match a query filter, and will be continuously notified of any changes to the queried data set that result from further cache operations. This includes incoming matches, for values that have joined the set, updated matches, for matching values that were modified and continue to match, and outgoing matches, for values that have left the set. By using a Continuous Query the application receives a steady stream of events instead of having to repeatedly execute the same query to discover changes, resulting in a more efficient use of resources. For instance, all of the following use cases could utilize Continuous Queries:
- Return all persons with an age between 18 and 25 (assuming the Person entity has an age property and is updated by the user application).
- Return all transactions higher than $2000.
- Return all times where the lap speed of F1 racers were less than 1:45.00s (assuming the cache contains Lap entries and that laps are entered live during the race).
14.2.3.4.1. Continuous Query Execution
A continuous query uses a listener that is notified when:
- An entry starts matching the specified query, represented by a Join event.
- A matching entry is updated and continues to match the query, represented by an Update event.
- An entry stops matching the query, represented by a Leave event.
When a client registers a continuous query listener it immediately begins to receive the results currently matching the query, received as Join events as described above. In addition, it will receive subsequent notifications when other entries begin matching the query, as Join events, or stop matching the query, as Leave events, as a consequence of any cache operations that would normally generate creation, modification, removal, or expiration events. Updated cache entries will generate Update events if the entry matches the query filter before and after the operation. To summarize, the logic used to determine if the listener receives a Join, Update or Leave event is:
- If the query on both the old and new values evaluate false, then the event is suppressed.
- If the query on the old value evaluates false and on the new value evaluates true, then a Join event is sent.
- If the query on both the old and new values evaluate true, then an Update event is sent.
- If the query on the old value evaluates true and on the new value evaluates false, then a Leave event is sent.
- If the query on the old value evaluates true and the entry is removed or expired, then a Leave event is sent.
Continuous Queries can use the full power of the Query DSL except: grouping, aggregation, and sorting operations.
14.2.3.4.2. Running Continuous Queries
To create a continuous query you’ll start by creating a Query object first. This is described in the Query DSL section. Then you’ll need to obtain the ContinuousQuery (org.infinispan.query.api.continuous.ContinuousQuery) object of your cache and register the query and a continuous query listener (org.infinispan.query.api.continuous.ContinuousQueryListener) with it. A ContinuousQuery object associated to a cache can be obtained by calling the static method org.infinispan.client.hotrod.Search.getContinuousQuery(RemoteCache<K, V> cache) if running in remote mode or org.infinispan.query.Search.getContinuousQuery(Cache<K, V> cache) when running in embedded mode. Once the listener has been created it may be registered by using the addContinuousQueryListener method of ContinuousQuery:
continuousQuery.addContinuousQueryListener(query, listener);
The following example demonstrates a simple continuous query use case in embedded mode:
Registering a Continuous Query
import org.infinispan.query.api.continuous.ContinuousQuery;
import org.infinispan.query.api.continuous.ContinuousQueryListener;
import org.infinispan.query.Search;
import org.infinispan.query.dsl.QueryFactory;
import org.infinispan.query.dsl.Query;

import java.util.Map;
import java.util.concurrent.ConcurrentHashMap;

[...]

// We have a cache of Persons
Cache<Integer, Person> cache = ...

// We begin by creating a ContinuousQuery instance on the cache
ContinuousQuery<Integer, Person> continuousQuery = Search.getContinuousQuery(cache);

// Define our query. In this case we will be looking for any Person instances under 21 years of age.
QueryFactory queryFactory = Search.getQueryFactory(cache);
Query query = queryFactory.from(Person.class)
    .having("age").lt(21)
    .build();

final Map<Integer, Person> matches = new ConcurrentHashMap<Integer, Person>();

// Define the ContinuousQueryListener
ContinuousQueryListener<Integer, Person> listener = new ContinuousQueryListener<Integer, Person>() {
    @Override
    public void resultJoining(Integer key, Person value) {
        matches.put(key, value);
    }

    @Override
    public void resultUpdated(Integer key, Person value) {
        // we do not process this event
    }

    @Override
    public void resultLeaving(Integer key) {
        matches.remove(key);
    }
};

// Add the listener and the query
continuousQuery.addContinuousQueryListener(query, listener);

[...]

// Remove the listener to stop receiving notifications
continuousQuery.removeContinuousQueryListener(listener);
As Person instances having an age less than 21 are added to the cache they will be received by the listener and will be placed into the matches map, and when these entries are removed from the cache or their age is modified to be greater or equal than 21 they will be removed from matches.
14.2.3.4.3. Removing Continuous Queries
To stop the query from further execution just remove the listener:
continuousQuery.removeContinuousQueryListener(listener);
14.2.3.4.4. Notes on performance of Continuous Queries
Continuous queries are designed to provide a constant stream of updates to the application, potentially resulting in a very large number of events being generated for particularly broad queries. A new temporary memory allocation is made for each event. This behavior may result in memory pressure, potentially leading to OutOfMemoryErrors (especially in remote mode) if queries are not carefully designed. To prevent such issues it is strongly recommended to ensure that each query captures the minimal information needed both in terms of number of matched entries and size of each match (projections can be used to capture the interesting properties), and that each ContinuousQueryListener is designed to quickly process all received events without blocking and to avoid performing actions that will lead to the generation of new matching events from the cache it listens to.
14.3. Remote Querying
Apart from supporting indexing and searching of Java entities to embedded clients, Data Grid introduced support for remote, language neutral, querying.
This leap required two major changes:
- Since non-JVM clients cannot benefit from directly using Apache Lucene's Java API, Data Grid defines its own new query language, based on an internal DSL that is easily implementable in all languages for which we currently have an implementation of the Hot Rod client.
- In order to enable indexing, the entities put in the cache by clients can no longer be opaque binary blobs understood solely by the client. Their structure has to be known to both server and client, so a common way of encoding structured data had to be adopted. Furthermore, allowing multi-language clients to access the data requires a language and platform-neutral encoding. Google’s Protocol Buffers was elected as an encoding format for both over-the-wire and storage due to its efficiency, robustness, good multi-language support and support for schema evolution.
14.3.1. Storing Protobuf encoded entities
Remote clients that want to be able to index and query their stored entities must do so using the ProtoStream marshaller. This is key for the search capability to work. But it’s also possible to store Protobuf entities just for gaining the benefit of platform independence and not enable indexing if you do not need it.
14.3.2. Indexing Protobuf-encoded entries
After configuring the client as described in the previous section you can start configuring indexing for your caches on the server side. Activating indexing and the various indexing specific configurations is identical to embedded mode and is explained in Querying Data Grid.
Data Grid does not index fields in Protobuf-encoded entries unless you use the @Indexed and @Field annotations to specify which fields are indexed.
14.3.2.1. Registering Protobuf Schemas on Data Grid Servers
Data Grid servers need to access indexing metadata from the same descriptor, .proto file, as clients. For this reason, Data Grid servers store .proto files in a dedicated cache, ___protobuf_metadata, that stores both keys and values as plain strings.
Prerequisites
-
If you use cache authorization to control access, assign users the '___schema_manager' role so they can write to the
___protobuf_metadatacache.
Procedure
To register a schema with Data Grid server, use the Data Grid CLI:
- Start the Data Grid CLI and connect to your Data Grid cluster.
Register schemas with the schema command.
For example, to register a file named
person.proto, do the following:[//containers/default]> schema --upload=person.proto person.proto
Use the get command to verify schemas.
For example, verify
person.protoas follows:[//containers/default]> cd caches/___protobuf_metadata [//containers/default/caches/___protobuf_metadata]> ls person.proto [//containers/default/caches/___protobuf_metadata]> get person.proto
Alternatively, if you enable JMX, you can invoke the registerProtofile() operation on the ProtobufMetadataManager MBean.
14.3.3. A remote query example
In this example, we will show you how to configure the client to utilise the example LibraryInitializerImpl, put some data in the cache and then try to search for it. Note, the following example assumes that Indexing has been enabled by registering the required .proto files with the ___protobuf_metadata cache.
ConfigurationBuilder clientBuilder = new ConfigurationBuilder();
clientBuilder.addServer()
    .host("10.1.2.3").port(11234)
    .addContextInitializers(new LibraryInitializerImpl());

RemoteCacheManager remoteCacheManager = new RemoteCacheManager(clientBuilder.build());

Book book1 = new Book();
book1.setTitle("Infinispan in Action");
remoteCache.put(1, book1);

Book book2 = new Book();
book2.setTile("Hibernate Search in Action");
remoteCache.put(2, book2);

QueryFactory qf = Search.getQueryFactory(remoteCache);
Query query = qf.from(Book.class)
            .having("title").like("%Hibernate Search%")
            .build();

List<Book> list = query.list(); // Voila! We have our book back from the cache!
The key part of creating a query is obtaining the QueryFactory for the remote cache using the org.infinispan.client.hotrod.Search.getQueryFactory() method. Once you have this creating the query is similar to embedded mode which is covered in this section.
14.3.4. Analysis
Analysis is a process that converts input data into one or more terms that you can index and query.
14.3.4.1. Default Analyzers
Data Grid provides a set of default analyzers as follows:
| Definition | Description |
|---|---|
|
| Splits text fields into tokens, treating whitespace and punctuation as delimiters. |
|
| Tokenizes input streams by delimiting at non-letters and then converting all letters to lowercase characters. Whitespace and non-letters are discarded. |
|
| Splits text streams on whitespace and returns sequences of non-whitespace characters as tokens. |
|
| Treats entire text fields as single tokens. |
|
| Stems English words using the Snowball Porter filter. |
|
| Generates n-gram tokens that are 3 grams in size by default. |
|
|
Splits text fields into larger size tokens than the |
These analyzer definitions are based on Apache Lucene and are provided "as-is". For more information about tokenizers, filters, and CharFilters, see the appropriate Lucene documentation.
14.3.4.2. Using Analyzer Definitions
To use analyzer definitions, reference them by name in the .proto schema file.
-
Include the
Analyze.YESattribute to indicate that the property is analyzed. -
Specify the analyzer definition with the
@Analyzerannotation.
The following example shows referenced analyzer definitions:
/* @Indexed */
message TestEntity {

    /* @Field(store = Store.YES, analyze = Analyze.YES, analyzer = @Analyzer(definition = "keyword")) */
    optional string id = 1;

    /* @Field(store = Store.YES, analyze = Analyze.YES, analyzer = @Analyzer(definition = "simple")) */
    optional string name = 2;
}
14.3.4.3. Creating Custom Analyzer Definitions
If you require custom analyzer definitions, do the following:
-
Create an implementation of the
ProgrammaticSearchMappingProviderinterface packaged in aJARfile. -
Provide a file named
org.infinispan.query.spi.ProgrammaticSearchMappingProviderin theMETA-INF/services/directory of yourJAR. This file should contain the fully qualified class name of your implementation. Copy the
JARto thestandalone/deploymentsdirectory of your Data Grid installation.ImportantYour deployment must be available to the Data Grid server during startup. You cannot add the deployment if the server is already running.
The following is an example implementation of the
ProgrammaticSearchMappingProviderinterface:import org.apache.lucene.analysis.core.LowerCaseFilterFactory; import org.apache.lucene.analysis.core.StopFilterFactory; import org.apache.lucene.analysis.standard.StandardFilterFactory; import org.apache.lucene.analysis.standard.StandardTokenizerFactory; import org.hibernate.search.cfg.SearchMapping; import org.infinispan.Cache; import org.infinispan.query.spi.ProgrammaticSearchMappingProvider; public final class MyAnalyzerProvider implements ProgrammaticSearchMappingProvider { @Override public void defineMappings(Cache cache, SearchMapping searchMapping) { searchMapping .analyzerDef("standard-with-stop", StandardTokenizerFactory.class) .filter(StandardFilterFactory.class) .filter(LowerCaseFilterFactory.class) .filter(StopFilterFactory.class); } }Specify the
JARin the cache container configuration, for example:<cache-container name="mycache" default-cache="default"> <modules> <module name="deployment.analyzers.jar"/> </modules> ...
14.4. Statistics
Query Statistics can be obtained from the SearchManager, as demonstrated in the following code snippet.
SearchManager searchManager = Search.getSearchManager(cache);
org.hibernate.search.stat.Statistics statistics = searchManager.getStatistics();
This data is also available via JMX through the Hibernate Search StatisticsInfoMBean registered under the name org.infinispan:type=Query,manager="{name-of-cache-manager}",cache="{name-of-cache}",component=Statistics. Please note this MBean is always registered by Data Grid but the statistics are collected only if statistics collection is enabled at cache level.
Hibernate Search has its own configuration properties hibernate.search.jmx_enabled and hibernate.search.generate_statistics for JMX statistics as explained here. Using them with Data Grid Query is forbidden as it will only lead to duplicated MBeans and unpredictable results.
14.5. Performance Tuning
14.5.1. Batch writing in SYNC mode
By default, the Index Managers work in sync mode, meaning when data is written to Data Grid, it will perform the indexing operations synchronously. This synchronicity guarantees indexes are always consistent with the data (and thus visible in searches), but can slowdown write operations since it will also perform a commit to the index. Committing is an extremely expensive operation in Lucene, and for that reason, multiple writes from different nodes can be automatically batched into a single commit to reduce the impact.
So, when doing data loads to Data Grid with index enabled, try to use multiple threads to take advantage of this batching.
If using multiple threads does not result in the required performance, an alternative is to load data with indexing temporarily disabled and run a re-indexing operation afterwards. This can be done writing data with the SKIP_INDEXING flag:
cache.getAdvancedCache().withFlags(Flag.SKIP_INDEXING).put("key","value");14.5.2. Writing using async mode
If it’s acceptable a small delay between data writes and when that data is visible in queries, an index manager can be configured to work in async mode. The async mode offers much better writing performance, since in this mode commits happen at a configurable interval.
Configuration:
<distributed-cache name="default">
    <indexing index="PRIMARY_OWNER">
        <property name="default.indexmanager">org.infinispan.query.indexmanager.InfinispanIndexManager</property>
        <!-- Index data in async mode -->
        <property name="default.worker.execution">async</property>
        <!-- Optional: configure the commit interval, default is 1000ms -->
        <property name="default.index_flush_interval">500</property>
    </indexing>
</distributed-cache>
14.5.3. Index reader async strategy
Lucene internally works with snapshots of the index: once an IndexReader is opened, it will only see the index changes up to the point it was opened; further index changes will not be visible until the IndexReader is refreshed. The Index Managers used in Data Grid by default will check the freshness of the index readers before every query and refresh them if necessary.
It is possible to tune this strategy to relax this freshness checking to a pre-configured interval by using the reader.strategy configuration set as async:
<distributed-cache name="default">
    <indexing index="PRIMARY_OWNER">
        <property name="default.indexmanager">org.infinispan.query.affinity.InfinispanIndexManager</property>
        <property name="default.reader.strategy">async</property>
        <!-- refresh reader every 1s, default is 5s -->
        <property name="default.reader.async_refresh_period_ms">1000</property>
    </indexing>
</distributed-cache>
14.5.4. Lucene Options
It is possible to apply tuning options in Lucene directly. For more details, see the Hibernate Search manual.
Chapter 15. Executing Code in the Grid
The main benefit of a Cache is the ability to very quickly lookup a value by its key, even across machines. In fact this use alone is probably the reason many users use Data Grid. However Data Grid can provide many more benefits that aren’t immediately apparent. Since Data Grid is usually used in a cluster of machines we also have features available that can help utilize the entire cluster for performing the user’s desired workload.
This section covers only executing code in the grid using an embedded cache, if you are using a remote cache you should review details about executing code in the remote grid.
15.1. Cluster Executor
Since you have a group of machines, it makes sense to leverage their combined computing power for executing code on all of them them. The cache manager comes with a nice utility that allows you to execute arbitrary code in the cluster. Note this feature requires no Cache to be used. This Cluster Executor can be retrieved by calling executor() on the EmbeddedCacheManager. This executor is retrievable in both clustered and non clustered configurations.
The ClusterExecutor is specifically designed for executing code where the code is not reliant upon the data in a cache and is used instead as a way to help users to execute code easily in the cluster.
This manager was built specifically using Java 8 and such has functional APIs in mind, thus all methods take a functional inteface as an argument. Also since these arguments will be sent to other nodes they need to be serializable. We even used a nice trick to ensure our lambdas are immediately Serializable. That is by having the arguments implement both Serializable and the real argument type (ie. Runnable or Function). The JRE will pick the most specific class when determining which method to invoke, so in that case your lambdas will always be serializable. It is also possible to use an Externalizer to possibly reduce message size further.
The manager by default will submit a given command to all nodes in the cluster including the node where it was submitted from. You can control on which nodes the task is executed on by using the filterTargets methods as is explained in the section.
15.1.1. Filtering execution nodes
It is possible to limit on which nodes the command will be ran. For example you may want to only run a computation on machines in the same rack. Or you may want to perform an operation once in the local site and again on a different site. A cluster executor can limit what nodes it sends requests to at the scope of same or different machine, rack or site level.
SameRack.java
EmbeddedCacheManager manager = ...;
manager.executor().filterTargets(ClusterExecutionPolicy.SAME_RACK).submit(...)
To use this topology base filtering you must enable topology aware consistent hashing through Server Hinting.
You can also filter using a predicate based on the Address of the node. This can also be optionally combined with topology based filtering in the previous code snippet.
We also allow the target node to be chosen by any means using a Predicate that will filter out which nodes can be considered for execution. Note this can also be combined with Topology filtering at the same time to allow even more fine control of where you code is executed within the cluster.
Predicate.java
EmbeddedCacheManager manager = ...;
// Just filter
manager.executor().filterTargets(a -> a.equals(..)).submit(...)
// Filter only those in the desired topology
manager.executor().filterTargets(ClusterExecutionPolicy.SAME_SITE, a -> a.equals(..)).submit(...)
15.1.2. Timeout
Cluster Executor allows for a timeout to be set per invocation. This defaults to the distributed sync timeout as configured on the Transport Configuration. This timeout works in both a clustered and non clustered cache manager. The executor may or may not interrupt the threads executing a task when the timeout expires. However when the timeout occurs any Consumer or Future will be completed passing back a TimeoutException. This value can be overridden by ivoking the timeout method and supplying the desired duration.
15.1.3. Single Node Submission
Cluster Executor can also run in single node submission mode instead of submitting the command to all nodes it will instead pick one of the nodes that would have normally received the command and instead submit it it to only one. Each submission will possibly use a different node to execute the task on. This can be very useful to use the ClusterExecutor as a java.util.concurrent.Executor which you may have noticed that ClusterExecutor implements.
SingleNode.java
EmbeddedCacheManager manager = ...;
manager.executor().singleNodeSubmission().submit(...)
15.1.3.1. Failover
When running in single node submission it may be desirable to also allow the Cluster Executor handle cases where an exception occurred during the processing of a given command by retrying the command again. When this occurs the Cluster Executor will choose a single node again to resubmit the command to up to the desired number of failover attempts. Note the chosen node could be any node that passes the topology or predicate check. Failover is enabled by invoking the overridden singleNodeSubmission method. The given command will be resubmitted again to a single node until either the command completes without exception or the total submission amount is equal to the provided failover count.
15.1.4. Example: PI Approximation
This example shows how you can use the ClusterExecutor to estimate the value of PI.
Pi approximation can greatly benefit from parallel distributed execution via Cluster Executor. Recall that area of the square is Sa = 4r2 and area of the circle is Ca=pi*r2. Substituting r2 from the second equation into the first one it turns out that pi = 4 * Ca/Sa. Now, image that we can shoot very large number of darts into a square; if we take ratio of darts that land inside a circle over a total number of darts shot we will approximate Ca/Sa value. Since we know that pi = 4 * Ca/Sa we can easily derive approximate value of pi. The more darts we shoot the better approximation we get. In the example below we shoot 1 billion darts but instead of "shooting" them serially we parallelize work of dart shooting across the entire Data Grid cluster. Note this will work in a cluster of 1 was well, but will be slower.
public class PiAppx {

   public static void main (String [] arg){
      EmbeddedCacheManager cacheManager = ..
      boolean isCluster = ..

      int numPoints = 1_000_000_000;
      int numServers = isCluster ? cacheManager.getMembers().size() : 1;
      int numberPerWorker = numPoints / numServers;

      ClusterExecutor clusterExecutor = cacheManager.executor();
      long start = System.currentTimeMillis();
      // We receive results concurrently - need to handle that
      AtomicLong countCircle = new AtomicLong();
      CompletableFuture<Void> fut = clusterExecutor.submitConsumer(m -> {
         int insideCircleCount = 0;
         for (int i = 0; i < numberPerWorker; i++) {
            double x = Math.random();
            double y = Math.random();
            if (insideCircle(x, y))
               insideCircleCount++;
         }
         return insideCircleCount;
      }, (address, count, throwable) -> {
         if (throwable != null) {
            throwable.printStackTrace();
            System.out.println("Address: " + address + " encountered an error: " + throwable);
         } else {
            countCircle.getAndAdd(count);
         }
      });
      fut.whenComplete((v, t) -> {
         // This is invoked after all nodes have responded with a value or exception
         if (t != null) {
            t.printStackTrace();
            System.out.println("Exception encountered while waiting:" + t);
         } else {
            double appxPi = 4.0 * countCircle.get() / numPoints;

            System.out.println("Distributed PI appx is " + appxPi +
                  " using " + numServers + " node(s), completed in " + (System.currentTimeMillis() - start) + " ms");
         }
      });

      // May have to sleep here to keep alive if no user threads left
   }

   private static boolean insideCircle(double x, double y) {
      return (Math.pow(x - 0.5, 2) + Math.pow(y - 0.5, 2))
            <= Math.pow(0.5, 2);
   }
}
Chapter 16. Streams
You may want to process a subset or all data in the cache to produce a result. This may bring thoughts of Map Reduce. Data Grid allows the user to do something very similar but utilizes the standard JRE APIs to do so. Java 8 introduced the concept of a Stream which allows functional-style operations on collections rather than having to procedurally iterate over the data yourself. Stream operations can be implemented in a fashion very similar to MapReduce. Streams, just like MapReduce allow you to perform processing upon the entirety of your cache, possibly a very large data set, but in an efficient way.
Streams are the preferred method when dealing with data that exists in the cache because streams automatically adjust to cluster topology changes.
Also since we can control how the entries are iterated upon we can more efficiently perform the operations in a cache that is distributed if you want it to perform all of the operations across the cluster concurrently.
A stream is retrieved from the entrySet, keySet or values collections returned from the Cache by invoking the stream or parallelStream methods.
16.1. Common stream operations
This section highlights various options that are present irrespective of what type of underlying cache you are using.
16.2. Key filtering
It is possible to filter the stream so that it only operates upon a given subset of keys. This can be done by invoking the filterKeys method on the CacheStream. This should always be used over a Predicate filter and will be faster if the predicate was holding all keys.
If you are familiar with the AdvancedCache interface you may be wondering why you even use getAll over this keyFilter. There are some small benefits (mostly smaller payloads) to using getAll if you need the entries as is and need them all in memory in the local node. However if you need to do processing on these elements a stream is recommended since you will get both distributed and threaded parallelism for free.
16.3. Segment based filtering
This is an advanced feature and should only be used with deep knowledge of Data Grid segment and hashing techniques. These segments based filtering can be useful if you need to segment data into separate invocations. This can be useful when integrating with other tools such as Apache Spark.
This option is only supported for replicated and distributed caches. This allows the user to operate upon a subset of data at a time as determined by the KeyPartitioner. The segments can be filtered by invoking filterKeySegments method on the CacheStream. This is applied after the key filter but before any intermediate operations are performed.
16.4. Local/Invalidation
A stream used with a local or invalidation cache can be used just the same way you would use a stream on a regular collection. Data Grid handles all of the translations if necessary behind the scenes and works with all of the more interesting options (ie. storeAsBinary and a cache loader). Only data local to the node where the stream operation is performed will be used, for example invalidation only uses local entries.
16.5. Example
The code below takes a cache and returns a map with all the cache entries whose values contain the string "JBoss"
Map<Object, String> jbossValues = cache.entrySet().stream()
              .filter(e -> e.getValue().contains("JBoss"))
              .collect(Collectors.toMap(Map.Entry::getKey, Map.Entry::getValue));
16.6. Distribution/Replication/Scattered
This is where streams come into their stride. When a stream operation is performed it will send the various intermediate and terminal operations to each node that has pertinent data. This allows processing the intermediate values on the nodes owning the data, and only sending the final results back to the originating nodes, improving performance.
16.6.1. Rehash Aware
Internally the data is segmented and each node only performs the operations upon the data it owns as a primary owner. This allows for data to be processed evenly, assuming segments are granular enough to provide for equal amounts of data on each node.
When you are utilizing a distributed cache, the data can be reshuffled between nodes when a new node joins or leaves. Distributed Streams handle this reshuffling of data automatically so you don’t have to worry about monitoring when nodes leave or join the cluster. Reshuffled entries may be processed a second time, and we keep track of the processed entries at the key level or at the segment level (depending on the terminal operation) to limit the amount of duplicate processing.
It is possible but highly discouraged to disable rehash awareness on the stream. This should only be considered if your request can handle only seeing a subset of data if a rehash occurs. This can be done by invoking CacheStream.disableRehashAware() The performance gain for most operations when a rehash doesn’t occur is completely negligible. The only exceptions are for iterator and forEach, which will use less memory, since they do not have to keep track of processed keys.
Please rethink disabling rehash awareness unless you really know what you are doing.
16.6.2. Serialization
Since the operations are sent across to other nodes they must be serializable by Data Grid marshalling. This allows the operations to be sent to the other nodes.
The simplest way is to use a CacheStream instance and use a lambda just as you would normally. Data Grid overrides all of the various Stream intermediate and terminal methods to take Serializable versions of the arguments (ie. SerializableFunction, SerializablePredicate…) You can find these methods at CacheStream. This relies on the spec to pick the most specific method as defined here.
In our previous example we used a Collector to collect all the results into a Map. Unfortunately the Collectors class doesn’t produce Serializable instances. Thus if you need to use these, there are two ways to do so:
One option would be to use the CacheCollectors class which allows for a Supplier<Collector> to be provided. This instance could then use the Collectors to supply a Collector which is not serialized.
Map<Object, String> jbossValues = cache.entrySet().stream()
              .filter(e -> e.getValue().contains("Jboss"))
              .collect(CacheCollectors.serializableCollector(() -> Collectors.toMap(Map.Entry::getKey, Map.Entry::getValue)));
Alternatively, you can avoid the use of CacheCollectors and instead use the overloaded collect methods that take Supplier<Collector>. These overloaded collect methods are only available via CacheStream interface.
Map<Object, String> jbossValues = cache.entrySet().stream()
              .filter(e -> e.getValue().contains("Jboss"))
              .collect(() -> Collectors.toMap(Map.Entry::getKey, Map.Entry::getValue));
If however you are not able to use the Cache and CacheStream interfaces you cannot utilize Serializable arguments and you must instead cast the lambdas to be Serializable manually by casting the lambda to multiple interfaces. It is not a pretty sight but it gets the job done.
Map<Object, String> jbossValues = map.entrySet().stream()
              .filter((Serializable & Predicate<Map.Entry<Object, String>>) e -> e.getValue().contains("Jboss"))
              .collect(CacheCollectors.serializableCollector(() -> Collectors.toMap(Map.Entry::getKey, Map.Entry::getValue)));
The recommended and most performant way is to use an AdvancedExternalizer as this provides the smallest payload. Unfortunately this means you cannot use lamdbas as advanced externalizers require defining the class before hand.
You can use an advanced externalizer as shown below:
   Map<Object, String> jbossValues = cache.entrySet().stream()
              .filter(new ContainsFilter("Jboss"))
              .collect(() -> Collectors.toMap(Map.Entry::getKey, Map.Entry::getValue));

   class ContainsFilter implements Predicate<Map.Entry<Object, String>> {
      private final String target;

      ContainsFilter(String target) {
         this.target = target;
      }

      @Override
      public boolean test(Map.Entry<Object, String> e) {
         return e.getValue().contains(target);
      }
   }

   class JbossFilterExternalizer implements AdvancedExternalizer<ContainsFilter> {

      @Override
      public Set<Class<? extends ContainsFilter>> getTypeClasses() {
         return Util.asSet(ContainsFilter.class);
      }

      @Override
      public Integer getId() {
         return CUSTOM_ID;
      }

      @Override
      public void writeObject(ObjectOutput output, ContainsFilter object) throws IOException {
         output.writeUTF(object.target);
      }

      @Override
      public ContainsFilter readObject(ObjectInput input) throws IOException, ClassNotFoundException {
         return new ContainsFilter(input.readUTF());
      }
   }
You could also use an advanced externalizer for the collector supplier to reduce the payload size even further.
Map<Object, String> map = (Map<Object, String>) cache.entrySet().stream()
              .filter(new ContainsFilter("Jboss"))
              .collect(Collectors.toMap(Map.Entry::getKey, Map.Entry::getValue));

 class ToMapCollectorSupplier<K, U> implements Supplier<Collector<Map.Entry<K, U>, ?, Map<K, U>>> {
      static final ToMapCollectorSupplier INSTANCE = new ToMapCollectorSupplier();

      private ToMapCollectorSupplier() { }

      @Override
      public Collector<Map.Entry<K, U>, ?, Map<K, U>> get() {
         return Collectors.toMap(Map.Entry::getKey, Map.Entry::getValue);
      }
   }

   class ToMapCollectorSupplierExternalizer implements AdvancedExternalizer<ToMapCollectorSupplier> {

      @Override
      public Set<Class<? extends ToMapCollectorSupplier>> getTypeClasses() {
         return Util.asSet(ToMapCollectorSupplier.class);
      }

      @Override
      public Integer getId() {
         return CUSTOM_ID;
      }

      @Override
      public void writeObject(ObjectOutput output, ToMapCollectorSupplier object) throws IOException {
      }

      @Override
      public ToMapCollectorSupplier readObject(ObjectInput input) throws IOException, ClassNotFoundException {
         return ToMapCollectorSupplier.INSTANCE;
      }
   }
16.7. Parallel Computation
Distributed streams by default try to parallelize as much as possible. It is possible for the end user to control this and actually they always have to control one of the options. There are 2 ways these streams are parallelized.
Local to each node When a stream is created from the cache collection the end user can choose between invoking stream or parallelStream method. Depending on if the parallel stream was picked will enable multiple threading for each node locally. Note that some operations like a rehash aware iterator and forEach operations will always use a sequential stream locally. This could be enhanced at some point to allow for parallel streams locally.
Users should be careful when using local parallelism as it requires having a large number of entries or operations that are computationally expensive to be faster. Also it should be noted that if a user uses a parallel stream with forEach that the action should not block as this would be executed on the common pool, which is normally reserved for computation operations.
Remote requests When there are multiple nodes it may be desirable to control whether the remote requests are all processed at the same time concurrently or one at a time. By default all terminal operations except the iterator perform concurrent requests. The iterator, method to reduce overall memory pressure on the local node, only performs sequential requests which actually performs slightly better.
If a user wishes to change this default however they can do so by invoking the sequentialDistribution or parallelDistribution methods on the CacheStream.
16.8. Task timeout
It is possible to set a timeout value for the operation requests. This timeout is used only for remote requests timing out and it is on a per request basis. The former means the local execution will not timeout and the latter means if you have a failover scenario as described above the subsequent requests each have a new timeout. If no timeout is specified it uses the replication timeout as a default timeout. You can set the timeout in your task by doing the following:
CacheStream<Map.Entry<Object, String>> stream = cache.entrySet().stream();
stream.timeout(1, TimeUnit.MINUTES);
For more information about this, please check the java doc in timeout javadoc.
16.9. Injection
The Stream has a terminal operation called forEach which allows for running some sort of side effect operation on the data. In this case it may be desirable to get a reference to the Cache that is backing this Stream. If your Consumer implements the CacheAware interface the injectCache method be invoked before the accept method from the Consumer interface.
16.10. Distributed Stream execution
Distributed streams execution works in a fashion very similiar to map reduce. Except in this case we are sending zero to many intermediate operations (map, filter etc.) and a single terminal operation to the various nodes. The operation basically comes down to the following:
- The desired segments are grouped by which node is the primary owner of the given segment
A request is generated to send to each remote node that contains the intermediate and terminal operations including which segments it should process
- The terminal operation will be performed locally if necessary
- Each remote node will receive this request and run the operations and subsequently send the response back
- The local node will then gather the local response and remote responses together performing any kind of reduction required by the operations themselves.
- Final reduced response is then returned to the user
In most cases all operations are fully distributed, as in the operations are all fully applied on each remote node and usually only the last operation or something related may be reapplied to reduce the results from multiple nodes. One important note is that intermediate values do not actually have to be serializable, it is the last value sent back that is the part desired (exceptions for various operations will be highlighted below).
Terminal operator distributed result reductions The following paragraphs describe how the distributed reductions work for the various terminal operators. Some of these are special in that an intermediate value may be required to be serializable instead of the final result.
- allMatch noneMatch anyMatch
- The allMatch operation is ran on each node and then all the results are logically anded together locally to get the appropriate value. The noneMatch and anyMatch operations use a logical or instead. These methods also have early termination support, stopping remote and local operations once the final result is known.
- collect
- The collect method is interesting in that it can do a few extra steps. The remote node performs everything as normal except it doesn’t perform the final finisher upon the result and instead sends back the fully combined results. The local thread then combines the remote and local result into a value which is then finally finished. The key here to remember is that the final value doesn’t have to be serializable but rather the values produced from the supplier and combiner methods.
- count
- The count method just adds the numbers together from each node.
- findAny findFirst
- The findAny operation returns just the first value they find, whether it was from a remote node or locally. Note this supports early termination in that once a value is found it will not process others. Note the findFirst method is special since it requires a sorted intermediate operation, which is detailed in the exceptions section.
- max min
- The max and min methods find the respective min or max value on each node then a final reduction is performed locally to ensure only the min or max across all nodes is returned.
- reduce
- The various reduce methods 1 , 2 , 3 will end up serializing the result as much as the accumulator can do. Then it will accumulate the local and remote results together locally, before combining if you have provided that. Note this means a value coming from the combiner doesn’t have to be Serializable.
16.11. Key based rehash aware operators
The iterator, spliterator and forEach are unlike the other terminal operators in that the rehash awareness has to keep track of what keys per segment have been processed instead of just segments. This is to guarantee an exactly once (iterator & spliterator) or at least once behavior (forEach) even under cluster membership changes.
The iterator and spliterator operators when invoked on a remote node will return back batches of entries, where the next batch is only sent back after the last has been fully consumed. This batching is done to limit how many entries are in memory at a given time. The user node will hold onto which keys it has processed and when a given segment is completed it will release those keys from memory. This is why sequential processing is preferred for the iterator method, so only a subset of segment keys are held in memory at once, instead of from all nodes.
The forEach() method also returns batches, but it returns a batch of keys after it has finished processing at least a batch worth of keys. This way the originating node can know what keys have been processed already to reduce chances of processing the same entry again. Unfortunately this means it is possible to have an at least once behavior when a node goes down unexpectedly. In this case that node could have been processing a batch and not yet completed one and those entries that were processed but not in a completed batch will be ran again when the rehash failure operation occurs. Note that adding a node will not cause this issue as the rehash failover doesn’t occur until all responses are received.
These operations batch sizes are both controlled by the same value which can be configured by invoking distributedBatchSize method on the CacheStream. This value will default to the chunkSize configured in state transfer. Unfortunately this value is a tradeoff with memory usage vs performance vs at least once and your mileage may vary.
Using iterator with replicated and distributed caches
When a node is the primary or backup owner of all requested segments for a distributed stream, Data Grid performs the iterator or spliterator terminal operations locally, which optimizes performance as remote iterations are more resource intensive.
This optimization applies to both replicated and distributed caches. However, Data Grid performs iterations remotely when using cache stores that are both shared and have write-behind enabled. In this case performing the iterations remotely ensures consistency.
16.12. Intermediate operation exceptions
There are some intermediate operations that have special exceptions, these are skip, peek, sorted 12. & distinct. All of these methods have some sort of artificial iterator implanted in the stream processing to guarantee correctness, they are documented as below. Note this means these operations may cause possibly severe performance degradation.
- Skip
- An artificial iterator is implanted up to the intermediate skip operation. Then results are brought locally so it can skip the appropriate amount of elements.
- Sorted
- WARNING: This operation requires having all entries in memory on the local node. An artificial iterator is implanted up to the intermediate sorted operation. All results are sorted locally. There are possible plans to have a distributed sort which returns batches of elements, but this is not yet implemented.
- Distinct
- WARNING: This operation requires having all or nearly all entries in memory on the local node. Distinct is performed on each remote node and then an artificial iterator returns those distinct values. Then finally all of those results have a distinct operation performed upon them.
The rest of the intermediate operations are fully distributed as one would expect.
16.13. Examples
Word Count
Word count is a classic, if overused, example of map/reduce paradigm. Assume we have a mapping of key → sentence stored on Data Grid nodes. Key is a String, each sentence is also a String, and we have to count occurrence of all words in all sentences available. The implementation of such a distributed task could be defined as follows:
public class WordCountExample {

   /**
    * In this example replace c1 and c2 with
    * real Cache references
    *
    * @param args
    */
   public static void main(String[] args) {
      Cache<String, String> c1 = ...;
      Cache<String, String> c2 = ...;

      c1.put("1", "Hello world here I am");
      c2.put("2", "Infinispan rules the world");
      c1.put("3", "JUDCon is in Boston");
      c2.put("4", "JBoss World is in Boston as well");
      c1.put("12","JBoss Application Server");
      c2.put("15", "Hello world");
      c1.put("14", "Infinispan community");
      c2.put("15", "Hello world");

      c1.put("111", "Infinispan open source");
      c2.put("112", "Boston is close to Toronto");
      c1.put("113", "Toronto is a capital of Ontario");
      c2.put("114", "JUDCon is cool");
      c1.put("211", "JBoss World is awesome");
      c2.put("212", "JBoss rules");
      c1.put("213", "JBoss division of RedHat ");
      c2.put("214", "RedHat community");

      Map<String, Long> wordCountMap = c1.entrySet().parallelStream()
         .map(e -> e.getValue().split("\\s"))
         .flatMap(Arrays::stream)
         .collect(() -> Collectors.groupingBy(Function.identity(), Collectors.counting()));
   }
}
In this case it is pretty simple to do the word count from the previous example.
However what if we want to find the most frequent word in the example? If you take a second to think about this case you will realize you need to have all words counted and available locally first. Thus we actually have a few options.
We could use a finisher on the collector, which is invoked on the user thread after all the results have been collected. Some redundant lines have been removed from the previous example.
public class WordCountExample {
   public static void main(String[] args) {
      // Lines removed

      String mostFrequentWord = c1.entrySet().parallelStream()
         .map(e -> e.getValue().split("\\s"))
         .flatMap(Arrays::stream)
         .collect(() -> Collectors.collectingAndThen(
            Collectors.groupingBy(Function.identity(), Collectors.counting()),
               wordCountMap -> {
                  String mostFrequent = null;
                  long maxCount = 0;
                     for (Map.Entry<String, Long> e : wordCountMap.entrySet()) {
                        int count = e.getValue().intValue();
                        if (count > maxCount) {
                           maxCount = count;
                           mostFrequent = e.getKey();
                        }
                     }
                     return mostFrequent;
               }));

}
Unfortunately the last step is only going to be ran in a single thread, which if we have a lot of words could be quite slow. Maybe there is another way to parallelize this with Streams.
We mentioned before we are in the local node after processing, so we could actually use a stream on the map results. We can therefore use a parallel stream on the results.
public class WordFrequencyExample {
   public static void main(String[] args) {
      // Lines removed

      Map<String, Long> wordCount = c1.entrySet().parallelStream()
              .map(e -> e.getValue().split("\\s"))
              .flatMap(Arrays::stream)
              .collect(() -> Collectors.groupingBy(Function.identity(), Collectors.counting()));
      Optional<Map.Entry<String, Long>> mostFrequent = wordCount.entrySet().parallelStream().reduce(
              (e1, e2) -> e1.getValue() > e2.getValue() ? e1 : e2);
This way you can still utilize all of the cores locally when calculating the most frequent element.
Remove specific entries
Distributed streams can also be used as a way to modify data where it lives. For example you may want to remove all entries in your cache that contain a specific word.
public class RemoveBadWords {
   public static void main(String[] args) {
      // Lines removed
      String word = ..

      c1.entrySet().parallelStream()
         .filter(e -> e.getValue().contains(word))
         .forEach((c, e) -> c.remove(e.getKey()));
If we carefully note what is serialized and what is not, we notice that only the word along with the operations are serialized across to other nods as it is captured by the lambda. However the real saving piece is that the cache operation is performed on the primary owner thus reducing the amount of network traffic required to remove these values from the cache. The cache is not captured by the lambda as we provide a special BiConsumer method override that when invoked on each node passes the cache to the BiConsumer
One thing to keep in mind using the forEach command in this manner is that the underlying stream obtains no locks. The cache remove operation will still obtain locks naturally, but the value could have changed from what the stream saw. That means that the entry could have been changed after the stream read it but the remove actually removed it.
We have specifically added a new variant which is called LockedStream.
Plenty of other examples
The Streams API is a JRE tool and there are lots of examples for using it. Just remember that your operations need to be Serializable in some way.
Chapter 17. JCache (JSR-107) API
Data Grid provides an implementation of JCache 1.0 API ( JSR-107 ). JCache specifies a standard Java API for caching temporary Java objects in memory. Caching java objects can help get around bottlenecks arising from using data that is expensive to retrieve (i.e. DB or web service), or data that is hard to calculate. Caching these type of objects in memory can help speed up application performance by retrieving the data directly from memory instead of doing an expensive roundtrip or recalculation. This document specifies how to use JCache with the Data Grid implementation of the specification, and explains key aspects of the API.
17.1. Creating embedded caches
Prerequisites
-
Ensure that
cache-apiis on your classpath. Add the following dependency to your
pom.xml:<dependency> <groupId>org.infinispan</groupId> <artifactId>infinispan-jcache</artifactId> </dependency>
Procedure
- Create embedded caches that use the default JCache API configuration as follows:
import javax.cache.*;
import javax.cache.configuration.*;

// Retrieve the system wide cache manager
CacheManager cacheManager = Caching.getCachingProvider().getCacheManager();
// Define a named cache with default JCache configuration
Cache<String, String> cache = cacheManager.createCache("namedCache",
      new MutableConfiguration<String, String>());
17.1.1. Configuring embedded caches
-
Pass the URI for custom Data Grid configuration to the
CachingProvider.getCacheManager(URI)call as follows:
import java.net.URI;
import javax.cache.*;
import javax.cache.configuration.*;

// Load configuration from an absolute filesystem path
URI uri = URI.create("file:///path/to/infinispan.xml");
// Load configuration from a classpath resource
// URI uri = this.getClass().getClassLoader().getResource("infinispan.xml").toURI();

// Create a cache manager using the above configuration
CacheManager cacheManager = Caching.getCachingProvider().getCacheManager(uri, this.getClass().getClassLoader(), null);
By default, the JCache API specifies that data should be stored as storeByValue, so that object state mutations outside of operations to the cache, won’t have an impact in the objects stored in the cache. Data Grid has so far implemented this using serialization/marshalling to make copies to store in the cache, and that way adhere to the spec. Hence, if using default JCache configuration with Data Grid, data stored must be marshallable.
Alternatively, JCache can be configured to store data by reference (just like Data Grid or JDK Collections work). To do that, simply call:
Cache<String, String> cache = cacheManager.createCache("namedCache",
      new MutableConfiguration<String, String>().setStoreByValue(false));
17.2. Creating remote caches
Prerequisites
-
Ensure that
cache-apiis on your classpath. Add the following dependency to your
pom.xml:<dependency> <groupId>org.infinispan</groupId> <artifactId>infinispan-jcache-remote</artifactId> </dependency>
Procedure
- Create caches on remote Data Grid servers and use the default JCache API configuration as follows:
import javax.cache.*;
import javax.cache.configuration.*;

// Retrieve the system wide cache manager via org.infinispan.jcache.remote.JCachingProvider
CacheManager cacheManager = Caching.getCachingProvider("org.infinispan.jcache.remote.JCachingProvider").getCacheManager();
// Define a named cache with default JCache configuration
Cache<String, String> cache = cacheManager.createCache("remoteNamedCache",
      new MutableConfiguration<String, String>());
17.2.1. Configuring remote caches
Hot Rod configuration files include infinispan.client.hotrod.cache.* properties that you can use to customize remote caches.
-
Pass the URI for your
hotrod-client.propertiesfile to theCachingProvider.getCacheManager(URI)call as follows:
import javax.cache.*;
import javax.cache.configuration.*;

// Load configuration from an absolute filesystem path
URI uri = URI.create("file:///path/to/hotrod-client.properties");
// Load configuration from a classpath resource
// URI uri = this.getClass().getClassLoader().getResource("hotrod-client.properties").toURI();

// Retrieve the system wide cache manager via org.infinispan.jcache.remote.JCachingProvider
CacheManager cacheManager = Caching.getCachingProvider("org.infinispan.jcache.remote.JCachingProvider")
      .getCacheManager(uri, this.getClass().getClassLoader(), null);
17.3. Store and retrieve data
Even though JCache API does not extend neither java.util.Map not java.util.concurrent.ConcurrentMap, it providers a key/value API to store and retrieve data:
import javax.cache.*;
import javax.cache.configuration.*;

CacheManager cacheManager = Caching.getCachingProvider().getCacheManager();
Cache<String, String> cache = cacheManager.createCache("namedCache",
      new MutableConfiguration<String, String>());
cache.put("hello", "world"); // Notice that javax.cache.Cache.put(K) returns void!
String value = cache.get("hello"); // Returns "world"
Contrary to standard java.util.Map, javax.cache.Cache comes with two basic put methods called put and getAndPut. The former returns void whereas the latter returns the previous value associated with the key. So, the equivalent of java.util.Map.put(K) in JCache is javax.cache.Cache.getAndPut(K).
Even though JCache API only covers standalone caching, it can be plugged with a persistence store, and has been designed with clustering or distribution in mind. The reason why javax.cache.Cache offers two put methods is because standard java.util.Map put call forces implementors to calculate the previous value. When a persistent store is in use, or the cache is distributed, returning the previous value could be an expensive operation, and often users call standard java.util.Map.put(K) without using the return value. Hence, JCache users need to think about whether the return value is relevant to them, in which case they need to call javax.cache.Cache.getAndPut(K) , otherwise they can call java.util.Map.put(K, V) which avoids returning the potentially expensive operation of returning the previous value.
17.4. Comparing java.util.concurrent.ConcurrentMap and javax.cache.Cache APIs
Here’s a brief comparison of the data manipulation APIs provided by java.util.concurrent.ConcurrentMap and javax.cache.Cache APIs.
| Operation | java.util.concurrent.ConcurrentMap<K, V> | javax.cache.Cache<K, V> |
|---|---|---|
| store and no return | N/A |
|
| store and return previous value |
|
|
| store if not present |
|
|
| retrieve |
|
|
| delete if present |
|
|
| delete and return previous value |
|
|
| delete conditional |
|
|
| replace if present |
|
|
| replace and return previous value |
|
|
| replace conditional |
|
|
Comparing the two APIs, it’s obvious to see that, where possible, JCache avoids returning the previous value to avoid operations doing expensive network or IO operations. This is an overriding principle in the design of JCache API. In fact, there’s a set of operations that are present in java.util.concurrent.ConcurrentMap , but are not present in the javax.cache.Cache because they could be expensive to compute in a distributed cache. The only exception is iterating over the contents of the cache:
| Operation | java.util.concurrent.ConcurrentMap<K, V> | javax.cache.Cache<K, V> |
|---|---|---|
| calculate size of cache |
| N/A |
| return all keys in the cache |
| N/A |
| return all values in the cache |
| N/A |
| return all entries in the cache |
| N/A |
| iterate over the cache |
use |
|
17.5. Clustering JCache instances
Data Grid JCache implementation goes beyond the specification in order to provide the possibility to cluster caches using the standard API. Given a Data Grid configuration file configured to replicate caches like this:
infinispan.xml
<infinispan>
   <cache-container default-cache="namedCache">
      <transport cluster="jcache-cluster" />
      <replicated-cache name="namedCache" />
   </cache-container>
</infinispan>
You can create a cluster of caches using this code:
import javax.cache.*;
import java.net.URI;

// For multiple cache managers to be constructed with the standard JCache API
// and live in the same JVM, either their names, or their classloaders, must
// be different.
// This example shows how to force their classloaders to be different.
// An alternative method would have been to duplicate the XML file and give
// it a different name, but this results in unnecessary file duplication.
ClassLoader tccl = Thread.currentThread().getContextClassLoader();
CacheManager cacheManager1 = Caching.getCachingProvider().getCacheManager(
      URI.create("infinispan-jcache-cluster.xml"), new TestClassLoader(tccl));
CacheManager cacheManager2 = Caching.getCachingProvider().getCacheManager(
      URI.create("infinispan-jcache-cluster.xml"), new TestClassLoader(tccl));

Cache<String, String> cache1 = cacheManager1.getCache("namedCache");
Cache<String, String> cache2 = cacheManager2.getCache("namedCache");

cache1.put("hello", "world");
String value = cache2.get("hello"); // Returns "world" if clustering is working

// --

public static class TestClassLoader extends ClassLoader {
  public TestClassLoader(ClassLoader parent) {
     super(parent);
  }
}
Chapter 18. Multimap Cache
MutimapCache is a type of Data Grid Cache that maps keys to values in which each key can contain multiple values.
18.1. Installation and configuration
pom.xml
<dependency>
  <groupId>org.infinispan</groupId>
  <artifactId>infinispan-multimap</artifactId>
</dependency>
18.2. MultimapCache API
MultimapCache API exposes several methods to interact with the Multimap Cache. These methods are non-blocking in most cases; see limitations for more information.
public interface MultimapCache<K, V> {

   CompletableFuture<Optional<CacheEntry<K, Collection<V>>>> getEntry(K key);

   CompletableFuture<Void> remove(SerializablePredicate<? super V> p);

   CompletableFuture<Void> put(K key, V value);

   CompletableFuture<Collection<V>> get(K key);

   CompletableFuture<Boolean> remove(K key);

   CompletableFuture<Boolean> remove(K key, V value);

   CompletableFuture<Void> remove(Predicate<? super V> p);

   CompletableFuture<Boolean> containsKey(K key);

   CompletableFuture<Boolean> containsValue(V value);

   CompletableFuture<Boolean> containsEntry(K key, V value);

   CompletableFuture<Long> size();

   boolean supportsDuplicates();

}
CompletableFuture<Void> put(K key, V value)
Puts a key-value pair in the multimap cache.
MultimapCache<String, String> multimapCache = ...;

multimapCache.put("girlNames", "marie")
             .thenCompose(r1 -> multimapCache.put("girlNames", "oihana"))
             .thenCompose(r3 -> multimapCache.get("girlNames"))
             .thenAccept(names -> {
                          if(names.contains("marie"))
                              System.out.println("Marie is a girl name");

                           if(names.contains("oihana"))
                              System.out.println("Oihana is a girl name");
                        });
The output of this code is as follows:
Marie is a girl name
Oihana is a girl name
CompletableFuture<Collection<V>> get(K key)
Asynchronous that returns a view collection of the values associated with key in this multimap cache, if any. Any changes to the retrieved collection won’t change the values in this multimap cache. When this method returns an empty collection, it means the key was not found.
CompletableFuture<Boolean> remove(K key)
Asynchronous that removes the entry associated with the key from the multimap cache, if such exists.
CompletableFuture<Boolean> remove(K key, V value)
Asynchronous that removes a key-value pair from the multimap cache, if such exists.
CompletableFuture<Void> remove(Predicate<? super V> p)
Asynchronous method. Removes every value that match the given predicate.
CompletableFuture<Boolean> containsKey(K key)
Asynchronous that returns true if this multimap contains the key.
CompletableFuture<Boolean> containsValue(V value)
Asynchronous that returns true if this multimap contains the value in at least one key.
CompletableFuture<Boolean> containsEntry(K key, V value)
Asynchronous that returns true if this multimap contains at least one key-value pair with the value.
CompletableFuture<Long> size()
Asynchronous that returns the number of key-value pairs in the multimap cache. It doesn’t return the distinct number of keys.
boolean supportsDuplicates()
Asynchronous that returns true if the multimap cache supports duplicates. This means that the content of the multimap can be 'a' → ['1', '1', '2']. For now this method will always return false, as duplicates are not yet supported. The existence of a given value is determined by 'equals' and `hashcode' method’s contract.
18.3. Creating a Multimap Cache
Currently the MultimapCache is configured as a regular cache. This can be done either by code or XML configuration. See how to configure a regular Cache in the section link to [configure a cache].
18.3.1. Embedded mode
// create or obtain your EmbeddedCacheManager
EmbeddedCacheManager cm = ... ;

// create or obtain a MultimapCacheManager passing the EmbeddedCacheManager
MultimapCacheManager multimapCacheManager = EmbeddedMultimapCacheManagerFactory.from(cm);

// define the configuration for the multimap cache
multimapCacheManager.defineConfiguration(multimapCacheName, c.build());

// get the multimap cache
multimapCache = multimapCacheManager.get(multimapCacheName);
18.4. Limitations
In almost every case the Multimap Cache will behave as a regular Cache, but some limitations exist in the current version, as follows:
18.4.1. Support for duplicates
Duplicates are not supported yet. This means that the multimap won’t contain any duplicate key-value pair. Whenever put method is called, if the key-value pair already exist, this key-value par won’t be added. Methods used to check if a key-value pair is already present in the Multimap are the equals and hashcode.
18.4.2. Eviction
For now, the eviction works per key, and not per key-value pair. This means that whenever a key is evicted, all the values associated with the key will be evicted too.
18.4.3. Transactions
Implicit transactions are supported through the auto-commit and all the methods are non blocking. Explicit transactions work without blocking in most of the cases. Methods that will block are size, containsEntry and remove(Predicate<? super V> p)
Chapter 19. Custom Interceptors
Custom interceptors are deprecated in Data Grid and will be removed in a future version.
Custom interceptors are a way of extending Data Grid by being able to influence or respond to any modifications to cache. Example of such modifications are: elements are added/removed/updated or transactions are committed.
19.1. Adding custom interceptors declaratively
Custom interceptors can be added on a per named cache basis. This is because each named cache have its own interceptor stack. Following xml snippet depicts the ways in which a custom interceptor can be added.
<local-cache name="cacheWithCustomInterceptors">
      <!--
      Define custom interceptors.  All custom interceptors need to extend org.jboss.cache.interceptors.base.CommandInterceptor
      -->
      <custom-interceptors>
         <interceptor position="FIRST" class="com.mycompany.CustomInterceptor1">
               <property name="attributeOne">value1</property>
               <property name="attributeTwo">value2</property>
         </interceptor>
         <interceptor position="LAST" class="com.mycompany.CustomInterceptor2"/>
         <interceptor index="3" class="com.mycompany.CustomInterceptor1"/>
         <interceptor before="org.infinispanpan.interceptors.CallInterceptor" class="com.mycompany.CustomInterceptor2"/>
         <interceptor after="org.infinispanpan.interceptors.CallInterceptor" class="com.mycompany.CustomInterceptor1"/>
      </custom-interceptors>
</local-cache>
19.2. Adding custom interceptors programatically
In order to do that one needs to obtain a reference to the AdvancedCache. This can be done as follows:
CacheManager cm = getCacheManager();//magic
Cache aCache = cm.getCache("aName");
AdvancedCache advCache = aCache.getAdvancedCache();
Then one of the addInterceptor() methods should be used to add the actual interceptor. For further documentation refer to AdvancedCache javadoc.
19.3. Custom interceptor design
When writing a custom interceptor, you need to abide by the following rules.
- Custom interceptors must declare a public, empty constructor to enable construction.
- Custom interceptors will have setters for any property defined through property tags used in the XML configuration.