
Security Guide
For securing Red Hat JBoss Data Grid 6.6.1
Abstract
Chapter 1. Introduction to Security in the Data Grid
1.1. Securing Data in Red Hat JBoss Data Grid
JBoss Data Grid features role-based access control for operations on designated secured caches. Roles can be assigned to users who access your application, with roles mapped to permissions for cache and cache-manager operations. Only authenticated users are able to perform the operations that are authorized for their role.
Node-level security requires new nodes or merging partitions to authenticate before joining a cluster. Only authenticated nodes that are authorized to join the cluster are permitted to do so. This provides data protection by preventing unauthorized servers from storing your data.
JBoss Data Grid increases data security by supporting encrypted communications between the nodes in a cluster by using a user-specified cryptography algorithm, as supported by Java Cryptography Architecture (JCA).
Chapter 2. Red Hat JBoss Data Grid Security: Authorization and Authentication
SecureCache. SecureCache is a simple wrapper around a cache, which checks whether the "current user" has the permissions required to perform an operation. The "current user" is a Subject associated with the AccessControlContext.
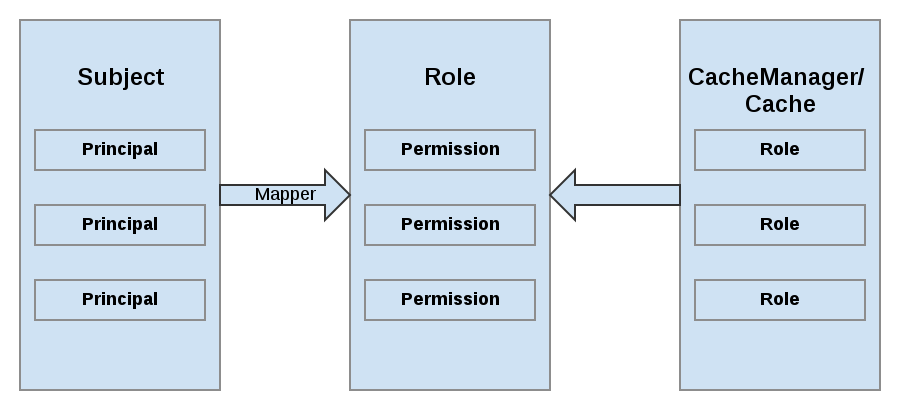
Figure 2.1. Roles and Permissions Mapping
2.1. Permissions
Table 2.1. CacheManager Permissions
| Permission | Function | Description |
|---|---|---|
| CONFIGURATION | defineConfiguration | Whether a new cache configuration can be defined. |
| LISTEN | addListener | Whether listeners can be registered against a cache manager. |
| LIFECYCLE | stop, start | Whether the cache manager can be stopped or started respectively. |
| ALL | A convenience permission which includes all of the above. |
Table 2.2. Cache Permissions
| Permission | Function | Description |
|---|---|---|
| READ | get, contains | Whether entries can be retrieved from the cache. |
| WRITE | put, putIfAbsent, replace, remove, evict | Whether data can be written/replaced/removed/evicted from the cache. |
| EXEC | distexec, mapreduce | Whether code execution can be run against the cache. |
| LISTEN | addListener | Whether listeners can be registered against a cache. |
| BULK_READ | keySet, values, entrySet,query | Whether bulk retrieve operations can be executed. |
| BULK_WRITE | clear, putAll | Whether bulk write operations can be executed. |
| LIFECYCLE | start, stop | Whether a cache can be started / stopped. |
| ADMIN | getVersion, addInterceptor*, removeInterceptor, getInterceptorChain, getEvictionManager, getComponentRegistry, getDistributionManager, getAuthorizationManager, evict, getRpcManager, getCacheConfiguration, getCacheManager, getInvocationContextContainer, setAvailability, getDataContainer, getStats, getXAResource | Whether access to the underlying components/internal structures is allowed. |
| ALL | A convenience permission which includes all of the above. | |
| ALL_READ | Combines READ and BULK_READ. | |
| ALL_WRITE | Combines WRITE and BULK_WRITE. |
Note
2.2. Role Mapping
PrincipalRoleMapper must be specified in the global configuration. Red Hat JBoss Data Grid ships with three mappers, and also allows you to provide a custom mapper.
Table 2.3. Mappers
| Mapper Name | Java | XML | Description |
|---|---|---|---|
| IdentityRoleMapper | org.infinispan.security.impl.IdentityRoleMapper | <identity-role-mapper /> | Uses the Principal name as the role name. |
| CommonNameRoleMapper | org.infinispan.security.impl.CommonRoleMapper | <common-name-role-mapper /> | If the Principal name is a Distinguished Name (DN), this mapper extracts the Common Name (CN) and uses it as a role name. For example the DN cn=managers,ou=people,dc=example,dc=com will be mapped to the role managers. |
| ClusterRoleMapper | org.infinispan.security.impl.ClusterRoleMapper | <cluster-role-mapper /> | Uses the ClusterRegistry to store principal to role mappings. This allows the use of the CLI’s GRANT and DENY commands to add/remove roles to a Principal. |
| Custom Role Mapper | <custom-role-mapper class="a.b.c" /> | Supply the fully-qualified class name of an implementation of org.infinispan.security.impl.PrincipalRoleMapper |
2.3. Configuring Authentication and Role Mapping using JBoss EAP Login Modules
IdentityRoleMapper:
Example 2.1. Mapping a Principal from JBoss EAP's Login Module
public class SimplePrincipalGroupRoleMapper implements PrincipalRoleMapper {
   @Override
   public Set<String> principalToRoles(Principal principal) {
      if (principal instanceof SimpleGroup) {
         Enumeration<Principal> members = ((SimpleGroup) principal).members();
         if (members.hasMoreElements()) {
            Set<String> roles = new HashSet<String>();
            while (members.hasMoreElements()) {
               Principal innerPrincipal = members.nextElement();
               if (innerPrincipal instanceof SimplePrincipal) {
                  SimplePrincipal sp = (SimplePrincipal) innerPrincipal;
                  roles.add(sp.getName());
               }
            }
            return roles;
         }
      }
      return null;
   }
}
Example 2.2. Example of JBoss EAP LDAP login module configuration
 <security-domain name="ispn-secure" cache-type="default">
                  <authentication>
                     <login-module code="org.jboss.security.auth.spi.LdapLoginModule" flag="required">
                        <module-option name="java.naming.factory.initial" value="com.sun.jndi.ldap.LdapCtxFactory"/>
                        <module-option name="java.naming.provider.url" value="ldap://localhost:389"/>
                        <module-option name="java.naming.security.authentication" value="simple"/>
                        <module-option name="principalDNPrefix" value="uid="/>
                        <module-option name="principalDNSuffix" value=",ou=People,dc=infinispan,dc=org"/>
                        <module-option name="rolesCtxDN" value="ou=Roles,dc=infinispan,dc=org"/>
                        <module-option name="uidAttributeID" value="member"/>
                        <module-option name="matchOnUserDN" value="true"/>
                        <module-option name="roleAttributeID" value="cn"/>
                        <module-option name="roleAttributeIsDN" value="false"/>
                        <module-option name="searchScope" value="ONELEVEL_SCOPE"/>
                     </login-module>
                  </authentication>
                </security-domain>
Example 2.3. Example of JBoss EAP Login Module Configuration
<security-domain name="krb-admin" cache-type="default">
                    <authentication>
                        <login-module code="Kerberos" flag="required">
                            <module-option name="useKeyTab" value="true"/>
                            <module-option name="principal" value="admin@INFINISPAN.ORG"/>
                            <module-option name="keyTab" value="${basedir}/keytab/admin.keytab"/>
                        </login-module>
                    </authentication>
</security-domain>Important
2.4. Configuring Red Hat JBoss Data Grid for Authorization
The following is an example configuration for authorization at the CacheManager level:
Example 2.4. CacheManager Authorization (Declarative Configuration)
<cache-container name="local" default-cache="default">
        <security>
           <authorization>
             <identity-role-mapper />
             <role name="admin" permissions="ALL"/>
             <role name="reader" permissions="READ"/>
             <role name="writer" permissions="WRITE"/>
             <role name="supervisor" permissions="ALL_READ ALL_WRITE"/>
           </authorization>
        </security>
</cache-container>- whether to use authorization.
- a class which will map principals to a set of roles.
- a set of named roles and the permissions they represent.
Roles may be applied on a cache-per-cache basis, using the roles defined at the cache-container level, as follows:
Example 2.5. Defining Roles
<local-cache name="secured">
  <security>
    <authorization roles="admin reader writer supervisor"/>
  </security>
</local-cache>
Important
The following example shows how to set up the same authorization parameters for Library mode using programmatic configuration:
Example 2.6. CacheManager Authorization Programmatic Configuration
GlobalConfigurationBuilder global = new GlobalConfigurationBuilder();
  global
     .security()
        .authorization()
           .principalRoleMapper(new IdentityRoleMapper())
           .role("admin")
              .permission(CachePermission.ALL)
           .role("supervisor")
              .permission(CachePermission.EXEC)
              .permission(CachePermission.READ)
              .permission(CachePermission.WRITE)
           .role("reader")
              .permission(CachePermission.READ);
  ConfigurationBuilder config = new ConfigurationBuilder();
  config
     .security()
        .enable()
        .authorization()
           .role("admin")
           .role("supervisor")
           .role("reader");
Important
SecurityException.
2.5. Data Security for Library Mode
2.5.1. Subject and Principal Classes
Subject class is the central class in JAAS. A Subject represents information for a single entity, such as a person or service. It encompasses the entity's principals, public credentials, and private credentials. The JAAS APIs use the existing Java 2 java.security.Principal interface to represent a principal, which is a typed name.
public Set getPrincipals() {...}
public Set getPrincipals(Class c) {...}
getPrincipals() returns all principals contained in the subject. getPrincipals(Class c) returns only those principals that are instances of class c or one of its subclasses. An empty set is returned if the subject has no matching principals.
Note
java.security.acl.Group interface is a sub-interface of java.security.Principal, so an instance in the principals set may represent a logical grouping of other principals or groups of principals.
2.5.2. Obtaining a Subject
javax.security.auth.Subject. The Subject represents information for a single cache entity, such as a person or a service.
Subject subject = SecurityContextAssociation.getSubject();
- Servlets:
ServletRequest.getUserPrincipal() - EJBs:
EJBContext.getCallerPrincipal() - MessageDrivenBeans:
MessageDrivenContext.getCallerPrincipal()
mapper is then used to identify the principals associated with the Subject and convert them into roles that correspond to those you have defined at the container level.
java.security.AccessControlContext. Either the container sets the Subject on the AccessControlContext, or the user must map the Principal to an appropriate Subject before wrapping the call to the JBoss Data Grid API using a Security.doAs() method.
Example 2.7. Obtaining a Subject
import org.infinispan.security.Security;

Security.doAs(subject, new PrivilegedExceptionAction<Void>() {
public Void run() throws Exception {
    cache.put("key", "value");
}
});Security.doAs() method is in place of the typical Subject.doAs() method. Unless the AccessControlContext must be modified for reasons specific to your application's security model, using Security.doAs() provides a performance advantage.
Security.getSubject();, which will retrieve the Subject from either the JBoss Data Grid context, or from the AccessControlContext.
2.5.3. Subject Authentication
- An application instantiates a
LoginContextand passes in the name of the login configuration and aCallbackHandlerto populate theCallbackobjects, as required by the configurationLoginModules. - The
LoginContextconsults aConfigurationto load all theLoginModulesincluded in the named login configuration. If no such named configuration exists theotherconfiguration is used as a default. - The application invokes the
LoginContext.loginmethod. - The login method invokes all the loaded
LoginModules. As eachLoginModuleattempts to authenticate the subject, it invokes the handle method on the associatedCallbackHandlerto obtain the information required for the authentication process. The required information is passed to the handle method in the form of an array ofCallbackobjects. Upon success, theLoginModules associate relevant principals and credentials with the subject. - The
LoginContextreturns the authentication status to the application. Success is represented by a return from the login method. Failure is represented through a LoginException being thrown by the login method. - If authentication succeeds, the application retrieves the authenticated subject using the
LoginContext.getSubjectmethod. - After the scope of the subject authentication is complete, all principals and related information associated with the subject by the
loginmethod can be removed by invoking theLoginContext.logoutmethod.
LoginContext class provides the basic methods for authenticating subjects and offers a way to develop an application that is independent of the underlying authentication technology. The LoginContext consults a Configuration to determine the authentication services configured for a particular application. LoginModule classes represent the authentication services. Therefore, you can plug different login modules into an application without changing the application itself. The following code shows the steps required by an application to authenticate a subject.
CallbackHandler handler = new MyHandler();
LoginContext lc = new LoginContext("some-config", handler);

try {
    lc.login();
    Subject subject = lc.getSubject();
} catch(LoginException e) {
    System.out.println("authentication failed");
    e.printStackTrace();
}

// Perform work as authenticated Subject
// ...

// Scope of work complete, logout to remove authentication info
try {
    lc.logout();
} catch(LoginException e) {
    System.out.println("logout failed");
    e.printStackTrace();
}

// A sample MyHandler class
class MyHandler
    implements CallbackHandler
{
    public void handle(Callback[] callbacks) throws
        IOException, UnsupportedCallbackException
    {
        for (int i = 0; i < callbacks.length; i++) {
            if (callbacks[i] instanceof NameCallback) {
                NameCallback nc = (NameCallback)callbacks[i];
                nc.setName(username);
            } else if (callbacks[i] instanceof PasswordCallback) {
                PasswordCallback pc = (PasswordCallback)callbacks[i];
                pc.setPassword(password);
            } else {
                throw new UnsupportedCallbackException(callbacks[i],
                                                       "Unrecognized Callback");
            }
        }
    }
}
LoginModule interface. This allows an administrator to plug different authentication technologies into an application. You can chain together multiple LoginModules to allow for more than one authentication technology to participate in the authentication process. For example, one LoginModule may perform user name/password-based authentication, while another may interface to hardware devices such as smart card readers or biometric authenticators.
LoginModule is driven by the LoginContext object against which the client creates and issues the login method. The process consists of two phases. The steps of the process are as follows:
- The
LoginContextcreates each configuredLoginModuleusing its public no-arg constructor. - Each
LoginModuleis initialized with a call to its initialize method. TheSubjectargument is guaranteed to be non-null. The signature of the initialize method is:public void initialize(Subject subject, CallbackHandler callbackHandler, Map sharedState, Map options) - The
loginmethod is called to start the authentication process. For example, a method implementation might prompt the user for a user name and password and then verify the information against data stored in a naming service such as NIS or LDAP. Alternative implementations might interface to smart cards and biometric devices, or simply extract user information from the underlying operating system. The validation of user identity by eachLoginModuleis considered phase 1 of JAAS authentication. The signature of theloginmethod isboolean login() throws LoginException. ALoginExceptionindicates failure. A return value of true indicates that the method succeeded, whereas a return value of false indicates that the login module should be ignored. - If the
LoginContext's overall authentication succeeds,commitis invoked on eachLoginModule. If phase 1 succeeds for aLoginModule, then the commit method continues with phase 2 and associates the relevant principals, public credentials, and/or private credentials with the subject. If phase 1 fails for aLoginModule, thencommitremoves any previously stored authentication state, such as user names or passwords. The signature of thecommitmethod is:boolean commit() throws LoginException. Failure to complete the commit phase is indicated by throwing aLoginException. A return of true indicates that the method succeeded, whereas a return of false indicates that the login module should be ignored. - If the
LoginContext's overall authentication fails, then theabortmethod is invoked on eachLoginModule. Theabortmethod removes or destroys any authentication state created by the login or initialize methods. The signature of theabortmethod isboolean abort() throws LoginException. Failure to complete theabortphase is indicated by throwing aLoginException. A return of true indicates that the method succeeded, whereas a return of false indicates that the login module should be ignored. - To remove the authentication state after a successful login, the application invokes
logouton theLoginContext. This in turn results in alogoutmethod invocation on eachLoginModule. Thelogoutmethod removes the principals and credentials originally associated with the subject during thecommitoperation. Credentials should be destroyed upon removal. The signature of thelogoutmethod is:boolean logout() throws LoginException. Failure to complete the logout process is indicated by throwing aLoginException. A return of true indicates that the method succeeded, whereas a return of false indicates that the login module should be ignored.
LoginModule must communicate with the user to obtain authentication information, it uses a CallbackHandler object. Applications implement the CallbackHandler interface and pass it to the LoginContext, which send the authentication information directly to the underlying login modules.
CallbackHandler both to gather input from users, such as a password or smart card PIN, and to supply information to users, such as status information. By allowing the application to specify the CallbackHandler, underlying LoginModules remain independent from the different ways applications interact with users. For example, a CallbackHandler's implementation for a GUI application might display a window to solicit user input. On the other hand, a CallbackHandler implementation for a non-GUI environment, such as an application server, might simply obtain credential information by using an application server API. The CallbackHandler interface has one method to implement:
void handle(Callback[] callbacks)
    throws java.io.IOException,
           UnsupportedCallbackException;
Callback interface is the last authentication class we will look at. This is a tagging interface for which several default implementations are provided, including the NameCallback and PasswordCallback used in an earlier example. A LoginModule uses a Callback to request information required by the authentication mechanism. LoginModules pass an array of Callbacks directly to the CallbackHandler.handle method during the authentication's login phase. If a callbackhandler does not understand how to use a Callback object passed into the handle method, it throws an UnsupportedCallbackException to abort the login call.
2.5.4. Authorization Using a SecurityManager
java -Djava.security.manager ...
System.setSecurityManager(new SecurityManager());
2.5.5. Security Manager in Java
2.5.5.1. About the Java Security Manager
The Java Security Manager is a class that manages the external boundary of the Java Virtual Machine (JVM) sandbox, controlling how code executing within the JVM can interact with resources outside the JVM. When the Java Security Manager is activated, the Java API checks with the security manager for approval before executing a wide range of potentially unsafe operations.
2.5.5.2. About Java Security Manager Policies
A set of defined permissions for different classes of code. The Java Security Manager compares actions requested by applications against the security policy. If an action is allowed by the policy, the Security Manager will permit that action to take place. If the action is not allowed by the policy, the Security Manager will deny that action. The security policy can define permissions based on the location of code, on the code's signature, or based on the subject's principals.
java.security.manager and java.security.policy.
A security policy's entry consists of the following configuration elements, which are connected to the policytool:
- CodeBase
- The URL location (excluding the host and domain information) where the code originates from. This parameter is optional.
- SignedBy
- The alias used in the keystore to reference the signer whose private key was used to sign the code. This can be a single value or a comma-separated list of values. This parameter is optional. If omitted, presence or lack of a signature has no impact on the Java Security Manager.
- Principals
- A list of
principal_type/principal_namepairs, which must be present within the executing thread's principal set. The Principals entry is optional. If it is omitted, it signifies that the principals of the executing thread will have no impact on the Java Security Manager. - Permissions
- A permission is the access which is granted to the code. Many permissions are provided as part of the Java Enterprise Edition 6 (Java EE 6) specification. This document only covers additional permissions which are provided by JBoss EAP 6.
Important
2.5.5.3. Write a Java Security Manager Policy
An application called policytool is included with most JDK and JRE distributions, for the purpose of creating and editing Java Security Manager security policies. Detailed information about policytool is linked from http://docs.oracle.com/javase/6/docs/technotes/tools/.
Procedure 2.1. Setup a new Java Security Manager Policy
Start
policytool.Start thepolicytooltool in one of the following ways.Red Hat Enterprise Linux
From your GUI or a command prompt, run/usr/bin/policytool.Microsoft Windows Server
Runpolicytool.exefrom your Start menu or from thebin\of your Java installation. The location can vary.
Create a policy.
To create a policy, select . Add the parameters you need, then click .Edit an existing policy
Select the policy from the list of existing policies, and select the button. Edit the parameters as needed.Delete an existing policy.
Select the policy from the list of existing policies, and select the button.
2.5.5.4. Run Red Hat JBoss Data Grid Server Within the Java Security Manager
standalone.sh script. The following procedure guides you through the steps of configuring your instance to run within a Java Security Manager policy.
Prerequisites
- Before you following this procedure, you need to write a security policy, using the
policytoolcommand which is included with your Java Development Kit (JDK). This procedure assumes that your policy is located atJDG_HOME/bin/server.policy. As an alternative, write the security policy using any text editor and manually save it asJDG_HOME/bin/server.policy - The JBoss Data Grid server must be completely stopped before you edit any configuration files.
Procedure 2.2. Configure the Security Manager for JBoss Data Grid Server
Open the configuration file.
Open the configuration file for editing. This location of this file is listed below by OS. Note that this is not the executable file used to start the server, but a configuration file that contains runtime parameters.- For Linux:
JDG_HOME/bin/standalone.conf - For Windows:
JDG_HOME\bin\standalone.conf.bat
Add the Java options to the file.
To ensure the Java options are used, add them to the code block that begins with:if [ "x$JAVA_OPTS" = "x" ]; then
You can modify the-Djava.security.policyvalue to specify the exact location of your security policy. It should go onto one line only, with no line break. Using==when setting the-Djava.security.policyproperty specifies that the security manager will use only the specified policy file. Using=specifies that the security manager will use the specified policy combined with the policy set in thepolicy.urlsection ofJAVA_HOME/lib/security/java.security.Important
JBoss Enterprise Application Platform releases from 6.2.2 onwards require that the system propertyjboss.modules.policy-permissionsis set to true.Example 2.8. standalone.conf
JAVA_OPTS="$JAVA_OPTS -Djava.security.manager -Djava.security.policy==$PWD/server.policy -Djboss.home.dir=$JBOSS_HOME -Djboss.modules.policy-permissions=true"
Example 2.9. standalone.conf.bat
set "JAVA_OPTS=%JAVA_OPTS% -Djava.security.manager -Djava.security.policy==\path\to\server.policy -Djboss.home.dir=%JBOSS_HOME% -Djboss.modules.policy-permissions=true"
Start the server.
Start the server as normal.
2.6. Data Security for Remote Client Server Mode
2.6.1. About Security Realms
ManagementRealmstores authentication information for the Management API, which provides the functionality for the Management CLI and web-based Management Console. It provides an authentication system for managing JBoss Data Grid Server itself. You could also use theManagementRealmif your application needed to authenticate with the same business rules you use for the Management API.ApplicationRealmstores user, password, and role information for Web Applications and EJBs.
REALM-users.propertiesstores usernames and hashed passwords.REALM-roles.propertiesstores user-to-role mappings.mgmt-groups.propertiesstores user-to-role mapping file forManagementRealm.
standalone/configuration/ directories. The files are written simultaneously by the add-user.sh or add-user.bat command. When you run the command, the first decision you make is which realm to add your new user to.
2.6.2. Add a New Security Realm
Run the Management CLI.
Start thecli.shorcli.batcommand and connect to the server.Create the new security realm itself.
Run the following command to create a new security realm namedMyDomainRealmon a domain controller or a standalone server./host=master/core-service=management/security-realm=MyDomainRealm:add()
Create the references to the properties file which will store information about the new role.
Run the following command to create a pointer a file namedmyfile.properties, which will contain the properties pertaining to the new role.Note
The newly-created properties file is not managed by the includedadd-user.shandadd-user.batscripts. It must be managed externally./host=master/core-service=management/security-realm=MyDomainRealm/authentication=properties:add(path=myfile.properties)
Your new security realm is created. When you add users and roles to this new realm, the information will be stored in a separate file from the default security realms. You can manage this new file using your own applications or procedures.
2.6.3. Add a User to a Security Realm
Run the
add-user.shoradd-user.batcommand.Open a terminal and change directories to theJDG_HOME/bin/directory. If you run Red Hat Enterprise Linux or another UNIX-like operating system, runadd-user.sh. If you run Microsoft Windows Server, runadd-user.bat.Choose whether to add a Management User or Application User.
For this procedure, typebto add an Application User.Choose the realm the user will be added to.
By default, the only available realm isApplicationRealm. If you have added a custom realm, you can type its name instead.Type the username, password, and roles, when prompted.
Type the desired username, password, and optional roles when prompted. Verify your choice by typingyes, or typenoto cancel the changes. The changes are written to each of the properties files for the security realm.
2.6.4. Configuring Security Realms Declaratively
authentication and an authorization section.
Example 2.10. Configuring Security Realms Declaratively
<security-realms>
            <security-realm name="ManagementRealm">
                <authentication>
                    <local default-user="$local" skip-group-loading="true"/>
                    <properties path="mgmt-users.properties" relative-to="jboss.server.config.dir"/>
                </authentication>
                <authorization map-groups-to-roles="false">
                    <properties path="mgmt-groups.properties" relative-to="jboss.server.config.dir"/>
                </authorization>
            </security-realm>
            <security-realm name="ApplicationRealm">
                <authentication>
                    <local default-user="$local" allowed-users="*" skip-group-loading="true"/>
                    <properties path="application-users.properties" relative-to="jboss.server.config.dir"/>
                </authentication>
                <authorization>
                    <properties path="application-roles.properties" relative-to="jboss.server.config.dir"/>
                </authorization>
            </security-realm>
</security-realms>server-identities parameter can also be used to specify certificates.
2.6.5. Loading Roles from LDAP for Authorization (Remote Client-Server Mode)
memberOf attributes; a group entity may map which users belong to it through uniqueMember attributes; or both mappings may be maintained by the LDAP server.
force attribute is set to "false". When force is true, the search is performed again during authorization (while loading groups). This is typically done when different servers perform authentication and authorization.
<authorization>
    <ldap connection="...">
    	<!-- OPTIONAL -->
       <username-to-dn force="true">
           <!-- Only one of the following. -->
           <username-is-dn />
           <username-filter base-dn="..." recursive="..." user-dn-attribute="..." attribute="..." />
           <advanced-filter base-dn="..." recursive="..." user-dn-attribute="..." filter="..." />
        </username-to-dn>

       <group-search group-name="..." iterative="..." group-dn-attribute="..." group-name-attribute="..." >
           <!-- One of the following -->
           <group-to-principal base-dn="..." recursive="..." search-by="...">
               <membership-filter principal-attribute="..." />
           </group-to-principal>
           <principal-to-group group-attribute="..." />
       </group-search>
    </ldap>
</authorization>
Important
force attribute. It is required, even when set to the default value of false.
username-to-dn
username-to-dn element specifies how to map the user name to the distinguished name of their entry in the LDAP directory. This element is only required when both of the following are true:
- The authentication and authorization steps are against different LDAP servers.
- The group search uses the distinguished name.
- 1:1 username-to-dn
- This specifies that the user name entered by the remote user is the user's distinguished name.
<username-to-dn force="false">
   <username-is-dn />
</username-to-dn>
This defines a 1:1 mapping and there is no additional configuration. - username-filter
- The next option is very similar to the simple option described above for the authentication step. A specified attribute is searched for a match against the supplied user name.
<username-to-dn force="true">
    <username-filter base-dn="dc=people,dc=harold,dc=example,dc=com" recursive="false" attribute="sn" user-dn-attribute="dn" />
</username-to-dn>
The attributes that can be set here are:base-dn: The distinguished name of the context to begin the search.recursive: Whether the search will extend to sub contexts. Defaults tofalse.attribute: The attribute of the users entry to try and match against the supplied user name. Defaults touid.user-dn-attribute: The attribute to read to obtain the users distinguished name. Defaults todn.
- advanced-filter
- The final option is to specify an advanced filter, as in the authentication section this is an opportunity to use a custom filter to locate the users distinguished name.
<username-to-dn force="true">
    <advanced-filter base-dn="dc=people,dc=harold,dc=example,dc=com" recursive="false" filter="sAMAccountName={0}" user-dn-attribute="dn" />
</username-to-dn>
For the attributes that match those in the username-filter example, the meaning and default values are the same. There is one new attribute:filter: Custom filter used to search for a user's entry where the user name will be substituted in the{0}place holder.
Important
The XML must remain valid after the filter is defined so if any special characters are used such as&ensure the proper form is used. For example&for the&character.
The Group Search
Example 2.11. Principal to Group - LDIF example.
TestUserOne who is a member of GroupOne, GroupOne is in turn a member of GroupFive. The group membership is shown by the use of a memberOf attribute which is set to the distinguished name of the group of which the user (or group) is a member.
memberOf attributes set, one for each group of which the user is directly a member.
dn: uid=TestUserOne,ou=users,dc=principal-to-group,dc=example,dc=org
objectClass: extensibleObject
objectClass: top
objectClass: groupMember
objectClass: inetOrgPerson
objectClass: uidObject
objectClass: person
objectClass: organizationalPerson
cn: Test User One
sn: Test User One
uid: TestUserOne
distinguishedName: uid=TestUserOne,ou=users,dc=principal-to-group,dc=example,dc=org
memberOf: uid=GroupOne,ou=groups,dc=principal-to-group,dc=example,dc=org
memberOf: uid=Slashy/Group,ou=groups,dc=principal-to-group,dc=example,dc=org
userPassword:: e1NTSEF9WFpURzhLVjc4WVZBQUJNbEI3Ym96UVAva0RTNlFNWUpLOTdTMUE9PQ==

dn: uid=GroupOne,ou=groups,dc=principal-to-group,dc=example,dc=org
objectClass: extensibleObject
objectClass: top
objectClass: groupMember
objectClass: group
objectClass: uidObject
uid: GroupOne
distinguishedName: uid=GroupOne,ou=groups,dc=principal-to-group,dc=example,dc=org
memberOf: uid=GroupFive,ou=subgroups,ou=groups,dc=principal-to-group,dc=example,dc=org

dn: uid=GroupFive,ou=subgroups,ou=groups,dc=principal-to-group,dc=example,dc=org
objectClass: extensibleObject
objectClass: top
objectClass: groupMember
objectClass: group
objectClass: uidObject
uid: GroupFive
distinguishedName: uid=GroupFive,ou=subgroups,ou=groups,dc=principal-to-group,dc=example,dc=org
Example 2.12. Group to Principal - LDIF Example
TestUserOne who is a member of GroupOne which is in turn a member of GroupFive - however in this case it is an attribute uniqueMember from the group to the user being used for the cross reference.
dn: uid=TestUserOne,ou=users,dc=group-to-principal,dc=example,dc=org
objectClass: top
objectClass: inetOrgPerson
objectClass: uidObject
objectClass: person
objectClass: organizationalPerson
cn: Test User One
sn: Test User One
uid: TestUserOne
userPassword:: e1NTSEF9SjR0OTRDR1ltaHc1VVZQOEJvbXhUYjl1dkFVd1lQTmRLSEdzaWc9PQ==

dn: uid=GroupOne,ou=groups,dc=group-to-principal,dc=example,dc=org
objectClass: top
objectClass: groupOfUniqueNames
objectClass: uidObject
cn: Group One
uid: GroupOne
uniqueMember: uid=TestUserOne,ou=users,dc=group-to-principal,dc=example,dc=org

dn: uid=GroupFive,ou=subgroups,ou=groups,dc=group-to-principal,dc=example,dc=org
objectClass: top
objectClass: groupOfUniqueNames
objectClass: uidObject
cn: Group Five
uid: GroupFive
uniqueMember: uid=TestUserFive,ou=users,dc=group-to-principal,dc=example,dc=org
uniqueMember: uid=GroupOne,ou=groups,dc=group-to-principal,dc=example,dc=org
General Group Searching
<group-search group-name="..." iterative="..." group-dn-attribute="..." group-name-attribute="..." >
    ...
</group-search>group-name: This attribute is used to specify the form that should be used for the group name returned as the list of groups of which the user is a member. This can either be the simple form of the group name or the group's distinguished name. If the distinguished name is required this attribute can be set toDISTINGUISHED_NAME. Defaults toSIMPLE.iterative: This attribute is used to indicate if, after identifying the groups a user is a member of, we should also iteratively search based on the groups to identify which groups the groups are a member of. If iterative searching is enabled we keep going until either we reach a group that is not a member if any other groups or a cycle is detected. Defaults tofalse.
Important
group-dn-attribute: On an entry for a group which attribute is its distinguished name. Defaults todn.group-name-attribute: On an entry for a group which attribute is its simple name. Defaults touid.
Example 2.13. Principal to Group Example Configuration
memberOf attribute on the user.
<authorization>
    <ldap connection="LocalLdap">
        <username-to-dn>
            <username-filter base-dn="ou=users,dc=principal-to-group,dc=example,dc=org" recursive="false" attribute="uid" user-dn-attribute="dn" />
        </username-to-dn>
        <group-search group-name="SIMPLE" iterative="true" group-dn-attribute="dn" group-name-attribute="uid">
            <principal-to-group group-attribute="memberOf" />
        </group-search>
    </ldap>
</authorization>principal-to-group element has been added with a single attribute.
group-attribute: The name of the attribute on the user entry that matches the distinguished name of the group the user is a member of. Defaults tomemberOf.
Example 2.14. Group to Principal Example Configuration
<authorization>
      <ldap connection="LocalLdap">
          <username-to-dn>
              <username-filter base-dn="ou=users,dc=group-to-principal,dc=example,dc=org" recursive="false" attribute="uid" user-dn-attribute="dn" />
          </username-to-dn>
          <group-search group-name="SIMPLE" iterative="true" group-dn-attribute="dn" group-name-attribute="uid">
              <group-to-principal base-dn="ou=groups,dc=group-to-principal,dc=example,dc=org" recursive="true" search-by="DISTINGUISHED_NAME">
                  <membership-filter principal-attribute="uniqueMember" />
              </group-to-principal>
          </group-search>
      </ldap>
</authorization>group-to-principal is added. This element is used to define how searches for groups that reference the user entry will be performed. The following attributes are set:
base-dn: The distinguished name of the context to use to begin the search.recursive: Whether sub-contexts also be searched. Defaults tofalse.search-by: The form of the role name used in searches. Valid values areSIMPLEandDISTINGUISHED_NAME. Defaults toDISTINGUISHED_NAME.
principal-attribute: The name of the attribute on the group entry that references the user entry. Defaults tomember.
2.6.6. Hot Rod Interface Security
2.6.6.1. Publish Hot Rod Endpoints as a Public Interface
interface parameter in the socket-binding element from management to public as follows:
<socket-binding name="hotrod" interface="public" port="11222" />
2.6.6.2. Encryption of communication between Hot Rod Server and Hot Rod client
Procedure 2.3. Secure Hot Rod Using SSL/TLS
Generate a Keystore
Create a Java Keystore using the keytool application distributed with the JDK and add your certificate to it. The certificate can be either self signed, or obtained from a trusted CA depending on your security policy.Place the Keystore in the Configuration Directory
Put the keystore in the~/JDG_HOME/standalone/configurationdirectory with thestandalone-hotrod-ssl.xmlfile from the~/JDG_HOME/docs/examples/configsdirectory.Declare an SSL Server Identity
Declare an SSL server identity within a security realm in the management section of the configuration file. The SSL server identity must specify the path to a keystore and its secret key.<server-identities> <ssl protocol="..."> <keystore path="..." relative-to="..." keystore-password="${VAULT::VAULT_BLOCK::ATTRIBUTE_NAME::ENCRYPTED_VALUE}" /> </ssl> <secret value="..." /> </server-identities>See Section 2.6.7.4, “Configure Hot Rod Authentication (X.509)” for details about these parameters.Add the Security Element
Add the security element to the Hot Rod connector as follows:<hotrod-connector socket-binding="hotrod" cache-container="local"> <encryption ssl="true" security-realm="ApplicationRealm" require-ssl-client-auth="false" /> </hotrod-connector>Server Authentication of Certificate
If you require the server to perform authentication of the client certificate, create a truststore that contains the valid client certificates and set therequire-ssl-client-authattribute totrue.
Start the Server
Start the server using the following:bin/standalone.sh -c standalone-hotrod-ssl.xml
This will start a server with a Hot Rod endpoint on port 11222. This endpoint will only accept SSL connections.
Example 2.15. Secure Hot Rod Using SSL/TLS
package org.infinispan.client.hotrod.configuration;

import java.util.Arrays;

import javax.net.ssl.KeyManager;
import javax.net.ssl.SSLContext;
import javax.net.ssl.TrustManager;

public class SslConfiguration {
	private final boolean enabled;
	private final String keyStoreFileName;
	private final char[] VAULT::VAULT_BLOCK::ATTRIBUTE_NAME::keyStorePassword;
	private final SSLContext sslContext;
	private final String trustStoreFileName;
	private final char[] VAULT::VAULT_BLOCK::ATTRIBUTE_NAME::trustStorePassword;

	SslConfiguration(boolean enabled, String keyStoreFileName, char[] keyStorePassword, SSLContext sslContext, String trustStoreFileName, char[] trustStorePassword) {
		this.enabled = enabled;
		this.keyStoreFileName = keyStoreFileName;
		this.keyStorePassword = VAULT::VAULT_BLOCK::ATTRIBUTE_NAME::keyStorePassword;
		this.sslContext = sslContext;
		this.trustStoreFileName = trustStoreFileName;
		this.trustStorePassword = VAULT::VAULT_BLOCK::ATTRIBUTE_NAME::trustStorePassword;
	}

	public boolean enabled() {
		return enabled;
	}

	public String keyStoreFileName() {
		return keyStoreFileName;
	}

	public char[] keyStorePassword() {
		return keyStorePassword;
	}

	public SSLContext sslContext() {
		return sslContext;
	}

	public String trustStoreFileName() {
		return trustStoreFileName;
	}

	public char[] trustStorePassword() {
		return trustStorePassword;
	}

	@Override
	public String toString() {
		return "SslConfiguration [enabled=" + enabled + ", keyStoreFileName="
			+ keyStoreFileName + ", sslContext=" + sslContext + ", trustStoreFileName=" + trustStoreFileName + "]";
	}
}
Important
2.6.7. User Authentication over Hot Rod Using SASL
PLAINis the least secure mechanism because credentials are transported in plain text format. However, it is also the simplest mechanism to implement. This mechanism can be used in conjunction with encryption (SSL) for additional security.DIGEST-MD5is a mechanism than hashes the credentials before transporting them. As a result, it is more secure than thePLAINmechanism.GSSAPIis a mechanism that uses Kerberos tickets. As a result, it requires a correctly configured Kerberos Domain Controller (for example, Microsoft Active Directory).EXTERNALis a mechanism that obtains the required credentials from the underlying transport (for example, from aX.509client certificate) and therefore requires client certificate encryption to work correctly.
2.6.7.1. Configure Hot Rod Authentication (GSSAPI/Kerberos)
Procedure 2.4. Configure SASL GSSAPI/Kerberos Authentication
Server-side Configuration
The following steps must be configured on the server-side:- Define a Kerberos security login module using the security domain subsystem:
<system-properties> <property name="java.security.krb5.conf" value="/tmp/infinispan/krb5.conf"/> <property name="java.security.krb5.debug" value="true"/> <property name="jboss.security.disable.secdomain.option" value="true"/> </system-properties> <security-domain name="infinispan-server" cache-type="default"> <authentication> <login-module code="Kerberos" flag="required"> <module-option name="debug" value="true"/> <module-option name="storeKey" value="true"/> <module-option name="refreshKrb5Config" value="true"/> <module-option name="useKeyTab" value="true"/> <module-option name="doNotPrompt" value="true"/> <module-option name="keyTab" value="/tmp/infinispan/infinispan.keytab"/> <module-option name="principal" value="HOTROD/localhost@INFINISPAN.ORG"/> </login-module> </authentication> </security-domain> - Ensure that the cache-container has authorization roles defined, and these roles are applied in the cache's authorization block as seen in Section 2.4, “Configuring Red Hat JBoss Data Grid for Authorization”.
- Configure a Hot Rod connector as follows:
<hotrod-connector socket-binding="hotrod" cache-container="default"> <authentication security-realm="ApplicationRealm"> <sasl server-name="node0" mechanisms="{mechanism_name}" qop="{qop_name}" strength="{value}"> <policy> <no-anonymous value="true" /> </policy> <property name="com.sun.security.sasl.digest.utf8">true</property> </sasl> </authentication> </hotrod-connector>- The
server-nameattribute specifies the name that the server declares to incoming clients. The client configuration must also contain the same server name value. - The
server-context-nameattribute specifies the name of the login context used to retrieve a server subject for certain SASL mechanisms (for example, GSSAPI). - The
mechanismsattribute specifies the authentication mechanism in use. See Section 2.6.7, “User Authentication over Hot Rod Using SASL” for a list of supported mechanisms. - The
qopattribute specifies the SASL quality of protection value for the configuration. Supported values for this attribute areauth(authentication),auth-int(authentication and integrity, meaning that messages are verified against checksums to detect tampering), andauth-conf(authentication, integrity, and confidentiality, meaning that messages are also encrypted). Multiple values can be specified, for example,auth-int auth-conf. The ordering implies preference, so the first value which matches both the client and server's preference is chosen. - The
strengthattribute specifies the SASL cipher strength. Valid values arelow,medium, andhigh. - The
no-anonymouselement within thepolicyelement specifies whether mechanisms that accept anonymous login are permitted. Set this value tofalseto permit andtrueto deny.
Client-side Configuration
The following steps must be configured on the client-side:- Define a login module in a login configuration file (
gss.conf) on the client side:GssExample { com.sun.security.auth.module.Krb5LoginModule required client=TRUE; }; - Set up the following system properties:
java.security.auth.login.config=gss.conf
java.security.krb5.conf=/etc/krb5.conf
Note
Thekrb5.conffile is dependent on the environment and must point to the Kerberos Key Distribution Center. - Configure the Hot Rod Client:
public class MyCallbackHandler implements CallbackHandler {
   final private String username;
   final private char[] password;
   final private String realm;

   public MyCallbackHandler() { }

   public MyCallbackHandler (String username, String realm, char[] password) {
      this.username = username;
      this.password = password;
      this.realm = realm;
   }

   @Override
   public void handle(Callback[] callbacks) throws IOException, UnsupportedCallbackException {
      for (Callback callback : callbacks) {
         if (callback instanceof NameCallback) {
            NameCallback nameCallback = (NameCallback) callback;
            nameCallback.setName(username);
         } else if (callback instanceof PasswordCallback) {
            PasswordCallback passwordCallback = (PasswordCallback) callback;
            passwordCallback.setPassword(password);
         } else if (callback instanceof AuthorizeCallback) {
            AuthorizeCallback authorizeCallback = (AuthorizeCallback) callback;
            authorizeCallback.setAuthorized(authorizeCallback.getAuthenticationID().equals(
                  authorizeCallback.getAuthorizationID()));
         } else if (callback instanceof RealmCallback) {
            RealmCallback realmCallback = (RealmCallback) callback;
            realmCallback.setText(realm);
         } else {
            throw new UnsupportedCallbackException(callback);
         }
      }
   }}
LoginContext lc = new LoginContext("GssExample", new MyCallbackHandler("krb_user", "krb_password".toCharArra()));lc.login();Subject clientSubject = lc.getSubject();

ConfigurationBuilder clientBuilder = new ConfigurationBuilder();clientBuilder
    .addServer()
        .host("127.0.0.1")
        .port(11222)
    .socketTimeout(1200000)
    .security()
        .authentication()
            .enable()
            .serverName("infinispan-server")
            .saslMechanism("GSSAPI")
            .clientSubject(clientSubject)
            .callbackHandler(new MyCallbackHandler());remoteCacheManager = new RemoteCacheManager(clientBuilder.build());RemoteCache<String, String> cache = remoteCacheManager.getCache("secured");
2.6.7.2. Configure Hot Rod Authentication (MD5)
Procedure 2.5. Configure Hot Rod Authentication (MD5)
- Set up the Hot Rod Connector configuration by adding the
saslelement to theauthenticationelement (for details on theauthenticationelement, see Section 2.6.4, “Configuring Security Realms Declaratively”) as follows:<hotrod-connector socket-binding="hotrod" cache-container="default"> <authentication security-realm="ApplicationRealm"> <sasl server-name="myhotrodserver" mechanisms="DIGEST-MD5" qop="auth" /> </authentication> </hotrod-connector>- The
server-nameattribute specifies the name that the server declares to incoming clients. The client configuration must also contain the same server name value. - The
mechanismsattribute specifies the authentication mechanism in use. See Section 2.6.7, “User Authentication over Hot Rod Using SASL” for a list of supported mechanisms. - The
qopattribute specifies the SASL quality of production value for the configuration. Supported values for this attribute areauth,auth-int, andauth-conf.
- Connect the client to the configured Hot Rod connector as follows:
public class MyCallbackHandler implements CallbackHandler {
   final private String username;
   final private char[] password;
   final private String realm;

   public MyCallbackHandler (String username, String realm, char[] password) {
      this.username = username;
      this.password = password;
      this.realm = realm;
   }

   @Override
   public void handle(Callback[] callbacks) throws IOException, UnsupportedCallbackException {
      for (Callback callback : callbacks) {
         if (callback instanceof NameCallback) {
            NameCallback nameCallback = (NameCallback) callback;
            nameCallback.setName(username);
         } else if (callback instanceof PasswordCallback) {
            PasswordCallback passwordCallback = (PasswordCallback) callback;
            passwordCallback.setPassword(password);
         } else if (callback instanceof AuthorizeCallback) {
            AuthorizeCallback authorizeCallback = (AuthorizeCallback) callback;
            authorizeCallback.setAuthorized(authorizeCallback.getAuthenticationID().equals(
                  authorizeCallback.getAuthorizationID()));
         } else if (callback instanceof RealmCallback) {
            RealmCallback realmCallback = (RealmCallback) callback;
            realmCallback.setText(realm);
         } else {
            throw new UnsupportedCallbackException(callback);
         }
      }
   }}
ConfigurationBuilder clientBuilder = new ConfigurationBuilder();clientBuilder
    .addServer()
        .host("127.0.0.1")
        .port(11222)
    .socketTimeout(1200000)
    .security()
        .authentication()
            .enable()
            .serverName("myhotrodserver")
            .saslMechanism("DIGEST-MD5")
            .callbackHandler(new MyCallbackHandler("myuser", "ApplicationRealm", "qwer1234!".toCharArray()));remoteCacheManager = new RemoteCacheManager(clientBuilder.build());RemoteCache<String, String> cache = remoteCacheManager.getCache("secured");
2.6.7.3. Configure Hot Rod Using LDAP/Active Directory
<security-realms>
	<security-realm name="ApplicationRealm">
		<authentication>
			<ldap connection="ldap_connection"
			      recursive="true"
			      base-dn="cn=users,dc=infinispan,dc=org">
				<username-filter attribute="cn" />
			</ldap>
		</authentication>
	</security-realm>
</security-realms>
<outbound-connections>
	<ldap name="ldap_connection"
	      url="ldap://my_ldap_server"
	      search-dn="CN=test,CN=Users,DC=infinispan,DC=org"
	      search-credential="Test_password"/>
</outbound-connections>
- The
security-realmelement'snameparameter specifies the security realm to reference to use when establishing the connection. - The
authenticationelement contains the authentication details. - The
ldapelement specifies how LDAP searches are used to authenticate a user. First, a connection to LDAP is established and a search is conducted using the supplied user name to identify the distinguished name of the user. A subsequent connection to the server is established using the password supplied by the user. If the second connection succeeds, the authentication is a success.- The
connectionparameter specifies the name of the connection to use to connect to LDAP. - The (optional)
recursiveparameter specifies whether the filter is executed recursively. The default value for this parameter isfalse. - The
base-dnparameter specifies the distinguished name of the context to use to begin the search from. - The (optional)
user-dnparameter specifies which attribute to read for the user's distinguished name after the user is located. The default value for this parameter isdn.
- The
outbound-connectionselement specifies the name of the connection used to connect to the LDAP. directory. - The
ldapelement specifies the properties of the outgoing LDAP connection.- The
nameparameter specifies the unique name used to reference this connection. - The
urlparameter specifies the URL used to establish the LDAP connection. - The
search-dnparameter specifies the distinguished name of the user to authenticate and to perform the searches. - The
search-credentialparameter specifies the password required to connect to LDAP as thesearch-dn. - The (optional)
initial-context-factoryparameter allows the overriding of the initial context factory. the default value of this parameter iscom.sun.jndi.ldap.LdapCtxFactory.
2.6.7.4. Configure Hot Rod Authentication (X.509)
X.509 certificate can be installed at the node, and be made available to other nodes for authentication purposes for inbound and outbound SSL connections. This is enabled using the <server-identities/> element of a security realm definition, which defines how a server appears to external applications. This element can be used to configure a password to be used when establishing a remote connection, as well as the loading of an X.509 key.
X.509 certificate on the node.
<security-realm name="ApplicationRealm">
  <server-identities>
    <ssl protocol="...">
      <keystore path="..." relative-to="..." keystore-password="..." alias="..." key-password="..." />
    </ssl>
  </server-identities>

  [... authentication/authorization ...]

</security-realms>Table 2.4. <server-identities/> Options
| Parameter | Mandatory/Optional | Description |
|---|---|---|
path | Mandatory | This is the path to the keystore, this can be an absolute path or relative to the next attribute. |
relative-to | Optional | The name of a service representing a path the keystore is relative to. |
keystore-password | Mandatory | The password required to open the keystore. |
alias | Optional | The alias of the entry to use from the keystore - for a keystore with multiple entries in practice the first usable entry is used but this should not be relied on and the alias should be set to guarantee which entry is used. |
key-password | Optional | The password to load the key entry, if omitted the keystore-password will be used instead. |
Note
key-password as well as an alias to ensure only one key is loaded.
UnrecoverableKeyException: Cannot recover key
2.7. Active Directory Authentication (Non-Kerberos)
2.8. Active Directory Authentication Using Kerberos (GSSAPI)
Procedure 2.6. Configure Kerberos Authentication for Active Directory (Library Mode)
- Configure JBoss EAP server to authenticate itself to Kerberos. This can be done by configuring a dedicated security domain, for example:
<security-domain name="ldap-service" cache-type="default"> <authentication> <login-module code="Kerberos" flag="required"> <module-option name="storeKey" value="true"/> <module-option name="useKeyTab" value="true"/> <module-option name="refreshKrb5Config" value="true"/> <module-option name="principal" value="ldap/localhost@INFINISPAN.ORG"/> <module-option name="keyTab" value="${basedir}/keytab/ldap.keytab"/> <module-option name="doNotPrompt" value="true"/> </login-module> </authentication> </security-domain> - The security domain for authentication must be configured correctly for JBoss EAP, an application must have a valid Kerberos ticket. To initiate the Kerberos ticket, you must reference another security domain using
<module-option name="usernamePasswordDomain" value="krb-admin"/>
. This points to the standard Kerberos login module described in Step 3.<security-domain name="ispn-admin" cache-type="default"> <authentication> <login-module code="SPNEGO" flag="requisite"> <module-option name="password-stacking" value="useFirstPass"/> <module-option name="serverSecurityDomain" value="ldap-service"/> <module-option name="usernamePasswordDomain" value="krb-admin"/> </login-module> <login-module code="AdvancedAdLdap" flag="required"> <module-option name="password-stacking" value="useFirstPass"/> <module-option name="bindAuthentication" value="GSSAPI"/> <module-option name="jaasSecurityDomain" value="ldap-service"/> <module-option name="java.naming.provider.url" value="ldap://localhost:389"/> <module-option name="baseCtxDN" value="ou=People,dc=infinispan,dc=org"/> <module-option name="baseFilter" value="(krb5PrincipalName={0})"/> <module-option name="rolesCtxDN" value="ou=Roles,dc=infinispan,dc=org"/> <module-option name="roleFilter" value="(member={1})"/> <module-option name="roleAttributeID" value="cn"/> </login-module> </authentication> </security-domain> - The security domain authentication configuration described in the previous step points to the following standard Kerberos login module:
<security-domain name="krb-admin" cache-type="default">
    <authentication>
        <login-module code="Kerberos" flag="required">
            <module-option name="useKeyTab" value="true"/>
            <module-option name="principal" value="admin@INFINISPAN.ORG"/>
            <module-option name="keyTab" value="${basedir}/keytab/admin.keytab"/>
        </login-module>
    </authentication>
</security-domain>
Chapter 3. The Security Audit Logger
org.infinispan.security.impl.DefaultAuditLogger. This logger outputs audit logs using the available logging framework (for example, JBoss Logging) and provides results at the TRACE level and the AUDIT category.
AUDIT category to either a log file, a JMS queue, or a database, use the appropriate log appender.
3.1. Configure the Security Audit Logger (Library Mode)
<infinispan>
  ...
	<global-security>
		<authorization audit-logger = "org.infinispan.security.impl.DefaultAuditLogger">
	  	 ...
		</authorization>
	</global-security>
	...
</infinispan>
GlobalConfigurationBuilder global = new GlobalConfigurationBuilder();
   global.security()
      .authorization()
.auditLogger(new DefaultAuditLogger());3.2. Configure the Security Audit Logger (Remote Client-Server Mode)
<authorization> element. The <authorization> element must be within the <cache-container> element in the Infinispan subsystem (in the standalone.xml configuration file).
<cache-container name="local" default-cache="default">
	<security>
	<authorization audit-logger="org.infinispan.security.impl.DefaultAuditLogger">
	<identity-role-mapper/>
	<role name="admin" permissions="ALL"/>
	<role name="reader" permissions="READ"/>
	<role name="writer" permissions="WRITE"/>
	<role name="supervisor" permissions="ALL_READ ALL_WRITE"/>
	</authorization>
	</security>
	<local-cache name="default" start="EAGER">
	<locking isolation="NONE" acquire-timeout="30000" concurrency-level="1000" striping="false"/>
	<transaction mode="NONE"/>
	<security>
	<authorization roles="admin reader writer supervisor"/>
	</security>
	</local-cache>
Note
org.jboss.as.clustering.infinispan.subsystem.ServerAuditLogger which sends the log messages to the server audit log. See the Management Interface Audit Logging chapter in the JBoss Enterprise Application Platform Administration and Configuration Guide for more information.
3.3. Custom Audit Loggers
org.infinispan.security.AuditLogger interface. If no custom logger is provided, the default logger (DefaultAuditLogger) is used.
Chapter 4. Security for Cluster Traffic
4.1. Node Authentication and Authorization (Remote Client-Server Mode)
DIGEST-MD5 or GSSAPI mechanisms are currently supported.
Example 4.1. Configure SASL Authentication
<management>
    <security-realms>
        <!-- Additional configuration information here -->
        <security-realm name="ClusterRealm">
            <authentication>
                <properties path="cluster-users.properties" relative-to="jboss.server.config.dir"/>
                </authentication>
                <authorization>
                    <properties path="cluster-roles.properties" relative-to="jboss.server.config.dir"/>
                </authorization>
            </security-realm>
        </security-realms>
        <!-- Additional configuration information here -->
    </security-realms>
</management>

<stack name="udp">
    <!-- Additional configuration information here -->
    <sasl mech="DIGEST-MD5" security-realm="ClusterRealm" cluster-role="cluster">
        <property name="client_name">node1</property>
        <property name="client_password">password</property>
    </sasl>
    <!-- Additional configuration information here -->
</stack>
DIGEST-MD5 mechanism to authenticate against the ClusterRealm. In order to join, nodes must have the cluster role.
cluster-role attribute determines the role all nodes must belong to in the security realm in order to JOIN or MERGE with the cluster. Unless it has been specified, the cluster-role attribute is the name of the clustered <cache-container> by default. Each node identifies itself using the client-name property. If none is specified, the hostname on which the server is running will be used.
jboss.node.name system property that can be overridden on the command line. For example:
$ clustered.sh -Djboss.node.name=node001
Note
4.1.1. Configure Node Authentication for Cluster Security (DIGEST-MD5)
DIGEST-MD5 with a properties-based security realm, with a dedicated realm for cluster node.
Example 4.2. Using the DIGEST-MD5 Mechanism
<management>
         <security-realms>
             <security-realm name="ClusterRealm">
                 <authentication>
                     <properties path="cluster-users.properties" relative-to="jboss.server.config.dir"/>
                 </authentication>
                 <authorization>
                     <properties path="cluster-roles.properties" relative-to="jboss.server.config.dir"/>
                 </authorization>
             </security-realm>
         </security-realms>
</management>
<subsystem xmlns="urn:infinispa:server:jgroups:6.1" default-stack="${jboss.default.jgroups.stack:udp}">
     <stack name="udp">
         <transport type="UDP" socket-binding="jgroups-udp"/>
         <protocol type="PING"/>
         <protocol type="MERGE2"/>
         <protocol type="FD_SOCK" socket-binding="jgroups-udp-fd"/>
         <protocol type="FD_ALL"/>
         <protocol type="pbcast.NAKACK"/>
         <protocol type="UNICAST2"/>
         <protocol type="pbcast.STABLE"/>
         <protocol type="pbcast.GMS"/>
         <protocol type="UFC"/>
         <protocol type="MFC"/>
         <protocol type="FRAG2"/>
         <protocol type="RSVP"/>
         <sasl security-realm="ClusterRealm" mech="DIGEST-MD5">
             <property name="client_password>...</property>
         </sasl>
     </stack>
</subsystem>
<subsystem xmlns="urn:infinispan:server:core:6.1" default-cache-container="clustered">
     <cache-container name="clustered" default-cache="default">
         <transport executor="infinispan-transport" lock-timeout="60000" stack="udp"/>
         <!-- various clustered cache definitions here -->
     </cache-container>
</subsystem>node001, node002, node003, the cluster-users.properties will contain:
node001=/<node001passwordhash>/node002=/<node002passwordhash>/node003=/<node003passwordhash>/
cluster-roles.properties will contain:
- node001=clustered
- node002=clustered
- node003=clustered
add-users.sh script can be used:
$ add-user.sh -up cluster-users.properties -gp cluster-roles.properties -r ClusterRealm -u node001 -g clustered -p <password>
MD5 password hash of the node must also be placed in the "client_password" property of the <sasl/> element.
<property name="client_password>...</property>
Note
JOINing and MERGEing node's credentials against the realm before letting the node become part of the cluster view.
4.1.2. Configure Node Authentication for Cluster Security (GSSAPI/Kerberos)
GSSAPI mechanism, the client_name is used as the name of a Kerberos-enabled login module defined within the security domain subsystem. For a full procedure on how to do this, see Section 2.6.7.1, “Configure Hot Rod Authentication (GSSAPI/Kerberos)”.
Example 4.3. Using the Kerberos Login Module
<security-domain name="krb-node0" cache-type="default">
    <authentication>
        <login-module code="Kerberos" flag="required">
            <module-option name="storeKey" value="true"/>
            <module-option name="useKeyTab" value="true"/>
            <module-option name="refreshKrb5Config" value="true"/>
            <module-option name="principal" value="jgroups/node0/clustered@INFINISPAN.ORG"/>
            <module-option name="keyTab" value="${jboss.server.config.dir}/keytabs/jgroups_node0_clustered.keytab"/>
            <module-option name="doNotPrompt" value="true"/>
        </login-module>
    </authentication>
</security-domain><sasl <!-- Additional configuration information here --> >
<property name="login_module_name">
<!-- Additional configuration information here -->
</property>
</sasl>authentication section of the security realm is ignored, as the nodes will be validated against the Kerberos Domain Controller. The authorization configuration is still required, as the node principal must belong to the required cluster-role.
jgroups/$NODE_NAME/$CACHE_CONTAINER_NAME@REALM
4.2. Configure Node Security in Library Mode
SASL protocol to your JGroups XML configuration.
CallbackHandlers, to obtain certain information necessary for the authentication handshake. Users must supply their own CallbackHandlers on both client and server sides.
Important
JAAS API is only available when configuring user authentication and authorization, and is not available for node security.
Note
CallbackHandler classes are examples only, and not contained in the Red Hat JBoss Data Grid release. Users must provide the appropriate CallbackHandler classes for their specific LDAP implementation.
Example 4.4. Setting Up SASL Authentication in JGroups
<SASL mech="DIGEST-MD5"
    client_name="node_user"
    client_password="node_password"
    server_callback_handler_class="org.example.infinispan.security.JGroupsSaslServerCallbackHandler"
    client_callback_handler_class="org.example.infinispan.security.JGroupsSaslClientCallbackHandler"
sasl_props="com.sun.security.sasl.digest.realm=test_realm" />DIGEST-MD5 mechanism. Each node must declare the user and password it will use when joining the cluster.
Important
CallbackHandler class. In this example, login and password are checked against values provided via Java properties when JBoss Data Grid is started, and authorization is checked against role which is defined in the class ("test_user").
Example 4.5. Callback Handler Class
public class SaslPropAuthUserCallbackHandler implements CallbackHandler {

   private static final String APPROVED_USER = "test_user";

   private final String name;
   private final char[] password;
   private final String realm;

   public SaslPropAuthUserCallbackHandler() {
      this.name = System.getProperty("sasl.username");
      this.password = System.getProperty("sasl.password").toCharArray();
      this.realm = System.getProperty("sasl.realm");
   }

   @Override
   public void handle(Callback[] callbacks) throws IOException, UnsupportedCallbackException {
      for (Callback callback : callbacks) {
         if (callback instanceof PasswordCallback) {
            ((PasswordCallback) callback).setPassword(password);
         } else if (callback instanceof NameCallback) {
            ((NameCallback) callback).setName(name);
         } else if (callback instanceof AuthorizeCallback) {
            AuthorizeCallback authorizeCallback = (AuthorizeCallback) callback;
            if (APPROVED_USER.equals(authorizeCallback.getAuthorizationID())) {
               authorizeCallback.setAuthorized(true);
            } else {
               authorizeCallback.setAuthorized(false);
            }
         } else if (callback instanceof RealmCallback) {
            RealmCallback realmCallback = (RealmCallback) callback;
            realmCallback.setText(realm);
         } else {
            throw new UnsupportedCallbackException(callback);
         }
      }
   }

}
javax.security.auth.callback.NameCallback and javax.security.auth.callback.PasswordCallback callbacks
javax.security.sasl.AuthorizeCallback callback.
4.2.1. Configure Node Authentication for Library Mode (DIGEST-MD5)
CallbackHandlers are required:
- The
server_callback_handler_classis used by the coordinator. - The
client_callback_handler_classis used by other nodes.
CallbackHandlers.
Example 4.6. Callback Handlers
<SASL mech="DIGEST-MD5"
      client_name="node_name"
      client_password="node_password"
      client_callback_handler_class="${CLIENT_CALLBACK_HANDLER_IN_CLASSPATH}"
      server_callback_handler_class="${SERVER_CALLBACK_HANDLER_IN_CLASSPATH}"
      sasl_props="com.sun.security.sasl.digest.realm=test_realm"
/>4.2.2. Configure Node Authentication for Library Mode (GSSAPI)
login_module_name parameter must be specified instead of callback.
server_name must also be specified, as the client principal is constructed as jgroups/$server_name@REALM.
Example 4.7. Specifying the login module and server on the coordinator node
<SASL mech="GSSAPI"
         server_name="node0/clustered"
         login_module_name="krb-node0"
server_callback_handler_class="org.infinispan.test.integration.security.utils.SaslPropCallbackHandler" />server_callback_handler_class must be specified for node authorization. This will determine if the authenticated joining node has permission to join the cluster.
Note
jgroups/server_name, therefore the server principal in Kerberos must also be jgroups/server_name. For example, if the server name in Kerberos is jgroups/node1/mycache, then the server name must be node1/mycache.
4.2.3. Node Authorization in Library Mode
SASL protocol in JGroups is concerned only with the authentication process. To implement node authorization, you can do so within the server callback handler by throwing an Exception.
Example 4.8. Implementing Node Authorization
public class AuthorizingServerCallbackHandler implements CallbackHandler {

@Override
public void handle(Callback[] callbacks) throws IOException,
UnsupportedCallbackException {
        for (Callback callback : callbacks) {
            <!-- Additional configuration information here -->
            if (callback instanceof AuthorizeCallback) {
                AuthorizeCallback acb = (AuthorizeCallback) callback;
                if (!"myclusterrole".equals(acb.getAuthenticationID()))) {
                    throw new SecurityException("Unauthorized node " +user);
            }
            <!-- Additional configuration information here -->
        }
    }
}4.3. JGroups Encryption
SYM_ENCRYPT and ASYM_ENCRYPT protocols to provide encryption for cluster traffic.
Important
ENCRYPT protocol has been deprecated and should not be used in production environments. It is recommended to use either SYM_ENCRYPT or ASYM_ENCRYPT
encrypt_entire_message must be true. When defining these protocols they should be placed directly under NAKACK2.
SYM_ENCRYPT: Configured with a secret key in a keystore using theJCEKSstore type.ASYM_ENCRYPT: Configured with algorithms and key sizes. In this scenario the secret key is not retrieved from the keystore, but instead generated by the coordinator and distributed to new members. Once a member joins the cluster they send a request for the secret key to the coordinator; the coordinator responds with the secret key back to the new member encrypted with the member's public key.
4.3.1. Configuring JGroups Encryption Protocols
- Standard Java properties can also be used in the configuration, and it is possible to pass the path to JGroups configuration via the
-Doption during start up. - The default, pre-configured JGroups files are packaged in
infinispan-embedded.jar, alternatively, you can create your own configuration file. - In Remote Client-Server mode, the JGroups configuration is part of the main server configuration file.
SYM_ENCRYPT and ASYM_ENCRYPT protocols, place them directly under NAKACK2 in the configuration file.
4.3.2. SYM_ENCRYPT: Using a Key Store
SYM_ENCRYPT uses store type JCEKS. To generate a keystore compatible with JCEKS, use the following command line options to keytool:
$ keytool -genseckey -alias myKey -keypass changeit -storepass changeit -keyalg Blowfish -keysize 56 -keystore defaultStore.keystore -storetype JCEKS
SYM_ENCRYPT can then be configured by adding the following information to the JGroups file used by the application.
<SYM_ENCRYPT sym_algorithm="AES"
            encrypt_entire_message="true"
            keystore_name="defaultStore.keystore"
            store_password="changeit"
            alias="myKey"/>
Note
defaultStore.keystore must be found in the classpath.
4.3.3. ASYM_ENCRYPT: Configured with Algorithms and Key Sizes
- The secret key is generated and distributed by the coordinator.
- When a view change occurs, a peer requests the secret key by sending a key request with its own public key.
- The coordinator encrypts the secret key with the public key, and sends it back to the peer.
- The peer then decrypts and installs the key as its own secret key.
- Any further communications are encrypted and decrypted using the secret key.
Example 4.9. ASYM_ENCRYPT Example
    ...
    <VERIFY_SUSPECT/>
    <ASYM_ENCRYPT encrypt_entire_message="true"
             sym_keylength="128"
             sym_algorithm="AES/ECB/PKCS5Padding"
             asym_keylength="512"
             asym_algorithm="RSA"/>

    <pbcast.NAKACK2/>
    <UNICAST3/>
    <pbcast.STABLE/>
    <FRAG2/>
    <AUTH auth_class="org.jgroups.auth.MD5Token"
          auth_value="chris"
          token_hash="MD5"/>
<pbcast.GMS join_timeout="2000" />ASYM_ENCRYPT has been placed immediately below NAKACK2, and encrypt_entire_message has been enabled, indicating that the message headers will be encrypted along with the message body. This means that the NAKACK2 and UNICAST3 protocols are also encrypted. In addition, AUTH has been included as part of the configuration, so that only authenticated nodes may request the secret key from the coordinator.
change_key_on_leave to true.
4.3.4. JGroups Encryption Configuration Parameters
ENCRYPT JGroups protocol, which both SYM_ENCRYPT and ASYM_ENCRYPT extend:
Table 4.1. ENCRYPT Configuration Parameters
| Name | Description |
|---|---|
| asym_algorithm | Cipher engine transformation for asymmetric algorithm. Default is RSA. |
| asym_keylength | Initial public/private key length. Default is 512. |
| asym_provider | Cryptographic Service Provider. Default is Bouncy Castle Provider. |
| encrypt_entire_message | By default only the message body is encrypted. Enabling encrypt_entire_message ensures that all headers, destination and source addresses, and the message body is encrypted. |
| sym_algorithm | Cipher engine transformation for symmetric algorithm. Default is AES. |
| sym_keylength | Initial key length for matching symmetric algorithm. Default is 128. |
| sym_provider | Cryptographic Service Provider. Default is Bouncy Castle Provider. |
SYM_ENCRYPT protocol parameters
Table 4.2. SYM_ENCRYPT Configuration Parameters
| Name | Description |
|---|---|
| alias | Alias used for recovering the key. Change the default. |
| key_password | Password for recovering the key. Change the default. |
| keystore_name | File on classpath that contains keystore repository. |
| store_password | Password used to check the integrity/unlock the keystore. Change the default. |
ASYM_ENCRYPT protocol parameters
Table 4.3. ASYM_ENCRYPT Configuration Parameters
| Name | Description |
|---|---|
| change_key_on_leave | When a member leaves the view, change the secret key, preventing old members from eavesdropping. |
Appendix A. Revision History
| Revision History | |||
|---|---|---|---|
| Revision 6.6.0-1 | Wed 7 Sep 2016 | ||
| |||
| Revision 6.6.0-0 | Mon 25 Jan 2016 | ||
| |||