
Administration and Configuration Guide
For use with Red Hat JBoss Data Grid 6.6.1
Abstract
Chapter 1. Setting up Red Hat JBoss Data Grid
1.1. Prerequisites
1.2. Steps to Set up Red Hat JBoss Data Grid
Procedure 1.1. Set Up JBoss Data Grid
Set Up the Cache Manager
The first step in a JBoss Data Grid configuration is a cache manager. Cache managers can retrieve cache instances and create cache instances quickly and easily using previously specified configuration templates. For details about setting up a cache manager, see Part I, “Set Up a Cache Manager”Set Up JVM Memory Management
An important step in configuring your JBoss Data Grid is to set up memory management for your Java Virtual Machine (JVM). JBoss Data Grid offers features such as eviction and expiration to help manage the JVM memory.Set Up Eviction
Use eviction to specify the logic used to remove entries from the in-memory cache implementation based on how often they are used. JBoss Data Grid offers different eviction strategies for finer control over entry eviction in your data grid. Eviction strategies and instructions to configure them are available in Chapter 3, Set Up Eviction.Set Up Expiration
To set upper limits to an entry's time in the cache, attach expiration information to each entry. Use expiration to set up the maximum period an entry is allowed to remain in the cache and how long the retrieved entry can remain idle before being removed from the cache. For details, see Chapter 4, Set Up Expiration
Monitor Your Cache
JBoss Data Grid uses logging via JBoss Logging to help users monitor their caches.Set Up Logging
It is not mandatory to set up logging for your JBoss Data Grid, but it is highly recommended. JBoss Data Grid uses JBoss Logging, which allows the user to easily set up automated logging for operations in the data grid. Logs can subsequently be used to troubleshoot errors and identify the cause of an unexpected failure. For details, see Chapter 5, Set Up Logging
Set Up Cache Modes
Cache modes are used to specify whether a cache is local (simple, in-memory cache) or a clustered cache (replicates state changes over a small subset of nodes). Additionally, if a cache is clustered, either replication, distribution or invalidation mode must be applied to determine how the changes propagate across the subset of nodes. For details, see Part IV, “Set Up Cache Modes”Set Up Locking for the Cache
When replication or distribution is in effect, copies of entries are accessible across multiple nodes. As a result, copies of the data can be accessed or modified concurrently by different threads. To maintain consistency for all copies across nodes, configure locking. For details, see Part VI, “Set Up Locking for the Cache” and Chapter 16, Set Up Isolation LevelsSet Up and Configure a Cache Store
JBoss Data Grid offers the passivation feature (or cache writing strategies if passivation is turned off) to temporarily store entries removed from memory in a persistent, external cache store. To set up passivation or a cache writing strategy, you must first set up a cache store.Set Up a Cache Store
The cache store serves as a connection to the persistent store. Cache stores are primarily used to fetch entries from the persistent store and to push changes back to the persistent store. For details, see Part VII, “Set Up and Configure a Cache Store”Set Up Passivation
Passivation stores entries evicted from memory in a cache store. This feature allows entries to remain available despite not being present in memory and prevents potentially expensive write operations to the persistent cache. For details, see Part VIII, “Set Up Passivation”Set Up a Cache Writing Strategy
If passivation is disabled, every attempt to write to the cache results in writing to the cache store. This is the default Write-Through cache writing strategy. Set the cache writing strategy to determine whether these cache store writes occur synchronously or asynchronously. For details, see Part IX, “Set Up Cache Writing”
Monitor Caches and Cache Managers
JBoss Data Grid includes two primary tools to monitor the cache and cache managers once the data grid is up and running.Set Up JMX
JMX is the standard statistics and management tool used for JBoss Data Grid. Depending on the use case, JMX can be configured at a cache level or a cache manager level or both. For details, see Chapter 21, Set Up Java Management Extensions (JMX)Set Up Red Hat JBoss Operations Network (JON)
Red Hat JBoss Operations Network (JON) is the second monitoring solution available for JBoss Data Grid. JBoss Operations Network (JON) offers a graphical interface to monitor runtime parameters and statistics for caches and cache managers. For details, see Chapter 22, Set Up JBoss Operations Network (JON)
Introduce Topology Information
Optionally, introduce topology information to your data grid to specify where specific types of information or objects in your data grid are located. Server hinting is one of the ways to introduce topology information in JBoss Data Grid.Set Up Server Hinting
When set up, server hinting provides high availability by ensuring that the original and backup copies of data are not stored on the same physical server, rack or data center. This is optional in cases such as a replicated cache, where all data is backed up on all servers, racks and data centers. For details, see Chapter 30, High Availability Using Server Hinting
Part I. Set Up a Cache Manager
Chapter 2. Cache Managers
- it creates cache instances on demand.
- it retrieves existing cache instances (i.e. caches that have already been created).
2.1. Types of Cache Managers
EmbeddedCacheManageris a cache manager that runs within the Java Virtual Machine (JVM) used by the client. Currently, JBoss Data Grid offers only theDefaultCacheManagerimplementation of theEmbeddedCacheManagerinterface.RemoteCacheManageris used to access remote caches. When started, theRemoteCacheManagerinstantiates connections to the Hot Rod server (or multiple Hot Rod servers). It then manages the persistentTCPconnections while it runs. As a result,RemoteCacheManageris resource-intensive. The recommended approach is to have a singleRemoteCacheManagerinstance for each Java Virtual Machine (JVM).
2.2. Creating CacheManagers
2.2.1. Create a New RemoteCacheManager
Procedure 2.1. Configure a New RemoteCacheManager
import org.infinispan.client.hotrod.RemoteCache;
import org.infinispan.client.hotrod.RemoteCacheManager;
import org.infinispan.client.hotrod.configuration.Configuration;
import org.infinispan.client.hotrod.configuration.ConfigurationBuilder;

Configuration conf = new
ConfigurationBuilder().addServer().host("localhost").port(11222).build();
RemoteCacheManager manager = new RemoteCacheManager(conf);
RemoteCache defaultCache = manager.getCache();- Use the
ConfigurationBuilder()constructor to create a new configuration builder. The.addServer()method adds a remote server, configured via the.host(<hostname|ip>)and.port(<port>)properties. - Create a new
RemoteCacheManagerusing the supplied configuration. - Retrieve the default cache from the remote server.
2.2.2. Create a New Embedded Cache Manager
Procedure 2.2. Create a New Embedded Cache Manager
- Create a configuration XML file. For example, create the
my-config-file.xmlfile on the classpath (in theresources/folder) and add the configuration information in this file. - Use the following programmatic configuration to create a cache manager using the configuration file:
EmbeddedCacheManager manager = new DefaultCacheManager("my-config-file.xml");
Cache defaultCache = manager.getCache();
my-config-file.xml.
2.2.3. Create a New Embedded Cache Manager Using CDI
Procedure 2.3. Use CDI to Create a New EmbeddedCacheManager
- Specify a default configuration:
public class Config @Produces public EmbeddedCacheManager defaultCacheManager() { ConfigurationBuilder builder = new ConfigurationBuilder(); Configuration configuration = builder.eviction().strategy(EvictionStrategy.LRU).maxEntries(100).build(); return new DefaultCacheManager(configuration); } } - Inject the default cache manager.
<!-- Additional configuration information here -->
@Inject
EmbeddedCacheManager cacheManager;
<!-- Additional configuration information here -->
2.3. Multiple Cache Managers
2.3.1. Create Multiple Caches with a Single Cache Manager
2.3.2. Using Multiple Cache Managers
TCP protocol and the other uses the UDP protocol, multiple cache managers must be used.
2.3.3. Create Multiple Cache Managers
infinispan.xml file to a new configuration file. Edit the new file for the desired configuration and then use the new file for a new cache manager.
Part II. Set Up JVM Memory Management
Chapter 3. Set Up Eviction
3.1. About Eviction
3.2. Eviction Strategies
Table 3.1. Eviction Strategies
| Strategy Name | Operations | Details |
|---|---|---|
EvictionStrategy.NONE | No eviction occurs. | This is the default eviction strategy in Red Hat JBoss Data Grid. |
EvictionStrategy.LRU | Least Recently Used eviction strategy. This strategy evicts entries that have not been used for the longest period. This ensures that entries that are reused periodically remain in memory. | |
EvictionStrategy.UNORDERED | Unordered eviction strategy. This strategy evicts entries without any ordered algorithm and may therefore evict entries that are required later. However, this strategy saves resources because no algorithm related calculations are required before eviction. | This strategy is recommended for testing purposes and not for a real work implementation. |
EvictionStrategy.LIRS | Low Inter-Reference Recency Set eviction strategy. | LIRS is an eviction algorithm that suits a large variety of production use cases. |
3.2.1. LRU Eviction Algorithm Limitations
- Single use access entries are not replaced in time.
- Entries that are accessed first are unnecessarily replaced.
3.3. Using Eviction
eviction /> element is used to enable eviction without any strategy or maximum entries settings, the following default values are automatically implemented:
- Strategy: If no eviction strategy is specified,
EvictionStrategy.NONEis assumed as a default. - max-entries/maxEntries: If no value is specified, the
max-entries/maxEntries value is set to-1, which allows unlimited entries.
3.3.1. Initialize Eviction
max-entries attributes value to a number greater than zero. Adjust the value set for max-entries to discover the optimal value for your configuration. It is important to remember that if too large a value is set for max-entries, Red Hat JBoss Data Grid runs out of memory.
Procedure 3.1. Initialize Eviction
Add the Eviction Tag
Add the <eviction> tag to your project's <cache> tags as follows:<eviction />
Set the Eviction Strategy
Set thestrategyvalue to set the eviction strategy employed. Possible values areLRU,UNORDEREDandLIRS(orNONEif no eviction is required). The following is an example of this step:<eviction strategy="LRU" />
Set the Maximum Entries
Set the maximum number of entries allowed in memory. The default value is-1for unlimited entries.- In Library mode, set the
maxEntriesparameter as follows:<eviction strategy="LRU" maxEntries="200" />
- In Remote Client Server mode, set the
max-entriesas follows:<eviction strategy="LRU" max-entries="200" />
Eviction is configured for the target cache.
3.3.2. Eviction Configuration Examples
- A sample XML configuration for Library mode is as follows:
<eviction strategy="LRU" maxEntries="2000"/>
- A sample XML configuration for Remote Client Server Mode is as follows:
<eviction strategy="LRU" max-entries="20"/>
- A sample programmatic configuration for Library Mode is as follows:
Configuration c = new ConfigurationBuilder().eviction().strategy(EvictionStrategy.LRU)
              .maxEntries(2000)
              .build();
Note
maxEntries parameter while Remote Client-Server mode uses the max-entries parameter to configure eviction.
3.3.3. Changing the Maximum Entries Value at Runtime
- Invoking the setMaxEntries operation sets maximum number of entries in the data container.
- If the data container does not support eviction, setting it will raise an exception.
- Defining a value less than 0 will throw an error.
3.3.4. Eviction Configuration Troubleshooting
max-entries parameter of the eviction element. This is because although the max-entries value can be configured to a value that is not a power of two, the underlying algorithm will alter the value to V, where V is the closest power of two value that is larger than the max-entries value. Eviction algorithms are in place to ensure that the size of the cache container will never exceed the value V.
3.3.5. Eviction and Passivation
Chapter 4. Set Up Expiration
4.1. About Expiration
- A lifespan value.
- A maximum idle time value.
lifespan or maxIdle value.
lifespan or maxIdle defined are mortal, as they will eventually be removed from the cache once one of these conditions are met.
- expiration removes entries based on the period they have been in memory. Expiration only removes entries when the life span period concludes or when an entry has been idle longer than the specified idle time.
- eviction removes entries based on how recently (and often) they are used. Eviction only removes entries when too many entries are present in the memory. If a cache store has been configured, evicted entries are persisted in the cache store.
4.2. Expiration Operations
lifespan) or maximum idle time (maxIdle in Library Mode and max-idle in Remote Client-Server Mode) defined for an individual key/value pair overrides the cache-wide default for the entry in question.
4.3. Eviction and Expiration Comparison
lifespan) and idle time (maxIdle in Library Mode and max-idle in Remote Client-Server Mode) values are replicated alongside each cache entry.
4.4. Cache Entry Expiration Behavior
- An entry is passivated/overflowed to disk and is discovered to have expired.
- The expiration maintenance thread discovers that an entry it has found is expired.
4.5. Configure Expiration
Procedure 4.1. Configure Expiration in Library Mode
Add the Expiration Tag
Add the <expiration> tag to your project's <cache> tags as follows:<expiration />
Set the Expiration Lifespan
Set thelifespanvalue to set the period of time (in milliseconds) an entry can remain in memory. The following is an example of this step:<expiration lifespan="1000" />
Set the Maximum Idle Time
Set the time that entries are allowed to remain idle (unused) after which they are removed (in milliseconds). The default value is-1for unlimited time.<expiration lifespan="1000" maxIdle="1000" />
Set the Background Reaper Thread
Enable or disable the background reaper thread to test entries for expiration. Regardless of whether a reaper is used, entries are tested for expiration lazily when they are touched. The default value istrue.<expiration lifespan="1000" maxIdle="1000" reaperEnabled="true" />
Set the Expiration Interval
Set the interval (in milliseconds) between subsequent runs to purge expired entries from memory and any associated cache stores. To disable the periodic eviction process set the interval to-1. The default value is1000.<expiration lifespan="1000" maxIdle="1000" reaperEnabled="true" wakeUpInterval="5000" />
Procedure 4.2. Configuration Expiration in Remote Client-Server Mode
Set the Expiration Lifespan
Set thelifespanvalue to set the period of time (in milliseconds) an entry can remain in memory. The following is an example of this step:<expiration lifespan="1000" />
Set the Maximum Idle Time
Set the time that entries are allowed to remain idle (unused) after which they are removed (in milliseconds). The default value is-1for unlimited time.<expiration lifespan="1000" max-idle="1000" />
Set the Expiration Interval
Set the interval (in milliseconds) between subsequent runs to purge expired entries from memory and any associated cache stores. To disable the periodic eviction process set the interval to-1. The default value is5000.<expiration lifespan="1000" max-idle="1000" interval="10000" />
Reaper Thread in Remote Client-Server Mode
In Remote Client-Server Mode the background reaper thread is only enabled ifintervalis greater than0. Asintervaldefaults to5000the background reaper thread is automatically enabled if expiration is configured.
4.6. Troubleshooting Expiration
put() are passed a life span value as a parameter. This value defines the interval after which the entry must expire. In cases where eviction is not configured and the life span interval expires, it can appear as if Red Hat JBoss Data Grid has not removed the entry. For example, when viewing JMX statistics, such as the number of entries, you may see an out of date count, or the persistent store associated with JBoss Data Grid may still contain this entry. Behind the scenes, JBoss Data Grid has marked it as an expired entry, but has not removed it. Removal of such entries happens as follows:
- An entry is passivated/overflowed to disk and is discovered to have expired.
- The expiration maintenance thread discovers that an entry it has found is expired.
get() or containsKey() for the expired entry causes JBoss Data Grid to return a null value. The expired entry is later removed by the expiration thread.
Part III. Monitor Your Cache
Chapter 5. Set Up Logging
5.1. About Logging
5.2. Supported Application Logging Frameworks
- JBoss Logging, which is included with Red Hat JBoss Data Grid 6.
5.2.1. About JBoss Logging
5.2.2. JBoss Logging Features
- Provides an innovative, easy to use typed logger.
- Full support for internationalization and localization. Translators work with message bundles in properties files while developers can work with interfaces and annotations.
- Build-time tooling to generate typed loggers for production, and runtime generation of typed loggers for development.
5.3. Boot Logging
5.3.1. Configure Boot Logging
logging.properties file to configure the boot log. This file is a standard Java properties file and can be edited in a text editor. Each line in the file has the format of property=value.
logging.properties file is available in the $JDG_HOME/standalone/configuration folder.
5.3.2. Default Log File Locations
Table 5.1. Default Log File Locations
| Log File | Location | Description |
|---|---|---|
boot.log | $JDG_HOME/standalone/log/ | The Server Boot Log. Contains log messages related to the start up of the server. |
server.log | $JDG_HOME/standalone/log/ | The Server Log. Contains all log messages once the server has launched. |
5.4. Logging Attributes
5.4.1. About Log Levels
TRACEDEBUGINFOWARNERRORFATAL
WARN will only record messages of the levels WARN, ERROR and FATAL.
5.4.2. Supported Log Levels
Table 5.2. Supported Log Levels
| Log Level | Value | Description |
|---|---|---|
| FINEST | 300 | - |
| FINER | 400 | - |
| TRACE | 400 | Used for messages that provide detailed information about the running state of an application. TRACE level log messages are captured when the server runs with the TRACE level enabled. |
| DEBUG | 500 | Used for messages that indicate the progress of individual requests or activities of an application. DEBUG level log messages are captured when the server runs with the DEBUG level enabled. |
| FINE | 500 | - |
| CONFIG | 700 | - |
| INFO | 800 | Used for messages that indicate the overall progress of the application. Used for application start up, shut down and other major lifecycle events. |
| WARN | 900 | Used to indicate a situation that is not in error but is not considered ideal. Indicates circumstances that can lead to errors in the future. |
| WARNING | 900 | - |
| ERROR | 1000 | Used to indicate an error that has occurred that could prevent the current activity or request from completing but will not prevent the application from running. |
| SEVERE | 1000 | - |
| FATAL | 1100 | Used to indicate events that could cause critical service failure and application shutdown and possibly cause JBoss Data Grid to shut down. |
5.4.3. About Log Categories
WARNING log level results in log values of 900, 1000 and 1100 are captured.
5.4.4. About the Root Logger
server.log. This file is sometimes referred to as the server log.
5.4.5. About Log Handlers
ConsoleFilePeriodicSizeAsyncCustom
5.4.6. Log Handler Types
Table 5.3. Log Handler Types
| Log Handler Type | Description | Use Case |
|---|---|---|
| Console | Console log handlers write log messages to either the host operating system’s standard out (stdout) or standard error (stderr) stream. These messages are displayed when JBoss Data Grid is run from a command line prompt. | The Console log handler is preferred when JBoss Data Grid is administered using the command line. In such a case, the messages from a Console log handler are not saved unless the operating system is configured to capture the standard out or standard error stream. |
| File | File log handlers are the simplest log handlers. Their primary use is to write log messages to a specified file. | File log handlers are most useful if the requirement is to store all log entries according to the time in one place. |
| Periodic | Periodic file handlers write log messages to a named file until a specified period of time has elapsed. Once the time period has elapsed, the specified time stamp is appended to the file name. The handler then continues to write into the newly created log file with the original name. | The Periodic file handler can be used to accumulate log messages on a weekly, daily, hourly or other basis depending on the requirements of the environment. |
| Size | Size log handlers write log messages to a named file until the file reaches a specified size. When the file reaches a specified size, it is renamed with a numeric prefix and the handler continues to write into a newly created log file with the original name. Each size log handler must specify the maximum number of files to be kept in this fashion. | The Size handler is best suited to an environment where the log file size must be consistent. |
| Async | Async log handlers are wrapper log handlers that provide asynchronous behavior for one or more other log handlers. These are useful for log handlers that have high latency or other performance problems such as writing a log file to a network file system. | The Async log handlers are best suited to an environment where high latency is a problem or when writing to a network file system. |
| Custom | Custom log handlers enable to you to configure new types of log handlers that have been implemented. A custom handler must be implemented as a Java class that extends java.util.logging.Handler and be contained in a module. | Custom log handlers create customized log handler types and are recommended for advanced users. |
5.4.7. Selecting Log Handlers
- The
Consolelog handler is preferred when JBoss Data Grid is administered using the command line. In such a case, errors and log messages appear on the console window and are not saved unless separately configured to do so. - The
Filelog handler is used to direct log entries into a specified file. This simplicity is useful if the requirement is to store all log entries according to the time in one place. - The
Periodiclog handler is similar to theFilehandler but creates files according to the specified period. As an example, this handler can be used to accumulate log messages on a weekly, daily, hourly or other basis depending on the requirements of the environment. - The
Sizelog handler also writes log messages to a specified file, but only while the log file size is within a specified limit. Once the file size reaches the specified limit, log files are written to a new log file. This handler is best suited to an environment where the log file size must be consistent. - The
Asynclog handler is a wrapper that forces other log handlers to operate asynchronously. This is best suited to an environment where high latency is a problem or when writing to a network file system. - The
Customlog handler creates new, customized types of log handlers. This is an advanced log handler.
5.4.8. About Log Formatters
java.util.Formatter class.
5.5. Logging Sample Configurations
5.5.1. Logging Sample Configuration Location
standalone.xml or clustered.xml.
5.5.2. Sample XML Configuration for the Root Logger
Procedure 5.1. Configure the Root Logger
Set the
levelPropertyThelevelproperty sets the maximum level of log message that the root logger records.<subsystem xmlns="urn:jboss:domain:logging:1.4"> <root-logger> <level name="INFO"/>List
handlershandlersis a list of log handlers that are used by the root logger.<subsystem xmlns="urn:jboss:domain:logging:1.4"> <root-logger> <level name="INFO"/> <handlers> <handler name="CONSOLE"/> <handler name="FILE"/> </handlers> </root-logger> </subsystem>
5.5.3. Sample XML Configuration for a Log Category
Procedure 5.2. Configure a Log Category
<subsystem xmlns="urn:jboss:domain:logging:1.4">
   <logger category="com.company.accounts.rec" use-parent-handlers="true">
      <level name="WARN"/>
      <handlers>
         <handler name="accounts-rec"/>
      </handlers>
   </logger>
</subsystem>- Use the
categoryproperty to specify the log category from which log messages will be captured.Theuse-parent-handlersis set to"true"by default. When set to"true", this category will use the log handlers of the root logger in addition to any other assigned handlers. - Use the
levelproperty to set the maximum level of log message that the log category records. - The
handlerselement contains a list of log handlers.
5.5.4. Sample XML Configuration for a Console Log Handler
Procedure 5.3. Configure the Console Log Handler
<subsystem xmlns="urn:jboss:domain:logging:1.4">
<console-handler name="CONSOLE" autoflush="true">
<level name="INFO"/>
<encoding value="UTF-8"/>
<target value="System.out"/>
<filter-spec value="not(match("JBAS.*"))"/>
<formatter>
<pattern-formatter pattern="%K{level}%d{HH:mm:ss,SSS} %-5p [%c] (%t) %s%E%n"/>
</formatter>
</console-handler>
</subsystem>Add the Log Handler Identifier Information
Thenameproperty sets the unique identifier for this log handler.Whenautoflushis set to"true"the log messages will be sent to the handler's target immediately upon request.Set the
levelPropertyThelevelproperty sets the maximum level of log messages recorded.Set the
encodingOutputUseencodingto set the character encoding scheme to be used for the output.Define the
targetValueThetargetproperty defines the system output stream where the output of the log handler goes. This can beSystem.errfor the system error stream, orSystem.outfor the standard out stream.Define the
filter-specPropertyThefilter-specproperty is an expression value that defines a filter. The example provided defines a filter that does not match a pattern:not(match("JBAS.*")).Specify the
formatterUseformatterto list the log formatter used by the log handler.
5.5.5. Sample XML Configuration for a File Log Handler
Procedure 5.4. Configure the File Log Handler
<file-handler name="accounts-rec-trail" autoflush="true">
    <level name="INFO"/>
    <encoding value="UTF-8"/>
    <file relative-to="jboss.server.log.dir" path="accounts-rec-trail.log"/>
    <formatter>
        <pattern-formatter pattern="%d{HH:mm:ss,SSS} %-5p [%c] (%t) %s%E%n"/>
    </formatter>
    <append value="true"/>
</file-handler>
Add the File Log Handler Identifier Information
Thenameproperty sets the unique identifier for this log handler.Whenautoflushis set to"true"the log messages will be sent to the handler's target immediately upon request.Set the
levelPropertyThelevelproperty sets the maximum level of log message that the root logger records.Set the
encodingOutputUseencodingto set the character encoding scheme to be used for the output.Set the
fileObjectThefileobject represents the file where the output of this log handler is written to. It has two configuration properties:relative-toandpath.Therelative-toproperty is the directory where the log file is written to. JBoss Enterprise Application Platform 6 file path variables can be specified here. Thejboss.server.log.dirvariable points to thelog/directory of the server.Thepathproperty is the name of the file where the log messages will be written. It is a relative path name that is appended to the value of therelative-toproperty to determine the complete path.Specify the
formatterUseformatterto list the log formatter used by the log handler.Set the
appendPropertyWhen theappendproperty is set to"true", all messages written by this handler will be appended to an existing file. If set to"false"a new file will be created each time the application server launches. Changes toappendrequire a server reboot to take effect.
5.5.6. Sample XML Configuration for a Periodic Log Handler
Procedure 5.5. Configure the Periodic Log Handler
<periodic-rotating-file-handler name="FILE" autoflush="true">
   <level name="INFO"/>
   <encoding value="UTF-8"/>
   <formatter>
      <pattern-formatter pattern="%d{HH:mm:ss,SSS} %-5p [%c] (%t) %s%E%n"/>
   </formatter>
   <file relative-to="jboss.server.log.dir" path="server.log"/>
   <suffix value=".yyyy-MM-dd"/>
   <append value="true"/>
</periodic-rotating-file-handler>
Add the Periodic Log Handler Identifier Information
Thenameproperty sets the unique identifier for this log handler.Whenautoflushis set to"true"the log messages will be sent to the handler's target immediately upon request.Set the
levelPropertyThelevelproperty sets the maximum level of log message that the root logger records.Set the
encodingOutputUseencodingto set the character encoding scheme to be used for the output.Specify the
formatterUseformatterto list the log formatter used by the log handler.Set the
fileObjectThefileobject represents the file where the output of this log handler is written to. It has two configuration properties:relative-toandpath.Therelative-toproperty is the directory where the log file is written to. JBoss Enterprise Application Platform 6 file path variables can be specified here. Thejboss.server.log.dirvariable points to thelog/directory of the server.Thepathproperty is the name of the file where the log messages will be written. It is a relative path name that is appended to the value of therelative-toproperty to determine the complete path.Set the
suffixValueThesuffixis appended to the filename of the rotated logs and is used to determine the frequency of rotation. The format of thesuffixis a dot (.) followed by a date string, which is parsable by thejava.text.SimpleDateFormatclass. The log is rotated on the basis of the smallest time unit defined by thesuffix. For example,yyyy-MM-ddwill result in daily log rotation. See http://docs.oracle.com/javase/6/docs/api/index.html?java/text/SimpleDateFormat.htmlSet the
appendPropertyWhen theappendproperty is set to"true", all messages written by this handler will be appended to an existing file. If set to"false"a new file will be created each time the application server launches. Changes toappendrequire a server reboot to take effect.
5.5.7. Sample XML Configuration for a Size Log Handler
Procedure 5.6. Configure the Size Log Handler
<size-rotating-file-handler name="accounts_debug" autoflush="false">
   <level name="DEBUG"/>
   <encoding value="UTF-8"/>
   <file relative-to="jboss.server.log.dir" path="accounts-debug.log"/>
   <rotate-size value="500k"/>
   <max-backup-index value="5"/>
   <formatter>
        <pattern-formatter pattern="%d{HH:mm:ss,SSS} %-5p [%c] (%t) %s%E%n"/>
    </formatter>
   <append value="true"/>
</size-rotating-file-handler>
Add the Size Log Handler Identifier Information
Thenameproperty sets the unique identifier for this log handler.Whenautoflushis set to"true"the log messages will be sent to the handler's target immediately upon request.Set the
levelPropertyThelevelproperty sets the maximum level of log message that the root logger records.Set the
encodingOutputUseencodingto set the character encoding scheme to be used for the output.Set the
fileObjectThefileobject represents the file where the output of this log handler is written to. It has two configuration properties:relative-toandpath.Therelative-toproperty is the directory where the log file is written to. JBoss Enterprise Application Platform 6 file path variables can be specified here. Thejboss.server.log.dirvariable points to thelog/directory of the server.Thepathproperty is the name of the file where the log messages will be written. It is a relative path name that is appended to the value of therelative-toproperty to determine the complete path.Specify the
rotate-sizeValueThe maximum size that the log file can reach before it is rotated. A single character appended to the number indicates the size units:bfor bytes,kfor kilobytes,mfor megabytes,gfor gigabytes. For example:50mfor 50 megabytes.Set the
max-backup-indexNumberThe maximum number of rotated logs that are kept. When this number is reached, the oldest log is reused.Specify the
formatterUseformatterto list the log formatter used by the log handler.Set the
appendPropertyWhen theappendproperty is set to"true", all messages written by this handler will be appended to an existing file. If set to"false"a new file will be created each time the application server launches. Changes toappendrequire a server reboot to take effect.
5.5.8. Sample XML Configuration for a Async Log Handler
Procedure 5.7. Configure the Async Log Handler
<async-handler name="Async_NFS_handlers">
   <level name="INFO"/>
   <queue-length value="512"/>
   <overflow-action value="block"/>
   <subhandlers>
      <handler name="FILE"/>
      <handler name="accounts-record"/>
   </subhandlers>
</async-handler>- The
nameproperty sets the unique identifier for this log handler. - The
levelproperty sets the maximum level of log message that the root logger records. - The
queue-lengthdefines the maximum number of log messages that will be held by this handler while waiting for sub-handlers to respond. - The
overflow-actiondefines how this handler responds when its queue length is exceeded. This can be set toBLOCKorDISCARD.BLOCKmakes the logging application wait until there is available space in the queue. This is the same behavior as an non-async log handler.DISCARDallows the logging application to continue but the log message is deleted. - The
subhandlerslist is the list of log handlers to which this async handler passes its log messages.
Part IV. Set Up Cache Modes
Chapter 6. Cache Modes
- Local mode is the only non-clustered cache mode offered in JBoss Data Grid. In local mode, JBoss Data Grid operates as a simple single-node in-memory data cache. Local mode is most effective when scalability and failover are not required and provides high performance in comparison with clustered modes.
- Clustered mode replicates state changes to a small subset of nodes. The subset size is sufficient for fault tolerance purposes but not large enough to hinder scalability. Before attempting to use clustered mode, it is important to first configure JGroups for a clustered configuration. For details about configuring JGroups, see Section 26.2, “Configure JGroups (Library Mode)”
6.1. About Cache Containers
cache-container element acts as a parent of one or more (local or clustered) caches. To add clustered caches to the container, transport must be defined.
Procedure 6.1. How to Configure the Cache Container
<subsystem xmlns="urn:infinispan:server:core:6.2"
	   default-cache-container="local">
	<cache-container name="local"
			 default-cache="default"
			 statistics="true"
			 listener-executor="infinispan-listener"
			 start="EAGER">
		<local-cache name="default"
			     start="EAGER"
			     statistics="false">
			     <!-- Additional configuration information here -->
		</local-cache>
	</cache-container>
</subsystem>
Configure the Cache Container
Thecache-containerelement specifies information about the cache container using the following parameters:- The
nameparameter defines the name of the cache container. - The
default-cacheparameter defines the name of the default cache used with the cache container. - The
statisticsattribute is optional and istrueby default. Statistics are useful in monitoring JBoss Data Grid via JMX or JBoss Operations Network, however they adversely affect performance. Disable this attribute by setting it tofalseif it is not required. - The
listener-executordefines the executor used for asynchronous cache listener notifications. - The
startparameter indicates when the cache container starts, i.e. whether it will start lazily when requested or "eagerly" when the server starts up. Valid values for this parameter areEAGERandLAZY.
Configure Per-cache Statistics
Ifstatisticsare enabled at the container level, per-cache statistics can be selectively disabled for caches that do not require monitoring by setting thestatisticsattribute tofalse.
6.2. Local Mode
- Write-through and write-behind caching to persist data.
- Entry eviction to prevent the Java Virtual Machine (JVM) running out of memory.
- Support for entries that expire after a defined period.
ConcurrentMap, resulting in a simple migration process from a map to JBoss Data Grid.
6.2.1. Configure Local Mode (Remote Client-Server Mode)
local-cache element.
Procedure 6.2. The local-cache Element
<cache-container name="local"
                  default-cache="default"
                  statistics="true">
         <local-cache name="default"
                          start="EAGER"
                          batching="false"
                          statistics="true">
                  <indexing index="NONE">
	                <property name="default.directory_provider">ram</property>
                  </indexing>
</local-cache>local-cache element specifies information about the local cache used with the cache container using the following parameters:
- The
nameparameter specifies the name of the local cache to use. - The
startparameter indicates when the cache container starts, i.e. whether it will start lazily when requested or "eagerly" when the server starts up. Valid values for this parameter areEAGERandLAZY. - The
batchingparameter specifies whether batching is enabled for the local cache. - If
statisticsare enabled at the container level, per-cache statistics can be selectively disabled for caches that do not require monitoring by setting thestatisticsattribute tofalse. - The
indexattribute of theindexingparameter specifies the type of indexing used for the local cache. Valid values for this attribute areNONE,LOCALandALL.
DefaultCacheManager with the "no-argument" constructor. Both of these methods create a local default cache.
<transport/> it can only contain local caches. The container used in the example can only contain local caches as it does not have a <transport/>.
ConcurrentMap and is compatible with multiple cache systems.
6.2.2. Configure Local Mode (Library Mode)
mode parameter to local equals not specifying a clustering mode at all. In the case of the latter, the cache defaults to local mode, even if its cache manager defines a transport.
<clustering mode="local" />
6.3. Clustered Modes
- Replication Mode replicates any entry that is added across all cache instances in the cluster.
- Invalidation Mode does not share any data, but signals remote caches to initiate the removal of invalid entries.
- Distribution Mode stores each entry on a subset of nodes instead of on all nodes in the cluster.
6.3.1. Asynchronous and Synchronous Operations
6.3.2. Cache Mode Troubleshooting
6.3.2.1. Invalid Data in ReadExternal
readExternal, it can be because when using Cache.putAsync(), starting serialization can cause your object to be modified, causing the datastream passed to readExternal to be corrupted. This can be resolved if access to the object is synchronized.
6.3.2.2. About Asynchronous Communications
local-cache, distributed-cache and replicated-cache elements respectively. Each of these elements contains a mode property, the value of which can be set to SYNC for synchronous or ASYNC for asynchronous communications.
Example 6.1. Asynchronous Communications Example Configuration
<replicated-cache name="default"
                  start="EAGER"
                  mode="ASYNC"
                  batching="false"
                  statistics="true">
                 <!-- Additional configuration information here -->
</replicated-cache>
Note
6.3.2.3. Cluster Physical Address Retrieval
The physical address can be retrieved using an instance method call. For example: AdvancedCache.getRpcManager().getTransport().getPhysicalAddresses().
6.4. State Transfer
numOwners copies of each key in the cache (as determined through consistent hashing). In invalidation mode the initial state transfer is similar to replication mode, the only difference being that the nodes are not guaranteed to have the same state. When a node leaves, a replicated mode or invalidation mode cache does not perform any state transfer. A distributed cache needs to make additional copies of the keys that were stored on the leaving nodes, again to keep numOwners copies of each key.
ClusterLoader must be configured, otherwise a node will become the owner or backup owner of a key without the data being loaded into its cache. In addition, if State Transfer is disabled in distributed mode then a key will occasionally have less than numOwners owners.
6.4.1. Non-Blocking State Transfer
- Minimize the interval(s) where the entire cluster cannot respond to requests because of a state transfer in progress.
- Minimize the interval(s) where an existing member stops responding to requests because of a state transfer in progress.
- Allow state transfer to occur with a drop in the performance of the cluster. However, the drop in the performance during the state transfer does not throw any exception, and allows processes to continue.
- Allows a
GEToperation to successfully retrieve a key from another node without returning a null value during a progressive state transfer.
- The blocking protocol queues the transaction delivery during the state transfer.
- State transfer control messages (such as CacheTopologyControlCommand) are sent according to the total order information.
6.4.2. Suppress State Transfer via JMX
getCache() call will timeout after stateTransfer.timeout expires unless rebalancing is re-enabled or stateTransfer.awaitInitialTransferis set to false.
6.4.3. The rebalancingEnabled Attribute
rebalancingEnabled JMX attribute, and requires no specific configuration.
rebalancingEnabled attribute can be modified for the entire cluster from the LocalTopologyManager JMX Mbean on any node. This attribute is true by default, and is configurable programmatically.
<await-initial-transfer="false"/>
Chapter 7. Set Up Distribution Mode
7.1. About Distribution Mode
7.2. Distribution Mode's Consistent Hash Algorithm
numSegments and cannot be changed without restarting the cluster. The mapping of keys to segments is also fixed — a key maps to the same segment, regardless of how the topology of the cluster changes.
7.3. Locating Entries in Distribution Mode
PUT operation can result in as many remote calls as specified by the num_copies parameter, while a GET operation executed on any node in the cluster results in a single remote call. In the background, the GET operation results in the same number of remote calls as a PUT operation (specifically the value of the num_copies parameter), but these occur in parallel and the returned entry is passed to the caller as soon as one returns.
7.4. Return Values in Distribution Mode
7.5. Configure Distribution Mode (Remote Client-Server Mode)
Procedure 7.1. The distributed-cache Element
<cache-container name="clustered"
		 default-cache="default"
		 statistics="true">
	<transport executor="infinispan-transport" lock-timeout="60000"/>
	<distributed-cache name="default"
			   mode="SYNC"
			   segments="20"
			   start="EAGER"
			   owners="2"
			   statistics="true">
			<!-- Additional configuration information here -->
	</distributed-cache>
</cache-container>
distributed-cache element configures settings for the distributed cache using the following parameters:
- The
nameparameter provides a unique identifier for the cache. - The
modeparameter sets the clustered cache mode. Valid values areSYNC(synchronous) andASYNC(asynchronous). - The (optional)
segmentsparameter specifies the number of hash space segments per cluster. The recommended value for this parameter is ten multiplied by the cluster size and the default value is20. - The
startparameter specifies whether the cache starts when the server starts up or when it is requested or deployed. - The
ownersparameter indicates the number of nodes that will contain the hash segment. - If
statisticsare enabled at the container level, per-cache statistics can be selectively disabled for caches that do not require monitoring by setting thestatisticsattribute tofalse.
Important
cache-container, locking, and transaction elements, see the appropriate chapter.
7.6. Configure Distribution Mode (Library Mode)
Procedure 7.2. Distributed Cache Configuration
Configure the Clustering Element
<clustering mode="distribution"> <sync replTimeout="${TIME}" /> <stateTransfer chunkSize="${SIZE}" fetchInMemoryState="{true/false}" awaitInitialTransfer="{true/false}" timeout="${TIME}" />- The
clusteringelement'smodeparameter's value determines the clustering mode selected for the cache. - The
syncelement'sreplTimeoutparameter specifies the maximum time period in milliseconds for an acknowledgment after a remote call. If the time period ends without any acknowledgment, an exception is thrown. - The
stateTransferelement specifies how state is transferred when a node leaves or joins the cluster. It uses the following parameters:- The
chunkSizeparameter is the number of cache entries to be transferred in one chunk. The defaultchunkSizevalue is 512. ThechunkSizedepends on many parameters (for example, size of entries) and the best setting needs to be measured. To change the value for larger cache entries, smaller chunks are advisable and for smaller cache entries, increasing thechunkSizeoffers better performance. - The
fetchInMemoryStateparameter when set totrue, requests state information from neighboring caches on start up. This impacts the start up time for the cache. Set the default totrueif there is no shared cache store behind to avoid cache inconsistency. - The
awaitInitialTransferparameter causes the first call to methodCacheManager.getCache()on the joiner node to block and wait until the joining is complete and the cache has finished receiving state from neighboring caches (iffetchInMemoryStateis enabled). This option applies to distributed and replicated caches only and is enabled by default. - The
timeoutparameter specifies the maximum time (in milliseconds) the cache waits for responses from neighboring caches with the requested states. If no response is received within thetimeoutperiod, the start up process aborts and an exception is thrown. As a result of the failed state transfer, the cache is not available on that instance.
Specify Transport Configuration
<global> <transport clusterName="${NAME}" distributedSyncTimeout="${TIME}" transportClass="${CLASS}" /> </global>Thetransportelement defines the transport configuration for the cache container as follows:- The
clusterNameparameter specifies the name of the cluster. Nodes can only connect to clusters that share the same name. - The
distributedSyncTimeoutparameter specifies the time to wait to acquire a lock on the distributed lock. This distributed lock ensures that a single cache can transfer state or rehash state at a time. - The
transportClassparameter specifies a class that represents a network transport for the cache container.
7.7. Synchronous and Asynchronous Distribution
Example 7.1. Communication Mode example
A, B and C, and a key K that maps nodes A and B. Perform an operation on node C that requires a return value, for example Cache.remove(K). To execute successfully, the operation must first synchronously forward the call to both node A and B, and then wait for a result returned from either node A or B. If asynchronous communication was used, the usefulness of the returned values cannot be guaranteed, despite the operation behaving as expected.
7.8. GET and PUT Usage in Distribution Mode
GET command before a write command. This occurs because certain methods (for example, Cache.put()) return the previous value associated with the specified key according to the java.util.Map contract. When this is performed on an instance that does not own the key and the entry is not found in the L1 cache, the only reliable way to elicit this return value is to perform a remote GET before the PUT.
GET operation that occurs before the PUT operation is always synchronous, whether the cache is synchronous or asynchronous, because Red Hat JBoss Data Grid must wait for the return value.
7.8.1. Distributed GET and PUT Operation Resource Usage
GET operation before executing the desired PUT operation.
GET operation does not wait for all responses, which would result in wasted resources. The GET process accepts the first valid response received, which allows its performance to be unrelated to cluster size.
Flag.SKIP_REMOTE_LOOKUP flag for a per-invocation setting if return values are not required for your implementation.
java.util.Map interface contract. The contract breaks because unreliable and inaccurate return values are provided to certain methods. As a result, ensure that these return values are not used for any important purpose on your configuration.
Chapter 8. Set Up Replication Mode
8.1. About Replication Mode
8.2. Optimized Replication Mode Usage
8.3. Configure Replication Mode (Remote Client-Server Mode)
Procedure 8.1. The replicated-cache Element
<cache-container name="clustered"
		 default-cache="default"
		 statistics="true">
        <transport executor="infinispan-transport"
        	   lock-timeout="60000"/>
	<replicated-cache name="default"
				mode="SYNC"
				start="EAGER"
				statistics="true">
		<transaction mode="NONE" />
	</replicated-cache>
</cache-container>
Important
replicated-cache element configures settings for the distributed cache using the following parameters:
- The
nameparameter provides a unique identifier for the cache. - The
modeparameter sets the clustered cache mode. Valid values areSYNC(synchronous) andASYNC(asynchronous). - The
startparameter specifies whether the cache starts when the server starts up or when it is requested or deployed. - If
statisticsare enabled at the container level, per-cache statistics can be selectively disabled for caches that do not require monitoring by setting thestatisticsattribute tofalse. - The
transactionelement sets up the transaction mode for the replicated cache.Important
In Remote Client-Server mode, the transactions element is set toNONEunless JBoss Data Grid is used in a compatibility mode where the cluster contains both JBoss Data Grid server and library instances. In this case, if transactions are configured in the library mode instance, they must also be configured in the server instance.
cache-container and locking, see the appropriate chapter.
8.4. Configure Replication Mode (Library Mode)
Procedure 8.2. Replication Mode Configuration
Configure the Clustering Element
<clustering mode="replication"> <sync replTimeout="${TIME}" /> <stateTransfer chunkSize="${SIZE}" fetchInMemoryState="{true/false}" awaitInitialTransfer="{true/false}" timeout="${TIME}" />- The
clusteringelement'smodeparameter's value determines the clustering mode selected for the cache. - The
syncelement'sreplTimeoutparameter specifies the maximum time period in milliseconds for an acknowledgment after a remote call. If the time period ends without any acknowledgment, an exception is thrown. - The
stateTransferelement specifies how state is transferred when a node leaves or joins the cluster. It uses the following parameters:- The
chunkSizeparameter is the number of cache entries to be transferred in one chunk. The defaultchunkSizevalue is 512. ThechunkSizedepends on many parameters (for example, size of entries) and the best setting needs to be measured. To change the value for larger cache entries, smaller chunks are advisable and for smaller cache entries, increasing thechunkSizeoffers better performance. - The
fetchInMemoryStateparameter when set totrue, requests state information from neighboring caches on start up. This impacts the startup time for the cache. Set the default totrueif there is no shared cache store behind to avoid cache inconsistency. - The
awaitInitialTransferparameter causes the first call to methodCacheManager.getCache()on the joiner node to block and wait until the joining is complete and the cache has finished receiving state from neighboring caches (iffetchInMemoryStateis enabled). This option applies to distributed and replicated caches only and is enabled by default. - The
timeoutparameter specifies the maximum time (in milliseconds) the cache waits for responses from neighboring caches with the requested states. If no response is received within thetimeoutperiod, the start up process aborts and an exception is thrown. As a result of the failed state transfer, the cache is not available on that instance.
Specify Transport Configuration
<global> <transport clusterName="${NAME}" distributedSyncTimeout="${TIME}" transportClass="${CLASS}" /> </global>Thetransportelement defines the transport configuration for the cache container as follows:- The
clusterNameparameter specifies the name of the cluster. Nodes can only connect to clusters that share the same name. - The
distributedSyncTimeoutparameter specifies the time to wait to acquire a lock on the distributed lock. This distributed lock ensures that a single cache can transfer state or rehash state at a time. - The
transportClassparameter specifies a class that represents a network transport for the cache container.
8.5. Synchronous and Asynchronous Replication
- Synchronous replication blocks a thread or caller (for example on a
put()operation) until the modifications are replicated across all nodes in the cluster. By waiting for acknowledgments, synchronous replication ensures that all replications are successfully applied before the operation is concluded. - Asynchronous replication operates significantly faster than synchronous replication because it does not need to wait for responses from nodes. Asynchronous replication performs the replication in the background and the call returns immediately. Errors that occur during asynchronous replication are written to a log. As a result, a transaction can be successfully completed despite the fact that replication of the transaction may not have succeeded on all the cache instances in the cluster.
8.5.1. Troubleshooting Asynchronous Replication Behavior
- Disable state transfer and use a
ClusteredCacheLoaderto lazily look up remote state as and when needed. - Enable state transfer and
REPL_SYNC. Use the Asynchronous API (for example, thecache.putAsync(k, v)) to activate 'fire-and-forget' capabilities. - Enable state transfer and
REPL_ASYNC. All RPCs end up becoming synchronous, but client threads will not be held up if a replication queue is enabled (which is recommended for asynchronous mode).
8.6. The Replication Queue
- Previously set intervals.
- The queue size exceeding the number of elements.
- A combination of previously set intervals and the queue size exceeding the number of elements.
8.6.1. Replication Queue Usage
- Disable asynchronous marshalling.
- Set the
max-threadscount value to1for thetransport executor. Thetransport executoris defined instandalone.xmlorclustered.xmlas follows:<transport executor="infinispan-transport"/>
queue-flush-interval, value is in milliseconds) and queue size (queue-size) as follows:
Example 8.1. Replication Queue in Asynchronous Mode
<replicated-cache name="asyncCache"
                  start="EAGER"
                  mode="ASYNC"
                  batching="false"
                  indexing="NONE"
                  statistics="true"
                  queue-size="1000"
                  queue-flush-interval="500">
              <!-- Additional configuration information here -->
</replicated-cache>8.7. About Replication Guarantees
8.8. Replication Traffic on Internal Networks
IP addresses than for traffic over public IP addresses, or do not charge at all for internal network traffic (for example, GoGrid). To take advantage of lower rates, you can configure Red Hat JBoss Data Grid to transfer replication traffic using the internal network. With such a configuration, it is difficult to know the internal IP address you are assigned. JBoss Data Grid uses JGroups interfaces to solve this problem.
Chapter 9. Set Up Invalidation Mode
9.1. About Invalidation Mode
9.2. Configure Invalidation Mode (Remote Client-Server Mode)
Procedure 9.1. The invalidation-cache Element
<cache-container name="local"
     		 default-cache="default"
     		 statistics="true">
	<invalidation-cache name="default"
			    mode="ASYNC"
			    start="EAGER"
			    statistics="true">
			<!-- Additional configuration information here -->
	</invalidation-cache>
</cache-container>invalidation-cache element configures settings for the distributed cache using the following parameters:
- The
nameparameter provides a unique identifier for the cache. - The
modeparameter sets the clustered cache mode. Valid values areSYNC(synchronous) andASYNC(asynchronous). - The
startparameter specifies whether the cache starts when the server starts up or when it is requested or deployed. - If
statisticsare enabled at the container level, per-cache statistics can be selectively disabled for caches that do not require monitoring by setting thestatisticsattribute tofalse.
Important
cache-container, locking, and transaction elements, see the appropriate chapter.
9.3. Configure Invalidation Mode (Library Mode)
Procedure 9.2. Invalidation Mode Configuration
Configure the Clustering Element
<clustering mode="invalidation"> <sync replTimeout="${TIME}" /> <stateTransfer chunkSize="${SIZE}" fetchInMemoryState="{true/false}" awaitInitialTransfer="{true/false}" timeout="${TIME}" />- The
clusteringelement'smodeparameter's value determines the clustering mode selected for the cache. - The
syncelement'sreplTimeoutparameter specifies the maximum time period in milliseconds for an acknowledgment after a remote call. If the time period ends without any acknowledgment, an exception is thrown. - The
stateTransferelement specifies how state is transferred when a node leaves or joins the cluster. It uses the following parameters:- The
chunkSizeparameter specifies the size of cache entry state batches to be transferred. If this value is greater than0, the value set is the size of chunks sent. If the value is less than0, all states are transferred at the same time. - The
fetchInMemoryStateparameter when set totrue, requests state information from neighboring caches on start up. This impacts the start up time for the cache. - The
awaitInitialTransferparameter causes the first call to methodCacheManager.getCache()on the joiner node to block and wait until the joining is complete and the cache has finished receiving state from neighboring caches (iffetchInMemoryStateis enabled). This option applies to distributed and replicated caches only and is enabled by default. - The
timeoutparameter specifies the maximum time (in milliseconds) the cache waits for responses from neighboring caches with the requested states. If no response is received within thetimeoutperiod, the start up process aborts and an exception is thrown.
Specify Transport Configuration
<global> <transport clusterName="${NAME}" distributedSyncTimeout="${TIME}" transportClass="${CLASS}" /> </global>Thetransportelement defines the transport configuration for the cache container as follows:- The
clusterNameparameter specifies the name of the cluster. Nodes can only connect to clusters that share the same name. - The
distributedSyncTimeoutparameter specifies the time to wait to acquire a lock on the distributed lock. This distributed lock ensures that a single cache can transfer state or rehash state at a time. - The
transportClassparameter specifies a class that represents a network transport for the cache container.
9.4. Synchronous/Asynchronous Invalidation
- Synchronous invalidation blocks the thread until all caches in the cluster have received invalidation messages and evicted the obsolete data.
- Asynchronous invalidation operates in a fire-and-forget mode that allows invalidation messages to be broadcast without blocking a thread to wait for responses.
9.5. The L1 Cache and Invalidation
Part V. Remote Client-Server Mode Interfaces
- The Asynchronous API (can only be used in conjunction with the Hot Rod Client in Remote Client-Server Mode)
- The REST Interface
- The Memcached Interface
- The Hot Rod Interface
- The RemoteCache API
Chapter 10. The Asynchronous API
Async appended to each method name. Asynchronous methods return a Future that contains the result of the operation.
Cache<String, String>, Cache.put(String key, String value) returns a String, while Cache.putAsync(String key, String value) returns a Future<String>.
10.1. Asynchronous API Benefits
- The guarantee of synchronous communication, with the added ability to handle failures and exceptions.
- Not being required to block a thread's operations until the call completes.
Example 10.1. Using the Asynchronous API
Set<Future<?>> futures = new HashSet<Future<?>>();
futures.add(cache.putAsync("key1", "value1"));
futures.add(cache.putAsync("key2", "value2"));
futures.add(cache.putAsync("key3", "value3"));futures.add(cache.putAsync(key1, value1));futures.add(cache.putAsync(key2, value2));futures.add(cache.putAsync(key3, value3));
10.2. About Asynchronous Processes
- Network calls
- Marshalling
- Writing to a cache store (optional)
- Locking
10.3. Return Values and the Asynchronous API
Future or the NotifyingFuture in order to query the previous value.
Note
NotifyingFutures are only available in JBoss Data Grid Library mode.
Future.get()
Chapter 11. The REST Interface
Important
security-domain and auth-method parameters from the connector.
11.1. Ruby Client Code
Example 11.1. Using the REST API with Ruby
require 'net/http'

http = Net::HTTP.new('localhost', 8080)

#An example of how to create a new entry

http.post('/rest/MyData/MyKey', 'DATA_HERE', {"Content-Type" => "text/plain"})

#An example of using a GET operation to retrieve the key

puts http.get('/rest/MyData/MyKey').body

#An Example of using a PUT operation to overwrite the key

http.put('/rest/MyData/MyKey', 'MORE DATA', {"Content-Type" => "text/plain"})

#An example of Removing the remote copy of the key

http.delete('/rest/MyData/MyKey')

#An example of creating binary data

http.put('/rest/MyImages/Image.png', File.read('/Users/michaelneale/logo.png'), {"Content-Type" => "image/png"})11.2. Using JSON with Ruby Example
To use JavaScript Object Notation (JSON) with ruby to interact with Red Hat JBoss Data Grid's REST Interface, install the JSON Ruby library (see your platform's package manager or the Ruby documentation) and declare the requirement using the following code:
require 'json'
The following code is an example of how to use JavaScript Object Notation (JSON) in conjunction with Ruby to send specific data, in this case the name and age of an individual, using the PUT function.
data = {:name => "michael", :age => 42 }
http.put('/rest/Users/data/0', data.to_json, {"Content-Type" => "application/json"})11.3. Python Client Code
Example 11.2. Using the REST API with Python
import httplib

#How to insert data

conn = httplib.HTTPConnection("localhost:8080")
data = "SOME DATA HERE \!" #could be string, or a file...
conn.request("POST", "/rest/default/0", data, {"Content-Type": "text/plain"})
response = conn.getresponse()
print response.status

#How to retrieve data

import httplib
conn = httplib.HTTPConnection("localhost:8080")
conn.request("GET", "/rest/default/0")
response = conn.getresponse()
print response.status
print response.read()11.4. Java Client Code
Example 11.3. Defining Imports
import java.io.BufferedReader;import java.io.IOException;
import java.io.InputStreamReader;import java.io.OutputStreamWriter;
import java.net.HttpURLConnection;import java.net.URL;
Example 11.4. Adding a String Value to a Cache
public class RestExample {

   /**
    * Method that puts a String value in cache.
    * @param urlServerAddress
    * @param value
    * @throws IOException
    */

   public void putMethod(String urlServerAddress, String value) throws IOException {
      System.out.println("----------------------------------------");
      System.out.println("Executing PUT");
      System.out.println("----------------------------------------");
      URL address = new URL(urlServerAddress);
      System.out.println("executing request " + urlServerAddress);
      HttpURLConnection connection = (HttpURLConnection) address.openConnection();
      System.out.println("Executing put method of value: " + value);
      connection.setRequestMethod("PUT");
      connection.setRequestProperty("Content-Type", "text/plain");
      connection.setDoOutput(true);

      OutputStreamWriter outputStreamWriter = new OutputStreamWriter(connection.getOutputStream());
      outputStreamWriter.write(value);

      connection.connect();
      outputStreamWriter.flush();

      System.out.println("----------------------------------------");
      System.out.println(connection.getResponseCode() + " " + connection.getResponseMessage());
      System.out.println("----------------------------------------");

      connection.disconnect();
}Example 11.5. Get a String Value from a Cache
   /**
    * Method that gets an value by a key in url as param value.
    * @param urlServerAddress
    * @return String value
    * @throws IOException
    */
   public String getMethod(String urlServerAddress) throws IOException {
      String line = new String();
      StringBuilder stringBuilder = new StringBuilder();

      System.out.println("----------------------------------------");
      System.out.println("Executing GET");
      System.out.println("----------------------------------------");

      URL address = new URL(urlServerAddress);
      System.out.println("executing request " + urlServerAddress);

      HttpURLConnection connection = (HttpURLConnection) address.openConnection();
      connection.setRequestMethod("GET");
      connection.setRequestProperty("Content-Type", "text/plain");
      connection.setDoOutput(true);

      BufferedReader bufferedReader = new BufferedReader(new InputStreamReader(connection.getInputStream()));

      connection.connect();

      while ((line = bufferedReader.readLine()) != null) {
         stringBuilder.append(line + '\n');
      }

      System.out.println("Executing get method of value: " + stringBuilder.toString());

      System.out.println("----------------------------------------");
      System.out.println(connection.getResponseCode() + " " + connection.getResponseMessage());
      System.out.println("----------------------------------------");

      connection.disconnect();

      return stringBuilder.toString();
   }
Example 11.6. Using a Java Main Method
   /**
    * Main method example.
    * @param args
    * @throws IOException
    */
   public static void main(String[] args) throws IOException {
      //Note that the cache name is "cacheX"
      RestExample restExample = new RestExample();
      restExample.putMethod("http://localhost:8080/rest/cacheX/1", "Infinispan REST Test");
      restExample.getMethod("http://localhost:8080/rest/cacheX/1");
   }
}11.5. The REST Interface Connector
<rest-connector virtual-server="default-host"
		cache-container="local"
		security-domain="other"
		auth-method="BASIC"/>
11.5.1. Configure REST Connectors
rest-connector element in Red Hat JBoss Data Grid's Remote Client-Server mode.
Procedure 11.1. Configuring REST Connectors for Remote Client-Server Mode
<subsystem xmlns="urn:infinispan:server:endpoint:6.1">
   <rest-connector virtual-server="default-host"
                 cache-container="local"
                 context-path="${CONTEXT_PATH}"
                 security-domain="${SECURITY_DOMAIN}"
                 auth-method="${METHOD}"
                 security-mode="${MODE}" />
</subsystem>rest-connector element specifies the configuration information for the REST connector.
- The
virtual-serverparameter specifies the virtual server used by the REST connector. The default value for this parameter isdefault-host. This is an optional parameter. - The
cache-containerparameter names the cache container used by the REST connector. This is a mandatory parameter. - The
context-pathparameter specifies the context path for the REST connector. The default value for this parameter is an empty string (""). This is an optional parameter. - The
security-domainparameter specifies that the specified domain, declared in the security subsystem, should be used to authenticate access to the REST endpoint. This is an optional parameter. If this parameter is omitted, no authentication is performed. - The
auth-methodparameter specifies the method used to retrieve credentials for the end point. The default value for this parameter isBASIC. Supported alternate values includeBASIC,DIGEST, andCLIENT-CERT. This is an optional parameter. - The
security-modeparameter specifies whether authentication is required only for write operations (such as PUT, POST and DELETE) or for read operations (such as GET and HEAD) as well. Valid values for this parameter areWRITEfor authenticating write operations only, orREAD_WRITEto authenticate read and write operations. The default value for this parameter isREAD_WRITE.
11.6. Using the REST Interface
- Adding data
- Retrieving data
- Removing data
11.6.1. Adding Data Using REST
- HTTP
PUTmethod - HTTP
POSTmethod
PUT and POST methods are used, the body of the request contains this data, which includes any information added by the user.
PUT and POST methods require a Content-Type header.
11.6.1.1. About PUT /{cacheName}/{cacheKey}
PUT request from the provided URL form places the payload, from the request body in the targeted cache using the provided key. The targeted cache must exist on the server for this task to successfully complete.
hr is the cache name and payRoll%2F3 is the key. The value %2F indicates that a / was used in the key.
http://someserver/rest/hr/payRoll%2F3
Time-To-Live and Last-Modified values are updated, if an update is required.
Note
%2F to represent a / in the key (as in the provided example) can be successfully run if the server is started using the following argument:
-Dorg.apache.tomcat.util.buf.UDecoder.ALLOW_ENCODED_SLASH=true
11.6.1.2. About POST /{cacheName}/{cacheKey}
POST method from the provided URL form places the payload (from the request body) in the targeted cache using the provided key. However, in a POST method, if a value in a cache/key exists, a HTTP CONFLICT status is returned and the content is not updated.
11.6.2. Retrieving Data Using REST
- HTTP
GETmethod. - HTTP
HEADmethod.
11.6.2.1. About GET /{cacheName}/{cacheKey}
GET method returns the data located in the supplied cacheName, matched to the relevant key, as the body of the response. The Content-Type header provides the type of the data. A browser can directly access the cache.
11.6.2.2. About HEAD /{cacheName}/{cacheKey}
HEAD method operates in a manner similar to the GET method, however returns no content (header fields are returned).
11.6.3. Removing Data Using REST
DELETE method to retrieve data from the cache. The DELETE method can:
- Remove a cache entry/value. (
DELETE /{cacheName}/{cacheKey}) - Remove all entries from a cache. (
DELETE /{cacheName})
11.6.3.1. About DELETE /{cacheName}/{cacheKey}
DELETE /{cacheName}/{cacheKey}), the DELETE method removes the key/value from the cache for the provided key.
11.6.3.2. About DELETE /{cacheName}
DELETE /{cacheName}), the DELETE method removes all entries in the named cache. After a successful DELETE operation, the HTTP status code 200 is returned.
11.6.3.3. Background Delete Operations
performAsync header to true to ensure an immediate return while the removal operation continues in the background.
11.6.4. REST Interface Operation Headers
Table 11.1. Header Types
| Headers | Mandatory/Optional | Values | Default Value | Details |
|---|---|---|---|---|
| Content-Type | Mandatory | - | - | If the Content-Type is set to application/x-java-serialized-object, it is stored as a Java object. |
| performAsync | Optional | True/False | - | If set to true, an immediate return occurs, followed by a replication of data to the cluster on its own. This feature is useful when dealing with bulk data inserts and large clusters. |
| timeToLiveSeconds | Optional | Numeric (positive and negative numbers) | -1 (This value prevents expiration as a direct result of timeToLiveSeconds. Expiration values set elsewhere override this default value.) | Reflects the number of seconds before the entry in question is automatically deleted. Setting a negative value for timeToLiveSeconds provides the same result as the default value. |
| maxIdleTimeSeconds | Optional | Numeric (positive and negative numbers) | -1 (This value prevents expiration as a direct result of maxIdleTimeSeconds. Expiration values set elsewhere override this default value.) | Contains the number of seconds after the last usage when the entry will be automatically deleted. Passing a negative value provides the same result as the default value. |
timeToLiveSeconds and maxIdleTimeSeconds headers:
- If both the
timeToLiveSecondsandmaxIdleTimeSecondsheaders are assigned the value0, the cache uses the defaulttimeToLiveSecondsandmaxIdleTimeSecondsvalues configured either using XML or programatically. - If only the
maxIdleTimeSecondsheader value is set to0, thetimeToLiveSecondsvalue should be passed as the parameter (or the default-1, if the parameter is not present). Additionally, themaxIdleTimeSecondsparameter value defaults to the values configured either using XML or programatically. - If only the
timeToLiveSecondsheader value is set to0, expiration occurs immediately and themaxIdleTimeSecondsvalue is set to the value passed as a parameter (or the default-1if no parameter was supplied).
ETags (Entity Tags) are returned for each REST Interface entry, along with a Last-Modified header that indicates the state of the data at the supplied URL. ETags are used in HTTP operations to request data exclusively in cases where the data has changed to save bandwidth. The following headers support ETags (Entity Tags) based optimistic locking:
Table 11.2. Entity Tag Related Headers
| Header | Algorithm | Example | Details |
|---|---|---|---|
| If-Match | If-Match = "If-Match" ":" ( "*" | 1#entity-tag ) | - | Used in conjunction with a list of associated entity tags to verify that a specified entity (that was previously obtained from a resource) remains current. |
| If-None-Match | - | Used in conjunction with a list of associated entity tags to verify that none of the specified entities (that was previously obtained from a resource) are current. This feature facilitates efficient updates of cached information when required and with minimal transaction overhead. | |
| If-Modified-Since | If-Modified-Since = "If-Modified-Since" ":" HTTP-date | If-Modified-Since: Sat, 29 Oct 1994 19:43:31 GMT | Compares the requested variant's last modification time and date with a supplied time and date value. If the requested variant has not been modified since the specified time and date, a 304 (not modified) response is returned without a message-body instead of an entity. |
| If-Unmodified-Since | If-Unmodified-Since = "If-Unmodified-Since" ":" HTTP-date | If-Unmodified-Since: Sat, 29 Oct 1994 19:43:31 GMT | Compares the requested variant's last modification time and date with a supplied time and date value. If the requested resources has not been modified since the supplied date and time, the specified operation is performed. If the requested resource has been modified since the supplied date and time, the operation is not performed and a 412 (Precondition Failed) response is returned. |
11.7. REST Interface Security
11.7.1. Publish REST Endpoints as a Public Interface
interface parameter in the socket-binding element from management to public as follows:
<socket-binding name="http"
		interface="public"
		port="8080"/>
11.7.2. Enable Security for the REST Endpoint
Note
Procedure 11.2. Enable Security for the REST Endpoint
standalone.xml:
Specify Security Parameters
Ensure that the rest endpoint specifies a valid value for thesecurity-domainandauth-methodparameters. Recommended settings for these parameters are as follows:<subsystem xmlns="urn:infinispan:server:endpoint:6.1"> <rest-connector virtual-server="default-host" cache-container="local" security-domain="other" auth-method="BASIC"/> </subsystem>Check Security Domain Declaration
Ensure that the security subsystem contains the corresponding security-domain declaration. For details about setting up security-domain declarations, see the JBoss Enterprise Application Platform 6 documentation.Add an Application User
Run the relevant script and enter the configuration settings to add an application user.- Run the
adduser.shscript (located in$JDG_HOME/bin).- On a Windows system, run the
adduser.batfile (located in$JDG_HOME/bin) instead.
- When prompted about the type of user to add, select
Application User (application-users.properties)by enteringb. - Accept the default value for realm (
ApplicationRealm) by pressing the return key. - Specify a username and password.
- When prompted for a group, enter
REST. - Ensure the username and application realm information is correct when prompted and enter "yes" to continue.
Verify the Created Application User
Ensure that the created application user is correctly configured.- Check the configuration listed in the
application-users.propertiesfile (located in$JDG_HOME/standalone/configuration/). The following is an example of what the correct configuration looks like in this file:user1=2dc3eacfed8cf95a4a31159167b936fc
- Check the configuration listed in the
application-roles.propertiesfile (located in$JDG_HOME/standalone/configuration/). The following is an example of what the correct configuration looks like in this file:user1=REST
Test the Server
Start the server and enter the following link in a browser window to access the REST endpoint:http://localhost:8080/rest/namedCache
Note
If testing using a GET request, a405response code is expected and indicates that the server was successfully authenticated.
Chapter 12. The Memcached Interface
12.1. About Memcached Servers
- Standalone, where each server acts independently without communication with any other memcached servers.
- Clustered, where servers replicate and distribute data to other memcached servers.
12.2. Memcached Statistics
Table 12.1. Memcached Statistics
| Statistic | Data Type | Details |
|---|---|---|
| uptime | 32-bit unsigned integer. | Contains the time (in seconds) that the memcached instance has been available and running. |
| time | 32-bit unsigned integer. | Contains the current time. |
| version | String | Contains the current version. |
| curr_items | 32-bit unsigned integer. | Contains the number of items currently stored by the instance. |
| total_items | 32-bit unsigned integer. | Contains the total number of items stored by the instance during its lifetime. |
| cmd_get | 64-bit unsigned integer | Contains the total number of get operation requests (requests to retrieve data). |
| cmd_set | 64-bit unsigned integer | Contains the total number of set operation requests (requests to store data). |
| get_hits | 64-bit unsigned integer | Contains the number of keys that are present from the keys requested. |
| get_misses | 64-bit unsigned integer | Contains the number of keys that were not found from the keys requested. |
| delete_hits | 64-bit unsigned integer | Contains the number of keys to be deleted that were located and successfully deleted. |
| delete_misses | 64-bit unsigned integer | Contains the number of keys to be deleted that were not located and therefore could not be deleted. |
| incr_hits | 64-bit unsigned integer | Contains the number of keys to be incremented that were located and successfully incremented |
| incr_misses | 64-bit unsigned integer | Contains the number of keys to be incremented that were not located and therefore could not be incremented. |
| decr_hits | 64-bit unsigned integer | Contains the number of keys to be decremented that were located and successfully decremented. |
| decr_misses | 64-bit unsigned integer | Contains the number of keys to be decremented that were not located and therefore could not be decremented. |
| cas_hits | 64-bit unsigned integer | Contains the number of keys to be compared and swapped that were found and successfully compared and swapped. |
| cas_misses | 64-bit unsigned integer | Contains the number of keys to be compared and swapped that were not found and therefore not compared and swapped. |
| cas_badval | 64-bit unsigned integer | Contains the number of keys where a compare and swap occurred but the original value did not match the supplied value. |
| evictions | 64-bit unsigned integer | Contains the number of eviction calls performed. |
| bytes_read | 64-bit unsigned integer | Contains the total number of bytes read by the server from the network. |
| bytes_written | 64-bit unsigned integer | Contains the total number of bytes written by the server to the network. |
12.3. The Memcached Interface Connector
memcached socket binding, and exposes the memcachedCache cache declared in the local container, using defaults for all other settings.
<memcached-connector socket-binding="memcached"
		     cache-container="local"/>
12.3.1. Configure Memcached Connectors
connectors element in Red Hat JBoss Data Grid's Remote Client-Server Mode.
Procedure 12.1. Configuring the Memcached Connector in Remote Client-Server Mode
memcached-connector element defines the configuration elements for use with memcached.
<subsystem xmlns="urn:infinispan:server:endpoint:6.1">
<memcached-connector socket-binding="memcached"
                     cache-container="local"
                     worker-threads="${VALUE}"
                     idle-timeout="{VALUE}"
                     tcp-nodelay="{TRUE/FALSE}"
                     send-buffer-size="{VALUE}"
                     receive-buffer-size="${VALUE}" />
</subsystem>- The
socket-bindingparameter specifies the socket binding port used by the memcached connector. This is a mandatory parameter. - The
cache-containerparameter names the cache container used by the memcached connector. This is a mandatory parameter. - The
worker-threadsparameter specifies the number of worker threads available for the memcached connector. The default value for this parameter is 160. This is an optional parameter. - The
idle-timeoutparameter specifies the time (in milliseconds) the connector can remain idle before the connection times out. The default value for this parameter is-1, which means that no timeout period is set. This is an optional parameter. - The
tcp-nodelayparameter specifies whether TCP packets will be delayed and sent out in batches. Valid values for this parameter aretrueandfalse. The default value for this parameter istrue. This is an optional parameter. - The
send-buffer-sizeparameter indicates the size of the send buffer for the memcached connector. The default value for this parameter is the size of the TCP stack buffer. This is an optional parameter. - The
receive-buffer-sizeparameter indicates the size of the receive buffer for the memcached connector. The default value for this parameter is the size of the TCP stack buffer. This is an optional parameter.
12.4. Memcached Interface Security
12.4.1. Publish Memcached Endpoints as a Public Interface
interface parameter in the socket-binding element from management to public as follows:
<socket-binding name="memcached"
		interface="public"
		port="11211" />
Chapter 13. The Hot Rod Interface
13.1. About Hot Rod
13.2. The Benefits of Using Hot Rod over Memcached
- Memcached
- The memcached protocol causes the server endpoint to use the memcached text wire protocol. The memcached wire protocol has the benefit of being commonly used, and is available for almost any platform. All of JBoss Data Grid's functions, including clustering, state sharing for scalability, and high availability, are available when using memcached.However the memcached protocol lacks dynamicity, resulting in the need to manually update the list of server nodes on your clients in the event one of the nodes in a cluster fails. Also, memcached clients are not aware of the location of the data in the cluster. This means that they will request data from a non-owner node, incurring the penalty of an additional request from that node to the actual owner, before being able to return the data to the client. This is where the Hot Rod protocol is able to provide greater performance than memcached.
- Hot Rod
- JBoss Data Grid's Hot Rod protocol is a binary wire protocol that offers all the capabilities of memcached, while also providing better scaling, durability, and elasticity.The Hot Rod protocol does not need the hostnames and ports of each node in the remote cache, whereas memcached requires these parameters to be specified. Hot Rod clients automatically detect changes in the topology of clustered Hot Rod servers; when new nodes join or leave the cluster, clients update their Hot Rod server topology view. Consequently, Hot Rod provides ease of configuration and maintenance, with the advantage of dynamic load balancing and failover.Additionally, the Hot Rod wire protocol uses smart routing when connecting to a distributed cache. This involves sharing a consistent hash algorithm between the server nodes and clients, resulting in faster read and writing capabilities than memcached.
Warning
cacheManager.getCache method.
13.3. Hot Rod Hash Functions
13.4. The Hot Rod Interface Connector
hotrod socket binding.
<hotrod-connector socket-binding="hotrod"
		  cache-container="local" />
<topology-state-transfer /> child element to the connector as follows:
<hotrod-connector socket-binding="hotrod"
		  cache-container="local">
   <topology-state-transfer lazy-retrieval="false"
   			    lock-timeout="1000"
   			    replication-timeout="5000" />
</hotrod-connector>
Note
13.4.1. Configure Hot Rod Connectors
hotrod-connector and topology-state-transfer elements must be configured based on the following procedure.
Procedure 13.1. Configuring Hot Rod Connectors for Remote Client-Server Mode
<subsystem xmlns="urn:infinispan:server:endpoint:6.1">
	<hotrod-connector socket-binding="hotrod"
			  cache-container="local"
			  worker-threads="${VALUE}"
			  idle-timeout="${VALUE}"
			  tcp-nodelay="${TRUE/FALSE}"
			  send-buffer-size="${VALUE}"
			  receive-buffer-size="${VALUE}" />
	<topology-state-transfer lock-timeout"="${MILLISECONDS}"
				 replication-timeout="${MILLISECONDS}"
				 external-host="${HOSTNAME}"
				 external-port="${PORT}"
				 lazy-retrieval="${TRUE/FALSE}"
				 await-initial-transfer="${TRUE/FALSE}" />
</subsystem>- The
hotrod-connectorelement defines the configuration elements for use with Hot Rod.- The
socket-bindingparameter specifies the socket binding port used by the Hot Rod connector. This is a mandatory parameter. - The
cache-containerparameter names the cache container used by the Hot Rod connector. This is a mandatory parameter. - The
worker-threadsparameter specifies the number of worker threads available for the Hot Rod connector. The default value for this parameter is160. This is an optional parameter. - The
idle-timeoutparameter specifies the time (in milliseconds) the connector can remain idle before the connection times out. The default value for this parameter is-1, which means that no timeout period is set. This is an optional parameter. - The
tcp-nodelayparameter specifies whether TCP packets will be delayed and sent out in batches. Valid values for this parameter aretrueandfalse. The default value for this parameter istrue. This is an optional parameter. - The
send-buffer-sizeparameter indicates the size of the send buffer for the Hot Rod connector. The default value for this parameter is the size of the TCP stack buffer. This is an optional parameter. - The
receive-buffer-sizeparameter indicates the size of the receive buffer for the Hot Rod connector. The default value for this parameter is the size of the TCP stack buffer. This is an optional parameter.
- The
topology-state-transferelement specifies the topology state transfer configurations for the Hot Rod connector. This element can only occur once within ahotrod-connectorelement.- The
lock-timeoutparameter specifies the time (in milliseconds) after which the operation attempting to obtain a lock times out. The default value for this parameter is10seconds. This is an optional parameter. - The
replication-timeoutparameter specifies the time (in milliseconds) after which the replication operation times out. The default value for this parameter is10seconds. This is an optional parameter. - The
external-hostparameter specifies the hostname sent by the Hot Rod server to clients listed in the topology information. The default value for this parameter is the host address. This is an optional parameter. - The
external-portparameter specifies the port sent by the Hot Rod server to clients listed in the topology information. The default value for this parameter is the configured port. This is an optional parameter. - The
lazy-retrievalparameter indicates whether the Hot Rod connector will carry out retrieval operations lazily. The default value for this parameter istrue. This is an optional parameter. - The
await-initial-transferparameter specifies whether the initial state retrieval happens immediately at startup. This parameter only applies whenlazy-retrievalis set tofalse. This default value for this parameter istrue.
13.5. Hot Rod Headers
13.5.1. Hot Rod Header Data Types
Table 13.1. Header Data Types
| Data Type | Size | Details |
|---|---|---|
| vInt | Between 1-5 bytes. | Unsigned variable length integer values. |
| vLong | Between 1-9 bytes. | Unsigned variable length long values. |
| string | - | Strings are always represented using UTF-8 encoding. |
13.5.2. Request Header
Table 13.2. Request Header Fields
| Field Name | Data Type/Size | Details |
|---|---|---|
| Magic | 1 byte | Indicates whether the header is a request header or response header. |
| Message ID | vLong | Contains the message ID. Responses use this unique ID when responding to a request. This allows Hot Rod clients to implement the protocol in an asynchronous manner. |
| Version | 1 byte | Contains the Hot Rod server version. |
| Opcode | 1 byte | Contains the relevant operation code. In a request header, opcode can only contain the request operation codes. |
| Cache Name Length | vInt | Stores the length of the cache name. If Cache Name Length is set to 0 and no value is supplied for Cache Name, the operation interacts with the default cache. |
| Cache Name | string | Stores the name of the target cache for the specified operation. This name must match the name of a predefined cache in the cache configuration file. |
| Flags | vInt | Contains a numeric value of variable length that represents flags passed to the system. Each bit represents a flag, except the most significant bit, which is used to determine whether more bytes must be read. Using a bit to represent each flag facilitates the representation of flag combinations in a condensed manner. |
| Client Intelligence | 1 byte | Contains a value that indicates the client capabilities to the server. |
| Topology ID | vInt | Contains the last known view ID in the client. Basic clients supply the value 0 for this field. Clients that support topology or hash information supply the value 0 until the server responds with the current view ID, which is subsequently used until a new view ID is returned by the server to replace the current view ID. |
| Transaction Type | 1 byte | Contains a value that represents one of two known transaction types. Currently, the only supported value is 0. |
| Transaction ID | byte-array | Contains a byte array that uniquely identifies the transaction associated with the call. The transaction type determines the length of this byte array. If the value for Transaction Type was set to 0, no Transaction ID is present. |
13.5.3. Response Header
Table 13.3. Response Header Fields
| Field Name | Data Type | Details |
|---|---|---|
| Magic | 1 byte | Indicates whether the header is a request or response header. |
| Message ID | vLong | Contains the message ID. This unique ID is used to pair the response with the original request. This allows Hot Rod clients to implement the protocol in an asynchronous manner. |
| Opcode | 1 byte | Contains the relevant operation code. In a response header, opcode can only contain the response operation codes. |
| Status | 1 byte | Contains a code that represents the status of the response. |
| Topology Change Marker | 1 byte | Contains a marker byte that indicates whether the response is included in the topology change information. |
13.5.4. Topology Change Headers
topology ID and the topology ID sent by the client and, if the two differ, it returns a new topology ID.
13.5.4.1. Topology Change Marker Values
Topology Change Marker field in a response header:
Table 13.4. Topology Change Marker Field Values
| Value | Details |
|---|---|
| 0 | No topology change information is added. |
| 1 | Topology change information is added. |
13.5.4.2. Topology Change Headers for Topology-Aware Clients
Table 13.5. Topology Change Header Fields
| Response Header Fields | Data Type/Size | Details |
|---|---|---|
| Response Header with Topology Change Marker | - | - |
| Topology ID | vInt | - |
| Num Servers in Topology | vInt | Contains the number of Hot Rod servers running in the cluster. This value can be a subset of the entire cluster if only some nodes are running Hot Rod servers. |
| mX: Host/IP Length | vInt | Contains the length of the hostname or IP address of an individual cluster member. Variable length allows this element to include hostnames, IPv4 and IPv6 addresses. |
| mX: Host/IP Address | string | Contains the hostname or IP address of an individual cluster member. The Hot Rod client uses this information to access the individual cluster member. |
| mX: Port | Unsigned Short. 2 bytes | Contains the port used by Hot Rod clients to communicate with the cluster member. |
mX, are repeated for each server in the topology. The first server in the topology's information fields will be prefixed with m1 and the numerical value is incremented by one for each additional server till the value of X equals the number of servers specified in the num servers in topology field.
13.5.4.3. Topology Change Headers for Hash Distribution-Aware Clients
Table 13.6. Topology Change Header Fields
| Field | Data Type/Size | Details |
|---|---|---|
| Response Header with Topology Change Marker | - | - |
| Topology ID | vInt | - |
| Number Key Owners | Unsigned short. 2 bytes. | Contains the number of globally configured copies for each distributed key. Contains the value 0 if distribution is not configured on the cache. |
| Hash Function Version | 1 byte | Contains a pointer to the hash function in use. Contains the value 0 if distribution is not configured on the cache. |
| Hash Space Size | vInt | Contains the modulus used by JBoss Data Grid for all module arithmetic related to hash code generation. Clients use this information to apply the correct hash calculations to the keys. Contains the value 0 if distribution is not configured on the cache. |
| Number servers in topology | vInt | Contains the number of Hot Rod servers running in the cluster. This value can be a subset of the entire cluster if only some nodes are running Hot Rod servers. This value also represents the number of host to port pairings included in the header. |
| Number Virtual Nodes Owners | vInt | Contains the number of configured virtual nodes. Contains the value 0 if no virtual nodes are configured or if distribution is not configured on the cache. |
| mX: Host/IP Length | vInt | Contains the length of the hostname or IP address of an individual cluster member. Variable length allows this element to include hostnames, IPv4 and IPv6 addresses. |
| mX: Host/IP Address | string | Contains the hostname or IP address of an individual cluster member. The Hot Rod client uses this information to access the individual cluster member. |
| mX: Port | Unsigned short. 2 bytes. | Contains the port used by Hot Rod clients to communicate with the cluster member. |
| mX: Hashcode | 4 bytes. |
mX, are repeated for each server in the topology. The first server in the topology's information fields will be prefixed with m1 and the numerical value is incremented by one for each additional server till the value of X equals the number of servers specified in the num servers in topology field.
13.6. Hot Rod Operations
- BulkGetKeys
- BulkGet
- Clear
- ContainsKey
- Get
- GetWithMetadata
- Ping
- PutIfAbsent
- Put
- Query
- RemoveIfUnmodified
- Remove
- ReplaceIfUnmodified
- Replace
- Stats
Important
Put, PutIfAbsent, Replace, and ReplaceWithVersion operations, if lifespan is set to a value greater than 30 days, the value is treated as UNIX time and represents the number of seconds since the date 1/1/1970.
13.6.1. Hot Rod BulkGet Operation
BulkGet operation uses the following request format:
Table 13.7. BulkGet Operation Request Format
| Field | Data Type | Details |
|---|---|---|
| Header | - | - |
| Entry Count | vInt | Contains the maximum number of Red Hat JBoss Data Grid entries to be returned by the server. The entry is the key and value pair. |
Table 13.8. BulkGet Operation Response Format
| Field | Data Type | Details |
|---|---|---|
| Header | - | - |
| More | vInt | Represents if more entries must be read from the stream. While More is set to 1, additional entries follow until the value of More is set to 0, which indicates the end of the stream. |
| Key Size | - | Contains the size of the key. |
| Key | - | Contains the key value. |
| Value Size | - | Contains the size of the value. |
| Value | - | Contains the value. |
More, Key Size, Key, Value Size and Value entry is appended to the response.
13.6.2. Hot Rod BulkGetKeys Operation
BulkGetKeys operation uses the following request format:
Table 13.9. BulkGetKeys Operation Request Format
| Field | Data Type | Details |
|---|---|---|
| Header | variable | Request header. |
| Scope | vInt |
|
Table 13.10. BulkGetKeys Operation Response Format
| Field | Data Type | Details |
|---|---|---|
| Header | variable | Response header |
| Response status | 1 byte | 0x00 = success, data follows. |
| More | 1 byte | One byte representing whether more keys need to be read from the stream. When set to 1 an entry follows, when set to 0, it is the end of stream and no more entries are left to read. |
| Key 1 Length | vInt | Length of key |
| Key 1 | Byte array | Retrieved key. |
| More | 1 byte | - |
| Key 2 Length | vInt | - |
| Key 2 | byte array | - |
| ...etc |
13.6.3. Hot Rod Clear Operation
clear operation format includes only a header.
Table 13.11. Clear Operation Response
| Response Status | Details |
|---|---|
| 0x00 | Red Hat JBoss Data Grid was successfully cleared. |
13.6.4. Hot Rod ContainsKey Operation
ContainsKey operation uses the following request format:
Table 13.12. ContainsKey Operation Request Format
| Field | Data Type | Details |
|---|---|---|
| Header | - | - |
| Key Length | vInt | Contains the length of the key. The vInt data type is used because of its size (up to 5 bytes), which is larger than the size of Integer.MAX_VALUE. However, Java disallows single array sizes to exceed the size of Integer.MAX_VALUE. As a result, this vInt is also limited to the maximum size of Integer.MAX_VALUE. |
| Key | Byte array | Contains a key, the corresponding value of which is requested. |
Table 13.13. ContainsKey Operation Response Format
| Response Status | Details |
|---|---|
| 0x00 | Successful operation. |
| 0x02 | The key does not exist. |
13.6.5. Hot Rod Get Operation
Get operation uses the following request format:
Table 13.14. Get Operation Request Format
| Field | Data Type | Details |
|---|---|---|
| Header | - | - |
| Key Length | vInt | Contains the length of the key. The vInt data type is used because of its size (up to 5 bytes), which is larger than the size of Integer.MAX_VALUE. However, Java disallows single array sizes to exceed the size of Integer.MAX_VALUE. As a result, this vInt is also limited to the maximum size of Integer.MAX_VALUE. |
| Key | Byte array | Contains a key, the corresponding value of which is requested. |
Table 13.15. Get Operation Response Format
| Response Status | Details |
|---|---|
| 0x00 | Successful operation. |
| 0x02 | The key does not exist. |
get operation's response when the key is found is as follows:
Table 13.16. Get Operation Response Format
| Field | Data Type | Details |
|---|---|---|
| Header | - | - |
| Value Length | vInt | Contains the length of the value. |
| Value | Byte array | Contains the requested value. |
13.6.6. Hot Rod GetWithMetadata Operation
GetWithMetadata operation uses the following request format:
Table 13.17. GetWithMetadata Operation Request Format
| Field | Data Type | Details |
|---|---|---|
| Header | variable | Request header. |
| Key Length | vInt | Length of key. Note that the size of a vInt can be up to five bytes, which theoretically can produce bigger numbers than Integer.MAX_VALUE. However, Java cannot create a single array that is bigger than Integer.MAX_VALUE, hence the protocol limits vInt array lengths to Integer.MAX_VALUE. |
| Key | byte array | Byte array containing the key whose value is being requested. |
Table 13.18. GetWithMetadata Operation Response Format
| Field | Data Type | Details |
|---|---|---|
| Header | variable | Response header. |
| Response status | 1 byte | 0x00 = success, if key retrieved.
0x02 = if key does not exist.
|
| Flag | 1 byte | A flag indicating whether the response contains expiration information. The value of the flag is obtained as a bitwise OR operation between INFINITE_LIFESPAN (0x01) and INFINITE_MAXIDLE (0x02). |
| Created | Long | (optional) a Long representing the timestamp when the entry was created on the server. This value is returned only if the flag's INFINITE_LIFESPAN bit is not set. |
| Lifespan | vInt | (optional) a vInt representing the lifespan of the entry in seconds. This value is returned only if the flag's INFINITE_LIFESPAN bit is not set. |
| LastUsed | Long | (optional) a Long representing the timestamp when the entry was last accessed on the server. This value is returned only if the flag's INFINITE_MAXIDLE bit is not set. |
| MaxIdle | vInt | (optional) a vInt representing the maxIdle of the entry in seconds. This value is returned only if the flag's INFINITE_MAXIDLE bit is not set. |
| Entry Version | 8 bytes | Unique value of an existing entry modification. The protocol does not mandate that entry_version values are sequential, however they need to be unique per update at the key level. |
| Value Length | vInt | If success, length of value. |
| Value | byte array | If success, the requested value. |
13.6.7. Hot Rod Ping Operation
ping is an application level request to check for server availability.
Table 13.19. Ping Operation Response
| Response Status | Details |
|---|---|
| 0x00 | Successful ping without any errors. |
13.6.8. Hot Rod Put Operation
put operation request format includes the following:
Table 13.20.
| Field | Data Type | Details |
|---|---|---|
| Header | - | - |
| Key Length | - | Contains the length of the key. |
| Key | Byte array | Contains the key value. |
| Lifespan | vInt | Contains the number of seconds before the entry expires. If the number of seconds exceeds thirty days, the value is treated as UNIX time (i.e. the number of seconds since the date 1/1/1970) as the entry lifespan. When set to the value 0, the entry will never expire. |
| Max Idle | vInt | Contains the number of seconds an entry is allowed to remain idle before it is evicted from the cache. If this entry is set to 0, the entry is allowed to remain idle indefinitely without being evicted due to the max idle value. |
| Value Length | vInt | Contains the length of the value. |
| Value | Byte array | The requested value. |
Table 13.21.
| Response Status | Details |
|---|---|
| 0x00 | The value was successfully stored. |
ForceReturnPreviousValue is passed, the previous value and key are returned. If the previous key and value do not exist, the value length would contain the value 0.
13.6.9. Hot Rod PutIfAbsent Operation
putIfAbsent operation request format includes the following:
Table 13.22. PutIfAbsent Operation Request Fields
| Field | Data Type | Details |
|---|---|---|
| Header | - | - |
| Key Length | vInt | Contains the length of the key. |
| Key | Byte array | Contains the key value. |
| Lifespan | vInt | Contains the number of seconds before the entry expires. If the number of seconds exceeds thirty days, the value is treated as UNIX time (i.e. the number of seconds since the date 1/1/1970) as the entry lifespan. When set to the value 0, the entry will never expire. |
| Max Idle | vInt | Contains the number of seconds an entry is allowed to remain idle before it is evicted from the cache. If this entry is set to 0, the entry is allowed to remain idle indefinitely without being evicted due to the max idle value. |
| Value Length | vInt | Contains the length of the value. |
| Value | Byte array | Contains the requested value. |
Table 13.23.
| Response Status | Details |
|---|---|
| 0x00 | The value was successfully stored. |
| 0x01 | The key was present, therefore the value was not stored. The current value of the key is returned. |
ForceReturnPreviousValue is passed, the previous value and key are returned. If the previous key and value do not exist, the value length would contain the value 0.
13.6.10. Hot Rod Query Operation
Query operation request format includes the following:
Table 13.24. Query Operation Request Fields
| Field | Data Type | Details |
|---|---|---|
| Header | variable | Request header. |
| Query Length | vInt | The length of the Protobuf encoded query object. |
| Query | Byte array | Byte array containing the Protobuf encoded query object, having a length specified by previous field. |
Table 13.25. Query Operation Response
| Response Status | Data | Details |
|---|---|---|
| Header | variable | Response header. |
| Response payload Length | vInt | The length of the Protobuf encoded response object. |
| Response payload | Byte array | Byte array containing the Protobuf encoded response object, having a length specified by previous field. |
13.6.11. Hot Rod Remove Operation
Hot Rod Remove operation uses the following request format:
Table 13.26. Remove Operation Request Format
| Field | Data Type | Details |
|---|---|---|
| Header | - | - |
| Key Length | vInt | Contains the length of the key. The vInt data type is used because of its size (up to 5 bytes), which is larger than the size of Integer.MAX_VALUE. However, Java disallows single array sizes to exceed the size of Integer.MAX_VALUE. As a result, this vInt is also limited to the maximum size of Integer.MAX_VALUE. |
| Key | Byte array | Contains a key, the corresponding value of which is requested. |
Table 13.27. Remove Operation Response Format
| Response Status | Details |
|---|---|
| 0x00 | Successful operation. |
| 0x02 | The key does not exist. |
ForceReturnPreviousValue is passed, the response header contains either:
- The value and length of the previous key.
- The value length
0and the response status0x02to indicate that the key does not exist.
ForceReturnPreviousValue is passed. If the key does not exist or the previous value was null, the value length is 0.
13.6.12. Hot Rod RemoveIfUnmodified Operation
RemoveIfUnmodified operation request format includes the following:
Table 13.28. RemoveIfUnmodified Operation Request Fields
| Field | Data Type | Details |
|---|---|---|
| Header | - | - |
| Key Length | vInt | Contains the length of the key. |
| Key | Byte array | Contains the key value. |
| Entry Version | 8 bytes | The version number for the entry. |
Table 13.29. RemoveIfUnmodified Operation Response
| Response Status | Details |
|---|---|
| 0x00 | Returned status if the entry was replaced or removed. |
| 0x01 | Returns status if the entry replace or remove was unsuccessful because the key was modified. |
| 0x02 | Returns status if the key does not exist. |
ForceReturnPreviousValue is passed, the previous value and key are returned. If the previous key and value do not exist, the value length would contain the value 0.
13.6.13. Hot Rod Replace Operation
replace operation request format includes the following:
Table 13.30. Replace Operation Request Fields
| Field | Data Type | Details |
|---|---|---|
| Header | - | - |
| Key Length | vInt | Contains the length of the key. |
| Key | Byte array | Contains the key value. |
| Lifespan | vInt | Contains the number of seconds before the entry expires. If the number of seconds exceeds thirty days, the value is treated as UNIX time (i.e. the number of seconds since the date 1/1/1970) as the entry lifespan. When set to the value 0, the entry will never expire. |
| Max Idle | vInt | Contains the number of seconds an entry is allowed to remain idle before it is evicted from the cache. If this entry is set to 0, the entry is allowed to remain idle indefinitely without being evicted due to the max idle value. |
| Value Length | vInt | Contains the length of the value. |
| Value | Byte array | Contains the requested value. |
Table 13.31. Replace Operation Response
| Response Status | Details |
|---|---|
| 0x00 | The value was successfully stored. |
| 0x01 | The value was not stored because the key does not exist. |
ForceReturnPreviousValue is passed, the previous value and key are returned. If the previous key and value do not exist, the value length would contain the value 0.
13.6.14. Hot Rod ReplaceWithVersion Operation
ReplaceWithVersion operation request format includes the following:
Note
ReplaceWithVersion operation uses the ReplaceIfUnmodified operation. As a result, these two operations are exactly the same in JBoss Data Grid.
Table 13.32. ReplaceWithVersion Operation Request Fields
| Field | Data Type | Details |
|---|---|---|
| Header | - | - |
| Key Length | vInt | Contains the length of the key. |
| Key | Byte array | Contains the key value. |
| Lifespan | vInt | Contains the number of seconds before the entry expires. If the number of seconds exceeds thirty days, the value is treated as UNIX time (i.e. the number of seconds since the date 1/1/1970) as the entry lifespan. When set to the value 0, the entry will never expire. |
| Max Idle | vInt | Contains the number of seconds an entry is allowed to remain idle before it is evicted from the cache. If this entry is set to 0, the entry is allowed to remain idle indefinitely without being evicted due to the max idle value. |
| Entry Version | 8 bytes | The version number for the entry. |
| Value Length | vInt | Contains the length of the value. |
| Value | Byte array | Contains the requested value. |
Table 13.33. ReplaceWithVersion Operation Response
| Response Status | Details |
|---|---|
| 0x00 | Returned status if the entry was replaced or removed. |
| 0x01 | Returns status if the entry replace or remove was unsuccessful because the key was modified. |
| 0x02 | Returns status if the key does not exist. |
ForceReturnPreviousValue is passed, the previous value and key are returned. If the previous key and value do not exist, the value length would contain the value 0.
13.6.15. Hot Rod Stats Operation
Table 13.34. Stats Operation Request Fields
| Name | Details |
|---|---|
| timeSinceStart | Contains the number of seconds since Hot Rod started. |
| currentNumberOfEntries | Contains the number of entries that currently exist in the Hot Rod server. |
| totalNumberOfEntries | Contains the total number of entries stored in the Hot Rod server. |
| stores | Contains the number of put operations attempted. |
| retrievals | Contains the number of get operations attempted. |
| hits | Contains the number of get hits. |
| misses | Contains the number of get misses. |
| removeHits | Contains the number of remove hits. |
| removeMisses | Contains the number of removal misses. |
Table 13.35. Stats Operation Response
| Name | Data Type | Details |
|---|---|---|
| Header | - | - |
| Number of Stats | vInt | Contains the number of individual statistics returned. |
| Name Length | vInt | Contains the length of the named statistic. |
| Name | string | Contains the name of the statistic. |
| Value Length | vInt | Contains the length of the value. |
| Value | string | Contains the statistic value. |
Name Length, Name, Value Length and Value recur for each statistic requested.
13.7. Hot Rod Operation Values
opcode values for a request header and their corresponding response header values:
Table 13.36. Opcode Request and Response Header Values
| Operation | Request Operation Code | Response Operation Code |
|---|---|---|
| put | 0x01 | 0x02 |
| get | 0x03 | 0x04 |
| putIfAbsent | 0x05 | 0x06 |
| replace | 0x07 | 0x08 |
| replaceIfUnmodified | 0x09 | 0x0A |
| remove | 0x0B | 0x0C |
| removeIfUnmodified | 0x0D | 0x0E |
| containsKey | 0x0F | 0x10 |
| clear | 0x13 | 0x14 |
| stats | 0x15 | 0x16 |
| ping | 0x17 | 0x18 |
| bulkGet | 0x19 | 0x1A |
| getWithMetadata | 0x1B | 0x1C |
| bulkKeysGet | 0x1D | 0x1E |
| query | 0x1F | 0x20 |
opcode value is 0x50, it indicates an error response.
13.7.1. Magic Values
Magic field in request and response headers:
Table 13.37. Magic Field Values
| Value | Details |
|---|---|
| 0xA0 | Cache request marker. |
| 0xA1 | Cache response marker. |
13.7.2. Status Values
Status field in a response header:
Table 13.38. Status Values
| Value | Details |
|---|---|
| 0x00 | No error. |
| 0x01 | Not put/removed/replaced. |
| 0x02 | Key does not exist. |
| 0x81 | Invalid Magic value or Message ID. |
| 0x82 | Unknown command. |
| 0x83 | Unknown version. |
| 0x84 | Request parsing error. |
| 0x85 | Server error. |
| 0x86 | Command timed out. |
13.7.3. Transaction Type Values
Transaction Type in a request header:
Table 13.39. Transaction Type Field Values
| Value | Details |
|---|---|
| 0 | Indicates a non-transactional call or that the client does not support transactions. If used, the TX_ID field is omitted. |
| 1 | Indicates X/Open XA transaction ID (XID). This value is currently not supported. |
13.7.4. Client Intelligence Values
Client Intelligence in a request header:
Table 13.40. Client Intelligence Field Values
| Value | Details |
|---|---|
| 0x01 | Indicates a basic client that does not require any cluster or hash information. |
| 0x02 | Indicates a client that is aware of topology and requires cluster information. |
| 0x03 | Indicates a client that is aware of hash and distribution and requires both the cluster and hash information. |
13.7.5. Flag Values
flag values in the request header:
Table 13.41. Flag Field Values
| Value | Details |
|---|---|
| 0x0001 | ForceReturnPreviousValue |
13.7.6. Hot Rod Error Handling
Table 13.42. Hot Rod Error Handling using Response Header Fields
| Field | Data Type | Details |
|---|---|---|
| Error Opcode | - | Contains the error operation code. |
| Error Status Number | - | Contains a status number that corresponds to the error opcode. |
| Error Message Length | vInt | Contains the length of the error message. |
| Error Message | string | Contains the actual error message. If an 0x84 error code returns, which indicates that there was an error in parsing the request, this field contains the latest version supported by the Hot Rod server. |
13.8. Put Request Example
put request using Hot Rod:
Table 13.43. Put Request Example
| Byte | 0 | 1 | 2 | 3 | 4 | 5 | 6 | 7 |
|---|---|---|---|---|---|---|---|---|
| 8 | 0xA0 | 0x09 | 0x41 | 0x01 | 0x07 | 0x4D ('M') | 0x79 ('y') | 0x43 ('C') |
| 16 | 0x61 ('a') | 0x63 ('c') | 0x68 ('h') | 0x65 ('e') | 0x00 | 0x03 | 0x00 | 0x00 |
| 24 | 0x00 | 0x05 | 0x48 ('H') | 0x65 ('e') | 0x6C ('l') | 0x6C ('l') | 0x6F ('o') | 0x00 |
| 32 | 0x00 | 0x05 | 0x57 ('W') | 0x6F ('o') | 0x72 ('r') | 0x6C ('l') | 0x64 ('d') | - |
Table 13.44. Example Request Field Names and Values
| Field Name | Byte | Value |
|---|---|---|
| Magic | 0 | 0xA0 |
| Version | 2 | 0x41 |
| Cache Name Length | 4 | 0x07 |
| Flag | 12 | 0x00 |
| Topology ID | 14 | 0x00 |
| Transaction ID | 16 | 0x00 |
| Key | 18-22 | 'Hello' |
| Max Idle | 24 | 0x00 |
| Value | 26-30 | 'World' |
| Message ID | 1 | 0x09 |
| Opcode | 3 | 0x01 |
| Cache Name | 5-11 | 'MyCache' |
| Client Intelligence | 13 | 0x03 |
| Transaction Type | 15 | 0x00 |
| Key Field Length | 17 | 0x05 |
| Lifespan | 23 | 0x00 |
| Value Field Length | 25 | 0x05 |
put request:
Table 13.45. Coded Response for the Sample Put Request
| Byte | 0 | 1 | 2 | 3 | 4 | 5 | 6 | 7 |
|---|---|---|---|---|---|---|---|---|
| 8 | 0xA1 | 0x09 | 0x01 | 0x00 | 0x00 | - | - | - |
Table 13.46. Example Response Field Names and Values
| Field Name | Byte | Value |
|---|---|---|
| Magic | 0 | 0xA1 |
| Opcode | 2 | 0x01 |
| Topology Change Marker | 4 | 0x00 |
| Message ID | 1 | 0x09 |
| Status | 3 | 0x00 |
13.9. Hot Rod Java Client
13.9.1. Hot Rod Java Client Download
Procedure 13.2. Download Hot Rod Java Client
- Log into the Customer Portal at https://access.redhat.com.
- Click the button near the top of the page.
- In the Product Downloads page, click .
- Select the appropriate JBoss Data Grid version from the Version: drop down menu.
- Locate the Red Hat JBoss Data Grid ${VERSION} Hot Rod Java Client entry and click the corresponding link.
13.9.2. Hot Rod Java Client Configuration
Example 13.1. Client Instance Creation
org.infinispan.client.hotrod.configuration.ConfigurationBuilder cb
= new org.infinispan.client.hotrod.configuration.ConfigurationBuilder();
cb.tcpNoDelay(true)
  .connectionPool()
      .numTestsPerEvictionRun(3)
      .testOnBorrow(false)
      .testOnReturn(false)
      .testWhileIdle(true)
  .addServer()
      .host("localhost")
      .port(11222);
RemoteCacheManager rmc = new RemoteCacheManager(cb.build());
To configure the Hot Rod Java client, edit the hotrod-client.properties file on the classpath.
hotrod-client.properties file.
Example 13.2. Configuration
infinispan.client.hotrod.transport_factory = org.infinispan.client.hotrod.impl.transport.tcp.TcpTransportFactory

infinispan.client.hotrod.server_list = 127.0.0.1:11222

infinispan.client.hotrod.marshaller = org.infinispan.commons.marshall.jboss.GenericJBossMarshaller

infinispan.client.hotrod.async_executor_factory = org.infinispan.client.hotrod.impl.async.DefaultAsyncExecutorFactory

infinispan.client.hotrod.default_executor_factory.pool_size = 1

infinispan.client.hotrod.default_executor_factory.queue_size = 10000

infinispan.client.hotrod.hash_function_impl.1 = org.infinispan.client.hotrod.impl.consistenthash.ConsistentHashV1

infinispan.client.hotrod.tcp_no_delay = true

infinispan.client.hotrod.ping_on_startup = true

infinispan.client.hotrod.request_balancing_strategy = org.infinispan.client.hotrod.impl.transport.tcp.RoundRobinBalancingStrategy

infinispan.client.hotrod.key_size_estimate = 64

infinispan.client.hotrod.value_size_estimate = 512

infinispan.client.hotrod.force_return_values = false

infinispan.client.hotrod.tcp_keep_alive = true

## below is connection pooling config

maxActive=-1

maxTotal = -1

maxIdle = -1

whenExhaustedAction = 1

timeBetweenEvictionRunsMillis=120000

minEvictableIdleTimeMillis=300000

testWhileIdle = true

minIdle = 1
Note
TCP KEEPALIVE configuration is enabled/disabled on the Hot Rod Java client either through a config property as seen in the example (infinispan.client.hotrod.tcp_keep_alive = true/false or programmatically through the org.infinispan.client.hotrod.ConfigurationBuilder.tcpKeepAlive() method.
new RemoteCacheManager(boolean start)new RemoteCacheManager()
13.9.3. Hot Rod Java Client Basic API
localhost:11222.
Example 13.3. Basic API
//API entry point, by default it connects to localhost:11222
        BasicCacheContainer cacheContainer = new RemoteCacheManager();
//obtain a handle to the remote default cache
        BasicCache<String, String> cache = cacheContainer.getCache();
//now add something to the cache and ensure it is there
        cache.put("car", "ferrari");
        assert cache.get("car").equals("ferrari");
//remove the data
        cache.remove("car");
assert !cache.containsKey("car") : "Value must have been removed!";RemoteCacheManager corresponds to DefaultCacheManager, and both implement BasicCacheContainer.
DefaultCacheManager and RemoteCacheManager, which is simplified by the common BasicCacheContainer interface.
keySet() method. If the remote cache is a distributed cache, the server will start a Map/Reduce job to retrieve all keys from clustered nodes and return all keys to the client.
Set keys = remoteCache.keySet();
13.9.4. Hot Rod Java Client Versioned API
getVersioned, clients can retrieve the value associated with the key as well as the current version.
RemoteCacheManager provides instances of the RemoteCache interface that accesses the named or default cache on the remote cluster. This extends the Cache interface to which it adds new methods, including the versioned API.
Example 13.4. Using Versioned Methods
// To use the versioned API, remote classes are specifically needed
RemoteCacheManager remoteCacheManager = new RemoteCacheManager();
RemoteCache<String, String> remoteCache = remoteCacheManager.getCache();
remoteCache.put("car", "ferrari");
VersionedValue valueBinary = remoteCache.getVersioned("car");
// removal only takes place only if the version has not been changed
// in between. (a new version is associated with 'car' key on each change)
assert remoteCache.removeWithVersion("car", valueBinary.getVersion());
assert !remoteCache.containsKey("car");
Example 13.5. Using Replace
remoteCache.put("car", "ferrari");
VersionedValue valueBinary = remoteCache.getVersioned("car");
assert remoteCache.replaceWithVersion("car", "lamborghini", valueBinary.getVersion());13.10. Hot Rod C++ Client
- Red Hat Enterprise Linux 5, 64-bit
- Red Hat Enterprise Linux 6, 64-bit
- Red Hat Enterprise Linux 7, 64-bit
13.10.1. Hot Rod C++ Client Formats
- Static library
- Shared/Dynamic library
The static library is statically linked to an application. This increases the size of the final executable. The application is self-contained and it does not need to ship a separate library.
Shared/Dynamic libraries are dynamically linked to an application at runtime. The library is stored in a separate file and can be upgraded separately from the application, without recompiling the application.
Note
13.10.2. Hot Rod C++ Client Prerequisites
- C++ 03 compiler with support for shared_ptr TR1 (GCC 4.0+, Visual Studio C++ 2010).
- Red Hat JBoss Data Grid Server 6.1.0 or higher version.
13.10.3. Hot Rod C++ Client Download
jboss-datagrid-<version>-hotrod-cpp-client-<platform>.zip under Red Hat JBoss Data Grid binaries on the Red Hat Customer Portal at https://access.redhat.com. Download the appropriate Hot Rod C++ client which applies to your operating system.
13.10.4. Hot Rod C++ Client Configuration
- The initial set of servers to connect to.
- Connection pooling attributes.
- Connection/Socket timeouts and TCP nodelay.
- Hot Rod protocol version.
The following example shows how to use the ConfigurationBuilder to configure a RemoteCacheManager and how to obtain the default remote cache:
Example 13.6. SimpleMain.cpp
#include "infinispan/hotrod/ConfigurationBuilder.h"
#include "infinispan/hotrod/RemoteCacheManager.h"
#include "infinispan/hotrod/RemoteCache.h"
#include <stdlib.h>
using namespace infinispan::hotrod;
int main(int argc, char** argv) {
    ConfigurationBuilder b;
    b.addServer().host("127.0.0.1").port(11222);
    RemoteCacheManager cm(builder.build());
    RemoteCache<std::string, std::string> cache = cm.getCache<std::string, std::string>();
    return 0;
}13.10.5. Hot Rod C++ Client API
Example 13.7. SimpleMain.cpp
RemoteCache<std::string, std::string> rc = cm.getCache<std::string, std::string>();
    std::string k1("key13");
    std::string v1("boron");
    // put
    rc.put(k1, v1);
    std::auto_ptr<std::string> rv(rc.get(k1));
    rc.putIfAbsent(k1, v1);
    std::auto_ptr<std::string> rv2(rc.get(k1));
    std::map<HR_SHARED_PTR<std::string>,HR_SHARED_PTR<std::string> > map = rc.getBulk(0);
    std::cout << "getBulk size" << map.size() << std::endl;
    ..
    .
cm.stop();13.11. Hot Rod C# Client
13.11.1. Hot Rod C# Client Download and Installation
jboss-datagrid-<version>-hotrod-dotnet-client.msi packed for download with Red Hat JBoss Data Grid . To install the Hot Rod C# client, execute the following instructions.
Procedure 13.3. Installing the Hot Rod C# Client
- As an administrator, navigate to the location where the Hot Rod C# .msi file is downloaded. Run the .msi file to launch the windows installer and then click .
Figure 13.1. Hot Rod C# Client Setup Welcome
- Review the end-user license agreement. Select the I accept the terms in the License Agreement check box and then click .
Figure 13.2. Hot Rod C# Client End-User License Agreement
- To change the default directory, click or click to install in the default directory.
Figure 13.3. Hot Rod C# Client Destination Folder
- Click to complete the Hot Rod C# client installation.
Figure 13.4. Hot Rod C# Client Setup Completion
13.11.2. Hot Rod C# Client Configuration
The following example shows how to use the ConfigurationBuilder to configure a RemoteCacheManager.
Example 13.8. C# configuration
using System;
using System.Collections.Generic;
using System.Linq;
using System.Text;
using System.Threading.Tasks;
using Infinispan.HotRod;
using Infinispan.HotRod.Config;
namespace simpleapp
{
    class Program
    {
        static void Main(string[] args)
        {
            ConfigurationBuilder builder = new ConfigurationBuilder();
            builder.AddServer()
                .Host(args.Length > 1 ? args[0] : "127.0.0.1")
                .Port(args.Length > 2 ? int.Parse(args[1]) : 11222);
            Configuration config = builder.Build();
            RemoteCacheManager cacheManager = new RemoteCacheManager(config);
            [...]
        }
    }
}13.11.3. Hot Rod C# Client API
RemoteCacheManager is a starting point to obtain a reference to a RemoteCache.
Example 13.9.
using System;
using System.Collections.Generic;
using System.Linq;
using System.Text;
using System.Threading.Tasks;
using Infinispan.HotRod;
using Infinispan.HotRod.Config;
namespace simpleapp
{
    class Program
    {
        static void Main(string[] args)
        {
            ConfigurationBuilder builder = new ConfigurationBuilder();
            builder.AddServer()
                .Host(args.Length > 1 ? args[0] : "127.0.0.1")
                .Port(args.Length > 2 ? int.Parse(args[1]) : 11222);
            Configuration config = builder.Build();
            RemoteCacheManager cacheManager = new RemoteCacheManager(config);
            cacheManager.Start();
            // Retrieve a reference to the default cache.
            IRemoteCache<String, String> cache = cacheManager.GetCache<String, String>();
            // Add entries.
            cache.Put("key1", "value1");
            cache.PutIfAbsent("key1", "anotherValue1");
            cache.PutIfAbsent("key2", "value2");
            cache.PutIfAbsent("key3", "value3");
            // Retrive entries.
            Console.WriteLine("key1 -> " + cache.Get("key1"));
            // Bulk retrieve key/value pairs.
            int limit = 10;
            IDictionary<String, String> result = cache.GetBulk(limit);
            foreach (KeyValuePair<String, String> kv in result)
            {
                Console.WriteLine(kv.Key + " -> " + kv.Value);
            }
            // Remove entries.
            cache.Remove("key2");
            Console.WriteLine("key2 -> " + cache.Get("key2"));
            cacheManager.Stop();
        }
    }
}13.11.4. String Marshaller for Interoperability
[...]
RemoteCacheManager cacheManager = new RemoteCacheManager(new CompatibilitySerializer());
[...]
cache.Put("key", "value");
String value = cache.Get("key");
[...]
Note
HotRodClientException being thrown.
13.12. Interoperability Between Hot Rod C++ and Hot Rod Java Client
Person object structured and serialized using Protobuf, and the Java C++ client can read the same Person object structured as Protobuf.
Example 13.10. Using Interoperability Between Languages
package sample;
message Person {
    required int32 age = 1;
    required string name = 2;
}13.13. Compatibility Between Server and Hot Rod Client Versions
Note
The following will be the impact on the client side:
- client will not have advantage of the latest protocol improvements.
- client might run into known issues which are fixed for the server-side version.
- client can only use the functionalities available in its current version and the previous versions.
In this case, when a Hot Rod client connects to a JBoss Data Grid server, the connection will be rejected with an exception error. The client can be downgraded to a known protocol version by setting the client side property - org.infinispan.client.hotrod.configuration.ConfigurationBuilder.protocolVersion to a specific version, such as Hot Rod 1.3, as a String. In this case the client is able to connect to the server, but will be restricted to the functionality of that version. Any command which is not supported by this protocol version will not work and throw an exception. Also, the topology information might be inefficient in this case.
Note
Table 13.47. Hot Rod client and server compatibility
| JBoss Data Grid Server Version | Hot Rod Protocol Version |
|---|---|
| JBoss Data Grid 6.6.1 | Hot Rod 2.3 |
| JBoss Data Grid 6.6.0 | Hot Rod 2.3 |
| JBoss Data Grid 6.5.1 | Hot Rod 2.2 |
| JBoss Data Grid 6.5.0 | Hot Rod 2.2 |
| JBoss Data Grid 6.4.1 | Hot Rod 2.0 |
| JBoss Data Grid 6.4.0 | Hot Rod 2.0 |
| JBoss Data Grid 6.3.2 | Hot Rod 2.0 |
| JBoss Data Grid 6.3.1 | Hot Rod 2.0 |
| JBoss Data Grid 6.3.0 | Hot Rod 2.0 |
| JBoss Data Grid 6.2.1 | Hot Rod 1.3 |
| JBoss Data Grid 6.2.0 | Hot Rod 1.3 |
| JBoss Data Grid 6.1.0 | Hot Rod 1.2 |
| JBoss Data Grid 6.0.1 | Hot Rod 1.1 |
| JBoss Data Grid 6.0.0 | Hot Rod 1.1 |
Part VI. Set Up Locking for the Cache
Chapter 14. Locking
14.1. Configure Locking (Remote Client-Server Mode)
locking element within the cache tags (for example, invalidation-cache, distributed-cache, replicated-cache or local-cache).
Note
READ_COMMITTED. If the isolation attribute is included to explicitly specify an isolation mode, it is ignored, a warning is thrown, and the default value is used instead.
Procedure 14.1. Configure Locking (Remote Client-Server Mode)
<distributed-cache>
	<locking acquire-timeout="30000"
	         concurrency-level="1000"
	         striping="false" />
	         <!-- Additional configuration here -->
</distributed-cache>
- The
acquire-timeoutparameter specifies the number of milliseconds after which lock acquisition will time out. - The
concurrency-levelparameter defines the number of lock stripes used by the LockManager. - The
stripingparameter specifies whether lock striping will be used for the local cache.
14.2. Configure Locking (Library Mode)
locking element and its parameters are set within the default element and for each named cache, it occurs within the namedCache element. The following is an example of this configuration:
Procedure 14.2. Configure Locking (Library Mode)
<infinispan>
	<!-- Other configuration elements here -->
	<default>
		<locking concurrencyLevel="${VALUE}"
			isolationLevel="${LEVEL}"
			lockAcquisitionTimeout="${TIME}"
			useLockStriping="${TRUE/FALSE}"
writeSkewCheck="${TRUE/FALSE}" />- The
concurrencyLevelparameter specifies the concurrency level for the lock container. Set this value according to the number of concurrent threads interacting with the data grid. - The
isolationLevelparameter specifies the cache's isolation level. Valid isolation levels areREAD_COMMITTEDandREPEATABLE_READ. For details about isolation levels, see Section 16.1, “About Isolation Levels” - The
lockAcquisitionTimeoutparameter specifies time (in milliseconds) after which a lock acquisition attempt times out. - The
useLockStripingparameter specifies whether a pool of shared locks are maintained for all entries that require locks. If set toFALSE, locks are created for each entry in the cache. For details, see Section 15.1, “About Lock Striping” - The
writeSkewCheckparameter is only valid if theisolationLevelis set toREPEATABLE_READ. If this parameter is set toFALSE, a disparity between a working entry and the underlying entry at write time results in the working entry overwriting the underlying entry. If the parameter is set toTRUE, such conflicts (namely write skews) throw an exception. ThewriteSkewCheckparameter can be only used withOPTIMISTICtransactions and it requires entry versioning to be enabled, withSIMPLEversioning scheme.
14.3. Locking Types
14.3.1. About Optimistic Locking
writeSkewCheck enabled, transactions in optimistic locking mode roll back if one or more conflicting modifications are made to the data before the transaction completes.
14.3.2. About Pessimistic Locking
14.3.3. Pessimistic Locking Types
- Explicit Pessimistic Locking, which uses the JBoss Data Grid Lock API to allow cache users to explicitly lock cache keys for the duration of a transaction. The Lock call attempts to obtain locks on specified cache keys across all nodes in a cluster. This attempt either fails or succeeds for all specified cache keys. All locks are released during the commit or rollback phase.
- Implicit Pessimistic Locking ensures that cache keys are locked in the background as they are accessed for modification operations. Using Implicit Pessimistic Locking causes JBoss Data Grid to check and ensure that cache keys are locked locally for each modification operation. Discovering unlocked cache keys causes JBoss Data Grid to request a cluster-wide lock to acquire a lock on the unlocked cache key.
14.3.4. Explicit Pessimistic Locking Example
Procedure 14.3. Transaction with Explicit Pessimistic Locking
tx.begin()
cache.lock(K)
cache.put(K,V5)
tx.commit()
- When the line
cache.lock(K)executes, a cluster-wide lock is acquired onK. - When the line
cache.put(K,V5)executes, it guarantees success. - When the line
tx.commit()executes, the locks held for this process are released.
14.3.5. Implicit Pessimistic Locking Example
Procedure 14.4. Transaction with Implicit Pessimistic locking
tx.begin()
cache.put(K,V)
cache.put(K2,V2)
cache.put(K,V5)
tx.commit()
- When the line
cache.put(K,V)executes, a cluster-wide lock is acquired onK. - When the line
cache.put(K2,V2)executes, a cluster-wide lock is acquired onK2. - When the line
cache.put(K,V5)executes, the lock acquisition is non operational because a cluster-wide lock forKhas been previously acquired. Theputoperation will still occur. - When the line
tx.commit()executes, all locks held for this transaction are released.
14.3.6. Configure Locking Mode (Remote Client-Server Mode)
transaction element as follows:
<transaction locking="{OPTIMISTIC/PESSIMISTIC}" />14.3.7. Configure Locking Mode (Library Mode)
transaction element as follows:
<transaction transactionManagerLookupClass="{TransactionManagerLookupClass}"
	     transactionMode="{TRANSACTIONAL,NON_TRANSACTIONAL}"
	     lockingMode="{OPTIMISTIC,PESSIMISTIC}"
	     useSynchronization="true">
</transaction>lockingMode value to OPTIMISTIC or PESSIMISTIC to configure the locking mode used for the transactional cache.
14.4. Locking Operations
14.4.1. About the LockManager
LockManager component is responsible for locking an entry before a write process initiates. The LockManager uses a LockContainer to locate, hold and create locks. There are two types of LockContainers JBoss Data Grid uses internally and their choice is dependent on the useLockStriping setting. The first type offers support for lock striping while the second type supports one lock per entry.
See Also:
14.4.2. About Lock Acquisition
14.4.3. About Concurrency Levels
ConcurrentHashMap based collections, such as those internal to DataContainers.
Chapter 15. Set Up Lock Striping
15.1. About Lock Striping
15.2. Configure Lock Striping (Remote Client-Server Mode)
striping element to true.
Example 15.1. Lock Striping (Remote Client-Server Mode)
<locking acquire-timeout="20000"
	 concurrency-level="500"
	 striping="true" />
Note
READ_COMMITTED. If the isolation attribute is included to explicitly specify an isolation mode, it is ignored, a warning is thrown, and the default value is used instead.
locking element uses the following attributes:
- The
acquire-timeoutattribute specifies the maximum time to attempt a lock acquisition. The default value for this attribute is10000milliseconds. - The
concurrency-levelattribute specifies the concurrency level for lock containers. Adjust this value according to the number of concurrent threads interacting with JBoss Data Grid. The default value for this attribute is32. - The
stripingattribute specifies whether a shared pool of locks is maintained for all entries that require locking (true). If set tofalse, a lock is created for each entry. Lock striping controls the memory footprint but can reduce concurrency in the system. The default value for this attribute isfalse.
15.3. Configure Lock Striping (Library Mode)
useLockStriping parameter as demonstrated in the following procedure.
Procedure 15.1. Configure Lock Striping (Library Mode)
<infinispan>
	<!-- Additional configuration elements here -->
	<default>

		<locking concurrencyLevel="${VALUE}"
			 isolationLevel="${LEVEL}"
			 lockAcquisitionTimeout="${TIME}"
			 useLockStriping="${TRUE/FALSE}"
			 writeSkewCheck="${TRUE/FALSE}" />
		<!-- Additional configuration elements here -->
	</default>
</infinispan>- The
concurrencyLevelis used to specify the size of the shared lock collection use when lock striping is enabled. - The
isolationLevelparameter specifies the cache's isolation level. Valid isolation levels areREAD_COMMITTEDandREPEATABLE_READ. - The
lockAcquisitionTimeoutparameter specifies time (in milliseconds) after which a lock acquisition attempt times out. - The
useLockStripingparameter specifies whether a pool of shared locks are maintained for all entries that require locks. If set toFALSE, locks are created for each entry in the cache. If set toTRUE, lock striping is enabled and shared locks are used as required from the pool. - The
writeSkewCheckcheck determines if a modification to the entry from a different transaction should roll back the transaction. Write skew set to true requiresisolation_levelset toREPEATABLE_READ. The default value forwriteSkewCheckandisolation_levelareFALSEandREAD_COMMITTEDrespectively. ThewriteSkewCheckparameter can be only used withOPTIMISTICtransactions and it requires entry versioning to be enabled, withSIMPLEversioning scheme.
Chapter 16. Set Up Isolation Levels
16.1. About Isolation Levels
READ_COMMITTED and REPEATABLE_READ are the two isolation modes offered in Red Hat JBoss Data Grid.
READ_COMMITTED. This isolation level is applicable to a wide variety of requirements. This is the default value in Remote Client-Server and Library modes.REPEATABLE_READ.Important
The only valid value for locks in Remote Client-Server mode is the defaultREAD_COMMITTEDvalue. The value explicitly specified with theisolationvalue is ignored.If thelockingelement is not present in the configuration, the default isolation value isREAD_COMMITTED.
- See Section 15.2, “Configure Lock Striping (Remote Client-Server Mode)” for a Remote Client-Server mode configuration sample.
- See Section 15.3, “Configure Lock Striping (Library Mode)” for a Library mode configuration sample.
16.2. About READ_COMMITTED
READ_COMMITTED is one of two isolation modes available in Red Hat JBoss Data Grid.
READ_COMMITTED mode, write operations are made to copies of data rather than the data itself. A write operation blocks other data from being written, however writes do not block read operations. As a result, both READ_COMMITTED and REPEATABLE_READ modes permit read operations at any time, regardless of when write operations occur.
READ_COMMITTED mode multiple reads of the same key within a transaction can return different results due to write operations in different transactions modifying data between reads. This phenomenon is known as non-repeatable reads and is avoided in REPEATABLE_READ mode.
16.3. About REPEATABLE_READ
REPEATABLE_READ is one of two isolation modes available in Red Hat JBoss Data Grid.
REPEATABLE_READ does not allow write operations while read operations are in progress, nor does it allow read operations when write operations occur. This prevents the "non-repeatable read" phenomenon, which occurs when a single transaction has two read operations on the same row but the retrieved values differ (possibly due to a write operation modifying the value between the two read operations).
REPEATABLE_READ isolation mode preserves the value of an entry before a modification occurs. As a result, the "non-repeatable read" phenomenon is avoided because a second read operation on the same entry retrieves the preserved value rather than the new modified value. As a result, the two values retrieved by the two read operations in a single transaction will always match, even if a write operation occurs in a different transaction between the two reads.
Part VII. Set Up and Configure a Cache Store
Chapter 17. Cache Stores
Note
shared is set to false), on node join, stale entries which might have been removed from the cluster might still be present in the stores and can reappear.
17.1. Cache Loaders and Cache Writers
org.infinispan.persistence.spi:
CacheLoaderCacheWriterAdvancedCacheLoaderAdvancedCacheWriter
CacheLoader and CacheWriter provide basic methods for reading and writing to a store. CacheLoader retrieves data from a data store when the required data is not present in the cache, and CacheWriter is used to enforce entry passivation and activation on eviction in a cache.
AdvancedCacheLoader and AdvancedCacheWriter provide operations to manipulate the underlying storage in bulk: parallel iteration and purging of expired entries, clear and size.
org.infinispan.persistence.file.SingleFileStore is a good starting point to write your own store implementation.
Note
CacheLoader, extended by CacheStore), which is also still available.
17.2. Cache Store Configuration
17.2.1. Configuring the Cache Store
ignoreModifications element has been set to "true" for a specific cache store.
17.2.2. Configure the Cache Store using XML (Library Mode)
<persistence passivation="false">
   <singleFile shared="false"
               preload="true"
               fetchPersistentState="true"
               ignoreModifications="false"
               purgeOnStartup="false"
               location="${java.io.tmpdir}" >
      <async enabled="true"
             flushLockTimeout="15000"
             threadPoolSize="5" />
      <singleton enabled="true"
      		 pushStateWhenCoordinator="true"
      		 pushStateTimeout="20000" />
   </singleFile>
</persistence>17.2.3. Configure the Cache Store Programmatically
ConfigurationBuilder builder = new ConfigurationBuilder();
builder.persistence()
    .passivation(false)
    .addSingleFileStore()
        .shared(false)
        .preload(true)
        .fetchPersistentState(true)
        .ignoreModifications(false)
        .purgeOnStartup(false)
        .location(System.getProperty("java.io.tmpdir"))
        .async()
           .enabled(true)
           .flushLockTimeout(15000)
           .threadPoolSize(5)
        .singleton()
           .enabled(true)
           .pushStateWhenCoordinator(true)
           .pushStateTimeout(20000);
Note
location are specific to the single-file cache store and are not used for other types of cache stores.
Procedure 17.1. Configure the Cache store Programatically
- Use the
ConfigurationBuilderto create a new configuration object. - The
passivationelements affects the way Red Hat JBoss Data Grid interacts with stores. Passivation removes an object from an in-memory cache and writes it to a secondary data store, such as a system or database. If no secondary data store exists, then the object will only be removed from the in-memory cache. Passivation isfalseby default. - The
addSingleFileStore()elements adds the SingleFileStore as the cache store for this configuration. It is possible to create other stores, such as a JDBC Cache Store, which can be added using theaddStoremethod. - The
sharedparameter indicates that the cache store is shared by different cache instances. For example, where all instances in a cluster use the same JDBC settings to talk to the same remote, shared database.sharedisfalseby default. When set totrue, it prevents duplicate data being written to the cache store by different cache instances. - The
preloadelement is set tofalseby default. When set totruethe data stored in the cache store is preloaded into the memory when the cache starts. This allows data in the cache store to be available immediately after startup and avoids cache operations delays as a result of loading data lazily. Preloaded data is only stored locally on the node, and there is no replication or distribution of the preloaded data. JBoss Data Grid will only preload up to the maximum configured number of entries in eviction. - The
fetchPersistentStateelement determines whether or not to fetch the persistent state of a cache and apply it to the local cache store when joining the cluster. If the cache store is shared the fetch persistent state is ignored, as caches access the same cache store. A configuration exception will be thrown when starting the cache service if more than one cache store has this property set totrue. ThefetchPersistentStateproperty isfalseby default. - The
ignoreModificationselement determines whether write methods are pushed to the specific cache store by allowing write operations to the local file cache store, but not the shared cache store. In some cases, transient application data should only reside in a file-based cache store on the same server as the in-memory cache. For example, this would apply with a further JDBC based cache store used by all servers in the network.ignoreModificationsisfalseby default. - The
purgeOnStartupelement controls whether cache store is purged when it starts up and isfalseby default. - The
locationelement configuration element sets a location on disk where the store can write. - These attributes configure aspects specific to each cache store. For example, the
locationattribute points to where the SingleFileStore will keep files containing data. Other stores may require more complex configuration. - The
singletonelement enables modifications to be stored by only one node in the cluster. This node is called the coordinator. The coordinator pushes the caches in-memory states to disk. This function is activated by setting theenabledattribute totruein all nodes. Thesharedparameter cannot be defined withsingletonenabled at the same time. Theenabledattribute isfalseby default. - The
pushStateWhenCoordinatorelement is set totrueby default. Iftrue, this property will cause a node that has become the coordinator to transfer in-memory state to the underlying cache store. This parameter is useful where the coordinator has crashed and a new coordinator is elected.
17.2.4. About SKIP_CACHE_LOAD Flag
SKIP_CACHE_LOAD flag.
17.2.5. About the SKIP_CACHE_STORE Flag
SKIP_CACHE_STORE Flag is used then the cache store will not be considered for the specified cache operations. This flag can be useful to place an entry in the cache without having it included in the configured cache store, along with determining if an entry is found within a cache without retrieving it from the associated cache store.
17.2.6. About the SKIP_SHARED_CACHE_STORE Flag
SKIP_SHARED_CACHE_STORE Flag is enabled then any shared cache store will not be considered for the specified cache operations. This flag can be useful to place an entry in the cache without having it included in the shared cache store, along with determining if an entry is found within a cache without retrieving it from the shared cache store.
17.4. Connection Factories
ConnectionFactory implementation to obtain a database connection. This process is also known as connection management or pooling.
ConnectionFactoryClass configuration attribute. JBoss Data Grid includes the following ConnectionFactory implementations:
- ManagedConnectionFactory
- SimpleConnectionFactory.
- PooledConnectionFactory.
17.4.1. About ManagedConnectionFactory
ManagedConnectionFactory is a connection factory that is ideal for use within managed environments such as application servers. This connection factory can explore a configured location in the JNDI tree and delegate connection management to the DataSource.
17.4.2. About SimpleConnectionFactory
SimpleConnectionFactory is a connection factory that creates database connections on a per invocation basis. This connection factory is not designed for use in a production environment.
Chapter 18. Cache Store Implementations
Note
shared is set to false), on node join, stale entries which might have been removed from the cluster might still be present in the stores and can reappear.
18.1. Cache Store Comparison
- The Single File Cache Store is a local file cache store. It persists data locally for each node of the clustered cache. The Single File Cache Store provides superior read and write performance, but keeps keys in memory which limits its use when persisting large data sets at each node. See Section 18.4, “Single File Cache Store” for details.
- The LevelDB file cache store is a local file cache store which provides high read and write performance. It does not have the limitation of Single File Cache Store of keeping keys in memory. See Section 18.5, “LevelDB Cache Store” for details.
- The JDBC cache store is a cache store that may be shared, if required. When using it, all nodes of a clustered cache persist to a single database or a local JDBC database for every node in the cluster. The shared cache store lacks the scalability and performance of a local cache store such as the LevelDB cache store, but it provides a single location for persisted data. The JDBC cache store persists entries as binary blobs, which are not readable outside JBoss Data Grid. See Section 18.6, “JDBC Based Cache Stores” for details.
- The JPA Cache Store (supported in Library mode only) is a shared cache store like JDBC cache store, but preserves schema information when persisting to the database. Therefore, the persisted entries can be read outside JBoss Data Grid. See Section 18.8, “JPA Cache Store” for details.
18.2. Cache Store Configuration Details (Library Mode)
- Add the name value to the
nameparameter to set the name of the cache store.
- The
passivationparameter affects the way in which Red Hat JBoss Data Grid interacts with stores. When an object is evicted from in-memory cache, passivation writes it to a secondary data store, such as a system or a database. Valid values for this parameter aretrueandfalsebutpassivationis set tofalseby default.
- The
sharedparameter indicates that the cache store is shared by different cache instances. For example, where all instances in a cluster use the same JDBC settings to talk to the same remote, shared database.sharedisfalseby default. When set totrue, it prevents duplicate data being written to the cache store by different cache instances. For the LevelDB cache stores, this parameter must be excluded from the configuration, or set tofalsebecause sharing this cache store is not supported. - The
preloadparameter is set tofalseby default. When set totruethe data stored in the cache store is preloaded into the memory when the cache starts. This allows data in the cache store to be available immediately after startup and avoids cache operations delays as a result of loading data lazily. Preloaded data is only stored locally on the node, and there is no replication or distribution of the preloaded data. Red Hat JBoss Data Grid will only preload up to the maximum configured number of entries in eviction. - The
fetchPersistentStateparameter determines whether or not to fetch the persistent state of a cache and apply it to the local cache store when joining the cluster. If the cache store is shared the fetch persistent state is ignored, as caches access the same cache store. A configuration exception will be thrown when starting the cache service if more than one cache store has this property set totrue. ThefetchPersistentStateproperty isfalseby default. - The
ignoreModificationsparameter determines whether modification methods are applied to the specific cache store. This allows write operations to be applied to the local file cache store, but not the shared cache store. In some cases, transient application data should only reside in a file-based cache store on the same server as the in-memory cache. For example, this would apply with a further JDBC based cache store used by all servers in the network.ignoreModificationsisfalseby default. - The
maxEntriesparameter provides maximum number of entries allowed. The default value is -1 for unlimited entries. - The
maxKeysInMemoryparameter is used to speed up data lookup. The single file store keeps an index of keys and their positions in the file, restricting the size of the index using themaxKeysInMemoryparameter. The default value for this parameter is -1. - The
purgeOnStartupparameter controls whether cache store is purged when it starts up. - The
locationconfiguration element sets a location on disk where the store can write.
The async element contains parameters that configure various aspects of the cache store.
- The
enabledparameter determines whether the file store is asynchronous. - The
threadPoolSizeparameter specifies the number of threads that concurrently apply modifications to the store. The default value for this parameter is1. - The
flushLockTimeoutparameter specifies the time to acquire the lock which guards the state to be flushed to the cache store periodically. The default value for this parameter is1. - The
modificationQueueSizeparameter specifies the size of the modification queue for the asynchronous store. If updates are made at a rate that is faster than the underlying cache store can process this queue, then the asynchronous store behaves like a synchronous store for that period, blocking until the queue can accept more elements. The default value for this parameter is1024elements. - The
shutdownTimeoutparameter specifies maximum amount of time that can be taken to stop the cache store. Default value for this parameter is25seconds.
The singleton element enables modifications to be stored by only one node in the cluster. This node is called the coordinator. The coordinator pushes the caches in-memory states to disk. The shared element cannot be defined with singleton enabled at the same time.
- The
enabledattribute determines whether this feature is enabled. Valid values for this parameter aretrueandfalse. Theenabledattribute is set tofalseby default. - The
pushStateWhenCoordinatorparameter is set totrueby default. Iftrue, this property causes a node that has become the coordinator to transfer in-memory state to the underlying cache store. This parameter is useful where the coordinator has crashed and a new coordinator is elected. - When
pushStateWhenCoordinatoris set totrue, thepushStateTimeoutparameter sets the maximum number of milliseconds that the process pushing the in-memory state to the underlying cache loader can take. The default time for this parameter is 10 seconds.
- The
remoteCacheNameattribute specifies the name of the remote cache to which it intends to connect in the remote Infinispan cluster. The default cache will be used if the remote cache name is unspecified. - The
fetchPersistentStateattribute, when set totrue, ensures that the persistent state is fetched when the remote cache joins the cluster. If multiple cache stores are chained, only one cache store can have this property set totrue. The default for this value isfalse. - The
sharedattribute is set totruewhen multiple cache instances share a cache store, which prevents multiple cache instances writing the same modification individually. The default for this attribute isfalse. - The
preloadattribute ensures that the cache store data is pre-loaded into memory and is immediately accessible after starting up. The disadvantage of setting this totrueis that the start up time increases. The default value for this attribute isfalse. - The
ignoreModificationsattribute prevents cache modification operations such as put, remove, clear, store, etc. from affecting the cache store. As a result, the cache store can become out of sync with the cache. The default value for this attribute isfalse. - The
purgeOnStartupattribute ensures that the cache store is purged during the start up process. The default value for this attribute isfalse. - The
tcpNoDelayattribute triggers theTCPNODELAYstack. The default value for this attribute istrue. - The
pingOnStartupattribute sends a ping request to a back end server to fetch the cluster topology. The default value for this attribute istrue. - The
keySizeEstimateattribute provides an estimation of the key size. The default value for this attribute is64. - The
valueSizeEstimateattribute specifies the size of the byte buffers when serializing and deserializing values. The default value for this attribute is512. - The
forceReturnValuesattribute sets whetherFORCE_RETURN_VALUEis enabled for all calls. The default value for this attribute isfalse.
Create a servers element within the remoteStore element to set up the server information for multiple servers. Add a server element within the general servers element to add the information for a single server.
- The
hostattribute configures the host address. - The
portattribute configures the port used by the Remote Cache Store.
- The
maxActiveattribute indicates the maximum number of active connections for each server at a time. The default value for this attribute is-1which indicates an infinite number of active connections. - The
maxIdleattribute indicates the maximum number of idle connections for each server at a time. The default value for this attribute is-1which indicates an infinite number of idle connections. - The
maxTotalattribute indicates the maximum number of persistent connections within the combined set of servers. The default setting for this attribute is-1which indicates an infinite number of connections. - The
connectionUrlparameter specifies the JDBC driver-specific connection URL. - The
usernameparameter contains the username used to connect via theconnectionUrl. - The
driverClassparameter specifies the class name of the driver used to connect to the database.
- The
locationparameter specifies the location to store the primary cache store. The directory is automatically created if it does not exist. - The
expiredLocationparameter specifies the location for expired data using. The directory stores expired data before it is purged. The directory is automatically created if it does not exist. - The
sharedparameter specifies whether the cache store is shared. The only supported value for this parameter in the LevelDB cache store isfalse. - The
preloadparameter specifies whether the cache store will be pre-loaded. Valid values aretrueandfalse.
- The
persistenceUnitNameattribute specifies the name of the JPA cache store. - The
entityClassNameattribute specifies the fully qualified class name of the JPA entity used to store the cache entry value. - The
batchSize(optional) attribute specifies the batch size for cache store streaming. The default value for this attribute is100. - The
storeMetadata(optional) attribute specifies whether the cache store keeps the metadata (for example expiration and versioning information) with the entries. The default value for this attribute istrue.
- The
fetchPersistentStateparameter determines whether the persistent state is fetched when joining a cluster. Set this totrueif using a replication and invalidation in a clustered environment. Additionally, if multiple cache stores are chained, only one cache store can have this property enabled. If a shared cache store is used, the cache does not allow a persistent state transfer despite this property being set totrue. ThefetchPersistentStateparameter isfalseby default. - The
ignoreModificationsparameter determines whether operations that modify the cache (e.g. put, remove, clear, store, etc.) do not affect the cache store. As a result, the cache store can become out of sync with the cache. - The
purgeOnStartupparameter specifies whether the cache store is purged when initially started. - The
key2StringMapperparameter specifies the class name of the Key2StringMapper used to map keys to strings for the database tables.
- The
dropOnExitparameter specifies whether the database tables are dropped upon shutdown. - The
createOnStartparameter specifies whether the database tables are created by the store on startup. - The
prefixparameter defines the string prepended to name of the target cache when composing the name of the cache bucket table.
- The
nameparameter specifies the name of the column used. - The
typeparameter specifies the type of the column used.
- The
classparameter specifies the class name of the cache store implementation. - The
preloadparameter specifies whether to load entries into the cache during start up. Valid values for this parameter aretrueandfalse. - The
sharedparameter specifies whether the cache store is shared. This is used when multiple cache instances share a cache store. Valid values for this parameter aretrueandfalse.
- The
nameparameter specifies the name of the property. - The
valueparameter specifies the value of the property.
18.3. Cache Store Configuration Details (Remote Client-Server Mode)
- The
nameparameter of thelocal-cacheattribute is used to specify a name for the cache. - The
statisticsparameter specifies whether statistics are enabled at the container level. Enable or disable statistics on a per-cache basis by setting thestatisticsattribute tofalse.
- The
nameparameter of thefile-storeelement is used to specify a name for the file store. - The
passivationparameter determines whether entries in the cache are passivated (true) or if the cache store retains a copy of the contents in memory (false). - The
purgeparameter specifies whether or not the cache store is purged when it is started. Valid values for this parameter aretrueandfalse. - The
sharedparameter is used when multiple cache instances share a cache store. This parameter can be set to prevent multiple cache instances writing the same modification multiple times. Valid values for this parameter aretrueandfalse. However, thesharedparameter is not recommended for the LevelDB cache store because this cache store cannot be shared. - The
relative-toproperty is the directory where thefile-storestores the data. It is used to define a named path. - The
pathproperty is the name of the file where the data is stored. It is a relative path name that is appended to the value of therelative-toproperty to determine the complete path. - The
maxEntriesparameter provides maximum number of entries allowed. The default value is -1 for unlimited entries. - The
fetch-stateparameter when set to true fetches the persistent state when joining a cluster. If multiple cache stores are chained, only one of them can have this property enabled. Persistent state transfer with a shared cache store does not make sense, as the same persistent store that provides the data will just end up receiving it. Therefore, if a shared cache store is used, the cache does not allow a persistent state transfer even if a cache store has this property set totrue. It is recommended to set this property to true only in a clustered environment. The default value for this parameter is false. - The
preloadparameter when set to true, loads the data stored in the cache store into memory when the cache starts. However, setting this parameter to true affects the performance as the startup time is increased. The default value for this parameter is false. - The
singletonparameter enables a singleton store cache store. SingletonStore is a delegating cache store used when only one instance in a cluster can interact with the underlying store. However,singletonparameter is not recommended forfile-store.
- The
classparameter specifies the class name of the cache store implementation.
- The
nameparameter specifies the name of the property. - The
valueparameter specifies the value assigned to the property.
- The
cacheparameter defines the name for the remote cache. If left undefined, the default cache is used instead. - The
socket-timeoutparameter sets whether the value defined inSO_TIMEOUT(in milliseconds) applies to remote Hot Rod servers on the specified timeout. A timeout value of0indicates an infinite timeout. The default value is 60,000 ms, or one minute. - The
tcp-no-delaysets whetherTCP_NODELAYapplies on socket connections to remote Hot Rod servers. - The
hotrod-wrappingsets whether a wrapper is required for Hot Rod on the remote store.
- The
outbound-socket-bindingparameter sets the outbound socket binding for the remote server.
- The
datasourceparameter defines the name of a JNDI for the datasource. - The
passivationparameter determines whether entries in the cache are passivated (true) or if the cache store retains a copy of the contents in memory (false). - The
preloadparameter specifies whether to load entries into the cache during start up. Valid values for this parameter aretrueandfalse. - The
purgeparameter specifies whether or not the cache store is purged when it is started. Valid values for this parameter aretrueandfalse. - The
sharedparameter is used when multiple cache instances share a cache store. This parameter can be set to prevent multiple cache instances writing the same modification multiple times. Valid values for this parameter aretrueandfalse. - The
singletonparameter enables a singleton store cache store. SingletonStore is a delegating cache store used when only one instance in a cluster can interact with the underlying store
- The
prefixparameter specifies a prefix string for the database table name.
- The
nameparameter specifies the name of the database column. - The
typeparameter specifies the type of the database column.
- The
relative-toparameter specifies the base directory to store the cache state. This value defaults tojboss.server.data.dir. - The
pathparameter defines where, within the directory specified in therelative-toparameter, the cache state is stored. If undefined, the path defaults to the cache container name. - The
passivationparameter specifies whether passivation is enabled for the LevelDB cache store. Valid values aretrueandfalse. - The
purgeparameter specifies whether the cache store is purged when it starts up. Valid values aretrueandfalse.
18.4. Single File Cache Store
SingleFileCacheStore.
SingleFileCacheStore is a simple, file system based implementation and a replacement to the older file system based cache store: the FileCacheStore.
SingleFileCacheStore stores all key/value pairs and their corresponding metadata information in a single file. To speed up data location, it also keeps all keys and the positions of their values and metadata in memory. Hence, using the single file cache store slightly increases the memory required, depending on the key size and the amount of keys stored. Hence SingleFileCacheStore is not recommended for use cases where the keys are too big.
SingleFileCacheStore can be used in a limited capacity in production environments. It can not be used on shared file system (such as NFS and Windows shares) due to a lack of proper file locking, resulting in data corruption. Furthermore, file systems are not inherently transactional, resulting in file writing failures during the commit phase if the cache is used in a transactional context.
18.4.1. Single File Store Configuration (Remote Client-Server Mode)
<local-cache name="default" statistics="true">
    <file-store name="myFileStore"
                passivation="true"
                purge="true"
                relative-to="{PATH}"
                path="{DIRECTORY}"
                max-entries="10000"
                fetch-state="true"
                preload="false" />
</local-cache>18.4.2. Single File Store Configuration (Library Mode)
<namedCache name="writeThroughToFile">
      <persistence passivation="false">
         <singleFile fetchPersistentState="true"
                     ignoreModifications="false"
                     purgeOnStartup="false"
                     shared="false"
                     preload="false"
                     location="/tmp/Another-FileCacheStore-Location"
                     maxEntries="100"
                     maxKeysInMemory="100">
            <async enabled="true"
    	           threadPoolSize="500"
    	           flushLockTimeout="1"
	           modificationQueueSize="1024"
	           shutdownTimeout="25000"/>
        </singleFile>
      </persistence>
</namedCache>18.4.3. Upgrade JBoss Data Grid Cache Stores
18.5. LevelDB Cache Store
18.5.1. Configuring LevelDB Cache Store (Remote Client-Server Mode)
Procedure 18.1. To configure LevelDB Cache Store:
- Add the following elements to a cache definition in
standalone.xmlto configure the database:<leveldb-store path="/path/to/leveldb/data" passivation="false" purge="false" > <expiration path="/path/to/leveldb/expires/data" /> <implementation type="JNI" /> </leveldb-store>Note
Directories will be automatically created if they do not exist.
18.5.2. LevelDB Cache Store Programmatic Configuration
Configuration cacheConfig = new ConfigurationBuilder().persistence()
                .addStore(LevelDBStoreConfigurationBuilder.class)
                .location("/tmp/leveldb/data")
                .expiredLocation("/tmp/leveldb/expired").build();
Procedure 18.2. LevelDB Cache Store programmatic configuration
- Use the
ConfigurationBuilderto create a new configuration object. - Add the store using
LevelDBCacheStoreConfigurationBuilderclass to build its configuration. - Set the LevelDB Cache Store location path. The specified path stores the primary cache store data. The directory is automatically created if it does not exist.
- Specify the location for expired data using the
expiredLocationparameter for the LevelDB Store. The specified path stores expired data before it is purged. The directory is automatically created if it does not exist.
Note
18.5.3. LevelDB Cache Store Sample XML Configuration (Library Mode)
<namedCache name="vehicleCache">
      <persistence passivation="false">
          <leveldbStore xmlns="urn:infinispan:config:store:leveldb:6.0
                        location="/path/to/leveldb/data"
                        expiredLocation="/path/to/expired/data"
                        shared="false"
                        preload="true"/>
      </persistence>
</namedCache>18.5.4. Configure a LevelDB Cache Store Using JBoss Operations Network
Procedure 18.3.
- Ensure that Red Hat JBoss Operations Network 3.2 or higher is installed and started.
- Install the Red Hat JBoss Data Grid Plugin Pack for JBoss Operations Network 3.2.0.
- Ensure that JBoss Data Grid is installed and started.
- Import JBoss Data Grid server into the inventory.
- Configure the JBoss Data Grid connection settings.
- Create a new LevelDB cache store as follows:
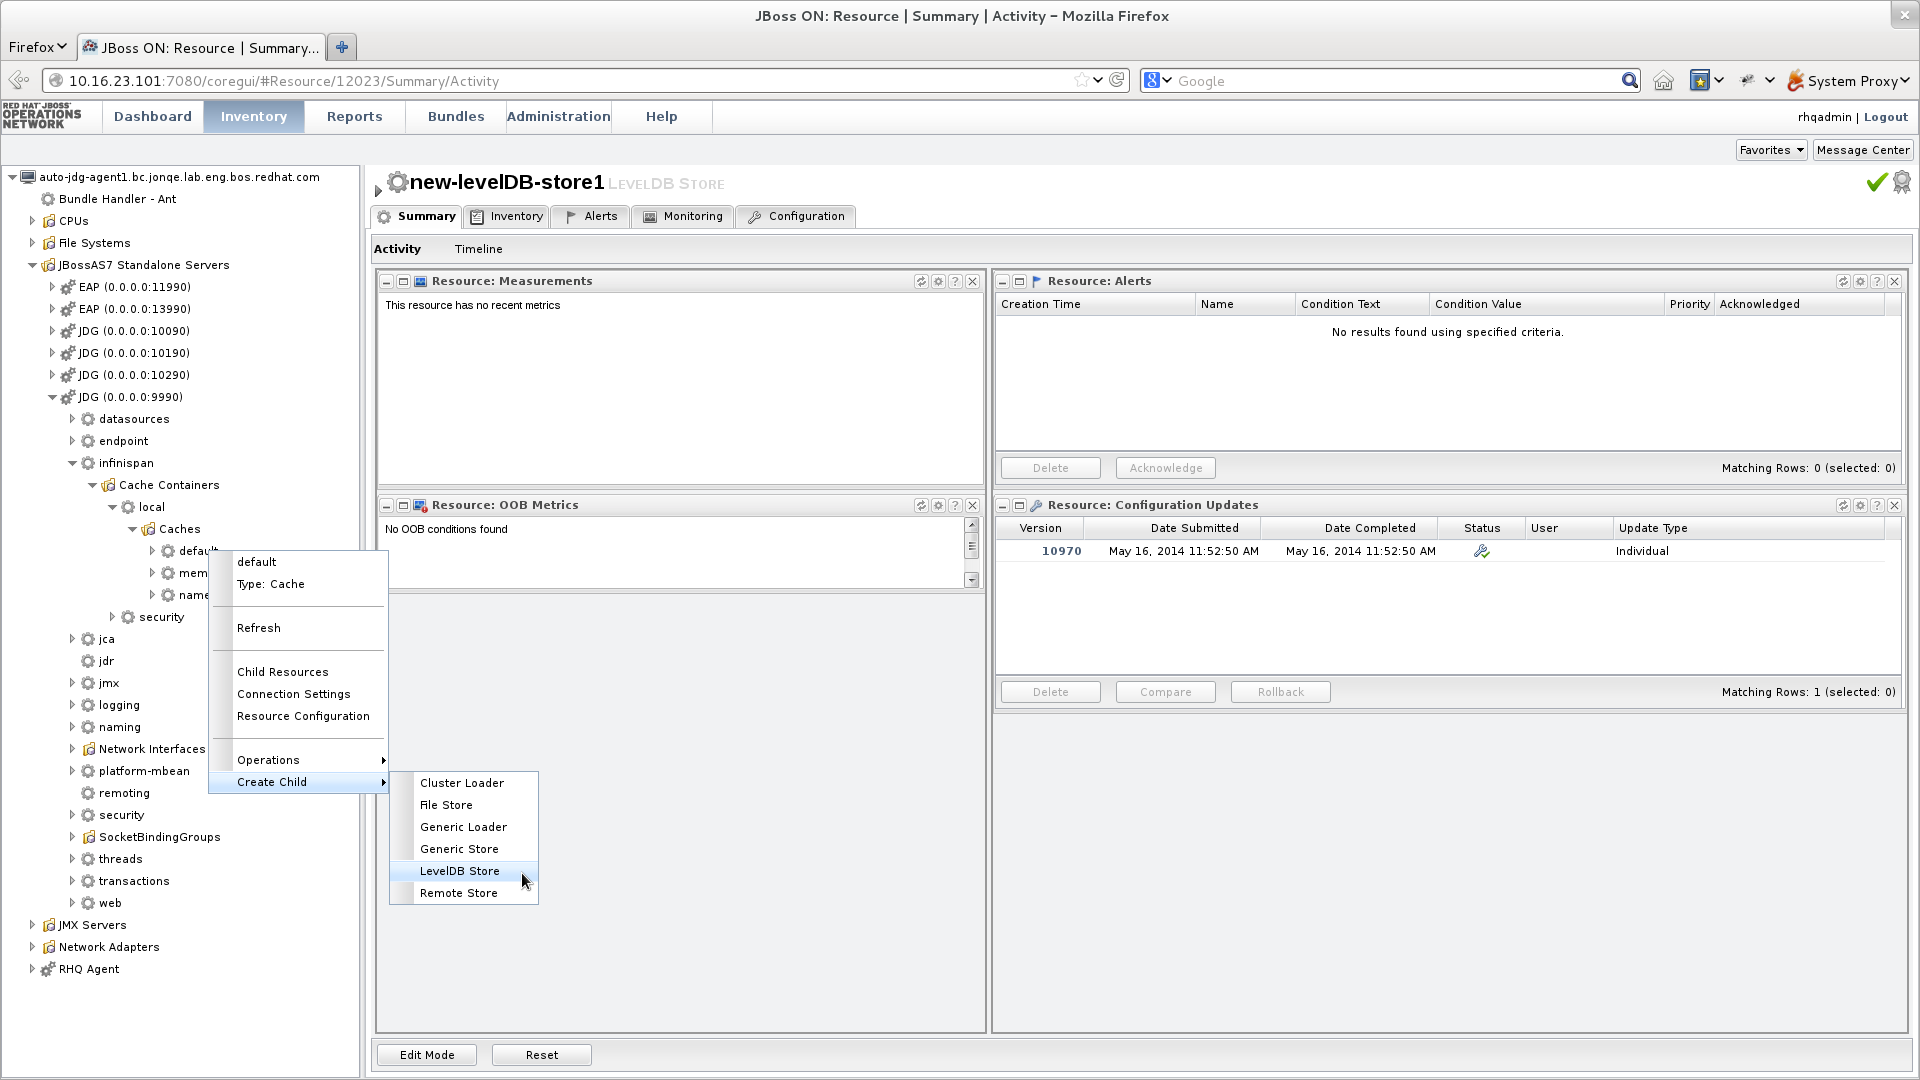
Figure 18.1. Create a new LevelDB Cache Store
- Right-click the
defaultcache. - In the menu, mouse over the option.
- In the submenu, click .
- Name the new LevelDB cache store as follows:
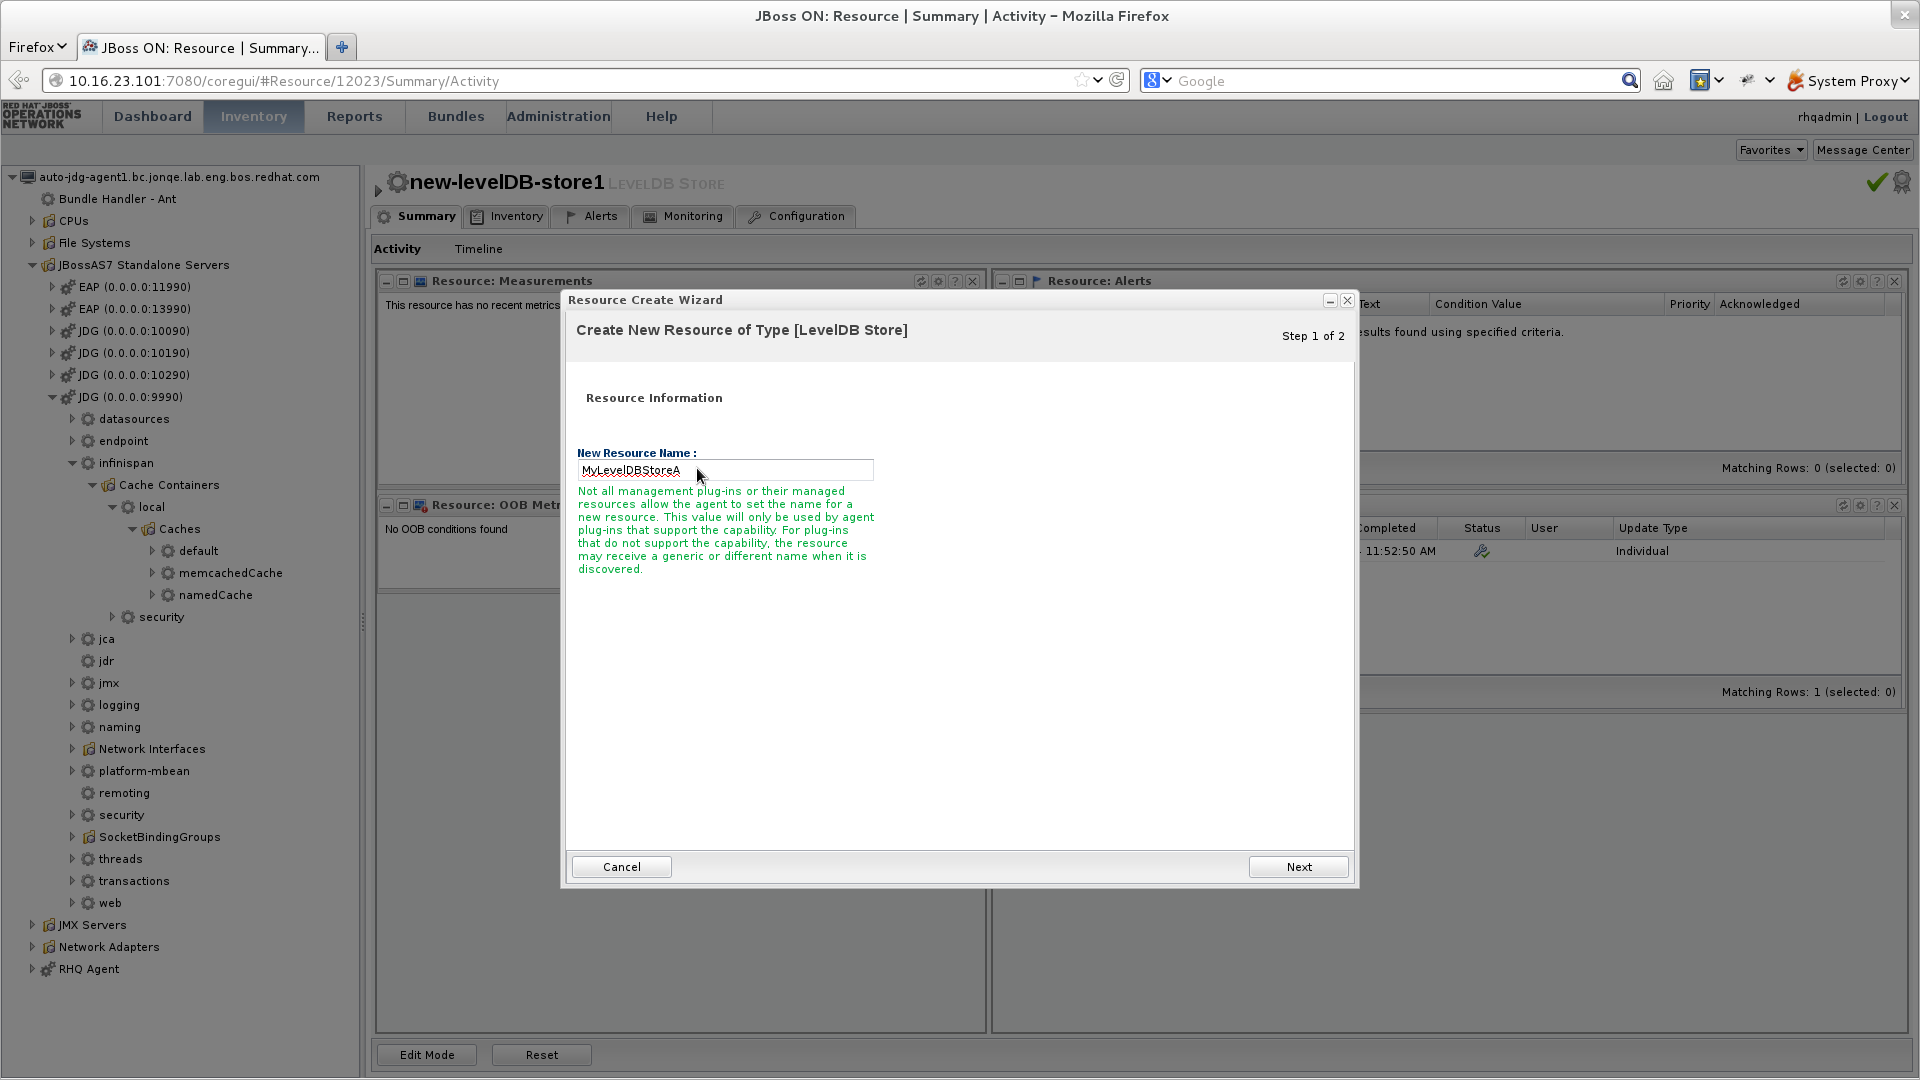
Figure 18.2. Name the new LevelDB Cache Store
- In the Resource Create Wizard that appears, add a name for the new LevelDB Cache Store.
- Click to continue.
- Configure the LevelDB Cache Store settings as follows:
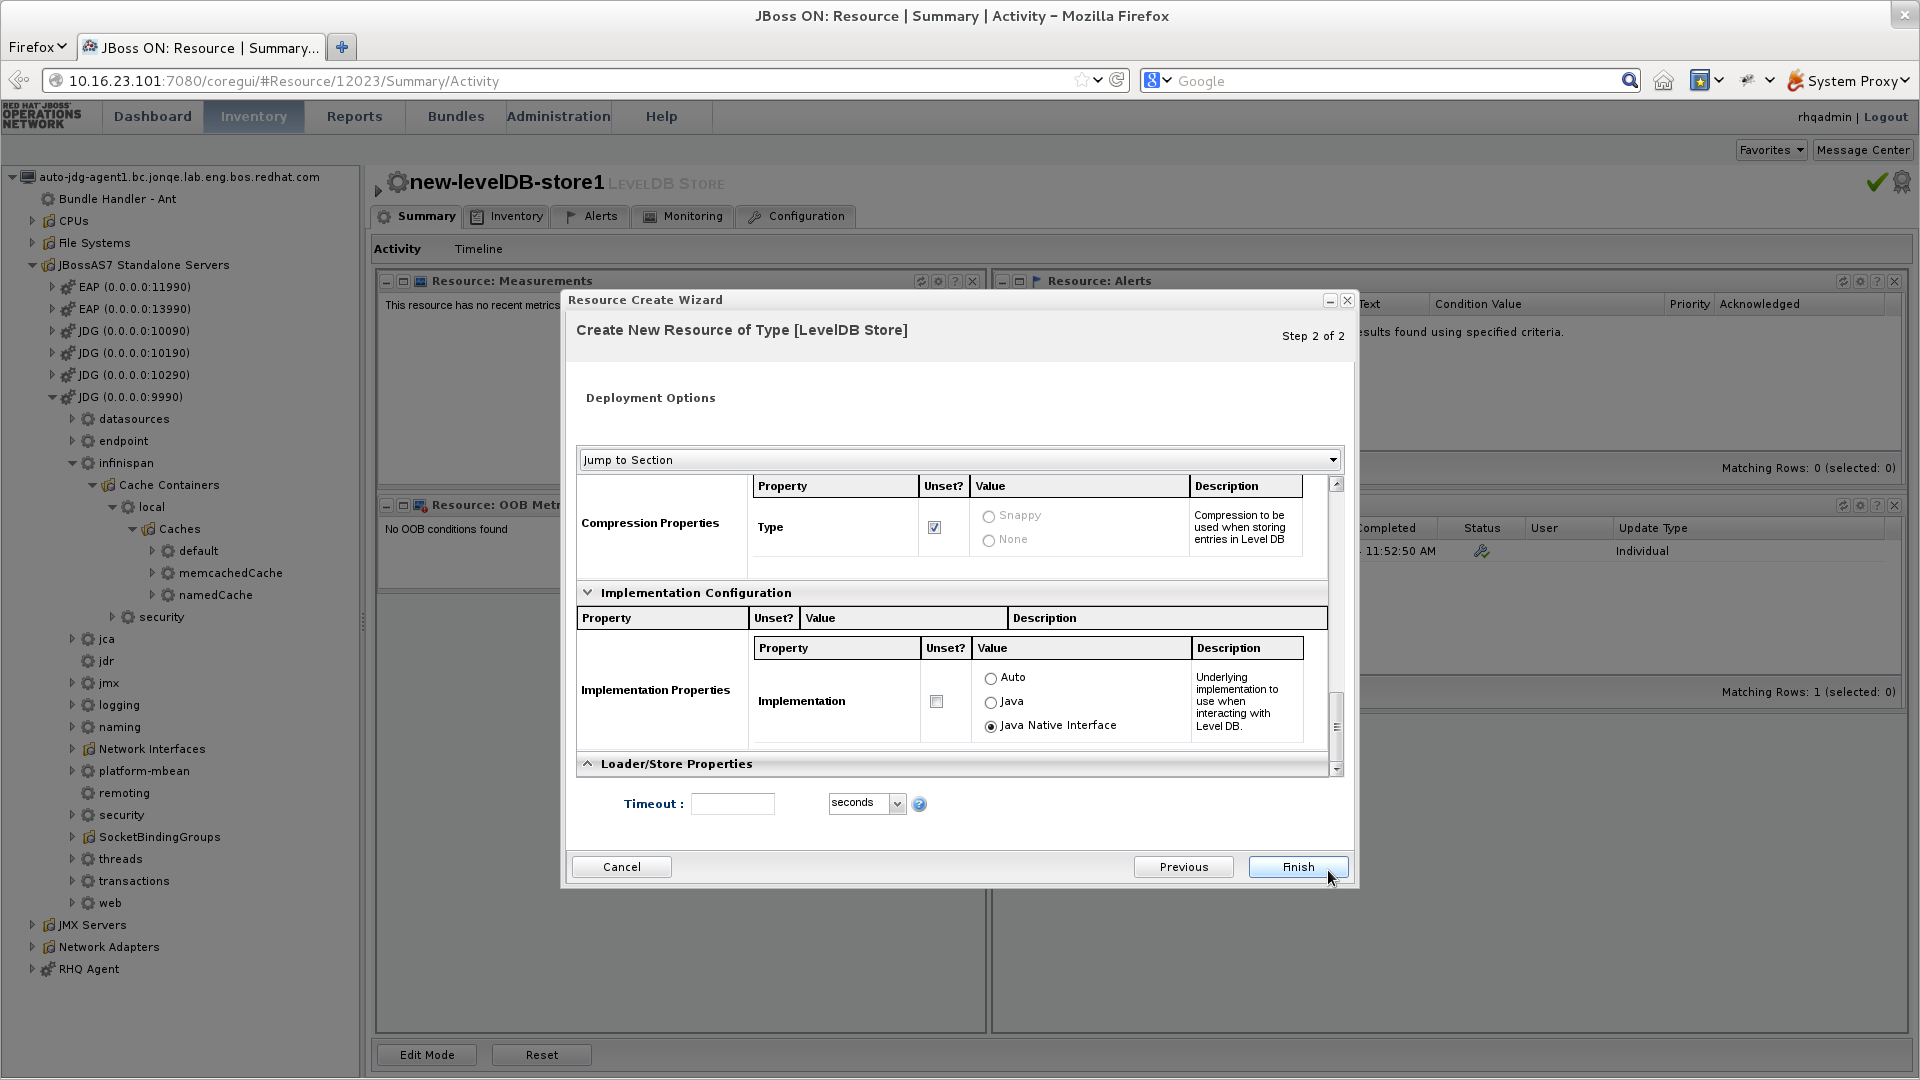
Figure 18.3. Configure the LevelDB Cache Store Settings
- Use the options in the configuration window to configure a new LevelDB cache store.
- Click to complete the configuration.
- Schedule a restart operation as follows:
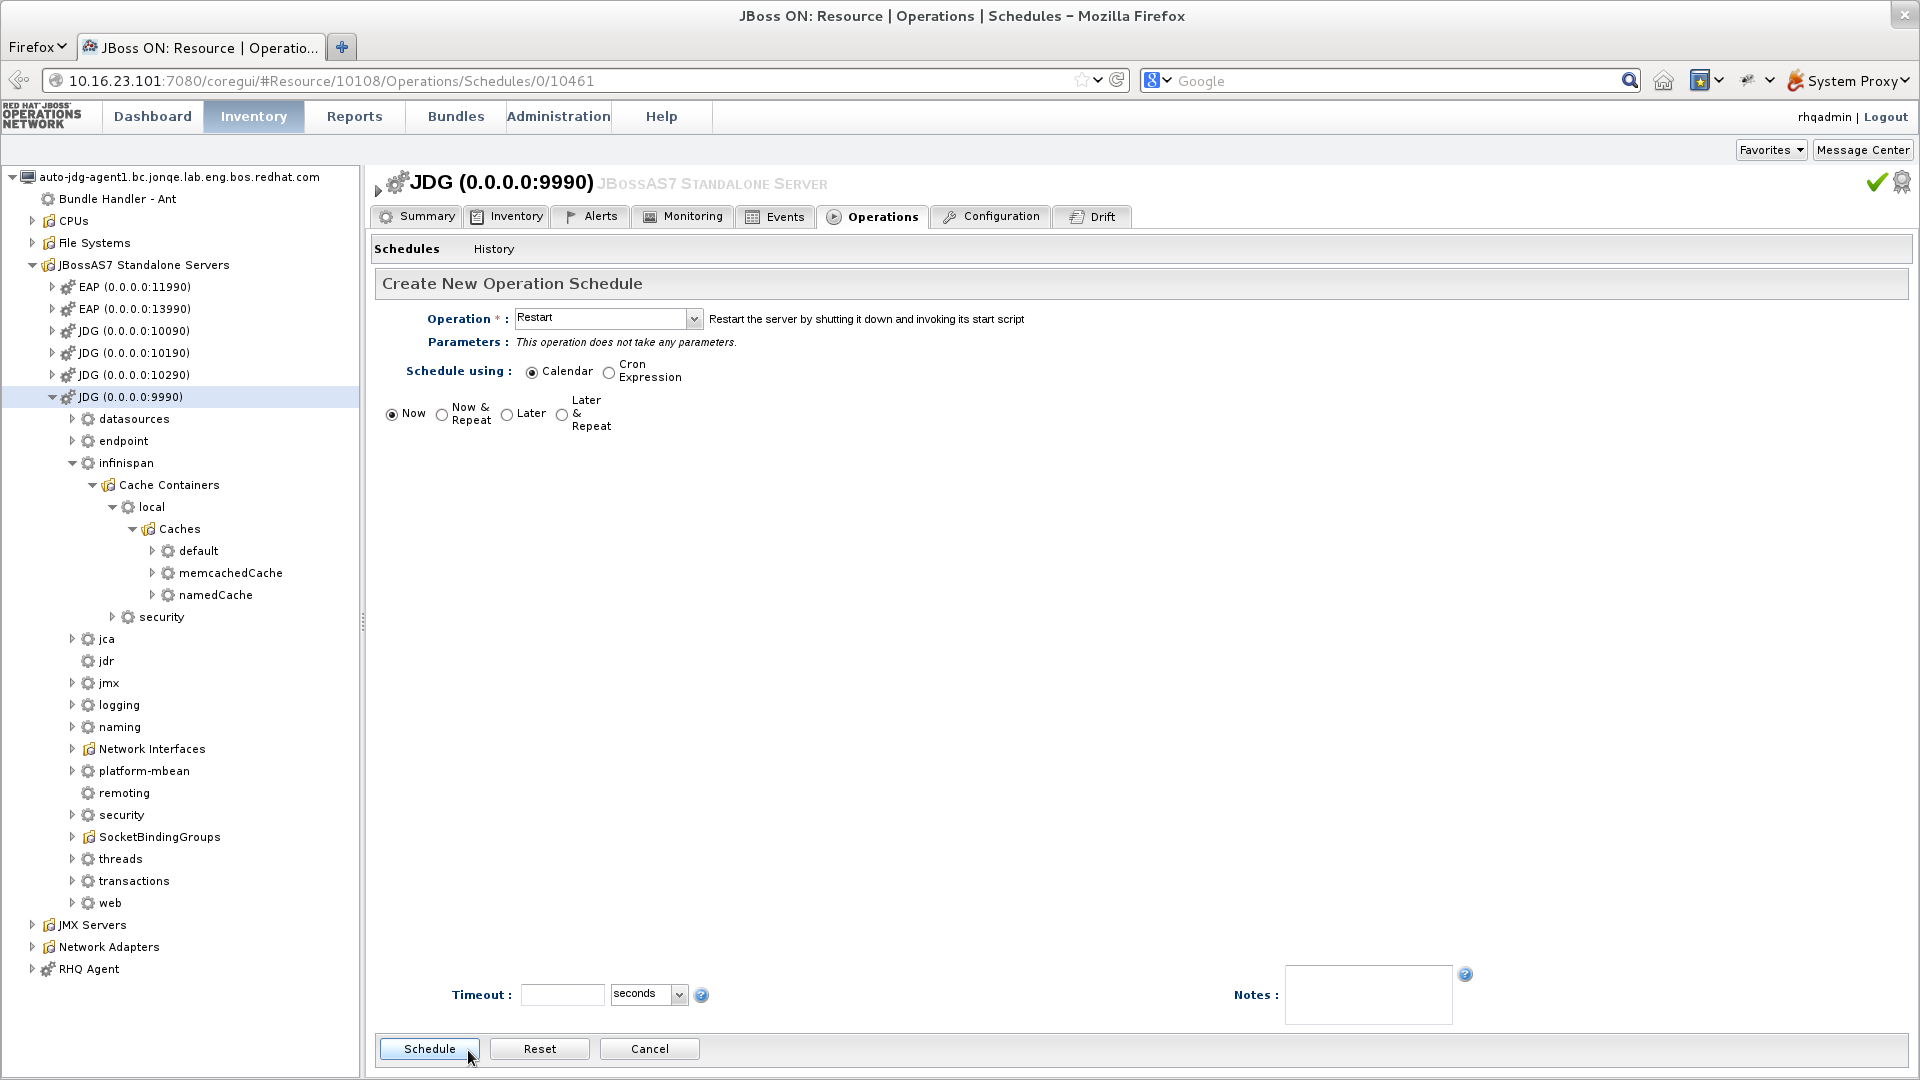
Figure 18.4. Schedule a Restart Operation
- In the screen's left panel, expand the JBossAS7 Standalone Servers entry, if it is not currently expanded.
- Click JDG (0.0.0.0:9990) from the expanded menu items.
- In the screen's right panel, details about the selected server display. Click the tab.
- In the Operation drop-down box, select the Restart operation.
- Select the radio button for the Now entry.
- Click to restart the server immediately.
- Discover the new LevelDB cache store as follows:
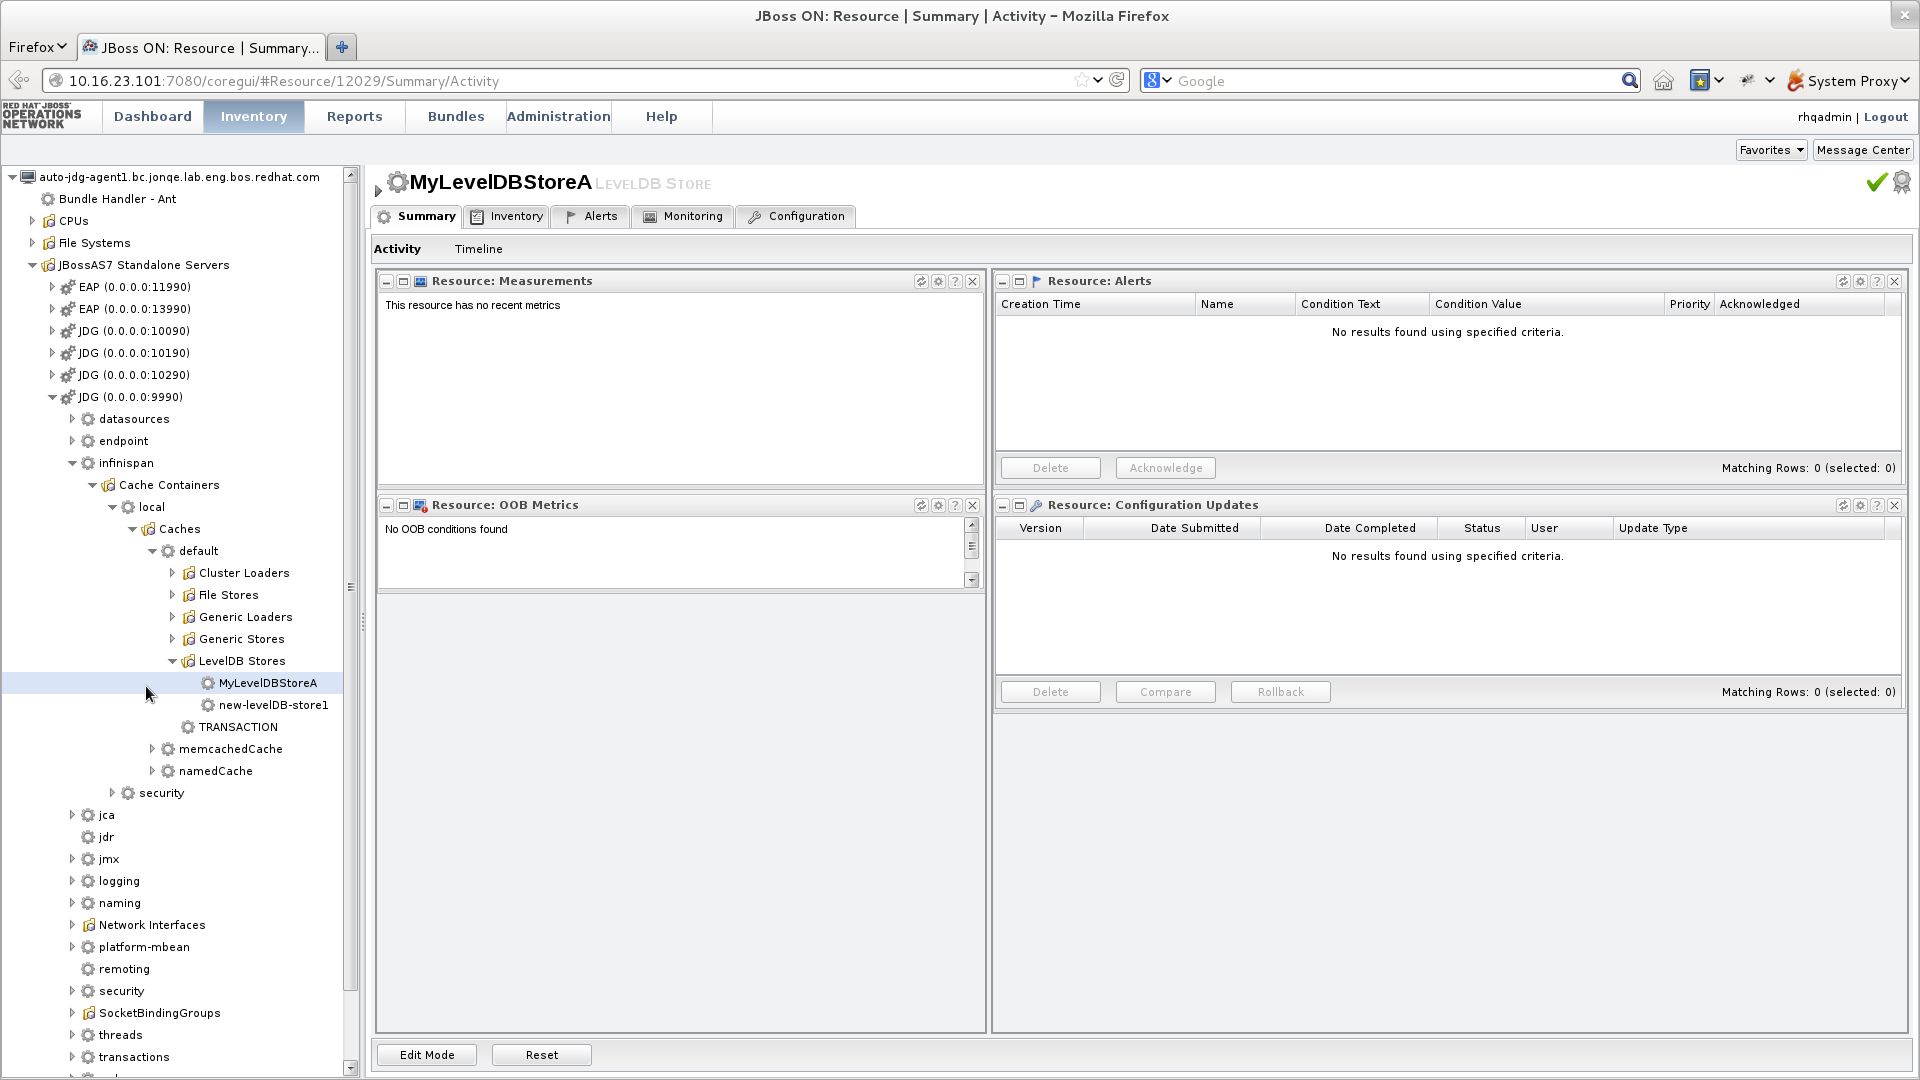
Figure 18.5. Discover the New LevelDB Cache Store
- In the screen's left panel, select each of the following items in the specified order to expand them: → → → → → → →
- Click the name of your new LevelDB Cache Store to view its configuration information in the right panel.
18.6. JDBC Based Cache Stores
JdbcBinaryStore.JdbcStringBasedStore.JdbcMixedStore.
18.6.1. JDBC Datasource Configuration
- connectionPool
- dataSource
- simpleConnection
A connectionPool uses a JDBC driver to establish a connection, along with creating a pool of threads which may be used for any requests. This configuration is typically used in stand-alone environments that require ready access to a database without having the overhead of creating the database connection on each invocation.
A dataSource is a connection factory that understands how to reference a JNDI tree and delegate connections to the datasource. This configuration is typically used in environments where a datasource has already been configured outside of JBoss Data Grid.
The simpleConnection is similar to connectionPool in that it uses a JDBC driver to establish each connection; however, instead of creating a pool of threads that are available a new connection is created on each invocation. This configuration is typically used in test environments, or where only a single connection is required.
<connectionPool />, <dataSource />, or <simpleConnection /> elements. Alternatively, these may be configured programmatically with the connectionPool(), dataSource(), or simpleConnection() methods on the JdbcBinaryStoreConfigurationBuilde, JdbcMixedStoreConfigurationBuilder, or JdbcBinaryStoreConfigurationBuilder classes.
18.6.2. JdbcBinaryStores
JdbcBinaryStore supports all key types. It stores all keys with the same hash value (hashCode method on the key) in the same table row/blob. The hash value common to the included keys is set as the primary key for the table row/blob. As a result of this hash value, JdbcBinaryStore offers excellent flexibility but at the cost of concurrency and throughput.
k1, k2 and k3) have the same hash code, they are stored in the same table row. If three different threads attempt to concurrently update k1, k2 and k3, they must do it sequentially because all three keys share the same row and therefore cannot be simultaneously updated.
18.6.2.1. JdbcBinaryStore Configuration (Remote Client-Server Mode)
JdbcBinaryStore using Red Hat JBoss Data Grid's Remote Client-Server mode with Passivation enabled:
<local-cache name="customCache">

	<!-- Additional configuration elements here -->
	<binary-keyed-jdbc-store datasource="java:jboss/datasources/JdbcDS"

				 passivation="${true/false}"
				 preload="${true/false}"
				 purge="${true/false}">
               	<binary-keyed-table prefix="JDG">
               		<id-column name="id"
				   type="${id.column.type}"/>
               		<data-column name="datum"
				     type="${data.column.type}"/>
              		<timestamp-column name="version"
					  type="${timestamp.column.type}"/>
              	</binary-keyed-table>
       	</binary-keyed-jdbc-store>
</local-cache>18.6.2.2. JdbcBinaryStore Configuration (Library Mode)
JdbcBinaryStore:
<infinispan
        xmlns:xsi="http://www.w3.org/2001/XMLSchema-instance"
        xsi:schemaLocation="urn:infinispan:config:6.0 http://www.infinispan.org/schemas/infinispan-config-6.0.xsd
            urn:infinispan:config:jdbc:6.0 http://www.infinispan.org/schemas/infinispan-cachestore-jdbc-config-6.0.xsd"
        xmlns="urn:infinispan:config:6.0">
        <!-- Additional configuration elements here -->
	<persistence>
	<binaryKeyedJdbcStore xmlns="urn:infinispan:config:jdbc:6.0"
                              fetchPersistentState="false"
			      ignoreModifications="false"
			      purgeOnStartup="false">
		<connectionPool connectionUrl="jdbc:h2:mem:infinispan_binary_based;DB_CLOSE_DELAY=-1"
				username="sa"
				driverClass="org.h2.Driver"/>
		<binaryKeyedTable dropOnExit="true"
				  createOnStart="true"
				  prefix="ISPN_BUCKET_TABLE">
			<idColumn name="ID_COLUMN"
				  type="VARCHAR(255)" />
			<dataColumn name="DATA_COLUMN"
				    type="BINARY" />
			<timestampColumn name="TIMESTAMP_COLUMN"
					 type="BIGINT" />
		</binaryKeyedTable>
	</binaryKeyedJdbcStore>
</persistence>18.6.2.3. JdbcBinaryStore Programmatic Configuration
JdbcBinaryStore:
ConfigurationBuilder builder = new ConfigurationBuilder();
  builder.persistence()
     .addStore(JdbcBinaryStoreConfigurationBuilder.class)
     .fetchPersistentState(false)
     .ignoreModifications(false)
     .purgeOnStartup(false)
     .table()
        .dropOnExit(true)
        .createOnStart(true)
        .tableNamePrefix("ISPN_BUCKET_TABLE")
        .idColumnName("ID_COLUMN").idColumnType("VARCHAR(255)")
        .dataColumnName("DATA_COLUMN").dataColumnType("BINARY")
        .timestampColumnName("TIMESTAMP_COLUMN").timestampColumnType("BIGINT")
     .connectionPool()
        .connectionUrl("jdbc:h2:mem:infinispan_binary_based;DB_CLOSE_DELAY=-1")
        .username("sa")
        .driverClass("org.h2.Driver");
Procedure 18.4. JdbcBinaryStore Programmatic Configuration (Library Mode)
- Use the
ConfigurationBuilderto create a new configuration object. - Add the
JdbcBinaryStoreconfiguration builder to build a specific configuration related to this store. - The
fetchPersistentStateelement determines whether or not to fetch the persistent state of a cache and apply it to the local cache store when joining the cluster. If the cache store is shared the fetch persistent state is ignored, as caches access the same cache store. A configuration exception will be thrown when starting the cache service if more than one cache loader has this property set totrue. ThefetchPersistentStateproperty isfalseby default. - The
ignoreModificationselement determines whether write methods are pushed to the specific cache loader by allowing write operations to the local file cache loader, but not the shared cache loader. In some cases, transient application data should only reside in a file-based cache loader on the same server as the in-memory cache. For example, this would apply with a further JDBC based cache loader used by all servers in the network.ignoreModificationsisfalseby default. - The
purgeOnStartupelement specifies whether the cache is purged when initially started. - Configure the table as follows:
dropOnExitdetermines if the table will be dropped when the cache store is stopped. This is set tofalseby default.createOnStartcreates the table when starting the cache store if no table currently exists. This method istrueby default.tableNamePrefixsets the prefix for the name of the table in which the data will be stored.- The
idColumnNameproperty defines the column where the cache key or bucket ID is stored. - The
dataColumnNameproperty specifies the column where the cache entry or bucket is stored. - The
timestampColumnNameelement specifies the column where the time stamp of the cache entry or bucket is stored.
- The
connectionPoolelement specifies a connection pool for the JDBC driver using the following parameters:- The
connectionUrlparameter specifies the JDBC driver-specific connection URL. - The
usernameparameter contains the user name used to connect via theconnectionUrl. - The
driverClassparameter specifies the class name of the driver used to connect to the database.
Note
18.6.3. JdbcStringBasedStores
JdbcStringBasedStore stores each entry in its own row in the table, instead of grouping multiple entries into each row, resulting in increased throughput under a concurrent load. It also uses a (pluggable) bijection that maps each key to a String object. The Key2StringMapper interface defines the bijection.
DefaultTwoWayKey2StringMapper that handles primitive types.
18.6.3.1. JdbcStringBasedStore Configuration (Remote Client-Server Mode)
JdbcStringBasedStore for Red Hat JBoss Data Grid's Remote Client-Server mode:
<local-cache name="customCache">
	<!-- Additional configuration elements here -->
	<string-keyed-jdbc-store datasource="java:jboss/datasources/JdbcDS"
				 passivation="true"
				 preload="false"
				 purge="false"
				 shared="false"
				 singleton="true">
               	<string-keyed-table prefix="JDG">
               		<id-column name="id"
				   type="${id.column.type}"/>
			<data-column name="datum"
				     type="${data.column.type}"/>
			<timestamp-column name="version"
					  type="${timestamp.column.type}"/>
	        </string-keyed-table>
	</string-keyed-jdbc-store>
</local-cache>18.6.3.2. JdbcStringBasedStore Configuration (Library Mode)
JdbcStringBasedStore:
<infinispan
        xmlns:xsi="http://www.w3.org/2001/XMLSchema-instance"
        xsi:schemaLocation="urn:infinispan:config:6.0 http://www.infinispan.org/schemas/infinispan-config-6.0.xsd
            urn:infinispan:config:jdbc:6.0 http://www.infinispan.org/schemas/infinispan-cachestore-jdbc-config-6.0.xsd"
        xmlns="urn:infinispan:config:6.0">
        <!-- Additional configuration elements here -->
	<persistence>
	<stringKeyedJdbcStore xmlns="urn:infinispan:config:jdbc:6.0"
	                      fetchPersistentState="false"
			      ignoreModifications="false"
			      purgeOnStartup="false"
			      key2StringMapper="org.infinispan.loaders.keymappers.DefaultTwoWayKey2StringMapper">
		<dataSource jndiUrl="java:jboss/datasources/JdbcDS"/>
		<stringKeyedTable dropOnExit="true"
				  createOnStart="true"
				  prefix="ISPN_STRING_TABLE">
			<idColumn name="ID_COLUMN"
				  type="VARCHAR(255)" />
			<dataColumn name="DATA_COLUMN"
				    type="BINARY" />
			<timestampColumn name="TIMESTAMP_COLUMN"
					 type="BIGINT" />
		</stringKeyedTable>
	</stringKeyedJdbcStore>
</persistence>18.6.3.3. JdbcStringBasedStore Multiple Node Configuration (Remote Client-Server Mode)
JdbcStringBasedStore in Red Hat JBoss Data Grid's Remote Client-Server mode. This configuration is used when multiple nodes must be used.
<subsystem xmlns="urn:infinispan:server:core:6.1" default-cache-container="default">
	<cache-container <!-- Additional configuration information here --> >
		<!-- Additional configuration elements here -->
      <replicated-cache>
			<!-- Additional configuration elements here -->
	      <string-keyed-jdbc-store datasource="java:jboss/datasources/JdbcDS"
	            		       fetch-state="true"
	            		       passivation="false"
	            		       preload="false"
	            		       purge="false"
	            		       shared="false"
	            		       singleton="true">
	         <string-keyed-table prefix="JDG">
	             <id-column name="id"
	                        type="${id.column.type}"/>
	             <data-column name="datum"
	                          type="${data.column.type}"/>
	             <timestamp-column name="version"
	                               type="${timestamp.column.type}"/>
				</string-keyed-table>
			</string-keyed-jdbc-store>
		</replicated-cache>
	</cache-container>
</subsystem>18.6.3.4. JdbcStringBasedStore Programmatic Configuration
JdbcStringBasedStore:
ConfigurationBuilder builder = new ConfigurationBuilder();
  builder.persistence().addStore(JdbcStringBasedStoreConfigurationBuilder.class)
     .fetchPersistentState(false)
     .ignoreModifications(false)
     .purgeOnStartup(false)
     .table()
        .dropOnExit(true)
        .createOnStart(true)
        .tableNamePrefix("ISPN_STRING_TABLE")
        .idColumnName("ID_COLUMN").idColumnType("VARCHAR(255)")
        .dataColumnName("DATA_COLUMN").dataColumnType("BINARY")
        .timestampColumnName("TIMESTAMP_COLUMN").timestampColumnType("BIGINT")
     .dataSource()
        .jndiUrl("java:jboss/datasources/JdbcDS");
Procedure 18.5. Configure the JdbcStringBasedStore Programmatically
- Use the
ConfigurationBuilderto create a new configuration object. - Add the
JdbcStringBasedStoreconfiguration builder to build a specific configuration related to this store. - The
fetchPersistentStateparameter determines whether or not to fetch the persistent state of a cache and apply it to the local cache store when joining the cluster. If the cache store is shared the fetch persistent state is ignored, as caches access the same cache store. A configuration exception will be thrown when starting the cache service if more than one cache loader has this property set totrue. ThefetchPersistentStateproperty isfalseby default. - The
ignoreModificationsparameter determines whether write methods are pushed to the specific cache loader by allowing write operations to the local file cache loader, but not the shared cache loader. In some cases, transient application data should only reside in a file-based cache loader on the same server as the in-memory cache. For example, this would apply with a further JDBC based cache loader used by all servers in the network.ignoreModificationsisfalseby default. - The
purgeOnStartupparameter specifies whether the cache is purged when initially started. - Configure the Table
dropOnExitdetermines if the table will be dropped when the cache store is stopped. This is set tofalseby default.createOnStartcreates the table when starting the cache store if no table currently exists. This method istrueby default.tableNamePrefixsets the prefix for the name of the table in which the data will be stored.- The
idColumnNameproperty defines the column where the cache key or bucket ID is stored. - The
dataColumnNameproperty specifies the column where the cache entry or bucket is stored. - The
timestampColumnNameelement specifies the column where the time stamp of the cache entry or bucket is stored.
- The
dataSourceelement specifies a data source using the following parameters:- The
jndiUrlspecifies the JNDI URL to the existing JDBC.
Note
18.6.4. JdbcMixedStores
JdbcMixedStore is a hybrid implementation that delegates keys based on their type to either the JdbcBinaryStore or JdbcStringBasedStore.
18.6.4.1. JdbcMixedStore Configuration (Remote Client-Server Mode)
JdbcMixedStore for Red Hat JBoss Data Grid's Remote Client-Server mode:
<local-cache name="customCache">
	<mixed-keyed-jdbc-store datasource="java:jboss/datasources/JdbcDS"
				passivation="true"
				preload="false"
				purge="false">
		<binary-keyed-table prefix="MIX_BKT2">
			<id-column name="id"
				   type="${id.column.type}"/>
			<data-column name="datum"
				     type="${data.column.type}"/>
			<timestamp-column name="version"
				   	  type="${timestamp.column.type}"/>
		</binary-keyed-table>
		<string-keyed-table prefix="MIX_STR2">
			<id-column name="id"
				   type="${id.column.type}"/>
			<data-column name="datum"
				     type="${data.column.type}"/>
			<timestamp-column name="version"
				   	  type="${timestamp.column.type}"/>
		</string-keyed-table>
	</mixed-keyed-jdbc-store>
</local-cache>18.6.4.2. JdbcMixedStore Configuration (Library Mode)
mixedKeyedJdbcStore:
<infinispan
        xmlns:xsi="http://www.w3.org/2001/XMLSchema-instance"
        xsi:schemaLocation="urn:infinispan:config:6.0 http://www.infinispan.org/schemas/infinispan-config-6.0.xsd
            urn:infinispan:config:jdbc:6.0 http://www.infinispan.org/schemas/infinispan-cachestore-jdbc-config-6.0.xsd"
        xmlns="urn:infinispan:config:6.0">
        <!-- Additional configuration elements here -->
	<persistence>
	<mixedKeyedJdbcStore xmlns="urn:infinispan:config:jdbc:6.0"
	                      fetchPersistentState="false"
			      ignoreModifications="false"
			      purgeOnStartup="false"
			      key2StringMapper="org.infinispan.persistence.keymappers.DefaultTwoWayKey2StringMapper">
		<connectionPool connectionUrl="jdbc:h2:mem:infinispan_binary_based;DB_CLOSE_DELAY=-1"
				username="sa"
				driverClass="org.h2.Driver"/>
		<binaryKeyedTable dropOnExit="true"
				  createOnStart="true"
				  prefix="ISPN_BUCKET_TABLE_BINARY">
			<idColumn name="ID_COLUMN"
				  type="VARCHAR(255)" />
			<dataColumn name="DATA_COLUMN"
				    type="BINARY" />
			<timestampColumn name="TIMESTAMP_COLUMN"
					 type="BIGINT" />
		</binaryKeyedTable>
		<stringKeyedTable dropOnExit="true"
				  createOnStart="true"
				  prefix="ISPN_BUCKET_TABLE_STRING">
			<idColumn name="ID_COLUMN"
				  type="VARCHAR(255)" />
			<dataColumn name="DATA_COLUMN"
				    type="BINARY" />
			<timestampColumn name="TIMESTAMP_COLUMN"
					 type="BIGINT" />
		</stringKeyedTable>
	</mixedKeyedJdbcStore>
</persistence>18.6.4.3. JdbcMixedStore Programmatic Configuration
JdbcMixedStore:
ConfigurationBuilder builder = new ConfigurationBuilder();
  builder.persistence().addStore(JdbcMixedStoreConfigurationBuilder.class)
     .fetchPersistentState(false)
     .ignoreModifications(false)
     .purgeOnStartup(false)
     .stringTable()
        .dropOnExit(true)
        .createOnStart(true)
        .tableNamePrefix("ISPN_MIXED_STR_TABLE")
        .idColumnName("ID_COLUMN").idColumnType("VARCHAR(255)")
        .dataColumnName("DATA_COLUMN").dataColumnType("BINARY")
        .timestampColumnName("TIMESTAMP_COLUMN").timestampColumnType("BIGINT")
     .binaryTable()
        .dropOnExit(true)
        .createOnStart(true)
        .tableNamePrefix("ISPN_MIXED_BINARY_TABLE")
        .idColumnName("ID_COLUMN").idColumnType("VARCHAR(255)")
        .dataColumnName("DATA_COLUMN").dataColumnType("BINARY")
        .timestampColumnName("TIMESTAMP_COLUMN").timestampColumnType("BIGINT")
     .connectionPool()
        .connectionUrl("jdbc:h2:mem:infinispan_binary_based;DB_CLOSE_DELAY=-1")
        .username("sa")
        .driverClass("org.h2.Driver");
Procedure 18.6. Configure JdbcMixedStore Programmatically
- Use the
ConfigurationBuilderto create a new configuration object. - Add the
JdbcMixedStoreconfiguration builder to build a specific configuration related to this store. - The
fetchPersistentStateparameter determines whether or not to fetch the persistent state of a cache and apply it to the local cache store when joining the cluster. If the cache store is shared the fetch persistent state is ignored, as caches access the same cache store. A configuration exception will be thrown when starting the cache service if more than one cache loader has this property set totrue. ThefetchPersistentStateproperty isfalseby default. - The
ignoreModificationsparameter determines whether write methods are pushed to the specific cache loader by allowing write operations to the local file cache loader, but not the shared cache loader. In some cases, transient application data should only reside in a file-based cache loader on the same server as the in-memory cache. For example, this would apply with a further JDBC based cache loader used by all servers in the network.ignoreModificationsisfalseby default. - The
purgeOnStartupparameter specifies whether the cache is purged when initially started. - Configure the table as follows:
dropOnExitdetermines if the table will be dropped when the cache store is stopped. This is set tofalseby default.createOnStartcreates the table when starting the cache store if no table currently exists. This method istrueby default.tableNamePrefixsets the prefix for the name of the table in which the data will be stored.- The
idColumnNameproperty defines the column where the cache key or bucket ID is stored. - The
dataColumnNameproperty specifies the column where the cache entry or bucket is stored. - The
timestampColumnNameelement specifies the column where the time stamp of the cache entry or bucket is stored.
- The
connectionPoolelement specifies a connection pool for the JDBC driver using the following parameters:- The
connectionUrlparameter specifies the JDBC driver-specific connection URL. - The
usernameparameter contains the username used to connect via theconnectionUrl. - The
driverClassparameter specifies the class name of the driver used to connect to the database.
Note
18.6.5. Cache Store Troubleshooting
18.6.5.1. IOExceptions with JdbcStringBasedStore
JdbcStringBasedStore indicates that your data column type is set to VARCHAR, CLOB or something similar instead of the correct type, BLOB or VARBINARY. Despite its name, JdbcStringBasedStore only requires that the keys are strings while the values can be any data type, so that they can be stored in a binary column.
18.7. The Remote Cache Store
RemoteCacheStore is an implementation of the cache loader that stores data in a remote Red Hat JBoss Data Grid cluster. The RemoteCacheStore uses the Hot Rod client-server architecture to communicate with the remote cluster.
RemoteCacheStore and the cluster.
18.7.1. Remote Cache Store Configuration (Remote Client-Server Mode)
<remote-store cache="default"
              socket-timeout="60000"
              tcp-no-delay="true"
              hotrod-wrapping="true">
	<remote-server outbound-socket-binding="remote-store-hotrod-server" />
</remote-store>18.7.2. Remote Cache Store Configuration (Library Mode)
<persistence passivation="false">
	<remoteStore xmlns="urn:infinispan:config:remote:6.0"
	             remoteCacheName="default"
		     fetchPersistentState="false"
		     shared="true"
		     preload="false"
		     ignoreModifications="false"
		     purgeOnStartup="false"
		     tcpNoDelay="true"
		     pingOnStartup="true"
		     keySizeEstimate="62"
		     valueSizeEstimate="512"
		     forceReturnValues="false">
		<servers>
			<server host="127.0.0.1"
				port="19711"/>
		</servers>
		<connectionPool maxActive="99"
				maxIdle="97"
				maxTotal="98" />
	</remoteStore>
</persistence>
18.7.3. Define the Outbound Socket for the Remote Cache Store
outbound-socket-binding element in a standalone.xml file.
standalone.xml file is as follows:
Example 18.1. Define the Outbound Socket
<server>
    <!-- Additional configuration elements here -->
    <socket-binding-group name="standard-sockets"
    			  default-interface="public"
    			  port-offset="${jboss.socket.binding.port-offset:0}">
        <!-- Additional configuration elements here -->
        <outbound-socket-binding name="remote-store-hotrod-server">
            <remote-destination host="remote-host"
                                port="11222"/>
        </outbound-socket-binding>
    </socket-binding-group>
</server>18.8. JPA Cache Store
Important
18.8.1. JPA Cache Store Sample XML Configuration (Library Mode)
infinispan.xml file:
<namedCache name="users">
  <!-- Insert additional configuration elements here -->
	<persistence passivation="false">
            <jpaStore xmlns="urn:infinispan:config:jpa:6.0"
                      shared="true"
                      preload="true"
                      persistenceUnitName="MyPersistenceUnit"
                      entityClassName="org.infinispan.loaders.jpa.entity.User" />
	</persistence>
</namedCache>18.8.2. JPA Cache Store Sample Programmatic Configuration
Configuration cacheConfig = new ConfigurationBuilder().persistence()
        .addStore(JpaStoreConfigurationBuilder.class)
        .persistenceUnitName("org.infinispan.loaders.jpa.configurationTest")
        .entityClass(User.class)
.build();- The
persistenceUnitNameparameter specifies the name of the JPA cache store in the configuration file (persistence.xml) that contains the JPA entity class. - The
entityClassparameter specifies the JPA entity class that is stored in this cache. Only one class can be specified for each configuration.
18.8.3. Storing Metadata in the Database
storeMetadata is set to true (default value), meta information about the entries such as expiration, creation and modification timestamps, and versioning is stored in the database. JBoss Data Grid stores the metadata in an additional table named __ispn_metadata__ because the entity table has a fixed layout that cannot accommodate the metadata.
Procedure 18.7. Configure persistence.xml for Metadata Entities
- Using Hibernate as the JPA implementation allows automatic creation of these tables using the property
hibernate.hbm2ddl.autoinpersistence.xmlas follows:<property name="hibernate.hbm2ddl.auto" value="update"/>
- Declare the metadata entity class to the JPA provider by adding the following to
persistence.xml:<class>org.infinispan.persistence.jpa.impl.MetadataEntity</class>
storeMetadata attribute to false in the JPA Store configuration.
18.8.4. Deploying JPA Cache Stores in Various Containers
<dependency>
    <groupId>org.infinispan</groupId>
    <artifactId>infinispan-cachestore-jpa</artifactId>
    <version>6.4.0.Final-redhat-4</version>
</dependency>
Procedure 18.8. Deploy JPA Cache Stores in JBoss EAP 6.3.x and earlier
- To add dependencies from the JBoss Data Grid modules to the application's classpath, provide the JBoss EAP deployer a list of dependencies in one of the following ways:
- Add a dependency configuration to the
MANIFEST.MFfile:Manifest-Version: 1.0 Dependencies: org.infinispan:jdg-6.6 services, org.infinispan.persistence.jpa:jdg-6.6 services
- Add a dependency configuration to the
jboss-deployment-structure.xmlfile:<jboss-deployment-structure xmlns="urn:jboss:deployment-structure:1.2"> <deployment> <dependencies> <module name="org.infinispan.persistence.jpa" slot="jdg-6.6" services="export"/> <module name="org.infinispan" slot="jdg-6.6" services="export"/> </dependencies> </deployment> </jboss-deployment-structure>
Procedure 18.9. Deploy JPA Cache Stores in JBoss EAP 6.4 and later
- Add the following property in
persistence.xml:<persistence-unit> [...] <properties> <property name="jboss.as.jpa.providerModule" value="application" /> </properties> </persistence-unit> - Add the following dependencies to the
jboss-deployment-structure.xml:<jboss-deployment-structure> <deployment> <dependencies> <module name="org.infinispan" slot="jdg-6.6"/> <module name="org.jgroups" slot="jdg-6.6"/> <module name="org.infinispan.persistence.jpa" slot="jdg-6.6" services="export"/> <module name="org.hibernate"/> </dependencies> </deployment> </jboss-deployment-structure> - Add any additional dependencies, such as additional JDG modules, are in use add these to the
dependenciessection injboss-deployment-structure.xml.
Important
18.9. Custom Cache Stores
CacheLoaderCacheWriterAdvancedCacheLoaderAdvancedCacheWriterExternalStoreAdvancedLoadWriteStore
Note
AdvancedCacheWriter is not implemented, the expired entries cannot be purged or cleared using the given writer.
Note
AdvancedCacheLoader is not implemented, the entries stored in the given loader will not be used for preloading and map/reduce iterations.
SingleFileStore as an example. To view the SingleFileStore example code, download the JBoss Data Grid source code.
SingleFileStore example code from the Customer Portal:
Procedure 18.10. Download JBoss Data Grid Source Code
- To access the Red Hat Customer Portal, navigate to https://access.redhat.com/home in a browser.
- Click .
- In the section labeled JBoss Development and Management, click .
- Enter the relevant credentials in the Red Hat Login and Password fields and click .
- From the list of downloadable files, locate Red Hat JBoss Data Grid ${VERSION} Source Code and click . Save and unpack it in a desired location.
- Locate the
SingleFileStoresource code by navigating throughjboss-datagrid-6.6.1-sources/infinispan-6.4.1.Final-redhat-1-src/core/src/main/java/org/infinispan/persistence/file/SingleFileStore.java.
18.9.1. Custom Cache Store Maven Archetype
Procedure 18.11. Generate a Maven Archetype
- Ensure the JBoss Data Grid Maven repository has been installed by following the instructions in the Red Hat JBoss Data Grid Getting Started Guide.
- Open a command prompt and execute the following command to generate an archetype in the current directory:
mvn -Dmaven.repo.local="path/to/unzipped/jboss-datagrid-6.6.0-maven-repository/"
  archetype:generate
  -DarchetypeGroupId=org.infinispan
  -DarchetypeArtifactId=custom-cache-store-archetype
  -DarchetypeVersion=6.4.1.Final-redhat-1
Note
The above command has been broken into multiple lines for readability; however, when executed this command and all arguments must be on a single line.
18.9.2. Custom Cache Store Configuration (Remote Client-Server Mode)
Example 18.2. Custom Cache Store Configuration
<distributed-cache name="cacheStore" mode="SYNC" segments="20" owners="2" remote-timeout="30000">
    <store class="my.package.CustomCacheStore">
        <property name="customStoreProperty">10</property>
    </store>
</distributed-cache>18.9.2.1. Option 1: Add Custom Cache Store using deployments (Remote Client-Server Mode)
Procedure 18.12. Deploy Custom Cache Store .jar file to JDG server using deployments
- Add the following Java service loader file
META-INF/services/org.infinispan.persistence.spi.AdvancedLoadWriteStoreto the module and add a reference to the Custom Cache Store Class, such as seen below:my.package.CustomCacheStore
- Copy the jar to the
$JDG_HOME/standalone/deployments/directory. - If the .jar file is available the server the following message will be displayed in the logs:
JBAS010287: Registering Deployed Cache Store service for store 'my.package.CustomCacheStore'
- In the
infinispan-coresubsystem add an entry for the cache inside acache-container, specifying the class that overrides one of the interfaces from Section 18.9, “Custom Cache Stores”:<subsystem xmlns="urn:infinispan:server:core:6.2"> [...] <distributed-cache name="cacheStore" mode="SYNC" segments="20" owners="2" remote-timeout="30000""> <store class="my.package.CustomCacheStore"> <!-- If custom properties are included these may be specified as below --> <property name="customStoreProperty">10</property> </store> </distributed-cache> [...] </subsystem>
18.9.2.2. Option 2: Add Custom Cache Store using the CLI (Remote Client-Server Mode)
Procedure 18.13. Deploying Custom Cache Store .jar file to JDG server using the CLI
- Connect to the JDG server by running the below command:
[$JDG_HOME] $ bin/cli.sh --connect=$IP:$PORT
- Deploy the .jar file by executing the following command:
deploy /path/to/artifact.jar
18.9.2.3. Option 3: Add Custom Cache Store using JON (Remote Client-Server Mode)
Procedure 18.14. Deploying Custom Cache Store .jar file to JDG server using JBoss Operation Network
- Log into JON.
- Navigate to
Bundlesalong the upper bar. - Click the
Newbutton and choose theReciperadio button. - Insert a deployment bundle file content that references the store, similar to the following example:
<?xml version="1.0"?> <project name="cc-bundle" default="main" xmlns:rhq="antlib:org.rhq.bundle"> <rhq:bundle name="Mongo DB Custom Cache Store" version="1.0" description="Custom Cache Store"> <rhq:deployment-unit name="JDG" compliance="full"> <rhq:file name="custom-store.jar"/> </rhq:deployment-unit> </rhq:bundle> <target name="main" /> </project> - Proceed with
Nextbutton toBundle Groupsconfiguration wizard page and proceed withNextbutton once again. - Locate custom cache store
.jarfile using file uploader andUploadthe file. - Proceed with
Nextbutton toSummaryconfiguration wizard page. Proceed withFinishbutton in order to finish bundle configuration. - Navigate back to the
Bundlestab along the upper bar. - Select the newly created bundle and click
Deploybutton. - Enter
Destination Nameand choose the proper Resource Group; this group should only consist of JDG servers. - Choose
Install DirectoryfromBase Location's radio box group. - Enter
/standalone/deploymentsinDeployment Directorytext field below. - Proceed with the wizard using the default options.
- Validate the deployment using the following command on the server's host:
find $JDG_HOME -name "custom-store.jar"
- Confirm the bundle has been installed in
$JDG_HOME/standalone/deployments.
18.9.3. Custom Cache Store Configuration (Library Mode)
Example 18.3. Custom Cache Store Configuration
<persistence>
	<store class="org.infinispan.custom.CustomCacheStore"
	       preload="true"
	       shared="true">
		<properties>
			<property name="customStoreProperty"
				  value="10" />
		</properties>
	</store>
</persistence>
Note
Part VIII. Set Up Passivation
Chapter 19. Activation and Passivation Modes
19.1. Passivation Mode Benefits
19.2. Configure Passivation
passivation parameter to the cache store element to toggle passivation for it:
Example 19.1. Toggle Passivation in Remote Client-Server Mode
<local-cache name="customCache"/>
	<!-- Additional configuration elements here -->
	<file-store passivation="true"
		    <!-- Additional configuration elements here --> />
	<!-- Additional configuration elements here -->
</local-cache>
passivation parameter to the persistence element to toggle passivation:
Example 19.2. Toggle Passivation in Library Mode
<persistence passivation="true">
   <!-- Additional configuration elements here -->
</persistence>
19.3. Eviction and Passivation
19.3.1. Eviction and Passivation Usage
- A notification regarding the passivated entry is emitted to the cache listeners.
- The evicted entry is stored.
19.3.2. Eviction Example when Passivation is Disabled
Table 19.1. Eviction when Passivation is Disabled
| Step | Key in Memory | Key on Disk |
|---|---|---|
Insert keyOne | Memory: keyOne | Disk: keyOne |
Insert keyTwo | Memory: keyOne, keyTwo | Disk: keyOne, keyTwo |
Eviction thread runs, evicts keyOne | Memory: keyTwo | Disk: keyOne, keyTwo |
Read keyOne | Memory: keyOne, keyTwo | Disk: keyOne, keyTwo |
Eviction thread runs, evicts keyTwo | Memory: keyOne | Disk: keyOne, keyTwo |
Remove keyTwo | Memory: keyOne | Disk: keyOne |
19.3.3. Eviction Example when Passivation is Enabled
Table 19.2. Eviction when Passivation is Enabled
| Step | Key in Memory | Key on Disk |
|---|---|---|
Insert keyOne | Memory: keyOne | Disk: |
Insert keyTwo | Memory: keyOne, keyTwo | Disk: |
Eviction thread runs, evicts keyOne | Memory: keyTwo | Disk: keyOne |
Read keyOne | Memory: keyOne, keyTwo | Disk: |
Eviction thread runs, evicts keyTwo | Memory: keyOne | Disk: keyTwo |
Remove keyTwo | Memory: keyOne | Disk: |
Part IX. Set Up Cache Writing
Chapter 20. Cache Writing Modes
- Write-Through (Synchronous)
- Write-Behind (Asynchronous)
20.1. Write-Through Caching
Cache.put() invocation), the call does not return until JBoss Data Grid has located and updated the underlying cache store. This feature allows updates to the cache store to be concluded within the client thread boundaries.
20.1.1. Write-Through Caching Benefits and Disadvantages
The primary advantage of the Write-Through mode is that the cache and cache store are updated simultaneously, which ensures that the cache store remains consistent with the cache contents.
Due to the cache store being updated simultaneously with the cache entry, there is a possibility of reduced performance for cache operations that occur concurrently with the cache store accesses and updates.
20.1.2. Write-Through Caching Configuration (Library Mode)
Procedure 20.1. Configure a Write-Through Local File Cache Store
<?xml version="1.0" encoding="UTF-8"?>
<infinispan xmlns:xsi="http://www.w3.org/2001/XMLSchema-instance"
            xmlns="urn:infinispan:config:6.2">
	<global />
	<default />
	<namedCache name="persistentCache">
		<persistence>
		    <singleFile fetchPersistentState="true"
			    ignoreModifications="false"
			    purgeOnStartup="false"
			    shared="false"
			    location="${java.io.tmpdir}"/>
		</persistence>
  	</namedCache>
</infinispan>- The
nameparameter specifies the name of thenamedCacheto use. - The
fetchPersistentStateparameter determines whether the persistent state is fetched when joining a cluster. Set this totrueif using a replication and invalidation in a clustered environment. Additionally, if multiple cache stores are chained, only one cache store can have this property enabled. If a shared cache store is used, the cache does not allow a persistent state transfer despite this property being set totrue. ThefetchPersistentStateparameter isfalseby default. - The
ignoreModificationsparameter determines whether operations that modify the cache (e.g. put, remove, clear, store, etc.) do not affect the cache store. As a result, the cache store can become out of sync with the cache. - The
purgeOnStartupparameter specifies whether the cache is purged when initially started. - The
sharedparameter is used when multiple cache instances share a cache store and is now defined at the cache store level. This parameter can be set to prevent multiple cache instances writing the same modification multiple times. Valid values for this parameter aretrueandfalse.
20.2. Write-Behind Caching
20.2.1. About Unscheduled Write-Behind Strategy
20.2.2. Unscheduled Write-Behind Strategy Configuration (Remote Client-Server Mode)
write-behind element to the target cache store configuration as follows:
Procedure 20.2. The write-behind Element
<file-store passivation="false"
            path="${PATH}"
            purge="true"
            shared="false">
    <write-behind modification-queue-size="1024"
                  shutdown-timeout="25000"
                  flush-lock-timeout="15000"
                  thread-pool-size="5" />
</file-store>write-behind element uses the following configuration parameters:
- The
modification-queue-sizeparameter sets the modification queue size for the asynchronous store. If updates occur faster than the cache store can process the queue, the asynchronous store behaves like a synchronous store. The store behavior remains synchronous and blocks elements until the queue is able to accept them, after which the store behavior becomes asynchronous again. - The
shutdown-timeoutparameter specifies the time in milliseconds after which the cache store is shut down. When the store is stopped some modifications may still need to be applied. Setting a large timeout value will reduce the chance of data loss. The default value for this parameter is25000. - The
flush-lock-timeoutparameter specifies the time (in milliseconds) to acquire the lock that guards the state to be periodically flushed. The default value for this parameter is15000. - The
thread-pool-sizeparameter specifies the size of the thread pool. The threads in this thread pool apply modifications to the cache store. The default value for this parameter is5.
20.2.3. Unscheduled Write-Behind Strategy Configuration (Library Mode)
async element to the store configuration as follows:
Procedure 20.3. The async Element
<persistence>
    <singleFile location="${LOCATION}">
        <async enabled="true"
                    modificationQueueSize="1024"
                    shutdownTimeout="25000"
                    flushLockTimeout="15000"
                    threadPoolSize="5"/>
    </singleFile>
</persistence>async element uses the following configuration parameters:
- The
modificationQueueSizeparameter sets the modification queue size for the asynchronous store. If updates occur faster than the cache store can process the queue, the asynchronous store behaves like a synchronous store. The store behavior remains synchronous and blocks elements until the queue is able to accept them, after which the store behavior becomes asynchronous again. - The
shutdownTimeoutparameter specifies the time in milliseconds after which the cache store is shut down. This provides time for the asynchronous writer to flush data to the store when a cache is shut down. The default value for this parameter is25000. - The
flushLockTimeoutparameter specifies the time (in milliseconds) to acquire the lock that guards the state to be periodically flushed. The default value for this parameter is15000. - The
threadPoolSizeparameter specifies the number of threads that concurrently apply modifications to the store. The default value for this parameter is5.
Part X. Monitor Caches and Cache Managers
Chapter 21. Set Up Java Management Extensions (JMX)
21.1. About Java Management Extensions (JMX)
MBeans.
21.2. Using JMX with Red Hat JBoss Data Grid
21.3. JMX Statistic Levels
- At the cache level, where management information is generated by individual cache instances.
- At the
CacheManagerlevel, where theCacheManageris the entity that governs all cache instances created from it. As a result, the management information is generated for all these cache instances instead of individual caches.
Important
21.4. Enable JMX for Cache Instances
Add the following snippet within either the <default> element for the default cache instance, or under the target <namedCache> element for a specific named cache:
<jmxStatistics enabled="true"/>
Add the following code to programmatically enable JMX at the cache level:
Configuration configuration = new
ConfigurationBuilder().jmxStatistics().enable().build();
21.5. Enable JMX for CacheManagers
CacheManager level, JMX statistics can be enabled either declaratively or programmatically, as follows.
Add the following in the <global> element to enable JMX declaratively at the CacheManager level:
<globalJmxStatistics enabled="true"/>
Add the following code to programmatically enable JMX at the CacheManager level:
GlobalConfiguration globalConfiguration = new
GlobalConfigurationBuilder()..globalJmxStatistics().enable().build();
21.6. Disabling the CacheStore via JMX When Using Rolling Upgrades
disconnectSource operation on the RollingUpgradeManager MBean.
See Also:
21.7. Multiple JMX Domains
CacheManager instances exist on a single virtual machine, or if the names of cache instances in different CacheManagers clash.
CacheManager in manner that allows it to be easily identified and used by monitoring tools such as JMX and JBoss Operations Network.
Add the following snippet to the relevant CacheManager configuration:
<globalJmxStatistics enabled="true" cacheManagerName="Hibernate2LC"/>
Add the following code to set the CacheManager name programmatically:
GlobalConfiguration globalConfiguration = new
GlobalConfigurationBuilder().globalJmxStatistics().enable().
cacheManagerName("Hibernate2LC").build();21.8. MBeans
MBean represents a manageable resource such as a service, component, device or an application.
MBeans that monitor and manage multiple aspects. For example, MBeans that provide statistics on the transport layer are provided. If a JBoss Data Grid server is configured with JMX statistics, an MBean that provides information such as the hostname, port, bytes read, bytes written and the number of worker threads exists at the following location:
jboss.infinispan:type=Server,name=<Memcached|Hotrod>,component=Transport
MBeans are available under two JMX domains:
- jboss.as - these
MBeansare created by the server subsystem. - jboss.infinispan - these
MBeansare symmetric to those created by embedded mode.
MBeans under jboss.infinispan should be used for Red Hat JBoss Data Grid, as the ones under jboss.as are for Red Hat JBoss Enterprise Application Platform.
Note
21.8.1. Understanding MBeans
MBeans are available:
- If Cache Manager-level JMX statistics are enabled, an
MBeannamedjboss.infinispan:type=CacheManager,name="DefaultCacheManager"exists, with properties specified by the Cache ManagerMBean. - If the cache-level JMX statistics are enabled, multiple
MBeansdisplay depending on the configuration in use. For example, if a write behind cache store is configured, anMBeanthat exposes properties that belong to the cache store component is displayed. All cache-levelMBeansuse the same format:jboss.infinispan:type=Cache,name="<name-of-cache>(<cache-mode>)",manager="<name-of-cache-manager>",component=<component-name>
In this format:- Specify the default name for the cache using the
cache-containerelement'sdefault-cacheattribute. - The
cache-modeis replaced by the cache mode of the cache. The lower case version of the possible enumeration values represents the cache mode. - The
component-nameis replaced by one of the JMX component names from the JMX reference documentation.
MBean for a default cache configured for synchronous distribution would be named as follows:
jboss.infinispan:type=Cache,name="default(dist_sync)", manager="default",component=CacheStore
21.8.2. Registering MBeans in Non-Default MBean Servers
getMBeanServer() method returns the desired (non default) MBeanServer.
Add the following snippet:
<globalJmxStatistics enabled="true" mBeanServerLookup="com.acme.MyMBeanServerLookup"/>
Add the following code:
GlobalConfiguration globalConfiguration = new
GlobalConfigurationBuilder().globalJmxStatistics().enable().
mBeanServerLookup("com.acme.MyMBeanServerLookup").build();Chapter 22. Set Up JBoss Operations Network (JON)
22.1. About JBoss Operations Network (JON)
Important
Important
Update 02 or higher version. For information on upgrading the JBoss Operations Network, see the Upgrading JBoss ON section in the JBoss Operations Network Installation Guide.
22.2. Download JBoss Operations Network (JON)
22.2.1. Prerequisites for Installing JBoss Operations Network (JON)
- A Linux, Windows, or Mac OSX operating system, and an x86_64, i686, or ia64 processor.
- Java 6 or higher is required to run both the JBoss Operations Network Server and the JBoss Operations Network Agent.
- Synchronized clocks on JBoss Operations Network Servers and Agents.
- An external database must be installed.
22.2.2. Download JBoss Operations Network
Procedure 22.1. Download JBoss Operations Network
- To access the Red Hat Customer Portal, navigate to https://access.redhat.com/home in a browser.
- Click .
- In the section labeled JBoss Development and Management, click .
- Enter the relevant credentials in the Red Hat Login and Password fields and click .
- Select the appropriate version in the Version drop down menu list.
- Click the button next to the desired download file.
22.2.3. Remote JMX Port Values
22.2.4. Download JBoss Operations Network (JON) Plugin
Procedure 22.2. Download Installation Files
- Open http://access.redhat.com in a web browser.
- Click in the menu across the top of the page.
- Click in the list under
JBoss Development and Management. - Enter your login information.You are taken to the Software Downloads page.
Download the JBoss Operations Network Plugin
If you intend to use the JBoss Operations Network plugin for JBoss Data Grid, selectJBoss ON for Data Gridfrom either the Product drop-down box, or the menu on the left.- Click the
Red Hat JBoss Operations Network VERSION Base Distributionbutton. - Repeat the steps to download the
Data Grid Management Plugin Pack for JBoss ON VERSION
22.3. JBoss Operations Network Server Installation
Note
22.4. JBoss Operations Network Agent
init.d script in a UNIX environment.
Note
22.5. JBoss Operations Network for Remote Client-Server Mode
- initiate and perform installation and configuration operations.
- monitor resources and their metrics.
22.5.1. Installing the JBoss Operations Network Plug-in (Remote Client-Server Mode)
Install the plug-ins
- Copy the JBoss Data Grid server rhq plug-in to
$JON_SERVER_HOME/plugins. - Copy the JBoss Enterprise Application Platform plug-in to
$JON_SERVER_HOME/plugins.
The server will automatically discover plug-ins here and deploy them. The plug-ins will be removed from the plug-ins directory after successful deployment.Obtain plug-ins
Obtain all available plug-ins from the JBoss Operations Network server. To do this, type the following into the agent's console:plugins update
List installed plug-ins
Ensure the JBoss Enterprise Application Platform plug-in and the JBoss Data Grid server rhq plug-in are installed correctly using the following:plugins info
22.6. JBoss Operations Network Remote-Client Server Plugin
22.6.1. JBoss Operations Network Plugin Metrics
Table 22.1. JBoss Operations Network Traits for the Cache Container (Cache Manager)
| Trait Name | Display Name | Description |
|---|---|---|
| cache-manager-status | Cache Container Status | The current runtime status of a cache container. |
| cluster-name | Cluster Name | The name of the cluster. |
| members | Cluster Members | The names of the members of the cluster. |
| coordinator-address | Coordinator Address | The coordinator node's address. |
| local-address | Local Address | The local node's address. |
| version | Version | The cache manager version. |
| defined-cache-names | Defined Cache Names | The caches that have been defined for this manager. |
Table 22.2. JBoss Operations Network Metrics for the Cache Container (Cache Manager)
| Metric Name | Display Name | Description |
|---|---|---|
| cluster-size | Cluster Size | How many members are in the cluster. |
| defined-cache-count | Defined Cache Count | How many caches that have been defined for this manager. |
| running-cache-count | Running Cache Count | How many caches are running under this manager. |
| created-cache-count | Created Cache Count | How many caches have actually been created under this manager. |
Table 22.3. JBoss Operations Network Traits for the Cache
| Trait Name | Display Name | Description |
|---|---|---|
| cache-status | Cache Status | The current runtime status of a cache. |
| cache-name | Cache Name | The current name of the cache. |
| version | Version | The cache version. |
Table 22.4. JBoss Operations Network Metrics for the Cache
| Metric Name | Display Name | Description |
|---|---|---|
| cache-status | Cache Status | The current runtime status of a cache. |
| number-of-locks-available | [LockManager] Number of locks available | The number of exclusive locks that are currently available. |
| concurrency-level | [LockManager] Concurrency level | The LockManager's configured concurrency level. |
| average-read-time | [Statistics] Average read time | Average number of milliseconds required for a read operation on the cache to complete. |
| hit-ratio | [Statistics] Hit ratio | The result (in percentage) when the number of hits (successful attempts) is divided by the total number of attempts. |
| elapsed-time | [Statistics] Seconds since cache started | The number of seconds since the cache started. |
| read-write-ratio | [Statistics] Read/write ratio | The read/write ratio (in percentage) for the cache. |
| average-write-time | [Statistics] Average write time | Average number of milliseconds a write operation on a cache requires to complete. |
| hits | [Statistics] Number of cache hits | Number of cache hits. |
| evictions | [Statistics] Number of cache evictions | Number of cache eviction operations. |
| remove-misses | [Statistics] Number of cache removal misses | Number of cache removals where the key was not found. |
| time-since-reset | [Statistics] Seconds since cache statistics were reset | Number of seconds since the last cache statistics reset. |
| number-of-entries | [Statistics] Number of current cache entries | Number of entries currently in the cache. |
| stores | [Statistics] Number of cache puts | Number of cache put operations |
| remove-hits | [Statistics] Number of cache removal hits | Number of cache removal operation hits. |
| misses | [Statistics] Number of cache misses | Number of cache misses. |
| success-ratio | [RpcManager] Successful replication ratio | Successful replications as a ratio of total replications in numeric double format. |
| replication-count | [RpcManager] Number of successful replications | Number of successful replications |
| replication-failures | [RpcManager] Number of failed replications | Number of failed replications |
| average-replication-time | [RpcManager] Average time spent in the transport layer | The average time (in milliseconds) spent in the transport layer. |
| commits | [Transactions] Commits | Number of transaction commits performed since the last reset. |
| prepares | [Transactions] Prepares | Number of transaction prepares performed since the last reset. |
| rollbacks | [Transactions] Rollbacks | Number of transaction rollbacks performed since the last reset. |
| invalidations | [Invalidation] Number of invalidations | Number of invalidations. |
| passivations | [Passivation] Number of cache passivations | Number of passivation events. |
| activations | [Activations] Number of cache entries activated | Number of activation events. |
| cache-loader-loads | [Activation] Number of cache store loads | Number of entries loaded from the cache store. |
| cache-loader-misses | [Activation] Number of cache store misses | Number of entries that did not exist in the cache store. |
| cache-loader-stores | [CacheStore] Number of cache store stores | Number of entries stored in the cache stores. |
Note
The metrics provided by the JBoss Operations Network (JON) plugin for Red Hat JBoss Data Grid are for REST and Hot Rod endpoints only. For the REST protocol, the data must be taken from the Web subsystem metrics. For details about each of these endpoints, see the Getting Started Guide.
Table 22.5. JBoss Operations Network Metrics for the Connectors
| Metric Name | Display Name | Description |
|---|---|---|
| bytesRead | Bytes Read | Number of bytes read. |
| bytesWritten | Bytes Written | Number of bytes written. |
Note
22.6.2. JBoss Operations Network Plugin Operations
Table 22.6. JBoss ON Plugin Operations for the Cache
| Operation Name | Description |
|---|---|
| Start Cache | Starts the cache. |
| Stop Cache | Stops the cache. |
| Clear Cache | Clears the cache contents. |
| Reset Statistics | Resets statistics gathered by the cache. |
| Reset Activation Statistics | Resets activation statistics gathered by the cache. |
| Reset Invalidation Statistics | Resets invalidations statistics gathered by the cache. |
| Reset Passivation Statistics | Resets passivation statistics gathered by the cache. |
| Reset Rpc Statistics | Resets replication statistics gathered by the cache. |
| Remove Cache | Removes the given cache from the cache-container. |
| Record Known Global Keyset | Records the global known keyset to a well-known key for retrieval by the upgrade process. |
| Synchronize Data | Synchronizes data from the old cluster to this using the specified migrator. |
| Disconnect Source | Disconnects the target cluster from the source cluster according to the specified migrator. |
The cache backups used for these operations are configured using cross-datacenter replication. In the JBoss Operations Network (JON) User Interface, each cache backup is the child of a cache. For more information about cross-datacenter replication, see Chapter 31, Set Up Cross-Datacenter Replication
Table 22.7. JBoss Operations Network Plugin Operations for the Cache Backups
| Operation Name | Description |
|---|---|
| status | Display the site status. |
| bring-site-online | Brings the site online. |
| take-site-offline | Takes the site offline. |
Red Hat JBoss Data Grid does not support using Transactions in Remote Client-Server mode. As a result, none of the endpoints can use transactions.
22.6.3. JBoss Operations Network Plugin Attributes
Table 22.8. JBoss ON Plugin Attributes for the Cache (Transport)
| Attribute Name | Type | Description |
|---|---|---|
| cluster | string | The name of the group communication cluster. |
| executor | string | The executor used for the transport. |
| lock-timeout | long | The timeout period for locks on the transport. The default value is 240000. |
| machine | string | A machine identifier for the transport. |
| rack | string | A rack identifier for the transport. |
| site | string | A site identifier for the transport. |
| stack | string | The JGroups stack used for the transport. |
22.6.4. Create a New Cache Using JBoss Operations Network (JON)
Procedure 22.3. Creating a new cache in Remote Client-Server mode
- Log into the JBoss Operations Network Console.
- From from the JBoss Operations Network console, click .
- Select from the list on the left of the console.
- Select the specific Red Hat JBoss Data Grid server from the servers list.
- Below the server name, click and then .
- Select the desired cache container that will be parent for the newly created cache.
- Right-click the selected cache container. For example, .
- In the context menu, navigate to and select .
- Create a new cache in the resource create wizard.
- Enter the new cache name and click .
- Set the cache attributes in the Deployment Options and click .
Note
22.7. JBoss Operations Network for Library Mode
- initiate and perform installation and configuration operations.
- monitor resources and their metrics.
22.7.1. Installing the JBoss Operations Network Plug-in (Library Mode)
Procedure 22.4. Install JBoss Operations Network Library Mode Plug-in
Open the JBoss Operations Network Console
- From the JBoss Operations Network console, select .
- Select from the options on the left side of the console.
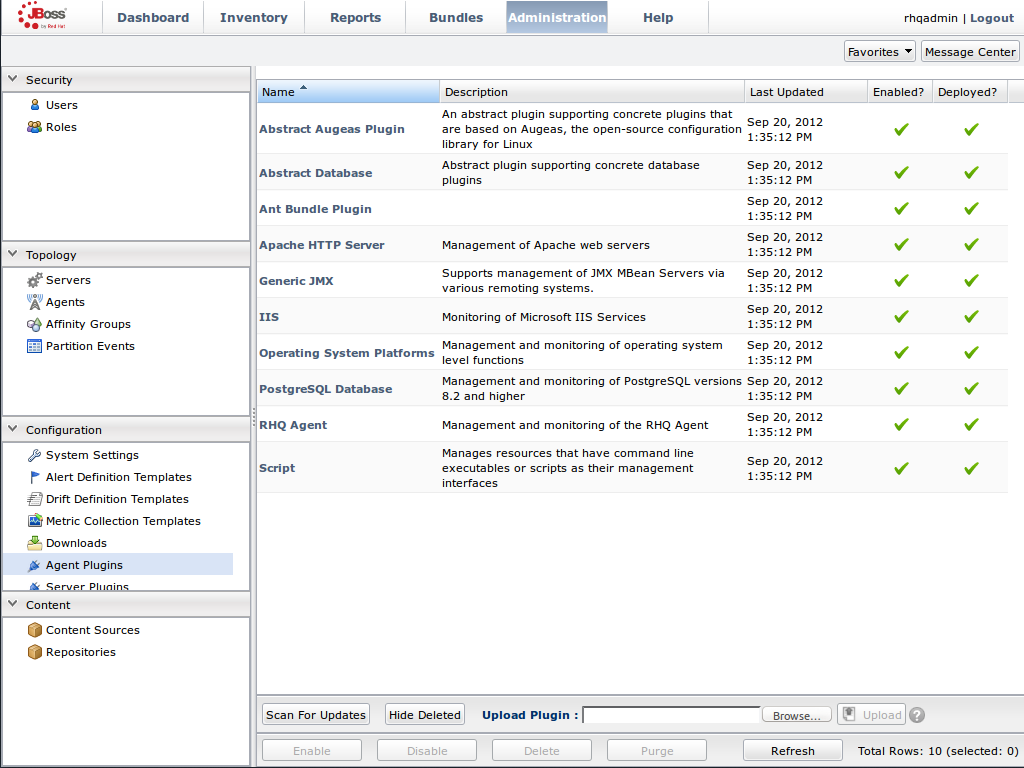
Figure 22.1. JBoss Operations Network Console for JBoss Data Grid
Upload the Library Mode Plug-in
- Click , locate the
InfinispanPluginon your local file system. - Click to add the plug-in to the JBoss Operations Network Server.
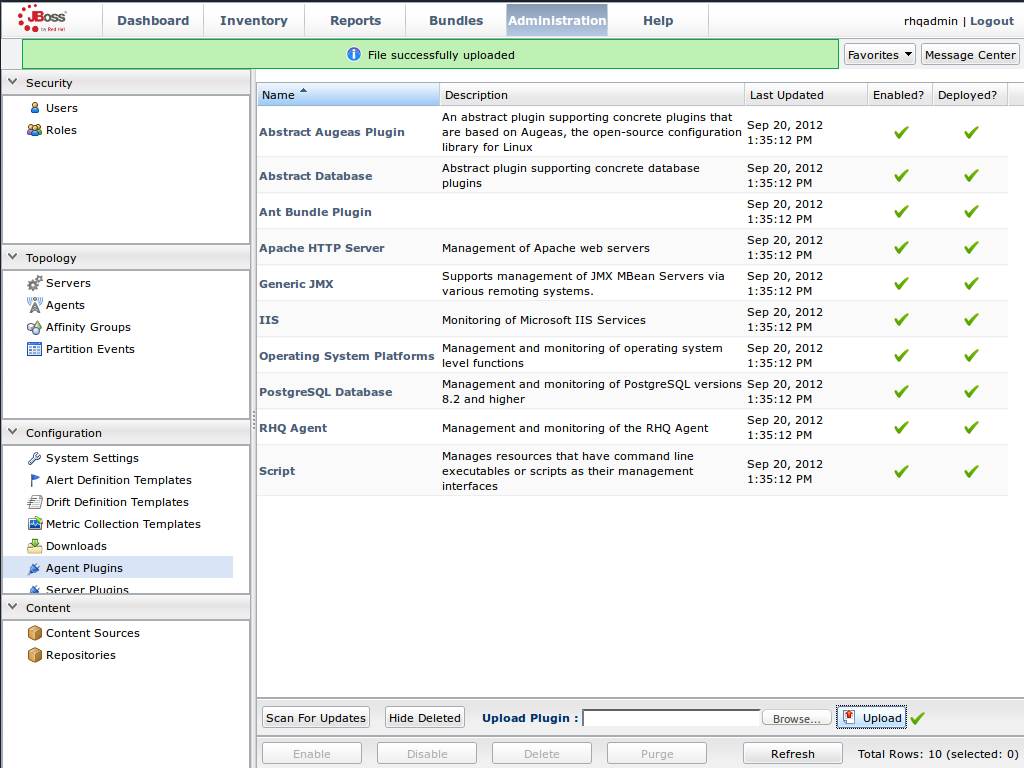
Figure 22.2. Upload the
InfinispanPlugin.Scan for Updates
- Once the file has successfully uploaded, click at the bottom of the screen.
- The
InfinispanPluginwill now appear in the list of installed plug-ins.
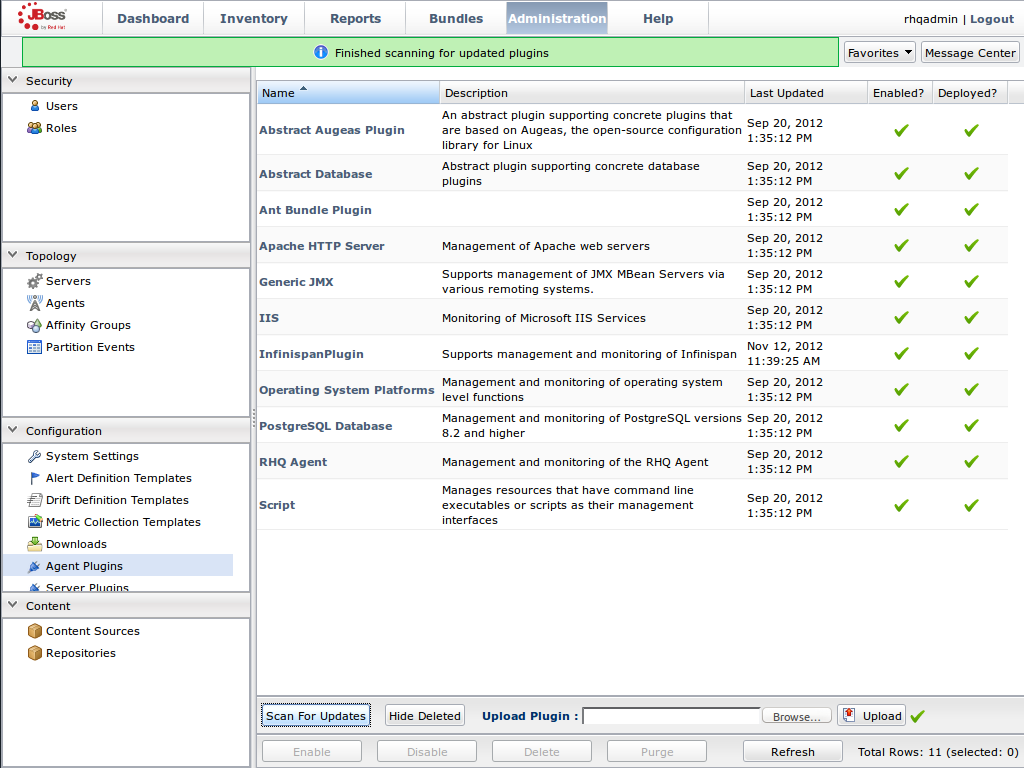
Figure 22.3. Scan for Updated Plug-ins.
22.7.2. Monitoring Of JBoss Data Grid Instances in Library Mode
22.7.2.1. Prerequisites
- A correctly configured instance of JBoss Operations Network (JON) 3.2.0 with patch
Update 02or higher version. - A running instance of JON Agent on the server where the application will run. For more information, see Section 22.4, “JBoss Operations Network Agent”
- An operational instance of the RHQ agent with a full JDK. Ensure that the agent has access to the
tools.jarfile from the JDK in particular. In the JON agent's environment file (bin/rhq-env.sh), set the value of theRHQ_AGENT_JAVA_HOMEproperty to point to a full JDK home. - The RHQ agent must have been initiated using the same user as the JBoss Enterprise Application Platform instance. As an example, running the JON agent as a user with root privileges and the JBoss Enterprise Application Platform process under a different user does not work as expected and must be avoided.
- An installed JON plugin for JBoss Data Grid Library Mode. For more information, see Section 22.7.1, “Installing the JBoss Operations Network Plug-in (Library Mode)”
Generic JMX pluginfrom JBoss Operation Networks 3.2.0 with patchUpdate 02or better version in use.- A custom application using Red Hat JBoss Data Grid's Library mode with enabled JMX statistics for library mode caches in order to make statistics and monitoring working. For details how to enable JMX statistics for cache instances, see Section 21.4, “Enable JMX for Cache Instances” and to enable JMX for cache managers see Section 21.5, “Enable JMX for CacheManagers”
- The Java Virtual Machine (JVM) must be configured to expose the JMX MBean Server. For the Oracle/Sun JDK, see http://docs.oracle.com/javase/1.5.0/docs/guide/management/agent.html
- A correctly added and configured management user for JBoss Enterprise Application Platform.
22.7.2.2. Manually Adding JBoss Data Grid Instances in Library Mode
Procedure 22.5. Add JBoss Data Grid Instances in Library Mode
Import the Platform
- Navigate to the and select from the list on the left of the console.
- Select the platform on which the application is running and click at the bottom of the screen.

Figure 22.4. Import the Platform from the .
Access the Servers on the Platform
- The
jdgPlatform now appears in the Platforms list. - Click on the Platform to access the servers that are running on it.
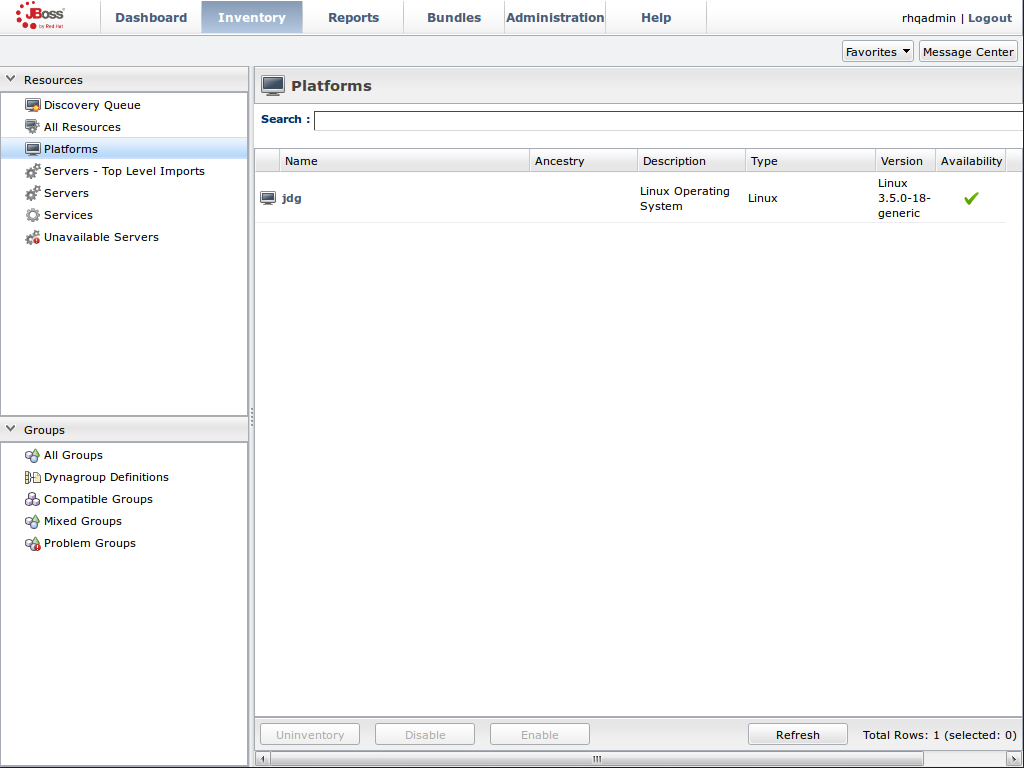
Figure 22.5. Open the
jdgPlatform to view the list of servers.Import the JMX Server
- From the tab, select .
- Click the button at the bottom of the screen and select the option from the list.
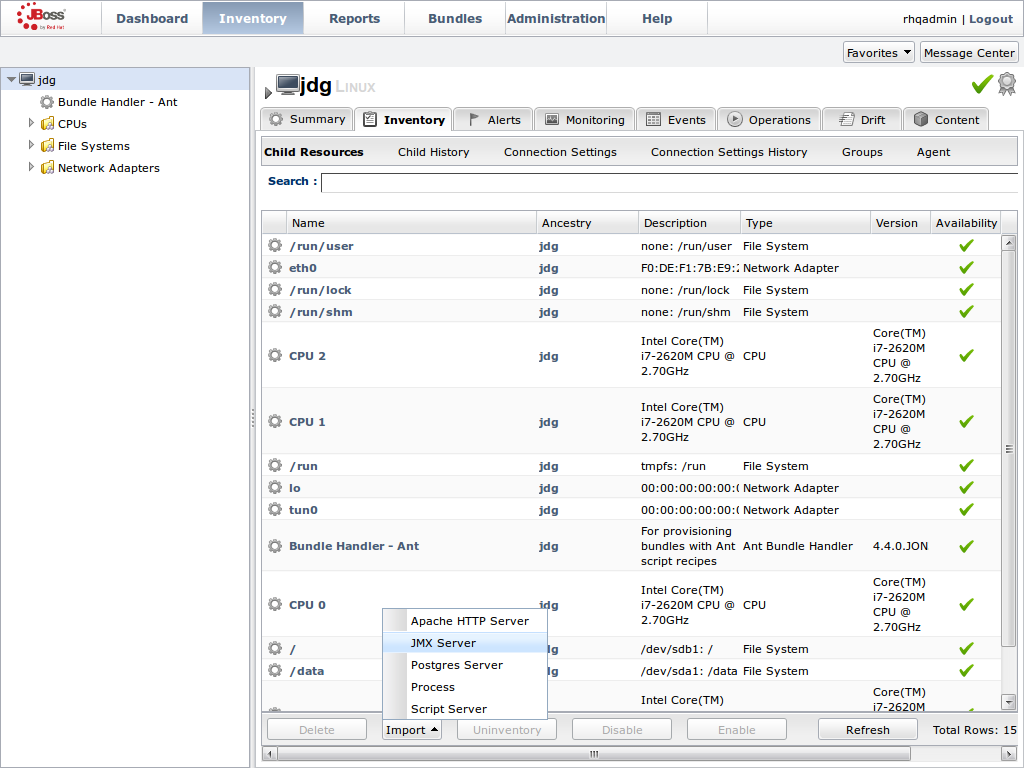
Figure 22.6. Import the JMX Server
Enable JDK Connection Settings
- In the window, specify from the list of options.
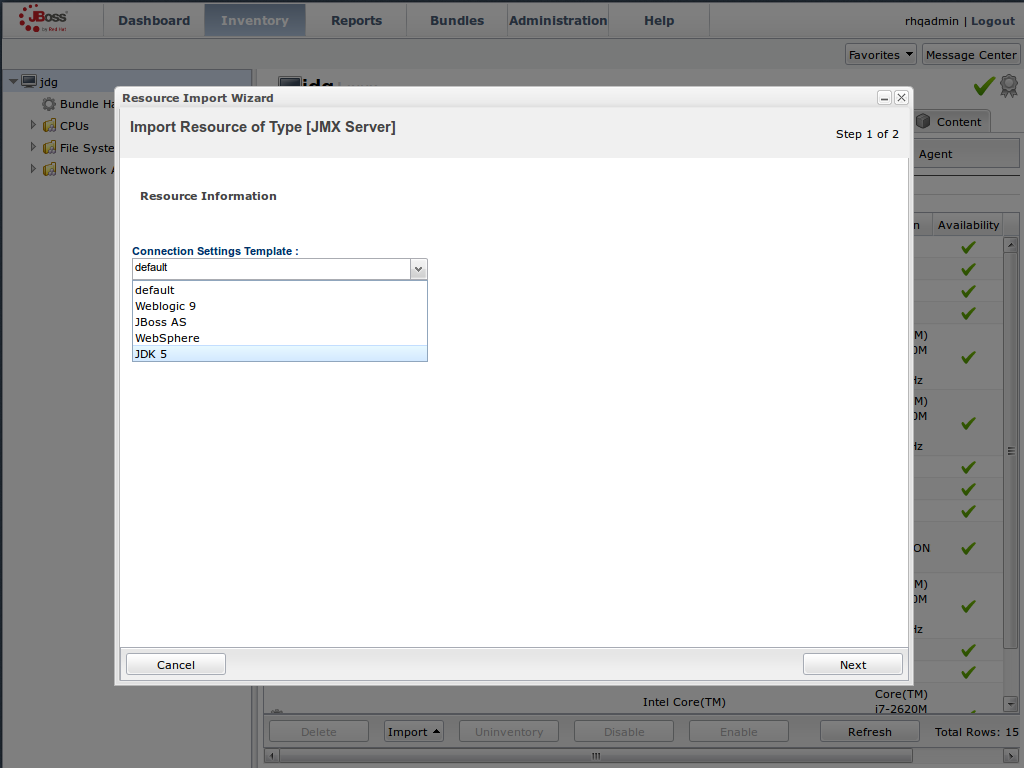
Figure 22.7. Select the JDK 5 Template.
Modify the Connector Address
- In the menu, modify the supplied with the hostname and JMX port of the process containing the Infinispan Library.
- Enter the JMX connector address of the new JBoss Data Grid instance you want to monitor. For example:Connector Address:
service:jmx:rmi://127.0.0.1/jndi/rmi://127.0.0.1:7997/jmxrmi
Note
The connector address varies depending on the host and the JMX port assigned to the new instance. In this case, instances require the following system properties at start up:-Dcom.sun.management.jmxremote.port=7997 -Dcom.sun.management.jmxremote.ssl=false -Dcom.sun.management.jmxremote.authenticate=false
- Specify the and information if required.
- Click .
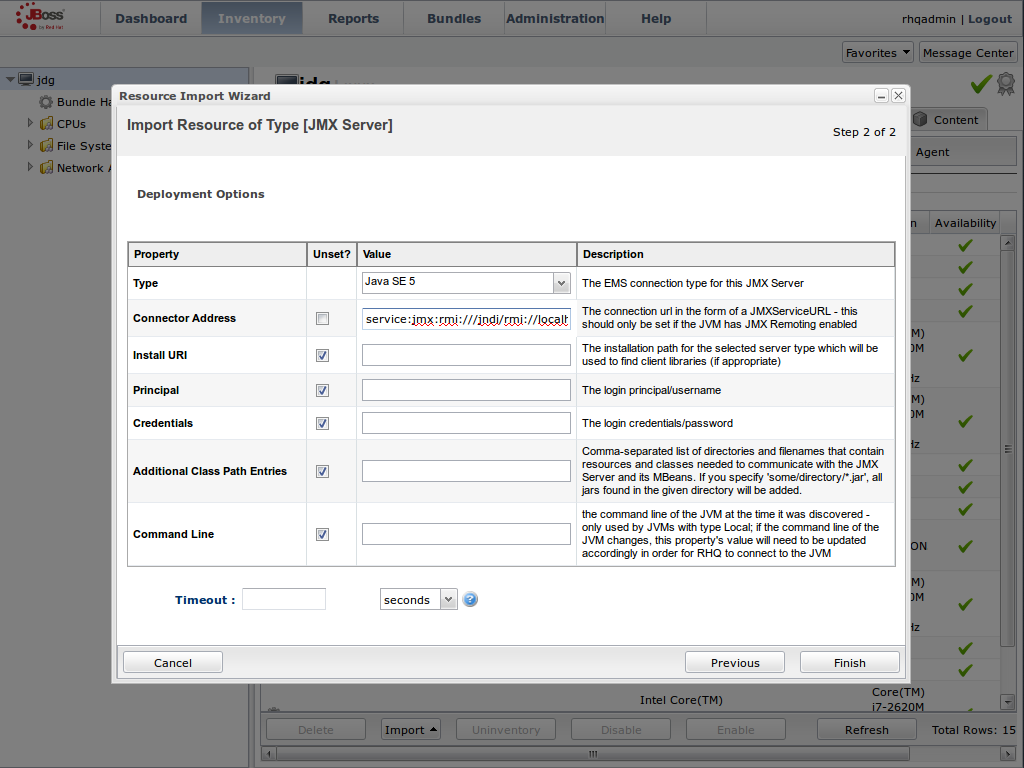
Figure 22.8. Modify the values in the Deployment Options screen.
View Cache Statistics and Operations
- Click to refresh the list of servers.
- The tree in the panel on the left side of the screen contains the node, which contains the available cache managers. The available cache managers contain the available caches.
- Select a cache from the available caches to view metrics.
- Select the tab.
- The view shows statistics and metrics.
- The tab provides access to the various operations that can be performed on the services.
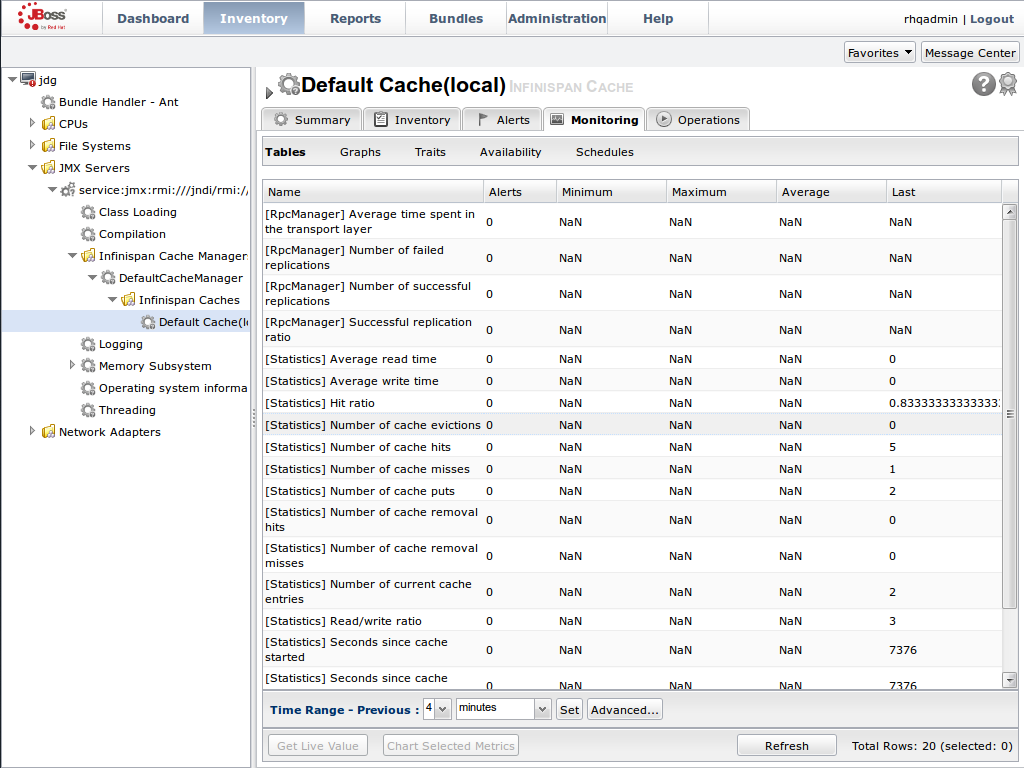
Figure 22.9. Metrics and operational data relayed through JMX is now available in the JBoss Operations Network console.
22.7.2.3. Monitor Custom Applications Using Library Mode Deployed On JBoss Enterprise Application Platform
22.7.2.3.1. Monitor an Application Deployed in Standalone Mode
Procedure 22.6. Monitor an Application Deployed in Standalone Mode
Start the JBoss Enterprise Application Platform Instance
Start the JBoss Enterprise Application Platform instance as follows:- Enter the following command at the command line or change standalone configuration file (
/bin/standalone.conf) respectively:JAVA_OPTS="$JAVA_OPTS -Dorg.rhq.resourceKey=MyEAP"
- Start the JBoss Enterprise Application Platform instance in standalone mode as follows:
$JBOSS_HOME/bin/standalone.sh
Deploy the Red Hat JBoss Data Grid Application
Deploy the WAR file that contains the JBoss Data Grid Library mode application withglobalJmxStatisticsandjmxStatisticsenabled.Run JBoss Operations Network (JON) Discovery
Run thediscovery --fullcommand in the JBoss Operations Network (JON) agent.Locate Application Server Process
In the JBoss Operations Network (JON) web interface, the JBoss Enterprise Application Platform process is listed as a JMX server.Import the Process Into Inventory
Import the process into the JBoss Operations Network (JON) inventory.Optional: Run Discovery Again
If required, run thediscovery --fullcommand again to discover the new resources.
The JBoss Data Grid Library mode application is now deployed in JBoss Enterprise Application Platform's standalone mode and can be monitored using the JBoss Operations Network (JON).
22.7.2.3.2. Monitor an Application Deployed in Domain Mode
Procedure 22.7. Monitor an Application Deployed in Domain Mode
Edit the Host Configuration
Edit thedomain/configuration/host.xmlfile to replace theserverelement with the following configuration:<servers> <server name="server-one" group="main-server-group"> <jvm name="default"> <jvm-options> <option value="-Dorg.rhq.resourceKey=EAP1"/> </jvm-options> </jvm> </server> <server name="server-two" group="main-server-group" auto-start="true"> <socket-bindings port-offset="150"/> <jvm name="default"> <jvm-options> <option value="-Dorg.rhq.resourceKey=EAP2"/> </jvm-options> </jvm> </server> </servers>
Start JBoss Enterprise Application Platform 6
Start JBoss Enterprise Application Platform 6 in domain mode:$JBOSS_HOME/bin/domain.sh
Deploy the Red Hat JBoss Data Grid Application
Deploy the WAR file that contains the JBoss Data Grid Library mode application withglobalJmxStatisticsandjmxStatisticsenabled.Run Discovery in JBoss Operations Network (JON)
If required, run thediscovery --fullcommand for the JBoss Operations Network (JON) agent to discover the new resources.
The JBoss Data Grid Library mode application is now deployed in JBoss Enterprise Application Platform's domain mode and can be monitored using the JBoss Operations Network (JON).
22.8. JBoss Operations Network Plug-in Quickstart
22.9. Other Management Tools and Operations
22.9.1. Accessing Data via URLs
put() and post() methods place data in the cache, and the URL used determines the cache name and key(s) used. The data is the value placed into the cache, and is placed in the body of the request.
GET and HEAD methods are used for data retrieval while other headers control cache settings and behavior.
Note
22.9.2. Limitations of Map Methods
size(), values(), keySet() and entrySet(), can be used with certain limitations with Red Hat JBoss Data Grid as they are unreliable. These methods do not acquire locks (global or local) and concurrent modification, additions and removals are excluded from consideration in these calls.
From Red Hat JBoss Data Grid 6.3 onwards, the map methods size(), values(), keySet(), and entrySet() include entries in the cache loader by default whereas previously these methods only included the local data container. The underlying cache loader directly affects the performance of these commands. As an example, when using a database, these methods run a complete scan of the table where data is stored which can result in slower processing. Use Cache.getAdvancedCache().withFlags(Flag.SKIP_CACHE_LOAD).values() to maintain the old behavior and not loading from the cache loader which would avoid the slower performance.
In JBoss Data Grid 6.3 the Cache#size() method returned only the number of entries on the local node, ignoring other nodes for clustered caches and including any expired entries. While the default behavior was not changed in JBoss Data Grid 6.4 or later, accurate results can be enabled for bulk operations, including size(), by setting the infinispan.accurate.bulk.ops system property to true. In this mode of operation, the result returned by the size() method is affected by the flags org.infinispan.context.Flag#CACHE_MODE_LOCAL, to force it to return the number of entries present on the local node, and org.infinispan.context.Flag#SKIP_CACHE_LOAD, to ignore any passivated entries.
In JBoss Data Grid 6.3, the Hot Rod size() method obtained the size of a cache by invoking the STATS operation and using the returned numberOfEntries statistic. This statistic is not an accurate measurement of the number of entries in a cache because it does not take into account expired and passivated entries and it is only local to the node that responded to the operation. As an additional result, when security was enabled, the client would need the ADMIN permission instead of the more appropriate BULK_READ.
SIZE operation, and the clients have been updated to use this operation for the size() method. The JBoss Data Grid server will need to be started with the infinispan.accurate.bulk.ops system property set to true so that size can be computed accurately.
Part XI. Command Line Tools
- The JBoss Data Grid Library CLI. For more information, see Section 23.1, “Red Hat JBoss Data Grid Library Mode CLI”.
- The JBoss Data Grid Server CLI. For more information, see Section 23.2, “Red Hat Data Grid Server CLI”.
Chapter 23. Red Hat JBoss Data Grid CLIs
23.1. Red Hat JBoss Data Grid Library Mode CLI
23.1.1. Start the Library Mode CLI (Server)
standalone and cluster files. For Linux, use the standlaone.sh or clustered.sh script and for Windows, use the standalone.bat or clustered.bat file.
23.1.2. Start the Library Mode CLI (Client)
cli files in the bin directory. For Linux, run bin/cli.sh and for Windows, run bin\cli.bat.
23.1.3. CLI Client Switches for the Command Line
Table 23.1. CLI Client Command Line Switches
| Short Option | Long Option | Description |
|---|---|---|
| -c | --connect=${URL} | Connects to a running Red Hat JBoss Data Grid instance. For example, for JMX over RMI use jmx://[username[:password]]@host:port[/container[/cache]] and for JMX over JBoss Remoting use remoting://[username[:password]]@host:port[/container[/cache]] |
| -f | --file=${FILE} | Read the input from the specified file rather than using interactive mode. If the value is set to - then the stdin is used as the input. |
| -h | --help | Displays the help information. |
| -v | --version | Displays the CLI version information. |
23.1.4. Connect to the Application
[disconnected//]> connect jmx://localhost:12000
[jmx://localhost:12000/MyCacheManager/>
Note
12000 depends on the value the JVM is started with. For example, starting the JVM with the -Dcom.sun.management.jmxremote.port=12000 command line parameter uses this port, but otherwise a random port is chosen. When the remoting protocol (remoting://localhost:9999) is used, the Red Hat JBoss Data Grid server administration port is used (the default is port 9999).
CacheManager.
cache command to select a cache before performing cache operations. The CLI supports tab completion, therefore using the cache and pressing the tab button displays a list of active caches:
[[jmx://localhost:12000/MyCacheManager/> cache
___defaultcache  namedCache
[jmx://localhost:12000/MyCacheManager/]> cache ___defaultcache
[jmx://localhost:12000/MyCacheManager/___defaultcache]>
23.2. Red Hat Data Grid Server CLI
- configuration
- management
- obtaining metrics
23.2.1. Start the Server Mode CLI
$ JDG_HOME/bin/cli.sh
C:\>JDG_HOME\bin\cli.bat
23.3. CLI Commands
deny (see Section 23.3.8, “The deny Command”), grant (see Section 23.3.14, “The grant Command”), and roles (see Section 23.3.19, “The roles command”) commands are only available on the Server Mode CLI.
23.3.1. The abort Command
abort command aborts a running batch initiated using the start command. Batching must be enabled for the specified cache. The following is a usage example:
[jmx://localhost:12000/MyCacheManager/namedCache]> start
[jmx://localhost:12000/MyCacheManager/namedCache]> put a a
[jmx://localhost:12000/MyCacheManager/namedCache]> abort
[jmx://localhost:12000/MyCacheManager/namedCache]> get a
null
23.3.2. The begin Command
begin command starts a transaction. This command requires transactions enabled for the cache it targets. An example of this command's usage is as follows:
[jmx://localhost:12000/MyCacheManager/namedCache]> begin
[jmx://localhost:12000/MyCacheManager/namedCache]> put a a
[jmx://localhost:12000/MyCacheManager/namedCache]> put b b
[jmx://localhost:12000/MyCacheManager/namedCache]> commit
23.3.3. The cache Command
cache command specifies the default cache used for all subsequent operations. If invoked without any parameters, it shows the currently selected cache. An example of its usage is as follows:
[jmx://localhost:12000/MyCacheManager/namedCache]> cache ___defaultcache
[jmx://localhost:12000/MyCacheManager/___defaultcache]> cache
___defaultcache
[jmx://localhost:12000/MyCacheManager/___defaultcache]>
23.3.4. The clear Command
clear command clears all content from the cache. An example of its usage is as follows:
[jmx://localhost:12000/MyCacheManager/namedCache]> put a a
[jmx://localhost:12000/MyCacheManager/namedCache]> clear
[jmx://localhost:12000/MyCacheManager/namedCache]> get a
null
23.3.5. The commit Command
commit command commits changes to an ongoing transaction. An example of its usage is as follows:
[jmx://localhost:12000/MyCacheManager/namedCache]> begin
[jmx://localhost:12000/MyCacheManager/namedCache]> put a a
[jmx://localhost:12000/MyCacheManager/namedCache]> put b b
[jmx://localhost:12000/MyCacheManager/namedCache]> commit
23.3.6. The container Command
container command selects the default cache container (cache manager). When invoked without any parameters, it lists all available containers. An example of its usage is as follows:
[jmx://localhost:12000/MyCacheManager/namedCache]> container
MyCacheManager OtherCacheManager
[jmx://localhost:12000/MyCacheManager/namedCache]> container OtherCacheManager
[jmx://localhost:12000/OtherCacheManager/]>
23.3.7. The create Command
create command creates a new cache based on the configuration of an existing cache definition. An example of its usage is as follows:
[jmx://localhost:12000/MyCacheManager/namedCache]> create newCache like namedCache
[jmx://localhost:12000/MyCacheManager/namedCache]> cache newCache
[jmx://localhost:12000/MyCacheManager/newCache]>
23.3.8. The deny Command
deny command can be used to deny roles previously assigned to a principal:
[remoting://localhost:9999]> deny supervisor to user1
Note
deny command is only available to the JBoss Data Grid Server Mode CLI.
23.3.9. The disconnect Command
disconnect command disconnects the currently active connection, which allows the CLI to connect to another instance. An example of its usage is as follows:
[jmx://localhost:12000/MyCacheManager/namedCache]> disconnect
[disconnected//]
23.3.10. The encoding Command
encoding command sets a default codec to use when reading and writing entries to and from a cache. If invoked with no arguments, the currently selected codec is displayed. An example of its usage is as follows:
[jmx://localhost:12000/MyCacheManager/namedCache]> encoding
none
[jmx://localhost:12000/MyCacheManager/namedCache]> encoding --list
memcached
hotrod
none
rest
[jmx://localhost:12000/MyCacheManager/namedCache]> encoding hotrod
23.3.11. The end Command
end command ends a running batch initiated using the start command. An example of its usage is as follows:
[jmx://localhost:12000/MyCacheManager/namedCache]> start
[jmx://localhost:12000/MyCacheManager/namedCache]> put a a
[jmx://localhost:12000/MyCacheManager/namedCache]> end
[jmx://localhost:12000/MyCacheManager/namedCache]> get a
a
23.3.12. The evict Command
evict command evicts an entry associated with a specific key from the cache. An example of it usage is as follows:
[jmx://localhost:12000/MyCacheManager/namedCache]> put a a
[jmx://localhost:12000/MyCacheManager/namedCache]> evict a
23.3.13. The get Command
get command shows the value associated with a specified key. For primitive types and Strings, the get command prints the default representation. For other objects, a JSON representation of the object is printed. An example of its usage is as follows:
[jmx://localhost:12000/MyCacheManager/namedCache]> put a a
[jmx://localhost:12000/MyCacheManager/namedCache]> get a
a
23.3.14. The grant Command
ClusterRoleMapper, the principal to role mappings are stored within the cluster registry (a replicated cache available to all nodes). The grant command can be used to grant new roles to a principal as follows:
[remoting://localhost:9999]> grant supervisor to user1
Note
grant command is only available to the JBoss Data Grid Server Mode CLI.
23.3.15. The info Command
info command displays the configuration of a selected cache or container. An example of its usage is as follows:
[jmx://localhost:12000/MyCacheManager/namedCache]> info
GlobalConfiguration{asyncListenerExecutor=ExecutorFactoryConfiguration{factory=org.infinispan.executors.DefaultExecutorFactory@98add58}, asyncTransportExecutor=ExecutorFactoryConfiguration{factory=org.infinispan.executors.DefaultExecutorFactory@7bc9c14c}, evictionScheduledExecutor=ScheduledExecutorFactoryConfiguration{factory=org.infinispan.executors.DefaultScheduledExecutorFactory@7ab1a411}, replicationQueueScheduledExecutor=ScheduledExecutorFactoryConfiguration{factory=org.infinispan.executors.DefaultScheduledExecutorFactory@248a9705}, globalJmxStatistics=GlobalJmxStatisticsConfiguration{allowDuplicateDomains=true, enabled=true, jmxDomain='jboss.infinispan', mBeanServerLookup=org.jboss.as.clustering.infinispan.MBeanServerProvider@6c0dc01, cacheManagerName='local', properties={}}, transport=TransportConfiguration{clusterName='ISPN', machineId='null', rackId='null', siteId='null', strictPeerToPeer=false, distributedSyncTimeout=240000, transport=null, nodeName='null', properties={}}, serialization=SerializationConfiguration{advancedExternalizers={1100=org.infinispan.server.core.CacheValue$Externalizer@5fabc91d, 1101=org.infinispan.server.memcached.MemcachedValue$Externalizer@720bffd, 1104=org.infinispan.server.hotrod.ServerAddress$Externalizer@771c7eb2}, marshaller=org.infinispan.marshall.VersionAwareMarshaller@6fc21535, version=52, classResolver=org.jboss.marshalling.ModularClassResolver@2efe83e5}, shutdown=ShutdownConfiguration{hookBehavior=DONT_REGISTER}, modules={}, site=SiteConfiguration{localSite='null'}}
23.3.16. The locate Command
locate command displays the physical location of a specified entry in a distributed cluster. An example of its usage is as follows:
[jmx://localhost:12000/MyCacheManager/namedCache]> locate a
[host/node1,host/node2]
23.3.17. The put Command
put command inserts an entry into the cache. If a mapping exists for a key, the put command overwrites the old value. The CLI allows control over the type of data used to store the key and value. An example of its usage is as follows:
[jmx://localhost:12000/MyCacheManager/namedCache]> put a a
[jmx://localhost:12000/MyCacheManager/namedCache]> put b 100
[jmx://localhost:12000/MyCacheManager/namedCache]> put c 4139l
[jmx://localhost:12000/MyCacheManager/namedCache]> put d true
[jmx://localhost:12000/MyCacheManager/namedCache]> put e { "package.MyClass": {"i": 5, "x": null, "b": true } }put can specify a life span and maximum idle time value as follows:
[jmx://localhost:12000/MyCacheManager/namedCache]> put a a expires 10s
[jmx://localhost:12000/MyCacheManager/namedCache]> put a a expires 10m maxidle 1m
23.3.18. The replace Command
replace command replaces an existing entry in the cache with a specified new value. An example of its usage is as follows:
[jmx://localhost:12000/MyCacheManager/namedCache]> put a a
[jmx://localhost:12000/MyCacheManager/namedCache]> replace a b
[jmx://localhost:12000/MyCacheManager/namedCache]> get a
b
[jmx://localhost:12000/MyCacheManager/namedCache]> replace a b c
[jmx://localhost:12000/MyCacheManager/namedCache]> get a
c
[jmx://localhost:12000/MyCacheManager/namedCache]> replace a b d
[jmx://localhost:12000/MyCacheManager/namedCache]> get a
c
23.3.19. The roles command
ClusterRoleMapper, the principal to role mappings are stored within the cluster registry (a replicated cache available to all nodes). The roles command can be used to list the roles associated to a specific user, or to all users if one is not given:
[remoting://localhost:9999]> roles user1
[supervisor, reader]
Note
roles command is only available to the JBoss Data Grid Server Mode CLI.
23.3.20. The rollback Command
rollback command rolls back any changes made by an ongoing transaction. An example of its usage is as follows:
[jmx://localhost:12000/MyCacheManager/namedCache]> begin
[jmx://localhost:12000/MyCacheManager/namedCache]> put a a
[jmx://localhost:12000/MyCacheManager/namedCache]> put b b
[jmx://localhost:12000/MyCacheManager/namedCache]> rollback
23.3.21. The site Command
site command performs administration tasks related to cross-datacenter replication. This command also retrieves information about the status of a site and toggles the status of a site. An example of its usage is as follows:
[jmx://localhost:12000/MyCacheManager/namedCache]> site --status NYC
online
[jmx://localhost:12000/MyCacheManager/namedCache]> site --offline NYC
ok
[jmx://localhost:12000/MyCacheManager/namedCache]> site --status NYC
offline
[jmx://localhost:12000/MyCacheManager/namedCache]> site --online NYC
23.3.22. The start Command
start command initiates a batch of operations. An example of its usage is as follows:
[jmx://localhost:12000/MyCacheManager/namedCache]> start
[jmx://localhost:12000/MyCacheManager/namedCache]> put a a
[jmx://localhost:12000/MyCacheManager/namedCache]> put b b
[jmx://localhost:12000/MyCacheManager/namedCache]> end
23.3.23. The stats Command
stats command displays statistics for the cache. An example of its usage is as follows:
[jmx://localhost:12000/MyCacheManager/namedCache]> stats
Statistics: {
  averageWriteTime: 143
  evictions: 10
  misses: 5
  hitRatio: 1.0
  readWriteRatio: 10.0
  removeMisses: 0
  timeSinceReset: 2123
  statisticsEnabled: true
  stores: 100
  elapsedTime: 93
  averageReadTime: 14
  removeHits: 0
  numberOfEntries: 100
  hits: 1000
}
LockManager: {
  concurrencyLevel: 1000
  numberOfLocksAvailable: 0
  numberOfLocksHeld: 0
}23.3.24. The upgrade Command
upgrade command implements the rolling upgrade procedure. For details about rolling upgrades, see the Rolling Upgrades chapter in the Red Hat JBoss Data Grid Developer Guide.
upgrade command's use is as follows:
[jmx://localhost:12000/MyCacheManager/namedCache]> upgrade --synchronize=hotrod --all
[jmx://localhost:12000/MyCacheManager/namedCache]> upgrade --disconnectsource=hotrod --all
23.3.25. The version Command
version command displays version information for the CLI client and server. An example of its usage is as follows:
[jmx://localhost:12000/MyCacheManager/namedCache]> version
Client Version 5.2.1.Final
Server Version 5.2.1.Final
Part XII. Other Red Hat JBoss Data Grid Functions
Chapter 24. Set Up the L1 Cache
24.1. About the L1 Cache
24.2. L1 Cache Configuration
24.2.1. L1 Cache Configuration (Library Mode)
Example 24.1. L1 Cache Configuration in Library Mode
<clustering mode="dist">
	<sync/>
	<l1 enabled="true"
            lifespan="60000" />
</clustering>l1 element configures the cache behavior in distributed cache instances. If used with non-distributed caches, this element is ignored.
- The
enabledparameter enables the L1 cache. - The
lifespanparameter sets the maximum life span of an entry when it is placed in the L1 cache.
24.2.2. L1 Cache Configuration (Remote Client-Server Mode)
Example 24.2. L1 Cache Configuration for Remote Client-Server Mode
<distributed-cache l1-lifespan="${VALUE}">
	<!-- Additional configuration information here -->
</distributed-cache>l1-lifespan element is added to a distributed-cache element to enable L1 caching and to set the life span of the L1 cache entries for the cache. This element is only valid for distributed caches.
l1-lifespan is set to 0 or a negative number (-1), L1 caching is disabled. L1 caching is enabled when the l1-lifespan value is greater than 0.
Note
Note
l1-lifespan attribute is not set. The default lifespan value was 10 minutes. Since JBoss Data Grid 6.3, the default lifespan is 0 which disables the L1 cache. Set a non-zero value for the l1-lifespan parameter to enable the L1 cache.
Chapter 25. Set Up Transactions
25.1. About Transactions
25.1.1. About the Transaction Manager
- initiating and concluding transactions
- managing information about each transaction
- coordinating transactions as they operate over multiple resources
- recovering from a failed transaction by rolling back changes
25.1.2. XA Resources and Synchronizations
OK or ABORT. If the Transaction Manager receives OK votes from all XA Resources, the transaction is committed, otherwise it is rolled back.
25.1.3. Optimistic and Pessimistic Transactions
- less messages being sent during the transaction execution
- locks held for shorter periods
- improved throughput
Note
FORCE_WRITE_LOCK flag with the operation.
25.1.4. Write Skew Checks
REPEATABLE_READ isolation level. Also, in clustered mode (distributed or replicated modes), set up entry versioning. For local mode, entry versioning is not required.
Important
25.1.5. Transactions Spanning Multiple Cache Instances
25.2. Configure Transactions
25.2.1. Configure Transactions (Library Mode)
Procedure 25.1. Configure Transactions in Library Mode (XML Configuration)
<namedCache <!-- Additional configuration information here -->>
	<transaction <!-- Additional configuration information here --> >
	<locking <!-- Additional configuration information here --> >
	<versioning enabled="{true,false}"
		    versioningScheme="{NONE|SIMPLE}"/>
        <!-- Additional configuration information here -->
</namedCache>- Set the
versioningparameter'senabledparameter totrue. - Set the
versioningSchemeparameter to eitherNONEorSIMPLEto set the versioning scheme used.
Procedure 25.2. Configure Transactions in Library Mode (Programmatic Configuration)
Configuration config = new ConfigurationBuilder()/* ... */.transaction() .transactionMode(TransactionMode.TRANSACTIONAL) .transactionManagerLookup(new GenericTransactionManagerLookup()) .lockingMode(LockingMode.OPTIMISTIC) .useSynchronization(true) .recovery() .recoveryInfoCacheName("anotherRecoveryCacheName").build();- Set the transaction mode.
- Select and set a lookup class. See the table below this procedure for a list of available lookup classes.
- The
lockingModevalue determines whether optimistic or pessimistic locking is used. If the cache is non-transactional, the locking mode is ignored. The default value isOPTIMISTIC. - The
useSynchronizationvalue configures the cache to register a synchronization with the transaction manager, or register itself as an XA resource. The default value istrue(use synchronization). - The
recoveryparameter enables recovery for the cache when set totrue.TherecoveryInfoCacheNamesets the name of the cache where recovery information is held. The default name of the cache is specified byRecoveryConfiguration.DEFAULT_RECOVERY_INFO_CACHE.
Configure Write Skew Check
ThewriteSkewcheck determines if a modification to the entry from a different transaction should roll back the transaction. Write skew set totruerequiresisolation_levelset toREPEATABLE_READ. The default value forwriteSkewandisolation_levelarefalseandREAD_COMMITTEDrespectively.Configuration config = new ConfigurationBuilder()/* ... */.locking() .isolationLevel(IsolationLevel.REPEATABLE_READ).writeSkewCheck(true);Configure Entry Versioning
For clustered caches, enable write skew check by enabling entry versioning and setting its value toSIMPLE.Configuration config = new ConfigurationBuilder()/* ... */.versioning() .enable() .scheme(VersioningScheme.SIMPLE);
Table 25.1. Transaction Manager Lookup Classes
| Class Name | Details |
|---|---|
| org.infinispan.transaction.lookup.DummyTransactionManagerLookup | Used primarily for testing environments. This testing transaction manager is not for use in a production environment and is severely limited in terms of functionality, specifically for concurrent transactions and recovery. |
| org.infinispan.transaction.lookup.JBossStandaloneJTAManagerLookup | The default transaction manager when Red Hat JBoss Data Grid runs in a standalone environment. It is a fully functional JBoss Transactions based transaction manager that overcomes the functionality limits of the DummyTransactionManager. |
| org.infinispan.transaction.lookup.GenericTransactionManagerLookup | GenericTransactionManagerLookup is used by default when no transaction lookup class is specified. This lookup class is recommended when using JBoss Data Grid with Java EE-compatible environment that provides a TransactionManager interface, and is capable of locating the Transaction Manager in most Java EE application servers. If no transaction manager is located, it defaults to DummyTransactionManager. |
| org.infinispan.transaction.lookup.JBossTransactionManagerLookup | The JbossTransactionManagerLookup finds the standard transaction manager running in the application server. This lookup class uses JNDI to look up the TransactionManager instance, and is recommended when custom caches are being used in JTA transactions. |
25.2.2. Configure Transactions (Remote Client-Server Mode)
Example 25.1. Transaction Configuration in Remote Client-Server Mode
<cache>
	<!-- Additional configuration elements here -->
 	<transaction mode="NONE" />
	<!-- Additional configuration elements here -->
</cache>
25.3. Transaction Recovery
25.3.1. Transaction Recovery Process
Procedure 25.3. The Transaction Recovery Process
- The Transaction Manager creates a list of transactions that require intervention.
- The system administrator, connected to JBoss Data Grid using JMX, is presented with the list of transactions (including transaction IDs) using email or logs. The status of each transaction is either
COMMITTEDorPREPARED. If some transactions are in bothCOMMITTEDandPREPAREDstates, it indicates that the transaction was committed on some nodes while in the preparation state on others. - The System Administrator visually maps the XID received from the Transaction Manager to a JBoss Data Grid internal ID. This step is necessary because the XID (a byte array) cannot be conveniently passed to the JMX tool and then reassembled by JBoss Data Grid without this mapping.
- The system administrator forces the commit or rollback process for a transaction based on the mapped internal ID.
25.3.2. Transaction Recovery Example
Example 25.2. Money Transfer from an Account Stored in a Database to an Account in JBoss Data Grid
- The
TransactionManager.commit()method is invoked to run the two phase commit protocol between the source (the database) and the destination (JBoss Data Grid) resources. - The
TransactionManagertells the database and JBoss Data Grid to initiate the prepare phase (the first phase of a Two Phase Commit).
Note
25.4. Deadlock Detection
disabled by default.
25.4.1. Enable Deadlock Detection
disabled by default but can be enabled and configured for each cache using the namedCache configuration element by adding the following:
<deadlockDetection enabled="true" spinDuration="100"/>
spinDuration attribute defines how often lock acquisition is attempted within the maximum time allowed to acquire a particular lock (in milliseconds).
Chapter 26. Configure JGroups
26.1. Configure Red Hat JBoss Data Grid Interface Binding (Remote Client-Server Mode)
26.1.1. Interfaces
link-local: Uses a169.x.x.xor254.x.x.xaddress. This suits the traffic within one box.<interfaces> <interface name="link-local"> <link-local-address/> </interface> <!-- Additional configuration elements here --> </interfaces>site-local: Uses a private IP address, for example192.168.x.x. This prevents extra bandwidth charged from GoGrid, and similar providers.<interfaces> <interface name="site-local"> <site-local-address/> </interface> <!-- Additional configuration elements here --> </interfaces>global: Picks a public IP address. This should be avoided for replication traffic.<interfaces> <interface name="global"> <any-address/> </interface> <!-- Additional configuration elements here --> </interfaces>non-loopback: Uses the first address found on an active interface that is not a127.x.x.xaddress.<interfaces> <interface name="non-loopback"> <not> <loopback /> </not> </interface> </interfaces>
26.1.2. Binding Sockets
26.1.2.1. Binding a Single Socket Example
socket-binding element.
Example 26.1. Socket Binding
<socket-binding name="jgroups-udp" <!-- Additional configuration elements here --> interface="site-local"/>
26.1.2.2. Binding a Group of Sockets Example
socket-binding-group element:
Example 26.2. Bind a Group
<socket-binding-group name="ha-sockets" default-interface="global">
	<!-- Additional configuration elements here -->
	<socket-binding name="jgroups-tcp" port="7600"/>
	<socket-binding name="jgroups-tcp-fd" port="57600"/>
	<!-- Additional configuration elements here -->
</socket-binding-group>
default-interface (global), therefore the interface attribute does not need to be specified.
26.1.3. Configure JGroups Socket Binding
Example 26.3. JGroups UDP Socket Binding Configuration
<subsystem xmlns="urn:jboss:domain:jgroups:1.2" default-stack="udp">
    <stack name="udp">
        <transport type="UDP" socket-binding="jgroups-udp">
            <!-- Additional configuration elements here -->
        </transport>
        <!-- rest of protocols -->
    </stack>
</subsystem>
Example 26.4. JGroups TCP Socket Binding Configuration
socket-binding section.
<subsystem xmlns="urn:infinispan:server:jgroups:6.1" default-stack="tcp">
    <stack name="tcp">
        <transport type="TCP" socket-binding="jgroups-tcp"/>
        <protocol type="TCPPING">
            <property name="initial_hosts">192.168.1.2[7600],192.168.1.3[7600]</property>
            <property name="num_initial_members">2</property>
            <property name="port_range">0</property>
            <property name="timeout">2000</property>
        </protocol>
        <protocol type="MERGE3"/>
        <protocol type="FD_SOCK" socket-binding="jgroups-tcp-fd"/>
        <protocol type="FD_ALL"/>
        <protocol type="VERIFY_SUSPECT"/>
        <protocol type="pbcast.NAKACK2">
            <property name="use_mcast_xmit">false</property>
        </protocol>
        <protocol type="UNICAST3"/>
        <protocol type="pbcast.STABLE"/>
        <protocol type="pbcast.GMS"/>
        <protocol type="MFC"/>
        <protocol type="FRAG2"/>
    </stack>
</subsystem>Important
26.2. Configure JGroups (Library Mode)
Example 26.5. JGroups Programmatic Configuration
GlobalConfiguration gc = new GlobalConfigurationBuilder()
  .transport()
  .defaultTransport()
  .addProperty("configurationFile","jgroups.xml")
  .build();
Example 26.6. JGroups XML Configuration
<infinispan>
  <global>
    <transport>
      <properties>
        <property name="configurationFile" value="jgroups.xml" />
      </properties>
    </transport>
  </global>
  <!-- Additional configuration elements here -->
</infinispan>jgroups.xml in the classpath before searching for an absolute path name if it is not found in the classpath.
26.2.1. JGroups Transport Protocols
26.2.1.1. The UDP Transport Protocol
- IP multicasting to send messages to all members of a cluster.
- UDP datagrams for unicast messages, which are sent to a single member.
26.2.1.2. The TCP Transport Protocol
- When sending multicast messages, TCP sends multiple unicast messages.
- When using TCP, each message to all cluster members is sent as multiple unicast messages, or one to each member.
26.2.1.3. Using the TCPPing Protocol
default-configs/default-jgroups-tcp.xml includes the MPING protocol, which uses UDP multicast for discovery. When UDP multicast is not available, the MPING protocol, has to be replaced by a different mechanism. The recommended alternative is the TCPPING protocol. The TCPPING configuration contains a static list of IP addresses which are contacted for node discovery.
Example 26.7. Configure the JGroups Subsystem to Use TCPPING
<TCP bind_port="7800" />
<TCPPING initial_hosts="${jgroups.tcpping.initial_hosts:HostA[7800],HostB[7801]}"
port_range="1" />26.2.2. Pre-Configured JGroups Files
infinispan-embedded.jar, and are available on the classpath by default. In order to use one of these files, specify one of these file names instead of using jgroups.xml.
default-configs/default-jgroups-udp.xmldefault-configs/default-jgroups-tcp.xmldefault-configs/default-jgroups-ec2.xml
26.2.2.1. default-jgroups-udp.xml
default-configs/default-jgroups-udp.xml file is a pre-configured JGroups configuration in Red Hat JBoss Data Grid. The default-jgroups-udp.xml configuration
- uses UDP as a transport and UDP multicast for discovery.
- is suitable for large clusters (over 8 nodes).
- is suitable if using Invalidation or Replication modes.
Table 26.1. default-jgroups-udp.xml System Properties
| System Property | Description | Default | Required? |
|---|---|---|---|
| jgroups.udp.mcast_addr | IP address to use for multicast (both for communications and discovery). Must be a valid Class D IP address, suitable for IP multicast. | 228.6.7.8 | No |
| jgroups.udp.mcast_port | Port to use for multicast socket | 46655 | No |
| jgroups.udp.ip_ttl | Specifies the time-to-live (TTL) for IP multicast packets. The value here refers to the number of network hops a packet is allowed to make before it is dropped | 2 | No |
26.2.2.2. default-jgroups-tcp.xml
default-configs/default-jgroups-tcp.xml file is a pre-configured JGroups configuration in Red Hat JBoss Data Grid. The default-jgroups-tcp.xml configuration
- uses TCP as a transport and UDP multicast for discovery.
- is generally only used where multicast UDP is not an option.
- TCP does not perform as well as UDP for clusters of eight or more nodes. Clusters of four nodes or fewer result in roughly the same level of performance for both UDP and TCP.
Table 26.2. default-jgroups-tcp.xml System Properties
| System Property | Description | Default | Required? |
|---|---|---|---|
| jgroups.tcp.address | IP address to use for the TCP transport. | 127.0.0.1 | No |
| jgroups.tcp.port | Port to use for TCP socket | 7800 | No |
| jgroups.udp.mcast_addr | IP address to use for multicast (for discovery). Must be a valid Class D IP address, suitable for IP multicast. | 228.6.7.8 | No |
| jgroups.udp.mcast_port | Port to use for multicast socket | 46655 | No |
| jgroups.udp.ip_ttl | Specifies the time-to-live (TTL) for IP multicast packets. The value here refers to the number of network hops a packet is allowed to make before it is dropped | 2 | No |
26.2.2.3. default-jgroups-ec2.xml
default-configs/default-jgroups-ec2.xml file is a pre-configured JGroups configuration in Red Hat JBoss Data Grid. The default-jgroups-ec2.xml configuration
- uses TCP as a transport and S3_PING for discovery.
- is suitable on Amazon EC2 nodes where UDP multicast isn't available.
Table 26.3. default-jgroups-ec2.xml System Properties
| System Property | Description | Default | Required? |
|---|---|---|---|
| jgroups.tcp.address | IP address to use for the TCP transport. | 127.0.0.1 | No |
| jgroups.tcp.port | Port to use for TCP socket | 7800 | No |
| jgroups.s3.access_key | The Amazon S3 access key used to access an S3 bucket | Yes | |
| jgroups.s3.secret_access_key | The Amazon S3 secret key used to access an S3 bucket | Yes | |
| jgroups.s3.bucket | Name of the Amazon S3 bucket to use. Must be unique and must already exist | Yes | |
| jgroups.s3.pre_signed_delete_url | The pre-signed URL to be used for the DELETE operation. | Yes | |
| jgroups.s3.pre_signed_put_url | The pre-signed URL to be used for the PUT operation. | Yes | |
| jgroups.s3.prefix | If set, S3_PING searches for a bucket with a name that starts with the prefix value. | No |
26.3. Test Multicast Using JGroups
26.3.1. Testing With Different Red Hat JBoss Data Grid Versions
Note
Table 26.4. Testing with Different JBoss Data Grid Versions
| Version | Test Case | Details |
|---|---|---|
| JBoss Data Grid 6.6.1 | Available |
The location of the test classes depends on the distribution:
|
| JBoss Data Grid 6.6.0 | Available |
The location of the test classes depends on the distribution:
|
| JBoss Data Grid 6.5.1 | Available |
The location of the test classes depends on the distribution:
|
| JBoss Data Grid 6.5.0 | Available |
The location of the test classes depends on the distribution:
|
| JBoss Data Grid 6.4.0 | Available |
The location of the test classes depends on the distribution:
|
| JBoss Data Grid 6.3.0 | Available |
The location of the test classes depends on the distribution:
|
| JBoss Data Grid 6.2.1 | Available |
The location of the test classes depends on the distribution:
|
| JBoss Data Grid 6.2.0 | Available |
The location of the test classes depends on the distribution:
|
| JBoss Data Grid 6.1.0 | Available |
The location of the test classes depends on the distribution:
|
| JBoss Data Grid 6.0.1 | Not Available | This version of JBoss Data Grid is based on JBoss Enterprise Application Platform 6.0, which does not include the test classes used for this test. |
| JBoss Data Grid 6.0.0 | Not Available | This version of JBoss Data Grid is based on JBoss Enterprise Application Server 6.0, which does not include the test classes used for this test. |
26.3.2. Testing Multicast Using JGroups
Ensure that the following prerequisites are met before starting the testing procedure.
- Set the
bind_addrvalue to the appropriate IP address for the instance. - For added accuracy, set
mcast_addrandportvalues that are the same as the cluster communication values. - Start two command line terminal windows. Navigate to the location of the JGroups JAR file for one of the two nodes in the first terminal and the same location for the second node in the second terminal.
Procedure 26.1. Test Multicast Using JGroups
Run the Multicast Server on Node One
Run the following command on the command line terminal for the first node (replacejgroups.jarwith theinfinispan-embedded.jarfor Library mode):java -cp jgroups.jar org.jgroups.tests.McastReceiverTest -mcast_addr 230.1.2.3 -port 5555 -bind_addr $YOUR_BIND_ADDRESS
Run the Multicast Server on Node Two
Run the following command on the command line terminal for the second node (replacejgroups.jarwith theinfinispan-embedded.jarfor Library mode):java -cp jgroups.jar org.jgroups.tests.McastSenderTest -mcast_addr 230.1.2.3 -port 5555 -bind_addr $YOUR_BIND_ADDRESS
Transmit Information Packets
Enter information on instance for node two (the node sending packets) and press enter to send the information.View Receives Information Packets
View the information received on the node one instance. The information entered in the previous step should appear here.Confirm Information Transfer
Repeat steps 3 and 4 to confirm all transmitted information is received without dropped packets.Repeat Test for Other Instances
Repeat steps 1 to 4 for each combination of sender and receiver. Repeating the test identifies other instances that are incorrectly configured.
All information packets transmitted from the sender node must appear on the receiver node. If the sent information does not appear as expected, multicast is incorrectly configured in the operating system or the network.
Chapter 27. Use Red Hat JBoss Data Grid with Amazon Web Services
27.1. The S3_PING JGroups Discovery Protocol
S3_PING is a discovery protocol that is ideal for use with Amazon's Elastic Compute Cloud (EC2) because EC2 does not allow multicast and therefore MPING is not allowed.
27.2. S3_PING Configuration Options
- In Library mode, use JGroups'
default-configs/default-jgroups-ec2.xmlfile (see Section 26.2.2.3, “default-jgroups-ec2.xml” for details) or use theS3_PINGprotocol. - In Remote Client-Server mode, use JGroups'
S3_PINGprotocol.
S3_PING protocol for clustering to work in Amazon AWS:
- Use Private S3 Buckets. These buckets use Amazon AWS credentials.
- Use Pre-Signed URLs. These pre-assigned URLs are assigned to buckets with private write and public read rights.
- Use Public S3 Buckets. These buckets do not have any credentials.
27.2.1. Using Private S3 Buckets
- List
- Upload/Delete
- View Permissions
- Edit Permissions
S3_PING configuration includes the following properties:
- either the
locationor theprefixproperty to specify the bucket, but not both. If theprefixproperty is set,S3_PINGsearches for a bucket with a name that starts with the prefix value. If a bucket with the prefix at the beginning of the name is found,S3_PINGuses that bucket. If a bucket with the prefix is not found,S3_PINGcreates a bucket using the AWS credentials and names it based on the prefix and a UUID (the naming format is {prefix value}-{UUID}). - the
access_keyandsecret_access_keyproperties for the AWS user.
Note
403 error displays when using this configuration, verify that the properties have the correct values. If the problem persists, confirm that the system time in the EC2 node is correct. Amazon S3 rejects requests with a time stamp that is more than 15 minutes old compared to their server's times for security purposes.
Example 27.1. Start the Red Hat JBoss Data Grid Server with a Private Bucket
bin/clustered.sh -Djboss.bind.address={server_ip_address} -Djboss.bind.address.management={server_ip_address} -Djboss.default.jgroups.stack=s3 -Djgroups.s3.bucket={s3_bucket_name} -Djgroups.s3.access_key={access_key} -Djgroups.s3.secret_access_key={secret_access_key}- Replace {server_ip_address} with the server's IP address.
- Replace {s3_bucket_name} with the appropriate bucket name.
- Replace {access_key} with the user's access key.
- Replace {secret_access_key} with the user's secret access key.
27.2.2. Using Pre-Signed URLs
S3_PING protocol. This URL points to a unique file and can include a folder path within the bucket.
Note
S3_PING. For example, a path such as my_bucket/DemoCluster/node1 works while a longer path such as my_bucket/Demo/Cluster/node1 will not.
27.2.2.1. Generating Pre-Signed URLs
S3_PING class includes a utility method to generate pre-signed URLs. The last argument for this method is the time when the URL expires expressed in the number of seconds since the Unix epoch (January 1, 1970).
String Url = S3_PING.generatePreSignedUrl("{access_key}", "{secret_access_key}", "{operation}", "{bucket_name}", "{path}", {seconds});- Replace {operation} with either
PUTorDELETE. - Replace {access_key} with the user's access key.
- Replace {secret_access_key} with the user's secret access key.
- Replace {bucket_name} with the name of the bucket.
- Replace {path} with the desired path to the file within the bucket.
- Replace {seconds} with the number of seconds since the Unix epoch (January 1, 1970) that the path remains valid.
Example 27.2. Generate a Pre-Signed URL
String putUrl = S3_PING.generatePreSignedUrl("access_key", "secret_access_key", "put", "my_bucket", "DemoCluster/node1", 1234567890);S3_PING configuration includes the pre_signed_put_url and pre_signed_delete_url properties generated by the call to S3_PING.generatePreSignedUrl(). This configuration is more secure than one using private S3 buckets, because the AWS credentials are not stored on each node in the cluster
Note
& characters in the URL must be replaced with its XML entity (&).
27.2.2.2. Set Pre-Signed URLs Using the Command Line
- Enclose the URL in double quotation marks (
""). - In the URL, each occurrence of the ampersand (
&) character must be escaped with a backslash (\)
Example 27.3. Start a JBoss Data Grid Server with a Pre-Signed URL
bin/clustered.sh -Djboss.bind.address={server_ip_address} -Djboss.bind.address.management={server_ip_address} -Djboss.default.jgroups.stack=s3 -Djgroups.s3.pre_signed_put_url="http://{s3_bucket_name}.s3.amazonaws.com/ node1?AWSAccessKeyId={access_key}\&Expires={expiration_time}\&Signature={signature}"-Djgroups.s3.pre_signed_delete_url="http://{s3_bucket_name}.s3.amazonaws.com/ node1?AWSAccessKeyId={access_key}\&Expires={expiration_time}\&Signature={signature}"{signatures} values are generated by the S3_PING.generatePreSignedUrl() method. Additionally, the {expiration_time} values are the expiration time for the URL that are passed into the S3_PING.generatePreSignedUrl() method.
27.2.3. Using Public S3 Buckets
location property must be specified with the bucket name for this configuration. This configuration method is the least secure because any user who knows the name of the bucket can upload and store data in the bucket and the bucket creator's account is charged for this data.
bin/clustered.sh -Djboss.bind.address={server_ip_address} -Djboss.bind.address.management={server_ip_address} -Djboss.default.jgroups.stack=s3 -Djgroups.s3.bucket={s3_bucket_name}27.2.4. Troubleshooting S3_PING Warnings
S3_PING configuration type used, the following warnings may appear when starting the JBoss Data Grid Server:
15:46:03,468 WARN [org.jgroups.conf.ProtocolConfiguration] (MSC service thread 1-7) variable "${jgroups.s3.pre_signed_put_url}" in S3_PING could not be substituted; pre_signed_put_url is removed from properties15:46:03,469 WARN [org.jgroups.conf.ProtocolConfiguration] (MSC service thread 1-7) variable "${jgroups.s3.prefix}" in S3_PING could not be substituted; prefix is removed from properties15:46:03,469 WARN [org.jgroups.conf.ProtocolConfiguration] (MSC service thread 1-7) variable "${jgroups.s3.pre_signed_delete_url}" in S3_PING could not be substituted; pre_signed_delete_url is removed from propertiesS3_PING configuration.
Chapter 28. Use Red Hat JBoss Data Grid with Google Compute Engine
28.1. The GOOGLE_PING Protocol
GOOGLE_PING is a discovery protocol used by JGroups during cluster formation. It is ideal to use with Google Compute Engine (GCE) and uses Google Cloud Storage to store information about individual cluster members.
28.2. GOOGLE_PING Configuration
- In Library mode, use the JGroups' configuration file
default-configs/default-jgroups-google.xmlor use theGOOGLE_PINGprotocol in an existing configuration file. - In Remote Client-Server mode, define the properties on the command line when you start the server to use the JGroups Google stack ( see example in Section 28.2.1, “Starting the Server in Google Compute Engine”).
GOOGLE_PING protocol to work in Google Compute Engine in Library and Remote Client-Server mode:
- Use JGroups bucket. These buckets use Google Compute Engine credentials.
- Use the access key.
- Use the secret access key.
Note
TCP protocol is supported in Google Compute Engine since multicasts are not allowed.
28.2.1. Starting the Server in Google Compute Engine
GOOGLE_PING configuration includes the following properties:
- the
access_keyand thesecret_access_keyproperties for the Google Compute Engine user.
Example 28.1. Start the Red Hat JBoss Data Grid Server with a Bucket
bin/clustered.sh -Djboss.bind.address={server_ip_address} -Djboss.bind.address.management={server_ip_address} -Djboss.default.jgroups.stack=google -Djgroups.google.bucket={google_bucket_name} -Djgroups.google.access_key={access_key} -Djgroups.google.secret_access_key={secret_access_key}- Replace {server_ip_address} with the server's IP address.
- Replace {google_bucket_name} with the appropriate bucket name.
- Replace {access_key} with the user's access key.
- Replace {secret_access_key} with the user's secret access key.
Chapter 29. Using Red Hat JBoss Data Grid with Microsoft Azure
JDBC_PING- Discovery protocol that utilizes a shared database.TCPGOSSIP- Discovery protocol that utilizes shared GossipRouter processes.
TCPPING may be used instead. An example configuration using TCPPING is found in Section 26.1.3, “Configure JGroups Socket Binding”.
29.1. The JDBC_PING JGroups Protocol
JDBC_PING discovery protocol uses a shared database to store information about the nodes in the cluster. With Microsoft Azure this should be a SQL database, and once the database has been created the JDBC connection URL may be performing the following steps:
- Select the properties of the SQL Database to be used.
- Navigate to the Connection Propertiessection and click the Show database connection strings link
- Click JDBC Connection URL. This value will be used for the
connection_urlproperty when configuringJDBC_PING.
connection_url has been retrieved, the SQL Driver may be obtained from Microsoft JDBC Drivers for SQL Server. This driver will be used in the following steps.
The following parameters must be defined, and are used to connect to the SQL database:
connection_url- the JDBC Connection URL obtained in the above steps.connection_username- The database username, obtained from theconnection_url.connection_password- The database password, obtained from theconnection_url.connection_driver- The driver used to connect to the database. The application or server must include the JDBC driver JAR file on the classpath.
In Library Mode the JGroups xml file should be used to configure JDBC_PING; however, there is no JDBC_PING configuration included by default. It is recommended to use one of the preexisting files specified in Section 26.2.2, “Pre-Configured JGroups Files” and then adjust the configuration to include JDBC_PING. For instance, default-configs/default-jgroups-ec2.xml could be selected and the S3_PING protocol removed, and then the following block added in its place:
<JDBC_PING connection_url="${jboss.jgroups.jdbc_ping.connection_url:}"
   connection_username="${jboss.jgroups.jdbc_ping.connection_username:}"
   connection_password="${jboss.jgroups.jdbc_ping.connection_password:}"
   connection_driver="com.microsoft.sqlserver.jdbc.SQLServerDriver"
/>
In Remote Client-Server Mode a stack may be defined for JDBC_PING in the jgroups subsystem of the server's configuration file. The following configuration snippet contains an example of this:
<subsystem xmlns="urn:infinispan:server:jgroups:6.1" default-stack="${jboss.default.jgroups.stack:jdbc_ping}">
[...]
    <stack name="jdbc_ping">
        <transport type="TCP" socket-binding="jgroups-tcp"/>
        <protocol type="JDBC_PING">
            <property name="connection_url">
                ${jboss.jgroups.jdbc_ping.connection_url:}
            </property>
            <property name="connection_username">${jboss.jgroups.jdbc_ping.connection_username:}</property>
            <property name="connection_password">${jboss.jgroups.jdbc_ping.connection_password:}</property>
            <property name="connection_driver">com.microsoft.sqlserver.jdbc.SQLServerDriver</property>
        </protocol>
        <protocol type="MERGE3"/>
        <protocol type="FD_SOCK" socket-binding="jgroups-tcp-fd"/>
        <protocol type="FD_ALL"/>
        <protocol type="VERIFY_SUSPECT"/>
        <protocol type="pbcast.NAKACK2">
            <property name="use_mcast_xmit">false</property>
        </protocol>
        <protocol type="UNICAST3"/>
        <protocol type="pbcast.STABLE"/>
        <protocol type="pbcast.GMS"/>
        <protocol type="MFC"/>
        <protocol type="FRAG2"/>
    </stack>
[...]
</subsystem>
29.2. The TCPGOSSIP JGroups Protocol
TCPGOSSIP discovery protocol uses one or more configured GossipRouter processes to store information about the nodes in the cluster.
Important
The GossipRouter is included in the JGroups jar file, and must be running before any nodes are started. This process may be started by pointing to the GossipRouter class in the JGroups jar file included with JBoss Data Grid:
java -classpath jgroups-${jgroups.version}.jar org.jgroups.stack.GossipRouter -bindaddress IP_ADDRESS -port PORT
In Library Mode the JGroups xml file should be used to configure TCPGOSSIP; however, there is no TCPGOSSIP configuration included by default. It is recommended to use one of the preexisting files specified in Section 26.2.2, “Pre-Configured JGroups Files” and then adjust the configuration to include TCPGOSSIP. For instance, default-configs/default-jgroups-ec2.xml could be selected and the S3_PING protocol removed, and then the following block added in its place:
<TCPGOSSIP initial_hosts="IP_ADDRESS_0[PORT_0],IP_ADDRESS_1[PORT_1]" />
In Remote Client-Server Mode a stack may be defined for TCPGOSSIP in the jgroups subsystem of the server's configuration file. The following configuration snippet contains an example of this:
<subsystem xmlns="urn:infinispan:server:jgroups:6.1" default-stack="${jboss.default.jgroups.stack:tcpgossip}">
[...]
    <stack name="jdbc_ping">
        <transport type="TCP" socket-binding="jgroups-tcp"/>
        <protocol type="TCPGOSSIP">
            <property name="initial_hosts">IP_ADDRESS_0[PORT_0],IP_ADDRESS_1[PORT_1]</property>
        </protocol>
        <protocol type="MERGE3"/>
        <protocol type="FD_SOCK" socket-binding="jgroups-tcp-fd"/>
        <protocol type="FD_ALL"/>
        <protocol type="VERIFY_SUSPECT"/>
        <protocol type="pbcast.NAKACK2">
            <property name="use_mcast_xmit">false</property>
        </protocol>
        <protocol type="UNICAST3"/>
        <protocol type="pbcast.STABLE"/>
        <protocol type="pbcast.GMS"/>
        <protocol type="MFC"/>
        <protocol type="FRAG2"/>
    </stack>
[...]
</subsystem>
29.3. TCPGOSSIP Configuration Options
TCPGOSSIP specific properties may be configured:
initial_hosts- Comma delimited list of hosts to be contacted for initial membership.reconnect_interval- Interval (in milliseconds) by which a disconnected node attempts to reconnect to the Gossip Router.sock_conn_timeout- Max time (in milliseconds) allowed for socket creation. Defaults to1000.sock_read_timeout- Max time (in milliseconds) to block on a read. A value of0will block forever.
Chapter 30. High Availability Using Server Hinting
machineId, rackId, or siteId in the transport configuration will trigger the use of TopologyAwareConsistentHashFactory, which is the equivalent of the DefaultConsistentHashFactory with Server Hinting enabled.
30.1. Establishing Server Hinting with JGroups
30.2. Configure Server Hinting (Remote Client-Server Mode)
transport element for the default stack, as follows:
Procedure 30.1. Configure Server Hinting in Remote Client-Server Mode
<subsystem xmlns="urn:jboss:domain:jgroups:1.1"
	   default-stack="${jboss.default.jgroups.stack:udp}">
	<stack name="udp">
		<transport type="UDP"
			   socket-binding="jgroups-udp"
			   site="${jboss.jgroups.transport.site:s1}"
			   rack="${jboss.jgroups.transport.rack:r1}"
			   machine="${jboss.jgroups.transport.machine:m1}">
			   <!-- Additional configuration elements here -->
		</transport>
	</stack>
</subsystem>- Find the JGroups subsystem configuration
- Enable Server Hinting via the
transportElement- Set the site ID using the
siteparameter. - Set the rack ID using the
rackparameter. - Set the machine ID using the
machineparameter.
30.3. Configure Server Hinting (Library Mode)
Procedure 30.2. Configure Server Hinting for Library Mode
<transport clusterName = "MyCluster"
           machineId = "LinuxServer01"
           rackId = "Rack01"
siteId = "US-WestCoast" />- The
clusterNameattribute specifies the name assigned to the cluster. - The
machineIdattribute specifies the JVM instance that contains the original data. This is particularly useful for nodes with multiple JVMs and physical hosts with multiple virtual hosts. - The
rackIdparameter specifies the rack that contains the original data, so that other racks are used for backups. - The
siteIdparameter differentiates between nodes in different data centers replicating to each other.
machineId, rackId, or siteId are included in the configuration, TopologyAwareConsistentHashFactory is selected automatically, enabling Server Hinting. However, if Server Hinting is not configured, JBoss Data Grid's distribution algorithms are allowed to store replications in the same physical machine/rack/data center as the original data.
30.4. ConsistentHashFactories
DefaultConsistentHashFactory- keeps segments balanced evenly across all the nodes, however the key mapping is not guaranteed to be same across caches,as this depends on the history of each cache. If no consistentHashFactory is specified this is the class that will be used.SyncConsistentHashFactory- guarantees that the key mapping is the same for each cache, provided the current membership is the same. This has a drawback in that a node joining the cache can cause the existing nodes to also exchange segments, resulting in either additional state transfer traffic, the distribution of the data becoming less even, or both.TopologyAwareConsistentHashFactory- equivalent ofDefaultConsistentHashFactory, but automatically selected when the configuration includes server hinting.TopologyAwareSyncConsistentHashFactory- equivalent ofSyncConsistentHashFactory, but automatically selected when the configuration includes server hinting.
<hash consistentHashFactory="org.infinispan.distribution.ch.SyncConsistentHashFactory"/>
machineId, rackId, or siteId attributes are specified in the transport configuration it also spreads backup copies across physical machines/racks/data centers.
SyncConsistentHashFactory and TopologyAwareSyncConsistentHashFactory both tend to reduce overhead in clustered environments, as neither of these calculate the hash based on the order that nodes have joined the cluster. In addition, both of these classes are typically faster than the default algorithms as both of these classes allow larger differences in the number of segments allocated to each node.
30.4.1. Implementing a ConsistentHashFactory
ConsistentHashFactory must implement the org.infinispan.distribution.ch.ConsistenHashFactory interface with the following methods (all of which return an implementation of org.infinispan.distribution.ch.ConsistentHash):
Example 30.1. ConsistentHashFactory Methods
create(Hash hashFunction, int numOwners, int numSegments, List<Address>
members,Map<Address, Float> capacityFactors)
updateMembers(ConsistentHash baseCH, List<Address> newMembers, Map<Address,
Float> capacityFactors)
rebalance(ConsistentHash baseCH)
union(ConsistentHash ch1, ConsistentHash ch2)
ConsistentHashFactory implementations.
30.5. Key Affinity Service
Example 30.2. Key Affinity Service
EmbeddedCacheManager cacheManager = getCacheManager();
Cache cache = cacheManager.getCache();
KeyAffinityService keyAffinityService =
        KeyAffinityServiceFactory.newLocalKeyAffinityService(
            cache,
            new RndKeyGenerator(),
            Executors.newSingleThreadExecutor(),
            100);
Object localKey = keyAffinityService.getKeyForAddress(cacheManager.getAddress());
cache.put(localKey, "yourValue");Procedure 30.3. Using the Key Affinity Service
- Obtain a reference to a cache manager and cache.
- This starts the service, then uses the supplied
Executorto generate and queue keys. - Obtain a key from the service which will be mapped to the local node (
cacheManager.getAddress()returns the local address). - The entry with a key obtained from the
KeyAffinityServiceis always stored on the node with the provided address. In this case, it is the local node.
30.5.1. Lifecycle
KeyAffinityService extends Lifecycle, which allows the key affinity service to be stopped, started, and restarted.
Example 30.3. Key Affinity Service Lifecycle Parameter
public interface Lifecycle {
     void start();
     void stop();
}KeyAffinityServiceFactory. All factory methods have an Executor, that is used for asynchronous key generation, so that this does not occur in the caller's thread. The user controls the shutting down of this Executor.
KeyAffinityService must be explicitly stopped when it is no longer required. This stops the background key generation, and releases other held resources. The KeyAffinityServce will only stop itself when the cache manager with which it is registered is shut down.
30.5.2. Topology Changes
KeyAffinityService key ownership may change when a topology change occurs. The key affinity service monitors topology changes and updates so that it doesn't return stale keys, or keys that would map to a different node than the one specified. However, this does not guarantee that a node affinity hasn't changed when a key is used. For example:
- Thread (
T1) reads a key (K1) that maps to a node (A). - A topology change occurs, resulting in
K1mapping to nodeB. T1usesK1to add something to the cache. At this point,K1maps toB, a different node to the one requested at the time of read.
KeyAffinityService provides an access proximity optimization for stable clusters, which does not apply during the instability of topology changes.
Chapter 31. Set Up Cross-Datacenter Replication
RELAY2 protocol.
31.1. Cross-Datacenter Replication Operations
Example 31.1. Cross-Datacenter Replication Example
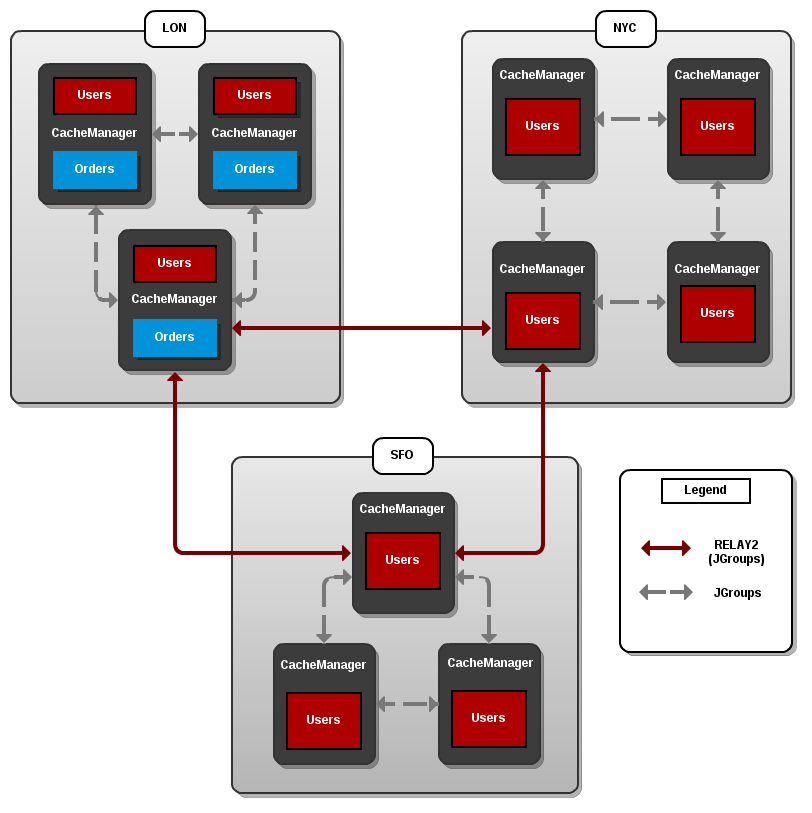
Figure 31.1. Cross-Datacenter Replication Example
LON, NYC and SFO. Each site hosts a running JBoss Data Grid cluster made up of three to four physical nodes.
Users cache is active in all three sites - LON, NYC and SFO. Changes to the Users cache at the any one of these sites will be replicated to the other two as long as the cache defines the other two sites as its backups through configuration. The Orders cache, however, is only available locally at the LON site because it is not replicated to the other sites.
Users cache can use different replication mechanisms each site. For example, it can back up data synchronously to SFO and asynchronously to NYC and LON.
Users cache can also have a different configuration from one site to another. For example, it can be configured as a distributed cache with numOwners set to 2 in the LON site, as a replicated cache in the NYC site and as a distributed cache with numOwners set to 1 in the SFO site.
RELAY2 facilitates communication between sites. For more information, see Section F.4, “About RELAY2”
31.2. Configure Cross-Datacenter Replication
31.2.1. Configure Cross-Datacenter Replication (Remote Client-Server Mode)
Procedure 31.1. Set Up Cross-Datacenter Replication
Set Up RELAY
Add the following configuration to thestandalone.xmlfile to set upRELAY:<subsystem xmlns="urn:jboss:domain:jgroups:1.2" default-stack="udp"> <stack name="udp"> <transport type="UDP" socket-binding="jgroups-udp"/> <!-- Additional configuration elements here --> <relay site="LON"> <remote-site name="NYC" stack="tcp" cluster="global"/> <remote-site name="SFO" stack="tcp" cluster="global"/> <property name="relay_multicasts">false</property> </relay> </stack> </subsystem>
TheRELAYprotocol creates an additional stack (running parallel to the existingTCPstack) to communicate with the remote site. If aTCPbased stack is used for the local cluster, twoTCPbased stack configurations are required: one for local communication and one to connect to the remote site. For an illustration, see Section 31.1, “Cross-Datacenter Replication Operations”Set Up Sites
Use the following configuration in thestandalone.xmlfile to set up sites for each distributed cache in the cluster:<distributed-cache> <!-- Additional configuration elements here --> <backups> <backup site="{FIRSTSITENAME}" strategy="{SYNC/ASYNC}" /> <backup site="{SECONDSITENAME}" strategy="{SYNC/ASYNC}" /> </backups> </distributed-cache>Configure Local Site Transport
Add the name of the local site in thetransportelement to configure transport:<transport executor="infinispan-transport" lock-timeout="60000" cluster="LON" stack="udp"/>
31.2.2. Configure Cross-Data Replication (Library Mode)
31.2.2.1. Configure Cross-Datacenter Replication Declaratively
relay.RELAY2 protocol creates an additional stack (running parallel to the existing TCP stack) to communicate with the remote site. If a TCP-based stack is used for the local cluster, two TCP based stack configurations are required: one for local communication and one to connect to the remote site.
Procedure 31.2. Setting Up Cross-Datacenter Replication
Configure the Local Site
<infinispan> <global> <site local="SFO" /> <transport clusterName="default"> <properties> <property name="configurationFile" value="jgroups-with-relay.xml"/> </properties> </transport> <!-- Additional configuration information here --> </global> <!-- Additional configuration information here --> <namedCache name="lonBackup"> <sites> <backupFor remoteSite="LON" remoteCache="lon" /> </sites> </namedCache> </infinispan>- Add the
siteelement to theglobalelement to add the local site (in this example, the local site is namedLON). - Cross-site replication requires a non-default JGroups configuration. Add the
transportelement and set up the path to the configuration file as theconfigurationFileproperty. In this example, the JGroups configuration file is namedjgroups-with-relay.xml. - Configure the cache in site
LONto back up to the sitesNYCandSFO. - Configure the back up caches:
- Configure the cache in site
NYCto receive back up data fromLON. - Configure the cache in site
SFOto receive back up data fromLON.
Add the Contents of the Configuration File
As a default, Red Hat JBoss Data Grid includes JGroups configuration files such asdefault-configs/default-jgroups-tcp.xmlanddefault-configs/default-jgroups-udp.xmlin theinfinispan-embedded-{VERSION}.jarpackage.Copy the JGroups configuration to a new file (in this example, it is namedjgroups-with-relay.xml) and add the provided configuration information to this file. Note that therelay.RELAY2protocol configuration must be the last protocol in the configuration stack.<config> ... <relay.RELAY2 site="LON" config="relay.xml" relay_multicasts="false" /> </config>Configure the relay.xml File
Set up therelay.RELAY2configuration in therelay.xmlfile. This file describes the global cluster configuration.<RelayConfiguration> <sites> <site name="LON" id="0"> <bridges> <bridge config="jgroups-global.xml" name="global"/> </bridges> </site> <site name="NYC" id="1"> <bridges> <bridge config="jgroups-global.xml" name="global"/> </bridges> </site> <site name="SFO" id="2"> <bridges> <bridge config="jgroups-global.xml" name="global"/> </bridges> </site> </sites> </RelayConfiguration>Configure the Global Cluster
The filejgroups-global.xmlreferenced inrelay.xmlcontains another JGroups configuration which is used for the global cluster: communication between sites.The global cluster configuration is usuallyTCP-based and uses theTCPPINGprotocol (instead ofPINGorMPING) to discover members. Copy the contents ofdefault-configs/default-jgroups-tcp.xmlintojgroups-global.xmland add the following configuration in order to configureTCPPING:<config> <TCP bind_port="7800" ... /> <TCPPING initial_hosts="lon.hostname[7800],nyc.hostname[7800],sfo.hostname[7800]" ergonomics="false" /> <!-- Rest of the protocols --> </config>Replace the hostnames (or IP addresses) inTCPPING.initial_hostswith those used for your site masters. The ports (7800in this example) must match theTCP.bind_port.For more information about theTCPPINGprotocol, see Section 26.2.1.3, “Using the TCPPing Protocol”
31.2.2.2. Configure Cross-Datacenter Replication Programmatically
Procedure 31.3. Configure Cross-Datacenter Replication Programmatically
Identify the Node Location
Declare the site the node resides in:globalConfiguration.site().localSite("LON");Configure JGroups
Configure JGroups to use theRELAYprotocol:globalConfiguration.transport().addProperty("configurationFile", jgroups-with-relay.xml);Set Up the Remote Site
Set up JBoss Data Grid caches to replicate to the remote site:ConfigurationBuilder lon = new ConfigurationBuilder(); lon.sites().addBackup() .site("NYC") .backupFailurePolicy(BackupFailurePolicy.WARN) .strategy(BackupConfiguration.BackupStrategy.SYNC) .replicationTimeout(12000) .sites().addInUseBackupSite("NYC") .sites().addBackup() .site("SFO") .backupFailurePolicy(BackupFailurePolicy.IGNORE) .strategy(BackupConfiguration.BackupStrategy.ASYNC) .sites().addInUseBackupSite("SFO")Optional: Configure the Backup Caches
JBoss Data Grid implicitly replicates data to a cache with same name as the remote site. If a backup cache on the remote site has a different name, users must specify abackupForcache to ensure data is replicated to the correct cache.Note
This step is optional and only required if the remote site's caches are named differently from the original caches.- Configure the cache in site
NYCto receive backup data fromLON:ConfigurationBuilder NYCbackupOfLon = new ConfigurationBuilder(); NYCbackupOfLon.sites().backupFor().remoteCache("lon").remoteSite("LON"); - Configure the cache in site
SFOto receive backup data fromLON:ConfigurationBuilder SFObackupOfLon = new ConfigurationBuilder(); SFObackupOfLon.sites().backupFor().remoteCache("lon").remoteSite("LON");
Add the Contents of the Configuration File
As a default, Red Hat JBoss Data Grid includes JGroups configuration files such asdefault-configs/default-jgroups-tcp.xmlanddefault-configs/default-jgroups-udp.xmlin theinfinispan-embedded-{VERSION}.jarpackage.Copy the JGroups configuration to a new file (in this example, it is namedjgroups-with-relay.xml) and add the provided configuration information to this file. Note that therelay.RELAY2protocol configuration must be the last protocol in the configuration stack.<config> <!-- Additional configuration information here --> <relay.RELAY2 site="LON" config="relay.xml" relay_multicasts="false" /> </config>Configure the relay.xml File
Set up therelay.RELAY2configuration in therelay.xmlfile. This file describes the global cluster configuration.<RelayConfiguration> <sites> <site name="LON" id="0"> <bridges> <bridge config="jgroups-global.xml" name="global"/> </bridges> </site> <site name="NYC" id="1"> <bridges> <bridge config="jgroups-global.xml" name="global"/> </bridges> </site> <site name="SFO" id="2"> <bridges> <bridge config="jgroups-global.xml" name="global"/> </bridges> </site> </sites> </RelayConfiguration>Configure the Global Cluster
The filejgroups-global.xmlreferenced inrelay.xmlcontains another JGroups configuration which is used for the global cluster: communication between sites.The global cluster configuration is usuallyTCP-based and uses theTCPPINGprotocol (instead ofPINGorMPING) to discover members. Copy the contents ofdefault-configs/default-jgroups-tcp.xmlintojgroups-global.xmland add the following configuration in order to configureTCPPING:<config> <TCP bind_port="7800" <!-- Additional configuration information here --> /> <TCPPING initial_hosts="lon.hostname[7800],nyc.hostname[7800],sfo.hostname[7800]" ergonomics="false" /> <!-- Rest of the protocols --> </config>Replace the hostnames (or IP addresses) inTCPPING.initial_hostswith those used for your site masters. The ports (7800in this example) must match theTCP.bind_port.For more information about theTCPPINGprotocol, see Section 26.2.1.3, “Using the TCPPing Protocol”
31.3. Taking a Site Offline
- Configure automatically taking a site offline:
- Declaratively in Remote Client-Server mode.
- Declaratively in Library mode.
- Using the programmatic method.
- Manually taking a site offline:
- Using JBoss Operations Network (JON).
- Using the JBoss Data Grid Command Line Interface (CLI).
31.3.1. Taking a Site Offline (Remote Client-Server Mode)
take-offline element is added to the backup element to configure when a site is automatically taken offline.
Example 31.2. Taking a Site Offline in Remote Client-Server Mode
<backup>
	<take-offline after-failures="${NUMBER}"
		      min-wait="${PERIOD}" />
</backup>take-offline element use the following parameters to configure when to take a site offline:
- The
after-failuresparameter specifies the number of times attempts to contact a site can fail before the site is taken offline. - The
min-waitparameter specifies the number (in milliseconds) to wait to mark an unresponsive site as offline. The site is offline when themin-waitperiod elapses after the first attempt, and the number of failed attempts specified in theafter-failuresparameter occur.
31.3.2. Taking a Site Offline (Library Mode)
backupFor element after defining all back up sites within the backups element:
Example 31.3. Taking a Site Offline in Library Mode
<backup>
        <takeOffline afterFailures="${NUM}"
                     minTimeToWait="${PERIOD}"/>
</backup>takeOffline element to the backup element to configure automatically taking a site offline.
- The
afterFailuresparameter specifies the number of times attempts to contact a site can fail before the site is taken offline. The default value (0) allows an infinite number of failures ifminTimeToWaitis less than0. If theminTimeToWaitis not less than0,afterFailuresbehaves as if the value is negative. A negative value for this parameter indicates that the site is taken offline after the time specified byminTimeToWaitelapses. - The
minTimeToWaitparameter specifies the number (in milliseconds) to wait to mark an unresponsive site as offline. The site is taken offline after the number attempts specified in theafterFailuresparameter conclude and the time specified byminTimeToWaitafter the first failure has elapsed. If this parameter is set to a value smaller than or equal to0, this parameter is disregarded and the site is taken offline based solely on theafterFailuresparameter.
31.3.3. Taking a Site Offline (Programmatically)
Example 31.4. Taking a Site Offline Programmatically
lon.sites().addBackup()
      .site("NYC")
      .backupFailurePolicy(BackupFailurePolicy.FAIL)
      .strategy(BackupConfiguration.BackupStrategy.SYNC)
      .takeOffline()
         .afterFailures(500)
.minTimeToWait(10000);31.3.4. Taking a Site Offline via JBoss Operations Network (JON)
31.3.5. Taking a Site Offline via the CLI
site command.
site command can be used to check the status of a site as follows:
[jmx://localhost:12000/MyCacheManager/namedCache]> site --status ${SITENAME}online or offline according to the current status of the named site.
[jmx://localhost:12000/MyCacheManager/namedCache]> site --offline ${SITENAME}[jmx://localhost:12000/MyCacheManager/namedCache]> site --online ${SITENAME}ok displays after the command. As an alternate, the site can also be brought online using JMX (see Section 31.3.6, “Bring a Site Back Online” for details).
31.3.6. Bring a Site Back Online
bringSiteOnline(siteName) operation on the XSiteAdmin MBean (See Section C.23, “XSiteAdmin” for details) or using the CLI (see Section 31.3.5, “Taking a Site Offline via the CLI” for details).
31.4. State Transfer Between Sites
pushState(SiteName String) operation available in the XSiteAdminOperations MBean.
pushState(SiteName String) operation in JConsole:
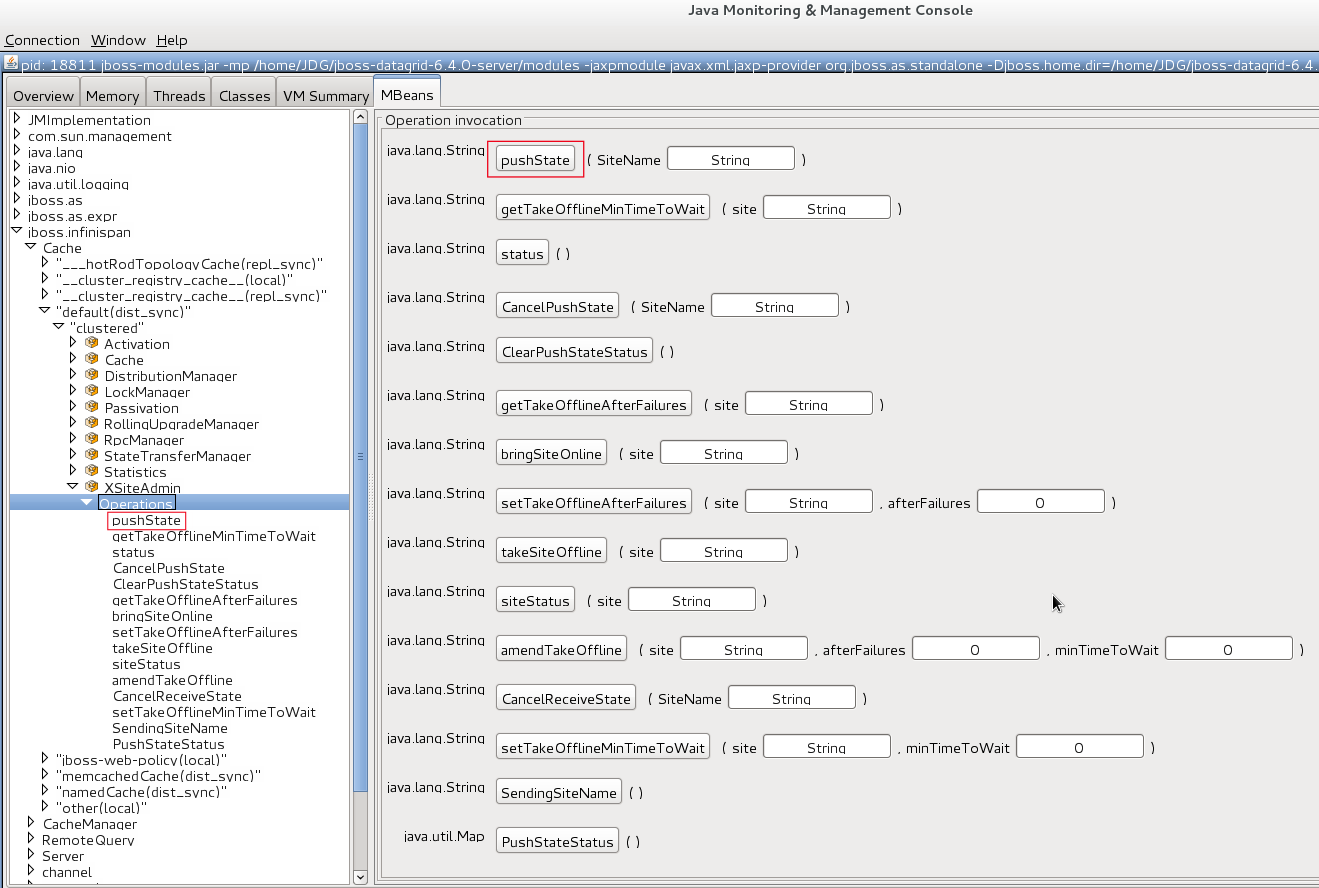
Figure 31.2. PushState Operation
site push sitename command. For example, when the master site is brought back online, the system administrator invokes the state transfer operation in the backup site, specifying the master site name that is to receive the state.
Note
31.4.1. Active-Passive State Transfer
- Boot the Red Hat JBoss Data Grid cluster in the master site.
- Command the backup site to push state to the master site.
- Wait until the state transfer is complete.
- Make the clients aware that the master site is available to process the requests.
31.4.2. Active-Active State Transfer
Warning
Note
- Boot the Red Hat JBoss Data Grid cluster in the new site.
- Command the running site to push state to the new site.
- Make the clients aware that the new site is available to process the requests.
31.4.3. State Transfer Configuration
<backups>
  <backup site="NYC"
	  strategy="SYNC"
	  failure-policy="FAIL">
    <state-transfer chunk-size="512"
		    timeout="1200000"
		    max-retries="30"
		    wait-time="2000" />
	</backup>
</backups>31.5. Hot Rod Cross Site Cluster Failover
If the main/primary cluster nodes are unavailable, the client application checks for alternatively defined clusters and will attempt to failover to them. Upon successful failover, the client will remain connected to the alternative cluster until it becomes unavailable. After that, the client will try to failover to other defined clusters and finally switch over to the main/primary cluster with the original server settings if the connectivity is restored.
Example 31.5. Configure Alternate Cluster
org.infinispan.client.hotrod.configuration.ConfigurationBuilder cb
      = new org.infinispan.client.hotrod.configuration.ConfigurationBuilder();
cb.addCluster("remote-cluster").addClusterNode("remote-cluster-host", 11222);
RemoteCacheManager rcm = new RemoteCacheManager(cb.build());
Note
For manual site cluster switchover, call RemoteCacheManager’s switchToCluster(clusterName) or switchToDefaultCluster().
switchToCluster(clusterName), users can force a client to switch to one of the clusters pre-defined in the Hot Rod client configuration. To switch to the initial servers defined in the client configuration, call switchToDefaultCluster().
31.6. Configure Multiple Site Masters
31.6.1. Multiple Site Master Operations
31.6.2. Configure Multiple Site Masters (Remote Client-Server Mode)
Configure Cross-Datacenter Replication for Red Hat JBoss Data Grid's Remote Client-Server Mode.
Procedure 31.4. Set Multiple Site Masters in Remote Client-Server Mode
<relay site="LON">
	<remote-site name="NYC" stack="tcp" cluster="global"/>
	<remote-site name="SFO" stack="tcp" cluster="global"/>
	<property name="relay_multicasts">false</property>
	<property name="max_site_masters">16</property>
	<property name="can_become_site_master">true</property>
</relay>
Locate the Target Configuration
Locate the target site's configuration in theclustered-xsite.xmlexample configuration file. The sample configuration looks like example provided above.Configure Maximum Sites
Use themax_site_mastersproperty to determine the maximum number of master nodes within the site. Set this value to the number of nodes in the site to make every node a master.Configure Site Master
Use thecan_become_site_masterproperty to allow the node to become the site master. This flag is set totrueas a default. Setting this flag tofalseprevents the node from becoming a site master. This is required in situations where the node does not have a network interface connected to the external network.
31.6.3. Configure Multiple Site Masters (Library Mode)
Procedure 31.5. Configure Multiple Site Masters (Library Mode)
Configure Cross-Datacenter Replication
Configure Cross-Datacenter Replication in JBoss Data Grid. Use the instructions in Section 31.2.2.1, “Configure Cross-Datacenter Replication Declaratively” for an XML configuration or the instructions in Section 31.2.2.2, “Configure Cross-Datacenter Replication Programmatically” for a programmatic configuration.Add the Contents of the Configuration File
Add thecan_become_site_masterandmax_site_mastersparameters to the configuration as follows:<config> <!-- Additional configuration information here --> <relay.RELAY2 site="LON" config="relay.xml" relay_multicasts="false" can_become_site_master="true" max_site_masters="16"/> </config>Set themax_site_mastersvalue to the number of nodes in the cluster to make all nodes masters.
Chapter 32. Externalize Sessions
32.1. Externalize HTTP Session from JBoss EAP 6.4 and later to JBoss Data Grid
Note
Note
Procedure 32.1. Externalize HTTP Sessions
- Ensure the remote cache containers are defined in EAP's
infinispansubsystem; in the example below thecacheattribute in theremote-storeelement defines the cache name on the remote JBoss Data Grid server:<subsystem xmlns="urn:jboss:domain:infinispan:1.5"> [...] <cache-container name="cacheContainer" default-cache="default-cache" module="org.jboss.as.clustering.web.infinispan" statistics-enabled="true"> <transport lock-timeout="60000"/> <replicated-cache name="default-cache" mode="SYNC" batching="true"> <remote-store cache="default" socket-timeout="60000" preload="true" passivation="false" purge="false" shared="true"> <remote-server outbound-socket-binding="remote-jdg-server1"/> <remote-server outbound-socket-binding="remote-jdg-server2"/> </remote-store> </replicated-cache> </cache-container> </subsystem> - Define the location of the remote Red Hat JBoss Data Grid server by adding the networking information to the
socket-binding-group:<socket-binding-group ...> <outbound-socket-binding name="remote-jdg-server1"> <remote-destination host="JDGHostName1" port="11222"/> </outbound-socket-binding> <outbound-socket-binding name="remote-jdg-server2"> <remote-destination host="JDGHostName2" port="11222"/> </outbound-socket-binding> </socket-binding-group> - Repeat the above steps for each cache-container and each Red Hat JBoss Data Grid server. Each server defined must have a separate
<outbound-socket-binding>element defined. - Add passivation and cache information into the application's
jboss-web.xml. In the following examplecacheContaineris the name of the cache container, anddefault-cacheis the name of the default cache located in this container. An example file is shown below:<?xml version="1.0" encoding="UTF-8"?> <jboss-web version="6.0" xmlns="http://www.jboss.com/xml/ns/javaee" xmlns:xsi="http://www.w3.org/2001/XMLSchema-instance" xsi:schemaLocation="http://www.jboss.com/xml/ns/javaee http://www.jboss.org/j2ee/schema/jboss-web_6_0.xsd"> <replication-config> <replication-trigger>SET</replication-trigger> <replication-granularity>SESSION</replication-granularity> <cache-name>cacheContainer.default-cache</cache-name> </replication-config> <passivation-config> <use-session-passivation>true</use-session-passivation> <passivation-min-idle-time>900</passivation-min-idle-time> <passivation-max-idle-time>1800</passivation-max-idle-time> </passivation-config> </jboss-web>Note
The passivation timeouts above are provided assuming that a typical session is abandoned within 15 minutes and uses the default HTTP session timeout in JBoss EAP of 30 minutes. These values may need to be adjusted based on each application's workload.
Chapter 33. Data Interoperability
33.1. Protocol Interoperability
The compatibility element's marshaller parameter may be set to a custom marshaler to enable compatibility conversions. An example of this is found below:
Example 33.1. Compatibility Mode Enabled
<cache-container name="local" default-cache="default" statistics="true">
    <local-cache name="default" start="EAGER" statistics="true">
        <compatibility marshaller="com.example.CustomMarshaller"/>
    </local-cache>
</cache-container>Chapter 34. Handling Network Partitions (Split Brain)
numOwners configuration attribute, which specifies the number of replicas for each cache entry in the cache. As a result, as long as the number of nodes that have failed are less than the value of numOwners, JBoss Data Grid retains a copy of the lost data and can recover.
Note
numOwners is always equal to the number of nodes in the cache, because each node contains a copy of every data item in the cache in this mode.
numOwners can disappear from the cache. Two common reasons for this are:
- Split-Brain: Usually, as the result of a router crash, the cache is divided into two or more partitions. Each of the partitions operates independently of the other and each may contain different versions of the same data.
- Sucessive Crashed Nodes: A number of nodes greater than the value of
numOwnerscrashes in succession for any reason. JBoss Data Grid is unable to properly balance the state between crashes, and the result is partial data loss.
34.1. Detecting and Recovering from a Split-Brain Problem
- At least one segment has lost all its owners, which means that a number of nodes equal to or greater than the value of
numOwnershave left the JGroups view. - The partition does not contain a majority of nodes (greater than half) of the nodes from the latest stable topology. The stable topology is updated each time a rebalance operation successfully concludes and the coordinator determines that additional rebalancing is not required.
AvailabilityException.
Note
Warning
- Transactional writes that were in progress at t1 when the split physically occurred may be rolled back on some of the owners. This can result in inconsistency between the copies (after the partitions rejoin) of an entry that is affected by such a write. However, transactional writes that started after t1 will fail as expected.
- If the write is non-transactional, then during this time window, a value written only in a minor partition (due to physical split and because the partition has not yet been Degraded) can be lost when partitions rejoin, if this minor partition receives state from a primary (Available) partition upon rejoin. If the partition does not receive state upon rejoin (i.e. all partitions are degraded), then the value is not lost, but an inconsistency can remain.
- There is also a possibility of a stale read in a minor partition during this transition period, as an entry is still Available until the minor partition enters Degraded state.
- If one of the partitions was Available during the network partition, then the joining partition(s) are wiped out and state transfer occurs from the Available (primary) partition to the joining nodes.
- If all joining partitions were Degraded during the Split Brain, then no state transfer occurs during the merge. The combined cache is then Available only if the merging partitions contain a simple majority of the members in the latest stable topology (one with the highest topology ID) and has at least an owner for each segment (i.e. keys are not lost).
Warning
34.2. Split Brain Timing: Detecting a Split
FD_ALL protocol a given node becomes suspected after the following amount of milliseconds have passed:
FD_ALL.timeout+FD_ALL.interval+VERIFY_SUSPECT.timeout+GMS.view_ack_collection_timeout
Important
34.3. Split Brain Timing: Recovering From a Split
3.1 * MERGE3.max_interval
10 * MERGE3.max_interval
Important
34.4. Detecting and Recovering from Successive Crashed Nodes
numOwners is greater than 1, the cluster remains available and JBoss Data Grid attempts to create new replicas of the lost data. However, if additional nodes crash during this rebalancing process, it is possible that for some entries, all copies of its data have left the node and therefore cannot be recovered.
numOwners to ensure that even if a large number of nodes leave the cluster in rapid succession, JBoss Data Grid is able to rebalance the nodes to recover the lost data.
34.5. Network Partition Recovery Examples
- A distributed four node cluster with
numOwnersset to 3 at Section 34.5.1, “Distributed 4-Node Cache Example With 3 NumOwners” - A distributed four node cluster with
numOwnersset to 2 at Section 34.5.2, “Distributed 4-Node Cache Example With 2 NumOwners” - A distributed five node cluster with
numOwnersset to 3 at Section 34.5.3, “Distributed 5-Node Cache Example With 3 NumOwners” - A replicated four node cluster with
numOwnersset to 4 at Section 34.5.4, “Replicated 4-Node Cache Example With 4 NumOwners” - A replicated five node cluster with
numOwnersset to 5 at Section 34.5.5, “Replicated 5-Node Cache Example With 5 NumOwners” - A replicated eight node cluster with
numOwnersset to 8 at Section 34.5.6, “Replicated 8-Node Cache Example With 8 NumOwners”
34.5.1. Distributed 4-Node Cache Example With 3 NumOwners
k1, k2, k3, and k4). For this cache, numOwners equals 3, which means that each data entry must have three copies on various nodes in the cache.
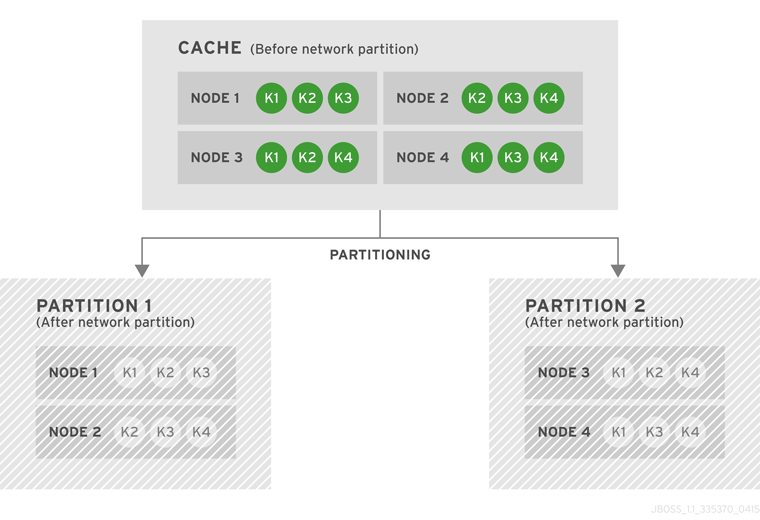
Figure 34.1. Cache Before and After a Network Partition
numOwners) nodes left from the last stable view. As a result, none of the four entries (k1, k2, k3, and k4) are available for reads or writes. No new entries can be written in either degraded partition, as neither partition can store 3 copies of an entry.
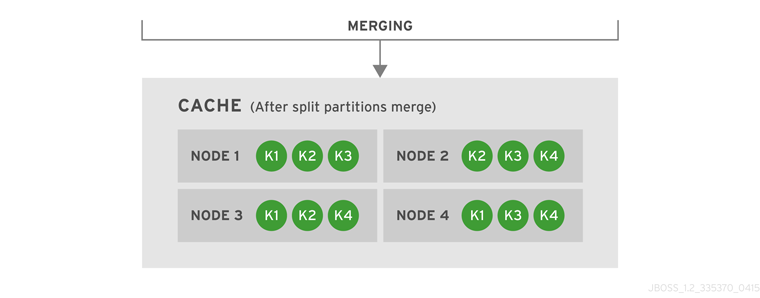
Figure 34.2. Cache After Partitions Are Merged
k1, k2, k3, and k4).
34.5.2. Distributed 4-Node Cache Example With 2 NumOwners
numOwners equals 2, so the four data entries (k1, k2, k3 and k4) have two copies each in the cache.
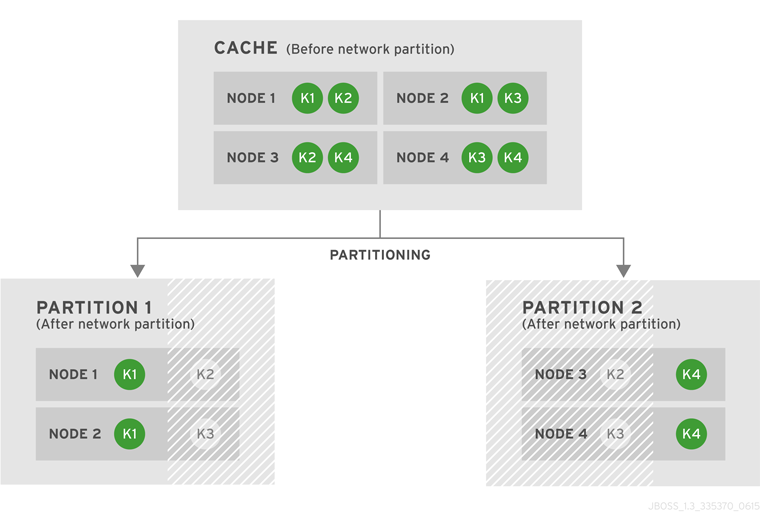
Figure 34.3. Cache Before and After a Network Partition
k1 is available for reads and writes because numOwners equals 2 and both copies of the entry remain in Partition 1. In Partition 2, k4 is available for reads and writes for the same reason. The entries k2 and k3 become unavailable in both partitions, as neither partition contains all copies of these entries. A new entry k5 can be written to a partition only if that partition were to own both copies of k5.
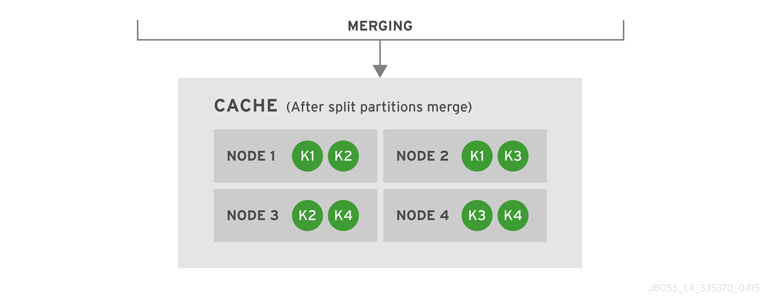
Figure 34.4. Cache After Partitions Are Merged
k1, k2, k3 and k4).
34.5.3. Distributed 5-Node Cache Example With 3 NumOwners
numOwners equal to 3.
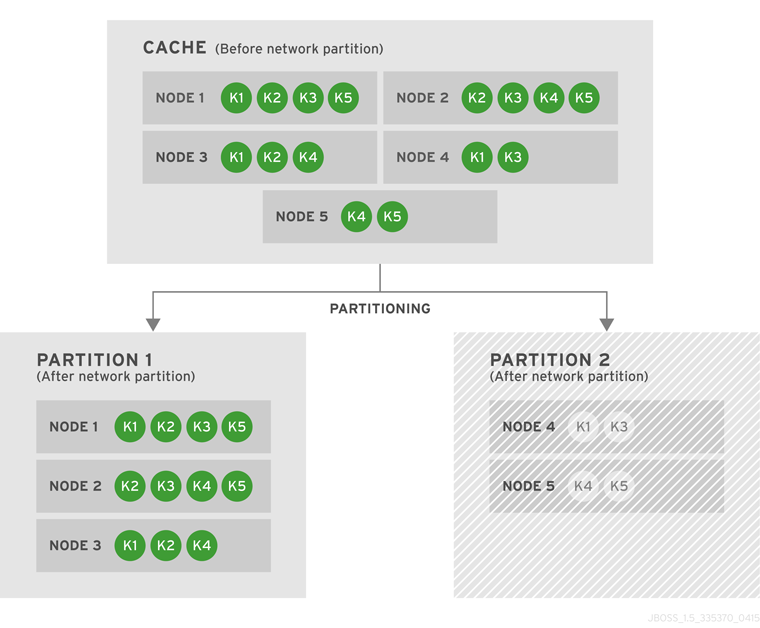
Figure 34.5. Cache Before and After a Network Partition
numOwners nodes.
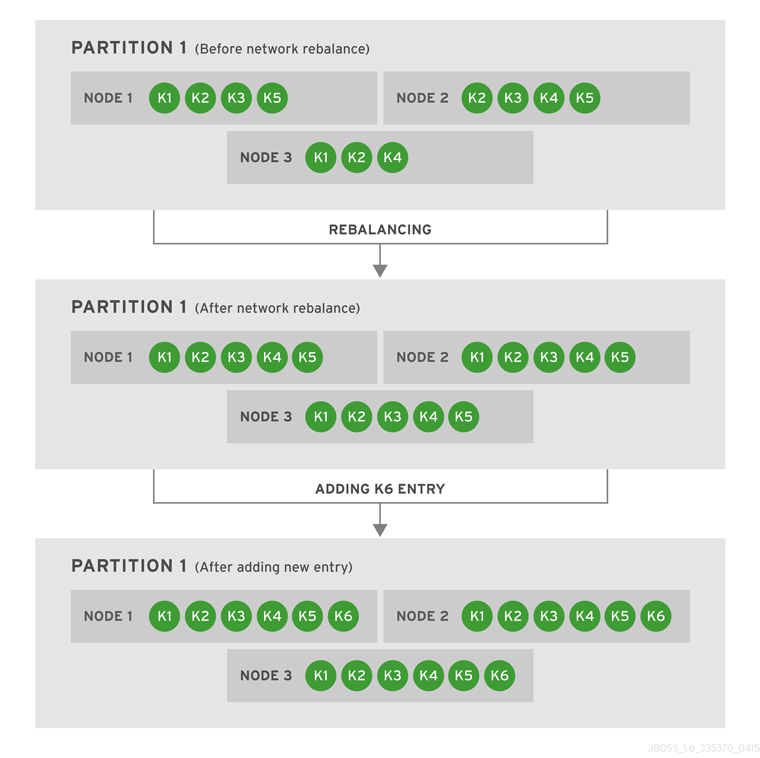
Figure 34.6. Partition 1 Rebalances and Another Entry is Added
numOwners equals 3) in the cache. As a result, each of the three nodes contains a copy of every entry in the cache. Next, we add a new entry, k6, to the cache. Since the numOwners value is still 3, and there are three nodes in Partition 1, each node includes a copy of k6.
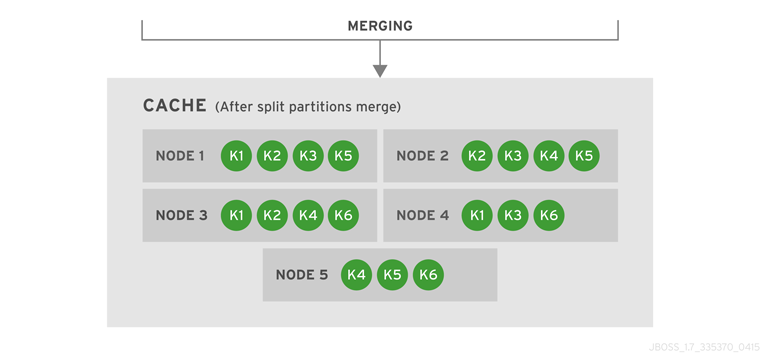
Figure 34.7. Cache After Partitions Are Merged
numOwners=3), JBoss Data Grid rebalances the nodes so that the data entries are distributed between the four nodes in the cache. The new combined cache becomes fully available.
34.5.4. Replicated 4-Node Cache Example With 4 NumOwners
numOwners equal to 4.

Figure 34.8. Cache Before and After a Network Partition
k1, k2, k3, and k4 are unavailable for reads and writes because neither of the two partitions owns all copies of any of the four keys.
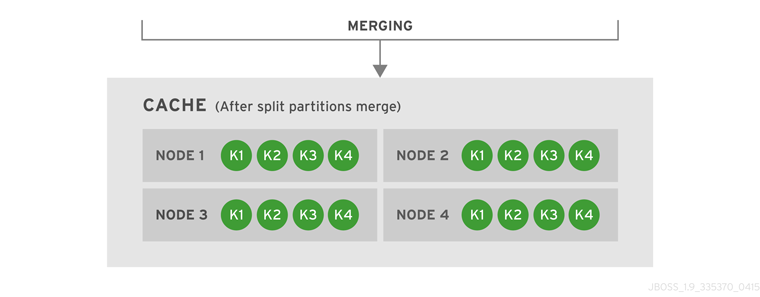
Figure 34.9. Cache After Partitions Are Merged
k1, k2, k3, and k4).
34.5.5. Replicated 5-Node Cache Example With 5 NumOwners
numOwners equal to 5.
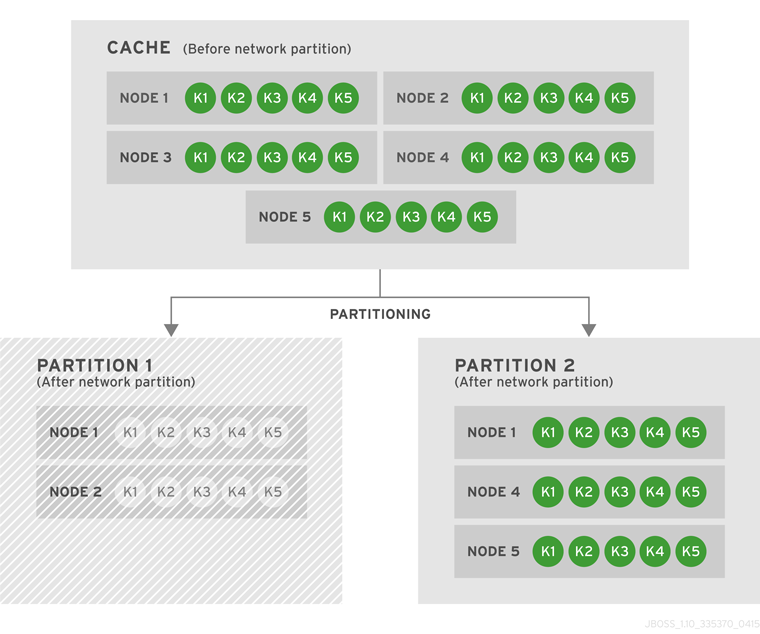
Figure 34.10. Cache Before and After a Network Partition
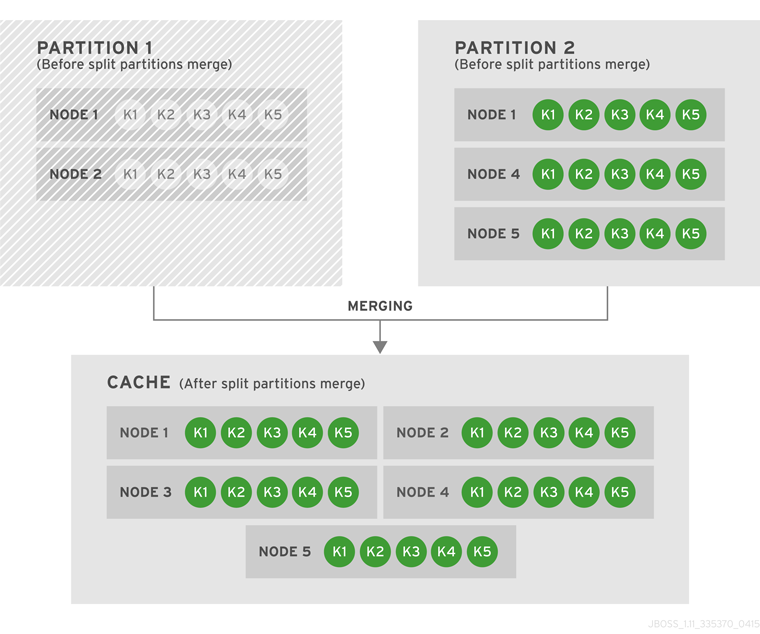
Figure 34.11. Both Partitions Are Merged Into One Cache
34.5.6. Replicated 8-Node Cache Example With 8 NumOwners
numOwners equal to 8.
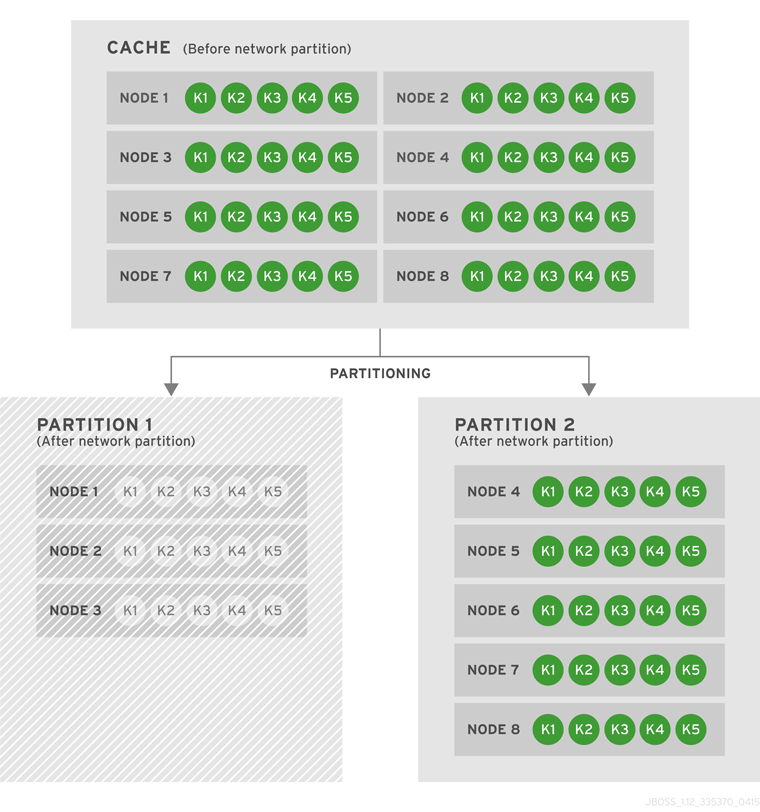
Figure 34.12. Cache Before and After a Network Partition

Figure 34.13. Partition 2 Further Splits into Partitions 2A and 2B
There are four potential resolutions for the caches from this scenario:
- Case 1: Partitions 2A and 2B Merge
- Case 2: Partition 1 and 2A Merge
- Case 3: Partition 1 and 2B Merge
- Case 4: Partition 1, Partition 2A, and Partition 2B Merge Together
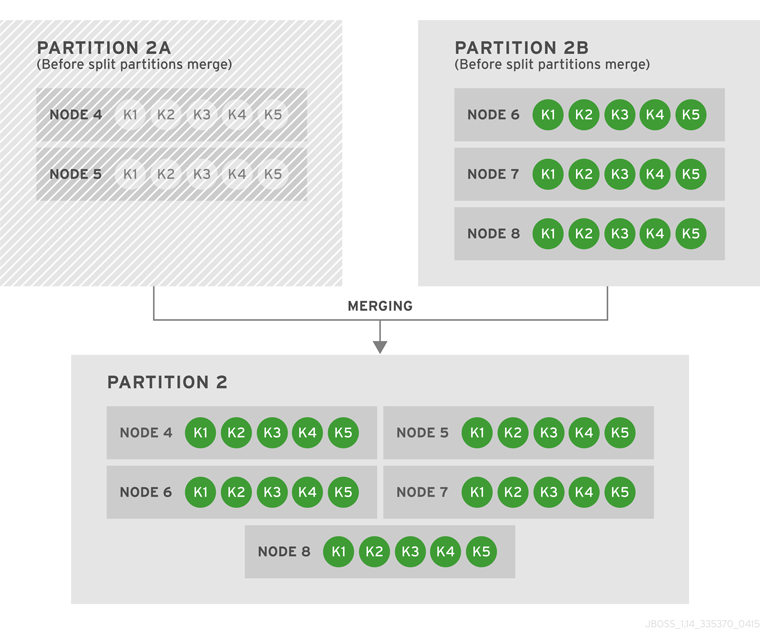
Figure 34.14. Case 1: Partitions 2A and 2B Merge
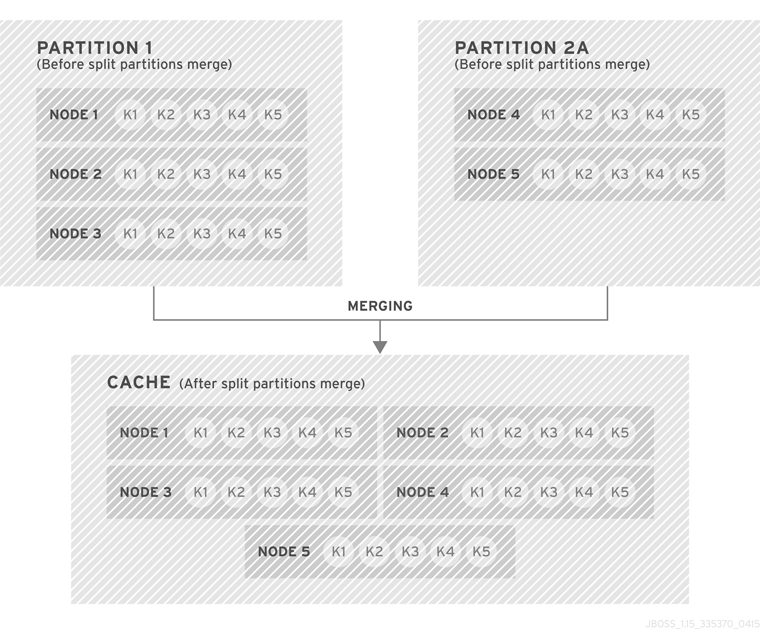
Figure 34.15. Case 2: Partition 1 and 2A Merge
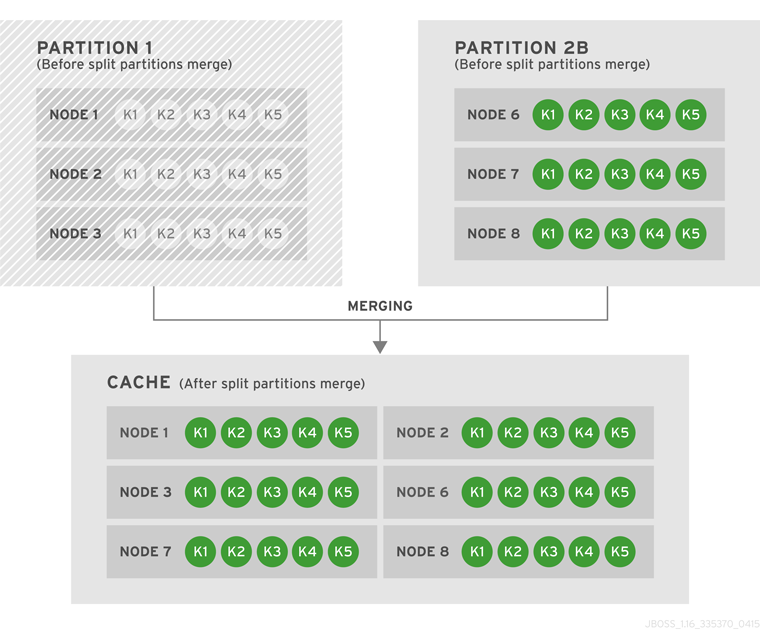
Figure 34.16. Case 3: Partition 1 and 2B Merge
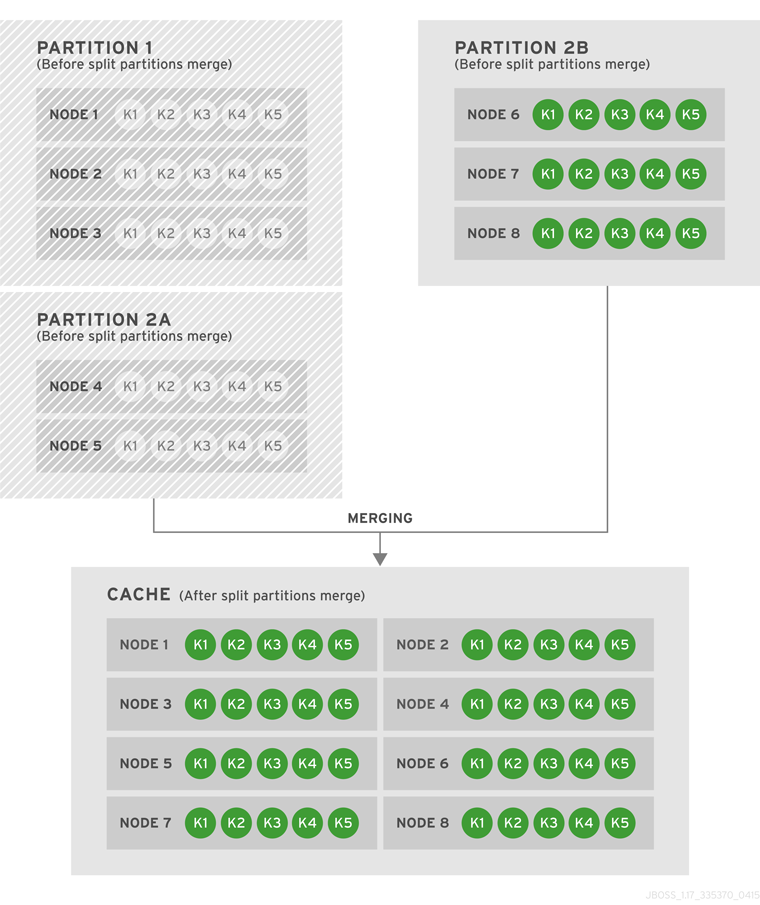
Figure 34.17. Case 4: Partition 1, Partition 2A, and Partition 2B Merge Together
34.6. Configure Partition Handling
Enable partition handling declaratively as follows:
<namedCache name="myCache">
  <clustering mode="distribution">
    <partitionHandling enabled="true" />
  </clustering>
</namedCache>Enable partition handling programmatically as follows:
ConfigurationBuilder dcc = new ConfigurationBuilder();
dcc.clustering().partitionHandling().enabled(true);
Enable partition handling declaratively in remote client-server mode by using the following configuration:
<subsystem xmlns="urn:infinispan:server:core:6.2" default-cache-container="clustered">
    <cache-container name="clustered" default-cache="default" statistics="true">
        <distributed-cache name="default" mode="SYNC" segments="20" owners="2"
                           remote-timeout="30000" start="EAGER">
            <partition-handling enabled="true" />
            <locking isolation="READ_COMMITTED" acquire-timeout="30000"
                     concurrency-level="1000" striping="false"/>
            <transaction mode="NONE"/>
        </distributed-cache>
    </cache-container>
</subsystem>Appendix A. Recommended JGroups Values for JBoss Data Grid
A.1. Supported JGroups Protocols
Table A.1. Supported JGroups Protocols
| Protocol | Details |
|---|---|
| TCP |
TCP/IP is a replacement transport for UDP in situations where IP multicast cannot be used, such as operations over a WAN where routers may discard IP multicast packets.
TCP is a transport protocol used to send unicast and multicast messages.
As IP multicasting cannot be used to discover initial members, another mechanism must be used to find initial membership.
Red Hat JBoss Data Grid's Hot Rod is a custom TCP client/server protocol.
|
| UDP |
UDP is a transport protocol that uses:
When the UDP transport is started, it opens a unicast socket and a multicast socket. The unicast socket is used to send and receive unicast messages, the multicast socket sends and receives multicast sockets. The physical address of the channel with be the same as the address and port number of the unicast socket.
|
| PING |
The PING protocol is used for the initial discovery of members. It is used to detect the coordinator, which is the oldest member, by multicasting PING requests to an IP multicast address.
Each member responds to the ping with a packet containing the coordinator's and their own address. After a specified number of milliseconds (N) or replies (M), the joiner determines the coordinator from the responses and sends it a JOIN request (handled by GMS). If there is no response, the joiner is considered the first member of the group.
PING differs from TCPPING because it used dynamic discovery, which means that a member does not need to know in advance where the other cluster members are. PING uses the transport's IP multicasting abilities to send a discovery request to the cluster. As a result, PING requires UDP as transport.
|
| TCPPING | The TCCPING protocol uses a set of known members and pings them for discovery. This protocol has a static configuration. |
| MPING | The MPING (Multicast PING) protocol uses IP multicast to discover the initial membership. It can be used with all transports, but is usually used in combination with TCP. |
| S3_PING |
S3_PING is a discovery protocol that is ideal for use with Amazon's Elastic Compute Cloud (EC2) because EC2 does not allow multicast and therefore MPING is not allowed.
Each EC2 instance adds a small file to an S3 data container, known as a bucket. Each instance then reads the files in the bucket to discover the other members of the cluster.
|
| JDBC_PING |
JDBC_PING is a discovery protocol that utilizes a shared database to store information regarding nodes in the cluster.
|
| TCPGOSSIP |
TCPGOSSIP is a discovery protocol that uses one or more configured GossipRouter processes to store information about the nodes in the cluster.
|
| MERGE3 | The MERGE3 protocol is available in JGroups 3.1 onwards. Unlike MERGE2, in MERGE3, all members periodically send an INFO message with their address (UUID), logical name, physical address and View ID. Periodically, each coordinator reviews the INFO details to ensure that there are no inconsistencies. |
| FD_ALL | Used for failure detection, FD_ALL uses a simple heartbeat protocol. Each member maintains a table of all other members (except itself) and periodically multicasts a heartbeat. For example, when data or a heartbeat from P is received, the timestamp for P is set to the current time. Periodically, expired members are identified using the timestamp values. |
| FD_SOCK | FD_SOCK is a failure detection protocol based on a ring of TCP sockets created between cluster members. Each cluster member connects to its neighbor (the last member connects to the first member), which forms a ring. Member B is suspected when its neighbor A detects an abnormal closing of its TCP socket (usually due to node B crashing). However, if member B is leaving gracefully, it informs member A and does not become suspected when it does exit. |
| FD_HOST |
FD_HOST is a failure detection protocol that detects the crashing or hanging of entire hosts and suspects all cluster members of that host through ICMP ping messages or custom commands. FD_HOST does not detect the crashing or hanging of single members on the local hosts, but only checks whether all the other hosts in the cluster are live and available. It is therefore used in conjunction with other failure detection protocols such as FD_ALL and FD_SOCK. This protocol is typically used when multiple cluster members are running on the same physical box.
The FD_HOST protocol is supported on Windows for JBoss Data Grid. The
cmd parameter must be set to ping.exe and the ping count must be specified.
|
| VERIFY_SUSPECT | The VERIFY_SUSPECT protocol verifies whether a suspected member is dead by pinging the member before excluding it. If the member responds, the suspect message is discarded. |
| NAKACK2 |
The NAKACK2 protocol is a successor to the NAKACK protocol and was introduced in JGroups 3.1.
The NACKACK2 protocol is used for multicast messages and uses NAK. Each message is tagged with a sequence number. The receiver tracks the sequence numbers and delivers the messages in order. When a gap in the sequence numbers is detected, the receiver asks the sender to retransmit the missing message.
|
| UNICAST3 |
The UNICAST3 protocol provides reliable delivery (no message sent by a sender is lost because they are sent in a numbered sequence) and uses the FIFO (First In First Out) properties for point to point messages between a sender and a receiver.
UNICAST3 uses positive acks for retransmission. For example, sender A keeps sending message M until receiver B receives message M and returns an ack to indicate a successful delivery. Sender A keeps resending message M until it receives an ack from B, until B leaves the cluster, or A crashes.
|
| STABLE | The STABLE protocol is a garbage collector for messages that have been viewed by all members in a cluster. Each member stores all messages because retransmission may be required. A message can only be removed from the retransmission buffers when all members have seen the message. The STABLE protocol periodically gossips its highest and lowest messages seen. The lowest value is used to compute the min (all lowest sequence numbers for all members) and messages with a sequence number below the min value can be discarded |
| GMS | The GMS protocol is the group membership protocol. This protocol handles joins/leaves/crashes (suspicions) and emits new views accordingly. |
| MFC | MFC is the Multicast version of the flow control protocol. |
| UFC | UFC is the Unicast version of the flow control protocol. |
| FRAG2 | The FRAG2 protocol fragments large messages into smaller ones and then sends the smaller messages. At the receiver side, the smaller fragments are reassembled into larger, complete messages and delivered to the application. FRAG2 is used for both multicast and unicast messages. |
| ENCRYPT |
JGroups includes the ENCRYPT protocol to provide encryption for cluster traffic. By default, encryption only encrypts the message body; it does not encrypt message headers. To encrypt the entire message, including all headers, as well as destination and source addresses, the property encrypt_entire_messagemust be true. ENCRYPT must also be below any protocols with headers that must be encrypted.
The ENCRYPT layer is used to encrypt and decrypt communication in JGroups. The JGroups ENCRYPT protocol can be used in two ways:
Each message is identified as encrypted with a specific encryption header identifying the encrypt header and an MD5 digest identifying the version of the key being used to encrypt and decrypt messages.
|
| SASL | The SASL (Simple Authentication and Security Layer) protocol is a framework that provides authentication and data security services in connection-oriented protocols using replaceable mechanisms. Additionally, SASL provides a structured interface between protocols and mechanisms. |
| RELAY2 |
The RELAY protocol bridges two remote clusters by creating a connection between one node in each site. This allows multicast messages sent out in one site to be relayed to the other and vice versa.
JGroups includes the RELAY2 protocol, which is used for communication between sites in Red Hat JBoss Data Grid's Cross-Site Replication.
The RELAY2 protocol works similarly to RELAY but with slight differences. Unlike RELAY, the RELAY2 protocol:
|
A.2. TCP Default and Recommended Values
Note
- Values in
JGroups Default Valueindicate values that are configured internally to JGroups, but may be overridden by a custom configuration file or by a JGroups configuration file shipped with JBoss Data Grid. - Values in
JBoss Data Grid Configured Valuesindicate values that are in use by default when using one of the configuration files for JGroups as shipped with JBoss Data Grid. It is recommended to use these values when custom configuration files for JGroups are in use with JBoss Data Grid.
Table A.2. Recommended and Default Values for TCP
| Parameter | JGroups Default Value | JBoss Data Grid Configured Values |
|---|---|---|
| bind_addr | Any non-loopback | Set address on specific interface |
| bind_port | Any free port | Set specific port |
| loopback | true | Same as default |
| port_range | 50 | Set based on desired range of ports |
| recv_buf_size | 150,000 | Same as default |
| send_buf_size | 150,000 | 640,000 |
| use_send_queues | true | Same as default |
| sock_conn_timeout | 2,000 | 300 |
| max_bundle_size | 64,000 | 64,000 |
| enable_diagnostics | true | false |
| thread_pool.enabled | true | Same as default |
| thread_pool.min_threads | 2 | This should equal the number of nodes |
| thread_pool.max_threads | 30 | This should be higher than thread_pool.min_threads. For example, for a smaller grid (2-10 nodes), set this value to twice the number of nodes, but for a larger grid (20 or more nodes), the ratio should be lower. As an example, if a grid contains 20 nodes, set this value to 25 and if the grid contains 100 nodes, set the value to 110. |
| thread_pool.keep_alive_time | 30,000 | 60,000 |
| thread_pool.queue_enabled | true | false |
| thread_pool.queue_max_size | 500 | None, queue should be disabled |
| thread_pool.rejection_policy | Discard | Same as default |
| internal_thread_pool.enabled | true | Same as default |
| internal_thread_pool.min_threads | 2 | 5 |
| internal_thread_pool.max_threads | 4 | 20 |
| internal_thread_pool.keep_alive_time | 30,000 | 60,000 |
| internal_thread_pool.queue_enabled | true | false |
| internal_thread_pool.rejection_policy | Discard | Abort |
| oob_thread_pool.enabled | true | Same as default |
| oob_thread_pool.min_threads | 2 | 20 or higher |
| oob_thread_pool.max_threads | 10 | 200 or higher, depending on the load |
| oob_thread_pool.keep_alive_time | 30,000 | 60,000 |
| oob_thread_pool.queue_enabled | true | false |
| oob_thread_pool.queue_max_size | 500 | None, queue should be disabled |
| oob_thread_pool.rejection_policy | Discard | Same as default |
Note
pbcast.GMS join_timeout value indicates the timeout period instead.
See Section 27.2, “S3_PING Configuration Options” for details about configuring S3_PING for JBoss Data Grid.
See Section 29.3, “TCPGOSSIP Configuration Options” for details about configuring TCPGOSSIP for JBoss Data Grid.
Table A.3. Recommended Values for MPING
| Parameter | JGroups Default Value | JBoss Data Grid Configured Values |
|---|---|---|
| bind_addr | Any non-loopback | Set address on specific interface |
| break_on_coord_rsp | true | Same as default |
| mcast_addr | 230.5.6.7 | Same as default |
| mcast_port | 7555 | Same as default |
| ip_ttl | 8 | 2 |
Note
pbcast.GMS join_timeout value indicates the timeout period instead.
Table A.4. Recommended Values for MERGE3
| Parameter | JGroups Default Value | JBoss Data Grid Configured Values |
|---|---|---|
| min_interval | 1,000 | 10,000 |
| max_interval | 10,000 | 30,000 |
Table A.5. Recommended Values for FD_SOCK
| Parameter | JGroups Default Value | JBoss Data Grid Configured Values |
|---|---|---|
| client_bind_por | 0 (randomly selects a port and uses it) | Same as default |
| get_cache_timeout | 1000 milliseconds | Same as default |
| keep_alive | true | Same as default |
| num_tries | 3 | Same as default |
| start_port | 0 (randomly selects a port and uses it) | Same as default |
| suspect_msg_interval | 5000 milliseconds. | Same as default |
Table A.6. Recommended Values for FD_ALL
| Parameter | JGroups Default Value | JBoss Data Grid Configured Values |
|---|---|---|
| timeout | 40,000 | 60,000. The FD_ALL timeout value is set to two times the longest possible stop the world garbage collection pause in the CMS garbage collector. In a well-tuned JVM, the longest pause is proportional to heap size and should not exceed 1 second per GB of heap. For example, an 8GB heap should not have a pause longer than 8 seconds, so the FD_ALL timeout value must be set to 16 seconds. If longer garbage collection pauses are used, then this timeout value should be increased to avoid false failure detection on a node. |
| interval | 8,000 | 15,000. The FD_ALL interval value must be at least four times smaller than the value set for FD_ALL's timeout value. |
| timeout_check_interval | 2,000 | 5,000 |
Table A.7. Recommended Values for FD_HOST
| Parameter | JGroups Default Value | JBoss Data Grid Configured Values |
|---|---|---|
| check_timeout | 3,000 | 5,000 |
| cmd | InetAddress.isReachable() (ICMP ping) | - |
| interval | 20,000 | 15,000. The interval value for FD_HOST must be four times smaller than FD_HOST's timeout value. |
| timeout | 60,000 | 60,000. |
Table A.8. Recommended Values for VERIFY_SUSPECT
| Parameter | JGroups Default Value | JBoss Data Grid Configured Values |
|---|---|---|
| timeout | 2,000 | 5,000 |
Table A.9. Recommended Values for pbcast.NAKACK2
| Parameter | JGroups Default Value | JBoss Data Grid Configured Values |
|---|---|---|
| use_mcast_xmit | true | false |
| xmit_interval | 1,000 | Same as default |
| xmit_table_num_rows | 50 | 50 |
| xmit_table_msgs_per_row | 10,000 | 1,024 |
| xmit_table_max_compaction_time | 10,000 | 30,000 |
| max_msg_batch_size | 100 | Same as default |
| resend_last_seqno | false | true |
Table A.10. Recommended Values for UNICAST3
| Parameter | JGroups Default Value | JBoss Data Grid Configured Values |
|---|---|---|
| xmit_interval | 500 | Same as default |
| xmit_table_num_rows | 100 | 50 |
| xmit_table_msgs_per_row | 1,0000 | 1,024 |
| xmit_table_max_compaction_time | 600,000 | 30,000 |
| max_msg_batch_size | 500 | 100 |
| conn_close_timeout | 60,000 | No recommended value. |
| conn_expiry_timeout | 120,000 | 0 |
Table A.11. Recommended Values for pbcast.STABLE
| Parameter | JGroups Default Value | JBoss Data Grid Configured Values |
|---|---|---|
| stability_delay | 6,000 | 500 |
| desired_avg_gossip | 20,000 | 5,000 |
| max_bytes | 2,000,000 | 1,000,000 |
Table A.12. Recommended Values for pbcast.GMS
| Parameter | JGroups Default Value | JBoss Data Grid Configured Values |
|---|---|---|
| print_local_addr | true | false |
| join_timeout | 5,000 | 15,000 |
| view_bundling | true | Same as default |
Table A.13. Recommended Values for MFC
| Parameter | JGroups Default Value | JBoss Data Grid Configured Values |
|---|---|---|
| max_credits | 500,000 | 2,000,000 |
| min_threshold | 0.40 | Same as default |
Table A.14. Recommended Values for FRAG2
| Parameter | JGroups Default Value | JBoss Data Grid Configured Values |
|---|---|---|
| frag_size | 60,000 | Same as default |
Table A.15. Recommended Values for ENCRYPT
| Parameter | JGroups Default Value | JBoss Data Grid Configured Values |
|---|---|---|
| asymAlgorithm | RSA | - |
| asymInit | 512 | - |
| asymProvider | Bouncy Castle Provider | - |
| changeKeysOnViewChange | false | - |
| symAlgorithm | AES | - |
| symInit | 128 | - |
| symProvider | Bouncy Castle Provider | - |
Note
See the Red Hat JBoss Data Grid Developer Guide's User Authentication over Hot Rod Using SASL section for details.
See Chapter 31, Set Up Cross-Datacenter Replication for details.
A.3. UDP Default and Recommended Values
Note
- Values in
JGroups Default Valueindicate values that are configured internally to JGroups, but may be overridden by a custom configuration file or by a JGroups configuration file shipped with JBoss Data Grid. - Values in
JBoss Data Grid Configured Valuesindicate values that are in use by default when using one of the configuration files for JGroups as shipped with JBoss Data Grid. It is recommended to use these values when custom configuration files for JGroups are in use with JBoss Data Grid.
Table A.16. Recommended Values for UDP
| Parameter | JGroups Default Value | JBoss Data Grid Configured Values |
|---|---|---|
| bind_addr | Any non-loopback | Set address on specific interface |
| bind_port | Any free port | Set specific port |
| loopback | true | true |
| port_range | 50 | Set based on desired range of ports |
| mcast_addr | 228.8.8.8 | Same as default |
| mcast_port | 7600 | Same as default |
| tos | 8 | Same as default |
| ucast_recv_buf_size | 64,000 | 20,000,000 |
| ucast_send_buf_size | 100,000 | 1,000,000 |
| mcast_recv_buf_size | 500,000 | 25,000,000 |
| mcast_send_buf_size | 100,000 | 1,000,000 |
| ip_ttl | 8 | 2 |
| thread_naming_pattern | cl | pl |
| max_bundle_size | 64,000 | Same as default |
| enable_diagnostics | true | false |
| thread_pool.enabled | true | Same as default |
| thread_pool.min_threads | 2 | This should equal the number of nodes. |
| thread_pool.max_threads | 30 | This should be higher than thread_pool.min_threads. For example, for a smaller grid (2-10 nodes), set this value to twice the number of nodes, but for a larger grid (20 or more nodes), the ratio should be lower. As an example, if a grid contains 20 nodes, set this value to 25 and if the grid contains 100 nodes, set the value to 110. |
| thread_pool.keep_alive_time | 30,000 | 60,000 |
| thread_pool.queue_enabled | true | false |
| thread_pool.queue_max_size | 500 | None, queue should be disabled |
| thread_pool.rejection_policy | Discard | Same as default |
| internal_thread_pool.enabled | true | Same as default |
| internal_thread_pool.min_threads | 2 | 5 |
| internal_thread_pool.max_threads | 4 | 20 |
| internal_thread_pool.keep_alive_time | 30,000 | 60,000 |
| internal_thread_pool.queue_enabled | true | false |
| internal_thread_pool.rejection_policy | Discard | Abort |
| oob_thread_pool.enabled | true | Same as default |
| oob_thread_pool.min_threads | 2 | 20 or higher |
| oob_thread_pool.max_threads | 10 | 200 or higher based on the load |
| oob_thread_pool.keep_alive_time | 30,000 | 60,000 |
| oob_thread_pool.queue_enabled | true | false |
| oob_thread_pool.queue_max_size | 500 | None, queue should be disabled |
| oob_thread_pool.rejection_policy | Discard | Same as default |
Note
join_timeout value indicates the timeout period instead.
Table A.17. Recommended Values for MERGE3
| Parameter | JGroups Default Value | JBoss Data Grid Configured Values |
|---|---|---|
| min_interval | 1,000 | 10,000 |
| max_interval | 10,000 | 30,000 |
Table A.18. Recommended Values for FD_SOCK
| Parameter | JGroups Default Value | JBoss Data Grid Configured Values |
|---|---|---|
| client_bind_por | 0 (randomly selects a port and uses it) | Same as default |
| get_cache_timeout | 1000 milliseconds | Same as default |
| keep_alive | true | Same as default |
| num_tries | 3 | Same as default |
| start_port | 0 (randomly selects a port and uses it) | Same as default |
| suspect_msg_interval | 5000 milliseconds. | Same as default |
Table A.19. Recommended Values for FD_ALL
| Parameter | JGroups Default Value | JBoss Data Grid Configured Values |
|---|---|---|
| timeout | 40,000 | 60,000. The FD_ALL timeout value is set to two times the longest possible stop the world garbage collection pause in the CMS garbage collector. In a well-tuned JVM, the longest pause is proportional to heap size and should not exceed 1 second per GB of heap. For example, an 8GB heap should not have a pause longer than 8 seconds, so the FD_ALL timeout value must be set to 16 seconds. If longer garbage collection pauses are used, then this timeout value should be increased to avoid false failure detection on a node. |
| interval | 8,000 | 15,000. The FD_ALL interval value must be at least four times smaller than the value set for FD_ALL's timeout value. |
| timeout_check_interval | 2,000 | 5,000 |
Table A.20. Recommended Values for FD_HOST
| Parameter | JGroups Default Value | JBoss Data Grid Configured Values |
|---|---|---|
| check_timeout | 3,000 | 5,000 |
| cmd | InetAddress.isReachable() (ICMP ping) | - |
| interval | 20,000 | 15,000. The interval value for FD_HOST must be four times smaller than FD_HOST's timeout value. |
| timeout | - | 60,000. |
Table A.21. Recommended Values for VERIFY_SUSPECT
| Parameter | JGroups Default Value | JBoss Data Grid Configured Values |
|---|---|---|
| timeout | 2,000 | 5,000 |
Table A.22. Recommended Values for pbcast.NAKACK2
| Parameter | JGroups Default Value | JBoss Data Grid Configured Values |
|---|---|---|
| use_mcast_xmit | true | false |
| xmit_interval | 1,000 | Same as default |
| xmit_table_num_rows | 50 | 50 |
| xmit_table_msgs_per_row | 10,000 | 1,024 |
| xmit_table_max_compaction_time | 10,000 | 30,000 |
| max_msg_batch_size | 100 | Same as default |
| resend_last_seqno | false | true |
Table A.23. Recommended Values for UNICAST3
| Parameter | JGroups Default Value | JBoss Data Grid Configured Values |
|---|---|---|
| xmit_interval | 500 | Same as default |
| xmit_table_num_rows | 100 | 50 |
| xmit_table_msgs_per_row | 1,0000 | 1,024 |
| xmit_table_max_compaction_time | 600,000 | 30,000 |
| max_msg_batch_size | 500 | 100 |
| conn_close_timeout | 60,000 | No recommended value |
| conn_expiry_timeout | 120,000 | 0 |
Table A.24. Recommended Values for pbcast.STABLE
| Parameter | JGroups Default Value | JBoss Data Grid Configured Values |
|---|---|---|
| stability_delay | 6,000 | 500 |
| desired_avg_gossip | 20,000 | 5,000 |
| max_bytes | 2,000,000 | 1,000,000 |
Table A.25. Recommended Values for pbcast.GMS
| Parameter | JGroups Default Value | JBoss Data Grid Configured Values |
|---|---|---|
| print_local_addr | true | false |
| join_timeout | 5,000 | 15,000 |
| view_bundling | true | Same as default |
Table A.26. Recommended Values for UFC
| Parameter | JGroups Default Value | JBoss Data Grid Configured Values |
|---|---|---|
| max_credits | 500,000 | 2,000,000 |
| min_threshold | 0.40 | Same as default |
Table A.27. Recommended Values for MFC
| Parameter | JGroups Default Value | JBoss Data Grid Configured Values |
|---|---|---|
| max_credits | 500,000 | 2,000,000 |
| min_threshold | 0.40 | Same as default |
Table A.28. Recommended Values for FRAG2
| Parameter | JGroups Default Value | JBoss Data Grid Configured Values |
|---|---|---|
| frag_size | 60,000 | Same as default |
Table A.29. Recommended Values for ENCRYPT
| Parameter | JGroups Default Value | JBoss Data Grid Configured Values |
|---|---|---|
| asymAlgorithm | RSA | - |
| asymInit | 512 | - |
| asymProvider | Bouncy Castle Provider | - |
| changeKeysOnViewChange | false | - |
| symAlgorithm | AES | - |
| symInit | 128 | - |
| symProvider | Bouncy Castle Provider | - |
Note
See the Red Hat JBoss Data Grid Developer Guide's User Authentication over Hot Rod Using SASL section for details.
See Chapter 31, Set Up Cross-Datacenter Replication for details.
A.4. JBoss Data Grid JGroups Configuration Files
infinispan-embedded-${infinispan.version}.jar found with the Library mode distribution.
default-configs/default-jgroups-ec2.xmldefault-configs/default-jgroups-google.xmldefault-configs/default-jgroups-tcp.xmldefault-configs/default-jgroups-udp.xml
Appendix B. Connecting with JConsole
B.1. Connect to JDG via JConsole
Procedure B.1. Add Management User to JBoss Data Grid
- Navigate to the
bindirectorycd $JDG_HOME/bin
- Execute the
add-user.shscript../add-user.sh
- Accept the default option of
ManagementUserby pressing return. - Accept the default option of
ManagementRealmby pressing return. - Enter the desired username. In this example
jmxadminwill be used. - Enter and confirm the password.
- Accept the default option of no groups by pressing return.
- Confirm that the desired user will be added to the
ManagementRealmby enteringyes. - Enter
noas this user will not be used for connections between processes. - The following image shows an example execution run.
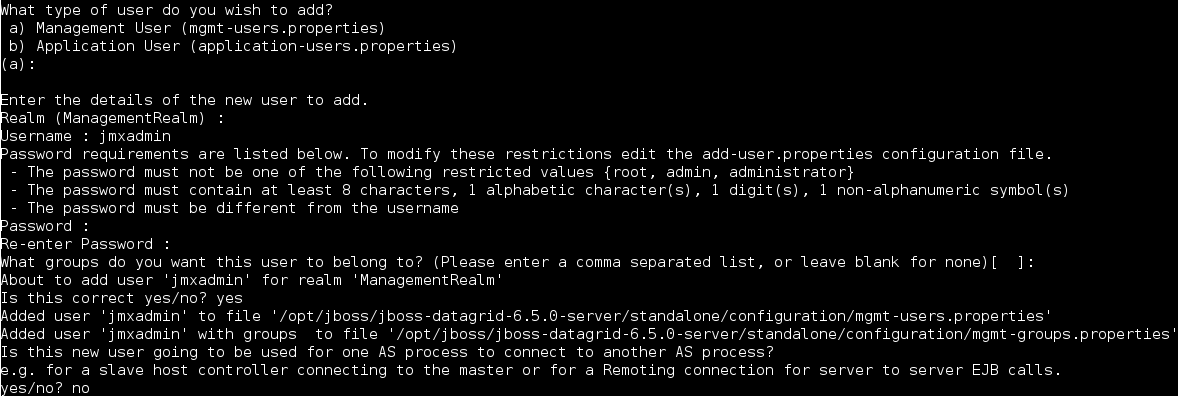
Figure B.1. Execution of add-user.sh
By default JBoss Data Grid will start with the management interface binding to 127.0.0.1. In order to connect remotely this interface must be bound to an IP address that is visible by the network. Either of the following options will correct this:
- Option 1: Runtime - By adjusting the
jboss.bind.address.managementproperty on startup a new IP address can be specified. In the following example JBoss Data Grid is starting with this bound to 192.168.122.5:./standalone.sh ... -Djboss.bind.address.management=192.168.122.5
- Option 2: Configuration - Adjust the
jboss.bind.address.managementin the configuration file. This is found in theinterfacessubsystem. A snippet of the configuration file, with the IP adjusted to 192.168.122.5, is provided below:<interfaces> <interface name="management"> <inet-address value="${jboss.bind.address.management:192.168.122.5}"/> </interface> [...] </interface>
A jconsole.sh script is provided in the $JDG_HOME/bin directory. Executing this script will launch JConsole.
Procedure B.2. Connecting to a remote JBoss Data Grid instance using JConsole
- Execute the
$JDG_HOME/bin/jconsole.shscript. This will result in the following window appearing: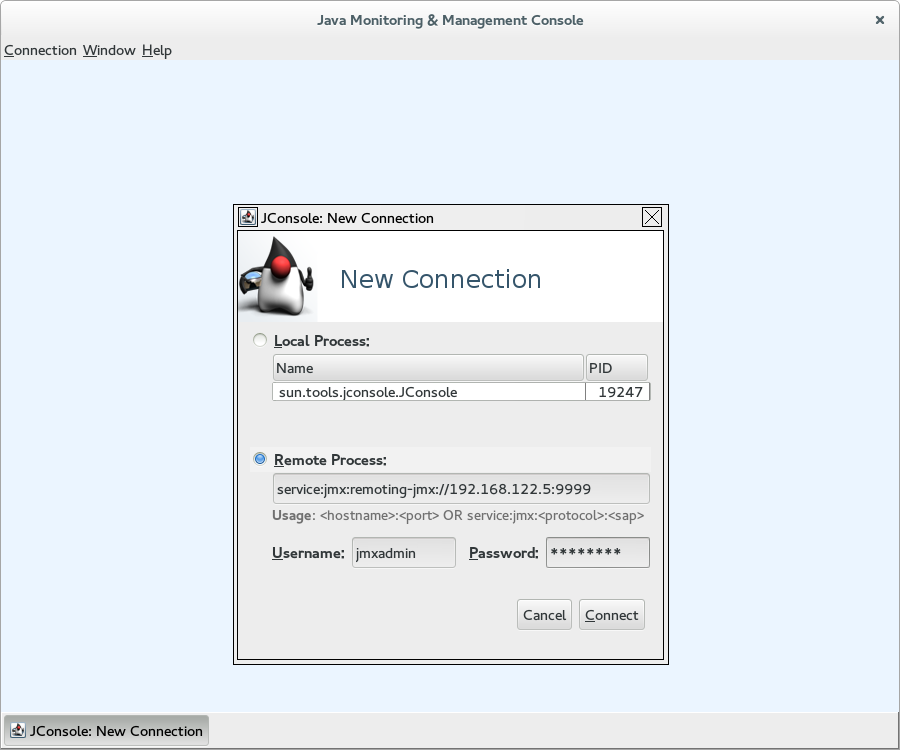
Figure B.2. JConsole
- Select
Remote Process. - Enter
service:jmx:remoting-jmx://$IP:9999in the text area. - Enter the username and password, created from the
add-user.shscript. - Click
Connectto initiate the connection. - Once connected ensure that the cache-related nodes may be viewed. The following screenshot shows such a node.

Figure B.3. JConsole: Showing a Cache
Appendix C. JMX MBeans in RedHat JBoss Data Grid
C.1. Activation
org.infinispan.eviction.ActivationManagerImpl
Table C.1. Attributes
| Name | Description | Type | Writable |
|---|---|---|---|
| activations | Number of activation events. | String | No |
| statisticsEnabled | Enables or disables the gathering of statistics by this component. | boolean | Yes |
Table C.2. Operations
| Name | Description | Signature |
|---|---|---|
| resetStatistics | Resets statistics gathered by this component. | void resetStatistics() |
C.2. Cache
org.infinispan.CacheImpl
Table C.3. Attributes
| Name | Description | Type | Writable |
|---|---|---|---|
| cacheName | Returns the cache name. | String | No |
| cacheStatus | Returns the cache status. | String | No |
| configurationAsProperties | Returns the cache configuration in form of properties. | Properties | No |
| version | Returns the version of Infinispan | String | No |
| cacheAvailability | Returns the cache availability | String | Yes |
Table C.4. Operations
| Name | Description | Signature |
|---|---|---|
| start | Starts the cache. | void start() |
| stop | Stops the cache. | void stop() |
| clear | Clears the cache. | void clear() |
C.3. CacheContainerStats
org.infinispan.stats.impl.CacheContainerStatsImpl
Table C.5. Attributes
| Name | Description | Type | Writable |
|---|---|---|---|
| averageReadTime | Cache container total average number of milliseconds for all read operations in this cache container. | long | No |
| averageRemoveTime | Cache container total average number of milliseconds for all remove operations in this cache container. | long | No |
| averageWriteTime | Cache container total average number of milliseconds for all write operations in this cache container. | long | No |
| evictions | Cache container total number of cache eviction operations. | long | No |
| hitRatio | Cache container total percentage hit/(hit+miss) ratio for this cache. | double | No |
| hits | Cache container total number of cache attribute hits. | long | No |
| misses | Cache container total number of cache attribute misses. | long | No |
| numberOfEntries | Cache container total number of entries currently in all caches from this cache container. | int | No |
| readWriteRatio | Cache container read/writes ratio in all caches from this cache container. | double | No |
| removeHits | Cache container total number of removal hits. | double | No |
| removeMisses | Cache container total number of cache removals where keys were not found. | long | No |
| statisticsEnabled | Enables or disables the gathering of statistics by this component. | boolean | Yes |
| stores | Cache container total number of cache attribute put operations. | long | No |
C.4. CacheLoader
org.infinispan.interceptors.CacheLoaderInterceptor
Table C.6. Attributes
| Name | Description | Type | Writable |
|---|---|---|---|
| cacheLoaderLoads | Number of entries loaded from the cache store. | long | No |
| cacheLoaderMisses | Number of entries that did not exist in cache store. | long | No |
| stores | Returns a collection of cache loader types which are configured and enabled. | Collection | No |
| statisticsEnabled | Enables or disables the gathering of statistics by this component. | boolean | Yes |
Table C.7. Operations
| Name | Description | Signature |
|---|---|---|
| disableStore | Disable all cache loaders of a given type, where type is a fully qualified class name of the cache loader to disable. | void disableStore(String storeType) |
| resetStatistics | Resets statistics gathered by this component. | void resetStatistics() |
C.5. CacheManager
org.infinispan.manager.DefaultCacheManager
Table C.8. Attributes
| Name | Description | Type | Writable |
|---|---|---|---|
| cacheManagerStatus | The status of the cache manager instance. | String | No |
| clusterMembers | Lists members in the cluster. | String | No |
| clusterName | Cluster name. | String | No |
| clusterSize | Size of the cluster in the number of nodes. | int | No |
| createdCacheCount | The total number of created caches, including the default cache. | String | No |
| definedCacheCount | The total number of defined caches, excluding the default cache. | String | No |
| definedCacheNames | The defined cache names and their statuses. The default cache is not included in this representation. | String | No |
| name | The name of this cache manager. | String | No |
| nodeAddress | The network address associated with this instance. | String | No |
| physicalAddresses | The physical network addresses associated with this instance. | String | No |
| runningCacheCount | The total number of running caches, including the default cache. | String | No |
| version | Infinispan version. | String | No |
| globalConfigurationAsProperties | Global configuration properties | Properties | No |
Table C.9. Operations
| Name | Description | Signature |
|---|---|---|
| startCache | Starts the default cache associated with this cache manager. | void startCache() |
| startCache | Starts a named cache from this cache manager. | void startCache (String p0) |
C.6. CacheStore
org.infinispan.interceptors.CacheWriterInterceptor
Table C.10. Attributes
| Name | Description | Type | Writable |
|---|---|---|---|
| writesToTheStores | Number of writes to the store. | long | No |
| statisticsEnabled | Enables or disables the gathering of statistics by this component. | boolean | Yes |
Table C.11. Operations
| Name | Description | Signature |
|---|---|---|
| resetStatistics | Resets statistics gathered by this component. | void resetStatistics() |
C.7. ClusterCacheStats
org.infinispan.stats.impl.ClusterCacheStatsImpl
Table C.12. Attributes
| Name | Description | Type | Writable |
|---|---|---|---|
| activations | The total number of activations in the cluster. | long | No |
| averageReadTime | Cluster wide total average number of milliseconds for a read operation on the cache. | long | No |
| averageRemoveTime | Cluster wide total average number of milliseconds for a remove operation in the cache. | long | No |
| averageWriteTime | Cluster wide average number of milliseconds for a write operation in the cache. | long | No |
| cacheLoaderLoads | The total number of cacheloader load operations in the cluster. | long | No |
| cacheLoaderMisses | The total number of cacheloader load misses in the cluster. | long | No |
| evictions | Cluster wide total number of cache eviction operations. | long | No |
| hitRatio | Cluster wide total percentage hit/(hit+miss) ratio for this cache. | double | No |
| hits | Cluster wide total number of cache hits. | long | No |
| invalidations | The total number of invalidations in the cluster. | long | No |
| misses | Cluster wide total number of cache attribute misses. | long | No |
| numberOfEntries | Cluster wide total number of entries currently in the cache. | int | No |
| numberOfLocksAvailable | Total number of exclusive locks available in the cluster. | int | No |
| numberOfLocksHeld | The total number of locks held in the cluster. | int | No |
| passivations | The total number of passivations in the cluster. | long | No |
| readWriteRatio | Cluster wide read/writes ratio for the cache. | double | No |
| removeHits | Cluster wide total number of cache removal hits. | double | No |
| removeMisses | Cluster wide total number of cache removals where keys were not found. | long | No |
| statisticsEnabled | Enables or disables the gathering of statistics by this component. | boolean | Yes |
| storeWrites | The total number of cachestore store operations in the cluster. | long | No |
| stores | Cluster wide total number of cache attribute put operations. | long | No |
| timeSinceStart | Number of seconds since the first cache node started. | long | No |
Table C.13. Operations
| Name | Description | Signature |
|---|---|---|
| setStaleStatsTreshold | Sets the threshold for cluster wide stats refresh (in milliseconds). | void setStaleStatsTreshold(long staleStatsThreshold) |
| resetStatistics | Resets statistics gathered by this component. | void resetStatistics() |
C.8. DeadlockDetectingLockManager
org.infinispan.util.concurrent.locks.DeadlockDetectingLockManager
Table C.14. Attributes
| Name | Description | Type | Writable |
|---|---|---|---|
| detectedLocalDeadlocks | Number of local transactions that were rolled back due to deadlocks. | long | No |
| detectedRemoteDeadlocks | Number of remote transactions that were rolled back due to deadlocks. | long | No |
| overlapWithNotDeadlockAwareLockOwners | Number of situations when we try to determine a deadlock and the other lock owner is NOT a transaction. In this scenario we cannot run the deadlock detection mechanism. | long | No |
| totalNumberOfDetectedDeadlocks | Total number of local detected deadlocks. | long | No |
| concurrencyLevel | The concurrency level that the MVCC Lock Manager has been configured with. | int | No |
| numberOfLocksAvailable | The number of exclusive locks that are available. | int | No |
| numberOfLocksHeld | The number of exclusive locks that are held. | int | No |
Table C.15. Operations
| Name | Description | Signature |
|---|---|---|
| resetStatistics | Resets statistics gathered by this component. | void resetStatistics() |
C.9. DistributionManager
org.infinispan.distribution.DistributionManagerImpl
Note
Table C.16. Operations
| Name | Description | Signature |
|---|---|---|
| isAffectedByRehash | Determines whether a given key is affected by an ongoing rehash. | boolean isAffectedByRehash(Object p0) |
| isLocatedLocally | Indicates whether a given key is local to this instance of the cache. Only works with String keys. | boolean isLocatedLocally(String p0) |
| locateKey | Locates an object in a cluster. Only works with String keys. | List locateKey(String p0) |
C.10. Interpreter
org.infinispan.cli.interpreter.Interpreter
Table C.17. Attributes
| Name | Description | Type | Writable |
|---|---|---|---|
| cacheNames | Retrieves a list of caches for the cache manager. | String[] | No |
Table C.18. Operations
| Name | Description | Signature |
|---|---|---|
| createSessionId | Creates a new interpreter session. | String createSessionId(String cacheName) |
| execute | Parses and executes IspnCliQL statements. | String execute(String p0, String p1) |
C.11. Invalidation
org.infinispan.interceptors.InvalidationInterceptor
Table C.19. Attributes
| Name | Description | Type | Writable |
|---|---|---|---|
| invalidations | Number of invalidations. | long | No |
| statisticsEnabled | Enables or disables the gathering of statistics by this component. | boolean | Yes |
Table C.20. Operations
| Name | Description | Signature |
|---|---|---|
| resetStatistics | Resets statistics gathered by this component. | void resetStatistics() |
C.12. LockManager
org.infinispan.util.concurrent.locks.LockManagerImpl
Table C.21. Attributes
| Name | Description | Type | Writable |
|---|---|---|---|
| concurrencyLevel | The concurrency level that the MVCC Lock Manager has been configured with. | int | No |
| numberOfLocksAvailable | The number of exclusive locks that are available. | int | No |
| numberOfLocksHeld | The number of exclusive locks that are held. | int | No |
C.13. LocalTopologyManager
org.infinispan.topology.LocalTopologyManagerImpl
Note
Table C.22. Attributes
| Name | Description | Type | Writable |
|---|---|---|---|
| rebalancingEnabled | If false, newly started nodes will not join the existing cluster nor will the state be transferred to them. If any of the current cluster members are stopped when rebalancing is disabled, the nodes will leave the cluster but the state will not be rebalanced among the remaining nodes. This will result in fewer copies than specified by the numOwners attribute until rebalancing is enabled again. | boolean | Yes |
| clusterAvailability | If AVAILABLE the node is currently operating regularly. If DEGRADED then data can not be safely accessed due to either a network split, or successive nodes leaving. | String | No |
C.14. MassIndexer
org.infinispan.query.MassIndexer
Table C.23. Operations
| Name | Description | Signature |
|---|---|---|
| start | Starts rebuilding the index. | void start() |
Note
C.15. Passivation
org.infinispan.eviction.PassivationManager
Table C.24. Attributes
| Name | Description | Type | Writable |
|---|---|---|---|
| passivations | Number of passivation events. | String | No |
| statisticsEnabled | Enables or disables the gathering of statistics by this component | boolean | Yes |
Table C.25. Operations
| Name | Description | Signature |
|---|---|---|
| resetStatistics | Resets statistics gathered by this component. | void resetStatistics() |
C.16. RecoveryAdmin
org.infinispan.transaction.xa.recovery.RecoveryAdminOperations
Table C.26. Operations
| Name | Description | Signature |
|---|---|---|
| forceCommit | Forces the commit of an in-doubt transaction. | String forceCommit(long p0) |
| forceCommit | Forces the commit of an in-doubt transaction | String forceCommit(int p0, byte[] p1, byte[] p2) |
| forceRollback | Forces the rollback of an in-doubt transaction. | String forceRollback(long p0) |
| forceRollback | Forces the rollback of an in-doubt transaction | String forceRollback(int p0, byte[] p1, byte[] p2) |
| forget | Removes recovery info for the given transaction. | String forget(long p0) |
| forget | Removes recovery info for the given transaction. | String forget(int p0, byte[] p1, byte[] p2) |
| showInDoubtTransactions | Shows all the prepared transactions for which the originating node crashed. | String showInDoubtTransactions() |
C.17. RollingUpgradeManager
org.infinispan.upgrade.RollingUpgradeManager
Table C.27. Operations
| Name | Description | Signature |
|---|---|---|
| disconnectSource | Disconnects the target cluster from the source cluster according to the specified migrator. | void disconnectSource(String p0) |
| recordKnownGlobalKeyset | Dumps the global known keyset to a well-known key for retrieval by the upgrade process. | void recordKnownGlobalKeyset() |
| synchronizeData | Synchronizes data from the old cluster to this using the specified migrator. | long synchronizeData(String p0) |
C.18. RpcManager
org.infinispan.remoting.rpc.RpcManagerImpl
Note
Table C.28. Attributes
| Name | Description | Type | Writable |
|---|---|---|---|
| averageReplicationTime | The average time spent in the transport layer, in milliseconds. | long | No |
| committedViewAsString | Retrieves the committed view. | String | No |
| pendingViewAsString | Retrieves the pending view. | String | No |
| replicationCount | Number of successful replications. | long | No |
| replicationFailures | Number of failed replications. | long | No |
| successRatio | Successful replications as a ratio of total replications. | String | No |
| successRatioFloatingPoint | Successful replications as a ratio of total replications in numeric double format. | double | No |
| statisticsEnabled | Enables or disables the gathering of statistics by this component. | boolean | Yes |
Table C.29. Operations
| Name | Description | Signature |
|---|---|---|
| resetStatistics | Resets statistics gathered by this component. | void resetStatistics() |
| setStatisticsEnabled | Whether statistics should be enabled or disabled (true/false) | void setStatisticsEnabled(boolean enabled) |
C.19. StateTransferManager
org.infinispan.statetransfer.StateTransferManager
Note
Table C.30. Attributes
| Name | Description | Type | Writable |
|---|---|---|---|
| joinComplete | If true, the node has successfully joined the grid and is considered to hold state. If false, the join process is still in progress.. | boolean | No |
| stateTransferInProgress | Checks whether there is a pending inbound state transfer on this cluster member. | boolean | No |
C.20. Statistics
org.infinispan.interceptors.CacheMgmtInterceptor
Table C.31. Attributes
| Name | Description | Type | Writable |
|---|---|---|---|
| averageReadTime | Average number of milliseconds for a read operation on the cache. | long | No |
| averageWriteTime | Average number of milliseconds for a write operation in the cache. | long | No |
| elapsedTime | Number of seconds since cache started. | long | No |
| evictions | Number of cache eviction operations. | long | No |
| hitRatio | Percentage hit/(hit+miss) ratio for the cache. | double | No |
| hits | Number of cache attribute hits. | long | No |
| misses | Number of cache attribute misses. | long | No |
| numberOfEntries | Number of entries currently in the cache. | int | No |
| readWriteRatio | Read/writes ratio for the cache. | double | No |
| removeHits | Number of cache removal hits. | long | No |
| removeMisses | Number of cache removals where keys were not found. | long | No |
| stores | Number of cache attribute PUT operations. | long | No |
| timeSinceReset | Number of seconds since the cache statistics were last reset. | long | No |
| averageRemoveTime | Average number of milliseconds for a remove operation in the cache | long | No |
Table C.32. Operations
| Name | Description | Signature |
|---|---|---|
| resetStatistics | Resets statistics gathered by this component. | void resetStatistics() |
C.21. Transactions
org.infinispan.interceptors.TxInterceptor
Table C.33. Attributes
| Name | Description | Type | Writable |
|---|---|---|---|
| commits | Number of transaction commits performed since last reset. | long | No |
| prepares | Number of transaction prepares performed since last reset. | long | No |
| rollbacks | Number of transaction rollbacks performed since last reset. | long | No |
| statisticsEnabled | Enables or disables the gathering of statistics by this component. | boolean | Yes |
Table C.34. Operations
| Name | Description | Signature |
|---|---|---|
| resetStatistics | Resets statistics gathered by this component. | void resetStatistics() |
C.22. Transport
org.infinispan.server.core.transport.NettyTransport
Table C.35. Attributes
| Name | Description | Type | Writable |
|---|---|---|---|
| hostName | Returns the host to which the transport binds. | String | No |
| idleTimeout | Returns the idle timeout. | String | No |
| numberOfGlobalConnections | Returns a count of active connections in the cluster. This operation will make remote calls to aggregate results, so latency may have an impact on the speed of calculation for this attribute. | Integer | false |
| numberOfLocalConnections | Returns a count of active connections this server. | Integer | No |
| numberWorkerThreads | Returns the number of worker threads. | String | No |
| port | Returns the port to which the transport binds. | String | |
| receiveBufferSize | Returns the receive buffer size. | String | No |
| sendBufferSize | Returns the send buffer size. | String | No |
| totalBytesRead | Returns the total number of bytes read by the server from clients, including both protocol and user information. | String | No |
| totalBytesWritten | Returns the total number of bytes written by the server back to clients, including both protocol and user information. | String | No |
| tcpNoDelay | Returns whether TCP no delay was configured or not. | String | No |
C.23. XSiteAdmin
org.infinispan.xsite.XSiteAdminOperations
Table C.36. Operations
| Name | Description | Signature |
|---|---|---|
| bringSiteOnline | Brings the given site back online on all the cluster. | String bringSiteOnline(String p0) |
| amendTakeOffline | Amends the values for 'TakeOffline' functionality on all the nodes in the cluster. | String amendTakeOffline(String p0, int p1, long p2) |
| getTakeOfflineAfterFailures | Returns the value of the 'afterFailures' for the 'TakeOffline' functionality. | String getTakeOfflineAfterFailures(String p0) |
| getTakeOfflineMinTimeToWait | Returns the value of the 'minTimeToWait' for the 'TakeOffline' functionality. | String getTakeOfflineMinTimeToWait(String p0) |
| setTakeOfflineAfterFailures | Amends the values for 'afterFailures' for the 'TakeOffline' functionality on all the nodes in the cluster. | String setTakeOfflineAfterFailures(String p0, int p1) |
| setTakeOfflineMinTimeToWait | Amends the values for 'minTimeToWait' for the 'TakeOffline' functionality on all the nodes in the cluster. | String setTakeOfflineMinTimeToWait(String p0, long p1) |
| siteStatus | Check whether the given backup site is offline or not. | String siteStatus(String p0) |
| status | Returns the status(offline/online) of all the configured backup sites. | String status() |
| takeSiteOffline | Takes this site offline in all nodes in the cluster. | String takeSiteOffline(String p0) |
| pushState | Starts the cross-site state transfer to the site name specified. | String pushState(String p0) |
| cancelPushState | Cancels the cross-site state transfer to the site name specified. | String cancelPushState(String p0) |
| getSendingSiteName | Returns the site name that is pushing state to this site. | String getSendingSiteName() |
| cancelReceiveState | Restores the site to the normal state. It is used when the link between the sites is broken during the state transfer. | String cancelReceiveState(String p0) |
| getPushStateStatus | Returns the status of completed and running cross-site state transfer. | String getPushStateStatus() |
| clearPushStateStatus | Clears the status of completed cross-site state transfer. | String clearPushStateStatus() |
Appendix D. Configuration Recommendations
D.1. Timeout Values
Table D.1. Timeout Value Recommendations for JBoss Data Grid
| Timeout Value | Parent Element | Default Value | Recommended Value |
|---|---|---|---|
| distributedSyncTimeout | transport | 240,000 (4 minutes) | Same as default |
| lockAcquisitionTimeout | locking | 10,000 (10 seconds) | Same as default |
| cacheStopTimeout | transaction | 30,000 (30 seconds) | Same as default |
| completedTxTimeout | transaction | 60,000 (60 seconds) | Same as default |
| replTimeout | sync | 15,000 (15 seconds) | Same as default |
| timeout | stateTransfer | 240,000 (4 minutes) | Same as default |
| timeout | backup | 10,000 (10 seconds) | Same as default |
| flushLockTimeout | async | 1 (1 millisecond) | Same as default. Note that this value applies to asynchronous cache stores, but not asynchronous caches. |
| shutdownTimeout | async | 25,000 (25 seconds) | Same as default. Note that this value applies to asynchronous cache stores, but not asynchronous caches. |
| pushStateTimeout | singletonStore | 10,000 (10 seconds) | Same as default. |
| backup | replicationTimeout | 10,000 (10 seconds) | |
| remoteCallTimeout | clusterLoader | 0 | For most requirements, same as default. This value is usually set to the same as the sync.replTimeout value. |
Appendix E. Performance Recommendations
E.1. Concurrent Startup for Large Clusters
- Start the first node in the cluster.
- Set JMX attribute
jboss.infinispan/CacheManager/"clustered"/LocalTopologyManager/rebalancingEnabledtofalse, as seen in Section C.13, “LocalTopologyManager”. - Start the remaining nodes in the cluster.
- Re-enable the JMX attribute
jboss.infinispan/CacheManager/"clustered"/LocalTopologyManager/rebalancingEnabledby setting this value back totrue, as seen in Section C.13, “LocalTopologyManager”.
Appendix F. References
F.1. About Consistency
F.2. About Consistency Guarantee
- If Key
Kis hashed to nodes{A,B}and transactionTX1acquires a lock forKon, for example, nodeAand - If another cache access occurs on node
B, or any other node, andTX2attempts to lockK, this access attempt fails with a timeout because the transactionTX1already holds a lock onK.
K is always deterministically acquired on the same node of the cluster, irrespective of the transaction's origin.
F.3. About JBoss Cache
F.4. About RELAY2
RELAY protocol bridges two remote clusters by creating a connection between one node in each site. This allows multicast messages sent out in one site to be relayed to the other and vice versa.
RELAY2 protocol, which is used for communication between sites in Red Hat JBoss Data Grid's Cross-Site Replication.
RELAY2 protocol works similarly to RELAY but with slight differences. Unlike RELAY, the RELAY2 protocol:
- connects more than two sites.
- connects sites that operate autonomously and are unaware of each other.
- offers both unicasts and multicast routing between sites.
F.5. About Return Values
F.6. About Runnable Interfaces
run() method, which executes the active part of the class' code. The Runnable object can be executed in its own thread after it is passed to a thread constructor.
F.7. About Two Phase Commit (2PC)
F.8. About Key-Value Pairs
- A key is unique to a particular data entry. It consists of entry data attributes from the related entry.
- A value is the data assigned to and identified by the key.
F.9. The Externalizer
F.9.1. About Externalizer
Externalizer is a class that can:
- Marshall a given object type to a byte array.
- Unmarshall the contents of a byte array into an instance of the object type.
F.9.2. Internal Externalizer Implementation Access
public static class ABCMarshallingExternalizer implements AdvancedExternalizer<ABCMarshalling> {
   @Override
   public void writeObject(ObjectOutput output, ABCMarshalling object) throws IOException {
      MapExternalizer ma = new MapExternalizer();
      ma.writeObject(output, object.getMap());
   }

   @Override
   public ABCMarshalling readObject(ObjectInput input) throws IOException, ClassNotFoundException {
      ABCMarshalling hi = new ABCMarshalling();
      MapExternalizer ma = new MapExternalizer();
      hi.setMap((ConcurrentHashMap<Long, Long>) ma.readObject(input));
      return hi;
   }
<!-- Additional configuration information here -->public static class ABCMarshallingExternalizer implements AdvancedExternalizer<ABCMarshalling> {
@Override
public void writeObject(ObjectOutput output, ABCMarshalling object) throws IOException {
output.writeObject(object.getMap());
}
@Override
public ABCMarshalling readObject(ObjectInput input) throws IOException, ClassNotFoundException {
ABCMarshalling hi = new ABCMarshalling();
hi.setMap((ConcurrentHashMap<Long, Long>) input.readObject());
return hi;
}
<!-- Additional configuration information here -->
}F.10. Hash Space Allocation
F.10.1. About Hash Space Allocation
F.10.2. Locating a Key in the Hash Space
F.10.3. Requesting a Full Byte Array
As a default, JBoss Data Grid only partially prints byte arrays to logs to avoid unnecessarily printing large byte arrays. This occurs when either:
- JBoss Data Grid caches are configured for lazy deserialization. Lazy deserialization is not available in JBoss Data Grid's Remote Client-Server mode.
- A
MemcachedorHot Rodserver is run.
-Dinfinispan.arrays.debug=true system property at start up.
Example F.1. Partial Byte Array Log
2010-04-14 15:46:09,342 TRACE [ReadCommittedEntry] (HotRodWorker-1-1) Updating entry
(key=CacheKey{data=ByteArray{size=19, hashCode=1b3278a,
array=[107, 45, 116, 101, 115, 116, 82, 101, 112, 108, ..]}}
removed=false valid=true changed=true created=true value=CacheValue{data=ByteArray{size=19,
array=[118, 45, 116, 101, 115, 116, 82, 101, 112, 108, ..]},
version=281483566645249}]
And here's a log message where the full byte array is shown:
2010-04-14 15:45:00,723 TRACE [ReadCommittedEntry] (Incoming-2,Infinispan-Cluster,eq-6834) Updating entry
(key=CacheKey{data=ByteArray{size=19, hashCode=6cc2a4,
array=[107, 45, 116, 101, 115, 116, 82, 101, 112, 108, 105, 99, 97, 116, 101, 100, 80, 117, 116]}}
removed=false valid=true changed=true created=true value=CacheValue{data=ByteArray{size=19,
array=[118, 45, 116, 101, 115, 116, 82, 101, 112, 108, 105, 99, 97, 116, 101, 100, 80, 117, 116]},
version=281483566645249}]Appendix G. Revision History
| Revision History | ||||||
|---|---|---|---|---|---|---|
| Revision 6.6.0-7 | Wed Jun 28 2017 | |||||
| ||||||
| Revision 6.6.0-6 | Thur May 25 2017 | |||||
| ||||||
| Revision 6.6.0-5 | Fri Apr 28 2017 | |||||
| ||||||
| Revision 6.6.0-4 | Wed Sep 7 2016 | |||||
| ||||||
| Revision 6.6.0-3 | Thu Mar 10 2016 | |||||
| ||||||
| Revision 6.6.0-2 | Thu Mar 10 2016 | |||||
| ||||||
| Revision 6.6.0-1 | Wed Feb 24 2016 | |||||
| ||||||
| Revision 6.6.0-0 | Thu 7 Jan 2016 | , | ||||
| ||||||