
Chapter 3. Developer workspaces
Red Hat CodeReady Workspaces provides developer workspaces with everything needed to a code, build, test, run, and debug applications. To allow that, the developer workspaces provide four main components:
- The source code of a project.
- A web-based integrated development environment (IDE).
- Tool dependencies, needed by developers to work on a project.
- Application runtime: a replica of the environment where the application runs in production.
Pods manage each component of a CodeReady Workspaces workspace. Therefore, everything running in a CodeReady Workspaces workspace is running inside containers. This makes a CodeReady Workspaces workspace highly portable.
The embedded browser-based IDE is the point of access for everything running in a CodeReady Workspaces workspace. This makes a CodeReady Workspaces workspace easy to share.
By default, it is possible to run only one workspace at a time. To increase the number of concurrent workspaces a user can run, update the CheCluster:
$ oc patch checluster/codeready-workspaces -n openshift-workspaces --type=merge \
-p '{ "spec": { "server": { "customCheProperties": { "CHE_LIMITS_USER_WORKSPACES_RUN_COUNT": "-1" } } } }'
For additional information, see: Users workspace limits.
Table 3.1. Features and benefits
| Features | Traditional IDE workspaces | Red Hat CodeReady Workspaces workspaces |
|---|---|---|
| Configuration and installation required | Yes. | No. |
| Embedded tools | Partial. IDE plug-ins need configuration. Dependencies need installation and configuration. Example: JDK, Maven, Node. | Yes. Plug-ins provide their dependencies. |
| Application runtime provided | No. Developers have to manage that separately. | Yes. Application runtime is replicated in the workspace. |
| Shareable | No. Or not easily | Yes. Developer workspaces are shareable with a URL. |
| Capable of being versioned | No | Yes. Devfiles exist with project source code. |
| Accessible from anywhere | No. Installation is needed. | Yes. Only requires a browser. |
To start a CodeReady Workspaces workspace:
Use the Dashboard to discover CodeReady Workspaces 2.9:
Use a devfile as the preferred way to start a CodeReady Workspaces 2.9 workspace:
Use the browser-based IDE as the preferred way to interact with a CodeReady Workspaces 2.9 workspace. For an alternative way to interact with a CodeReady Workspaces 2.9 workspace, see: Section 3.8, “Remotely accessing workspaces”.
3.1. Creating a workspace from code sample
This section explains how to create a workspace from code sample or devfile template.
- Creating a workspace from sample using the Get Started view.
- Creating a custom workspace using templates on Custom Workspace view.
For more information about devfiles, see Section 4.2, “Authoring devfiles version 2”.
3.1.1. Creating a workspace from Get Started view of user dashboard
This section describes how to create a workspace from the user dashboard with a code sample.
Prerequisites
- A running instance of Red Hat CodeReady Workspaces. To install an instance of Red Hat CodeReady Workspaces, see Installing CodeReady Workspaces.
Procedure
- Navigate to the CodeReady Workspaces Dashboard. See Section 1.1, “Navigating CodeReady Workspaces using the Dashboard”.
- In the left navigation panel, go to Get Started.
- Click the tab.
In the gallery, there is list of samples that may be used to build and run projects.
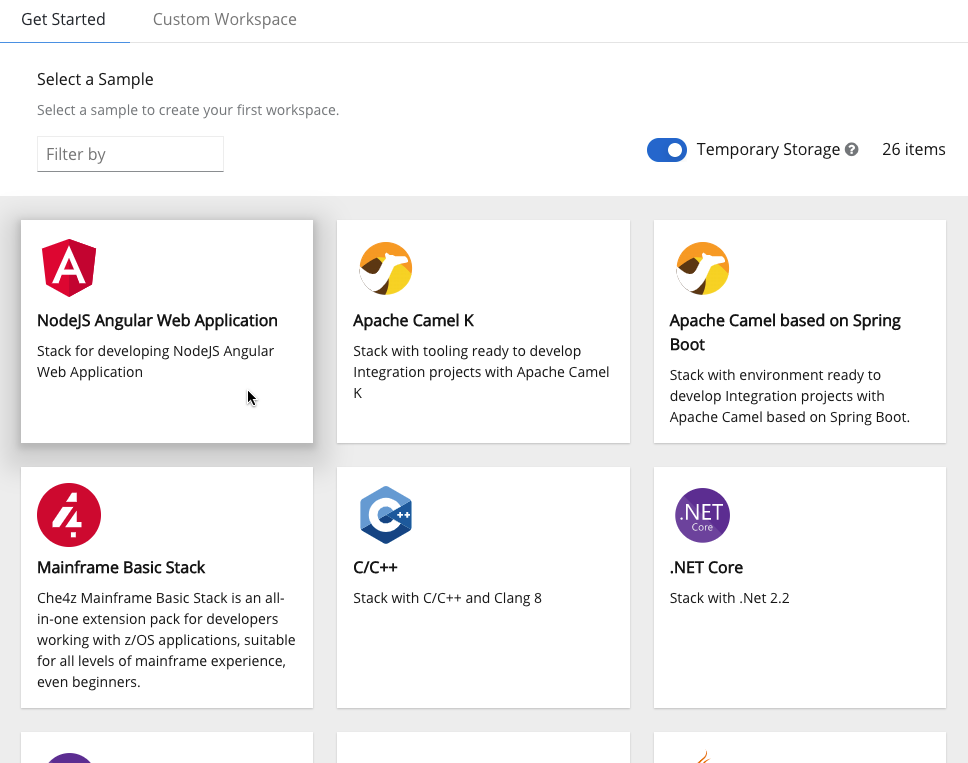
Start the workspace: click the chosen stack card.
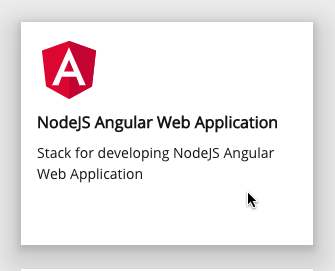
Workspace name can be auto-generated based on the underlying devfile of the stack. Generated names always consist of the devfile metadata.generateName property as the prefix and four random characters.
3.1.2. Creating a custom workspace from a template
This section describes how to create a custom workspace from a template.
Prerequisites
- A running instance of Red Hat CodeReady Workspaces. To install an instance of Red Hat CodeReady Workspaces, see Installing CodeReady Workspaces.
Procedure
- Navigate to the CodeReady Workspaces Dashboard. See Section 1.1, “Navigating CodeReady Workspaces using the Dashboard”.
- In the left navigation panel, go to Get Started.
- Click the tab.
Define a Name for the workspace.
New workspace nameWorkspace name can be auto-generated based on the underlying devfile of the stack. Generated names always consist of the devfile
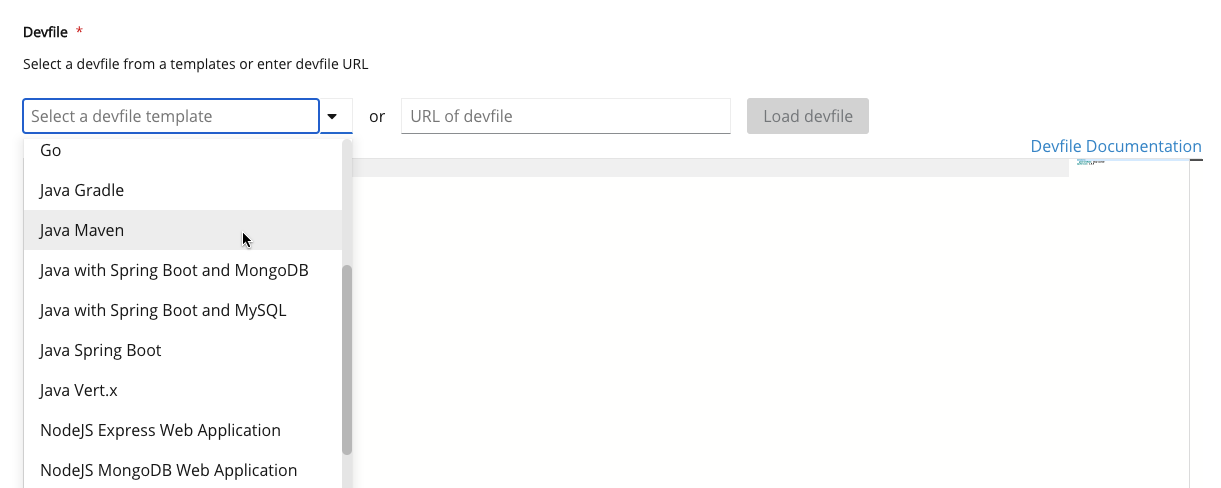
metadata.generateNameproperty as the prefix and four random characters.In the Devfile section, select the devfile template that will be used to build and run projects.
- Start the workspace: click the button at the bottom of the form:
3.2. Creating a workspace from remote devfile
For quick and easy CodeReady Workspaces workspace creation, use a factory link.
3.2.1. Creating a workspace from the default branch of a Git repository
This section describes how to start a CodeReady Workspaces workspace using a factory URL. The factory URL is a link pointing CodeReady Workspaces to a Git source repository containing a devfile.
The factory URL exist in two forms:
-
the short form
/#$URL -
long
/f?url=$URLform that supports additional configuration parameters used in previous versions of CodeReady Workspaces
Prerequisites
- A running instance of Red Hat CodeReady Workspaces. See Installing CodeReady Workspaces.
-
The Git repository <GIT_REPOSITORY_URL> is available over HTTPS and contains a
devfile.yamlor.devfile.yamlin the root folder. See Section 4.2, “Authoring devfiles version 2”.
Procedure
Run the workspace by opening the factory URL. Two formats are available:
\https://codeready-<openshift_deployment_name>.<domain_name>/#<GIT_REPOSITORY_URL>- This is the short format.
\https://codeready-<openshift_deployment_name>.<domain_name>/f?url=<GIT_REPOSITORY_URL>This long format supports additional configuration parameters.
Example 3.1. Create a workspace on Eclipse Che hosted by Red Hat from the default branch of the
https://github.com/eclipse-che/che-serverrepository using the short factory URL format.Example 3.2. Create a workspace on Eclipse Che hosted by Red Hat from the default branch of the
https://github.com/eclipse-che/che-serverrepository using the long factory URL format.
3.2.2. Creating a workspace from a feature branch of a Git repository
A CodeReady Workspaces workspace can be created by pointing to devfile that is stored in a Git source repository on a feature branch of the user’s choice. The CodeReady Workspaces instance then uses the discovered devfile to build a workspace.
Prerequisites
- A running instance of Red Hat CodeReady Workspaces. To install an instance of Red Hat CodeReady Workspaces, see Installing CodeReady Workspaces.
-
The
devfile.yamlor.devfile.yamlfile is located in the root folder of a Git repository, on a specific branch of the user’s choice that is accessible over HTTPS. See Section 4.2, “Authoring devfiles version 2” for detailed information about creating and using devfiles.
Procedure
Execute the workspace by opening the following URL: \https://codeready-<openshift_deployment_name>.<domain_name>/#<GitHubBranch>
Example
Use following URL format to open an experimental quarkus-quickstarts branch hosted on workspaces.openshift.com.
https://workspaces.openshift.com/f?url=https://github.com/maxandersen/quarkus-quickstarts/tree/che
3.2.3. Creating a workspace from a publicly accessible standalone devfile using HTTP
A workspace can be created using a devfile, the URL of which is pointing to the raw content of the devfile. The CodeReady Workspaces instance then uses the discovered devfile to build a workspace.
Prerequisites
- A running instance of Red Hat CodeReady Workspaces. To install an instance of Red Hat CodeReady Workspaces, see Installing CodeReady Workspaces.
-
The publicly-accessible standalone
devfile.yamlfile. See Section 4.2, “Authoring devfiles version 2” for detailed information about creating and using devfiles.
Procedure
-
Execute the workspace by opening the following URL:
\https://codeready-<openshift_deployment_name>.<domain_name>/#https://<yourhosturl>/devfile.yaml
3.2.4. Overriding devfile values using factory parameters
Values in the following sections of a remote devfile can be overridden using specially constructed additional factory parameters:
-
apiVersion -
metadata -
projects -
attributes
Prerequisites
- A running instance of Red Hat CodeReady Workspaces. To install an instance of Red Hat CodeReady Workspaces, see Installing CodeReady Workspaces.
-
A publicly accessible standalone
devfile.yamlfile. See Section 4.2, “Authoring devfiles version 2” for detailed information about creating and using devfiles.
Procedure
-
Open the workspace by navigating to the following URL:
\https://codeready-<openshift_deployment_name>.<domain_name>/f?url=https://<hostURL>/devfile.yaml&override.<parameter.path>=<value>
Example 3.3. Example of overriding the generateName property
Consider the following initial devfile:
apiVersion: 1.0.0
metadata:
  generateName: golang-
projects:
...
To add or override generateName value, use the following factory URL:
https://workspaces.openshift.com/f?url=<repository-url>&override.metadata.generateName=myprefixThe resulting workspace has the following devfile model:
apiVersion: 1.0.0
metadata:
  generateName: myprefix
projects:
...
Example 3.4. Example of overriding project source branch property
Consider the following initial devfile:
apiVersion: 1.0.0
metadata:
  generateName: java-mysql-
projects:
  - name: web-java-spring-petclinic
    source:
      type: git
      location: "https://github.com/spring-projects/spring-petclinic.git"
...
To add or override source branch value, use the following factory URL:
https://workspaces.openshift.com/f?url=<repository-url>&override.projects.web-java-spring-petclinic.source.branch=1.0.xThe resulting workspace has the following devfile model:
apiVersion: 1.0.0
metadata:
  generateName: java-mysql-
projects:
  - name: web-java-spring-petclinic
    source:
      type: git
      location: "https://github.com/spring-projects/spring-petclinic.git"
      branch: 1.0.x
...
Example 3.5. Example of overriding or creating an attribute value
Consider the following initial devfile:
apiVersion: 1.0.0
metadata:
  generateName: golang-
attributes:
   persistVolumes: false
projects:
...
To add or override persistVolumes attribute value, use the following factory URL:
https://workspaces.openshift.com/f?url=<repository-url>&override.attributes.persistVolumes=trueThe resulting workspace has the following devfile model:
---
apiVersion: 1.0.0
metadata:
  generateName: golang-
attributes:
   persistVolumes: true
projects:
...
When overriding attributes, everything that follows the attributes keyword is interpreted as an attribute name, so a user can use dot-separated names:
https://workspaces.openshift.com/f?url=<repository-url>&override.attributes.dot.name.format.attribute=trueThe resulting workspace has the following devfile model:
apiVersion: 1.0.0
metadata:
  generateName: golang-
attributes:
   dot.name.format.attribute: true
projects:
...
Verification steps
- Using CodeReady Workspaces Dashboard, move to the Devfile tab of the newly created workspace and check its content.
3.2.5. Allowing users to define workspace deployment labels and annotations
This section describes how to customize workspace deployment labels and annotation using factory parameters.
Prerequisites
- A running instance of Red Hat CodeReady Workspaces. To install an instance of Red Hat CodeReady Workspaces, see Installing CodeReady Workspaces.
-
A publicly accessible standalone
devfile.yamlfile. See Section 4.2, “Authoring devfiles version 2” for detailed information about creating and using devfiles.
Procedure
-
Open the workspace by navigating to the following URL:
\https://codeready-<openshift_deployment_name>.<domain_name>/f?url=https://<hostURL>/devfile.yaml&workspaceDeploymentLabels=<url_encoded_comma_separated_key_values>&workspaceDeploymentAnnotations=<url_encoded_comma_separated_key_values override>
Example 3.6. Example of overriding the deployment labels
Consider the following labels to add:
ike.target=preference-v1
ike.session=test
To add or override labels, use the following factory URL:
https://workspaces.openshift.com/f?url=<repository-url>&workspaceDeploymentLabels=ike.target%3Dpreference-v1%2Cike.session%3DtestThe resulting workspace has the following deployment labels:
apiVersion: apps/v1
kind: Deployment
metadata:
  annotations:
    deployment.kubernetes.io/revision: "1"
  creationTimestamp: "2020-10-27T14:03:26Z"
  generation: 1
  labels:
    che.component.name: che-docs-dev
    che.original_name: che-docs-dev
    che.workspace_id: workspacegln2g1shejjufpkd
    ike.session: test
    ike.target: preference-v1
  name: workspacegln2g1shejjufpkd.che-docs-dev
  namespace: opentlc-mgr-che
  resourceVersion: "107516"
spec:
...
Example 3.7. Example of overriding the deployment annotations
Consider the following annotations to add:
ike.A1=preference-v1
ike.A=test
To add or override annotations, use the following factory URL:
https://workspaces.openshift.com/f?url=<repository-url>&workspaceDeploymentAnnotations=ike.A1%3Dpreference-v1%2Cike.A%3DtestThe resulting workspace has the following deployment annotations:
apiVersion: apps/v1
kind: Deployment
metadata:
  annotations:
    deployment.kubernetes.io/revision: "1"
    ike.A: test
    ike.A1: preference-v1
  creationTimestamp: "2020-10-28T09:58:52Z"
  generation: 1
  labels:
    che.component.name: che-docs-dev
    che.original_name: che-docs-dev
    che.workspace_id: workspacexrtf710v64rl5ouz
  name: workspacexrtf710v64rl5ouz.che-docs-dev
  namespace: opentlc-mgr-che
  resourceVersion: "213191"
...
Verification steps
To display the deployment labels and annotations:
- Get the name of the user’s namespace:
- Using CodeReady Workspaces Dashboard, move to the Workspaces tab and read the name of the OpenShift namespace field.
Log in to the cluster:
Retrieve the CodeReady Workspaces cluster URL from the
checlusterCR (Custom Resource), run:$ oc get checluster --output jsonpath='{.items[0].status.cheURL}'Log in:
$ oc login -u <username> -p <password> <cluster_URL>
Display the deployment labels and annotations for all deployments in the project using the OpenShift namespace name from the first step:
$ oc get deployment -n <NAMESPACE> -o=custom-columns="NAMESPACE:.metadata.namespace,NAME:.metadata.name,LABELS:.metadata.labels,ANNOTATIONS:.metadata.annotations"
3.2.6. Allowing users to define workspace creation strategy
As a developer, you can configure CodeReady Workspaces to create a new workspace each time it accepts a factory URL, or to reuse the existing workspace if a user already has one.
CodeReady Workspaces supports the following options:
-
perclick: The default strategy, which creates a new workspace each time a given factory URL is accepted. -
peruser: Initially, a workspace is created using a factory URL. Other user’s calls then re-use the particular workspace created by the factory URL (1 factory = 1 workspace).
Prerequisites
- A running instance of CodeReady Workspaces. See Installing CodeReady Workspaces.
- The Git repository <GIT_REPOSITORY_URL> is available over HTTPS.
Procedure
Run the workspace by opening the factory URL and specify the additional strategy parameter:
\https://codeready-<openshift_deployment_name>.<domain_name>/f?url=<GIT_REPOSITORY_URL>&policies.create=<value>
Additional resources
3.3. Creating a workspace using crwctl and a local devfile
A CodeReady Workspaces workspace can be created by pointing the crwctl tool to a locally stored devfile. The CodeReady Workspaces instance then uses the discovered devfile to build a workspace.
Prerequisites
- A running instance of Red Hat CodeReady Workspaces. To install an instance of Red Hat CodeReady Workspaces, see Installing CodeReady Workspaces.
- The CodeReady Workspaces CLI management tool. See Using the crwctl management tool.
- The devfile is available on the local filesystem in the current working directory. See Section 4.2, “Authoring devfiles version 2” for detailed information about creating and using devfiles.
- You are logged in to Red Hat CodeReady Workspaces. See How to login into CodeReady Workspaces using crwctl
Procedure
-
Run a workspace from a devfile using the
workspace:createparameter with thecrwctltool as follows:
$ crwctl workspace:create --name=<WORKSPACE_NAME> \ 1
--devfile=devfile.yaml --start \
-n openshift-workspaces
- 1
- The workspace name to create.
If --devfile flag is omitted, the crwctl looks for devfile.yaml or devfile.yml files in the current directory to create a workspace from.
3.4. Creating a workspace by importing the source code of a project
This section describes how to create a new workspace for editing an existing codebase.
Prerequisites
- A running instance of CodeReady Workspaces. To install an instance of CodeReady Workspaces, see Installing CodeReady Workspaces.
- An existing workspace with plug-ins related to your development environment defined on this instance of Red Hat CodeReady Workspaces Section 3.5, “Configuring a CodeReady Workspaces 2.9 workspace”.
A user can progress with two methods that have to be applied before starting a workspace:
To create a new workspace for editing an existing codebase, use one of the following methods after the workspace has been started:
3.4.1. Select a sample from the Dashboard, then change the devfile to include your project
- In the left navigation panel, go to Get Started.
- In a case it’s not selected already, click the Custom Workspace tab.
In the Devfile section, select the devfile template that will be used to build and run projects.
In the Devfile editor, update
projectssection: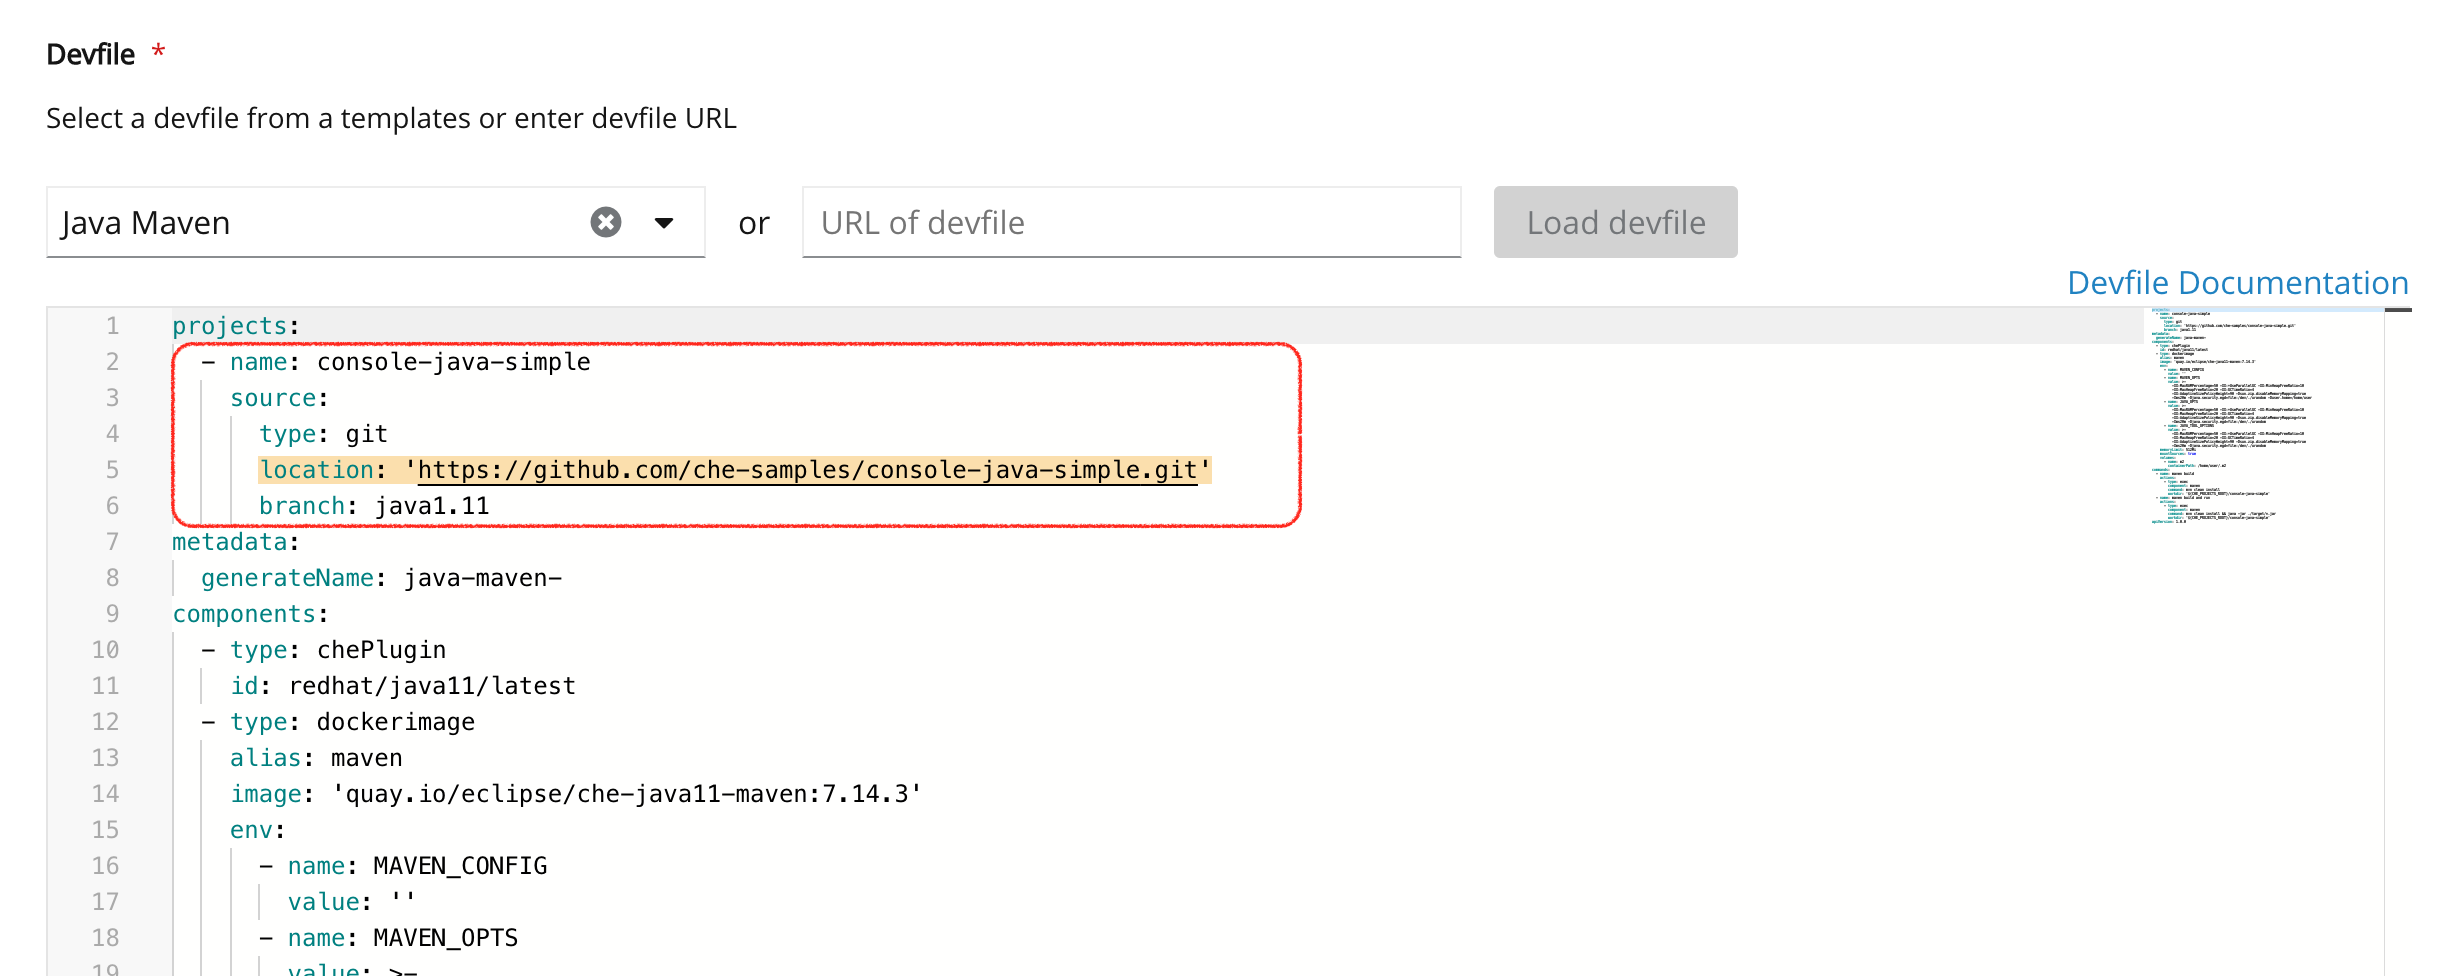 Example: add a project
To add a project into the workspace, add or edit the following section:
projects:
  - name: che
    source:
      type: git
      location: 'https://github.com/eclipse-che/che-server.git'
See the Devfile reference.
- To open the workspace, click the button.
3.4.2. Importing from the Dashboard into an existing workspace
- From the Dashboard, select Workspaces.
- Select your workspace by selecting its name. This will link you to the workspace’s Overview tab.
- Open Devfile tab where you can enter your own YAML configuration.
- Add the project.
To add a project into the workspace, add or edit the following section:
projects:
  - name: che
    source:
      type: git
      location: 'https://github.com/eclipse-che/che-server.git'
See the Devfile reference.
3.4.2.1. Editing the commands after importing a project
After you have a project in your workspace, you can add commands to it. Adding commands to your projects allows you to run, debug, or start your application in a browser.
To add commands to the project:
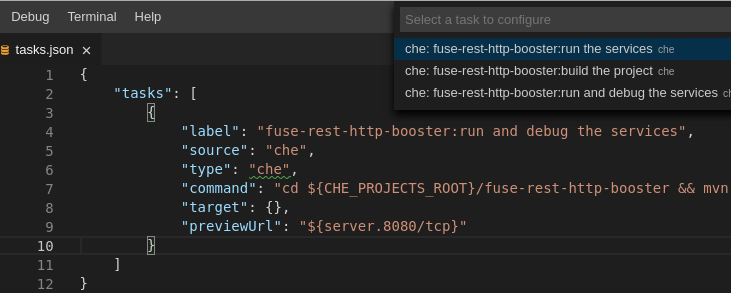
- Open the workspace configuration in the Dashboard, then select the Devfile tab.
- Modify the commands field.
- Open the workspace.
To run a command, select Terminal > Run Task from the main menu.
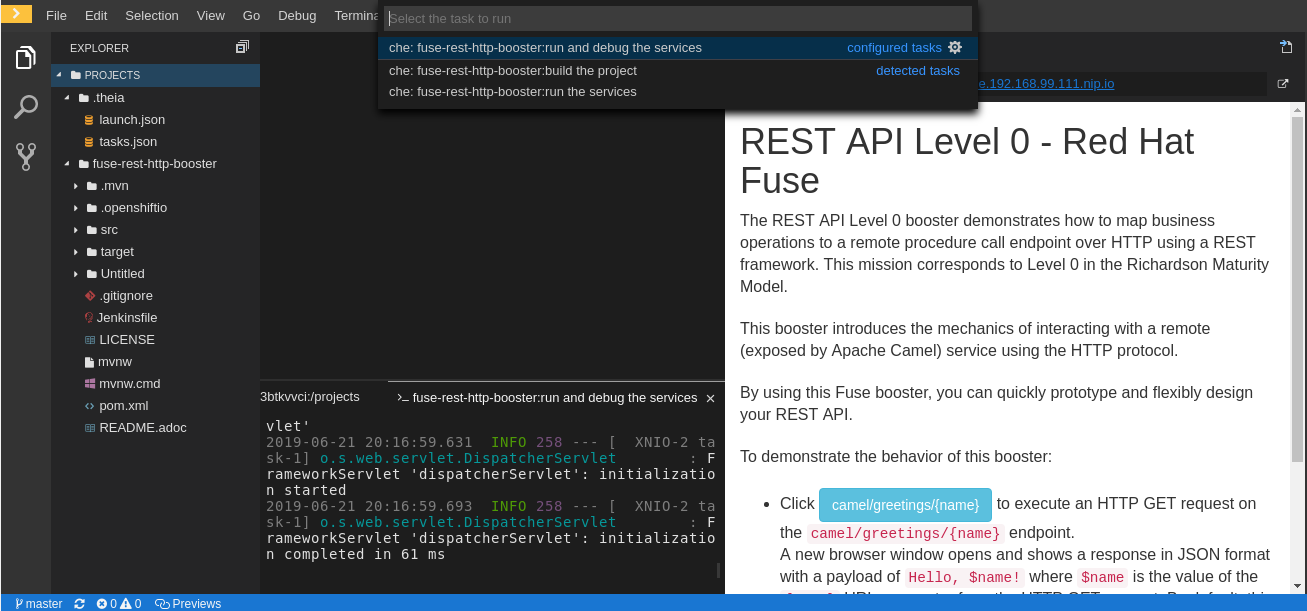
To configure commands, select Terminal > Configure Tasks from the main menu.
3.4.3. Importing to a running workspace using the Git: Clone command
To import to a running workspace using the Git: Clone command:
Start a workspace, then use the Git: Clone command from the command palette or the Welcome screen to import a project to a running workspace.
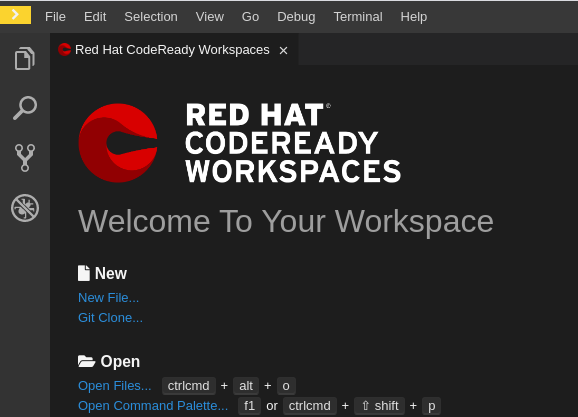
Open the command palette by using
F1,CTRL-SHIFT-P, or the link displayed on the Welcome screen.
Enter the path to the project that is about to be cloned.

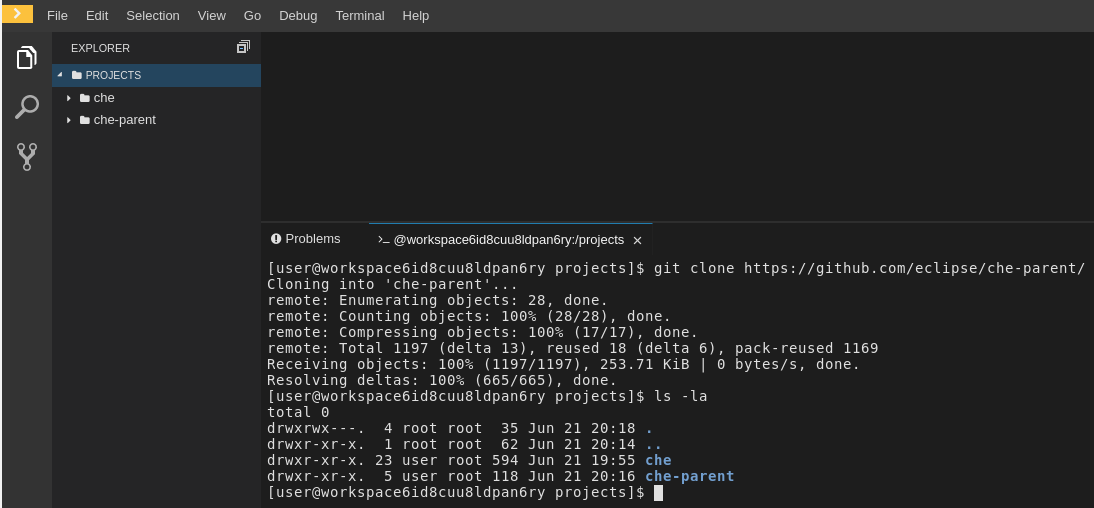
3.4.4. Importing to a running workspace with git clone in a terminal
In addition to the approaches above, you can also start a workspace, open a Terminal, and type git clone to pull code.
Importing or deleting workspace projects in the terminal does not update the workspace configuration, and the IDE does not reflect the changes in the Devfile tab in the dashboard.
Similarly, when you add a project using the Dashboard, then delete it with rm -fr myproject, it may still appear in the Devfile tab.
3.5. Configuring a CodeReady Workspaces 2.9 workspace
3.5.1. Changing the configuration of an existing workspace
This section describes how to change the configuration of an existing workspace from the user Dashboard.
Prerequisites
- A running instance of CodeReady Workspaces. To install an instance of CodeReady Workspaces, see Installing CodeReady Workspaces.
- An existing workspace defined on this instance of CodeReady Workspaces.
Procedure
- Navigate to the CodeReady Workspaces Dashboard. See Section 1.1, “Navigating CodeReady Workspaces using the Dashboard”.
- In the left navigation panel, go to Workspaces.
- Click the name of a workspace to navigate to the configuration overview page.
Click the Overview tab and execute following actions:
- Change the Workspace name.
- Select Storage Type.
- Review project.
- From the Devfile tab, edit YAML configuration of the workspace. See Section 4.2, “Authoring devfiles version 2”.
3.5.2. Adding projects to your workspace
Prerequisites
- A running instance of CodeReady Workspaces. To install an instance of CodeReady Workspaces, see Installing CodeReady Workspaces.
- An existing workspace defined on this instance of CodeReady Workspaces.
Procedure
To add a project to your workspace:
- Navigate to the Workspaces page and click the workspace, which is about to be updated.
- Open the Devfile tab.
In the Devfile editor, add a
projectssection with desired project.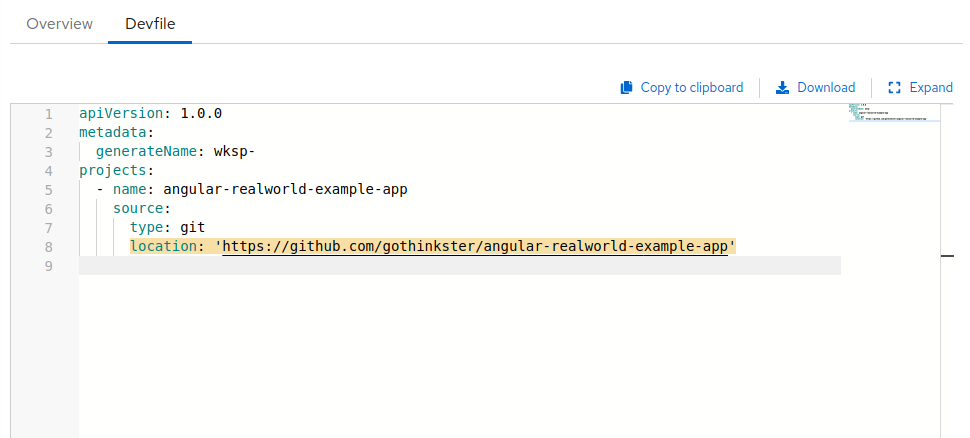
Once the project is added, click the button to save this workspace configuration.
For demonstration example, see below:
Example - Adding a
.gitproject into a workspace using a devfileIn the following instance, the project
crwacts as the example of a user’s project. A user specifies this project using thenameattribute of a devfile. Thelocationattribute defines the source repository represented by an URL to a Git repository or ZIP archive.To add a project into the workspace, add or edit the following section:
projects:
  - name: <crw>
    source:
      type: git
      location: 'https://github.com/<github-organization>/<crw>.git'
For additional information, see the Section 4.1.5, “Devfile reference” section.
3.5.3. Configuring the workspace tools
3.5.3.1. Adding plug-ins
Prerequisites
- A running instance of CodeReady Workspaces. To install an instance of CodeReady Workspaces, see Installing CodeReady Workspaces.
- An existing workspace defined on this instance of CodeReady Workspaces.
Procedure
To add plug-ins to your workspace:
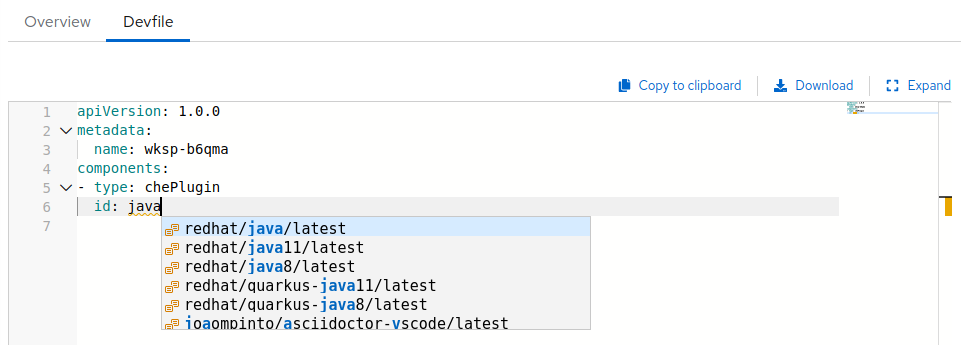
- Click the Devfile tab.
Add the desired
chePlugincomponent and click the button.NoteTo see a list of available plugins, activate the completion feature by pressing Ctrl+Space.
3.5.3.2. Defining the workspace editor
Prerequisites
- A running instance of CodeReady Workspaces. To install an instance of CodeReady Workspaces, see Installing CodeReady Workspaces.
- An existing workspace defined on this instance of CodeReady Workspaces.
Procedure
To define the editor to use with the workspace:
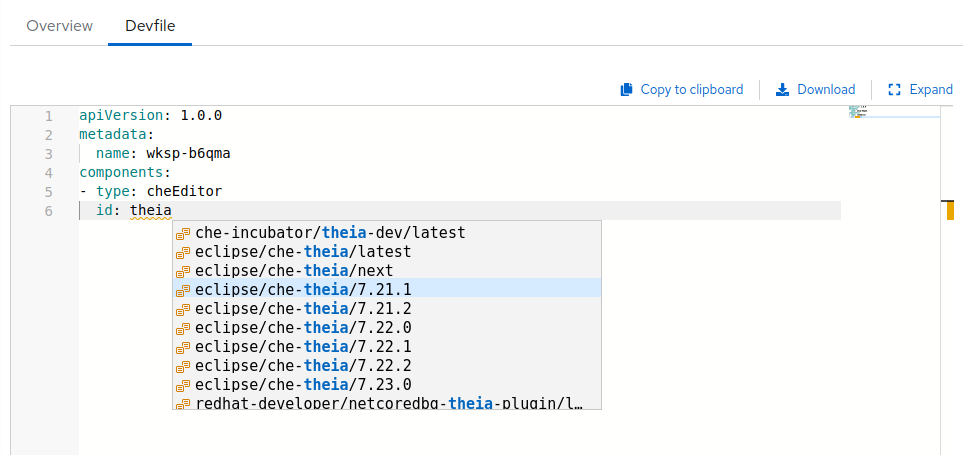
- Click the Devfile tab.
Add the desired
cheEditorcomponent and click the button.NoteTo see a list of available plugins, activate the completion feature by pressing Ctrl+Space. The recommended editor for CodeReady Workspaces 2.9 is Che-Theia.
Additional resources
3.6. Running an existing workspace from the user dashboard
This section describes how to run an existing workspace from the user dashboard.
3.6.1. Running an existing workspace from the user dashboard with the Run button
This section describes how to run an existing workspace from the user dashboard using the Run button.
Prerequisites
- A running instance of CodeReady Workspaces. To install an instance of CodeReady Workspaces, see Installing CodeReady Workspaces.
- An existing workspace defined on this instance of CodeReady Workspaces.
Procedure
- Navigate to the CodeReady Workspaces Dashboard. See Section 1.1, “Navigating CodeReady Workspaces using the Dashboard”.
- In the left navigation panel, navigate to Workspaces.
- Click on the name of a non-running workspace to navigate to the overview page.
Click on the button in the top right corner of the page.
The workspace is started, and a browser does not navigates to the workspace.
3.6.2. Running an existing workspace from the user dashboard using the Open button
This section describes how to run an existing workspace from the user dashboard using the Open button.
Prerequisites
- A running instance of CodeReady Workspaces. To install an instance of CodeReady Workspaces, see Installing CodeReady Workspaces.
- An existing workspace defined on this instance of CodeReady Workspaces.
Procedure
- Navigate to the CodeReady Workspaces Dashboard. See Section 1.1, “Navigating CodeReady Workspaces using the Dashboard”.
- In the left navigation panel, navigate to Workspaces.
- Click on the name of a non-running workspace to navigate to the overview page.
Click on the button in the top right corner of the page.
The workspace is started, and a browser navigates to the workspace.
3.6.3. Running an existing workspace from the user dashboard using the Recent Workspaces
This section describes how to run an existing workspace from the user dashboard using the Recent Workspaces.
Prerequisites
- A running instance of CodeReady Workspaces. To install an instance of CodeReady Workspaces, see Installing CodeReady Workspaces.
- An existing workspace defined on this instance of CodeReady Workspaces.
Procedure
- Navigate to the CodeReady Workspaces Dashboard. See Section 1.1, “Navigating CodeReady Workspaces using the Dashboard”.
- In the left navigation panel, in the Recent Workspaces section, right-click the name of a non-running workspace and click Run in the contextual menu to start it.
3.7. Importing OpenShift applications into a workspace
To deploy a new instance of an application in a CodeReady Workspaces workspace, use one of the following scenarios:
- Modifying an existing workspace: Using the Dashboard user interface
-
From a running application: Generating a devfile with
crwctl
3.7.1. Including a OpenShift application in a workspace devfile definition
This procedure describes how to define a CodeReady Workspaces workspace devfile to include a OpenShift application.
For demonstration purposes, the section uses a sample OpenShift application having the following two Pods:
- A Node.js application specified by this nodejs-app.yaml
- A MongoDB Pod specified by this mongo-db.yaml
To run the application on a OpenShift cluster:
$ node=https://raw.githubusercontent.com/redhat-developer/devfile/master/samples/web-nodejs-with-db-sample/nodejs-app.yaml && \
mongo=https://raw.githubusercontent.com/redhat-developer/devfile/master/samples/web-nodejs-with-db-sample/mongo-db.yaml && \
oc  apply -f ${mongo} && \
oc  apply -f ${node}
Prerequisites
- You are logged in to the cluster with a running instance of Red Hat CodeReady Workspaces. To install an instance of Red Hat CodeReady Workspaces, see Installing CodeReady Workspaces.
-
The
crwctlmanagement tool is available. See the Using the crwctl management tool section.
Procedure
Create the simplest devfile:
apiVersion: 1.0.0 metadata: name: minimal-workspace 1- 1
- Specify the name
minimal-workspace. After the CodeReady Workspaces server processes this devfile, the devfile is converted to a minimal CodeReady Workspaces workspace that only has the default editor (Che-Theia) and the default editor plug-ins, including, for example, the terminal.
To add OpenShift applications to a workspace, modify the devfile and add the
Kubernetescomponent type.For example, to embed the NodeJS-Mongo application in the
minimal-workspace:apiVersion: 1.0.0 metadata: name: minimal-workspace components: - type: openshift reference: https://raw.githubusercontent.com/.../mongo-db.yaml - alias: nodejs-app type: openshift reference: https://raw.githubusercontent.com/.../nodejs-app.yaml entrypoints: - command: ['sleep'] 1 args: ['infinity']- 1
- The
sleep infinitycommand is added as the entrypoint of the Node.js application. The command prevents the application from starting at the workspace start phase. This configuration allows the user to start the application when needed for testing or debugging purposes.
Add the commands in the devfile to make it easier for a developer to test the application:
apiVersion: 1.0.0 metadata: name: nodejs-with-db projects: - name: nodejs-mongo-app source: type: git location: 'https://github.com/ijason/NodeJS-Sample-App.git' commitId: 187d468 # refers to the last commitId the project compiles (with express3) components: - type: openshift reference: https://raw.githubusercontent.com/redhat-developer/devfile/master/samples/web-nodejs-with-db-sample/mongo-db.yaml - alias: nodejs-app type: openshift reference: https://raw.githubusercontent.com/redhat-developer/devfile/master/samples/web-nodejs-with-db-sample/nodejs-app.yaml commands: - name: run 1 actions: - type: exec component: nodejs-app command: cd ${CHE_PROJECTS_ROOT}/nodejs-mongo-app/EmployeeDB/ && npm install && sed -i -- ''s/localhost/mongo/g'' app.js && node app.js- 1
- The
runcommand added to the devfile is available as a task in Che-Theia from the command palette. When executed, the command starts the Node.js application.
Use the devfile to create and start a workspace:
$ crwctl workspace:start --devfile <devfile-path>
Additional resources
3.7.2. Adding a OpenShift application to an existing workspace using the dashboard
This procedure demonstrates how to modify an existing workspace and import the OpenShift application using the newly created devfile.
Prerequisites
- A running instance of CodeReady Workspaces. To install an instance of CodeReady Workspaces, see Installing CodeReady Workspaces.
- An existing workspace defined on this instance of CodeReady Workspaces.
Procedure
- After the creation of a workspace, use the Workspace menu and then click on the desired workspace.
- Modify the workspace devfile, use the Devfile tab.
- Add a OpenShift component.
- For the changes to take effect, save the devfile and restart the CodeReady Workspaces workspace.
3.7.3. Generating a devfile from an existing OpenShift application
This procedure demonstrates how to generate a devfile from an existing OpenShift application using the crwctl tool.
Prerequisites
- A running instance of CodeReady Workspaces. To install an instance of CodeReady Workspaces, see Installing CodeReady Workspaces.
-
The
crwctlmanagement tool is available. See Using the crwctl management tool. - You are logged in to CodeReady Workspaces. See How to login into CodeReady Workspaces using crwctl
Procedure
To generate a devfile, use:
$ crwctl devfile:generate
It is also possible to generate a devfile from, for example, the
NodeJS-MongoDBapplication that includes theNodeJScomponent, using thecrwctl devfile:generatecommand:Example:
$ crwctl devfile:generate --selector="app=nodejs"
apiVersion: 1.0.0
metadata:
  name: crwctl-generated
components:
  - type: kubernetes
    alias: app=nodejs
    referenceContent: |
      kind: List
      apiVersion: v1
      metadata:
        name: app=nodejs
      items:
        - apiVersion: apps/v1
          kind: Deployment
          metadata:
            labels:
              app: nodejs
            name: web
(...)
The Node.js application YAML definition is available in the devfile, inline, using the
referenceContentattribute.To include support for a language, use the
--languageparameter:$ crwctl devfile:generate --selector="app=nodejs" --language="typescript" apiVersion: 1.0.0 metadata: name: crwctl-generated components: - type: kubernetes alias: app=nodejs referenceContent: | kind: List apiVersion: v1 (...) - type: chePlugin alias: typescript-ls id: che-incubator/typescript/latest
Use the generated devfile to start a CodeReady Workspaces workspace with
crwctl.$ crwctl workspace:start --devfile=devfile.yaml
3.8. Remotely accessing workspaces
This section describes how to remotely access CodeReady Workspaces workspaces outside of the browser.
CodeReady Workspaces workspaces exist as containers and are, by default, modified from a browser window. In addition to this, there are the following methods of interacting with a CodeReady Workspaces workspace:
-
Opening a command line in the workspace container using the OpenShift command-line tool,
oc. -
Uploading and downloading files using the
octool.
3.8.1. Remotely accessing workspaces using oc
To access CodeReady Workspaces workspaces remotely using OpenShift command-line tool (oc), follow the instructions in this section.
Prerequisites
The
oc, version 1.5.0 or higher, is available. For information about installed version, use:$ oc version Client Version: version.Info{Major:"1", Minor:"15", GitVersion:"v1.15.0" ...
Procedure
In the example below:
-
workspace7b2wemdf3hx7s3ln.maven-74885cf4d5-kf2q4is the name of the Pod. crwis the project.To find the name of the OpenShift project and the Pod that runs the CodeReady Workspaces workspace:
$ oc  get pod -l che.workspace_id --all-namespaces
NAMESPACE   NAME                                               READY   STATUS    RESTARTS   AGE
crw         workspace7b2wemdf3hx7s3ln.maven-74885cf4d5-kf2q4   4/4     Running   0          6m4s
To find the name of the container:
$ NAMESPACE=crw
$ POD=workspace7b2wemdf3hx7s3ln.maven-74885cf4d5-kf2q4
$ oc  get pod ${POD} -o custom-columns=CONTAINERS:.spec.containers[*].name
CONTAINERS
maven,che-machine-execpau,theia-ide6dj,vscode-javaw92
When you have the project, Pod name, and the name of the container, use the `oc ` command to open a remote shell:
$ NAMESPACE=crw
$ POD=workspace7b2wemdf3hx7s3ln.maven-74885cf4d5-kf2q4
$ CONTAINER=maven
$ oc exec -ti -n ${NAMESPACE} ${POD} -c ${CONTAINER} bash
user@workspace7b2wemdf3hx7s3ln $
From the container, execute the
buildandruncommands (as if from the CodeReady Workspaces workspace terminal):user@workspace7b2wemdf3hx7s3ln $ mvn clean install [INFO] Scanning for projects... (...)
Additional resources
-
For more about
oc, see the Getting started with the CLI.
3.8.2. Downloading and uploading a file to a workspace using the command-line interface
This procedure describes how to use the oc tool to download or upload files remotely from or to an CodeReady Workspaces workspace.
Prerequisites
- A running instance of CodeReady Workspaces. To install an instance of CodeReady Workspaces, see Installing CodeReady Workspaces.
- Remote access to the CodeReady Workspaces workspace you intend to modify. See Remotely accessing workspaces.
The
oc, version 1.5.0 or higher, is available. For information about installed version, use:$ oc version Client Version: version.Info{Major:"1", Minor:"15", GitVersion:"v1.15.0" ...
Procedure
The following procedure uses crw as an example of a user project.
To download a local file named
downloadme.txtfrom a workspace container to the current home directory of the user, use the following in the CodeReady Workspaces remote shell.$ REMOTE_FILE_PATH=/projects/downloadme.txt $ NAMESPACE=crw $ POD=workspace7b2wemdf3hx7s3ln.maven-74885cf4d5-kf2q4 $ CONTAINER=maven $ oc cp ${NAMESPACE}/${POD}:${REMOTE_FILE_PATH} ~/downloadme.txt -c ${CONTAINER}-
To upload a local file named
uploadme.txtto a workspace container in the/projectsdirectory:
$ LOCAL_FILE_PATH=./uploadme.txt
$ NAMESPACE=crw
$ POD=workspace7b2wemdf3hx7s3ln.maven-74885cf4d5-kf2q4
$ CONTAINER=maven
$ oc cp ${LOCAL_FILE_PATH} ${NAMESPACE}/${POD}:/projects -c ${CONTAINER}
Using the preceding steps, the user can also download and upload directories.
Additional resources
-
For more about
oc, see the Getting started with the CLI.
3.9. Mounting a secret as a file or an environment variable into a workspace container
Secrets are OpenShift objects that store sensitive data such as user names, passwords, authentication tokens, and configurations in an encrypted form.
Users can mount a secret that contains sensitive data in a workspace container. This reapplies the stored data from the secret automatically for every newly created workspace. As a result, the user does not have to provide these credentials and configuration settings manually.
The following section describes how to automatically mount a OpenShift secret in a workspace container and create permanent mount points for components such as:
-
Maven configuration, the
settings.xmlfile - SSH key pairs
- AWS authorization tokens
- Git credentials store file
A OpenShift secret can be mounted into a workspace container as:
- A file - This creates automatically mounted Maven settings that will be applied to every new workspace with Maven capabilities.
An environment variable - This uses SSH key pairs and AWS authorization tokens for automatic authentication.
NoteSSH key pairs can also be mounted as a file, but this format is primarily aimed at the settings of the Maven configuration.
The mounting process uses the standard OpenShift mounting mechanism, but it requires additional annotations and labeling for a proper bound of a secret with the required CodeReady Workspaces workspace container.
3.9.1. Mounting a secret as a file into a workspace container
On OpenShift 3.11, secrets mounted as file overrides volume mounts defined in the devfile.
This section describes how to mount a secret from the user’s project as a file in single-workspace or multiple-workspace containers of CodeReady Workspaces.
Prerequisites
- A running instance of CodeReady Workspaces. To install an instance of CodeReady Workspaces, see Installing CodeReady Workspaces.
Procedure
Create a new OpenShift secret in the OpenShift project where a CodeReady Workspaces workspace will be created.
-
The labels of the secret that is about to be created must match the set of labels configured in
che.workspace.provision.secret.labelsproperty of CodeReady Workspaces. The default labels are: -
app.kubernetes.io/part-of: che.eclipse.org app.kubernetes.io/component: workspace-secret:NoteNote that the following example describes variations in the usage of the
target-containerannotation in versions 2.1 and 2.2 of Red Hat CodeReady Workspaces.Example:
apiVersion: v1
kind: Secret
metadata:
  name: mvn-settings-secret
  labels:
    app.kubernetes.io/part-of: che.eclipse.org
    app.kubernetes.io/component: workspace-secret
...
Annotations must indicate the given secret is mounted as a file, provide the mount path, and, optionally, specify the name of the container in which the secret is mounted. If there is no target-container annotation, the secret will be mounted into all user containers of the CodeReady Workspaces workspace, but this is applicable only for the CodeReady Workspaces version 2.1.
apiVersion: v1
kind: Secret
metadata:
  name: mvn-settings-secret
  annotations:
    che.eclipse.org/target-container: maven
    che.eclipse.org/mount-path: {prod-home}/.m2/
    che.eclipse.org/mount-as: file
  labels:
...
Since the CodeReady Workspaces version 2.2, the
target-containerannotation is deprecated andautomount-workspace-secretannotation with Boolean values is introduced. Its purpose is to define the default secret mounting behavior, with the ability to be overridden in a devfile. Thetruevalue enables the automatic mounting into all workspace containers. In contrast, thefalsevalue disables the mounting process until it is explicitly requested in a devfile component using theautomountWorkspaceSecrets:trueproperty.apiVersion: v1 kind: Secret metadata: name: mvn-settings-secret annotations: che.eclipse.org/automount-workspace-secret: "true" che.eclipse.org/mount-path: {prod-home}/.m2/ che.eclipse.org/mount-as: file labels: ...Data of the OpenShift secret may contain several items, whose names must match the desired file name mounted into the container.
apiVersion: v1
kind: Secret
metadata:
  name: mvn-settings-secret
  labels:
    app.kubernetes.io/part-of: che.eclipse.org
    app.kubernetes.io/component: workspace-secret
  annotations:
    che.eclipse.org/automount-workspace-secret: "true"
    che.eclipse.org/mount-path: {prod-home}/.m2/
    che.eclipse.org/mount-as: file
data:
  settings.xml: <base64 encoded data content here>
This results in a file named
settings.xmlbeing mounted at the/home/jboss/.m2/path of all workspace containers.The secret-s mount path can be overridden for specific components of the workspace using devfile. To change mount path, an additional volume should be declared in a component of the devfile, with name matching overridden secret name, and desired mount path.
apiVersion: 1.0.0
metadata:
  ...
components:
 - type: dockerimage
   alias: maven
   image: maven:3.11
   volumes:
     - name: <secret-name>
       containerPath: /my/new/path
   ...
Note that for this kind of overrides, components must declare an alias to be able to distinguish containers which belong to them and apply override path exclusively for those containers.
-
The labels of the secret that is about to be created must match the set of labels configured in
3.9.2. Mounting a secret as an environment variable into a workspace container
The following section describes how to mount a OpenShift secret from the user’s project as an environment variable, or variables, into single-workspace or multiple-workspace containers of CodeReady Workspaces.
Prerequisites
- A running instance of CodeReady Workspaces. To install an instance of CodeReady Workspaces, see Installing CodeReady Workspaces.
Procedure
In the OpenShift project where a CodeReady Workspaces workspace will be created, generate a new OpenShift secret.
-
The labels of the secret that is about to be generated must match the set of labels configured in
che.workspace.provision.secret.labelsproperty of CodeReady Workspaces. By default, it is a set of two labels: -
app.kubernetes.io/part-of: che.eclipse.org app.kubernetes.io/component: workspace-secret:NoteNote that the following example describes variations in the usage of the
target-containerannotation in versions 2.1 and 2.2 of Red Hat CodeReady Workspaces.Example:
apiVersion: v1
kind: Secret
metadata:
  name: mvn-settings-secret
  labels:
    app.kubernetes.io/part-of: che.eclipse.org
    app.kubernetes.io/component: workspace-secret
...
Annotations must indicate that the given secret is mounted as an environment variable, provides variable names, and optionally, specifies the container name where this mount will be applied. If there is no target-container annotation defined, the secret will be mounted into all user containers of the CodeReady Workspaces workspace, but this is applicable only for the CodeReady Workspaces version 2.1.
apiVersion: v1
kind: Secret
metadata:
  name: mvn-settings-secret
  annotations:
    che.eclipse.org/target-container: maven
    che.eclipse.org/env-name: FOO_ENV
    che.eclipse.org/mount-as: env
  labels:
   ...
data:
  mykey: myvalue
This results in the environment variable named
FOO_ENVand the valuemyvaluebeing provisioned into the container namedmaven.Since the CodeReady Workspaces version 2.2, the
target-containerannotation is deprecated andautomount-workspace-secretannotation with Boolean values is introduced. Its purpose is to define the default secret mounting behavior, with the ability to be overridden in a devfile. Thetruevalue enables the automatic mounting into all workspace containers. In contrast, thefalsevalue disables the mounting process until it is explicitly requested in a devfile component using theautomountWorkspaceSecrets:trueproperty.apiVersion: v1 kind: Secret metadata: name: mvn-settings-secret annotations: che.eclipse.org/automount-workspace-secret: "true" che.eclipse.org/env-name: FOO_ENV che.eclipse.org/mount-as: env labels: ... data: mykey: myvalueThis results in the environment variable named
FOO_ENVand the valuemyvaluebeing provisioned into all workspace containers.If the secret provides more than one data item, the environment variable name must be provided for each of the data keys as follows:
apiVersion: v1
kind: Secret
metadata:
  name: mvn-settings-secret
  annotations:
    che.eclipse.org/automount-workspace-secret: "true"
    che.eclipse.org/mount-as: env
    che.eclipse.org/mykey_env-name: FOO_ENV
    che.eclipse.org/otherkey_env-name: OTHER_ENV
  labels:
   ...
data:
  mykey: myvalue
  otherkey: othervalue
This results in two environment variables with names
FOO_ENV,OTHER_ENV, and valuesmyvalueandothervalue, being provisioned into all workpsace containers.NoteThe maximum length of annotation names in a OpenShift secret is 63 characters, where 9 characters are reserved for a prefix that ends with
/. This acts as a restriction for the maximum length of the key that can be used for the secret.
-
The labels of the secret that is about to be generated must match the set of labels configured in
3.9.3. Mounting a git credentials store into a workspace container
This section describes how to mount git credentials store as secret from the user’s project into the file in single-workspace or multiple-workspace containers of CodeReady Workspaces.
Prerequisites
- A running instance of CodeReady Workspaces. To install an instance of CodeReady Workspaces, see Installing CodeReady Workspaces.
Procedure
- Prepare git credential file in the Storage format.
- Encode content of the file to the base64 format.
Create a new OpenShift secret in the OpenShift project where a CodeReady Workspaces workspace will be created.
-
The labels of the secret that is about to be created must match the set of labels configured in
che.workspace.provision.secret.labelsproperty of CodeReady Workspaces. The default labels are: -
app.kubernetes.io/part-of: che.eclipse.org -
app.kubernetes.io/component: workspace-secret:
-
The labels of the secret that is about to be created must match the set of labels configured in
3.9.4. The use of annotations in the process of mounting a secret into a workspace container
Kubernetes annotations and labels are tools used by libraries, tools, and other clients, to attach arbitrary non-identifying metadata to OpenShift native objects.
Labels select objects and connect them to a collection that satisfies certain conditions, where annotations are used for non-identifying information that is not used by OpenShift objects internally.
This section describes OpenShift annotation values used in the process of OpenShift secret mounting in a CodeReady Workspaces workspace.
Annotations must contain items that help identify the proper mounting configuration. These items are:
-
che.eclipse.org/target-container: Valid till the version 2.1. The name of the mounting container. If the name is not defined, the secret mounts into all user’s containers of the CodeReady Workspaces workspace. -
che.eclipse.org/automount-workspace-secret: Introduced in the version 2.2.. The main mount selector. When set totrue, the secret mounts into all user’s containers of the CodeReady Workspaces workspace. When set tofalse, the secret does not mount into containers by default. The value of this attribute can be overridden in devfile components, using theautomountWorkspaceSecretsboolean property that gives more flexibility to workspace owners. This property requires analiasto be defined for the component that uses it. -
che.eclipse.org/env-name: The name of the environment variable that is used to mount a secret. -
che.eclipse.org/mount-as: This item describes if a secret will be mounted as an environmental variable or a file. Options:envorfile. -
che.eclipse.org/<mykeyName>-env-name: FOO_ENV: The name of the environment variable used when data contains multiple items.mykeyNameis used as an example.
3.10. Authenticating users on private repositories of SCM servers
The following section describes how to configure user authentications for SCM servers.
3.10.1. Authenticating on Bitbucket servers
Red Hat CodeReady Workspaces users may use public or private repositories on Bitbucket SCM (Source Code Management) system as a source of their projects.
The use of private repositories requires additional configuration described below.
Bitbucket authentication is based on using personal access tokens. Each Bitbucket user is able to request several personal access tokens with different names, permissions, expiration times, and so on. Those tokens can be used to sign Bitbucket REST API calls and perform Git repository operations.
To allow Bitbucket authentication on CodeReady Workspaces side, personal tokens must be stored in the user’s project in the form of a secret. The secret must look as follows:
apiVersion: v1
kind: Secret
metadata:
  name: bitbucket-personal-access-token-secret
  labels:
    app.kubernetes.io/part-of: che.eclipse.org
    app.kubernetes.io/component: scm-personal-access-token
  annotations:
    che.eclipse.org/expired-after: '-1'
    che.eclipse.org/che-userid: '355d1ce5-990e-401e-9a8c-094bca10b5b3'
    che.eclipse.org/scm-userid: '2'
    che.eclipse.org/scm-username: 'user-foo'
    che.eclipse.org/scm-url: 'https://bitbucket.apps.cluster-example.com'
data:
  token: TlRnNE1UazRORFl5TWpNeU9sMTI1aDFFT2dRbXBlTUYvbmhiLzNQUC9hT08=
The main parts of the secret are:
| Label |
| Indicates it is a SCM personal token secret. |
| Annotation |
| Red Hat CodeReady Workspaces id of the user token belongs to |
| Annotation |
| Bitbucket user id to which token belongs |
| Annotation |
| Bitbucket user name to which token belongs |
| Annotation |
| Bitbucket server URL to which this token belong |
| Annotation |
| Personal access token expiration time |
| Data entry |
| Base-64 encoded value of the personal access token |
Encoding a string into the base64 format using the base64 tool on Linux machines leads to adding the newline character to the end of the source string and causing a value to be unusable as the authentication header value after decoding. Avoid this by using base64 -w0, which removes newly added lines, or strip newlines explicitly using`tr -d \\n`.
To obtain a user ID from a secret using a call to a REST API URL:
For Bitbucket:
https://<bitbucket-hostname>/rest/api/1.0/users/<username>
For CodeReady Workspaces
\https://codeready-<openshift_deployment_name>.<domain_name>/api/user
- With the token credentials obtained from a secret, another secret is automatically created, allowing authorization to Git operations. This secret is mounted into a workspace container as a Git credentials file, and any additional configurations are not required to work with private Git repositories.
- When a remote Git repository uses a self-signed certificate, add an additional server configuration. See Deploying CodeReady Workspaces with support for Git repositories with self-signed certificates.
3.10.2. Authenticating on GitLab servers
Configuring authentication on the GitLab system is similar to Bitbucket.
GitLab authentication is based on using personal access tokens. Each GitLab user is able to request several personal access tokens with different names, permissions, expiration times, and so on. Those tokens can be used to sign GitLab REST API calls and perform Git repository operations.
See the GitLab documentation for more details about personal access tokens.
To allow GitLab authentication on CodeReady Workspaces side, personal tokens must be stored in the user’s project in the form of a secret. The secret must look as follows:
Example 3.8. GitLab personal access token secret
apiVersion: v1
kind: Secret
metadata:
  name: gitlab-personal-access-token-secret
  labels:
    app.kubernetes.io/part-of: che.eclipse.org
    app.kubernetes.io/component: scm-personal-access-token
  annotations:
    che.eclipse.org/expired-after: '-1'
    che.eclipse.org/che-userid: '355d1ce5-990e-401e-9a8c-094bca10b5b3'
    che.eclipse.org/scm-userid: '2'
    che.eclipse.org/scm-username: 'user-foo'
    che.eclipse.org/scm-url: 'https://gitlab.apps.cluster-example.com'
data:
  token: Yzh5cEt6cURxUWVCa3FKazhtaHg=
The main parts of the secret are:
| Label |
| Indicates it is a SCM personal token secret. |
| Annotation |
| Red Hat CodeReady Workspaces id of the user token belongs to |
| Annotation |
| GitLab user id to which token belongs |
| Annotation |
| GitlLab user name to which token belongs |
| Annotation |
| GitLab server URL to which this token belong |
| Annotation |
| Personal access token expiration time |
| Data entry |
| Base-64 encoded value of the personal access token |
Encoding a string into the base64 format using the base64 tool on Linux machines leads to adding the newline character to the end of the source string and causing a value to be unusable as the authentication header value after decoding. Avoid this by using base64 -w0, which removes newly added lines, or strip newlines explicitly using`tr -d \\n`.
To obtain a user ID from a secret, take a look into user profile page on GitLab web UI or make a call to a REST API URL:
For GitLab:
https://<gitlab-hostname>/api/v4/users?username=<username>
For CodeReady Workspaces
\https://codeready-<openshift_deployment_name>.<domain_name>/api/user
- With the token credentials obtained from a secret, another secret is automatically created, allowing authorization to Git operations. This secret is mounted into a workspace container as a Git credentials file, and any additional configurations are not required to work with private Git repositories.
- When a remote Git repository uses a self-signed certificate, add an additional server configuration. See: Deploying CodeReady Workspaces with support for Git repositories with self-signed certificates.