
Administration Guide
Administering Red Hat CodeReady Workspaces 2.12
Abstract
Making open source more inclusive
Red Hat is committed to replacing problematic language in our code, documentation, and web properties. We are beginning with these four terms: master, slave, blacklist, and whitelist. Because of the enormity of this endeavor, these changes will be implemented gradually over several upcoming releases. For more details, see our CTO Chris Wright’s message.
Chapter 1. CodeReady Workspaces architecture overview
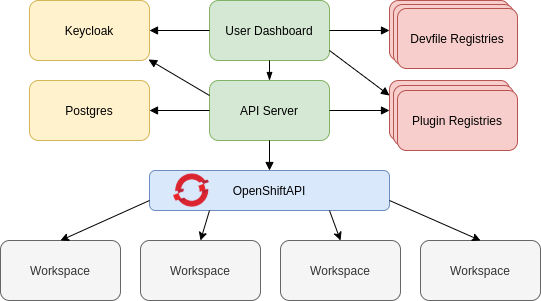
Red Hat CodeReady Workspaces components are:
- A central workspace controller: an always-running service that manages user workspaces through the OpenShift API.
- User workspaces: container-based IDEs that the controller stops when the user stops coding.
Figure 1.1. High-level CodeReady Workspaces architecture

When CodeReady Workspaces is installed on a OpenShift cluster, the workspace controller is the only component that is deployed. A CodeReady Workspaces workspace is created immediately after a user requests it.
Additional resources
1.1. Understanding CodeReady Workspaces workspace controller
This chapter describes the CodeReady Workspaces controller and the services that are a part of the controller.
1.1.1. CodeReady Workspaces workspace controller
The workspaces controller manages the container-based development environments: CodeReady Workspaces workspaces. To secure the development environments with authentication, the deployment is always multiuser and multitenant.
The following diagram shows the different services that are a part of the CodeReady Workspaces workspaces controller.
Figure 1.2. CodeReady Workspaces workspaces controller
Additional resources
1.1.2. CodeReady Workspaces server
The CodeReady Workspaces server is the central service of the workspaces controller. It is a Java web service that exposes an HTTP REST API to manage CodeReady Workspaces workspaces and CodeReady Workspaces users.
| Container image |
|
Additional resources
1.1.3. CodeReady Workspaces user dashboard
The user dashboard is the landing page of Red Hat CodeReady Workspaces. It is an Angular front-end application. CodeReady Workspaces users create, start, and manage CodeReady Workspaces workspaces from their browsers through the user dashboard.
| Container image |
|
1.1.4. CodeReady Workspaces Devfile registry
The CodeReady Workspaces devfile registry is a service that provides a list of CodeReady Workspaces stacks to create ready-to-use workspaces. This list of stacks is used in the Dashboard → Create Workspace window. The devfile registry runs in a container and can be deployed wherever the user dashboard can connect.
For more information about devfile registry customization, see the Customizing devfile registry section.
| Container image |
|
1.1.5. CodeReady Workspaces plug-in registry
The CodeReady Workspaces plug-in registry is a service that provides the list of plug-ins and editors for the CodeReady Workspaces workspaces. A devfile only references a plug-in that is published in a CodeReady Workspaces plug-in registry. It runs in a container and can be deployed wherever CodeReady Workspaces server connects.
| Container image |
|
1.1.6. CodeReady Workspaces and PostgreSQL
The PostgreSQL database is a prerequisite to configure CodeReady Workspaces. The CodeReady Workspaces administrator can choose to connect CodeReady Workspaces to an existing PostgreSQL instance or let the CodeReady Workspaces deployment start a new dedicated PostgreSQL instance.
The CodeReady Workspaces server uses the database to persist user configurations (workspaces metadata, Git credentials). RH-SSO uses the database as its back end to persist user information.
| Container image |
|
1.1.7. CodeReady Workspaces and RH-SSO
RH-SSO is a prerequisite to configure CodeReady Workspaces. The CodeReady Workspaces administrator can choose to connect CodeReady Workspaces to an existing RH-SSO instance or let the CodeReady Workspaces deployment start a new dedicated RH-SSO instance.
The CodeReady Workspaces server uses RH-SSO as an OpenID Connect (OIDC) provider to authenticate CodeReady Workspaces users and secure access to CodeReady Workspaces resources.
| Container image |
|
1.2. Understanding CodeReady Workspaces workspaces architecture
This chapter describes the architecture and components of CodeReady Workspaces.
1.2.1. CodeReady Workspaces workspaces architecture
A CodeReady Workspaces deployment on the cluster consists of the CodeReady Workspaces server component, a database for storing user profile and preferences, and several additional deployments hosting workspaces. The CodeReady Workspaces server orchestrates the creation of workspaces, which consist of a deployment containing the workspace containers and enabled plug-ins, plus the related components, such as:
- ConfigMaps
- services
- endpoints
- ingresses or routes
- secrets
- persistent volumes (PVs)
The CodeReady Workspaces workspace is a web application. It is composed of microservices running in containers that provide all the services of a modern IDE such as an editor, language auto-completion, and debugging tools. The IDE services are deployed with the development tools, packaged in containers and user runtime applications, which are defined as OpenShift resources.
The source code of the projects of a CodeReady Workspaces workspace is persisted in a OpenShift PersistentVolume. Microservices run in containers that have read-write access to the source code (IDE services, development tools), and runtime applications have read-write access to this shared directory.
The following diagram shows the detailed components of a CodeReady Workspaces workspace.
Figure 1.3. CodeReady Workspaces workspace components
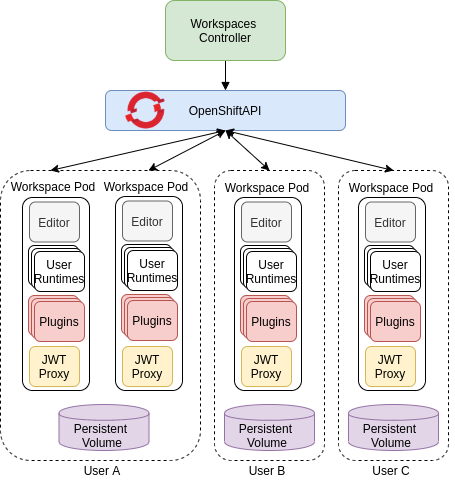
In the diagram, there are four running workspaces: two belonging to User A, one to User B and one to User C.
Use the devfile format to specify the tools and runtime applications of a CodeReady Workspaces workspace.
1.2.2. CodeReady Workspaces workspace components
This section describes the components of a CodeReady Workspaces workspace.
1.2.2.1. Che Editor plug-in
A Che Editor plug-in is a CodeReady Workspaces workspace plug-in. It defines the web application that is used as an editor in a workspace. The default CodeReady Workspaces workspace editor is Che-Theia. It is a web-based source-code editor similar to Visual Studio Code (VS Code). It has a plug-in system that supports VS Code extensions.
| Source code | |
| Container image |
|
| Endpoints |
|
Additional resources
1.2.2.2. CodeReady Workspaces user runtimes
Use any non-terminating user container as a user runtime. An application that can be defined as a container image or as a set of OpenShift resources can be included in a CodeReady Workspaces workspace. This makes it easy to test applications in the CodeReady Workspaces workspace.
To test an application in the CodeReady Workspaces workspace, include the application YAML definition used in stage or production in the workspace specification. It is a 12-factor application development / production parity.
Examples of user runtimes are Node.js, SpringBoot or MongoDB, and MySQL.
1.2.2.3. CodeReady Workspaces workspace JWT proxy
The JWT proxy is responsible for securing the communication of the CodeReady Workspaces workspace services.
An HTTP proxy is used to sign outgoing requests from a workspace service to the CodeReady Workspaces server and to authenticate incoming requests from the IDE client running on a browser.
| Source code | |
| Container image |
|
1.2.2.4. CodeReady Workspaces plug-ins broker
Plug-in brokers are special services that, given a plug-in meta.yaml file:
- Gather all the information to provide a plug-in definition that the CodeReady Workspaces server knows.
- Perform preparation actions in the workspace project (download, unpack files, process configuration).
The main goal of the plug-in broker is to decouple the CodeReady Workspaces plug-ins definitions from the actual plug-ins that CodeReady Workspaces can support. With brokers, CodeReady Workspaces can support different plug-ins without updating the CodeReady Workspaces server.
The CodeReady Workspaces server starts the plug-in broker. The plug-in broker runs in the same OpenShift project as the workspace. It has access to the plug-ins and project persistent volumes.
A plug-ins broker is defined as a container image (for example, eclipse/che-plugin-broker). The plug-in type determines the type of the broker that is started. Two types of plug-ins are supported: Che Plugin and Che Editor.
| Source code | |
| Container image |
|
1.2.3. CodeReady Workspaces workspace creation flow

The following is a CodeReady Workspaces workspace creation flow:
A user starts a CodeReady Workspaces workspace defined by:
- An editor (the default is Che-Theia)
- A list of plug-ins (for example, Java and OpenShift tools)
- A list of runtime applications
- CodeReady Workspaces server retrieves the editor and plug-in metadata from the plug-in registry.
- For every plug-in type, CodeReady Workspaces server starts a specific plug-in broker.
The CodeReady Workspaces plug-ins broker transforms the plug-in metadata into a Che Plugin definition. It executes the following steps:
- Downloads a plug-in and extracts its content.
-
Processes the plug-in
meta.yamlfile and sends it back to CodeReady Workspaces server in the format of a Che Plugin.
- CodeReady Workspaces server starts the editor and the plug-in sidecars.
- The editor loads the plug-ins from the plug-in persistent volume.
Chapter 2. Calculating CodeReady Workspaces resource requirements
This section describes how to calculate resources, such as memory and CPU, required to run Red Hat CodeReady Workspaces.
Both the CodeReady Workspaces central controller and user workspaces consist of a set of containers. Those containers contribute to the resources consumption in terms of CPU and RAM limits and requests.
2.1. Controller requirements
The Workspace Controller consists of a set of five services running in five distinct containers. The following table presents the default resource requirements of each of these services.
Table 2.1. ControllerServices
| Pod | Container name | Default memory limit | Default memory request |
|---|---|---|---|
| CodeReady Workspaces Server and Dashboard | che | 1 GiB | 512 MiB |
| PostgreSQL |
| 1 GiB | 512 MiB |
| RH-SSO |
| 2 GiB | 512 MiB |
| Devfile registry |
| 256 MiB | 16 MiB |
| Plug-in registry |
| 256 MiB | 16 MiB |
These default values are sufficient when the CodeReady Workspaces Workspace Controller manages a small amount of CodeReady Workspaces workspaces. For larger deployments, increase the memory limit. See the Advanced configuration options for the CodeReady Workspaces server component article for instructions on how to override the default requests and limits. For example, the Eclipse Che hosted by Red Hat that runs on https://workspaces.openshift.com uses 1 GB of memory.
Additional resources
2.2. Workspaces requirements
This section describes how to calculate the resources required for a workspace. It is the sum of the resources required for each component of this workspace.
These examples demonstrate the necessity of a proper calculation:
- A workspace with ten active plug-ins requires more resources than the same workspace with fewer plug-ins.
- A standard Java workspace requires more resources than a standard Node.js workspace because running builds, tests, and application debugging requires more resources.
Procedure
-
Identify the workspace components explicitly specified in the
componentssection of the Authoring a devfile 2.0.0. Identify the implicit workspace components:
-
CodeReady Workspaces implicitly loads the default
cheEditor:che-theia, and thechePluginthat allows commands execution:che-machine-exec-plugin. To change the default editor, add acheEditorcomponent section in the devfile. - The JWT Proxy component is responsible for the authentication and authorization of the external communications of the workspace components.
-
CodeReady Workspaces implicitly loads the default
Calculate the requirements for each component:
Default values:
The following table displays the default requirements for all workspace components, and the corresponding CodeReady Workspaces server properties. Use the CodeReady Workspaces server properties to modify the defaults cluster-wide.
Table 2.2. Default requirements of workspace components by type
Component types CodeReady Workspaces server property Default memory limit Default memory request chePluginche.workspace.sidecar.default_memory_limit_mb128 MiB
64 MiB
cheEditorche.workspace.sidecar.default_memory_limit_mb128 MiB
64 MiB
kubernetes,openshift,dockerimageche.workspace.default_memory_limit_mb,che.workspace.default_memory_request_mb1 Gi
200 MiB
JWT Proxyche.server.secure_exposer.jwtproxy.memory_limit,che.server.secure_exposer.jwtproxy.memory_request128 MiB
15 MiB
Custom requirements for
chePluginsandcheEditorscomponents:Custom memory limit and request:
Define the
memoryLimitandmemoryRequestattributes of thecontainerssection of themeta.yamlfile to configure the memory limit of thechePluginsorcheEditorscomponents. CodeReady Workspaces automatically sets the memory request to match the memory limit if it is not specified explicitly.Example 2.1. The
chePluginche-incubator/typescript/latestmeta.yamlspec section:spec: containers: - image: docker.io/eclipse/che-remote-plugin-node:next name: vscode-typescript memoryLimit: 512Mi memoryRequest: 256MiThis results in a container with the following memory limit and request:
Memory limit
512 MiB
Memory request
256 MiB
NoteFor IBM Power Systems (ppc64le), the memory limit for some plugins has been increased by up to 1.5G to allow pods sufficient RAM to run. For example, on IBM Power Systems (ppc64le), the Theia editor pod requires 2G; the OpenShift connector pod requires 2.5G. For AMD64 and Intel 64 (x86_64) and IBM Z (s390x), memory requirements remain lower at 512M and 1500M respectively. However, some devfiles may still be configured to set the lower limit valid for AMD64 and Intel 64 (x86_64) and IBM Z (s390x), so to work around this, edit devfiles for workspaces that are crashing to increase the default memoryLimit by at least 1 - 1.5 GB.
NoteHow to find the
meta.yamlfile ofchePluginCommunity plug-ins are available in the CodeReady Workspaces plug-ins registry repository in folder
v3/plugins/${organization}/${name}/${version}/.For non-community or customized plug-ins, the
meta.yamlfiles are available on the local OpenShift cluster at${pluginRegistryEndpoint}/v3/plugins/${organization}/${name}/${version}/meta.yaml.Custom CPU limit and request:
CodeReady Workspaces does not set CPU limits and requests by default. However, it is possible to configure CPU limits for the
chePluginandcheEditortypes in themeta.yamlfile or in the devfile in the same way as it done for memory limits.Example 2.2. The
chePluginche-incubator/typescript/latestmeta.yamlspec section:spec: containers: - image: docker.io/eclipse/che-remote-plugin-node:next name: vscode-typescript cpuLimit: 2000m cpuRequest: 500mIt results in a container with the following CPU limit and request:
CPU limit
2 cores
CPU request
0.5 cores
To set CPU limits and requests globally, use the following dedicated environment variables:
|
|
|
|
|
|
See also Advanced configuration options for the CodeReady Workspaces server component.
Note that the LimitRange object of the OpenShift project may specify defaults for CPU limits and requests set by cluster administrators. To prevent start errors due to resources overrun, limits on application or workspace levels must comply with those settings.
Custom requirements for
dockerimagecomponentsDefine the
memoryLimitandmemoryRequestattributes of the devfile to configure the memory limit of adockerimagecontainer. CodeReady Workspaces automatically sets the memory request to match the memory limit if it is not specified explicitly.- alias: maven type: dockerimage image: eclipse/maven-jdk8:latest memoryLimit: 1536MCustom requirements for
kubernetesoropenshiftcomponents:The referenced manifest may define the memory requirements and limits.
- Add all previously calculated requirements.
Additional resources
2.3. A workspace example
This section describes a CodeReady Workspaces workspace example.
The following devfile defines the CodeReady Workspaces workspace:
apiVersion: 1.0.0
metadata:
 generateName: guestbook-nodejs-sample-
projects:
  - name: guestbook-nodejs-sample
    source:
      location: 'https://github.com/crw-samples/nodejs-mongodb-sample'
      type: git
components:
  - id: vscode/typescript-language-features/latest
    type: chePlugin
  - mountSources: true
    type: kubernetes
    entrypoints:
      - command:
          - sleep
        args:
          - infinity
    reference: 'https://raw.githubusercontent.com/crw-samples/nodejs-mongodb-sample/master/kubernetes-manifests/guestbook-app.deployment.yaml'
    alias: guestbook-frontend
This table provides the memory requirements for each workspace component:
Table 2.3. Total workspace memory requirement and limit
| Pod | Container name | Default memory limit | Default memory request |
|---|---|---|---|
| Workspace |
theia-ide (default | 512 MiB | 512 MiB |
| Workspace |
machine-exec (default | 128 MiB | 32 MiB |
| Workspace |
vscode-typescript ( | 512 MiB | 512 MiB |
| Workspace |
nodejs ( | 1 GiB | 512 MiB |
| JWT Proxy | verifier | 128 MiB | 128 MiB |
| Total | 2.25 GiB | 1.38 GiB | |
-
The
theia-ideandmachine-execcomponents are implicitly added to the workspace, even when not included in the devfile. -
The resources required by
machine-execare the default forchePlugin. -
The resources for
theia-ideare specifically set in thecheEditormeta.yamlto 512 MiB asmemoryLimit. -
The Typescript VS Code extension has also overridden the default memory limits. In its
meta.yamlfile, the limits are explicitly specified to 512 MiB. - CodeReady Workspaces is applying the defaults for the dockerimage component type: a memory limit of 1 GiB and a memory request of 512 MiB.
- The JWT container requires 128 MiB of memory.
Adding all together results in 1.38 GiB of memory requests with a 2.25 GiB limit.
Additional resources
Chapter 3. Customizing the registries
This chapter describes how to build and run custom registries for CodeReady Workspaces.
3.1. Understanding the CodeReady Workspaces registries
CodeReady Workspaces uses two registries: the plug-ins registry and the devfile registry. They are static websites publishing the metadata of CodeReady Workspaces plug-ins and devfiles. When built in offline mode they also include artifacts.
The devfile and plug-in registries run in two separate Pods. Their deployment is part of the CodeReady Workspaces installation.
The devfile and plug-in registries
- The devfile registry
-
The devfile registry holds the definitions of the CodeReady Workspaces stacks. Stacks are available on the CodeReady Workspaces user dashboard when selecting Create Workspace. It contains the list of CodeReady Workspaces technological stack samples with example projects. When built in offline mode it also contains all sample projects referenced in devfiles as
zipfiles. - The plug-in registry
- The plug-in registry makes it possible to share a plug-in definition across all the users of the same instance of CodeReady Workspaces. When built in offline mode it also contains all plug-in or extension artifacts.
Additional resources
3.2. Building custom registry images
3.2.1. Building a custom devfile registry image
This section describes how to build a custom devfile registry image. The procedure explains how to add a devfile. The image contains all sample projects referenced in devfiles.
Prerequisites
- A running installation of podman or docker.
- Valid content for the devfile to add. See: Authoring a devfile 2.0.0.
Procedure
Clone the devfile registry repository and check out the version to deploy:
$ git clone git@github.com:redhat-developer/codeready-workspaces.git
$ cd codeready-workspaces
$ git checkout crw-2.12-rhel-8
In the
./dependencies/che-devfile-registry/devfiles/directory, create a subdirectory<devfile-name>/and add thedevfile.yamlandmeta.yamlfiles.Example 3.1. File organization for a devfile
./dependencies/che-devfile-registry/devfiles/ └── <devfile-name> ├── devfile.yaml └── meta.yaml-
Add valid content in the
devfile.yamlfile. For a detailed description of the devfile format, see Authoring a devfile 2.0.0. Ensure that the
meta.yamlfile conforms to the following structure:Table 3.1. Parameters for a devfile
meta.yamlAttribute Description descriptionDescription as it appears on the user dashboard.
displayNameName as it appears on the user dashboard.
iconLink to an
.svgfile that is displayed on the user dashboard.tagsList of tags. Tags typically include the tools included in the stack.
globalMemoryLimitOptional parameter: the sum of the expected memory consumed by all the components launched by the devfile. This number will be visible on the user dashboard. It is informative and is not taken into account by the CodeReady Workspaces server.
Example 3.2. Example devfile
meta.yamldisplayName: Rust description: Rust Stack with Rust 1.39 tags: ["Rust"] icon: https://www.eclipse.org/che/images/logo-eclipseche.svg globalMemoryLimit: 1686Mi
Build a custom devfile registry image:
$ cd dependencies/che-devfile-registry
$ ./build.sh --organization <my-org> \
           --registry <my-registry> \
           --tag <my-tag>
NoteTo display full options for the
build.shscript, use the--helpparameter.
Additional resources
3.2.2. Building a custom plug-ins registry image
This section describes how to build a custom plug-ins registry image. The procedure explains how to add a plug-in. The image contains plug-ins or extensions metadata.
Prerequisites
- Node.js 12.x
- A running version of yarn. See: Installing Yarn.
-
./node_modules/.binis in thePATHenvironment variable. - A running installation of podman or docker.
Procedure
Clone the plug-ins registry repository and check out the version to deploy:
$ git clone git@github.com:redhat-developer/codeready-workspaces.git
$ cd codeready-workspaces
$ git checkout crw-2.12-rhel-8
-
In the
./dependencies/che-plugin-registry/directory, edit theche-theia-plugins.yamlfile. -
Add valid content to the
che-theia-plugins.yamlfile, for detailed information see: Adding a VS Code extension to the Che plug-ins registry. Build a custom plug-ins registry image:
$ cd dependencies/che-plugin-registry
$ ./build.sh --organization <my-org> \
           --registry <my-registry> \
           --tag <my-tag>
NoteTo display full options for the
build.shscript, use the--helpparameter. To include the plug-in binaries in the registry image, add the--offlineparameter.Observe the contents of
./dependencies/che-plugin-registry/v3/plugins/present in the container after building the registry. Allmeta.yamlfiles resulting from a successful plug-ins registry build will be located here../dependencies/che-plugin-registry/v3/plugins/ ├── <publisher> │ └── <plugin-name> │ ├── latest │ │ └── meta.yaml │ └── latest.txt
Additional resources
3.3. Running custom registries
Prerequisites
The my-plug-in-registry and my-devfile-registry images used in this section are built using the docker command. This section assumes that these images are available on the OpenShift cluster where CodeReady Workspaces is deployed.
These images can be then pushed to:
-
A public container registry such as
quay.io, or the DockerHub. - A private registry.
3.3.1. Deploying registries in OpenShift
Procedure
An OpenShift template to deploy the plug-in registry is available in the deploy/openshift/ directory of the GitHub repository.
To deploy the plug-in registry using the OpenShift template, run the following command:
NAMESPACE=<namespace-name>  1
IMAGE_NAME="my-plug-in-registry"
IMAGE_TAG="latest"
oc new-app -f openshift/che-plugin-registry.yml \
 -n "$\{NAMESPACE}" \
 -p IMAGE="$\{IMAGE_NAME}" \
 -p IMAGE_TAG="$\{IMAGE_TAG}" \
 -p PULL_POLICY="Always"
- 1
- If installed using crwctl, the default CodeReady Workspaces project is
openshift-workspaces. The OperatorHub installation method deploys CodeReady Workspaces to the users current project.
The devfile registry has an OpenShift template in the
deploy/openshift/directory of the GitHub repository. To deploy it, run the command:NAMESPACE=<namespace-name> 1 IMAGE_NAME="my-devfile-registry" IMAGE_TAG="latest" oc new-app -f openshift/che-devfile-registry.yml \ -n "$\{NAMESPACE}" \ -p IMAGE="$\{IMAGE_NAME}" \ -p IMAGE_TAG="$\{IMAGE_TAG}" \ -p PULL_POLICY="Always"
- 1
- If installed using crwctl, the default CodeReady Workspaces project is
openshift-workspaces. The OperatorHub installation method deploys CodeReady Workspaces to the users current project.
Verification steps
The <plug-in> plug-in is available in the plug-in registry.
Example 3.3. Find <plug-in> requesting the plug-in registry API.
$ URL=$(oc  get route -l app=che,component=plugin-registry \
  -o 'custom-columns=URL:.spec.host' --no-headers)
$ INDEX_JSON=$(curl -sSL http://${URL}/v3/plugins/index.json)
$ echo ${INDEX_JSON} | jq '.[] | select(.name == "<plug-in>")'
The <devfile> devfile is available in the devfile registry.
Example 3.4. Find <devfile> requesting the devfile registry API.
$ URL=$(oc  get route -l app=che,component=devfile-registry \
  -o 'custom-columns=URL:.spec.host' --no-headers)
$ INDEX_JSON=$(curl -sSL http://${URL}/v3/plugins/index.json)
$ echo ${INDEX_JSON} | jq '.[] | select(.name == "<devfile>")'
CodeReady Workspaces server points to the URL of the plug-in registry.
Example 3.5. Compare the value of the
CHE_WORKSPACE_PLUGIN__REGISTRY__URLparameter in thecheConfigMap with the URL of the plug-in registry route.Get the value of the
CHE_WORKSPACE_PLUGIN__REGISTRY__URLparameter in thecheConfigMap.$ oc get cm/che \ -o "custom-columns=URL:.data['CHE_WORKSPACE_PLUGIN__REGISTRY__URL']" \ --no-headers
Get the URL of the plug-in registry route.
$ oc  get route -l app=che,component=plugin-registry \
  -o 'custom-columns=URL: .spec.host' --no-headers
CodeReady Workspaces server points to the URL of the devfile registry.
Example 3.6. Compare the value of the
CHE_WORKSPACE_DEVFILE__REGISTRY__URLparameter in thecheConfigMap with the URL of the devfile registry route.Get the value of the
CHE_WORKSPACE_DEVFILE__REGISTRY__URLparameter in thecheConfigMap.$ oc get cm/che \ -o "custom-columns=URL:.data['CHE_WORKSPACE_DEVFILE__REGISTRY__URL']" \ --no-headers
Get the URL of the devfile registry route.
$ oc  get route -l app=che,component=devfile-registry \
  -o 'custom-columns=URL: .spec.host' --no-headers
If the values do not match, update the ConfigMap and restart the CodeReady Workspaces server.
$ oc  edit cm/codeready
(...)
$ oc  scale --replicas=0 deployment/codeready
$ oc  scale --replicas=1 deployment/codeready
The plug-ins are available in the:
- Completion to chePlugin components in the Devfile tab of a workspace details
- Plugin Che-Theia view of a workspace
- The devfiles are available in the Quick Add and Custom Workspace tab of the Create Workspace page on the user dashboard.
3.3.2. Adding a custom plug-in registry in an existing CodeReady Workspaces workspace
The following section describes two methods of adding a custom plug-in registry in an existing CodeReady Workspaces workspace:
- Adding a custom plug-in registry using Command palette - For adding a new custom plug-in registry quickly, with a use of text inputs from Command palette command. This method does not allow a user to edit already existing information, such as plug-in registry URL or name.
-
Adding a custom plug-in registry using the
settings.jsonfile - For adding a new custom plug-in registry and editing of the already existing entries.
3.3.2.1. Adding a custom plug-in registry using Command Palette
Prerequisites
- An instance of CodeReady Workspaces
Procedure
In the CodeReady Workspaces IDE, press F1 to open the Command Palette, or navigate to View → Find Command in the top menu.
The command palette can be also activated by pressing Ctrl+Shift+p (or Cmd+Shift+p on macOS).
-
Enter the
Add Registrycommand into the search box and pres Enter once filled. Enter the registry name and registry URL in next two command prompts.
- After adding a new plug-in registry, the list of plug-ins in the Plug-ins view is refreshed, and if the new plug-in registry is not valid, a user is notified by a warning message.
3.3.2.2. Adding a custom plug-in registry using the settings.json file
The following section describes the use of the main CodeReady Workspaces Settings menu to edit and add a new plug-in registry using the settings.json file.
Prerequisites
- An instance of CodeReady Workspaces
Procedure
- From the main CodeReady Workspaces screen, select Open Preferences by pressing Ctrl+, or using the gear wheel icon on the left bar.
Select Che Plug-ins and continue by Edit in
setting.jsonlink.The
setting.jsonfile is displayed.Add a new plug-in registry using the
chePlugins.repositoriesattribute as shown below:{ “application.confirmExit”: “never”, “chePlugins.repositories”: {“test”: “https://test.com”} }Save the changes to add a custom plug-in registry in an existing CodeReady Workspaces workspace.
-
A newly added plug-in validation tool checks the correctness of URL values set in the
chePlugins.repositoriesfield of thesettings.jsonfile. -
After adding a new plug-in registry, the list of plug-ins in the Plug-ins view is refreshed, and if the new plug-in registry is not valid, a user is notified by a warning message. This check is also functional for plug-ins added using the Command palette command
Add plugin registry.
-
A newly added plug-in validation tool checks the correctness of URL values set in the
Chapter 4. Retrieving CodeReady Workspaces logs
For information about obtaining various types of logs in CodeReady Workspaces, see the following sections:
4.1. Configuring server logging
It is possible to fine-tune the log levels of individual loggers available in the CodeReady Workspaces server.
The log level of the whole CodeReady Workspaces server is configured globally using the cheLogLevel configuration property of the Operator. To set the global log level in installations not managed by the Operator, specify the CHE_LOG_LEVEL environment variable in the che ConfigMap.
It is possible to configure the log levels of the individual loggers in the CodeReady Workspaces server using the CHE_LOGGER_CONFIG environment variable.
4.1.1. Configuring log levels
The format of the value of the CHE_LOGGER_CONFIG property is a list of comma-separated key-value pairs, where keys are the names of the loggers as seen in the CodeReady Workspaces server log output and values are the required log levels.
In Operator-based deployments, the CHE_LOGGER_CONFIG variable is specified under the customCheProperties of the custom resource.
For example, the following snippet would make the WorkspaceManager produce the DEBUG log messages.
...
server:
  customCheProperties:
    CHE_LOGGER_CONFIG: "org.eclipse.che.api.workspace.server.WorkspaceManager=DEBUG"
4.1.2. Logger naming
The names of the loggers follow the class names of the internal server classes that use those loggers.
4.1.3. Logging HTTP traffic
It is possible to log the HTTP traffic between the CodeReady Workspaces server and the API server of the Kubernetes or OpenShift cluster. To do that, one has to set the che.infra.request-logging logger to the TRACE level.
...
server:
  customCheProperties:
    CHE_LOGGER_CONFIG: "che.infra.request-logging=TRACE"
4.2. Accessing OpenShift events on OpenShift
For high-level monitoring of OpenShift projects, view the OpenShift events that the project performs.
This section describes how to access these events in the OpenShift web console.
Prerequisites
- A running OpenShift web console.
Procedure
- In the left panel of the OpenShift web console, click the Home → Events.
- To view the list of all events for a particular project, select the project from the list.
- The details of the events for the current project are displayed.
Additional resources
- For a list of OpenShift events, see Comprehensive List of Events in OpenShift documentation.
4.3. Viewing the state of the CodeReady Workspaces cluster deployment using OpenShift 4 CLI tools
This section describes how to view the state of the CodeReady Workspaces cluster deployment using OpenShift 4 CLI tools.
Prerequisites
- An instance of Red Hat CodeReady Workspaces running on OpenShift.
-
An installation of the OpenShift command-line tool,
oc.
Procedure
Run the following commands to select the
crwproject:$ oc project <project_name>Run the following commands to get the name and status of the Pods running in the selected project:
$ oc get pods
Check that the status of all the Pods is
Running.Example 4.1. Pods with status
RunningNAME READY STATUS RESTARTS AGE codeready-8495f4946b-jrzdc 0/1 Running 0 86s codeready-operator-578765d954-99szc 1/1 Running 0 42m keycloak-74fbfb9654-g9vp5 1/1 Running 0 4m32s postgres-5d579c6847-w6wx5 1/1 Running 0 5m14s
To see the state of the CodeReady Workspaces cluster deployment, run:
$ oc logs --tail=10 -f `(oc get pods -o name | grep operator)`
Example 4.2. Logs of the Operator:
time="2019-07-12T09:48:29Z" level=info msg="Exec successfully completed"
time="2019-07-12T09:48:29Z" level=info msg="Updating eclipse-che CR with status: provisioned with OpenShift identity provider: true"
time="2019-07-12T09:48:29Z" level=info msg="Custom resource eclipse-che updated"
time="2019-07-12T09:48:29Z" level=info msg="Creating a new object: ConfigMap, name: che"
time="2019-07-12T09:48:29Z" level=info msg="Creating a new object: ConfigMap, name: custom"
time="2019-07-12T09:48:29Z" level=info msg="Creating a new object: Deployment, name: che"
time="2019-07-12T09:48:30Z" level=info msg="Updating eclipse-che CR with status: CodeReady Workspaces API: Unavailable"
time="2019-07-12T09:48:30Z" level=info msg="Custom resource eclipse-che updated"
time="2019-07-12T09:48:30Z" level=info msg="Waiting for deployment che. Default timeout: 420 seconds"
4.4. Viewing CodeReady Workspaces server logs
This section describes how to view the CodeReady Workspaces server logs using the command line.
4.4.1. Viewing the CodeReady Workspaces server logs using the OpenShift CLI
This section describes how to view the CodeReady Workspaces server logs using the OpenShift CLI (command line interface).
Procedure
In the terminal, run the following command to get the Pods:
$ oc get pods
Example
$ oc get pods
NAME            READY  STATUS   RESTARTS  AGE
codeready-11-j4w2b    1/1    Running  0         3m
To get the logs for a deployment, run the following command:
$ oc logs <name-of-pod>Example
$ oc logs codeready-11-j4w2b
4.5. Viewing external service logs
This section describes how the view the logs from external services related to CodeReady Workspaces server.
4.5.1. Viewing RH-SSO logs
The RH-SSO OpenID provider consists of two parts: Server and IDE. It writes its diagnostics or error information to several logs.
4.5.1.1. Viewing the RH-SSO server logs
This section describes how to view the RH-SSO OpenID provider server logs.
Procedure
- In the OpenShift Web Console, click Deployments.
-
In the Filter by label search field, type
keycloakto see the RH-SSO logs.
. In the Deployment Configs section, click the keycloak link to open it.
- In the History tab, click the View log link for the active RH-SSO deployment.
- The RH-SSO logs are displayed.
Additional resources
- See the Section 4.4, “Viewing CodeReady Workspaces server logs” for diagnostics and error messages related to the RH-SSO IDE Server.
4.5.1.2. Viewing the RH-SSO client logs on Firefox
This section describes how to view the RH-SSO IDE client diagnostics or error information in the Firefox WebConsole.
Procedure
- Click Menu > WebDeveloper > WebConsole.
4.5.1.3. Viewing the RH-SSO client logs on Google Chrome
This section describes how to view the RH-SSO IDE client diagnostics or error information in the Google Chrome Console tab.
Procedure
- Click Menu > More Tools > Developer Tools.
- Click the Console tab.
4.5.2. Viewing the CodeReady Workspaces database logs
This section describes how to view the database logs in CodeReady Workspaces, such as PostgreSQL server logs.
Procedure
- In the OpenShift Web Console, click Deployments.
In the Find by label search field, type:
-
app=cheand press Enter component=postgresand press EnterThe OpenShift Web Console is searching base on those two keys and displays PostgreSQL logs.
-
-
Click
postgresdeployment to open it. Click the View log link for the active PostgreSQL deployment.
The OpenShift Web Console displays the database logs.
Additional resources
- Some diagnostics or error messages related to the PostgreSQL server can be found in the active CodeReady Workspaces deployment log. For details to access the active CodeReady Workspaces deployments logs, see the Section 4.4, “Viewing CodeReady Workspaces server logs” section.
4.6. Viewing the plug-in broker logs
This section describes how to view the plug-in broker logs.
The che-plugin-broker Pod itself is deleted when its work is complete. Therefore, its event logs are only available while the workspace is starting.
Procedure
To see logged events from temporary Pods:
- Start a CodeReady Workspaces workspace.
- From the main OpenShift Container Platform screen, go to Workload → Pods.
- Use the OpenShift terminal console located in the Pod’s Terminal tab
Verification step
- OpenShift terminal console displays the plug-in broker logs while the workspace is starting
4.7. Collecting logs using crwctl
It is possible to get all Red Hat CodeReady Workspaces logs from a OpenShift cluster using the crwctl tool.
-
crwctl server:deployautomatically starts collecting Red Hat CodeReady Workspaces servers logs during installation of Red Hat CodeReady Workspaces -
crwctl server:logscollects existing Red Hat CodeReady Workspaces server logs -
crwctl workspace:logscollects workspace logs
Chapter 5. Monitoring CodeReady Workspaces
This chapter describes how to configure CodeReady Workspaces to expose metrics and how to build an example monitoring stack with external tools to process data exposed as metrics by CodeReady Workspaces.
5.1. Enabling and exposing CodeReady Workspaces metrics
This section describes how to enable and expose CodeReady Workspaces metrics.
Procedure
-
Set the
CHE_METRICS_ENABLED=trueenvironment variable, which will expose the8087port as a service on the che-master host.
When Red Hat CodeReady Workspaces is installed from the OperatorHub, the environment variable is set automatically if the default CheCluster CR is used:

spec:
  metrics:
    enable: true
5.2. Collecting CodeReady Workspaces metrics with Prometheus
This section describes how to use the Prometheus monitoring system to collect, store and query metrics about CodeReady Workspaces.
Prerequisites
-
CodeReady Workspaces is exposing metrics on port
8087. See Enabling and exposing che metrics. -
Prometheus 2.9.1 or higher is running. The Prometheus console is running on port
9090with a corresponding service and route. See First steps with Prometheus.
Procedure
Configure Prometheus to scrape metrics from the
8087port:Example 5.1. Prometheus configuration example
apiVersion: v1 kind: ConfigMap metadata: name: prometheus-config data: prometheus.yml: |- global: scrape_interval: 5s 1 evaluation_interval: 5s 2 scrape_configs: 3 - job_name: 'che' static_configs: - targets: ['[che-host]:8087'] 4- 1
- Rate, at which a target is scraped.
- 2
- Rate, at which recording and alerting rules are re-checked (not used in the system at the moment).
- 3
- Resources Prometheus monitors. In the default configuration, there is a single job called
che, which scrapes the time series data exposed by the CodeReady Workspaces server. - 4
- Scrape metrics from the
8087port.
Verification steps
Use the Prometheus console to query and view metrics.
Metrics are available at:
http://<che-server-url>:9090/metrics.For more information, see Using the expression browser in the Prometheus documentation.
Additional resources
Chapter 6. Tracing CodeReady Workspaces
Tracing helps gather timing data to troubleshoot latency problems in microservice architectures and helps to understand a complete transaction or workflow as it propagates through a distributed system. Every transaction may reflect performance anomalies in an early phase when new services are being introduced by independent teams.
Tracing the CodeReady Workspaces application may help analyze the execution of various operations, such as workspace creations, workspace startup, breaking down the duration of sub-operations executions, helping finding bottlenecks and improve the overall state of the platform.
Tracers live in applications. They record timing and metadata about operations that take place. They often instrument libraries, so that their use is indiscernible to users. For example, an instrumented web server records when it received a request and when it sent a response. The trace data collected is called a span. A span has a context that contains information such as trace and span identifiers and other kinds of data that can be propagated down the line.
6.1. Tracing API
CodeReady Workspaces utilizes OpenTracing API - a vendor-neutral framework for instrumentation. This means that if a developer wants to try a different tracing back end, then rather than repeating the whole instrumentation process for the new distributed tracing system, the developer can simply change the configuration of the tracer back end.
6.2. Tracing back end
By default, CodeReady Workspaces uses Jaeger as the tracing back end. Jaeger was inspired by Dapper and OpenZipkin, and it is a distributed tracing system released as open source by Uber Technologies. Jaeger extends a more complex architecture for a larger scale of requests and performance.
6.3. Installing the Jaeger tracing tool
The following sections describe the installation methods for the Jaeger tracing tool. Jaeger can then be used for gathering metrics in CodeReady Workspaces.
Installation methods available:
For tracing a CodeReady Workspaces instance using Jaeger, version 1.12.0 or above is required. For additional information about Jaeger, see the Jaeger website.
6.3.1. Installing Jaeger using OperatorHub on OpenShift 4
This section provide information about using Jaeger tracing tool for testing an evaluation purposes in production.
To install the Jaeger tracing tool from the OperatorHub interface in OpenShift Container Platform, follow the instructions below.
Prerequisites
- The user is logged in to the OpenShift Container Platform Web Console.
- A CodeReady Workspaces instance is available in a project.
Procedure
- Open the OpenShift Container Platform console.
- From the left menu of the main OpenShift Container Platform screen, navigate to Operators → OperatorHub.
-
In the Search by keyword search bar, type
Jaeger Operator. -
Click the
Jaeger Operatortile. -
Click the button in the
Jaeger Operatorpop-up window. -
Select the installation method:
A specific project on the clusterwhere the CodeReady Workspaces is deployed and leave the rest in its default values. - Click the Subscribe button.
- From the left menu of the main OpenShift Container Platform screen, navigate to the Operators → Installed Operators section.
- Red Hat CodeReady Workspaces is displayed as an Installed Operator, as indicated by the InstallSucceeded status.
- Click the Jaeger Operator name in the list of installed Operators.
- Navigate to the Overview tab.
-
In the Conditions sections at the bottom of the page, wait for this message:
install strategy completed with no errors. -
Jaeger Operatorand additionalElasticsearch Operatoris installed. - Navigate to the Operators → Installed Operators section.
- Click Jaeger Operator in the list of installed Operators.
- The Jaeger Cluster page is displayed.
- In the lower left corner of the window, click Create Instance
- Click Save.
-
OpenShift creates the Jaeger cluster
jaeger-all-in-one-inmemory. - Follow the steps in Enabling metrics collection to finish the procedure.
6.3.2. Installing Jaeger using CLI on OpenShift 4
This section provide information about using Jaeger tracing tool for testing an evaluation purposes.
To install the Jaeger tracing tool from a CodeReady Workspaces project in OpenShift Container Platform, follow the instructions in this section.
Prerequisites
- The user is logged in to the OpenShift Container Platform web console.
- A instance of CodeReady Workspaces in an OpenShift Container Platform cluster.
Procedure
In the CodeReady Workspaces installation project of the OpenShift Container Platform cluster, use the
occlient to create a new application for the Jaeger deployment.$ oc new-app -f / ${CHE_LOCAL_GIT_REPO}/deploy/openshift/templates/jaeger-all-in-one-template.yml: --> Deploying template "<project_name>/jaeger-template-all-in-one" for "/home/user/crw-projects/crw/deploy/openshift/templates/jaeger-all-in-one-template.yml" to project <project_name> Jaeger (all-in-one) --------- Jaeger Distributed Tracing Server (all-in-one) * With parameters: * Jaeger Service Name=jaeger * Image version=latest * Jaeger Zipkin Service Name=zipkin --> Creating resources ... deployment.apps "jaeger" created service "jaeger-query" created service "jaeger-collector" created service "jaeger-agent" created service "zipkin" created route.route.openshift.io "jaeger-query" created --> Success Access your application using the route: 'jaeger-query-<project_name>.apps.ci-ln-whx0352-d5d6b.origin-ci-int-aws.dev.rhcloud.com' Run 'oc status' to view your app.- Using the Workloads → Deployments from the left menu of main OpenShift Container Platform screen, monitor the Jaeger deployment until it finishes successfully.
- Select Networking → Routes from the left menu of the main OpenShift Container Platform screen, and click the URL link to access the Jaeger dashboard.
- Follow the steps in Enabling metrics collection to finish the procedure.
6.4. Enabling metrics collection
Prerequisites
- Installed Jaeger v1.12.0 or above. See instructions at Section 6.3, “Installing the Jaeger tracing tool”
Procedure
For Jaeger tracing to work, enable the following environment variables in your CodeReady Workspaces deployment:
# Activating CodeReady Workspaces tracing modules
CHE_TRACING_ENABLED=true

# Following variables are the basic Jaeger client library configuration.
JAEGER_ENDPOINT="http://jaeger-collector:14268/api/traces"

# Service name
JAEGER_SERVICE_NAME="che-server"

# URL to remote sampler
JAEGER_SAMPLER_MANAGER_HOST_PORT="jaeger:5778"

# Type and param of sampler (constant sampler for all traces)
JAEGER_SAMPLER_TYPE="const"
JAEGER_SAMPLER_PARAM="1"

# Maximum queue size of reporter
JAEGER_REPORTER_MAX_QUEUE_SIZE="10000"
To enable the following environment variables:
In the
yamlsource code of the CodeReady Workspaces deployment, add the following configuration variables underspec.server.customCheProperties.customCheProperties: CHE_TRACING_ENABLED: 'true' JAEGER_SAMPLER_TYPE: const DEFAULT_JAEGER_REPORTER_MAX_QUEUE_SIZE: '10000' JAEGER_SERVICE_NAME: che-server JAEGER_ENDPOINT: 'http://jaeger-collector:14268/api/traces' JAEGER_SAMPLER_MANAGER_HOST_PORT: 'jaeger:5778' JAEGER_SAMPLER_PARAM: '1'Edit the
JAEGER_ENDPOINTvalue to match the name of the Jaeger collector service in your deployment.From the left menu of the main OpenShift Container Platform screen, obtain the value of JAEGER_ENDPOINT by navigation to Networking → Services. Alternatively, execute the following
occommand:$ oc get services
The requested value is included in the service name that contains the
collectorstring.
Additional resources
- For additional information about custom environment properties and how to define them in CheCluster Custom Resource, see Advanced configuration options for the CodeReady Workspaces server component.
- For custom configuration of Jaeger, see the list of Jaeger client environment variables.
6.5. Viewing CodeReady Workspaces traces in Jaeger UI
This section demonstrates how to use the Jaeger UI to overview traces of CodeReady Workspaces operations.
Procedure
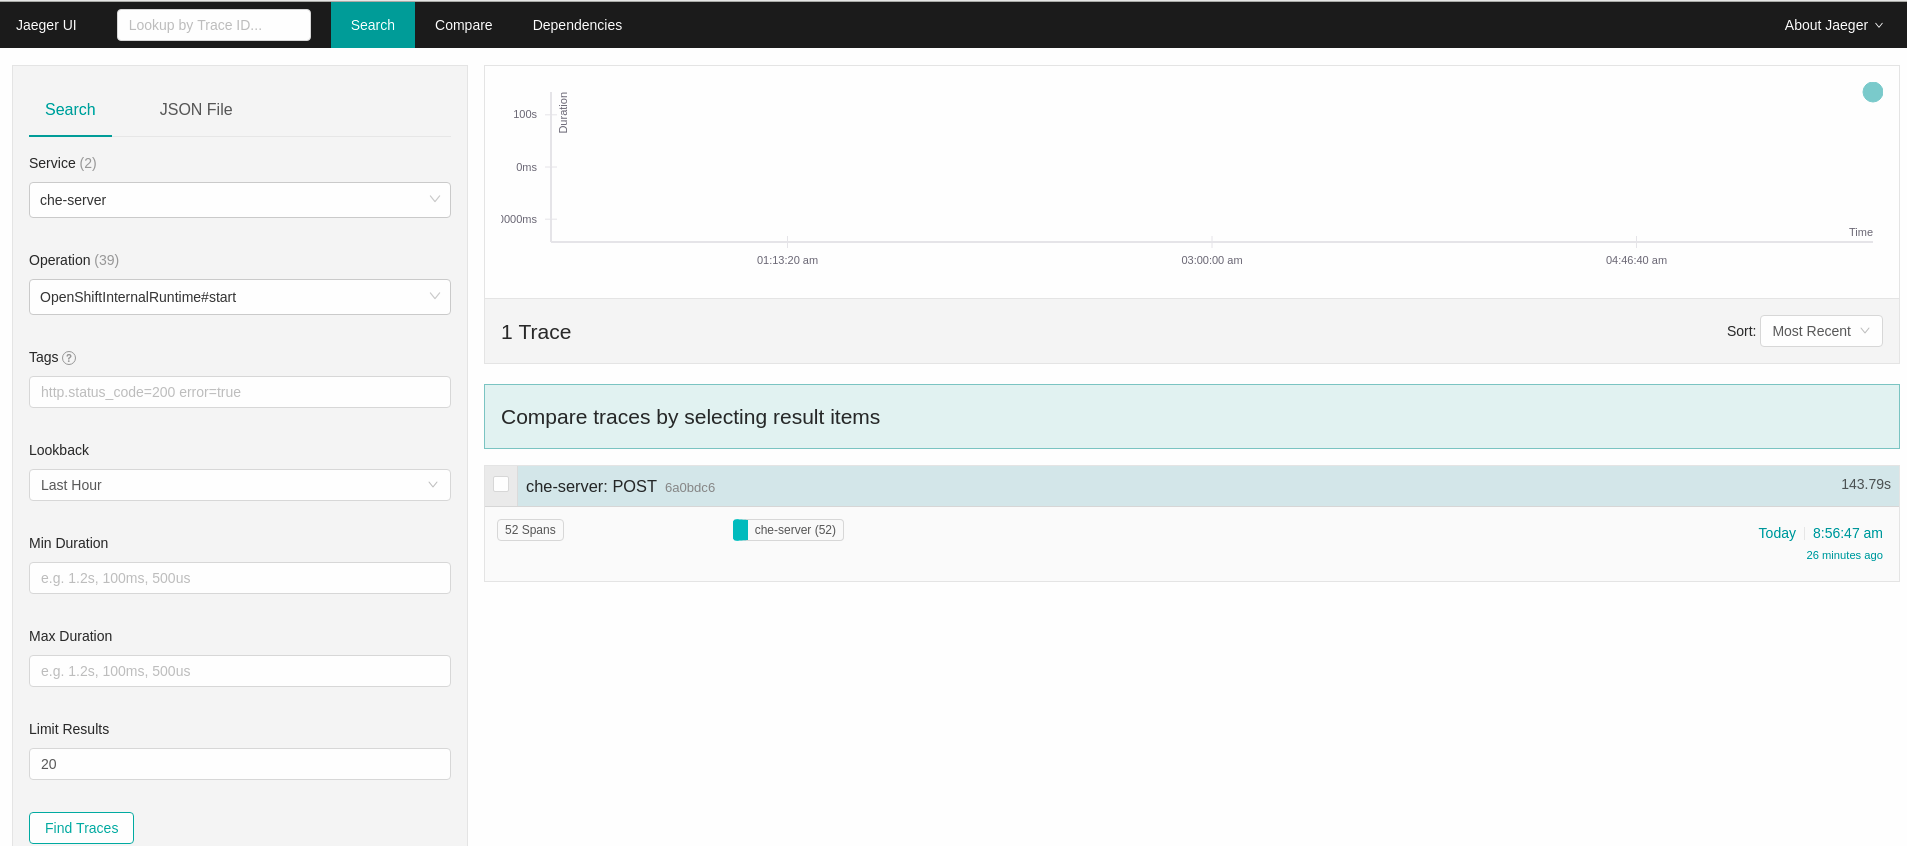
In this example, the CodeReady Workspaces instance has been running for some time and one workspace start has occurred.
To inspect the trace of the workspace start:
In the Search panel on the left, filter spans by the operation name (span name), tags, or time and duration.
Figure 6.1. Using Jaeger UI to trace CodeReady Workspaces
Select the trace to expand it and show the tree of nested spans and additional information about the highlighted span, such as tags or durations.
Figure 6.2. Expanded tracing tree

6.6. CodeReady Workspaces tracing codebase overview and extension guide
The core of the tracing implementation for CodeReady Workspaces is in the che-core-tracing-core and che-core-tracing-web modules.
All HTTP requests to the tracing API have their own trace. This is done by TracingFilter from the OpenTracing library, which is bound for the whole server application. Adding a @Traced annotation to methods causes the TracingInterceptor to add tracing spans for them.
6.6.1. Tagging
Spans may contain standard tags, such as operation name, span origin, error, and other tags that may help users with querying and filtering spans. Workspace-related operations (such as starting or stopping workspaces) have additional tags, including userId, workspaceID, and stackId. Spans created by TracingFilter also have an HTTP status code tag.
Declaring tags in a traced method is done statically by setting fields from the TracingTags class:
TracingTags.WORKSPACE_ID.set(workspace.getId());
TracingTags is a class where all commonly used tags are declared, as respective AnnotationAware tag implementations.
Additional resources
For more information about how to use Jaeger UI, visit Jaeger documentation: Jaeger Getting Started Guide.
Chapter 7. Backup and disaster recovery
Red Hat CodeReady Workspaces Operator can create backups of CodeReady Workspaces instances and restore them from a backup snapshot if needed. The following chapter describes ways of preparing such backups and their use in the follow-up recovery phase:
- The standard backup mechanism of CodeReady Workspaces does not back up the content of users' workspaces. To preserve local changes, see Section 7.6, “Persistent Volumes backups”.
- Backup snapshots are bound to their own specific cluster and must be used only there.
Additional resources
7.1. Setting up a backup server
The following section describes the supported CodeReady Workspaces backup servers and provides information for their setup.
- Red Hat CodeReady Workspaces Operator can automatically configure a backup server inside the same cluster; however, it is not recommended for production use.
- Users who agreed to the limitations coming from the decision to back up their data inside the same OpenShift project as CodeReady Workspaces installation may skip this section.
CodeReady Workspaces uses the restic tool to:
- manage backup snapshots
push to or to pull backup data from a backup server
NoteThe
resticbackup tool is licensed under the BSD 2-Clause license.
The backup servers currently supported for CodeReady Workspaces:
- REST
-
The REST server is a solution designed to cooperate with the
restictool. See How to set up a REST server documentation. - Amazon S3 and API compatible alternatives
- See AWS S3 Simple Storage Service Documentation or the docs of alternative services that have compatible API with AWS.
- SFTP
- See How to configure an SFTP server .
7.2. Managing backups using crwctl
The following section describes how to create backups of CodeReady Workspaces installation and do recovery using crwctl.
- Red Hat CodeReady Workspaces Operator can automatically configure a backup server inside the same cluster; however, it is not recommended for production use.
- Users who agreed to the limitations coming from the decision to back up their data inside the same OpenShift project as CodeReady Workspaces installation may skip this section.
7.2.1. Creating a new backup
Create a backup and send it to the pre-configured backup server:
$ crwctl server:backup --repository-url=<repository-url> --repository-password=<repository-password>
-
It is possible to create other backups to the same backup server using the
server:backupcommand with no arguments. -
After using the
server:backupcommand with no arguments for the first time on installation of CodeReady Workspaces, an internal backup server is configured and used.
-
It is possible to create other backups to the same backup server using the
7.2.2. Restoring from a backup
Recover the previous state of CodeReady Workspaces:
$ crwctl server:restore --repository-url=<repository-url> --repository-password=<repository-password>
-
The
server:restorecommand can be run with no arguments when the backup server was used before.
-
The
Recover from a specific snapshot by specifying its ID:
$ crwctl server:restore --snapshot-id=<snapshot-id>
7.3. Configuring crwctl to use a backup server
The following section describes how to define environment variables for a specific backup server using the crwctl tool.
Procedure
Determine backup server type and the server URL. Use the restic repository documentation as the reference.
The URL can be specified with the
-rparameter or defined using theBACKUP_REPOSITORY_URLenvironment variable.Retrieve or create a password for the backup repository.
The password can be specified with the
-pparameter or defined using theBACKUP_REPOSITORY_PASSWORDenvironment variable.WarningBackup data are encrypted with this password. The loss of the backup repository password will cause losing the data.
Set the following environment variables for the chosen backup server type:
- REST
-
When optional authentication is turned on, export
REST_SERVER_USERNAMEandREST_SERVER_PASSWORDenvironment variables. - AWS S3
-
Export the
AWS_ACCESS_KEY_IDandAWS_SECRET_ACCESS_KEYenvironment variables with AWS user credentials. - SFTP
For login without a password, export the
SSH_KEY_FILEenvironment variable that holds the path to a file with a corresponding SSH key, or provide the--ssh-key-fileparameter.Alternatively, the
SSH_KEYenvironment variable that holds an SSH key itself can be used.
It is possible to point directly to the backup server configuration object using --backup-server-config-name parameter or BACKUP_SERVER_CONFIG_NAME environment variable. In such a case, all the configuration above is not needed. For more details, see Section 7.4, “Managing backups using custom resources”
7.4. Managing backups using custom resources
This section describes how to create backups of CodeReady Workspaces installation and recover directly using Custom Resource objects.
- Red Hat CodeReady Workspaces Operator can automatically configure a backup server inside the same cluster; however, it is not recommended for production use.
- Users who agreed to the limitations coming from the decision to back up their data inside the same OpenShift project as CodeReady Workspaces installation may skip this section.
7.4.1. Creating a new backup
Create a
CheClusterBackupobject to create a new backup:apiVersion: org.eclipse.che/v1 kind: CheClusterBackup metadata: name: CodeReady Workspaces-backup spec: backupServerConfigRef: backup-server-configuration 1
- 1
- Name of the
CheBackupServerConfigurationobject defining what backup server to use.-
The creation of a
CheClusterBackupobject starts a new backup. Before reusing the same name for a new backup object, delete the old object:
oc delete CheClusterBackup <name> -n openshift-workspaces
-
The creation of a
Editing the CheClusterBackup objects has no effect.
Alternative
To use the internal backup server, request automatic configuration from CodeReady Workspaces Operator. The preparation described above is not required.
Configure the automatic setup and sending of the backup to the internal backup server:
apiVersion: org.eclipse.che/v1
kind: CheClusterBackup
metadata:
  name: CodeReady Workspaces-backup
spec:
  useInternalBackupServer: true
7.4.2. Restoring from a backup
Create a new object of
CheClusterRestoreto recover a CodeReady Workspaces installation from a backup:apiVersion: org.eclipse.che/v1 kind: CheClusterRestore metadata: name: CodeReady Workspaces-restore spec: backupServerConfigRef: backup-server-configuration 1 snapshotId: ba92c7e0 2
- 1
- Name of the
CheBackupServerConfigurationobject that defines what backup server to use. - 2
- Optional parameter defining the Snapshot ID to restore from. The default value is the last snapshot on the backup server.
Create a new
CheClusterRestoreobject to request a new recovery.Before reusing the same name for a new backup object, delete the old object first:
oc delete CheClusterBackup <name> -n openshift-workspaces
Wait until the recovery process finishes.
In a case of errors occurrences in your browser after the recovery, clean up the browser data for the CodeReady Workspaces domain.
Editing of CheClusterRestore objects has no effect.
Verification
Verify backup process state:
Read the
statussection of theCheClusterBackupobject to check the backup process:status: message: 'Backup is in progress. Start time: <timestamp>' 1 stage: Collecting CodeReady Workspaces installation data 2 state: InProgress 3 snapshotId: ba92c7e0 4
Verify recovery process state
Read the
statussection of theCheClusterRestoreobject to check the recovery process:status: message: 'Restore is in progress. Start time: <timestamp>' 1 stage: Restoring CodeReady Workspaces related cluster objects 2 state: InProgress 3
7.5. Configuring CodeReady Workspaces to use a backup server
To configure a backup server for CodeReady Workspaces, a user needs to create the CheBackupServerConfiguration Custom Resource object in the openshift-workspaces namespace. The object’s spec property is divided in several sections where each corresponds to a specific backup server type:
- REST
- AWS S3 or API compatible
- Note
-
The Custom Resource object, stored in the
openshift-workspacesnamespace, must have only one section configured in thespecproperty. -
It is possible to configure as many backup servers as needed, but each in a separate
Custom Resource. - Referenced secrets for each server type must exist and have required fields specified. See the description of each secret in the corresponding server-type chapters.
-
The Custom Resource object, stored in the
7.5.1. Configuring REST server
apiVersion: org.eclipse.che/v1
kind: CheBackupServerConfiguration
metadata:
  name: backup-server-configuration
spec:
  rest:
    protocol: http                                                 1
    hostname: my-domain.net                                        2
    port: 1234                                                     3
    repositoryPath: CodeReady Workspaces-backups                           4
    repositoryPasswordSecretRef: backup-encryption-password-secret 5
credentialsSecretRef: rest-server-auth-secret 6- 1
- Optional property that specifies the protocol to be used. The default value is
httpswithhttpas the second allowed option. - 2
- Backup server hostname.
- 3
- Optional property that specifies the port on which the backup server is running. The default value is
8000. - 4
- Path on the backup server where the backup snapshots are stored.
- 5
- Secret name containing a repository password, stored in the
repo-passwordfield. If the secret contains only one field, its name is arbitrary. The password is used to encrypt and decrypt backup snapshots data. - 6
- Optional property that specifies the name of the secret with the REST server user credentials, stored in the
usernameandpasswordfields.
7.5.2. Configuring AWS S3 or API compatible server
apiVersion: org.eclipse.che/v1
kind: CheBackupServerConfiguration
metadata:
  name: backup-server-configuration
spec:
  awss3:
    protocol: https                                                1
    hostname: my-domain.net                                        2
    port: 1234                                                     3
    repositoryPath: CodeReady Workspaces-backups                           4
    repositoryPasswordSecretRef: backup-encryption-password-secret 5
awsAccessKeySecretRef: aws-user-credentials-secret 6- 1
- Optional property that specifies the protocol to be used. The default value is
httpswithhttpas the second allowed option. - 2
- Optional property that specifies the S3 hostname. The default value is
s3.amazonaws.com. - 3
- Optional property that specifies the port on which the backup server is running.
- 4
- The name of the bucket resource where the backup snapshots are stored. The bucket resource must be manually pre-created.
- 5
- The name of the secret containing a repository password, stored in the
repo-passwordfield. If the secret contains only one field, this name is arbitrary. The password is used to encrypt and decrypt backup snapshots data. - 6
- The name of the secret containing user credentials stored in the
awsAccessKeyIdandawsSecretAccessKeyfields.
7.5.3. Configuring SFTP server
apiVersion: org.eclipse.che/v1
kind: CheBackupServerConfiguration
metadata:
  name: backup-server-configuration
spec:
  awss3:
    username: user                                                 1
    hostname: my-domain.net                                        2
    port: 1234                                                     3
    repositoryPath: CodeReady Workspaces-backups                           4
    repositoryPasswordSecretRef: backup-encryption-password-secret 5
sshKeySecretRef: ssh-key-secret 6- 1
- User name on the remote server to login with using the SSH protocol.
- 2
- Remote server hostname.
- 3
- Optional property that specifies the port on which an SFTP server is running. The default value is
22. - 4
- Absolute or relative path on the server where backup snapshots are stored.
- 5
- The name of the secret containing a repository password, stored in the
repo-passwordfield. If the secret contains only one field, this name is arbitrary. The password is used to encrypt and decrypt backup snapshots data. - 6
- The name of the secret containing a private SSH key, stored in the
ssh-privatekeyfield. This SSH key can be used to perform a login without a password on an SFTP server.
7.6. Persistent Volumes backups
Persistent Volumes (PVs) store the CodeReady Workspaces workspace data similarly to how workspace data is stored for desktop IDEs on the local hard disk drive.
To prevent data loss, back up PVs periodically. The recommended approach is to use storage-agnostic tools for backing up and restoring OpenShift resources, including PVs.
7.6.1. Recommended backup tool: Velero
Velero is an open-source tool for backing up OpenShift applications and their PVs. Velero allows you to:
- Deploy in the cloud or on premises.
- Back up the cluster and restore in case of data loss.
- Migrate cluster resources to other clusters.
- Replicate a production cluster to development and testing clusters.
Alternatively, you can use backup solutions dependent on the underlying storage system. For example, solutions that are Gluster or Ceph-specific.
Additional resources
7.7. External database setup
The PostgreSQL database is used by the CodeReady Workspaces server for persisting data about the state of CodeReady Workspaces. It contains information about user accounts, workspaces, preferences, and other details.
By default, the CodeReady Workspaces Operator creates and manages the database deployment.
However, the CodeReady Workspaces Operator does not support full life-cycle capabilities, such as backups and recovery.
For a business-critical setup, configure an external database with the following recommended disaster-recovery options:
- High Availability (HA)
- Point In Time Recovery (PITR)
Configure an external PostgreSQL instance on-premises or use a cloud service, such as Amazon Relational Database Service (Amazon RDS). With Amazon RDS, it is possible to deploy production databases in a Multi-Availability Zone configuration for a resilient disaster recovery strategy with daily and on-demand snapshots.
The recommended configuration of the example database is:
| Parameter | Value |
|---|---|
| Instance class | db.t2.small |
| vCPU | 1 |
| RAM | 2 GB |
| Multi-az | true, 2 replicas |
| Engine version | 9.6.11 |
| TLS | enabled |
| Automated backups | enabled (30 days) |
7.7.1. Configuring external PostgreSQL
By configuring the external PostgreSQL, you can make the workspace metadata and the user information persistent.
Procedure
Define the values of the following placeholders:
-
<database-user>is the CodeReady Workspaces server database user name -
<database-password>is the CodeReady Workspaces server database password -
<database>is the CodeReady Workspaces server database name
-
Use the following SQL script to create a user and a database for the CodeReady Workspaces server to make workspace metadata persistent:
CREATE USER <database-user> WITH PASSWORD '<database-password>'
CREATE DATABASE <database>
GRANT ALL PRIVILEGES ON DATABASE <database> TO <database-user>
ALTER USER <database-user> WITH SUPERUSER
Define the value of the following placeholder:
-
<identity-database-password>is the RH-SSO database password
-
Use the following SQL script to create a database for the RH-SSO back end to make the user information persistent:
CREATE USER keycloak WITH PASSWORD '<identity-database-password>'
CREATE DATABASE keycloak
GRANT ALL PRIVILEGES ON DATABASE keycloak TO keycloak
7.7.2. Configuring CodeReady Workspaces to work with an external PostgreSQL
Prerequisites
-
The
octool is available.
Procedure
Pre-create a project for CodeReady Workspaces:
$ oc create namespace openshift-workspaces
Create a secret to store CodeReady Workspaces server database credentials:
$ oc create secret generic <server-database-credentials> \ 1
--from-literal=user=<database-user> \                            2
--from-literal=password=<database-password> \                    3
-n openshift-workspaces
Create a secret to store RH-SSO database credentials:
$ oc create secret generic <identity-database-credentials> \ 1
--from-literal=password=<identity-database-password> \             2
-n openshift-workspaces
Deploy Red Hat CodeReady Workspaces by executing the
crwctlcommand with applying a patch. For example:$ crwctl server:deploy --che-operator-cr-patch-yaml=patch.yaml ...
patch.yaml should contain the following to make the Operator skip deploying a database and pass connection details of an existing database to a CodeReady Workspaces server:
spec:
  database:
    externalDb: true
    chePostgresHostName: <hostname>                     1
    chePostgresPort: <port>                             2
    chePostgresSecret: <server-database-credentials>    3
    chePostgresDb: <database>                           4
spec:
  auth:
identityProviderPostgresSecret: <identity-database-credentials> 5Additional resources
Chapter 8. Caching images for faster workspace start
To improve the start time performance of CodeReady Workspaces workspaces, use the Image Puller, a CodeReady Workspaces-agnostic component that can be used to pre-pull images for OpenShift clusters. The Image Puller is an additional OpenShift deployment which creates a DaemonSet that can be configured to pre-pull relevant CodeReady Workspaces workspace images on each node. These images would already be available when a CodeReady Workspaces workspace starts, therefore improving the workspace start time.
The Image Puller provides the following parameters for configuration.
Table 8.1. Image Puller parameters
| Parameter | Usage | Default |
|---|---|---|
|
| DaemonSets health checks interval in hours |
|
|
| The memory request for each cached image when the puller is running. See Section 8.2, “Defining the memory parameters for the Image Puller”. |
|
|
| The memory limit for each cached image when the puller is running. See Section 8.2, “Defining the memory parameters for the Image Puller”. |
|
|
| The processor request for each cached image when the puller is running |
|
|
| The processor limit for each cached image when the puller is running |
|
|
| Name of DaemonSet to create |
|
|
| Name of the Deployment to create |
|
|
| OpenShift project containing DaemonSet to create |
|
|
|
Semicolon separated list of images to pull, in the format | |
|
| Node selector to apply to the Pods created by the DaemonSet |
|
|
| Affinity applied to pods created by the DaemonSet |
|
|
|
List of image pull secrets, in the format |
|
Additional resources
- Section 8.1, “Defining the list of images to pull”
- Section 8.2, “Defining the memory parameters for the Image Puller”.
- Section 8.3, “Installing Image Puller using the CodeReady Workspaces Operator”
- Section 8.4, “Installing Image Puller on OpenShift 4 using OperatorHub”
- Section 8.5, “Installing Image Puller on OpenShift using OpenShift templates”
- Kubernetes Image Puller source code repository
8.1. Defining the list of images to pull
The Image Puller can pre-pull most images, including scratch images such as che-machine-exec. However, images that mount volumes in the Dockerfile, such as traefik, are not supported for pre-pulling on OpenShift 3.11.
Pre-pulling images involved in workspace startup will reduce workspace start times. For example:
- Che-Theia
- broker images
- plug-in sidecar images
Prerequisites
-
The
curltool is available. See curl homepage. -
The
jqtool is available. See jq homepage. -
The
yqtool is available. See yq homepage.
Procedure
Gather a list of relevant container images for the OpenShift platform:
Example 8.1. Getting the list of all images for CodeReady Workspaces 2.12
$ curl -sSLo- https://raw.githubusercontent.com/redhat-developer/codeready-workspaces-images/crw-2.12-rhel-8/codeready-workspaces-operator-metadata-generated/manifests/codeready-workspaces.csv.yaml \
  | yq -r '.spec.relatedImages[]'
Retain the images involved on the workspace startup phase:
-
eap -
machineexec -
mongodb -
pluginbroker -
plugin- -
stacks -
theia -
ubi-minimal
-
Exclude from the list the container images not supported by the target platform.
For AMD64 and Intel 64 (x86_64), exclude
openj9images.Example 8.2. Image list for AMD64 and Intel 64 (x86_64), excluding
openj9imagesche_workspace_plugin_broker_artifacts=registry.redhat.io/codeready-workspaces/pluginbroker-artifacts-rhel8@sha256:3436bacdc249e8dcc289b67e89340bdc2c5b6694304fe369af751f684a140d60; che_workspace_plugin_broker_metadata=registry.redhat.io/codeready-workspaces/pluginbroker-metadata-rhel8@sha256:e709e89bd1ab1612baad039ad6b824b027a070ff0a37be3395202faa55518e09; codeready_workspaces_machineexec_plugin_registry_image_gixdcmqk=registry.redhat.io/codeready-workspaces/machineexec-rhel8@sha256:93dc77a7f33171b36dbc112e7e732da4044c4c75a48b7a25907521c529170c0c; codeready_workspaces_plugin_java11_devfile_registry_image_gixdcmqk=registry.redhat.io/codeready-workspaces/plugin-java11-rhel8@sha256:f06f983d5e49a1ab05b9de54e449b2033688e7a38a6c57550f2ed87b3bef3fe2; codeready_workspaces_plugin_java11_plugin_registry_image_gixdcmqk=registry.redhat.io/codeready-workspaces/plugin-java11-rhel8@sha256:f06f983d5e49a1ab05b9de54e449b2033688e7a38a6c57550f2ed87b3bef3fe2; codeready_workspaces_plugin_java8_devfile_registry_image_gixdcmqk=registry.redhat.io/codeready-workspaces/plugin-java8-rhel8@sha256:c451114be8be1ff012a85eae983d85216d0171dfc1376df1c410f54af0226bc2; codeready_workspaces_plugin_java8_plugin_registry_image_gixdcmqk=registry.redhat.io/codeready-workspaces/plugin-java8-rhel8@sha256:c451114be8be1ff012a85eae983d85216d0171dfc1376df1c410f54af0226bc2; codeready_workspaces_plugin_kubernetes_plugin_registry_image_gixdcmqk=registry.redhat.io/codeready-workspaces/plugin-kubernetes-rhel8@sha256:3e43ffa6757980fb0f092798b76d6bbfa63768c72d2f071b666f6401b6c0df5c; codeready_workspaces_plugin_openshift_plugin_registry_image_gixdcmqk=registry.redhat.io/codeready-workspaces/plugin-openshift-rhel8@sha256:55e67c70b3b04e045230bf553e2394920d088027aad6eb5ce0a21abede138af5; codeready_workspaces_stacks_cpp_devfile_registry_image_gixdcmqk=registry.redhat.io/codeready-workspaces/stacks-cpp-rhel8@sha256:5ae3c3fcef5050ca30126d55229fe3334e887c658d6e5fbe9ef6aa8339dfc89e; codeready_workspaces_stacks_cpp_plugin_registry_image_gixdcmqk=registry.redhat.io/codeready-workspaces/stacks-cpp-rhel8@sha256:5ae3c3fcef5050ca30126d55229fe3334e887c658d6e5fbe9ef6aa8339dfc89e; codeready_workspaces_stacks_dotnet_devfile_registry_image_gixdcmqk=registry.redhat.io/codeready-workspaces/stacks-dotnet-rhel8@sha256:68875b794b80d9590fceff2e35eaa8f0ac47cd9e8f183f54652a1d1703024dd8; codeready_workspaces_stacks_dotnet_plugin_registry_image_gixdcmqk=registry.redhat.io/codeready-workspaces/stacks-dotnet-rhel8@sha256:68875b794b80d9590fceff2e35eaa8f0ac47cd9e8f183f54652a1d1703024dd8; codeready_workspaces_stacks_golang_devfile_registry_image_gixdcmqk=registry.redhat.io/codeready-workspaces/stacks-golang-rhel8@sha256:a007380852029dcb01f2a00956f4e2b26c9c53d2063eca92d41d56fff4e83a27; codeready_workspaces_stacks_golang_plugin_registry_image_gixdcmqk=registry.redhat.io/codeready-workspaces/stacks-golang-rhel8@sha256:a007380852029dcb01f2a00956f4e2b26c9c53d2063eca92d41d56fff4e83a27; codeready_workspaces_stacks_php_devfile_registry_image_gixdcmqk=registry.redhat.io/codeready-workspaces/stacks-php-rhel8@sha256:193b9775d58e1f7d9a45607b23bbfea4cfcba53356872da3e28de3ee9a8254e5; codeready_workspaces_stacks_php_plugin_registry_image_gixdcmqk=registry.redhat.io/codeready-workspaces/stacks-php-rhel8@sha256:193b9775d58e1f7d9a45607b23bbfea4cfcba53356872da3e28de3ee9a8254e5; codeready_workspaces_theia_endpoint_plugin_registry_image_gixdcmqk=registry.redhat.io/codeready-workspaces/theia-endpoint-rhel8@sha256:2eb5fd69e08e3a1a8f557fe1d41170ee9dac89d15c5947aabc477d4e2107a9ea; codeready_workspaces_theia_plugin_registry_image_gixdcmqk=registry.redhat.io/codeready-workspaces/theia-rhel8@sha256:7c1fcf0a972e2905a0758d53e2155534643d0fbcbb688d57b54f05bafe323582; jboss_eap_7_eap74_openjdk8_openshift_rhel7_devfile_registry_image_g4xdilrqbi______=registry.redhat.io/jboss-eap-7/eap74-openjdk8-openshift-rhel7@sha256:b4a113c4d4972d142a3c350e2006a2b297dc883f8ddb29a88db19c892358632d; jboss_eap_7_eap_xp3_openjdk11_openshift_devfile_registry_image_gmxdaljzbi______=registry.redhat.io/jboss-eap-7/eap-xp3-openjdk11-openshift-rhel8@sha256:3875b2ee2826a6d8134aa3b80ac0c8b5ebc4a7f718335d76dfc3461b79f93d19; pvc_jobs=registry.redhat.io/ubi8/ubi-minimal@sha256:54ef2173bba7384dc7609e8affbae1c36f8a3ec137cacc0866116d65dd4b9afe; rhscl_mongodb_36_rhel7_devfile_registry_image_gewtkmak=registry.redhat.io/rhscl/mongodb-36-rhel7@sha256:9f799d356d7d2e442bde9d401b720600fd9059a3d8eefea6f3b2ffa721c0dc73;
For IBM Z and IBM Power Systems, use
openj9version forjava8andjava11, and excludedotnet.Example 8.3. Image list for IBM Z and IBM Power Systems: using
openj9version forjava8andjava11, and excludingdotnetche_workspace_plugin_broker_artifacts=registry.redhat.io/codeready-workspaces/pluginbroker-artifacts-rhel8@sha256:3436bacdc249e8dcc289b67e89340bdc2c5b6694304fe369af751f684a140d60; che_workspace_plugin_broker_metadata=registry.redhat.io/codeready-workspaces/pluginbroker-metadata-rhel8@sha256:e709e89bd1ab1612baad039ad6b824b027a070ff0a37be3395202faa55518e09; codeready_workspaces_machineexec_plugin_registry_image_gixdcmqk=registry.redhat.io/codeready-workspaces/machineexec-rhel8@sha256:93dc77a7f33171b36dbc112e7e732da4044c4c75a48b7a25907521c529170c0c; codeready_workspaces_plugin_java11_openj9_devfile_registry_image_gixdcmqk=registry.redhat.io/codeready-workspaces/plugin-java11-openj9-rhel8@sha256:ff81f7332ae1fed4c84fa9f47921173a754624ef3e019fcd71a5192491857866; codeready_workspaces_plugin_java11_openj9_plugin_registry_image_gixdcmqk=registry.redhat.io/codeready-workspaces/plugin-java11-openj9-rhel8@sha256:ff81f7332ae1fed4c84fa9f47921173a754624ef3e019fcd71a5192491857866; codeready_workspaces_plugin_java8_openj9_devfile_registry_image_gixdcmqk=registry.redhat.io/codeready-workspaces/plugin-java8-openj9-rhel8@sha256:712968392395b940f18c586ee6fe9c50037be70813e099189ff24bc0767057fb; codeready_workspaces_plugin_java8_openj9_plugin_registry_image_gixdcmqk=registry.redhat.io/codeready-workspaces/plugin-java8-openj9-rhel8@sha256:712968392395b940f18c586ee6fe9c50037be70813e099189ff24bc0767057fb; codeready_workspaces_plugin_kubernetes_plugin_registry_image_gixdcmqk=registry.redhat.io/codeready-workspaces/plugin-kubernetes-rhel8@sha256:3e43ffa6757980fb0f092798b76d6bbfa63768c72d2f071b666f6401b6c0df5c; codeready_workspaces_plugin_openshift_plugin_registry_image_gixdcmqk=registry.redhat.io/codeready-workspaces/plugin-openshift-rhel8@sha256:55e67c70b3b04e045230bf553e2394920d088027aad6eb5ce0a21abede138af5; codeready_workspaces_stacks_cpp_devfile_registry_image_gixdcmqk=registry.redhat.io/codeready-workspaces/stacks-cpp-rhel8@sha256:5ae3c3fcef5050ca30126d55229fe3334e887c658d6e5fbe9ef6aa8339dfc89e; codeready_workspaces_stacks_cpp_plugin_registry_image_gixdcmqk=registry.redhat.io/codeready-workspaces/stacks-cpp-rhel8@sha256:5ae3c3fcef5050ca30126d55229fe3334e887c658d6e5fbe9ef6aa8339dfc89e; codeready_workspaces_stacks_golang_devfile_registry_image_gixdcmqk=registry.redhat.io/codeready-workspaces/stacks-golang-rhel8@sha256:a007380852029dcb01f2a00956f4e2b26c9c53d2063eca92d41d56fff4e83a27; codeready_workspaces_stacks_golang_plugin_registry_image_gixdcmqk=registry.redhat.io/codeready-workspaces/stacks-golang-rhel8@sha256:a007380852029dcb01f2a00956f4e2b26c9c53d2063eca92d41d56fff4e83a27; codeready_workspaces_stacks_php_devfile_registry_image_gixdcmqk=registry.redhat.io/codeready-workspaces/stacks-php-rhel8@sha256:193b9775d58e1f7d9a45607b23bbfea4cfcba53356872da3e28de3ee9a8254e5; codeready_workspaces_stacks_php_plugin_registry_image_gixdcmqk=registry.redhat.io/codeready-workspaces/stacks-php-rhel8@sha256:193b9775d58e1f7d9a45607b23bbfea4cfcba53356872da3e28de3ee9a8254e5; codeready_workspaces_theia_endpoint_plugin_registry_image_gixdcmqk=registry.redhat.io/codeready-workspaces/theia-endpoint-rhel8@sha256:2eb5fd69e08e3a1a8f557fe1d41170ee9dac89d15c5947aabc477d4e2107a9ea; codeready_workspaces_theia_plugin_registry_image_gixdcmqk=registry.redhat.io/codeready-workspaces/theia-rhel8@sha256:7c1fcf0a972e2905a0758d53e2155534643d0fbcbb688d57b54f05bafe323582; jboss_eap_7_eap74_openjdk8_openshift_rhel7_devfile_registry_image_g4xdilrqbi______=registry.redhat.io/jboss-eap-7/eap74-openjdk8-openshift-rhel7@sha256:b4a113c4d4972d142a3c350e2006a2b297dc883f8ddb29a88db19c892358632d; jboss_eap_7_eap_xp3_openj9_11_openshift_devfile_registry_image_gmxdacq_=registry.redhat.io/jboss-eap-7/eap-xp3-openj9-11-openshift-rhel8@sha256:896c1a9baf21400e8bc75e8b7fb22fc3a829aa3fee68ca9f8373111b7c21e27d; jboss_eap_7_eap_xp3_openjdk11_openshift_devfile_registry_image_gmxdaljzbi______=registry.redhat.io/jboss-eap-7/eap-xp3-openjdk11-openshift-rhel8@sha256:3875b2ee2826a6d8134aa3b80ac0c8b5ebc4a7f718335d76dfc3461b79f93d19; pvc_jobs=registry.redhat.io/ubi8/ubi-minimal@sha256:54ef2173bba7384dc7609e8affbae1c36f8a3ec137cacc0866116d65dd4b9afe; rhscl_mongodb_36_rhel7_devfile_registry_image_gewtkmak=registry.redhat.io/rhscl/mongodb-36-rhel7@sha256:9f799d356d7d2e442bde9d401b720600fd9059a3d8eefea6f3b2ffa721c0dc73;
Determine images from the list for pre-pulling.
For faster workspace startup times, consider pre-pulling the workspace-related images:
-
theia-rhel8 -
theia-endpoint-rhel8 -
pluginbroker-artifacts-rhel8 -
pluginbroker-metadata-rhel8 -
stacks-*-rhel8 plugin-*-rhel8- The list of stacks images: Container images - Stacks
- The list of plug-in images: Container images - Plug-ins
-
Additional resources
8.2. Defining the memory parameters for the Image Puller
Define the memory requests and limits parameters to ensure pulled containers and the platform have enough memory to run.
Prerequisites
Procedure
-
To define the minimal value for
CACHING_MEMORY_REQUESTorCACHING_MEMORY_LIMIT, consider the necessary amount of memory required to run each of the container images to pull. To define the maximal value for
CACHING_MEMORY_REQUESTorCACHING_MEMORY_LIMIT, consider the total memory allocated to the DaemonSet Pods in the cluster:(memory limit) * (number of images) * (number of nodes in the cluster)
Pulling 5 images on 20 nodes, with a container memory limit of
20Mirequires2000Miof memory.
8.3. Installing Image Puller using the CodeReady Workspaces Operator
This section describes how to use the CodeReady Workspaces Operator to install the Image Puller, which is a community-supported feature in the technology preview state.
Prerequisites
- Section 8.1, “Defining the list of images to pull”
- Section 8.2, “Defining the memory parameters for the Image Puller”
- Operator Lifecycle Manager and OperatorHub are available on the OpenShift instance. OpenShift provides them starting with version 4.2.
- The CodeReady Workspaces Operator is available. See Installing CodeReady Workspaces on OpenShift 4 using OperatorHub
Procedure
Enable Image Puller in the
CheClusterCustom Resource by setting.spec.imagePuller.enabletotrue:apiVersion: org.eclipse.che/v1 kind: CheCluster metadata: name: codeready-workspaces spec: # ... imagePuller: enable: trueConfigure Image Puller in the
CheClusterCustom Resource:apiVersion: org.eclipse.che/v1 kind: CheCluster metadata: name: codeready-workspaces spec: ... imagePuller: enable: true spec: configMapName: <kubernetes-image-puller> daemonsetName: <kubernetes-image-puller> deploymentName: <kubernetes-image-puller> images: 'che_workspace_plugin_broker_artifacts=registry.redhat.io/codeready-workspaces/pluginbroker-artifacts-rhel8@sha256:3436bacdc249e8dcc289b67e89340bdc2c5b6694304fe369af751f684a140d60;che_workspace_plugin_broker_metadata=registry.redhat.io/codeready-workspaces/pluginbroker-metadata-rhel8@sha256:e709e89bd1ab1612baad039ad6b824b027a070ff0a37be3395202faa55518e09;codeready_workspaces_machineexec_plugin_registry_image_gixdcmqk=registry.redhat.io/codeready-workspaces/machineexec-rhel8@sha256:93dc77a7f33171b36dbc112e7e732da4044c4c75a48b7a25907521c529170c0c;codeready_workspaces_plugin_java11_devfile_registry_image_gixdcmqk=registry.redhat.io/codeready-workspaces/plugin-java11-rhel8@sha256:f06f983d5e49a1ab05b9de54e449b2033688e7a38a6c57550f2ed87b3bef3fe2;codeready_workspaces_plugin_java11_plugin_registry_image_gixdcmqk=registry.redhat.io/codeready-workspaces/plugin-java11-rhel8@sha256:f06f983d5e49a1ab05b9de54e449b2033688e7a38a6c57550f2ed87b3bef3fe2;codeready_workspaces_plugin_java8_devfile_registry_image_gixdcmqk=registry.redhat.io/codeready-workspaces/plugin-java8-rhel8@sha256:c451114be8be1ff012a85eae983d85216d0171dfc1376df1c410f54af0226bc2;codeready_workspaces_plugin_java8_plugin_registry_image_gixdcmqk=registry.redhat.io/codeready-workspaces/plugin-java8-rhel8@sha256:c451114be8be1ff012a85eae983d85216d0171dfc1376df1c410f54af0226bc2;codeready_workspaces_plugin_kubernetes_plugin_registry_image_gixdcmqk=registry.redhat.io/codeready-workspaces/plugin-kubernetes-rhel8@sha256:3e43ffa6757980fb0f092798b76d6bbfa63768c72d2f071b666f6401b6c0df5c;codeready_workspaces_plugin_openshift_plugin_registry_image_gixdcmqk=registry.redhat.io/codeready-workspaces/plugin-openshift-rhel8@sha256:55e67c70b3b04e045230bf553e2394920d088027aad6eb5ce0a21abede138af5;codeready_workspaces_stacks_cpp_devfile_registry_image_gixdcmqk=registry.redhat.io/codeready-workspaces/stacks-cpp-rhel8@sha256:5ae3c3fcef5050ca30126d55229fe3334e887c658d6e5fbe9ef6aa8339dfc89e;codeready_workspaces_stacks_cpp_plugin_registry_image_gixdcmqk=registry.redhat.io/codeready-workspaces/stacks-cpp-rhel8@sha256:5ae3c3fcef5050ca30126d55229fe3334e887c658d6e5fbe9ef6aa8339dfc89e;codeready_workspaces_stacks_dotnet_devfile_registry_image_gixdcmqk=registry.redhat.io/codeready-workspaces/stacks-dotnet-rhel8@sha256:68875b794b80d9590fceff2e35eaa8f0ac47cd9e8f183f54652a1d1703024dd8;codeready_workspaces_stacks_dotnet_plugin_registry_image_gixdcmqk=registry.redhat.io/codeready-workspaces/stacks-dotnet-rhel8@sha256:68875b794b80d9590fceff2e35eaa8f0ac47cd9e8f183f54652a1d1703024dd8;codeready_workspaces_stacks_golang_devfile_registry_image_gixdcmqk=registry.redhat.io/codeready-workspaces/stacks-golang-rhel8@sha256:a007380852029dcb01f2a00956f4e2b26c9c53d2063eca92d41d56fff4e83a27;codeready_workspaces_stacks_golang_plugin_registry_image_gixdcmqk=registry.redhat.io/codeready-workspaces/stacks-golang-rhel8@sha256:a007380852029dcb01f2a00956f4e2b26c9c53d2063eca92d41d56fff4e83a27;codeready_workspaces_stacks_php_devfile_registry_image_gixdcmqk=registry.redhat.io/codeready-workspaces/stacks-php-rhel8@sha256:193b9775d58e1f7d9a45607b23bbfea4cfcba53356872da3e28de3ee9a8254e5;codeready_workspaces_stacks_php_plugin_registry_image_gixdcmqk=registry.redhat.io/codeready-workspaces/stacks-php-rhel8@sha256:193b9775d58e1f7d9a45607b23bbfea4cfcba53356872da3e28de3ee9a8254e5;codeready_workspaces_theia_endpoint_plugin_registry_image_gixdcmqk=registry.redhat.io/codeready-workspaces/theia-endpoint-rhel8@sha256:2eb5fd69e08e3a1a8f557fe1d41170ee9dac89d15c5947aabc477d4e2107a9ea;codeready_workspaces_theia_plugin_registry_image_gixdcmqk=registry.redhat.io/codeready-workspaces/theia-rhel8@sha256:7c1fcf0a972e2905a0758d53e2155534643d0fbcbb688d57b54f05bafe323582;jboss_eap_7_eap74_openjdk8_openshift_rhel7_devfile_registry_image_g4xdilrqbi______=registry.redhat.io/jboss-eap-7/eap74-openjdk8-openshift-rhel7@sha256:b4a113c4d4972d142a3c350e2006a2b297dc883f8ddb29a88db19c892358632d;jboss_eap_7_eap_xp3_openjdk11_openshift_devfile_registry_image_gmxdaljzbi______=registry.redhat.io/jboss-eap-7/eap-xp3-openjdk11-openshift-rhel8@sha256:3875b2ee2826a6d8134aa3b80ac0c8b5ebc4a7f718335d76dfc3461b79f93d19;pvc_jobs=registry.redhat.io/ubi8/ubi-minimal@sha256:54ef2173bba7384dc7609e8affbae1c36f8a3ec137cacc0866116d65dd4b9afe;rhscl_mongodb_36_rhel7_devfile_registry_image_gewtkmak=registry.redhat.io/rhscl/mongodb-36-rhel7@sha256:9f799d356d7d2e442bde9d401b720600fd9059a3d8eefea6f3b2ffa721c0dc73;'
To use the supported Image Puller, install it separately from the KubernetesImagePuller Operator. Red Hat official build benefits from extra testing and validation provided by Red Hat.
Enabling the use of KubernetesImagePuller in Operator Hub during CodeReady Workspaces installation, sets the Community supported version for use.
Default images
-
The CodeReady Workspaces Operator populates the
.spec.imagePuller.spec.imagesfield with default images used for workspace startup (Theia images, plugin broker images, sidecar plugin images), provided that no images were added to this field before creating theCheClusterCustom Resource. The CodeReady Workspaces Operator updates the default images in the.spec.imagePuller.spec.imagesfield after every rollout update of CodeReady Workspaces. However, if images were added to the.spec.imagePuller.spec.imagesfield before creating theCheClusterCustom Resource, the CodeReady Workspaces Operator will not add default images. -
If user-provided images are added to the
.spec.imagePuller.spec.imagesfield after creating theCheClusterCustom Resource, the CodeReady Workspaces Operator will still update default images on subsequent CodeReady Workspaces rollout updates. Non-default images remain unchanged in the.spec.imagePuller.spec.imagesfield after rollout updates.
Verification
-
OpenShift creates a
kubernetes-image-puller-operatorSubscription. The
eclipse-che namespacecontains acommunity supported Kubernetes Image Puller OperatorClusterServiceVersion:$ oc get clusterserviceversions
The
eclipse-che namespacecontains these deployments:kubernetes-image-pullerandkubernetes-image-puller-operator.$ oc get deployments
The community supported Kubernetes Image Puller Operator creates a
KubernetesImagePullerCustom Resource:$ oc get kubernetesimagepullers
Uninstalling Image Puller using CodeReady Workspaces Operator
-
Edit the
CheClusterCustom Resource and set.spec.imagePuller.enabletofalse. -
Edit the
CheClusterCustom Resource and set the.spec.imagePuller.specto configure the optional Image Puller parameters for the CodeReady Workspaces Operator.
8.4. Installing Image Puller on OpenShift 4 using OperatorHub
This procedure describes how to install the community supported Kubernetes Image Puller Operator on OpenShift 4 using the Operator.
Prerequisites
- An administrator account on a running instance of OpenShift 4.
- Section 8.1, “Defining the list of images to pull”
- Section 8.2, “Defining the memory parameters for the Image Puller”.
Procedure
- To create an OpenShift project <kubernetes-image-puller> to host the Image Puller, open the OpenShift web console, navigate to the Home → Projects section and click .
Specify the project details:
- Name: <kubernetes-image-puller>
- Display Name: <Image Puller>
- Description: <Kubernetes Image Puller>
- Navigate to → .
-
Use the box to search for
community supported Kubernetes Image Puller Operator. Click the . - Read the description of the Operator. Click → .
- Select for the . In the drop-down find the OpenShift project <kubernetes-image-puller>. Click .
- Wait for the community supported Kubernetes Image Puller Operator to install. Click the → .
-
In a redirected window with a YAML editor, make modifications to the
KubernetesImagePullerCustom Resource and click . - Navigate to the and menu in the <kubernetes-image-puller> OpenShift project. Verify that the Image Puller is available.
8.5. Installing Image Puller on OpenShift using OpenShift templates
This procedure describes how to install the Kubernetes Image Puller on OpenShift using OpenShift templates.
Prerequisites
- A running OpenShift cluster.
-
The
octool is available. - Section 8.1, “Defining the list of images to pull”.
- Section 8.2, “Defining the memory parameters for the Image Puller”.
Procedure
Clone the Image Puller repository and get in the directory containing the OpenShift templates:
$ git clone https://github.com/che-incubator/kubernetes-image-puller
$ cd kubernetes-image-puller/deploy/openshift
Configure the
app.yaml,configmap.yamlandserviceaccount.yamlOpenShift templates using following parameters:Table 8.2. Image Puller OpenShift templates parameters in
app.yamlValue Usage Default DEPLOYMENT_NAMEThe value of
DEPLOYMENT_NAMEin the ConfigMapkubernetes-image-pullerIMAGEImage used for the
kubernetes-image-pullerdeploymentregistry.redhat.io/codeready-workspaces/imagepuller-rhel8:2.12IMAGE_TAGThe image tag to pull
latestSERVICEACCOUNT_NAMEThe name of the ServiceAccount created and used by the deployment
kubernetes-image-pullerTable 8.3. Image Puller OpenShift templates parameters in
configmap.yamlValue Usage Default CACHING_CPU_LIMITThe value of
CACHING_CPU_LIMITin the ConfigMap.2CACHING_CPU_REQUESTThe value of
CACHING_CPU_REQUESTin the ConfigMap.05CACHING_INTERVAL_HOURSThe value of
CACHING_INTERVAL_HOURSin the ConfigMap"1"CACHING_MEMORY_LIMITThe value of
CACHING_MEMORY_LIMITin the ConfigMap"20Mi"CACHING_MEMORY_REQUESTThe value of
CACHING_MEMORY_REQUESTin the ConfigMap"10Mi"DAEMONSET_NAMEThe value of
DAEMONSET_NAMEin the ConfigMapkubernetes-image-pullerDEPLOYMENT_NAMEThe value of
DEPLOYMENT_NAMEin the ConfigMapkubernetes-image-pullerIMAGESThe value of
IMAGESin the ConfigMap'che_workspace_plugin_broker_artifacts=registry.redhat.io/codeready-workspaces/pluginbroker-artifacts-rhel8@sha256:3436bacdc249e8dcc289b67e89340bdc2c5b6694304fe369af751f684a140d60;che_workspace_plugin_broker_metadata=registry.redhat.io/codeready-workspaces/pluginbroker-metadata-rhel8@sha256:e709e89bd1ab1612baad039ad6b824b027a070ff0a37be3395202faa55518e09;codeready_workspaces_machineexec_plugin_registry_image_gixdcmqk=registry.redhat.io/codeready-workspaces/machineexec-rhel8@sha256:93dc77a7f33171b36dbc112e7e732da4044c4c75a48b7a25907521c529170c0c;codeready_workspaces_plugin_java11_devfile_registry_image_gixdcmqk=registry.redhat.io/codeready-workspaces/plugin-java11-rhel8@sha256:f06f983d5e49a1ab05b9de54e449b2033688e7a38a6c57550f2ed87b3bef3fe2;codeready_workspaces_plugin_java11_plugin_registry_image_gixdcmqk=registry.redhat.io/codeready-workspaces/plugin-java11-rhel8@sha256:f06f983d5e49a1ab05b9de54e449b2033688e7a38a6c57550f2ed87b3bef3fe2;codeready_workspaces_plugin_java8_devfile_registry_image_gixdcmqk=registry.redhat.io/codeready-workspaces/plugin-java8-rhel8@sha256:c451114be8be1ff012a85eae983d85216d0171dfc1376df1c410f54af0226bc2;codeready_workspaces_plugin_java8_plugin_registry_image_gixdcmqk=registry.redhat.io/codeready-workspaces/plugin-java8-rhel8@sha256:c451114be8be1ff012a85eae983d85216d0171dfc1376df1c410f54af0226bc2;codeready_workspaces_plugin_kubernetes_plugin_registry_image_gixdcmqk=registry.redhat.io/codeready-workspaces/plugin-kubernetes-rhel8@sha256:3e43ffa6757980fb0f092798b76d6bbfa63768c72d2f071b666f6401b6c0df5c;codeready_workspaces_plugin_openshift_plugin_registry_image_gixdcmqk=registry.redhat.io/codeready-workspaces/plugin-openshift-rhel8@sha256:55e67c70b3b04e045230bf553e2394920d088027aad6eb5ce0a21abede138af5;codeready_workspaces_stacks_cpp_devfile_registry_image_gixdcmqk=registry.redhat.io/codeready-workspaces/stacks-cpp-rhel8@sha256:5ae3c3fcef5050ca30126d55229fe3334e887c658d6e5fbe9ef6aa8339dfc89e;codeready_workspaces_stacks_cpp_plugin_registry_image_gixdcmqk=registry.redhat.io/codeready-workspaces/stacks-cpp-rhel8@sha256:5ae3c3fcef5050ca30126d55229fe3334e887c658d6e5fbe9ef6aa8339dfc89e;codeready_workspaces_stacks_dotnet_devfile_registry_image_gixdcmqk=registry.redhat.io/codeready-workspaces/stacks-dotnet-rhel8@sha256:68875b794b80d9590fceff2e35eaa8f0ac47cd9e8f183f54652a1d1703024dd8;codeready_workspaces_stacks_dotnet_plugin_registry_image_gixdcmqk=registry.redhat.io/codeready-workspaces/stacks-dotnet-rhel8@sha256:68875b794b80d9590fceff2e35eaa8f0ac47cd9e8f183f54652a1d1703024dd8;codeready_workspaces_stacks_golang_devfile_registry_image_gixdcmqk=registry.redhat.io/codeready-workspaces/stacks-golang-rhel8@sha256:a007380852029dcb01f2a00956f4e2b26c9c53d2063eca92d41d56fff4e83a27;codeready_workspaces_stacks_golang_plugin_registry_image_gixdcmqk=registry.redhat.io/codeready-workspaces/stacks-golang-rhel8@sha256:a007380852029dcb01f2a00956f4e2b26c9c53d2063eca92d41d56fff4e83a27;codeready_workspaces_stacks_php_devfile_registry_image_gixdcmqk=registry.redhat.io/codeready-workspaces/stacks-php-rhel8@sha256:193b9775d58e1f7d9a45607b23bbfea4cfcba53356872da3e28de3ee9a8254e5;codeready_workspaces_stacks_php_plugin_registry_image_gixdcmqk=registry.redhat.io/codeready-workspaces/stacks-php-rhel8@sha256:193b9775d58e1f7d9a45607b23bbfea4cfcba53356872da3e28de3ee9a8254e5;codeready_workspaces_theia_endpoint_plugin_registry_image_gixdcmqk=registry.redhat.io/codeready-workspaces/theia-endpoint-rhel8@sha256:2eb5fd69e08e3a1a8f557fe1d41170ee9dac89d15c5947aabc477d4e2107a9ea;codeready_workspaces_theia_plugin_registry_image_gixdcmqk=registry.redhat.io/codeready-workspaces/theia-rhel8@sha256:7c1fcf0a972e2905a0758d53e2155534643d0fbcbb688d57b54f05bafe323582;jboss_eap_7_eap74_openjdk8_openshift_rhel7_devfile_registry_image_g4xdilrqbi______=registry.redhat.io/jboss-eap-7/eap74-openjdk8-openshift-rhel7@sha256:b4a113c4d4972d142a3c350e2006a2b297dc883f8ddb29a88db19c892358632d;jboss_eap_7_eap_xp3_openjdk11_openshift_devfile_registry_image_gmxdaljzbi______=registry.redhat.io/jboss-eap-7/eap-xp3-openjdk11-openshift-rhel8@sha256:3875b2ee2826a6d8134aa3b80ac0c8b5ebc4a7f718335d76dfc3461b79f93d19;pvc_jobs=registry.redhat.io/ubi8/ubi-minimal@sha256:54ef2173bba7384dc7609e8affbae1c36f8a3ec137cacc0866116d65dd4b9afe;rhscl_mongodb_36_rhel7_devfile_registry_image_gewtkmak=registry.redhat.io/rhscl/mongodb-36-rhel7@sha256:9f799d356d7d2e442bde9d401b720600fd9059a3d8eefea6f3b2ffa721c0dc73;'NAMESPACEThe value of
NAMESPACEin the ConfigMapk8s-image-pullerNODE_SELECTORThe value of
NODE_SELECTORin the ConfigMap"{}"Table 8.4. Image Puller OpenShift templates parameters in
serviceaccount.yamlValue Usage Default SERVICEACCOUNT_NAMEThe name of the ServiceAccount created and used by the deployment
kubernetes-image-pullerCreate an OpenShift project to host the Image Puller:
$ oc new-project <k8s-image-puller>Process and apply the templates to install the puller:
$ oc process -f serviceaccount.yaml | oc apply -f -
$ oc process -f configmap.yaml | oc apply -f -
$ oc process -f app.yaml | oc apply -f -
Verification steps
Verify the existence of a <kubernetes-image-puller> deployment and a <kubernetes-image-puller> DaemonSet. The DaemonSet needs to have a Pod for each node in the cluster:
$ oc get deployment,daemonset,pod --namespace <k8s-image-puller>Verify the values of the <kubernetes-image-puller>
ConfigMap.$ oc get configmap <kubernetes-image-puller> --output yaml
Chapter 9. Managing identities and authorizations
This section describes different aspects of managing identities and authorizations of Red Hat CodeReady Workspaces.
9.1. Authenticating users
This document covers all aspects of user authentication in Red Hat CodeReady Workspaces, both on the CodeReady Workspaces server and in workspaces. This includes securing all REST API endpoints, WebSocket or JSON RPC connections, and some web resources.
All authentication types use the JWT open standard as a container for transferring user identity information. In addition, CodeReady Workspaces server authentication is based on the OpenID Connect protocol implementation, which is provided by default by RH-SSO.
Authentication in workspaces implies the issuance of self-signed per-workspace JWT tokens and their verification on a dedicated service based on JWTProxy.
9.1.1. Authenticating to the CodeReady Workspaces server
9.1.1.1. Authenticating to the CodeReady Workspaces server using other authentication implementations
This procedure describes how to use an OpenID Connect (OIDC) authentication implementation other than RH-SSO.
Procedure
-
Update the authentication configuration parameters that are stored in the
multiuser.propertiesfile (such as client ID, authentication URL, realm name). -
Write a single filter or a chain of filters to validate tokens, create the user in the CodeReady Workspaces dashboard, and compose the
subjectobject. - If the new authorization provider supports the OpenID protocol, use the OIDC JS client library available at the settings endpoint because it is decoupled from specific implementations.
- If the selected provider stores additional data about the user (first and last name, job title), it is recommended to write a provider-specific ProfileDao implementation that provides this information.
9.1.1.2. Authenticating to the CodeReady Workspaces server using OAuth
For easy user interaction with third-party services, the CodeReady Workspaces server supports OAuth authentication. OAuth tokens are also used for GitHub-related plug-ins.
OAuth authentication has two main flows:
- delegated
- Default. Delegates OAuth authentication to RH-SSO server.
- embedded
- Uses built-in CodeReady Workspaces server mechanism to communicate with OAuth providers.
To switch between the two implementations, use the che.oauth.service_mode=<embedded|delegated> configuration property.
The main REST endpoint in the OAuth API is /api/oauth, which contains:
-
An authentication method,
/authenticate, that the OAuth authentication flow can start with. -
A callback method,
/callback, to process callbacks from the provider. -
A token GET method,
/token, to retrieve the current user’s OAuth token. -
A token DELETE method,
/token, to invalidated the current user’s OAuth token. -
A GET method,
/, to get the list of configured identity providers.
9.1.1.3. Using Swagger or REST clients to execute queries
The user’s RH-SSO token is used to execute queries to the secured API on the user’s behalf through REST clients. A valid token must be attached as the Request header or the ?token=$token query parameter.
Access the CodeReady Workspaces Swagger interface at \https://codeready-<openshift_deployment_name>.<domain_name>/swagger. The user must be signed in through RH-SSO, so that the access token is included in the Request header.
9.1.2. Authenticating in a CodeReady Workspaces workspace
Workspace containers may contain services that must be protected with authentication. Such protected services are called secure. To secure these services, use a machine authentication mechanism.
JWT tokens avoid the need to pass RH-SSO tokens to workspace containers (which can be insecure). Also, RH-SSO tokens may have a relatively shorter lifetime and require periodic renewals or refreshes, which is difficult to manage and keep in sync with the same user session tokens on clients.
Figure 9.1. Authentication inside a workspace

9.1.2.1. Creating secure servers
To create secure servers in CodeReady Workspaces workspaces, set the secure attribute of the endpoint to true in the dockerimage type component in the devfile.
Devfile snippet for a secure server
components:
  - type: dockerimage
    endpoints:
      - attributes:
          secure: 'true'
9.1.2.2. Workspace JWT token
Workspace tokens are JSON web tokens (JWT) that contain the following information in their claims:
-
uid: The ID of the user who owns this token -
uname: The name of the user who owns this token -
wsid: The ID of a workspace which can be queried with this token
Every user is provided with a unique personal token for each workspace. The structure of a token and the signature are different than they are in RH-SSO. The following is an example token view:
# Header
{
  "alg": "RS512",
  "kind": "machine_token"
}
# Payload
{
  "wsid": "workspacekrh99xjenek3h571",
  "uid": "b07e3a58-ed50-4a6e-be17-fcf49ff8b242",
  "uname": "john",
  "jti": "06c73349-2242-45f8-a94c-722e081bb6fd"
}
# Signature
{
  "value": "RSASHA256(base64UrlEncode(header) + . +  base64UrlEncode(payload))"
}
The SHA-256 cipher with the RSA algorithm is used for signing JWT tokens. It is not configurable. Also, there is no public service that distributes the public part of the key pair with which the token is signed.
9.1.2.3. Machine token validation
The validation of machine tokens (JWT tokens) is performed using a dedicated per-workspace service with JWTProxy running on it in a separate Pod. When the workspace starts, this service receives the public part of the SHA key from the CodeReady Workspaces server. A separate verification endpoint is created for each secure server. When traffic comes to that endpoint, JWTProxy tries to extract the token from the cookies or headers and validates it using the public-key part.
To query the CodeReady Workspaces server, a workspace server can use the machine token provided in the CHE_MACHINE_TOKEN environment variable. This token is the user’s who starts the workspace. The scope of such requests is restricted to the current workspace only. The list of allowed operations is also strictly limited.
9.2. Authorizing users
User authorization in CodeReady Workspaces is based on the permissions model. Permissions are used to control the allowed actions of users and establish a security model. Every request is verified for the presence of the required permission in the current user subject after it passes authentication. You can control resources managed by CodeReady Workspaces and allow certain actions by assigning permissions to users.
Permissions can be applied to the following entities:
- Workspace
- System
All permissions can be managed using the provided REST API. The APIs are documented using Swagger at \https://codeready-<openshift_deployment_name>.<domain_name>/swagger/#!/permissions.
9.2.1. CodeReady Workspaces workspace permissions
The user who creates a workspace is the workspace owner. By default, the workspace owner has the following permissions: read, use, run, configure, setPermissions, and delete. Workspace owners can invite users into the workspace and control workspace permissions for other users.
The following permissions are associated with workspaces:
Table 9.1. CodeReady Workspaces workspace permissions
| Permission | Description |
|---|---|
| read | Allows reading the workspace configuration. |
| use | Allows using a workspace and interacting with it. |
| run | Allows starting and stopping a workspace. |
| configure | Allows defining and changing the workspace configuration. |
| setPermissions | Allows updating the workspace permissions for other users. |
| delete | Allows deleting the workspace. |
9.2.2. CodeReady Workspaces system permissions
CodeReady Workspaces system permissions control aspects of the whole CodeReady Workspaces installation. The following permissions are applicable to the system:
Table 9.2. CodeReady Workspaces system permission
| Permission | Description |
|---|---|
| manageSystem | Allows control of the system and workspaces. |
| setPermissions | Allows updating the permissions for users on the system. |
| manageUsers | Allows creating and managing users. |
| monitorSystem | Allows accessing endpoints used for monitoring the state of the server. |
All system permissions are granted to the administrative user. To configure the administrative user, use the CHE_SYSTEM_ADMIN__NAME property. The default value is admin. The system permissions are granted when the CodeReady Workspaces server starts. If the record of the user is not in the CodeReady Workspaces user database, the permissions are granted after the first login of the user.
9.2.3. manageSystem permission
Users with the manageSystem permission have access to the following services:
| Path | HTTP Method | Description |
|---|---|---|
| /resource/free/ | GET | Get free resource limits. |
| /resource/free/{accountId} | GET | Get free resource limits for the given account. |
| /resource/free/{accountId} | POST | Edit free resource limit for the given account. |
| /resource/free/{accountId} | DELETE | Remove free resource limit for the given account. |
| /installer/ | POST | Add installer to the registry. |
| /installer/{key} | PUT | Update installer in the registry. |
| /installer/{key} | DELETE | Remove installer from the registry. |
| /logger/ | GET | Get logging configurations in the CodeReady Workspaces server. |
| /logger/{name} | GET | Get configurations of logger by its name in the CodeReady Workspaces server. |
| /logger/{name} | PUT | Create logger in the CodeReady Workspaces server. |
| /logger/{name} | POST | Edit logger in the CodeReady Workspaces server. |
| /resource/{accountId}/details | GET | Get detailed information about resources for the given account. |
| /system/stop | POST | Shutdown all system services, prepare CodeReady Workspaces to stop. |
9.2.4. monitorSystem permission
Users with the monitorSystem permission have access to the following services.
| Path | HTTP Method | Description |
|---|---|---|
| /activity | GET | Get workspaces in a certain state for a certain amount of time. |
9.2.5. Listing CodeReady Workspaces permissions
To list CodeReady Workspaces permissions that apply to a specific resource, perform the GET /permissions request.
To list the permissions that apply to a user, perform the GET /permissions/{domain} request.
To list the permissions that apply to all users, perform the GET /permissions/{domain}/all request. The user must have manageSystem permissions to see this information.
The suitable domain values are:
- system
- organization
- workspace
The domain is optional. If no domain is specified, the API returns all possible permissions for all the domains.
9.2.6. Assigning CodeReady Workspaces permissions
To assign permissions to a resource, perform the POST /permissions request. The suitable domain values are:
- system
- organization
- workspace
The following is a message body that requests permissions for a user with a userId to a workspace with a workspaceID:
Requesting CodeReady Workspaces user permissions
{
  "actions": [
    "read",
    "use",
    "run",
    "configure",
    "setPermissions"
  ],
  "userId": "userID",          1
  "domainId": "workspace",
  "instanceId": "workspaceID"  2
}
9.3. Configuring authorization
CodeReady Workspaces uses the permissions model for user authorization.
9.3.1. Authorization and user management
Red Hat CodeReady Workspaces uses RH-SSO to create, import, manage, delete, and authenticate users. RH-SSO uses built-in authentication mechanisms and user storage. It can use third-party identity management systems to create and authenticate users. Red Hat CodeReady Workspaces requires a RH-SSO token when you request access to CodeReady Workspaces resources.
Local users and imported federation users must have an email address in their profile.
The default RH-SSO credentials are admin:admin. You can use the admin:admin credentials when logging into Red Hat CodeReady Workspaces for the first time. It has system privileges.
Identifying the RH-SSO URL
Go to the OpenShift web console and to the RH-SSO project.
9.3.2. Configuring CodeReady Workspaces to work with RH-SSO
The deployment script configures RH-SSO. It creates a codeready-public client with the following fields:
- Valid Redirect URIs: Use this URL to access CodeReady Workspaces.
- Web Origins
The following are common errors when configuring CodeReady Workspaces to work with RH-SSO:
- Invalid
redirectURIerror -
Occurs when you access CodeReady Workspaces at
myhost, which is an alias, and your originalCHE_HOSTis1.1.1.1. If this error occurs, go to the RH-SSO administration console and ensure that the valid redirect URIs are configured. - CORS error
- Occurs when you have an invalid web origin.
9.3.3. Configuring RH-SSO tokens
A user token expires after 30 minutes by default.
You can change the following RH-SSO token settings:

9.3.4. Setting up user federation
RH-SSO federates external user databases and supports LDAP and Active Directory. You can test the connection and authenticate users before choosing a storage provider.
See the User storage federation page in RH-SSO documentation to learn how to add a provider.
See the LDAP and Active Directory page in RH-SSO documentation to specify multiple LDAP servers.
9.3.5. Enabling authentication with social accounts and brokering
RH-SSO provides built-in support for GitHub, OpenShift, and most common social networks such as Facebook and Twitter. See RH-SSO documentation to learn how to enable Login with GitHub.
9.3.5.1. Configuring GitHub OAuth
OAuth for GitHub allows for automatic SSH key upload to GitHub.
Prerequisites
-
The
octool is available.
Procedure
Create a OAuth application in GitHub using CodeReady Workspaces URL as the value for the application
Homepage URLand RH-SSO GitHub endpoint URL as the value for Authorization callback URL. The default values arehttps://codeready-openshift-workspaces.<DOMAIN>/andhttps://keycloak-openshift-workspaces.<DOMAIN>/auth/realms/codeready/broker/github/endpointrespectively, where<DOMAIN>is OpenShift cluster domain.Create a new secret in the project where CodeReady Workspaces is deployed.
$ oc apply -f - <<EOF
kind: Secret
apiVersion: v1
metadata:
  name: github-oauth-config
  namespace: <...> 1
  labels:
    app.kubernetes.io/part-of: che.eclipse.org
    app.kubernetes.io/component: oauth-scm-configuration
  annotations:
    che.eclipse.org/oauth-scm-server: github
type: Opaque
data:
  id: <...> 2
  secret: <...> 3
EOF
- If CodeReady Workspaces was already installed wait until rollout of RH-SSO component finishes.
9.3.5.2. Configuring a Bitbucket server that uses self-signed TLS certificates
The following chapter describes how to configure a Bitbucket (BB) server that uses self-signed TLS certificates so that the CodeReady Workspaces server and workspace components can establish a trusted connection with BB.
Creating ConfigMaps for additional TLS and
gitSelfSigncertificates. This enables:- Launching a factory using a devfile URL.
- Importing and cloning a project.
- Configure the OAuth 1 authentication on the BB server side. For more information, see Configuring Bitbucket Server OAuth 1
- Creating a ConfigMap for importing additional certificates is necessary only if a BB server is setup with self-signed TLS certificates. These certificates are needed for the proper functionality of CodeReady Workspaces server and tools inside of a workspace, which use them for performing Git operations related to a specific repository.
Prerequisites
-
A value of the BB server certification authority (CA) exported in the Base64 ASCII format and stored in a
ca.crtfile. - An instance of CodeReady Workspaces.
Procedure
Provision the CA of the BB server to the CodeReady Workspaces server to enable it to read the devfiles stored in the BB server. To do so, add the following ConfigMap to the
openshift-workspacesproject:$ oc create configmap bitbucket-ca-cert-for-factory --from-file=ca.crt -n openshift-workspaces
$ oc label configmap bitbucket-ca-cert-for-factory app.kubernetes.io/part-of=che.eclipse.org app.kubernetes.io/component=ca-bundle -n openshift-workspaces
Provision the CA of the BB server to the CodeReady Workspaces server to be able to use Git operations. To do so, add a new ConfigMap to the
openshift-workspacesproject:$ oc create configmap che-git-self-signed-cert --from-file=ca.crt --from-literal=githost=<bitbucket_server_url> -n openshift-workspacesEdit the CheCluster Custom Resource (CR) to configure the CodeReady Workspaces server.
spec: server: # … gitSelfSignedCert: <boolean> 1- 1
- Use
truefor a BB server that use a self-signed cert. Default value:false.- For more information, see Advanced configuration options for the CodeReady Workspaces server component.
Reference
- For adding a Bitbucket CA certificate into CodeReady Workspaces, see Importing untrusted TLS certificates to CodeReady Workspaces.
9.3.5.3. Configuring the Bitbucket and CodeReady Workspaces integration to use OAuth1
The following section describes the configuration of the OAuth 1 authentication that is needed for performing read and write operations with Bitbucket (BB) repositories. To use BB repositories with allowed Git operations, such as clone and push, register a BB endpoint with CodeReady Workspaces first, and configure the OAuth 1 authentication.
This procedure requires:
- generating RSA key pairs
- generating a consumer key-secret pair
- creating an application link on the BB side
- configuring BB on the CodeReady Workspaces-server side
This procedure also describes how to activate OAuth 1 for Bitbucket Server to:
- Use devfiles hosted on a Bitbucket Server.
- Enable CodeReady Workspaces to obtain and renew Bitbucket Server Personal access tokens.
Prerequisites
-
The
octool is available. - Bitbucket Server is available from CodeReady Workspaces server.
- An instance of CodeReady Workspaces.
Procedure
Generate an RSA key pair and a stripped-down version of the public key:
$ openssl genrsa -out <private.pem> 2048$ openssl rsa -in <private.pem> -pubout > <public.pub>
$ openssl pkcs8 -topk8 -inform pem -outform pem -nocrypt -in <private.pem> -out <privatepkcs8.pem>
$ cat <public.pub> | sed 's/-----BEGIN PUBLIC KEY-----//g' | sed 's/-----END PUBLIC KEY-----//g' | tr -d '\n' > <public-stripped.pub>
Generate a consumer key and a shared secret.
$ openssl rand -base64 24 > <bitbucket_server_consumer_key>$ openssl rand -base64 24 > <bitbucket_shared_secret>Configure an Application Link in Bitbucket to enable the communication from CodeReady Workspaces to Bitbucket Server.
- In Bitbucket Server, click the cog in the top navigation bar to navigate to Administration > Application Links.
-
Enter the application URL:
\https://codeready-<openshift_deployment_name>.<domain_name>and click the button. -
In the warning message stating
No response was received from the URLclick the button. Complete the Link Applications form and click the button.
- Application Name
-
<CodeReady Workspaces> - Application Type
- Generic Application.
- Service Provider Name
-
<CodeReady Workspaces> - Consumer Key
-
Paste the content of the
<bitbucket_server_consumer_key>file. - Shared secret
-
Paste the content of the
<bitbucket_shared_secret>file. - Request Token URL
-
<Bitbucket Server URL>/plugins/servlet/oauth/request-token - Access token URL
-
<Bitbucket Server URL>/plugins/servlet/oauth/access-token - Authorize URL
-
<Bitbucket Server URL>/plugins/servlet/oauth/access-token - Create incoming link
- Enabled.
Complete the Link Applications form and click the button.
- Consumer Key
-
Paste the content of the
<bitbucket_server_consumer_key>file. - Consumer name
-
<CodeReady Workspaces> - Public Key
-
Paste the content of the
<public-stripped.pub>file.
Create a OpenShift Secret in CodeReady Workspaces project containing the consumer and private keys.
$ oc apply -f - <<EOF
kind: Secret
apiVersion: v1
metadata:
  name: bitbucket-oauth-config
  namespace: <CodeReady Workspaces-namespace> 1
  labels:
    app.kubernetes.io/component: oauth-scm-configuration
    app.kubernetes.io/part-of: che.eclipse.org
  annotations:
    che.eclipse.org/oauth-scm-server: bitbucket
    che.eclipse.org/scm-server-endpoint: '<scm-server-endpoint>' 2
type: Opaque
data:
  private.key: '<user-private-key>' 3
  consumer.key: '<bitbucket_server_consumer_key>' 4
EOF
Example
#!/usr/bin/env bash NS=${1:-eclipse-che} CONSUMER_KEY=$(cat ./certs/bitbucket_server_consumer_key) PRIVATE_KEY=$(cat ./certs/privatepkcs8.pem | sed 's/-----BEGIN PRIVATE KEY-----//g' | sed 's/-----END PRIVATE KEY-----//g' | tr -d '\n') BITBUCKET_HOST='<your-bitbucket-host-here>' unameOut="$(uname -s)" case "${unameOut}" in Linux*) BASE64_FUNC='base64 -w 0';; Darwin*) BASE64_FUNC='base64';; CYGWIN*) BASE64_FUNC='base64 -w 0';; MINGW*) BASE64_FUNC='base64 -w 0';; *) BASE64_FUNC='base64 -w 0' esac cat <<EOF | oc apply -n $NS -f - kind: Secret apiVersion: v1 metadata: name: bitbucket-oauth-config labels: app.kubernetes.io/part-of: che.eclipse.org app.kubernetes.io/component: oauth-scm-configuration annotations: che.eclipse.org/oauth-scm-server: bitbucket che.eclipse.org/scm-server-endpoint: https://$BITBUCKET_HOST type: Opaque data: private.key: $(echo -n $PRIVATE_KEY | $BASE64_FUNC) consumer.key: $(echo -n $CONSUMER_KEY | $BASE64_FUNC) EOF- See the whole script in this GitHub example.
9.3.5.4. Configuring GitLab servers
To use a GitLab server as a project sources supplier, register the GitLab server URL with CodeReady Workspaces using the CHE_INTEGRATION_GITLAB_SERVER__ENDPOINTS property and specify the hostname of the server to register.
Example
https://gitlab.apps.cluster-2ab2.2ab2.example.opentlc.com/
For additional examples of configuring GitLab servers using:
Additional resources
9.3.5.5. Configuring GitLab OAuth2
OAuth2 for GitLab allows accepting factories from private GitLab repositories.
Prerequisites
- GitLab server is running and available from CodeReady Workspaces
Procedure
Create a Authorized OAuth2 application in GitLab using CodeReady Workspaces as the application
Nameand RH-SSO GitLab endpoint URL as the value forRedirect URI. The callback URL default value ishttps://keycloak-openshift-workspaces.<DOMAIN>/auth/realms/codeready/broker/gitlab/endpoint, where<DOMAIN>is OpenShift cluster domain. Store theApplication IDandSecretvalues. All three types of GitLab OAuth 2 applications are supported: User owned, Group owned and Instance-wide.Create a custom OIDC provider link on RH-SSO pointing to GitLab server. Fill the following fields:
- Client ID
-
a value from the
Application IDfield provided by GitLab server in previous step; - Client Secret
-
a value from
Secretfield provided by GitLab server in previous step; - Authorization URL
-
a URL which have a
https://<GITLAB_DOMAIN>/oauth/authorizeformat; - Token URL
-
a URL which have a
https://<GITLAB_DOMAIN>/oauth/tokenformat; - Scopes
-
set of scopes which must contain (but not limited to) the following set:
api write_repository openid; - Store Tokens
- needs to be enabled;
- Store Tokens Readable
- needs to be enabled
Note-
Substitute
<GITLAB_DOMAIN>with the URL and port of the GitLab installation.
Register the GitLab instance URL with the enabled OAuth 2 support in CodeReady Workspaces using the
CHE_INTEGRATION_GITLAB_OAUTH__ENDPOINTproperty.Warning-
The GitLab instance URL must be present in the list of configured GitLab integration endpoints, set by the
CHE_INTEGRATION_GITLAB_SERVER__ENDPOINTSproperty.
-
The GitLab instance URL must be present in the list of configured GitLab integration endpoints, set by the
Additional resources
In case of having issues CodeReady Workspaces accessing GitLab related to TLS keys, consult with the following docs:
9.3.6. Using protocol-based providers
RH-SSO supports SAML v2.0 and OpenID Connect v1.0 protocols.
9.3.7. Managing users using RH-SSO
You can add, delete, and edit users in the user interface. See RH-SSO User Management for more information.
9.3.8. Configuring CodeReady Workspaces to use an external RH-SSO installation
By default, CodeReady Workspaces installation includes the deployment of a dedicated RH-SSO instance. However, using an external RH-SSO is also possible. This option is useful when a user has an existing RH-SSO instance with already-defined users, for example, a company-wide RH-SSO server used by several applications.
Table 9.3. Placeholders used in examples
|
| RH-SSO realm name intended for use by CodeReady Workspaces |
|
|
Name of the |
|
| Base URL of the external RH-SSO server |
Prerequisites
In the administration console of the external installation of RH-SSO, define a realm containing the users intended to connect to CodeReady Workspaces:
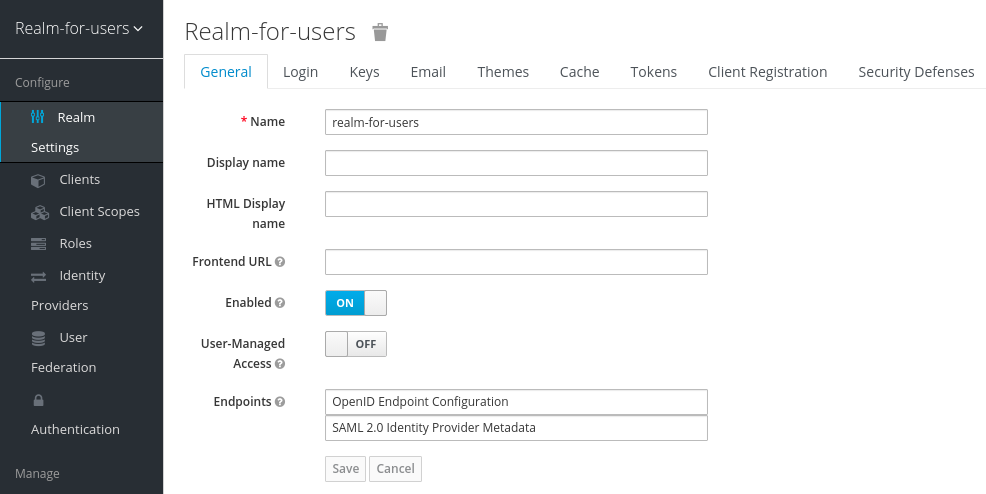
In this
realm, define an OIDC client that CodeReady Workspaces will use to authenticate the users. This is an example of such a client with the correct settings: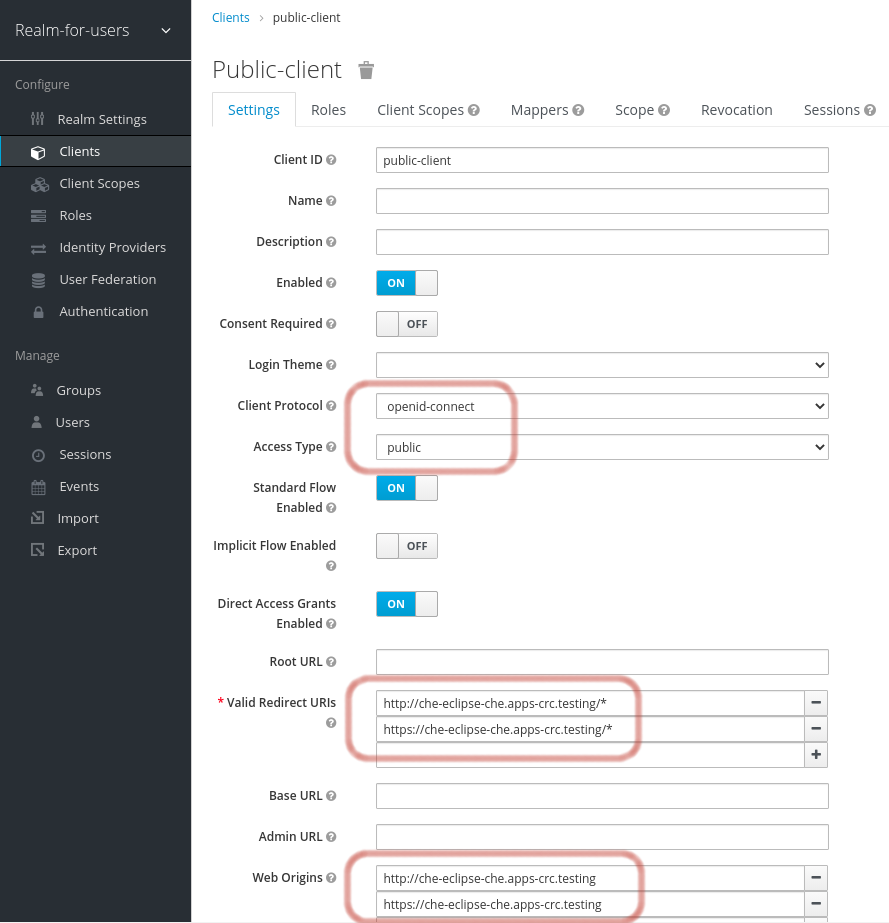 Note
Note-
Client Protocol must be
openid-connect. -
Access Type must be
public. CodeReady Workspaces only supports thepublicaccess type. -
Valid Redirect URIs must contain at least two URIs related to the CodeReady Workspaces server, one using the
httpprotocol and the otherhttps. These URIs must contain the base URL of the CodeReady Workspaces server, followed by/*wildcards. Web Origins must contain at least two URIs related to the CodeReady Workspaces server, one using the
httpprotocol and the otherhttps. These URIs must contain the base URL of the CodeReady Workspaces server, without any path after the host.The number of URIs depends on the number of installed product tools.
-
Client Protocol must be
With CodeReady Workspaces that uses the default OpenShift OAuth support, user authentication relies on the integration of RH-SSO with OpenShift OAuth. This allows users to log in to CodeReady Workspaces with their OpenShift login and have their workspaces created under personal OpenShift projects.
This requires setting up an OpenShift "RH-SSO Identity Provider". When using an external RH-SSO, configure the RH-SSO manually. For instructions, see the appropriate RH-SSO documentations for either OpenShift 3 or OpenShift 4.
- The configured RH-SSO has the options Store Tokens and Stored Tokens Readable enabled.
Procedure
Set the following properties in the
CheClusterCustom Resource (CR):spec: auth: externalIdentityProvider: true identityProviderURL: <auth-base-url> identityProviderRealm: <provider-realm-name> identityProviderClientId: <oidc-client-name>When installing CodeReady Workspaces with OpenShift OAuth support enabled, set the following properties in the
CheClusterCustom Resource (CR):spec: auth: openShiftoAuth: true # Note: only if the OpenShift "RH-SSO Identity Provider" alias is different from 'openshift-v3' or 'openshift-v4' server: customCheProperties: CHE_INFRA_OPENSHIFT_OAUTHIDENTITYPROVIDER: <OpenShift "RH-SSO Identity Provider" alias>
9.3.9. Configuring SMTP and email notifications
Red Hat CodeReady Workspaces does not provide any pre-configured MTP servers.
To enable SMTP servers in RH-SSO:
-
Go to
che realm settings > Email. - Specify the host, port, username, and password.
Red Hat CodeReady Workspaces uses the default theme for email templates for registration, email confirmation, password recovery, and failed login.
9.3.10. Enabling self-registration
Self-registration allows users to register themselves in a CodeReady Workspaces instance by accessing the CodeReady Workspaces server URL.
For CodeReady Workspaces installed without OpenShift OAuth support, self-registration is disabled by default, therefore the option to register a new user is not available on the login page.
Prerequisites
- You are logged in as an administrator.
Procedure
To enable self-registration of users:
- Navigate to the Realm Settings menu on the left and open the Login tab.
- Set User registration option to On.
9.4. Configuring OpenShift OAuth
For users to interact with OpenShift, they must first authenticate to the OpenShift cluster. OpenShift OAuth is a process in which users prove themselves to a cluster through an API with obtained OAuth access tokens.
Authentication with the OpenShift Connector overview is a possible way for CodeReady Workspaces users to authenticate with an OpenShift cluster.
The following section describes the OpenShift OAuth configuration options and its use with a CodeReady Workspaces.
9.4.1. Configuring OpenShift OAuth with initial user
Prerequisites
-
The
octool is available. -
crwctlmanagement tool is available. See Using the crwctl management tool.
Procedure
Configure OpenShift identity providers on the cluster. See the Understanding identity provider configuration.
When a user skips the Configuring step of OpenShift "RH-SSO Identity Provider", and the OpenShift cluster does not already contain a configured RH-SSO, CodeReady Workspaces creates an initial OpenShift user for the
HTPasswdidentity provider. Credentials of this user are stored in theopenshift-oauth-user-credentialssecret, located in theopenshift-confignamespace.Obtain the credentials for logging in to an OpenShift cluster and CodeReady Workspaces instance:
Obtain OpenShift user name:
$ oc get secret openshift-oauth-user-credentials -n openshift-config -o json | jq -r '.data.user' | base64 -d
Obtain OpenShift user password:
$ oc get secret openshift-oauth-user-credentials -n openshift-config -o json | jq -r '.data.password' | base64 -d
-
Deploy CodeReady Workspaces using OperatorHub or the crwctl, see the
crwctl server:deployspecification chapter. OpenShift OAuth will be enabled by default.
9.4.2. Configuring OpenShift OAuth without provisioning OpenShift initial OAuth user
The following procedure describes how to configure OpenShift OAuth without provisioning the initial OAuth user.
Prerequisites
-
crwctlmanagement tool is available. See Using the crwctl management tool.
Procedure
If you have installed CodeReady Workspaces by using the Operator, configure the following values in the codeready-workspaces Custom Resource:
spec:
  auth:
    openShiftoAuth: true
    initialOpenShiftOAuthUser: ''
If you have installed CodeReady Workspaces by using the
crwctltool, use the--che-operator-cr-patch-yamlflag:$ crwctl server:deploy --che-operator-cr-patch-yaml=patch.yaml ...
The
patch.yamlfile must contain the following:spec: auth: openShiftoAuth: true initialOpenShiftOAuthUser: ''
9.4.3. Removing OpenShift initial OAuth user
The following procedure describes how to remove OpenShift initial OAuth user provisioned by Red Hat CodeReady Workspaces.
Prerequisites
-
The
octool installed. - An instance of Red Hat CodeReady Workspaces running on OpenShift.
-
Logged in to OpenShift cluster using the
octool.
Procedure
Update codeready-workspaces custom resource:
$ oc patch checluster/codeready-workspaces -n openshift-workspaces --type=json -p \
'[{"op": "replace", "path": "/spec/auth/initialOpenShiftOAuthUser", "value": false}]'
9.5. Removing user data
9.5.1. Removing user data according to GDPR
The General Data Protection Regulation (GDPR) law enforces the right for individuals to have personal data erased.
The following procedure describes how to remove a user’s data from a cluster and the RH-SSO database.
The following commands use the default OpenShift project, openshift-workspaces, as a user’s example for the -n option.
Prerequisites
A user or an administrator authorization token. To delete any other data except the data bound to a user account,
adminprivileges are required. Theadminis a special CodeReady Workspaces administrator account pre-created and enabled using theCHE_SYSTEM_ADMIN__NAMEandCHE_SYSTEM_SUPER__PRIVILEGED__MODE = trueCustom Resource definitions.spec: server: customCheProperties: CHE_SYSTEM_SUPER__PRIVILEGED__MODE: 'true' CHE_SYSTEM_ADMIN__NAME: '<admin-name>'If needed, use commands below for creating the
adminuser:$ oc patch checluster/codeready-workspaces \ --type merge \ -p '{ "spec": { "server": {"customCheProperties": {"CHE_SYSTEM_SUPER__PRIVILEGED__MODE": "true"} } }}' \ -n openshift-workspaces$ oc patch checluster/codeready-workspaces \ --type merge \ -p '{ "spec": { "server": {"customCheProperties": {"CHE_SYSTEM_ADMIN__NAME": "<admin-name>"} } }}' \ -n openshift-workspacesNoteAll system permissions are granted to the administrative user. To configure the administrative user, use the
CHE_SYSTEM_ADMIN__NAMEproperty. The default value isadmin. The system permissions are granted when the CodeReady Workspaces server starts. If the user record is not in the CodeReady Workspaces user database, the permissions are granted after the first login of the user.Authorization token privileges:
-
admin- Can delete all personal data of all users -
user- Can delete only the data related to the user
-
- A user or an administrator is logged in the OpenShift cluster with deployed CodeReady Workspaces.
A user ID is obtained. Get the user ID using the commands below:
For the current user:
$ curl -X GET \
  --header 'Authorization: Bearer <user-token>' \
  'https://<codeready-<openshift_deployment_name>.<domain_name>>/api/user'
To find a user by name:
$ curl -X GET \
  --header 'Authorization: Bearer <user-token>' \
  'https://<codeready-<openshift_deployment_name>.<domain_name>>/api/user/find?name=<username>'
To find a user by email:
$ curl -X GET \
  --header 'Authorization: Bearer <user-token>' \
  'https://<codeready-<openshift_deployment_name>.<domain_name>>/api/user/find?email=<email>'
Example of obtaining a user ID
This example uses
vparfonoas a local user name.$ curl -X GET \ --header 'Authorization: Bearer <user-token>' \ 'https://che-vp-che.apps.che-dev.x6e0.p1.openshiftapps.com/api/user/find?name=vparfono'The user ID is at the bottom of the curl command output.
{
 "name": "vparfono",
 "links": [
   {
.
.
.
   }
 ],
 "email": "vparfono@redhat.com",
 "id": "921b6f33-2657-407e-93a6-fb14cf2329ce"
}
Procedure
Update the
codeready-workspacesCheCluster CustomResource (CR) definition to permit the removal of a user’s data from the RH-SSO database:$ oc patch checluster/codeready-workspaces \ --patch "{\"spec\":{\"server\":{\"customCheProperties\": {\"CHE_KEYCLOAK_CASCADE__USER__REMOVAL__ENABLED\": \"true\"}}}}" \ --type=merge -n openshift-workspacesRemove the data using the API:
$ curl -i -X DELETE \
  --header 'Authorization: Bearer <user-token>' \
  https://<codeready-<openshift_deployment_name>.<domain_name>>/api/user/<user-id>
Verification
Running the following command returns code 204 as the API response:
$ curl -i -X DELETE \
  --header 'Authorization: Bearer <user-token>' \
  https://<codeready-<openshift_deployment_name>.<domain_name>>/api/user/<user-id>
Additional resources
To remove the data of all users, follow the instructions for Uninstalling CodeReady Workspaces.