
Chapter 7. Managing users
7.1. Authorization and user management
CodeReady Workspaces uses Keycloak to create, import, manage, delete, and authenticate users. Keycloak uses built-in authentication mechanisms and user storage. It can use third-party identity management systems to create and authenticate users. CodeReady Workspaces requires a Keycloak token when you request access to CodeReady Workspaces resources.
Local users and imported federation users must have an email address in their profile.
The default Keycloak credentials are admin:admin. You can use the admin:admin credentials when logging into CodeReady Workspaces for the first time. It has system privileges.
To find your Keycloak URL:
If CodeReady Workspaces is deployed on OpenShift:
- Go to the OpenShift web console and navigate to the Keycloak namespace.
7.2. Configuring CodeReady Workspaces to work with Keycloak
The deployment script ensures that Keycloak is properly configured when CodeReady Workspaces is deployed on OpenShift or installed on Docker. When the che-public client is created, the following fields are populated:
- Valid Redirect URIs: Use this URL to access CodeReady Workspaces.
- Web Origins
The following are common errors when configuring CodeReady Workspaces to work with Keycloak:
Invalid redirectURI error: occurs when you access CodeReady Workspaces at myhost, which is an alias, and your original CHE_HOST is 1.1.1.1. If this error occurs, go to the Keycloak administration console and ensure that the valid redirect URIs are configured.
CORS error: occurs when you have an invalid web origin
7.3. Configuring Keycloak tokens
A user token expires after 30 minutes by default.
You can change the following Keycloak token settings:

7.4. Setting up user federation
Keycloak federates external user databases and supports LDAP and Active Directory. You can test the connection and authenticate users before choosing a storage provider.
See the User storage federation page in Keycloak documentation to learn how to add a provider.
See the LDAP and Active Directory page in Keycloak documentation to specify multiple LDAP servers.
7.5. Enabling authentication with social accounts and brokering
Keycloak provides built-in support for GitHub, OpenShift, and most common social networks such as Facebook and Twitter. See Instructions to enable Login with GitHub.
You can also enable the SSH key and upload it to the CodeReady Workspaces users’ GitHub accounts.
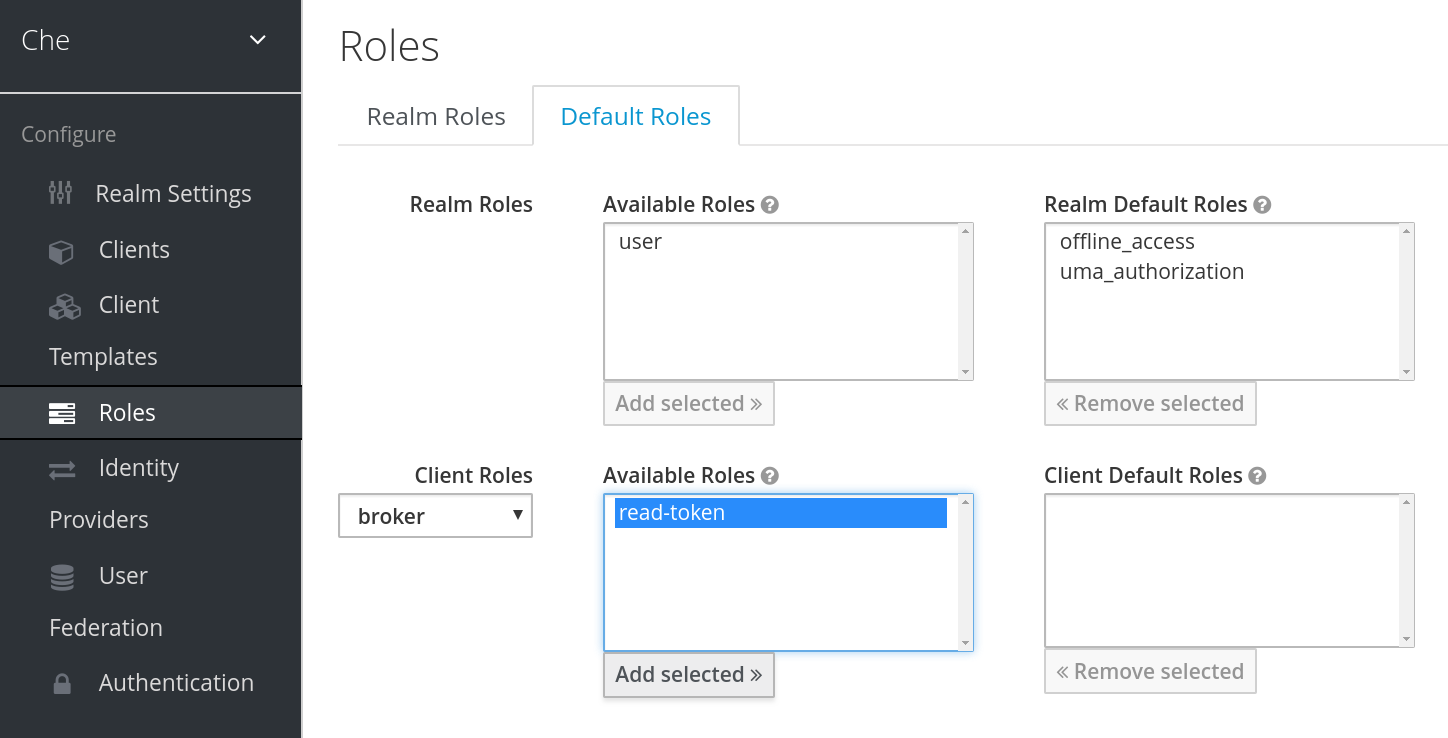
To enable this feature when you register a GitHub identity provider:
-
Set scope to
repo,user,write:public_key. - Set store tokens and stored tokens readable to ON.
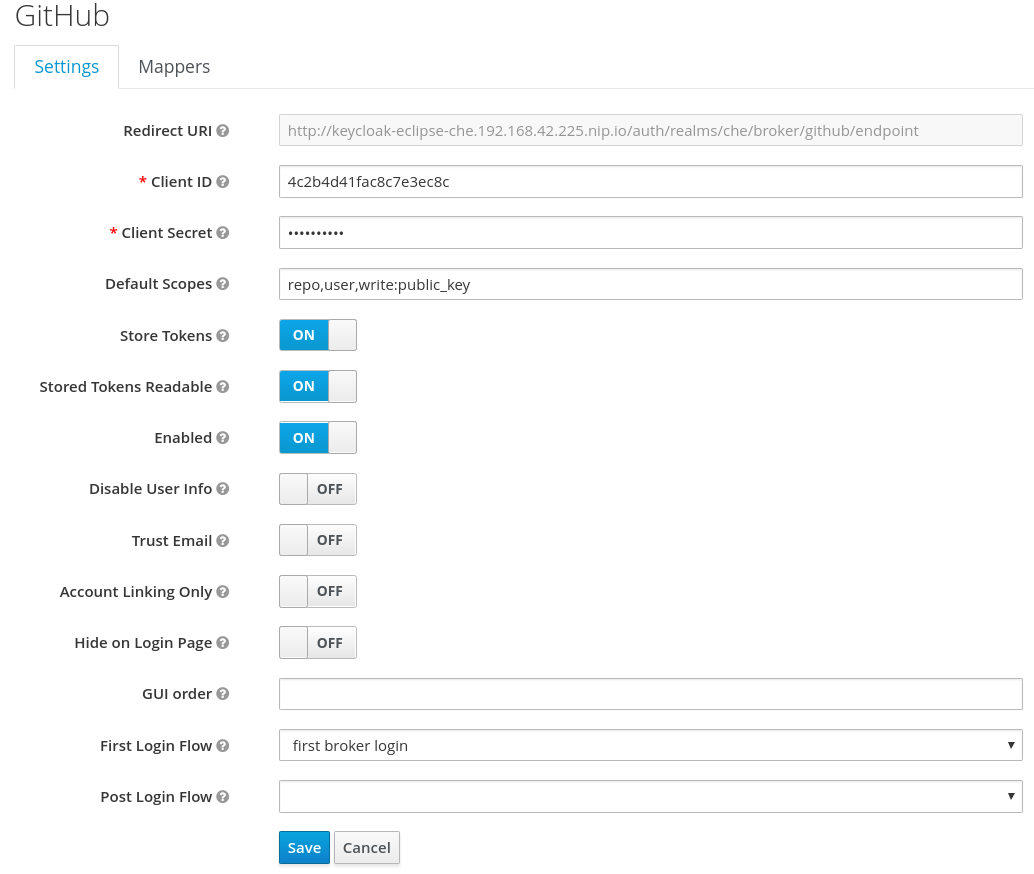
- Add a default read-token role.
This is the default delegated OAuth service mode for CodeReady Workspaces. You can configure the OAuth service mode with the property che.oauth.service_mode.
To use CodeReady Workspaces’s OAuth Authenticator, set che.oauth.service_mode to embedded and use Instructions for single-user mode.
See SSH key management for more information.
7.6. Using protocol-based providers
Keycloak supports SAML v2.0 and OpenID Connect v1.0 protocols. You can connect your identity provider systems if they support these protocols.
7.7. Managing users
You can add, delete, and edit users in the user interface. See: Keycloak User Management for more information.
7.8. Configuring SMTP and email notifications
CodeReady Workspaces does not provide any pre-configured MTP servers.
To enable SMTP servers in Keycloak:
-
Go to
che realm settings > Email. - Specify the host, port, username, and password.
CodeReady Workspaces uses the default theme for email templates for registration, email confirmation, password recovery, and failed login.
7.9. CodeReady Workspaces Authentication
7.9.1. Authentication on CodeReady Workspaces Master
7.9.1.1. OpenId
OpenId authentication on CodeReady Workspaces master, implies presence of an external OpenId provider and has 2 main steps:
Authenticate the user through the JWT token he brought or redirect him to login;
(Authentication tokens should be send in a
Authorizationheader. Also, in limited cases when it’s not possible to useAuthorizationheader, token can be send intokenquery parameter. An example of such exceptional case can be: OAuth authentification initialization, IDE shows javadoc in iframe where authentication must be initialized.)- Compose internal "subject" object which represents the current user inside of the CodeReady Workspaces master code.
At the time of writing the only supported/tested OpenId provider is Keycloak, so all examples/links will refer to this implementation.
The flow starts from the settings service where clients can find all the necessary URLs and properties of the OpenId provider such as jwks.endpoint, token.endpoint, logout.endpoint, realm.name, client_id etc returned. in JSON format.
Service class is org.eclipse.che.multiuser.keycloak.server.KeycloakSettings, and it is bound only in multi-user version of CodeReady Workspaces, so by its presence it is possible to detect if authentication enabled in current deployment or not.
Example output:
{
    "che.keycloak.token.endpoint": "http://172.19.20.9:5050/auth/realms/che/protocol/openid-connect/token",
    "che.keycloak.profile.endpoint": "http://172.19.20.9:5050/auth/realms/che/account",
    "che.keycloak.client_id": "che-public",
    "che.keycloak.auth_server_url": "http://172.19.20.9:5050/auth",
    "che.keycloak.password.endpoint": "http://172.19.20.9:5050/auth/realms/che/account/password",
    "che.keycloak.logout.endpoint": "http://172.19.20.9:5050/auth/realms/che/protocol/openid-connect/logout",
    "che.keycloak.realm": "che"
}
Also, this service allows to download JS client library to interact with provider. Service URL is <che.host>:<che.port>/api/keycloak/settings for retrieving settings JSON and <che.host>:<che.port>/api/keycloak/OIDCKeycloak.js for JS adapter library.
Next step is redirection of user to the appropriate provider’s login page with all the necessary params like client_id, return redirection path etc. This can be basically done with any client library (JS or Java etc).
After user logged in on provider’s side and client side code obtained and passed the JWT token, validation of it and creation of subject begins.
Verification of tokens signature occurs in the two main filters chain:
-
org.eclipse.che.multiuser.keycloak.server.KeycloakAuthenticationFilter class. Token is extracted from
Authorizationheader ortokenquery param and tried to being parsed using public key retrieved from provider. In case of expired/invalid/malformed token, 403 error is sent to user. As noted above, usage of query parameter should be minimised as much as possible, since support of it may be limited/dropped at some point.
If validation was successful, token is passed to the
-
org.eclipse.che.multiuser.keycloak.server.KeycloakEnvironmentInitalizationFilter filter in the parsed form. This filter simply extracts data from JWT token claims, creates user in the local DB if it is not yet present, and constructs subject object and sets it into per-request
EnvironmentContextobject which is statically accessible everywhere.
If the request was made using machine token only (e.g. from ws agent) then it is only one auth filter in the chain:
- org.eclipse.che.multiuser.machine.authentication.server.MachineLoginFilter - finds userId given token belongs to, than retrieves user instance and sets principal to the session.
Master-to-master requests are performed using org.eclipse.che.multiuser.keycloak.server.KeycloakHttpJsonRequestFactory which signs every request with the current subject token obtained from EnvironmentContext.
7.9.1.1.1. User Profile
Since keycloak may store user specific information (first/last name, phone number, job title etc), there is special implementation of the ProfileDao which can provide this data to consumers inside CodeReady Workspaces. Implementation is read-only, so no create/update operations are possible. Class is org.eclipse.che.multiuser.keycloak.server.dao.KeycloakProfileDao.
7.9.1.1.2. Obtaining Token From Keycloak
For the clients which cannot run JS or other type clients (like CLI or selenium tests), auth token may be requested directly from Keycloak. The simplest way to obtain Keycloak auth token, is to perform request to the token endpoint with username and password credentials. This request can be schematically described as following cURL request:
curl
    --data "grant_type=password&client_id=<client_name>&username=<username>&password=<password>"
     http://<keyckloak_host>:5050/auth/realms/<realm_name>/protocol/openid-connect/token
Since the two main CodeReady Workspaces clients (IDE and Dashboard) utilizes native Keycloak js library, they’re using a customized Keycloak login page and somewhat more complicated authentication mechanism using grant_type=authorization_code. It’s a two step authentication: first step is login and obtaining authorization code, and second step is obtaining token using this code.
Example of correct token response:
{
   "access_token":"eyJhb...<rest of JWT token here>",
   "expires_in":300,
   "refresh_expires_in":1800,
   "refresh_token":"Nj0C...<rest of refresh token here>",
   "token_type":"bearer",
   "not-before-policy":0,
   "session_state":"14de1b98-8065-43e1-9536-43e7472250c9"
}
7.9.1.2. Other authentication implementations
If you want to adapt authentication implementation other than Keycloak, the following steps must be done:
- Write own or refactor existing info service which will provide list of configured provider endpoints to the clients;
- Write single or chain of filters to validate tokens, create user in CodeReady Workspaces DB and compose the Subject object;
- If the new auth provider supports OpenId protocol, OIDC JS client available at settings endpoint can be used as well since it is maximally decoupled of specific implementations.
- If the selected provider stores some additional data about user (first/last name, job title etc), it is a good idea to write an provider-specific ProfileDao implementation which will provide such kind of information.
7.9.1.3. OAuth
OAuth authentication part has 2 main flows - internal and external based on Keycloak brokering mechanism. So, there are 2 main OAuth API implementations - org.eclipse.che.security.oauth.EmbeddedOAuthAPI and org.eclipse.che.multiuser.keycloak.server.oauth2.DelegatedOAuthAPI.
They can be switched using che.oauth.service_mode=<embedded|delegated> configuration property.
Also, there is support of OAuth1 protocol can be found at org.eclipse.che.security.oauth1 package.
The main REST endpoint in tha OAuth API is org.eclipse.che.security.oauth.OAuthAuthenticationService, which contains authenticate method to start OAuth authentication flow, callback method to process callbacks from provider, token to retrieve current user’s oauth token, etc.
Those methods refer to the currently activated embedded/delegated OAuthAPI which is doing all the undercover stuff (finds appropriate authenticator, initializes the login process, user forwarding etc).
7.9.2. Authentication on CodeReady Workspaces Agents
Machines may contain services that must be protected with authentication, e.g. agents like workspace agent and terminal. For this purpose, machine authentication mechanism should be used. Machine tokens were introduced to avoid passing the Keycloak tokens to the machine side (which can be potentially insecure). Another reason is that Keycloak tokens may have relatively small lifetime and require periodical renewal/refresh which is hard to manage and keep in sync with same user session tokens on clients etc.
As agents cannot be queried using Keycloak token, there is only Machine Token option. Machine token can be also passed in header or query parameter.
7.9.2.1. Machine JWT Token
Machine token is JWT that contains the following information in its claim:
- uid - id of user who owns this token
- uname - name of user who owns this token
- wsid - id of a workspace which can be queried with this token
Each user is provided with unique personal token for each workspace.
The structure of token and the signature are different to Keycloak and have the following view:
# Header
{
  "alg": "RS512",
  "kind": "machine_token"
}
# Payload
{
  "wsid": "workspacekrh99xjenek3h571",
  "uid": "b07e3a58-ed50-4a6e-be17-fcf49ff8b242",
  "uname": "john",
  "jti": "06c73349-2242-45f8-a94c-722e081bb6fd"
}
# Signature
{
  "value": "RSASHA512(base64UrlEncode(header) + . +  base64UrlEncode(payload))"
}
The algorithm that is used for signing machine tokens is SHA-512 and it’s not configurable for now. Also, there is no public service that distributes the public part of the key pair with which the token was signed. But in each machine, there must be environment variables that contains key value. So, agents can verify machine JWT token using the following environment variables:
-
CHE_MACHINE_AUTH_SIGNATURE__ALGORITHM- contains information about the algorithm which the token was signed -
CHE_MACHINE_AUTH_SIGNATURE__PUBLIC__KEY- contains public key value encoded in Base64
It’s all that is needed for verifying machine token inside of machine. To make sure that specified token is related to current workspace, it is needed to fetch wsid from JWT token claims and compare it with CHE_WORKSPACE_ID environment variable.
Also, if agents need to query CodeReady Workspaces Master they can use machine token provided in CHE_MACHINE_TOKEN environment, actually it is token of user who starts a workspace.
7.9.2.2. Authentication schema
The way how CodeReady Workspaces master interacts with agents with enabled authentication mechanism is the following:
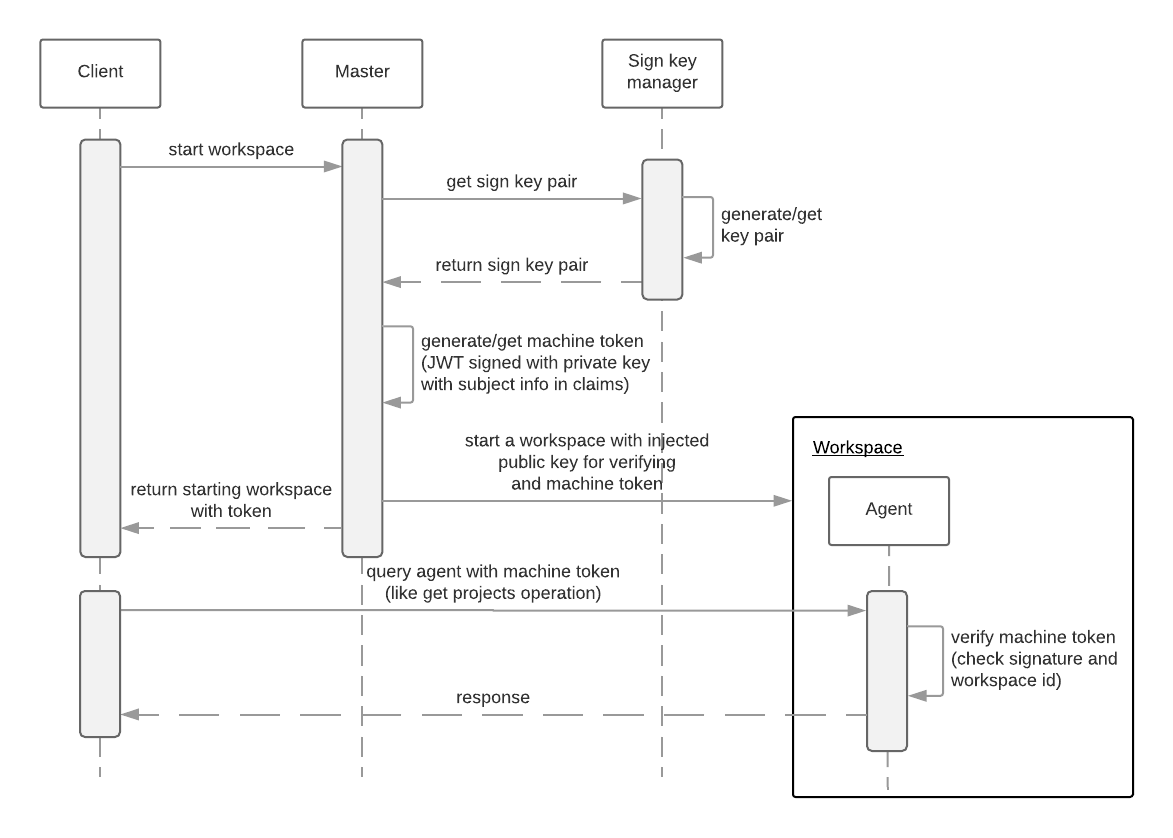
Machine token verification on agents is done by the following components:
- org.eclipse.che.multiuser.machine.authentication.agent.MachineLoginFilter - doing basically the same as the appropriate filter on a master, the only thing that is different it’s a way how agent obtains the public signature part. The public key for the signature check is placed in a machine environment, with algorithm description.
- auth.auth.go - the entry point for all request that is proceeding on go agents side, the logic of token verification is similar with MachineLoginFilter.
7.9.2.3. Obtaining Machine Token
A machine token is provided for users in runtime object. It can be fetched by using get workspace by key (id or namespace/name) method which path equals to /api/workspace/<workspace_key>. The machine token will be placed in runtime.machineToken field.
7.9.3. Using Swagger or REST Clients
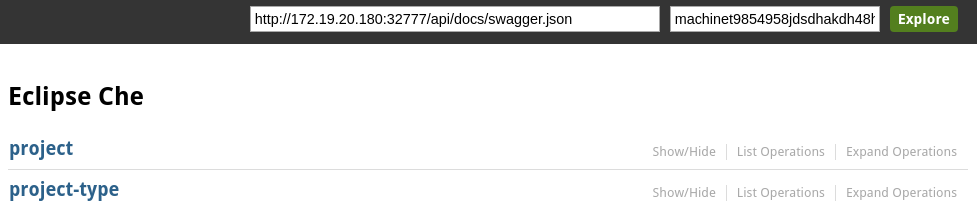
User’s Keycloak token is used to execute queries to secured API on his behalf through REST clients. A valid token must be attached as request header or query parameter - ?token=$token. CodeReady Workspaces Swagger can be accessed from http://che_host:8080/swagger. A user must be signed-in through Keycloak so that access token is included in request headers.
By default, swagger loads swagger.json from CodeReady Workspaces master.
To work with WS Agent, a URL to its swagger.json should be provided. It can be retrieved from Workspace Runtime, by getting URL to WS Agent server endpoint and adding api/docs/swagger.json to it. Also, to authenticate on WS Agent API, user must include Machine Token, which can be found in Workspace Runtime as well.
To use Swagger for a workspace agent, user must do following steps:
-
get workspace object with runtimes fetched (using
/api/workspace/<workspace_key>service) -
get WS agent API endpoint URL, and add a path to its
swagger.json(e.g.http://<che_host>:<machine_port>/api/docs/swagger.jsonfor Docker orhttp://<ws-agent-route>/api/docs/swagger.jsonfor OpenShift ). Put it in the upper barURLfield:
"wsagent/http": {
  "url": "http://172.19.20.180:32777/api",
  "attributes": {},
  "status": "RUNNING"
}-
get machine token from
runtime.machineTokenfield, and put it in the upper bartokenfield
"machineToken": "eyJhbGciOiJSUzUxMiIsImtpbmQiOiJtYWNoaW5lX3Rva2VuIn0.eyJ3c2lkIjoid29ya3NwYWNlMzEiLCJ1aWQiOiJ1c2VyMTMiLCJ1bmFtZSI6InRlc3RVc2VyIiwianRpIjoiOTAwYTUwNWYtYWY4ZS00MWQxLWFhYzktMTFkOGI5OTA5Y2QxIn0.UwU7NDzqnHxTr4vu8UqjZ7-cjIfQBY4gP70Nqxkwfx8EsPfZMpoHGPt8bfqLWVWkpp3OacQVaswAOMOG9Uc9FtLnQWnup_6vvyMo6gchZ1lTZFJMVHIw9RnSJAGFl98adWe3NqE_DdM02PyHb23MoHqE_xd8z3eFhngyaMImhc4",
- click Explore to load Swagger for WS Agent
7.10. Permissions
7.10.1. Overview
Permissions are used to control the actions of users and establish a security model. You can control resources managed by CodeReady Workspaces and allow certain actions by assigning permissions to users.
Permissions can be applied to the following:
- Workspace
- Organization
- Stack
- System
7.10.2. Workspace permissions
The user who creates a workspace is the workspace owner. The workspace owner has the following permissions by default: read, use, run, configure, setPermissions, and delete. Workspace owners invite users into the workspace and control workspace permissions for each user.
The following permissions are associated with workspaces:
| Permission | Description |
|---|---|
| read | Allows reading the workspace configuration. |
| use | Allows using a workspace and interacting with it. |
| run | Allows starting and stopping a workspace. |
| configure | Allows defining and changing the workspace configuration. |
| setPermissions | Allows updating the workspace permissions for other users. |
| delete | Allows deleting the workspace. |
7.10.3. Organization permissions
An organization is a named set of users.
The following permissions are applicable to organizations:
| Permission | Description |
|---|---|
| update | Allows editing of the organization settings and information. |
| delete | Allows deleting an organization. |
| manageSuborganizations | Allows creating and managing sub-organizations. |
| manageResources | Allows redistribution of an organization’s resources and defining the resource limits. |
| manageWorkspaces | Allows creating and managing all the organization’s workspaces. |
| setPermissions | Allows adding and removing users and updating their permissions. |
7.10.4. System permissions
System permissions control aspects of the whole CodeReady Workspaces installation.
The following permissions are applicable to the organization:
| Permission | Description |
|---|---|
| manageSystem | Allows control of the system, workspaces, and organizations. |
| setPermissions | Allows updating the permissions for users on the system. |
| manageUsers | Allows creating and managing users. |
| monitorSystem | Allows for accessing endpoints used for monitoring the state of the server. |
All system permissions will be granted to the administration user configured with the `CHE_SYSTEM_ADMIN__NAME` property (the default is admin). This happens at CodeReady Workspaces Server start. If the user is not present in the CodeReady Workspaces user database, it happens after the user’s login.
7.10.5. manageSystem permission
Users with the manageSystem permission have access to the following services:
| Path | HTTP Method | Description |
|---|---|---|
|
| GET | Get free resource limits |
|
| GET | Get free resource limits for given account |
|
| POST | Edit free resource limit for given account |
|
| DELETE | Remove free resource limit for given account |
|
| POST | Add installer to the registry |
|
| PUT | Update installer in the registry |
|
| DELETE | Remove installer from the registry |
|
| GET | Get logging configurations in CodeReady Workspaces Server |
|
| GET | Get configurations of logger by its name in CodeReady Workspaces Server |
|
| PUT | Create logging in CodeReady Workspaces Server |
|
| POST | Edit logging in CodeReady Workspaces Server |
|
| GET | Get detailed information about resources for given account |
|
| POST | Shutdown all system services, prepare CodeReady Workspaces to stop |
|
| All methods | All Stack service methods |
7.10.6. monitorSystem permission
Users with the monitorSystem permission have access to the following services:
| Path | HTTP Method | Description |
|---|---|---|
|
| GET | Get workspaces in certain state for a certain amount of time |
7.10.7. Super-privileged mode
The manageSystem permission can be extended to provide a super-privileged mode. This allows the user to perform advanced actions on any resources managed by the system. You can read and stop any workspaces with the manageSystem permission and assign permissions to users as needed.
The super-privileged mode is disabled by default. You can change to super-privileged mode by configuring the `CHE_SYSTEM_SUPER__PRIVILEGED__MODE` variable to true in the che.env file.
List of services that are enabled for users with manageSystems permissions and with super-privileged mode on:
| Path | HTTP Method | Description |
|---|---|---|
|
| GET | Get all workspaces for given namespace. |
|
| DELETE | Stop workspace |
|
| GET | Get workspace by key |
|
| GET | Get resource cap for given organization |
|
| POST | Set resource cap for given organization |
|
| GET | Get child organizations |
|
| GET | Get user’s organizations |
7.10.8. Stack permissions
A stack is a runtime configuration for a workspace. See stack definition for more information on stacks.
The following permissions are applicable to stacks:
| Permission | Description |
|---|---|
| search | Allows searching of the stacks. |
| read | Allows reading of the stack configuration. |
| update | Allows updating of the stack configuration. |
| delete | Allows deleting of the stack. |
| setPermissions | Allows managing permissions for the stack. |
7.10.9. Permissions API
All permissions can be managed using the provided REST API. The APIs are documented using Swagger at [{host}/swagger/#!/permissions].
7.10.10. Listing permissions
To list the permissions that apply to a specific resources, run this command:
$ GET /permissions
The domain values are:
| Domain |
|---|
|
|
|
|
|
|
|
|
domain is optional. In this case, the API returns all possible permissions for all domains.
7.10.11. Listing permissions for a user
To list the permissions that apply to a user, run this command:
$ GET /permissions/{domain}
The domain values are:
| Domain |
|---|
|
|
|
|
|
|
|
|
7.10.12. Listing permissions for all users
You must have sufficient permissions to see this information.
To list the permissions that apply to all users, run this command:
GET /permissions/{domain}/all
The domain values are:
| Domain |
|---|
|
|
|
|
|
|
|
|
7.10.13. Assigning permissions
To assign permissions to a resource, run this command:
POST /permissions
The domain values are:
| Domain |
|---|
|
|
|
|
|
|
|
|
The following is a message body that requests permissions for a user with a userID to a workspace with a workspaceID:
{
  "actions": [
    "read",
    "use",
    "run",
    "configure",
    "setPermissions"
  ],
  "userId": "userID",
  "domainId": "workspace",
  "instanceId": "workspaceID"
}
The instanceId parameter corresponds to the ID of the resource that retrieves the permission for all users. The userId parameter corresponds to the ID of the user that has been granted certain permissions.
7.10.14. Sharing permissions
A user with setPermissions privileges can share a workspace and grant read, use, run, configure, or setPermissions privileges to other users.
To share workspace permissions:
- Select a workspace in the user dashboard, navigate to the Share tab and enter emails of users. Use commas or space as separators if there are multiple emails.
7.11. Organizations
7.11.1. Organizations in CodeReady Workspaces
Organizations allow administrators to group CodeReady Workspaces users and allocate resources. The system administrator controls and allocates resources and permissions within the administrator dashboard.
7.11.1.1. Roles in an organization
A user can have the following roles in an organization:
- Members
- Create workspaces, manage their own workspaces, and use any workspaces they have permissions for.
- Administrators
- Manage the organization, members, resources, and sub-organization, and can edit settings.
- System Administrators
- Create root organizations, manages resources, members and sub-organizations. System administrators have more permissions than the administrators and members.
7.11.1.2. Root organizations and sub-organizations
The top-level organizations are called root organizations. Multiple root organizations can be created. Any organization can have zero to a set number of sub-organizations. Only the system administrator can create root organizations and manage the resources of the root organization.
7.11.1.3. Creating an organization
Only the system administrator can create root organizations. An administrator can create sub-organizations.
To create an organization:
- Click the menu in the left sidebar. A new page displays all the organizations in your system.
- Click on the upper-left button to create a new organization.
7.11.1.4. Displaying the list of organizations
The Organization page displays a list of all the organizations. The list contains the following information for each organization: number of members, total RAM, available RAM, and number of sub-organizations.
7.11.1.5. Adding members to organizations
To add members to an organization:
- Click the Add button to add a member. A new pop-up window displays. You can change the role of a member or remove them from the organization at any time.
- Enter the new member name.
Users with the green checkmark beside their name already have an CodeReady Workspaces account and can be added to the organization. Users without a checkmark do not have an account and cannot be added into the organization.
7.11.1.6. Workspaces in organizations
A workspace is created inside of an organization and uses the resources of the organization. The workspace creator chooses the organization on the Workspace Creation page.
7.11.1.7. Setting email notifications
To send notifications from the CodeReady Workspaces server when a user joins or leaves an organization, you can do either of the following:
-
Configure the SMTP server in the
che.envfile. - For OpenShift, add environment variables to the deployment.
CodeReady Workspaces does not have a built-in SMTP server by default. You may use any mail server.
For example, to send a notification email to your Gmail account, set the following environment variables:
CHE_MAIL_PORT=465
CHE_MAIL_HOST=smtp.gmail.com
CHE_MAIL_SMTP_STARTTLS_ENABLE=true
CHE_MAIL_SMTP_AUTH=true
CHE_MAIL_SMTP_AUTH_USERNAME=no-reply@gmail.com
CHE_MAIL_SMTP_AUTH_PASSWORD=password
7.11.1.8. Creating sub-organizations
To create a sub-organization:
- On the Organization Details page, select the Sub-Organizations tab.
- Click the Add Sub-Organization button.
The steps to create a sub-organization are the same as that for creating an organization. Use them to create the organization.
7.11.1.9. Adding members to sub-organizations
You can only add members of the parent organization as members of the sub-organization.
7.11.1.10. Organization and sub-organization administration
The settings of the organization are visible to all members of the organization. Only the CodeReady Workspaces system administrator can modify the settings.
7.11.1.11. Renaming an organization or sub-organization
Only an CodeReady Workspaces system administrator and administrator of the organization can rename an organization or sub-organization.
To rename an organization:
- Click the Name field to edit the name of the organization. The save mode appears.
- Click the Save button to update the name.
The name of the organization or sub-organization must follow these rules:
- Only alphanumeric characters and a single dash (-) can be used.
- Spaces cannot be used.
- Each organization name must be unique within the CodeReady Workspaces installation.
- Each sub-organization name must be unique within an organization.
7.11.1.12. Leaving an organization or sub-organization
To leave an organization, members need to contact the administrator of the organization or the system administrator of CodeReady Workspaces.
7.11.1.13. Deleting an organization or sub-organization
- Only system administrators or administrators of the organization can delete an organization or sub-organization.
- This action cannot be reverted, and all workspaces created under the organization will be deleted.
- All members of the organization will receive an email notification to inform them about the deletion of the organization.
To delete an organization or a sub-organization:
- Click the Delete button.
7.11.1.14. Allocating resources for organizations
Workspaces use the resources of the organization that are allocated by the system administrator. The resources for sub-organizations are taken from the parent organization. Administrators control the portion of resources, of the parent organization, that are available to the sub-organization.
7.11.1.15. Managing limits
Managing limits is restricted to the CodeReady Workspaces system administrator and administrator of the organization.
The system configuration defines the default limits. The administrator of the organization manages only the limits of its sub-organizations. No resource limits apply to the organization by default. The following are the limits defined by the system administrator:
- Workspace Cap: The maximum number of workspaces that can exist in the organization.
-
Running Workspace Cap: The maximum number of workspaces that can run simultaneously in the organization.
- Workspace RAM Cap: The maximum amount of RAM that a workspace can use in GB.
7.11.1.16. Updating organization and sub-organization member roles
Updating the members of an organization or sub-organization is restricted to the CodeReady Workspaces system administrator and administrator of the organization.
To edit the role of an organization member:
- Click the Edit button in the Actions column. Update the role of the selected member in the pop-up window.
- Click Save to confirm the update.
7.11.1.17. Removing members from an organization and sub-organization
Removing the members of an organization or sub-organization is restricted to the CodeReady Workspaces system administrator and administrator of the organization.
To remove a member:
- Click the Delete button in the Actions column. In the confirmation pop-up window, confirm the deletion.
To remove multiple members:
- Select the check boxes to select multiple members from the organization.
- Click the Delete button that appears in the header of the table. The members that are removed from the organization will receive an email notification.
7.12. Resource Management
7.12.1. Overview
The Resource API manages the resources that are utilized by CodeReady Workspaces users. The CodeReady Workspaces administrators set the limits on the amount of resources available for each resource type and each user.
There are two kinds of accounts used in CodeReady Workspaces:
- personal - This account belongs to a user. Only one user can utilize resources provided to the account.
- organizational - This account belongs to an organization. This type of account allows each member of the organization to use resources. Resources are distributed between an organization and sub-organizations.
Resource usage mostly refers to resources used by workspaces and runtimes in the development flow.
CodeReady Workspaces supports the following types of resources:
- RAM - Amount of RAM which can be used by running workspaces at the same time.
- Timeout - Period of time that is used to control idling of user workspaces.
- Runtime - Number of workspaces that users can run at the same time.
- Workspace - Number of workspaces that users can have at the same time.
7.12.2. Resource API
Total resources
GET resource/${accountId}: Gets the list of total resources an account can use;
Used resources
GET resource/{accountId}/used: Gets the resources used by an account;
Available resources
GET resource/${accountId}/available: Gets the resources that are available and not used by an account. If no resources are used, the available resources equal total resources. If resources are used, the available resources equals total resources minus used resources.
Resource details
GET resource/{accountId}/details: Gets detailed information about the resources available for an account. The detailed information includes: resource providers, resource-usage start time, and resource-usage end time.
For more information about the response objects and required parameters, see the Swagger page at ${che-host}/swagger/#/resource.
7.12.3. Distributing resources
The following are ways to distribute resources to an account:
- CodeReady Workspaces administrator specifies default free resources limit for account by configuration.
- CodeReady Workspaces administrator overrides the default free resources limit for account by resource-free API.
7.12.4. Configuring workspaces and resources
The CodeReady Workspaces administrator can limit how workspaces are created and the resources that these workspaces consume. Detailed information about each property can be found in the che.env file.
| Property name | Default Value | Unit | Description |
|---|---|---|---|
|
| -1 | item | maximum number of workspaces that the CodeReady Workspaces user can create |
|
| -1 | item | maximum number of simultaneously running workspaces for a CodeReady Workspaces user |
|
| -1 | memory | maximum amount of RAM that workspaces use |
|
| -1 | item | maximum number of workspaces that members of an organization can create |
|
| -1 | item | maximum number of workspaces that members of an organization can simultaneously run |
|
| -1 | memory | maximum amount of RAM that workspaces from all organizations can simultaneously use |
|
| -1 | millisecond | maxium number of workspaces that can stay inactive before they are idled |
|
| 16gb | memory | maximum amount of RAM that workspace environment can use simultaneously |
7.12.5. Unit formats
The unit has the following formats:
-
-1: An unlimited value. Any operation, aggregation, and deduction of resources will return-1. memory: A plain or fixed-point integer measured in bytes.Memory uses one of the following suffixes:
Suffix name Description k/kb/kibkilo bytes
1k=1024bm/mb/mibmega bytes
1m=1024kg/gb/gibgiga bytes
1g=1024mt/tb/tibterra bytes
1t=1024gp/pb/pibpeta bytes
1p=1024t-
item- An integer describing the number of objects. -
millisecond- An integer describing the time frame in milliseconds.
7.12.6. Resource-free API
The Resource-free API manages the free resources that are provided by the system configuration. You can override resources for an account.
Free Resources
GET resource/free: Gets the resources that are available.
GET resource/free/{accountId}: Gets the resources that are available for this account.
Set Free Resources
POST resource/free: Sets the maximum amount of resources available for the user organization account. This number overrides the Сhe configuration. It will be used in all further operations with resources.
Remove Free Resources
DELETE resource/free/{accountId}: Deletes the number of resources available for the user and organization account. The system configuration defines the amount of resources available.
For more information on response objects and required parameters, see the Swagger page at {che-host}/swagger/#/resource-free.
7.12.7. Organization Resource API
Distributed Organization Resources
GET organization/resource/{organizationId}: Gets the resources that the parent organization provides to the sub-organization.
Sub-Organization Resources Cap
GET organization/resource/{suborganizationId}/cap: Gets the maximum amount of resources that are available for a sub-organization; By default, sub-organizations can use all the resources of the parent organization.
Set Sub-Organization Resources Cap
POST organization/resource/{suborganizationId}/cap: Sets the maximum amount of resources for a sub-organization. This limits the usage of shared resources by the sub-organization.
See the Swagger page at {che-host}/swagger/#/organization-resource for more detailed specification of response objects and required parameters.