
Getting Started with CodeReady Studio Tools
Introduction to using Red Hat CodeReady Studio tools
Abstract
Making open source more inclusive
Red Hat is committed to replacing problematic language in our code, documentation, and web properties. We are beginning with these four terms: master, slave, blacklist, and whitelist. Because of the enormity of this endeavor, these changes will be implemented gradually over several upcoming releases. For more details, see our CTO Chris Wright’s message.
Chapter 1. Git basics in CodeReady Studio
CodeReady Studio includes Git Perspective, which allows developers to manage their Git repositories from a graphical interface. The following section outlines the basic workflow of a Git project in Git Perspective and describes how to accomplish the most common Git-related tasks.
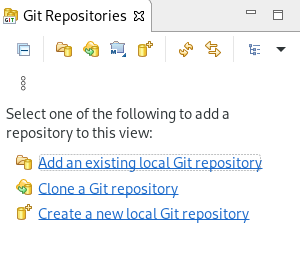
1.1. Setting up Git Perspective
The following section describes how to open Git Perspective in CodeReady Studio.
Procedure
- Start CodeReady Studio.
Click → → → .

The Open Perspective window appears.

- Select Git.
Click .
The Git Repositories view appears.
1.2. Managing repositories in Git Perspective
1.2.1. Creating a new Git repository
The following section describes how to use Git Perspective to create a new Git repository.
Procedure
- Start CodeReady Studio.
- Open Git Perspective.
Click the Create a new Git Repository and add it to this view icon.

The Create a Git Repository window appears.
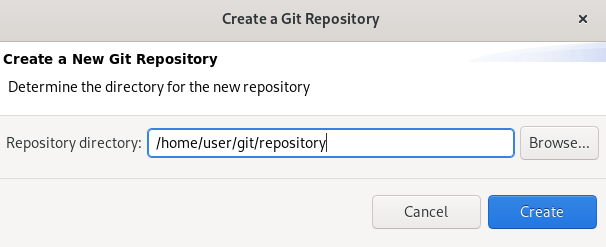
The path to the default Repository directory is generated automatically. Choose the path where you want your repository to be stored at and continue with the repository creation.
Optionally, you can select the Create as bare repository check box.
NoteBare repositories are recommended for central repositories, not for development environments. They do not contain a working or checked out copy of any source file. This prevents editing files and committing changes. Additionally, they store the Git revision history for your repository in the
rootfolder instead of a.gitsub-folder.Click .
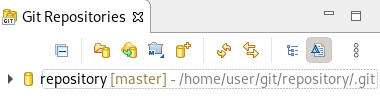
A new Git repository is created on your local machine and is now listed in the Git Repositories view.
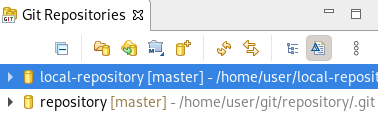
1.2.2. Adding an existing local Git repository
The following section describes how to use Git Perspective to add a local Git repository to CodeReady Studio.
Procedure
- Start CodeReady Studio.
- Open Git Perspective.
Click the Add an existing local Git Repository to this view icon.

The Add Git Repositories window appears.
Click to locate your local Git repository.
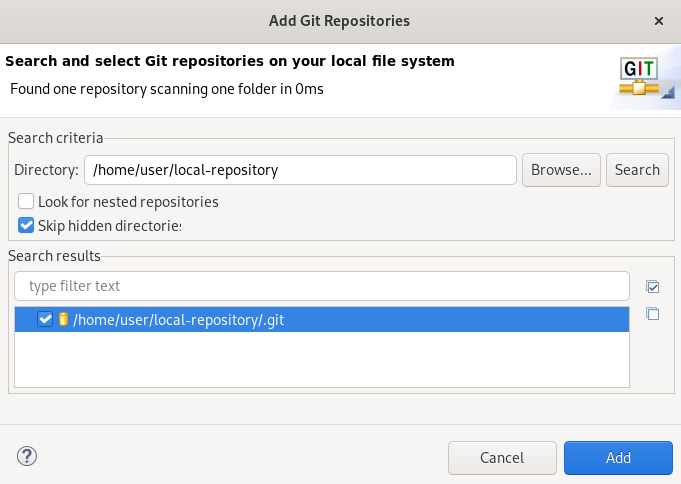
-
In the Search results field, select the checkbox displaying the path to the
.gitfile. - Click .
Your local repository is now listed in the Git Repositories view.
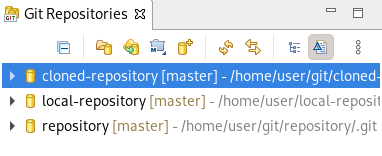
1.2.3. Cloning an existing Git repository
The following section describes how to use Git Perspective to create a local clone of a repository that already exists online (GitHub, GitLab).
Procedure
- Start CodeReady Studio.
- Open Git Perspective.
Click the Clone a Git Repository and add the clone to this view icon.

The Clone Git Repository window appears.
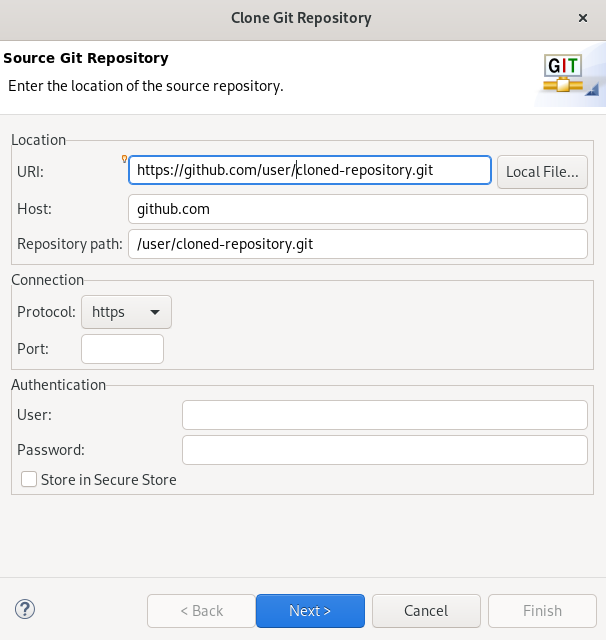
Add the address for the source repository to the URI field.
The Host and Repository path fields are populated automatically.
- Click .
- Select the branches you want to clone.
- Click .
Ensure that the Directory path and Initial branch are set correctly.

- Click .
Your cloned repository is now listed in the Git Repositories view of CodeReady Studio.
1.2.4. Adding a remote for the repository
After setting up your repository in Git Perspective for the first time, add a remote for the repository. This is a one-time set up step for newly created or added repositories.
The following section describes how to use Git Perspective to set up the remote for your repository.
Procedure
- Start CodeReady Studio.
- Open Git Perspective.
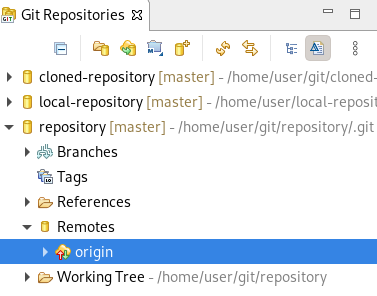
Expand your repository.

Right-click → .
The New Remote window appears.
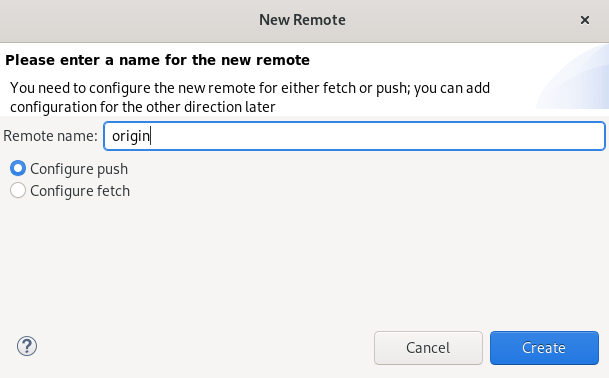
- Name your remote.
- Ensure that Configure push is selected.
Click .
The Configure Push window appears.
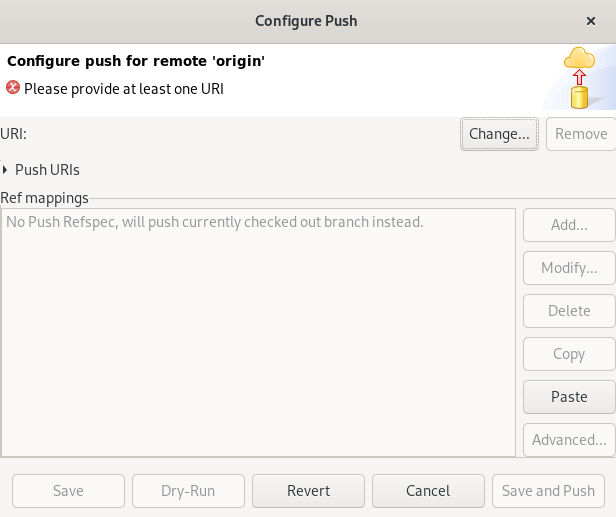
Click .
The Select a URI window appears.
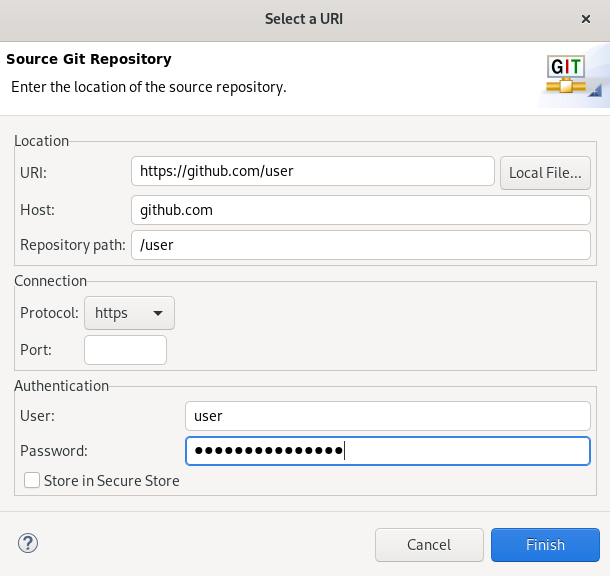
Add the URI, username and password for the source repository.
The Host and Repository path fields are populated automatically.
- Click .
- Click .
Your newly added remote is now listed in the Git Repositories view in CodeReady Studio.
1.3. Managing branches in Git Perspective
1.3.1. Creating a new branch
The following section describes how to use Git Perspective to create a new branch.
Procedure
- Start CodeReady Studio.
- Open Git Perspective.
- Expand your repository.
Under → , right-click → .
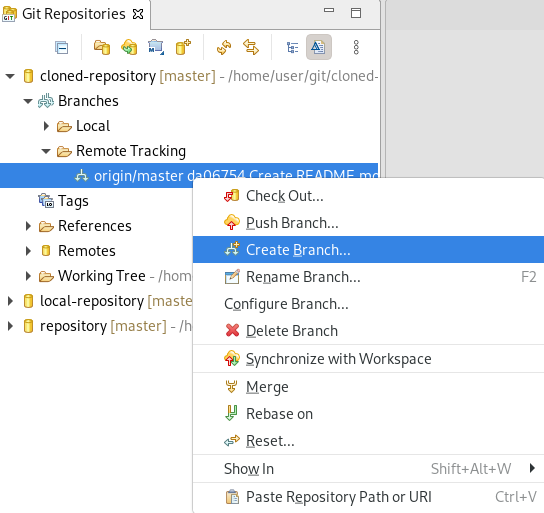
The Create Branch window appears.

- Click to pick the source of the new branch.
- Name your branch.
- Select the Configure upstream for push and pull and Checkout new branch check boxes.
- Select an option in the When pulling field.
- Click .
Your newly added branch is now listed in the Git Repositories view under → in CodeReady Studio.

1.3.2. Working in the branch
The following section describes how to open a built-in terminal in Git Perspective so you can work on the created branch.
Procedure
- Start CodeReady Studio.
- Open Git Perspective.
Press Shift+Ctrl+Alt+T.
The Launch Terminal window appears.
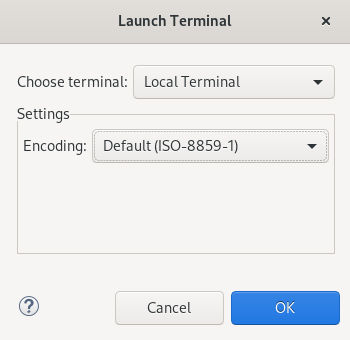
- Choose Local Terminal.
- Set Encoding to Default (ISO-8859-1).
Click .
The Terminal window now displays the command-line terminal.
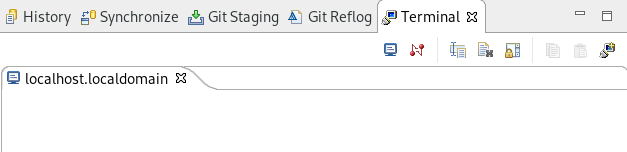
Note that by default the current working directory is the home directory of your current user.
1.3.3. Updating your local repository
To avoid merge conflicts, update your local repository before merging your changes, especially when working in a shared repository.
To update your local repository, pull changes from the remote repository and merge them into your local repository.
Procedure
- Start CodeReady Studio.
- Open Git Perspective.
Right-click your → .
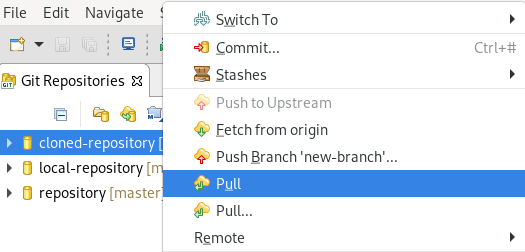
The Pull Results window appears.

- Click .
Now the changes from the remote repository are merged into your local repository.
1.4. Committing and pushing changes
The following section describes how to commit and push changes in CodeReady Studio.
Procedure
- Start CodeReady Studio.
- Open Git Perspective.
Right-click your → .
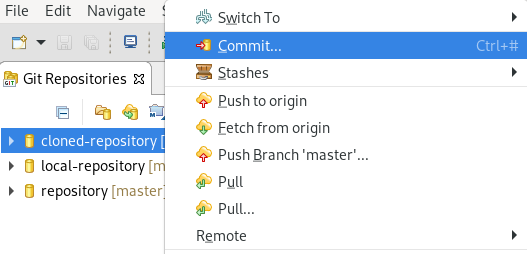
The Git Staging view appears.

- Select the changes you want to stage.
- Click the Add selected files to the index icon to stage the changes.
Add a commit message to the Commit Message field.
Author and Committer fields are populated automatically.
- Click to commit your changes, or to commit your changes and push them to the remote repository.
Note that when selecting the Commit and Push option you are prompted to enter the repository address, your access username, and password for the repository.
Chapter 2. Maven basics in CodeReady Studio
Maven provides a standardized build system for application development, and facilitates fetching dependencies from one or more repositories.
Root Maven projects can serve as aggregators for multiple Maven modules (sub-projects). For each module that is part of a maven project, a <module> entry is added to the project’s pom.xml file. A pom.xml contains <module> entries and is often referred to as an aggregator pom.
When modules are included into a project it is possible to execute Maven goals across all modules by a single command issued from the parent project directory.
2.1. Creating a new Maven project
The following section describes how to create a new Maven project in CodeReady Studio.
Procedure
- Start CodeReady Studio.
Click → → .
The Show View window appears.
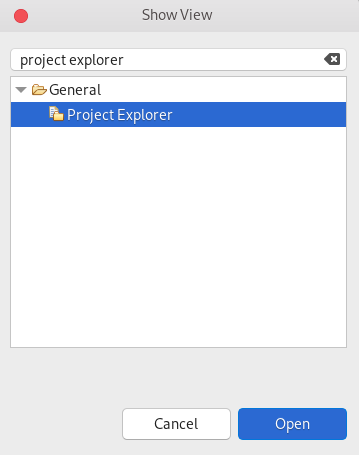
- Enter Project Explorer in the search field.
- Select Project Explorer.
Click .
The Project Explorer view appears.

Press Ctrl+N.
The Select a wizard window appears.
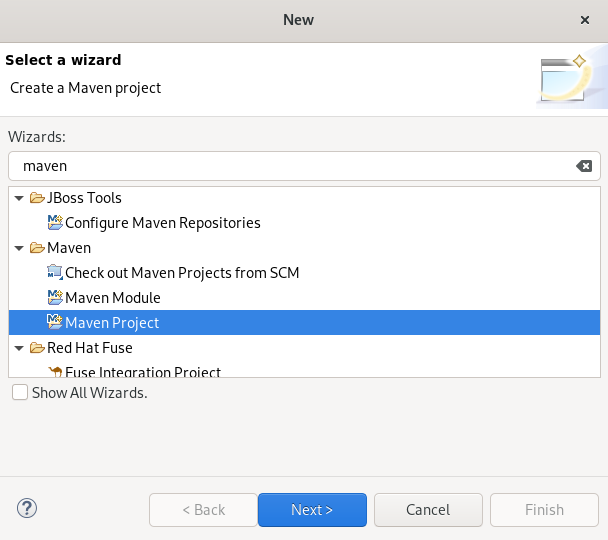
- Enter Maven in the Wizards field.
- Select Maven Project.
Click .
The New Maven Project window appears.
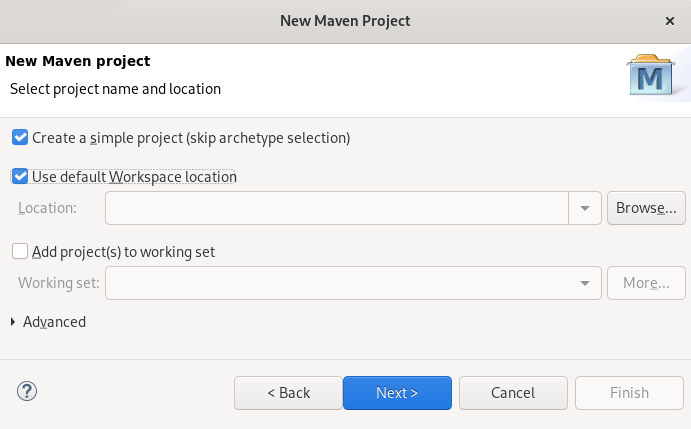
Select the Create a simple project check box.
NoteBy selecting the Create a simple project check box you are skipping the archetype selection and the project type is automatically set to Project Object Model (POM), which is a requirement for multi-module Maven projects.
To create a standalone Maven project instead, clear the Create a simple project check box and follow the onscreen instructions to set the packaging option to
jarorwar.- Click to select the workspace location.
Click .
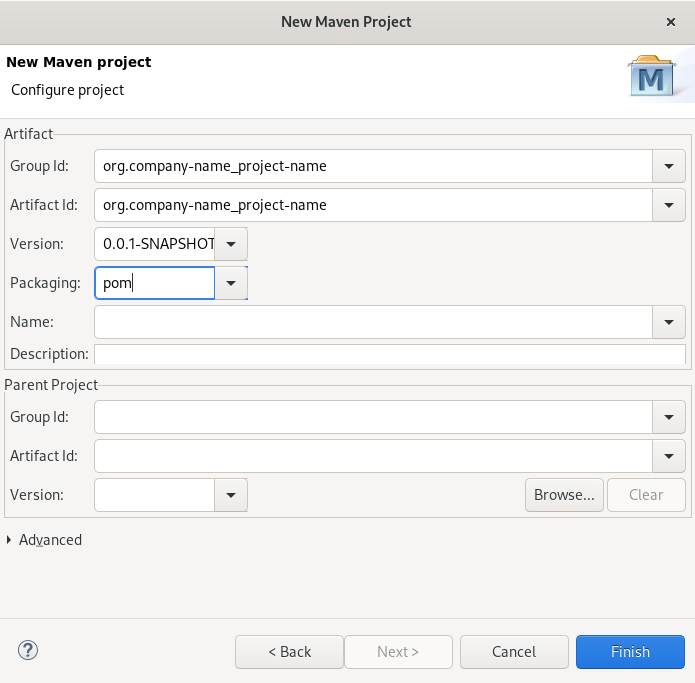
Enter the group ID and the artifact ID.
NoteThe values for the IDs cannot include spaces or special characters. The only special characters allowed are periods (
.), underscores (_), and dashes (-). An example of a typical group ID or artifact ID isorg.company-name_project-name.Optionally, you can name your project and add a description.
- Set Packaging to pom, jar or war.
- Click .
Your newly created Maven project is now listed in the Project Explorer view.
2.2. Importing existing Maven projects
The following section describes how to import existing Maven projects into CodeReady Studio.
2.2.1. Importing an existing locally stored Maven project
The following section describes how to import an existing locally stored Maven project into CodeReady Studio.
Procedure
- Start CodeReady Studio.
Click → .
The Import window appears.

- Enter Maven in the Select an import wizard field.
- Select Existing Maven Projects.
Click .
The Import Maven Project window appears.
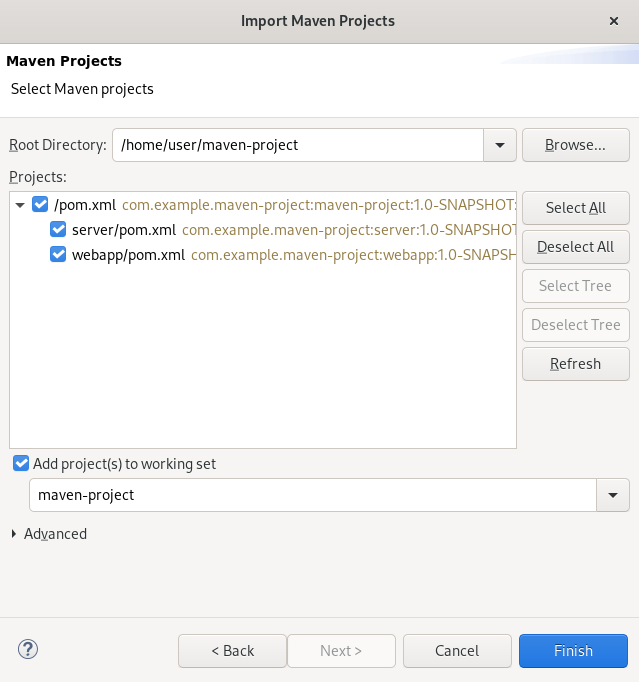
- Click to locate your Maven project.
- Select the Add project(s) to working set check box.
- Click .
Your local Maven project is now listed in the Project Explorer view.
2.2.2. Importing an existing remotely stored Maven project
The following section describes how to import an existing remotely stored Maven project into CodeReady Studio.
Procedure
- Start CodeReady Studio.
- Open Git Perspective.
Click the Clone a Git repository and import existing Maven projects icon.

The Check out as Maven project from SCM window appears.
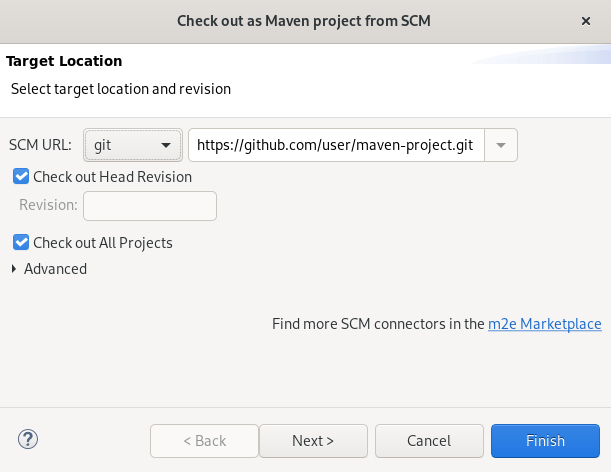
- Add the address for the source repository to the SCM URL field.
Click .
The Select Project Location window appears.

- Click to select the workspace location.
- Click .
Your remote Maven project is now listed in the Git Repositories view.
2.3. Creating a new Maven module
The following section describes how to create a new Maven module.
Prerequisites
An existing Maven project.
For more information on how to create a Maven project, see Section 2.1, “Creating a new Maven project”.
Procedure
- Start CodeReady Studio.
Press Ctrl+N.
The Select a wizard window appears.
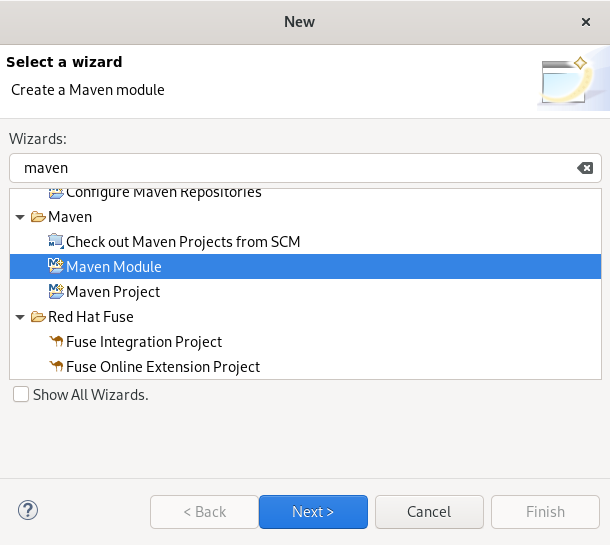
- Enter Maven in the Wizards field.
- Select Maven Module.
Click .
The New Maven Module window appears.
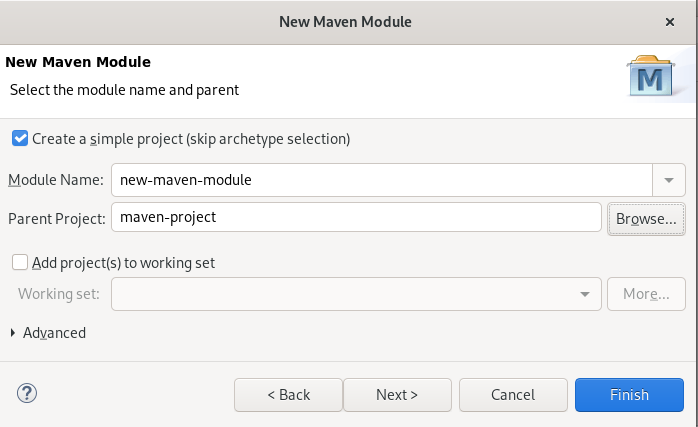
Select the Create a simple project check box.
NoteBy selecting the Create a simple project check box you are skipping the archetype selection and the project type is automatically set to Project Object Model (POM), which is a requirement for multi-module Maven projects.
To create a standalone Maven project instead, clear the Create a simple project check box and follow the onscreen instructions to set the packaging option to
jarorwar.- Name your module.
- Click to select the parent project.
Click .
The Configure Project window appears.

Set Packaging to pom, jar or war.
Optionally, you can name your module and add a description.
- Click .
Your newly created Maven module is now listed below your Maven project.
2.4. Adding a Maven dependency to a Maven project
The following section describes how to add a Maven dependency to a Maven project in CodeReady Studio.
Prerequisites
An existing Maven project.
For more information on how to create a Maven project, see Section 2.1, “Creating a new Maven project”.
Procedure
- Start CodeReady Studio.
- Open Project Explorer.
Right-click your Maven → → .
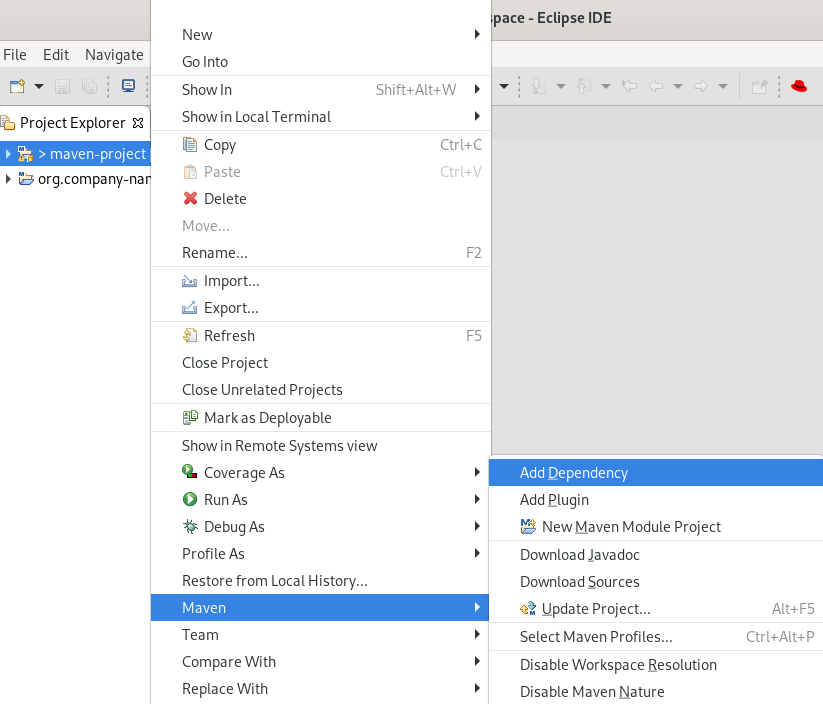
The Add Dependency window appears.
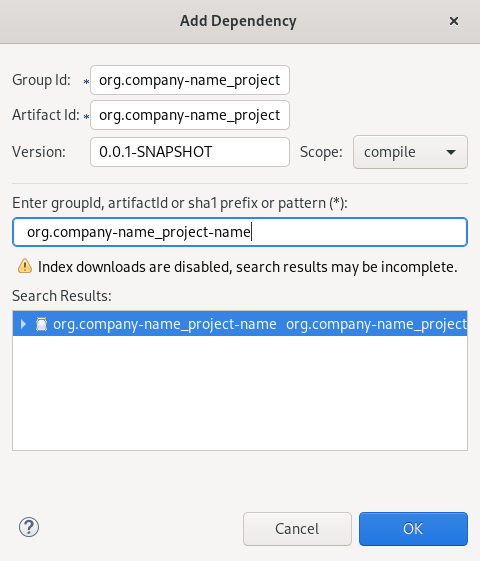
Enter the group ID or the artifact ID in the Enter groupId, artifactId or sha1 prefix or pattern field.
The fields above are populated automatically.
- Click .
The dependency is now added to the pom.xml file of your project.
2.5. Adding Maven support to an existing non-Maven project
The following section describes how to add Maven support to an application created without Maven support.
- Start CodeReady Studio.
- Open Project Explorer.
Right-click your → → .
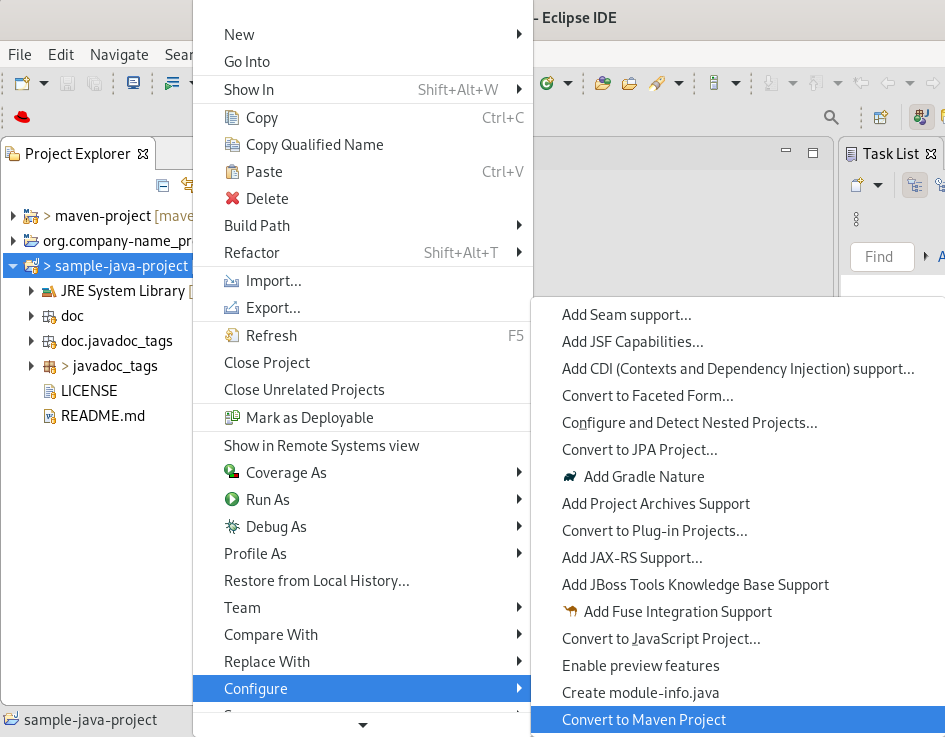
The Create a new POM window appears.

All fields are populated automatically. If you want to change the group ID or the artifact ID, note that the values cannot include spaces or special characters. The only special characters allowed are periods (
.), underscores (_), and dashes (-). An example of a typical group ID or artifact ID is org.company-name_project-name.Click .
Your newly generated
pom.xmlfile appears under your Java project.
2.6. Additional resources
- For more information on how to use the Maven software project management and comprehension tool, see the JBoss Community Archive.
Chapter 3. Application deployment in CodeReady Studio
In order to deploy applications to a server from within CodeReady Studio you must configure the IDE with information about the server. For a local server this information includes the following:
- A server runtime environment with details about the server location, runtime JRE, and configuration files
- A server adapter with management settings for the server runtime environment, including access parameters, launch arguments, and publishing options
JBoss Server Tools enables you to efficiently configure a local server ready for use with CodeReady Studio using Runtime Detection. This feature is useful for quickly configuring a server for deploying and testing an application.
3.1. Configuring a local server
Runtime Detection searches a given local system path to locate certain types of runtime servers. For any servers found, Runtime Detection automatically generates both a default server runtime environment and a default server adapter. These items can be used for immediate application deployment as is or they can be customized to meet your requirements.
The following section describes how to configure a local server in CodeReady Studio.
Procedure
- Start CodeReady Studio.
Click → .

The Preferences window appears.

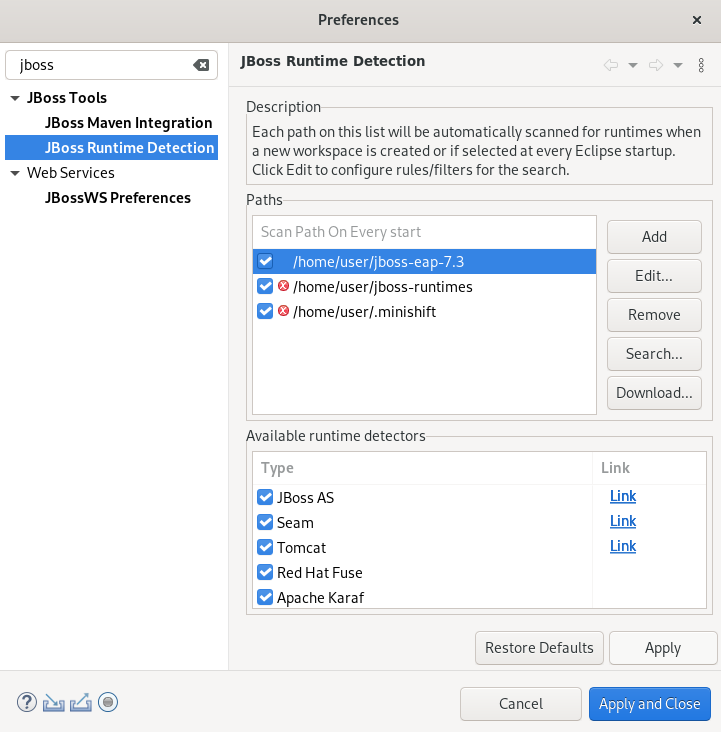
- Enter JBoss in the search field.
- Select JBoss Runtime Detection.
- Click .
- Locate the directory containing the runtime server.
Click .
The Searching for runtimes window appears.

- Click .
Select the path to the runtime server directory.

- Click .
3.2. Configuring a remote server
The following section describes how to configure a remote server in CodeReady Studio.
Procedure
- Start CodeReady Studio.
Press Ctrl+N.
The Select a wizard window appears.
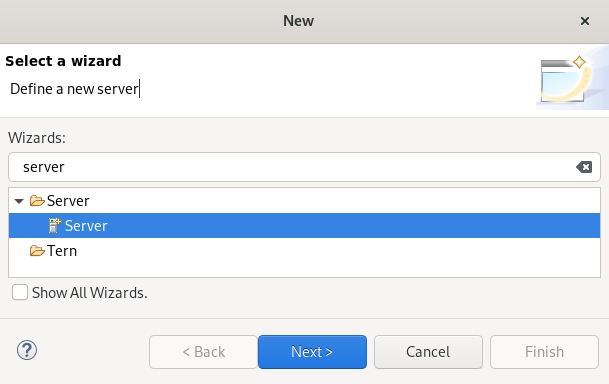
- Enter Server in the search field.
- Select Server.
Click .
The Define a New Server window appears.

- Select a server type.
Click .
The Create a new Server Adapter window appears.
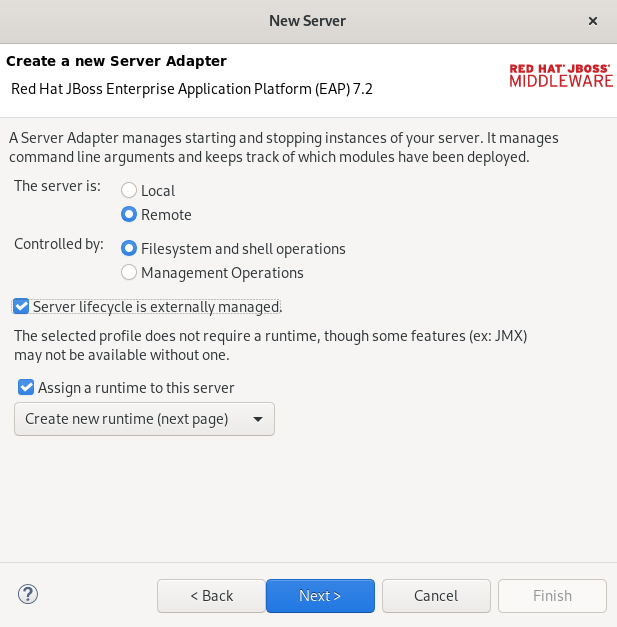
- Select the Remote check box.
- Select a Controlled by option.
- Select the Server lifecycle externally managed check box.
- Select the Assign a runtime to the server check box.
Click .
The JBoss Runtime window appears.

- Click in the Home Directory field to locate the runtime server.
Click .
The Remote System Integration window appears.

Click in the Remote Server Home field.
The Browse remote system window appears.

- Specify the path to the directory that contains the remote server.
- Click .
3.3. Deploying an application
After configuring the local server, you can deploy applications to the server from CodeReady Studio using the server adapter. The server adapter enables runtime communication between the server and CodeReady Studio for easy deployment of applications and server management.
The following section describes how to deploy an application to the server in CodeReady Studio.
Procedure
- Start CodeReady Studio.
Right-click your → → .

The Run on Server window appears.

- Select the Choose an existing server check box.
- Select the server you want to deploy.
- Click .
Your application opens in the internal CodeReady Studio web browser.
Chapter 4. JBoss EAP and JBoss WFK basics in CodeReady Studio
The Eclipse IDE supports application development and deployment with Red Hat JBoss Enterprise Application Platform (JBoss EAP) and Red Hat JBoss Web Framework Kit (JBoss WFK).
However, you need to configure Maven repositories first. This configuration is essential for using the enterprise versions of the example Maven projects provided in Red Hat Central. These projects are intended for deployment to JBoss EAP and require IDE access to JBoss EAP and JBoss WFK repositories.
4.1. Configuring Maven repositories
The following section describes how to configure Maven repositories.
Procedure
- Start CodeReady Studio.
Click → .
The Preferences window appears.

- Enter JBoss in the search field.
- Select JBoss Maven Integration.
Click .
The Configure Maven Repositories window appears.
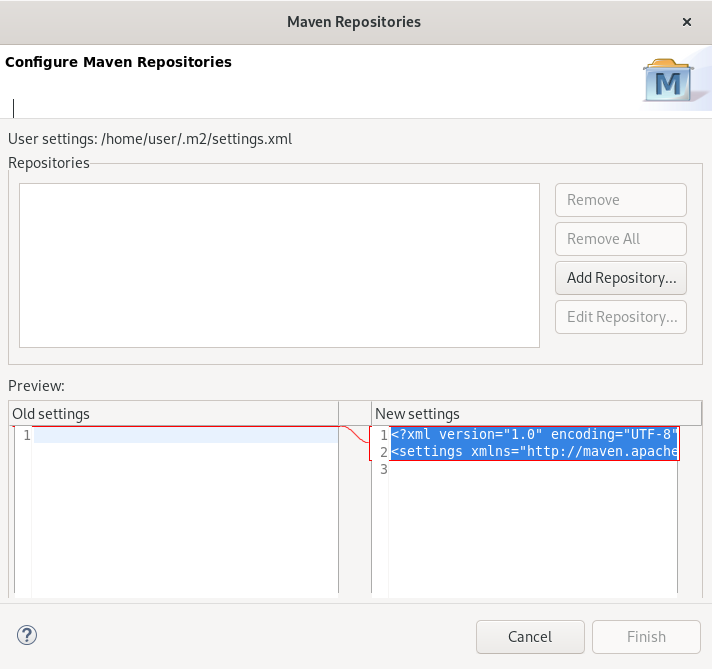
Click .
The Add Maven Repository window appears.

- Click the down-arrow in the Profile ID field.
Select the redhat-ga-repository.
Other fields are populated automatically.
- Click .
Click .
The Confirm File Update window appears.
- Click .
- Click .
Additional resources
- For more information on Maven repositories, see Maven: Getting Started - Developers.
4.2. Setting up JBoss EAP
To set up JBoss EAP in Eclipse, you must direct the IDE to the local or remote runtime servers. This establishes a communication channel between the IDE and the JBoss EAP server for efficient deployment and server management workflows.
The following section describes how to install JBoss EAP in CodeReady Studio.
Prerequisites
Configured Maven repositories.
For more information on how to configure Maven repositories, see Section 4.1, “Configuring Maven repositories”.
Procedure
- Start CodeReady Studio.
Click → .
The Preferences window appears.
- Enter JBoss in the search field.
- Select JBoss Runtime Detection.
Click .
The Download Runtimes window appears.
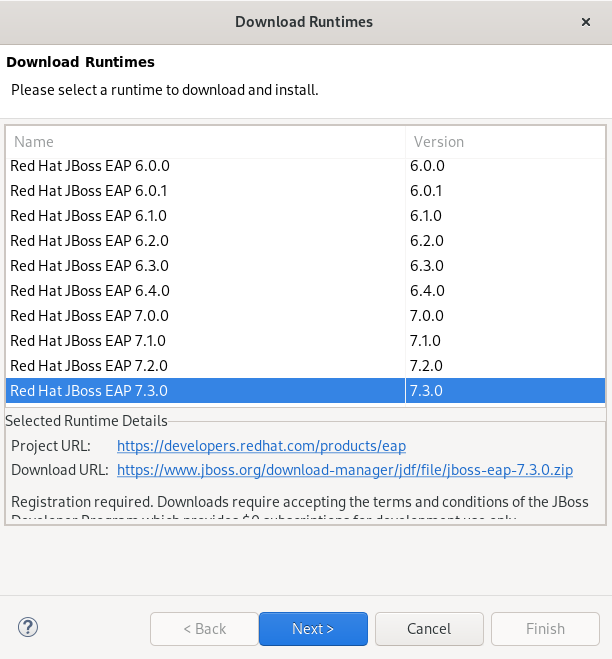
Select the JBoss EAP version you need.
NoteIf you select the JBoss EAP version 6.0.x or earlier, follow the on-screen instructions. If you select a later version, follow the instructions below.
Click .
The Credentials window appears.
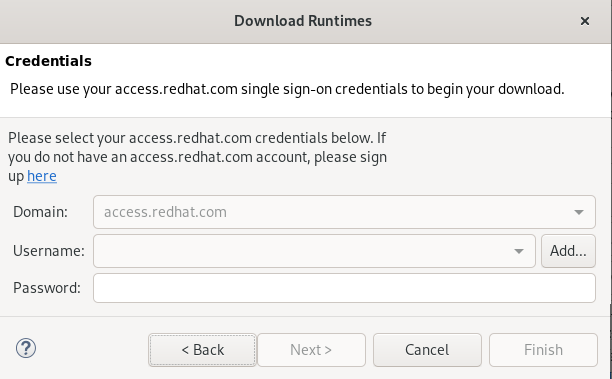
- Click .
- Enter your access.redhat.com username and password.
- Click .
Click .
Review the license agreement, if satisfied, accept the license and click to continue with the installation.
The Download Runtimes window appears.

- Click to select the Install folder.
- Click to select the Download folder.
Click .
Note that downloading and installing the Runtime might take a while.
The JBoss Runtime Detection window appears.
- Select the path to the JBoss EAP installation file check box.
- Click .
Verification steps
Click → → .
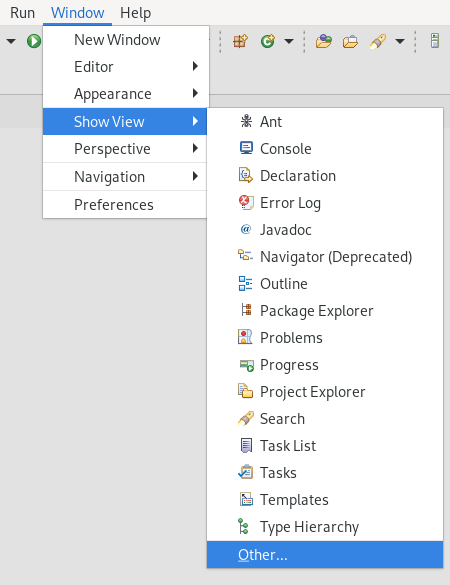
The Show View window appears.
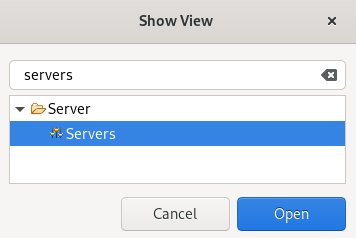
- Type Servers in the search field.
- Select Servers.
Click .
The Servers view appears.
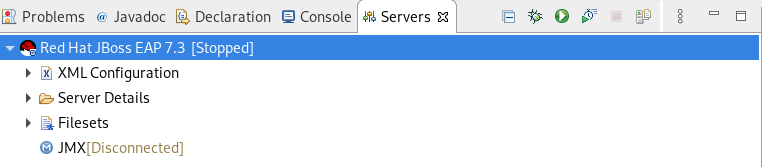
Your newly added JBoss EAP is now listed in the Servers view.
Chapter 5. OpenShift basics in CodeReady Studio
CodeReady Studio includes the OpenShift Application Explorer view, which provides a simplified user experience allowing easy and rapid feedback through the inner loop as well as debugging.
The OpenShift Application Explorer is set in CodeReady Studio as the default view. In case you need to open it manually, follow the instructions in Setting Up Openshift App Explorer View.
5.1. Setting up the OpenShift Application Explorer view
The following section describes how to open OpenShift Application Explorer in CodeReady Studio.
Procedure
- Start CodeReady Studio.
Click → → .
The Show View window appears.
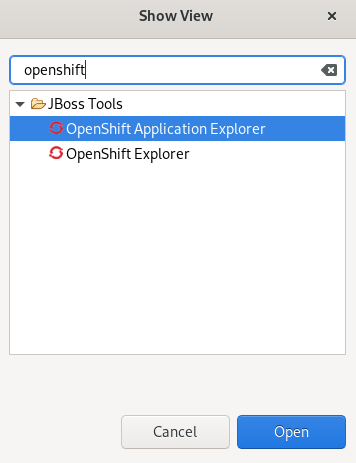
- Enter OpenShift in the search field.
- Select OpenShift Application Explorer.
Click .
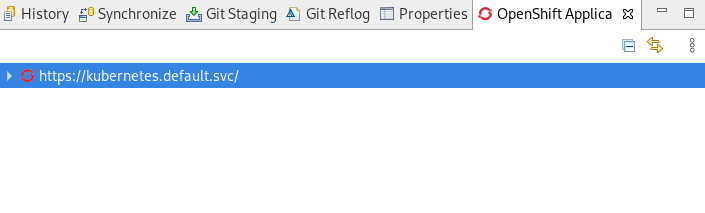
The OpenShift Application Explorer view appears.
5.2. Connecting to the OpenShift cluster using OpenShift Application Explorer
The following section describes how to login to the OpenShift cluster in CodeReady Studio using OpenShift Application Explorer.
Procedure
- Start CodeReady Studio.
- Open OpenShift Application Explorer.
Click Can’t connect to cluster. Click to login.
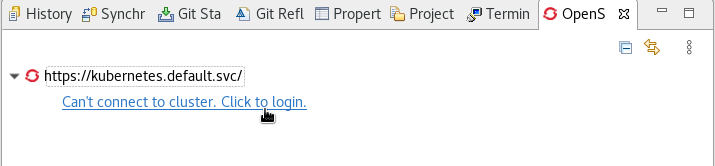
The Login window appears.
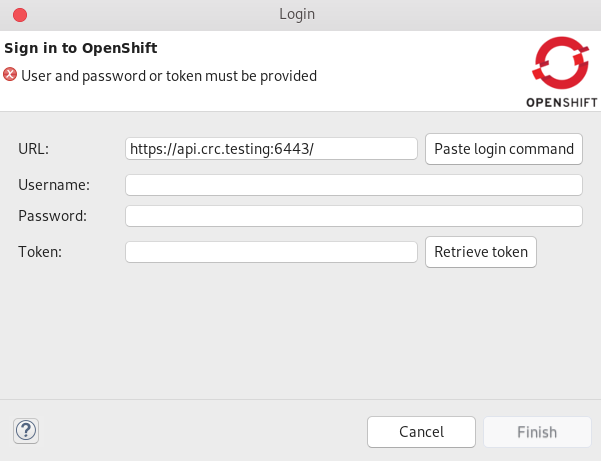
Paste your OpenShift API URL into the URL field.
For more information on accessing your cluster through OpenShift API URL, visit Red Hat OpenShift - Accessing your Services.
- Enter your username and password or token.
- Click .
5.2.1. Browser-based token retrieval
Alternatively to providing your username and password or token, you can use browser based token retrieval to log in to your OpenShift cluster. There are two login options, "Paste Login Command" and "Retrieve Token".
Use "Paste Login Command"
Paste your OpenShift API URL into the URL field.
For more information on accessing your cluster through OpenShift API URL, visit Red Hat OpenShift - Accessing your Services.
Visit the OpenShift Container Platform web UI.
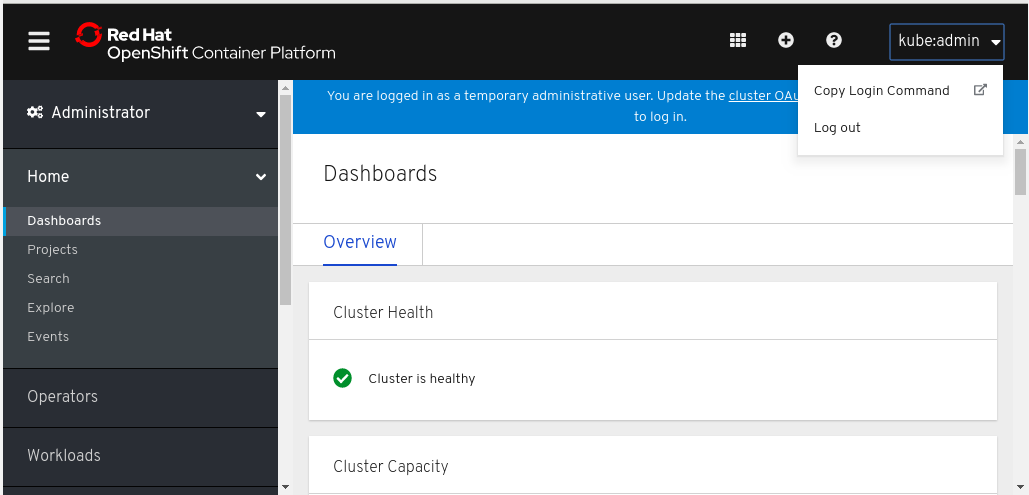
- Click the drop-down menu in the top right corner.
- Click Copy Login Command.
- Click Display Token.
- Copy the login command.
In the Sign in to OpenShift window, click .
Click .
NoteFor OpenShift 3, the login command is copied into your clipboard automatically.
Use "Retrieve Token"
Paste your OpenShift API URL into the URL field.
For more information on accessing your cluster through OpenShift API URL, visit Red Hat OpenShift - Accessing your Services.
Click .
- Enter your username and password.
- Click .
- Click .
- Click .
Your projects now appear in the OpenShift Application Explorer view.
5.3. Setting up a Developer Sandbox using OpenShift tools
The following section describes how to bootstrap and login to a Developer Sandbox in CodeReady Studio.
Procedure
- Start CodeReady Studio.
Open OpenShift Application Explorer.

- Right-click your OpenShift connection.
Click Login.
The Sign in to OpenShift window appears.

- Click Red Hat Developer Sandbox.
Provide the credentials of your Red Hat account and click .
Your Developer Sandbox has been bootstrapped.
The Login to Red Hat Developer Sandbox window appears.
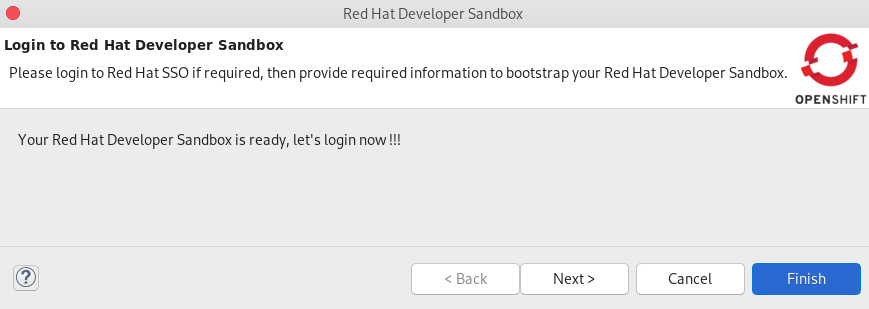
- Click .
- Click .
- Provide the credentials of your Red Hat account again and click .
- Click Display Token.
Click Finish.
Your Token is displayed in the Sign in to OpenShift window.
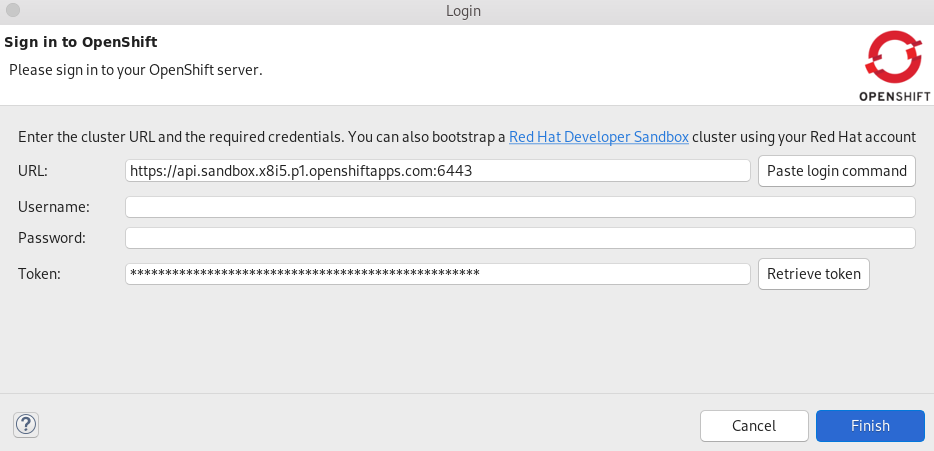
Click .
You are now logged in to your Developer Sandbox.
Your Developer Sandbox shows in the OpenShift Application Explorer view.
5.4. Building an application based on devfiles
To deploy applications based on devfiles, you need an empty project in your local workspace as well as an empty project in OpenShift, for which you need to create a devfile component. After the component is established, your project will be updated and local and remote artifacts created in OpenShift.
5.4.1. Creating an empty project
The following section describes how to create an empty project in CodeReady Studio.
Procedure
- Start CodeReady Studio.
Press Ctrl+N.
The Select a wizard window appears.

- Select → .
Click .
The New Project window appears.

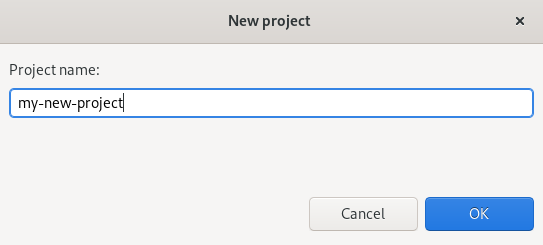
- Name your project.
- Select the location for your project.
- Click .
Your newly created empty project is now listed in the Project Explorer view.
5.4.2. Creating an empty OpenShift project using OpenShift Application Explorer
The following section describes how to create an empty project using OpenShift Application Explorer in CodeReady Studio.
Procedure
- Start CodeReady Studio.
- Start OpenShift Application Explorer.
Right-click any place in → → .

The New project window appears.
- Name your project.
- Click .
Your newly created project is now listed in the OpenShift Application Explorer view.
5.4.3. Creating a devfile component using OpenShift Application Explorer
The following section describes how to create a devfile component using OpenShift Application Explorer in CodeReady Studio.
Procedure
- Start CodeReady Studio.
- Start OpenShift Application Explorer.
Right-click the target → → .

The Create component window appears.

- Name your project.
- Click to select your Eclipse Project.
-
Set your Component type to
java-vertx. -
Set the Project starter to
java-vertx. - Name your application.
- Clear the Push after create check box.
- Click .
The Console view appears, displaying the validation process.
Your newly created component is now listed in the OpenShift Application Explorer view under your project.
5.4.4. Devfile registry management using OpenShift Application Explorer
The following section describes how to create, delete, and edit devfile registries using OpenShift Application Explorer in CodeReady Studio.
Adding a devfile registry
- Start CodeReady Studio.
- Start OpenShift Application Explorer.
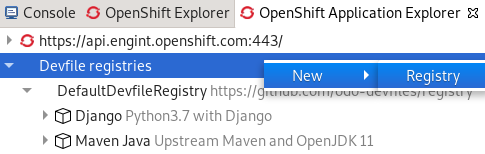
Devfile registries are displayed under the Devfile registries node.

If you expand the devfile registry node, all devfiles of that registry are shown.

To add a new devfile registry, right-click Devfile registries and click new.
The Create devfile registry window appears.
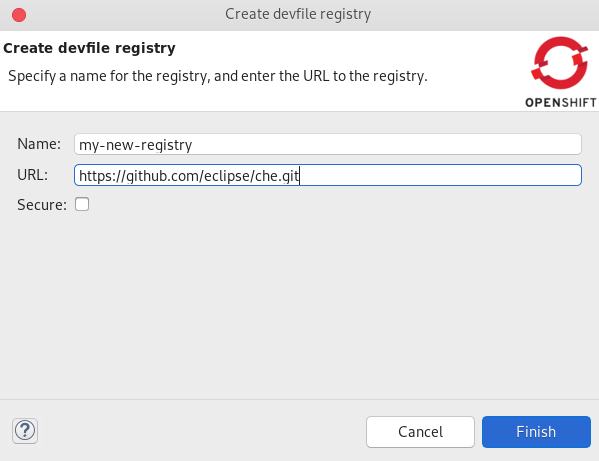
- Name your devfile registry.
- Paste your devfile URL.
- Click .
Your newly created devfile registry is now listed in the OpenShift Application Explorer view under Devfile registries.
Deleting a devfile registry
- Start CodeReady Studio.
- Start OpenShift Application Explorer.
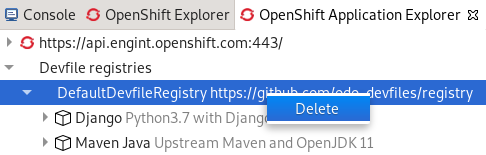
Devfile registries are displayed under the Devfile registries node.
An expanded devfile registry node shows all devfiles of that registry.
To delete a devfile registry, right click the node of a devfile registry and click delete.
Your devfile registry is now deleted.
Editing a devfile registry
- To edit a devfile registry, use the YAML editor. The YAML editor provides syntax validation and content assist.
Additional resources
For further information on devfiles, visit Introduction to Devfile.
5.5. Building an application based on S2I files
To deploy applications based on S2I files, you need a launcher project in your local workspace as well as an empty project in OpenShift, for which you need to create a component. After the component is established, your project will be updated and local and remote artifacts created in OpenShift.
5.5.1. Creating a launcher project
The following section describes how to create a launcher project in CodeReady Studio.
Procedure
- Start CodeReady Studio.
Press Ctrl+N.
The Select a wizard window appears.

- Enter Launcher in the search field.
- Select Launcher project.
Click .
The New Launcher project window appears.
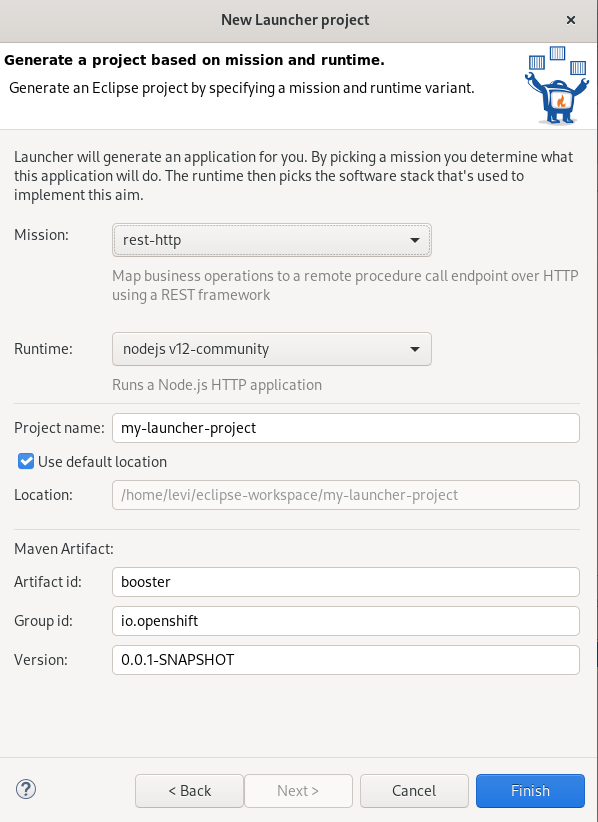
-
Set Mission to
rest-http. -
Set Runtime to
vert.x community. - Name your project.
- Select the location for your project.
Click .
Note that the process of resolving dependencies might take some time to complete.
Your newly created launcher project is now listed in the Project Explorer view.
5.5.2. Creating an empty OpenShift project in OpenShift Application Explorer
The following section describes how to create an empty project using OpenShift Application Explorer in CodeReady Studio.
Procedure
Right-click any place in → → .
The New project window appears.
- Name your project.
- Click .
Your newly created project is now listed in the OpenShift Application Explorer view.
5.5.3. Creating an S2I component using OpenShift Application Explorer
The following section describes how to create a component using OpenShift Application Explorer in CodeReady Studio.
Procedure
- Start CodeReady Studio.
- Start OpenShift Application Explorer.
Right-click the target → → .
The Create component window appears.
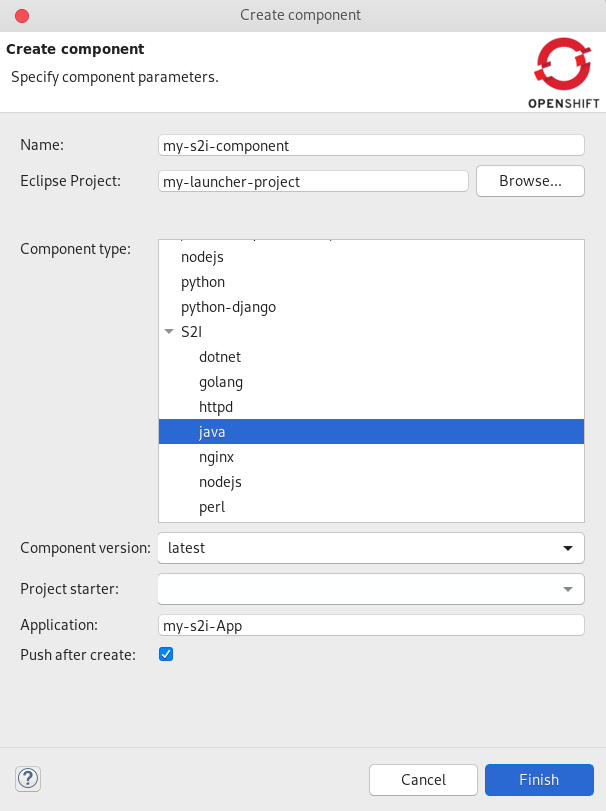
- Name your project.
- Click to select your Eclipse Project.
-
Click on the arrow next to
S2Iand set your Component type tojava. -
Set the Component version to
latest. - Name your application.
- Clear the Push after create check box.
- Click .
The Console view appears, displaying the validation process.
Your newly created component is now listed in the OpenShift Application Explorer view under your project.
5.6. Deploying a component on a cluster using OpenShift Application Explorer
The following section describes how to deploy a component on a cluster using OpenShift Application Explorer in CodeReady Studio.
Procedure
- Start CodeReady Studio.
- Start OpenShift Application Explorer.
- Expand your project.
- Expand your application.
Right-click your → .

The Console view appears, displaying the process of file synchronization.
5.7. Defining an external access URL using OpenShift Application Explorer
The following section describes how to define an external access URL using OpenShift Application Explorer in CodeReady Studio.
Procedure
- Start CodeReady Studio.
- Start OpenShift Application Explorer.
- Expand your project.
- Expand your application.
Right-click your → → .

The Create URL window appears.

- Name your URL.
- Set the Port value to 8080.
Click .
The Console view appears, displaying the process of URL creation.
In OpenShift Application Explorer, right-click your → .
The Console view appears, displaying the process of file synchronization.
Your newly created URL is now listed in the OpenShift Application Explorer view under your component.
5.8. Debugging an application on a cluster using OpenShift Application Explorer
The following section describes how to debug an application on a cluster using OpenShift Application Explorer in CodeReady Studio.
Procedure
- Start CodeReady Studio.
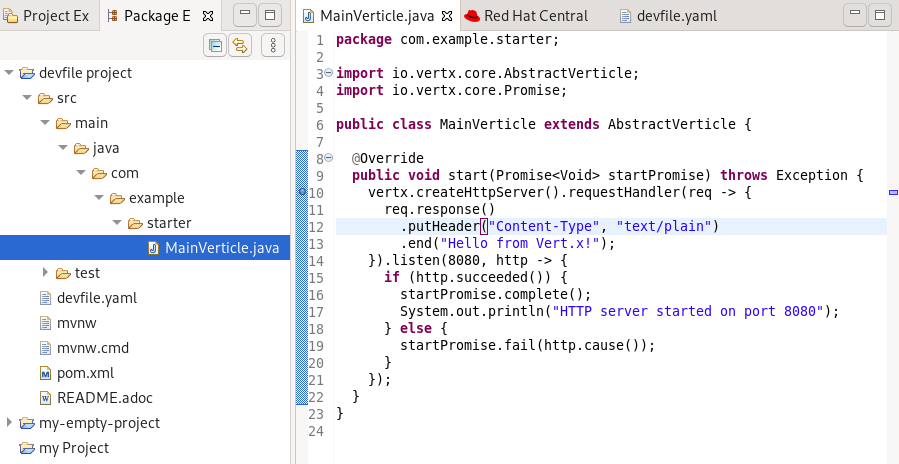
-
In the Project Explorer view, locate the
MainVerticle.java(devfiles) orHttpApplication.java(S2I) file and double-click to open it. Double-click on the left ruler column to set a breakpoint.
- Open OpenShift Application Explorer.
- Expand your project.
- Expand your application.
Right-click your → .
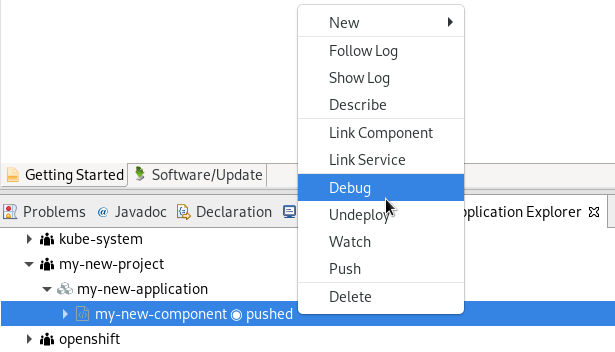
The Console view appears.
- In OpenShift Application Explorer, expand your component.
Right-click your → .

The Confirm Perspective Switch window appears.
Click .
The Debug Perspective window appears displaying the debugging process.
Chapter 6. Quarkus tools basics in CodeReady Studio
Quarkus is a Kubernetes-Native full-stack Java framework aimed to optimize work with Java virtual machines. Quarkus provides tools for Quarkus application developers, helping to reduce the size of Java applications and container image footprints, as well as the amount of memory required.
Prerequisites
- The latest version of JBoss Tools is installed. For more information, see JBoss Tools Downloads.
6.1. Creating a new Quarkus project
The following section describes how to create a new Quarkus project in CodeReady Studio.
Procedure
- Start CodeReady Studio.
Press Ctrl+N.
The Select a wizard window appears.

- Enter Quarkus in the search field.
- Select Quarkus Project.
Click .
The New Quarkus project window appears.
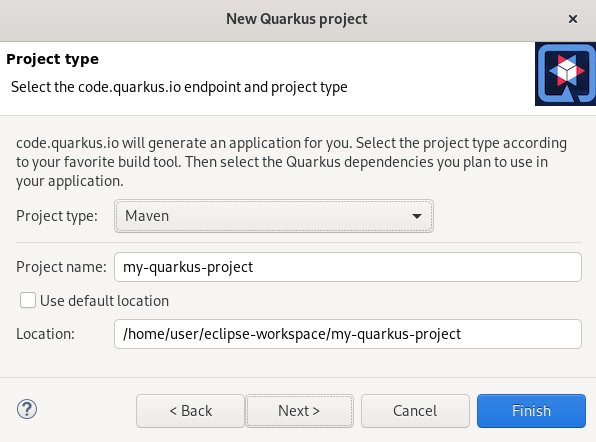
- Select the needed project type.
- Name your project.
- Select the location for your project.
Click .
The Project type window appears.
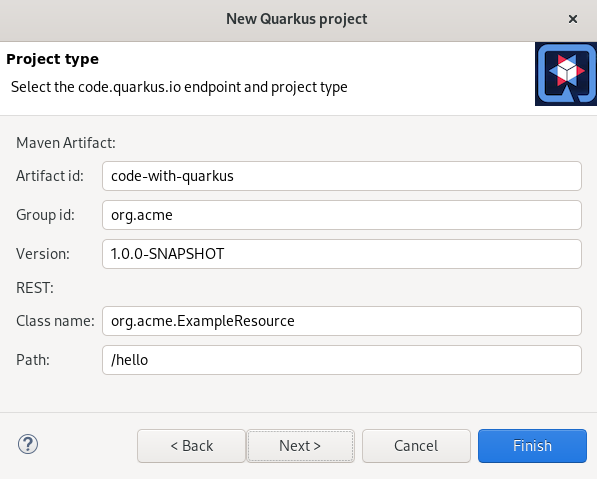
- Ensure that the default values are correct.
Click .
The Quarkus extensions window appears.

Select the needed Categories for your projects.
The available extensions of the selected category are displayed in the Extensions column.
Select the needed Extensions for your projects.
Double-click on the extension to select or deselect it. The selected extensions appear in the Selected column.
- Click .
Your newly created Quarkus project is now listed in the Project Explorer view.
6.2. Running a Quarkus application
The following section describes how to run a Quarkus application in CodeReady Studio.
Procedure
- Start CodeReady Studio.
Click → .

The Run Configurations window appears.
Scroll down to Quarkus Application.

Right-click → .

- Name your configuration.
Click to locate your project.
NoteIt is possible to add environment variables to your Quarkus project. To add a new environment variable, click → and select a name and value.
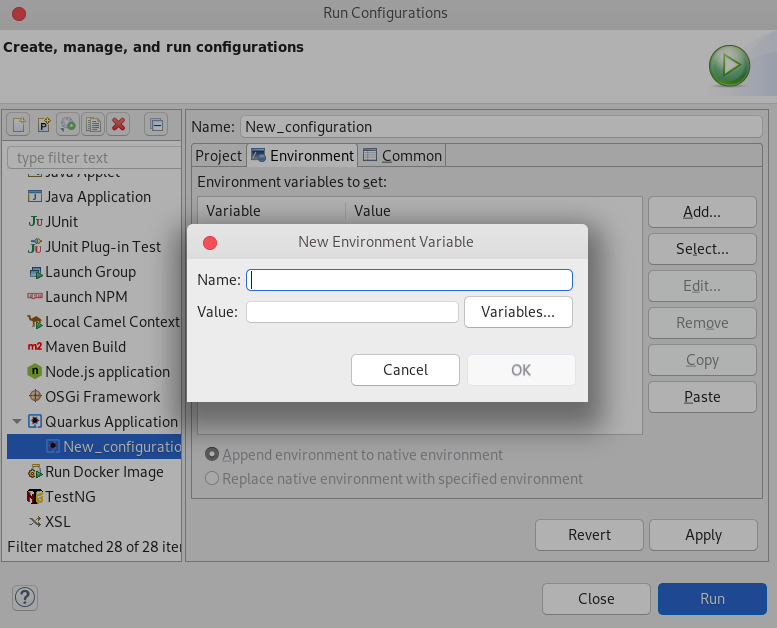
- Click .
Click .
The Console view appears.
Your application will start after the built process.
6.3. Debugging a Quarkus application
The following section describes how to debug a Quarkus application in CodeReady Studio.
Procedure
- Start CodeReady Studio.
Click → .
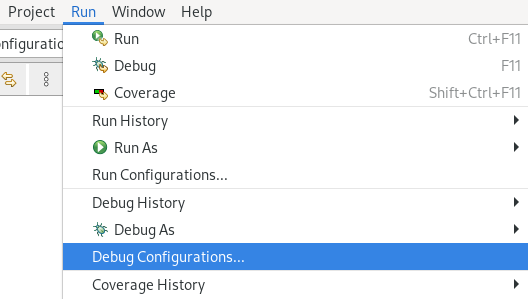
The Debug Configurations window appears.

- Expand Quarkus Application.
- Select your configuration.
Click .
The Console view appears.
Your Quarkus application starts and connects to a remote JVM debug configuration. If you set breakpoints in your application source files, the execution automatically stops after reaching the breakpoint.
6.4. Using language support in CodeReady Studio
Every Quarkus application is configured through an application.properties configuration file. The content of this configuration file is dependent on the set of Quarkus extensions that your application is using.
Quarkus Tools includes content assist, which provides code completion, validation, and documentation. Code completion allows you to quickly complete statements in your code. Multiple choices are available to you via popups. This language support is now available for Kubernetes, OpenShift, S2i, Docker properties, MicroProfile REST Client properties, and MicroProfile Health artifacts.
Note that language support for MicroProfile REST Client properties needs to be enabled separately. For more information, see Section 6.4.2, “Enabling language support for MicroProfile REST Client properties”.
6.4.1. Using Quarkus content assist
The following section describes how to use Quarkus application.properties content assist in CodeReady Studio.
Prerequisites
An existing Quarkus project.
For more information on how to create a Quarkus project, see Section 6.1, “Creating a new Quarkus project”.
Procedure
- Start CodeReady Studio.
- Start Project Explorer.
- Expand your → .
Right-click → → .
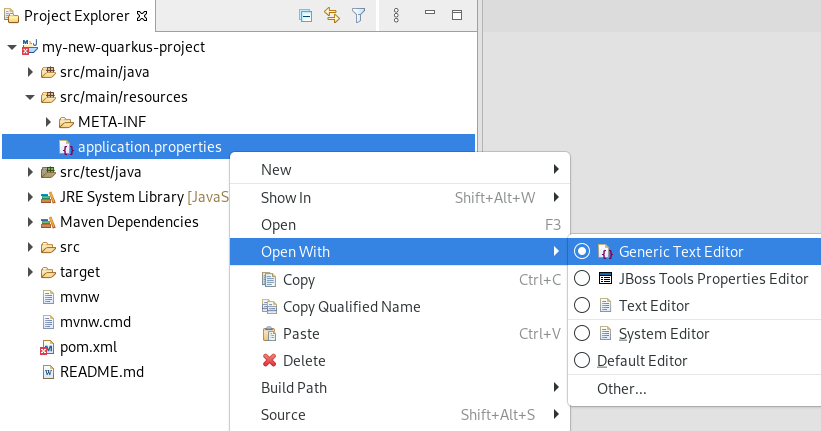
The Generic Text Editor window appears.
- Navigate to an empty line.
Press Ctrl+Space to invoke code completion.
The code completion suggestions appear. Hover the mouse over the suggestions to display documentation.
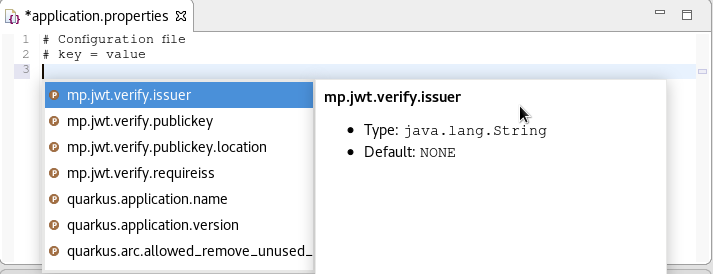
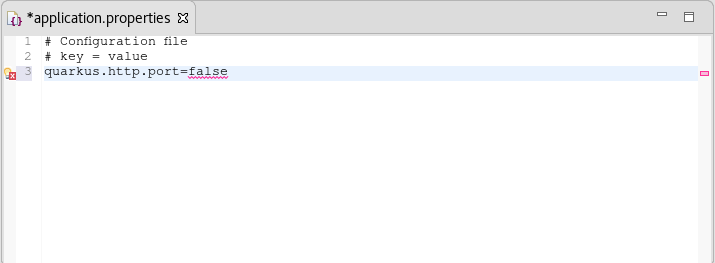
If you enter a wrong value, the editor underlines the error with a red wavy line.
Additional resources
- Language support for MicroProfile REST Client properties needs to be enabled separately. For more information, see Section 6.4.2, “Enabling language support for MicroProfile REST Client properties”.
6.4.2. Enabling language support for MicroProfile REST Client properties
The following section describes how to enable language support for MicroProfile REST Client properties.
Prerequisites
An existing Quarkus project.
For more information on how to create a Quarkus project, see Section 6.1, “Creating a new Quarkus project”.
Procedure
- Start CodeReady Studio.
- Start Project Explorer.
- Expand your → .
Right-click → → .
The Select wizard window appears.

- Enter file in the search field.
- Select File.
Click .
The Create a new file resource window appears.
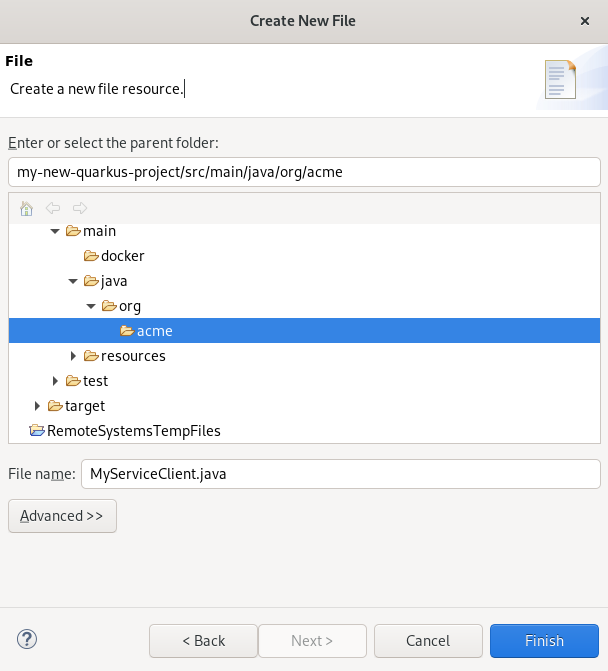
- Name your new file.
- Click .
Paste the following content into your newly created file:
package org.acme; import javax.ws.rs.GET; import javax.ws.rs.Path; import javax.ws.rs.core.Response; import org.eclipse.microprofile.rest.client.inject.RegisterRestClient; @RegisterRestClient public interface MyServiceClient { @GET ("/greet") Response greet(); }- Press Ctrl+S to save the changes.
Additional resources
- For more information on how to use language support, see Section 6.4.1, “Using Quarkus content assist”.
- For information on adjusting language support, see Quarkus - Using the REST client, Create the interface.
Chapter 7. Hibernate Tools basics in CodeReady Studio
Hibernate Tools is a collection of tools for projects related to Hibernate version 5 and earlier. The tools provide Eclipse plugins for reverse engineering, code generation, visualization, and interaction with Hibernate.
7.1. Creating a new JPA project
The following section describes how to create a new JPA project in CodeReady Studio.
Prerequisites
You need to start the Sakila database server before you can create a new JPA project in CodeReady Studio.
- Download the h2 version of the Sakila database.
-
Navigate to the directory that contains the
runh2.shfile. Execute the
runh2.shfile:$ ./runh2.sh
Procedure
- Start CodeReady Studio.
Press Ctrl+N.
The Select a Wizard window appears.
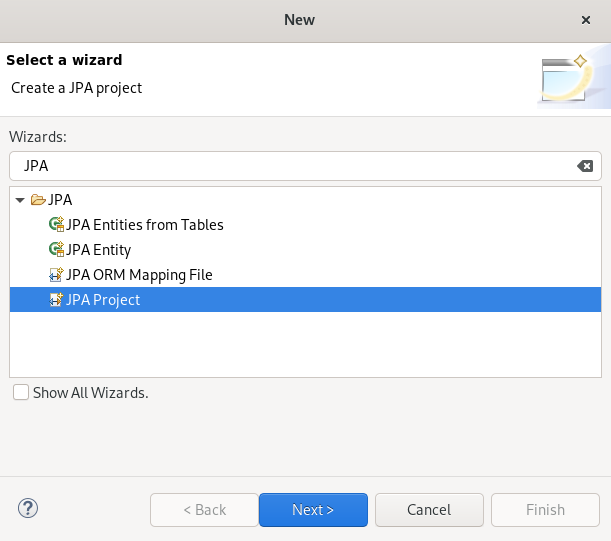
- Enter JPA in the search field.
- Select JPA Project.
Click .
The New JPA Project window appears.
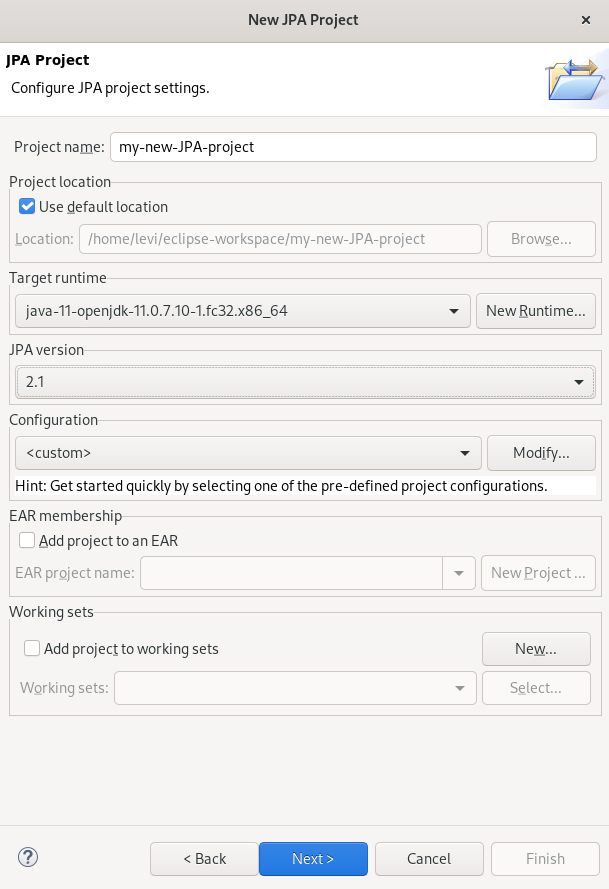
- Name your project.
- Select the location for your project.
- Click the down-arrow in the Target runtime field to select the runtime server.
- Set the JPA version to 2.1.
Click .
The Java window appears.

- Select the source folder.
Click .
The JPA Facet window appears.
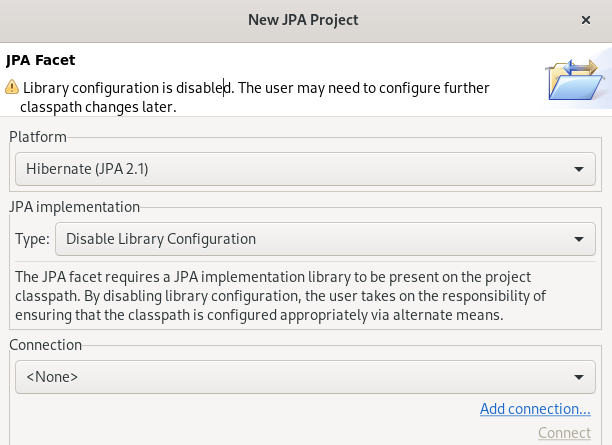
- Click the down-arrow in the Platform field and select Hibernate (JPA 2.1).
Add user libraries or set the JPA Implementation Type to Disable Library Configuration.
For more information on how to set up user libraries, see Section 7.2, “Adding libraries”.
Click .
The Connection Profile window appears.
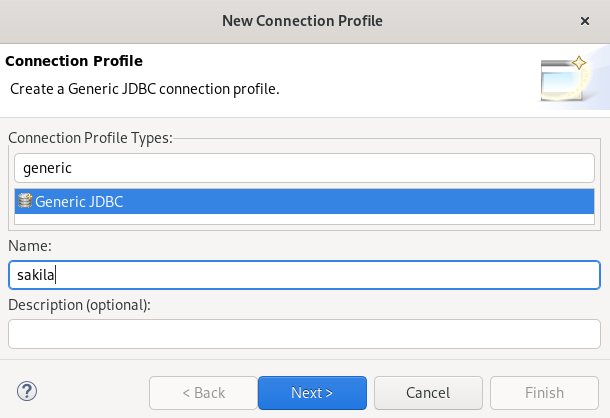
- Enter Generic in the search field.
- Select Generic JDBC.
- Enter Sakila in the Name field.
Click .
The Specify a Driver and Connection Details window appears.
Click the icon.
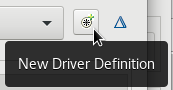
The New Driver Definition window appears.
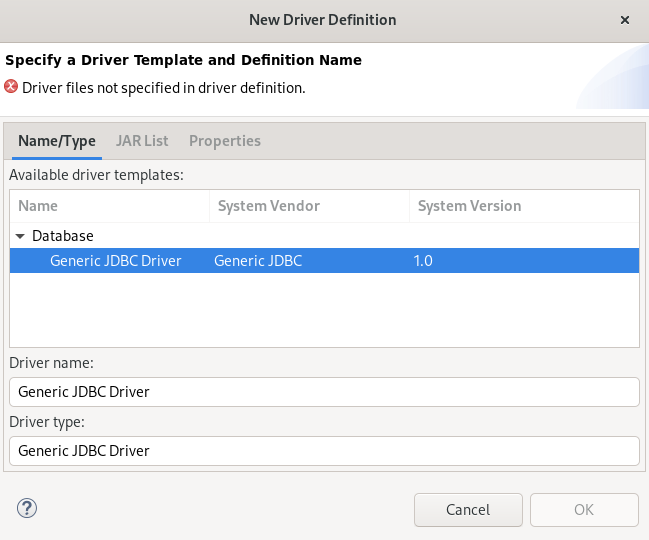
- Select the Generic JDBC Driver.
Click the JAR List tab.

- Click the button.
-
Select the
.jarfile for the Sakila database. Click the Properties tab.

-
Add
jdbc:h2:tcp://localhost/./sakilato the Connection URL field. - Click the Driver Class field.
Click the three dots icon at the end of the Driver Class field.
The Available Classes from Jar List window appears.

- Select the Browse for Class option.
- Select org.h2.Driver.
- Click .
Enter
sain the User ID field.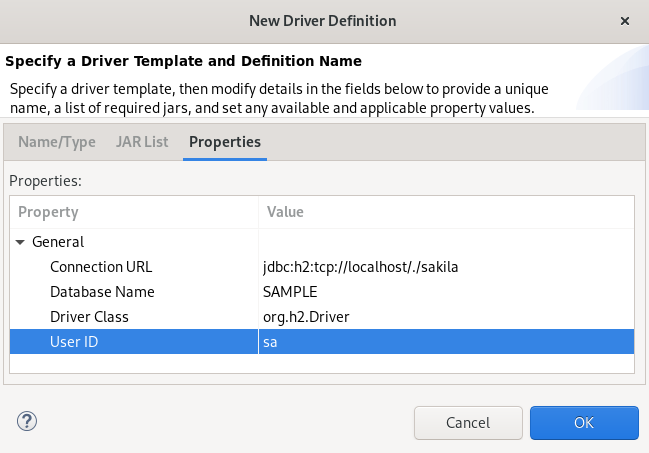
- Click → → .
Your newly created JPA project is now listed in the Project Explorer view.
7.2. Adding libraries
The following section describes how to add libraries to your Hibernate project in CodeReady Studio.
Procedure
- Download Hibernate ORM.
- Extract the files.
- Start CodeReady Studio.
Click → .
The Preferences window appears.
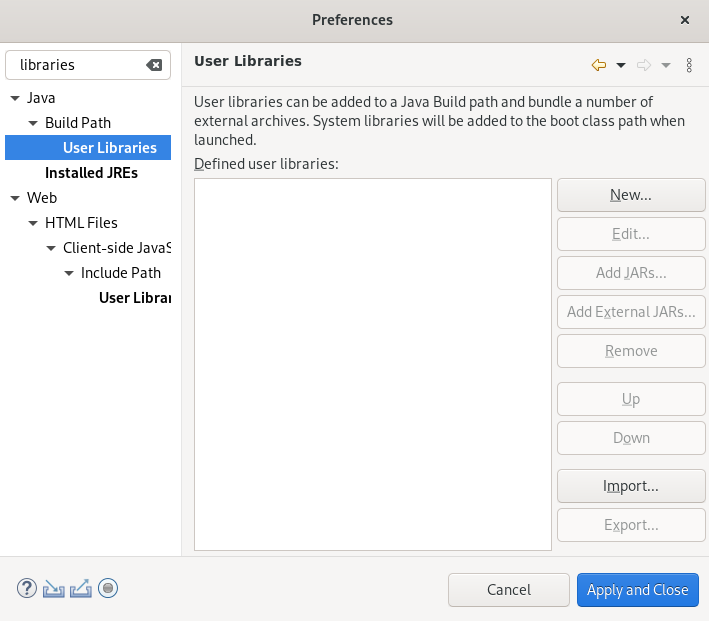
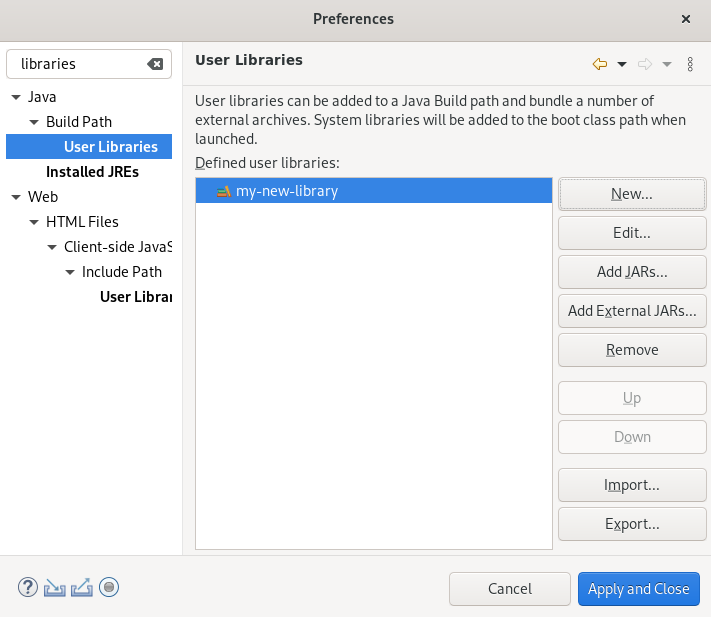
- Enter Libraries in the search field.
- Select User Libraries under Java.
Click the button.
The New User Library window appears.
- Name your user library.
- Click .
Select your new user library.
- Click the button.
- Select the directory you extracted the Hibernate ORM files into.
-
Navigate to the
/lib/required/directory. -
Select a
.jarfile. Click .
Your selected
.jarfile appears under your user library.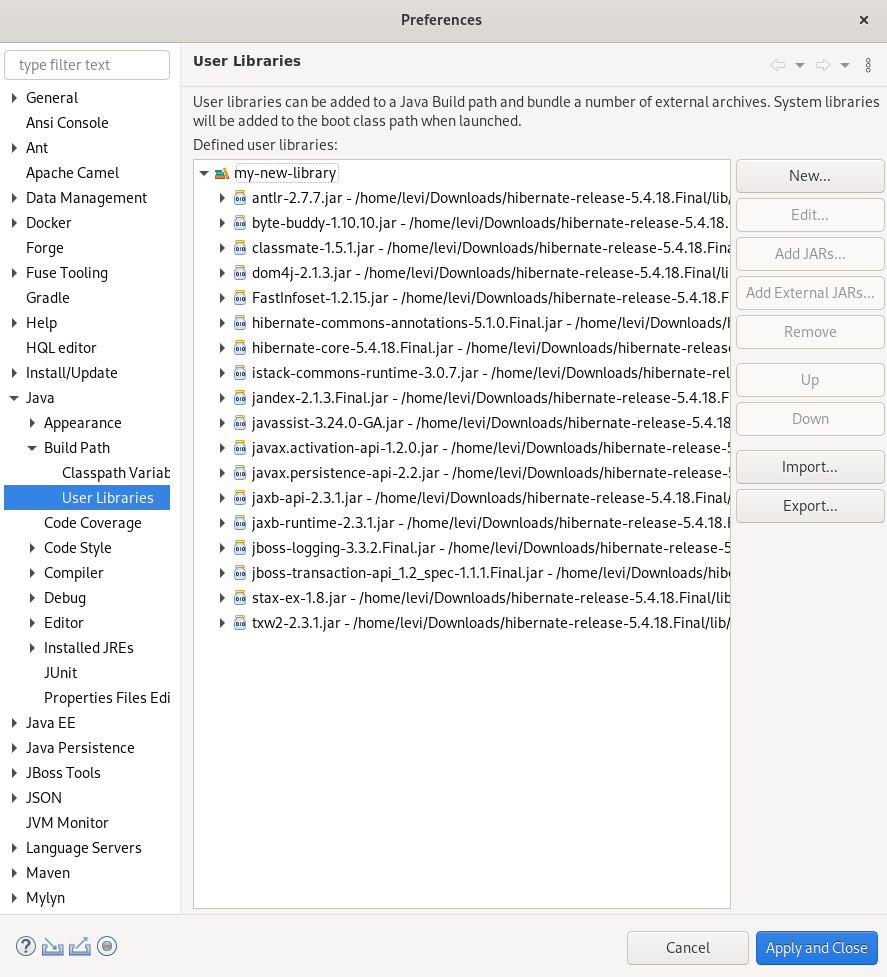
- Click .
7.3. Generating tables from entities
The following section describes how to generate tables from entities for your Hibernate project in CodeReady Studio.
Procedure
- Start CodeReady Studio.
- Open Project Explorer.
Right-click your → → .
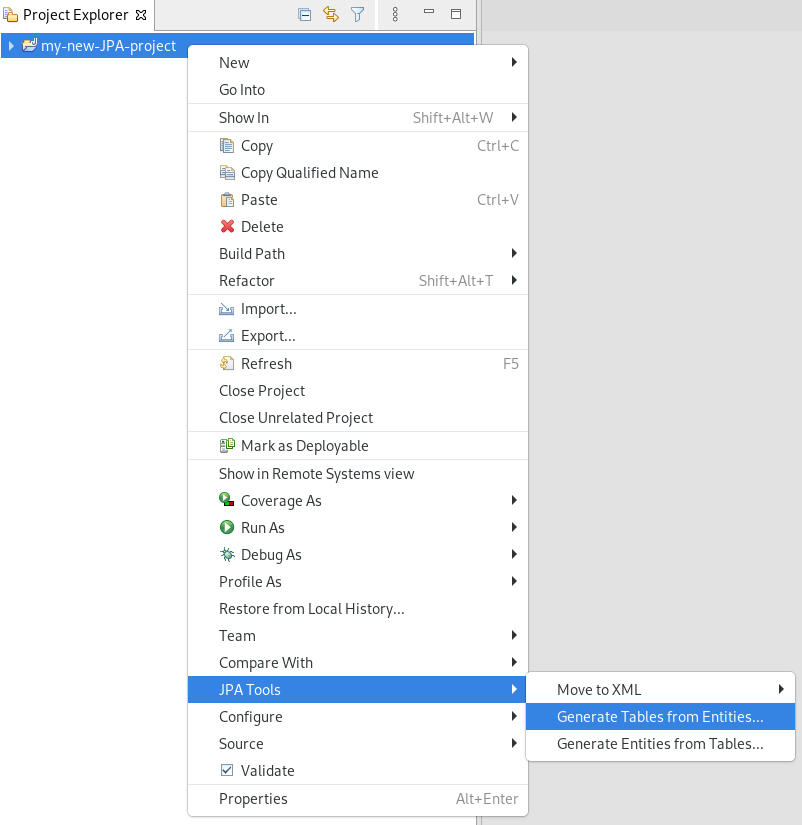
The Generate Tables from Entities window appears.

- Select the Use Console Configuration check box.
- Click .
7.4. Creating a Hibernate mapping file
Hibernate mapping files specify how your objects relate to the database tables.
The following section describes how to create a Hibernate mapping file in CodeReady Studio.
Procedure
- Start CodeReady Studio.
Press Ctrl+N.
The Select a wizard window appears.

- Enter Hibernate in the search field.
- Select Hibernate XML Mapping file (hbm.xml).
Click .
The Create Hibernate XML Mapping file window appears.

- Click the button to add classes.
Click the button to add packages.
Alternatively, you can create an empty
.hbm.xmlfile by not selecting any packages or classes.- Select the depth control check box to define the dependency depth used when choosing classes.
Click .
The New Hibernate XML Mapping files window appears.
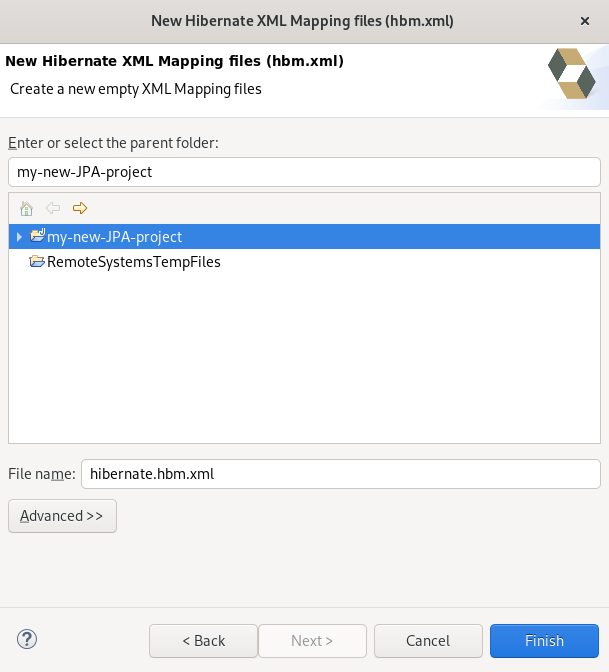
- Select the parent directory.
-
Name your
.hbm.xmlfile . - Click .
7.5. Creating a Hibernate configuration file
For reverse engineering, prototype queries, or Hibernate Core usage, a hibernate.properties or a hibernate.cfg.xml file is required. CodeReady Studio provides a wizard to generate the configuration file hibernate.cfg.xml.
The following section describes how to create a Hibernate configuration file in CodeReady Studio.
Procedure
- Start CodeReady Studio.
Press Ctrl+N.
The Select a wizard window appears.

- Enter Hibernate in the search field.
- Select Hibernate Configuration file (cfg.xml).
Click .
The Create Hibernate Configuration file (cfg.xml) window appears.

- Select the parent directory.
Click .
The Hibernate Configuration File (cfg.xml) window appears.

- Click the down-arrow in the Database dialect field to select the database.
- Click the down-arrow in the Driver class field to select the driver.
- Click the down-arrow in the Connection URL field to select the URL.
- Click .
7.6. Creating a Hibernate console configuration file
A console configuration file describes how the Hibernate plugin configures Hibernate. It also describes the configuration files and classpaths needed to load the POJOs, JDBC drivers, and so on. It is required to make use of query prototyping, reverse engineering and code generation. You can have multiple console configurations per project, however, one configuration is sufficient.
The following section describes how to create a Hibernate console configuration file in CodeReady Studio.
Procedure
- Start CodeReady Studio.
Press Ctrl+N.
The Select a wizard window appears.
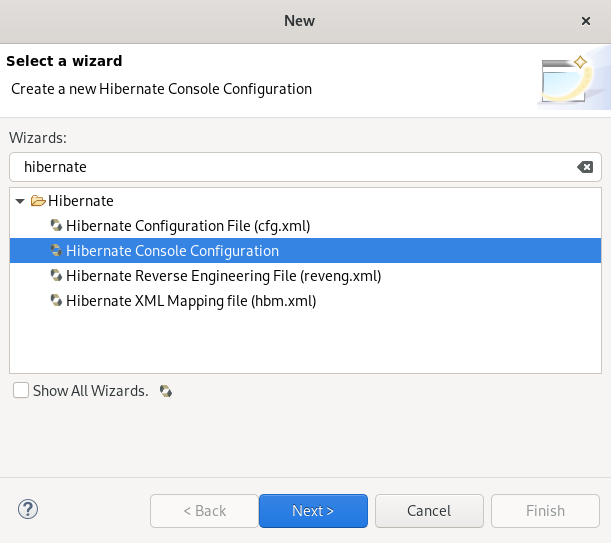
- Enter Hibernate in the search field.
- Select Hibernate Console Configuration.
Click .
The Create Hibernate Console Configuration window appears.
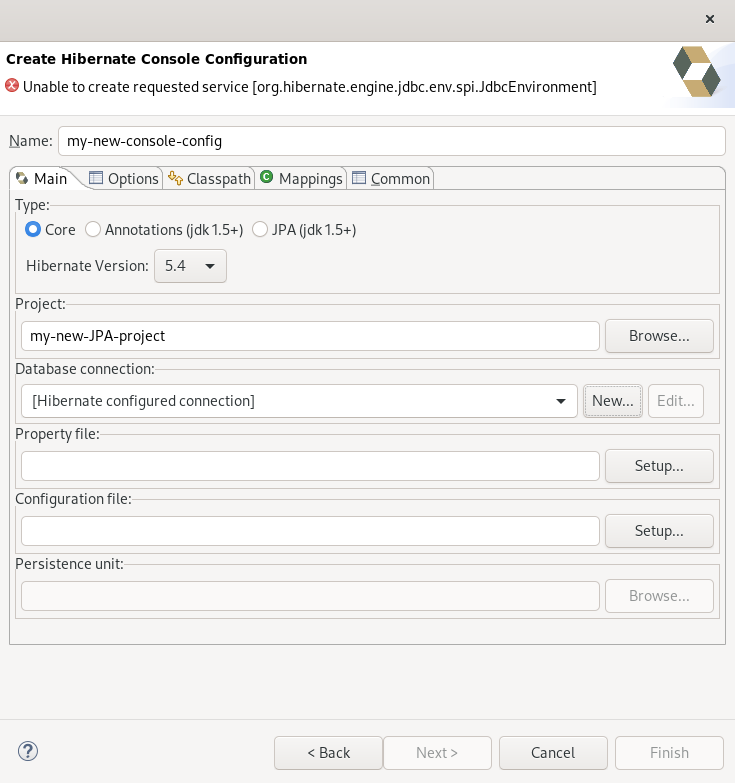
- Name your configuration file .
- Ensure that the Type is set to Core.
- Select the correct Hibernate version.
- Click to locate your project.
Click to configure a new Database connection.
The New Connection Profile window appears.
- Select the Database Connection or create a new one.
Click to set up the Property file.
The Setup property file window appears.
Click .
The Create Hibernate Properties file (.properties) window appears.
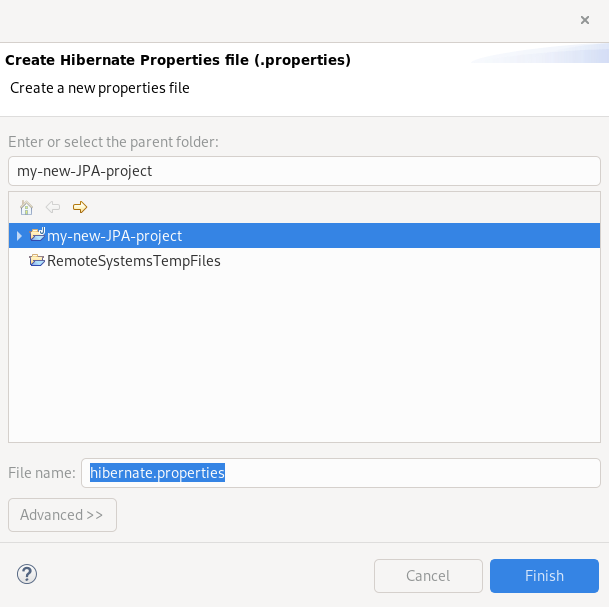
- Select the parent directory.
-
Name your
.propertiesfile. - Click .
- Click to set up the Configuration file.
Select the path to the target
.cfg.xmlfile.The Setup configuration file window appears.
Click .
The Create Hibernate Configuration file (cfg.xml) window appears.
- Select the parent directory.
Click .
The Hibernate Configuration File (cfg.xml) window appears.
- Click the down-arrow in the Database dialect field to select the database.
- Click the down-arrow in the Driver class field to select the driver.
- Click the down-arrow in the Connection URL field to select the URL.
Click .
The Create Hibernate Console Configuration window appears.
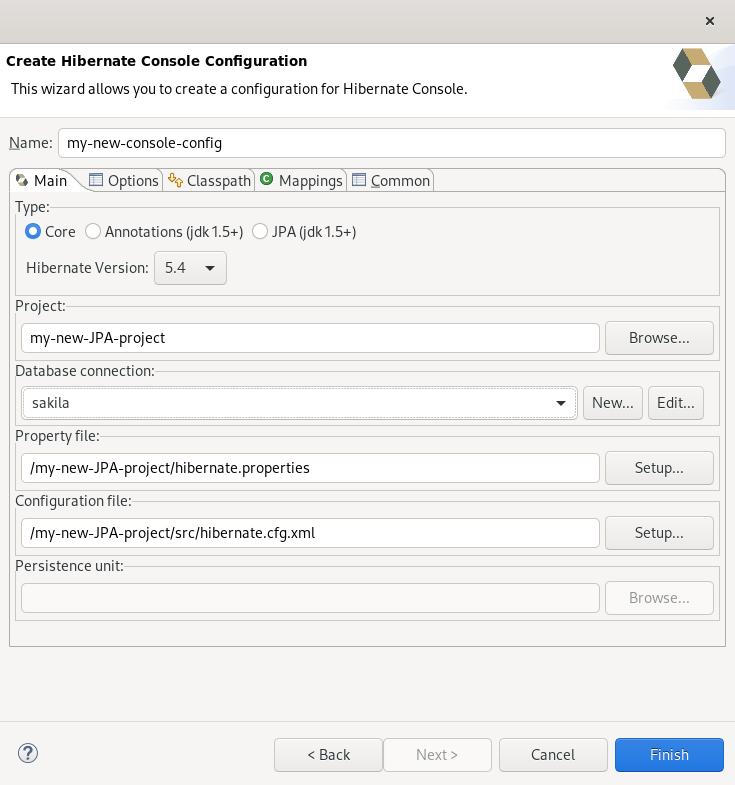
-
Set the database connection to
sakila. - Click .
7.7. Editing Hibernate project configurations
The following section describes how to edit configurations for your Hibernate project in CodeReady Studio.
Procedure
- Start CodeReady Studio.
Click → → .
The Show View window appears.
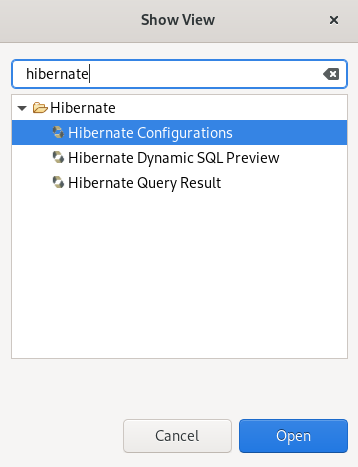
- Enter Hibernate in the search field.
- Select Hibernate Configurations.
Click .
The Hibernate Configurations view appears.
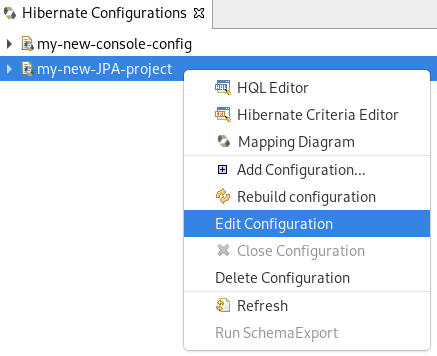
Right-click your → .
The Edit Configuration window appears.
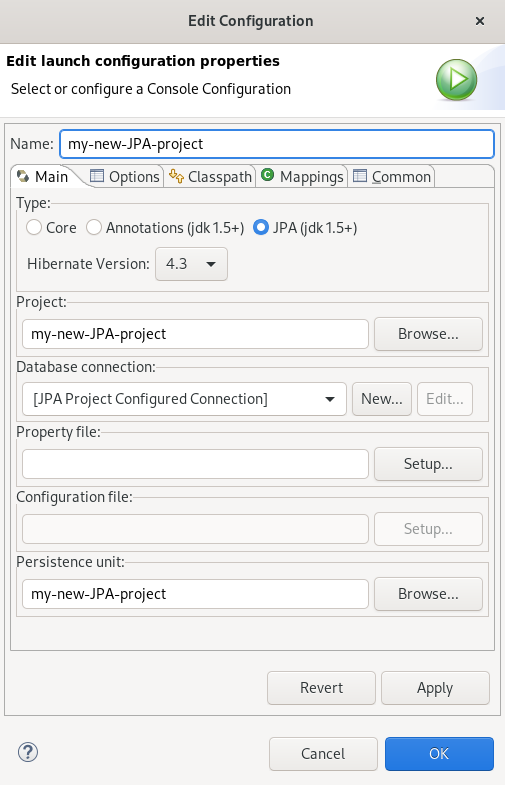
- Edit your configurations.
- Click .
- Click .
Chapter 8. Mobile Web Tools basics in CodeReady Studio
Mobile Web Tools provide an HTML5 Project wizard that enables you to create web applications optimized for mobile devices. The HTML5 Project wizard is a useful starting point for creating all new HTML5 web applications in CodeReady Studio. The wizard generates a sample ready-to-deploy HTML5 mobile application with REST resources from a Maven archetype.
You can customize the application using the built-in editor, and deploy and view the application with the built-in browser.
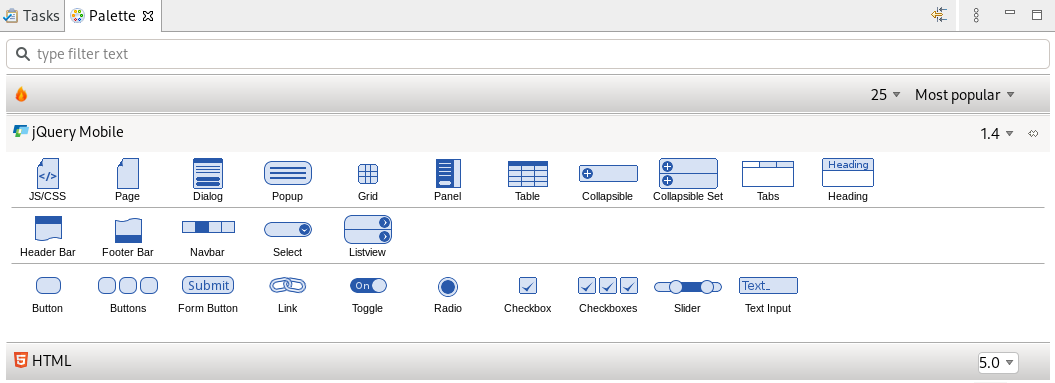
CodeReady Studio provides the Mobile Web palette that allows the user to make interactive web applications. This palette offers a wide range of features including drag-and-drop widgets for adding common web interface framework features such as HTML5, jQuery Mobile, and Ionic tags to html files. It also contains widgets like Panels, Pages, Lists, and Buttons to make your applications more user friendly and efficient.
8.1. Creating an HTML5 Project
The HTML5 Project wizard generates a sample project based on a Maven archetype and the project and application identifiers provided by you. The Maven archetype version is indicated in the Description field on the first page of the wizard. You can change the version, and therefore the project look and dependencies, by selecting either an enterprise or non-enterprise target runtime within the wizard.
The following section describes how to create an HTML5 project in CodeReady Studio.
Prerequisites
A configured server.
For information on configuring a local runtime server and deploying applications to it, see Section 3.1, “Configuring a local server”.
CodeReady Studio must be configured for any servers to which you want to deploy your application, including the location and type of the application server and any custom configuration or management settings.
Procedure
- Start CodeReady Studio.
Press Ctrl+N.
The Select a wizard window appears.

- Enter HTML5 in the search field.
- Select HTML5 Project.
Click .
The New Project Example window appears.

- Click the down-arrow in the Target Runtime field.
- Select your server.
- Click .
- Name your project and your package.
- Select the location for your project.
Click .
Note that it might take some time for the project to generate.
The New Project Example window appears.
- Click .
Your newly created project is now listed in the Project Explorer view.
8.2. Adding a new HTML5 jQuery mobile file
The HTML5 jQuery Mobile file template consists of JavaScript and CSS library references that are inserted in the file’s HTML header. The template also inserts a skeleton of the jQuery Mobile page and listview widgets in the file’s HTML body.
The following section describes how to add a new HTML5 jQuery Mobile file to an existing project.
Prerequisites
A configured server.
For information on configuring a local runtime server and deploying applications to it, see Section 3.1, “Configuring a local server”.
CodeReady Studio must be configured for any servers to which you want to deploy your application, including the location and type of the application server and any custom configuration or management settings.
Procedure
- Start CodeReady Studio.
Press Ctrl+N.
The Select a wizard window appears.
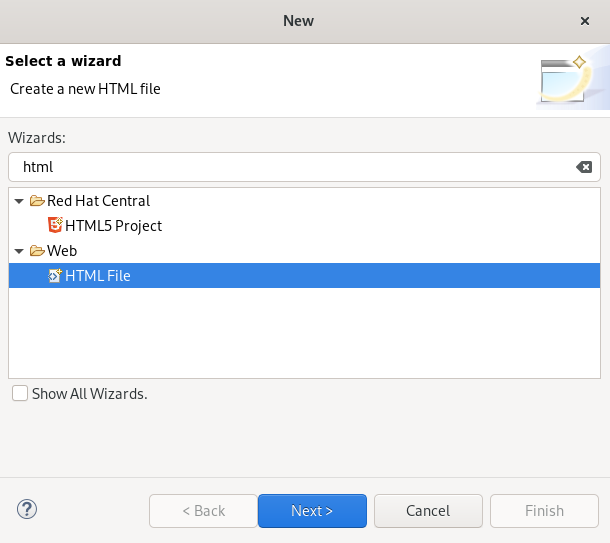
- Enter HTML in the search field.
- Select HTML File.
Click .
The New HTML File window appears.

- Select the location for your file.
- Name your file.
Click .
The Select HTML Template window appears.

- Select a template.
- Click .
The newly created HTML file is now displayed in the CodeReady Studio editor.
8.3. Adding a new mobile page
The following section describes how to add a new jQuery Mobile Page to an existing web application.
Prerequisites
An HTML5 project.
For more information on how to create an HTML5 project, see Section 8.1, “Creating an HTML5 Project”.
Procedure
- Start CodeReady Studio.
Click → → .
The Show View window appears.
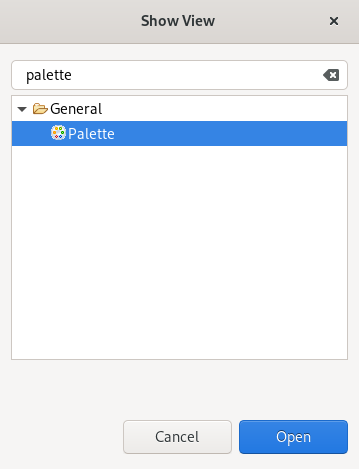
- Enter Palette in the search field.
- Select Palette.
Click .
The Palette view appears.
Click the Page icon.
The Insert Tag window appears.

- Name the Header.
- Name the Footer.
- Click .
Your newly added page is now displayed in the CodeReady Studio editor.
You can use the same workflow to customize the pages of your web application by selecting widgets from the Palette view.