
Chapter 3. Developing with Docker
3.1. Using Docker tooling in CodeReady Studio
The CodeReady Studio Docker tooling allows you to manage Docker Images and Containers. The Docker tooling functionality is the same as running the docker commands on the CLI. Docker tooling is the GUI-based interface of the Docker commands on the CLI.
3.1.1. Connecting to Docker Daemon
You must have a connection to a Docker daemon before you can work with Docker Images or Containers.
Installing Docker
Install Docker on your system. To install it on different platforms:
- On RHEL, use: https://docs.docker.com/install/linux/docker-ee/rhel/
Only Docker Enterprise Edition (Docker EE) is supported on Red Hat Enterprise Linux. For more information, go to https://success.docker.com/article/compatibility-matrix
- On Fedora, use: https://fedoraproject.org/wiki/Docker or https://docs.docker.com/engine/installation/
- On Windows, use: https://docs.docker.com/docker-for-windows/install/
- On MacOS, use: https://docs.docker.com/docker-for-mac/install/
For other platforms, go to https://docs.docker.com/
After you have installed Docker, grant the user permission to work with Docker by running the following commands as the root user:
# groupadd docker && sudo gpasswd -a ${USER} docker && sudo systemctl restart docker
# usermod -aG docker ${USER}
Where, {USER} is your username.
- Either restart the system or log out and log into the system again for the changes to take effect.
Setting up an account in the Docker tooling
You must set up the account in Docker tooling only if you want to push the images to the remote registry. If not, you may skip this section.
You must have an account set up in Docker Tooling. To do that:
In the IDE, click Window > Preferences > Docker > Registry Accounts.
Figure 3.1. Creating a New Registry Account
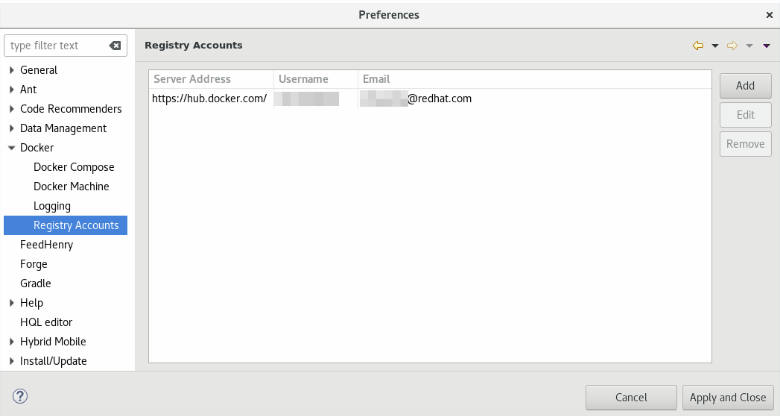
- Click to display the New Registry Account window.
In New Registry Account window:
- In the Server Address field, type https://hub.docker.com/ (in this example, we are using https://hub.docker.com/ as the Docker Registry).
- In the Username field, type the username that you use on hub.docker.com (if you don’t already have a Docker ID as yet, navigate to https://hub.docker.com/ and create one).
- In the Email field, type the email address that you used on https://hub.docker.com/.
- In the Password field, type the password for https://hub.docker.com/.
Click .
Figure 3.2. Entering Details for the New Registry Account
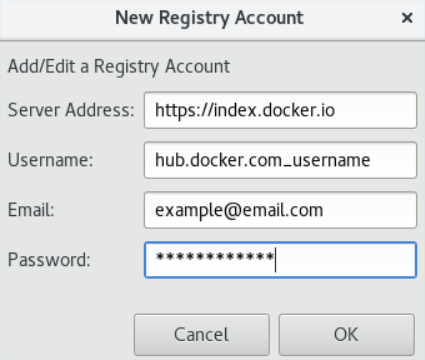
- The Preferences window shows the details that you just entered. Click .
3.1.1.1. Testing an existing Docker connection
You must be connected to a Docker daemon before you can manage Docker images or containers.
Procedure
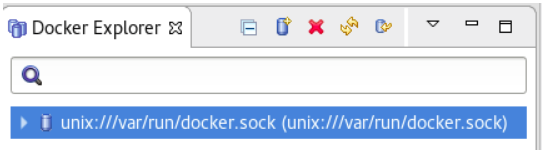
To display the Docker Explorer view, take the following steps:
- Click Window > Show View > Other (or click Window > Perspective > Open Perspective > Other and then click Docker Tooling).
In the type filter text field, type Docker and from the results click Docker Explorer. If you already have Docker installed on your system, the Unix socket location displays in the Docker Explorer view.
ImportantIn case the Unix socket does not appear, refer to the note in the Installing Docker section to grant user the permissions required to work with Docker.
Figure 3.3. Unix Socket Location Displayed in the Docker Explorer View
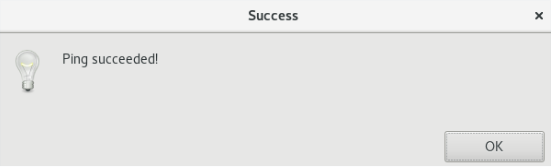
To test the connection:
- In the Docker Explorer view, right-click unix:///var/run/docker.sock and click to open the Edit Docker Connection window.
Click . The Ping succeeded! message confirms the connection.
Figure 3.4. The Ping succeeded! Message Confirming the Connection
 Note
NoteIn case your connection to the Docker daemon is lost, use the following two commands to restart the Docker daemon:
sudo systemctl start docker
sudo systemctl enable docker
3.1.1.2. Editing a Docker connection
Procedure
To edit a Docker connection, atke teh following steps:
- In the Docker Explorer view, right-click the connection and click . The Edit Docker Connection window opens.
- Click next to the Unix socket Location field to locate a new location of the Unix socket (or, check the TCP connection and add the URI).
After you have selected the new location, click and then click .
To filter the Docker Explorer view:
- In the Docker Explorer view, click the View Menu arrow and then click Filters and Customization.
Select the appropriate options to filter out the required images:
- Click the Dangling (untagged) images checkbox, to filter out images that are no longer referred to.
- Click the Intermediate images checkbox, to filter out the images that have no repo tags that are parents of named images.
- Click the Stopped containers checkbox, to filter out containers that are stopped but not paused.
- Click the Top-level images checkbox, to show the first repo tag for an Image with multiple tags. You have performed various management operations on your Docker container.
3.1.2. Managing Docker images
In this section you will work with the jboss/wildfly:11.0.0.Final image.
3.1.2.1. Pulling the jboss/wildfly:11.0.0.Final image
Procedure
To pull the jboss/wildfly:11.0.0.Final image, take the following steps:
- In the Docker Explorer view, expand the docker URL > Images.
- Right-click the Images folder and click Pull. The Pull Image window opens.
- In the Pull Image window, the Docker Hub registry is used by default. To specify an additional private registry, click the Add a registry account link.
- Click Search to display the Search and pull a Docker Image window.
In the Image field, type jboss/wildfly and press Enter
Figure 3.5. Searching for the jboss/wildfly Image
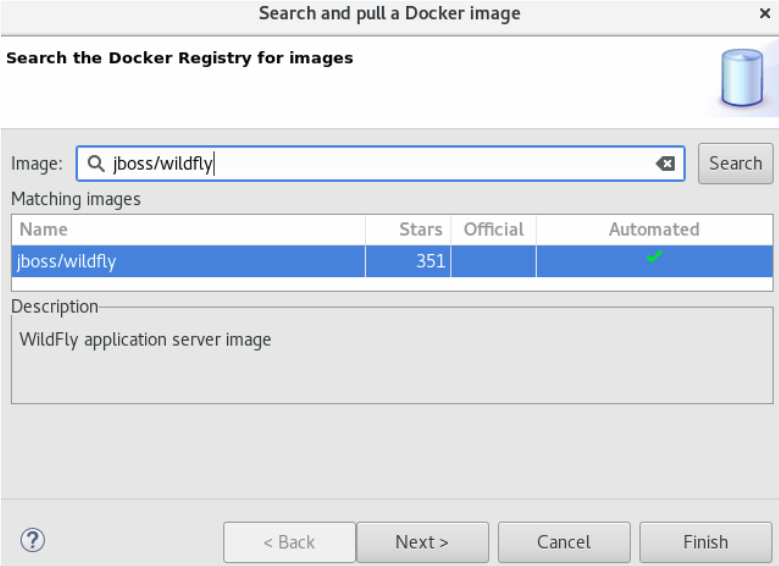
- Select the jboss/wildfly image and click .
- In the Choose a tag for the selected image window, locate and click 11.0.0.Final.
- Click . The Pull Image window, Image name field shows jboss/wildfly:11.0.0.Final.
- Click . The notification area in the IDE shows the progress of the image being pulled. Wait for the pull task to complete. This may take time because an Image may use several intermediate Images each of which may be several bytes.
In the Docker Explorer view, expand the docker URL > Images. The docker.io/jboss/wildfly:11.0.0.Final image is listed.
3.1.2.2. Pushing images
After you push an image to the Docker Registry or to your private registry, the image becomes available in the Docker Cloud. This image is then available for use by other developers.
Prerequisites
- Before you try to push, an Image it is important that you tag your Image.
To tag the Image, take the follwoing steps:
- In the Docker Explorer view, expand the docker URL > Images.
- Right-click the image name that you want to add a tag to. Click Add Tag.
In the Tag Image window:
- In the New Tag field, type docker_hub/<your_username_on_docker_hub>/<image tag>:<version> (here: docker.io/<your_username_on_docker_hub>/wildfly:11.0.0.Final).
- Click . The new image with the tag appears in the Images folder: docker.io/<your_username_on_docker_hub>/wildfly:11.0.0.Final.
Procedure
To push an Image, atke teh following steps:
- In the Docker Explorer view, expand the docker URL > Images.
- Right-click the image name that you want to Push. Click Push. The Push Image window opens.
- In the Registry account list, by default, the docker.io account appears. Change this to select the account that shows <your_dockerhub_username>@<dockerhub URL>.
- Ensure that the Image name list displays the name of the image that you want to push. If not, select the image name from the list.
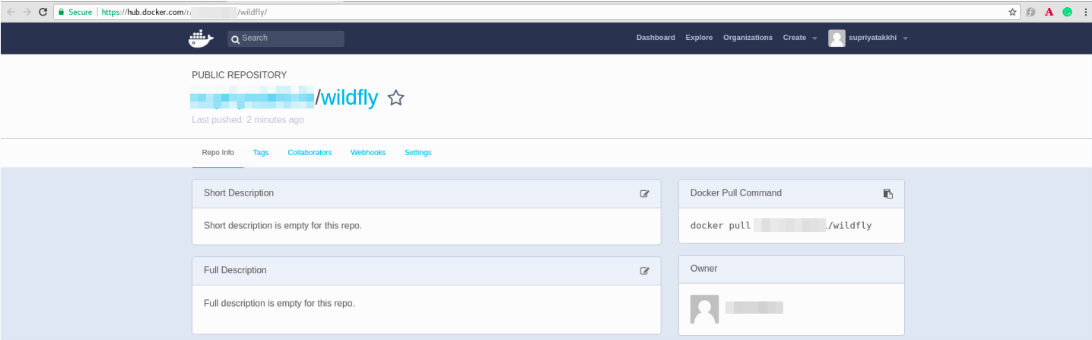
Click . The notification area in the IDE shows the progress of the image being pushed. Wait for the push task to complete. After it is complete, the pushed Image is available in your public repository at https://hub.docker.com/.
Figure 3.6. Pushed Image in the Public Repository
3.1.2.3. Running Image Launch Configuration
In this section you will use the Run Image wizard to create a Container based on an Image.
Procedure
To run an Image, take the following steps:
- In the Docker Explorer view, expand the docker URL > Images.
- Right-click the image name that you want to run (docker.io/<your_username_on_docker_hub>/wildfly:11.0.0.Final, in this case). Click Run.
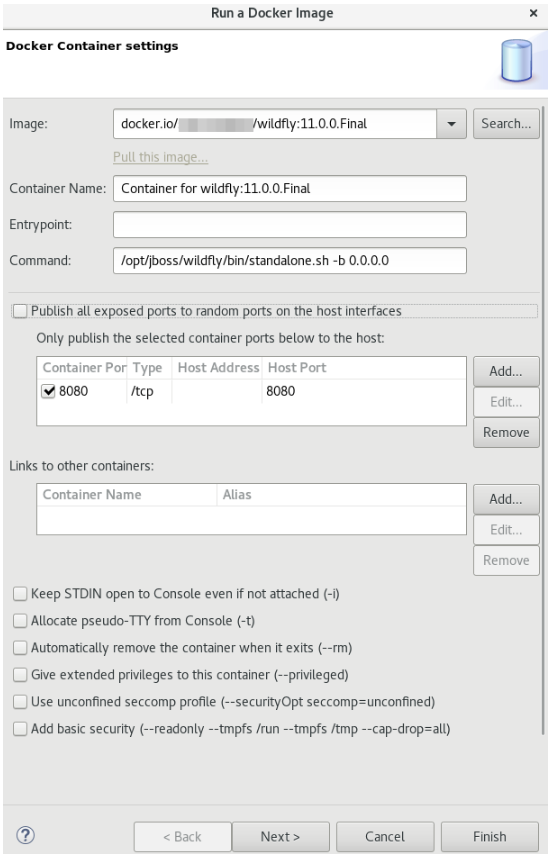
In the Run a Docker Image window:
- The Image field, by default, shows the name of the image you are running. To run an Image that is not currently loaded, type the Image name in this field.
- In the Container Name field, type a name for the container.
- Clear the Publish all exposed ports to random ports on the host interfaces check box.
Click .
Figure 3.7. Running the Image Launch Configuration
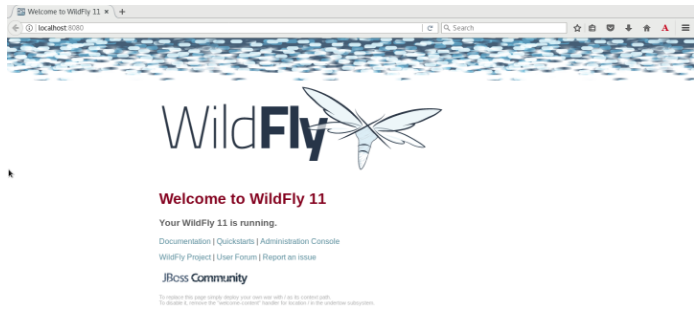
The Console view is the view in focus showing the progress of the task. The WildFly Full 11.0.0.Final (WildFly Core 3.0.8.Final) started in 3188ms - Started 292 of 553 services (347 services are lazy, passive or on-demand) message indicates that the image is started.
In the web browser navigate to http://localhost:8080/ to see the Image running.
Figure 3.8. Image Running on Localhost
3.1.2.4. Building images with Dockerfile
You can build an Image or create an Image by modifying an existing image. Typically, this involves installing new packages. The specification of the new Docker Image is done via a special file which must be named Dockerfile
Prerequisites
- You must have a Dockerfile created on your local machine.
Following is an example of a Dockerfile. You may use this sample file or have your own Dockerfile.
# Use latest jboss/base-jdk:8 image as the base
FROM jboss/base-jdk:8
# Set the WILDFLY_VERSION env variable
ENV WILDFLY_VERSION 11.0.0.Final
ENV WILDFLY_SHA1 0e89fe0860a87bfd6b09379ee38d743642edfcfb
ENV JBOSS_HOME /opt/jboss/wildfly
USER root
# Add the WildFly distribution to /opt, and make wildfly the owner of the extracted tar content
# Make sure the distribution is available from a well-known place
RUN cd $HOME \
	&& curl -O https://download.jboss.org/wildfly/$WILDFLY_VERSION/wildfly-$WILDFLY_VERSION.tar.gz \
	&& sha1sum wildfly-$WILDFLY_VERSION.tar.gz | grep $WILDFLY_SHA1 \
	&& tar xf wildfly-$WILDFLY_VERSION.tar.gz \
	&& mv $HOME/wildfly-$WILDFLY_VERSION $JBOSS_HOME \
	&& rm wildfly-$WILDFLY_VERSION.tar.gz \
	&& chown -R jboss:0 ${JBOSS_HOME} \
	&& chmod -R g+rw ${JBOSS_HOME}
# Ensure signals are forwarded to the JVM process correctly for graceful shutdown
ENV LAUNCH_JBOSS_IN_BACKGROUND true
USER jboss
# Expose the ports we're interested in
EXPOSE 8080
# Set the default command to run on boot
# This will boot WildFly in the standalone mode and bind to all interface
CMD ["/opt/jboss/wildfly/bin/standalone.sh", "-b", "0.0.0.0"]
Procedure
To build an image, take the following steps:
- Open the Docker Images view by clicking → → → .
- Click the Build Image icon (image::docker_build_image_icon.png[width=25px]).
In the Build a Docker Image window:
- In the Image Name field, type a new name for the Image in the repo/name:version format (mydockerrepo/wildfly:11.0.0.Final, in this case).
- Click next to the Directory field to locate and select the Dockerfile.
- Click . The Console view is the view in focus showing the progress of the image being built. The Successfully built <image_ID> message shows that the image has been built successfully.
3.1.2.5. Working with image tags
Tags are additional names for images. They are usually in the following format: docker_hub/<your_username_on_docker_hub>/<image tag>:<version>.
3.1.2.5.1. Adding tags to images
Procedure
To add a tag to an image, take the following steps:
- In the Docker Explorer view, right-click the image name that you want to add a tag to and, from the context menu, click Add Tag.
In the Tag Image window:
- In the New Tag field, type docker_hub/<your_username_on_docker_hub>/<image tag>:<version> (in this case, docker.io/<your_username_on_docker_hub>/wildfly:11.0.0.Final).
- Click .
3.1.2.5.2. Removing tags for images
Procedure
To remove a tag, take the following steps:
- In the Docker Explorer view, right-click the image name that you want to remove the tag for.
- From the context menu, click Remove Tag.
In the Remove Image Tag window:
- Ensure that the Tag field, shows the name of the image that you want to remove the tag for. If not, select the appropriate image from the list.
- Click . The image is no longer listed in the Docker Explorer view.
3.1.3. Managing Docker Containers
Docker containers are isolated processes that are based on Docker Images. Once created, users can stop, start, pause, unpause, kill, or remove the containers, or read their logs. To manage the Docker Containers:
Procedure
- Click → → .
- In the filter text field, type Docker to view Docker-related options in the list.
- Expand Docker and double-click Docker Containers. The Docker Containers view appears displaying a list of all containers running on the Docker host.
Click the desired container to select it. You can now manage your containers using the buttons in the Docker Container view header:
- To pause the container, click .
- To start the container, click .
- To view the container logs, right-click the container name and click Display Log.
- To view a list of all containers, click on the right-most icon in the list of icons in the view, which displays a drop-down option to view all containers. Click this option to view all available containers.
3.1.4. Working with docker-compose.yml files
You can use a docker-compose.yml file and start Docker Compose from the context menu of a project in the Project Explorer view. The docker-compose.yml file contains the configuration that is applied to each container started for a service. Docker Compose is a tool for running applications composed from containers.
Prerequisites
- Install Docker Compose: For instruction, see https://docs.docker.com/compose/install/.
-
Set up Docker Compose in CodeReady Studio: Navigate to → → → . In the Docker Compose field, select the location where Docker Compose is installed (usually,
/usr/local/bin). Click .
3.1.4.1. Creating the docker-compose project
Procedure
To create the docker-compose project, take the follwoing steps:
- In the IDE, click → → .
- In the New Project wizard, click General > Project. Click .
- In the Project name field, type docker-compose and click . The new docker-compose project is listed in the Project Explorer view.
3.1.4.2. Creating the required files in the docker-compose project
In this section you will create the files required to run the docker-compose build.
Procedure
To create the files in the docker-compose project, take the following steps:
- In the Project Explorer view, right-click docker-compose and click New > File.
- In the New File window, File name field, type Dockerfile and click . The Dockerfile opens in the default editor.
In the Dockerfile, copy and paste the following content and save the file.
1FROM python:3.4-alpine
2ADD . /code
3WORKDIR /code
4RUN pip install -r requirements.txt
5CMD ["python", "app.py"]
- In the Project Explorer view, right-click docker-compose and click New > File.
-
In the New File window, File name field, type app.py and click The
app.pyfile opens in the default editor. In the
app.pyfile, copy and paste the following content and save the file.from flask import Flask from redis import Redis app = Flask(__name__) redis = Redis(host='redis', port=6379) @app.route('/') def hello(): count = redis.incr('hits') return 'Hello World! I have been seen {} times.\n'.format(count) if __name__ == "__main__": app.run(host="0.0.0.0", debug=True)- In the Project Explorer view, right-click docker-compose and click New > File.
-
In the New File window, File name field, type d_ocker-compose.yml_ and click . The
docker-compose.ymlfile opens in the default editor. In the
docker-compose.ymlfile, copy and paste the following content and save the file.ImportantThe indentation for the following file must be retained as shown here. If not retained, the
docker-compose.ymlfile will have errors and will not build.version: '3' services: web: build: . ports: - "5000:5000" redis: image: "redis:alpine"- In the Project Explorer view, right-click docker-compose and click New > File.
-
In the New File window, File name field, type requirements.txt and click . The
requirements.txtfile opens in the default editor. In the
requirements.txtfile, copy and paste the following content and save the file.1 | flask 2 | redis
= Building the docker-compose project
Procedure
To build the docker-compose project:
- In the Project Explorer view, expand the docker-compose project.
Right-click the
docker-compose.ymlfile, click Run As > Docker Compose. The Console view is the view in focus showing the progress of the of the image being pulled.Figure 3.9. Console View Showing Progress of the Image Being Pulled
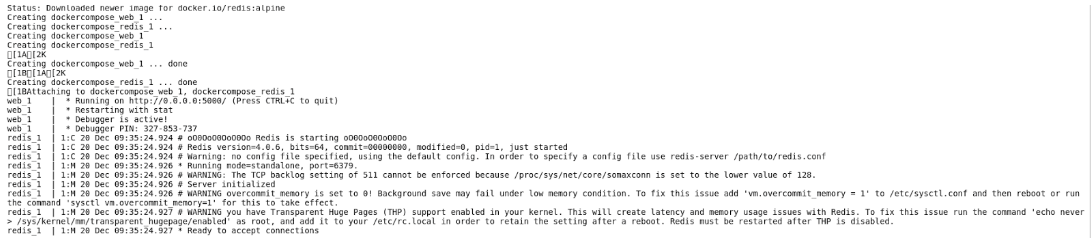
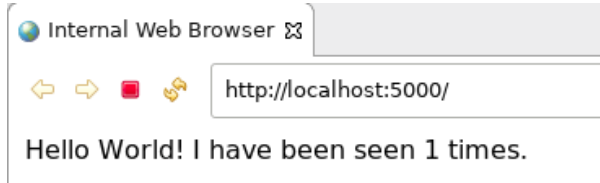
The Docker Explorer view shows the containers running. Navigate to localhost:5000 to see the application running.
Figure 3.10. Application Running on Localhost
3.1.5. Troubleshooting
Procedure
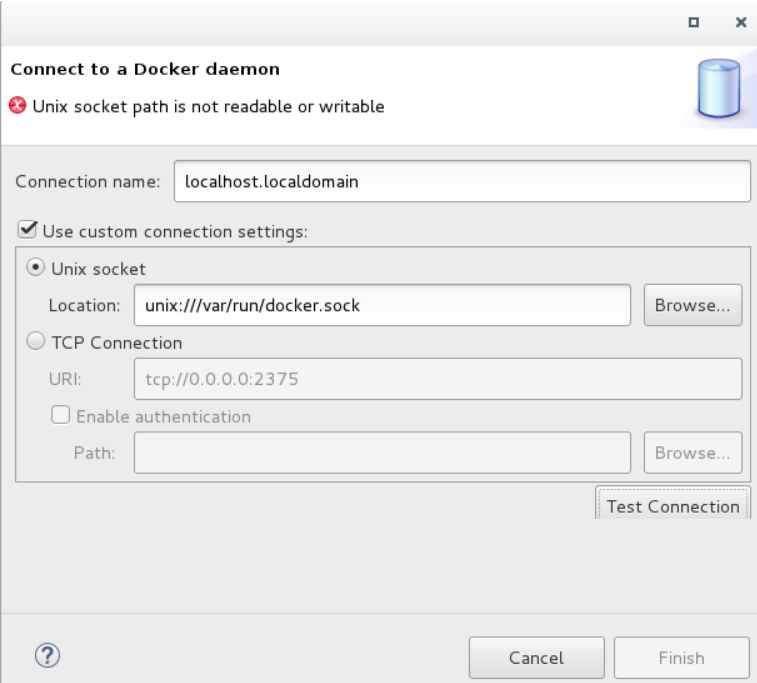
Attempting to connect to a running local Docker instance as a non-root user results in errors being logged, but not displayed in the User Interface, which results in the error being non-obvious. The following workarounds are available for this problem:
Connect to the Docker instance manually. Define a custom configuration file and specify the TCP URL displayed by the systemctl status docker service. As an example, you can use a TCP URL such as tcp://0.0.0.0:2375 to connect to the running Docker instance instead of the default unix:///var/run/docker.sock configuration file.
Figure 3.11. Error while Connection to Docker Daemon
- Run Eclipse as root. This solution avoids the problem but is not the recommended solution.