
6.2. Revoking Certificates
6.2.1. Performing a CMC Revocation
Similar to Certificate Management over CMS (CMC) enrollment, CMC revocation enables users to set up a revocation client, and sign the revocation request with either an agent certificate or a user certificate with a matching
subjectDN attribute. Then the user can send the signed request to the Certificate Manager.
Alternatively, CMC revocation can also be authenticated using the Shared Secret Token mechanism. For details, see Section 8.1.3, “CMC SharedSecret Authentication”.
Regardless of whether a user or agent signs the request or if a Shared Secret Token is used, the Certificate Manager automatically revokes the certificate when it receives a valid revocation request.
Certificate System provides the following utilities for CMC revocation requests:
CMCRequest. For details, see Section 6.2.1.1, “Revoking a Certificate UsingCMCRequest”.CMCRevoke. For details, see Section 6.2.1.2, “Revoking a Certificate UsingCMCRevoke”.
Important
Red Hat recommends using the
CMCRequest utility to generate CMC revocation requests, because it provides more options than CMCRevoke.
6.2.1.1. Revoking a Certificate Using CMCRequest
To revoke a certificate using
CMCRequest:
- Create a configuration file for the CMC revocation request, such as
/home/user_name/cmc-request.cfg, with the following content:#numRequests: Total number of PKCS10 requests or CRMF requests. numRequests=1 #output: full path for the CMC request in binary format output=/home/user_name/cmc.revoke.userSigned.req #tokenname: name of token where user signing cert can be found #(default is internal) tokenname=internal #nickname: nickname for user signing certificate which will be used #to sign the CMC full request. nickname=signer_user_certificate #dbdir: directory for cert8.db, key3.db and secmod.db dbdir=/home/user_name/.dogtag/nssdb/ #password: password for cert8.db which stores the user signing #certificate and keys password=myPass #format: request format, either pkcs10 or crmf. format=pkcs10 ## revocation parameters revRequest.enable=true revRequest.serial=45 revRequest.reason=unspecified revRequest.comment=user test revocation revRequest.issuer=issuer revRequest.sharedSecret=shared_secret
- Create the CMC request:
# CMCRequest /home/user_name/cmc-request.cfg
If the command succeeds, theCMCRequestutility stores the CMC request in the file specified in theoutputparameter in the request configuration file. - Create a configuration file, such as
/home/user_name/cmc-submit.cfg, which you use in a later step to submit the CMC revocation request to the CA. Add the following content to the created file:#host: host name for the http server host=>server.example.com #port: port number port=8443 #secure: true for secure connection, false for nonsecure connection secure=true #input: full path for the enrollment request, the content must be #in binary format input=/home/user_name/cmc.revoke.userSigned.req #output: full path for the response in binary format output=/home/user_name/cmc.revoke.userSigned.resp #tokenname: name of token where TLS client authentication certificate #can be found (default is internal) #This parameter will be ignored if secure=false tokenname=internal #dbdir: directory for cert8.db, key3.db and secmod.db #This parameter will be ignored if secure=false dbdir=/home/user_name/.dogtag/nssdb/ #clientmode: true for client authentication, false for no client #authentication. This parameter will be ignored if secure=false clientmode=true #password: password for cert8.db #This parameter will be ignored if secure=false and clientauth=false password=password #nickname: nickname for client certificate #This parameter will be ignored if clientmode=false nickname=signer_user_certificate
Important
If the CMC revocation request is signed, set thesecureandclientmodeparameters totrueand, additionally, fill thenicknameparameter. - Depending on who signed the request, the
servletparameter in the configuration file forHttpClientmust be set accordingly:- If an agent signed the request, set:
servlet=/ca/ee/ca/profileSubmitCMCFull
- If a user signed the request, set:
servlet=/ca/ee/ca/profileSubmitUserSignedCMCFull
- Submit the CMC request:
# HttpClient /home/user_name/cmc-submit.cfg
For further details about revoking a certificate using
CMCRequest, see the CMCRequest(1) man page.
6.2.1.2. Revoking a Certificate Using CMCRevoke
The CMC revocation utility,
CMCRevoke, is used to sign a revocation request with an agent's certificate. This utility simply passes the required information — certificate serial number, issuer name, and revocation reason — to identify the certificate to revoke, and then the require information to identify the CA agent performing the revocation (certificate nickname and the database with the certificate).
Important
Using
CMCRevoke requires that the CA administrator followed the instructions specified in the Enabling CMCRevoke for the Web User Interface section in the Red Hat Certificate System 9 Planning, Installation and Deployment Guide (Common Criteria Edition) during the installation.
The reason the certificate is being revoked can be any of the following (with the number being the value passed to the
CMCRevoke utility):
0— unspecified1— the key was compromised2— the CA key was compromised3— the employee's affiliation changed4— the certificate has been superseded5— cessation of operation6— the certificate is on hold
The available tool arguments are described in detail in the Command-Line Tools Guide.
6.2.1.2.1. Testing CMCRevoke
- Create a CMC revocation request for an existing certificate.
CMCRevoke -d/path/to/agent-cert-db -nnickname -iissuerName -sserialName -mreason -ccomment
For example, if the directory containing the agent certificate is~jsmith/.mozilla/firefox/, the nickname of the certificate isAgentCert, and the serial number of the certificate is22, the command is as shown:CMCRevoke -d"~jsmith/.mozilla/firefox/" -n"ManagerAgentCert" -i"cn=agentAuthMgr" -s22 -m0 -c"test comment"
Note
Surround values that include spaces in quotation marks.Important
Do not have a space between the argument and its value. For example, giving a serial number of 26 is-s26, not-s 26. - Open the end-entities page.
http
s://server.example.com:8443/ca/ee/ca - Select the Revocation tab.
- Select the CMC Revoke link on the menu.
- Paste the output from the
CMCRevokeinto the text area. - Remove
-----BEGIN NEW CERTIFICATE REQUEST-----and----END NEW CERTIFICATE REQUEST-----from the pasted content. - Click .
- The returned page should confirm that correct certificate has been revoked.
6.2.2. Performing Revocation as an Agent from the Web UI
A Certificate Manager agent can use the agent services page to find a specific certificate issued by the Certificate System or to retrieve a list of certificates that match specified criteria. The certificates which are retrieved can be examined or revoked by the agent. The Certificate Manager agent can also manage the certificate revocation list (CRL).
6.2.2.1. Listing Certificates
It is possible to list certificates within a range of serial numbers. All certificates within the range may be displayed or, if the agent selects, only those that are currently valid.
To find a specific certificate or to list certificates by serial number:
- Open the Certificate Manager agent services page.
- Click List Certificates.
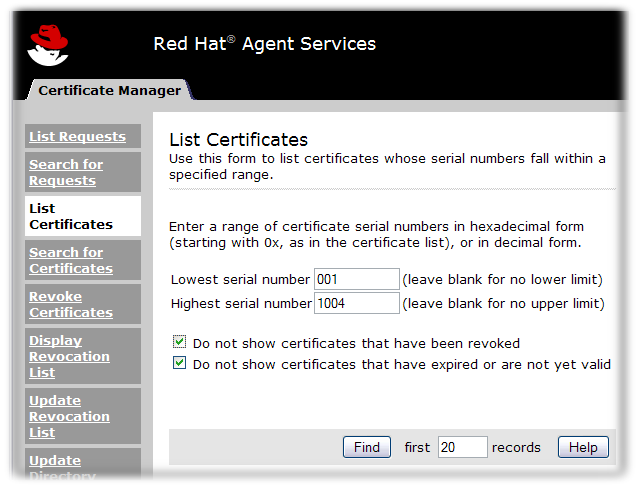
Figure 6.1. List Certificates
- To find a certificate with a specific serial number, enter the serial number in both the upper limit and lower limit fields of the List Certificates form, in either decimal or hexadecimal form. Use
0xto indicate the beginning of a hexadecimal number; for example,0x00000006. Serial numbers are displayed in hexadecimal form in the Search Results and Details pages. - To find all certificates within a range of serial numbers, enter the upper and lower limits of the serial number range in decimal or hexadecimal form.
Leaving either the lower limit or upper limit field blank displays the certificate with the specified number, plus all certificates before or after it in sequence. - To limit the returned list to valid certificates, select the check boxes labeled with filtering methods. It is possible to include revoked certificates, to include expired certificates or certificates that are not yet valid, or to display only valid certificates.
- Enter the maximum number of certificates matching the criteria that should be returned in the results page.When any number is entered, the first certificates up to that number matching the criteria are displayed.
- Click .The Certificate System displays a list of the certificates that match the search criteria. Select a certificate in the list to examine it in more detail or perform various operations on it. For more information, refer to Section 6.2.2.3, “Examining Certificate Details”.
6.2.2.2. Searching for Certificates (Advanced)
Search for certificates by more complex criteria than serial number using the advanced search form. To perform an advanced search for certificates:
- Open the Certificate Manager agent services page. The agent must submit the proper client certificate to access this page.
- Click Search for Certificates to display the Search for Certificates form to specify search criteria.

- To search by particular criteria, use one or more of the sections of the Search for Certificates form. To use a section, select the check box, then fill in any necessary information.
- Serial Number Range. Finds a certificate with a specific serial number or lists all certificates within a range of serial numbers.
- To find a certificate with a specific serial number, enter the serial number in both the upper limit and lower limit fields in either decimal or hexadecimal. Use
0xto indicate the beginning of a hexadecimal number, such as0x2A. Serial numbers are displayed in hexadecimal form in the Search Results and Details pages. - To find all certificates within a range of serial numbers, enter the upper and lower limits of the serial number range in decimal or hexadecimal. Leaving either the lower limit or upper limit field blank returns all certificates before or after the number specified.
- Status. Selects certificates by their status. A certificate has one of the following status codes:
- Valid. A valid certificate has been issued, its validity period has begun but not ended, and it has not been revoked.
- Invalid. An invalid certificate has been issued, but its validity period has not yet begun.
- Revoked. The certificate has been revoked.
- Expired. An expired certificate has passed the end of its validity period.
- Revoked and Expired. The certificate has passed its validity period and been revoked.
- Subject Name. Lists certificates belonging to a particular owner; it is possible to use wildcards in this field.
Note
Certificate System certificate request forms support all UTF-8 characters for the common name, organizational unit, and requester name fields. The common name and organization unit fields are included in the subject name of the certificate. This means that the searches for subject names support UTF-8 characters.This support does not include supporting internationalized domain names. - Revocation Information. Lists certificates that have been revoked during a particular period, by a particular agent, or for a particular reason. For example, an agent can list all certificates revoked between July 2005 and April 2006 or all certificates revoked by the agent with the username
admin.- To list certificates revoked within a time period, select the day, month, and year from the drop-down lists to identify the beginning and end of the period.
- To list certificates revoked by a particular agent, enter the name of the agent; it is possible to use wildcards in this field.
- To list certificates revoked for a specific reason, select the revocation reasons from the list.
- Issuing Information. Lists certificates that have been issued during a particular period or by a particular agent. For example, an agent can list all certificates issued between July 2005 and April 2006 or all certificates issued by the agent with the username
jsmith.- To list certificates issued within a time period, select the day, month, and year from the drop-down lists to identify the beginning and end of the period.
- To list certificates issued by a particular agent, enter the name of the agent; it is possible to use wildcards in this field.
- To list certificates enrolled through a specific profile, enter the name of the profile.
- Dates of Validity. List certificates that become effective or expire during a particular period. For example, an agent can list all certificates that became valid on June 1, 2003, or that expired between January 1, 2006, and June 1, 2006.It is also possible to list certificates that have a validity period of a certain length of time, such as all certificates that are valid for less than one month.
- To list certificates that become effective or expire within a time period, select the day, month, and year from the drop-down lists to identify the beginning and end of the period.
- To list certificates that have a validity period of a certain length in time, select or from the drop-down list, enter a number, and select a time unit from the drop-down list: days, weeks, months, or years.
- Basic Constraints. Shows CA certificates that are based on the Basic Constraints extension.
- Type. Lists certain types of certificates, such as all certificates for subordinate CAs. This search works only for certificates containing the Netscape Certificate Type extension, which stores type information. For each type, choose from the drop-down list to find certificates where that type is , , or .
- To find a certificate with a specific subject name, use the Subject Name section. Select the check box, then enter the subject name criteria. Enter values for the included search criteria and leave the others blank.The standard tags or components are as follows:
- Email address. Narrows the search by email address.
- Common name. Finds certificates associated with a specific person or server.
- UserID. Searches certificates by the user ID for the person to whom the certificate belongs.
- Organization unit. Narrows the search to a specific division, department, or unit within an organization.
- Organization. Narrows the search by organization.
- Locality. Narrows the search by locality, such as the city.
- State. Narrows the search by state or province.
- Country. Narrows the search by country; use the two-letter country code, such as
US.
Note
Certificate System certificate request forms support all UTF-8 characters for the common name and organizational unit fields. The common name and organization unit fields are included in the subject name of the certificate. This means that the searches for subject names or those elements in the subject name support UTF-8 characters.This support does not include supporting internationalized domain names, such as in email addresses. - After entering the field values for the server to match, specify the type of search to perform:
- Exact searches for certificate subject names match the exact components specified and contain none of the components left blank. Wildcards cannot be used in this type of search.
- Partial searches for certificate subject names match the specified components, but the returned certificates may also contain values in components that were left blank. Wildcard patterns can be used in this type of search by using a question mark (
?) to match an arbitrary single character and an asterisk (*) to match an arbitrary string of characters.Note
Placing a single asterisk in a search field means that the component must be in the certificate's subject name but may have any value. Leave the field blank if it does not matter if the field is present.
- After entering the search criteria, scroll to the bottom of the form, and enter the number of certificates matching the specified criteria that should be returned.Setting the number of certificates to be returned returns the first certificates found that match the search criteria up to that number. It is also possible to put a time limit on the search in seconds.
- Click .
- The Search Results form appears, showing a list of the certificates that match the search criteria. Select a certificate in the list to examine it in more detail. For more information, refer to Section 6.2.2.3, “Examining Certificate Details”.

6.2.2.3. Examining Certificate Details
- On the agent services page, click List Certificates or Search for Certificates, specify search criteria, and click to display a list of certificates.
- On the Search Results form, select a certificate to examine.If the desired certificate is not shown, scroll to the bottom of the list, specify an additional number of certificates to be returned, and click . The system displays the next certificates up to that number that match the original search criteria.
- After selecting a certificate, click the button at the left side of its entry.
- The Certificate page shows the detailed contents of the selected certificate and instructions for installing the certificate in a server or in a web browser.
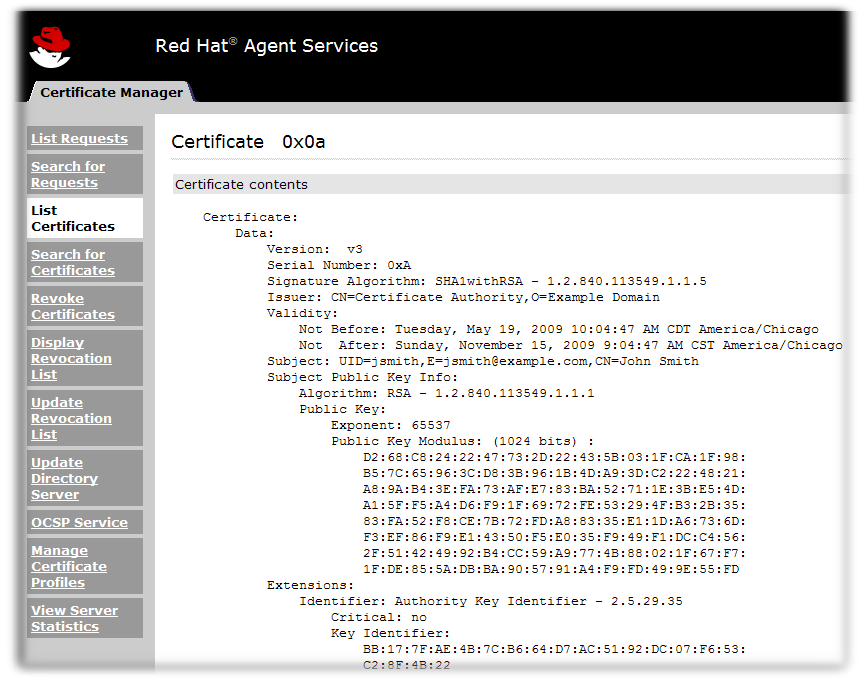
Figure 6.2. Certificate Details
- The certificate is shown in base-64 encoded form at the bottom of the Certificate page, under the heading Installing this certificate in a server.
6.2.2.4. Revoking Certificates
Only Certificate Manager agents can revoke certificates other than their own. A certificate must be revoked if one of the following situations occurs:
These two reasons are not the only ones why a certificate would need revoked; there are six reasons available for revoking a certificate.
- The owner of the certificate has changed status and no longer has the right to use the certificate.
- The private key of a certificate owner has been compromised.
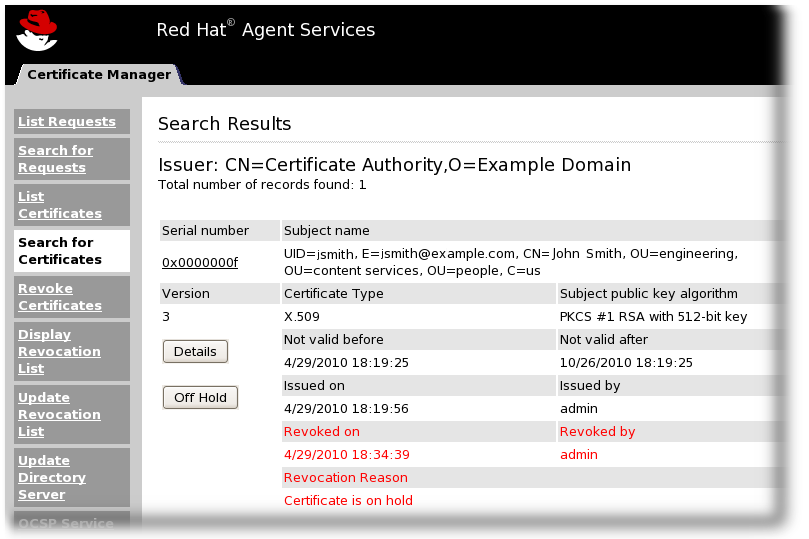
To revoke one or more certificates, search for the certificates to revoke using the button. While the search is similar to the one through the Search for Certificates form, the Search Results form returned by this search offers the option of revoking one or all of the returned certificates.
6.2.2.4.1. Revoking Certificates
- Open the Certificate Manager agent services page.
- Click .
Note
The search form that appears has the same search criteria sections as the Search for Certificates form. - Specify the search criteria by selecting the check boxes for the sections and filling in the required information.
- Scroll to the bottom of the form, and set the number of matching certificates to display.
- Click .
- The search returns a list of matching certificates. It is possible to revoke one or all certificates in the list.

Note
If the search criteria are very specific and all of the certificates returned are to be revoked, then click the button at the bottom of the page. The number shown on the button is the total number of certificates returned by the search. This is usually a larger number than the number of certificates displayed on the current page.Verify that all of the certificates returned by the search should be revoked, not only those displayed on the current page. - Click the button next to the certificate to be revoked.
Warning
Whether revoking a single certificate or a list of certificates, be extremely careful that the correct certificate has been selected or that the list contains only certificates which should be revoked. Once a revocation operation has been confirmed, there is no way to undo it. - Select an invalidity date. The invalidity date is the date which it is known or suspected that the user's private key was compromised or that the certificate became invalid. A set of drop down lists allows the agent to select the correct invalidity date.
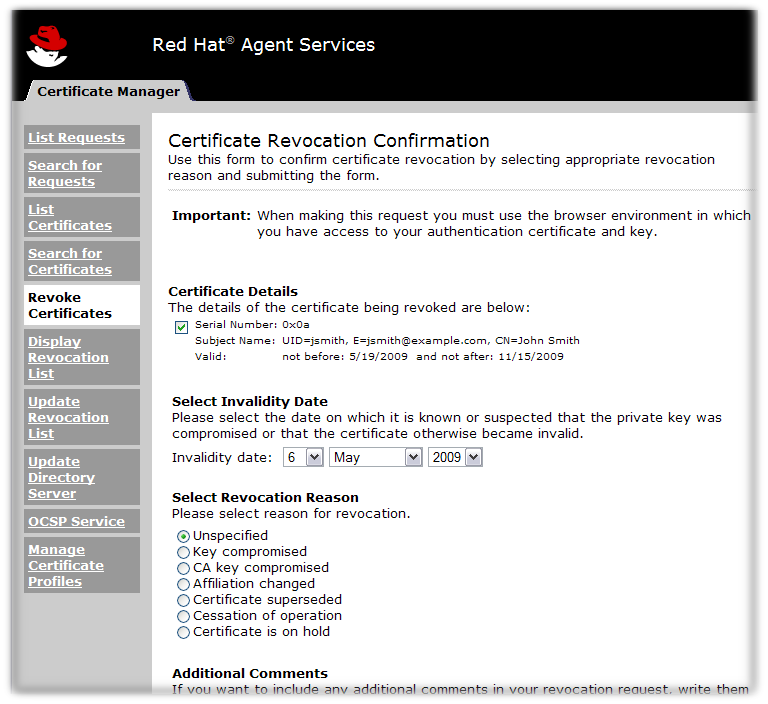
- Select a reason for the revocation.
- Key compromised
- CA key compromised
- Affiliation changed
- Certificate superseded
- Cessation of operation
- Certificate is on hold
- Enter any additional comment. The comment is included in the revocation request.
When the revocation request is submitted, it is automatically approved, and the certificate is revoked. Revocation requests are viewed by listing requests with a status of
Completed.
6.2.2.4.2. Taking Ceritificates Off Hold
There can be instances when a certificate is inaccessible, and therefore should be treated as revoked, but that certificate can be recovered. For example, a user may have a personal email certificate stored on a flash drive which he accidentally leaves at home. The certificate is not compromised, but it should be temporarily suspended.
That certificate can be temporarily revoked by putting it on hold (one of the options given when revoking a certificate, as in Section 6.2.2.4.1, “Revoking Certificates”). At a later time — such as when the forgotten flash drive is picked up — that certificate can be taken off hold and is again active.
- Search for the on hold certificate, as in Section 6.2.2.2, “Searching for Certificates (Advanced)”. Scroll to the Revocation Information section, and set the Certificate is on hold revocation reason as the search criterion.

- In the results list, click the button by the certificate to take off hold.
6.2.2.5. Managing the Certificate Revocation List
Revoking a certificate notifies other users that the certificate is no longer valid. This notification is done by publishing a list of the revoked certificates, called the certificate revocation list (CRL), to an LDAP directory or to a flat file. This list is publicly available and ensures that revoked certificates are not misused.
6.2.2.5.1. Viewing or Examining CRLs
It may be necessary to view or examine a CRL, such as before manually updating a directory with the latest CRL. To view or display the CRL:
- Go to the Certificate Manager agent services page.
- Click Display Certificate Revocation List to display the form for viewing the CRL.
- Select the CRL to view. If the administrator has created multiple issuing points, these are listed in the drop-down list. Otherwise, only the master CRL is shown.
- Choose how to display the CRL by selecting one of the options from the menu. The choices on this menu are as follows:
- Cached CRL. Views the CRL from the cache rather than from the CRL itself. This option displays results faster than viewing the entire CRL.
- Entire CRL. Retrieves and displays the entire CRL.
- CRL header. Retrieves and displays the CRL header only.
- Base 64 Encoded. Retrieves and displays the CRL in base-64 encoded format.
- Delta CRL. Retrieves and displays a delta CRL, which is a subset of the CRL showing only new revocations since the last CRL was published. This option is available only if delta CRL generation is enabled.
- To examine the selected CRL, click .The CRL appears in the browser window. This allows the agent to check whether a particular certificate (by its serial number) appears in the list and to note recent changes such as the total number of certificates revoked since the last update, the total number of certificates taken off hold since the last update, and the total number of certificates that expired since the last update.
6.2.2.5.2. Updating the CRL
CRLs can be automatically updated if a schedule for automatic CRL generation is enabled, and the schedule can set the CRL to be generated at set time schedules or whenever there are certificate revocations.
Likewise, CRLs can be also automatically published if CRL publishing is enabled.
In some cases, the CRL may need to be updated manually, such as updating the list after the system has been down or removing expired certificates to reduce the file size. (Expired certificates do not need to be included in the CRL because they are already invalid because of the expiration date.) Only a Certificate Manager agent can manually update the CRL.
To update the CRL manually:
- Open the Certificate Manager agent services page.
- Click Update Revocation List to display the form for updating the CRL.

Figure 6.3. Update Certificate Revocation List
- Select the CRL issuing point which will update the CRL. There can be multiple issuing points configured for a single CA.
- Select the algorithm to use to sign the new CRL. Before choosing an algorithm, make sure that any system or network applications that need to read or view this CRL support the algorithm.
- SHA-256 with RSA.
- SHA-384 with RSA.
- SHA-512 with RSA.
Before selecting an algorithm, make sure that the Certificate System has that algorithm enabled. The Certificate System administrator will have that information. - Click to update the CRL with the latest certificate revocation information.
6.2.3. Performing Revocation on Own Certificate as a User Using the Web UI
Revoking a certificate invalidates it before its expiration date. This can be necessary if a certificate is lost, compromised, or no longer needed.
6.2.3.1. Revoking Your User Certificate
- Click the Revocation tab.
- Click the User Certificate link.
- Select the reason why the certificate is being revoked, and click .

- Select the certificates to revoke from the list.
6.2.3.2. Checking Whether a Certificate Is Revoked
- Click the Retrieval tab.
- Click the Import Certificate Revocation List link.
- Select the radio button by Check whether the following certificate is included in CRL cache or Check whether the following certificate is listed by CRL, and enter the serial number of the certificate.

- Click the Submit button.A message is returned either saying that the certificate is not listed in any CRL or giving the information for the CRL which contains the certificate.
6.2.3.3. Downloading and Importing CRLs
Certificate revocation lists (CRLs) can be downloaded and installed in a web client, application, or machine. They can also be viewed to see what certificates have been revoked.
- Click the Retrieval tab.
- Click the Import Certificate Revocation List link.
- Select the radio button to view, download, or import the CRL.
- To import the CRL into the browser or download and save it, select the appropriate radio button. There are two options: to download/import the full CRL or the delta CRL. The delta CRL only imports/downloads the list of certificates which have been revoked since the last time the CRL was generated.
- To view the CRL, select Display the CRL information and select which CRL subset (called an issuing point) to view. This shows the CRL information, including the number of certificates included in it.

- Click the button.
- Save the file or approve the import operation.