
2.3. Graphical Interface
pkiconsole is a graphical interface that is designed for users with the Administrator role privilege to manage the subsystem itself. This includes adding users, configuring logs, managing profiles and plug-ins, and the internal database, among many other functions. This utility communicates with the Certificate System server via TLS using client-authentication and can be used to manage the server remotely.
2.3.1. pkiconsole Initialization
To use the
pkiconsole interface for the first time, specify a new password and use the following command:
$ pki -c password -d ~/.redhat-idm-console client-init
This command creates a new client NSS database in the
~/.redhat-idm-console/ directory.
To import the CA certificate into the PKI client NSS database, see the Importing a certificate into an NSS Database section in the Red Hat Certificate System Planning, Installation, and Deployment Guide.
To request a new client certificate, see Chapter 5, Requesting, Enrolling, and Managing Certificates.
Execute the following command to extract the admin client certificate from the
.p12 file:
$ openssl pkcs12 -in file -clcerts -nodes -nokeys -out file.crt
Validate and import the admin client certificate as described in the Managing Certificate/Key Crypto Token section in the Red Hat Certificate System Planning, Installation, and Deployment Guide:
$ PKICertImport -d ~/.redhat-idm-console -n "nickname" -t ",," -a -i file.crt -u C
Important
Make sure all intermediate certificates and the root CA certificate have been imported before importing the CA admin client certificate.
To import an existing client certificate and its key into the client NSS database:
$ pki -c password -d ~/.redhat-idm-console pkcs12-import --pkcs12-file file --pkcs12-password pkcs12-password
Verify the client certificate with the following command:
$ certutil -V -u C -n "nickname" -d ~/.redhat-idm-console
2.3.2. Using pkiconsole for CA, OCSP, KRA, and TKS Subsystems
The Java console is used by four subsystems: the CA, OCSP, KRA, and TKS. The console is accessed using a locally-installed
pkiconsole utility. It can access any subsystem because the command requires the host name, the subsystem's administrative TLS port, and the specific subsystem type.
pkiconsole https://server.example.com:admin_port/subsystem_type
If DNS is not configured, you can use an IPv4 or IPv6 address to connect to the console. For example:
https://192.0.2.1:8443/ca
https://[2001:DB8::1111]:8443/ca
This opens a console, as in Figure 2.1, “Certificate System Console”.
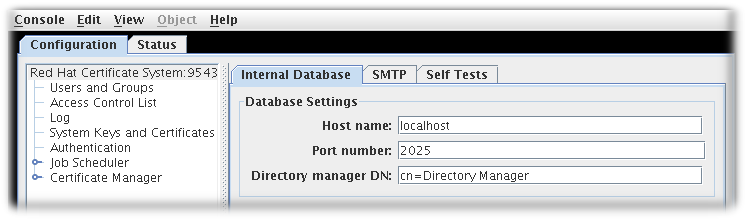
Figure 2.1. Certificate System Console
The Configuration tab controls all of the setup for the subsystem, as the name implies. The choices available in this tab are different depending on which subsystem type the instance is; the CA has the most options since it has additional configuration for jobs, notifications, and certificate enrollment authentication.
- Users and groups
- Access control lists
- Log configuration
- Subsystem certificates (meaning the certificates issued to the subsystem for use, for example, in the security domain or audit signing)