
Managing Smart Cards with the Enterprise Security Client
Red Hat Certificate System 9
Updated for Red Hat Certificate System 9.7
Abstract
This guide is meant for regular users of Certificate System subsystems. It explains how to manage personal certificates and keys using the Enterprise Security Client, a simple interface to format and manage smart cards.
Chapter 1. Introduction to the Enterprise Security Client
The Enterprise Security Client is a tool for Red Hat Certificate System which simplifies managing smart cards. End users can employ security tokens (smart cards) to store user certificates for applications such as single sign-on (SSO) access and client authentication. End users are issued the tokens containing certificates and keys required for signing, encryption, and other cryptographic functions.
The Enterprise Security Client is the third part of Certificate System's complete token management system. Two subsystems — the Token Key Service (TKS) and Token Processing System (TPS) — are used to process token-related operations. The Enterprise Security Client is the interface which allows the smart card and user to access the token management system.
After a token is enrolled, applications such as Mozilla Firefox and Thunderbird can be configured to recognize the token and use it for security operations, like client authentication and S/MIME mail. The Enterprise Security Client provides the following capabilities:
- Supports Global Platform-compliant smart cards like Gemalto 64K V2 and Safenet 300J Java smart cards.
- Enrolls security tokens so they are recognized by TPS.
- Maintains the security token, such as re-enrolling a token with TPS.
- Provides information about the current status of the token or tokens being managed.
- Supports server-side key generation through the TPS and DRM subsystems so that keys can be archived and recovered on a separate token if a token is lost.
1.1. Red Hat Enterprise Linux, Single Sign-On, and Authentication
Network users frequently have to submit multiple passwords for the various services they use, such as e-mail, web browsing and intranets, and servers on the network. Maintaining multiple passwords, and constantly being prompted to enter them, is a hassle for users and administrators. Single sign-on is a configuration which allows administrators to create a single password store so that users can log in once, using a single password, and be authenticated to all network resources.
Red Hat Enterprise Linux supports single sign-on for several resources, including logging into workstations and unlocking screensavers, accessing encrypted web pages using Mozilla Firefox, and sending encrypted email using Mozilla Thunderbird.
Single sign-on is both a convenience to users and another layer of security for the server and the network. Single sign-on hinges on secure and effective authentication, and the Enterprise Security Client ties into the public-key infrastructure implemented by Red Hat Certificate System.
One of the cornerstones of establishing a secure network environment is making sure that access is restricted to people who have the right to access the network. If access is allowed, users can authenticate to the system, meaning they can verify their identities. One such method is presenting a certificatee: an electronic document that identifies the entity presenting it.
These certificates can be stored on a smart card. When inserted by a user, the smart card presents the certificates to the system and identifies the user so it can be authenticated. One of the two authentication methods for Red Hat Enterprise Linux's single sign-on is smart card authentication. (The other is Kerberos-based authentication.)
Single sign-on using smart cards goes through three steps:
- A user inserts a smart card into the card reader. This is detected by the pluggable authentication modules (PAM) on Red Hat Enterprise Linux.
- The system maps the certificate to the user entry and then compares the presented certificates on the smart card to the certificates stored in the user entry.
- If the certificate is successfully validated against the key distribution center (KDC), then the user is allowed to log in.
The Enterprise Security Client manages the smart cards, which is part of administering single sign-on.
1.2. Red Hat Certificate System and the Enterprise Security Client
Red Hat Certificate System creates, manages, renews, and revokes certificates and keys. For managing smart cards, the Certificate System has a token management system to generate keys, create certificate requests, and receive certificates.
Two subsystems — the Token Key Service (TKS) and Token Processing System (TPS) — are used to process token-related operations. The Enterprise Security Client is the interface that allows the smart card and user to access the token management system.
A total of four Certificate System subsystems are involved with managing tokens, two for managing the tokens (TKS and TPS) and two for managing the keys and certificates within the public-key infrastructure (CA and DRM).
- The Token Processing System (TPS) interacts with smart cards to help them generate and store keys and certificates for a specific entity, such as a user or device. Smart card operations go through the TPS and are forwarded to the appropriate subsystem for action, such as the Certificate Authority to generate certificates or the Data Recovery Manager to archive and recover keys.
- The Token Key Service (TKS) generates, or derives, symmetric keys used for communication between the TPS and smart card. Each set of keys generated by the TKS is unique because they are based on the card's unique ID. The keys are formatted on the smart card and are used to encrypt communications, or provide authentication, between the smart card and TPS.
- The Certificate Authority (CA) creates and revokes user certificates stored on the smart card.
- Optionally, the Data Recovery Manager (DRM) archives and recovers keys for the smart card.
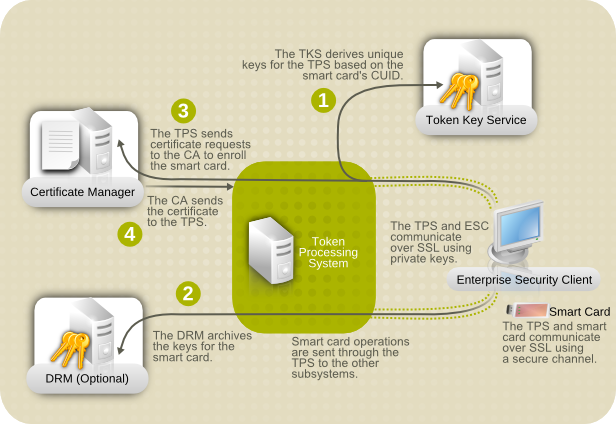
Figure 1.1. How Certificate System Manages Smart Cards
As Figure 1.1, “How Certificate System Manages Smart Cards” shows, the TPS is the central hub in the Red Hat Certificate System token management system. The token communicates with the TPS directly. The TPS then communicates with the TKS to derive a set of unique keys that can be used for TPS-token communication (1). When the smart card is enrolled, new private keys are created for the token; those keys can be archived in a DRM (2), if key archival is configured. The CA then processes the certificate request (3) and issues the certificates to store on the token. The TPS sends those certificates back to the Enterprise Security Client (4), and they are saved to the token.
The Enterprise Security Client is the conduit through which TPS communicates with each token over a secure HTTP channel (HTTPS), and, through the TPS, with the Certificate System.
To use the tokens, the Token Processing System must be able to recognize and communicate with them. The tokens must first be enrolled to populate the tokens with required keys and certificates and add the tokens to the Certificate System. The Enterprise Security Client provides the user interface for end entities to enroll tokens.
Chapter 2. Installing the Enterprise Security Client
2.1. Supported Platforms for the Client
The Enterprise Security Client interface is supported on the Red Hat Enterprise Linux 7.3 and later platforms.
The ESC is also supported on latest versions of Red Hat Enterprise Linux 5 and 6. Although these platforms do not support Red Hat Certificate System 9, those clients can be used against the TMS system in Red Hat Certificate System 9.
2.2. Supported Smart Cards
For details, see the corresponding section in the Red Hat Certificate System 9 Release Notes.
2.3. Installing and Uninstalling the Enterprise Security Client on Red Hat Enterprise Linux
2.3.1. Installing the ESC Client
The first step in installing the Enterprise Security Client is to download the required packages. There are two ways to obtain the packages:
- Downloading an ISO image from the Customer Portal.
- Using the Red Hat
yumutility
The preferred method of obtaining RPMs is using the
yum command-line utility, as follows:
# yum install esc
If the
yum command completes successfully, all of the necessary Enterprise Security Client RPMs and dependencies will be installed and ready for use.
Note
If you used the
yum utility to install the Enterprise Security Client, there is no need for further installation; the client has already been installed. The following procedure is for installing from a CD image.
- As the
rootuser, install the Enterprise Security Client packages:# yum install esc
The Enterprise Security Client is located in
/usr/lib/esc-1.1.0 on Red Hat Enterprise Linux 32-bit systems and /usr/lib64/esc-1.1.0 on Red Hat Enterprise Linux 64-bit system. The esc shell script is installed in /usr/bin/esc. You can launch the Enterprise Security Client by running the esc command.
The Enterprise Security Client for Linux implements a daemon (
escd) that runs silently, waiting for a smart card to be inserted. When an unenrolled smart card is inserted, the daemon automatically launches the client UI, and the Enterprise Security Client guides the user through the enrollment process. It is also possible to launch the client manually from the menu, by selecting System Settings, then Smart Card Manager.
2.3.2. Uninstalling the ESC client
- Unplug all USB tokens.
- Stop the Enterprise Security Client.
- Log in as the
rootuser, and userpm -evto remove the Enterprise Security Client RPM:# yum remove esc
Note
Update the version numbers of the RPM files to match your version. - Remove any remaining files in the installation directory.
Chapter 3. Using the Enterprise Security Client
The following sections contain basic instructions on using the Enterprise Security Client for token enrollment, formatting, and password reset operations.
3.1. Tray Icons for the Enterprise Security Client
Many programs maintain an icon in the tray or notification area which can be used to control the operation of the program, usually through context menus when right-clicking the icon. The Enterprise Security Client provides tray icons, including tooltips for errors and actions such as inserting or removing a smart card.
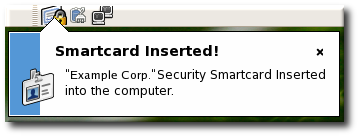
Figure 3.1. Example Token Tray Icon and Tooltip
In its default configuration, the Enterprise Security Client launches and automatically minimizes to the tray. On Red Hat Enterprise Linux, the tray icon appears only if the notification area in Gnome has been enabled.
3.2. Launching Enterprise Security Client
There are two concepts for launching the Enterprise Security Client. The Enterprise Security Client process must be started and it runs silently, waiting to detect any inserted smart card or token. The user interface for the Enterprise Security Client opens automatically when smart cards are inserted or can be opened manually.
3.2.1. Opening the Enterprise Security Client on Red Hat Enterprise Linux
Initiate the Enterprise Security Client daemon (
escd) from the command line:
esc
This daemon listens silently for smart cards and opens the GUI as soon as a smart card is inserted.
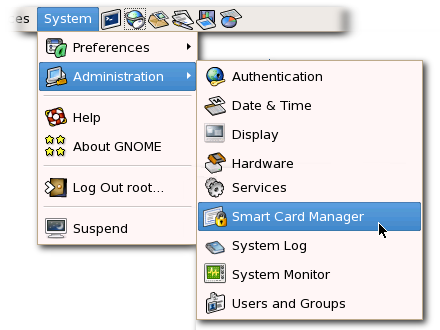
To open the Enterprise Security Client GUI manually, click , , and then .
3.3. Configuring Phone Home
The Phone Home feature in the Enterprise Security Client associates information within each smart card with information that points to distinct TPS servers and Enterprise Security Client UI pages. Whenever the Enterprise Security Client accesses a new smart card, it can connect to the TPS instance and retrieve the Phone Home information.
Phone Home retrieves and then caches this information; because the information is cached locally, the TPS subsystem does not have to be contacted each time a formatted smart card is inserted.
The information can be different for every key or token, which means that different TPS servers and enrollment URLs can be configured for different corporate or customer groups. Phone Home makes it possible to configure different TPS servers for different issuers or company units, without having to configure the Enterprise Security Client manually to locate the correct server and URL.
Note
In order for the TPS subsystem to utilize the Phone Home feature, Phone Home must be enabled in the TPS configuration file, as follows:
op.format.userKey.issuerinfo.enable=true
op.format.userKey.issuerinfo.value=http://server.example.com
3.3.1. About Phone Home Profiles
The Enterprise Security Client is based on Mozilla XULRunner. Consequently, each user has a profile similar to the user profiles used by Mozilla Firefox and Thunderbird. The Enterprise Security Client accesses the configuration preferences file. When the Enterprise Security Client caches information for each token, the information is stored in the user's configuration file. The next time the Enterprise Security Client is launched, it retrieves the information from the configuration file instead of contacting the server again.
When a smart card is inserted and Phone Home is launched, the Enterprise Security Client first checks the token for the Phone Home information. If no information is on the token, then the client checks the
esc-prefs.js file for the esc.global.phone.home.url parameter.
If no Phone Home information is stored on the token and there is no global Phone Home parameter, the user is prompted for the Phone Home URL when a smart card is inserted, as shown in Figure 3.2, “Prompt for Phone Home Information”. The other information is supplied and stored when the token is formatted. In this case, the company supplies the specific Phone Home URL for the user. After the user submits the URL, the format process adds the rest of the information to the Phone Home profile. The format process is not any different for the user.

Figure 3.2. Prompt for Phone Home Information
3.3.2. Setting Global Phone Home Information
Phone Home is triggered automatically when a security token is inserted into a machine. The system immediately attempts to read the Phone Home URL from the token and to contact the TPS server. For new tokens or for previously formatted tokens, the Phone Home information may not be available to the card.
The Enterprise Security Client configuration file,
esc-prefs.js, has a parameter which allows a global Phone Home URL default to be set. This parameter is esc.global.phone.home.url and is not in the file by default.
To define the global Phone Home URL:
- Remove any existing Enterprise Security Client user profile directory. Profile directories are created automatically when a smart card is inserted. On Red Hat Enterprise Linux, the profile directory is
~/.redhat/esc. - Open the
esc-prefs.jsfile. On Red Hat Enterprise Linux (32-bit), the profile directory is/usr/lib/esc-1.1.0/defaults/preferences. On 64-bit systems, this is/usr/lib64/esc-1.1.0/defaults/preferences. - Add the global Phone Home parameter line to the
esc-prefs.jsfile. For example:pref("pref("esc.global.phone.home.url","https://localhost:8443/tps/phoneHome");");The URL can reference a machine name, a fully-qualified domain name, or an IPv4 or IPv6 address, depending on the DNS and network configuration.
3.3.3. Adding Phone Home Information to a Token Manually
The Phone Home information can be manually put on a token in one of two ways:
- The preferred method is that the information is burned onto the token at the factory. When the tokens are ordered from the manufacturer, the company supplies detailed information on how the tokens should be configured when shipped.
- If tokens are blank, the company IT department can supply the information when formatting small groups of tokens.
The following information is used by the Phone Home feature for each smart card in the
~/.redhat/esc/alphanumeric_string.default/prefs.js file:
- The TPS server and port. For example:
"esc.key.token_ID.tps.url" = "http://server.example.com:7888/nk_service"
- The TPS enrollment interface URL. For example:
"esc.key.token_ID.tps.enrollment-ui.url" = "http://server.example.com:7888/cgi_bin/esc.cgi?"
- The issuing company name or ID. For example:
"esc.key.token_ID.issuer.name" = "Example Corp"
- The Phone Home URL. For example:
"esc.key.token_ID.phone.home.url" = "https://localhost:8443/tps/phoneHome"
- Optionally, a default browser URL to access when an enrolled smart card is inserted.
"esc.key.token_ID.EnrolledTokenBrowserURL" = "http://www.test.example.com"
More of the parameters used by the
prefs.js file are listed in Table 5.2, “prefs.js Parameters”.
Note
The URLs for these parameters can reference a machine name, a fully-qualified domain name, or an IPv4 or IPv6 address, depending on the DNS and network configuration.
3.3.4. Configuring the TPS to Use Phone Home
The Phone Home feature and the different type of information used by it only work when the TPS has been properly configured to use Phone Home. If the TPS is not configured for Phone Home, then this feature is ignored. Phone Home is configured in the
index.cgi in the /var/lib/pki-tps/cgi-bin/home directory; this prints the Phone Home information to XML.
Example 3.1, “TPS Phone Home Configuration File” shows an example XML file used by the TPS subsystem to configure the Phone Home feature.
Example 3.1. TPS Phone Home Configuration File
<ServiceInfo><IssuerName>Example Corp</IssuerName>
    <Services>
        <Operation>http://server.example.com:7888/nk_service ## TPS server URL
        </Operation>
        <UI>http://server.example.com:7888/cgi_bin/esc.cgi   ## Optional
Enrollment UI
        </UI>
        <EnrolledTokenBrowserURL>http://www.test.url.com   ## Optional
enrolled token url
        </EnrolledTokenBrowserURL>
    </Services>
</ServiceInfo>
The TPS configuration URI is the URL of the TPS server which returns the rest of the Phone Home information to the Enterprise Security Client. An example of this URL is
https://localhost:8443/tps/phoneHome; the URL can reference the machine name, fully-qualified domain name, or an IPv4 or IPv6 address, as appropriate. When the TPS configuration URI is accessed, the TPS server is prompted to return all of the Phone Home information to the Enterprise Security Client.
To test the URL of the Smart Card server, enter the address in the TPS Config URI field, and click .
If the server is successfully contacted, a message box indicates success. If the test connection fails, an error dialog appears.
3.4. Setting up Users to Be Enrolled
When the Token Processing System is installed, one of its configuration settings is the LDAP directory which contains the users who are allowed to enroll a token. Only users who are stored within this authentication directory are allowed to enroll, format, or have a token. Before attempting to enroll a token or smart card, make sure that the person requesting the operation has an entry in the LDAP directory.
The TPS is configured to look at a specific base DN in the LDAP directory. This is configured in the TPS's
CS.cfg:
auth.instance.0.baseDN=dc=example,dc=comauth.instance.0.hostport=server.example.com:389
For a user to be allowed to enroll a token, the user must be somewhere below the base DN.
If the user does not already have an entry, then the administrator must add the user to the specified LDAP directory in the specified base DN before any tokens can be enrolled for the user.
/usr/bin/ldapmodify -a -D "cn=Directory Manager" -w secret-p 389 -h server.example.comdn: uid=jsmith,ou=People,dc=example,dc=comobjectclass: person objectclass: inetorgperson objectclass: top uid: jsmith cn: John Smith email: jsmith@example.com userPassword: secret
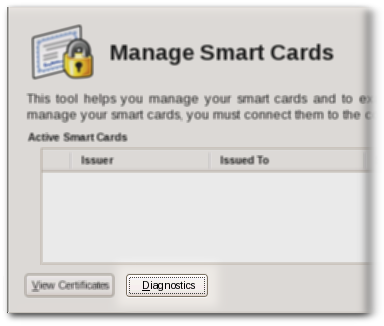
3.5. Managing Smart Cards
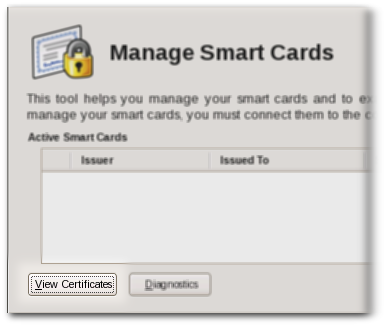
You can use the Manage Smart Cards page to perform many of the operations that can be applied to one of the cryptographic keys stored on the token.
You can use this page to format the token, set and reset the card's password, and to display card information. Two other operations, enrolling tokens and viewing the diagnostic logs, are also accessed through the Manage Smart Cards page. These operations are addressed in other sections.

Figure 3.3. Manage Smart Cards Page
3.5.1. Formatting the Smart Card
When you format a smart card, it is reset to the uninitialized state. This removes all previously generated user key pairs and erases the password set on the smart card during enrollment.
The TPS server can be configured to load newer versions of the applet and symmetric keys onto the card. The TPS supports the CoolKey applet which is shipped with Red Hat Enterprise Linux 7.9.
To format a smart card:
- Insert a supported smart card into the computer. Ensure that the card is listed in the Active Smart Cards table.
- In the Smart Card Functions section of the Manage Smart Cards screen, click .
- If the TPS has been configured for user authentication, enter the user credentials in the authentication dialog, and click .
- During the formatting process, the status of the card changes to BUSY and a progress bar is displayed. A success message is displayed when the formatting process is complete. Click to close the message box.
- When the formatting process is complete, the Active Smart Cards table shows the card status as UNINITIALIZED.
3.5.2. Resetting a Smart Card Password
If a user forgets the password for a smart card after the card is enrolled, it is possible to reset the password. To reset the password on a smart card:
- Insert a supported smart card into the computer. Ensure that the card is listed in the Active Smart Cards table.
- In the Smart Card Functions section of the Manage Smart Cards screen, click to display the Password dialog.
- Enter a new smart card password in the Enter new password field.
- Confirm the new smart card password in the Re-Enter password field, and then click .

- If the TPS has been configured for user authentication, enter the user credentials in the authentication dialog, and click .
- Wait for the password to finish being reset.
3.5.3. Viewing Certificates
The Smart Card Manager can display basic information about a selected smart card, including stored keys and certificates. To view certificate information:
- Insert a supported smart card into the computer. Ensure that the card is listed in the Active Smart Cards table.
- Select the card from the list, and click .
 This displays basic information about the certificates stored on the card, including the serial number, certificate nickname, and validity dates.
 - To view more detailed information about a certificate, select the certificate from the list and click .

3.5.4. Importing CA Certificates
The Xulrunner Gecko engine implements stringent controls over which SSL-based URLs can be visited by client like a browser or the Enterprise Security Client. If the Enterprise Security Client (through the Xulrunner framework) does not trust a URL, the URL can not be visited.
One way to trust an SSL-based URL is to import and trust the CA certificate chain of the CA which issued the certificates for the site. (The other is to create a trust security exception for the site, as in Section 3.5.5, “Adding Exceptions for Servers”.)
Any CA which issues certificates for smart cards must be trusted by the Enterprise Security Client application, which means that its CA certificate must be imported into the Enterprise Security Client.
- Open the CA's end user pages in a web browser.
http
s://server.example.com:9444/ca/ee/ca/ - Click the Retrieval tab at the top.
- In the left menu, click the Import CA Certificate Chain link.
- Choose the radio button to download the chain as a file, and remember the location and name of the downloaded file.
- Open the Enterprise Security Client.
- Click the button.
- Click the Authorities tab.
- Click Import.

- Browse to the CA certificate chain file, and select it.
- When prompted, confirm that you want to trust the CA.
3.5.5. Adding Exceptions for Servers
The Xulrunner Gecko engine implements stringent controls over which SSL-based URLs can be visited by client like a browser or the Enterprise Security Client. If the Enterprise Security Client (through the Xulrunner framework) does not trust a URL, the URL can not be visited.
One way to trust an SSL-based URL is to create a trust security exception for the site, which imports the certificate for the site and forces the Enterprise Security Client to recognize it. (The other option is to import the CA certificate chain for the site and automatically trust it, as in Section 3.5.4, “Importing CA Certificates”.)
The smart card may be used to access services or websites over SSL that require special security exceptions; these exceptions can be configured through the Enterprise Security Client, similar to configuring exceptions for websites in a browser like Mozilla Firefox.
- Open the Enterprise Security Client.
- Click the button.
- Click the Servers tab.
- Click Add Exception.

- Enter the URL, including any port numbers, for the site or service which the smart card will be used to access. Then click the button to download the server certificate for the site.

- Click to add the site to the list of allowed sites.
3.5.6. Enrolling Smart Cards
Most smart cards will be automatically enrolled using the automated enrollment procedure. You can also use the Manage Smart Cards facility to manually enroll a smart card.
If you enroll a token with the user key pairs, then the token can be used for certificate-based operations such as SSL client authentication and S/MIME.
Note
The TPS server can be configured to generate the user key pairs on the server and then archived in the DRM subsystem for recovery if the token is lost.
To enroll a smart card manually:
- Insert a supported, unenrolled smart card into the computer. Ensure that the card is listed in the Active Smart Cards table.
- Click to display the Password dialog.
- Enter a new key password in the Enter a password field.Confirm the new password in the Re-Enter a password field.
- Click to begin the enrollment.
- If the TPS has been configured for user authentication, enter the user credentials in the authentication dialog, and click .If the TPS has been configured to archive keys to the DRM, the enrollment process will begin generating and archiving keys.

When the enrollment is complete, the status of the smart card is displayed as ENROLLED.
3.6. Diagnosing Problems
The Enterprise Security Client includes basic diagnostic tools and a simple interface to log errors and common events, such as inserting and removing a smart card or changing the card's password. The diagnostic tools can identify and notify users about problems with the Enterprise Security Client, smart cards, and TPS connections.
To open the Diagnostics Information window:
- Open the Enterprise Security Client.
- Select the smart card to check from the list.
- Click the button.
- This opens the window for the selected smart card.

The Diagnostics Information screen displays the following information:
- The Enterprise Security Client version number.
- The version information for the Xulrunner framework upon which the client is running.
- The number of cards detected by the Enterprise Security Client.
For each card detected, the following information is displayed:
- The version of the applet running on the smart card.
- The alpha-numeric ID of the smart card.
- The card's status, which can be any of the three things:
- NO_APPLET No key was detected.
- UNINITIALIZED. The key was detected, but no certificates have been enrolled.
- ENROLLED. The detected card has been enrolled with certificate and card information.
- The card's Phone Home URL. This is the URL from which all Phone Home information is obtained.
- The card issuer name, such as
Example Corp. - The card's answer-to-reset (ATR) string. This is a unique value that can be used to identify different classes of smart cards. For example:
3BEC00FF8131FE45A0000000563333304A330600A1
- The TPS Phone Home URL.
- The TPS server URL. This is retrieved through Phone Home.
- The TPS enrollment form URL. This is retrieved through Phone Home.
- Detailed information about each certificate contained on the card.
- A running log of the most recent Enterprise Security Client errors and common events.
The Enterprise Security Client records two types of diagnostic information. It records errors that are returned by the smart card, and it records events that have occurred through the Enterprise Security Client. It also returns basic information about the smart card configuration.
3.6.1. Errors
- The Enterprise Security Client does not recognize a card.
- Problems occur during a smart card operation, such as a certificate enrollment, password reset, or format operation.
- The Enterprise Security Client loses the connection to the smart card. This can happen when problems occur communicating with the
PCSCdaemon. - The connection between the Enterprise Security Client and TPS is lost.
Smart cards can report certain error codes to the TPS; these are recorded in the TPS's
tps-debug.log or tps-error.log files, depending on the cause for the message.
Table 3.1. Smart Card Error Codes
| Return Code | Description |
|---|---|
| General Error Codes | |
| 6400 | No specific diagnosis |
| 6700 | Wrong length in Lc |
| 6982 | Security status not satisfied |
| 6985 | Conditions of use not satisfied |
| 6a86 | Incorrect P1 P2 |
| 6d00 | Invalid instruction |
| 6e00 | Invalid class |
| Install Load Errors | |
| 6581 | Memory Failure |
| 6a80 | Incorrect parameters in data field |
| 6a84 | Not enough memory space |
| 6a88 | Referenced data not found |
| Delete Errors | |
| 6200 | Application has been logically deleted |
| 6581 | Memory failure |
| 6985 | Referenced data cannot be deleted |
| 6a88 | Referenced data not found |
| 6a82 | Application not found |
| 6a80 | Incorrect values in command data |
| Get Data Errors | |
| 6a88 | Referenced data not found |
| Get Status Errors | |
| 6310 | More data available |
| 6a88 | Referenced data not found |
| 6a80 | Incorrect values in command data |
| Load Errors | |
| 6581 | Memory failure |
| 6a84 | Not enough memory space |
| 6a86 | Incorrect P1/P2 |
| 6985 | Conditions of use not satisfied |
3.6.2. Events
- Simple events such as card insertions and removals, successfully completed operations, card operations that result in an error, and similar events.
- Errors are reported from the TPS to the Enterprise Security Client.
- The NSS crypto library is initialized.
- Other low-level smart card events are detected.
Chapter 4. Using Smart Cards for Web and Mail Clients
After a smart card is enrolled, the smart card can be used for SSL client authentication and S/MIME email applications. The PKCS #11 module has different names and is located in different directories depending on the operating system.
Table 4.1. PKCS #11 Module Locations
| Platform | Module Name | Location |
|---|---|---|
| Red Hat Enterprise Linux | onepin-opensc-pkcs11.so | /usr/lib64/ |
4.1. Setting up Browsers to Support SSL for Tokens
To set up the Firefox browser to support SSL for tokens:
- Open the menu and select .If the menu bar is not visible in Firefox, press the Alt key to temporarily display it.
- In the entry, select the tab, and click the button.
- Add the PKCS #11 driver:
- Click the button.
- Enter a module name.
- Click , select the Enterprise Security Client PKCS #11 driver library, and click .

- If the CA is not yet trusted, download and import the CA certificate.
- Open the SSL End Entity page on the CA. For example:
http
s://server.example.com:9444/ca/ee/ca/ - Click the Retrieval tab, and then click Import CA Certificate Chain.
- Click Download the CA certificate chain in binary form and then click .
- Choose a suitable directory to save the certificate chain, and then click .
- Click , and select the Advanced tab.
- Click the button.
- Click , and import the CA certificate.
- Set the certificate trust relationships.
- Click , and select the Advanced tab.
- Click the button.
- Click , and set the trust for websites.
The certificates can be used for SSL.
Chapter 5. Setting up Enterprise Security Client
The Enterprise Security Client is now based on Mozilla XULRunner, allowing the preferences facility built into Mozilla to be used for simple configuration of the Enterprise Security Client. A simple UI, discussed in Chapter 3, Using the Enterprise Security Client, manages most important configuration settings.
Note
The Enterprise Security Client can be launched without requiring extra configuration.
5.1. Overview of Enterprise Security Client Configuration
The Enterprise Security Client is an intermediary frontend that provides connections between users (and their tokens), the Token Processing System, and certificate authority. The Enterprise Security Client provides two slightly different interfaces:
- A local interface, based on XUL and JavaScript
- A web-hosted interface which can be used for remote access, based on CGIs, HTML, and JavaScript
The primary Enterprise Security Client user interface, which is accessed from the local server, incorporates Mozilla XULRunner technology. XULRunner is a runtime package which hosts standalone applications based on XUL, an XML markup language with a rich feature set for user interfaces and offers several advantages over HTML for applications:
- A wide UI widget set and greater control over the presentation.
- Local markup to the client machine, so it has a greater privilege level than HTML.
- JavaScript as the scripting language for convenient program logic scripting and the ability to leverage XPCOM technology.
All of the files for the web-hosted interface can be customized and edited to change the behavior or appearance of the Enterprise Security Client, within reason.
The Enterprise Security Client, in conjunction with the Token Processing System, supports different user profiles so that different types of users have different token enrollment paths. Both the Enterprise Security Client and TPS also support different token profiles, so that the certificate settings can be custom-defined for different types of tokens. Both of these configurations are set in the TPS, and are described in the Red Hat Certificate System Planning, Installation, and Deployment Guide.
5.1.1. About the Preferences Configuration Files
The Enterprise Security Client is configured similarly to Mozilla applications, using preferences files. The primary configuration file is
esc-prefs.js, which is installed with Enterprise Security Client. The second one is prefs.js in the Mozilla profiles directory, which is created when the Enterprise Security Client is first launched.
The Enterprise Security Client uses the Mozilla configuration preferences for each of the supported platforms. A default configuration file is located in the following directories on each platform:
- On Red Hat Enterprise Linux 32-bit, this is in
/usr/lib/esc-1.1.0/defaults/preferences/esc-prefs.js. - On Red Hat Enterprise Linux 64-bit, this is in
/usr/lib64/esc-1.1.0/defaults/preferences/esc-prefs.js.
The
esc-prefs.js file specifies the default configuration to use when the Enterprise Security Client is first launched. This includes parameters to connect to the TPS subsystem, to set the password prompt, and configure Phone Home information. Each setting is prefaced by the word pref, then the parameter and value are enclosed in parentheses. For example:
pref(parameter, value);
The
esc-prefs.js file parameters are listed in Table 5.1, “esc-prefs.js Parameters”. The default esc-prefs.js file is shown in Example 5.1, “Default esc-prefs.js File”.
Table 5.1. esc-prefs.js Parameters
| Parameter | Description | Notes and Defaults |
|---|---|---|
| toolkit.defaultChromeURI | Defines the URL for the Enterprise Security Client to use to contact the XUL Chrome page. | ("toolkit.defaultChromeURI", "chrome://esc/content/settings.xul") |
| esc.tps.message.timeout | Sets a timeout period, in seconds, for connecting to the TPS. | ("esc.tps.message.timeout","90"); |
| esc.disable.password.prompt | Enables the password prompt, which means that a password is required to read the certificate information off the smart card.
The password prompt is disabled by default, so anyone can use the Enterprise Security Client. However, in security contexts, like when a company uses security officers to manage token operations, then enable the password prompt to restrict access to the Enterprise Security Client.
|
("esc.disable.password.prompt","yes");
|
| esc.global.phone.home.url |
Sets the URL to use to contact the TPS server.
Normally, the Phone Home information is set on the token already through its applet. If a token does not have Phone Home information, meaning it has no way to contact the TPS server, then the Enterprise Security Client checks for a global default Phone Home URL.
This setting is only checked if it is explicitly set. This setting also applies to every token formatted through the client, so setting this parameter forces all tokens to point to the same TPS. Only use this parameter if that specific behavior is desired.
|
("esc.global.phone.home.url", "http://server.example.com:7888/cgi-bin/home/index.cgi");
|
| esc.global.alt.nss.db |
Points to a directory that contains a common security database that is used by all Enterprise Security Client users on the server.
This setting is only checked if it is explicitly set. If this is not set, then each user accesses only each individual profile security database, rather than a shared database.
|
prefs("esc.global.alt.nss.db", "C:/Documents and Settings/All Users/shared-db");
|
Example 5.1. Default esc-prefs.js File
The comments in this file are not included in the example.
#pref("toolkit.defaultChromeURI", "chrome://esc/content/settings.xul");
pref("signed.applets.codebase_principal_support",true); for internal use only

pref("capability.principal.codebase.p0.granted", "UniversalXPConnect"); for internal use only
pref("capability.principal.codebase.p0.id", "file://"); for internal use only

pref("esc.tps.message.timeout","90");

#Hide the format button or not.
pref("esc.hide.format","no");

#Use this if you absolutely want a global phone home url for all tokens
#Not recommended!
#pref("esc.global.phone.home.url","http:/test.host.com:7888/cgi-bin/home/index.cgi");
When the Enterprise Security Client is launched, it creates a separate, unique profile directory for each user on the system. On Red Hat Enterprise Linux, these profiles are stored in
~/.redhat/esc/alphanumeric_string.default/prefs.js.
Note
When the Enterprise Security Client requires any changes to a user's configuration values, the updated values are written to the user's profile area, not to the default JavaScript file.
Table 5.2, “prefs.js Parameters” lists the most relevant parameters for the
prefs.js file. Editing this file is tricky. The prefs.js file is generated and edited dynamically by the Enterprise Security Client, and manual changes to this file are overwritten when the Enterprise Security Client exits.
Table 5.2. prefs.js Parameters
| Parameter | Description | Notes and Defaults |
|---|---|---|
| esc.tps.url | Sets a URL for the Enterprise Security Client to use to connect to the TPS. This is not set by default. | |
| esc.key.token_ID.tps.url |
Sets the hostname and port to use to contact a TPS.
If this Phone Home information was not burned into the card at the factory, it can be manually added to the card by adding the TPS URL, an enrollment page URL, the issuer's name, and Phone Home URL.
|
("esc.key.token_ID.tps.url" = "https://test.host.com:8443/tps/tps");
|
| esc.key.token_ID.issuer.name |
Gives the name of the organization enrolling the token.
| ("esc.key.token_ID.issuer.name" = "Example Corp"); |
| esc.key.token_ID.phone.home.url |
Gives the URL to use to contact the Phone Home functionality for the TPS.
The global Phone Home parameter sets a default to use with any token enrollment, if the token does not specify the Phone Home information. By setting this parameter to a specific token ID number, the specified Phone Home parameter applies only to that token.
| ("esc.key.token_ID.phone.home.url" = "http://server.example.com:7888/cgi-bin/home/index.cgi?"); |
5.2. Configuring SSL Connections with the TPS
By default, the TPS communicates with the Enterprise Security Client over standard HTTP. It is also possible, and in many situations desirable, to secure the TPS-client communications by using HTTP over SSL (HTTPS).
The Enterprise Security Client has to have the CA certificate for the CA which issued the TPS's certificates in order to trust the TPS connection. From there, the Enterprise Security Client can be configured to connect to the TPS's SSL certificate.
- Download the CA certificate used by the TPS.
- Open the CA's end user pages in a web browser.
http
s://server.example.com:9444/ca/ee/ca/ - Click the Retrieval tab at the top.
- In the left menu, click the Import CA Certificate Chain link.
- Choose the radio button to download the chain as a file, and remember the location and name of the downloaded file.
- Open the Enterprise Security Client.
- Import the CA certificate.
- Click the button.
- Click the Authorities tab.
- Click Import.
- Browse to the CA certificate chain file, and select it.
- When prompted, confirm that you want to trust the CA.
- The Enterprise Security Client needs to be configured to communicate with the TPS over SSL; this is done by setting the Phone Home URL, which is the default URL the Enterprise Security Client uses to connect to the TPS.
- Insert a new, blank token into the machine.Blank tokens are unformatted, so they do not have an existing Phone Home URL, and the URL must be set manually. Formatted tokens (tokens can be formatted by the manufacturer or by your IT department) already have the URL set, and thus do not prompt to set the Phone Home URL.
- Fill in the new TPS URL with the SSL port information. For example:
http
s://server.example.com:7890/cgi-bin/home/index.cgi - Click the button to send a message to the TPS.If the request is successful, the client opens a dialog box saying that the Phone Home URL was successfully obtained.
5.4. Disabling LDAP Authentication for Token Operations
By default, each user who requests a token operation is authenticated against an LDAP directory. If the user has an entry, then the operation is allowed; if the user does not have an entry, then the operation is rejected.
For testing purposes or for certain types of users, then it can be simpler or preferable to disable LDAP authentication. This is not configured in the Enterprise Security Client configuration, but in the Token Processing System configuration, and must be done by a TPS administrator.
- Stop the TPS subsystem.
# systemctl stop pki-tps
- Open the TPS configuration file.
# vim /var/lib/pki-tps/conf/CS.cfg
- Set the authentication parameters to
false.op.operation_type.token_type.loginRequest.enable=false op.operation_type.token_type.auth.enable=false
The operation_type is the token operation for which LDAP authentication is being disabled, such asenroll,format, orpinreset. Disabling authentication for one operation type does not disable it for any other operation types.The token_type is the token profile. There are default profiles for regular users, security officers, and the users enrolled by security officers. There can also be custom token types for other kinds of users or certificates.For example:op.
enroll.userKey.loginRequest.enable=false op.enroll.userKey.pinReset.enable=false - Restart the TPS subsystem.
# systemctl restart pki-tomcatd@pki-tomcat.service
Editing the TPS configuration is covered in the Red Hat Certificate System 9 Administration Guide.
Appendix A. Revision History
Note that revision numbers relate to the edition of this manual, not to version numbers of Red Hat Certificate System.
| Revision History | |||
|---|---|---|---|
| Revision 9.7-0 | Fri Nov 20 2020 | ||
| |||
| Revision 9.5-0 | Tue Aug 06 2019 | ||
| |||
| Revision 9.4-0 | Thu Oct 25 2018 | ||
| |||
| Revision 9.3-1 | Tue Apr 10 2018 | ||
| |||
| Revision 9.2-0 | Tue Aug 01 2017 | ||
| |||
| Revision 9.1-1 | Thu Mar 09 2017 | ||
| |||
| Revision 9.1-0 | Tue Nov 01 2016 | ||
| |||
| Revision 8.9-0 | Thu Jul 02 2015 | ||
| |||
Legal Notice
Copyright © 2020 Red Hat, Inc.
This document is licensed by Red Hat under the Creative Commons Attribution-ShareAlike 3.0 Unported License. If you distribute this document, or a modified version of it, you must provide attribution to Red Hat, Inc. and provide a link to the original. If the document is modified, all Red Hat trademarks must be removed.
Red Hat, as the licensor of this document, waives the right to enforce, and agrees not to assert, Section 4d of CC-BY-SA to the fullest extent permitted by applicable law.
Red Hat, Red Hat Enterprise Linux, the Shadowman logo, the Red Hat logo, JBoss, OpenShift, Fedora, the Infinity logo, and RHCE are trademarks of Red Hat, Inc., registered in the United States and other countries.
Linux® is the registered trademark of Linus Torvalds in the United States and other countries.
Java® is a registered trademark of Oracle and/or its affiliates.
XFS® is a trademark of Silicon Graphics International Corp. or its subsidiaries in the United States and/or other countries.
MySQL® is a registered trademark of MySQL AB in the United States, the European Union and other countries.
Node.js® is an official trademark of Joyent. Red Hat is not formally related to or endorsed by the official Joyent Node.js open source or commercial project.
The OpenStack® Word Mark and OpenStack logo are either registered trademarks/service marks or trademarks/service marks of the OpenStack Foundation, in the United States and other countries and are used with the OpenStack Foundation's permission. We are not affiliated with, endorsed or sponsored by the OpenStack Foundation, or the OpenStack community.
All other trademarks are the property of their respective owners.