
5.2. Creating Certificate Signing Requests
Traditionally, the following methods are used to generate Certificate requests (CSRs):
- Generating CSRs using command line utilities
- Generating CSRs inside a supporting browser
- Generating CSRs inside an application, such as the installer of a server
Some of these methods support direct submission of the CSRs, while some do not.
Starting from RHCS 9.7, Server-Side key generation is supported to overcome the inconvenience brought on by the removal of the key generation support inside newer versions of browsers, such as Firefox v69 and up, as well as Chrome. For this reason, in this section, we will not discuss browser support for key generation. Although there is no reason to believe that older versions of those browsers should not continue to function as specified in older RHCS documentation.
CSRs generated from an application generally take the form of PKCS#10. Provided that they are generated correctly, they should be supported by RHCS.
In the following subsections, we are going to go over the following methods supported by RHCS:
- Command-line utilities
- Server-Side Key Generation
5.2.1. Generating CSRs Using Command-Line Utilities
Red Hat Certificate System supports using the following utilities to create CSRs:
certutil: Supports creating PKCS #10 requests.PKCS10Client: Supports creating PKCS #10 requests.CRMFPopClient: Supports creating CRMF requests.pki client-cert-request: Supports both PKCS#10 and CRMF requests.
The following sections provide some examples on how to use these utilities with the feature-rich enrollment profile framework.
5.2.1.1. Creating a CSR Using certutil
This section describes examples on how to use the
certutil utility to create a CSR.
For further details about using
certutil, see:
- The certutil(1) man page
- The output of the
certutil --helpcommand
5.2.1.1.1. Using certutil to Create a CSR with EC Keys
The following procedure demonstrates how to use the
certutil utility to create an Elliptic Curve (EC) key pair and CSR:
- Change to the certificate database directory of the user or entity for which the certificate is being requested, for example:
$ cd /user_or_entity_database_directory/
- Create the binary CSR and store it in the
/user_or_entity_database_directory/request.csrfile:$ certutil -d . -R -k ec -q nistp256 -s "CN=subject_name" -o /user_or_entity_database_directory/request-bin.csr
Enter the required NSS database password when prompted.For further details about the parameters, see the certutil(1) man page. - Convert the created binary format CSR to PEM format:
$ BtoA /user_or_entity_database_directory/request-bin.csr /user_or_entity_database_directory/request.csr
- Optionally, verify that the CSR file is correct:
$ cat /user_or_entity_database_directory/request.csr

		MIICbTCCAVUCAQAwKDEQMA4GA1UEChMHRXhhbXBsZTEUMBIGA1UEAxMLZXhhbXBs
		...
This is a PKCS#10 PEM certificate request.
5.2.1.1.2. Using certutil to Create a CSR With User-defined Extensions
The following procedure demonstrates how to create a CSR with user-defined extensions using the
certutil utility.
Note that the enrollment requests are constrained by the enrollment profiles defined by the CA. See Example B.3, “Multiple User Supplied Extensions in CSR”.
- Change to the certificate database directory of the user or entity for which the certificate is being requested, for example:
$ cd /user_or_entity_database_directory/
- Create the CSR with user-defined Key Usage extension as well as user-defined Extended Key Usage extension and store it in the
/user_or_entity_database_directory/request.csrfile:$ certutil -d . -R -k rsa -g 1024 -s "CN=subject_name" --keyUsage keyEncipherment,dataEncipherment,critical --extKeyUsage timeStamp,msTrustListSign,critical -a -o /user_or_entity_database_directory/request.csr
Enter the required NSS database password when prompted.For further details about the parameters, see the certutil(1) man page. - Optionally, verify that the CSR file is correct:
$ cat /user_or_entity_database_directory/request.csr
		Certificate request generated by Netscape certutil
		Phone: (not specified)

		Common Name: user 4-2-1-2
		Email: (not specified)
		Organization: (not specified)
		State: (not specified)
		Country: (not specified)
This is a PKCS#10 PEM certificate request.
5.2.1.2. Creating a CSR Using PKCS10Client
This section describes examples how to use the
PKCS10Client utility to create a CSR.
For further details about using
PKCS10Client, see:
- The PKCS10Client(1) man page
- The output of the
PKCS10Client --helpcommand
5.2.1.2.1. Using PKCS10Client to Create a CSR
The following procedure explains how to use the
PKCS10Client utility to create an Elliptic Curve (EC) key pair and CSR:
- Change to the certificate database directory of the user or entity for which the certificate is being requested, for example:
$ cd /user_or_entity_database_directory/
- Create the CSR and store it in the
/user_or_entity_database_directory/example.csrfile:$ PKCS10Client -d . -p NSS_password -a ec -c nistp256 -o /user_or_entity_database_directory/example.csr -n "CN=subject_name"
For further details about the parameters, see the PKCS10Client(1) man page. - Optionally, verify that the CSR is correct:
$ cat /user_or_entity_database_directory/example.csr
		-----BEGIN CERTIFICATE REQUEST-----
		MIICzzCCAbcCAQAwgYkx
		...
		-----END CERTIFICATE REQUEST-----
5.2.1.2.2. Using PKCS10Client to Create a CSR for SharedSecret-based CMC
The following procedure explains how to use the
PKCS10Client utility to create an RSA key pair and CSR for SharedSecret-based CMC. Use it only with the CMC Shared Secret authentication method which is, by default, handled by the caFullCMCSharedTokenCert and caECFullCMCSharedTokenCert profiles.
- Change to the certificate database directory of the user or entity for which the certificate is being requested, for example:
$ cd /user_or_entity_database_directory/
- Create the CSR and store it in the
/user_or_entity_database_directory/example.csrfile:$ PKCS10Client -d . -p NSS_password -o /user_or_entity_database_directory/example.csr -y true -n "CN=subject_name"
For further details about the parameters, see the PKCS10Client(1) man page. - Optionally, verify that the CSR is correct:
$ cat /user_or_entity_database_directory/example.csr
		-----BEGIN CERTIFICATE REQUEST-----
		MIICzzCCAbcCAQAwgYkx
		...
		-----END CERTIFICATE REQUEST-----
5.2.1.3. Creating a CSR Using CRMFPopClient
Certificate Request Message Format (CRMF) is a CSR format accepted in CMC that allows key archival information to be securely embedded in the request.
This section describes examples how to use the
CRMFPopClient utility to create a CSR.
For further details about using
CRMFPopClient, see the CRMFPopClient(1) man page.
5.2.1.3.1. Using CRMFPopClient to Create a CSR with Key Archival
The following procedure explains how to use the
CRMFPopClient utility to create an RSA key pair and a CSR with the key archival option:
- Change to the certificate database directory of the user or entity for which the certificate is being requested, for example:
$ cd /user_or_entity_database_directory/
- Retrieve the KRA transport certificate:
$ pki ca-cert-find --name "DRM Transport Certificate"
		---------------
		1 entries found
		---------------
			Serial Number: 0x7
			Subject DN: CN=DRM Transport Certificate,O=EXAMPLE
			Status: VALID
			Type: X.509 version 3
			Key A    lgorithm: PKCS #1 RSA with 2048-bit key
			Not Valid Before: Thu Oct 22 18:26:11 CEST 2015
			Not Valid After: Wed Oct 11 18:26:11 CEST 2017
			Issued On: Thu Oct 22 18:26:11 CEST 2015
			Issued By: caadmin
		----------------------------
		Number of entries returned 1
- Export the KRA transport certificate:
$ pki ca-cert-show 0x7 --output kra.transport
- Create the CSR and store it in the
/user_or_entity_database_directory/example.csrfile:$ CRMFPopClient -d . -p password -n "cn=subject_name" -q POP_SUCCESS -b kra.transport -w "AES/CBC/PKCS5Padding" -v -o /user_or_entity_database_directory/example.csr
To create an Elliptic Curve (EC) key pair and CSR, pass the-a ec -t falseoptions to the command.For further details about the parameters, see the CRMFPopClient(1) man page. - Optionally, verify that the CSR is correct:
$ cat /user_or_entity_database_directory/example.csr
		-----BEGIN CERTIFICATE REQUEST-----
		MIICzzCCAbcCAQAwgYkx
		...
		-----END CERTIFICATE REQUEST-----
5.2.1.3.2. Using CRMFPopClient to Create a CSR for SharedSecret-based CMC
The following procedure explains how to use the
CRMFPopClient utility to create an RSA key pair and CSR for SharedSecret-based CMC. Use it only with the CMC Shared Secret authentication method which is, by default, handled by the caFullCMCSharedTokenCert and caECFullCMCSharedTokenCert profiles.
- Change to the certificate database directory of the user or entity for which the certificate is being requested, for example:
$ cd /user_or_entity_database_directory/
- Retrieve the KRA transport certificate:
$ pki ca-cert-find --name "DRM Transport Certificate"
		---------------
		1 entries found
		---------------
			Serial Number: 0x7
			Subject DN: CN=DRM Transport Certificate,O=EXAMPLE
			Status: VALID
			Type: X.509 version 3
			Key A    lgorithm: PKCS #1 RSA with 2048-bit key
			Not Valid Before: Thu Oct 22 18:26:11 CEST 2015
			Not Valid After: Wed Oct 11 18:26:11 CEST 2017
			Issued On: Thu Oct 22 18:26:11 CEST 2015
			Issued By: caadmin
		----------------------------
		Number of entries returned 1
- Export the KRA transport certificate:
$ pki ca-cert-show 0x7 --output kra.transport
- Create the CSR and store it in the
/user_or_entity_database_directory/example.csrfile:$ CRMFPopClient -d . -p password -n "cn=subject_name" -q POP_SUCCESS -b kra.transport -w "AES/CBC/PKCS5Padding" -y -v -o /user_or_entity_database_directory/example.csr
To create an EC key pair and CSR, pass the-a ec -t falseoptions to the command.For further details about the parameters, see the output of theCRMFPopClient --helpcommand. - Optionally, verify that the CSR is correct:
$ cat /user_or_entity_database_directory/example.csr
		-----BEGIN CERTIFICATE REQUEST-----
		MIICzzCCAbcCAQAwgYkx
		...
		-----END CERTIFICATE REQUEST-----
5.2.1.4. Creating a CSR using client-cert-request in the PKI CLI
The
pkicommand-line tool can also be used with the client-cert-request command to generate a CSR. However, unlike the previously discussed tools, CSR generated with pki are submitted directly to the CA. Both PKCS#10 or CRMF requests can be generated.
Example on generating a PKCS#10 request:
pki -d user token db directory -P https -p 8443 -h host.test.com -c user token db passwd client-cert-request "uid=test2" --length 4096 --type pkcs10
Example on generating a CRMF request:
pki -d user token db directory -P https -p 8443 -h host.test.com -c user token db passwd client-cert-request "uid=test2" --length 4096 --type crmf
A request id will be returned upon success.
Once a request is submitted, an agent could approve it by using the pki
ca-cert-request-approve command.
For example:
pki -d agent token db directory -P https -p 8443 -h host.test.com -c agent token db passwd -n <CA agent cert nickname> ca-cert-request-approve request id
For more information, see the man page by running the
pki client-cert-request --help command.
5.2.2. Generating CSRs Using Server-Side Key Generation
Many newer versions of browsers, including Firefox v69 and up, as well as Chrome, have removed the functionality to generate PKI keys and the support for CRMF for key archival. On RHEL, CLIs such as
CRMFPopClient (see CRMFPopClient --help) or pki (see pki client-cert-request --help) could be used as a workaround.
Server-Side Keygen enrollment has been around for a long time since the introduction of Token Key Management System (TMS), where keys could be generated on a KRA instead of locally on smart cards. Red Hat Certificate System now adopts a similar mechanism to resolve the browser keygen deficiency issue. Keys are generated on the server (specifically, on the KRA) and then transferred securely back to the client in PKCS#12.
Note
It is highly recommended to employ the Server-Side Keygen mechanism only for encryption certificates.
5.2.2.1. Functionality Highlights
- Certificate request keys are generated on the KRA (Note: a KRA must be installed to work with the CA)
- The profile default plugin,
serverKeygenUserKeyDefaultImpl, provides selection to enable or disable key archival (i.e. the enableArchival parameter) - Support for both RSA and EC keys
- Support for both manual (agent) approval and automatic approval (e.g. directory password-based)
5.2.2.2. Enrolling a Certificate Using Server-Side Keygen
The default Sever-Side Keygen enrollment profile can be found on the EE page, under the List Certificate Profiles tab:
Manual User Dual-Use Certificate Enrollment Using server-side Key generation
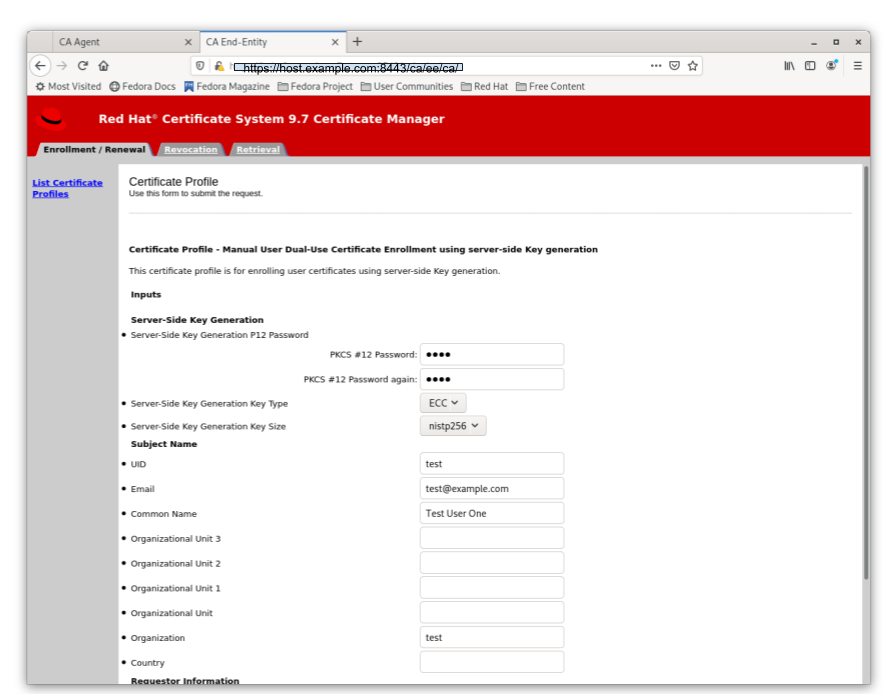
Figure 5.1. Server-Side Keygen Enrollment that requires agent manual approval
Directory-authenticated User Dual-Use Certificate Enrollment Using server-side Key generation
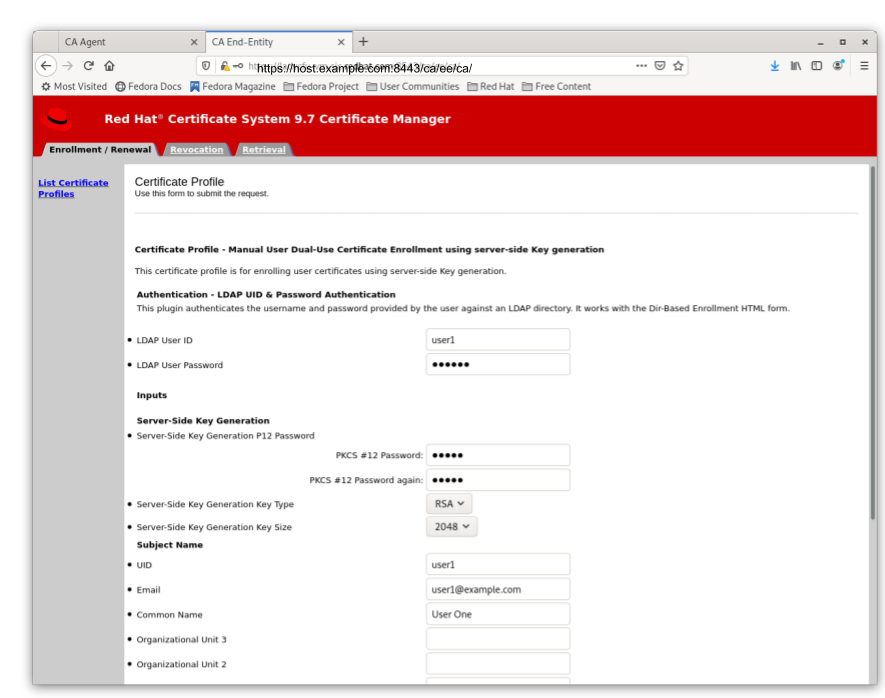
Figure 5.2. Server-Side Keygen Enrollment that will be automatically approved upon successful LDAP uid/pwd authentication
Regardless of how the request is approved, the Server-Side Keygen Enrollment mechanism requires the End Entity user to enter a password for the PKCS#12 package which will contain the issued certificate as well as the encrypted private key generated by the server once issued.
Important
Users should not share their passwords with anyone. Not even the CA or KRA agents.
When the enrollment request is approved, the PKCS#12 package will be generated and,
- In case of manual approval, the PKCS#12 file will be returned to the CA agent that approves the request; the agent is then expected to forward the PKCS#12 file to the user.
- In case of automatic approval, the PKCS#12 file will be returned to the user who submitted the request
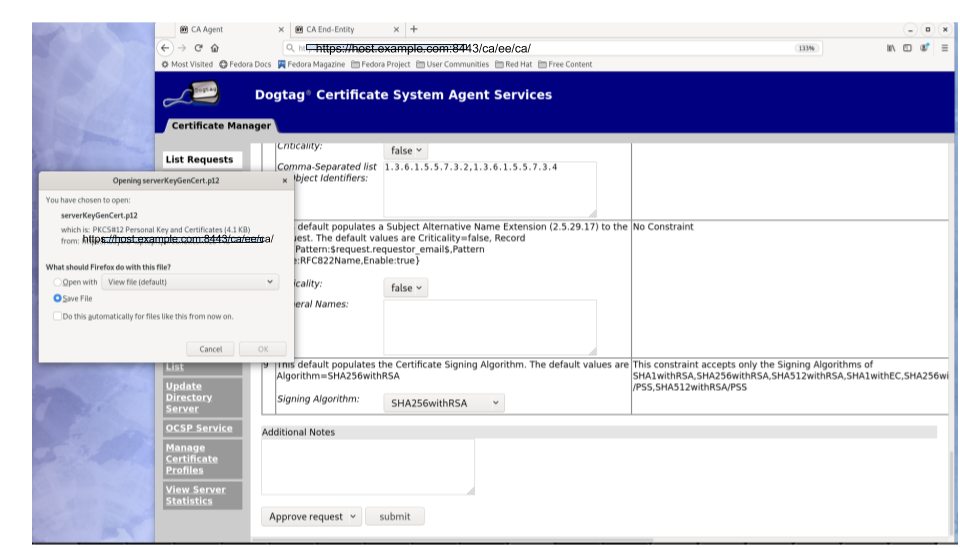
Figure 5.3. Enrollment manually approved by an agent
Once the PKCS#12 file is received, the user could use a CLI such as
pkcs12util to import this file into their own user internal cert/key database for each application. E.g. the Firefox nss database of the user.
5.2.2.3. Key Recovery
If the enableArchival parameter is set to true in the certificate enrollment profile, then the private keys are archived at the time of Server-Side Keygen enrollment. The archived private keys could then be recovered by the authorized KRA agents.
5.2.2.4. Additional Information
5.2.2.4.1. KRA Request Records
Note
Due to the nature of this mechanism, in case the enableArchival parameter is set to true in the profile, there are two KRA requests records per Server-Side keygen request:
- One for the request type asymkeyGenRequestThis request type cannot be filtered using List Requests on the KRA agent page; you can select Show All Requests to see them listed.
- One for the request type recovery
5.2.2.4.2. Audit Records
Some audit records could be observed if enabled:
CA
- SERVER_SIDE_KEYGEN_ENROLL_KEYGEN_REQUEST
- SERVER_SIDE_KEYGEN_ENROLL_KEY_RETRIEVAL_REQUEST
KRA
- SERVER_SIDE_KEYGEN_ENROLL_KEYGEN_REQUEST_PROCESSED
- SERVER_SIDE_KEYGEN_ENROLL_KEY_RETRIEVAL_REQUEST_PROCESSED (not yet implemented)