
15.5. Configuring Access Control for Users
Authorization is the mechanism that checks whether a user is allowed to perform an operation. Authorization points are defined in certain groups of operations that require an authorization check.
15.5.1. About Access Control
Access control lists (ACLs) are the mechanisms that specify the authorization to server operations. An ACL exists for each set of operations where an authorization check occurs. Additional operations can be added to a ACL.
The ACL contains access control instructions (ACIs) which specifically allow or deny operations, such as read or modify. The ACI also contains an evaluator expression. The default implementation of ACLs specifies only users, groups, and IP addresses as possible evaluator types. Each ACI in an ACL specifies whether access is allowed or denied, what the specific operator is being allowed or denied, and which users, groups, or IP addresses are being allowed or denied to perform the operation.
The privileges of Certificate System users are changed by changing the access control lists (ACL) that are associated with the group in which the user is a member, for the users themselves, or for the IP address of the user. New groups are assigned access control by adding that group to the access control lists. For example, a new group for administrators who are only authorized to view logs,
LogAdmins, can be added to the ACLs relevant to logs to allow read or modify access to this group. If this group is not added to any other ACLs, members of this group only have access to the logs.
The access for a user, group, or IP address is changed by editing the ACI entries in the ACLs. In the ACL interface, each ACI is shown on a line of its own. In this interface window, the ACI has the following syntax:
allow|deny (operation) user|group|IP="name"
Note
The IP address can be an IPv4 or IPv6 address. An IPv4 address must be in the format n.n.n.n or n.n.n.n,m.m.m.m. For example, 128.21.39.40 or 128.21.39.40,255.255.255.00. An IPv6 address uses a 128-bit namespace, with the IPv6 address separated by colons and the netmask separated by periods. For example, 0:0:0:0:0:0:13.1.68.3, FF01::43, 0:0:0:0:0:0:13.1.68.3,FFFF:FFFF:FFFF:FFFF:FFFF:FFFF:255.255.255.0, and FF01::43,FFFF:FFFF:FFFF:FFFF:FFFF:FFFF:FF00:0000.
For example, the following is an ACI that allows administrators to perform read operations:
allow (read) group="Administrators"
An ACI can have more than one operation or action configured. The operations are separated with a comma with no space on either side. For example:
allow (read,modify) group="Administrators"
An ACI can have more than one group, user, or IP address by separating them with two pipe symbols (
||) with a space on either side. For example:
allow (read) group="Administrators" || group="Auditors"
The administrative console can create or modify ACIs. The interface sets whether to allow or deny the operation in the Allow and Deny field, sets which operations are possible in the Operations field, and then lists the groups, users, or IP addresses being granted or denied access in the Syntax field.
An ACI can either allow or deny an operation for the specified group, user ID, or IP address. Generally, ACIs do not need to be created to deny access. If there are no allow ACIs that include a user ID, group, or IP address, then the group, user ID, or IP address is denied access.
Note
If a user is not explicitly allowed access to any of the operations for a resource, then this user is considered denied; he does not specifically need to be denied access.
For example, user JohnB is a member of the
Administrators group. If an ACL has only the following ACL, JohnB is denied any access since he does not match any of the allow ACIs:
Allow (read,modify) group="Auditors" || user="BrianC"
There usually is no need to include a deny statement. Some situations can arise, however, when it is useful to specify one. For example,
JohnB, a member of the Administrators group, has just been fired. It may be necessary to deny access specifically to JohnB if the user cannot be deleted immediately. Another situation is that a user, BrianC, is an administrator, but he should not have the ability to change some resource. Since the Administrators group must access this resource, BrianC can be specifically denied access by creating an ACI that denies this user access.
The allowed rights are the operations which the ACI controls, either by allowing or denying permission to perform the operation. The actions that can be set for an ACL vary depending on the ACL and subsystem. Two common operations that can be defined are read and modify.
The syntax field of the ACI editor sets the evaluator for the expression. The evaluator can specify group, name, and IP address (both IPv4 and IPv6 addresses). These are specified along with the name of the entity set as equals (
=) or does not equal (!=).
The syntax to include a group in the ACL is
group="groupname". The syntax to exclude a group is group!="groupname", which allows any group except for the group named. For example:
group="Administrators" || group!="Auditors"
It is also possible to use regular expressions to specify the group, such as using wildcard characters like an asterisk (
*). For example:
group="* Managers"
For more information on supported regular expression patterns, see https://docs.oracle.com/javase/7/docs/api/java/util/regex/Pattern.html.
The syntax to include a user in the ACL is
user="userID". The syntax to exclude the user is user!="userID", which allows any user ID except for the user ID named. For example:
user="BobC" || user!="JaneK"
To specify all users, provide the value
anybody. For example:
user="anybody"
It is also possible to use regular expressions to specify the user names, such as using wildcard characters like an asterisk (
*). For example:
user="*johnson"
For more information on supported regular expression patterns, see https://docs.oracle.com/javase/7/docs/api/java/util/regex/Pattern.html.
The syntax to include an IP address in the ACL is
ipaddress="ipaddress". The syntax to exclude an ID address from the ACL is ipaddress!="ipaddress". An IP address is specified using its numeric value; DNS values are not permitted. For example:
ipaddress="12.33.45.99"
ipaddress!="23.99.09.88"
The IP address can be an IPv4 address, as shown above, or IPv6 address. An IPv4 address has the format n.n.n.n or n.n.n.n,m.m.m.m with the netmask. An IPv6 address uses a 128-bit namespace, with the IPv6 address separated by colons and the netmask separated by periods. For example:
ipaddress="0:0:0:0:0:0:13.1.68.3"
It is also possible to use regular expressions to specify the IP address, such as using wildcard characters like an asterisk (
*). For example:
ipaddress="12.33.45.*"
For more information on supported regular expression patterns, see https://docs.oracle.com/javase/7/docs/api/java/util/regex/Pattern.html.
It is possible to create a string with more than one value by separating each value with two pipe characters (||) with a space on either side. For example:
user="BobC" || group="Auditors" || group="Administrators"
15.5.2. Changing the Access Control Settings for the Subsystem
For instruction on how to configure this feature by editing the
CS.cfg file, see the Changing the Access Control Settings for the Subsystem section in the Red Hat Certificate System Planning, Installation, and Deployment Guide.
15.5.3. Adding ACLs
ACLs are stored in the internal database and can only be modified in the administrative console.
To add a new ACL:
- Log into the administrative console.
- Select Access Control List.

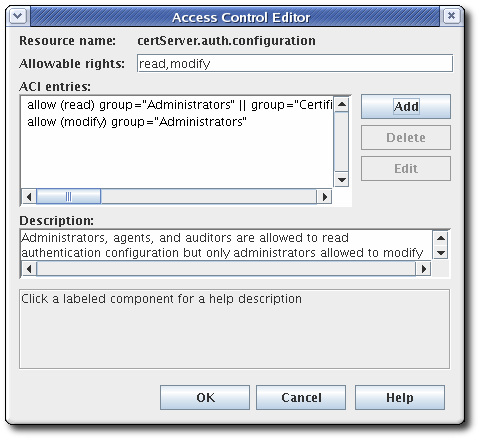
- Click to open the Access Control Editor.
- Fill the
Resource nameandAvailable rightsfields.
- To add an access control instruction (ACI), click , and supply the ACI information.
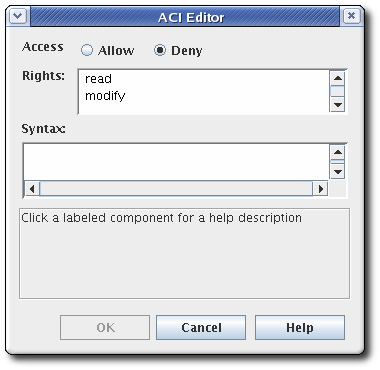
- Select the allow or deny radio button from the Access field to allow or deny the operation to the groups, users, or IP addresses specified. For more information about allowing or denying access, see Section 15.5.1, “About Access Control”.
- Set the rights. The available options are
readandmodify. To select both, hold the or button while selecting the entries. - Specify the user, group, or IP address that will be granted or denied access in the Syntax field. See Section 15.5.1, “About Access Control” for details on syntax.
- Click to return to the Access Control Editor window.
- Click to store the ACI.
15.5.4. Editing ACLs
ACLs are stored in the internal database and can only be modified in the administrative console.
To edit the existing ACLs:
- Log into the administrative console.
- Select Access Control List in the left navigation menu.
- Select the ACL to edit from the list, and click .The ACL opens in the Access Control Editor window.
- To add an ACI, click , and supply the ACI information.To edit an ACI, select the ACI from the list in the ACI entries text area of the ACL Editor window. Click .
- Select the allow or deny radio button from the Access field to allow or deny the operation to the groups, users, or IP addresses specified. For more information about allowing or denying access, see Section 15.5.1, “About Access Control”.
- Set the rights for the access control. The options are
readandmodify. To set both, use the or buttons. - Specify the user, group, or IP address that will be granted or denied access in the Syntax field. See Section 15.5.1, “About Access Control” for details on syntax.