
Developer Guide
Using the various application programming interfaces for Red Hat Ceph Storage
Abstract
Chapter 1. Ceph RESTful API
As a storage administrator, you can use the Ceph RESTful API, or simply the Ceph API, provided by the Red Hat Ceph Storage Dashboard to interact with the Red Hat Ceph Storage cluster. You can display information about the Ceph Monitors and OSDs, along with their respective configuration options. You can even create or edit Ceph pools.
The Ceph API uses the following standards:
- HTTP 1.1
- JSON
- MIME and HTTP Content Negotiation
- JWT
These standards are OpenAPI 3.0 compliant, regulating the API syntax, semantics, content encoding, versioning, authentication, and authorization.
Prerequisites
- A healthy running Red Hat Ceph Storage cluster.
- Access to the node running the Ceph Manager.
1.1. Versioning for the Ceph API
A main goal for the Ceph RESTful API, is to provide a stable interface. To achieve a stable interface, the Ceph API is built on the following principles:
- A mandatory explicit default version for all endpoints to avoid implicit defaults.
Fine-grain change control per-endpoint.
The expected version from a specific endpoint is stated in the HTTP header.
Syntax
Accept: application/vnd.ceph.api.vMAJOR.MINOR+json
Example
Accept: application/vnd.ceph.api.v1.0+json
If the current Ceph API server is not able to address that specific version, a
415 - Unsupported Media Typeresponse will be returned.
Using semantic versioning.
- Major changes are backwards incompatible. Changes might result in non-additive changes to the request, and to the response formats for a specific endpoint.
- Minor changes are backwards and forwards compatible. Changes consist of additive changes to the request or response formats for a specific endpoint.
1.2. Authentication and authorization for the Ceph API
Access to the Ceph RESTful API goes through two checkpoints. The first is authenticating that the request is done on the behalf of a valid, and existing user. Secondly, is authorizing the previously authenticated user can do a specific action, such as creating, reading, updating, or deleting, on the target end point.
Before users start using the Ceph API, they need a valid JSON Web Token (JWT). The /api/auth endpoint allows you to retrieve this token.
Example
[root@mon ~]# curl -X POST "https://example.com:8443/api/auth" \
  -H  "Accept: application/vnd.ceph.api.v1.0+json" \
  -H  "Content-Type: application/json" \
  -d '{"username": user1, "password": password1}'
This token must be used together with every API request by placing it within the Authorization HTTP header.
Syntax
curl -H "Authorization: Bearer TOKEN" ...
Additional Resources
- See the Ceph user management chapter in the Red Hat Ceph Storage Administration Guide for more details.
1.3. Enabling and Securing the Ceph API module
The Red Hat Ceph Storage Dashboard module offers the RESTful API access to the storage cluster over an SSL-secured connection.
If disabling SSL, then user names and passwords are sent unencrypted to the Red Hat Ceph Storage Dashboard.
Prerequisites
- Root-level access to a Ceph Monitor node.
-
Ensure that you have at least one
ceph-mgrdaemon active. -
If you use a firewall, ensure that TCP port
8443, for SSL, and TCP port8080, without SSL, are open on the node with the activeceph-mgrdaemon.
Procedure
Log into the Cephadm shell:
Example
root@host01 ~]# cephadm shell
Enable the RESTful plug-in:
[ceph: root@host01 /]# ceph mgr module enable dashboard
Configure an SSL certificate.
If your organization’s certificate authority (CA) provides a certificate, then set using the certificate files:
Syntax
ceph dashboard set-ssl-certificate HOST_NAME -i CERT_FILE
ceph dashboard set-ssl-certificate-key HOST_NAME -i KEY_FILE
Example
[ceph: root@host01 /]# ceph dashboard set-ssl-certificate -i dashboard.crt
[ceph: root@host01 /]# ceph dashboard set-ssl-certificate-key -i dashboard.key
If you want to set unique node-based certificates, then add a HOST_NAME to the commands:
Example
[ceph: root@host01 /]# ceph dashboard set-ssl-certificate host01 -i dashboard.crt
[ceph: root@host01 /]# ceph dashboard set-ssl-certificate-key host01 -i dashboard.key
Alternatively, you can generate a self-signed certificate. However, using a self-signed certificate does not provide full security benefits of the HTTPS protocol:
[ceph: root@host01 /]# ceph dashboard create-self-signed-cert
WarningMost modern web browsers will complain about self-signed certificates, which require you to confirm before establishing a secure connection.
Create a user, set the password, and set the role:
Syntax
echo -n "PASSWORD" > PATH_TO_FILE/PASSWORD_FILE
ceph dashboard ac-user-create USER_NAME -i PASSWORD_FILE ROLE
Example
[ceph: root@host01 /]# echo -n "p@ssw0rd" > /root/dash-password.txt
[ceph: root@host01 /]# ceph dashboard ac-user-create user1 -i /root/dash-password.txt administrator
This example creates a user named
user1with theadministratorrole.Connect to the RESTful plug-in web page. Open a web browser and enter the following URL:
Syntax
https://HOST_NAME:8443Example
https://host01:8443
If you used a self-signed certificate, confirm a security exception.
Additional Resources
-
The
ceph dashboard --helpcommand. -
The
https://HOST_NAME:8443/docpage, where HOST_NAME is the IP address or name of the node with the runningceph-mgrinstance. - For more information, see the Security Hardening guide within the Product Documentation for Red Hat Enterprise Linux for your OS version, on the Red Hat Customer Portal.
1.4. Questions and Answers
1.4.1. Getting information
This section describes how to use the Ceph API to view information about the storage cluster, Ceph Monitors, OSDs, pools, and hosts.
1.4.1.1. How Can I View All Cluster Configuration Options?
This section describes how to use the RESTful plug-in to view cluster configuration options and their values.
The curl Command
On the command line, use:
curl --silent --user USER 'https://CEPH_MANAGER:CEPH_MANAGER_PORT/api/cluster_conf'
Replace:
-
USERwith the user name -
CEPH_MANAGERwith the IP address or short host name of the node with the activeceph-mgrinstance -
CEPH_MANAGER_PORTwith the TCP port number. The default TCP port number is 8443.
Enter the user’s password when prompted.
If you used a self-signed certificate, use the --insecure option:
curl --silent --insecure --user USER 'https://CEPH_MANAGER:8080/api/cluster_conf'
Python
In the Python interpreter, enter:
$ python
>> import requests
>> result = requests.get('https://CEPH_MANAGER:8080/api/cluster_conf', auth=("USER", "PASSWORD"))
>> print result.json()
Replace:
-
CEPH_MANAGERwith the IP address or short host name of the node with the activeceph-mgrinstance -
USERwith the user name -
PASSWORDwith the user’s password
If you used a self-signed certificate, use the verify=False option:
$ python
>> import requests
>> result = requests.get('https://CEPH_MANAGER:8080/api/cluster_conf', auth=("USER", "PASSWORD"), verify=False)
>> print result.json()
Web Browser
In the web browser, enter:
https://CEPH_MANAGER:8080/api/cluster_confReplace:
-
CEPH_MANAGERwith the IP address or short host name of the node with the activeceph-mgrinstance
Enter the user name and password when prompted.
Additional Resources
- The Configuration Guide for Red Hat Ceph Storage 6
1.4.1.2. How Can I View a Particular Cluster Configuration Option?
This section describes how to view a particular cluster option and its value.
The curl Command
On the command line, use:
curl --silent --user USER 'https://CEPH_MANAGER:8080/api/cluster_conf/ARGUMENT'
Replace:
-
USERwith the user name -
CEPH_MANAGERwith the IP address or short host name of the node with the activeceph-mgrinstance -
ARGUMENTwith the configuration option you want to view
Enter the user’s password when prompted.
If you used a self-signed certificate, use the --insecure option:
curl --silent --insecure --user USER 'https://CEPH_MANAGER:8080/api/cluster_conf/ARGUMENT'
Python
In the Python interpreter, enter:
$ python
>> import requests
>> result = requests.get('https://CEPH_MANAGER:8080/api/cluster_conf/ARGUMENT', auth=("USER", "PASSWORD"))
>> print result.json()
Replace:
-
CEPH_MANAGERwith the IP address or short host name of the node with the activeceph-mgrinstance -
ARGUMENTwith the configuration option you want to view -
USERwith the user name -
PASSWORDwith the user’s password
If you used a self-signed certificate, use the verify=False option:
$ python
>> import requests
>> result = requests.get('https://CEPH_MANAGER:8080/api/cluster_conf/ARGUMENT', auth=("USER", "PASSWORD"), verify=False)
>> print result.json()
Web Browser
In the web browser, enter:
https://CEPH_MANAGER:8080/api/cluster_conf/ARGUMENT
Replace:
-
CEPH_MANAGERwith the IP address or short host name of the node with the activeceph-mgrinstance -
ARGUMENTwith the configuration option you want to view
Enter the user name and password when prompted.
Additional Resources
- The Configuration Guide for Red Hat Ceph Storage 6
1.4.1.3. How Can I View All Configuration Options for OSDs?
This section describes how to view all configuration options and their values for OSDs.
The curl Command
On the command line, use:
curl --silent --user USER 'https://CEPH_MANAGER:8080/api/osd/flags'
Replace:
-
USERwith the user name -
CEPH_MANAGERwith the IP address or short host name of the node with the activeceph-mgrinstance
Enter the user’s password when prompted.
If you used a self-signed certificate, use the --insecure option:
curl --silent --insecure --user USER 'https://CEPH_MANAGER:8080/api/osd/flags'
Python
In the Python interpreter, enter:
$ python
>> import requests
>> result = requests.get('https://CEPH_MANAGER:8080/api/osd/flags', auth=("USER", "PASSWORD"))
>> print result.json()
Replace:
-
CEPH_MANAGERwith the IP address or short host name of the node with the activeceph-mgrinstance -
USERwith the user name -
PASSWORDwith the user’s password
If you used a self-signed certificate, use the verify=False option:
$ python
>> import requests
>> result = requests.get('https://CEPH_MANAGER:8080/api/osd/flags', auth=("USER", "PASSWORD"), verify=False)
>> print result.json()
Web Browser
In the web browser, enter:
https://CEPH_MANAGER:8080/api/osd/flagsReplace:
-
CEPH_MANAGERwith the IP address or short host name of the node with the activeceph-mgrinstance
Enter the user name and password when prompted.
Additional Resources
- The Configuration Guide for Red Hat Ceph Storage 6
1.4.1.4. How Can I View CRUSH Rules?
This section describes how to view CRUSH rules.
The curl Command
On the command line, use:
curl --silent --user USER 'https://CEPH_MANAGER:8080/api/crush_rule'
Replace:
-
USERwith the user name -
CEPH_MANAGERwith the IP address or short host name of the node with the activeceph-mgrinstance
Enter the user’s password when prompted.
If you used a self-signed certificate, use the --insecure option:
curl --silent --insecure --user USER 'https://CEPH_MANAGER:8080/api/crush_rule'
Python
In the Python interpreter, enter:
$ python
>> import requests
>> result = requests.get('https://CEPH_MANAGER:8080/api/crush_rule', auth=("USER", "PASSWORD"))
>> print result.json()
Replace:
-
CEPH_MANAGERwith the IP address or short host name of the node with the activeceph-mgrinstance -
USERwith the user name -
PASSWORDwith the user’s password
If you used a self-signed certificate, use the verify=False option:
$ python
>> import requests
>> result = requests.get('https://CEPH_MANAGER:8080/api/crush_rule', auth=("USER", "PASSWORD"), verify=False)
>> print result.json()
Web Browser
In the web browser, enter:
https://CEPH_MANAGER:8080/api/crush_ruleReplace:
-
CEPH_MANAGERwith the IP address or short host name of the node with the activeceph-mgrinstance
Enter the user name and password when prompted.
Additional Resources
- The CRUSH Rules section in the Administration Guide for Red Hat Ceph Storage 6.
1.4.1.5. How Can I View Information about Monitors?
This section describes how to view information about a particular Monitor, such as:
- IP address
- Name
- Quorum status
The curl Command
On the command line, use:
curl --silent --user USER 'https://CEPH_MANAGER:8080/api/monitor'
Replace:
-
USERwith the user name -
CEPH_MANAGERwith the IP address or short host name of the node with the activeceph-mgrinstance
Enter the user’s password when prompted.
If you used a self-signed certificate, use the --insecure option:
curl --silent --insecure --user USER 'https://CEPH_MANAGER:8080/api/monitor'
Python
In the Python interpreter, enter:
$ python
>> import requests
>> result = requests.get('https://CEPH_MANAGER:8080/api/monitor', auth=("USER", "PASSWORD"))
>> print result.json()
Replace:
-
CEPH_MANAGERwith the IP address or short host name of the node with the activeceph-mgrinstance -
USERwith the user name -
PASSWORDwith the user’s password
If you used a self-signed certificate, use the verify=False option:
$ python
>> import requests
>> result = requests.get('https://CEPH_MANAGER:8080/api/monitor', auth=("USER", "PASSWORD"), verify=False)
>> print result.json()
Web Browser
In the web browser, enter:
https://CEPH_MANAGER:8080/api/monitorReplace:
-
CEPH_MANAGERwith the IP address or short host name of the node with the activeceph-mgrinstance
Enter the user name and password when prompted.
1.4.1.6. How Can I View Information About a Particular Monitor?
This section describes how to view information about a particular Monitor, such as:
- IP address
- Name
- Quorum status
The curl Command
On the command line, use:
curl --silent --user USER 'https://CEPH_MANAGER:8080/api/monitor/NAME'
Replace:
-
USERwith the user name -
CEPH_MANAGERwith the IP address or short host name of the node with the activeceph-mgrinstance -
NAMEwith the short host name of the Monitor
Enter the user’s password when prompted.
If you used a self-signed certificate, use the --insecure option:
curl --silent --insecure --user USER 'https://CEPH_MANAGER:8080/api/monitor/NAME'
Python
In the Python interpreter, enter:
$ python
>> import requests
>> result = requests.get('https://CEPH_MANAGER:8080/api/monitor/NAME', auth=("USER", "PASSWORD"))
>> print result.json()
Replace:
-
CEPH_MANAGERwith the IP address or short host name of the node with the activeceph-mgrinstance -
NAMEwith the short host name of the Monitor -
USERwith the user name -
PASSWORDwith the user’s password
If you used a self-signed certificate, use the verify=False option:
$ python
>> import requests
>> result = requests.get('https://CEPH_MANAGER:8080/api/monitor/NAME', auth=("USER", "PASSWORD"), verify=False)
>> print result.json()
Web Browser
In the web browser, enter:
https://CEPH_MANAGER:8080/api/monitor/NAME
Replace:
-
CEPH_MANAGERwith the IP address or short host name of the node with the activeceph-mgrinstance -
NAMEwith the short host name of the Monitor
Enter the user name and password when prompted.
1.4.1.7. How Can I View Information about OSDs?
This section describes how to view information about OSDs, such as:
- IP address
- Its pools
- Affinity
- Weight
The curl Command
On the command line, use:
curl --silent --user USER 'https://CEPH_MANAGER:8080/api/osd'
Replace:
-
USERwith the user name -
CEPH_MANAGERwith the IP address or short host name of the node with the activeceph-mgrinstance
Enter the user’s password when prompted.
If you used a self-signed certificate, use the --insecure option:
curl --silent --insecure --user USER 'https://CEPH_MANAGER:8080/api/osd'
Python
In the Python interpreter, enter:
$ python
>> import requests
>> result = requests.get('https://CEPH_MANAGER:8080/api/osd/', auth=("USER", "PASSWORD"))
>> print result.json()
Replace:
-
CEPH_MANAGERwith the IP address or short host name of the node with the activeceph-mgrinstance -
USERwith the user name -
PASSWORDwith the user’s password
If you used a self-signed certificate, use the verify=False option:
$ python
>> import requests
>> result = requests.get('https://CEPH_MANAGER:8080/api/osd/', auth=("USER", "PASSWORD"), verify=False)
>> print result.json()
Web Browser
In the web browser, enter:
https://CEPH_MANAGER:8080/api/osdReplace:
-
CEPH_MANAGERwith the IP address or short host name of the node with the activeceph-mgrinstance
Enter the user name and password when prompted.
1.4.1.8. How Can I View Information about a Particular OSD?
This section describes how to view information about a particular OSD, such as:
- IP address
- Its pools
- Affinity
- Weight
The curl Command
On the command line, use:
curl --silent --user USER 'https://CEPH_MANAGER:8080/api/osd/ID'
Replace:
-
USERwith the user name -
CEPH_MANAGERwith the IP address or short host name of the node with the activeceph-mgrinstance -
IDwith the ID of the OSD listed in theosdfield
Enter the user’s password when prompted.
If you used a self-signed certificate, use the --insecure option:
curl --silent --insecure --user USER 'https://CEPH_MANAGER:8080/api/osd/ID'
Python
In the Python interpreter, enter:
$ python
>> import requests
>> result = requests.get('https://CEPH_MANAGER:8080/api/osd/ID', auth=("USER", "PASSWORD"))
>> print result.json()
Replace:
-
CEPH_MANAGERwith the IP address or short host name of the node with the activeceph-mgrinstance -
IDwith the ID of the OSD listed in theosdfield -
USERwith the user name -
PASSWORDwith the user’s password
If you used a self-signed certificate, use the verify=False option:
$ python
>> import requests
>> result = requests.get('https://CEPH_MANAGER:8080/api/osd/ID', auth=("USER", "PASSWORD"), verify=False)
>> print result.json()
Web Browser
In the web browser, enter:
https://CEPH_MANAGER:8080/api/osd/ID
Replace:
-
CEPH_MANAGERwith the IP address or short host name of the node with the activeceph-mgrinstance -
IDwith the ID of the OSD listed in theosdfield
Enter the user name and password when prompted.
1.4.1.9. How Can I Determine What Processes Can Be Scheduled on an OSD?
This section describes how to use the RESTful plug-in to view what processes, such as scrubbing or deep scrubbing, can be scheduled on an OSD.
The curl Command
On the command line, use:
curl --silent --user USER 'https://CEPH_MANAGER:8080/api/osd/ID/command'
Replace:
-
USERwith the user name -
CEPH_MANAGERwith the IP address or short host name of the node with the activeceph-mgrinstance -
IDwith the ID of the OSD listed in theosdfield
Enter the user’s password when prompted.
If you used a self-signed certificate, use the --insecure option:
curl --silent --insecure --user USER 'https://CEPH_MANAGER:8080/api/osd/ID/command'
Python
In the Python interpreter, enter:
$ python
>> import requests
>> result = requests.get('https://CEPH_MANAGER:8080/api/osd/ID/command', auth=("USER", "PASSWORD"))
>> print result.json()
Replace:
-
CEPH_MANAGERwith the IP address or short host name of the node with the activeceph-mgrinstance -
IDwith the ID of the OSD listed in theosdfield -
USERwith the user name -
PASSWORDwith the user’s password
If you used a self-signed certificate, use the verify=False option:
$ python
>> import requests
>> result = requests.get('https://CEPH_MANAGER:8080/api/osd/ID/command', auth=("USER", "PASSWORD"), verify=False)
>> print result.json()
Web Browser
In the web browser, enter:
https://CEPH_MANAGER:8080/api/osd/ID/command
Replace:
-
CEPH_MANAGERwith the IP address or short host name of the node with the activeceph-mgrinstance -
IDwith the ID of the OSD listed in theosdfield
Enter the user name and password when prompted.
1.4.1.10. How Can I View Information About Pools?
This section describes how to view information about pools, such as:
- Flags
- Size
- Number of placement groups
The curl Command
On the command line, use:
curl --silent --user USER 'https://CEPH_MANAGER:8080/api/pool'
Replace:
-
USERwith the user name -
CEPH_MANAGERwith the IP address or short host name of the node with the activeceph-mgrinstance
Enter the user’s password when prompted.
If you used a self-signed certificate, use the --insecure option:
curl --silent --insecure --user USER 'https://CEPH_MANAGER:8080/api/pool'
Python
In the Python interpreter, enter:
$ python
>> import requests
>> result = requests.get('https://CEPH_MANAGER:8080/api/pool', auth=("USER", "PASSWORD"))
>> print result.json()
Replace:
-
CEPH_MANAGERwith the IP address or short host name of the node with the activeceph-mgrinstance -
USERwith the user name -
PASSWORDwith the user’s password
If you used a self-signed certificate, use the verify=False option:
$ python
>> import requests
>> result = requests.get('https://CEPH_MANAGER:8080/api/pool', auth=("USER", "PASSWORD"), verify=False)
>> print result.json()
Web Browser
In the web browser, enter:
https://CEPH_MANAGER:8080/api/poolReplace:
-
CEPH_MANAGERwith the IP address or short host name of the node with the activeceph-mgrinstance
Enter the user name and password when prompted.
1.4.1.11. How Can I View Information About a Particular Pool?
This section describes how to view information about a particular pool, such as:
- Flags
- Size
- Number of placement groups
The curl Command
On the command line, use:
curl --silent --user USER 'https://CEPH_MANAGER:8080/api/pool/ID'
Replace:
-
USERwith the user name -
CEPH_MANAGERwith the IP address or short host name of the node with the activeceph-mgrinstance -
IDwith the ID of the pool listed in thepoolfield
Enter the user’s password when prompted.
If you used a self-signed certificate, use the --insecure option:
curl --silent --insecure --user USER 'https://CEPH_MANAGER:8080/api/pool/ID'
Python
In the Python interpreter, enter:
$ python
>> import requests
>> result = requests.get('https://CEPH_MANAGER:8080/api/pool/ID', auth=("USER", "PASSWORD"))
>> print result.json()
Replace:
-
CEPH_MANAGERwith the IP address or short host name of the node with the activeceph-mgrinstance -
IDwith the ID of the pool listed in thepoolfield -
USERwith the user name -
PASSWORDwith the user’s password
If you used a self-signed certificate, use the verify=False option:
$ python
>> import requests
>> result = requests.get('https://CEPH_MANAGER:8080/api/pool/ID', auth=("USER", "PASSWORD"), verify=False)
>> print result.json()
Web Browser
In the web browser, enter:
https://CEPH_MANAGER:8080/api/pool/ID
Replace:
-
CEPH_MANAGERwith the IP address or short host name of the node with the activeceph-mgrinstance -
IDwith the ID of the pool listed in thepoolfield
Enter the user name and password when prompted.
1.4.1.12. How Can I View Information About Hosts?
This section describes how to view information about hosts, such as:
- Host names
- Ceph daemons and their IDs
- Ceph version
The curl Command
On the command line, use:
curl --silent --user USER 'https://CEPH_MANAGER:8080/api/host'
Replace:
-
USERwith the user name -
CEPH_MANAGERwith the IP address or short host name of the node with the activeceph-mgrinstance
Enter the user’s password when prompted.
If you used a self-signed certificate, use the --insecure option:
curl --silent --insecure --user USER 'https://CEPH_MANAGER:8080/api/host'
Python
In the Python interpreter, enter:
$ python
>> import requests
>> result = requests.get('https://CEPH_MANAGER:8080/api/host', auth=("USER", "PASSWORD"))
>> print result.json()
Replace:
-
CEPH_MANAGERwith the IP address or short host name of the node with the activeceph-mgrinstance -
USERwith the user name -
PASSWORDwith the user’s password
If you used a self-signed certificate, use the verify=False option:
$ python
>> import requests
>> result = requests.get('https://CEPH_MANAGER:8080/api/host', auth=("USER", "PASSWORD"), verify=False)
>> print result.json()
Web Browser
In the web browser, enter:
https://CEPH_MANAGER:8080/api/hostReplace:
-
CEPH_MANAGERwith the IP address or short host name of the node with the activeceph-mgrinstance
Enter the user name and password when prompted.
1.4.1.13. How Can I View Information About a Particular Host?
This section describes how to view information about a particular host, such as:
- Host names
- Ceph daemons and their IDs
- Ceph version
The curl Command
On the command line, use:
curl --silent --user USER 'https://CEPH_MANAGER:8080/api/host/HOST_NAME'
Replace:
-
USERwith the user name -
CEPH_MANAGERwith the IP address or short host name of the node with the activeceph-mgrinstance -
HOST_NAMEwith the host name of the host listed in thehostnamefield
Enter the user’s password when prompted.
If you used a self-signed certificate, use the --insecure option:
curl --silent --insecure --user USER 'https://CEPH_MANAGER:8080/api/host/HOST_NAME'
Python
In the Python interpreter, enter:
$ python
>> import requests
>> result = requests.get('https://CEPH_MANAGER:8080/api/host/HOST_NAME', auth=("USER", "PASSWORD"))
>> print result.json()
Replace:
-
CEPH_MANAGERwith the IP address or short host name of the node with the activeceph-mgrinstance -
HOST_NAMEwith the host name of the host listed in thehostnamefield -
USERwith the user name -
PASSWORDwith the user’s password
If you used a self-signed certificate, use the verify=False option:
$ python
>> import requests
>> result = requests.get('https://CEPH_MANAGER:8080/api/host/HOST_NAME', auth=("USER", "PASSWORD"), verify=False)
>> print result.json()
Web Browser
In the web browser, enter:
https://CEPH_MANAGER:8080/api/host/HOST_NAME
Replace:
-
CEPH_MANAGERwith the IP address or short host name of the node with the activeceph-mgrinstance -
HOST_NAMEwith the host name of the host listed in thehostnamefield
Enter the user name and password when prompted.
1.4.2. Changing Configuration
This section describes how to use the Ceph API to change OSD configuration options, the state of an OSD, and information about pools.
1.4.2.1. How Can I Change OSD Configuration Options?
This section describes how to use the RESTful plug-in to change OSD configuration options.
The curl Command
On the command line, use:
echo -En '{"OPTION": VALUE}' | curl --request PATCH --data @- --silent --user USER 'https://CEPH_MANAGER:8080/api/osd/flags'Replace:
-
OPTIONwith the option to modify;pause,noup,nodown,noout,noin,nobackfill,norecover,noscrub,nodeep-scrub -
VALUEwithtrueorfalse -
USERwith the user name -
CEPH_MANAGERwith the IP address or short host name of the node with the activeceph-mgrinstance
Enter the user’s password when prompted.
If you used a self-signed certificate, use the --insecure option:
echo -En '{"OPTION": VALUE}' | curl --request PATCH --data @- --silent --insecure --user USER 'https://CEPH_MANAGER:8080/api/osd/flags'Python
In the Python interpreter, enter:
$ python
>> import requests
>> result = requests.patch('https://CEPH_MANAGER:8080/api/osd/flags', json={"OPTION": VALUE}, auth=("USER", "PASSWORD"))
>> print result.json()
Replace:
-
CEPH_MANAGERwith the IP address or short host name of the node with the activeceph-mgrinstance -
OPTIONwith the option to modify;pause,noup,nodown,noout,noin,nobackfill,norecover,noscrub,nodeep-scrub -
VALUEwithTrueorFalse -
USERwith the user name -
PASSWORDwith the user’s password
If you used a self-signed certificate, use the verify=False option:
$ python
>> import requests
>> result = requests.patch('https://CEPH_MANAGER:8080/api/osd/flags', json={"OPTION": VALUE}, auth=("USER", "PASSWORD"), verify=False)
>> print result.json()
1.4.2.2. How Can I Change the OSD State?
This section describes how to use the RESTful plug-in to change the state of an OSD.
The curl Command
On the command line, use:
echo -En '{"STATE": VALUE}' | curl --request PATCH --data @- --silent --user USER 'https://CEPH_MANAGER:8080/api/osd/ID'Replace:
-
STATEwith the state to change (inorup) -
VALUEwithtrueorfalse -
USERwith the user name -
CEPH_MANAGERwith the IP address or short host name of the node with the activeceph-mgrinstance -
IDwith the ID of the OSD listed in theosdfield
Enter the user’s password when prompted.
If you used a self-signed certificate, use the --insecure option:
echo -En '{"STATE": VALUE}' | curl --request PATCH --data @- --silent --insecure --user USER 'https://CEPH_MANAGER:8080/api/osd/ID'Python
In the Python interpreter, enter:
$ python
>> import requests
>> result = requests.patch('https://CEPH_MANAGER:8080/api/osd/ID', json={"STATE": VALUE}, auth=("USER", "PASSWORD"))
>> print result.json()
Replace:
-
CEPH_MANAGERwith the IP address or short host name of the node with the activeceph-mgrinstance -
IDwith the ID of the OSD listed in theosdfield -
STATEwith the state to change (inorup) -
VALUEwithTrueorFalse -
USERwith the user name -
PASSWORDwith the user’s password
If you used a self-signed certificate, use the verify=False option:
$ python
>> import requests
>> result = requests.patch('https://CEPH_MANAGER:8080/api/osd/ID', json={"STATE": VALUE}, auth=("USER", "PASSWORD"), verify=False)
>> print result.json()
1.4.2.3. How Can I Reweight an OSD?
This section describes how to change the weight of an OSD.
The curl Command
On the command line, use:
echo -En '{"reweight": VALUE}' | curl --request PATCH --data @- --silent --user USER 'https://CEPH_MANAGER:8080/api/osd/ID'Replace:
-
VALUEwith the new weight -
USERwith the user name -
CEPH_MANAGERwith the IP address or short host name of the node with the activeceph-mgrinstance -
IDwith the ID of the OSD listed in theosdfield
Enter the user’s password when prompted.
If you used a self-signed certificate, use the --insecure option:
echo -En '{"reweight": VALUE}' | curl --request PATCH --data @- --silent --insecure --user USER 'https://CEPH_MANAGER:8080/api/osd/ID'Python
In the Python interpreter, enter:
$ python
>> import requests
>> result = requests.patch('https://CEPH_MANAGER:8080/osd/ID', json={"reweight": VALUE}, auth=("USER", "PASSWORD"))
>> print result.json()
Replace:
-
CEPH_MANAGERwith the IP address or short host name of the node with the activeceph-mgrinstance -
IDwith the ID of the OSD listed in theosdfield -
VALUEwith the new weight -
USERwith the user name -
PASSWORDwith the user’s password
If you used a self-signed certificate, use the verify=False option:
$ python
>> import requests
>> result = requests.patch('https://CEPH_MANAGER:8080/api/osd/ID', json={"reweight": VALUE}, auth=("USER", "PASSWORD"), verify=False)
>> print result.json()
1.4.2.4. How Can I Change Information for a Pool?
This section describes how to use the RESTful plug-in to change information for a particular pool.
The curl Command
On the command line, use:
echo -En '{"OPTION": VALUE}' | curl --request PATCH --data @- --silent --user USER 'https://CEPH_MANAGER:8080/api/pool/ID'Replace:
-
OPTIONwith the option to modify -
VALUEwith the new value of the option -
USERwith the user name -
CEPH_MANAGERwith the IP address or short host name of the node with the activeceph-mgrinstance -
IDwith the ID of the pool listed in thepoolfield
Enter the user’s password when prompted.
If you used a self-signed certificate, use the --insecure option:
echo -En '{"OPTION": VALUE}' | curl --request PATCH --data @- --silent --insecure --user USER 'https://CEPH_MANAGER:8080/api/pool/ID'Python
In the Python interpreter, enter:
$ python
>> import requests
>> result = requests.patch('https://CEPH_MANAGER:8080/api/pool/ID', json={"OPTION": VALUE}, auth=("USER, "PASSWORD"))
>> print result.json()
Replace:
-
CEPH_MANAGERwith the IP address or short host name of the node with the activeceph-mgrinstance -
IDwith the ID of the pool listed in thepoolfield -
OPTIONwith the option to modify -
VALUEwith the new value of the option -
USERwith the user name -
PASSWORDwith the user’s password
If you used a self-signed certificate, use the verify=False option:
$ python
>> import requests
>> result = requests.patch('https://CEPH_MANAGER:8080/api/pool/ID', json={"OPTION": VALUE}, auth=("USER, "PASSWORD"), verify=False)
>> print result.json()
1.4.3. Administering the Cluster
This section describes how to use the Ceph API to initialize scrubbing or deep scrubbing on an OSD, create a pool or remove data from a pool, remove requests, or create a request.
1.4.3.1. How Can I Run a Scheduled Process on an OSD?
This section describes how to use the RESTful API to run scheduled processes, such as scrubbing or deep scrubbing, on an OSD.
The curl Command
On the command line, use:
echo -En '{"command": "COMMAND"}' | curl --request POST --data @- --silent --user USER 'https://CEPH_MANAGER:8080/api/osd/ID/command'Replace:
-
COMMANDwith the process (scrub,deep-scrub, orrepair) you want to start. Verify it the process is supported on the OSD. See Section 1.4.1.9, “How Can I Determine What Processes Can Be Scheduled on an OSD?” for details. -
USERwith the user name -
CEPH_MANAGERwith the IP address or short host name of the node with the activeceph-mgrinstance -
IDwith the ID of the OSD listed in theosdfield
Enter the user’s password when prompted.
If you used a self-signed certificate, use the --insecure option:
echo -En '{"command": "COMMAND"}' | curl --request POST --data @- --silent --insecure --user USER 'https://CEPH_MANAGER:8080/api/osd/ID/command'Python
In the Python interpreter, enter:
$ python
>> import requests
>> result = requests.post('https://CEPH_MANAGER:8080/api/osd/ID/command', json={"command": "COMMAND"}, auth=("USER", "PASSWORD"))
>> print result.json()
Replace:
-
CEPH_MANAGERwith the IP address or short host name of the node with the activeceph-mgrinstance -
IDwith the ID of the OSD listed in theosdfield -
COMMANDwith the process (scrub,deep-scrub, orrepair) you want to start. Verify it the process is supported on the OSD. See Section 1.4.1.9, “How Can I Determine What Processes Can Be Scheduled on an OSD?” for details. -
USERwith the user name -
PASSWORDwith the user’s password
If you used a self-signed certificate, use the verify=False option:
$ python
>> import requests
>> result = requests.post('https://CEPH_MANAGER:8080/api/osd/ID/command', json={"command": "COMMAND"}, auth=("USER", "PASSWORD"), verify=False)
>> print result.json()
1.4.3.2. How Can I Create a New Pool?
This section describes how to use the RESTful plug-in to create a new pool.
The curl Command
On the command line, use:
echo -En '{"name": "NAME", "pg_num": NUMBER}' | curl --request POST --data @- --silent --user USER 'https://CEPH_MANAGER:8080/api/pool'Replace:
-
NAMEwith the name of the new pool -
NUMBERwith the number of the placement groups -
USERwith the user name -
CEPH_MANAGERwith the IP address or short host name of the node with the activeceph-mgrinstance
Enter the user’s password when prompted.
If you used a self-signed certificate, use the --insecure option:
echo -En '{"name": "NAME", "pg_num": NUMBER}' | curl --request POST --data @- --silent --insecure --user USER 'https://CEPH_MANAGER:8080/api/pool'Python
In the Python interpreter, enter:
$ python
>> import requests
>> result = requests.post('https://CEPH_MANAGER:8080/api/pool', json={"name": "NAME", "pg_num": NUMBER}, auth=("USER", "PASSWORD"))
>> print result.json()
Replace:
-
CEPH_MANAGERwith the IP address or short host name of the node with the activeceph-mgrinstance -
NAMEwith the name of the new pool -
NUMBERwith the number of the placement groups -
USERwith the user name -
PASSWORDwith the user’s password
If you used a self-signed certificate, use the verify=False option:
$ python
>> import requests
>> result = requests.post('https://CEPH_MANAGER:8080/api/pool', json={"name": "NAME", "pg_num": NUMBER}, auth=("USER", "PASSWORD"), verify=False)
>> print result.json()
1.4.3.3. How Can I Remove Pools?
This section describes how to use the RESTful plug-in to remove a pool.
This request is by default forbidden. To allow it, add the following parameter to the Ceph configuration guide.
mon_allow_pool_delete = true
The curl Command
On the command line, use:
curl --request DELETE --silent --user USER 'https://CEPH_MANAGER:8080/api/pool/ID'
Replace:
-
USERwith the user name -
CEPH_MANAGERwith the IP address or short host name of the node with the activeceph-mgrinstance -
IDwith the ID of the pool listed in thepoolfield
Enter the user’s password when prompted.
If you used a self-signed certificate, use the --insecure option:
curl --request DELETE --silent --insecure --user USER 'https://CEPH_MANAGER:8080/api/pool/ID'
Python
In the Python interpreter, enter:
$ python
>> import requests
>> result = requests.delete('https://CEPH_MANAGER:8080/api/pool/ID', auth=("USER", "PASSWORD"))
>> print result.json()
Replace:
-
CEPH_MANAGERwith the IP address or short host name of the node with the activeceph-mgrinstance -
IDwith the ID of the pool listed in thepoolfield -
USERwith the user name -
PASSWORDwith the user’s password
If you used a self-signed certificate, use the verify=False option:
$ python
>> import requests
>> result = requests.delete('https://CEPH_MANAGER:8080/api/pool/ID', auth=("USER", "PASSWORD"), verify=False)
>> print result.json()
Chapter 2. Ceph Object Gateway administrative API
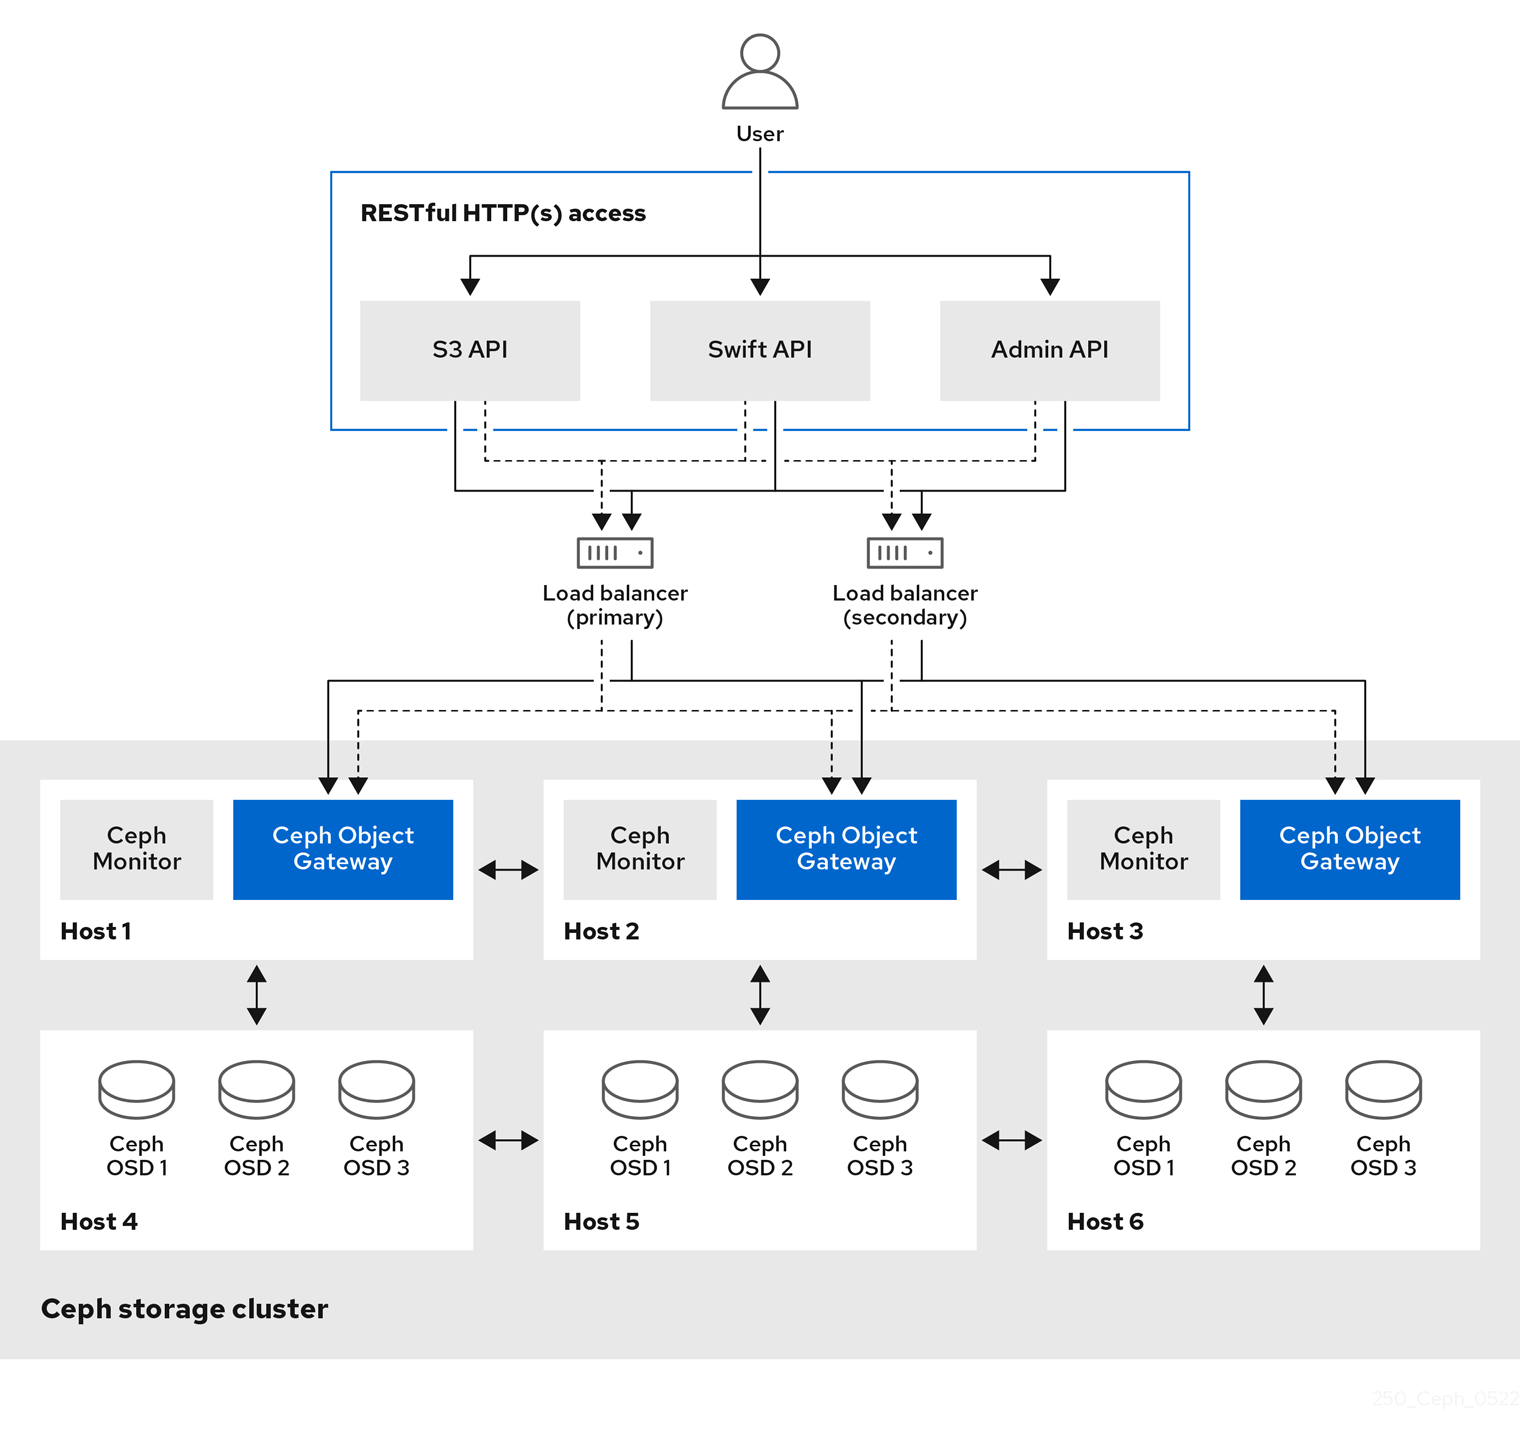
As a developer, you can administer the Ceph Object Gateway by interacting with the RESTful application programming interface (API). The Ceph Object Gateway makes available the features of the radosgw-admin command in a RESTful API. You can manage users, data, quotas, and usage which you can integrate with other management platforms.
Red Hat recommends using the command-line interface when configuring the Ceph Object Gateway.
The administrative API provides the following functionality:
- Authentication Requests
User Account Management
User Capabilities Management
Key Management
Bucket Management
Object Management
- Getting Usage Information
- Removing Usage Information
- Standard Error Responses
Prerequisites
- A running Red Hat Ceph Storage cluster.
- A RESTful client.
2.1. Administration operations
An administrative Application Programming Interface (API) request will be done on a URI that starts with the configurable 'admin' resource entry point. Authorization for the administrative API duplicates the S3 authorization mechanism. Some operations require that the user holds special administrative capabilities. The response entity type, either XML or JSON, might be specified as the 'format' option in the request and defaults to JSON if not specified.
Example
PUT /admin/user?caps&format=json HTTP/1.1
Host: FULLY_QUALIFIED_DOMAIN_NAME
Content-Type: text/plain
Authorization: AUTHORIZATION_TOKEN

usage=read
2.2. Administration authentication requests
Amazon’s S3 service uses the access key and a hash of the request header and the secret key to authenticate the request. It has the benefit of providing an authenticated request, especially large uploads, without SSL overhead.
Most use cases for the S3 API involve using open-source S3 clients such as the AmazonS3Client in the Amazon SDK for Java or Python Boto. These libraries do not support the Ceph Object Gateway Admin API. You can subclass and extend these libraries to support the Ceph Admin API. Alternatively, you can create a unique Gateway client.
Creating an execute() method
The CephAdminAPI example class in this section illustrates how to create an execute() method that can take request parameters, authenticate the request, call the Ceph Admin API and receive a response.
The CephAdminAPI class example is not supported or intended for commercial use. It is for illustrative purposes only.
Calling the Ceph Object Gateway
The client code contains five calls to the Ceph Object Gateway to demonstrate CRUD operations:
- Create a User
- Get a User
- Modify a User
- Create a Subuser
- Delete a User
To use this example, get the httpcomponents-client-4.5.3 Apache HTTP components. You can download it for example here: http://hc.apache.org/downloads.cgi. Then unzip the tar file, navigate to its lib directory and copy the contents to the /jre/lib/ext directory of the JAVA_HOME directory, or a custom classpath.
As you examine the CephAdminAPI class example, notice that the execute() method takes an HTTP method, a request path, an optional subresource, null if not specified, and a map of parameters. To execute with subresources, for example, subuser, and key, you will need to specify the subresource as an argument in the execute() method.
The example method:
- Builds a URI.
- Builds an HTTP header string.
-
Instantiates an HTTP request, for example,
PUT,POST,GET,DELETE. -
Adds the
Dateheader to the HTTP header string and the request header. -
Adds the
Authorizationheader to the HTTP request header. - Instantiates an HTTP client and passes it the instantiated HTTP request.
- Makes a request.
- Returns a response.
Building the header string
Building the header string is the portion of the process that involves Amazon’s S3 authentication procedure. Specifically, the example method does the following:
-
Adds a request type, for example,
PUT,POST,GET,DELETE. - Adds the date.
- Adds the requestPath.
The request type should be uppercase with no leading or trailing white space. If you do not trim white space, authentication will fail. The date MUST be expressed in GMT, or authentication will fail.
The exemplary method does not have any other headers. The Amazon S3 authentication procedure sorts x-amz headers lexicographically. So if you are adding x-amz headers, be sure to add them lexicographically.
Once you have built the header string, the next step is to instantiate an HTTP request and pass it the URI. The exemplary method uses PUT for creating a user and subuser, GET for getting a user, POST for modifying a user and DELETE for deleting a user.
Once you instantiate a request, add the Date header followed by the Authorization header. Amazon’s S3 authentication uses the standard Authorization header, and has the following structure:
Authorization: AWS ACCESS_KEY:HASH_OF_HEADER_AND_SECRET
The CephAdminAPI example class has a base64Sha1Hmac() method, which takes the header string and the secret key for the admin user, and returns a SHA1 HMAC as a base-64 encoded string. Each execute() call will invoke the same line of code to build the Authorization header:
httpRequest.addHeader("Authorization", "AWS " + this.getAccessKey() + ":" + base64Sha1Hmac(headerString.toString(), this.getSecretKey()));
The following CephAdminAPI example class requires you to pass the access key, secret key, and an endpoint to the constructor. The class provides accessor methods to change them at runtime.
Example
import java.io.IOException;
import java.net.URI;
import java.net.URISyntaxException;
import java.time.OffsetDateTime;
import java.time.format.DateTimeFormatter;
import java.time.ZoneId;

import org.apache.http.HttpEntity;
import org.apache.http.NameValuePair;
import org.apache.http.Header;
import org.apache.http.client.entity.UrlEncodedFormEntity;
import org.apache.http.client.methods.CloseableHttpResponse;
import org.apache.http.client.methods.HttpRequestBase;
import org.apache.http.client.methods.HttpGet;
import org.apache.http.client.methods.HttpPost;
import org.apache.http.client.methods.HttpPut;
import org.apache.http.client.methods.HttpDelete;
import org.apache.http.impl.client.CloseableHttpClient;
import org.apache.http.impl.client.HttpClients;
import org.apache.http.message.BasicNameValuePair;
import org.apache.http.util.EntityUtils;
import org.apache.http.client.utils.URIBuilder;

import java.util.Base64;
import java.util.Base64.Encoder;
import java.security.MessageDigest;
import java.security.NoSuchAlgorithmException;
import javax.crypto.spec.SecretKeySpec;
import javax.crypto.Mac;

import java.util.Map;
import java.util.Iterator;
import java.util.Set;
import java.util.Map.Entry;

public class CephAdminAPI {

	/*
	 * Each call must specify an access key, secret key, endpoint and format.
	 */
	String accessKey;
	String secretKey;
	String endpoint;
	String scheme = "http"; //http only.
	int port = 80;

	/*
	 * A constructor that takes an access key, secret key, endpoint and format.
	 */
	public CephAdminAPI(String accessKey, String secretKey, String endpoint){
		this.accessKey = accessKey;
		this.secretKey = secretKey;
		this.endpoint = endpoint;
	}

	/*
	 * Accessor methods for access key, secret key, endpoint and format.
	 */
	public String getEndpoint(){
		return this.endpoint;
	}

	public void setEndpoint(String endpoint){
		this.endpoint = endpoint;
	}

	public String getAccessKey(){
		return this.accessKey;
	}

	public void setAccessKey(String accessKey){
		this.accessKey = accessKey;
	}

	public String getSecretKey(){
		return this.secretKey;
	}

	public void setSecretKey(String secretKey){
		this.secretKey = secretKey;
	}

	/*
	 * Takes an HTTP Method, a resource and a map of arguments and
	 * returns a CloseableHTTPResponse.
	 */
	public CloseableHttpResponse execute(String HTTPMethod, String resource,
                                        String subresource, Map arguments) {

		String httpMethod = HTTPMethod;
		String requestPath = resource;
		StringBuffer request = new StringBuffer();
		StringBuffer headerString = new StringBuffer();
		HttpRequestBase httpRequest;
		CloseableHttpClient httpclient;
		URI uri;
		CloseableHttpResponse httpResponse = null;

		try {

			uri = new URIBuilder()
				.setScheme(this.scheme)
				.setHost(this.getEndpoint())
				.setPath(requestPath)
				.setPort(this.port)
				.build();


			if (subresource != null){
				uri = new URIBuilder(uri)
					.setCustomQuery(subresource)
					.build();
			}


			for (Iterator iter = arguments.entrySet().iterator();
			iter.hasNext();) {
				Entry entry = (Entry)iter.next();
				uri = new URIBuilder(uri)
					.setParameter(entry.getKey().toString(),
                                 entry.getValue().toString())
					.build();

			}

			request.append(uri);

			headerString.append(HTTPMethod.toUpperCase().trim() + "\n\n\n");

			OffsetDateTime dateTime = OffsetDateTime.now(ZoneId.of("GMT"));
			DateTimeFormatter formatter = DateTimeFormatter.RFC_1123_DATE_TIME;
			String date = dateTime.format(formatter);

			headerString.append(date + "\n");
			headerString.append(requestPath);

			if (HTTPMethod.equalsIgnoreCase("PUT")){
				httpRequest = new HttpPut(uri);
			} else if (HTTPMethod.equalsIgnoreCase("POST")){
				httpRequest = new HttpPost(uri);
			} else if (HTTPMethod.equalsIgnoreCase("GET")){
				httpRequest = new HttpGet(uri);
			} else if (HTTPMethod.equalsIgnoreCase("DELETE")){
				httpRequest = new HttpDelete(uri);
			} else {
				System.err.println("The HTTP Method must be PUT,
				POST, GET or DELETE.");
				throw new IOException();
			}

			httpRequest.addHeader("Date", date);
			httpRequest.addHeader("Authorization", "AWS " + this.getAccessKey()
			+ ":" + base64Sha1Hmac(headerString.toString(),
			this.getSecretKey()));

			httpclient = HttpClients.createDefault();
			httpResponse = httpclient.execute(httpRequest);

		} 	catch  (URISyntaxException e){
			System.err.println("The URI is not formatted properly.");
			e.printStackTrace();
		}  catch (IOException e){
			System.err.println("There was an error making the request.");
			e.printStackTrace();
		}
			return httpResponse;
	}

	/*
	 * Takes a uri and a secret key and returns a base64-encoded
	 * SHA-1 HMAC.
	 */
	public String base64Sha1Hmac(String uri, String secretKey) {
		try {

			byte[] keyBytes = secretKey.getBytes("UTF-8");
			SecretKeySpec signingKey = new SecretKeySpec(keyBytes, "HmacSHA1");

			Mac mac = Mac.getInstance("HmacSHA1");
			mac.init(signingKey);

			byte[] rawHmac = mac.doFinal(uri.getBytes("UTF-8"));

			Encoder base64 = Base64.getEncoder();
			return base64.encodeToString(rawHmac);

		} catch (Exception e) {
			throw new RuntimeException(e);
		}
	}

}
The subsequent CephAdminAPIClient example illustrates how to instantiate the CephAdminAPI class, build a map of request parameters, and use the execute() method to create, get, update and delete a user.
Example
import java.io.IOException;
import org.apache.http.client.methods.CloseableHttpResponse;
import org.apache.http.HttpEntity;
import org.apache.http.util.EntityUtils;
import java.util.*;


public class CephAdminAPIClient {

	public static void main (String[] args){

		CephAdminAPI adminApi = new CephAdminAPI ("FFC6ZQ6EMIF64194158N",
		                            "Xac39eCAhlTGcCAUreuwe1ZuH5oVQFa51lbEMVoT",
		                            "ceph-client");

		/*
		 * Create a user
		 */
		Map requestArgs = new HashMap();
		requestArgs.put("access", "usage=read, write; users=read, write");
		requestArgs.put("display-name", "New User");
		requestArgs.put("email", "new-user@email.com");
		requestArgs.put("format", "json");
		requestArgs.put("uid", "new-user");

		CloseableHttpResponse response =
			adminApi.execute("PUT", "/admin/user", null, requestArgs);

		System.out.println(response.getStatusLine());
		HttpEntity entity = response.getEntity();

		try {
			System.out.println("\nResponse Content is: "
				+ EntityUtils.toString(entity, "UTF-8") + "\n");
			response.close();
		} catch (IOException e){
			System.err.println ("Encountered an I/O exception.");
			e.printStackTrace();
		}

		/*
		 * Get a user
		 */
		requestArgs = new HashMap();
		requestArgs.put("format", "json");
		requestArgs.put("uid", "new-user");

		response = adminApi.execute("GET", "/admin/user", null, requestArgs);

		System.out.println(response.getStatusLine());
		entity = response.getEntity();

		try {
			System.out.println("\nResponse Content is: "
				+ EntityUtils.toString(entity, "UTF-8") + "\n");
			response.close();
		} catch (IOException e){
			System.err.println ("Encountered an I/O exception.");
			e.printStackTrace();
		}

		/*
		 * Modify a user
		 */
		requestArgs = new HashMap();
		requestArgs.put("display-name", "John Doe");
		requestArgs.put("email", "johndoe@email.com");
		requestArgs.put("format", "json");
		requestArgs.put("uid", "new-user");
		requestArgs.put("max-buckets", "100");

		response = adminApi.execute("POST", "/admin/user", null, requestArgs);

		System.out.println(response.getStatusLine());
		entity = response.getEntity();

		try {
			System.out.println("\nResponse Content is: "
				+ EntityUtils.toString(entity, "UTF-8") + "\n");
			response.close();
		} catch (IOException e){
			System.err.println ("Encountered an I/O exception.");
			e.printStackTrace();
		}


		/*
		 * Create a subuser
		 */
		requestArgs = new HashMap();
		requestArgs.put("format", "json");
		requestArgs.put("uid", "new-user");
		requestArgs.put("subuser", "foobar");

		response = adminApi.execute("PUT", "/admin/user", "subuser", requestArgs);
		System.out.println(response.getStatusLine());
		entity = response.getEntity();

		try {
			System.out.println("\nResponse Content is: "
				+ EntityUtils.toString(entity, "UTF-8") + "\n");
			response.close();
		} catch (IOException e){
			System.err.println ("Encountered an I/O exception.");
			e.printStackTrace();
		}


		/*
		 * Delete a user
		 */
		requestArgs = new HashMap();
		requestArgs.put("format", "json");
		requestArgs.put("uid", "new-user");

		response = adminApi.execute("DELETE", "/admin/user", null, requestArgs);
		System.out.println(response.getStatusLine());
		entity = response.getEntity();

		try {
			System.out.println("\nResponse Content is: "
				+ EntityUtils.toString(entity, "UTF-8") + "\n");
			response.close();
		} catch (IOException e){
			System.err.println ("Encountered an I/O exception.");
			e.printStackTrace();
		}
	}
}
Additional Resources
- See the S3 Authentication section in the Red Hat Ceph Storage Developer Guide for additional details.
- For a more extensive explanation of the Amazon S3 authentication procedure, consult the Signing and Authenticating REST Requests section of Amazon Simple Storage Service documentation.
2.3. Creating an administrative user
To run the radosgw-admin command from the Ceph Object Gateway node, ensure the node has the admin key. The admin key can be copied from any Ceph Monitor node.
Prerequisites
- Root-level access to the Ceph Object Gateway node.
Procedure
Create an object gateway user:
Syntax
radosgw-admin user create --uid="USER_NAME" --display-name="DISPLAY_NAME"
Example
[user@client ~]$ radosgw-admin user create --uid="admin-api-user" --display-name="Admin API User"
The
radosgw-admincommand-line interface will return the user.Example output
{
    "user_id": "admin-api-user",
    "display_name": "Admin API User",
    "email": "",
    "suspended": 0,
    "max_buckets": 1000,
    "auid": 0,
    "subusers": [],
    "keys": [
        {
            "user": "admin-api-user",
            "access_key": "NRWGT19TWMYOB1YDBV1Y",
            "secret_key": "gr1VEGIV7rxcP3xvXDFCo4UDwwl2YoNrmtRlIAty"
        }
    ],
    "swift_keys": [],
    "caps": [],
    "op_mask": "read, write, delete",
    "default_placement": "",
    "placement_tags": [],
    "bucket_quota": {
        "enabled": false,
        "max_size_kb": -1,
        "max_objects": -1
    },
    "user_quota": {
        "enabled": false,
        "max_size_kb": -1,
        "max_objects": -1
    },
    "temp_url_keys": []
}
Assign administrative capabilities to the user you create:
Syntax
radosgw-admin caps add --uid="USER_NAME" --caps="users=*"Example
[user@client ~]$ radosgw-admin caps add --uid=admin-api-user --caps="users=*"
The
radosgw-admincommand-line interface will return the user. The"caps":will have the capabilities you assigned to the user:Example output
{
    "user_id": "admin-api-user",
    "display_name": "Admin API User",
    "email": "",
    "suspended": 0,
    "max_buckets": 1000,
    "auid": 0,
    "subusers": [],
    "keys": [
        {
            "user": "admin-api-user",
            "access_key": "NRWGT19TWMYOB1YDBV1Y",
            "secret_key": "gr1VEGIV7rxcP3xvXDFCo4UDwwl2YoNrmtRlIAty"
        }
    ],
    "swift_keys": [],
    "caps": [
        {
            "type": "users",
            "perm": "*"
        }
    ],
    "op_mask": "read, write, delete",
    "default_placement": "",
    "placement_tags": [],
    "bucket_quota": {
        "enabled": false,
        "max_size_kb": -1,
        "max_objects": -1
    },
    "user_quota": {
        "enabled": false,
        "max_size_kb": -1,
        "max_objects": -1
    },
    "temp_url_keys": []
}
Now you have a user with administrative privileges.
2.4. Get user information
Get the user’s information.
Capabilities
users=read
Syntax
GET /admin/user?format=json HTTP/1.1
Host: FULLY_QUALIFIED_DOMAIN_NAME
Request Parameters
uid- Description
- The user for which the information is requested.
- Type
- String
- Example
-
foo_user - Required
- Yes
Response Entities
user- Description
- A container for the user data information.
- Type
- Container
- Parent
- N/A
user_id- Description
- The user ID.
- Type
- String
- Parent
-
user
display_name- Description
- Display name for the user.
- Type
- String
- Parent
-
user
suspended- Description
- True if the user is suspended.
- Type
- Boolean
- Parent
-
user
max_buckets- Description
- The maximum number of buckets to be owned by the user.
- Type
- Integer
- Parent
-
user
subusers- Description
- Subusers associated with this user account.
- Type
- Container
- Parent
-
user
keys- Description
- S3 keys associated with this user account.
- Type
- Container
- Parent
-
user
swift_keys- Description
- Swift keys associated with this user account.
- Type
- Container
- Parent
-
user
caps- Description
- User capabilities.
- Type
- Container
- Parent
-
user
If successful, the response contains the user information.
Special Error Responses
None.
2.5. Create a user
Create a new user. By default, an S3 key pair will be created automatically and returned in the response. If only a access-key or secret-key is provided, the omitted key will be automatically generated. By default, a generated key is added to the keyring without replacing an existing key pair. If access-key is specified and refers to an existing key owned by the user then it will be modified.
Capabilities
`users=write`
Syntax
PUT /admin/user?format=json HTTP/1.1
Host: FULLY_QUALIFIED_DOMAIN_NAME
Request Parameters
uid- Description
- The user ID to be created.
- Type
- String
- Example
-
foo_user - Required
- Yes
display-name- Description
- The display name of the user to be created.
- Type
- String
- Example
-
foo_user - Required
- Yes
email- Description
- The email address associated with the user.
- Type
- String
- Example
-
foo@bar.com - Required
- No
key-type- Description
- Key type to be generated, options are: swift, s3 (default).
- Type
- String
- Example
-
s3[s3] - Required
- No
access-key- Description
- Specify access key.
- Type
- String
- Example
-
ABCD0EF12GHIJ2K34LMN - Required
- No
secret-key- Description
- Specify secret key.
- Type
- String
- Example
-
0AbCDEFg1h2i34JklM5nop6QrSTUV+WxyzaBC7D8 - Required
- No
user-caps- Description
- User capabilities.
- Type
- String
- Example
-
usage=read, write; users=read - Required
- No
generate-key- Description
- Generate a new key pair and add to the existing keyring.
- Type
- Boolean
- Example
- True [True]
- Required
- No
max-buckets- Description
- Specify the maximum number of buckets the user can own.
- Type
- Integer
- Example
- 500 [1000]
- Required
- No
suspended- Description
- Specify whether the user should be suspended
- Type
- Boolean
- Example
- False [False]
- Required
- No
Response Entities
user- Description
- Specify whether the user should be suspended
- Type
- Boolean
- Parent
- No
user_id- Description
- The user ID.
- Type
- String
- Parent
-
user
display_name- Description
- Display name for the user.
- Type
- String
- Parent
-
user
suspended- Description
- True if the user is suspended.
- Type
- Boolean
- Parent
-
user
max_buckets- Description
- The maximum number of buckets to be owned by the user.
- Type
- Integer
- Parent
-
user
subusers- Description
- Subusers associated with this user account.
- Type
- Container
- Parent
-
user
keys- Description
- S3 keys associated with this user account.
- Type
- Container
- Parent
-
user
swift_keys- Description
- Swift keys associated with this user account.
- Type
- Container
- Parent
-
user
caps- Description
- User capabilities.
- Type
- Container
- Parent
- If successful, the response contains the user information.
Special Error Responses
UserExists- Description
- Attempt to create existing user.
- Code
- 409 Conflict
InvalidAccessKey- Description
- Invalid access key specified.
- Code
- 400 Bad Request
InvalidKeyType- Description
- Invalid key type specified.
- Code
- 400 Bad Request
InvalidSecretKey- Description
- Invalid secret key specified.
- Code
- 400 Bad Request
KeyExists- Description
- Provided access key exists and belongs to another user.
- Code
- 409 Conflict
EmailExists- Description
- Provided email address exists.
- Code
- 409 Conflict
InvalidCap- Description
- Attempt to grant invalid admin capability.
- Code
- 400 Bad Request
Additional Resources
- See the Red Hat Ceph Storage Developer Guide for creating subusers.
2.6. Modify a user
Modify an existing user.
Capabilities
`users=write`
Syntax
POST /admin/user?format=json HTTP/1.1
Host: FULLY_QUALIFIED_DOMAIN_NAME
Request Parameters
uid- Description
- The user ID to be created.
- Type
- String
- Example
-
foo_user - Required
- Yes
display-name- Description
- The display name of the user to be created.
- Type
- String
- Example
-
foo_user - Required
- Yes
email- Description
- The email address associated with the user.
- Type
- String
- Example
-
foo@bar.com - Required
- No
generate-key- Description
- Generate a new key pair and add to the existing keyring.
- Type
- Boolean
- Example
- True [False]
- Required
- No
access-key- Description
- Specify access key.
- Type
- String
- Example
-
ABCD0EF12GHIJ2K34LMN - Required
- No
secret-key- Description
- Specify secret key.
- Type
- String
- Example
-
0AbCDEFg1h2i34JklM5nop6QrSTUV+WxyzaBC7D8 - Required
- No
key-type- Description
- Key type to be generated, options are: swift, s3 (default).
- Type
- String
- Example
-
s3 - Required
- No
user-caps- Description
- User capabilities.
- Type
- String
- Example
-
usage=read, write; users=read - Required
- No
max-buckets- Description
- Specify the maximum number of buckets the user can own.
- Type
- Integer
- Example
- 500 [1000]
- Required
- No
suspended- Description
- Specify whether the user should be suspended
- Type
- Boolean
- Example
- False [False]
- Required
- No
Response Entities
user- Description
- Specify whether the user should be suspended
- Type
- Boolean
- Parent
- No
user_id- Description
- The user ID.
- Type
- String
- Parent
-
user
display_name- Description
- Display name for the user.
- Type
- String
- Parent
-
user
suspended- Description
- True if the user is suspended.
- Type
- Boolean
- Parent
-
user
max_buckets- Description
- The maximum number of buckets to be owned by the user.
- Type
- Integer
- Parent
-
user
subusers- Description
- Subusers associated with this user account.
- Type
- Container
- Parent
-
user
keys- Description
- S3 keys associated with this user account.
- Type
- Container
- Parent
-
user
swift_keys- Description
- Swift keys associated with this user account.
- Type
- Container
- Parent
-
user
caps- Description
- User capabilities.
- Type
- Container
- Parent
- If successful, the response contains the user information.
Special Error Responses
InvalidAccessKey- Description
- Invalid access key specified.
- Code
- 400 Bad Request
InvalidKeyType- Description
- Invalid key type specified.
- Code
- 400 Bad Request
InvalidSecretKey- Description
- Invalid secret key specified.
- Code
- 400 Bad Request
KeyExists- Description
- Provided access key exists and belongs to another user.
- Code
- 409 Conflict
EmailExists- Description
- Provided email address exists.
- Code
- 409 Conflict
InvalidCap- Description
- Attempt to grant invalid admin capability.
- Code
- 400 Bad Request
Additional Resources
- See the Red Hat Ceph Storage Developer Guide for modifying subusers.
2.7. Remove a user
Remove an existing user.
Capabilities
`users=write`
Syntax
DELETE /admin/user?format=json HTTP/1.1
Host: FULLY_QUALIFIED_DOMAIN_NAME
Request Parameters
uid- Description
- The user ID to be removed.
- Type
- String
- Example
-
foo_user - Required
- Yes
purge-data- Description
- When specified the buckets and objects belonging to the user will also be removed.
- Type
- Boolean
- Example
- True
- Required
- No
Response Entities
None.
Special Error Responses
None.
Additional Resources
- See Red Hat Ceph Storage Developer Guide for removing subusers.
2.8. Create a subuser
Create a new subuser, primarily useful for clients using the Swift API.
Either gen-subuser or subuser is required for a valid request. In general, for a subuser to be useful, it must be granted permissions by specifying access. As with user creation if subuser is specified without secret, then a secret key is automatically generated.
Capabilities
`users=write`
Syntax
PUT /admin/user?subuser&format=json HTTP/1.1
Host FULLY_QUALIFIED_DOMAIN_NAME
Request Parameters
uid- Description
- The user ID under which a subuser is to be created.
- Type
- String
- Example
-
foo_user - Required
- Yes
subuser- Description
- Specify the subuser ID to be created.
- Type
- String
- Example
-
sub_foo - Required
-
Yes (or
gen-subuser)
gen-subuser- Description
- Specify the subuser ID to be created.
- Type
- String
- Example
-
sub_foo - Required
-
Yes (or
gen-subuser)
secret-key- Description
- Specify secret key.
- Type
- String
- Example
-
0AbCDEFg1h2i34JklM5nop6QrSTUV+WxyzaBC7D8 - Required
- No
key-type- Description
- Key type to be generated, options are: swift (default), s3.
- Type
- String
- Example
-
swift[swift] - Required
- No
access- Description
-
Set access permissions for sub-user, should be one of
read, write, readwrite, full. - Type
- String
- Example
-
read - Required
- No
generate-secret- Description
- Generate the secret key.
- Type
- Boolean
- Example
- True [False]
- Required
- No
Response Entities
subusers- Description
- Subusers associated with the user account.
- Type
- Container
- Parent
- N/A
permissions- Description
- Subuser access to user account.
- Type
- String
- Parent
-
subusers
If successful, the response contains the subuser information.
Special Error Responses
SubuserExists- Description
- Specified subuser exists.
- Code
- 409 Conflict
InvalidKeyType- Description
- Invalid key type specified.
- Code
- 400 Bad Request
InvalidSecretKey- Description
- Invalid secret key specified.
- Code
- 400 Bad Request
InvalidAccess- Description
- Invalid subuser access specified
- Code
- 400 Bad Request
2.9. Modify a subuser
Modify an existing subuser.
Capabilities
`users=write`
Syntax
POST /admin/user?subuser&format=json HTTP/1.1
Host FULLY_QUALIFIED_DOMAIN_NAME
Request Parameters
uid- Description
- The user ID under which a subuser is to be created.
- Type
- String
- Example
-
foo_user - Required
- Yes
subuser- Description
- The subuser ID to be modified.
- Type
- String
- Example
-
sub_foo - Required
generate-secret- Description
- Generate a new secret key for the subuser, replacing the existing key.
- Type
- Boolean
- Example
- True [False]
- Required
- No
secret- Description
- Specify secret key.
- Type
- String
- Example
-
0AbCDEFg1h2i34JklM5nop6QrSTUV+WxyzaBC7D8 - Required
- No
key-type- Description
- Key type to be generated, options are: swift (default), s3.
- Type
- String
- Example
-
swift[swift] - Required
- No
access- Description
-
Set access permissions for sub-user, should be one of
read, write, readwrite, full. - Type
- String
- Example
-
read - Required
- No
Response Entities
subusers- Description
- Subusers associated with the user account.
- Type
- Container
- Parent
- N/A
id- Description
- Subuser ID
- Type
- String
- Parent
-
subusers
permissions- Description
- Subuser access to user account.
- Type
- String
- Parent
-
subusers
If successful, the response contains the subuser information.
Special Error Responses
InvalidKeyType- Description
- Invalid key type specified.
- Code
- 400 Bad Request
InvalidSecretKey- Description
- Invalid secret key specified.
- Code
- 400 Bad Request
InvalidAccess- Description
- Invalid subuser access specified
- Code
- 400 Bad Request
2.10. Remove a subuser
Remove an existing subuser.
Capabilities
`users=write`
Syntax
DELETE /admin/user?subuser&format=json HTTP/1.1
Host FULLY_QUALIFIED_DOMAIN_NAME
Request Parameters
uid- Description
- The user ID to be removed.
- Type
- String
- Example
-
foo_user - Required
- Yes
subuser- Description
- The subuser ID to be removed.
- Type
- String
- Example
-
sub_foo - Required
- Yes
purge-keys- Description
- Remove keys belonging to the subuser.
- Type
- Boolean
- Example
- True [True]
- Required
- No
Response Entities
None.
Special Error Responses
None.
2.11. Add capabilities to a user
Add an administrative capability to a specified user.
Capabilities
`users=write`
Syntax
PUT /admin/user?caps&format=json HTTP/1.1
Host FULLY_QUALIFIED_DOMAIN_NAME
Request Parameters
uid- Description
- The user ID to add an administrative capability to.
- Type
- String
- Example
-
foo_user - Required
- Yes
user-caps- Description
- The administrative capability to add to the user.
- Type
- String
- Example
-
usage=read, write - Required
- Yes
Response Entities
user- Description
- A container for the user data information.
- Type
- Container
- Parent
- N/A
user_id- Description
- The user ID
- Type
- String
- Parent
-
user
caps- Description
- User capabilities,
- Type
- Container
- Parent
-
user
If successful, the response contains the user’s capabilities.
Special Error Responses
InvalidCap- Description
- Attempt to grant invalid admin capability.
- Code
- 400 Bad Request
2.12. Remove capabilities from a user
Remove an administrative capability from a specified user.
Capabilities
`users=write`
Syntax
DELETE /admin/user?caps&format=json HTTP/1.1
Host FULLY_QUALIFIED_DOMAIN_NAME
Request Parameters
uid- Description
- The user ID to remove an administrative capability from.
- Type
- String
- Example
-
foo_user - Required
- Yes
user-caps- Description
- The administrative capabilities to remove from the user.
- Type
- String
- Example
-
usage=read, write - Required
- Yes
Response Entities
user- Description
- A container for the user data information.
- Type
- Container
- Parent
- N/A
user_id- Description
- The user ID.
- Type
- String
- Parent
-
user
caps- Description
- User capabilities.
- Type
- Container
- Parent
-
user
If successful, the response contains the user’s capabilities.
Special Error Responses
InvalidCap- Description
- Attempt to remove an invalid admin capability.
- Code
- 400 Bad Request
NoSuchCap- Description
- User does not possess specified capability.
- Code
- 404 Not Found
2.13. Create a key
Create a new key. If a subuser is specified then by default created keys will be swift type. If only one of access-key or secret-key is provided the committed key will be automatically generated, that is if only secret-key is specified then access-key will be automatically generated. By default, a generated key is added to the keyring without replacing an existing key pair. If access-key is specified and refers to an existing key owned by the user then it will be modified. The response is a container listing all keys of the same type as the key created.
When creating a swift key, specifying the option access-key will have no effect. Additionally, only one swift key might be held by each user or subuser.
Capabilities
`users=write`
Syntax
PUT /admin/user?key&format=json HTTP/1.1
Host FULLY_QUALIFIED_DOMAIN_NAME
Request Parameters
uid- Description
- The user ID to receive the new key.
- Type
- String
- Example
-
foo_user - Required
- Yes
subuser- Description
- The subuser ID to receive the new key.
- Type
- String
- Example
-
sub_foo - Required
- No
key-type- Description
- Key type to be generated, options are: swift, s3 (default).
- Type
- String
- Example
-
s3[s3] - Required
- No
access-key- Description
- Specify access key.
- Type
- String
- Example
-
AB01C2D3EF45G6H7IJ8K - Required
- No
secret-key- Description
- Specify secret key.
- Type
- String
- Example
-
0ab/CdeFGhij1klmnopqRSTUv1WxyZabcDEFgHij - Required
- No
generate-key- Description
- Generate a new key pair and add to the existing keyring.
- Type
- Boolean
- Example
-
True [
True] - Required
- No
Response Entities
keys- Description
- Keys of type created associated with this user account.
- Type
- Container
- Parent
- N/A
user- Description
- The user account associated with the key.
- Type
- String
- Parent
-
keys
access-key- Description
- The access key.
- Type
- String
- Parent
-
keys
secret-key- Description
- The secret key.
- Type
- String
- Parent
-
keys
Special Error Responses
InvalidAccessKey- Description
- Invalid access key specified.
- Code
- 400 Bad Request
InvalidKeyType- Description
- Invalid key type specified.
- Code
- 400 Bad Request
InvalidSecretKey- Description
- Invalid secret key specified.
- Code
- 400 Bad Request
InvalidKeyType- Description
- Invalid key type specified.
- Code
- 400 Bad Request
KeyExists- Description
- Provided access key exists and belongs to another user.
- Code
- 409 Conflict
2.14. Remove a key
Remove an existing key.
Capabilities
`users=write`
Syntax
DELETE /admin/user?key&format=json HTTP/1.1
Host FULLY_QUALIFIED_DOMAIN_NAME
Request Parameters
access-key- Description
- The S3 access key belonging to the S3 key pair to remove.
- Type
- String
- Example
-
AB01C2D3EF45G6H7IJ8K - Required
- Yes
uid- Description
- The user to remove the key from.
- Type
- String
- Example
-
foo_user - Required
- No
subuser- Description
- The subuser to remove the key from.
- Type
- String
- Example
-
sub_foo - Required
- No
key-type- Description
Key type to be removed, options are: swift, s3.
NoteRequired to remove swift key.
- Type
- String
- Example
-
swift - Required
- No
Special Error Responses
None.
Response Entities
None.
2.15. Bucket notifications
As a storage administrator, you can use these APIs to provide configuration and control interfaces for the bucket notification mechanism. The API topics are named objects that contain the definition of a specific endpoint. Bucket notifications associate topics with a specific bucket. The S3 bucket operations section gives more details on bucket notifications.
In all topic actions, the parameters are URL encoded, and sent in the message body using application/x-www-form-urlencoded content type.
Any bucket notification already associated with the topic needs to be re-created for the topic update to take effect.
Prerequisites
- Create bucket notifications on the Ceph Object Gateway.
2.15.1. Overview of bucket notifications
Bucket notifications provide a way to send information out of the Ceph Object Gateway when certain events happen in the bucket. Bucket notifications can be sent to HTTP, AMQP0.9.1, and Kafka endpoints. A notification entry must be created to send bucket notifications for events on a specific bucket and to a specific topic. A bucket notification can be created on a subset of event types or by default for all event types. The bucket notification can filter out events based on key prefix or suffix, regular expression matching the keys, and the metadata attributes attached to the object, or the object tags. Bucket notifications have a REST API to provide configuration and control interfaces for the bucket notification mechanism.
Sending a bucket notification when an object is synced to a zone lets the external system get information into the zone syncing status at the object level. The bucket notification event types s3:ObjectSynced:* and s3:ObjectSynced:Created, when configured via the bucket notification mechanism, send a notification event from the synced RGW upon successful sync of an object. Both the topics and the notification configuration should be done separately in each zone from which the notification events are being sent.
2.15.2. Persistent notifications
Persistent notifications enable reliable and asynchronous delivery of notifications from the Ceph Object Gateway to the endpoint configured at the topic. Regular notifications are also reliable because the delivery to the endpoint is performed synchronously during the request. With persistent notifications, the Ceph Object Gateway retries sending notifications even when the endpoint is down or there are network issues during the operations, that is notifications are retried if not successfully delivered to the endpoint. Notifications are sent only after all other actions related to the notified operation are successful. If an endpoint goes down for a longer duration, the notification queue fills up and the S3 operations that have configured notifications for these endpoints will fail.
With kafka-ack-level=none, there is no indication for message failures, and therefore messages sent while broker is down are not retried, when the broker is up again. After the broker is up again, only new notifications are seen.
2.15.3. Creating a topic
You can create topics before creating bucket notifications. A topic is a Simple Notification Service (SNS) entity and all the topic operations, that is, create, delete, list, and get, are SNS operations. The topic needs to have endpoint parameters that are used when a bucket notification is created. Once the request is successful, the response includes the topic Amazon Resource Name (ARN) that can be used later to reference this topic in the bucket notification request.
A topic_arn provides the bucket notification configuration and is generated after a topic is created.
Prerequisites
- A running Red Hat Ceph Storage cluster.
- Root-level access.
- Installation of the Ceph Object Gateway.
- User access key and secret key.
- Endpoint parameters.
Procedure
Create a topic with the following request format:
Syntax
POST
Action=CreateTopic
&Name=TOPIC_NAME
[&Attributes.entry.1.key=amqp-exchange&Attributes.entry.1.value=EXCHANGE]
[&Attributes.entry.2.key=amqp-ack-level&Attributes.entry.2.value=none|broker|routable]
[&Attributes.entry.3.key=verify-ssl&Attributes.entry.3.value=true|false]
[&Attributes.entry.4.key=kafka-ack-level&Attributes.entry.4.value=none|broker]
[&Attributes.entry.5.key=use-ssl&Attributes.entry.5.value=true|false]
[&Attributes.entry.6.key=ca-location&Attributes.entry.6.value=FILE_PATH]
[&Attributes.entry.7.key=OpaqueData&Attributes.entry.7.value=OPAQUE_DATA]
[&Attributes.entry.8.key=push-endpoint&Attributes.entry.8.value=ENDPOINT]
[&Attributes.entry.9.key=persistent&Attributes.entry.9.value=true|false]
Here are the request parameters:
-
Endpoint: URL of an endpoint to send notifications to. -
OpaqueData: opaque data is set in the topic configuration and added to all notifications triggered by the topic. -
persistent: indication of whether notifications to this endpoint are persistent that is asynchronous or not. By default the value isfalse. HTTP endpoint:
-
URL: https://FQDN:PORT -
port defaults to: Use 80/443 for HTTP[S] accordingly. -
verify-ssl: Indicates whether the server certificate is validated by the client or not. By default , it istrue.
-
AMQP0.9.1 endpoint:
-
URL: amqp://USER:PASSWORD@FQDN:PORT[/VHOST]. -
User and password defaults to:
guestandguestrespectively. - User and password details should be provided over HTTPS, otherwise the topic creation request is rejected.
-
port defaults to: 5672. -
vhostdefaults to: “/” -
amqp-exchange: The exchanges must exist and be able to route messages based on topics. This is a mandatory parameter for AMQP0.9.1. Different topics pointing to the same endpoint must use the same exchange. amqp-ack-level: No end to end acknowledgment is required, as messages may persist in the broker before being delivered into their final destination. Three acknowledgment methods exist:-
none: Message is considereddeliveredif sent to the broker. -
broker: By default, the message is considereddeliveredif acknowledged by the broker. routable: Message is considereddeliveredif the broker can route to a consumer.NoteThe key and value of a specific parameter do not have to reside in the same line, or in any specific order, but must use the same index. Attribute indexing does not need to be sequential or start from any specific value.
NoteThe
topic-nameis used for the AMQP topic.
-
-
Kafka endpoint:
-
URL: kafka://USER:PASSWORD@FQDN:PORT. -
use-sslis set tofalseby default. Ifuse-sslis set totrue, secure connection is used for connecting with the broker. -
If
ca-locationis provided, and secure connection is used, the specified CA will be used, instead of the default one, to authenticate the broker. - User and password can only be provided over HTTP[S]. Otherwise, the topic creation request is rejected.
-
User and password may only be provided together with
use-ssl, otherwise, the connection to the broker will fail. -
port defaults to: 9092. kafka-ack-level: no end to end acknowledgment required, as messages may persist in the broker before being delivered into their final destination. Two acknowledgment methods exist:-
none: message is considereddeliveredif sent to the broker. -
broker: By default, the message is considereddeliveredif acknowledged by the broker.
-
-
-
The following is an example of the response format:
Example
<CreateTopicResponse xmlns="https://sns.amazonaws.com/doc/2010-03-31/">
    <CreateTopicResult>
        <TopicArn></TopicArn>
    </CreateTopicResult>
    <ResponseMetadata>
        <RequestId></RequestId>
    </ResponseMetadata>
</CreateTopicResponse>
The topic Amazon Resource Name (ARN) in the response will have the following format: arn:aws:sns:ZONE_GROUP:TENANT:TOPIC
The following is an example of AMQP0.9.1 endpoint:
Example
client.create_topic(Name='my-topic' , Attributes={'push-endpoint': 'amqp://127.0.0.1:5672', 'amqp-exchange': 'ex1', 'amqp-ack-level': 'broker'}) "
2.15.4. Getting topic information
Returns information about a specific topic. This can include endpoint information if it is provided.
Prerequisites
- A running Red Hat Ceph Storage cluster.
- Root-level access.
- Installation of the Ceph Object Gateway.
- User access key and secret key.
- Endpoint parameters.
Procedure
Get topic information with the following request format:
Syntax
POST
Action=GetTopic
&TopicArn=TOPIC_ARN
Here is an example of the response format:
<GetTopicResponse>
<GetTopicRersult>
<Topic>
<User></User>
<Name></Name>
<EndPoint>
<EndpointAddress></EndpointAddress>
<EndpointArgs></EndpointArgs>
<EndpointTopic></EndpointTopic>
<HasStoredSecret></HasStoredSecret>
<Persistent></Persistent>
</EndPoint>
<TopicArn></TopicArn>
<OpaqueData></OpaqueData>
</Topic>
</GetTopicResult>
<ResponseMetadata>
<RequestId></RequestId>
</ResponseMetadata>
</GetTopicResponse>
The following are the tags and definitions:
-
User: Name of the user that created the topic. -
Name: Name of the topic. JSON formatted endpoints include:
EndpointAddress: The endpoint URL. If the endpoint URL contains user and password information, the request must be made over HTTPS. Otheriwse, the topic get request is rejected.-
EndPointArgs: The endpoint arguments. -
EndpointTopic: The topic name that is be sent to the endpoint can be different than the above example topic name. -
HasStoredSecret:truewhen the endpoint URL contains user and password information. -
Persistent:truewhen the topic is persistent.
-
-
TopicArn: Topic ARN. -
OpaqueData: This is an opaque data set on the topic.
-
2.15.5. Listing topics
List the topics that the user has defined.
Prerequisites
- A running Red Hat Ceph Storage cluster.
- Root-level access.
- Installation of the Ceph Object Gateway.
- User access key and secret key.
- Endpoint parameters.
Procedure
List topic information with the following request format:
Syntax
POST
Action=ListTopics
Here is an example of the response format:
<ListTopicdResponse xmlns="https://sns.amazonaws.com/doc/2020-03-31/">
<ListTopicsRersult>
<Topics>
<member>
<User></User>
<Name></Name>
<EndPoint>
<EndpointAddress></EndpointAddress>
<EndpointArgs></EndpointArgs>
<EndpointTopic></EndpointTopic>
</EndPoint>
<TopicArn></TopicArn>
<OpaqueData></OpaqueData>
</member>
</Topics>
</ListTopicsResult>
<ResponseMetadata>
<RequestId></RequestId>
</ResponseMetadata>
</ListTopicsResponse>
NoteIf endpoint URL contains user and password information, in any of the topics, the request must be made over HTTPS. Otherwise, the topic list request is rejected.
2.15.6. Deleting topics
Removing a deleted topic results in no operation and is not a failure.
Prerequisites
- A running Red Hat Ceph Storage cluster.
- Root-level access.
- Installation of the Ceph Object Gateway.
- User access key and secret key.
- Endpoint parameters.
Procedure
Delete a topic with the following request format:
Syntax
POST
Action=DeleteTopic
&TopicArn=TOPIC_ARN
Here is an example of the response format:
<DeleteTopicResponse xmlns="https://sns.amazonaws.com/doc/2020-03-31/">
<ResponseMetadata>
<RequestId></RequestId>
</ResponseMetadata>
</DeleteTopicResponse>
2.15.7. Using the command-line interface for topic management
You can list, get, and remove topics using the command-line interface.
Prerequisites
- Root-level access to the Ceph Object Gateway node.
Procedure
To get a list of all topics of a user:
Syntax
radosgw-admin topic list --uid=USER_IDExample
[root@rgw ~]# radosgw-admin topic list --uid=example
To get configuration of a specific topic:
Syntax
radosgw-admin topic get --uid=USER_ID --topic=TOPIC_NAME
Example
[root@rgw ~]# radosgw-admin topic get --uid=example --topic=example-topic
To remove a specific topic:
Syntax
radosgw-admin topic rm --uid=USER_ID --topic=TOPIC_NAME
Example
[root@rgw ~]# radosgw-admin topic rm --uid=example --topic=example-topic
2.15.8. Event record
An event holds information about the operation done by the Ceph Object Gateway and is sent as a payload over the chosen endpoint, such as HTTP, HTTPS, Kafka, or AMQ0.9.1. The event record is in JSON format.
Starting with Red Hat Ceph Storage 6, the following ObjectLifecycle:Expiration events are supported:
-
ObjectLifecycle:Expiration:Current -
ObjectLifecycle:Expiration:NonCurrent -
ObjectLifecycle:Expiration:DeleteMarker -
ObjectLifecycle:Expiration:AbortMultipartUpload
Example
{"Records":[
    {
        "eventVersion":"2.1",
        "eventSource":"ceph:s3",
        "awsRegion":"us-east-1",
        "eventTime":"2019-11-22T13:47:35.124724Z",
        "eventName":"ObjectCreated:Put",
        "userIdentity":{
            "principalId":"tester"
        },
        "requestParameters":{
            "sourceIPAddress":""
        },
        "responseElements":{
            "x-amz-request-id":"503a4c37-85eb-47cd-8681-2817e80b4281.5330.903595",
            "x-amz-id-2":"14d2-zone1-zonegroup1"
        },
        "s3":{
            "s3SchemaVersion":"1.0",
            "configurationId":"mynotif1",
            "bucket":{
                "name":"mybucket1",
                "ownerIdentity":{
                    "principalId":"tester"
                },
                "arn":"arn:aws:s3:us-east-1::mybucket1",
                "id":"503a4c37-85eb-47cd-8681-2817e80b4281.5332.38"
            },
            "object":{
                "key":"myimage1.jpg",
                "size":"1024",
                "eTag":"37b51d194a7513e45b56f6524f2d51f2",
                "versionId":"",
                "sequencer": "F7E6D75DC742D108",
                "metadata":[],
                "tags":[]
            }
        },
        "eventId":"",
        "opaqueData":"me@example.com"
    }
]}
These are the event record keys and their definitions:
-
awsRegion: Zonegroup. -
eventTime: Timestamp that indicates when the event was triggered. -
eventName: The type of the event. It can beObjectCreated,ObjectRemoved, orObjectLifecycle:Expiration -
userIdentity.principalId: The identity of the user that triggered the event. -
requestParameters.sourceIPAddress: The IP address of the client that triggered the event. This field is not supported. -
responseElements.x-amz-request-id: The request ID that triggered the event. -
responseElements.x_amz_id_2: The identity of the Ceph Object Gateway on which the event was triggered. The identity format is RGWID-ZONE-ZONEGROUP. -
s3.configurationId: The notification ID that created the event. -
s3.bucket.name: The name of the bucket. -
s3.bucket.ownerIdentity.principalId: The owner of the bucket. -
s3.bucket.arn: Amazon Resource Name (ARN) of the bucket. -
s3.bucket.id: Identity of the bucket. -
s3.object.key: The object key. -
s3.object.size: The size of the object. -
s3.object.eTag: The object etag. -
s3.object.version: The object version in a versioned bucket. -
s3.object.sequencer: Monotonically increasing identifier of the change per object in the hexadecimal format. -
s3.object.metadata: Any metadata set on the object sent asx-amz-meta. -
s3.object.tags: Any tags set on the object. -
s3.eventId: Unique identity of the event. -
s3.opaqueData: Opaque data is set in the topic configuration and added to all notifications triggered by the topic.
Additional Resources
- See the Event Message Structure for more information.
2.15.9. Get bucket information
Get information about a subset of the existing buckets. If uid is specified without bucket then all buckets belonging to the user will be returned. If bucket alone is specified, information for that particular bucket will be retrieved.
Capabilities
`buckets=read`
Syntax
GET /admin/bucket?format=json HTTP/1.1
Host FULLY_QUALIFIED_DOMAIN_NAME
Request Parameters
bucket- Description
- The bucket to return info on.
- Type
- String
- Example
-
foo_bucket - Required
- No
uid- Description
- The user to retrieve bucket information for.
- Type
- String
- Example
-
foo_user - Required
- No
stats- Description
- Return bucket statistics.
- Type
- Boolean
- Example
- True [False]
- Required
- No
Response Entities
stats- Description
- Per bucket information.
- Type
- Container
- Parent
- N/A
buckets- Description
- Contains a list of one or more bucket containers.
- Type
- Container
- Parent
-
buckets
bucket- Description
- Container for single bucket information.
- Type
- Container
- Parent
-
buckets
name- Description
- The name of the bucket.
- Type
- String
- Parent
-
bucket
pool- Description
- The pool the bucket is stored in.
- Type
- String
- Parent
-
bucket
id- Description
- The unique bucket ID.
- Type
- String
- Parent
-
bucket
marker- Description
- Internal bucket tag.
- Type
- String
- Parent
-
bucket
owner- Description
- The user ID of the bucket owner.
- Type
- String
- Parent
-
bucket
usage- Description
- Storage usage information.
- Type
- Container
- Parent
-
bucket
index- Description
- Status of bucket index.
- Type
- String
- Parent
-
bucket
If successful, then the request returns a bucket’s container with the bucket information.
Special Error Responses
IndexRepairFailed- Description
- Bucket index repair failed.
- Code
- 409 Conflict
2.15.10. Check a bucket index
Check the index of an existing bucket.
To check multipart object accounting with check-objects, fix must be set to True.
Capabilities
buckets=write
Syntax
GET /admin/bucket?index&format=json HTTP/1.1
Host FULLY_QUALIFIED_DOMAIN_NAME
Request Parameters
bucket- Description
- The bucket to return info on.
- Type
- String
- Example
-
foo_bucket - Required
- Yes
check-objects- Description
- Check multipart object accounting.
- Type
- Boolean
- Example
- True [False]
- Required
- No
fix- Description
- Also fix the bucket index when checking.
- Type
- Boolean
- Example
- False [False]
- Required
- No
Response Entities
index- Description
- Status of bucket index.
- Type
- String
Special Error Responses
IndexRepairFailed- Description
- Bucket index repair failed.
- Code
- 409 Conflict
2.15.11. Remove a bucket
Removes an existing bucket.
Capabilities
`buckets=write`
Syntax
DELETE /admin/bucket?format=json HTTP/1.1
Host FULLY_QUALIFIED_DOMAIN_NAME
Request Parameters
bucket- Description
- The bucket to remove.
- Type
- String
- Example
-
foo_bucket - Required
- Yes
purge-objects- Description
- Remove a bucket’s objects before deletion.
- Type
- Boolean
- Example
- True [False]
- Required
- No
Response Entities
None.
Special Error Responses
BucketNotEmpty- Description
- Attempted to delete non-empty bucket.
- Code
- 409 Conflict
ObjectRemovalFailed- Description
- Unable to remove objects.
- Code
- 409 Conflict
2.15.12. Link a bucket
Link a bucket to a specified user, unlinking the bucket from any previous user.
Capabilities
`buckets=write`
Syntax
PUT /admin/bucket?format=json HTTP/1.1
Host FULLY_QUALIFIED_DOMAIN_NAME
Request Parameters
bucket- Description
- The bucket to unlink.
- Type
- String
- Example
-
foo_bucket - Required
- Yes
uid- Description
- The user ID to link the bucket to.
- Type
- String
- Example
-
foo_user - Required
- Yes
Response Entities
bucket- Description
- Container for single bucket information.
- Type
- Container
- Parent
- N/A
name- Description
- The name of the bucket.
- Type
- String
- Parent
-
bucket
pool- Description
- The pool the bucket is stored in.
- Type
- String
- Parent
-
bucket
id- Description
- The unique bucket ID.
- Type
- String
- Parent
-
bucket
marker- Description
- Internal bucket tag.
- Type
- String
- Parent
-
bucket
owner- Description
- The user ID of the bucket owner.
- Type
- String
- Parent
-
bucket
usage- Description
- Storage usage information.
- Type
- Container
- Parent
-
bucket
index- Description
- Status of bucket index.
- Type
- String
- Parent
-
bucket
Special Error Responses
BucketUnlinkFailed- Description
- Unable to unlink bucket from specified user.
- Code
- 409 Conflict
BucketLinkFailed- Description
- Unable to link bucket to specified user.
- Code
- 409 Conflict
2.15.13. Unlink a bucket
Unlink a bucket from a specified user. Primarily useful for changing bucket ownership.
Capabilities
`buckets=write`
Syntax
POST /admin/bucket?format=json HTTP/1.1
Host FULLY_QUALIFIED_DOMAIN_NAME
Request Parameters
bucket- Description
- The bucket to unlink.
- Type
- String
- Example
-
foo_bucket - Required
- Yes
uid- Description
- The user ID to link the bucket to.
- Type
- String
- Example
-
foo_user - Required
- Yes
Response Entities
None.
Special Error Responses
BucketUnlinkFailed- Description
- Unable to unlink bucket from specified user.
- Type
- 409 Conflict
2.15.14. Get a bucket or object policy
Read the policy of an object or bucket.
Capabilities
`buckets=read`
Syntax
GET /admin/bucket?policy&format=json HTTP/1.1
Host FULLY_QUALIFIED_DOMAIN_NAME
Request Parameters
bucket- Description
- The bucket to read the policy from.
- Type
- String
- Example
-
foo_bucket - Required
- Yes
object- Description
- The object to read the policy from.
- Type
- String
- Example
-
foo.txt - Required
- No
Response Entities
policy- Description
- Access control policy.
- Type
- Container
- Parent
- N/A
If successful, returns the object or bucket policy
Special Error Responses
IncompleteBody- Description
- Either bucket was not specified for a bucket policy request or bucket and object were not specified for an object policy request.
- Code
- 400 Bad Request
2.15.15. Remove an object
Remove an existing object.
Does not require owner to be non-suspended.
Capabilities
`buckets=write`
Syntax
DELETE /admin/bucket?object&format=json HTTP/1.1
Host FULLY_QUALIFIED_DOMAIN_NAME
Request Parameters
bucket- Description
- The bucket containing the object to be removed.
- Type
- String
- Example
-
foo_bucket - Required
- Yes
object- Description
- The object to remove
- Type
- String
- Example
-
foo.txt - Required
- Yes
Response Entities
None.
Special Error Responses
NoSuchObject- Description
- Specified object does not exist.
- Code
- 404 Not Found
ObjectRemovalFailed- Description
- Unable to remove objects.
- Code
- 409 Conflict
2.15.16. Quotas
The administrative Operations API enables you to set quotas on users and on buckets owned by users. Quotas include the maximum number of objects in a bucket and the maximum storage size in megabytes.
To view quotas, the user must have a users=read capability. To set, modify or disable a quota, the user must have users=write capability.
Valid parameters for quotas include:
-
Bucket: The
bucketoption allows you to specify a quota for buckets owned by a user. -
Maximum Objects: The
max-objectssetting allows you to specify the maximum number of objects. A negative value disables this setting. -
Maximum Size: The
max-sizeoption allows you to specify a quota for the maximum number of bytes. A negative value disables this setting. -
Quota Scope: The
quota-scopeoption sets the scope for the quota. The options arebucketanduser.
2.15.17. Get a user quota
To get a quota, the user must have users capability set with read permission.
Syntax
GET /admin/user?quota&uid=UID"a-type=user
2.15.18. Set a user quota
To set a quota, the user must have users capability set with write permission.
Syntax
PUT /admin/user?quota&uid=UID"a-type=user
The content must include a JSON representation of the quota settings as encoded in the corresponding read operation.
2.15.19. Get a bucket quota
Get information about a subset of the existing buckets. If uid is specified without bucket then all buckets belonging to the user will be returned. If bucket alone is specified, information for that particular bucket will be retrieved.
Capabilities
`buckets=read`
Syntax
GET /admin/bucket?format=json HTTP/1.1
Host FULLY_QUALIFIED_DOMAIN_NAME
Request Parameters
bucket- Description
- The bucket to return info on.
- Type
- String
- Example
-
foo_bucket - Required
- No
uid- Description
- The user to retrieve bucket information for.
- Type
- String
- Example
-
foo_user - Required
- No
stats- Description
- Return bucket statistics.
- Type
- Boolean
- Example
- True [False]
- Required
- No
Response Entities
stats- Description
- Per bucket information.
- Type
- Container
- Parent
- N/A
buckets- Description
- Contains a list of one or more bucket containers.
- Type
- Container
- Parent
- N/A
bucket- Description
- Container for single bucket information.
- Type
- Container
- Parent
-
buckets
name- Description
- The name of the bucket.
- Type
- String
- Parent
-
bucket
pool- Description
- The pool the bucket is stored in.
- Type
- String
- Parent
-
bucket
id- Description
- The unique bucket ID.
- Type
- String
- Parent
-
bucket
marker- Description
- Internal bucket tag.
- Type
- String
- Parent
-
bucket
owner- Description
- The user ID of the bucket owner.
- Type
- String
- Parent
-
bucket
usage- Description
- Storage usage information.
- Type
- Container
- Parent
-
bucket
index- Description
- Status of bucket index.
- Type
- String
- Parent
-
bucket
If successful, then the request returns a bucket’s container with the bucket information.
Special Error Responses
IndexRepairFailed- Description
- Bucket index repair failed.
- Code
- 409 Conflict
2.15.20. Set a bucket quota
To set a quota, the user must have users capability set with write permission.
Syntax
PUT /admin/user?quota&uid=UID"a-type=bucket
The content must include a JSON representation of the quota settings as encoded in the corresponding read operation.
2.15.21. Get usage information
Requesting bandwidth usage information.
Capabilities
`usage=read`
Syntax
GET /admin/usage?format=json HTTP/1.1
Host: FULLY_QUALIFIED_DOMAIN_NAME
Request Parameters
uid- Description
- The user for which the information is requested.
- Type
- String
- Required
- Yes
start- Description
-
The date, and optionally, the time of when the data request started. For example,
2012-09-25 16:00:00. - Type
- String
- Required
- No
end- Description
-
The date, and optionally, the time of when the data request ended. For example,
2012-09-25 16:00:00. - Type
- String
- Required
- No
show-entries- Description
- Specifies whether data entries should be returned.
- Type
- Boolean
- Required
- No
show-summary- Description
- Specifies whether data entries should be returned.
- Type
- Boolean
- Required
- No
Response Entities
usage- Description
- A container for the usage information.
- Type
- Container
entries- Description
- A container for the usage entries information.
- Type
- Container
user- Description
- A container for the user data information.
- Type
- Container
owner- Description
- The name of the user that owns the buckets.
- Type
- String
bucket- Description
- The bucket name.
- Type
- String
time- Description
- Time lower bound for which data is being specified that is rounded to the beginning of the first relevant hour.
- Type
- String
epoch- Description
-
The time specified in seconds since
1/1/1970. - Type
- String
categories- Description
- A container for stats categories.
- Type
- Container
entry- Description
- A container for stats entry.
- Type
- Container
category- Description
- Name of request category for which the stats are provided.
- Type
- String
bytes_sent- Description
- Number of bytes sent by the Ceph Object Gateway.
- Type
- Integer
bytes_received- Description
- Number of bytes received by the Ceph Object Gateway.
- Type
- Integer
ops- Description
- Number of operations.
- Type
- Integer
successful_ops- Description
- Number of successful operations.
- Type
- Integer
summary- Description
- Number of successful operations.
- Type
- Container
total- Description
- A container for stats summary aggregated total.
- Type
- Container
If successful, the response contains the requested information.
2.15.22. Remove usage information
Remove usage information. With no dates specified, removes all usage information.
Capabilities
`usage=write`
Syntax
DELETE /admin/usage?format=json HTTP/1.1
Host: FULLY_QUALIFIED_DOMAIN_NAME
Request Parameters
uid- Description
- The user for which the information is requested.
- Type
- String
- Example
-
foo_user - Required
- Yes
start- Description
-
The date, and optionally, the time of when the data request started. For example,
2012-09-25 16:00:00. - Type
- String
- Example
-
2012-09-25 16:00:00 - Required
- No
end- Description
-
The date, and optionally, the time of when the data request ended. For example,
2012-09-25 16:00:00. - Type
- String
- Example
-
2012-09-25 16:00:00 - Required
- No
remove-all- Description
-
Required when
uidis not specified, in order to acknowledge multi-user data removal. - Type
- Boolean
- Example
- True [False]
- Required
- No
2.15.23. Standard error responses
The following list details standard error responses and their descriptions.
AccessDenied- Description
- Access denied.
- Code
- 403 Forbidden
InternalError- Description
- Internal server error.
- Code
- 500 Internal Server Error
NoSuchUser- Description
- User does not exist.
- Code
- 404 Not Found
NoSuchBucket- Description
- Bucket does not exist.
- Code
- 404 Not Found
NoSuchKey- Description
- No such access key.
- Code
- 404 Not Found
Chapter 3. Ceph Object Gateway and the S3 API
As a developer, you can use a RESTful application programming interface (API) that is compatible with the Amazon S3 data access model. You can manage the buckets and objects stored in a Red Hat Ceph Storage cluster through the Ceph Object Gateway.
Prerequisites
- A running Red Hat Ceph Storage cluster.
- A RESTful client.
3.1. S3 limitations
The following limitations should be used with caution. There are implications related to your hardware selections, so you should always discuss these requirements with your Red Hat account team.
-
Maximum object size when using Amazon S3: Individual Amazon S3 objects can range in size from a minimum of 0B to a maximum of 5TB. The largest object that can be uploaded in a single
PUTis 5GB. For objects larger than 100MB, you should consider using the Multipart Upload capability. - Maximum metadata size when using Amazon S3: There is no defined limit on the total size of user metadata that can be applied to an object, but a single HTTP request is limited to 16,000 bytes.
- The amount of data overhead Red Hat Ceph Storage cluster produces to store S3 objects and metadata: The estimate here is 200-300 bytes plus the length of the object name. Versioned objects consume additional space proportional to the number of versions. Also, transient overhead is produced during multi-part upload and other transactional updates, but these overheads are recovered during garbage collection.
Additional Resources
- See the Red Hat Ceph Storage Developer Guide for details on the unsupported header fields.
3.2. Accessing the Ceph Object Gateway with the S3 API
As a developer, you must configure access to the Ceph Object Gateway and the Secure Token Service (STS) before you can start using the Amazon S3 API.
Prerequisites
- A running Red Hat Ceph Storage cluster.
- A running Ceph Object Gateway.
- A RESTful client.
3.2.1. S3 authentication
Requests to the Ceph Object Gateway can be either authenticated or unauthenticated. Ceph Object Gateway assumes unauthenticated requests are sent by an anonymous user. Ceph Object Gateway supports canned ACLs.
For most use cases, clients use existing open source libraries like the Amazon SDK’s AmazonS3Client for Java, and Python Boto. With open source libraries you simply pass in the access key and secret key and the library builds the request header and authentication signature for you. However, you can create requests and sign them too.
Authenticating a request requires including an access key and a base 64-encoded hash-based Message Authentication Code (HMAC) in the request before it is sent to the Ceph Object Gateway server. Ceph Object Gateway uses an S3-compatible authentication approach.
Example
HTTP/1.1
PUT /buckets/bucket/object.mpeg
Host: cname.domain.com
Date: Mon, 2 Jan 2012 00:01:01 +0000
Content-Encoding: mpeg
Content-Length: 9999999

Authorization: AWS ACCESS_KEY:HASH_OF_HEADER_AND_SECRET
In the above example, replace ACCESS_KEY with the value for the access key ID followed by a colon (:). Replace HASH_OF_HEADER_AND_SECRET with a hash of a canonicalized header string and the secret corresponding to the access key ID.
Generate hash of header string and secret
To generate the hash of the header string and secret:
- Get the value of the header string.
- Normalize the request header string into canonical form.
- Generate an HMAC using a SHA-1 hashing algorithm.
-
Encode the
hmacresult as base-64.
Normalize header
To normalize the header into canonical form:
-
Get all
content-headers. -
Remove all
content-headers except forcontent-typeandcontent-md5. -
Ensure the
content-header names are lowercase. -
Sort the
content-headers lexicographically. -
Ensure you have a
Dateheader AND ensure the specified date uses GMT and not an offset. -
Get all headers beginning with
x-amz-. -
Ensure that the
x-amz-headers are all lowercase. -
Sort the
x-amz-headers lexicographically. - Combine multiple instances of the same field name into a single field and separate the field values with a comma.
- Replace white space and line breaks in header values with a single space.
- Remove white space before and after colons.
- Append a new line after each header.
- Merge the headers back into the request header.
Replace the HASH_OF_HEADER_AND_SECRET with the base-64 encoded HMAC string.
Additional Resources
- For additional details, consult the Signing and Authenticating REST Requests section of Amazon Simple Storage Service documentation.
3.2.2. S3-server-side encryption
The Ceph Object Gateway supports server-side encryption of uploaded objects for the S3 application programming interface (API). Server-side encryption means that the S3 client sends data over HTTP in its unencrypted form, and the Ceph Object Gateway stores that data in the Red Hat Ceph Storage cluster in encrypted form.
Red Hat does NOT support S3 object encryption of Static Large Object (SLO) or Dynamic Large Object (DLO).
To use encryption, client requests MUST send requests over an SSL connection. Red Hat does not support S3 encryption from a client unless the Ceph Object Gateway uses SSL. However, for testing purposes, administrators can disable SSL during testing by setting the rgw_crypt_require_ssl configuration setting to false at runtime, using the ceph config set client.rgw command, and then restarting the Ceph Object Gateway instance.
In a production environment, it might not be possible to send encrypted requests over SSL. In such a case, send requests using HTTP with server-side encryption.
For information about how to configure HTTP with server-side encryption, see the Additional Resources section below.
There are two options for the management of encryption keys:
Customer-provided Keys
When using customer-provided keys, the S3 client passes an encryption key along with each request to read or write encrypted data. It is the customer’s responsibility to manage those keys. Customers must remember which key the Ceph Object Gateway used to encrypt each object.
Ceph Object Gateway implements the customer-provided key behavior in the S3 API according to the Amazon SSE-C specification.
Since the customer handles the key management and the S3 client passes keys to the Ceph Object Gateway, the Ceph Object Gateway requires no special configuration to support this encryption mode.
Key Management Service
When using a key management service, the secure key management service stores the keys and the Ceph Object Gateway retrieves them on demand to serve requests to encrypt or decrypt data.
Ceph Object Gateway implements the key management service behavior in the S3 API according to the Amazon SSE-KMS specification.
Currently, the only tested key management implementations are HashiCorp Vault, and OpenStack Barbican. However, OpenStack Barbican is a Technology Preview and is not supported for use in production systems.
Additional Resources
3.2.3. S3 access control lists
Ceph Object Gateway supports S3-compatible Access Control Lists (ACL) functionality. An ACL is a list of access grants that specify which operations a user can perform on a bucket or on an object. Each grant has a different meaning when applied to a bucket versus applied to an object:
Table 3.1. User Operations
| Permission | Bucket | Object |
|---|---|---|
|
| Grantee can list the objects in the bucket. | Grantee can read the object. |
|
| Grantee can write or delete objects in the bucket. | N/A |
|
| Grantee can read bucket ACL. | Grantee can read the object ACL. |
|
| Grantee can write bucket ACL. | Grantee can write to the object ACL. |
|
| Grantee has full permissions for object in the bucket. | Grantee can read or write to the object ACL. |
3.2.4. Preparing access to the Ceph Object Gateway using S3
You have to follow some pre-requisites on the Ceph Object Gateway node before attempting to access the gateway server.
Prerequisites
- Installation of the Ceph Object Gateway software.
- Root-level access to the Ceph Object Gateway node.
Procedure
As
root, open port8080on the firewall:[root@rgw ~]# firewall-cmd --zone=public --add-port=8080/tcp --permanent [root@rgw ~]# firewall-cmd --reload
Add a wildcard to the DNS server that you are using for the gateway as mentioned in the Object Gateway Configuration and Administration Guide.
You can also set up the gateway node for local DNS caching. To do so, execute the following steps:
As
root, install and setupdnsmasq:[root@rgw ~]# yum install dnsmasq [root@rgw ~]# echo "address=/.FQDN_OF_GATEWAY_NODE/IP_OF_GATEWAY_NODE" | tee --append /etc/dnsmasq.conf [root@rgw ~]# systemctl start dnsmasq [root@rgw ~]# systemctl enable dnsmasq
Replace
IP_OF_GATEWAY_NODEandFQDN_OF_GATEWAY_NODEwith the IP address and FQDN of the gateway node.As
root, stop NetworkManager:[root@rgw ~]# systemctl stop NetworkManager [root@rgw ~]# systemctl disable NetworkManager
As
root, set the gateway server’s IP as the nameserver:[root@rgw ~]# echo "DNS1=IP_OF_GATEWAY_NODE" | tee --append /etc/sysconfig/network-scripts/ifcfg-eth0 [root@rgw ~]# echo "IP_OF_GATEWAY_NODE FQDN_OF_GATEWAY_NODE" | tee --append /etc/hosts [root@rgw ~]# systemctl restart network [root@rgw ~]# systemctl enable network [root@rgw ~]# systemctl restart dnsmasq
Replace
IP_OF_GATEWAY_NODEandFQDN_OF_GATEWAY_NODEwith the IP address and FQDN of the gateway node.Verify subdomain requests:
[user@rgw ~]$ ping mybucket.FQDN_OF_GATEWAY_NODEReplace
FQDN_OF_GATEWAY_NODEwith the FQDN of the gateway node.WarningSetting up the gateway server for local DNS caching is for testing purposes only. You won’t be able to access the outside network after doing this. It is strongly recommended to use a proper DNS server for the Red Hat Ceph Storage cluster and gateway node.
-
Create the
radosgwuser forS3access carefully as mentioned in the Object Gateway Configuration and Administration Guide and copy the generatedaccess_keyandsecret_key. You will need these keys forS3access and subsequent bucket management tasks.
3.2.5. Accessing the Ceph Object Gateway using Ruby AWS S3
You can use Ruby programming language along with aws-s3 gem for S3 access. Execute the steps mentioned below on the node used for accessing the Ceph Object Gateway server with Ruby AWS::S3.
Prerequisites
- User-level access to Ceph Object Gateway.
- Root-level access to the node accessing the Ceph Object Gateway.
- Internet access.
Procedure
Install the
rubypackage:[root@dev ~]# yum install ruby
NoteThe above command will install
rubyand its essential dependencies likerubygemsandruby-libs. If somehow the command does not install all the dependencies, install them separately.Install the
aws-s3Ruby package:[root@dev ~]# gem install aws-s3
Create a project directory:
[user@dev ~]$ mkdir ruby_aws_s3
[user@dev ~]$ cd ruby_aws_s3
Create the connection file:
[user@dev ~]$ vim conn.rb
Paste the following contents into the
conn.rbfile:Syntax
#!/usr/bin/env ruby

require 'aws/s3'
require 'resolv-replace'

AWS::S3::Base.establish_connection!(
        :server            => 'FQDN_OF_GATEWAY_NODE',
        :port           => '8080',
        :access_key_id     => 'MY_ACCESS_KEY',
        :secret_access_key => 'MY_SECRET_KEY'
)
Replace
FQDN_OF_GATEWAY_NODEwith the FQDN of the Ceph Object Gateway node. ReplaceMY_ACCESS_KEYandMY_SECRET_KEYwith theaccess_keyandsecret_keythat were generated when you created theradosgwuser forS3access as mentioned in the Red Hat Ceph Storage Object Gateway Configuration and Administration Guide.Example
#!/usr/bin/env ruby

require 'aws/s3'
require 'resolv-replace'

AWS::S3::Base.establish_connection!(
        :server            => 'testclient.englab.pnq.redhat.com',
        :port           => '8080',
        :access_key_id     => '98J4R9P22P5CDL65HKP8',
        :secret_access_key => '6C+jcaP0dp0+FZfrRNgyGA9EzRy25pURldwje049'
)
Save the file and exit the editor.
Make the file executable:
[user@dev ~]$ chmod +x conn.rb
Run the file:
[user@dev ~]$ ./conn.rb | echo $?
If you have provided the values correctly in the file, the output of the command will be
0.Create a new file for creating a bucket:
[user@dev ~]$ vim create_bucket.rb
Paste the following contents into the file:
#!/usr/bin/env ruby

load 'conn.rb'

AWS::S3::Bucket.create('my-new-bucket1')
Save the file and exit the editor.
Make the file executable:
[user@dev ~]$ chmod +x create_bucket.rb
Run the file:
[user@dev ~]$ ./create_bucket.rb
If the output of the command is
trueit would mean that bucketmy-new-bucket1was created successfully.Create a new file for listing owned buckets:
[user@dev ~]$ vim list_owned_buckets.rb
Paste the following content into the file:
#!/usr/bin/env ruby

load 'conn.rb'

AWS::S3::Service.buckets.each do |bucket|
        puts "{bucket.name}\t{bucket.creation_date}"
end
Save the file and exit the editor.
Make the file executable:
[user@dev ~]$ chmod +x list_owned_buckets.rb
Run the file:
[user@dev ~]$ ./list_owned_buckets.rb
The output should look something like this:
my-new-bucket1 2020-01-21 10:33:19 UTC
Create a new file for creating an object:
[user@dev ~]$ vim create_object.rb
Paste the following contents into the file:
#!/usr/bin/env ruby

load 'conn.rb'

AWS::S3::S3Object.store(
        'hello.txt',
        'Hello World!',
        'my-new-bucket1',
        :content_type => 'text/plain'
)
Save the file and exit the editor.
Make the file executable:
[user@dev ~]$ chmod +x create_object.rb
Run the file:
[user@dev ~]$ ./create_object.rb
This will create a file
hello.txtwith the stringHello World!.Create a new file for listing a bucket’s content:
[user@dev ~]$ vim list_bucket_content.rb
Paste the following content into the file:
#!/usr/bin/env ruby

load 'conn.rb'

new_bucket = AWS::S3::Bucket.find('my-new-bucket1')
new_bucket.each do |object|
        puts "{object.key}\t{object.about['content-length']}\t{object.about['last-modified']}"
end
Save the file and exit the editor.
Make the file executable.
[user@dev ~]$ chmod +x list_bucket_content.rb
Run the file:
[user@dev ~]$ ./list_bucket_content.rb
The output will look something like this:
hello.txt 12 Fri, 22 Jan 2020 15:54:52 GMT
Create a new file for deleting an empty bucket:
[user@dev ~]$ vim del_empty_bucket.rb
Paste the following contents into the file:
#!/usr/bin/env ruby

load 'conn.rb'

AWS::S3::Bucket.delete('my-new-bucket1')
Save the file and exit the editor.
Make the file executable:
[user@dev ~]$ chmod +x del_empty_bucket.rb
Run the file:
[user@dev ~]$ ./del_empty_bucket.rb | echo $?
If the bucket is successfully deleted, the command will return
0as output.NoteEdit the
create_bucket.rbfile to create empty buckets, for example,my-new-bucket4,my-new-bucket5. Next, edit the above-mentioneddel_empty_bucket.rbfile accordingly before trying to delete empty buckets.Create a new file for deleting non-empty buckets:
[user@dev ~]$ vim del_non_empty_bucket.rb
Paste the following contents into the file:
#!/usr/bin/env ruby

load 'conn.rb'

AWS::S3::Bucket.delete('my-new-bucket1', :force => true)
Save the file and exit the editor.
Make the file executable:
[user@dev ~]$ chmod +x del_non_empty_bucket.rb
Run the file:
[user@dev ~]$ ./del_non_empty_bucket.rb | echo $?
If the bucket is successfully deleted, the command will return
0as output.Create a new file for deleting an object:
[user@dev ~]$ vim delete_object.rb
Paste the following contents into the file:
#!/usr/bin/env ruby

load 'conn.rb'

AWS::S3::S3Object.delete('hello.txt', 'my-new-bucket1')
Save the file and exit the editor.
Make the file executable:
[user@dev ~]$ chmod +x delete_object.rb
Run the file:
[user@dev ~]$ ./delete_object.rb
This will delete the object
hello.txt.
3.2.6. Accessing the Ceph Object Gateway using Ruby AWS SDK
You can use the Ruby programming language along with aws-sdk gem for S3 access. Execute the steps mentioned below on the node used for accessing the Ceph Object Gateway server with Ruby AWS::SDK.
Prerequisites
- User-level access to Ceph Object Gateway.
- Root-level access to the node accessing the Ceph Object Gateway.
- Internet access.
Procedure
Install the
rubypackage:[root@dev ~]# yum install ruby
NoteThe above command will install
rubyand its essential dependencies likerubygemsandruby-libs. If somehow the command does not install all the dependencies, install them separately.Install the
aws-sdkRuby package:[root@dev ~]# gem install aws-sdk
Create a project directory:
[user@dev ~]$ mkdir ruby_aws_sdk
[user@dev ~]$ cd ruby_aws_sdk
Create the connection file:
[user@dev ~]$ vim conn.rb
Paste the following contents into the
conn.rbfile:Syntax
#!/usr/bin/env ruby

require 'aws-sdk'
require 'resolv-replace'

Aws.config.update(
        endpoint: 'http://FQDN_OF_GATEWAY_NODE:8080',
        access_key_id: 'MY_ACCESS_KEY',
        secret_access_key: 'MY_SECRET_KEY',
        force_path_style: true,
        region: 'us-east-1'
)
Replace
FQDN_OF_GATEWAY_NODEwith the FQDN of the Ceph Object Gateway node. ReplaceMY_ACCESS_KEYandMY_SECRET_KEYwith theaccess_keyandsecret_keythat were generated when you created theradosgwuser forS3access as mentioned in the Red Hat Ceph Storage Object Gateway Configuration and Administration Guide.Example
#!/usr/bin/env ruby

require 'aws-sdk'
require 'resolv-replace'

Aws.config.update(
        endpoint: 'http://testclient.englab.pnq.redhat.com:8080',
        access_key_id: '98J4R9P22P5CDL65HKP8',
        secret_access_key: '6C+jcaP0dp0+FZfrRNgyGA9EzRy25pURldwje049',
        force_path_style: true,
        region: 'us-east-1'
)
Save the file and exit the editor.
Make the file executable:
[user@dev ~]$ chmod +x conn.rb
Run the file:
[user@dev ~]$ ./conn.rb | echo $?
If you have provided the values correctly in the file, the output of the command will be
0.Create a new file for creating a bucket:
[user@dev ~]$ vim create_bucket.rb
Paste the following contents into the file:
Syntax
#!/usr/bin/env ruby

load 'conn.rb'

s3_client = Aws::S3::Client.new
s3_client.create_bucket(bucket: 'my-new-bucket2')
Save the file and exit the editor.
Make the file executable:
[user@dev ~]$ chmod +x create_bucket.rb
Run the file:
[user@dev ~]$ ./create_bucket.rb
If the output of the command is
true, this means that bucketmy-new-bucket2was created successfully.Create a new file for listing owned buckets:
[user@dev ~]$ vim list_owned_buckets.rb
Paste the following content into the file:
#!/usr/bin/env ruby

load 'conn.rb'

s3_client = Aws::S3::Client.new
s3_client.list_buckets.buckets.each do |bucket|
        puts "{bucket.name}\t{bucket.creation_date}"
end
Save the file and exit the editor.
Make the file executable:
[user@dev ~]$ chmod +x list_owned_buckets.rb
Run the file:
[user@dev ~]$ ./list_owned_buckets.rb
The output should look something like this:
my-new-bucket2 2020-01-21 10:33:19 UTC
Create a new file for creating an object:
[user@dev ~]$ vim create_object.rb
Paste the following contents into the file:
#!/usr/bin/env ruby

load 'conn.rb'

s3_client = Aws::S3::Client.new
s3_client.put_object(
        key: 'hello.txt',
        body: 'Hello World!',
        bucket: 'my-new-bucket2',
        content_type: 'text/plain'
)
Save the file and exit the editor.
Make the file executable:
[user@dev ~]$ chmod +x create_object.rb
Run the file:
[user@dev ~]$ ./create_object.rb
This will create a file
hello.txtwith the stringHello World!.Create a new file for listing a bucket’s content:
[user@dev ~]$ vim list_bucket_content.rb
Paste the following content into the file:
#!/usr/bin/env ruby

load 'conn.rb'

s3_client = Aws::S3::Client.new
s3_client.list_objects(bucket: 'my-new-bucket2').contents.each do |object|
        puts "{object.key}\t{object.size}"
end
Save the file and exit the editor.
Make the file executable.
[user@dev ~]$ chmod +x list_bucket_content.rb
Run the file:
[user@dev ~]$ ./list_bucket_content.rb
The output will look something like this:
hello.txt 12 Fri, 22 Jan 2020 15:54:52 GMT
Create a new file for deleting an empty bucket:
[user@dev ~]$ vim del_empty_bucket.rb
Paste the following contents into the file:
#!/usr/bin/env ruby

load 'conn.rb'

s3_client = Aws::S3::Client.new
s3_client.delete_bucket(bucket: 'my-new-bucket2')
Save the file and exit the editor.
Make the file executable:
[user@dev ~]$ chmod +x del_empty_bucket.rb
Run the file:
[user@dev ~]$ ./del_empty_bucket.rb | echo $?
If the bucket is successfully deleted, the command will return
0as output.NoteEdit the
create_bucket.rbfile to create empty buckets, for example,my-new-bucket6,my-new-bucket7. Next, edit the above-mentioneddel_empty_bucket.rbfile accordingly before trying to delete empty buckets.Create a new file for deleting a non-empty bucket:
[user@dev ~]$ vim del_non_empty_bucket.rb
Paste the following contents into the file:
#!/usr/bin/env ruby

load 'conn.rb'

s3_client = Aws::S3::Client.new
Aws::S3::Bucket.new('my-new-bucket2', client: s3_client).clear!
s3_client.delete_bucket(bucket: 'my-new-bucket2')
Save the file and exit the editor.
Make the file executable:
[user@dev ~]$ chmod +x del_non_empty_bucket.rb
Run the file:
[user@dev ~]$ ./del_non_empty_bucket.rb | echo $?
If the bucket is successfully deleted, the command will return
0as output.Create a new file for deleting an object:
[user@dev ~]$ vim delete_object.rb
Paste the following contents into the file:
#!/usr/bin/env ruby

load 'conn.rb'

s3_client = Aws::S3::Client.new
s3_client.delete_object(key: 'hello.txt', bucket: 'my-new-bucket2')
Save the file and exit the editor.
Make the file executable:
[user@dev ~]$ chmod +x delete_object.rb
Run the file:
[user@dev ~]$ ./delete_object.rb
This will delete the object
hello.txt.
3.2.7. Accessing the Ceph Object Gateway using PHP
You can use PHP scripts for S3 access. This procedure provides some example PHP scripts to do various tasks, such as deleting a bucket or an object.
The examples given below are tested against php v5.4.16 and aws-sdk v2.8.24.
Prerequisites
- Root-level access to a development workstation.
- Internet access.
Procedure
Install the
phppackage:[root@dev ~]# yum install php
-
Download the zip archive of
aws-sdkfor PHP and extract it. Create a project directory:
[user@dev ~]$ mkdir php_s3
[user@dev ~]$ cd php_s3
Copy the extracted
awsdirectory to the project directory. For example:[user@dev ~]$ cp -r ~/Downloads/aws/ ~/php_s3/
Create the connection file:
[user@dev ~]$ vim conn.php
Paste the following contents in the
conn.phpfile:Syntax
<?php
define('AWS_KEY', 'MY_ACCESS_KEY');
define('AWS_SECRET_KEY', 'MY_SECRET_KEY');
define('HOST', 'FQDN_OF_GATEWAY_NODE');
define('PORT', '8080');

// require the AWS SDK for php library
require '/PATH_TO_AWS/aws-autoloader.php';

use Aws\S3\S3Client;

// Establish connection with host using S3 Client
client = S3Client::factory(array(
    'base_url' => HOST,
    'port' => PORT,
    'key'      => AWS_KEY,
    'secret'   => AWS_SECRET_KEY
));
?>
Replace
FQDN_OF_GATEWAY_NODEwith the FQDN of the gateway node. ReplaceMY_ACCESS_KEYandMY_SECRET_KEYwith theaccess_keyandsecret_keythat were generated when creating theradosgwuser forS3access as mentioned in the Red Hat Ceph Storage Object Gateway Configuration and Administration Guide. ReplacePATH_TO_AWSwith the absolute path to the extractedawsdirectory that you copied to thephpproject directory.Save the file and exit the editor.
Run the file:
[user@dev ~]$ php -f conn.php | echo $?
If you have provided the values correctly in the file, the output of the command will be
0.Create a new file for creating a bucket:
[user@dev ~]$ vim create_bucket.php
Paste the following contents into the new file:
Syntax
<?php

include 'conn.php';

client->createBucket(array('Bucket' => 'my-new-bucket3'));

?>
Save the file and exit the editor.
Run the file:
[user@dev ~]$ php -f create_bucket.php
Create a new file for listing owned buckets:
[user@dev ~]$ vim list_owned_buckets.php
Paste the following content into the file:
Syntax
<?php

include 'conn.php';

blist = client->listBuckets();
echo "Buckets belonging to " . blist['Owner']['ID'] . ":\n";
foreach (blist['Buckets'] as b) {
    echo "{b['Name']}\t{b['CreationDate']}\n";
}

?>
Save the file and exit the editor.
Run the file:
[user@dev ~]$ php -f list_owned_buckets.php
The output should look similar to this:
my-new-bucket3 2020-01-21 10:33:19 UTC
Create an object by first creating a source file named
hello.txt:[user@dev ~]$ echo "Hello World!" > hello.txt
Create a new php file:
[user@dev ~]$ vim create_object.php
Paste the following contents into the file:
Syntax
<?php

include 'conn.php';

key         = 'hello.txt';
source_file = './hello.txt';
acl         = 'private';
bucket      = 'my-new-bucket3';
client->upload(bucket, key, fopen(source_file, 'r'), acl);

?>
Save the file and exit the editor.
Run the file:
[user@dev ~]$ php -f create_object.php
This will create the object
hello.txtin bucketmy-new-bucket3.Create a new file for listing a bucket’s content:
[user@dev ~]$ vim list_bucket_content.php
Paste the following content into the file:
Syntax
<?php

include 'conn.php';

o_iter = client->getIterator('ListObjects', array(
    'Bucket' => 'my-new-bucket3'
));
foreach (o_iter as o) {
    echo "{o['Key']}\t{o['Size']}\t{o['LastModified']}\n";
}
?>
Save the file and exit the editor.
Run the file:
[user@dev ~]$ php -f list_bucket_content.php
The output will look similar to this:
hello.txt 12 Fri, 22 Jan 2020 15:54:52 GMT
Create a new file for deleting an empty bucket:
[user@dev ~]$ vim del_empty_bucket.php
Paste the following contents into the file:
Syntax
<?php

include 'conn.php';

client->deleteBucket(array('Bucket' => 'my-new-bucket3'));
?>
Save the file and exit the editor.
Run the file:
[user@dev ~]$ php -f del_empty_bucket.php | echo $?
If the bucket is successfully deleted, the command will return
0as output.NoteEdit the
create_bucket.phpfile to create empty buckets, for example,my-new-bucket4,my-new-bucket5. Next, edit the above-mentioneddel_empty_bucket.phpfile accordingly before trying to delete empty buckets.ImportantDeleting a non-empty bucket is currently not supported in PHP 2 and newer versions of
aws-sdk.Create a new file for deleting an object:
[user@dev ~]$ vim delete_object.php
Paste the following contents into the file:
Syntax
<?php

include 'conn.php';

client->deleteObject(array(
    'Bucket' => 'my-new-bucket3',
    'Key'    => 'hello.txt',
));
?>
Save the file and exit the editor.
Run the file:
[user@dev ~]$ php -f delete_object.php
This will delete the object
hello.txt.
3.2.8. Secure Token Service
The Amazon Web Services' Secure Token Service (STS) returns a set of temporary security credentials for authenticating users.
Red Hat Ceph Storage Object Gateway supports a subset of Amazon STS application programming interfaces (APIs) for identity and access management (IAM).
Users first authenticate against STS and receive a short-lived S3 access key and secret key that can be used in subsequent requests.
Red Hat Ceph Storage can authenticate S3 users by integrating with a Single Sign-On by configuring an OIDC provider. This feature enables Object Storage users to authenticate against an enterprise identity provider rather than the local Ceph Object Gateway database. For instance, if the SSO is connected to an enterprise IDP in the backend, Object Storage users can use their enterprise credentials to authenticate and get access to the Ceph Object Gateway S3 endpoint.
By using STS along with the IAM role policy feature, you can create finely tuned authorization policies to control access to your data. This enables you to implement either a Role-Based Access Control (RBAC) or Attribute-Based Access Control (ABAC) authorization model for your object storage data, giving you complete control over who can access the data.
Additional Resources
- Amazon Web Services Secure Token Service welcome page.
- See the Configuring and using STS Lite with Keystone section of the Red Hat Ceph Storage Developer Guide for details on STS Lite and Keystone.
- See the Working around the limitations of using STS Lite with Keystone section of the Red Hat Ceph Storage Developer Guide for details on the limitations of STS Lite and Keystone.
- For more information on how to set up step-by-step STS Authentication with RHSSO using IDM (LDAP) as the IDP backend and Authorization using IAM roles with an RBAC model based on LDAP groups, see IBM Redbook.
3.2.8.1. The Secure Token Service application programming interfaces
The Ceph Object Gateway implements the following Secure Token Service (STS) application programming interfaces (APIs):
AssumeRole
This API returns a set of temporary credentials for cross-account access. These temporary credentials allow for both, permission policies attached with Role and policies attached with AssumeRole API. The RoleArn and the RoleSessionName request parameters are required, but the other request parameters are optional.
RoleArn- Description
- The role to assume for the Amazon Resource Name (ARN) with a length of 20 to 2048 characters.
- Type
- String
- Required
- Yes
RoleSessionName- Description
-
Identifying the role session name to assume. The role session name can uniquely identify a session when different principals or different reasons assume a role. This parameter’s value has a length of 2 to 64 characters. The
=,,,.,@, and-characters are allowed, but no spaces allowed. - Type
- String
- Required
- Yes
Policy- Description
- An identity and access management policy (IAM) in a JSON format for use in an inline session. This parameter’s value has a length of 1 to 2048 characters.
- Type
- String
- Required
- No
DurationSeconds- Description
-
The duration of the session in seconds, with a minimum value of
900seconds to a maximum value of43200seconds. The default value is3600seconds. - Type
- Integer
- Required
- No
ExternalId- Description
- When assuming a role for another account, provide the unique external identifier if available. This parameter’s value has a length of 2 to 1224 characters.
- Type
- String
- Required
- No
SerialNumber- Description
- A user’s identification number from their associated multi-factor authentication (MFA) device. The parameter’s value can be the serial number of a hardware device or a virtual device, with a length of 9 to 256 characters.
- Type
- String
- Required
- No
TokenCode- Description
- The value generated from the multi-factor authentication (MFA) device, if the trust policy requires MFA. If an MFA device is required, and if this parameter’s value is empty or expired, then AssumeRole call returns an "access denied" error message. This parameter’s value has a fixed length of 6 characters.
- Type
- String
- Required
- No
AssumeRoleWithWebIdentity
This API returns a set of temporary credentials for users who have been authenticated by an application, such as OpenID Connect or OAuth 2.0 Identity Provider. The RoleArn and the RoleSessionName request parameters are required, but the other request parameters are optional.
RoleArn- Description
- The role to assume for the Amazon Resource Name (ARN) with a length of 20 to 2048 characters.
- Type
- String
- Required
- Yes
RoleSessionName- Description
-
Identifying the role session name to assume. The role session name can uniquely identify a session when different principals or different reasons assume a role. This parameter’s value has a length of 2 to 64 characters. The
=,,,.,@, and-characters are allowed, but no spaces are allowed. - Type
- String
- Required
- Yes
Policy- Description
- An identity and access management policy (IAM) in a JSON format for use in an inline session. This parameter’s value has a length of 1 to 2048 characters.
- Type
- String
- Required
- No
DurationSeconds- Description
-
The duration of the session in seconds, with a minimum value of
900seconds to a maximum value of43200seconds. The default value is3600seconds. - Type
- Integer
- Required
- No
ProviderId- Description
- The fully qualified host component of the domain name from the identity provider. This parameter’s value is only valid for OAuth 2.0 access tokens, with a length of 4 to 2048 characters.
- Type
- String
- Required
- No
WebIdentityToken- Description
- The OpenID Connect identity token or OAuth 2.0 access token provided from an identity provider. This parameter’s value has a length of 4 to 2048 characters.
- Type
- String
- Required
- No
Additional Resources
- See the Examples using the Secure Token Service APIs section of the Red Hat Ceph Storage Developer Guide for more details.
- Amazon Web Services Security Token Service, the AssumeRole action.
- Amazon Web Services Security Token Service, the AssumeRoleWithWebIdentity action.
3.2.8.2. Configuring the Secure Token Service
Configure the Secure Token Service (STS) for use with the Ceph Object Gateway by setting the rgw_sts_key, and rgw_s3_auth_use_sts options.
The S3 and STS APIs co-exist in the same namespace, and both can be accessed from the same endpoint in the Ceph Object Gateway.
Prerequisites
- A running Red Hat Ceph Storage cluster.
- A running Ceph Object Gateway.
- Root-level access to a Ceph Manager node.
Procedure
Set the following configuration options for the Ceph Object Gateway client:
Syntax
ceph config set RGW_CLIENT_NAME rgw_sts_key STS_KEY
ceph config set RGW_CLIENT_NAME rgw_s3_auth_use_sts true
The
rgw_sts_keyis the STS key for encrypting or decrypting the session token and is exactly 16 hex characters.ImportantThe STS key needs to be alphanumeric.
Example
[root@mgr ~]# ceph config set client.rgw rgw_sts_key 7f8fd8dd4700mnop
[root@mgr ~]# ceph config set client.rgw rgw_s3_auth_use_sts true
Restart the Ceph Object Gateway for the added key to take effect.
NoteUse the output from the
ceph orch pscommand, under theNAMEcolumn, to get the SERVICE_TYPE.ID information.To restart the Ceph Object Gateway on an individual node in the storage cluster:
Syntax
systemctl restart ceph-CLUSTER_ID@SERVICE_TYPE.ID.service
Example
[root@host01 ~]# systemctl restart ceph-c4b34c6f-8365-11ba-dc31-529020a7702d@rgw.realm.zone.host01.gwasto.service
To restart the Ceph Object Gateways on all nodes in the storage cluster:
Syntax
ceph orch restart SERVICE_TYPEExample
[ceph: root@host01 /]# ceph orch restart rgw
Additional Resources
- See Secure Token Service application programming interfaces section in the Red Hat Ceph Storage Developer Guide for more details on the STS APIs.
- See the The basics of Ceph configuration chapter in the Red Hat Ceph Storage Configuration Guide for more details on using the Ceph configuration database.
3.2.8.3. Creating a user for an OpenID Connect provider
To establish trust between the Ceph Object Gateway and the OpenID Connect Provider create a user entity and a role trust policy.
Prerequisites
- User-level access to the Ceph Object Gateway node.
- Secure Token Service configured.
Procedure
Create a new Ceph user:
Syntax
radosgw-admin --uid USER_NAME --display-name "DISPLAY_NAME" --access_key USER_NAME --secret SECRET user create
Example
[user@rgw ~]$ radosgw-admin --uid TESTER --display-name "TestUser" --access_key TESTER --secret test123 user create
Configure the Ceph user capabilities:
Syntax
radosgw-admin caps add --uid="USER_NAME" --caps="oidc-provider=*"Example
[user@rgw ~]$ radosgw-admin caps add --uid="TESTER" --caps="oidc-provider=*"
Add a condition to the role trust policy using the Secure Token Service (STS) API:
Syntax
"{\"Version\":\"2020-01-17\",\"Statement\":[{\"Effect\":\"Allow\",\"Principal\":{\"Federated\":[\"arn:aws:iam:::oidc-provider/IDP_URL\"]},\"Action\":[\"sts:AssumeRoleWithWebIdentity\"],\"Condition\":{\"StringEquals\":{\"IDP_URL:app_id\":\"AUD_FIELD\"\}\}\}\]\}"ImportantThe
app_idin the syntax example above must match theAUD_FIELDfield of the incoming token.
Additional Resources
- See the Obtaining the Root CA Thumbprint for an OpenID Connect Identity Provider article on Amazon’s website.
- See the Secure Token Service application programming interfaces section in the Red Hat Ceph Storage Developer Guide for more details on the STS APIs.
- See the Examples using the Secure Token Service APIs section of the Red Hat Ceph Storage Developer Guide for more details.
3.2.8.4. Obtaining a thumbprint of an OpenID Connect provider
Get the OpenID Connect provider’s (IDP) configuration document.
Any SSO that follows the OIDC protocol standards is expected to work with the Ceph Object Gateway. Red Hat has tested with the following SSO providers:
- Red Hat Single Sing-on
- Keycloak
Prerequisites
-
Installation of the
opensslandcurlpackages.
Procedure
Get the configuration document from the IDP’s URL:
Syntax
curl -k -v \
     -X GET \
     -H "Content-Type: application/x-www-form-urlencoded" \
     "IDP_URL:8000/CONTEXT/realms/REALM/.well-known/openid-configuration" \
   | jq .
Example
[user@client ~]$ curl -k -v \
     -X GET \
     -H "Content-Type: application/x-www-form-urlencoded" \
     "http://www.example.com:8000/auth/realms/quickstart/.well-known/openid-configuration" \
   | jq .
Get the IDP certificate:
Syntax
curl -k -v \
     -X GET \
     -H "Content-Type: application/x-www-form-urlencoded" \
     "IDP_URL/CONTEXT/realms/REALM/protocol/openid-connect/certs" \
     | jq .
Example
[user@client ~]$ curl -k -v \ -X GET \ -H "Content-Type: application/x-www-form-urlencoded" \ "http://www.example.com/auth/realms/quickstart/protocol/openid-connect/certs" \ | jq .NoteThe
x5ccert can be available on the/certspath or in the/jwkspath depending on the SSO provider.Copy the result of the "x5c" response from the previous command and paste it into the
certificate.crtfile. Include—–BEGIN CERTIFICATE—–at the beginning and—–END CERTIFICATE—–at the end.Example
-----BEGIN CERTIFICATE-----

MIIDYjCCAkqgAwIBAgIEEEd2CDANBgkqhkiG9w0BAQsFADBzMQkwBwYDVQQGEwAxCTAHBgNVBAgTADEJMAcGA1UEBxMAMQkwBwYDVQQKEwAxCTAHBgNVBAsTADE6MDgGA1UEAxMxYXV0aHN2Yy1pbmxpbmVtZmEuZGV2LnZlcmlmeS5pYm1jbG91ZHNlY3VyaXR5LmNvbTAeFw0yMTA3MDUxMzU2MzZaFw0zMTA3MDMxMzU2MzZaMHMxCTAHBgNVBAYTADEJMAcGA1UECBMAMQkwBwYDVQQHEwAxCTAHBgNVBAoTADEJMAcGA1UECxMAMTowOAYDVQQDEzFhdXRoc3ZjLWlubGluZW1mYS5kZXYudmVyaWZ5LmlibWNsb3Vkc2VjdXJpdHkuY29tMIIBIjANBgkqhkiG9w0BAQEFAAOCAQ8AMIIBCgKCAQEAphyu3HaAZ14JH/EXetZxtNnerNuqcnfxcmLhBz9SsTlFD59ta+BOVlRnK5SdYEqO3ws2iGEzTvC55rczF+hDVHFZEBJLVLQe8ABmi22RAtG1P0dA/Bq8ReFxpOFVWJUBc31QM+ummW0T4yw44wQJI51LZTMz7PznB0ScpObxKe+frFKd1TCMXPlWOSzmTeFYKzR83Fg9hsnz7Y8SKGxi+RoBbTLT+ektfWpR7O+oWZIf4INe1VYJRxZvn+qWcwI5uMRCtQkiMknc3Rj6Eupiqq6FlAjDs0p//EzsHAlW244jMYnHCGq0UP3oE7vViLJyiOmZw7J3rvs3m9mOQiPLoQIDAQABMA0GCSqGSIb3DQEBCwUAA4IBAQCeVqAzSh7Tp8LgaTIFUuRbdjBAKXC9Nw3+pRBHoiUTdhqO3ualyGih9m/js/clb8Vq/39zl0VPeaslWl2NNX9zaK7xo+ckVIOY3ucCaTC04ZUn1KzZu/7azlN0C5XSWg/CfXgU2P3BeMNzc1UNY1BASGyWn2lEplIVWKLaDZpNdSyyGyaoQAIBdzxeNCyzDfPCa2oSO8WH1czmFiNPqR5kdknHI96CmsQdi+DT4jwzVsYgrLfcHXmiWyIAb883hR3Pobp+Bsw7LUnxebQ5ewccjYmrJzOk5Wb5FpXBhaJH1B3AEd6RGalRUyc/zUKdvEy0nIRMDS9x2BP3NVvZSADD

-----END CERTIFICATE-----
Get the certificate thumbprint:
Syntax
openssl x509 -in CERT_FILE -fingerprint -nooutExample
[user@client ~]$ openssl x509 -in certificate.crt -fingerprint -noout
SHA1 Fingerprint=F7:D7:B3:51:5D:D0:D3:19:DD:21:9A:43:A9:EA:72:7A:D6:06:52:87
- Remove all the colons from the SHA1 fingerprint and use this as the input for creating the IDP entity in the IAM request.
Additional Resources
- See the Obtaining the Root CA Thumbprint for an OpenID Connect Identity Provider article on Amazon’s website.
- See the Secure Token Service application programming interfaces section in the Red Hat Ceph Storage Developer Guide for more details on the STS APIs.
- See the Examples using the Secure Token Service APIs section of the Red Hat Ceph Storage Developer Guide for more details.
3.2.8.5. Registering the OpenID Connect provider
Register the OpenID Connect provider’s (IDP) configuration document.
Prerequisites
-
Installation of the
opensslandcurlpackages. - Secure Token Service configured.
- User created for an OIDC provider.
- Thumbprint of an OIDC obtained.
Procedure
Extract URL from the token.
Example
[root@host01 ~]# bash check_token_isv.sh | jq .iss

"https://keycloak-sso.apps.ocp.example.com/auth/realms/ceph"
Register the OIDC provider with Ceph Object Gateway.
Example
[root@host01 ~]# aws --endpoint https://cephproxy1.example.com:8443 iam create-open-id-connect-provider --url https://keycloak-sso.apps.ocp.example.com/auth/realms/ceph --thumbprint-list 00E9CFD697E0B16DD13C86B0FFDC29957E5D24DF
Verify that the OIDC provider is added to the Ceph Object Gateway.
Example
[root@host01 ~]# aws --endpoint https://cephproxy1.example.com:8443 iam
list-open-id-connect-providers

{
 "OpenIDConnectProviderList": [
 {
 "Arn":
"arn:aws:iam:::oidc-provider/keycloak-sso.apps.ocp.example.com/auth/realms/ceph"
 }
 ]
}
3.2.8.6. Creating IAM roles and policies
Create IAM roles and policies.
Prerequisites
-
Installation of the
opensslandcurlpackages. - Secure Token Service configured.
- User created for an OIDC provider.
- Thumbprint of an OIDC obtained.
- The OIDC provider in Ceph Object Gateway registered.
Procedure
Retrieve and validate JWT token.
Example
[root@host01 ~]# curl -k -q -L -X POST
"https://keycloak-sso.apps.example.com/auth/realms/ceph/protocol/openid-connect/
token" \
-H 'Content-Type: application/x-www-form-urlencoded' \
--data-urlencode 'client_id=ceph' \
--data-urlencode 'grant_type=password' \
--data-urlencode 'client_secret=XXXXXXXXXXXXXXXXXXXXXXX' \
--data-urlencode 'scope=openid' \
--data-urlencode "username=SSOUSERNAME" \
--data-urlencode "password=SSOPASSWORD"
Verify the token.
Example
[root@host01 ~]# cat check_token.sh
USERNAME=$1
PASSWORD=$2
KC_CLIENT="ceph"
KC_CLIENT_SECRET="7sQXqyMSzHIeMcSALoKaljB6sNIBDRjU"
KC_ACCESS_TOKEN="$(./get_web_token.sh $USERNAME $PASSWORD | jq -r '.access_token')"
KC_SERVER="https://keycloak-sso.apps.ocp.stg.local"
KC_CONTEXT="auth"
KC_REALM="ceph"
curl -k -s -q \
-X POST \
-u "$KC_CLIENT:$KC_CLIENT_SECRET" \
-d "token=$KC_ACCESS_TOKEN" \
"$KC_SERVER/$KC_CONTEXT/realms/$KC_REALM/protocol/openid-connect/token/introspect" | jq .


[root@host01 ~]# ./check_token.sh s3admin passw0rd | jq .sub
"ceph"
In this example, the jq filter is used by the subfield in the token and is set to ceph.
Create a JSON file with role properties. Set
StatementtoAllowand theActionasAssumeRoleWithWebIdentity. Allow access to any user with the JWT token that matches the condition withsub:ceph.Example
[root@host01 ~]# cat role-rgwadmins.json
{
 "Version": "2012-10-17",
 "Statement": [
   {
     "Effect": "Allow",
     "Principal": {
       "Federated": [
         "arn:aws:iam:::oidc-provider/keycloak-sso.apps.example.com/auth/realms/ceph"
       ]
     },
     "Action": [
       "sts:AssumeRoleWithWebIdentity"
     ],
     "Condition": {
       "StringLike": { "keycloak-sso.apps.example.com/auth/realms/ceph:sub":"ceph" }
     }
   }
 ]
}
Create a Ceph Object Gateway role using the JSON file.
Example
[root@host01 ~]# radosgw-admin role create --role-name rgwadmins \
--assume-role-policy-doc=$(jq -rc . /root/role-rgwadmins.json)
.
3.2.8.7. Accessing S3 resources
Verify the Assume Role with STS credentials to access S3 resources.
Prerequisites
-
Installation of the
opensslandcurlpackages. - Secure Token Service configured.
- User created for an OIDC provider.
- Thumbprint of an OIDC obtained.
- The OIDC provider in Ceph Object Gateway registered.
- IAM roles and policies created
Procedure
Following is an example of assume Role with STS to get temporary access and secret key to access S3 resources.
[roo@host01 ~]# cat test-assume-role.sh
#!/bin/bash
export AWS_CA_BUNDLE="/etc/pki/ca-trust/source/anchors/cert.pem"
unset AWS_ACCESS_KEY_ID
unset AWS_SECRET_ACCESS_KEY
unset AWS_SESSION_TOKEN
KC_ACCESS_TOKEN=$(curl -k -q -L -X POST
"https://keycloak-sso.apps.ocp.example.com/auth/realms/ceph/protocol/openid-connect/
token" \
-H 'Content-Type: application/x-www-form-urlencoded' \
--data-urlencode 'client_id=ceph' \
--data-urlencode 'grant_type=password' \
--data-urlencode 'client_secret=XXXXXXXXXXXXXXXXXXXXXXX' \
--data-urlencode 'scope=openid' \
--data-urlencode "<varname>SSOUSERNAME</varname>" \
--data-urlencode "<varname>SSOPASSWORD</varname>" | jq -r .access_token)
echo ${KC_ACCESS_TOKEN}
IDM_ASSUME_ROLE_CREDS=$(aws sts assume-role-with-web-identity --role-arn
"arn:aws:iam:::role/$3" --role-session-name testbr
--endpoint=https://cephproxy1.example.com:8443
--web-identity-token="$KC_ACCESS_TOKEN")
echo "aws sts assume-role-with-web-identity --role-arn "arn:aws:iam:::role/$3"
--role-session-name testb --endpoint=https://cephproxy1.example.com:8443
--web-identity-token="$KC_ACCESS_TOKEN""
echo $IDM_ASSUME_ROLE_CREDS
export AWS_ACCESS_KEY_ID=$(echo $IDM_ASSUME_ROLE_CREDS | jq -r
.Credentials.AccessKeyId)
export AWS_SECRET_ACCESS_KEY=$(echo $IDM_ASSUME_ROLE_CREDS | jq -r
.Credentials.SecretAccessKey)
export AWS_SESSION_TOKEN=$(echo $IDM_ASSUME_ROLE_CREDS | jq -r
.Credentials.SessionToken)
Run the script.
Example
[root@host01 ~]# source ./test-assume-role.sh s3admin passw0rd rgwadmins
[root@host01 ~]# aws s3 mb s3://testbucket
[root@host01 ~]# aws s3 ls
3.2.9. Configuring and using STS Lite with Keystone (Technology Preview)
The Amazon Secure Token Service (STS) and S3 APIs co-exist in the same namespace. The STS options can be configured in conjunction with the Keystone options.
Both S3 and STS APIs can be accessed using the same endpoint in Ceph Object Gateway.
Prerequisites
- Red Hat Ceph Storage 5.0 or higher.
- A running Ceph Object Gateway.
- Installation of the Boto Python module, version 3 or higher.
- Root-level access to a Ceph Manager node.
- User-level access to an OpenStack node.
Procedure
Set the following configuration options for the Ceph Object Gateway client:
Syntax
ceph config set RGW_CLIENT_NAME rgw_sts_key STS_KEY
ceph config set RGW_CLIENT_NAME rgw_s3_auth_use_sts true
The
rgw_sts_keyis the STS key for encrypting or decrypting the session token and is exactly 16 hex characters.ImportantThe STS key needs to be alphanumeric.
Example
[root@mgr ~]# ceph config set client.rgw rgw_sts_key 7f8fd8dd4700mnop
[root@mgr ~]# ceph config set client.rgw rgw_s3_auth_use_sts true
Generate the EC2 credentials on the OpenStack node:
Example
[user@osp ~]$ openstack ec2 credentials create

+------------+--------------------------------------------------------+
| Field      | Value                                                  |
+------------+--------------------------------------------------------+
| access     | b924dfc87d454d15896691182fdeb0ef                       |
| links      | {u'self': u'http://192.168.0.15/identity/v3/users/     |
|            | 40a7140e424f493d8165abc652dc731c/credentials/          |
|            | OS-EC2/b924dfc87d454d15896691182fdeb0ef'}              |
| project_id | c703801dccaf4a0aaa39bec8c481e25a                       |
| secret     | 6a2142613c504c42a94ba2b82147dc28                       |
| trust_id   | None                                                   |
| user_id    | 40a7140e424f493d8165abc652dc731c                       |
+------------+--------------------------------------------------------+
Use the generated credentials to get back a set of temporary security credentials using GetSessionToken API:
Example
import boto3

access_key = b924dfc87d454d15896691182fdeb0ef
secret_key = 6a2142613c504c42a94ba2b82147dc28

client = boto3.client('sts',
aws_access_key_id=access_key,
aws_secret_access_key=secret_key,
endpoint_url=https://www.example.com/rgw,
region_name='',
)

response = client.get_session_token(
    DurationSeconds=43200
)
Obtaining the temporary credentials can be used for making S3 calls:
Example
s3client = boto3.client('s3',
  aws_access_key_id = response['Credentials']['AccessKeyId'],
  aws_secret_access_key = response['Credentials']['SecretAccessKey'],
  aws_session_token = response['Credentials']['SessionToken'],
  endpoint_url=https://www.example.com/s3,
  region_name='')

bucket = s3client.create_bucket(Bucket='my-new-shiny-bucket')
response = s3client.list_buckets()
for bucket in response["Buckets"]:
  print "{name}\t{created}".format(
    name = bucket['Name'],
    created = bucket['CreationDate'],
  )
Create a new S3Access role and configure a policy.
Assign a user with administrative CAPS:
Syntax
radosgw-admin caps add --uid="USER" --caps="roles=*"Example
[root@mgr ~]# radosgw-admin caps add --uid="gwadmin" --caps="roles=*"
Create the S3Access role:
Syntax
radosgw-admin role create --role-name=ROLE_NAME --path=PATH --assume-role-policy-doc=TRUST_POLICY_DOC
Example
[root@mgr ~]# radosgw-admin role create --role-name=S3Access --path=/application_abc/component_xyz/ --assume-role-policy-doc=\{\"Version\":\"2012-10-17\",\"Statement\":\[\{\"Effect\":\"Allow\",\"Principal\":\{\"AWS\":\[\"arn:aws:iam:::user/TESTER\"\]\},\"Action\":\[\"sts:AssumeRole\"\]\}\]\}Attach a permission policy to the S3Access role:
Syntax
radosgw-admin role-policy put --role-name=ROLE_NAME --policy-name=POLICY_NAME --policy-doc=PERMISSION_POLICY_DOC
Example
[root@mgr ~]# radosgw-admin role-policy put --role-name=S3Access --policy-name=Policy --policy-doc=\{\"Version\":\"2012-10-17\",\"Statement\":\[\{\"Effect\":\"Allow\",\"Action\":\[\"s3:*\"\],\"Resource\":\"arn:aws:s3:::example_bucket\"\}\]\}-
Now another user can assume the role of the
gwadminuser. For example, thegwuseruser can assume the permissions of thegwadminuser. Make a note of the assuming user’s
access_keyandsecret_keyvalues.Example
[root@mgr ~]# radosgw-admin user info --uid=gwuser | grep -A1 access_key
Use the AssumeRole API call, providing the
access_keyandsecret_keyvalues from the assuming user:Example
import boto3 access_key = 11BS02LGFB6AL6H1ADMW secret_key = vzCEkuryfn060dfee4fgQPqFrncKEIkh3ZcdOANY client = boto3.client('sts', aws_access_key_id=access_key, aws_secret_access_key=secret_key, endpoint_url=https://www.example.com/rgw, region_name='', ) response = client.assume_role( RoleArn='arn:aws:iam:::role/application_abc/component_xyz/S3Access', RoleSessionName='Bob', DurationSeconds=3600 )ImportantThe AssumeRole API requires the S3Access role.
Additional Resources
- See the Test S3 Access section in the Red Hat Ceph Storage Object Gateway Guide for more information on installing the Boto Python module.
- See the Create a User section in the Red Hat Ceph Storage Object Gateway Guide for more information.
3.2.10. Working around the limitations of using STS Lite with Keystone (Technology Preview)
A limitation with Keystone is that it does not supports Secure Token Service (STS) requests. Another limitation is the payload hash is not included with the request. To work around these two limitations the Boto authentication code must be modified.
Prerequisites
- A running Red Hat Ceph Storage cluster, version 5.0 or higher.
- A running Ceph Object Gateway.
- Installation of Boto Python module, version 3 or higher.
Procedure
Open and edit Boto’s
auth.pyfile.Add the following four lines to the code block:
class SigV4Auth(BaseSigner):
  """
  Sign a request with Signature V4.
  """
  REQUIRES_REGION = True

  def __init__(self, credentials, service_name, region_name):
      self.credentials = credentials
      # We initialize these value here so the unit tests can have
      # valid values.  But these will get overriden in ``add_auth``
      # later for real requests.
      self._region_name = region_name
      if service_name == 'sts': 1
          self._service_name = 's3' 2
      else: 3
          self._service_name = service_name 4
Add the following two lines to the code block:
def _modify_request_before_signing(self, request):
        if 'Authorization' in request.headers:
            del request.headers['Authorization']
        self._set_necessary_date_headers(request)
        if self.credentials.token:
            if 'X-Amz-Security-Token' in request.headers:
                del request.headers['X-Amz-Security-Token']
            request.headers['X-Amz-Security-Token'] = self.credentials.token

        if not request.context.get('payload_signing_enabled', True):
            if 'X-Amz-Content-SHA256' in request.headers:
                del request.headers['X-Amz-Content-SHA256']
            request.headers['X-Amz-Content-SHA256'] = UNSIGNED_PAYLOAD 1
        else: 2
            request.headers['X-Amz-Content-SHA256'] = self.payload(request)
Additional Resources
- See the Test S3 Access section in the Red Hat Ceph Storage Object Gateway Guide for more information on installing the Boto Python module.
3.3. S3 bucket operations
As a developer, you can perform bucket operations with the Amazon S3 application programming interface (API) through the Ceph Object Gateway.
The following table list the Amazon S3 functional operations for buckets, along with the function’s support status.
Table 3.2. Bucket operations
| Feature | Status | Notes |
|---|---|---|
| Supported | ||
| Supported | Different set of canned ACLs. | |
| Supported | ||
| Supported | ||
| Supported | ||
| Partially Supported |
| |
| Partially Supported |
| |
| Supported | ||
| Supported | ||
| Supported | ||
| Supported | ||
| Supported | ||
| Supported | ||
| Supported | Different set of canned ACLs | |
| Supported | Different set of canned ACLs | |
| Supported | ||
| Supported | ||
| Supported | ||
| Supported | ||
| Supported | ||
| Supported | ||
| Partially Supported | ||
| Supported | ||
| Supported | ||
| Supported | ||
| Supported | ||
| Supported | ||
| Supported |
Prerequisites
- A running Red Hat Ceph Storage cluster.
- A RESTful client.
3.3.1. S3 create bucket notifications
Create bucket notifications at the bucket level. The notification configuration has the Red Hat Ceph Storage Object Gateway S3 events, ObjectCreated, ObjectRemoved, and ObjectLifecycle:Expiration. These need to be published and the destination to send the bucket notifications. Bucket notifications are S3 operations.
To create a bucket notification for s3:objectCreate, s3:objectRemove and s3:ObjectLifecycle:Expiration events, use PUT:
Example
client.put_bucket_notification_configuration(
   Bucket=bucket_name,
   NotificationConfiguration={
       'TopicConfigurations': [
           {
               'Id': notification_name,
               'TopicArn': topic_arn,
               'Events': ['s3:ObjectCreated:*', 's3:ObjectRemoved:*', 's3:ObjectLifecycle:Expiration:*']
           }]})
Red Hat supports ObjectCreate events, such as put, post, multipartUpload, and copy. Red Hat also supports ObjectRemove events, such as object_delete and s3_multi_object_delete.
Request Entities
NotificationConfiguration- Description
-
list of
TopicConfigurationentities. - Type
- Container
- Required
- Yes
TopicConfiguration- Description
-
Id,Topic, andlistof Event entities. - Type
- Container
- Required
- Yes
id- Description
- Name of the notification.
- Type
- String
- Required
- Yes
Topic- Description
Topic Amazon Resource Name(ARN)
NoteThe topic must be created beforehand.
- Type
- String
- Required
- Yes
Event- Description
- List of supported events. Multiple event entities can be used. If omitted, all events are handled.
- Type
- String
- Required
- No
Filter- Description
-
S3Key,S3MetadataandS3Tagsentities. - Type
- Container
- Required
- No
S3Key- Description
-
A list of
FilterRuleentities, for filtering based on the object key. At most, 3 entities may be in the list, for exampleNamewould beprefix,suffix, orregex. All filter rules in the list must match for the filter to match. - Type
- Container
- Required
- No
S3Metadata- Description
-
A list of
FilterRuleentities, for filtering based on object metadata. All filter rules in the list must match the metadata defined on the object. However, the object still matches if it has other metadata entries not listed in the filter. - Type
- Container
- Required
- No
S3Tags- Description
-
A list of
FilterRuleentities, for filtering based on object tags. All filter rules in the list must match the tags defined on the object. However, the object still matches if it has other tags not listed in the filter. - Type
- Container
- Required
- No
S3Key.FilterRule- Description
-
NameandValueentities. Name is :prefix,suffix, orregex. TheValuewould hold the key prefix, key suffix, or a regular expression for matching the key, accordingly. - Type
- Container
- Required
- Yes
S3Metadata.FilterRule- Description
-
NameandValueentities. Name is the name of the metadata attribute for examplex-amz-meta-xxx. The value is the expected value for this attribute. - Type
- Container
- Required
- Yes
S3Tags.FilterRule- Description
-
NameandValueentities. Name is the tag key, and the value is the tag value. - Type
- Container
- Required
- Yes
HTTP response
400- Status Code
-
MalformedXML - Description
- The XML is not well-formed.
400- Status Code
-
InvalidArgument - Description
- Missing Id or missing or invalid topic ARN or invalid event.
404- Status Code
-
NoSuchBucket - Description
- The bucket does not exist.
404- Status Code
-
NoSuchKey - Description
- The topic does not exist.
3.3.2. S3 get bucket notifications
Get a specific notification or list all the notifications configured on a bucket.
Syntax
Get /BUCKET?notification=NOTIFICATION_ID HTTP/1.1
Host: cname.domain.com
Date: date
Authorization: AWS ACCESS_KEY:HASH_OF_HEADER_AND_SECRET
Example
Get /testbucket?notification=testnotificationID HTTP/1.1
Host: cname.domain.com
Date: date
Authorization: AWS ACCESS_KEY:HASH_OF_HEADER_AND_SECRET
Example Response
<NotificationConfiguration xmlns="http://s3.amazonaws.com/doc/2006-03-01/">
    <TopicConfiguration>
        <Id></Id>
        <Topic></Topic>
        <Event></Event>
        <Filter>
            <S3Key>
                <FilterRule>
                    <Name></Name>
                    <Value></Value>
                </FilterRule>
                 </S3Key>
             <S3Metadata>
                 <FilterRule>
                     <Name></Name>
                     <Value></Value>
                 </FilterRule>
             </S3Metadata>
             <S3Tags>
                 <FilterRule>
                     <Name></Name>
                     <Value></Value>
                 </FilterRule>
             </S3Tags>
         </Filter>
    </TopicConfiguration>
</NotificationConfiguration>
The notification subresource returns the bucket notification configuration or an empty NotificationConfiguration element. The caller must be the bucket owner.
Request Entities
notification-id- Description
- Name of the notification. All notifications are listed if the ID is not provided.
- Type
- String
NotificationConfiguration- Description
-
list of
TopicConfigurationentities. - Type
- Container
- Required
- Yes
TopicConfiguration- Description
-
Id,Topic, andlistof Event entities. - Type
- Container
- Required
- Yes
id- Description
- Name of the notification.
- Type
- String
- Required
- Yes
Topic- Description
Topic Amazon Resource Name(ARN)
NoteThe topic must be created beforehand.
- Type
- String
- Required
- Yes
Event- Description
- Handled event. Multiple event entities may exist.
- Type
- String
- Required
- Yes
Filter- Description
- The filters for the specified configuration.
- Type
- Container
- Required
- No
HTTP response
404- Status Code
-
NoSuchBucket - Description
- The bucket does not exist.
404- Status Code
-
NoSuchKey - Description
- The notification does not exist if it has been provided.
3.3.3. S3 delete bucket notifications
Delete a specific or all notifications from a bucket.
Notification deletion is an extension to the S3 notification API. Any defined notifications on a bucket are deleted when the bucket is deleted. Deleting an unknown notification for example double delete, is not considered an error.
To delete a specific or all notifications use DELETE:
Syntax
DELETE /BUCKET?notification=NOTIFICATION_ID HTTP/1.1
Example
DELETE /testbucket?notification=testnotificationID HTTP/1.1
Request Entities
notification-id- Description
- Name of the notification. All notifications on the bucket are deleted if the notification ID is not provided.
- Type
- String
HTTP response
404- Status Code
-
NoSuchBucket - Description
- The bucket does not exist.
3.3.4. Accessing bucket host names
There are two different modes of accessing the buckets. The first, and preferred method identifies the bucket as the top-level directory in the URI.
Example
GET /mybucket HTTP/1.1
Host: cname.domain.com
The second method identifies the bucket via a virtual bucket host name.
Example
GET / HTTP/1.1
Host: mybucket.cname.domain.com
Red Hat prefers the first method, because the second method requires expensive domain certification and DNS wild cards.
3.3.5. S3 list buckets
GET / returns a list of buckets created by the user making the request. GET / only returns buckets created by an authenticated user. You cannot make an anonymous request.
Syntax
GET / HTTP/1.1
Host: cname.domain.com

Authorization: AWS ACCESS_KEY:HASH_OF_HEADER_AND_SECRET
Response Entities
Buckets- Description
- Container for list of buckets.
- Type
- Container
Bucket- Description
- Container for bucket information.
- Type
- Container
Name- Description
- Bucket name.
- Type
- String
CreationDate- Description
- UTC time when the bucket was created.
- Type
- Date
ListAllMyBucketsResult- Description
- A container for the result.
- Type
- Container
Owner- Description
-
A container for the bucket owner’s
IDandDisplayName. - Type
- Container
ID- Description
- The bucket owner’s ID.
- Type
- String
DisplayName- Description
- The bucket owner’s display name.
- Type
- String
3.3.6. S3 return a list of bucket objects
Returns a list of bucket objects.
Syntax
GET /BUCKET?max-keys=25 HTTP/1.1
Host: cname.domain.com
Parameters
prefix- Description
- Only returns objects that contain the specified prefix.
- Type
- String
delimiter- Description
- The delimiter between the prefix and the rest of the object name.
- Type
- String
marker- Description
- A beginning index for the list of objects returned.
- Type
- String
max-keys- Description
- The maximum number of keys to return. Default is 1000.
- Type
- Integer
HTTP Response
200- Status Code
-
OK - Description
- Buckets retrieved.
GET /BUCKET returns a container for buckets with the following fields:
Bucket Response Entities
ListBucketResult- Description
- The container for the list of objects.
- Type
- Entity
Name- Description
- The name of the bucket whose contents will be returned.
- Type
- String
Prefix- Description
- A prefix for the object keys.
- Type
- String
Marker- Description
- A beginning index for the list of objects returned.
- Type
- String
MaxKeys- Description
- The maximum number of keys returned.
- Type
- Integer
Delimiter- Description
-
If set, objects with the same prefix will appear in the
CommonPrefixeslist. - Type
- String
IsTruncated- Description
-
If
true, only a subset of the bucket’s contents were returned. - Type
- Boolean
CommonPrefixes- Description
- If multiple objects contain the same prefix, they will appear in this list.
- Type
- Container
The ListBucketResult contains objects, where each object is within a Contents container.
Object Response Entities
Contents- Description
- A container for the object.
- Type
- Object
Key- Description
- The object’s key.
- Type
- String
LastModified- Description
- The object’s last-modified date and time.
- Type
- Date
ETag- Description
- An MD-5 hash of the object. Etag is an entity tag.
- Type
- String
Size- Description
- The object’s size.
- Type
- Integer
StorageClass- Description
-
Should always return
STANDARD. - Type
- String
3.3.7. S3 create a new bucket
Creates a new bucket. To create a bucket, you must have a user ID and a valid AWS Access Key ID to authenticate requests. You can not create buckets as an anonymous user.
Constraints
In general, bucket names should follow domain name constraints.
- Bucket names must be unique.
- Bucket names cannot be formatted as IP address.
- Bucket names can be between 3 and 63 characters long.
- Bucket names must not contain uppercase characters or underscores.
- Bucket names must start with a lowercase letter or number.
- Bucket names can contain a dash (-).
- Bucket names must be a series of one or more labels. Adjacent labels are separated by a single period (.). Bucket names can contain lowercase letters, numbers, and hyphens. Each label must start and end with a lowercase letter or a number.
The above constraints are relaxed if rgw_relaxed_s3_bucket_names is set to true. The bucket names must still be unique, cannot be formatted as IP address, and can contain letters, numbers, periods, dashes, and underscores of up to 255 characters long.
Syntax
PUT /BUCKET HTTP/1.1
Host: cname.domain.com
x-amz-acl: public-read-write

Authorization: AWS ACCESS_KEY:HASH_OF_HEADER_AND_SECRET
Parameters
x-amz-acl- Description
- Canned ACLs.
- Valid Values
-
private,public-read,public-read-write,authenticated-read - Required
- No
HTTP Response
If the bucket name is unique, within constraints, and unused, the operation will succeed. If a bucket with the same name already exists and the user is the bucket owner, the operation will succeed. If the bucket name is already in use, the operation will fail.
409- Status Code
-
BucketAlreadyExists - Description
- Bucket already exists under different user’s ownership.
3.3.8. S3 put bucket website
The put bucket website API sets the configuration of the website that is specified in the website subresource. To configure a bucket as a website, the website subresource can be added on the bucket.
Put operation requires S3:PutBucketWebsite permission. By default, only the bucket owner can configure the website attached to a bucket.
Syntax
PUT /BUCKET?website-configuration=HTTP/1.1
Example
PUT /testbucket?website-configuration=HTTP/1.1
Additional Resources
- For more information about this API call, see S3 API.
3.3.9. S3 get bucket website
The get bucket website API retrieves the configuration of the website that is specified in the website subresource.
Get operation requires the S3:GetBucketWebsite permission. By default, only the bucket owner can read the bucket website configuration.
Syntax
GET /BUCKET?website-configuration=HTTP/1.1
Example
GET /testbucket?website-configuration=HTTP/1.1
Additional Resources
- For more information about this API call, see S3 API.
3.3.10. S3 delete bucket website
The delete bucket website API removes the website configuration for a bucket.
Syntax
DELETE /BUCKET?website-configuration=HTTP/1.1
Example
DELETE /testbucket?website-configuration=HTTP/1.1
Additional Resources
- For more information about this API call, see S3 API.
3.3.11. S3 delete a bucket
Deletes a bucket. You can reuse bucket names following a successful bucket removal.
Syntax
DELETE /BUCKET HTTP/1.1
Host: cname.domain.com

Authorization: AWS ACCESS_KEY:HASH_OF_HEADER_AND_SECRET
HTTP Response
204- Status Code
-
No Content - Description
- Bucket removed.
3.3.12. S3 bucket lifecycle
You can use a bucket lifecycle configuration to manage your objects so they are stored effectively throughout their lifetime. The S3 API in the Ceph Object Gateway supports a subset of the AWS bucket lifecycle actions:
-
Expiration: This defines the lifespan of objects within a bucket. It takes the number of days the object should live or expiration date, at which point Ceph Object Gateway will delete the object. If the bucket doesn’t enable versioning, Ceph Object Gateway will delete the object permanently. If the bucket enables versioning, Ceph Object Gateway will create a delete marker for the current version, and then delete the current version. -
NoncurrentVersionExpiration: This defines the lifespan of non-current object versions within a bucket. To use this feature, the bucket must enable versioning. It takes the number of days a non-current object should live, at which point Ceph Object Gateway will delete the non-current object. -
AbortIncompleteMultipartUpload: This defines the number of days an incomplete multipart upload should live before it is aborted.
The lifecycle configuration contains one or more rules using the <Rule> element.
Example
<LifecycleConfiguration>
    <Rule>
      <Prefix/>
      <Status>Enabled</Status>
      <Expiration>
        <Days>10</Days>
      </Expiration>
    </Rule>
</LifecycleConfiguration>
A lifecycle rule can apply to all or a subset of objects in a bucket based on the <Filter> element that you specify in the lifecycle rule. You can specify a filter in several ways:
- Key prefixes
- Object tags
- Both key prefix and one or more object tags
Key prefixes
You can apply a lifecycle rule to a subset of objects based on the key name prefix. For example, specifying <keypre/> would apply to objects that begin with keypre/:
<LifecycleConfiguration>
    <Rule>
        <Status>Enabled</Status>
        <Filter>
           <Prefix>keypre/</Prefix>
        </Filter>
    </Rule>
</LifecycleConfiguration>
You can also apply different lifecycle rules to objects with different key prefixes:
<LifecycleConfiguration>
    <Rule>
        <Status>Enabled</Status>
        <Filter>
           <Prefix>keypre/</Prefix>
        </Filter>
    </Rule>
    <Rule>
        <Status>Enabled</Status>
        <Filter>
           <Prefix>mypre/</Prefix>
        </Filter>
    </Rule>
</LifecycleConfiguration>
Object tags
You can apply a lifecycle rule to only objects with a specific tag using the <Key> and <Value> elements:
<LifecycleConfiguration>
    <Rule>
        <Status>Enabled</Status>
        <Filter>
           <Tag>
              <Key>key</Key>
              <Value>value</Value>
           </Tag>
        </Filter>
    </Rule>
</LifecycleConfiguration>
Both prefix and one or more tags
In a lifecycle rule, you can specify a filter based on both the key prefix and one or more tags. They must be wrapped in the <And> element. A filter can have only one prefix, and zero or more tags:
<LifecycleConfiguration>
    <Rule>
        <Status>Enabled</Status>
        <Filter>
          <And>
             <Prefix>key-prefix</Prefix>
             <Tag>
                <Key>key1</Key>
                <Value>value1</Value>
             </Tag>
             <Tag>
                <Key>key2</Key>
                <Value>value2</Value>
             </Tag>
              ...
          </And>
        </Filter>
    </Rule>
</LifecycleConfiguration>
Additional Resources
- See the S3 GET bucket lifecycle section in the Red Hat Ceph Storage Developer Guide for details on getting a bucket lifecycle.
- See the S3 create or replace a bucket lifecycle section in the Red Hat Ceph Storage Developer Guide for details on creating a bucket lifecycle.
- See the S3 delete a bucket lifecycle secton in the Red Hat Ceph Storage Developer Guide for details on deleting a bucket lifecycle.
3.3.13. S3 GET bucket lifecycle
To get a bucket lifecycle, use GET and specify a destination bucket.
Syntax
GET /BUCKET?lifecycle HTTP/1.1
Host: cname.domain.com

Authorization: AWS ACCESS_KEY:HASH_OF_HEADER_AND_SECRET
Request Headers
See the S3 common request headers in Appendix B for more information about common request headers.
Response
The response contains the bucket lifecycle and its elements.
3.3.14. S3 create or replace a bucket lifecycle
To create or replace a bucket lifecycle, use PUT and specify a destination bucket and a lifecycle configuration. The Ceph Object Gateway only supports a subset of the S3 lifecycle functionality.
Syntax
PUT /BUCKET?lifecycle HTTP/1.1
Host: cname.domain.com

Authorization: AWS ACCESS_KEY:HASH_OF_HEADER_AND_SECRET
<LifecycleConfiguration>
  <Rule>
    <Expiration>
      <Days>10</Days>
    </Expiration>
  </Rule>
    ...
  <Rule>
  </Rule>
</LifecycleConfiguration>
Request Headers
content-md5- Description
- A base64 encoded MD-5 hash of the message
- Valid Values
- String No defaults or constraints.
- Required
- No
Additional Resources
- See the S3 common request headers section in Appendix B of the Red Hat Ceph Storage Developer Guide for more information on Amazon S3 common request headers.
- See the S3 bucket lifecycles section of the Red Hat Ceph Storage Developer Guide for more information on Amazon S3 bucket lifecycles.
3.3.15. S3 delete a bucket lifecycle
To delete a bucket lifecycle, use DELETE and specify a destination bucket.
Syntax
DELETE /BUCKET?lifecycle HTTP/1.1
Host: cname.domain.com

Authorization: AWS ACCESS_KEY:HASH_OF_HEADER_AND_SECRET
Request Headers
The request does not contain any special elements.
Response
The response returns common response status.
Additional Resources
- See the S3 common request headers section in Appendix B of the Red Hat Ceph Storage Developer Guide for more information on Amazon S3 common request headers.
- See the S3 common response status codes section in Appendix C of Red Hat Ceph Storage Developer Guide for more information on Amazon S3 common response status codes.
3.3.16. S3 get bucket location
Retrieves the bucket’s zone group. The user needs to be the bucket owner to call this. A bucket can be constrained to a zone group by providing LocationConstraint during a PUT request.
Add the location subresource to the bucket resource as shown below.
Syntax
GET /BUCKET?location HTTP/1.1
Host: cname.domain.com

Authorization: AWS ACCESS_KEY:HASH_OF_HEADER_AND_SECRET
Response Entities
LocationConstraint- Description
- The zone group where bucket resides, an empty string for default zone group.
- Type
- String
3.3.17. S3 get bucket versioning
Retrieves the versioning state of a bucket. The user needs to be the bucket owner to call this.
Add the versioning subresource to the bucket resource as shown below.
Syntax
GET /BUCKET?versioning HTTP/1.1
Host: cname.domain.com

Authorization: AWS ACCESS_KEY:HASH_OF_HEADER_AND_SECRET
3.3.18. S3 put bucket versioning
This subresource set the versioning state of an existing bucket. The user needs to be the bucket owner to set the versioning state. If the versioning state has never been set on a bucket, then it has no versioning state. Doing a GET versioning request does not return a versioning state value.
Setting the bucket versioning state:
Enabled: Enables versioning for the objects in the bucket. All objects added to the bucket receive a unique version ID. Suspended: Disables versioning for the objects in the bucket. All objects added to the bucket receive the version ID null.
Syntax
PUT /BUCKET?versioning HTTP/1.1
Example
PUT /testbucket?versioning HTTP/1.1
Bucket Request Entities
VersioningConfiguration- Description
- A container for the request.
- Type
- Container
Status- Description
- Sets the versioning state of the bucket. Valid Values: Suspended/Enabled
- Type
- String
3.3.19. S3 get bucket access control lists
Retrieves the bucket access control list. The user needs to be the bucket owner or to have been granted READ_ACP permission on the bucket.
Add the acl subresource to the bucket request as shown below.
Syntax
GET /BUCKET?acl HTTP/1.1
Host: cname.domain.com

Authorization: AWS ACCESS_KEY:HASH_OF_HEADER_AND_SECRET
Response Entities
AccessControlPolicy- Description
- A container for the response.
- Type
- Container
AccessControlList- Description
- A container for the ACL information.
- Type
- Container
Owner- Description
-
A container for the bucket owner’s
IDandDisplayName. - Type
- Container
ID- Description
- The bucket owner’s ID.
- Type
- String
DisplayName- Description
- The bucket owner’s display name.
- Type
- String
Grant- Description
-
A container for
GranteeandPermission. - Type
- Container
Grantee- Description
-
A container for the
DisplayNameandIDof the user receiving a grant of permission. - Type
- Container
Permission- Description
-
The permission given to the
Granteebucket. - Type
- String
3.3.20. S3 put bucket Access Control Lists
Sets an access control to an existing bucket. The user needs to be the bucket owner or to have been granted WRITE_ACP permission on the bucket.
Add the acl subresource to the bucket request as shown below.
Syntax
PUT /BUCKET?acl HTTP/1.1
Request Entities
S3 list multipart uploads
AccessControlList- Description
- A container for the ACL information.
- Type
- Container
Owner- Description
-
A container for the bucket owner’s
IDandDisplayName. - Type
- Container
ID- Description
- The bucket owner’s ID.
- Type
- String
DisplayName- Description
- The bucket owner’s display name.
- Type
- String
Grant- Description
-
A container for
GranteeandPermission. - Type
- Container
Grantee- Description
-
A container for the
DisplayNameandIDof the user receiving a grant of permission. - Type
- Container
Permission- Description
-
The permission given to the
Granteebucket. - Type
- String
3.3.21. S3 get bucket cors
Retrieves the cors configuration information set for the bucket. The user needs to be the bucket owner or to have been granted READ_ACP permission on the bucket.
Add the cors subresource to the bucket request as shown below.
Syntax
GET /BUCKET?cors HTTP/1.1
Host: cname.domain.com

Authorization: AWS ACCESS_KEY:HASH_OF_HEADER_AND_SECRET
3.3.22. S3 put bucket cors
Sets the cors configuration for the bucket. The user needs to be the bucket owner or to have been granted READ_ACP permission on the bucket.
Add the cors subresource to the bucket request as shown below.
Syntax
PUT /BUCKET?cors HTTP/1.1
Host: cname.domain.com

Authorization: AWS ACCESS_KEY:HASH_OF_HEADER_AND_SECRET
3.3.23. S3 delete a bucket cors
Deletes the cors configuration information set for the bucket. The user needs to be the bucket owner or to have been granted READ_ACP permission on the bucket.
Add the cors subresource to the bucket request as shown below.
Syntax
DELETE /BUCKET?cors HTTP/1.1
Host: cname.domain.com

Authorization: AWS ACCESS_KEY:HASH_OF_HEADER_AND_SECRET
3.3.24. S3 list bucket object versions
Returns a list of metadata about all the version of objects within a bucket. Requires READ access to the bucket.
Add the versions subresource to the bucket request as shown below.
Syntax
GET /BUCKET?versions HTTP/1.1
Host: cname.domain.com

Authorization: AWS ACCESS_KEY:HASH_OF_HEADER_AND_SECRET
You can specify parameters for GET /BUCKET?versions, but none of them are required.
Parameters
prefix- Description
- Returns in-progress uploads whose keys contain the specified prefix.
- Type
- String
delimiter- Description
- The delimiter between the prefix and the rest of the object name.
- Type
- String
key-marker- Description
- The beginning marker for the list of uploads.
- Type
- String
max-keys- Description
- The maximum number of in-progress uploads. The default is 1000.
- Type
- Integer
version-id-marker- Description
- Specifies the object version to begin the list.
- Type
- String
Response Entities
KeyMarker- Description
-
The key marker specified by the
key-markerrequest parameter, if any. - Type
- String
NextKeyMarker- Description
-
The key marker to use in a subsequent request if
IsTruncatedistrue. - Type
- String
NextUploadIdMarker- Description
-
The upload ID marker to use in a subsequent request if
IsTruncatedistrue. - Type
- String
IsTruncated- Description
-
If
true, only a subset of the bucket’s upload contents were returned. - Type
- Boolean
Size- Description
- The size of the uploaded part.
- Type
- Integer
DisplayName- Description
- The owner’s display name.
- Type
- String
ID- Description
- The owner’s ID.
- Type
- String
Owner- Description
-
A container for the
IDandDisplayNameof the user who owns the object. - Type
- Container
StorageClass- Description
-
The method used to store the resulting object.
STANDARDorREDUCED_REDUNDANCY - Type
- String
Version- Description
- Container for the version information.
- Type
- Container
versionId- Description
- Version ID of an object.
- Type
- String
versionIdMarker- Description
- The last version of the key in a truncated response.
- Type
- String
3.3.25. S3 head bucket
Calls HEAD on a bucket to determine if it exists and if the caller has access permissions. Returns 200 OK if the bucket exists and the caller has permissions; 404 Not Found if the bucket does not exist; and, 403 Forbidden if the bucket exists but the caller does not have access permissions.
Syntax
HEAD /BUCKET HTTP/1.1
Host: cname.domain.com
Date: date
Authorization: AWS ACCESS_KEY:HASH_OF_HEADER_AND_SECRET
3.3.26. S3 list multipart uploads
GET /?uploads returns a list of the current in-progress multipart uploads, that is, the application initiates a multipart upload, but the service hasn’t completed all the uploads yet.
Syntax
GET /BUCKET?uploads HTTP/1.1
You can specify parameters for GET /BUCKET?uploads, but none of them are required.
Parameters
prefix- Description
- Returns in-progress uploads whose keys contain the specified prefix.
- Type
- String
delimiter- Description
- The delimiter between the prefix and the rest of the object name.
- Type
- String
key-marker- Description
- The beginning marker for the list of uploads.
- Type
- String
max-keys- Description
- The maximum number of in-progress uploads. The default is 1000.
- Type
- Integer
max-uploads- Description
- The maximum number of multipart uploads. The range is from 1-1000. The default is 1000.
- Type
- Integer
version-id-marker- Description
-
Ignored if
key-markerisn’t specified. Specifies theIDof the first upload to list in lexicographical order at or following theID. - Type
- String
Response Entities
ListMultipartUploadsResult- Description
- A container for the results.
- Type
- Container
ListMultipartUploadsResult.Prefix- Description
-
The prefix specified by the
prefixrequest parameter, if any. - Type
- String
Bucket- Description
- The bucket that will receive the bucket contents.
- Type
- String
KeyMarker- Description
-
The key marker specified by the
key-markerrequest parameter, if any. - Type
- String
UploadIdMarker- Description
-
The marker specified by the
upload-id-markerrequest parameter, if any. - Type
- String
NextKeyMarker- Description
-
The key marker to use in a subsequent request if
IsTruncatedistrue. - Type
- String
NextUploadIdMarker- Description
-
The upload ID marker to use in a subsequent request if
IsTruncatedistrue. - Type
- String
MaxUploads- Description
-
The max uploads specified by the
max-uploadsrequest parameter. - Type
- Integer
Delimiter- Description
-
If set, objects with the same prefix will appear in the
CommonPrefixeslist. - Type
- String
IsTruncated- Description
-
If
true, only a subset of the bucket’s upload contents were returned. - Type
- Boolean
Upload- Description
-
A container for
Key,UploadId,InitiatorOwner,StorageClass, andInitiatedelements. - Type
- Container
Key- Description
- The key of the object once the multipart upload is complete.
- Type
- String
UploadId- Description
-
The
IDthat identifies the multipart upload. - Type
- String
Initiator- Description
-
Contains the
IDandDisplayNameof the user who initiated the upload. - Type
- Container
DisplayName- Description
- The initiator’s display name.
- Type
- String
ID- Description
- The initiator’s ID.
- Type
- String
Owner- Description
-
A container for the
IDandDisplayNameof the user who owns the uploaded object. - Type
- Container
StorageClass- Description
-
The method used to store the resulting object.
STANDARDorREDUCED_REDUNDANCY - Type
- String
Initiated- Description
- The date and time the user initiated the upload.
- Type
- Date
CommonPrefixes- Description
- If multiple objects contain the same prefix, they will appear in this list.
- Type
- Container
CommonPrefixes.Prefix- Description
-
The substring of the key after the prefix as defined by the
prefixrequest parameter. - Type
- String
3.3.27. S3 bucket policies
The Ceph Object Gateway supports a subset of the Amazon S3 policy language applied to buckets.
Creation and Removal
Ceph Object Gateway manages S3 Bucket policies through standard S3 operations rather than using the radosgw-admin CLI tool.
Administrators may use the s3cmd command to set or delete a policy.
Example
$ cat > examplepol
{
  "Version": "2012-10-17",
  "Statement": [{
    "Effect": "Allow",
    "Principal": {"AWS": ["arn:aws:iam::usfolks:user/fred"]},
    "Action": "s3:PutObjectAcl",
    "Resource": [
      "arn:aws:s3:::happybucket/*"
    ]
  }]
}

$ s3cmd setpolicy examplepol s3://happybucket
$ s3cmd delpolicy s3://happybucket
Limitations
Ceph Object Gateway only supports the following S3 actions:
-
s3:AbortMultipartUpload -
s3:CreateBucket -
s3:DeleteBucketPolicy -
s3:DeleteBucket -
s3:DeleteBucketWebsite -
s3:DeleteObject -
s3:DeleteObjectVersion -
s3:GetBucketAcl -
s3:GetBucketCORS -
s3:GetBucketLocation -
s3:GetBucketPolicy -
s3:GetBucketRequestPayment -
s3:GetBucketVersioning -
s3:GetBucketWebsite -
s3:GetLifecycleConfiguration -
s3:GetObjectAcl -
s3:GetObject -
s3:GetObjectTorrent -
s3:GetObjectVersionAcl -
s3:GetObjectVersion -
s3:GetObjectVersionTorrent -
s3:ListAllMyBuckets -
s3:ListBucketMultiPartUploads -
s3:ListBucket -
s3:ListBucketVersions -
s3:ListMultipartUploadParts -
s3:PutBucketAcl -
s3:PutBucketCORS -
s3:PutBucketPolicy -
s3:PutBucketRequestPayment -
s3:PutBucketVersioning -
s3:PutBucketWebsite -
s3:PutLifecycleConfiguration -
s3:PutObjectAcl -
s3:PutObject -
s3:PutObjectVersionAcl
Ceph Object Gateway does not support setting policies on users, groups, or roles.
The Ceph Object Gateway uses the RGW ‘tenant’ identifier in place of the Amazon twelve-digit account ID. Ceph Object Gateway administrators who want to use policies between Amazon Web Service (AWS) S3 and Ceph Object Gateway S3 will have to use the Amazon account ID as the tenant ID when creating users.
With AWS S3, all tenants share a single namespace. By contrast, Ceph Object Gateway gives every tenant its own namespace of buckets. At present, Ceph Object Gateway clients trying to access a bucket belonging to another tenant MUST address it as tenant:bucket in the S3 request.
In the AWS, a bucket policy can grant access to another account, and that account owner can then grant access to individual users with user permissions. Since Ceph Object Gateway does not yet support user, role, and group permissions, account owners will need to grant access directly to individual users.
Granting an entire account access to a bucket grants access to ALL users in that account.
Bucket policies do NOT support string interpolation.
Ceph Object Gateway supports the following condition keys:
-
aws:CurrentTime -
aws:EpochTime -
aws:PrincipalType -
aws:Referer -
aws:SecureTransport -
aws:SourceIp -
aws:UserAgent -
aws:username
Ceph Object Gateway ONLY supports the following condition keys for the ListBucket action:
-
s3:prefix -
s3:delimiter -
s3:max-keys
Impact on Swift
Ceph Object Gateway provides no functionality to set bucket policies under the Swift API. However, bucket policies that have been set with the S3 API govern Swift as well as S3 operations.
Ceph Object Gateway matches Swift credentials against Principals specified in a policy.
3.3.28. S3 get the request payment configuration on a bucket
Uses the requestPayment subresource to return the request payment configuration of a bucket. The user needs to be the bucket owner or to have been granted READ_ACP permission on the bucket.
Add the requestPayment subresource to the bucket request as shown below.
Syntax
GET /BUCKET?requestPayment HTTP/1.1
Host: cname.domain.com

Authorization: AWS ACCESS_KEY:HASH_OF_HEADER_AND_SECRET
3.3.29. S3 set the request payment configuration on a bucket
Uses the requestPayment subresource to set the request payment configuration of a bucket. By default, the bucket owner pays for downloads from the bucket. This configuration parameter enables the bucket owner to specify that the person requesting the download will be charged for the request and the data download from the bucket.
Add the requestPayment subresource to the bucket request as shown below.
Syntax
PUT /BUCKET?requestPayment HTTP/1.1
Host: cname.domain.com
Request Entities
Payer- Description
- Specifies who pays for the download and request fees.
- Type
- Enum
RequestPaymentConfiguration- Description
-
A container for
Payer. - Type
- Container
3.3.30. Multi-tenant bucket operations
When a client application accesses buckets, it always operates with the credentials of a particular user. In Red Hat Ceph Storage cluster, every user belongs to a tenant. Consequently, every bucket operation has an implicit tenant in its context if no tenant is specified explicitly. Thus multi-tenancy is completely backward compatible with previous releases, as long as the referred buckets and referring user belong to the same tenant.
Extensions employed to specify an explicit tenant differ according to the protocol and authentication system used.
In the following example, a colon character separates tenant and bucket. Thus a sample URL would be:
https://rgw.domain.com/tenant:bucket
By contrast, a simple Python example separates the tenant and bucket in the bucket method itself:
Example
from boto.s3.connection import S3Connection, OrdinaryCallingFormat
  c = S3Connection(
    aws_access_key_id="TESTER",
    aws_secret_access_key="test123",
    host="rgw.domain.com",
    calling_format = OrdinaryCallingFormat()
  )
  bucket = c.get_bucket("tenant:bucket")
It’s not possible to use S3-style subdomains using multi-tenancy, since host names cannot contain colons or any other separators that are not already valid in bucket names. Using a period creates an ambiguous syntax. Therefore, the bucket-in-URL-path format has to be used with multi-tenancy.
Additional Resources
- See the Multi Tenancy section under User Management in the Red Hat Ceph Storage Object Gateway Guide for additional details.
3.3.31. S3 Block Public Access
You can use the S3 Block Public Access feature to set buckets and users to help you manage public access to Red Hat Ceph Storage object storage S3 resources.
Using this feature, bucket policies, access point policies, and object permissions can be overridden to allow public access. By default, new buckets, access points, and objects do not allow public access.
The S3 API in the Ceph Object Gateway supports a subset of the AWS public access settings:
BlockPublicPolicy: This defines the setting to allow users to manage access point and bucket policies. This setting does not allow the users to publicly share the bucket or the objects it contains. Existing access point and bucket policies are not affected by enabling this setting. Setting this option toTRUEcauses the S3:- To reject calls to PUT Bucket policy.
- To reject calls to PUT access point policy for all of the bucket’s same-account access points.
Apply this setting at the user level so that users cannot alter a specific bucket’s block public access setting.
The TRUE setting only works if the specified policy allows public access.
-
RestrictPublicBuckets: This defines the setting to restrict access to a bucket or access point with public policy. The restriction applies to only AWS service principals and authorized users within the bucket owner’s account and access point owner’s account. This blocks cross-account access to the access point or bucket, except for the cases specified, while still allowing users within the account to manage the access points or buckets. Enabling this setting does not affect existing access point or bucket policies. It only defines that Amazon S3 blocks public and cross-account access derived from any public access point or bucket policy, including non-public delegation to specific accounts.
Access control lists (ACLs) are not currently supported by Red Hat Ceph Storage.
Bucket policies are assumed to be public unless defined otherwise. To block public access a bucket policy must give access only to fixed values for one or more of the following:
A fixed value does not contain a wildcard (*) or an AWS Identity and Access Management Policy Variable.
- An AWS principal, user, role, or service principal
-
A set of Classless Inter-Domain Routings (CIDRs), using
aws:SourceIp -
aws:SourceArn -
aws:SourceVpc -
aws:SourceVpce -
aws:SourceOwner -
aws:SourceAccount -
s3:x-amz-server-side-encryption-aws-kms-key-id -
aws:userid, outside the patternAROLEID:* s3:DataAccessPointArnNoteWhen used in a bucket policy, this value can contain a wildcard for the access point name without rendering the policy public, as long as the account ID is fixed.
-
s3:DataAccessPointPointAccount
The following example policy is considered public.
Example
{
		"Principal": "*",
		"Resource": "*",
		"Action": "s3:PutObject",
		"Effect": "Allow",
		"Condition": { "StringLike": {"aws:SourceVpc": "vpc-*"}}
	}
To make a policy non-public, include any of the condition keys with a fixed value.
Example
{
		"Principal": "*",
		"Resource": "*",
		"Action": "s3:PutObject",
		"Effect": "Allow",
		"Condition": {"StringEquals": {"aws:SourceVpc": "vpc-91237329"}}
	}
Additional Resources
- See the S3 GET `PublicAccessBlock` section in the Red Hat Ceph Storage Developer Guide for details on getting a PublicAccessBlock.
- See the S3 PUT `PublicAccessBlock` section in the Red Hat Ceph Storage Developer Guide for details on creating or modifying a PublicAccessBlock.
- See the S3 Delete `PublicAccessBlock` section in the Red Hat Ceph Storage Developer Guide for details on deleting a PublicAccessBlock.
- See the S3 bucket policies section in the Red Hat Ceph Storage Developer Guide for details on bucket policies.
- See the Blocking public access to your Amazon S3 storage section of Amazon Simple Storage Service (S3) documentation.
3.3.32. S3 GET PublicAccessBlock
To get the S3 Block Public Access feature configured, use GET and specify a destination AWS account.
Syntax
GET /v20180820/configuration/publicAccessBlock HTTP/1.1
Host: cname.domain.com
x-amz-account-id: _ACCOUNTID_
Request Headers
See the S3 common request headers in Appendix B for more information about common request headers.
Response
The response is an HTTP 200 response and is returned in XML format.
3.3.33. S3 PUT PublicAccessBlock
Use this to create or modify the PublicAccessBlock configuration for an S3 bucket.
To use this operation, you must have the s3:PutBucketPublicAccessBlock permission.
If the PublicAccessBlock configuration is different between the bucket and the account, Amazon S3 uses the most restrictive combination of the bucket-level and account-level settings.
Syntax
PUT /?publicAccessBlock HTTP/1.1
Host: Bucket.s3.amazonaws.com
Content-MD5: ContentMD5
x-amz-sdk-checksum-algorithm: ChecksumAlgorithm
x-amz-expected-bucket-owner: ExpectedBucketOwner
<?xml version="1.0" encoding="UTF-8"?>
<PublicAccessBlockConfiguration xmlns="http://s3.amazonaws.com/doc/2006-03-01/">
   <BlockPublicAcls>boolean</BlockPublicAcls>
   <IgnorePublicAcls>boolean</IgnorePublicAcls>
   <BlockPublicPolicy>boolean</BlockPublicPolicy>
   <RestrictPublicBuckets>boolean</RestrictPublicBuckets>
</PublicAccessBlockConfiguration>
Request Headers
See the S3 common request headers in Appendix B for more information about common request headers.
Response
The response is an HTTP 200 response and is returned with an empty HTTP body.
3.3.34. S3 delete PublicAccessBlock
Use this to delete the PublicAccessBlock configuration for an S3 bucket.
Syntax
DELETE /v20180820/configuration/publicAccessBlock HTTP/1.1
Host: s3-control.amazonaws.com
x-amz-account-id: AccountId
Request Headers
See the S3 common request headers in Appendix B for more information about common request headers.
Response
The response is an HTTP 200 response and is returned with an empty HTTP body.
3.4. S3 object operations
As a developer, you can perform object operations with the Amazon S3 application programming interface (API) through the Ceph Object Gateway.
The following table list the Amazon S3 functional operations for objects, along with the function’s support status.
Table 3.3. Object operations
| Feature | Status |
|---|---|
| Supported | |
| Supported | |
| Supported | |
| Supported | |
| Supported | |
| Supported | |
| Supported | |
| Supported | |
| Supported | |
| Supported | |
| Supported | |
| Supported | |
| Supported | |
| Supported | |
| Supported | |
| Supported | |
| Supported | |
| Supported | |
| Supported | |
| Supported | |
| Supported | |
| Supported | |
| Supported | |
| Supported | |
| Supported | |
| Multi-Tenancy | Supported |
Prerequisites
- A running Red Hat Ceph Storage cluster.
- A RESTful client.
3.4.1. S3 get an object from a bucket
Retrieves an object from a bucket:
Syntax
GET /BUCKET/OBJECT HTTP/1.1
Add the versionId subresource to retrieve a particular version of the object:
Syntax
GET /BUCKET/OBJECT?versionId=VERSION_ID HTTP/1.1
Request Headers
partNumber- Description
-
Part number of the object being read. This enables a ranged
GETrequest for the specified part. Using this request is useful for downloading just a part of an object. - Valid Values
- A positive integer between 1 and 10,000.
- Required
- No
range- Description
The range of the object to retrieve.
NoteMultiple ranges of data per GET request are not supported.
- Valid Values
- Range:bytes=beginbyte-endbyte
- Required
- No
if-modified-since- Description
- Gets only if modified since the timestamp.
- Valid Values
- Timestamp
- Required
- No
if-unmodified-since- Description
- Gets only if not modified since the timestamp.
- Valid Values
- Timestamp
- Required
- No
if-match- Description
- Gets only if object ETag matches ETag.
- Valid Values
- Entity Tag
- Required
- No
if-none-match- Description
- Gets only if object ETag matches ETag.
- Valid Values
- Entity Tag
- Required
- No
Sytnax with request headers
GET /BUCKET/OBJECT?partNumber=PARTNUMBER&versionId=VersionId HTTP/1.1
Host: Bucket.s3.amazonaws.com
If-Match: IfMatch
If-Modified-Since: IfModifiedSince
If-None-Match: IfNoneMatch
If-Unmodified-Since: IfUnmodifiedSince
Range: Range
Response Headers
Content-Range- Description
- Data range, will only be returned if the range header field was specified in the request.
x-amz-version-id- Description
- Returns the version ID or null.
3.4.2. S3 get information on an object
Returns information about an object. This request will return the same header information as with the Get Object request, but will include the metadata only, not the object data payload.
Retrieves the current version of the object:
Syntax
HEAD /BUCKET/OBJECT HTTP/1.1
Add the versionId subresource to retrieve info for a particular version:
Syntax
HEAD /BUCKET/OBJECT?versionId=VERSION_ID HTTP/1.1
Request Headers
range- Description
- The range of the object to retrieve.
- Valid Values
- Range:bytes=beginbyte-endbyte
- Required
- No
if-modified-since- Description
- Gets only if modified since the timestamp.
- Valid Values
- Timestamp
- Required
- No
if-match- Description
- Gets only if object ETag matches ETag.
- Valid Values
- Entity Tag
- Required
- No
if-none-match- Description
- Gets only if object ETag matches ETag.
- Valid Values
- Entity Tag
- Required
- No
Response Headers
x-amz-version-id- Description
- Returns the version ID or null.
3.4.3. S3 put object lock
The put object lock API places a lock configuration on the selected bucket. With object lock, you can store objects using a write-once-read-many(WORM) model. Object lock ensures an object is not deleted or overwritten, for a fixed amount of time or indefinitely. The rule specified in the object lock configuration is applied by default to every new object placed in the selected bucket.
Enable the object lock when creating a bucket otherwise, the operation fails.
Syntax
PUT /BUCKET?object-lock HTTP/1.1
Example
PUT /testbucket?object-lock HTTP/1.1
Request Entities
ObjectLockConfiguration- Description
- A container for the request.
- Type
- Container
- Required
- Yes
ObjectLockEnabled- Description
- Indicates whether this bucket has an object lock configuration enabled.
- Type
- String
- Required
- Yes
Rule- Description
- The object lock rule in place for the specified bucket.
- Type
- Container
- Required
- No
DefaultRetention- Description
- The default retention period applied to new objects placed in the specified bucket.
- Type
- Container
- Required
- No
Mode- Description
- The default object lock retention mode. Valid values: GOVERNANCE/COMPLIANCE.
- Type
- Container
- Required
- Yes
Days- Description
- The number of days specified for the default retention period.
- Type
- Integer
- Required
- No
Years- Description
- The number of years specified for the default retention period.
- Type
- Integer
- Required
- No
HTTP Response
400- Status Code
-
MalformedXML - Description
- The XML is not well-formed.
409- Status Code
-
InvalidBucketState - Description
- The bucket object lock is not enabled.
Additional Resources
- For more information about this API call, see S3 API.
3.4.4. S3 get object lock
The get object lock API retrieves the lock configuration for a bucket.
Syntax
GET /BUCKET?object-lock HTTP/1.1
Example
GET /testbucket?object-lock HTTP/1.1
Response Entities
ObjectLockConfiguration- Description
- A container for the request.
- Type
- Container
- Required
- Yes
ObjectLockEnabled- Description
- Indicates whether this bucket has an object lock configuration enabled.
- Type
- String
- Required
- Yes
Rule- Description
- The object lock rule is in place for the specified bucket.
- Type
- Container
- Required
- No
DefaultRetention- Description
- The default retention period applied to new objects placed in the specified bucket.
- Type
- Container
- Required
- No
Mode- Description
- The default object lock retention mode. Valid values: GOVERNANCE/COMPLIANCE.
- Type
- Container
- Required
- Yes
Days- Description
- The number of days specified for the default retention period.
- Type
- Integer
- Required
- No
Years- Description
- The number of years specified for the default retention period.
- Type
- Integer
- Required
- No
Additional Resources
- For more information about this API call, see S3 API.
3.4.5. S3 put object legal hold
The put object legal hold API applies a legal hold configuration to the selected object. With a legal hold in place, you cannot overwrite or delete an object version. A legal hold does not have an associated retention period and remains in place until you explicitly remove it.
Syntax
PUT /BUCKET/OBJECT?legal-hold&versionId= HTTP/1.1
Example
PUT /testbucket/testobject?legal-hold&versionId= HTTP/1.1
The versionId subresource retrieves a particular version of the object.
Request Entities
LegalHold- Description
- A container for the request.
- Type
- Container
- Required
- Yes
Status- Description
- Indicates whether the specified object has a legal hold in place. Valid values: ON/OFF
- Type
- String
- Required
- Yes
Additional Resources
- For more information about this API call, see S3 API.
3.4.6. S3 get object legal hold
The get object legal hold API retrieves an object’s current legal hold status.
Syntax
GET /BUCKET/OBJECT?legal-hold&versionId= HTTP/1.1
Example
GET /testbucket/testobject?legal-hold&versionId= HTTP/1.1
The versionId subresource retrieves a particular version of the object.
Response Entities
LegalHold- Description
- A container for the request.
- Type
- Container
- Required
- Yes
Status- Description
- Indicates whether the specified object has a legal hold in place. Valid values: ON/OFF
- Type
- String
- Required
- Yes
Additional Resources
- For more information about this API call, see S3 API.
3.4.7. S3 put object retention
The put object retention API places an object retention configuration on an object. A retention period protects an object version for a fixed amount of time. There are two modes: governance mode and compliance mode. These two retention modes apply different levels of protection to your objects.
During this period, your object is write-once-read-many(WORM protected) and can not be overwritten or deleted.
Syntax
PUT /BUCKET/OBJECT?retention&versionId= HTTP/1.1
Example
PUT /testbucket/testobject?retention&versionId= HTTP/1.1
The versionId subresource retrieves a particular version of the object.
Request Entities
Retention- Description
- A container for the request.
- Type
- Container
- Required
- Yes
Mode- Description
- Retention mode for the specified object. Valid values: GOVERNANCE/COMPLIANCE
- Type
- String
- Required
- Yes
RetainUntilDate- Description
- Retention date. Format: 2020-01-05T00:00:00.000Z
- Type
- Timestamp
- Required
- Yes
Additional Resources
- For more information about this API call, see S3 API.
3.4.8. S3 get object retention
The get object retention API retrieves an object retention configuration on an object.
Syntax
GET /BUCKET/OBJECT?retention&versionId= HTTP/1.1
Example
GET /testbucket/testobject?retention&versionId= HTTP/1.1
The versionId subresource retrieves a particular version of the object.
Response Entities
Retention- Description
- A container for the request.
- Type
- Container
- Required
- Yes
Mode- Description
- Retention mode for the specified object. Valid values: GOVERNANCE/COMPLIANCE
- Type
- String
- Required
- Yes
RetainUntilDate- Description
- Retention date. Format: 2020-01-05T00:00:00.000Z
- Type
- Timestamp
- Required
- Yes
Additional Resources
- For more information about this API call, see S3 API.
3.4.9. S3 put object tagging
The put object tagging API associates tags with an object. A tag is a key-value pair. To put tags of any other version, use the versionId query parameter. You must have permission to perform the s3:PutObjectTagging action. By default, the bucket owner has this permission and can grant this permission to others.
Syntax
PUT /BUCKET/OBJECT?tagging&versionId= HTTP/1.1
Example
PUT /testbucket/testobject?tagging&versionId= HTTP/1.1
Request Entities
Tagging- Description
- A container for the request.
- Type
- Container
- Required
- Yes
TagSet- Description
- A collection of a set of tags.
- Type
- String
- Required
- Yes
Additional Resources
- For more information about this API call, see S3 API.
3.4.10. S3 get object tagging
The get object tagging API returns the tag of an object. By default, the GET operation returns information on the current version of an object.
For a versioned bucket, you can have multiple versions of an object in your bucket. To retrieve tags of any other version, add the versionId query parameter in the request.
Syntax
GET /BUCKET/OBJECT?tagging&versionId= HTTP/1.1
Example
GET /testbucket/testobject?tagging&versionId= HTTP/1.1
Additional Resources
- For more information about this API call, see S3 API.
3.4.11. S3 delete object tagging
The delete object tagging API removes the entire tag set from the specified object. You must have permission to perform the s3:DeleteObjectTagging action, to use this operation.
To delete tags of a specific object version, add the versionId query parameter in the request.
Syntax
DELETE /BUCKET/OBJECT?tagging&versionId= HTTP/1.1
Example
DELETE /testbucket/testobject?tagging&versionId= HTTP/1.1
Additional Resources
- For more information about this API call, see S3 API.
3.4.12. S3 add an object to a bucket
Adds an object to a bucket. You must have write permissions on the bucket to perform this operation.
Syntax
PUT /BUCKET/OBJECT HTTP/1.1
Request Headers
content-md5- Description
- A base64 encoded MD-5 hash of the message.
- Valid Values
- A string. No defaults or constraints.
- Required
- No
content-type- Description
- A standard MIME type.
- Valid Values
-
Any MIME type. Default:
binary/octet-stream. - Required
- No
x-amz-meta-<…>*- Description
- User metadata. Stored with the object.
- Valid Values
- A string up to 8kb. No defaults.
- Required
- No
x-amz-acl- Description
- A canned ACL.
- Valid Values
-
private,public-read,public-read-write,authenticated-read - Required
- No
Response Headers
x-amz-version-id- Description
- Returns the version ID or null.
3.4.13. S3 delete an object
Removes an object. Requires WRITE permission set on the containing bucket.
Deletes an object. If object versioning is on, it creates a marker.
Syntax
DELETE /BUCKET/OBJECT HTTP/1.1
To delete an object when versioning is on, you must specify the versionId subresource and the version of the object to delete.
DELETE /BUCKET/OBJECT?versionId=VERSION_ID HTTP/1.1
3.4.14. S3 delete multiple objects
This API call deletes multiple objects from a bucket.
Syntax
POST /BUCKET/OBJECT?delete HTTP/1.1
3.4.15. S3 get an object’s Access Control List (ACL)
Returns the ACL for the current version of the object:
Syntax
GET /BUCKET/OBJECT?acl HTTP/1.1
Add the versionId subresource to retrieve the ACL for a particular version:
Syntax
GET /BUCKET/OBJECT?versionId=VERSION_ID&acl HTTP/1.1
Response Headers
x-amz-version-id- Description
- Returns the version ID or null.
Response Entities
AccessControlPolicy- Description
- A container for the response.
- Type
- Container
AccessControlList- Description
- A container for the ACL information.
- Type
- Container
Owner- Description
-
A container for the bucket owner’s
IDandDisplayName. - Type
- Container
ID- Description
- The bucket owner’s ID.
- Type
- String
DisplayName- Description
- The bucket owner’s display name.
- Type
- String
Grant- Description
-
A container for
GranteeandPermission. - Type
- Container
Grantee- Description
-
A container for the
DisplayNameandIDof the user receiving a grant of permission. - Type
- Container
Permission- Description
-
The permission given to the
Granteebucket. - Type
- String
3.4.16. S3 set an object’s Access Control List (ACL)
Sets an object ACL for the current version of the object.
Syntax
PUT /BUCKET/OBJECT?acl
Request Entities
AccessControlPolicy- Description
- A container for the response.
- Type
- Container
AccessControlList- Description
- A container for the ACL information.
- Type
- Container
Owner- Description
-
A container for the bucket owner’s
IDandDisplayName. - Type
- Container
ID- Description
- The bucket owner’s ID.
- Type
- String
DisplayName- Description
- The bucket owner’s display name.
- Type
- String
Grant- Description
-
A container for
GranteeandPermission. - Type
- Container
Grantee- Description
-
A container for the
DisplayNameandIDof the user receiving a grant of permission. - Type
- Container
Permission- Description
-
The permission given to the
Granteebucket. - Type
- String
3.4.17. S3 copy an object
To copy an object, use PUT and specify a destination bucket and the object name.
Syntax
PUT /DEST_BUCKET/DEST_OBJECT HTTP/1.1
x-amz-copy-source: SOURCE_BUCKET/SOURCE_OBJECT
Request Headers
x-amz-copy-source- Description
- The source bucket name + object name.
- Valid Values
-
BUCKET/OBJECT - Required
- Yes
x-amz-acl- Description
- A canned ACL.
- Valid Values
-
private,public-read,public-read-write,authenticated-read - Required
- No
x-amz-copy-if-modified-since- Description
- Copies only if modified since the timestamp.
- Valid Values
- Timestamp
- Required
- No
x-amz-copy-if-unmodified-since- Description
- Copies only if unmodified since the timestamp.
- Valid Values
- Timestamp
- Required
- No
x-amz-copy-if-match- Description
- Copies only if object ETag matches ETag.
- Valid Values
- Entity Tag
- Required
- No
x-amz-copy-if-none-match- Description
- Copies only if object ETag matches ETag.
- Valid Values
- Entity Tag
- Required
- No
Response Entities
CopyObjectResult- Description
- A container for the response elements.
- Type
- Container
LastModified- Description
- The last modified date of the source object.
- Type
- Date
Etag- Description
- The ETag of the new object.
- Type
- String
3.4.18. S3 add an object to a bucket using HTML forms
Adds an object to a bucket using HTML forms. You must have write permissions on the bucket to perform this operation.
Syntax
POST /BUCKET/OBJECT HTTP/1.1
3.4.19. S3 determine options for a request
A preflight request to determine if an actual request can be sent with the specific origin, HTTP method, and headers.
Syntax
OPTIONS /OBJECT HTTP/1.1
3.4.20. S3 initiate a multipart upload
Initiates a multi-part upload process. Returns a UploadId, which you can specify when adding additional parts, listing parts, and completing or abandoning a multi-part upload.
Syntax
POST /BUCKET/OBJECT?uploads
Request Headers
content-md5- Description
- A base64 encoded MD-5 hash of the message.
- Valid Values
- A string. No defaults or constraints.
- Required
- No
content-type- Description
- A standard MIME type.
- Valid Values
-
Any MIME type. Default:
binary/octet-stream - Required
- No
x-amz-meta-<…>- Description
- User metadata. Stored with the object.
- Valid Values
- A string up to 8kb. No defaults.
- Required
- No
x-amz-acl- Description
- A canned ACL.
- Valid Values
-
private,public-read,public-read-write,authenticated-read - Required
- No
Response Entities
InitiatedMultipartUploadsResult- Description
- A container for the results.
- Type
- Container
Bucket- Description
- The bucket that will receive the object contents.
- Type
- String
Key- Description
-
The key specified by the
keyrequest parameter, if any. - Type
- String
UploadId- Description
-
The ID specified by the
upload-idrequest parameter identifying the multipart upload, if any. - Type
- String
3.4.21. S3 add a part to a multipart upload
Adds a part to a multi-part upload.
Specify the uploadId subresource and the upload ID to add a part to a multi-part upload:
Syntax
PUT /BUCKET/OBJECT?partNumber=&uploadId=UPLOAD_ID HTTP/1.1
The following HTTP response might be returned:
HTTP Response
404- Status Code
-
NoSuchUpload - Description
- Specified upload-id does not match any initiated upload on this object.
3.4.22. S3 list the parts of a multipart upload
Specify the uploadId subresource and the upload ID to list the parts of a multi-part upload:
Syntax
GET /BUCKET/OBJECT?uploadId=UPLOAD_ID HTTP/1.1
Response Entities
InitiatedMultipartUploadsResult- Description
- A container for the results.
- Type
- Container
Bucket- Description
- The bucket that will receive the object contents.
- Type
- String
Key- Description
-
The key specified by the
keyrequest parameter, if any. - Type
- String
UploadId- Description
-
The ID specified by the
upload-idrequest parameter identifying the multipart upload, if any. - Type
- String
Initiator- Description
-
Contains the
IDandDisplayNameof the user who initiated the upload. - Type
- Container
ID- Description
- The initiator’s ID.
- Type
- String
DisplayName- Description
- The initiator’s display name.
- Type
- String
Owner- Description
-
A container for the
IDandDisplayNameof the user who owns the uploaded object. - Type
- Container
StorageClass- Description
-
The method used to store the resulting object.
STANDARDorREDUCED_REDUNDANCY - Type
- String
PartNumberMarker- Description
-
The part marker to use in a subsequent request if
IsTruncatedistrue. Precedes the list. - Type
- String
NextPartNumberMarker- Description
-
The next part marker to use in a subsequent request if
IsTruncatedistrue. The end of the list. - Type
- String
IsTruncated- Description
-
If
true, only a subset of the object’s upload contents were returned. - Type
- Boolean
Part- Description
-
A container for
Key,Part,InitiatorOwner,StorageClass, andInitiatedelements. - Type
- Container
PartNumber- Description
-
A container for
Key,Part,InitiatorOwner,StorageClass, andInitiatedelements. - Type
- Integer
ETag- Description
- The part’s entity tag.
- Type
- String
Size- Description
- The size of the uploaded part.
- Type
- Integer
3.4.23. S3 assemble the uploaded parts
Assembles uploaded parts and creates a new object, thereby completing a multipart upload.
Specify the uploadId subresource and the upload ID to complete a multi-part upload:
Syntax
POST /BUCKET/OBJECT?uploadId=UPLOAD_ID HTTP/1.1
Request Entities
CompleteMultipartUpload- Description
- A container consisting of one or more parts.
- Type
- Container
- Required
- Yes
Part- Description
-
A container for the
PartNumberandETag. - Type
- Container
- Required
- Yes
PartNumber- Description
- The identifier of the part.
- Type
- Integer
- Required
- Yes
ETag- Description
- The part’s entity tag.
- Type
- String
- Required
- Yes
Response Entities
CompleteMultipartUploadResult- Description
- A container for the response.
- Type
- Container
Location- Description
- The resource identifier (path) of the new object.
- Type
- URI
bucket- Description
- The name of the bucket that contains the new object.
- Type
- String
Key- Description
- The object’s key.
- Type
- String
ETag- Description
- The entity tag of the new object.
- Type
- String
3.4.24. S3 copy a multipart upload
Uploads a part by copying data from an existing object as data source.
Specify the uploadId subresource and the upload ID to perform a multi-part upload copy:
Syntax
PUT /BUCKET/OBJECT?partNumber=PartNumber&uploadId=UPLOAD_ID HTTP/1.1
Host: cname.domain.com

Authorization: AWS ACCESS_KEY:HASH_OF_HEADER_AND_SECRET
Request Headers
x-amz-copy-source- Description
- The source bucket name and object name.
- Valid Values
- BUCKET/OBJECT
- Required
- Yes
x-amz-copy-source-range- Description
- The range of bytes to copy from the source object.
- Valid Values
-
Range:
bytes=first-last, where the first and last are the zero-based byte offsets to copy. For example,bytes=0-9indicates that you want to copy the first ten bytes of the source. - Required
- No
Response Entities
CopyPartResult- Description
- A container for all response elements.
- Type
- Container
ETag- Description
- Returns the ETag of the new part.
- Type
- String
LastModified- Description
- Returns the date the part was last modified.
- Type
- String
Additional Resources
- For more information about this feature, see the Amazon S3 site.
3.4.25. S3 abort a multipart upload
Aborts a multipart upload.
Specify the uploadId subresource and the upload ID to abort a multi-part upload:
Syntax
DELETE /BUCKET/OBJECT?uploadId=UPLOAD_ID HTTP/1.1
3.4.26. S3 Hadoop interoperability
For data analytics applications that require Hadoop Distributed File System (HDFS) access, the Ceph Object Gateway can be accessed using the Apache S3A connector for Hadoop. The S3A connector is an open-source tool that presents S3 compatible object storage as an HDFS file system with HDFS file system read and write semantics to the applications while data is stored in the Ceph Object Gateway.
Ceph Object Gateway is fully compatible with the S3A connector that ships with Hadoop 2.7.3.
Additional Resources
- See the Red Hat Ceph Storage Object Gateway Guide for details on multi-tenancy.
3.5. S3 select operations (Technology Preview)
The S3 select operations are a Technology Preview feature only. Technology Preview features are not supported with Red Hat production service level agreements (SLAs), might not be functionally complete, and Red Hat does not recommend using them for production. These features provide early access to upcoming product features, enabling customers to test functionality and provide feedback during the development process. See the support scope for Red Hat Technology Preview features for more details.
As a developer, you can run S3 select to accelerate throughput. Users can run S3 select queries directly without a mediator.
There are two S3 select workflows, one for CSV and one for Apache Parquet (Parquet), that provide S3 select operations with CSV and Parquet objects.
- A CSV file stores tabular data in plain text format. Each line of the file is a data record.
- Parquet is an open source, column-oriented data file format designed for efficient data storage and retrieval. It provides highly efficient data compression and encoding schemes with enhanced performance to handle complex data in bulk.
For example, a CSV or Parquet S3 object with several gigabytes of data allows the user to extract a single column which is filtered by another column using the following query:
Example
select customerid from s3Object where age>30 and age<65;
Currently, the S3 object must retrieve data from the Ceph OSD through the Ceph Object Gateway before filtering and extracting data. There is improved performance when the object is large and the query is more specific. The Parquet format can be processed more efficiently than CSV.
Prerequisites
- A running Red Hat Ceph Storage cluster.
- A RESTful client.
- A S3 user created with user access.
3.5.1. S3 select content from an object
The select object content API filters the content of an object through the structured query language (SQL). See the Metadata collected by inventory section in the AWS Systems Manager User Guide for an example of the description of what should reside in the inventory object. The inventory content impacts the type of queries that should be run against that inventory. The number of SQL statements that potentially could provide essential information is large, but S3 select is an SQL-like utility and therefore, some operators are not supported, such as group-by and join.
For CSV only, you must specify the data serialization format as comma-separated values of the object to retrieve the specified content. Parquet has no delimiter because it is in binary format. Amazon Web Services (AWS) command-line interface (CLI) select object content uses the CSV or Parquet format to parse object data into records and returns only the records specified in the query.
You must specify the data serialization format for the response. You must have s3:GetObject permission for this operation.
-
The
InputSerializationelement describes the format of the data in the object that is being queried. Objects can be in CSV or Parquet format. -
The
OutputSerializationelement is part of the AWS-CLI user client and describes how the output data is formatted. Ceph has implemented the server client for AWS-CLI and therefore, provides the same output according toOutputSerializationwhich currently is CSV only. -
The format of the
InputSerializationdoes not need to match the format of theOutputSerialization. So, for example, you can specify Parquet in theInputSerializationand CSV in theOutputSerialization.
Syntax
POST /BUCKET/KEY?select&select-type=2 HTTP/1.1\r\n
Example
POST /testbucket/sample1csv?select&select-type=2 HTTP/1.1\r\n
POST /testbucket/sample1parquet?select&select-type=2 HTTP/1.1\r\n
Request entities
Bucket- Description
- The bucket to select object content from.
- Type
- String
- Required
- Yes
Key- Description
- The object key.
- Length Constraints
- Minimum length of 1.
- Type
- String
- Required
- Yes
SelectObjectContentRequest- Description
- Root level tag for the select object content request parameters.
- Type
- String
- Required
- Yes
Expression- Description
- The expression that is used to query the object.
- Type
- String
- Required
- Yes
ExpressionType- Description
- The type of the provided expression for example SQL.
- Type
- String
- Valid Values
- SQL
- Required
- Yes
InputSerialization- Description
- Describes the format of the data in the object that is being queried.
- Type
- String
- Required
- Yes
OutputSerialization- Description
- Format of data returned in comma separator and new-line.
- Type
- String
- Required
- Yes
Response entities
If the action is successful, the service sends back HTTP 200 response. Data is returned in XML format by the service:
Payload- Description
- Root level tag for the payload parameters.
- Type
- String
- Required
- Yes
Records- Description
- The records event.
- Type
- Base64-encoded binary data object
- Required
- No
Stats- Description
- The stats event.
- Type
- Long
- Required
- No
The Ceph Object Gateway supports the following response:
Example
{:event-type,records} {:content-type,application/octet-stream} :message-type,event}
Syntax (for CSV)
aws --endpoint-URL http://localhost:80 s3api select-object-content
 --bucket BUCKET_NAME
 --expression-type 'SQL'
 --input-serialization
 '{"CSV": {"FieldDelimiter": "," , "QuoteCharacter": "\"" , "RecordDelimiter" : "\n" , "QuoteEscapeCharacter" : "\\" , "FileHeaderInfo": "USE" }, "CompressionType": "NONE"}'
 --output-serialization '{"CSV": {}}'
 --key OBJECT_NAME
 --expression "select count(0) from s3object where int(_1)<10;" output.csv
Example (for CSV)
aws --endpoint-url http://localhost:80 s3api select-object-content
 --bucket testbucket
 --expression-type 'SQL'
 --input-serialization
 '{"CSV": {"FieldDelimiter": "," , "QuoteCharacter": "\"" , "RecordDelimiter" : "\n" , "QuoteEscapeCharacter" : "\\" , "FileHeaderInfo": "USE" }, "CompressionType": "NONE"}'
 --output-serialization '{"CSV": {}}'
 --key testobject
 --expression "select count(0) from s3object where int(_1)<10;" output.csv
Syntax (for Parquet)
aws --endpoint-URL http://localhost:80 s3api select-object-content
 --bucket BUCKET_NAME
 --expression-type 'SQL'
 --input-serialization
 '{"Parquet": {}, {"CompressionType": "NONE"}'
 --output-serialization '{"CSV": {}}'
 --key OBJECT_NAME.parquet
 --expression "select count(0) from s3object where int(_1)<10;" output.csv
Example (for Parquet)
aws --endpoint-url http://localhost:80 s3api select-object-content
 --bucket testbucket
 --expression-type 'SQL'
 --input-serialization
 '{"Parquet": {}, {"CompressionType": "NONE"}'
 --output-serialization '{"CSV": {}}'
 --key testobject.parquet
 --expression "select count(0) from s3object where int(_1)<10;" output.csv
Supported features
Currently, only part of the AWS s3 select command is supported:
Additional Resources
- See Amazon’s S3 Select Object Content API for more details.
3.5.2. S3 supported select functions
S3 select supports the following functions: .Timestamp
- timestamp(string)
- Description
- Converts string to the basic type of timestamp.
- Supported
- Currently it converts: yyyy:mm:dd hh:mi:dd
- extract(date-part,timestamp)
- Description
- Returns integer according to date-part extract from input timestamp.
- Supported
- date-part: year,month,week,day.
- dateadd(date-part ,integer,timestamp)
- Description
- Returns timestamp, a calculation based on the results of input timestamp and date-part.
- Supported
- date-part : year,month,day.
- datediff(date-part,timestamp,timestamp)
- Description
- Return an integer, a calculated result of the difference between two timestamps according to date-part.
- Supported
- date-part : year,month,day,hours.
- utcnow()
- Description
- Return timestamp of current time.
Aggregation
- count()
- Description
- Returns integers based on the number of rows that match a condition if there is one.
- sum(expression)
- Description
- Returns a summary of expression on each row that matches a condition if there is one.
- avg(expression)
- Description
- Returns an average expression on each row that matches a condition if there is one.
- max(expression)
- Description
- Returns the maximal result for all expressions that match a condition if there is one.
- min(expression)
- Description
- Returns the minimal result for all expressions that match a condition if there is one.
String
- substring(string,from,to)
- Description
- Returns a string extract from input string based on from and to inputs.
- Char_length
- Description
- Returns a number of characters in string. Character_length also does the same.
- Trim
- Description
- Trims the leading or trailing characters from the target string, default is a blank character.
- Upper\lower
- Description
- Converts characters into uppercase or lowercase.
NULL
The NULL value is missing or unknown that is NULL can not produce a value on any arithmetic operations. The same applies to arithmetic comparison, any comparison to NULL is NULL that is unknown.
Table 3.4. The NULL use case
| A is NULL | Result(NULL=UNKNOWN) |
|---|---|
| Not A |
|
| A or False |
|
| A or True |
|
| A or A |
|
| A and False |
|
| A and True |
|
| A and A |
|
Additional Resources
- See Amazon’s S3 Select Object Content API for more details.
3.5.3. S3 alias programming construct
Alias programming construct is an essential part of the s3 select language because it enables better programming with objects that contain many columns or complex queries. When a statement with alias construct is parsed, it replaces the alias with a reference to the right projection column and on query execution, the reference is evaluated like any other expression. Alias maintains result-cache that is if an alias is used more than once, the same expression is not evaluated and the same result is returned because the result from the cache is used. Currently, Red Hat supports the column alias.
Example
select int(_1) as a1, int(_2) as a2 , (a1+a2) as a3 from s3object where a3>100 and a3<300;")
3.5.4. S3 CSV parsing explained
The CSV definitions with input serialization uses these default values:
-
Use
{\n}`for row-delimiter. -
Use
{“}for quote. -
Use
{\}for escape characters.
The csv-header-info is parsed upon USE appearing in the AWS-CLI; this is the first row in the input object containing the schema. Currently, output serialization and compression-type is not supported. The S3 select engine has a CSV parser which parses S3-objects:
- Each row ends with a row-delimiter.
- The field-separator separates the adjacent columns.
-
The successive field separator defines the
NULLcolumn. - The quote-character overrides the field-separator; that is, the field separator is any character between the quotes.
- The escape character disables any special character except the row delimiter.
The following are examples of CSV parsing rules:
Table 3.5. CSV parsing
| Feature | Description | Input (Tokens) |
|---|---|---|
|
| Successive field delimiter |
|
|
| The quote character overrides the field delimiter. |
|
|
| The escape character overrides the meta-character. |
A container for the object owner’s |
|
| There is no closed quote; row delimiter is the closing line. |
|
|
| FileHeaderInfo tag | USE value means each token on the first line is the column-name; IGNORE value means to skip the first line. |
Additional Resources
- See Amazon’s S3 Select Object Content API for more details.
Chapter 4. Ceph Object Gateway and the Swift API
As a developer, you can use a RESTful application programming interface (API) that is compatible with the Swift API data access model. You can manage the buckets and objects stored in Red Hat Ceph Storage cluster through the Ceph Object Gateway.
The following table describes the support status for current Swift functional features:
Table 4.1. Features
| Feature | Status | Remarks |
|---|---|---|
| Supported | ||
| Get Account Metadata | Supported | No custom metadata |
| Supported | Supports a subset of Swift ACLs | |
| Supported | ||
| Supported | ||
| Supported | ||
| Supported | ||
| Get Container Metadata | Supported | |
| Supported | ||
| Delete Container Metadata | Supported | |
| Supported | ||
| Supported | ||
| Create Large Object | Supported | |
| Supported | ||
| Supported | ||
| Supported | ||
| Supported | ||
| Supported | ||
| CORS | Not Supported | |
| Expiring Objects | Supported | |
| Object Versioning | Not Supported | |
| Static Website | Not Supported |
Prerequisites
- A running Red Hat Ceph Storage cluster.
- A RESTful client.
4.1. Swift API limitations
The following limitations should be used with caution. There are implications related to your hardware selections, so you should always discuss these requirements with your Red Hat account team.
- Maximum object size when using Swift API: 5GB
- Maximum metadata size when using Swift API: There is no defined limit on the total size of user metadata that can be applied to an object, but a single HTTP request is limited to 16,000 bytes.
4.2. Create a Swift user
To test the Swift interface, create a Swift subuser. Creating a Swift user is a two-step process. The first step is to create the user. The second step is to create the secret key.
In a multi-site deployment, always create a user on a host in the master zone of the master zone group.
Prerequisites
- Installation of the Ceph Object Gateway.
- Root-level access to the Ceph Object Gateway node.
Procedure
Create the Swift user:
Syntax
radosgw-admin subuser create --uid=NAME --subuser=NAME:swift --access=full
Replace
NAMEwith the Swift user name, for example:Example
[root@host01 ~]# radosgw-admin subuser create --uid=testuser --subuser=testuser:swift --access=full
{
    "user_id": "testuser",
    "display_name": "First User",
    "email": "",
    "suspended": 0,
    "max_buckets": 1000,
    "auid": 0,
    "subusers": [
        {
            "id": "testuser:swift",
            "permissions": "full-control"
        }
    ],
    "keys": [
        {
            "user": "testuser",
            "access_key": "O8JDE41XMI74O185EHKD",
            "secret_key": "i4Au2yxG5wtr1JK01mI8kjJPM93HNAoVWOSTdJd6"
        }
    ],
    "swift_keys": [
        {
            "user": "testuser:swift",
            "secret_key": "13TLtdEW7bCqgttQgPzxFxziu0AgabtOc6vM8DLA"
        }
    ],
    "caps": [],
    "op_mask": "read, write, delete",
    "default_placement": "",
    "placement_tags": [],
    "bucket_quota": {
        "enabled": false,
        "check_on_raw": false,
        "max_size": -1,
        "max_size_kb": 0,
        "max_objects": -1
    },
    "user_quota": {
        "enabled": false,
        "check_on_raw": false,
        "max_size": -1,
        "max_size_kb": 0,
        "max_objects": -1
    },
    "temp_url_keys": [],
    "type": "rgw"
}
Create the secret key:
Syntax
radosgw-admin key create --subuser=NAME:swift --key-type=swift --gen-secretReplace
NAMEwith the Swift user name, for example:Example
[root@host01 ~]# radosgw-admin key create --subuser=testuser:swift --key-type=swift --gen-secret
{
    "user_id": "testuser",
    "display_name": "First User",
    "email": "",
    "suspended": 0,
    "max_buckets": 1000,
    "auid": 0,
    "subusers": [
        {
            "id": "testuser:swift",
            "permissions": "full-control"
        }
    ],
    "keys": [
        {
            "user": "testuser",
            "access_key": "O8JDE41XMI74O185EHKD",
            "secret_key": "i4Au2yxG5wtr1JK01mI8kjJPM93HNAoVWOSTdJd6"
        }
    ],
    "swift_keys": [
        {
            "user": "testuser:swift",
            "secret_key": "a4ioT4jEP653CDcdU8p4OuhruwABBRZmyNUbnSSt"
        }
    ],
    "caps": [],
    "op_mask": "read, write, delete",
    "default_placement": "",
    "placement_tags": [],
    "bucket_quota": {
        "enabled": false,
        "check_on_raw": false,
        "max_size": -1,
        "max_size_kb": 0,
        "max_objects": -1
    },
    "user_quota": {
        "enabled": false,
        "check_on_raw": false,
        "max_size": -1,
        "max_size_kb": 0,
        "max_objects": -1
    },
    "temp_url_keys": [],
    "type": "rgw"
}
4.3. Swift authenticating a user
To authenticate a user, make a request containing an X-Auth-User and a X-Auth-Key in the header.
Syntax
GET /auth HTTP/1.1
Host: swift.example.com
X-Auth-User: johndoe
X-Auth-Key: R7UUOLFDI2ZI9PRCQ53K
Example Response
HTTP/1.1 204 No Content
Date: Mon, 16 Jul 2012 11:05:33 GMT
Server: swift
X-Storage-Url: https://swift.example.com
X-Storage-Token: UOlCCC8TahFKlWuv9DB09TWHF0nDjpPElha0kAa
Content-Length: 0
Content-Type: text/plain; charset=UTF-8
You can retrieve data about Ceph’s Swift-compatible service by executing GET requests using the X-Storage-Url value during authentication.
Additional Resources
- See the Red Hat Ceph Storage Developer Guide for Swift request headers.
- See the Red Hat Ceph Storage Developer Guide for Swift response headers.
4.4. Swift container operations
As a developer, you can perform container operations with the Swift application programming interface (API) through the Ceph Object Gateway. You can list, create, update, and delete containers. You can also add or update the container’s metadata.
Prerequisites
- A running Red Hat Ceph Storage cluster.
- A RESTful client.
4.4.1. Swift container operations
A container is a mechanism for storing data objects. An account can have many containers, but container names must be unique. This API enables a client to create a container, set access controls and metadata, retrieve a container’s contents, and delete a container. Since this API makes requests related to information in a particular user’s account, all requests in this API must be authenticated unless a container’s access control is deliberately made publicly accessible, that is, allows anonymous requests.
The Amazon S3 API uses the term 'bucket' to describe a data container. When you hear someone refer to a 'bucket' within the Swift API, the term 'bucket' might be construed as the equivalent of the term 'container.'
One facet of object storage is that it does not support hierarchical paths or directories. Instead, it supports one level consisting of one or more containers, where each container might have objects. The RADOS Gateway’s Swift-compatible API supports the notion of 'pseudo-hierarchical containers', which is a means of using object naming to emulate a container, or directory hierarchy without actually implementing one in the storage system. You can name objects with pseudo-hierarchical names, for example, photos/buildings/empire-state.jpg, but container names cannot contain a forward slash (/) character.
When uploading large objects to versioned Swift containers, use the --leave-segments option with the python-swiftclient utility. Not using --leave-segments overwrites the manifest file. Consequently, an existing object is overwritten, which leads to data loss.
4.4.2. Swift update a container’s Access Control List (ACL)
When a user creates a container, the user has read and write access to the container by default. To allow other users to read a container’s contents or write to a container, you must specifically enable the user. You can also specify * in the X-Container-Read or X-Container-Write settings, which effectively enables all users to either read from or write to the container. Setting * makes the container public. That is it enables anonymous users to either read from or write to the container.
Syntax
POST /API_VERSION/ACCOUNT/TENANT:CONTAINER HTTP/1.1
Host: FULLY_QUALIFIED_DOMAIN_NAME
X-Auth-Token: AUTH_TOKEN
X-Container-Read: *
X-Container-Write: UID1, UID2, UID3
Request Headers
X-Container-Read- Description
- The user IDs with read permissions for the container.
- Type
- Comma-separated string values of user IDs.
- Required
- No
X-Container-Write- Description
- The user IDs with write permissions for the container.
- Type
- Comma-separated string values of user IDs.
- Required
- No
4.4.3. Swift list containers
A GET request that specifies the API version and the account will return a list of containers for a particular user account. Since the request returns a particular user’s containers, the request requires an authentication token. The request cannot be made anonymously.
Syntax
GET /API_VERSION/ACCOUNT HTTP/1.1
Host: FULLY_QUALIFIED_DOMAIN_NAME
X-Auth-Token: AUTH_TOKEN
Request Parameters
limit- Description
- Limits the number of results to the specified value.
- Type
- Integer
- Valid Values
- N/A
- Required
- Yes
format- Description
- Limits the number of results to the specified value.
- Type
- Integer
- Valid Values
-
jsonorxml - Required
- No
marker- Description
- Returns a list of results greater than the marker value.
- Type
- String
- Valid Values
- N/A
- Required
- No
The response contains a list of containers, or returns with an HTTP 204 response code.
Response Entities
account- Description
- A list for account information.
- Type
- Container
container- Description
- The list of containers.
- Type
- Container
name- Description
- The name of a container.
- Type
- String
bytes- Description
- The size of the container.
- Type
- Integer
4.4.4. Swift list a container’s objects
To list the objects within a container, make a GET request with the API version, account, and the name of the container. You can specify query parameters to filter the full list, or leave out the parameters to return a list of the first 10,000 object names stored in the container.
Syntax
GET /API_VERSION/TENANT:CONTAINER HTTP/1.1
Host: FULLY_QUALIFIED_DOMAIN_NAME
X-Auth-Token: AUTH_TOKEN
Request Parameters
format- Description
- Limits the number of results to the specified value.
- Type
- Integer
- Valid Values
-
jsonorxml - Required
- No
prefix- Description
- Limits the result set to objects beginning with the specified prefix.
- Type
- String
- Valid Values
- N/A
- Required
- No
marker- Description
- Returns a list of results greater than the marker value.
- Type
- String
- Valid Values
- N/A
- Required
- No
limit- Description
- Limits the number of results to the specified value.
- Type
- Integer
- Valid Values
- 0 - 10,000
- Required
- No
delimiter- Description
- The delimiter between the prefix and the rest of the object name.
- Type
- String
- Valid Values
- N/A
- Required
- No
path- Description
- The pseudo-hierarchical path of the objects.
- Type
- String
- Valid Values
- N/A
- Required
- No
Response Entities
container- Description
- The container.
- Type
- Container
object- Description
- An object within the container.
- Type
- Container
name- Description
- The name of an object within the container.
- Type
- String
hash- Description
- A hash code of the object’s contents.
- Type
- String
last_modified- Description
- The last time the object’s contents were modified.
- Type
- Date
content_type- Description
- The type of content within the object.
- Type
- String
4.4.5. Swift create a container
To create a new container, make a PUT request with the API version, account, and the name of the new container. The container name must be unique, must not contain a forward-slash (/) character, and should be less than 256 bytes. You can include access control headers and metadata headers in the request. You can also include a storage policy identifying a key for a set of placement pools. For example, execute radosgw-admin zone get to see a list of available keys under placement_pools. A storage policy enables you to specify a special set of pools for the container, for example, SSD-based storage. The operation is idempotent. If you make a request to create a container that already exists, it will return with a HTTP 202 return code, but will not create another container.
Syntax
PUT /API_VERSION/ACCOUNT/TENANT:CONTAINER HTTP/1.1
Host: FULLY_QUALIFIED_DOMAIN_NAME
X-Auth-Token: AUTH_TOKEN
X-Container-Read: COMMA_SEPARATED_UIDS
X-Container-Write: COMMA_SEPARATED_UIDS
X-Container-Meta-KEY:VALUE
X-Storage-Policy: PLACEMENT_POOLS_KEY
Headers
X-Container-Read- Description
- The user IDs with read permissions for the container.
- Type
- Comma-separated string values of user IDs.
- Required
- No
X-Container-Write- Description
- The user IDs with write permissions for the container.
- Type
- Comma-separated string values of user IDs.
- Required
- No
X-Container-Meta-KEY- Description
- A user-defined metadata key that takes an arbitrary string value.
- Type
- String
- Required
- No
X-Storage-Policy- Description
-
The key that identifies the storage policy under
placement_poolsfor the Ceph Object Gateway. Executeradosgw-admin zone getfor available keys. - Type
- String
- Required
- No
If a container with the same name already exists, and the user is the container owner then the operation will succeed. Otherwise, the operation will fail.
HTTP Response
409- Status Code
-
BucketAlreadyExists - Description
- The container already exists under a different user’s ownership.
4.4.6. Swift delete a container
To delete a container, make a DELETE request with the API version, account, and the name of the container. The container must be empty. If you’d like to check if the container is empty, execute a HEAD request against the container. Once you’ve successfully removed the container, you’ll be able to reuse the container name.
Syntax
DELETE /API_VERSION/ACCOUNT/TENANT:CONTAINER HTTP/1.1
Host: FULLY_QUALIFIED_DOMAIN_NAME
X-Auth-Token: AUTH_TOKEN
HTTP Response
204- Status Code
-
NoContent - Description
- The container was removed.
4.4.7. Swift add or update the container metadata
To add metadata to a container, make a POST request with the API version, account, and container name. You must have write permissions on the container to add or update metadata.
Syntax
POST /API_VERSION/ACCOUNT/TENANT:CONTAINER HTTP/1.1
Host: FULLY_QUALIFIED_DOMAIN_NAME
X-Auth-Token: AUTH_TOKEN
X-Container-Meta-Color: red
X-Container-Meta-Taste: salty
Request Headers
X-Container-Meta-KEY- Description
- A user-defined metadata key that takes an arbitrary string value.
- Type
- String
- Required
- No
4.5. Swift object operations
As a developer, you can perform object operations with the Swift application programming interface (API) through the Ceph Object Gateway. You can list, create, update, and delete objects. You can also add or update the object’s metadata.
Prerequisites
- A running Red Hat Ceph Storage cluster.
- A RESTful client.
4.5.1. Swift object operations
An object is a container for storing data and metadata. A container might have many objects, but the object names must be unique. This API enables a client to create an object, set access controls and metadata, retrieve an object’s data and metadata, and delete an object. Since this API makes requests related to information in a particular user’s account, all requests in this API must be authenticated. Unless the container or object’s access control is deliberately made publicly accessible, that is, allows anonymous requests.
4.5.2. Swift get an object
To retrieve an object, make a GET request with the API version, account, container, and object name. You must have read permissions on the container to retrieve an object within it.
Syntax
GET /API_VERSION/ACCOUNT/TENANT:CONTAINER/OBJECT HTTP/1.1
Host: FULLY_QUALIFIED_DOMAIN_NAME
X-Auth-Token: AUTH_TOKEN
Request Headers
range- Description
- To retrieve a subset of an object’s contents, you can specify a byte range.
- Type
- Date
- Required
- No
If-Modified-Since- Description
-
Only copies if modified since the date and time of the source object’s
last_modifiedattribute. - Type
- Date
- Required
- No
If-Unmodified-Since- Description
-
Only copies if not modified since the date and time of the source object’s
last_modifiedattribute. - Type
- Date
- Required
- No
Copy-If-Match- Description
- Copies only if the ETag in the request matches the source object’s ETag.
- Type
- ETag
- Required
- No
Copy-If-None-Match- Description
-
Copies only if the
ETagin the request does not match the source object’s ETag. - Type
- ETag
- Required
- No
Response Headers
Content-Range- Description
- The range of the subset of object contents. Returned only if the range header field was specified in the request.
4.5.3. Swift create or update an object
To create a new object, make a PUT request with the API version, account, container name, and the name of the new object. You must have write permission on the container to create or update an object. The object name must be unique within the container. The PUT request is not idempotent, so if you do not use a unique name, the request will update the object. However, you can use pseudo-hierarchical syntax in the object name to distinguish it from another object of the same name if it is under a different pseudo-hierarchical directory. You can include access control headers and metadata headers in the request.
Syntax
PUT /API_VERSION/ACCOUNT/TENANT:CONTAINER HTTP/1.1
Host: FULLY_QUALIFIED_DOMAIN_NAME
X-Auth-Token: AUTH_TOKEN
Request Headers
ETag- Description
- An MD5 hash of the object’s contents. Recommended.
- Type
- String
- Valid Values
- N/A
- Required
- No
Content-Type- Description
- An MD5 hash of the object’s contents.
- Type
- String
- Valid Values
- N/A
- Required
- No
Transfer-Encoding- Description
- Indicates whether the object is part of a larger aggregate object.
- Type
- String
- Valid Values
-
chunked - Required
- No
4.5.4. Swift delete an object
To delete an object, make a DELETE request with the API version, account, container, and object name. You must have write permissions on the container to delete an object within it. Once you’ve successfully deleted the object, you will be able to reuse the object name.
Syntax
DELETE /API_VERSION/ACCOUNT/TENANT:CONTAINER/OBJECT HTTP/1.1
Host: FULLY_QUALIFIED_DOMAIN_NAME
X-Auth-Token: AUTH_TOKEN
4.5.5. Swift copy an object
Copying an object allows you to make a server-side copy of an object, so that you do not have to download it and upload it under another container. To copy the contents of one object to another object, you can make either a PUT request or a COPY request with the API version, account, and the container name.
For a PUT request, use the destination container and object name in the request, and the source container and object in the request header.
For a Copy request, use the source container and object in the request, and the destination container and object in the request header. You must have write permission on the container to copy an object. The destination object name must be unique within the container. The request is not idempotent, so if you do not use a unique name, the request will update the destination object. You can use pseudo-hierarchical syntax in the object name to distinguish the destination object from the source object of the same name if it is under a different pseudo-hierarchical directory. You can include access control headers and metadata headers in the request.
Syntax
PUT /API_VERSION/ACCOUNT/TENANT:CONTAINER HTTP/1.1
X-Copy-From: TENANT:SOURCE_CONTAINER/SOURCE_OBJECT
Host: FULLY_QUALIFIED_DOMAIN_NAME
X-Auth-Token: AUTH_TOKEN
or alternatively:
Syntax
COPY /API_VERSION/ACCOUNT/TENANT:SOURCE_CONTAINER/SOURCE_OBJECT HTTP/1.1
Destination: TENANT:DEST_CONTAINER/DEST_OBJECT
Request Headers
X-Copy-From- Description
-
Used with a
PUTrequest to define the source container/object path. - Type
- String
- Required
-
Yes, if using
PUT.
Destination- Description
-
Used with a
COPYrequest to define the destination container/object path. - Type
- String
- Required
-
Yes, if using
COPY.
If-Modified-Since- Description
-
Only copies if modified since the date and time of the source object’s
last_modifiedattribute. - Type
- Date
- Required
- No
If-Unmodified-Since- Description
-
Only copies if not modified since the date and time of the source object’s
last_modifiedattribute. - Type
- Date
- Required
- No
Copy-If-Match- Description
- Copies only if the ETag in the request matches the source object’s ETag.
- Type
- ETag
- Required
- No
Copy-If-None-Match- Description
-
Copies only if the
ETagin the request does not match the source object’s ETag. - Type
- ETag
- Required
- No
4.5.6. Swift get object metadata
To retrieve an object’s metadata, make a HEAD request with the API version, account, container, and object name. You must have read permissions on the container to retrieve metadata from an object within the container. This request returns the same header information as the request for the object itself, but it does not return the object’s data.
Syntax
HEAD /API_VERSION/ACCOUNT/TENANT:CONTAINER/OBJECT HTTP/1.1
Host: FULLY_QUALIFIED_DOMAIN_NAME
X-Auth-Token: AUTH_TOKEN
4.5.7. Swift add or update object metadata
To add metadata to an object, make a POST request with the API version, account, container, and object name. You must have write permissions on the parent container to add or update metadata.
Syntax
POST /API_VERSION/ACCOUNT/TENANT:CONTAINER/OBJECT HTTP/1.1
Host: FULLY_QUALIFIED_DOMAIN_NAME
X-Auth-Token: AUTH_TOKEN
Request Headers
X-Object-Meta-KEY- Description
- A user-defined meta data key that takes an arbitrary string value.
- Type
- String
- Required
- No
4.6. Swift temporary URL operations
To allow temporary access, temp url functionality is supported by swift endpoint of radosgw. For example GET requests, to objects without the need to share credentials.
For this functionality, initially the value of X-Account-Meta-Temp-URL-Key and optionally X-Account-Meta-Temp-URL-Key-2 should be set. The Temp URL functionality relies on a HMAC-SHA1 signature against these secret keys.
4.7. Swift get temporary URL objects
Temporary URL uses a cryptographic HMAC-SHA1 signature, which includes the following elements:
- The value of the Request method, "GET" for instance
- The expiry time, in the format of seconds since the epoch, that is, Unix time
- The request path starting from "v1" onwards
The above items are normalized with newlines appended between them, and a HMAC is generated using the SHA-1 hashing algorithm against one of the Temp URL Keys posted earlier.
A sample python script to demonstrate the above is given below:
Example
import hmac
from hashlib import sha1
from time import time

method = 'GET'
host = 'https://objectstore.example.com'
duration_in_seconds = 300  # Duration for which the url is valid
expires = int(time() + duration_in_seconds)
path = '/v1/your-bucket/your-object'
key = 'secret'
hmac_body = '%s\n%s\n%s' % (method, expires, path)
hmac_body = hmac.new(key, hmac_body, sha1).hexdigest()
sig = hmac.new(key, hmac_body, sha1).hexdigest()
rest_uri = "{host}{path}?temp_url_sig={sig}&temp_url_expires={expires}".format(
     host=host, path=path, sig=sig, expires=expires)
print rest_uri
Example Output
https://objectstore.example.com/v1/your-bucket/your-object?temp_url_sig=ff4657876227fc6025f04fcf1e82818266d022c6&temp_url_expires=1423200992
4.8. Swift POST temporary URL keys
A POST request to the swift account with the required Key will set the secret temp URL key for the account against which temporary URL access can be provided to accounts. Up to two keys are supported, and signatures are checked against both the keys, if present, so that keys can be rotated without invalidating the temporary URLs.
Syntax
POST /API_VERSION/ACCOUNT HTTP/1.1
Host: FULLY_QUALIFIED_DOMAIN_NAME
X-Auth-Token: AUTH_TOKEN
Request Headers
X-Account-Meta-Temp-URL-Key- Description
- A user-defined key that takes an arbitrary string value.
- Type
- String
- Required
- Yes
X-Account-Meta-Temp-URL-Key-2- Description
- A user-defined key that takes an arbitrary string value.
- Type
- String
- Required
- No
4.9. Swift multi-tenancy container operations
When a client application accesses containers, it always operates with credentials of a particular user. In Red Hat Ceph Storage cluster, every user belongs to a tenant. Consequently, every container operation has an implicit tenant in its context if no tenant is specified explicitly. Thus multi-tenancy is completely backward compatible with previous releases, as long as the referred containers and referring user belong to the same tenant.
Extensions employed to specify an explicit tenant differ according to the protocol and authentication system used.
A colon character separates tenant and container, thus a sample URL would be:
Example
https://rgw.domain.com/tenant:container
By contrast, in a create_container() method, simply separate the tenant and container in the container method itself:
Example
create_container("tenant:container")
Appendix A. The Ceph RESTful API specifications
As a storage administrator, you can access the various Ceph sub-systems through the Ceph RESTful API endpoints. This is a reference guide for the available Ceph RESTful API methods.
The available Ceph API endpoints:
- Section A.1, “Ceph summary”
- Section A.2, “Authentication”
- Section A.3, “Ceph File System”
- Section A.4, “Storage cluster configuration”
- Section A.5, “CRUSH rules”
- Section A.6, “Erasure code profiles”
- Section A.7, “Feature toggles”
- Section A.8, “Grafana”
- Section A.9, “Storage cluster health”
- Section A.11, “Logs”
- Section A.12, “Ceph Manager modules”
- Section A.13, “Ceph Monitor”
- Section A.14, “Ceph OSD”
- Section A.15, “Ceph Object Gateway”
- Section A.16, “REST APIs for manipulating a role”
- Section A.17, “NFS Ganesha”
- Section A.18, “Ceph Orchestrator”
- Section A.19, “Pools”
- Section A.20, “Prometheus”
- Section A.21, “RADOS block device”
- Section A.22, “Performance counters”
- Section A.23, “Roles”
- Section A.24, “Services”
- Section A.25, “Settings”
- Section A.26, “Ceph task”
- Section A.27, “Telemetry”
- Section A.28, “Ceph users”
Prerequisites
- An understanding of how to use a RESTful API.
- A healthy running Red Hat Ceph Storage cluster.
-
The Ceph Manager
dashboardmodule is enabled.
A.1. Ceph summary
The method reference for using the Ceph RESTful API summary endpoint to display the Ceph summary details.
GET /api/summary- Description
- Display a summary of Ceph details.
- Example
GET /api/summary HTTP/1.1 Host: example.com
- Status Codes
- 200 OK – Okay.
- 400 Bad Request – Operation exception. Please check the response body for details.
- 401 Unauthorized – Unauthenticated access. Please login first.
- 403 Forbidden – Unauthorized access. Please check your permissions.
- 500 Internal Server Error – Unexpected error. Please check the response body for the stack trace.
Additional Resources
- See the Ceph RESTful API chapter in the Red Hat Ceph Storage Developer Guide for more details.
A.2. Authentication
The method reference for using the Ceph RESTful API auth endpoint to initiate a session with Red Hat Ceph Storage.
POST /api/auth- Curl Example
curl -i -k --location -X POST 'https://192.168.0.44:8443/api/auth' -H 'Accept: application/vnd.ceph.api.v1.0+json' -H 'Content-Type: application/json' --data '{"password": "admin@123", "username": "admin"}'- Example
POST /api/auth HTTP/1.1 Host: example.com Content-Type: application/json { "password": "STRING", "username": "STRING" }- Status Codes
- 201 Created – Resource created.
- 202 Accepted – Operation is still executing. Please check the task queue.
- 400 Bad Request – Operation exception. Please check the response body for details.
- 401 Unauthorized – Unauthenticated access. Please login first.
- 403 Forbidden – Unauthorized access. Please check your permissions.
- 500 Internal Server Error – Unexpected error. Please check the response body for the stack trace.
POST /api/auth/check- Description
- Check the requirement for an authentication token.
- Example
POST /api/auth/check?token=STRING HTTP/1.1 Host: example.com Content-Type: application/json { "token": "STRING" }
- Status Codes
- 201 Created – Resource created.
- 202 Accepted – Operation is still executing. Please check the task queue.
- 400 Bad Request – Operation exception. Please check the response body for details.
- 401 Unauthorized – Unauthenticated access. Please login first.
- 403 Forbidden – Unauthorized access. Please check your permissions.
- 500 Internal Server Error – Unexpected error. Please check the response body for the stack trace.
POST /api/auth/logout- Status Codes
- 201 Created – Resource created.
- 202 Accepted – Operation is still executing. Please check the task queue.
- 400 Bad Request – Operation exception. Please check the response body for details.
- 401 Unauthorized – Unauthenticated access. Please login first.
- 403 Forbidden – Unauthorized access. Please check your permissions.
- 500 Internal Server Error – Unexpected error. Please check the response body for the stack trace.
Additional Resources
- See the Ceph RESTful API chapter in the Red Hat Ceph Storage Developer Guide for more details.
A.3. Ceph File System
The method reference for using the Ceph RESTful API cephfs endpoint to manage Ceph File Systems (CephFS).
GET /api/cephfs- Example
GET /api/cephfs HTTP/1.1 Host: example.com
- Status Codes
- 200 OK – Okay.
- 400 Bad Request – Operation exception. Please check the response body for details.
- 401 Unauthorized – Unauthenticated access. Please login first.
- 403 Forbidden – Unauthorized access. Please check your permissions.
- 500 Internal Server Error – Unexpected error. Please check the response body for the stack trace.
GET /api/cephfs/FS_ID- Parameters
-
Replace
FS_IDwith the Ceph File System identifier string.
-
Replace
- Example
GET /api/cephfs/FS_ID HTTP/1.1 Host: example.com- Status Codes
- 200 OK – Okay.
- 400 Bad Request – Operation exception. Please check the response body for details.
- 401 Unauthorized – Unauthenticated access. Please login first.
- 403 Forbidden – Unauthorized access. Please check your permissions.
- 500 Internal Server Error – Unexpected error. Please check the response body for the stack trace.
DELETE /api/cephfs/FS_ID/client/CLIENT_ID- Parameters
-
Replace
FS_IDwith the Ceph File System identifier string. -
Replace
CLIENT_IDwith the Ceph client identifier string.
-
Replace
- Status Codes
- 202 Accepted – Operation is still executing. Please check the task queue.
- 204 No Content – Resource deleted.
- 400 Bad Request – Operation exception. Please check the response body for details.
- 401 Unauthorized – Unauthenticated access. Please login first.
- 403 Forbidden – Unauthorized access. Please check your permissions.
- 500 Internal Server Error – Unexpected error. Please check the response body for the stack trace.
GET /api/cephfs/FS_ID/clients- Parameters
-
Replace
FS_IDwith the Ceph File System identifier string.
-
Replace
- Example
GET /api/cephfs/FS_ID/clients HTTP/1.1 Host: example.com- Status Codes
- 200 OK – Okay.
- 400 Bad Request – Operation exception. Please check the response body for details.
- 401 Unauthorized – Unauthenticated access. Please login first.
- 403 Forbidden – Unauthorized access. Please check your permissions.
- 500 Internal Server Error – Unexpected error. Please check the response body for the stack trace.
GET /api/cephfs/FS_ID/get_root_directory- Description
-
The root directory that can not be fetched using the
ls_dirAPI call. - Parameters
-
Replace
FS_IDwith the Ceph File System identifier string.
-
Replace
- Example
GET /api/cephfs/FS_ID/get_root_directory HTTP/1.1 Host: example.com- Status Codes
- 200 OK – Okay.
- 400 Bad Request – Operation exception. Please check the response body for details.
- 401 Unauthorized – Unauthenticated access. Please login first.
- 403 Forbidden – Unauthorized access. Please check your permissions.
- 500 Internal Server Error – Unexpected error. Please check the response body for the stack trace.
GET /api/cephfs/FS_ID/ls_dir- Description
- List directories for a given path.
- Parameters
-
Replace
FS_IDwith the Ceph File System identifier string. Queries:
-
path- The string value where you want to start the listing. The default path is/, if not given. -
depth- An integer value specifying the number of steps to go down the directory tree.
-
-
Replace
- Example
GET /api/cephfs/FS_ID/ls_dir HTTP/1.1 Host: example.com- Status Codes
- 200 OK – Okay.
- 400 Bad Request – Operation exception. Please check the response body for details.
- 401 Unauthorized – Unauthenticated access. Please login first.
- 403 Forbidden – Unauthorized access. Please check your permissions.
- 500 Internal Server Error – Unexpected error. Please check the response body for the stack trace.
GET /api/cephfs/FS_ID/mds_counters- Parameters
-
Replace
FS_IDwith the Ceph File System identifier string. Queries:
-
counters- An integer value.
-
-
Replace
- Example
GET /api/cephfs/FS_ID/mds_counters HTTP/1.1 Host: example.com- Status Codes
- 200 OK – Okay.
- 400 Bad Request – Operation exception. Please check the response body for details.
- 401 Unauthorized – Unauthenticated access. Please login first.
- 403 Forbidden – Unauthorized access. Please check your permissions.
- 500 Internal Server Error – Unexpected error. Please check the response body for the stack trace.
GET /api/cephfs/FS_ID/quota- Description
- Display the CephFS quotas for the given path.
- Parameters
-
Replace
FS_IDwith the Ceph File System identifier string. Queries:
-
path- A required string value specifying the directory path.
-
-
Replace
- Example
GET /api/cephfs/FS_ID/quota?path=STRING HTTP/1.1 Host: example.com
- Status Codes
- 200 OK – Okay.
- 400 Bad Request – Operation exception. Please check the response body for details.
- 401 Unauthorized – Unauthenticated access. Please login first.
- 403 Forbidden – Unauthorized access. Please check your permissions.
- 500 Internal Server Error – Unexpected error. Please check the response body for the stack trace.
PUT /api/cephfs/FS_ID/quota- Description
- Sets the quota for a given path.
- Parameters
-
Replace
FS_IDwith the Ceph File System identifier string. -
max_bytes- A string value defining the byte limit. -
max_files- A string value defining the file limit. -
path- A string value defining the path to the directory or file.
-
Replace
- Example
PUT /api/cephfs/FS_ID/quota HTTP/1.1 Host: example.com Content-Type: application/json { "max_bytes": "STRING", "max_files": "STRING", "path": "STRING" }
- Status Codes
- 200 OK – Okay.
- 202 Accepted – Operation is still executing, check the task queue.
- 400 Bad Request – Operation exception. Please check the response body for details.
- 401 Unauthorized – Unauthenticated access. Please login first.
- 403 Forbidden – Unauthorized access. Please check your permissions.
- 500 Internal Server Error – Unexpected error. Please check the response body for the stack trace.
DELETE /api/cephfs/FS_ID/snapshot- Description
- Remove a snapsnot.
- Parameters
-
Replace
FS_IDwith the Ceph File System identifier string. Queries:
-
name- A required string value specifying the snapshot name. -
path- A required string value defining the path to the directory.
-
-
Replace
- Status Codes
- 202 Accepted – Operation is still executing, check the task queue.
- 204 No Content – Resource deleted.
- 400 Bad Request – Operation exception. Please check the response body for details.
- 401 Unauthorized – Unauthenticated access. Please login first.
- 403 Forbidden – Unauthorized access. Please check your permissions.
- 500 Internal Server Error – Unexpected error. Please check the response body for the stack trace.
POST /api/cephfs/FS_ID/snapshot- Description
- Create a snapshot.
- Parameters
-
Replace
FS_IDwith the Ceph File System identifier string. -
name- A string value specifying the snapshot name. If no name is specified, then a name using the current time in RFC3339 UTC format is generated. -
path- A string value defining the path to the directory.
-
Replace
- Example
POST /api/cephfs/FS_ID/snapshot HTTP/1.1 Host: example.com Content-Type: application/json { "name": "STRING", "path": "STRING" }
- Status Codes
- 201 Created – Resource created.
- 202 Accepted – Operation is still executing, check the task queue.
- 400 Bad Request – Operation exception. Please check the response body for details.
- 401 Unauthorized – Unauthenticated access. Please login first.
- 403 Forbidden – Unauthorized access. Please check your permissions.
- 500 Internal Server Error – Unexpected error. Please check the response body for the stack trace.
DELETE /api/cephfs/FS_ID/tree- Description
- Remove a directory.
- Parameters
-
Replace
FS_IDwith the Ceph File System identifier string. Queries:
-
path- A required string value defining the path to the directory.
-
-
Replace
- Status Codes
- 202 Accepted – Operation is still executing, check the task queue.
- 204 No Content – Resource deleted.
- 400 Bad Request – Operation exception. Please check the response body for details.
- 401 Unauthorized – Unauthenticated access. Please login first.
- 403 Forbidden – Unauthorized access. Please check your permissions.
- 500 Internal Server Error – Unexpected error. Please check the response body for the stack trace.
POST /api/cephfs/FS_ID/tree- Description
- Creates a directory.
- Parameters
-
Replace
FS_IDwith the Ceph File System identifier string. -
path- A string value defining the path to the directory.
-
Replace
- Example
POST /api/cephfs/FS_ID/tree HTTP/1.1 Host: example.com Content-Type: application/json { "path": "STRING" }
- Status Codes
- 201 Created – Resource created.
- 202 Accepted – Operation is still executing, check the task queue.
- 400 Bad Request – Operation exception. Please check the response body for details.
- 401 Unauthorized – Unauthenticated access. Please login first.
- 403 Forbidden – Unauthorized access. Please check your permissions.
- 500 Internal Server Error – Unexpected error. Please check the response body for the stack trace.
Additional Resources
- See the Ceph RESTful API chapter in the Red Hat Ceph Storage Developer Guide for more details.
A.4. Storage cluster configuration
The method reference for using the Ceph RESTful API cluster_conf endpoint to manage the Red Hat Ceph Storage cluster.
GET /api/cluster_conf- Example
GET /api/cluster_conf HTTP/1.1 Host: example.com
- Status Codes
- 200 OK – Okay.
- 400 Bad Request – Operation exception. Please check the response body for details.
- 401 Unauthorized – Unauthenticated access. Please login first.
- 403 Forbidden – Unauthorized access. Please check your permissions.
- 500 Internal Server Error – Unexpected error. Please check the response body for the stack trace.
POST /api/cluster_conf- Example
POST /api/cluster_conf HTTP/1.1 Host: example.com Content-Type: application/json { "name": "STRING", "value": "STRING" }- Status Codes
- 201 Created – Resource created.
- 202 Accepted – Operation is still executing, check the task queue.
- 400 Bad Request – Operation exception. Please check the response body for details.
- 401 Unauthorized – Unauthenticated access. Please login first.
- 403 Forbidden – Unauthorized access. Please check your permissions.
- 500 Internal Server Error – Unexpected error. Please check the response body for the stack trace.
PUT /api/cluster_conf- Example
PUT /api/cluster_conf HTTP/1.1 Host: example.com Content-Type: application/json { "options": "STRING" }- Status Codes
- 200 OK – Okay.
- 202 Accepted – Operation is still executing, check the task queue.
- 400 Bad Request – Operation exception. Please check the response body for details.
- 401 Unauthorized – Unauthenticated access. Please login first.
- 403 Forbidden – Unauthorized access. Please check your permissions.
- 500 Internal Server Error – Unexpected error. Please check the response body for the stack trace.
GET /api/cluster_conf/filter- Description
- Display the storage cluster configuration by name.
- Parameters
Queries:
-
names- A string value for the configuration option names.
-
- Example
GET /api/cluster_conf/filter HTTP/1.1 Host: example.com
- Status Codes
- 200 OK – Okay.
- 400 Bad Request – Operation exception. Please check the response body for details.
- 401 Unauthorized – Unauthenticated access. Please login first.
- 403 Forbidden – Unauthorized access. Please check your permissions.
- 500 Internal Server Error – Unexpected error. Please check the response body for the stack trace.
DELETE /api/cluster_conf/NAME- Parameters
-
Replace
NAMEwith the storage cluster configuration name. Queries:
-
section- A required string value.
-
-
Replace
- Status Codes
- 202 Accepted – Operation is still executing, check the task queue.
- 204 No Content – Resource deleted.
- 400 Bad Request – Operation exception. Please check the response body for details.
- 401 Unauthorized – Unauthenticated access. Please login first.
- 403 Forbidden – Unauthorized access. Please check your permissions.
- 500 Internal Server Error – Unexpected error. Please check the response body for the stack trace.
GET /api/cluster_conf/NAME- Parameters
-
Replace
NAMEwith the storage cluster configuration name.
-
Replace
- Example
GET /api/cluster_conf/NAME HTTP/1.1 Host: example.com- Status Codes
- 200 OK – Okay.
- 400 Bad Request – Operation exception. Please check the response body for details.
- 401 Unauthorized – Unauthenticated access. Please login first.
- 403 Forbidden – Unauthorized access. Please check your permissions.
- 500 Internal Server Error – Unexpected error. Please check the response body for the stack trace.
Additional Resources
- See the Ceph RESTful API chapter in the Red Hat Ceph Storage Developer Guide for more details.
A.5. CRUSH rules
The method reference for using the Ceph RESTful API crush_rule endpoint to manage the CRUSH rules.
GET /api/crush_rule- Description
- List the CRUSH rule configuration.
- Example
GET /api/crush_rule HTTP/1.1 Host: example.com
- Status Codes
- 200 OK – Okay.
- 400 Bad Request – Operation exception. Please check the response body for details.
- 401 Unauthorized – Unauthenticated access. Please login first.
- 403 Forbidden – Unauthorized access. Please check your permissions.
- 500 Internal Server Error – Unexpected error. Please check the response body for the stack trace.
POST /api/crush_rule- Example
POST /api/crush_rule HTTP/1.1 Host: example.com Content-Type: application/json { "device_class": "STRING", "failure_domain": "STRING", "name": "STRING", "root": "STRING" }- Status Codes
- 201 Created – Resource created.
- 202 Accepted – Operation is still executing, check the task queue.
- 400 Bad Request – Operation exception. Please check the response body for details.
- 401 Unauthorized – Unauthenticated access. Please login first.
- 403 Forbidden – Unauthorized access. Please check your permissions.
- 500 Internal Server Error – Unexpected error. Please check the response body for the stack trace.
DELETE /api/crush_rule/NAME- Parameters
-
Replace
NAMEwith the rule name.
-
Replace
- Status Codes
- 202 Accepted – Operation is still executing, check the task queue.
- 204 No Content – Resource deleted.
- 400 Bad Request – Operation exception. Please check the response body for details.
- 401 Unauthorized – Unauthenticated access. Please login first.
- 403 Forbidden – Unauthorized access. Please check your permissions.
- 500 Internal Server Error – Unexpected error. Please check the response body for the stack trace.
GET /api/crush_rule/NAME- Parameters
-
Replace
NAMEwith the rule name.
-
Replace
- Example
GET /api/crush_rule/NAME HTTP/1.1 Host: example.com- Status Codes
- 202 Accepted – Operation is still executing, check the task queue.
- 204 No Content – Resource deleted.
- 400 Bad Request – Operation exception. Please check the response body for details.
- 401 Unauthorized – Unauthenticated access. Please login first.
- 403 Forbidden – Unauthorized access. Please check your permissions.
- 500 Internal Server Error – Unexpected error. Please check the response body for the stack trace.
Additional Resources
- See the Ceph RESTful API chapter in the Red Hat Ceph Storage Developer Guide for more details.
A.6. Erasure code profiles
The method reference for using the Ceph RESTful API erasure_code_profile endpoint to manage the profiles for erasure coding.
GET /api/erasure_code_profile- Description
- List erasure-coded profile information.
- Example
GET /api/erasure_code_profile HTTP/1.1 Host: example.com
- Status Codes
- 200 OK – Okay.
- 400 Bad Request – Operation exception. Please check the response body for details.
- 401 Unauthorized – Unauthenticated access. Please login first.
- 403 Forbidden – Unauthorized access. Please check your permissions.
- 500 Internal Server Error – Unexpected error. Please check the response body for the stack trace.
POST /api/erasure_code_profile- Example
POST /api/erasure_code_profile HTTP/1.1 Host: example.com Content-Type: application/json { "name": "STRING" }- Status Codes
- 201 Created – Resource created.
- 202 Accepted – Operation is still executing, check the task queue.
- 400 Bad Request – Operation exception. Please check the response body for details.
- 401 Unauthorized – Unauthenticated access. Please login first.
- 403 Forbidden – Unauthorized access. Please check your permissions.
- 500 Internal Server Error – Unexpected error. Please check the response body for the stack trace.
DELETE /api/erasure_code_profile/NAME- Parameters
-
Replace
NAMEwith the profile name.
-
Replace
- Status Codes
- 202 Accepted – Operation is still executing, check the task queue.
- 204 No Content – Resource deleted.
- 400 Bad Request – Operation exception. Please check the response body for details.
- 401 Unauthorized – Unauthenticated access. Please login first.
- 403 Forbidden – Unauthorized access. Please check your permissions.
- 500 Internal Server Error – Unexpected error. Please check the response body for the stack trace.
GET /api/erasure_code_profile/NAME- Parameters
-
Replace
NAMEwith the profile name.
-
Replace
- Example
GET /api/erasure_code_profile/NAME HTTP/1.1 Host: example.com- Status Codes
- 202 Accepted – Operation is still executing, check the task queue.
- 204 No Content – Resource deleted.
- 400 Bad Request – Operation exception. Please check the response body for details.
- 401 Unauthorized – Unauthenticated access. Please login first.
- 403 Forbidden – Unauthorized access. Please check your permissions.
- 500 Internal Server Error – Unexpected error. Please check the response body for the stack trace.
Additional Resources
- See the Ceph RESTful API chapter in the Red Hat Ceph Storage Developer Guide for more details.
A.7. Feature toggles
The method reference for using the Ceph RESTful API feature_toggles endpoint to manage the CRUSH rules.
GET /api/feature_toggles- Description
- List the features of Red Hat Ceph Storage.
- Example
GET /api/feature_toggles HTTP/1.1 Host: example.com
- Status Codes
- 200 OK – Okay.
- 400 Bad Request – Operation exception. Please check the response body for details.
- 401 Unauthorized – Unauthenticated access. Please login first.
- 403 Forbidden – Unauthorized access. Please check your permissions.
- 500 Internal Server Error – Unexpected error. Please check the response body for the stack trace.
Additional Resources
- See the Ceph RESTful API chapter in the Red Hat Ceph Storage Developer Guide for more details.
A.8. Grafana
The method reference for using the Ceph RESTful API grafana endpoint to manage Grafana.
POST /api/grafana/dashboards- Status Codes
- 201 Created – Resource created.
- 202 Accepted – Operation is still executing. Please check the task queue.
- 400 Bad Request – Operation exception. Please check the response body for details.
- 401 Unauthorized – Unauthenticated access. Please login first.
- 403 Forbidden – Unauthorized access. Please check your permissions.
- 500 Internal Server Error – Unexpected error. Please check the response body for the stack trace.
GET /api/grafana/url- Description
- List the Grafana URL instance.
- Example
GET /api/grafana/url HTTP/1.1 Host: example.com
- Status Codes
- 200 OK – Okay.
- 400 Bad Request – Operation exception. Please check the response body for details.
- 401 Unauthorized – Unauthenticated access. Please login first.
- 403 Forbidden – Unauthorized access. Please check your permissions.
- 500 Internal Server Error – Unexpected error. Please check the response body for the stack trace.
GET /api/grafana/validation/PARAMS- Parameters
-
Replace
PARAMSwith a string value.
-
Replace
- Example
GET /api/grafana/validation/PARAMS HTTP/1.1 Host: example.com- Status Codes
- 200 OK – Okay.
- 400 Bad Request – Operation exception. Please check the response body for details.
- 401 Unauthorized – Unauthenticated access. Please login first.
- 403 Forbidden – Unauthorized access. Please check your permissions.
- 500 Internal Server Error – Unexpected error. Please check the response body for the stack trace.
Additional Resources
- See the Ceph RESTful API chapter in the Red Hat Ceph Storage Developer Guide for more details.
A.9. Storage cluster health
The method reference for using the Ceph RESTful API health endpoint to display the storage cluster health details and status.
GET /api/health/full- Example
GET /api/health/full HTTP/1.1 Host: example.com
- Status Codes
- 200 OK – Okay.
- 400 Bad Request – Operation exception. Please check the response body for details.
- 401 Unauthorized – Unauthenticated access. Please login first.
- 403 Forbidden – Unauthorized access. Please check your permissions.
- 500 Internal Server Error – Unexpected error. Please check the response body for the stack trace.
GET /api/health/minimal- Description
- Display the storage cluster’s minimal health report.
- Example
GET /api/health/minimal HTTP/1.1 Host: example.com
- Status Codes
- 200 OK – Okay.
- 400 Bad Request – Operation exception. Please check the response body for details.
- 401 Unauthorized – Unauthenticated access. Please login first.
- 403 Forbidden – Unauthorized access. Please check your permissions.
- 500 Internal Server Error – Unexpected error. Please check the response body for the stack trace.
Additional Resources
- See the Ceph RESTful API chapter in the Red Hat Ceph Storage Developer Guide for more details.
A.10. Host
The method reference for using the Ceph RESTful API host endpoint to display host, also known as node, information.
GET /api/host- Description
- List the host specifications.
- Parameters
Queries:
-
sources- A string value of host sources.
-
- Example
GET /api/host HTTP/1.1 Host: example.com
- Status Codes
- 200 OK – Okay.
- 400 Bad Request – Operation exception. Please check the response body for details.
- 401 Unauthorized – Unauthenticated access. Please login first.
- 403 Forbidden – Unauthorized access. Please check your permissions.
- 500 Internal Server Error – Unexpected error. Please check the response body for the stack trace.
POST /api/host- Example
POST /api/host HTTP/1.1 Host: example.com Content-Type: application/json { "hostname": "STRING", "status": "STRING" }- Status Codes
- 201 Created – Resource created.
- 202 Accepted – Operation is still executing. Please check the task queue.
- 400 Bad Request – Operation exception. Please check the response body for details.
- 401 Unauthorized – Unauthenticated access. Please login first.
- 403 Forbidden – Unauthorized access. Please check your permissions.
- 500 Internal Server Error – Unexpected error. Please check the response body for the stack trace.
DELETE /api/host/HOST_NAME- Parameters
-
Replace
HOST_NAMEwith the name of the node.
-
Replace
- Status Codes
- 202 Accepted – Operation is still executing. Please check the task queue.
- 204 No Content – Resource deleted.
- 400 Bad Request – Operation exception. Please check the response body for details.
- 401 Unauthorized – Unauthenticated access. Please login first.
- 403 Forbidden – Unauthorized access. Please check your permissions.
- 500 Internal Server Error – Unexpected error. Please check the response body for the stack trace.
GET /api/host/HOST_NAME- Description
- Displays information on the given host.
- Parameters
-
Replace
HOST_NAMEwith the name of the node.
-
Replace
- Example
GET /api/host/HOST_NAME HTTP/1.1 Host: example.com- Status Codes
- 200 OK – Okay.
- 400 Bad Request – Operation exception. Please check the response body for details.
- 401 Unauthorized – Unauthenticated access. Please login first.
- 403 Forbidden – Unauthorized access. Please check your permissions.
- 500 Internal Server Error – Unexpected error. Please check the response body for the stack trace.
PUT /api/host/HOST_NAME- Description
- Updates information for the given host. This method is only supported when the Ceph Orchestrator is enabled.
- Parameters
-
Replace
HOST_NAMEwith the name of the node. -
force- Force the host to enter maintenance mode. -
labels- A list of labels. -
maintenance- Enter or exit maintenance mode. -
update_labels- Updates the labels.
-
Replace
- Example
PUT /api/host/HOST_NAME HTTP/1.1 Host: example.com Content-Type: application/json { "force": true, "labels": [ "STRING" ], "maintenance": true, "update_labels": true }
- Status Codes
- 200 OK – Okay.
- 202 Accepted – Operation is still executing. Please check the task queue.
- 400 Bad Request – Operation exception. Please check the response body for details.
- 401 Unauthorized – Unauthenticated access. Please login first.
- 403 Forbidden – Unauthorized access. Please check your permissions.
- 500 Internal Server Error – Unexpected error. Please check the response body for the stack trace.
GET /api/host/HOST_NAME/daemons- Parameters
-
Replace
HOST_NAMEwith the name of the node.
-
Replace
- Example
GET /api/host/HOST_NAME/daemons HTTP/1.1 Host: example.com- Status Codes
- 200 OK – Okay.
- 400 Bad Request – Operation exception. Please check the response body for details.
- 401 Unauthorized – Unauthenticated access. Please login first.
- 403 Forbidden – Unauthorized access. Please check your permissions.
- 500 Internal Server Error – Unexpected error. Please check the response body for the stack trace.
GET /api/host/HOST_NAME/devices- Parameters
-
Replace
HOST_NAMEwith the name of the node.
-
Replace
- Example
GET /api/host/HOST_NAME/devices HTTP/1.1 Host: example.com- Status Codes
- 200 OK – Okay.
- 400 Bad Request – Operation exception. Please check the response body for details.
- 401 Unauthorized – Unauthenticated access. Please login first.
- 403 Forbidden – Unauthorized access. Please check your permissions.
- 500 Internal Server Error – Unexpected error. Please check the response body for the stack trace.
POST /api/host/HOST_NAME/identify_device- Description
- Identify a device by switching on the device’s light for a specified number of seconds.
- Parameters
-
Replace
HOST_NAMEwith the name of the node. -
device- The device id, such as,/dev/dm-0orABC1234DEF567-1R1234_ABC8DE0Q. -
duration- The number of seconds the device’s LED should flash.
-
Replace
- Example
POST /api/host/HOST_NAME/identify_device HTTP/1.1 Host: example.com Content-Type: application/json { "device": "STRING", "duration": "STRING" }
- Status Codes
- 201 Created – Resource created.
- 202 Accepted – Operation is still executing. Please check the task queue.
- 400 Bad Request – Operation exception. Please check the response body for details.
- 401 Unauthorized – Unauthenticated access. Please login first.
- 403 Forbidden – Unauthorized access. Please check your permissions.
- 500 Internal Server Error – Unexpected error. Please check the response body for the stack trace.
GET /api/host/HOST_NAME/inventory- Description
- Display the inventory of the host.
- Parameters
-
Replace
HOST_NAMEwith the name of the node. Queries:
-
refresh- A string value to trigger an asynchronous refresh.
-
-
Replace
- Example
GET /api/host/HOST_NAME/inventory HTTP/1.1 Host: example.com- Status Codes
- 200 OK – Okay.
- 400 Bad Request – Operation exception. Please check the response body for details.
- 401 Unauthorized – Unauthenticated access. Please login first.
- 403 Forbidden – Unauthorized access. Please check your permissions.
- 500 Internal Server Error – Unexpected error. Please check the response body for the stack trace.
GET /api/host/HOST_NAME/smart- Parameters
-
Replace
HOST_NAMEwith the name of the node.
-
Replace
- Example
GET /api/host/HOST_NAME/smart HTTP/1.1 Host: example.com- Status Codes
- 200 OK – Okay.
- 400 Bad Request – Operation exception. Please check the response body for details.
- 401 Unauthorized – Unauthenticated access. Please login first.
- 403 Forbidden – Unauthorized access. Please check your permissions.
- 500 Internal Server Error – Unexpected error. Please check the response body for the stack trace.
Additional Resources
- See the Ceph RESTful API chapter in the Red Hat Ceph Storage Developer Guide for more details.
A.11. Logs
The method reference for using the Ceph RESTful API logs endpoint to display log information.
GET /api/logs/all- Description
- View all the log configuration.
- Example
GET /api/logs/all HTTP/1.1 Host: example.com
- Status Codes
- 200 OK – Okay.
- 400 Bad Request – Operation exception. Please check the response body for details.
- 401 Unauthorized – Unauthenticated access. Please login first.
- 403 Forbidden – Unauthorized access. Please check your permissions.
- 500 Internal Server Error – Unexpected error. Please check the response body for the stack trace.
Additional Resources
- See the Ceph RESTful API chapter in the Red Hat Ceph Storage Developer Guide for more details.
A.12. Ceph Manager modules
The method reference for using the Ceph RESTful API mgr/module endpoint to manage the Ceph Manager modules.
GET /api/mgr/module- Description
- View the list of managed modules.
- Example
GET /api/mgr/module HTTP/1.1 Host: example.com
- Status Codes
- 200 OK – Okay.
- 400 Bad Request – Operation exception. Please check the response body for details.
- 401 Unauthorized – Unauthenticated access. Please login first.
- 403 Forbidden – Unauthorized access. Please check your permissions.
- 500 Internal Server Error – Unexpected error. Please check the response body for the stack trace.
GET /api/mgr/module/MODULE_NAME- Description
- Retrieve the values of the persistent configuration settings.
- Parameters
-
Replace
MODULE_NAMEwith the Ceph Manager module name.
-
Replace
- Example
GET /api/mgr/module/MODULE_NAME HTTP/1.1 Host: example.com- Status Codes
- 200 OK – Okay.
- 400 Bad Request – Operation exception. Please check the response body for details.
- 401 Unauthorized – Unauthenticated access. Please login first.
- 403 Forbidden – Unauthorized access. Please check your permissions.
- 500 Internal Server Error – Unexpected error. Please check the response body for the stack trace.
PUT /api/mgr/module/MODULE_NAME- Description
- Set the values of the persistent configuration settings.
- Parameters
-
Replace
MODULE_NAMEwith the Ceph Manager module name. -
config- The values of the module options.
-
Replace
- Example
PUT /api/mgr/module/MODULE_NAME HTTP/1.1 Host: example.com Content-Type: application/json { "config": "STRING" }
- Status Codes
- 200 OK – Okay.
- 202 Accepted – Operation is still executing. Please check the task queue.
- 400 Bad Request – Operation exception. Please check the response body for details.
- 401 Unauthorized – Unauthenticated access. Please login first.
- 403 Forbidden – Unauthorized access. Please check your permissions.
- 500 Internal Server Error – Unexpected error. Please check the response body for the stack trace.
POST /api/mgr/module/MODULE_NAME/disable- Description
- Disable the given Ceph Manager module.
- Parameters
-
Replace
MODULE_NAMEwith the Ceph Manager module name.
-
Replace
- Status Codes
- 201 Created – Resource created.
- 202 Accepted – Operation is still executing. Please check the task queue.
- 400 Bad Request – Operation exception. Please check the response body for details.
- 401 Unauthorized – Unauthenticated access. Please login first.
- 403 Forbidden – Unauthorized access. Please check your permissions.
- 500 Internal Server Error – Unexpected error. Please check the response body for the stack trace.
POST /api/mgr/module/MODULE_NAME/enable- Description
- Enable the given Ceph Manager module.
- Parameters
-
Replace
MODULE_NAMEwith the Ceph Manager module name.
-
Replace
- Status Codes
- 201 Created – Resource created.
- 202 Accepted – Operation is still executing. Please check the task queue.
- 400 Bad Request – Operation exception. Please check the response body for details.
- 401 Unauthorized – Unauthenticated access. Please login first.
- 403 Forbidden – Unauthorized access. Please check your permissions.
- 500 Internal Server Error – Unexpected error. Please check the response body for the stack trace.
GET /api/mgr/module/MODULE_NAME/options- Description
- View the options for the given Ceph Manager module.
- Parameters
-
Replace
MODULE_NAMEwith the Ceph Manager module name.
-
Replace
- Example
GET /api/mgr/module/MODULE_NAME/options HTTP/1.1 Host: example.com- Status Codes
- 200 OK – Okay.
- 400 Bad Request – Operation exception. Please check the response body for details.
- 401 Unauthorized – Unauthenticated access. Please login first.
- 403 Forbidden – Unauthorized access. Please check your permissions.
- 500 Internal Server Error – Unexpected error. Please check the response body for the stack trace.
Additional Resources
- See the Ceph RESTful API chapter in the Red Hat Ceph Storage Developer Guide for more details.
A.13. Ceph Monitor
The method reference for using the Ceph RESTful API monitor endpoint to display information on the Ceph Monitor.
GET /api/monitor- Description
- View Ceph Monitor details.
- Example
GET /api/monitor HTTP/1.1 Host: example.com
- Status Codes
- 200 OK – Okay.
- 400 Bad Request – Operation exception. Please check the response body for details.
- 401 Unauthorized – Unauthenticated access. Please login first.
- 403 Forbidden – Unauthorized access. Please check your permissions.
- 500 Internal Server Error – Unexpected error. Please check the response body for the stack trace.
Additional Resources
- See the Ceph RESTful API chapter in the Red Hat Ceph Storage Developer Guide for more details.
A.14. Ceph OSD
The method reference for using the Ceph RESTful API osd endpoint to manage the Ceph OSDs.
GET /api/osd- Example
GET /api/osd HTTP/1.1 Host: example.com
- Status Codes
- 200 OK – Okay.
- 400 Bad Request – Operation exception. Please check the response body for details.
- 401 Unauthorized – Unauthenticated access. Please login first.
- 403 Forbidden – Unauthorized access. Please check your permissions.
- 500 Internal Server Error – Unexpected error. Please check the response body for the stack trace.
POST /api/osd- Example
POST /api/osd HTTP/1.1 Host: example.com Content-Type: application/json { "data": "STRING", "method": "STRING", "tracking_id": "STRING" }- Status Codes
- 201 Created – Resource created.
- 202 Accepted – Operation is still executing. Please check the task queue.
- 400 Bad Request – Operation exception. Please check the response body for details.
- 401 Unauthorized – Unauthenticated access. Please login first.
- 403 Forbidden – Unauthorized access. Please check your permissions.
- 500 Internal Server Error – Unexpected error. Please check the response body for the stack trace.
GET /api/osd/flags- Description
- View the Ceph OSD flags.
- Example
GET /api/osd/flags HTTP/1.1 Host: example.com
- Status Codes
- 200 OK – Okay.
- 400 Bad Request – Operation exception. Please check the response body for details.
- 401 Unauthorized – Unauthenticated access. Please login first.
- 403 Forbidden – Unauthorized access. Please check your permissions.
- 500 Internal Server Error – Unexpected error. Please check the response body for the stack trace.
PUT /api/osd/flags- Description
- Sets the Ceph OSD flags for the entire storage cluster.
- Parameters
-
The
recovery_deletes,sortbitwise, andpglog_hardlimitflags can not be unset. The
purged_snapshotsflag can not be set.ImportantYou must include these four flags for a successful operation.
-
The
- Example
PUT /api/osd/flags HTTP/1.1 Host: example.com Content-Type: application/json { "flags": [ "STRING" ] }- Status Codes
- 200 OK – Okay.
- 202 Accepted – Operation is still executing. Please check the task queue.
- 400 Bad Request – Operation exception. Please check the response body for details.
- 401 Unauthorized – Unauthenticated access. Please login first.
- 403 Forbidden – Unauthorized access. Please check your permissions.
- 500 Internal Server Error – Unexpected error. Please check the response body for the stack trace.
GET /api/osd/flags/individual- Description
- View the individual Ceph OSD flags.
- Example
GET /api/osd/flags/individual HTTP/1.1 Host: example.com
- Status Codes
- 200 OK – Okay.
- 400 Bad Request – Operation exception. Please check the response body for details.
- 401 Unauthorized – Unauthenticated access. Please login first.
- 403 Forbidden – Unauthorized access. Please check your permissions.
- 500 Internal Server Error – Unexpected error. Please check the response body for the stack trace.
PUT /api/osd/flags/individual- Description
-
Updates the
noout,noin,nodown, andnoupflags for an individual subset of Ceph OSDs. - Example
PUT /api/osd/flags/individual HTTP/1.1 Host: example.com Content-Type: application/json { "flags": { "nodown": true, "noin": true, "noout": true, "noup": true }, "ids": [ 1 ] }- Status Codes
- 200 OK – Okay.
- 202 Accepted – Operation is still executing. Please check the task queue.
- 400 Bad Request – Operation exception. Please check the response body for details.
- 401 Unauthorized – Unauthenticated access. Please login first.
- 403 Forbidden – Unauthorized access. Please check your permissions.
- 500 Internal Server Error – Unexpected error. Please check the response body for the stack trace.
GET /api/osd/safe_to_delete- Parameters
Queries:
-
svc_ids- A required string of the Ceph OSD service identifier.
-
- Example
GET /api/osd/safe_to_delete?svc_ids=STRING HTTP/1.1 Host: example.com- Status Codes
- 200 OK – Okay.
- 400 Bad Request – Operation exception. Please check the response body for details.
- 401 Unauthorized – Unauthenticated access. Please login first.
- 403 Forbidden – Unauthorized access. Please check your permissions.
- 500 Internal Server Error – Unexpected error. Please check the response body for the stack trace.
GET /api/osd/safe_to_destroy- Description
- Check to see if the Ceph OSD is safe to destroy.
- Parameters
Queries:
-
ids- A required string of the Ceph OSD service identifier.
-
- Example
GET /api/osd/safe_to_destroy?ids=STRING HTTP/1.1 Host: example.com- Status Codes
- 200 OK – Okay.
- 400 Bad Request – Operation exception. Please check the response body for details.
- 401 Unauthorized – Unauthenticated access. Please login first.
- 403 Forbidden – Unauthorized access. Please check your permissions.
- 500 Internal Server Error – Unexpected error. Please check the response body for the stack trace.
DELETE /api/osd/SVC_ID- Parameters
-
Replace
SVC_IDwith a string value for the Ceph OSD service identifier. Queries:
-
preserve_id- A string value. -
force- A string value.
-
-
Replace
- Status Codes
- 202 Accepted – Operation is still executing. Please check the task queue.
- 204 No Content – Resource deleted.
- 400 Bad Request – Operation exception. Please check the response body for details.
- 401 Unauthorized – Unauthenticated access. Please login first.
- 403 Forbidden – Unauthorized access. Please check your permissions.
- 500 Internal Server Error – Unexpected error. Please check the response body for the stack trace.
GET /api/osd/SVC_ID- Description
- Returns collected data about a Ceph OSD.
- Parameters
-
Replace
SVC_IDwith a string value for the Ceph OSD service identifier.
-
Replace
- Example
GET /api/osd/SVC_ID HTTP/1.1 Host: example.com- Status Codes
- 200 OK – Okay.
- 400 Bad Request – Operation exception. Please check the response body for details.
- 401 Unauthorized – Unauthenticated access. Please login first.
- 403 Forbidden – Unauthorized access. Please check your permissions.
- 500 Internal Server Error – Unexpected error. Please check the response body for the stack trace.
PUT /api/osd/SVC_ID- Parameters
-
Replace
SVC_IDwith a string value for the Ceph OSD service identifier.
-
Replace
- Example
PUT /api/osd/SVC_ID HTTP/1.1 Host: example.com Content-Type: application/json { "device_class": "STRING" }
- Status Codes
- 200 OK – Okay.
- 202 Accepted – Operation is still executing. Please check the task queue.
- 400 Bad Request – Operation exception. Please check the response body for details.
- 401 Unauthorized – Unauthenticated access. Please login first.
- 403 Forbidden – Unauthorized access. Please check your permissions.
- 500 Internal Server Error – Unexpected error. Please check the response body for the stack trace.
POST /api/osd/SVC_ID/destroy- Description
Marks Ceph OSD as being destroyed. The Ceph OSD must be marked down before being destroyed. This operation keeps the Ceph OSD identifier intact, but removes the Cephx keys, configuration key data, and lockbox keys.
WarningThis operation renders the data permanently unreadable.
- Parameters
-
Replace
SVC_IDwith a string value for the Ceph OSD service identifier.
-
Replace
- Status Codes
- 201 Created – Resource created.
- 202 Accepted – Operation is still executing. Please check the task queue.
- 400 Bad Request – Operation exception. Please check the response body for details.
- 401 Unauthorized – Unauthenticated access. Please login first.
- 403 Forbidden – Unauthorized access. Please check your permissions.
- 500 Internal Server Error – Unexpected error. Please check the response body for the stack trace.
GET /api/osd/SVC_ID/devices- Parameters
-
Replace
SVC_IDwith a string value for the Ceph OSD service identifier.
-
Replace
- Example
GET /api/osd/SVC_ID/devices HTTP/1.1 Host: example.com- Status Codes
- 200 OK – Okay.
- 400 Bad Request – Operation exception. Please check the response body for details.
- 401 Unauthorized – Unauthenticated access. Please login first.
- 403 Forbidden – Unauthorized access. Please check your permissions.
- 500 Internal Server Error – Unexpected error. Please check the response body for the stack trace.
GET /api/osd/SVC_ID/histogram- Description
- Returns the Ceph OSD histogram data.
- Parameters
-
Replace
SVC_IDwith a string value for the Ceph OSD service identifier.
-
Replace
- Example
GET /api/osd/SVC_ID/histogram HTTP/1.1 Host: example.com- Status Codes
- 200 OK – Okay.
- 400 Bad Request – Operation exception. Please check the response body for details.
- 401 Unauthorized – Unauthenticated access. Please login first.
- 403 Forbidden – Unauthorized access. Please check your permissions.
- 500 Internal Server Error – Unexpected error. Please check the response body for the stack trace.
PUT /api/osd/SVC_ID/mark- Description
Marks a Ceph OSD
out,in,down, andlost.NoteA Ceph OSD must be marked
downbefore marking itlost.- Parameters
-
Replace
SVC_IDwith a string value for the Ceph OSD service identifier.
-
Replace
- Example
PUT /api/osd/SVC_ID/mark HTTP/1.1 Host: example.com Content-Type: application/json { "action": "STRING" }
- Status Codes
- 200 OK – Okay.
- 202 Accepted – Operation is still executing. Please check the task queue.
- 400 Bad Request – Operation exception. Please check the response body for details.
- 401 Unauthorized – Unauthenticated access. Please login first.
- 403 Forbidden – Unauthorized access. Please check your permissions.
- 500 Internal Server Error – Unexpected error. Please check the response body for the stack trace.
POST /api/osd/SVC_ID/purge- Description
Removes the Ceph OSD from the CRUSH map.
NoteThe Ceph OSD must be marked
downbefore removal.- Parameters
-
Replace
SVC_IDwith a string value for the Ceph OSD service identifier.
-
Replace
- Status Codes
- 201 Created – Resource created.
- 202 Accepted – Operation is still executing. Please check the task queue.
- 400 Bad Request – Operation exception. Please check the response body for details.
- 401 Unauthorized – Unauthenticated access. Please login first.
- 403 Forbidden – Unauthorized access. Please check your permissions.
- 500 Internal Server Error – Unexpected error. Please check the response body for the stack trace.
POST /api/osd/SVC_ID/reweight- Description
-
Temporarily reweights the Ceph OSD. When a Ceph OSD is marked
out, the OSD’s weight is set to0. When the Ceph OSD is marked backin, the OSD’s weight is set to1. - Parameters
-
Replace
SVC_IDwith a string value for the Ceph OSD service identifier.
-
Replace
- Example
POST /api/osd/SVC_ID/reweight HTTP/1.1 Host: example.com Content-Type: application/json { "weight": "STRING" }
- Status Codes
- 201 Created – Resource created.
- 202 Accepted – Operation is still executing. Please check the task queue.
- 400 Bad Request – Operation exception. Please check the response body for details.
- 401 Unauthorized – Unauthenticated access. Please login first.
- 403 Forbidden – Unauthorized access. Please check your permissions.
- 500 Internal Server Error – Unexpected error. Please check the response body for the stack trace.
POST /api/osd/SVC_ID/scrub- Parameters
-
Replace
SVC_IDwith a string value for the Ceph OSD service identifier. Queries:
-
deep- A boolean value, eithertrueorfalse.
-
-
Replace
- Example
POST /api/osd/SVC_ID/scrub HTTP/1.1 Host: example.com Content-Type: application/json { "deep": true }- Status Codes
- 201 Created – Resource created.
- 202 Accepted – Operation is still executing. Please check the task queue.
- 400 Bad Request – Operation exception. Please check the response body for details.
- 401 Unauthorized – Unauthenticated access. Please login first.
- 403 Forbidden – Unauthorized access. Please check your permissions.
- 500 Internal Server Error – Unexpected error. Please check the response body for the stack trace.
GET /api/osd/SVC_ID/smart- Parameters
-
Replace
SVC_IDwith a string value for the Ceph OSD service identifier.
-
Replace
- Example
GET /api/osd/SVC_ID/smart HTTP/1.1 Host: example.com- Status Codes
- 200 OK – Okay.
- 400 Bad Request – Operation exception. Please check the response body for details.
- 401 Unauthorized – Unauthenticated access. Please login first.
- 403 Forbidden – Unauthorized access. Please check your permissions.
- 500 Internal Server Error – Unexpected error. Please check the response body for the stack trace.
Additional Resources
- See the Ceph RESTful API chapter in the Red Hat Ceph Storage Developer Guide for more details.
A.15. Ceph Object Gateway
The method reference for using the Ceph RESTful API rgw endpoint to manage the Ceph Object Gateway.
GET /api/rgw/status- Description
- Display the Ceph Object Gateway status.
- Example
GET /api/rgw/status HTTP/1.1 Host: example.com
- Status Codes
- 200 OK – Okay.
- 400 Bad Request – Operation exception. Please check the response body for details.
- 401 Unauthorized – Unauthenticated access. Please login first.
- 403 Forbidden – Unauthorized access. Please check your permissions.
- 500 Internal Server Error – Unexpected error. Please check the response body for the stack trace.
GET /api/rgw/daemon- Description
- Display the Ceph Object Gateway daemons.
- Example
GET /api/rgw/daemon HTTP/1.1 Host: example.com
- Status Codes
- 200 OK – Okay.
- 400 Bad Request – Operation exception. Please check the response body for details.
- 401 Unauthorized – Unauthenticated access. Please login first.
- 403 Forbidden – Unauthorized access. Please check your permissions.
- 500 Internal Server Error – Unexpected error. Please check the response body for the stack trace.
GET /api/rgw/daemon/SVC_ID- Parameters
-
Replace
SVC_IDwith the service identifier as a string value.
-
Replace
- Example
GET /api/rgw/daemon/SVC_ID HTTP/1.1 Host: example.com- Status Codes
- 200 OK – Okay.
- 400 Bad Request – Operation exception. Please check the response body for details.
- 401 Unauthorized – Unauthenticated access. Please login first.
- 403 Forbidden – Unauthorized access. Please check your permissions.
- 500 Internal Server Error – Unexpected error. Please check the response body for the stack trace.
GET /api/rgw/site- Parameters
Queries:
-
query- A string value. -
daemon_name- The name of the daemon as a string value.
-
- Example
GET /api/rgw/site HTTP/1.1 Host: example.com
- Status Codes
- 200 OK – Okay.
- 400 Bad Request – Operation exception. Please check the response body for details.
- 401 Unauthorized – Unauthenticated access. Please login first.
- 403 Forbidden – Unauthorized access. Please check your permissions.
- 500 Internal Server Error – Unexpected error. Please check the response body for the stack trace.
Bucket Management
GET /api/rgw/bucket- Parameters
Queries:
-
stats- A boolean value for bucket statistics. -
daemon_name- The name of the daemon as a string value.
-
- Example
GET /api/rgw/bucket HTTP/1.1 Host: example.com
- Status Codes
- 200 OK – Okay.
- 400 Bad Request – Operation exception. Please check the response body for details.
- 401 Unauthorized – Unauthenticated access. Please login first.
- 403 Forbidden – Unauthorized access. Please check your permissions.
- 500 Internal Server Error – Unexpected error. Please check the response body for the stack trace.
POST /api/rgw/bucket- Example
POST /api/rgw/bucket HTTP/1.1 Host: example.com Content-Type: application/json { "bucket": "STRING", "daemon_name": "STRING", "lock_enabled": "false", "lock_mode": "STRING", "lock_retention_period_days": "STRING", "lock_retention_period_years": "STRING", "placement_target": "STRING", "uid": "STRING", "zonegroup": "STRING" }- Status Codes
- 201 Created – Resource created.
- 202 Accepted – Operation is still executing. Please check the task queue.
- 400 Bad Request – Operation exception. Please check the response body for details.
- 401 Unauthorized – Unauthenticated access. Please login first.
- 403 Forbidden – Unauthorized access. Please check your permissions.
- 500 Internal Server Error – Unexpected error. Please check the response body for the stack trace.
DELETE /api/rgw/bucket/BUCKET- Parameters
-
Replace
BUCKETwith the bucket name as a string value. Queries:
-
purge_objects- A string value. -
daemon_name- The name of the daemon as a string value.
-
-
Replace
- Status Codes
- 202 Accepted – Operation is still executing. Please check the task queue.
- 204 No Content – Resource deleted.
- 400 Bad Request – Operation exception. Please check the response body for details.
- 401 Unauthorized – Unauthenticated access. Please login first.
- 403 Forbidden – Unauthorized access. Please check your permissions.
- 500 Internal Server Error – Unexpected error. Please check the response body for the stack trace.
GET /api/rgw/bucket/BUCKET- Parameters
-
Replace
BUCKETwith the bucket name as a string value. Queries:
-
daemon_name- The name of the daemon as a string value.
-
-
Replace
- Example
GET /api/rgw/bucket/BUCKET HTTP/1.1 Host: example.com- Status Codes
- 200 OK – Okay.
- 400 Bad Request – Operation exception. Please check the response body for details.
- 401 Unauthorized – Unauthenticated access. Please login first.
- 403 Forbidden – Unauthorized access. Please check your permissions.
- 500 Internal Server Error – Unexpected error. Please check the response body for the stack trace.
PUT /api/rgw/bucket/BUCKET- Parameters
-
Replace
BUCKETwith the bucket name as a string value.
-
Replace
- Example
PUT /api/rgw/bucket/BUCKET HTTP/1.1 Host: example.com Content-Type: application/json { "bucket_id": "STRING", "daemon_name": "STRING", "lock_mode": "STRING", "lock_retention_period_days": "STRING", "lock_retention_period_years": "STRING", "mfa_delete": "STRING", "mfa_token_pin": "STRING", "mfa_token_serial": "STRING", "uid": "STRING", "versioning_state": "STRING" }
- Status Codes
- 200 OK – Okay.
- 202 Accepted – Operation is still executing. Please check the task queue.
- 400 Bad Request – Operation exception. Please check the response body for details.
- 401 Unauthorized – Unauthenticated access. Please login first.
- 403 Forbidden – Unauthorized access. Please check your permissions.
- 500 Internal Server Error – Unexpected error. Please check the response body for the stack trace.
User Management
GET /api/rgw/user- Description
- Display the Ceph Object Gateway users.
- Parameters
Queries:
-
daemon_name- The name of the daemon as a string value.
-
- Example
GET /api/rgw/user HTTP/1.1 Host: example.com
- Status Codes
- 200 OK – Okay.
- 400 Bad Request – Operation exception. Please check the response body for details.
- 401 Unauthorized – Unauthenticated access. Please login first.
- 403 Forbidden – Unauthorized access. Please check your permissions.
- 500 Internal Server Error – Unexpected error. Please check the response body for the stack trace.
POST /api/rgw/user- Example
POST /api/rgw/user HTTP/1.1 Host: example.com Content-Type: application/json { "access_key": "STRING", "daemon_name": "STRING", "display_name": "STRING", "email": "STRING", "generate_key": "STRING", "max_buckets": "STRING", "secret_key": "STRING", "suspended": "STRING", "uid": "STRING" }- Status Codes
- 201 Created – Resource created.
- 202 Accepted – Operation is still executing. Please check the task queue.
- 400 Bad Request – Operation exception. Please check the response body for details.
- 401 Unauthorized – Unauthenticated access. Please login first.
- 403 Forbidden – Unauthorized access. Please check your permissions.
- 500 Internal Server Error – Unexpected error. Please check the response body for the stack trace.
GET /api/rgw/user/get_emails- Parameters
Queries:
-
daemon_name- The name of the daemon as a string value.
-
- Example
GET /api/rgw/user/get_emails HTTP/1.1 Host: example.com
- Status Codes
- 200 OK – Okay.
- 400 Bad Request – Operation exception. Please check the response body for details.
- 401 Unauthorized – Unauthenticated access. Please login first.
- 403 Forbidden – Unauthorized access. Please check your permissions.
- 500 Internal Server Error – Unexpected error. Please check the response body for the stack trace.
DELETE /api/rgw/user/UID- Parameters
-
Replace
UIDwith the user identifier as a string. Queries:
-
daemon_name- The name of the daemon as a string value.
-
-
Replace
- Status Codes
- 202 Accepted – Operation is still executing. Please check the task queue.
- 204 No Content – Resource deleted.
- 400 Bad Request – Operation exception. Please check the response body for details.
- 401 Unauthorized – Unauthenticated access. Please login first.
- 403 Forbidden – Unauthorized access. Please check your permissions.
- 500 Internal Server Error – Unexpected error. Please check the response body for the stack trace.
GET /api/rgw/user/UID- Parameters
-
Replace
UIDwith the user identifier as a string. Queries:
-
daemon_name- The name of the daemon as a string value. -
stats- A boolean value for user statistics.
-
-
Replace
- Example
GET /api/rgw/user/UID HTTP/1.1 Host: example.com- Status Codes
- 200 OK – Okay.
- 400 Bad Request – Operation exception. Please check the response body for details.
- 401 Unauthorized – Unauthenticated access. Please login first.
- 403 Forbidden – Unauthorized access. Please check your permissions.
- 500 Internal Server Error – Unexpected error. Please check the response body for the stack trace.
PUT /api/rgw/user/UID- Parameters
-
Replace
UIDwith the user identifier as a string.
-
Replace
- Example
PUT /api/rgw/user/UID HTTP/1.1 Host: example.com Content-Type: application/json { "daemon_name": "STRING", "display_name": "STRING", "email": "STRING", "max_buckets": "STRING", "suspended": "STRING" }
- Status Codes
- 200 OK – Okay.
- 202 Accepted – Operation is still executing. Please check the task queue.
- 400 Bad Request – Operation exception. Please check the response body for details.
- 401 Unauthorized – Unauthenticated access. Please login first.
- 403 Forbidden – Unauthorized access. Please check your permissions.
- 500 Internal Server Error – Unexpected error. Please check the response body for the stack trace.
DELETE /api/rgw/user/UID/capability- Parameters
-
Replace
UIDwith the user identifier as a string. Queries:
-
daemon_name- The name of the daemon as a string value. -
type- Required. A string value. -
perm- Required. A string value.
-
-
Replace
- Status Codes
- 202 Accepted – Operation is still executing. Please check the task queue.
- 204 No Content – Resource deleted.
- 400 Bad Request – Operation exception. Please check the response body for details.
- 401 Unauthorized – Unauthenticated access. Please login first.
- 403 Forbidden – Unauthorized access. Please check your permissions.
- 500 Internal Server Error – Unexpected error. Please check the response body for the stack trace.
POST /api/rgw/user/UID/capability- Parameters
-
Replace
UIDwith the user identifier as a string.
-
Replace
- Example
POST /api/rgw/user/UID/capability HTTP/1.1 Host: example.com Content-Type: application/json { "daemon_name": "STRING", "perm": "STRING", "type": "STRING" }
- Status Codes
- 201 Created – Resource created.
- 202 Accepted – Operation is still executing. Please check the task queue.
- 400 Bad Request – Operation exception. Please check the response body for details.
- 401 Unauthorized – Unauthenticated access. Please login first.
- 403 Forbidden – Unauthorized access. Please check your permissions.
- 500 Internal Server Error – Unexpected error. Please check the response body for the stack trace.
DELETE /api/rgw/user/UID/key- Parameters
-
Replace
UIDwith the user identifier as a string. Queries:
-
daemon_name- The name of the daemon as a string value. -
key_type- A string value. -
subuser- A string value. -
access_key- A string value.
-
-
Replace
- Status Codes
- 202 Accepted – Operation is still executing. Please check the task queue.
- 204 No Content – Resource deleted.
- 400 Bad Request – Operation exception. Please check the response body for details.
- 401 Unauthorized – Unauthenticated access. Please login first.
- 403 Forbidden – Unauthorized access. Please check your permissions.
- 500 Internal Server Error – Unexpected error. Please check the response body for the stack trace.
POST /api/rgw/user/UID/key- Parameters
-
Replace
UIDwith the user identifier as a string.
-
Replace
- Example
POST /api/rgw/user/UID/key HTTP/1.1 Host: example.com Content-Type: application/json { "access_key": "STRING", "daemon_name": "STRING", "generate_key": "true", "key_type": "s3", "secret_key": "STRING", "subuser": "STRING" }
- Status Codes
- 201 Created – Resource created.
- 202 Accepted – Operation is still executing. Please check the task queue.
- 400 Bad Request – Operation exception. Please check the response body for details.
- 401 Unauthorized – Unauthenticated access. Please login first.
- 403 Forbidden – Unauthorized access. Please check your permissions.
- 500 Internal Server Error – Unexpected error. Please check the response body for the stack trace.
GET /api/rgw/user/UID/quota- Parameters
-
Replace
UIDwith the user identifier as a string.
-
Replace
- Example
GET /api/rgw/user/UID/quota HTTP/1.1 Host: example.com- Status Codes
- 200 OK – Okay.
- 400 Bad Request – Operation exception. Please check the response body for details.
- 401 Unauthorized – Unauthenticated access. Please login first.
- 403 Forbidden – Unauthorized access. Please check your permissions.
- 500 Internal Server Error – Unexpected error. Please check the response body for the stack trace.
PUT /api/rgw/user/UID/quota- Parameters
-
Replace
UIDwith the user identifier as a string.
-
Replace
- Example
PUT /api/rgw/user/UID/quota HTTP/1.1 Host: example.com Content-Type: application/json { "daemon_name": "STRING", "enabled": "STRING", "max_objects": "STRING", "max_size_kb": 1, "quota_type": "STRING" }
- Status Codes
- 200 OK – Okay.
- 202 Accepted – Operation is still executing. Please check the task queue.
- 400 Bad Request – Operation exception. Please check the response body for details.
- 401 Unauthorized – Unauthenticated access. Please login first.
- 403 Forbidden – Unauthorized access. Please check your permissions.
- 500 Internal Server Error – Unexpected error. Please check the response body for the stack trace.
POST /api/rgw/user/UID/subuser- Parameters
-
Replace
UIDwith the user identifier as a string.
-
Replace
- Example
POST /api/rgw/user/UID/subuser HTTP/1.1 Host: example.com Content-Type: application/json { "access": "STRING", "access_key": "STRING", "daemon_name": "STRING", "generate_secret": "true", "key_type": "s3", "secret_key": "STRING", "subuser": "STRING" }
- Status Codes
- 201 Created – Resource created.
- 202 Accepted – Operation is still executing. Please check the task queue.
- 400 Bad Request – Operation exception. Please check the response body for details.
- 401 Unauthorized – Unauthenticated access. Please login first.
- 403 Forbidden – Unauthorized access. Please check your permissions.
- 500 Internal Server Error – Unexpected error. Please check the response body for the stack trace.
DELETE /api/rgw/user/UID/subuser/SUBUSER- Parameters
-
Replace
UIDwith the user identifier as a string. -
Replace
SUBUSERwith the sub user name as a string. Queries:
-
purge_keys- Set tofalseto not purge the keys. This only works for S3 subusers. -
daemon_name- The name of the daemon as a string value.
-
-
Replace
- Status Codes
- 202 Accepted – Operation is still executing. Please check the task queue.
- 204 No Content – Resource deleted.
- 400 Bad Request – Operation exception. Please check the response body for details.
- 401 Unauthorized – Unauthenticated access. Please login first.
- 403 Forbidden – Unauthorized access. Please check your permissions.
- 500 Internal Server Error – Unexpected error. Please check the response body for the stack trace.
Additional Resources
- See the Ceph RESTful API chapter in the Red Hat Ceph Storage Developer Guide for more details.
A.16. REST APIs for manipulating a role
In addition to the radosgw-admin role commands, you can use the REST APIs for manipulating a role.
To invoke the REST admin APIs, create a user with admin caps.
Example
[root@host01 ~]# radosgw-admin --uid TESTER --display-name "TestUser" --access_key TESTER --secret test123 user create [root@host01 ~]# radosgw-admin caps add --uid="TESTER" --caps="roles=*"
Create a role:
Syntax
POST “<hostname>?Action=CreateRole&RoleName=ROLE_NAME&Path=PATH_TO_FILE&AssumeRolePolicyDocument=TRUST_RELATIONSHIP_POLICY_DOCUMENT”
Example
POST “<hostname>?Action=CreateRole&RoleName=S3Access&Path=/application_abc/component_xyz/&AssumeRolePolicyDocument={"Version":"2022-06-17","Statement":[{"Effect":"Allow","Principal":{"AWS":["arn:aws:iam:::user/TESTER"]},"Action":["sts:AssumeRole"]}]}”Example response
<role> <id>8f41f4e0-7094-4dc0-ac20-074a881ccbc5</id> <name>S3Access</name> <path>/application_abc/component_xyz/</path> <arn>arn:aws:iam:::role/application_abc/component_xyz/S3Access</arn> <create_date>2022-06-23T07:43:42.811Z</create_date> <max_session_duration>3600</max_session_duration> <assume_role_policy_document>{"Version":"2022-06-17","Statement":[{"Effect":"Allow","Principal":{"AWS":["arn:aws:iam:::user/TESTER"]},"Action":["sts:AssumeRole"]}]}</assume_role_policy_document> </role>Get a role:
Syntax
POST “<hostname>?Action=GetRole&RoleName=ROLE_NAME”Example
POST “<hostname>?Action=GetRole&RoleName=S3Access”
Example response
<role> <id>8f41f4e0-7094-4dc0-ac20-074a881ccbc5</id> <name>S3Access</name> <path>/application_abc/component_xyz/</path> <arn>arn:aws:iam:::role/application_abc/component_xyz/S3Access</arn> <create_date>2022-06-23T07:43:42.811Z</create_date> <max_session_duration>3600</max_session_duration> <assume_role_policy_document>{"Version":"2022-06-17","Statement":[{"Effect":"Allow","Principal":{"AWS":["arn:aws:iam:::user/TESTER"]},"Action":["sts:AssumeRole"]}]}</assume_role_policy_document> </role>List a role:
Syntax
POST “<hostname>?Action=GetRole&RoleName=ROLE_NAME&PathPrefix=PATH_PREFIX”
Example request
POST “<hostname>?Action=ListRoles&RoleName=S3Access&PathPrefix=/application”
Example response
<role> <id>8f41f4e0-7094-4dc0-ac20-074a881ccbc5</id> <name>S3Access</name> <path>/application_abc/component_xyz/</path> <arn>arn:aws:iam:::role/application_abc/component_xyz/S3Access</arn> <create_date>2022-06-23T07:43:42.811Z</create_date> <max_session_duration>3600</max_session_duration> <assume_role_policy_document>{"Version":"2022-06-17","Statement":[{"Effect":"Allow","Principal":{"AWS":["arn:aws:iam:::user/TESTER"]},"Action":["sts:AssumeRole"]}]}</assume_role_policy_document> </role>Update the assume role policy document:
Syntax
POST “<hostname>?Action=UpdateAssumeRolePolicy&RoleName=ROLE_NAME&PolicyDocument=TRUST_RELATIONSHIP_POLICY_DOCUMENT”
Example
POST “<hostname>?Action=UpdateAssumeRolePolicy&RoleName=S3Access&PolicyDocument={"Version":"2022-06-17","Statement":[{"Effect":"Allow","Principal":{"AWS":["arn:aws:iam:::user/TESTER2"]},"Action":["sts:AssumeRole"]}]}”Update policy attached to a role:
Syntax
POST “<hostname>?Action=PutRolePolicy&RoleName=ROLE_NAME&PolicyName=POLICY_NAME&PolicyDocument=TRUST_RELATIONSHIP_POLICY_DOCUMENT”
Example
POST “<hostname>?Action=PutRolePolicy&RoleName=S3Access&PolicyName=Policy1&PolicyDocument={"Version":"2022-06-17","Statement":[{"Effect":"Allow","Action":["s3:CreateBucket"],"Resource":"arn:aws:s3:::example_bucket"}]}”List permission policy names attached to a role:
Syntax
POST “<hostname>?Action=ListRolePolicies&RoleName=ROLE_NAME”Example
POST “<hostname>?Action=ListRolePolicies&RoleName=S3Access” <PolicyNames> <member>Policy1</member> </PolicyNames>
Get permission policy attached to a role:
Syntax
POST “<hostname>?Action=GetRolePolicy&RoleName=ROLE_NAME&PolicyName=POLICY_NAME”
Example
POST “<hostname>?Action=GetRolePolicy&RoleName=S3Access&PolicyName=Policy1” <GetRolePolicyResult> <PolicyName>Policy1</PolicyName> <RoleName>S3Access</RoleName> <Permission_policy>{"Version":"2022-06-17","Statement":[{"Effect":"Allow","Action":["s3:CreateBucket"],"Resource":"arn:aws:s3:::example_bucket"}]}</Permission_policy> </GetRolePolicyResult>Delete policy attached to a role:
Syntax
POST “hostname>?Action=DeleteRolePolicy&RoleName=ROLE_NAME&PolicyName=POLICY_NAME“
Example
POST “<hostname>?Action=DeleteRolePolicy&RoleName=S3Access&PolicyName=Policy1”
Delete a role:
NoteYou can delete a role only when it does not have any permission policy attached to it.
Syntax
POST “<hostname>?Action=DeleteRole&RoleName=ROLE_NAME"Example
POST “<hostname>?Action=DeleteRole&RoleName=S3Access"
Additional Resources
- See the Role management section in the Red Hat Ceph Storage Object Gateway Guide for details.
A.17. NFS Ganesha
The method reference for using the Ceph RESTful API nfs-ganesha endpoint to manage the Ceph NFS gateway.
GET /api/nfs-ganesha/daemon- Description
- View information on the NFS Ganesha daemons.
- Example
GET /api/nfs-ganesha/daemon HTTP/1.1 Host: example.com
- Status Codes
- 200 OK – Okay.
- 400 Bad Request – Operation exception. Please check the response body for details.
- 401 Unauthorized – Unauthenticated access. Please login first.
- 403 Forbidden – Unauthorized access. Please check your permissions.
- 500 Internal Server Error – Unexpected error. Please check the response body for the stack trace.
GET /api/nfs-ganesha/export- Description
- View all of the NFS Ganesha exports.
- Example
GET /api/nfs-ganesha/export HTTP/1.1 Host: example.com
- Status Codes
- 200 OK – Okay.
- 400 Bad Request – Operation exception. Please check the response body for details.
- 401 Unauthorized – Unauthenticated access. Please login first.
- 403 Forbidden – Unauthorized access. Please check your permissions.
- 500 Internal Server Error – Unexpected error. Please check the response body for the stack trace.
POST /api/nfs-ganesha/export- Description
- Creates a new NFS Ganesha export.
- Example
POST /api/nfs-ganesha/export HTTP/1.1 Host: example.com Content-Type: application/json { "access_type": "STRING", "clients": [ { "access_type": "STRING", "addresses": [ "STRING" ], "squash": "STRING" } ], "cluster_id": "STRING", "daemons": [ "STRING" ], "fsal": { "filesystem": "STRING", "name": "STRING", "rgw_user_id": "STRING", "sec_label_xattr": "STRING", "user_id": "STRING" }, "path": "STRING", "protocols": [ 1 ], "pseudo": "STRING", "reload_daemons": true, "security_label": "STRING", "squash": "STRING", "tag": "STRING", "transports": [ "STRING" ] }- Status Codes
- 201 Created – Resource created.
- 202 Accepted – Operation is still executing. Please check the task queue.
- 400 Bad Request – Operation exception. Please check the response body for details.
- 401 Unauthorized – Unauthenticated access. Please login first.
- 403 Forbidden – Unauthorized access. Please check your permissions.
- 500 Internal Server Error – Unexpected error. Please check the response body for the stack trace.
DELETE /api/nfs-ganesha/export/CLUSTER_ID/EXPORT_ID- Description
- Deletes a NFS Ganesha export.
- Parameters
-
Replace
CLUSTER_IDwith the storage cluster identifier string. -
Replace
EXPORT_IDwith the export identifier as an integer. Queries:
-
reload_daemons- A boolean value that triggers the reloading of the NFS Ganesha daemons configuration.
-
-
Replace
- Status Codes
- 202 Accepted – Operation is still executing. Please check the task queue.
- 204 No Content – Resource deleted.
- 400 Bad Request – Operation exception. Please check the response body for details.
- 401 Unauthorized – Unauthenticated access. Please login first.
- 403 Forbidden – Unauthorized access. Please check your permissions.
- 500 Internal Server Error – Unexpected error. Please check the response body for the stack trace.
GET /api/nfs-ganesha/export/CLUSTER_ID/EXPORT_ID- Description
- View NFS Ganesha export information.
- Parameters
-
Replace
CLUSTER_IDwith the storage cluster identifier string. -
Replace
EXPORT_IDwith the export identifier as an integer.
-
Replace
- Example
GET /api/nfs-ganesha/export/CLUSTER_ID/EXPORT_ID HTTP/1.1 Host: example.com
- Status Codes
- 200 OK – Okay.
- 400 Bad Request – Operation exception. Please check the response body for details.
- 401 Unauthorized – Unauthenticated access. Please login first.
- 403 Forbidden – Unauthorized access. Please check your permissions.
- 500 Internal Server Error – Unexpected error. Please check the response body for the stack trace.
PUT /api/nfs-ganesha/export/CLUSTER_ID/EXPORT_ID- Description
- Update the NFS Ganesha export information.
- Parameters
-
Replace
CLUSTER_IDwith the storage cluster identifier string. -
Replace
EXPORT_IDwith the export identifier as an integer.
-
Replace
- Example
PUT /api/nfs-ganesha/export/CLUSTER_ID/EXPORT_ID HTTP/1.1 Host: example.com Content-Type: application/json { "access_type": "STRING", "clients": [ { "access_type": "STRING", "addresses": [ "STRING" ], "squash": "STRING" } ], "daemons": [ "STRING" ], "fsal": { "filesystem": "STRING", "name": "STRING", "rgw_user_id": "STRING", "sec_label_xattr": "STRING", "user_id": "STRING" }, "path": "STRING", "protocols": [ 1 ], "pseudo": "STRING", "reload_daemons": true, "security_label": "STRING", "squash": "STRING", "tag": "STRING", "transports": [ "STRING" ] }
- Status Codes
- 200 OK – Okay.
- 202 Accepted – Operation is still executing. Please check the task queue.
- 400 Bad Request – Operation exception. Please check the response body for details.
- 401 Unauthorized – Unauthenticated access. Please login first.
- 403 Forbidden – Unauthorized access. Please check your permissions.
- 500 Internal Server Error – Unexpected error. Please check the response body for the stack trace.
GET /api/nfs-ganesha/status- Description
- View the status information for the NFS Ganesha management feature.
- Example
GET /api/nfs-ganesha/status HTTP/1.1 Host: example.com
- Status Codes
- 200 OK – Okay.
- 400 Bad Request – Operation exception. Please check the response body for details.
- 401 Unauthorized – Unauthenticated access. Please login first.
- 403 Forbidden – Unauthorized access. Please check your permissions.
- 500 Internal Server Error – Unexpected error. Please check the response body for the stack trace.
Additional Resources
- See the Ceph RESTful API chapter in the Red Hat Ceph Storage Developer Guide for more details.
- See the Exporting the Namespace to NFS-Ganesha section in the Red Hat Ceph Storage Object Gateway Guide for more information.
A.18. Ceph Orchestrator
The method reference for using the Ceph RESTful API orchestrator endpoint to display the Ceph Orchestrator status.
GET /api/orchestrator/status- Description
- Display the Ceph Orchestrator status.
- Example
GET /api/orchestrator/status HTTP/1.1 Host: example.com
- Status Codes
- 200 OK – Okay.
- 400 Bad Request – Operation exception. Please check the response body for details.
- 401 Unauthorized – Unauthenticated access. Please login first.
- 403 Forbidden – Unauthorized access. Please check your permissions.
- 500 Internal Server Error – Unexpected error. Please check the response body for the stack trace.
Additional Resources
- See the Ceph RESTful API chapter in the Red Hat Ceph Storage Developer Guide for more details.
A.19. Pools
The method reference for using the Ceph RESTful API pool endpoint to manage the storage pools.
GET /api/pool- Description
- Display the pool list.
- Parameters
Queries:
-
attrs- A string value of pool attributes. -
stats- A boolean value for pool statistics.
-
- Example
GET /api/pool HTTP/1.1 Host: example.com
- Status Codes
- 200 OK – Okay.
- 400 Bad Request – Operation exception. Please check the response body for details.
- 401 Unauthorized – Unauthenticated access. Please login first.
- 403 Forbidden – Unauthorized access. Please check your permissions.
- 500 Internal Server Error – Unexpected error. Please check the response body for the stack trace.
POST /api/pool- Example
POST /api/pool HTTP/1.1 Host: example.com Content-Type: application/json { "application_metadata": "STRING", "configuration": "STRING", "erasure_code_profile": "STRING", "flags": "STRING", "pg_num": 1, "pool": "STRING", "pool_type": "STRING", "rule_name": "STRING" }- Status Codes
- 201 Created – Resource created.
- 202 Accepted – Operation is still executing. Please check the task queue.
- 400 Bad Request – Operation exception. Please check the response body for details.
- 401 Unauthorized – Unauthenticated access. Please login first.
- 403 Forbidden – Unauthorized access. Please check your permissions.
- 500 Internal Server Error – Unexpected error. Please check the response body for the stack trace.
DELETE /api/pool/POOL_NAME- Parameters
-
Replace
POOL_NAMEwith the name of the pool.
-
Replace
- Status Codes
- 202 Accepted – Operation is still executing. Please check the task queue.
- 204 No Content – Resource deleted.
- 400 Bad Request – Operation exception. Please check the response body for details.
- 401 Unauthorized – Unauthenticated access. Please login first.
- 403 Forbidden – Unauthorized access. Please check your permissions.
- 500 Internal Server Error – Unexpected error. Please check the response body for the stack trace.
GET /api/pool/POOL_NAME- Parameters
-
Replace
POOL_NAMEwith the name of the pool. Queries:
-
attrs- A string value of pool attributes. -
stats- A boolean value for pool statistics.
-
-
Replace
- Example
GET /api/pool/POOL_NAME HTTP/1.1 Host: example.com- Status Codes
- 200 OK – Okay.
- 400 Bad Request – Operation exception. Please check the response body for details.
- 401 Unauthorized – Unauthenticated access. Please login first.
- 403 Forbidden – Unauthorized access. Please check your permissions.
- 500 Internal Server Error – Unexpected error. Please check the response body for the stack trace.
PUT /api/pool/POOL_NAME- Parameters
-
Replace
POOL_NAMEwith the name of the pool.
-
Replace
- Example
PUT /api/pool/POOL_NAME HTTP/1.1 Host: example.com Content-Type: application/json { "application_metadata": "STRING", "configuration": "STRING", "flags": "STRING" }
- Status Codes
- 200 OK – Okay.
- 202 Accepted – Operation is still executing. Please check the task queue.
- 400 Bad Request – Operation exception. Please check the response body for details.
- 401 Unauthorized – Unauthenticated access. Please login first.
- 403 Forbidden – Unauthorized access. Please check your permissions.
- 500 Internal Server Error – Unexpected error. Please check the response body for the stack trace.
GET /api/pool/POOL_NAME/configuration- Parameters
-
Replace
POOL_NAMEwith the name of the pool.
-
Replace
- Example
GET /api/pool/POOL_NAME/configuration HTTP/1.1 Host: example.com- Status Codes
- 200 OK – Okay.
- 400 Bad Request – Operation exception. Please check the response body for details.
- 401 Unauthorized – Unauthenticated access. Please login first.
- 403 Forbidden – Unauthorized access. Please check your permissions.
- 500 Internal Server Error – Unexpected error. Please check the response body for the stack trace.
Additional Resources
- See the Ceph RESTful API chapter in the Red Hat Ceph Storage Developer Guide for more details.
A.20. Prometheus
The method reference for using the Ceph RESTful API prometheus endpoint to manage Prometheus.
GET /api/prometheus- Example
GET /api/prometheus/rules HTTP/1.1 Host: example.com
- Status Codes
- 200 OK – Okay.
- 400 Bad Request – Operation exception. Please check the response body for details.
- 401 Unauthorized – Unauthenticated access. Please login first.
- 403 Forbidden – Unauthorized access. Please check your permissions.
- 500 Internal Server Error – Unexpected error. Please check the response body for the stack trace.
GET /api/prometheus/rules- Example
GET /api/prometheus/rules HTTP/1.1 Host: example.com
- Status Codes
- 200 OK – Okay.
- 400 Bad Request – Operation exception. Please check the response body for details.
- 401 Unauthorized – Unauthenticated access. Please login first.
- 403 Forbidden – Unauthorized access. Please check your permissions.
- 500 Internal Server Error – Unexpected error. Please check the response body for the stack trace.
POST /api/prometheus/silence- Status Codes
- 201 Created – Resource created.
- 202 Accepted – Operation is still executing. Please check the task queue.
- 400 Bad Request – Operation exception. Please check the response body for details.
- 401 Unauthorized – Unauthenticated access. Please login first.
- 403 Forbidden – Unauthorized access. Please check your permissions.
- 500 Internal Server Error – Unexpected error. Please check the response body for the stack trace.
DELETE /api/prometheus/silence/S_ID- Parameters
-
Replace
S_IDwith a string value.
-
Replace
- Status Codes
- 202 Accepted – Operation is still executing. Please check the task queue.
- 204 No Content – Resource deleted.
- 400 Bad Request – Operation exception. Please check the response body for details.
- 401 Unauthorized – Unauthenticated access. Please login first.
- 403 Forbidden – Unauthorized access. Please check your permissions.
- 500 Internal Server Error – Unexpected error. Please check the response body for the stack trace.
GET /api/prometheus/silences- Example
GET /api/prometheus/silences HTTP/1.1 Host: example.com
- Status Codes
- 200 OK – Okay.
- 400 Bad Request – Operation exception. Please check the response body for details.
- 401 Unauthorized – Unauthenticated access. Please login first.
- 403 Forbidden – Unauthorized access. Please check your permissions.
- 500 Internal Server Error – Unexpected error. Please check the response body for the stack trace.
GET /api/prometheus/notifications- Example
GET /api/prometheus/notifications HTTP/1.1 Host: example.com
- Status Codes
- 200 OK – Okay.
- 400 Bad Request – Operation exception. Please check the response body for details.
- 401 Unauthorized – Unauthenticated access. Please login first.
- 403 Forbidden – Unauthorized access. Please check your permissions.
- 500 Internal Server Error – Unexpected error. Please check the response body for the stack trace.
Additional Resources
- See the Ceph RESTful API chapter in the Red Hat Ceph Storage Developer Guide for more details.
A.21. RADOS block device
The method reference for using the Ceph RESTful API block endpoint to manage RADOS block devices (RBD). This reference includes all available RBD feature endpoints, such as:
RBD Images
GET /api/block/image- Description
- View the RBD images.
- Parameters
Queries:
-
pool_name- The pool name as a string.
-
- Example
GET /api/block/image HTTP/1.1 Host: example.com
- Status Codes
- 200 OK – Okay.
- 400 Bad Request – Operation exception. Please check the response body for details.
- 401 Unauthorized – Unauthenticated access. Please login first.
- 403 Forbidden – Unauthorized access. Please check your permissions.
- 500 Internal Server Error – Unexpected error. Please check the response body for the stack trace.
POST /api/block/image- Example
POST /api/block/image HTTP/1.1 Host: example.com Content-Type: application/json { "configuration": "STRING", "data_pool": "STRING", "features": "STRING", "name": "STRING", "namespace": "STRING", "obj_size": 1, "pool_name": "STRING", "size": 1, "stripe_count": 1, "stripe_unit": "STRING" }- Status Codes
- 201 Created – Resource created.
- 202 Accepted – Operation is still executing. Please check the task queue.
- 400 Bad Request – Operation exception. Please check the response body for details.
- 401 Unauthorized – Unauthenticated access. Please login first.
- 403 Forbidden – Unauthorized access. Please check your permissions.
- 500 Internal Server Error – Unexpected error. Please check the response body for the stack trace.
GET /api/block/image/clone_format_version- Description
- Returns the RBD clone format version.
- Example
GET /api/block/image/clone_format_version HTTP/1.1 Host: example.com
- Status Codes
- 200 OK – Okay.
- 400 Bad Request – Operation exception. Please check the response body for details.
- 401 Unauthorized – Unauthenticated access. Please login first.
- 403 Forbidden – Unauthorized access. Please check your permissions.
- 500 Internal Server Error – Unexpected error. Please check the response body for the stack trace.
GET /api/block/image/default_features- Example
GET /api/block/image/default_features HTTP/1.1 Host: example.com
- Status Codes
- 200 OK – Okay.
- 400 Bad Request – Operation exception. Please check the response body for details.
- 401 Unauthorized – Unauthenticated access. Please login first.
- 403 Forbidden – Unauthorized access. Please check your permissions.
- 500 Internal Server Error – Unexpected error. Please check the response body for the stack trace.
DELETE /api/block/image/IMAGE_SPEC- Parameters
-
Replace
IMAGE_SPECwith the image name as a string value.
-
Replace
- Status Codes
- 202 Accepted – Operation is still executing. Please check the task queue.
- 204 No Content – Resource deleted.
- 400 Bad Request – Operation exception. Please check the response body for details.
- 401 Unauthorized – Unauthenticated access. Please login first.
- 403 Forbidden – Unauthorized access. Please check your permissions.
- 500 Internal Server Error – Unexpected error. Please check the response body for the stack trace.
GET /api/block/image/IMAGE_SPEC- Parameters
-
Replace
IMAGE_SPECwith the image name as a string value.
-
Replace
- Example
GET /api/block/image/IMAGE_SPEC HTTP/1.1 Host: example.com- Status Codes
- 200 OK – Okay.
- 400 Bad Request – Operation exception. Please check the response body for details.
- 401 Unauthorized – Unauthenticated access. Please login first.
- 403 Forbidden – Unauthorized access. Please check your permissions.
- 500 Internal Server Error – Unexpected error. Please check the response body for the stack trace.
PUT /api/block/image/IMAGE_SPEC- Parameters
-
Replace
IMAGE_SPECwith the image name as a string value.
-
Replace
- Example
PUT /api/block/image/IMAGE_SPEC HTTP/1.1 Host: example.com Content-Type: application/json { "configuration": "STRING", "features": "STRING", "name": "STRING", "size": 1 }
- Status Codes
- 200 OK – Okay.
- 202 Accepted – Operation is still executing. Please check the task queue.
- 400 Bad Request – Operation exception. Please check the response body for details.
- 401 Unauthorized – Unauthenticated access. Please login first.
- 403 Forbidden – Unauthorized access. Please check your permissions.
- 500 Internal Server Error – Unexpected error. Please check the response body for the stack trace.
POST /api/block/image/IMAGE_SPEC/copy- Parameters
-
Replace
IMAGE_SPECwith the image name as a string value.
-
Replace
- Example
POST /api/block/image/IMAGE_SPEC/copy HTTP/1.1 Host: example.com Content-Type: application/json { "configuration": "STRING", "data_pool": "STRING", "dest_image_name": "STRING", "dest_namespace": "STRING", "dest_pool_name": "STRING", "features": "STRING", "obj_size": 1, "snapshot_name": "STRING", "stripe_count": 1, "stripe_unit": "STRING" }
- Status Codes
- 201 Created – Resource created.
- 202 Accepted – Operation is still executing. Please check the task queue.
- 400 Bad Request – Operation exception. Please check the response body for details.
- 401 Unauthorized – Unauthenticated access. Please login first.
- 403 Forbidden – Unauthorized access. Please check your permissions.
- 500 Internal Server Error – Unexpected error. Please check the response body for the stack trace.
POST /api/block/image/IMAGE_SPEC/flatten- Parameters
-
Replace
IMAGE_SPECwith the image name as a string value.
-
Replace
- Status Codes
- 201 Created – Resource created.
- 202 Accepted – Operation is still executing. Please check the task queue.
- 400 Bad Request – Operation exception. Please check the response body for details.
- 401 Unauthorized – Unauthenticated access. Please login first.
- 403 Forbidden – Unauthorized access. Please check your permissions.
- 500 Internal Server Error – Unexpected error. Please check the response body for the stack trace.
POST /api/block/image/IMAGE_SPEC/move_trash- Description
- Move an image to the trash. Images actively in-use by clones can be moved to the trash, and deleted at a later time.
- Parameters
-
Replace
IMAGE_SPECwith the image name as a string value.
-
Replace
- Example
POST /api/block/image/IMAGE_SPEC/move_trash HTTP/1.1 Host: example.com Content-Type: application/json { "delay": 1 }- Status Codes
- 201 Created – Resource created.
- 202 Accepted – Operation is still executing. Please check the task queue.
- 400 Bad Request – Operation exception. Please check the response body for details.
- 401 Unauthorized – Unauthenticated access. Please login first.
- 403 Forbidden – Unauthorized access. Please check your permissions.
- 500 Internal Server Error – Unexpected error. Please check the response body for the stack trace.
RBD Mirroring
GET /api/block/mirroring/site_name- Description
- Display the RBD mirroring site name.
- Example
GET /api/block/mirroring/site_name HTTP/1.1 Host: example.com
- Status Codes
- 200 OK – Okay.
- 400 Bad Request – Operation exception. Please check the response body for details.
- 401 Unauthorized – Unauthenticated access. Please login first.
- 403 Forbidden – Unauthorized access. Please check your permissions.
- 500 Internal Server Error – Unexpected error. Please check the response body for the stack trace.
PUT /api/block/mirroring/site_name- Example
PUT /api/block/mirroring/site_name HTTP/1.1 Host: example.com Content-Type: application/json { "site_name": "STRING" }- Status Codes
- 200 OK – Okay.
- 202 Accepted – Operation is still executing. Please check the task queue.
- 400 Bad Request – Operation exception. Please check the response body for details.
- 401 Unauthorized – Unauthenticated access. Please login first.
- 403 Forbidden – Unauthorized access. Please check your permissions.
- 500 Internal Server Error – Unexpected error. Please check the response body for the stack trace.
RBD Mirroring Pool Bootstrap
POST /api/block/mirroring/pool/POOL_NAME/bootstrap/peer- Parameters
-
Replace
POOL_NAMEwith the name of the pool as a string.
-
Replace
- Example
POST /api/block/mirroring/pool/POOL_NAME/bootstrap/peer HTTP/1.1 Host: example.com Content-Type: application/json { "direction": "STRING", "token": "STRING" }
- Status Codes
- 201 Created – Resource created.
- 202 Accepted – Operation is still executing. Please check the task queue.
- 400 Bad Request – Operation exception. Please check the response body for details.
- 401 Unauthorized – Unauthenticated access. Please login first.
- 403 Forbidden – Unauthorized access. Please check your permissions.
- 500 Internal Server Error – Unexpected error. Please check the response body for the stack trace.
POST /api/block/mirroring/pool/POOL_NAME/bootstrap/token- Parameters
-
Replace
POOL_NAMEwith the name of the pool as a string.
-
Replace
- Status Codes
- 201 Created – Resource created.
- 202 Accepted – Operation is still executing. Please check the task queue.
- 400 Bad Request – Operation exception. Please check the response body for details.
- 401 Unauthorized – Unauthenticated access. Please login first.
- 403 Forbidden – Unauthorized access. Please check your permissions.
- 500 Internal Server Error – Unexpected error. Please check the response body for the stack trace.
RBD Mirroring Pool Mode
GET /api/block/mirroring/pool/POOL_NAME- Description
- Display the RBD mirroring summary.
- Parameters
-
Replace
POOL_NAMEwith the name of the pool as a string.
-
Replace
- Example
GET /api/block/mirroring/pool/POOL_NAME HTTP/1.1 Host: example.com- Status Codes
- 200 OK – Okay.
- 400 Bad Request – Operation exception. Please check the response body for details.
- 401 Unauthorized – Unauthenticated access. Please login first.
- 403 Forbidden – Unauthorized access. Please check your permissions.
- 500 Internal Server Error – Unexpected error. Please check the response body for the stack trace.
PUT /api/block/mirroring/pool/POOL_NAME- Parameters
-
Replace
POOL_NAMEwith the name of the pool as a string.
-
Replace
- Example
PUT /api/block/mirroring/pool/POOL_NAME HTTP/1.1 Host: example.com Content-Type: application/json { "mirror_mode": "STRING" }
- Status Codes
- 200 OK – Okay.
- 202 Accepted – Operation is still executing. Please check the task queue.
- 400 Bad Request – Operation exception. Please check the response body for details.
- 401 Unauthorized – Unauthenticated access. Please login first.
- 403 Forbidden – Unauthorized access. Please check your permissions.
- 500 Internal Server Error – Unexpected error. Please check the response body for the stack trace.
RBD Mirroring Pool Peer
GET /api/block/mirroring/pool/POOL_NAME/peer- Parameters
-
Replace
POOL_NAMEwith the name of the pool as a string.
-
Replace
- Example
GET /api/block/mirroring/pool/POOL_NAME/peer HTTP/1.1 Host: example.com- Status Codes
- 200 OK – Okay.
- 400 Bad Request – Operation exception. Please check the response body for details.
- 401 Unauthorized – Unauthenticated access. Please login first.
- 403 Forbidden – Unauthorized access. Please check your permissions.
- 500 Internal Server Error – Unexpected error. Please check the response body for the stack trace.
POST /api/block/mirroring/pool/POOL_NAME/peer- Parameters
-
Replace
POOL_NAMEwith the name of the pool as a string.
-
Replace
- Example
POST /api/block/mirroring/pool/POOL_NAME/peer HTTP/1.1 Host: example.com Content-Type: application/json { "client_id": "STRING", "cluster_name": "STRING", "key": "STRING", "mon_host": "STRING" }
- Status Codes
- 201 Created – Resource created.
- 202 Accepted – Operation is still executing. Please check the task queue.
- 400 Bad Request – Operation exception. Please check the response body for details.
- 401 Unauthorized – Unauthenticated access. Please login first.
- 403 Forbidden – Unauthorized access. Please check your permissions.
- 500 Internal Server Error – Unexpected error. Please check the response body for the stack trace.
DELETE /api/block/mirroring/pool/POOL_NAME/peer/PEER_UUID- Parameters
-
Replace
POOL_NAMEwith the name of the pool as a string. -
Replace
PEER_UUIDwith the UUID of the peer as a string.
-
Replace
- Status Codes
- 202 Accepted – Operation is still executing. Please check the task queue.
- 204 No Content – Resource deleted.
- 400 Bad Request – Operation exception. Please check the response body for details.
- 401 Unauthorized – Unauthenticated access. Please login first.
- 403 Forbidden – Unauthorized access. Please check your permissions.
- 500 Internal Server Error – Unexpected error. Please check the response body for the stack trace.
GET /api/block/mirroring/pool/POOL_NAME/peer/PEER_UUID- Parameters
-
Replace
POOL_NAMEwith the name of the pool as a string. -
Replace
PEER_UUIDwith the UUID of the peer as a string.
-
Replace
- Example
GET /api/block/mirroring/pool/POOL_NAME/peer/PEER_UUID HTTP/1.1 Host: example.com
- Status Codes
- 200 OK – Okay.
- 400 Bad Request – Operation exception. Please check the response body for details.
- 401 Unauthorized – Unauthenticated access. Please login first.
- 403 Forbidden – Unauthorized access. Please check your permissions.
- 500 Internal Server Error – Unexpected error. Please check the response body for the stack trace.
PUT /api/block/mirroring/pool/POOL_NAME/peer/PEER_UUID- Parameters
-
Replace
POOL_NAMEwith the name of the pool as a string. -
Replace
PEER_UUIDwith the UUID of the peer as a string.
-
Replace
- Example
PUT /api/block/mirroring/pool/POOL_NAME/peer/PEER_UUID HTTP/1.1 Host: example.com Content-Type: application/json { "client_id": "STRING", "cluster_name": "STRING", "key": "STRING", "mon_host": "STRING" }
- Status Codes
- 200 OK – Okay.
- 202 Accepted – Operation is still executing. Please check the task queue.
- 400 Bad Request – Operation exception. Please check the response body for details.
- 401 Unauthorized – Unauthenticated access. Please login first.
- 403 Forbidden – Unauthorized access. Please check your permissions.
- 500 Internal Server Error – Unexpected error. Please check the response body for the stack trace.
RBD Mirroring Summary
GET /api/block/mirroring/summary- Description
- Display the RBD mirroring summary.
- Example
GET /api/block/mirroring/summary HTTP/1.1 Host: example.com
- Status Codes
- 200 OK – Okay.
- 400 Bad Request – Operation exception. Please check the response body for details.
- 401 Unauthorized – Unauthenticated access. Please login first.
- 403 Forbidden – Unauthorized access. Please check your permissions.
- 500 Internal Server Error – Unexpected error. Please check the response body for the stack trace.
RBD Namespace
GET /api/block/pool/POOL_NAME/namespace- Parameters
-
Replace
POOL_NAMEwith the name of the pool as a string.
-
Replace
- Example
GET /api/block/pool/POOL_NAME/namespace HTTP/1.1 Host: example.com- Status Codes
- 200 OK – Okay.
- 400 Bad Request – Operation exception. Please check the response body for details.
- 401 Unauthorized – Unauthenticated access. Please login first.
- 403 Forbidden – Unauthorized access. Please check your permissions.
- 500 Internal Server Error – Unexpected error. Please check the response body for the stack trace.
POST /api/block/pool/POOL_NAME/namespace- Parameters
-
Replace
POOL_NAMEwith the name of the pool as a string.
-
Replace
- Example
POST /api/block/pool/POOL_NAME/namespace HTTP/1.1 Host: example.com Content-Type: application/json { "namespace": "STRING" }
- Status Codes
- 201 Created – Resource created.
- 202 Accepted – Operation is still executing. Please check the task queue.
- 400 Bad Request – Operation exception. Please check the response body for details.
- 401 Unauthorized – Unauthenticated access. Please login first.
- 403 Forbidden – Unauthorized access. Please check your permissions.
- 500 Internal Server Error – Unexpected error. Please check the response body for the stack trace.
DELETE /api/block/pool/POOL_NAME/namespace/NAMESPACE- Parameters
-
Replace
POOL_NAMEwith the name of the pool as a string. -
Replace
NAMESPACEwith the namespace as a string.
-
Replace
- Status Codes
- 202 Accepted – Operation is still executing. Please check the task queue.
- 204 No Content – Resource deleted.
- 400 Bad Request – Operation exception. Please check the response body for details.
- 401 Unauthorized – Unauthenticated access. Please login first.
- 403 Forbidden – Unauthorized access. Please check your permissions.
- 500 Internal Server Error – Unexpected error. Please check the response body for the stack trace.
RBD Snapshots
POST /api/block/image/IMAGE_SPEC/snap- Parameters
-
Replace
IMAGE_SPECwith the image name as a string value.
-
Replace
- Example
POST /api/block/image/IMAGE_SPEC/snap HTTP/1.1 Host: example.com Content-Type: application/json { "snapshot_name": "STRING" }
- Status Codes
- 201 Created – Resource created.
- 202 Accepted – Operation is still executing. Please check the task queue.
- 400 Bad Request – Operation exception. Please check the response body for details.
- 401 Unauthorized – Unauthenticated access. Please login first.
- 403 Forbidden – Unauthorized access. Please check your permissions.
- 500 Internal Server Error – Unexpected error. Please check the response body for the stack trace.
DELETE /api/block/image/IMAGE_SPEC/snap/SNAPSHOT_NAME- Parameters
-
Replace
IMAGE_SPECwith the image name as a string value. -
Replace
SNAPSHOT_NAMEwith the name of the snapshot as a string value.
-
Replace
- Status Codes
- 202 Accepted – Operation is still executing. Please check the task queue.
- 204 No Content – Resource deleted.
- 400 Bad Request – Operation exception. Please check the response body for details.
- 401 Unauthorized – Unauthenticated access. Please login first.
- 403 Forbidden – Unauthorized access. Please check your permissions.
- 500 Internal Server Error – Unexpected error. Please check the response body for the stack trace.
PUT /api/block/image/IMAGE_SPEC/snap/SNAPSHOT_NAME- Parameters
-
Replace
IMAGE_SPECwith the image name as a string value. -
Replace
SNAPSHOT_NAMEwith the name of the snapshot as a string value.
-
Replace
- Example
PUT /api/block/image/IMAGE_SPEC/snap/SNAPSHOT_NAME HTTP/1.1 Host: example.com Content-Type: application/json { "is_protected": true, "new_snap_name": "STRING" }
- Status Codes
- 200 OK – Okay.
- 202 Accepted – Operation is still executing. Please check the task queue.
- 400 Bad Request – Operation exception. Please check the response body for details.
- 401 Unauthorized – Unauthenticated access. Please login first.
- 403 Forbidden – Unauthorized access. Please check your permissions.
- 500 Internal Server Error – Unexpected error. Please check the response body for the stack trace.
POST /api/block/image/IMAGE_SPEC/snap/SNAPSHOT_NAME/clone- Description
- Clones a snapshot to an image.
- Parameters
-
Replace
IMAGE_SPECwith the image name as a string value. -
Replace
SNAPSHOT_NAMEwith the name of the snapshot as a string value.
-
Replace
- Example
POST /api/block/image/IMAGE_SPEC/snap/SNAPSHOT_NAME/clone HTTP/1.1 Host: example.com Content-Type: application/json { "child_image_name": "STRING", "child_namespace": "STRING", "child_pool_name": "STRING", "configuration": "STRING", "data_pool": "STRING", "features": "STRING", "obj_size": 1, "stripe_count": 1, "stripe_unit": "STRING" }
- Status Codes
- 201 Created – Resource created.
- 202 Accepted – Operation is still executing. Please check the task queue.
- 400 Bad Request – Operation exception. Please check the response body for details.
- 401 Unauthorized – Unauthenticated access. Please login first.
- 403 Forbidden – Unauthorized access. Please check your permissions.
- 500 Internal Server Error – Unexpected error. Please check the response body for the stack trace.
POST /api/block/image/IMAGE_SPEC/snap/SNAPSHOT_NAME/rollback- Parameters
-
Replace
IMAGE_SPECwith the image name as a string value. -
Replace
SNAPSHOT_NAMEwith the name of the snapshot as a string value.
-
Replace
- Status Codes
- 201 Created – Resource created.
- 202 Accepted – Operation is still executing. Please check the task queue.
- 400 Bad Request – Operation exception. Please check the response body for details.
- 401 Unauthorized – Unauthenticated access. Please login first.
- 403 Forbidden – Unauthorized access. Please check your permissions.
- 500 Internal Server Error – Unexpected error. Please check the response body for the stack trace.
RBD Trash
GET /api/block/image/trash- Description
- Display all the RBD trash entries, or the RBD trash details by pool name.
- Parameters
Queries:
-
pool_name- The name of the pool as a string value.
-
- Example
GET /api/block/image/trash HTTP/1.1 Host: example.com
- Status Codes
- 200 OK – Okay.
- 400 Bad Request – Operation exception. Please check the response body for details.
- 401 Unauthorized – Unauthenticated access. Please login first.
- 403 Forbidden – Unauthorized access. Please check your permissions.
- 500 Internal Server Error – Unexpected error. Please check the response body for the stack trace.
POST /api/block/image/trash/purge- Description
- Remove all the expired images from trash.
- Parameters
Queries:
-
pool_name- The name of the pool as a string value.
-
- Example
POST /api/block/image/trash/purge HTTP/1.1 Host: example.com Content-Type: application/json { "pool_name": "STRING" }- Status Codes
- 201 Created – Resource created.
- 202 Accepted – Operation is still executing. Please check the task queue.
- 400 Bad Request – Operation exception. Please check the response body for details.
- 401 Unauthorized – Unauthenticated access. Please login first.
- 403 Forbidden – Unauthorized access. Please check your permissions.
- 500 Internal Server Error – Unexpected error. Please check the response body for the stack trace.
DELETE /api/block/image/trash/IMAGE_ID_SPEC- Description
-
Deletes an image from the trash. If the image deferment time has not expired, you can not delete it unless you use
force. An actively in-use image by clones or has snapshots, it can not be deleted. - Parameters
-
Replace
IMAGE_ID_SPECwith the image name as a string value. Queries:
-
force- A boolean value to force the deletion of an image from trash.
-
-
Replace
- Status Codes
- 202 Accepted – Operation is still executing. Please check the task queue.
- 204 No Content – Resource deleted.
- 400 Bad Request – Operation exception. Please check the response body for details.
- 401 Unauthorized – Unauthenticated access. Please login first.
- 403 Forbidden – Unauthorized access. Please check your permissions.
- 500 Internal Server Error – Unexpected error. Please check the response body for the stack trace.
POST /api/block/image/trash/IMAGE_ID_SPEC/restore- Description
- Restores an image from the trash.
- Parameters
-
Replace
IMAGE_ID_SPECwith the image name as a string value.
-
Replace
- Example
POST /api/block/image/trash/IMAGE_ID_SPEC/restore HTTP/1.1 Host: example.com Content-Type: application/json { "new_image_name": "STRING" }
- Status Codes
- 201 Created – Resource created.
- 202 Accepted – Operation is still executing. Please check the task queue.
- 400 Bad Request – Operation exception. Please check the response body for details.
- 401 Unauthorized – Unauthenticated access. Please login first.
- 403 Forbidden – Unauthorized access. Please check your permissions.
- 500 Internal Server Error – Unexpected error. Please check the response body for the stack trace.
Additional Resources
- See the Ceph RESTful API chapter in the Red Hat Ceph Storage Developer Guide for more details.
A.22. Performance counters
The method reference for using the Ceph RESTful API perf_counters endpoint to display the various Ceph performance counter. This reference includes all available performance counter endpoints, such as:
- Ceph Metadata Server (MDS)
- Ceph Manager
- Ceph Monitor
- Ceph OSD
- Ceph Object Gateway
- Ceph RADOS Block Device (RBD) Mirroring
GET /api/perf_counters- Description
- Displays the performance counters.
- Example
GET /api/perf_counters HTTP/1.1 Host: example.com
- Status Codes
- 200 OK – Okay.
- 400 Bad Request – Operation exception. Please check the response body for details.
- 401 Unauthorized – Unauthenticated access. Please login first.
- 403 Forbidden – Unauthorized access. Please check your permissions.
- 500 Internal Server Error – Unexpected error. Please check the response body for the stack trace.
Ceph Metadata Server
GET /api/perf_counters/mds/SERVICE_ID- Parameters
-
Replace
SERVICE_IDwith the required service identifier as a string.
-
Replace
- Example
GET /api/perf_counters/mds/SERVICE_ID HTTP/1.1 Host: example.com- Status Codes
- 200 OK – Okay.
- 400 Bad Request – Operation exception. Please check the response body for details.
- 401 Unauthorized – Unauthenticated access. Please login first.
- 403 Forbidden – Unauthorized access. Please check your permissions.
- 500 Internal Server Error – Unexpected error. Please check the response body for the stack trace.
Ceph Manager
GET /api/perf_counters/mgr/SERVICE_ID- Parameters
-
Replace
SERVICE_IDwith the required service identifier as a string.
-
Replace
- Example
GET /api/perf_counters/mgr/SERVICE_ID HTTP/1.1 Host: example.com- Status Codes
- 200 OK – Okay.
- 400 Bad Request – Operation exception. Please check the response body for details.
- 401 Unauthorized – Unauthenticated access. Please login first.
- 403 Forbidden – Unauthorized access. Please check your permissions.
- 500 Internal Server Error – Unexpected error. Please check the response body for the stack trace.
Ceph Monitor
GET /api/perf_counters/mon/SERVICE_ID- Parameters
-
Replace
SERVICE_IDwith the required service identifier as a string.
-
Replace
- Example
GET /api/perf_counters/mon/SERVICE_ID HTTP/1.1 Host: example.com- Status Codes
- 200 OK – Okay.
- 400 Bad Request – Operation exception. Please check the response body for details.
- 401 Unauthorized – Unauthenticated access. Please login first.
- 403 Forbidden – Unauthorized access. Please check your permissions.
- 500 Internal Server Error – Unexpected error. Please check the response body for the stack trace.
Ceph OSD
GET /api/perf_counters/osd/SERVICE_ID- Parameters
-
Replace
SERVICE_IDwith the required service identifier as a string.
-
Replace
- Example
GET /api/perf_counters/osd/SERVICE_ID HTTP/1.1 Host: example.com- Status Codes
- 200 OK – Okay.
- 400 Bad Request – Operation exception. Please check the response body for details.
- 401 Unauthorized – Unauthenticated access. Please login first.
- 403 Forbidden – Unauthorized access. Please check your permissions.
- 500 Internal Server Error – Unexpected error. Please check the response body for the stack trace.
Ceph RADOS Block Device (RBD) Mirroring
GET /api/perf_counters/rbd-mirror/SERVICE_ID- Parameters
-
Replace
SERVICE_IDwith the required service identifier as a string.
-
Replace
- Example
GET /api/perf_counters/rbd-mirror/SERVICE_ID HTTP/1.1 Host: example.com- Status Codes
- 200 OK – Okay.
- 400 Bad Request – Operation exception. Please check the response body for details.
- 401 Unauthorized – Unauthenticated access. Please login first.
- 403 Forbidden – Unauthorized access. Please check your permissions.
- 500 Internal Server Error – Unexpected error. Please check the response body for the stack trace.
Ceph Object Gateway
GET /api/perf_counters/rgw/SERVICE_ID- Parameters
-
Replace
SERVICE_IDwith the required service identifier as a string.
-
Replace
- Example
GET /api/perf_counters/rgw/SERVICE_ID HTTP/1.1 Host: example.com- Status Codes
- 200 OK – Okay.
- 400 Bad Request – Operation exception. Please check the response body for details.
- 401 Unauthorized – Unauthenticated access. Please login first.
- 403 Forbidden – Unauthorized access. Please check your permissions.
- 500 Internal Server Error – Unexpected error. Please check the response body for the stack trace.
TCMU Runner
GET /api/perf_counters/tcmu-runner/SERVICE_ID- Parameters
-
Replace
SERVICE_IDwith the required service identifier as a string.
-
Replace
- Example
GET /api/perf_counters/tcmu-runner/SERVICE_ID HTTP/1.1 Host: example.com- Status Codes
- 200 OK – Okay.
- 400 Bad Request – Operation exception. Please check the response body for details.
- 401 Unauthorized – Unauthenticated access. Please login first.
- 403 Forbidden – Unauthorized access. Please check your permissions.
- 500 Internal Server Error – Unexpected error. Please check the response body for the stack trace.
Additional Resources
- See the Ceph RESTful API chapter in the Red Hat Ceph Storage Developer Guide for more details.
A.23. Roles
The method reference for using the Ceph RESTful API role endpoint to manage the various user roles in Ceph.
GET /api/role- Description
- Display the role list.
- Example
GET /api/role HTTP/1.1 Host: example.com
- Status Codes
- 200 OK – Okay.
- 400 Bad Request – Operation exception. Please check the response body for details.
- 401 Unauthorized – Unauthenticated access. Please login first.
- 403 Forbidden – Unauthorized access. Please check your permissions.
- 500 Internal Server Error – Unexpected error. Please check the response body for the stack trace.
POST /api/role- Example
POST /api/role HTTP/1.1 Host: example.com Content-Type: application/json { "description": "STRING", "name": "STRING", "scopes_permissions": "STRING" }- Status Codes
- 201 Created – Resource created.
- 202 Accepted – Operation is still executing. Please check the task queue.
- 400 Bad Request – Operation exception. Please check the response body for details.
- 401 Unauthorized – Unauthenticated access. Please login first.
- 403 Forbidden – Unauthorized access. Please check your permissions.
- 500 Internal Server Error – Unexpected error. Please check the response body for the stack trace.
DELETE /api/role/NAME- Parameters
-
Replace
NAMEwith the role name as a string.
-
Replace
- Status Codes
- 202 Accepted – Operation is still executing. Please check the task queue.
- 204 No Content – Resource deleted.
- 400 Bad Request – Operation exception. Please check the response body for details.
- 401 Unauthorized – Unauthenticated access. Please login first.
- 403 Forbidden – Unauthorized access. Please check your permissions.
- 500 Internal Server Error – Unexpected error. Please check the response body for the stack trace.
GET /api/role/NAME- Parameters
-
Replace
NAMEwith the role name as a string.
-
Replace
- Example
GET /api/role/NAME HTTP/1.1 Host: example.com- Status Codes
- 200 OK – Okay.
- 400 Bad Request – Operation exception. Please check the response body for details.
- 401 Unauthorized – Unauthenticated access. Please login first.
- 403 Forbidden – Unauthorized access. Please check your permissions.
- 500 Internal Server Error – Unexpected error. Please check the response body for the stack trace.
PUT /api/role/NAME- Parameters
-
Replace
NAMEwith the role name as a string.
-
Replace
- Example
PUT /api/role/NAME HTTP/1.1 Host: example.com Content-Type: application/json { "description": "STRING", "scopes_permissions": "STRING" }
- Status Codes
- 200 OK – Okay.
- 202 Accepted – Operation is still executing. Please check the task queue.
- 400 Bad Request – Operation exception. Please check the response body for details.
- 401 Unauthorized – Unauthenticated access. Please login first.
- 403 Forbidden – Unauthorized access. Please check your permissions.
- 500 Internal Server Error – Unexpected error. Please check the response body for the stack trace.
POST /api/role/NAME/clone- Parameters
-
Replace
NAMEwith the role name as a string.
-
Replace
- Example
POST /api/role/NAME/clone HTTP/1.1 Host: example.com Content-Type: application/json { "new_name": "STRING" }
- Status Codes
- 201 Created – Resource created.
- 202 Accepted – Operation is still executing. Please check the task queue.
- 400 Bad Request – Operation exception. Please check the response body for details.
- 401 Unauthorized – Unauthenticated access. Please login first.
- 403 Forbidden – Unauthorized access. Please check your permissions.
- 500 Internal Server Error – Unexpected error. Please check the response body for the stack trace.
Additional Resources
- See the Ceph RESTful API chapter in the Red Hat Ceph Storage Developer Guide for more details.
A.24. Services
The method reference for using the Ceph RESTful API service endpoint to manage the various Ceph services.
GET /api/service- Parameters
Queries:
-
service_name- The name of the service as a string.
-
- Example
GET /api/service HTTP/1.1 Host: example.com
- Status Codes
- 200 OK – Okay.
- 400 Bad Request – Operation exception. Please check the response body for details.
- 401 Unauthorized – Unauthenticated access. Please login first.
- 403 Forbidden – Unauthorized access. Please check your permissions.
- 500 Internal Server Error – Unexpected error. Please check the response body for the stack trace.
POST /api/service- Parameters
-
service_spec- The service specification as a JSON file. -
service_name- The name of the service.
-
- Example
POST /api/service HTTP/1.1 Host: example.com Content-Type: application/json { "service_name": "STRING", "service_spec": "STRING" }- Status Codes
- 201 Created – Resource created.
- 202 Accepted – Operation is still executing. Please check the task queue.
- 400 Bad Request – Operation exception. Please check the response body for details.
- 401 Unauthorized – Unauthenticated access. Please login first.
- 403 Forbidden – Unauthorized access. Please check your permissions.
- 500 Internal Server Error – Unexpected error. Please check the response body for the stack trace.
GET /api/service/known_types- Description
- Display a list of known service types.
- Example
GET /api/service/known_types HTTP/1.1 Host: example.com
- Status Codes
- 200 OK – Okay.
- 400 Bad Request – Operation exception. Please check the response body for details.
- 401 Unauthorized – Unauthenticated access. Please login first.
- 403 Forbidden – Unauthorized access. Please check your permissions.
- 500 Internal Server Error – Unexpected error. Please check the response body for the stack trace.
DELETE /api/service/SERVICE_NAME- Parameters
-
Replace
SERVICE_NAMEwith the name of the service as a string.
-
Replace
- Status Codes
- 202 Accepted – Operation is still executing. Please check the task queue.
- 204 No Content – Resource deleted.
- 400 Bad Request – Operation exception. Please check the response body for details.
- 401 Unauthorized – Unauthenticated access. Please login first.
- 403 Forbidden – Unauthorized access. Please check your permissions.
- 500 Internal Server Error – Unexpected error. Please check the response body for the stack trace.
GET /api/service/SERVICE_NAME- Parameters
-
Replace
SERVICE_NAMEwith the name of the service as a string.
-
Replace
- Example
GET /api/service/SERVICE_NAME HTTP/1.1 Host: example.com- Status Codes
- 200 OK – Okay.
- 400 Bad Request – Operation exception. Please check the response body for details.
- 401 Unauthorized – Unauthenticated access. Please login first.
- 403 Forbidden – Unauthorized access. Please check your permissions.
- 500 Internal Server Error – Unexpected error. Please check the response body for the stack trace.
GET /api/service/SERVICE_NAME/daemons- Parameters
-
Replace
SERVICE_NAMEwith the name of the service as a string.
-
Replace
- Example
GET /api/service/SERVICE_NAME/daemons HTTP/1.1 Host: example.com- Status Codes
- 200 OK – Okay.
- 400 Bad Request – Operation exception. Please check the response body for details.
- 401 Unauthorized – Unauthenticated access. Please login first.
- 403 Forbidden – Unauthorized access. Please check your permissions.
- 500 Internal Server Error – Unexpected error. Please check the response body for the stack trace.
Additional Resources
- See the Ceph RESTful API chapter in the Red Hat Ceph Storage Developer Guide for more details.
A.25. Settings
The method reference for using the Ceph RESTful API settings endpoint to manage the various Ceph settings.
GET /api/settings- Description
- Display the list of available options
- Parameters
Queries:
-
names- A comma-separated list of option names.
-
- Example
GET /api/settings HTTP/1.1 Host: example.com
- Status Codes
- 200 OK – Okay.
- 400 Bad Request – Operation exception. Please check the response body for details.
- 401 Unauthorized – Unauthenticated access. Please login first.
- 403 Forbidden – Unauthorized access. Please check your permissions.
- 500 Internal Server Error – Unexpected error. Please check the response body for the stack trace.
PUT /api/settings- Status Codes
- 200 OK – Okay.
- 202 Accepted – Operation is still executing. Please check the task queue.
- 400 Bad Request – Operation exception. Please check the response body for details.
- 401 Unauthorized – Unauthenticated access. Please login first.
- 403 Forbidden – Unauthorized access. Please check your permissions.
- 500 Internal Server Error – Unexpected error. Please check the response body for the stack trace.
DELETE /api/settings/NAME- Parameters
-
Replace
NAMEwith the option name as a string.
-
Replace
- Status Codes
- 202 Accepted – Operation is still executing. Please check the task queue.
- 204 No Content – Resource deleted.
- 400 Bad Request – Operation exception. Please check the response body for details.
- 401 Unauthorized – Unauthenticated access. Please login first.
- 403 Forbidden – Unauthorized access. Please check your permissions.
- 500 Internal Server Error – Unexpected error. Please check the response body for the stack trace.
GET /api/settings/NAME- Description
- Display the given option.
- Parameters
-
Replace
NAMEwith the option name as a string.
-
Replace
- Example
GET /api/settings/NAME HTTP/1.1 Host: example.com- Status Codes
- 200 OK – Okay.
- 400 Bad Request – Operation exception. Please check the response body for details.
- 401 Unauthorized – Unauthenticated access. Please login first.
- 403 Forbidden – Unauthorized access. Please check your permissions.
- 500 Internal Server Error – Unexpected error. Please check the response body for the stack trace.
PUT /api/settings/NAME- Parameters
-
Replace
NAMEwith the option name as a string.
-
Replace
- Example
PUT /api/settings/NAME HTTP/1.1 Host: example.com Content-Type: application/json { "value": "STRING" }
- Status Codes
- 200 OK – Okay.
- 202 Accepted – Operation is still executing. Please check the task queue.
- 400 Bad Request – Operation exception. Please check the response body for details.
- 401 Unauthorized – Unauthenticated access. Please login first.
- 403 Forbidden – Unauthorized access. Please check your permissions.
- 500 Internal Server Error – Unexpected error. Please check the response body for the stack trace.
Additional Resources
- See the Ceph RESTful API chapter in the Red Hat Ceph Storage Developer Guide for more details.
A.26. Ceph task
The method reference for using the Ceph RESTful API task endpoint to display Ceph tasks.
GET /api/task- Description
- Display Ceph tasks.
- Parameters
Queries:
-
name- The name of the task.
-
- Example
GET /api/task HTTP/1.1 Host: example.com
- Status Codes
- 200 OK – Okay.
- 400 Bad Request – Operation exception. Please check the response body for details.
- 401 Unauthorized – Unauthenticated access. Please login first.
- 403 Forbidden – Unauthorized access. Please check your permissions.
- 500 Internal Server Error – Unexpected error. Please check the response body for the stack trace.
Additional Resources
- See the Ceph RESTful API chapter in the Red Hat Ceph Storage Developer Guide for more details.
A.27. Telemetry
The method reference for using the Ceph RESTful API telemetry endpoint to manage data for the telemetry Ceph Manager module.
PUT /api/telemetry- Description
- Enables or disables the sending of collected data by the telemetry module.
- Parameters
-
enable- A boolean value. -
license_name- A string value, such as,sharing-1-0. Make sure the user is aware of and accepts the license for sharing telemetry data.
-
- Example
PUT /api/telemetry HTTP/1.1 Host: example.com Content-Type: application/json { "enable": true, "license_name": "STRING" }- Status Codes
- 200 OK – Okay.
- 202 Accepted – Operation is still executing. Please check the task queue.
- 400 Bad Request – Operation exception. Please check the response body for details.
- 401 Unauthorized – Unauthenticated access. Please login first.
- 403 Forbidden – Unauthorized access. Please check your permissions.
- 500 Internal Server Error – Unexpected error. Please check the response body for the stack trace.
GET /api/telemetry/report- Description
- Display report data on Ceph and devices.
- Example
GET /api/telemetry/report HTTP/1.1 Host: example.com
- Status Codes
- 200 OK – Okay.
- 400 Bad Request – Operation exception. Please check the response body for details.
- 401 Unauthorized – Unauthenticated access. Please login first.
- 403 Forbidden – Unauthorized access. Please check your permissions.
- 500 Internal Server Error – Unexpected error. Please check the response body for the stack trace.
Additional Resources
- See the Ceph RESTful API chapter in the Red Hat Ceph Storage Developer Guide for more details.
- See the Activating and deactivating telemetry chapter in the Red Hat Ceph Storage Dashboard Guide for details about managing with the Ceph dashboard.
A.28. Ceph users
The method reference for using the Ceph RESTful API user endpoint to display Ceph user details and to manage Ceph user passwords.
GET /api/user- Description
- Display a list of users.
- Example
GET /api/user HTTP/1.1 Host: example.com
- Status Codes
- 200 OK – Okay.
- 400 Bad Request – Operation exception. Please check the response body for details.
- 401 Unauthorized – Unauthenticated access. Please login first.
- 403 Forbidden – Unauthorized access. Please check your permissions.
- 500 Internal Server Error – Unexpected error. Please check the response body for the stack trace.
POST /api/user- Example
POST /api/user HTTP/1.1 Host: example.com Content-Type: application/json { "email": "STRING", "enabled": true, "name": "STRING", "password": "STRING", "pwdExpirationDate": "STRING", "pwdUpdateRequired": true, "roles": "STRING", "username": "STRING" }- Status Codes
- 201 Created – Resource created.
- 202 Accepted – Operation is still executing. Please check the task queue.
- 400 Bad Request – Operation exception. Please check the response body for details.
- 401 Unauthorized – Unauthenticated access. Please login first.
- 403 Forbidden – Unauthorized access. Please check your permissions.
- 500 Internal Server Error – Unexpected error. Please check the response body for the stack trace.
DELETE /api/user/USER_NAME- Parameters
-
Replace
USER_NAMEwith the name of the user as a string.
-
Replace
- Status Codes
- 202 Accepted – Operation is still executing. Please check the task queue.
- 204 No Content – Resource deleted.
- 400 Bad Request – Operation exception. Please check the response body for details.
- 401 Unauthorized – Unauthenticated access. Please login first.
- 403 Forbidden – Unauthorized access. Please check your permissions.
- 500 Internal Server Error – Unexpected error. Please check the response body for the stack trace.
GET /api/user/USER_NAME- Parameters
-
Replace
USER_NAMEwith the name of the user as a string.
-
Replace
- Example
GET /api/user/USER_NAME HTTP/1.1 Host: example.com- Status Codes
- 200 OK – Okay.
- 400 Bad Request – Operation exception. Please check the response body for details.
- 401 Unauthorized – Unauthenticated access. Please login first.
- 403 Forbidden – Unauthorized access. Please check your permissions.
- 500 Internal Server Error – Unexpected error. Please check the response body for the stack trace.
PUT /api/user/USER_NAME- Parameters
-
Replace
USER_NAMEwith the name of the user as a string.
-
Replace
- Example
PUT /api/user/USER_NAME HTTP/1.1 Host: example.com Content-Type: application/json { "email": "STRING", "enabled": "STRING", "name": "STRING", "password": "STRING", "pwdExpirationDate": "STRING", "pwdUpdateRequired": true, "roles": "STRING" }
- Status Codes
- 200 OK – Okay.
- 202 Accepted – Operation is still executing. Please check the task queue.
- 400 Bad Request – Operation exception. Please check the response body for details.
- 401 Unauthorized – Unauthenticated access. Please login first.
- 403 Forbidden – Unauthorized access. Please check your permissions.
- 500 Internal Server Error – Unexpected error. Please check the response body for the stack trace.
POST /api/user/USER_NAME/change_password- Parameters
-
Replace
USER_NAMEwith the name of the user as a string.
-
Replace
- Example
POST /api/user/USER_NAME/change_password HTTP/1.1 Host: example.com Content-Type: application/json { "new_password": "STRING", "old_password": "STRING" }
- Status Codes
- 201 Created – Resource created.
- 202 Accepted – Operation is still executing. Please check the task queue.
- 400 Bad Request – Operation exception. Please check the response body for details.
- 401 Unauthorized – Unauthenticated access. Please login first.
- 403 Forbidden – Unauthorized access. Please check your permissions.
- 500 Internal Server Error – Unexpected error. Please check the response body for the stack trace.
POST /api/user/validate_password- Description
- Checks the password to see if it meets the password policy.
- Parameters
-
password- The password to validate. -
username- Optional. The name of the user. -
old_password- Optional. The old password.
-
- Example
POST /api/user/validate_password HTTP/1.1 Host: example.com Content-Type: application/json { "old_password": "STRING", "password": "STRING", "username": "STRING" }- Status Codes
- 201 Created – Resource created.
- 202 Accepted – Operation is still executing. Please check the task queue.
- 400 Bad Request – Operation exception. Please check the response body for details.
- 401 Unauthorized – Unauthenticated access. Please login first.
- 403 Forbidden – Unauthorized access. Please check your permissions.
- 500 Internal Server Error – Unexpected error. Please check the response body for the stack trace.
Additional Resources
- See the Ceph RESTful API chapter in the Red Hat Ceph Storage Developer Guide for more details.
Appendix B. S3 common request headers
The following table lists the valid common request headers and their descriptions.
Table B.1. Request Headers
| Request Header | Description |
|---|---|
|
| Length of the request body. |
|
| Request time and date (in UTC). |
|
| The name of the host server. |
|
| Authorization token. |
Appendix C. S3 common response status codes
The following table lists the valid common HTTP response status and its corresponding code.
Table C.1. Response Status
| HTTP Status | Response Code |
|---|---|
|
| Continue |
|
| Success |
|
| Created |
|
| Accepted |
|
| NoContent |
|
| Partial content |
|
| NotModified |
|
| InvalidArgument |
|
| InvalidDigest |
|
| BadDigest |
|
| InvalidBucketName |
|
| InvalidObjectName |
|
| UnresolvableGrantByEmailAddress |
|
| InvalidPart |
|
| InvalidPartOrder |
|
| RequestTimeout |
|
| EntityTooLarge |
|
| AccessDenied |
|
| UserSuspended |
|
| RequestTimeTooSkewed |
|
| NoSuchKey |
|
| NoSuchBucket |
|
| NoSuchUpload |
|
| MethodNotAllowed |
|
| RequestTimeout |
|
| BucketAlreadyExists |
|
| BucketNotEmpty |
|
| MissingContentLength |
|
| PreconditionFailed |
|
| InvalidRange |
|
| UnprocessableEntity |
|
| InternalError |
Appendix D. S3 unsupported header fields
Table D.1. Unsupported Header Fields
| Name | Type |
|---|---|
| x-amz-security-token | Request |
| Server | Response |
| x-amz-delete-marker | Response |
| x-amz-id-2 | Response |
| x-amz-request-id | Response |
| x-amz-version-id | Response |
Appendix E. Swift request headers
Table E.1. Request Headers
| Name | Description | Type | Required |
|---|---|---|---|
|
| The key Ceph Object Gateway username to authenticate. | String | Yes |
|
| The key associated to a Ceph Object Gateway username. | String | Yes |
Appendix F. Swift response headers
The response from the server should include an X-Auth-Token value. The response might also contain a X-Storage-Url that provides the API_VERSION/ACCOUNT prefix that is specified in other requests throughout the API documentation.
Table F.1. Response Headers
| Name | Description | Type |
|---|---|---|
|
|
The authorization token for the | String |
|
|
The URL and | String |
Appendix G. Examples using the Secure Token Service APIs
These examples are using Python’s boto3 module to interface with the Ceph Object Gateway’s implementation of the Secure Token Service (STS). In these examples, TESTER2 assumes a role created by TESTER1, as to access S3 resources owned by TESTER1 based on the permission policy attached to the role.
The AssumeRole example creates a role, assigns a policy to the role, then assumes a role to get temporary credentials and access to S3 resources using those temporary credentials.
The AssumeRoleWithWebIdentity example authenticates users using an external application with Keycloak, an OpenID Connect identity provider, assumes a role to get temporary credentials and access S3 resources according to the permission policy of the role.
AssumeRole Example
import boto3
iam_client = boto3.client('iam',
aws_access_key_id=ACCESS_KEY_OF_TESTER1,
aws_secret_access_key=SECRET_KEY_OF_TESTER1,
endpoint_url=<IAM URL>,
region_name=''
)
policy_document = "{\"Version\":\"2012-10-17\",\"Statement\":[{\"Effect\":\"Allow\",\"Principal\":{\"AWS\":[\"arn:aws:iam:::user/TESTER1\"]},\"Action\":[\"sts:AssumeRole\"]}]}"
role_response = iam_client.create_role(
AssumeRolePolicyDocument=policy_document,
Path='/',
RoleName='S3Access',
)
role_policy = "{\"Version\":\"2012-10-17\",\"Statement\":{\"Effect\":\"Allow\",\"Action\":\"s3:*\",\"Resource\":\"arn:aws:s3:::*\"}}"
response = iam_client.put_role_policy(
RoleName='S3Access',
PolicyName='Policy1',
PolicyDocument=role_policy
)
sts_client = boto3.client('sts',
aws_access_key_id=ACCESS_KEY_OF_TESTER2,
aws_secret_access_key=SECRET_KEY_OF_TESTER2,
endpoint_url=<STS URL>,
region_name='',
)
response = sts_client.assume_role(
RoleArn=role_response['Role']['Arn'],
RoleSessionName='Bob',
DurationSeconds=3600
)
s3client = boto3.client('s3',
aws_access_key_id = response['Credentials']['AccessKeyId'],
aws_secret_access_key = response['Credentials']['SecretAccessKey'],
aws_session_token = response['Credentials']['SessionToken'],
endpoint_url=<S3 URL>,
region_name='',)
bucket_name = 'my-bucket'
s3bucket = s3client.create_bucket(Bucket=bucket_name)
resp = s3client.list_buckets()
AssumeRoleWithWebIdentity Example
import boto3
iam_client = boto3.client('iam',
aws_access_key_id=ACCESS_KEY_OF_TESTER1,
aws_secret_access_key=SECRET_KEY_OF_TESTER1,
endpoint_url=<IAM URL>,
region_name=''
)
oidc_response = iam_client.create_open_id_connect_provider(
Url=<URL of the OpenID Connect Provider>,
ClientIDList=[
<Client id registered with the IDP>
],
ThumbprintList=[
<IDP THUMBPRINT>
]
)
policy_document = "{\"Version\":\"2012-10-17\",\"Statement\":\[\{\"Effect\":\"Allow\",\"Principal\":\{\"Federated\":\[\"arn:aws:iam:::oidc-provider/localhost:8080/auth/realms/demo\"\]\},\"Action\":\[\"sts:AssumeRoleWithWebIdentity\"\],\"Condition\":\{\"StringEquals\":\{\"localhost:8080/auth/realms/demo:app_id\":\"customer-portal\"\}\}\}\]\}"
role_response = iam_client.create_role(
AssumeRolePolicyDocument=policy_document,
Path='/',
RoleName='S3Access',
)
role_policy = "{\"Version\":\"2012-10-17\",\"Statement\":{\"Effect\":\"Allow\",\"Action\":\"s3:*\",\"Resource\":\"arn:aws:s3:::*\"}}"
response = iam_client.put_role_policy(
RoleName='S3Access',
PolicyName='Policy1',
PolicyDocument=role_policy
)
sts_client = boto3.client('sts',
aws_access_key_id=ACCESS_KEY_OF_TESTER2,
aws_secret_access_key=SECRET_KEY_OF_TESTER2,
endpoint_url=<STS URL>,
region_name='',
)
response = client.assume_role_with_web_identity(
RoleArn=role_response['Role']['Arn'],
RoleSessionName='Bob',
DurationSeconds=3600,
WebIdentityToken=<Web Token>
)
s3client = boto3.client('s3',
aws_access_key_id = response['Credentials']['AccessKeyId'],
aws_secret_access_key = response['Credentials']['SecretAccessKey'],
aws_session_token = response['Credentials']['SessionToken'],
endpoint_url=<S3 URL>,
region_name='',)
bucket_name = 'my-bucket'
s3bucket = s3client.create_bucket(Bucket=bucket_name)
resp = s3client.list_buckets()
Additional Resources
-
See the Test S3 Access section of the Red Hat Ceph Storage Object Gateway Configuration and Administration Guide for more details on using Python’s
botomodule.