
Object Gateway Guide
Deploying, configuring, and administering a Ceph Object Gateway
Abstract
Chapter 1. The Ceph Object Gateway
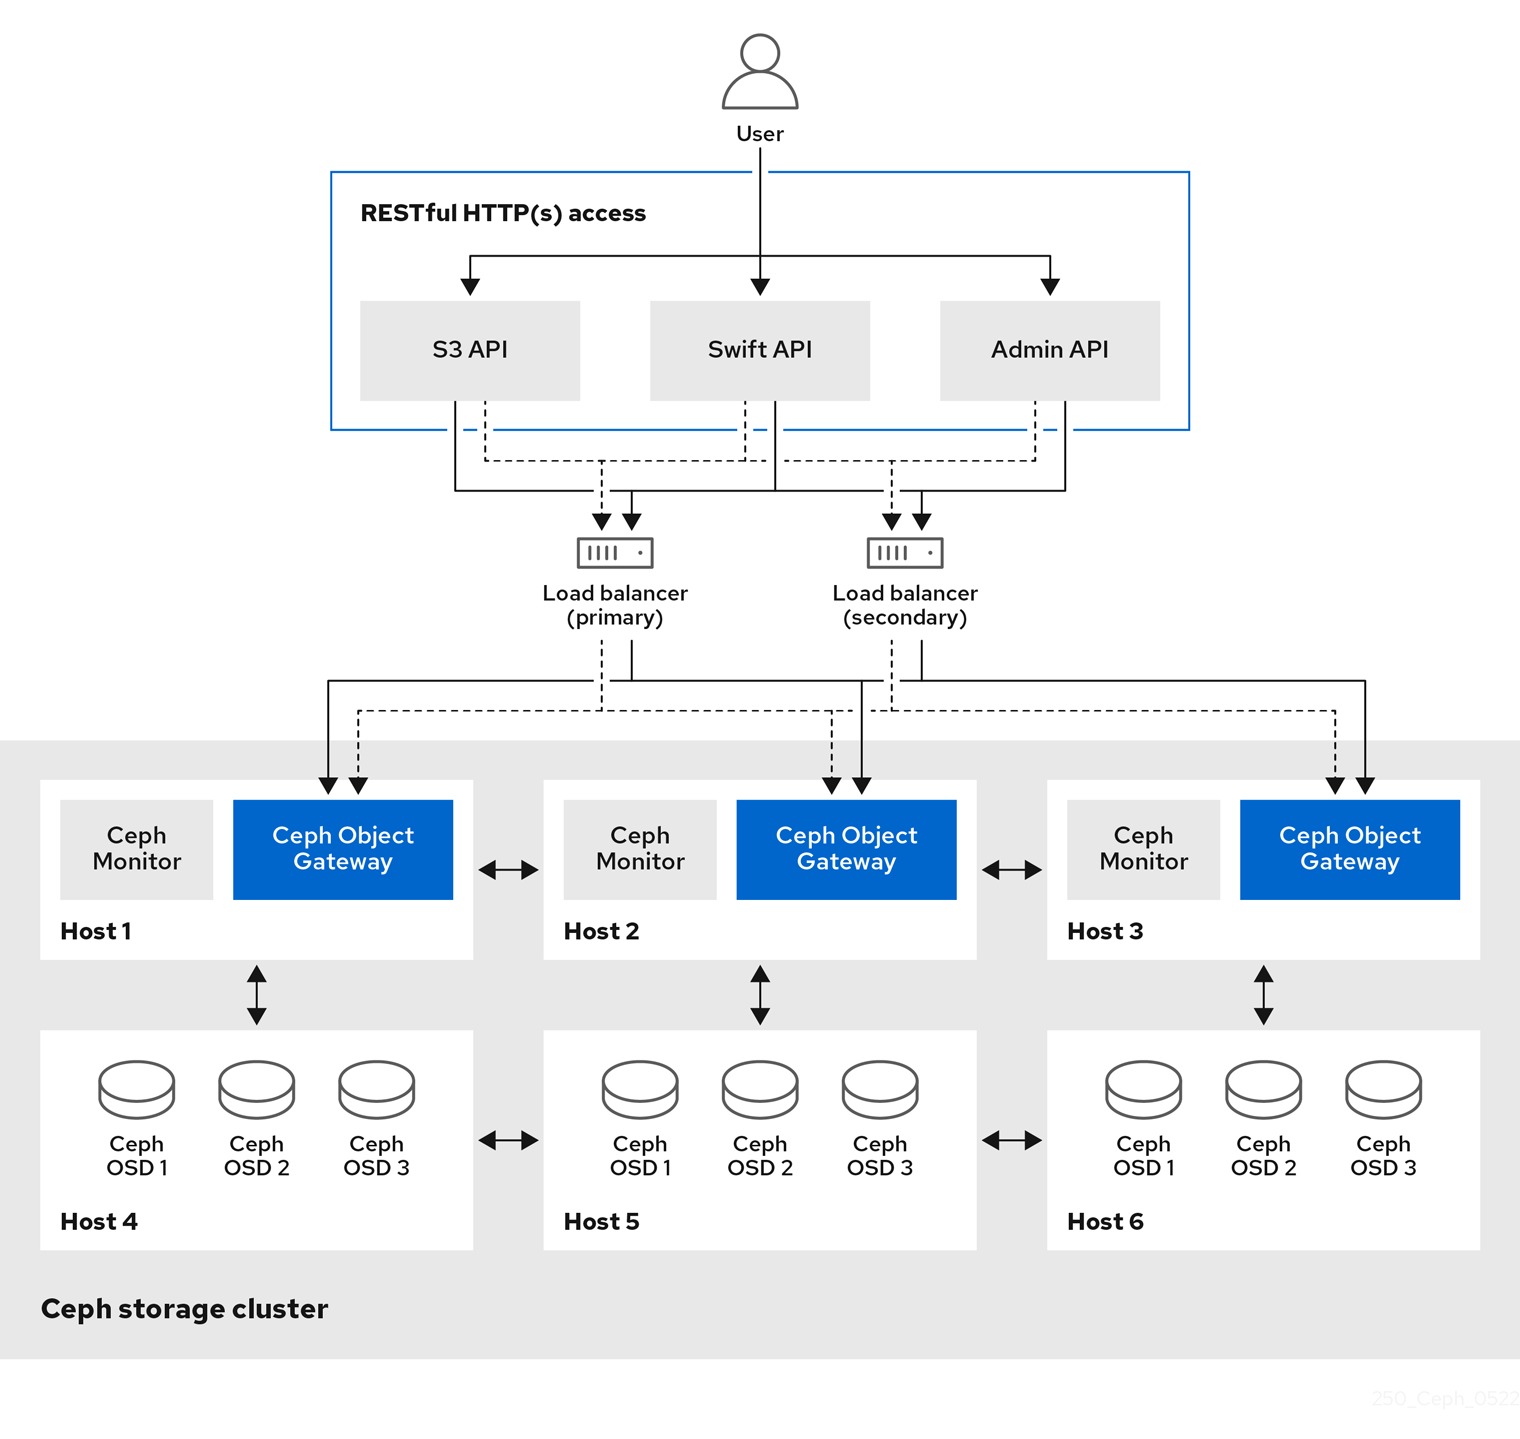
Ceph Object Gateway, also known as RADOS Gateway (RGW), is an object storage interface built on top of the librados library to provide applications with a RESTful gateway to Ceph storage clusters. Ceph Object Gateway supports three interfaces:
S3-compatibility:
Provides object storage functionality with an interface that is compatible with a large subset of the Amazon S3 RESTful API.
Swift-compatibility:
Provides object storage functionality with an interface that is compatible with a large subset of the OpenStack Swift API.
The Ceph Object Gateway is a service interacting with a Ceph storage cluster. Since it provides interfaces compatible with OpenStack Swift and Amazon S3, the Ceph Object Gateway has its own user management system. Ceph Object Gateway can store data in the same Ceph storage cluster used to store data from Ceph block device clients; however, it would involve separate pools and likely a different CRUSH hierarchy. The S3 and Swift APIs share a common namespace, so you can write data with one API and retrieve it with the other.
Administrative API:
Provides an administrative interface for managing the Ceph Object Gateways.
Administrative API requests are done on a URI that starts with the admin resource end point. Authorization for the administrative API mimics the S3 authorization convention. Some operations require the user to have special administrative capabilities. The response type can be either XML or JSON by specifying the format option in the request, but defaults to the JSON format.
Additional Resources
- See the Red Hat Ceph Storage Developer Guide for details on the available APIs in Red Hat Ceph Storage.
Chapter 2. Considerations and recommendations
As a storage administrator, a basic understanding about what to consider before running a Ceph Object Gateway and implementing a multi-site Ceph Object Gateway solution is important. You can learn the hardware and network requirements, knowing what type of workloads work well with a Ceph Object Gateway, and Red Hat’s recommendations.
2.1. Prerequisites
- Time to understand, consider, and plan a storage solution.
2.2. Network considerations for Red Hat Ceph Storage
An important aspect of a cloud storage solution is that storage clusters can run out of IOPS due to network latency, and other factors. Also, the storage cluster can run out of throughput due to bandwidth constraints long before the storage clusters run out of storage capacity. This means that the network hardware configuration must support the chosen workloads to meet price versus performance requirements.
Storage administrators prefer that a storage cluster recovers as quickly as possible. Carefully consider bandwidth requirements for the storage cluster network, be mindful of network link oversubscription, and segregate the intra-cluster traffic from the client-to-cluster traffic. Also consider that network performance is increasingly important when considering the use of Solid State Disks (SSD), flash, NVMe, and other high performing storage devices.
Ceph supports a public network and a storage cluster network. The public network handles client traffic and communication with Ceph Monitors. The storage cluster network handles Ceph OSD heartbeats, replication, backfilling, and recovery traffic. At a minimum, a single 10 Gb/s Ethernet link should be used for storage hardware, and you can add additional 10 Gb/s Ethernet links for connectivity and throughput.
Red Hat recommends allocating bandwidth to the storage cluster network, such that it is a multiple of the public network using the osd_pool_default_size as the basis for the multiple on replicated pools. Red Hat also recommends running the public and storage cluster networks on separate network cards.
Red Hat recommends using 10 Gb/s Ethernet for Red Hat Ceph Storage deployments in production. A 1 Gb/s Ethernet network is not suitable for production storage clusters.
In the case of a drive failure, replicating 1 TB of data across a 1 Gb/s network takes 3 hours and replicating 10 TB across a 1 Gb/s network takes 30 hours. Using 10 TB is the typical drive configuration. By contrast, with a 10 Gb/s Ethernet network, the replication times would be 20 minutes for 1 TB and 1 hour for 10 TB. Remember that when a Ceph OSD fails, the storage cluster recovers by replicating the data it contained to other OSDs within the same failure domain and device class as the failed OSD.
The failure of a larger domain such as a rack means that the storage cluster utilizes considerably more bandwidth. When building a storage cluster consisting of multiple racks, which is common for large storage implementations, consider utilizing as much network bandwidth between switches in a "fat tree" design for optimal performance. A typical 10 Gb/s Ethernet switch has 48 10 Gb/s ports and four 40 Gb/s ports. Use the 40 Gb/s ports on the spine for maximum throughput. Alternatively, consider aggregating unused 10 Gb/s ports with QSFP+ and SFP+ cables into more 40 Gb/s ports to connect to other rack and spine routers. Also, consider using LACP mode 4 to bond network interfaces. Additionally, use jumbo frames, with a maximum transmission unit (MTU) of 9000, especially on the backend or cluster network.
Before installing and testing a Red Hat Ceph Storage cluster, verify the network throughput. Most performance-related problems in Ceph usually begin with a networking issue. Simple network issues like a kinked or bent Cat-6 cable could result in degraded bandwidth. Use a minimum of 10 Gb/s ethernet for the front side network. For large clusters, consider using 40 Gb/s ethernet for the backend or cluster network.
For network optimization, Red Hat recommends using jumbo frames for a better CPU per bandwidth ratio, and a non-blocking network switch back-plane. Red Hat Ceph Storage requires the same MTU value throughout all networking devices in the communication path, end-to-end for both public and cluster networks. Verify that the MTU value is the same on all hosts and networking equipment in the environment before using a Red Hat Ceph Storage cluster in production.
Additional Resources
- See the Configuring a private network section in the Red Hat Ceph Storage Configuration Guide for more details.
- See the Configuring a public network section in the Red Hat Ceph Storage Configuration Guide for more details.
- See the Configuring multiple public networks to the cluster section in the Red Hat Ceph Storage Configuration Guide for more details.
2.3. Basic Red Hat Ceph Storage considerations
The first consideration for using Red Hat Ceph Storage is developing a storage strategy for the data. A storage strategy is a method of storing data that serves a particular use case. If you need to store volumes and images for a cloud platform like OpenStack, you can choose to store data on faster Serial Attached SCSI (SAS) drives with Solid State Drives (SSD) for journals. By contrast, if you need to store object data for an S3- or Swift-compliant gateway, you can choose to use something more economical, like traditional Serial Advanced Technology Attachment (SATA) drives. Red Hat Ceph Storage can accommodate both scenarios in the same storage cluster, but you need a means of providing the fast storage strategy to the cloud platform, and a means of providing more traditional storage for your object store.
One of the most important steps in a successful Ceph deployment is identifying a price-to-performance profile suitable for the storage cluster’s use case and workload. It is important to choose the right hardware for the use case. For example, choosing IOPS-optimized hardware for a cold storage application increases hardware costs unnecessarily. Whereas, choosing capacity-optimized hardware for its more attractive price point in an IOPS-intensive workload will likely lead to unhappy users complaining about slow performance.
Red Hat Ceph Storage can support multiple storage strategies. Use cases, cost versus benefit performance tradeoffs, and data durability are the primary considerations that help develop a sound storage strategy.
Use Cases
Ceph provides massive storage capacity, and it supports numerous use cases, such as:
- The Ceph Block Device client is a leading storage backend for cloud platforms that provides limitless storage for volumes and images with high performance features like copy-on-write cloning.
- The Ceph Object Gateway client is a leading storage backend for cloud platforms that provides a RESTful S3-compliant and Swift-compliant object storage for objects like audio, bitmap, video, and other data.
- The Ceph File System for traditional file storage.
Cost vs. Benefit of Performance
Faster is better. Bigger is better. High durability is better. However, there is a price for each superlative quality, and a corresponding cost versus benefit tradeoff. Consider the following use cases from a performance perspective: SSDs can provide very fast storage for relatively small amounts of data and journaling. Storing a database or object index can benefit from a pool of very fast SSDs, but proves too expensive for other data. SAS drives with SSD journaling provide fast performance at an economical price for volumes and images. SATA drives without SSD journaling provide cheap storage with lower overall performance. When you create a CRUSH hierarchy of OSDs, you need to consider the use case and an acceptable cost versus performance tradeoff.
Data Durability
In large scale storage clusters, hardware failure is an expectation, not an exception. However, data loss and service interruption remain unacceptable. For this reason, data durability is very important. Ceph addresses data durability with multiple replica copies of an object or with erasure coding and multiple coding chunks. Multiple copies or multiple coding chunks present an additional cost versus benefit tradeoff: it is cheaper to store fewer copies or coding chunks, but it can lead to the inability to service write requests in a degraded state. Generally, one object with two additional copies, or two coding chunks can allow a storage cluster to service writes in a degraded state while the storage cluster recovers.
Replication stores one or more redundant copies of the data across failure domains in case of a hardware failure. However, redundant copies of data can become expensive at scale. For example, to store 1 petabyte of data with triple replication would require a cluster with at least 3 petabytes of storage capacity.
Erasure coding stores data as data chunks and coding chunks. In the event of a lost data chunk, erasure coding can recover the lost data chunk with the remaining data chunks and coding chunks. Erasure coding is substantially more economical than replication. For example, using erasure coding with 8 data chunks and 3 coding chunks provides the same redundancy as 3 copies of the data. However, such an encoding scheme uses approximately 1.5x the initial data stored compared to 3x with replication.
The CRUSH algorithm aids this process by ensuring that Ceph stores additional copies or coding chunks in different locations within the storage cluster. This ensures that the failure of a single storage device or host does not lead to a loss of all of the copies or coding chunks necessary to preclude data loss. You can plan a storage strategy with cost versus benefit tradeoffs, and data durability in mind, then present it to a Ceph client as a storage pool.
ONLY the data storage pool can use erasure coding. Pools storing service data and bucket indexes use replication.
Ceph’s object copies or coding chunks make RAID solutions obsolete. Do not use RAID, because Ceph already handles data durability, a degraded RAID has a negative impact on performance, and recovering data using RAID is substantially slower than using deep copies or erasure coding chunks.
Additional Resources
- See the Minimum hardware considerations for Red Hat Ceph Storage section of the Red Hat Ceph Storage Installation Guide for more details.
2.3.1. Colocating Ceph daemons and its advantages
You can colocate containerized Ceph daemons on the same host. Here are the advantages of colocating some of Ceph’s daemons:
- Significantly improves the total cost of ownership (TCO) at small scale.
- Can increase overall performance.
- Reduces the amount of physical hosts for a minimum configuration.
- Better resource utilization.
- Upgrading Red Hat Ceph Storage is easier.
By using containers you can colocate one daemon from the following list with a Ceph OSD daemon (ceph-osd). Additionally, for the Ceph Object Gateway (radosgw), Ceph Metadata Server (ceph-mds), and Grafana, you can colocate it either with a Ceph OSD daemon, plus a daemon from the list below.
-
Ceph Metadata Server (
ceph-mds) -
Ceph Monitor (
ceph-mon) -
Ceph Manager (
ceph-mgr) -
NFS Ganesha (
nfs-ganesha) -
Ceph Manager (
ceph-grafana)
Table 2.1. Daemon Placement Example
| Host Name | Daemon | Daemon | Daemon |
|---|---|---|---|
| host1 | OSD | Monitor & Manager | Prometheus |
| host2 | OSD | Monitor & Manager | RGW |
| host3 | OSD | Monitor & Manager | RGW |
| host4 | OSD | Metadata Server | |
| host5 | OSD | Metadata Server |
Because ceph-mon and ceph-mgr work closely together, they are not considered two separate daemons for the purposes of colocation.
Colocating Ceph daemons can be done from the command line interface, by using the --placement option to the ceph orch command, or you can use a service specification YAML file.
Command line Example
[ceph: root@host01 /]# ceph orch apply mon --placement="host1 host2 host3"
Service Specification YAML File Example
service_type: mon
placement:
  hosts:
   - host01
   - host02
   - host03
[ceph: root@host01 /]# ceph orch apply -i mon.yml
Red Hat recommends colocating the Ceph Object Gateway with Ceph OSD containers to increase performance. To achieve the highest performance without incurring additional hardware cost, use two Ceph Object Gateway daemons per host.
Ceph Object Gateway Command line Example
[ceph: root@host01 /]# ceph orch apply rgw example --placement="6 host1 host2 host3"
Ceph Object Gateway Service Specification YAML File Example
service_type: rgw
service_id: example
placement:
  count: 6
  hosts:
   - host01
   - host02
   - host03
[ceph: root@host01 /]# ceph orch apply -i rgw.yml
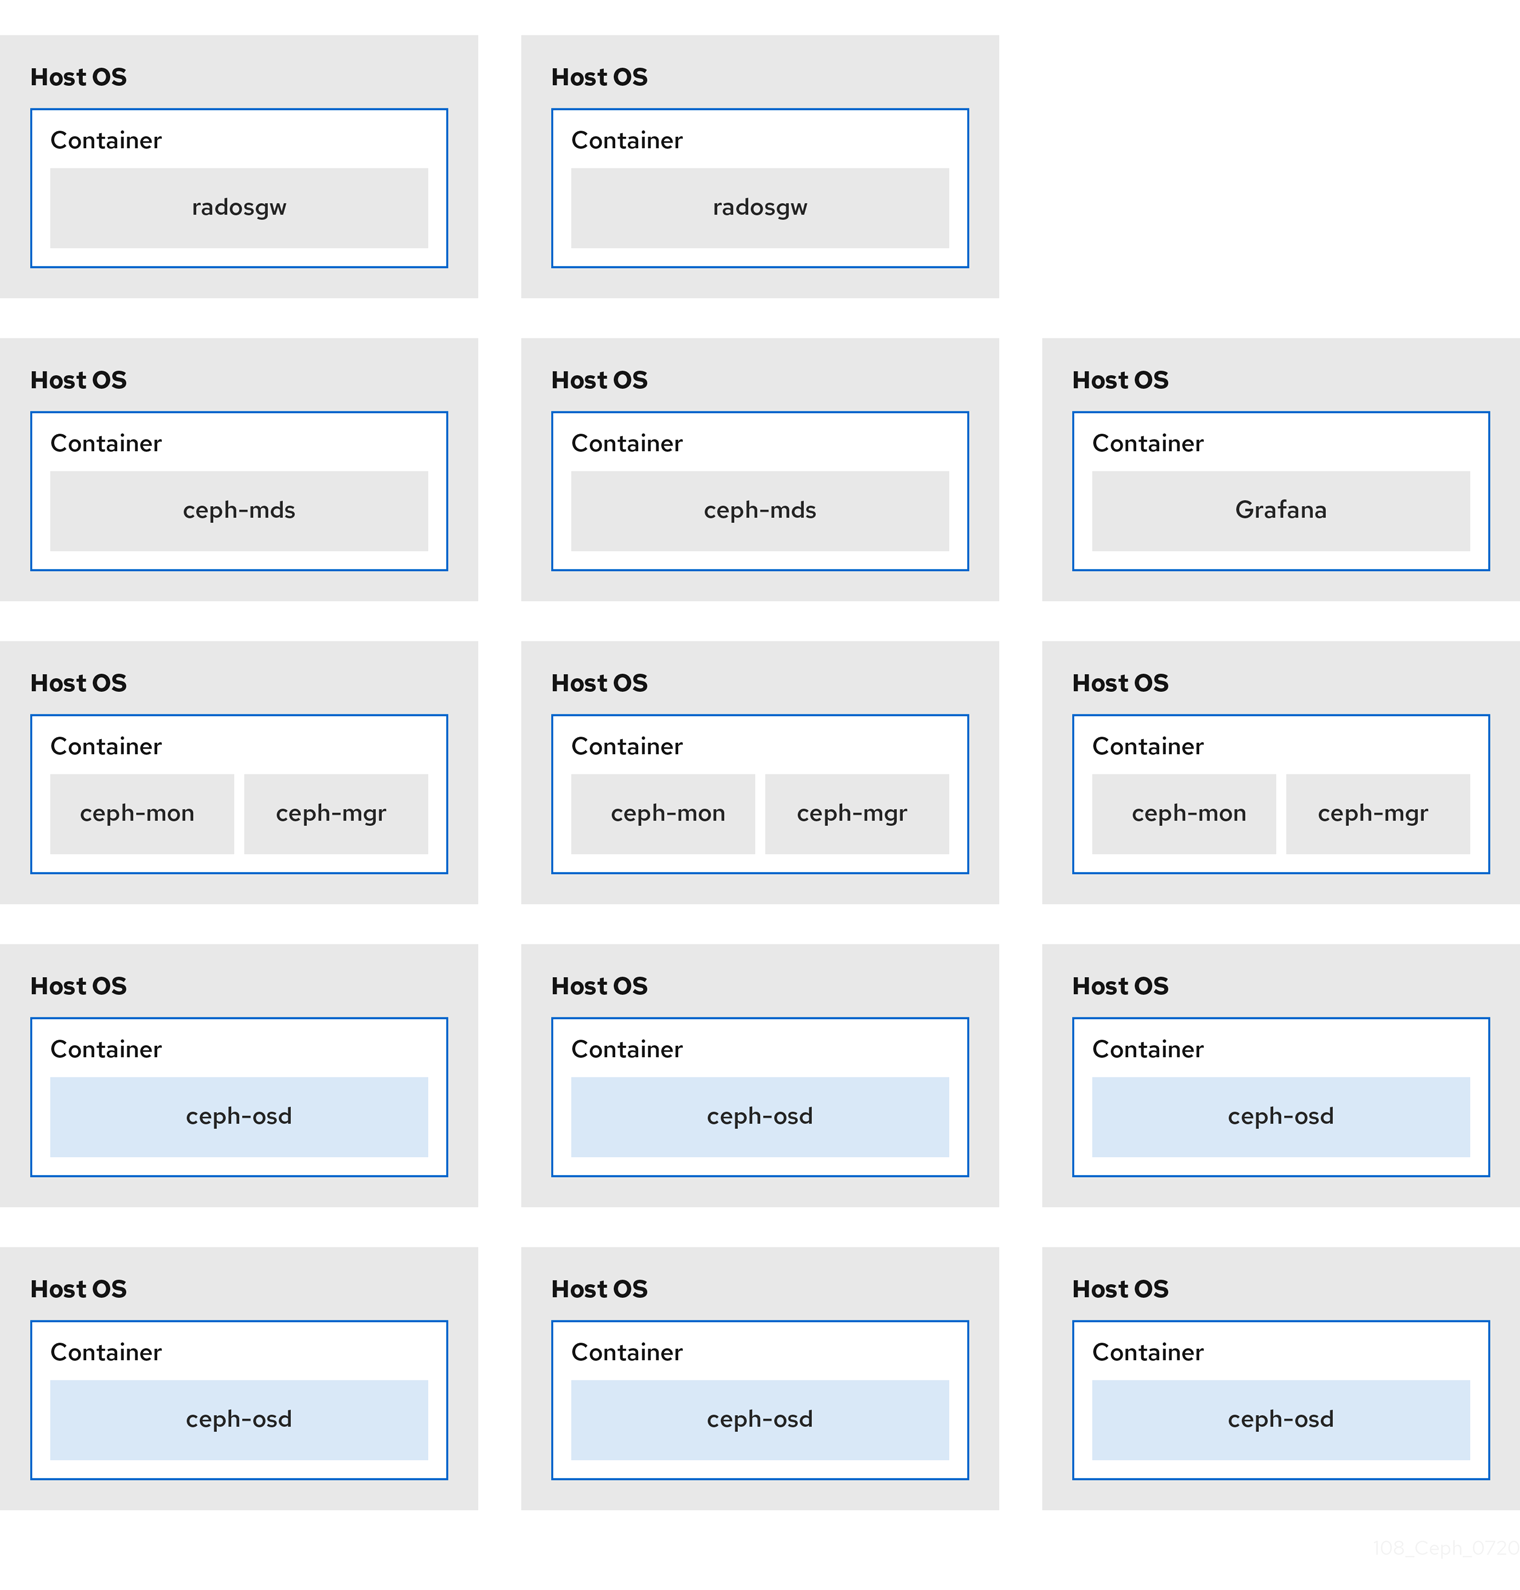
The diagrams below shows the difference between storage clusters with colocated and non-colocated daemons.
Figure 2.1. Colocated Daemons
Figure 2.2. Non-colocated Daemons
Additional resources
-
See the Management of services using the Ceph Orchestrator chapter in the Red Hat Ceph Storage Operations Guide for more details on using the
--placementoption. - See the Red Hat Ceph Storage RGW deployment strategies and sizing guidance article for more information.
2.4. Red Hat Ceph Storage workload considerations
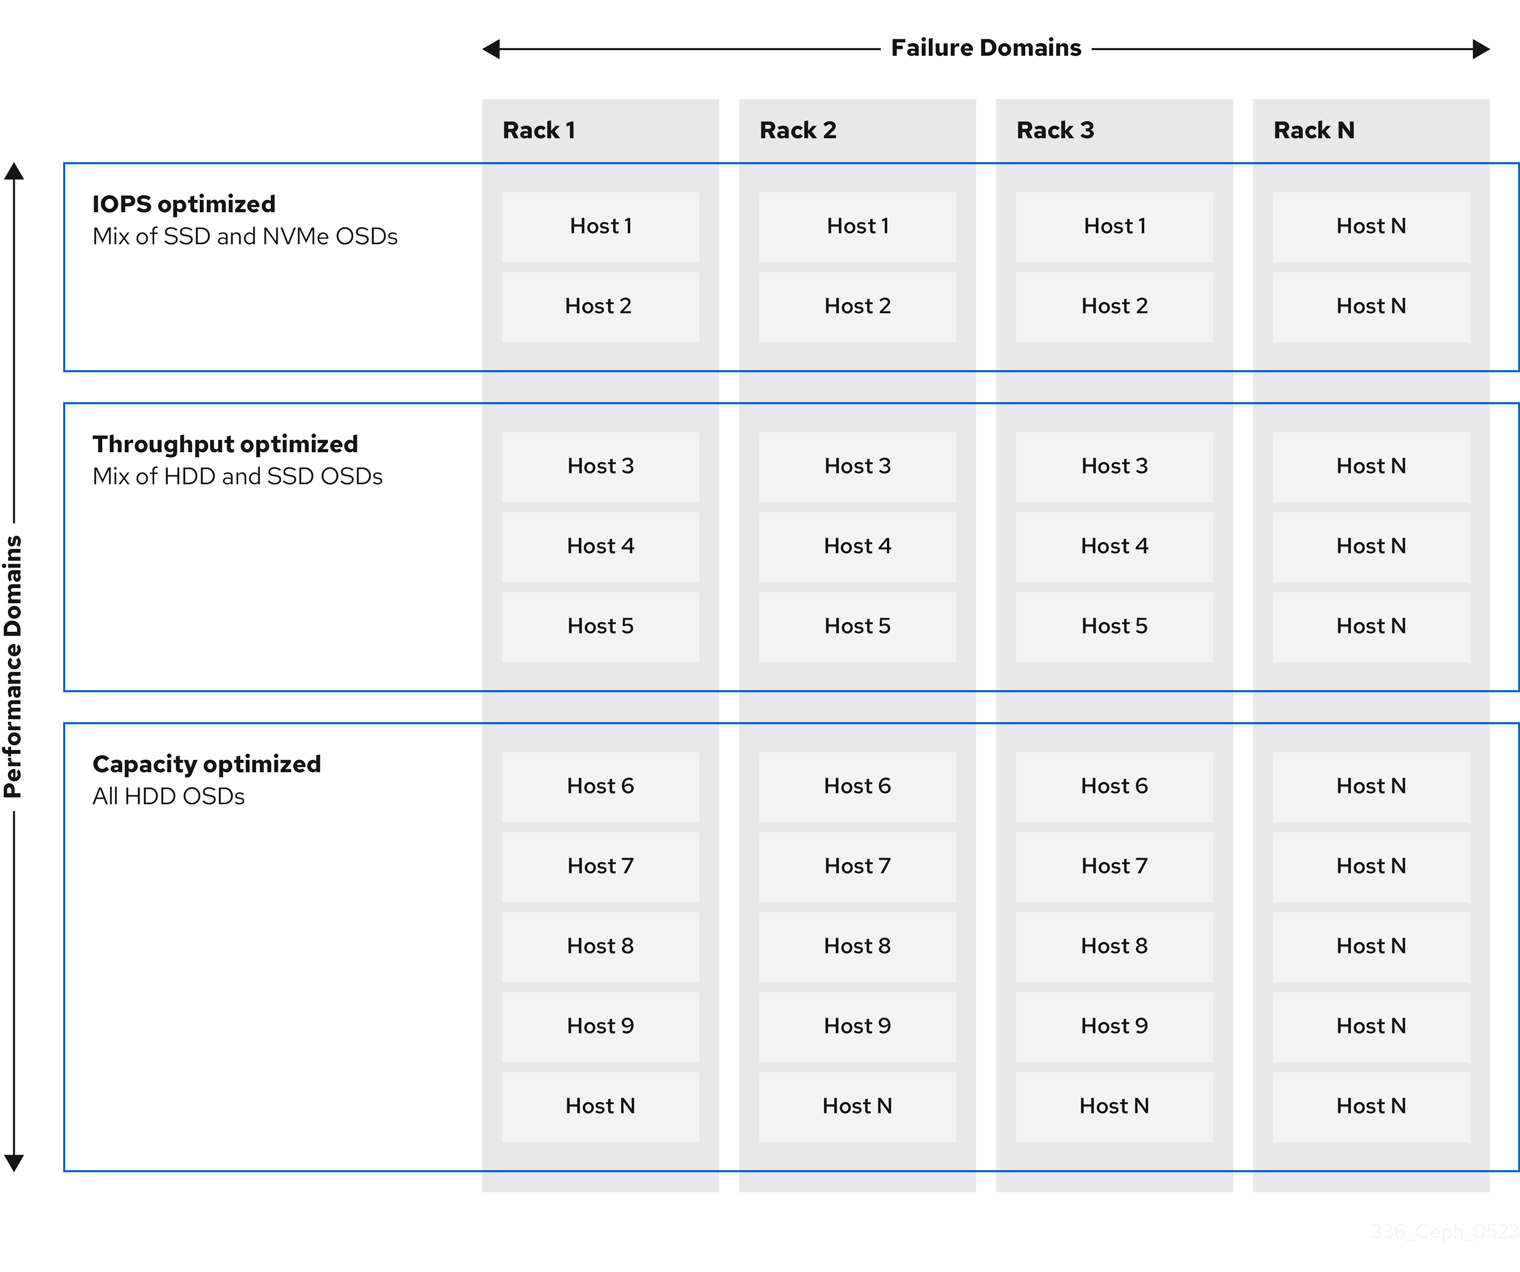
One of the key benefits of a Ceph storage cluster is the ability to support different types of workloads within the same storage cluster using performance domains. Different hardware configurations can be associated with each performance domain. Storage administrators can deploy storage pools on the appropriate performance domain, providing applications with storage tailored to specific performance and cost profiles. Selecting appropriately sized and optimized servers for these performance domains is an essential aspect of designing a Red Hat Ceph Storage cluster.
To the Ceph client interface that reads and writes data, a Ceph storage cluster appears as a simple pool where the client stores data. However, the storage cluster performs many complex operations in a manner that is completely transparent to the client interface. Ceph clients and Ceph object storage daemons, referred to as Ceph OSDs, or simply OSDs, both use the Controlled Replication Under Scalable Hashing (CRUSH) algorithm for the storage and retrieval of objects. Ceph OSDs can run in containers within the storage cluster.
A CRUSH map describes a topography of cluster resources, and the map exists both on client hosts as well as Ceph Monitor hosts within the cluster. Ceph clients and Ceph OSDs both use the CRUSH map and the CRUSH algorithm. Ceph clients communicate directly with OSDs, eliminating a centralized object lookup and a potential performance bottleneck. With awareness of the CRUSH map and communication with their peers, OSDs can handle replication, backfilling, and recovery—allowing for dynamic failure recovery.
Ceph uses the CRUSH map to implement failure domains. Ceph also uses the CRUSH map to implement performance domains, which simply take the performance profile of the underlying hardware into consideration. The CRUSH map describes how Ceph stores data, and it is implemented as a simple hierarchy, specifically an acyclic graph, and a ruleset. The CRUSH map can support multiple hierarchies to separate one type of hardware performance profile from another. Ceph implements performance domains with device "classes".
For example, you can have these performance domains coexisting in the same Red Hat Ceph Storage cluster:
- Hard disk drives (HDDs) are typically appropriate for cost and capacity-focused workloads.
- Throughput-sensitive workloads typically use HDDs with Ceph write journals on solid state drives (SSDs).
- IOPS-intensive workloads, such as MySQL and MariaDB, often use SSDs.
Figure 2.3. Performance and Failure Domains
Workloads
Red Hat Ceph Storage is optimized for three primary workloads.
Carefully consider the workload being run by Red Hat Ceph Storage clusters BEFORE considering what hardware to purchase, because it can significantly impact the price and performance of the storage cluster. For example, if the workload is capacity-optimized and the hardware is better suited to a throughput-optimized workload, then hardware will be more expensive than necessary. Conversely, if the workload is throughput-optimized and the hardware is better suited to a capacity-optimized workload, then the storage cluster can suffer from poor performance.
IOPS optimized: Input, output per second (IOPS) optimization deployments are suitable for cloud computing operations, such as running MYSQL or MariaDB instances as virtual machines on OpenStack. IOPS optimized deployments require higher performance storage such as 15k RPM SAS drives and separate SSD journals to handle frequent write operations. Some high IOPS scenarios use all flash storage to improve IOPS and total throughput.
An IOPS-optimized storage cluster has the following properties:
- Lowest cost per IOPS.
- Highest IOPS per GB.
- 99th percentile latency consistency.
Uses for an IOPS-optimized storage cluster are:
- Typically block storage.
- 3x replication for hard disk drives (HDDs) or 2x replication for solid state drives (SSDs).
- MySQL on OpenStack clouds.
Throughput optimized: Throughput-optimized deployments are suitable for serving up significant amounts of data, such as graphic, audio, and video content. Throughput-optimized deployments require high bandwidth networking hardware, controllers, and hard disk drives with fast sequential read and write characteristics. If fast data access is a requirement, then use a throughput-optimized storage strategy. Also, if fast write performance is a requirement, using Solid State Disks (SSD) for journals will substantially improve write performance.
A throughput-optimized storage cluster has the following properties:
- Lowest cost per MBps (throughput).
- Highest MBps per TB.
- Highest MBps per BTU.
- Highest MBps per Watt.
- 97th percentile latency consistency.
Uses for a throughput-optimized storage cluster are:
- Block or object storage.
- 3x replication.
- Active performance storage for video, audio, and images.
- Streaming media, such as 4k video.
Capacity optimized: Capacity-optimized deployments are suitable for storing significant amounts of data as inexpensively as possible. Capacity-optimized deployments typically trade performance for a more attractive price point. For example, capacity-optimized deployments often use slower and less expensive SATA drives and co-locate journals rather than using SSDs for journaling.
A cost and capacity-optimized storage cluster has the following properties:
- Lowest cost per TB.
- Lowest BTU per TB.
- Lowest Watts required per TB.
Uses for a cost and capacity-optimized storage cluster are:
- Typically object storage.
- Erasure coding for maximizing usable capacity
- Object archive.
- Video, audio, and image object repositories.
2.5. Ceph Object Gateway considerations
Another important aspect of designing a storage cluster is to determine if the storage cluster will be in one data center site or span multiple data center sites. Multi-site storage clusters benefit from geographically distributed failover and disaster recovery, such as long-term power outages, earthquakes, hurricanes, floods or other disasters. Additionally, multi-site storage clusters can have an active-active configuration, which can direct client applications to the closest available storage cluster. This is a good storage strategy for content delivery networks. Consider placing data as close to the client as possible. This is important for throughput-intensive workloads, such as streaming 4k video.
Red Hat recommends identifying realm, zone group and zone names BEFORE creating Ceph’s storage pools. Prepend some pool names with the zone name as a standard naming convention.
Additional Resources
- See the Multi-site configuration and administration section in the Red Hat Ceph Storage Object Gateway Guide for more information.
2.5.1. Administrative data storage
A Ceph Object Gateway stores administrative data in a series of pools defined in an instance’s zone configuration. For example, the buckets, users, user quotas, and usage statistics discussed in the subsequent sections are stored in pools in the Ceph storage cluster. By default, Ceph Object Gateway creates the following pools and maps them to the default zone.
-
.rgw.root -
.default.rgw.control -
.default.rgw.meta -
.default.rgw.log -
.default.rgw.buckets.index -
.default.rgw.buckets.data -
.default.rgw.buckets.non-ec
The .default.rgw.buckets.index pool is created only after the bucket is created in Ceph Object Gateway, while the .default.rgw.buckets.data pool is created after the data is uploaded to the bucket.
Consider creating these pools manually so you can set the CRUSH ruleset and the number of placement groups. In a typical configuration, the pools that store the Ceph Object Gateway’s administrative data will often use the same CRUSH ruleset, and use fewer placement groups, because there are 10 pools for the administrative data.
Red Hat recommends that the .rgw.root pool and the service pools use the same CRUSH hierarchy, and use at least node as the failure domain in the CRUSH rule. Red Hat recommends using replicated for data durability, and NOT erasure for the .rgw.root pool, and the service pools.
The mon_pg_warn_max_per_osd setting warns you if you assign too many placement groups to a pool, 300 by default. You may adjust the value to suit your needs and the capabilities of your hardware where n is the maximum number of PGs per OSD.
mon_pg_warn_max_per_osd = n
For service pools, including .rgw.root, the suggested PG count from the Ceph placement groups (PGs) per pool calculator is substantially less than the target PGs per Ceph OSD. Also, ensure the number of Ceph OSDs is set in step 4 of the calculator.
Garbage collection uses the .log pool with regular RADOS objects instead of OMAP. In future releases, more features will store metadata on the .log pool. Therefore, Red Hat recommends using NVMe/SSD Ceph OSDs for the .log pool.
.rgw.root Pool
The pool where the Ceph Object Gateway configuration is stored. This includes realms, zone groups, and zones. By convention, its name is not prepended with the zone name.
Service Pools
The service pools store objects related to service control, garbage collection, logging, user information, and usage. By convention, these pool names have the zone name prepended to the pool name.
-
.ZONE_NAME.rgw.control: The control pool. -
.ZONE_NAME.log: The log pool contains logs of all bucket, container, and object actions, such as create, read, update, and delete. -
.ZONE_NAME.rgw.buckets.index: This pool stores index of the buckets. -
.ZONE_NAME.rgw.buckets.data: This pool stores data of the buckets. -
.ZONE_NAME.rgw.meta: The metadata pool stores user_keys and other critical metadata. -
.ZONE_NAME.meta:users.uid: The user ID pool contains a map of unique user IDs. -
.ZONE_NAME.meta:users.keys: The keys pool contains access keys and secret keys for each user ID. -
.ZONE_NAME.meta:users.email: The email pool contains email addresses associated to a user ID. -
.ZONE_NAME.meta:users.swift: The Swift pool contains the Swift subuser information for a user ID.
Additional Resources
- See the About pools section in the Red Hat Ceph Storage Object Gateway Guide for more details.
- See the Red Hat Ceph Storage Storage Strategies Guide for additional details.
2.5.2. Index pool
When selecting OSD hardware for use with a Ceph Object Gateway--irrespective of the use case--an OSD node that has at least one high performance drive, either an SSD or NVMe drive, is required for storing the index pool. This is particularly important when buckets contain a large number of objects.
For Red Hat Ceph Storage running Bluestore, Red Hat recommends deploying an NVMe drive as a block.db device, rather than as a separate pool.
Ceph Object Gateway index data is written only into an object map (OMAP). OMAP data for BlueStore resides on the block.db device on an OSD. When an NVMe drive functions as a block.db device for an HDD OSD and when the index pool is backed by HDD OSDs, the index data will ONLY be written to the block.db device. As long as the block.db partition/lvm is sized properly at 4% of block, this configuration is all that is needed for BlueStore.
Red Hat does not support HDD devices for index pools. For more information on supported configurations, see the Red Hat Ceph Storage: Supported configurations article.
An index entry is approximately 200 bytes of data, stored as an OMAP in rocksdb. While this is a trivial amount of data, some uses of Ceph Object Gateway can result in tens or hundreds of millions of objects in a single bucket. By mapping the index pool to a CRUSH hierarchy of high performance storage media, the reduced latency provides a dramatic performance improvement when buckets contain very large numbers of objects.
In a production cluster, a typical OSD node will have at least one SSD or NVMe drive for storing the OSD journal and the index pool or block.db device, which use separate partitions or logical volumes for the same physical drive.
2.5.3. Data pool
The data pool is where the Ceph Object Gateway stores the object data for a particular storage policy. The data pool has a full complement of placement groups (PGs), not the reduced number of PGs for service pools. Consider using erasure coding for the data pool, as it is substantially more efficient than replication, and can significantly reduce the capacity requirements while maintaining data durability.
To use erasure coding, create an erasure code profile. See the Erasure Code Profiles section in the Red Hat Ceph Storage Storage Strategies Guide for more details.
Choosing the correct profile is important because you cannot change the profile after you create the pool. To modify a profile, you must create a new pool with a different profile and migrate the objects from the old pool to the new pool.
The default configuration is two data chunks (k) and two encoding chunks (m), which means only one OSD can be lost. For higher resiliency, consider a larger number of data and encoding chunks. For example, some large scale systems use 8 data chunks and 3 encoding chunks, which allows 3 OSDs to fail without losing data.
Each data and encoding chunk SHOULD get stored on a different node or host at a minimum. For smaller storage clusters, this makes using rack impractical as the minimum CRUSH failure domain for a larger number of data and encoding chunks. Consequently, it is common for the data pool to use a separate CRUSH hierarchy with host as the minimum CRUSH failure domain. Red Hat recommends host as the minimum failure domain. If erasure code chunks get stored on Ceph OSDs within the same host, a host failure, such as a failed journal or network card, could lead to data loss.
To create a data pool, run the ceph osd pool create command with the pool name, the number of PGs and PGPs, the erasure data durability method, the erasure code profile, and the name of the rule.
2.5.4. Data extra pool
The data_extra_pool is for data that cannot use erasure coding. For example, multi-part uploads allow uploading a large object, such as a movie in multiple parts. These parts must first be stored without erasure coding. Erasure coding applies to the whole object, not the partial uploads.
The placement group (PG) per Pool Calculator recommends a smaller number of PGs per pool for the data_extra_pool; however, the PG count is approximately twice the number of PGs as the service pools and the same as the bucket index pool.
To create a data extra pool, run the ceph osd pool create command with the pool name, the number of PGs and PGPs, the replicated data durability method, and the name of the rule. For example:
# ceph osd pool create .us-west.rgw.buckets.non-ec 64 64 replicated rgw-service
2.6. Developing CRUSH hierarchies
As a storage administrator, when deploying a Ceph storage cluster and an Object Gateway, typically the Ceph Object Gateway has a default zone group and zone. The Ceph storage cluster will have default pools, which in turn will use a CRUSH map with a default CRUSH hierarchy and a default CRUSH rule.
The default rbd pool can use the default CRUSH rule. DO NOT delete the default rule or hierarchy if Ceph clients have used them to store client data.
Production gateways typically use a custom realm, zone group and zone named according to the use and geographic location of the gateways. Additionally, the Ceph storage cluster will have a CRUSH map that has multiple CRUSH hierarchies.
-
Service Pools: At least one CRUSH hierarchy will be for service pools and potentially for data. The service pools include
.rgw.rootand the service pools associated with the zone. Service pools typically fall under a single CRUSH hierarchy, and use replication for data durability. A data pool may also use the CRUSH hierarchy, but the pool will usually be configured with erasure coding for data durability. - Index: At least one CRUSH hierarchy SHOULD be for the index pool, where the CRUSH hierarchy maps to high performance media, such as SSD or NVMe drives. Bucket indices can be a performance bottleneck. Red Hat recommends to use SSD or NVMe drives in this CRUSH hierarchy. Create partitions for indices on SSDs or NVMe drives used for Ceph OSD journals. Additionally, an index should be configured with bucket sharding.
- Placement Pools: The placement pools for each placement target include the bucket index, the data bucket, and the bucket extras. These pools can fall under separate CRUSH hierarchies. Since the Ceph Object Gateway can support multiple storage policies, the bucket pools of the storage policies may be associated with different CRUSH hierarchies, reflecting different use cases, such as IOPS-optimized, throughput-optimized, and capacity-optimized. The bucket index pool SHOULD use its own CRUSH hierarchy to map the bucket index pool to higher performance storage media, such as SSD or NVMe drives.
2.6.1. Creating CRUSH roots
From the command line on the administration node, create CRUSH roots in the CRUSH map for each CRUSH hierarchy. There MUST be at least one CRUSH hierarchy for service pools that may also potentially serve data storage pools. There SHOULD be at least one CRUSH hierarchy for the bucket index pool, mapped to high performance storage media, such as SSDs or NVMe drives.
For details on CRUSH hierarchies, see the CRUSH Hierarchies section in the Red Hat Ceph Storage Storage Strategies Guide 5.
To manually edit a CRUSH map, see the Editing a CRUSH Map section in the Red Hat Ceph Storage Storage Strategies Guide 5.
In the following examples, the hosts named data0, data1, and data2 use extended logical names, such as data0-sas-ssd, data0-index, and so forth in the CRUSH map, because there are multiple CRUSH hierarchies pointing to the same physical hosts.
A typical CRUSH root might represent nodes with SAS drives and SSDs for journals. For example:
##
# SAS-SSD ROOT DECLARATION
##

root sas-ssd {
  id -1   # do not change unnecessarily
  # weight 0.000
  alg straw
  hash 0  # rjenkins1
  item data2-sas-ssd weight 4.000
  item data1-sas-ssd weight 4.000
  item data0-sas-ssd weight 4.000
}
A CRUSH root for bucket indexes SHOULD represent high performance media, such as SSD or NVMe drives. Consider creating partitions on SSD or NVMe media that store OSD journals. For example:
##
# INDEX ROOT DECLARATION
##

root index {
  id -2    # do not change unnecessarily
  # weight 0.000
  alg straw
  hash 0  # rjenkins1
  item data2-index weight 1.000
  item data1-index weight 1.000
  item data0-index weight 1.000
}
2.6.2. Creating CRUSH rules
Like the default CRUSH hierarchy, the CRUSH map also contains a default CRUSH rule.
The default rbd pool may use this rule. DO NOT delete the default rule if other pools have used it to store customer data.
For general details on CRUSH rules, see the CRUSH rules section in the Red Hat Ceph Storage Storage Strategies Guide for Red Hat Ceph Storage 5. To manually edit a CRUSH map, see the Editing a CRUSH map section in the Red Hat Ceph Storage Storage Strategies Guide for Red Hat Ceph Storage 5.
For each CRUSH hierarchy, create a CRUSH rule. The following example illustrates a rule for the CRUSH hierarchy that will store the service pools, including .rgw.root. In this example, the root sas-ssd serves as the main CRUSH hierarchy. It uses the name rgw-service to distinguish itself from the default rule. The step take sas-ssd line tells the pool to use the sas-ssd root created in Creating CRUSH roots, whose child buckets contain OSDs with SAS drives and high performance storage media, such as SSD or NVMe drives, for journals in a high throughput hardware configuration. The type rack portion of step chooseleaf is the failure domain. In the following example, it is a rack.
##
# SERVICE RULE DECLARATION
##

rule rgw-service {
 type replicated
 min_size 1
 max_size 10
 step take sas-ssd
 step chooseleaf firstn 0 type rack
 step emit
}In the foregoing example, if data gets replicated three times, there should be at least three racks in the cluster containing a similar number of OSD nodes.
The type replicated setting has NOTHING to do with data durability, the number of replicas, or the erasure coding. Only replicated is supported.
The following example illustrates a rule for the CRUSH hierarchy that will store the data pool. In this example, the root sas-ssd serves as the main CRUSH hierarchy—the same CRUSH hierarchy as the service rule. It uses rgw-throughput to distinguish itself from the default rule and rgw-service. The step take sas-ssd line tells the pool to use the sas-ssd root created in Creating CRUSH roots, whose child buckets contain OSDs with SAS drives and high performance storage media, such as SSD or NVMe drives, in a high throughput hardware configuration. The type host portion of step chooseleaf is the failure domain. In the following example, it is a host. Notice that the rule uses the same CRUSH hierarchy, but a different failure domain.
##
# THROUGHPUT RULE DECLARATION
##

rule rgw-throughput {
 type replicated
 min_size 1
 max_size 10
 step take sas-ssd
 step chooseleaf firstn 0 type host
 step emit
}
In the foregoing example, if the pool uses erasure coding with a larger number of data and encoding chunks than the default, there should be at least as many racks in the cluster containing a similar number of OSD nodes to facilitate the erasure coding chunks. For smaller clusters, this may not be practical, so the foregoing example uses host as the CRUSH failure domain.
The following example illustrates a rule for the CRUSH hierarchy that will store the index pool. In this example, the root index serves as the main CRUSH hierarchy. It uses rgw-index to distinguish itself from rgw-service and rgw-throughput. The step take index line tells the pool to use the index root created in Creating CRUSH roots, whose child buckets contain high performance storage media, such as SSD or NVMe drives, or partitions on SSD or NVMe drives that also store OSD journals. The type rack portion of step chooseleaf is the failure domain. In the following example, it is a rack.
##
# INDEX RULE DECLARATION
##

rule rgw-index {
 type replicated
 min_size 1
 max_size 10
 step take index
 step chooseleaf firstn 0 type rack
 step emit
}
2.6.3. Additional Resources
- For general details on CRUSH hierarchies, see the CRUSH Administration section of the Red Hat Ceph Storage Storage Strategies Guide.
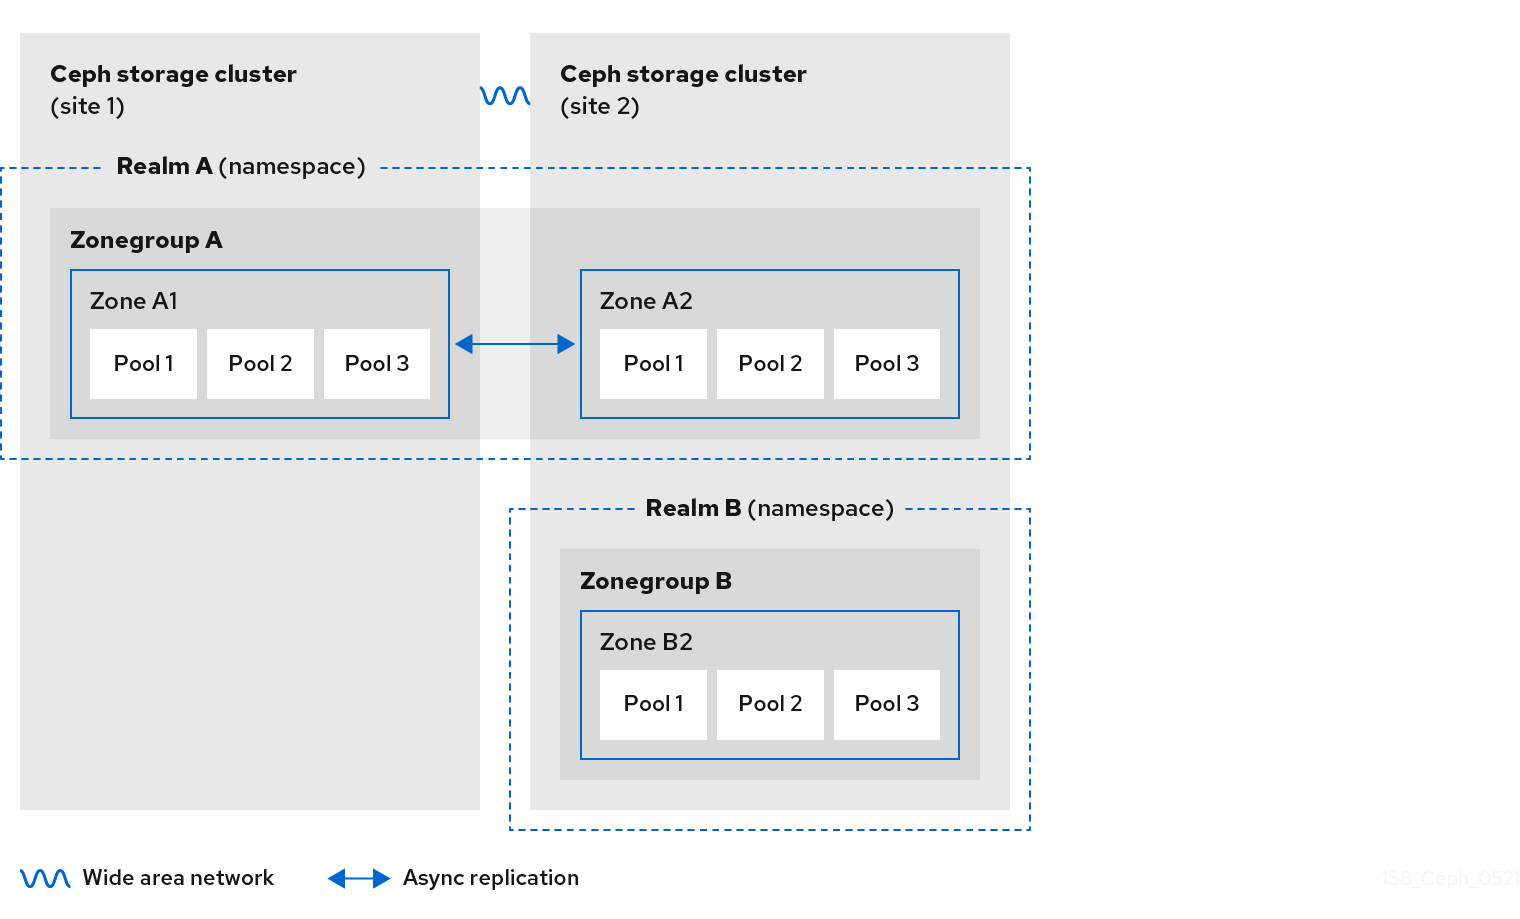
2.7. Ceph Object Gateway multi-site considerations
A Ceph Object Gateway multi-site configuration requires at least two Red Hat Ceph Storage clusters, and at least two Ceph Object Gateway instances, one for each Red Hat Ceph Storage cluster. Typically, the two Red Hat Ceph Storage clusters will be in geographically separate locations; however, this same multi-site configuration can work on two Red Hat Ceph Storage clusters located at the same physical site.
Multi-site configurations require a primary zone group and a primary zone. Additionally, each zone group requires a primary zone. Zone groups might have one or more secondary zones.
The primary zone within the primary zone group of a realm is responsible for storing the primary copy of the realm’s metadata, including users, quotas, and buckets. This metadata gets synchronized to secondary zones and secondary zone groups automatically. Metadata operations issued with the radosgw-admin command line interface (CLI) MUST be issued on a node within the primary zone of the primary zone group to ensure that they synchronize to the secondary zone groups and zones. Currently, it is possible to issue metadata operations on secondary zones and zone groups, but it is NOT recommended because they WILL NOT be synchronized, which can lead to fragmentation of the metadata.
The diagrams below illustrate the possible one, and two realm configurations in multi-site Ceph Object Gateway environments.
Figure 2.4. One Realm
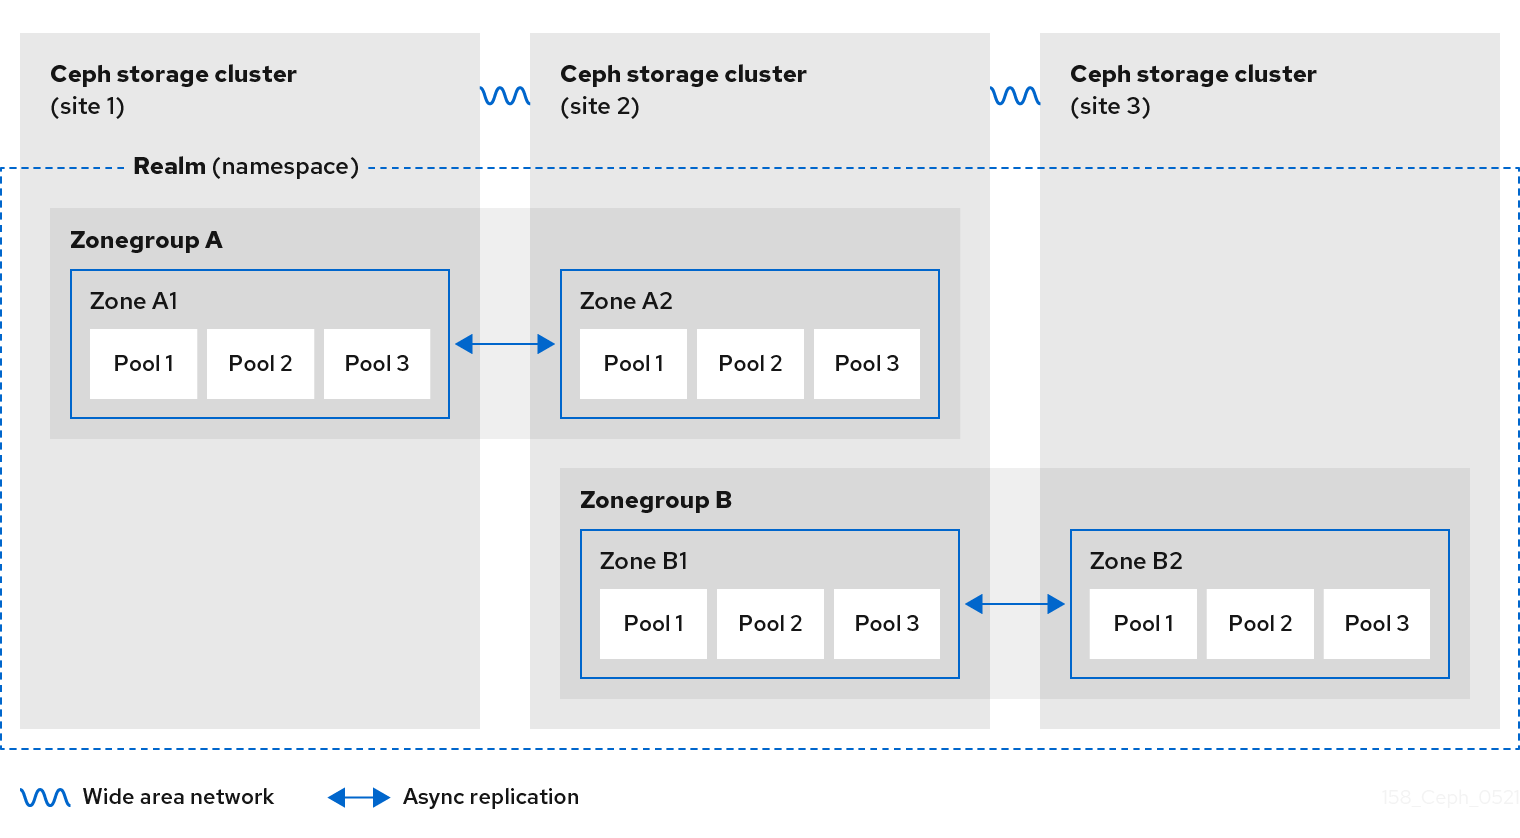
Figure 2.5. Two Realms
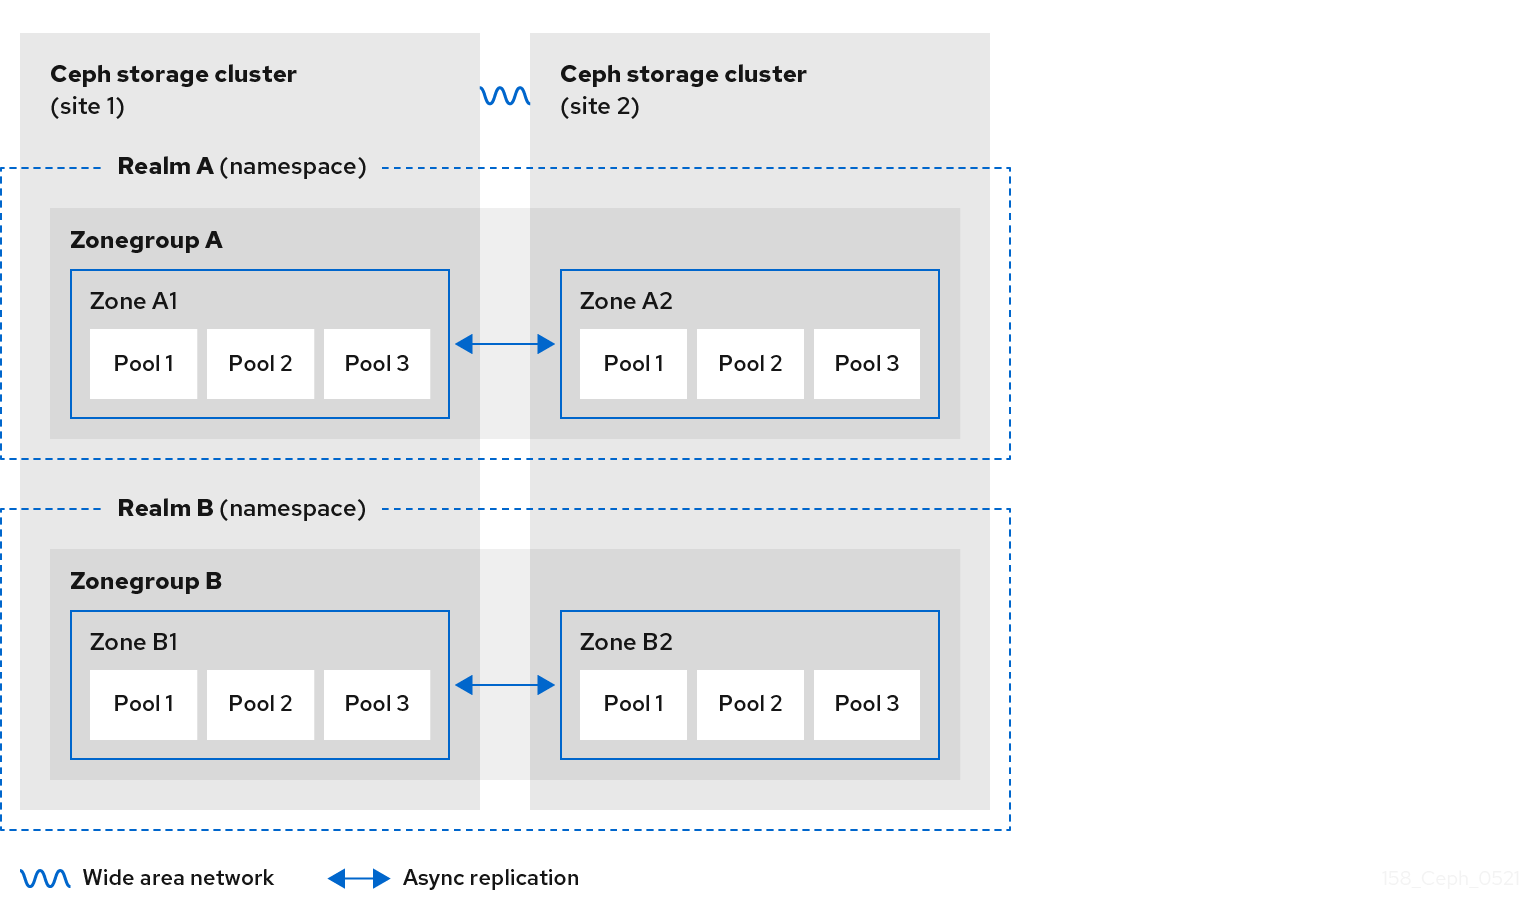
Figure 2.6. Two Realms Variant
2.8. Considering storage sizing
One of the most important factors in designing a cluster is to determine the storage requirements (sizing). Ceph Storage is designed to scale into petabytes and beyond. The following examples are common sizes for Ceph storage clusters.
- Small: 250 terabytes
- Medium: 1 petabyte
- Large: 2 petabytes or more
Sizing includes current needs and near future needs. Consider the rate at which the gateway client will add new data to the cluster. That can differ from use-case to use-case. For example, recording 4k videos or storing medical images can add significant amounts of data faster than less storage-intensive information, such as financial market data. Additionally, consider that the data durability methods, such as replication versus erasure coding, can have a significant impact on the storage media required.
For additional information on sizing, see the Red Hat Ceph Storage Hardware Guide and its associated links for selecting OSD hardware.
2.9. Considering storage density
Another important aspect of Ceph’s design, includes storage density. Generally, a storage cluster stores data across at least 10 nodes to ensure reasonable performance when replicating, backfilling, and recovery. If a node fails, with at least 10 nodes in the storage cluster, only 10% of the data has to move to the surviving nodes. If the number of nodes is substantially less, a higher percentage of the data must move to the surviving nodes. Additionally, the full_ratio and near_full_ratio options need to be set to accommodate a node failure to ensure that the storage cluster can write data. For this reason, it is important to consider storage density. Higher storage density is not necessarily a good idea.
Another factor that favors more nodes over higher storage density is erasure coding. When writing an object using erasure coding and using node as the minimum CRUSH failure domain, the Ceph storage cluster will need as many nodes as data and coding chunks. For example, a cluster using k=8, m=3 should have at least 11 nodes so that each data or coding chunk is stored on a separate node.
Hot-swapping is also an important consideration. Most modern servers support drive hot-swapping. However, some hardware configurations require removing more than one drive to replace a drive. Red Hat recommends avoiding such configurations, because they can bring down more Ceph OSDs than required when swapping out failed disks.
2.10. Considering disks for the Ceph Monitor nodes
Ceph Monitors use rocksdb, which is sensitive to synchronous write latency. Red Hat strongly recommends using SSD disks to store the Ceph Monitor data. Choose SSD disks that have sufficient sequential write and throughput characteristics.
2.11. Adjusting backfill and recovery settings
I/O is negatively impacted by both backfilling and recovery operations, leading to poor performance and unhappy end users. To help accommodate I/O demand during a cluster expansion or recovery, set the following options and values in the Ceph Configuration file:
[osd]
osd_max_backfills = 1
osd_recovery_max_active = 1
osd_recovery_op_priority = 1
2.12. Adjusting the cluster map size
By default, the ceph-osd daemon caches 500 previous osdmaps. Even with deduplication, the map might consume a lot of memory per daemon. Tuning the cache size in the Ceph configuration might help reduce memory consumption significantly. For example:
[ceph: root@host01 /]# ceph config set global osd_map_message_max 10
[ceph: root@host01 /]# ceph config set osd osd_map_cache_size 20
[ceph: root@host01 /]# ceph config set osd osd_map_share_max_epochs 10
[ceph: root@host01 /]# ceph config set osd osd_pg_epoch_persisted_max_stale 10
For Red Hat Ceph Storage version 3 and later, the ceph-manager daemon handles PG queries, so the cluster map should not impact performance.
2.13. Adjusting scrubbing
By default, Ceph performs light scrubbing daily and deep scrubbing weekly. Light scrubbing checks object sizes and checksums to ensure that PGs are storing the same object data. Over time, disk sectors can go bad irrespective of object sizes and checksums. Deep scrubbing checks an object’s content with that of its replicas to ensure that the actual contents are the same. In this respect, deep scrubbing ensures data integrity in the manner of fsck, but the procedure imposes an I/O penalty on the cluster. Even light scrubbing can impact I/O.
The default settings may allow Ceph OSDs to initiate scrubbing at inopportune times, such as peak operating times or periods with heavy loads. End users may experience latency and poor performance when scrubbing operations conflict with end user operations.
To prevent end users from experiencing poor performance, Ceph provides a number of scrubbing settings that can limit scrubbing to periods with lower loads or during off-peak hours. For details, see the Scrubbing the OSD section in the Red Hat Ceph Storage Configuration Guide.
If the cluster experiences high loads during the day and low loads late at night, consider restricting scrubbing to night time hours. For example:
[osd]
osd_scrub_begin_hour = 23   #23:01H, or 10:01PM.
osd_scrub_end_hour = 6      #06:01H or 6:01AM.
If time constraints aren’t an effective method of determining a scrubbing schedule, consider using the osd_scrub_load_threshold. The default value is 0.5, but it could be modified for low load conditions. For example:
[osd]
osd_scrub_load_threshold = 0.25
2.14. Increase objecter_inflight_ops
To improve scalability, you can edit the value of the objecter_inflight_ops parameter, which specifies the maximum number of unsent I/O requests allowed. This parameter is used for client traffic control.
objecter_inflight_ops = 24576
2.15. Increase rgw_thread_pool_size
To improve scalability, you can edit the value of the rgw_thread_pool_size parameter, which is the size of the thread pool. The new beast frontend is not restricted by the thread pool size to accept new connections.
rgw_thread_pool_size = 512
2.16. Tuning considerations for the Linux kernel when running Ceph
Production Red Hat Ceph Storage clusters generally benefit from tuning the operating system, specifically around limits and memory allocation. Ensure that adjustments are set for all hosts within the storage cluster. You can also open a case with Red Hat support asking for additional guidance.
Increase the File Descriptors
The Ceph Object Gateway can hang if it runs out of file descriptors. You can modify the /etc/security/limits.conf file on Ceph Object Gateway hosts to increase the file descriptors for the Ceph Object Gateway.
ceph soft nofile unlimited
Adjusting the ulimit value for Large Storage Clusters
When running Ceph administrative commands on large storage clusters, for example, with 1024 Ceph OSDs or more, create an /etc/security/limits.d/50-ceph.conf file on each host that runs administrative commands with the following contents:
USER_NAME soft nproc unlimitedReplace USER_NAME with the name of the non-root user account that runs the Ceph administrative commands.
The root user’s ulimit value is already set to unlimited by default on Red Hat Enterprise Linux.
2.17. Additional Resources
- For more details about Ceph’s various internal components and the strategies around those components, see the Red Hat Ceph Storage Storage Strategies Guide.
Chapter 3. Deployment
As a storage administrator, you can deploy the Ceph Object Gateway using the Ceph Orchestrator with the command line interface or the service specification. You can also configure multi-site Ceph Object Gateways, and remove the Ceph Object Gateway using the Ceph Orchestrator.
The cephadm command deploys the Ceph Object Gateway as a collection of daemons that manages a single-cluster deployment or a particular realm and zone in a multi-site deployment.
With cephadm, the Ceph Object Gateway daemons are configured using the Ceph Monitor configuration database instead of the ceph.conf file or the command line options. If the configuration is not in the client.rgw section, then the Ceph Object Gateway daemons start up with default settings and bind to port 80.
If you want Cephadm to handle the setting of a realm and zone, specify the realm and zone in the service specification during the deployment of the Ceph Object Gateway. If you want to change that realm or zone at a later point, ensure to update and reapply the rgw_realm and rgw_zone parameters in the specification file.
If you want to handle these options manually without Cephadm, do not include them in the service specification. Cephadm still deploys the Ceph Object Gateway daemons without setting the configuration option for which realm or zone the daemons should use. In this case, the update of the specification file is not necesarry.
This section covers the following administrative tasks:
3.1. Prerequisites
- A running, and healthy Red Hat Ceph Storage cluster.
- Root-level access to all the nodes.
- Available nodes on the storage cluster.
- All the managers, monitors, and OSDs are deployed in the storage cluster.
3.2. Deploying the Ceph Object Gateway using the command line interface
Using the Ceph Orchestrator, you can deploy the Ceph Object Gateway with the ceph orch command in the command line interface.
Prerequisites
- A running Red Hat Ceph Storage cluster.
- Root-level access to all the nodes.
- Hosts are added to the cluster.
- All manager, monitor and OSD daemons are deployed.
Procedure
Log into the Cephadm shell:
Example
[root@host01 ~]# cephadm shell
- You can deploy the Ceph object gateway daemons in three different ways:
Method 1
Create realm, zone group, zone, and then use the placement specification with the host name:
Create a realm:
Syntax
radosgw-admin realm create --rgw-realm=REALM_NAME --defaultExample
[ceph: root@host01 /]# radosgw-admin realm create --rgw-realm=test_realm --default
Create a zone group:
Syntax
radosgw-admin zonegroup create --rgw-zonegroup=ZONE_GROUP_NAME --master --defaultExample
[ceph: root@host01 /]# radosgw-admin zonegroup create --rgw-zonegroup=default --master --default
Create a zone:
Syntax
radosgw-admin zone create --rgw-zonegroup=ZONE_GROUP_NAME --rgw-zone=ZONE_NAME --master --default
Example
[ceph: root@host01 /]# radosgw-admin zone create --rgw-zonegroup=default --rgw-zone=test_zone --master --default
Commit the changes:
Syntax
radosgw-admin period update --rgw-realm=REALM_NAME --commitExample
[ceph: root@host01 /]# radosgw-admin period update --rgw-realm=test_realm --commit
Run the
ceph orch applycommand:Syntax
ceph orch apply rgw NAME [--realm=REALM_NAME] [--zone=ZONE_NAME] --placement="NUMBER_OF_DAEMONS [HOST_NAME_1 HOST_NAME_2]"
Example
[ceph: root@host01 /]# ceph orch apply rgw test --realm=test_realm --zone=test_zone --placement="2 host01 host02"
Method 2
Use an arbitrary service name to deploy two Ceph Object Gateway daemons for a single cluster deployment:
Syntax
ceph orch apply rgw SERVICE_NAMEExample
[ceph: root@host01 /]# ceph orch apply rgw foo
Method 3
Use an arbitrary service name on a labeled set of hosts:
Syntax
ceph orch host label add HOST_NAME_1 LABEL_NAME
ceph orch host label add HOSTNAME_2 LABEL_NAME
ceph orch apply rgw SERVICE_NAME --placement="label:LABEL_NAME count-per-host:NUMBER_OF_DAEMONS" --port=8000
NoteNUMBER_OF_DAEMONS controls the number of Ceph object gateways deployed on each host. To achieve the highest performance without incurring an additional cost, set this value to 2.
Example
[ceph: root@host01 /]# ceph orch host label add host01 rgw  # the 'rgw' label can be anything
[ceph: root@host01 /]# ceph orch host label add host02 rgw
[ceph: root@host01 /]# ceph orch apply rgw foo --placement="2 label:rgw" --port=8000
Verification
List the service:
Example
[ceph: root@host01 /]# ceph orch ls
List the hosts, daemons, and processes:
Syntax
ceph orch ps --daemon_type=DAEMON_NAMEExample
[ceph: root@host01 /]# ceph orch ps --daemon_type=rgw
3.3. Deploying the Ceph Object Gateway using the service specification
You can deploy the Ceph Object Gateway using the service specification with either the default or the custom realms, zones, and zone groups.
Prerequisites
- A running Red Hat Ceph Storage cluster.
- Root-level access to the bootstrapped host.
- Hosts are added to the cluster.
- All manager, monitor, and OSD daemons are deployed.
Procedure
As a root user, create a specification file:
Example
[root@host01 ~]# touch radosgw.yml
Edit the
radosgw.ymlfile to include the following details for the default realm, zone, and zone group:Syntax
service_type: rgw
service_id: REALM_NAME.ZONE_NAME
placement:
  hosts:
  - HOST_NAME_1
  - HOST_NAME_2
  count_per_host: NUMBER_OF_DAEMONS
spec:
  rgw_realm: REALM_NAME
  rgw_zone: ZONE_NAME
  rgw_frontend_port: FRONT_END_PORT
networks:
  -  NETWORK_CIDR # Ceph Object Gateway service binds to a specific network
NoteNUMBER_OF_DAEMONS controls the number of Ceph Object Gateways deployed on each host. To achieve the highest performance without incurring an additional cost, set this value to 2.
Example
service_type: rgw
service_id: default
placement:
  hosts:
  - host01
  - host02
  - host03
  count_per_host: 2
spec:
  rgw_realm: default
  rgw_zone: default
  rgw_frontend_port: 1234
networks:
  - 192.169.142.0/24
Optional: For custom realm, zone, and zone group, create the resources and then create the
radosgw.ymlfile:Create the custom realm, zone, and zone group:
Example
[root@host01 ~]# radosgw-admin realm create --rgw-realm=test_realm --default
[root@host01 ~]# radosgw-admin zonegroup create --rgw-zonegroup=test_zonegroup --default
[root@host01 ~]# radosgw-admin zone create --rgw-zonegroup=test_zonegroup --rgw-zone=test_zone --default
[root@host01 ~]# radosgw-admin period update --rgw-realm=test_realm --commit
Create the
radosgw.ymlfile with the following details:Example
service_type: rgw
service_id: test_realm.test_zone
placement:
  hosts:
  - host01
  - host02
  - host03
  count_per_host: 2
spec:
  rgw_realm: test_realm
  rgw_zone: test_zone
  rgw_frontend_port: 1234
networks:
  - 192.169.142.0/24
Mount the
radosgw.ymlfile under a directory in the container:Example
[root@host01 ~]# cephadm shell --mount radosgw.yml:/var/lib/ceph/radosgw/radosgw.yml
NoteEvery time you exit the shell, you have to mount the file in the container before deploying the daemon.
Deploy the Ceph Object Gateway using the service specification:
Syntax
ceph orch apply -i FILE_NAME.ymlExample
[ceph: root@host01 /]# ceph orch apply -i radosgw.yml
Verification
List the service:
Example
[ceph: root@host01 /]# ceph orch ls
List the hosts, daemons, and processes:
Syntax
ceph orch ps --daemon_type=DAEMON_NAMEExample
[ceph: root@host01 /]# ceph orch ps --daemon_type=rgw
3.4. Deploying a multi-site Ceph Object Gateway using the Ceph Orchestrator
Ceph Orchestrator supports multi-site configuration options for the Ceph Object Gateway.
You can configure each object gateway to work in an active-active zone configuration allowing writes to a non-primary zone. The multi-site configuration is stored within a container called a realm.
The realm stores zone groups, zones, and a time period. The rgw daemons handle the synchronization eliminating the need for a separate synchronization agent, thereby operating with an active-active configuration.
You can also deploy multi-site zones using the command line interface (CLI).
The following configuration assumes at least two Red Hat Ceph Storage clusters are in geographically separate locations. However, the configuration also works on the same site.
Prerequisites
- At least two running Red Hat Ceph Storage clusters.
- At least two Ceph Object Gateway instances, one for each Red Hat Ceph Storage cluster.
- Root-level access to all the nodes.
- Nodes or containers are added to the storage cluster.
- All Ceph Manager, Monitor and OSD daemons are deployed.
Procedure
In the
cephadmshell, configure the primary zone:Create a realm:
Syntax
radosgw-admin realm create --rgw-realm=REALM_NAME --defaultExample
[ceph: root@host01 /]# radosgw-admin realm create --rgw-realm=test_realm --default
If the storage cluster has a single realm, then specify the
--defaultflag.Create a primary zone group:
Syntax
radosgw-admin zonegroup create --rgw-zonegroup=ZONE_GROUP_NAME --endpoints=http://RGW_PRIMARY_HOSTNAME:RGW_PRIMARY_PORT_NUMBER_1 --master --default
Example
[ceph: root@host01 /]# radosgw-admin zonegroup create --rgw-zonegroup=us --endpoints=http://rgw1:80 --master --default
Create a primary zone:
Syntax
radosgw-admin zone create --rgw-zonegroup=PRIMARY_ZONE_GROUP_NAME --rgw-zone=PRIMARY_ZONE_NAME --endpoints=http://RGW_PRIMARY_HOSTNAME:RGW_PRIMARY_PORT_NUMBER_1 --access-key=SYSTEM_ACCESS_KEY --secret=SYSTEM_SECRET_KEY
Example
[ceph: root@host01 /]# radosgw-admin zone create --rgw-zonegroup=us --rgw-zone=us-east-1 --endpoints=http://rgw1:80 --access-key=LIPEYZJLTWXRKXS9LPJC --secret-key=IsAje0AVDNXNw48LjMAimpCpI7VaxJYSnfD0FFKQ
Optional: Delete the default zone, zone group, and the associated pools.
ImportantDo not delete the default zone and its pools if you are using the default zone and zone group to store data. Also, removing the default zone group deletes the system user.
To access old data in the
defaultzone and zonegroup, use--rgw-zone defaultand--rgw-zonegroup defaultinradosgw-admincommands.Example
[ceph: root@host01 /]# radosgw-admin zonegroup delete --rgw-zonegroup=default
[ceph: root@host01 /]# ceph osd pool rm default.rgw.log default.rgw.log --yes-i-really-really-mean-it
[ceph: root@host01 /]# ceph osd pool rm default.rgw.meta default.rgw.meta --yes-i-really-really-mean-it
[ceph: root@host01 /]# ceph osd pool rm default.rgw.control default.rgw.control --yes-i-really-really-mean-it
[ceph: root@host01 /]# ceph osd pool rm default.rgw.data.root default.rgw.data.root --yes-i-really-really-mean-it
[ceph: root@host01 /]# ceph osd pool rm default.rgw.gc default.rgw.gc --yes-i-really-really-mean-it
Create a system user:
Syntax
radosgw-admin user create --uid=USER_NAME --display-name="USER_NAME" --access-key=SYSTEM_ACCESS_KEY --secret=SYSTEM_SECRET_KEY --system
Example
[ceph: root@host01 /]# radosgw-admin user create --uid=zone.user --display-name="Zone user" --system
Make a note of the
access_keyandsecret_key.Add the access key and system key to the primary zone:
Syntax
radosgw-admin zone modify --rgw-zone=PRIMARY_ZONE_NAME --access-key=ACCESS_KEY --secret=SECRET_KEY
Example
[ceph: root@host01 /]# radosgw-admin zone modify --rgw-zone=us-east-1 --access-key=NE48APYCAODEPLKBCZVQ --secret=u24GHQWRE3yxxNBnFBzjM4jn14mFIckQ4EKL6LoW
Commit the changes:
Syntax
radosgw-admin period update --commit
Example
[ceph: root@host01 /]# radosgw-admin period update --commit
Outside the
cephadmshell, fetch theFSIDof the storage cluster and the processes:Example
[root@host01 ~]# systemctl list-units | grep ceph
Start the Ceph Object Gateway daemon:
Syntax
systemctl start ceph-FSID@DAEMON_NAME
systemctl enable ceph-FSID@DAEMON_NAME
Example
[root@host01 ~]# systemctl start ceph-62a081a6-88aa-11eb-a367-001a4a000672@rgw.test_realm.us-east-1.host01.ahdtsw.service
[root@host01 ~]# systemctl enable ceph-62a081a6-88aa-11eb-a367-001a4a000672@rgw.test_realm.us-east-1.host01.ahdtsw.service
In the Cephadm shell, configure the secondary zone.
Pull the primary realm configuration from the host:
Syntax
radosgw-admin realm pull --rgw-realm=PRIMARY_REALM --url=URL_TO_PRIMARY_ZONE_GATEWAY --access-key=ACCESS_KEY --secret-key=SECRET_KEY --default
Example
[ceph: root@host04 /]# radosgw-admin realm pull --rgw-realm=test_realm --url=http://10.74.249.26:80 --access-key=LIPEYZJLTWXRKXS9LPJC --secret-key=IsAje0AVDNXNw48LjMAimpCpI7VaxJYSnfD0FFKQ --default
Pull the primary period configuration from the host:
Syntax
radosgw-admin period pull --url=URL_TO_PRIMARY_ZONE_GATEWAY --access-key=ACCESS_KEY --secret-key=SECRET_KEY
Example
[ceph: root@host04 /]# radosgw-admin period pull --url=http://10.74.249.26:80 --access-key=LIPEYZJLTWXRKXS9LPJC --secret-key=IsAje0AVDNXNw48LjMAimpCpI7VaxJYSnfD0FFKQ
Configure a secondary zone:
Syntax
radosgw-admin zone create --rgw-zonegroup=ZONE_GROUP_NAME \
             --rgw-zone=SECONDARY_ZONE_NAME --endpoints=http://RGW_SECONDARY_HOSTNAME:RGW_PRIMARY_PORT_NUMBER_1 \
             --access-key=SYSTEM_ACCESS_KEY --secret=SYSTEM_SECRET_KEY \
             --endpoints=http://FQDN:80 \
             [--read-only]
Example
[ceph: root@host04 /]# radosgw-admin zone create --rgw-zonegroup=us --rgw-zone=us-east-2 --endpoints=http://rgw2:80 --access-key=LIPEYZJLTWXRKXS9LPJC --secret-key=IsAje0AVDNXNw48LjMAimpCpI7VaxJYSnfD0FFKQ
Optional: Delete the default zone.
ImportantDo not delete the default zone and its pools if you are using the default zone and zone group to store data.
To access old data in the
defaultzone and zonegroup, use--rgw-zone defaultand--rgw-zonegroup defaultinradosgw-admincommands.Example
[ceph: root@host04 /]# radosgw-admin zone rm --rgw-zone=default
[ceph: root@host04 /]# ceph osd pool rm default.rgw.log default.rgw.log --yes-i-really-really-mean-it
[ceph: root@host04 /]# ceph osd pool rm default.rgw.meta default.rgw.meta --yes-i-really-really-mean-it
[ceph: root@host04 /]# ceph osd pool rm default.rgw.control default.rgw.control --yes-i-really-really-mean-it
[ceph: root@host04 /]# ceph osd pool rm default.rgw.data.root default.rgw.data.root --yes-i-really-really-mean-it
[ceph: root@host04 /]# ceph osd pool rm default.rgw.gc default.rgw.gc --yes-i-really-really-mean-it
Update the Ceph configuration database:
Syntax
ceph config set SERVICE_NAME rgw_zone SECONDARY_ZONE_NAME
Example
[ceph: root@host04 /]# ceph config set rgw rgw_zone us-east-2
Commit the changes:
Syntax
radosgw-admin period update --commit
Example
[ceph: root@host04 /]# radosgw-admin period update --commit
Outside the Cephadm shell, fetch the FSID of the storage cluster and the processes:
Example
[root@host04 ~]# systemctl list-units | grep ceph
Start the Ceph Object Gateway daemon:
Syntax
systemctl start ceph-FSID@DAEMON_NAME
systemctl enable ceph-FSID@DAEMON_NAME
Example
[root@host04 ~]# systemctl start ceph-62a081a6-88aa-11eb-a367-001a4a000672@rgw.test_realm.us-east-2.host04.ahdtsw.service
[root@host04 ~]# systemctl enable ceph-62a081a6-88aa-11eb-a367-001a4a000672@rgw.test_realm.us-east-2.host04.ahdtsw.service
Optional: Deploy multi-site Ceph Object Gateways using the placement specification:
Syntax
ceph orch apply rgw NAME --realm=REALM_NAME --zone=PRIMARY_ZONE_NAME --placement="NUMBER_OF_DAEMONS HOST_NAME_1 HOST_NAME_2"
Example
[ceph: root@host04 /]# ceph orch apply rgw east --realm=test_realm --zone=us-east-1 --placement="2 host01 host02"
Verification
Check the synchronization status to verify the deployment:
Example
[ceph: root@host04 /]# radosgw-admin sync status
3.5. Removing the Ceph Object Gateway using the Ceph Orchestrator
You can remove the Ceph object gateway daemons using the ceph orch rm command.
Prerequisites
- A running Red Hat Ceph Storage cluster.
- Root-level access to all the nodes.
- Hosts are added to the cluster.
- At least one Ceph object gateway daemon deployed on the hosts.
Procedure
Log into the Cephadm shell:
Example
[root@host01 ~]# cephadm shell
List the service:
Example
[ceph: root@host01 /]# ceph orch ls
Remove the service:
Syntax
ceph orch rm SERVICE_NAMEExample
[ceph: root@host01 /]# ceph orch rm rgw.test_realm.test_zone_bb
Verification
List the hosts, daemons, and processes:
Syntax
ceph orch ps
Example
[ceph: root@host01 /]# ceph orch ps
Additional Resources
- See Deploying the Ceph object gateway using the command line interface section in the Red Hat Ceph Storage Operations Guide for more information.
- See Deploying the Ceph object gateway using the service specification section in the Red Hat Ceph Storage Operations Guide for more information.
Chapter 4. Basic configuration
As a storage administrator, learning the basics of configuring the Ceph Object Gateway is important. You can learn about the defaults and the embedded web server called Beast. For troubleshooting issues with the Ceph Object Gateway, you can adjust the logging and debugging output generated by the Ceph Object Gateway. Also, you can provide a High-Availability proxy for storage cluster access using the Ceph Object Gateway.
4.1. Prerequisites
- A running, and healthy Red Hat Ceph Storage cluster.
- Installation of the Ceph Object Gateway software package.
4.2. Add a wildcard to the DNS
You can add the wildcard such as hostname to the DNS record of the DNS server.
Prerequisite
- A running Red Hat Ceph Storage cluster.
- Ceph Object Gateway installed.
- Root-level access to the admin node.
Procedure
To use Ceph with S3-style subdomains, add a wildcard to the DNS record of the DNS server that the
ceph-radosgwdaemon uses to resolve domain names:Syntax
bucket-name.domain-name.com
For
dnsmasq, add the following address setting with a dot (.) prepended to the host name:Syntax
address=/.HOSTNAME_OR_FQDN/HOST_IP_ADDRESS
Example
address=/.gateway-host01/192.168.122.75
For
bind, add a wildcard to the DNS record:Example
$TTL    604800
@       IN      SOA     gateway-host01. root.gateway-host01. (
                              2         ; Serial
                         604800         ; Refresh
                          86400         ; Retry
                        2419200         ; Expire
                         604800 )       ; Negative Cache TTL
;
@       IN      NS      gateway-host01.
@       IN      A       192.168.122.113
*       IN      CNAME   @
Restart the DNS server and ping the server with a subdomain to ensure that the
ceph-radosgwdaemon can process the subdomain requests:Syntax
ping mybucket.HOSTNAMEExample
[root@host01 ~]# ping mybucket.gateway-host01
-
If the DNS server is on the local machine, you might need to modify
/etc/resolv.confby adding a nameserver entry for the local machine. Add the host name in the Ceph Object Gateway zone group:
Get the zone group:
Syntax
radosgw-admin zonegroup get --rgw-zonegroup=ZONEGROUP_NAME > zonegroup.jsonExample
[ceph: root@host01 /]# radosgw-admin zonegroup get --rgw-zonegroup=us > zonegroup.json
Take a back-up of the JSON file:
Example
[ceph: root@host01 /]# cp zonegroup.json zonegroup.backup.json
View the
zonegroup.jsonfile:Example
[ceph: root@host01 /]# cat zonegroup.json
{
    "id": "d523b624-2fa5-4412-92d5-a739245f0451",
    "name": "asia",
    "api_name": "asia",
    "is_master": "true",
    "endpoints": [],
    "hostnames": [],
    "hostnames_s3website": [],
    "master_zone": "d2a3b90f-f4f3-4d38-ac1f-6463a2b93c32",
    "zones": [
        {
            "id": "d2a3b90f-f4f3-4d38-ac1f-6463a2b93c32",
            "name": "india",
            "endpoints": [],
            "log_meta": "false",
            "log_data": "false",
            "bucket_index_max_shards": 11,
            "read_only": "false",
            "tier_type": "",
            "sync_from_all": "true",
            "sync_from": [],
            "redirect_zone": ""
        }
    ],
    "placement_targets": [
        {
            "name": "default-placement",
            "tags": [],
            "storage_classes": [
                "STANDARD"
            ]
        }
    ],
    "default_placement": "default-placement",
    "realm_id": "d7e2ad25-1630-4aee-9627-84f24e13017f",
    "sync_policy": {
        "groups": []
    }
}
Update the
zonegroup.jsonfile with new host name:Example
"hostnames": ["host01", "host02","host03"],
Set the zone group back in the Ceph Object Gateway:
Syntax
radosgw-admin zonegroup set --rgw-zonegroup=ZONEGROUP_NAME --infile=zonegroup.jsonExample
[ceph: root@host01 /]# radosgw-admin zonegroup set --rgw-zonegroup=us --infile=zonegroup.json
Update the period:
Example
[ceph: root@host01 /]# radosgw-admin period update --commit
- Restart the Ceph Object Gateway so that the DNS setting takes effect.
Additional Resources
- See the The Ceph configuration database section in the Red Hat Ceph Storage Configuration Guide for more details.
4.3. The Beast front-end web server
The Ceph Object Gateway provides Beast, a C/C embedded front-end web server. Beast uses the `Boost.Beast` C library to parse HTTP, and Boost.Asio for asynchronous network I/O.
Additional Resources
4.4. Configuring SSL for Beast
You can configure the Beast front-end web server to use the OpenSSL library to provide Transport Layer Security (TLS). To use Secure Socket Layer (SSL) with Beast, you need to obtain a certificate from a Certificate Authority (CA) that matches the hostname of the Ceph Object Gateway node. Beast also requires the secret key, server certificate, and any other CA in a single .pem file.
Prevent unauthorized access to the .pem file, because it contains the secret key hash.
Red Hat recommends obtaining a certificate from a CA with the Subject Alternative Name (SAN) field, and a wildcard for use with S3-style subdomains.
Red Hat recommends only using SSL with the Beast front-end web server for small to medium sized test environments. For production environments, you must use HAProxy and keepalived to terminate the SSL connection at the HAProxy.
If the Ceph Object Gateway acts as a client and a custom certificate is used on the server, you can inject a custom CA by importing it on the node and then mapping the etc/pki directory into the container with the extra_container_args parameter in the Ceph Object Gateway specification file.
Prerequisites
- A running, and healthy Red Hat Ceph Storage cluster.
- Installation of the Ceph Object Gateway software package.
- Installation of the OpenSSL software package.
- Root-level access to the Ceph Object Gateway node.
Procedure
Create a new file named
rgw.ymlin the current directory:Example
[ceph: root@host01 /]# touch rgw.yml
Open the
rgw.ymlfile for editing, and customize it for the environment:Syntax
service_type: rgw
service_id: SERVICE_ID
service_name: SERVICE_NAME
placement:
  hosts:
  - HOST_NAME
spec:
  ssl: true
  rgw_frontend_ssl_certificate: CERT_HASH
Example
service_type: rgw
service_id: foo
service_name: rgw.foo
placement:
  hosts:
  - host01
spec:
  ssl: true
  rgw_frontend_ssl_certificate: |
    -----BEGIN RSA PRIVATE KEY-----
    MIIEpAIBAAKCAQEA+Cf4l9OagD6x67HhdCy4Asqw89Zz9ZuGbH50/7ltIMQpJJU0
    gu9ObNtIoC0zabJ7n1jujueYgIpOqGnhRSvsGJiEkgN81NLQ9rqAVaGpadjrNLcM
    bpgqJCZj0vzzmtFBCtenpb5l/EccMFcAydGtGeLP33SaWiZ4Rne56GBInk6SATI/
    JSKweGD1y5GiAWipBR4C74HiAW9q6hCOuSdp/2WQxWT3T1j2sjlqxkHdtInUtwOm
    j5Ism276IndeQ9hR3reFR8PJnKIPx73oTBQ7p9CMR1J4ucq9Ny0J12wQYT00fmJp
    -----END RSA PRIVATE KEY-----
    -----BEGIN CERTIFICATE-----
    MIIEBTCCAu2gAwIBAgIUGfYFsj8HyA9Zv2l600hxzT8+gG4wDQYJKoZIhvcNAQEL
    BQAwgYkxCzAJBgNVBAYTAklOMQwwCgYDVQQIDANLQVIxDDAKBgNVBAcMA0JMUjEM
    MAoGA1UECgwDUkhUMQswCQYDVQQLDAJCVTEkMCIGA1UEAwwbY2VwaC1zc2wtcmhj
    czUtOGRjeHY2LW5vZGU1MR0wGwYJKoZIhvcNAQkBFg5hYmNAcmVkaGF0LmNvbTAe
    -----END CERTIFICATE-----
Deploy the Ceph Object Gateway using the service specification file:
Example
[ceph: root@host01 /]# ceph orch apply -i rgw.yml
4.5. Adjusting logging and debugging output
Once you finish the setup procedure, check your logging output to ensure it meets your needs. By default, the Ceph daemons log to journald, and you can view the logs using the journalctl command. Alternatively, you can also have the Ceph daemons log to files, which are located under the /var/log/ceph/CEPH_CLUSTER_ID/ directory.
Verbose logging can generate over 1 GB of data per hour. This type of logging can potentially fill up the operating system’s disk, causing the operating system to stop functioning.
Prerequisites
- A running Red Hat Ceph Storage cluster.
- Installation of the Ceph Object Gateway software.
Procedure
Set the following parameter to increase the Ceph Object Gateway logging output:
Syntax
ceph config set client.rgw debug_rgw VALUEExample
[ceph: root@host01 /]# ceph config set client.rgw debug_rgw 20
You can also modify these settings at runtime:
Syntax
ceph --admin-daemon /var/run/ceph/ceph-client.rgw.NAME.asok config set debug_rgw VALUE
Example
[ceph: root@host01 /]# ceph --admin-daemon /var/run/ceph/ceph-client.rgw.rgw.asok config set debug_rgw 20
Optionally, you can configure the Ceph daemons to log their output to files. Set the
log_to_file, andmon_cluster_log_to_fileoptions totrue:Example
[ceph: root@host01 /]# ceph config set global log_to_file true
[ceph: root@host01 /]# ceph config set global mon_cluster_log_to_file true
Additional Resources
- See the Ceph debugging and logging configuration section of the Red Hat Ceph Storage Configuration Guide for more details.
4.6. Static web hosting
As a storage administrator, you can configure the Ceph Object Gateway to host static websites in S3 buckets. Traditional website hosting involves configuring a web server for each website, which can use resources inefficiently when content does not change dynamically. For example, sites that do not use server-side services like PHP, servlets, databases, nodejs, and the like. This approach is substantially more economical than setting up virtual machines with web servers for each site.
4.6.1. Prerequisites
- A healthy, running Red Hat Ceph Storage cluster.
4.6.2. Static web hosting assumptions
Static web hosting requires at least one running Red Hat Ceph Storage cluster, and at least two Ceph Object Gateway instances for the static web sites. Red Hat assumes that each zone will have multiple gateway instances using a load balancer, such as high-availability (HA) Proxy and keepalived.
Red Hat DOES NOT support using a Ceph Object Gateway instance to deploy both standard S3/Swift APIs and static web hosting simultaneously.
Additional Resources
- See the High availability service section in the Red Hat Ceph Storage Object Gateway Guide for additional details on using high availability.
4.6.3. Static web hosting requirements
Static web hosting functionality uses its own API, so configuring a gateway to use static web sites in S3 buckets requires the following:
- S3 static web hosting uses Ceph Object Gateway instances that are separate and distinct from instances used for standard S3/Swift API use cases.
- Gateway instances hosting S3 static web sites should have separate, non-overlapping domain names from the standard S3/Swift API gateway instances.
- Gateway instances hosting S3 static web sites should use separate public-facing IP addresses from the standard S3/Swift API gateway instances.
- Gateway instances hosting S3 static web sites load balance, and if necessary terminate SSL, using HAProxy/keepalived.
4.6.4. Static web hosting gateway setup
To enable a Ceph Object Gateway for static web hosting, set the following options:
Syntax
ceph config set client.rgw OPTION VALUE
Example
[ceph: root@host01 /]# ceph config set client.rgw rgw_enable_static_website true
[ceph: root@host01 /]# ceph config set client.rgw rgw_enable_apis s3,s3website
[ceph: root@host01 /]# ceph config set client.rgw rgw_dns_name objects-zonegroup.example.com
[ceph: root@host01 /]# ceph config set client.rgw rgw_dns_s3website_name objects-website-zonegroup.example.com
[ceph: root@host01 /]# ceph config set client.rgw rgw_resolve_cname true
The rgw_enable_static_website setting MUST be true. The rgw_enable_apis setting MUST enable the s3website API. The rgw_dns_name and rgw_dns_s3website_name settings must provide their fully qualified domains. If the site uses canonical name extensions, then set the rgw_resolve_cname option to true.
The FQDNs of rgw_dns_name and rgw_dns_s3website_name MUST NOT overlap.
4.6.5. Static web hosting DNS configuration
The following is an example of assumed DNS settings, where the first two lines specify the domains of the gateway instance using a standard S3 interface and point to the IPv4 and IPv6 addresses. The third line provides a wildcard CNAME setting for S3 buckets using canonical name extensions. The fourth and fifth lines specify the domains for the gateway instance using the S3 website interface and point to their IPv4 and IPv6 addresses.
objects-zonegroup.domain.com. IN    A 192.0.2.10
objects-zonegroup.domain.com. IN AAAA 2001:DB8::192:0:2:10
*.objects-zonegroup.domain.com. IN CNAME objects-zonegroup.domain.com.
objects-website-zonegroup.domain.com. IN    A 192.0.2.20
objects-website-zonegroup.domain.com. IN AAAA 2001:DB8::192:0:2:20
The IP addresses in the first two lines differ from the IP addresses in the fourth and fifth lines.
If using Ceph Object Gateway in a multi-site configuration, consider using a routing solution to route traffic to the gateway closest to the client.
The Amazon Web Service (AWS) requires static web host buckets to match the host name. Ceph provides a few different ways to configure the DNS, and HTTPS will work if the proxy has a matching certificate.
Hostname to a Bucket on a Subdomain
To use AWS-style S3 subdomains, use a wildcard in the DNS entry which can redirect requests to any bucket. A DNS entry might look like the following:
*.objects-website-zonegroup.domain.com. IN CNAME objects-website-zonegroup.domain.com.
Access the bucket name, where the bucket name is bucket1, in the following manner:
http://bucket1.objects-website-zonegroup.domain.com
Hostname to Non-Matching Bucket
Ceph supports mapping domain names to buckets without including the bucket name in the request, which is unique to Ceph Object Gateway. To use a domain name to access a bucket, map the domain name to the bucket name. A DNS entry might look like the following:
www.example.com. IN CNAME bucket2.objects-website-zonegroup.domain.com.
Where the bucket name is bucket2.
Access the bucket in the following manner:
http://www.example.com
Hostname to Long Bucket with CNAME
AWS typically requires the bucket name to match the domain name. To configure the DNS for static web hosting using CNAME, the DNS entry might look like the following:
www.example.com. IN CNAME www.example.com.objects-website-zonegroup.domain.com.
Access the bucket in the following manner:
http://www.example.com
Hostname to Long Bucket without CNAME
If the DNS name contains other non-CNAME records, such as SOA, NS, MX or TXT, the DNS record must map the domain name directly to the IP address. For example:
www.example.com. IN A 192.0.2.20
www.example.com. IN AAAA 2001:DB8::192:0:2:20
Access the bucket in the following manner:
http://www.example.com
4.6.6. Creating a static web hosting site
To create a static website, perform the following steps:
Create an S3 bucket. The bucket name MIGHT be the same as the website’s domain name. For example,
mysite.commay have a bucket name ofmysite.com. This is required for AWS, but it is NOT required for Ceph.- See the Static web hosting DNS configuration section in the Red Hat Ceph Storage Object Gateway Guide for details.
-
Upload the static website content to the bucket. Contents may include HTML, CSS, client-side JavaScript, images, audio/video content, and other downloadable files. A website MUST have an
index.htmlfile and might have anerror.htmlfile. - Verify the website’s contents. At this point, only the creator of the bucket has access to the contents.
- Set permissions on the files so that they are publicly readable.
4.7. High availability for the Ceph Object Gateway
As a storage administrator, you can assign many instances of the Ceph Object Gateway to a single zone. This allows you to scale out as the load increases, that is, the same zone group and zone; however, you do not need a federated architecture to use a highly available proxy. Since each Ceph Object Gateway daemon has its own IP address, you can use the ingress service to balance the load across many Ceph Object Gateway daemons or nodes. The ingress service manages HAProxy and keepalived daemons for the Ceph Object Gateway environment. You can also terminate HTTPS traffic at the HAProxy server, and use HTTP between the HAProxy server and the Beast front-end web server instances for the Ceph Object Gateway.
4.7.1. Prerequisites
- At least two Ceph Object Gateway daemons running on different hosts.
-
Capacity for at least two instances of the
ingressservice running on different hosts.
4.7.2. High availability service
The ingress service provides a highly available endpoint for the Ceph Object Gateway. The ingress service can be deployed to any number of hosts as needed. Red Hat recommends having at least two Red Hat Enterprise Linux 8 servers, each server configured with the ingress service. You can run a high availability (HA) service with a minimum set of configuration options. The Ceph orchestrator deploys the ingress service, which manages the haproxy and keepalived daemons, by providing load balancing with a floating virtual IP address. The active haproxy distributes all Ceph Object Gateway requests to all the available Ceph Object Gateway daemons.
A virtual IP address is automatically configured on one of the ingress hosts at a time, known as the primary host. The Ceph orchestrator selects the first network interface based on existing IP addresses that are configured as part of the same subnet. In cases where the virtual IP address does not belong to the same subnet, you can define a list of subnets for the Ceph orchestrator to match with existing IP addresses. If the keepalived daemon and the active haproxy are not responding on the primary host, then the virtual IP address moves to a backup host. This backup host becomes the new primary host.
Currently, you can not configure a virtual IP address on a network interface that does not have a configured IP address.
To use the secure socket layer (SSL), SSL must be terminated by the ingress service and not at the Ceph Object Gateway.
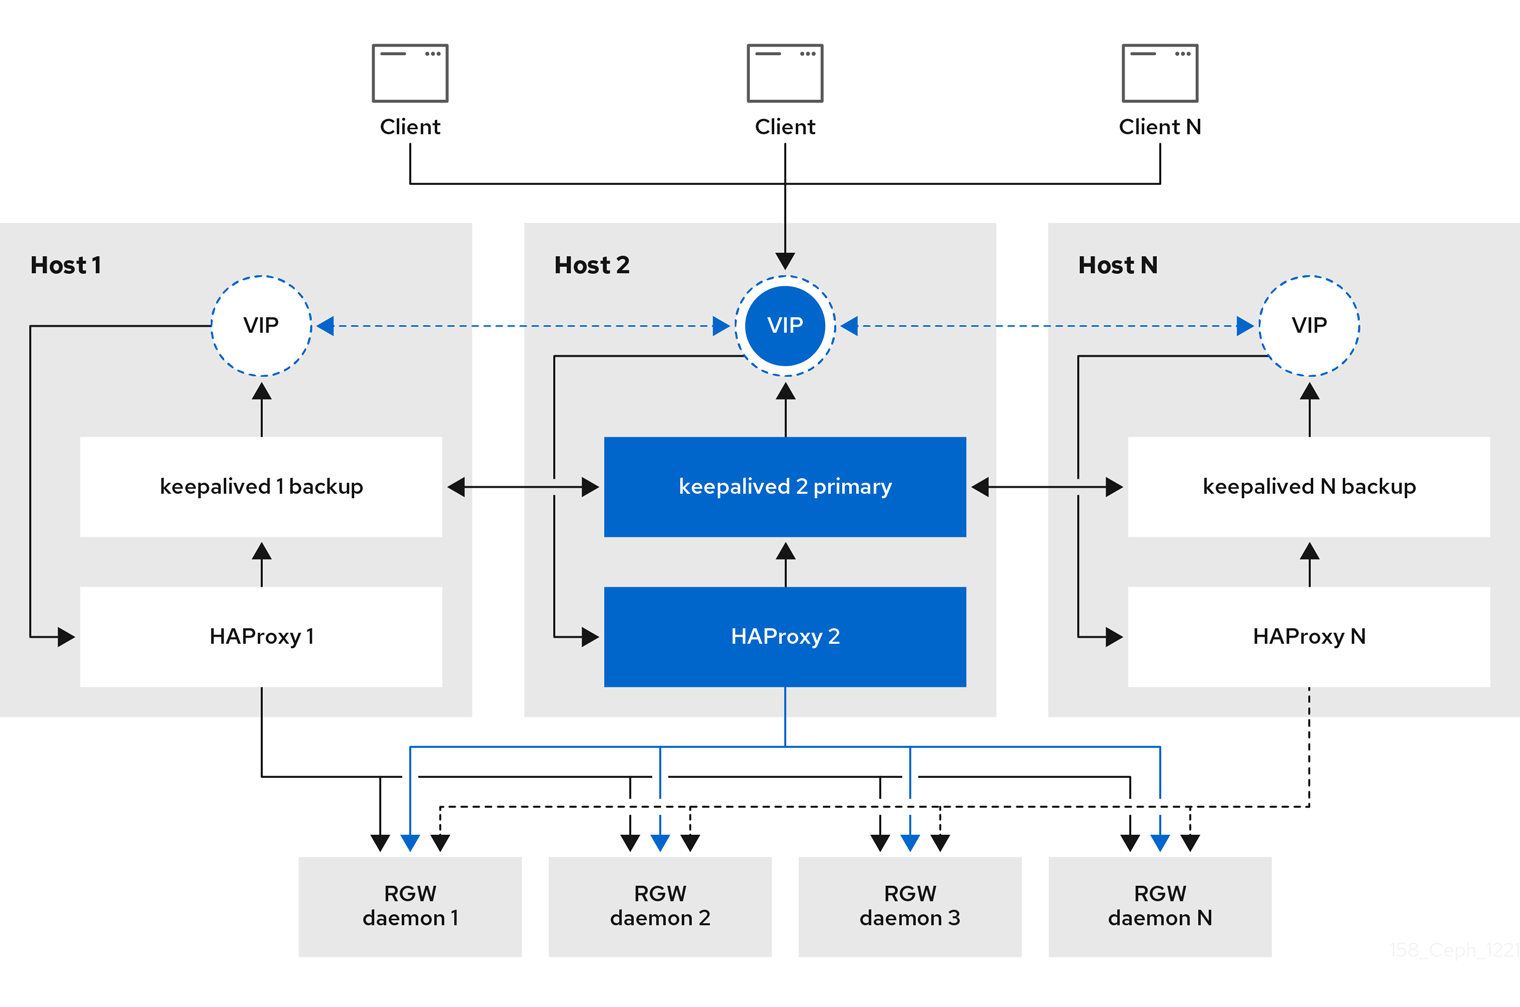
4.7.3. Configuring high availability for the Ceph Object Gateway
To configure high availability (HA) for the Ceph Object Gateway you write a YAML configuation file, and the Ceph orchestrator does the installation, configuraton, and management of the ingress service. The ingress service uses the haproxy and keepalived daemons to provide high availability for the Ceph Object Gateway.
Prerequisites
-
A minimum of two hosts running Red Hat Enterprise Linux 8, or higher, for installing the
ingressservice on. - A healthy running Red Hat Ceph Storage cluster.
- A minimum of two Ceph Object Gateway daemons running on different hosts.
-
Root-level access to the host running the
ingressservice. - If using a firewall, then open port 80 for HTTP and port 443 for HTTPS traffic.
Procedure
Create a new
ingress.yamlfile:Example
[root@host01 ~] touch ingress.yaml
Open the
ingress.yamlfile for editing. Added the following options, and add values applicable to the environment:Syntax
service_type: ingress 1
service_id: SERVICE_ID 2
placement: 3
  hosts:
    - HOST1
    - HOST2
    - HOST3
spec:
  backend_service: SERVICE_ID
  virtual_ip: IP_ADDRESS/CIDR 4
  frontend_port: INTEGER 5
  monitor_port: INTEGER 6
  virtual_interface_networks: 7
    - IP_ADDRESS/CIDR
  ssl_cert: | 8
- 1
- Must be set to
ingress. - 2
- Must match the existing Ceph Object Gateway service name.
- 3
- Where to deploy the
haproxyandkeepalivedcontainers. - 4
- The virtual IP address where the
ingressservice is available. - 5
- The port to access the
ingressservice. - 6
- The port to access the
haproxyload balancer status. - 7
- Optional list of available subnets.
- 8
- Optional SSL certificate and private key.
Example
service_type: ingress
service_id: rgw.foo
placement:
  hosts:
    - host01.example.com
    - host02.example.com
    - host03.example.com
spec:
  backend_service: rgw.foo
  virtual_ip: 192.168.1.2/24
  frontend_port: 8080
  monitor_port: 1967
  virtual_interface_networks:
    - 10.10.0.0/16
  ssl_cert: |
    -----BEGIN CERTIFICATE-----
    MIIEpAIBAAKCAQEA+Cf4l9OagD6x67HhdCy4Asqw89Zz9ZuGbH50/7ltIMQpJJU0
    gu9ObNtIoC0zabJ7n1jujueYgIpOqGnhRSvsGJiEkgN81NLQ9rqAVaGpadjrNLcM
    bpgqJCZj0vzzmtFBCtenpb5l/EccMFcAydGtGeLP33SaWiZ4Rne56GBInk6SATI/
    JSKweGD1y5GiAWipBR4C74HiAW9q6hCOuSdp/2WQxWT3T1j2sjlqxkHdtInUtwOm
    j5Ism276IndeQ9hR3reFR8PJnKIPx73oTBQ7p9CMR1J4ucq9Ny0J12wQYT00fmJp
    -----END CERTIFICATE-----
    -----BEGIN PRIVATE KEY-----
    MIIEBTCCAu2gAwIBAgIUGfYFsj8HyA9Zv2l600hxzT8+gG4wDQYJKoZIhvcNAQEL
    BQAwgYkxCzAJBgNVBAYTAklOMQwwCgYDVQQIDANLQVIxDDAKBgNVBAcMA0JMUjEM
    MAoGA1UECgwDUkhUMQswCQYDVQQLDAJCVTEkMCIGA1UEAwwbY2VwaC1zc2wtcmhj
    czUtOGRjeHY2LW5vZGU1MR0wGwYJKoZIhvcNAQkBFg5hYmNAcmVkaGF0LmNvbTAe
    -----END PRIVATE KEY-----
Launch the Cephadm shell:
Example
[root@host01 ~]# cephadm shell --mount ingress.yaml:/var/lib/ceph/radosgw/igress.yaml
Configure the latest
haproxyandkeepalivedimages:Syntax
ceph config set mgr mgr/cephadm/container_image_haproxy HAPROXY_IMAGE_ID
ceph config set mgr mgr/cephadm/container_image_keepalived KEEPALIVED_IMAGE_ID
Example
[ceph: root@host01 /]# ceph config set mgr mgr/cephadm/container_image_haproxy registry.redhat.io/rhceph/rhceph-haproxy-rhel8:latest
[ceph: root@host01 /]# ceph config set mgr mgr/cephadm/container_image_keepalived registry.redhat.io/rhceph/keepalived-rhel8:latest
Install and configure the new
ingressservice using the Ceph orchestrator:[ceph: root@host01 /]# ceph orch apply -i ingress.yaml
After the Ceph orchestrator completes, verify the HA configuration.
On the host running the
ingressservice, check that the virtual IP address appears:Example
[root@host01 ~]# ip addr show
Try reaching the Ceph Object Gateway from a Ceph client:
Syntax
wget HOST_NAMEExample
[root@client ~]# wget host01.example.com
If this returns an
index.htmlwith similar content as in the example below, then the HA configuration for the Ceph Object Gateway is working properly.Example
<?xml version="1.0" encoding="UTF-8"?>
	<ListAllMyBucketsResult xmlns="http://s3.amazonaws.com/doc/2006-03-01/">
		<Owner>
			<ID>anonymous</ID>
			<DisplayName></DisplayName>
		</Owner>
		<Buckets>
		</Buckets>
	</ListAllMyBucketsResult>
Additional resources
- See the Performing a Standard RHEL Installation Guide for more details.
- See the High availability service section in the Red Hat Ceph Storage Object Gateway Guide for more details.
4.7.4. HAProxy and keepalived
As a storage administrator, you can assign many instances of the Ceph Object Gateway to a single zone. This allows you scale out as the load increases, that is, the same zone group and zone; however, you do not need a federated architecture to use HAProxy and keepalived. Since each object gateway instance has its own IP address, you can use HAProxy and keepalived to balance the load across Ceph Object Gateway servers.
Another use case for HAProxy and keepalived is to terminate HTTPS at the HAProxy server. You can use an HAProxy server to terminate HTTPS at the HAProxy server and use HTTP between the HAProxy server and the Beast web server instances.
4.7.4.1. HAProxy/keepalived Prerequisites
To set up an HAProxy with the Ceph Object Gateway, you must have:
- A running Red Hat Ceph Storage cluster
-
At least two Ceph Object Gateway servers within the same zone are configured to run on port
80. If you follow the simple installation procedure, the gateway instances are in the same zone group and zone by default. If you are using a federated architecture, ensure that the instances are in the same zone group and zone. -
At least two Red Hat Enterprise Linux 8 servers for HAProxy and
keepalived.
This section assumes that you have at least two Ceph Object Gateway servers running, and that you get a valid response from each of them when running test scripts over port 80.
4.7.4.2. Preparing HAProxy Nodes
The following setup assumes two HAProxy nodes named haproxy and haproxy2 and two Ceph Object Gateway servers named rgw1 and rgw2. You might use any naming convention you prefer. Perform the following procedure on at least two HAProxy nodes:
- Install Red Hat Enterprise Linux 8 or 9.
Register the nodes.
[root@haproxy]# subscription-manager register
Enable the RHEL server repository.
Red Hat Enterprise Linux 9
[root@haproxy]# subscription-manager repos --enable=rhel-9-server-rpms
Red Hat Enterprise Linux 8
[root@haproxy]# subscription-manager repos --enable=rhel-8-server-rpms
Update the server.
[root@haproxy]# dnf update -y
-
Install admin tools (e.g.,
wget,vim, etc.) as needed. Open port
80.[root@haproxy]# firewall-cmd --zone=public --add-port 80/tcp --permanent [root@haproxy]# firewall-cmd --reload
For HTTPS, open port
443.[root@haproxy]# firewall-cmd --zone=public --add-port 443/tcp --permanent [root@haproxy]# firewall-cmd --reload
4.7.4.3. Installing and Configuring keepalived
Perform the following procedure on your at least two HAProxy nodes:
Prerequisites
- A minimum of two HAProxy nodes.
- A minimum of two Object Gateway nodes.
Procedure
Install
keepalived:[root@haproxy]# yum install -y keepalived
Configure
keepalivedon both HAProxy nodes:[root@haproxy]# vim /etc/keepalived/keepalived.conf
In the configuration file, there is a script to check the
haproxyprocesses:vrrp_script chk_haproxy { script "killall -0 haproxy" # check the haproxy process interval 2 # every 2 seconds weight 2 # add 2 points if OK }Next, the instance on the primary and backup load balancers uses
eno1as the network interface. It also assigns a virtual IP address, that is,192.168.1.20.Primary load balancer node
vrrp_instance RGW {
    state MASTER # might not be necessary. This is on the primary LB node.
    @main interface eno1
    priority 100
    advert_int 1
    interface eno1
    virtual_router_id 50
    @main unicast_src_ip 10.8.128.43 80
    unicast_peer {
           10.8.128.53
           }
    authentication {
        auth_type PASS
        auth_pass 1111
    }
    virtual_ipaddress {
        192.168.1.20
    }
    track_script {
      chk_haproxy
    }
}
virtual_server 192.168.1.20 80 eno1 { #populate correct interface
    delay_loop 6
    lb_algo wlc
    lb_kind dr
    persistence_timeout 600
    protocol TCP
    real_server 10.8.128.43 80 { # ip address of rgw2 on physical interface, haproxy listens here, rgw listens to localhost:8080 or similar
        weight 100
        TCP_CHECK { # perhaps change these to a HTTP/SSL GET?
            connect_timeout 3
        }
    }
    real_server 10.8.128.53 80 { # ip address of rgw3 on physical interface, haproxy listens here, rgw listens to localhost:8080 or similar
        weight 100
        TCP_CHECK { # perhaps change these to a HTTP/SSL GET?
            connect_timeout 3
        }
    }
}
Backup load balancer node
vrrp_instance RGW {
    state BACKUP # might not be necessary?
    priority 99
    advert_int 1
    interface eno1
    virtual_router_id 50
    unicast_src_ip 10.8.128.53 80
    unicast_peer {
           10.8.128.43
           }
    authentication {
        auth_type PASS
        auth_pass 1111
    }
    virtual_ipaddress {
        192.168.1.20
    }
    track_script {
      chk_haproxy
    }
}
virtual_server 192.168.1.20 80 eno1 { #populate correct interface
    delay_loop 6
    lb_algo wlc
    lb_kind dr
    persistence_timeout 600
    protocol TCP
    real_server 10.8.128.43 80 { # ip address of rgw2 on physical interface, haproxy listens here, rgw listens to localhost:8080 or similar
        weight 100
        TCP_CHECK { # perhaps change these to a HTTP/SSL GET?
            connect_timeout 3
        }
    }
    real_server 10.8.128.53 80 { # ip address of rgw3 on physical interface, haproxy listens here, rgw listens to localhost:8080 or similar
        weight 100
        TCP_CHECK { # perhaps change these to a HTTP/SSL GET?
            connect_timeout 3
        }
    }
}
Enable and start the
keepalivedservice:[root@haproxy]# systemctl enable keepalived [root@haproxy]# systemctl start keepalived
Additional Resources
-
For more details on using
keepalived, refer to the Setting up a Linux cluster with Keepalived: Basic configuration article on the Red Hat’s Customer Portal.
4.7.4.4. Installing and Configuring HAProxy
Perform the following procedure on your at least two HAProxy nodes:
Install
haproxy.[root@haproxy]# dnf install haproxy
Configure
haproxyfor SELinux and HTTP.[root@haproxy]# vim /etc/firewalld/services/haproxy-http.xml
Add the following lines:
<?xml version="1.0" encoding="utf-8"?>
<service>
<short>HAProxy-HTTP</short>
<description>HAProxy load-balancer</description>
<port protocol="tcp" port="80"/>
</service>
As
root, assign the correct SELinux context and file permissions to thehaproxy-http.xmlfile.[root@haproxy]# cd /etc/firewalld/services [root@haproxy]# restorecon haproxy-http.xml [root@haproxy]# chmod 640 haproxy-http.xml
If you intend to use HTTPS, configure
haproxyfor SELinux and HTTPS.[root@haproxy]# vim /etc/firewalld/services/haproxy-https.xml
Add the following lines:
<?xml version="1.0" encoding="utf-8"?>
<service>
<short>HAProxy-HTTPS</short>
<description>HAProxy load-balancer</description>
<port protocol="tcp" port="443"/>
</service>
As
root, assign the correct SELinux context and file permissions to thehaproxy-https.xmlfile.# cd /etc/firewalld/services # restorecon haproxy-https.xml # chmod 640 haproxy-https.xml
If you intend to use HTTPS, generate keys for SSL. If you do not have a certificate, you can use a self-signed certificate.
Finally, put the certificate and key into a PEM file.
[root@haproxy]# cat example.com.crt example.com.key > example.com.pem
[root@haproxy]# cp example.com.pem /etc/ssl/private/
Configure
haproxy.[root@haproxy]# vim /etc/haproxy/haproxy.cfg
The
globalanddefaultsmay remain unchanged. After thedefaultssection, you will need to configurefrontendandbackendsections. For example:frontend http_web bind *:80 mode http default_backend rgw frontend rgw-https bind *:443 ssl crt /etc/ssl/private/example.com.pem default_backend rgw backend rgw balance roundrobin mode http server rgw1 10.0.0.71:80 check server rgw2 10.0.0.80:80 checkFor details on HAProxy configuration, refer to Add an HAProxy Load Balancer chapter in the Red Hat Update Infrastructure System Administrator’s Guide.
Enable/start
haproxy[root@haproxy]# systemctl enable haproxy [root@haproxy]# systemctl start haproxy
4.7.4.5. Testing the HAProxy Configuration
On the HAProxy nodes, check to ensure the virtual IP address from the
keepalivedconfiguration appears.[root@haproxy]# ip addr show
On the node hosting the Red Hat Ceph Dashboard container, see if you can reach the Ceph Object Gateway nodes using the load balancer configuration. For example:
[root@haproxy]# wget haproxy
This should return the same result as:
[root@haproxy]# wget rgw1
If it returns an
index.htmlfile with the following contents:<?xml version="1.0" encoding="UTF-8"?> <ListAllMyBucketsResult xmlns="http://s3.amazonaws.com/doc/2020-03-01/"> <Owner> <ID>anonymous</ID> <DisplayName></DisplayName> </Owner> <Buckets> </Buckets> </ListAllMyBucketsResult>
Then, your configuration is working properly.
4.8. Exporting the namespace to NFS-Ganesha
To configure new NFS Ganesha exports for use with the Ceph Object Gateway, you have to use the Red Hat Ceph Storage Dashboard. See the Management of NFS Ganesha exports on the Ceph Dashboard section in the Red Hat Ceph Storage Dashboard Guide for more details.
For existing NFS environments using the Ceph Object Gateway, upgrading from Red Hat Ceph Storage 4 to Red Hat Ceph Storage 5 is not supported at this time.
Red Hat does not support NFS version 3 exports using the Ceph Object Gateway.
Chapter 5. Advanced configuration
As a storage administrator, you can configure some of the more advanced features of the Ceph Object Gateway. You can configure a multisite Ceph Object Gateway and integrate it with directory services, such as Microsoft Active Directory and OpenStack Keystone service.
5.1. Prerequisites
- A healthy running Red Hat Ceph Storage cluster.
5.2. Multi-site configuration and administration
As a storage administrator, you can configure and administer multiple Ceph Object Gateways for a variety of use cases. You can learn what to do during a disaster recovery and failover events. Also, you can learn more about realms, zones, and syncing policies in multi-site Ceph Object Gateway environments.
A single zone configuration typically consists of one zone group containing one zone and one or more ceph-radosgw instances where you may load-balance gateway client requests between the instances. In a single zone configuration, typically multiple gateway instances point to a single Ceph storage cluster. However, Red Hat supports several multi-site configuration options for the Ceph Object Gateway:
-
Multi-zone: A more advanced configuration consists of one zone group and multiple zones, each zone with one or more
ceph-radosgwinstances. Each zone is backed by its own Ceph Storage Cluster. Multiple zones in a zone group provides disaster recovery for the zone group should one of the zones experience a significant failure. Each zone is active and may receive write operations. In addition to disaster recovery, multiple active zones may also serve as a foundation for content delivery networks. To configure multiple zones without replication, see the Configuring multiple zones without replication. - Multi-zone-group: Formerly called 'regions', the Ceph Object Gateway can also support multiple zone groups, each zone group with one or more zones. Objects stored to zone groups within the same realm share a global namespace, ensuring unique object IDs across zone groups and zones.
- Multiple Realms: The Ceph Object Gateway supports the notion of realms, which can be a single zone group or multiple zone groups and a globally unique namespace for the realm. Multiple realms provides the ability to support numerous configurations and namespaces.
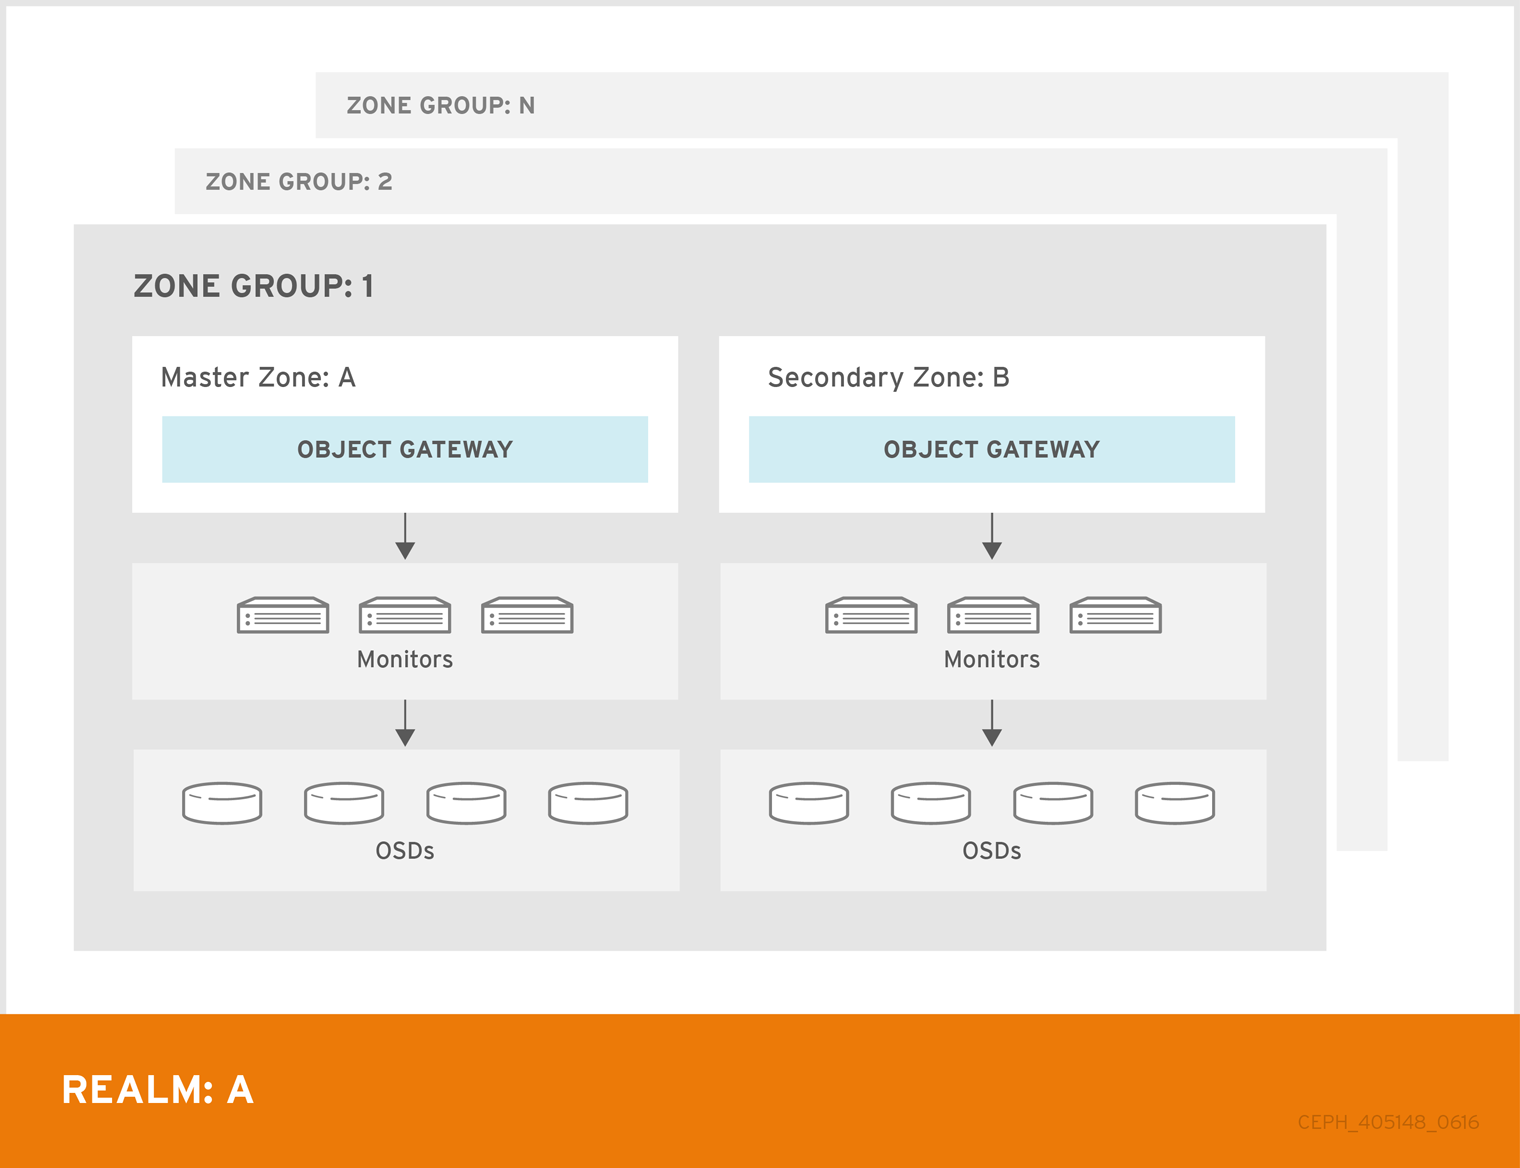
Prerequisites
- A healthy running Red Hat Ceph Storage cluster.
- Deployment of the Ceph Object Gateway software.
5.2.1. Requirements and Assumptions
A multi-site configuration requires at least two Ceph storage clusters, and At least two Ceph object gateway instances, one for each Ceph storage cluster.
This guide assumes at least two Ceph storage clusters in geographically separate locations; however, the configuration can work on the same physical site. This guide also assumes four Ceph object gateway servers named rgw1, rgw2, rgw3 and rgw4 respectively.
A multi-site configuration requires a master zone group and a master zone. Additionally, each zone group requires a master zone. Zone groups may have one or more secondary or non-master zones.
When planning network considerations for multi-site, it is important to understand the relation bandwidth and latency observed on the multi-site synchronization network and the clients ingest rate in direct correlation with the current sync state of the objects owed to the secondary site. The network link between Red Hat Ceph Storage multi-site clusters must be able to handle the ingest into the primary cluster to maintain an effective recovery time on the secondary site. Multi-site synchronization is asynchronous and one of the limitations is the rate at which the sync gateways can process data across the link. An example to look at in terms of network inter-connectivity speed could be 1 GbE or inter-datacenter connectivity, for every 8 TB or cumulative receive data, per client gateway. Thus, if you replicate to two other sites, and ingest 16 TB a day, you need 6 GbE of dedicated bandwidth for multi-site replication.
Red Hat also recommends private Ethernet or Dense wavelength-division multiplexing (DWDM) as a VPN over the internet is not ideal due to the additional overhead incurred.
The master zone within the master zone group of a realm is responsible for storing the master copy of the realm’s metadata, including users, quotas and buckets (created by the radosgw-admin CLI). This metadata gets synchronized to secondary zones and secondary zone groups automatically. Metadata operations executed with the radosgw-admin CLI MUST be executed on a host within the master zone of the master zone group in order to ensure that they get synchronized to the secondary zone groups and zones. Currently, it is possible to execute metadata operations on secondary zones and zone groups, but it is NOT recommended because they WILL NOT be synchronized, leading to fragmented metadata.
In the following examples, the rgw1 host will serve as the master zone of the master zone group; the rgw2 host will serve as the secondary zone of the master zone group; the rgw3 host will serve as the master zone of the secondary zone group; and the rgw4 host will serve as the secondary zone of the secondary zone group.
When you have a large cluster with more Ceph Object Gateways configured in a multi-site storage cluster, Red Hat recommends to dedicate not more than three sync-enabled Ceph Object Gateways with HAProxy load balancer per site for multi-site synchronization. If there are more than three syncing Ceph Object Gateways, it has diminishing returns sync rate in terms of performance and the increased contention creates an incremental risk for hitting timing-related error conditions. This is due to a sync-fairness known issue BZ#1740782.
For the rest of the Ceph Object Gateways in such a configuration, which are dedicated for client I/O operations through load balancers, run the ceph config set client.rgw.CLIENT_NODE rgw_run_sync_thread false command to prevent them from performing sync operations, and then restart the Ceph Object Gateway.
Following is a typical configuration file for HAProxy for syncing gateways:
Example
[root@host01 ~]# cat ./haproxy.cfg

global

	log     	127.0.0.1 local2

	chroot  	/var/lib/haproxy
	pidfile 	/var/run/haproxy.pid
	maxconn 	7000
	user    	haproxy
	group   	haproxy
	daemon

	stats socket /var/lib/haproxy/stats

defaults
	mode                	http
	log                 	global
	option              	httplog
	option              	dontlognull
	option http-server-close
	option forwardfor   	except 127.0.0.0/8
	option              	redispatch
	retries             	3
	timeout http-request	10s
	timeout queue       	1m
	timeout connect     	10s
	timeout client      	30s
	timeout server      	30s
	timeout http-keep-alive 10s
	timeout check       	10s
        timeout client-fin 1s
        timeout server-fin 1s
	maxconn             	6000


listen  stats
	bind	0.0.0.0:1936
    	mode        	http
    	log         	global

    	maxconn 256


    	clitimeout  	10m
    	srvtimeout  	10m
    	contimeout  	10m
    	timeout queue   10m

# JTH start
    	stats enable
    	stats hide-version
    	stats refresh 30s
    	stats show-node
##    	stats auth admin:password
    	stats uri  /haproxy?stats
       stats admin if TRUE


frontend  main
	bind	 *:5000
	acl url_static   	path_beg   	-i /static /images /javascript /stylesheets
	acl url_static   	path_end   	-i .jpg .gif .png .css .js

	use_backend static      	if url_static
	default_backend         	app
        maxconn 6000

backend static
	balance 	roundrobin
    fullconn 6000
    server  app8 host01:8080 check maxconn 2000
    server  app9 host02:8080 check maxconn 2000
    server  app10 host03:8080 check maxconn 2000


backend app
	balance 	roundrobin
    fullconn 6000
    server  app8 host01:8080 check maxconn 2000
    server  app9 host02:8080 check maxconn 2000
    server  app10 host03:8080 check maxconn 2000
5.2.2. Pools
Red Hat recommends using the Ceph Placement Group’s per Pool Calculator to calculate a suitable number of placement groups for the pools the radosgw daemon will create. Set the calculated values as defaults in the Ceph configuration database.
Example
[ceph: root@host01 /]#  ceph config set osd osd_pool_default_pg_num 50
[ceph: root@host01 /]#  ceph config set osd osd_pool_default_pgp_num 50
Making this change to the Ceph configuration will use those defaults when the Ceph Object Gateway instance creates the pools. Alternatively, you can create the pools manually.
Pool names particular to a zone follow the naming convention ZONE_NAME.POOL_NAME. For example, a zone named us-east will have the following pools:
-
.rgw.root -
us-east.rgw.control -
us-east.rgw.meta -
us-east.rgw.log -
us-east.rgw.buckets.index -
us-east.rgw.buckets.data -
us-east.rgw.buckets.non-ec -
us-east.rgw.meta:users.keys -
us-east.rgw.meta:users.email -
us-east.rgw.meta:users.swift -
us-east.rgw.meta:users.uid
Additional Resources
- See the Pools chapter in the Red Hat Ceph Storage Storage Strategies Guide for details on creating pools.
5.2.3. Migrating a single site system to multi-site
To migrate from a single site system with a default zone group and zone to a multi-site system, use the following steps:
Create a realm. Replace
NAMEwith the realm name.Syntax
radosgw-admin realm create --rgw-realm=NAME --defaultRename the default zone and zonegroup. Replace
<name>with the zonegroup or zone name.Syntax
radosgw-admin zonegroup rename --rgw-zonegroup default --zonegroup-new-name=NEW_ZONE_GROUP_NAME
radosgw-admin zone rename --rgw-zone default --zone-new-name us-east-1 --rgw-zonegroup=ZONE_GROUP_NAME
Configure the primary zonegroup. Replace
NAMEwith the realm or zonegroup name. ReplaceFQDNwith the fully qualified domain name(s) in the zonegroup.Syntax
radosgw-admin zonegroup modify --rgw-realm=REALM_NAME --rgw-zonegroup=ZONE_GROUP_NAME --endpoints http://FQDN:80 --master --default
Create a system user. Replace
USER_IDwith the username. ReplaceDISPLAY_NAMEwith a display name. It can contain spaces.Syntax
radosgw-admin user create --uid=USER_ID \
                            --display-name="DISPLAY_NAME" \
                            --access-key=ACCESS_KEY --secret=SECRET_KEY \ --system
Configure the primary zone. Replace
NAMEwith the realm, zonegroup, or zone name. ReplaceFQDNwith the fully qualified domain name(s) in the zonegroup.Syntax
radosgw-admin zone modify --rgw-realm=REALM_NAME --rgw-zonegroup=ZONE_GROUP_NAME \
                            --rgw-zone=ZONE_NAME --endpoints http://FQDN:80 \
                            --access-key=ACCESS_KEY --secret=SECRET_KEY \
                            --master --default
Optional: If you specified the realm and zone in the service specification during the deployment of the Ceph Object Gateway, update the
specsection of the specification file:Syntax
spec:
  rgw_realm: REALM_NAME
  rgw_zone: ZONE_NAME
Update the Ceph configuration database:
Syntax
ceph config set client.rgw.SERVICE_NAME rgw_realm REALM_NAME
ceph config set client.rgw.SERVICE_NAME rgw_zonegroup ZONE_GROUP_NAME
ceph config set client.rgw.SERVICE_NAME rgw_zone PRIMARY_ZONE_NAME
Example
[ceph: root@host01 /]# ceph config set client.rgw.rgwsvcid.mons-1.jwgwwp rgw_realm test_realm
[ceph: root@host01 /]# ceph config set client.rgw.rgwsvcid.mons-1.jwgwwp rgw_zonegroup us
[ceph: root@host01 /]# ceph config set client.rgw.rgwsvcid.mons-1.jwgwwp rgw_zone us-east-1
Commit the updated configuration:
Example
[ceph: root@host01 /]# radosgw-admin period update --commit
Restart the Ceph Object Gateway:
NoteUse the output from the
ceph orch pscommand, under theNAMEcolumn, to get the SERVICE_TYPE.ID information.To restart the Ceph Object Gateway on an individual node in the storage cluster:
Syntax
systemctl restart ceph-CLUSTER_ID@SERVICE_TYPE.ID.service
Example
[root@host01 ~]# systemctl restart ceph-c4b34c6f-8365-11ba-dc31-529020a7702d@rgw.realm.zone.host01.gwasto.service
To restart the Ceph Object Gateways on all nodes in the storage cluster:
Syntax
ceph orch restart SERVICE_TYPEExample
[ceph: root@host01 /]# ceph orch restart rgw
- Establish the secondary zone. See the Establishing a secondary zone section.
5.2.4. Establishing a secondary zone
Zones within a zone group replicate all data to ensure that each zone has the same data. When creating the secondary zone, issue ALL of the radosgw-admin zone operations on a host identified to serve the secondary zone.
To add a additional zones, follow the same procedures as for adding the secondary zone. Use a different zone name.
You must run metadata operations, such as user creation and quotas, on a host within the master zone of the master zonegroup. The master zone and the secondary zone can receive bucket operations from the RESTful APIs, but the secondary zone redirects bucket operations to the master zone. If the master zone is down, bucket operations will fail. If you create a bucket using the radosgw-admin CLI, you must run it on a host within the master zone of the master zone group so that the buckets will synchronize with other zone groups and zones.
Prerequisites
- At least two running Red Hat Ceph Storage clusters.
- At least two Ceph Object Gateway instances, one for each Red Hat Ceph Storage cluster.
- Root-level access to all the nodes.
- Nodes or containers are added to the storage cluster.
- All Ceph Manager, Monitor, and OSD daemons are deployed.
Procedure
Log into the
cephadmshell:Example
[root@host04 ~]# cephadm shell
Pull the primary realm configuration from the host:
Syntax
radosgw-admin realm pull --url=URL_TO_PRIMARY_ZONE_GATEWAY --access-key=ACCESS_KEY --secret-key=SECRET_KEY
Example
[ceph: root@host04 /]# radosgw-admin realm pull --url=http://10.74.249.26:80 --access-key=LIPEYZJLTWXRKXS9LPJC --secret-key=IsAje0AVDNXNw48LjMAimpCpI7VaxJYSnfD0FFKQ
Pull the primary period configuration from the host:
Syntax
radosgw-admin period pull --url=URL_TO_PRIMARY_ZONE_GATEWAY --access-key=ACCESS_KEY --secret-key=SECRET_KEY
Example
[ceph: root@host04 /]# radosgw-admin period pull --url=http://10.74.249.26:80 --access-key=LIPEYZJLTWXRKXS9LPJC --secret-key=IsAje0AVDNXNw48LjMAimpCpI7VaxJYSnfD0FFKQ
Configure a secondary zone:
NoteAll zones run in an active-active configuration by default; that is, a gateway client might write data to any zone and the zone will replicate the data to all other zones within the zone group. If the secondary zone should not accept write operations, specify the
`--read-onlyflag to create an active-passive configuration between the master zone and the secondary zone. Additionally, provide theaccess_keyandsecret_keyof the generated system user stored in the master zone of the master zone group.Syntax
radosgw-admin zone create --rgw-zonegroup=_ZONE_GROUP_NAME_ \
             --rgw-zone=_SECONDARY_ZONE_NAME_ --endpoints=http://_RGW_SECONDARY_HOSTNAME_:_RGW_PRIMARY_PORT_NUMBER_1_ \
             --access-key=_SYSTEM_ACCESS_KEY_ --secret=_SYSTEM_SECRET_KEY_ \
             [--read-only]
Example
[ceph: root@host04 /]# radosgw-admin zone create --rgw-zonegroup=us --rgw-zone=us-east-2 --endpoints=http://rgw2:80 --access-key=LIPEYZJLTWXRKXS9LPJC --secret-key=IsAje0AVDNXNw48LjMAimpCpI7VaxJYSnfD0FFKQ
Optional: Delete the default zone:
ImportantDo not delete the default zone and its pools if you are using the default zone and zone group to store data.
Example
[ceph: root@host04 /]# radosgw-admin zone rm --rgw-zone=default
[ceph: root@host04 /]# ceph osd pool rm default.rgw.log default.rgw.log --yes-i-really-really-mean-it
[ceph: root@host04 /]# ceph osd pool rm default.rgw.meta default.rgw.meta --yes-i-really-really-mean-it
[ceph: root@host04 /]# ceph osd pool rm default.rgw.control default.rgw.control --yes-i-really-really-mean-it
[ceph: root@host04 /]# ceph osd pool rm default.rgw.data.root default.rgw.data.root --yes-i-really-really-mean-it
[ceph: root@host04 /]# ceph osd pool rm default.rgw.gc default.rgw.gc --yes-i-really-really-mean-it
Optional: If you specified the realm and zone in the service specification during the deployment of the Ceph Object Gateway, update the
specsection of the specification file:Syntax
spec:
  rgw_realm: REALM_NAME
  rgw_zone: ZONE_NAME
Update the Ceph configuration database:
Syntax
ceph config set client.rgw.SERVICE_NAME rgw_realm REALM_NAME
ceph config set client.rgw.SERVICE_NAME rgw_zonegroup ZONE_GROUP_NAME
ceph config set client.rgw.SERVICE_NAME rgw_zone SECONDARY_ZONE_NAME
Example
[ceph: root@host04 /]# ceph config set client.rgw.rgwsvcid.mons-1.jwgwwp rgw_realm test_realm
[ceph: root@host04 /]# ceph config set client.rgw.rgwsvcid.mons-1.jwgwwp rgw_zonegroup us
[ceph: root@host04 /]# ceph config set client.rgw.rgwsvcid.mons-1.jwgwwp rgw_zone us-east-2
Commit the changes:
Syntax
radosgw-admin period update --commit
Example
[ceph: root@host04 /]# radosgw-admin period update --commit
Outside the
cephadmshell, fetch the FSID of the storage cluster and the processes:Example
[root@host04 ~]# systemctl list-units | grep ceph
Start the Ceph Object Gateway daemon:
Syntax
systemctl start ceph-FSID@DAEMON_NAME
systemctl enable ceph-FSID@DAEMON_NAME
Example
[root@host04 ~]# systemctl start ceph-62a081a6-88aa-11eb-a367-001a4a000672@rgw.test_realm.us-east-2.host04.ahdtsw.service
[root@host04 ~]# systemctl enable ceph-62a081a6-88aa-11eb-a367-001a4a000672@rgw.test_realm.us-east-2.host04.ahdtsw.service
5.2.5. Configuring the archive zone (Technology Preview)
The archive sync module uses the versioning feature of S3 objects in Ceph Object Gateway to have an archive zone. The archive zone has a history of versions of S3 objects that can only be eliminated through the gateways that are associated with the archive zone. It captures all the data updates and metadata to consolidate them as versions of S3 objects.
The archive sync module is a Technology Preview feature only. Technology Preview features are not supported with Red Hat production service level agreements (SLAs), might not be functionally complete, and Red Hat does not recommend using them for production. These features provide early access to upcoming product features, enabling customers to test functionality and provide feedback during the development process. See the support scope for Red Hat Technology Preview features for more details.
Prerequisites
- A running Red Hat Ceph Storage cluster.
- Root-level access to a Ceph Monitor node.
- Installation of the Ceph Object Gateway software.
Procedure
Configure the archive zone when creating a new zone by using the
archivetier:Syntax
radosgw-admin zone create --rgw-zonegroup={ZONE_GROUP_NAME} --rgw-zone={ZONE_NAME} --endpoints={http://FQDN:PORT},{http://FQDN:PORT} --tier-type=archiveExample
[ceph: root@host01 /]# radosgw-admin zone create --rgw-zonegroup=us --rgw-zone=us-east --endpoints={http://example.com:8080} --tier-type=archive
Additional resources
- See the Deploying a multi-site Ceph Object Gateway using the Ceph Orchestrator section in the Red Hat Ceph Storage Object Gateway Guide for more details.
5.2.5.1. Deleting objects in archive zone
You can use an S3 lifecycle policy extension to delete objects within an <ArchiveZone> element.
Archive zone objects can only be deleted using the expiration lifecycle policy rule.
-
If any
<Rule>section contains an<ArchiveZone>element, that rule executes in archive zone and are the ONLY rules which run in an archive zone. -
Rules marked
<ArchiveZone>do NOT execute in non-archive zones.
The rules within the lifecycle policy determine when and what objects to delete. For more information about lifecycle creation and management, see Bucket lifecycle.
Prerequisites
- A running Red Hat Ceph Storage cluster.
- Root-level access to a Ceph Monitor node.
- Installation of the Ceph Object Gateway software.
Procedure
Set the
<ArchiveZone>lifecycle policy rule. For more information about creating a lifecycle policy, see See the Creating a lifecycle management policy section in the Red Hat Ceph Storage Object Gateway Guide for more details.Example
<?xml version="1.0" ?>
<LifecycleConfiguration xmlns="http://s3.amazonaws.com/doc/2006-03-01/">
        <Rule>
                <ID>delete-1-days-az</ID>
                <Filter>
		  <Prefix></Prefix>
		  <ArchiveZone />   1
                </Filter>
                <Status>Enabled</Status>
                <Expiration>
                        <Days>1</Days>
                </Expiration>
        </Rule>
</LifecycleConfiguration>
Optional: See if a specific lifecycle policy contains an archive zone rule.
Syntax
radosgw-admin lc get --bucket BUCKET_NAMEExample
[ceph: root@host01 /]# radosgw-admin lc get --bucket test-bkt { "prefix_map": { "": { "status": true, "dm_expiration": true, "expiration": 0, "noncur_expiration": 2, "mp_expiration": 0, "transitions": {}, "noncur_transitions": {} } }, "rule_map": [ { "id": "Rule 1", "rule": { "id": "Rule 1", "prefix": "", "status": "Enabled", "expiration": { "days": "", "date": "" }, "noncur_expiration": { "days": "2", "date": "" }, "mp_expiration": { "days": "", "date": "" }, "filter": { "prefix": "", "obj_tags": { "tagset": {} }, "archivezone": "" 1 }, "transitions": {}, "noncur_transitions": {}, "dm_expiration": true } } ] }If the Ceph Object Gateway user is deleted, the buckets at the archive site owned by that user is inaccessible. Link those buckets to another Ceph Object Gateway user to access the data.
Syntax
radosgw-admin bucket link --uid NEW_USER_ID --bucket BUCKET_NAME --yes-i-really-mean-it
Example
[ceph: root@host01 /]# radosgw-admin bucket link --uid arcuser1 --bucket arc1-deleted-da473fbbaded232dc5d1e434675c1068 --yes-i-really-mean-it
Additional resources
- See the Bucket lifecycle section in the Red Hat Ceph Storage Object Gateway Guide for more details.
- See the S3 bucket lifecycle section in the Red Hat Ceph Storage Developer Guide for more details.
5.2.5.2. Deleting objects in archive module
Starting from Red Hat Ceph Storage 5.3 and later, you can use an S3 lifecycle policy extension to delete objects within an <ArchiveZone> element.
-
If any
<Rule>section contains an<ArchiveZone>element, that rule executes in archive zone and are the ONLY rules which run in an archive zone. -
Rules marked
<ArchiveZone>do NOT execute in non-archive zones.
The rules within the lifecycle policy determine when and what objects to delete. For more information about lifecycle creation and management, see Bucket lifecycle.
Prerequisites
- A running Red Hat Ceph Storage cluster.
- Root-level access to a Ceph Monitor node.
- Installation of the Ceph Object Gateway software.
Procedure
Set the
<ArchiveZone>lifecycle policy rule. For more information about creating a lifecycle policy, see * See the Creating a lifecycle management policy section in the Red Hat Ceph Storage Object Gateway Guide for more details.Example
<?xml version="1.0" ?>
<LifecycleConfiguration xmlns="http://s3.amazonaws.com/doc/2006-03-01/">
        <Rule>
                <ID>delete-1-days-az</ID>
                <Filter>
		  <Prefix></Prefix>
		  <ArchiveZone />   1
                </Filter>
                <Status>Enabled</Status>
                <Expiration>
                        <Days>1</Days>
                </Expiration>
        </Rule>
</LifecycleConfiguration>
Optional: See if a specific lifecycle policy contains an archive zone rule.
Syntax
radosgw-admin lc get -- _BUCKET_NAME_
Example
[ceph: root@host01 /]# radosgw-admin lc get --bucket test-bkt

{
    "prefix_map": {
        "": {
            "status": true,
            "dm_expiration": true,
            "expiration": 0,
            "noncur_expiration": 2,
            "mp_expiration": 0,
            "transitions": {},
            "noncur_transitions": {}
        }
    },
    "rule_map": [
        {
            "id": "Rule 1",
            "rule": {
                "id": "Rule 1",
                "prefix": "",
                "status": "Enabled",
                "expiration": {
                    "days": "",
                    "date": ""
                },
                "noncur_expiration": {
                    "days": "2",
                    "date": ""
                },
                "mp_expiration": {
                    "days": "",
                    "date": ""
                },
                "filter": {
                    "prefix": "",
                    "obj_tags": {
                        "tagset": {}
                    },
                    "archivezone": ""   1
                },
                "transitions": {},
                "noncur_transitions": {},
                "dm_expiration": true
            }
        }
    ]
}
Additional resources
- See the Bucket lifecycle section in the Red Hat Ceph Storage Object Gateway Guide for more details.
- See the S3 bucket lifecycle section in the Red Hat Ceph Storage Developer Guide for more details.
5.2.6. Failover and disaster recovery
If the primary zone fails, failover to the secondary zone for disaster recovery.
Prerequisites
- A running Red Hat Ceph Storage cluster.
- Root-level access to a Ceph Monitor node.
- Installation of the Ceph Object Gateway software.
Procedure
Make the secondary zone the primary and default zone. For example:
Syntax
radosgw-admin zone modify --rgw-zone=ZONE_NAME --master --defaultBy default, Ceph Object Gateway runs in an active-active configuration. If the cluster was configured to run in an active-passive configuration, the secondary zone is a read-only zone. Remove the
--read-onlystatus to allow the zone to receive write operations. For example:Syntax
radosgw-admin zone modify --rgw-zone=ZONE_NAME --master --default --read-only=falseUpdate the period to make the changes take effect:
Example
[ceph: root@host01 /]# radosgw-admin period update --commit
Restart the Ceph Object Gateway.
NoteUse the output from the
ceph orch pscommand, under theNAMEcolumn, to get the SERVICE_TYPE.ID information.To restart the Ceph Object Gateway on an individual node in the storage cluster:
Syntax
systemctl restart ceph-CLUSTER_ID@SERVICE_TYPE.ID.service
Example
[root@host01 ~]# systemctl restart ceph-c4b34c6f-8365-11ba-dc31-529020a7702d@rgw.realm.zone.host01.gwasto.service
To restart the Ceph Object Gateways on all nodes in the storage cluster:
Syntax
ceph orch restart SERVICE_TYPEExample
[ceph: root@host01 /]# ceph orch restart rgw
If the former primary zone recovers, revert the operation.
From the recovered zone, pull the realm from the current primary zone:
Syntax
radosgw-admin realm pull --url=URL_TO_PRIMARY_ZONE_GATEWAY \
                            --access-key=ACCESS_KEY --secret=SECRET_KEY
Make the recovered zone the primary and default zone:
Syntax
radosgw-admin zone modify --rgw-zone=ZONE_NAME --master --defaultUpdate the period to make the changes take effect:
Example
[ceph: root@host01 /]# radosgw-admin period update --commit
Restart the Ceph Object Gateway in the recovered zone:
Syntax
ceph orch restart SERVICE_TYPEExample
[ceph: root@host01 /]# ceph orch restart rgw
If the secondary zone needs to be a read-only configuration, update the secondary zone:
Syntax
radosgw-admin zone modify --rgw-zone=ZONE_NAME --read-only
radosgw-admin zone modify --rgw-zone=ZONE_NAME --read-only
Update the period to make the changes take effect:
Example
[ceph: root@host01 /]# radosgw-admin period update --commit
Restart the Ceph Object Gateway in the secondary zone:
Syntax
ceph orch restart SERVICE_TYPEExample
[ceph: root@host01 /]# ceph orch restart rgw
5.2.7. Synchronizing multi-site data logs
By default, in Red Hat Ceph Storage 4 and earlier versions, multi-site data logging is set to object map (OMAP) data logs.
It is recommended to use default datalog type.
You do not have to synchronize and trim everything down when switching. The Red Hat Ceph Storage cluster starts a data log of the requested type when you use the radosgw-admin data log type, and continues synchronizing and trimming the old log, purging it when it is empty, before going to the new log.
Prerequisites
- A running Red Hat Ceph Storage cluster.
- Ceph Object Gateway multi-site installed.
- Root-level access on all the nodes.
Procedure
View the type of data log:
Example
[root@host01 ~]# radosgw-admin datalog status { "marker": "1_1657793517.559260_543389.1", "last_update": "2022-07-14 10:11:57.559260Z" },1_in marker reflects OMAP data log type.Change the data log type to FIFO:
NoteConfiguration values are case-sensitive. Use
fifoin lowercase to set configuration options.NoteAfter upgrading from Red Hat Ceph Storage 4 to Red Hat Ceph Storage 5, change the default data log type to
fifo.Example
[root@host01 ~]# radosgw-admin --log-type fifo datalog type
Verify the changes:
Example
[root@host01 ~]# radosgw-admin datalog status { "marker": "G00000000000000000001@00000000000000000037:00000000000003563105", "last_update": "2022-07-14T10:14:07.516629Z" },:in marker reflects FIFO data log type.
5.2.8. Configuring multiple zones without replication
You can configure multiple zones that will not replicate each other. For example, you can create a dedicated zone for each team in a company.
Prerequisites
- A running Red Hat Ceph Storage cluster.
- Installation of the Ceph Object Gateway software.
- Root-level access to the Ceph Object Gateway node.
Procedure
Create a new realm:
Syntax
radosgw-admin realm create --rgw-realm=REALM_NAME [--default]Example
[ceph: root@host01 /]# radosgw-admin realm create --rgw-realm=test_realm --default
{
    "id": "0956b174-fe14-4f97-8b50-bb7ec5e1cf62",
    "name": "test_realm",
    "current_period": "1950b710-3e63-4c41-a19e-46a715000980",
    "epoch": 1
}
Create a new zone group:
Syntax
radosgw-admin zonegroup create --rgw-zonegroup=ZONE_GROUP_NAME --endpoints=FQDN:PORT --rgw-realm=REALM_NAME|--realm-id=REALM_ID --master --default
Example
[ceph: root@host01 /]# radosgw-admin zonegroup create --rgw-zonegroup=us --endpoints=http://rgw1:80 --rgw-realm=test_realm --master --default
{
    "id": "f1a233f5-c354-4107-b36c-df66126475a6",
    "name": "us",
    "api_name": "us",
    "is_master": "true",
    "endpoints": [
        "http:\/\/rgw1:80"
    ],
    "hostnames": [],
    "hostnames_s3webzone": [],
    "master_zone": "",
    "zones": [],
    "placement_targets": [],
    "default_placement": "",
    "realm_id": "0956b174-fe14-4f97-8b50-bb7ec5e1cf62"
}
Create one or more zones depending on the use case:
Syntax
radosgw-admin zone create --rgw-zonegroup=ZONE_GROUP_NAME --rgw-zone=ZONE_NAME --master --default --endpoints=FQDN:PORT,FQDN:PORT
Example
[ceph: root@host01 /]# radosgw-admin zone create --rgw-zonegroup=us --rgw-zone=us-east --master --default --endpoints=http://rgw1:80
Get the JSON file with the configuration of the zone group:
Syntax
radosgw-admin zonegroup get --rgw-zonegroup=ZONE_GROUP_NAME > JSON_FILE_NAME
Example
[ceph: root@host01 /]# radosgw-admin zonegroup get --rgw-zonegroup=us > zonegroup-us.json
Open the file for editing, and set the
log_meta,log_data, andsync_from_allfields tofalse:Example
    {
        "id": "72f3a886-4c70-420b-bc39-7687f072997d",
        "name": "default",
        "api_name": "",
        "is_master": "true",
        "endpoints": [],
        "hostnames": [],
        "hostnames_s3website": [],
        "master_zone": "a5e44ecd-7aae-4e39-b743-3a709acb60c5",
        "zones": [
            {
                "id": "975558e0-44d8-4866-a435-96d3e71041db",
                "name": "testzone",
                "endpoints": [],
                "log_meta": "false",
                "log_data": "false",
                "bucket_index_max_shards": 11,
                "read_only": "false",
                "tier_type": "",
                "sync_from_all": "false",
                "sync_from": []
            },
            {
                "id": "a5e44ecd-7aae-4e39-b743-3a709acb60c5",
                "name": "default",
                "endpoints": [],
                "log_meta": "false",
                "log_data": "false",
                "bucket_index_max_shards": 11,
                "read_only": "false",
                "tier_type": "",
                "sync_from_all": "false",
                "sync_from": []
            }
        ],
        "placement_targets": [
            {
                "name": "default-placement",
                "tags": []
            }
        ],
        "default_placement": "default-placement",
        "realm_id": "2d988e7d-917e-46e7-bb18-79350f6a5155"
    }
Use the updated JSON file to set the zone group:
Syntax
radosgw-admin zonegroup set --rgw-zonegroup=ZONE_GROUP_NAME --infile=JSON_FILE_NAME
Example
[ceph: root@host01 /]# radosgw-admin zonegroup set --rgw-zonegroup=us --infile=zonegroup-us.json
Update the period:
Example
[ceph: root@host01 /]# radosgw-admin period update --commit
Optional: If you specified the realm and zone in the service specification during the deployment of the Ceph Object Gateway, update the
specsection of the specification file:Syntax
spec:
  rgw_realm: REALM_NAME
  rgw_zone: ZONE_NAME
Validate if the two zones are successfully disabled:
Example
[root@ceph-ck-multi-pst82t-node5 ~]# radosgw-admin sync status

realm 1e513df5-279b-4558-9dd0-3e50af411740 (india)
zonegroup 09d320dd-d9f8-4fce-b951-8a59306a2d85 (south)
zone a88defd9-84f4-4a4e-8b21-7f3fbc190005 (ka)
current time 2024-03-15T05:01:18Z
zonegroup features enabled: compress-encrypted,resharding
metadata sync no sync (zone is master)
data sync source: 7a1ad335-9e09-403a-879c-d29cd81e9c4d (tn)
not syncing from zone
Additional Resources
5.2.9. Configuring multiple realms in the same storage cluster
You can configure multiple realms in the same storage cluster. This is a more advanced use case for multi-site. Configuring multiple realms in the same storage cluster enables you to use a local realm to handle local Ceph Object Gateway client traffic, as well as a replicated realm for data that will be replicated to a secondary site.
Red Hat recommends that each realm has its own Ceph Object Gateway.
Prerequisites
- Two running Red Hat Ceph Storage data centers in a storage cluster.
- The access key and secret key for each data center in the storage cluster.
- Root-level access to all the Ceph Object Gateway nodes.
- Each data center has its own local realm. They share a realm that replicates on both sites.
Procedure
Create one local realm on the first data center in the storage cluster:
Syntax
radosgw-admin realm create --rgw-realm=REALM_NAME --defaultExample
[ceph: root@host01 /]# radosgw-admin realm create --rgw-realm=ldc1 --default
Create one local master zonegroup on the first data center:
Syntax
radosgw-admin zonegroup create --rgw-zonegroup=ZONE_GROUP_NAME --endpoints=http://RGW_NODE_NAME:80 --rgw-realm=REALM_NAME --master --default
Example
[ceph: root@host01 /]# radosgw-admin zonegroup create --rgw-zonegroup=ldc1zg --endpoints=http://rgw1:80 --rgw-realm=ldc1 --master --default
Create one local zone on the first data center:
Syntax
radosgw-admin zone create --rgw-zonegroup=ZONE_GROUP_NAME --rgw-zone=ZONE_NAME --master --default --endpoints=HTTP_FQDN[,HTTP_FQDN]
Example
[ceph: root@host01 /]# radosgw-admin zone create --rgw-zonegroup=ldc1zg --rgw-zone=ldc1z --master --default --endpoints=http://rgw.example.com
Commit the period:
Example
[ceph: root@host01 /]# radosgw-admin period update --commit
Optional: If you specified the realm and zone in the service specification during the deployment of the Ceph Object Gateway, update the
specsection of the specification file:Syntax
spec:
  rgw_realm: REALM_NAME
  rgw_zone: ZONE_NAME
You can either deploy the Ceph Object Gateway daemons with the appropriate realm and zone or update the configuration database:
Deploy the Ceph Object Gateway using placement specification:
Syntax
ceph orch apply rgw SERVICE_NAME --realm=REALM_NAME --zone=ZONE_NAME --placement="NUMBER_OF_DAEMONS HOST_NAME_1 HOST_NAME_2"
Example
[ceph: root@host01 /]# ceph orch apply rgw rgw --realm=ldc1 --zone=ldc1z --placement="1 host01"
Update the Ceph configuration database:
Syntax
ceph config set client.rgw.SERVICE_NAME rgw_realm REALM_NAME
ceph config set client.rgw.SERVICE_NAME rgw_zonegroup ZONE_GROUP_NAME
ceph config set client.rgw.SERVICE_NAME rgw_zone ZONE_NAME
Example
[ceph: root@host01 /]# ceph config set client.rgw.rgwsvcid.mons-1.jwgwwp rgw_realm ldc1
[ceph: root@host01 /]# ceph config set client.rgw.rgwsvcid.mons-1.jwgwwp rgw_zonegroup ldc1zg
[ceph: root@host01 /]# ceph config set client.rgw.rgwsvcid.mons-1.jwgwwp rgw_zone ldc1z
Restart the Ceph Object Gateway.
NoteUse the output from the
ceph orch pscommand, under theNAMEcolumn, to get the SERVICE_TYPE.ID information.To restart the Ceph Object Gateway on an individual node in the storage cluster:
Syntax
systemctl restart ceph-CLUSTER_ID@SERVICE_TYPE.ID.service
Example
[root@host01 ~]# systemctl restart ceph-c4b34c6f-8365-11ba-dc31-529020a7702d@rgw.realm.zone.host01.gwasto.service
To restart the Ceph Object Gateways on all nodes in the storage cluster:
Syntax
ceph orch restart SERVICE_TYPEExample
[ceph: root@host01 /]# ceph orch restart rgw
Create one local realm on the second data center in the storage cluster:
Syntax
radosgw-admin realm create --rgw-realm=REALM_NAME --defaultExample
[ceph: root@host04 /]# radosgw-admin realm create --rgw-realm=ldc2 --default
Create one local master zonegroup on the second data center:
Syntax
radosgw-admin zonegroup create --rgw-zonegroup=ZONE_GROUP_NAME --endpoints=http://RGW_NODE_NAME:80 --rgw-realm=REALM_NAME --master --default
Example
[ceph: root@host04 /]# radosgw-admin zonegroup create --rgw-zonegroup=ldc2zg --endpoints=http://rgw2:80 --rgw-realm=ldc2 --master --default
Create one local zone on the second data center:
Syntax
radosgw-admin zone create --rgw-zonegroup=ZONE_GROUP_NAME --rgw-zone=ZONE_NAME --master --default --endpoints=HTTP_FQDN[, HTTP_FQDN]
Example
[ceph: root@host04 /]# radosgw-admin zone create --rgw-zonegroup=ldc2zg --rgw-zone=ldc2z --master --default --endpoints=http://rgw.example.com
Commit the period:
Example
[ceph: root@host04 /]# radosgw-admin period update --commit
Optional: If you specified the realm and zone in the service specification during the deployment of the Ceph Object Gateway, update the
specsection of the specification file:Syntax
spec:
  rgw_realm: REALM_NAME
  rgw_zone: ZONE_NAME
You can either deploy the Ceph Object Gateway daemons with the appropriate realm and zone or update the configuration database:
Deploy the Ceph Object Gateway using placement specification:
Syntax
ceph orch apply rgw SERVICE_NAME --realm=REALM_NAME --zone=ZONE_NAME --placement="NUMBER_OF_DAEMONS HOST_NAME_1 HOST_NAME_2"
Example
[ceph: root@host01 /]# ceph orch apply rgw rgw --realm=ldc2 --zone=ldc2z --placement="1 host01"
Update the Ceph configuration database:
Syntax
ceph config set client.rgw.SERVICE_NAME rgw_realm REALM_NAME
ceph config set client.rgw.SERVICE_NAME rgw_zonegroup ZONE_GROUP_NAME
ceph config set client.rgw.SERVICE_NAME rgw_zone ZONE_NAME
Example
[ceph: root@host01 /]# ceph config set client.rgw.rgwsvcid.mons-1.jwgwwp rgw_realm ldc2
[ceph: root@host01 /]# ceph config set client.rgw.rgwsvcid.mons-1.jwgwwp rgw_zonegroup ldc2zg
[ceph: root@host01 /]# ceph config set client.rgw.rgwsvcid.mons-1.jwgwwp rgw_zone ldc2z
Restart the Ceph Object Gateway.
NoteUse the output from the
ceph orch pscommand, under theNAMEcolumn, to get the SERVICE_TYPE.ID information.To restart the Ceph Object Gateway on individual node in the storage cluster:
Syntax
systemctl restart ceph-CLUSTER_ID@SERVICE_TYPE.ID.service
Example
[root@host04 ~]# systemctl restart ceph-c4b34c6f-8365-11ba-dc31-529020a7702d@rgw.realm.zone.host01.gwasto.service
To restart the Ceph Object Gateways on all nodes in the storage cluster:
Syntax
ceph orch restart SERVICE_TYPEExample
[ceph: root@host04 /]# ceph orch restart rgw
Create a replicated realm on the first data center in the storage cluster:
Syntax
radosgw-admin realm create --rgw-realm=REPLICATED_REALM_1 --defaultExample
[ceph: root@host01 /]# radosgw-admin realm create --rgw-realm=rdc1 --default
Use the
--defaultflag to make the replicated realm default on the primary site.Create a master zonegroup for the first data center:
Syntax
radosgw-admin zonegroup create --rgw-zonegroup=RGW_ZONE_GROUP --endpoints=http://_RGW_NODE_NAME:80 --rgw-realm=_RGW_REALM_NAME --master --defaultExample
[ceph: root@host01 /]# radosgw-admin zonegroup create --rgw-zonegroup=rdc1zg --endpoints=http://rgw1:80 --rgw-realm=rdc1 --master --default
Create a master zone on the first data center:
Syntax
radosgw-admin zone create --rgw-zonegroup=RGW_ZONE_GROUP --rgw-zone=_MASTER_RGW_NODE_NAME --master --default --endpoints=HTTP_FQDN[,HTTP_FQDN]
Example
[ceph: root@host01 /]# radosgw-admin zone create --rgw-zonegroup=rdc1zg --rgw-zone=rdc1z --master --default --endpoints=http://rgw.example.com
Create a synchronization user and add the system user to the master zone for multi-site:
Syntax
radosgw-admin user create --uid="SYNCHRONIZATION_USER" --display-name="Synchronization User" --system
radosgw-admin zone modify --rgw-zone=RGW_ZONE --access-key=ACCESS_KEY --secret=SECRET_KEY
Example
radosgw-admin user create --uid="synchronization-user" --display-name="Synchronization User" --system
[ceph: root@host01 /]# radosgw-admin zone modify --rgw-zone=rdc1zg --access-key=3QV0D6ZMMCJZMSCXJ2QJ --secret=VpvQWcsfI9OPzUCpR4kynDLAbqa1OIKqRB6WEnH8
Commit the period:
Example
[ceph: root@host01 /]# radosgw-admin period update --commit
Optional: If you specified the realm and zone in the service specification during the deployment of the Ceph Object Gateway, update the
specsection of the specification file:Syntax
spec:
  rgw_realm: REALM_NAME
  rgw_zone: ZONE_NAME
You can either deploy the Ceph Object Gateway daemons with the appropriate realm and zone or update the configuration database:
Deploy the Ceph Object Gateway using placement specification:
Syntax
ceph orch apply rgw SERVICE_NAME --realm=REALM_NAME --zone=ZONE_NAME --placement="NUMBER_OF_DAEMONS HOST_NAME_1 HOST_NAME_2"
Example
[ceph: root@host01 /]# ceph orch apply rgw rgw --realm=rdc1 --zone=rdc1z --placement="1 host01"
Update the Ceph configuration database:
Syntax
ceph config set client.rgw.SERVICE_NAME  rgw_realm REALM_NAME
ceph config set client.rgw.SERVICE_NAME  rgw_zonegroup ZONE_GROUP_NAME
ceph config set client.rgw.SERVICE_NAME  rgw_zone ZONE_NAME
Example
[ceph: root@host01 /]# ceph config set client.rgw.rgwsvcid.mons-1.jwgwwp rgw_realm rdc1
[ceph: root@host01 /]# ceph config set client.rgw.rgwsvcid.mons-1.jwgwwp rgw_zonegroup rdc1zg
[ceph: root@host01 /]# ceph config set client.rgw.rgwsvcid.mons-1.jwgwwp rgw_zone rdc1z
Restart the Ceph Object Gateway.
NoteUse the output from the
ceph orch pscommand, under theNAMEcolumn, to get the SERVICE_TYPE.ID information.To restart the Ceph Object Gateway on individual node in the storage cluster:
Syntax
systemctl restart ceph-CLUSTER_ID@SERVICE_TYPE.ID.service
Example
[root@host01 ~]# systemctl restart ceph-c4b34c6f-8365-11ba-dc31-529020a7702d@rgw.realm.zone.host01.gwasto.service
To restart the Ceph Object Gateways on all nodes in the storage cluster:
Syntax
ceph orch restart SERVICE_TYPEExample
[ceph: root@host01 /]# ceph orch restart rgw
Pull the replicated realm on the second data center:
Syntax
radosgw-admin realm pull --url=https://tower-osd1.cephtips.com --access-key=ACCESS_KEY --secret-key=SECRET_KEY
Example
[ceph: root@host01 /]# radosgw-admin realm pull --url=https://tower-osd1.cephtips.com --access-key=3QV0D6ZMMCJZMSCXJ2QJ --secret-key=VpvQWcsfI9OPzUCpR4kynDLAbqa1OIKqRB6WEnH8
Pull the period from the first data center:
Syntax
radosgw-admin period pull --url=https://tower-osd1.cephtips.com --access-key=ACCESS_KEY --secret-key=SECRET_KEY
Example
[ceph: root@host01 /]# radosgw-admin period pull --url=https://tower-osd1.cephtips.com --access-key=3QV0D6ZMMCJZMSCXJ2QJ --secret-key=VpvQWcsfI9OPzUCpR4kynDLAbqa1OIKqRB6WEnH8
Create the secondary zone on the second data center:
Syntax
radosgw-admin zone create --rgw-zone=RGW_ZONE --rgw-zonegroup=RGW_ZONE_GROUP --endpoints=https://tower-osd4.cephtips.com --access-key=_ACCESS_KEY --secret-key=SECRET_KEY
Example
[ceph: root@host04 /]# radosgw-admin zone create --rgw-zone=rdc2z --rgw-zonegroup=rdc1zg --endpoints=https://tower-osd4.cephtips.com --access-key=3QV0D6ZMMCJZMSCXJ2QJ --secret-key=VpvQWcsfI9OPzUCpR4kynDLAbqa1OIKqRB6WEnH8
Commit the period:
Example
[ceph: root@host04 /]# radosgw-admin period update --commit
Optional: If you specified the realm and zone in the service specification during the deployment of the Ceph Object Gateway, update the
specsection of the specification file:Syntax
spec:
  rgw_realm: REALM_NAME
  rgw_zone: ZONE_NAME
You can either deploy the Ceph Object Gateway daemons with the appropriate realm and zone or update the configuration database:
Deploy the Ceph Object Gateway using placement specification:
Syntax
ceph orch apply rgw SERVICE_NAME --realm=REALM_NAME --zone=ZONE_NAME --placement="NUMBER_OF_DAEMONS HOST_NAME_1 HOST_NAME_2"
Example
[ceph: root@host04 /]# ceph orch apply rgw rgw --realm=rdc1 --zone=rdc2z --placement="1 host04"
Update the Ceph configuration database:
Syntax
ceph config set client.rgw.SERVICE_NAME rgw_realm REALM_NAME
ceph config set client.rgw.SERVICE_NAME rgw_zonegroup ZONE_GROUP_NAME
ceph config set client.rgw.SERVICE_NAME rgw_zone ZONE_NAME
Example
[ceph: root@host04 /]# ceph config set client.rgw.rgwsvcid.mons-1.jwgwwp rgw_realm rdc1
[ceph: root@host04 /]# ceph config set client.rgw.rgwsvcid.mons-1.jwgwwp rgw_zonegroup rdc1zg
[ceph: root@host04 /]# ceph config set client.rgw.rgwsvcid.mons-1.jwgwwp rgw_zone rdc2z
Restart the Ceph Object Gateway.
NoteUse the output from the
ceph orch pscommand, under theNAMEcolumn, to get the SERVICE_TYPE.ID information.To restart the Ceph Object Gateway on individual node in the storage cluster:
Syntax
systemctl restart ceph-CLUSTER_ID@SERVICE_TYPE.ID.service
Example
[root@host02 ~]# systemctl restart ceph-c4b34c6f-8365-11ba-dc31-529020a7702d@rgw.realm.zone.host01.gwasto.service
To restart the Ceph Object Gateways on all nodes in the storage cluster:
Syntax
ceph orch restart SERVICE_TYPEExample
[ceph: root@host04 /]# ceph orch restart rgw
-
Log in as
rooton the endpoint for the second data center. Verify the synchronization status on the master realm:
Syntax
radosgw-admin sync status
Example
[ceph: root@host04 /]# radosgw-admin sync status realm 59762f08-470c-46de-b2b1-d92c50986e67 (ldc2) zonegroup 7cf8daf8-d279-4d5c-b73e-c7fd2af65197 (ldc2zg) zone 034ae8d3-ae0c-4e35-8760-134782cb4196 (ldc2z) metadata sync no sync (zone is master) current time 2023-08-17T05:49:56Z zonegroup features enabled: resharding disabled: compress-encryptedImportantIn Red Hat Ceph Storage 5.3z5 release,
compress-encryptedfeature is displayed withradosgw-admin sync statuscommand and it is disabled by default. Do not enable this feature as it is not supported until Red Hat Ceph Storage 6.1z2.-
Log in as
rooton the endpoint for the first data center. Verify the synchronization status for the replication-synchronization realm:
Syntax
radosgw-admin sync status --rgw-realm RGW_REALM_NAMEExample
[ceph: root@host01 /]# radosgw-admin sync status --rgw-realm rdc1
          realm 73c7b801-3736-4a89-aaf8-e23c96e6e29d (rdc1)
      zonegroup d67cc9c9-690a-4076-89b8-e8127d868398 (rdc1zg)
           zone 67584789-375b-4d61-8f12-d1cf71998b38 (rdc2z)
  metadata sync syncing
                full sync: 0/64 shards
                incremental sync: 64/64 shards
                metadata is caught up with master
      data sync source: 705ff9b0-68d5-4475-9017-452107cec9a0 (rdc1z)
                        syncing
                        full sync: 0/128 shards
                        incremental sync: 128/128 shards
                        data is caught up with source
To store and access data in the local site, create the user for local realm:
Syntax
radosgw-admin user create --uid="LOCAL_USER" --display-name="Local user" --rgw-realm=_REALM_NAME --rgw-zonegroup=ZONE_GROUP_NAME --rgw-zone=ZONE_NAME
Example
[ceph: root@host04 /]# radosgw-admin user create --uid="local-user" --display-name="Local user" --rgw-realm=ldc1 --rgw-zonegroup=ldc1zg --rgw-zone=ldc1z
ImportantBy default, users are created under the default realm. For the users to access data in the local realm, the
radosgw-admincommand requires the--rgw-realmargument.
5.2.10. Using multi-site sync policies (Technology Preview)
The Ceph Object Gateway multi-site sync policies are a Technology Preview feature only. Technology Preview features are not supported with Red Hat production service level agreements (SLAs), might not be functionally complete, and Red Hat does not recommend using them for production. These features provide early access to upcoming product features, enabling customers to test functionality and provide feedback during the development process. See the support scope for Red Hat Technology Preview features for more details.
As a storage administrator, you can use multi-site sync policies at the bucket level to control data movement between buckets in different zones. These policies are called bucket-granularity sync policies. Previously, all buckets within zones were treated symmetrically. This means that each zone contained a mirror copy of a given bucket, and the copies of buckets were identical in all of the zones. The sync process assumed that the bucket sync source and the bucket sync destination referred to the same bucket.
Using bucket-granularity sync policies allows for the buckets in different zones to contain different data. This enables a bucket to pull data from other buckets in other zones, and those buckets do not have the same name or ID as the bucket pulling the data. In this case, the bucket sync source and the bucket sync destination refer to different buckets.
The sync policy supersedes the old zone group coarse configuration (sync_from*). The sync policy can be configured at the zone group level. If it is configured, it replaces the old-style configuration at the zone group level, but it can also be configured at the bucket level.
5.2.10.1. Prerequisites
- A running Red Hat Ceph Storage cluster.
- Root-level access to a Ceph Monitor node.
- Installation of the Ceph Object Gateway software.
5.2.10.2. Multi-site sync policy group state
In the sync policy, multiple groups that can contain lists of data-flow configurations can be defined, as well as lists of pipe configurations. The data-flow defines the flow of data between the different zones. It can define symmetrical data flow, in which multiple zones sync data from each other, and it can define directional data flow, in which the data moves in one way from one zone to another.
A pipe defines the actual buckets that can use these data flows, and the properties that are associated with it, such as the source object prefix.
A sync policy group can be in 3 states:
- Enabled — sync is allowed and enabled.
- Allowed — sync is allowed.
- Forbidden — sync, as defined by this group, is not allowed. Sync states in this group can override other groups.
A policy can be defined at the bucket level. A bucket level sync policy inherits the data flow of the zonegroup policy, and can only define a subset of what the zonegroup allows.
A wildcard zone, and a wildcard bucket parameter in the policy defines all relevant zones, or all relevant buckets. In the context of a bucket policy it means the current bucket instance. A disaster recovery configuration where entire zones are mirrored does not require configuring anything on the buckets. However, for a fine grained bucket sync it would be better to configure the pipes to be synced by allowing (status=allowed) them at the zonegroup level, such as using wildcards, but only enable the specific sync at the bucket level (status=enabled). If needed, the policy at the bucket level can limit the data movement to specific relevant zones.
| ZoneGroup | Bucket | Sync in the bucket |
|---|---|---|
| enabled | enabled | enabled |
| enabled | allowed | enabled |
| enabled | forbidden | disabled |
| allowed | enabled | enabled |
| allowed | allowed | disabled |
| allowed | forbidden | disabled |
| forbidden | enabled | disabled |
| forbidden | allowed | disabled |
| forbidden | forbidden | disabled |
For multiple group polices that are set to reflect for any sync pair (SOURCE_ZONE, SOURCE_BUCKET), (DESTINATION_ZONE, DESTINATION_BUCKET), the following rules are applied in the following order:
-
Even if one sync policy is
forbidden, the sync isdisabled. -
At least one policy should be
enabledfor the sync to beallowed.
Sync states in this group can override other groups.
A wildcard zone, and a wildcard bucket parameter in the policy defines all relevant zones, or all relevant buckets. In the context of a bucket policy, it means the current bucket instance. A disaster recovery configuration where entire zones are mirrored does not require configuring anything on the buckets. However, for a fine grained bucket sync it would be better to configure the pipes to be synced by allowing (status=allowed) them at the zonegroup level (for example, by using wildcard). However, enable the specific sync at the bucket level (status=enabled) only.
Any changes to the zonegroup policy need to be applied on the zonegroup master zone, and require period update and commit. Changes to the bucket policy need to be applied on the zonegroup master zone. Ceph Object Gateway handles these changes dynamically.
5.2.10.3. Retrieving the current policy
You can use the get command to retrieve the current zonegroup sync policy, or a specific bucket policy.
Prerequisites
- A running Red Hat Ceph Storage cluster.
-
Root or
sudoaccess. - The Ceph Object Gateway is installed.
Procedure
Retrieve the current zonegroup sync policy or bucket policy. To retrieve a specific bucket policy, use the
--bucketoption:Syntax
radosgw-admin sync policy get --bucket=BUCKET_NAMEExample
[ceph: root@host01 /]# radosgw-admin sync policy get --bucket=mybucket
5.2.10.4. Creating a sync policy group
You can create a sync policy group for the current zone group, or for a specific bucket.
Prerequisites
- A running Red Hat Ceph Storage cluster.
-
Root or
sudoaccess. - The Ceph Object Gateway is installed.
Procedure
Create a sync policy group or a bucket policy. To create a bucket policy, use the
--bucketoption:Syntax
radosgw-admin sync group create --bucket=BUCKET_NAME --group-id=GROUP_ID --status=enabled | allowed | forbidden
Example
[ceph: root@host01 /]# radosgw-admin sync group create --group-id=mygroup1 --status=enabled
5.2.10.5. Modifying a sync policy group
You can modify an existing sync policy group for the current zone group, or for a specific bucket.
Prerequisites
- A running Red Hat Ceph Storage cluster.
-
Root or
sudoaccess. - The Ceph Object Gateway is installed.
Procedure
Modify the sync policy group or a bucket policy. To modify a bucket policy, use the
--bucketoption:Syntax
radosgw-admin sync group modify --bucket=BUCKET_NAME --group-id=GROUP_ID --status=enabled | allowed | forbidden
Example
[ceph: root@host01 /]# radosgw-admin sync group modify --group-id=mygroup1 --status=forbidden
5.2.10.6. Get a sync policy group
You can use the group get command to show the current sync policy group by group ID, or to show a specific bucket policy.
Prerequisites
- A running Red Hat Ceph Storage cluster.
-
Root or
sudoaccess. - The Ceph Object Gateway is installed.
Procedure
Show the current sync policy group or bucket policy. To show a specific bucket policy, use the
--bucketoption:NoteIf
--bucketoption is not provided, then the group created at zonegroup-level is retrieved and not bucket-level.Syntax
radosgw-admin sync group get --bucket=BUCKET_NAME --group-id=GROUP_ID
Example
[ceph: root@host01 /]# radosgw-admin sync group get --group-id=mygroup
5.2.10.7. Removing a sync policy group
You can use the group remove command to remove the current sync policy group by group ID, or to remove a specific bucket policy.
Prerequisites
- A running Red Hat Ceph Storage cluster.
-
Root or
sudoaccess. - The Ceph Object Gateway is installed.
Procedure
Remove the current sync policy group or bucket policy. To remove a specific bucket policy, use the
--bucketoption:Syntax
radosgw-admin sync group remove --bucket=BUCKET_NAME --group-id=GROUP_ID
Example
[ceph: root@host01 /]# radosgw-admin sync group remove --group-id=mygroup
5.2.10.8. Creating a sync flow
You can create two different types of flows for a sync policy group or for a specific bucket:
- Directional sync flow
- Symmetrical sync flow
The group flow create command creates a sync flow. If you issue the group flow create command for a sync policy group or bucket that already has a sync flow, the command overwrites the existing settings for the sync flow and applies the settings you specify.
| Option | Description | Required/Optional |
|---|---|---|
| --bucket | Name of the bucket to which the sync policy needs to be configured. Used only in bucket-level sync policy. | Optional |
| --group-id | ID of the sync group. | Required |
| --flow-id | ID of the flow. | Required |
| --flow-type | Types of flows for a sync policy group or for a specific bucket - directional or symmetrical. | Required |
| --source-zone | To specify the source zone from which sync should happen. Zone that send data to the sync group. Required if flow type of sync group is directional. | Optional |
| --dest-zone | To specify the destination zone to which sync should happen. Zone that receive data from the sync group. Required if flow type of sync group is directional. | Optional |
| --zones | Zones that part of the sync group. Zones mention will be both sender and receiver zone. Specify zones separated by ",". Required if flow type of sync group is symmetrical. | Optional |
Prerequisites
- A running Red Hat Ceph Storage cluster.
-
Root or
sudoaccess. - The Ceph Object Gateway is installed.
Procedure
Create or update a directional sync flow. To create or update directional sync flow for a specific bucket, use the
--bucketoption.Syntax
radosgw-admin sync group flow create --bucket=BUCKET_NAME --group-id=GROUP_ID --flow-id=FLOW_ID --flow-type=directional --source-zone=SOURCE_ZONE --dest-zone=DESTINATION_ZONE
Create or update a symmetrical sync flow. To specify multiple zones for a symmetrical flow type, use a comma-separated list for the
--zonesoption.Syntax
radosgw-admin sync group flow create --bucket=BUCKET_NAME --group-id=GROUP_ID --flow-id=FLOW_ID --flow-type=symmetrical --zones=ZONE_NAME
5.2.10.9. Removing sync flows and zones
The group flow remove command removes sync flows or zones from a sync policy group or bucket.
For sync policy groups or buckets using directional flows, group flow remove command removes the flow. For sync policy groups or buckets using symmetrical flows, you can use the group flow remove command to remove specified zones from the flow, or to remove the flow.
Prerequisites
- A running Red Hat Ceph Storage cluster.
-
Root or
sudoaccess. - The Ceph Object Gateway is installed.
Procedure
Remove a directional sync flow. To remove the directional sync flow for a specific bucket, use the
--bucketoption.Syntax
radosgw-admin sync group flow remove --bucket=BUCKET_NAME --group-id=GROUP_ID --flow-id=FLOW_ID --flow-type=directional --source-zone=SOURCE_ZONE --dest-zone=DESTINATION_ZONE
Remove specific zones from a symmetrical sync flow. To remove multiple zones from a symmetrical flow, use a comma-separated list for the
--zonesoption.Syntax
radosgw-admin sync group flow remove --bucket=BUCKET_NAME --group-id=GROUP_ID --flow-id=FLOW_ID --flow-type=symmetrical --zones=ZONE_NAME
Remove a symmetrical sync flow. To remove the sync flow from a bucket, use the
--bucketoption.Syntax
radosgw-admin sync group flow remove --bucket=BUCKET_NAME --group-id=GROUP_ID --flow-id=FLOW_ID --flow-type=symmetrical --zones=ZONE_NAME
5.2.10.10. Creating or modifying a sync group pipe
As a storage administrator, you can define pipes to specify which buckets can use your configured data flows and the properties associated with those data flows.
The sync group pipe create command enables you to create pipes, which are custom sync group data flows between specific buckets or groups of buckets, or between specific zones or groups of zones.
This command uses the following options:
| Option | Description | Required/Optional |
|---|---|---|
| --bucket | Name of the bucket to which sync policy need to be configured. Used only in bucket-level sync policy. | Optional |
| --group-id | ID of the sync group | Required |
| --pipe-id | ID of the pipe | Required |
| --source-zones |
Zones that send data to the sync group. Use single quotes (') for value. Use commas to separate multiple zones. Use the wildcard | Required |
| --source-bucket |
Bucket or buckets that send data to the sync group. If bucket name is not mentioned, then | Optional |
| --source-bucket-id | ID of the source bucket. | Optional |
| --dest-zones |
Zone or zones that receive the sync data. Use single quotes (') for value. Use commas to separate multiple zones. Use the wildcard | Required |
| --dest-bucket |
Bucket or buckets that receive the sync data. If bucket name is not mentioned, then | Optional |
| --dest-bucket-id | ID of the destination bucket. | Optional |
| --prefix |
Bucket prefix. Use the wildcard | Optional |
| --prefix-rm | Do not use bucket prefix for filtering. | Optional |
| --tags-add | Comma-separated list of key=value pairs. | Optional |
| --tags-rm | Removes one or more key=value pairs of tags. | Optional |
| --dest-owner | Destination owner of the objects from source. | Optional |
| --storage-class | Destination storage class for the objects from source. | Optional |
| --mode |
Use | Optional |
| --uid | Used for permissions validation in user mode. Specifies the user ID under which the sync operation will be issued. | Optional |
To enable or disable sync at zonegroup level for certain buckets, set zonegroup level sync policy to enable or disable state respectively, and create a pipe for each bucket with --source-bucket and --dest-bucket with its bucket name or with bucket-id, i.e, --source-bucket-id and --dest-bucket-id.
Prerequisites
- A running Red Hat Ceph Storage cluster.
-
Root or
sudoaccess. - The Ceph Object Gateway is installed.
Procedure
Create the sync group pipe:
Syntax
radosgw-admin sync group pipe create --bucket=BUCKET_NAME --group-id=GROUP_ID --pipe-id=PIPE_ID --source-zones='ZONE_NAME','ZONE_NAME2'... --source-bucket=SOURCE_BUCKET1 --source-bucket-id=SOURCE_BUCKET_ID --dest-zones='ZONE_NAME','ZONE_NAME2'... --dest-bucket=DESTINATION_BUCKET1 --dest-bucket-id=DESTINATION_BUCKET_ID --prefix=SOURCE_PREFIX --prefix-rm --tags-add=KEY1=VALUE1, KEY2=VALUE2, ... --tags-rm=KEY1=VALUE1, KEY2=VALUE2, ... --dest-owner=OWNER_ID --storage-class=STORAGE_CLASS --mode=USER --uid=USER_ID
5.2.10.11. Modifying or deleting a sync group pipe
As a storage administrator, you can use the sync group pipe modify command to modify the sync group pipe and sync group pipe remove to remove the sync group pipe.
Prerequisites
- A running Red Hat Ceph Storage cluster.
-
Root or
sudoaccess. - The Ceph Object Gateway is installed.
Procedure
Modify the sync group pipe options.
Syntax
radosgw-admin sync group pipe modify --bucket=BUCKET_NAME --group-id=GROUP_ID --pipe-id=PIPE_ID --source-zones='ZONE_NAME','ZONE_NAME2'... --source-bucket=SOURCE_BUCKET1 --source-bucket-id=SOURCE_BUCKET_ID --dest-zones='ZONE_NAME','ZONE_NAME2'... --dest-bucket=DESTINATION_BUCKET1 --dest-bucket-id=DESTINATION_BUCKET-IDDelete a sync group pipe.
Syntax
radosgw-admin sync group pipe remove --bucket=BUCKET_NAME --group-id=GROUP_ID --pipe-id=PIPE_ID
5.2.10.12. Obtaining information about sync operations
The sync info command enables you to get information about the expected sync sources and targets, as defined by the sync policy.
When you create a sync policy for a bucket, that policy defines how data moves from that bucket toward a different bucket in a different zone. Creating the policy also creates a list of bucket dependencies that are used as hints whenever that bucket syncs with another bucket. Note that a bucket can refer to another bucket without actually syncing to it, since syncing depends on whether the data flow allows the sync to take place.
Both the --bucket and effective-zone-name parameters are optional. If you invoke the sync info command without specifying any options, the Object Gateway returns all of the sync operations defined by the sync policy in all zones.
Prerequisites
- A running Red Hat Ceph Storage cluster.
-
Root or
sudoaccess. - The Ceph Object Gateway is installed.
- A group sync policy is defined.
Procedure
Get information about sync operations:
Syntax
radosgw-admin sync info --bucket=BUCKET_NAME --effective-zone-name=ZONE_NAME
5.2.11. Multi-site Ceph Object Gateway command line usage
As a storage administrator, you can have a good understanding of how to use the Ceph Object Gateway in a multi-site environment. You can learn how to better manage the realms, zone groups, and zones in a multi-site environment.
5.2.11.1. Prerequisites
- A running Red Hat Ceph Storage.
- Deployment of the Ceph Object Gateway software.
- Access to a Ceph Object Gateway node or container.
5.2.11.2. Realms
A realm represents a globally unique namespace consisting of one or more zonegroups containing one or more zones, and zones containing buckets, which in turn contain objects. A realm enables the Ceph Object Gateway to support multiple namespaces and their configuration on the same hardware.
A realm contains the notion of periods. Each period represents the state of the zone group and zone configuration in time. Each time you make a change to a zonegroup or zone, update the period and commit it.
Red Hat recommends creating realms for new clusters.
5.2.11.2.1. Creating a realm
To create a realm, issue the realm create command and specify the realm name. If the realm is the default, specify --default.
Syntax
radosgw-admin realm create --rgw-realm=REALM_NAME [--default]
Example
[ceph: root@host01 /]# radosgw-admin realm create --rgw-realm=test_realm --default
By specifying --default, the realm will be called implicitly with each radosgw-admin call unless --rgw-realm and the realm name are explicitly provided.
5.2.11.2.2. Making a Realm the Default
One realm in the list of realms should be the default realm. There may be only one default realm. If there is only one realm and it wasn’t specified as the default realm when it was created, make it the default realm. Alternatively, to change which realm is the default, run the following command:
[ceph: root@host01 /]# radosgw-admin realm default --rgw-realm=test_realm
When the realm is default, the command line assumes --rgw-realm=REALM_NAME as an argument.
5.2.11.2.3. Deleting a Realm
To delete a realm, run the realm delete command and specify the realm name.
Syntax
radosgw-admin realm delete --rgw-realm=REALM_NAME
Example
[ceph: root@host01 /]# radosgw-admin realm delete --rgw-realm=test_realm
5.2.11.2.4. Getting a realm
To get a realm, run the realm get command and specify the realm name.
Syntax
radosgw-admin realm get --rgw-realm=REALM_NAME
Example
[ceph: root@host01 /]# radosgw-admin realm get --rgw-realm=test_realm >filename.json
The CLI will echo a JSON object with the realm properties.
{
    "id": "0a68d52e-a19c-4e8e-b012-a8f831cb3ebc",
    "name": "test_realm",
    "current_period": "b0c5bbef-4337-4edd-8184-5aeab2ec413b",
    "epoch": 1
}
Use > and an output file name to output the JSON object to a file.
5.2.11.2.5. Setting a realm
To set a realm, run the realm set command, specify the realm name, and --infile= with an input file name.
Syntax
radosgw-admin realm set --rgw-realm=REALM_NAME --infile=IN_FILENAME
Example
[ceph: root@host01 /]# radosgw-admin realm set --rgw-realm=test_realm --infile=filename.json
5.2.11.2.6. Listing realms
To list realms, run the realm list command:
Example
[ceph: root@host01 /]# radosgw-admin realm list
5.2.11.2.7. Listing Realm Periods
To list realm periods, run the realm list-periods command.
Example
[ceph: root@host01 /]# radosgw-admin realm list-periods
5.2.11.2.8. Pulling a Realm
To pull a realm from the node containing the master zone group and master zone to a node containing a secondary zone group or zone, run the realm pull command on the node that will receive the realm configuration.
Syntax
radosgw-admin realm pull --url=URL_TO_MASTER_ZONE_GATEWAY--access-key=ACCESS_KEY --secret=SECRET_KEY
5.2.11.2.9. Renaming a Realm
A realm is not part of the period. Consequently, renaming the realm is only applied locally, and will not get pulled with realm pull. When renaming a realm with multiple zones, run the command on each zone. To rename a realm, run the following command:
Syntax
radosgw-admin realm rename --rgw-realm=REALM_NAME --realm-new-name=NEW_REALM_NAME
Do NOT use realm set to change the name parameter. That changes the internal name only. Specifying --rgw-realm would still use the old realm name.
5.2.11.3. Zone Groups
The Ceph Object Gateway supports multi-site deployments and a global namespace by using the notion of zone groups. Formerly called a region, a zone group defines the geographic location of one or more Ceph Object Gateway instances within one or more zones.
Configuring zone groups differs from typical configuration procedures, because not all of the settings end up in a Ceph configuration file. You can list zone groups, get a zone group configuration, and set a zone group configuration.
The radosgw-admin zonegroup operations can be performed on any node within the realm, because the step of updating the period propagates the changes throughout the cluster. However, radosgw-admin zone operations MUST be performed on a host within the zone.
5.2.11.3.1. Creating a Zone Group
Creating a zone group consists of specifying the zone group name. Creating a zone assumes it will live in the default realm unless --rgw-realm=REALM_NAME is specified. If the zonegroup is the default zonegroup, specify the --default flag. If the zonegroup is the master zonegroup, specify the --master flag.
Syntax
radosgw-admin zonegroup create --rgw-zonegroup=ZONE_GROUP_NAME [--rgw-realm=REALM_NAME] [--master] [--default]
Use zonegroup modify --rgw-zonegroup=ZONE_GROUP_NAME to modify an existing zone group’s settings.
5.2.11.3.2. Making a Zone Group the Default
One zonegroup in the list of zonegroups should be the default zonegroup. There may be only one default zonegroup. If there is only one zonegroup and it wasn’t specified as the default zonegroup when it was created, make it the default zonegroup. Alternatively, to change which zonegroup is the default, run the following command:
Example
[ceph: root@host01 /]# radosgw-admin zonegroup default --rgw-zonegroup=us
When the zonegroup is the default, the command line assumes --rgw-zonegroup=ZONE_GROUP_NAME as an argument.
Then, update the period:
[ceph: root@host01 /]# radosgw-admin period update --commit
5.2.11.3.3. Adding a Zone to a Zone Group
To add a zone to a zonegroup, you MUST run this command on a host that will be in the zone. To add a zone to a zonegroup, run the following command:
Syntax
radosgw-admin zonegroup add --rgw-zonegroup=ZONE_GROUP_NAME --rgw-zone=ZONE_NAME
Then, update the period:
Example
[ceph: root@host01 /]# radosgw-admin period update --commit
5.2.11.3.4. Removing a Zone from a Zone Group
To remove a zone from a zonegroup, run the following command:
Syntax
radosgw-admin zonegroup remove --rgw-zonegroup=ZONE_GROUP_NAME --rgw-zone=ZONE_NAME
Then, update the period:
Example
[ceph: root@host01 /]# radosgw-admin period update --commit
5.2.11.3.5. Renaming a Zone Group
To rename a zonegroup, run the following command:
Syntax
radosgw-admin zonegroup rename --rgw-zonegroup=ZONE_GROUP_NAME --zonegroup-new-name=NEW_ZONE_GROUP_NAME
Then, update the period:
Example
[ceph: root@host01 /]# radosgw-admin period update --commit
5.2.11.3.6. Deleting a Zone group
To delete a zonegroup, run the following command:
Syntax
radosgw-admin zonegroup delete --rgw-zonegroup=ZONE_GROUP_NAME
Then, update the period:
Example
[ceph: root@host01 /]# radosgw-admin period update --commit
5.2.11.3.7. Listing Zone Groups
A Ceph cluster contains a list of zone groups. To list the zone groups, run the following command:
[ceph: root@host01 /]# radosgw-admin zonegroup list
The radosgw-admin returns a JSON formatted list of zone groups.
{
    "default_info": "90b28698-e7c3-462c-a42d-4aa780d24eda",
    "zonegroups": [
        "us"
    ]
}
5.2.11.3.8. Getting a Zone Group
To view the configuration of a zone group, run the following command:
Syntax
radosgw-admin zonegroup get [--rgw-zonegroup=ZONE_GROUP_NAME]
The zone group configuration looks like this:
{
    "id": "90b28698-e7c3-462c-a42d-4aa780d24eda",
    "name": "us",
    "api_name": "us",
    "is_master": "true",
    "endpoints": [
        "http:\/\/rgw1:80"
    ],
    "hostnames": [],
    "hostnames_s3website": [],
    "master_zone": "9248cab2-afe7-43d8-a661-a40bf316665e",
    "zones": [
        {
            "id": "9248cab2-afe7-43d8-a661-a40bf316665e",
            "name": "us-east",
            "endpoints": [
                "http:\/\/rgw1"
            ],
            "log_meta": "true",
            "log_data": "true",
            "bucket_index_max_shards": 11,
            "read_only": "false"
        },
        {
            "id": "d1024e59-7d28-49d1-8222-af101965a939",
            "name": "us-west",
            "endpoints": [
                "http:\/\/rgw2:80"
            ],
            "log_meta": "false",
            "log_data": "true",
            "bucket_index_max_shards": 11,
            "read_only": "false"
        }
    ],
    "placement_targets": [
        {
            "name": "default-placement",
            "tags": []
        }
    ],
    "default_placement": "default-placement",
    "realm_id": "ae031368-8715-4e27-9a99-0c9468852cfe"
}
5.2.11.3.9. Setting a Zone Group
Defining a zone group consists of creating a JSON object, specifying at least the required settings:
-
name: The name of the zone group. Required. -
api_name: The API name for the zone group. Optional. is_master: Determines if the zone group is the master zone group. Required.Note: You can only have one master zone group.
-
endpoints: A list of all the endpoints in the zone group. For example, you may use multiple domain names to refer to the same zone group. Remember to escape the forward slashes (\/). You may also specify a port (fqdn:port) for each endpoint. Optional. -
hostnames: A list of all the hostnames in the zone group. For example, you may use multiple domain names to refer to the same zone group. Optional. Thergw dns namesetting will automatically be included in this list. You should restart the gateway daemon(s) after changing this setting. master_zone: The master zone for the zone group. Optional. Uses the default zone if not specified.NoteYou can only have one master zone per zone group.
-
zones: A list of all zones within the zone group. Each zone has a name (required), a list of endpoints (optional), and whether or not the gateway will log metadata and data operations (false by default). -
placement_targets: A list of placement targets (optional). Each placement target contains a name (required) for the placement target and a list of tags (optional) so that only users with the tag can use the placement target (i.e., the user’splacement_tagsfield in the user info). -
default_placement: The default placement target for the object index and object data. Set todefault-placementby default. You may also set a per-user default placement in the user info for each user.
To set a zone group, create a JSON object consisting of the required fields, save the object to a file, for example, zonegroup.json; then, run the following command:
Example
[ceph: root@host01 /]# radosgw-admin zonegroup set --infile zonegroup.json
Where zonegroup.json is the JSON file you created.
The default zone group is_master setting is true by default. If you create a new zone group and want to make it the master zone group, you must either set the default zone group is_master setting to false, or delete the default zone group.
Finally, update the period:
Example
[ceph: root@host01 /]# radosgw-admin period update --commit
5.2.11.3.10. Setting a Zone Group Map
Setting a zone group map consists of creating a JSON object consisting of one or more zone groups, and setting the master_zonegroup for the cluster. Each zone group in the zone group map consists of a key/value pair, where the key setting is equivalent to the name setting for an individual zone group configuration, and the val is a JSON object consisting of an individual zone group configuration.
You may only have one zone group with is_master equal to true, and it must be specified as the master_zonegroup at the end of the zone group map. The following JSON object is an example of a default zone group map.
{
    "zonegroups": [
        {
            "key": "90b28698-e7c3-462c-a42d-4aa780d24eda",
            "val": {
                "id": "90b28698-e7c3-462c-a42d-4aa780d24eda",
                "name": "us",
                "api_name": "us",
                "is_master": "true",
                "endpoints": [
                    "http:\/\/rgw1:80"
                ],
                "hostnames": [],
                "hostnames_s3website": [],
                "master_zone": "9248cab2-afe7-43d8-a661-a40bf316665e",
                "zones": [
                    {
                        "id": "9248cab2-afe7-43d8-a661-a40bf316665e",
                        "name": "us-east",
                        "endpoints": [
                            "http:\/\/rgw1"
                        ],
                        "log_meta": "true",
                        "log_data": "true",
                        "bucket_index_max_shards": 11,
                        "read_only": "false"
                    },
                    {
                        "id": "d1024e59-7d28-49d1-8222-af101965a939",
                        "name": "us-west",
                        "endpoints": [
                            "http:\/\/rgw2:80"
                        ],
                        "log_meta": "false",
                        "log_data": "true",
                        "bucket_index_max_shards": 11,
                        "read_only": "false"
                    }
                ],
                "placement_targets": [
                    {
                        "name": "default-placement",
                        "tags": []
                    }
                ],
                "default_placement": "default-placement",
                "realm_id": "ae031368-8715-4e27-9a99-0c9468852cfe"
            }
        }
    ],
    "master_zonegroup": "90b28698-e7c3-462c-a42d-4aa780d24eda",
    "bucket_quota": {
        "enabled": false,
        "max_size_kb": -1,
        "max_objects": -1
    },
    "user_quota": {
        "enabled": false,
        "max_size_kb": -1,
        "max_objects": -1
    }
}
To set a zone group map, run the following command:
Example
[ceph: root@host01 /]# radosgw-admin zonegroup-map set --infile zonegroupmap.json
Where zonegroupmap.json is the JSON file you created. Ensure that you have zones created for the ones specified in the zone group map. Finally, update the period.
Example
[ceph: root@host01 /]# radosgw-admin period update --commit
5.2.11.4. Zones
Ceph Object Gateway supports the notion of zones. A zone defines a logical group consisting of one or more Ceph Object Gateway instances.
Configuring zones differs from typical configuration procedures, because not all of the settings end up in a Ceph configuration file. You can list zones, get a zone configuration, and set a zone configuration.
All radosgw-admin zone operations MUST be issued on a host that operates or will operate within the zone.
5.2.11.4.1. Creating a Zone
To create a zone, specify a zone name. If it is a master zone, specify the --master option. Only one zone in a zone group may be a master zone. To add the zone to a zonegroup, specify the --rgw-zonegroup option with the zonegroup name.
Zones must be created on a Ceph Object Gateway node that will be within the zone.
Syntax
radosgw-admin zone create --rgw-zone=ZONE_NAME \
                [--zonegroup=ZONE_GROUP_NAME]\
                [--endpoints=ENDPOINT_PORT [,<endpoint:port>] \
                [--master] [--default] \
                --access-key ACCESS_KEY --secret SECRET_KEY
Then, update the period:
Example
[ceph: root@host01 /]# radosgw-admin period update --commit
5.2.11.4.2. Deleting a zone
To delete a zone, first remove it from the zonegroup.
Procedure
Remove the zone from the zonegroup:
Syntax
radosgw-admin zonegroup remove --rgw-zonegroup=ZONE_GROUP_NAME\
                                 --rgw-zone=ZONE_NAME
Update the period:
Example
[ceph: root@host01 /]# radosgw-admin period update --commit
Delete the zone:
ImportantThis procedure MUST be used on a host within the zone.
Syntax
radosgw-admin zone delete --rgw-zone=ZONE_NAMEUpdate the period:
Example
[ceph: root@host01 /]# radosgw-admin period update --commit
ImportantDo not delete a zone without removing it from a zone group first. Otherwise, updating the period will fail.
If the pools for the deleted zone will not be used anywhere else, consider deleting the pools. Replace DELETED_ZONE_NAME in the example below with the deleted zone’s name.
Once Ceph deletes the zone pools, it deletes all of the data within them in an unrecoverable manner. Only delete the zone pools if Ceph clients no longer need the pool contents.
In a multi-realm cluster, deleting the .rgw.root pool along with the zone pools will remove ALL the realm information for the cluster. Ensure that .rgw.root does not contain other active realms before deleting the .rgw.root pool.
Syntax
ceph osd pool delete DELETED_ZONE_NAME.rgw.control DELETED_ZONE_NAME.rgw.control --yes-i-really-really-mean-it
ceph osd pool delete DELETED_ZONE_NAME.rgw.data.root DELETED_ZONE_NAME.rgw.data.root --yes-i-really-really-mean-it
ceph osd pool delete DELETED_ZONE_NAME.rgw.log DELETED_ZONE_NAME.rgw.log --yes-i-really-really-mean-it
ceph osd pool delete DELETED_ZONE_NAME.rgw.users.uid DELETED_ZONE_NAME.rgw.users.uid --yes-i-really-really-mean-it
After deleting the pools, restart the RGW process.
5.2.11.4.3. Modifying a Zone
To modify a zone, specify the zone name and the parameters you wish to modify.
Zones should be modified on a Ceph Object Gateway node that will be within the zone.
Syntax
radosgw-admin zone modify [options]--access-key=<key>--secret/--secret-key=<key>--master--default--endpoints=<list>
Then, update the period:
Example
[ceph: root@host01 /]# radosgw-admin period update --commit
5.2.11.4.4. Listing Zones
As root, to list the zones in a cluster, run the following command:
Example
[ceph: root@host01 /]# radosgw-admin zone list
5.2.11.4.5. Getting a Zone
As root, to get the configuration of a zone, run the following command:
Syntax
radosgw-admin zone get [--rgw-zone=ZONE_NAME]
The default zone looks like this:
{ "domain_root": ".rgw",
  "control_pool": ".rgw.control",
  "gc_pool": ".rgw.gc",
  "log_pool": ".log",
  "intent_log_pool": ".intent-log",
  "usage_log_pool": ".usage",
  "user_keys_pool": ".users",
  "user_email_pool": ".users.email",
  "user_swift_pool": ".users.swift",
  "user_uid_pool": ".users.uid",
  "system_key": { "access_key": "", "secret_key": ""},
  "placement_pools": [
      {  "key": "default-placement",
         "val": { "index_pool": ".rgw.buckets.index",
                  "data_pool": ".rgw.buckets"}
      }
    ]
  }
5.2.11.4.6. Setting a Zone
Configuring a zone involves specifying a series of Ceph Object Gateway pools. For consistency, we recommend using a pool prefix that is the same as the zone name. See the Pools chapter in the Red Hat Ceph Storage Storage Strategies Guide for details on configuring pools.
Zones should be set on a Ceph Object Gateway node that will be within the zone.
To set a zone, create a JSON object consisting of the pools, save the object to a file, for example, zone.json; then, run the following command, replacing ZONE_NAME with the name of the zone:
Example
[ceph: root@host01 /]# radosgw-admin zone set --rgw-zone=test-zone --infile zone.json
Where zone.json is the JSON file you created.
Then, as root, update the period:
Example
[ceph: root@host01 /]# radosgw-admin period update --commit
5.2.11.4.7. Renaming a Zone
To rename a zone, specify the zone name and the new zone name. Issue the following command on a host within the zone:
Syntax
radosgw-admin zone rename --rgw-zone=ZONE_NAME --zone-new-name=NEW_ZONE_NAME
Then, update the period:
Example
[ceph: root@host01 /]# radosgw-admin period update --commit
5.3. Configure LDAP and Ceph Object Gateway
Perform the following steps to configure the Red Hat Directory Server to authenticate Ceph Object Gateway users.
5.3.1. Installing a Red Hat Directory Server
Red Hat Directory Server should be installed on a Red Hat Enterprise Linux 8 with a graphical user interface (GUI) in order to use the Java Swing GUI Directory and Administration consoles. However, Red Hat Directory Server can still be serviced exclusively from the command line interface (CLI).
Prerequisites
- Red Hat Enterprise Linux (RHEL) is installed on the server.
-
The Directory Server node’s FQDN is resolvable using DNS or the
/etc/hostsfile. - Register the Directory Server node to the Red Hat subscription management service.
- A valid Red Hat Directory Server subscription is available in your Red Hat account.
Procedure
Additional Resources
- See the Red Hat Director Server Installation Guide for more details.
5.3.2. Configure the Directory Server firewall
On the LDAP host, make sure that the firewall allows access to the Directory Server’s secure (636) port, so that LDAP clients can access the Directory Server. Leave the default unsecure port (389) closed.
# firewall-cmd --zone=public --add-port=636/tcp
# firewall-cmd --zone=public --add-port=636/tcp --permanent
5.3.3. Label ports for SELinux
To ensure SELinux does not block requests, label the ports for SELinux. For details see the Changing Directory Server Port Numbers section in the Administration Guide for Red Hat Directory Server 10.
5.3.4. Configure LDAPS
The Ceph Object Gateway uses a simple ID and password to authenticate with the LDAP server, so the connection requires an SSL certificate for LDAP. To configure the Directory Server for LDAP, see the Configuring Secure Connections chapter in the Administration Guide for Red Hat Directory Server 11.
Once the LDAP is working, configure the Ceph Object Gateway servers to trust the Directory Server’s certificate.
- Extract/Download a PEM-formatted certificate for the Certificate Authority (CA) that signed the LDAP server’s SSL certificate.
-
Confirm that
/etc/openldap/ldap.confdoes not haveTLS_REQCERTset. -
Confirm that
/etc/openldap/ldap.confcontains aTLS_CACERTDIR /etc/openldap/certssetting. Use the
certutilcommand to add the AD CA to the store at/etc/openldap/certs.For example, if the CA is "msad-frog-MSAD-FROG-CA", and the PEM-formatted CA file isldap.pem, use the following command:Example
# certutil -d /etc/openldap/certs -A -t "TC,," -n "msad-frog-MSAD-FROG-CA" -i /path/to/ldap.pem
Update SELinux on all remote LDAP sites:
Example
# setsebool -P httpd_can_network_connect on
NoteThis still has to be set even if SELinux is in permissive mode.
Make the
certsdatabase world-readable:Example
# chmod 644 /etc/openldap/certs/*
Connect to the server using the "ldapwhoami" command as a non-root user.
Example
$ ldapwhoami -H ldaps://rh-directory-server.example.com -d 9
The
-d 9option will provide debugging information in case something went wrong with the SSL negotiation.
5.3.5. Check if the gateway user exists
Before creating the gateway user, ensure that the Ceph Object Gateway does not already have the user.
Example
[ceph: root@host01 /]# radosgw-admin metadata list user
The user name should NOT be in this list of users.
5.3.6. Add a gateway user
Create a Ceph Object Gateway user to user LDAP.
Procedure
-
Create an LDAP user for the Ceph Object Gateway, and make a note of the
binddn. Since the Ceph object gateway uses thecephuser, consider usingcephas the username. The user needs to have permissions to search the directory. The Ceph Object Gateway binds to this user as specified inrgw_ldap_binddn. Test to ensure that the user creation worked. Where
cephis the user ID underPeopleandexample.comis the domain, you can perform a search for the user.# ldapsearch -x -D "uid=ceph,ou=People,dc=example,dc=com" -W -H ldaps://example.com -b "ou=People,dc=example,dc=com" -s sub 'uid=ceph'
-
On each gateway node, create a file for the user’s secret. For example, the secret might get stored in a file entitled
/etc/bindpass. For security, change the owner of this file to thecephuser and group to ensure it is not globally readable. Add the
rgw_ldap_secretoption:Syntax
ceph config set client.rgw OPTION VALUE
Example
[ceph: root@host01 /]# ceph config set client.rgw rgw_ldap_secret /etc/bindpass
Patch the bind password file to the Ceph Object Gateway container and reapply the Ceph Object Gateway specification:
Example
service_type: rgw
service_id: rgw.1
service_name: rgw.rgw.1
placement:
  label: rgw
  extra_container_args:
  - -v
  - /etc/bindpass:/etc/bindpass
Note/etc/bindpassis not shipped automatically with Red Hat Ceph Storage and you need to ensure that the content is available on all the possible Ceph Object Gateway instance nodes.
5.3.7. Configure the gateway to use LDAP
Change the Ceph configuration with the following commands on all the Ceph nodes:
Syntax
ceph config set client.rgw OPTION VALUE
Example
[ceph: root@host01 /]# ceph config set client.rgw rgw_ldap_uri ldaps://:636
[ceph: root@host01 /]# ceph config set client.rgw rgw_ldap_binddn "ou=poc,dc=example,dc=local"
[ceph: root@host01 /]# ceph config set client.rgw rgw_ldap_searchdn "ou=poc,dc=example,dc=local"
[ceph: root@host01 /]# ceph config set client.rgw rgw_ldap_dnattr "uid"
[ceph: root@host01 /]# ceph config set client.rgw rgw_s3_auth_use_ldap true
Restart the Ceph Object Gateway.
NoteUse the output from the
ceph orch pscommand, under theNAMEcolumn, to get the SERVICE_TYPE.ID information.To restart the Ceph Object Gateway on an individual node in the storage cluster:
Syntax
systemctl restart ceph-CLUSTER_ID@SERVICE_TYPE.ID.service
Example
[root@host01 ~]# systemctl restart ceph-c4b34c6f-8365-11ba-dc31-529020a7702d@rgw.realm.zone.host01.gwasto.service
To restart the Ceph Object Gateways on all nodes in the storage cluster:
Syntax
ceph orch restart SERVICE_TYPEExample
[ceph: root@host01 /]# ceph orch restart rgw
5.3.8. Using a custom search filter
You can create a custom search filter to limit user access by using the rgw_ldap_searchfilter setting. There are two ways to use the rgw_ldap_searchfilter setting:
Specifying a partial filter:
Example
"objectclass=inetorgperson"
The Ceph Object Gateway generates the search filter with the user name from the token and the value of
rgw_ldap_dnattr. The constructed filter is then combined with the partial filter from thergw_ldap_searchfiltervalue. For example, the user name and the settings generate the final search filter:Example
"(&(uid=joe)(objectclass=inetorgperson))"
User
joeis only granted access if he is found in the LDAP directory, has an object class ofinetorgperson, and specifies a valid password.Specifying a complete filter:
A complete filter must contain a
USERNAMEtoken which is substituted with the user name during the authentication attempt. Thergw_ldap_dnattrsetting is not used in this case. For example, to limit valid users to a specific group, use the following filter:Example
"(&(uid=@USERNAME@)(memberOf=cn=ceph-users,ou=groups,dc=mycompany,dc=com))"
5.3.9. Add an S3 user to the LDAP server
In the administrative console on the LDAP server, create at least one S3 user so that an S3 client can use the LDAP user credentials. Make a note of the user name and secret for use when passing the credentials to the S3 client.
5.3.10. Export an LDAP token
When running Ceph Object Gateway with LDAP, the access token is all that is required. However, the access token is created from the access key and secret key. Export the access key and secret key as an LDAP token.
Export the access key:
Syntax
export RGW_ACCESS_KEY_ID="USERNAME"Export the secret key:
Syntax
export RGW_SECRET_ACCESS_KEY="PASSWORD"Export the token. For LDAP, use
ldapas the token type (ttype).Example
radosgw-token --encode --ttype=ldap
For Active Directory, use
adas the token type.Example
radosgw-token --encode --ttype=ad
The result is a base-64 encoded string, which is the access token. Provide this access token to S3 clients in lieu of the access key. The secret key is no longer required.
Optional: For added convenience, export the base-64 encoded string to the
RGW_ACCESS_KEY_IDenvironment variable if the S3 client uses the environment variable.Example
export RGW_ACCESS_KEY_ID="ewogICAgIlJHV19UT0tFTiI6IHsKICAgICAgICAidmVyc2lvbiI6IDEsCiAgICAgICAgInR5cGUiOiAibGRhcCIsCiAgICAgICAgImlkIjogImNlcGgiLAogICAgICAgICJrZXkiOiAiODAwI0dvcmlsbGEiCiAgICB9Cn0K"
5.3.11. Test the configuration with an S3 client
Test the configuration with a Ceph Object Gateway client, using a script such as Python Boto.
Procedure
Use the
RGW_ACCESS_KEY_IDenvironment variable to configure the Ceph Object Gateway client. Alternatively, you can copy the base-64 encoded string and specify it as the access key. Following is an example of the configured S3 client:Example
cat .aws/credentials

[default]
aws_access_key_id = ewogICaGbnjlwe9UT0tFTiI6IHsKICAgICAgICAidmVyc2lvbiI6IDEsCiAgICAgICAgInR5cGUiOiAiYWQiLAogICAgICAgICJpZCI6ICJjZXBoIiwKICAgICAgICAia2V5IjogInBhc3M0Q2VwaCIKICAgIH0KfQo=
aws_secret_access_key =
NoteThe secret key is no longer required.
Run the
aws s3 lscommand to verify the user:Example
[root@host01 ~]# aws s3 ls --endpoint http://host03

2023-12-11 17:08:50 mybucket
2023-12-24 14:55:44 mybucket2
Optional: You can also run the
radosgw-admin usercommand to verify the user in the directory:Example
[root@host01 ~]# radosgw-admin user info --uid dir1
{
    "user_id": "dir1",
    "display_name": "dir1",
    "email": "",
    "suspended": 0,
    "max_buckets": 1000,
    "subusers": [],
    "keys": [],
    "swift_keys": [],
    "caps": [],
    "op_mask": "read, write, delete",
    "default_placement": "",
    "default_storage_class": "",
    "placement_tags": [],
    "bucket_quota": {
        "enabled": false,
        "check_on_raw": false,
        "max_size": -1,
        "max_size_kb": 0,
        "max_objects": -1
    },
    "user_quota": {
        "enabled": false,
        "check_on_raw": false,
        "max_size": -1,
        "max_size_kb": 0,
        "max_objects": -1
    },
    "temp_url_keys": [],
    "type": "ldap",
    "mfa_ids": []
}
5.4. Configure Active Directory and Ceph Object Gateway
Perform the following steps to configure an Active Directory server to authenticate Ceph Object Gateway users.
5.4.1. Using Microsoft Active Directory
Ceph Object Gateway LDAP authentication is compatible with any LDAP-compliant directory service that can be configured for simple bind, including Microsoft Active Directory. Using Active Directory is similar to using RH Directory server in that the Ceph Object Gateway binds as the user configured in the rgw_ldap_binddn setting, and uses LDAPs to ensure security.
The process for configuring Active Directory is essentially identical to Configure LDAP and Ceph Object Gateway, but may have some Windows-specific usage.
5.4.2. Configuring Active Directory for LDAPS
Active Directory LDAP servers are configured to use LDAPs by default. Windows Server 2012 and higher can use Active Directory Certificate Services. Instructions for generating and installing SSL certificates for use with Active Directory LDAP are available in the following MS TechNet article: LDAP over SSL (LDAPS) Certificate.
Ensure that port 636 is open on the Active Directory host.
5.4.3. Check if the gateway user exists
Before creating the gateway user, ensure that the Ceph Object Gateway does not already have the user.
Example
[ceph: root@host01 /]# radosgw-admin metadata list user
The user name should NOT be in this list of users.
5.4.4. Add a gateway user
Create a Ceph Object Gateway user to user LDAP.
Procedure
-
Create an LDAP user for the Ceph Object Gateway, and make a note of the
binddn. Since the Ceph object gateway uses thecephuser, consider usingcephas the username. The user needs to have permissions to search the directory. The Ceph Object Gateway binds to this user as specified inrgw_ldap_binddn. Test to ensure that the user creation worked. Where
cephis the user ID underPeopleandexample.comis the domain, you can perform a search for the user.# ldapsearch -x -D "uid=ceph,ou=People,dc=example,dc=com" -W -H ldaps://example.com -b "ou=People,dc=example,dc=com" -s sub 'uid=ceph'
-
On each gateway node, create a file for the user’s secret. For example, the secret might get stored in a file entitled
/etc/bindpass. For security, change the owner of this file to thecephuser and group to ensure it is not globally readable. Add the
rgw_ldap_secretoption:Syntax
ceph config set client.rgw OPTION VALUE
Example
[ceph: root@host01 /]# ceph config set client.rgw rgw_ldap_secret /etc/bindpass
Patch the bind password file to the Ceph Object Gateway container and reapply the Ceph Object Gateway specification:
Example
service_type: rgw
service_id: rgw.1
service_name: rgw.rgw.1
placement:
  label: rgw
  extra_container_args:
  - -v
  - /etc/bindpass:/etc/bindpass
Note/etc/bindpassis not shipped automatically with Red Hat Ceph Storage and you need to ensure that the content is available on all the possible Ceph Object Gateway instance nodes.
5.4.5. Configuring the gateway to use Active Directory
Add the following options after setting the
rgw_ldap_secretsetting:Syntax
ceph config set client.rgw OPTION VALUE
Example
[ceph: root@host01 /]# ceph config set client.rgw rgw_ldap_uri ldaps://_FQDN_:636
[ceph: root@host01 /]# ceph config set client.rgw rgw_ldap_binddn "_BINDDN_"
[ceph: root@host01 /]# ceph config set client.rgw rgw_ldap_searchdn "_SEARCHDN_"
[ceph: root@host01 /]# ceph config set client.rgw rgw_ldap_dnattr "cn"
[ceph: root@host01 /]# ceph config set client.rgw rgw_s3_auth_use_ldap true
For the
rgw_ldap_urisetting, substitute FQDN with the fully qualified domain name of the LDAP server. If there is more than one LDAP server, specify each domain.For the
rgw_ldap_binddnsetting, substitute BINDDN with the bind domain. With a domain ofexample.comand acephuser underusersandaccounts, it should look something like this:Example
rgw_ldap_binddn "uid=ceph,cn=users,cn=accounts,dc=example,dc=com"
For the
rgw_ldap_searchdnsetting, substitute SEARCHDN with the search domain. With a domain ofexample.comand users underusersandaccounts, it should look something like this:rgw_ldap_searchdn "cn=users,cn=accounts,dc=example,dc=com"
Restart the Ceph Object Gateway:
NoteUse the output from the
ceph orch pscommand, under theNAMEcolumn, to get the SERVICE_TYPE.ID information.To restart the Ceph Object Gateway on an individual node in the storage cluster:
Syntax
systemctl restart ceph-CLUSTER_ID@SERVICE_TYPE.ID.service
Example
[root@host01 ~]# systemctl restart ceph-c4b34c6f-8365-11ba-dc31-529020a7702d@rgw.realm.zone.host01.gwasto.service
To restart the Ceph Object Gateways on all nodes in the storage cluster:
Syntax
ceph orch restart SERVICE_TYPEExample
[ceph: root@host01 /]# ceph orch restart rgw
5.4.6. Add an S3 user to the LDAP server
In the administrative console on the LDAP server, create at least one S3 user so that an S3 client can use the LDAP user credentials. Make a note of the user name and secret for use when passing the credentials to the S3 client.
5.4.7. Export an LDAP token
When running Ceph Object Gateway with LDAP, the access token is all that is required. However, the access token is created from the access key and secret key. Export the access key and secret key as an LDAP token.
Export the access key:
Syntax
export RGW_ACCESS_KEY_ID="USERNAME"Export the secret key:
Syntax
export RGW_SECRET_ACCESS_KEY="PASSWORD"Export the token. For LDAP, use
ldapas the token type (ttype).Example
radosgw-token --encode --ttype=ldap
For Active Directory, use
adas the token type.Example
radosgw-token --encode --ttype=ad
The result is a base-64 encoded string, which is the access token. Provide this access token to S3 clients in lieu of the access key. The secret key is no longer required.
Optional: For added convenience, export the base-64 encoded string to the
RGW_ACCESS_KEY_IDenvironment variable if the S3 client uses the environment variable.Example
export RGW_ACCESS_KEY_ID="ewogICAgIlJHV19UT0tFTiI6IHsKICAgICAgICAidmVyc2lvbiI6IDEsCiAgICAgICAgInR5cGUiOiAibGRhcCIsCiAgICAgICAgImlkIjogImNlcGgiLAogICAgICAgICJrZXkiOiAiODAwI0dvcmlsbGEiCiAgICB9Cn0K"
5.4.8. Test the configuration with an S3 client
Test the configuration with a Ceph Object Gateway client, using a script such as Python Boto.
Procedure
Use the
RGW_ACCESS_KEY_IDenvironment variable to configure the Ceph Object Gateway client. Alternatively, you can copy the base-64 encoded string and specify it as the access key. Following is an example of the configured S3 client:Example
cat .aws/credentials

[default]
aws_access_key_id = ewogICaGbnjlwe9UT0tFTiI6IHsKICAgICAgICAidmVyc2lvbiI6IDEsCiAgICAgICAgInR5cGUiOiAiYWQiLAogICAgICAgICJpZCI6ICJjZXBoIiwKICAgICAgICAia2V5IjogInBhc3M0Q2VwaCIKICAgIH0KfQo=
aws_secret_access_key =
NoteThe secret key is no longer required.
Run the
aws s3 lscommand to verify the user:Example
[root@host01 ~]# aws s3 ls --endpoint http://host03

2023-12-11 17:08:50 mybucket
2023-12-24 14:55:44 mybucket2
Optional: You can also run the
radosgw-admin usercommand to verify the user in the directory:Example
[root@host01 ~]# radosgw-admin user info --uid dir1
{
    "user_id": "dir1",
    "display_name": "dir1",
    "email": "",
    "suspended": 0,
    "max_buckets": 1000,
    "subusers": [],
    "keys": [],
    "swift_keys": [],
    "caps": [],
    "op_mask": "read, write, delete",
    "default_placement": "",
    "default_storage_class": "",
    "placement_tags": [],
    "bucket_quota": {
        "enabled": false,
        "check_on_raw": false,
        "max_size": -1,
        "max_size_kb": 0,
        "max_objects": -1
    },
    "user_quota": {
        "enabled": false,
        "check_on_raw": false,
        "max_size": -1,
        "max_size_kb": 0,
        "max_objects": -1
    },
    "temp_url_keys": [],
    "type": "ldap",
    "mfa_ids": []
}
5.5. The Ceph Object Gateway and OpenStack Keystone
As a storage administrator, you can use OpenStack’s Keystone authentication service to authenticate users through the Ceph Object Gateway. Before you can configure the Ceph Object Gateway, you need to configure Keystone first. This enables the Swift service, and points the Keystone service to the Ceph Object Gateway. Next, you need to configure the Ceph Object Gateway to accept authentication requests from the Keystone service.
5.5.1. Prerequisites
- A running Red Hat OpenStack Platform environment.
- A running Red Hat Ceph Storage environment.
- A running Ceph Object Gateway environment.
5.5.2. Roles for Keystone authentication
The OpenStack Keystone service provides three roles: admin, member, and reader. These roles are hierarchical; users with the admin role inherit the capabilities of the member role and users with the member role inherit the capabilities of the reader role.
The member role’s read permissions only apply to objects of the project it belongs to.
admin
The admin role is reserved for the highest level of authorization within a particular scope. This usually includes all the create, read, update, or delete operations on a resource or API.
member
The member role is not used directly by default. It provides flexibility during deployments and helps reduce responsibility for administrators.
For example, you can override a policy for a deployment by using the default member role and a simple policy override, to allow system members to update services and endpoints. This provides a layer of authorization between admin and reader roles.
reader
The reader role is reserved for read-only operations regardless of the scope.
If you use a reader to access sensitive information such as image license keys, administrative image data, administrative volume metadata, application credentials, and secrets, you might unintentionally expose sensitive information. Hence, APIs that expose these resources should carefully consider the impact of the reader role and appropriately defer access to the member and admin roles.
5.5.3. Keystone authentication and the Ceph Object Gateway
Organizations using OpenStack Keystone to authenticate users can integrate Keystone with the Ceph Object Gateway. The Ceph Object Gateway enables the gateway to accept a Keystone token, authenticate the user, and create a corresponding Ceph Object Gateway user. When Keystone validates a token, the gateway considers the user authenticated.
Benefits
-
Assigning
admin,member, andreaderroles to users with Keystone. - Automatic user creation in the Ceph Object Gateway.
- Managing users with Keystone.
- The Ceph Object Gateway will query Keystone periodically for a list of revoked tokens.
5.5.4. Creating the Swift service
Before configuring the Ceph Object Gateway, configure Keystone so that the Swift service is enabled and pointing to the Ceph Object Gateway.
Prerequisites
- A running Red Hat Ceph Storage cluster.
- Access to the Ceph software repository.
- Root-level access to OpenStack controller node.
Procedure
Create the Swift service:
[root@swift~]# openstack service create --name=swift --description="Swift Service" object-store
Creating the service will echo the service settings.
Table 5.1. Example
Field Value description
Swift Service
enabled
True
id
37c4c0e79571404cb4644201a4a6e5ee
name
swift
type
object-store
5.5.5. Setting the Ceph Object Gateway endpoints
After creating the Swift service, point the service to a Ceph Object Gateway.
Prerequisites
- A running Red Hat Ceph Storage cluster.
- Access to the Ceph software repository.
- A running Swift service on a Red Hat OpenStack Platform 17 environment.
Procedure
Create the OpenStack endpoints pointing to the Ceph Object Gateway:
Syntax
openstack endpoint create --region REGION_NAME swift admin "URL"
openstack endpoint create --region REGION_NAME swift public "URL"
openstack endpoint create --region REGION_NAME swift internal "URL"
Replace REGION_NAME with the name of the gateway’s zone group name or region name. Replace URL with URLs appropriate for the Ceph Object Gateway.
Example
[root@osp ~]# openstack endpoint create --region us-west swift admin "http://radosgw.example.com:8080/swift/v1"
[root@osp ~]# openstack endpoint create --region us-west swift public "http://radosgw.example.com:8080/swift/v1"
[root@osp ~]# openstack endpoint create --region us-west swift internal "http://radosgw.example.com:8080/swift/v1"
Field Value adminurl
id
e4249d2b60e44743a67b5e5b38c18dd3internalurl
publicurl
region
us-westservice_id
37c4c0e79571404cb4644201a4a6e5eeservice_name
swiftservice_type
object-storeSetting the endpoints will output the service endpoint settings.
5.5.6. Verifying Openstack is using the Ceph Object Gateway endpoints
After creating the Swift service and setting the endpoints, show the endpoints to ensure that all settings are correct.
Prerequisites
- A running Red Hat Ceph Storage cluster.
- Access to the Ceph software repository.
Procedure
List the endpoints under the Swift service:
[root@swift~]# openstack endpoint list --service=swift
Verify settings for the endpoints listed in the previous command:
Syntax
[root@swift~]# openstack endpoint show ENDPOINT_IDShowing the endpoints will echo the endpoints settings, and the service settings.
Table 5.2. Example
Field Value adminurl
enabled
True
id
e4249d2b60e44743a67b5e5b38c18dd3
internalurl
publicurl
region
us-west
service_id
37c4c0e79571404cb4644201a4a6e5ee
service_name
swift
service_type
object-store
Additional Resources
- For more information on getting the details about endpoints, see Show endpoints in the Red Hat OpenStack guide.
5.5.7. Configuring the Ceph Object Gateway to use Keystone SSL
Converting the OpenSSL certificates that Keystone uses configures the Ceph Object Gateway to work with Keystone. When the Ceph Object Gateway interacts with OpenStack’s Keystone authentication, Keystone will terminate with a self-signed SSL certificate.
Prerequisites
- A running Red Hat Ceph Storage cluster.
- Access to the Ceph software repository.
Procedure
Convert the OpenSSL certificate to the
nss dbformat:Example
[root@osp ~]# mkdir /var/ceph/nss

[root@osp ~]# openssl x509 -in /etc/keystone/ssl/certs/ca.pem -pubkey | \
    certutil -d /var/ceph/nss -A -n ca -t "TCu,Cu,Tuw"

[root@osp ~]# openssl x509 -in /etc/keystone/ssl/certs/signing_cert.pem -pubkey | \
    certutil -A -d /var/ceph/nss -n signing_cert -t "P,P,P"
Install Keystone’s SSL certificate in the node running the Ceph Object Gateway. Alternatively set the value of the configurable
rgw_keystone_verify_sslsetting tofalse.Setting
rgw_keystone_verify_ssltofalsemeans that the gateway will not attempt to verify the certificate.
5.5.8. Configuring the Ceph Object Gateway to use Keystone authentication
Configure the Red Hat Ceph Storage to use OpenStack’s Keystone authentication.
Prerequisites
- A running Red Hat Ceph Storage cluster.
- Access to the Ceph software repository.
-
Have
adminprivileges to the production environment.
Procedure
Do the following for each gateway instance.
Set the
rgw_s3_auth_use_keystoneoption totrue:Example
[ceph: root@host01 /]# ceph config set client.rgw rgw_s3_auth_use_keystone true
Set the
nss_db_pathsetting to the path where the NSS database is stored:Example
[ceph: root@host01 /]# ceph config set client.rgw nss_db_path "/var/lib/ceph/radosgw/ceph-rgw.rgw01/nss"
Provide authentication credentials:
It is possible to configure a Keystone service tenant, user, and password for keystone for the OpenStack Identity API, similar to the way system administrators tend to configure OpenStack services. Providing a username and password avoids providing the shared secret to the
rgw_keystone_admin_tokensetting.ImportantRed Hat recommends disabling authentication by admin token in production environments. The service tenant credentials should have
adminprivileges.The necessary configuration options are:
Syntax
ceph config set client.rgw rgw_keystone_url KEYSTONE_URL:ADMIN_PORT
ceph config set client.rgw rgw_keystone_admin_user KEYSTONE_TENANT_USER_NAME
ceph config set client.rgw rgw_keystone_admin_password KEYSTONE_TENANT_USER_PASSWORD
ceph config set client.rgw rgw_keystone_admin_tenant KEYSTONE_TENANT_NAME
ceph config set client.rgw rgw_keystone_accepted_roles KEYSTONE_ACCEPTED_USER_ROLES
ceph config set client.rgw rgw_keystone_token_cache_size NUMBER_OF_TOKENS_TO_CACHE
ceph config set client.rgw rgw_keystone_revocation_interval NUMBER_OF_SECONDS_BEFORE_CHECKING_REVOKED_TICKETS
ceph config set client.rgw rgw_keystone_implicit_tenants TRUE_FOR_PRIVATE_TENANT_FOR_EACH_NEW_USER
A Ceph Object Gateway user is mapped into a Keystone
tenant. A Keystone user has different roles assigned to it on possibly more than a single tenant. When the Ceph Object Gateway gets the ticket, it looks at the tenant, and the user roles that are assigned to that ticket, and accepts or rejects the request according to thergw_keystone_accepted_rolesconfigurable.
Additional Resources
- See the Users and Identity Management Guide for Red Hat OpenStack Platform.
5.5.9. Restarting the Ceph Object Gateway daemon
Restarting the Ceph Object Gateway must be done to active configuration changes.
Prerequisites
- A running Red Hat Ceph Storage cluster.
- Access to the Ceph software repository.
-
adminprivileges to the production environment.
Procedure
Once you have saved the Ceph configuration file and distributed it to each Ceph node, restart the Ceph Object Gateway instances:
NoteUse the output from the
ceph orch pscommand, under theNAMEcolumn, to get the SERVICE_TYPE.ID information.To restart the Ceph Object Gateway on an individual node in the storage cluster:
Syntax
systemctl restart ceph-CLUSTER_ID@SERVICE_TYPE.ID.service
Example
[root@host01 ~]# systemctl restart ceph-c4b34c6f-8365-11ba-dc31-529020a7702d@rgw.realm.zone.host01.gwasto.service
To restart the Ceph Object Gateways on all nodes in the storage cluster:
Syntax
ceph orch restart SERVICE_TYPEExample
[ceph: root@host01 /]# ceph orch restart rgw
Chapter 6. Security
As a storage administrator, securing the storage cluster environment is important. Red Hat Ceph Storage provides encryption and key management to secure the Ceph Object Gateway access point.
6.1. Prerequisites
- A healthy running Red Hat Ceph Storage cluster.
- Installation of the Ceph Object Gateway software.
6.2. Server-Side Encryption (SSE)
The Ceph Object Gateway supports server-side encryption of uploaded objects for the S3 application programming interface (API). Server-side encryption means that the S3 client sends data over HTTP in its unencrypted form, and the Ceph Object Gateway stores that data in the Red Hat Ceph Storage cluster in encrypted form.
- Red Hat does NOT support S3 object encryption of Static Large Object (SLO) or Dynamic Large Object (DLO).
-
Currently, none of the Server-Side Encryption (SSE) modes have implemented support for
CopyObject. It is currently being developed [BZ#2149450].
To use encryption, client requests MUST send requests over an SSL connection. Red Hat does not support S3 encryption from a client unless the Ceph Object Gateway uses SSL. However, for testing purposes, administrators can disable SSL during testing by setting the rgw_crypt_require_ssl configuration setting to false at runtime, using the ceph config set client.rgw command, and then restarting the Ceph Object Gateway instance.
In a production environment, it might not be possible to send encrypted requests over SSL. In such a case, send requests using HTTP with server-side encryption.
For information about how to configure HTTP with server-side encryption, see the Additional Resources section below.
S3 multipart uploads using Server-Side Encryption now replicate correctly in multi-site. Previously, the replicas of such objects were corrupted by decryption You can use the radosgw-admin bucket resync encrypted multipart --bucket-name BUCKET_NAME command to identify multipart uploads using SSE. This command scans for the primary non-replicated copies of encrypted multipart objects. For each object, the LastModified timestamp of any identified object is incremented by 1ns to cause peer zones to replicate it again. For multi-site deployments that use SSE, run this command against every bucket in every zone after upgrading all the zones. This ensures that S3 multipart uploads using SSE replicates correctly in multi-site.
There are two options for the management of encryption keys:
Customer-provided Keys
When using customer-provided keys, the S3 client passes an encryption key along with each request to read or write encrypted data. It is the customer’s responsibility to manage those keys. Customers must remember which key the Ceph Object Gateway used to encrypt each object.
Ceph Object Gateway implements the customer-provided key behavior in the S3 API according to the Amazon SSE-C specification.
Since the customer handles the key management and the S3 client passes keys to the Ceph Object Gateway, the Ceph Object Gateway requires no special configuration to support this encryption mode.
Key Management Service
When using a key management service, the secure key management service stores the keys and the Ceph Object Gateway retrieves them on demand to serve requests to encrypt or decrypt data.
Ceph Object Gateway implements the key management service behavior in the S3 API according to the Amazon SSE-KMS specification.
Currently, the only tested key management implementations are HashiCorp Vault, and OpenStack Barbican. However, OpenStack Barbican is a Technology Preview and is not supported for use in production systems.
Additional Resources
6.3. Server-side encryption requests
In a production environment, clients often contact the Ceph Object Gateway through a proxy. This proxy is referred to as a load balancer because it connects to multiple Ceph Object Gateways. When the client sends requests to the Ceph Object Gateway, the load balancer routes those requests to the multiple Ceph Object Gateways, thus distributing the workload.
In this type of configuration, it is possible that SSL terminations occur both at a load balancer and between the load balancer and the multiple Ceph Object Gateways. Communication occurs using HTTP only. To set up the Ceph Object Gateways to accept the server-side encryption requests, see Configuring server-side encryption.
6.4. Configuring server-side encryption
You can set up server-side encryption to send requests to the Ceph Object Gateway using HTTP, in cases where it might not be possible to send encrypted requests over SSL.
This procedure uses HAProxy as proxy and load balancer.
Prerequisites
- Root-level access to all nodes in the storage cluster.
- A running Red Hat Ceph Storage cluster.
- Installation of the Ceph Object Gateway software.
- Installation of the HAProxy software.
Procedure
Edit the
haproxy.cfgfile:Example
frontend http_web *:80 mode http default_backend rgw frontend rgw-https bind *:443 ssl crt /etc/ssl/private/example.com.pem default_backend rgw backend rgw balance roundrobin mode http server rgw1 10.0.0.71:8080 check server rgw2 10.0.0.80:8080 checkComment out the lines that allow access to the
httpfront end and add instructions to direct HAProxy to use thehttpsfront end instead:Example
# frontend http_web *:80 # mode http # default_backend rgw frontend rgw-https bind *:443 ssl crt /etc/ssl/private/example.com.pem http-request set-header X-Forwarded-Proto https if { ssl_fc } http-request set-header X-Forwarded-Proto https # here we set the incoming HTTPS port on the load balancer (eg : 443) http-request set-header X-Forwarded-Port 443 default_backend rgw backend rgw balance roundrobin mode http server rgw1 10.0.0.71:8080 check server rgw2 10.0.0.80:8080 checkSet the
rgw_trust_forwarded_httpsoption totrue:Example
[ceph: root@host01 /]# ceph config set client.rgw rgw_trust_forwarded_https true
Enable and start HAProxy:
[root@host01 ~]# systemctl enable haproxy
[root@host01 ~]# systemctl start haproxy
Additional Resources
- See the High availability service section in the Red Hat Ceph Storage Object Gateway Guide for additional details.
- See the Red Hat Ceph Storage installation chapter in the Red Hat Ceph Storage Installation Guide for additional details.
6.5. The HashiCorp Vault
As a storage administrator, you can securely store keys, passwords, and certificates in the HashiCorp Vault for use with the Ceph Object Gateway. The HashiCorp Vault provides a secure key management service for server-side encryption used by the Ceph Object Gateway.

The basic workflow:
- The client requests the creation of a secret key from the Vault based on an object’s key ID.
- The client uploads an object with the object’s key ID to the Ceph Object Gateway.
- The Ceph Object Gateway then requests the newly created secret key from the Vault.
- The Vault replies to the request by returning the secret key to the Ceph Object Gateway.
- Now the Ceph Object Gateway can encrypt the object using the new secret key.
- After encryption is done the object is then stored on the Ceph OSD.
Red Hat works with our technology partners to provide this documentation as a service to our customers. However, Red Hat does not provide support for this product. If you need technical assistance for this product, then contact Hashicorp for support.
6.5.1. Prerequisites
- A running Red Hat Ceph Storage cluster.
- Installation of the Ceph Object Gateway software.
- Installation of the HashiCorp Vault software.
6.5.2. Secret engines for Vault
The HashiCorp Vault provides several secret engines to generate, store, or encrypt data. The application programming interface (API) sends data calls to the secret engine asking for action on that data, and the secret engine returns a result of that action request.
The Ceph Object Gateway supports two of the HashiCorp Vault secret engines:
- Key/Value version 2
- Transit
Key/Value version 2
The Key/Value secret engine stores random secrets within the Vault, on disk. With version 2 of the kv engine, a key can have a configurable number of versions. The default number of versions is 10. Deleting a version does not delete the underlying data, but marks the data as deleted, allowing deleted versions to be undeleted. You can use the API endpoint or the destroy command to permanently remove a version’s data. To delete all versions and metadata for a key, you can use the metadata command or the API endpoint. The key names must be strings, and the engine will convert non-string values into strings when using the command line interface. To preserve non-string values, provide a JSON file or use the HTTP application programming interface (API).
For access control list (ACL) policies, the Key/Value secret engine recognizes the distinctions between the create and update capabilities.
Transit
The Transit secret engine performs cryptographic functions on in-transit data. The Transit secret engine can generate hashes, can be a source of random bytes, and can also sign and verify data. The Vault does not store data when using the Transit secret engine. The Transit secret engine supports key derivation, by allowing the same key to be used for multiple purposes. Also, the transit secret engine supports key versioning. The Transit secret engine supports these key types:
aes128-gcm96- AES-GCM with a 128-bit AES key and a 96-bit nonce; supports encryption, decryption, key derivation, and convergent encryption
aes256-gcm96- AES-GCM with a 256-bit AES key and a 96-bit nonce; supports encryption, decryption, key derivation, and convergent encryption (default)
chacha20-poly1305- ChaCha20-Poly1305 with a 256-bit key; supports encryption, decryption, key derivation, and convergent encryption
ed25519- Ed25519; supports signing, signature verification, and key derivation
ecdsa-p256- ECDSA using curve P-256; supports signing and signature verification
ecdsa-p384- ECDSA using curve P-384; supports signing and signature verification
ecdsa-p521- ECDSA using curve P-521; supports signing and signature verification
rsa-2048- 2048-bit RSA key; supports encryption, decryption, signing, and signature verification
rsa-3072- 3072-bit RSA key; supports encryption, decryption, signing, and signature verification
rsa-4096- 4096-bit RSA key; supports encryption, decryption, signing, and signature verification
Additional Resources
- See the KV Secrets Engine documentation on Vault’s project site for more information.
- See the Transit Secrets Engine documentation on Vault’s project site for more information.
6.5.3. Authentication for Vault
The HashiCorp Vault supports several types of authentication mechanisms. The Ceph Object Gateway currently supports the Vault agent method. The Ceph Object Gateway uses the rgw_crypt_vault_auth, and rgw_crypt_vault_addr options to configure the use of the HashiCorp Vault.
Red Hat supports the usage of Vault agent as the authentication method for containers and the usage of token authentication is not supported on containers.
Vault Agent
The Vault agent is a daemon that runs on a client node and provides client-side caching, along with token renewal. The Vault agent typically runs on the Ceph Object Gateway node. Run the Vault agent and refresh the token file. When the Vault agent is used in this mode, you can use file system permissions to restrict who has access to the usage of tokens. Also, the Vault agent can act as a proxy server, that is, Vault will add a token when required and add it to the requests passed to it before forwarding them to the actual server. The Vault agent can still handle token renewal just as it would when storing a token in the Filesystem. It is required to secure the network that Ceph Object Gateways uses to connect with the Vault agent, for example, the Vault agent listens to only the localhost.
Additional Resources
- See the Vault Agent documentation on Vault’s project site for more information.
6.5.4. Namespaces for Vault
Using HashiCorp Vault as an enterprise service provides centralized management for isolated namespaces that teams within an organization can use. These isolated namespace environments are known as tenants, and teams within an organization can utilize these tenants to isolate their policies, secrets, and identities from other teams. The namespace features of Vault help support secure multi-tenancy from within a single infrastructure.
Additional Resources
- See the Vault Enterprise Namespaces documentation on Vault’s project site for more information.
6.5.5. Transit engine compatibility support
There is compatibility support for the previous versions of Ceph which used the Transit engine as a simple key store. You can use the compat option in the Transit engine to configure the compatibility support. You can disable previous support with the following command:
Example
[ceph: root@host03 /]# ceph config set client.rgw rgw_crypt_vault_secret_engine transit compat=0
This is the default for future versions and you can use the current version for new installations.
The normal default with the current version is:
Example
[ceph: root@host03 /]# ceph config set client.rgw rgw_crypt_vault_secret_engine transit compat=1
This enables the new engine for newly created objects and still allows the old engine to be used for the old objects. To access old and new objects, the Vault token must have both the old and new transit policies.
You can force use only the old engine with the following command:
Example
[ceph: root@host03 /]# ceph config set client.rgw rgw_crypt_vault_secret_engine transit compat=2
This mode is selected by default if the Vault ends in export/encryption-key.
After configuring the client.rgw options, you need to restart the Ceph Object Gateway daemons for the new values to take effect.
Additional Resources
- See the Vault Agent documentation on Vault’s project site for more information.
6.5.6. Creating token policies for Vault
A token policy specifies the powers that all Vault tokens have. One token can have multiple policies. You should use the required policy for the configuration.
Prerequisites
- A running Red Hat Ceph Storage cluster.
- Installation of the HashiCorp Vault software.
- Root-level access to the HashiCorp Vault node.
Procedure
Create a token policy:
For the Key/Value secret engine:
Example
[root@vault ~]# vault policy write rgw-kv-policy -<<EOF
 path "secret/data/*" {
   capabilities = ["read"]
 }
EOF
For the Transit engine:
Example
[root@vault ~]# vault policy write rgw-transit-policy -<<EOF path "transit/keys/*" { capabilities = [ "create", "update" ] denied_parameters = {"exportable" = [], "allow_plaintext_backup" = [] } } path "transit/keys/*" { capabilities = ["read", "delete"] } path "transit/keys/" { capabilities = ["list"] } path "transit/keys/+/rotate" { capabilities = [ "update" ] } path "transit/*" { capabilities = [ "update" ] } EOFNoteIf you have used the Transit secret engine on an older version of Ceph, the token policy is:
Example
[root@vault ~]# vault policy write old-rgw-transit-policy -<<EOF
  path "transit/export/encryption-key/*" {
    capabilities = ["read"]
  }
EOF
6.5.7. Configuring the Ceph Object Gateway to use the Vault
To configure the Ceph Object Gateway to use the HashiCorp Vault, it must be set as the encryption key store. Currently, the Ceph Object Gateway supports two different secret engines, and two different authentication methods.
Prerequisites
- A running Red Hat Ceph Storage cluster.
- Installation of the Ceph Object Gateway software.
- Root-level access to a Ceph Object Gateway node.
Procedure
Use the
ceph config set client.rgw OPTION VALUEcommand to enable Vault as the encryption key store:Syntax
ceph config set client.rgw rgw_crypt_s3_kms_backend vault
Add the following options and values:
Syntax
ceph config set client.rgw rgw_crypt_vault_auth agent ceph config set client.rgw rgw_crypt_vault_addr http://VAULT_SERVER:8100- Customize the policy as per the use case.
Get the role-id:
Syntax
vault read auth/approle/role/rgw-ap/role-id -format=json | \ jq -r .data.role_id > PATH_TO_FILEGet the secret-id:
Syntax
vault read auth/approle/role/rgw-ap/role-id -format=json | \ jq -r .data.secret_id > PATH_TO_FILECreate the configuration for the Vault agent:
Example
pid_file = "/run/kv-vault-agent-pid"
auto_auth {
  method "AppRole" {
    mount_path = "auth/approle"
    config = {
      role_id_file_path ="/root/vault_configs/kv-agent-role-id"
      secret_id_file_path ="/root/vault_configs/kv-agent-secret-id"
      remove_secret_id_file_after_reading ="false"
    }
  }
}
cache {
  use_auto_auth_token = true
}
listener "tcp" {
  address = "127.0.0.1:8100"
  tls_disable = true
}
vault {
  address = "http://10.8.128.9:8200"
}
Use systemctl to run the persistent daemon:
Example
[root@host03 ~]# /usr/local/bin/vault agent -config=/usr/local/etc/vault/rgw-agent.hcl
- A token file is populated with a valid token when the Vault agent runs.
Select a Vault secret engine, either Key/Value or Transit.
If using Key/Value, then add the following line:
Example
[ceph: root@host03 /]# ceph config set client.rgw rgw_crypt_vault_secret_engine kv
If using Transit, then add the following line:
Example
[ceph: root@host03 /]# ceph config set client.rgw rgw_crypt_vault_secret_engine transit
Use the
ceph config set client.rgw OPTION VALUEcommand to set the Vault namespace to retrieve the encryption keys:Example
[ceph: root@host03 /]# ceph config set client.rgw rgw_crypt_vault_namespace testnamespace1
Restrict where the Ceph Object Gateway retrieves the encryption keys from the Vault by setting a path prefix:
Example
[ceph: root@host03 /]# ceph config set client.rgw rgw_crypt_vault_prefix /v1/secret/data
For exportable Transit keys, set the prefix path as follows:
Example
[ceph: root@host03 /]# ceph config set client.rgw rgw_crypt_vault_prefix /v1/transit/export/encryption-key
Assuming the domain name of the Vault server is
vault-server, the Ceph Object Gateway will fetch encrypted transit keys from the following URL:Example
http://vault-server:8200/v1/transit/export/encryption-key
Restart the Ceph Object Gateway daemons.
To restart the Ceph Object Gateway on an individual node in the storage cluster:
Syntax
systemctl restart ceph-CLUSTER_ID@SERVICE_TYPE.ID.service
Example
[root@host03 ~]# systemctl restart ceph-c4b34c6f-8365-11ba-dc31-529020a7702d@rgw.realm.zone.host01.gwasto.service
To restart the Ceph Object Gateways on all nodes in the storage cluster:
Syntax
ceph orch restart SERVICE_TYPEExample
[ceph: root@host03 /]# ceph orch restart rgw
Additional Resources
- See the Secret engines for Vault section of the Red Hat Ceph Storage Object Gateway Guide for more details.
- See the Authentication for Vault section of the Red Hat Ceph Storage Object Gateway Guide for more details.
6.5.8. Creating a key using the kv engine
Configure the HashiCorp Vault Key/Value secret engine (kv) so you can create a key for use with the Ceph Object Gateway. Secrets are stored as key-value pairs in the kv secret engine.
Keys for server-side encryption must be 256-bits long and encoded using base64.
Prerequisites
- A running Red Hat Ceph Storage cluster.
- Installation of the HashiCorp Vault software.
- Root-level access to the HashiCorp Vault node.
Procedure
Enable the Key/Value version 2 secret engine:
Example
vault secrets enable -path secret kv-v2
Create a new key:
Syntax
vault kv put secret/PROJECT_NAME/BUCKET_NAME key=$(openssl rand -base64 32)
Example
[root@vault ~]# vault kv put secret/myproject/mybucketkey key=$(openssl rand -base64 32)

====== Metadata ======
Key              Value
---              -----
created_time     2020-02-21T17:01:09.095824999Z
deletion_time    n/a
destroyed        false
version          1
6.5.9. Creating a key using the transit engine
Configure the HashiCorp Vault Transit secret engine (transit) so you can create a key for use with the Ceph Object Gateway. Creating keys with the Transit secret engine must be exportable in order to be used for server-side encryption with the Ceph Object Gateway.
Prerequisites
- A running Red Hat Ceph Storage cluster.
- Installation of the HashiCorp Vault software.
- Root-level access to the HashiCorp Vault node.
Procedure
Enable the Transit secret engine:
[root@vault ~]# vault secrets enable transit
Create a new exportable key:
Syntax
vault write -f transit/keys/BUCKET_NAME exportable=trueExample
[root@vault ~]# vault write -f transit/keys/mybucketkey exportable=true
NoteBy default the above command creates a
aes256-gcm96type key.Verify the creation of the key:
Syntax
vault read transit/export/encryption-key/BUCKET_NAME/VERSION_NUMBER
Example
[root@vault ~]# vault read transit/export/encryption-key/mybucketkey/1

Key     Value
---     -----
keys    map[1:-gbTI9lNpqv/V/2lDcmH2Nq1xKn6FPDWarCmFM2aNsQ=]
name    mybucketkey
type    aes256-gcm96
NoteProviding the full key path, including the key version, is required.
6.5.10. Uploading an object using AWS and the Vault
When uploading an object to the Ceph Object Gateway, the Ceph Object Gateway will fetch the key from the Vault, and then encrypt and store the object in a bucket. When a request is made to download the object, the Ceph Object Gateway will automatically retrieve the corresponding key from the Vault and decrypt the object. To upload an object, the Ceph object Gateway fetches the key from the Vault and then encrypts the object and stores it in the bucket. The Ceph Object Gateway retrieves the corresponding key from the Vault and decrypts the object when there is a request to download the object.
The URL is constructed using the base address, set by the rgw_crypt_vault_addr option, and the path prefix, set by the rgw_crypt_vault_prefix option.
Prerequisites
- A running Red Hat Ceph Storage cluster.
- Installation of the Ceph Object Gateway software.
- Installation of the HashiCorp Vault software.
- Access to a Ceph Object Gateway client node.
- Access to Amazon Web Services (AWS).
Procedure
Upload an object using the AWS command line client and provide the Secure Side Encryption(SSE) key ID in the request:
For the Key/Value secret engine:
Example
[user@client ~]$ aws --endpoint=http://radosgw:8000 s3 cp plaintext.txt s3://mybucket/encrypted.txt --sse=aws:kms --sse-kms-key-id myproject/mybucketkey
NoteIn the example, the Ceph Object Gateway would fetch the secret from
http://vault-server:8200/v1/secret/data/myproject/mybucketkeyFor the Transit engine:
Example
[user@client ~]$ aws --endpoint=http://radosgw:8000 s3 cp plaintext.txt s3://mybucket/encrypted.txt --sse=aws:kms --sse-kms-key-id mybucketkey
In the example, the Ceph Object Gateway would fetch the secret from http://vaultserver:8200/v1/transit/mybucketkey
6.5.11. Additional Resources
- See the Install Vault documentation on Vault’s project site for more information.
6.6. The Ceph Object Gateway and multi-factor authentication
As a storage administrator, you can manage time-based one time password (TOTP) tokens for Ceph Object Gateway users.
6.6.1. Multi-factor authentication
When a bucket is configured for object versioning, a developer can optionally configure the bucket to require multi-factor authentication (MFA) for delete requests. Using MFA, a time-based one time password (TOTP) token is passed as a key to the x-amz-mfa header. The tokens are generated with virtual MFA devices like Google Authenticator, or a hardware MFA device like those provided by Gemalto.
Use radosgw-admin to assign time-based one time password tokens to a user. You must set a secret seed and a serial ID. You can also use radosgw-admin to list, remove, and resynchronize tokens.
In a multisite environment it is advisable to use different tokens for different zones, because, while MFA IDs are set on the user’s metadata, the actual MFA one time password configuration resides on the local zone’s OSDs.
Table 6.1. Terminology
| Term | Description |
|---|---|
| TOTP | Time-based One Time Password. |
| Token serial | A string that represents the ID of a TOTP token. |
| Token seed | The secret seed that is used to calculate the TOTP. It can be hexadecimal or base32. |
| TOTP seconds | The time resolution used for TOTP generation. |
| TOTP window | The number of TOTP tokens that are checked before and after the current token when validating tokens. |
| TOTP pin | The valid value of a TOTP token at a certain time. |
6.6.2. Creating a seed for multi-factor authentication
To set up multi-factor authentication (MFA), you must create a secret seed for use by the one-time password generator and the back-end MFA system.
Prerequisites
- A Linux system.
- Access to the command line shell.
Procedure
Generate a 30 character seed from the
urandomLinux device file and store it in the shell variableSEED:Example
[user@host01 ~]$ SEED=$(head -10 /dev/urandom | sha512sum | cut -b 1-30)
Print the seed by running echo on the
SEEDvariable:Example
[user@host01 ~]$ echo $SEED
492dedb20cf51d1405ef6a1316017e
Configure the one-time password generator and the back-end MFA system to use the same seed.
Additional Resources
- For more information, see the solution Unable to create RGW MFA token for bucket.
- For more information, see The Ceph Object Gateway and multi-factor authentication.
6.6.3. Creating a new multi-factor authentication TOTP token
Create a new multi-factor authentication (MFA) time-based one time password (TOTP) token.
Prerequisites
- A running Red Hat Ceph Storage cluster.
- Ceph Object Gateway is installed.
- You have root access on a Ceph Monitor node.
- A secret seed for the one-time password generator and Ceph Object Gateway MFA was generated.
Procedure
Create a new MFA TOTP token:
Syntax
radosgw-admin mfa create --uid=USERID --totp-serial=SERIAL --totp-seed=SEED --totp-seed-type=SEED_TYPE --totp-seconds=TOTP_SECONDS --totp-window=TOTP_WINDOW
Set USERID to the user name to set up MFA on, set SERIAL to a string that represents the ID for the TOTP token, and set SEED to a hexadecimal or base32 value that is used to calculate the TOTP. The following settings are optional: Set the SEED_TYPE to
hexorbase32, set TOTP_SECONDS to the timeout in seconds, or set TOTP_WINDOW to the number of TOTP tokens to check before and after the current token when validating tokens.Example
[root@host01 ~]# radosgw-admin mfa create --uid=johndoe --totp-serial=MFAtest --totp-seed=492dedb20cf51d1405ef6a1316017e
Additional Resources
- For more information, see Creating a seed for multi-factor authentication.
- For more information, See Resynchronizing a multi-factor authentication token.
6.6.4. Test a multi-factor authentication TOTP token
Test a multi-factor authentication (MFA) time-based one time password (TOTP) token.
Prerequisites
- A running Red Hat Ceph Storage cluster.
- Ceph Object Gateway is installed.
- You have root access on a Ceph Monitor node.
-
An MFA TOTP token was created using
radosgw-admin mfa create.
Procedure
Test the TOTP token PIN to verify that TOTP functions correctly:
Syntax
radosgw-admin mfa check --uid=USERID --totp-serial=SERIAL --totp-pin=PIN
Set USERID to the user name MFA is set up on, set SERIAL to the string that represents the ID for the TOTP token, and set PIN to the latest PIN from the one-time password generator.
Example
[root@host01 ~]# radosgw-admin mfa check  --uid=johndoe --totp-serial=MFAtest --totp-pin=870305
ok
If this is the first time you have tested the PIN, it may fail. If it fails, resynchronize the token. See Resynchronizing a multi-factor authentication token in the Red Hat Ceph Storage Object Gateway Configuration and Administration Guide.
Additional Resources
- For more information, see Creating a seed for multi-factor authentication.
- For more information, see Resynchronizing a multi-factor authentication token.
6.6.5. Resynchronizing a multi-factor authentication TOTP token
Resynchronize a multi-factor authentication (MFA) time-based one time password token.
Prerequisites
- A running Red Hat Ceph Storage cluster.
- Ceph Object Gateway is installed.
- You have root access on a Ceph Monitor node.
-
An MFA TOTP token was created using
radosgw-admin mfa create.
Procedure
Resynchronize a multi-factor authentication TOTP token in case of time skew or failed checks.
This requires passing in two consecutive pins: the previous pin, and the current pin.
Syntax
radosgw-admin mfa resync --uid=USERID --totp-serial=SERIAL --totp-pin=PREVIOUS_PIN --totp=pin=CURRENT_PIN
Set USERID to the user name MFA is set up on, set SERIAL to the string that represents the ID for the TOTP token, set PREVIOUS_PIN to the user’s previous PIN, and set CURRENT_PIN to the user’s current PIN.
Example
[root@host01 ~]# radosgw-admin mfa resync --uid=johndoe --totp-serial=MFAtest --totp-pin=802021 --totp-pin=439996
Verify the token was successfully resynchronized by testing a new PIN:
Syntax
radosgw-admin mfa check --uid=USERID --totp-serial=SERIAL --totp-pin=PIN
Set USERID to the user name MFA is set up on, set SERIAL to the string that represents the ID for the TOTP token, and set PIN to the user’s PIN.
Example
[root@host01 ~]# radosgw-admin mfa check  --uid=johndoe --totp-serial=MFAtest --totp-pin=870305
ok
Additional Resources
- For more information, see Creating a new multi-factor authentication TOTP token.
6.6.6. Listing multi-factor authentication TOTP tokens
List all multi-factor authentication (MFA) time-based one time password (TOTP) tokens that a particular user has.
Prerequisites
- A running Red Hat Ceph Storage cluster.
- Ceph Object Gateway is installed.
- You have root access on a Ceph Monitor node.
-
An MFA TOTP token was created using
radosgw-admin mfa create.
Procedure
List MFA TOTP tokens:
Syntax
radosgw-admin mfa list --uid=USERIDSet USERID to the user name MFA is set up on.
Example
[root@host01 ~]# radosgw-admin mfa list --uid=johndoe
{
    "entries": [
        {
            "type": 2,
            "id": "MFAtest",
            "seed": "492dedb20cf51d1405ef6a1316017e",
            "seed_type": "hex",
            "time_ofs": 0,
            "step_size": 30,
            "window": 2
        }
    ]
}
Additional Resources
- For more information, see Creating a new multi-factor authentication TOTP token.
6.6.7. Display a multi-factor authentication TOTP token
Display a specific multi-factor authentication (MFA) time-based one time password (TOTP) token by specifying its serial.
Prerequisites
- A running Red Hat Ceph Storage cluster.
- Ceph Object Gateway is installed.
- You have root access on a Ceph Monitor node.
-
An MFA TOTP token was created using
radosgw-admin mfa create.
Procedure
Show the MFA TOTP token:
Syntax
radosgw-admin mfa get --uid=USERID --totp-serial=SERIAL
Set USERID to the user name MFA is set up on and set SERIAL to the string that represents the ID for the TOTP token.
Additional Resources
- For more information, see Creating a new multi-factor authentication TOTP token.
6.6.8. Deleting a multi-factor authentication TOTP token
Delete a multi-factor authentication (MFA) time-based one time password (TOTP) token.
Prerequisites
- A running Red Hat Ceph Storage cluster.
- Ceph Object Gateway is installed.
- You have root access on a Ceph Monitor node.
-
An MFA TOTP token was created using
radosgw-admin mfa create.
Procedure
Delete an MFA TOTP token:
Syntax
radosgw-admin mfa remove --uid=USERID --totp-serial=SERIAL
Set USERID to the user name MFA is set up on and set SERIAL to the string that represents the ID for the TOTP token.
Example
[root@host01 ~]# radosgw-admin mfa remove --uid=johndoe --totp-serial=MFAtest
Verify the MFA TOTP token was deleted:
Syntax
radosgw-admin mfa get --uid=USERID --totp-serial=SERIAL
Set USERID to the user name MFA is set up on and set SERIAL to the string that represents the ID for the TOTP token.
Example
[root@host01 ~]# radosgw-admin mfa get --uid=johndoe --totp-serial=MFAtest
MFA serial id not found
Additional Resources
- For more information, see The Ceph Object Gateway and multi-factor authentication.
Chapter 7. Administration
As a storage administrator, you can manage the Ceph Object Gateway using the radosgw-admin command line interface (CLI) or using the Red Hat Ceph Storage Dashboard.
Not all of the Ceph Object Gateway features are available to the Red Hat Ceph Storage Dashboard.
- Storage Policies
- Indexless Buckets
- Configure Bucket Index Resharding
- Compression
- User Management
- Role Management
- Quota Management
- Bucket Management
- Usage
- Ceph Object Gateway data layout
- Object Gateway data layout parameters
- Optimize the Ceph Object Gateway’s garbage collection
- Optimize the Ceph Object Gateway’s data object storage
7.1. Prerequisites
- A healthy running Red Hat Ceph Storage cluster.
- Installation of the Ceph Object Gateway software.
7.2. Creating storage policies
The Ceph Object Gateway stores the client bucket and object data by identifying placement targets, and storing buckets and objects in the pools associated with a placement target. If you don’t configure placement targets and map them to pools in the instance’s zone configuration, the Ceph Object Gateway will use default targets and pools, for example, default_placement.
Storage policies give Ceph Object Gateway clients a way of accessing a storage strategy, that is, the ability to target a particular type of storage, such as SSDs, SAS drives, and SATA drives, as a way of ensuring, for example, durability, replication, and erasure coding. For details, see the Storage Strategies guide for Red Hat Ceph Storage 5.
To create a storage policy, use the following procedure:
-
Create a new pool
.rgw.buckets.specialwith the desired storage strategy. For example, a pool customized with erasure-coding, a particular CRUSH ruleset, the number of replicas, and thepg_numandpgp_numcount. Get the zone group configuration and store it in a file:
Syntax
radosgw-admin zonegroup --rgw-zonegroup=ZONE_GROUP_NAME get > FILE_NAME.json
Example
[root@host01 ~]# radosgw-admin zonegroup --rgw-zonegroup=default get > zonegroup.json
Add a
special-placemententry underplacement_targetin thezonegroup.jsonfile:Example
{
	"name": "default",
	"api_name": "",
	"is_master": "true",
	"endpoints": [],
	"hostnames": [],
	"master_zone": "",
	"zones": [{
		"name": "default",
		"endpoints": [],
		"log_meta": "false",
		"log_data": "false",
		"bucket_index_max_shards": 5
	}],
	"placement_targets": [{
		"name": "default-placement",
		"tags": []
	}, {
		"name": "special-placement",
		"tags": []
	}],
	"default_placement": "default-placement"
}
Set the zone group with the modified
zonegroup.jsonfile:Example
[root@host01 ~]# radosgw-admin zonegroup set < zonegroup.json
Get the zone configuration and store it in a file, for example,
zone.json:Example
[root@host01 ~]# radosgw-admin zone get > zone.json
Edit the zone file and add the new placement policy key under
placement_pool:Example
{
	"domain_root": ".rgw",
	"control_pool": ".rgw.control",
	"gc_pool": ".rgw.gc",
	"log_pool": ".log",
	"intent_log_pool": ".intent-log",
	"usage_log_pool": ".usage",
	"user_keys_pool": ".users",
	"user_email_pool": ".users.email",
	"user_swift_pool": ".users.swift",
	"user_uid_pool": ".users.uid",
	"system_key": {
		"access_key": "",
		"secret_key": ""
	},
	"placement_pools": [{
		"key": "default-placement",
		"val": {
			"index_pool": ".rgw.buckets.index",
			"data_pool": ".rgw.buckets",
			"data_extra_pool": ".rgw.buckets.extra"
		}
	}, {
		"key": "special-placement",
		"val": {
			"index_pool": ".rgw.buckets.index",
			"data_pool": ".rgw.buckets.special",
			"data_extra_pool": ".rgw.buckets.extra"
		}
	}]
}
Set the new zone configuration:
Example
[root@host01 ~]# radosgw-admin zone set < zone.json
Update the zone group map:
Example
[root@host01 ~]# radosgw-admin period update --commit
The
special-placemententry is listed as aplacement_target.To specify the storage policy when making a request:
Example
$ curl -i http://10.0.0.1/swift/v1/TestContainer/file.txt -X PUT -H "X-Storage-Policy: special-placement" -H "X-Auth-Token: AUTH_rgwtxxxxxx"
7.3. Creating indexless buckets
You can configure a placement target where created buckets do not use the bucket index to store objects index; that is, indexless buckets. Placement targets that do not use data replication or listing might implement indexless buckets. Indexless buckets provide a mechanism in which the placement target does not track objects in specific buckets. This removes a resource contention that happens whenever an object write happens and reduces the number of round trips that Ceph Object Gateway needs to make to the Ceph storage cluster. This can have a positive effect on concurrent operations and small object write performance.
The bucket index does not reflect the correct state of the bucket, and listing these buckets does not correctly return their list of objects. This affects multiple features. Specifically, these buckets are not synced in a multi-zone environment because the bucket index is not used to store change information. Red Hat recommends not to use S3 object versioning on indexless buckets, because the bucket index is necessary for this feature.
Using indexless buckets removes the limit of the max number of objects in a single bucket.
Objects in indexless buckets cannot be listed from NFS.
Prerequisites
- A running and healthy Red Hat Ceph Storage cluster.
- Installation of the Ceph Object Gateway software.
- Root-level access to a Ceph Object Gateway node.
Procedure
Add a new placement target to the zonegroup:
Example
[ceph: root@host03 /]# radosgw-admin zonegroup placement add --rgw-zonegroup="default" \
  --placement-id="indexless-placement"
Add a new placement target to the zone:
Example
[ceph: root@host03 /]# radosgw-admin zone placement add --rgw-zone="default" \
   --placement-id="indexless-placement" \
   --data-pool="default.rgw.buckets.data" \
   --index-pool="default.rgw.buckets.index" \
   --data_extra_pool="default.rgw.buckets.non-ec" \
   --placement-index-type="indexless"
Set the zonegroup’s default placement to
indexless-placement:Example
[ceph: root@host03 /]# radosgw-admin zonegroup placement default --placement-id "indexless-placement"
In this example, the buckets created in the
indexless-placementtarget will be indexless buckets.Update and commit the period if the cluster is in a multi-site configuration:
Example
[ceph: root@host03 /]# radosgw-admin period update --commit
Restart the Ceph Object Gateways on all nodes in the storage cluster for the change to take effect:
Syntax
ceph orch restart SERVICE_TYPEExample
[ceph: root@host03 /]# ceph orch restart rgw
7.4. Configure bucket index resharding
As a storage administrator, you can configure bucket index resharding in single-site and multi-site deployments to improve performance.
You can reshard a bucket index either manually offline or dynamically online.
7.4.1. Bucket index resharding
The Ceph Object Gateway stores bucket index data in the index pool, which defaults to .rgw.buckets.index parameter. When the client puts many objects in a single bucket without setting quotas for the maximum number of objects per bucket, the index pool can result in significant performance degradation.
- Bucket index resharding prevents performance bottlenecks when you add a high number of objects per bucket.
- You can configure bucket index resharding for new buckets or change the bucket index on the existing ones.
- You need to have the shard count as the nearest prime number to the calculated shard count. The bucket index shards that are prime numbers tend to work better in an evenly distributed bucket index entries across shards.
Bucket index can be resharded manually or dynamically.
During the process of resharding bucket index dynamically, there is a periodic check of all the Ceph Object Gateway buckets and it detects buckets that require resharding. If a bucket has grown larger than the value specified in the
rgw_max_objs_per_shardparameter, the Ceph Object Gateway reshards the bucket dynamically in the background. The default value forrgw_max_objs_per_shardis 100k objects per shard. Resharding bucket index dynamically works as expected on the upgraded single-site configuration without any modification to the zone or the zone group. A single site-configuration can be any of the following:- A default zone configuration with no realm.
- A non-default configuration with at least one realm.
- A multi-realm single-site configuration.
7.4.2. Recovering bucket index
Resharding a bucket that was created with bucket_index_max_shards = 0, removes the bucket’s metadata. However, you can restore the bucket indexes by recovering the affected buckets.
Resharding a bucket that was created with bucket_index_max_shards = 0, removes the bucket’s metadata. However, you can restore the bucket indexes by recovering the affected buckets.
The /usr/bin/rgw-restore-bucket-index tool creates temporary files in the /tmp directory. These temporary files consume space based on the bucket objects count from the previous buckets. The previous buckets with more than 10M objects needs more than 4GB of free space in /tmp directory. If the storage space in /tmp is exhausted, the tool fails with the following message:
ln: failed to access '/tmp/rgwrbi-object-list.4053207': No such file or directory
The temporary objects are removed.
Prerequisites
- A running Red Hat Ceph Storage cluster.
- A Ceph Object Gateway installed at a minimum of two sites.
-
The
jqpackage installed.
Procedure
Perform either of the below two steps to perform recovery of bucket indexes:
-
Run
radosgw-admin object reindex --bucket BUCKET_NAME --object OBJECT_NAMEcommand. Run the script -
/usr/bin/rgw-restore-bucket-index -b BUCKET_NAME -p DATA_POOL_NAME.Example
[root@host01 ceph]# /usr/bin/rgw-restore-bucket-index -b bucket-large-1 -p local-zone.rgw.buckets.data

marker is d8a347a4-99b6-4312-a5c1-75b83904b3d4.41610.2
bucket_id is d8a347a4-99b6-4312-a5c1-75b83904b3d4.41610.2
number of bucket index shards is 5
data pool is local-zone.rgw.buckets.data
NOTICE: This tool is currently considered EXPERIMENTAL.
The list of objects that we will attempt to restore can be found in "/tmp/rgwrbi-object-list.49946".
Please review the object names in that file (either below or in another window/terminal) before proceeding.
Type "proceed!" to proceed, "view" to view object list, or "q" to quit: view
Viewing...
Type "proceed!" to proceed, "view" to view object list, or "q" to quit: proceed!
Proceeding...
NOTICE: Bucket stats are currently incorrect. They can be restored with the following command after 2 minutes:
    radosgw-admin bucket list --bucket=bucket-large-1 --allow-unordered --max-entries=1073741824
Would you like to take the time to recalculate bucket stats now? [yes/no] yes
Done

real    2m16.530s
user    0m1.082s
sys    0m0.870s
-
Run
The tool does not work for versioned buckets.
[root@host01 ~]# time rgw-restore-bucket-index  --proceed serp-bu-ver-1 default.rgw.buckets.data
NOTICE: This tool is currently considered EXPERIMENTAL.
marker is e871fb65-b87f-4c16-a7c3-064b66feb1c4.25076.5
bucket_id is e871fb65-b87f-4c16-a7c3-064b66feb1c4.25076.5
Error: this bucket appears to be versioned, and this tool cannot work with versioned buckets.
-
The tool’s scope is limited to a single site only and not multisite, that is, if we execute
rgw-restore-bucket-indextool at site-1, it does not recover objects in site-2 and vice versa. On a multisite, the recovery tool and the object reindex command should be executed at both sites for a bucket.
7.4.3. Limitations of bucket index resharding
Use the following limitations with caution. There are implications related to your hardware selections, so you should always discuss these requirements with your Red Hat account team.
- Maximum number of objects in one bucket before it needs resharding: Use a maximum of 102,400 objects per bucket index shard. To take full advantage of resharding and maximize parallelism, provide a sufficient number of OSDs in the Ceph Object Gateway bucket index pool. This parallelization scales with the number of Ceph Object Gateway instances, and replaces the in-order index shard enumeration with a number sequence. The default locking timeout is extended from 60 seconds to 90 seconds.
- Maximum number of objects when using sharding: Based on prior testing, the number of bucket index shards currently supported is 65,521.
You can reshard a bucket three times before the other zones catch-up: Resharding is not recommended until the older generations synchronize. Around four generations of the buckets from previous reshards are supported. Once the limit is reached, dynamic resharding does not reshard the bucket again until at least one of the old log generations are fully trimmed. Using the command
radosgw-admin bucket reshardthrows the following error:Bucket _BUCKET_NAME_ already has too many log generations (4) from previous reshards that peer zones haven't finished syncing. Resharding is not recommended until the old generations sync, but you can force a reshard with `--yes-i-really-mean-it`.
7.4.4. Configuring bucket index resharding in simple deployments
To enable and configure bucket index resharding on all new buckets, use the rgw_override_bucket_index_max_shards parameter.
You can set the parameter to one of the following values:
-
0to disable bucket index sharding, which is the default value. -
A value greater than
0to enable bucket sharding and to set the maximum number of shards.
Prerequisites
- A running Red Hat Ceph Storage cluster.
- A Ceph Object Gateway installed at a minimum of two sites.
Procedure
Calculate the recommended number of shards:
number of objects expected in a bucket / 100,000
NoteThe maximum number of bucket index shards currently supported is 65,521.
Set the
rgw_override_bucket_index_max_shardsparameter accordingly:Syntax
ceph config set client.rgw rgw_override_bucket_index_max_shards VALUEReplace VALUE with the recommended number of shards calculated:
Example
[ceph: root@host01 /]# ceph config set client.rgw rgw_override_bucket_index_max_shards 12
-
To configure bucket index resharding for all instances of the Ceph Object Gateway, set the
rgw_override_bucket_index_max_shardsparameter with theglobaloption. -
To configure bucket index resharding only for a particular instance of the Ceph Object Gateway, add
rgw_override_bucket_index_max_shardsparameter under the instance.
-
To configure bucket index resharding for all instances of the Ceph Object Gateway, set the
Restart the Ceph Object Gateways on all nodes in the cluster to take effect:
Syntax
ceph orch restart SERVICE_TYPEExample
[ceph: root#host01 /]# ceph orch restart rgw
Additional Resources
- See the Resharding bucket index dynamically
- See the Resharding bucket index manually
7.4.5. Configuring bucket index resharding in multi-site deployments
In multi-site deployments, each zone can have a different index_pool setting to manage failover. To configure a consistent shard count for zones in one zone group, set the bucket_index_max_shards parameter in the configuration for that zone group. The default value of bucket_index_max_shards parameter is 11.
You can set the parameter to one of the following values:
-
0to disable bucket index sharding. -
A value greater than
0to enable bucket sharding and to set the maximum number of shards.
Mapping the index pool, for each zone, if applicable, to a CRUSH ruleset of SSD-based OSDs might also help with bucket index performance. See the Establishing performance domains section for more information.
To prevent sync issues in multi-site deployments, a bucket should not have more than three generation gaps.
Prerequisites
- A running Red Hat Ceph Storage cluster.
- A Ceph Object Gateway installed at a minimum of two sites.
Procedure
Calculate the recommended number of shards:
number of objects expected in a bucket / 100,000
NoteThe maximum number of bucket index shards currently supported is 65,521.
Extract the zone group configuration to the
zonegroup.jsonfile:Example
[ceph: root@host01 /]# radosgw-admin zonegroup get > zonegroup.json
In the
zonegroup.jsonfile, set thebucket_index_max_shardsparameter for each named zone:Syntax
bucket_index_max_shards = VALUEReplace VALUE with the recommended number of shards calculated:
Example
bucket_index_max_shards = 12
Reset the zone group:
Example
[ceph: root@host01 /]# radosgw-admin zonegroup set < zonegroup.json
Update the period:
Example
[ceph: root@host01 /]# radosgw-admin period update --commit
Check if resharding is complete:
Syntax
radosgw-admin reshard status --bucket BUCKET_NAMEExample
[ceph: root@host01 /]# radosgw-admin reshard status --bucket data
Verification
Check the sync status of the storage cluster:
Example
[ceph: root@host01 /]# radosgw-admin sync status
7.4.6. Resharding bucket index dynamically
You can reshard the bucket index dynamically by adding the bucket to the resharding queue. It gets scheduled to be resharded. The reshard threads run in the background and executes the scheduled resharding, one at a time.
Prerequisites
- A running Red Hat Ceph Storage cluster.
- A Ceph Object Gateway installed at a minimum of two sites.
Procedure
Set the
rgw_dynamic_reshardingparameter is set totrue.Example
[ceph: root@host01 /]# radosgw-admin period get
Optional: Customize Ceph configuration using the following command:
Syntax
ceph config set client.rgw OPTION VALUE
Replace OPTION with the following options:
-
rgw_reshard_num_logs: The number of shards for the resharding log. The default value is16. -
rgw_reshard_bucket_lock_duration: The duration of the lock on a bucket during resharding. The default value is360seconds. -
rgw_dynamic_resharding: Enables or disables dynamic resharding. The default value istrue. -
rgw_max_objs_per_shard: The maximum number of objects per shard. The default value is100000objects per shard. -
rgw_reshard_thread_interval: The maximum time between rounds of reshard thread processing. The default value is600seconds.
Example
[ceph: root@host01 /]# ceph config set client.rgw rgw_reshard_num_logs 23
-
Add a bucket to the resharding queue:
Syntax
radosgw-admin reshard add --bucket BUCKET --num-shards NUMBER
Example
[ceph: root@host01 /]# radosgw-admin reshard add --bucket data --num-shards 10
List the resharding queue:
Example
[ceph: root@host01 /]# radosgw-admin reshard list
Check the bucket log generations and shards:
Example
[ceph: root@host01 /]# radosgw-admin bucket layout --bucket data
{
    "layout": {
        "resharding": "None",
        "current_index": {
            "gen": 1,
            "layout": {
                "type": "Normal",
                "normal": {
                    "num_shards": 23,
                    "hash_type": "Mod"
                }
            }
        },
        "logs": [
            {
                "gen": 0,
                "layout": {
                    "type": "InIndex",
                    "in_index": {
                        "gen": 0,
                        "layout": {
                            "num_shards": 11,
                            "hash_type": "Mod"
                        }
                    }
                }
            },
            {
                "gen": 1,
                "layout": {
                    "type": "InIndex",
                    "in_index": {
                        "gen": 1,
                        "layout": {
                            "num_shards": 23,
                            "hash_type": "Mod"
                        }
                    }
                }
            }
        ]
    }
}
Check bucket resharding status:
Syntax
radosgw-admin reshard status --bucket BUCKETExample
[ceph: root@host01 /]# radosgw-admin reshard status --bucket data
Process entries on the resharding queue immediately:
[ceph: root@host01 /]# radosgw-admin reshard process
Cancel pending bucket resharding:
WarningYou can only cancel pending resharding operations. Do not cancel ongoing resharding operations.
Syntax
radosgw-admin reshard cancel --bucket BUCKETExample
[ceph: root@host01 /]# radosgw-admin reshard cancel --bucket data
Verification
Check bucket resharding status:
Syntax
radosgw-admin reshard status --bucket BUCKETExample
[ceph: root@host01 /]# radosgw-admin reshard status --bucket data
Additional resources
- See the Cleaning stale instances of bucket entries after resharding section to remove the stale bucket entries.
- See the Resharding bucket index manually.
- See the Configuring bucket index resharding in simple deployments.
7.4.7. Resharding bucket index dynamically in multi-site configuration
Red Hat Ceph Storage 5.3 supports dynamic bucket index resharding in multi-site configuration. The feature allows buckets to be resharded in a multi-site configuration without interrupting the replication of their objects. When rgw_dynamic_resharding is enabled, it runs on each zone independently, and the zones might choose different shard counts for the same bucket.
These steps that need to be followed are for an existing Red Hat Ceph Storage cluster only. You need to enable the resharding feature manually on the existing zones and the zone groups after upgrading the storage cluster.
For a new installation of Red Hat Ceph Storage 5.3, the resharding feature for the zones and the zone groups are supported and enabled by default.
You can reshard a bucket three times before the other zones catch-up. See the Limitations of bucket index resharding for more details.
If a bucket is created and uploaded with more than the threshold number of objects for resharding dynamically, you need to continue to write I/Os to old buckets to begin the resharding process.
Prerequisites
- The Red Hat Ceph Storage clusters at both sites are upgraded to the latest version.
- All the Ceph Object Gateway daemons enabled at both the sites are upgraded to the latest version.
- Root-level access to all the nodes.
Procedure
Check if
reshardingis enabled on the zonegroup:Example
[ceph: root@host01 /]# radosgw-admin sync status
If
zonegroup features enabledis not enabled for resharding on the zonegroup, then continue with the procedure.Enable the
reshardingfeature on all the zonegroups in the multi-site configuration where Ceph Object Gateway is installed:Syntax
radosgw-admin zonegroup modify --rgw-zonegroup=ZONEGROUP_NAME --enable-feature=reshardingExample
[ceph: root@host01 /]# radosgw-admin zonegroup modify --rgw-zonegroup=us --enable-feature=resharding
Update the period and commit:
Example
[ceph: root@host01 /]# radosgw-admin period update --commit
Enable the
reshardingfeature on all the zones in the multi-site configuration where Ceph Object Gateway is installed:Syntax
radosgw-admin zone modify --rgw-zone=ZONE_NAME --enable-feature=reshardingExample
[ceph: root@host01 /]# radosgw-admin zone modify --rgw-zone=us-east --enable-feature=resharding
Update the period and commit:
Example
[ceph: root@host01 /]# radosgw-admin period update --commit
Verify the
reshardingfeature is enabled on the zones and zonegroups. You can see that each zone lists itssupported_featuresand the zonegroups lists itsenabled_featuresExample
[ceph: root@host01 /]# radosgw-admin period get

"zones": [
                    {
                        "id": "505b48db-6de0-45d5-8208-8c98f7b1278d",
                        "name": "us_east",
                        "endpoints": [
                            "http://10.0.208.11:8080"
                        ],
                        "log_meta": "false",
                        "log_data": "true",
                        "bucket_index_max_shards": 11,
                        "read_only": "false",
                        "tier_type": "",
                        "sync_from_all": "true",
                        "sync_from": [],
                        "redirect_zone": "",
                        "supported_features": [
                            "resharding"
                        ]
.
.
                "default_placement": "default-placement",
                "realm_id": "26cf6f23-c3a0-4d57-aae4-9b0010ee55cc",
                "sync_policy": {
                    "groups": []
                },
                "enabled_features": [
                    "resharding"
                ]
Check the sync status:
Example
[ceph: root@host01 /]# radosgw-admin sync status
          realm 26cf6f23-c3a0-4d57-aae4-9b0010ee55cc (usa)
      zonegroup 33a17718-6c77-493e-99fe-048d3110a06e (us)
           zone 505b48db-6de0-45d5-8208-8c98f7b1278d (us_east)
zonegroup features enabled: resharding
In this example. you can see that the
reshardingfeature is enabled for theuszonegroup.Optional: You can disable the
reshardingfeature for the zonegroups:Disable the feature on all the zonegroups in the multi-site where Ceph Object Gateway is installed:
Syntax
radosgw-admin zonegroup modify --rgw-zonegroup=ZONEGROUP_NAME --disable-feature=reshardingExample
[ceph: root@host01 /]# radosgw-admin zonegroup modify --rgw-zonegroup=us --disable-feature=resharding
Update the period and commit:
Example
[ceph: root@host01 /]# radosgw-admin period update --commit
Additional Resources
- For more configurable parameters for dynamic bucket index resharding, see the Dynamic Bucket Index Resharding section in the Red Hat Ceph Storage Object Gateway Configuration and Administration Guide.
7.4.8. Resharding bucket index manually
If a bucket has grown larger than the initial configuration for which it was optimzed, reshard the bucket index pool by using the radosgw-admin bucket reshard command. This command performs the following tasks:
- Creates a new set of bucket index objects for the specified bucket.
- Distributes object entries across these bucket index objects.
- Creates a new bucket instance.
- Links the new bucket instance with the bucket so that all new index operations go through the new bucket indexes.
- Prints the old and the new bucket ID to the command output.
Prerequisites
- A running Red Hat Ceph Storage cluster.
- A Ceph Object Gateway installed at a minimum of two sites.
Procedure
Back up the original bucket index:
Syntax
radosgw-admin bi list --bucket=BUCKET > BUCKET.list.backup
Example
[ceph: root@host01 /]# radosgw-admin bi list --bucket=data > data.list.backup
Reshard the bucket index:
Syntax
radosgw-admin bucket reshard --bucket=BUCKET --num-shards=NUMBER
Example
[ceph: root@host01 /]# radosgw-admin bucket reshard --bucket=data --num-shards=100
Verification
Check bucket resharding status:
Syntax
radosgw-admin reshard status --bucket bucketExample
[ceph: root@host01 /]# radosgw-admin reshard status --bucket data
Additional Resources
- See the Configuring bucket index resharding in multi-site deployments in the Red Hat Ceph Storage Object Gateway Guide for more details.
- See the Resharding bucket index dynamically.
- See the Configuring bucket index resharding in simple deployments.
7.4.9. Cleaning stale instances of bucket entries after resharding
The resharding process might not clean stale instances of bucket entries automatically and these instances can impact performance of the storage cluster.
Clean them manually to prevent the stale instances from negatively impacting the performance of the storage cluster.
Contact Red Hat Support prior to cleaning the stale instances.
Use this procedure only in simple deployments, not in multi-site clusters.
Prerequisites
- A running Red Hat Ceph Storage cluster.
- Ceph Object Gateway installed.
Procedure
List stale instances:
[ceph: root@host01 /]# radosgw-admin reshard stale-instances list
Clean the stale instances of the bucket entries:
[ceph: root@host01 /]# radosgw-admin reshard stale-instances rm
Verification
Check bucket resharding status:
Syntax
radosgw-admin reshard status --bucket BUCKETExample
[ceph: root@host01 /]# radosgw-admin reshard status --bucket data
7.4.10. Fixing lifecycle policies after resharding
For storage clusters with resharded instances, the old lifecycle processes would have flagged and deleted the lifecycle processing as the bucket instance changed during a reshard. However, for older buckets that had lifecycle policies and have undergone resharding, you can fix such buckets with the reshard fix option.
Prerequisites
- A running Red Hat Ceph Storage cluster.
- Ceph Object Gateway installed.
Procedure
Fix the lifecycle policies of the older bucket:
Syntax
radosgw-admin lc reshard fix --bucket BUCKET_NAMEImportantIf you do not use the
--bucketargument, then the command fixes lifecycle policies for all the buckets in the storage cluster.Example
[ceph: root@host01 /]# radosgw-admin lc reshard fix --bucket mybucket
7.5. Enabling compression
The Ceph Object Gateway supports server-side compression of uploaded objects using any of Ceph’s compression plugins. These include:
-
zlib: Supported. -
snappy: Supported. -
zstd: Supported.
Configuration
To enable compression on a zone’s placement target, provide the --compression=TYPE option to the radosgw-admin zone placement modify command. The compression TYPE refers to the name of the compression plugin to use when writing new object data.
Each compressed object stores the compression type. Changing the setting does not hinder the ability to decompress existing compressed objects, nor does it force the Ceph Object Gateway to recompress existing objects.
This compression setting applies to all new objects uploaded to buckets using this placement target.
To disable compression on a zone’s placement target, provide the --compression=TYPE option to the radosgw-admin zone placement modify command and specify an empty string or none.
Example
[root@host01 ~] radosgw-admin zone placement modify --rgw-zone=default --placement-id=default-placement --compression=zlib
{
...
    "placement_pools": [
        {
            "key": "default-placement",
            "val": {
                "index_pool": "default.rgw.buckets.index",
                "data_pool": "default.rgw.buckets.data",
                "data_extra_pool": "default.rgw.buckets.non-ec",
                "index_type": 0,
                "compression": "zlib"
            }
        }
    ],
...
}
After enabling or disabling compression, restart the Ceph Object Gateway instance so the change will take effect.
Ceph Object Gateway creates a default zone and a set of pools. For production deployments, see the Creating a Realm section first.
Statistics
While all existing commands and APIs continue to report object and bucket sizes based on their uncompressed data, the radosgw-admin bucket stats command includes compression statistics for all buckets.
Syntax
radosgw-admin bucket stats --bucket=BUCKET_NAME
{
...
    "usage": {
        "rgw.main": {
            "size": 1075028,
            "size_actual": 1331200,
            "size_utilized": 592035,
            "size_kb": 1050,
            "size_kb_actual": 1300,
            "size_kb_utilized": 579,
            "num_objects": 104
        }
    },
...
}
The size is the accumulated size of the objects in the bucket, uncompressed and unencrypted. The size_kb is the accumulated size in kilobytes and is calculated as ceiling(size/1024). In this example, it is ceiling(1075028/1024) = 1050.
The size_actual is the accumulated size of all the objects after each object is distributed in a set of 4096-byte blocks. If a bucket has two objects, one of size 4100 bytes and the other of 8500 bytes, the first object is rounded up to 8192 bytes, and the second one rounded 12288 bytes, and their total for the bucket is 20480 bytes. The size_kb_actual is the actual size in kilobytes and is calculated as size_actual/1024. In this example, it is 1331200/1024 = 1300.
The size_utilized is the total size of the data in bytes after it has been compressed and/or encrypted. Encryption could increase the size of the object while compression could decrease it. The size_kb_utilized is the total size in kilobytes and is calculated as ceiling(size_utilized/1024). In this example, it is ceiling(592035/1024)= 579.
7.6. User management
Ceph Object Storage user management refers to users that are client applications of the Ceph Object Storage service; not the Ceph Object Gateway as a client application of the Ceph Storage Cluster. You must create a user, access key, and secret to enable client applications to interact with the Ceph Object Gateway service.
There are two user types:
- User: The term 'user' reflects a user of the S3 interface.
- Subuser: The term 'subuser' reflects a user of the Swift interface. A subuser is associated to a user .
You can create, modify, view, suspend, and remove users and subusers.
When managing users in a multi-site deployment, ALWAYS issue the radosgw-admin command on a Ceph Object Gateway node within the master zone of the master zone group to ensure that users synchronize throughout the multi-site cluster. DO NOT create, modify, or delete users on a multi-site cluster from a secondary zone or a secondary zone group.
In addition to creating user and subuser IDs, you may add a display name and an email address for a user. You can specify a key and secret, or generate a key and secret automatically. When generating or specifying keys, note that user IDs correspond to an S3 key type and subuser IDs correspond to a swift key type. Swift keys also have access levels of read, write, readwrite and full.
User management command line syntax generally follows the pattern user COMMAND USER_ID where USER_ID is either the --uid= option followed by the user’s ID (S3) or the --subuser= option followed by the user name (Swift).
Syntax
radosgw-admin user <create|modify|info|rm|suspend|enable|check|stats> <--uid=USER_ID|--subuser=SUB_USER_NAME> [other-options]
Additional options may be required depending on the command you issue.
7.6.1. Multi-tenancy
The Ceph Object Gateway supports multi-tenancy for both the S3 and Swift APIs, where each user and bucket lies under a "tenant." Multi tenancy prevents namespace clashing when multiple tenants are using common bucket names, such as "test", "main", and so forth.
Each user and bucket lies under a tenant. For backward compatibility, a "legacy" tenant with an empty name is added. Whenever referring to a bucket without specifically specifying a tenant, the Swift API will assume the "legacy" tenant. Existing users are also stored under the legacy tenant, so they will access buckets and objects the same way as earlier releases.
Tenants as such do not have any operations on them. They appear and disappear as needed, when users are administered. In order to create, modify, and remove users with explicit tenants, either an additional option --tenant is supplied, or a syntax "TENANT$USER" is used in the parameters of the radosgw-admin command.
To create a user testx$tester for S3, run the following command:
Example
[root@host01 ~]# radosgw-admin --tenant testx --uid tester \
                    --display-name "Test User" --access_key TESTER \
                    --secret test123 user create
To create a user testx$tester for Swift, run one of the following commands:
Example
[root@host01 ~]# radosgw-admin --tenant testx --uid tester \
                    --display-name "Test User" --subuser tester:swift \
                    --key-type swift --access full subuser create

[root@host01 ~]# radosgw-admin key create --subuser 'testx$tester:swift' \
                    --key-type swift --secret test123
The subuser with explicit tenant had to be quoted in the shell.
7.6.2. Create a user
Use the user create command to create an S3-interface user. You MUST specify a user ID and a display name. You may also specify an email address. If you DO NOT specify a key or secret, radosgw-admin will generate them for you automatically. However, you may specify a key and/or a secret if you prefer not to use generated key/secret pairs.
Syntax
radosgw-admin user create --uid=USER_ID \
[--key-type=KEY_TYPE] [--gen-access-key|--access-key=ACCESS_KEY]\
[--gen-secret | --secret=SECRET_KEY] \
[--email=EMAIL] --display-name=DISPLAY_NAME
Example
[root@host01 ~]# radosgw-admin user create --uid=janedoe --access-key=11BS02LGFB6AL6H1ADMW --secret=vzCEkuryfn060dfee4fgQPqFrncKEIkh3ZcdOANY --email=jane@example.com --display-name=Jane Doe
{ "user_id": "janedoe",
  "display_name": "Jane Doe",
  "email": "jane@example.com",
  "suspended": 0,
  "max_buckets": 1000,
  "auid": 0,
  "subusers": [],
  "keys": [
        { "user": "janedoe",
          "access_key": "11BS02LGFB6AL6H1ADMW",
          "secret_key": "vzCEkuryfn060dfee4fgQPqFrncKEIkh3ZcdOANY"}],
  "swift_keys": [],
  "caps": [],
  "op_mask": "read, write, delete",
  "default_placement": "",
  "placement_tags": [],
  "bucket_quota": { "enabled": false,
      "max_size_kb": -1,
      "max_objects": -1},
  "user_quota": { "enabled": false,
      "max_size_kb": -1,
      "max_objects": -1},
  "temp_url_keys": []}
Check the key output. Sometimes radosgw-admin generates a JSON escape (\) character, and some clients do not know how to handle JSON escape characters. Remedies include removing the JSON escape character (\), encapsulating the string in quotes, regenerating the key to ensure that it does not have a JSON escape character, or specifying the key and secret manually.
7.6.3. Create a subuser
To create a subuser (Swift interface), you must specify the user ID (--uid=USERNAME), a subuser ID and the access level for the subuser. If you DO NOT specify a key or secret, radosgw-admin generates them for you automatically. However, you can specify a key, a secret, or both if you prefer not to use generated key and secret pairs.
full is not readwrite, as it also includes the access control policy.
Syntax
radosgw-admin subuser create --uid=USER_ID --subuser=SUB_USER_ID --access=[ read | write | readwrite | full ]
Example
[root@host01 ~]# radosgw-admin subuser create --uid=janedoe --subuser=janedoe:swift --access=full

{ "user_id": "janedoe",
  "display_name": "Jane Doe",
  "email": "jane@example.com",
  "suspended": 0,
  "max_buckets": 1000,
  "auid": 0,
  "subusers": [
        { "id": "janedoe:swift",
          "permissions": "full-control"}],
  "keys": [
        { "user": "janedoe",
          "access_key": "11BS02LGFB6AL6H1ADMW",
          "secret_key": "vzCEkuryfn060dfee4fgQPqFrncKEIkh3ZcdOANY"}],
  "swift_keys": [],
  "caps": [],
  "op_mask": "read, write, delete",
  "default_placement": "",
  "placement_tags": [],
  "bucket_quota": { "enabled": false,
      "max_size_kb": -1,
      "max_objects": -1},
  "user_quota": { "enabled": false,
      "max_size_kb": -1,
      "max_objects": -1},
  "temp_url_keys": []}
7.6.4. Get user information
To get information about a user, specify user info and the user ID (--uid=USERNAME).
Example
[root@host01 ~]# radosgw-admin user info --uid=janedoe
To get information about a tenanted user, specify both the user ID and the name of the tenant.
[root@host01 ~]# radosgw-admin user info --uid=janedoe --tenant=test
7.6.5. Modify user information
To modify information about a user, you must specify the user ID (--uid=USERNAME) and the attributes you want to modify. Typical modifications are to keys and secrets, email addresses, display names, and access levels.
Example
[root@host01 ~]# radosgw-admin user modify --uid=janedoe --display-name="Jane E. Doe"
To modify subuser values, specify subuser modify and the subuser ID.
Example
[root@host01 ~]# radosgw-admin subuser modify --subuser=janedoe:swift --access=full
7.6.6. Enable and suspend users
When you create a user, the user is enabled by default. However, you may suspend user privileges and re-enable them at a later time. To suspend a user, specify user suspend and the user ID.
[root@host01 ~]# radosgw-admin user suspend --uid=johndoe
To re-enable a suspended user, specify user enable and the user ID:
[root@host01 ~]# radosgw-admin user enable --uid=johndoe
Disabling the user disables the subuser.
7.6.7. Remove a user
When you remove a user, the user and subuser are removed from the system. However, you may remove only the subuser if you wish. To remove a user (and subuser), specify user rm and the user ID.
Syntax
radosgw-admin user rm --uid=USER_ID[--purge-keys] [--purge-data]
Example
[ceph: root@host01 /]# radosgw-admin user rm --uid=johndoe --purge-data
To remove the subuser only, specify subuser rm and the subuser name.
Example
[ceph: root@host01 /]# radosgw-admin subuser rm --subuser=johndoe:swift --purge-keys
Options include:
-
Purge Data: The
--purge-dataoption purges all data associated with the UID. -
Purge Keys: The
--purge-keysoption purges all keys associated with the UID.
7.6.8. Remove a subuser
When you remove a subuser, you are removing access to the Swift interface. The user remains in the system. To remove the subuser, specify subuser rm and the subuser ID.
Syntax
radosgw-admin subuser rm --subuser=SUB_USER_ID
Example
[root@host01 /]# radosgw-admin subuser rm --subuser=johndoe:swift
Options include:
-
Purge Keys: The
--purge-keysoption purges all keys associated with the UID.
7.6.9. Rename a user
To change the name of a user, use the radosgw-admin user rename command. The time that this command takes depends on the number of buckets and objects that the user has. If the number is large, Red Hat recommends using the command in the Screen utility provided by the screen package.
Prerequisites
- A working Ceph cluster.
-
rootorsudoaccess to the host running the Ceph Object Gateway. - Installed Ceph Object Gateway.
Procedure
Rename a user:
Syntax
radosgw-admin user rename --uid=CURRENT_USER_NAME --new-uid=NEW_USER_NAME
Example
[ceph: root@host01 /]# radosgw-admin user rename --uid=user1 --new-uid=user2

{
    "user_id": "user2",
    "display_name": "user 2",
    "email": "",
    "suspended": 0,
    "max_buckets": 1000,
    "auid": 0,
    "subusers": [],
    "keys": [
        {
            "user": "user2",
            "access_key": "59EKHI6AI9F8WOW8JQZJ",
            "secret_key": "XH0uY3rKCUcuL73X0ftjXbZqUbk0cavD11rD8MsA"
        }
    ],
    "swift_keys": [],
    "caps": [],
    "op_mask": "read, write, delete",
    "default_placement": "",
    "placement_tags": [],
    "bucket_quota": {
        "enabled": false,
        "check_on_raw": false,
        "max_size": -1,
        "max_size_kb": 0,
        "max_objects": -1
    },
    "user_quota": {
        "enabled": false,
        "check_on_raw": false,
        "max_size": -1,
        "max_size_kb": 0,
        "max_objects": -1
    },
    "temp_url_keys": [],
    "type": "rgw"
}
If a user is inside a tenant, specify both the user name and the tenant:
Syntax
radosgw-admin user rename --uid USER_NAME --new-uid NEW_USER_NAME --tenant TENANT
Example
[ceph: root@host01 /]# radosgw-admin user rename --uid=test$user1 --new-uid=test$user2 --tenant test

1000 objects processed in tvtester1. Next marker 80_tVtester1_99
2000 objects processed in tvtester1. Next marker 64_tVtester1_44
3000 objects processed in tvtester1. Next marker 48_tVtester1_28
4000 objects processed in tvtester1. Next marker 2_tVtester1_74
5000 objects processed in tvtester1. Next marker 14_tVtester1_53
6000 objects processed in tvtester1. Next marker 87_tVtester1_61
7000 objects processed in tvtester1. Next marker 6_tVtester1_57
8000 objects processed in tvtester1. Next marker 52_tVtester1_91
9000 objects processed in tvtester1. Next marker 34_tVtester1_74
9900 objects processed in tvtester1. Next marker 9_tVtester1_95
1000 objects processed in tvtester2. Next marker 82_tVtester2_93
2000 objects processed in tvtester2. Next marker 64_tVtester2_9
3000 objects processed in tvtester2. Next marker 48_tVtester2_22
4000 objects processed in tvtester2. Next marker 32_tVtester2_42
5000 objects processed in tvtester2. Next marker 16_tVtester2_36
6000 objects processed in tvtester2. Next marker 89_tVtester2_46
7000 objects processed in tvtester2. Next marker 70_tVtester2_78
8000 objects processed in tvtester2. Next marker 51_tVtester2_41
9000 objects processed in tvtester2. Next marker 33_tVtester2_32
9900 objects processed in tvtester2. Next marker 9_tVtester2_83
{
    "user_id": "test$user2",
    "display_name": "User 2",
    "email": "",
    "suspended": 0,
    "max_buckets": 1000,
    "auid": 0,
    "subusers": [],
    "keys": [
        {
            "user": "test$user2",
            "access_key": "user2",
            "secret_key": "123456789"
        }
    ],
    "swift_keys": [],
    "caps": [],
    "op_mask": "read, write, delete",
    "default_placement": "",
    "placement_tags": [],
    "bucket_quota": {
        "enabled": false,
        "check_on_raw": false,
        "max_size": -1,
        "max_size_kb": 0,
        "max_objects": -1
    },
    "user_quota": {
        "enabled": false,
        "check_on_raw": false,
        "max_size": -1,
        "max_size_kb": 0,
        "max_objects": -1
    },
    "temp_url_keys": [],
    "type": "rgw"
}
Verify that the user has been renamed successfully:
Syntax
radosgw-admin user info --uid=NEW_USER_NAMEExample
[ceph: root@host01 /]# radosgw-admin user info --uid=user2
If a user is inside a tenant, use the TENANT$USER_NAME format:
Syntax
radosgw-admin user info --uid= TENANT$USER_NAME
Example
[ceph: root@host01 /]# radosgw-admin user info --uid=test$user2
Additional Resources
-
The
screen(1)manual page
7.6.10. Create a key
To create a key for a user, you must specify key create. For a user, specify the user ID and the s3 key type. To create a key for a subuser, you must specify the subuser ID and the swift keytype.
Example
[ceph: root@host01 /]# radosgw-admin key create --subuser=johndoe:swift --key-type=swift --gen-secret

{ "user_id": "johndoe",
  "rados_uid": 0,
  "display_name": "John Doe",
  "email": "john@example.com",
  "suspended": 0,
  "subusers": [
     { "id": "johndoe:swift",
       "permissions": "full-control"}],
  "keys": [
    { "user": "johndoe",
      "access_key": "QFAMEDSJP5DEKJO0DDXY",
      "secret_key": "iaSFLDVvDdQt6lkNzHyW4fPLZugBAI1g17LO0+87"}],
  "swift_keys": [
    { "user": "johndoe:swift",
      "secret_key": "E9T2rUZNu2gxUjcwUBO8n\/Ev4KX6\/GprEuH4qhu1"}]}
7.6.11. Add and remove access keys
Users and subusers must have access keys to use the S3 and Swift interfaces. When you create a user or subuser and you do not specify an access key and secret, the key and secret get generated automatically. You may create a key and either specify or generate the access key and/or secret. You may also remove an access key and secret. Options include:
-
--secret=SECRET_KEYspecifies a secret key, for example, manually generated. -
--gen-access-keygenerates a random access key (for S3 users by default). -
--gen-secretgenerates a random secret key. -
--key-type=KEY_TYPEspecifies a key type. The options are: swift and s3.
To add a key, specify the user:
Example
[root@host01 ~]# radosgw-admin key create --uid=johndoe --key-type=s3 --gen-access-key --gen-secret
You might also specify a key and a secret.
To remove an access key, you need to specify the user and the key:
Find the access key for the specific user:
Example
[root@host01 ~]# radosgw-admin user info --uid=johndoe
The access key is the
"access_key"value in the output:Example
[root@host01 ~]# radosgw-admin user info --uid=johndoe
{
    "user_id": "johndoe",
    ...
    "keys": [
        {
            "user": "johndoe",
            "access_key": "0555b35654ad1656d804",
            "secret_key": "h7GhxuBLTrlhVUyxSPUKUV8r/2EI4ngqJxD7iBdBYLhwluN30JaT3Q=="
        }
    ],
    ...
}
Specify the user ID and the access key from the previous step to remove the access key:
Syntax
radosgw-admin key rm --uid=USER_ID --access-key ACCESS_KEY
Example
[root@host01 ~]# radosgw-admin key rm --uid=johndoe --access-key 0555b35654ad1656d804
7.6.12. Add and remove admin capabilities
The Ceph Storage Cluster provides an administrative API that enables users to run administrative functions via the REST API. By default, users DO NOT have access to this API. To enable a user to exercise administrative functionality, provide the user with administrative capabilities.
To add administrative capabilities to a user, run the following command:
Syntax
radosgw-admin caps add --uid=USER_ID--caps=CAPS
You can add read, write, or all capabilities to users, buckets, metadata, and usage (utilization).
Syntax
--caps="[users|buckets|metadata|usage|zone]=[*|read|write|read, write]"
Example
[root@host01 ~]# radosgw-admin caps add --uid=johndoe --caps="users=*"
To remove administrative capabilities from a user, run the following command:
Example
[root@host01 ~]# radosgw-admin caps remove --uid=johndoe --caps={caps}
7.7. Role management
As a storage administrator, you can create, delete, or update a role and the permissions associated with that role with the radosgw-admin commands.
A role is similar to a user and has permission policies attached to it. It can be assumed by any identity. If a user assumes a role, a set of dynamically created temporary credentials are returned to the user. A role can be used to delegate access to users, applications and services that do not have permissions to access some S3 resources.
7.7.1. Creating a role
Create a role for the user with the radosgw-admin role create command. You need to create a user with assume-role-policy-doc parameter in the command, which is the trust relationship policy document that grants an entity the permission to assume the role.
Prerequisites
- A running Red Hat Ceph Storage cluster.
- Installation of the Ceph Object Gateway.
- Root-level access to a Ceph Object Gateway node.
- An S3 bucket created.
- An S3 user created with user access.
Procedure
Create the role:
Syntax
radosgw-admin role create --role-name=ROLE_NAME [--path=="PATH_TO_FILE"] [--assume-role-policy-doc=TRUST_RELATIONSHIP_POLICY_DOCUMENT]
Example
[root@host01 ~]# radosgw-admin role create --role-name=S3Access1 --path=/application_abc/component_xyz/ --assume-role-policy-doc=\{\"Version\":\"2012-10-17\",\"Statement\":\[\{\"Effect\":\"Allow\",\"Principal\":\{\"AWS\":\[\"arn:aws:iam:::user/TESTER\"\]\},\"Action\":\[\"sts:AssumeRole\"\]\}\]\}

{
  "RoleId": "ca43045c-082c-491a-8af1-2eebca13deec",
  "RoleName": "S3Access1",
  "Path": "/application_abc/component_xyz/",
  "Arn": "arn:aws:iam:::role/application_abc/component_xyz/S3Access1",
  "CreateDate": "2022-06-17T10:18:29.116Z",
  "MaxSessionDuration": 3600,
  "AssumeRolePolicyDocument": "{\"Version\":\"2012-10-17\",\"Statement\":[{\"Effect\":\"Allow\",\"Principal\":{\"AWS\":[\"arn:aws:iam:::user/TESTER\"]},\"Action\":[\"sts:AssumeRole\"]}]}"
}
The value for
--pathis/by default.
7.7.2. Getting a role
Get the information about a role with the get command.
Prerequisites
- A running Red Hat Ceph Storage cluster.
- Installation of the Ceph Object Gateway.
- Root-level access to a Ceph Object Gateway node.
- An S3 bucket created.
- A role created.
- An S3 user created with user access.
Procedure
Getting the information about the role:
Syntax
radosgw-admin role get --role-name=ROLE_NAMEExample
[root@host01 ~]# radosgw-admin role get --role-name=S3Access1

{
  "RoleId": "ca43045c-082c-491a-8af1-2eebca13deec",
  "RoleName": "S3Access1",
  "Path": "/application_abc/component_xyz/",
  "Arn": "arn:aws:iam:::role/application_abc/component_xyz/S3Access1",
  "CreateDate": "2022-06-17T10:18:29.116Z",
  "MaxSessionDuration": 3600,
  "AssumeRolePolicyDocument": "{\"Version\":\"2012-10-17\",\"Statement\":[{\"Effect\":\"Allow\",\"Principal\":{\"AWS\":[\"arn:aws:iam:::user/TESTER\"]},\"Action\":[\"sts:AssumeRole\"]}]}"
}
Additional Resources
- See the Creating a role section in the Red Hat Ceph Storage Object Gateway Guide for details.
7.7.3. Listing a role
You can list the roles in the specific path with the list command.
Prerequisites
- A running Red Hat Ceph Storage cluster.
- Installation of the Ceph Object Gateway.
- Root-level access to a Ceph Object Gateway node.
- An S3 bucket created.
- A role created.
- An S3 user created with user access.
Procedure
To list the roles, use the following command:
Syntax
radosgw-admin role list
Example
[root@host01 ~]# radosgw-admin role list
[
    {
        "RoleId": "85fb46dd-a88a-4233-96f5-4fb54f4353f7",
        "RoleName": "kvm-sts",
        "Path": "/application_abc/component_xyz/",
        "Arn": "arn:aws:iam:::role/application_abc/component_xyz/kvm-sts",
        "CreateDate": "2022-09-13T11:55:09.39Z",
        "MaxSessionDuration": 7200,
        "AssumeRolePolicyDocument": "{\"Version\":\"2012-10-17\",\"Statement\":[{\"Effect\":\"Allow\",\"Principal\":{\"AWS\":[\"arn:aws:iam:::user/kvm\"]},\"Action\":[\"sts:AssumeRole\"]}]}"
    },
    {
        "RoleId": "9116218d-4e85-4413-b28d-cdfafba24794",
        "RoleName": "kvm-sts-1",
        "Path": "/application_abc/component_xyz/",
        "Arn": "arn:aws:iam:::role/application_abc/component_xyz/kvm-sts-1",
        "CreateDate": "2022-09-16T00:05:57.483Z",
        "MaxSessionDuration": 3600,
        "AssumeRolePolicyDocument": "{\"Version\":\"2012-10-17\",\"Statement\":[{\"Effect\":\"Allow\",\"Principal\":{\"AWS\":[\"arn:aws:iam:::user/kvm\"]},\"Action\":[\"sts:AssumeRole\"]}]}"
    }
]
7.7.4. Updating assume role policy document of a role
You can update the assume role policy document that grants an entity permission to assume the role with the modify command.
Prerequisites
- A running Red Hat Ceph Storage cluster.
- Installation of the Ceph Object Gateway.
- Root-level access to a Ceph Object Gateway node.
- An S3 bucket created.
- A role created.
- An S3 user created with user access.
Procedure
Modify the assume role policy document of a role:
Syntax
radosgw-admin role-trust-policy modify --role-name=ROLE_NAME --assume-role-policy-doc=TRUST_RELATIONSHIP_POLICY_DOCUMENT
Example
[root@host01 ~]# radosgw-admin role-trust-policy modify --role-name=S3Access1 --assume-role-policy-doc=\{\"Version\":\"2012-10-17\",\"Statement\":\[\{\"Effect\":\"Allow\",\"Principal\":\{\"AWS\":\[\"arn:aws:iam:::user/TESTER\"\]\},\"Action\":\[\"sts:AssumeRole\"\]\}\]\}

{
  "RoleId": "ca43045c-082c-491a-8af1-2eebca13deec",
  "RoleName": "S3Access1",
  "Path": "/application_abc/component_xyz/",
  "Arn": "arn:aws:iam:::role/application_abc/component_xyz/S3Access1",
  "CreateDate": "2022-06-17T10:18:29.116Z",
  "MaxSessionDuration": 3600,
  "AssumeRolePolicyDocument": "{\"Version\":\"2012-10-17\",\"Statement\":[{\"Effect\":\"Allow\",\"Principal\":{\"AWS\":[\"arn:aws:iam:::user/TESTER\"]},\"Action\":[\"sts:AssumeRole\"]}]}"
}
7.7.5. Getting permission policy attached to a role
You can get the specific permission policy attached to a role with the get command.
Prerequisites
- A running Red Hat Ceph Storage cluster.
- Installation of the Ceph Object Gateway.
- Root-level access to a Ceph Object Gateway node.
- An S3 bucket created.
- A role created.
- An S3 user created with user access.
Procedure
Get the permission policy:
Syntax
radosgw-admin role-policy get --role-name=ROLE_NAME --policy-name=POLICY_NAME
Example
[root@host01 ~]# radosgw-admin role-policy get --role-name=S3Access1 --policy-name=Policy1

{
  "Permission policy": "{\"Version\":\"2012-10-17\",\"Statement\":[{\"Effect\":\"Allow\",\"Action\":[\"s3:*\"],\"Resource\":\"arn:aws:s3:::example_bucket\"}]}"
}
7.7.6. Deleting a role
You can delete the role only after removing the permission policy attached to it.
Prerequisites
- A running Red Hat Ceph Storage cluster.
- Installation of the Ceph Object Gateway.
- Root-level access to a Ceph Object Gateway node.
- A role created.
- An S3 bucket created.
- An S3 user created with user access.
Procedure
Delete the policy attached to the role:
Syntax
radosgw-admin role policy delete --role-name=ROLE_NAME --policy-name=POLICY_NAME
Example
[root@host01 ~]# radosgw-admin role policy delete --role-name=S3Access1 --policy-name=Policy1
Delete the role:
Syntax
radosgw-admin role delete --role-name=ROLE_NAMEExample
[root@host01 ~]# radosgw-admin role delete --role-name=S3Access1
7.7.7. Updating a policy attached to a role
You can either add or update the inline policy attached to a role with the put command.
Prerequisites
- A running Red Hat Ceph Storage cluster.
- Installation of the Ceph Object Gateway.
- Root-level access to a Ceph Object Gateway node.
- An S3 bucket created.
- A role created.
- An S3 user created with user access.
Procedure
Update the inline policy:
Syntax
radosgw-admin role-policy put --role-name=ROLE_NAME --policy-name=POLICY_NAME --policy-doc=PERMISSION_POLICY_DOCUMENT
Example
[root@host01 ~]# radosgw-admin role-policy put --role-name=S3Access1 --policy-name=Policy1 --policy-doc=\{\"Version\":\"2012-10-17\",\"Statement\":\[\{\"Effect\":\"Allow\",\"Action\":\[\"s3:*\"\],\"Resource\":\"arn:aws:s3:::example_bucket\"\}\]\}In this example, you attach the
Policy1to the roleS3Access1which allows all S3 actions on anexample_bucket.
7.7.8. Listing permission policy attached to a role
You can list the names of the permission policies attached to a role with the list command.
Prerequisites
- A running Red Hat Ceph Storage cluster.
- Installation of the Ceph Object Gateway.
- Root-level access to a Ceph Object Gateway node.
- An S3 bucket created.
- A role created.
- An S3 user created with user access.
Procedure
List the names of the permission policies:
Syntax
radosgw-admin role-policy list --role-name=ROLE_NAMEExample
[root@host01 ~]# radosgw-admin role-policy list --role-name=S3Access1

[
  "Policy1"
]
7.7.9. Deleting policy attached to a role
You can delete the permission policy attached to a role with the rm command.
Prerequisites
- A running Red Hat Ceph Storage cluster.
- Installation of the Ceph Object Gateway.
- Root-level access to a Ceph Object Gateway node.
- An S3 bucket created.
- A role created.
- An S3 user created with user access.
Procedure
Delete the permission policy:
Syntax
radosgw-admin role policy delete --role-name=ROLE_NAME --policy-name=POLICY_NAME
Example
[root@host01 ~]# radosgw-admin role policy delete --role-name=S3Access1 --policy-name=Policy1
7.7.10. Updating the session duration of a role
You can update the session duration of a role with the update command.
Prerequisites
- A running Red Hat Ceph Storage cluster.
- Installation of the Ceph Object Gateway.
- Root-level access to a Ceph Object Gateway node.
- An S3 bucket created.
- A role created.
- An S3 user created with user access.
Procedure
Update the max-session-duration using the
updatecommand:Syntax
[root@node1 ~]# radosgw-admin role update --role-name=ROLE_NAME --max-session-duration=7200Example
[root@node1 ~]# radosgw-admin role update --role-name=test-sts-role --max-session-duration=7200
Verification
List the roles to verify the updates:
Example
[root@node1 ~]#radosgw-admin role list
[
    {
        "RoleId": "d4caf33f-caba-42f3-8bd4-48c84b4ea4d3",
        "RoleName": "test-sts-role",
        "Path": "/",
        "Arn": "arn:aws:iam:::role/test-role",
        "CreateDate": "2022-09-07T20:01:15.563Z",
        "MaxSessionDuration": 7200,				<<<<<<
        "AssumeRolePolicyDocument": "{\"Version\":\"2012-10-17\",\"Statement\":[{\"Effect\":\"Allow\",\"Principal\":{\"AWS\":[\"arn:aws:iam:::user/kvm\"]},\"Action\":[\"sts:AssumeRole\"]}]}"
    }
]
Additional Resources
- See the REST APIs for manipulating a role section in the Red Hat Ceph Storage Developer Guide for details.
7.8. Quota management
The Ceph Object Gateway enables you to set quotas on users and buckets owned by users. Quotas include the maximum number of objects in a bucket and the maximum storage size in megabytes.
-
Bucket: The
--bucketoption allows you to specify a quota for buckets the user owns. -
Maximum Objects: The
--max-objectssetting allows you to specify the maximum number of objects. A negative value disables this setting. -
Maximum Size: The
--max-sizeoption allows you to specify a quota for the maximum number of bytes. A negative value disables this setting. -
Quota Scope: The
--quota-scopeoption sets the scope for the quota. The options arebucketanduser. Bucket quotas apply to buckets a user owns. User quotas apply to a user.
Buckets with a large number of objects can cause serious performance issues. The recommended maximum number of objects in one bucket is 100,000. To increase this number, configure bucket index sharding. See Section 7.4, “Configure bucket index resharding” for details.
7.8.1. Set user quotas
Before you enable a quota, you must first set the quota parameters.
Syntax
radosgw-admin quota set --quota-scope=user --uid=USER_ID [--max-objects=NUMBER_OF_OBJECTS] [--max-size=MAXIMUM_SIZE_IN_BYTES]
Example
[root@host01 ~]# radosgw-admin quota set --quota-scope=user --uid=johndoe --max-objects=1024 --max-size=1024
A negative value for num objects and / or max size means that the specific quota attribute check is disabled.
7.8.2. Enable and disable user quotas
Once you set a user quota, you can enable it.
Syntax
radosgw-admin quota enable --quota-scope=user --uid=USER_ID
You may disable an enabled user quota.
Syntax
radosgw-admin quota disable --quota-scope=user --uid=USER_ID
7.8.3. Set bucket quotas
Bucket quotas apply to the buckets owned by the specified uid. They are independent of the user.
Syntax
radosgw-admin quota set --uid=USER_ID --quota-scope=bucket --bucket=BUCKET_NAME [--max-objects=NUMBER_OF_OBJECTS] [--max-size=MAXIMUM_SIZE_IN_BYTES]
A negative value for NUMBER_OF_OBJECTS, MAXIMUM_SIZE_IN_BYTES, or both means that the specific quota attribute check is disabled.
7.8.4. Enable and disable bucket quotas
Once you set a bucket quota, you may enable it.
Syntax
radosgw-admin quota enable --quota-scope=bucket --uid=USER_ID
You may disable an enabled bucket quota.
Syntax
radosgw-admin quota disable --quota-scope=bucket --uid=USER_ID
7.8.5. Get quota settings
You may access each user’s quota settings via the user information API. To read user quota setting information with the CLI interface, run the following command:
Syntax
radosgw-admin user info --uid=USER_ID
To get quota settings for a tenanted user, specify the user ID and the name of the tenant:
Syntax
radosgw-admin user info --uid=USER_ID --tenant=TENANT
7.8.6. Update quota stats
Quota stats get updated asynchronously. You can update quota statistics for all users and all buckets manually to retrieve the latest quota stats.
Syntax
radosgw-admin user stats --uid=USER_ID --sync-stats
7.8.7. Get user quota usage stats
To see how much of the quota a user has consumed, run the following command:
Syntax
radosgw-admin user stats --uid=USER_ID
You should run the radosgw-admin user stats command with the --sync-stats option to receive the latest data.
7.8.8. Quota cache
Quota statistics are cached for each Ceph Gateway instance. If there are multiple instances, then the cache can keep quotas from being perfectly enforced, as each instance will have a different view of the quotas. The options that control this are rgw bucket quota ttl, rgw user quota bucket sync interval, and rgw user quota sync interval. The higher these values are, the more efficient quota operations are, but the more out-of-sync multiple instances will be. The lower these values are, the closer to perfect enforcement multiple instances will achieve. If all three are 0, then quota caching is effectively disabled, and multiple instances will have perfect quota enforcement. See Appendix A, Configuration reference for more details on these options.
7.8.9. Reading and writing global quotas
You can read and write quota settings in a zonegroup map. To get a zonegroup map:
[root@host01 ~]# radosgw-admin global quota get
The global quota settings can be manipulated with the global quota counterparts of the quota set, quota enable, and quota disable commands, for example:
[root@host01 ~]# radosgw-admin global quota set --quota-scope bucket --max-objects 1024
[root@host01 ~]# radosgw-admin global quota enable --quota-scope bucket
In a multi-site configuration, where there is a realm and period present, changes to the global quotas must be committed using period update --commit. If there is no period present, the Ceph Object Gateways must be restarted for the changes to take effect.
7.9. Bucket management
As a storage administrator, when using the Ceph Object Gateway you can manage buckets by moving them between users and renaming them. You can create bucket notifications to trigger on specific events. Also, you can find orphan or leaky objects within the Ceph Object Gateway that can occur over the lifetime of a storage cluster.
When millions of objects are uploaded to a Ceph Object Gateway bucket with a high ingest rate, incorrect num_objects are reported with the radosgw-admin bucket stats command. With the radosgw-admin bucket list command you can correct the value of num_objects parameter.
The radosgw-admin bucket stats command does not return Unknown error 2002 error and explicitly translates to POSIX error 2 such as "No such file or directory" error.
In a multi-site cluster, deletion of a bucket from the secondary site does not sync the metadata changes with the primary site. Hence, Red Hat recommends to delete a bucket only from the primary site and not from the secondary site.
7.9.1. Renaming buckets
You can rename buckets. If you want to allow underscores in bucket names, then set the rgw_relaxed_s3_bucket_names option to true.
Prerequisites
- A running Red Hat Ceph Storage cluster.
- Installation of the Ceph Object Gateway software.
- An existing bucket.
Procedure
List the buckets:
Example
[ceph: root@host01 /]# radosgw-admin bucket list
[
    "34150b2e9174475db8e191c188e920f6/swcontainer",
    "s3bucket1",
    "34150b2e9174475db8e191c188e920f6/swimpfalse",
    "c278edd68cfb4705bb3e07837c7ad1a8/ec2container",
    "c278edd68cfb4705bb3e07837c7ad1a8/demoten1",
    "c278edd68cfb4705bb3e07837c7ad1a8/demo-ct",
    "c278edd68cfb4705bb3e07837c7ad1a8/demopostup",
    "34150b2e9174475db8e191c188e920f6/postimpfalse",
    "c278edd68cfb4705bb3e07837c7ad1a8/demoten2",
    "c278edd68cfb4705bb3e07837c7ad1a8/postupsw"
]
Rename the bucket:
Syntax
radosgw-admin bucket link --bucket=ORIGINAL_NAME --bucket-new-name=NEW_NAME --uid=USER_ID
Example
[ceph: root@host01 /]# radosgw-admin bucket link --bucket=s3bucket1 --bucket-new-name=s3newb --uid=testuser
If the bucket is inside a tenant, specify the tenant as well:
Syntax
radosgw-admin bucket link --bucket=tenant/ORIGINAL_NAME --bucket-new-name=NEW_NAME --uid=TENANT$USER_ID
Example
[ceph: root@host01 /]# radosgw-admin bucket link --bucket=test/s3bucket1 --bucket-new-name=s3newb --uid=test$testuser
Verify the bucket was renamed:
Example
[ceph: root@host01 /]# radosgw-admin bucket list
[
    "34150b2e9174475db8e191c188e920f6/swcontainer",
    "34150b2e9174475db8e191c188e920f6/swimpfalse",
    "c278edd68cfb4705bb3e07837c7ad1a8/ec2container",
    "s3newb",
    "c278edd68cfb4705bb3e07837c7ad1a8/demoten1",
    "c278edd68cfb4705bb3e07837c7ad1a8/demo-ct",
    "c278edd68cfb4705bb3e07837c7ad1a8/demopostup",
    "34150b2e9174475db8e191c188e920f6/postimpfalse",
    "c278edd68cfb4705bb3e07837c7ad1a8/demoten2",
    "c278edd68cfb4705bb3e07837c7ad1a8/postupsw"
]
7.9.2. Moving buckets
The radosgw-admin bucket utility provides the ability to move buckets between users. To do so, link the bucket to a new user and change the ownership of the bucket to the new user.
You can move buckets:
7.9.2.1. Prerequisites
- A running Red Hat Ceph Storage cluster.
- Ceph Object Gateway is installed.
- An S3 bucket.
- Various tenanted and non-tenanted users.
7.9.2.2. Moving buckets between non-tenanted users
The radosgw-admin bucket chown command provides the ability to change the ownership of buckets and all objects they contain from one user to another. To do so, unlink a bucket from the current user, link it to a new user, and change the ownership of the bucket to the new user.
Procedure
Link the bucket to a new user:
Syntax
radosgw-admin bucket link --uid=USER --bucket=BUCKET
Example
[ceph: root@host01 /]# radosgw-admin bucket link --uid=user2 --bucket=data
Verify that the bucket has been linked to
user2successfully:Example
[ceph: root@host01 /]# radosgw-admin bucket list --uid=user2
[
    "data"
]
Change the ownership of the bucket to the new user:
Syntax
radosgw-admin bucket chown --uid=user --bucket=bucket
Example
[ceph: root@host01 /]# radosgw-admin bucket chown --uid=user2 --bucket=data
Verify that the ownership of the
databucket has been successfully changed by checking theownerline in the output of the following command:Example
[ceph: root@host01 /]# radosgw-admin bucket list --bucket=data
7.9.2.3. Moving buckets between tenanted users
You can move buckets between one tenanted user and another.
Procedure
Link the bucket to a new user:
Syntax
radosgw-admin bucket link --bucket=CURRENT_TENANT/BUCKET --uid=NEW_TENANT$USER
Example
[ceph: root@host01 /]# radosgw-admin bucket link --bucket=test/data --uid=test2$user2
Verify that the bucket has been linked to
user2successfully:[ceph: root@host01 /]# radosgw-admin bucket list --uid=test$user2 [ "data" ]Change the ownership of the bucket to the new user:
Syntax
radosgw-admin bucket chown --bucket=NEW_TENANT/BUCKET --uid=NEW_TENANT$USER
Example
[ceph: root@host01 /]# radosgw-admin bucket chown --bucket='test2/data' --uid='test$tuser2'
Verify that the ownership of the
databucket has been successfully changed by checking theownerline in the output of the following command:[ceph: root@host01 /]# radosgw-admin bucket list --bucket=test2/data
7.9.2.4. Moving buckets from non-tenanted users to tenanted users
You can move buckets from a non-tenanted user to a tenanted user.
Procedure
Optional: If you do not already have multiple tenants, you can create them by enabling
rgw_keystone_implicit_tenantsand accessing the Ceph Object Gateway from an external tenant:Enable the
rgw_keystone_implicit_tenantsoption:Example
[ceph: root@host01 /]# ceph config set client.rgw rgw_keystone_implicit_tenants true
Access the Ceph Object Gateway from an eternal tenant using either the
s3cmdorswiftcommand:Example
[ceph: root@host01 /]# swift list
Or use
s3cmd:Example
[ceph: root@host01 /]# s3cmd ls
The first access from an external tenant creates an equivalent Ceph Object Gateway user.
Move a bucket to a tenanted user:
Syntax
radosgw-admin bucket link --bucket=/BUCKET --uid='TENANT$USER'
Example
[ceph: root@host01 /]# radosgw-admin bucket link --bucket=/data --uid='test$tenanted-user'
Verify that the
databucket has been linked totenanted-usersuccessfully:Example
[ceph: root@host01 /]# radosgw-admin bucket list --uid='test$tenanted-user'
[
    "data"
]
Change the ownership of the bucket to the new user:
Syntax
radosgw-admin bucket chown --bucket='tenant/bucket name' --uid='tenant$user'
Example
[ceph: root@host01 /]# radosgw-admin bucket chown --bucket='test/data' --uid='test$tenanted-user'
Verify that the ownership of the
databucket has been successfully changed by checking theownerline in the output of the following command:Example
[ceph: root@host01 /]# radosgw-admin bucket list --bucket=test/data
7.9.3. Finding orphan and leaky objects
A healthy storage cluster does not have any orphan or leaky objects, but in some cases orphan or leaky objects can occur.
An orphan object exists in a storage cluster and has an object ID associated with the RADOS object. However, there is no reference of the RADOS object with the S3 object in the bucket index reference. For example, if the Ceph Object Gateway goes down in the middle of an operation, this can cause some objects to become orphans. Also, an undiscovered bug can cause orphan objects to occur.
You can see how the Ceph Object Gateway objects map to the RADOS objects. The radosgw-admin command provides a tool to search for and produce a list of these potential orphan or leaky objects. Using the radoslist subcommand displays objects stored within buckets, or all buckets in the storage cluster. The rgw-orphan-list script displays orphan objects within a pool.
The radoslist subcommand is replacing the deprecated orphans find and orphans finish subcommands.
Do not use this command where Indexless buckets are in use as all the objects appear as orphaned.
Another alternate way to identity orphaned objects is to run the rados -p <pool> ls | grep BUCKET_ID command
Prerequisites
- A running Red Hat Ceph Storage cluster.
- A running Ceph Object Gateway.
Procedure
Generate a list of objects that hold data within a bucket.
Syntax
radosgw-admin bucket radoslist --bucket BUCKET_NAMEExample
[root@host01 ~]# radosgw-admin bucket radoslist --bucket mybucket
NoteIf the BUCKET_NAME is omitted, then all objects in all buckets are displayed.
Check the version of
rgw-orphan-list.Example
[root@host01 ~]# head /usr/bin/rgw-orphan-list
The version should be
2023-01-11or newer.Create a directory where you need to generate the list of orphans.
Example
[root@host01 ~]# mkdir orphans
Navigate to the directory created earlier.
Example
[root@host01 ~]# cd orphans
From the pool list, select the pool in which you want to find orphans. This script might run for a long time depending on the objects in the cluster.
Example
[root@host01 orphans]# rgw-orphan-list
Example
Available pools:
    .rgw.root
    default.rgw.control
    default.rgw.meta
    default.rgw.log
    default.rgw.buckets.index
    default.rgw.buckets.data
    rbd
    default.rgw.buckets.non-ec
    ma.rgw.control
    ma.rgw.meta
    ma.rgw.log
    ma.rgw.buckets.index
    ma.rgw.buckets.data
    ma.rgw.buckets.non-ec
Which pool do you want to search for orphans?
Enter the pool name to search for orphans.
ImportantA data pool must be specified when using the
rgw-orphan-listcommand, and not a metadata pool.View the details of the
rgw-orphan-listtool usage. `Synatx
rgw-orphan-list -h
rgw-orphan-list POOL_NAME /DIRECTORY
Example
[root@host01 orphans]# rgw-orphan-list default.rgw.buckets.data /orphans

2023-09-12 08:41:14 ceph-host01 Computing delta...
2023-09-12 08:41:14 ceph-host01 Computing results...
10 potential orphans found out of a possible 2412 (0%).         <<<<<<< orphans detected
The results can be found in './orphan-list-20230912124113.out'.
    Intermediate files are './rados-20230912124113.intermediate' and './radosgw-admin-20230912124113.intermediate'.
***
*** WARNING: This is EXPERIMENTAL code and the results should be used
***          only with CAUTION!
***
Done at 2023-09-12 08:41:14.
Run the
ls -lcommand to verify the files ending with error should be zero length indicating the script ran without any issues.Example
[root@host01 orphans]# ls -l

-rw-r--r--. 1 root root    770 Sep 12 03:59 orphan-list-20230912075939.out
-rw-r--r--. 1 root root      0 Sep 12 03:59 rados-20230912075939.error
-rw-r--r--. 1 root root 248508 Sep 12 03:59 rados-20230912075939.intermediate
-rw-r--r--. 1 root root      0 Sep 12 03:59 rados-20230912075939.issues
-rw-r--r--. 1 root root      0 Sep 12 03:59 radosgw-admin-20230912075939.error
-rw-r--r--. 1 root root 247738 Sep 12 03:59 radosgw-admin-20230912075939.intermediate
Review the orphan objects listed.
Example
[root@host01 orphans]# cat ./orphan-list-20230912124113.out

a9c042bc-be24-412c-9052-dda6b2f01f55.16749.1_key1.cherylf.433-bucky-4865-0.0
a9c042bc-be24-412c-9052-dda6b2f01f55.16749.1_key1.cherylf.433-bucky-4865-0.1
a9c042bc-be24-412c-9052-dda6b2f01f55.16749.1_key1.cherylf.433-bucky-4865-0.2
a9c042bc-be24-412c-9052-dda6b2f01f55.16749.1_key1.cherylf.433-bucky-4865-0.3
a9c042bc-be24-412c-9052-dda6b2f01f55.16749.1_key1.cherylf.433-bucky-4865-0.4
a9c042bc-be24-412c-9052-dda6b2f01f55.16749.1_key1.cherylf.433-bucky-4865-0.5
a9c042bc-be24-412c-9052-dda6b2f01f55.16749.1_key1.cherylf.433-bucky-4865-0.6
a9c042bc-be24-412c-9052-dda6b2f01f55.16749.1_key1.cherylf.433-bucky-4865-0.7
a9c042bc-be24-412c-9052-dda6b2f01f55.16749.1_key1.cherylf.433-bucky-4865-0.8
a9c042bc-be24-412c-9052-dda6b2f01f55.16749.1_key1.cherylf.433-bucky-4865-0.9
Remove orphan objects:
Syntax
rados -p POOL_NAME rm OBJECT_NAME
Example
[root@host01 orphans]# rados -p default.rgw.buckets.data rm myobject
WarningVerify you are removing the correct objects. Running the
rados rmcommand removes data from the storage cluster.
7.9.4. Managing bucket index entries
You can manage the bucket index entries of the Ceph Object Gateway in a Red Hat Ceph Storage cluster using the radosgw-admin bucket check sub-command.
Each bucket index entry related to a piece of a multipart upload object is matched against its corresponding .meta index entry. There should be one .meta entry for all the pieces of a given multipart upload. If it fails to find a corresponding .meta entry for a piece, it lists out the "orphaned" piece entries in a section of the output.
The stats for the bucket are stored in the bucket index headers. This phase loads those headers and also iterates through all the plain object entries in the bucket index and recalculates the stats. It then displays the actual and calculated stats in sections labeled "existing_header" and "calculated_header" respectively, so they can be compared.
If you use the --fix option with the bucket check sub-command, it removes the "orphaned" entries from the bucket index and also overwrites the existing stats in the header with those that it calculated. It causes all entries, including the multiple entries used in versioning, to be listed in the output.
Prerequisites
- A running Red Hat Ceph Storage cluster.
- A running Ceph Object Gateway.
- A newly created bucket.
Procedure
Check the bucket index of a specific bucket:
Syntax
radosgw-admin bucket check --bucket=BUCKET_NAMEExample
[root@rgw ~]# radosgw-admin bucket check --bucket=mybucket
Fix the inconsistencies in the bucket index, including removal of orphaned objects:
Syntax
radosgw-admin bucket check --fix --bucket=BUCKET_NAMEExample
[root@rgw ~]# radosgw-admin bucket check --fix --bucket=mybucket
7.9.5. Bucket notifications
Bucket notifications provide a way to send information out of the Ceph Object Gateway when certain events happen in the bucket. Bucket notifications can be sent to HTTP, AMQP0.9.1, and Kafka endpoints. A notification entry must be created to send bucket notifications for events on a specific bucket and to a specific topic. A bucket notification can be created on a subset of event types or by default for all event types. The bucket notification can filter out events based on key prefix or suffix, regular expression matching the keys, and on the metadata attributes attached to the object, or the object tags. Bucket notifications have a REST API to provide configuration and control interfaces for the bucket notification mechanism.
The bucket notifications API is enabled by default. If rgw_enable_apis configuration parameter is explicitly set, ensure that s3, and notifications are included. To verify this, run the ceph --admin-daemon /var/run/ceph/ceph-client.rgw.NAME.asok config get rgw_enable_apis command. Replace NAME with the Ceph Object Gateway instance name.
Topic management using CLI
You can manage list, get, and remove topics for the Ceph Object Gateway buckets:
List topics: Run the following command to list the configuration of all topics:
Example
[ceph: host01 /]# radosgw-admin topic list
Get topics: Run the following command to get the configuration of a specific topic:
Example
[ceph: host01 /]# radosgw-admin topic get --topic=topic1
Remove topics: Run the following command to remove the configuration of a specific topic:
Example
[ceph: host01 /]# radosgw-admin topic rm --topic=topic1
NoteThe topic is removed even if the Ceph Object Gateway bucket is configured to that topic.
7.9.6. Creating bucket notifications
Create bucket notifications at the bucket level. The notification configuration has the Red Hat Ceph Storage Object Gateway S3 events, ObjectCreated and ObjectRemoved. These need to be published with the destination to send the bucket notifications. Bucket notifications are S3 operations.
Prerequisites
- A running Red Hat Ceph Storage cluster.
- A running HTTP server, RabbitMQ server, or a Kafka server.
- Root-level access.
- Installation of the Red Hat Ceph Storage Object Gateway.
- User access key and secret key.
- Endpoint parameters.
Red Hat supports ObjectCreate events, such as put, post, multipartUpload, and copy. Red Hat also supports ObjectRemove events, such as object_delete and s3_multi_object_delete.
Listed here are two ways of creating bucket notifications:
- Using the boto script
- Using AWS CLI
Using the boto script
Install the python3-boto3 package:
Example
[user@client ~]$ dnf install python3-boto3
- Create an S3 bucket.
Create a python script
topic.pyto create an SNS topic forhttp,amqp, orkafkaprotocol:Example
import boto3
from botocore.client import Config
import sys

# endpoint and keys from vstart
endpoint = 'http://127.0.0.1:8000'
access_key='0555b35654ad1656d804'
secret_key='h7GhxuBLTrlhVUyxSPUKUV8r/2EI4ngqJxD7iBdBYLhwluN30JaT3Q=='

client = boto3.client('sns',
    	endpoint_url=endpoint,
    	aws_access_key_id=access_key,
    	aws_secret_access_key=secret_key,
    	config=Config(signature_version='s3'))

attributes = {"push-endpoint": "amqp://localhost:5672", "amqp-exchange": "ex1", "amqp-ack-level": "broker"}

client.create_topic(topic_name="mytopic", Attributes=attributes)
Run the python script for creating topic:
Example
python3 topic.py
Create a python script
notification.pyto create S3 bucket notification fors3:objectCreateands3:objectRemoveevents:Example
import boto3
import sys

# bucket name as first argument
bucketname = sys.argv[1]
# topic ARN as second argument
topic_arn = sys.argv[2]
# notification id as third argument
notification_id = sys.argv[3]

# endpoint and keys from vstart
endpoint = 'http://127.0.0.1:8000'
access_key='0555b35654ad1656d804'
secret_key='h7GhxuBLTrlhVUyxSPUKUV8r/2EI4ngqJxD7iBdBYLhwluN30JaT3Q=='

client = boto3.client('s3',
        endpoint_url=endpoint,
        aws_access_key_id=access_key,
        aws_secret_access_key=secret_key)

# regex filter on the object name and metadata based filtering are extension to AWS S3 API
# bucket and topic should be created beforehand

topic_conf_list = [{'Id': notification_id,
                    'TopicArn': topic_arn,
                    'Events': ['s3:ObjectCreated:*', 's3:ObjectRemoved:*'],
                    }]

client.put_bucket_notification_configuration(
   Bucket=bucketname,
   NotificationConfiguration={
       'TopicConfigurations': [
           {
               'Id': notification_name,
               'TopicArn': topic_arn,
               'Events': ['s3:ObjectCreated:*', 's3:ObjectRemoved:*']
           }]})
Run the python script for creating the bucket notification:
Example
python3 notification.py
- Create S3 objects in the bucket.
Fetch the notification configuration:
Example
endpoint = 'http://127.0.0.1:8000'
access_key='0555b35654ad1656d804'
secret_key='h7GhxuBLTrlhVUyxSPUKUV8r/2EI4ngqJxD7iBdBYLhwluN30JaT3Q=='

client = boto3.client('s3',
        endpoint_url=endpoint,
        aws_access_key_id=access_key,
        aws_secret_access_key=secret_key)

# getting a specific notification configuration is an extension to AWS S3 API

print(client.get_bucket_notification_configuration(Bucket=bucketname))
Optional: Delete the objects.
-
Verify the object deletion events at the
http,rabbitmq, orkafkareceiver.
-
Verify the object deletion events at the
Using thr AWS CLI
Create topic:
Syntax
aws --endpoint=AWS_END_POINT sns create-topic --name NAME --attributes=ATTRIBUTES_FILE
Example
[user@client ~]$ aws --endpoint=http://localhost sns create-topic --name test-kafka --attributes=file://topic.json

sample topic.json:
{"push-endpoint": "kafka://localhost","verify-ssl": "False", "kafka-ack-level": "broker", "persistent":"true"}
ref: https://docs.aws.amazon.com/cli/latest/reference/sns/create-topic.html
Create the bucket notification:
Syntax
aws s3api put-bucket-notification-configuration --bucket BUCKET_NAME --notification-configuration NOTIFICATION_FILE
Example
[user@client ~]$ aws s3api put-bucket-notification-configuration --bucket my-bucket --notification-configuration file://notification.json

sample notification.json
{
    "TopicConfigurations": [
        {
            "Id": "test_notification",
            "TopicArn": "arn:aws:sns:us-west-2:123456789012:test-kafka",
            "Events": [
                "s3:ObjectCreated:*"
            ]
        }
    ]
}
Fetch the notification configuration:
Syntax
aws s3api --endpoint=AWS_ENDPOINT get-bucket-notification-configuration --bucket BUCKET_NAME
Example
[user@client ~]$ aws s3api --endpoint=http://localhost get-bucket-notification-configuration --bucket my-bucket
{
    "TopicConfigurations": [
        {
            "Id": "test_notification",
            "TopicArn": "arn:aws:sns:default::test-kafka",
            "Events": [
                "s3:ObjectCreated:*"
            ]
        }
    ]
}
7.9.7. Additional Resources
- See the Red Hat Ceph Storage Developer Guide for more information.
7.10. Bucket lifecycle
As a storage administrator, you can use a bucket lifecycle configuration to manage your objects so they are stored effectively throughout their lifetime. For example, you can transition objects to less expensive storage classes, archive, or even delete them based on your use case.
RADOS Gateway supports S3 API object expiration by using rules defined for a set of bucket objects. Each rule has a prefix, which selects the objects, and a number of days after which objects become unavailable.
The radosgw-admin lc reshard command is deprecated in Red Hat Ceph Storage 3.3 and not supported in Red Hat Ceph Storage 4 and later releases.
7.10.1. Creating a lifecycle management policy
You can manage a bucket lifecycle policy configuration using standard S3 operations rather than using the radosgw-admin command. RADOS Gateway supports only a subset of the Amazon S3 API policy language applied to buckets. The lifecycle configuration contains one or more rules defined for a set of bucket objects.
Prerequisites
- A running Red Hat Storage cluster.
- Installation of the Ceph Object Gateway.
- Root-level access to a Ceph Object Gateway node.
- An S3 bucket created.
- An S3 user created with user access.
-
Access to a Ceph Object Gateway client with the
AWS CLIpackage installed.
Procedure
Create a JSON file for lifecycle configuration:
Example
[user@client ~]$ vi lifecycle.json
Add the specific lifecycle configuration rules in the file:
Example
{
	"Rules": [
        {
		    "Filter": {
			    "Prefix": "images/"
		    },
		    "Status": "Enabled",
		    "Expiration": {
			    "Days": 1
		    },
		    "ID": "ImageExpiration"
	    }
    ]
}
The lifecycle configuration example expires objects in the images directory that are more than 1 day old.
Set the lifecycle configuration on the bucket:
Syntax
aws --endpoint-url=RADOSGW_ENDPOINT_URL:PORT s3api put-bucket-lifecycle-configuration --bucket BUCKET_NAME --lifecycle-configuration file://PATH_TO_LIFECYCLE_CONFIGURATION_FILE/LIFECYCLE_CONFIGURATION_FILE.json
Example
[user@client ~]$ aws --endpoint-url=http://host01:80 s3api put-bucket-lifecycle-configuration --bucket testbucket --lifecycle-configuration file://lifecycle.json
In this example, the
lifecycle.jsonfile exists in the current directory.
Verification
Retrieve the lifecycle configuration for the bucket:
Syntax
aws --endpoint-url=RADOSGW_ENDPOINT_URL:PORT s3api get-bucket-lifecycle-configuration --bucket BUCKET_NAME
Example
[user@client ~]$ aws --endpoint-url=http://host01:80 s3api get-bucket-lifecycle-configuration --bucket testbucket
{
	"Rules": [
        {
		    "Expiration": {
			    "Days": 1
		    },
		    "ID": "ImageExpiration",
		    "Filter": {
			    "Prefix": "images/"
		    },
		    "Status": "Enabled"
	    }
    ]
}
Optional: From the Ceph Object Gateway node, log into the Cephadm shell and retrieve the bucket lifecycle configuration:
Syntax
radosgw-admin lc get --bucket=BUCKET_NAMEExample
[ceph: root@host01 /]# radosgw-admin lc get --bucket=testbucket
{
	"prefix_map": {
		"images/": {
			"status": true,
			"dm_expiration": false,
			"expiration": 1,
			"noncur_expiration": 0,
			"mp_expiration": 0,
			"transitions": {},
			"noncur_transitions": {}
		}
	},
	"rule_map": [
        {
		"id": "ImageExpiration",
		"rule": {
			"id": "ImageExpiration",
			"prefix": "",
			"status": "Enabled",
			"expiration": {
				"days": "1",
				"date": ""
			},
			"mp_expiration": {
				"days": "",
				"date": ""
			},
			"filter": {
				"prefix": "images/",
				"obj_tags": {
					"tagset": {}
				}
			},
			"transitions": {},
			"noncur_transitions": {},
			"dm_expiration": false
		}
	}
  ]
}
Additional Resources
- See the S3 bucket lifecycle section in the Red Hat Ceph Storage Developer Guide for details.
-
For more information on using the
AWS CLIto manage lifecycle configurations, see the Setting lifecycle configuration on a bucket section of the Amazon Simple Storage Service documentation.
7.10.2. Deleting a lifecycle management policy
You can delete the lifecycle management policy for a specified bucket by using the s3api delete-bucket-lifecycle command.
Prerequisites
- A running Red Hat Storage cluster.
- Installation of the Ceph Object Gateway.
- Root-level access to a Ceph Object Gateway node.
- An S3 bucket created.
- An S3 user created with user access.
-
Access to a Ceph Object Gateway client with the
AWS CLIpackage installed.
Procedure
Delete a lifecycle configuration:
Syntax
aws --endpoint-url=RADOSGW_ENDPOINT_URL:PORT s3api delete-bucket-lifecycle --bucket BUCKET_NAME
Example
[user@client ~]$ aws --endpoint-url=http://host01:80 s3api delete-bucket-lifecycle --bucket testbucket
Verification
Retrieve lifecycle configuration for the bucket:
Syntax
aws --endpoint-url=RADOSGW_ENDPOINT_URL:PORT s3api get-bucket-lifecycle-configuration --bucket BUCKET_NAME
Example
[user@client ~]# aws --endpoint-url=http://host01:80 s3api get-bucket-lifecycle-configuration --bucket testbucket
Optional: From the Ceph Object Gateway node, retrieve the bucket lifecycle configuration:
Syntax
radosgw-admin lc get --bucket=BUCKET_NAMEExample
[ceph: root@host01 /]# radosgw-admin lc get --bucket=testbucket
NoteThe command does not return any information if a bucket lifecycle policy is not present.
Additional Resources
- See the S3 bucket lifecycle section in the Red Hat Ceph Storage Developer Guide for details.
7.10.3. Updating a lifecycle management policy
You can update a lifecycle management policy by using the s3cmd put-bucket-lifecycle-configuration command.
The put-bucket-lifecycle-configuration overwrites an existing bucket lifecycle configuration. If you want to retain any of the current lifecycle policy settings, you must include them in the lifecycle configuration file.
Prerequisites
- A running Red Hat Storage cluster.
- Installation of the Ceph Object Gateway.
- Root-level access to a Ceph Object Gateway node.
- An S3 bucket created.
- An S3 user created with user access.
-
Access to a Ceph Object Gateway client with the
AWS CLIpackage installed.
Procedure
Create a JSON file for the lifecycle configuration:
Example
[user@client ~]$ vi lifecycle.json
Add the specific lifecycle configuration rules to the file:
Example
{
	"Rules": [
        {
		    "Filter": {
			    "Prefix": "images/"
		    },
		    "Status": "Enabled",
		    "Expiration": {
			    "Days": 1
		    },
		    "ID": "ImageExpiration"
	    },
		{
			"Filter": {
				"Prefix": "docs/"
			},
			"Status": "Enabled",
			"Expiration": {
				"Days": 30
			},
			"ID": "DocsExpiration"
		}
	]
}
Update the lifecycle configuration on the bucket:
Syntax
aws --endpoint-url=RADOSGW_ENDPOINT_URL:PORT s3api put-bucket-lifecycle-configuration --bucket BUCKET_NAME --lifecycle-configuration file://PATH_TO_LIFECYCLE_CONFIGURATION_FILE/LIFECYCLE_CONFIGURATION_FILE.json
Example
[user@client ~]$ aws --endpoint-url=http://host01:80 s3api put-bucket-lifecycle-configuration --bucket testbucket --lifecycle-configuration file://lifecycle.json
Verification
Retrieve the lifecycle configuration for the bucket:
Syntax
aws --endpointurl=RADOSGW_ENDPOINT_URL:PORT s3api get-bucket-lifecycle-configuration --bucket BUCKET_NAME
Example
[user@client ~]$ aws -endpoint-url=http://host01:80 s3api get-bucket-lifecycle-configuration --bucket testbucket

{
    "Rules": [
        {
            "Expiration": {
                "Days": 30
            },
            "ID": "DocsExpiration",
            "Filter": {
                "Prefix": "docs/"
            },
            "Status": "Enabled"
        },
        {
            "Expiration": {
                "Days": 1
            },
            "ID": "ImageExpiration",
            "Filter": {
                "Prefix": "images/"
            },
            "Status": "Enabled"
        }
    ]
}
Optional: From the Ceph Object Gateway node, log into the Cephadm shell and retrieve the bucket lifecycle configuration:
Syntax
radosgw-admin lc get --bucket=BUCKET_NAMEExample
[ceph: root@host01 /]# radosgw-admin lc get --bucket=testbucket
{
	"prefix_map": {
        "docs/": {
			"status": true,
			"dm_expiration": false,
			"expiration": 1,
			"noncur_expiration": 0,
			"mp_expiration": 0,
			"transitions": {},
			"noncur_transitions": {}
		},
		"images/": {
			"status": true,
			"dm_expiration": false,
			"expiration": 1,
			"noncur_expiration": 0,
			"mp_expiration": 0,
			"transitions": {},
			"noncur_transitions": {}
		}
	},
	"rule_map": [
        {
        "id": "DocsExpiration",
    	"rule": {
    		"id": "DocsExpiration",
    		"prefix": "",
    		"status": "Enabled",
    		"expiration": {
    			"days": "30",
    			"date": ""
    		},
            "noncur_expiration": {
                "days": "",
                "date": ""
            },
    		"mp_expiration": {
    			"days": "",
    			"date": ""
    		},
    		"filter": {
    			"prefix": "docs/",
    			"obj_tags": {
    				"tagset": {}
    			}
    		},
    		"transitions": {},
    		"noncur_transitions": {},
    		"dm_expiration": false
    	}
    },
    {
		"id": "ImageExpiration",
		"rule": {
			"id": "ImageExpiration",
			"prefix": "",
			"status": "Enabled",
			"expiration": {
				"days": "1",
				"date": ""
			},
			"mp_expiration": {
				"days": "",
				"date": ""
			},
			"filter": {
				"prefix": "images/",
				"obj_tags": {
					"tagset": {}
				}
			},
			"transitions": {},
			"noncur_transitions": {},
			"dm_expiration": false
		}
	}
  ]
}
Additional Resources
- See the Red Hat Ceph Storage Developer Guide for details on Amazon S3 bucket lifecycles.
7.10.4. Monitoring bucket lifecycles
You can monitor lifecycle processing and manually process the lifecycle of buckets with the radosgw-admin lc list and radosgw-admin lc process commands.
Prerequisites
- A running Red Hat Ceph Storage cluster.
- Root-level access to a Ceph Object Gateway node.
- Creation of an S3 bucket with a lifecycle configuration policy applied.
Procedure
Log into the Cephadm shell:
Example
[root@host01 ~]# cephadm shell
List bucket lifecycle progress:
Example
[ceph: root@host01 /]# radosgw-admin lc list

[
   {
         “bucket”: “:testbucket:8b63d584-9ea1-4cf3-8443-a6a15beca943.54187.1”,
         “started”: “Thu, 01 Jan 1970 00:00:00 GMT”,
         “status” : “UNINITIAL”
   },
   {
         “bucket”: “:testbucket1:8b635499-9e41-4cf3-8443-a6a15345943.54187.2”,
         “started”: “Thu, 01 Jan 1970 00:00:00 GMT”,
         “status” : “UNINITIAL”
   }
]
The bucket lifecycle processing status can be one of the following:
- UNINITIAL - The process has not run yet.
- PROCESSING - The process is currently running.
- COMPLETE - The process has completed.
Optional: You can manually process bucket lifecycle policies:
Process the lifecycle policy for a single bucket:
Syntax
radosgw-admin lc process --bucket=BUCKET_NAMEExample
[ceph: root@host01 /]# radosgw-admin lc process --bucket=testbucket1
Process all bucket lifecycle policies immediately:
Example
[ceph: root@host01 /]# radosgw-admin lc process
Verification
List the bucket lifecycle policies:
[ceph: root@host01 /]# radosgw-admin lc list
[
    {
          “bucket”: “:testbucket:8b63d584-9ea1-4cf3-8443-a6a15beca943.54187.1”,
          “started”: “Thu, 17 Mar 2022 21:48:50 GMT”,
          “status” : “COMPLETE”
    }
    {
          “bucket”: “:testbucket1:8b635499-9e41-4cf3-8443-a6a15345943.54187.2”,
          “started”: “Thu, 17 Mar 2022 20:38:50 GMT”,
          “status” : “COMPLETE”
    }
]
Additional Resources
- See the S3 bucket lifecycle section in the Red Hat Ceph Storage Developer Guide for details.
7.10.5. Configuring lifecycle expiration window
You can set the time that the lifecycle management process runs each day by setting the rgw_lifecycle_work_time parameter. By default, lifecycle processing occurs once per day, at midnight.
Prerequisites
- A running Red Hat Ceph Storage cluster.
- Installation of the Ceph Object Gateway.
- Root-level access to a Ceph Object Gateway node.
Procedure
Log into the Cephadm shell:
Example
[root@host01 ~]# cephadm shell
Set the lifecycle expiration time:
Syntax
ceph config set client.rgw rgw_lifecycle_work_time %D:%D-%D:%DReplace %d:%d-%d:%d with
start_hour:start_minute-end_hour:end_minute.Example
[ceph: root@host01 /]# ceph config set client.rgw rgw_lifecycle_work_time 06:00-08:00
Verification
Retrieve the lifecycle expiration work time:
Example
[ceph: root@host01 /]# ceph config get client.rgw rgw_lifecycle_work_time

06:00-08:00
Additional Resources
- See the S3 bucket lifecycle section in the Red Hat Ceph Storage Developer Guide for details.
7.10.6. S3 bucket lifecycle transition within a storage cluster
You can use a bucket lifecycle configuration to manage objects so objects are stored effectively throughout the object’s lifetime. The object lifecycle transition rule allows you to manage, and effectively store the objects throughout the object’s lifetime. You can transition objects to less expensive storage classes, archive, or even delete them.
You can create storage classes for:
- Fast media, such as SSD or NVMe for I/O sensitive workloads.
- Slow magnetic media, such as SAS or SATA for archiving.
You can create a schedule for data movement between a hot storage class and a cold storage class. You can schedule this movement after a specified time so that the object expires and is deleted permanently for example you can transition objects to a storage class 30 days after you have created or even archived the objects to a storage class one year after creating them. You can do this through a transition rule. This rule applies to an object transitioning from one storage class to another. The lifecycle configuration contains one or more rules using the <Rule> element.
Additional Resources
- See the Red Hat Ceph Storage Developer Guide for details on bucket lifecycle.
7.10.7. Transitioning an object from one storage class to another
The object lifecycle transition rule allows you to transition an object from one storage class to another class.
You can migrate data between replicated pools, erasure-coded pools, replicated to erasure-coded pools, or erasure-coded to replicated pools with the Ceph Object Gateway lifecycle transition policy.
In a multi-site configuration, when the LC transition rule is applied on the first site to transition objects from one data pool to another in the same storage cluster, then the same rule is valid for the second site, if the second site has the respective data pool created and enabled with rgw application.
Prerequisites
- Installation of the Ceph Object Gateway software.
- Root-level access to the Ceph Object Gateway node.
- An S3 user created with user access.
Procedure
Create a new data pool:
Syntax
ceph osd pool create POOL_NAMEExample
[ceph: root@host01 /]# ceph osd pool create test.hot.data
Add a new storage class:
Syntax
radosgw-admin zonegroup placement add --rgw-zonegroup default --placement-id PLACEMENT_TARGET --storage-class STORAGE_CLASS
Example
[ceph: root@host01 /]# radosgw-admin zonegroup placement add  --rgw-zonegroup default --placement-id default-placement --storage-class hot.test
{
        "key": "default-placement",
        "val": {
            "name": "default-placement",
            "tags": [],
            "storage_classes": [
                "STANDARD",
                "hot.test"
            ]
        }
    }
Provide the zone placement information for the new storage class:
Syntax
radosgw-admin zone placement add --rgw-zone default --placement-id PLACEMENT_TARGET --storage-class STORAGE_CLASS --data-pool DATA_POOL
Example
[ceph: root@host01 /]# radosgw-admin zone placement add --rgw-zone default --placement-id default-placement --storage-class hot.test --data-pool test.hot.data { "key": "default-placement", "val": { "index_pool": "test_zone.rgw.buckets.index", "storage_classes": { "STANDARD": { "data_pool": "test.hot.data" }, "hot.test": { "data_pool": "test.hot.data", } }, "data_extra_pool": "", "index_type": 0 }NoteConsider setting the
compression_typewhen creating cold or archival data storage pools with write once.Enable the
rgwapplication on the data pool:Syntax
ceph osd pool application enable POOL_NAME rgwExample
[ceph: root@host01 /]# ceph osd pool application enable test.hot.data rgw
enabled application 'rgw' on pool 'test.hot.data'
-
Restart all the
rgwdaemons. Create a bucket:
Example
[ceph: root@host01 /]# aws s3api create-bucket --bucket testbucket10 --create-bucket-configuration LocationConstraint=default:default-placement --endpoint-url http://10.0.0.80:8080
Add the object:
Example
[ceph: root@host01 /]# aws --endpoint=http://10.0.0.80:8080 s3api put-object --bucket testbucket10 --key compliance-upload --body /root/test2.txt
Create a second data pool:
Syntax
ceph osd pool create POOL_NAMEExample
[ceph: root@host01 /]# ceph osd pool create test.cold.data
Add a new storage class:
Syntax
radosgw-admin zonegroup placement add --rgw-zonegroup default --placement-id PLACEMENT_TARGET --storage-class STORAGE_CLASS
Example
[ceph: root@host01 /]# radosgw-admin zonegroup placement add  --rgw-zonegroup default --placement-id default-placement --storage-class cold.test
{
        "key": "default-placement",
        "val": {
            "name": "default-placement",
            "tags": [],
            "storage_classes": [
                "STANDARD",
                "cold.test"
            ]
        }
    }
Provide the zone placement information for the new storage class:
Syntax
radosgw-admin zone placement add --rgw-zone default --placement-id PLACEMENT_TARGET --storage-class STORAGE_CLASS --data-pool DATA_POOL
Example
[ceph: root@host01 /]# radosgw-admin zone placement add --rgw-zone default --placement-id default-placement --storage-class cold.test --data-pool test.cold.data
Enable
rgwapplication on the data pool:Syntax
ceph osd pool application enable POOL_NAME rgwExample
[ceph: root@host01 /]# ceph osd pool application enable test.cold.data rgw
enabled application 'rgw' on pool 'test.cold.data'
-
Restart all the
rgwdaemons. To view the zone group configuration, run the following command:
Syntax
radosgw-admin zonegroup get
{
    "id": "3019de59-ddde-4c5c-b532-7cdd29de09a1",
    "name": "default",
    "api_name": "default",
    "is_master": "true",
    "endpoints": [],
    "hostnames": [],
    "hostnames_s3website": [],
    "master_zone": "adacbe1b-02b4-41b8-b11d-0d505b442ed4",
    "zones": [
        {
            "id": "adacbe1b-02b4-41b8-b11d-0d505b442ed4",
            "name": "default",
            "endpoints": [],
            "log_meta": "false",
            "log_data": "false",
            "bucket_index_max_shards": 11,
            "read_only": "false",
            "tier_type": "",
            "sync_from_all": "true",
            "sync_from": [],
            "redirect_zone": ""
        }
    ],
    "placement_targets": [
        {
            "name": "default-placement",
            "tags": [],
            "storage_classes": [
                "hot.test",
                "cold.test",
                "STANDARD"
            ]
        }
    ],
    "default_placement": "default-placement",
    "realm_id": "",
    "sync_policy": {
        "groups": []
    }
}
To view the zone configuration, run the following command:
Syntax
radosgw-admin zone get
{
    "id": "adacbe1b-02b4-41b8-b11d-0d505b442ed4",
    "name": "default",
    "domain_root": "default.rgw.meta:root",
    "control_pool": "default.rgw.control",
    "gc_pool": "default.rgw.log:gc",
    "lc_pool": "default.rgw.log:lc",
    "log_pool": "default.rgw.log",
    "intent_log_pool": "default.rgw.log:intent",
    "usage_log_pool": "default.rgw.log:usage",
    "roles_pool": "default.rgw.meta:roles",
    "reshard_pool": "default.rgw.log:reshard",
    "user_keys_pool": "default.rgw.meta:users.keys",
    "user_email_pool": "default.rgw.meta:users.email",
    "user_swift_pool": "default.rgw.meta:users.swift",
    "user_uid_pool": "default.rgw.meta:users.uid",
    "otp_pool": "default.rgw.otp",
    "system_key": {
        "access_key": "",
        "secret_key": ""
    },
    "placement_pools": [
        {
            "key": "default-placement",
            "val": {
                "index_pool": "default.rgw.buckets.index",
                "storage_classes": {
                    "cold.test": {
                        "data_pool": "test.cold.data"
                    },
                    "hot.test": {
                        "data_pool": "test.hot.data"
                    },
                    "STANDARD": {
                        "data_pool": "default.rgw.buckets.data"
                    }
                },
                "data_extra_pool": "default.rgw.buckets.non-ec",
                "index_type": 0
            }
        }
    ],
    "realm_id": "",
    "notif_pool": "default.rgw.log:notif"
}
Create a bucket:
Example
[ceph: root@host01 /]# aws s3api create-bucket --bucket testbucket10 --create-bucket-configuration LocationConstraint=default:default-placement --endpoint-url http://10.0.0.80:8080
List the objects prior to transition:
Example
[ceph: root@host01 /]# radosgw-admin bucket list --bucket testbucket10

        {
            "ETag": "\"211599863395c832a3dfcba92c6a3b90\"",
            "Size": 540,
            "StorageClass": "STANDARD",
            "Key": "obj1",
            "VersionId": "W95teRsXPSJI4YWJwwSG30KxSCzSgk-",
            "IsLatest": true,
            "LastModified": "2023-11-23T10:38:07.214Z",
            "Owner": {
                "DisplayName": "test-user",
                "ID": "test-user"
            }
        }
Create a JSON file for lifecycle configuration:
Example
[ceph: root@host01 /]# vi lifecycle.json
Add the specific lifecycle configuration rule in the file:
Example
{
    "Rules": [
        {
            "Filter": {
                "Prefix": ""
            },
            "Status": "Enabled",
            "Transitions": [
                {
                    "Days": 5,
                    "StorageClass": "hot.test"
                },
 {
                    "Days": 20,
                    "StorageClass": "cold.test"
                }
            ],
            "Expiration": {
                "Days": 365
            },
            "ID": "double transition and expiration"
        }
    ]
}
The lifecycle configuration example shows an object that will transition from the default
STANDARDstorage class to thehot.teststorage class after 5 days, again transitions after 20 days to thecold.teststorage class, and finally expires after 365 days in thecold.teststorage class.Set the lifecycle configuration on the bucket:
Example
[ceph: root@host01 /]# aws s3api put-bucket-lifecycle-configuration --bucket testbucket20 --lifecycle-configuration file://lifecycle.json
Retrieve the lifecycle configuration on the bucket:
Example
[ceph: root@host01 /]# aws s3api get-bucket-lifecycle-configuration --bucket testbucket20
{
    "Rules": [
        {
            "Expiration": {
                "Days": 365
            },
            "ID": "double transition and expiration",
            "Prefix": "",
            "Status": "Enabled",
            "Transitions": [
                {
                    "Days": 20,
                    "StorageClass": "cold.test"
                },
                {
                    "Days": 5,
                    "StorageClass": "hot.test"
                }
            ]
        }
    ]
}
Verify that the object is transitioned to the given storage class:
Example
[ceph: root@host01 /]# radosgw-admin bucket list --bucket testbucket10

        {
            "ETag": "\"211599863395c832a3dfcba92c6a3b90\"",
            "Size": 540,
            "StorageClass": "cold.test",
            "Key": "obj1",
            "VersionId": "W95teRsXPSJI4YWJwwSG30KxSCzSgk-",
            "IsLatest": true,
            "LastModified": "2023-11-23T10:38:07.214Z",
            "Owner": {
                "DisplayName": "test-user",
                "ID": "test-user"
            }
        }
Additional Resources
- See the Red Hat Ceph Storage Developer Guide for details on bucket lifecycle.
7.10.8. Enabling object lock for S3
Using the S3 object lock mechanism, you can use object lock concepts like retention period, legal hold, and bucket configuration to implement Write-Once-Read_Many (WORM) functionality as part of the custom workflow overriding data deletion permissions.
The object version(s), not the object name, is the defining and required value for object lock to perform correctly to support the GOVERNANCE or COMPLIANCE mode. You need to know the version of the object when it is written so that you can retrieve it at a later time.
Prerequisites
- A running Red Hat Ceph Storage cluster with Ceph Object Gateway installed.
- Root-level access to the Ceph Object Gateway node.
- S3 user with version-bucket creation access.
Procedure
Create a bucket with object lock enabled:
Syntax
aws --endpoint=http://RGW_PORT:8080 s3api create-bucket --bucket BUCKET_NAME --object-lock-enabled-for-bucket
Example
[root@rgw-2 ~]# aws --endpoint=http://rgw.ceph.com:8080 s3api create-bucket --bucket worm-bucket --object-lock-enabled-for-bucket
Set a retention period for the bucket:
Syntax
aws --endpoint=http://RGW_PORT:8080 s3api put-object-lock-configuration --bucket BUCKET_NAME --object-lock-configuration '{ "ObjectLockEnabled": "Enabled", "Rule": { "DefaultRetention": { "Mode": "RETENTION_MODE", "Days": NUMBER_OF_DAYS }}}'
Example
[root@rgw-2 ~]# aws --endpoint=http://rgw.ceph.com:8080 s3api put-object-lock-configuration --bucket worm-bucket --object-lock-configuration '{ "ObjectLockEnabled": "Enabled", "Rule": { "DefaultRetention": { "Mode": "COMPLIANCE", "Days": 10 }}}'NoteYou can choose either the GOVERNANCE or COMPLIANCE mode for the RETENTION_MODE in S3 object lock, to apply different levels of protection to any object version that is protected by object lock.
In GOVERNANCE mode, users cannot overwrite or delete an object version or alter its lock settings unless they have special permissions.
In COMPLIANCE mode, a protected object version cannot be overwritten or deleted by any user, including the root user in your AWS account. When an object is locked in COMPLIANCE mode, its RETENTION_MODE cannot be changed, and its retention period cannot be shortened. COMPLIANCE mode helps ensure that an object version cannot be overwritten or deleted for the duration of the period.
Put the object into the bucket with a retention time set:
Syntax
aws --endpoint=http://RGW_PORT:8080 s3api put-object --bucket BUCKET_NAME --object-lock-mode RETENTION_MODE --object-lock-retain-until-date "DATE" --key compliance-upload --body TEST_FILE
Example
[root@rgw-2 ~]# aws --endpoint=http://rgw.ceph.com:8080 s3api put-object --bucket worm-bucket --object-lock-mode COMPLIANCE --object-lock-retain-until-date "2022-05-31" --key compliance-upload --body test.dd
{
    "ETag": "\"d560ea5652951637ba9c594d8e6ea8c1\"",
    "VersionId": "Nhhk5kRS6Yp6dZXVWpZZdRcpSpBKToD"
}
Upload a new object using the same key:
Syntax
aws --endpoint=http://RGW_PORT:8080 s3api put-object --bucket BUCKET_NAME --object-lock-mode RETENTION_MODE --object-lock-retain-until-date "DATE" --key compliance-upload --body PATH
Example
[root@rgw-2 ~]# aws --endpoint=http://rgw.ceph.com:8080 s3api put-object --bucket worm-bucket --object-lock-mode COMPLIANCE --object-lock-retain-until-date "2022-05-31" --key compliance-upload --body /etc/fstab { "ETag": "\"d560ea5652951637ba9c594d8e6ea8c1\"", "VersionId": "Nhhk5kRS6Yp6dZXVWpZZdRcpSpBKToD" }
Command line options
Set an object lock legal hold on an object version:
Example
[root@rgw-2 ~]# aws --endpoint=http://rgw.ceph.com:8080 s3api put-object-legal-hold --bucket worm-bucket --key compliance-upload --legal-hold Status=ON
NoteUsing the object lock legal hold operation, you can place a legal hold on an object version, thereby preventing an object version from being overwritten or deleted. A legal hold doesn’t have an associated retention period and hence, remains in effect until removed.
List the objects from the bucket to retrieve only the latest version of the object:
Example
[root@rgw-2 ~]# aws --endpoint=http://rgw.ceph.com:8080 s3api list-objects --bucket worm-bucket
List the object versions from the bucket:
Example
[root@rgw-2 ~]# aws --endpoint=http://rgw.ceph.com:8080 s3api list-objects --bucket worm-bucket { "Versions": [ { "ETag": "\"d560ea5652951637ba9c594d8e6ea8c1\"", "Size": 288, "StorageClass": "STANDARD", "Key": "hosts", "VersionId": "Nhhk5kRS6Yp6dZXVWpZZdRcpSpBKToD", "IsLatest": true, "LastModified": "2022-06-17T08:51:17.392000+00:00", "Owner": { "DisplayName": "Test User in Tenant test", "ID": "test$test.user" } } } ] }Access objects using version-ids:
Example
[root@rgw-2 ~]# aws --endpoint=http://rgw.ceph.com:8080 s3api get-object --bucket worm-bucket --key compliance-upload --version-id 'IGOU.vdIs3SPduZglrB-RBaK.sfXpcd' download.1 { "AcceptRanges": "bytes", "LastModified": "2022-06-17T08:51:17+00:00", "ContentLength": 288, "ETag": "\"d560ea5652951637ba9c594d8e6ea8c1\"", "VersionId": "Nhhk5kRS6Yp6dZXVWpZZdRcpSpBKToD", "ContentType": "binary/octet-stream", "Metadata": {}, "ObjectLockMode": "COMPLIANCE", "ObjectLockRetainUntilDate": "2023-06-17T08:51:17+00:00" }
7.11. Usage
The Ceph Object Gateway logs usage for each user. You can track user usage within date ranges too.
Options include:
-
Start Date: The
--start-dateoption allows you to filter usage stats from a particular start date (format:yyyy-mm-dd[HH:MM:SS]). -
End Date: The
--end-dateoption allows you to filter usage up to a particular date (format:yyyy-mm-dd[HH:MM:SS]). -
Log Entries: The
--show-log-entriesoption allows you to specify whether or not to include log entries with the usage stats (options:true|false).
You can specify time with minutes and seconds, but it is stored with 1 hour resolution.
7.11.1. Show usage
To show usage statistics, specify the usage show. To show usage for a particular user, you must specify a user ID. You may also specify a start date, end date, and whether or not to show log entries.
Example
[ceph: root@host01 /]# radosgw-admin usage show \
--uid=johndoe --start-date=2022-06-01 \
--end-date=2022-07-01
You may also show a summary of usage information for all users by omitting a user ID.
Example
[ceph: root@host01 /]# radosgw-admin usage show --show-log-entries=false
7.11.2. Trim usage
With heavy use, usage logs can begin to take up storage space. You can trim usage logs for all users and for specific users. You may also specify date ranges for trim operations.
Example
[ceph: root@host01 /]# radosgw-admin usage trim --start-date=2022-06-01 \
--end-date=2022-07-31
[ceph: root@host01 /]# radosgw-admin usage trim --uid=johndoe
[ceph: root@host01 /]# radosgw-admin usage trim --uid=johndoe --end-date=2021-04-31
7.12. Ceph Object Gateway data layout
Although RADOS only knows about pools and objects with their Extended Attributes (xattrs) and object map (OMAP), conceptually Ceph Object Gateway organizes its data into three different kinds:
- metadata
- bucket index
- data
Metadata
There are three sections of metadata:
-
user: Holds user information. -
bucket: Holds a mapping between bucket name and bucket instance ID. -
bucket.instance: Holds bucket instance information.
You can use the following commands to view metadata entries:
Syntax
radosgw-admin metadata get bucket:BUCKET_NAME radosgw-admin metadata get bucket.instance:BUCKET:BUCKET_ID radosgw-admin metadata get user:USER radosgw-admin metadata set user:USER
Example
[ceph: root@host01 /]# radosgw-admin metadata list [ceph: root@host01 /]# radosgw-admin metadata list bucket [ceph: root@host01 /]# radosgw-admin metadata list bucket.instance [ceph: root@host01 /]# radosgw-admin metadata list user
Every metadata entry is kept on a single RADOS object.
When using the radosgw-admin tool, ensure that the tool and the Ceph Cluster are of the same version. The use of mismatched versions is not supported.
A Ceph Object Gateway object might consist of several RADOS objects, the first of which is the head that contains the metadata, such as manifest, Access Control List (ACL), content type, ETag, and user-defined metadata. The metadata is stored in xattrs. The head might also contain up to 512 KB of object data, for efficiency and atomicity. The manifest describes how each object is laid out in RADOS objects.
Bucket index
It is a different kind of metadata, and kept separately. The bucket index holds a key-value map in RADOS objects. By default, it is a single RADOS object per bucket, but it is possible to shard the map over multiple RADOS objects.
The map itself is kept in OMAP associated with each RADOS object. The key of each OMAP is the name of the objects, and the value holds some basic metadata of that object, the metadata that appears when listing the bucket. Each OMAP holds a header, and we keep some bucket accounting metadata in that header such as number of objects, total size, and the like.
OMAP is a key-value store, associated with an object, in a way similar to how extended attributes associate with a POSIX file. An object’s OMAP is not physically located in the object’s storage, but its precise implementation is invisible and immaterial to the Ceph Object Gateway.
Data
Objects data is kept in one or more RADOS objects for each Ceph Object Gateway object.
7.12.1. Object lookup path
When accessing objects, REST APIs come to Ceph Object Gateway with three parameters:
- Account information, which has the access key in S3 or account name in Swift
- Bucket or container name
- Object name or key
At present, Ceph Object Gateway only uses account information to find out the user ID and for access control. It uses only the bucket name and object key to address the object in a pool.
Account information
The user ID in Ceph Object Gateway is a string, typically the actual user name from the user credentials and not a hashed or mapped identifier.
When accessing a user’s data, the user record is loaded from an object USER_ID in the default.rgw.meta pool with users.uid namespace.
Bucket names
They are represented in the default.rgw.meta pool with root namespace. Bucket record is loaded in order to obtain a marker, which serves as a bucket ID.
Object names
The object is located in the default.rgw.buckets.data pool. Object name is MARKER_KEY, for example default.7593.4_image.png, where the marker is default.7593.4 and the key is image.png. These concatenated names are not parsed and are passed down to RADOS only. Therefore, the choice of the separator is not important and causes no ambiguity. For the same reason, slashes are permitted in object names, such as keys.
7.12.1.1. Multiple data pools
It is possible to create multiple data pools so that different users’ buckets are created in different RADOS pools by default, thus providing the necessary scaling. The layout and naming of these pools is controlled by a policy setting.
7.12.2. Bucket and object listing
Buckets that belong to a given user are listed in an OMAP of an object named USER_ID.buckets, for example, foo.buckets, in the default.rgw.meta pool with users.uid namespace. These objects are accessed when listing buckets, when updating bucket contents, and updating and retrieving bucket statistics such as quota. These listings are kept consistent with buckets in the .rgw pool.
See the user-visible, encoded class cls_user_bucket_entry and its nested class cls_user_bucket for the values of these OMAP entries.
Objects that belong to a given bucket are listed in a bucket index. The default naming for index objects is .dir.MARKER in the default.rgw.buckets.index pool.
Additional Resources
- See the Configure bucket index resharding section in the Red Hat Ceph Storage Object Gateway Guide for more details.
7.13. Object Gateway data layout parameters
This is a list of data layout parameters for Ceph Object Gateway.
Known pools:
.rgw.root- Unspecified region, zone, and global information records, one per object.
ZONE.rgw.control- notify.N
ZONE.rgw.metaMultiple namespaces with different kinds of metadata
- namespace: root
BUCKET .bucket.meta.BUCKET:MARKER # see put_bucket_instance_info()
The tenant is used to disambiguate buckets, but not bucket instances.
Example
.bucket.meta.prodtx:test%25star:default.84099.6 .bucket.meta.testcont:default.4126.1 .bucket.meta.prodtx:testcont:default.84099.4 prodtx/testcont prodtx/test%25star testcont
- namespace: users.uid
Contains per-user information (RGWUserInfo) in
USERobjects and per-user lists of buckets in omaps ofUSER.bucketsobjects. TheUSERmight contain the tenant if non-empty.Example
prodtx$prodt test2.buckets prodtx$prodt.buckets test2
- namespace: users.email
- Unimportant
- namespace: users.keys
47UA98JSTJZ9YAN3OS3O
This allows Ceph Object Gateway to look up users by their access keys during authentication.
- namespace: users.swift
- test:tester
ZONE.rgw.buckets.index-
Objects are named
.dir.MARKER, each contains a bucket index. If the index is sharded, each shard appends the shard index after the marker. ZONE.rgw.buckets.datadefault.7593.4__shadow_.488urDFerTYXavx4yAd-Op8mxehnvTI_1 MARKER_KEY
An example of a marker would be
default.16004.1ordefault.7593.4. The current format isZONE.INSTANCE_ID.BUCKET_ID, but once generated, a marker is not parsed again, so its format might change freely in the future.
Additional Resources
- See the Ceph Object Gateway data layout section in the Red Hat Ceph Storage Object Gateway Guide for more details.
7.14. Optimize the Ceph Object Gateway’s garbage collection
When new data objects are written into the storage cluster, the Ceph Object Gateway immediately allocates the storage for these new objects. After you delete or overwrite data objects in the storage cluster, the Ceph Object Gateway deletes those objects from the bucket index. Some time afterward, the Ceph Object Gateway then purges the space that was used to store the objects in the storage cluster. The process of purging the deleted object data from the storage cluster is known as Garbage Collection, or GC.
Garbage collection operations typically run in the background. You can configure these operations to either run continuously, or to run only during intervals of low activity and light workloads. By default, the Ceph Object Gateway conducts GC operations continuously. Because GC operations are a normal part of Ceph Object Gateway operations, deleted objects that are eligible for garbage collection exist most of the time.
7.14.1. Viewing the garbage collection queue
Before you purge deleted and overwritten objects from the storage cluster, use radosgw-admin to view the objects awaiting garbage collection.
Prerequisites
- A running Red Hat Ceph Storage cluster.
- Root-level access to the Ceph Object Gateway.
Procedure
To view the queue of objects awaiting garbage collection:
Example
[ceph: root@host01 /]# radosgw-admin gc list
To list all entries in the queue, including unexpired entries, use the --include-all option.
7.14.2. Adjusting Garbage Collection Settings
The Ceph Object Gateway allocates storage for new and overwritten objects immediately. Additionally, the parts of a multi-part upload also consume some storage.
The Ceph Object Gateway purges the storage space used for deleted objects after deleting the objects from the bucket index. Similarly, the Ceph Object Gateway will delete data associated with a multi-part upload after the multi-part upload completes or when the upload has gone inactive or failed to complete for a configurable amount of time. The process of purging the deleted object data from the Red Hat Ceph Storage cluster is known as garbage collection (GC).
Viewing the objects awaiting garbage collection can be done with the following command:
radosgw-admin gc list
Garbage collection is a background activity that runs continuously or during times of low loads, depending upon how the storage administrator configures the Ceph Object Gateway. By default, the Ceph Object Gateway conducts garbage collection operations continuously. Since garbage collection operations are a normal function of the Ceph Object Gateway, especially with object delete operations, objects eligible for garbage collection exist most of the time.
Some workloads can temporarily or permanently outpace the rate of garbage collection activity. This is especially true of delete-heavy workloads, where many objects get stored for a short period of time and then deleted. For these types of workloads, storage administrators can increase the priority of garbage collection operations relative to other operations with the following configuration parameters:
-
The
rgw_gc_obj_min_waitconfiguration option waits a minimum length of time, in seconds, before purging a deleted object’s data. The default value is two hours, or 7200 seconds. The object is not purged immediately, because a client might be reading the object. Under heavy workloads, this setting can consume too much storage or have a large number of deleted objects to purge. Red Hat recommends not setting this value below 30 minutes, or 1800 seconds. -
The
rgw_gc_processor_periodconfiguration option is the garbage collection cycle run time. That is, the amount of time between the start of consecutive runs of garbage collection threads. If garbage collection runs longer than this period, the Ceph Object Gateway will not wait before running a garbage collection cycle again. -
The
rgw_gc_max_concurrent_ioconfiguration option specifies the maximum number of concurrent IO operations that the gateway garbage collection thread will use when purging deleted data. Under delete heavy workloads, consider increasing this setting to a larger number of concurrent IO operations. -
The
rgw_gc_max_trim_chunkconfiguration option specifies the maximum number of keys to remove from the garbage collector log in a single operation. Under delete heavy operations, consider increasing the maximum number of keys so that more objects are purged during each garbage collection operation.
Starting with Red Hat Ceph Storage 4.1, offloading the index object’s OMAP from the garbage collection log helps lessen the performance impact of garbage collection activities on the storage cluster. Some new configuration parameters have been added to Ceph Object Gateway to tune the garbage collection queue, as follows:
-
The
rgw_gc_max_deferred_entries_sizeconfiguration option sets the maximum size of deferred entries in the garbage collection queue. -
The
rgw_gc_max_queue_sizeconfiguration option sets the maximum queue size used for garbage collection. This value should not be greater thanosd_max_object_sizeminusrgw_gc_max_deferred_entries_sizeminus 1 KB. -
The
rgw_gc_max_deferredconfiguration option sets the maximum number of deferred entries stored in the garbage collection queue.
These garbage collection configuration parameters are for Red Hat Ceph Storage 5 and higher.
In testing, with an evenly balanced delete-write workload, such as 50% delete and 50% write operations, the storage cluster fills completely in 11 hours. This is because Ceph Object Gateway garbage collection fails to keep pace with the delete operations. The cluster status switches to the HEALTH_ERR state if this happens. Aggressive settings for parallel garbage collection tunables significantly delayed the onset of storage cluster fill in testing and can be helpful for many workloads. Typical real-world storage cluster workloads are not likely to cause a storage cluster fill primarily due to garbage collection.
7.14.3. Adjusting garbage collection for delete-heavy workloads
Some workloads may temporarily or permanently outpace the rate of garbage collection activity. This is especially true of delete-heavy workloads, where many objects get stored for a short period of time and are then deleted. For these types of workloads, consider increasing the priority of garbage collection operations relative to other operations. Contact Red Hat Support with any additional questions about Ceph Object Gateway Garbage Collection.
Prerequisites
- A running Red Hat Ceph Storage cluster.
- Root-level access to all nodes in the storage cluster.
Procedure
Set the value of
rgw_gc_max_concurrent_ioto20, and the value ofrgw_gc_max_trim_chunkto64:Example
[ceph: root@host01 /]# ceph config set client.rgw rgw_gc_max_concurrent_io 20 [ceph: root@host01 /]# ceph config set client.rgw rgw_gc_max_trim_chunk 64
- Restart the Ceph Object Gateway to allow the changed settings to take effect.
- Monitor the storage cluster during GC activity to verify that the increased values do not adversely affect performance.
Never modify the value for the rgw_gc_max_objs option in a running cluster. You should only change this value before deploying the RGW nodes.
Additional Resources
7.15. Optimize the Ceph Object Gateway’s data object storage
Bucket lifecycle configuration optimizes data object storage to increase its efficiency and to provide effective storage throughout the lifetime of the data.
The S3 API in the Ceph Object Gateway currently supports a subset of the AWS bucket lifecycle configuration actions:
- Expiration
- NoncurrentVersionExpiration
- AbortIncompleteMultipartUpload
Prerequisites
- A running Red Hat Ceph Storage cluster.
- Root-level access to all of the nodes in the storage cluster.
7.15.1. Parallel thread processing for bucket life cycles
The Ceph Object Gateway now allows for parallel thread processing of bucket life cycles across multiple Ceph Object Gateway instances. Increasing the number of threads that run in parallel enables the Ceph Object Gateway to process large workloads more efficiently. In addition, the Ceph Object Gateway now uses a numbered sequence for index shard enumeration instead of using in-order numbering.
7.15.2. Optimizing the bucket lifecycle
Two options in the Ceph configuration file affect the efficiency of bucket lifecycle processing:
-
rgw_lc_max_workerspecifies the number of lifecycle worker threads to run in parallel. This enables the simultaneous processing of both bucket and index shards. The default value for this option is 3. -
rgw_lc_max_wp_workerspecifies the number of threads in each lifecycle worker thread’s work pool. This option helps to accelerate processing for each bucket. The default value for this option is 3.
For a workload with a large number of buckets — for example, a workload with thousands of buckets — consider increasing the value of the rgw_lc_max_worker option.
For a workload with a smaller number of buckets but with a higher number of objects in each bucket — such as in the hundreds of thousands — consider increasing the value of the rgw_lc_max_wp_worker option.
Before increasing the value of either of these options, please validate current storage cluster performance and Ceph Object Gateway utilization. Red Hat does not recommend that you assign a value of 10 or above for either of these options.
Prerequisites
- A running Red Hat Ceph Storage cluster.
- Root-level access to all of the nodes in the storage cluster.
Procedure
To increase the number of threads to run in parallel, set the value of
rgw_lc_max_workerto a value between3and9:Example
[ceph: root@host01 /]# ceph config set client.rgw rgw_lc_max_worker 7
To increase the number of threads in each thread’s work pool, set the value of
rgw_lc_max_wp_workerto a value between3and9:Example
[ceph: root@host01 /]# ceph config set client.rgw rgw_lc_max_wp_worker 7
- Restart the Ceph Object Gateway to allow the changed settings to take effect.
- Monitor the storage cluster to verify that the increased values do not adversely affect performance.
Additional Resources
- For more information about the bucket lifecycle and parallel thread processing, see Bucket lifecycle parallel processing
- For more information about Ceph Object Gateway lifecycle, contact Red Hat Support.
Chapter 8. Testing
As a storage administrator, you can do basic functionality testing to verify that the Ceph Object Gateway environment is working as expected. You can use the REST interfaces by creating an initial Ceph Object Gateway user for the S3 interface, and then create a subuser for the Swift interface.
8.1. Prerequisites
- A healthy running Red Hat Ceph Storage cluster.
- Installation of the Ceph Object Gateway software.
8.2. Create an S3 user
To test the gateway, create an S3 user and grant the user access. The man radosgw-admin command provides information on additional command options.
In a multi-site deployment, always create a user on a host in the master zone of the master zone group.
Prerequisites
-
rootorsudoaccess - Ceph Object Gateway installed
Procedure
Create an S3 user:
Syntax
radosgw-admin user create --uid=name --display-name="USER_NAME"
Replace name with the name of the S3 user:
Example
[root@host01 ~]# radosgw-admin user create --uid="testuser" --display-name="Jane Doe" { "user_id": "testuser", "display_name": "Jane Doe", "email": "", "suspended": 0, "max_buckets": 1000, "auid": 0, "subusers": [], "keys": [ { "user": "testuser", "access_key": "CEP28KDIQXBKU4M15PDC", "secret_key": "MARoio8HFc8JxhEilES3dKFVj8tV3NOOYymihTLO" } ], "swift_keys": [], "caps": [], "op_mask": "read, write, delete", "default_placement": "", "placement_tags": [], "bucket_quota": { "enabled": false, "check_on_raw": false, "max_size": -1, "max_size_kb": 0, "max_objects": -1 }, "user_quota": { "enabled": false, "check_on_raw": false, "max_size": -1, "max_size_kb": 0, "max_objects": -1 }, "temp_url_keys": [], "type": "rgw" }Verify the output to ensure that the values of
access_keyandsecret_keydo not include a JSON escape character (\). These values are needed for access validation, but certain clients cannot handle if the values include JSON escape characters. To fix this problem, perform one of the following actions:- Remove the JSON escape character.
- Encapsulate the string in quotes.
- Regenerate the key and ensure that it does not include a JSON escape character.
- Specify the key and secret manually.
Do not remove the forward slash
/because it is a valid character.
8.3. Create a Swift user
To test the Swift interface, create a Swift subuser. Creating a Swift user is a two-step process. The first step is to create the user. The second step is to create the secret key.
In a multi-site deployment, always create a user on a host in the master zone of the master zone group.
Prerequisites
- Installation of the Ceph Object Gateway.
- Root-level access to the Ceph Object Gateway node.
Procedure
Create the Swift user:
Syntax
radosgw-admin subuser create --uid=NAME --subuser=NAME:swift --access=full
Replace
NAMEwith the Swift user name, for example:Example
[root@host01 ~]# radosgw-admin subuser create --uid=testuser --subuser=testuser:swift --access=full { "user_id": "testuser", "display_name": "First User", "email": "", "suspended": 0, "max_buckets": 1000, "auid": 0, "subusers": [ { "id": "testuser:swift", "permissions": "full-control" } ], "keys": [ { "user": "testuser", "access_key": "O8JDE41XMI74O185EHKD", "secret_key": "i4Au2yxG5wtr1JK01mI8kjJPM93HNAoVWOSTdJd6" } ], "swift_keys": [ { "user": "testuser:swift", "secret_key": "13TLtdEW7bCqgttQgPzxFxziu0AgabtOc6vM8DLA" } ], "caps": [], "op_mask": "read, write, delete", "default_placement": "", "placement_tags": [], "bucket_quota": { "enabled": false, "check_on_raw": false, "max_size": -1, "max_size_kb": 0, "max_objects": -1 }, "user_quota": { "enabled": false, "check_on_raw": false, "max_size": -1, "max_size_kb": 0, "max_objects": -1 }, "temp_url_keys": [], "type": "rgw" }Create the secret key:
Syntax
radosgw-admin key create --subuser=NAME:swift --key-type=swift --gen-secretReplace
NAMEwith the Swift user name, for example:Example
[root@host01 ~]# radosgw-admin key create --subuser=testuser:swift --key-type=swift --gen-secret { "user_id": "testuser", "display_name": "First User", "email": "", "suspended": 0, "max_buckets": 1000, "auid": 0, "subusers": [ { "id": "testuser:swift", "permissions": "full-control" } ], "keys": [ { "user": "testuser", "access_key": "O8JDE41XMI74O185EHKD", "secret_key": "i4Au2yxG5wtr1JK01mI8kjJPM93HNAoVWOSTdJd6" } ], "swift_keys": [ { "user": "testuser:swift", "secret_key": "a4ioT4jEP653CDcdU8p4OuhruwABBRZmyNUbnSSt" } ], "caps": [], "op_mask": "read, write, delete", "default_placement": "", "placement_tags": [], "bucket_quota": { "enabled": false, "check_on_raw": false, "max_size": -1, "max_size_kb": 0, "max_objects": -1 }, "user_quota": { "enabled": false, "check_on_raw": false, "max_size": -1, "max_size_kb": 0, "max_objects": -1 }, "temp_url_keys": [], "type": "rgw" }
8.4. Test S3 access
You need to write and run a Python test script for verifying S3 access. The S3 access test script will connect to the radosgw, create a new bucket, and list all buckets. The values for aws_access_key_id and aws_secret_access_key are taken from the values of access_key and secret_key returned by the radosgw_admin command.
Prerequisites
- A running Red Hat Ceph Storage cluster.
- Root-level access to the nodes.
Procedure
Enable the High Availability repository for Red Hat Enterprise Linux 8:
subscription-manager repos --enable=rhel-8-for-x86_64-highavailability-rpms
Install the
python3-boto3package:dnf install python3-boto3
Create the Python script:
vi s3test.py
Add the following contents to the file:
Syntax
import boto3 endpoint = "" # enter the endpoint URL along with the port "http://URL:PORT" access_key = 'ACCESS' secret_key = 'SECRET' s3 = boto3.client( 's3', endpoint_url=endpoint, aws_access_key_id=access_key, aws_secret_access_key=secret_key ) s3.create_bucket(Bucket='my-new-bucket') response = s3.list_buckets() for bucket in response['Buckets']: print("{name}\t{created}".format( name = bucket['Name'], created = bucket['CreationDate'] ))
-
Replace
endpointwith the URL of the host where you have configured the gateway service. That is, thegateway host. Ensure that thehostsetting resolves with DNS. ReplacePORTwith the port number of the gateway. -
Replace
ACCESSandSECRETwith theaccess_keyandsecret_keyvalues from the Create an S3 User section in the Red Hat Ceph Storage Object Gateway Guide.
-
Replace
Run the script:
python3 s3test.py
The output will be something like the following:
my-new-bucket 2022-05-31T17:09:10.000Z
8.5. Test Swift access
Swift access can be verified via the swift command line client. The command man swift will provide more information on available command line options.
To install the swift client, run the following command:
sudo yum install python-setuptools sudo easy_install pip sudo pip install --upgrade setuptools sudo pip install --upgrade python-swiftclient
To test swift access, run the following command:
Syntax
# swift -A http://IP_ADDRESS:PORT/auth/1.0 -U testuser:swift -K 'SWIFT_SECRET_KEY' list
Replace IP_ADDRESS with the public IP address of the gateway server and SWIFT_SECRET_KEY with its value from the output of the radosgw-admin key create command issued for the swift user. Replace PORT with the port number you are using with Beast. If you do not replace the port, it will default to port 80.
For example:
swift -A http://10.10.143.116:80/auth/1.0 -U testuser:swift -K '244+fz2gSqoHwR3lYtSbIyomyPHf3i7rgSJrF/IA' list
The output should be:
my-new-bucket
Appendix A. Configuration reference
As a storage administrator, you can set various options for the Ceph Object Gateway. These options contain default values. If you do not specify each option, then the default value is set automatically.
To set specific values for these options, update the configuration database by using the ceph config set client.rgw OPTION VALUE command.
A.1. General settings
| Name | Description | Type | Default |
|---|---|---|---|
|
| Sets the location of the data files for Ceph Object Gateway. | String |
|
|
| Enables the specified APIs. | String |
|
|
| Whether the Ceph Object Gateway cache is enabled. | Boolean |
|
|
| The number of entries in the Ceph Object Gateway cache. | Integer |
|
|
|
The socket path for the domain socket. | String | N/A |
|
| The host for the Ceph Object Gateway instance. Can be an IP address or a hostname. | String |
|
|
| Port the instance listens for requests. If not specified, Ceph Object Gateway runs external FastCGI. | String | None |
|
|
The DNS name of the served domain. See also the | String | None |
|
|
The alternative value for the | String | None |
|
|
The alternative value for the | String | None |
|
|
Enable | Boolean |
|
|
|
The remote address parameter. For example, the HTTP field containing the remote address, or the | String |
|
|
| The timeout in seconds for open threads. | Integer | 600 |
|
|
The | Integer |
|
|
| The size of the thread pool. | Integer | 512 threads. |
|
|
The number of notification objects used for cache synchronization between different | Integer |
|
|
| The number of seconds before Ceph Object Gateway gives up on initialization. | Integer |
|
|
| The path and location of the MIME types. Used for Swift auto-detection of object types. | String |
|
|
| The maximum number of objects that may be handled by garbage collection in one garbage collection processing cycle. | Integer |
|
|
| The minimum wait time before the object may be removed and handled by garbage collection processing. | Integer |
|
|
| The maximum time between the beginning of two consecutive garbage collection processing cycles. | Integer |
|
|
| The cycle time for garbage collection processing. | Integer |
|
|
|
The alternate success status response for | Integer |
|
|
|
Whether | Boolean |
|
|
| The size of an object stripe for Ceph Object Gateway objects. | Integer |
|
|
| Add a new set of attributes that could be set on an object. These extra attributes can be set through HTTP header fields when putting the objects. If set, these attributes will return as HTTP fields when doing GET/HEAD on the object. | String | None. For example: "content_foo, content_bar" |
|
| Number of seconds to wait for a process before exiting unconditionally. | Integer |
|
|
| The window size in bytes for a single object request. | Integer |
|
|
| The maximum request size of a single get operation sent to the Ceph Storage Cluster. | Integer |
|
|
| Enables relaxed S3 bucket names rules for zone group buckets. | Boolean |
|
|
| The maximum number of buckets to retrieve in a single operation when listing user buckets. | Integer |
|
|
|
The number of shards for the bucket index object. A value of
This variable should be set in the | Integer |
|
|
|
The timeout in milliseconds for certain | Integer |
|
|
| Enables output of object progress during long copy operations. | Boolean |
|
|
| The minimum bytes between copy progress output. | Integer |
|
|
| The entry point for an admin request URL. | String |
|
|
| Enable compatibility handling of FCGI requests with both CONTENT_LENGTH AND HTTP_CONTENT_LENGTH set. | Boolean |
|
|
| The default maximum number of objects per bucket. This value is set on new users if no other quota is specified. It has no effect on existing users.
This variable should be set in the | Integer |
|
|
| The amount of time in seconds cached quota information is trusted. After this timeout, the quota information will be re-fetched from the cluster. | Integer | 600 |
|
| The amount of time in seconds bucket quota information is accumulated before syncing to the cluster. During this time, other RGW instances will not see the changes in bucket quota stats from operations on this instance. | Integer | 180 |
|
| The amount of time in seconds user quota information is accumulated before syncing to the cluster. During this time, other RGW instances will not see the changes in user quota stats from operations on this instance. | Integer | 3600 * 24 |
|
| A zone parameter to determine whether or not the gateway logs the metadata operations. | Boolean |
|
|
| A zone parameter to determine whether or not the gateway logs the data operations. | Boolean |
|
|
|
A | Boolean |
|
A.2. About pools
Ceph zones map to a series of Ceph Storage Cluster pools.
Manually Created Pools vs. Generated Pools
If the user key for the Ceph Object Gateway contains write capabilities, the gateway has the ability to create pools automatically. This is convenient for getting started. However, the Ceph Object Storage Cluster uses the placement group default values unless they were set in the Ceph configuration file. Additionally, Ceph will use the default CRUSH hierarchy. These settings are NOT ideal for production systems.
The default pools for the Ceph Object Gateway’s default zone include:
-
.rgw.root -
.default.rgw.control -
.default.rgw.meta -
.default.rgw.log -
.default.rgw.buckets.index -
.default.rgw.buckets.data -
.default.rgw.buckets.non-ec
The Ceph Object Gateway creates pools on a per zone basis. If you create the pools manually, prepend the zone name. The system pools store objects related to, for example, system control, logging, and user information. By convention, these pool names have the zone name prepended to the pool name.
-
.<zone-name>.rgw.control: The control pool. -
.<zone-name>.log: The log pool contains logs of all bucket/container and object actions, such as create, read, update, and delete. -
.<zone-name>.rgw.buckets.index: This pool stores the index of the buckets. -
.<zone-name>.rgw.buckets.data: This pool stores the data of the buckets. -
.<zone-name>.rgw.meta: The metadata pool storesuser_keysand other critical metadata. -
.<zone-name>.meta:users.uid: The user ID pool contains a map of unique user IDs. -
.<zone-name>.meta:users.keys: The keys pool contains access keys and secret keys for each user ID. -
.<zone-name>.meta:users.email: The email pool contains email addresses associated with a user ID. -
.<zone-name>.meta:users.swift: The Swift pool contains the Swift subuser information for a user ID.
Ceph Object Gateways store data for the bucket index (index_pool) and bucket data (data_pool) in placement pools. These may overlap; that is, you may use the same pool for the index and the data. The index pool for default placement is {zone-name}.rgw.buckets.index and for the data pool for default placement is {zone-name}.rgw.buckets.
| Name | Description | Type | Default |
|---|---|---|---|
|
| The pool for storing all zone group-specific information. | String |
|
|
| The pool for storing zone-specific information. | String |
|
A.3. Lifecycle settings
As a storage administrator, you can set various bucket lifecycle options for a Ceph Object Gateway. These options contain default values. If you do not specify each option, then the default value is set automatically.
To set specific values for these options, update the configuration database by using the ceph config set client.rgw OPTION VALUE command.
| Name | Description | Type | Default |
|---|---|---|---|
|
| For developer use only to debug lifecycle rules by scaling expiration rules from days into an interval in seconds. Red Hat recommends that this option not be used in a production cluster. | Integer |
|
|
| The timeout value used internally by the Ceph Object Gateway. | Integer |
|
|
| Controls the sharding of the RADOS Gateway internal lifecycle work queues, and should only be set as part of a deliberate resharding workflow. Red Hat recommends not changing this setting after the setup of your cluster, without first contacting Red Hat support. | Integer |
|
|
| The number of lifecycle rules to include in one, per bucket, lifecycle configuration document. The Amazon Web Service (AWS) limit is 1000 rules. | Integer |
|
|
| The number of lifecycle worker threads to run in parallel, processing bucket and index shards simultaneously. Red Hat does not recommend setting a value larger than 10 without contacting Red Hat support. | Integer |
|
|
| The number of buckets that each lifecycle worker thread can process in parallel. Red Hat does not recommend setting a value larger than 10 without contacting Red Hat Support. | Integer |
|
|
| A delay, in milliseconds, that can be injected into shard processing at several points. The default value is 0. Setting a value from 10 to 100 ms would reduce CPU utilization on RADOS Gateway instances and reduce the proportion of workload capacity of lifecycle threads relative to ingest if saturation is being observed. | Integer |
|
A.4. Swift settings
| Name | Description | Type | Default |
|---|---|---|---|
|
| Enforces the Swift Access Control List (ACL) settings. | Boolean |
|
|
| The time in seconds for expiring a Swift token. | Integer |
|
|
| The URL for the Ceph Object Gateway Swift API. | String | None |
|
|
The URL prefix for the Swift API, for example, |
| N/A |
|
| Default URL for verifying v1 auth tokens (if not using internal Swift auth). | String | None |
|
| The entry point for a Swift auth URL. | String |
|
A.5. Logging settings
| Name | Description | Type | Default |
|---|---|---|---|
|
| Enables Ceph Object Gateway to log a request for a non-existent bucket. | Boolean |
|
|
| The logging format for an object name. See manpage date for details about format specifiers. | Date |
|
|
|
Whether a logged object name includes a UTC time. If | Boolean |
|
|
| The maximum number of shards for usage logging. | Integer |
|
|
| The maximum number of shards used for a single user’s usage logging. | Integer |
|
|
| Enable logging for each successful Ceph Object Gateway operation. | Boolean |
|
|
| Enable the usage log. | Boolean |
|
|
| Whether the operations log should be written to the Ceph Storage Cluster backend. | Boolean |
|
|
| The Unix domain socket for writing operations logs. | String | None |
|
| The maximum data backlog data size for operations logs written to a Unix domain socket. | Integer |
|
|
| The number of dirty merged entries in the usage log before flushing synchronously. | Integer | 1024 |
|
|
Flush pending usage log data every | Integer |
|
|
| The logging format for the intent log object name. See manpage date for details about format specifiers. | Date |
|
|
|
Whether the intent log object name includes a UTC time. If | Boolean |
|
|
| The data log entries window in seconds. | Integer |
|
|
| The number of in-memory entries to hold for the data changes log. | Integer |
|
|
| The number of shards (objects) on which to keep the data changes log. | Integer |
|
|
| The object name prefix for the data log. | String |
|
|
| The object name prefix for the replica log. | String |
|
|
| The maximum number of shards for the metadata log. | Integer |
|
|
| Comma-delimited list of HTTP headers to include with ops log entries. Header names are case insensitive, and use the full header name with words separated by underscores. | String | None |
A.6. Keystone settings
| Name | Description | Type | Default |
|---|---|---|---|
|
| The URL for the Keystone server. | String | None |
|
| The Keystone admin token (shared secret). | String | None |
|
| The roles required to serve requests. | String |
|
|
| The maximum number of entries in each Keystone token cache. | Integer |
|
|
| The number of seconds between token revocation checks. | Integer |
|
A.7. LDAP settings
| Name | Description | Type | Example |
|---|---|---|---|
|
| A space-separated list of LDAP servers in URI format. | String |
|
|
| The LDAP search domain name, also known as base domain. | String |
|
|
| The gateway will bind with this LDAP entry (user match). | String |
|
|
|
A file containing credentials for | String |
|
|
| LDAP attribute containing Ceph object gateway user names (to form binddns). | String |
|