
Configuration Guide
Configuration settings for Red Hat Ceph Storage
Abstract
Chapter 1. The basics of Ceph configuration
As a storage administrator, you need to have a basic understanding of how to view the Ceph configuration, and how to set the Ceph configuration options for the Red Hat Ceph Storage cluster. You can view and set the Ceph configuration options at runtime.
1.1. Prerequisites
- Installation of the Red Hat Ceph Storage software.
1.2. Ceph configuration
All Red Hat Ceph Storage clusters have a configuration, which defines:
- Cluster Identity
- Authentication settings
- Ceph daemons
- Network configuration
- Node names and addresses
- Paths to keyrings
- Paths to OSD log files
- Other runtime options
A deployment tool, such as cephadm, will typically create an initial Ceph configuration file for you. However, you can create one yourself if you prefer to bootstrap a Red Hat Ceph Storage cluster without using a deployment tool.
Additional Resources
-
For more information about
cephadmand the Ceph orchestrator, see the Red Hat Ceph Storage Operations Guide.
1.3. The Ceph configuration database
The Ceph Monitor manages a configuration database of Ceph options that centralize configuration management by storing configuration options for the entire storage cluster. By centralizing the Ceph configuration in a database, this simplifies storage cluster administration.
The priority order that Ceph uses to set options is:
- Compiled-in default values
- Ceph cluster configuration database
-
Local
ceph.conffile -
Runtime override, using the
ceph daemon DAEMON-NAME config setorceph tell DAEMON-NAME injectargscommands
There are still a few Ceph options that can be defined in the local Ceph configuration file, which is /etc/ceph/ceph.conf by default. However, ceph.conf has been deprecated for Red Hat Ceph Storage 5.
cephadm uses a basic ceph.conf file that only contains a minimal set of options for connecting to Ceph Monitors, authenticating, and fetching configuration information. In most cases, cephadm uses only the mon_host option. To avoid using ceph.conf only for the mon_host option, use DNS SRV records to perform operations with Monitors.
Red Hat recommends that you use the assimilate-conf administrative command to move valid options into the configuration database from the ceph.conf file. For more information about assimilate-conf, see Administrative Commands.
Ceph allows you to make changes to the configuration of a daemon at runtime. This capability can be useful for increasing or decreasing the logging output, by enabling or disabling debug settings, and can even be used for runtime optimization.
When the same option exists in the configuration database and the Ceph configuration file, the configuration database option has a lower priority than what is set in the Ceph configuration file.
Sections and Masks
Just as you can configure Ceph options globally, per daemon type, or by a specific daemon in the Ceph configuration file, you can also configure the Ceph options in the configuration database according to these sections:
| Section | Description |
|---|---|
|
| Affects all daemons and clients. |
|
| Affects all Ceph Monitors. |
|
| Affects all Ceph Managers. |
|
| Affects all Ceph OSDs. |
|
| Affects all Ceph Metadata Servers. |
|
| Affects all Ceph Clients, including mounted file systems, block devices, and RADOS Gateways. |
Ceph configuration options can have a mask associated with them. These masks can further restrict which daemons or clients the options apply to.
Masks have two forms:
type:locationThe
typeis a CRUSH property, for example,rackorhost. Thelocationis a value for the property type. For example,host:foolimits the option only to daemons or clients running on thefoohost.Example
ceph config set osd/host:magna045 debug_osd 20
class:device-classThe
device-classis the name of the CRUSH device class, such ashddorssd. For example,class:ssdlimits the option only to Ceph OSDs backed by solid state drives (SSD). This mask has no effect on non-OSD daemons of clients.Example
ceph config set osd/class:hdd osd_max_backfills 8
Administrative Commands
The Ceph configuration database can be administered with the subcommand ceph config ACTION. These are the actions you can do:
ls- Lists the available configuration options.
dump- Dumps the entire configuration database of options for the storage cluster.
get WHO-
Dumps the configuration for a specific daemon or client. For example, WHO can be a daemon, like
mds.a. set WHO OPTION VALUE- Sets a configuration option in the Ceph configuration database, where WHO is the target daemon, OPTION is the option to set, and VALUE is the desired value.
show WHO- Shows the reported running configuration for a running daemon. These options might be different from those stored by the Ceph Monitors if there is a local configuration file in use or options have been overridden on the command line or at run time. Also, the source of the option values is reported as part of the output.
assimilate-conf -i INPUT_FILE -o OUTPUT_FILE- Assimilate a configuration file from the INPUT_FILE and move any valid options into the Ceph Monitors’ configuration database. Any options that are unrecognized, invalid, or cannot be controlled by the Ceph Monitor return in an abbreviated configuration file stored in the OUTPUT_FILE. This command can be useful for transitioning from legacy configuration files to a centralized configuration database. Note that when you assimilate a configuration and the Monitors or other daemons have different configuration values set for the same set of options, the end result depends on the order in which the files are assimilated.
help OPTION -f json-pretty- Displays help for a particular OPTION using a JSON-formatted output.
Additional Resources
- For more information about the command, see Setting a specific configuration at runtime.
1.4. Using the Ceph metavariables
Metavariables simplify Ceph storage cluster configuration dramatically. When a metavariable is set in a configuration value, Ceph expands the metavariable into a concrete value.
Metavariables are very powerful when used within the [global], [osd], [mon], or [client] sections of the Ceph configuration file. However, you can also use them with the administration socket. Ceph metavariables are similar to Bash shell expansion.
Ceph supports the following metavariables:
$cluster- Description
- Expands to the Ceph storage cluster name. Useful when running multiple Ceph storage clusters on the same hardware.
- Example
-
/etc/ceph/$cluster.keyring - Default
-
ceph
$type- Description
-
Expands to one of
osdormon, depending on the type of the instant daemon. - Example
-
/var/lib/ceph/$type
$id- Description
-
Expands to the daemon identifier. For
osd.0, this would be0. - Example
-
/var/lib/ceph/$type/$cluster-$id
$host- Description
- Expands to the host name of the instant daemon.
$name- Description
-
Expands to
$type.$id. - Example
-
/var/run/ceph/$cluster-$name.asok
1.5. Viewing the Ceph configuration at runtime
The Ceph configuration files can be viewed at boot time and run time.
Prerequisites
- Root-level access to the Ceph node.
- Access to admin keyring.
Procedure
To view a runtime configuration, log in to a Ceph node running the daemon and execute:
Syntax
ceph daemon DAEMON_TYPE.ID config show
To see the configuration for
osd.0, you can log into the node containingosd.0and execute this command:Example
[root@osd ~]# ceph daemon osd.0 config show
For additional options, specify a daemon and
help.Example
[root@osd ~]# ceph daemon osd.0 help
1.6. Viewing a specific configuration at runtime
Configuration settings for Red Hat Ceph Storage can be viewed at runtime from the Ceph Monitor node.
Prerequisites
- A running Red Hat Ceph Storage cluster.
- Root-level access to the Ceph Monitor node.
Procedure
Log into a Ceph node and execute:
Syntax
ceph daemon DAEMON_TYPE.ID config get PARAMETER
Example
[root@mon ~]# ceph daemon osd.0 config get public_addr
1.7. Setting a specific configuration at runtime
To set a specific Ceph configuration at runtime, use the ceph config set command.
Prerequisites
- A running Red Hat Ceph Storage cluster.
- Root-level access to the Ceph Monitor or OSD nodes.
Procedure
Set the configuration on all Monitor or OSD daemons :
Syntax
ceph config set DAEMON CONFIG-OPTION VALUE
Example
[root@mon ~]# ceph config set osd debug_osd 10
Validate that the option and value are set:
Example
[root@mon ~]# ceph config dump
osd      advanced debug_osd  10/10
To remove the configuration option from all daemons:
Syntax
ceph config rm DAEMON CONFIG-OPTION VALUE
Example
[root@mon ~]# ceph config rm osd debug_osd
To set the configuration for a specific daemon:
Syntax
ceph config set DAEMON.DAEMON-NUMBER CONFIG-OPTION VALUE
Example
[root@mon ~]# ceph config set osd.0 debug_osd 10
To validate that the configuration is set for the specified daemon:
Example
[root@mon ~]# ceph config dump
osd.0      advanced debug_osd     10/10
To remove the configuration for a specific daemon:
Syntax
ceph config rm DAEMON.DAEMON-NUMBER CONFIG-OPTION
Example
[root@mon ~]# ceph config rm osd.0 debug_osd
If you use a client that does not support reading options from the configuration database, or if you still need to use ceph.conf to change your cluster configuration for other reasons, run the following command:
ceph config set mgr mgr/cephadm/manage_etc_ceph_ceph_conf false
You must maintain and distribute the ceph.conf file across the storage cluster.
1.8. OSD Memory Target
BlueStore keeps OSD heap memory usage under a designated target size with the osd_memory_target configuration option.
The option osd_memory_target sets OSD memory based upon the available RAM in the system. Use this option when TCMalloc is configured as the memory allocator, and when the bluestore_cache_autotune option in BlueStore is set to true.
Ceph OSD memory caching is more important when the block device is slow; for example, traditional hard drives, because the benefit of a cache hit is much higher than it would be with a solid state drive. However, this must be weighed into a decision to colocate OSDs with other services, such as in a hyper-converged infrastructure (HCI) or other applications.
1.8.1. Setting the OSD memory target
Use the osd_memory_target option to set the maximum memory threshold for all OSDs in the storage cluster, or for specific OSDs. An OSD with an osd_memory_target option set to 16 GB might use up to 16 GB of memory.
Configuration options for individual OSDs take precedence over the settings for all OSDs.
Prerequisites
- A running Red Hat Ceph Storage cluster.
- Root-level access to all hosts in the storage cluster.
Procedure
To set
osd_memory_targetfor all OSDs in the storage cluster:Syntax
ceph config set osd osd_memory_target VALUEVALUE is the number of GBytes of memory to be allocated to each OSD in the storage cluster.
To set
osd_memory_targetfor a specific OSD in the storage cluster:Syntax
ceph config set osd.id osd_memory_target VALUE.idis the ID of the OSD and VALUE is the number of GB of memory to be allocated to the specified OSD. For example, to configure the OSD with ID 8 to use up to 16 GBytes of memory:Example
[ceph: root@host01 /]# ceph config set osd.8 osd_memory_target 16G
To set an individual OSD to use one maximum amount of memory and configure the rest of the OSDs to use another amount, specify the individual OSD first:
Example
[ceph: root@host01 /]# ceph config set osd osd_memory_target 16G
[ceph: root@host01 /]# ceph config set osd.8 osd_memory_target 8G
Additional resources
- To configure Red Hat Ceph Storage to autotune OSD memory usage, see Automatically tuning OSD memory in the Operations Guide.
1.9. Automatically tuning OSD memory
The OSD daemons adjust the memory consumption based on the osd_memory_target configuration option. The option osd_memory_target sets OSD memory based upon the available RAM in the system.
If Red Hat Ceph Storage is deployed on dedicated nodes that do not share memory with other services, cephadm automatically adjusts the per-OSD consumption based on the total amount of RAM and the number of deployed OSDs.
By default, the osd_memory_target_autotune parameter is set to true in Red Hat Ceph Storage 5.1.
Syntax
ceph config set osd osd_memory_target_autotune true
Once the storage cluster is upgraded to Red Hat Ceph Storage 5.0, for cluster maintenance such as addition of OSDs or replacement of OSDs, Red Hat recommends setting osd_memory_target_autotune parameter to true to autotune osd memory as per system memory.
Cephadm starts with a fraction mgr/cephadm/autotune_memory_target_ratio, which defaults to 0.7 of the total RAM in the system, subtract off any memory consumed by non-autotuned daemons such as non-OSDS and for OSDs for which osd_memory_target_autotune is false, and then divide by the remaining OSDs.
By default, autotune_memory_target_ratio is 0.2 for hyper-converged infrastructure and 0.7 for other environments.
The osd_memory_target parameter is calculated as follows:
Syntax
osd_memory_target = TOTAL_RAM_OF_THE_OSD_NODE (in Bytes) * (autotune_memory_target_ratio) / NUMBER_OF_OSDS_IN_THE_OSD_NODE - (SPACE_ALLOCATED_FOR_OTHER_DAEMONS (in Bytes))
SPACE_ALLOCATED_FOR_OTHER_DAEMONS may optionally include the following daemon space allocations:
- Alertmanager: 1 GB
- Grafana: 1 GB
- Ceph Manager: 4 GB
- Ceph Monitor: 2 GB
- Node-exporter: 1 GB
- Prometheus: 1 GB
For example, if a node has 24 OSDs and has 251 GB RAM space, then osd_memory_target is 7860684936.
The final targets are reflected in the configuration database with options. You can view the limits and the current memory consumed by each daemon from the ceph orch ps output under MEM LIMIT column.
In Red Hat Ceph Storage 5.1, the default setting of osd_memory_target_autotune true is unsuitable for hyperconverged infrastructures where compute and Ceph storage services are colocated. In a hyperconverged infrastructure, the autotune_memory_target_ratio can be set to 0.2 to reduce the memory consumption of Ceph.
Example
[ceph: root@host01 /]# ceph config set mgr mgr/cephadm/autotune_memory_target_ratio 0.2
You can manually set a specific memory target for an OSD in the storage cluster.
Example
[ceph: root@host01 /]# ceph config set osd.123 osd_memory_target 7860684936
You can manually set a specific memory target for an OSD host in the storage cluster.
Syntax
ceph config set osd/host:HOSTNAME osd_memory_target TARGET_BYTES
Example
[ceph: root@host01 /]# ceph config set osd/host:host01 osd_memory_target 1000000000
Enabling osd_memory_target_autotune overwrites existing manual OSD memory target settings. To prevent daemon memory from being tuned even when the osd_memory_target_autotune option or other similar options are enabled, set the _no_autotune_memory label on the host.
Syntax
ceph orch host label add HOSTNAME _no_autotune_memory
You can exclude an OSD from memory autotuning by disabling the autotune option and setting a specific memory target.
Example
[ceph: root@host01 /]# ceph config set osd.123 osd_memory_target_autotune false
[ceph: root@host01 /]# ceph config set osd.123 osd_memory_target 16G
1.10. MDS Memory Cache Limit
MDS servers keep their metadata in a separate storage pool, named cephfs_metadata, and are the users of Ceph OSDs. For Ceph File Systems, MDS servers have to support an entire Red Hat Ceph Storage cluster, not just a single storage device within the storage cluster, so their memory requirements can be significant, particularly if the workload consists of small-to-medium-size files, where the ratio of metadata to data is much higher.
Example: Set the mds_cache_memory_limit to 2000000000 bytes
ceph_conf_overrides:
  osd:
mds_cache_memory_limit=2000000000For a large Red Hat Ceph Storage cluster with a metadata-intensive workload, do not put an MDS server on the same node as other memory-intensive services, doing so gives you the option to allocate more memory to MDS, for example, sizes greater than 100 GB.
Additional Resources
- See Metadata Server cache size limits in Red Hat Ceph Storage File System Guide.
1.11. Additional Resources
- See the general Ceph configuration options in Appendix A for specific option descriptions and usage.
Chapter 2. Ceph network configuration
As a storage administrator, you must understand the network environment that the Red Hat Ceph Storage cluster will operate in, and configure the Red Hat Ceph Storage accordingly. Understanding and configuring the Ceph network options will ensure optimal performance and reliability of the overall storage cluster.
2.1. Prerequisites
- Network connectivity.
- Installation of the Red Hat Ceph Storage software.
2.2. Network configuration for Ceph
Network configuration is critical for building a high performance Red Hat Ceph Storage cluster. The Ceph storage cluster does not perform request routing or dispatching on behalf of the Ceph client. Instead, Ceph clients make requests directly to Ceph OSD daemons. Ceph OSDs perform data replication on behalf of Ceph clients, which means replication and other factors impose additional loads on the networks of Ceph storage clusters.
Ceph has one network configuration requirement that applies to all daemons. The Ceph configuration file must specify the host for each daemon.
Some deployment utilities, such as cephadm creates a configuration file for you. Do not set these values if the deployment utility does it for you.
The host option is the short name of the node, not its FQDN. It is not an IP address.
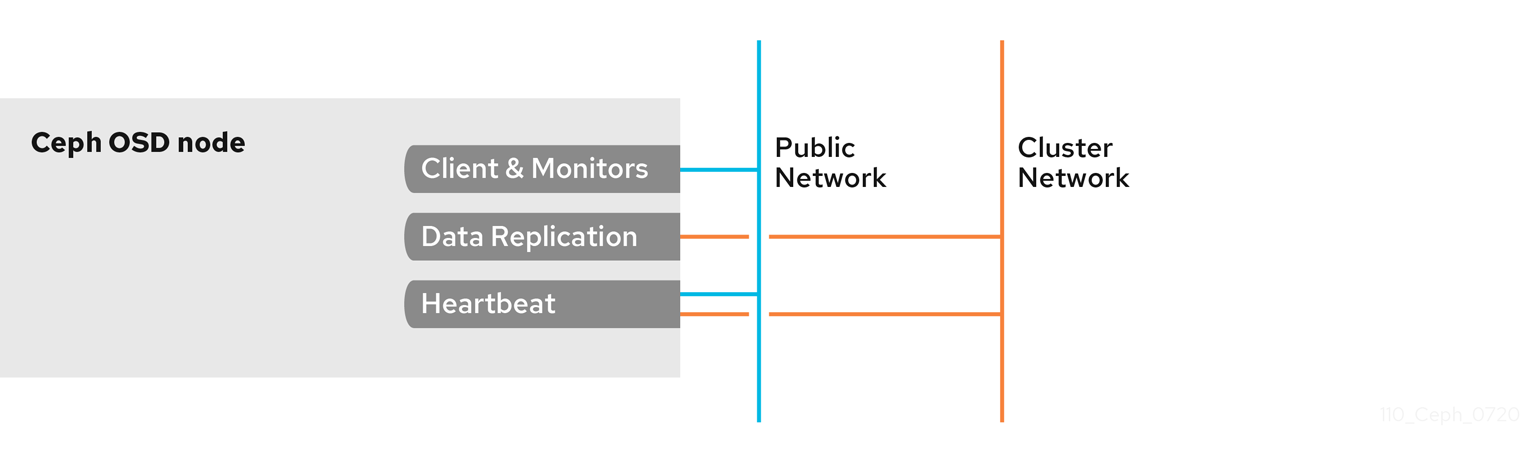
All Ceph clusters must use a public network. However, unless you specify an internal cluster network, Ceph assumes a single public network. Ceph can function with a public network only, but for large storage clusters, you will see significant performance improvement with a second private network for carrying only cluster-related traffic.
Red Hat recommends running a Ceph storage cluster with two networks. One public network and one private network.
To support two networks, each Ceph Node will need to have more than one network interface card (NIC).

There are several reasons to consider operating two separate networks:
- Performance: Ceph OSDs handle data replication for the Ceph clients. When Ceph OSDs replicate data more than once, the network load between Ceph OSDs easily dwarfs the network load between Ceph clients and the Ceph storage cluster. This can introduce latency and create a performance problem. Recovery and rebalancing can also introduce significant latency on the public network.
-
Security: While most people are generally civil, some actors will engage in what is known as a Denial of Service (DoS) attack. When traffic between Ceph OSDs gets disrupted, peering may fail and placement groups may no longer reflect an
active + cleanstate, which may prevent users from reading and writing data. A great way to defeat this type of attack is to maintain a completely separate cluster network that does not connect directly to the internet.
Network configuration settings are not required. Ceph can function with a public network only, assuming a public network is configured on all hosts running a Ceph daemon. However, Ceph allows you to establish much more specific criteria, including multiple IP networks and subnet masks for your public network. You can also establish a separate cluster network to handle OSD heartbeat, object replication, and recovery traffic.
Do not confuse the IP addresses you set in the configuration with the public-facing IP addresses network clients might use to access your service. Typical internal IP networks are often 192.168.0.0 or 10.0.0.0.
Ceph uses CIDR notation for subnets, for example, 10.0.0.0/24.
If you specify more than one IP address and subnet mask for either the public or the private network, the subnets within the network must be capable of routing to each other. Additionally, make sure you include each IP address and subnet in your IP tables and open ports for them as necessary.
When you configured the networks, you can restart the cluster or restart each daemon. Ceph daemons bind dynamically, so you do not have to restart the entire cluster at once if you change the network configuration.
Additional Resources
- See the common options in Red Hat Ceph Storage Configuration Guide, Appendix B for specific option descriptions and usage.
2.3. Ceph network messenger
Messenger is the Ceph network layer implementation. Red Hat supports two messenger types:
-
simple -
async
In Red Hat Ceph Storage 4 and higher, async is the default messenger type. To change the messenger type, specify the ms_type configuration setting in the [global] section of the Ceph configuration file.
For the async messenger, Red Hat supports the posix transport type, but does not currently support rdma or dpdk. By default, the ms_type setting in Red Hat Ceph Storage 4 or higher reflects async+posix, where async is the messenger type and posix is the transport type.
SimpleMessenger
The SimpleMessenger implementation uses TCP sockets with two threads per socket. Ceph associates each logical session with a connection. A pipe handles the connection, including the input and output of each message. While SimpleMessenger is effective for the posix transport type, it is not effective for other transport types such as rdma or dpdk.
AsyncMessenger
Consequently, AsyncMessenger is the default messenger type for Red Hat Ceph Storage 4 or higher. For Red Hat Ceph Storage 4 or higher, the AsyncMessenger implementation uses TCP sockets with a fixed-size thread pool for connections, which should be equal to the highest number of replicas or erasure-code chunks. The thread count can be set to a lower value if performance degrades due to a low CPU count or a high number of OSDs per server.
Red Hat does not support other transport types such as rdma or dpdk at this time.
Additional Resources
- See the AsyncMessenger options in Red Hat Ceph Storage Configuration Guide, Appendix B for specific option descriptions and usage.
- See the Red Hat Ceph Storage Architecture Guide for details about using on-wire encryption with the Ceph messenger version 2 protocol.
2.4. Configuring a public network
To configure Ceph networks, use the config set command within the cephadm shell. Note that the IP addresses you set in your network configuration are different from the public-facing IP addresses that network clients might use to access your service.
Ceph functions perfectly well with only a public network. However, Ceph allows you to establish much more specific criteria, including multiple IP networks for your public network.
You can also establish a separate, private cluster network to handle OSD heartbeat, object replication, and recovery traffic. For more information about the private network, see Configuring a private network.
Ceph uses CIDR notation for subnets, for example, 10.0.0.0/24. Typical internal IP networks are often 192.168.0.0/24 or 10.0.0.0/24.
If you specify more than one IP address for either the public or the cluster network, the subnets within the network must be capable of routing to each other. In addition, make sure you include each IP address in your IP tables, and open ports for them as necessary.
The public network configuration allows you specifically define IP addresses and subnets for the public network.
Prerequisites
- Installation of the Red Hat Ceph Storage software.
Procedure
Log in to the
cephadmshell:Example
[root@host01 ~]# cephadm shell
Configure the public network with the subnet:
Syntax
ceph config set mon public_network IP_ADDRESS_WITH_SUBNETExample
[ceph: root@host01 /]# ceph config set mon public_network 192.168.0.0/24
Get the list of services in the storage cluster:
Example
[ceph: root@host01 /]# ceph orch ls
Restart the daemons. Ceph daemons bind dynamically, so you do not have to restart the entire cluster at once if you change the network configuration for a specific daemon.
Example
[ceph: root@host01 /]# ceph orch restart mon
Optional: If you want to restart the cluster, on the admin node as a root user, run
systemctlcommand:Syntax
systemctl restart ceph-FSID_OF_CLUSTER.targetExample
[root@host01 ~]# systemctl restart ceph-1ca9f6a8-d036-11ec-8263-fa163ee967ad.target
Additional Resources
- See the common options in Red Hat Ceph Storage Configuration Guide, Appendix B for specific option descriptions and usage.
2.5. Configuring multiple public networks to the cluster
When the user wants to place the Ceph Monitor daemons on hosts belonging to multiple network subnets, configuring multiple public networks to the cluster is necessary. An example of usage is a stretch cluster mode used for Advanced Cluster Management (ACM) in Metro DR for OpenShift Data Foundation.
You can configure multiple public networks to the cluster during bootstrap and once bootstrap is complete.
Prerequisites
- Before adding a host be sure that you have a running Red Hat Ceph Storage cluster.
Procedure
Bootstrap a Ceph cluster configured with multiple public networks.
Prepare a
ceph.conffile containing amonpublic network section:ImportantAt least one of the provided public networks must be configured on the current host used for bootstrap.
Syntax
[mon]
public_network = PUBLIC_NETWORK1, PUBLIC_NETWORK2
Example
[mon]
public_network = 10.40.0.0/24, 10.41.0.0/24, 10.42.0.0/24
This is an example with three public networks to be provided for bootstrap.
Bootstrap the cluster by providing the
ceph.conffile as input:NoteDuring the bootstrap you can include any other arguments that you want to provide.
Syntax
cephadm --image IMAGE_URL bootstrap --mon-ip MONITOR_IP -c PATH_TO_CEPH_CONF
NoteAlternatively, an
IMAGE_ID(such as,13ea90216d0be03003d12d7869f72ad9de5cec9e54a27fd308e01e467c0d4a0a) can be used instead ofIMAGE_URL.Example
[root@host01 ~]# cephadm –image cp.icr.io/cp/ibm-ceph/ceph-5-rhel8:latest bootstrap –mon-ip 10.40.0.0/24 -c /etc/ceph/ceph.conf
Add new hosts to the subnets:
NoteThe host being added must be reachable from the host that the active manager is running on.
Install the cluster’s public SSH key in the new host’s root user’s
authorized_keysfile:Syntax
ssh-copy-id -f -i /etc/ceph/ceph.pub root@NEW_HOSTExample
[root@host01 ~]# ssh-copy-id -f -i /etc/ceph/ceph.pub root@host02
[root@host01 ~]# ssh-copy-id -f -i /etc/ceph/ceph.pub root@host03
Log into
cephadmshell:Example
[root@host01 ~]# cephadm shell
Add the new host to the Ceph cluster:
Syntax
ceph orch host add NEW_HOST IP [LABEL1 ...]
Example
[root@host01 ~]# ceph orch host add host02 10.10.0.102 label1
[root@host01 ~]# ceph orch host add host03 10.10.0.103 label2
Note- It is best to explicitly provide the host IP address. If an IP is not provided, then the host name is immediately resolved via DNS and that IP is used.
-
One or more labels can also be included to immediately label the new host. For example, by default the
_adminlabel makes cephadm maintain a copy of theceph.conffile and aclient.adminkeyring file in/etc/cephdirectory.
Add the networks configurations for the public network parameters to a running cluster. Be sure that the subnets are separated by commas and that the subnets are listed in subnet/mask format.
Syntax
ceph config set mon public_network "SUBNET_1,SUBNET_2, ..."
Example
[root@host01 ~]# ceph config set mon public_network "192.168.0.0/24, 10.42.0.0/24, ..."
If necessary, update the
monspecifications to place themondaemons on hosts within the specified subnets.
Additional Resources
- See Adding hosts for more details about adding hosts in the Red Hat Ceph Storage Installation Guide.
- See Stretch clusters for Ceph storage for more details about stretch clusters in the Red Hat Ceph Storage Administration Guide.
2.6. Configuring a private network
Network configuration settings are not required. Ceph assumes a public network with all hosts operating on it, unless you specifically configure a cluster network, also known as a private network.
If you create a cluster network, OSDs routes heartbeat, object replication, and recovery traffic over the cluster network. This can improve performance, compared to using a single network.
For added security, the cluster network should not be reachable from the public network or the Internet.
To assign a cluster network, use the --cluster-network option with the cephadm bootstrap command. The cluster network that you specify must define a subnet in CIDR notation (for example, 10.90.90.0/24 or fe80::/64).
You can also configure the cluster_network after boostrap.
Prerequisites
- Access to the Ceph software repository.
- Root-level access to all nodes in the storage cluster.
Procedure
Run the
cephadm bootstrap commandfrom the initial node that you want to use as the Monitor node in the storage cluster. Include the--cluster-networkoption in the command.Syntax
cephadm bootstrap --mon-ip IP-ADDRESS --registry-url registry.redhat.io --registry-username USER_NAME --registry-password PASSWORD --cluster-network NETWORK-IP-ADDRESS
Example
[root@host01 ~]# cephadm bootstrap --mon-ip 10.10.128.68 --registry-url registry.redhat.io --registry-username myuser1 --registry-password mypassword1 --cluster-network 10.10.0.0/24
To configure the
cluster_networkafter bootstrap, run theconfig setcommand and redeploy the daemons:Log in to the
cephadmshell:Example
[root@host01 ~]# cephadm shell
Configure the cluster network with the subnet:
Syntax
ceph config set global cluster_network IP_ADDRESS_WITH_SUBNETExample
[ceph: root@host01 /]# ceph config set global cluster_network 10.10.0.0/24
Get the list of services in the storage cluster:
Example
[ceph: root@host01 /]# ceph orch ls
Restart the daemons. Ceph daemons bind dynamically, so you do not have to restart the entire cluster at once if you change the network configuration for a specific daemon.
Example
[ceph: root@host01 /]# ceph orch restart mon
Optional: If you want to restart the cluster, on the admin node as a root user, run
systemctlcommand:Syntax
systemctl restart ceph-FSID_OF_CLUSTER.targetExample
[root@host01 ~]# systemctl restart ceph-1ca9f6a8-d036-11ec-8263-fa163ee967ad.target
Additional Resources
-
For more information about invoking
cephadm bootstrap, see the Bootstrapping a new storage cluster section in the Red Hat Ceph Storage Installation Guide.
2.7. Verifying firewall rules are configured for default Ceph ports
By default, Red Hat Ceph Storage daemons use TCP ports 6800—7100 to communicate with other hosts in the cluster. You can verify that the host’s firewall allows connection on these ports.
If your network has a dedicated firewall, you might need to verify its configuration in addition to following this procedure. See the firewall’s documentation for more information.
See the firewall’s documentation for more information.
Prerequisites
- Root-level access to the host.
Procedure
Verify the host’s
iptablesconfiguration:List active rules:
[root@host1 ~]# iptables -L
Verify the absence of rules that restrict connectivity on TCP ports 6800—7100.
Example
REJECT all -- anywhere anywhere reject-with icmp-host-prohibited
Verify the host’s
firewalldconfiguration:List ports open on the host:
Syntax
firewall-cmd --zone ZONE --list-portsExample
[root@host1 ~]# firewall-cmd --zone default --list-ports
- Verify the range is inclusive of TCP ports 6800—7100.
2.8. Firewall settings for Ceph Monitor node
You can enable encryption for all Ceph traffic over the network with the introduction of the messenger version 2 protocol. The secure mode setting for messenger v2 encrypts communication between Ceph daemons and Ceph clients, giving you end-to-end encryption.
Messenger v2 Protocol
The second version of Ceph’s on-wire protocol, msgr2, includes several new features:
- A secure mode encrypts all data moving through the network.
- Encapsulation improvement of authentication payloads.
- Improvements to feature advertisement and negotiation.
The Ceph daemons bind to multiple ports allowing both the legacy, v1-compatible, and the new, v2-compatible, Ceph clients to connect to the same storage cluster. Ceph clients or other Ceph daemons connecting to the Ceph Monitor daemon will try to use the v2 protocol first, if possible, but if not, then the legacy v1 protocol will be used. By default, both messenger protocols, v1 and v2, are enabled. The new v2 port is 3300, and the legacy v1 port is 6789, by default.
Prerequisites
- A running Red Hat Ceph Storage cluster.
- Access to the Ceph software repository.
- Root-level access to the Ceph Monitor node.
Procedure
Add rules using the following example:
[root@mon ~]# sudo iptables -A INPUT -i IFACE -p tcp -s IP-ADDRESS/NETMASK --dport 6789 -j ACCEPT
[root@mon ~]# sudo iptables -A INPUT -i IFACE -p tcp -s IP-ADDRESS/NETMASK --dport 3300 -j ACCEPT
-
Replace
IFACEwith the public network interface (for example,eth0,eth1, and so on). -
Replace
IP-ADDRESSwith the IP address of the public network andNETMASKwith the netmask for the public network.
-
Replace
For the
firewallddaemon, execute the following commands:[root@mon ~]# firewall-cmd --zone=public --add-port=6789/tcp [root@mon ~]# firewall-cmd --zone=public --add-port=6789/tcp --permanent [root@mon ~]# firewall-cmd --zone=public --add-port=3300/tcp [root@mon ~]# firewall-cmd --zone=public --add-port=3300/tcp --permanent
2.9. Firewall settings for Ceph OSDs
By default, Ceph OSDs bind to the first available ports on a Ceph node beginning at port 6800. Ensure to open at least four ports beginning at port 6800 for each OSD that runs on the node:
- One for talking to clients and monitors on the public network.
- One for sending data to other OSDs on the cluster network.
- Two for sending heartbeat packets on the cluster network.
Ports are node-specific. However, you might need to open more ports than the number of ports needed by Ceph daemons running on that Ceph node in the event that processes get restarted and the bound ports do not get released. Consider opening a few additional ports in case a daemon fails and restarts without releasing the port such that the restarted daemon binds to a new port. Also, consider opening the port range of 6800—7300 on each OSD node.
If you set separate public and cluster networks, you must add rules for both the public network and the cluster network, because clients will connect using the public network and other Ceph OSD Daemons will connect using the cluster network.
Prerequisites
- A running Red Hat Ceph Storage cluster.
- Access to the Ceph software repository.
- Root-level access to the Ceph OSD nodes.
Procedure
Add rules using the following example:
[root@mon ~]# sudo iptables -A INPUT -i IFACE -m multiport -p tcp -s IP-ADDRESS/NETMASK --dports 6800:7300 -j ACCEPT
-
Replace
IFACEwith the public network interface (for example,eth0,eth1, and so on). -
Replace
IP-ADDRESSwith the IP address of the public network andNETMASKwith the netmask for the public network.
-
Replace
For the
firewallddaemon, execute the following:[root@mon ~] # firewall-cmd --zone=public --add-port=6800-7300/tcp [root@mon ~] # firewall-cmd --zone=public --add-port=6800-7300/tcp --permanent
If you put the cluster network into another zone, open the ports within that zone as appropriate.
2.10. Additional Resources
- See the Red Hat Ceph Storage network configuration options in Appendix B for specific option descriptions and usage.
- See the Red Hat Ceph Storage Architecture Guide for details about using on-wire encryption with the Ceph messenger version 2 protocol.
Chapter 3. Ceph Monitor configuration
As a storage administrator, you can use the default configuration values for the Ceph Monitor or customize them according to the intended workload.
3.1. Prerequisites
- Installation of the Red Hat Ceph Storage software.
3.2. Ceph Monitor configuration
Understanding how to configure a Ceph Monitor is an important part of building a reliable Red Hat Ceph Storage cluster. All storage clusters have at least one monitor. A Ceph Monitor configuration usually remains fairly consistent, but you can add, remove or replace a Ceph Monitor in a storage cluster.
Ceph monitors maintain a "master copy" of the cluster map. That means a Ceph client can determine the location of all Ceph monitors and Ceph OSDs just by connecting to one Ceph monitor and retrieving a current cluster map.
Before Ceph clients can read from or write to Ceph OSDs, they must connect to a Ceph Monitor first. With a current copy of the cluster map and the CRUSH algorithm, a Ceph client can compute the location for any object. The abilityto compute object locations allows a Ceph client to talk directly to Ceph OSDs, which is a very important aspect of Ceph’s high scalability and performance.
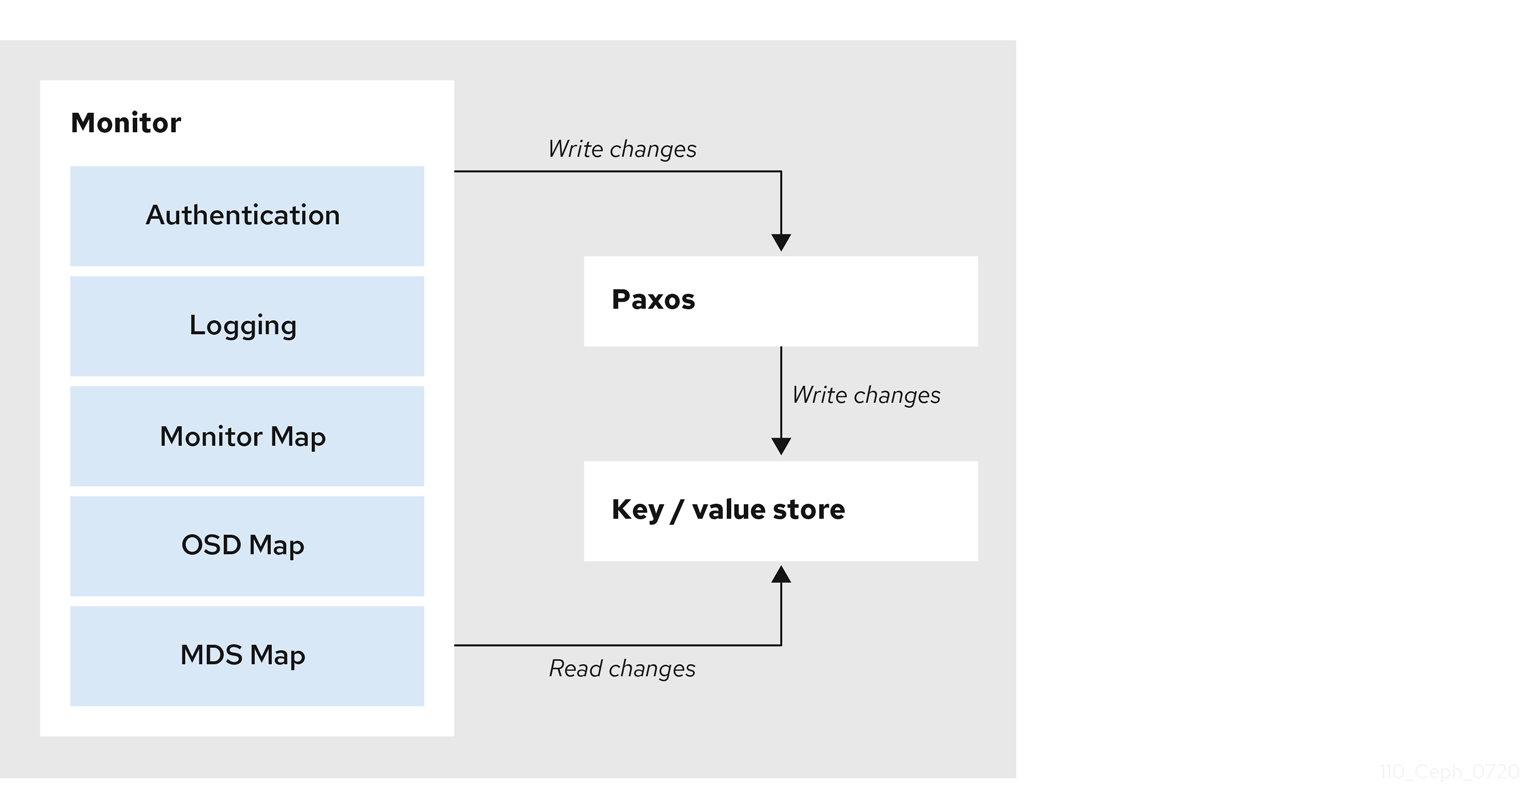
The primary role of the Ceph Monitor is to maintain a master copy of the cluster map. Ceph Monitors also provide authentication and logging services. Ceph Monitors write all changes in the monitor services to a single Paxos instance, and Paxos writes the changes to a key-value store for strong consistency. Ceph Monitors can query the most recent version of the cluster map during synchronization operations. Ceph Monitors leverage the key-value store’s snapshots and iterators, using the rocksdb database, to perform store-wide synchronization.
3.2.1. Viewing the Ceph Monitor configuration database
You can view Ceph Monitor configuration in the configuration database.
Previous releases of Red Hat Ceph Storage centralize Ceph Monitor configuration in /etc/ceph/ceph.conf. This configuration file has been deprecated as of Red Hat Ceph Storage 5.
Prerequisites
- A running Red Hat Ceph Storage cluster.
- Root-level access to a Ceph Monitor host.
Procedure
Log into the
cephadmshell.[root@host01 ~]# cephadm shell
Use the
ceph configcommand to view the configuration database:Example
[ceph: root@host01 /]# ceph config get mon
Additional Resources
-
For more information about the options available for the
ceph configcommand, useceph config -h.
3.3. Ceph cluster maps
The cluster map is a composite of maps, including the monitor map, the OSD map, and the placement group map. The cluster map tracks a number of important events:
-
Which processes are
inthe Red Hat Ceph Storage cluster. -
Which processes that are
inthe Red Hat Ceph Storage cluster areupand running ordown. -
Whether, the placement groups are
activeorinactive, andcleanor in some other state. other details that reflect the current state of the cluster such as:
- the total amount of storage space or
- the amount of storage used.
When there is a significant change in the state of the cluster, for example, a Ceph OSD goes down, a placement group falls into a degraded state, and so on. The cluster map gets updated to reflect the current state of the cluster. Additionally, the Ceph monitor also maintains a history of the prior states of the cluster. The monitor map, OSD map, and placement group map each maintain a history of their map versions. Each version is called an epoch.
When operating the Red Hat Ceph Storage cluster, keeping track of these states is an important part of the cluster administration.
3.4. Ceph Monitor quorum
A cluster will run sufficiently with a single monitor. However, a single monitor is a single-point-of-failure. To ensure high availability in a production Ceph storage cluster, run Ceph with multiple monitors so that the failure of a single monitor will not cause a failure of the entire storage cluster.
When a Ceph storage cluster runs multiple Ceph Monitors for high availability, Ceph Monitors use the Paxos algorithm to establish consensus about the master cluster map. A consensus requires a majority of monitors running to establish a quorum for consensus about the cluster map. For example, 1; 2 out of 3; 3 out of 5; 4 out of 6; and so on.
Red Hat recommends running a production Red Hat Ceph Storage cluster with at least three Ceph Monitors to ensure high availability. When you run multiple monitors, you can specify the initial monitors that must be members of the storage cluster to establish a quorum. This may reduce the time it takes for the storage cluster to come online.
[mon]
mon_initial_members = a,b,c
A majority of the monitors in the storage cluster must be able to reach each other in to establish a quorum. You can decrease the initial number of monitors to establish a quorum with the mon_initial_members option.
3.5. Ceph Monitor consistency
When you add monitor settings to the Ceph configuration file, you need to be aware of some of the architectural aspects of Ceph Monitors. Ceph imposes strict consistency requirements for a Ceph Monitor when discovering another Ceph Monitor within the cluster. Whereas Ceph clients and other Ceph daemons use the Ceph configuration file to discover monitors, monitors discover each other using the monitor map (monmap), not the Ceph configuration file.
A Ceph Monitor always refers to the local copy of the monitor map when discovering other Ceph Monitors in the Red Hat Ceph Storage cluster. Using the monitor map instead of the Ceph configuration file avoids errors that could break the cluster. For example, typos in the Ceph configuration file when specifying a monitor address or port. Since monitors use monitor maps for discovery and they share monitor maps with clients and other Ceph daemons, the monitor map provides monitors with a strict guarantee that their consensus is valid.
Strict consistency when applying updates to the monitor maps
As with any other updates on the Ceph Monitor, changes to the monitor map always run through a distributed consensus algorithm called Paxos. The Ceph Monitors must agree on each update to the monitor map, such as adding or removing a Ceph Monitor, to ensure that each monitor in the quorum has the same version of the monitor map. Updates to the monitor map are incremental so that Ceph Monitors have the latest agreed-upon version and a set of previous versions.
Maintaining history
Maintaining a history enables a Ceph Monitor that has an older version of the monitor map to catch up with the current state of the Red Hat Ceph Storage cluster.
If Ceph Monitors discovered each other through the Ceph configuration file instead of through the monitor map, it would introduce additional risks because the Ceph configuration files are not updated and distributed automatically. Ceph Monitors might inadvertently use an older Ceph configuration file, fail to recognize a Ceph Monitor, fall out of a quorum, or develop a situation where Paxos is not able to determine the current state of the system accurately.
3.6. Bootstrap the Ceph Monitor
In most configuration and deployment cases, tools that deploy Ceph, such as cephadm, might help bootstrap the Ceph monitors by generating a monitor map for you.
A Ceph monitor requires a few explicit settings:
-
File System ID: The
fsidis the unique identifier for your object store. Since you can run multiple storage clusters on the same hardware, you must specify the unique ID of the object store when bootstrapping a monitor. Using deployment tools, such ascephadm, will generate a file system identifier, but you can also specify thefsidmanually. Monitor ID: A monitor ID is a unique ID assigned to each monitor within the cluster. By convention, the ID is set to the monitor’s hostname. This option can be set using a deployment tool, using the
cephcommand, or in the Ceph configuration file. In the Ceph configuration file, sections are formed as follows:Example
[mon.host1]

[mon.host2]
- Keys: The monitor must have secret keys.
Additional Resources
-
For more information about
cephadmand the Ceph orchestrator, see the Red Hat Ceph Storage Operations Guide.
3.7. Minimum configuration for a Ceph Monitor
The bare minimum monitor settings for a Ceph Monitor in the Ceph configuration file includes a host name for each monitor if it is not configured for DNS and the monitor address. The Ceph Monitors run on port 6789 and 3300 by default.
Do not edit the Ceph configuration file.
This minimum configuration for monitors assumes that a deployment tool generates the fsid and the mon. key for you.
You can use the following commands to set or read the storage cluster configuration options.
-
ceph config dump- Dumps the entire configuration database for the whole storage cluster. -
ceph config generate-minimal-conf- Generates a minimalceph.conffile. -
ceph config get WHO- Dumps the configuration for a specific daemon or a client, as stored in the Ceph Monitor’s configuration database. -
ceph config set WHO OPTION VALUE- Sets the configuration option in the Ceph Monitor’s configuration database. -
ceph config show WHO- Shows the reported running configuration for a running daemon. -
ceph config assimilate-conf -i INPUT_FILE -o OUTPUT_FILE- Ingests a configuration file from the input file and moves any valid options into the Ceph Monitors’ configuration database.
Here, WHO parameter might be name of the section or a Ceph daemon, OPTION is a configuration file, and VALUE can be either true or false.
When a Ceph daemon needs a config option prior to getting the option from the config store, you can set the configuration by running the following command:
ceph cephadm set-extra-ceph-conf
This command adds text to all the daemon’s ceph.conf files. It is a workaround and is NOT a recommended operation.
3.8. Unique identifier for Ceph
Each Red Hat Ceph Storage cluster has a unique identifier (fsid). If specified, it usually appears under the [global] section of the configuration file. Deployment tools usually generate the fsid and store it in the monitor map, so the value may not appear in a configuration file. The fsid makes it possible to run daemons for multiple clusters on the same hardware.
Do not set this value if you use a deployment tool that does it for you.
3.9. Ceph Monitor data store
Ceph provides a default path where Ceph monitors store data.
Red Hat recommends running Ceph monitors on separate drives from Ceph OSDs for optimal performance in a production Red Hat Ceph Storage cluster.
A dedicated /var/lib/ceph partition should be used for the MON database with a size between 50 and 100 GB.
Ceph monitors call the fsync() function often, which can interfere with Ceph OSD workloads.
Ceph monitors store their data as key-value pairs. Using a data store prevents recovering Ceph monitors from running corrupted versions through Paxos, and it enables multiple modification operations in one single atomic batch, among other advantages.
Red Hat does not recommend changing the default data location. If you modify the default location, make it uniform across Ceph monitors by setting it in the [mon] section of the configuration file.
3.10. Ceph storage capacity
When a Red Hat Ceph Storage cluster gets close to its maximum capacity (specifies by the mon_osd_full_ratio parameter), Ceph prevents you from writing to or reading from Ceph OSDs as a safety measure to prevent data loss. Therefore, letting a production Red Hat Ceph Storage cluster approach its full ratio is not a good practice, because it sacrifices high availability. The default full ratio is .95, or 95% of capacity. This a very aggressive setting for a test cluster with a small number of OSDs.
When monitoring a cluster, be alert to warnings related to the nearfull ratio. This means that a failure of some OSDs could result in a temporary service disruption if one or more OSDs fails. Consider adding more OSDs to increase storage capacity.
A common scenario for test clusters involves a system administrator removing a Ceph OSD from the Red Hat Ceph Storage cluster to watch the cluster re-balance. Then, removing another Ceph OSD, and so on until the Red Hat Ceph Storage cluster eventually reaches the full ratio and locks up.
Red Hat recommends a bit of capacity planning even with a test cluster. Planning enables you to gauge how much spare capacity you will need in to maintain high availability.
Ideally, you want to plan for a series of Ceph OSD failures where the cluster can recover to an active + clean state without replacing those Ceph OSDs immediately. You can run a cluster in an active + degraded state, but this is not ideal for normal operating conditions.
The following diagram depicts a simplistic Red Hat Ceph Storage cluster containing 33 Ceph Nodes with one Ceph OSD per host, each Ceph OSD Daemon reading from and writing to a 3TB drive. So this exemplary Red Hat Ceph Storage cluster has a maximum actual capacity of 99TB. With a mon osd full ratio of 0.95, if the Red Hat Ceph Storage cluster falls to 5 TB of remaining capacity, the cluster will not allow Ceph clients to read and write data. So the Red Hat Ceph Storage cluster’s operating capacity is 95 TB, not 99 TB.
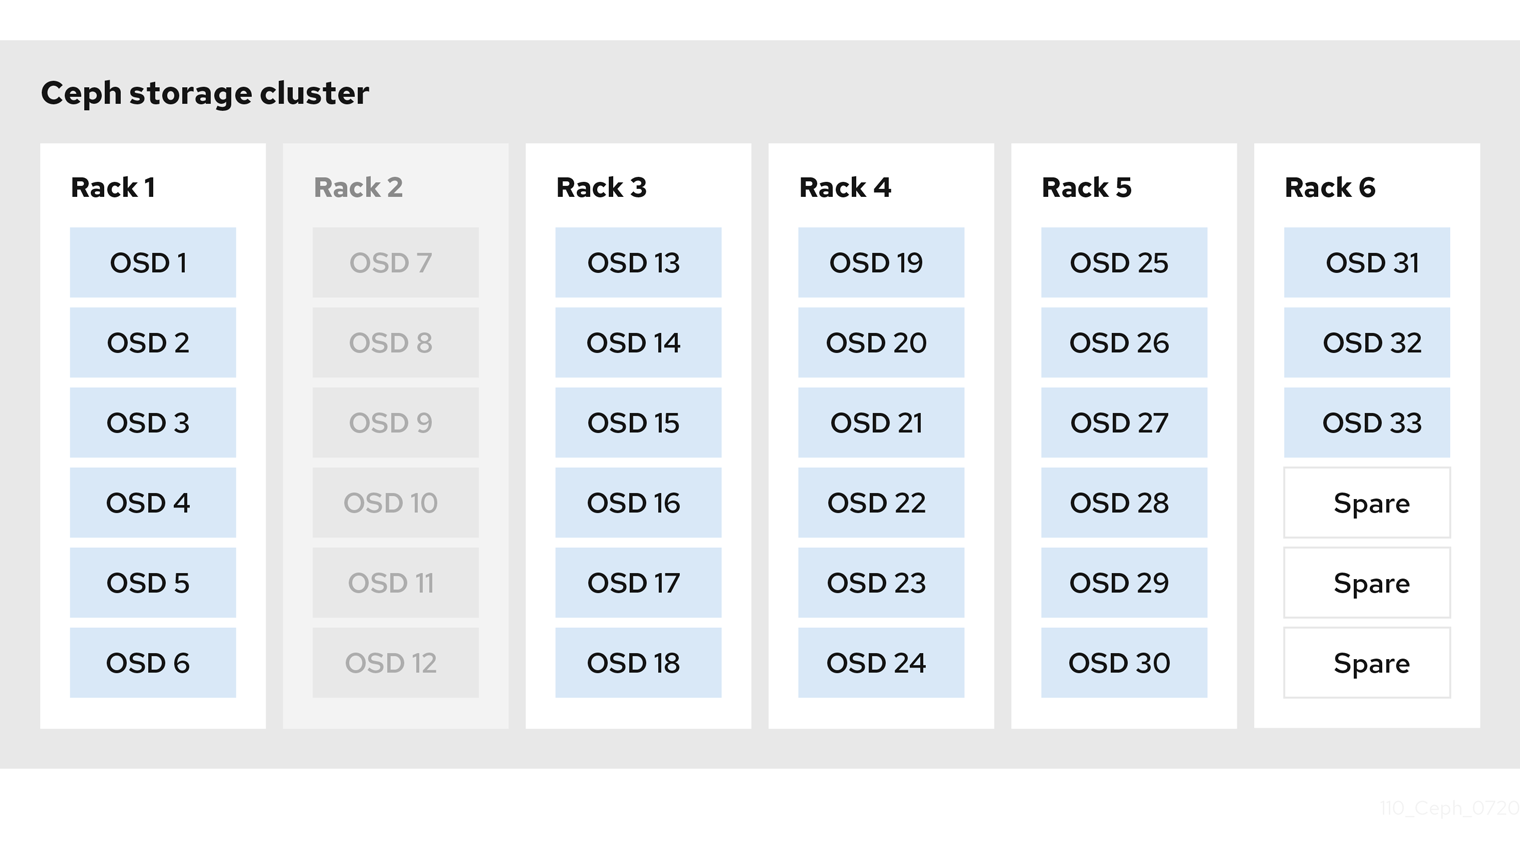
It is normal in such a cluster for one or two OSDs to fail. A less frequent but reasonable scenario involves a rack’s router or power supply failing, which brings down multiple OSDs simultaneously, for example, OSDs 7-12. In such a scenario, you should still strive for a cluster that can remain operational and achieve an active + clean state, even if that means adding a few hosts with additional OSDs in short order. If your capacity utilization is too high, you might not lose data, but you could still sacrifice data availability while resolving an outage within a failure domain if capacity utilization of the cluster exceeds the full ratio. For this reason, Red Hat recommends at least some rough capacity planning.
Identify two numbers for your cluster:
- the number of OSDs
- the total capacity of the cluster
To determine the mean average capacity of an OSD within a cluster, divide the total capacity of the cluster by the number of OSDs in the cluster. Consider multiplying that number by the number of OSDs you expect to fail simultaneously during normal operations (a relatively small number). Finally, multiply the capacity of the cluster by the full ratio to arrive at a maximum operating capacity. Then, subtract the amount of data from the OSDs you expect to fail to arrive at a reasonable full ratio. Repeat the foregoing process with a higher number of OSD failures (for example, a rack of OSDs) to arrive at a reasonable number for a near full ratio.
3.11. Ceph heartbeat
Ceph monitors know about the cluster by requiring reports from each OSD, and by receiving reports from OSDs about the status of their neighboring OSDs. Ceph provides reasonable default settings for interaction between monitor and OSD, however, you can modify them as needed.
3.12. Ceph Monitor synchronization role
When you run a production cluster with multiple monitors which is recommended, each monitor checks to see if a neighboring monitor has a more recent version of the cluster map. For example, a map in a neighboring monitor with one or more epoch numbers higher than the most current epoch in the map of the instant monitor. Periodically, one monitor in the cluster might fall behind the other monitors to the point where it must leave the quorum, synchronize to retrieve the most current information about the cluster, and then rejoin the quorum.
Synchronization roles
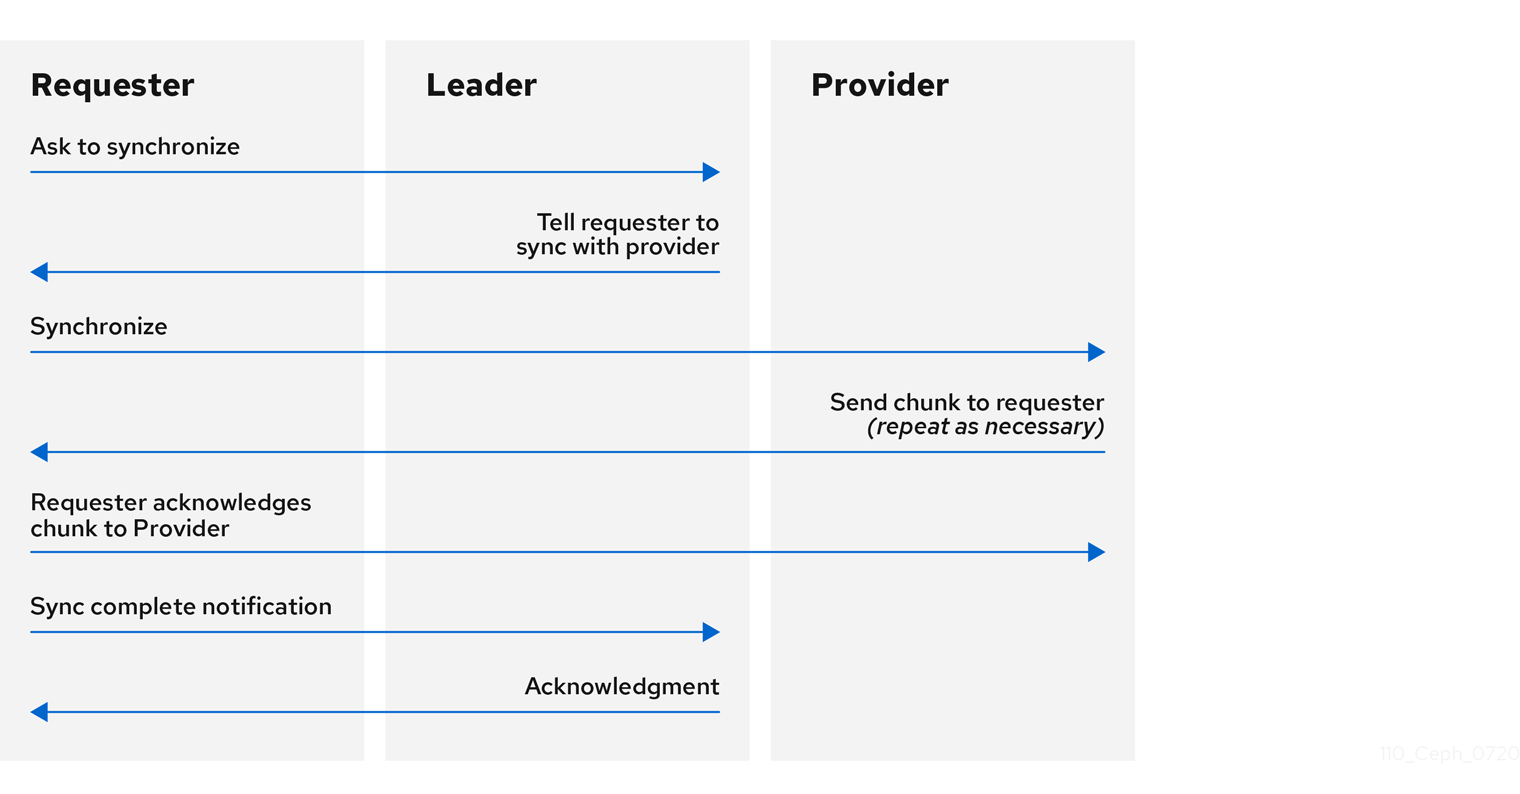
For the purposes of synchronization, monitors can assume one of three roles:
- Leader: The Leader is the first monitor to achieve the most recent Paxos version of the cluster map.
- Provider: The Provider is a monitor that has the most recent version of the cluster map, but was not the first to achieve the most recent version.
- Requester: The Requester is a monitor that has fallen behind the leader and must synchronize to retrieve the most recent information about the cluster before it can rejoin the quorum.
These roles enable a leader to delegate synchronization duties to a provider, which prevents synchronization requests from overloading the leader and improving performance. In the following diagram, the requester has learned that it has fallen behind the other monitors. The requester asks the leader to synchronize, and the leader tells the requester to synchronize with a provider.
Monitor synchronization
Synchronization always occurs when a new monitor joins the cluster. During runtime operations, monitors can receive updates to the cluster map at different times. This means the leader and provider roles may migrate from one monitor to another. If this happens while synchronizing, for example, a provider falls behind the leader, the provider can terminate synchronization with a requester.
Once synchronization is complete, Ceph requires trimming across the cluster. Trimming requires that the placement groups are active + clean.
3.13. Ceph time synchronization
Ceph daemons pass critical messages to each other, which must be processed before daemons reach a timeout threshold. If the clocks in Ceph monitors are not synchronized, it can lead to a number of anomalies.
For example:
- Daemons ignoring received messages such as outdated timestamps.
- Timeouts triggered too soon or late when a message was not received in time.
Install NTP on the Ceph monitor hosts to ensure that the monitor cluster operates with synchronized clocks.
Clock drift may still be noticeable with NTP even though the discrepancy is not yet harmful. Ceph clock drift and clock skew warnings can get triggered even though NTP maintains a reasonable level of synchronization. Increasing your clock drift may be tolerable under such circumstances. However, a number of factors such as workload, network latency, configuring overrides to default timeouts, and other synchronization options can influence the level of acceptable clock drift without compromising Paxos guarantees.
Additional Resources
- See the section on Ceph time synchronization for more details.
3.14. Additional Resources
- See all the Red Hat Ceph Storage Monitor configuration options in Appendix C for specific option descriptions and usage.
Chapter 4. Ceph authentication configuration
As a storage administrator, authenticating users and services is important to the security of the Red Hat Ceph Storage cluster. Red Hat Ceph Storage includes the Cephx protocol, as the default, for cryptographic authentication, and the tools to manage authentication in the storage cluster.
4.1. Prerequisites
- Installation of the Red Hat Ceph Storage software.
4.2. Cephx authentication
The cephx protocol is enabled by default. Cryptographic authentication has some computational costs, though they are generally quite low. If the network environment connecting clients and hosts is considered safe and you cannot afford authentication computational costs, you can disable it. When deploying a Ceph storage cluster, the deployment tool will create the client.admin user and keyring.
Red Hat recommends using authentication.
If you disable authentication, you are at risk of a man-in-the-middle attack altering client and server messages, which could lead to significant security issues.
Enabling and disabling Cephx
Enabling Cephx requires that you have deployed keys for the Ceph Monitors and OSDs. When toggling Cephx authentication on or off, you do not have to repeat the deployment procedures.
4.3. Enabling Cephx
When cephx is enabled, Ceph will look for the keyring in the default search path, which includes /etc/ceph/$cluster.$name.keyring. You can override this location by adding a keyring option in the [global] section of the Ceph configuration file, but this is not recommended.
Execute the following procedures to enable cephx on a cluster with authentication disabled. If you or your deployment utility have already generated the keys, you may skip the steps related to generating keys.
Prerequisites
- A running Red Hat Ceph Storage cluster.
- Root-level access to the Ceph Monitor node.
Procedure
Create a
client.adminkey, and save a copy of the key for your client host:[root@mon ~]# ceph auth get-or-create client.admin mon 'allow *' osd 'allow *' -o /etc/ceph/ceph.client.admin.keyring
WarningThis will erase the contents of any existing
/etc/ceph/client.admin.keyringfile. Do not perform this step if a deployment tool has already done it for you.Create a keyring for the monitor cluster and generate a monitor secret key:
[root@mon ~]# ceph-authtool --create-keyring /tmp/ceph.mon.keyring --gen-key -n mon. --cap mon 'allow *'
Copy the monitor keyring into a
ceph.mon.keyringfile in every monitormon datadirectory. For example, to copy it tomon.ain clusterceph, use the following:[root@mon ~]# cp /tmp/ceph.mon.keyring /var/lib/ceph/mon/ceph-a/keyring
Generate a secret key for every OSD, where
IDis the OSD number:ceph auth get-or-create osd.ID mon 'allow rwx' osd 'allow *' -o /var/lib/ceph/osd/ceph-ID/keyring
By default the
cephxauthentication protocol is enabled.NoteIf the
cephxauthentication protocol was disabled previously by setting the authentication options tonone, then by removing the following lines under the[global]section in the Ceph configuration file (/etc/ceph/ceph.conf) will reenable thecephxauthentication protocol:auth_cluster_required = none auth_service_required = none auth_client_required = none
Start or restart the Ceph storage cluster.
ImportantEnabling
cephxrequires downtime because the cluster needs to be completely restarted, or it needs to be shut down and then started while client I/O is disabled.These flags need to be set before restarting or shutting down the storage cluster:
[root@mon ~]# ceph osd set noout [root@mon ~]# ceph osd set norecover [root@mon ~]# ceph osd set norebalance [root@mon ~]# ceph osd set nobackfill [root@mon ~]# ceph osd set nodown [root@mon ~]# ceph osd set pause
Once
cephxis enabled and all PGs are active and clean, unset the flags:[root@mon ~]# ceph osd unset noout [root@mon ~]# ceph osd unset norecover [root@mon ~]# ceph osd unset norebalance [root@mon ~]# ceph osd unset nobackfill [root@mon ~]# ceph osd unset nodown [root@mon ~]# ceph osd unset pause
4.4. Disabling Cephx
The following procedure describes how to disable Cephx. If your cluster environment is relatively safe, you can offset the computation expense of running authentication.
Red Hat recommends enabling authentication.
However, it may be easier during setup or troubleshooting to temporarily disable authentication.
Prerequisites
- A running Red Hat Ceph Storage cluster.
- Root-level access to the Ceph Monitor node.
Procedure
Disable
cephxauthentication by setting the following options in the[global]section of the Ceph configuration file:Example
auth_cluster_required = none
auth_service_required = none
auth_client_required = none
- Start or restart the Ceph storage cluster.
4.5. Cephx user keyrings
When you run Ceph with authentication enabled, the ceph administrative commands and Ceph clients require authentication keys to access the Ceph storage cluster.
The most common way to provide these keys to the ceph administrative commands and clients is to include a Ceph keyring under the /etc/ceph/ directory. The file name is usually ceph.client.admin.keyring or $cluster.client.admin.keyring. If you include the keyring under the /etc/ceph/ directory, you do not need to specify a keyring entry in the Ceph configuration file.
Red Hat recommends copying the Red Hat Ceph Storage cluster keyring file to nodes where you will run administrative commands, because it contains the client.admin key.
To do so, execute the following command:
# scp USER@HOSTNAME:/etc/ceph/ceph.client.admin.keyring /etc/ceph/ceph.client.admin.keyring
Replace USER with the user name used on the host with the client.admin key and HOSTNAME with the host name of that host.
Ensure the ceph.keyring file has appropriate permissions set on the client machine.
You can specify the key itself in the Ceph configuration file using the key setting, which is not recommended, or a path to a key file using the keyfile setting.
4.6. Cephx daemon keyrings
Administrative users or deployment tools might generate daemon keyrings in the same way as generating user keyrings. By default, Ceph stores daemons keyrings inside their data directory. The default keyring locations, and the capabilities necessary for the daemon to function.
The monitor keyring contains a key but no capabilities, and is not part of the Ceph storage cluster auth database.
The daemon data directory locations default to directories of the form:
/var/lib/ceph/$type/CLUSTER-ID
Example
/var/lib/ceph/osd/ceph-12
You can override these locations, but it is not recommended.
4.7. Cephx message signatures
Ceph provides fine-grained control so you can enable or disable signatures for service messages between the client and Ceph. You can enable or disable signatures for messages between Ceph daemons.
Red Hat recommends that Ceph authenticate all ongoing messages between the entities using the session key set up for that initial authentication.
Ceph kernel modules do not support signatures yet.
4.8. Additional Resources
- See all the Red Hat Ceph Storage Cephx configuration options in Appendix D for specific option descriptions and usage.
Chapter 5. Pools, placement groups, and CRUSH configuration
As a storage administrator, you can choose to use the Red Hat Ceph Storage default options for pools, placement groups, and the CRUSH algorithm or customize them for the intended workload.
5.1. Prerequisites
- Installation of the Red Hat Ceph Storage software.
5.2. Pools placement groups and CRUSH
When you create pools and set the number of placement groups for the pool, Ceph uses default values when you do not specifically override the defaults.
Red Hat recommends overriding some of the defaults. Specifically, set a pool’s replica size and override the default number of placement groups.
You can set these values when running pool commands.
By default, Ceph makes 3 replicas of objects. If you want to set 4 copies of an object as the default value, a primary copy and three replica copies, reset the default values as shown in osd_pool_default_size. If you want to allow Ceph to write a lesser number of copies in a degraded state, set osd_pool_default_min_size to a number less than the osd_pool_default_size value.
Example
[ceph: root@host01 /]# ceph config set global osd_pool_default_size 4  # Write an object 4 times.
[ceph: root@host01 /]# ceph config set global osd_pool_default_min_size 1  # Allow writing one copy in a degraded state.
Ensure you have a realistic number of placement groups. Red Hat recommends approximately 100 per OSD. For example, total number of OSDs multiplied by 100 divided by the number of replicas, that is, osd_pool_default_size. For 10 OSDs and osd_pool_default_size = 4, we would recommend approximately (100 * 10) / 4 = 250.
Example
[ceph: root@host01 /]# ceph config set global osd_pool_default_pg_num 250
[ceph: root@host01 /]# ceph config set global osd_pool_default_pgp_num 250
5.3. Additional Resources
- See all the Red Hat Ceph Storage pool, placement group, and CRUSH configuration options in Appendix E for specific option descriptions and usage.
Chapter 6. Ceph Object Storage Daemon (OSD) configuration
As a storage administrator, you can configure the Ceph Object Storage Daemon (OSD) to be redundant and optimized based on the intended workload.
6.1. Prerequisites
- Installation of the Red Hat Ceph Storage software.
6.2. Ceph OSD configuration
All Ceph clusters have a configuration, which defines:
- Cluster identity
- Authentication settings
- Ceph daemon membership in the cluster
- Network configuration
- Host names and addresses
- Paths to keyrings
- Paths to OSD log files
- Other runtime options
A deployment tool, such as cephadm, will typically create an initial Ceph configuration file for you. However, you can create one yourself if you prefer to bootstrap a cluster without using a deployment tool.
For your convenience, each daemon has a series of default values. Many are set by the ceph/src/common/config_opts.h script. You can override these settings with a Ceph configuration file or at runtime by using the monitor tell command or connecting directly to a daemon socket on a Ceph node.
Red Hat does not recommend changing the default paths, as it makes it more difficult to troubleshoot Ceph later.
Additional Resources
-
For more information about
cephadmand the Ceph orchestrator, see the Red Hat Ceph Storage Operations Guide.
6.3. Scrubbing the OSD
In addition to making multiple copies of objects, Ceph ensures data integrity by scrubbing placement groups. Ceph scrubbing is analogous to the fsck command on the object storage layer.
For each placement group, Ceph generates a catalog of all objects and compares each primary object and its replicas to ensure that no objects are missing or mismatched.
Light scrubbing (daily) checks the object size and attributes. Deep scrubbing (weekly) reads the data and uses checksums to ensure data integrity.
Scrubbing is important for maintaining data integrity, but it can reduce performance. Adjust the following settings to increase or decrease scrubbing operations.
Additional resources
- See Ceph scrubbing options in the appendix of the Red Hat Ceph Storage Configuration Guide for more details.
6.4. Backfilling an OSD
When you add Ceph OSDs to a cluster or remove them from the cluster, the CRUSH algorithm rebalances the cluster by moving placement groups to or from Ceph OSDs to restore the balance. The process of migrating placement groups and the objects they contain can reduce the cluster operational performance considerably. To maintain operational performance, Ceph performs this migration with the 'backfill' process, which allows Ceph to set backfill operations to a lower priority than requests to read or write data.
6.5. OSD recovery
When the cluster starts or when a Ceph OSD terminates unexpectedly and restarts, the OSD begins peering with other Ceph OSDs before a write operation can occur.
If a Ceph OSD crashes and comes back online, usually it will be out of sync with other Ceph OSDs containing more recent versions of objects in the placement groups. When this happens, the Ceph OSD goes into recovery mode and seeks to get the latest copy of the data and bring its map back up to date. Depending upon how long the Ceph OSD was down, the OSD’s objects and placement groups may be significantly out of date. Also, if a failure domain went down, for example, a rack, more than one Ceph OSD might come back online at the same time. This can make the recovery process time consuming and resource intensive.
To maintain operational performance, Ceph performs recovery with limitations on the number of recovery requests, threads, and object chunk sizes which allows Ceph to perform well in a degraded state.
6.6. Additional Resources
- See all the Red Hat Ceph Storage Ceph OSD configuration options in Appendix F for specific option descriptions and usage.
Chapter 7. Ceph Monitor and OSD interaction configuration
As a storage administrator, you must properly configure the interactions between the Ceph Monitors and OSDs to ensure a stable working environment.
7.1. Prerequisites
- Installation of the Red Hat Ceph Storage software.
7.2. Ceph Monitor and OSD interaction
After you have completed your initial Ceph configuration, you can deploy and run Ceph. When you execute a command such as ceph health or ceph -s, the Ceph Monitor reports on the current state of the Ceph storage cluster. The Ceph Monitor knows about the Ceph storage cluster by requiring reports from each Ceph OSD daemon, and by receiving reports from Ceph OSD daemons about the status of their neighboring Ceph OSD daemons. If the Ceph Monitor does not receive reports, or if it receives reports of changes in the Ceph storage cluster, the Ceph Monitor updates the status of the Ceph cluster map.
Ceph provides reasonable default settings for Ceph Monitor and OSD interaction. However, you can override the defaults. The following sections describe how Ceph Monitors and Ceph OSD daemons interact for the purposes of monitoring the Ceph storage cluster.
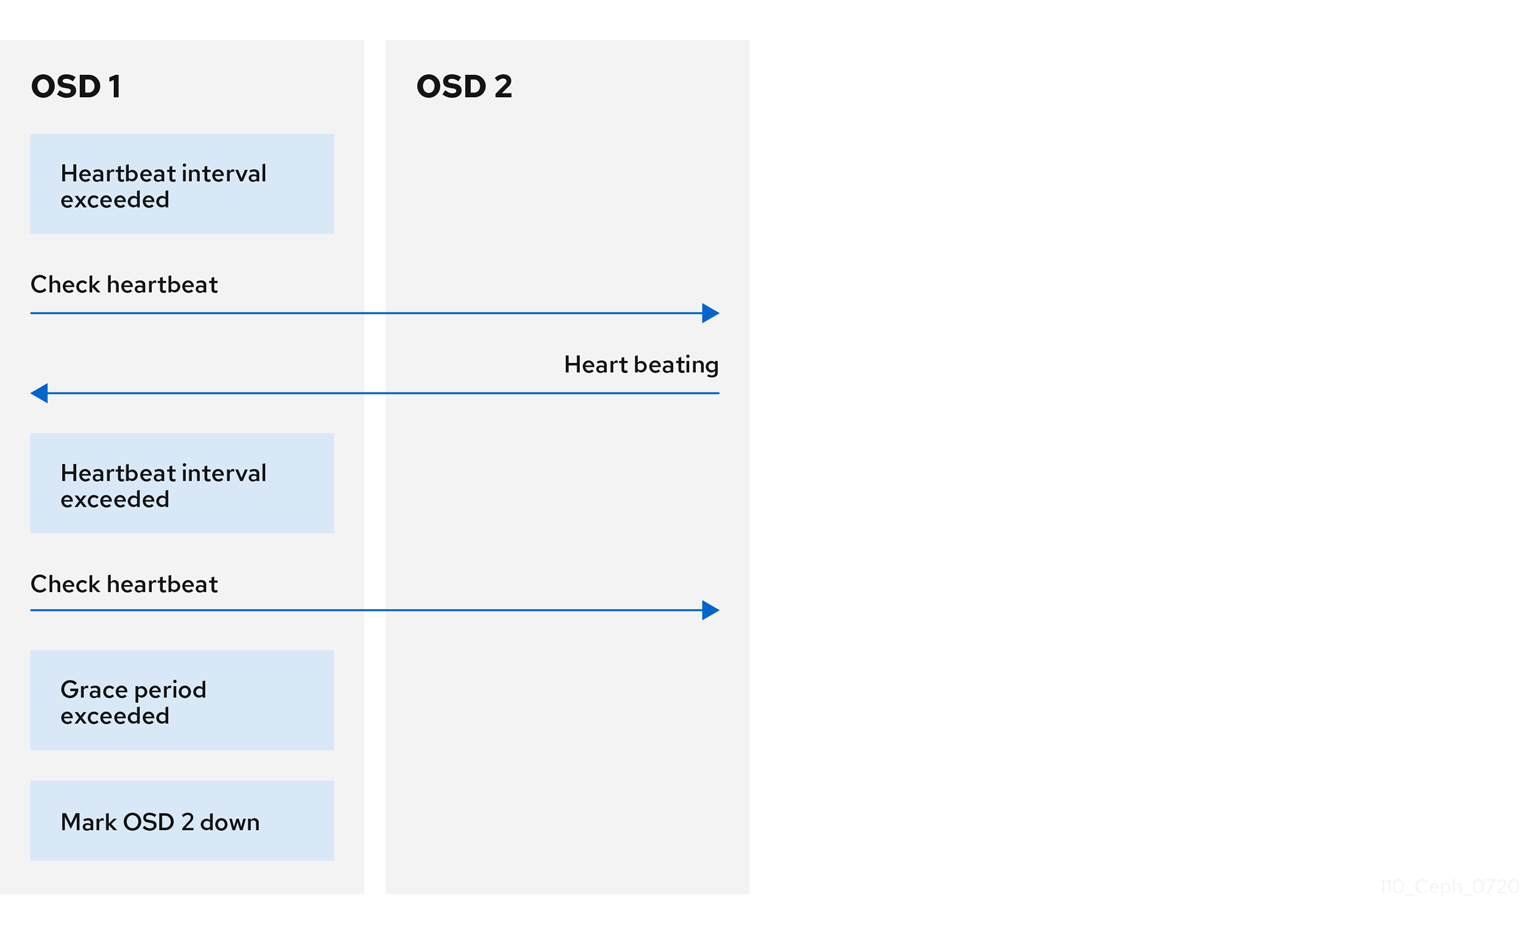
7.3. OSD heartbeat
Each Ceph OSD daemon checks the heartbeat of other Ceph OSD daemons every 6 seconds. To change the heartbeat interval, change the value at runtime:
Syntax
ceph config set osd osd_heartbeat_interval TIME_IN_SECONDS
Example
[ceph: root@host01 /]# ceph config set osd osd_heartbeat_interval 60
If a neighboring Ceph OSD daemon does not send heartbeat packets within a 20 second grace period, the Ceph OSD daemon might consider the neighboring Ceph OSD daemon down. It can report it back to a Ceph Monitor, which updates the Ceph cluster map. To change the grace period, set the value at runtime:
Syntax
ceph config set osd osd_heartbeat_grace TIME_IN_SECONDS
Example
[ceph: root@host01 /]# ceph config set osd osd_heartbeat_grace 30
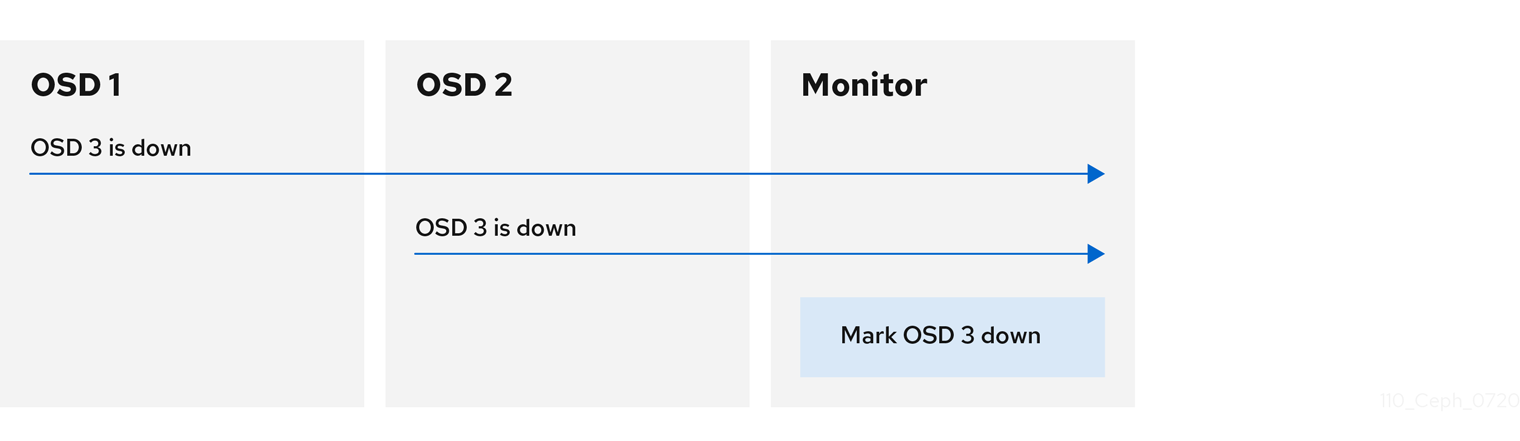
7.4. Reporting an OSD as down
By default, two Ceph OSD Daemons from different hosts must report to the Ceph Monitors that another Ceph OSD Daemon is down before the Ceph Monitors acknowledge that the reported Ceph OSD Daemon is down.
However, there is the chance that all the OSDs reporting the failure are in different hosts in a rack with a bad switch that causes connection problems between OSDs.
To avoid a "false alarm," Ceph considers the peers reporting the failure as a proxy for a "subcluster" that is similarly laggy. While this is not always the case, it may help administrators localize the grace correction to a subset of the system that is performing poorly.
Ceph uses the mon_osd_reporter_subtree_level setting to group the peers into the "subcluster" by their common ancestor type in the CRUSH map.
By default, only two reports from a different subtree are required to report another Ceph OSD Daemon down. Administrators can change the number of reporters from unique subtrees and the common ancestor type required to report a Ceph OSD Daemon down to a Ceph Monitor by setting the mon_osd_min_down_reporters and mon_osd_reporter_subtree_level values at runtime:
Syntax
ceph config set mon mon_osd_min_down_reporters NUMBER
Example
[ceph: root@host01 /]# ceph config set mon mon_osd_min_down_reporters 4
Syntax
ceph config set mon mon_osd_reporter_subtree_level CRUSH_ITEM
Example
[ceph: root@host01 /]# ceph config set mon mon_osd_reporter_subtree_level host
[ceph: root@host01 /]# ceph config set mon mon_osd_reporter_subtree_level rack
[ceph: root@host01 /]# ceph config set mon mon_osd_reporter_subtree_level osd
7.5. Reporting a peering failure
If a Ceph OSD daemon cannot peer with any of the Ceph OSD daemons defined in its Ceph configuration file or the cluster map, it pings a Ceph Monitor for the most recent copy of the cluster map every 30 seconds. You can change the Ceph Monitor heartbeat interval by setting the value at runtime:
Syntax
ceph config set osd osd_mon_heartbeat_interval TIME_IN_SECONDS
Example
[ceph: root@host01 /]# ceph config set osd osd_mon_heartbeat_interval 60

7.6. OSD reporting status
If a Ceph OSD Daemon does not report to a Ceph Monitor, the Ceph Monitor marks the Ceph OSD Daemon down after the mon_osd_report_timeout, which is 900 seconds, elapses. A Ceph OSD Daemon sends a report to a Ceph Monitor when a reportable event such as a failure, a change in placement group stats, a change in up_thru or when it boots within 5 seconds.
You can change the Ceph OSD Daemon minimum report interval by setting the osd_mon_report_interval value at runtime:
Syntax
ceph config set osd osd_mon_report_interval TIME_IN_SECONDS
To get, set, and verify the config you can use the following example:
Example
[ceph: root@host01 /]# ceph config get osd osd_mon_report_interval
5
[ceph: root@host01 /]# ceph config set osd osd_mon_report_interval 20
[ceph: root@host01 /]# ceph config dump | grep osd

global                  advanced  osd_pool_default_crush_rule                  -1
  osd                   basic     osd_memory_target                            4294967296
  osd                   advanced  osd_mon_report_interval                      20

7.7. Additional Resources
- See all the Red Hat Ceph Storage Ceph Monitor and OSD configuration options in Appendix G for specific option descriptions and usage.
Chapter 8. Ceph debugging and logging configuration
As a storage administrator, you can increase the amount of debugging and logging information in cephadm to help diagnose problems with Red Hat Ceph Storage.
8.1. Prerequisites
- Red Hat Ceph Storage software is installed.
8.2. Additional Resources
-
For more information about troubleshooting
cephadm, see Cephadm troubleshooting in the Red Hat Ceph Storage Administration Guide. -
For more information about
cephadmlogging, see Cephadm operations in the Red Hat Ceph Storage Administration Guide.
Appendix A. General configuration options
These are the general configuration options for Ceph.
Typically, these will be set automatically by deployment tools, such as cephadm.
fsid- Description
- The file system ID. One per cluster.
- Type
- UUID
- Required
- No.
- Default
- N/A. Usually generated by deployment tools.
admin_socket- Description
- The socket for executing administrative commands on a daemon, irrespective of whether Ceph monitors have established a quorum.
- Type
- String
- Required
- No
- Default
-
/var/run/ceph/$cluster-$name.asok
pid_file- Description
-
The file in which the monitor or OSD will write its PID. For instance,
/var/run/$cluster/$type.$id.pidwill create /var/run/ceph/mon.a.pid for themonwith idarunning in thecephcluster. Thepid fileis removed when the daemon stops gracefully. If the process is not daemonized (meaning it runs with the-for-doption), thepid fileis not created. - Type
- String
- Required
- No
- Default
- No
chdir- Description
-
The directory Ceph daemons change to once they are up and running. Default
/directory recommended. - Type
- String
- Required
- No
- Default
-
/
max_open_files- Description
-
If set, when the Red Hat Ceph Storage cluster starts, Ceph sets the
max_open_fdsat the OS level (that is, the max # of file descriptors). It helps prevent Ceph OSDs from running out of file descriptors. - Type
- 64-bit Integer
- Required
- No
- Default
-
0
fatal_signal_handlers- Description
- If set, we will install signal handlers for SEGV, ABRT, BUS, ILL, FPE, XCPU, XFSZ, SYS signals to generate a useful log message.
- Type
- Boolean
- Default
-
true
Appendix B. Ceph network configuration options
These are the common network configuration options for Ceph.
public_network- Description
-
The IP address and netmask of the public (front-side) network (for example,
192.168.0.0/24). Set in[global]. You can specify comma-delimited subnets. - Type
-
<ip-address>/<netmask> [, <ip-address>/<netmask>] - Required
- No
- Default
- N/A
public_addr- Description
- The IP address for the public (front-side) network. Set for each daemon.
- Type
- IP Address
- Required
- No
- Default
- N/A
cluster_network- Description
-
The IP address and netmask of the cluster network (for example,
10.0.0.0/24). Set in[global]. You can specify comma-delimited subnets. - Type
-
<ip-address>/<netmask> [, <ip-address>/<netmask>] - Required
- No
- Default
- N/A
cluster_addr- Description
- The IP address for the cluster network. Set for each daemon.
- Type
- Address
- Required
- No
- Default
- N/A
ms_type- Description
-
The messenger type for the network transport layer. Red Hat supports the
simpleand theasyncmessenger type usingposixsemantics. - Type
- String.
- Required
- No.
- Default
-
async+posix
ms_public_type- Description
-
The messenger type for the network transport layer of the public network. It operates identically to
ms_type, but is applicable only to the public or front-side network. This setting enables Ceph to use a different messenger type for the public or front-side and cluster or back-side networks. - Type
- String.
- Required
- No.
- Default
- None.
ms_cluster_type- Description
-
The messenger type for the network transport layer of the cluster network. It operates identically to
ms_type, but is applicable only to the cluster or back-side network. This setting enables Ceph to use a different messenger type for the public or front-side and cluster or back-side networks. - Type
- String.
- Required
- No.
- Default
- None.
Host options
You must declare at least one Ceph Monitor in the Ceph configuration file, with a mon addr setting under each declared monitor. Ceph expects a host setting under each declared monitor, metadata server and OSD in the Ceph configuration file.
Do not use localhost. Use the short name of the node, not the fully-qualified domain name (FQDN). Do not specify any value for host when using a third party deployment system that retrieves the node name for you.
mon_addr- Description
-
A list of
<hostname>:<port>entries that clients can use to connect to a Ceph monitor. If not set, Ceph searches[mon.*]sections. - Type
- String
- Required
- No
- Default
- N/A
host- Description
-
The host name. Use this setting for specific daemon instances (for example,
[osd.0]). - Type
- String
- Required
- Yes, for daemon instances.
- Default
-
localhost
TCP options
Ceph disables TCP buffering by default.
ms_tcp_nodelay- Description
-
Ceph enables
ms_tcp_nodelayso that each request is sent immediately (no buffering). Disabling Nagle’s algorithm increases network traffic, which can introduce congestion. If you experience large numbers of small packets, you may try disablingms_tcp_nodelay, but be aware that disabling it will generally increase latency. - Type
- Boolean
- Required
- No
- Default
-
true
ms_tcp_rcvbuf- Description
- The size of the socket buffer on the receiving end of a network connection. Disabled by default.
- Type
- 32-bit Integer
- Required
- No
- Default
-
0
ms_tcp_read_timeout- Description
-
If a client or daemon makes a request to another Ceph daemon and does not drop an unused connection, the
tcp read timeoutdefines the connection as idle after the specified number of seconds. - Type
- Unsigned 64-bit Integer
- Required
- No
- Default
-
90015 minutes.
Bind options
The bind options configure the default port ranges for the Ceph OSD daemons. The default range is 6800:7100. You can also enable Ceph daemons to bind to IPv6 addresses.
Verify that the firewall configuration allows you to use the configured port range.
ms_bind_port_min- Description
- The minimum port number to which an OSD daemon will bind.
- Type
- 32-bit Integer
- Default
-
6800 - Required
- No
ms_bind_port_max- Description
- The maximum port number to which an OSD daemon will bind.
- Type
- 32-bit Integer
- Default
-
7300 - Required
- No.
ms_bind_ipv6- Description
- Enables Ceph daemons to bind to IPv6 addresses.
- Type
- Boolean
- Default
-
false - Required
- No
Asynchronous messenger options
These Ceph messenger options configure the behavior of AsyncMessenger.
ms_async_transport_type- Description
-
Transport type used by the
AsyncMessenger. Red Hat supports theposixsetting, but does not support thedpdkorrdmasettings at this time. POSIX uses standard TCP/IP networking and is the default value. Other transport types are experimental and are NOT supported. - Type
- String
- Required
- No
- Default
-
posix
ms_async_op_threads- Description
-
Initial number of worker threads used by each
AsyncMessengerinstance. This configuration setting SHOULD equal the number of replicas or erasure code chunks, but it may be set lower if the CPU core count is low or the number of OSDs on a single server is high. - Type
- 64-bit Unsigned Integer
- Required
- No
- Default
-
3
ms_async_max_op_threads- Description
-
The maximum number of worker threads used by each
AsyncMessengerinstance. Set to lower values if the OSD host has limited CPU count, and increase if Ceph is underutilizing CPUs are underutilized. - Type
- 64-bit Unsigned Integer
- Required
- No
- Default
-
5
ms_async_set_affinity- Description
-
Set to
trueto bindAsyncMessengerworkers to particular CPU cores. - Type
- Boolean
- Required
- No
- Default
-
true
ms_async_affinity_cores- Description
-
When
ms_async_set_affinityistrue, this string specifies howAsyncMessengerworkers are bound to CPU cores. For example,0,2will bind workers #1 and #2 to CPU cores #0 and #2, respectively. NOTE: When manually setting affinity, make sure to not assign workers to virtual CPUs created as an effect of hyper threading or similar technology, because they are slower than physical CPU cores. - Type
- String
- Required
- No
- Default
-
(empty)
ms_async_send_inline- Description
-
Send messages directly from the thread that generated them instead of queuing and sending from the
AsyncMessengerthread. This option is known to decrease performance on systems with a lot of CPU cores, so it’s disabled by default. - Type
- Boolean
- Required
- No
- Default
-
false
Connection mode configuration options
Starting with Red Hat Ceph Storage 5 and later, for most connections, there are options that control the modes that are used for encryption.
ms_cluster_mode- Description
- Connection mode used for intra-cluster communication between Ceph daemons. If multiple modes are listed, the modes listed first are preferred.
- Type
- String
- Default
-
crc secure
ms_service_mode- Description
- A list of permitted modes for clients to use when connecting to the storage cluster.
- Type
- String
- Default
-
crc secure
ms_client_mode- Description
- A list of connection modes, in order of preference, for clients to use when interacting with a Ceph cluster.
- Type
- String
- Default
-
crc secure
ms_mon_cluster_mode- Description
- The connection mode to use between Ceph monitors.
- Type
- String
- Default
-
secure crc
ms_mon_service_mode- Description
- A list of permitted modes for clients or other Ceph daemons to use when connecting to monitors.
- Type
- String
- Default
-
secure crc
ms_mon_client_mode- Description
- A list of connection modes, in order of preference, for clients or non-monitor daemons to use when connecting to Ceph monitors.
- Type
- String
- Default
-
secure crc
Appendix C. Ceph firewall ports
These are the general firewall ports used by various components in Red Hat Ceph Storage.
| Port | Port type | Component |
|---|---|---|
| 3260 and 5000 | TCP | Ceph iSCSI Gateway (Deprecated) |
| 6800-7300 | TCP | Ceph OSDs |
| 3300 | TCP | Ceph clients and Ceph daemons connecting to the Ceph Monitor daemon. This port is preferred over 6789. |
| 6789 | TCP | Ceph clients and Ceph daemons connecting to the Ceph Monitor daemon. This port is considered if port 3300 fails. |
Appendix D. Ceph Monitor configuration options
The following are Ceph monitor configuration options that can be set up during deployment.
You can set these configuration options with the ceph config set mon CONFIGURATION_OPTION VALUE command.
mon_initial_members- Description
- The IDs of initial monitors in a cluster during startup. If specified, Ceph requires an odd number of monitors to form an initial quorum (for example, 3).
- Type
- String
- Default
- None
mon_force_quorum_join- Description
- Force monitor to join quorum even if it has been previously removed from the map
- Type
- Boolean
- Default
-
False
mon_dns_srv_name- Description
- The service name used for querying the DNS for the monitor hosts/addresses.
- Type
- String
- Default
-
ceph-mon
fsid- Description
- The cluster ID. One per cluster.
- Type
- UUID
- Required
- Yes.
- Default
- N/A. May be generated by a deployment tool if not specified.
mon_data- Description
- The monitor’s data location.
- Type
- String
- Default
-
/var/lib/ceph/mon/$cluster-$id
mon_data_size_warn- Description
-
Ceph issues a
HEALTH_WARNstatus in the cluster log when the monitor’s data store reaches this threshold. The default value is 15GB. - Type
- Integer
- Default
-
15*1024*1024*1024*
mon_data_avail_warn- Description
-
Ceph issues a
HEALTH_WARNstatus in the cluster log when the available disk space of the monitor’s data store is lower than or equal to this percentage. - Type
- Integer
- Default
-
30
mon_data_avail_crit- Description
-
Ceph issues a
HEALTH_ERRstatus in the cluster log when the available disk space of the monitor’s data store is lower or equal to this percentage. - Type
- Integer
- Default
-
5
mon_warn_on_cache_pools_without_hit_sets- Description
-
Ceph issues a
HEALTH_WARNstatus in the cluster log if a cache pool does not have thehit_set_typeparameter set. - Type
- Boolean
- Default
- True
mon_warn_on_crush_straw_calc_version_zero- Description
-
Ceph issues a
HEALTH_WARNstatus in the cluster log if the CRUSH’sstraw_calc_versionis zero. See CRUSH tunables for details. - Type
- Boolean
- Default
- True
mon_warn_on_legacy_crush_tunables- Description
-
Ceph issues a
HEALTH_WARNstatus in the cluster log if CRUSH tunables are too old (older thanmon_min_crush_required_version). - Type
- Boolean
- Default
- True
mon_crush_min_required_version- Description
- This setting defines the minimum tunable profile version required by the cluster.
- Type
- String
- Default
-
hammer
mon_warn_on_osd_down_out_interval_zero- Description
-
Ceph issues a
HEALTH_WARNstatus in the cluster log if themon_osd_down_out_intervalsetting is zero, because the Leader behaves in a similar manner when thenooutflag is set. Administrators find it easier to troubleshoot a cluster by setting thenooutflag. Ceph issues the warning to ensure administrators know that the setting is zero. - Type
- Boolean
- Default
- True
mon_cache_target_full_warn_ratio- Description
-
Ceph issues a warning when between the ratio of
cache_target_fullandtarget_max_object. - Type
- Float
- Default
-
0.66
mon_health_data_update_interval- Description
- How often (in seconds) a monitor in the quorum shares its health status with its peers. A negative number disables health updates.
- Type
- Float
- Default
-
60
mon_health_to_clog- Description
- This setting enables Ceph to send a health summary to the cluster log periodically.
- Type
- Boolean
- Default
- True
mon_health_detail_to_clog- Description
- This setting enable Ceph to send a health details to the cluster log periodically.
- Type
- Boolean
- Default
- True
mon_op_complaint_time- Description
- Number of seconds after which the Ceph Monitor operation is considered blocked after no updates.
- Type
- Integer
- Default
- 30
mon_health_to_clog_tick_interval- Description
- How often (in seconds) the monitor sends a health summary to the cluster log. A non-positive number disables it. If the current health summary is empty or identical to the last time, the monitor will not send the status to the cluster log.
- Type
- Integer
- Default
- 60.000000
mon_health_to_clog_interval- Description
- How often (in seconds) the monitor sends a health summary to the cluster log. A non-positive number disables it. The monitor will always send the summary to the cluster log.
- Type
- Integer
- Default
- 600
mon_osd_full_ratio- Description
-
The percentage of disk space used before an OSD is considered
full. - Type
- Float:
- Default
-
.95
mon_osd_nearfull_ratio- Description
-
The percentage of disk space used before an OSD is considered
nearfull. - Type
- Float
- Default
-
.85
mon_sync_trim_timeout- Description, Type
- Double
- Default
-
30.0
mon_sync_heartbeat_timeout- Description, Type
- Double
- Default
-
30.0
mon_sync_heartbeat_interval- Description, Type
- Double
- Default
-
5.0
mon_sync_backoff_timeout- Description, Type
- Double
- Default
-
30.0
mon_sync_timeout- Description
- The number of seconds the monitor will wait for the next update message from its sync provider before it gives up and bootstraps again.
- Type
- Double
- Default
-
60.000000
mon_sync_max_retries- Description, Type
- Integer
- Default
-
5
mon_sync_max_payload_size- Description
- The maximum size for a sync payload (in bytes).
- Type
- 32-bit Integer
- Default
-
1045676
paxos_max_join_drift- Description
- The maximum Paxos iterations before we must first sync the monitor data stores. When a monitor finds that its peer is too far ahead of it, it will first sync with data stores before moving on.
- Type
- Integer
- Default
-
10
paxos_stash_full_interval- Description
-
How often (in commits) to stash a full copy of the PaxosService state. Currently this setting only affects
mds,mon,authandmgrPaxosServices. - Type
- Integer
- Default
- 25
paxos_propose_interval- Description
- Gather updates for this time interval before proposing a map update.
- Type
- Double
- Default
-
1.0
paxos_min- Description
- The minimum number of paxos states to keep around
- Type
- Integer
- Default
- 500
paxos_min_wait- Description
- The minimum amount of time to gather updates after a period of inactivity.
- Type
- Double
- Default
-
0.05
paxos_trim_min- Description
- Number of extra proposals tolerated before trimming
- Type
- Integer
- Default
- 250
paxos_trim_max- Description
- The maximum number of extra proposals to trim at a time
- Type
- Integer
- Default
- 500
paxos_service_trim_min- Description
- The minimum amount of versions to trigger a trim (0 disables it)
- Type
- Integer
- Default
- 250
paxos_service_trim_max- Description
- The maximum amount of versions to trim during a single proposal (0 disables it)
- Type
- Integer
- Default
- 500
mon_max_log_epochs- Description
- The maximum amount of log epochs to trim during a single proposal
- Type
- Integer
- Default
- 500
mon_max_pgmap_epochs- Description
- The maximum amount of pgmap epochs to trim during a single proposal
- Type
- Integer
- Default
- 500
mon_mds_force_trim_to- Description
- Force monitor to trim mdsmaps to this point (0 disables it. dangerous, use with care)
- Type
- Integer
- Default
- 0
mon_osd_force_trim_to- Description
- Force monitor to trim osdmaps to this point, even if there is PGs not clean at the specified epoch (0 disables it. dangerous, use with care)
- Type
- Integer
- Default
- 0
mon_osd_cache_size- Description
- The size of osdmaps cache, not to rely on underlying store’s cache
- Type
- Integer
- Default
- 500
mon_election_timeout- Description
- On election proposer, maximum waiting time for all ACKs in seconds.
- Type
- Float
- Default
-
5
mon_lease- Description
- The length (in seconds) of the lease on the monitor’s versions.
- Type
- Float
- Default
-
5
mon_lease_renew_interval_factor- Description
-
mon lease*mon lease renew interval factorwill be the interval for the Leader to renew the other monitor’s leases. The factor should be less than1.0. - Type
- Float
- Default
-
0.6
mon_lease_ack_timeout_factor- Description
-
The Leader will wait
mon lease*mon lease ack timeout factorfor the Providers to acknowledge the lease extension. - Type
- Float
- Default
-
2.0
mon_accept_timeout_factor- Description
-
The Leader will wait
mon lease*mon accept timeout factorfor the Requesters to accept a Paxos update. It is also used during the Paxos recovery phase for similar purposes. - Type
- Float
- Default
-
2.0
mon_min_osdmap_epochs- Description
- Minimum number of OSD map epochs to keep at all times.
- Type
- 32-bit Integer
- Default
-
500
mon_max_pgmap_epochs- Description
- Maximum number of PG map epochs the monitor should keep.
- Type
- 32-bit Integer
- Default
-
500
mon_max_log_epochs- Description
- Maximum number of Log epochs the monitor should keep.
- Type
- 32-bit Integer
- Default
-
500
clock_offset- Description
-
How much to offset the system clock. See
Clock.ccfor details. - Type
- Double
- Default
-
0
mon_tick_interval- Description
- A monitor’s tick interval in seconds.
- Type
- 32-bit Integer
- Default
-
5
mon_clock_drift_allowed- Description
- The clock drift in seconds allowed between monitors.
- Type
- Float
- Default
-
.050
mon_clock_drift_warn_backoff- Description
- Exponential backoff for clock drift warnings.
- Type
- Float
- Default
-
5
mon_timecheck_interval- Description
- The time check interval (clock drift check) in seconds for the leader.
- Type
- Float
- Default
-
300.0
mon_timecheck_skew_interval- Description
- The time check interval (clock drift check) in seconds when in the presence of a skew in seconds for the Leader.
- Type
- Float
- Default
-
30.0
mon_max_osd- Description
- The maximum number of OSDs allowed in the cluster.
- Type
- 32-bit Integer
- Default
-
10000
mon_globalid_prealloc- Description
- The number of global IDs to pre-allocate for clients and daemons in the cluster.
- Type
- 32-bit Integer
- Default
-
10000
mon_sync_fs_threshold- Description
-
Synchronize with the filesystem when writing the specified number of objects. Set it to
0to disable it. - Type
- 32-bit Integer
- Default
-
5
mon_subscribe_interval- Description
- The refresh interval, in seconds, for subscriptions. The subscription mechanism enables obtaining the cluster maps and log information.
- Type
- Double
- Default
-
86400.000000
mon_stat_smooth_intervals- Description
-
Ceph will smooth statistics over the last
NPG maps. - Type
- Integer
- Default
-
6
mon_probe_timeout- Description
- Number of seconds the monitor will wait to find peers before bootstrapping.
- Type
- Double
- Default
-
2.0
mon_daemon_bytes- Description
- The message memory cap for metadata server and OSD messages (in bytes).
- Type
- 64-bit Integer Unsigned
- Default
-
400ul << 20
mon_max_log_entries_per_event- Description
- The maximum number of log entries per event.
- Type
- Integer
- Default
-
4096
mon_osd_prime_pg_temp- Description
-
Enables or disable priming the PGMap with the previous OSDs when an out OSD comes back into the cluster. With the
truesetting, the clients will continue to use the previous OSDs until the newly in OSDs as that PG peered. - Type
- Boolean
- Default
-
true
mon_osd_prime_pg_temp_max_time- Description
- How much time in seconds the monitor should spend trying to prime the PGMap when an out OSD comes back into the cluster.
- Type
- Float
- Default
-
0.5
mon_osd_prime_pg_temp_max_time_estimate- Description
- Maximum estimate of time spent on each PG before we prime all PGs in parallel.
- Type
- Float
- Default
-
0.25
mon_osd_allow_primary_affinity- Description
-
Allow
primary_affinityto be set in the osdmap. - Type
- Boolean
- Default
- False
mon_osd_pool_ec_fast_read- Description
-
Whether turn on fast read on the pool or not. It will be used as the default setting of newly created erasure pools if
fast_readis not specified at create time. - Type
- Boolean
- Default
- False
mon_mds_skip_sanity- Description
- Skip safety assertions on FSMap, in case of bugs where we want to continue anyway. Monitor terminates if the FSMap sanity check fails, but we can disable it by enabling this option.
- Type
- Boolean
- Default
- False
mon_max_mdsmap_epochs- Description
- The maximum amount of mdsmap epochs to trim during a single proposal.
- Type
- Integer
- Default
- 500
mon_config_key_max_entry_size- Description
- The maximum size of config-key entry (in bytes).
- Type
- Integer
- Default
- 65536
mon_warn_pg_not_scrubbed_ratio- Description
- The percentage of the scrub max interval past the scrub max interval to warn.
- Type
- float
- Default
- 0.5
mon_warn_pg_not_deep_scrubbed_ratio- Description
- The percentage of the deep scrub interval past the deep scrub interval to warn
- Type
- float
- Default
- 0.75
mon_scrub_interval- Description
- How often, in seconds, the monitor scrub its store by comparing the stored checksums with the computed ones of all the stored keys.
- Type
- Integer
- Default
- 3600*24
mon_scrub_timeout- Description
- The timeout to restart scrub of mon quorum participant does not respond for the latest chunk.
- Type
- Integer
- Default
- 5 min
mon_scrub_max_keys- Description
- The maximum number of keys to scrub each time.
- Type
- Integer
- Default
- 100
mon_scrub_inject_crc_mismatch- Description
- The probability of injecting CRC mismatches into Ceph Monitor scrub.
- Type
- Integer
- Default
- 3600*24
mon_scrub_inject_missing_keys- Description
- The probability of injecting missing keys into mon scrub.
- Type
- float
- Default
- 0
mon_compact_on_start- Description
-
Compact the database used as Ceph Monitor store on
ceph-monstart. A manual compaction helps to shrink the monitor database and improve its performance if the regular compaction fails to work. - Type
- Boolean
- Default
- False
mon_compact_on_bootstrap- Description
- Compact the database used as Ceph Monitor store on bootstrap. The monitor starts probing each other for creating a quorum after bootstrap. If it times out before joining the quorum, it will start over and bootstrap itself again.
- Type
- Boolean
- Default
- False
mon_compact_on_trim- Description
- Compact a certain prefix (including paxos) when we trim its old states.
- Type
- Boolean
- Default
- True
mon_cpu_threads- Description
- Number of threads for performing CPU intensive work on monitor.
- Type
- Boolean
- Default
- True
mon_osd_mapping_pgs_per_chunk- Description
- We calculate the mapping from the placement group to OSDs in chunks. This option specifies the number of placement groups per chunk.
- Type
- Integer
- Default
- 4096
mon_osd_max_split_count- Description
-
Largest number of PGs per "involved" OSD to let split create. When we increase the
pg_numof a pool, the placement groups will be split on all OSDs serving that pool. We want to avoid extreme multipliers on PG splits. - Type
- Integer
- Default
- 300
rados_mon_op_timeout- Description
- Number of seconds to wait for a response from the monitor before returning an error from a rados operation. 0 means at limit, or no wait time.
- Type
- Double
- Default
- 0
Additional Resources
Appendix E. Cephx configuration options
The following are Cephx configuration options that can be set up during deployment.
- auth_cluster_required
- Description
-
If enabled, the Red Hat Ceph Storage cluster daemons,
ceph-monandceph-osd, must authenticate with each other. Valid settings arecephxornone. - Type
- String
- Required
- No
- Default
-
cephx.
- auth_service_required
- Description
-
If enabled, the Red Hat Ceph Storage cluster daemons require Ceph clients to authenticate with the Red Hat Ceph Storage cluster in order to access Ceph services. Valid settings are
cephxornone. - Type
- String
- Required
- No
- Default
-
cephx.
- auth_client_required
- Description
-
If enabled, the Ceph client requires the Red Hat Ceph Storage cluster to authenticate with the Ceph client. Valid settings are
cephxornone. - Type
- String
- Required
- No
- Default
-
cephx.
- keyring
- Description
- The path to the keyring file.
- Type
- String
- Required
- No
- Default
-
/etc/ceph/$cluster.$name.keyring,/etc/ceph/$cluster.keyring,/etc/ceph/keyring,/etc/ceph/keyring.bin
- keyfile
- Description
- The path to a key file (that is. a file containing only the key).
- Type
- String
- Required
- No
- Default
- None
- key
- Description
- The key (that is, the text string of the key itself). Not recommended.
- Type
- String
- Required
- No
- Default
- None
- ceph-mon
- Location
-
$mon_data/keyring - Capabilities
-
mon 'allow *'
- ceph-osd
- Location
-
$osd_data/keyring - Capabilities
-
mon 'allow profile osd' osd 'allow *'
- radosgw
- Location
-
$rgw_data/keyring - Capabilities
-
mon 'allow rwx' osd 'allow rwx'
- cephx_require_signatures
- Description
-
If set to
true, Ceph requires signatures on all message traffic between the Ceph client and the Red Hat Ceph Storage cluster, and between daemons comprising the Red Hat Ceph Storage cluster. - Type
- Boolean
- Required
- No
- Default
-
false
- cephx_cluster_require_signatures
- Description
-
If set to
true, Ceph requires signatures on all message traffic between Ceph daemons comprising the Red Hat Ceph Storage cluster. - Type
- Boolean
- Required
- No
- Default
-
false
- cephx_service_require_signatures
- Description
-
If set to
true, Ceph requires signatures on all message traffic between Ceph clients and the Red Hat Ceph Storage cluster. - Type
- Boolean
- Required
- No
- Default
-
false
- cephx_sign_messages
- Description
- If the Ceph version supports message signing, Ceph will sign all messages so they cannot be spoofed.
- Type
- Boolean
- Default
-
true
- auth_service_ticket_ttl
- Description
- When the Red Hat Ceph Storage cluster sends a Ceph client a ticket for authentication, the cluster assigns the ticket a time to live.
- Type
- Double
- Default
-
60*60
Appendix F. Pools, placement groups, and CRUSH configuration options
The Ceph options that govern pools, placement groups, and the CRUSH algorithm.
- mon_allow_pool_delete
- Description
- Allows a monitor to delete a pool. In RHCS 3 and later releases, the monitor cannot delete the pool by default as an added measure to protect data.
- Type
- Boolean
- Default
-
false
- mon_max_pool_pg_num
- Description
- The maximum number of placement groups per pool.
- Type
- Integer
- Default
-
65536
- mon_pg_create_interval
- Description
- Number of seconds between PG creation in the same Ceph OSD Daemon.
- Type
- Float
- Default
-
30.0
- mon_pg_stuck_threshold
- Description
- Number of seconds after which PGs can be considered as being stuck.
- Type
- 32-bit Integer
- Default
-
300
- mon_pg_min_inactive
- Description
-
Ceph issues a
HEALTH_ERRstatus in the cluster log if the number of PGs that remain inactive longer than themon_pg_stuck_thresholdexceeds this setting. The default setting is one PG. A non-positive number disables this setting. - Type
- Integer
- Default
-
1
- mon_pg_warn_min_per_osd
- Description
-
Ceph issues a
HEALTH_WARNstatus in the cluster log if the average number of PGs per OSD in the cluster is less than this setting. A non-positive number disables this setting. - Type
- Integer
- Default
-
30
- mon_pg_warn_max_per_osd
- Description
-
Ceph issues a
HEALTH_WARNstatus in the cluster log if the average number of PGs per OSD in the cluster is greater than this setting. A non-positive number disables this setting. - Type
- Integer
- Default
-
300
- mon_pg_warn_min_objects
- Description
- Do not warn if the total number of objects in the cluster is below this number.
- Type
- Integer
- Default
-
1000
- mon_pg_warn_min_pool_objects
- Description
- Do not warn on pools whose object number is below this number.
- Type
- Integer
- Default
-
1000
- mon_pg_check_down_all_threshold
- Description
-
The threshold of
downOSDs by percentage after which Ceph checks all PGs to ensure they are not stuck or stale. - Type
- Float
- Default
-
0.5
- mon_pg_warn_max_object_skew
- Description
-
Ceph issue a
HEALTH_WARNstatus in the cluster log if the average number of objects in a pool is greater thanmon pg warn max object skewtimes the average number of objects for all pools. A non-positive number disables this setting. - Type
- Float
- Default
-
10
- mon_delta_reset_interval
- Description
- The number of seconds of inactivity before Ceph resets the PG delta to zero. Ceph keeps track of the delta of the used space for each pool to aid administrators in evaluating the progress of recovery and performance.
- Type
- Integer
- Default
-
10
- mon_osd_max_op_age
- Description
-
The maximum age in seconds for an operation to complete before issuing a
HEALTH_WARNstatus. - Type
- Float
- Default
-
32.0
- osd_pg_bits
- Description
- Placement group bits per Ceph OSD Daemon.
- Type
- 32-bit Integer
- Default
-
6
- osd_pgp_bits
- Description
- The number of bits per Ceph OSD Daemon for Placement Groups for Placement purpose (PGPs).
- Type
- 32-bit Integer
- Default
-
6
- osd_crush_chooseleaf_type
- Description
-
The bucket type to use for
chooseleafin a CRUSH rule. Uses ordinal rank rather than name. - Type
- 32-bit Integer
- Default
-
1. Typically a host containing one or more Ceph OSD Daemons.
- osd_pool_default_crush_replicated_ruleset
- Description
- The default CRUSH ruleset to use when creating a replicated pool.
- Type
- 8-bit Integer
- Default
-
0
- osd_pool_erasure_code_stripe_unit
- Description
-
Sets the default size, in bytes, of a chunk of an object stripe for erasure coded pools. Every object of size S will be stored as N stripes, with each data chunk receiving
stripe unitbytes. Each stripe ofN * stripe unitbytes will be encoded/decoded individually. This option can be overridden by thestripe_unitsetting in an erasure code profile. - Type
- Unsigned 32-bit Integer
- Default
-
4096
- osd_pool_default_size
- Description
-
Sets the number of replicas for objects in the pool. The default value is the same as
ceph osd pool set {pool-name} size {size}. - Type
- 32-bit Integer
- Default
-
3
- osd_pool_default_min_size
- Description
-
Sets the minimum number of written replicas for objects in the pool in order to acknowledge a write operation to the client. If the minimum is not met, Ceph will not acknowledge the write to the client. This setting ensures a minimum number of replicas when operating in
degradedmode. - Type
- 32-bit Integer
- Default
-
0, which means no particular minimum. If0, minimum issize - (size / 2).
- osd_pool_default_pg_num
- Description
-
The default number of placement groups for a pool. The default value is the same as
pg_numwithmkpool. - Type
- 32-bit Integer
- Default
-
32
- osd_pool_default_pgp_num
- Description
-
The default number of placement groups for placement for a pool. The default value is the same as
pgp_numwithmkpool. PG and PGP should be equal. - Type
- 32-bit Integer
- Default
-
0
- osd_pool_default_flags
- Description
- The default flags for new pools.
- Type
- 32-bit Integer
- Default
-
0
- osd_max_pgls
- Description
- The maximum number of placement groups to list. A client requesting a large number can tie up the Ceph OSD Daemon.
- Type
- Unsigned 64-bit Integer
- Default
-
1024 - Note
- Default should be fine.
- osd_min_pg_log_entries
- Description
- The minimum number of placement group logs to maintain when trimming log files.
- Type
- 32-bit Int Unsigned
- Default
-
250
- osd_default_data_pool_replay_window
- Description
- The time, in seconds, for an OSD to wait for a client to replay a request.
- Type
- 32-bit Integer
- Default
-
45
Appendix G. Object Storage Daemon (OSD) configuration options
The following are Ceph Object Storage Daemon (OSD) configuration options that can be set during deployment.
You can set these configuration options with the ceph config set osd CONFIGURATION_OPTION VALUE command.
- osd_uuid
- Description
- The universally unique identifier (UUID) for the Ceph OSD.
- Type
- UUID
- Default
- The UUID.
- Note
-
The
osd uuidapplies to a single Ceph OSD. Thefsidapplies to the entire cluster.
- osd_data
- Description
The path to the OSD’s data. You must create the directory when deploying Ceph. Mount a drive for OSD data at this mount point.
IMPORTANT: Red Hat does not recommend changing the default.
- Type
- String
- Default
-
/var/lib/ceph/osd/$cluster-$id
- osd_max_write_size
- Description
- The maximum size of a write in megabytes.
- Type
- 32-bit Integer
- Default
-
90
- osd_client_message_size_cap
- Description
- The largest client data message allowed in memory.
- Type
- 64-bit Integer Unsigned
- Default
-
500MB default.
500*1024L*1024L
- osd_class_dir
- Description
- The class path for RADOS class plug-ins.
- Type
- String
- Default
-
$libdir/rados-classes
- osd_max_scrubs
- Description
- The maximum number of simultaneous scrub operations for a Ceph OSD.
- Type
- 32-bit Int
- Default
-
1
- osd_scrub_thread_timeout
- Description
- The maximum time in seconds before timing out a scrub thread.
- Type
- 32-bit Integer
- Default
-
60
- osd_scrub_finalize_thread_timeout
- Description
- The maximum time in seconds before timing out a scrub finalize thread.
- Type
- 32-bit Integer
- Default
-
60*10
- osd_scrub_begin_hour
- Description
-
This restricts scrubbing to this hour of the day or later. Use
osd_scrub_begin_hour = 0andosd_scrub_end_hour = 0to allow scrubbing the entire day. Along withosd_scrub_end_hour, they define a time window, in which the scrubs can happen. But a scrub is performed no matter whether the time window allows or not, as long as the placement group’s scrub interval exceedsosd_scrub_max_interval. - Type
- Integer
- Default
-
0 - Allowed range
-
[0,23]
- osd_scrub_end_hour
- Description
-
This restricts scrubbing to the hour earlier than this. Use
osd_scrub_begin_hour = 0andosd_scrub_end_hour = 0to allow scrubbing for the entire day. Along withosd_scrub_begin_hour, they define a time window, in which the scrubs can happen. But a scrub is performed no matter whether the time window allows or not, as long as the placement group’s scrub interval exceedsosd_scrub_max_interval. - Type
- Integer
- Default
-
0 - Allowed range
-
[0,23]
- osd_scrub_load_threshold
- Description
-
The maximum load. Ceph will not scrub when the system load (as defined by the
getloadavg()function) is higher than this number. Default is0.5. - Type
- Float
- Default
-
0.5
- osd_scrub_min_interval
- Description
- The minimum interval in seconds for scrubbing the Ceph OSD when the Red Hat Ceph Storage cluster load is low.
- Type
- Float
- Default
-
Once per day.
60*60*24
- osd_scrub_max_interval
- Description
- The maximum interval in seconds for scrubbing the Ceph OSD irrespective of cluster load.
- Type
- Float
- Default
-
Once per week.
7*60*60*24
- osd_scrub_interval_randomize_ratio
- Description
-
Takes the ratio and randomizes the scheduled scrub between
osd scrub min intervalandosd scrub max interval. - Type
- Float
- Default
-
0.5.
- mon_warn_not_scrubbed
- Description
-
Number of seconds after
osd_scrub_intervalto warn about any PGs that were not scrubbed. - Type
- Integer
- Default
-
0(no warning).
- osd_scrub_chunk_min
- Description
-
The object store is partitioned into chunks which end on hash boundaries. For chunky scrubs, Ceph scrubs objects one chunk at a time with writes blocked for that chunk. The
osd scrub chunk minsetting represents the minimum number of chunks to scrub. - Type
- 32-bit Integer
- Default
-
5
- osd_scrub_chunk_max
- Description
- The maximum number of chunks to scrub.
- Type
- 32-bit Integer
- Default
-
25
- osd_scrub_sleep
- Description
- The time to sleep between deep scrub operations.
- Type
- Float
- Default
-
0(or off).
- osd_scrub_during_recovery
- Description
- Allows scrubbing during recovery.
- Type
- Bool
- Default
-
false
- osd_scrub_invalid_stats
- Description
- Forces extra scrub to fix stats marked as invalid.
- Type
- Bool
- Default
-
true
- osd_scrub_priority
- Description
- Controls queue priority of scrub operations versus client I/O.
- Type
- Unsigned 32-bit Integer
- Default
-
5
- osd_requested_scrub_priority
- Description
-
The priority set for user requested scrub on the work queue. If this value were to be smaller than
osd_client_op_priority, it can be boosted to the value ofosd_client_op_prioritywhen scrub is blocking client operations. - Type
- Unsigned 32-bit Integer
- Default
-
120
- osd_scrub_cost
- Description
- Cost of scrub operations in megabytes for queue scheduling purposes.
- Type
- Unsigned 32-bit Integer
- Default
-
52428800
- osd_deep_scrub_interval
- Description
-
The interval for deep scrubbing, that is fully reading all data. The
osd scrub load thresholdparameter does not affect this setting. - Type
- Float
- Default
-
Once per week.
60*60*24*7
- osd_deep_scrub_stride
- Description
- Read size when doing a deep scrub.
- Type
- 32-bit Integer
- Default
-
512 KB.
524288
- mon_warn_not_deep_scrubbed
- Description
-
Number of seconds after
osd_deep_scrub_intervalto warn about any PGs that were not scrubbed. - Type
- Integer
- Default
-
0(no warning)
- osd_deep_scrub_randomize_ratio
- Description
-
The rate at which scrubs will randomly become deep scrubs (even before
osd_deep_scrub_intervalhas passed). - Type
- Float
- Default
-
0.15or 15%
- osd_deep_scrub_update_digest_min_age
- Description
- How many seconds old objects must be before scrub updates the whole-object digest.
- Type
- Integer
- Default
-
7200(120 hours)
- osd_deep_scrub_large_omap_object_key_threshold
- Description
- Warning when you encounter an object with more OMAP keys than this.
- Type
- Integer
- Default
-
200000
- osd_deep_scrub_large_omap_object_value_sum_threshold
- Description
- Warning when you encounter an object with more OMAP key bytes than this.
- Type
- Integer
- Default
-
1 G
- osd_op_num_shards
- Description
- The number of shards for client operations.
- Type
- 32-bit Integer
- Default
-
0
- osd_op_num_threads_per_shard
- Description
- The number of threads per shard for client operations.
- Type
- 32-bit Integer
- Default
-
0
- osd_op_num_shards_hdd
- Description
- The number of shards for HDD operations.
- Type
- 32-bit Integer
- Default
-
5
- osd_op_num_threads_per_shard_hdd
- Description
- The number of threads per shard for HDD operations.
- Type
- 32-bit Integer
- Default
-
1
- osd_op_num_shards_ssd
- Description
- The number of shards for SSD operations.
- Type
- 32-bit Integer
- Default
-
8
- osd_op_num_threads_per_shard_ssd
- Description
- The number of threads per shard for SSD operations.
- Type
- 32-bit Integer
- Default
-
2
- osd_client_op_priority
- Description
-
The priority set for client operations. It is relative to
osd recovery op priority. - Type
- 32-bit Integer
- Default
-
63 - Valid Range
- 1-63
- osd_recovery_op_priority
- Description
-
The priority set for recovery operations. It is relative to
osd client op priority. - Type
- 32-bit Integer
- Default
-
3 - Valid Range
- 1-63
- osd_op_thread_timeout
- Description
- The Ceph OSD operation thread timeout in seconds.
- Type
- 32-bit Integer
- Default
-
15
- osd_op_complaint_time
- Description
- An operation becomes complaint worthy after the specified number of seconds have elapsed.
- Type
- Float
- Default
-
30
- osd_disk_threads
- Description
- The number of disk threads, which are used to perform background disk intensive OSD operations such as scrubbing and snap trimming.
- Type
- 32-bit Integer
- Default
-
1
- osd_op_history_size
- Description
- The maximum number of completed operations to track.
- Type
- 32-bit Unsigned Integer
- Default
-
20
- osd_op_history_duration
- Description
- The oldest completed operation to track.
- Type
- 32-bit Unsigned Integer
- Default
-
600
- osd_op_log_threshold
- Description
- How many operations logs to display at once.
- Type
- 32-bit Integer
- Default
-
5
- osd_op_timeout
- Description
- The time in seconds after which running OSD operations time out.
- Type
- Integer
- Default
-
0
Do not set the osd op timeout option unless your clients can handle the consequences. For example, setting this parameter on clients running in virtual machines can lead to data corruption because the virtual machines interpret this timeout as a hardware failure.
- osd_max_backfills
- Description
- The maximum number of backfill operations allowed to or from a single OSD.
- Type
- 64-bit Unsigned Integer
- Default
-
1
- osd_backfill_scan_min
- Description
- The minimum number of objects per backfill scan.
- Type
- 32-bit Integer
- Default
-
64
- osd_backfill_scan_max
- Description
- The maximum number of objects per backfill scan.
- Type
- 32-bit Integer
- Default
-
512
- osd_backfill_full_ratio
- Description
- Refuse to accept backfill requests when the Ceph OSD’s full ratio is above this value.
- Type
- Float
- Default
-
0.85
- osd_backfill_retry_interval
- Description
- The number of seconds to wait before retrying backfill requests.
- Type
- Double
- Default
-
30.000000
- osd_map_dedup
- Description
- Enable removing duplicates in the OSD map.
- Type
- Boolean
- Default
-
true
- osd_map_cache_size
- Description
- The size of the OSD map cache in megabytes.
- Type
- 32-bit Integer
- Default
-
50
- osd_map_cache_bl_size
- Description
- The size of the in-memory OSD map cache in OSD daemons.
- Type
- 32-bit Integer
- Default
-
50
- osd_map_cache_bl_inc_size
- Description
- The size of the in-memory OSD map cache incrementals in OSD daemons.
- Type
- 32-bit Integer
- Default
-
100
- osd_map_message_max
- Description
- The maximum map entries allowed per MOSDMap message.
- Type
- 32-bit Integer
- Default
-
40
- osd_snap_trim_thread_timeout
- Description
- The maximum time in seconds before timing out a snap trim thread.
- Type
- 32-bit Integer
- Default
-
60*60*1
- osd_pg_max_concurrent_snap_trims
- Description
- The max number of parallel snap trims/PG. This controls how many objects per PG to trim at once.
- Type
- 32-bit Integer
- Default
-
2
- osd_snap_trim_sleep
- Description
- Insert a sleep between every trim operation a PG issues.
- Type
- 32-bit Integer
- Default
-
0
- osd_max_trimming_pgs
- Description
- The max number of trimming PGs
- Type
- 32-bit Integer
- Default
-
2
- osd_backlog_thread_timeout
- Description
- The maximum time in seconds before timing out a backlog thread.
- Type
- 32-bit Integer
- Default
-
60*60*1
- osd_default_notify_timeout
- Description
- The OSD default notification timeout (in seconds).
- Type
- 32-bit Integer Unsigned
- Default
-
30
- osd_check_for_log_corruption
- Description
- Check log files for corruption. Can be computationally expensive.
- Type
- Boolean
- Default
-
false
- osd_remove_thread_timeout
- Description
- The maximum time in seconds before timing out a remove OSD thread.
- Type
- 32-bit Integer
- Default
-
60*60
- osd_command_thread_timeout
- Description
- The maximum time in seconds before timing out a command thread.
- Type
- 32-bit Integer
- Default
-
10*60
- osd_command_max_records
- Description
- Limits the number of lost objects to return.
- Type
- 32-bit Integer
- Default
-
256
- osd_auto_upgrade_tmap
- Description
-
Uses
tmapforomapon old objects. - Type
- Boolean
- Default
-
true
- osd_tmapput_sets_users_tmap
- Description
-
Uses
tmapfor debugging only. - Type
- Boolean
- Default
-
false
- osd_preserve_trimmed_log
- Description
- Preserves trimmed log files, but uses more disk space.
- Type
- Boolean
- Default
-
false
- osd_recovery_delay_start
- Description
- After peering completes, Ceph delays for the specified number of seconds before starting to recover objects.
- Type
- Float
- Default
-
0
- osd_recovery_max_active
- Description
- The number of active recovery requests per OSD at one time. More requests will accelerate recovery, but the requests place an increased load on the cluster.
- Type
- 32-bit Integer
- Default
-
0
- osd_recovery_max_chunk
- Description
- The maximum size of a recovered chunk of data to push.
- Type
- 64-bit Integer Unsigned
- Default
-
8388608
- osd_recovery_threads
- Description
- The number of threads for recovering data.
- Type
- 32-bit Integer
- Default
-
1
- osd_recovery_thread_timeout
- Description
- The maximum time in seconds before timing out a recovery thread.
- Type
- 32-bit Integer
- Default
-
30
- osd_recover_clone_overlap
- Description
-
Preserves clone overlap during recovery. Should always be set to
true. - Type
- Boolean
- Default
-
true
- rados_osd_op_timeout
- Description
- Number of seconds that RADOS waits for a response from the OSD before returning an error from a RADOS operation. A value of 0 means no limit.
- Type
- Double
- Default
- 0
Appendix H. Ceph Monitor and OSD configuration options
When modifying heartbeat settings, include them in the [global] section of the Ceph configuration file.
- mon_osd_min_up_ratio
- Description
-
The minimum ratio of
upCeph OSD Daemons before Ceph will mark Ceph OSD Daemonsdown. - Type
- Double
- Default
-
.3
- mon_osd_min_in_ratio
- Description
-
The minimum ratio of
inCeph OSD Daemons before Ceph will mark Ceph OSD Daemonsout. - Type
- Double
- Default
-
0.750000
- mon_osd_laggy_halflife
- Description
-
The number of seconds
laggyestimates will decay. - Type
- Integer
- Default
-
60*60
- mon_osd_laggy_weight
- Description
-
The weight for new samples in
laggyestimation decay. - Type
- Double
- Default
-
0.3
- mon_osd_laggy_max_interval
- Description
-
Maximum value of
laggy_intervalin laggy estimations (in seconds). The monitor uses an adaptive approach to evaluate thelaggy_intervalof a certain OSD. This value will be used to calculate the grace time for that OSD. - Type
- Integer
- Default
-
300
- mon_osd_adjust_heartbeat_grace
- Description
-
If set to
true, Ceph will scale based onlaggyestimations. - Type
- Boolean
- Default
-
true
- mon_osd_adjust_down_out_interval
- Description
-
If set to
true, Ceph will scaled based onlaggyestimations. - Type
- Boolean
- Default
-
true
- mon_osd_auto_mark_in
- Description
-
Ceph will mark any booting Ceph OSD Daemons as
inthe Ceph Storage Cluster. - Type
- Boolean
- Default
-
false
- mon_osd_auto_mark_auto_out_in
- Description
-
Ceph will mark booting Ceph OSD Daemons auto marked
outof the Ceph Storage Cluster asinthe cluster. - Type
- Boolean
- Default
-
true
- mon_osd_auto_mark_new_in
- Description
-
Ceph will mark booting new Ceph OSD Daemons as
inthe Ceph Storage Cluster. - Type
- Boolean
- Default
-
true
- mon_osd_down_out_interval
- Description
-
The number of seconds Ceph waits before marking a Ceph OSD Daemon
downandoutif it does not respond. - Type
- 32-bit Integer
- Default
-
600
- mon_osd_downout_subtree_limit
- Description
-
The largest CRUSH unit type that Ceph will automatically mark
out. - Type
- String
- Default
-
rack
- mon_osd_reporter_subtree_level
- Description
-
This setting defines the parent CRUSH unit type for the reporting OSDs. The OSDs send failure reports to the monitor if they find an unresponsive peer. The monitor may mark the reported OSD
downand thenoutafter a grace period. - Type
- String
- Default
-
host
- mon_osd_report_timeout
- Description
-
The grace period in seconds before declaring unresponsive Ceph OSD Daemons
down. - Type
- 32-bit Integer
- Default
-
900
- mon_osd_min_down_reporters
- Description
-
The minimum number of Ceph OSD Daemons required to report a
downCeph OSD Daemon. - Type
- 32-bit Integer
- Default
-
2
- osd_heartbeat_address
- Description
- A Ceph OSD Daemon’s network address for heartbeats.
- Type
- Address
- Default
- The host address.
- osd_heartbeat_interval
- Description
- How often a Ceph OSD Daemon pings its peers (in seconds).
- Type
- 32-bit Integer
- Default
-
6
- osd_heartbeat_grace
- Description
-
The elapsed time when a Ceph OSD Daemon has not shown a heartbeat that the Ceph Storage Cluster considers it
down. - Type
- 32-bit Integer
- Default
-
20
- osd_mon_heartbeat_interval
- Description
- How often the Ceph OSD Daemon pings a Ceph Monitor if it has no Ceph OSD Daemon peers.
- Type
- 32-bit Integer
- Default
-
30
- osd_mon_report_interval_max
- Description
- The maximum time in seconds that a Ceph OSD Daemon can wait before it must report to a Ceph Monitor.
- Type
- 32-bit Integer
- Default
-
120
- osd_mon_report_interval_min
- Description
- The minimum number of seconds a Ceph OSD Daemon may wait from startup or another reportable event before reporting to a Ceph Monitor.
- Type
- 32-bit Integer
- Default
-
5 - Valid Range
-
Should be less than
osd mon report interval max
- osd_mon_ack_timeout
- Description
- The number of seconds to wait for a Ceph Monitor to acknowledge a request for statistics.
- Type
- 32-bit Integer
- Default
-
30
Appendix I. Ceph scrubbing options
Ceph ensures data integrity by scrubbing placement groups. The following are the Ceph scrubbing options that you can adjust to increase or decrease scrubbing operations.
You can set these configuration options with the ceph config set global CONFIGURATION_OPTION VALUE command.
- mds_max_scrub_ops_in_progress
- Description
-
The maximum number of scrub operations performed in parallel. You can set this value with
ceph config set mds_max_scrub_ops_in_progress VALUEcommand. - Type
- integer
- Default
- 5
- osd_max_scrubs
- Description
- The maximum number of simultaneous scrub operations for a Ceph OSD Daemon.
- Type
- integer
- Default
- 1
- osd_scrub_begin_hour
- Description
-
The specific hour at which the scrubbing begins. Along with
osd_scrub_end_hour, you can define a time window in which the scrubs can happen. Useosd_scrub_begin_hour = 0andosd_scrub_end_hour = 0to allow scrubbing the entire day. - Type
- integer
- Default
- 0
- Allowed range
-
[0, 23]
- osd_scrub_end_hour
- Description
-
The specific hour at which the scrubbing ends. Along with
osd_scrub_begin_hour, you can define a time window, in which the scrubs can happen. Useosd_scrub_begin_hour = 0andosd_scrub_end_hour = 0to allow scrubbing for the entire day. - Type
- integer
- Default
- 0
- Allowed range
-
[0, 23]
- osd_scrub_begin_week_day
- Description
-
The specific day on which the scrubbing begins. 0 = Sunday, 1 = Monday, etc. Along with “osd_scrub_end_week_day”, you can define a time window in which scrubs can happen. Use
osd_scrub_begin_week_day = 0andosd_scrub_end_week_day = 0to allow scrubbing for the entire week. - Type
- integer
- Default
- 0
- Allowed range
-
[0, 6]
- osd_scrub_end_week_day
- Description
-
This defines the day on which the scrubbing ends. 0 = Sunday, 1 = Monday, etc. Along with
osd_scrub_begin_week_day, they define a time window, in which the scrubs can happen. Useosd_scrub_begin_week_day = 0andosd_scrub_end_week_day = 0to allow scrubbing for the entire week. - Type
- integer
- Default
- 0
- Allowed range
-
[0, 6]
- osd_scrub_during_recovery
- Description
-
Allow scrub during recovery. Setting this to
falsedisables scheduling new scrub, and deep-scrub, while there is an active recovery. The already running scrubs continue which is useful to reduce load on busy storage clusters. - Type
- boolean
- Default
- false
- osd_scrub_load_threshold
- Description
- The normalized maximum load. Scrubbing does not happen when the system load, as defined by getloadavg() / number of online CPUs, is higher than this defined number.
- Type
- float
- Default
- 0.5
- osd_scrub_min_interval
- Description
- The minimal interval in seconds for scrubbing the Ceph OSD daemon when the Ceph storage Cluster load is low.
- Type
- float
- Default
- 1 day
- osd_scrub_max_interval
- Description
- The maximum interval in seconds for scrubbing the Ceph OSD daemon irrespective of cluster load.
- Type
- float
- Default
- 7 days
- osd_scrub_chunk_min
- Description
- The minimal number of object store chunks to scrub during a single operation. Ceph blocks writes to a single chunk during scrub.
- type
- integer
- Default
- 5
- osd_scrub_chunk_max
- Description
- The maximum number of object store chunks to scrub during a single operation.
- type
- integer
- Default
- 25
- osd_scrub_sleep
- Description
- Time to sleep before scrubbing the next group of chunks. Increasing this value slows down the overall rate of scrubbing, so that client operations are less impacted.
- type
- float
- Default
- 0.0
- osd_scrub_extended_sleep
- Description
- Duration to inject a delay during scrubbing out of scrubbing hours or seconds.
- type
- float
- Default
- 0.0
- osd_scrub_backoff_ratio
- Description
- Backoff ratio for scheduling scrubs. This is the percentage of ticks that do NOT schedule scrubs, 66% means that 1 out of 3 ticks schedules scrubs.
- type
- float
- Default
- 0.66
- osd_deep_scrub_interval
- Description
-
The interval for
deepscrubbing, fully reading all data. Theosd_scrub_load_thresholddoes not affect this setting. - type
- float
- Default
- 7 days
- osd_debug_deep_scrub_sleep
- Description
- Inject an expensive sleep during deep scrub IO to make it easier to induce preemption.
- type
- float
- Default
- 0
- osd_scrub_interval_randomize_ratio
- Description
-
Add a random delay to
osd_scrub_min_intervalwhen scheduling the next scrub job for a placement group. The delay is a random value less thanosd_scrub_min_interval*osd_scrub_interval_randomized_ratio. The default setting spreads scrubs throughout the allowed time window of[1, 1.5]*osd_scrub_min_interval. - type
- float
- Default
- 0.5
- osd_deep_scrub_stride
- Description
- Read size when doing a deep scrub.
- type
- size
- Default
- 512 KB
- osd_scrub_auto_repair_num_errors
- Description
- Auto repair does not occur if more than these many errors are found.
- type
- integer
- Default
- 5
- osd_scrub_auto_repair
- Description
-
Setting this to
trueenables automatic Placement Group (PG) repair when errors are found by scrubs or deep-scrubs. However, if more thanosd_scrub_auto_repair_num_errorserrors are found, a repair is NOT performed. This option is for periodic scrubs and not for operator-initiated scrubs. - type
- boolean
- Default
- false
- osd_scrub_max_preemptions
- Description
- Set the maximum number of times you need to preempt a deep scrub due to a client operation before blocking client IO to complete the scrub.
- type
- integer
- Default
- 5
- osd_deep_scrub_keys
- Description
- Number of keys to read from an object at a time during deep scrub.
- type
- integer
- Default
- 1024
Appendix J. BlueStore configuration options
The following are Ceph BlueStore configuration options that can be configured during deployment.
This list is not complete.
- rocksdb_cache_size
- Description
- The size of the RocksDB cache in MB.
- Type
- 32-bit Integer
- Default
-
512