
Chapter 2. Configuration
2.1. The Beast and CivetWeb front end web servers
The Ceph Object Gateway provides Beast and CivetWeb as front ends, both are C/C++ embedded web servers.
Beast
Starting with Red Hat Ceph Storage 4, Beast is the default front-end web server. When upgrading from Red Hat Ceph Storage 3, the rgw_frontends parameter automatically changes to Beast. Beast uses the Boost.Beast C++ library to parse HTTP, and Boost.Asio to do asynchronous network I/O.
CivetWeb
In Red Hat Ceph Storage 3, CivetWeb is the default front end, but Beast can also be used by setting the rgw_frontends option accordingly. CivetWeb is an HTTP library, which is a fork of the Mongoose project.
Additional Resources
2.2. Using the Beast front end
The Ceph Object Gateway provides CivetWeb and Beast embedded HTTP servers as front ends. The Beast front end uses the Boost.Beast library for HTTP parsing and the Boost.Asio library for asynchronous network I/O. In Red Hat Ceph Storage version 3.x, CivetWeb was the default front end, and to use the Beast front end it needed to be specified with rgw_frontends in the Red Hat Ceph Storage configuration file. As of Red Hat Ceph Storage version 4.0, the Beast front end is default, and upgrading from Red Hat Ceph Storage 3.x automatically changes the rgw_frontends parameter to Beast.
Additional Resources
2.3. Beast configuration options
The following Beast configuration options can be passed to the embedded web server in the Ceph configuration file for the RADOS Gateway. Each option has a default value. If a value is not specified, the default value is empty.
| Option | Description | Default |
|---|---|---|
|
|
Sets the listening address in the form | EMPTY |
|
| Path to the SSL certificate file used for SSL-enabled endpoints. If the file is a PEM file containing more than one item the order is important. The file must begin with the RGW server key, then any intermediate certificate, and finally the CA certificate. | EMPTY |
|
|
Optional path to the private key file used for SSL-enabled endpoints. If one is not given the file specified by | EMPTY |
|
| Performance optimization in some environments. | EMPTY |
|
| Set an explicit request timeout for the Beast front end. Setting a larger request timeout can make the gateway more tolerant of slow clients (for example, clients connected over high-latency networks). | 65 |
Example /etc/ceph/ceph.conf file with Beast options using SSL:
...

[client.rgw.node1]
rgw frontends = beast ssl_endpoint=192.168.0.100:443 ssl_certificate=<path to SSL certificate>
By default, the Beast front end writes an access log line recording all requests processed by the server to the RADOS Gateway log file.
Additional Resources
- See Using the Beast front end for more information.
2.4. Changing the CivetWeb port
When the Ceph Object Gateway is installed using Ansible it configures CivetWeb to run on port 8080. Ansible does this by adding a line similar to the following in the Ceph configuration file:
rgw frontends = civetweb port=192.168.122.199:8080 num_threads=100
If the Ceph configuration file does not include the rgw frontends = civetweb line, the Ceph Object Gateway listens on port 7480. If it includes an rgw_frontends = civetweb line but there is no port specified, the Ceph Object Gateway listens on port 80.
Because Ansible configures the Ceph Object Gateway to listen on port 8080 and the supported way to install Red Hat Ceph Storage 4 is using ceph-ansible, port 8080 is considered the default port in the Red Hat Ceph Storage 4 documentation.
Prerequisites
- A running Red Hat Ceph Storage 4.1 cluster.
- A Ceph Object Gateway node.
Procedure
-
On the gateway node, open the Ceph configuration file in the
/etc/ceph/directory. Find an Ceph Object Gateway (RGW) client section similar to the example:
[client.rgw.gateway-node1]
host = gateway-node1
keyring = /var/lib/ceph/radosgw/ceph-rgw.gateway-node1/keyring
log file = /var/log/ceph/ceph-rgw-gateway-node1.log
rgw frontends = civetweb port=192.168.122.199:8080 num_threads=100
The
[client.rgw.gateway-node1]heading identifies this portion of the Ceph configuration file as configuring a Ceph Storage Cluster client where the client type is a Ceph Object Gateway as identified byrgw, and the name of the node isgateway-node1.To change the default Ansible configured port of
8080to80edit thergw frontendsline:rgw frontends = civetweb port=192.168.122.199:80 num_threads=100
Ensure there is no whitespace between
port=port-numberin thergw_frontendskey/value pair.Repeat this step on any other gateway nodes you want to change the port on.
Restart the Ceph Object Gateway service from each gateway node to make the new port setting take effect:
# systemctl restart ceph-radosgw.target
Ensure the configured port is open on each gateway node’s firewall:
# firewall-cmd --list-all
If the port is not open, add the port and reload the firewall configuration:
# firewall-cmd --zone=public --add-port 80/tcp --permanent
# firewall-cmd --reload
Additional Resources
2.5. Using SSL with Civetweb
In Red Hat Ceph Storage 1, Civetweb SSL support for the Ceph Object Gateway relied on HAProxy and keepalived. In Red Hat Ceph Storage 2 and later releases, Civetweb can use the OpenSSL library to provide Transport Layer Security (TLS).
Production deployments MUST use HAProxy and keepalived to terminate the SSL connection at HAProxy. Using SSL with Civetweb is recommended ONLY for small-to-medium sized test and pre-production deployments.
To use SSL with Civetweb, obtain a certificate from a Certificate Authority (CA) that matches the hostname of the gateway node. Red Hat recommends obtaining a certificate from a CA that has subject alternate name fields and a wildcard for use with S3-style subdomains.
Civetweb requires the key, server certificate and any other certificate authority or intermediate certificate in a single .pem file.
A .pem file contains the secret key. Protect the .pem file from unauthorized access.
To configure a port for SSL, add the port number to rgw_frontends and append an s to the port number to indicate that it is a secure port. Additionally, add ssl_certificate with a path to the .pem file. For example:
[client.rgw.{hostname}]
rgw_frontends = "civetweb port=443s ssl_certificate=/etc/ceph/private/server.pem"
2.6. Civetweb Configuration Options
The following Civetweb configuration options can be passed to the embedded web server in the Ceph configuration file for the RADOS Gateway. Each option has a default value and if a value is not specified, then the default value is empty.
| Option | Description | Default |
|---|---|---|
|
| Path to a file for access logs. Either full path, or relative to the current working directory. If absent (default), then accesses are not logged. | EMPTY |
|
| Path to a file for error logs. Either full path, or relative to the current working directory. If absent (default), then errors are not logged. | EMPTY |
|
| Number of worker threads. Civetweb handles each incoming connection in a separate thread. Therefore, the value of this option is effectively the number of concurrent HTTP connections Civetweb can handle. | 50 |
|
| Timeout for network read and network write operations, in milliseconds. If a client intends to keep long-running connection, either increase this value or (better) use keep-alive messages. | 30000 |
The following is an example of the /etc/ceph/ceph.conf file with some of these options set:
...

[client.rgw.node1]
rgw frontends = civetweb request_timeout_ms=30000 error_log_file=/var/log/radosgw/civetweb.error.log access_log_file=/var/log/radosgw/civetweb.access.log
Both the CivetWeb and Beast frontends write an access log line recording of all requests processed by the server to the RADOS gateway log file.
2.7. Add a Wildcard to the DNS
To use Ceph with S3-style subdomains, for example bucket-name.domain-name.com, add a wildcard to the DNS record of the DNS server the ceph-radosgw daemon uses to resolve domain names.
For dnsmasq, add the following address setting with a dot (.) prepended to the host name:
address=/.{hostname-or-fqdn}/{host-ip-address}For example:
address=/.gateway-node1/192.168.122.75
For bind, add a wildcard to the DNS record. For example:
$TTL    604800
@       IN      SOA     gateway-node1. root.gateway-node1. (
                              2         ; Serial
                         604800         ; Refresh
                          86400         ; Retry
                        2419200         ; Expire
                         604800 )       ; Negative Cache TTL
;
@       IN      NS      gateway-node1.
@       IN      A       192.168.122.113
*       IN      CNAME   @
Restart the DNS server and ping the server with a subdomain to ensure that the ceph-radosgw daemon can process the subdomain requests:
ping mybucket.{hostname}For example:
ping mybucket.gateway-node1
If the DNS server is on the local machine, you may need to modify /etc/resolv.conf by adding a nameserver entry for the local machine.
Finally, specify the host name or address of the DNS server in the appropriate [client.rgw.{instance}] section of the Ceph configuration file using the rgw_dns_name = {hostname} setting. For example:
[client.rgw.rgw1.rgw0]
...
rgw_dns_name = {hostname}
As a best practice, make changes to the Ceph configuration file at a centralized location such as an admin node or ceph-ansible and redistribute the configuration file as necessary to ensure consistency across the cluster.
Finally, restart the Ceph object gateway so that DNS setting takes effect.
2.8. Adjusting Logging and Debugging Output
Once you finish the setup procedure, check your logging output to ensure it meets your needs. If you encounter issues with your configuration, you can increase logging and debugging messages in the [global] section of your Ceph configuration file and restart the gateway(s) to help troubleshoot any configuration issues. For example:
[global]
#append the following in the global section.
debug ms = 1
debug civetweb = 20
For RGW debug logs, add the following parameter in the [client.rgw.{instance}] section of your Ceph configuration file:
[client.rgw.rgw1.rgw0]
...
debug rgw = 20
You may also modify these settings at runtime. For example:
# ceph tell osd.0 injectargs --debug_civetweb 10/20
The Ceph log files reside in /var/log/ceph by default.
For general details on logging and debugging, see the Ceph debugging and logging configuration section of the Red Hat Ceph Storage Configuration Guide.
2.9. S3 server-side encryption
The Ceph Object Gateway supports server-side encryption of uploaded objects for the S3 application programing interface (API). Server-side encryption means that the S3 client sends data over HTTP in its unencrypted form, and the Ceph Object Gateway stores that data in the Red Hat Ceph Storage cluster in encrypted form.
Red Hat does NOT support S3 object encryption of Static Large Object (SLO) or Dynamic Large Object (DLO).
To use encryption, client requests MUST send requests over an SSL connection. Red Hat does not support S3 encryption from a client unless the Ceph Object Gateway uses SSL. However, for testing purposes, administrators may disable SSL during testing by setting the rgw_crypt_require_ssl configuration setting to false at runtime, setting it to false in the Ceph configuration file and restarting the gateway instance, or setting it to false in the Ansible configuration files and replaying the Ansible playbooks for the Ceph Object Gateway.
In a production environment, it might not be possible to send encrypted requests over SSL. In such a case, send requests using HTTP with server-side encryption.
For information about how to configure HTTP with server-side encryption, see the Additional Resources section below.
There are two options for the management of encryption keys:
Customer-provided Keys
When using customer-provided keys, the S3 client passes an encryption key along with each request to read or write encrypted data. It is the customer’s responsibility to manage those keys. Customers must remember which key the Ceph Object Gateway used to encrypt each object.
Ceph Object Gateway implements the customer-provided key behavior in the S3 API according to the Amazon SSE-C specification.
Since the customer handles the key management and the S3 client passes keys to the Ceph Object Gateway, the Ceph Object Gateway requires no special configuration to support this encryption mode.
Key Management Service
When using a key management service, the secure key management service stores the keys and the Ceph Object Gateway retrieves them on demand to serve requests to encrypt or decrypt data.
Ceph Object Gateway implements the key management service behavior in the S3 API according to the Amazon SSE-KMS specification.
Currently, the only tested key management implementations are HashiCorp Vault, and OpenStack Barbican. However, OpenStack Barbican is a Technology Preview and is not supported for use in production systems.
Additional Resources
2.10. Server-side encryption requests
In a production environment, clients often contact the Ceph Object Gateway through a proxy. This proxy is referred to as a load balancer because it connects to multiple Ceph Object Gateways. When the client sends requests to the Ceph Object Gateway, the load balancer routes those requests to the multiple Ceph Object Gateways, thus distributing the workload.
In this type of configuration, it is possible that SSL terminations occur both at a load balancer and between the load balancer and the multiple Ceph Object Gateways. Communication occurs using HTTP only. To set up the Ceph Object Gateways to accept the server-side encryption requests, see Configuring server-side encryption.
2.11. Configuring server-side encryption
As a storage administrator, you can set up server-side encryption to send requests to the Ceph Object Gateway using HTTP, in cases where it might not be possible to send encrypted requests over SSL.
This procedure uses HAProxy as proxy and load balancer.
Prerequisites
- Root-level access to all nodes in the storage cluster.
- A running Red Hat Ceph Storage cluster.
- Ceph Object Gateway is installed.
- HAProxy is installed.
Procedure
Edit the
haproxy.cfgfile:Example
frontend http_web bind *:80 mode http default_backend rgw frontend rgw-https bind *:443 ssl crt /etc/ssl/private/example.com.pem default_backend rgw backend rgw balance roundrobin mode http server rgw1 10.0.0.71:8080 check server rgw2 10.0.0.80:8080 checkComment out the lines that allow access to the
httpfront end and add instructions to direct HAProxy to use thehttpsfront end instead:Example
# frontend http_web # bind *:80 # mode http # default_backend rgw frontend rgw-https bind *:443 ssl crt /etc/ssl/private/example.com.pem http-request set-header X-Forwarded-Proto https if { ssl_fc } http-request set-header X-Forwarded-Proto https # here we set the incoming HTTPS port on the load balancer (eg : 443) http-request set-header X-Forwarded-Port 443 default_backend rgw backend rgw balance roundrobin mode http server rgw1 10.0.0.71:8080 check server rgw2 10.0.0.80:8080 checkOn all nodes in the cluster, add the following parameter to the
[global]section of the Ceph configuration file:rgw_trust_forwarded_https=true
Enable and start HAProxy:
[root@haproxy]# systemctl enable haproxy
[root@haproxy]# systemctl start haproxy
To ensure that
rgw_trust_forwarded_https=trueis not removed from the Ceph configuration file when Ansible is run, edit the ceph-ansibleall.ymlfile and setrgw_trust_forwarded_httpsin theceph_conf_overrides / globalsection totrue.ceph_conf_overrides: global: rgw_trust_forwarded_https: true- When you have finished making changes, run the ceph-ansible playbook to update the configuration on all Ceph nodes.
2.12. The HashiCorp Vault
As a storage administrator, you can securely store keys, passwords and certificates in the HashiCorp Vault for use with the Ceph Object Gateway. The HashiCorp Vault provides a secure key management service for server-side encryption used by the Ceph Object Gateway.
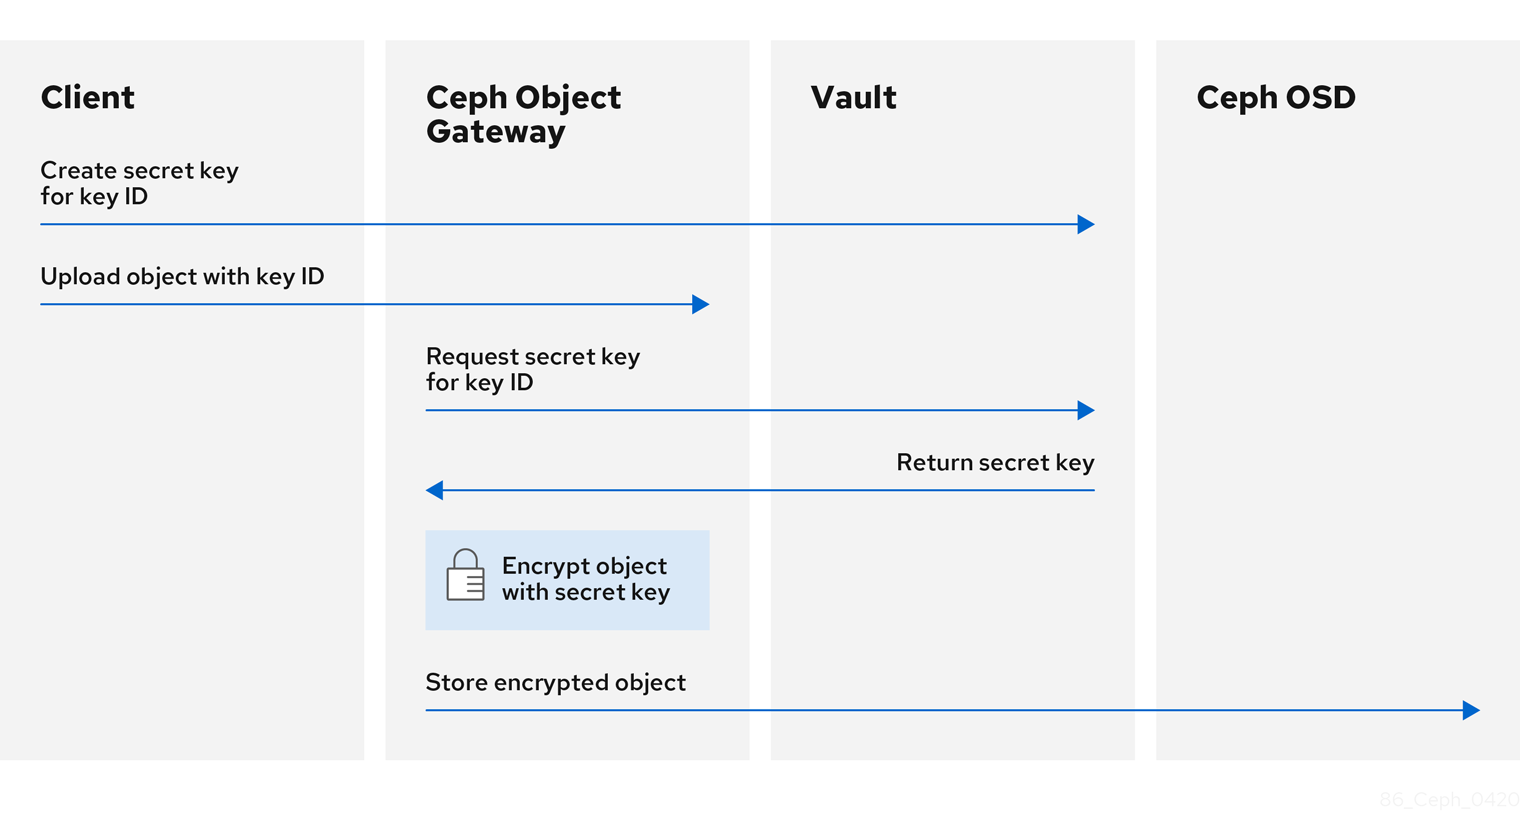
The basic workflow:
- The client requests the creation of a secret key from the Vault based on an object’s key ID.
- The client uploads an object with the object’s key ID to the Ceph Object Gateway.
- The Ceph Object Gateway then requests the newly created secret key from the Vault.
- The Vault replies to the request by returning the secret key to the Ceph Object Gateway.
- Now the Ceph Object Gateway can encrypt the object using the new secret key.
- After encryption is done the object is then stored on the Ceph OSD.
Red Hat works with our technology partners to provide this documentation as a service to our customers. However, Red Hat does not provide support for this product. If you need technical assistance for this product, then contact Hashicorp for support.
2.12.1. Prerequisites
- A running Red Hat Ceph Storage cluster.
- Installation of the Ceph Object Gateway software.
- Installation of the HashiCorp Vault software.
2.12.2. Secret engines for Vault
The HashiCorp Vault provides several secret engines to generate, store, or encrypt data. The application programming interface (API) send data calls to the secret engine asking for action on that data, and the secret engine returns a result of that action request.
The Ceph Object Gateway supports two of the HashiCorp Vault secret engines:
- Key/Value version 2
- Transit
Key/Value version 2
The Key/Value secret engine stores random secrets within the Vault, on disk. With version 2 of the kv engine, a key can have a configurable number of versions. The default number of versions is 10. Deleting a version does not delete the underlying data, but marks the data as deleted, allowing deleted versions to be undeleted. The key names must be strings, and the engine will convert non-string values into strings when using the command-line interface. To preserve non-string values, provide a JSON file or use the HTTP application programming interface (API).
For access control list (ACL) policies, the Key/Value secret engine recognizes the distinctions between the create and update capabilities.
Transit
The Transit secret engine performs cryptographic functions on in-transit data. The Transit secret engine can generate hashes, can be a source of random bytes, and can also sign and verify data. The Vault does not store data when using the Transit secret engine. The Transit secret engine supports key derivation, by allowing the same key to be used for multiple purposes. Also, the transit secret engine supports key versioning. The Transit secret engine supports these key types:
aes128-gcm96- AES-GCM with a 128-bit AES key and a 96-bit nonce; supports encryption, decryption, key derivation, and convergent encryption
aes256-gcm96- AES-GCM with a 256-bit AES key and a 96-bit nonce; supports encryption, decryption, key derivation, and convergent encryption (default)
chacha20-poly1305- ChaCha20-Poly1305 with a 256-bit key; supports encryption, decryption, key derivation, and convergent encryption
ed25519- Ed25519; supports signing, signature verification, and key derivation
ecdsa-p256- ECDSA using curve P-256; supports signing and signature verification
ecdsa-p384- ECDSA using curve P-384; supports signing and signature verification
ecdsa-p521- ECDSA using curve P-521; supports signing and signature verification
rsa-2048- 2048-bit RSA key; supports encryption, decryption, signing, and signature verification
rsa-3072- 3072-bit RSA key; supports encryption, decryption, signing, and signature verification
rsa-4096- 4096-bit RSA key; supports encryption, decryption, signing, and signature verification
Additional Resources
- See the KV Secrets Engine documentation on Vault’s project site for more information.
- See the Transit Secrets Engine documentation on Vault’s project site for more information.
2.12.3. Authentication for Vault
The HashiCorp Vault supports several types of authentication mechanisms. The Ceph Object Gateway currently supports the Vault agent and the token authentication method. The Ceph Object Gateway uses the rgw_crypt_vault_auth, and rgw_crypt_vault_addr options to configure the use of the HashiCorp Vault.
Token
The token authentication method allows users to authenticate using a token. You can create new tokens, revoke secrets by token, and many other token operations. You can bypass other authentication methods, by using the token store. When using the token authentication method, the rgw_crypt_vault_token_file option must also be used. The token file can only be readable by the Ceph Object Gateway. Also, a Vault token with a restricted policy that allows fetching of keyrings from a specific path must be used.
Red Hat recommends not using token authentication for production environments.
Vault Agent
The Vault agent is a daemon that runs on a client node and provides client-side caching, along with token renewal. The Vault agent typically runs on the Ceph Object Gateway node.
Additional Resources
- See the Token Auth Method documentation on Vault’s project site for more information.
- See the Vault Agent documentation on Vault’s project site for more information.
2.12.4. Namespaces for Vault
Using HashiCorp Vault as an enterprise service provides centralized management for isolated namespaces that teams within an organization can use. These isolated namespace environments are known as tenants, and teams within an organization can utilize these tenants to isolate their policies, secrets, and identities from other teams. The namespace features of Vault help support secure multi-tenancy from within a single infrastructure.
Additional Resources
- See the Vault Enterprise Namespaces documentation on Vault’s project site for more information.
2.12.5. Configuring the Ceph Object Gateway to use the Vault
To configure the Ceph Object Gateway to use the HashiCorp Vault it must be set as the encryption key store. Currently, the Ceph Object Gateway supports two different secret engines, and two different authentication methods.
Prerequisites
- A running Red Hat Ceph Storage cluster.
- Installation of the Ceph Object Gateway software.
- Root-level access to a Ceph Object Gateway node.
Procedure
Open for editing the Ceph configuration file, by default
/etc/ceph/ceph.conf, and enable the Vault as the encryption key store:rgw_crypt_s3_kms_backend = vault
Under the
[client.radosgw.INSTANCE_NAME]section, choose a Vault authentication method, either Token or the Vault agent.If using Token, then add the following lines:
rgw_crypt_vault_auth = token
rgw_crypt_vault_token_file = /etc/ceph/vault.token
rgw_crypt_vault_addr = http://VAULT_SERVER:8200
If using the Vault agent, then add the following lines:
rgw_crypt_vault_auth = agent
rgw_crypt_vault_addr = http://VAULT_SERVER:8100
Under the
[client.radosgw.INSTANCE_NAME]section, choose a Vault secret engine, either Key/Value or Transit.If using Key/Value, then add the following line:
rgw_crypt_vault_secret_engine = kv
If using Transit, then add the following line:
rgw_crypt_vault_secret_engine = transit
Optionally, Under the
[client.radosgw.INSTANCE_NAME]section, you can set the Vault namespace where the encryption keys will be retrieved:rgw_crypt_vault_namespace = NAME_OF_THE_NAMESPACERestrict where the Ceph Object Gateway retrieves the encryption keys from the Vault by setting a path prefix:
Example
rgw_crypt_vault_prefix = /v1/secret/data
For exportable Transit keys, set the prefix path as follows:
rgw_crypt_vault_prefix = /v1/transit/export/encryption-key
Assuming the domain name of the Vault server is
vault-server, the Ceph Object Gateway will fetch encrypted transit keys from the following URL:Example
http://vault-server:8200/v1/transit/export/encryption-key
- Save the changes to the Ceph configuration file.
Additional Resources
- See the Secret engines for Vault section of the Red Hat Ceph Storage Object Gateway Configuration and Administration Guide for more details.
- See the Authentication for Vault section of the Red Hat Ceph Storage Object Gateway Configuration and Administration Guide for more details.
2.12.6. Creating a key using the kv engine
Configure the HashiCorp Vault Key/Value secret engine (kv) so you can create a key for use with the Ceph Object Gateway. Secrets are stored as key-value pairs in the kv secret engine.
Keys for server-side encyption must be 256-bits long and encoded using base64.
Prerequisites
- A running Red Hat Ceph Storage cluster.
- Installation of the HashiCorp Vault software.
- Root-level access to the HashiCorp Vault node.
Procedure
Enable the Key/Value version 2 secret engine:
[root@vault ~]# vault secrets enable kv-v2
Create a new key:
Syntax
vault kv put secret/PROJECT_NAME/BUCKET_NAME key=$(openssl rand -base64 32)
Example
[root@vault ~]# vault kv put secret/myproject/mybucketkey key=$(openssl rand -base64 32)

====== Metadata ======
Key              Value
---              -----
created_time     2020-02-21T17:01:09.095824999Z
deletion_time    n/a
destroyed        false
version          1
2.12.7. Creating a key using the transit engine
Configure the HashiCorp Vault Transit secret engine (transit) so you can create a key for use with the Ceph Object Gateway. Creating keys with the Transit secret engine must be exportable in order to be used for server-side encryption with the Ceph Object Gateway.
Prerequisites
- A running Red Hat Ceph Storage cluster.
- Installation of the HashiCorp Vault software.
- Root-level access to the HashiCorp Vault node.
Procedure
Enable the Transit secret engine:
[root@vault ~]# vault secrets enable transit
Create a new exportable key:
Syntax
vault write -f transit/keys/BUCKET_NAME exportable=trueExample
[root@vault ~]# vault write -f transit/keys/mybucketkey exportable=true
NoteBy default the above command creates a
aes256-gcm96type key.Verify the creation of the key:
Syntax
vault read transit/export/encryption-key/BUCKET_NAME/VERSION_NUMBER
Example
[root@vault ~]# vault read transit/export/encryption-key/mybucketkey/1

Key     Value
---     -----
keys    map[1:-gbTI9lNpqv/V/2lDcmH2Nq1xKn6FPDWarCmFM2aNsQ=]
name    mybucketkey
type    aes256-gcm96
NoteProviding the full key path, including the key version is required.
2.12.8. Uploading an object using AWS and the Vault
When uploading an object to the Ceph Object Gateway, the Ceph Object Gateway will fetch the key from the Vault, and then encrypt and store the object in a bucket. When a request is made to download the object, the Ceph Object Gateway will automatically retrieve the corresponding key from the Vault and decrypt the object.
The URL is constructed using the base address, set by the rgw_crypt_vault_addr option, and the path prefix, set by the rgw_crypt_vault_prefix option.
Prerequisites
- A running Red Hat Ceph Storage cluster.
- Installation of the Ceph Object Gateway software.
- Installation of the HashiCorp Vault software.
- Access to a Ceph Object Gateway client node.
- Access to Amazon Web Services (AWS).
Procedure
Upload an object using the AWS command-line client:
Example
[user@client ~]$ aws --endpoint=http://radosgw:8000 s3 cp plaintext.txt s3://mybucket/encrypted.txt --sse=aws:kms --sse-kms-key-id myproject/mybucketkey
NoteThe key fetching URL used in the example is:
http://vault-server:8200/v1/secret/data/myproject/mybucketkey
2.12.9. Additional Resources
- See the Install Vault documentation on Vault’s project site for more information.
2.13. Testing the Gateway
To use the REST interfaces, first create an initial Ceph Object Gateway user for the S3 interface. Then, create a subuser for the Swift interface. You then need to verify if the created users are able to access the gateway.
2.13.1. Create an S3 User
To test the gateway, create an S3 user and grant the user access. The man radosgw-admin command provides information on additional command options.
In a multi-site deployment, always create a user on a host in the master zone of the master zone group.
Prerequisites
-
rootorsudoaccess - Ceph Object Gateway installed
Procedure
Create an S3 user:
radosgw-admin user create --uid=name --display-name="First User"Replace name with the name of the S3 user, for example:
[root@master-zone]# radosgw-admin user create --uid="testuser" --display-name="First User"
{
    "user_id": "testuser",
    "display_name": "First User",
    "email": "",
    "suspended": 0,
    "max_buckets": 1000,
    "auid": 0,
    "subusers": [],
    "keys": [
        {
            "user": "testuser",
            "access_key": "CEP28KDIQXBKU4M15PDC",
            "secret_key": "MARoio8HFc8JxhEilES3dKFVj8tV3NOOYymihTLO"
        }
    ],
    "swift_keys": [],
    "caps": [],
    "op_mask": "read, write, delete",
    "default_placement": "",
    "placement_tags": [],
    "bucket_quota": {
        "enabled": false,
        "check_on_raw": false,
        "max_size": -1,
        "max_size_kb": 0,
        "max_objects": -1
    },
    "user_quota": {
        "enabled": false,
        "check_on_raw": false,
        "max_size": -1,
        "max_size_kb": 0,
        "max_objects": -1
    },
    "temp_url_keys": [],
    "type": "rgw"
}
Verify the output to ensure that the values of
access_keyandsecret_keydo not include a JSON escape character (\). These values are needed for access validation, but certain clients cannot handle if the values include JSON escape character. To fix this problem, perform one of the following actions:- Remove the JSON escape character.
- Encapsulate the string in quotes.
- Regenerate the key and ensure that is does not include a JSON escape character.
- Specify the key and secret manually.
Do not remove the forward slash
/because it is a valid character.
2.13.2. Create a Swift user
To test the Swift interface, create a Swift subuser. Creating a Swift user is a two step process. The first step is to create the user. The second step is to create the secret key.
In a multi-site deployment, always create a user on a host in the master zone of the master zone group.
Prerequisites
- Installation of the Ceph Object Gateway.
- Root-level access to the Ceph Object Gateway node.
Procedure
Create the Swift user:
Syntax
radosgw-admin subuser create --uid=NAME --subuser=NAME:swift --access=full
Replace NAME with the Swift user name, for example:
Example
[root@rgw]# radosgw-admin subuser create --uid=testuser --subuser=testuser:swift --access=full
{
    "user_id": "testuser",
    "display_name": "First User",
    "email": "",
    "suspended": 0,
    "max_buckets": 1000,
    "auid": 0,
    "subusers": [
        {
            "id": "testuser:swift",
            "permissions": "full-control"
        }
    ],
    "keys": [
        {
            "user": "testuser",
            "access_key": "O8JDE41XMI74O185EHKD",
            "secret_key": "i4Au2yxG5wtr1JK01mI8kjJPM93HNAoVWOSTdJd6"
        }
    ],
    "swift_keys": [
        {
            "user": "testuser:swift",
            "secret_key": "13TLtdEW7bCqgttQgPzxFxziu0AgabtOc6vM8DLA"
        }
    ],
    "caps": [],
    "op_mask": "read, write, delete",
    "default_placement": "",
    "placement_tags": [],
    "bucket_quota": {
        "enabled": false,
        "check_on_raw": false,
        "max_size": -1,
        "max_size_kb": 0,
        "max_objects": -1
    },
    "user_quota": {
        "enabled": false,
        "check_on_raw": false,
        "max_size": -1,
        "max_size_kb": 0,
        "max_objects": -1
    },
    "temp_url_keys": [],
    "type": "rgw"
}
Create the secret key:
Syntax
radosgw-admin key create --subuser=NAME:swift --key-type=swift --gen-secretReplace NAME with the Swift user name, for example:
Example
[root@rgw]# radosgw-admin key create --subuser=testuser:swift --key-type=swift --gen-secret
{
    "user_id": "testuser",
    "display_name": "First User",
    "email": "",
    "suspended": 0,
    "max_buckets": 1000,
    "auid": 0,
    "subusers": [
        {
            "id": "testuser:swift",
            "permissions": "full-control"
        }
    ],
    "keys": [
        {
            "user": "testuser",
            "access_key": "O8JDE41XMI74O185EHKD",
            "secret_key": "i4Au2yxG5wtr1JK01mI8kjJPM93HNAoVWOSTdJd6"
        }
    ],
    "swift_keys": [
        {
            "user": "testuser:swift",
            "secret_key": "a4ioT4jEP653CDcdU8p4OuhruwABBRZmyNUbnSSt"
        }
    ],
    "caps": [],
    "op_mask": "read, write, delete",
    "default_placement": "",
    "placement_tags": [],
    "bucket_quota": {
        "enabled": false,
        "check_on_raw": false,
        "max_size": -1,
        "max_size_kb": 0,
        "max_objects": -1
    },
    "user_quota": {
        "enabled": false,
        "check_on_raw": false,
        "max_size": -1,
        "max_size_kb": 0,
        "max_objects": -1
    },
    "temp_url_keys": [],
    "type": "rgw"
}
2.13.3. Test S3 Access
You need to write and run a Python test script for verifying S3 access. The S3 access test script will connect to the radosgw, create a new bucket and list all buckets. The values for aws_access_key_id and aws_secret_access_key are taken from the values of access_key and secret_key returned by the radosgw_admin command.
System users must have root privileges over the entire zone, as the output would contain additional json fields for maintaining metadata.
Prerequisites
-
rootorsudoaccess. - Ceph Object Gateway installed.
- S3 user created.
Procedure
Enable the common repository for Red Hat Enterprise Linux 7 and the High Availability repository for Red Hat Enterprise Linux 8:
Red Hat Enterprise Linux 7
# subscription-manager repos --enable=rhel-7-server-rh-common-rpms
Red Hat Enterprise Linux 8
# subscription-manager repos --enable=rhel-8-for-x86_64-highavailability-rpms
Install the
python-botopackage.Red Hat Enterprise Linux 7
# yum install python-boto
Red Hat Enterprise Linux 8
# dnf install python3-boto3
Create the Python script:
vi s3test.py
Add the following contents to the file:
Red Hat Enterprise Linux 7
import boto
import boto.s3.connection

access_key = 'ACCESS'
secret_key = 'SECRET'

boto.config.add_section('s3')

conn = boto.connect_s3(
        aws_access_key_id = access_key,
        aws_secret_access_key = secret_key,
        host = 's3.ZONE.hostname',
        port = PORT,
        is_secure=False,
        calling_format = boto.s3.connection.OrdinaryCallingFormat(),
        )

bucket = conn.create_bucket('my-new-bucket')
for bucket in conn.get_all_buckets():
	print "{name}\t{created}".format(
		name = bucket.name,
		created = bucket.creation_date,
)
Red Hat Enterprise Linux 8
import boto3

endpoint = "" # enter the endpoint URL along with the port "http://URL:_PORT_"

access_key = 'ACCESS'
secret_key = 'SECRET'

s3 = boto3.client(
        's3',
        endpoint_url=endpoint,
        aws_access_key_id=access_key,
        aws_secret_access_key=secret_key
        )

s3.create_bucket(Bucket='my-new-bucket')

response = s3.list_buckets()
for bucket in response['Buckets']:
    print("{name}\t{created}".format(
		name = bucket['Name'],
		created = bucket['CreationDate']
))
-
Replace
ZONEwith the zone name of the host where you have configured the gateway service. That is, thegateway host. Ensure that thehost`setting resolves with DNS. Replace `PORTwith the port number of the gateway. -
Replace
ACCESSandSECRETwith theaccess_keyandsecret_keyvalues from the Create an S3 User section in the Red Hat Ceph Storage Object Gateway Configuration and Administration Guide.
-
Replace
Run the script:
Red Hat Enterprise Linux 7
python s3test.py
Red Hat Enterprise Linux 8
python3 s3test.py
Example output:
my-new-bucket 2021-08-16T17:09:10.000Z
2.13.4. Test Swift Access
Swift access can be verified via the swift command line client. The command man swift will provide more information on available command line options.
To install swift client, execute the following:
sudo yum install python-setuptools
sudo easy_install pip
sudo pip install --upgrade setuptools
sudo pip install --upgrade python-swiftclient
To test swift access, execute the following:
swift -A http://{IP ADDRESS}:{port}/auth/1.0 -U testuser:swift -K '{swift_secret_key}' list
Replace {IP ADDRESS} with the public IP address of the gateway server and {swift_secret_key} with its value from the output of radosgw-admin key create command executed for the swift user. Replace {port} with the port number you are using with Civetweb (e.g., 8080 is the default). If you don’t replace the port, it will default to port 80.
For example:
swift -A http://10.19.143.116:8080/auth/1.0 -U testuser:swift -K '244+fz2gSqoHwR3lYtSbIyomyPHf3i7rgSJrF/IA' list
The output should be:
my-new-bucket
2.14. Configuring HAProxy/keepalived
The Ceph Object Gateway allows you to assign many instances of the object gateway to a single zone so that you can scale out as load increases, that is, the same zone group and zone; however, you do not need a federated architecture to use HAProxy/keepalived. Since each Ceph Object Gateway instance has its own IP address, you can use HAProxy and keepalived to balance the load across Ceph Object Gateway servers.
Another use case for HAProxy and keepalived is to terminate HTTPS at the HAProxy server. You can use an HAProxy server to terminate HTTPS at the HAProxy server and use HTTP between the HAProxy server and the Civetweb gateway instances.
This section describes configuration of HAProxy and keepalived for Red Hat Enterprise Linux 7.
For Red Hat Enterprise Linux 8, install keepalived and haproxy packages to install the Load Balancer. See the Do we need any additional subscription for Load Balancing on Red Hat Enterprise Linux 8? Knowledgebase article for details.
2.14.1. HAProxy/keepalived Prerequisites
To set up an HA Proxy with the Ceph Object Gateway, you must have:
- A running Ceph cluster
-
At least two Ceph Object Gateway servers within the same zone configured to run on port
80. If you follow the simple installation procedure, the gateway instances are in the same zone group and zone by default. If you are using a federated architecture, ensure that the instances are in the same zone group and zone; and, -
At least two servers for HAProxy and
keepalived.
This section assumes that you have at least two Ceph Object Gateway servers running, and that you get a valid response from each of them when running test scripts over port 80.
For a detailed discussion of HAProxy and keepalived, see Load Balancer Administration.
2.14.2. Preparing HAProxy Nodes
The following setup assumes two HAProxy nodes named haproxy and haproxy2 and two Ceph Object Gateway servers named rgw1 and rgw2. You may use any naming convention you prefer. Perform the following procedure on your at least two HAProxy nodes:
- Install Red Hat Enterprise Linux 7.
Register the nodes.
[root@haproxy]# subscription-manager register
Enable the RHEL server repository.
[root@haproxy]# subscription-manager repos --enable=rhel-7-server-rpms
Update the server.
[root@haproxy]# yum update -y
-
Install admin tools (e.g.,
wget,vim, etc.) as needed. Open port
80.[root@haproxy]# firewall-cmd --zone=public --add-port 80/tcp --permanent [root@haproxy]# firewall-cmd --reload
For HTTPS, open port
443.[root@haproxy]# firewall-cmd --zone=public --add-port 443/tcp --permanent [root@haproxy]# firewall-cmd --reload
Connect to the required port.
[root@haproxy]# semanage port -m -t http_cache_port_t -p tcp 8081
2.14.3. Installing and Configuring keepalived
Perform the following procedure on your at least two HAProxy nodes:
Prerequisites
- A minimum of two HAProxy nodes.
- A minimum of two Object Gateway nodes.
Procedure
Install
keepalived:[root@haproxy]# yum install -y keepalived
Configure
keepalivedon both HAProxy nodes:[root@haproxy]# vim /etc/keepalived/keepalived.conf
In the configuration file, there is a script to check the
haproxyprocesses:vrrp_script chk_haproxy { script "killall -0 haproxy" # check the haproxy process interval 2 # every 2 seconds weight 2 # add 2 points if OK }Next, the instance on the master and backup load balancers uses
eno1as the network interface. It also assigns a virtual IP address, that is,192.168.1.20.Master load balancer node
vrrp_instance RGW {
    state MASTER # might not be necessary. This is on the Master LB node.
    @main interface eno1
    priority 100
    advert_int 1
    interface eno1
    virtual_router_id 50
    @main unicast_src_ip 10.8.128.43 80
    unicast_peer {
           10.8.128.53
           }
    authentication {
        auth_type PASS
        auth_pass 1111
    }
    virtual_ipaddress {
        192.168.1.20
    }
    track_script {
      chk_haproxy
    }
}
virtual_server 192.168.1.20 80 eno1 { #populate correct interface
    delay_loop 6
    lb_algo wlc
    lb_kind dr
    persistence_timeout 600
    protocol TCP
    real_server 10.8.128.43 80 { # ip address of rgw2 on physical interface, haproxy listens here, rgw listens to localhost:8080 or similar
        weight 100
        TCP_CHECK { # perhaps change these to a HTTP/SSL GET?
            connect_timeout 3
        }
    }
    real_server 10.8.128.53 80 { # ip address of rgw3 on physical interface, haproxy listens here, rgw listens to localhost:8080 or similar
        weight 100
        TCP_CHECK { # perhaps change these to a HTTP/SSL GET?
            connect_timeout 3
        }
    }
}
Backup load balancer node
vrrp_instance RGW {
    state BACKUP # might not be necessary?
    priority 99
    advert_int 1
    interface eno1
    virtual_router_id 50
    unicast_src_ip 10.8.128.53 80
    unicast_peer {
           10.8.128.43
           }
    authentication {
        auth_type PASS
        auth_pass 1111
    }
    virtual_ipaddress {
        192.168.1.20
    }
    track_script {
      chk_haproxy
    }
}
virtual_server 192.168.1.20 80 eno1 { #populate correct interface
    delay_loop 6
    lb_algo wlc
    lb_kind dr
    persistence_timeout 600
    protocol TCP
    real_server 10.8.128.43 80 { # ip address of rgw2 on physical interface, haproxy listens here, rgw listens to localhost:8080 or similar
        weight 100
        TCP_CHECK { # perhaps change these to a HTTP/SSL GET?
            connect_timeout 3
        }
    }
    real_server 10.8.128.53 80 { # ip address of rgw3 on physical interface, haproxy listens here, rgw listens to localhost:8080 or similar
        weight 100
        TCP_CHECK { # perhaps change these to a HTTP/SSL GET?
            connect_timeout 3
        }
    }
}
Enable and start the
keepalivedservice:[root@haproxy]# systemctl enable keepalived [root@haproxy]# systemctl start keepalived
Additional Resources
-
For a detailed discussion of configuring
keepalived, refer to Initial Load Balancer Configuration with Keepalived.
2.14.4. Installing and Configuring HAProxy
Perform the following procedure on your at least two HAProxy nodes:
Install
haproxy.[root@haproxy]# yum install haproxy
Configure
haproxyfor SELinux and HTTP.[root@haproxy]# vim /etc/firewalld/services/haproxy-http.xml
Add the following lines:
<?xml version="1.0" encoding="utf-8"?>
<service>
<short>HAProxy-HTTP</short>
<description>HAProxy load-balancer</description>
<port protocol="tcp" port="80"/>
</service>
As
root, assign the correct SELinux context and file permissions to thehaproxy-http.xmlfile.[root@haproxy]# cd /etc/firewalld/services [root@haproxy]# restorecon haproxy-http.xml [root@haproxy]# chmod 640 haproxy-http.xml
If you intend to use HTTPS, configure
haproxyfor SELinux and HTTPS.[root@haproxy]# vim /etc/firewalld/services/haproxy-https.xml
Add the following lines:
<?xml version="1.0" encoding="utf-8"?>
<service>
<short>HAProxy-HTTPS</short>
<description>HAProxy load-balancer</description>
<port protocol="tcp" port="443"/>
</service>
As
root, assign the correct SELinux context and file permissions to thehaproxy-https.xmlfile.# cd /etc/firewalld/services # restorecon haproxy-https.xml # chmod 640 haproxy-https.xml
If you intend to use HTTPS, generate keys for SSL. If you do not have a certificate, you may use a self-signed certificate. To generate a key, see to Generating a New Key and Certificate section in the System Administrator’s Guide for Red Hat Enterprise Linux 7.
Finally, put the certificate and key into a PEM file.
[root@haproxy]# cat example.com.crt example.com.key > example.com.pem
[root@haproxy]# cp example.com.pem /etc/ssl/private/
Configure
haproxy.[root@haproxy]# vim /etc/haproxy/haproxy.cfg
The
globalanddefaultsmay remain unchanged. After thedefaultssection, you will need to configurefrontendandbackendsections. For example:frontend http_web bind *:80 mode http default_backend rgw frontend rgw-https bind *:443 ssl crt /etc/ssl/private/example.com.pem default_backend rgw backend rgw balance roundrobin mode http server rgw1 10.0.0.71:80 check server rgw2 10.0.0.80:80 checkFor a detailed discussion of HAProxy configuration, refer to HAProxy Configuration.
Enable/start
haproxy[root@haproxy]# systemctl enable haproxy [root@haproxy]# systemctl start haproxy
2.14.5. Testing the HAProxy Configuration
On your HAProxy nodes, check to ensure the virtual IP address from your keepalived configuration appears.
[root@haproxy]# ip addr show
On your calamari node, see if you can reach the gateway nodes via the load balancer configuration. For example:
[root@haproxy]# wget haproxy
This should return the same result as:
[root@haproxy]# wget rgw1
If it returns an index.html file with the following contents:
<?xml version="1.0" encoding="UTF-8"?>
	<ListAllMyBucketsResult xmlns="http://s3.amazonaws.com/doc/2006-03-01/">
		<Owner>
			<ID>anonymous</ID>
			<DisplayName></DisplayName>
		</Owner>
		<Buckets>
		</Buckets>
	</ListAllMyBucketsResult>
Then, your configuration is working properly.
2.15. Configuring Gateways for Static Web Hosting
Traditional web hosting involves setting up a web server for each website, which can use resources inefficiently when content does not change dynamically. Ceph Object Gateway can host static web sites in S3 buckets—that is, sites that do not use server-side services like PHP, servlets, databases, nodejs and the like. This approach is substantially more economical than setting up VMs with web servers for each site.
2.15.1. Static Web Hosting Assumptions
Static web hosting requires at least one running Ceph Storage Cluster, and at least two Ceph Object Gateway instances for static web sites. Red Hat assumes that each zone will have multiple gateway instances load balanced by HAProxy/keepalived.
See Configuring HAProxy/keepalived for additional details on HAProxy/keepalived.
Red Hat DOES NOT support using a Ceph Object Gateway instance to deploy both standard S3/Swift APIs and static web hosting simultaneously.
2.15.2. Static Web Hosting Requirements
Static web hosting functionality uses its own API, so configuring a gateway to use static web sites in S3 buckets requires the following:
- S3 static web hosting uses Ceph Object Gateway instances that are separate and distinct from instances used for standard S3/Swift API use cases.
- Gateway instances hosting S3 static web sites should have separate, non-overlapping domain names from the standard S3/Swift API gateway instances.
- Gateway instances hosting S3 static web sites should use separate public-facing IP addresses from the standard S3/Swift API gateway instances.
- Gateway instances hosting S3 static web sites load balance, and if necessary terminate SSL, using HAProxy/keepalived.
2.15.3. Static Web Hosting Gateway Setup
To enable a gateway for static web hosting, edit the Ceph configuration file and add the following settings:
[client.rgw.<STATIC-SITE-HOSTNAME>]
...
rgw_enable_static_website = true
rgw_enable_apis = s3, s3website
rgw_dns_name = objects-zonegroup.domain.com
rgw_dns_s3website_name = objects-website-zonegroup.domain.com
rgw_resolve_cname = true
...
The rgw_enable_static_website setting MUST be true. The rgw_enable_apis setting MUST enable the s3website API. The rgw_dns_name and rgw_dns_s3website_name settings must provide their fully qualified domains. If the site will use canonical name extensions, set rgw_resolve_cname to true.
The FQDNs of rgw_dns_name and rgw_dns_s3website_name MUST NOT overlap.
2.15.4. Static Web Hosting DNS Configuration
The following is an example of assumed DNS settings, where the first two lines specify the domains of the gateway instance using a standard S3 interface and point to the IPv4 and IPv6 addresses respectively. The third line provides a wildcard CNAME setting for S3 buckets using canonical name extensions. The fourth and fifth lines specify the domains for the gateway instance using the S3 website interface and point to their IPv4 and IPv6 addresses respectively.
objects-zonegroup.domain.com. IN    A 192.0.2.10
objects-zonegroup.domain.com. IN AAAA 2001:DB8::192:0:2:10
*.objects-zonegroup.domain.com. IN CNAME objects-zonegroup.domain.com.
objects-website-zonegroup.domain.com. IN    A 192.0.2.20
objects-website-zonegroup.domain.com. IN AAAA 2001:DB8::192:0:2:20
The IP addresses in the first two lines differ from the IP addresses in the fourth and fifth lines.
If using Ceph Object Gateway in a multi-site configuration, consider using a routing solution to route traffic to the gateway closest to the client.
The Amazon Web Service (AWS) requires static web host buckets to match the host name. Ceph provides a few different ways to configure the DNS, and HTTPS will work if the proxy has a matching certificate.
Hostname to a Bucket on a Subdomain
To use AWS-style S3 subdomains, use a wildcard in the DNS entry and can redirect requests to any bucket. A DNS entry might look like the following:
*.objects-website-zonegroup.domain.com. IN CNAME objects-website-zonegroup.domain.com.
Access the bucket name in the following manner:
http://bucket1.objects-website-zonegroup.domain.com
Where the bucket name is bucket1.
Hostname to Non-Matching Bucket
Ceph supports mapping domain names to buckets without including the bucket name in the request, which is unique to Ceph Object Gateway. To use a domain name to access a bucket, map the domain name to the bucket name. A DNS entry might look like the following:
www.example.com. IN CNAME bucket2.objects-website-zonegroup.domain.com.
Where the bucket name is bucket2.
Access the bucket in the following manner:
http://www.example.com
Hostname to Long Bucket with CNAME
AWS typically requires the bucket name to match the domain name. To configure the DNS for static web hosting using CNAME, the DNS entry might look like the following:
www.example.com. IN CNAME www.example.com.objects-website-zonegroup.domain.com.
Access the bucket in the following manner:
http://www.example.com
Hostname to Long Bucket without CNAME
If the DNS name contains other non-CNAME records such as SOA, NS, MX or TXT, the DNS record must map the domain name directly to the IP address. For example:
www.example.com. IN A 192.0.2.20
www.example.com. IN AAAA 2001:DB8::192:0:2:20
Access the bucket in the following manner:
http://www.example.com
2.15.5. Creating a Static Web Hosting Site
To create a static website perform the following steps:
-
Create an S3 bucket. The bucket name MAY be the same as the website’s domain name. For example,
mysite.commay have a bucket name ofmysite.com. This is required for AWS, but it is NOT required for Ceph. See DNS Settings for details. -
Upload the static website content to the bucket. Contents may include HTML, CSS, client-side JavaScript, images, audio/video content and other downloadable files. A website MUST have an
index.htmlfile and MAY haveerror.htmlfile. - Verify the website’s contents. At this point, only the creator of the bucket will have access to the contents.
- Set permissions on the files so that they are publicly readable.
2.16. Exporting the Namespace to NFS-Ganesha
In Red Hat Ceph Storage 3 and later, the Ceph Object Gateway provides the ability to export S3 object namespaces by using NFS version 3 and NFS version 4.1 for production systems.
The NFS Ganesha feature is not for general use, but rather for migration to an S3 cloud only.
Red Hat Ceph Storage does not support NFS-export of versioned buckets.
The implementation conforms to Amazon Web Services (AWS) hierarchical namespace conventions which map UNIX-style path names onto S3 buckets and objects. The top level of the attached namespace, which is subordinate to the NFSv4 pseudo root if present, consists of the Ceph Object Gateway S3 buckets, where buckets are represented as NFS directories. Objects within a bucket are presented as NFS file and directory hierarchies, following S3 conventions. Operations to create files and directories are supported.
Creating or deleting hard or soft links IS NOT supported. Performing rename operations on buckets or directories IS NOT supported via NFS, but rename on files IS supported within and between directories, and between a file system and an NFS mount. File rename operations are more expensive when conducted over NFS, as they change the target directory and typically forces a full readdir to refresh it.
Editing files via the NFS mount IS NOT supported.
The Ceph Object Gateway requires applications to write sequentially from offset 0 to the end of a file. Attempting to write out of order causes the upload operation to fail. To work around this issue, use utilities like cp, cat, or rsync when copying files into NFS space. Always mount with the sync option.
The Ceph Object Gateway with NFS is based on an in-process library packaging of the Gateway server and a File System Abstraction Layer (FSAL) namespace driver for the NFS-Ganesha NFS server. At runtime, an instance of the Ceph Object Gateway daemon with NFS combines a full Ceph Object Gateway daemon, albeit without the Civetweb HTTP service, with an NFS-Ganesha instance in a single process. To make use of this feature, deploy NFS-Ganesha version 2.3.2 or later.
Perform the steps in the Before you Start and Configuring an NFS-Ganesha Instance procedures on the host that will contain the NFS-Ganesha (nfs-ganesha-rgw) instance.
Running Multiple NFS Gateways
Each NFS-Ganesha instance acts as a full gateway endpoint, with the current limitation that an NFS-Ganesha instance cannot be configured to export HTTP services. As with ordinary gateway instances, any number of NFS-Ganesha instances can be started, exporting the same or different resources from the cluster. This enables the clustering of NFS-Ganesha instances. However, this does not imply high availability.
When regular gateway instances and NFS-Ganesha instances overlap the same data resources, they will be accessible from both the standard S3 API and through the NFS-Ganesha instance as exported. You can co-locate the NFS-Ganesha instance with a Ceph Object Gateway instance on the same host.
Before you Start
- Disable any running kernel NFS service instances on any host that will run NFS-Ganesha before attempting to run NFS-Ganesha. NFS-Ganesha will not start if another NFS instance is running.
As
root, enable the Red Hat Ceph Storage Tools repository:Red Hat Enterprise Linux 7
# subscription-manager repos --enable=rhel-7-server-rhceph-4-tools-rpms
Red Hat Enterprise Linux 8
# subscription-manager repos --enable=rhceph-4-tools-for-rhel-8-x86_64-rpms
Make sure that the
rpcbindservice is running:# systemctl start rpcbind
NoteThe
rpcbindpackage that providesrpcbindis usually installed by default. If that is not the case, install the package first.For details on how NFS uses
rpcbind, see the Required Services section in the Storage Administration Guide for Red Hat Enterprise Linux 7.If the
nfs-serviceservice is running, stop and disable it:# systemctl stop nfs-server.service # systemctl disable nfs-server.service
Configuring an NFS-Ganesha Instance
Install the
nfs-ganesha-rgwpackage:# yum install nfs-ganesha-rgw
Copy the Ceph configuration file from a Ceph Monitor node to the
/etc/ceph/directory of the NFS-Ganesha host, and edit it as necessary:# scp <mon-host>:/etc/ceph/ceph.conf <nfs-ganesha-rgw-host>:/etc/ceph
NoteThe Ceph configuration file must contain a valid
[client.rgw.{instance-name}]section and corresponding parameters for the various required Gateway configuration variables such asrgw_data,keyring, orrgw_frontends. If exporting Swift containers that do not conform to valid S3 bucket naming requirements, setrgw_relaxed_s3_bucket_namestotruein the[client.rgw]section of the Ceph configuration file. For example, if a Swift container name contains underscores, it is not a valid S3 bucket name and will not get synchronized unlessrgw_relaxed_s3_bucket_namesis set totrue. When adding objects and buckets outside of NFS, those objects will appear in the NFS namespace in the time set byrgw_nfs_namespace_expire_secs, which is about 5 minutes by default. Override the default value forrgw_nfs_namespace_expire_secsin the Ceph configuration file to change the refresh rate.Open the NFS-Ganesha configuration file:
# vim /etc/ganesha/ganesha.conf
Configure the
EXPORTsection with anFSAL(File System Abstraction Layer) block. Provide an ID, S3 user ID, S3 access key, and secret. For NFSv4, it should look something like this:EXPORT { Export_ID={numeric-id}; Path = "/"; Pseudo = "/"; Access_Type = RW; SecType = "sys"; NFS_Protocols = 4; Transport_Protocols = TCP; Squash = No_Root_Squash; FSAL { Name = RGW; User_Id = {s3-user-id}; Access_Key_Id ="{s3-access-key}"; Secret_Access_Key = "{s3-secret}"; } }The
Pathoption instructs Ganesha where to find the export. For the VFS FSAL, this is the location within the server’s namespace. For other FSALs, it may be the location within the filesystem managed by that FSAL’s namespace. For example, if the Ceph FSAL is used to export an entire CephFS volume,Pathwould be/.The
Pseudooption instructs Ganesha where to place the export within NFS v4’s pseudo file system namespace. NFS v4 specifies the server may construct a pseudo namespace that may not correspond to any actual locations of exports, and portions of that pseudo filesystem may exist only within the realm of the NFS server and not correspond to any physical directories. Further, an NFS v4 server places all its exports within a single namespace. It is possible to have a single export exported as the pseudo filesystem root, but it is much more common to have multiple exports placed in the pseudo filesystem. With a traditional VFS, often thePseudolocation is the same as thePathlocation. Returning to the example CephFS export with/as thePath, if multiple exports are desired, the export would likely have something else as thePseudooption. For example,/ceph.Any
EXPORTblock which should support NFSv3 should include version 3 in theNFS_Protocolssetting. Additionally, NFSv3 is the last major version to support the UDP transport. Early versions of the standard included UDP, but RFC 7530 forbids its use. To enable UDP, include it in theTransport_Protocolssetting. For example:EXPORT { ... NFS_Protocols = 3,4; Transport_Protocols = UDP,TCP; ... }Setting
SecType = sys;allows clients to attach without Kerberos authentication.Setting
Squash = No_Root_Squash;enables a user to change directory ownership in the NFS mount.NFS clients using a conventional OS-native NFS 4.1 client typically see a federated namespace of exported file systems defined by the destination server’s
pseudofsroot. Any number of these can be Ceph Object Gateway exports.Each export has its own tuple of
name,User_Id,Access_Key, andSecret_Access_Keyand creates a proxy of the object namespace visible to the specified user.An export in
ganesha.confcan also contain anNFSV4block. Red Hat Ceph Storage supports theAllow_Numeric_OwnersandOnly_Numberic_Ownersparameters as an alternative to setting up theidmapperprogram.NFSV4 { Allow_Numeric_Owners = true; Only_Numeric_Owners = true; }Configure an
NFS_CORE_PARAMblock.NFS_CORE_PARAM{ mount_path_pseudo = true; }When the
mount_path_pseudoconfiguration setting is set totrue, it will make the NFS v3 and NFS v4.x mounts use the same server side path to reach an export, for example:mount -o vers=3 <IP ADDRESS>:/export /mnt mount -o vers=4 <IP ADDRESS>:/export /mntPath Pseudo Tag Mechanism Mount /export/test1 /export/test1 test1 v3 Pseudo mount -o vers=3 server:/export/test1 /export/test1 /export/test1 test1 v3 Tag mount -o vers=3 server:test1 /export/test1 /export/test1 test1 v4 Pseudo mount -o vers=4 server:/export/test1 / /export/ceph1 ceph1 v3 Pseudo mount -o vers=3 server:/export/ceph1 / /export/ceph1 ceph1 v3 Tag mount -o vers=3 server:ceph1 / /export/ceph1 ceph1 v4 Pseudo mount -o vers=4 server:/export/ceph1 / /export/ceph2 ceph2 v3 Pseudo mount -o vers=3 server:/export/ceph2 / /export/ceph2 ceph2 v3 Tag mount -o vers=3 server:ceph2 / /export/ceph2 ceph2 v4 Pseudo mount -o vers=4
When the
mount_path_pseudoconfiguration setting is set tofalse, NFS v3 mounts use thePathoption and NFS v4.x mounts use thePseudooption.Path Pseudo Tag Mechanism Mount /export/test1 /export/test1 test1 v3 Path mount -o vers=3 server:/export/test1 /export/test1 /export/test1 test1 v3 Tag mount -o vers=3 server:test1 /export/test1 /export/test1 test1 v4 Pseudo mount -o vers=4 server:/export/test1 / /export/ceph1 ceph1 v3 Path mount -o vers=3 server:/ / /export/ceph1 ceph1 v3 Tag mount -o vers=3 server:ceph1 / /export/ceph1 ceph1 v4 Pseudo mount -o vers=4 server:/export/ceph1 / /export/ceph2 ceph2 v3 Path not accessible / /export/ceph2 ceph2 v3 Tag mount -o vers=3 server:ceph2 / /export/ceph2 ceph2 v4 Pseudo mount -o vers=4 server:/export/ceph2
Configure the
RGWsection. Specify the name of the instance, provide a path to the Ceph configuration file, and specify any initialization arguments:RGW { name = "client.rgw.{instance-name}"; ceph_conf = "/etc/ceph/ceph.conf"; init_args = "--{arg}={arg-value}"; }-
Save the
/etc/ganesha/ganesha.confconfiguration file. Enable and start the
nfs-ganeshaservice.# systemctl enable nfs-ganesha # systemctl start nfs-ganesha
For very large pseudo directories, set the configurable parameter
rgw_nfs_s3_fast_attrstotruein theceph.conffile to make the namespace immutable and accelerated:rgw_nfs_s3_fast_attrs= true
Restart the Ceph Object Gateway service from each gateway node:
# systemctl restart ceph-radosgw.target
Configuring NFSv4 clients
To access the namespace, mount the configured NFS-Ganesha export(s) into desired locations in the local POSIX namespace. As noted, this implementation has a few unique restrictions:
- Only the NFS 4.1 and higher protocol flavors are supported.
-
To enforce write ordering, use the
syncmount option.
To mount the NFS-Ganesha exports, add the following entry to the /etc/fstab file on the client host:
<ganesha-host-name>:/ <mount-point> nfs noauto,soft,nfsvers=4.1,sync,proto=tcp 0 0
Specify the NFS-Ganesha host name and the path to the mount point on the client.
To successfully mount the NFS-Ganesha exports, the /sbin/mount.nfs file must exist on the client. The nfs-tools package provides this file. In most cases, the package is installed by default. However, verify that the nfs-tools package is installed on the client and if not, install it.
For additional details on NFS, see the Network File System (NFS) chapter in the Storage Administration Guide for Red Hat Enterprise Linux 7.
Configuring NFSv3 clients
Linux clients can be configured to mount with NFSv3 by supplying nfsvers=3 and noacl as mount options. To use UDP as the transport, add proto=udp to the mount options. However, TCP is the preferred protocol.
<ganesha-host-name>:/ <mount-point> nfs noauto,noacl,soft,nfsvers=3,sync,proto=tcp 0 0
Configure the NFS Ganesha EXPORT block Protocols setting with version 3 and the Transports setting with UDP if the mount will use version 3 with UDP.
Since NFSv3 does not communicate client OPEN and CLOSE operations to file servers, RGW NFS cannot use these operations to mark the beginning and ending of file upload transactions. Instead, RGW NFS attempts to start a new upload when the first write is sent to a file at offset 0, and finalizes the upload when no new writes to the file have been seen for a period of time—by default, 10 seconds. To change this value, set a value for rgw_nfs_write_completion_interval_s in the RGW section(s) of the Ceph configuration file.