
Red Hat Training
A Red Hat training course is available for Red Hat Ceph Storage
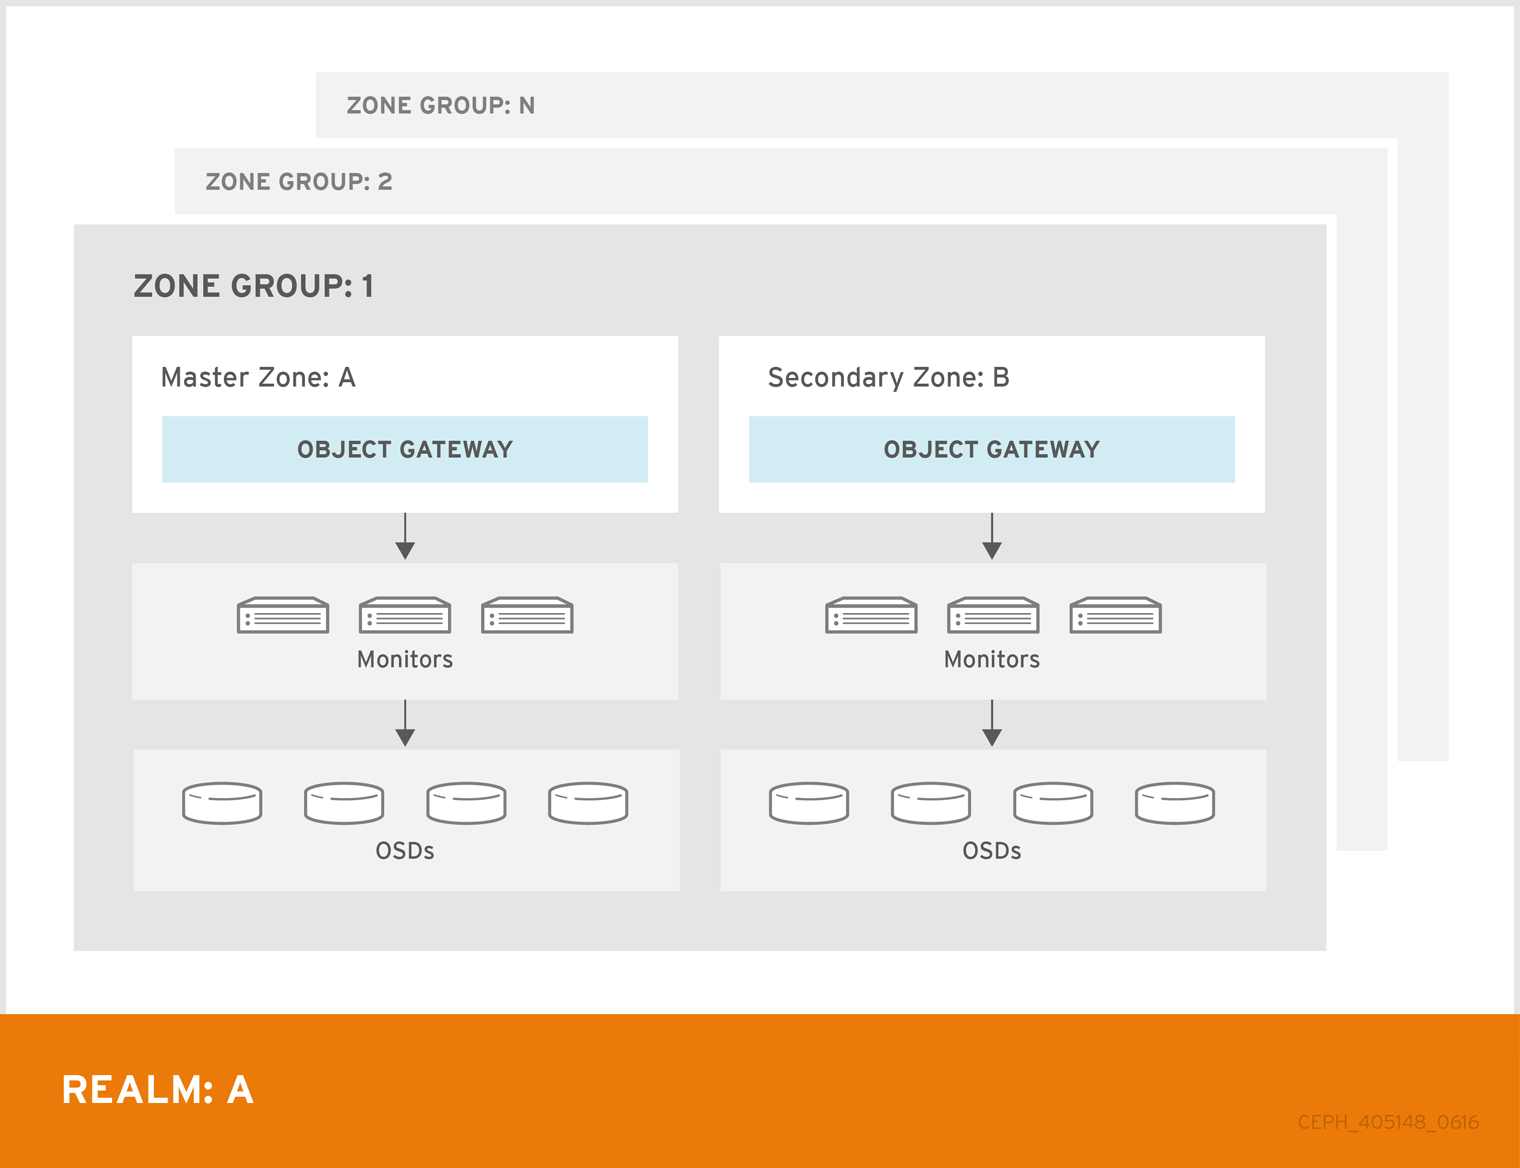
Chapter 5. Multi-Site
A single zone configuration typically consists of one zone group containing one zone and one or more ceph-radosgw instances where you may load-balance gateway client requests between the instances. In a single zone configuration, typically multiple gateway instances point to a single Ceph storage cluster. However, Red Hat supports several multi-site configuration options for the Ceph Object Gateway:
-
Multi-zone: A more advanced configuration consists of one zone group and multiple zones, each zone with one or more
ceph-radosgwinstances. Each zone is backed by its own Ceph Storage Cluster. Multiple zones in a zone group provides disaster recovery for the zone group should one of the zones experience a significant failure. In Red Hat Ceph Storage 2, each zone is active and may receive write operations. In addition to disaster recovery, multiple active zones may also serve as a foundation for content delivery networks. To configure multiple zones without replication, see Section 5.10, “Configuring Multiple Zones without Replication” - Multi-zone-group: Formerly called 'regions', Ceph Object Gateway can also support multiple zone groups, each zone group with one or more zones. Objects stored to zone groups within the same realm share a global namespace, ensuring unique object IDs across zone groups and zones.
- Multiple Realms: In Red Hat Ceph Storage 2, the Ceph Object Gateway supports the notion of realms, which can be a single zone group or multiple zone groups and a globally unique namespace for the realm. Multiple realms provides the ability to support numerous configurations and namespaces.
5.1. Functional Changes from Red Hat Ceph Storage v1.x
In Red Hat Ceph Storage 2, you can configure each Ceph Object Gateway to work in an active-active zone configuration, allowing for writes to non-master zones.
The multi-site configuration is stored within a container called a "realm." The realm stores zone groups, zones, and a time "period" with multiple epochs for tracking changes to the configuration. In Red Hat Ceph Storage 2, the ceph-radosgw daemons handle the synchronization, eliminating the need for a separate synchronization agent. Additionally, the new approach to synchronization allows the Ceph Object Gateway to operate with an "active-active" configuration instead of "active-passive".
5.2. Requirements and Assumptions
A multi-site configuration requires at least two Ceph storage clusters, preferably given a distinct cluster name. At least two Ceph object gateway instances, one for each Ceph storage cluster.
This guide assumes at least two Ceph storage clusters in geographically separate locations; however, the configuration can work on the same physical site. This guide also assumes four Ceph object gateway servers named rgw1, rgw2, rgw3 and rgw4 respectively.
A multi-site configuration requires a master zone group and a master zone. Additionally, each zone group requires a master zone. Zone groups may have one or more secondary or non-master zones.
The master zone within the master zone group of a realm is responsible for storing the master copy of the realm’s metadata, including users, quotas and buckets (created by the radosgw-admin CLI). This metadata gets synchronized to secondary zones and secondary zone groups automatically. Metadata operations executed with the radosgw-admin CLI MUST be executed on a host within the master zone of the master zone group in order to ensure that they get synchronized to the secondary zone groups and zones. Currently, it is possible to execute metadata operations on secondary zones and zone groups, but it is NOT recommended because they WILL NOT be syncronized, leading to fragmented metadata.
In this guide, the rgw1 host will serve as the master zone of the master zone group; the rgw2 host will serve as the secondary zone of the master zone group; the rgw3 host will serve as the master zone of the secondary zone group; and the rgw4 host will serve as the secondary zone of the secondary zone group.
5.3. Pools
Red Hat recommends using the Ceph Placement Group’s per Pool Calculator to calculate a suitable number of placement groups for the pools the ceph-radosgw daemon will create. Set the calculated values as defaults in your Ceph configuration file. For example:
osd pool default pg num = 50
osd pool default pgp num = 50
Make this change to the Ceph configuration file on your storage cluster; then, either make a runtime change to the configuration so that it will use those defaults when the gateway instance creates the pools.
Alternatively, create the pools manually. See Pools for details on creating pools.
Pool names particular to a zone follow the naming convention {zone-name}.pool-name. For example, a zone named us-east will have the following pools:
-
.rgw.root -
us-east.rgw.control -
us-east.rgw.data.root -
us-east.rgw.gc -
us-east.rgw.log -
us-east.rgw.intent-log -
us-east.rgw.usage -
us-east.rgw.users.keys -
us-east.rgw.users.email -
us-east.rgw.users.swift -
us-east.rgw.users.uid -
us-east.rgw.buckets.index -
us-east.rgw.buckets.data
5.4. Installing an Object Gateway
To install the Ceph Object Gateway, see the Red Hat Ceph Storage Installation Guide for Ubuntu.
All Ceph Object Gateway nodes must follow the tasks listed in the Prerequisites section. Red Hat supports two methods for installing Ceph Object Gateway
- by using the command line
- by using the Ansible automation application
5.4.1. Installing using the Command Line
The procedure for installing Ceph Object Gateway is identical to the procedure described in the Red Hat Ceph Storage Installation Guide for Ubuntu but with this difference: proceed to configure the zones BEFORE starting the Ceph Object Gateway daemons to avoid the need to remove default zones and pools.
5.4.2. Installing an Object Gateway using Ansible
Ansible can install and configure Ceph Object Gateways for use with a Ceph Storage cluster. So for a simple configuration, add Ceph Object Gateways to your Ansible configuration. For multi-site and multi-site group deployments, you should have an Ansible configuration for each zone.
If you install Ceph Object Gateway with Ansible, the Ansible playbooks will handle the initial configuration for you. To install the Ceph Object Gateway with Ansible, add your hosts to the /etc/ansible/hosts file. Add the Ceph Object Gateway hosts under an [rgws] section to identify their roles to Ansible. If your hosts have sequential naming, you may use a range. For example:
[rgws]
<rgw-host-name-1>
<rgw-host-name-2>
<rgw-host-name[3..10]>
Once you have added the hosts, you may rerun your Ansible playbooks.
Ansible will ensure your gateway is running, so the default zones and pools may need to be deleted manually. This guide provides those steps.
5.5. Configuring a Master Zone
All gateways in a multi-site configuration will retrieve their configuration from a ceph-radosgw daemon on a host within the master zone group and master zone. To configure your gateways in a multi-site configuration, choose a ceph-radosgw instance to configure the master zone group and master zone.
5.5.1. Create a Realm
A realm contains the multi-site configuration of zone groups and zones and also serves to enforce a globally unique namespace within the realm.
Create a new realm for the multi-site configuration by opening a command line interface on a host identified to serve in the master zone group and zone. Then, execute the following:
[root@master-zone]# radosgw-admin realm create --rgw-realm={realm-name} [--default]For example:
[root@master-zone]# radosgw-admin realm create --rgw-realm=movies --default
If the cluster will have a single realm, specify the --default flag. If --default is specified, radosgw-admin will use this realm by default. If --default is not specified, adding zone-groups and zones requires specifying either the --rgw-realm flag or the --realm-id flag to identify the realm when adding zone groups and zones.
After creating the realm, radosgw-admin will echo back the realm configuration. For example:
{
    "id": "0956b174-fe14-4f97-8b50-bb7ec5e1cf62",
    "name": "movies",
    "current_period": "1950b710-3e63-4c41-a19e-46a715000980",
    "epoch": 1
}Ceph generates a unique ID for the realm, which allows the renaming of a realm if the need arises.
5.5.2. Create a Master Zone Group
A realm must have at least one zone group, which will serve as the master zone group for the realm.
Create a new master zone group for the multi-site configuration by opening a command line interface on a host identified to serve in the master zone group and zone. Then, execute the following:
[root@master-zone]# radosgw-admin zonegroup create --rgw-zonegroup={name} --endpoints={url} [--rgw-realm={realm-name}|--realm-id={realm-id}] --master --defaultFor example:
[root@master-zone]# radosgw-admin zonegroup create --rgw-zonegroup=us --endpoints=http://rgw1:80 --rgw-realm=movies --master --default
If the realm will only have a single zone group, specify the --default flag. If --default is specified, radosgw-admin will use this zone group by default when adding new zones. If --default is not specified, adding zones will require either the --rgw-zonegroup flag or the --zonegroup-id flag to identify the zone group when adding or modifying zones.
After creating the master zone group, radosgw-admin will echo back the zone group configuration. For example:
{
    "id": "f1a233f5-c354-4107-b36c-df66126475a6",
    "name": "us",
    "api_name": "us",
    "is_master": "true",
    "endpoints": [
        "http:\/\/rgw1:80"
    ],
    "hostnames": [],
    "hostnames_s3webzone": [],
    "master_zone": "",
    "zones": [],
    "placement_targets": [],
    "default_placement": "",
    "realm_id": "0956b174-fe14-4f97-8b50-bb7ec5e1cf62"
}
5.5.3. Create a Master Zone
Zones must be created on a Ceph Object Gateway node that will be within the zone.
Create a new master zone for the multi-site configuration by opening a command line interface on a host identified to serve in the master zone group and zone. Then, execute the following:
[root@master-zone]# radosgw-admin zone create \
                            --rgw-zonegroup={zone-group-name} \
                            --rgw-zone={zone-name} \
                            --master --default \
                            --endpoints={http://fqdn}[,{http://fqdn}
For example:
[root@master-zone]# radosgw-admin zone create --rgw-zonegroup=us \
                            --rgw-zone=us-east \
                            --master --default \
                            --endpoints={http://fqdn}[,{http://fqdn}
The --access-key and --secret aren’t specified. These settings will be added to the zone once the user is created in the next section.
The following steps assume a multi-site configuration using newly installed systems that aren’t storing data yet. DO NOT DELETE the default zone and its pools if you are already using it to store data, or the data will be deleted and unrecoverable.
5.5.4. Delete Default Zone Group and Zone
Delete the default zone if it exists. Make sure to remove it from the default zone group first.
[root@master-zone]# radosgw-admin zonegroup remove --rgw-zonegroup=default --rgw-zone=default
[root@master-zone]# radosgw-admin period update --commit
[root@master-zone]# radosgw-admin zone delete --rgw-zone=default
[root@master-zone]# radosgw-admin period update --commit
[root@master-zone]# radosgw-admin zonegroup delete --rgw-zonegroup=default
[root@master-zone]# radosgw-admin period update --commit
Finally, delete the default pools in your Ceph storage cluster if they exist.
The following step assumes a multi-site configuration using newly installed systems that aren’t currently storing data. DO NOT DELETE the default zone group if you are already using it to store data.
# rados rmpool default.rgw.control default.rgw.control --yes-i-really-really-mean-it
# rados rmpool default.rgw.data.root default.rgw.data.root --yes-i-really-really-mean-it
# rados rmpool default.rgw.gc default.rgw.gc --yes-i-really-really-mean-it
# rados rmpool default.rgw.log default.rgw.log --yes-i-really-really-mean-it
# rados rmpool default.rgw.users.uid default.rgw.users.uid --yes-i-really-really-mean-it
5.5.5. Create a System User
The ceph-radosgw daemons must authenticate before pulling realm and period information. In the master zone, create a system user to facilitate authentication between daemons.
[root@master-zone]# radosgw-admin user create --uid="{user-name}" --display-name="{Display Name}" --systemFor example:
[root@master-zone]# radosgw-admin user create --uid="synchronization-user" --display-name="Synchronization User" --system
Make a note of the access_key and secret_key, as the secondary zones will require them to authenticate with the master zone.
Finally, add the system user to the master zone.
[root@master-zone]# radosgw-admin zone modify --rgw-zone=us-east --access-key={access-key} --secret={secret}
[root@master-zone]# radosgw-admin period update --commit
5.5.6. Update the Period
After updating the master zone configuration, update the period.
# radosgw-admin period update --commit
Updating the period changes the epoch, and ensures that other zones will receive the updated configuration.
5.5.7. Update the Ceph Configuration File
Update the Ceph configuration file on master zone hosts by adding the rgw_zone configuration option and the name of the master zone to the instance entry.
[client.rgw.{instance-name}]
...
rgw_zone={zone-name}
For example:
[client.rgw.rgw1]
host = rgw1
rgw frontends = "civetweb port=80"
rgw_zone=us-east
5.5.8. Start the Gateway
On the object gateway host, start and enable the Ceph Object Gateway service:
$ sudo systemctl start ceph-radosgw@rgw.`hostname -s`
$ sudo systemctl enable ceph-radosgw@rgw.`hostname -s`
If the service is already running, restart the service instead of starting and enabling it:
$ sudo systemctl restart ceph-radosgw@rgw.`hostname -s`
5.6. Configure Secondary Zones
Zones within a zone group replicate all data to ensure that each zone has the same data. When creating the secondary zone, execute ALL of the zone operations on a host identified to serve the secondary zone.
To add a third zone, follow the same procedures as for adding the secondary zone. Use different zone name.
You must execute metadata operations, such as user creation and quotas on a host within the master zone of the master zone group. The master zone and the secondary zone can receive bucket operations executed via the RESTful API, and the secondary zone redirects bucket operations to the master zone. If the master zone is down, bucket operations will fail. If you create buckets using the radosgw-admin CLI, you MUST do so on a host within the master zone of the master zone group, or the buckets WILL NOT synchronize with secondary zones and zone groups.
5.6.1. Pull the Realm
Using the URL path, access key and secret of the master zone in the master zone group, pull the realm to the host. To pull a non-default realm, specify the realm using the --rgw-realm or --realm-id configuration options.
# radosgw-admin realm pull --url={url-to-master-zone-gateway} --access-key={access-key} --secret={secret}If this realm is the default realm or the only realm, make the realm the default realm.
# radosgw-admin realm default --rgw-realm={realm-name}5.6.2. Pull the Period
Using the URL path, access key and secret of the master zone in the master zone group, pull the period to the host. To pull a period from a non-default realm, specify the realm using the --rgw-realm or --realm-id configuration options.
# radosgw-admin period pull --url={url-to-master-zone-gateway} --access-key={access-key} --secret={secret}Pulling the period retrieves the latest version of the zone group and zone configurations for the realm.
5.6.3. Create a Secondary Zone
Zones must be created on a Ceph Object Gateway node that will be within the zone.
Create a secondary zone for the multi-site configuration by opening a command line interface on a host identified to serve the secondary zone. Specify the zone group ID, the new zone name and an endpoint for the zone. DO NOT use the --master or --default flags. In Red Hat Ceph Storage 2, all zones run in an active-active configuration by default; that is, a gateway client may write data to any zone and the zone will replicate the data to all other zones within the zone group. If the secondary zone should not accept write operations, specify the --read-only flag to create an active-passive configuration between the master zone and the secondary zone. Additionally, provide the access_key and secret_key of the generated system user stored in the master zone of the master zone group. Execute the following:
[root@second-zone]# radosgw-admin zone create --rgw-zonegroup={zone-group-name}\
                           --rgw-zone={zone-name} --endpoints={url} \
                           --access-key={system-key} --secret={secret}\
                           --endpoints=http://{fqdn}:80 \
                           [--read-only]
For example:
[root@second-zone]# radosgw-admin zone create --rgw-zonegroup=us \
                            --rgw-zone=us-west \
                            --access-key={system-key} --secret={secret} \
                            --endpoints=http://rgw2:80
The following steps assume a multi-site configuration using newly installed systems that aren’t storing data. DO NOT DELETE the default zone and its pools if you are already using them to store data, or the data will be lost and unrecoverable.
Delete the default zone if needed.
[root@second-zone]# radosgw-admin zone delete --rgw-zone=default
Finally, delete the default pools in your Ceph storage cluster if needed.
# rados rmpool default.rgw.control default.rgw.control --yes-i-really-really-mean-it
# rados rmpool default.rgw.data.root default.rgw.data.root --yes-i-really-really-mean-it
# rados rmpool default.rgw.gc default.rgw.gc --yes-i-really-really-mean-it
# rados rmpool default.rgw.log default.rgw.log --yes-i-really-really-mean-it
# rados rmpool default.rgw.users.uid default.rgw.users.uid --yes-i-really-really-mean-it
5.6.4. Update the Ceph Configuration File
Update the Ceph configuration file on the secondary zone hosts by adding the rgw_zone configuration option and the name of the secondary zone to the instance entry.
[client.rgw.{instance-name}]
...
rgw_zone={zone-name}
For example:
[client.rgw.rgw2]
host = rgw2
rgw frontends = "civetweb port=80"
rgw_zone=us-west
5.6.5. Update the Period
After updating the master zone configuration, update the period.
# radosgw-admin period update --commit
Updating the period changes the epoch, and ensures that other zones will receive the updated configuration.
5.6.6. Start the Gateway
On the object gateway host, start and enable the Ceph Object Gateway service:
$ sudo systemctl start ceph-radosgw@rgw.`hostname -s`
$ sudo systemctl enable ceph-radosgw@rgw.`hostname -s`
If the service is already running, restart the service instead of starting and enabling it:
$ sudo systemctl restart ceph-radosgw@rgw.`hostname -s`
5.6.7. Check Synchronization Status
Once the secondary zone is up and running, check the synchronization status. Synchronization copies users and buckets created in the master zone to the secondary zone.
# radosgw-admin sync status
The output will provide the status of synchronization operations. For example:
realm f3239bc5-e1a8-4206-a81d-e1576480804d (earth)
    zonegroup c50dbb7e-d9ce-47cc-a8bb-97d9b399d388 (us)
         zone 4c453b70-4a16-4ce8-8185-1893b05d346e (us-west)
metadata sync syncing
              full sync: 0/64 shards
              metadata is caught up with master
              incremental sync: 64/64 shards
    data sync source: 1ee9da3e-114d-4ae3-a8a4-056e8a17f532 (us-east)
                      syncing
                      full sync: 0/128 shards
                      incremental sync: 128/128 shards
data is caught up with sourceSecondary zones accept bucket operations; however, secondary zones redirect bucket operations to the master zone and then synchronize with the master zone to receive the result of the bucket operations. If the master zone is down, bucket operations executed on the secondary zone will fail, but object operations should succeed.
5.7. Failover and Disaster Recovery
If the master zone should fail, failover to the secondary zone for disaster recovery.
Make the secondary zone the master and default zone. For example:
# radosgw-admin zone modify --rgw-zone={zone-name} --master --defaultBy default, Ceph Object Gateway will run in an active-active configuration. If the cluster was configured to run in an active-passive configuration, the secondary zone is a read-only zone. Remove the
--read-onlystatus to allow the zone to receive write operations. For example:# radosgw-admin zone modify --rgw-zone={zone-name} --master --defaultUpdate the period to make the changes take effect.
# radosgw-admin period update --commit
Finally, restart the Ceph Object Gateway.
$ sudo systemctl restart ceph-radosgw@rgw.`hostname -s`
If the former master zone recovers, revert the operation.
From the recovered zone, pull the period from the current master zone.
# radosgw-admin period pull --url={url-to-master-zone-gateway} \
                            --access-key={access-key} --secret={secret}
Make the recovered zone the master and default zone.
# radosgw-admin zone modify --rgw-zone={zone-name} --master --defaultUpdate the period to make the changes take effect.
# radosgw-admin period update --commit
Then, restart the Ceph Object Gateway in the recovered zone.
$ sudo systemctl restart ceph-radosgw@rgw.`hostname -s`
If the secondary zone needs to be a read-only configuration, update the secondary zone.
# radosgw-admin zone modify --rgw-zone={zone-name} --read-onlyUpdate the period to make the changes take effect.
# radosgw-admin period update --commit
Finally, restart the Ceph Object Gateway in the secondary zone.
$ sudo systemctl restart ceph-radosgw@rgw.`hostname -s`
5.8. Migrating a Single Site System to Multi-Site
To migrate from a single site system with a default zone group and zone to a multi site system, use the following steps:
Create a realm. Replace
<name>with the realm name.# radosgw-admin realm create --rgw-realm=<name> --default
Rename the default zone and zonegroup. Replace
<name>with the zonegroup or zone name.# radosgw-admin zonegroup rename --rgw-zonegroup default --zonegroup-new-name=<name> # radosgw-admin zone rename --rgw-zone default --zone-new-name us-east-1 --rgw-zonegroup=<name>
Configure the master zonegroup. Replace
<name>with the realm or zonegroup name. Replace<fqdn>with the fully qualified domain name(s) in the zonegroup.# radosgw-admin zonegroup modify --rgw-realm=<name> --rgw-zonegroup=<name> --endpoints http://<fqdn>:80 --master --default
Configure the master zone. Replace
<name>with the realm, zonegroup or zone name. Replace<fqdn>with the fully qualified domain name(s) in the zonegroup.# radosgw-admin zone modify --rgw-realm=<name> --rgw-zonegroup=<name> \ --rgw-zone=<name> --endpoints http://<fqdn>:80 \ --access-key=<access-key> --secret=<secret-key> \ --master --defaultCreate a system user. Replace
<user-id>with the username. Replace<display-name>with a display name. It may contain spaces.# radosgw-admin user create --uid=<user-id> --display-name="<display-name>"\ --access-key=<access-key> --secret=<secret-key> --systemCommit the updated configuration.
# radosgw-admin period update --commit
Finally, restart the Ceph Object Gateway.
$ sudo systemctl restart ceph-radosgw@rgw.`hostname -s`
After completing this procedure, proceed to Configure a Secondary Zone to create a secondary zone in the master zone group.
5.9. Migrating a 1.3 Multi-Site System to version 2
Customers wishing to migrate from a 1.3 multi-site system, formerly called "federated", contact customer support for advice on recommended steps so Red Hat Support can look at the configuration, environment, and data first.
5.10. Configuring Multiple Zones without Replication
You can configure multiple zones that will not replicate each other. For example you can create a dedicated zone for each team in a company.
Prerequisites
- A Ceph Storage Cluster with the Ceph Object Gateway installed.
Procedure
Create a realm.
radosgw-admin realm create --rgw-realm=realm-name [--default]For example:
[root@master-zone]# radosgw-admin realm create --rgw-realm=movies --default
{
    "id": "0956b174-fe14-4f97-8b50-bb7ec5e1cf62",
    "name": "movies",
    "current_period": "1950b710-3e63-4c41-a19e-46a715000980",
    "epoch": 1
}
Create a zone group.
radosgw-admin zonegroup create --rgw-zonegroup=zone-group-name --endpoints=url [--rgw-realm=realm-name|--realm-id=realm-id] --master --default
For example:
[root@master-zone]# radosgw-admin zonegroup create --rgw-zonegroup=us --endpoints=http://rgw1:80 --rgw-realm=movies --master --default
{
    "id": "f1a233f5-c354-4107-b36c-df66126475a6",
    "name": "us",
    "api_name": "us",
    "is_master": "true",
    "endpoints": [
        "http:\/\/rgw1:80"
    ],
    "hostnames": [],
    "hostnames_s3webzone": [],
    "master_zone": "",
    "zones": [],
    "placement_targets": [],
    "default_placement": "",
    "realm_id": "0956b174-fe14-4f97-8b50-bb7ec5e1cf62"
}
Create one or more zones depending on your use case.
radosgw-admin zone create
             --rgw-zonegroup=zone-group-name \
             --rgw-zone=zone-name \
             --master --default \
             --endpoints=http://fqdn:port[,http://fqdn:port]
For example:
[root@master-zone]# radosgw-admin zone create --rgw-zonegroup=us \
                                              --rgw-zone=us-east \
                                              --master --default \
                                              --endpoints=http://rgw1:80
Get the JSON file with the configuration of the zone group.
radosgw-admin zonegroup get --rgw-zonegroup=zone-group-name > zonegroup.jsonFor example:
[root@master-zone]# radosgw-admin zonegroup get --rgw-zonegroup=us > zonegroup.json
In the file, set the
log_meta,log_data, andsync_from_allparameters tofalse.{ "id": "72f3a886-4c70-420b-bc39-7687f072997d", "name": "default", "api_name": "", "is_master": "true", "endpoints": [], "hostnames": [], "hostnames_s3website": [], "master_zone": "a5e44ecd-7aae-4e39-b743-3a709acb60c5", "zones": [ { "id": "975558e0-44d8-4866-a435-96d3e71041db", "name": "testzone", "endpoints": [], "log_meta": "false", "log_data": "false", "bucket_index_max_shards": 0, "read_only": "false", "tier_type": "", "sync_from_all": "false", "sync_from": [] }, { "id": "a5e44ecd-7aae-4e39-b743-3a709acb60c5", "name": "default", "endpoints": [], "log_meta": "false", "log_data": "false", "bucket_index_max_shards": 0, "read_only": "false", "tier_type": "", "sync_from_all": "false", "sync_from": [] } ], "placement_targets": [ { "name": "default-placement", "tags": [] } ], "default_placement": "default-placement", "realm_id": "2d988e7d-917e-46e7-bb18-79350f6a5155" }Use the updated JSON file.
radosgw-admin zonegroup set --rgw-zonegroup=zone-group-name --infile=zonegroup.jsonFor example:
[root@master-zone]# radosgw-admin zonegroup set --rgw-zonegroup=us --infile=zonegroup.json
Update the period.
# radosgw-admin period update --commit
Additional Resources