
Red Hat Training
A Red Hat training course is available for Red Hat Ceph Storage
Block Device Guide
Manging, creating, configuring, and using Red Hat Ceph Storage block devices
Abstract
Chapter 1. Overview
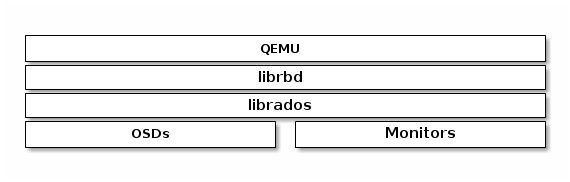
A block is a sequence of bytes (for example, a 512-byte block of data). Block-based storage interfaces are the most common way to store data with rotating media such as hard disks, CDs, floppy disks, and even traditional 9-track tape. The ubiquity of block device interfaces makes a virtual block device an ideal candidate to interact with a mass data storage system like Ceph.
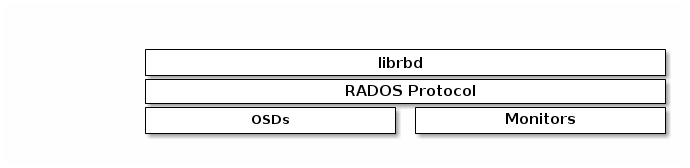
Ceph block devices are thin-provisioned, resizable and store data striped over multiple OSDs in a Ceph cluster. Ceph block devices leverage RADOS (Reliable Autonomic Distributed Object Store) capabilities such as snapshotting, replication and consistency. Ceph’s RADOS (Reliable Autonomic Distributed Object Store) Block Devices (RBD) interact with OSDs using the librbd library.
Ceph’s block devices deliver high performance with infinite scalability to KVMs (kernel virtual machines) such as Qemu, and cloud-based computing systems like OpenStack and CloudStack that rely on libvirt and Qemu to integrate with Ceph block devices. You can use the same cluster to operate the Ceph Object Gateway and Ceph block devices simultaneously.
To use Ceph Block Devices, you must have access to a running Ceph cluster.
Chapter 2. Block Device Commands
The rbd command enables you to create, list, introspect and remove block device images. You can also use it to clone images, create snapshots, rollback an image to a snapshot, view a snapshot, etc.
To use Ceph Block Device commands, you must have access to a running Ceph cluster.
2.1. Prerequisites
To use Ceph Block Device commands on your client node, you will have to meet some prerequisites.
Follow Ceph Client Quick Start Guide to prepare your client node for rbd usage.
The Ceph Client Quick Start Guide will also provide you information to mount and use block device on your client node. Please execute the steps on the client node only after creating an image for the block device in the Ceph Storage Cluster.
2.1.1. Access to the Storage Cluster
The client node where you will add a block device, also needs to have access to the Ceph Storage Cluster. To be able to access the cluster, the client node will need the cluster configuration file.
Execute from the admin node of the cluster:
ceph-deploy --overwrite-conf config push <client-node>
2.2. Creating a Block Device Image
Before you can add a block device to a node, you must create an image for it in the Ceph Storage Cluster first. To create a block device image, execute the following:
rbd create {image-name} --size {megabytes} --pool {pool-name}
For example, to create a 1GB image named foo that stores information in a pool named swimmingpool, execute the following:
rbd create foo --size 1024
rbd create bar --size 1024 --pool swimmingpool
You must create a pool first before you can specify it as a source.
2.3. Listing Block Device Images
To list block devices in the rbd pool, execute the following (rbd is the default pool name):
rbd ls
To list block devices in a particular pool, execute the following, but replace {poolname} with the name of the pool:
rbd ls {poolname}For example:
rbd ls swimmingpool
2.4. Retrieving Image Information
To retrieve information from a particular image, execute the following, but replace {image-name} with the name for the image:
rbd --image {image-name} infoFor example:
rbd --image foo info
To retrieve information from an image within a pool, execute the following, but replace {image-name} with the name of the image and replace {pool-name} with the name of the pool:
rbd --image {image-name} -p {pool-name} infoFor example:
rbd --image bar -p swimmingpool info
2.5. Resizing a Block Device Image
Ceph Block Device images are thin provisioned. They don’t actually use any physical storage until you begin saving data to them. However, they do have a maximum capacity that you set with the --size option. If you want to increase (or decrease) the maximum size of a Ceph Block Device image, execute the following:
rbd resize --image foo --size 2048
2.6. Removing a Block Device Image
To remove a block device, execute the following, but replace {image-name} with the name of the image you want to remove:
rbd rm {image-name}For example:
rbd rm foo
To remove a block device from a pool, execute the following, but replace {image-name} with the name of the image to remove and replace {pool-name} with the name of the pool:
rbd rm {image-name} -p {pool-name}For example:
rbd rm bar -p swimmingpool
Chapter 3. Snapshots
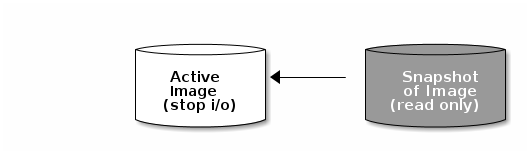
A snapshot is a read-only copy of the state of an image at a particular point in time. One of the advanced features of Ceph block devices is that you can create snapshots of the images to retain a history of an image’s state. Ceph also supports snapshot layering, which allows you to clone images (for example a VM image) quickly and easily. Ceph supports block device snapshots using the rbd command and many higher level interfaces, including QEMU, libvirt,OpenStack and CloudStack.
To use RBD snapshots, you must have a running Ceph cluster.
If a snapshot is taken while I/O is still in progress in a image, the snapshot might not get the exact or latest data of the image and the snapshot may have to be cloned to a new image to be mountable. So, we recommend to stop I/O before taking a snapshot of an image. If the image contains a filesystem, the filesystem must be in a consistent state before taking a snapshot. To stop I/O you can use fsfreeze command. See fsfreeze(8) man page for more details. For virtual machines, qemu-guest-agent can be used to automatically freeze filesystems when creating a snapshot.
3.1. Cephx Notes
When cephx is enabled (it is by default), you must specify a user name or ID and a path to the keyring containing the corresponding key for the user. You may also add the CEPH_ARGS environment variable to avoid re-entry of the following parameters:
rbd --id {user-ID} --keyring=/path/to/secret [commands]
rbd --name {username} --keyring=/path/to/secret [commands]
For example:
rbd --id admin --keyring=/etc/ceph/ceph.keyring [commands]
rbd --name client.admin --keyring=/etc/ceph/ceph.keyring [commands]
Add the user and secret to the CEPH_ARGS environment variable so that you don’t need to enter them each time.
3.2. Snapshot Basics
The following procedures demonstrate how to create, list, and remove snapshots using the rbd command on the command line.
3.2.1. Create Snapshot
To create a snapshot with rbd, specify the snap create option, the pool name and the image name:
rbd --pool {pool-name} snap create --snap {snap-name} {image-name}
rbd snap create {pool-name}/{image-name}@{snap-name}
For example:
rbd --pool rbd snap create --snap snapname foo
rbd snap create rbd/foo@snapname
3.2.2. List Snapshots
To list snapshots of an image, specify the pool name and the image name:
rbd --pool {pool-name} snap ls {image-name}
rbd snap ls {pool-name}/{image-name}
For example:
rbd --pool rbd snap ls foo
rbd snap ls rbd/foo
3.2.3. Rollback Snapshot
To rollback to a snapshot with rbd, specify the snap rollback option, the pool name, the image name and the snap name:
rbd --pool {pool-name} snap rollback --snap {snap-name} {image-name}
rbd snap rollback {pool-name}/{image-name}@{snap-name}
For example:
rbd --pool rbd snap rollback --snap snapname foo
rbd snap rollback rbd/foo@snapname
Rolling back an image to a snapshot means overwriting the current version of the image with data from a snapshot. The time it takes to execute a rollback increases with the size of the image. It is faster to clone from a snapshot than to rollback an image to a snapshot, and it is the preferred method of returning to a pre-existing state.
3.2.4. Delete a Snapshot
To delete a snapshot with rbd, specify the snap rm option, the pool name, the image name and the user name:
rbd --pool {pool-name} snap rm --snap {snap-name} {image-name}
rbd snap rm {pool-name}/{image-name}@{snap-name}
For example:
rbd --pool rbd snap rm --snap snapname foo
rbd snap rm rbd/foo@snapname
Ceph OSDs delete data asynchronously, so deleting a snapshot doesn’t free up the disk space immediately.
3.2.5. Purge Snapshots
To delete all snapshots for an image with rbd, specify the snap purge option and the image name:
rbd --pool {pool-name} snap purge {image-name}
rbd snap purge {pool-name}/{image-name}
For example:
rbd --pool rbd snap purge foo
rbd snap purge rbd/foo
3.3. Layering
Ceph supports the ability to create many copy-on-write (COW) or copy-on-read (COR) clones of a block device snapshot. Snapshot layering enables Ceph block device clients to create images very quickly. For example, you might create a block device image with a Linux VM written to it; then, snapshot the image, protect the snapshot, and create as many clones as you like. A snapshot is read-only, so cloning a snapshot simplifies semantics—making it possible to create clones rapidly.
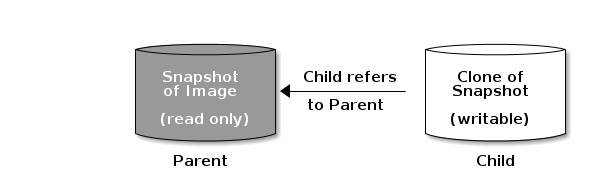
The terms parent and child mean a Ceph block device snapshot (parent), and the corresponding image cloned from the snapshot (child). These terms are important for the command line usage below.
Each cloned image (child) stores a reference to its parent image, which enables the cloned image to open the parent snapshot and read it. This reference is removed when the clone is flattened that is, when information from the snapshot is completely copied to the clone. For more information on flattening see Flattening a Cloned Image.
A clone of a snapshot behaves exactly like any other Ceph block device image. You can read to, write from, clone, and resize cloned images. There are no special restrictions with cloned images. However, the clone of a snapshot refers to the snapshot, so you MUST protect the snapshot before you clone it.
A clone of a snapshot can be a copy-on-write (COW) or copy-on-read (COR) clone. Copy-on-write (COW) is always enabled for clones while copy-on-read (COR) has to be enabled explicitly. Copy-on-write (COW) copies data from the parent to the clone when it writes to an unallocated object within the clone. Copy-on-read (COR) copies data from the parent to the clone when it reads from an unallocated object within the clone. Reading data from a clone will only read data from the parent if the object does not yet exist in the clone. Rados block device breaks up large images into multiple objects (defaults to 4 MB) and all copy-on-write (COW) and copy-on-read (COR) operations occur on a full object (that is writing 1 byte to a clone will result in a 4 MB object being read from the parent and written to the clone if the destination object does not already exist in the clone from a previous COW/COR operation).
Whether or not copy-on-read (COR) is enabled, any reads that cannot be satisfied by reading an underlying object from the clone will be rerouted to the parent. Since there is practically no limit to the number of parents (meainig you can clone a clone), this reroute continues until an object is found or you hit the base parent image. If copy-on-read (COR) is enabled, any reads that fail to be satisfied directly from the clone result in a full object read from the parent and writing that data to the clone so that future reads of the same extent can be satisfied from the clone itself without the need of reading from the parent.
This is essentially an on-demand, object-by-object flatten operation. This is specially useful when the clone is in a high-latency connection away from it’s parent (parent in a different pool in another geographical location). Copy-on-read (COR) reduces the amortized latency of reads. The first few reads will have high latency because it will result in extra data being read from the parent (for example, you read 1 byte from the clone but now 4 MB has to be read from the parent and written to the clone), but all future reads will be served from the clone itself.
To create copy-on-read (COR) clones from snapshot you have to explicitly enable this feature by adding rbd_clone_copy_on_read = true under [global] or [client] section in your ceph.conf file.
Ceph only supports cloning for format 2 images (created with rbd create --image-format 2), and is not yet supported by the kernel rbd module. So you MUST use QEMU/KVM or librbd directly to access clones in the current release.
3.3.1. Getting Started with Layering
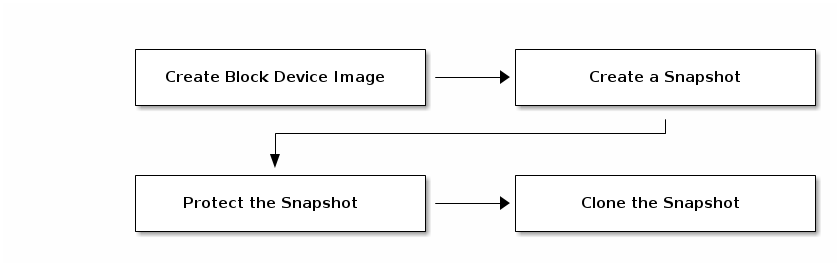
Ceph block device layering is a simple process. You must have an image. You must create a snapshot of the image. You must protect the snapshot. Once you have performed these steps, you can begin cloning the snapshot.
The cloned image has a reference to the parent snapshot, and includes the pool ID, image ID and snapshot ID. The inclusion of the pool ID means that you may clone snapshots from one pool to images in another pool.
-
Image Template: A common use case for block device layering is to create a a master image and a snapshot that serves as a template for clones. For example, a user may create an image for a RHEL7 distribution and create a snapshot for it. Periodically, the user may update the image and create a new snapshot (for example
yum update,yum upgrade, followed byrbd snap create). As the image matures, the user can clone any one of the snapshots. - Extended Template: A more advanced use case includes extending a template image that provides more information than a base image. For example, a user may clone an image (for example, a VM template) and install other software (for example, a database, a content management system, an analytics system, and so on) and then snapshot the extended image, which itself may be updated just like the base image.
- Template Pool: One way to use block device layering is to create a pool that contains master images that act as templates, and snapshots of those templates. You may then extend read-only privileges to users so that they may clone the snapshots without the ability to write or execute within the pool.
- Image Migration/Recovery: One way to use block device layering is to migrate or recover data from one pool into another pool.
3.3.2. Protecting a Snapshot
Clones access the parent snapshots. All clones would break if a user inadvertently deleted the parent snapshot. To prevent data loss, you MUST protect the snapshot before you can clone it. To do so, run the following commands:
rbd --pool {pool-name} snap protect --image {image-name} --snap {snapshot-name}
rbd snap protect {pool-name}/{image-name}@{snapshot-name}
For example:
rbd --pool rbd snap protect --image my-image --snap my-snapshot
rbd snap protect rbd/my-image@my-snapshot
You cannot delete a protected snapshot.
3.3.3. Cloning a Snapshot
To clone a snapshot, you need to specify the parent pool, image and snapshot; and the child pool and image name. You must protect the snapshot before you can clone it. To do so, run the following commands:
rbd --pool {pool-name} --image {parent-image} --snap {snap-name} --dest-pool {pool-name} --dest {child-image}
rbd clone {pool-name}/{parent-image}@{snap-name} {pool-name}/{child-image-name}
For example:
rbd clone rbd/my-image@my-snapshot rbd/new-image
You may clone a snapshot from one pool to an image in another pool. For example, you may maintain read-only images and snapshots as templates in one pool, and writeable clones in another pool.
3.3.4. Unprotecting a Snapshot
Before you can delete a snapshot, you must unprotect it first. Additionally, you may NOT delete snapshots that have references from clones. You must flatten each clone of a snapshot, before you can delete the snapshot. To do so, run the following commands:
rbd --pool {pool-name} snap unprotect --image {image-name} --snap {snapshot-name}
rbd snap unprotect {pool-name}/{image-name}@{snapshot-name}
For example:
rbd --pool rbd snap unprotect --image my-image --snap my-snapshot
rbd snap unprotect rbd/my-image@my-snapshot
3.3.5. Listing Children of a Snapshot
To list the children of a snapshot, execute the following:
rbd --pool {pool-name} children --image {image-name} --snap {snap-name}
rbd children {pool-name}/{image-name}@{snapshot-name}
For example:
rbd --pool rbd children --image my-image --snap my-snapshot
rbd children rbd/my-image@my-snapshot
3.3.6. Flattening a Cloned Image
Cloned images retain a reference to the parent snapshot. When you remove the reference from the child clone to the parent snapshot, you effectively "flatten" the image by copying the information from the snapshot to the clone. The time it takes to flatten a clone increases with the size of the snapshot. To delete a snapshot, you must flatten the child images first:
rbd --pool {pool-name} flatten --image {image-name}
rbd flatten {pool-name}/{image-name}
For example:
rbd --pool rbd flatten --image my-image
rbd flatten rbd/my-image
Since a flattened image contains all the information from the snapshot, a flattened image will take up more storage space than a layered clone.
Chapter 4. Block Device Configuration
4.1. General Settings
- rbd_op_threads
- Description
- The number of block device operation threads.
- Type
- Integer
- Default
-
1
- rbd_op_thread_timeout
- Description
- The timeout (in seconds) for block device operation threads.
- Type
- Integer
- Default
-
60
- rbd_non_blocking_aio
- Description
-
If
true, Ceph will process block device asynchronous I/O operations from a worker thread to prevent blocking. - Type
- Boolean
- Default
-
true
- rbd_concurrent_management_ops
- Description
- The maximum number of concurrent management operations in flight (for example, deleting or resizing an image).
- Type
- Integer
- Default
-
10
- rbd_request_timed_out_seconds
- Description
- The number of seconds before a maintenance request times out.
- Type
- Integer
- Default
-
30
- rbd_clone_copy_on_read
- Description
-
When set to
true, copy-on-read cloning is enabled. - Type
- Boolean
- Default
-
false
- rbd_enable_alloc_hint
- Description
-
If
true, allocation hinting is enabled, and the block device will issue a hint to the OSD backend to indicate the expected size object. - Type
- Boolean
- Default
-
true
- rbd_skip_partial_discard
- Description
-
If
true, the block device will skip zeroing a range when trying to discard a range inside an object. - Type
- Boolean
- Default
-
false
4.2. Default Settings
It is possible to override the default settings for creating an image. Ceph will create images with format 2 and no striping.
- rbd_default_format
- Description
-
The default format (
2) if no other format is specified. Format1is the original format for a new image, which is compatible with all versions oflibrbdand the kernel module, but does not support newer features like cloning. Format2is supported bylibrbdand the kernel module since version 3.11 (except for striping). Format2adds support for cloning and is more easily extensible to allow more features in the future. - Type
- Integer
- Default
-
2
- rbd_default_order
- Description
- The default order if no other order is specified.
- Type
- Integer
- Default
-
22
- rbd_default_stripe_count
- Description
- The default stripe count if no other stripe count is specified. Changing the default value requires striping v2 feature.
- Type
- 64-bit Unsigned Integer
- Default
-
0
- rbd_default_stripe_unit
- Description
-
The default stripe unit if no other stripe unit is specified. Changing the unit from
0(that is, the object size) requires the striping v2 feature. - Type
- 64-bit Unsigned Integer
- Default
-
0
- rbd_default_features
- Description
The default features enabled when creating an block device image. This setting only applies to format 2 images. The settings are:
1: Layering support. Layering enables you to use cloning.
2: Striping v2 support. Striping spreads data across multiple objects. Striping helps with parallelism for sequential read/write workloads.
4: Exclusive locking support. When enabled, it requires a client to get a lock on an object before making a write.
8: Object map support. Block devices are thin provisioned—meaning, they only store data that actually exists. Object map support helps track which objects actually exist (have data stored on a drive). Enabling object map support speeds up I/O operations for cloning, or importing and exporting a sparsely populated image.
16: Fast-diff support. Fast-diff support depends on object map support and exclusive lock support. It adds another property to the object map, which makes it much faster to generate diffs between snapshots of an image, and the actual data usage of a snapshot much faster.
32: Deep-flatten support. Deep-flatten makes
rbd flattenwork on all the snapshots of an image, in addition to the image itself. Without it, snapshots of an image will still rely on the parent, so the parent will not be delete-able until the snapshots are deleted. Deep-flatten makes a parent independent of its clones, even if they have snapshots.The enabled features are the sum of the numeric settings.
- Type
- Integer
- Default
-
3, or layering support and striping support.
- rbd_default_map_options
- Description
-
Most of the options are useful mainly for debugging and benchmarking. See
man rbdunderMap Optionsfor details. - Type
- String
- Default
-
""
4.3. Cache Settings
The user space implementation of the Ceph block device (that is, librbd) cannot take advantage of the Linux page cache, so it includes its own in-memory caching, called RBD caching. RBD caching behaves just like well-behaved hard disk caching. When the OS sends a barrier or a flush request, all dirty data is written to the OSDs. This means that using write-back caching is just as safe as using a well-behaved physical hard disk with a VM that properly sends flushes (that is, Linux kernel >= 2.6.32). The cache uses a Least Recently Used (LRU) algorithm, and in write-back mode it can coalesce contiguous requests for better throughput.
Ceph supports write-back caching for RBD. To enable it, add rbd cache = true to the [client] section of your ceph.conf file. By default librbd does not perform any caching. Writes and reads go directly to the storage cluster, and writes return only when the data is on disk on all replicas. With caching enabled, writes return immediately, unless there are more than rbd cache max dirty unflushed bytes. In this case, the write triggers writeback and blocks until enough bytes are flushed.
Ceph supports write-through caching for RBD. You can set the size of the cache, and you can set targets and limits to switch from write-back caching to write through caching. To enable write-through mode, set rbd cache max dirty to 0. This means writes return only when the data is on disk on all replicas, but reads may come from the cache. The cache is in memory on the client, and each RBD image has its own. Since the cache is local to the client, there’s no coherency if there are others accessing the image. Running GFS or OCFS on top of RBD will not work with caching enabled.
The ceph.conf file settings for RBD should be set in the [client] section of your configuration file. The settings include:
- rbd cache
- Description
- Enable caching for RADOS Block Device (RBD).
- Type
- Boolean
- Required
- No
- Default
-
true
- rbd cache size
- Description
- The RBD cache size in bytes.
- Type
- 64-bit Integer
- Required
- No
- Default
-
32 MiB
- rbd cache max dirty
- Description
-
The
dirtylimit in bytes at which the cache triggers write-back. If0, uses write-through caching. - Type
- 64-bit Integer
- Required
- No
- Constraint
-
Must be less than
rbd cache size. - Default
-
24 MiB
- rbd cache target dirty
- Description
-
The
dirty targetbefore the cache begins writing data to the data storage. Does not block writes to the cache. - Type
- 64-bit Integer
- Required
- No
- Constraint
-
Must be less than
rbd cache max dirty. - Default
-
16 MiB
- rbd cache max dirty age
- Description
- The number of seconds dirty data is in the cache before writeback starts.
- Type
- Float
- Required
- No
- Default
-
1.0
- rbd_cache_max_dirty_object
- Description
-
The dirty limit for objects - set to
0for auto calculate fromrbd_cache_size. - Type
- Integer
- Default
-
0
- rbd_cache_block_writes_upfront
- Description
-
If
true, it will block writes to the cache before theaio_writecall completes. Iffalse, it will block before theaio_completionis called. - Type
- Boolean
- Default
-
false
- rbd cache writethrough until flush
- Description
- Start out in write-through mode, and switch to write-back after the first flush request is received. Enabling this is a conservative but safe setting in case VMs running on rbd are too old to send flushes, like the virtio driver in Linux before 2.6.32.
- Type
- Boolean
- Required
- No
- Default
-
true
4.4. Parent/Child Reads
- rbd_balance_snap_reads
- Description
- Ceph typically reads objects from the primary OSD. Since reads are immutable, you may enable this feature to balance snap reads between the primary OSD and the replicas.
- Type
- Boolean
- Default
-
false
- rbd_localize_snap_reads
- Description
-
Whereas
rbd_balance_snap_readswill randomize the replica for reading a snapshot, if you enablerbd_localize_snap_reads, the block device will look to the CRUSH map to find the closest (local) OSD for reading the snapshot. - Type
- Boolean
- Default
-
false
- rbd_balance_parent_reads
- Description
- Ceph typically reads objects from the primary OSD. Since reads are immutable, you may enable this feature to balance parent reads between the primary OSD and the replicas.
- Type
- Boolean
- Default
-
false
- rbd_localize_parent_reads
- Description
-
Whereas
rbd_balance_parent_readswill randomize the replica for reading a parent, if you enablerbd_localize_parent_reads, the block device will look to the CRUSH map to find the closest (local) OSD for reading the parent. - Type
- Boolean
- Default
-
true
4.5. Read-ahead Settings
RBD supports read-ahead/prefetching to optimize small, sequential reads. This should normally be handled by the guest OS in the case of a VM, but boot loaders may not issue efficient reads. Read-ahead is automatically disabled if caching is disabled.
- rbd readahead trigger requests
- Description
- Number of sequential read requests necessary to trigger read-ahead.
- Type
- Integer
- Required
- No
- Default
-
10
- rbd readahead max bytes
- Description
- Maximum size of a read-ahead request. If zero, read-ahead is disabled.
- Type
- 64-bit Integer
- Required
- No
- Default
-
512 KiB
- rbd readahead disable after bytes
- Description
- After this many bytes have been read from an RBD image, read-ahead is disabled for that image until it is closed. This allows the guest OS to take over read-ahead once it is booted. If zero, read-ahead stays enabled.
- Type
- 64-bit Integer
- Required
- No
- Default
-
50 MiB
4.6. Blacklist
- rbd_blacklist_on_break_lock
- Description
- Whether to blacklist clients whose lock was broken.
- Type
- Boolean
- Default
-
true
- rbd_blacklist_expire_seconds
- Description
- The number of seconds to blacklist - set to 0 for OSD default.
- Type
- Integer
- Default
-
0
Chapter 5. Librbd (Python)
The rbd python module provides file-like access to RBD images.
5.1. Example: Creating and writing to an image
To use rbd, you must first connect to RADOS and open an IO context:
cluster = rados.Rados(conffile='my_ceph.conf')
cluster.connect()
ioctx = cluster.open_ioctx('mypool')
Then you instantiate an :class:rbd.RBD object, which you use to create the image:
rbd_inst = rbd.RBD()
size = 4 * 1024**3  # 4 GiB
rbd_inst.create(ioctx, 'myimage', size)
To perform I/O on the image, you instantiate an :class:rbd.Image object:
image = rbd.Image(ioctx, 'myimage')
data = 'foo' * 200
image.write(data, 0)
This writes 'foo' to the first 600 bytes of the image. Note that data cannot be :type:unicode - Librbd does not know how to deal with characters wider than a :c:type:char.
In the end, you’ll close the image, the IO context and the connection to RADOS:
image.close()
ioctx.close()
cluster.shutdown()
To be safe, each of these calls would need to be in a separate :finally block:
cluster = rados.Rados(conffile='my_ceph_conf')
try:
    ioctx = cluster.open_ioctx('my_pool')
    try:
        rbd_inst = rbd.RBD()
        size = 4 * 1024**3  # 4 GiB
        rbd_inst.create(ioctx, 'myimage', size)
        image = rbd.Image(ioctx, 'myimage')
        try:
            data = 'foo' * 200
            image.write(data, 0)
        finally:
            image.close()
    finally:
        ioctx.close()
finally:
    cluster.shutdown()
This can be cumbersome, so the Rados, Ioctx, and Image classes can be used as context managers that close/shutdown automatically. Using them as context managers, the above example becomes:
with rados.Rados(conffile='my_ceph.conf') as cluster:
    with cluster.open_ioctx('mypool') as ioctx:
        rbd_inst = rbd.RBD()
        size = 4 * 1024**3  # 4 GiB
        rbd_inst.create(ioctx, 'myimage', size)
        with rbd.Image(ioctx, 'myimage') as image:
            data = 'foo' * 200
            image.write(data, 0)
Chapter 6. QEMU
One of the use cases for Ceph Block Devices involves providing block device images to virtual machines. For example, a user may create a "golden" image with an operating system and any relevant software in an ideal configuration. Then, the user takes a snapshot of the image. Finally, the user clones the snapshot, typically many times. The ability to make copy-on-write clones of a snapshot means that Ceph can provision block device images to virtual machines quickly, because the client doesn’t have to download an entire image each time it spins up a new virtual machine. See Chapter 3, Snapshots for more details. Ceph Block Devices can integrate with the QEMU virtual machine.
To use Ceph Block Devices with QEMU, you must have access to a running Ceph storage cluster.
6.1. Quick Start
A storage pool, a RBD image and a client key will need to be created to host the virtual machines images. Perform the following commands from a Ceph Monitor or a Ceph client node.
Create a storage pool:
Syntax
# ceph osd pool create <pool_name> <pg_num> [<pgp_num>]
Example
# ceph osd pool create libvirt-pool 128 128
Create a RBD image for the virtual machine:
Syntax
# rbd create <image_name> --size <megabytes> --pool <pool-name> --image-format 2
Example
# rbd create librbd --size 13240 --pool libvirt-pool --image-format 2
Create a Ceph user and add capabilities:
Syntax
# ceph auth get-or-create client.<user_name> <daemon_type> 'allow <capability>' [<daemon_type> 'allow <capability> pool=<pool_name>']
Example
# ceph auth get-or-create client.libvirt mon 'allow r' osd 'allow class-read object_prefix rbd_children, allow rwx pool=libvirt-pool'
Verify the user’s authentication key and capabilities:
Exmaple
# ceph auth list client.libvirt client.libvirt key: AQC/+EhVmQ+NOxAA0OZAEXBSR0pD3gDPwxrFDA== caps: [mon] allow r caps: [osd] allow class-read object_prefix rbd_children, allow rwx pool=libvirt-poolNoteMake note of the
client.libvirtkey.
On the client node, verify that KVM/QEMU packages are installed and the libvirtd service is running. See the Red Hat Enterprise Linux Virtualization Deployment and Administration Guide for more details. Also, verify that the latest ceph-common package is installed. See the Red Hat Ceph Storage Installation Guide for more details. Then create a virtual machine, but do not add any storage devices to the virtual machine. If the virtual machine powers on after creation, then power off the virtual machine before editing.
Edit the virtual machine configuration:
Syntax
# virsh edit <VM_name>
Exmaple
# virsh edit example-vm
Add the new RBD image to the virtual machine configuration. Append the following code block to the end of the virtual machine configuration. Substitute the Ceph Monitor for the
<monitor_host_name>variable:Example
<disk type='network' device='disk'>
      <source protocol='rbd' name='libvirt-pool/librbd'>
            <host name='<monitor_host_name>' port='6789'/>
      </source>
      <target dev='vda' bus='virtio'/>
</disk>
Create a
secret.xmlfile using theclient.libvirtuser:Example
# cat > secret.xml <<EOF
<secret ephemeral='no' private='no'>
      <usage type='ceph'>
            <name>client.libvirt secret</name>
      </usage>
</secret>
EOF
Define the secret:
Example
# virsh secret-define --file secret.xml
NoteMake note of the generated UUID that is returned. This will be used to set the secret.
Set the UUID:
Syntax
# virsh secret-set-value --secret <uuid_from_previous_step> --base64 <ceph_user_key>
Example
# virsh secret-set-value --secret 727c2e12-a6ac-4f57-a553-8b6fd13a1da9 --base64 AQC/+EhVmQ+NOxAA0OZAEXBSR0pD3gDPwxrFDA==
Edit the virtual machine configuration and add authentication block to the disk block:
Authentication Block Example
<auth username='libvirt'>
      <secret type='ceph' uuid='727c2e12-a6ac-4f57-a553-8b6fd13a1da9'/>
</auth>
Full Disk Block Example
<disk type='network' device='disk'> <driver name='qemu' type='raw'/> <auth username='libvirt'> <secret type='ceph' uuid='727c2e12-a6ac-4f57-a553-8b6fd13a1da9'/> </auth> <source protocol='rbd' name='libvirt-pool/librbd'> <host name='MON1' port='6789'/> </source> <target dev='vda' bus='virtio'/> </disk>- Start the virtual machine and install an operating system.
Configuring the authentication is required for each KVM/QEMU client.
Chapter 7. Kernel Module Operations
To use kernel module operations, you must have a running Ceph cluster.
This feature has been added in Red Hat Ceph Storage v1.3 for use with RHEL 7.1 and Ubuntu 14.04.
7.1. Get a List of Images
To mount a block device image, first return a list of the images.
To do so, execute the following:
rbd list
7.2. Map a Block Device
Use rbd to map an image name to a kernel module. You must specify the image name, the pool name and the user name. rbd will load RBD kernel module on your behalf if it’s not already loaded.
To do so, execute the following:
sudo rbd map {image-name} --pool {pool-name} --id {user-name}For example:
sudo rbd map --pool rbd myimage --id admin
If you use cephx authentication, you must also specify a secret. It may come from a keyring or a file containing the secret.
To do so, execute the following:
sudo rbd map --pool rbd myimage --id admin --keyring /path/to/keyring
sudo rbd map --pool rbd myimage --id admin --keyfile /path/to/file
7.3. Show Mapped Block Devices
To show block device images mapped to kernel modules with the rbd command, specify the showmapped option.
To do so, execute the following:
rbd showmapped
7.4. Unmapping a Block Device
To unmap a block device image with the rbd command, specify the unmap option and the device name (by convention the same as the block device image name).
To do so, execute the following:
sudo rbd unmap /dev/rbd/{poolname}/{imagename}For example:
sudo rbd unmap /dev/rbd/rbd/foo