
Red Hat Training
A Red Hat training course is available for Red Hat Application Migration Toolkit
Chapter 4. Identify and Resolve Migration Issues
Follow these steps to use the Eclipse plugin to identify and resolve migration issues.
- Import the project to analyze into Eclipse.
Create a run configuration. From the Issue Explorer, press the RHAMT button (
 ).
).

At a minimum, select the project to analyze. Set additional options as needed.
- Click Run to execute RHAMT.
- Review RHAMT issues listed in the Issue Explorer.
- Resolve RHAMT issues by manually updating code or by using quick fixes when available.
-
Run RHAMT again as necessary. Use the drop down next to the Run button (
 ) to run an existing configuration.
4.1. Create an RHAMT Run Configuration
RHAMT run configurations can be created using the RHAMT button (
). A run configuration specifies the project to analyze, migration path, and additional options for the execution. You can create multiple run configurations, and each must have a unique name.
Input
- Migration Path
- Select a migration path, which determines which RHAMT rulesets are used. The migration path defaults to Anything to EAP 7, but can be changed to any supported migration path.
- Projects
- Select one or more projects to analyze. Hold the Ctrl key to select multiple projects in the list.
- Packages
- Select one or more packages to scan. It is recommended to select only those packages that you need to analyze to reduce the overall RHAMT execution time. If no packages are selected, all packages in the project will be scanned. Hold the Ctrl key to select multiple packages in the list.
Options
- Report
- Check the Generate Report checkbox if you want to generate the RHAMT HTML report. The report will be shown in the RHAMT Report tab and can be found in the Issue Explorer when you group by File.
- Options
-
Set additional RHAMT options. Any option that is a boolean flag, such as
enableTattletale, should usetrueas the value. See the RHAMT Command-line Arguments section of the CLI Guide for a description of each RHAMT argument.
Rules
- Custom Rules Repositories
- Select custom rulesets to include during analysis if you have imported or created any custom RHAMT rules in the Eclipse plugin. See Add Custom Rules for more information.
4.2. Execute RHAMT
Once a run configuration has been created, you can execute RHAMT using that configuration in one of the following ways:
- Select the run configuration from the Run Configurations dialog and click Run.
-
Select a recent run configuration from the drop down next to the Run button (
).
If the RHAMT server is not currently running, it will start once a run configuration is executed.
If you do not plan on running RHAMT in the near future, it is recommended to stop the RHAMT server to conserve memory on your machine.
Once execution is complete, the Issue Explorer will be populated with RHAMT issues.
4.3. Review RHAMT Issues
Use the Issue Explorer to review migration issues identified by RHAMT. Different icons indicate the issue’s severity and state.
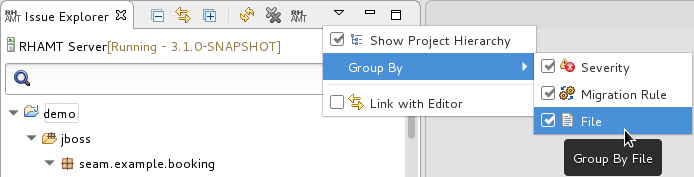
Change how issues are grouped by adjusting the Group By selections: Severity, Migration Rule, and File.
Double-click the RHAMT issue in the Issue Explorer to open the associated line of code in an editor. Right-click and select Issue Details to view information about the RHAMT issue, including its severity and how to address it.
4.4. Resolve RHAMT Issues
You can resolve RHAMT issues by updating the code manually or by applying a quick fix when available.
4.4.1. Resolve an Issue Manually
Review the RHAMT issue details and additional resources and update the source code as necessary. When you update a line of code marked as an RHAMT issue, the RHAMT issue will be marked with the stale icon (
 ) until the next time that RHAMT is run on the project.
You can also manually mark an RHAMT issue as fixed, which will mark the issue with the resolved icon (
 ) until the next time that RHAMT is run on the project. To mark an issue as fixed, right-click the RHAMT issue in the Issue Explorer and select Mark as Fixed.
4.4.2. Resolve an Issue Using a Quick Fix
Some RHAMT issues provide a quick fix, which assists in making the necessary edits to address the issue. See the icon legend to see the icons that indicate the RHAMT issue has a quick fix available.
- Preview a Quick Fix
- Right-click the issue and select Preview Quick Fix. This will bring up a window that allows you to preview the change. From here, you can apply the fix or close the window.
- Apply a Quick Fix
- Right-click the issue and select Apply Quick Fix. This will update the source code as required and will mark the RHAMT issue as resolved.