
Red Hat Ansible Security Automation Guide
This guide provides procedures for automating and streamlining various security processes needed to identify, triage, and respond to security events using Ansible.
Abstract
Making open source more inclusive
Red Hat is committed to replacing problematic language in our code, documentation, and web properties. We are beginning with these four terms: master, slave, blacklist, and whitelist. Because of the enormity of this endeavor, these changes will be implemented gradually over several upcoming releases. For more details, see our CTO Chris Wright’s message.
Chapter 1. Firewall policy management with Ansible security automation
As a security operator, you can use Ansible security automation to manage multiple firewall policies. Create and delete firewall rules to block or unblock a source IP address from accessing a destination IP address.
1.1. About firewall policy management
An organization’s network firewall is the first line of defense against an attack and a vital component for maintaining a secure environment. As a security operator, you construct and manage secure networks to ensure that your firewall only allows inbound and outbound network traffic defined by your organization’s firewall policies. A firewall policy consists of security rules that protect the network against harmful incoming and outgoing traffic.
Managing multiple firewall rules across various products and vendors can be both challenging and time consuming for security teams. Manual workflow processes that involve complex tasks can result in errors and ultimately cause delays in investigating an application’s suspicious behavior or stopping an ongoing attack on a server. When every solution in a security portfolio is automated through the same language, both security analysts and operators can perform a series of actions across various products in a fraction of the time. This automated process maximizes the overall efficiency of the security team.
Ansible security automation interacts with a wide variety of security technologies from a range of vendors. Ansible enables security teams to manage different products, interfaces, and workflows in a unified way to produce a successful deployment. For example, your security team can automate tasks such as blocking and unblocking IP and URLs on supported technologies such as enterprise firewalls.
1.2. Automate firewall rules
Ansible security automation enables you to automate various firewall policies that require a series of actions across various products. You can use an Ansible role, such as the acl_manager role to manage your Access Control Lists (ACLs) for many firewall devices such as blocking or unblocking an IP or URL. Roles let you automatically load related vars, files, tasks, handlers, and other Ansible artifacts based on a known file structure. After you group your content in roles, you can easily reuse them and share them with other users.
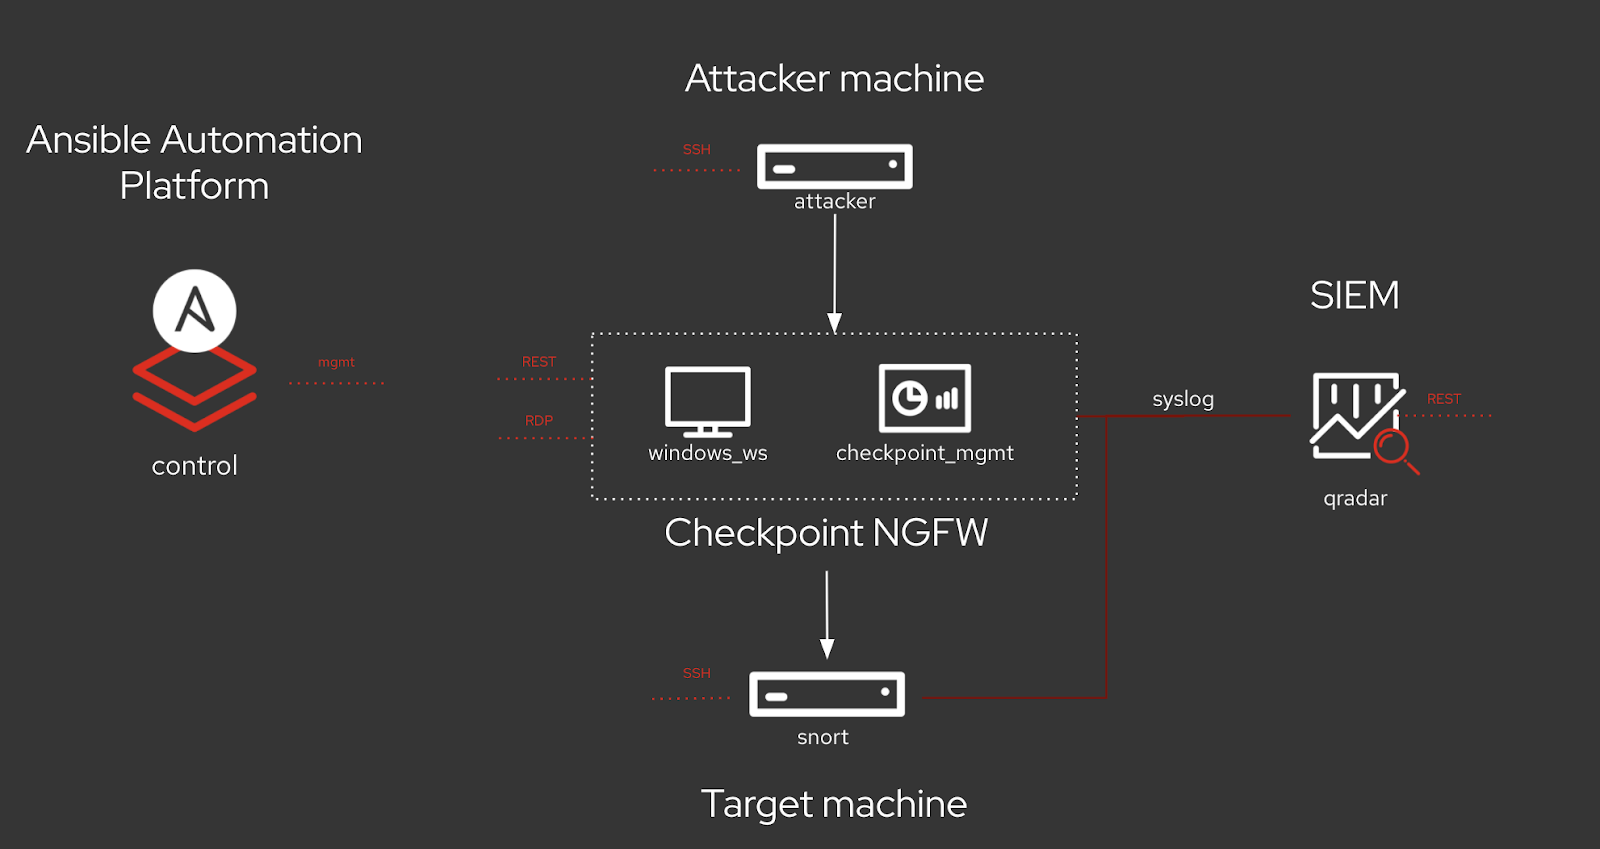
The below lab environment is a simplified example of a real-world enterprise security architecture, which can be more complex and include additional vendor-specific tools. This is a typical incident response scenario where you receive an intrusion alert and immediately execute a playbook with the acl_manger role that blocks the attacker’s IP address.
Your entire team can use Ansible security automation to address investigations, threat hunting, and incident response all on one platform. Red Hat Ansible Automation Platform provides you with certified content collections that are easy to consume and reuse within your security team.
Additional resources
For more information on Ansible roles, see roles on docs.ansible.com.
1.2.1. Creating a new firewall rule
Use the acl_manager role to create a new firewall rule for blocking a source IP address from accessing a destination IP address.
Prerequisites
- You have installed Ansible 2.9 or later
- You have access to the Check Point Management server to enforce the new policies
Procedure
Install the acl_manager role using the ansible-galaxy command.
$ ansible-galaxy install ansible_security.acl_manager
Create a new playbook and set the following parameter. For example, source object, destination object, access rule between the two objects and the actual firewall you are managing, such as Check Point:
- name: block IP address
  hosts: checkpoint
  connection: httpapi

  tasks:
    - include_role:
        name: acl_manager
        tasks_from: block_ip
      vars:
        source_ip: 172.17.13.98
        destination_ip: 192.168.0.10
        ansible_network_os: checkpoint
Run the playbook
$ ansible-navigator run --ee false <playbook.yml>.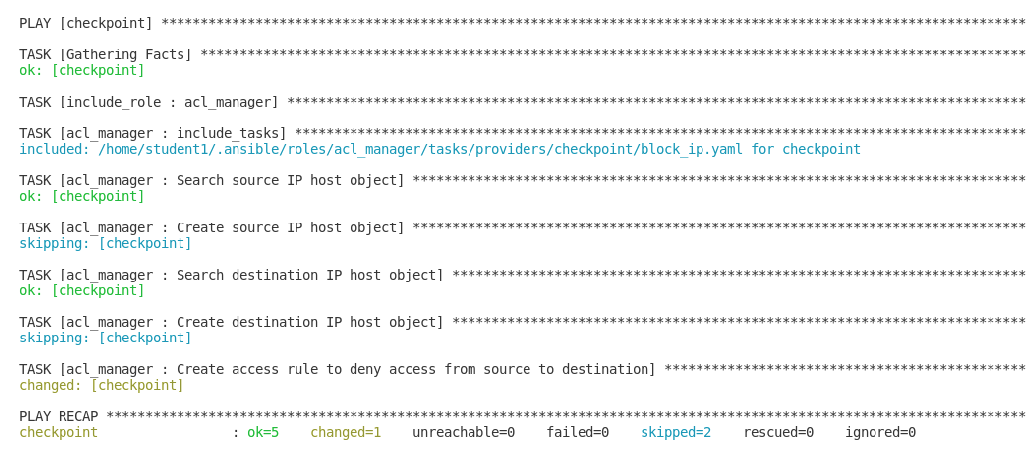
Verification
You have created a new firewall rule that blocks a source IP address from accessing a destination IP address. Access the MGMT server and verify that the new security policy has been created.
Additional resources
For more information on installing roles, see Installing roles from Galaxy.
1.2.2. Deleting a firewall rule
Use the acl_manager role to delete a security rule.
Prerequisites
- You have installed Ansible 2.9 or later
- You have access to the firewall MGMT servers to enforce the new policies
Procedure
Install the acl_manager role using the ansible-galaxy command:
$ ansible-galaxy install ansible_security.acl_manager
Using CLI, create a new playbook with the acl_manger role and set the parameters (e.g., source object, destination object, access rule between the two objects):
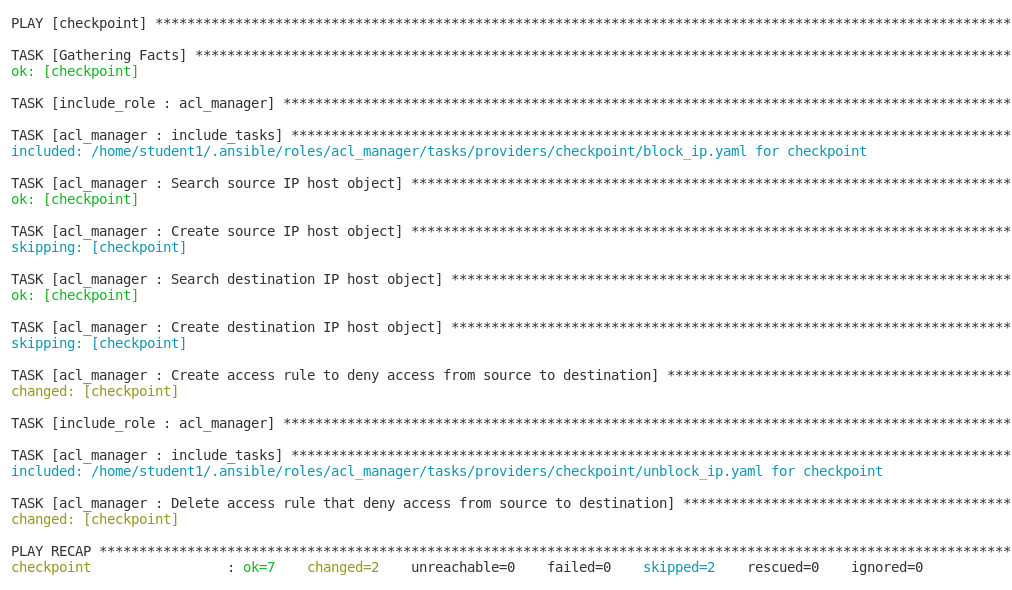
- name: delete block list entry
  hosts: checkpoint
  connection: httpapi

    - include_role:
        name: acl_manager
        Tasks_from: unblock_ip
      vars:
        source_ip: 192.168.0.10
        destination_ip: 192.168.0.11
        ansible_network_os: checkpoint
Run the playbook $ ansible-navigator run --ee false <playbook.yml>:
Verification
You have deleted the firewall rule. Access the MGMT server and verify that the new security policy has been removed.
Additional resources
For more information on installing roles, see Installing roles from Galaxy.
Chapter 2. Automating Network Intrusion Detection and Prevention Systems (IDPS) with Ansible
You can use Ansible to automate your Intrusion Detection and Prevention System (IDPS). For the purpose of this guide, we use Snort as the IDPS. Use Ansible automation hub to consume content collections, such as tasks, roles, and modules to create automated workflows.
2.1. Requirements and prerequisites
Before you begin automating your IDPS with Ansible, ensure that you have the proper installations and configurations necessary to successfully manage your IDPS.
- You have installed Ansible 2.9 or later.
- SSH connection and keys are configured.
- IDPS software (Snort) is installed and configured.
- You have access to the IDPS server (Snort) to enforce new policies.
2.1.1. Verifying your IDPS installation
Additional resources
To verify that Snort has been configured successfully, call it via sudo and ask for the version:
  $ sudo snort --version

   ,,_     -*> Snort! <*-
  o"  )~   Version 2.9.13 GRE (Build 15013)
  ""    By Martin Roesch & The Snort Team: http://www.snort.org/contact#team
        Copyright (C) 2014-2019 Cisco and/or its affiliates. All rights reserved.
        Copyright (C) 1998-2013 Sourcefire, Inc., et al.
        Using libpcap version 1.5.3
        Using PCRE version: 8.32 2012-11-30
        Using ZLIB version: 1.2.7
Verify that the service is actively running via sudo systemctl:
$ sudo systemctl status snort
● snort.service - Snort service
   Loaded: loaded (/etc/systemd/system/snort.service; enabled; vendor preset: disabled)
   Active: active (running) since Mon 2019-08-26 17:06:10 UTC; 1s ago
  Main PID: 17217 (snort)
   CGroup: /system.slice/snort.service
           └─17217 /usr/sbin/snort -u root -g root -c /etc/snort/snort.conf -i eth0 -p -R 1 --pid-path=/var/run/snort --no-interface-pidfile --nolock-pidfile
[...]
If the Snort service is not actively running, restart it with systemctl restart snort and recheck the status.
Once you confirm the service is actively running, exit the Snort server by simultaneously pressing CTRL and D, or by typing exit on the command line. All further interaction will be done through Ansible from the Ansible control host.
2.2. Automating your IDPS rules with Ansible
To automate your IDPS, use the ids_rule role to create and change Snort rules. Snort uses rule-based language that analyzes your network traffic and compares it against the given rule set.
The following lab environment demonstrates what an Ansible security automation integration would look like. A machine called “Attacker” simulates a potential attack pattern on the target machine on which the IDPS is running.
Keep in mind that a real world setup will feature other vendors and technologies.

2.2.1. Creating a new IDPS rule
Additional resources
Use the ids_rule role to manage your rules and signatures for IDPS. For example, you can set a new rule that looks for a certain pattern aligning with a previous attack on your firewall.
Currently, the ids_rule role only supports Snort IDPS.
Prerequisites
-
You need
rootprivileges to make any changes on the Snort server.
Procedure
Install the
ids_rulerole using the ansible-galaxy command:$ ansible-galaxy install ansible_security.ids_rule
Create a new playbook file titled
add_snort_rule.yml. Set the following parameters:- name: Add Snort rule hosts: snort
Add the
becomeflag to ensure that Ansible handles privilege escalation.- name: Add Snort rule hosts: snort become: true
Specify the name of your IDPS provider by adding the following variables:
- name: Add Snort rule hosts: snort become: true vars: ids_provider: snortAdd the following tasks and task-specific variables (e.g., rules, Snort rules file, and the state of the rule - present or absent) to the playbook:
- name: Add Snort rule hosts: snort become: true vars: ids_provider: snort tasks: - name: Add snort password attack rule include_role: name: "ansible_security.ids_rule" vars: ids_rule: 'alert tcp any any -> any any (msg:"Attempted /etc/passwd Attack"; uricontent:"/etc/passwd"; classtype:attempted-user; sid:99000004; priority:1; rev:1;)' ids_rules_file: '/etc/snort/rules/local.rules' ids_rule_state: presentTasks are components that make changes on the target machine. Since you are using a role that defines these tasks, the
include_roleis the only entry you need.The
ids_rules_filevariable specifies a defined location for thelocal.rulesfile, while theids_rule_statevariable indicates that the rule should be created if it does not already exist.Run the playbook by executing the following command:
$ ansible-navigator run add_snort_rule.ym --mode stdout
Once you run the playbook, all of your tasks will be executed in addition to your newly created rules. Your playbook output will confirm your PLAY, TASK, RUNNING HANDLER, and PLAY RECAP.
Verification
To verify that your IDPS rules were successfully created, SSH to the Snort server and view the content of the /etc/snort/rules/local.rules file.