
Deploying and Upgrading AMQ Streams on OpenShift
Deploy AMQ Streams 2.3 on OpenShift Container Platform
Abstract
Making open source more inclusive
Red Hat is committed to replacing problematic language in our code, documentation, and web properties. We are beginning with these four terms: master, slave, blacklist, and whitelist. Because of the enormity of this endeavor, these changes will be implemented gradually over several upcoming releases. For more details, see our CTO Chris Wright’s message.
Chapter 1. Deployment overview
AMQ Streams simplifies the process of running Apache Kafka in an OpenShift cluster.
This guide provides instructions on all the options available for deploying and upgrading AMQ Streams, describing what is deployed, and the order of deployment required to run Apache Kafka in an OpenShift cluster.
As well as describing the deployment steps, the guide also provides pre- and post-deployment instructions to prepare for and verify a deployment. The guide also describes additional deployment options for introducing metrics.
Upgrade instructions are provided for AMQ Streams and Kafka upgrades.
AMQ Streams is designed to work on all types of OpenShift cluster regardless of distribution, from public and private clouds to local deployments intended for development.
1.1. Configuring a deployment
The deployment procedures in this guide are designed to help you set up the initial structure of your deployment. After setting up the structure, you can use custom resources to configure the deployment to your precise needs. The deployment procedures use the example installation files provided with AMQ Streams. The procedures highlight any important configuration considerations, but they do not describe all the configuration options available.
You might want to review the configuration options available for Kafka components before you deploy AMQ Streams. For more information on the configuration options, see Configuring AMQ Streams on OpenShift.
1.1.1. Securing Kafka
On deployment, the Cluster Operator automatically sets up TLS certificates for data encryption and authentication within your cluster.
AMQ Streams provides additional configuration options for encryption, authentication and authorization:
- Secure data exchange between the Kafka cluster and clients by Managing secure access to Kafka.
- Configure your deployment to use an authorization server to provide OAuth 2.0 authentication and OAuth 2.0 authorization.
- Secure Kafka using your own certificates.
1.1.2. Monitoring a deployment
AMQ Streams supports additional deployment options to monitor your deployment.
- Extract metrics and monitor Kafka components by deploying Prometheus and Grafana with your Kafka cluster.
- Extract additional metrics, particularly related to monitoring consumer lag, by deploying Kafka Exporter with your Kafka cluster.
- Track messages end-to-end by setting up distributed tracing.
1.1.3. CPU and memory resource limits and requests
By default, the AMQ Streams Cluster Operator does not specify requests and limits for CPU and memory resources for any operands it deploys.
Having sufficient resources is important for applications like Kafka to be stable and deliver good performance.
The right amount of resources you should use depends on the specific requirements and use-cases.
You should consider configuring the CPU and memory resources. You can set resource requests and limits for each container in the AMQ Streams custom resources.
1.2. AMQ Streams custom resources
A deployment of Kafka components to an OpenShift cluster using AMQ Streams is highly configurable through the application of custom resources. Custom resources are created as instances of APIs added by Custom resource definitions (CRDs) to extend OpenShift resources.
CRDs act as configuration instructions to describe the custom resources in an OpenShift cluster, and are provided with AMQ Streams for each Kafka component used in a deployment, as well as users and topics. CRDs and custom resources are defined as YAML files. Example YAML files are provided with the AMQ Streams distribution.
CRDs also allow AMQ Streams resources to benefit from native OpenShift features like CLI accessibility and configuration validation.
1.2.1. AMQ Streams custom resource example
CRDs require a one-time installation in a cluster to define the schemas used to instantiate and manage AMQ Streams-specific resources.
After a new custom resource type is added to your cluster by installing a CRD, you can create instances of the resource based on its specification.
Depending on the cluster setup, installation typically requires cluster admin privileges.
Access to manage custom resources is limited to AMQ Streams administrators. For more information, see Designating AMQ Streams administrators.
A CRD defines a new kind of resource, such as kind:Kafka, within an OpenShift cluster.
The Kubernetes API server allows custom resources to be created based on the kind and understands from the CRD how to validate and store the custom resource when it is added to the OpenShift cluster.
When CRDs are deleted, custom resources of that type are also deleted. Additionally, the resources created by the custom resource, such as pods and statefulsets are also deleted.
Each AMQ Streams-specific custom resource conforms to the schema defined by the CRD for the resource’s kind. The custom resources for AMQ Streams components have common configuration properties, which are defined under spec.
To understand the relationship between a CRD and a custom resource, let’s look at a sample of the CRD for a Kafka topic.
Kafka topic CRD
apiVersion: kafka.strimzi.io/v1beta2
kind: CustomResourceDefinition
metadata: 1
  name: kafkatopics.kafka.strimzi.io
  labels:
    app: strimzi
spec: 2
  group: kafka.strimzi.io
  versions:
    v1beta2
  scope: Namespaced
  names:
    # ...
    singular: kafkatopic
    plural: kafkatopics
    shortNames:
    - kt 3
  additionalPrinterColumns: 4
      # ...
  subresources:
    status: {} 5
  validation: 6
    openAPIV3Schema:
      properties:
        spec:
          type: object
          properties:
            partitions:
              type: integer
              minimum: 1
            replicas:
              type: integer
              minimum: 1
              maximum: 32767
      # ...
- 1
- The metadata for the topic CRD, its name and a label to identify the CRD.
- 2
- The specification for this CRD, including the group (domain) name, the plural name and the supported schema version, which are used in the URL to access the API of the topic. The other names are used to identify instance resources in the CLI. For example,
oc get kafkatopic my-topicoroc get kafkatopics. - 3
- The shortname can be used in CLI commands. For example,
oc get ktcan be used as an abbreviation instead ofoc get kafkatopic. - 4
- The information presented when using a
getcommand on the custom resource. - 5
- The current status of the CRD as described in the schema reference for the resource.
- 6
- openAPIV3Schema validation provides validation for the creation of topic custom resources. For example, a topic requires at least one partition and one replica.
You can identify the CRD YAML files supplied with the AMQ Streams installation files, because the file names contain an index number followed by ‘Crd’.
Here is a corresponding example of a KafkaTopic custom resource.
Kafka topic custom resource
apiVersion: kafka.strimzi.io/v1beta2
kind: KafkaTopic 1
metadata:
  name: my-topic
  labels:
    strimzi.io/cluster: my-cluster 2
spec: 3
  partitions: 1
  replicas: 1
  config:
    retention.ms: 7200000
    segment.bytes: 1073741824
status:
  conditions: 4
    lastTransitionTime: "2019-08-20T11:37:00.706Z"
    status: "True"
    type: Ready
  observedGeneration: 1
  / ...
- 1
- The
kindandapiVersionidentify the CRD of which the custom resource is an instance. - 2
- A label, applicable only to
KafkaTopicandKafkaUserresources, that defines the name of the Kafka cluster (which is same as the name of theKafkaresource) to which a topic or user belongs. - 3
- The spec shows the number of partitions and replicas for the topic as well as the configuration parameters for the topic itself. In this example, the retention period for a message to remain in the topic and the segment file size for the log are specified.
- 4
- Status conditions for the
KafkaTopicresource. Thetypecondition changed toReadyat thelastTransitionTime.
Custom resources can be applied to a cluster through the platform CLI. When the custom resource is created, it uses the same validation as the built-in resources of the Kubernetes API.
After a KafkaTopic custom resource is created, the Topic Operator is notified and corresponding Kafka topics are created in AMQ Streams.
1.3. Using the Kafka Bridge to connect with a Kafka cluster
You can use the AMQ Streams Kafka Bridge API to create and manage consumers and send and receive records over HTTP rather than the native Kafka protocol.
When you set up the Kafka Bridge you configure HTTP access to the Kafka cluster. You can then use the Kafka Bridge to produce and consume messages from the cluster, as well as performing other operations through its REST interface.
Additional resources
- For information on installing and using the Kafka Bridge, see Using the AMQ Streams Kafka Bridge.
1.4. Document Conventions
User-replaced values
User-replaced values, also known as replaceables, are shown in italics with angle brackets (< >). Underscores ( _ ) are used for multi-word values. If the value refers to code or commands, monospace is also used.
For example, in the following code, you will want to replace <my_namespace> with the name of your namespace:
sed -i 's/namespace: .*/namespace: <my_namespace>/' install/cluster-operator/*RoleBinding*.yaml1.5. Additional resources
Chapter 2. AMQ Streams installation methods
You can install AMQ Streams on OpenShift 4.8 to 4.12 in two ways.
| Installation method | Description |
|---|---|
|
Download Red Hat AMQ Streams 2.3 OpenShift Installation and Example Files from the AMQ Streams software downloads page. Deploy the YAML installation artifacts to your OpenShift cluster using
You can also use the
| |
| Use the Red Hat Integration - AMQ Streams in the OperatorHub to deploy AMQ Streams to a single namespace or all namespaces. |
For the greatest flexibility, choose the installation artifacts method. The OperatorHub method provides a standard configuration and allows you to take advantage of automatic updates.
Installation of AMQ Streams using Helm is not supported.
Chapter 3. What is deployed with AMQ Streams
Apache Kafka components are provided for deployment to OpenShift with the AMQ Streams distribution. The Kafka components are generally run as clusters for availability.
A typical deployment incorporating Kafka components might include:
- Kafka cluster of broker nodes
- ZooKeeper cluster of replicated ZooKeeper instances
- Kafka Connect cluster for external data connections
- Kafka MirrorMaker cluster to mirror the Kafka cluster in a secondary cluster
- Kafka Exporter to extract additional Kafka metrics data for monitoring
- Kafka Bridge to make HTTP-based requests to the Kafka cluster
Not all of these components are mandatory, though you need Kafka and ZooKeeper as a minimum. Some components can be deployed without Kafka, such as MirrorMaker or Kafka Connect.
3.1. Order of deployment
The required order of deployment to an OpenShift cluster is as follows:
- Deploy the Cluster Operator to manage your Kafka cluster
- Deploy the Kafka cluster with the ZooKeeper cluster, and include the Topic Operator and User Operator in the deployment
Optionally deploy:
- The Topic Operator and User Operator standalone if you did not deploy them with the Kafka cluster
- Kafka Connect
- Kafka MirrorMaker
- Kafka Bridge
- Components for the monitoring of metrics
The Cluster Operator creates OpenShift resources for the components, such as Deployment, Service, and Pod resources. The names of the OpenShift resources are appended with the name specified for a component when it’s deployed. For example, a Kafka cluster named my-kafka-cluster has a service named my-kafka-cluster-kafka.
Chapter 4. Preparing for your AMQ Streams deployment
This section shows how you prepare for an AMQ Streams deployment, describing:
- The prerequisites you need before you can deploy AMQ Streams
- How to download the AMQ Streams release artifacts to use in your deployment
- How to push the AMQ Streams container images into your own registry (if required)
- How to set up admin roles for configuration of custom resources used in deployment
To run the commands in this guide, your cluster user must have the rights to manage role-based access control (RBAC) and CRDs.
4.1. Deployment prerequisites
To deploy AMQ Streams, you will need the following:
An OpenShift 4.8 to 4.12 cluster.
AMQ Streams is based on Strimzi 0.32.x.
-
The
occommand-line tool is installed and configured to connect to the running cluster.
4.2. Downloading AMQ Streams release artifacts
To use deployment files to install AMQ Streams, download and extract the files from the AMQ Streams software downloads page.
AMQ Streams release artifacts include sample YAML files to help you deploy the components of AMQ Streams to OpenShift, perform common operations, and configure your Kafka cluster.
Use oc to deploy the Cluster Operator from the install/cluster-operator folder of the downloaded ZIP file. For more information about deploying and configuring the Cluster Operator, see Section 6.2, “Deploying the Cluster Operator”.
In addition, if you want to use standalone installations of the Topic and User Operators with a Kafka cluster that is not managed by the AMQ Streams Cluster Operator, you can deploy them from the install/topic-operator and install/user-operator folders.
Additionally, AMQ Streams container images are available through the Red Hat Ecosystem Catalog. However, we recommend that you use the YAML files provided to deploy AMQ Streams.
4.3. Example configuration and deployment files
Use the example configuration and deployment files provided with AMQ Streams to deploy Kafka components with different configurations and monitor your deployment. Example configuration files for custom resources contain important properties and values, which you can extend with additional supported configuration properties for your own deployment.
4.3.1. Example files location
The example files are provided with the downloadable release artifacts from the AMQ Streams software downloads page.
You can download and apply the examples using the oc command-line tool. The examples can serve as a starting point when building your own Kafka component configuration for deployment.
If you installed AMQ Streams using the Operator, you can still download the example files and use them to upload configuration.
4.3.2. Example files provided with AMQ Streams
The release artifacts include an examples directory that contains the configuration examples.
Examples directory
examples
├── user 1
├── topic 2
├── security 3
│   ├── tls-auth
│   ├── scram-sha-512-auth
│   └── keycloak-authorization
├── mirror-maker 4
├── metrics 5
├── kafka 6
├── cruise-control 7
├── connect 8
└── bridge 9
- 1
KafkaUsercustom resource configuration, which is managed by the User Operator.- 2
KafkaTopiccustom resource configuration, which is managed by Topic Operator.- 3
- Authentication and authorization configuration for Kafka components. Includes example configuration for TLS and SCRAM-SHA-512 authentication. The Red Hat Single Sign-On example includes
Kafkacustom resource configuration and a Red Hat Single Sign-On realm specification. You can use the example to try Red Hat Single Sign-On authorization services. There is also an example with enabledoauthauthentication andkeycloakauthorization metrics. - 4
Kafkacustom resource configuration for a deployment of Mirror Maker. Includes example configuration for replication policy and synchronization frequency.- 5
- Metrics configuration, including Prometheus installation and Grafana dashboard files.
- 6
Kafkacustom resource configuration for a deployment of Kafka. Includes example configuration for an ephemeral or persistent single or multi-node deployment.- 7
Kafkacustom resource with a deployment configuration for Cruise Control. IncludesKafkaRebalancecustom resources to generate optimizations proposals from Cruise Control, with example configurations to use the default or user optimization goals.- 8
KafkaConnectandKafkaConnectorcustom resource configuration for a deployment of Kafka Connect. Includes example configuration for a single or multi-node deployment.- 9
KafkaBridgecustom resource configuration for a deployment of Kafka Bridge.
Additional resources
4.4. Pushing container images to your own registry
Container images for AMQ Streams are available in the Red Hat Ecosystem Catalog. The installation YAML files provided by AMQ Streams will pull the images directly from the Red Hat Ecosystem Catalog.
If you do not have access to the Red Hat Ecosystem Catalog or want to use your own container repository, do the following:
- Pull all container images listed here
- Push them into your own registry
- Update the image names in the installation YAML files
Each Kafka version supported for the release has a separate image.
| Container image | Namespace/Repository | Description |
|---|---|---|
| Kafka |
| AMQ Streams image for running Kafka, including:
|
| Operator |
| AMQ Streams image for running the operators:
|
| Kafka Bridge |
| AMQ Streams image for running the AMQ Streams Kafka Bridge |
| AMQ Streams Drain Cleaner |
| AMQ Streams image for running the AMQ Streams Drain Cleaner |
4.5. Creating a pull secret for authentication to the container image registry
The installation YAML files provided by AMQ Streams pull container images directly from the Red Hat Ecosystem Catalog. If an AMQ Streams deployment requires authentication, configure authentication credentials in a secret and add it to the installation YAML.
Authentication is not usually required, but might be requested on certain platforms.
Prerequisites
- You need your Red Hat username and password or the login details from your Red Hat registry service account.
You can use your Red Hat subscription to create a registry service account from the Red Hat Customer Portal.
Procedure
Create a pull secret containing your login details and the container registry where the AMQ Streams image is pulled from:
oc create secret docker-registry <pull_secret_name> \
    --docker-server=registry.redhat.io \
    --docker-username=<user_name> \
    --docker-password=<password> \
    --docker-email=<email>
Add your user name and password. The email address is optional.
Edit the
install/cluster-operator/060-Deployment-strimzi-cluster-operator.yamldeployment file to specify the pull secret using theSTRIMZI_IMAGE_PULL_SECRETenvironment variable:apiVersion: apps/v1 kind: Deployment metadata: name: strimzi-cluster-operator spec: # ... template: spec: serviceAccountName: strimzi-cluster-operator containers: # ... env: - name: STRIMZI_IMAGE_PULL_SECRETS value: "<pull_secret_name>" # ...The secret applies to all pods created by the Cluster Operator.
4.6. Designating AMQ Streams administrators
AMQ Streams provides custom resources for configuration of your deployment. By default, permission to view, create, edit, and delete these resources is limited to OpenShift cluster administrators. AMQ Streams provides two cluster roles that you can use to assign these rights to other users:
-
strimzi-viewallows users to view and list AMQ Streams resources. -
strimzi-adminallows users to also create, edit or delete AMQ Streams resources.
When you install these roles, they will automatically aggregate (add) these rights to the default OpenShift cluster roles. strimzi-view aggregates to the view role, and strimzi-admin aggregates to the edit and admin roles. Because of the aggregation, you might not need to assign these roles to users who already have similar rights.
The following procedure shows how to assign a strimzi-admin role that allows non-cluster administrators to manage AMQ Streams resources.
A system administrator can designate AMQ Streams administrators after the Cluster Operator is deployed.
Prerequisites
- The AMQ Streams Custom Resource Definitions (CRDs) and role-based access control (RBAC) resources to manage the CRDs have been deployed with the Cluster Operator.
Procedure
Create the
strimzi-viewandstrimzi-admincluster roles in OpenShift.oc create -f install/strimzi-admin
If needed, assign the roles that provide access rights to users that require them.
oc create clusterrolebinding strimzi-admin --clusterrole=strimzi-admin --user=user1 --user=user2
Chapter 5. Installing AMQ Streams from the OperatorHub using the web console
Install the Red Hat Integration - AMQ Streams operator from the OperatorHub in the OpenShift Container Platform web console.
The procedures in this section show how to:
5.1. Using the Red Hat Integration Operator to install the AMQ Streams operator
The Red Hat Integration operator (deprecated) allows you to choose and install the Operators that manage your Red Hat Integration components. If you have more than one Red Hat Integration subscription, you can use the Red Hat Integration operator to install and update the AMQ Streams operator, as well as the Operators for all subscribed Red Hat Integration components.
As with the AMQ Streams operator, you can use the Operator Lifecycle Manager (OLM) to install the Red Hat Integration operator on an OpenShift Container Platform (OCP) cluster from the OperatorHub in the OCP console.
The Red Hat Integration operator has been deprecated and will be removed in the future. It is available from the OperatorHub in OpenShift 4.6 to 4.10.
Additional resources
For more information on installing and using the Red Hat Integration operator, see Installing the Red Hat Integration Operator
5.2. Installing the AMQ Streams operator from the OperatorHub
You can install and subscribe to the AMQ Streams operator using the OperatorHub in the OpenShift Container Platform web console.
This procedure describes how to create a project and install the AMQ Streams operator to that project. A project is a representation of a namespace. For manageability, it is a good practice to use namespaces to separate functions.
Make sure you use the appropriate update channel. If you are on a supported version of OpenShift, installing AMQ Streams from the default stable channel is generally safe. However, we do not recommend enabling automatic updates on the stable channel. An automatic upgrade will skip any necessary steps prior to upgrade. Use automatic upgrades only on version-specific channels.
Prerequisites
-
Access to an OpenShift Container Platform web console using an account with
cluster-adminorstrimzi-adminpermissions.
Procedure
Navigate in the OpenShift web console to the Home > Projects page and create a project (namespace) for the installation.
We use a project named
amq-streams-kafkain this example.- Navigate to the Operators > OperatorHub page.
Scroll or type a keyword into the Filter by keyword box to find the Red Hat Integration - AMQ Streams operator.
The operator is located in the Streaming & Messaging category.
- Click Red Hat Integration - AMQ Streams to display the operator information.
- Read the information about the operator and click Install.
On the Install Operator page, choose from the following installation and update options:
Update Channel: Choose the update channel for the operator.
- The (default) stable channel contains all the latest updates and releases, including major, minor, and micro releases, which are assumed to be well tested and stable.
- An amq-streams-X.x channel contains the minor and micro release updates for a major release, where X is the major release version number.
- An amq-streams-X.Y.x channel contains the micro release updates for a minor release, where X is the major release version number and Y is the minor release version number.
Installation Mode: Choose the project you created to install the operator on a specific namespace.
You can install the AMQ Streams operator to all namespaces in the cluster (the default option) or a specific namespace. We recommend that you dedicate a specific namespace to the Kafka cluster and other AMQ Streams components.
- Update approval: By default, the AMQ Streams operator is automatically upgraded to the latest AMQ Streams version by the Operator Lifecycle Manager (OLM). Optionally, select Manual if you want to manually approve future upgrades. For more information, see the Operators guide in the OpenShift documentation.
Click Install to install the operator to your selected namespace.
The AMQ Streams operator deploys the Cluster Operator, CRDs, and role-based access control (RBAC) resources to the selected namespace.
After the operator is ready for use, navigate to Operators > Installed Operators to verify that the operator has installed to the selected namespace.
The status will show as Succeeded.
You can now use the AMQ Streams operator to deploy Kafka components, starting with a Kafka cluster.
If you navigate to Workloads > Deployments, you can see the deployment details for the Cluster Operator and Entity Operator. The name of the Cluster Operator includes a version number: amq-streams-cluster-operator-<version>. The name is different when deploying the Cluster Operator using the AMQ Streams installation artifacts. In this case, the name is strimzi-cluster-operator.
5.3. Deploying Kafka components using the AMQ Streams operator
When installed on Openshift, the AMQ Streams operator makes Kafka components available for installation from the user interface.
The following Kafka components are available for installation:
- Kafka
- Kafka Connect
- Kafka MirrorMaker
- Kafka MirrorMaker 2
- Kafka Topic
- Kafka User
- Kafka Bridge
- Kafka Connector
- Kafka Rebalance
You select the component and create an instance. As a minimum, you create a Kafka instance. This procedure describes how to create a Kafka instance using the default settings. You can configure the default installation specification before you perform the installation.
The process is the same for creating instances of other Kafka components.
Prerequisites
- The AMQ Streams operator is installed on the OpenShift cluster.
Procedure
Navigate in the web console to the Operators > Installed Operators page and click Red Hat Integration - AMQ Streams to display the operator details.
From Provided APIs, you can create instances of Kafka components.
Click Create instance under Kafka to create a Kafka instance.
By default, you’ll create a Kafka cluster called
my-clusterwith three Kafka broker nodes and three ZooKeeper nodes. The cluster uses ephemeral storage.Click Create to start the installation of Kafka.
Wait until the status changes to Ready.
Chapter 6. Deploying AMQ Streams using installation artifacts
Having prepared your environment for a deployment of AMQ Streams, you can deploy AMQ Streams to an OpenShift cluster. Use the installation files provided with the release artifacts.
AMQ Streams is based on Strimzi 0.32.x. You can deploy AMQ Streams 2.3 on OpenShift 4.8 to 4.12.
The steps to deploy AMQ Streams using the installation files are as follows:
- Deploy the Cluster Operator
Use the Cluster Operator to deploy the following:
Optionally, deploy the following Kafka components according to your requirements:
To run the commands in this guide, an OpenShift user must have the rights to manage role-based access control (RBAC) and CRDs.
6.1. Basic deployment path
You can set up a deployment where AMQ Streams manages a single Kafka cluster in the same namespace. You might use this configuration for development or testing. Or you can use AMQ Streams in a production environment to manage a number of Kafka clusters in different namespaces.
The first step for any deployment of AMQ Streams is to install the Cluster Operator using the install/cluster-operator files.
A single command applies all the installation files in the cluster-operator folder: oc apply -f ./install/cluster-operator.
The command sets up everything you need to be able to create and manage a Kafka deployment, including the following:
-
Cluster Operator (
Deployment,ConfigMap) -
AMQ Streams CRDs (
CustomResourceDefinition) -
RBAC resources (
ClusterRole,ClusterRoleBinding,RoleBinding) -
Service account (
ServiceAccount)
The basic deployment path is as follows:
- Download the release artifacts
- Create an OpenShift namespace in which to deploy the Cluster Operator
-
Update the
install/cluster-operatorfiles to use the namespace created for the Cluster Operator - Install the Cluster Operator to watch one, multiple, or all namespaces
-
Update the
- Create a Kafka cluster
After which, you can deploy other Kafka components and set up monitoring of your deployment.
6.2. Deploying the Cluster Operator
The Cluster Operator is responsible for deploying and managing Kafka clusters within an OpenShift cluster.
When the Cluster Operator is running, it starts to watch for updates of Kafka resources.
By default, a single replica of the Cluster Operator is deployed. You can add replicas with leader election so that additional Cluster Operators are on standby in case of disruption. For more information, see Running multiple Cluster Operator replicas with leader election.
6.2.1. Specifying the namespaces the Cluster Operator watches
The Cluster Operator watches for updates in the namespaces where the Kafka resources are deployed. When you deploy the Cluster Operator, you specify which namespaces to watch. You can specify the following namespaces:
- A single namespace (the same namespace containing the Cluster Operator)
- Multiple namespaces
- All namespaces
The Cluster Operator can watch one, multiple, or all namespaces in an OpenShift cluster. The Topic Operator and User Operator watch for KafkaTopic and KafkaUser resources in a single namespace. For more information, see Watching namespaces with AMQ Streams operators.
The Cluster Operator watches for changes to the following resources:
-
Kafkafor the Kafka cluster. -
KafkaConnectfor the Kafka Connect cluster. -
KafkaConnectorfor creating and managing connectors in a Kafka Connect cluster. -
KafkaMirrorMakerfor the Kafka MirrorMaker instance. -
KafkaMirrorMaker2for the Kafka MirrorMaker 2.0 instance. -
KafkaBridgefor the Kafka Bridge instance. -
KafkaRebalancefor the Cruise Control optimization requests.
When one of these resources is created in the OpenShift cluster, the operator gets the cluster description from the resource and starts creating a new cluster for the resource by creating the necessary OpenShift resources, such as StatefulSets, Services and ConfigMaps.
Each time a Kafka resource is updated, the operator performs corresponding updates on the OpenShift resources that make up the cluster for the resource.
Resources are either patched or deleted, and then recreated in order to make the cluster for the resource reflect the desired state of the cluster. This operation might cause a rolling update that might lead to service disruption.
When a resource is deleted, the operator undeploys the cluster and deletes all related OpenShift resources.
6.2.2. Deploying the Cluster Operator to watch a single namespace
This procedure shows how to deploy the Cluster Operator to watch AMQ Streams resources in a single namespace in your OpenShift cluster.
Prerequisites
-
You need an account with permission to create and manage
CustomResourceDefinitionand RBAC (ClusterRole, andRoleBinding) resources.
Procedure
Edit the AMQ Streams installation files to use the namespace the Cluster Operator is going to be installed into.
For example, in this procedure the Cluster Operator is installed into the namespace
my-cluster-operator-namespace.On Linux, use:
sed -i 's/namespace: .*/namespace: my-cluster-operator-namespace/' install/cluster-operator/*RoleBinding*.yaml
On MacOS, use:
sed -i '' 's/namespace: .*/namespace: my-cluster-operator-namespace/' install/cluster-operator/*RoleBinding*.yaml
Deploy the Cluster Operator:
oc create -f install/cluster-operator -n my-cluster-operator-namespace
Check the status of the deployment:
oc get deployments -n my-cluster-operator-namespace
Output shows the deployment name and readiness
NAME                      READY  UP-TO-DATE  AVAILABLE
strimzi-cluster-operator  1/1    1           1
READYshows the number of replicas that are ready/expected. The deployment is successful when theAVAILABLEoutput shows1.
6.2.3. Deploying the Cluster Operator to watch multiple namespaces
This procedure shows how to deploy the Cluster Operator to watch AMQ Streams resources across multiple namespaces in your OpenShift cluster.
Prerequisites
-
You need an account with permission to create and manage
CustomResourceDefinitionand RBAC (ClusterRole, andRoleBinding) resources.
Procedure
Edit the AMQ Streams installation files to use the namespace the Cluster Operator is going to be installed into.
For example, in this procedure the Cluster Operator is installed into the namespace
my-cluster-operator-namespace.On Linux, use:
sed -i 's/namespace: .*/namespace: my-cluster-operator-namespace/' install/cluster-operator/*RoleBinding*.yaml
On MacOS, use:
sed -i '' 's/namespace: .*/namespace: my-cluster-operator-namespace/' install/cluster-operator/*RoleBinding*.yaml
Edit the
install/cluster-operator/060-Deployment-strimzi-cluster-operator.yamlfile to add a list of all the namespaces the Cluster Operator will watch to theSTRIMZI_NAMESPACEenvironment variable.For example, in this procedure the Cluster Operator will watch the namespaces
watched-namespace-1,watched-namespace-2,watched-namespace-3.apiVersion: apps/v1 kind: Deployment spec: # ... template: spec: serviceAccountName: strimzi-cluster-operator containers: - name: strimzi-cluster-operator image: registry.redhat.io/amq7/amq-streams-rhel8-operator:2.3.0 imagePullPolicy: IfNotPresent env: - name: STRIMZI_NAMESPACE value: watched-namespace-1,watched-namespace-2,watched-namespace-3For each namespace listed, install the
RoleBindings.In this example, we replace
watched-namespacein these commands with the namespaces listed in the previous step, repeating them forwatched-namespace-1,watched-namespace-2,watched-namespace-3:oc create -f install/cluster-operator/020-RoleBinding-strimzi-cluster-operator.yaml -n <watched_namespace> oc create -f install/cluster-operator/023-RoleBinding-strimzi-cluster-operator.yaml -n <watched_namespace> oc create -f install/cluster-operator/031-RoleBinding-strimzi-cluster-operator-entity-operator-delegation.yaml -n <watched_namespace>
Deploy the Cluster Operator:
oc create -f install/cluster-operator -n my-cluster-operator-namespace
Check the status of the deployment:
oc get deployments -n my-cluster-operator-namespace
Output shows the deployment name and readiness
NAME                      READY  UP-TO-DATE  AVAILABLE
strimzi-cluster-operator  1/1    1           1
READYshows the number of replicas that are ready/expected. The deployment is successful when theAVAILABLEoutput shows1.
6.2.4. Deploying the Cluster Operator to watch all namespaces
This procedure shows how to deploy the Cluster Operator to watch AMQ Streams resources across all namespaces in your OpenShift cluster.
When running in this mode, the Cluster Operator automatically manages clusters in any new namespaces that are created.
Prerequisites
-
You need an account with permission to create and manage
CustomResourceDefinitionand RBAC (ClusterRole, andRoleBinding) resources.
Procedure
Edit the AMQ Streams installation files to use the namespace the Cluster Operator is going to be installed into.
For example, in this procedure the Cluster Operator is installed into the namespace
my-cluster-operator-namespace.On Linux, use:
sed -i 's/namespace: .*/namespace: my-cluster-operator-namespace/' install/cluster-operator/*RoleBinding*.yaml
On MacOS, use:
sed -i '' 's/namespace: .*/namespace: my-cluster-operator-namespace/' install/cluster-operator/*RoleBinding*.yaml
Edit the
install/cluster-operator/060-Deployment-strimzi-cluster-operator.yamlfile to set the value of theSTRIMZI_NAMESPACEenvironment variable to*.apiVersion: apps/v1 kind: Deployment spec: # ... template: spec: # ... serviceAccountName: strimzi-cluster-operator containers: - name: strimzi-cluster-operator image: registry.redhat.io/amq7/amq-streams-rhel8-operator:2.3.0 imagePullPolicy: IfNotPresent env: - name: STRIMZI_NAMESPACE value: "*" # ...Create
ClusterRoleBindingsthat grant cluster-wide access for all namespaces to the Cluster Operator.oc create clusterrolebinding strimzi-cluster-operator-namespaced --clusterrole=strimzi-cluster-operator-namespaced --serviceaccount my-cluster-operator-namespace:strimzi-cluster-operator oc create clusterrolebinding strimzi-cluster-operator-watched --clusterrole=strimzi-cluster-operator-watched --serviceaccount my-cluster-operator-namespace:strimzi-cluster-operator oc create clusterrolebinding strimzi-cluster-operator-entity-operator-delegation --clusterrole=strimzi-entity-operator --serviceaccount my-cluster-operator-namespace:strimzi-cluster-operator
Deploy the Cluster Operator to your OpenShift cluster.
oc create -f install/cluster-operator -n my-cluster-operator-namespace
Check the status of the deployment:
oc get deployments -n my-cluster-operator-namespace
Output shows the deployment name and readiness
NAME                      READY  UP-TO-DATE  AVAILABLE
strimzi-cluster-operator  1/1    1           1
READYshows the number of replicas that are ready/expected. The deployment is successful when theAVAILABLEoutput shows1.
6.3. Deploying Kafka
To be able to manage a Kafka cluster with the Cluster Operator, you must deploy it as a Kafka resource. AMQ Streams provides example deployment files to do this. You can use these files to deploy the Topic Operator and User Operator at the same time.
After you have deployed the Cluster Operator, use a Kafka resource to deploy the following components:
When installing Kafka, AMQ Streams also installs a ZooKeeper cluster and adds the necessary configuration to connect Kafka with ZooKeeper.
If you haven’t deployed a Kafka cluster as a Kafka resource, you can’t use the Cluster Operator to manage it. This applies, for example, to a Kafka cluster running outside of OpenShift. However, you can use the Topic Operator and User Operator with a Kafka cluster that is not managed by AMQ Streams, by deploying them as standalone components. You can also deploy and use other Kafka components with a Kafka cluster not managed by AMQ Streams.
6.3.1. Deploying the Kafka cluster
This procedure shows how to deploy a Kafka cluster to your OpenShift cluster using the Cluster Operator.
The deployment uses a YAML file to provide the specification to create a Kafka resource.
AMQ Streams provides the following example files you can use to create a Kafka cluster:
kafka-persistent.yaml- Deploys a persistent cluster with three ZooKeeper and three Kafka nodes.
kafka-jbod.yaml- Deploys a persistent cluster with three ZooKeeper and three Kafka nodes (each using multiple persistent volumes).
kafka-persistent-single.yaml- Deploys a persistent cluster with a single ZooKeeper node and a single Kafka node.
kafka-ephemeral.yaml- Deploys an ephemeral cluster with three ZooKeeper and three Kafka nodes.
kafka-ephemeral-single.yaml- Deploys an ephemeral cluster with three ZooKeeper nodes and a single Kafka node.
In this procedure, we use the examples for an ephemeral and persistent Kafka cluster deployment.
- Ephemeral cluster
-
In general, an ephemeral (or temporary) Kafka cluster is suitable for development and testing purposes, not for production. This deployment uses
emptyDirvolumes for storing broker information (for ZooKeeper) and topics or partitions (for Kafka). Using anemptyDirvolume means that its content is strictly related to the pod life cycle and is deleted when the pod goes down. - Persistent cluster
A persistent Kafka cluster uses persistent volumes to store ZooKeeper and Kafka data. A
PersistentVolumeis acquired using aPersistentVolumeClaimto make it independent of the actual type of thePersistentVolume. ThePersistentVolumeClaimcan use aStorageClassto trigger automatic volume provisioning. When noStorageClassis specified, OpenShift will try to use the defaultStorageClass.The following examples show some common types of persistent volumes:
- If your OpenShift cluster runs on Amazon AWS, OpenShift can provision Amazon EBS volumes
- If your OpenShift cluster runs on Microsoft Azure, OpenShift can provision Azure Disk Storage volumes
- If your OpenShift cluster runs on Google Cloud, OpenShift can provision Persistent Disk volumes
- If your OpenShift cluster runs on bare metal, OpenShift can provision local persistent volumes
The example YAML files specify the latest supported Kafka version, and configuration for its supported log message format version and inter-broker protocol version. The inter.broker.protocol.version property for the Kafka config must be the version supported by the specified Kafka version (spec.kafka.version). The property represents the version of Kafka protocol used in a Kafka cluster.
From Kafka 3.0.0, when the inter.broker.protocol.version is set to 3.0 or higher, the log.message.format.version option is ignored and doesn’t need to be set.
An update to the inter.broker.protocol.version is required when upgrading Kafka.
The example clusters are named my-cluster by default. The cluster name is defined by the name of the resource and cannot be changed after the cluster has been deployed. To change the cluster name before you deploy the cluster, edit the Kafka.metadata.name property of the Kafka resource in the relevant YAML file.
Default cluster name and specified Kafka versions
apiVersion: kafka.strimzi.io/v1beta2
kind: Kafka
metadata:
  name: my-cluster
spec:
  kafka:
    version: 3.3.1
    #...
    config:
      #...
      log.message.format.version: "3.3"
      inter.broker.protocol.version: "3.3"
  # ...
Prerequisites
Procedure
Create and deploy an ephemeral or persistent cluster.
To create and deploy an ephemeral cluster:
oc apply -f examples/kafka/kafka-ephemeral.yaml
To create and deploy a persistent cluster:
oc apply -f examples/kafka/kafka-persistent.yaml
Check the status of the deployment:
oc get pods -n <my_cluster_operator_namespace>Output shows the pod names and readiness
NAME                        READY   STATUS    RESTARTS
my-cluster-entity-operator  3/3     Running   0
my-cluster-kafka-0          1/1     Running   0
my-cluster-kafka-1          1/1     Running   0
my-cluster-kafka-2          1/1     Running   0
my-cluster-zookeeper-0      1/1     Running   0
my-cluster-zookeeper-1      1/1     Running   0
my-cluster-zookeeper-2      1/1     Running   0
my-clusteris the name of the Kafka cluster.With the default deployment, you install an Entity Operator cluster, 3 Kafka pods, and 3 ZooKeeper pods.
READYshows the number of replicas that are ready/expected. The deployment is successful when theSTATUSshows asRunning.
Additional resources
6.3.2. Deploying the Topic Operator using the Cluster Operator
This procedure describes how to deploy the Topic Operator using the Cluster Operator.
You configure the entityOperator property of the Kafka resource to include the topicOperator. By default, the Topic Operator watches for KafkaTopic resources in the namespace of the Kafka cluster deployed by the Cluster Operator. You can also specify a namespace using watchedNamespace in the Topic Operator spec. A single Topic Operator can watch a single namespace. One namespace should be watched by only one Topic Operator.
If you use AMQ Streams to deploy multiple Kafka clusters into the same namespace, enable the Topic Operator for only one Kafka cluster or use the watchedNamespace property to configure the Topic Operators to watch other namespaces.
If you want to use the Topic Operator with a Kafka cluster that is not managed by AMQ Streams, you must deploy the Topic Operator as a standalone component.
For more information about configuring the entityOperator and topicOperator properties, see Configuring the Entity Operator.
Prerequisites
Procedure
Edit the
entityOperatorproperties of theKafkaresource to includetopicOperator:apiVersion: kafka.strimzi.io/v1beta2 kind: Kafka metadata: name: my-cluster spec: #... entityOperator: topicOperator: {} userOperator: {}Configure the Topic Operator
specusing the properties described inEntityTopicOperatorSpecschema reference.Use an empty object (
{}) if you want all properties to use their default values.Create or update the resource:
oc apply -f <kafka_configuration_file>Check the status of the deployment:
oc get pods -n <my_cluster_operator_namespace>Output shows the pod name and readiness
NAME                        READY   STATUS    RESTARTS
my-cluster-entity-operator  3/3     Running   0
# ...
my-clusteris the name of the Kafka cluster.READYshows the number of replicas that are ready/expected. The deployment is successful when theSTATUSshows asRunning.
6.3.3. Deploying the User Operator using the Cluster Operator
This procedure describes how to deploy the User Operator using the Cluster Operator.
You configure the entityOperator property of the Kafka resource to include the userOperator. By default, the User Operator watches for KafkaUser resources in the namespace of the Kafka cluster deployment. You can also specify a namespace using watchedNamespace in the User Operator spec. A single User Operator can watch a single namespace. One namespace should be watched by only one User Operator.
If you want to use the User Operator with a Kafka cluster that is not managed by AMQ Streams, you must deploy the User Operator as a standalone component.
For more information about configuring the entityOperator and userOperator properties, see Configuring the Entity Operator.
Prerequisites
Procedure
Edit the
entityOperatorproperties of theKafkaresource to includeuserOperator:apiVersion: kafka.strimzi.io/v1beta2 kind: Kafka metadata: name: my-cluster spec: #... entityOperator: topicOperator: {} userOperator: {}Configure the User Operator
specusing the properties described inEntityUserOperatorSpecschema reference.Use an empty object (
{}) if you want all properties to use their default values.Create or update the resource:
oc apply -f <kafka_configuration_file>Check the status of the deployment:
oc get pods -n <my_cluster_operator_namespace>Output shows the pod name and readiness
NAME                        READY   STATUS    RESTARTS
my-cluster-entity-operator  3/3     Running   0
# ...
my-clusteris the name of the Kafka cluster.READYshows the number of replicas that are ready/expected. The deployment is successful when theSTATUSshows asRunning.
6.4. Deploying Kafka Connect
Kafka Connect is a tool for streaming data between Apache Kafka and external systems.
In AMQ Streams, Kafka Connect is deployed in distributed mode. Kafka Connect can also work in standalone mode, but this is not supported by AMQ Streams.
Using the concept of connectors, Kafka Connect provides a framework for moving large amounts of data into and out of your Kafka cluster while maintaining scalability and reliability.
Kafka Connect is typically used to integrate Kafka with external databases and storage and messaging systems.
The Cluster Operator manages Kafka Connect clusters deployed using the KafkaConnect resource and connectors created using the KafkaConnector resource.
The following procedures show how to deploy Kafka Connect and set up connectors for streaming data:
- Section 6.4.1, “Deploying Kafka Connect to your OpenShift cluster”
- Section 6.4.2, “Kafka Connect configuration for multiple instances”
- Section 6.4.3, “Extending Kafka Connect with connector plugins”
- Section 6.4.4, “Creating and managing connectors”
- Section 6.4.4.2, “Deploying example KafkaConnector resources”
The term connector is used interchangeably to mean a connector instance running within a Kafka Connect cluster, or a connector class. In this guide, the term connector is used when the meaning is clear from the context.
6.4.1. Deploying Kafka Connect to your OpenShift cluster
This procedure shows how to deploy a Kafka Connect cluster to your OpenShift cluster using the Cluster Operator.
A Kafka Connect cluster is implemented as a Deployment with a configurable number of nodes (also called workers) that distribute the workload of connectors as tasks so that the message flow is highly scalable and reliable.
The deployment uses a YAML file to provide the specification to create a KafkaConnect resource.
AMQ Streams provides example configuration files. In this procedure, we use the following example file:
-
examples/connect/kafka-connect.yaml
Prerequisites
Procedure
Deploy Kafka Connect to your OpenShift cluster. Use the
examples/connect/kafka-connect.yamlfile to deploy Kafka Connect.oc apply -f examples/connect/kafka-connect.yaml
Check the status of the deployment:
oc get deployments -n <my_cluster_operator_namespace>Output shows the deployment name and readiness
NAME                        READY  UP-TO-DATE  AVAILABLE
my-connect-cluster-connect  1/1    1           1
my-connect-clusteris the name of the Kafka Connect cluster.READYshows the number of replicas that are ready/expected. The deployment is successful when theAVAILABLEoutput shows1.
Additional resources
6.4.2. Kafka Connect configuration for multiple instances
If you are running multiple instances of Kafka Connect, you have to change the default configuration of the following config properties:
apiVersion: kafka.strimzi.io/v1beta2
kind: KafkaConnect
metadata:
  name: my-connect
spec:
  # ...
  config:
    group.id: connect-cluster 1
    offset.storage.topic: connect-cluster-offsets 2
    config.storage.topic: connect-cluster-configs 3
    status.storage.topic: connect-cluster-status  4
    # ...
# ...
Values for the three topics must be the same for all Kafka Connect instances with the same group.id.
Unless you change the default settings, each Kafka Connect instance connecting to the same Kafka cluster is deployed with the same values. What happens, in effect, is all instances are coupled to run in a cluster and use the same topics.
If multiple Kafka Connect clusters try to use the same topics, Kafka Connect will not work as expected and generate errors.
If you wish to run multiple Kafka Connect instances, change the values of these properties for each instance.
6.4.3. Extending Kafka Connect with connector plugins
Kafka Connect uses connector instances to integrate with other systems to stream data. Connectors can be one of the following type:
- Source connectors that push data into Kafka
- Sink connectors that extract data out of Kafka
The procedures in this section describe how you can add connectors by doing one of the following:
- Section 6.4.3.1, “Creating a new container image automatically using AMQ Streams”
- Section 6.4.3.2, “Creating a Docker image from the Kafka Connect base image”(manually or using continuous integration)
You create the configuration for connectors directly using the Kafka Connect REST API or KafkaConnector custom resources.
You can use your own connectors or try the example FileStreamSourceConnector and FileStreamSinkConnector connectors for moving file-based data into and out of a Kafka cluster. For information on deploying the example file connectors as KafkaConnector resources, see Section 6.4.4.2, “Deploying example KafkaConnector resources”.
Up until Apache Kafka 3.1.0, the AMQ Streams container images for Kafka Connect included the example file connectors. From Apache Kafka 3.1.1 and 3.2.0, these connectors are no longer included and must be deployed like any connector.
6.4.3.1. Creating a new container image automatically using AMQ Streams
This procedure shows how to configure Kafka Connect so that AMQ Streams automatically builds a new container image with additional connectors. You define the connector plugins using the .spec.build.plugins property of the KafkaConnect custom resource. AMQ Streams will automatically download and add the connector plugins into a new container image. The container is pushed into the container repository specified in .spec.build.output and automatically used in the Kafka Connect deployment.
Prerequisites
- The Cluster Operator must be deployed.
- A container registry.
You need to provide your own container registry where images can be pushed to, stored, and pulled from. AMQ Streams supports private container registries as well as public registries such as Quay or Docker Hub.
Procedure
Configure the
KafkaConnectcustom resource by specifying the container registry in.spec.build.output, and additional connectors in.spec.build.plugins:apiVersion: kafka.strimzi.io/v1beta2 kind: KafkaConnect metadata: name: my-connect-cluster spec: 1 #... build: output: 2 type: docker image: my-registry.io/my-org/my-connect-cluster:latest pushSecret: my-registry-credentials plugins: 3 - name: debezium-postgres-connector artifacts: - type: tgz url: https://repo1.maven.org/maven2/io/debezium/debezium-connector-postgres/1.3.1.Final/debezium-connector-postgres-1.3.1.Final-plugin.tar.gz sha512sum: 962a12151bdf9a5a30627eebac739955a4fd95a08d373b86bdcea2b4d0c27dd6e1edd5cb548045e115e33a9e69b1b2a352bee24df035a0447cb820077af00c03 - name: camel-telegram artifacts: - type: tgz url: https://repo.maven.apache.org/maven2/org/apache/camel/kafkaconnector/camel-telegram-kafka-connector/0.7.0/camel-telegram-kafka-connector-0.7.0-package.tar.gz sha512sum: a9b1ac63e3284bea7836d7d24d84208c49cdf5600070e6bd1535de654f6920b74ad950d51733e8020bf4187870699819f54ef5859c7846ee4081507f48873479 #...
Create or update the resource:
$ oc apply -f KAFKA-CONNECT-CONFIG-FILE- Wait for the new container image to build, and for the Kafka Connect cluster to be deployed.
- Use the Kafka Connect REST API or the KafkaConnector custom resources to use the connector plugins you added.
Additional resources
See the Using Strimzi guide for more information on:
6.4.3.2. Creating a Docker image from the Kafka Connect base image
This procedure shows how to create a custom image and add it to the /opt/kafka/plugins directory.
You can use the Kafka container image on Red Hat Ecosystem Catalog as a base image for creating your own custom image with additional connector plugins.
At startup, the AMQ Streams version of Kafka Connect loads any third-party connector plugins contained in the /opt/kafka/plugins directory.
Prerequisites
Procedure
Create a new
Dockerfileusingregistry.redhat.io/amq7/amq-streams-kafka-33-rhel8:2.3.0as the base image:FROM registry.redhat.io/amq7/amq-streams-kafka-33-rhel8:2.3.0 USER root:root COPY ./my-plugins/ /opt/kafka/plugins/ USER 1001Example plug-in file
$ tree ./my-plugins/
./my-plugins/
├── debezium-connector-mongodb
│   ├── bson-3.4.2.jar
│   ├── CHANGELOG.md
│   ├── CONTRIBUTE.md
│   ├── COPYRIGHT.txt
│   ├── debezium-connector-mongodb-0.7.1.jar
│   ├── debezium-core-0.7.1.jar
│   ├── LICENSE.txt
│   ├── mongodb-driver-3.4.2.jar
│   ├── mongodb-driver-core-3.4.2.jar
│   └── README.md
├── debezium-connector-mysql
│   ├── CHANGELOG.md
│   ├── CONTRIBUTE.md
│   ├── COPYRIGHT.txt
│   ├── debezium-connector-mysql-0.7.1.jar
│   ├── debezium-core-0.7.1.jar
│   ├── LICENSE.txt
│   ├── mysql-binlog-connector-java-0.13.0.jar
│   ├── mysql-connector-java-5.1.40.jar
│   ├── README.md
│   └── wkb-1.0.2.jar
└── debezium-connector-postgres
    ├── CHANGELOG.md
    ├── CONTRIBUTE.md
    ├── COPYRIGHT.txt
    ├── debezium-connector-postgres-0.7.1.jar
    ├── debezium-core-0.7.1.jar
    ├── LICENSE.txt
    ├── postgresql-42.0.0.jar
    ├── protobuf-java-2.6.1.jar
    └── README.md
NoteThis example uses the Debezium connectors for MongoDB, MySQL, and PostgreSQL. Debezium running in Kafka Connect looks the same as any other Kafka Connect task.
- Build the container image.
- Push your custom image to your container registry.
Point to the new container image.
You can either:
Edit the
KafkaConnect.spec.imageproperty of theKafkaConnectcustom resource.If set, this property overrides the
STRIMZI_KAFKA_CONNECT_IMAGESvariable in the Cluster Operator.apiVersion: kafka.strimzi.io/v1beta2 kind: KafkaConnect metadata: name: my-connect-cluster spec: 1 #... image: my-new-container-image 2 config: 3 #...
or
-
In the
install/cluster-operator/060-Deployment-strimzi-cluster-operator.yamlfile, edit theSTRIMZI_KAFKA_CONNECT_IMAGESvariable to point to the new container image, and then reinstall the Cluster Operator.
6.4.4. Creating and managing connectors
When you have created a container image for your connector plug-in, you need to create a connector instance in your Kafka Connect cluster. You can then configure, monitor, and manage a running connector instance.
A connector is an instance of a particular connector class that knows how to communicate with the relevant external system in terms of messages. Connectors are available for many external systems, or you can create your own.
You can create source and sink types of connector.
- Source connector
- A source connector is a runtime entity that fetches data from an external system and feeds it to Kafka as messages.
- Sink connector
- A sink connector is a runtime entity that fetches messages from Kafka topics and feeds them to an external system.
6.4.4.1. APIs for creating and managing connectors
AMQ Streams provides two APIs for creating and managing connectors:
-
KafkaConnectorcustom resources (referred to as KafkaConnectors) - The Kafka Connect REST API
Using the APIs, you can:
- Check the status of a connector instance
- Reconfigure a running connector
- Increase or decrease the number of connector tasks for a connector instance
- Restart connectors
- Restart connector tasks, including failed tasks
- Pause a connector instance
- Resume a previously paused connector instance
- Delete a connector instance
KafkaConnector custom resources
KafkaConnectors allow you to create and manage connector instances for Kafka Connect in an OpenShift-native way, so an HTTP client such as cURL is not required. Like other Kafka resources, you declare a connector’s desired state in a KafkaConnector YAML file that is deployed to your OpenShift cluster to create the connector instance. KafkaConnector resources must be deployed to the same namespace as the Kafka Connect cluster they link to.
You manage a running connector instance by updating its corresponding KafkaConnector resource, and then applying the updates. You remove a connector by deleting its corresponding KafkaConnector.
To ensure compatibility with earlier versions of AMQ Streams, KafkaConnectors are disabled by default. To enable KafkaConnectors for a Kafka Connect cluster, you set the strimzi.io/use-connector-resources annotation to true in the KafkaConnect resource. For instructions, see Configuring Kafka Connect.
When KafkaConnectors are enabled, the Cluster Operator begins to watch for them. It updates the configurations of running connector instances to match the configurations defined in their KafkaConnectors.
AMQ Streams provides an example KafkaConnector configuration file, which you can use to create and manage a FileStreamSourceConnector and a FileStreamSinkConnector.
You can restart a connector or restart a connector task by annotating a KafkaConnector resource.
Kafka Connect API
The operations supported by the Kafka Connect REST API are described in the Apache Kafka Connect API documentation.
Switching from using the Kafka Connect API to using KafkaConnectors
You can switch from using the Kafka Connect API to using KafkaConnectors to manage your connectors. To make the switch, do the following in the order shown:
-
Deploy
KafkaConnectorresources with the configuration to create your connector instances. -
Enable KafkaConnectors in your Kafka Connect configuration by setting the
strimzi.io/use-connector-resourcesannotation totrue.
If you enable KafkaConnectors before creating the resources, you will delete all your connectors.
To switch from using KafkaConnectors to using the Kafka Connect API, first remove the annotation that enables the KafkaConnectors from your Kafka Connect configuration. Otherwise, manual changes made directly using the Kafka Connect REST API are reverted by the Cluster Operator.
6.4.4.2. Deploying example KafkaConnector resources
The KafkaConnector resource offers an OpenShift-native approach to management of connectors by the Cluster Operator. AMQ Streams provides example configuration files. In this procedure, we use the examples/connect/source-connector.yaml file to create the following connector instances as KafkaConnector resources:
-
A
FileStreamSourceConnectorinstance that reads each line from the Kafka license file (the source) and writes the data as messages to a single Kafka topic. -
A
FileStreamSinkConnectorinstance that reads messages from the Kafka topic and writes the messages to a temporary file (the sink).
Alternatively, you can use the examples/connect/kafka-connect-build.yaml file to build a new Kafka Connect image with the file connectors.
Up until Apache Kafka 3.1.0, the example file connector plugins were included with Apache Kafka. Starting from the 3.1.1 and 3.2.0 releases of Apache Kafka, the examples need to be added to the plugin path as any other connector. See Extending Kafka Connect with connector plugins for more details.
In a production environment, you prepare container images with the required Kafka Connect connectors, as described in Section 6.4.3, “Extending Kafka Connect with connector plugins”.
The FileStreamSourceConnector and FileStreamSinkConnector are provided as examples. Running these connectors in containers as described here is unlikely to be suitable for production use cases.
Prerequisites
- A Kafka Connect deployment
- KafkaConnectors are enabled in the Kafka Connect deployment
- The Cluster Operator is running
Procedure
Edit the
examples/connect/source-connector.yamlfile:apiVersion: kafka.strimzi.io/v1beta2 kind: KafkaConnector metadata: name: my-source-connector 1 labels: strimzi.io/cluster: my-connect-cluster 2 spec: class: org.apache.kafka.connect.file.FileStreamSourceConnector 3 tasksMax: 2 4 config: 5 file: "/opt/kafka/LICENSE" 6 topic: my-topic 7 # ...
- 1
- Name of the
KafkaConnectorresource, which is used as the name of the connector. Use any name that is valid for an OpenShift resource. - 2
- Name of the Kafka Connect cluster to create the connector instance in. Connectors must be deployed to the same namespace as the Kafka Connect cluster they link to.
- 3
- Full name or alias of the connector class. This should be present in the image being used by the Kafka Connect cluster.
- 4
- Maximum number of Kafka Connect
Tasksthat the connector can create. - 5
- Connector configuration as key-value pairs.
- 6
- This example source connector configuration reads data from the
/opt/kafka/LICENSEfile. - 7
- Kafka topic to publish the source data to.
Create the source
KafkaConnectorin your OpenShift cluster:oc apply -f examples/connect/source-connector.yaml
Create an
examples/connect/sink-connector.yamlfile:touch examples/connect/sink-connector.yaml
Paste the following YAML into the
sink-connector.yamlfile:apiVersion: kafka.strimzi.io/v1beta2 kind: KafkaConnector metadata: name: my-sink-connector labels: strimzi.io/cluster: my-connect spec: class: org.apache.kafka.connect.file.FileStreamSinkConnector 1 tasksMax: 2 config: 2 file: "/tmp/my-file" 3 topics: my-topic 4- 1
- Full name or alias of the connector class. This should be present in the image being used by the Kafka Connect cluster.
- 2
- Connector configuration as key-value pairs.
- 3
- Temporary file to publish the source data to.
- 4
- Kafka topic to read the source data from.
Create the sink
KafkaConnectorin your OpenShift cluster:oc apply -f examples/connect/sink-connector.yaml
Check that the connector resources were created:
oc get kctr --selector strimzi.io/cluster=MY-CONNECT-CLUSTER -o name

my-source-connector
my-sink-connector
Replace MY-CONNECT-CLUSTER with your Kafka Connect cluster.
In the container, execute
kafka-console-consumer.shto read the messages that were written to the topic by the source connector:oc exec MY-CLUSTER-kafka-0 -i -t -- bin/kafka-console-consumer.sh --bootstrap-server MY-CLUSTER-kafka-bootstrap.NAMESPACE.svc:9092 --topic my-topic --from-beginning
Source and sink connector configuration options
The connector configuration is defined in the spec.config property of the KafkaConnector resource.
The FileStreamSourceConnector and FileStreamSinkConnector classes support the same configuration options as the Kafka Connect REST API. Other connectors support different configuration options.
Table 6.1. Configuration options for the FileStreamSource connector class
| Name | Type | Default value | Description |
|---|---|---|---|
|
| String | Null | Source file to write messages to. If not specified, the standard input is used. |
|
| List | Null | The Kafka topic to publish data to. |
Table 6.2. Configuration options for FileStreamSinkConnector class
| Name | Type | Default value | Description |
|---|---|---|---|
|
| String | Null | Destination file to write messages to. If not specified, the standard output is used. |
|
| List | Null | One or more Kafka topics to read data from. |
|
| String | Null | A regular expression matching one or more Kafka topics to read data from. |
6.4.4.3. Performing a restart of a Kafka connector
This procedure describes how to manually trigger a restart of a Kafka connector by using an OpenShift annotation.
Prerequisites
- The Cluster Operator is running.
Procedure
Find the name of the
KafkaConnectorcustom resource that controls the Kafka connector you want to restart:oc get KafkaConnector
To restart the connector, annotate the
KafkaConnectorresource in OpenShift. For example, usingoc annotate:oc annotate KafkaConnector KAFKACONNECTOR-NAME strimzi.io/restart=trueWait for the next reconciliation to occur (every two minutes by default).
The Kafka connector is restarted, as long as the annotation was detected by the reconciliation process. When Kafka Connect accepts the restart request, the annotation is removed from the
KafkaConnectorcustom resource.
6.4.4.4. Performing a restart of a Kafka connector task
This procedure describes how to manually trigger a restart of a Kafka connector task by using an OpenShift annotation.
Prerequisites
- The Cluster Operator is running.
Procedure
Find the name of the
KafkaConnectorcustom resource that controls the Kafka connector task you want to restart:oc get KafkaConnector
Find the ID of the task to be restarted from the
KafkaConnectorcustom resource. Task IDs are non-negative integers, starting from 0.oc describe KafkaConnector KAFKACONNECTOR-NAMETo restart the connector task, annotate the
KafkaConnectorresource in OpenShift. For example, usingoc annotateto restart task 0:oc annotate KafkaConnector KAFKACONNECTOR-NAME strimzi.io/restart-task=0Wait for the next reconciliation to occur (every two minutes by default).
The Kafka connector task is restarted, as long as the annotation was detected by the reconciliation process. When Kafka Connect accepts the restart request, the annotation is removed from the
KafkaConnectorcustom resource.
6.4.4.5. Exposing the Kafka Connect API
Use the Kafka Connect REST API as an alternative to using KafkaConnector resources to manage connectors. The Kafka Connect REST API is available as a service running on <connect_cluster_name>-connect-api:8083, where <connect_cluster_name> is the name of your Kafka Connect cluster. The service is created when you create a Kafka Connect instance.
The strimzi.io/use-connector-resources annotation enables KafkaConnectors. If you applied the annotation to your KafkaConnect resource configuration, you need to remove it to use the Kafka Connect API. Otherwise, manual changes made directly using the Kafka Connect REST API are reverted by the Cluster Operator.
You can add the connector configuration as a JSON object.
Example curl request to add connector configuration
curl -X POST \
  http://my-connect-cluster-connect-api:8083/connectors \
  -H 'Content-Type: application/json' \
  -d '{ "name": "my-source-connector",
    "config":
    {
      "connector.class":"org.apache.kafka.connect.file.FileStreamSourceConnector",
      "file": "/opt/kafka/LICENSE",
      "topic":"my-topic",
      "tasksMax": "4",
      "type": "source"
    }
}'
The API is only accessible within the OpenShift cluster. If you want to make the Kafka Connect API accessible to applications running outside of the OpenShift cluster, you can expose it manually by creating one of the following features:
-
LoadBalancerorNodePorttype services -
Ingressresources - OpenShift routes
The connection is insecure, so allow external access advisedly.
If you decide to create services, use the labels from the selector of the <connect_cluster_name>-connect-api service to configure the pods to which the service will route the traffic:
Selector configuration for the service
# ...
selector:
  strimzi.io/cluster: my-connect-cluster 1
  strimzi.io/kind: KafkaConnect
  strimzi.io/name: my-connect-cluster-connect 2
#...
You must also create a NetworkPolicy that allows HTTP requests from external clients.
Example NetworkPolicy to allow requests to the Kafka Connect API
apiVersion: networking.k8s.io/v1
kind: NetworkPolicy
metadata:
  name: my-custom-connect-network-policy
spec:
  ingress:
  - from:
    - podSelector: 1
        matchLabels:
          app: my-connector-manager
    ports:
    - port: 8083
      protocol: TCP
  podSelector:
    matchLabels:
      strimzi.io/cluster: my-connect-cluster
      strimzi.io/kind: KafkaConnect
      strimzi.io/name: my-connect-cluster-connect
  policyTypes:
  - Ingress
- 1
- The label of the pod that is allowed to connect to the API.
To add the connector configuration outside the cluster, use the URL of the resource that exposes the API in the curl command.
6.4.4.6. Limiting access to the Kafka Connect API
It is crucial to restrict access to the Kafka Connect API only to trusted users to prevent unauthorized actions and potential security issues. The Kafka Connect API provides extensive capabilities for altering connector configurations, which makes it all the more important to take security precautions. Someone with access to the Kafka Connect API could potentially obtain sensitive information that an administrator may assume is secure.
The Kafka Connect REST API can be accessed by anyone who has authenticated access to the OpenShift cluster and knows the endpoint URL, which includes the hostname/IP address and port number.
For example, suppose an organization uses a Kafka Connect cluster and connectors to stream sensitive data from a customer database to a central database. The administrator uses a configuration provider plugin to store store sensitive information related to connecting to the customer database and the central database, such as database connection details and authentication credentials. The configuration provider protects this sensitive information from being exposed to unauthorized users. However, someone who has access to the Kafka Connect API can still obtain access to the customer database without the consent of the administrator. They can do this by setting up a fake database and configuring a connector to connect to it. They then modify the connector configuration to point to the customer database, but instead of sending the data to the central database, they send it to the fake database. By configuring the connector to connect to the fake database, the login details and credentials for connecting to the customer database are intercepted, even though they are stored securely in the configuration provider.
If you are using the KafkaConnector custom resources, then by default the OpenShift RBAC rules permit only OpenShift cluster administrators to make changes to connectors. You can also designate non-cluster administrators to manage AMQ Streams resources. With KafkaConnector resources enabled in your Kafka Connect configuration, changes made directly using the Kafka Connect REST API are reverted by the Cluster Operator. If you are not using the KafkaConnector resource, the default RBAC rules do not limit access to the Kafka Connect API. If you want to limit direct access to the Kafka Connect REST API using OpenShift RBAC, you need to enable and use the KafkaConnector resources.
For improved security, we recommend configuring the following property for the Kafka Connect API:
connector.client.config.override.policySet the
connector.client.config.override.policyproperty toNone(default) to prevent connector configurations from overriding the Kafka Connect configuration and the consumers and producers it uses.Example configuration to specify connector override policy
apiVersion: kafka.strimzi.io/v1beta2
kind: KafkaConnect
metadata:
  name: my-connect-cluster
  annotations:
    strimzi.io/use-connector-resources: "true"
spec:
  # ...
  config:
    connector.client.config.override.policy: None
# ...
6.5. Deploying Kafka MirrorMaker
The Cluster Operator deploys one or more Kafka MirrorMaker replicas to replicate data between Kafka clusters. This process is called mirroring to avoid confusion with the Kafka partitions replication concept. MirrorMaker consumes messages from the source cluster and republishes those messages to the target cluster.
6.5.1. Deploying Kafka MirrorMaker to your OpenShift cluster
This procedure shows how to deploy a Kafka MirrorMaker cluster to your OpenShift cluster using the Cluster Operator.
The deployment uses a YAML file to provide the specification to create a KafkaMirrorMaker or KafkaMirrorMaker2 resource depending on the version of MirrorMaker deployed.
Kafka MirrorMaker 1 (referred to as just MirrorMaker in the documentation) has been deprecated in Apache Kafka 3.0.0 and will be removed in Apache Kafka 4.0.0. As a result, the KafkaMirrorMaker custom resource which is used to deploy Kafka MirrorMaker 1 has been deprecated in AMQ Streams as well. The KafkaMirrorMaker resource will be removed from AMQ Streams when we adopt Apache Kafka 4.0.0. As a replacement, use the KafkaMirrorMaker2 custom resource with the IdentityReplicationPolicy.
AMQ Streams provides example configuration files. In this procedure, we use the following example files:
-
examples/mirror-maker/kafka-mirror-maker.yaml -
examples/mirror-maker/kafka-mirror-maker-2.yaml
Prerequisites
Procedure
Deploy Kafka MirrorMaker to your OpenShift cluster:
For MirrorMaker:
oc apply -f examples/mirror-maker/kafka-mirror-maker.yaml
For MirrorMaker 2.0:
oc apply -f examples/mirror-maker/kafka-mirror-maker-2.yaml
Check the status of the deployment:
oc get deployments -n <my_cluster_operator_namespace>Output shows the deployment name and readiness
NAME                          READY  UP-TO-DATE  AVAILABLE
my-mirror-maker-mirror-maker  1/1    1           1
my-mm2-cluster-mirrormaker2   1/1    1           1
my-mirror-makeris the name of the Kafka MirrorMaker cluster.my-mm2-clusteris the name of the Kafka MirrorMaker 2.0 cluster.READYshows the number of replicas that are ready/expected. The deployment is successful when theAVAILABLEoutput shows1.
Additional resources
6.6. Deploying Kafka Bridge
The Cluster Operator deploys one or more Kafka bridge replicas to send data between Kafka clusters and clients via HTTP API.
6.6.1. Deploying Kafka Bridge to your OpenShift cluster
This procedure shows how to deploy a Kafka Bridge cluster to your OpenShift cluster using the Cluster Operator.
The deployment uses a YAML file to provide the specification to create a KafkaBridge resource.
AMQ Streams provides example configuration files. In this procedure, we use the following example file:
-
examples/bridge/kafka-bridge.yaml
Prerequisites
Procedure
Deploy Kafka Bridge to your OpenShift cluster:
oc apply -f examples/bridge/kafka-bridge.yaml
Check the status of the deployment:
oc get deployments -n <my_cluster_operator_namespace>Output shows the deployment name and readiness
NAME              READY  UP-TO-DATE  AVAILABLE
my-bridge-bridge  1/1    1           1
my-bridgeis the name of the Kafka Bridge cluster.READYshows the number of replicas that are ready/expected. The deployment is successful when theAVAILABLEoutput shows1.
Additional resources
6.6.2. Exposing the Kafka Bridge service to your local machine
Use port forwarding to expose the AMQ Streams Kafka Bridge service to your local machine on http://localhost:8080.
Port forwarding is only suitable for development and testing purposes.
Procedure
List the names of the pods in your OpenShift cluster:
oc get pods -o name

pod/kafka-consumer
# ...
pod/my-bridge-bridge-7cbd55496b-nclrt
Connect to the Kafka Bridge pod on port
8080:oc port-forward pod/my-bridge-bridge-7cbd55496b-nclrt 8080:8080 &
NoteIf port 8080 on your local machine is already in use, use an alternative HTTP port, such as
8008.
API requests are now forwarded from port 8080 on your local machine to port 8080 in the Kafka Bridge pod.
6.6.3. Accessing the Kafka Bridge outside of OpenShift
After deployment, the AMQ Streams Kafka Bridge can only be accessed by applications running in the same OpenShift cluster. These applications use the <kafka_bridge_name>-bridge-service service to access the API.
If you want to make the Kafka Bridge accessible to applications running outside of the OpenShift cluster, you can expose it manually by creating one of the following features:
-
LoadBalancerorNodePorttype services -
Ingressresources - OpenShift routes
If you decide to create Services, use the labels from the selector of the <kafka_bridge_name>-bridge-service service to configure the pods to which the service will route the traffic:
  # ...
  selector:
    strimzi.io/cluster: kafka-bridge-name 1
    strimzi.io/kind: KafkaBridge
#...- 1
- Name of the Kafka Bridge custom resource in your OpenShift cluster.
6.7. Alternative standalone deployment options for AMQ Streams operators
You can perform a standalone deployment of the Topic Operator and User Operator. Consider a standalone deployment of these operators if you are using a Kafka cluster that is not managed by the Cluster Operator.
You deploy the operators to OpenShift. Kafka can be running outside of OpenShift. For example, you might be using a Kafka as a managed service. You adjust the deployment configuration for the standalone operator to match the address of your Kafka cluster.
6.7.1. Deploying the standalone Topic Operator
This procedure shows how to deploy the Topic Operator as a standalone component for topic management. You can use a standalone Topic Operator with a Kafka cluster that is not managed by the Cluster Operator.
A standalone deployment can operate with any Kafka cluster.
Standalone deployment files are provided with AMQ Streams. Use the 05-Deployment-strimzi-topic-operator.yaml deployment file to deploy the Topic Operator. Add or set the environment variables needed to make a connection to a Kafka cluster.
The Topic Operator watches for KafkaTopic resources in a single namespace. You specify the namespace to watch, and the connection to the Kafka cluster, in the Topic Operator configuration. A single Topic Operator can watch a single namespace. One namespace should be watched by only one Topic Operator. If you want to use more than one Topic Operator, configure each of them to watch different namespaces. In this way, you can use Topic Operators with multiple Kafka clusters.
Prerequisites
You are running a Kafka cluster for the Topic Operator to connect to.
As long as the standalone Topic Operator is correctly configured for connection, the Kafka cluster can be running on a bare-metal environment, a virtual machine, or as a managed cloud application service.
Procedure
Edit the
envproperties in theinstall/topic-operator/05-Deployment-strimzi-topic-operator.yamlstandalone deployment file.Example standalone Topic Operator deployment configuration
apiVersion: apps/v1 kind: Deployment metadata: name: strimzi-topic-operator labels: app: strimzi spec: # ... template: # ... spec: # ... containers: - name: strimzi-topic-operator # ... env: - name: STRIMZI_NAMESPACE 1 valueFrom: fieldRef: fieldPath: metadata.namespace - name: STRIMZI_KAFKA_BOOTSTRAP_SERVERS 2 value: my-kafka-bootstrap-address:9092 - name: STRIMZI_RESOURCE_LABELS 3 value: "strimzi.io/cluster=my-cluster" - name: STRIMZI_ZOOKEEPER_CONNECT 4 value: my-cluster-zookeeper-client:2181 - name: STRIMZI_ZOOKEEPER_SESSION_TIMEOUT_MS 5 value: "18000" - name: STRIMZI_FULL_RECONCILIATION_INTERVAL_MS 6 value: "120000" - name: STRIMZI_TOPIC_METADATA_MAX_ATTEMPTS 7 value: "6" - name: STRIMZI_LOG_LEVEL 8 value: INFO - name: STRIMZI_TLS_ENABLED 9 value: "false" - name: STRIMZI_JAVA_OPTS 10 value: "-Xmx=512M -Xms=256M" - name: STRIMZI_JAVA_SYSTEM_PROPERTIES 11 value: "-Djavax.net.debug=verbose -DpropertyName=value" - name: STRIMZI_PUBLIC_CA 12 value: "false" - name: STRIMZI_TLS_AUTH_ENABLED 13 value: "false" - name: STRIMZI_SASL_ENABLED 14 value: "false" - name: STRIMZI_SASL_USERNAME 15 value: "admin" - name: STRIMZI_SASL_PASSWORD 16 value: "password" - name: STRIMZI_SASL_MECHANISM 17 value: "scram-sha-512" - name: STRIMZI_SECURITY_PROTOCOL 18 value: "SSL"- 1
- The OpenShift namespace for the Topic Operator to watch for
KafkaTopicresources. Specify the namespace of the Kafka cluster. - 2
- The host and port pair of the bootstrap broker address to discover and connect to all brokers in the Kafka cluster. Use a comma-separated list to specify two or three broker addresses in case a server is down.
- 3
- The label to identify the
KafkaTopicresources managed by the Topic Operator. This does not have to be the name of the Kafka cluster. It can be the label assigned to theKafkaTopicresource. If you deploy more than one Topic Operator, the labels must be unique for each. That is, the operators cannot manage the same resources. - 4
- The host and port pair of the address to connect to the ZooKeeper cluster. This must be the same ZooKeeper cluster that your Kafka cluster is using.
- 5
- The ZooKeeper session timeout, in milliseconds. The default is
18000(18 seconds). - 6
- The interval between periodic reconciliations, in milliseconds. The default is
120000(2 minutes). - 7
- The number of attempts at getting topic metadata from Kafka. The time between each attempt is defined as an exponential backoff. Consider increasing this value when topic creation takes more time due to the number of partitions or replicas. The default is
6attempts. - 8
- The level for printing logging messages. You can set the level to
ERROR,WARNING,INFO,DEBUG, orTRACE. - 9
- Enables TLS support for encrypted communication with the Kafka brokers.
- 10
- (Optional) The Java options used by the JVM running the Topic Operator.
- 11
- (Optional) The debugging (
-D) options set for the Topic Operator. - 12
- (Optional) Skips the generation of trust store certificates if TLS is enabled through
STRIMZI_TLS_ENABLED. If this environment variable is enabled, the brokers must use a public trusted certificate authority for their TLS certificates. The default isfalse. - 13
- (Optional) Generates key store certificates for mTLS authentication. Setting this to
falsedisables client authentication with mTLS to the Kafka brokers. The default istrue. - 14
- (Optional) Enables SASL support for client authentication when connecting to Kafka brokers. The default is
false. - 15
- (Optional) The SASL username for client authentication. Mandatory only if SASL is enabled through
STRIMZI_SASL_ENABLED. - 16
- (Optional) The SASL password for client authentication. Mandatory only if SASL is enabled through
STRIMZI_SASL_ENABLED. - 17
- (Optional) The SASL mechanism for client authentication. Mandatory only if SASL is enabled through
STRIMZI_SASL_ENABLED. You can set the value toplain,scram-sha-256, orscram-sha-512. - 18
- (Optional) The security protocol used for communication with Kafka brokers. The default value is "PLAINTEXT". You can set the value to
PLAINTEXT,SSL,SASL_PLAINTEXT, orSASL_SSL.
-
If you want to connect to Kafka brokers that are using certificates from a public certificate authority, set
STRIMZI_PUBLIC_CAtotrue. Set this property totrue, for example, if you are using Amazon AWS MSK service. If you enabled mTLS with the
STRIMZI_TLS_ENABLEDenvironment variable, specify the keystore and truststore used to authenticate connection to the Kafka cluster.Example mTLS configuration
# ....
env:
  - name: STRIMZI_TRUSTSTORE_LOCATION 1
    value: "/path/to/truststore.p12"
  - name: STRIMZI_TRUSTSTORE_PASSWORD 2
    value: "TRUSTSTORE-PASSWORD"
  - name: STRIMZI_KEYSTORE_LOCATION 3
    value: "/path/to/keystore.p12"
  - name: STRIMZI_KEYSTORE_PASSWORD 4
    value: "KEYSTORE-PASSWORD"
# ...
Deploy the Topic Operator.
oc create -f install/topic-operator
Check the status of the deployment:
oc get deployments
Output shows the deployment name and readiness
NAME                    READY  UP-TO-DATE  AVAILABLE
strimzi-topic-operator  1/1    1           1
READYshows the number of replicas that are ready/expected. The deployment is successful when theAVAILABLEoutput shows1.
6.7.2. Deploying the standalone User Operator
This procedure shows how to deploy the User Operator as a standalone component for user management. You can use a standalone User Operator with a Kafka cluster that is not managed by the Cluster Operator.
A standalone deployment can operate with any Kafka cluster.
Standalone deployment files are provided with AMQ Streams. Use the 05-Deployment-strimzi-user-operator.yaml deployment file to deploy the User Operator. Add or set the environment variables needed to make a connection to a Kafka cluster.
The User Operator watches for KafkaUser resources in a single namespace. You specify the namespace to watch, and the connection to the Kafka cluster, in the User Operator configuration. A single User Operator can watch a single namespace. One namespace should be watched by only one User Operator. If you want to use more than one User Operator, configure each of them to watch different namespaces. In this way, you can use the User Operator with multiple Kafka clusters.
Prerequisites
You are running a Kafka cluster for the User Operator to connect to.
As long as the standalone User Operator is correctly configured for connection, the Kafka cluster can be running on a bare-metal environment, a virtual machine, or as a managed cloud application service.
Procedure
Edit the following
envproperties in theinstall/user-operator/05-Deployment-strimzi-user-operator.yamlstandalone deployment file.Example standalone User Operator deployment configuration
apiVersion: apps/v1 kind: Deployment metadata: name: strimzi-user-operator labels: app: strimzi spec: # ... template: # ... spec: # ... containers: - name: strimzi-user-operator # ... env: - name: STRIMZI_NAMESPACE 1 valueFrom: fieldRef: fieldPath: metadata.namespace - name: STRIMZI_KAFKA_BOOTSTRAP_SERVERS 2 value: my-kafka-bootstrap-address:9092 - name: STRIMZI_CA_CERT_NAME 3 value: my-cluster-clients-ca-cert - name: STRIMZI_CA_KEY_NAME 4 value: my-cluster-clients-ca - name: STRIMZI_LABELS 5 value: "strimzi.io/cluster=my-cluster" - name: STRIMZI_FULL_RECONCILIATION_INTERVAL_MS 6 value: "120000" - name: STRIMZI_WORK_QUEUE_SIZE 7 value: 10000 - name: STRIMZI_CONTROLLER_THREAD_POOL_SIZE 8 value: 10 - name: STRIMZI_LOG_LEVEL 9 value: INFO - name: STRIMZI_GC_LOG_ENABLED 10 value: "true" - name: STRIMZI_CA_VALIDITY 11 value: "365" - name: STRIMZI_CA_RENEWAL 12 value: "30" - name: STRIMZI_JAVA_OPTS 13 value: "-Xmx=512M -Xms=256M" - name: STRIMZI_JAVA_SYSTEM_PROPERTIES 14 value: "-Djavax.net.debug=verbose -DpropertyName=value" - name: STRIMZI_SECRET_PREFIX 15 value: "kafka-" - name: STRIMZI_ACLS_ADMIN_API_SUPPORTED 16 value: "true" - name: STRIMZI_MAINTENANCE_TIME_WINDOWS 17 value: '* * 8-10 * * ?;* * 14-15 * * ?' - name: STRIMZI_KAFKA_ADMIN_CLIENT_CONFIGURATION 18 value: | default.api.timeout.ms=120000 request.timeout.ms=60000- 1
- The OpenShift namespace for the User Operator to watch for
KafkaUserresources. Only one namespace can be specified. - 2
- The host and port pair of the bootstrap broker address to discover and connect to all brokers in the Kafka cluster. Use a comma-separated list to specify two or three broker addresses in case a server is down.
- 3
- The OpenShift
Secretthat contains the public key (ca.crt) value of the Certificate Authority that signs new user certificates for mTLS authentication. - 4
- The OpenShift
Secretthat contains the private key (ca.key) value of the Certificate Authority that signs new user certificates for mTLS authentication. - 5
- The label to identify the
KafkaUserresources managed by the User Operator. This does not have to be the name of the Kafka cluster. It can be the label assigned to theKafkaUserresource. If you deploy more than one User Operator, the labels must be unique for each. That is, the operators cannot manage the same resources. - 6
- The interval between periodic reconciliations, in milliseconds. The default is
120000(2 minutes). - 7
- The size of the controller event queue. The size of the queue should be at least as big as the maximal amount of users you expect the User Operator to operate. The default is
1024. - 8
- The size of the worker pool for reconciling the users. Bigger pool might require more resources, but it will also handle more
KafkaUserresources The default is50. - 9
- The level for printing logging messages. You can set the level to
ERROR,WARNING,INFO,DEBUG, orTRACE. - 10
- Enables garbage collection (GC) logging. The default is
true. - 11
- The validity period for the Certificate Authority. The default is
365days. - 12
- The renewal period for the Certificate Authority. The renewal period is measured backwards from the expiry date of the current certificate. The default is
30days to initiate certificate renewal before the old certificates expire. - 13
- (Optional) The Java options used by the JVM running the User Operator
- 14
- (Optional) The debugging (
-D) options set for the User Operator - 15
- (Optional) Prefix for the names of OpenShift secrets created by the User Operator.
- 16
- (Optional) Indicates whether the Kafka cluster supports management of authorization ACL rules using the Kafka Admin API. When set to
false, the User Operator will reject all resources withsimpleauthorization ACL rules. This helps to avoid unnecessary exceptions in the Kafka cluster logs. The default istrue. - 17
- (Optional) Semi-colon separated list of Cron Expressions defining the maintenance time windows during which the expiring user certificates will be renewed.
- 18
- (Optional) Configuration options for configuring the Kafka Admin client used by the User Operator in the properties format.
If you are using mTLS to connect to the Kafka cluster, specify the secrets used to authenticate connection. Otherwise, go to the next step.
Example mTLS configuration
# ....
env:
  - name: STRIMZI_CLUSTER_CA_CERT_SECRET_NAME 1
    value: my-cluster-cluster-ca-cert
  - name: STRIMZI_EO_KEY_SECRET_NAME 2
    value: my-cluster-entity-operator-certs
# ..."
- 1
- The OpenShift
Secretthat contains the public key (ca.crt) value of the CA that signs Kafka broker certificates. - 2
- The OpenShift
Secretthat contains the keystore (entity-operator.p12) with the private key and certificate for mTLS authentication against the Kafka cluster. TheSecretmust also contain the password (entity-operator.password) for accessing the keystore.
Deploy the User Operator.
oc create -f install/user-operator
Check the status of the deployment:
oc get deployments
Output shows the deployment name and readiness
NAME                   READY  UP-TO-DATE  AVAILABLE
strimzi-user-operator  1/1    1           1
READYshows the number of replicas that are ready/expected. The deployment is successful when theAVAILABLEoutput shows1.
Chapter 7. Setting up client access to a Kafka cluster
After you have deployed AMQ Streams, the procedures in this section explain how to:
- Deploy example producer and consumer clients, which you can use to verify your deployment
Set up client access to a Kafka cluster using listeners
The steps to set up access to the Kafka cluster for a client outside OpenShift are more complex, and require familiarity with the Kafka component configuration procedures.
7.1. Deploying example clients
This procedure shows how to deploy example producer and consumer clients that use the Kafka cluster you created to send and receive messages.
Prerequisites
- The Kafka cluster is available for the clients.
Procedure
Deploy a Kafka producer.
oc run kafka-producer -ti --image=registry.redhat.io/amq7/amq-streams-kafka-33-rhel8:2.3.0 --rm=true --restart=Never -- bin/kafka-console-producer.sh --bootstrap-server cluster-name-kafka-bootstrap:9092 --topic my-topic
- Type a message into the console where the producer is running.
- Press Enter to send the message.
Deploy a Kafka consumer.
oc run kafka-consumer -ti --image=registry.redhat.io/amq7/amq-streams-kafka-33-rhel8:2.3.0 --rm=true --restart=Never -- bin/kafka-console-consumer.sh --bootstrap-server cluster-name-kafka-bootstrap:9092 --topic my-topic --from-beginning
- Confirm that you see the incoming messages in the consumer console.
7.2. Setting up client access to a Kafka cluster using listeners
Using the address of the Kafka cluster, you can provide access to a client in the same OpenShift cluster; or provide external access to a client on a different OpenShift namespace or outside OpenShift entirely. This procedure shows how to configure client access to a Kafka cluster from outside OpenShift or from another OpenShift cluster.
Kafka listeners provide access. The following listener types are supported:
-
internalto connect within the same OpenShift cluster -
routeto use OpenShiftRouteand the default HAProxy router -
loadbalancerto use loadbalancer services -
nodeportto use ports on OpenShift nodes -
ingressto use OpenShift Ingress and the Ingress NGINX Controller for Kubernetes -
cluster-ipto expose Kafka using per-brokerClusterIPservices
The type chosen depends on your requirements, and your environment and infrastructure. For example, loadbalancers might not be suitable for certain infrastructure, such as bare metal, where node ports provide a better option.
In this procedure:
-
An external listener is configured for the Kafka cluster, with TLS encryption and mTLS authentication, and Kafka
simpleauthorization enabled. -
A
KafkaUseris created for the client, with mTLS authentication, and Access Control Lists (ACLs) defined forsimpleauthorization.
You can configure your listener to use mutual tls, scram-sha-512, or oauth authentication. mTLS always uses encryption, but encryption is also recommended when using SCRAM-SHA-512 and OAuth 2.0 authentication.
You can configure simple, oauth, opa, or custom authorization for Kafka brokers. When enabled, authorization is applied to all enabled listeners.
When you configure the KafkaUser authentication and authorization mechanisms, ensure they match the equivalent Kafka configuration:
-
KafkaUser.spec.authenticationmatchesKafka.spec.kafka.listeners[*].authentication -
KafkaUser.spec.authorizationmatchesKafka.spec.kafka.authorization
You should have at least one listener supporting the authentication you want to use for the KafkaUser.
Authentication between Kafka users and Kafka brokers depends on the authentication settings for each. For example, it is not possible to authenticate a user with mTLS if it is not also enabled in the Kafka configuration.
AMQ Streams operators automate the configuration process and create the certificates required for authentication:
- The Cluster Operator creates the listeners and sets up the cluster and client certificate authority (CA) certificates to enable authentication with the Kafka cluster.
- The User Operator creates the user representing the client and the security credentials used for client authentication, based on the chosen authentication type.
You add the certificates to your client configuration.
In this procedure, the CA certificates generated by the Cluster Operator are used, but you can replace them by installing your own certificates. You can also configure your listener to use a Kafka listener certificate managed by an external CA (certificate authority).
Certificates are available in PEM (.crt) and PKCS #12 (.p12) formats. This procedure uses PEM certificates. Use PEM certificates with clients that use certificates in X.509 format.
For internal clients in the same OpenShift cluster and namespace, you can mount the cluster CA certificate in the pod specification. For more information, see Configuring internal clients to trust the cluster CA.
Prerequisites
- The Kafka cluster is available for connection by a client running outside the OpenShift cluster
- The Cluster Operator and User Operator are running in the cluster
Procedure
Configure the Kafka cluster with a Kafka listener.
- Define the authentication required to access the Kafka broker through the listener.
Enable authorization on the Kafka broker.
Example listener configuration
apiVersion: kafka.strimzi.io/v1beta2 kind: Kafka metadata: name: my-cluster namespace: myproject spec: kafka: # ... listeners: 1 - name: external 2 port: 9094 3 type: <listener_type> 4 tls: true 5 authentication: type: tls 6 configuration: 7 #... authorization: 8 type: simple superUsers: - super-user-name 9 # ...- 1
- Configuration options for enabling external listeners are described in the Generic Kafka listener schema reference.
- 2
- Name to identify the listener. Must be unique within the Kafka cluster.
- 3
- Port number used by the listener inside Kafka. The port number has to be unique within a given Kafka cluster. Allowed port numbers are 9092 and higher with the exception of ports 9404 and 9999, which are already used for Prometheus and JMX. Depending on the listener type, the port number might not be the same as the port number that connects Kafka clients.
- 4
- External listener type specified as
route,loadbalancer,nodeportoringress. An internal listener is specified asinternalorcluster-ip. - 5
- Required. TLS encryption on the listener. For
routeandingresstype listeners it must be set totrue. For mTLS authentication, also use theauthenticationproperty. - 6
- Client authentication mechanism on the listener. For server and client authentication using mTLS, you specify
tls: trueandauthentication.type: tls. - 7
- (Optional) Depending on the requirements of the listener type, you can specify additional listener configuration.
- 8
- Authorization specified as
simple, which uses theAclAuthorizerKafka plugin. - 9
- (Optional) Super users can access all brokers regardless of any access restrictions defined in ACLs.
WarningAn OpenShift Route address comprises the name of the Kafka cluster, the name of the listener, and the name of the namespace it is created in. For example,
my-cluster-kafka-listener1-bootstrap-myproject(CLUSTER-NAME-kafka-LISTENER-NAME-bootstrap-NAMESPACE). If you are using aroutelistener type, be careful that the whole length of the address does not exceed a maximum limit of 63 characters.
Create or update the
Kafkaresource.oc apply -f <kafka_configuration_file>The Kafka cluster is configured with a Kafka broker listener using mTLS authentication.
A service is created for each Kafka broker pod.
A service is created to serve as the bootstrap address for connection to the Kafka cluster.
A service is also created as the external bootstrap address for external connection to the Kafka cluster using
nodeportlisteners.The cluster CA certificate to verify the identity of the kafka brokers is also created in the secret
<cluster_name>-cluster-ca-cert.NoteIf you scale your Kafka cluster while using external listeners, it might trigger a rolling update of all Kafka brokers. This depends on the configuration.
Retrieve the bootstrap address you can use to access the Kafka cluster from the status of the
Kafkaresource.oc get kafka <kafka_cluster_name> -o=jsonpath='{.status.listeners[?(@.name=="<listener_name>")].bootstrapServers}{"\n"}'
For example:
oc get kafka my-cluster -o=jsonpath='{.status.listeners[?(@.name=="external")].bootstrapServers}{"\n"}'Use the bootstrap address in your Kafka client to connect to the Kafka cluster.
Create or modify a user representing the client that requires access to the Kafka cluster.
-
Specify the same authentication type as the
Kafkalistener. Specify the authorization ACLs for
simpleauthorization.Example user configuration
apiVersion: kafka.strimzi.io/v1beta2
kind: KafkaUser
metadata:
  name: my-user
  labels:
    strimzi.io/cluster: my-cluster 1
spec:
  authentication:
    type: tls 2
  authorization:
    type: simple
    acls: 3
      - resource:
          type: topic
          name: my-topic
          patternType: literal
        operations:
          - Describe
          - Read
      - resource:
          type: group
          name: my-group
          patternType: literal
        operations:
          - Read
-
Specify the same authentication type as the
Create or modify the
KafkaUserresource.oc apply -f USER-CONFIG-FILEThe user is created, as well as a secret with the same name as the
KafkaUserresource. The secret contains a public and private key for mTLS authentication.Example secret
apiVersion: v1
kind: Secret
metadata:
  name: my-user
  labels:
    strimzi.io/kind: KafkaUser
    strimzi.io/cluster: my-cluster
type: Opaque
data:
  ca.crt: <public_key> # Public key of the clients CA
  user.crt: <user_certificate> # Public key of the user
  user.key: <user_private_key> # Private key of the user
  user.p12: <store> # PKCS #12 store for user certificates and keys
  user.password: <password_for_store> # Protects the PKCS #12 store
Extract the cluster CA certificate from the
<cluster_name>-cluster-ca-certsecret of the Kafka cluster.oc get secret <cluster_name>-cluster-ca-cert -o jsonpath='{.data.ca\.crt}' | base64 -d > ca.crtExtract the user CA certificate from the
<user_name>secret.oc get secret <user_name> -o jsonpath='{.data.user\.crt}' | base64 -d > user.crtExtract the private key of the user from the
<user_name>secret.oc get secret <user_name> -o jsonpath='{.data.user\.key}' | base64 -d > user.keyConfigure your client with the bootstrap address hostname and port for connecting to the Kafka cluster:
props.put(ConsumerConfig.BOOTSTRAP_SERVERS_CONFIG, "<hostname>:<port>");Configure your client with the truststore credentials to verify the identity of the Kafka cluster.
Specify the public cluster CA certificate.
Example truststore configuration
props.put(CommonClientConfigs.SECURITY_PROTOCOL_CONFIG, "SSL");
props.put(SslConfigs.SSL_TRUSTSTORE_TYPE_CONFIG, "PEM");
props.put(SslConfigs.SSL_TRUSTSTORE_CERTIFICATES_CONFIG, "<ca.crt_file_content>");
SSL is the specified security protocol for mTLS authentication. Specify
SASL_SSLfor SCRAM-SHA-512 authentication over TLS. PEM is the file format of the truststore.Configure your client with the keystore credentials to verify the user when connecting to the Kafka cluster.
Specify the public certificate and private key.
Example keystore configuration
props.put(CommonClientConfigs.SECURITY_PROTOCOL_CONFIG, "SSL");
props.put(SslConfigs.SSL_KEYSTORE_TYPE_CONFIG, "PEM");
props.put(SslConfigs.SSL_KEYSTORE_CERTIFICATE_CHAIN_CONFIG, "<user.crt_file_content>");
props.put(SslConfigs.SSL_KEYSTORE_KEY_CONFIG, "<user.key_file_content>");
Add the keystore certificate and the private key directly to the configuration. Add as a single-line format. Between the
BEGIN CERTIFICATEandEND CERTIFICATEdelimiters, start with a newline character (\n). End each line from the original certificate with\ntoo.Example keystore configuration
props.put(SslConfigs.SSL_KEYSTORE_CERTIFICATE_CHAIN_CONFIG, "-----BEGIN CERTIFICATE----- \n<user_certificate_content_line_1>\n<user_certificate_content_line_n>\n-----END CERTIFICATE---");
props.put(SslConfigs.SSL_KEYSTORE_KEY_CONFIG, "----BEGIN PRIVATE KEY-----\n<user_key_content_line_1>\n<user_key_content_line_n>\n-----END PRIVATE KEY-----");
Additional resources
- Listener authentication options
- Kafka authorization options
- If you are using an authorization server, you can use token-based OAuth 2.0 authentication and OAuth 2.0 authorization.
Chapter 8. Setting up metrics and dashboards for AMQ Streams
You can use Prometheus and Grafana to monitor your AMQ Streams deployment.
You can monitor your AMQ Streams deployment by viewing key metrics on dashboards and setting up alerts that trigger under certain conditions. Metrics are available for each of the components of AMQ Streams.
You can also collect metrics specific to oauth authentication and opa or keycloak authorization. You do this by setting the enableMetrics property to true in the listener configuration of the Kafka resource. For example, set enableMetrics to true in spec.kafka.listeners.authentication and spec.kafka.authorization. Similarly, you can enable metrics for oauth authentication in the KafkaBridge, KafkaConnect, KafkaMirrorMaker, and KafkaMirrorMaker2 custom resources.
To provide metrics information, AMQ Streams uses Prometheus rules and Grafana dashboards.
When configured with a set of rules for each component of AMQ Streams, Prometheus consumes key metrics from the pods that are running in your cluster. Grafana then visualizes those metrics on dashboards. AMQ Streams includes example Grafana dashboards that you can customize to suit your deployment.
AMQ Streams employs monitoring for user-defined projects (an OpenShift feature) to simplify the Prometheus setup process.
Depending on your requirements, you can:
With Prometheus and Grafana set up, you can use the example Grafana dashboards provided by AMQ Streams for monitoring.
Additionally, you can configure your deployment to track messages end-to-end by setting up distributed tracing.
AMQ Streams provides example installation files for Prometheus and Grafana. You can use these files as a starting point when trying out monitoring of AMQ Streams. For further support, try engaging with the Prometheus and Grafana developer communities.
Supporting documentation for metrics and monitoring tools
For more information on the metrics and monitoring tools, refer to the supporting documentation:
- Prometheus
- Prometheus configuration
- Kafka Exporter
- Grafana Labs
- Apache Kafka Monitoring describes JMX metrics exposed by Apache Kafka
- ZooKeeper JMX describes JMX metrics exposed by Apache ZooKeeper
8.1. Monitoring consumer lag with Kafka Exporter
Kafka Exporter is an open source project to enhance monitoring of Apache Kafka brokers and clients. You can configure the Kafka resource to deploy Kafka Exporter with your Kafka cluster. Kafka Exporter extracts additional metrics data from Kafka brokers related to offsets, consumer groups, consumer lag, and topics. The metrics data is used, for example, to help identify slow consumers. Lag data is exposed as Prometheus metrics, which can then be presented in Grafana for analysis.
Kafka Exporter reads from the __consumer_offsets topic, which stores information on committed offsets for consumer groups. For Kafka Exporter to be able to work properly, consumer groups needs to be in use.
A Grafana dashboard for Kafka Exporter is one of a number of example Grafana dashboards provided by AMQ Streams.
Kafka Exporter provides only additional metrics related to consumer lag and consumer offsets. For regular Kafka metrics, you have to configure the Prometheus metrics in Kafka brokers.
Consumer lag indicates the difference in the rate of production and consumption of messages. Specifically, consumer lag for a given consumer group indicates the delay between the last message in the partition and the message being currently picked up by that consumer.
The lag reflects the position of the consumer offset in relation to the end of the partition log.
Consumer lag between the producer and consumer offset
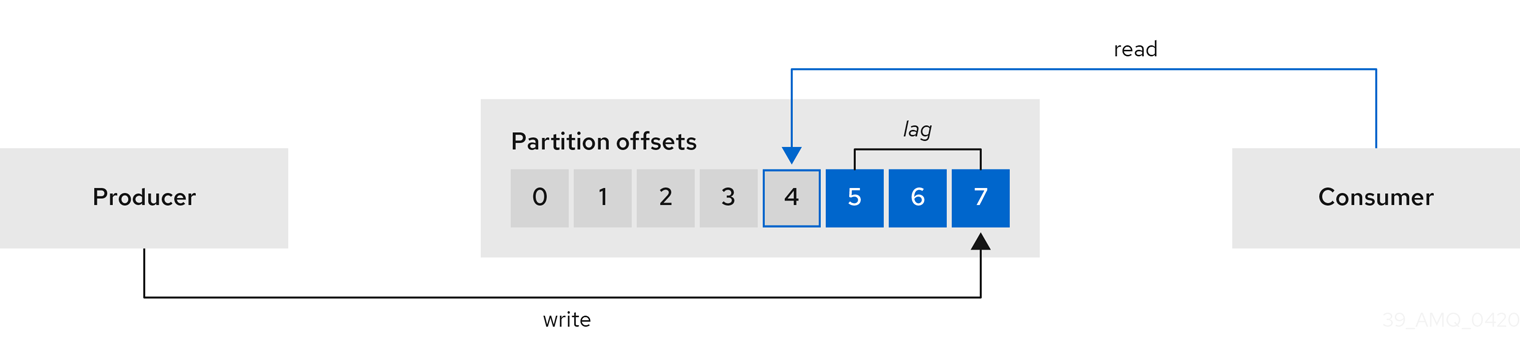
This difference is sometimes referred to as the delta between the producer offset and consumer offset: the read and write positions in the Kafka broker topic partitions.
Suppose a topic streams 100 messages a second. A lag of 1000 messages between the producer offset (the topic partition head) and the last offset the consumer has read means a 10-second delay.
The importance of monitoring consumer lag
For applications that rely on the processing of (near) real-time data, it is critical to monitor consumer lag to check that it does not become too big. The greater the lag becomes, the further the process moves from the real-time processing objective.
Consumer lag, for example, might be a result of consuming too much old data that has not been purged, or through unplanned shutdowns.
Reducing consumer lag
Use the Grafana charts to analyze lag and to check if actions to reduce lag are having an impact on an affected consumer group. If, for example, Kafka brokers are adjusted to reduce lag, the dashboard will show the Lag by consumer group chart going down and the Messages consumed per minute chart going up.
Typical actions to reduce lag include:
- Scaling-up consumer groups by adding new consumers
- Increasing the retention time for a message to remain in a topic
- Adding more disk capacity to increase the message buffer
Actions to reduce consumer lag depend on the underlying infrastructure and the use cases AMQ Streams is supporting. For instance, a lagging consumer is less likely to benefit from the broker being able to service a fetch request from its disk cache. And in certain cases, it might be acceptable to automatically drop messages until a consumer has caught up.
8.2. Monitoring Cruise Control operations
Cruise Control monitors Kafka brokers in order to track the utilization of brokers, topics, and partitions. Cruise Control also provides a set of metrics for monitoring its own performance.
The Cruise Control metrics reporter collects raw metrics data from Kafka brokers. The data is produced to topics that are automatically created by Cruise Control. The metrics are used to generate optimization proposals for Kafka clusters.
Cruise Control metrics are available for real-time monitoring of Cruise Control operations. For example, you can use Cruise Control metrics to monitor the status of rebalancing operations that are running or provide alerts on any anomalies that are detected in an operation’s performance.
You expose Cruise Control metrics by enabling the Prometheus JMX Exporter in the Cruise Control configuration.
For a full list of available Cruise Control metrics, which are known as sensors, see the Cruise Control documentation.
8.2.1. Exposing Cruise Control metrics
If you want to expose metrics on Cruise Control operations, configure the Kafka resource to deploy Cruise Control and enable Prometheus metrics in the deployment. You can use your own configuration or use the example kafka-cruise-control-metrics.yaml file provided by AMQ Streams.
You add the configuration to the metricsConfig of the CruiseControl property in the Kafka resource. The configuration enables the Prometheus JMX Exporter to expose Cruise Control metrics through an HTTP endpoint. The HTTP endpoint is scraped by the Prometheus server.
Example metrics configuration for Cruise Control
  apiVersion: kafka.strimzi.io/v1beta2
  kind: Kafka
  metadata:
    name: my-cluster
  Spec:
    # ...
    cruiseControl:
      # ...
      metricsConfig:
        type: jmxPrometheusExporter
        valueFrom:
          configMapKeyRef:
            name: cruise-control-metrics
            key: metrics-config.yml
  ---
  kind: ConfigMap
  apiVersion: v1
  metadata:
    name: cruise-control-metrics
    labels:
      app: strimzi
  data:
    metrics-config.yml: |
    # metrics configuration...
8.2.2. Viewing Cruise Control metrics
After you expose the Cruise Control metrics, you can use Prometheus or another suitable monitoring system to view information on the metrics data. AMQ Streams provides an example Grafana dashboard to display visualizations of Cruise Control metrics. The dashboard is a JSON file called strimzi-cruise-control.json. The exposed metrics provide the monitoring data when you enable the Grafana dashboard.
8.2.2.1. Monitoring balancedness scores
Cruise Control metrics include a balancedness score. Balancedness is the measure of how evenly a workload is distributed in a Kafka cluster.
The Cruise Control metric for balancedness score (balancedness-score) might differ from the balancedness score in the KafkaRebalance resource. Cruise Control calculates each score using anomaly.detection.goals which might not be the same as the default.goals used in the KafkaRebalance resource. The anomaly.detection.goals are specified in the spec.cruiseControl.config of the Kafka custom resource.
Refreshing the KafkaRebalance resource fetches an optimization proposal. The latest cached optimization proposal is fetched if one of the following conditions applies:
-
KafkaRebalance
goalsmatch the goals configured in thedefault.goalssection of theKafkaresource -
KafkaRebalance
goalsare not specified
Otherwise, Cruise Control generates a new optimization proposal based on KafkaRebalance goals. If new proposals are generated with each refresh, this can impact performance monitoring.
8.2.2.2. Alerts on anomaly detection
Cruise control’s anomaly detector provides metrics data for conditions that block the generation of optimization goals, such as broker failures. If you want more visibility, you can use the metrics provided by the anomaly detector to set up alerts and send out notifications. You can set up Cruise Control’s anomaly notifier to route alerts based on these metrics through a specified notification channel. Alternatively, you can set up Prometheus to scrape the metrics data provided by the anomaly detector and generate alerts. Prometheus Alertmanager can then route the alerts generated by Prometheus.
The Cruise Control documentation provides information on AnomalyDetector metrics and the anomaly notifier.
8.3. Example metrics files
You can find example Grafana dashboards and other metrics configuration files in the example configuration files provided by AMQ Streams.
Example metrics files provided with AMQ Streams
metrics
├── grafana-dashboards 1
│   ├── strimzi-cruise-control.json
│   ├── strimzi-kafka-bridge.json
│   ├── strimzi-kafka-connect.json
│   ├── strimzi-kafka-exporter.json
│   ├── strimzi-kafka-mirror-maker-2.json
│   ├── strimzi-kafka.json
│   ├── strimzi-operators.json
│   └── strimzi-zookeeper.json
├── grafana-install
│   └── grafana.yaml 2
├── prometheus-additional-properties
│   └── prometheus-additional.yaml 3
├── prometheus-alertmanager-config
│   └── alert-manager-config.yaml 4
├── prometheus-install
│    ├── alert-manager.yaml 5
│    ├── prometheus-rules.yaml 6
│    ├── prometheus.yaml 7
│    ├── strimzi-pod-monitor.yaml 8
├── kafka-bridge-metrics.yaml 9
├── kafka-connect-metrics.yaml 10
├── kafka-cruise-control-metrics.yaml 11
├── kafka-metrics.yaml 12
└── kafka-mirror-maker-2-metrics.yaml 13
- 1
- Example Grafana dashboards for the different AMQ Streams components.
- 2
- Installation file for the Grafana image.
- 3
- Additional configuration to scrape metrics for CPU, memory and disk volume usage, which comes directly from the OpenShift cAdvisor agent and kubelet on the nodes.
- 4
- Hook definitions for sending notifications through Alertmanager.
- 5
- Resources for deploying and configuring Alertmanager.
- 6
- Alerting rules examples for use with Prometheus Alertmanager (deployed with Prometheus).
- 7
- Installation resource file for the Prometheus image.
- 8
- PodMonitor definitions translated by the Prometheus Operator into jobs for the Prometheus server to be able to scrape metrics data directly from pods.
- 9
- Kafka Bridge resource with metrics enabled.
- 10
- Metrics configuration that defines Prometheus JMX Exporter relabeling rules for Kafka Connect.
- 11
- Metrics configuration that defines Prometheus JMX Exporter relabeling rules for Cruise Control.
- 12
- Metrics configuration that defines Prometheus JMX Exporter relabeling rules for Kafka and ZooKeeper.
- 13
- Metrics configuration that defines Prometheus JMX Exporter relabeling rules for Kafka Mirror Maker 2.0.
8.3.1. Example Prometheus metrics configuration
AMQ Streams uses the Prometheus JMX Exporter to expose metrics through an HTTP endpoint, which can be scraped by the Prometheus server.
Grafana dashboards are dependent on Prometheus JMX Exporter relabeling rules, which are defined for AMQ Streams components in the custom resource configuration.
A label is a name-value pair. Relabeling is the process of writing a label dynamically. For example, the value of a label may be derived from the name of a Kafka server and client ID.
AMQ Streams provides example custom resource configuration YAML files with relabeling rules. When deploying Prometheus metrics configuration, you can can deploy the example custom resource or copy the metrics configuration to your own custom resource definition.
Table 8.1. Example custom resources with metrics configuration
| Component | Custom resource | Example YAML file |
|---|---|---|
| Kafka and ZooKeeper |
|
|
| Kafka Connect |
|
|
| Kafka MirrorMaker 2.0 |
|
|
| Kafka Bridge |
|
|
| Cruise Control |
|
|
8.3.2. Example Prometheus rules for alert notifications
Example Prometheus rules for alert notifications are provided with the example metrics configuration files provided by AMQ Streams. The rules are specified in the example prometheus-rules.yaml file for use in a Prometheus deployment.
Alerting rules provide notifications about specific conditions observed in metrics. Rules are declared on the Prometheus server, but Prometheus Alertmanager is responsible for alert notifications.
Prometheus alerting rules describe conditions using PromQL expressions that are continuously evaluated.
When an alert expression becomes true, the condition is met and the Prometheus server sends alert data to the Alertmanager. Alertmanager then sends out a notification using the communication method configured for its deployment.
General points about the alerting rule definitions:
-
A
forproperty is used with the rules to determine the period of time a condition must persist before an alert is triggered. -
A tick is a basic ZooKeeper time unit, which is measured in milliseconds and configured using the
tickTimeparameter ofKafka.spec.zookeeper.config. For example, if ZooKeepertickTime=3000, 3 ticks (3 x 3000) equals 9000 milliseconds. -
The availability of the
ZookeeperRunningOutOfSpacemetric and alert is dependent on the OpenShift configuration and storage implementation used. Storage implementations for certain platforms may not be able to supply the information on available space required for the metric to provide an alert.
Alertmanager can be configured to use email, chat messages or other notification methods. Adapt the default configuration of the example rules according to your specific needs.
8.3.2.1. Example altering rules
The prometheus-rules.yaml file contains example rules for the following components:
- Kafka
- ZooKeeper
- Entity Operator
- Kafka Connect
- Kafka Bridge
- MirrorMaker
- Kafka Exporter
A description of each of the example rules is provided in the file.
8.3.3. Example Grafana dashboards
If you deploy Prometheus to provide metrics, you can use the example Grafana dashboards provided with AMQ Streams to monitor AMQ Streams components.
Example dashboards are provided in the examples/metrics/grafana-dashboards directory as JSON files.
All dashboards provide JVM metrics, as well as metrics specific to the component. For example, the Grafana dashboard for AMQ Streams operators provides information on the number of reconciliations or custom resources they are processing.
The example dashboards don’t show all the metrics supported by Kafka. The dashboards are populated with a representative set of metrics for monitoring.
Table 8.2. Example Grafana dashboard files
| Component | Example JSON file |
|---|---|
| AMQ Streams operators |
|
| Kafka |
|
| ZooKeeper |
|
| Kafka Connect |
|
| Kafka MirrorMaker 2.0 |
|
| Kafka Bridge |
|
| Cruise Control |
|
| Kafka Exporter |
|
When metrics are not available to the Kafka Exporter, because there is no traffic in the cluster yet, the Kafka Exporter Grafana dashboard will show N/A for numeric fields and No data to show for graphs.
8.4. Deploying Prometheus metrics configuration
Deploy Prometheus metrics configuration to use Prometheus with AMQ Streams. Use the metricsConfig property to enable and configure Prometheus metrics.
You can use your own configuration or the example custom resource configuration files provided with AMQ Streams.
-
kafka-metrics.yaml -
kafka-connect-metrics.yaml -
kafka-mirror-maker-2-metrics.yaml -
kafka-bridge-metrics.yaml -
kafka-cruise-control-metrics.yaml
The example configuration files have relabeling rules and the configuration required to enable Prometheus metrics. Prometheus scrapes metrics from target HTTP endpoints. The example files are a good way to try Prometheus with AMQ Streams.
To apply the relabeling rules and metrics configuration, do one of the following:
- Copy the example configuration to your own custom resources
- Deploy the custom resource with the metrics configuration
If you want to include Kafka Exporter metrics, add kafkaExporter configuration to your Kafka resource.
Kafka Exporter provides only additional metrics related to consumer lag and consumer offsets. For regular Kafka metrics, you have to configure the Prometheus metrics in Kafka brokers.
This procedure shows how to deploy Prometheus metrics configuration in the Kafka resource. The process is the same when using the example files for other resources.
Procedure
Deploy the example custom resource with the Prometheus configuration.
For example, for each
Kafkaresource you apply thekafka-metrics.yamlfile.Deploying the example configuration
oc apply -f kafka-metrics.yaml
Alternatively, you can copy the example configuration in
kafka-metrics.yamlto your ownKafkaresource.Copying the example configuration
oc edit kafka <kafka-configuration-file>Copy the
metricsConfigproperty and theConfigMapit references to yourKafkaresource.Example metrics configuration for Kafka
apiVersion: kafka.strimzi.io/v1beta2 kind: Kafka metadata: name: my-cluster spec: kafka: # ... metricsConfig: 1 type: jmxPrometheusExporter valueFrom: configMapKeyRef: name: kafka-metrics key: kafka-metrics-config.yml --- kind: ConfigMap 2 apiVersion: v1 metadata: name: kafka-metrics labels: app: strimzi data: kafka-metrics-config.yml: | # metrics configuration...NoteFor Kafka Bridge, you specify the
enableMetricsproperty and set it totrue.apiVersion: kafka.strimzi.io/v1beta2 kind: KafkaBridge metadata: name: my-bridge spec: # ... bootstrapServers: my-cluster-kafka:9092 http: # ... enableMetrics: true # ...To deploy Kafka Exporter, add
kafkaExporterconfiguration.kafkaExporterconfiguration is only specified in theKafkaresource.Example configuration for deploying Kafka Exporter
apiVersion: kafka.strimzi.io/v1beta2 kind: Kafka metadata: name: my-cluster spec: # ... kafkaExporter: image: my-registry.io/my-org/my-exporter-cluster:latest 1 groupRegex: ".*" 2 topicRegex: ".*" 3 resources: 4 requests: cpu: 200m memory: 64Mi limits: cpu: 500m memory: 128Mi logging: debug 5 enableSaramaLogging: true 6 template: 7 pod: metadata: labels: label1: value1 imagePullSecrets: - name: my-docker-credentials securityContext: runAsUser: 1000001 fsGroup: 0 terminationGracePeriodSeconds: 120 readinessProbe: 8 initialDelaySeconds: 15 timeoutSeconds: 5 livenessProbe: 9 initialDelaySeconds: 15 timeoutSeconds: 5 # ...- 1
- ADVANCED OPTION: Container image configuration, which is recommended only in special situations.
- 2
- A regular expression to specify the consumer groups to include in the metrics.
- 3
- A regular expression to specify the topics to include in the metrics.
- 4
- 5
- Logging configuration, to log messages with a given severity (debug, info, warn, error, fatal) or above.
- 6
- Boolean to enable Sarama logging, a Go client library used by Kafka Exporter.
- 7
- 8
- 9
For Kafka Exporter to be able to work properly, consumer groups need to be in use.
Additional resources
8.5. Viewing Kafka metrics and dashboards in OpenShift
When AMQ Streams is deployed to OpenShift Container Platform, metrics are provided through monitoring for user-defined projects. This OpenShift feature gives developers access to a separate Prometheus instance for monitoring their own projects (for example, a Kafka project).
If monitoring for user-defined projects is enabled, the openshift-user-workload-monitoring project contains the following components:
- A Prometheus Operator
- A Prometheus instance (automatically deployed by the Prometheus Operator)
- A Thanos Ruler instance
AMQ Streams uses these components to consume metrics.
A cluster administrator must enable monitoring for user-defined projects and then grant developers and other users permission to monitor applications within their own projects.
Grafana deployment
You can deploy a Grafana instance to the project containing your Kafka cluster. The example Grafana dashboards can then be used to visualize Prometheus metrics for AMQ Streams in the Grafana user interface.
The openshift-monitoring project provides monitoring for core platform components. Do not use the Prometheus and Grafana components in this project to configure monitoring for AMQ Streams on OpenShift Container Platform 4.x.
Procedure outline
To set up AMQ Streams monitoring in OpenShift Container Platform, follow these procedures in order:
8.5.1. Prerequisites
- You have deployed the Prometheus metrics configuration using the example YAML files.
-
Monitoring for user-defined projects is enabled. A cluster administrator has created a
cluster-monitoring-configconfig map in your OpenShift cluster. -
A cluster administrator has assigned you a
monitoring-rules-editormonitoring-editrole.
For more information on creating a cluster-monitoring-config config map and granting users permission to monitor user-defined projects, see OpenShift Container Platform Monitoring.
8.5.2. Additional resources
- OpenShift Container Platform Monitoring
8.5.3. Deploying the Prometheus resources
Use Prometheus to obtain monitoring data in your Kafka cluster.
You can use your own Prometheus deployment or deploy Prometheus using the example metrics configuration files provided by AMQ Streams. To use the example files, you configure and deploy the PodMonitor resources. The PodMonitors scrape data directly from pods for Apache Kafka, ZooKeeper, Operators, the Kafka Bridge, and Cruise Control.
Then, you deploy the example alerting rules for Alertmanager.
Prerequisites
- A running Kafka cluster.
- Check the example alerting rules provided with AMQ Streams.
Procedure
Check that monitoring for user-defined projects is enabled:
oc get pods -n openshift-user-workload-monitoring
If enabled, pods for the monitoring components are returned. For example:
NAME                                   READY   STATUS    RESTARTS   AGE
prometheus-operator-5cc59f9bc6-kgcq8   1/1     Running   0          25s
prometheus-user-workload-0             5/5     Running   1          14s
prometheus-user-workload-1             5/5     Running   1          14s
thanos-ruler-user-workload-0           3/3     Running   0          14s
thanos-ruler-user-workload-1           3/3     Running   0          14s
If no pods are returned, monitoring for user-defined projects is disabled. See the Prerequisites in Section 8.5, “Viewing Kafka metrics and dashboards in OpenShift”.
Multiple
PodMonitorresources are defined inexamples/metrics/prometheus-install/strimzi-pod-monitor.yaml.For each
PodMonitorresource, edit thespec.namespaceSelector.matchNamesproperty:apiVersion: monitoring.coreos.com/v1 kind: PodMonitor metadata: name: cluster-operator-metrics labels: app: strimzi spec: selector: matchLabels: strimzi.io/kind: cluster-operator namespaceSelector: matchNames: - <project-name> 1 podMetricsEndpoints: - path: /metrics port: http # ...- 1
- The project where the pods to scrape the metrics from are running, for example,
Kafka.
Deploy the
strimzi-pod-monitor.yamlfile to the project where your Kafka cluster is running:oc apply -f strimzi-pod-monitor.yaml -n MY-PROJECTDeploy the example Prometheus rules to the same project:
oc apply -f prometheus-rules.yaml -n MY-PROJECT
8.5.4. Creating a service account for Grafana
A Grafana instance for AMQ Streams needs to run with a service account that is assigned the cluster-monitoring-view role.
Create a service account if you are using Grafana to present metrics for monitoring.
Prerequisites
Procedure
Create a
ServiceAccountfor Grafana. Here the resource is namedgrafana-serviceaccount.apiVersion: v1 kind: ServiceAccount metadata: name: grafana-serviceaccount labels: app: strimziDeploy the
ServiceAccountto the project containing your Kafka cluster:oc apply -f GRAFANA-SERVICEACCOUNT -n MY-PROJECT
Create a
ClusterRoleBindingresource that assigns thecluster-monitoring-viewrole to the GrafanaServiceAccount. Here the resource is namedgrafana-cluster-monitoring-binding.apiVersion: rbac.authorization.k8s.io/v1 kind: ClusterRoleBinding metadata: name: grafana-cluster-monitoring-binding labels: app: strimzi subjects: - kind: ServiceAccount name: grafana-serviceaccount namespace: <my-project> 1 roleRef: kind: ClusterRole name: cluster-monitoring-view apiGroup: rbac.authorization.k8s.io- 1
- Name of your project.
Deploy the
ClusterRoleBindingto the project containing your Kafka cluster:oc apply -f <grafana-cluster-monitoring-binding> -n <my-project>
8.5.5. Deploying Grafana with a Prometheus datasource
Deploy Grafana to present Prometheus metrics. A Grafana application requires configuration for the OpenShift Container Platform monitoring stack.
OpenShift Container Platform includes a Thanos Querier instance in the openshift-monitoring project. Thanos Querier is used to aggregate platform metrics.
To consume the required platform metrics, your Grafana instance requires a Prometheus data source that can connect to Thanos Querier. To configure this connection, you create a config map that authenticates, by using a token, to the oauth-proxy sidecar that runs alongside Thanos Querier. A datasource.yaml file is used as the source of the config map.
Finally, you deploy the Grafana application with the config map mounted as a volume to the project containing your Kafka cluster.
Procedure
Get the access token of the Grafana
ServiceAccount:oc serviceaccounts get-token grafana-serviceaccount -n MY-PROJECTCopy the access token to use in the next step.
Create a
datasource.yamlfile containing the Thanos Querier configuration for Grafana.Paste the access token into the
httpHeaderValue1property as indicated.apiVersion: 1 datasources: - name: Prometheus type: prometheus url: https://thanos-querier.openshift-monitoring.svc.cluster.local:9091 access: proxy basicAuth: false withCredentials: false isDefault: true jsonData: timeInterval: 5s tlsSkipVerify: true httpHeaderName1: "Authorization" secureJsonData: httpHeaderValue1: "Bearer ${GRAFANA-ACCESS-TOKEN}" 1 editable: true- 1
GRAFANA-ACCESS-TOKEN: The value of the access token for the GrafanaServiceAccount.
Create a config map named
grafana-configfrom thedatasource.yamlfile:oc create configmap grafana-config --from-file=datasource.yaml -n MY-PROJECTCreate a Grafana application consisting of a
Deploymentand aService.The
grafana-configconfig map is mounted as a volume for the datasource configuration.apiVersion: apps/v1 kind: Deployment metadata: name: grafana labels: app: strimzi spec: replicas: 1 selector: matchLabels: name: grafana template: metadata: labels: name: grafana spec: serviceAccountName: grafana-serviceaccount containers: - name: grafana image: grafana/grafana:9.3.1 ports: - name: grafana containerPort: 3000 protocol: TCP volumeMounts: - name: grafana-data mountPath: /var/lib/grafana - name: grafana-logs mountPath: /var/log/grafana - name: grafana-config mountPath: /etc/grafana/provisioning/datasources/datasource.yaml readOnly: true subPath: datasource.yaml readinessProbe: httpGet: path: /api/health port: 3000 initialDelaySeconds: 5 periodSeconds: 10 livenessProbe: httpGet: path: /api/health port: 3000 initialDelaySeconds: 15 periodSeconds: 20 volumes: - name: grafana-data emptyDir: {} - name: grafana-logs emptyDir: {} - name: grafana-config configMap: name: grafana-config --- apiVersion: v1 kind: Service metadata: name: grafana labels: app: strimzi spec: ports: - name: grafana port: 3000 targetPort: 3000 protocol: TCP selector: name: grafana type: ClusterIPDeploy the Grafana application to the project containing your Kafka cluster:
oc apply -f <grafana-application> -n <my-project>
8.5.6. Creating a route to the Grafana Service
You can access the Grafana user interface through a Route that exposes the Grafana service.
Prerequisites
Procedure
Create an edge route to the
grafanaservice:oc create route edge <my-grafana-route> --service=grafana --namespace=KAFKA-NAMESPACE
8.5.7. Importing the example Grafana dashboards
Use Grafana to provide visualizations of Prometheus metrics on customizable dashboards.
AMQ Streams provides example dashboard configuration files for Grafana in JSON format.
-
examples/metrics/grafana-dashboards
This procedure uses the example Grafana dashboards.
The example dashboards are a good starting point for monitoring key metrics, but they don’t show all the metrics supported by Kafka. You can modify the example dashboards or add other metrics, depending on your infrastructure.
Prerequisites
Procedure
Get the details of the Route to the Grafana Service. For example:
oc get routes

NAME               HOST/PORT                         PATH  SERVICES
MY-GRAFANA-ROUTE   MY-GRAFANA-ROUTE-amq-streams.net        grafana
- In a web browser, access the Grafana login screen using the URL for the Route host and port.
Enter your user name and password, and then click Log In.
The default Grafana user name and password are both
admin. After logging in for the first time, you can change the password.- In Configuration > Data Sources, check that the Prometheus data source was created. The data source was created in Section 8.5.5, “Deploying Grafana with a Prometheus datasource”.
- Click the + icon and then click Import.
-
In
examples/metrics/grafana-dashboards, copy the JSON of the dashboard to import. - Paste the JSON into the text box, and then click Load.
- Repeat steps 5-7 for the other example Grafana dashboards.
The imported Grafana dashboards are available to view from the Dashboards home page.
Chapter 9. Introducing distributed tracing
Distributed tracing tracks the progress of transactions between applications in a distributed system. In a microservices architecture, tracing tracks the progress of transactions between services. Trace data is useful for monitoring application performance and investigating issues with target systems and end-user applications.
In AMQ Streams, tracing facilitates the end-to-end tracking of messages: from source systems to Kafka, and then from Kafka to target systems and applications. Distributed tracing complements the monitoring of metrics in Grafana dashboards, as well as the component loggers.
Support for tracing is built in to the following Kafka components:
- MirrorMaker to trace messages from a source cluster to a target cluster
- Kafka Connect to trace messages consumed and produced by Kafka Connect
- Kafka Bridge to trace messages between Kafka and HTTP client applications
Tracing is not supported for Kafka brokers.
You enable and configure tracing for these components through their custom resources. You add tracing configuration using spec.template properties.
You enable tracing by specifying a tracing type using the spec.tracing.type property:
opentelemetry-
Specify
type: opentelemetryto use OpenTelemetry. By Default, OpenTelemetry uses the OTLP (OpenTelemetry Protocol) exporter and endpoint to get trace data. You can specify other tracing systems supported by OpenTelemetry, including Jaeger tracing. To do this, you change the OpenTelemetry exporter and endpoint in the tracing configuration. jaeger-
Specify
type:jaegerto use OpenTracing and the Jaeger client to get trace data.
Support for type: jaeger tracing is deprecated. The Jaeger clients are now retired and the OpenTracing project archived. As such, we cannot guarantee their support for future Kafka versions. If possible, we will maintain the support for type: jaeger tracing until June 2023 and remove it afterwards. Please migrate to OpenTelemetry as soon as possible.
9.1. Tracing options
Use OpenTelemetry or OpenTracing (deprecated) with the Jaeger tracing system.
OpenTelemetry and OpenTracing provide API specifications that are independent from the tracing or monitoring system.
You use the APIs to instrument application code for tracing.
- Instrumented applications generate traces for individual requests across the distributed system.
- Traces are composed of spans that define specific units of work over time.
Jaeger is a tracing system for microservices-based distributed systems.
- Jaeger implements the tracing APIs and provides client libraries for instrumentation.
- The Jaeger user interface allows you to query, filter, and analyze trace data.
The Jaeger user interface showing a simple query

Additional resources
9.2. Environment variables for tracing
Use environment variables when you are enabling tracing for Kafka components or initializing a tracer for Kafka clients.
Tracing environment variables are subject to change. For the latest information, see the OpenTelemetry documentation and OpenTracing documentation.
The following tables describe the key environment variables for setting up a tracer.
Table 9.1. OpenTelemetry environment variables
| Property | Required | Description |
|---|---|---|
|
| Yes | The name of the Jaeger tracing service for OpenTelemetry. |
|
| Yes | The exporter used for tracing. |
|
| Yes |
The exporter used for tracing. Set to |
Table 9.2. OpenTracing environment variables
| Property | Required | Description |
|---|---|---|
|
| Yes | The name of the Jaeger tracer service. |
|
| No |
The hostname for communicating with the |
|
| No |
The port used for communicating with the |
9.3. Setting up distributed tracing
Enable distributed tracing in Kafka components by specifying a tracing type in the custom resource. Instrument tracers in Kafka clients for end-to-end tracking of messages.
To set up distributed tracing, follow these procedures in order:
- Enable tracing for MirrorMaker, Kafka Connect, and the Kafka Bridge
Set up tracing for clients:
Instrument clients with tracers:
9.3.1. Prerequisites
Before setting up distributed tracing, make sure Jaeger backend components are deployed to your OpenShift cluster. We recommend using the Jaeger operator for deploying Jaeger on your OpenShift cluster.
For deployment instructions, see the Jaeger documentation.
Setting up tracing for applications and systems beyond AMQ Streams is outside the scope of this content.
9.3.2. Enabling tracing in MirrorMaker, Kafka Connect, and Kafka Bridge resources
Distributed tracing is supported for MirrorMaker, MirrorMaker 2.0, Kafka Connect, and the AMQ Streams Kafka Bridge. Configure the custom resource of the component to specify and enable a tracer service.
Enabling tracing in a resource triggers the following events:
- Interceptor classes are updated in the integrated consumers and producers of the component.
- For MirrorMaker, MirrorMaker 2.0, and Kafka Connect, the tracing agent initializes a tracer based on the tracing configuration defined in the resource.
- For the Kafka Bridge, a tracer based on the tracing configuration defined in the resource is initialized by the Kafka Bridge itself.
You can enable tracing that uses OpenTelemetry or OpenTracing.
Tracing in MirrorMaker and MirrorMaker 2.0
For MirrorMaker and MirrorMaker 2.0, messages are traced from the source cluster to the target cluster. The trace data records messages entering and leaving the MirrorMaker or MirrorMaker 2.0 component.
Tracing in Kafka Connect
For Kafka Connect, only messages produced and consumed by Kafka Connect are traced. To trace messages sent between Kafka Connect and external systems, you must configure tracing in the connectors for those systems.
Tracing in the Kafka Bridge
For the Kafka Bridge, messages produced and consumed by the Kafka Bridge are traced. Incoming HTTP requests from client applications to send and receive messages through the Kafka Bridge are also traced. To have end-to-end tracing, you must configure tracing in your HTTP clients.
Procedure
Perform these steps for each KafkaMirrorMaker, KafkaMirrorMaker2, KafkaConnect, and KafkaBridge resource.
In the
spec.templateproperty, configure the tracer service.- Use the tracing environment variables as template configuration properties.
-
For OpenTelemetry, set the
spec.tracing.typeproperty toopentelemetry. -
For OpenTracing, set the
spec.tracing.typeproperty tojaeger.
Example tracing configuration for Kafka Connect using OpenTelemetry
apiVersion: kafka.strimzi.io/v1beta2
kind: KafkaConnect
metadata:
  name: my-connect-cluster
spec:
  #...
  template:
    connectContainer:
      env:
        - name: OTEL_SERVICE_NAME
          value: my-otel-service
        - name: OTEL_EXPORTER_JAEGER_ENDPOINT
          value: "http://jaeger-host:14250"
  tracing:
    type: opentelemetry
  #...
Example tracing configuration for MirrorMaker using OpenTelemetry
apiVersion: kafka.strimzi.io/v1beta2
kind: KafkaMirrorMaker
metadata:
  name: my-mirror-maker
spec:
  #...
  template:
    mirrorMakerContainer:
      env:
        - name: OTEL_SERVICE_NAME
          value: my-otel-service
        - name: OTEL_EXPORTER_JAEGER_ENDPOINT
          value: "http://jaeger-host:14250"
  tracing:
    type: opentelemetry
#...
Example tracing configuration for MirrorMaker 2.0 using OpenTelemetry
apiVersion: kafka.strimzi.io/v1beta2
kind: KafkaMirrorMaker2
metadata:
  name: my-mm2-cluster
spec:
  #...
  template:
    connectContainer:
      env:
        - name: OTEL_SERVICE_NAME
          value: my-otel-service
        - name: OTEL_EXPORTER_JAEGER_ENDPOINT
          value: "http://jaeger-host:14250"
  tracing:
    type: opentelemetry
#...
Example tracing configuration for the Kafka Bridge using OpenTelemetry
apiVersion: kafka.strimzi.io/v1beta2
kind: KafkaBridge
metadata:
  name: my-bridge
spec:
  #...
  template:
    bridgeContainer:
      env:
        - name: OTEL_SERVICE_NAME
          value: my-otel-service
        - name: OTEL_EXPORTER_JAEGER_ENDPOINT
          value: "http://jaeger-host:14250"
  tracing:
    type: opentelemetry
#...
Example tracing configuration for Kafka Connect using OpenTracing
apiVersion: kafka.strimzi.io/v1beta2
kind: KafkaConnect
metadata:
  name: my-connect-cluster
spec:
  #...
  template:
    connectContainer:
      env:
        - name: JAEGER_SERVICE_NAME
          value: my-jaeger-service
        - name: JAEGER_AGENT_HOST
          value: jaeger-agent-name
        - name: JAEGER_AGENT_PORT
          value: "6831"
  tracing:
    type: jaeger
  #...
Example tracing configuration for MirrorMaker using OpenTracing
apiVersion: kafka.strimzi.io/v1beta2
kind: KafkaMirrorMaker
metadata:
  name: my-mirror-maker
spec:
  #...
  template:
    mirrorMakerContainer:
      env:
        - name: JAEGER_SERVICE_NAME
          value: my-jaeger-service
        - name: JAEGER_AGENT_HOST
          value: jaeger-agent-name
        - name: JAEGER_AGENT_PORT
          value: "6831"
  tracing:
    type: jaeger
#...
Example tracing configuration for MirrorMaker 2.0 using OpenTracing
apiVersion: kafka.strimzi.io/v1beta2
kind: KafkaMirrorMaker2
metadata:
  name: my-mm2-cluster
spec:
  #...
  template:
    connectContainer:
      env:
        - name: JAEGER_SERVICE_NAME
          value: my-jaeger-service
        - name: JAEGER_AGENT_HOST
          value: jaeger-agent-name
        - name: JAEGER_AGENT_PORT
          value: "6831"
  tracing:
    type: jaeger
#...
Example tracing configuration for the Kafka Bridge using OpenTracing
apiVersion: kafka.strimzi.io/v1beta2
kind: KafkaBridge
metadata:
  name: my-bridge
spec:
  #...
  template:
    bridgeContainer:
      env:
        - name: JAEGER_SERVICE_NAME
          value: my-jaeger-service
        - name: JAEGER_AGENT_HOST
          value: jaeger-agent-name
        - name: JAEGER_AGENT_PORT
          value: "6831"
  tracing:
    type: jaeger
#...
Create or update the resource:
oc apply -f <resource_configuration_file>
9.3.3. Initializing tracing for Kafka clients
Initialize a tracer, then instrument your client applications for distributed tracing. You can instrument Kafka producer and consumer clients, and Kafka Streams API applications. You can initialize a tracer for OpenTracing or OpenTelemetry.
Configure and initialize a tracer using a set of tracing environment variables.
Procedure
In each client application add the dependencies for the tracer:
Add the Maven dependencies to the
pom.xmlfile for the client application:Dependencies for OpenTelemetry
<dependency>
    <groupId>io.opentelemetry</groupId>
    <artifactId>opentelemetry-sdk-extension-autoconfigure</artifactId>
    <version>1.18.0-alpha</version>
</dependency>
<dependency>
  <groupId>io.opentelemetry.instrumentation</groupId>
  <artifactId>opentelemetry-kafka-clients-{OpenTelemetryKafkaClient}</artifactId>
  <version>1.18.0-alpha</version>
</dependency>
<dependency>
  <groupId>io.opentelemetry</groupId>
  <artifactId>opentelemetry-exporter-jaeger</artifactId>
  <version>1.18.0</version>
</dependency>
Dependencies for OpenTracing
<dependency> <groupId>io.jaegertracing</groupId> <artifactId>jaeger-client</artifactId> <version>1.3.2</version> </dependency> <dependency> <groupId>io.opentracing.contrib</groupId> <artifactId>opentracing-kafka-client</artifactId> <version>0.1.15</version> </dependency>- Define the configuration of the tracer using the tracing environment variables.
Create a tracer, which is initialized with the environment variables:
Creating a tracer for OpenTelemetry
OpenTelemetry ot = GlobalOpenTelemetry.get();
Creating a tracer for OpenTracing
Tracer tracer = Configuration.fromEnv().getTracer();
Register the tracer as a global tracer:
GlobalTracer.register(tracer);
Instrument your client:
9.3.4. Instrumenting producers and consumers for tracing
Instrument application code to enable tracing in Kafka producers and consumers. Use a decorator pattern or interceptors to instrument your Java producer and consumer application code for tracing. You can then record traces when messages are produced or retrieved from a topic.
OpenTelemetry and OpenTracing instrumentation projects provide classes that support instrumentation of producers and consumers.
- Decorator instrumentation
- For decorator instrumentation, create a modified producer or consumer instance for tracing. Decorator instrumentation is different for OpenTelemetry and OpenTracing.
- Interceptor instrumentation
- For interceptor instrumentation, add the tracing capability to the consumer or producer configuration. Interceptor instrumentation is the same for OpenTelemetry and OpenTracing.
Prerequisites
You have initialized tracing for the client.
You enable instrumentation in producer and consumer applications by adding the tracing JARs as dependencies to your project.
Procedure
Perform these steps in the application code of each producer and consumer application. Instrument your client application code using either a decorator pattern or interceptors.
To use a decorator pattern, create a modified producer or consumer instance to send or receive messages.
You pass the original
KafkaProducerorKafkaConsumerclass.Example decorator instrumentation for OpenTelemetry
// Producer instance
Producer < String, String > op = new KafkaProducer < > (
    configs,
    new StringSerializer(),
    new StringSerializer()
    );
    Producer < String, String > producer = tracing.wrap(op);
KafkaTracing tracing = KafkaTracing.create(GlobalOpenTelemetry.get());
producer.send(...);

//consumer instance
Consumer<String, String> oc = new KafkaConsumer<>(
    configs,
    new StringDeserializer(),
    new StringDeserializer()
    );
    Consumer<String, String> consumer = tracing.wrap(oc);
consumer.subscribe(Collections.singleton("mytopic"));
ConsumerRecords<Integer, String> records = consumer.poll(1000);
ConsumerRecord<Integer, String> record = ...
SpanContext spanContext = TracingKafkaUtils.extractSpanContext(record.headers(), tracer);
Example decorator instrumentation for OpenTracing
//producer instance
KafkaProducer<Integer, String> producer = new KafkaProducer<>(senderProps);
TracingKafkaProducer<Integer, String> tracingProducer = new TracingKafkaProducer<>(producer, tracer);
TracingKafkaProducer.send(...)

//consumer instance
KafkaConsumer<Integer, String> consumer = new KafkaConsumer<>(consumerProps);
TracingKafkaConsumer<Integer, String> tracingConsumer = new TracingKafkaConsumer<>(consumer, tracer);
tracingConsumer.subscribe(Collections.singletonList("mytopic"));
ConsumerRecords<Integer, String> records = tracingConsumer.poll(1000);
ConsumerRecord<Integer, String> record = ...
SpanContext spanContext = TracingKafkaUtils.extractSpanContext(record.headers(), tracer);
To use interceptors, set the interceptor class in the producer or consumer configuration.
You use the
KafkaProducerandKafkaConsumerclasses in the usual way. TheTracingProducerInterceptorandTracingConsumerInterceptorinterceptor classes take care of the tracing capability.Example producer configuration using interceptors
senderProps.put(ProducerConfig.INTERCEPTOR_CLASSES_CONFIG,
    TracingProducerInterceptor.class.getName());

KafkaProducer<Integer, String> producer = new KafkaProducer<>(senderProps);
producer.send(...);
Example consumer configuration using interceptors
consumerProps.put(ConsumerConfig.INTERCEPTOR_CLASSES_CONFIG,
    TracingConsumerInterceptor.class.getName());

KafkaConsumer<Integer, String> consumer = new KafkaConsumer<>(consumerProps);
consumer.subscribe(Collections.singletonList("messages"));
ConsumerRecords<Integer, String> records = consumer.poll(1000);
ConsumerRecord<Integer, String> record = ...
SpanContext spanContext = TracingKafkaUtils.extractSpanContext(record.headers(), tracer);
9.3.5. Instrumenting Kafka Streams applications for tracing
Instrument application code to enable tracing in Kafka Streams API applications. Use a decorator pattern or interceptors to instrument your Kafka Streams API applications for tracing. You can then record traces when messages are produced or retrieved from a topic.
- Decorator instrumentation
-
For decorator instrumentation, create a modified Kafka Streams instance for tracing. The OpenTracing instrumentation project provides a
TracingKafkaClientSupplierclass that supports instrumentation of Kafka Streams. You create a wrapped instance of theTracingKafkaClientSuppliersupplier interface, which provides tracing instrumentation for Kafka Streams. For OpenTelemetry, the process is the same but you need to create a customTracingKafkaClientSupplierclass to provide the support. - Interceptor instrumentation
- For interceptor instrumentation, add the tracing capability to the Kafka Streams producer and consumer configuration.
Prerequisites
You have initialized tracing for the client.
You enable instrumentation in Kafka Streams applications by adding the tracing JARs as dependencies to your project.
-
To instrument Kafka Streams with OpenTelemetry, you’ll need to write a custom
TracingKafkaClientSupplier. The custom
TracingKafkaClientSuppliercan extend Kafka’sDefaultKafkaClientSupplier, overriding the producer and consumer creation methods to wrap the instances with the telemetry-related code.Example custom
TracingKafkaClientSupplierprivate class TracingKafkaClientSupplier extends DefaultKafkaClientSupplier { @Override public Producer<byte[], byte[]> getProducer(Map<String, Object> config) { KafkaTelemetry telemetry = KafkaTelemetry.create(GlobalOpenTelemetry.get()); return telemetry.wrap(super.getProducer(config)); } @Override public Consumer<byte[], byte[]> getConsumer(Map<String, Object> config) { KafkaTelemetry telemetry = KafkaTelemetry.create(GlobalOpenTelemetry.get()); return telemetry.wrap(super.getConsumer(config)); } @Override public Consumer<byte[], byte[]> getRestoreConsumer(Map<String, Object> config) { return this.getConsumer(config); } @Override public Consumer<byte[], byte[]> getGlobalConsumer(Map<String, Object> config) { return this.getConsumer(config); } }
Procedure
Perform these steps for each Kafka Streams API application.
To use a decorator pattern, create an instance of the
TracingKafkaClientSuppliersupplier interface, then provide the supplier interface toKafkaStreams.Example decorator instrumentation
KafkaClientSupplier supplier = new TracingKafkaClientSupplier(tracer);
KafkaStreams streams = new KafkaStreams(builder.build(), new StreamsConfig(config), supplier);
streams.start();
To use interceptors, set the interceptor class in the Kafka Streams producer and consumer configuration.
The
TracingProducerInterceptorandTracingConsumerInterceptorinterceptor classes take care of the tracing capability.Example producer and consumer configuration using interceptors
props.put(StreamsConfig.PRODUCER_PREFIX + ProducerConfig.INTERCEPTOR_CLASSES_CONFIG, TracingProducerInterceptor.class.getName());
props.put(StreamsConfig.CONSUMER_PREFIX + ConsumerConfig.INTERCEPTOR_CLASSES_CONFIG, TracingConsumerInterceptor.class.getName());
9.3.6. Introducing a different OpenTelemetry tracing system
Instead of the default Jaeger system, you can specify other tracing systems that are supported by OpenTelemetry. You do this by adding the required artifacts to the Kafka image provided with AMQ Streams. Any required implementation specific environment variables must also be set. You then enable the new tracing implementation using the OTEL_TRACES_EXPORTER environment variable.
This procedure shows how to implement Zipkin tracing.
Procedure
Add the tracing artifacts to the
/opt/kafka/libs/directory of the AMQ Streams Kafka image.You can use the Kafka container image on the Red Hat Ecosystem Catalog as a base image for creating a new custom image.
OpenTelemetry artifact for Zipkin
io.opentelemetry:opentelemetry-exporter-zipkin
Set the tracing exporter and endpoint for the new tracing implementation.
Example Zikpin tracer configuration
apiVersion: kafka.strimzi.io/v1beta2
kind: KafkaMirrorMaker2
metadata:
  name: my-mm2-cluster
spec:
  #...
  template:
    connectContainer:
      env:
        - name: OTEL_SERVICE_NAME
          value: my-zipkin-service
        - name: OTEL_EXPORTER_ZIPKIN_ENDPOINT
          value: http://zipkin-exporter-host-name:9411/api/v2/spans 1
        - name: OTEL_TRACES_EXPORTER
          value: zipkin 2
  tracing:
    type: opentelemetry
#...
9.3.7. Custom span names
A tracing span is a logical unit of work in Jaeger, with an operation name, start time, and duration. Spans have built-in names, but you can specify custom span names in your Kafka client instrumentation where used.
Specifying custom span names is optional and only applies when using a decorator pattern in producer and consumer client instrumentation or Kafka Streams instrumentation.
9.3.7.1. Specifying span names for OpenTelemetry
Custom span names cannot be specified directly with OpenTelemetry. Instead, you retrieve span names by adding code to your client application to extract additional tags and attributes.
Example code to extract attributes
//Defines attribute extraction for a producer
private static class ProducerAttribExtractor implements AttributesExtractor < ProducerRecord < ? , ? > , Void > {
    @Override
    public void onStart(AttributesBuilder attributes, ProducerRecord < ? , ? > producerRecord) {
        set(attributes, AttributeKey.stringKey("prod_start"), "prod1");
    }
    @Override
    public void onEnd(AttributesBuilder attributes, ProducerRecord < ? , ? > producerRecord, @Nullable Void unused, @Nullable Throwable error) {
        set(attributes, AttributeKey.stringKey("prod_end"), "prod2");
    }
}
//Defines attribute extraction for a consumer
private static class ConsumerAttribExtractor implements AttributesExtractor < ConsumerRecord < ? , ? > , Void > {
    @Override
    public void onStart(AttributesBuilder attributes, ConsumerRecord < ? , ? > producerRecord) {
        set(attributes, AttributeKey.stringKey("con_start"), "con1");
    }
    @Override
    public void onEnd(AttributesBuilder attributes, ConsumerRecord < ? , ? > producerRecord, @Nullable Void unused, @Nullable Throwable error) {
        set(attributes, AttributeKey.stringKey("con_end"), "con2");
    }
}
//Extracts the attributes
public static void main(String[] args) throws Exception {
        Map < String, Object > configs = new HashMap < > (Collections.singletonMap(ProducerConfig.BOOTSTRAP_SERVERS_CONFIG, "localhost:9092"));
        System.setProperty("otel.traces.exporter", "jaeger");
        System.setProperty("otel.service.name", "myapp1");
        KafkaTracing tracing = KafkaTracing.newBuilder(GlobalOpenTelemetry.get())
            .addProducerAttributesExtractors(new ProducerAttribExtractor())
            .addConsumerAttributesExtractors(new ConsumerAttribExtractor())
            .build();
9.3.7.2. Specifying span names for OpenTracing
To specify custom span names for OpenTracing, pass a BiFunction object as an additional argument when instrumenting producers and consumers.
For more information on built-in names and specifying custom span names to instrument client application code in a decorator pattern, see the OpenTracing Apache Kafka client instrumentation.
Chapter 10. Upgrading AMQ Streams
AMQ Streams can be upgraded to version 2.3 to take advantage of new features and enhancements, performance improvements, and security options.
As part of the upgrade, you upgrade Kafka to the latest supported version. Each Kafka release introduces new features, improvements, and bug fixes to your AMQ Streams deployment.
AMQ Streams can be downgraded to the previous version if you encounter issues with the newer version.
Released versions of AMQ Streams are available from the AMQ Streams software downloads page.
Upgrade downtime and availability
If topics are configured for high availability, upgrading AMQ Streams should not cause any downtime for consumers and producers that publish and read data from those topics. Highly available topics have a replication factor of at least 3 and partitions distributed evenly among the brokers.
Upgrading AMQ Streams triggers rolling updates, where all brokers are restarted in turn, at different stages of the process. During rolling updates, not all brokers are online, so overall cluster availability is temporarily reduced. A reduction in cluster availability increases the chance that a broker failure will result in lost messages.
10.1. AMQ Streams upgrade paths
Two upgrade paths are possible.
- Incremental upgrade
- Upgrading AMQ Streams from the previous minor version to version 2.3.
- Multi-version upgrade
Upgrading AMQ Streams from an old version to version 2.3 within a single upgrade (skipping one or more intermediate versions).
For example, upgrading from AMQ Streams 1.8 directly to AMQ Streams 2.3.
10.1.1. Supported Kafka versions
Decide which Kafka version to upgrade to before starting the AMQ Streams upgrade process. You can review supported Kafka versions in the AMQ Streams Supported Configurations.
- Kafka 3.3.1 is supported for production use.
- Kafka 3.2.3 is supported only for the purpose of upgrading to AMQ Streams 2.3.
You can only use a Kafka version supported by the version of AMQ Streams you are using. You can upgrade to a higher Kafka version as long as it is supported by your version of AMQ Streams. In some cases, you can also downgrade to a previous supported Kafka version.
10.1.2. Upgrading from an AMQ Streams version earlier than 1.7
If you are upgrading to the latest version of AMQ Streams from a version prior to version 1.7, do the following:
- Upgrade AMQ Streams to version 1.7 following the standard sequence.
-
Convert AMQ Streams custom resources to
v1beta2using the Red Hat AMQ Streams API Conversion Tool provided with AMQ Streams 1.8. Do one of the following:
-
Upgrade to AMQ Streams 1.8 (where the
ControlPlaneListenerfeature gate is disabled by default). -
Upgrade to AMQ Streams 2.0 or 2.2 (where the
ControlPlaneListenerfeature gate is enabled by default) with theControlPlaneListenerfeature gate disabled.
-
Upgrade to AMQ Streams 1.8 (where the
-
Enable the
ControlPlaneListenerfeature gate. - Upgrade to AMQ Streams 2.3 following the standard sequence.
AMQ Streams custom resources started using the v1beta2 API version in release 1.7. CRDs and custom resources must be converted before upgrading to AMQ Streams 1.8 or newer. For information on using the API conversion tool, see the AMQ Streams 1.7 upgrade documentation.
As an alternative to first upgrading to version 1.7, you can install the custom resources from version 1.7 and then convert the resources.
The ControlPlaneListener feature is now permanently enabled in AMQ Streams. You must upgrade to a version of AMQ Streams where it is disabled, then enable it using the STRIMZI_FEATURE_GATES environment variable in the Cluster Operator configuration.
Disabling the ControlPlaneListener feature gate
env:
  - name: STRIMZI_FEATURE_GATES
    value: -ControlPlaneListener
Enabling the ControlPlaneListener feature gate
env:
  - name: STRIMZI_FEATURE_GATES
    value: +ControlPlaneListener
10.2. Required upgrade sequence
To upgrade brokers and clients without downtime, you must complete the AMQ Streams upgrade procedures in the following order:
Make sure your OpenShift cluster version is supported.
AMQ Streams 2.3 is supported by OpenShift 4.8 to 4.12.
- Upgrade the Cluster Operator.
- Upgrade all Kafka brokers and client applications to the latest supported Kafka version.
- Optional: Upgrade consumers and Kafka Streams applications to use the incremental cooperative rebalance protocol for partition rebalances.
10.3. Upgrading OpenShift with minimal downtime
If you are upgrading OpenShift, refer to the OpenShift upgrade documentation to check the upgrade path and the steps to upgrade your nodes correctly. Before upgrading OpenShift, check the supported versions for your version of AMQ Streams.
When performing your upgrade, you’ll want to keep your Kafka clusters available.
You can employ one of the following strategies:
- Configuring pod disruption budgets
Rolling pods by one of these methods:
- Using the AMQ Streams Drain Cleaner
- Manually by applying an annotation to your pod
You have to configure the pod disruption budget before using one of the methods to roll your pods.
For Kafka to stay operational, topics must also be replicated for high availability. This requires topic configuration that specifies a replication factor of at least 3 and a minimum number of in-sync replicas to 1 less than the replication factor.
Kafka topic replicated for high availability
apiVersion: kafka.strimzi.io/v1beta2
kind: KafkaTopic
metadata:
  name: my-topic
  labels:
    strimzi.io/cluster: my-cluster
spec:
  partitions: 1
  replicas: 3
  config:
    # ...
    min.insync.replicas: 2
    # ...
In a highly available environment, the Cluster Operator maintains a minimum number of in-sync replicas for topics during the upgrade process so that there is no downtime.
10.3.1. Rolling pods using the AMQ Streams Drain Cleaner
You can use the AMQ Streams Drain Cleaner tool to evict nodes during an upgrade. The AMQ Streams Drain Cleaner annotates pods with a rolling update pod annotation. This informs the Cluster Operator to perform a rolling update of an evicted pod.
A pod disruption budget allows only a specified number of pods to be unavailable at a given time. During planned maintenance of Kafka broker pods, a pod disruption budget ensures Kafka continues to run in a highly available environment.
You specify a pod disruption budget using a template customization for a Kafka component. By default, pod disruption budgets allow only a single pod to be unavailable at a given time.
To do this, you set maxUnavailable to 0 (zero). Reducing the maximum pod disruption budget to zero prevents voluntary disruptions, so pods must be evicted manually.
Specifying a pod disruption budget
apiVersion: kafka.strimzi.io/v1beta2
kind: Kafka
metadata:
  name: my-cluster
  namespace: myproject
spec:
  kafka:
    # ...
    template:
      podDisruptionBudget:
        maxUnavailable: 0
# ...
10.3.2. Rolling pods manually while keeping topics available
During an upgrade, you can trigger a manual rolling update of pods through the Cluster Operator. Using Pod resources, rolling updates restart the pods of resources with new pods. As with using the AMQ Streams Drain Cleaner, you’ll need to set the maxUnavailable value to zero for the pod disruption budget.
You need to watch the pods that need to be drained. You then add a pod annotation to make the update.
Here, the annotation updates a Kafka broker.
Performing a manual rolling update on a Kafka broker pod
oc annotate pod <cluster_name>-kafka-<index> strimzi.io/manual-rolling-update=true
You replace <cluster_name> with the name of the cluster. Kafka broker pods are named <cluster-name>-kafka-<index>, where <index> starts at zero and ends at the total number of replicas minus one. For example, my-cluster-kafka-0.
10.4. Upgrading the Cluster Operator
Use the same method to upgrade the Cluster Operator as the initial method of deployment.
- Using installation files
- If you deployed the Cluster Operator using the installation YAML files, perform your upgrade by modifying the Operator installation files, as described in Upgrading the Cluster Operator using installation files.
- Using the OperatorHub
If you deployed AMQ Streams from the OperatorHub, use the Operator Lifecycle Manager (OLM) to change the update channel for the AMQ Streams operators to a new AMQ Streams version.
Updating the channel starts one of the following types of upgrade, depending on your chosen upgrade strategy:
- An automatic upgrade is initiated
- A manual upgrade that requires approval before installation begins
NoteIf you subscribe to the stable channel, you can get automatic updates without changing channels. However, enabling automatic updates is not recommended because of the potential for missing any pre-installation upgrade steps. Use automatic upgrades only on version-specific channels.
For more information on using the OperatorHub to upgrade Operators, see Upgrading installed Operators (OpenShift documentation).
10.4.1. Upgrading the Cluster Operator returns Kafka version error
If you upgrade the Cluster Operator and get an unsupported Kafka version error, your Kafka cluster deployment has an older Kafka version that is not supported by the new operator version. This error applies to all installation methods.
If this error occurs, upgrade Kafka to a supported Kafka version. Change the spec.kafka.version in the Kafka resource to the supported version.
You can use oc to check for error messages like this in the status of the Kafka resource.
Checking the Kafka status for errors
oc get kafka <kafka_cluster_name> -n <namespace> -o jsonpath='{.status.conditions}'
Replace <kafka_cluster_name> with the name of your Kafka cluster and <namespace> with the OpenShift namespace where the pod is running.
10.4.2. Upgrading from AMQ Streams 1.7 or earlier using the OperatorHub
Action required if upgrading from AMQ Streams 1.7 or earlier using the OperatorHub
Before you upgrade the Red Hat Integration - AMQ Streams Operator to version 2.3, you need to make the following changes:
-
Convert custom resources and CRDs to
v1beta2 -
Upgrade to a version of AMQ Streams where the
ControlPlaneListenerfeature gate is disabled
These requirements are described in Section 10.1.2, “Upgrading from an AMQ Streams version earlier than 1.7”.
If you are upgrading from AMQ Streams 1.7 or earlier, do the following:
- Upgrade to AMQ Streams 1.7.
- Download the Red Hat AMQ Streams API Conversion Tool provided with AMQ Streams 1.8.
Convert custom resources and CRDs to
v1beta2.For more information, see the AMQ Streams 1.7 upgrade documentation.
- In the OperatorHub, delete version 1.7 of the Red Hat Integration - AMQ Streams Operator.
If it also exists, delete version 2.3 of the Red Hat Integration - AMQ Streams Operator.
If it does not exist, go to the next step.
If the Approval Strategy for the AMQ Streams Operator was set to Automatic, version 2.3 of the operator might already exist in your cluster. If you did not convert custom resources and CRDs to the
v1beta2API version before release, the operator-managed custom resources and CRDs will be using the old API version. As a result, the 2.3 Operator is stuck in Pending status. In this situation, you need to delete version 2.3 of the Red Hat Integration - AMQ Streams Operator as well as version 1.7.If you delete both operators, reconciliations are paused until the new operator version is installed. Follow the next steps immediately so that any changes to custom resources are not delayed.
In the OperatorHub, do one of the following:
-
Upgrade to version 1.8 of the Red Hat Integration - AMQ Streams Operator (where the
ControlPlaneListenerfeature gate is disabled by default). -
Upgrade to version 2.0 or 2.2 of the Red Hat Integration - AMQ Streams Operator (where the
ControlPlaneListenerfeature gate is enabled by default) with theControlPlaneListenerfeature gate disabled.
-
Upgrade to version 1.8 of the Red Hat Integration - AMQ Streams Operator (where the
Upgrade to version 2.3 of the Red Hat Integration - AMQ Streams Operator immediately.
The installed 2.3 operator begins to watch the cluster and performs rolling updates. You might notice a temporary decrease in cluster performance during this process.
10.4.3. Upgrading the Cluster Operator using installation files
This procedure describes how to upgrade a Cluster Operator deployment to use AMQ Streams 2.3.
Follow this procedure if you deployed the Cluster Operator using the installation YAML files.
The availability of Kafka clusters managed by the Cluster Operator is not affected by the upgrade operation.
Refer to the documentation supporting a specific version of AMQ Streams for information on how to upgrade to that version.
Prerequisites
- An existing Cluster Operator deployment is available.
- You have downloaded the release artifacts for AMQ Streams 2.3.
Procedure
-
Take note of any configuration changes made to the existing Cluster Operator resources (in the
/install/cluster-operatordirectory). Any changes will be overwritten by the new version of the Cluster Operator. - Update your custom resources to reflect the supported configuration options available for AMQ Streams version 2.3.
Update the Cluster Operator.
Modify the installation files for the new Cluster Operator version according to the namespace the Cluster Operator is running in.
On Linux, use:
sed -i 's/namespace: .*/namespace: my-cluster-operator-namespace/' install/cluster-operator/*RoleBinding*.yaml
On MacOS, use:
sed -i '' 's/namespace: .*/namespace: my-cluster-operator-namespace/' install/cluster-operator/*RoleBinding*.yaml
-
If you modified one or more environment variables in your existing Cluster Operator
Deployment, edit theinstall/cluster-operator/060-Deployment-strimzi-cluster-operator.yamlfile to use those environment variables.
When you have an updated configuration, deploy it along with the rest of the installation resources:
oc replace -f install/cluster-operator
Wait for the rolling updates to complete.
If the new Operator version no longer supports the Kafka version you are upgrading from, the Cluster Operator returns an error message to say the version is not supported. Otherwise, no error message is returned.
If the error message is returned, upgrade to a Kafka version that is supported by the new Cluster Operator version:
-
Edit the
Kafkacustom resource. -
Change the
spec.kafka.versionproperty to a supported Kafka version.
-
Edit the
- If the error message is not returned, go to the next step. You will upgrade the Kafka version later.
Get the image for the Kafka pod to ensure the upgrade was successful:
oc get pods my-cluster-kafka-0 -o jsonpath='{.spec.containers[0].image}'The image tag shows the new Operator version. For example:
registry.redhat.io/amq7/amq-streams-kafka-33-rhel8:2.3.0
Your Cluster Operator was upgraded to version 2.3 but the version of Kafka running in the cluster it manages is unchanged.
Following the Cluster Operator upgrade, you must perform a Kafka upgrade.
10.5. Upgrading Kafka
After you have upgraded your Cluster Operator to 2.3, the next step is to upgrade all Kafka brokers to the latest supported version of Kafka.
Kafka upgrades are performed by the Cluster Operator through rolling updates of the Kafka brokers.
The Cluster Operator initiates rolling updates based on the Kafka cluster configuration.
If Kafka.spec.kafka.config contains… | The Cluster Operator initiates… |
|---|---|
|
Both the |
A single rolling update. After the update, the |
|
Either the | Two rolling updates. |
|
No configuration for the | Two rolling updates. |
From Kafka 3.0.0, when the inter.broker.protocol.version is set to 3.0 or higher, the log.message.format.version option is ignored and doesn’t need to be set. The log.message.format.version property for brokers and the message.format.version property for topics are deprecated and will be removed in a future release of Kafka.
As part of the Kafka upgrade, the Cluster Operator initiates rolling updates for ZooKeeper.
- A single rolling update occurs even if the ZooKeeper version is unchanged.
- Additional rolling updates occur if the new version of Kafka requires a new ZooKeeper version.
10.5.1. Kafka versions
Kafka’s log message format version and inter-broker protocol version specify, respectively, the log format version appended to messages and the version of the Kafka protocol used in a cluster. To ensure the correct versions are used, the upgrade process involves making configuration changes to existing Kafka brokers and code changes to client applications (consumers and producers).
The following table shows the differences between Kafka versions:
Table 10.1. Kafka version differences
| Kafka version | Inter-broker protocol version | Log message format version | ZooKeeper version |
|---|---|---|---|
| 3.2.0 | 3.2 | 3.2 | 3.6.3 |
| 3.2.1 | 3.2 | 3.2 | 3.6.3 |
| 3.2.3 | 3.2 | 3.2 | 3.6.3 |
| 3.3.1 | 3.3 | 3.3 | 3.6.3 |
Inter-broker protocol version
In Kafka, the network protocol used for inter-broker communication is called the inter-broker protocol. Each version of Kafka has a compatible version of the inter-broker protocol. The minor version of the protocol typically increases to match the minor version of Kafka, as shown in the preceding table.
The inter-broker protocol version is set cluster wide in the Kafka resource. To change it, you edit the inter.broker.protocol.version property in Kafka.spec.kafka.config.
Log message format version
When a producer sends a message to a Kafka broker, the message is encoded using a specific format. The format can change between Kafka releases, so messages specify which version of the message format they were encoded with.
The properties used to set a specific message format version are as follows:
-
message.format.versionproperty for topics -
log.message.format.versionproperty for Kafka brokers
From Kafka 3.0.0, the message format version values are assumed to match the inter.broker.protocol.version and don’t need to be set. The values reflect the Kafka version used.
When upgrading to Kafka 3.0.0 or higher, you can remove these settings when you update the inter.broker.protocol.version. Otherwise, set the message format version based on the Kafka version you are upgrading to.
The default value of message.format.version for a topic is defined by the log.message.format.version that is set on the Kafka broker. You can manually set the message.format.version of a topic by modifying its topic configuration.
10.5.2. Strategies for upgrading clients
The right approach to upgrading your client applications (including Kafka Connect connectors) depends on your particular circumstances.
Consuming applications need to receive messages in a message format that they understand. You can ensure that this is the case in one of two ways:
- By upgrading all the consumers for a topic before upgrading any of the producers.
- By having the brokers down-convert messages to an older format.
Using broker down-conversion puts extra load on the brokers, so it is not ideal to rely on down-conversion for all topics for a prolonged period of time. For brokers to perform optimally they should not be down converting messages at all.
Broker down-conversion is configured in two ways:
-
The topic-level
message.format.versionconfigures it for a single topic. -
The broker-level
log.message.format.versionis the default for topics that do not have the topic-levelmessage.format.versionconfigured.
Messages published to a topic in a new-version format will be visible to consumers, because brokers perform down-conversion when they receive messages from producers, not when they are sent to consumers.
Common strategies you can use to upgrade your clients are described as follows. Other strategies for upgrading client applications are also possible.
The steps outlined in each strategy change slightly when upgrading to Kafka 3.0.0 or later. From Kafka 3.0.0, the message format version values are assumed to match the inter.broker.protocol.version and don’t need to be set.
Broker-level consumers first strategy
- Upgrade all the consuming applications.
-
Change the broker-level
log.message.format.versionto the new version. - Upgrade all the producing applications.
This strategy is straightforward, and avoids any broker down-conversion. However, it assumes that all consumers in your organization can be upgraded in a coordinated way, and it does not work for applications that are both consumers and producers. There is also a risk that, if there is a problem with the upgraded clients, new-format messages might get added to the message log so that you cannot revert to the previous consumer version.
Topic-level consumers first strategy
For each topic:
- Upgrade all the consuming applications.
-
Change the topic-level
message.format.versionto the new version. - Upgrade all the producing applications.
This strategy avoids any broker down-conversion, and means you can proceed on a topic-by-topic basis. It does not work for applications that are both consumers and producers of the same topic. Again, it has the risk that, if there is a problem with the upgraded clients, new-format messages might get added to the message log.
Topic-level consumers first strategy with down conversion
For each topic:
-
Change the topic-level
message.format.versionto the old version (or rely on the topic defaulting to the broker-levellog.message.format.version). - Upgrade all the consuming and producing applications.
- Verify that the upgraded applications function correctly.
-
Change the topic-level
message.format.versionto the new version.
This strategy requires broker down-conversion, but the load on the brokers is minimized because it is only required for a single topic (or small group of topics) at a time. It also works for applications that are both consumers and producers of the same topic. This approach ensures that the upgraded producers and consumers are working correctly before you commit to using the new message format version.
The main drawback of this approach is that it can be complicated to manage in a cluster with many topics and applications.
It is also possible to apply multiple strategies. For example, for the first few applications and topics the "per-topic consumers first, with down conversion" strategy can be used. When this has proved successful another, more efficient strategy can be considered acceptable to use instead.
10.5.3. Kafka version and image mappings
When upgrading Kafka, consider your settings for the STRIMZI_KAFKA_IMAGES environment variable and the Kafka.spec.kafka.version property.
-
Each
Kafkaresource can be configured with aKafka.spec.kafka.version. The Cluster Operator’s
STRIMZI_KAFKA_IMAGESenvironment variable provides a mapping between the Kafka version and the image to be used when that version is requested in a givenKafkaresource.-
If
Kafka.spec.kafka.imageis not configured, the default image for the given version is used. -
If
Kafka.spec.kafka.imageis configured, the default image is overridden.
-
If
The Cluster Operator cannot validate that an image actually contains a Kafka broker of the expected version. Take care to ensure that the given image corresponds to the given Kafka version.
10.5.4. Upgrading Kafka brokers and client applications
Upgrade an AMQ Streams Kafka cluster to the latest supported Kafka version and inter-broker protocol version.
You should also choose a strategy for upgrading clients. Kafka clients are upgraded in step 6 of this procedure.
Prerequisites
- The Cluster Operator is up and running.
-
Before you upgrade the AMQ Streams Kafka cluster, check that the
Kafka.spec.kafka.configproperties of theKafkaresource do not contain configuration options that are not supported in the new Kafka version.
Procedure
Update the Kafka cluster configuration:
oc edit kafka <my_cluster>If configured, check that the
inter.broker.protocol.versionandlog.message.format.versionproperties are set to the current version.For example, the current version is 3.2 if upgrading from Kafka version 3.2.3 to 3.3.1:
kind: Kafka
spec:
  # ...
  kafka:
    version: 3.2.3
    config:
      log.message.format.version: "3.2"
      inter.broker.protocol.version: "3.2"
      # ...
If
log.message.format.versionandinter.broker.protocol.versionare not configured, AMQ Streams automatically updates these versions to the current defaults after the update to the Kafka version in the next step.NoteThe value of
log.message.format.versionandinter.broker.protocol.versionmust be strings to prevent them from being interpreted as floating point numbers.Change the
Kafka.spec.kafka.versionto specify the new Kafka version; leave thelog.message.format.versionandinter.broker.protocol.versionat the defaults for the current Kafka version.NoteChanging the
kafka.versionensures that all brokers in the cluster will be upgraded to start using the new broker binaries. During this process, some brokers are using the old binaries while others have already upgraded to the new ones. Leaving theinter.broker.protocol.versionunchanged at the current setting ensures that the brokers can continue to communicate with each other throughout the upgrade.For example, if upgrading from Kafka 3.2.3 to 3.3.1:
apiVersion: kafka.strimzi.io/v1beta2 kind: Kafka spec: # ... kafka: version: 3.3.1 1 config: log.message.format.version: "3.2" 2 inter.broker.protocol.version: "3.2" 3 # ...WarningYou cannot downgrade Kafka if the
inter.broker.protocol.versionfor the new Kafka version changes. The inter-broker protocol version determines the schemas used for persistent metadata stored by the broker, including messages written to__consumer_offsets. The downgraded cluster will not understand the messages.If the image for the Kafka cluster is defined in the Kafka custom resource, in
Kafka.spec.kafka.image, update theimageto point to a container image with the new Kafka version.Save and exit the editor, then wait for rolling updates to complete.
Check the progress of the rolling updates by watching the pod state transitions:
oc get pods my-cluster-kafka-0 -o jsonpath='{.spec.containers[0].image}'The rolling updates ensure that each pod is using the broker binaries for the new version of Kafka.
Depending on your chosen strategy for upgrading clients, upgrade all client applications to use the new version of the client binaries.
If required, set the
versionproperty for Kafka Connect and MirrorMaker as the new version of Kafka:-
For Kafka Connect, update
KafkaConnect.spec.version. -
For MirrorMaker, update
KafkaMirrorMaker.spec.version. -
For MirrorMaker 2.0, update
KafkaMirrorMaker2.spec.version.
-
For Kafka Connect, update
If configured, update the Kafka resource to use the new
inter.broker.protocol.versionversion. Otherwise, go to step 9.For example, if upgrading to Kafka 3.3.1:
apiVersion: kafka.strimzi.io/v1beta2 kind: Kafka spec: # ... kafka: version: 3.3.1 config: log.message.format.version: "3.2" inter.broker.protocol.version: "3.3" # ...- Wait for the Cluster Operator to update the cluster.
If configured, update the Kafka resource to use the new
log.message.format.versionversion. Otherwise, go to step 10.For example, if upgrading to Kafka 3.3.1:
apiVersion: kafka.strimzi.io/v1beta2 kind: Kafka spec: # ... kafka: version: 3.3.1 config: log.message.format.version: "3.3" inter.broker.protocol.version: "3.3" # ...ImportantFrom Kafka 3.0.0, when the
inter.broker.protocol.versionis set to3.0or higher, thelog.message.format.versionoption is ignored and doesn’t need to be set.Wait for the Cluster Operator to update the cluster.
- The Kafka cluster and clients are now using the new Kafka version.
- The brokers are configured to send messages using the inter-broker protocol version and message format version of the new version of Kafka.
Following the Kafka upgrade, if required, you can upgrade consumers to use the incremental cooperative rebalance protocol.
10.6. Upgrading consumers to cooperative rebalancing
You can upgrade Kafka consumers and Kafka Streams applications to use the incremental cooperative rebalance protocol for partition rebalances instead of the default eager rebalance protocol. The new protocol was added in Kafka 2.4.0.
Consumers keep their partition assignments in a cooperative rebalance and only revoke them at the end of the process, if needed to achieve a balanced cluster. This reduces the unavailability of the consumer group or Kafka Streams application.
Upgrading to the incremental cooperative rebalance protocol is optional. The eager rebalance protocol is still supported.
Prerequisites
- You have upgraded Kafka brokers and client applications to Kafka 3.3.1.
Procedure
To upgrade a Kafka consumer to use the incremental cooperative rebalance protocol:
-
Replace the Kafka clients
.jarfile with the new version. -
In the consumer configuration, append
cooperative-stickyto thepartition.assignment.strategy. For example, if therangestrategy is set, change the configuration torange, cooperative-sticky. - Restart each consumer in the group in turn, waiting for the consumer to rejoin the group after each restart.
-
Reconfigure each consumer in the group by removing the earlier
partition.assignment.strategyfrom the consumer configuration, leaving only thecooperative-stickystrategy. - Restart each consumer in the group in turn, waiting for the consumer to rejoin the group after each restart.
To upgrade a Kafka Streams application to use the incremental cooperative rebalance protocol:
-
Replace the Kafka Streams
.jarfile with the new version. -
In the Kafka Streams configuration, set the
upgrade.fromconfiguration parameter to the Kafka version you are upgrading from (for example, 2.3). - Restart each of the stream processors (nodes) in turn.
-
Remove the
upgrade.fromconfiguration parameter from the Kafka Streams configuration. - Restart each consumer in the group in turn.
Chapter 11. Downgrading AMQ Streams
If you are encountering issues with the version of AMQ Streams you upgraded to, you can revert your installation to the previous version.
If you used the YAML installation files to install AMQ Streams, you can use the YAML installation files from the previous release to perform the following downgrade procedures:
If the previous version of AMQ Streams does not support the version of Kafka you are using, you can also downgrade Kafka as long as the log message format versions appended to messages match.
If you deployed AMQ Streams using another installation method, use a supported approach to downgrade AMQ Streams. Do not use the downgrade instructions provided here. For example, if you installed AMQ Streams using the Operator Lifecycle Manager (OLM), you can downgrade by changing the deployment channel to an earlier version of AMQ Streams.
11.1. Downgrading the Cluster Operator to a previous version
If you are encountering issues with AMQ Streams, you can revert your installation.
This procedure describes how to downgrade a Cluster Operator deployment to a previous version.
Prerequisites
- An existing Cluster Operator deployment is available.
- You have downloaded the installation files for the previous version.
Procedure
-
Take note of any configuration changes made to the existing Cluster Operator resources (in the
/install/cluster-operatordirectory). Any changes will be overwritten by the previous version of the Cluster Operator. - Revert your custom resources to reflect the supported configuration options available for the version of AMQ Streams you are downgrading to.
Update the Cluster Operator.
Modify the installation files for the previous version according to the namespace the Cluster Operator is running in.
On Linux, use:
sed -i 's/namespace: .*/namespace: my-cluster-operator-namespace/' install/cluster-operator/*RoleBinding*.yaml
On MacOS, use:
sed -i '' 's/namespace: .*/namespace: my-cluster-operator-namespace/' install/cluster-operator/*RoleBinding*.yaml
-
If you modified one or more environment variables in your existing Cluster Operator
Deployment, edit theinstall/cluster-operator/060-Deployment-strimzi-cluster-operator.yamlfile to use those environment variables.
When you have an updated configuration, deploy it along with the rest of the installation resources:
oc replace -f install/cluster-operator
Wait for the rolling updates to complete.
Get the image for the Kafka pod to ensure the downgrade was successful:
oc get pod my-cluster-kafka-0 -o jsonpath='{.spec.containers[0].image}'The image tag shows the new AMQ Streams version followed by the Kafka version. For example,
NEW-STRIMZI-VERSION-kafka-CURRENT-KAFKA-VERSION.
Your Cluster Operator was downgraded to the previous version.
11.2. Downgrading Kafka
Kafka version downgrades are performed by the Cluster Operator.
11.2.1. Kafka version compatibility for downgrades
Kafka downgrades are dependent on compatible current and target Kafka versions, and the state at which messages have been logged.
You cannot revert to the previous Kafka version if that version does not support any of the inter.broker.protocol.version settings which have ever been used in that cluster, or messages have been added to message logs that use a newer log.message.format.version.
The inter.broker.protocol.version determines the schemas used for persistent metadata stored by the broker, such as the schema for messages written to __consumer_offsets. If you downgrade to a version of Kafka that does not understand an inter.broker.protocol.version that has ever been previously used in the cluster the broker will encounter data it cannot understand.
If the target downgrade version of Kafka has:
-
The same
log.message.format.versionas the current version, the Cluster Operator downgrades by performing a single rolling restart of the brokers. A different
log.message.format.version, downgrading is only possible if the running cluster has always hadlog.message.format.versionset to the version used by the downgraded version. This is typically only the case if the upgrade procedure was aborted before thelog.message.format.versionwas changed. In this case, the downgrade requires:- Two rolling restarts of the brokers if the interbroker protocol of the two versions is different
- A single rolling restart if they are the same
Downgrading is not possible if the new version has ever used a log.message.format.version that is not supported by the previous version, including when the default value for log.message.format.version is used. For example, this resource can be downgraded to Kafka version 3.2.3 because the log.message.format.version has not been changed:
apiVersion: kafka.strimzi.io/v1beta2
kind: Kafka
spec:
  # ...
  kafka:
    version: 3.3.1
    config:
      log.message.format.version: "3.2"
      # ...
The downgrade would not be possible if the log.message.format.version was set at "3.3" or a value was absent, so that the parameter took the default value for a 3.3.1 broker of 3.3.
From Kafka 3.0.0, when the inter.broker.protocol.version is set to 3.0 or higher, the log.message.format.version option is ignored and doesn’t need to be set.
11.2.2. Downgrading Kafka brokers and client applications
Downgrade an AMQ Streams Kafka cluster to a lower (previous) version of Kafka, such as downgrading from 3.3.1 to 3.2.3.
Prerequisites
- The Cluster Operator is up and running.
Before you downgrade the AMQ Streams Kafka cluster, check the following for the
Kafkaresource:- IMPORTANT: Compatibility of Kafka versions.
-
Kafka.spec.kafka.configdoes not contain options that are not supported by the Kafka version being downgraded to. Kafka.spec.kafka.confighas alog.message.format.versionandinter.broker.protocol.versionthat is supported by the Kafka version being downgraded to.From Kafka 3.0.0, when the
inter.broker.protocol.versionis set to3.0or higher, thelog.message.format.versionoption is ignored and doesn’t need to be set.
Procedure
Update the Kafka cluster configuration.
oc edit kafka KAFKA-CONFIGURATION-FILEChange the
Kafka.spec.kafka.versionto specify the previous version.For example, if downgrading from Kafka 3.3.1 to 3.2.3:
apiVersion: kafka.strimzi.io/v1beta2 kind: Kafka spec: # ... kafka: version: 3.2.3 1 config: log.message.format.version: "3.2" 2 inter.broker.protocol.version: "3.2" 3 # ...NoteThe value of
log.message.format.versionandinter.broker.protocol.versionmust be strings to prevent them from being interpreted as floating point numbers.If the image for the Kafka version is different from the image defined in
STRIMZI_KAFKA_IMAGESfor the Cluster Operator, updateKafka.spec.kafka.image.Save and exit the editor, then wait for rolling updates to complete.
Check the update in the logs or by watching the pod state transitions:
oc logs -f CLUSTER-OPERATOR-POD-NAME | grep -E "Kafka version downgrade from [0-9.]+ to [0-9.]+, phase ([0-9]+) of \1 completed"oc get pod -w
Check the Cluster Operator logs for an
INFOlevel message:Reconciliation #NUM(watch) Kafka(NAMESPACE/NAME): Kafka version downgrade from FROM-VERSION to TO-VERSION, phase 1 of 1 completed
Downgrade all client applications (consumers) to use the previous version of the client binaries.
The Kafka cluster and clients are now using the previous Kafka version.
If you are reverting back to a version of AMQ Streams earlier than 1.7, which uses ZooKeeper for the storage of topic metadata, delete the internal topic store topics from the Kafka cluster.
oc run kafka-admin -ti --image=registry.redhat.io/amq7/amq-streams-kafka-33-rhel8:2.3.0 --rm=true --restart=Never -- ./bin/kafka-topics.sh --bootstrap-server localhost:9092 --topic __strimzi-topic-operator-kstreams-topic-store-changelog --delete && ./bin/kafka-topics.sh --bootstrap-server localhost:9092 --topic __strimzi_store_topic --delete
Additional resources
Chapter 12. Finding information on Kafka restarts
After the Cluster Operator restarts a Kafka pod in an OpenShift cluster, it emits an OpenShift event into the pod’s namespace explaining why the pod restarted. For help in understanding cluster behavior, you can check restart events from the command line.
You can export and monitor restart events using metrics collection tools like Prometheus. Use the metrics tool with an event exporter that can export the output in a suitable format.
12.1. Reasons for a restart event
The Cluster Operator initiates a restart event for a specific reason. You can check the reason by fetching information on the restart event.
The reason given depends on whether you are using StrimziPodSet or StatefulSet resources for the creation and management of pods.
Table 12.1. Restart reasons
| StrimziPodSet | StatefulSet | Description |
|---|---|---|
| CaCertHasOldGeneration | CaCertHasOldGeneration | The pod is still using a server certificate signed with an old CA, so needs to be restarted as part of the certificate update. |
| CaCertRemoved | CaCertRemoved | Expired CA certificates have been removed, and the pod is restarted to run with the current certificates. |
| CaCertRenewed | CaCertRenewed | CA certificates have been renewed, and the pod is restarted to run with the updated certificates. |
| ClientCaCertKeyReplaced | ClientCaCertKeyReplaced | The key used to sign clients CA certificates has been replaced, and the pod is being restarted as part of the CA renewal process. |
| ClusterCaCertKeyReplaced | ClusterCaCertKeyReplaced | The key used to sign the cluster’s CA certificates has been replaced, and the pod is being restarted as part of the CA renewal process. |
| ConfigChangeRequiresRestart | ConfigChangeRequiresRestart | Some Kafka configuration properties are changed dynamically, but others require that the broker be restarted. |
| CustomListenerCaCertChanged | CustomListenerCaCertChanged | The CA certificate used to secure the Kafka network listeners has changed, and the pod is restarted to use it. |
| FileSystemResizeNeeded | FileSystemResizeNeeded | The file system size has been increased, and a restart is needed to apply it. |
| KafkaCertificatesChanged | KafkaCertificatesChanged | One or more TLS certificates used by the Kafka broker have been updated, and a restart is needed to use them. |
| ManualRollingUpdate | ManualRollingUpdate |
A user annotated the pod, or the |
| PodForceRestartOnError | PodForceRestartOnError | An error occurred that requires a pod restart to rectify. |
| PodHasOldRevision | JbodVolumesChanged |
A disk was added or removed from the Kafka volumes, and a restart is needed to apply the change. When using |
| PodHasOldRevision | PodHasOldGeneration |
The |
| PodStuck | PodStuck | The pod is still pending, and is not scheduled or cannot be scheduled, so the operator has restarted the pod in a final attempt to get it running. |
| PodUnresponsive | PodUnresponsive | AMQ Streams was unable to connect to the pod, which can indicate a broker not starting correctly, so the operator restarted it in an attempt to resolve the issue. |
12.2. Restart event filters
When checking restart events from the command line, you can specify a field-selector to filter on OpenShift event fields.
The following fields are available when filtering events with field-selector.
regardingObject.kind-
The object that was restarted, and for restart events, the kind is always
Pod. regarding.namespace- The namespace that the pod belongs to.
regardingObject.name-
The pod’s name, for example,
strimzi-cluster-kafka-0. regardingObject.uid- The unique ID of the pod.
reason-
The reason the pod was restarted, for example,
JbodVolumesChanged. reportingController-
The reporting component is always
strimzi.io/cluster-operatorfor AMQ Streams restart events. source-
sourceis an older version ofreportingController. The reporting component is alwaysstrimzi.io/cluster-operatorfor AMQ Streams restart events. type-
The event type, which is either
WarningorNormal. For AMQ Streams restart events, the type isNormal.
In older versions of OpenShift, the fields using the regarding prefix might use an involvedObject prefix instead. reportingController was previously called reportingComponent.
12.3. Checking Kafka restarts
Use a oc command to list restart events initiated by the Cluster Operator. Filter restart events emitted by the Cluster Operator by setting the Cluster Operator as the reporting component using the reportingController or source event fields.
Prerequisites
- The Cluster Operator is running in the OpenShift cluster.
Procedure
Get all restart events emitted by the Cluster Operator:
oc -n kafka get events --field-selector reportingController=strimzi.io/cluster-operator
Example showing events returned
LAST SEEN   TYPE     REASON                   OBJECT                        MESSAGE
2m          Normal   CaCertRenewed            pod/strimzi-cluster-kafka-0   CA certificate renewed
58m         Normal   PodForceRestartOnError   pod/strimzi-cluster-kafka-1   Pod needs to be forcibly restarted due to an error
5m47s       Normal   ManualRollingUpdate      pod/strimzi-cluster-kafka-2   Pod was manually annotated to be rolled
You can also specify a
reasonor otherfield-selectoroptions to constrain the events returned.Here, a specific reason is added:
oc -n kafka get events --field-selector reportingController=strimzi.io/cluster-operator,reason=PodForceRestartOnError
Use an output format, such as YAML, to return more detailed information about one or more events.
oc -n kafka get events --field-selector reportingController=strimzi.io/cluster-operator,reason=PodForceRestartOnError -o yaml
Example showing detailed events output
apiVersion: v1
items:
- action: StrimziInitiatedPodRestart
  apiVersion: v1
  eventTime: "2022-05-13T00:22:34.168086Z"
  firstTimestamp: null
  involvedObject:
      kind: Pod
      name: strimzi-cluster-kafka-1
      namespace: kafka
  kind: Event
  lastTimestamp: null
  message: Pod needs to be forcibly restarted due to an error
  metadata:
      creationTimestamp: "2022-05-13T00:22:34Z"
      generateName: strimzi-event
      name: strimzi-eventwppk6
      namespace: kafka
      resourceVersion: "432961"
      uid: 29fcdb9e-f2cf-4c95-a165-a5efcd48edfc
  reason: PodForceRestartOnError
  reportingController: strimzi.io/cluster-operator
  reportingInstance: strimzi-cluster-operator-6458cfb4c6-6bpdp
  source: {}
  type: Normal
kind: List
metadata:
  resourceVersion: ""
  selfLink: ""
The following fields are deprecated, so they are not populated for these events:
-
firstTimestamp -
lastTimestamp -
source
Chapter 13. Uninstalling AMQ Streams
You can uninstall AMQ Streams on OpenShift 4.8 to 4.12 from the OperatorHub using the OpenShift Container Platform web console or CLI.
Use the same approach you used to install AMQ Streams.
When you uninstall AMQ Streams, you will need to identify resources created specifically for a deployment and referenced from the AMQ Streams resource.
Such resources include:
- Secrets (Custom CAs and certificates, Kafka Connect secrets, and other Kafka secrets)
-
Logging
ConfigMaps(of typeexternal)
These are resources referenced by Kafka, KafkaConnect, KafkaMirrorMaker, or KafkaBridge configuration.
Deleting CustomResourceDefinitions results in the garbage collection of the corresponding custom resources (Kafka, KafkaConnect, KafkaMirrorMaker, or KafkaBridge) and the resources dependent on them (Deployments, StatefulSets, and other dependent resources).
13.1. Uninstalling AMQ Streams from the OperatorHub using the web console
This procedure describes how to uninstall AMQ Streams from the OperatorHub and remove resources related to the deployment.
You can perform the steps from the console or use alternative CLI commands.
Prerequisites
-
Access to an OpenShift Container Platform web console using an account with
cluster-adminorstrimzi-adminpermissions. You have identified the resources to be deleted.
You can use the following
ocCLI command to find resources and also verify that they have been removed when you have uninstalled AMQ Streams.Command to find resources related to an AMQ Streams deployment
oc get <resource_type> --all-namespaces | grep <kafka_cluster_name>
Replace <resource_type> with the type of the resource you are checking, such as
secretorconfigmap.
Procedure
- Navigate in the OpenShift web console to Operators > Installed Operators.
For the installed Red Hat Integration - AMQ Streams operator, select the options icon (three vertical dots) and click Uninstall Operator.
The operator is removed from Installed Operators.
- Navigate to Home > Projects and select the project where you installed AMQ Streams and the Kafka components.
Click the options under Inventory to delete related resources.
Resources include the following:
- Deployments
- StatefulSets
- Pods
- Services
- ConfigMaps
- Secrets
TipUse the search to find related resources that begin with the name of the Kafka cluster. You can also find the resources under Workloads.
Alternative CLI commands
You can use CLI commands to uninstall AMQ Streams from the OperatorHub.
Delete the AMQ Streams subscription.
oc delete subscription amq-streams -n openshift-operators
Delete the cluster service version (CSV).
oc delete csv amqstreams.<version> -n openshift-operatorsRemove related CRDs.
oc get crd -l app=strimzi -o name | xargs oc delete
13.2. Uninstalling AMQ Streams using the CLI
This procedure describes how to use the oc command-line tool to uninstall AMQ Streams and remove resources related to the deployment.
Prerequisites
-
Access to an OpenShift cluster using an account with
cluster-adminorstrimzi-adminpermissions. You have identified the resources to be deleted.
You can use the following
ocCLI command to find resources and also verify that they have been removed when you have uninstalled AMQ Streams.Command to find resources related to an AMQ Streams deployment
oc get <resource_type> --all-namespaces | grep <kafka_cluster_name>
Replace <resource_type> with the type of the resource you are checking, such as
secretorconfigmap.
Procedure
Delete the Cluster Operator
Deployment, relatedCustomResourceDefinitions, andRBACresources.Specify the installation files used to deploy the Cluster Operator.
oc delete -f install/cluster-operator
Delete the resources you identified in the prerequisites.
oc delete <resource_type> <resource_name> -n <namespace>
Replace <resource_type> with the type of resource you are deleting and <resource_name> with the name of the resource.
Example to delete a secret
oc delete secret my-cluster-clients-ca -n my-project
Chapter 14. Using Metering on AMQ Streams
You can use the Metering tool that is available on OpenShift to generate metering reports from different data sources. As a cluster administrator, you can use metering to analyze what is happening in your cluster. You can either write your own, or use predefined SQL queries to define how you want to process data from the different data sources you have available. Using Prometheus as a default data source, you can generate reports on pods, namespaces, and most other OpenShift resources.
You can also use the OpenShift Metering operator to analyze your installed AMQ Streams components to determine whether you are in compliance with your Red Hat subscription.
To use metering with AMQ Streams, you must first install and configure the Metering operator on OpenShift Container Platform.
14.1. Metering resources
Metering has many resources which can be used to manage the deployment and installation of metering, as well as the reporting functionality metering provides. Metering is managed using the following CRDs:
Table 14.1. Metering resources
| Name | Description |
|---|---|
|
| Configures the metering stack for deployment. Contains customizations and configuration options to control each component that makes up the metering stack. |
|
| Controls what query to use, when, and how often the query should be run, and where to store the results. |
|
|
Contains the SQL queries used to perform analysis on the data contained within |
|
| Controls the data available to ReportQueries and Reports. Allows configuring access to different databases for use within metering. |
14.2. Metering labels for AMQ Streams
The following table lists the metering labels for AMQ Streams infrastructure components and integrations.
Table 14.2. Metering Labels
| Label | Possible values |
|---|---|
|
|
|
|
|
|
|
|
|
|
|
|
|
|
|
|
| Infrastructure
|
| Application
| |
|
|
|
Examples
Infrastructure example (where the infrastructure component is entity-operator)
com.company=Red_Hat
rht.prod_name=Red_Hat_Application_Foundations
rht.prod_ver=2023.Q1
rht.comp=AMQ_Streams
rht.comp_ver=2.3
rht.subcomp=entity-operator
rht.comp_t=infrastructure
Application example (where the integration deployment name is kafka-bridge)
com.company=Red_Hat
rht.prod_name=Red_Hat_Application_Foundations
rht.prod_ver=2023.Q1
rht.comp=AMQ_Streams
rht.comp_ver=2.3
rht.subcomp=kafka-bridge
rht.comp_t=application
Appendix A. Using your subscription
AMQ Streams is provided through a software subscription. To manage your subscriptions, access your account at the Red Hat Customer Portal.
Accessing Your Account
- Go to access.redhat.com.
- If you do not already have an account, create one.
- Log in to your account.
Activating a Subscription
- Go to access.redhat.com.
- Navigate to My Subscriptions.
- Navigate to Activate a subscription and enter your 16-digit activation number.
Downloading Zip and Tar Files
To access zip or tar files, use the customer portal to find the relevant files for download. If you are using RPM packages, this step is not required.
- Open a browser and log in to the Red Hat Customer Portal Product Downloads page at access.redhat.com/downloads.
- Locate the AMQ Streams for Apache Kafka entries in the INTEGRATION AND AUTOMATION category.
- Select the desired AMQ Streams product. The Software Downloads page opens.
- Click the Download link for your component.
Installing packages with DNF
To install a package and all the package dependencies, use:
dnf install <package_name>To install a previously-downloaded package from a local directory, use:
dnf install <path_to_download_package>Revised on 2023-03-08 14:49:02 UTC