
Using AMQ Streams on RHEL
Configure and manage a deployment of AMQ Streams 2.2 on Red Hat Enterprise Linux
Abstract
Making open source more inclusive
Red Hat is committed to replacing problematic language in our code, documentation, and web properties. We are beginning with these four terms: master, slave, blacklist, and whitelist. Because of the enormity of this endeavor, these changes will be implemented gradually over several upcoming releases. For more details, see our CTO Chris Wright’s message.
Chapter 1. Overview of AMQ Streams
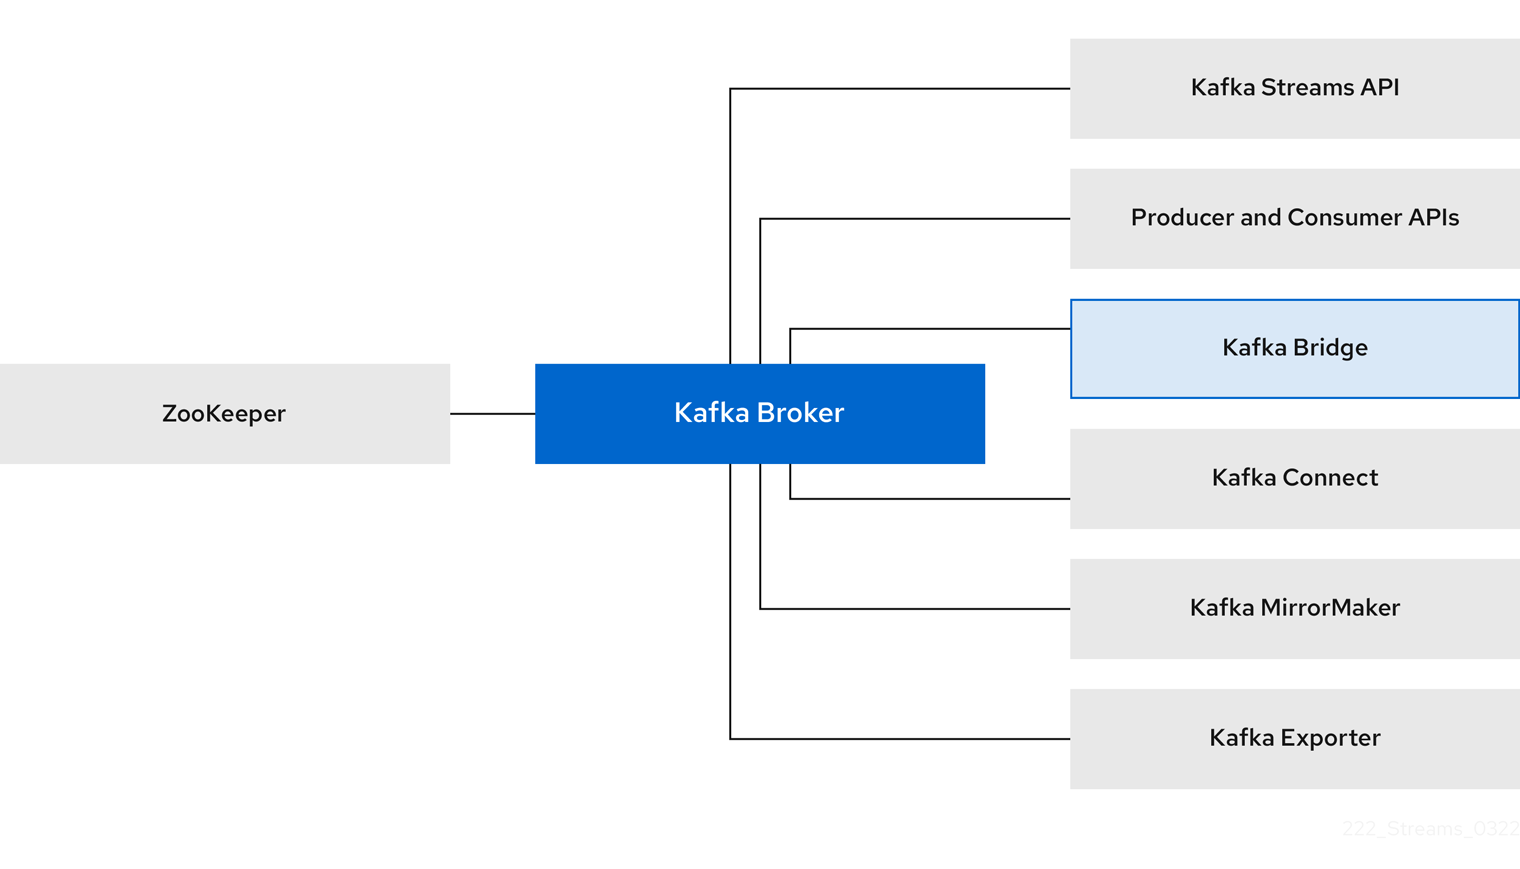
Red Hat AMQ Streams is a massively-scalable, distributed, and high-performance data streaming platform based on the Apache ZooKeeper and Apache Kafka projects.
The main components comprise:
- Kafka Broker
Messaging broker responsible for delivering records from producing clients to consuming clients.
Apache ZooKeeper is a core dependency for Kafka, providing a cluster coordination service for highly reliable distributed coordination.
- Kafka Streams API
- API for writing stream processor applications.
- Producer and Consumer APIs
- Java-based APIs for producing and consuming messages to and from Kafka brokers.
- Kafka Bridge
- AMQ Streams Kafka Bridge provides a RESTful interface that allows HTTP-based clients to interact with a Kafka cluster.
- Kafka Connect
- A toolkit for streaming data between Kafka brokers and other systems using Connector plugins.
- Kafka MirrorMaker
- Replicates data between two Kafka clusters, within or across data centers.
- Kafka Exporter
- An exporter used in the extraction of Kafka metrics data for monitoring.
A cluster of Kafka brokers is the hub connecting all these components. The broker uses Apache ZooKeeper for storing configuration data and for cluster coordination. Before running Apache Kafka, an Apache ZooKeeper cluster has to be ready.
Figure 1.1. AMQ Streams architecture
1.1. Using the Kafka Bridge to connect with a Kafka cluster
You can use the AMQ Streams Kafka Bridge API to create and manage consumers and send and receive records over HTTP rather than the native Kafka protocol.
When you set up the Kafka Bridge you configure HTTP access to the Kafka cluster. You can then use the Kafka Bridge to produce and consume messages from the cluster, as well as performing other operations through its REST interface.
Additional resources
- For information on installing and using the Kafka Bridge, see Using the AMQ Streams Kafka Bridge.
1.2. Supported Configurations
To run in a supported configuration, AMQ Streams must be running in a supported JVM version on a supported operating system.
For more information, see Supported Configurations.
1.3. Document conventions
User-replaced values
User-replaced values, also known as replaceables, are shown in italics with angle brackets (< >). Underscores ( _ ) are used for multi-word values. If the value refers to code or commands, monospace is also used.
For example, in the following code, you will want to replace <bootstrap_address> and <topic_name> with your own address and topic name:
bin/kafka-console-consumer.sh --bootstrap-server <bootstrap_address> --topic <topic_name> --from-beginning
Chapter 2. Getting started
2.1. AMQ Streams distribution
AMQ Streams is distributed as single ZIP file. This ZIP file contains AMQ Streams components:
- Apache ZooKeeper
- Apache Kafka
- Apache Kafka Connect
- Apache Kafka MirrorMaker
- Kafka Bridge
- Kafka Exporter
2.2. Downloading an AMQ Streams Archive
An archived distribution of AMQ Streams is available for download from the Red Hat website. You can download a copy of the distribution by following the steps below.
Procedure
- Download the latest version of the Red Hat AMQ Streams archive from the AMQ Streams software downloads page.
2.3. Installing AMQ Streams
Follow this procedure to install the latest version of AMQ Streams on Red Hat Enterprise Linux.
For instructions on upgrading an existing cluster to AMQ Streams 2.2, see AMQ Streams and Kafka upgrades.
Prerequisites
- Download the installation archive.
- Review the Supported configurations.
Procedure
Add new
kafkauser and group.sudo groupadd kafka sudo useradd -g kafka kafka sudo passwd kafka
Create directory
/opt/kafka.sudo mkdir /opt/kafka
Create a temporary directory and extract the contents of the AMQ Streams ZIP file.
mkdir /tmp/kafka
unzip amq-streams_y.y-x.x.x.zip -d /tmp/kafka
Move the extracted contents into
/opt/kafkadirectory and delete the temporary directory.sudo mv /tmp/kafka/kafka_y.y-x.x.x/* /opt/kafka/ rm -r /tmp/kafkaChange the ownership of the
/opt/kafkadirectory to thekafkauser.sudo chown -R kafka:kafka /opt/kafka
Create directory
/var/lib/zookeeperfor storing ZooKeeper data and set its ownership to thekafkauser.sudo mkdir /var/lib/zookeeper sudo chown -R kafka:kafka /var/lib/zookeeper
Create directory
/var/lib/kafkafor storing Kafka data and set its ownership to thekafkauser.sudo mkdir /var/lib/kafka sudo chown -R kafka:kafka /var/lib/kafka
2.4. Data storage considerations
An efficient data storage infrastructure is essential to the optimal performance of AMQ Streams.
Block storage is required. File storage, such as NFS, does not work with Kafka.
Choose from one of the following options for your block storage:
- Cloud-based block storage solutions, such as Amazon Elastic Block Store (EBS)
- Local storage
- Storage Area Network (SAN) volumes accessed by a protocol such as Fibre Channel or iSCSI
2.4.1. File systems
Kafka uses a file system for storing messages. AMQ Streams is compatible with the XFS and ext4 file systems, which are commonly used with Kafka. Consider the underlying architecture and requirements of your deployment when choosing and setting up your file system.
For more information, refer to Filesystem Selection in the Kafka documentation.
2.4.2. Apache Kafka and ZooKeeper storage
Use separate disks for Apache Kafka and ZooKeeper.
Kafka supports JBOD (Just a Bunch of Disks) storage, a data storage configuration of multiple disks or volumes. JBOD provides increased data storage for Kafka brokers. It can also improve performance.
Solid-state drives (SSDs), though not essential, can improve the performance of Kafka in large clusters where data is sent to and received from multiple topics asynchronously. SSDs are particularly effective with ZooKeeper, which requires fast, low latency data access.
You do not need to provision replicated storage because Kafka and ZooKeeper both have built-in data replication.
Additional resources
2.5. Running a single-node Kafka cluster
This procedure shows how to run a basic AMQ Streams cluster consisting of a single Apache ZooKeeper node and a single Apache Kafka node, both running on the same host. The default configuration files are used for ZooKeeper and Kafka.
A single node AMQ Streams cluster does not provide reliability and high availability and is suitable only for development purposes.
Prerequisites
- AMQ Streams is installed on the host
Running the cluster
Edit the ZooKeeper configuration file
/opt/kafka/config/zookeeper.properties. Set thedataDiroption to/var/lib/zookeeper/:dataDir=/var/lib/zookeeper/
Edit the Kafka configuration file
/opt/kafka/config/server.properties. Set thelog.dirsoption to/var/lib/kafka/:log.dirs=/var/lib/kafka/
Switch to the
kafkauser:su - kafka
Start ZooKeeper:
/opt/kafka/bin/zookeeper-server-start.sh -daemon /opt/kafka/config/zookeeper.properties
Check that ZooKeeper is running:
jcmd | grep zookeeper
Returns:
number org.apache.zookeeper.server.quorum.QuorumPeerMain /opt/kafka/config/zookeeper.propertiesStart Kafka:
/opt/kafka/bin/kafka-server-start.sh -daemon /opt/kafka/config/server.properties
Check that Kafka is running:
jcmd | grep kafka
Returns:
number kafka.Kafka /opt/kafka/config/server.properties
2.6. Sending and receiving messages from a topic
This procedure describes how to start the Kafka console producer and consumer clients and use them to send and receive several messages.
A new topic is automatically created in step one. Topic auto-creation is controlled using the auto.create.topics.enable configuration property (set to true by default). Alternatively, you can configure and create topics before using the cluster. For more information, see Topics.
Procedure
Start the Kafka console producer and configure it to send messages to a new topic:
/opt/kafka/bin/kafka-console-producer.sh --broker-list <bootstrap_address> --topic <topic-name>
For example:
/opt/kafka/bin/kafka-console-producer.sh --broker-list localhost:9092 --topic my-topic
Enter several messages into the console. Press Enter to send each individual message to your new topic:
>message 1
>message 2
>message 3
>message 4
When Kafka creates a new topic automatically, you might receive a warning that the topic does not exist:
WARN Error while fetching metadata with correlation id 39 :
{4-3-16-topic1=LEADER_NOT_AVAILABLE} (org.apache.kafka.clients.NetworkClient)
The warning should not reappear after you send further messages.
In a new terminal window, start the Kafka console consumer and configure it to read messages from the beginning of your new topic.
/opt/kafka/bin/kafka-console-consumer.sh --bootstrap-server <bootstrap_address> --topic <topic-name> --from-beginning
For example:
/opt/kafka/bin/kafka-console-consumer.sh --bootstrap-server localhost:9092 --topic my-topic --from-beginning
The incoming messages display in the consumer console.
- Switch to the producer console and send additional messages. Check that they display in the consumer console.
- Stop the Kafka console producer and then the consumer by pressing Ctrl+C.
2.7. Stopping the AMQ Streams services
You can stop the Kafka and ZooKeeper services by running a script. All connections to the Kafka and ZooKeeper services will be terminated.
Prerequisites
- AMQ Streams is installed on the host
- ZooKeeper and Kafka are up and running
Procedure
Stop the Kafka broker.
su - kafka
/opt/kafka/bin/kafka-server-stop.sh
Confirm that the Kafka broker is stopped.
jcmd | grep kafka
Stop ZooKeeper.
su - kafka
/opt/kafka/bin/zookeeper-server-stop.sh
Chapter 3. Running a multi-node environment
A multi-node environment comprises a number of nodes that operate as a cluster. You can have a cluster of replicated ZooKeeper nodes and a cluster of broker nodes, with topic replication across the brokers.
Multi-node environments offer stability and availability.
3.1. Running a multi-node ZooKeeper cluster
Configure and run ZooKeeper as a multi-node cluster.
Prerequisites
- AMQ Streams is installed on all hosts which will be used as ZooKeeper cluster nodes.
Running the cluster
Create the
myidfile in/var/lib/zookeeper/. Enter ID1for the first ZooKeeper node,2for the second ZooKeeper node, and so on.su - kafka echo "<NodeID>" > /var/lib/zookeeper/myidFor example:
su - kafka
echo "1" > /var/lib/zookeeper/myid
Edit the ZooKeeper
/opt/kafka/config/zookeeper.propertiesconfiguration file for the following:-
Set the option
dataDirto/var/lib/zookeeper/. -
Configure the
initLimitandsyncLimitoptions. -
Configure the
reconfigEnabledandstandaloneEnabledoptions. Add a list of all ZooKeeper nodes. The list should include also the current node.
Example configuration for a node of ZooKeeper cluster with five members
tickTime=2000
dataDir=/var/lib/zookeeper/
initLimit=5
syncLimit=2
reconfigEnabled=true
standaloneEnabled=false
listener.security.protocol.map=PLAINTEXT:PLAINTEXT,REPLICATION:PLAINTEXT

server.1=172.17.0.1:2888:3888:participant;172.17.0.1:2181
server.2=172.17.0.2:2888:3888:participant;172.17.0.2:2181
server.3=172.17.0.3:2888:3888:participant;172.17.0.3:2181
server.4=172.17.0.4:2888:3888:participant;172.17.0.4:2181
server.5=172.17.0.5:2888:3888:participant;172.17.0.5:2181
-
Set the option
Start ZooKeeper with the default configuration file.
su - kafka
/opt/kafka/bin/zookeeper-server-start.sh -daemon /opt/kafka/config/zookeeper.properties
Verify that ZooKeeper is running.
jcmd | grep zookeeper
Returns:
number org.apache.zookeeper.server.quorum.QuorumPeerMain /opt/kafka/config/zookeeper.properties
- Repeat this procedure on all the nodes of the cluster.
Verify that all nodes are members of the cluster by sending a
statcommand to each of the nodes using thencatutility.Use ncat stat to check the node status
echo stat | ncat localhost 2181
To use four-letter word commands, like
stat, you need to specify4lw.commands.whitelist=*inzookeeper.properties.The output shows that a node is either a
leaderorfollower.Example output from the ncat command
ZooKeeper version: 3.4.13-2d71af4dbe22557fda74f9a9b4309b15a7487f03, built on 06/29/2018 00:39 GMT
Clients:
 /0:0:0:0:0:0:0:1:59726[0](queued=0,recved=1,sent=0)

Latency min/avg/max: 0/0/0
Received: 2
Sent: 1
Connections: 1
Outstanding: 0
Zxid: 0x200000000
Mode: follower
Node count: 4
3.2. Running a multi-node Kafka cluster
Configure and run Kafka as a multi-node cluster.
Prerequisites
- AMQ Streams is installed on all hosts which will be used as Kafka brokers.
- A ZooKeeper cluster is configured and running.
Running the cluster
For each Kafka broker in your AMQ Streams cluster:
Edit the
/opt/kafka/config/server.propertiesKafka configuration file as follows:-
Set the
broker.idfield to0for the first broker,1for the second broker, and so on. -
Configure the details for connecting to ZooKeeper in the
zookeeper.connectoption. - Configure the Kafka listeners.
Set the directories where the commit logs should be stored in the
logs.dirdirectory.Here we see an example configuration for a Kafka broker:
broker.id=0
zookeeper.connect=zoo1.my-domain.com:2181,zoo2.my-domain.com:2181,zoo3.my-domain.com:2181
listeners=REPLICATION://:9091,PLAINTEXT://:9092
listener.security.protocol.map=PLAINTEXT:PLAINTEXT,REPLICATION:PLAINTEXT
inter.broker.listener.name=REPLICATION
log.dirs=/var/lib/kafka
In a typical installation where each Kafka broker is running on identical hardware, only the
broker.idconfiguration property will differ between each broker config.
-
Set the
Start the Kafka broker with the default configuration file.
su - kafka
/opt/kafka/bin/kafka-server-start.sh -daemon /opt/kafka/config/server.properties
Verify that the Kafka broker is running.
jcmd | grep Kafka
Returns:
number kafka.Kafka /opt/kafka/config/server.properties
Verify that all nodes are members of the Kafka cluster by sending a
dumpcommand to one of the ZooKeeper nodes using thencatutility.Use ncat dump to check all Kafka brokers registered in ZooKeeper
echo dump | ncat zoo1.my-domain.com 2181
To use four-letter word commands, like
dump, you need to specify4lw.commands.whitelist=*inzookeeper.properties.The output must contain all Kafka brokers you just configured and started.
Example output from the ncat command for a Kafka cluster with 3 nodes
SessionTracker dump:
org.apache.zookeeper.server.quorum.LearnerSessionTracker@28848ab9
ephemeral nodes dump:
Sessions with Ephemerals (3):
0x20000015dd00000:
        /brokers/ids/1
0x10000015dc70000:
        /controller
        /brokers/ids/0
0x10000015dc70001:
        /brokers/ids/2
3.3. Performing a graceful rolling restart of Kafka brokers
This procedure shows how to do a graceful rolling restart of brokers in a multi-node cluster. A rolling restart is usually required following an upgrade or change to the Kafka cluster configuration properties.
Some broker configurations do not need a restart of the broker. For more information, see Updating Broker Configs in the Apache Kafka documentation.
After you perform a restart of a broker, check for under-replicated topic partitions to make sure that replica partitions have caught up.
You can only perform a graceful restart, with no loss of availability, if you are replicating topics and ensuring that at least one replica is in sync. For a multi-node cluster, the standard approach is to have a topic replication factor of at least 3 and a minimum number of in-sync replicas set to 1 less than the replication factor. If you are using acks=all in your producer configuration for data durability, check that the broker you restarted is in sync with all the partitions it’s replicating before restarting the next broker.
Single-node clusters are unavailable during a restart, since all partitions are on the same broker.
Prerequisites
- AMQ Streams is installed on all hosts which will be used as Kafka brokers.
- A ZooKeeper cluster is configured and running.
The Kafka cluster is operating as expected.
Check for under-replicated partitions or any other issues affecting broker operation. The steps in this procedure describe how to check for under-replicated partitions.
Procedure
Perform the following steps on each Kafka broker. Complete the steps on the first broker before moving on to the next. Perform the steps on the broker that’s the active controller last. Otherwise, the active controller needs to change on more than one restart.
Stop the Kafka broker:
/opt/kafka/bin/kafka-server-stop.sh
Make any changes to the broker configuration that require a restart after completion.
For further information, see the following:
Restart the Kafka broker:
/opt/kafka/bin/kafka-server-start.sh -daemon /opt/kafka/config/server.properties
Check that Kafka is running:
jcmd | grep kafka
Returns:
number kafka.Kafka /opt/kafka/config/server.properties
Verify that all nodes are members of the Kafka cluster by sending a
dumpcommand to one of the ZooKeeper nodes using thencatutility.Use ncat dump to check all Kafka brokers registered in ZooKeeper
echo dump | ncat zoo1.my-domain.com 2181
To use four-letter word commands, like
dump, you need to specify4lw.commands.whitelist=*inzookeeper.properties.The output must contain the Kafka broker you started.
Example output from the ncat command for a Kafka cluster with 3 nodes
SessionTracker dump:
org.apache.zookeeper.server.quorum.LearnerSessionTracker@28848ab9
ephemeral nodes dump:
Sessions with Ephemerals (3):
0x20000015dd00000:
        /brokers/ids/1
0x10000015dc70000:
        /controller
        /brokers/ids/0
0x10000015dc70001:
        /brokers/ids/2
Wait until the broker has zero under-replicated partitions. You can check from the command line or use metrics.
Use the
kafka-topics.shcommand with the--under-replicated-partitionsparameter:/opt/kafka/bin/kafka-topics.sh --bootstrap-server <bootstrap_address> --describe --under-replicated-partitionsFor example:
/opt/kafka/bin/kafka-topics.sh --bootstrap-server localhost:9092 --describe --under-replicated-partitions
The command provides a list of topics with under-replicated partitions in a cluster.
Topics with under-replicated partitions
Topic: topic3 Partition: 4 Leader: 2 Replicas: 2,3 Isr: 2
Topic: topic3 Partition: 5 Leader: 3 Replicas: 1,2 Isr: 1
Topic: topic1 Partition: 1 Leader: 3 Replicas: 1,3 Isr: 3
# …
Under-replicated partitions are listed if the ISR (in-sync replica) count is less than the number of replicas. If a list is not returned, there are no under-replicated partitions.
Use the
UnderReplicatedPartitionsmetric:kafka.server:type=ReplicaManager,name=UnderReplicatedPartitions
The metric provides a count of partitions where replicas have not caught up. You wait until the count is zero.
TipUse the Kafka Exporter to create an alert when there are one or more under-replicated partitions for a topic.
Checking logs when restarting
If a broker fails to start, check the application logs for information. You can also check the status of a broker shutdown and restart in the /opt/kafka/logs/server.log application log.
Log for the successful shutdown of a broker
# ...
[2022-06-08 14:32:29,885] INFO Terminating process due to signal SIGTERM (org.apache.kafka.common.utils.LoggingSignalHandler)
[2022-06-08 14:32:29,886] INFO [KafkaServer id=0] shutting down (kafka.server.KafkaServer)
[2022-06-08 14:32:29,887] INFO [KafkaServer id=0] Starting controlled shutdown (kafka.server.KafkaServer)
[2022-06-08 14:32:29,896] INFO [KafkaServer id=0] Controlled shutdown request returned successfully after 6ms (kafka.server.KafkaServer)
# ...
Log for the successful restart of a broker
# ...
[2022-06-08 14:39:35,245] INFO [KafkaServer id=0] started (kafka.server.KafkaServer)
# ...
Chapter 4. Running Kafka in KRaft mode (development preview)
When you run AMQ Streams in KRaft (Kafka Raft metadata) mode, Kafka clusters are managed by an internal quorum of controllers instead of ZooKeeper.
Apache Kafka is in the process of phasing out the need for ZooKeeper. KRaft mode is now available to try. You can deploy a Kafka cluster in KRaft mode without ZooKeeper.
KRaft mode is experimental, intended only for development and testing, and must not be enabled for a production environment.
Currently, the KRaft mode in AMQ Streams has the following major limitations:
- Moving from Kafka clusters with ZooKeeper to KRaft clusters or the other way around is not supported.
- Upgrades and downgrades of Apache Kafka versions are not supported.
- SCRAM-SHA-512 authentication is not supported.
- JBOD storage with multiple disks is not supported.
- Many configuration options are still in development.
4.1. Using AMQ Streams with Kafka in KRaft mode
If you use Kafka in KRaft mode, you do not need to use ZooKeeper for cluster coordination or storing metadata. Kafka coordinates the cluster itself using brokers that act as controllers. Kafka also stores the metadata used to track the status of brokers and partitions.
To identify a cluster, create an ID. The ID is used when creating logs for the brokers you add to the cluster.
In the configuration of each broker node, specify the following:
- A node ID
- Broker roles
-
A list of brokers (or
voters) that act as controllers
A broker performs the role of broker, controller, or both.
- Broker role
- A broker, sometimes referred to as a node or server, orchestrates the storage and passing of messages.
- Controller role
- A controller coordinates the cluster and manages the tracking metadata.
You can use combined broker and controller nodes, though you might want to separate these functions. Brokers performing combined roles can be more efficient in simpler deployments.
You specify a list of controllers, configured as voters, using the node ID and connection details (hostname and port) for each controller.
4.2. Running a Kafka cluster in KRaft mode
Configure and run Kafka in KRaft mode. You can run Kafka in KRaft mode if you are using a single-node or multi-node Kafka cluster. Run a minimum of three broker and controller nodes for stability and availability.
You set roles for brokers so that they can also be controllers. You apply broker configuration, including the setting of roles, using a configuration properties file. Broker configuration differs according to role. KRaft provides three example broker configuration properties files.
-
/opt/kafka/config/kraft/broker.propertieshas example configuration for a broker role -
/opt/kafka/config/kraft/controller.propertieshas example configuration for a controller role -
/opt/kafka/config/kraft/server.propertieshas example configuration for a combined role
You can base your broker configuration on these example properties files. In this procedure, the example server.properties configuration is used.
Prerequisites
- AMQ Streams is installed on all hosts which will be used as Kafka brokers.
Procedure
Generate an ID for the Kafka cluster using the
kafka-storage tool:/opt/kafka/bin/kafka-storage.sh random-uuid
The command returns an ID. A cluster ID is required in KRaft mode.
Create a configuration properties file for each broker in the cluster.
You can base the file on the examples provided with Kafka.
Specify a role as
broker, `controllerorbroker, controllerFor example,
process.roles=broker, controller.Specify a unique
node.idfor each node in the cluster starting from0.For example,
node.id=1.Specify a list of
controller.quorum.votersin the format<node_id>@<hostname:port>.For example,
controller.quorum.voters=1@localhost:9093.
Set up log directories for each node in your Kafka cluster:
/opt/kafka/bin/kafka-storage.sh format -t <uuid> -c /opt/kafka/config/kraft/server.propertiesReturns:
Formatting /tmp/kraft-combined-logs
Replace <uuid> with the cluster ID you generated. Use the same ID for each node in your cluster.
Apply the broker configuration using the properties file you created for the broker.
The default log directory location specified in the
server.propertiesconfiguration file is/tmp/kraft-combined-logs. You can add a comma-separated list to set up multiple log directories.Start each Kafka broker.
/opt/kafka/bin/kafka-server-start.sh /opt/kafka/config/kraft/server.properties
Check that Kafka is running:
jcmd | grep kafka
Returns:
number kafka.Kafka /opt/kafka/config/kraft/server.properties
You can now create topics, and send and receive messages from the brokers.
For brokers passing messages, you can use topic replication across the brokers in a cluster for data durability. Configure topics to have a replication factor of at least three and a minimum number of in-sync replicas set to 1 less than the replication factor. For more information, see Section 6.7, “Creating a topic”.
Chapter 5. Configuring an AMQ Streams on RHEL deployment
Use the Kafka and ZooKeeper properties files to configure AMQ Streams.
- ZooKeeper
-
/kafka/config/zookeeper.properties - Kafka
-
/kafka/config/server.properties
The properties files are in the Java format, with each property on separate line in the following format:
<option> = <value>
Lines starting with # or ! will be treated as comments and will be ignored by AMQ Streams components.
# This is a comment
Values can be split into multiple lines by using \ directly before the newline / carriage return.
sasl.jaas.config=org.apache.kafka.common.security.plain.PlainLoginModule required \
    username="bob" \
    password="bobs-password";
After you save the changes in the properties files, you need to restart the Kafka broker or ZooKeeper. In a multi-node environment, you will need to repeat the process on each node in the cluster.
5.1. Using standard Kafka configuration properties
Use standard Kafka configuration properties to configure Kafka components.
The properties provide options to control and tune the configuration of the following Kafka components:
- Brokers
- Topics
- Clients (producers and consumers)
- Admin client
- Kafka Connect
- Kafka Streams
Broker and client parameters include options to configure authorization, authentication and encryption.
For AMQ Streams on OpenShift, some configuration properties are managed entirely by AMQ Streams and cannot be changed.
For further information on Kafka configuration properties and how to use the properties to tune your deployment, see the following guides:
5.2. Loading configuration values from environment variables
Use the Environment Variables Configuration Provider plugin to load configuration data from environment variables. You can use the Environment Variables Configuration Provider, for example, to load certificates or JAAS configuration from environment variables.
You can use the provider to load configuration data for all Kafka components, including producers and consumers. Use the provider, for example, to provide the credentials for Kafka Connect connector configuration.
Prerequisites
- AMQ Streams is downloaded and installed on the host
Environment Variables Configuration Provider JAR file
The JAR file is available from the AMQ Streams archive
Procedure
-
Add the Environment Variables Configuration Provider JAR file to the Kafka
libsdirectory. Initialize the Environment Variables Configuration Provider in the configuration properties file of the Kafka component. For example, to initialize the provider for Kafka, add the configuration to the
server.propertiesfile.Configuration to enable the Environment Variables Configuration Provider
config.providers=env
config.providers.env.class=io.strimzi.kafka.EnvVarConfigProvider
Add configuration to the properties file to load data from environment variables.
Configuration to load data from an environment variable
option=${env:<MY_ENV_VAR_NAME>}Use capitalized or upper-case environment variable naming conventions, such as
MY_ENV_VAR_NAME.- Save the changes.
Restart the Kafka component.
For information on restarting brokers in a multi-node cluster, see Section 3.3, “Performing a graceful rolling restart of Kafka brokers”.
5.3. Configuring ZooKeeper
Kafka uses ZooKeeper to store configuration data and for cluster coordination. It is strongly recommended to run a cluster of replicated ZooKeeper instances.
5.3.1. Basic configuration
The most important ZooKeeper configuration options are:
tickTime- ZooKeeper’s basic time unit in milliseconds. It is used for heartbeats and session timeouts. For example, minimum session timeout will be two ticks.
dataDir-
The directory where ZooKeeper stores its transaction logs and snapshots of its in-memory database. This should be set to the
/var/lib/zookeeper/directory that was created during installation. clientPort-
Port number where clients can connect. Defaults to
2181.
An example ZooKeeper configuration file named config/zookeeper.properties is located in the AMQ Streams installation directory. It is recommended to place the dataDir directory on a separate disk device to minimize the latency in ZooKeeper.
ZooKeeper configuration file should be located in /opt/kafka/config/zookeeper.properties. A basic example of the configuration file can be found below. The configuration file has to be readable by the kafka user.
tickTime=2000
dataDir=/var/lib/zookeeper/
clientPort=2181
5.3.2. ZooKeeper cluster configuration
In most production environments, we recommend you deploy a cluster of replicated ZooKeeper instances. A stable and highly available ZooKeeper cluster is important for running for a reliable ZooKeeper service. ZooKeeper clusters are also referred to as ensembles.
ZooKeeper clusters usually consist of an odd number of nodes. ZooKeeper requires that a majority of the nodes in the cluster are up and running. For example:
- In a cluster with three nodes, at least two of the nodes must be up and running. This means it can tolerate one node being down.
- In a cluster consisting of five nodes, at least three nodes must be available. This means it can tolerate two nodes being down.
- In a cluster consisting of seven nodes, at least four nodes must be available. This means it can tolerate three nodes being down.
Having more nodes in the ZooKeeper cluster delivers better resiliency and reliability of the whole cluster.
ZooKeeper can run in clusters with an even number of nodes. The additional node, however, does not increase the resiliency of the cluster. A cluster with four nodes requires at least three nodes to be available and can tolerate only one node being down. Therefore it has exactly the same resiliency as a cluster with only three nodes.
Ideally, the different ZooKeeper nodes should be located in different data centers or network segments. Increasing the number of ZooKeeper nodes increases the workload spent on cluster synchronization. For most Kafka use cases, a ZooKeeper cluster with 3, 5 or 7 nodes should be sufficient.
A ZooKeeper cluster with 3 nodes can tolerate only 1 unavailable node. This means that if a cluster node crashes while you are doing maintenance on another node your ZooKeeper cluster will be unavailable.
Replicated ZooKeeper configuration supports all configuration options supported by the standalone configuration. Additional options are added for the clustering configuration:
initLimit-
Amount of time to allow followers to connect and sync to the cluster leader. The time is specified as a number of ticks (see the
tickTimeoption for more details). syncLimit-
Amount of time for which followers can be behind the leader. The time is specified as a number of ticks (see the
tickTimeoption for more details). reconfigEnabled- Enables or disables dynamic reconfiguration. Must be enabled in order to add or remove servers to a ZooKeeper cluster.
standaloneEnabled- Enables or disables standalone mode, where ZooKeeper runs with only one server.
In addition to the options above, every configuration file should contain a list of servers which should be members of the ZooKeeper cluster. The server records should be specified in the format server.id=hostname:port1:port2, where:
id- The ID of the ZooKeeper cluster node.
hostname- The hostname or IP address where the node listens for connections.
port1- The port number used for intra-cluster communication.
port2- The port number used for leader election.
The following is an example configuration file of a ZooKeeper cluster with three nodes:
tickTime=2000
dataDir=/var/lib/zookeeper/
initLimit=5
syncLimit=2
reconfigEnabled=true
standaloneEnabled=false

server.1=172.17.0.1:2888:3888:participant;172.17.0.1:2181
server.2=172.17.0.2:2888:3888:participant;172.17.0.2:2181
server.3=172.17.0.3:2888:3888:participant;172.17.0.3:2181
To use four letter word commands, specify 4lw.commands.whitelist=* in zookeeper.properties.
myid files
Each node in the ZooKeeper cluster must be assigned a unique ID. Each node’s ID must be configured in a myid file and stored in the dataDir folder, like /var/lib/zookeeper/. The myid files should contain only a single line with the written ID as text. The ID can be any integer from 1 to 255. You must manually create this file on each cluster node. Using this file, each ZooKeeper instance will use the configuration from the corresponding server. line in the configuration file to configure its listeners. It will also use all other server. lines to identify other cluster members.
In the above example, there are three nodes, so each one will have a different myid with values 1, 2, and 3 respectively.
5.3.3. Authentication
By default, ZooKeeper does not use any form of authentication and allows anonymous connections. However, it supports Java Authentication and Authorization Service (JAAS) which can be used to set up authentication using Simple Authentication and Security Layer (SASL). ZooKeeper supports authentication using the DIGEST-MD5 SASL mechanism with locally stored credentials.
5.3.3.1. Authentication with SASL
JAAS is configured using a separate configuration file. It is recommended to place the JAAS configuration file in the same directory as the ZooKeeper configuration (/opt/kafka/config/). The recommended file name is zookeeper-jaas.conf. When using a ZooKeeper cluster with multiple nodes, the JAAS configuration file has to be created on all cluster nodes.
JAAS is configured using contexts. Separate parts such as the server and client are always configured with a separate context. The context is a configuration option and has the following format:
ContextName {
       param1
       param2;
};
SASL Authentication is configured separately for server-to-server communication (communication between ZooKeeper instances) and client-to-server communication (communication between Kafka and ZooKeeper). Server-to-server authentication is relevant only for ZooKeeper clusters with multiple nodes.
Server-to-Server authentication
For server-to-server authentication, the JAAS configuration file contains two parts:
- The server configuration
- The client configuration
When using DIGEST-MD5 SASL mechanism, the QuorumServer context is used to configure the authentication server. It must contain all the usernames to be allowed to connect together with their passwords in an unencrypted form. The second context, QuorumLearner, has to be configured for the client which is built into ZooKeeper. It also contains the password in an unencrypted form. An example of the JAAS configuration file for DIGEST-MD5 mechanism can be found below:
QuorumServer {
       org.apache.zookeeper.server.auth.DigestLoginModule required
       user_zookeeper="123456";
};

QuorumLearner {
       org.apache.zookeeper.server.auth.DigestLoginModule required
       username="zookeeper"
       password="123456";
};
In addition to the JAAS configuration file, you must enable the server-to-server authentication in the regular ZooKeeper configuration file by specifying the following options:
quorum.auth.enableSasl=true
quorum.auth.learnerRequireSasl=true
quorum.auth.serverRequireSasl=true
quorum.auth.learner.loginContext=QuorumLearner
quorum.auth.server.loginContext=QuorumServer
quorum.cnxn.threads.size=20
Use the KAFKA_OPTS environment variable to pass the JAAS configuration file to the ZooKeeper server as a Java property:
su - kafka
export KAFKA_OPTS="-Djava.security.auth.login.config=/opt/kafka/config/zookeeper-jaas.conf"; /opt/kafka/bin/zookeeper-server-start.sh -daemon /opt/kafka/config/zookeeper.properties
For more information about server-to-server authentication, see ZooKeeper wiki.
Client-to-Server authentication
Client-to-server authentication is configured in the same JAAS file as the server-to-server authentication. However, unlike the server-to-server authentication, it contains only the server configuration. The client part of the configuration has to be done in the client. For information on how to configure a Kafka broker to connect to ZooKeeper using authentication, see the Kafka installation section.
Add the Server context to the JAAS configuration file to configure client-to-server authentication. For DIGEST-MD5 mechanism it configures all usernames and passwords:
Server {
    org.apache.zookeeper.server.auth.DigestLoginModule required
    user_super="123456"
    user_kafka="123456"
    user_someoneelse="123456";
};
After configuring the JAAS context, enable the client-to-server authentication in the ZooKeeper configuration file by adding the following line:
requireClientAuthScheme=sasl
authProvider.1=org.apache.zookeeper.server.auth.SASLAuthenticationProvider
authProvider.2=org.apache.zookeeper.server.auth.SASLAuthenticationProvider
authProvider.3=org.apache.zookeeper.server.auth.SASLAuthenticationProvider
You must add the authProvider.<ID> property for every server that is part of the ZooKeeper cluster.
Use the KAFKA_OPTS environment variable to pass the JAAS configuration file to the ZooKeeper server as a Java property:
su - kafka
export KAFKA_OPTS="-Djava.security.auth.login.config=/opt/kafka/config/zookeeper-jaas.conf"; /opt/kafka/bin/zookeeper-server-start.sh -daemon /opt/kafka/config/zookeeper.properties
For more information about configuring ZooKeeper authentication in Kafka brokers, see Section 5.4.5, “ZooKeeper authentication”.
5.3.3.2. Enabling server-to-server authentication using DIGEST-MD5
This procedure describes how to enable authentication using the SASL DIGEST-MD5 mechanism between the nodes of the ZooKeeper cluster.
Prerequisites
- AMQ Streams is installed on the host
- ZooKeeper cluster is configured with multiple nodes.
Enabling SASL DIGEST-MD5 authentication
On all ZooKeeper nodes, create or edit the
/opt/kafka/config/zookeeper-jaas.confJAAS configuration file and add the following contexts:QuorumServer { org.apache.zookeeper.server.auth.DigestLoginModule required user_<Username>="<Password>"; }; QuorumLearner { org.apache.zookeeper.server.auth.DigestLoginModule required username="<Username>" password="<Password>"; };The username and password must be the same in both JAAS contexts. For example:
QuorumServer {
       org.apache.zookeeper.server.auth.DigestLoginModule required
       user_zookeeper="123456";
};

QuorumLearner {
       org.apache.zookeeper.server.auth.DigestLoginModule required
       username="zookeeper"
       password="123456";
};
On all ZooKeeper nodes, edit the
/opt/kafka/config/zookeeper.propertiesZooKeeper configuration file and set the following options:quorum.auth.enableSasl=true quorum.auth.learnerRequireSasl=true quorum.auth.serverRequireSasl=true quorum.auth.learner.loginContext=QuorumLearner quorum.auth.server.loginContext=QuorumServer quorum.cnxn.threads.size=20
Restart all ZooKeeper nodes one by one. To pass the JAAS configuration to ZooKeeper, use the
KAFKA_OPTSenvironment variable.su - kafka export KAFKA_OPTS="-Djava.security.auth.login.config=/opt/kafka/config/zookeeper-jaas.conf"; /opt/kafka/bin/zookeeper-server-start.sh -daemon /opt/kafka/config/zookeeper.properties
5.3.3.3. Enabling Client-to-server authentication using DIGEST-MD5
This procedure describes how to enable authentication using the SASL DIGEST-MD5 mechanism between ZooKeeper clients and ZooKeeper.
Prerequisites
- AMQ Streams is installed on the host
- ZooKeeper cluster is configured and running.
Enabling SASL DIGEST-MD5 authentication
On all ZooKeeper nodes, create or edit the
/opt/kafka/config/zookeeper-jaas.confJAAS configuration file and add the following context:Server { org.apache.zookeeper.server.auth.DigestLoginModule required user_super="<SuperUserPassword>" user<Username1>_="<Password1>" user<USername2>_="<Password2>"; };The
superautomatically has administrator priviledges. The file can contain multiple users, but only one additional user is required by the Kafka brokers. The recommended name for the Kafka user iskafka.The following example shows the
Servercontext for client-to-server authentication:Server { org.apache.zookeeper.server.auth.DigestLoginModule required user_super="123456" user_kafka="123456"; };On all ZooKeeper nodes, edit the
/opt/kafka/config/zookeeper.propertiesZooKeeper configuration file and set the following options:requireClientAuthScheme=sasl authProvider.<IdOfBroker1>=org.apache.zookeeper.server.auth.SASLAuthenticationProvider authProvider.<IdOfBroker2>=org.apache.zookeeper.server.auth.SASLAuthenticationProvider authProvider.<IdOfBroker3>=org.apache.zookeeper.server.auth.SASLAuthenticationProvider
The
authProvider.<ID>property has to be added for every node which is part of the ZooKeeper cluster. An example three-node ZooKeeper cluster configuration must look like the following:requireClientAuthScheme=sasl authProvider.1=org.apache.zookeeper.server.auth.SASLAuthenticationProvider authProvider.2=org.apache.zookeeper.server.auth.SASLAuthenticationProvider authProvider.3=org.apache.zookeeper.server.auth.SASLAuthenticationProvider
Restart all ZooKeeper nodes one by one. To pass the JAAS configuration to ZooKeeper, use the
KAFKA_OPTSenvironment variable.su - kafka export KAFKA_OPTS="-Djava.security.auth.login.config=/opt/kafka/config/zookeeper-jaas.conf"; /opt/kafka/bin/zookeeper-server-start.sh -daemon /opt/kafka/config/zookeeper.properties
5.3.4. Authorization
ZooKeeper supports access control lists (ACLs) to protect data stored inside it. Kafka brokers can automatically configure the ACL rights for all ZooKeeper records they create so no other ZooKeeper user can modify them.
For more information about enabling ZooKeeper ACLs in Kafka brokers, see Section 5.4.7, “ZooKeeper authorization”.
5.3.5. TLS
ZooKeeper supports TLS for encryption or authentication.
5.3.6. Additional configuration options
You can set the following additional ZooKeeper configuration options based on your use case:
maxClientCnxns- The maximum number of concurrent client connections to a single member of the ZooKeeper cluster.
autopurge.snapRetainCount-
Number of snapshots of ZooKeeper’s in-memory database which will be retained. Default value is
3. autopurge.purgeInterval-
The time interval in hours for purging snapshots. The default value is
0and this option is disabled.
All available configuration options can be found in the ZooKeeper documentation.
5.3.7. Logging
ZooKeeper is using log4j as their logging infrastructure. Logging configuration is by default read from the log4j.properties configuration file which should be placed either in the /opt/kafka/config/ directory or in the classpath. The location and name of the configuration file can be changed using the Java property log4j.configuration which can be passed to ZooKeeper using the KAFKA_LOG4J_OPTS environment variable:
su - kafka
export KAFKA_LOG4J_OPTS="-Dlog4j.configuration=file:/my/path/to/log4j.properties"; /opt/kafka/bin/zookeeper-server-start.sh -daemon /opt/kafka/config/zookeeper.properties
For more information about Log4j configurations, see Log4j documentation.
5.4. Configuring Kafka
Kafka uses a properties file to store static configuration. The recommended location for the configuration file is /opt/kafka/config/server.properties. The configuration file has to be readable by the kafka user.
AMQ Streams ships an example configuration file that highlights various basic and advanced features of the product. It can be found under config/server.properties in the AMQ Streams installation directory.
This chapter explains the most important configuration options.
5.4.1. ZooKeeper
Kafka brokers need ZooKeeper to store some parts of their configuration as well as to coordinate the cluster (for example to decide which node is a leader for which partition). Connection details for the ZooKeeper cluster are stored in the configuration file. The field zookeeper.connect contains a comma-separated list of hostnames and ports of members of the zookeeper cluster.
For example:
zookeeper.connect=zoo1.my-domain.com:2181,zoo2.my-domain.com:2181,zoo3.my-domain.com:2181
Kafka will use these addresses to connect to the ZooKeeper cluster. With this configuration, all Kafka znodes will be created directly in the root of ZooKeeper database. Therefore, such a ZooKeeper cluster could be used only for a single Kafka cluster. To configure multiple Kafka clusters to use single ZooKeeper cluster, specify a base (prefix) path at the end of the ZooKeeper connection string in the Kafka configuration file:
zookeeper.connect=zoo1.my-domain.com:2181,zoo2.my-domain.com:2181,zoo3.my-domain.com:2181/my-cluster-1
5.4.2. Listeners
Listeners are used to connect to Kafka brokers. Each Kafka broker can be configured to use multiple listeners. Each listener requires a different configuration so it can listen on a different port or network interface.
To configure listeners, edit the listeners property in the configuration file (/opt/kafka/config/server.properties). Add listeners to the listeners property as a comma-separated list. Configure each property as follows:
<listenerName>://<hostname>:<port>
If <hostname> is empty, Kafka uses the java.net.InetAddress.getCanonicalHostName() class as the hostname.
Example configuration for multiple listeners
listeners=internal-1://:9092,internal-2://:9093,replication://:9094
When a Kafka client wants to connect to a Kafka cluster, it first connects to the bootstrap server, which is one of the cluster nodes. The bootstrap server provides the client with a list of all the brokers in the cluster, and the client connects to each one individually. The list of brokers is based on the configured listeners.
Advertised listeners
Optionally, you can use the advertised.listeners property to provide the client with a different set of listener addresses than those given in the listeners property. This is useful if additional network infrastructure, such as a proxy, is between the client and the broker, or an external DNS name is being used instead of an IP address.
The advertised.listeners property is formatted in the same way as the listeners property.
Example configuration for advertised listeners
listeners=internal-1://:9092,internal-2://:9093
advertised.listeners=internal-1://my-broker-1.my-domain.com:1234,internal-2://my-broker-1.my-domain.com:1235
The names of the advertised listeners must match those listed in the listeners property.
Inter-broker listeners
Inter-broker listeners are used for communication between Kafka brokers. Inter-broker communication is required for:
- Coordinating workloads between different brokers
- Replicating messages between partitions stored on different brokers
- Handling administrative tasks from the controller, such as partition leadership changes
The inter-broker listener can be assigned to a port of your choice. When multiple listeners are configured, you can define the name of the inter-broker listener in the inter.broker.listener.name property.
Here, the inter-broker listener is named as REPLICATION:
listeners=REPLICATION://0.0.0.0:9091
inter.broker.listener.name=REPLICATION
Control plane listeners
By default, communication between the controller and other brokers uses the inter-broker listener. The controller is responsible for coordinating administrative tasks, such as partition leadership changes.
You can enable a dedicated control plane listener for controller connections. The control plane listener can be assigned to a port of your choice.
To enable the control plane listener, configure the control.plane.listener.name property with a listener name:
listeners=CONTROLLER://0.0.0.0:9090,REPLICATION://0.0.0.0:9091
...
control.plane.listener.name=CONTROLLER
Enabling the control plane listener might improve cluster performance because controller communications are not delayed by data replication across brokers. Data replication continues through the inter-broker listener.
If control.plane.listener is not configured, controller connections use the inter-broker listener.
5.4.3. Commit logs
Apache Kafka stores all records it receives from producers in commit logs. The commit logs contain the actual data, in the form of records, that Kafka needs to deliver. These are not the application log files which record what the broker is doing.
Log directories
You can configure log directories using the log.dirs property file to store commit logs in one or multiple log directories. It should be set to /var/lib/kafka directory created during installation:
log.dirs=/var/lib/kafka
For performance reasons, you can configure log.dirs to multiple directories and place each of them on a different physical device to improve disk I/O performance. For example:
log.dirs=/var/lib/kafka1,/var/lib/kafka2,/var/lib/kafka3
5.4.4. Broker ID
Broker ID is a unique identifier for each broker in the cluster. You can assign an integer greater than or equal to 0 as broker ID. The broker ID is used to identify the brokers after restarts or crashes and it is therefore important that the id is stable and does not change over time. The broker ID is configured in the broker properties file:
broker.id=1
5.4.5. ZooKeeper authentication
By default, connections between ZooKeeper and Kafka are not authenticated. However, Kafka and ZooKeeper support Java Authentication and Authorization Service (JAAS) which can be used to set up authentication using Simple Authentication and Security Layer (SASL). ZooKeeper supports authentication using the DIGEST-MD5 SASL mechanism with locally stored credentials.
5.4.5.1. JAAS Configuration
SASL authentication for ZooKeeper connections has to be configured in the JAAS configuration file. By default, Kafka will use the JAAS context named Client for connecting to ZooKeeper. The Client context should be configured in the /opt/kafka/config/jass.conf file. The context has to enable the PLAIN SASL authentication, as in the following example:
Client {
    org.apache.kafka.common.security.plain.PlainLoginModule required
    username="kafka"
    password="123456";
};
5.4.5.2. Enabling ZooKeeper authentication
This procedure describes how to enable authentication using the SASL DIGEST-MD5 mechanism when connecting to ZooKeeper.
Prerequisites
- Client-to-server authentication is enabled in ZooKeeper
Enabling SASL DIGEST-MD5 authentication
On all Kafka broker nodes, create or edit the
/opt/kafka/config/jaas.confJAAS configuration file and add the following context:Client { org.apache.kafka.common.security.plain.PlainLoginModule required username="<Username>" password="<Password>"; };The username and password should be the same as configured in ZooKeeper.
Following example shows the
Clientcontext:Client { org.apache.kafka.common.security.plain.PlainLoginModule required username="kafka" password="123456"; };Restart all Kafka broker nodes one by one. To pass the JAAS configuration to Kafka brokers, use the
KAFKA_OPTSenvironment variable.su - kafka export KAFKA_OPTS="-Djava.security.auth.login.config=/opt/kafka/config/jaas.conf"; /opt/kafka/bin/kafka-server-start.sh -daemon /opt/kafka/config/server.properties
For information on restarting brokers in a multi-node cluster, see Section 3.3, “Performing a graceful rolling restart of Kafka brokers”.
Additional resources
5.4.6. Authorization
Authorization in Kafka brokers is implemented using authorizer plugins.
In this section we describe how to use the AclAuthorizer plugin provided with Kafka.
Alternatively, you can use your own authorization plugins. For example, if you are using OAuth 2.0 token-based authentication, you can use OAuth 2.0 authorization.
5.4.6.1. Simple ACL authorizer
Authorizer plugins, including AclAuthorizer, are enabled through the authorizer.class.name property:
authorizer.class.name=kafka.security.auth.AclAuthorizer
A fully-qualified name is required for the chosen authorizer. For AclAuthorizer, the fully-qualified name is kafka.security.auth.AclAuthorizer.
5.4.6.1.1. ACL rules
AclAuthorizer uses ACL rules to manage access to Kafka brokers.
ACL rules are defined in the format:
Principal P is allowed / denied operation O on Kafka resource R from host H
For example, a rule might be set so that user:
John can view the topic comments from host 127.0.0.1
Host is the IP address of the machine that John is connecting from.
In most cases, the user is a producer or consumer application:
Consumer01 can write to the consumer group accounts from host 127.0.0.1
If ACL rules are not present
If ACL rules are not present for a given resource, all actions are denied. This behavior can be changed by setting the property allow.everyone.if.no.acl.found to true in the Kafka configuration file /opt/kafka/config/server.properties.
5.4.6.1.2. Principals
A principal represents the identity of a user. The format of the ID depends on the authentication mechanism used by clients to connect to Kafka:
-
User:ANONYMOUSwhen connected without authentication. User:<username>when connected using simple authentication mechanisms, such as PLAIN or SCRAM.For example
User:adminorUser:user1.User:<DistinguishedName>when connected using TLS client authentication.For example
User:CN=user1,O=MyCompany,L=Prague,C=CZ.-
User:<Kerberos username>when connected using Kerberos.
The DistinguishedName is the distinguished name from the client certificate.
The Kerberos username is the primary part of the Kerberos principal, which is used by default when connecting using Kerberos. You can use the sasl.kerberos.principal.to.local.rules property to configure how the Kafka principal is built from the Kerberos principal.
5.4.6.1.3. Authentication of users
To use authorization, you need to have authentication enabled and used by your clients. Otherwise, all connections will have the principal User:ANONYMOUS.
For more information on methods of authentication, see Encryption and authentication.
5.4.6.1.4. Super users
Super users are allowed to take all actions regardless of the ACL rules.
Super users are defined in the Kafka configuration file using the property super.users.
For example:
super.users=User:admin,User:operator
5.4.6.1.5. Replica broker authentication
When authorization is enabled, it is applied to all listeners and all connections. This includes the inter-broker connections used for replication of data between brokers. If enabling authorization, therefore, ensure that you use authentication for inter-broker connections and give the users used by the brokers sufficient rights. For example, if authentication between brokers uses the kafka-broker user, then super user configuration must include the username super.users=User:kafka-broker.
5.4.6.1.6. Supported resources
You can apply Kafka ACLs to these types of resource:
- Topics
- Consumer groups
- The cluster
- TransactionId
- DelegationToken
5.4.6.1.7. Supported operations
AclAuthorizer authorizes operations on resources.
Fields with X in the following table mark the supported operations for each resource.
Table 5.1. Supported operations for a resource
| Topics | Consumer Groups | Cluster | |
|---|---|---|---|
| Read | X | X | |
| Write | X | ||
| Create | X | ||
| Delete | X | ||
| Alter | X | ||
| Describe | X | X | X |
| ClusterAction | X | ||
| All | X | X | X |
5.4.6.1.8. ACL management options
ACL rules are managed using the bin/kafka-acls.sh utility, which is provided as part of the Kafka distribution package.
Use kafka-acls.sh parameter options to add, list and remove ACL rules, and perform other functions.
The parameters require a double-hyphen convention, such as --add.
| Option | Type | Description | Default |
|---|---|---|---|
|
| Action | Add ACL rule. | |
|
| Action | Remove ACL rule. | |
|
| Action | List ACL rules. | |
|
| Action | Fully-qualified class name of the authorizer. |
|
|
| Configuration | Key/value pairs passed to the authorizer for initialization.
For | |
|
| Resource | Host/port pairs to connect to the Kafka cluster. |
Use this option or the |
|
| Resource |
Configuration property file to pass to the Admin Client, which is used in conjunction with the | |
|
| Resource | Specifies a cluster as an ACL resource. | |
|
| Resource | Specifies a topic name as an ACL resource.
An asterisk (
A single command can specify multiple | |
|
| Resource | Specifies a consumer group name as an ACL resource.
A single command can specify multiple | |
|
| Resource | Specifies a transactional ID as an ACL resource. Transactional delivery means that all messages sent by a producer to multiple partitions must be successfully delivered or none of them.
An asterisk ( | |
|
| Resource | Specifies a delegation token as an ACL resource.
An asterisk ( | |
|
| Configuration |
Specifies a type of resource pattern for the
Use
Use |
|
|
| Principal | Principal added to an allow ACL rule.
A single command can specify multiple | |
|
| Principal | Principal added to a deny ACL rule.
A single command can specify multiple | |
|
| Principal |
Principal name used with the
A single command can specify multiple | |
|
| Host |
IP address that allows access to the principals listed in Hostnames or CIDR ranges are not supported. |
If |
|
| Host |
IP address that denies access to the principals listed in Hostnames or CIDR ranges are not supported. |
if |
|
| Operation | Allows or denies an operation.
A single command can specify multipleMultiple | All |
|
| Shortcut | A shortcut to allow or deny all operations needed by a message producer (WRITE and DESCRIBE on topic, CREATE on cluster). | |
|
| Shortcut | A shortcut to allow or deny all operations needed by a message consumer (READ and DESCRIBE on topic, READ on consumer group). | |
|
| Shortcut |
A shortcut to enable idempotence when used with the Idepmotence is enabled automatically if the producer is authorized to send messages based on a specific transactional ID. | |
|
| Shortcut | A shortcut to accept all queries and do not prompt. |
5.4.6.2. Enabling authorization
This procedure describes how to enable the AclAuthorizer plugin for authorization in Kafka brokers.
Prerequisites
- AMQ Streams is installed on all hosts used as Kafka brokers.
Procedure
Edit the
/opt/kafka/config/server.propertiesKafka configuration file to use theAclAuthorizer.authorizer.class.name=kafka.security.auth.AclAuthorizer
- (Re)start the Kafka brokers.
5.4.6.3. Adding ACL rules
AclAuthorizer uses Access Control Lists (ACLs), which define a set of rules describing what users can and cannot do.
This procedure describes how to add ACL rules when using the AclAuthorizer plugin in Kafka brokers.
Rules are added using the kafka-acls.sh utility and stored in ZooKeeper.
Prerequisites
- AMQ Streams is installed on all hosts used as Kafka brokers.
- Authorization is enabled in Kafka brokers.
Procedure
Run
kafka-acls.shwith the--addoption.Examples:
Allow
user1anduser2access to read frommyTopicusing theMyConsumerGroupconsumer group.bin/kafka-acls.sh --authorizer-properties zookeeper.connect=zoo1.my-domain.com:2181 --add --operation Read --topic myTopic --allow-principal User:user1 --allow-principal User:user2 bin/kafka-acls.sh --authorizer-properties zookeeper.connect=zoo1.my-domain.com:2181 --add --operation Describe --topic myTopic --allow-principal User:user1 --allow-principal User:user2 bin/kafka-acls.sh --authorizer-properties zookeeper.connect=zoo1.my-domain.com:2181 --add --operation Read --operation Describe --group MyConsumerGroup --allow-principal User:user1 --allow-principal User:user2
Deny
user1access to readmyTopicfrom IP address host127.0.0.1.bin/kafka-acls.sh --authorizer-properties zookeeper.connect=zoo1.my-domain.com:2181 --add --operation Describe --operation Read --topic myTopic --group MyConsumerGroup --deny-principal User:user1 --deny-host 127.0.0.1
Add
user1as the consumer ofmyTopicwithMyConsumerGroup.bin/kafka-acls.sh --authorizer-properties zookeeper.connect=zoo1.my-domain.com:2181 --add --consumer --topic myTopic --group MyConsumerGroup --allow-principal User:user1
Additional resources
5.4.6.4. Listing ACL rules
This procedure describes how to list existing ACL rules when using the AclAuthorizer plugin in Kafka brokers.
Rules are listed using the kafka-acls.sh utility.
Prerequisites
- AMQ Streams is installed on all hosts used as Kafka brokers.
- Authorization is enabled in Kafka brokers
- ACLs have been added.
Procedure
Run
kafka-acls.shwith the--listoption.For example:
$ bin/kafka-acls.sh --authorizer-properties zookeeper.connect=zoo1.my-domain.com:2181 --list --topic myTopic Current ACLs for resource `Topic:myTopic`: User:user1 has Allow permission for operations: Read from hosts: * User:user2 has Allow permission for operations: Read from hosts: * User:user2 has Deny permission for operations: Read from hosts: 127.0.0.1 User:user1 has Allow permission for operations: Describe from hosts: * User:user2 has Allow permission for operations: Describe from hosts: * User:user2 has Deny permission for operations: Describe from hosts: 127.0.0.1
Additional resources
5.4.6.5. Removing ACL rules
This procedure describes how to remove ACL rules when using the AclAuthorizer plugin in Kafka brokers.
Rules are removed using the kafka-acls.sh utility.
Prerequisites
- AMQ Streams is installed on all hosts used as Kafka brokers.
- Authorization is enabled in Kafka brokers.
- ACLs have been added.
Procedure
Run
kafka-acls.shwith the--removeoption.Examples:
Remove the ACL allowing Allow
user1anduser2access to read frommyTopicusing theMyConsumerGroupconsumer group.bin/kafka-acls.sh --authorizer-properties zookeeper.connect=zoo1.my-domain.com:2181 --remove --operation Read --topic myTopic --allow-principal User:user1 --allow-principal User:user2 bin/kafka-acls.sh --authorizer-properties zookeeper.connect=zoo1.my-domain.com:2181 --remove --operation Describe --topic myTopic --allow-principal User:user1 --allow-principal User:user2 bin/kafka-acls.sh --authorizer-properties zookeeper.connect=zoo1.my-domain.com:2181 --remove --operation Read --operation Describe --group MyConsumerGroup --allow-principal User:user1 --allow-principal User:user2
Remove the ACL adding
user1as the consumer ofmyTopicwithMyConsumerGroup.bin/kafka-acls.sh --authorizer-properties zookeeper.connect=zoo1.my-domain.com:2181 --remove --consumer --topic myTopic --group MyConsumerGroup --allow-principal User:user1
Remove the ACL denying
user1access to readmyTopicfrom IP address host127.0.0.1.bin/kafka-acls.sh --authorizer-properties zookeeper.connect=zoo1.my-domain.com:2181 --remove --operation Describe --operation Read --topic myTopic --group MyConsumerGroup --deny-principal User:user1 --deny-host 127.0.0.1
Additional resources
5.4.7. ZooKeeper authorization
When authentication is enabled between Kafka and ZooKeeper, you can use ZooKeeper Access Control List (ACL) rules to automatically control access to Kafka’s metadata stored in ZooKeeper.
5.4.7.1. ACL Configuration
Enforcement of ZooKeeper ACL rules is controlled by the zookeeper.set.acl property in the config/server.properties Kafka configuration file.
The property is disabled by default and enabled by setting to true:
zookeeper.set.acl=true
If ACL rules are enabled, when a znode is created in ZooKeeper only the Kafka user who created it can modify or delete it. All other users have read-only access.
Kafka sets ACL rules only for newly created ZooKeeper znodes. If the ACLs are only enabled after the first start of the cluster, the zookeeper-security-migration.sh tool can set ACLs on all existing znodes.
Confidentiality of data in ZooKeeper
Data stored in ZooKeeper includes:
- Topic names and their configuration
- Salted and hashed user credentials when SASL SCRAM authentication is used.
But ZooKeeper does not store any records sent and received using Kafka. The data stored in ZooKeeper is assumed to be non-confidential.
If the data is to be regarded as confidential (for example because topic names contain customer IDs), the only option available for protection is isolating ZooKeeper on the network level and allowing access only to Kafka brokers.
5.4.7.2. Enabling ZooKeeper ACLs for a new Kafka cluster
This procedure describes how to enable ZooKeeper ACLs in Kafka configuration for a new Kafka cluster. Use this procedure only before the first start of the Kafka cluster. For enabling ZooKeeper ACLs in a cluster that is already running, see Section 5.4.7.3, “Enabling ZooKeeper ACLs in an existing Kafka cluster”.
Prerequisites
- AMQ Streams is installed on all hosts which will be used as Kafka brokers.
- ZooKeeper cluster is configured and running.
- Client-to-server authentication is enabled in ZooKeeper.
- ZooKeeper authentication is enabled in the Kafka brokers.
- Kafka brokers have not yet been started.
Procedure
Edit the
/opt/kafka/config/server.propertiesKafka configuration file to set thezookeeper.set.aclfield totrueon all cluster nodes.zookeeper.set.acl=true
- Start the Kafka brokers.
5.4.7.3. Enabling ZooKeeper ACLs in an existing Kafka cluster
This procedure describes how to enable ZooKeeper ACLs in Kafka configuration for a Kafka cluster that is running. Use the zookeeper-security-migration.sh tool to set ZooKeeper ACLs on all existing znodes. The zookeeper-security-migration.sh is available as part of AMQ Streams, and can be found in the bin directory.
Prerequisites
- Kafka cluster is configured and running.
Enabling the ZooKeeper ACLs
Edit the
/opt/kafka/config/server.propertiesKafka configuration file to set thezookeeper.set.aclfield totrueon all cluster nodes.zookeeper.set.acl=true
Restart all Kafka brokers one by one.
For information on restarting brokers in a multi-node cluster, see Section 3.3, “Performing a graceful rolling restart of Kafka brokers”.
Set the ACLs on all existing ZooKeeper
znodesusing thezookeeper-security-migration.shtool.su - kafka cd /opt/kafka KAFKA_OPTS="-Djava.security.auth.login.config=./config/jaas.conf"; ./bin/zookeeper-security-migration.sh --zookeeper.acl=secure --zookeeper.connect=<ZooKeeperURL> exitFor example:
su - kafka cd /opt/kafka KAFKA_OPTS="-Djava.security.auth.login.config=./config/jaas.conf"; ./bin/zookeeper-security-migration.sh --zookeeper.acl=secure --zookeeper.connect=zoo1.my-domain.com:2181 exit
5.4.8. Encryption and authentication
AMQ Streams supports encryption and authentication, which is configured as part of the listener configuration.
5.4.8.1. Listener configuration
Encryption and authentication in Kafka brokers is configured per listener. For more information about Kafka listener configuration, see Section 5.4.2, “Listeners”.
Each listener in the Kafka broker is configured with its own security protocol. The configuration property listener.security.protocol.map defines which listener uses which security protocol. It maps each listener name to its security protocol. Supported security protocols are:
PLAINTEXT- Listener without any encryption or authentication.
SSL- Listener using TLS encryption and, optionally, authentication using TLS client certificates.
SASL_PLAINTEXT- Listener without encryption but with SASL-based authentication.
SASL_SSL- Listener with TLS-based encryption and SASL-based authentication.
Given the following listeners configuration:
listeners=INT1://:9092,INT2://:9093,REPLICATION://:9094
the listener.security.protocol.map might look like this:
listener.security.protocol.map=INT1:SASL_PLAINTEXT,INT2:SASL_SSL,REPLICATION:SSL
This would configure the listener INT1 to use unencrypted connections with SASL authentication, the listener INT2 to use encrypted connections with SASL authentication and the REPLICATION interface to use TLS encryption (possibly with TLS client authentication). The same security protocol can be used multiple times. The following example is also a valid configuration:
listener.security.protocol.map=INT1:SSL,INT2:SSL,REPLICATION:SSL
Such a configuration would use TLS encryption and TLS authentication for all interfaces. The following chapters will explain in more detail how to configure TLS and SASL.
5.4.8.2. TLS Encryption
Kafka supports TLS for encrypting communication with Kafka clients.
In order to use TLS encryption and server authentication, a keystore containing private and public keys has to be provided. This is usually done using a file in the Java Keystore (JKS) format. A path to this file is set in the ssl.keystore.location property. The ssl.keystore.password property should be used to set the password protecting the keystore. For example:
ssl.keystore.location=/path/to/keystore/server-1.jks ssl.keystore.password=123456
In some cases, an additional password is used to protect the private key. Any such password can be set using the ssl.key.password property.
Kafka is able to use keys signed by certification authorities as well as self-signed keys. Using keys signed by certification authorities should always be the preferred method. In order to allow clients to verify the identity of the Kafka broker they are connecting to, the certificate should always contain the advertised hostname(s) as its Common Name (CN) or in the Subject Alternative Names (SAN).
It is possible to use different SSL configurations for different listeners. All options starting with ssl. can be prefixed with listener.name.<NameOfTheListener>., where the name of the listener has to be always in lower case. This will override the default SSL configuration for that specific listener. The following example shows how to use different SSL configurations for different listeners:
listeners=INT1://:9092,INT2://:9093,REPLICATION://:9094 listener.security.protocol.map=INT1:SSL,INT2:SSL,REPLICATION:SSL # Default configuration - will be used for listeners INT1 and INT2 ssl.keystore.location=/path/to/keystore/server-1.jks ssl.keystore.password=123456 # Different configuration for listener REPLICATION listener.name.replication.ssl.keystore.location=/path/to/keystore/server-1.jks listener.name.replication.ssl.keystore.password=123456
Additional TLS configuration options
In addition to the main TLS configuration options described above, Kafka supports many options for fine-tuning the TLS configuration. For example, to enable or disable TLS / SSL protocols or cipher suites:
ssl.cipher.suites- List of enabled cipher suites. Each cipher suite is a combination of authentication, encryption, MAC and key exchange algorithms used for the TLS connection. By default, all available cipher suites are enabled.
ssl.enabled.protocols-
List of enabled TLS / SSL protocols. Defaults to
TLSv1.2,TLSv1.1,TLSv1.
5.4.8.3. Enabling TLS encryption
This procedure describes how to enable encryption in Kafka brokers.
Prerequisites
- AMQ Streams is installed on all hosts which will be used as Kafka brokers.
Procedure
- Generate TLS certificates for all Kafka brokers in your cluster. The certificates should have their advertised and bootstrap addresses in their Common Name or Subject Alternative Name.
Edit the
/opt/kafka/config/server.propertiesKafka configuration file on all cluster nodes for the following:-
Change the
listener.security.protocol.mapfield to specify theSSLprotocol for the listener where you want to use TLS encryption. -
Set the
ssl.keystore.locationoption to the path to the JKS keystore with the broker certificate. Set the
ssl.keystore.passwordoption to the password you used to protect the keystore.For example:
listeners=UNENCRYPTED://:9092,ENCRYPTED://:9093,REPLICATION://:9094 listener.security.protocol.map=UNENCRYPTED:PLAINTEXT,ENCRYPTED:SSL,REPLICATION:PLAINTEXT ssl.keystore.location=/path/to/keystore/server-1.jks ssl.keystore.password=123456
-
Change the
- (Re)start the Kafka brokers
5.4.8.4. Authentication
For authentication, you can use:
- TLS client authentication based on X.509 certificates on encrypted connections
- A supported Kafka SASL (Simple Authentication and Security Layer) mechanism
- OAuth 2.0 token based authentication
5.4.8.4.1. TLS client authentication
TLS client authentication can be used only on connections which are already using TLS encryption. To use TLS client authentication, a truststore with public keys can be provided to the broker. These keys can be used to authenticate clients connecting to the broker. The truststore should be provided in Java Keystore (JKS) format and should contain public keys of the certification authorities. All clients with public and private keys signed by one of the certification authorities included in the truststore will be authenticated. The location of the truststore is set using field ssl.truststore.location. In case the truststore is password protected, the password should be set in the ssl.truststore.password property. For example:
ssl.truststore.location=/path/to/keystore/server-1.jks ssl.truststore.password=123456
Once the truststore is configured, TLS client authentication has to be enabled using the ssl.client.auth property. This property can be set to one of three different values:
none- TLS client authentication is switched off. (Default value)
requested- TLS client authentication is optional. Clients will be asked to authenticate using TLS client certificate but they can choose not to.
required- Clients are required to authenticate using TLS client certificate.
When a client authenticates using TLS client authentication, the authenticated principal name is the distinguished name from the authenticated client certificate. For example, a user with a certificate which has a distinguished name CN=someuser will be authenticated with the following principal CN=someuser,OU=Unknown,O=Unknown,L=Unknown,ST=Unknown,C=Unknown. When TLS client authentication is not used and SASL is disabled, the principal name will be ANONYMOUS.
5.4.8.4.2. SASL authentication
SASL authentication is configured using Java Authentication and Authorization Service (JAAS). JAAS is also used for authentication of connections between Kafka and ZooKeeper. JAAS uses its own configuration file. The recommended location for this file is /opt/kafka/config/jaas.conf. The file has to be readable by the kafka user. When running Kafka, the location of this file is specified using Java system property java.security.auth.login.config. This property has to be passed to Kafka when starting the broker nodes:
KAFKA_OPTS="-Djava.security.auth.login.config=/path/to/my/jaas.config"; bin/kafka-server-start.sh
SASL authentication is supported both through plain unencrypted connections as well as through TLS connections. SASL can be enabled individually for each listener. To enable it, the security protocol in listener.security.protocol.map has to be either SASL_PLAINTEXT or SASL_SSL.
SASL authentication in Kafka supports several different mechanisms:
PLAIN- Implements authentication based on username and passwords. Usernames and passwords are stored locally in Kafka configuration.
SCRAM-SHA-256andSCRAM-SHA-512- Implements authentication using Salted Challenge Response Authentication Mechanism (SCRAM). SCRAM credentials are stored centrally in ZooKeeper. SCRAM can be used in situations where ZooKeeper cluster nodes are running isolated in a private network.
GSSAPI- Implements authentication against a Kerberos server.
The PLAIN mechanism sends the username and password over the network in an unencrypted format. It should be therefore only be used in combination with TLS encryption.
The SASL mechanisms are configured via the JAAS configuration file. Kafka uses the JAAS context named KafkaServer. After they are configured in JAAS, the SASL mechanisms have to be enabled in the Kafka configuration. This is done using the sasl.enabled.mechanisms property. This property contains a comma-separated list of enabled mechanisms:
sasl.enabled.mechanisms=PLAIN,SCRAM-SHA-256,SCRAM-SHA-512
In case the listener used for inter-broker communication is using SASL, the property sasl.mechanism.inter.broker.protocol has to be used to specify the SASL mechanism which it should use. For example:
sasl.mechanism.inter.broker.protocol=PLAIN
The username and password which will be used for the inter-broker communication has to be specified in the KafkaServer JAAS context using the field username and password.
SASL PLAIN
To use the PLAIN mechanism, the usernames and password which are allowed to connect are specified directly in the JAAS context. The following example shows the context configured for SASL PLAIN authentication. The example configures three different users:
-
admin -
user1 -
user2
KafkaServer {
org.apache.kafka.common.security.plain.PlainLoginModule required
user_admin="123456"
user_user1="123456"
user_user2="123456";
};The JAAS configuration file with the user database should be kept in sync on all Kafka brokers.
When SASL PLAIN is also used for inter-broker authentication, the username and password properties should be included in the JAAS context:
KafkaServer {
org.apache.kafka.common.security.plain.PlainLoginModule required
username="admin"
password="123456"
user_admin="123456"
user_user1="123456"
user_user2="123456";
};SASL SCRAM
SCRAM authentication in Kafka consists of two mechanisms: SCRAM-SHA-256 and SCRAM-SHA-512. These mechanisms differ only in the hashing algorithm used - SHA-256 versus stronger SHA-512. To enable SCRAM authentication, the JAAS configuration file has to include the following configuration:
KafkaServer {
org.apache.kafka.common.security.scram.ScramLoginModule required;
};When enabling SASL authentication in the Kafka configuration file, both SCRAM mechanisms can be listed. However, only one of them can be chosen for the inter-broker communication. For example:
sasl.enabled.mechanisms=SCRAM-SHA-256,SCRAM-SHA-512 sasl.mechanism.inter.broker.protocol=SCRAM-SHA-512
User credentials for the SCRAM mechanism are stored in ZooKeeper. The kafka-configs.sh tool can be used to manage them. For example, run the following command to add user user1 with password 123456:
bin/kafka-configs.sh --bootstrap-server localhost:9092 --alter --add-config 'SCRAM-SHA-256=[password=123456],SCRAM-SHA-512=[password=123456]' --entity-type users --entity-name user1
To delete a user credential use:
bin/kafka-configs.sh --bootstrap-server localhost:9092 --alter --delete-config 'SCRAM-SHA-512' --entity-type users --entity-name user1
SASL GSSAPI
The SASL mechanism used for authentication using Kerberos is called GSSAPI. To configure Kerberos SASL authentication, the following configuration should be added to the JAAS configuration file:
KafkaServer {
com.sun.security.auth.module.Krb5LoginModule required
useKeyTab=true
storeKey=true
keyTab="/etc/security/keytabs/kafka_server.keytab"
principal="kafka/kafka1.hostname.com@EXAMPLE.COM";
};The domain name in the Kerberos principal has to be always in upper case.
In addition to the JAAS configuration, the Kerberos service name needs to be specified in the sasl.kerberos.service.name property in the Kafka configuration:
sasl.enabled.mechanisms=GSSAPI sasl.mechanism.inter.broker.protocol=GSSAPI sasl.kerberos.service.name=kafka
Multiple SASL mechanisms
Kafka can use multiple SASL mechanisms at the same time. The different JAAS configurations can be all added to the same context:
KafkaServer {
org.apache.kafka.common.security.plain.PlainLoginModule required
user_admin="123456"
user_user1="123456"
user_user2="123456";
com.sun.security.auth.module.Krb5LoginModule required
useKeyTab=true
storeKey=true
keyTab="/etc/security/keytabs/kafka_server.keytab"
principal="kafka/kafka1.hostname.com@EXAMPLE.COM";
org.apache.kafka.common.security.scram.ScramLoginModule required;
};When multiple mechanisms are enabled, clients will be able to choose the mechanism which they want to use.
5.4.8.5. Enabling TLS client authentication
This procedure describes how to enable TLS client authentication in Kafka brokers.
Prerequisites
Procedure
- Prepare a JKS truststore containing the public key of the certification authority used to sign the user certificates.
Edit the
/opt/kafka/config/server.propertiesKafka configuration file on all cluster nodes for the following:-
Set the
ssl.truststore.locationoption to the path to the JKS truststore with the certification authority of the user certificates. -
Set the
ssl.truststore.passwordoption to the password you used to protect the truststore. Set the
ssl.client.authoption torequired.For example:
ssl.truststore.location=/path/to/truststore.jks ssl.truststore.password=123456 ssl.client.auth=required
-
Set the
- (Re)start the Kafka brokers
5.4.8.6. Enabling SASL PLAIN authentication
This procedure describes how to enable SASL PLAIN authentication in Kafka brokers.
Prerequisites
- AMQ Streams is installed on all hosts which will be used as Kafka brokers.
Procedure
Edit or create the
/opt/kafka/config/jaas.confJAAS configuration file. This file should contain all your users and their passwords. Make sure this file is the same on all Kafka brokers.For example:
KafkaServer { org.apache.kafka.common.security.plain.PlainLoginModule required user_admin="123456" user_user1="123456" user_user2="123456"; };Edit the
/opt/kafka/config/server.propertiesKafka configuration file on all cluster nodes for the following:-
Change the
listener.security.protocol.mapfield to specify theSASL_PLAINTEXTorSASL_SSLprotocol for the listener where you want to use SASL PLAIN authentication. Set the
sasl.enabled.mechanismsoption toPLAIN.For example:
listeners=INSECURE://:9092,AUTHENTICATED://:9093,REPLICATION://:9094 listener.security.protocol.map=INSECURE:PLAINTEXT,AUTHENTICATED:SASL_PLAINTEXT,REPLICATION:PLAINTEXT sasl.enabled.mechanisms=PLAIN
-
Change the
(Re)start the Kafka brokers using the KAFKA_OPTS environment variable to pass the JAAS configuration to Kafka brokers.
su - kafka
export KAFKA_OPTS="-Djava.security.auth.login.config=/opt/kafka/config/jaas.conf"; /opt/kafka/bin/kafka-server-start.sh -daemon /opt/kafka/config/server.properties
5.4.8.7. Enabling SASL SCRAM authentication
This procedure describes how to enable SASL SCRAM authentication in Kafka brokers.
Prerequisites
- AMQ Streams is installed on all hosts which will be used as Kafka brokers.
Procedure
Edit or create the
/opt/kafka/config/jaas.confJAAS configuration file. Enable theScramLoginModulefor theKafkaServercontext. Make sure this file is the same on all Kafka brokers.For example:
KafkaServer { org.apache.kafka.common.security.scram.ScramLoginModule required; };Edit the
/opt/kafka/config/server.propertiesKafka configuration file on all cluster nodes for the following:-
Change the
listener.security.protocol.mapfield to specify theSASL_PLAINTEXTorSASL_SSLprotocol for the listener where you want to use SASL SCRAM authentication. Set the
sasl.enabled.mechanismsoption toSCRAM-SHA-256orSCRAM-SHA-512.For example:
listeners=INSECURE://:9092,AUTHENTICATED://:9093,REPLICATION://:9094 listener.security.protocol.map=INSECURE:PLAINTEXT,AUTHENTICATED:SASL_PLAINTEXT,REPLICATION:PLAINTEXT sasl.enabled.mechanisms=SCRAM-SHA-512
-
Change the
(Re)start the Kafka brokers using the KAFKA_OPTS environment variable to pass the JAAS configuration to Kafka brokers.
su - kafka
export KAFKA_OPTS="-Djava.security.auth.login.config=/opt/kafka/config/jaas.conf"; /opt/kafka/bin/kafka-server-start.sh -daemon /opt/kafka/config/server.properties
Additional resources
5.4.8.8. Adding SASL SCRAM users
This procedure describes how to add new users for authentication using SASL SCRAM.
Prerequisites
Procedure
Use the
kafka-configs.shtool to add new SASL SCRAM users.bin/kafka-configs.sh --bootstrap-server <broker_address> --alter --add-config 'SCRAM-SHA-512=[password=<Password>]' --entity-type users --entity-name <Username>
For example:
bin/kafka-configs.sh --bootstrap-server localhost:9092 --alter --add-config 'SCRAM-SHA-512=[password=123456]' --entity-type users --entity-name user1
5.4.8.9. Deleting SASL SCRAM users
This procedure describes how to remove users when using SASL SCRAM authentication.
Prerequisites
Procedure
Use the
kafka-configs.shtool to delete SASL SCRAM users./opt/kafka/bin/kafka-configs.sh --bootstrap-server <broker_address> --alter --delete-config 'SCRAM-SHA-512' --entity-type users --entity-name <Username>
For example:
/opt/kafka/bin/kafka-configs.sh --bootstrap-server localhost:9092 --alter --delete-config 'SCRAM-SHA-512' --entity-type users --entity-name user1
5.4.9. Using OAuth 2.0 token-based authentication
AMQ Streams supports the use of OAuth 2.0 authentication using the OAUTHBEARER and PLAIN mechanisms.
OAuth 2.0 enables standardized token-based authentication and authorization between applications, using a central authorization server to issue tokens that grant limited access to resources.
Kafka brokers and clients both need to be configured to use OAuth 2.0. You can configure OAuth 2.0 authentication, then OAuth 2.0 authorization.
OAuth 2.0 authentication can be used in conjunction with ACL-based Kafka authorization regardless of the authorization server used.
Using OAuth 2.0 authentication, application clients can access resources on application servers (called resource servers) without exposing account credentials.
The application client passes an access token as a means of authenticating, which application servers can also use to determine the level of access to grant. The authorization server handles the granting of access and inquiries about access.
In the context of AMQ Streams:
- Kafka brokers act as OAuth 2.0 resource servers
- Kafka clients act as OAuth 2.0 application clients
Kafka clients authenticate to Kafka brokers. The brokers and clients communicate with the OAuth 2.0 authorization server, as necessary, to obtain or validate access tokens.
For a deployment of AMQ Streams, OAuth 2.0 integration provides:
- Server-side OAuth 2.0 support for Kafka brokers
- Client-side OAuth 2.0 support for Kafka MirrorMaker, Kafka Connect, and the Kafka Bridge
AMQ Streams on RHEL includes two OAuth 2.0 libraries:
kafka-oauth-client-
Provides a custom login callback handler class named
io.strimzi.kafka.oauth.client.JaasClientOauthLoginCallbackHandler. To handle theOAUTHBEARERauthentication mechanism, use the login callback handler with theOAuthBearerLoginModuleprovided by Apache Kafka. kafka-oauth-common-
A helper library that provides some of the functionality needed by the
kafka-oauth-clientlibrary.
The provided client libraries also have dependencies on some additional third-party libraries, such as: keycloak-core, jackson-databind, and slf4j-api.
We recommend using a Maven project to package your client to ensure that all the dependency libraries are included. Dependency libraries might change in future versions.
Additional resources
5.4.9.1. OAuth 2.0 authentication mechanisms
AMQ Streams supports the OAUTHBEARER and PLAIN mechanisms for OAuth 2.0 authentication. Both mechanisms allow Kafka clients to establish authenticated sessions with Kafka brokers. The authentication flow between clients, the authorization server, and Kafka brokers is different for each mechanism.
We recommend that you configure clients to use OAUTHBEARER whenever possible. OAUTHBEARER provides a higher level of security than PLAIN because client credentials are never shared with Kafka brokers. Consider using PLAIN only with Kafka clients that do not support OAUTHBEARER.
You configure Kafka broker listeners to use OAuth 2.0 authentication for connecting clients. If necessary, you can use the OAUTHBEARER and PLAIN mechanisms on the same oauth listener. The properties to support each mechanism must be explicitly specified in the oauth listener configuration.
OAUTHBEARER overview
To use OAUTHBEARER, set sasl.enabled.mechanisms to OAUTHBEARER in the OAuth authentication listener configuration for the Kafka broker. For detailed configuration, see Section 5.4.9.2, “OAuth 2.0 Kafka broker configuration”.
listener.name.client.sasl.enabled.mechanisms=OAUTHBEARER
Many Kafka client tools use libraries that provide basic support for OAUTHBEARER at the protocol level. To support application development, AMQ Streams provides an OAuth callback handler for the upstream Kafka Client Java libraries (but not for other libraries). Therefore, you do not need to write your own callback handlers. An application client can use the callback handler to provide the access token. Clients written in other languages, such as Go, must use custom code to connect to the authorization server and obtain the access token.
With OAUTHBEARER, the client initiates a session with the Kafka broker for credentials exchange, where credentials take the form of a bearer token provided by the callback handler. Using the callbacks, you can configure token provision in one of three ways:
- Client ID and Secret (by using the OAuth 2.0 client credentials mechanism)
- A long-lived access token, obtained manually at configuration time
- A long-lived refresh token, obtained manually at configuration time
OAUTHBEARER authentication can only be used by Kafka clients that support the OAUTHBEARER mechanism at the protocol level.
PLAIN overview
To use PLAIN, add PLAIN to the value of sasl.enabled.mechanisms.
listener.name.client.sasl.enabled.mechanisms=OAUTHBEARER,PLAIN
PLAIN is a simple authentication mechanism used by all Kafka client tools. To enable PLAIN to be used with OAuth 2.0 authentication, AMQ Streams provides OAuth 2.0 over PLAIN server-side callbacks.
With the AMQ Streams implementation of PLAIN, the client credentials are not stored in ZooKeeper. Instead, client credentials are handled centrally behind a compliant authorization server, similar to when OAUTHBEARER authentication is used.
When used with the OAuth 2.0 over PLAIN callbacks, Kafka clients authenticate with Kafka brokers using either of the following methods:
- Client ID and secret (by using the OAuth 2.0 client credentials mechanism)
- A long-lived access token, obtained manually at configuration time
For both methods, the client must provide the PLAIN username and password properties to pass credentials to the Kafka broker. The client uses these properties to pass a client ID and secret or username and access token.
Client IDs and secrets are used to obtain access tokens.
Access tokens are passed as password property values. You pass the access token with or without an $accessToken: prefix.
-
If you configure a token endpoint (
oauth.token.endpoint.uri) in the listener configuration, you need the prefix. -
If you don’t configure a token endpoint (
oauth.token.endpoint.uri) in the listener configuration, you don’t need the prefix. The Kafka broker interprets the password as a raw access token.
If the password is set as the access token, the username must be set to the same principal name that the Kafka broker obtains from the access token. You can specify username extraction options in your listener using the oauth.username.claim, oauth.fallback.username.claim, oauth.fallback.username.prefix, and oauth.userinfo.endpoint.uri properties. The username extraction process also depends on your authorization server; in particular, how it maps client IDs to account names.
5.4.9.1.1. Configuring OAuth 2.0 with properties or variables
You can configure OAuth 2.0 settings using Java Authentication and Authorization Service (JAAS) properties or environment variables.
-
JAAS properties are configured in the
server.propertiesconfiguration file, and passed as key-values pairs of thelistener.name.LISTENER-NAME.oauthbearer.sasl.jaas.configproperty. If using environment variables, you still need to provide the
listener.name.LISTENER-NAME.oauthbearer.sasl.jaas.configproperty in theserver.propertiesfile, but you can omit the other JAAS properties.You can use capitalized or upper-case environment variable naming conventions.
The AMQ Streams OAuth 2.0 libraries use properties that start with:
-
oauth.to configure authentication -
strimzi.to configure OAuth 2.0 authorization
Additional resources
5.4.9.2. OAuth 2.0 Kafka broker configuration
Kafka broker configuration for OAuth 2.0 authentication involves:
- Creating the OAuth 2.0 client in the authorization server
- Configuring OAuth 2.0 authentication in the Kafka cluster
In relation to the authorization server, Kafka brokers and Kafka clients are both regarded as OAuth 2.0 clients.
5.4.9.2.1. OAuth 2.0 client configuration on an authorization server
To configure a Kafka broker to validate the token received during session initiation, the recommended approach is to create an OAuth 2.0 client definition in an authorization server, configured as confidential, with the following client credentials enabled:
-
Client ID of
kafka-broker(for example) - Client ID and secret as the authentication mechanism
You only need to use a client ID and secret when using a non-public introspection endpoint of the authorization server. The credentials are not typically required when using public authorization server endpoints, as with fast local JWT token validation.
5.4.9.2.2. OAuth 2.0 authentication configuration in the Kafka cluster
To use OAuth 2.0 authentication in the Kafka cluster, you enable an OAuth authentication listener configuration for your Kafka cluster, in the Kafka server.properties file. A minimum configuration is required. You can also configure a TLS listener, where TLS is used for inter-broker communication.
You can configure the broker for token validation by the authorization server using one of the following methods:
- Fast local token validation: a JWKS endpoint in combination with signed JWT-formatted access tokens
- Introspection endpoint
You can configure OAUTHBEARER or PLAIN authentication, or both.
The following example shows a minimum configuration that applies a global listener configuration, which means that inter-broker communication goes through the same listener as application clients.
The example also shows an OAuth 2.0 configuration for a specific listener, where you specify listener.name.LISTENER-NAME.sasl.enabled.mechanisms instead of sasl.enabled.mechanisms. LISTENER-NAME is the case-insensitive name of the listener. Here, we name the listener CLIENT, so the property name is listener.name.client.sasl.enabled.mechanisms.
The example uses OAUTHBEARER authentication.
Example: Minimum listener configuration for OAuth 2.0 authentication using a JWKS endpoint
sasl.enabled.mechanisms=OAUTHBEARER 1
listeners=CLIENT://0.0.0.0:9092 2
listener.security.protocol.map=CLIENT:SASL_PLAINTEXT 3
listener.name.client.sasl.enabled.mechanisms=OAUTHBEARER 4
sasl.mechanism.inter.broker.protocol=OAUTHBEARER 5
inter.broker.listener.name=CLIENT 6
listener.name.client.oauthbearer.sasl.server.callback.handler.class=io.strimzi.kafka.oauth.server.JaasServerOauthValidatorCallbackHandler 7
listener.name.client.oauthbearer.sasl.jaas.config=org.apache.kafka.common.security.oauthbearer.OAuthBearerLoginModule required \ 8
  oauth.valid.issuer.uri="https://AUTH-SERVER-ADDRESS" \ 9
  oauth.jwks.endpoint.uri="https://AUTH-SERVER-ADDRESS/jwks" \ 10
  oauth.username.claim="preferred_username"  \ 11
  oauth.client.id="kafka-broker" \ 12
  oauth.client.secret="kafka-secret" \ 13
  oauth.token.endpoint.uri="https://AUTH-SERVER-ADDRESS/token" ; 14
listener.name.client.oauthbearer.sasl.login.callback.handler.class=io.strimzi.kafka.oauth.client.JaasClientOauthLoginCallbackHandler 15
listener.name.client.oauthbearer.connections.max.reauth.ms=3600000 16
- 1
- Enables the OAUTHBEARER mechanism for credentials exchange over SASL.
- 2
- Configures a listener for client applications to connect to. The system
hostnameis used as an advertised hostname, which clients must resolve in order to reconnect. The listener is namedCLIENTin this example. - 3
- Specifies the channel protocol for the listener.
SASL_SSLis for TLS.SASL_PLAINTEXTis used for an unencrypted connection (no TLS), but there is risk of eavesdropping and interception at the TCP connection layer. - 4
- Specifies the OAUTHBEARER mechanism for the CLIENT listener. The client name (
CLIENT) is usually specified in uppercase in thelistenersproperty, in lowercase forlistener.nameproperties (listener.name.client), and in lowercase when part of alistener.name.client.*property. - 5
- Specifies the OAUTHBEARER mechanism for inter-broker communication.
- 6
- Specifies the listener for inter-broker communication. The specification is required for the configuration to be valid.
- 7
- Configures OAuth 2.0 authentication on the client listener.
- 8
- Configures authentication settings for client and inter-broker communication. The
oauth.client.id,oauth.client.secret, andauth.token.endpoint.uriproperties relate to inter-broker configuration. - 9
- A valid issuer URI. Only access tokens issued by this issuer will be accepted. For example, https://AUTH-SERVER-ADDRESS/auth/realms/REALM-NAME.
- 10
- The JWKS endpoint URL. For example, https://AUTH-SERVER-ADDRESS/auth/realms/REALM-NAME/protocol/openid-connect/certs.
- 11
- The token claim (or key) that contains the actual user name in the token. The user name is the principal used to identify the user. The value will depend on the authentication flow and the authorization server used.
- 12
- Client ID of the Kafka broker, which is the same for all brokers. This is the client registered with the authorization server as
kafka-broker. - 13
- Secret for the Kafka broker, which is the same for all brokers.
- 14
- The OAuth 2.0 token endpoint URL to your authorization server. For production, always use
https://urls. For example, https://AUTH-SERVER-ADDRESS/auth/realms/REALM-NAME/protocol/openid-connect/token. - 15
- Enables (and is only required for) OAuth 2.0 authentication for inter-broker communication.
- 16
- (Optional) Enforces session expiry when a token expires, and also activates the Kafka re-authentication mechanism. If the specified value is less than the time left for the access token to expire, then the client will have to re-authenticate before the actual token expiry. By default, the session does not expire when the access token expires, and the client does not attempt re-authentication.
The following example shows a minimum configuration for a TLS listener, where TLS is used for inter-broker communication.
Example: TLS listener configuration for OAuth 2.0 authentication
listeners=REPLICATION://kafka:9091,CLIENT://kafka:9092 1
listener.security.protocol.map=REPLICATION:SSL,CLIENT:SASL_PLAINTEXT 2
listener.name.client.sasl.enabled.mechanisms=OAUTHBEARER
inter.broker.listener.name=REPLICATION
listener.name.replication.ssl.keystore.password=KEYSTORE-PASSWORD 3
listener.name.replication.ssl.truststore.password=TRUSTSTORE-PASSWORD
listener.name.replication.ssl.keystore.type=JKS
listener.name.replication.ssl.truststore.type=JKS
listener.name.replication.ssl.endpoint.identification.algorithm=HTTPS 4
listener.name.replication.ssl.secure.random.implementation=SHA1PRNG 5
listener.name.replication.ssl.keystore.location=PATH-TO-KEYSTORE 6
listener.name.replication.ssl.truststore.location=PATH-TO-TRUSTSTORE 7
listener.name.replication.ssl.client.auth=required 8
listener.name.client.oauthbearer.sasl.server.callback.handler.class=io.strimzi.kafka.oauth.server.JaasServerOauthValidatorCallbackHandler
listener.name.client.oauthbearer.sasl.jaas.config=org.apache.kafka.common.security.oauthbearer.OAuthBearerLoginModule required \
  oauth.valid.issuer.uri="https://AUTH-SERVER-ADDRESS" \
  oauth.jwks.endpoint.uri="https://AUTH-SERVER-ADDRESS/jwks" \
  oauth.username.claim="preferred_username" ; 9
- 1
- Separate configurations are required for inter-broker communication and client applications.
- 2
- Configures the REPLICATION listener to use TLS, and the CLIENT listener to use SASL over an unencrypted channel. The client could use an encrypted channel (
SASL_SSL) in a production environment. - 3
- The
ssl.properties define the TLS configuration. - 4
- Random number generator implementation. If not set, the Java platform SDK default is used.
- 5
- Hostname verification. If set to an empty string, the hostname verification is turned off. If not set, the default value is HTTPS, which enforces hostname verification for server certificates.
- 6
- Path to the keystore for the listener.
- 7
- Path to the truststore for the listener.
- 8
- Specifies that clients of the REPLICATION listener have to authenticate with a client certificate when establishing a TLS connection (used for inter-broker connectivity).
- 9
- Configures the CLIENT listener for OAuth 2.0. Connectivity with the authorization server should use secure HTTPS connections.
The following example shows a minimum configuration for OAuth 2.0 authentication using the PLAIN authentication mechanism for credentials exchange over SASL. Fast local token validation is used.
Example: Minimum listener configuration for PLAIN authentication
listeners=CLIENT://0.0.0.0:9092 1
listener.security.protocol.map=CLIENT:SASL_PLAINTEXT 2
listener.name.client.sasl.enabled.mechanisms=OAUTHBEARER,PLAIN 3
sasl.mechanism.inter.broker.protocol=OAUTHBEARER 4
inter.broker.listener.name=CLIENT 5
listener.name.client.oauthbearer.sasl.server.callback.handler.class=io.strimzi.kafka.oauth.server.JaasServerOauthValidatorCallbackHandler 6
listener.name.client.oauthbearer.sasl.jaas.config=org.apache.kafka.common.security.oauthbearer.OAuthBearerLoginModule required \ 7
  oauth.valid.issuer.uri="http://AUTH_SERVER/auth/realms/REALM" \ 8
  oauth.jwks.endpoint.uri="https://AUTH_SERVER/auth/realms/REALM/protocol/openid-connect/certs" \ 9
  oauth.username.claim="preferred_username"  \ 10
  oauth.client.id="kafka-broker" \ 11
  oauth.client.secret="kafka-secret" \ 12
  oauth.token.endpoint.uri="https://AUTH-SERVER-ADDRESS/token" ; 13
listener.name.client.oauthbearer.sasl.login.callback.handler.class=io.strimzi.kafka.oauth.client.JaasClientOauthLoginCallbackHandler 14
listener.name.client.plain.sasl.server.callback.handler.class=io.strimzi.kafka.oauth.server.plain.JaasServerOauthOverPlainValidatorCallbackHandler 15
listener.name.client.plain.sasl.jaas.config=org.apache.kafka.common.security.plain.PlainLoginModule required \ 16
  oauth.valid.issuer.uri="https://AUTH-SERVER-ADDRESS" \ 17
  oauth.jwks.endpoint.uri="https://AUTH-SERVER-ADDRESS/jwks" \ 18
  oauth.username.claim="preferred_username"  \ 19
  oauth.token.endpoint.uri="http://AUTH_SERVER/auth/realms/REALM/protocol/openid-connect/token" ; 20
connections.max.reauth.ms=3600000 21
- 1
- Configures a listener (named
CLIENTin this example) for client applications to connect to. The systemhostnameis used as an advertised hostname, which clients must resolve in order to reconnect. Because this is the only configured listener, it is also used for inter-broker communication. - 2
- Configures the example
CLIENTlistener to use SASL over an unencrypted channel. In a production environment, the client should use an encrypted channel (SASL_SSL) in order to guard against eavesdropping and interception at the TCP connection layer. - 3
- Enables the PLAIN authentication mechanism for credentials exchange over SASL as well as OAUTHBEARER. OAUTHBEARER is also specified because it is required for inter-broker communication. Kafka clients can choose which mechanism to use to connect.
- 4
- Specifies the OAUTHBEARER authentication mechanism for inter-broker communication.
- 5
- Specifies the listener (named
CLIENTin this example) for inter-broker communication. Required for the configuration to be valid. - 6
- Configures the server callback handler for the OAUTHBEARER mechanism.
- 7
- Configures authentication settings for client and inter-broker communication using the OAUTHBEARER mechanism. The
oauth.client.id,oauth.client.secret, andoauth.token.endpoint.uriproperties relate to inter-broker configuration. - 8
- A valid issuer URI. Only access tokens from this issuer are accepted. For example, https://AUTH-SERVER-ADDRESS/auth/realms/REALM-NAME
- 9
- The JWKS endpoint URL. For example, https://AUTH-SERVER-ADDRESS/auth/realms/REALM-NAME/protocol/openid-connect/certs
- 10
- The token claim (or key) that contains the actual user name in the token. The user name is the principal that identifies the user. The value depends on the authentication flow and the authorization server that is used.
- 11
- Client ID of the Kafka broker, which is the same for all brokers. This is the client registered with the authorization server as
kafka-broker. - 12
- Secret for the Kafka broker (the same for all brokers).
- 13
- The OAuth 2.0 token endpoint URL to your authorization server. For production, always use
https://urls. For example, https://AUTH-SERVER-ADDRESS/auth/realms/REALM-NAME/protocol/openid-connect/token - 14
- Enables OAuth 2.0 authentication for inter-broker communication.
- 15
- Configures the server callback handler for PLAIN authentication.
- 16
- Configures authentication settings for client communication using PLAIN authentication.
oauth.token.endpoint.uriis an optional property that enables OAuth 2.0 over PLAIN using the OAuth 2.0 client credentials mechanism. - 17
- A valid issuer URI. Only access tokens from this issuer are accepted. For example, https://AUTH-SERVER-ADDRESS/auth/realms/REALM-NAME
- 18
- The JWKS endpoint URL. For example, https://AUTH-SERVER-ADDRESS/auth/realms/REALM-NAME/protocol/openid-connect/certs
- 19
- The token claim (or key) that contains the actual user name in the token. The user name is the principal that identifies the user. The value depends on the authentication flow and the authorization server used.
- 20
- The OAuth 2.0 token endpoint URL to your authorization server. Additional configuration for the PLAIN mechanism. If specified, clients can authenticate over PLAIN by passing an access token as the
passwordusing an$accessToken:prefix.For production, always use
https://urls. For example, https://AUTH-SERVER-ADDRESS/auth/realms/REALM-NAME/protocol/openid-connect/token. - 21
- (Optional) Enforces session expiry when a token expires, and also activates the Kafka re-authentication mechanism. If the specified value is less than the time left for the access token to expire, then the client will have to re-authenticate before the actual token expiry. By default, the session does not expire when the access token expires, and the client does not attempt re-authentication.
5.4.9.2.3. Fast local JWT token validation configuration
Fast local JWT token validation checks a JWT token signature locally.
The local check ensures that a token:
-
Conforms to type by containing a (typ) claim value of
Bearerfor an access token - Is valid (not expired)
-
Has an issuer that matches a
validIssuerURI
You specify a valid issuer URI when you configure the listener, so that any tokens not issued by the authorization server are rejected.
The authorization server does not need to be contacted during fast local JWT token validation. You activate fast local JWT token validation by specifying a JWKs endpoint URI exposed by the OAuth 2.0 authorization server. The endpoint contains the public keys used to validate signed JWT tokens, which are sent as credentials by Kafka clients.
All communication with the authorization server should be performed using HTTPS.
For a TLS listener, you can configure a certificate truststore and point to the truststore file.
Example properties for fast local JWT token validation
listener.name.client.oauthbearer.sasl.jaas.config=org.apache.kafka.common.security.oauthbearer.OAuthBearerLoginModule required \
  oauth.valid.issuer.uri="https://AUTH-SERVER-ADDRESS" \ 1
  oauth.jwks.endpoint.uri="https://AUTH-SERVER-ADDRESS/jwks" \ 2
  oauth.jwks.refresh.seconds="300" \ 3
  oauth.jwks.refresh.min.pause.seconds="1" \ 4
  oauth.jwks.expiry.seconds="360" \ 5
  oauth.username.claim="preferred_username" \ 6
  oauth.ssl.truststore.location="PATH-TO-TRUSTSTORE-P12-FILE" \ 7
  oauth.ssl.truststore.password="TRUSTSTORE-PASSWORD" \ 8
  oauth.ssl.truststore.type="PKCS12" ; 9
- 1
- A valid issuer URI. Only access tokens issued by this issuer will be accepted. For example, https://AUTH-SERVER-ADDRESS/auth/realms/REALM-NAME.
- 2
- The JWKS endpoint URL. For example, https://AUTH-SERVER-ADDRESS/auth/realms/REALM-NAME/protocol/openid-connect/certs.
- 3
- The period between endpoint refreshes (default 300).
- 4
- The minimum pause in seconds between consecutive attempts to refresh JWKS public keys. When an unknown signing key is encountered, the JWKS keys refresh is scheduled outside the regular periodic schedule with at least the specified pause since the last refresh attempt. The refreshing of keys follows the rule of exponential backoff, retrying on unsuccessful refreshes with ever increasing pause, until it reaches
oauth.jwks.refresh.seconds. The default value is 1. - 5
- The duration the JWKs certificates are considered valid before they expire. Default is
360seconds. If you specify a longer time, consider the risk of allowing access to revoked certificates. - 6
- The token claim (or key) that contains the actual user name in the token. The user name is the principal used to identify the user. The value will depend on the authentication flow and the authorization server used.
- 7
- The location of the truststore used in the TLS configuration.
- 8
- Password to access the truststore.
- 9
- The truststore type in PKCS #12 format.
5.4.9.2.4. OAuth 2.0 introspection endpoint configuration
Token validation using an OAuth 2.0 introspection endpoint treats a received access token as opaque. The Kafka broker sends an access token to the introspection endpoint, which responds with the token information necessary for validation. Importantly, it returns up-to-date information if the specific access token is valid, and also information about when the token expires.
To configure OAuth 2.0 introspection-based validation, you specify an introspection endpoint URI rather than the JWKs endpoint URI specified for fast local JWT token validation. Depending on the authorization server, you typically have to specify a client ID and client secret, because the introspection endpoint is usually protected.
Example properties for an introspection endpoint
listener.name.client.oauthbearer.sasl.jaas.config=org.apache.kafka.common.security.oauthbearer.OAuthBearerLoginModule required \
  oauth.introspection.endpoint.uri="https://AUTH-SERVER-ADDRESS/introspection" \ 1
  oauth.client.id="kafka-broker" \ 2
  oauth.client.secret="kafka-broker-secret" \ 3
  oauth.ssl.truststore.location="PATH-TO-TRUSTSTORE-P12-FILE" \ 4
  oauth.ssl.truststore.password="TRUSTSTORE-PASSWORD" \ 5
  oauth.ssl.truststore.type="PKCS12" \ 6
  oauth.username.claim="preferred_username" ; 7
- 1
- The OAuth 2.0 introspection endpoint URI. For example, https://AUTH-SERVER-ADDRESS/auth/realms/REALM-NAME/protocol/openid-connect/token/introspect.
- 2
- Client ID of the Kafka broker.
- 3
- Secret for the Kafka broker.
- 4
- The location of the truststore used in the TLS configuration.
- 5
- Password to access the truststore.
- 6
- The truststore type in PKCS #12 format.
- 7
- The token claim (or key) that contains the actual user name in the token. The user name is the principal used to identify the user. The value of
oauth.username.claimdepends on the authorization server used.
5.4.9.3. Session re-authentication for Kafka brokers
You can configure OAuth listeners to use Kafka session re-authentication for OAuth 2.0 sessions between Kafka clients and Kafka brokers. This mechanism enforces the expiry of an authenticated session between the client and the broker after a defined period of time. When a session expires, the client immediately starts a new session by reusing the existing connection rather than dropping it.
Session re-authentication is disabled by default. You can enable it in the server.properties file. Set the connections.max.reauth.ms property for a TLS listener with OAUTHBEARER or PLAIN enabled as the SASL mechanism.
You can specify session re-authentication per listener. For example:
listener.name.client.oauthbearer.connections.max.reauth.ms=3600000
Session re-authentication must be supported by the Kafka client libraries used by the client.
Session re-authentication can be used with fast local JWT or introspection endpoint token validation.
Client re-authentication
When the broker’s authenticated session expires, the client must re-authenticate to the existing session by sending a new, valid access token to the broker, without dropping the connection.
If token validation is successful, a new client session is started using the existing connection. If the client fails to re-authenticate, the broker will close the connection if further attempts are made to send or receive messages. Java clients that use Kafka client library 2.2 or later automatically re-authenticate if the re-authentication mechanism is enabled on the broker.
Session re-authentication also applies to refresh tokens, if used. When the session expires, the client refreshes the access token by using its refresh token. The client then uses the new access token to re-authenticate over the existing connection.
Session expiry for OAUTHBEARER and PLAIN
When session re-authentication is configured, session expiry works differently for OAUTHBEARER and PLAIN authentication.
For OAUTHBEARER and PLAIN, using the client ID and secret method:
-
The broker’s authenticated session will expire at the configured
connections.max.reauth.ms. - The session will expire earlier if the access token expires before the configured time.
For PLAIN using the long-lived access token method:
-
The broker’s authenticated session will expire at the configured
connections.max.reauth.ms. - Re-authentication will fail if the access token expires before the configured time. Although session re-authentication is attempted, PLAIN has no mechanism for refreshing tokens.
If connections.max.reauth.ms is not configured, OAUTHBEARER and PLAIN clients can remain connected to brokers indefinitely, without needing to re-authenticate. Authenticated sessions do not end with access token expiry. However, this can be considered when configuring authorization, for example, by using keycloak authorization or installing a custom authorizer.
5.4.9.4. OAuth 2.0 Kafka client configuration
A Kafka client is configured with either:
- The credentials required to obtain a valid access token from an authorization server (client ID and Secret)
- A valid long-lived access token or refresh token, obtained using tools provided by an authorization server
The only information ever sent to the Kafka broker is an access token. The credentials used to authenticate with the authorization server to obtain the access token are never sent to the broker.
When a client obtains an access token, no further communication with the authorization server is needed.
The simplest mechanism is authentication with a client ID and Secret. Using a long-lived access token, or a long-lived refresh token, adds more complexity because there is an additional dependency on authorization server tools.
If you are using long-lived access tokens, you may need to configure the client in the authorization server to increase the maximum lifetime of the token.
If the Kafka client is not configured with an access token directly, the client exchanges credentials for an access token during Kafka session initiation by contacting the authorization server. The Kafka client exchanges either:
- Client ID and Secret
- Client ID, refresh token, and (optionally) a Secret
5.4.9.5. OAuth 2.0 client authentication flows
OAuth 2.0 authentication flows depend on the underlying Kafka client and Kafka broker configuration. The flows must also be supported by the authorization server used.
The Kafka broker listener configuration determines how clients authenticate using an access token. The client can pass a client ID and secret to request an access token.
If a listener is configured to use PLAIN authentication, the client can authenticate with a client ID and secret or username and access token. These values are passed as the username and password properties of the PLAIN mechanism.
Listener configuration supports the following token validation options:
- You can use fast local token validation based on JWT signature checking and local token introspection, without contacting an authorization server. The authorization server provides a JWKS endpoint with public certificates that are used to validate signatures on the tokens.
- You can use a call to a token introspection endpoint provided by an authorization server. Each time a new Kafka broker connection is established, the broker passes the access token received from the client to the authorization server. The Kafka broker checks the response to confirm whether or not the token is valid.
An authorization server might only allow the use of opaque access tokens, which means that local token validation is not possible.
Kafka client credentials can also be configured for the following types of authentication:
- Direct local access using a previously generated long-lived access token
- Contact with the authorization server for a new access token to be issued (using a client ID and a secret, or a refresh token)
5.4.9.5.1. Example client authentication flows using the SASL OAUTHBEARER mechanism
You can use the following communication flows for Kafka authentication using the SASL OAUTHBEARER mechanism.
- Client using client ID and secret, with broker delegating validation to authorization server
- Client using client ID and secret, with broker performing fast local token validation
- Client using long-lived access token, with broker delegating validation to authorization server
- Client using long-lived access token, with broker performing fast local validation
Client using client ID and secret, with broker delegating validation to authorization server
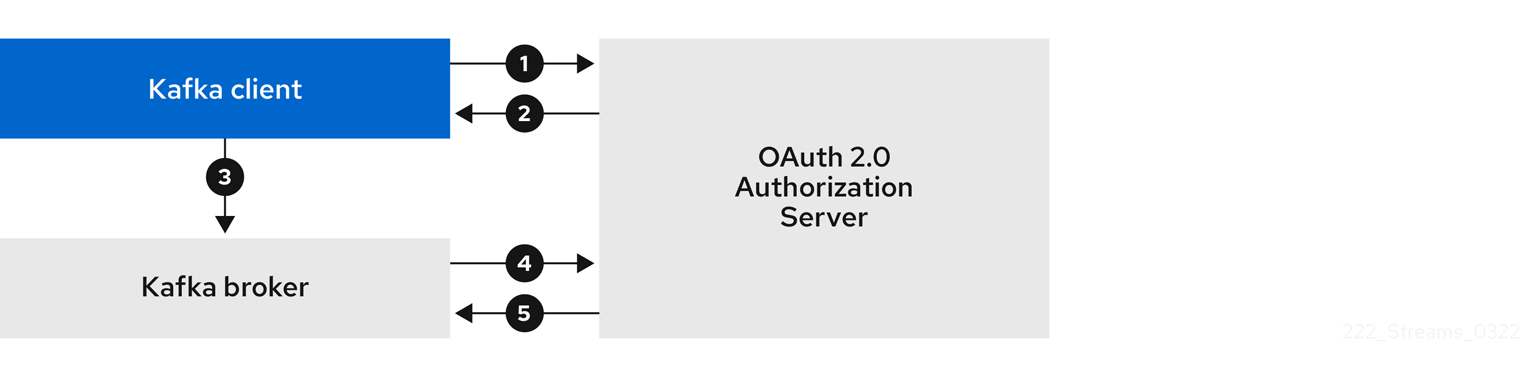
- The Kafka client requests an access token from the authorization server using a client ID and secret, and optionally a refresh token.
- The authorization server generates a new access token.
- The Kafka client authenticates with the Kafka broker using the SASL OAUTHBEARER mechanism to pass the access token.
- The Kafka broker validates the access token by calling a token introspection endpoint on the authorization server using its own client ID and secret.
- A Kafka client session is established if the token is valid.
Client using client ID and secret, with broker performing fast local token validation
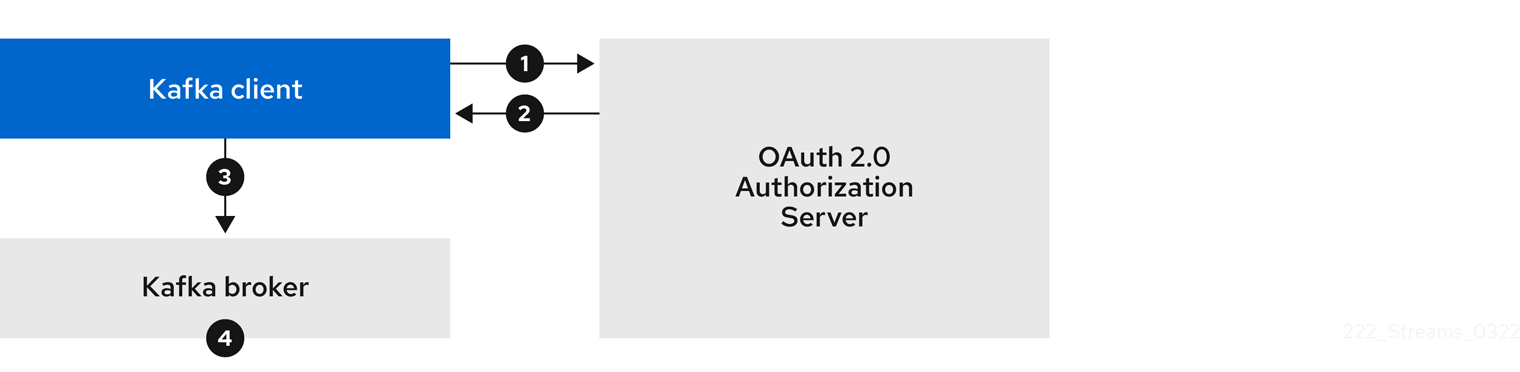
- The Kafka client authenticates with the authorization server from the token endpoint, using a client ID and secret, and optionally a refresh token.
- The authorization server generates a new access token.
- The Kafka client authenticates with the Kafka broker using the SASL OAUTHBEARER mechanism to pass the access token.
- The Kafka broker validates the access token locally using a JWT token signature check, and local token introspection.
Client using long-lived access token, with broker delegating validation to authorization server
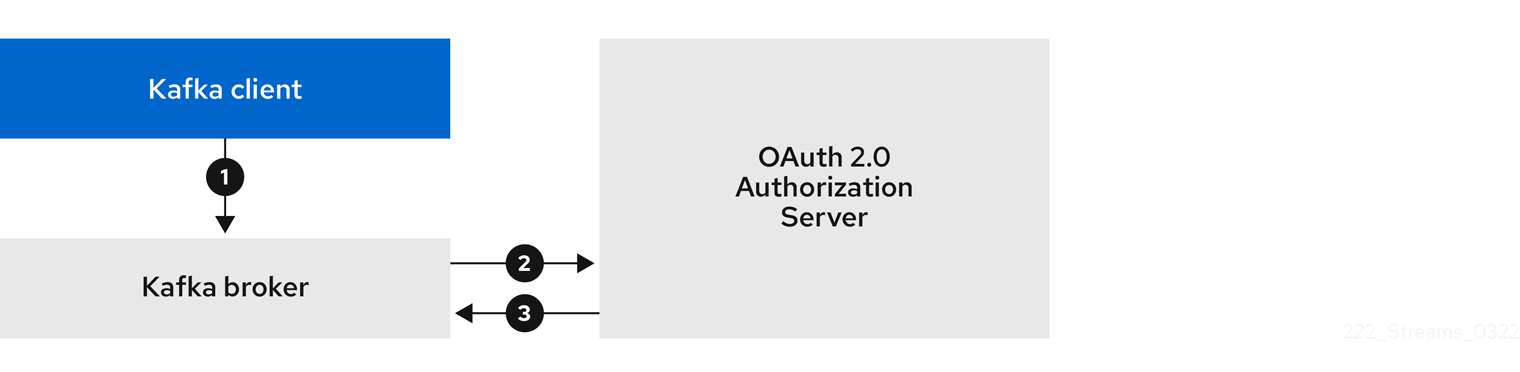
- The Kafka client authenticates with the Kafka broker using the SASL OAUTHBEARER mechanism to pass the long-lived access token.
- The Kafka broker validates the access token by calling a token introspection endpoint on the authorization server, using its own client ID and secret.
- A Kafka client session is established if the token is valid.
Client using long-lived access token, with broker performing fast local validation
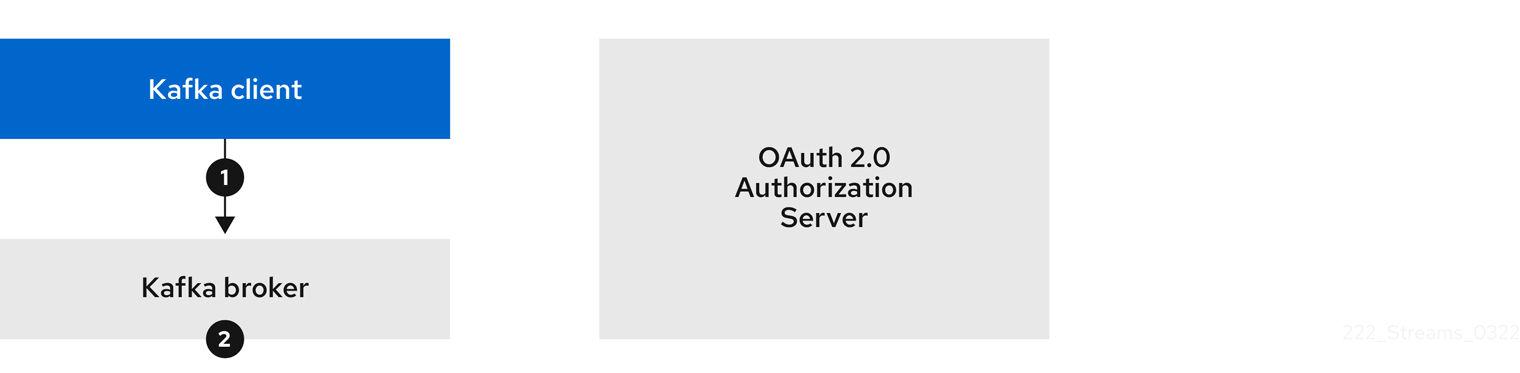
- The Kafka client authenticates with the Kafka broker using the SASL OAUTHBEARER mechanism to pass the long-lived access token.
- The Kafka broker validates the access token locally using a JWT token signature check and local token introspection.
Fast local JWT token signature validation is suitable only for short-lived tokens as there is no check with the authorization server if a token has been revoked. Token expiration is written into the token, but revocation can happen at any time, so cannot be accounted for without contacting the authorization server. Any issued token would be considered valid until it expires.
5.4.9.5.2. Example client authentication flows using the SASL PLAIN mechanism
You can use the following communication flows for Kafka authentication using the OAuth PLAIN mechanism.
Client using a client ID and secret, with the broker obtaining the access token for the client
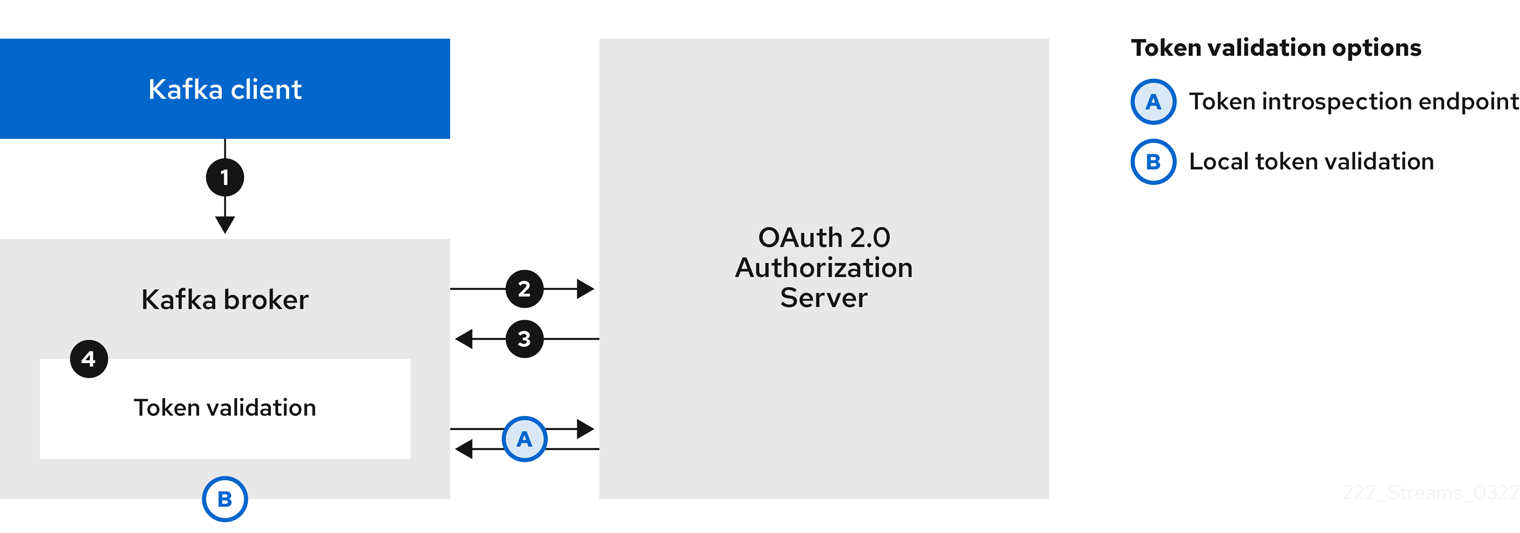
-
The Kafka client passes a
clientIdas a username and asecretas a password. -
The Kafka broker uses a token endpoint to pass the
clientIdandsecretto the authorization server. - The authorization server returns a fresh access token or an error if the client credentials are not valid.
The Kafka broker validates the token in one of the following ways:
- If a token introspection endpoint is specified, the Kafka broker validates the access token by calling the endpoint on the authorization server. A session is established if the token validation is successful.
- If local token introspection is used, a request is not made to the authorization server. The Kafka broker validates the access token locally using a JWT token signature check.
Client using a long-lived access token without a client ID and secret
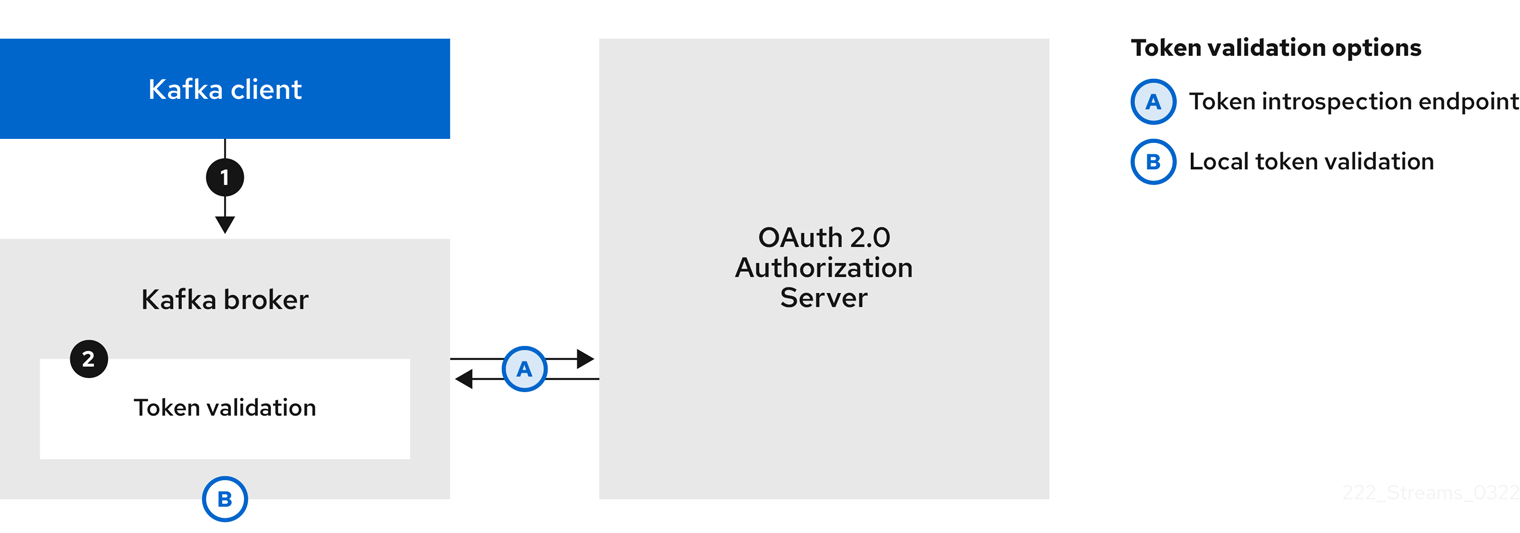
- The Kafka client passes a username and password. The password provides the value of an access token that was obtained manually and configured before running the client.
The password is passed with or without an
$accessToken:string prefix depending on whether or not the Kafka broker listener is configured with a token endpoint for authentication.-
If the token endpoint is configured, the password should be prefixed by
$accessToken:to let the broker know that the password parameter contains an access token rather than a client secret. The Kafka broker interprets the username as the account username. -
If the token endpoint is not configured on the Kafka broker listener (enforcing a
no-client-credentials mode), the password should provide the access token without the prefix. The Kafka broker interprets the username as the account username. In this mode, the client doesn’t use a client ID and secret, and thepasswordparameter is always interpreted as a raw access token.
-
If the token endpoint is configured, the password should be prefixed by
The Kafka broker validates the token in one of the following ways:
- If a token introspection endpoint is specified, the Kafka broker validates the access token by calling the endpoint on the authorization server. A session is established if token validation is successful.
- If local token introspection is used, there is no request made to the authorization server. Kafka broker validates the access token locally using a JWT token signature check.
5.4.9.6. Configuring OAuth 2.0 authentication
OAuth 2.0 is used for interaction between Kafka clients and AMQ Streams components.
In order to use OAuth 2.0 for AMQ Streams, you must:
5.4.9.6.1. Configuring Red Hat Single Sign-On as an OAuth 2.0 authorization server
This procedure describes how to deploy Red Hat Single Sign-On as an authorization server and configure it for integration with AMQ Streams.
The authorization server provides a central point for authentication and authorization, and management of users, clients, and permissions. Red Hat Single Sign-On has a concept of realms where a realm represents a separate set of users, clients, permissions, and other configuration. You can use a default master realm, or create a new one. Each realm exposes its own OAuth 2.0 endpoints, which means that application clients and application servers all need to use the same realm.
To use OAuth 2.0 with AMQ Streams, you use a deployment of Red Hat Single Sign-On to create and manage authentication realms.
If you already have Red Hat Single Sign-On deployed, you can skip the deployment step and use your current deployment.
Before you begin
You will need to be familiar with using Red Hat Single Sign-On.
For installation and administration instructions, see:
Prerequisites
- AMQ Streams and Kafka are running
For the Red Hat Single Sign-On deployment:
Procedure
Install Red Hat Single Sign-On.
You can install from a ZIP file or by using an RPM.
Log in to the Red Hat Single Sign-On Admin Console to create the OAuth 2.0 policies for AMQ Streams.
Login details are provided when you deploy Red Hat Single Sign-On.
Create and enable a realm.
You can use an existing master realm.
- Adjust the session and token timeouts for the realm, if required.
-
Create a client called
kafka-broker. From the Settings tab, set:
-
Access Type to
Confidential -
Standard Flow Enabled to
OFFto disable web login for this client -
Service Accounts Enabled to
ONto allow this client to authenticate in its own name
-
Access Type to
- Click Save before continuing.
- From the tab, take a note of the secret for using in your AMQ Streams Kafka cluster configuration.
Repeat the client creation steps for any application client that will connect to your Kafka brokers.
Create a definition for each new client.
You will use the names as client IDs in your configuration.
What to do next
After deploying and configuring the authorization server, configure the Kafka brokers to use OAuth 2.0.
5.4.9.6.2. Configuring OAuth 2.0 support for Kafka brokers
This procedure describes how to configure Kafka brokers so that the broker listeners are enabled to use OAuth 2.0 authentication using an authorization server.
We advise use of OAuth 2.0 over an encrypted interface through configuration of TLS listeners. Plain listeners are not recommended.
Configure the Kafka brokers using properties that support your chosen authorization server, and the type of authorization you are implementing.
Before you start
For more information on the configuration and authentication of Kafka broker listeners, see:
For a description of the properties used in the listener configuration, see:
Prerequisites
- AMQ Streams and Kafka are running
- An OAuth 2.0 authorization server is deployed
Procedure
Configure the Kafka broker listener configuration in the
server.propertiesfile.For example, using the OAUTHBEARER mechanism:
sasl.enabled.mechanisms=OAUTHBEARER
listeners=CLIENT://0.0.0.0:9092
listener.security.protocol.map=CLIENT:SASL_PLAINTEXT
listener.name.client.sasl.enabled.mechanisms=OAUTHBEARER
sasl.mechanism.inter.broker.protocol=OAUTHBEARER
inter.broker.listener.name=CLIENT
listener.name.client.oauthbearer.sasl.server.callback.handler.class=io.strimzi.kafka.oauth.server.JaasServerOauthValidatorCallbackHandler
listener.name.client.oauthbearer.sasl.jaas.config=org.apache.kafka.common.security.oauthbearer.OAuthBearerLoginModule required ;
listener.name.client.oauthbearer.sasl.login.callback.handler.class=io.strimzi.kafka.oauth.client.JaasClientOauthLoginCallbackHandler
Configure broker connection settings as part of the
listener.name.client.oauthbearer.sasl.jaas.config.The examples here show connection configuration options.
Example 1: Local token validation using a JWKS endpoint configuration
listener.name.client.oauthbearer.sasl.jaas.config=org.apache.kafka.common.security.oauthbearer.OAuthBearerLoginModule required \
  oauth.valid.issuer.uri="https://AUTH-SERVER-ADDRESS/auth/realms/REALM-NAME" \
  oauth.jwks.endpoint.uri="https://AUTH-SERVER-ADDRESS/auth/realms/REALM-NAME/protocol/openid-connect/certs" \
  oauth.jwks.refresh.seconds="300" \
  oauth.jwks.refresh.min.pause.seconds="1" \
  oauth.jwks.expiry.seconds="360" \
  oauth.username.claim="preferred_username" \
  oauth.ssl.truststore.location="PATH-TO-TRUSTSTORE-P12-FILE" \
  oauth.ssl.truststore.password="TRUSTSTORE-PASSWORD" \
  oauth.ssl.truststore.type="PKCS12" ;
listener.name.client.oauthbearer.connections.max.reauth.ms=3600000
Example 2: Delegating token validation to the authorization server through the OAuth 2.0 introspection endpoint
listener.name.client.oauthbearer.sasl.jaas.config=org.apache.kafka.common.security.oauthbearer.OAuthBearerLoginModule required \
  oauth.introspection.endpoint.uri="https://AUTH-SERVER-ADDRESS/auth/realms/REALM-NAME/protocol/openid-connect/introspection" \
  # ...
If required, configure access to the authorization server.
This step is normally required for a production environment, unless a technology like service mesh is used to configure secure channels outside containers.
Provide a custom truststore for connecting to a secured authorization server. SSL is always required for access to the authorization server.
Set properties to configure the truststore.
For example:
listener.name.client.oauthbearer.sasl.jaas.config=org.apache.kafka.common.security.oauthbearer.OAuthBearerLoginModule required \
  # ...
  oauth.client.id="kafka-broker" \
  oauth.client.secret="kafka-broker-secret" \
  oauth.ssl.truststore.location="PATH-TO-TRUSTSTORE-P12-FILE" \
  oauth.ssl.truststore.password="TRUSTSTORE-PASSWORD" \
  oauth.ssl.truststore.type="PKCS12" ;
If the certificate hostname does not match the access URL hostname, you can turn off certificate hostname validation:
oauth.ssl.endpoint.identification.algorithm=""
The check ensures that client connection to the authorization server is authentic. You may wish to turn off the validation in a non-production environment.
Configure additional properties according to your chosen authentication flow.
listener.name.client.oauthbearer.sasl.jaas.config=org.apache.kafka.common.security.oauthbearer.OAuthBearerLoginModule required \
  # ...
  oauth.token.endpoint.uri="https://AUTH-SERVER-ADDRESS/auth/realms/REALM-NAME/protocol/openid-connect/token" \ 1
  oauth.custom.claim.check="@.custom == 'custom-value'" \ 2
  oauth.scope="SCOPE" \ 3
  oauth.check.audience="true" \ 4
  oauth.audience="AUDIENCE" \ 5
  oauth.valid.issuer.uri="https://https://AUTH-SERVER-ADDRESS/auth/REALM-NAME" \ 6
  oauth.client.id="kafka-broker" \ 7
  oauth.client.secret="kafka-broker-secret" \ 8
  oauth.refresh.token="REFRESH-TOKEN-FOR-KAFKA-BROKERS" \ 9
  oauth.access.token="ACCESS-TOKEN-FOR-KAFKA-BROKERS" ; 10
  oauth.connect.timeout.seconds=60 11
  oauth.read.timeout.seconds=60 12
  oauth.groups.claim="$.groups" 13
  oauth.groups.claim.delimiter="," 14
- 1
- The OAuth 2.0 token endpoint URL to your authorization server. For production, always use
https://urls. Required whenKeycloakRBACAuthorizeris used, or an OAuth 2.0 enabled listener is used for inter-broker communication. - 2
- (Optional) Custom claim checking. A JsonPath filter query that applies additional custom rules to the JWT access token during validation. If the access token does not contain the necessary data, it is rejected. When using the introspection endpoint method, the custom check is applied to the introspection endpoint response JSON.
- 3
- (Optional) A
scopeparameter passed to the token endpoint. A scope is used when obtaining an access token for inter-broker authentication. It is also used in the name of a client for OAuth 2.0 over PLAIN client authentication using aclientIdandsecret. This only affects the ability to obtain the token, and the content of the token, depending on the authorization server. It does not affect token validation rules by the listener. - 4
- (Optional) Audience checking. If your authorization server provides an
aud(audience) claim, and you want to enforce an audience check, setouath.check.audiencetotrue. Audience checks identify the intended recipients of tokens. As a result, the Kafka broker will reject tokens that do not have itsclientIdin theiraudclaims. Default isfalse. - 5
- (Optional) An
audienceparameter passed to the token endpoint. An audience is used when obtaining an access token for inter-broker authentication. It is also used in the name of a client for OAuth 2.0 over PLAIN client authentication using aclientIdandsecret. This only affects the ability to obtain the token, and the content of the token, depending on the authorization server. It does not affect token validation rules by the listener. - 6
- A valid issuer URI. Only access tokens issued by this issuer will be accepted. (Always required.)
- 7
- The configured client ID of the Kafka broker, which is the same for all brokers. This is the client registered with the authorization server as
kafka-broker. Required when an introspection endpoint is used for token validation, or whenKeycloakRBACAuthorizeris used. - 8
- The configured secret for the Kafka broker, which is the same for all brokers. When the broker must authenticate to the authorization server, either a client secret, access token or a refresh token has to be specified.
- 9
- (Optional) A long-lived refresh token for Kafka brokers.
- 10
- (Optional) A long-lived access token for Kafka brokers.
- 11
- (Optional) The connect timeout in seconds when connecting to the authorization server. The default value is 60.
- 12
- (Optional) The read timeout in seconds when connecting to the authorization server. The default value is 60.
- 13
- A JsonPath query used to extract groups information from JWT token or introspection endpoint response. Not set by default. This can be used by a custom authorizer to make authorization decisions based on user groups.
- 14
- A delimiter used to parse groups information when returned as a single delimited string. The default value is ',' (comma).
Depending on how you apply OAuth 2.0 authentication, and the type of authorization server being used, add additional configuration settings:
listener.name.client.oauthbearer.sasl.jaas.config=org.apache.kafka.common.security.oauthbearer.OAuthBearerLoginModule required \
  # ...
  oauth.check.issuer=false \ 1
  oauth.fallback.username.claim="CLIENT-ID" \ 2
  oauth.fallback.username.prefix="CLIENT-ACCOUNT" \ 3
  oauth.valid.token.type="bearer" \ 4
  oauth.userinfo.endpoint.uri="https://AUTH-SERVER-ADDRESS/auth/realms/REALM-NAME/protocol/openid-connect/userinfo" ; 5
- 1
- If your authorization server does not provide an
issclaim, it is not possible to perform an issuer check. In this situation, setoauth.check.issuertofalseand do not specify aoauth.valid.issuer.uri. Default istrue. - 2
- An authorization server may not provide a single attribute to identify both regular users and clients. When a client authenticates in its own name, the server might provide a client ID. When a user authenticates using a username and password, to obtain a refresh token or an access token, the server might provide a username attribute in addition to a client ID. Use this fallback option to specify the username claim (attribute) to use if a primary user ID attribute is not available.
- 3
- In situations where
oauth.fallback.username.claimis applicable, it may also be necessary to prevent name collisions between the values of the username claim, and those of the fallback username claim. Consider a situation where a client calledproducerexists, but also a regular user calledproducerexists. In order to differentiate between the two, you can use this property to add a prefix to the user ID of the client. - 4
- (Only applicable when using
oauth.introspection.endpoint.uri) Depending on the authorization server you are using, the introspection endpoint may or may not return the token type attribute, or it may contain different values. You can specify a valid token type value that the response from the introspection endpoint has to contain. - 5
- (Only applicable when using
oauth.introspection.endpoint.uri) The authorization server may be configured or implemented in such a way to not provide any identifiable information in an introspection endpoint response. In order to obtain the user ID, you can configure the URI of theuserinfoendpoint as a fallback. Theoauth.fallback.username.claim,oauth.fallback.username.claim, andoauth.fallback.username.prefixsettings are applied to the response of theuserinfoendpoint.
What to do next
5.4.9.6.3. Configuring Kafka Java clients to use OAuth 2.0
This procedure describes how to configure Kafka producer and consumer APIs to use OAuth 2.0 for interaction with Kafka brokers.
Add a client callback plugin to your pom.xml file, and configure the system properties.
Prerequisites
- AMQ Streams and Kafka are running
- An OAuth 2.0 authorization server is deployed and configured for OAuth access to Kafka brokers
- Kafka brokers are configured for OAuth 2.0
Procedure
Add the client library with OAuth 2.0 support to the
pom.xmlfile for the Kafka client:<dependency> <groupId>io.strimzi</groupId> <artifactId>kafka-oauth-client</artifactId> <version>0.10.0.redhat-00014</version> </dependency>
Configure the system properties for the callback:
For example:
System.setProperty(ClientConfig.OAUTH_TOKEN_ENDPOINT_URI, “https://<auth-server-address>/auth/realms/master/protocol/openid-connect/token”); 1
System.setProperty(ClientConfig.OAUTH_CLIENT_ID, "<client_name>"); 2
System.setProperty(ClientConfig.OAUTH_CLIENT_SECRET, "<client_secret>"); 3
System.setProperty(ClientConfig.OAUTH_SCOPE, "<scope_value>") 4
System.setProperty(ClientConfig.OAUTH_AUDIENCE, "<audience_value") 5
- 1
- URI of the authorization server token endpoint.
- 2
- Client ID, which is the name used when creating the client in the authorization server.
- 3
- Client secret created when creating the client in the authorization server.
- 4
- (Optional) The
scopefor requesting the token from the token endpoint. An authorization server may require a client to specify the scope. - 5
- (Optional) The
audiencefor requesting the token from the token endpoint. An authorization server may require a client to specify the audience.
Enable the OAUTHBEARER or PLAIN mechanism on a TLS encrypted connection in the Kafka client configuration.
For example:
Enabling OAUTHBEARER for a Kafka client
props.put("sasl.jaas.config", "org.apache.kafka.common.security.oauthbearer.OAuthBearerLoginModule required;");
props.put("security.protocol", "SASL_SSL");
props.put("sasl.mechanism", "OAUTHBEARER");
props.put("sasl.login.callback.handler.class", "io.strimzi.kafka.oauth.client.JaasClientOauthLoginCallbackHandler");
Enabling PLAIN for a Kafka client
props.put("sasl.jaas.config", "org.apache.kafka.common.security.plain.PlainLoginModule required username=\"$CLIENT_ID_OR_ACCOUNT_NAME\" password=\"$SECRET_OR_ACCESS_TOKEN\" ;"); props.put("security.protocol", "SASL_SSL"); 1 props.put("sasl.mechanism", "PLAIN");- 1
- Here we use
SASL_SSLfor use over TLS connections. UseSASL_PLAINTEXTover unencrypted connections for local development only.
- Verify that the Kafka client can access the Kafka brokers.
5.4.10. Using OAuth 2.0 token-based authorization
AMQ Streams supports the use of OAuth 2.0 token-based authorization through Red Hat Single Sign-On Authorization Services, which allows you to manage security policies and permissions centrally.
Security policies and permissions defined in Red Hat Single Sign-On are used to grant access to resources on Kafka brokers. Users and clients are matched against policies that permit access to perform specific actions on Kafka brokers.
Kafka allows all users full access to brokers by default, and also provides the AclAuthorizer plugin to configure authorization based on Access Control Lists (ACLs).
ZooKeeper stores ACL rules that grant or deny access to resources based on username. However, OAuth 2.0 token-based authorization with Red Hat Single Sign-On offers far greater flexibility on how you wish to implement access control to Kafka brokers. In addition, you can configure your Kafka brokers to use OAuth 2.0 authorization and ACLs.
Additional resources
5.4.10.1. OAuth 2.0 authorization mechanism
OAuth 2.0 authorization in AMQ Streams uses Red Hat Single Sign-On server Authorization Services REST endpoints to extend token-based authentication with Red Hat Single Sign-On by applying defined security policies on a particular user, and providing a list of permissions granted on different resources for that user. Policies use roles and groups to match permissions to users. OAuth 2.0 authorization enforces permissions locally based on the received list of grants for the user from Red Hat Single Sign-On Authorization Services.
5.4.10.1.1. Kafka broker custom authorizer
A Red Hat Single Sign-On authorizer (KeycloakRBACAuthorizer) is provided with AMQ Streams. To be able to use the Red Hat Single Sign-On REST endpoints for Authorization Services provided by Red Hat Single Sign-On, you configure a custom authorizer on the Kafka broker.
The authorizer fetches a list of granted permissions from the authorization server as needed, and enforces authorization locally on the Kafka Broker, making rapid authorization decisions for each client request.
5.4.10.2. Configuring OAuth 2.0 authorization support
This procedure describes how to configure Kafka brokers to use OAuth 2.0 authorization using Red Hat Single Sign-On Authorization Services.
Before you begin
Consider the access you require or want to limit for certain users. You can use a combination of Red Hat Single Sign-On groups, roles, clients, and users to configure access in Red Hat Single Sign-On.
Typically, groups are used to match users based on organizational departments or geographical locations. And roles are used to match users based on their function.
With Red Hat Single Sign-On, you can store users and groups in LDAP, whereas clients and roles cannot be stored this way. Storage and access to user data may be a factor in how you choose to configure authorization policies.
Super users always have unconstrained access to a Kafka broker regardless of the authorization implemented on the Kafka broker.
Prerequisites
- AMQ Streams must be configured to use OAuth 2.0 with Red Hat Single Sign-On for token-based authentication. You use the same Red Hat Single Sign-On server endpoint when you set up authorization.
- You need to understand how to manage policies and permissions for Red Hat Single Sign-On Authorization Services, as described in the Red Hat Single Sign-On documentation.
Procedure
- Access the Red Hat Single Sign-On Admin Console or use the Red Hat Single Sign-On Admin CLI to enable Authorization Services for the Kafka broker client you created when setting up OAuth 2.0 authentication.
- Use Authorization Services to define resources, authorization scopes, policies, and permissions for the client.
- Bind the permissions to users and clients by assigning them roles and groups.
Configure the Kafka brokers to use Red Hat Single Sign-On authorization.
Add the following to the Kafka
server.propertiesconfiguration file to install the authorizer in Kafka:authorizer.class.name=io.strimzi.kafka.oauth.server.authorizer.KeycloakRBACAuthorizer principal.builder.class=io.strimzi.kafka.oauth.server.authorizer.JwtKafkaPrincipalBuilder
Add configuration for the Kafka brokers to access the authorization server and Authorization Services.
Here we show example configuration added as additional properties to
server.properties, but you can also define them as environment variables using capitalized or upper-case naming conventions.strimzi.authorization.token.endpoint.uri="https://AUTH-SERVER-ADDRESS/auth/realms/REALM-NAME/protocol/openid-connect/token" 1 strimzi.authorization.client.id="kafka" 2
(Optional) Add configuration for specific Kafka clusters.
For example:
strimzi.authorization.kafka.cluster.name="kafka-cluster" 1- 1
- The name of a specific Kafka cluster. Names are used to target permissions, making it possible to manage multiple clusters within the same Red Hat Single Sign-On realm. The default value is
kafka-cluster.
(Optional) Delegate to simple authorization.
For example:
strimzi.authorization.delegate.to.kafka.acl="false" 1- 1
- Delegate authorization to Kafka
AclAuthorizerif access is denied by Red Hat Single Sign-On Authorization Services policies. The default isfalse.
(Optional) Add configuration for TLS connection to the authorization server.
For example:
strimzi.authorization.ssl.truststore.location=<path-to-truststore> 1
strimzi.authorization.ssl.truststore.password=<my-truststore-password> 2
strimzi.authorization.ssl.truststore.type=JKS 3
strimzi.authorization.ssl.secure.random.implementation=SHA1PRNG 4
strimzi.authorization.ssl.endpoint.identification.algorithm=HTTPS 5
- 1
- The path to the truststore that contain the certificates.
- 2
- The password for the truststore.
- 3
- The truststore type. If not set, the default Java keystore type is used.
- 4
- Random number generator implementation. If not set, the Java platform SDK default is used.
- 5
- Hostname verification. If set to an empty string, the hostname verification is turned off. If not set, the default value is
HTTPS, which enforces hostname verification for server certificates.
(Optional) Configure the refresh of grants from the authorization server. The grants refresh job works by enumerating the active tokens and requesting the latest grants for each.
For example:
strimzi.authorization.grants.refresh.period.seconds="120" 1
strimzi.authorization.grants.refresh.pool.size="10" 2
- 1
- Specifies how often the list of grants from the authorization server is refreshed (once per minute by default). To turn grants refresh off for debugging purposes, set to
"0". - 2
- Specifies the size of the thread pool (the degree of parallelism) used by the grants refresh job. The default value is
"5".
- Verify the configured permissions by accessing Kafka brokers as clients or users with specific roles, making sure they have the necessary access, or do not have the access they are not supposed to have.
5.4.11. Using OPA policy-based authorization
Open Policy Agent (OPA) is an open-source policy engine. You can integrate OPA with AMQ Streams to act as a policy-based authorization mechanism for permitting client operations on Kafka brokers.
When a request is made from a client, OPA will evaluate the request against policies defined for Kafka access, then allow or deny the request.
Red Hat does not support the OPA server.
Additional resources
5.4.11.1. Defining OPA policies
Before integrating OPA with AMQ Streams, consider how you will define policies to provide fine-grained access controls.
You can define access control for Kafka clusters, consumer groups and topics. For instance, you can define an authorization policy that allows write access from a producer client to a specific broker topic.
For this, the policy might specify the:
- User principal and host address associated with the producer client
- Operations allowed for the client
-
Resource type (
topic) and resource name the policy applies to
Allow and deny decisions are written into the policy, and a response is provided based on the request and client identification data provided.
In our example the producer client would have to satisfy the policy to be allowed to write to the topic.
5.4.11.2. Connecting to the OPA
To enable Kafka to access the OPA policy engine to query access control policies, , you configure a custom OPA authorizer plugin (kafka-authorizer-opa-VERSION.jar) in your Kafka server.properties file.
When a request is made by a client, the OPA policy engine is queried by the plugin using a specified URL address and a REST endpoint, which must be the name of the defined policy.
The plugin provides the details of the client request — user principal, operation, and resource — in JSON format to be checked against the policy. The details will include the unique identity of the client; for example, taking the distinguished name from the client certificate if TLS authentication is used.
OPA uses the data to provide a response — either true or false — to the plugin to allow or deny the request.
5.4.11.3. Configuring OPA authorization support
This procedure describes how to configure Kafka brokers to use OPA authorization.
Before you begin
Consider the access you require or want to limit for certain users. You can use a combination of users and Kafka resources to define OPA policies.
It is possible to set up OPA to load user information from an LDAP data source.
Super users always have unconstrained access to a Kafka broker regardless of the authorization implemented on the Kafka broker.
Prerequisites
- An OPA server must be available for connection.
- OPA authorizer plugin for Kafka
Procedure
Write the OPA policies required for authorizing client requests to perform operations on the Kafka brokers.
Now configure the Kafka brokers to use OPA.
Install the OPA authorizer plugin for Kafka.
Make sure that the plugin files are included in the Kafka classpath.
Add the following to the Kafka
server.propertiesconfiguration file to enable the OPA plugin:authorizer.class.name: com.bisnode.kafka.authorization.OpaAuthorizer
Add further configuration to
server.propertiesfor the Kafka brokers to access the OPA policy engine and policies.For example:
opa.authorizer.url=https://OPA-ADDRESS/allow 1
opa.authorizer.allow.on.error=false 2
opa.authorizer.cache.initial.capacity=50000 3
opa.authorizer.cache.maximum.size=50000 4
opa.authorizer.cache.expire.after.seconds=600000 5
super.users=User:alice;User:bob 6
- 1
- (Required) The OAuth 2.0 token endpoint URL for the policy the authorizer plugin will query. In this example, the policy is called
allow. - 2
- Flag to specify whether a client is allowed or denied access by default if the authorizer plugin fails to connect with the OPA policy engine.
- 3
- Initial capacity in bytes of the local cache. The cache is used so that the plugin does not have to query the OPA policy engine for every request.
- 4
- Maximum capacity in bytes of the local cache.
- 5
- Time in milliseconds that the local cache is refreshed by reloading from the OPA policy engine.
- 6
- A list of user principals treated as super users, so that they are always allowed without querying the Open Policy Agent policy.
Refer to the Open Policy Agent website for information on authentication and authorization options.
- Verify the configured permissions by accessing Kafka brokers using clients that have and do not have the correct authorization.
5.4.12. Logging
Kafka brokers use Log4j as their logging infrastructure. By default, the logging configuration is read from the log4j.properties configuration file, which should be placed either in the /opt/kafka/config/ directory or on the classpath. The location and name of the configuration file can be changed using the Java property log4j.configuration, which can be passed to Kafka by using the KAFKA_LOG4J_OPTS environment variable:
su - kafka
export KAFKA_LOG4J_OPTS="-Dlog4j.configuration=file:/my/path/to/log4j.config"; /opt/kafka/bin/kafka-server-start.sh /opt/kafka/config/server.properties
For more information about Log4j configurations, see the Log4j manual.
5.4.12.1. Dynamically change logging levels for Kafka broker loggers
Kafka broker logging is provided by multiple broker loggers in each broker. You can dynamically change the logging level for broker loggers without having to restart the broker. Increasing the level of detail returned in logs—by changing from INFO to DEBUG, for example—is useful for investigating performance issues in a Kafka cluster.
Broker loggers can also be dynamically reset to their default logging levels.
Procedure
Switch to the
kafkauser:su - kafka
List all the broker loggers for a broker by using the
kafka-configs.shtool:/opt/kafka/bin/kafka-configs.sh --bootstrap-server <broker_address> --describe --entity-type broker-loggers --entity-name BROKER-ID
For example, for broker
0:/opt/kafka/bin/kafka-configs.sh --bootstrap-server localhost:9092 --describe --entity-type broker-loggers --entity-name 0
This returns the logging level for each logger:
TRACE,DEBUG,INFO,WARN,ERROR, orFATAL. For example:#... kafka.controller.ControllerChannelManager=INFO sensitive=false synonyms={} kafka.log.TimeIndex=INFO sensitive=false synonyms={}Change the logging level for one or more broker loggers. Use the
--alterand--add-configoptions and specify each logger and its level as a comma-separated list in double quotes./opt/kafka/bin/kafka-configs.sh --bootstrap-server <broker_address> --alter --add-config "LOGGER-ONE=NEW-LEVEL,LOGGER-TWO=NEW-LEVEL" --entity-type broker-loggers --entity-name BROKER-ID
For example, for broker
0:/opt/kafka/bin/kafka-configs.sh --bootstrap-server localhost:9092 --alter --add-config "kafka.controller.ControllerChannelManager=WARN,kafka.log.TimeIndex=WARN" --entity-type broker-loggers --entity-name 0
If successful this returns:
Completed updating config for broker: 0.
Resetting a broker logger
You can reset one or more broker loggers to their default logging levels by using the kafka-configs.sh tool. Use the --alter and --delete-config options and specify each broker logger as a comma-separated list in double quotes:
/opt/kafka/bin/kafka-configs.sh --bootstrap-server localhost:9092 --alter --delete-config "LOGGER-ONE,LOGGER-TWO" --entity-type broker-loggers --entity-name BROKER-ID
Additional resources
- Updating Broker Configs in the Apache Kafka documentation
Chapter 6. Creating and managing topics
Messages in Kafka are always sent to or received from a topic. This chapter describes how to create and manage Kafka topics.
6.1. Partitions and replicas
Messages in Kafka are always sent to or received from a topic. A topic is always split into one or more partitions. Partitions act as shards. That means that every message sent by a producer is always written only into a single partition. Thanks to the sharding of messages into different partitions, topics are easy to scale horizontally.
Each partition can have one or more replicas, which will be stored on different brokers in the cluster. When creating a topic you can configure the number of replicas using the replication factor. Replication factor defines the number of copies which will be held within the cluster. One of the replicas for given partition will be elected as a leader. The leader replica will be used by the producers to send new messages and by the consumers to consume messages. The other replicas will be follower replicas. The followers replicate the leader.
If the leader fails, one of the followers will automatically become the new leader. Each server acts as a leader for some of its partitions and a follower for others so the load is well balanced within the cluster.
The replication factor determines the number of replicas including the leader and the followers. For example, if you set the replication factor to 3, then there will one leader and two follower replicas.
6.2. Message retention
The message retention policy defines how long the messages will be stored on the Kafka brokers. It can be defined based on time, partition size or both.
For example, you can define that the messages should be kept:
- For 7 days
- Until the parition has 1GB of messages. Once the limit is reached, the oldest messages will be removed.
- For 7 days or until the 1GB limit has been reached. Whatever limit comes first will be used.
Kafka brokers store messages in log segments. The messages which are past their retention policy will be deleted only when a new log segment is created. New log segments are created when the previous log segment exceeds the configured log segment size. Additionally, users can request new segments to be created periodically.
Additionally, Kafka brokers support a compacting policy.
For a topic with the compacted policy, the broker will always keep only the last message for each key. The older messages with the same key will be removed from the partition. Because compacting is a periodically executed action, it does not happen immediately when the new message with the same key are sent to the partition. Instead it might take some time until the older messages are removed.
For more information about the message retention configuration options, see Section 6.5, “Topic configuration”.
6.3. Topic auto-creation
When a producer or consumer tries to send messages to or receive messages from a topic that does not exist, Kafka will, by default, automatically create that topic. This behavior is controlled by the auto.create.topics.enable configuration property which is set to true by default.
To disable it, set auto.create.topics.enable to false in the Kafka broker configuration file:
auto.create.topics.enable=false
6.4. Topic deletion
Kafka offers the possibility to disable deletion of topics. This is configured through the delete.topic.enable property, which is set to true by default (that is, deleting topics is possible). When this property is set to false it will be not possible to delete topics and all attempts to delete topic will return success but the topic will not be deleted.
delete.topic.enable=false
6.5. Topic configuration
Auto-created topics will use the default topic configuration which can be specified in the broker properties file. However, when creating topics manually, their configuration can be specified at creation time. It is also possible to change a topic’s configuration after it has been created. The main topic configuration options for manually created topics are:
cleanup.policy-
Configures the retention policy to
deleteorcompact. Thedeletepolicy will delete old records. Thecompactpolicy will enable log compaction. The default value isdelete. For more information about log compaction, see Kafka website. compression.type-
Specifies the compression which is used for stored messages. Valid values are
gzip,snappy,lz4,uncompressed(no compression) andproducer(retain the compression codec used by the producer). The default value isproducer. max.message.bytes-
The maximum size of a batch of messages allowed by the Kafka broker, in bytes. The default value is
1000012. min.insync.replicas-
The minimum number of replicas which must be in sync for a write to be considered successful. The default value is
1. retention.ms-
Maximum number of milliseconds for which log segments will be retained. Log segments older than this value will be deleted. The default value is
604800000(7 days). retention.bytes-
The maximum number of bytes a partition will retain. Once the partition size grows over this limit, the oldest log segments will be deleted. Value of
-1indicates no limit. The default value is-1. segment.bytes-
The maximum file size of a single commit log segment file in bytes. When the segment reaches its size, a new segment will be started. The default value is
1073741824bytes (1 gibibyte).
The defaults for auto-created topics can be specified in the Kafka broker configuration using similar options:
log.cleanup.policy-
See
cleanup.policyabove. compression.type-
See
compression.typeabove. message.max.bytes-
See
max.message.bytesabove. min.insync.replicas-
See
min.insync.replicasabove. log.retention.ms-
See
retention.msabove. log.retention.bytes-
See
retention.bytesabove. log.segment.bytes-
See
segment.bytesabove. default.replication.factor-
Default replication factor for automatically created topics. Default value is
1. num.partitions-
Default number of partitions for automatically created topics. Default value is
1.
6.6. Internal topics
Internal topics are created and used internally by the Kafka brokers and clients. Kafka has several internal topics. These are used to store consumer offsets (__consumer_offsets) or transaction state (__transaction_state). These topics can be configured using dedicated Kafka broker configuration options starting with prefix offsets.topic. and transaction.state.log.. The most important configuration options are:
offsets.topic.replication.factor-
Number of replicas for
__consumer_offsetstopic. The default value is3. offsets.topic.num.partitions-
Number of partitions for
__consumer_offsetstopic. The default value is50. transaction.state.log.replication.factor-
Number of replicas for
__transaction_statetopic. The default value is3. transaction.state.log.num.partitions-
Number of partitions for
__transaction_statetopic. The default value is50. transaction.state.log.min.isr-
Minimum number of replicas that must acknowledge a write to
__transaction_statetopic to be considered successful. If this minimum cannot be met, then the producer will fail with an exception. The default value is2.
6.7. Creating a topic
Use the kafka-topics.sh tool to manage topics. kafka-topics.sh is part of the AMQ Streams distribution and is found in the bin directory.
Prerequisites
- AMQ Streams cluster is installed and running
Creating a topic
Create a topic using the
kafka-topics.shutility and specify the following:-
Host and port of the Kafka broker in the
--bootstrap-serveroption. -
The new topic to be created in the
--createoption. -
Topic name in the
--topicoption. -
The number of partitions in the
--partitionsoption. Topic replication factor in the
--replication-factoroption.You can also override some of the default topic configuration options using the option
--config. This option can be used multiple times to override different options./opt/kafka/bin/kafka-topics.sh --bootstrap-server <broker_address> --create --topic <TopicName> --partitions <NumberOfPartitions> --replication-factor <ReplicationFactor> --config <Option1>=<Value1> --config <Option2>=<Value2>
Example of the command to create a topic named
mytopic/opt/kafka/bin/kafka-topics.sh --bootstrap-server localhost:9092 --create --topic mytopic --partitions 50 --replication-factor 3 --config cleanup.policy=compact --config min.insync.replicas=2
-
Host and port of the Kafka broker in the
Verify that the topic exists using
kafka-topics.sh./opt/kafka/bin/kafka-topics.sh --bootstrap-server <broker_address> --describe --topic <TopicName>
Example of the command to describe a topic named
mytopic/opt/kafka/bin/kafka-topics.sh --bootstrap-server localhost:9092 --describe --topic mytopic
Additional resources
6.8. Listing and describing topics
The kafka-topics.sh tool can be used to list and describe topics. kafka-topics.sh is part of the AMQ Streams distribution and can be found in the bin directory.
Prerequisites
- AMQ Streams cluster is installed and running
-
Topic
mytopicexists
Describing a topic
Describe a topic using the
kafka-topics.shutility and specify the following:-
Host and port of the Kafka broker in the
--bootstrap-serveroption. -
Use the
--describeoption to specify that you want to describe a topic. -
Topic name must be specified in the
--topicoption. When the
--topicoption is omitted, it will describe all available topics./opt/kafka/bin/kafka-topics.sh --bootstrap-server <broker_address> --describe --topic <TopicName>
Example of the command to describe a topic named
mytopic/opt/kafka/bin/kafka-topics.sh --bootstrap-server localhost:9092 --describe --topic mytopic
The command lists all partitions and replicas which belong to this topic. It also lists all topic configuration options.
-
Host and port of the Kafka broker in the
Additional resources
6.9. Modifying a topic configuration
The kafka-configs.sh tool can be used to modify topic configurations. kafka-configs.sh is part of the AMQ Streams distribution and can be found in the bin directory.
Prerequisites
- AMQ Streams cluster is installed and running
-
Topic
mytopicexists
Modify topic configuration
Use the
kafka-configs.shtool to get the current configuration.-
Specify the host and port of the Kafka broker in the
--bootstrap-serveroption. -
Set the
--entity-typeastopicand--entity-nameto the name of your topic. Use
--describeoption to get the current configuration./opt/kafka/bin/kafka-configs.sh --bootstrap-server <broker_address> --entity-type topics --entity-name <TopicName> --describe
Example of the command to get configuration of a topic named
mytopic/opt/kafka/bin/kafka-configs.sh --bootstrap-server localhost:9092 --entity-type topics --entity-name mytopic --describe
-
Specify the host and port of the Kafka broker in the
Use the
kafka-configs.shtool to change the configuration.-
Specify the host and port of the Kafka broker in the
--bootstrap-serveroption. -
Set the
--entity-typeastopicand--entity-nameto the name of your topic. -
Use
--alteroption to modify the current configuration. Specify the options you want to add or change in the option
--add-config./opt/kafka/bin/kafka-configs.sh --bootstrap-server <broker_address> --entity-type topics --entity-name <TopicName> --alter --add-config <Option>=<Value>
Example of the command to change configuration of a topic named
mytopic/opt/kafka/bin/kafka-configs.sh --bootstrap-server localhost:9092 --entity-type topics --entity-name mytopic --alter --add-config min.insync.replicas=1
-
Specify the host and port of the Kafka broker in the
Use the
kafka-configs.shtool to delete an existing configuration option.-
Specify the host and port of the Kafka broker in the
--bootstrap-serveroption. -
Set the
--entity-typeastopicand--entity-nameto the name of your topic. -
Use
--delete-configoption to remove existing configuration option. Specify the options you want to remove in the option
--remove-config./opt/kafka/bin/kafka-configs.sh --bootstrap-server <broker_address> --entity-type topics --entity-name <TopicName> --alter --delete-config <Option>
Example of the command to change configuration of a topic named
mytopic/opt/kafka/bin/kafka-configs.sh --bootstrap-server localhost:9092 --entity-type topics --entity-name mytopic --alter --delete-config min.insync.replicas
-
Specify the host and port of the Kafka broker in the
Additional resources
6.10. Deleting a topic
The kafka-topics.sh tool can be used to manage topics. kafka-topics.sh is part of the AMQ Streams distribution and can be found in the bin directory.
Prerequisites
- AMQ Streams cluster is installed and running
-
Topic
mytopicexists
Deleting a topic
Delete a topic using the
kafka-topics.shutility.-
Host and port of the Kafka broker in the
--bootstrap-serveroption. -
Use the
--deleteoption to specify that an existing topic should be deleted. Topic name must be specified in the
--topicoption./opt/kafka/bin/kafka-topics.sh --bootstrap-server <broker_address> --delete --topic <TopicName>
Example of the command to create a topic named
mytopic/opt/kafka/bin/kafka-topics.sh --bootstrap-server localhost:9092 --delete --topic mytopic
-
Host and port of the Kafka broker in the
Verify that the topic was deleted using
kafka-topics.sh./opt/kafka/bin/kafka-topics.sh --bootstrap-server <broker_address> --listExample of the command to list all topics
/opt/kafka/bin/kafka-topics.sh --bootstrap-server localhost:9092 --list
Additional resources
Chapter 7. Using AMQ Streams with Kafka Connect
Use Kafka Connect to stream data between Kafka and external systems. Kafka Connect provides a framework for moving large amounts of data while maintaining scalability and reliability. Kafka Connect is typically used to integrate Kafka with database, storage, and messaging systems that are external to your Kafka cluster.
Kafka Connect uses connector plug-ins that implement connectivity for different types of external systems. There are two types of connector plug-ins: sink and source. Sink connectors stream data from Kafka to external systems. Source connectors stream data from external systems into Kafka.
Kafka Connect can run in standalone or distributed modes.
- Standalone mode
- In standalone mode, Kafka Connect runs on a single node with user-defined configuration read from a properties file.
- Distributed mode
- In distributed mode, Kafka Connect runs across one or more worker nodes and the workloads are distributed among them. You manage connectors and their configuration using an HTTP REST interface.
Handling high volumes of messages
You can tune the configuration to handle high volumes of messages. For more information, see Chapter 9, Handling high volumes of messages.
7.1. Kafka Connect in standalone mode
In standalone mode, Kafka Connect runs as a single process, on a single node. You manage the configuration of standalone mode using properties files.
7.1.1. Configuring Kafka Connect in standalone mode
To configure Kafka Connect in standalone mode, edit the config/connect-standalone.properties configuration file. The following options are the most important.
bootstrap.servers-
A list of Kafka broker addresses used as bootstrap connections to Kafka. For example,
kafka0.my-domain.com:9092,kafka1.my-domain.com:9092,kafka2.my-domain.com:9092. key.converter-
The class used to convert message keys to and from Kafka format. For example,
org.apache.kafka.connect.json.JsonConverter. value.converter-
The class used to convert message payloads to and from Kafka format. For example,
org.apache.kafka.connect.json.JsonConverter. offset.storage.file.filename- Specifies the file in which the offset data is stored.
An example configuration file is provided in the installation directory at config/connect-standalone.properties.
Connector plug-ins open client connections to the Kafka brokers using the bootstrap address. To configure these connections, use the standard Kafka producer and consumer configuration options prefixed by producer. or consumer..
7.1.2. Configuring connectors in Kafka Connect in standalone mode
You can configure connector plug-ins for Kafka Connect in standalone mode using properties files. Most configuration options are specific to each connector. The following options apply to all connectors:
name- The name of the connector, which must be unique within the current Kafka Connect instance.
connector.class-
The class of the connector plug-in. For example,
org.apache.kafka.connect.file.FileStreamSinkConnector. tasks.max- The maximum number of tasks that the specified connector can use. Tasks enable the connector to perform work in parallel. The connector might create fewer tasks than specified.
key.converter-
The class used to convert message keys to and from Kafka format. This overrides the default value set by the Kafka Connect configuration. For example,
org.apache.kafka.connect.json.JsonConverter. value.converter-
The class used to convert message payloads to and from Kafka format. This overrides the default value set by the Kafka Connect configuration. For example,
org.apache.kafka.connect.json.JsonConverter.
Additionally, you must set at least one of the following options for sink connectors:
topics- A comma-separated list of topics used as input.
topics.regex- A Java regular expression of topics used as input.
For all other options, see the documentation for the available connectors.
AMQ Streams includes example connector configuration files – see config/connect-file-sink.properties and config/connect-file-source.properties in the AMQ Streams installation directory.
7.1.3. Running Kafka Connect in standalone mode
This procedure describes how to configure and run Kafka Connect in standalone mode.
Prerequisites
- An installed and running AMQ Streams} cluster.
Procedure
Edit the
/opt/kafka/config/connect-standalone.propertiesKafka Connect configuration file and setbootstrap.serverto point to your Kafka brokers. For example:bootstrap.servers=kafka0.my-domain.com:9092,kafka1.my-domain.com:9092,kafka2.my-domain.com:9092
Start Kafka Connect with the configuration file and specify one or more connector configurations.
su - kafka
/opt/kafka/bin/connect-standalone.sh /opt/kafka/config/connect-standalone.properties connector1.properties
[connector2.properties ...]
Verify that Kafka Connect is running.
jcmd | grep ConnectStandalone
7.2. Kafka Connect in distributed mode
In distributed mode, Kafka Connect runs across one or more worker nodes and the workloads are distributed among them. You manage connector plug-ins and their configuration using the HTTP REST interface.
7.2.1. Configuring Kafka Connect in distributed mode
To configure Kafka Connect in distributed mode, edit the config/connect-distributed.properties configuration file. The following options are the most important.
bootstrap.servers-
A list of Kafka broker addresses used as bootstrap connections to Kafka. For example,
kafka0.my-domain.com:9092,kafka1.my-domain.com:9092,kafka2.my-domain.com:9092. key.converter-
The class used to convert message keys to and from Kafka format. For example,
org.apache.kafka.connect.json.JsonConverter. value.converter-
The class used to convert message payloads to and from Kafka format. For example,
org.apache.kafka.connect.json.JsonConverter. group.id-
The name of the distributed Kafka Connect cluster. This must be unique and must not conflict with another consumer group ID. The default value is
connect-cluster. config.storage.topic-
The Kafka topic used to store connector configurations. The default value is
connect-configs. offset.storage.topic-
The Kafka topic used to store offsets. The default value is
connect-offset. status.storage.topic-
The Kafka topic used for worker node statuses. The default value is
connect-status.
AMQ Streams includes an example configuration file for Kafka Connect in distributed mode – see config/connect-distributed.properties in the AMQ Streams installation directory.
Connector plug-ins open client connections to the Kafka brokers using the bootstrap address. To configure these connections, use the standard Kafka producer and consumer configuration options prefixed by producer. or consumer..
7.2.2. Configuring connectors in distributed Kafka Connect
HTTP REST Interface
Connectors for distributed Kafka Connect are configured using HTTP REST interface. The REST interface listens on port 8083 by default. It supports following endpoints:
GET /connectors- Return a list of existing connectors.
POST /connectors- Create a connector. The request body has to be a JSON object with the connector configuration.
GET /connectors/<name>- Get information about a specific connector.
GET /connectors/<name>/config- Get configuration of a specific connector.
PUT /connectors/<name>/config- Update the configuration of a specific connector.
GET /connectors/<name>/status- Get the status of a specific connector.
PUT /connectors/<name>/pause- Pause the connector and all its tasks. The connector will stop processing any messages.
PUT /connectors/<name>/resume- Resume a paused connector.
POST /connectors/<name>/restart- Restart a connector in case it has failed.
DELETE /connectors/<name>- Delete a connector.
GET /connector-plugins- Get a list of all supported connector plugins.
Connector configuration
Most configuration options are connector specific and included in the documentation for the connectors. The following fields are common for all connectors.
name- Name of the connector. Must be unique within a given Kafka Connect instance.
connector.class-
Class of the connector plugin. For example
org.apache.kafka.connect.file.FileStreamSinkConnector. tasks.max- The maximum number of tasks used by this connector. Tasks are used by the connector to parallelise its work. Connetors may create fewer tasks than specified.
key.converter-
Class used to convert message keys to and from Kafka format. This overrides the default value set by the Kafka Connect configuration. For example,
org.apache.kafka.connect.json.JsonConverter. value.converter-
Class used to convert message payloads to and from Kafka format. This overrides the default value set by the Kafka Connect configuration. For example,
org.apache.kafka.connect.json.JsonConverter.
Additionally, one of the following options must be set for sink connectors:
topics- A comma-separated list of topics used as input.
topics.regex- A Java regular expression of topics used as input.
For all other options, see the documentation for the specific connector.
AMQ Streams includes example connector configuration files. They can be found in config/connect-file-sink.properties and config/connect-file-source.properties in the AMQ Streams installation directory.
7.2.3. Running distributed Kafka Connect
This procedure describes how to configure and run Kafka Connect in distributed mode.
Prerequisites
- An installed and running AMQ Streams cluster.
Running the cluster
Edit the
/opt/kafka/config/connect-distributed.propertiesKafka Connect configuration file on all Kafka Connect worker nodes.-
Set the
bootstrap.serveroption to point to your Kafka brokers. -
Set the
group.idoption. -
Set the
config.storage.topicoption. -
Set the
offset.storage.topicoption. Set the
status.storage.topicoption.For example:
bootstrap.servers=kafka0.my-domain.com:9092,kafka1.my-domain.com:9092,kafka2.my-domain.com:9092
group.id=my-group-id
config.storage.topic=my-group-id-configs
offset.storage.topic=my-group-id-offsets
status.storage.topic=my-group-id-status
-
Set the
Start the Kafka Connect workers with the
/opt/kafka/config/connect-distributed.propertiesconfiguration file on all Kafka Connect nodes.su - kafka /opt/kafka/bin/connect-distributed.sh /opt/kafka/config/connect-distributed.properties
Verify that Kafka Connect is running.
jcmd | grep ConnectDistributed
7.2.4. Creating connectors
This procedure describes how to use the Kafka Connect REST API to create a connector plug-in for use with Kafka Connect in distributed mode.
Prerequisites
- A Kafka Connect installation running in distributed mode.
Procedure
Prepare a JSON payload with the connector configuration. For example:
{
  "name": "my-connector",
  "config": {
  "connector.class": "org.apache.kafka.connect.file.FileStreamSinkConnector",
    "tasks.max": "1",
    "topics": "my-topic-1,my-topic-2",
    "file": "/tmp/output-file.txt"
  }
}
Send a POST request to
<KafkaConnectAddress>:8083/connectorsto create the connector. The following example usescurl:curl -X POST -H "Content-Type: application/json" --data @sink-connector.json http://connect0.my-domain.com:8083/connectors
Verify that the connector was deployed by sending a GET request to
<KafkaConnectAddress>:8083/connectors. The following example usescurl:curl http://connect0.my-domain.com:8083/connectors
7.2.5. Deleting connectors
This procedure describes how to use the Kafka Connect REST API to delete a connector plug-in from Kafka Connect in distributed mode.
Prerequisites
- A Kafka Connect installation running in distributed mode.
Deleting connectors
Verify that the connector exists by sending a
GETrequest to<KafkaConnectAddress>:8083/connectors/<ConnectorName>. The following example usescurl:curl http://connect0.my-domain.com:8083/connectors
To delete the connector, send a
DELETErequest to<KafkaConnectAddress>:8083/connectors. The following example usescurl:curl -X DELETE http://connect0.my-domain.com:8083/connectors/my-connector
Verify that the connector was deleted by sending a GET request to
<KafkaConnectAddress>:8083/connectors. The following example usescurl:curl http://connect0.my-domain.com:8083/connectors
7.3. Connector plug-ins
The following connector plug-ins are included with AMQ Streams.
- FileStreamSink
- Reads data from Kafka topics and writes the data to a file.
- FileStreamSource
- Reads data from a file and sends the data to Kafka topics.
You can add more connector plug-ins if needed. Kafka Connect searches for and runs additional connector plug-ins at startup. To define the path that kafka Connect searches for plug-ins, set the plugin.path configuration option:
plugin.path=/opt/kafka/connector-plugins,/opt/connectors
The plugin.path configuration option can contain a comma-separated list of paths.
When running Kafka Connect in distributed mode, plug-ins must be made available on all worker nodes.
7.4. Adding connector plugins
This procedure shows you how to add additional connector plug-ins.
Prerequisites
- An installed and running AMQ Streams cluster.
Procedure
Create the
/opt/kafka/connector-pluginsdirectory.su - kafka mkdir /opt/kafka/connector-plugins
Edit the
/opt/kafka/config/connect-standalone.propertiesor/opt/kafka/config/connect-distributed.propertiesKafka Connect configuration file, and set theplugin.pathoption to/opt/kafka/connector-plugins. For example:plugin.path=/opt/kafka/connector-plugins
-
Copy your connector plug-ins to
/opt/kafka/connector-plugins. - Start or restart the Kafka Connect workers.
Chapter 8. Using AMQ Streams with MirrorMaker 2.0
Use MirrorMaker 2.0 to replicate data between two or more active Kafka clusters, within or across data centers.
Data replication across clusters supports scenarios that require:
- Recovery of data in the event of a system failure
- Aggregation of data for analysis
- Restriction of data access to a specific cluster
- Provision of data at a specific location to improve latency
To configure MirrorMaker 2.0, edit the config/connect-mirror-maker.properties configuration file.
If required, you can enable distributed tracing for MirrorMaker 2.0.
Handling high volumes of messages
You can tune the configuration to handle high volumes of messages. For more information, see Chapter 9, Handling high volumes of messages.
MirrorMaker 2.0 has features not supported by the previous version of MirrorMaker. However, you can configure MirrorMaker 2.0 to be used in legacy mode.
8.1. MirrorMaker 2.0 data replication
MirrorMaker 2.0 consumes messages from a source Kafka cluster and writes them to a target Kafka cluster.
MirrorMaker 2.0 uses:
- Source cluster configuration to consume data from the source cluster
- Target cluster configuration to output data to the target cluster
MirrorMaker 2.0 is based on the Kafka Connect framework, connectors managing the transfer of data between clusters.
MirrorMaker 2.0 uses the following connectors:
MirrorSourceConnector- The source connector replicates topics from a source cluster to a target cluster.
MirrorCheckpointConnector- The checkpoint connector periodically tracks offsets. If enabled, it also synchronizes consumer group offsets between the source and target cluster.
MirrorHeartbeatConnector- The heartbeat connector periodically checks connectivity between the source and target cluster.
The process of mirroring data from one cluster to another cluster is asynchronous. The recommended pattern is for messages to be produced locally alongside the source Kafka cluster, then consumed remotely close to the target Kafka cluster.
MirrorMaker 2.0 can be used with more than one source cluster.
Figure 8.1. Replication across two clusters
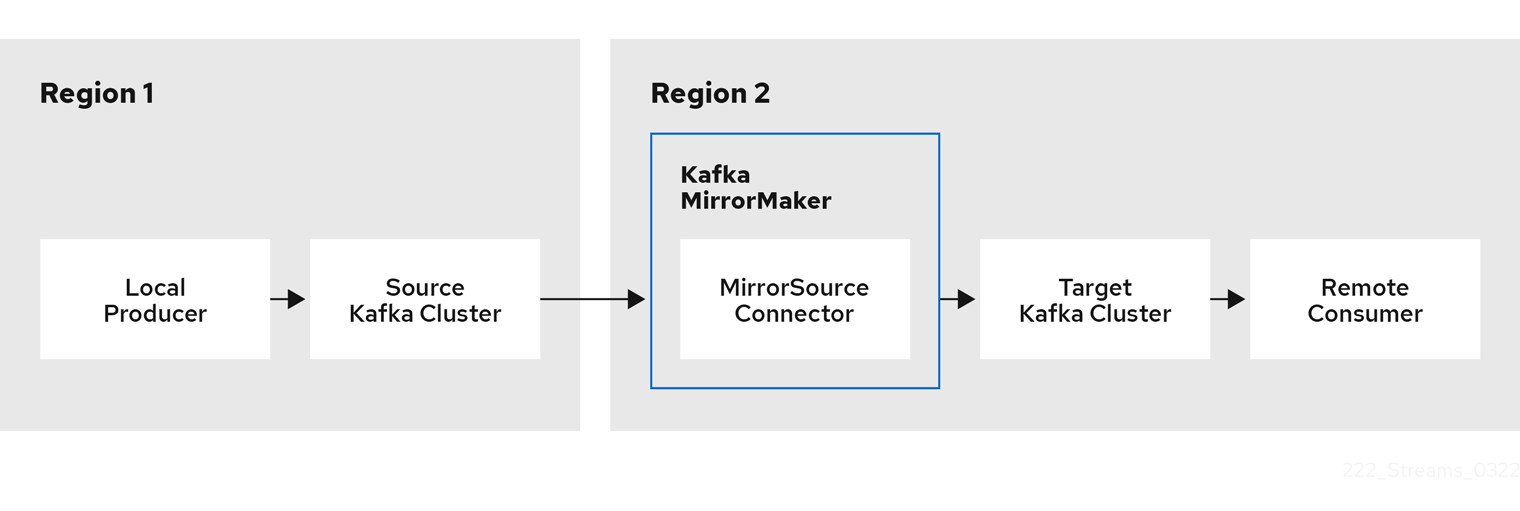
By default, a check for new topics in the source cluster is made every 10 minutes. You can change the frequency by adding refresh.topics.interval.seconds to the source connector configuration. However, increasing the frequency of the operation might affect overall performance.
8.2. Cluster configuration
You can use MirrorMaker 2.0 in active/passive or active/active cluster configurations.
- In an active/active configuration, both clusters are active and provide the same data simultaneously, which is useful if you want to make the same data available locally in different geographical locations.
- In an active/passive configuration, the data from an active cluster is replicated in a passive cluster, which remains on standby, for example, for data recovery in the event of system failure.
The expectation is that producers and consumers connect to active clusters only.
A MirrorMaker 2.0 cluster is required at each target destination.
8.2.1. Bidirectional replication (active/active)
The MirrorMaker 2.0 architecture supports bidirectional replication in an active/active cluster configuration.
Each cluster replicates the data of the other cluster using the concept of source and remote topics. As the same topics are stored in each cluster, remote topics are automatically renamed by MirrorMaker 2.0 to represent the source cluster. The name of the originating cluster is prepended to the name of the topic.
Figure 8.2. Topic renaming
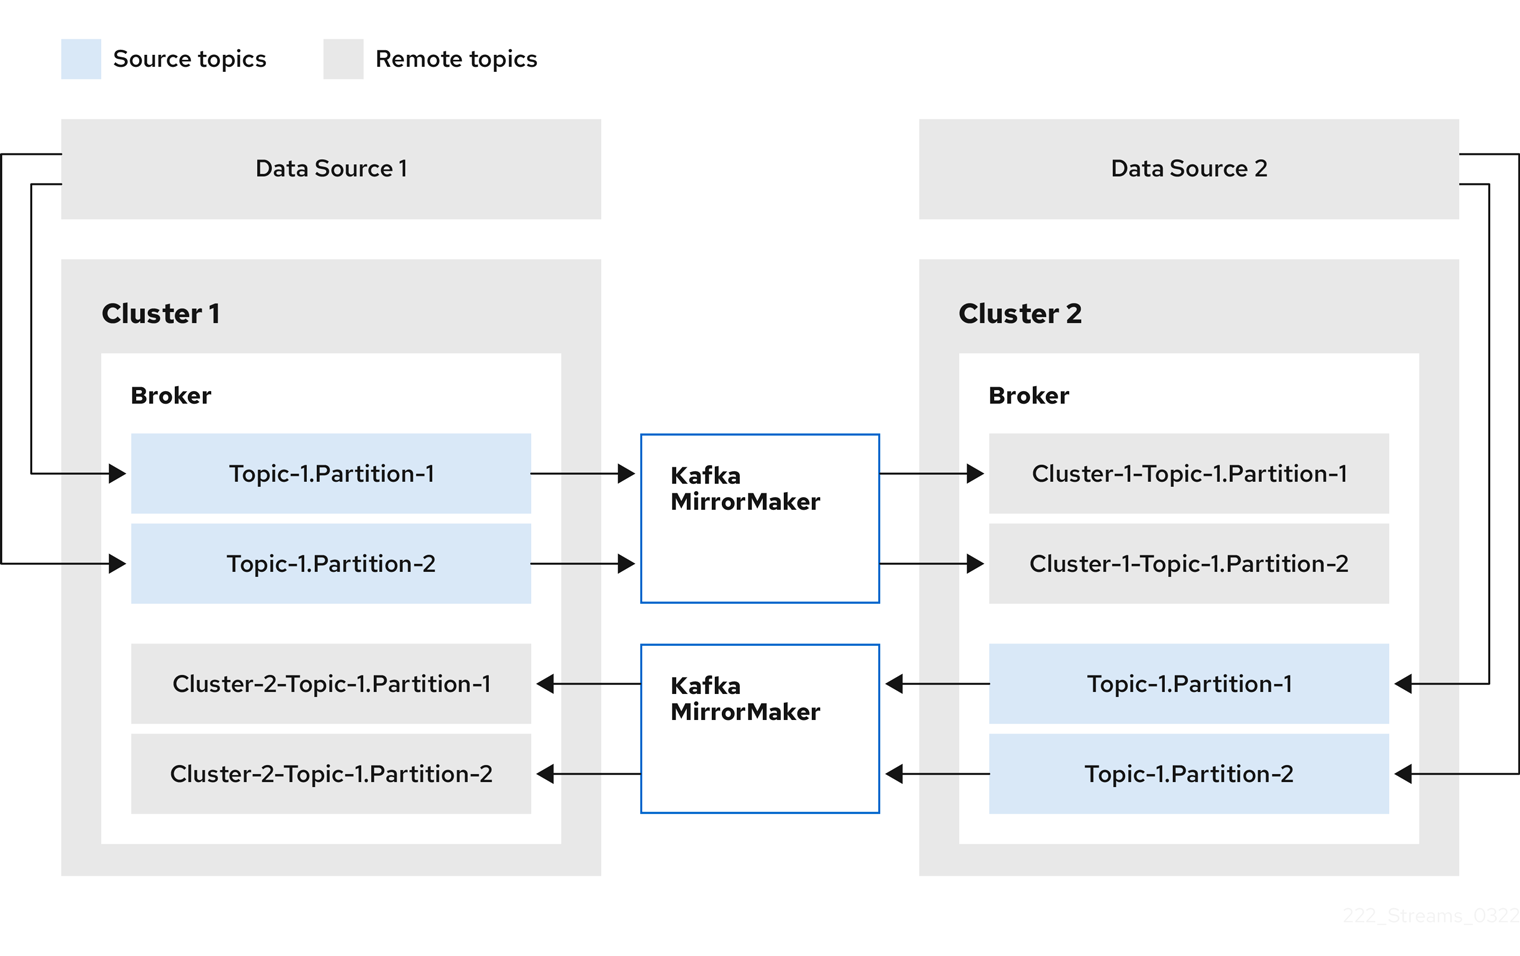
By flagging the originating cluster, topics are not replicated back to that cluster.
The concept of replication through remote topics is useful when configuring an architecture that requires data aggregation. Consumers can subscribe to source and remote topics within the same cluster, without the need for a separate aggregation cluster.
8.2.2. Unidirectional replication (active/passive)
The MirrorMaker 2.0 architecture supports unidirectional replication in an active/passive cluster configuration.
You can use an active/passive cluster configuration to make backups or migrate data to another cluster. In this situation, you might not want automatic renaming of remote topics.
You can override automatic renaming by adding IdentityReplicationPolicy to the source connector configuration. With this configuration applied, topics retain their original names.
8.2.3. Topic configuration synchronization
Topic configuration is automatically synchronized between source and target clusters. By synchronizing configuration properties, the need for rebalancing is reduced.
8.2.4. Data integrity
MirrorMaker 2.0 monitors source topics and propagates any configuration changes to remote topics, checking for and creating missing partitions. Only MirrorMaker 2.0 can write to remote topics.
8.2.5. Offset tracking
MirrorMaker 2.0 tracks offsets for consumer groups using internal topics.
-
The
offset-syncstopic maps the source and target offsets for replicated topic partitions from record metadata -
The
checkpointstopic maps the last committed offset in the source and target cluster for replicated topic partitions in each consumer group
MirrorCheckpointConnector emits checkpoints for offset tracking. Offsets for the checkpoints topic are tracked at predetermined intervals through configuration. Both topics enable replication to be fully restored from the correct offset position on failover.
The location of the offset-syncs topic is the source cluster by default. You can use the offset-syncs.topic.location connector configuration to change this to the target cluster. You need read/write access to the cluster that contains the topic. Using the target cluster as the location of the offset-syncs topic allows you to use MirrorMaker 2.0 even if you have only read access to the source cluster.
8.2.6. Synchronizing consumer group offsets
The __consumer_offsets topic stores information on committed offsets for each consumer group. Offset synchronization periodically transfers the consumer offsets for the consumer groups of a source cluster into the consumer offsets topic of a target cluster.
Offset synchronization is particularly useful in an active/passive configuration. If the active cluster goes down, consumer applications can switch to the passive (standby) cluster and pick up from the last transferred offset position.
To use topic offset synchronization, enable the synchronization by adding sync.group.offsets.enabled to the checkpoint connector configuration, and setting the property to true. Synchronization is disabled by default.
When using the IdentityReplicationPolicy in the source connector, it also has to be configured in the checkpoint connector configuration. This ensures that the mirrored consumer offsets will be applied for the correct topics.
Consumer offsets are only synchronized for consumer groups that are not active in the target cluster. If the consumer groups are in the target cluster, the synchronization cannot be performed and an UNKNOWN_MEMBER_ID error is returned.
If enabled, the synchronization of offsets from the source cluster is made periodically. You can change the frequency by adding sync.group.offsets.interval.seconds and emit.checkpoints.interval.seconds to the checkpoint connector configuration. The properties specify the frequency in seconds that the consumer group offsets are synchronized, and the frequency of checkpoints emitted for offset tracking. The default for both properties is 60 seconds. You can also change the frequency of checks for new consumer groups using the refresh.groups.interval.seconds property, which is performed every 10 minutes by default.
Because the synchronization is time-based, any switchover by consumers to a passive cluster will likely result in some duplication of messages.
8.2.7. Connectivity checks
MirrorHeartbeatConnector emits heartbeats to check connectivity between clusters.
An internal heartbeat topic is replicated from the source cluster. Target clusters use the heartbeat topic to check the following:
- The connector managing connectivity between clusters is running
- The source cluster is available
8.3. Connector configuration
Use Mirrormaker 2.0 connector configuration for the internal connectors that orchestrate the synchronization of data between Kafka clusters.
The following table describes connector properties and the connectors you configure to use them.
Table 8.1. MirrorMaker 2.0 connector configuration properties
| Property | sourceConnector | checkpointConnector | heartbeatConnector |
|---|---|---|---|
| ✓ | ✓ | ✓ |
| ✓ | ✓ | ✓ |
| ✓ | ✓ | ✓ |
| ✓ | ✓ | |
| ✓ | ✓ | |
| ✓ | ✓ | |
| ✓ | ||
| ✓ | ||
| ✓ | ||
| ✓ | ||
| ✓ | ||
| ✓ | ||
| ✓ | ||
| ✓ | ||
| ✓ | ||
| ✓ | ||
| ✓ | ||
| ✓ | ||
| ✓ | ||
| ✓ | ||
| ✓ | ||
| ✓ | ||
| ✓ | ||
| ✓ | ||
| ✓ | ||
| ✓ | ||
| ✓ | ||
| ✓ |
8.4. Connector producer and consumer configuration
MirrorMaker 2.0 connectors use internal producers and consumers. If needed, you can configure these producers and consumers to override the default settings.
Producer and consumer configuration options depend on the MirrorMaker 2.0 implementation, and may be subject to change.
Producer and consumer configuration applies to all connectors. You specify the configuration in the config/connect-mirror-maker.properties file.
Use the properties file to override any default configuration for the producers and consumers in the following format:
-
<source_cluster_name>.consumer.<property> -
<source_cluster_name>.producer.<property> -
<target_cluster_name>.consumer.<property> -
<target_cluster_name>.producer.<property>
The following example shows how you configure the producers and consumers. Though the properties are set for all connectors, some configuration properties are only relevant to certain connectors.
Example configuration for connector producers and consumers
clusters=cluster-1,cluster-2

# ...
cluster-1.consumer.fetch.max.bytes=52428800
cluster-2.producer.batch.size=327680
cluster-2.producer.linger.ms=100
cluster-2.producer.request.timeout.ms=30000
8.5. Specifying a maximum number of tasks
Connectors create the tasks that are responsible for moving data in and out of Kafka. Each connector comprises one or more tasks that are distributed across a group of worker pods that run the tasks. Increasing the number of tasks can help with performance issues when replicating a large number of partitions or synchronizing the offsets of a large number of consumer groups.
Tasks run in parallel. Workers are assigned one or more tasks. A single task is handled by one worker pod, so you don’t need more worker pods than tasks. If there are more tasks than workers, workers handle multiple tasks.
You can specify the maximum number of connector tasks in your MirrorMaker configuration using the tasks.max property. Without specifying a maximum number of tasks, the default setting is a single task.
The heartbeat connector always uses a single task.
The number of tasks that are started for the source and checkpoint connectors is the lower value between the maximum number of possible tasks and the value for tasks.max. For the source connector, the maximum number of tasks possible is one for each partition being replicated from the source cluster. For the checkpoint connector, the maximum number of tasks possible is one for each consumer group being replicated from the source cluster. When setting a maximum number of tasks, consider the number of partitions and the hardware resources that support the process.
If the infrastructure supports the processing overhead, increasing the number of tasks can improve throughput and latency. For example, adding more tasks reduces the time taken to poll the source cluster when there is a high number of partitions or consumer groups.
tasks.max configuration for MirrorMaker connectors
clusters=cluster-1,cluster-2
# ...
tasks.max = 10
By default, MirrorMaker 2.0 checks for new consumer groups every 10 minutes. You can adjust the refresh.groups.interval.seconds configuration to change the frequency. Take care when adjusting lower. More frequent checks can have a negative impact on performance.
8.6. ACL rules synchronization
If AclAuthorizer is being used, ACL rules that manage access to brokers also apply to remote topics. Users that can read a source topic can read its remote equivalent.
OAuth 2.0 authorization does not support access to remote topics in this way.
8.7. Running MirrorMaker 2.0 in dedicated mode
Use MirrorMaker 2.0 to synchronize data between Kafka clusters through configuration. This procedure shows how to configure and run a dedicated single-node MirrorMaker 2.0 cluster. Dedicated clusters use Kafka Connect worker nodes to mirror data between Kafka clusters. At present, MirrorMaker 2.0 in dedicated mode only works with a single worker node.
It is also possible to run MirrorMaker 2.0 in distributed mode. In distributed mode, MirrorMaker 2.0 runs as connectors in a Kafka Connect cluster. Kafka provides MirrorMaker source connectors for data replication. If you wish to use the connectors instead of running a dedicated MirrorMaker cluster, the connectors must be configured in the Kafka Connect cluster. For more information, refer to the Apache Kafka documentation.
The previous version of MirrorMaker continues to be supported, by running MirrorMaker 2.0 in legacy mode.
The configuration must specify:
- Each Kafka cluster
- Connection information for each cluster, including TLS authentication
The replication flow and direction
- Cluster to cluster
- Topic to topic
- Replication rules
- Committed offset tracking intervals
This procedure describes how to implement MirrorMaker 2.0 by creating the configuration in a properties file, then passing the properties when using the MirrorMaker script file to set up the connections.
You can specify the topics and consumer groups you wish to replicate from a source cluster. You specify the names of the source and target clusters, then specify the topics and consumer groups to replicate.
In the following example, topics and consumer groups are specified for replication from cluster 1 to 2.
Example configuration to replicate specific topics and consumer groups
clusters=cluster-1,cluster-2
cluster-1->cluster-2.topics = topic-1, topic-2
cluster-1->cluster-2.groups = group-1, group-2
You can provide a list of names or use a regular expression. By default, all topics and consumer groups are replicated if you do not set these properties. You can also replicate all topics and consumer groups by using .* as a regular expression. However, try to specify only the topics and consumer groups you need to avoid causing any unnecessary extra load on the cluster.
Before you begin
A sample configuration properties file is provided in ./config/connect-mirror-maker.properties.
Prerequisites
- You need AMQ Streams installed on the hosts of each Kafka cluster node you are replicating.
Procedure
Open the sample properties file in a text editor, or create a new one, and edit the file to include connection information and the replication flows for each Kafka cluster.
The following example shows a configuration to connect two clusters, cluster-1 and cluster-2, bidirectionally. Cluster names are configurable through the
clustersproperty.Example MirrorMaker 2.0 configuration
clusters=cluster-1,cluster-2 1

cluster-1.bootstrap.servers=<cluster_name>-kafka-bootstrap-<project_name_one>:443 2
cluster-1.security.protocol=SSL 3
cluster-1.ssl.truststore.password=<truststore_name>
cluster-1.ssl.truststore.location=<path_to_truststore>/truststore.cluster-1.jks_
cluster-1.ssl.keystore.password=<keystore_name>
cluster-1.ssl.keystore.location=<path_to_keystore>/user.cluster-1.p12_

cluster-2.bootstrap.servers=<cluster_name>-kafka-bootstrap-<project_name_two>:443 4
cluster-2.security.protocol=SSL 5
cluster-2.ssl.truststore.password=<truststore_name>
cluster-2.ssl.truststore.location=<path_to_truststore>/truststore.cluster-2.jks_
cluster-2.ssl.keystore.password=<keystore_name>
cluster-2.ssl.keystore.location=<path_to_keystore>/user.cluster-2.p12_

cluster-1->cluster-2.enabled=true 6
cluster-2->cluster-1.enabled=true 7
cluster-1->cluster-2.topics=.* 8
cluster-2->cluster-1.topics=topic-1, topic-2 9
cluster-1->cluster-2.groups=.* 10
cluster-2->cluster-1.groups=group-1, group-2 11

replication.policy.separator=- 12
sync.topic.acls.enabled=false 13
refresh.topics.interval.seconds=60 14
refresh.groups.interval.seconds=60 15
- 1
- Each Kafka cluster is identified with its alias.
- 2
- Connection information for cluster-1, using the bootstrap address and port 443. Both clusters use port 443 to connect to Kafka using OpenShift Routes.
- 3
- The
ssl.properties define TLS configuration for cluster-1. - 4
- Connection information for cluster-2.
- 5
- The
ssl.properties define the TLS configuration for cluster-2. - 6
- Replication flow enabled from cluster-1 to cluster-2.
- 7
- Replication flow enabled from cluster-2 to cluster-1.
- 8
- Replication of all topics from cluster-1 to cluster-2. The source connector replicates the specified topics. The checkpoint connector tracks offsets for the specified topics.
- 9
- Replication of specific topics from cluster-2 to cluster-1.
- 10
- Replication of all consumer groups from cluster-1 to cluster-2. The checkpoint connector replicates the specified consumer groups.
- 11
- Replication of specific consumer groups from cluster-2 to cluster-1.
- 12
- Defines the separator used for the renaming of remote topics.
- 13
- When enabled, ACLs are applied to synchronized topics. The default is
false. - 14
- The period between checks for new topics to synchronize.
- 15
- The period between checks for new consumer groups to synchronize.
OPTION: If required, add a policy that overrides the automatic renaming of remote topics. Instead of prepending the name with the name of the source cluster, the topic retains its original name.
This optional setting is used for active/passive backups and data migration.
replication.policy.class=org.apache.kafka.connect.mirror.IdentityReplicationPolicy
OPTION: If you want to synchronize consumer group offsets, add configuration to enable and manage the synchronization:
refresh.groups.interval.seconds=60
sync.group.offsets.enabled=true 1
sync.group.offsets.interval.seconds=60 2
emit.checkpoints.interval.seconds=60 3
- 1
- Optional setting to synchronize consumer group offsets, which is useful for recovery in an active/passive configuration. Synchronization is not enabled by default.
- 2
- If the synchronization of consumer group offsets is enabled, you can adjust the frequency of the synchronization.
- 3
- Adjusts the frequency of checks for offset tracking. If you change the frequency of offset synchronization, you might also need to adjust the frequency of these checks.
Start ZooKeeper and Kafka in the target clusters:
su - kafka
/opt/kafka/bin/zookeeper-server-start.sh -daemon /opt/kafka/config/zookeeper.properties
/opt/kafka/bin/kafka-server-start.sh -daemon /opt/kafka/config/server.properties
Start MirrorMaker with the cluster connection configuration and replication policies you defined in your properties file:
/opt/kafka/bin/connect-mirror-maker.sh /config/connect-mirror-maker.properties
MirrorMaker sets up connections between the clusters.
For each target cluster, verify that the topics are being replicated:
/opt/kafka/bin/kafka-topics.sh --bootstrap-server <broker_address> --list
8.8. Using MirrorMaker 2.0 in legacy mode
This procedure describes how to configure MirrorMaker 2.0 to use it in legacy mode. Legacy mode supports the previous version of MirrorMaker.
The MirrorMaker script /opt/kafka/bin/kafka-mirror-maker.sh can run MirrorMaker 2.0 in legacy mode.
Kafka MirrorMaker 1 (referred to as just MirrorMaker in the documentation) has been deprecated in Apache Kafka 3.0.0 and will be removed in Apache Kafka 4.0.0. As a result, Kafka MirrorMaker 1 has been deprecated in AMQ Streams as well. Kafka MirrorMaker 1 will be removed from AMQ Streams when we adopt Apache Kafka 4.0.0. As a replacement, use MirrorMaker 2.0 with the IdentityReplicationPolicy.
Prerequisites
You need the properties files you currently use with the legacy version of MirrorMaker.
-
/opt/kafka/config/consumer.properties -
/opt/kafka/config/producer.properties
Procedure
Edit the MirrorMaker
consumer.propertiesandproducer.propertiesfiles to turn off MirrorMaker 2.0 features.For example:
replication.policy.class=org.apache.kafka.mirror.LegacyReplicationPolicy 1

refresh.topics.enabled=false 2
refresh.groups.enabled=false
emit.checkpoints.enabled=false
emit.heartbeats.enabled=false
sync.topic.configs.enabled=false
sync.topic.acls.enabled=false
Save the changes and restart MirrorMaker with the properties files you used with the previous version of MirrorMaker:
su - kafka /opt/kafka/bin/kafka-mirror-maker.sh \
--consumer.config /opt/kafka/config/consumer.properties \
--producer.config /opt/kafka/config/producer.properties \
--num.streams=2
The
consumerproperties provide the configuration for the source cluster and theproducerproperties provide the target cluster configuration.MirrorMaker sets up connections between the clusters.
Start ZooKeeper and Kafka in the target cluster:
su - kafka
/opt/kafka/bin/zookeeper-server-start.sh -daemon /opt/kafka/config/zookeeper.properties
su - kafka
/opt/kafka/bin/kafka-server-start.sh -daemon /opt/kafka/config/server.properties
For the target cluster, verify that the topics are being replicated:
/opt/kafka/bin/kafka-topics.sh --bootstrap-server <broker_address> --list
Chapter 9. Handling high volumes of messages
If your AMQ Streams deployment needs to handle a high volume of messages, you can use configuration options to optimize for throughput and latency.
Kafka producer and consumer configuration can help control the size and frequency of requests to Kafka brokers. For more information on the configuration options, see the following:
You can also use the same configuration options with the producers and consumers used by the Kafka Connect runtime source connectors (including MirrorMaker 2.0) and sink connectors.
- Source connectors
- Producers from the Kafka Connect runtime send messages to the Kafka cluster.
- For MirrorMaker 2.0, since the source system is Kafka, consumers retrieve messages from a source Kafka cluster.
- Sink connectors
- Consumers from the Kafka Connect runtime retrieve messages from the Kafka cluster.
For consumer configuration (consumer.*), you might increase the amount of data fetched in a single fetch request to reduce latency. You increase the fetch request size using the fetch.max.bytes and max.partition.fetch.bytes properties. You can also set a maximum limit on the number of messages returned from the consumer buffer using the max.poll.records property.
For producer configuration (producer.*), you might increase the size of the message batches sent in a single produce request. You increase the batch size using the batch.size property. A larger batch size reduces the number of outstanding messages ready to be sent and the size of the backlog in the message queue. Messages being sent to the same partition are batched together. A produce request is sent to the target cluster when the batch size is reached. By increasing the batch size, produce requests are delayed and more messages are added to the batch and sent to brokers at the same time. This can improve throughput when you have just a few topic partitions that handle large numbers of messages.
Consider the number and size of the records that the producer handles for a suitable producer batch size.
Use linger.ms to add a wait time in milliseconds to delay produce requests when producer load decreases. The delay means that more records can be added to batches if they are under the maximum batch size.
For Kafka Connect source connectors, the data streaming pipeline to the target Kafka cluster is as follows:
Data streaming pipeline for Kafka Connect source connector
external data source → (Kafka Connect tasks) source message queue → producer buffer → target Kafka topic
For Kafka Connect sink connectors, the data streaming pipeline to the target external data source is as follows:
Data streaming pipeline for Kafka Connect sink connector
source Kafka topic → (Kafka Connect tasks) sink message queue → consumer buffer → external data source
For MirrorMaker 2.0, the data mirroring pipeline to the target Kafka cluster is as follows:
Data mirroring pipeline for MirrorMaker 2.0
source Kafka topic → (Kafka Connect tasks) source message queue → producer buffer → target Kafka topic
The producer sends messages in its buffer to topics in the target Kafka cluster. While this is happening, Kafka Connect tasks continue to poll the data source to add messages to the source message queue.
The size of the producer buffer for the source connector is set using the buffer.memory property. Tasks wait for a specified timeout period (offset.flush.timeout.ms) before the buffer is flushed. This should be enough time for the sent messages to be acknowledged by the brokers and offset data committed. The source task does not wait for the producer to empty the message queue before committing offsets, except during shutdown.
If the producer is unable to keep up with the throughput of messages in the source message queue, buffering is blocked until there is space available in the buffer within a time period bounded by max.block.ms. Any unacknowledged messages still in the buffer are sent during this period. New messages are not added to the buffer until these messages are acknowledged and flushed.
You can try the following configuration changes to keep the underlying source message queue of outstanding messages at a manageable size:
-
Increasing the default value in milliseconds of the
offset.flush.timeout.ms - Ensuring that there are enough CPU and memory resources
Increasing the number of tasks that run in parallel by doing the following:
-
Increasing the number of tasks that run in parallel using the
tasks.maxproperty - Increasing the number of nodes for the workers that run tasks
-
Increasing the number of tasks that run in parallel using the
Consider the number of tasks that can run in parallel according to the available CPU and memory resources and number of worker nodes. You might need to keep adjusting the configuration values until they have the desired effect.
9.1. Configuring Kafka Connect for high-volume messages
Kafka Connect fetches data from the source external data system and hands it to the Kafka Connect runtime producers so that it’s replicated to the target cluster.
The following example shows configuration for a Kafka Connect source connector.
Example source connector configuration for handling high volumes of messages
# ...
producer.batch.size=327680
producer.linger.ms=100
# ...
tasks.max = 2
Consumer configuration is added for the sink connector.
Example sink connector configuration for handling high volumes of messages
# ...
consumer.fetch.max.bytes=52428800
consumer.max.partition.fetch.bytes=1048576
consumer.max.poll.records=500
# ...
tasks.max = 2
9.2. Configuring MirrorMaker 2.0 for high-volume messages
MirrorMaker 2.0 fetches data from the source cluster and hands it to the Kafka Connect runtime producers so that it’s replicated to the target cluster.
The following example shows the configuration for MirrorMaker 2.0. The configuration relates to the consumer that fetches messages from the source and the producer that sends messages to the target Kafka cluster.
Example MirrorMaker 2.0 configuration for handling high volumes of messages
clusters=cluster-1,cluster-2
# ...
cluster-2.producer.batch.size=327680
cluster-2.producer.linger.ms=100
cluster-1.consumer.fetch.max.bytes=52428800
cluster-1.consumer.max.partition.fetch.bytes=1048576
cluster-1.consumer.max.poll.records=500
# ...
tasks.max = 2
Chapter 10. Managing Kafka
Use additional configuration properties to maintain a deployment of AMQ Streams. You can add and adjust settings to respond to the performance of AMQ Streams. For example, you can introduce additional configuration to improve throughput and data reliability.
10.1. Setting limits on brokers using the Kafka Static Quota plugin
The Kafka Static Quota plugin is a Technology Preview only. Technology Preview features are not supported with Red Hat production service-level agreements (SLAs) and might not be functionally complete. Red Hat does not recommend implementing any Technology Preview features in production environments. This Technology Preview feature provides early access to upcoming product innovations, enabling you to test functionality and provide feedback during the development process. For more information about the support scope of Red Hat Technology Preview features, see Technology Preview Features Support Scope.
Use the Kafka Static Quota plugin to set throughput and storage limits on brokers in your Kafka cluster. You enable the plugin and set limits by adding properties to the Kafka configuration file. You can set a byte-rate threshold and storage quotas to put limits on the clients interacting with your brokers.
You can set byte-rate thresholds for producer and consumer bandwidth. The total limit is distributed across all clients accessing the broker. For example, you can set a byte-rate threshold of 40 MBps for producers. If two producers are running, they are each limited to a throughput of 20 MBps.
Storage quotas throttle Kafka disk storage limits between a soft limit and hard limit. The limits apply to all available disk space. Producers are slowed gradually between the soft and hard limit. The limits prevent disks filling up too quickly and exceeding their capacity. Full disks can lead to issues that are hard to rectify. The hard limit is the maximum storage limit.
For JBOD storage, the limit applies across all disks. If a broker is using two 1 TB disks and the quota is 1.1 TB, one disk might fill and the other disk will be almost empty.
Prerequisites
- AMQ Streams is installed on all hosts which will be used as Kafka brokers.
- A ZooKeeper cluster is configured and running.
Procedure
Edit the
/opt/kafka/config/server.propertiesKafka configuration file.The plugin properties are shown in this example configuration.
Example Kafka Static Quota plugin configuration
# ...
client.quota.callback.class=io.strimzi.kafka.quotas.StaticQuotaCallback 1
client.quota.callback.static.produce=1000000 2
client.quota.callback.static.fetch=1000000 3
client.quota.callback.static.storage.soft=400000000000 4
client.quota.callback.static.storage.hard=500000000000 5
client.quota.callback.static.storage.check-interval=5 6
# ...
- 1
- Loads the Kafka Static Quota plugin.
- 2
- Sets the producer byte-rate threshold. 1 MBps in this example.
- 3
- Sets the consumer byte-rate threshold. 1 MBps in this example.
- 4
- Sets the lower soft limit for storage. 400 GB in this example.
- 5
- Sets the higher hard limit for storage. 500 GB in this example.
- 6
- Sets the interval in seconds between checks on storage. 5 seconds in this example. You can set this to 0 to disable the check.
Start the Kafka broker with the default configuration file.
su - kafka
/opt/kafka/bin/kafka-server-start.sh -daemon /opt/kafka/config/server.properties
Verify that the Kafka broker is running.
jcmd | grep Kafka
10.2. Scaling Kafka clusters
You can add or remove brokers from a Kafka cluster. You can also add or remove nodes from ZooKeeper cluster.
When you add or remove brokers, you can use the kafka-reassign-partitions.sh to assign partitions.
You can also use Cruise Control to incorporate changes to the number of brokers when rebalancing a Kafka cluster. You can install new brokers and include them in the rebalance. You can perform a rebalance that excludes brokers from the rebalance before removing them. For more information, see Chapter 14, Using Cruise Control for cluster rebalancing.
10.2.1. Adding and removing brokers from a Kafka cluster
The primary way of increasing throughput for a topic is to increase the number of partitions for that topic. The partitions allow the load for that topic to be shared between the brokers in the cluster. When the brokers are constrained by a resource (typically I/O), then using more partitions will not yield an increase in throughput. Instead, you must add brokers to the cluster.
When you add an extra broker to the cluster, AMQ Streams does not assign any partitions to it automatically. You have to decide which partitions to move from the existing brokers to the new broker. Once the partitions have been redistributed between all brokers, each broker should have a lower resource utilization.
Before you remove a broker from a cluster, you must ensure that it is not assigned to any partitions. You should decide which remaining brokers will be responsible for each of the partitions on the broker being decommissioned. Once the broker has no assigned partitions, you can stop it.
10.2.2. Reassignment of partitions
The kafka-reassign-partitions.sh utility is used to reassign partitions to different brokers.
It has three different modes:
--generate- Takes a set of topics and brokers and generates a reassignment JSON file which will result in the partitions of those topics being assigned to those brokers. It is an easy way to generate a reassignment JSON file, but it operates on whole topics, so its use is not always appropriate.
--execute- Takes a reassignment JSON file and applies it to the partitions and brokers in the cluster. Brokers which are gaining partitions will become followers of the partition leader. For a given partition, once the new broker has caught up and joined the ISR the old broker will stop being a follower and will delete its replica.
--verify-
Using the same reassignment JSON file as the
--executestep,--verifychecks whether all of the partitions in the file have been moved to their intended brokers. If the reassignment is complete it will also remove any throttles which are in effect. Unless removed, throttles will continue to affect the cluster even after the reassignment has finished.
It is only possible to have one reassignment running in the cluster at any given time, and it is not possible to cancel a running reassignment. If you need to cancel a reassignment you have to wait for it to complete and then perform another reassignment to revert the effects of the first one. The kafka-reassign-partitions.sh will print the reassignment JSON for this reversion as part of its output. Very large reassignments should be broken down into a number of smaller reassignments in case there is a need to stop in-progress reassignment.
10.2.2.1. Reassignment JSON file
The reassignment JSON file has a specific structure:
{
  "version": 1,
  "partitions": [
    <PartitionObjects>
  ]
}
Where <PartitionObjects> is a comma-separated list of objects like:
{
  "topic": <TopicName>,
  "partition": <Partition>,
  "replicas": [ <AssignedBrokerIds> ],
  "log_dirs": [<LogDirs>]
}
The "log_dirs" property is optional and is used to move the partition to a specific log directory.
The following is an example reassignment JSON file that assigns topic topic-a, partition 4 to brokers 2, 4 and 7, and topic topic-b partition 2 to brokers 1, 5 and 7:
{
  "version": 1,
  "partitions": [
    {
      "topic": "topic-a",
      "partition": 4,
      "replicas": [2,4,7]
    },
    {
      "topic": "topic-b",
      "partition": 2,
      "replicas": [1,5,7]
    }
  ]
}
Partitions not included in the JSON are not changed.
10.2.2.2. Generating reassignment JSON files
The easiest way to assign all the partitions for a given set of topics to a given set of brokers is to generate a reassignment JSON file using the kafka-reassign-partitions.sh --generate command.
/opt/kafka/bin/kafka-reassign-partitions.sh --bootstrap-server <bootstrap_address> --topics-to-move-json-file <topics_file> --broker-list <broker_list> --generate
The <topics_file> is a JSON file which lists the topics to move. It has the following structure:
{
  "version": 1,
  "topics": [
    <topic_objects>
  ]
}
where <topic_objects> is a comma-separated list of objects like:
{
  "topic": <TopicName>
}
For example to move all the partitions of topic-a and topic-b to brokers 4 and 7
/opt/kafka/bin/kafka-reassign-partitions.sh --bootstrap-server localhost:9092 --topics-to-move-json-file topics-to-be-moved.json --broker-list 4,7 --generate
where topics-to-be-moved.json has contents:
{
  "version": 1,
  "topics": [
    { "topic": "topic-a"},
    { "topic": "topic-b"}
  ]
}
10.2.2.3. Creating reassignment JSON files manually
You can manually create the reassignment JSON file if you want to move specific partitions.
10.2.3. Reassignment throttles
Reassigning partitions can be a slow process because it can require moving lots of data between brokers. To avoid this having a detrimental impact on clients it is possible to throttle the reassignment. Using a throttle can mean the reassignment takes longer. If the throttle is too low then the newly assigned brokers will not be able to keep up with records being published and the reassignment will never complete. If the throttle is too high then clients will be impacted. For example, for producers, this could manifest as higher than normal latency waiting for acknowledgement. For consumers, this could manifest as a drop in throughput caused by higher latency between polls.
10.2.4. Scaling up a Kafka cluster
This procedure describes how to increase the number of brokers in a Kafka cluster.
Prerequisites
- An existing Kafka cluster.
- A new machine with the AMQ broker installed.
- A reassignment JSON file of how partitions should be reassigned to brokers in the enlarged cluster.
Procedure
-
Create a configuration file for the new broker using the same settings as for the other brokers in your cluster, except for
broker.idwhich should be a number that is not already used by any of the other brokers. Start the new Kafka broker passing the configuration file you created in the previous step as the argument to the
kafka-server-start.shscript:su - kafka /opt/kafka/bin/kafka-server-start.sh -daemon /opt/kafka/config/server.properties
Verify that the Kafka broker is running.
jcmd | grep Kafka
- Repeat the above steps for each new broker.
Run the partition reassignment using the
kafka-reassign-partitions.shcommand line tool./opt/kafka/bin/kafka-reassign-partitions.sh --bootstrap-server <bootstrap_address> --reassignment-json-file <reassignment_json_file> --execute
If you are going to throttle replication you can also pass the
--throttleoption with an inter-broker throttled rate in bytes per second. For example:/opt/kafka/bin/kafka-reassign-partitions.sh --bootstrap-server localhost:9092 --reassignment-json-file reassignment.json --throttle 5000000 --execute
This command will print out two reassignment JSON objects. The first records the current assignment for the partitions being moved. You should save this to a file in case you need to revert the reassignment later on. The second JSON object is the target reassignment you have passed in your reassignment JSON file.
If you need to change the throttle during reassignment you can use the same command line with a different throttled rate. For example:
/opt/kafka/bin/kafka-reassign-partitions.sh --bootstrap-server localhost:9092 --reassignment-json-file reassignment.json --throttle 10000000 --execute
Periodically verify whether the reassignment has completed using the
kafka-reassign-partitions.shcommand line tool. This is the same command as the previous step but with the--verifyoption instead of the--executeoption./opt/kafka/bin/kafka-reassign-partitions.sh --bootstrap-server <bootstrap_address> --reassignment-json-file <reassignment_json_file> --verify
For example:
/opt/kafka/bin/kafka-reassign-partitions.sh --bootstrap-server localhost:9092 --reassignment-json-file reassignment.json --verify
-
The reassignment has finished when the
--verifycommand reports each of the partitions being moved as completed successfully. This final--verifywill also have the effect of removing any reassignment throttles. You can now delete the revert file if you saved the JSON for reverting the assignment to their original brokers.
10.2.5. Scaling down a Kafka cluster
This procedure describes how to decrease the number of brokers in a Kafka cluster.
Prerequisites
- An existing Kafka cluster.
- A reassignment JSON file of how partitions should be reassigned to brokers in the cluster once the broker(s) have been removed.
Procedure
Run the partition reassignment using the
kafka-reassign-partitions.shcommand line tool./opt/kafka/bin/kafka-reassign-partitions.sh --bootstrap-server <bootstrap_address> --reassignment-json-file <reassignment_json_file> --execute
If you are going to throttle replication you can also pass the
--throttleoption with an inter-broker throttled rate in bytes per second. For example:/opt/kafka/bin/kafka-reassign-partitions.sh --bootstrap-server localhost:9092 --reassignment-json-file reassignment.json --throttle 5000000 --execute
This command will print out two reassignment JSON objects. The first records the current assignment for the partitions being moved. You should save this to a file in case you need to revert the reassignment later on. The second JSON object is the target reassignment you have passed in your reassignment JSON file.
If you need to change the throttle during reassignment you can use the same command line with a different throttled rate. For example:
/opt/kafka/bin/kafka-reassign-partitions.sh --bootstrap-server localhost:9092 --reassignment-json-file reassignment.json --throttle 10000000 --execute
Periodically verify whether the reassignment has completed using the
kafka-reassign-partitions.shcommand line tool. This is the same command as the previous step but with the--verifyoption instead of the--executeoption./opt/kafka/bin/kafka-reassign-partitions.sh --bootstrap-server <bootstrap_address> --reassignment-json-file <reassignment_json_file> --verify
For example:
/opt/kafka/bin/kafka-reassign-partitions.sh --bootstrap-server localhost:9092 --reassignment-json-file reassignment.json --verify
-
The reassignment has finished when the
--verifycommand reports each of the partitions being moved as completed successfully. This final--verifywill also have the effect of removing any reassignment throttles. You can now delete the revert file if you saved the JSON for reverting the assignment to their original brokers. Check that each broker being removed does not have any live partitions in its log (
log.dirs).ls -l <LogDir> | grep -E '^d' | grep -vE '[a-zA-Z0-9.-]+\.[a-z0-9]+-delete$'If a log directory does not match the regular expression
\.[a-z0-9]-delete$, active partitions are still present. If you have active partitions, check the reassignment has finished or the configuration in the reassignment JSON file. You can run the reassignment again. Make sure that there are no active partitions before moving on to the next step.Stop the broker.
su - kafka
/opt/kafka/bin/kafka-server-stop.sh
Confirm that the Kafka broker has stopped.
jcmd | grep kafka
10.2.6. Scaling up a ZooKeeper cluster
This procedure describes how to add servers (nodes) to a ZooKeeper cluster. The dynamic reconfiguration feature of ZooKeeper maintains a stable ZooKeeper cluster during the scale up process.
Prerequisites
-
Dynamic reconfiguration is enabled in the ZooKeeper configuration file (
reconfigEnabled=true). - ZooKeeper authentication is enabled and you can access the new server using the authentication mechanism.
Procedure
Perform the following steps for each ZooKeeper server, one at a time:
- Add a server to the ZooKeeper cluster as described in Section 3.1, “Running a multi-node ZooKeeper cluster” and then start ZooKeeper.
- Note the IP address and configured access ports of the new server.
Start a
zookeeper-shellsession for the server. Run the following command from a machine that has access to the cluster (this might be one of the ZooKeeper nodes or your local machine, if it has access).su - kafka /opt/kafka/bin/zookeeper-shell.sh <ip-address>:<zk-port>
In the shell session, with the ZooKeeper node running, enter the following line to add the new server to the quorum as a voting member:
reconfig -add server.<positive-id> = <address1>:<port1>:<port2>[:role];[<client-port-address>:]<client-port>
For example:
reconfig -add server.4=172.17.0.4:2888:3888:participant;172.17.0.4:2181
Where
<positive-id>is the new server ID4.For the two ports,
<port1>2888 is for communication between ZooKeeper servers, and<port2>3888 is for leader election.The new configuration propagates to the other servers in the ZooKeeper cluster; the new server is now a full member of the quorum.
- Repeat steps 1-4 for the other servers that you want to add.
10.2.7. Scaling down a ZooKeeper cluster
This procedure describes how to remove servers (nodes) from a ZooKeeper cluster. The dynamic reconfiguration feature of ZooKeeper maintains a stable ZooKeeper cluster during the scale down process.
Prerequisites
-
Dynamic reconfiguration is enabled in the ZooKeeper configuration file (
reconfigEnabled=true). - ZooKeeper authentication is enabled and you can access the new server using the authentication mechanism.
Procedure
Perform the following steps for each ZooKeeper server, one at a time:
Log in to the
zookeeper-shellon one of the servers that will be retained after the scale down (for example, server 1).NoteAccess the server using the authentication mechanism configured for the ZooKeeper cluster.
Remove a server, for example server 5.
reconfig -remove 5
- Deactivate the server that you removed.
- Repeat steps 1-3 to reduce the cluster size.
Additional resources
- Removing servers in the ZooKeeper documentation
Chapter 11. Adding Kafka clients
The kafka-clients JAR file contains the Kafka Producer and Consumer APIs together with the Kafka AdminClient API.
- The Producer API allows applications to send data to a Kafka broker.
- The Consumer API allows applications to consume data from a Kafka broker.
- The AdminClient API provides functionality for managing Kafka clusters, including topics, brokers, and other components.
11.1. Adding Kafka clients as a dependency to your Maven project
This procedure shows you how to add the AMQ Streams Java clients as a dependency to your Maven project.
Prerequisites
-
A Maven project with an existing
pom.xml.
Procedure
Add the Red Hat Maven repository to the
<repositories>section of yourpom.xmlfile.<?xml version="1.0" encoding="UTF-8"?> <project xmlns="http://maven.apache.org/POM/4.0.0" xmlns:xsi="http://www.w3.org/2001/XMLSchema-instance" xsi:schemaLocation="http://maven.apache.org/POM/4.0.0 http://maven.apache.org/xsd/maven-4.0.0.xsd"> <!-- ... --> <repositories> <repository> <id>redhat-maven</id> <url>https://maven.repository.redhat.com/ga/</url> </repository> </repositories> <!-- ... --> </project>Add the clients to the
<dependencies>section of yourpom.xmlfile.<?xml version="1.0" encoding="UTF-8"?> <project xmlns="http://maven.apache.org/POM/4.0.0" xmlns:xsi="http://www.w3.org/2001/XMLSchema-instance" xsi:schemaLocation="http://maven.apache.org/POM/4.0.0 http://maven.apache.org/xsd/maven-4.0.0.xsd"> <!-- ... --> <dependencies> <dependency> <groupId>org.apache.kafka</groupId> <artifactId>kafka-clients</artifactId> <version>3.2.3.redhat-00016</version> </dependency> </dependencies> <!-- ... --> </project>- Build your Maven project.
Chapter 12. Adding the Kafka Streams API
The Kafka Streams API allows applications to receive data from one or more input streams, execute complex operations like mapping, filtering or joining, and write the results into one or more output streams. It is part of the kafka-streams JAR package that is available in the Red Hat Maven repository.
12.1. Adding the Kafka Streams API as a dependency to your Maven project
This procedure shows you how to add the AMQ Streams Java clients as a dependency to your Maven project.
Prerequisites
-
A Maven project with an existing
pom.xml.
Procedure
Add the Red Hat Maven repository to the
<repositories>section of yourpom.xmlfile.<?xml version="1.0" encoding="UTF-8"?> <project xmlns="http://maven.apache.org/POM/4.0.0" xmlns:xsi="http://www.w3.org/2001/XMLSchema-instance" xsi:schemaLocation="http://maven.apache.org/POM/4.0.0 http://maven.apache.org/xsd/maven-4.0.0.xsd"> <!-- ... --> <repositories> <repository> <id>redhat-maven</id> <url>https://maven.repository.redhat.com/ga/</url> </repository> </repositories> <!-- ... --> </project>Add
kafka-streamsto the<dependencies>section of yourpom.xmlfile.<?xml version="1.0" encoding="UTF-8"?> <project xmlns="http://maven.apache.org/POM/4.0.0" xmlns:xsi="http://www.w3.org/2001/XMLSchema-instance" xsi:schemaLocation="http://maven.apache.org/POM/4.0.0 http://maven.apache.org/xsd/maven-4.0.0.xsd"> <!-- ... --> <dependencies> <dependency> <groupId>org.apache.kafka</groupId> <artifactId>kafka-streams</artifactId> <version>3.2.3.redhat-00016</version> </dependency> </dependencies> <!-- ... --> </project>- Build your Maven project.
Chapter 13. Using Kerberos (GSSAPI) authentication
AMQ Streams supports the use of the Kerberos (GSSAPI) authentication protocol for secure single sign-on access to your Kafka cluster. GSSAPI is an API wrapper for Kerberos functionality, insulating applications from underlying implementation changes.
Kerberos is a network authentication system that allows clients and servers to authenticate to each other by using symmetric encryption and a trusted third party, the Kerberos Key Distribution Centre (KDC).
13.1. Setting up AMQ Streams to use Kerberos (GSSAPI) authentication
This procedure shows how to configure AMQ Streams so that Kafka clients can access Kafka and ZooKeeper using Kerberos (GSSAPI) authentication.
The procedure assumes that a Kerberos krb5 resource server has been set up on a Red Hat Enterprise Linux host.
The procedure shows, with examples, how to configure:
- Service principals
- Kafka brokers to use the Kerberos login
- ZooKeeper to use Kerberos login
- Producer and consumer clients to access Kafka using Kerberos authentication
The instructions describe Kerberos set up for a single ZooKeeper and Kafka installation on a single host, with additional configuration for a producer and consumer client.
Prerequisites
To be able to configure Kafka and ZooKeeper to authenticate and authorize Kerberos credentials, you will need:
- Access to a Kerberos server
- A Kerberos client on each Kafka broker host
For more information on the steps to set up a Kerberos server, and clients on broker hosts, see the example Kerberos on RHEL set up configuration.
Add service principals for authentication
From your Kerberos server, create service principals (users) for ZooKeeper, Kafka brokers, and Kafka producer and consumer clients.
Service principals must take the form SERVICE-NAME/FULLY-QUALIFIED-HOST-NAME@DOMAIN-REALM.
Create the service principals, and keytabs that store the principal keys, through the Kerberos KDC.
For example:
-
zookeeper/node1.example.redhat.com@EXAMPLE.REDHAT.COM -
kafka/node1.example.redhat.com@EXAMPLE.REDHAT.COM -
producer1/node1.example.redhat.com@EXAMPLE.REDHAT.COM consumer1/node1.example.redhat.com@EXAMPLE.REDHAT.COMThe ZooKeeper service principal must have the same hostname as the
zookeeper.connectconfiguration in the Kafkaconfig/server.propertiesfile:zookeeper.connect=node1.example.redhat.com:2181If the hostname is not the same, localhost is used and authentication will fail.
-
Create a directory on the host and add the keytab files:
For example:
/opt/kafka/krb5/zookeeper-node1.keytab
/opt/kafka/krb5/kafka-node1.keytab
/opt/kafka/krb5/kafka-producer1.keytab
/opt/kafka/krb5/kafka-consumer1.keytab
Ensure the
kafkauser can access the directory:chown kafka:kafka -R /opt/kafka/krb5
Configure ZooKeeper to use a Kerberos Login
Configure ZooKeeper to use the Kerberos Key Distribution Center (KDC) for authentication using the user principals and keytabs previously created for zookeeper.
Create or modify the
opt/kafka/config/jaas.conffile to support ZooKeeper client and server operations:Client { com.sun.security.auth.module.Krb5LoginModule required debug=true useKeyTab=true 1 storeKey=true 2 useTicketCache=false 3 keyTab="/opt/kafka/krb5/zookeeper-node1.keytab" 4 principal="zookeeper/node1.example.redhat.com@EXAMPLE.REDHAT.COM"; 5 }; Server { com.sun.security.auth.module.Krb5LoginModule required debug=true useKeyTab=true storeKey=true useTicketCache=false keyTab="/opt/kafka/krb5/zookeeper-node1.keytab" principal="zookeeper/node1.example.redhat.com@EXAMPLE.REDHAT.COM"; }; QuorumServer { com.sun.security.auth.module.Krb5LoginModule required debug=true useKeyTab=true storeKey=true keyTab="/opt/kafka/krb5/zookeeper-node1.keytab" principal="zookeeper/node1.example.redhat.com@EXAMPLE.REDHAT.COM"; }; QuorumLearner { com.sun.security.auth.module.Krb5LoginModule required debug=true useKeyTab=true storeKey=true keyTab="/opt/kafka/krb5/zookeeper-node1.keytab" principal="zookeeper/node1.example.redhat.com@EXAMPLE.REDHAT.COM"; };- 1
- Set to
trueto get the principal key from the keytab. - 2
- Set to
trueto store the principal key. - 3
- Set to
trueto obtain the Ticket Granting Ticket (TGT) from the ticket cache. - 4
- The
keyTabproperty points to the location of the keytab file copied from the Kerberos KDC. The location and file must be readable by thekafkauser. - 5
- The
principalproperty is configured to match the fully-qualified principal name created on the KDC host, which follows the formatSERVICE-NAME/FULLY-QUALIFIED-HOST-NAME@DOMAIN-NAME.
Edit
opt/kafka/config/zookeeper.propertiesto use the updated JAAS configuration:# ... requireClientAuthScheme=sasl jaasLoginRenew=3600000 1 kerberos.removeHostFromPrincipal=false 2 kerberos.removeRealmFromPrincipal=false 3 quorum.auth.enableSasl=true 4 quorum.auth.learnerRequireSasl=true 5 quorum.auth.serverRequireSasl=true quorum.auth.learner.loginContext=QuorumLearner 6 quorum.auth.server.loginContext=QuorumServer quorum.auth.kerberos.servicePrincipal=zookeeper/_HOST 7 quorum.cnxn.threads.size=20
- 1
- Controls the frequency for login renewal in milliseconds, which can be adjusted to suit ticket renewal intervals. Default is one hour.
- 2
- Dictates whether the hostname is used as part of the login principal name. If using a single keytab for all nodes in the cluster, this is set to
true. However, it is recommended to generate a separate keytab and fully-qualified principal for each broker host for troubleshooting. - 3
- Controls whether the realm name is stripped from the principal name for Kerberos negotiations. It is recommended that this setting is set as
false. - 4
- Enables SASL authentication mechanisms for the ZooKeeper server and client.
- 5
- The
RequireSaslproperties controls whether SASL authentication is required for quorum events, such as master elections. - 6
- The
loginContextproperties identify the name of the login context in the JAAS configuration used for authentication configuration of the specified component. The loginContext names correspond to the names of the relevant sections in theopt/kafka/config/jaas.conffile. - 7
- Controls the naming convention to be used to form the principal name used for identification. The placeholder
_HOSTis automatically resolved to the hostnames defined by theserver.1properties at runtime.
Start ZooKeeper with JVM parameters to specify the Kerberos login configuration:
su - kafka
export EXTRA_ARGS="-Djava.security.krb5.conf=/etc/krb5.conf -Djava.security.auth.login.config=/opt/kafka/config/jaas.conf"; /opt/kafka/bin/zookeeper-server-start.sh -daemon /opt/kafka/config/zookeeper.properties
If you are not using the default service name (
zookeeper), add the name using the-Dzookeeper.sasl.client.username=NAMEparameter.NoteIf you are using the
/etc/krb5.conflocation, you do not need to specify-Djava.security.krb5.conf=/etc/krb5.confwhen starting ZooKeeper, Kafka, or the Kafka producer and consumer.
Configure the Kafka broker server to use a Kerberos login
Configure Kafka to use the Kerberos Key Distribution Center (KDC) for authentication using the user principals and keytabs previously created for kafka.
Modify the
opt/kafka/config/jaas.conffile with the following elements:KafkaServer { com.sun.security.auth.module.Krb5LoginModule required useKeyTab=true storeKey=true keyTab="/opt/kafka/krb5/kafka-node1.keytab" principal="kafka/node1.example.redhat.com@EXAMPLE.REDHAT.COM"; }; KafkaClient { com.sun.security.auth.module.Krb5LoginModule required debug=true useKeyTab=true storeKey=true useTicketCache=false keyTab="/opt/kafka/krb5/kafka-node1.keytab" principal="kafka/node1.example.redhat.com@EXAMPLE.REDHAT.COM"; };Configure each broker in the Kafka cluster by modifying the listener configuration in the
config/server.propertiesfile so the listeners use the SASL/GSSAPI login.Add the SASL protocol to the map of security protocols for the listener, and remove any unwanted protocols.
For example:
# ...
broker.id=0
# ...
listeners=SECURE://:9092,REPLICATION://:9094 1
inter.broker.listener.name=REPLICATION
# ...
listener.security.protocol.map=SECURE:SASL_PLAINTEXT,REPLICATION:SASL_PLAINTEXT 2
# ..
sasl.enabled.mechanisms=GSSAPI 3
sasl.mechanism.inter.broker.protocol=GSSAPI 4
sasl.kerberos.service.name=kafka 5
...
- 1
- Two listeners are configured: a secure listener for general-purpose communications with clients (supporting TLS for communications), and a replication listener for inter-broker communications.
- 2
- For TLS-enabled listeners, the protocol name is SASL_PLAINTEXT. For non-TLS-enabled connectors, the protocol name is SASL_PLAINTEXT. If SSL is not required, you can remove the
ssl.*properties. - 3
- SASL mechanism for Kerberos authentication is
GSSAPI. - 4
- Kerberos authentication for inter-broker communication.
- 5
- The name of the service used for authentication requests is specified to distinguish it from other services that may also be using the same Kerberos configuration.
Start the Kafka broker, with JVM parameters to specify the Kerberos login configuration:
su - kafka
export KAFKA_OPTS="-Djava.security.krb5.conf=/etc/krb5.conf -Djava.security.auth.login.config=/opt/kafka/config/jaas.conf"; /opt/kafka/bin/kafka-server-start.sh -daemon /opt/kafka/config/server.properties
If the broker and ZooKeeper cluster were previously configured and working with a non-Kerberos-based authentication system, it is possible to start the ZooKeeper and broker cluster and check for configuration errors in the logs.
After starting the broker and Zookeeper instances, the cluster is now configured for Kerberos authentication.
Configure Kafka producer and consumer clients to use Kerberos authentication
Configure Kafka producer and consumer clients to use the Kerberos Key Distribution Center (KDC) for authentication using the user principals and keytabs previously created for producer1 and consumer1.
Add the Kerberos configuration to the producer or consumer configuration file.
For example:
/opt/kafka/config/producer.properties
# ...
sasl.mechanism=GSSAPI 1
security.protocol=SASL_PLAINTEXT 2
sasl.kerberos.service.name=kafka 3
sasl.jaas.config=com.sun.security.auth.module.Krb5LoginModule required \ 4
    useKeyTab=true  \
    useTicketCache=false \
    storeKey=true  \
    keyTab="/opt/kafka/krb5/producer1.keytab" \
    principal="producer1/node1.example.redhat.com@EXAMPLE.REDHAT.COM";
# ...
/opt/kafka/config/consumer.properties
# ...
sasl.mechanism=GSSAPI
security.protocol=SASL_PLAINTEXT
sasl.kerberos.service.name=kafka
sasl.jaas.config=com.sun.security.auth.module.Krb5LoginModule required \
    useKeyTab=true  \
    useTicketCache=false \
    storeKey=true  \
    keyTab="/opt/kafka/krb5/consumer1.keytab" \
    principal="consumer1/node1.example.redhat.com@EXAMPLE.REDHAT.COM";
# ...
Run the clients to verify that you can send and receive messages from the Kafka brokers.
Producer client:
export KAFKA_HEAP_OPTS="-Djava.security.krb5.conf=/etc/krb5.conf -Dsun.security.krb5.debug=true"; /opt/kafka/bin/kafka-console-producer.sh --producer.config /opt/kafka/config/producer.properties --topic topic1 --bootstrap-server node1.example.redhat.com:9094
Consumer client:
export KAFKA_HEAP_OPTS="-Djava.security.krb5.conf=/etc/krb5.conf -Dsun.security.krb5.debug=true"; /opt/kafka/bin/kafka-console-consumer.sh --consumer.config /opt/kafka/config/consumer.properties --topic topic1 --bootstrap-server node1.example.redhat.com:9094
Additional resources
- Kerberos man pages: krb5.conf(5), kinit(1), klist(1), and kdestroy(1)
- Example Kerberos server on RHEL set up configuration
- Example client application to authenticate with a Kafka cluster using Kerberos tickets
Chapter 14. Using Cruise Control for cluster rebalancing
Cruise Control is an open source system for automating Kafka operations, such as monitoring cluster workload, rebalancing a cluster based on predefined constraints, and detecting and fixing anomalies. It consists of four main components—the Load Monitor, the Analyzer, the Anomaly Detector, and the Executor—and a REST API for client interactions.
You can use Cruise Control to rebalance a Kafka cluster. Cruise Control for AMQ Streams on Red Hat Enterprise Linux is provided as a separate zipped distribution.
AMQ Streams utilizes the REST API to support the following Cruise Control features:
- Generating optimization proposals from optimization goals.
Rebalancing a Kafka cluster based on an optimization proposal.
- Optimization goals
An optimization goal describes a specific objective to achieve from a rebalance. For example, a goal might be to distribute topic replicas across brokers more evenly. You can change what goals to include through configuration. A goal is defined as a hard goal or soft goal. You can add hard goals through Cruise Control deployment configuration. You also have main, default, and user-provided goals that fit into each of these categories.
- Hard goals are preset and must be satisfied for an optimization proposal to be successful.
- Soft goals do not need to be satisfied for an optimization proposal to be successful. They can be set aside if it means that all hard goals are met.
- Main goals are inherited from Cruise Control. Some are preset as hard goals. Main goals are used in optimization proposals by default.
- Default goals are the same as the main goals by default. You can specify your own set of default goals.
- User-provided goals are a subset of default goals that are configured for generating a specific optimization proposal.
- Optimization proposals
Optimization proposals comprise the goals you want to achieve from a rebalance. You generate an optimization proposal to create a summary of proposed changes and the results that are possible with the rebalance. The goals are assessed in a specific order of priority. You can then choose to approve or reject the proposal. You can reject the proposal to run it again with an adjusted set of goals.
You can generate and approve an optimization proposal by making a request to one of the following API endpoints.
- /rebalance endpoint to run a full rebalance.
- /add_broker endpoint to rebalance after adding brokers when scaling up a Kafka cluster.
- /remove_broker endpoint to rebalance before removing brokers when scaling down a Kafka cluster.
You configure optimization goals through a configuration properties file. AMQ Streams provides example properties files for Cruise Control.
Other Cruise Control features are not currently supported, including self healing, notifications, write-your-own goals, and changing the topic replication factor.
14.1. Why use Cruise Control?
Cruise Control reduces the time and effort involved in running an efficient and balanced Kafka cluster.
A typical cluster can become unevenly loaded over time. Partitions that handle large amounts of message traffic might be unevenly distributed across the available brokers. To rebalance the cluster, administrators must monitor the load on brokers and manually reassign busy partitions to brokers with spare capacity.
Cruise Control automates the cluster rebalancing process. It constructs a workload model of resource utilization for the cluster—based on CPU, disk, and network load—and generates optimization proposals (that you can approve or reject) for more balanced partition assignments. A set of configurable optimization goals is used to calculate these proposals.
When you approve an optimization proposal, Cruise Control applies it to your Kafka cluster. When the cluster rebalancing operation is complete, the broker pods are used more effectively and the Kafka cluster is more evenly balanced.
Additional resources
14.2. Downloading a Cruise Control archive
A zipped distribution of Cruise Control for AMQ Streams on Red Hat Enterprise Linux is available for download from the Red Hat Customer Portal.
Procedure
- Download the latest version of the Red Hat AMQ Streams Cruise Control archive from the Red Hat Customer Portal.
Create the
/opt/cruise-controldirectory:sudo mkdir /opt/cruise-control
Extract the contents of the Cruise Control ZIP file to the new directory:
unzip amq-streams-y.y.y-cruise-control-bin.zip -d /opt/cruise-controlChange the ownership of the
/opt/cruise-controldirectory to thekafkauser:sudo chown -R kafka:kafka /opt/cruise-control
14.3. Deploying the Cruise Control Metrics Reporter
Before starting Cruise Control, you must configure the Kafka brokers to use the provided Cruise Control Metrics Reporter. The file for the Metrics Reporter is supplied with the AMQ Streams installation artifacts.
When loaded at runtime, the Metrics Reporter sends metrics to the __CruiseControlMetrics topic, one of three auto-created topics. Cruise Control uses these metrics to create and update the workload model and to calculate optimization proposals.
Prerequisites
-
You are logged in to Red Hat Enterprise Linux as the
kafkauser. - Kafka and ZooKeeper are running.
Procedure
For each broker in the Kafka cluster and one at a time:
Stop the Kafka broker:
/opt/kafka/bin/kafka-server-stop.sh
In the Kafka configuration file (
/opt/kafka/config/server.properties) configure the Cruise Control Metrics Reporter:Add the
CruiseControlMetricsReporterclass to themetric.reportersconfiguration option. Do not remove any existing Metrics Reporters.metric.reporters=com.linkedin.kafka.cruisecontrol.metricsreporter.CruiseControlMetricsReporter
Add the following configuration options and values:
cruise.control.metrics.topic.auto.create=true
cruise.control.metrics.topic.num.partitions=1
cruise.control.metrics.topic.replication.factor=1
These options enable the Cruise Control Metrics Reporter to create the
__CruiseControlMetricstopic with a log cleanup policy ofDELETE. For more information, see Auto-created topics and Log cleanup policy for Cruise Control Metrics topic.
Configure SSL, if required.
In the Kafka configuration file (
/opt/kafka/config/server.properties) configure SSL between the Cruise Control Metrics Reporter and the Kafka broker by setting the relevant client configuration properties.The Metrics Reporter accepts all standard producer-specific configuration properties with the
cruise.control.metrics.reporterprefix. For example:cruise.control.metrics.reporter.ssl.truststore.password.In the Cruise Control properties file (
/opt/cruise-control/config/cruisecontrol.properties) configure SSL between the Kafka broker and the Cruise Control server by setting the relevant client configuration properties.Cruise Control inherits SSL client property options from Kafka and uses those properties for all Cruise Control server clients.
Restart the Kafka broker:
/opt/kafka/bin/kafka-server-start.sh -daemon /opt/kafka/config/server.properties
For information on restarting brokers in a multi-node cluster, see Section 3.3, “Performing a graceful rolling restart of Kafka brokers”.
- Repeat steps 1-5 for the remaining brokers.
14.4. Configuring and starting Cruise Control
Configure the properties used by Cruise Control and then start the Cruise Control server using the kafka-cruise-control-start.sh script. The server is hosted on a single machine for the whole Kafka cluster.
Three topics are auto-created when Cruise Control starts. For more information, see Auto-created topics.
Prerequisites
-
You are logged in to Red Hat Enterprise Linux as the
kafkauser. - Section 14.2, “Downloading a Cruise Control archive”
- Section 14.3, “Deploying the Cruise Control Metrics Reporter”
Procedure
-
Edit the Cruise Control properties file (
/opt/cruise-control/config/cruisecontrol.properties). Configure the properties shown in the following example configuration:
# The Kafka cluster to control.
bootstrap.servers=localhost:9092 1

# The replication factor of Kafka metric sample store topic
sample.store.topic.replication.factor=2 2

# The configuration for the BrokerCapacityConfigFileResolver (supports JBOD, non-JBOD, and heterogeneous CPU core capacities)
#capacity.config.file=config/capacity.json
#capacity.config.file=config/capacityCores.json
capacity.config.file=config/capacityJBOD.json 3

# The list of goals to optimize the Kafka cluster for with pre-computed proposals
default.goals={List of default optimization goals} 4

# The list of supported goals
goals={list of main optimization goals} 5

# The list of supported hard goals
hard.goals={List of hard goals} 6

# How often should the cached proposal be expired and recalculated if necessary
proposal.expiration.ms=60000 7

# The zookeeper connect of the Kafka cluster
zookeeper.connect=localhost:2181 8
- 1
- Host and port numbers of the Kafka broker (always port 9092).
- 2
- Replication factor of the Kafka metric sample store topic. If you are evaluating Cruise Control in a single-node Kafka and ZooKeeper cluster, set this property to 1. For production use, set this property to 2 or more.
- 3
- The configuration file that sets the maximum capacity limits for broker resources. Use the file that applies to your Kafka deployment configuration. For more information, see Capacity configuration.
- 4
- Comma-separated list of default optimization goals, using fully-qualified domain names (FQDNs). A number of main optimization goals (see 5) are already set as default optimization goals; you can add or remove goals if desired. For more information, see Section 14.5, “Optimization goals overview”.
- 5
- Comma-separated list of main optimization goals, using FQDNs. To completely exclude goals from being used to generate optimization proposals, remove them from the list. For more information, see Section 14.5, “Optimization goals overview”.
- 6
- Comma-separated list of hard goals, using FQDNs. Seven of the main optimization goals are already set as hard goals; you can add or remove goals if desired. For more information, see Section 14.5, “Optimization goals overview”.
- 7
- The interval, in milliseconds, for refreshing the cached optimization proposal that is generated from the default optimization goals. For more information, see Section 14.6, “Optimization proposals overview”.
- 8
- Host and port numbers of the ZooKeeper connection (always port 2181).
Start the Cruise Control server. The server starts on port 9092 by default; optionally, specify a different port.
cd /opt/cruise-control/
./kafka-cruise-control-start.sh config/cruisecontrol.properties <port_number>
To verify that Cruise Control is running, send a GET request to the
/stateendpoint of the Cruise Control server:curl 'http://HOST:PORT/kafkacruisecontrol/state'
Auto-created topics
The following table shows the three topics that are automatically created when Cruise Control starts. These topics are required for Cruise Control to work properly and must not be deleted or changed.
Table 14.1. Auto-created topics
| Auto-created topic | Created by | Function |
|---|---|---|
|
| Cruise Control Metrics Reporter | Stores the raw metrics from the Metrics Reporter in each Kafka broker. |
|
| Cruise Control | Stores the derived metrics for each partition. These are created by the Metric Sample Aggregator. |
|
| Cruise Control | Stores the metrics samples used to create the Cluster Workload Model. |
To ensure that log compaction is disabled in the auto-created topics, make sure that you configure the Cruise Control Metrics Reporter as described in Section 14.3, “Deploying the Cruise Control Metrics Reporter”. Log compaction can remove records that are needed by Cruise Control and prevent it from working properly.
Additional resources
14.5. Optimization goals overview
Optimization goals are constraints on workload redistribution and resource utilization across a Kafka cluster. To rebalance a Kafka cluster, Cruise Control uses optimization goals to generate optimization proposals.
14.5.1. Goals order of priority
AMQ Streams on Red Hat Enterprise Linux supports all the optimization goals developed in the Cruise Control project. The supported goals, in the default descending order of priority, are as follows:
- Rack-awareness
- Minimum number of leader replicas per broker for a set of topics
- Replica capacity
- Capacity: Disk capacity, Network inbound capacity, Network outbound capacity
- CPU capacity
- Replica distribution
- Potential network output
- Resource distribution: Disk utilization distribution, Network inbound utilization distribution, Network outbound utilization distribution
- Leader bytes-in rate distribution
- Topic replica distribution
- CPU usage distribution
- Leader replica distribution
- Preferred leader election
- Kafka Assigner disk usage distribution
- Intra-broker disk capacity
- Intra-broker disk usage
For more information on each optimization goal, see Goals in the Cruise Control Wiki.
14.5.2. Goals configuration in the Cruise Control properties file
You configure optimization goals in the cruisecontrol.properties file in the cruise-control/config/ directory. Cruise Control has configurations for hard optimization goals that must be satisfied, as well as main, default, and user-provided optimization goals.
You can specify the following types of optimization goal in the following configuration:
-
Main goals —
cruisecontrol.propertiesfile -
Hard goals —
cruisecontrol.propertiesfile -
Default goals —
cruisecontrol.propertiesfile - User-provided goals — runtime parameters
Optionally, user-provided optimization goals are set at runtime as parameters in requests to the /rebalance endpoint.
Optimization goals are subject to any capacity limits on broker resources.
14.5.3. Hard and soft optimization goals
Hard goals are goals that must be satisfied in optimization proposals. Goals that are not configured as hard goals are known as soft goals. You can think of soft goals as best effort goals: they do not need to be satisfied in optimization proposals, but are included in optimization calculations.
Cruise Control will calculate optimization proposals that satisfy all the hard goals and as many soft goals as possible (in their priority order). An optimization proposal that does not satisfy all the hard goals is rejected by the Analyzer and is not sent to the user.
For example, you might have a soft goal to distribute a topic’s replicas evenly across the cluster (the topic replica distribution goal). Cruise Control will ignore this goal if doing so enables all the configured hard goals to be met.
In Cruise Control, the following main optimization goals are preset as hard goals:
RackAwareGoal; MinTopicLeadersPerBrokerGoal; ReplicaCapacityGoal; DiskCapacityGoal; NetworkInboundCapacityGoal; NetworkOutboundCapacityGoal; CpuCapacityGoal
To change the hard goals, edit the hard.goals property of the cruisecontrol.properties file and specify the goals using their fully-qualified domain names.
Increasing the number of hard goals reduces the likelihood that Cruise Control will calculate and generate valid optimization proposals.
14.5.4. Main optimization goals
The main optimization goals are available to all users. Goals that are not listed in the main optimization goals are not available for use in Cruise Control operations.
The following main optimization goals are preset in the goals property of the cruisecontrol.properties file in descending priority order:
RackAwareGoal; MinTopicLeadersPerBrokerGoal; ReplicaCapacityGoal; DiskCapacityGoal; NetworkInboundCapacityGoal; NetworkOutboundCapacityGoal; ReplicaDistributionGoal; PotentialNwOutGoal; DiskUsageDistributionGoal; NetworkInboundUsageDistributionGoal; NetworkOutboundUsageDistributionGoal; CpuUsageDistributionGoal; TopicReplicaDistributionGoal; LeaderReplicaDistributionGoal; LeaderBytesInDistributionGoal; PreferredLeaderElectionGoal
To reduce complexity, we recommend that you do not change the preset main optimization goals, unless you need to completely exclude one or more goals from being used to generate optimization proposals. The priority order of the main optimization goals can be modified, if desired, in the configuration for default optimization goals.
To modify the preset main optimization goals, specify a list of goals in the goals property in descending priority order. Use fully-qualified domain names as shown in the cruisecontrol.properties file.
You must specify at least one main goal, or Cruise Control will crash.
If you change the preset main optimization goals, you must ensure that the configured hard.goals are a subset of the main optimization goals that you configured. Otherwise, errors will occur when generating optimization proposals.
14.5.5. Default optimization goals
Cruise Control uses the default optimization goals list to generate the cached optimization proposal. For more information, see Section 14.6, “Optimization proposals overview”.
You can override the default optimization goals at runtime by setting user-provided optimization goals.
The following default optimization goals are preset in the default.goals property of the cruisecontrol.properties file in descending priority order:
RackAwareGoal; MinTopicLeadersPerBrokerGoal; ReplicaCapacityGoal; DiskCapacityGoal; NetworkInboundCapacityGoal; NetworkOutboundCapacityGoal; CpuCapacityGoal; ReplicaDistributionGoal; PotentialNwOutGoal; DiskUsageDistributionGoal; NetworkInboundUsageDistributionGoal; NetworkOutboundUsageDistributionGoal; CpuUsageDistributionGoal; TopicReplicaDistributionGoal; LeaderReplicaDistributionGoal; LeaderBytesInDistributionGoal
You must specify at least one default goal, or Cruise Control will crash.
To modify the default optimization goals, specify a list of goals in the default.goals property in descending priority order. Default goals must be a subset of the main optimization goals; use fully-qualified domain names.
14.5.6. User-provided optimization goals
User-provided optimization goals narrow down the configured default goals for a particular optimization proposal. You can set them, as required, as parameters in HTTP requests to the /rebalance endpoint. For more information, see Section 14.9, “Generating optimization proposals”.
User-provided optimization goals can generate optimization proposals for different scenarios. For example, you might want to optimize leader replica distribution across the Kafka cluster without considering disk capacity or disk utilization. So, you send a request to the /rebalance endpoint containing a single goal for leader replica distribution.
User-provided optimization goals must:
- Include all configured hard goals, or an error occurs
- Be a subset of the main optimization goals
To ignore the configured hard goals in an optimization proposal, add the skip_hard_goals_check=true parameter to the request.
Additional resources
- Cruise Control configuration
- Configurations in the Cruise Control Wiki
14.6. Optimization proposals overview
An optimization proposal is a summary of proposed changes that would produce a more balanced Kafka cluster, with partition workloads distributed more evenly among the brokers.
Each optimization proposal is based on the set of optimization goals that was used to generate it, subject to any configured capacity limits on broker resources.
All optimization proposals are estimates of the impact of a proposed rebalance. You can approve or reject a proposal. You cannot approve a cluster rebalance without first generating the optimization proposal.
You can run the optimization proposal using one of the following endpoints:
-
/rebalance -
/add_broker -
/remove_broker
14.6.1. Rebalancing endpoints
You specify a rebalancing endpoint when you send a POST request to generate an optimization proposal.
/rebalance-
The
/rebalanceendpoint runs a full rebalance by moving replicas across all the brokers in the cluster. /add_broker-
The
add_brokerendpoint is used after scaling up a Kafka cluster by adding one or more brokers. Normally, after scaling up a Kafka cluster, new brokers are used to host only the partitions of newly created topics. If no new topics are created, the newly added brokers are not used and the existing brokers remain under the same load. By using theadd_brokerendpoint immediately after adding brokers to the cluster, the rebalancing operation moves replicas from existing brokers to the newly added brokers. You specify the new brokers as abrokeridlist in the POST request. /remove_broker-
The
/remove_brokerendpoint is used before scaling down a Kafka cluster by removing one or more brokers. If you scale down a Kafka cluster, brokers are shut down even if they host replicas. This can lead to under-replicated partitions and possibly result in some partitions being under their minimum ISR (in-sync replicas). To avoid this potential problem, the/remove_brokerendpoint moves replicas off the brokers that are going to be removed. When these brokers are not hosting replicas anymore, you can safely run the scaling down operation. You specify the brokers you’re removing as abrokeridlist in the POST request.
In general, use the /rebalance endpoint to rebalance a Kafka cluster by spreading the load across brokers. Use the /add-broker endpoint and /remove_broker endpoint only if you want to scale your cluster up or down and rebalance the replicas accordingly.
The procedure to run a rebalance is actually the same across the three different endpoints. The only difference is with listing brokers that have been added or will be removed to the request.
14.6.2. Approving or rejecting an optimization proposal
An optimization proposal summary shows the proposed scope of changes. The summary is returned in a response to a HTTP request through the Cruise Control API.
When you make a POST request to the /rebalance endpoint, an optimization proposal summary is returned in the response.
Returning an optimization proposal summary
curl -v -X POST 'cruise-control-server:9090/kafkacruisecontrol/rebalance'
Use the summary to decide whether to approve or reject an optimization proposal.
- Approving an optimization proposal
-
You approve the optimization proposal by making a POST request to the
/rebalanceendpoint and setting thedryrunparameter tofalse(defaulttrue). Cruise Control applies the proposal to the Kafka cluster and starts a cluster rebalance operation. - Rejecting an optimization proposal
-
If you choose not to approve an optimization proposal, you can change the optimization goals or update any of the rebalance performance tuning options, and then generate another proposal. You can resend a request without the
dryrunparameter to generate a new optimization proposal.
Use the optimization proposal to assess the movements required for a rebalance. For example, a summary describes inter-broker and intra-broker movements. Inter-broker rebalancing moves data between separate brokers. Intra-broker rebalancing moves data between disks on the same broker when you are using a JBOD storage configuration. Such information can be useful even if you don’t go ahead and approve the proposal.
You might reject an optimization proposal, or delay its approval, because of the additional load on a Kafka cluster when rebalancing.
In the following example, the proposal suggests the rebalancing of data between separate brokers. The rebalance involves the movement of 55 partition replicas, totaling 12MB of data, across the brokers. Though the inter-broker movement of partition replicas has a high impact on performance, the total amount of data is not large. If the total data was much larger, you could reject the proposal, or time when to approve the rebalance to limit the impact on the performance of the Kafka cluster.
Rebalance performance tuning options can help reduce the impact of data movement. If you can extend the rebalance period, you can divide the rebalance into smaller batches. Fewer data movements at a single time reduces the load on the cluster.
Example optimization proposal summary
Optimization has 55 inter-broker replica (12 MB) moves, 0 intra-broker
replica (0 MB) moves and 24 leadership moves with a cluster model of 5
recent windows and 100.000% of the partitions covered.
Excluded Topics: [].
Excluded Brokers For Leadership: [].
Excluded Brokers For Replica Move: [].
Counts: 3 brokers 343 replicas 7 topics.
On-demand Balancedness Score Before (78.012) After (82.912).
Provision Status: RIGHT_SIZED.
The proposal will also move 24 partition leaders to different brokers. This requires a change to the ZooKeeper configuration, which has a low impact on performance.
The balancedness scores are measurements of the overall balance of the Kafka Cluster before and after the optimization proposal is approved. A balancedness score is based on optimization goals. If all goals are satisfied, the score is 100. The score is reduced for each goal that will not be met. Compare the balancedness scores to see whether the Kafka cluster is less balanced than it could be following a rebalance.
The provision status indicates whether the current cluster configuration supports the optimization goals. Check the provision status to see if you should add or remove brokers.
Table 14.2. Optimization proposal provision status
| Status | Description |
|---|---|
| RIGHT_SIZED | The cluster has an appropriate number of brokers to satisfy the optimization goals. |
| UNDER_PROVISIONED | The cluster is under-provisioned and requires more brokers to satisfy the optimization goals. |
| OVER_PROVISIONED | The cluster is over-provisioned and requires fewer brokers to satisfy the optimization goals. |
| UNDECIDED | The status is not relevant or it has not yet been decided. |
14.6.3. Optimization proposal summary properties
The following table describes the properties contained in an optimization proposal.
Table 14.3. Properties contained in an optimization proposal summary
| Property | Description |
|---|---|
|
|
Performance impact during rebalance operation: Relatively high.
Performance impact during rebalance operation: Variable. The larger the number of MBs, the longer the cluster rebalance will take to complete. |
|
|
Performance impact during rebalance operation: Relatively high, but less than
Performance impact during rebalance operation: Variable. The larger the number, the longer the cluster rebalance will take to complete. Moving a large amount of data between disks on the same broker has less impact than between separate brokers (see |
|
| The number of topics excluded from the calculation of partition replica/leader movements in the optimization proposal. You can exclude topics in one of the following ways:
In the
In a POST request to the Topics that match the regular expression are listed in the response and will be excluded from the cluster rebalance. |
|
|
Performance impact during rebalance operation: Relatively low. |
|
|
|
|
|
|
|
| Measurements of the overall balance of a Kafka Cluster.
Cruise Control assigns a
The |
14.6.4. Cached optimization proposal
Cruise Control maintains a cached optimization proposal based on the configured default optimization goals. Generated from the workload model, the cached optimization proposal is updated every 15 minutes to reflect the current state of the Kafka cluster.
The most recent cached optimization proposal is returned when the following goal configurations are used:
- The default optimization goals
- User-provided optimization goals that can be met by the current cached proposal
To change the cached optimization proposal refresh interval, edit the proposal.expiration.ms setting in the cruisecontrol.properties file. Consider a shorter interval for fast changing clusters, although this increases the load on the Cruise Control server.
Additional resources
14.7. Rebalance performance tuning overview
You can adjust several performance tuning options for cluster rebalances. These options control how partition replica and leadership movements in a rebalance are executed, as well as the bandwidth that is allocated to a rebalance operation.
Partition reassignment commands
Optimization proposals are composed of separate partition reassignment commands. When you initiate a proposal, the Cruise Control server applies these commands to the Kafka cluster.
A partition reassignment command consists of either of the following types of operations:
Partition movement: Involves transferring the partition replica and its data to a new location. Partition movements can take one of two forms:
- Inter-broker movement: The partition replica is moved to a log directory on a different broker.
- Intra-broker movement: The partition replica is moved to a different log directory on the same broker.
- Leadership movement: Involves switching the leader of the partition’s replicas.
Cruise Control issues partition reassignment commands to the Kafka cluster in batches. The performance of the cluster during the rebalance is affected by the number of each type of movement contained in each batch.
To configure partition reassignment commands, see Rebalance tuning options.
Replica movement strategies
Cluster rebalance performance is also influenced by the replica movement strategy that is applied to the batches of partition reassignment commands. By default, Cruise Control uses the BaseReplicaMovementStrategy, which applies the commands in the order in which they were generated. However, if there are some very large partition reassignments early in the proposal, this strategy can slow down the application of the other reassignments.
Cruise Control provides three alternative replica movement strategies that can be applied to optimization proposals:
-
PrioritizeSmallReplicaMovementStrategy: Order reassignments in ascending size. -
PrioritizeLargeReplicaMovementStrategy: Order reassignments in descending size. -
PostponeUrpReplicaMovementStrategy: Prioritize reassignments for replicas of partitions which have no out-of-sync replicas.
These strategies can be configured as a sequence. The first strategy attempts to compare two partition reassignments using its internal logic. If the reassignments are equivalent, then it passes them to the next strategy in the sequence to decide the order, and so on.
To configure replica movement strategies, see Rebalance tuning options.
Rebalance tuning options
Cruise Control provides several configuration options for tuning rebalance parameters. These options are set in the following ways:
-
As properties, in the default Cruise Control configuration, in the
cruisecontrol.propertiesfile -
As parameters in POST requests to the
/rebalanceendpoint
The relevant configurations for both methods are summarized in the following table.
Table 14.4. Rebalance performance tuning configuration
| Cruise Control properties | KafkaRebalance parameters | Default | Description |
|---|---|---|---|
|
|
| 5 | The maximum number of inter-broker partition movements in each partition reassignment batch |
|
|
| 2 | The maximum number of intra-broker partition movements in each partition reassignment batch |
|
|
| 1000 | The maximum number of partition leadership changes in each partition reassignment batch |
|
|
| Null (no limit) | The bandwidth (in bytes per second) to assign to partition reassignment |
|
|
|
|
The list of strategies (in priority order) used to determine the order in which partition reassignment commands are executed for generated proposals. There are three strategies: |
Changing the default settings affects the length of time that the rebalance takes to complete, as well as the load placed on the Kafka cluster during the rebalance. Using lower values reduces the load but increases the amount of time taken, and vice versa.
Additional resources
- Configurations in the Cruise Control Wiki
- REST APIs in the Cruise Control Wiki
14.8. Cruise Control configuration
The config/cruisecontrol.properties file contains the configuration for Cruise Control. The file consists of properties in one of the following types:
- String
- Number
- Boolean
You can specify and configure all the properties listed in the Configurations section of the Cruise Control Wiki.
Capacity configuration
Cruise Control uses capacity limits to determine if certain resource-based optimization goals are being broken. An attempted optimization fails if one or more of these resource-based goals is set as a hard goal and then broken. This prevents the optimization from being used to generate an optimization proposal.
You specify capacity limits for Kafka broker resources in one of the following three .json files in cruise-control/config:
-
capacityJBOD.json: For use in JBOD Kafka deployments (the default file). -
capacity.json: For use in non-JBOD Kafka deployments where each broker has the same number of CPU cores. -
capacityCores.json: For use in non-JBOD Kafka deployments where each broker has varying numbers of CPU cores.
Set the file in the capacity.config.file property in cruisecontrol.properties. The selected file will be used for broker capacity resolution. For example:
capacity.config.file=config/capacityJBOD.json
Capacity limits can be set for the following broker resources in the described units:
-
DISK: Disk storage in MB -
CPU: CPU utilization as a percentage (0-100) or as a number of cores -
NW_IN: Inbound network throughput in KB per second -
NW_OUT: Outbound network throughput in KB per second
To apply the same capacity limits to every broker monitored by Cruise Control, set capacity limits for broker ID -1. To set different capacity limits for individual brokers, specify each broker ID and its capacity configuration.
Example capacity limits configuration
{
  "brokerCapacities":[
    {
      "brokerId": "-1",
      "capacity": {
        "DISK": "100000",
        "CPU": "100",
        "NW_IN": "10000",
        "NW_OUT": "10000"
      },
      "doc": "This is the default capacity. Capacity unit used for disk is in MB, cpu is in percentage, network throughput is in KB."
    },
    {
      "brokerId": "0",
      "capacity": {
        "DISK": "500000",
        "CPU": "100",
        "NW_IN": "50000",
        "NW_OUT": "50000"
      },
      "doc": "This overrides the capacity for broker 0."
    }
  ]
}
For more information, see Populating the Capacity Configuration File in the Cruise Control Wiki.
Log cleanup policy for Cruise Control Metrics topic
It is important that the auto-created __CruiseControlMetrics topic (see auto-created topics) has a log cleanup policy of DELETE rather than COMPACT. Otherwise, records that are needed by Cruise Control might be removed.
As described in Section 14.3, “Deploying the Cruise Control Metrics Reporter”, setting the following options in the Kafka configuration file ensures that the COMPACT log cleanup policy is correctly set:
-
cruise.control.metrics.topic.auto.create=true -
cruise.control.metrics.topic.num.partitions=1 -
cruise.control.metrics.topic.replication.factor=1
If topic auto-creation is disabled in the Cruise Control Metrics Reporter (cruise.control.metrics.topic.auto.create=false), but enabled in the Kafka cluster, then the __CruiseControlMetrics topic is still automatically created by the broker. In this case, you must change the log cleanup policy of the __CruiseControlMetrics topic to DELETE using the kafka-configs.sh tool.
Get the current configuration of the
__CruiseControlMetricstopic:opt/kafka/bin/kafka-configs.sh --bootstrap-server <broker_address> --entity-type topics --entity-name __CruiseControlMetrics --describeChange the log cleanup policy in the topic configuration:
/opt/kafka/bin/kafka-configs.sh --bootstrap-server <broker_address> --entity-type topics --entity-name __CruiseControlMetrics --alter --add-config cleanup.policy=delete
If topic auto-creation is disabled in both the Cruise Control Metrics Reporter and the Kafka cluster, you must create the __CruiseControlMetrics topic manually and then configure it to use the DELETE log cleanup policy using the kafka-configs.sh tool.
For more information, see Section 6.9, “Modifying a topic configuration”.
Logging configuration
Cruise Control uses log4j1 for all server logging. To change the default configuration, edit the log4j.properties file in /opt/cruise-control/config/log4j.properties.
You must restart the Cruise Control server before the changes take effect.
14.9. Generating optimization proposals
When you make a POST request to the /rebalance endpoint, Cruise Control generates an optimization proposal to rebalance the Kafka cluster based on the optimization goals provided. You can use the results of the optimization proposal to rebalance your Kafka cluster.
You can run the optimization proposal using one of the following endpoints:
-
/rebalance -
/add_broker -
/remove_broker
The endpoint you use depends on whether you are rebalancing across all the brokers already running in the Kafka cluster; or you want to rebalance after scaling up or before scaling down your Kafka cluster. For more information, see Rebalancing endpoints with broker scaling.
The optimization proposal is generated as a dry run, unless the dryrun parameter is supplied and set to false. In "dry run mode", Cruise Control generates the optimization proposal and the estimated result, but doesn’t initiate the proposal by rebalancing the cluster.
You can analyze the information returned in the optimization proposal and decide whether to approve it.
Use the following parameters to make requests to the endpoints:
dryrun
type: boolean, default: true
Informs Cruise Control whether you want to generate an optimization proposal only (true), or generate an optimization proposal and perform a cluster rebalance (false).
When dryrun=true (the default), you can also pass the verbose parameter to return more detailed information about the state of the Kafka cluster. This includes metrics for the load on each Kafka broker before and after the optimization proposal is applied, and the differences between the before and after values.
excluded_topics
type: regex
A regular expression that matches the topics to exclude from the calculation of the optimization proposal.
goals
type: list of strings, default: the configured default.goals list
List of user-provided optimization goals to use to prepare the optimization proposal. If goals are not supplied, the configured default.goals list in the cruisecontrol.properties file is used.
skip_hard_goals_check
type: boolean, default: false
By default, Cruise Control checks that the user-provided optimization goals (in the goals parameter) contain all the configured hard goals (in hard.goals). A request fails if you supply goals that are not a subset of the configured hard.goals.
Set skip_hard_goals_check to true if you want to generate an optimization proposal with user-provided optimization goals that do not include all the configured hard.goals.
json
type: boolean, default: false
Controls the type of response returned by the Cruise Control server. If not supplied, or set to false, then Cruise Control returns text formatted for display on the command line. If you want to extract elements of the returned information programmatically, set json=true. This will return JSON formatted text that can be piped to tools such as jq, or parsed in scripts and programs.
verbose
type: boolean, default: false
Controls the level of detail in responses that are returned by the Cruise Control server. Can be used with dryrun=true.
Other parameters are available. For more information, see REST APIs in the Cruise Control Wiki.
Prerequisites
- Kafka and ZooKeeper are running
- Cruise Control is running
- (Optional for scaling up) You have installed new brokers on hosts to include in the rebalance
Procedure
Generate an optimization proposal using a POST request to the
/rebalance,/add_broker, or/remove_brokerendpoint.Example request to
/rebalanceusing default goalscurl -v -X POST 'cruise-control-server:9090/kafkacruisecontrol/rebalance'
The cached optimization proposal is immediately returned.
NoteIf
NotEnoughValidWindowsis returned, Cruise Control has not yet recorded enough metrics data to generate an optimization proposal. Wait a few minutes and then resend the request.Example request to
/rebalanceusing specified goalscurl -v -X POST 'cruise-control-server:9090/kafkacruisecontrol/rebalance?goals=RackAwareGoal,ReplicaCapacityGoal'
If the request satisfies the supplied goals, the cached optimization proposal is immediately returned. Otherwise, a new optimization proposal is generated using the supplied goals; this takes longer to calculate. You can enforce this behavior by adding the
ignore_proposal_cache=trueparameter to the request.Example request to
/rebalanceusing specified goals without hard goalscurl -v -X POST 'cruise-control-server:9090/kafkacruisecontrol/rebalance?goals=RackAwareGoal,ReplicaCapacityGoal,ReplicaDistributionGoal&skip_hard_goal_check=true'
Example request to
/add_brokerthat includes specified brokerscurl -v -X POST 'cruise-control-server:9090/kafkacruisecontrol/add_broker?brokerid=3,4'
The request includes the IDs of the new brokers only. For example, this request adds brokers with the IDs
3and4. Replicas are moved to the new brokers from existing brokers when rebalancing.Example request to
/remove_brokerthat excludes specified brokerscurl -v -X POST 'cruise-control-server:9090/kafkacruisecontrol/remove_broker?brokerid=3,4'
The request includes the IDs of the brokers being excluded only. For example, this request excludes brokers with the IDs
3and4. Replicas are moved from the brokers being removed to other existing brokers when rebalancing.NoteIf a broker that is being removed has excluded topics, replicas are still moved.
Review the optimization proposal contained in the response. The properties describe the pending cluster rebalance operation.
The proposal contains a high level summary of the proposed optimization, followed by summaries for each default optimization goal, and the expected cluster state after the proposal has executed.
Pay particular attention to the following information:
-
The
Cluster load after rebalancesummary. If it meets your requirements, you should assess the impact of the proposed changes using the high level summary. -
n inter-broker replica (y MB) movesindicates how much data will be moved across the network between brokers. The higher the value, the greater the potential performance impact on the Kafka cluster during the rebalance. -
n intra-broker replica (y MB) movesindicates how much data will be moved within the brokers themselves (between disks). The higher the value, the greater the potential performance impact on individual brokers (although less than that ofn inter-broker replica (y MB) moves). - The number of leadership moves. This has a negligible impact on the performance of the cluster during the rebalance.
-
The
Asynchronous responses
The Cruise Control REST API endpoints timeout after 10 seconds by default, although proposal generation continues on the server. A timeout might occur if the most recent cached optimization proposal is not ready, or if user-provided optimization goals were specified with ignore_proposal_cache=true.
To allow you to retrieve the optimization proposal at a later time, take note of the request’s unique identifier, which is given in the header of responses from the /rebalance endpoint.
To obtain the response using curl, specify the verbose (-v) option:
curl -v -X POST 'cruise-control-server:9090/kafkacruisecontrol/rebalance'
Here is an example header:
* Connected to cruise-control-server (::1) port 9090 (#0)
> POST /kafkacruisecontrol/rebalance HTTP/1.1
> Host: cc-host:9090
> User-Agent: curl/7.70.0
> Accept: /
>
* Mark bundle as not supporting multiuse
< HTTP/1.1 200 OK
< Date: Mon, 01 Jun 2020 15:19:26 GMT
< Set-Cookie: JSESSIONID=node01wk6vjzjj12go13m81o7no5p7h9.node0; Path=/
< Expires: Thu, 01 Jan 1970 00:00:00 GMT
< User-Task-ID: 274b8095-d739-4840-85b9-f4cfaaf5c201
< Content-Type: text/plain;charset=utf-8
< Cruise-Control-Version: 2.0.103.redhat-00002
< Cruise-Control-Commit_Id: 58975c9d5d0a78dd33cd67d4bcb497c9fd42ae7c
< Content-Length: 12368
< Server: Jetty(9.4.26.v20200117-redhat-00001)
If an optimization proposal is not ready within the timeout, you can re-submit the POST request, this time including the User-Task-ID of the original request in the header:
curl -v -X POST -H 'User-Task-ID: 274b8095-d739-4840-85b9-f4cfaaf5c201' 'cruise-control-server:9090/kafkacruisecontrol/rebalance'
What to do next
14.10. Approving an optimization proposal
If you are satisfied with your most recently generated optimization proposal, you can instruct Cruise Control to initiate a cluster rebalance and begin reassigning partitions.
Leave as little time as possible between generating an optimization proposal and initiating the cluster rebalance. If some time has passed since you generated the original optimization proposal, the cluster state might have changed. Therefore, the cluster rebalance that is initiated might be different to the one you reviewed. If in doubt, first generate a new optimization proposal.
Only one cluster rebalance, with a status of "Active", can be in progress at a time.
Prerequisites
- You have generated an optimization proposal from Cruise Control.
Procedure
Send a POST request to the
/rebalance,/add_broker, or/remove_brokerendpoint with thedryrun=falseparameter:If you used the
/add_brokeror/remove_brokerendpoint to generate a proposal that included or excluded brokers, use the same endpoint to perform the rebalance with or without the specified brokers.Example request to
/rebalancecurl -X POST 'cruise-control-server:9090/kafkacruisecontrol/rebalance?dryrun=false'
Example request to
/add_brokercurl -v -X POST 'cruise-control-server:9090/kafkacruisecontrol/add_broker?dryrun=false&brokerid=3,4'
Example request to
/remove_brokercurl -v -X POST 'cruise-control-server:9090/kafkacruisecontrol/remove_broker?dryrun=false&brokerid=3,4'
Cruise Control initiates the cluster rebalance and returns the optimization proposal.
- Check the changes that are summarized in the optimization proposal. If the changes are not what you expect, you can stop the rebalance.
Check the progress of the cluster rebalance using the
/user_tasksendpoint. The cluster rebalance in progress has a status of "Active".To view all cluster rebalance tasks executed on the Cruise Control server:
curl 'cruise-control-server:9090/kafkacruisecontrol/user_tasks'

USER TASK ID      CLIENT ADDRESS  START TIME     STATUS  REQUEST URL
c459316f-9eb5-482f-9d2d-97b5a4cd294d  0:0:0:0:0:0:0:1       2020-06-01_16:10:29 UTC  Active      POST /kafkacruisecontrol/rebalance?dryrun=false
445e2fc3-6531-4243-b0a6-36ef7c5059b4  0:0:0:0:0:0:0:1       2020-06-01_14:21:26 UTC  Completed   GET /kafkacruisecontrol/state?json=true
05c37737-16d1-4e33-8e2b-800dee9f1b01  0:0:0:0:0:0:0:1       2020-06-01_14:36:11 UTC  Completed   GET /kafkacruisecontrol/state?json=true
aebae987-985d-4871-8cfb-6134ecd504ab  0:0:0:0:0:0:0:1       2020-06-01_16:10:04 UTC
To view the status of a particular cluster rebalance task, supply the
user-task-idsparameter and the task ID:curl 'cruise-control-server:9090/kafkacruisecontrol/user_tasks?user_task_ids=c459316f-9eb5-482f-9d2d-97b5a4cd294d'
(Optional) Removing brokers when scaling down
After a successful rebalance you can stop any brokers you excluded in order to scale down the Kafka cluster.
Check that each broker being removed does not have any live partitions in its log (
log.dirs).ls -l <LogDir> | grep -E '^d' | grep -vE '[a-zA-Z0-9.-]+\.[a-z0-9]+-delete$'If a log directory does not match the regular expression
\.[a-z0-9]-delete$, active partitions are still present. If you have active partitions, check the rebalance has finished or the configuration for the optimization proposal. You can run the proposal again. Make sure that there are no active partitions before moving on to the next step.Stop the broker.
su - kafka
/opt/kafka/bin/kafka-server-stop.sh
Confirm that the broker has stopped.
jcmd | grep kafka
14.11. Stopping an active cluster rebalance
You can stop the cluster rebalance that is currently in progress.
This instructs Cruise Control to finish the current batch of partition reassignments and then stop the rebalance. When the rebalance has stopped, completed partition reassignments have already been applied; therefore, the state of the Kafka cluster is different when compared to before the start of the rebalance operation. If further rebalancing is required, you should generate a new optimization proposal.
The performance of the Kafka cluster in the intermediate (stopped) state might be worse than in the initial state.
Prerequisites
- A cluster rebalance is in progress (indicated by a status of "Active").
Procedure
Send a POST request to the
/stop_proposal_executionendpoint:curl -X POST 'cruise-control-server:9090/kafkacruisecontrol/stop_proposal_execution'
Additional resources
Chapter 15. Setting up distributed tracing
Distributed tracing allows you to track the progress of transactions between applications in a distributed system. In a microservices architecture, tracing tracks the progress of transactions between services. Trace data is useful for monitoring application performance and investigating issues with target systems and end-user applications.
In AMQ Streams on Red Hat Enterprise Linux, tracing facilitates the end-to-end tracking of messages: from source systems to Kafka, and then from Kafka to target systems and applications. Tracing complements the available JMX metrics.
How AMQ Streams supports tracing
Support for tracing is provided for the following clients and components.
Kafka clients:
- Kafka producers and consumers
- Kafka Streams API applications
Kafka components:
- Kafka Connect
- Kafka Bridge
- MirrorMaker
- MirrorMaker 2.0
Support for OpenTracing is deprecated. The Jaeger clients are now retired and the OpenTracing project archived. As such, we cannot guarantee their support for future Kafka versions. We are introducing a new tracing implementation based on the OpenTelemetry project.
To enable tracing, you perform four high-level tasks:
- Enable a Jaeger tracer.
Enable the Interceptors:
- For Kafka clients, you instrument your application code using the OpenTracing Apache Kafka Client Instrumentation library (included with AMQ Streams).
- For Kafka components, you set configuration properties for each component.
- Set tracing environment variables.
- Deploy the client or component.
When instrumented, clients generate trace data. For example, when producing messages or writing offsets to the log.
Traces are sampled according to a sampling strategy and then visualized in the Jaeger user interface.
Tracing is not supported for Kafka brokers.
Setting up tracing for applications and systems beyond AMQ Streams is outside the scope of this chapter. To learn more about this subject, search for "inject and extract" in the OpenTracing documentation.
Outline of procedures
To set up tracing for AMQ Streams, follow these procedures in order:
Set up tracing for clients:
Set up tracing for MirrorMaker, MirrorMaker 2.0, and Kafka Connect:
- Enable tracing for the Kafka Bridge
Prerequisites
- The Jaeger backend components are deployed to your Kubernetes cluster. For deployment instructions, see the Jaeger documentation.
15.1. Overview of OpenTracing and Jaeger
AMQ Streams uses the OpenTracing and Jaeger projects.
OpenTracing is an API specification that is independent from the tracing or monitoring system.
- The OpenTracing APIs are used to instrument application code
- Instrumented applications generate traces for individual transactions across the distributed system
- Traces are composed of spans that define specific units of work over time
Jaeger is a tracing system for microservices-based distributed systems.
- Jaeger implements the OpenTracing APIs and provides client libraries for instrumentation
- The Jaeger user interface allows you to query, filter, and analyze trace data

Additional resources
15.2. Setting up tracing for Kafka clients
Initialize a Jaeger tracer to instrument your client applications for distributed tracing.
15.2.1. Initializing a Jaeger tracer for Kafka clients
Configure and initialize a Jaeger tracer using a set of tracing environment variables.
Procedure
In each client application:
Add Maven dependencies for Jaeger to the
pom.xmlfile for the client application:<dependency> <groupId>io.jaegertracing</groupId> <artifactId>jaeger-client</artifactId> <version>1.5.0.redhat-00001</version> </dependency>- Define the configuration of the Jaeger tracer using the tracing environment variables.
Create the Jaeger tracer from the environment variables that you defined in step two:
Tracer tracer = Configuration.fromEnv().getTracer();
NoteFor alternative ways to initialize a Jaeger tracer, see the Java OpenTracing library documentation.
Register the Jaeger tracer as a global tracer:
GlobalTracer.register(tracer);
A Jaeger tracer is now initialized for the client application to use.
15.2.2. Instrumenting producers and consumers for tracing
Use a Decorator pattern or Interceptors to instrument your Java producer and consumer application code for tracing.
Procedure
In the application code of each producer and consumer application:
Add a Maven dependency for OpenTracing to the producer or consumer’s
pom.xmlfile.<dependency> <groupId>io.opentracing.contrib</groupId> <artifactId>opentracing-kafka-client</artifactId> <version>0.1.15.redhat-00006</version> </dependency>Instrument your client application code using either a Decorator pattern or Interceptors.
To use a Decorator pattern:
// Create an instance of the KafkaProducer:
KafkaProducer<Integer, String> producer = new KafkaProducer<>(senderProps);

// Create an instance of the TracingKafkaProducer:
TracingKafkaProducer<Integer, String> tracingProducer = new TracingKafkaProducer<>(producer,
        tracer);

// Send:
tracingProducer.send(...);

// Create an instance of the KafkaConsumer:
KafkaConsumer<Integer, String> consumer = new KafkaConsumer<>(consumerProps);

// Create an instance of the TracingKafkaConsumer:
TracingKafkaConsumer<Integer, String> tracingConsumer = new TracingKafkaConsumer<>(consumer,
        tracer);

// Subscribe:
tracingConsumer.subscribe(Collections.singletonList("messages"));

// Get messages:
ConsumerRecords<Integer, String> records = tracingConsumer.poll(1000);

// Retrieve SpanContext from polled record (consumer side):
ConsumerRecord<Integer, String> record = ...
SpanContext spanContext = TracingKafkaUtils.extractSpanContext(record.headers(), tracer);
To use Interceptors:
// Register the tracer with GlobalTracer:
GlobalTracer.register(tracer);

// Add the TracingProducerInterceptor to the sender properties:
senderProps.put(ProducerConfig.INTERCEPTOR_CLASSES_CONFIG,
          TracingProducerInterceptor.class.getName());

// Create an instance of the KafkaProducer:
KafkaProducer<Integer, String> producer = new KafkaProducer<>(senderProps);

// Send:
producer.send(...);

// Add the TracingConsumerInterceptor to the consumer properties:
consumerProps.put(ConsumerConfig.INTERCEPTOR_CLASSES_CONFIG,
          TracingConsumerInterceptor.class.getName());

// Create an instance of the KafkaConsumer:
KafkaConsumer<Integer, String> consumer = new KafkaConsumer<>(consumerProps);

// Subscribe:
consumer.subscribe(Collections.singletonList("messages"));

// Get messages:
ConsumerRecords<Integer, String> records = consumer.poll(1000);

// Retrieve the SpanContext from a polled message (consumer side):
ConsumerRecord<Integer, String> record = ...
SpanContext spanContext = TracingKafkaUtils.extractSpanContext(record.headers(), tracer);
Custom span names in a Decorator pattern
A span is a logical unit of work in Jaeger, with an operation name, start time, and duration.
To use a Decorator pattern to instrument your producer and consumer applications, define custom span names by passing a BiFunction object as an additional argument when creating the TracingKafkaProducer and TracingKafkaConsumer objects. The OpenTracing Apache Kafka Client Instrumentation library includes several built-in span names.
Example: Using custom span names to instrument client application code in a Decorator pattern
// Create a BiFunction for the KafkaProducer that operates on (String operationName, ProducerRecord consumerRecord) and returns a String to be used as the name:

BiFunction<String, ProducerRecord, String> producerSpanNameProvider =
    (operationName, producerRecord) -> "CUSTOM_PRODUCER_NAME";

// Create an instance of the KafkaProducer:
KafkaProducer<Integer, String> producer = new KafkaProducer<>(senderProps);

// Create an instance of the TracingKafkaProducer
TracingKafkaProducer<Integer, String> tracingProducer = new TracingKafkaProducer<>(producer,
        tracer,
        producerSpanNameProvider);

// Spans created by the tracingProducer will now have "CUSTOM_PRODUCER_NAME" as the span name.

// Create a BiFunction for the KafkaConsumer that operates on (String operationName, ConsumerRecord consumerRecord) and returns a String to be used as the name:

BiFunction<String, ConsumerRecord, String> consumerSpanNameProvider =
    (operationName, consumerRecord) -> operationName.toUpperCase();

// Create an instance of the KafkaConsumer:
KafkaConsumer<Integer, String> consumer = new KafkaConsumer<>(consumerProps);

// Create an instance of the TracingKafkaConsumer, passing in the consumerSpanNameProvider BiFunction:

TracingKafkaConsumer<Integer, String> tracingConsumer = new TracingKafkaConsumer<>(consumer,
        tracer,
        consumerSpanNameProvider);

// Spans created by the tracingConsumer will have the operation name as the span name, in upper-case.
// "receive" -> "RECEIVE"
Built-in span names
When defining custom span names, you can use the following BiFunctions in the ClientSpanNameProvider class. If no spanNameProvider is specified, CONSUMER_OPERATION_NAME and PRODUCER_OPERATION_NAME are used.
Table 15.1. BiFunctions to define custom span names
| BiFunction | Description |
|---|---|
|
|
Returns the |
|
|
Returns a String concatenation of |
|
|
Returns the name of the topic that the message was sent to or retrieved from in the format |
|
|
Returns a String concatenation of |
|
|
Returns the operation name and the topic name: |
|
|
Returns a String concatenation of |
15.2.3. Instrumenting Kafka Streams applications for tracing
Instrument Kafka Streams applications for distributed tracing using a supplier interface. This enables the Interceptors in the application.
Procedure
In each Kafka Streams application:
Add the
opentracing-kafka-streamsdependency to the Kafka Streams application’spom.xmlfile.<dependency> <groupId>io.opentracing.contrib</groupId> <artifactId>opentracing-kafka-streams</artifactId> <version>0.1.15.redhat-00006</version> </dependency>Create an instance of the
TracingKafkaClientSuppliersupplier interface:KafkaClientSupplier supplier = new TracingKafkaClientSupplier(tracer);
Provide the supplier interface to
KafkaStreams:KafkaStreams streams = new KafkaStreams(builder.build(), new StreamsConfig(config), supplier); streams.start();
15.3. Setting up tracing for MirrorMaker and Kafka Connect
This section describes how to configure MirrorMaker, MirrorMaker 2.0, and Kafka Connect for distributed tracing.
You must enable a Jaeger tracer for each component.
15.3.1. Enabling tracing for MirrorMaker
Enable distributed tracing for MirrorMaker by passing the Interceptor properties as consumer and producer configuration parameters.
Messages are traced from the source cluster to the target cluster. The trace data records messages entering and leaving the MirrorMaker component.
Procedure
- Configure and enable a Jaeger tracer.
Edit the
/opt/kafka/config/consumer.propertiesfile.Add the following Interceptor property:
consumer.interceptor.classes=io.opentracing.contrib.kafka.TracingConsumerInterceptor
Edit the
/opt/kafka/config/producer.propertiesfile.Add the following Interceptor property:
producer.interceptor.classes=io.opentracing.contrib.kafka.TracingProducerInterceptor
Start MirrorMaker with the consumer and producer configuration files as parameters:
su - kafka
/opt/kafka/bin/kafka-mirror-maker.sh --consumer.config /opt/kafka/config/consumer.properties --producer.config /opt/kafka/config/producer.properties --num.streams=2
15.3.2. Enabling tracing for MirrorMaker 2.0
Enable distributed tracing for MirrorMaker 2.0 by defining the Interceptor properties in the MirrorMaker 2.0 properties file.
Messages are traced between Kafka clusters. The trace data records messages entering and leaving the MirrorMaker 2.0 component.
Procedure
- Configure and enable a Jaeger tracer.
Edit the MirrorMaker 2.0 configuration properties file,
./config/connect-mirror-maker.properties, and add the following properties:header.converter=org.apache.kafka.connect.converters.ByteArrayConverter 1 consumer.interceptor.classes=io.opentracing.contrib.kafka.TracingConsumerInterceptor 2 producer.interceptor.classes=io.opentracing.contrib.kafka.TracingProducerInterceptor
- Start MirrorMaker 2.0 using the instructions in Synchronizing data between Kafka clusters using MirrorMaker 2.0.
Additional resources
15.3.3. Enabling tracing for Kafka Connect
Enable distributed tracing for Kafka Connect using configuration properties.
Only messages produced and consumed by Kafka Connect itself are traced. To trace messages sent between Kafka Connect and external systems, you must configure tracing in the connectors for those systems.
Procedure
- Configure and enable a Jaeger tracer.
Edit the relevant Kafka Connect configuration file.
-
If you are running Kafka Connect in standalone mode, edit the
/opt/kafka/config/connect-standalone.propertiesfile. -
If you are running Kafka Connect in distributed mode, edit the
/opt/kafka/config/connect-distributed.propertiesfile.
-
If you are running Kafka Connect in standalone mode, edit the
Add the following properties to the configuration file:
producer.interceptor.classes=io.opentracing.contrib.kafka.TracingProducerInterceptor
consumer.interceptor.classes=io.opentracing.contrib.kafka.TracingConsumerInterceptor
- Save the configuration file.
- Set tracing environment variables and then run Kafka Connect in standalone or distributed mode.
The Interceptors in Kafka Connect’s internal consumers and producers are now enabled.
15.4. Enabling tracing for the Kafka Bridge
Enable distributed tracing for the Kafka Bridge by editing the Kafka Bridge configuration file. You can then deploy a Kafka Bridge instance that is configured for distributed tracing to the host operating system.
Traces are generated when:
- The Kafka Bridge sends messages to HTTP clients and consumes messages from HTTP clients
- HTTP clients send HTTP requests to send and receive messages through the Kafka Bridge
To have end-to-end tracing, you must configure tracing in your HTTP clients.
Procedure
Edit the
config/application.propertiesfile in the Kafka Bridge installation directory.Remove the code comments from the following line:
bridge.tracing=jaeger
- Save the configuration file.
Run the
bin/kafka_bridge_run.shscript using the configuration properties as a parameter:cd kafka-bridge-0.xy.x.redhat-0000x ./bin/kafka_bridge_run.sh --config-file=config/application.properties
The Interceptors in the Kafka Bridge’s internal consumers and producers are now enabled.
15.5. Environment variables for tracing
Use these environment variables when configuring a Jaeger tracer for Kafka clients and components.
The tracing environment variables are part of the Jaeger project and are subject to change. For the latest environment variables, see the Jaeger documentation.
Table 15.2. Jaeger tracer environment variables
| Property | Required | Description |
|---|---|---|
|
| Yes | The name of the Jaeger tracer service. |
|
| No |
The hostname for communicating with the |
|
| No |
The port used for communicating with the |
|
| No |
The |
|
| No | The authentication token to send to the endpoint as a bearer token. |
|
| No | The username to send to the endpoint if using basic authentication. |
|
| No | The password to send to the endpoint if using basic authentication. |
|
| No |
A comma-separated list of formats to use for propagating the trace context. Defaults to the standard Jaeger format. Valid values are |
|
| No | Indicates whether the reporter should also log the spans. |
|
| No | The reporter’s maximum queue size. |
|
| No | The reporter’s flush interval, in ms. Defines how frequently the Jaeger reporter flushes span batches. |
|
| No | The sampling strategy to use for client traces:
To sample all traces, use the Constant sampling strategy with a parameter of 1. For an overview of the Jaeger architecture and client sampling configuration parameters, see the Jaeger documentation. |
|
| No | The sampler parameter (number). |
|
| No | The hostname and port to use if a Remote sampling strategy is selected. |
|
| No | A comma-separated list of tracer-level tags that are added to all reported spans.
The value can also refer to an environment variable using the format |
Chapter 16. Using Kafka Exporter
Kafka Exporter is an open source project to enhance monitoring of Apache Kafka brokers and clients.
Kafka Exporter is provided with AMQ Streams for deployment with a Kafka cluster to extract additional metrics data from Kafka brokers related to offsets, consumer groups, consumer lag, and topics.
The metrics data is used, for example, to help identify slow consumers.
Lag data is exposed as Prometheus metrics, which can then be presented in Grafana for analysis.
If you are already using Prometheus and Grafana for monitoring of built-in Kafka metrics, you can configure Prometheus to also scrape the Kafka Exporter Prometheus endpoint.
Kafka exposes metrics through JMX, which can then be exported as Prometheus metrics. For more information, see Monitoring your cluster using JMX.
16.1. Consumer lag
Consumer lag indicates the difference in the rate of production and consumption of messages. Specifically, consumer lag for a given consumer group indicates the delay between the last message in the partition and the message being currently picked up by that consumer. The lag reflects the position of the consumer offset in relation to the end of the partition log.
This difference is sometimes referred to as the delta between the producer offset and consumer offset, the read and write positions in the Kafka broker topic partitions.
Suppose a topic streams 100 messages a second. A lag of 1000 messages between the producer offset (the topic partition head) and the last offset the consumer has read means a 10-second delay.
The importance of monitoring consumer lag
For applications that rely on the processing of (near) real-time data, it is critical to monitor consumer lag to check that it does not become too big. The greater the lag becomes, the further the process moves from the real-time processing objective.
Consumer lag, for example, might be a result of consuming too much old data that has not been purged, or through unplanned shutdowns.
Reducing consumer lag
Typical actions to reduce lag include:
- Scaling-up consumer groups by adding new consumers
- Increasing the retention time for a message to remain in a topic
- Adding more disk capacity to increase the message buffer
Actions to reduce consumer lag depend on the underlying infrastructure and the use cases AMQ Streams is supporting. For instance, a lagging consumer is less likely to benefit from the broker being able to service a fetch request from its disk cache. And in certain cases, it might be acceptable to automatically drop messages until a consumer has caught up.
16.2. Kafka Exporter alerting rule examples
The sample alert notification rules specific to Kafka Exporter are as follows:
UnderReplicatedPartition- An alert to warn that a topic is under-replicated and the broker is not replicating enough partitions. The default configuration is for an alert if there are one or more under-replicated partitions for a topic. The alert might signify that a Kafka instance is down or the Kafka cluster is overloaded. A planned restart of the Kafka broker may be required to restart the replication process.
TooLargeConsumerGroupLag- An alert to warn that the lag on a consumer group is too large for a specific topic partition. The default configuration is 1000 records. A large lag might indicate that consumers are too slow and are falling behind the producers.
NoMessageForTooLong- An alert to warn that a topic has not received messages for a period of time. The default configuration for the time period is 10 minutes. The delay might be a result of a configuration issue preventing a producer from publishing messages to the topic.
You can adapt alerting rules according to your specific needs.
Additional resources
For more information about setting up alerting rules, see Configuration in the Prometheus documentation.
16.3. Kafka Exporter metrics
Lag information is exposed by Kafka Exporter as Prometheus metrics for presentation in Grafana.
Kafka Exporter exposes metrics data for brokers, topics, and consumer groups.
Table 16.1. Broker metrics output
| Name | Information |
|---|---|
|
| Number of brokers in the Kafka cluster |
Table 16.2. Topic metrics output
| Name | Information |
|---|---|
|
| Number of partitions for a topic |
|
| Current topic partition offset for a broker |
|
| Oldest topic partition offset for a broker |
|
| Number of in-sync replicas for a topic partition |
|
| Leader broker ID of a topic partition |
|
|
Shows |
|
| Number of replicas for this topic partition |
|
|
Shows |
Table 16.3. Consumer group metrics output
| Name | Information |
|---|---|
|
| Current topic partition offset for a consumer group |
|
| Current approximate lag for a consumer group at a topic partition |
16.4. Running Kafka Exporter
Run Kafka Exporter to expose Prometheus metrics for presentation in a Grafana dashboard.
Download and install the Kafka Exporter package to use the Kafka Exporter with AMQ Streams. You need an AMQ Streams subscription to be able to download and install the package.
This procedure assumes you already have access to a Grafana user interface and Prometheus is deployed and added as a data source.
Procedure
Install the Kafka Exporter package:
dnf install kafka_exporter
Verify the package has installed:
dnf info kafka_exporter
Run the Kafka Exporter using appropriate configuration parameter values:
kafka_exporter --kafka.server=<kafka_bootstrap_address>:9092 --kafka.version=3.2.3 --<my_other_parameters>
The parameters require a double-hyphen convention, such as
--kafka.server.Table 16.4. Kafka Exporter configuration parameters
Option Description Default kafka.serverHost/post address of the Kafka server.
kafka:9092kafka.versionKafka broker version.
1.0.0group.filterA regular expression to specify the consumer groups to include in the metrics.
.*(all)topic.filterA regular expression to specify the topics to include in the metrics.
.*(all)sasl.<parameter>Parameters to enable and connect to the Kafka cluster using SASL/PLAIN authentication, with user name and password.
falsetls.<parameter>Parameters to enable connect to the Kafka cluster using TLS authentication, with optional certificate and key.
falseweb.listen-addressPort address to expose the metrics.
:9308web.telemetry-pathPath for the exposed metrics.
/metricslog.levelLogging configuration, to log messages with a given severity (debug, info, warn, error, fatal) or above.
infolog.enable-saramaBoolean to enable Sarama logging, a Go client library used by the Kafka Exporter.
falselegacy.partitionsBoolean to enable metrics to be fetched from inactive topic partitions as well as from active partitions. If you want Kafka Exporter to return metrics for inactive partitions, set to
true.falseYou can use
kafka_exporter --helpfor information on the properties.Configure Prometheus to monitor the Kafka Exporter metrics.
For more information on configuring Prometheus, see the Prometheus documentation.
Enable Grafana to present the Kafka Exporter metrics data exposed by Prometheus.
For more information, see Presenting Kafka Exporter metrics in Grafana.
Updating Kafka Exporter
Use the latest version of Kafka Exporter with your AMQ Streams installation.
To check for updates, use:
dnf check-update
To update Kafka Exporter, use:
dnf update kafka_exporter
16.5. Presenting Kafka Exporter metrics in Grafana
Using Kafka Exporter Prometheus metrics as a data source, you can create a dashboard of Grafana charts.
For example, from the metrics you can create the following Grafana charts:
- Message in per second (from topics)
- Message in per minute (from topics)
- Lag by consumer group
- Messages consumed per minute (by consumer groups)
When metrics data has been collected for some time, the Kafka Exporter charts are populated.
Use the Grafana charts to analyze lag and to check if actions to reduce lag are having an impact on an affected consumer group. If, for example, Kafka brokers are adjusted to reduce lag, the dashboard will show the Lag by consumer group chart going down and the Messages consumed per minute chart going up.
Additional resources
Chapter 17. Upgrading AMQ Streams and Kafka
AMQ Streams can be upgraded with no cluster downtime. Each version of AMQ Streams supports one or more versions of Apache Kafka: you can upgrade to a higher Kafka version as long as it is supported by your version of AMQ Streams. Newer versions of AMQ Streams may support newer versions of Kafka, but you need to upgrade AMQ Streams before you can upgrade to a higher supported Kafka version.
Refer to the documentation supporting a specific version of AMQ Streams for information on how to upgrade to that version.
17.1. Upgrade prerequisites
Before you begin the upgrade process, make sure that:
- AMQ Streams is installed. For instructions, see Chapter 2, Getting started.
- You are familiar with any upgrade changes described in the AMQ Streams 2.2 on Red Hat Enterprise Linux Release Notes.
17.2. Kafka versions
Kafka’s log message format version and inter-broker protocol version specify, respectively, the log format version appended to messages and the version of the Kafka protocol used in a cluster. To ensure the correct versions are used, the upgrade process involves making configuration changes to existing Kafka brokers and code changes to client applications (consumers and producers).
The following table shows the differences between Kafka versions:
Table 17.1. Kafka version differences
| Kafka version | Inter-broker protocol version | Log message format version | ZooKeeper version |
|---|---|---|---|
| 3.2.3 | 3.2 | 3.2 | 3.6.3 |
| 3.1.0 | 3.1 | 3.1 | 3.6.3 |
Inter-broker protocol version
In Kafka, the network protocol used for inter-broker communication is called the inter-broker protocol. Each version of Kafka has a compatible version of the inter-broker protocol. The minor version of the protocol typically increases to match the minor version of Kafka, as shown in the preceding table.
The inter-broker protocol version is set cluster wide in the Kafka resource. To change it, you edit the inter.broker.protocol.version property in Kafka.spec.kafka.config.
Log message format version
When a producer sends a message to a Kafka broker, the message is encoded using a specific format. The format can change between Kafka releases, so messages specify which version of the message format they were encoded with.
The properties used to set a specific message format version are as follows:
-
message.format.versionproperty for topics -
log.message.format.versionproperty for Kafka brokers
From Kafka 3.0.0, the message format version values are assumed to match the inter.broker.protocol.version and don’t need to be set. The values reflect the Kafka version used.
When upgrading to Kafka 3.0.0 or higher, you can remove these settings when you update the inter.broker.protocol.version. Otherwise, set the message format version based on the Kafka version you are upgrading to.
The default value of message.format.version for a topic is defined by the log.message.format.version that is set on the Kafka broker. You can manually set the message.format.version of a topic by modifying its topic configuration.
17.3. Upgrading Kafka brokers and ZooKeeper
This procedure describes how to upgrade Kafka brokers and ZooKeeper on a host machine to use the latest version of AMQ Streams.
You update your files, then configure and restart all Kafka brokers to use a new inter-broker protocol version. After performing these steps, data is transmitted between the Kafka brokers using the new inter-broker protocol version.
From Kafka 3.0.0, message format version values are assumed to match the inter.broker.protocol.version and don’t need to be set. The values reflect the Kafka version used.
Messages received are still appended to the message logs in the earlier message format version.
Prerequisites
-
You are logged in to Red Hat Enterprise Linux as the
kafkauser.
Procedure
For each Kafka broker in your AMQ Streams cluster and one at a time:
Download the AMQ Streams archive from the AMQ Streams software downloads page.
NoteIf prompted, log in to your Red Hat account.
On the command line, create a temporary directory and extract the contents of the
amq-streams-x.y.z-bin.zipfile.mkdir /tmp/kafka unzip amq-streams-x.y.z-bin.zip -d /tmp/kafka
If running, stop ZooKeeper and the Kafka broker running on the host.
/opt/kafka/bin/zookeeper-server-stop.sh
/opt/kafka/bin/kafka-server-stop.sh
jcmd | grep zookeeper
jcmd | grep kafka
Delete the
libsandbindirectories from your existing installation:rm -rf /opt/kafka/libs /opt/kafka/bin
Copy the
libsandbindirectories from the temporary directory:cp -r /tmp/kafka/kafka_y.y-x.x.x/libs /opt/kafka/ cp -r /tmp/kafka/kafka_y.y-x.x.x/bin /opt/kafka/
Delete the temporary directory.
rm -r /tmp/kafka
Edit the
/opt/kafka/config/server.propertiesproperties file.Set the
inter.broker.protocol.versionandlog.message.format.versionproperties to the current version.For example, the current version is 3.1 if upgrading from Kafka version 3.1.0 to 3.2.3:
inter.broker.protocol.version=3.1
log.message.format.version=3.1
Use the correct version for the Kafka version you are upgrading from (
3.0,3.1and so on). Leaving theinter.broker.protocol.versionunchanged at the current setting ensures that the brokers can continue to communicate with each other throughout the upgrade.If the properties are not configured, add them with the current version.
If you are upgrading from Kafka 3.0.0 or later, you only need to set the
inter.broker.protocol.version.Restart the updated ZooKeeper and Kafka broker:
/opt/kafka/bin/zookeeper-server-start.sh -daemon /opt/kafka/config/zookeeper.properties
/opt/kafka/bin/kafka-server-start.sh -daemon /opt/kafka/config/server.properties
The Kafka broker and Zookeeper will start using the binaries for the latest Kafka version.
For information on restarting brokers in a multi-node cluster, see Section 3.3, “Performing a graceful rolling restart of Kafka brokers”.
Verify that the restarted Kafka broker has caught up with the partition replicas it is following.
Use the
kafka-topics.shtool to ensure that all replicas contained in the broker are back in sync. For instructions, see Listing and describing topics.In the next steps, update your Kafka brokers to use the new inter-broker protocol version.
Update each broker, one at a time.
WarningDowngrading AMQ Streams is not possible after completing the following steps.
Set the
inter.broker.protocol.versionproperty to3.2in the/opt/kafka/config/server.propertiesproperties file:inter.broker.protocol.version=3.2
On the command line, stop the Kafka broker that you modified:
/opt/kafka/bin/kafka-server-stop.sh
Check that Kafka is not running:
jcmd | grep kafka
Restart the Kafka broker that you modified:
/opt/kafka/bin/kafka-server-start.sh -daemon /opt/kafka/config/server.properties
Check that Kafka is running:
jcmd | grep kafka
If you are upgrading from a version earlier than Kafka 3.0.0, set the
log.message.format.versionproperty to3.2in the/opt/kafka/config/server.propertiesproperties file:log.message.format.version=3.2
On the command line, stop the Kafka broker that you modified:
/opt/kafka/bin/kafka-server-stop.sh
Check that Kafka is not running:
jcmd | grep kafka
Restart the Kafka broker that you modified:
/opt/kafka/bin/kafka-server-start.sh -daemon /opt/kafka/config/server.properties
Check that Kafka is running:
jcmd | grep kafka
Verify that the restarted Kafka broker has caught up with the partition replicas it is following.
Use the
kafka-topics.shtool to ensure that all replicas contained in the broker are back in sync. For instructions, see Listing and describing topics.
17.4. Upgrading Kafka Connect
This procedure describes how to upgrade a Kafka Connect cluster on a host machine.
Prerequisites
-
You are logged in to Red Hat Enterprise Linux as the
kafkauser. - Kafka Connect is not started.
Procedure
For each Kafka broker in your AMQ Streams cluster and one at a time:
Download the AMQ Streams archive from the AMQ Streams software downloads page.
NoteIf prompted, log in to your Red Hat account.
On the command line, create a temporary directory and extract the contents of the
amq-streams-x.y.z-bin.zipfile.mkdir /tmp/kafka unzip amq-streams-x.y.z-bin.zip -d /tmp/kafka
If running, stop the Kafka broker and ZooKeeper running on the host.
/opt/kafka/bin/kafka-server-stop.sh
/opt/kafka/bin/zookeeper-server-stop.sh
Delete the
libsandbindirectories from your existing installation:rm -rf /opt/kafka/libs /opt/kafka/bin
Copy the
libsandbindirectories from the temporary directory:cp -r /tmp/kafka/kafka_y.y-x.x.x/libs /opt/kafka/ cp -r /tmp/kafka/kafka_y.y-x.x.x/bin /opt/kafka/
Delete the temporary directory.
rm -r /tmp/kafka
Start Kafka Connect in either standalone or distributed mode.
To start in standalone mode, run the
connect-standalone.shscript. Specify the Kafka Connect standalone configuration file and the configuration files of your Kafka Connect connectors.su - kafka /opt/kafka/bin/connect-standalone.sh /opt/kafka/config/connect-standalone.properties connector1.properties [connector2.properties ...]
To start in distributed mode, start the Kafka Connect workers with the
/opt/kafka/config/connect-distributed.propertiesconfiguration file on all Kafka Connect nodes:su - kafka /opt/kafka/bin/connect-distributed.sh /opt/kafka/config/connect-distributed.properties
Verify that Kafka Connect is running:
In standalone mode:
jcmd | grep ConnectStandalone
In distributed mode:
jcmd | grep ConnectDistributed
- Verify that Kafka Connect is producing and consuming data as expected.
Additional resources
17.5. Upgrading consumers and Kafka Streams applications to cooperative rebalancing
Following a Kafka upgrade, if required, you can upgrade Kafka consumers and Kafka Streams applications to use the incremental cooperative rebalance protocol for partition rebalances instead of the default eager rebalance protocol. The new protocol was added in Kafka 2.4.0.
Consumers keep their partition assignments in a cooperative rebalance and only revoke them at the end of the process, if needed to achieve a balanced cluster. This reduces the unavailability of the consumer group or Kafka Streams application.
Upgrading to the incremental cooperative rebalance protocol is optional. The eager rebalance protocol is still supported.
Prerequisites
- You have upgraded your Kafka brokers
Procedure
To upgrade a Kafka consumer to use the incremental cooperative rebalance protocol:
-
Replace the Kafka clients
.jarfile with the new version. -
In the consumer configuration, append
cooperative-stickyto thepartition.assignment.strategy. For example, if therangestrategy is set, change the configuration torange, cooperative-sticky. - Restart each consumer in the group in turn, waiting for the consumer to rejoin the group after each restart.
-
Reconfigure each consumer in the group by removing the earlier
partition.assignment.strategyfrom the consumer configuration, leaving only thecooperative-stickystrategy. - Restart each consumer in the group in turn, waiting for the consumer to rejoin the group after each restart.
To upgrade a Kafka Streams application to use the incremental cooperative rebalance protocol:
-
Replace the Kafka Streams
.jarfile with the new version. -
In the Kafka Streams configuration, set the
upgrade.fromconfiguration parameter to the Kafka version you are upgrading from (for example, 2.3). - Restart each of the stream processors (nodes) in turn.
-
Remove the
upgrade.fromconfiguration parameter from the Kafka Streams configuration. - Restart each consumer in the group in turn.
Chapter 18. Monitoring your cluster using JMX
ZooKeeper, the Kafka broker, Kafka Connect, and the Kafka clients all expose management information using Java Management Extensions (JMX). Most management information is in the form of metrics that are useful for monitoring the condition and performance of your Kafka cluster. Like other Java applications, Kafka provides this management information through managed beans or MBeans.
JMX works at the level of the JVM (Java Virtual Machine). To obtain management information, external tools can connect to the JVM that is running ZooKeeper, the Kafka broker, and so on. By default, only tools on the same machine and running as the same user as the JVM are able to connect.
Management information for ZooKeeper is not documented here. You can view ZooKeeper metrics in JConsole. For more information, see Monitoring using JConsole.
18.1. JMX configuration options
You configure JMX using JVM system properties. The scripts provided with AMQ Streams (bin/kafka-server-start.sh and bin/connect-distributed.sh, and so on) use the KAFKA_JMX_OPTS environment variable to set these system properties. The system properties for configuring JMX are the same, even though Kafka producer, consumer, and streams applications typically start the JVM in different ways.
18.2. Disabling the JMX agent
You can prevent local JMX tools from connecting to the JVM (for example, for compliance reasons) by disabling the JMX agent for an AMQ Streams component. The following procedure explains how to disable the JMX agent for a Kafka broker.
Procedure
Use the
KAFKA_JMX_OPTSenvironment variable to setcom.sun.management.jmxremotetofalse.export KAFKA_JMX_OPTS=-Dcom.sun.management.jmxremote=false bin/kafka-server-start.sh
- Start the JVM.
18.3. Connecting to the JVM from a different machine
You can connect to the JVM from a different machine by configuring the port that the JMX agent listens on. This is insecure because it allows JMX tools to connect from anywhere, with no authentication.
Procedure
Use the
KAFKA_JMX_OPTSenvironment variable to set-Dcom.sun.management.jmxremote.port=<port>. For<port>, enter the name of the port on which you want the Kafka broker to listen for JMX connections.export KAFKA_JMX_OPTS="-Dcom.sun.management.jmxremote=true -Dcom.sun.management.jmxremote.port=<port> -Dcom.sun.management.jmxremote.authenticate=false -Dcom.sun.management.jmxremote.ssl=false" bin/kafka-server-start.sh- Start the JVM.
It is recommended that you configure authentication and SSL to ensure that the remote JMX connection is secure. For more information about the system properties needed to do this, see the JMX documentation.
18.4. Monitoring using JConsole
The JConsole tool is distributed with the Java Development Kit (JDK). You can use JConsole to connect to a local or remote JVM and discover and display management information from Java applications. If using JConsole to connect to a local JVM, the names of the JVM processes correspond to the AMQ Streams components.
Table 18.1. JVM processes for AMQ Streams components
| AMQ Streams component | JVM process |
|---|---|
| ZooKeeper |
|
| Kafka broker |
|
| Kafka Connect standalone |
|
| Kafka Connect distributed |
|
| A Kafka producer, consumer, or Streams application |
The name of the class containing the |
When using JConsole to connect to a remote JVM, use the appropriate hostname and JMX port.
Many other tools and monitoring products can be used to fetch the metrics using JMX and provide monitoring and alerting based on those metrics. Refer to the product documentation for those tools.
18.5. Important Kafka broker metrics
Kafka provides many MBeans for monitoring the performance of the brokers in your Kafka cluster. These apply to an individual broker rather than the entire cluster.
The following tables present a selection of these broker-level MBeans organized into server, network, logging, and controller metrics.
18.5.1. Kafka server metrics
The following table shows a selection of metrics that report information about the Kafka server.
Table 18.2. Metrics for the Kafka server
| Metric | MBean | Description | Expected value |
|---|---|---|---|
| Messages in per second |
| The rate at which individual messages are consumed by the broker. | Approximately the same as the other brokers in the cluster. |
| Bytes in per second |
| The rate at which data sent from producers is consumed by the broker. | Approximately the same as the other brokers in the cluster. |
| Replication bytes in per second |
| The rate at which data sent from other brokers is consumed by the follower broker. | N/A |
| Bytes out per second |
| The rate at which data is fetched and read from the broker by consumers. | N/A |
| Replication bytes out per second |
| The rate at which data is sent from the broker to other brokers. This metric is useful to monitor if the broker is a leader for a group of partitions. | N/A |
| Under-replicated partitions |
| The number of partitions that have not been fully replicated in the follower replicas. | Zero |
| Under minimum ISR partition count |
| The number of partitions under the minimum In-Sync Replica (ISR) count. The ISR count indicates the set of replicas that are up-to-date with the leader. | Zero |
| Partition count |
| The number of partitions in the broker. | Approximately even when compared with the other brokers. |
| Leader count |
| The number of replicas for which this broker is the leader. | Approximately the same as the other brokers in the cluster. |
| ISR shrinks per second |
| The rate at which the number of ISRs in the broker decreases | Zero |
| ISR expands per second |
| The rate at which the number of ISRs in the broker increases. | Zero |
| Maximum lag |
| The maximum lag between the time that messages are received by the leader replica and by the follower replicas. | Proportional to the maximum batch size of a produce request. |
| Requests in producer purgatory |
| The number of send requests in the producer purgatory. | N/A |
| Requests in fetch purgatory |
| The number of fetch requests in the fetch purgatory. | N/A |
| Request handler average idle percent |
| Indicates the percentage of time that the request handler (IO) threads are not in use. | A lower value indicates that the workload of the broker is high. |
| Request (Requests exempt from throttling) |
| The number of requests that are exempt from throttling. | N/A |
| ZooKeeper request latency in milliseconds |
| The latency for ZooKeeper requests from the broker, in milliseconds. | N/A |
| ZooKeeper session state |
| The status of the broker’s connection to ZooKeeper. | CONNECTED |
18.5.2. Kafka network metrics
The following table shows a selection of metrics that report information about requests.
| Metric | MBean | Description | Expected value |
|---|---|---|---|
| Requests per second |
|
The total number of requests made for the request type per second. The | N/A |
| Request bytes (request size in bytes) |
|
The size of requests, in bytes, made for the request type identified by the | N/A |
| Temporary memory size in bytes |
| The amount of temporary memory used for converting message formats and decompressing messages. | N/A |
| Message conversions time |
| Time, in milliseconds, spent on converting message formats. | N/A |
| Total request time in milliseconds |
| Total time, in milliseconds, spent processing requests. | N/A |
| Request queue time in milliseconds |
|
The time, in milliseconds, that a request currently spends in the queue for the request type given in the | N/A |
| Local time (leader local processing time) in milliseconds |
| The time taken, in milliseconds, for the leader to process the request. | N/A |
| Remote time (leader remote processing time) in milliseconds |
|
The length of time, in milliseconds, that the request waits for the follower. Separate MBeans for all available request types are listed under the | N/A |
| Response queue time in milliseconds |
| The length of time, in milliseconds, that the request waits in the response queue. | N/A |
| Response send time in milliseconds |
| The time taken, in milliseconds, to send the response. | N/A |
| Network processor average idle percent |
| The average percentage of time that the network processors are idle. | Between zero and one. |
18.5.3. Kafka log metrics
The following table shows a selection of metrics that report information about logging.
| Metric | MBean | Description | Expected Value |
|---|---|---|---|
| Log flush rate and time in milliseconds |
| The rate at which log data is written to disk, in milliseconds. | N/A |
| Offline log directory count |
| The number of offline log directories (for example, after a hardware failure). | Zero |
18.5.4. Kafka controller metrics
The following table shows a selection of metrics that report information about the controller of the cluster.
| Metric | MBean | Description | Expected Value |
|---|---|---|---|
| Active controller count |
| The number of brokers designated as controllers. | One indicates that the broker is the controller for the cluster. |
| Leader election rate and time in milliseconds |
| The rate at which new leader replicas are elected. | Zero |
18.5.5. Yammer metrics
Metrics that express a rate or unit of time are provided as Yammer metrics. The class name of an MBean that uses Yammer metrics is prefixed with com.yammer.metrics.
Yammer rate metrics have the following attributes for monitoring requests:
- Count
- EventType (Bytes)
- FifteenMinuteRate
- RateUnit (Seconds)
- MeanRate
- OneMinuteRate
- FiveMinuteRate
Yammer time metrics have the following attributes for monitoring requests:
- Max
- Min
- Mean
- StdDev
- 75/95/98/99/99.9th Percentile
18.6. Producer MBeans
MBeans are present in Kafka producer applications, including Kafka Streams applications and Kafka Connect with source connectors.
Producer metrics
Table 18.3. Mbeans matching kafka.producer:type=producer-metrics,client-id=*
| Attribute | Description |
|---|---|
| batch-size-avg | The average number of bytes sent per partition per-request. |
| batch-size-max | The max number of bytes sent per partition per-request. |
| batch-split-rate | The average number of batch splits per second. |
| batch-split-total | The total number of batch splits. |
| buffer-available-bytes | The total amount of buffer memory that is not being used (either unallocated or in the free list). |
| buffer-total-bytes | The maximum amount of buffer memory the client can use (whether or not it is currently used). |
| bufferpool-wait-time | The fraction of time an appender waits for space allocation. |
| bufferpool-wait-time-ns-total | The total time an appender waits for space allocation in nanoseconds. |
| bufferpool-wait-time-total | Deprecated The total time an appender waits for space allocation in nanoseconds. Replacement is bufferpool-wait-time-ns-total. |
| compression-rate-avg | The average compression rate of record batches, defined as the average ratio of the compressed batch size over the uncompressed size. |
| connection-close-rate | Connections closed per second in the window. |
| connection-close-total | Total connections closed in the window. |
| connection-count | The current number of active connections. |
| connection-creation-rate | New connections established per second in the window. |
| connection-creation-total | Total new connections established in the window. |
| failed-authentication-rate | Connections per second that failed authentication. |
| failed-authentication-total | Total connections that failed authentication. |
| failed-reauthentication-rate | Connections per second that failed re-authentication. |
| failed-reauthentication-total | Total connections that failed re-authentication. |
| incoming-byte-rate | Bytes/second read off all sockets. |
| incoming-byte-total | Total bytes read off all sockets. |
| io-ratio | The fraction of time the I/O thread spent doing I/O. |
| io-time-ns-avg | The average length of time for I/O per select call in nanoseconds. |
| io-time-ns-total | The total time the I/O thread spent doing I/O in nanoseconds. |
| io-wait-ratio | The fraction of time the I/O thread spent waiting. |
| io-wait-time-ns-avg | The average length of time the I/O thread spent waiting for a socket ready for reads or writes in nanoseconds. |
| io-wait-time-ns-total | The total time the I/O thread spent waiting in nanoseconds. |
| io-waittime-total | Deprecated The total time the I/O thread spent waiting in nanoseconds. Replacement is io-wait-time-ns-total. |
| iotime-total | Deprecated The total time the I/O thread spent doing I/O in nanoseconds. Replacement is io-time-ns-total. |
| metadata-age | The age in seconds of the current producer metadata being used. |
| network-io-rate | The average number of network operations (reads or writes) on all connections per second. |
| network-io-total | The total number of network operations (reads or writes) on all connections. |
| outgoing-byte-rate | The average number of outgoing bytes sent per second to all servers. |
| outgoing-byte-total | The total number of outgoing bytes sent to all servers. |
| produce-throttle-time-avg | The average time in ms a request was throttled by a broker. |
| produce-throttle-time-max | The maximum time in ms a request was throttled by a broker. |
| reauthentication-latency-avg | The average latency in ms observed due to re-authentication. |
| reauthentication-latency-max | The maximum latency in ms observed due to re-authentication. |
| record-error-rate | The average per-second number of record sends that resulted in errors. |
| record-error-total | The total number of record sends that resulted in errors. |
| record-queue-time-avg | The average time in ms record batches spent in the send buffer. |
| record-queue-time-max | The maximum time in ms record batches spent in the send buffer. |
| record-retry-rate | The average per-second number of retried record sends. |
| record-retry-total | The total number of retried record sends. |
| record-send-rate | The average number of records sent per second. |
| record-send-total | The total number of records sent. |
| record-size-avg | The average record size. |
| record-size-max | The maximum record size. |
| records-per-request-avg | The average number of records per request. |
| request-latency-avg | The average request latency in ms. |
| request-latency-max | The maximum request latency in ms. |
| request-rate | The average number of requests sent per second. |
| request-size-avg | The average size of all requests in the window. |
| request-size-max | The maximum size of any request sent in the window. |
| request-total | The total number of requests sent. |
| requests-in-flight | The current number of in-flight requests awaiting a response. |
| response-rate | Responses received per second. |
| response-total | Total responses received. |
| select-rate | Number of times the I/O layer checked for new I/O to perform per second. |
| select-total | Total number of times the I/O layer checked for new I/O to perform. |
| successful-authentication-no-reauth-total | Total connections that were successfully authenticated by older, pre-2.2.0 SASL clients that do not support re-authentication. May only be non-zero. |
| successful-authentication-rate | Connections per second that were successfully authenticated using SASL or SSL. |
| successful-authentication-total | Total connections that were successfully authenticated using SASL or SSL. |
| successful-reauthentication-rate | Connections per second that were successfully re-authenticated using SASL. |
| successful-reauthentication-total | Total connections that were successfully re-authenticated using SASL. |
| waiting-threads | The number of user threads blocked waiting for buffer memory to enqueue their records. |
Producer metrics about broker connections
Table 18.4. Mbeans matching kafka.producer:type=producer-metrics,client-id=*,node-id=*
| Attribute | Description |
|---|---|
| incoming-byte-rate | The average number of bytes received per second for a node. |
| incoming-byte-total | The total number of bytes received for a node. |
| outgoing-byte-rate | The average number of outgoing bytes sent per second for a node. |
| outgoing-byte-total | The total number of outgoing bytes sent for a node. |
| request-latency-avg | The average request latency in ms for a node. |
| request-latency-max | The maximum request latency in ms for a node. |
| request-rate | The average number of requests sent per second for a node. |
| request-size-avg | The average size of all requests in the window for a node. |
| request-size-max | The maximum size of any request sent in the window for a node. |
| request-total | The total number of requests sent for a node. |
| response-rate | Responses received per second for a node. |
| response-total | Total responses received for a node. |
Producer metrics about messages sent to topics
Table 18.5. Mbeans matching kafka.producer:type=producer-topic-metrics,client-id=*,topic=*
| Attribute | Description |
|---|---|
| byte-rate | The average number of bytes sent per second for a topic. |
| byte-total | The total number of bytes sent for a topic. |
| compression-rate | The average compression rate of record batches for a topic, defined as the average ratio of the compressed batch size over the uncompressed size. |
| record-error-rate | The average per-second number of record sends that resulted in errors for a topic. |
| record-error-total | The total number of record sends that resulted in errors for a topic. |
| record-retry-rate | The average per-second number of retried record sends for a topic. |
| record-retry-total | The total number of retried record sends for a topic. |
| record-send-rate | The average number of records sent per second for a topic. |
| record-send-total | The total number of records sent for a topic. |
18.7. Consumer MBeans
MBeans are present in Kafka consumer applications, including Kafka Streams applications and Kafka Connect with sink connectors.
Consumer metrics
Table 18.6. Mbeans matching kafka.consumer:type=consumer-metrics,client-id=*
| Attribute | Description |
|---|---|
| connection-close-rate | Connections closed per second in the window. |
| connection-close-total | Total connections closed in the window. |
| connection-count | The current number of active connections. |
| connection-creation-rate | New connections established per second in the window. |
| connection-creation-total | Total new connections established in the window. |
| failed-authentication-rate | Connections per second that failed authentication. |
| failed-authentication-total | Total connections that failed authentication. |
| failed-reauthentication-rate | Connections per second that failed re-authentication. |
| failed-reauthentication-total | Total connections that failed re-authentication. |
| incoming-byte-rate | Bytes/second read off all sockets. |
| incoming-byte-total | Total bytes read off all sockets. |
| io-ratio | The fraction of time the I/O thread spent doing I/O. |
| io-time-ns-avg | The average length of time for I/O per select call in nanoseconds. |
| io-time-ns-total | The total time the I/O thread spent doing I/O in nanoseconds. |
| io-wait-ratio | The fraction of time the I/O thread spent waiting. |
| io-wait-time-ns-avg | The average length of time the I/O thread spent waiting for a socket ready for reads or writes in nanoseconds. |
| io-wait-time-ns-total | The total time the I/O thread spent waiting in nanoseconds. |
| io-waittime-total | Deprecated The total time the I/O thread spent waiting in nanoseconds. Replacement is io-wait-time-ns-total. |
| iotime-total | Deprecated The total time the I/O thread spent doing I/O in nanoseconds. Replacement is io-time-ns-total. |
| network-io-rate | The average number of network operations (reads or writes) on all connections per second. |
| network-io-total | The total number of network operations (reads or writes) on all connections. |
| outgoing-byte-rate | The average number of outgoing bytes sent per second to all servers. |
| outgoing-byte-total | The total number of outgoing bytes sent to all servers. |
| reauthentication-latency-avg | The average latency in ms observed due to re-authentication. |
| reauthentication-latency-max | The maximum latency in ms observed due to re-authentication. |
| request-rate | The average number of requests sent per second. |
| request-size-avg | The average size of all requests in the window. |
| request-size-max | The maximum size of any request sent in the window. |
| request-total | The total number of requests sent. |
| response-rate | Responses received per second. |
| response-total | Total responses received. |
| select-rate | Number of times the I/O layer checked for new I/O to perform per second. |
| select-total | Total number of times the I/O layer checked for new I/O to perform. |
| successful-authentication-no-reauth-total | Total connections that were successfully authenticated by older, pre-2.2.0 SASL clients that do not support re-authentication. May only be non-zero. |
| successful-authentication-rate | Connections per second that were successfully authenticated using SASL or SSL. |
| successful-authentication-total | Total connections that were successfully authenticated using SASL or SSL. |
| successful-reauthentication-rate | Connections per second that were successfully re-authenticated using SASL. |
| successful-reauthentication-total | Total connections that were successfully re-authenticated using SASL. |
Consumer metrics about broker connections
Table 18.7. Mbeans matching kafka.consumer:type=consumer-metrics,client-id=*,node-id=*
| Attribute | Description |
|---|---|
| incoming-byte-rate | The average number of bytes received per second for a node. |
| incoming-byte-total | The total number of bytes received for a node. |
| outgoing-byte-rate | The average number of outgoing bytes sent per second for a node. |
| outgoing-byte-total | The total number of outgoing bytes sent for a node. |
| request-latency-avg | The average request latency in ms for a node. |
| request-latency-max | The maximum request latency in ms for a node. |
| request-rate | The average number of requests sent per second for a node. |
| request-size-avg | The average size of all requests in the window for a node. |
| request-size-max | The maximum size of any request sent in the window for a node. |
| request-total | The total number of requests sent for a node. |
| response-rate | Responses received per second for a node. |
| response-total | Total responses received for a node. |
Consumer group metrics
Table 18.8. Mbeans matching kafka.consumer:type=consumer-coordinator-metrics,client-id=*
| Attribute | Description |
|---|---|
| assigned-partitions | The number of partitions currently assigned to this consumer. |
| commit-latency-avg | The average time taken for a commit request. |
| commit-latency-max | The max time taken for a commit request. |
| commit-rate | The number of commit calls per second. |
| commit-total | The total number of commit calls. |
| failed-rebalance-rate-per-hour | The number of failed group rebalance event per hour. |
| failed-rebalance-total | The total number of failed group rebalances. |
| heartbeat-rate | The average number of heartbeats per second. |
| heartbeat-response-time-max | The max time taken to receive a response to a heartbeat request. |
| heartbeat-total | The total number of heartbeats. |
| join-rate | The number of group joins per second. |
| join-time-avg | The average time taken for a group rejoin. |
| join-time-max | The max time taken for a group rejoin. |
| join-total | The total number of group joins. |
| last-heartbeat-seconds-ago | The number of seconds since the last controller heartbeat. |
| last-rebalance-seconds-ago | The number of seconds since the last rebalance event. |
| partitions-assigned-latency-avg | The average time taken by the on-partitions-assigned rebalance listener callback. |
| partitions-assigned-latency-max | The max time taken by the on-partitions-assigned rebalance listener callback. |
| partitions-lost-latency-avg | The average time taken by the on-partitions-lost rebalance listener callback. |
| partitions-lost-latency-max | The max time taken by the on-partitions-lost rebalance listener callback. |
| partitions-revoked-latency-avg | The average time taken by the on-partitions-revoked rebalance listener callback. |
| partitions-revoked-latency-max | The max time taken by the on-partitions-revoked rebalance listener callback. |
| rebalance-latency-avg | The average time taken for a group rebalance. |
| rebalance-latency-max | The max time taken for a group rebalance. |
| rebalance-latency-total | The total time taken for group rebalances so far. |
| rebalance-rate-per-hour | The number of group rebalance participated per hour. |
| rebalance-total | The total number of group rebalances participated. |
| sync-rate | The number of group syncs per second. |
| sync-time-avg | The average time taken for a group sync. |
| sync-time-max | The max time taken for a group sync. |
| sync-total | The total number of group syncs. |
Consumer fetcher metrics
Table 18.9. Mbeans matching kafka.consumer:type=consumer-fetch-manager-metrics,client-id=*
| Attribute | Description |
|---|---|
| bytes-consumed-rate | The average number of bytes consumed per second. |
| bytes-consumed-total | The total number of bytes consumed. |
| fetch-latency-avg | The average time taken for a fetch request. |
| fetch-latency-max | The max time taken for any fetch request. |
| fetch-rate | The number of fetch requests per second. |
| fetch-size-avg | The average number of bytes fetched per request. |
| fetch-size-max | The maximum number of bytes fetched per request. |
| fetch-throttle-time-avg | The average throttle time in ms. |
| fetch-throttle-time-max | The maximum throttle time in ms. |
| fetch-total | The total number of fetch requests. |
| records-consumed-rate | The average number of records consumed per second. |
| records-consumed-total | The total number of records consumed. |
| records-lag-max | The maximum lag in terms of number of records for any partition in this window. |
| records-lead-min | The minimum lead in terms of number of records for any partition in this window. |
| records-per-request-avg | The average number of records in each request. |
Consumer fetcher metrics at the topic level
Table 18.10. Mbeans matching kafka.consumer:type=consumer-fetch-manager-metrics,client-id=*,topic=*
| Attribute | Description |
|---|---|
| bytes-consumed-rate | The average number of bytes consumed per second for a topic. |
| bytes-consumed-total | The total number of bytes consumed for a topic. |
| fetch-size-avg | The average number of bytes fetched per request for a topic. |
| fetch-size-max | The maximum number of bytes fetched per request for a topic. |
| records-consumed-rate | The average number of records consumed per second for a topic. |
| records-consumed-total | The total number of records consumed for a topic. |
| records-per-request-avg | The average number of records in each request for a topic. |
Consumer fetcher metrics at the partition level
Table 18.11. Mbeans matching kafka.consumer:type=consumer-fetch-manager-metrics,client-id=*,topic=*,partition=*
| Attribute | Description |
|---|---|
| preferred-read-replica | The current read replica for the partition, or -1 if reading from leader. |
| records-lag | The latest lag of the partition. |
| records-lag-avg | The average lag of the partition. |
| records-lag-max | The max lag of the partition. |
| records-lead | The latest lead of the partition. |
| records-lead-avg | The average lead of the partition. |
| records-lead-min | The min lead of the partition. |
18.8. Kafka Connect MBeans
Kafka Connect metrics
Table 18.12. Mbeans matching kafka.connect:type=connect-metrics,client-id=*
| Attribute | Description |
|---|---|
| connection-close-rate | Connections closed per second in the window. |
| connection-close-total | Total connections closed in the window. |
| connection-count | The current number of active connections. |
| connection-creation-rate | New connections established per second in the window. |
| connection-creation-total | Total new connections established in the window. |
| failed-authentication-rate | Connections per second that failed authentication. |
| failed-authentication-total | Total connections that failed authentication. |
| failed-reauthentication-rate | Connections per second that failed re-authentication. |
| failed-reauthentication-total | Total connections that failed re-authentication. |
| incoming-byte-rate | Bytes/second read off all sockets. |
| incoming-byte-total | Total bytes read off all sockets. |
| io-ratio | The fraction of time the I/O thread spent doing I/O. |
| io-time-ns-avg | The average length of time for I/O per select call in nanoseconds. |
| io-time-ns-total | The total time the I/O thread spent doing I/O in nanoseconds. |
| io-wait-ratio | The fraction of time the I/O thread spent waiting. |
| io-wait-time-ns-avg | The average length of time the I/O thread spent waiting for a socket ready for reads or writes in nanoseconds. |
| io-wait-time-ns-total | The total time the I/O thread spent waiting in nanoseconds. |
| io-waittime-total | Deprecated The total time the I/O thread spent waiting in nanoseconds. Replacement is io-wait-time-ns-total. |
| iotime-total | Deprecated The total time the I/O thread spent doing I/O in nanoseconds. Replacement is io-time-ns-total. |
| network-io-rate | The average number of network operations (reads or writes) on all connections per second. |
| network-io-total | The total number of network operations (reads or writes) on all connections. |
| outgoing-byte-rate | The average number of outgoing bytes sent per second to all servers. |
| outgoing-byte-total | The total number of outgoing bytes sent to all servers. |
| reauthentication-latency-avg | The average latency in ms observed due to re-authentication. |
| reauthentication-latency-max | The maximum latency in ms observed due to re-authentication. |
| request-rate | The average number of requests sent per second. |
| request-size-avg | The average size of all requests in the window. |
| request-size-max | The maximum size of any request sent in the window. |
| request-total | The total number of requests sent. |
| response-rate | Responses received per second. |
| response-total | Total responses received. |
| select-rate | Number of times the I/O layer checked for new I/O to perform per second. |
| select-total | Total number of times the I/O layer checked for new I/O to perform. |
| successful-authentication-no-reauth-total | Total connections that were successfully authenticated by older, pre-2.2.0 SASL clients that do not support re-authentication. May only be non-zero. |
| successful-authentication-rate | Connections per second that were successfully authenticated using SASL or SSL. |
| successful-authentication-total | Total connections that were successfully authenticated using SASL or SSL. |
| successful-reauthentication-rate | Connections per second that were successfully re-authenticated using SASL. |
| successful-reauthentication-total | Total connections that were successfully re-authenticated using SASL. |
Kafka Connect metrics about broker connections
Table 18.13. Mbeans matching kafka.connect:type=connect-metrics,client-id=*,node-id=*
| Attribute | Description |
|---|---|
| incoming-byte-rate | The average number of bytes received per second for a node. |
| incoming-byte-total | The total number of bytes received for a node. |
| outgoing-byte-rate | The average number of outgoing bytes sent per second for a node. |
| outgoing-byte-total | The total number of outgoing bytes sent for a node. |
| request-latency-avg | The average request latency in ms for a node. |
| request-latency-max | The maximum request latency in ms for a node. |
| request-rate | The average number of requests sent per second for a node. |
| request-size-avg | The average size of all requests in the window for a node. |
| request-size-max | The maximum size of any request sent in the window for a node. |
| request-total | The total number of requests sent for a node. |
| response-rate | Responses received per second for a node. |
| response-total | Total responses received for a node. |
Kafka Connect metrics about workers
Table 18.14. Mbeans matching kafka.connect:type=connect-worker-metrics
| Attribute | Description |
|---|---|
| connector-count | The number of connectors run in this worker. |
| connector-startup-attempts-total | The total number of connector startups that this worker has attempted. |
| connector-startup-failure-percentage | The average percentage of this worker’s connectors starts that failed. |
| connector-startup-failure-total | The total number of connector starts that failed. |
| connector-startup-success-percentage | The average percentage of this worker’s connectors starts that succeeded. |
| connector-startup-success-total | The total number of connector starts that succeeded. |
| task-count | The number of tasks run in this worker. |
| task-startup-attempts-total | The total number of task startups that this worker has attempted. |
| task-startup-failure-percentage | The average percentage of this worker’s tasks starts that failed. |
| task-startup-failure-total | The total number of task starts that failed. |
| task-startup-success-percentage | The average percentage of this worker’s tasks starts that succeeded. |
| task-startup-success-total | The total number of task starts that succeeded. |
Kafka Connect metrics about rebalances
Table 18.15. Mbeans matching kafka.connect:type=connect-worker-rebalance-metrics
| Attribute | Description |
|---|---|
| completed-rebalances-total | The total number of rebalances completed by this worker. |
| connect-protocol | The Connect protocol used by this cluster. |
| epoch | The epoch or generation number of this worker. |
| leader-name | The name of the group leader. |
| rebalance-avg-time-ms | The average time in milliseconds spent by this worker to rebalance. |
| rebalance-max-time-ms | The maximum time in milliseconds spent by this worker to rebalance. |
| rebalancing | Whether this worker is currently rebalancing. |
| time-since-last-rebalance-ms | The time in milliseconds since this worker completed the most recent rebalance. |
Kafka Connect metrics about connectors
Table 18.16. Mbeans matching kafka.connect:type=connector-metrics,connector=*
| Attribute | Description |
|---|---|
| connector-class | The name of the connector class. |
| connector-type | The type of the connector. One of 'source' or 'sink'. |
| connector-version | The version of the connector class, as reported by the connector. |
| status | The status of the connector. One of 'unassigned', 'running', 'paused', 'failed', or 'destroyed'. |
Kafka Connect metrics about connector tasks
Table 18.17. Mbeans matching kafka.connect:type=connector-task-metrics,connector=*,task=*
| Attribute | Description |
|---|---|
| batch-size-avg | The average size of the batches processed by the connector. |
| batch-size-max | The maximum size of the batches processed by the connector. |
| offset-commit-avg-time-ms | The average time in milliseconds taken by this task to commit offsets. |
| offset-commit-failure-percentage | The average percentage of this task’s offset commit attempts that failed. |
| offset-commit-max-time-ms | The maximum time in milliseconds taken by this task to commit offsets. |
| offset-commit-success-percentage | The average percentage of this task’s offset commit attempts that succeeded. |
| pause-ratio | The fraction of time this task has spent in the pause state. |
| running-ratio | The fraction of time this task has spent in the running state. |
| status | The status of the connector task. One of 'unassigned', 'running', 'paused', 'failed', or 'destroyed'. |
Kafka Connect metrics about sink connectors
Table 18.18. Mbeans matching kafka.connect:type=sink-task-metrics,connector=*,task=*
| Attribute | Description |
|---|---|
| offset-commit-completion-rate | The average per-second number of offset commit completions that were completed successfully. |
| offset-commit-completion-total | The total number of offset commit completions that were completed successfully. |
| offset-commit-seq-no | The current sequence number for offset commits. |
| offset-commit-skip-rate | The average per-second number of offset commit completions that were received too late and skipped/ignored. |
| offset-commit-skip-total | The total number of offset commit completions that were received too late and skipped/ignored. |
| partition-count | The number of topic partitions assigned to this task belonging to the named sink connector in this worker. |
| put-batch-avg-time-ms | The average time taken by this task to put a batch of sinks records. |
| put-batch-max-time-ms | The maximum time taken by this task to put a batch of sinks records. |
| sink-record-active-count | The number of records that have been read from Kafka but not yet completely committed/flushed/acknowledged by the sink task. |
| sink-record-active-count-avg | The average number of records that have been read from Kafka but not yet completely committed/flushed/acknowledged by the sink task. |
| sink-record-active-count-max | The maximum number of records that have been read from Kafka but not yet completely committed/flushed/acknowledged by the sink task. |
| sink-record-lag-max | The maximum lag in terms of number of records that the sink task is behind the consumer’s position for any topic partitions. |
| sink-record-read-rate | The average per-second number of records read from Kafka for this task belonging to the named sink connector in this worker. This is before transformations are applied. |
| sink-record-read-total | The total number of records read from Kafka by this task belonging to the named sink connector in this worker, since the task was last restarted. |
| sink-record-send-rate | The average per-second number of records output from the transformations and sent/put to this task belonging to the named sink connector in this worker. This is after transformations are applied and excludes any records filtered out by the transformations. |
| sink-record-send-total | The total number of records output from the transformations and sent/put to this task belonging to the named sink connector in this worker, since the task was last restarted. |
Kafka Connect metrics about source connectors
Table 18.19. Mbeans matching kafka.connect:type=source-task-metrics,connector=*,task=*
| Attribute | Description |
|---|---|
| poll-batch-avg-time-ms | The average time in milliseconds taken by this task to poll for a batch of source records. |
| poll-batch-max-time-ms | The maximum time in milliseconds taken by this task to poll for a batch of source records. |
| source-record-active-count | The number of records that have been produced by this task but not yet completely written to Kafka. |
| source-record-active-count-avg | The average number of records that have been produced by this task but not yet completely written to Kafka. |
| source-record-active-count-max | The maximum number of records that have been produced by this task but not yet completely written to Kafka. |
| source-record-poll-rate | The average per-second number of records produced/polled (before transformation) by this task belonging to the named source connector in this worker. |
| source-record-poll-total | The total number of records produced/polled (before transformation) by this task belonging to the named source connector in this worker. |
| source-record-write-rate | The average per-second number of records output from the transformations and written to Kafka for this task belonging to the named source connector in this worker. This is after transformations are applied and excludes any records filtered out by the transformations. |
| source-record-write-total | The number of records output from the transformations and written to Kafka for this task belonging to the named source connector in this worker, since the task was last restarted. |
| transaction-size-avg | The average number of records in the transactions the task has committed so far. |
| transaction-size-max | The number of records in the largest transaction the task has committed so far. |
| transaction-size-min | The number of records in the smallest transaction the task has committed so far. |
Kafka Connect metrics about connector errors
Table 18.20. Mbeans matching kafka.connect:type=task-error-metrics,connector=*,task=*
| Attribute | Description |
|---|---|
| deadletterqueue-produce-failures | The number of failed writes to the dead letter queue. |
| deadletterqueue-produce-requests | The number of attempted writes to the dead letter queue. |
| last-error-timestamp | The epoch timestamp when this task last encountered an error. |
| total-errors-logged | The number of errors that were logged. |
| total-record-errors | The number of record processing errors in this task. |
| total-record-failures | The number of record processing failures in this task. |
| total-records-skipped | The number of records skipped due to errors. |
| total-retries | The number of operations retried. |
18.9. Kafka Streams MBeans
Kafka Streams metrics for clients
These metrics are collected when the metrics.recording.level configuration parameter is info or debug.
Table 18.21. Mbeans matching kafka.streams:type=stream-metrics,client-id=*
| Attribute | Description |
|---|---|
| commit-latency-avg | The average execution time in ms, for committing, across all running tasks of this thread. |
| commit-latency-max | The maximum execution time in ms, for committing, across all running tasks of this thread. |
| commit-rate | The average number of commits per second. |
| commit-total | The total number of commit calls. |
| poll-latency-avg | The average execution time in ms, for consumer polling. |
| poll-latency-max | The maximum execution time in ms, for consumer polling. |
| poll-rate | The average number of consumer poll calls per second. |
| poll-total | The total number of consumer poll calls. |
| process-latency-avg | The average execution time in ms, for processing. |
| process-latency-max | The maximum execution time in ms, for processing. |
| process-rate | The average number of processed records per second. |
| process-total | The total number of processed records. |
| punctuate-latency-avg | The average execution time in ms, for punctuating. |
| punctuate-latency-max | The maximum execution time in ms, for punctuating. |
| punctuate-rate | The average number of punctuate calls per second. |
| punctuate-total | The total number of punctuate calls. |
| task-closed-rate | The average number of tasks closed per second. |
| task-closed-total | The total number of tasks closed. |
| task-created-rate | The average number of tasks created per second. |
| task-created-total | The total number of tasks created. |
Kafka Streams metrics for tasks
These metrics are collected when the metrics.recording.level configuration parameter is debug.
Table 18.22. Mbeans matching kafka.streams:type=stream-task-metrics,client-id=*,task-id=*
| Attribute | Description |
|---|---|
| active-process-ratio | The fraction of time the stream thread spent on processing this task among all assigned active tasks. |
| commit-latency-avg | The average execution time in ns, for committing. |
| commit-latency-max | The maximum execution time in ns, for committing. |
| commit-rate | The average number of commit calls per second. |
| commit-total | The total number of commit calls. |
| dropped-records-rate | The average number of records dropped within this task. |
| dropped-records-total | The total number of records dropped within this task. |
| enforced-processing-rate | The average number of enforced processings per second. |
| enforced-processing-total | The total number enforced processings. |
| process-latency-avg | The average execution time in ns, for processing. |
| process-latency-max | The maximum execution time in ns, for processing. |
| process-rate | The average number of processed records per second across all source processor nodes of this task. |
| process-total | The total number of processed records across all source processor nodes of this task. |
| record-lateness-avg | The average observed lateness of records (stream time - record timestamp). |
| record-lateness-max | The max observed lateness of records (stream time - record timestamp). |
Kafka Streams metrics for processor nodes
These metrics are collected when the metrics.recording.level configuration parameter is debug.
Table 18.23. Mbeans matching kafka.streams:type=stream-processor-node-metrics,client-id=*,task-id=*,processor-node-id=*
| Attribute | Description |
|---|---|
| process-rate | The average number of records processed by a source processor node per second. |
| process-total | The total number of records processed by a source processor node per second. |
| record-e2e-latency-avg | The average end-to-end latency of a record, measured by comparing the record timestamp with the system time when it has been fully processed by the node. |
| record-e2e-latency-max | The maximum end-to-end latency of a record, measured by comparing the record timestamp with the system time when it has been fully processed by the node. |
| record-e2e-latency-min | The minimum end-to-end latency of a record, measured by comparing the record timestamp with the system time when it has been fully processed by the node. |
| suppression-emit-rate | The rate at which records that have been emitted downstream from suppression operation nodes. |
| suppression-emit-total | The total number of records that have been emitted downstream from suppression operation nodes. |
Kafka Streams metrics for state stores
These metrics are collected when the metrics.recording.level configuration parameter is debug.
Table 18.24. Mbeans matching kafka.streams:type=stream-[store-scope]-metrics,client-id=*,task-id=*,[store-scope]-id=*
| Attribute | Description |
|---|---|
| all-latency-avg | The average all operation execution time in ns. |
| all-latency-max | The maximum all operation execution time in ns. |
| all-rate | The average all operation rate for this store. |
| delete-latency-avg | The average delete execution time in ns. |
| delete-latency-max | The maximum delete execution time in ns. |
| delete-rate | The average delete rate for this store. |
| flush-latency-avg | The average flush execution time in ns. |
| flush-latency-max | The maximum flush execution time in ns. |
| flush-rate | The average flush rate for this store. |
| get-latency-avg | The average get execution time in ns. |
| get-latency-max | The maximum get execution time in ns. |
| get-rate | The average get rate for this store. |
| put-all-latency-avg | The average put-all execution time in ns. |
| put-all-latency-max | The maximum put-all execution time in ns. |
| put-all-rate | The average put-all rate for this store. |
| put-if-absent-latency-avg | The average put-if-absent execution time in ns. |
| put-if-absent-latency-max | The maximum put-if-absent execution time in ns. |
| put-if-absent-rate | The average put-if-absent rate for this store. |
| put-latency-avg | The average put execution time in ns. |
| put-latency-max | The maximum put execution time in ns. |
| put-rate | The average put rate for this store. |
| range-latency-avg | The average range execution time in ns. |
| range-latency-max | The maximum range execution time in ns. |
| range-rate | The average range rate for this store. |
| record-e2e-latency-avg | The average end-to-end latency of a record, measured by comparing the record timestamp with the system time when it has been fully processed by the node. |
| record-e2e-latency-max | The maximum end-to-end latency of a record, measured by comparing the record timestamp with the system time when it has been fully processed by the node. |
| record-e2e-latency-min | The minimum end-to-end latency of a record, measured by comparing the record timestamp with the system time when it has been fully processed by the node. |
| restore-latency-avg | The average restore execution time in ns. |
| restore-latency-max | The maximum restore execution time in ns. |
| restore-rate | The average restore rate for this store. |
| suppression-buffer-count-avg | The average number of records buffered over the sampling window. |
| suppression-buffer-count-max | The maximum number of records buffered over the sampling window. |
| suppression-buffer-size-avg | The average total size, in bytes, of the buffered data over the sampling window. |
| suppression-buffer-size-max | The maximum total size, in bytes, of the buffered data over the sampling window. |
Kafka Streams metrics for record caches
These metrics are collected when the metrics.recording.level configuration parameter is debug.
Table 18.25. Mbeans matching kafka.streams:type=stream-record-cache-metrics,client-id=*,task-id=*,record-cache-id=*
| Attribute | Description |
|---|---|
| hit-ratio-avg | The average cache hit ratio defined as the ratio of cache read hits over the total cache read requests. |
| hit-ratio-max | The maximum cache hit ratio. |
| hit-ratio-min | The mininum cache hit ratio. |
Appendix A. Using your subscription
AMQ Streams is provided through a software subscription. To manage your subscriptions, access your account at the Red Hat Customer Portal.
Accessing Your Account
- Go to access.redhat.com.
- If you do not already have an account, create one.
- Log in to your account.
Activating a Subscription
- Go to access.redhat.com.
- Navigate to My Subscriptions.
- Navigate to Activate a subscription and enter your 16-digit activation number.
Downloading Zip and Tar Files
To access zip or tar files, use the customer portal to find the relevant files for download. If you are using RPM packages, this step is not required.
- Open a browser and log in to the Red Hat Customer Portal Product Downloads page at access.redhat.com/downloads.
- Locate the AMQ Streams for Apache Kafka entries in the INTEGRATION AND AUTOMATION category.
- Select the desired AMQ Streams product. The Software Downloads page opens.
- Click the Download link for your component.
Installing packages with DNF
To install a package and all the package dependencies, use:
dnf install <package_name>To install a previously-downloaded package from a local directory, use:
dnf install <path_to_download_package>Revised on 2024-03-20 10:38:38 UTC