
Chapter 3. Deployment configuration
This chapter describes how to configure different aspects of the supported deployments:
- Kafka clusters
- Kafka Connect clusters
- Kafka Connect clusters with Source2Image support
- Kafka Mirror Maker
- Kafka Bridge
- OAuth 2.0 token-based authentication
- OAuth 2.0 token-based authorization
3.1. Kafka cluster configuration
The full schema of the Kafka resource is described in the Section B.1, “Kafka schema reference”. All labels that are applied to the desired Kafka resource will also be applied to the OpenShift resources making up the Kafka cluster. This provides a convenient mechanism for resources to be labeled as required.
3.1.1. Sample Kafka YAML configuration
For help in understanding the configuration options available for your Kafka deployment, refer to sample YAML file provided here.
The sample shows only some of the possible configuration options, but those that are particularly important include:
- Resource requests (CPU / Memory)
- JVM options for maximum and minimum memory allocation
- Listeners (and authentication)
- Authentication
- Storage
- Rack awareness
- Metrics
apiVersion: kafka.strimzi.io/v1beta1
kind: Kafka
metadata:
  name: my-cluster
spec:
  kafka:
    replicas: 3 1
    version: 1.5 2
    resources: 3
      requests:
        memory: 64Gi
        cpu: "8"
      limits: 4
        memory: 64Gi
        cpu: "12"
    jvmOptions: 5
      -Xms: 8192m
      -Xmx: 8192m
    listeners: 6
      tls:
        authentication:7
          type: tls
      external: 8
        type: route
        authentication:
          type: tls
        configuration:
          brokerCertChainAndKey: 9
            secretName: my-secret
            certificate: my-certificate.crt
            key: my-key.key
    authorization: 10
      type: simple
    config: 11
      auto.create.topics.enable: "false"
      offsets.topic.replication.factor: 3
      transaction.state.log.replication.factor: 3
      transaction.state.log.min.isr: 2
      ssl.cipher.suites: "TLS_ECDHE_RSA_WITH_AES_256_GCM_SHA384" 12
      ssl.enabled.protocols: "TLSv1.2"
      ssl.protocol: "TLSv1.2"
    storage: 13
      type: persistent-claim 14
      size: 10000Gi 15
    rack: 16
      topologyKey: failure-domain.beta.kubernetes.io/zone
    metrics: 17
      lowercaseOutputName: true
      rules: 18
      # Special cases and very specific rules
      - pattern : kafka.server<type=(.+), name=(.+), clientId=(.+), topic=(.+), partition=(.*)><>Value
        name: kafka_server_$1_$2
        type: GAUGE
        labels:
          clientId: "$3"
          topic: "$4"
          partition: "$5"
        # ...
  zookeeper: 19
    replicas: 3
    resources:
      requests:
        memory: 8Gi
        cpu: "2"
      limits:
        memory: 8Gi
        cpu: "2"
    jvmOptions:
      -Xms: 4096m
      -Xmx: 4096m
    storage:
      type: persistent-claim
      size: 1000Gi
    metrics:
      # ...
  entityOperator: 20
    topicOperator:
      resources:
        requests:
          memory: 512Mi
          cpu: "1"
        limits:
          memory: 512Mi
          cpu: "1"
    userOperator:
      resources:
        requests:
          memory: 512Mi
          cpu: "1"
        limits:
          memory: 512Mi
          cpu: "1"
  kafkaExporter: 21
    # ...
  cruiseControl: 22
# ...- 1
- Replicas specifies the number of broker nodes.
- 2
- Kafka version, which can be changed by following the upgrade procedure.
- 3
- Resource requests specify the resources to reserve for a given container.
- 4
- Resource limits specify the maximum resources that can be consumed by a container.
- 5
- 6
- Listeners configure how clients connect to the Kafka cluster via bootstrap addresses. Listeners are configured as
plain(without encryption),tlsorexternal. - 7
- Listener authentication mechanisms may be configured for each listener, and specified as mutual TLS or SCRAM-SHA.
- 8
- External listener configuration specifies how the Kafka cluster is exposed outside OpenShift, such as through a
route,loadbalancerornodeport. - 9
- Optional configuration for a Kafka listener certificate managed by an external Certificate Authority. The
brokerCertChainAndKeyproperty specifies aSecretthat holds a server certificate and a private key. Kafka listener certificates can also be configured for TLS listeners. - 10
- 11
- Config specifies the broker configuration. Standard Apache Kafka configuration may be provided, restricted to those properties not managed directly by AMQ Streams.
- 12
- 13
- 14
- Storage size for persistent volumes may be increased and additional volumes may be added to JBOD storage.
- 15
- Persistent storage has additional configuration options, such as a storage
idandclassfor dynamic volume provisioning. - 16
- Rack awareness is configured to spread replicas across different racks. A
topologykey must match the label of a cluster node. - 17
- 18
- Kafka rules for exporting metrics to a Grafana dashboard through the JMX Exporter. A set of rules provided with AMQ Streams may be copied to your Kafka resource configuration.
- 19
- ZooKeeper-specific configuration, which contains properties similar to the Kafka configuration.
- 20
- Entity Operator configuration, which specifies the configuration for the Topic Operator and User Operator.
- 21
- Kafka Exporter configuration, which is used to expose data as Prometheus metrics.
- 22
- Cruise Control configuration, which is used to rebalance the Kafka cluster.
3.1.2. Data storage considerations
An efficient data storage infrastructure is essential to the optimal performance of AMQ Streams.
Block storage is required. File storage, such as NFS, does not work with Kafka.
For your block storage, you can choose, for example:
- Cloud-based block storage solutions, such as Amazon Elastic Block Store (EBS)
- Local persistent volumes
- Storage Area Network (SAN) volumes accessed by a protocol such as Fibre Channel or iSCSI
AMQ Streams does not require OpenShift raw block volumes.
3.1.2.1. File systems
It is recommended that you configure your storage system to use the XFS file system. AMQ Streams is also compatible with the ext4 file system, but this might require additional configuration for best results.
3.1.2.2. Apache Kafka and ZooKeeper storage
Use separate disks for Apache Kafka and ZooKeeper.
Three types of data storage are supported:
- Ephemeral (Recommended for development only)
- Persistent
- JBOD (Just a Bunch of Disks, suitable for Kafka only)
For more information, see Kafka and ZooKeeper storage.
Solid-state drives (SSDs), though not essential, can improve the performance of Kafka in large clusters where data is sent to and received from multiple topics asynchronously. SSDs are particularly effective with ZooKeeper, which requires fast, low latency data access.
You do not need to provision replicated storage because Kafka and ZooKeeper both have built-in data replication.
3.1.3. Kafka and ZooKeeper storage types
As stateful applications, Kafka and ZooKeeper need to store data on disk. AMQ Streams supports three storage types for this data:
- Ephemeral
- Persistent
- JBOD storage
JBOD storage is supported only for Kafka, not for ZooKeeper.
When configuring a Kafka resource, you can specify the type of storage used by the Kafka broker and its corresponding ZooKeeper node. You configure the storage type using the storage property in the following resources:
-
Kafka.spec.kafka -
Kafka.spec.zookeeper
The storage type is configured in the type field.
The storage type cannot be changed after a Kafka cluster is deployed.
Additional resources
- For more information about ephemeral storage, see ephemeral storage schema reference.
- For more information about persistent storage, see persistent storage schema reference.
- For more information about JBOD storage, see JBOD schema reference.
-
For more information about the schema for
Kafka, seeKafkaschema reference.
3.1.3.1. Ephemeral storage
Ephemeral storage uses the `emptyDir` volumes volumes to store data. To use ephemeral storage, the type field should be set to ephemeral.
emptyDir volumes are not persistent and the data stored in them will be lost when the Pod is restarted. After the new pod is started, it has to recover all data from other nodes of the cluster. Ephemeral storage is not suitable for use with single node ZooKeeper clusters and for Kafka topics with replication factor 1, because it will lead to data loss.
An example of Ephemeral storage
apiVersion: kafka.strimzi.io/v1beta1
kind: Kafka
metadata:
  name: my-cluster
spec:
  kafka:
    # ...
    storage:
      type: ephemeral
    # ...
  zookeeper:
    # ...
    storage:
      type: ephemeral
    # ...
3.1.3.1.1. Log directories
The ephemeral volume will be used by the Kafka brokers as log directories mounted into the following path:
/var/lib/kafka/data/kafka-log_idx_-
Where
idxis the Kafka broker pod index. For example/var/lib/kafka/data/kafka-log0.
3.1.3.2. Persistent storage
Persistent storage uses Persistent Volume Claims to provision persistent volumes for storing data. Persistent Volume Claims can be used to provision volumes of many different types, depending on the Storage Class which will provision the volume. The data types which can be used with persistent volume claims include many types of SAN storage as well as Local persistent volumes.
To use persistent storage, the type has to be set to persistent-claim. Persistent storage supports additional configuration options:
id(optional)-
Storage identification number. This option is mandatory for storage volumes defined in a JBOD storage declaration. Default is
0. size(required)- Defines the size of the persistent volume claim, for example, "1000Gi".
class(optional)- The OpenShift Storage Class to use for dynamic volume provisioning.
selector(optional)- Allows selecting a specific persistent volume to use. It contains key:value pairs representing labels for selecting such a volume.
deleteClaim(optional)-
Boolean value which specifies if the Persistent Volume Claim has to be deleted when the cluster is undeployed. Default is
false.
Increasing the size of persistent volumes in an existing AMQ Streams cluster is only supported in OpenShift versions that support persistent volume resizing. The persistent volume to be resized must use a storage class that supports volume expansion. For other versions of OpenShift and storage classes which do not support volume expansion, you must decide the necessary storage size before deploying the cluster. Decreasing the size of existing persistent volumes is not possible.
Example fragment of persistent storage configuration with 1000Gi size
# ...
storage:
  type: persistent-claim
  size: 1000Gi
# ...
The following example demonstrates the use of a storage class.
Example fragment of persistent storage configuration with specific Storage Class
# ...
storage:
  type: persistent-claim
  size: 1Gi
  class: my-storage-class
# ...
Finally, a selector can be used to select a specific labeled persistent volume to provide needed features such as an SSD.
Example fragment of persistent storage configuration with selector
# ...
storage:
  type: persistent-claim
  size: 1Gi
  selector:
    hdd-type: ssd
  deleteClaim: true
# ...
3.1.3.2.1. Storage class overrides
You can specify a different storage class for one or more Kafka brokers, instead of using the default storage class. This is useful if, for example, storage classes are restricted to different availability zones or data centers. You can use the overrides field for this purpose.
In this example, the default storage class is named my-storage-class:
Example AMQ Streams cluster using storage class overrides
apiVersion: kafka.strimzi.io/v1beta1
kind: Kafka
metadata:
  labels:
    app: my-cluster
  name: my-cluster
  namespace: myproject
spec:
  # ...
  kafka:
    replicas: 3
    storage:
      deleteClaim: true
      size: 100Gi
      type: persistent-claim
      class: my-storage-class
      overrides:
        - broker: 0
          class: my-storage-class-zone-1a
        - broker: 1
          class: my-storage-class-zone-1b
        - broker: 2
          class: my-storage-class-zone-1c
  # ...
As a result of the configured overrides property, the broker volumes use the following storage classes:
-
The persistent volumes of broker 0 will use
my-storage-class-zone-1a. -
The persistent volumes of broker 1 will use
my-storage-class-zone-1b. -
The persistent volumes of broker 2 will use
my-storage-class-zone-1c.
The overrides property is currently used only to override storage class configurations. Overriding other storage configuration fields is not currently supported. Other fields from the storage configuration are currently not supported.
3.1.3.2.2. Persistent Volume Claim naming
When persistent storage is used, it creates Persistent Volume Claims with the following names:
data-cluster-name-kafka-idx-
Persistent Volume Claim for the volume used for storing data for the Kafka broker pod
idx. data-cluster-name-zookeeper-idx-
Persistent Volume Claim for the volume used for storing data for the ZooKeeper node pod
idx.
3.1.3.2.3. Log directories
The persistent volume will be used by the Kafka brokers as log directories mounted into the following path:
/var/lib/kafka/data/kafka-log_idx_-
Where
idxis the Kafka broker pod index. For example/var/lib/kafka/data/kafka-log0.
3.1.3.3. Resizing persistent volumes
You can provision increased storage capacity by increasing the size of the persistent volumes used by an existing AMQ Streams cluster. Resizing persistent volumes is supported in clusters that use either a single persistent volume or multiple persistent volumes in a JBOD storage configuration.
You can increase but not decrease the size of persistent volumes. Decreasing the size of persistent volumes is not currently supported in OpenShift.
Prerequisites
- An OpenShift cluster with support for volume resizing.
- The Cluster Operator is running.
- A Kafka cluster using persistent volumes created using a storage class that supports volume expansion.
Procedure
In a
Kafkaresource, increase the size of the persistent volume allocated to the Kafka cluster, the ZooKeeper cluster, or both.-
To increase the volume size allocated to the Kafka cluster, edit the
spec.kafka.storageproperty. To increase the volume size allocated to the ZooKeeper cluster, edit the
spec.zookeeper.storageproperty.For example, to increase the volume size from
1000Gito2000Gi:apiVersion: kafka.strimzi.io/v1beta1 kind: Kafka metadata: name: my-cluster spec: kafka: # ... storage: type: persistent-claim size: 2000Gi class: my-storage-class # ... zookeeper: # ...
-
To increase the volume size allocated to the Kafka cluster, edit the
Create or update the resource.
Use
oc apply:oc apply -f your-fileOpenShift increases the capacity of the selected persistent volumes in response to a request from the Cluster Operator. When the resizing is complete, the Cluster Operator restarts all pods that use the resized persistent volumes. This happens automatically.
Additional resources
For more information about resizing persistent volumes in OpenShift, see Resizing Persistent Volumes using Kubernetes.
3.1.3.4. JBOD storage overview
You can configure AMQ Streams to use JBOD, a data storage configuration of multiple disks or volumes. JBOD is one approach to providing increased data storage for Kafka brokers. It can also improve performance.
A JBOD configuration is described by one or more volumes, each of which can be either ephemeral or persistent. The rules and constraints for JBOD volume declarations are the same as those for ephemeral and persistent storage. For example, you cannot change the size of a persistent storage volume after it has been provisioned.
3.1.3.4.1. JBOD configuration
To use JBOD with AMQ Streams, the storage type must be set to jbod. The volumes property allows you to describe the disks that make up your JBOD storage array or configuration. The following fragment shows an example JBOD configuration:
# ...
storage:
  type: jbod
  volumes:
  - id: 0
    type: persistent-claim
    size: 100Gi
    deleteClaim: false
  - id: 1
    type: persistent-claim
    size: 100Gi
    deleteClaim: false
# ...
The ids cannot be changed once the JBOD volumes are created.
Users can add or remove volumes from the JBOD configuration.
3.1.3.4.2. JBOD and Persistent Volume Claims
When persistent storage is used to declare JBOD volumes, the naming scheme of the resulting Persistent Volume Claims is as follows:
data-id-cluster-name-kafka-idx-
Where
idis the ID of the volume used for storing data for Kafka broker podidx.
3.1.3.4.3. Log directories
The JBOD volumes will be used by the Kafka brokers as log directories mounted into the following path:
/var/lib/kafka/data-id/kafka-log_idx_-
Where
idis the ID of the volume used for storing data for Kafka broker podidx. For example/var/lib/kafka/data-0/kafka-log0.
3.1.3.5. Adding volumes to JBOD storage
This procedure describes how to add volumes to a Kafka cluster configured to use JBOD storage. It cannot be applied to Kafka clusters configured to use any other storage type.
When adding a new volume under an id which was already used in the past and removed, you have to make sure that the previously used PersistentVolumeClaims have been deleted.
Prerequisites
- An OpenShift cluster
- A running Cluster Operator
- A Kafka cluster with JBOD storage
Procedure
Edit the
spec.kafka.storage.volumesproperty in theKafkaresource. Add the new volumes to thevolumesarray. For example, add the new volume with id2:apiVersion: kafka.strimzi.io/v1beta1 kind: Kafka metadata: name: my-cluster spec: kafka: # ... storage: type: jbod volumes: - id: 0 type: persistent-claim size: 100Gi deleteClaim: false - id: 1 type: persistent-claim size: 100Gi deleteClaim: false - id: 2 type: persistent-claim size: 100Gi deleteClaim: false # ... zookeeper: # ...Create or update the resource.
This can be done using
oc apply:oc apply -f your-file- Create new topics or reassign existing partitions to the new disks.
Additional resources
For more information about reassigning topics, see Section 3.1.25.2, “Partition reassignment”.
3.1.3.6. Removing volumes from JBOD storage
This procedure describes how to remove volumes from Kafka cluster configured to use JBOD storage. It cannot be applied to Kafka clusters configured to use any other storage type. The JBOD storage always has to contain at least one volume.
To avoid data loss, you have to move all partitions before removing the volumes.
Prerequisites
- An OpenShift cluster
- A running Cluster Operator
- A Kafka cluster with JBOD storage with two or more volumes
Procedure
- Reassign all partitions from the disks which are you going to remove. Any data in partitions still assigned to the disks which are going to be removed might be lost.
Edit the
spec.kafka.storage.volumesproperty in theKafkaresource. Remove one or more volumes from thevolumesarray. For example, remove the volumes with ids1and2:apiVersion: kafka.strimzi.io/v1beta1 kind: Kafka metadata: name: my-cluster spec: kafka: # ... storage: type: jbod volumes: - id: 0 type: persistent-claim size: 100Gi deleteClaim: false # ... zookeeper: # ...Create or update the resource.
This can be done using
oc apply:oc apply -f your-file
Additional resources
For more information about reassigning topics, see Section 3.1.25.2, “Partition reassignment”.
3.1.4. Kafka broker replicas
A Kafka cluster can run with many brokers. You can configure the number of brokers used for the Kafka cluster in Kafka.spec.kafka.replicas. The best number of brokers for your cluster has to be determined based on your specific use case.
3.1.4.1. Configuring the number of broker nodes
This procedure describes how to configure the number of Kafka broker nodes in a new cluster. It only applies to new clusters with no partitions. If your cluster already has topics defined, see Section 3.1.25, “Scaling clusters”.
Prerequisites
- An OpenShift cluster
- A running Cluster Operator
- A Kafka cluster with no topics defined yet
Procedure
Edit the
replicasproperty in theKafkaresource. For example:apiVersion: kafka.strimzi.io/v1beta1 kind: Kafka metadata: name: my-cluster spec: kafka: # ... replicas: 3 # ... zookeeper: # ...Create or update the resource.
This can be done using
oc apply:oc apply -f your-file
Additional resources
If your cluster already has topics defined, see Section 3.1.25, “Scaling clusters”.
3.1.5. Kafka broker configuration
AMQ Streams allows you to customize the configuration of the Kafka brokers in your Kafka cluster. You can specify and configure most of the options listed in the "Broker Configs" section of the Apache Kafka documentation. You cannot configure options that are related to the following areas:
- Security (Encryption, Authentication, and Authorization)
- Listener configuration
- Broker ID configuration
- Configuration of log data directories
- Inter-broker communication
- ZooKeeper connectivity
These options are automatically configured by AMQ Streams.
3.1.5.1. Kafka broker configuration
The config property in Kafka.spec.kafka contains Kafka broker configuration options as keys with values in one of the following JSON types:
- String
- Number
- Boolean
You can specify and configure all of the options in the "Broker Configs" section of the Apache Kafka documentation apart from those managed directly by AMQ Streams. Specifically, you are prevented from modifying all configuration options with keys equal to or starting with one of the following strings:
-
listeners -
advertised. -
broker. -
listener. -
host.name -
port -
inter.broker.listener.name -
sasl. -
ssl. -
security. -
password. -
principal.builder.class -
log.dir -
zookeeper.connect -
zookeeper.set.acl -
authorizer. -
super.user
If the config property specifies a restricted option, it is ignored and a warning message is printed to the Cluster Operator log file. All other supported options are passed to Kafka.
Use the three allowed ssl configuration options to run external listeners with a specific cipher suite for a TLS version. A cipher suite combines algorithms for secure connection and data transfer.
Example Kafka broker configuration
apiVersion: kafka.strimzi.io/v1beta1
kind: Kafka
metadata:
  name: my-cluster
spec:
  kafka:
    # ...
    config:
      num.partitions: 1
      num.recovery.threads.per.data.dir: 1
      default.replication.factor: 3
      offsets.topic.replication.factor: 3
      transaction.state.log.replication.factor: 3
      transaction.state.log.min.isr: 1
      log.retention.hours: 168
      log.segment.bytes: 1073741824
      log.retention.check.interval.ms: 300000
      num.network.threads: 3
      num.io.threads: 8
      socket.send.buffer.bytes: 102400
      socket.receive.buffer.bytes: 102400
      socket.request.max.bytes: 104857600
      group.initial.rebalance.delay.ms: 0
      ssl.cipher.suites: "TLS_ECDHE_RSA_WITH_AES_256_GCM_SHA384" 1
      ssl.enabled.protocols: "TLSv1.2" 2
      ssl.protocol: "TLSv1.2" 3
    # ...
- 1
- The cipher suite for TLS using a combination of
ECDHEkey exchange mechanism,RSAauthentication algorithm,AESbulk encyption algorithm andSHA384MAC algorithm. - 2
- The SSl protocol
TLSv1.2is enabled. - 3
- Specifies the
TLSv1.2protocol to generate the SSL context. Allowed values areTLSv1.1andTLSv1.2.
3.1.5.2. Configuring Kafka brokers
You can configure an existing Kafka broker, or create a new Kafka broker with a specified configuration.
Prerequisites
- An OpenShift cluster is available.
- The Cluster Operator is running.
Procedure
-
Open the YAML configuration file that contains the
Kafkaresource specifying the cluster deployment. In the
spec.kafka.configproperty in theKafkaresource, enter one or more Kafka configuration settings. For example:apiVersion: kafka.strimzi.io/v1beta1 kind: Kafka spec: kafka: # ... config: default.replication.factor: 3 offsets.topic.replication.factor: 3 transaction.state.log.replication.factor: 3 transaction.state.log.min.isr: 1 # ... zookeeper: # ...Apply the new configuration to create or update the resource.
Use
oc apply:oc apply -f kafka.yamlwhere
kafka.yamlis the YAML configuration file for the resource that you want to configure; for example,kafka-persistent.yaml.
3.1.6. Kafka broker listeners
You can configure the listeners enabled in Kafka brokers. The following types of listeners are supported:
- Plain listener on port 9092 (without TLS encryption)
- TLS listener on port 9093 (with TLS encryption)
- External listener on port 9094 for access from outside of OpenShift
OAuth 2.0
If you are using OAuth 2.0 token-based authentication, you can configure the listeners to connect to your authorization server. For more information, see Using OAuth 2.0 token-based authentication.
Listener certificates
You can provide your own server certificates, called Kafka listener certificates, for TLS listeners or external listeners which have TLS encryption enabled. For more information, see Section 12.8, “Kafka listener certificates”.
3.1.6.1. Kafka listeners
You can configure Kafka broker listeners using the listeners property in the Kafka.spec.kafka resource. The listeners property contains three sub-properties:
-
plain -
tls -
external
Each listener will only be defined when the listeners object has the given property.
An example of listeners property with all listeners enabled
# ...
listeners:
  plain: {}
  tls: {}
  external:
    type: loadbalancer
# ...
An example of listeners property with only the plain listener enabled
# ...
listeners:
  plain: {}
# ...
3.1.6.2. Configuring Kafka listeners
Prerequisites
- An OpenShift cluster
- A running Cluster Operator
Procedure
Edit the
listenersproperty in theKafka.spec.kafkaresource.An example configuration of the plain (unencrypted) listener without authentication:
apiVersion: kafka.strimzi.io/v1beta1
kind: Kafka
spec:
  kafka:
    # ...
    listeners:
      plain: {}
    # ...
  zookeeper:
    # ...
Create or update the resource.
This can be done using
oc apply:oc apply -f your-file
Additional resources
-
For more information about the schema, see
KafkaListenersschema reference.
3.1.6.3. Listener authentication
The listener authentication property is used to specify an authentication mechanism specific to that listener:
- Mutual TLS authentication (only on the listeners with TLS encryption)
- SCRAM-SHA authentication
If no authentication property is specified then the listener does not authenticate clients which connect through that listener.
Authentication must be configured when using the User Operator to manage KafkaUsers.
3.1.6.3.1. Authentication configuration for a listener
The following example shows:
-
A
plainlistener configured for SCRAM-SHA authentication -
A
tlslistener with mutual TLS authentication -
An
externallistener with mutual TLS authentication
An example showing listener authentication configuration
# ...
listeners:
  plain:
    authentication:
      type: scram-sha-512
  tls:
    authentication:
      type: tls
  external:
    type: loadbalancer
    tls: true
    authentication:
      type: tls
# ...
3.1.6.3.2. Mutual TLS authentication
Mutual TLS authentication is always used for the communication between Kafka brokers and ZooKeeper pods.
Mutual authentication or two-way authentication is when both the server and the client present certificates. AMQ Streams can configure Kafka to use TLS (Transport Layer Security) to provide encrypted communication between Kafka brokers and clients either with or without mutual authentication. When you configure mutual authentication, the broker authenticates the client and the client authenticates the broker.
TLS authentication is more commonly one-way, with one party authenticating the identity of another. For example, when HTTPS is used between a web browser and a web server, the server obtains proof of the identity of the browser.
3.1.6.3.2.1. When to use mutual TLS authentication for clients
Mutual TLS authentication is recommended for authenticating Kafka clients when:
- The client supports authentication using mutual TLS authentication
- It is necessary to use the TLS certificates rather than passwords
- You can reconfigure and restart client applications periodically so that they do not use expired certificates.
3.1.6.3.3. SCRAM-SHA authentication
SCRAM (Salted Challenge Response Authentication Mechanism) is an authentication protocol that can establish mutual authentication using passwords. AMQ Streams can configure Kafka to use SASL (Simple Authentication and Security Layer) SCRAM-SHA-512 to provide authentication on both unencrypted and TLS-encrypted client connections. TLS authentication is always used internally between Kafka brokers and ZooKeeper nodes. When used with a TLS client connection, the TLS protocol provides encryption, but is not used for authentication.
The following properties of SCRAM make it safe to use SCRAM-SHA even on unencrypted connections:
- The passwords are not sent in the clear over the communication channel. Instead the client and the server are each challenged by the other to offer proof that they know the password of the authenticating user.
- The server and client each generate a new challenge for each authentication exchange. This means that the exchange is resilient against replay attacks.
3.1.6.3.3.1. Supported SCRAM credentials
AMQ Streams supports SCRAM-SHA-512 only. When a KafkaUser.spec.authentication.type is configured with scram-sha-512 the User Operator will generate a random 12 character password consisting of upper and lowercase ASCII letters and numbers.
3.1.6.3.3.2. When to use SCRAM-SHA authentication for clients
SCRAM-SHA is recommended for authenticating Kafka clients when:
- The client supports authentication using SCRAM-SHA-512
- It is necessary to use passwords rather than the TLS certificates
- Authentication for unencrypted communication is required
3.1.6.4. External listeners
Use an external listener to expose your AMQ Streams Kafka cluster to a client outside an OpenShift environment.
Additional resources
3.1.6.4.1. Customizing advertised addresses on external listeners
By default, AMQ Streams tries to automatically determine the hostnames and ports that your Kafka cluster advertises to its clients. This is not sufficient in all situations, because the infrastructure on which AMQ Streams is running might not provide the right hostname or port through which Kafka can be accessed. You can customize the advertised hostname and port in the overrides property of the external listener. AMQ Streams will then automatically configure the advertised address in the Kafka brokers and add it to the broker certificates so it can be used for TLS hostname verification. Overriding the advertised host and ports is available for all types of external listeners.
Example of an external listener configured with overrides for advertised addresses
# ...
listeners:
  external:
    type: route
    authentication:
      type: tls
    overrides:
      brokers:
      - broker: 0
        advertisedHost: example.hostname.0
        advertisedPort: 12340
      - broker: 1
        advertisedHost: example.hostname.1
        advertisedPort: 12341
      - broker: 2
        advertisedHost: example.hostname.2
        advertisedPort: 12342
# ...
Additionally, you can specify the name of the bootstrap service. This name will be added to the broker certificates and can be used for TLS hostname verification. Adding the additional bootstrap address is available for all types of external listeners.
Example of an external listener configured with an additional bootstrap address
# ...
listeners:
  external:
    type: route
    authentication:
      type: tls
    overrides:
      bootstrap:
        address: example.hostname
# ...
3.1.6.4.2. Route external listeners
An external listener of type route exposes Kafka using OpenShift Routes and the HAProxy router.
route is only supported on OpenShift
3.1.6.4.2.1. Exposing Kafka using OpenShift Routes
When exposing Kafka using OpenShift Routes and the HAProxy router, a dedicated Route is created for every Kafka broker pod. An additional Route is created to serve as a Kafka bootstrap address. Kafka clients can use these Routes to connect to Kafka on port 443.
TLS encryption is always used with Routes.
By default, the route hosts are automatically assigned by OpenShift. However, you can override the assigned route hosts by specifying the requested hosts in the overrides property. AMQ Streams will not perform any validation that the requested hosts are available; you must ensure that they are free and can be used.
Example of an external listener of type routes configured with overrides for OpenShift route hosts
# ...
listeners:
  external:
    type: route
    authentication:
      type: tls
    overrides:
      bootstrap:
        host: bootstrap.myrouter.com
      brokers:
      - broker: 0
        host: broker-0.myrouter.com
      - broker: 1
        host: broker-1.myrouter.com
      - broker: 2
        host: broker-2.myrouter.com
# ...
For more information on using Routes to access Kafka, see Section 3.1.6.4.2.2, “Accessing Kafka using OpenShift routes”.
3.1.6.4.2.2. Accessing Kafka using OpenShift routes
Prerequisites
- An OpenShift cluster
- A running Cluster Operator
Procedure
Deploy Kafka cluster with an external listener enabled and configured to the type
route.An example configuration with an external listener configured to use
Routes:apiVersion: kafka.strimzi.io/v1beta1 kind: Kafka spec: kafka: # ... listeners: external: type: route # ... # ... zookeeper: # ...Create or update the resource.
oc apply -f your-fileFind the address of the bootstrap
Route.oc get routes CLUSTER-NAME-kafka-bootstrap -o=jsonpath='{.status.ingress[0].host}{"\n"}'Use the address together with port 443 in your Kafka client as the bootstrap address.
Extract the public certificate of the broker certification authority
oc get secret CLUSTER-NAME-cluster-ca-cert -o jsonpath='{.data.ca\.crt}' | base64 -d > ca.crtUse the extracted certificate in your Kafka client to configure TLS connection. If you enabled any authentication, you will also need to configure SASL or TLS authentication.
Additional resources
-
For more information about the schema, see
KafkaListenersschema reference.
3.1.6.4.3. Loadbalancer external listeners
External listeners of type loadbalancer expose Kafka by using Loadbalancer type Services.
3.1.6.4.3.1. Exposing Kafka using loadbalancers
When exposing Kafka using Loadbalancer type Services, a new loadbalancer service is created for every Kafka broker pod. An additional loadbalancer is created to serve as a Kafka bootstrap address. Loadbalancers listen to connections on port 9094.
By default, TLS encryption is enabled. To disable it, set the tls field to false.
Example of an external listener of type loadbalancer
# ...
listeners:
  external:
    type: loadbalancer
    authentication:
      type: tls
# ...
For more information on using loadbalancers to access Kafka, see Section 3.1.6.4.3.4, “Accessing Kafka using loadbalancers”.
3.1.6.4.3.2. Customizing the DNS names of external loadbalancer listeners
On loadbalancer listeners, you can use the dnsAnnotations property to add additional annotations to the loadbalancer services. You can use these annotations to instrument DNS tooling such as External DNS, which automatically assigns DNS names to the loadbalancer services.
Example of an external listener of type loadbalancer using dnsAnnotations
# ...
listeners:
  external:
    type: loadbalancer
    authentication:
      type: tls
    overrides:
      bootstrap:
        dnsAnnotations:
          external-dns.alpha.kubernetes.io/hostname: kafka-bootstrap.mydomain.com.
          external-dns.alpha.kubernetes.io/ttl: "60"
      brokers:
      - broker: 0
        dnsAnnotations:
          external-dns.alpha.kubernetes.io/hostname: kafka-broker-0.mydomain.com.
          external-dns.alpha.kubernetes.io/ttl: "60"
      - broker: 1
        dnsAnnotations:
          external-dns.alpha.kubernetes.io/hostname: kafka-broker-1.mydomain.com.
          external-dns.alpha.kubernetes.io/ttl: "60"
      - broker: 2
        dnsAnnotations:
          external-dns.alpha.kubernetes.io/hostname: kafka-broker-2.mydomain.com.
          external-dns.alpha.kubernetes.io/ttl: "60"
# ...
3.1.6.4.3.3. Customizing the loadbalancer IP addresses
On loadbalancer listeners, you can use the loadBalancerIP property to request a specific IP address when creating a loadbalancer. Use this property when you need to use a loadbalancer with a specific IP address. The loadBalancerIP field is ignored if the cloud provider does not support the feature.
Example of an external listener of type loadbalancer with specific loadbalancer IP address requests
# ...
listeners:
  external:
    type: loadbalancer
    authentication:
      type: tls
    overrides:
      bootstrap:
        loadBalancerIP: 172.29.3.10
      brokers:
      - broker: 0
        loadBalancerIP: 172.29.3.1
      - broker: 1
        loadBalancerIP: 172.29.3.2
      - broker: 2
        loadBalancerIP: 172.29.3.3
# ...
3.1.6.4.3.4. Accessing Kafka using loadbalancers
Prerequisites
- An OpenShift cluster
- A running Cluster Operator
Procedure
Deploy Kafka cluster with an external listener enabled and configured to the type
loadbalancer.An example configuration with an external listener configured to use loadbalancers:
apiVersion: kafka.strimzi.io/v1beta1
kind: Kafka
spec:
  kafka:
    # ...
    listeners:
      external:
        type: loadbalancer
        authentication:
          type: tls
        # ...
    # ...
  zookeeper:
    # ...
Create or update the resource.
This can be done using
oc apply:oc apply -f your-fileFind the hostname of the bootstrap loadbalancer.
This can be done using
oc get:oc get service cluster-name-kafka-external-bootstrap -o=jsonpath='{.status.loadBalancer.ingress[0].hostname}{"\n"}'If no hostname was found (nothing was returned by the command), use the loadbalancer IP address.
This can be done using
oc get:oc get service cluster-name-kafka-external-bootstrap -o=jsonpath='{.status.loadBalancer.ingress[0].ip}{"\n"}'Use the hostname or IP address together with port 9094 in your Kafka client as the bootstrap address.
Unless TLS encryption was disabled, extract the public certificate of the broker certification authority.
This can be done using
oc get:oc get secret cluster-name-cluster-ca-cert -o jsonpath='{.data.ca\.crt}' | base64 -d > ca.crtUse the extracted certificate in your Kafka client to configure TLS connection. If you enabled any authentication, you will also need to configure SASL or TLS authentication.
Additional resources
-
For more information about the schema, see
KafkaListenersschema reference.
3.1.6.4.4. Node Port external listeners
External listeners of type nodeport expose Kafka by using NodePort type Services.
3.1.6.4.4.1. Exposing Kafka using node ports
When exposing Kafka using NodePort type Services, Kafka clients connect directly to the nodes of OpenShift. You must enable access to the ports on the OpenShift nodes for each client (for example, in firewalls or security groups). Each Kafka broker pod is then accessible on a separate port.
An additional NodePort type of service is created to serve as a Kafka bootstrap address.
When configuring the advertised addresses for the Kafka broker pods, AMQ Streams uses the address of the node on which the given pod is running. Nodes often have multiple addresses. The address type used is based on the first type found in the following order of priority:
- ExternalDNS
- ExternalIP
- Hostname
- InternalDNS
- InternalIP
You can use the preferredAddressType property in your listener configuration to specify the first address type checked as the node address. This property is useful, for example, if your deployment does not have DNS support, or you only want to expose a broker internally through an internal DNS or IP address. If an address of this type is found, it is used. If the preferred address type is not found, AMQ Streams proceeds through the types in the standard order of priority.
Example of an external listener configured with a preferred address type
apiVersion: kafka.strimzi.io/v1beta1
kind: Kafka
spec:
  kafka:
    # ...
    listeners:
      external:
        type: nodeport
        tls: true
        authentication:
          type: tls
        configuration:
          preferredAddressType: InternalDNS
    # ...
  zookeeper:
    # ...
By default, TLS encryption is enabled. To disable it, set the tls field to false.
TLS hostname verification is not currently supported when exposing Kafka clusters using node ports.
By default, the port numbers used for the bootstrap and broker services are automatically assigned by OpenShift. However, you can override the assigned node ports by specifying the requested port numbers in the overrides property. AMQ Streams does not perform any validation on the requested ports; you must ensure that they are free and available for use.
Example of an external listener configured with overrides for node ports
# ...
listeners:
  external:
    type: nodeport
    tls: true
    authentication:
      type: tls
    overrides:
      bootstrap:
        nodePort: 32100
      brokers:
      - broker: 0
        nodePort: 32000
      - broker: 1
        nodePort: 32001
      - broker: 2
        nodePort: 32002
# ...
For more information on using node ports to access Kafka, see Section 3.1.6.4.4.3, “Accessing Kafka using node ports”.
3.1.6.4.4.2. Customizing the DNS names of external node port listeners
On nodeport listeners, you can use the dnsAnnotations property to add additional annotations to the nodeport services. You can use these annotations to instrument DNS tooling such as External DNS, which automatically assigns DNS names to the cluster nodes.
Example of an external listener of type nodeport using dnsAnnotations
# ...
listeners:
  external:
    type: nodeport
    tls: true
    authentication:
      type: tls
    overrides:
      bootstrap:
        dnsAnnotations:
          external-dns.alpha.kubernetes.io/hostname: kafka-bootstrap.mydomain.com.
          external-dns.alpha.kubernetes.io/ttl: "60"
      brokers:
      - broker: 0
        dnsAnnotations:
          external-dns.alpha.kubernetes.io/hostname: kafka-broker-0.mydomain.com.
          external-dns.alpha.kubernetes.io/ttl: "60"
      - broker: 1
        dnsAnnotations:
          external-dns.alpha.kubernetes.io/hostname: kafka-broker-1.mydomain.com.
          external-dns.alpha.kubernetes.io/ttl: "60"
      - broker: 2
        dnsAnnotations:
          external-dns.alpha.kubernetes.io/hostname: kafka-broker-2.mydomain.com.
          external-dns.alpha.kubernetes.io/ttl: "60"
# ...
3.1.6.4.4.3. Accessing Kafka using node ports
This procedure describes how to access a AMQ Streams Kafka cluster from an external client using node ports.
To connect to a broker, you need the hostname (advertised address) and port number for the Kafka bootstrap address, as well as the certificate used for authentication.
Prerequisites
- An OpenShift cluster
- A running Cluster Operator
Procedure
Deploy the Kafka cluster with an external listener enabled and configured to the type
nodeport.For example:
apiVersion: kafka.strimzi.io/v1beta1 kind: Kafka spec: kafka: # ... listeners: external: type: nodeport tls: true authentication: type: tls configuration: brokerCertChainAndKey: 1 secretName: my-secret certificate: my-certificate.crt key: my-key.key preferredAddressType: InternalDNS 2 # ... zookeeper: # ...- 1
- Optional configuration for a Kafka listener certificate managed by an external Certificate Authority. The
brokerCertChainAndKeyproperty specifies aSecretthat holds a server certificate and a private key. Kafka listener certificates can also be configured for TLS listeners. - 2
- Optional configuration to specify a preference for the first address type used by AMQ Streams as the node address.
Create or update the resource.
oc apply -f your-fileFind the port number of the bootstrap service.
oc get service cluster-name-kafka-external-bootstrap -o=jsonpath='{.spec.ports[0].nodePort}{"\n"}'The port is used in the Kafka bootstrap address.
Find the address of the OpenShift node.
oc get node node-name -o=jsonpath='{range .status.addresses[*]}{.type}{"\t"}{.address}{"\n"}'If several different addresses are returned, select the address type you want based on the following order:
- ExternalDNS
- ExternalIP
- Hostname
- InternalDNS
- InternalIP
Use the address with the port found in the previous step in the Kafka bootstrap address.
Unless TLS encryption was disabled, extract the public certificate of the broker certification authority.
oc get secret cluster-name-cluster-ca-cert -o jsonpath='{.data.ca\.crt}' | base64 -d > ca.crtUse the extracted certificate in your Kafka client to configure TLS connection. If you enabled any authentication, you will also need to configure SASL or TLS authentication.
Additional resources
-
For more information about the schema, see
KafkaListenersschema reference.
3.1.6.4.5. OpenShift Ingress external listeners
External listeners of type ingress exposes Kafka by using Kubernetes Ingress and the NGINX Ingress Controller for Kubernetes.
3.1.6.4.5.1. Exposing Kafka using Kubernetes Ingress
When exposing Kafka using using Kubernetes Ingress and the NGINX Ingress Controller for Kubernetes, a dedicated Ingress resource is created for every Kafka broker pod. An additional Ingress resource is created to serve as a Kafka bootstrap address. Kafka clients can use these Ingress resources to connect to Kafka on port 443.
External listeners using Ingress have been currently tested only with the NGINX Ingress Controller for Kubernetes.
Kafka uses a binary protocol over TCP, but the NGINX Ingress Controller for Kubernetes is designed to work with the HTTP protocol. To be able to pass the Kafka connections through the Ingress, AMQ Streams uses the TLS passthrough feature of the NGINX Ingress Controller for Kubernetes. Make sure TLS passthrough is enabled in your NGINX Ingress Controller for Kubernetes deployment. For more information about enabling TLS passthrough see TLS passthrough documentation. Because it is using the TLS passthrough functionality, TLS encryption cannot be disabled when exposing Kafka using Ingress.
The Ingress controller does not assign any hostnames automatically. You have to specify the hostnames which should be used by the bootstrap and per-broker services in the spec.kafka.listeners.external.configuration section. You also have to make sure that the hostnames resolve to the Ingress endpoints. AMQ Streams will not perform any validation that the requested hosts are available and properly routed to the Ingress endpoints.
Example of an external listener of type ingress
# ...
listeners:
  external:
    type: ingress
    authentication:
      type: tls
    configuration:
      bootstrap:
        host: bootstrap.myingress.com
      brokers:
      - broker: 0
        host: broker-0.myingress.com
      - broker: 1
        host: broker-1.myingress.com
      - broker: 2
        host: broker-2.myingress.com
# ...
For more information on using Ingress to access Kafka, see Section 3.1.6.4.5.4, “Accessing Kafka using ingress”.
3.1.6.4.5.2. Configuring the Ingress class
By default, the Ingress class is set to nginx. You can change the Ingress class using the class property.
Example of an external listener of type ingress using Ingress class nginx-internal
# ...
listeners:
  external:
    type: ingress
    class: nginx-internal
    # ...
# ...
3.1.6.4.5.3. Customizing the DNS names of external ingress listeners
On ingress listeners, you can use the dnsAnnotations property to add additional annotations to the ingress resources. You can use these annotations to instrument DNS tooling such as External DNS, which automatically assigns DNS names to the ingress resources.
Example of an external listener of type ingress using dnsAnnotations
# ...
listeners:
  external:
    type: ingress
    authentication:
      type: tls
    configuration:
      bootstrap:
        dnsAnnotations:
          external-dns.alpha.kubernetes.io/hostname: bootstrap.myingress.com.
          external-dns.alpha.kubernetes.io/ttl: "60"
        host: bootstrap.myingress.com
      brokers:
      - broker: 0
        dnsAnnotations:
          external-dns.alpha.kubernetes.io/hostname: broker-0.myingress.com.
          external-dns.alpha.kubernetes.io/ttl: "60"
        host: broker-0.myingress.com
      - broker: 1
        dnsAnnotations:
          external-dns.alpha.kubernetes.io/hostname: broker-1.myingress.com.
          external-dns.alpha.kubernetes.io/ttl: "60"
        host: broker-1.myingress.com
      - broker: 2
        dnsAnnotations:
          external-dns.alpha.kubernetes.io/hostname: broker-2.myingress.com.
          external-dns.alpha.kubernetes.io/ttl: "60"
        host: broker-2.myingress.com
# ...
3.1.6.4.5.4. Accessing Kafka using ingress
This procedure shows how to access AMQ Streams Kafka clusters from outside of OpenShift using Ingress.
Prerequisites
- An OpenShift cluster
- Deployed NGINX Ingress Controller for Kubernetes with TLS passthrough enabled
- A running Cluster Operator
Procedure
Deploy Kafka cluster with an external listener enabled and configured to the type
ingress.An example configuration with an external listener configured to use
Ingress:apiVersion: kafka.strimzi.io/v1beta1 kind: Kafka spec: kafka: # ... listeners: external: type: ingress authentication: type: tls configuration: bootstrap: host: bootstrap.myingress.com brokers: - broker: 0 host: broker-0.myingress.com - broker: 1 host: broker-1.myingress.com - broker: 2 host: broker-2.myingress.com # ... zookeeper: # ...-
Make sure the hosts in the
configurationsection properly resolve to the Ingress endpoints. Create or update the resource.
oc apply -f your-fileExtract the public certificate of the broker certificate authority
oc get secret cluster-name-cluster-ca-cert -o jsonpath='{.data.ca\.crt}' | base64 -d > ca.crt- Use the extracted certificate in your Kafka client to configure the TLS connection. If you enabled any authentication, you will also need to configure SASL or TLS authentication. Connect with your client to the host you specified in the configuration on port 443.
Additional resources
-
For more information about the schema, see
KafkaListenersschema reference.
3.1.6.5. Network policies
AMQ Streams automatically creates a NetworkPolicy resource for every listener that is enabled on a Kafka broker. By default, a NetworkPolicy grants access to a listener to all applications and namespaces.
If you want to restrict access to a listener at the network level to only selected applications or namespaces, use the networkPolicyPeers field.
Use network policies in conjunction with authentication and authorization.
Each listener can have a different networkPolicyPeers configuration.
3.1.6.5.1. Network policy configuration for a listener
The following example shows a networkPolicyPeers configuration for a plain and a tls listener:
# ...
listeners:
  plain:
    authentication:
      type: scram-sha-512
    networkPolicyPeers:
      - podSelector:
          matchLabels:
            app: kafka-sasl-consumer
      - podSelector:
          matchLabels:
            app: kafka-sasl-producer
  tls:
    authentication:
      type: tls
    networkPolicyPeers:
      - namespaceSelector:
          matchLabels:
            project: myproject
      - namespaceSelector:
          matchLabels:
            project: myproject2
# ...
In the example:
-
Only application pods matching the labels
app: kafka-sasl-consumerandapp: kafka-sasl-producercan connect to theplainlistener. The application pods must be running in the same namespace as the Kafka broker. -
Only application pods running in namespaces matching the labels
project: myprojectandproject: myproject2can connect to thetlslistener.
The syntax of the networkPolicyPeers field is the same as the from field in NetworkPolicy resources. For more information about the schema, see NetworkPolicyPeer API reference and the KafkaListeners schema reference.
Your configuration of OpenShift must support ingress NetworkPolicies in order to use network policies in AMQ Streams.
3.1.6.5.2. Restricting access to Kafka listeners using networkPolicyPeers
You can restrict access to a listener to only selected applications by using the networkPolicyPeers field.
Prerequisites
- An OpenShift cluster with support for Ingress NetworkPolicies.
- The Cluster Operator is running.
Procedure
-
Open the
Kafkaresource. In the
networkPolicyPeersfield, define the application pods or namespaces that will be allowed to access the Kafka cluster.For example, to configure a
tlslistener to allow connections only from application pods with the labelappset tokafka-client:apiVersion: kafka.strimzi.io/v1beta1 kind: Kafka spec: kafka: # ... listeners: tls: networkPolicyPeers: - podSelector: matchLabels: app: kafka-client # ... zookeeper: # ...Create or update the resource.
Use
oc apply:oc apply -f your-file
Additional resources
-
For more information about the schema, see NetworkPolicyPeer API reference and the
KafkaListenersschema reference.
3.1.7. Authentication and Authorization
AMQ Streams supports authentication and authorization. Authentication can be configured independently for each listener. Authorization is always configured for the whole Kafka cluster.
3.1.7.1. Authentication
Authentication is configured as part of the listener configuration in the authentication property. The authentication mechanism is defined by the type field.
When the authentication property is missing, no authentication is enabled on a given listener. The listener will accept all connections without authentication.
Supported authentication mechanisms:
- TLS client authentication
- SASL SCRAM-SHA-512
- OAuth 2.0 token based authentication
3.1.7.1.1. TLS client authentication
TLS Client authentication is enabled by specifying the type as tls. The TLS client authentication is supported only on the tls listener.
An example of authentication with type tls
# ...
authentication:
  type: tls
# ...
3.1.7.2. Configuring authentication in Kafka brokers
Prerequisites
- An OpenShift cluster is available.
- The Cluster Operator is running.
Procedure
-
Open the YAML configuration file that contains the
Kafkaresource specifying the cluster deployment. In the
spec.kafka.listenersproperty in theKafkaresource, add theauthenticationfield to the listeners for which you want to enable authentication. For example:apiVersion: kafka.strimzi.io/v1beta1 kind: Kafka spec: kafka: # ... listeners: tls: authentication: type: tls # ... zookeeper: # ...Apply the new configuration to create or update the resource.
Use
oc apply:oc apply -f kafka.yamlwhere
kafka.yamlis the YAML configuration file for the resource that you want to configure; for example,kafka-persistent.yaml.
Additional resources
- For more information about the supported authentication mechanisms, see authentication reference.
-
For more information about the schema for
Kafka, seeKafkaschema reference.
3.1.7.3. Authorization
You can configure authorization for Kafka brokers using the authorization property in the Kafka.spec.kafka resource. If the authorization property is missing, no authorization is enabled. When enabled, authorization is applied to all enabled listeners. The authorization method is defined in the type field.
You can configure:
- Simple authorization
- OAuth 2.0 authorization (if you are using OAuth 2.0 token based authentication)
- Open Policy Agent authorization
3.1.7.3.1. Simple authorization
Simple authorization in AMQ Streams uses the SimpleAclAuthorizer plugin, the default Access Control Lists (ACLs) authorization plugin provided with Apache Kafka. ACLs allow you to define which users have access to which resources at a granular level. To enable simple authorization, set the type field to simple.
An example of Simple authorization
# ...
authorization:
  type: simple
# ...
Access rules for users are defined using Access Control Lists (ACLs). You can optionally designate a list of super users in the superUsers field.
3.1.7.3.2. Super users
Super users can access all resources in your Kafka cluster regardless of any access restrictions defined in ACLs. To designate super users for a Kafka cluster, enter a list of user principals in the superUsers field. If a user uses TLS Client Authentication, the username will be the common name from their certificate subject prefixed with CN=.
An example of designating super users
# ...
authorization:
  type: simple
  superUsers:
    - CN=fred
    - sam
    - CN=edward
# ...
The super.user configuration option in the config property in Kafka.spec.kafka is ignored. Designate super users in the authorization property instead. For more information, see Kafka broker configuration.
3.1.7.4. Configuring authorization in Kafka brokers
Configure authorization and designate super users for a particular Kafka broker.
Prerequisites
- An OpenShift cluster
- The Cluster Operator is running
Procedure
Add or edit the
authorizationproperty in theKafka.spec.kafkaresource. For example:apiVersion: kafka.strimzi.io/v1beta1 kind: Kafka spec: kafka: # ... authorization: type: simple superUsers: - CN=fred - sam - CN=edward # ... zookeeper: # ...Create or update the resource.
This can be done using
oc apply:oc apply -f your-file
Additional resources
- For more information about the supported authorization methods, see authorization reference.
-
For more information about the schema for
Kafka, seeKafkaschema reference. - For more information about configuring user authentication, see Kafka User resource.
3.1.8. ZooKeeper replicas
ZooKeeper clusters or ensembles usually run with an odd number of nodes, typically three, five, or seven.
The majority of nodes must be available in order to maintain an effective quorum. If the ZooKeeper cluster loses its quorum, it will stop responding to clients and the Kafka brokers will stop working. Having a stable and highly available ZooKeeper cluster is crucial for AMQ Streams.
- Three-node cluster
- A three-node ZooKeeper cluster requires at least two nodes to be up and running in order to maintain the quorum. It can tolerate only one node being unavailable.
- Five-node cluster
- A five-node ZooKeeper cluster requires at least three nodes to be up and running in order to maintain the quorum. It can tolerate two nodes being unavailable.
- Seven-node cluster
- A seven-node ZooKeeper cluster requires at least four nodes to be up and running in order to maintain the quorum. It can tolerate three nodes being unavailable.
For development purposes, it is also possible to run ZooKeeper with a single node.
Having more nodes does not necessarily mean better performance, as the costs to maintain the quorum will rise with the number of nodes in the cluster. Depending on your availability requirements, you can decide for the number of nodes to use.
3.1.8.1. Number of ZooKeeper nodes
The number of ZooKeeper nodes can be configured using the replicas property in Kafka.spec.zookeeper.
An example showing replicas configuration
apiVersion: kafka.strimzi.io/v1beta1
kind: Kafka
metadata:
  name: my-cluster
spec:
  kafka:
    # ...
  zookeeper:
    # ...
    replicas: 3
    # ...
3.1.8.2. Changing the number of ZooKeeper replicas
Prerequisites
- An OpenShift cluster is available.
- The Cluster Operator is running.
Procedure
-
Open the YAML configuration file that contains the
Kafkaresource specifying the cluster deployment. In the
spec.zookeeper.replicasproperty in theKafkaresource, enter the number of replicated ZooKeeper servers. For example:apiVersion: kafka.strimzi.io/v1beta1 kind: Kafka metadata: name: my-cluster spec: kafka: # ... zookeeper: # ... replicas: 3 # ...Apply the new configuration to create or update the resource.
Use
oc apply:oc apply -f kafka.yamlwhere
kafka.yamlis the YAML configuration file for the resource that you want to configure; for example,kafka-persistent.yaml.
3.1.9. ZooKeeper configuration
AMQ Streams allows you to customize the configuration of Apache ZooKeeper nodes. You can specify and configure most of the options listed in the ZooKeeper documentation.
Options which cannot be configured are those related to the following areas:
- Security (Encryption, Authentication, and Authorization)
- Listener configuration
- Configuration of data directories
- ZooKeeper cluster composition
These options are automatically configured by AMQ Streams.
3.1.9.1. ZooKeeper configuration
ZooKeeper nodes are configured using the config property in Kafka.spec.zookeeper. This property contains the ZooKeeper configuration options as keys. The values can be described using one of the following JSON types:
- String
- Number
- Boolean
Users can specify and configure the options listed in ZooKeeper documentation with the exception of those options which are managed directly by AMQ Streams. Specifically, all configuration options with keys equal to or starting with one of the following strings are forbidden:
-
server. -
dataDir -
dataLogDir -
clientPort -
authProvider -
quorum.auth -
requireClientAuthScheme
When one of the forbidden options is present in the config property, it is ignored and a warning message is printed to the Cluster Operator log file. All other options are passed to ZooKeeper.
The Cluster Operator does not validate keys or values in the provided config object. When invalid configuration is provided, the ZooKeeper cluster might not start or might become unstable. In such cases, the configuration in the Kafka.spec.zookeeper.config object should be fixed and the Cluster Operator will roll out the new configuration to all ZooKeeper nodes.
Selected options have default values:
-
timeTickwith default value2000 -
initLimitwith default value5 -
syncLimitwith default value2 -
autopurge.purgeIntervalwith default value1
These options will be automatically configured when they are not present in the Kafka.spec.zookeeper.config property.
Use the three allowed ssl configuration options to run external listeners with a specific cipher suite for a TLS version. A cipher suite combines algorithms for secure connection and data transfer.
Example ZooKeeper configuration
apiVersion: kafka.strimzi.io/v1beta1
kind: Kafka
spec:
  kafka:
    # ...
  zookeeper:
    # ...
    config:
      autopurge.snapRetainCount: 3
      autopurge.purgeInterval: 1
      ssl.cipher.suites: "TLS_ECDHE_RSA_WITH_AES_256_GCM_SHA384" 1
      ssl.enabled.protocols: "TLSv1.2" 2
      ssl.protocol: "TLSv1.2" 3
    # ...
- 1
- The cipher suite for TLS using a combination of
ECDHEkey exchange mechanism,RSAauthentication algorithm,AESbulk encyption algorithm andSHA384MAC algorithm. - 2
- The SSl protocol
TLSv1.2is enabled. - 3
- Specifies the
TLSv1.2protocol to generate the SSL context. Allowed values areTLSv1.1andTLSv1.2.
3.1.9.2. Configuring ZooKeeper
Prerequisites
- An OpenShift cluster is available.
- The Cluster Operator is running.
Procedure
-
Open the YAML configuration file that contains the
Kafkaresource specifying the cluster deployment. In the
spec.zookeeper.configproperty in theKafkaresource, enter one or more ZooKeeper configuration settings. For example:apiVersion: kafka.strimzi.io/v1beta1 kind: Kafka spec: kafka: # ... zookeeper: # ... config: autopurge.snapRetainCount: 3 autopurge.purgeInterval: 1 # ...Apply the new configuration to create or update the resource.
Use
oc apply:oc apply -f kafka.yamlwhere
kafka.yamlis the YAML configuration file for the resource that you want to configure; for example,kafka-persistent.yaml.
3.1.10. ZooKeeper connection
ZooKeeper services are secured with encryption and authentication and are not intended to be used by external applications that are not part of AMQ Streams.
However, if you want to use Kafka CLI tools that require a connection to ZooKeeper, such as the kafka-topics tool, you can use a terminal inside a Kafka container and connect to the local end of the TLS tunnel to ZooKeeper by using localhost:2181 as the ZooKeeper address.
3.1.10.1. Connecting to ZooKeeper from a terminal
Open a terminal inside a Kafka container to use Kafka CLI tools that require a ZooKeeper connection.
Prerequisites
- An OpenShift cluster is available.
- A kafka cluster is running.
- The Cluster Operator is running.
Procedure
Open the terminal using the OpenShift console or run the
execcommand from your CLI.For example:
oc exec -it my-cluster-kafka-0 -- bin/kafka-topics.sh --list --zookeeper localhost:2181Be sure to use
localhost:2181.You can now run Kafka commands to ZooKeeper.
3.1.11. Entity Operator
The Entity Operator is responsible for managing Kafka-related entities in a running Kafka cluster.
The Entity Operator comprises the:
- Topic Operator to manage Kafka topics
- User Operator to manage Kafka users
Through Kafka resource configuration, the Cluster Operator can deploy the Entity Operator, including one or both operators, when deploying a Kafka cluster.
When deployed, the Entity Operator contains the operators according to the deployment configuration.
The operators are automatically configured to manage the topics and users of the Kafka cluster.
3.1.11.1. Entity Operator configuration properties
Use the entityOperator property in Kafka.spec to configure the Entity Operator.
The entityOperator property supports several sub-properties:
-
tlsSidecar -
topicOperator -
userOperator -
template
The tlsSidecar property contains the configuration of the TLS sidecar container, which is used to communicate with ZooKeeper. For more information on configuring the TLS sidecar, see Section 3.1.20, “TLS sidecar”.
The template property contains the configuration of the Entity Operator pod, such as labels, annotations, affinity, and tolerations. For more information on configuring templates, see Section 3.9.1, “Template properties”.
The topicOperator property contains the configuration of the Topic Operator. When this option is missing, the Entity Operator is deployed without the Topic Operator.
The userOperator property contains the configuration of the User Operator. When this option is missing, the Entity Operator is deployed without the User Operator.
For more information on the properties to configure the Entity Operator, see the EntityUserOperatorSpec schema reference.
Example of basic configuration enabling both operators
apiVersion: kafka.strimzi.io/v1beta1
kind: Kafka
metadata:
  name: my-cluster
spec:
  kafka:
    # ...
  zookeeper:
    # ...
  entityOperator:
    topicOperator: {}
    userOperator: {}
If an empty object ({}) is used for the topicOperator and userOperator, all properties use their default values.
When both topicOperator and userOperator properties are missing, the Entity Operator is not deployed.
3.1.11.2. Topic Operator configuration properties
Topic Operator deployment can be configured using additional options inside the topicOperator object. The following properties are supported:
watchedNamespace-
The OpenShift namespace in which the topic operator watches for
KafkaTopics. Default is the namespace where the Kafka cluster is deployed. reconciliationIntervalSeconds-
The interval between periodic reconciliations in seconds. Default
90. zookeeperSessionTimeoutSeconds-
The ZooKeeper session timeout in seconds. Default
20. topicMetadataMaxAttempts-
The number of attempts at getting topic metadata from Kafka. The time between each attempt is defined as an exponential back-off. Consider increasing this value when topic creation could take more time due to the number of partitions or replicas. Default
6. image-
The
imageproperty can be used to configure the container image which will be used. For more details about configuring custom container images, see Section 3.1.19, “Container images”. resources-
The
resourcesproperty configures the amount of resources allocated to the Topic Operator. For more details about resource request and limit configuration, see Section 3.1.12, “CPU and memory resources”. logging-
The
loggingproperty configures the logging of the Topic Operator. For more details, see Section 3.1.11.4, “Operator loggers”.
Example of Topic Operator configuration
apiVersion: kafka.strimzi.io/v1beta1
kind: Kafka
metadata:
  name: my-cluster
spec:
  kafka:
    # ...
  zookeeper:
    # ...
  entityOperator:
    # ...
    topicOperator:
      watchedNamespace: my-topic-namespace
      reconciliationIntervalSeconds: 60
    # ...
3.1.11.3. User Operator configuration properties
User Operator deployment can be configured using additional options inside the userOperator object. The following properties are supported:
watchedNamespace-
The OpenShift namespace in which the user operator watches for
KafkaUsers. Default is the namespace where the Kafka cluster is deployed. reconciliationIntervalSeconds-
The interval between periodic reconciliations in seconds. Default
120. zookeeperSessionTimeoutSeconds-
The ZooKeeper session timeout in seconds. Default
6. image-
The
imageproperty can be used to configure the container image which will be used. For more details about configuring custom container images, see Section 3.1.19, “Container images”. resources-
The
resourcesproperty configures the amount of resources allocated to the User Operator. For more details about resource request and limit configuration, see Section 3.1.12, “CPU and memory resources”. logging-
The
loggingproperty configures the logging of the User Operator. For more details, see Section 3.1.11.4, “Operator loggers”.
Example of User Operator configuration
apiVersion: kafka.strimzi.io/v1beta1
kind: Kafka
metadata:
  name: my-cluster
spec:
  kafka:
    # ...
  zookeeper:
    # ...
  entityOperator:
    # ...
    userOperator:
      watchedNamespace: my-user-namespace
      reconciliationIntervalSeconds: 60
    # ...
3.1.11.4. Operator loggers
The Topic Operator and User Operator have a configurable logger:
-
rootLogger.level
The operators use the Apache log4j2 logger implementation.
Use the logging property in the Kafka resource to configure loggers and logger levels.
You can set the log levels by specifying the logger and level directly (inline) or use a custom (external) ConfigMap. If a ConfigMap is used, you set logging.name property to the name of the ConfigMap containing the external logging configuration. Inside the ConfigMap, the logging configuration is described using log4j2.properties.
Here we see examples of inline and external logging.
Inline logging
apiVersion: kafka.strimzi.io/v1beta1
kind: Kafka
metadata:
  name: my-cluster
spec:
  kafka:
    # ...
  zookeeper:
    # ...
  entityOperator:
    # ...
    topicOperator:
      watchedNamespace: my-topic-namespace
      reconciliationIntervalSeconds: 60
      logging:
        type: inline
        loggers:
          rootLogger.level: INFO
    # ...
    userOperator:
      watchedNamespace: my-topic-namespace
      reconciliationIntervalSeconds: 60
      logging:
        type: inline
        loggers:
          rootLogger.level: INFO
# ...
External logging
apiVersion: kafka.strimzi.io/v1beta1
kind: Kafka
metadata:
  name: my-cluster
spec:
  kafka:
    # ...
  zookeeper:
    # ...
  entityOperator:
    # ...
    topicOperator:
      watchedNamespace: my-topic-namespace
      reconciliationIntervalSeconds: 60
      logging:
        type: external
        name: customConfigMap
# ...
Additional resources
- Garbage collector (GC) logging can also be enabled (or disabled). For more information about GC logging, see Section 3.1.18.1, “JVM configuration”
- For more information about log levels, see Apache logging services.
3.1.11.5. Configuring the Entity Operator
Prerequisites
- An OpenShift cluster
- A running Cluster Operator
Procedure
Edit the
entityOperatorproperty in theKafkaresource. For example:apiVersion: kafka.strimzi.io/v1beta1 kind: Kafka metadata: name: my-cluster spec: kafka: # ... zookeeper: # ... entityOperator: topicOperator: watchedNamespace: my-topic-namespace reconciliationIntervalSeconds: 60 userOperator: watchedNamespace: my-user-namespace reconciliationIntervalSeconds: 60Create or update the resource.
This can be done using
oc apply:oc apply -f your-file
3.1.12. CPU and memory resources
For every deployed container, AMQ Streams allows you to request specific resources and define the maximum consumption of those resources.
AMQ Streams supports two types of resources:
- CPU
- Memory
AMQ Streams uses the OpenShift syntax for specifying CPU and memory resources.
3.1.12.1. Resource limits and requests
Resource limits and requests are configured using the resources property in the following resources:
-
Kafka.spec.kafka -
Kafka.spec.kafka.tlsSidecar -
Kafka.spec.zookeeper -
Kafka.spec.entityOperator.topicOperator -
Kafka.spec.entityOperator.userOperator -
Kafka.spec.entityOperator.tlsSidecar -
Kafka.spec.KafkaExporter -
KafkaConnect.spec -
KafkaConnectS2I.spec -
KafkaBridge.spec
Additional resources
- For more information about managing computing resources on OpenShift, see Managing Compute Resources for Containers.
3.1.12.1.1. Resource requests
Requests specify the resources to reserve for a given container. Reserving the resources ensures that they are always available.
If the resource request is for more than the available free resources in the OpenShift cluster, the pod is not scheduled.
Resources requests are specified in the requests property. Resources requests currently supported by AMQ Streams:
-
cpu -
memory
A request may be configured for one or more supported resources.
Example resource request configuration with all resources
# ...
resources:
  requests:
    cpu: 12
    memory: 64Gi
# ...
3.1.12.1.2. Resource limits
Limits specify the maximum resources that can be consumed by a given container. The limit is not reserved and might not always be available. A container can use the resources up to the limit only when they are available. Resource limits should be always higher than the resource requests.
Resource limits are specified in the limits property. Resource limits currently supported by AMQ Streams:
-
cpu -
memory
A resource may be configured for one or more supported limits.
Example resource limits configuration
# ...
resources:
  limits:
    cpu: 12
    memory: 64Gi
# ...
3.1.12.1.3. Supported CPU formats
CPU requests and limits are supported in the following formats:
-
Number of CPU cores as integer (
5CPU core) or decimal (2.5CPU core). -
Number or millicpus / millicores (
100m) where 1000 millicores is the same1CPU core.
Example CPU units
# ...
resources:
  requests:
    cpu: 500m
  limits:
    cpu: 2.5
# ...
The computing power of 1 CPU core may differ depending on the platform where OpenShift is deployed.
Additional resources
- For more information on CPU specification, see the Meaning of CPU.
3.1.12.1.4. Supported memory formats
Memory requests and limits are specified in megabytes, gigabytes, mebibytes, and gibibytes.
-
To specify memory in megabytes, use the
Msuffix. For example1000M. -
To specify memory in gigabytes, use the
Gsuffix. For example1G. -
To specify memory in mebibytes, use the
Misuffix. For example1000Mi. -
To specify memory in gibibytes, use the
Gisuffix. For example1Gi.
An example of using different memory units
# ...
resources:
  requests:
    memory: 512Mi
  limits:
    memory: 2Gi
# ...
Additional resources
- For more details about memory specification and additional supported units, see Meaning of memory.
3.1.12.2. Configuring resource requests and limits
Prerequisites
- An OpenShift cluster
- A running Cluster Operator
Procedure
Edit the
resourcesproperty in the resource specifying the cluster deployment. For example:apiVersion: kafka.strimzi.io/v1beta1 kind: Kafka spec: kafka: # ... resources: requests: cpu: "8" memory: 64Gi limits: cpu: "12" memory: 128Gi # ... zookeeper: # ...Create or update the resource.
This can be done using
oc apply:oc apply -f your-file
Additional resources
- For more information about the schema, see {K8sResourceRequirementsAPI}.
3.1.13. Kafka loggers
Kafka has its own configurable loggers:
-
kafka.root.logger.level -
log4j.logger.org.I0Itec.zkclient.ZkClient -
log4j.logger.org.apache.zookeeper -
log4j.logger.kafka -
log4j.logger.org.apache.kafka -
log4j.logger.kafka.request.logger -
log4j.logger.kafka.network.Processor -
log4j.logger.kafka.server.KafkaApis -
log4j.logger.kafka.network.RequestChannel$ -
log4j.logger.kafka.controller -
log4j.logger.kafka.log.LogCleaner -
log4j.logger.state.change.logger -
log4j.logger.kafka.authorizer.logger
ZooKeeper also has a configurable logger:
-
zookeeper.root.logger
Kafka and ZooKeeper use the Apache log4j logger implementation.
Use the logging property to configure loggers and logger levels.
You can set the log levels by specifying the logger and level directly (inline) or use a custom (external) ConfigMap. If a ConfigMap is used, you set logging.name property to the name of the ConfigMap containing the external logging configuration. Inside the ConfigMap, the logging configuration is described using log4j.properties.
Here we see examples of inline and external logging.
Inline logging
apiVersion: kafka.strimzi.io/v1beta1
kind: Kafka
spec:
  # ...
  logging:
    type: inline
    loggers:
      kafka.root.logger.level: "INFO"
  # ...
  zookeeper:
    # ...
    logging:
      type: inline
      loggers:
        zookeeper.root.logger: "INFO"
  # ...
  entityOperator:
    # ...
    topicOperator:
      # ...
      logging:
        type: inline
        loggers:
          rootLogger.level: INFO
    # ...
    userOperator:
      # ...
      logging:
        type: inline
        loggers:
          rootLogger.level: INFO
    # ...
External logging
apiVersion: kafka.strimzi.io/v1beta1
kind: Kafka
spec:
  # ...
  logging:
    type: external
    name: customConfigMap
  # ...
Operators use the Apache log4j2 logger implementation, so the logging configuration is described inside the ConfigMap using log4j2.properties. For more information, see Section 3.1.11.4, “Operator loggers”.
Additional resources
- Garbage collector (GC) logging can also be enabled (or disabled). For more information on garbage collection, see Section 3.1.18.1, “JVM configuration”
- For more information about log levels, see Apache logging services.
3.1.14. Kafka rack awareness
The rack awareness feature in AMQ Streams helps to spread the Kafka broker pods and Kafka topic replicas across different racks. Enabling rack awareness helps to improve availability of Kafka brokers and the topics they are hosting.
"Rack" might represent an availability zone, data center, or an actual rack in your data center.
3.1.14.1. Configuring rack awareness in Kafka brokers
Kafka rack awareness can be configured in the rack property of Kafka.spec.kafka. The rack object has one mandatory field named topologyKey. This key needs to match one of the labels assigned to the OpenShift cluster nodes. The label is used by OpenShift when scheduling the Kafka broker pods to nodes. If the OpenShift cluster is running on a cloud provider platform, that label should represent the availability zone where the node is running. Usually, the nodes are labeled with failure-domain.beta.kubernetes.io/zone that can be easily used as the topologyKey value. This has the effect of spreading the broker pods across zones, and also setting the brokers' broker.rack configuration parameter inside Kafka broker.
Prerequisites
- An OpenShift cluster
- A running Cluster Operator
Procedure
- Consult your OpenShift administrator regarding the node label that represents the zone / rack into which the node is deployed.
Edit the
rackproperty in theKafkaresource using the label as the topology key.apiVersion: kafka.strimzi.io/v1beta1 kind: Kafka metadata: name: my-cluster spec: kafka: # ... rack: topologyKey: failure-domain.beta.kubernetes.io/zone # ...Create or update the resource.
This can be done using
oc apply:oc apply -f your-file
Additional resources
- For information about Configuring init container image for Kafka rack awareness, see Section 3.1.19, “Container images”.
3.1.15. Healthchecks
Healthchecks are periodical tests which verify the health of an application. When a Healthcheck probe fails, OpenShift assumes that the application is not healthy and attempts to fix it.
OpenShift supports two types of Healthcheck probes:
- Liveness probes
- Readiness probes
For more details about the probes, see Configure Liveness and Readiness Probes. Both types of probes are used in AMQ Streams components.
Users can configure selected options for liveness and readiness probes.
3.1.15.1. Healthcheck configurations
Liveness and readiness probes can be configured using the livenessProbe and readinessProbe properties in following resources:
-
Kafka.spec.kafka -
Kafka.spec.kafka.tlsSidecar -
Kafka.spec.zookeeper -
Kafka.spec.entityOperator.tlsSidecar -
Kafka.spec.entityOperator.topicOperator -
Kafka.spec.entityOperator.userOperator -
Kafka.spec.KafkaExporter -
KafkaConnect.spec -
KafkaConnectS2I.spec -
KafkaMirrorMaker.spec -
KafkaBridge.spec
Both livenessProbe and readinessProbe support the following options:
-
initialDelaySeconds -
timeoutSeconds -
periodSeconds -
successThreshold -
failureThreshold
For more information about the livenessProbe and readinessProbe options, see Section B.40, “Probe schema reference”.
An example of liveness and readiness probe configuration
# ...
readinessProbe:
  initialDelaySeconds: 15
  timeoutSeconds: 5
livenessProbe:
  initialDelaySeconds: 15
  timeoutSeconds: 5
# ...
3.1.15.2. Configuring healthchecks
Prerequisites
- An OpenShift cluster
- A running Cluster Operator
Procedure
Edit the
livenessProbeorreadinessProbeproperty in theKafka,KafkaConnectorKafkaConnectS2Iresource. For example:apiVersion: kafka.strimzi.io/v1beta1 kind: Kafka metadata: name: my-cluster spec: kafka: # ... readinessProbe: initialDelaySeconds: 15 timeoutSeconds: 5 livenessProbe: initialDelaySeconds: 15 timeoutSeconds: 5 # ... zookeeper: # ...Create or update the resource.
This can be done using
oc apply:oc apply -f your-file
3.1.16. Prometheus metrics
AMQ Streams supports Prometheus metrics using Prometheus JMX exporter to convert the JMX metrics supported by Apache Kafka and ZooKeeper to Prometheus metrics. When metrics are enabled, they are exposed on port 9404.
For more information about setting up and deploying Prometheus and Grafana, see Introducing Metrics to Kafka.
3.1.16.1. Metrics configuration
Prometheus metrics are enabled by configuring the metrics property in following resources:
-
Kafka.spec.kafka -
Kafka.spec.zookeeper -
KafkaConnect.spec -
KafkaConnectS2I.spec
When the metrics property is not defined in the resource, the Prometheus metrics will be disabled. To enable Prometheus metrics export without any further configuration, you can set it to an empty object ({}).
Example of enabling metrics without any further configuration
apiVersion: kafka.strimzi.io/v1beta1
kind: Kafka
metadata:
  name: my-cluster
spec:
  kafka:
    # ...
    metrics: {}
    # ...
  zookeeper:
    # ...
The metrics property might contain additional configuration for the Prometheus JMX exporter.
Example of enabling metrics with additional Prometheus JMX Exporter configuration
apiVersion: kafka.strimzi.io/v1beta1
kind: Kafka
metadata:
  name: my-cluster
spec:
  kafka:
    # ...
    metrics:
      lowercaseOutputName: true
      rules:
        - pattern: "kafka.server<type=(.+), name=(.+)PerSec\\w*><>Count"
          name: "kafka_server_$1_$2_total"
        - pattern: "kafka.server<type=(.+), name=(.+)PerSec\\w*, topic=(.+)><>Count"
          name: "kafka_server_$1_$2_total"
          labels:
            topic: "$3"
    # ...
  zookeeper:
    # ...
3.1.16.2. Configuring Prometheus metrics
Prerequisites
- An OpenShift cluster
- A running Cluster Operator
Procedure
Edit the
metricsproperty in theKafka,KafkaConnectorKafkaConnectS2Iresource. For example:apiVersion: kafka.strimzi.io/v1beta1 kind: Kafka metadata: name: my-cluster spec: kafka: # ... zookeeper: # ... metrics: lowercaseOutputName: true # ...Create or update the resource.
This can be done using
oc apply:oc apply -f your-file
3.1.17. JMX Options
AMQ Streams supports obtaining JMX metrics from the Kafka brokers by opening a JMX port on 9999. You can obtain various metrics about each Kafka broker, for example, usage data such as the BytesPerSecond value or the request rate of the network of the broker. AMQ Streams supports opening a password and username protected JMX port or a non-protected JMX port.
3.1.17.1. Configuring JMX options
Prerequisites
- An OpenShift cluster
- A running Cluster Operator
You can configure JMX options by using the jmxOptions property in the following resources:
-
Kafka.spec.kafka
You can configure username and password protection for the JMX port that is opened on the Kafka brokers.
Securing the JMX Port
You can secure the JMX port to prevent unauthorized pods from accessing the port. Currently the JMX port can only be secured using a username and password. To enable security for the JMX port, set the type parameter in the authentication field to password.:
apiVersion: kafka.strimzi.io/v1beta1
kind: Kafka
metadata:
  name: my-cluster
spec:
  kafka:
    # ...
    jmxOptions:
      authentication:
        type: "password"
    # ...
  zookeeper:
    # ...
This allows you to deploy a pod internally into a cluster and obtain JMX metrics by using the headless service and specifying which broker you want to address. To get JMX metrics from broker 0 we address the headless service appending broker 0 in front of the headless service:
"<cluster-name>-kafka-0-<cluster-name>-<headless-service-name>"
If the JMX port is secured, you can get the username and password by referencing them from the JMX secret in the deployment of your pod.
Using an open JMX port
To disable security for the JMX port, do not fill in the authentication field
apiVersion: kafka.strimzi.io/v1beta1
kind: Kafka
metadata:
  name: my-cluster
spec:
  kafka:
    # ...
    jmxOptions: {}
    # ...
  zookeeper:
    # ...
This will just open the JMX Port on the headless service and you can follow a similar approach as described above to deploy a pod into the cluster. The only difference is that any pod will be able to read from the JMX port.
3.1.18. JVM Options
The following components of AMQ Streams run inside a Virtual Machine (VM):
- Apache Kafka
- Apache ZooKeeper
- Apache Kafka Connect
- Apache Kafka MirrorMaker
- AMQ Streams Kafka Bridge
JVM configuration options optimize the performance for different platforms and architectures. AMQ Streams allows you to configure some of these options.
3.1.18.1. JVM configuration
JVM options can be configured using the jvmOptions property in following resources:
-
Kafka.spec.kafka -
Kafka.spec.zookeeper -
KafkaConnect.spec -
KafkaConnectS2I.spec -
KafkaMirrorMaker.spec -
KafkaBridge.spec
Only a selected subset of available JVM options can be configured. The following options are supported:
-Xms and -Xmx
-Xms configures the minimum initial allocation heap size when the JVM starts. -Xmx configures the maximum heap size.
The units accepted by JVM settings such as -Xmx and -Xms are those accepted by the JDK java binary in the corresponding image. Accordingly, 1g or 1G means 1,073,741,824 bytes, and Gi is not a valid unit suffix. This is in contrast to the units used for memory requests and limits, which follow the OpenShift convention where 1G means 1,000,000,000 bytes, and 1Gi means 1,073,741,824 bytes
The default values used for -Xms and -Xmx depends on whether there is a memory request limit configured for the container:
- If there is a memory limit then the JVM’s minimum and maximum memory will be set to a value corresponding to the limit.
-
If there is no memory limit then the JVM’s minimum memory will be set to
128Mand the JVM’s maximum memory will not be defined. This allows for the JVM’s memory to grow as-needed, which is ideal for single node environments in test and development.
Setting -Xmx explicitly requires some care:
-
The JVM’s overall memory usage will be approximately 4 × the maximum heap, as configured by
-Xmx. -
If
-Xmxis set without also setting an appropriate OpenShift memory limit, it is possible that the container will be killed should the OpenShift node experience memory pressure (from other Pods running on it). -
If
-Xmxis set without also setting an appropriate OpenShift memory request, it is possible that the container will be scheduled to a node with insufficient memory. In this case, the container will not start but crash (immediately if-Xmsis set to-Xmx, or some later time if not).
When setting -Xmx explicitly, it is recommended to:
- set the memory request and the memory limit to the same value,
-
use a memory request that is at least 4.5 × the
-Xmx, -
consider setting
-Xmsto the same value as-Xmx.
Containers doing lots of disk I/O (such as Kafka broker containers) will need to leave some memory available for use as operating system page cache. On such containers, the requested memory should be significantly higher than the memory used by the JVM.
Example fragment configuring -Xmx and -Xms
# ...
jvmOptions:
  "-Xmx": "2g"
  "-Xms": "2g"
# ...
In the above example, the JVM will use 2 GiB (=2,147,483,648 bytes) for its heap. Its total memory usage will be approximately 8GiB.
Setting the same value for initial (-Xms) and maximum (-Xmx) heap sizes avoids the JVM having to allocate memory after startup, at the cost of possibly allocating more heap than is really needed. For Kafka and ZooKeeper pods such allocation could cause unwanted latency. For Kafka Connect avoiding over allocation may be the most important concern, especially in distributed mode where the effects of over-allocation will be multiplied by the number of consumers.
-server
-server enables the server JVM. This option can be set to true or false.
Example fragment configuring -server
# ...
jvmOptions:
  "-server": true
# ...
When neither of the two options (-server and -XX) is specified, the default Apache Kafka configuration of KAFKA_JVM_PERFORMANCE_OPTS will be used.
-XX
-XX object can be used for configuring advanced runtime options of a JVM. The -server and -XX options are used to configure the KAFKA_JVM_PERFORMANCE_OPTS option of Apache Kafka.
Example showing the use of the -XX object
jvmOptions:
  "-XX":
    "UseG1GC": true
    "MaxGCPauseMillis": 20
    "InitiatingHeapOccupancyPercent": 35
    "ExplicitGCInvokesConcurrent": true
    "UseParNewGC": false
The example configuration above will result in the following JVM options:
-XX:+UseG1GC -XX:MaxGCPauseMillis=20 -XX:InitiatingHeapOccupancyPercent=35 -XX:+ExplicitGCInvokesConcurrent -XX:-UseParNewGC
When neither of the two options (-server and -XX) is specified, the default Apache Kafka configuration of KAFKA_JVM_PERFORMANCE_OPTS will be used.
3.1.18.1.1. Garbage collector logging
The jvmOptions section also allows you to enable and disable garbage collector (GC) logging. GC logging is disabled by default. To enable it, set the gcLoggingEnabled property as follows:
Example of enabling GC logging
# ...
jvmOptions:
  gcLoggingEnabled: true
# ...
3.1.18.2. Configuring JVM options
Prerequisites
- An OpenShift cluster
- A running Cluster Operator
Procedure
Edit the
jvmOptionsproperty in theKafka,KafkaConnect,KafkaConnectS2I,KafkaMirrorMaker, orKafkaBridgeresource. For example:apiVersion: kafka.strimzi.io/v1beta1 kind: Kafka metadata: name: my-cluster spec: kafka: # ... jvmOptions: "-Xmx": "8g" "-Xms": "8g" # ... zookeeper: # ...Create or update the resource.
This can be done using
oc apply:oc apply -f your-file
3.1.19. Container images
AMQ Streams allows you to configure container images which will be used for its components. Overriding container images is recommended only in special situations, where you need to use a different container registry. For example, because your network does not allow access to the container repository used by AMQ Streams. In such a case, you should either copy the AMQ Streams images or build them from the source. If the configured image is not compatible with AMQ Streams images, it might not work properly.
3.1.19.1. Container image configurations
You can specify which container image to use for each component using the image property in the following resources:
-
Kafka.spec.kafka -
Kafka.spec.kafka.tlsSidecar -
Kafka.spec.zookeeper -
Kafka.spec.entityOperator.topicOperator -
Kafka.spec.entityOperator.userOperator -
Kafka.spec.entityOperator.tlsSidecar -
KafkaConnect.spec -
KafkaConnectS2I.spec -
KafkaBridge.spec
3.1.19.1.1. Configuring the image property for Kafka, Kafka Connect, and Kafka MirrorMaker
Kafka, Kafka Connect (including Kafka Connect with S2I support), and Kafka MirrorMaker support multiple versions of Kafka. Each component requires its own image. The default images for the different Kafka versions are configured in the following environment variables:
-
STRIMZI_KAFKA_IMAGES -
STRIMZI_KAFKA_CONNECT_IMAGES -
STRIMZI_KAFKA_CONNECT_S2I_IMAGES -
STRIMZI_KAFKA_MIRROR_MAKER_IMAGES
These environment variables contain mappings between the Kafka versions and their corresponding images. The mappings are used together with the image and version properties:
-
If neither
imagenorversionare given in the custom resource then theversionwill default to the Cluster Operator’s default Kafka version, and the image will be the one corresponding to this version in the environment variable. -
If
imageis given butversionis not, then the given image is used and theversionis assumed to be the Cluster Operator’s default Kafka version. -
If
versionis given butimageis not, then the image that corresponds to the given version in the environment variable is used. -
If both
versionandimageare given, then the given image is used. The image is assumed to contain a Kafka image with the given version.
The image and version for the different components can be configured in the following properties:
-
For Kafka in
spec.kafka.imageandspec.kafka.version. -
For Kafka Connect, Kafka Connect S2I, and Kafka MirrorMaker in
spec.imageandspec.version.
It is recommended to provide only the version and leave the image property unspecified. This reduces the chance of making a mistake when configuring the custom resource. If you need to change the images used for different versions of Kafka, it is preferable to configure the Cluster Operator’s environment variables.
3.1.19.1.2. Configuring the image property in other resources
For the image property in the other custom resources, the given value will be used during deployment. If the image property is missing, the image specified in the Cluster Operator configuration will be used. If the image name is not defined in the Cluster Operator configuration, then the default value will be used.
For Kafka broker TLS sidecar:
-
Container image specified in the
STRIMZI_DEFAULT_TLS_SIDECAR_KAFKA_IMAGEenvironment variable from the Cluster Operator configuration. -
registry.redhat.io/amq7/amq-streams-kafka-25-rhel7:1.5.0container image.
-
Container image specified in the
For Topic Operator:
-
Container image specified in the
STRIMZI_DEFAULT_TOPIC_OPERATOR_IMAGEenvironment variable from the Cluster Operator configuration. -
registry.redhat.io/amq7/amq-streams-rhel7-operator:1.5.0container image.
-
Container image specified in the
For User Operator:
-
Container image specified in the
STRIMZI_DEFAULT_USER_OPERATOR_IMAGEenvironment variable from the Cluster Operator configuration. -
registry.redhat.io/amq7/amq-streams-rhel7-operator:1.5.0container image.
-
Container image specified in the
For Entity Operator TLS sidecar:
-
Container image specified in the
STRIMZI_DEFAULT_TLS_SIDECAR_ENTITY_OPERATOR_IMAGEenvironment variable from the Cluster Operator configuration. -
registry.redhat.io/amq7/amq-streams-kafka-25-rhel7:1.5.0container image.
-
Container image specified in the
For Kafka Exporter:
-
Container image specified in the
STRIMZI_DEFAULT_KAFKA_EXPORTER_IMAGEenvironment variable from the Cluster Operator configuration. -
registry.redhat.io/amq7/amq-streams-kafka-25-rhel7:1.5.0container image.
-
Container image specified in the
For Kafka Bridge:
-
Container image specified in the
STRIMZI_DEFAULT_KAFKA_BRIDGE_IMAGEenvironment variable from the Cluster Operator configuration. -
registry.redhat.io/amq7/amq-streams-bridge-rhel7:1.5.0container image.
-
Container image specified in the
For Kafka broker initializer:
-
Container image specified in the
STRIMZI_DEFAULT_KAFKA_INIT_IMAGEenvironment variable from the Cluster Operator configuration. -
registry.redhat.io/amq7/amq-streams-rhel7-operator:1.5.0container image.
-
Container image specified in the
Overriding container images is recommended only in special situations, where you need to use a different container registry. For example, because your network does not allow access to the container repository used by AMQ Streams. In such case, you should either copy the AMQ Streams images or build them from source. In case the configured image is not compatible with AMQ Streams images, it might not work properly.
Example of container image configuration
apiVersion: kafka.strimzi.io/v1beta1
kind: Kafka
metadata:
  name: my-cluster
spec:
  kafka:
    # ...
    image: my-org/my-image:latest
    # ...
  zookeeper:
    # ...
3.1.19.2. Configuring container images
Prerequisites
- An OpenShift cluster
- A running Cluster Operator
Procedure
Edit the
imageproperty in theKafka,KafkaConnectorKafkaConnectS2Iresource. For example:apiVersion: kafka.strimzi.io/v1beta1 kind: Kafka metadata: name: my-cluster spec: kafka: # ... image: my-org/my-image:latest # ... zookeeper: # ...Create or update the resource.
This can be done using
oc apply:oc apply -f your-file
3.1.20. TLS sidecar
A sidecar is a container that runs in a pod but serves a supporting purpose. In AMQ Streams, the TLS sidecar uses TLS to encrypt and decrypt all communication between the various components and ZooKeeper. ZooKeeper does not have native TLS support.
The TLS sidecar is used in:
- Kafka brokers
- ZooKeeper nodes
- Entity Operator
3.1.20.1. TLS sidecar configuration
The TLS sidecar can be configured using the tlsSidecar property in:
-
Kafka.spec.kafka -
Kafka.spec.zookeeper -
Kafka.spec.entityOperator
The TLS sidecar supports the following additional options:
-
image -
resources -
logLevel -
readinessProbe -
livenessProbe
The resources property can be used to specify the memory and CPU resources allocated for the TLS sidecar.
The image property can be used to configure the container image which will be used. For more details about configuring custom container images, see Section 3.1.19, “Container images”.
The logLevel property is used to specify the logging level. Following logging levels are supported:
- emerg
- alert
- crit
- err
- warning
- notice
- info
- debug
The default value is notice.
For more information about configuring the readinessProbe and livenessProbe properties for the healthchecks, see Section 3.1.15.1, “Healthcheck configurations”.
Example of TLS sidecar configuration
apiVersion: kafka.strimzi.io/v1beta1
kind: Kafka
metadata:
name: my-cluster
spec:
kafka:
# ...
tlsSidecar:
image: my-org/my-image:latest
resources:
requests:
cpu: 200m
memory: 64Mi
limits:
cpu: 500m
memory: 128Mi
logLevel: debug
readinessProbe:
initialDelaySeconds: 15
timeoutSeconds: 5
livenessProbe:
initialDelaySeconds: 15
timeoutSeconds: 5
# ...
zookeeper:
# ...
3.1.20.2. Configuring TLS sidecar
Prerequisites
- An OpenShift cluster
- A running Cluster Operator
Procedure
Edit the
tlsSidecarproperty in theKafkaresource. For example:apiVersion: kafka.strimzi.io/v1beta1 kind: Kafka metadata: name: my-cluster spec: kafka: # ... tlsSidecar: resources: requests: cpu: 200m memory: 64Mi limits: cpu: 500m memory: 128Mi # ... zookeeper: # ...Create or update the resource.
This can be done using
oc apply:oc apply -f your-file
3.1.21. Configuring pod scheduling
When two applications are scheduled to the same OpenShift node, both applications might use the same resources like disk I/O and impact performance. That can lead to performance degradation. Scheduling Kafka pods in a way that avoids sharing nodes with other critical workloads, using the right nodes or dedicated a set of nodes only for Kafka are the best ways how to avoid such problems.
3.1.21.1. Scheduling pods based on other applications
3.1.21.1.1. Avoid critical applications to share the node
Pod anti-affinity can be used to ensure that critical applications are never scheduled on the same disk. When running Kafka cluster, it is recommended to use pod anti-affinity to ensure that the Kafka brokers do not share the nodes with other workloads like databases.
3.1.21.1.2. Affinity
Affinity can be configured using the affinity property in following resources:
-
Kafka.spec.kafka.template.pod -
Kafka.spec.zookeeper.template.pod -
Kafka.spec.entityOperator.template.pod -
KafkaConnect.spec.template.pod -
KafkaConnectS2I.spec.template.pod -
KafkaBridge.spec.template.pod
The affinity configuration can include different types of affinity:
- Pod affinity and anti-affinity
- Node affinity
The format of the affinity property follows the OpenShift specification. For more details, see the Kubernetes node and pod affinity documentation.
3.1.21.1.3. Configuring pod anti-affinity in Kafka components
Prerequisites
- An OpenShift cluster
- A running Cluster Operator
Procedure
Edit the
affinityproperty in the resource specifying the cluster deployment. Use labels to specify the pods which should not be scheduled on the same nodes. ThetopologyKeyshould be set tokubernetes.io/hostnameto specify that the selected pods should not be scheduled on nodes with the same hostname. For example:apiVersion: kafka.strimzi.io/v1beta1 kind: Kafka spec: kafka: # ... template: pod: affinity: podAntiAffinity: requiredDuringSchedulingIgnoredDuringExecution: - labelSelector: matchExpressions: - key: application operator: In values: - postgresql - mongodb topologyKey: "kubernetes.io/hostname" # ... zookeeper: # ...Create or update the resource.
This can be done using
oc apply:oc apply -f your-file
3.1.21.2. Scheduling pods to specific nodes
3.1.21.2.1. Node scheduling
The OpenShift cluster usually consists of many different types of worker nodes. Some are optimized for CPU heavy workloads, some for memory, while other might be optimized for storage (fast local SSDs) or network. Using different nodes helps to optimize both costs and performance. To achieve the best possible performance, it is important to allow scheduling of AMQ Streams components to use the right nodes.
OpenShift uses node affinity to schedule workloads onto specific nodes. Node affinity allows you to create a scheduling constraint for the node on which the pod will be scheduled. The constraint is specified as a label selector. You can specify the label using either the built-in node label like beta.kubernetes.io/instance-type or custom labels to select the right node.
3.1.21.2.2. Affinity
Affinity can be configured using the affinity property in following resources:
-
Kafka.spec.kafka.template.pod -
Kafka.spec.zookeeper.template.pod -
Kafka.spec.entityOperator.template.pod -
KafkaConnect.spec.template.pod -
KafkaConnectS2I.spec.template.pod -
KafkaBridge.spec.template.pod
The affinity configuration can include different types of affinity:
- Pod affinity and anti-affinity
- Node affinity
The format of the affinity property follows the OpenShift specification. For more details, see the Kubernetes node and pod affinity documentation.
3.1.21.2.3. Configuring node affinity in Kafka components
Prerequisites
- An OpenShift cluster
- A running Cluster Operator
Procedure
Label the nodes where AMQ Streams components should be scheduled.
This can be done using
oc label:oc label node your-node node-type=fast-networkAlternatively, some of the existing labels might be reused.
Edit the
affinityproperty in the resource specifying the cluster deployment. For example:apiVersion: kafka.strimzi.io/v1beta1 kind: Kafka spec: kafka: # ... template: pod: affinity: nodeAffinity: requiredDuringSchedulingIgnoredDuringExecution: nodeSelectorTerms: - matchExpressions: - key: node-type operator: In values: - fast-network # ... zookeeper: # ...Create or update the resource.
This can be done using
oc apply:oc apply -f your-file
3.1.21.3. Using dedicated nodes
3.1.21.3.1. Dedicated nodes
Cluster administrators can mark selected OpenShift nodes as tainted. Nodes with taints are excluded from regular scheduling and normal pods will not be scheduled to run on them. Only services which can tolerate the taint set on the node can be scheduled on it. The only other services running on such nodes will be system services such as log collectors or software defined networks.
Taints can be used to create dedicated nodes. Running Kafka and its components on dedicated nodes can have many advantages. There will be no other applications running on the same nodes which could cause disturbance or consume the resources needed for Kafka. That can lead to improved performance and stability.
To schedule Kafka pods on the dedicated nodes, configure node affinity and tolerations.
3.1.21.3.2. Affinity
Affinity can be configured using the affinity property in following resources:
-
Kafka.spec.kafka.template.pod -
Kafka.spec.zookeeper.template.pod -
Kafka.spec.entityOperator.template.pod -
KafkaConnect.spec.template.pod -
KafkaConnectS2I.spec.template.pod -
KafkaBridge.spec.template.pod
The affinity configuration can include different types of affinity:
- Pod affinity and anti-affinity
- Node affinity
The format of the affinity property follows the OpenShift specification. For more details, see the Kubernetes node and pod affinity documentation.
3.1.21.3.3. Tolerations
Tolerations can be configured using the tolerations property in following resources:
-
Kafka.spec.kafka.template.pod -
Kafka.spec.zookeeper.template.pod -
Kafka.spec.entityOperator.template.pod -
KafkaConnect.spec.template.pod -
KafkaConnectS2I.spec.template.pod -
KafkaBridge.spec.template.pod
The format of the tolerations property follows the OpenShift specification. For more details, see the Kubernetes taints and tolerations.
3.1.21.3.4. Setting up dedicated nodes and scheduling pods on them
Prerequisites
- An OpenShift cluster
- A running Cluster Operator
Procedure
- Select the nodes which should be used as dedicated.
- Make sure there are no workloads scheduled on these nodes.
Set the taints on the selected nodes:
This can be done using
oc adm taint:oc adm taint node your-node dedicated=Kafka:NoScheduleAdditionally, add a label to the selected nodes as well.
This can be done using
oc label:oc label node your-node dedicated=KafkaEdit the
affinityandtolerationsproperties in the resource specifying the cluster deployment. For example:apiVersion: kafka.strimzi.io/v1beta1 kind: Kafka spec: kafka: # ... template: pod: tolerations: - key: "dedicated" operator: "Equal" value: "Kafka" effect: "NoSchedule" affinity: nodeAffinity: requiredDuringSchedulingIgnoredDuringExecution: nodeSelectorTerms: - matchExpressions: - key: dedicated operator: In values: - Kafka # ... zookeeper: # ...Create or update the resource.
This can be done using
oc apply:oc apply -f your-file
3.1.22. Kafka Exporter
You can configure the Kafka resource to automatically deploy Kafka Exporter in your cluster.
Kafka Exporter extracts data for analysis as Prometheus metrics, primarily data relating to offsets, consumer groups, consumer lag and topics.
For information on Kafka Exporter and why it is important to monitor consumer lag for performance, see Kafka Exporter.
3.1.22.1. Configuring Kafka Exporter
This procedure shows how to configure Kafka Exporter in the Kafka resource through KafkaExporter properties.
For more information about configuring the Kafka resource, see the sample Kafka YAML configuration.
The properties relevant to the Kafka Exporter configuration are shown in this procedure.
You can configure these properties as part of a deployment or redeployment of the Kafka cluster.
Prerequisites
- An OpenShift cluster
- A running Cluster Operator
Procedure
Edit the
KafkaExporterproperties for theKafkaresource.The properties you can configure are shown in this example configuration:
apiVersion: kafka.strimzi.io/v1beta1 kind: Kafka metadata: name: my-cluster spec: # ... kafkaExporter: image: my-org/my-image:latest 1 groupRegex: ".*" 2 topicRegex: ".*" 3 resources: 4 requests: cpu: 200m memory: 64Mi limits: cpu: 500m memory: 128Mi logging: debug 5 enableSaramaLogging: true 6 template: 7 pod: metadata: labels: label1: value1 imagePullSecrets: - name: my-docker-credentials securityContext: runAsUser: 1000001 fsGroup: 0 terminationGracePeriodSeconds: 120 readinessProbe: 8 initialDelaySeconds: 15 timeoutSeconds: 5 livenessProbe: 9 initialDelaySeconds: 15 timeoutSeconds: 5 # ...- 1
- ADVANCED OPTION: Container image configuration, which is recommended only in special situations.
- 2
- A regular expression to specify the consumer groups to include in the metrics.
- 3
- A regular expression to specify the topics to include in the metrics.
- 4
- 5
- Logging configuration, to log messages with a given severity (debug, info, warn, error, fatal) or above.
- 6
- Boolean to enable Sarama logging, a Go client library used by Kafka Exporter.
- 7
- 8
- 9
Create or update the resource:
oc apply -f kafka.yaml
What to do next
After configuring and deploying Kafka Exporter, you can enable Grafana to present the Kafka Exporter dashboards.
Additional resources
3.1.23. Performing a rolling update of a Kafka cluster
This procedure describes how to manually trigger a rolling update of an existing Kafka cluster by using an OpenShift annotation.
Prerequisites
- A running Kafka cluster.
- A running Cluster Operator.
Procedure
Find the name of the
StatefulSetthat controls the Kafka pods you want to manually update.For example, if your Kafka cluster is named my-cluster, the corresponding
StatefulSetis named my-cluster-kafka.Annotate the
StatefulSetresource in OpenShift. For example, usingoc annotate:oc annotate statefulset cluster-name-kafka strimzi.io/manual-rolling-update=true-
Wait for the next reconciliation to occur (every two minutes by default). A rolling update of all pods within the annotated
StatefulSetis triggered, as long as the annotation was detected by the reconciliation process. When the rolling update of all the pods is complete, the annotation is removed from theStatefulSet.
Additional resources
- For more information about deploying the Cluster Operator, see Section 2.2.1, “Deploying the Cluster Operator”.
- For more information about deploying the Kafka cluster, see Section 2.2.2.1, “Deploying the Kafka cluster”.
3.1.24. Performing a rolling update of a ZooKeeper cluster
This procedure describes how to manually trigger a rolling update of an existing ZooKeeper cluster by using an OpenShift annotation.
Prerequisites
- A running ZooKeeper cluster.
- A running Cluster Operator.
Procedure
Find the name of the
StatefulSetthat controls the ZooKeeper pods you want to manually update.For example, if your Kafka cluster is named my-cluster, the corresponding
StatefulSetis named my-cluster-zookeeper.Annotate the
StatefulSetresource in OpenShift. For example, usingoc annotate:oc annotate statefulset cluster-name-zookeeper strimzi.io/manual-rolling-update=true-
Wait for the next reconciliation to occur (every two minutes by default). A rolling update of all pods within the annotated
StatefulSetis triggered, as long as the annotation was detected by the reconciliation process. When the rolling update of all the pods is complete, the annotation is removed from theStatefulSet.
Additional resources
- For more information about deploying the Cluster Operator, see Section 2.2.1, “Deploying the Cluster Operator”.
- For more information about deploying the ZooKeeper cluster, see Section 2.2.2.1, “Deploying the Kafka cluster”.
3.1.25. Scaling clusters
3.1.25.1. Scaling Kafka clusters
3.1.25.1.1. Adding brokers to a cluster
The primary way of increasing throughput for a topic is to increase the number of partitions for that topic. That works because the extra partitions allow the load of the topic to be shared between the different brokers in the cluster. However, in situations where every broker is constrained by a particular resource (typically I/O) using more partitions will not result in increased throughput. Instead, you need to add brokers to the cluster.
When you add an extra broker to the cluster, Kafka does not assign any partitions to it automatically. You must decide which partitions to move from the existing brokers to the new broker.
Once the partitions have been redistributed between all the brokers, the resource utilization of each broker should be reduced.
3.1.25.1.2. Removing brokers from a cluster
Because AMQ Streams uses StatefulSets to manage broker pods, you cannot remove any pod from the cluster. You can only remove one or more of the highest numbered pods from the cluster. For example, in a cluster of 12 brokers the pods are named cluster-name-kafka-0 up to cluster-name-kafka-11. If you decide to scale down by one broker, the cluster-name-kafka-11 will be removed.
Before you remove a broker from a cluster, ensure that it is not assigned to any partitions. You should also decide which of the remaining brokers will be responsible for each of the partitions on the broker being decommissioned. Once the broker has no assigned partitions, you can scale the cluster down safely.
3.1.25.2. Partition reassignment
The Topic Operator does not currently support reassigning replicas to different brokers, so it is necessary to connect directly to broker pods to reassign replicas to brokers.
Within a broker pod, the kafka-reassign-partitions.sh utility allows you to reassign partitions to different brokers.
It has three different modes:
--generate- Takes a set of topics and brokers and generates a reassignment JSON file which will result in the partitions of those topics being assigned to those brokers. Because this operates on whole topics, it cannot be used when you just need to reassign some of the partitions of some topics.
--execute- Takes a reassignment JSON file and applies it to the partitions and brokers in the cluster. Brokers that gain partitions as a result become followers of the partition leader. For a given partition, once the new broker has caught up and joined the ISR (in-sync replicas) the old broker will stop being a follower and will delete its replica.
--verify-
Using the same reassignment JSON file as the
--executestep,--verifychecks whether all of the partitions in the file have been moved to their intended brokers. If the reassignment is complete, --verify also removes any throttles that are in effect. Unless removed, throttles will continue to affect the cluster even after the reassignment has finished.
It is only possible to have one reassignment running in a cluster at any given time, and it is not possible to cancel a running reassignment. If you need to cancel a reassignment, wait for it to complete and then perform another reassignment to revert the effects of the first reassignment. The kafka-reassign-partitions.sh will print the reassignment JSON for this reversion as part of its output. Very large reassignments should be broken down into a number of smaller reassignments in case there is a need to stop in-progress reassignment.
3.1.25.2.1. Reassignment JSON file
The reassignment JSON file has a specific structure:
{
"version": 1,
"partitions": [
<PartitionObjects>
]
}Where <PartitionObjects> is a comma-separated list of objects like:
{
"topic": <TopicName>,
"partition": <Partition>,
"replicas": [ <AssignedBrokerIds> ]
}
Although Kafka also supports a "log_dirs" property this should not be used in AMQ Streams.
The following is an example reassignment JSON file that assigns topic topic-a, partition 4 to brokers 2, 4 and 7, and topic topic-b partition 2 to brokers 1, 5 and 7:
{
"version": 1,
"partitions": [
{
"topic": "topic-a",
"partition": 4,
"replicas": [2,4,7]
},
{
"topic": "topic-b",
"partition": 2,
"replicas": [1,5,7]
}
]
}Partitions not included in the JSON are not changed.
3.1.25.2.2. Reassigning partitions between JBOD volumes
When using JBOD storage in your Kafka cluster, you can choose to reassign the partitions between specific volumes and their log directories (each volume has a single log directory). To reassign a partition to a specific volume, add the log_dirs option to <PartitionObjects> in the reassignment JSON file.
{
"topic": <TopicName>,
"partition": <Partition>,
"replicas": [ <AssignedBrokerIds> ],
"log_dirs": [ <AssignedLogDirs> ]
}
The log_dirs object should contain the same number of log directories as the number of replicas specified in the replicas object. The value should be either an absolute path to the log directory, or the any keyword.
For example:
{
"topic": "topic-a",
"partition": 4,
"replicas": [2,4,7].
"log_dirs": [ "/var/lib/kafka/data-0/kafka-log2", "/var/lib/kafka/data-0/kafka-log4", "/var/lib/kafka/data-0/kafka-log7" ]
}3.1.25.3. Generating reassignment JSON files
This procedure describes how to generate a reassignment JSON file that reassigns all the partitions for a given set of topics using the kafka-reassign-partitions.sh tool.
Prerequisites
- A running Cluster Operator
-
A
Kafkaresource - A set of topics to reassign the partitions of
Procedure
Prepare a JSON file named
topics.jsonthat lists the topics to move. It must have the following structure:{ "version": 1, "topics": [ <TopicObjects> ] }where <TopicObjects> is a comma-separated list of objects like:
{ "topic": <TopicName> }For example if you want to reassign all the partitions of
topic-aandtopic-b, you would need to prepare atopics.jsonfile like this:{ "version": 1, "topics": [ { "topic": "topic-a"}, { "topic": "topic-b"} ] }Copy the
topics.jsonfile to one of the broker pods:cat topics.json | oc exec -c kafka <BrokerPod> -i -- \ /bin/bash -c \ 'cat > /tmp/topics.json'
Use the
kafka-reassign-partitions.shcommand to generate the reassignment JSON.oc exec <BrokerPod> -c kafka -it -- \ bin/kafka-reassign-partitions.sh --zookeeper localhost:2181 \ --topics-to-move-json-file /tmp/topics.json \ --broker-list <BrokerList> \ --generate
For example, to move all the partitions of
topic-aandtopic-bto brokers4and7oc exec <BrokerPod> -c kafka -it -- \ bin/kafka-reassign-partitions.sh --zookeeper localhost:2181 \ --topics-to-move-json-file /tmp/topics.json \ --broker-list 4,7 \ --generate
3.1.25.4. Creating reassignment JSON files manually
You can manually create the reassignment JSON file if you want to move specific partitions.
3.1.25.5. Reassignment throttles
Partition reassignment can be a slow process because it involves transferring large amounts of data between brokers. To avoid a detrimental impact on clients, you can throttle the reassignment process. This might cause the reassignment to take longer to complete.
- If the throttle is too low then the newly assigned brokers will not be able to keep up with records being published and the reassignment will never complete.
- If the throttle is too high then clients will be impacted.
For example, for producers, this could manifest as higher than normal latency waiting for acknowledgement. For consumers, this could manifest as a drop in throughput caused by higher latency between polls.
3.1.25.6. Scaling up a Kafka cluster
This procedure describes how to increase the number of brokers in a Kafka cluster.
Prerequisites
- An existing Kafka cluster.
-
A reassignment JSON file named
reassignment.jsonthat describes how partitions should be reassigned to brokers in the enlarged cluster.
Procedure
-
Add as many new brokers as you need by increasing the
Kafka.spec.kafka.replicasconfiguration option. - Verify that the new broker pods have started.
Copy the
reassignment.jsonfile to the broker pod on which you will later execute the commands:cat reassignment.json | \ oc exec broker-pod -c kafka -i -- /bin/bash -c \ 'cat > /tmp/reassignment.json'
For example:
cat reassignment.json | \ oc exec my-cluster-kafka-0 -c kafka -i -- /bin/bash -c \ 'cat > /tmp/reassignment.json'Execute the partition reassignment using the
kafka-reassign-partitions.shcommand line tool from the same broker pod.oc exec broker-pod -c kafka -it -- \ bin/kafka-reassign-partitions.sh --zookeeper localhost:2181 \ --reassignment-json-file /tmp/reassignment.json \ --executeIf you are going to throttle replication you can also pass the
--throttleoption with an inter-broker throttled rate in bytes per second. For example:oc exec my-cluster-kafka-0 -c kafka -it -- \ bin/kafka-reassign-partitions.sh --zookeeper localhost:2181 \ --reassignment-json-file /tmp/reassignment.json \ --throttle 5000000 \ --execute
This command will print out two reassignment JSON objects. The first records the current assignment for the partitions being moved. You should save this to a local file (not a file in the pod) in case you need to revert the reassignment later on. The second JSON object is the target reassignment you have passed in your reassignment JSON file.
If you need to change the throttle during reassignment you can use the same command line with a different throttled rate. For example:
oc exec my-cluster-kafka-0 -c kafka -it -- \ bin/kafka-reassign-partitions.sh --zookeeper localhost:2181 \ --reassignment-json-file /tmp/reassignment.json \ --throttle 10000000 \ --execute
Periodically verify whether the reassignment has completed using the
kafka-reassign-partitions.shcommand line tool from any of the broker pods. This is the same command as the previous step but with the--verifyoption instead of the--executeoption.oc exec broker-pod -c kafka -it -- \ bin/kafka-reassign-partitions.sh --zookeeper localhost:2181 \ --reassignment-json-file /tmp/reassignment.json \ --verifyFor example,
oc exec my-cluster-kafka-0 -c kafka -it -- \ bin/kafka-reassign-partitions.sh --zookeeper localhost:2181 \ --reassignment-json-file /tmp/reassignment.json \ --verify
-
The reassignment has finished when the
--verifycommand reports each of the partitions being moved as completed successfully. This final--verifywill also have the effect of removing any reassignment throttles. You can now delete the revert file if you saved the JSON for reverting the assignment to their original brokers.
3.1.25.7. Scaling down a Kafka cluster
Additional resources
This procedure describes how to decrease the number of brokers in a Kafka cluster.
Prerequisites
- An existing Kafka cluster.
-
A reassignment JSON file named
reassignment.jsondescribing how partitions should be reassigned to brokers in the cluster once the broker(s) in the highest numberedPod(s)have been removed.
Procedure
Copy the
reassignment.jsonfile to the broker pod on which you will later execute the commands:cat reassignment.json | \ oc exec broker-pod -c kafka -i -- /bin/bash -c \ 'cat > /tmp/reassignment.json'
For example:
cat reassignment.json | \ oc exec my-cluster-kafka-0 -c kafka -i -- /bin/bash -c \ 'cat > /tmp/reassignment.json'Execute the partition reassignment using the
kafka-reassign-partitions.shcommand line tool from the same broker pod.oc exec broker-pod -c kafka -it -- \ bin/kafka-reassign-partitions.sh --zookeeper localhost:2181 \ --reassignment-json-file /tmp/reassignment.json \ --executeIf you are going to throttle replication you can also pass the
--throttleoption with an inter-broker throttled rate in bytes per second. For example:oc exec my-cluster-kafka-0 -c kafka -it -- \ bin/kafka-reassign-partitions.sh --zookeeper localhost:2181 \ --reassignment-json-file /tmp/reassignment.json \ --throttle 5000000 \ --execute
This command will print out two reassignment JSON objects. The first records the current assignment for the partitions being moved. You should save this to a local file (not a file in the pod) in case you need to revert the reassignment later on. The second JSON object is the target reassignment you have passed in your reassignment JSON file.
If you need to change the throttle during reassignment you can use the same command line with a different throttled rate. For example:
oc exec my-cluster-kafka-0 -c kafka -it -- \ bin/kafka-reassign-partitions.sh --zookeeper localhost:2181 \ --reassignment-json-file /tmp/reassignment.json \ --throttle 10000000 \ --execute
Periodically verify whether the reassignment has completed using the
kafka-reassign-partitions.shcommand line tool from any of the broker pods. This is the same command as the previous step but with the--verifyoption instead of the--executeoption.oc exec broker-pod -c kafka -it -- \ bin/kafka-reassign-partitions.sh --zookeeper localhost:2181 \ --reassignment-json-file /tmp/reassignment.json \ --verifyFor example,
oc exec my-cluster-kafka-0 -c kafka -it -- \ bin/kafka-reassign-partitions.sh --zookeeper localhost:2181 \ --reassignment-json-file /tmp/reassignment.json \ --verify
-
The reassignment has finished when the
--verifycommand reports each of the partitions being moved as completed successfully. This final--verifywill also have the effect of removing any reassignment throttles. You can now delete the revert file if you saved the JSON for reverting the assignment to their original brokers. Once all the partition reassignments have finished, the broker(s) being removed should not have responsibility for any of the partitions in the cluster. You can verify this by checking that the broker’s data log directory does not contain any live partition logs. If the log directory on the broker contains a directory that does not match the extended regular expression
\.[a-z0-9]-delete$then the broker still has live partitions and it should not be stopped.You can check this by executing the command:
oc exec my-cluster-kafka-0 -c kafka -it -- \ /bin/bash -c \ "ls -l /var/lib/kafka/kafka-log_<N>_ | grep -E '^d' | grep -vE '[a-zA-Z0-9.-]+\.[a-z0-9]+-delete$'"
where N is the number of the
Pod(s)being deleted.If the above command prints any output then the broker still has live partitions. In this case, either the reassignment has not finished, or the reassignment JSON file was incorrect.
-
Once you have confirmed that the broker has no live partitions you can edit the
Kafka.spec.kafka.replicasof yourKafkaresource, which will scale down theStatefulSet, deleting the highest numbered brokerPod(s).
3.1.26. Deleting Kafka nodes manually
Additional resources
This procedure describes how to delete an existing Kafka node by using an OpenShift annotation. Deleting a Kafka node consists of deleting both the Pod on which the Kafka broker is running and the related PersistentVolumeClaim (if the cluster was deployed with persistent storage). After deletion, the Pod and its related PersistentVolumeClaim are recreated automatically.
Deleting a PersistentVolumeClaim can cause permanent data loss. The following procedure should only be performed if you have encountered storage issues.
Prerequisites
- A running Kafka cluster.
- A running Cluster Operator.
Procedure
Find the name of the
Podthat you want to delete.For example, if the cluster is named cluster-name, the pods are named cluster-name-kafka-index, where index starts at zero and ends at the total number of replicas.
Annotate the
Podresource in OpenShift.Use
oc annotate:oc annotate pod cluster-name-kafka-index strimzi.io/delete-pod-and-pvc=true
- Wait for the next reconciliation, when the annotated pod with the underlying persistent volume claim will be deleted and then recreated.
Additional resources
- For more information about deploying the Cluster Operator, see Section 2.2.1, “Deploying the Cluster Operator”.
- For more information about deploying the Kafka cluster, see Section 2.2.2.1, “Deploying the Kafka cluster”.
3.1.27. Deleting ZooKeeper nodes manually
This procedure describes how to delete an existing ZooKeeper node by using an OpenShift annotation. Deleting a ZooKeeper node consists of deleting both the Pod on which ZooKeeper is running and the related PersistentVolumeClaim (if the cluster was deployed with persistent storage). After deletion, the Pod and its related PersistentVolumeClaim are recreated automatically.
Deleting a PersistentVolumeClaim can cause permanent data loss. The following procedure should only be performed if you have encountered storage issues.
Prerequisites
- A running ZooKeeper cluster.
- A running Cluster Operator.
Procedure
Find the name of the
Podthat you want to delete.For example, if the cluster is named cluster-name, the pods are named cluster-name-zookeeper-index, where index starts at zero and ends at the total number of replicas.
Annotate the
Podresource in OpenShift.Use
oc annotate:oc annotate pod cluster-name-zookeeper-index strimzi.io/delete-pod-and-pvc=true
- Wait for the next reconciliation, when the annotated pod with the underlying persistent volume claim will be deleted and then recreated.
Additional resources
- For more information about deploying the Cluster Operator, see Section 2.2.1, “Deploying the Cluster Operator”.
- For more information about deploying the ZooKeeper cluster, see Section 2.2.2.1, “Deploying the Kafka cluster”.
3.1.28. Maintenance time windows for rolling updates
Maintenance time windows allow you to schedule certain rolling updates of your Kafka and ZooKeeper clusters to start at a convenient time.
3.1.28.1. Maintenance time windows overview
In most cases, the Cluster Operator only updates your Kafka or ZooKeeper clusters in response to changes to the corresponding Kafka resource. This enables you to plan when to apply changes to a Kafka resource to minimize the impact on Kafka client applications.
However, some updates to your Kafka and ZooKeeper clusters can happen without any corresponding change to the Kafka resource. For example, the Cluster Operator will need to perform a rolling restart if a CA (Certificate Authority) certificate that it manages is close to expiry.
While a rolling restart of the pods should not affect availability of the service (assuming correct broker and topic configurations), it could affect performance of the Kafka client applications. Maintenance time windows allow you to schedule such spontaneous rolling updates of your Kafka and ZooKeeper clusters to start at a convenient time. If maintenance time windows are not configured for a cluster then it is possible that such spontaneous rolling updates will happen at an inconvenient time, such as during a predictable period of high load.
3.1.28.2. Maintenance time window definition
You configure maintenance time windows by entering an array of strings in the Kafka.spec.maintenanceTimeWindows property. Each string is a cron expression interpreted as being in UTC (Coordinated Universal Time, which for practical purposes is the same as Greenwich Mean Time).
The following example configures a single maintenance time window that starts at midnight and ends at 01:59am (UTC), on Sundays, Mondays, Tuesdays, Wednesdays, and Thursdays:
# ... maintenanceTimeWindows: - "* * 0-1 ? * SUN,MON,TUE,WED,THU *" # ...
In practice, maintenance windows should be set in conjunction with the Kafka.spec.clusterCa.renewalDays and Kafka.spec.clientsCa.renewalDays properties of the Kafka resource, to ensure that the necessary CA certificate renewal can be completed in the configured maintenance time windows.
AMQ Streams does not schedule maintenance operations exactly according to the given windows. Instead, for each reconciliation, it checks whether a maintenance window is currently "open". This means that the start of maintenance operations within a given time window can be delayed by up to the Cluster Operator reconciliation interval. Maintenance time windows must therefore be at least this long.
Additional resources
- For more information about the Cluster Operator configuration, see Section 4.1.3, “Cluster Operator Configuration”.
3.1.28.3. Configuring a maintenance time window
You can configure a maintenance time window for rolling updates triggered by supported processes.
Prerequisites
- An OpenShift cluster.
- The Cluster Operator is running.
Procedure
Add or edit the
maintenanceTimeWindowsproperty in theKafkaresource. For example to allow maintenance between 0800 and 1059 and between 1400 and 1559 you would set themaintenanceTimeWindowsas shown below:apiVersion: kafka.strimzi.io/v1beta1 kind: Kafka metadata: name: my-cluster spec: kafka: # ... zookeeper: # ... maintenanceTimeWindows: - "* * 8-10 * * ?" - "* * 14-15 * * ?"Create or update the resource.
This can be done using
oc apply:oc apply -f your-file
Additional resources
- Performing a rolling update of a Kafka cluster, see Section 3.1.23, “Performing a rolling update of a Kafka cluster”
- Performing a rolling update of a ZooKeeper cluster, see Section 3.1.24, “Performing a rolling update of a ZooKeeper cluster”
3.1.29. Renewing CA certificates manually
Unless the Kafka.spec.clusterCa.generateCertificateAuthority and Kafka.spec.clientsCa.generateCertificateAuthority objects are set to false, the cluster and clients CA certificates will auto-renew at the start of their respective certificate renewal periods. You can manually renew one or both of these certificates before the certificate renewal period starts, if required for security reasons. A renewed certificate uses the same private key as the old certificate.
Prerequisites
- The Cluster Operator is running.
- A Kafka cluster in which CA certificates and private keys are installed.
Procedure
Apply the
strimzi.io/force-renewannotation to theSecretthat contains the CA certificate that you want to renew.Certificate Secret Annotate command Cluster CA
<cluster-name>-cluster-ca-cert
oc annotate secret <cluster-name>-cluster-ca-cert strimzi.io/force-renew=trueClients CA
<cluster-name>-clients-ca-cert
oc annotate secret <cluster-name>-clients-ca-cert strimzi.io/force-renew=true
At the next reconciliation the Cluster Operator will generate a new CA certificate for the Secret that you annotated. If maintenance time windows are configured, the Cluster Operator will generate the new CA certificate at the first reconciliation within the next maintenance time window.
Client applications must reload the cluster and clients CA certificates that were renewed by the Cluster Operator.
3.1.30. Replacing private keys
You can replace the private keys used by the cluster CA and clients CA certificates. When a private key is replaced, the Cluster Operator generates a new CA certificate for the new private key.
Prerequisites
- The Cluster Operator is running.
- A Kafka cluster in which CA certificates and private keys are installed.
Procedure
Apply the
strimzi.io/force-replaceannotation to theSecretthat contains the private key that you want to renew.Private key for Secret Annotate command Cluster CA
<cluster-name>-cluster-ca
oc annotate secret <cluster-name>-cluster-ca strimzi.io/force-replace=trueClients CA
<cluster-name>-clients-ca
oc annotate secret <cluster-name>-clients-ca strimzi.io/force-replace=true
At the next reconciliation the Cluster Operator will:
-
Generate a new private key for the
Secretthat you annotated - Generate a new CA certificate
If maintenance time windows are configured, the Cluster Operator will generate the new private key and CA certificate at the first reconciliation within the next maintenance time window.
Client applications must reload the cluster and clients CA certificates that were renewed by the Cluster Operator.
Additional resources
3.1.31. List of resources created as part of Kafka cluster
The following resources will created by the Cluster Operator in the OpenShift cluster:
cluster-name-kafka- StatefulSet which is in charge of managing the Kafka broker pods.
cluster-name-kafka-brokers- Service needed to have DNS resolve the Kafka broker pods IP addresses directly.
cluster-name-kafka-bootstrap- Service can be used as bootstrap servers for Kafka clients.
cluster-name-kafka-external-bootstrap- Bootstrap service for clients connecting from outside of the OpenShift cluster. This resource will be created only when external listener is enabled.
cluster-name-kafka-pod-id- Service used to route traffic from outside of the OpenShift cluster to individual pods. This resource will be created only when external listener is enabled.
cluster-name-kafka-external-bootstrap-
Bootstrap route for clients connecting from outside of the OpenShift cluster. This resource will be created only when external listener is enabled and set to type
route. cluster-name-kafka-pod-id-
Route for traffic from outside of the OpenShift cluster to individual pods. This resource will be created only when external listener is enabled and set to type
route. cluster-name-kafka-config- ConfigMap which contains the Kafka ancillary configuration and is mounted as a volume by the Kafka broker pods.
cluster-name-kafka-brokers- Secret with Kafka broker keys.
cluster-name-kafka- Service account used by the Kafka brokers.
cluster-name-kafka- Pod Disruption Budget configured for the Kafka brokers.
strimzi-namespace-name-cluster-name-kafka-init- Cluster role binding used by the Kafka brokers.
cluster-name-zookeeper- StatefulSet which is in charge of managing the ZooKeeper node pods.
cluster-name-zookeeper-nodes- Service needed to have DNS resolve the ZooKeeper pods IP addresses directly.
cluster-name-zookeeper-client- Service used by Kafka brokers to connect to ZooKeeper nodes as clients.
cluster-name-zookeeper-config- ConfigMap which contains the ZooKeeper ancillary configuration and is mounted as a volume by the ZooKeeper node pods.
cluster-name-zookeeper-nodes- Secret with ZooKeeper node keys.
cluster-name-zookeeper- Pod Disruption Budget configured for the ZooKeeper nodes.
cluster-name-entity-operator- Deployment with Topic and User Operators. This resource will be created only if Cluster Operator deployed Entity Operator.
cluster-name-entity-topic-operator-config- Configmap with ancillary configuration for Topic Operators. This resource will be created only if Cluster Operator deployed Entity Operator.
cluster-name-entity-user-operator-config- Configmap with ancillary configuration for User Operators. This resource will be created only if Cluster Operator deployed Entity Operator.
cluster-name-entity-operator-certs- Secret with Entity operators keys for communication with Kafka and ZooKeeper. This resource will be created only if Cluster Operator deployed Entity Operator.
cluster-name-entity-operator- Service account used by the Entity Operator.
strimzi-cluster-name-topic-operator- Role binding used by the Entity Operator.
strimzi-cluster-name-user-operator- Role binding used by the Entity Operator.
cluster-name-cluster-ca- Secret with the Cluster CA used to encrypt the cluster communication.
cluster-name-cluster-ca-cert- Secret with the Cluster CA public key. This key can be used to verify the identity of the Kafka brokers.
cluster-name-clients-ca- Secret with the Clients CA used to encrypt the communication between Kafka brokers and Kafka clients.
cluster-name-clients-ca-cert- Secret with the Clients CA public key. This key can be used to verify the identity of the Kafka brokers.
cluster-name-cluster-operator-certs- Secret with Cluster operators keys for communication with Kafka and ZooKeeper.
data-cluster-name-kafka-idx-
Persistent Volume Claim for the volume used for storing data for the Kafka broker pod
idx. This resource will be created only if persistent storage is selected for provisioning persistent volumes to store data. data-id-cluster-name-kafka-idx-
Persistent Volume Claim for the volume
idused for storing data for the Kafka broker podidx. This resource is only created if persistent storage is selected for JBOD volumes when provisioning persistent volumes to store data. data-cluster-name-zookeeper-idx-
Persistent Volume Claim for the volume used for storing data for the ZooKeeper node pod
idx. This resource will be created only if persistent storage is selected for provisioning persistent volumes to store data. cluster-name-jmx- Secret with JMX username and password used to secure the Kafka broker port.
3.2. Kafka Connect cluster configuration
The full schema of the KafkaConnect resource is described in the Section B.74, “KafkaConnect schema reference”. All labels that are applied to the desired KafkaConnect resource will also be applied to the OpenShift resources making up the Kafka Connect cluster. This provides a convenient mechanism for resources to be labeled as required.
3.2.1. Replicas
Kafka Connect clusters can consist of one or more nodes. The number of nodes is defined in the KafkaConnect and KafkaConnectS2I resources. Running a Kafka Connect cluster with multiple nodes can provide better availability and scalability. However, when running Kafka Connect on OpenShift it is not necessary to run multiple nodes of Kafka Connect for high availability. If a node where Kafka Connect is deployed to crashes, OpenShift will automatically reschedule the Kafka Connect pod to a different node. However, running Kafka Connect with multiple nodes can provide faster failover times, because the other nodes will be up and running already.
3.2.1.1. Configuring the number of nodes
The number of Kafka Connect nodes is configured using the replicas property in KafkaConnect.spec and KafkaConnectS2I.spec.
Prerequisites
- An OpenShift cluster
- A running Cluster Operator
Procedure
Edit the
replicasproperty in theKafkaConnectorKafkaConnectS2Iresource. For example:apiVersion: kafka.strimzi.io/v1beta1 kind: KafkaConnectS2I metadata: name: my-cluster spec: # ... replicas: 3 # ...
Create or update the resource.
This can be done using
oc apply:oc apply -f your-file
3.2.2. Bootstrap servers
A Kafka Connect cluster always works in combination with a Kafka cluster. A Kafka cluster is specified as a list of bootstrap servers. On OpenShift, the list must ideally contain the Kafka cluster bootstrap service named cluster-name-kafka-bootstrap, and a port of 9092 for plain traffic or 9093 for encrypted traffic.
The list of bootstrap servers is configured in the bootstrapServers property in KafkaConnect.spec and KafkaConnectS2I.spec. The servers must be defined as a comma-separated list specifying one or more Kafka brokers, or a service pointing to Kafka brokers specified as a hostname:_port_ pairs.
When using Kafka Connect with a Kafka cluster not managed by AMQ Streams, you can specify the bootstrap servers list according to the configuration of the cluster.
3.2.2.1. Configuring bootstrap servers
Prerequisites
- An OpenShift cluster
- A running Cluster Operator
Procedure
Edit the
bootstrapServersproperty in theKafkaConnectorKafkaConnectS2Iresource. For example:apiVersion: kafka.strimzi.io/v1beta1 kind: KafkaConnect metadata: name: my-cluster spec: # ... bootstrapServers: my-cluster-kafka-bootstrap:9092 # ...
Create or update the resource.
This can be done using
oc apply:oc apply -f your-file
3.2.3. Connecting to Kafka brokers using TLS
By default, Kafka Connect tries to connect to Kafka brokers using a plain text connection. If you prefer to use TLS, additional configuration is required.
3.2.3.1. TLS support in Kafka Connect
TLS support is configured in the tls property in KafkaConnect.spec and KafkaConnectS2I.spec. The tls property contains a list of secrets with key names under which the certificates are stored. The certificates must be stored in X509 format.
An example showing TLS configuration with multiple certificates
apiVersion: kafka.strimzi.io/v1beta1
kind: KafkaConnect
metadata:
name: my-cluster
spec:
# ...
tls:
trustedCertificates:
- secretName: my-secret
certificate: ca.crt
- secretName: my-other-secret
certificate: certificate.crt
# ...
When multiple certificates are stored in the same secret, it can be listed multiple times.
An example showing TLS configuration with multiple certificates from the same secret
apiVersion: kafka.strimzi.io/v1beta1
kind: KafkaConnectS2I
metadata:
name: my-cluster
spec:
# ...
tls:
trustedCertificates:
- secretName: my-secret
certificate: ca.crt
- secretName: my-secret
certificate: ca2.crt
# ...
3.2.3.2. Configuring TLS in Kafka Connect
Prerequisites
- An OpenShift cluster
- A running Cluster Operator
-
If they exist, the name of the
Secretfor the certificate used for TLS Server Authentication, and the key under which the certificate is stored in theSecret
Procedure
(Optional) If they do not already exist, prepare the TLS certificate used in authentication in a file and create a
Secret.NoteThe secrets created by the Cluster Operator for Kafka cluster may be used directly.
This can be done using
oc create:oc create secret generic my-secret --from-file=my-file.crt
Edit the
tlsproperty in theKafkaConnectorKafkaConnectS2Iresource. For example:apiVersion: kafka.strimzi.io/v1beta1 kind: KafkaConnect metadata: name: my-connect spec: # ... tls: trustedCertificates: - secretName: my-cluster-cluster-cert certificate: ca.crt # ...Create or update the resource.
This can be done using
oc apply:oc apply -f your-file
3.2.4. Connecting to Kafka brokers with Authentication
By default, Kafka Connect will try to connect to Kafka brokers without authentication. Authentication is enabled through the KafkaConnect and KafkaConnectS2I resources.
3.2.4.1. Authentication support in Kafka Connect
Authentication is configured through the authentication property in KafkaConnect.spec and KafkaConnectS2I.spec. The authentication property specifies the type of the authentication mechanisms which should be used and additional configuration details depending on the mechanism. The supported authentication types are:
- TLS client authentication
- SASL-based authentication using the SCRAM-SHA-512 mechanism
- SASL-based authentication using the PLAIN mechanism
- OAuth 2.0 token based authentication
3.2.4.1.1. TLS Client Authentication
To use TLS client authentication, set the type property to the value tls. TLS client authentication uses a TLS certificate to authenticate. The certificate is specified in the certificateAndKey property and is always loaded from an OpenShift secret. In the secret, the certificate must be stored in X509 format under two different keys: public and private.
TLS client authentication can be used only with TLS connections. For more details about TLS configuration in Kafka Connect see Section 3.2.3, “Connecting to Kafka brokers using TLS”.
An example TLS client authentication configuration
apiVersion: kafka.strimzi.io/v1beta1
kind: KafkaConnect
metadata:
name: my-cluster
spec:
# ...
authentication:
type: tls
certificateAndKey:
secretName: my-secret
certificate: public.crt
key: private.key
# ...
3.2.4.1.2. SASL based SCRAM-SHA-512 authentication
To configure Kafka Connect to use SASL-based SCRAM-SHA-512 authentication, set the type property to scram-sha-512. This authentication mechanism requires a username and password.
-
Specify the username in the
usernameproperty. -
In the
passwordSecretproperty, specify a link to aSecretcontaining the password. ThesecretNameproperty contains the name of theSecretand thepasswordproperty contains the name of the key under which the password is stored inside theSecret.
Do not specify the actual password in the password field.
An example SASL based SCRAM-SHA-512 client authentication configuration
apiVersion: kafka.strimzi.io/v1beta1
kind: KafkaConnect
metadata:
name: my-cluster
spec:
# ...
authentication:
type: scram-sha-512
username: my-connect-user
passwordSecret:
secretName: my-connect-user
password: my-connect-password-key
# ...
3.2.4.1.3. SASL based PLAIN authentication
To configure Kafka Connect to use SASL-based PLAIN authentication, set the type property to plain. This authentication mechanism requires a username and password.
The SASL PLAIN mechanism will transfer the username and password across the network in cleartext. Only use SASL PLAIN authentication if TLS encryption is enabled.
-
Specify the username in the
usernameproperty. -
In the
passwordSecretproperty, specify a link to aSecretcontaining the password. ThesecretNameproperty contains the name of such aSecretand thepasswordproperty contains the name of the key under which the password is stored inside theSecret.
Do not specify the actual password in the password field.
An example showing SASL based PLAIN client authentication configuration
apiVersion: kafka.strimzi.io/v1beta1
kind: KafkaConnect
metadata:
name: my-cluster
spec:
# ...
authentication:
type: plain
username: my-connect-user
passwordSecret:
secretName: my-connect-user
password: my-connect-password-key
# ...
3.2.4.2. Configuring TLS client authentication in Kafka Connect
Prerequisites
- An OpenShift cluster
- A running Cluster Operator
-
If they exist, the name of the
Secretwith the public and private keys used for TLS Client Authentication, and the keys under which they are stored in theSecret
Procedure
(Optional) If they do not already exist, prepare the keys used for authentication in a file and create the
Secret.NoteSecrets created by the User Operator may be used.
This can be done using
oc create:oc create secret generic my-secret --from-file=my-public.crt --from-file=my-private.key
Edit the
authenticationproperty in theKafkaConnectorKafkaConnectS2Iresource. For example:apiVersion: kafka.strimzi.io/v1beta1 kind: KafkaConnect metadata: name: my-connect spec: # ... authentication: type: tls certificateAndKey: secretName: my-secret certificate: my-public.crt key: my-private.key # ...Create or update the resource.
This can be done using
oc apply:oc apply -f your-file
3.2.4.3. Configuring SCRAM-SHA-512 authentication in Kafka Connect
Prerequisites
- An OpenShift cluster
- A running Cluster Operator
- Username of the user which should be used for authentication
-
If they exist, the name of the
Secretwith the password used for authentication and the key under which the password is stored in theSecret
Procedure
(Optional) If they do not already exist, prepare a file with the password used in authentication and create the
Secret.NoteSecrets created by the User Operator may be used.
This can be done using
oc create:echo -n '<password>' > <my-password.txt> oc create secret generic <my-secret> --from-file=<my-password.txt>
Edit the
authenticationproperty in theKafkaConnectorKafkaConnectS2Iresource. For example:apiVersion: kafka.strimzi.io/v1beta1 kind: KafkaConnect metadata: name: my-connect spec: # ... authentication: type: scram-sha-512 username: <my-username> passwordSecret: secretName: <my-secret> password: <my-password.txt> # ...Create or update the resource.
On OpenShift this can be done using
oc apply:oc apply -f your-file
3.2.5. Kafka Connect configuration
AMQ Streams allows you to customize the configuration of Apache Kafka Connect nodes by editing certain options listed in Apache Kafka documentation.
Configuration options that cannot be configured relate to:
- Kafka cluster bootstrap address
- Security (Encryption, Authentication, and Authorization)
- Listener / REST interface configuration
- Plugin path configuration
These options are automatically configured by AMQ Streams.
3.2.5.1. Kafka Connect configuration
Kafka Connect is configured using the config property in KafkaConnect.spec and KafkaConnectS2I.spec. This property contains the Kafka Connect configuration options as keys. The values can be one of the following JSON types:
- String
- Number
- Boolean
You can specify and configure the options listed in the Apache Kafka documentation with the exception of those options that are managed directly by AMQ Streams. Specifically, configuration options with keys equal to or starting with one of the following strings are forbidden:
-
ssl. -
sasl. -
security. -
listeners -
plugin.path -
rest. -
bootstrap.servers
When a forbidden option is present in the config property, it is ignored and a warning message is printed to the Cluster Operator log file. All other options are passed to Kafka Connect.
The Cluster Operator does not validate keys or values in the config object provided. When an invalid configuration is provided, the Kafka Connect cluster might not start or might become unstable. In this circumstance, fix the configuration in the KafkaConnect.spec.config or KafkaConnectS2I.spec.config object, then the Cluster Operator can roll out the new configuration to all Kafka Connect nodes.
Certain options have default values:
-
group.idwith default valueconnect-cluster -
offset.storage.topicwith default valueconnect-cluster-offsets -
config.storage.topicwith default valueconnect-cluster-configs -
status.storage.topicwith default valueconnect-cluster-status -
key.converterwith default valueorg.apache.kafka.connect.json.JsonConverter -
value.converterwith default valueorg.apache.kafka.connect.json.JsonConverter
These options are automatically configured in case they are not present in the KafkaConnect.spec.config or KafkaConnectS2I.spec.config properties.
Use the three allowed ssl configuration options to run external listeners with a specific cipher suite for a TLS version. A cipher suite combines algorithms for secure connection and data transfer.
Example Kafka Connect configuration
apiVersion: kafka.strimzi.io/v1beta1
kind: KafkaConnect
metadata:
name: my-connect
spec:
# ...
config:
group.id: my-connect-cluster
offset.storage.topic: my-connect-cluster-offsets
config.storage.topic: my-connect-cluster-configs
status.storage.topic: my-connect-cluster-status
key.converter: org.apache.kafka.connect.json.JsonConverter
value.converter: org.apache.kafka.connect.json.JsonConverter
key.converter.schemas.enable: true
value.converter.schemas.enable: true
config.storage.replication.factor: 3
offset.storage.replication.factor: 3
status.storage.replication.factor: 3
ssl.cipher.suites: "TLS_ECDHE_RSA_WITH_AES_256_GCM_SHA384" 1
ssl.enabled.protocols: "TLSv1.2" 2
ssl.protocol: "TLSv1.2" 3
# ...
- 1
- The cipher suite for TLS using a combination of
ECDHEkey exchange mechanism,RSAauthentication algorithm,AESbulk encyption algorithm andSHA384MAC algorithm. - 2
- The SSl protocol
TLSv1.2is enabled. - 3
- Specifies the
TLSv1.2protocol to generate the SSL context. Allowed values areTLSv1.1andTLSv1.2.
3.2.5.2. Kafka Connect configuration for multiple instances
If you are running multiple instances of Kafka Connect, you have to change the default configuration of the following config properties:
apiVersion: kafka.strimzi.io/v1beta1
kind: KafkaConnect
metadata:
name: my-connect
spec:
# ...
config:
group.id: connect-cluster 1
offset.storage.topic: connect-cluster-offsets 2
config.storage.topic: connect-cluster-configs 3
status.storage.topic: connect-cluster-status 4
# ...
# ...
Values for the three topics must be the same for all Kafka Connect instances with the same group.id.
Unless you change the default settings, each Kafka Connect instance connecting to the same Kafka cluster is deployed with the same values. What happens, in effect, is all instances are coupled to run in a cluster and use the same topics.
If multiple Kafka Connect clusters try to use the same topics, Kafka Connect will not work as expected and generate errors.
If you wish to run multiple Kafka Connect instances, change the values of these properties for each instance.
3.2.5.3. Configuring Kafka Connect
Prerequisites
- An OpenShift cluster
- A running Cluster Operator
Procedure
Edit the
configproperty in theKafkaConnectorKafkaConnectS2Iresource. For example:apiVersion: kafka.strimzi.io/v1beta1 kind: KafkaConnect metadata: name: my-connect spec: # ... config: group.id: my-connect-cluster offset.storage.topic: my-connect-cluster-offsets config.storage.topic: my-connect-cluster-configs status.storage.topic: my-connect-cluster-status key.converter: org.apache.kafka.connect.json.JsonConverter value.converter: org.apache.kafka.connect.json.JsonConverter key.converter.schemas.enable: true value.converter.schemas.enable: true config.storage.replication.factor: 3 offset.storage.replication.factor: 3 status.storage.replication.factor: 3 # ...Create or update the resource.
This can be done using
oc apply:oc apply -f your-file- If authorization is enabled for Kafka Connect, configure the Kafka Connect user to enable access to the Kafka Connect consumer group and topics.
3.2.6. Kafka Connect user authorization
If authorization is enabled for Kafka Connect, the Kafka Connect user must be configured to provide read/write access rights to the Kafka Connect consumer group and internal topics.
The properties for the consumer group and internal topics are automatically configured by AMQ Streams, or they can be specified explicitly in the spec for the KafkaConnect or KafkaConnectS2I configuration.
The following example shows the configuration of the properties in the KafkaConnect resource, which need to be represented in the Kafka Connect user configuration.
apiVersion: kafka.strimzi.io/v1beta1
kind: KafkaConnect
metadata:
name: my-connect
spec:
# ...
config:
group.id: my-connect-cluster 1
offset.storage.topic: my-connect-cluster-offsets 2
config.storage.topic: my-connect-cluster-configs 3
status.storage.topic: my-connect-cluster-status 4
# ...
# ...3.2.6.1. Configuring Kafka Connect user authorization
This procedure describes how to authorize user access to Kafka Connect.
When any type of authorization is being used in Kafka, a Kafka Connect user requires access rights to the consumer group and the internal topics of Kafka Connect.
This procedure shows how access is provided when simple authorization is being used.
Simple authorization uses ACL rules, handled by the Kafka SimpleAclAuthorizer plugin, to provide the right level of access. For more information on configuring a KafkaUser resource to use simple authorization, see Kafka User resource.
The default values for the consumer group and topics will differ when running multiple instances.
Prerequisites
- An OpenShift cluster
- A running Cluster Operator
Procedure
Edit the
authorizationproperty in theKafkaUserresource to provide access rights to the user.In the following example, access rights are configured for the Kafka Connect topics and consumer group using
literalname values:Property Name offset.storage.topicconnect-cluster-offsetsstatus.storage.topicconnect-cluster-statusconfig.storage.topicconnect-cluster-configsgroupconnect-clusterapiVersion: kafka.strimzi.io/v1beta1 kind: KafkaUser metadata: name: my-user labels: strimzi.io/cluster: my-cluster spec: # ... authorization: type: simple acls: # access to offset.storage.topic - resource: type: topic name: connect-cluster-offsets patternType: literal operation: Write host: "*" - resource: type: topic name: connect-cluster-offsets patternType: literal operation: Create host: "*" - resource: type: topic name: connect-cluster-offsets patternType: literal operation: Describe host: "*" - resource: type: topic name: connect-cluster-offsets patternType: literal operation: Read host: "*" # access to status.storage.topic - resource: type: topic name: connect-cluster-status patternType: literal operation: Write host: "*" - resource: type: topic name: connect-cluster-status patternType: literal operation: Create host: "*" - resource: type: topic name: connect-cluster-status patternType: literal operation: Describe host: "*" - resource: type: topic name: connect-cluster-status patternType: literal operation: Read host: "*" # access to config.storage.topic - resource: type: topic name: connect-cluster-configs patternType: literal operation: Write host: "*" - resource: type: topic name: connect-cluster-configs patternType: literal operation: Create host: "*" - resource: type: topic name: connect-cluster-configs patternType: literal operation: Describe host: "*" - resource: type: topic name: connect-cluster-configs patternType: literal operation: Read host: "*" # consumer group - resource: type: group name: connect-cluster patternType: literal operation: Read host: "*"Create or update the resource.
oc apply -f your-file
3.2.7. CPU and memory resources
For every deployed container, AMQ Streams allows you to request specific resources and define the maximum consumption of those resources.
AMQ Streams supports two types of resources:
- CPU
- Memory
AMQ Streams uses the OpenShift syntax for specifying CPU and memory resources.
3.2.7.1. Resource limits and requests
Resource limits and requests are configured using the resources property in the following resources:
-
Kafka.spec.kafka -
Kafka.spec.kafka.tlsSidecar -
Kafka.spec.zookeeper -
Kafka.spec.entityOperator.topicOperator -
Kafka.spec.entityOperator.userOperator -
Kafka.spec.entityOperator.tlsSidecar -
Kafka.spec.KafkaExporter -
KafkaConnect.spec -
KafkaConnectS2I.spec -
KafkaBridge.spec
Additional resources
- For more information about managing computing resources on OpenShift, see Managing Compute Resources for Containers.
3.2.7.1.1. Resource requests
Requests specify the resources to reserve for a given container. Reserving the resources ensures that they are always available.
If the resource request is for more than the available free resources in the OpenShift cluster, the pod is not scheduled.
Resources requests are specified in the requests property. Resources requests currently supported by AMQ Streams:
-
cpu -
memory
A request may be configured for one or more supported resources.
Example resource request configuration with all resources
# ...
resources:
requests:
cpu: 12
memory: 64Gi
# ...
3.2.7.1.2. Resource limits
Limits specify the maximum resources that can be consumed by a given container. The limit is not reserved and might not always be available. A container can use the resources up to the limit only when they are available. Resource limits should be always higher than the resource requests.
Resource limits are specified in the limits property. Resource limits currently supported by AMQ Streams:
-
cpu -
memory
A resource may be configured for one or more supported limits.
Example resource limits configuration
# ...
resources:
limits:
cpu: 12
memory: 64Gi
# ...
3.2.7.1.3. Supported CPU formats
CPU requests and limits are supported in the following formats:
-
Number of CPU cores as integer (
5CPU core) or decimal (2.5CPU core). -
Number or millicpus / millicores (
100m) where 1000 millicores is the same1CPU core.
Example CPU units
# ...
resources:
requests:
cpu: 500m
limits:
cpu: 2.5
# ...
The computing power of 1 CPU core may differ depending on the platform where OpenShift is deployed.
Additional resources
- For more information on CPU specification, see the Meaning of CPU.
3.2.7.1.4. Supported memory formats
Memory requests and limits are specified in megabytes, gigabytes, mebibytes, and gibibytes.
-
To specify memory in megabytes, use the
Msuffix. For example1000M. -
To specify memory in gigabytes, use the
Gsuffix. For example1G. -
To specify memory in mebibytes, use the
Misuffix. For example1000Mi. -
To specify memory in gibibytes, use the
Gisuffix. For example1Gi.
An example of using different memory units
# ...
resources:
requests:
memory: 512Mi
limits:
memory: 2Gi
# ...
Additional resources
- For more details about memory specification and additional supported units, see Meaning of memory.
3.2.7.2. Configuring resource requests and limits
Prerequisites
- An OpenShift cluster
- A running Cluster Operator
Procedure
Edit the
resourcesproperty in the resource specifying the cluster deployment. For example:apiVersion: kafka.strimzi.io/v1beta1 kind: Kafka spec: kafka: # ... resources: requests: cpu: "8" memory: 64Gi limits: cpu: "12" memory: 128Gi # ... zookeeper: # ...Create or update the resource.
This can be done using
oc apply:oc apply -f your-file
Additional resources
- For more information about the schema, see {K8sResourceRequirementsAPI}.
3.2.8. Kafka Connect loggers
Kafka Connect has its own configurable loggers:
-
connect.root.logger.level -
log4j.logger.org.reflections
Kafka Connect uses the Apache log4j logger implementation.
Use the logging property to configure loggers and logger levels.
You can set the log levels by specifying the logger and level directly (inline) or use a custom (external) ConfigMap. If a ConfigMap is used, you set logging.name property to the name of the ConfigMap containing the external logging configuration. Inside the ConfigMap, the logging configuration is described using log4j.properties.
Here we see examples of inline and external logging.
Inline logging
apiVersion: kafka.strimzi.io/v1beta1
kind: KafkaConnect
spec:
# ...
logging:
type: inline
loggers:
connect.root.logger.level: "INFO"
# ...
External logging
apiVersion: kafka.strimzi.io/v1beta1
kind: KafkaConnect
spec:
# ...
logging:
type: external
name: customConfigMap
# ...
Additional resources
- Garbage collector (GC) logging can also be enabled (or disabled). For more information about GC logging, see Section 3.1.18.1, “JVM configuration”
- For more information about log levels, see Apache logging services.
3.2.9. Healthchecks
Healthchecks are periodical tests which verify the health of an application. When a Healthcheck probe fails, OpenShift assumes that the application is not healthy and attempts to fix it.
OpenShift supports two types of Healthcheck probes:
- Liveness probes
- Readiness probes
For more details about the probes, see Configure Liveness and Readiness Probes. Both types of probes are used in AMQ Streams components.
Users can configure selected options for liveness and readiness probes.
3.2.9.1. Healthcheck configurations
Liveness and readiness probes can be configured using the livenessProbe and readinessProbe properties in following resources:
-
Kafka.spec.kafka -
Kafka.spec.kafka.tlsSidecar -
Kafka.spec.zookeeper -
Kafka.spec.entityOperator.tlsSidecar -
Kafka.spec.entityOperator.topicOperator -
Kafka.spec.entityOperator.userOperator -
Kafka.spec.KafkaExporter -
KafkaConnect.spec -
KafkaConnectS2I.spec -
KafkaMirrorMaker.spec -
KafkaBridge.spec
Both livenessProbe and readinessProbe support the following options:
-
initialDelaySeconds -
timeoutSeconds -
periodSeconds -
successThreshold -
failureThreshold
For more information about the livenessProbe and readinessProbe options, see Section B.40, “Probe schema reference”.
An example of liveness and readiness probe configuration
# ... readinessProbe: initialDelaySeconds: 15 timeoutSeconds: 5 livenessProbe: initialDelaySeconds: 15 timeoutSeconds: 5 # ...
3.2.9.2. Configuring healthchecks
Prerequisites
- An OpenShift cluster
- A running Cluster Operator
Procedure
Edit the
livenessProbeorreadinessProbeproperty in theKafka,KafkaConnectorKafkaConnectS2Iresource. For example:apiVersion: kafka.strimzi.io/v1beta1 kind: Kafka metadata: name: my-cluster spec: kafka: # ... readinessProbe: initialDelaySeconds: 15 timeoutSeconds: 5 livenessProbe: initialDelaySeconds: 15 timeoutSeconds: 5 # ... zookeeper: # ...Create or update the resource.
This can be done using
oc apply:oc apply -f your-file
3.2.10. Prometheus metrics
AMQ Streams supports Prometheus metrics using Prometheus JMX exporter to convert the JMX metrics supported by Apache Kafka and ZooKeeper to Prometheus metrics. When metrics are enabled, they are exposed on port 9404.
For more information about setting up and deploying Prometheus and Grafana, see Introducing Metrics to Kafka.
3.2.10.1. Metrics configuration
Prometheus metrics are enabled by configuring the metrics property in following resources:
-
Kafka.spec.kafka -
Kafka.spec.zookeeper -
KafkaConnect.spec -
KafkaConnectS2I.spec
When the metrics property is not defined in the resource, the Prometheus metrics will be disabled. To enable Prometheus metrics export without any further configuration, you can set it to an empty object ({}).
Example of enabling metrics without any further configuration
apiVersion: kafka.strimzi.io/v1beta1
kind: Kafka
metadata:
name: my-cluster
spec:
kafka:
# ...
metrics: {}
# ...
zookeeper:
# ...
The metrics property might contain additional configuration for the Prometheus JMX exporter.
Example of enabling metrics with additional Prometheus JMX Exporter configuration
apiVersion: kafka.strimzi.io/v1beta1
kind: Kafka
metadata:
name: my-cluster
spec:
kafka:
# ...
metrics:
lowercaseOutputName: true
rules:
- pattern: "kafka.server<type=(.+), name=(.+)PerSec\\w*><>Count"
name: "kafka_server_$1_$2_total"
- pattern: "kafka.server<type=(.+), name=(.+)PerSec\\w*, topic=(.+)><>Count"
name: "kafka_server_$1_$2_total"
labels:
topic: "$3"
# ...
zookeeper:
# ...
3.2.10.2. Configuring Prometheus metrics
Prerequisites
- An OpenShift cluster
- A running Cluster Operator
Procedure
Edit the
metricsproperty in theKafka,KafkaConnectorKafkaConnectS2Iresource. For example:apiVersion: kafka.strimzi.io/v1beta1 kind: Kafka metadata: name: my-cluster spec: kafka: # ... zookeeper: # ... metrics: lowercaseOutputName: true # ...Create or update the resource.
This can be done using
oc apply:oc apply -f your-file
3.2.11. JVM Options
The following components of AMQ Streams run inside a Virtual Machine (VM):
- Apache Kafka
- Apache ZooKeeper
- Apache Kafka Connect
- Apache Kafka MirrorMaker
- AMQ Streams Kafka Bridge
JVM configuration options optimize the performance for different platforms and architectures. AMQ Streams allows you to configure some of these options.
3.2.11.1. JVM configuration
JVM options can be configured using the jvmOptions property in following resources:
-
Kafka.spec.kafka -
Kafka.spec.zookeeper -
KafkaConnect.spec -
KafkaConnectS2I.spec -
KafkaMirrorMaker.spec -
KafkaBridge.spec
Only a selected subset of available JVM options can be configured. The following options are supported:
-Xms and -Xmx
-Xms configures the minimum initial allocation heap size when the JVM starts. -Xmx configures the maximum heap size.
The units accepted by JVM settings such as -Xmx and -Xms are those accepted by the JDK java binary in the corresponding image. Accordingly, 1g or 1G means 1,073,741,824 bytes, and Gi is not a valid unit suffix. This is in contrast to the units used for memory requests and limits, which follow the OpenShift convention where 1G means 1,000,000,000 bytes, and 1Gi means 1,073,741,824 bytes
The default values used for -Xms and -Xmx depends on whether there is a memory request limit configured for the container:
- If there is a memory limit then the JVM’s minimum and maximum memory will be set to a value corresponding to the limit.
-
If there is no memory limit then the JVM’s minimum memory will be set to
128Mand the JVM’s maximum memory will not be defined. This allows for the JVM’s memory to grow as-needed, which is ideal for single node environments in test and development.
Setting -Xmx explicitly requires some care:
-
The JVM’s overall memory usage will be approximately 4 × the maximum heap, as configured by
-Xmx. -
If
-Xmxis set without also setting an appropriate OpenShift memory limit, it is possible that the container will be killed should the OpenShift node experience memory pressure (from other Pods running on it). -
If
-Xmxis set without also setting an appropriate OpenShift memory request, it is possible that the container will be scheduled to a node with insufficient memory. In this case, the container will not start but crash (immediately if-Xmsis set to-Xmx, or some later time if not).
When setting -Xmx explicitly, it is recommended to:
- set the memory request and the memory limit to the same value,
-
use a memory request that is at least 4.5 × the
-Xmx, -
consider setting
-Xmsto the same value as-Xmx.
Containers doing lots of disk I/O (such as Kafka broker containers) will need to leave some memory available for use as operating system page cache. On such containers, the requested memory should be significantly higher than the memory used by the JVM.
Example fragment configuring -Xmx and -Xms
# ... jvmOptions: "-Xmx": "2g" "-Xms": "2g" # ...
In the above example, the JVM will use 2 GiB (=2,147,483,648 bytes) for its heap. Its total memory usage will be approximately 8GiB.
Setting the same value for initial (-Xms) and maximum (-Xmx) heap sizes avoids the JVM having to allocate memory after startup, at the cost of possibly allocating more heap than is really needed. For Kafka and ZooKeeper pods such allocation could cause unwanted latency. For Kafka Connect avoiding over allocation may be the most important concern, especially in distributed mode where the effects of over-allocation will be multiplied by the number of consumers.
-server
-server enables the server JVM. This option can be set to true or false.
Example fragment configuring -server
# ... jvmOptions: "-server": true # ...
When neither of the two options (-server and -XX) is specified, the default Apache Kafka configuration of KAFKA_JVM_PERFORMANCE_OPTS will be used.
-XX
-XX object can be used for configuring advanced runtime options of a JVM. The -server and -XX options are used to configure the KAFKA_JVM_PERFORMANCE_OPTS option of Apache Kafka.
Example showing the use of the -XX object
jvmOptions:
"-XX":
"UseG1GC": true
"MaxGCPauseMillis": 20
"InitiatingHeapOccupancyPercent": 35
"ExplicitGCInvokesConcurrent": true
"UseParNewGC": false
The example configuration above will result in the following JVM options:
-XX:+UseG1GC -XX:MaxGCPauseMillis=20 -XX:InitiatingHeapOccupancyPercent=35 -XX:+ExplicitGCInvokesConcurrent -XX:-UseParNewGC
When neither of the two options (-server and -XX) is specified, the default Apache Kafka configuration of KAFKA_JVM_PERFORMANCE_OPTS will be used.
3.2.11.1.1. Garbage collector logging
The jvmOptions section also allows you to enable and disable garbage collector (GC) logging. GC logging is disabled by default. To enable it, set the gcLoggingEnabled property as follows:
Example of enabling GC logging
# ... jvmOptions: gcLoggingEnabled: true # ...
3.2.11.2. Configuring JVM options
Prerequisites
- An OpenShift cluster
- A running Cluster Operator
Procedure
Edit the
jvmOptionsproperty in theKafka,KafkaConnect,KafkaConnectS2I,KafkaMirrorMaker, orKafkaBridgeresource. For example:apiVersion: kafka.strimzi.io/v1beta1 kind: Kafka metadata: name: my-cluster spec: kafka: # ... jvmOptions: "-Xmx": "8g" "-Xms": "8g" # ... zookeeper: # ...Create or update the resource.
This can be done using
oc apply:oc apply -f your-file
3.2.12. Container images
AMQ Streams allows you to configure container images which will be used for its components. Overriding container images is recommended only in special situations, where you need to use a different container registry. For example, because your network does not allow access to the container repository used by AMQ Streams. In such a case, you should either copy the AMQ Streams images or build them from the source. If the configured image is not compatible with AMQ Streams images, it might not work properly.
3.2.12.1. Container image configurations
You can specify which container image to use for each component using the image property in the following resources:
-
Kafka.spec.kafka -
Kafka.spec.kafka.tlsSidecar -
Kafka.spec.zookeeper -
Kafka.spec.entityOperator.topicOperator -
Kafka.spec.entityOperator.userOperator -
Kafka.spec.entityOperator.tlsSidecar -
KafkaConnect.spec -
KafkaConnectS2I.spec -
KafkaBridge.spec
3.2.12.1.1. Configuring the image property for Kafka, Kafka Connect, and Kafka MirrorMaker
Kafka, Kafka Connect (including Kafka Connect with S2I support), and Kafka MirrorMaker support multiple versions of Kafka. Each component requires its own image. The default images for the different Kafka versions are configured in the following environment variables:
-
STRIMZI_KAFKA_IMAGES -
STRIMZI_KAFKA_CONNECT_IMAGES -
STRIMZI_KAFKA_CONNECT_S2I_IMAGES -
STRIMZI_KAFKA_MIRROR_MAKER_IMAGES
These environment variables contain mappings between the Kafka versions and their corresponding images. The mappings are used together with the image and version properties:
-
If neither
imagenorversionare given in the custom resource then theversionwill default to the Cluster Operator’s default Kafka version, and the image will be the one corresponding to this version in the environment variable. -
If
imageis given butversionis not, then the given image is used and theversionis assumed to be the Cluster Operator’s default Kafka version. -
If
versionis given butimageis not, then the image that corresponds to the given version in the environment variable is used. -
If both
versionandimageare given, then the given image is used. The image is assumed to contain a Kafka image with the given version.
The image and version for the different components can be configured in the following properties:
-
For Kafka in
spec.kafka.imageandspec.kafka.version. -
For Kafka Connect, Kafka Connect S2I, and Kafka MirrorMaker in
spec.imageandspec.version.
It is recommended to provide only the version and leave the image property unspecified. This reduces the chance of making a mistake when configuring the custom resource. If you need to change the images used for different versions of Kafka, it is preferable to configure the Cluster Operator’s environment variables.
3.2.12.1.2. Configuring the image property in other resources
For the image property in the other custom resources, the given value will be used during deployment. If the image property is missing, the image specified in the Cluster Operator configuration will be used. If the image name is not defined in the Cluster Operator configuration, then the default value will be used.
For Kafka broker TLS sidecar:
-
Container image specified in the
STRIMZI_DEFAULT_TLS_SIDECAR_KAFKA_IMAGEenvironment variable from the Cluster Operator configuration. -
registry.redhat.io/amq7/amq-streams-kafka-25-rhel7:1.5.0container image.
-
Container image specified in the
For Topic Operator:
-
Container image specified in the
STRIMZI_DEFAULT_TOPIC_OPERATOR_IMAGEenvironment variable from the Cluster Operator configuration. -
registry.redhat.io/amq7/amq-streams-rhel7-operator:1.5.0container image.
-
Container image specified in the
For User Operator:
-
Container image specified in the
STRIMZI_DEFAULT_USER_OPERATOR_IMAGEenvironment variable from the Cluster Operator configuration. -
registry.redhat.io/amq7/amq-streams-rhel7-operator:1.5.0container image.
-
Container image specified in the
For Entity Operator TLS sidecar:
-
Container image specified in the
STRIMZI_DEFAULT_TLS_SIDECAR_ENTITY_OPERATOR_IMAGEenvironment variable from the Cluster Operator configuration. -
registry.redhat.io/amq7/amq-streams-kafka-25-rhel7:1.5.0container image.
-
Container image specified in the
For Kafka Exporter:
-
Container image specified in the
STRIMZI_DEFAULT_KAFKA_EXPORTER_IMAGEenvironment variable from the Cluster Operator configuration. -
registry.redhat.io/amq7/amq-streams-kafka-25-rhel7:1.5.0container image.
-
Container image specified in the
For Kafka Bridge:
-
Container image specified in the
STRIMZI_DEFAULT_KAFKA_BRIDGE_IMAGEenvironment variable from the Cluster Operator configuration. -
registry.redhat.io/amq7/amq-streams-bridge-rhel7:1.5.0container image.
-
Container image specified in the
For Kafka broker initializer:
-
Container image specified in the
STRIMZI_DEFAULT_KAFKA_INIT_IMAGEenvironment variable from the Cluster Operator configuration. -
registry.redhat.io/amq7/amq-streams-rhel7-operator:1.5.0container image.
-
Container image specified in the
Overriding container images is recommended only in special situations, where you need to use a different container registry. For example, because your network does not allow access to the container repository used by AMQ Streams. In such case, you should either copy the AMQ Streams images or build them from source. In case the configured image is not compatible with AMQ Streams images, it might not work properly.
Example of container image configuration
apiVersion: kafka.strimzi.io/v1beta1
kind: Kafka
metadata:
  name: my-cluster
spec:
  kafka:
    # ...
    image: my-org/my-image:latest
    # ...
  zookeeper:
    # ...
3.2.12.2. Configuring container images
Prerequisites
- An OpenShift cluster
- A running Cluster Operator
Procedure
Edit the
imageproperty in theKafka,KafkaConnectorKafkaConnectS2Iresource. For example:apiVersion: kafka.strimzi.io/v1beta1 kind: Kafka metadata: name: my-cluster spec: kafka: # ... image: my-org/my-image:latest # ... zookeeper: # ...Create or update the resource.
This can be done using
oc apply:oc apply -f your-file
3.2.13. Configuring pod scheduling
When two applications are scheduled to the same OpenShift node, both applications might use the same resources like disk I/O and impact performance. That can lead to performance degradation. Scheduling Kafka pods in a way that avoids sharing nodes with other critical workloads, using the right nodes or dedicated a set of nodes only for Kafka are the best ways how to avoid such problems.
3.2.13.1. Scheduling pods based on other applications
3.2.13.1.1. Avoid critical applications to share the node
Pod anti-affinity can be used to ensure that critical applications are never scheduled on the same disk. When running Kafka cluster, it is recommended to use pod anti-affinity to ensure that the Kafka brokers do not share the nodes with other workloads like databases.
3.2.13.1.2. Affinity
Affinity can be configured using the affinity property in following resources:
-
Kafka.spec.kafka.template.pod -
Kafka.spec.zookeeper.template.pod -
Kafka.spec.entityOperator.template.pod -
KafkaConnect.spec.template.pod -
KafkaConnectS2I.spec.template.pod -
KafkaBridge.spec.template.pod
The affinity configuration can include different types of affinity:
- Pod affinity and anti-affinity
- Node affinity
The format of the affinity property follows the OpenShift specification. For more details, see the Kubernetes node and pod affinity documentation.
3.2.13.1.3. Configuring pod anti-affinity in Kafka components
Prerequisites
- An OpenShift cluster
- A running Cluster Operator
Procedure
Edit the
affinityproperty in the resource specifying the cluster deployment. Use labels to specify the pods which should not be scheduled on the same nodes. ThetopologyKeyshould be set tokubernetes.io/hostnameto specify that the selected pods should not be scheduled on nodes with the same hostname. For example:apiVersion: kafka.strimzi.io/v1beta1 kind: Kafka spec: kafka: # ... template: pod: affinity: podAntiAffinity: requiredDuringSchedulingIgnoredDuringExecution: - labelSelector: matchExpressions: - key: application operator: In values: - postgresql - mongodb topologyKey: "kubernetes.io/hostname" # ... zookeeper: # ...Create or update the resource.
This can be done using
oc apply:oc apply -f your-file
3.2.13.2. Scheduling pods to specific nodes
3.2.13.2.1. Node scheduling
The OpenShift cluster usually consists of many different types of worker nodes. Some are optimized for CPU heavy workloads, some for memory, while other might be optimized for storage (fast local SSDs) or network. Using different nodes helps to optimize both costs and performance. To achieve the best possible performance, it is important to allow scheduling of AMQ Streams components to use the right nodes.
OpenShift uses node affinity to schedule workloads onto specific nodes. Node affinity allows you to create a scheduling constraint for the node on which the pod will be scheduled. The constraint is specified as a label selector. You can specify the label using either the built-in node label like beta.kubernetes.io/instance-type or custom labels to select the right node.
3.2.13.2.2. Affinity
Affinity can be configured using the affinity property in following resources:
-
Kafka.spec.kafka.template.pod -
Kafka.spec.zookeeper.template.pod -
Kafka.spec.entityOperator.template.pod -
KafkaConnect.spec.template.pod -
KafkaConnectS2I.spec.template.pod -
KafkaBridge.spec.template.pod
The affinity configuration can include different types of affinity:
- Pod affinity and anti-affinity
- Node affinity
The format of the affinity property follows the OpenShift specification. For more details, see the Kubernetes node and pod affinity documentation.
3.2.13.2.3. Configuring node affinity in Kafka components
Prerequisites
- An OpenShift cluster
- A running Cluster Operator
Procedure
Label the nodes where AMQ Streams components should be scheduled.
This can be done using
oc label:oc label node your-node node-type=fast-networkAlternatively, some of the existing labels might be reused.
Edit the
affinityproperty in the resource specifying the cluster deployment. For example:apiVersion: kafka.strimzi.io/v1beta1 kind: Kafka spec: kafka: # ... template: pod: affinity: nodeAffinity: requiredDuringSchedulingIgnoredDuringExecution: nodeSelectorTerms: - matchExpressions: - key: node-type operator: In values: - fast-network # ... zookeeper: # ...Create or update the resource.
This can be done using
oc apply:oc apply -f your-file
3.2.13.3. Using dedicated nodes
3.2.13.3.1. Dedicated nodes
Cluster administrators can mark selected OpenShift nodes as tainted. Nodes with taints are excluded from regular scheduling and normal pods will not be scheduled to run on them. Only services which can tolerate the taint set on the node can be scheduled on it. The only other services running on such nodes will be system services such as log collectors or software defined networks.
Taints can be used to create dedicated nodes. Running Kafka and its components on dedicated nodes can have many advantages. There will be no other applications running on the same nodes which could cause disturbance or consume the resources needed for Kafka. That can lead to improved performance and stability.
To schedule Kafka pods on the dedicated nodes, configure node affinity and tolerations.
3.2.13.3.2. Affinity
Affinity can be configured using the affinity property in following resources:
-
Kafka.spec.kafka.template.pod -
Kafka.spec.zookeeper.template.pod -
Kafka.spec.entityOperator.template.pod -
KafkaConnect.spec.template.pod -
KafkaConnectS2I.spec.template.pod -
KafkaBridge.spec.template.pod
The affinity configuration can include different types of affinity:
- Pod affinity and anti-affinity
- Node affinity
The format of the affinity property follows the OpenShift specification. For more details, see the Kubernetes node and pod affinity documentation.
3.2.13.3.3. Tolerations
Tolerations can be configured using the tolerations property in following resources:
-
Kafka.spec.kafka.template.pod -
Kafka.spec.zookeeper.template.pod -
Kafka.spec.entityOperator.template.pod -
KafkaConnect.spec.template.pod -
KafkaConnectS2I.spec.template.pod -
KafkaBridge.spec.template.pod
The format of the tolerations property follows the OpenShift specification. For more details, see the Kubernetes taints and tolerations.
3.2.13.3.4. Setting up dedicated nodes and scheduling pods on them
Prerequisites
- An OpenShift cluster
- A running Cluster Operator
Procedure
- Select the nodes which should be used as dedicated.
- Make sure there are no workloads scheduled on these nodes.
Set the taints on the selected nodes:
This can be done using
oc adm taint:oc adm taint node your-node dedicated=Kafka:NoScheduleAdditionally, add a label to the selected nodes as well.
This can be done using
oc label:oc label node your-node dedicated=KafkaEdit the
affinityandtolerationsproperties in the resource specifying the cluster deployment. For example:apiVersion: kafka.strimzi.io/v1beta1 kind: Kafka spec: kafka: # ... template: pod: tolerations: - key: "dedicated" operator: "Equal" value: "Kafka" effect: "NoSchedule" affinity: nodeAffinity: requiredDuringSchedulingIgnoredDuringExecution: nodeSelectorTerms: - matchExpressions: - key: dedicated operator: In values: - Kafka # ... zookeeper: # ...Create or update the resource.
This can be done using
oc apply:oc apply -f your-file
3.2.14. Using external configuration and secrets
Connectors are created, reconfigured, and deleted using the Kafka Connect HTTP REST interface, or by using KafkaConnectors. For more information on these methods, see Section 2.3.3, “Creating and managing connectors”. The connector configuration is passed to Kafka Connect as part of an HTTP request and stored within Kafka itself.
ConfigMaps and Secrets are standard OpenShift resources used for storing configurations and confidential data. Whichever method you use to manage connectors, you can use ConfigMaps and Secrets to configure certain elements of a connector. You can then reference the configuration values in HTTP REST commands (this keeps the configuration separate and more secure, if needed). This method applies especially to confidential data, such as usernames, passwords, or certificates.
3.2.14.1. Storing connector configurations externally
You can mount ConfigMaps or Secrets into a Kafka Connect pod as volumes or environment variables. Volumes and environment variables are configured in the externalConfiguration property in KafkaConnect.spec and KafkaConnectS2I.spec.
3.2.14.1.1. External configuration as environment variables
The env property is used to specify one or more environment variables. These variables can contain a value from either a ConfigMap or a Secret.
The names of user-defined environment variables cannot start with KAFKA_ or STRIMZI_.
To mount a value from a Secret to an environment variable, use the valueFrom property and the secretKeyRef as shown in the following example.
Example of an environment variable set to a value from a Secret
apiVersion: kafka.strimzi.io/v1beta1
kind: KafkaConnect
metadata:
name: my-connect
spec:
# ...
externalConfiguration:
env:
- name: MY_ENVIRONMENT_VARIABLE
valueFrom:
secretKeyRef:
name: my-secret
key: my-key
A common use case for mounting Secrets to environment variables is when your connector needs to communicate with Amazon AWS and needs to read the AWS_ACCESS_KEY_ID and AWS_SECRET_ACCESS_KEY environment variables with credentials.
To mount a value from a ConfigMap to an environment variable, use configMapKeyRef in the valueFrom property as shown in the following example.
Example of an environment variable set to a value from a ConfigMap
apiVersion: kafka.strimzi.io/v1beta1
kind: KafkaConnect
metadata:
name: my-connect
spec:
# ...
externalConfiguration:
env:
- name: MY_ENVIRONMENT_VARIABLE
valueFrom:
configMapKeyRef:
name: my-config-map
key: my-key
3.2.14.1.2. External configuration as volumes
You can also mount ConfigMaps or Secrets to a Kafka Connect pod as volumes. Using volumes instead of environment variables is useful in the following scenarios:
- Mounting truststores or keystores with TLS certificates
- Mounting a properties file that is used to configure Kafka Connect connectors
In the volumes property of the externalConfiguration resource, list the ConfigMaps or Secrets that will be mounted as volumes. Each volume must specify a name in the name property and a reference to ConfigMap or Secret.
Example of volumes with external configuration
apiVersion: kafka.strimzi.io/v1beta1
kind: KafkaConnect
metadata:
name: my-connect
spec:
# ...
externalConfiguration:
volumes:
- name: connector1
configMap:
name: connector1-configuration
- name: connector1-certificates
secret:
secretName: connector1-certificates
The volumes will be mounted inside the Kafka Connect containers in the path /opt/kafka/external-configuration/<volume-name>. For example, the files from a volume named connector1 would appear in the directory /opt/kafka/external-configuration/connector1.
The FileConfigProvider has to be used to read the values from the mounted properties files in connector configurations.
3.2.14.2. Mounting Secrets as environment variables
You can create an OpenShift Secret and mount it to Kafka Connect as an environment variable.
Prerequisites
- A running Cluster Operator.
Procedure
Create a secret containing the information that will be mounted as an environment variable. For example:
apiVersion: v1 kind: Secret metadata: name: aws-creds type: Opaque data: awsAccessKey: QUtJQVhYWFhYWFhYWFhYWFg= awsSecretAccessKey: Ylhsd1lYTnpkMjl5WkE=
Create or edit the Kafka Connect resource. Configure the
externalConfigurationsection of theKafkaConnectorKafkaConnectS2Icustom resource to reference the secret. For example:apiVersion: kafka.strimzi.io/v1beta1 kind: KafkaConnect metadata: name: my-connect spec: # ... externalConfiguration: env: - name: AWS_ACCESS_KEY_ID valueFrom: secretKeyRef: name: aws-creds key: awsAccessKey - name: AWS_SECRET_ACCESS_KEY valueFrom: secretKeyRef: name: aws-creds key: awsSecretAccessKeyApply the changes to your Kafka Connect deployment.
Use
oc apply:oc apply -f your-file
The environment variables are now available for use when developing your connectors.
Additional resources
-
For more information about external configuration in Kafka Connect, see Section B.84, “
ExternalConfigurationschema reference”.
3.2.14.3. Mounting Secrets as volumes
You can create an OpenShift Secret, mount it as a volume to Kafka Connect, and then use it to configure a Kafka Connect connector.
Prerequisites
- A running Cluster Operator.
Procedure
Create a secret containing a properties file that defines the configuration options for your connector configuration. For example:
apiVersion: v1 kind: Secret metadata: name: mysecret type: Opaque stringData: connector.properties: |- dbUsername: my-user dbPassword: my-passwordCreate or edit the Kafka Connect resource. Configure the
FileConfigProviderin theconfigsection and theexternalConfigurationsection of theKafkaConnectorKafkaConnectS2Icustom resource to reference the secret. For example:apiVersion: kafka.strimzi.io/v1beta1 kind: KafkaConnect metadata: name: my-connect spec: # ... config: config.providers: file config.providers.file.class: org.apache.kafka.common.config.provider.FileConfigProvider #... externalConfiguration: volumes: - name: connector-config secret: secretName: mysecretApply the changes to your Kafka Connect deployment.
Use
oc apply:oc apply -f your-fileConfigure your connector
If you are using the Kafka Connect HTTP REST interface, use the values from the mounted properties file in your JSON payload with connector configuration. For example:
{ "name":"my-connector", "config":{ "connector.class":"MyDbConnector", "tasks.max":"3", "database": "my-postgresql:5432", "username":"${file:/opt/kafka/external-configuration/connector-config/connector.properties:dbUsername}", "password":"${file:/opt/kafka/external-configuration/connector-config/connector.properties:dbPassword}", # ... } }If you are using a
KafkaConnectorresource, use the values from the mounted properties file in thespec.configsection of your custom resource. For example:apiVersion: kafka.strimzi.io/v1beta1 kind: KafkaConnector metadata: name: my-connector # ... spec: class: "MyDbConnector" tasksMax: 3 config: database: "my-postgresql:5432" username: "${file:/opt/kafka/external-configuration/connector-config/connector.properties:dbUsername}" password: "${file:/opt/kafka/external-configuration/connector-config/connector.properties:dbPassword}"
Additional resources
-
For more information about external configuration in Kafka Connect, see Section B.84, “
ExternalConfigurationschema reference”.
3.2.15. Enabling KafkaConnector resources
To enable KafkaConnectors for a Kafka Connect cluster, add the strimzi.io/use-connector-resources annotation to the KafkaConnect or KafkaConnectS2I custom resource.
Prerequisites
- A running Cluster Operator
Procedure
Edit the
KafkaConnectorKafkaConnectS2Iresource. Add thestrimzi.io/use-connector-resourcesannotation. For example:apiVersion: kafka.strimzi.io/v1beta1 kind: KafkaConnect metadata: name: my-connect-cluster annotations: strimzi.io/use-connector-resources: "true" spec: # ...Create or update the resource using
oc apply:oc apply -f kafka-connect.yaml
3.2.16. List of resources created as part of Kafka Connect cluster
The following resources will created by the Cluster Operator in the OpenShift cluster:
- connect-cluster-name-connect
- Deployment which is in charge to create the Kafka Connect worker node pods.
- connect-cluster-name-connect-api
- Service which exposes the REST interface for managing the Kafka Connect cluster.
- connect-cluster-name-config
- ConfigMap which contains the Kafka Connect ancillary configuration and is mounted as a volume by the Kafka broker pods.
- connect-cluster-name-connect
- Pod Disruption Budget configured for the Kafka Connect worker nodes.
3.3. Kafka Connect cluster configuration with Source2Image support
The full schema of the KafkaConnectS2I resource is described in the Section B.90, “KafkaConnectS2I schema reference”. All labels that are applied to the desired KafkaConnectS2I resource will also be applied to the OpenShift resources making up the Kafka Connect cluster with Source2Image support. This provides a convenient mechanism for resources to be labeled as required.
3.3.1. Replicas
Kafka Connect clusters can consist of one or more nodes. The number of nodes is defined in the KafkaConnect and KafkaConnectS2I resources. Running a Kafka Connect cluster with multiple nodes can provide better availability and scalability. However, when running Kafka Connect on OpenShift it is not necessary to run multiple nodes of Kafka Connect for high availability. If a node where Kafka Connect is deployed to crashes, OpenShift will automatically reschedule the Kafka Connect pod to a different node. However, running Kafka Connect with multiple nodes can provide faster failover times, because the other nodes will be up and running already.
3.3.1.1. Configuring the number of nodes
The number of Kafka Connect nodes is configured using the replicas property in KafkaConnect.spec and KafkaConnectS2I.spec.
Prerequisites
- An OpenShift cluster
- A running Cluster Operator
Procedure
Edit the
replicasproperty in theKafkaConnectorKafkaConnectS2Iresource. For example:apiVersion: kafka.strimzi.io/v1beta1 kind: KafkaConnectS2I metadata: name: my-cluster spec: # ... replicas: 3 # ...
Create or update the resource.
This can be done using
oc apply:oc apply -f your-file
3.3.2. Bootstrap servers
A Kafka Connect cluster always works in combination with a Kafka cluster. A Kafka cluster is specified as a list of bootstrap servers. On OpenShift, the list must ideally contain the Kafka cluster bootstrap service named cluster-name-kafka-bootstrap, and a port of 9092 for plain traffic or 9093 for encrypted traffic.
The list of bootstrap servers is configured in the bootstrapServers property in KafkaConnect.spec and KafkaConnectS2I.spec. The servers must be defined as a comma-separated list specifying one or more Kafka brokers, or a service pointing to Kafka brokers specified as a hostname:_port_ pairs.
When using Kafka Connect with a Kafka cluster not managed by AMQ Streams, you can specify the bootstrap servers list according to the configuration of the cluster.
3.3.2.1. Configuring bootstrap servers
Prerequisites
- An OpenShift cluster
- A running Cluster Operator
Procedure
Edit the
bootstrapServersproperty in theKafkaConnectorKafkaConnectS2Iresource. For example:apiVersion: kafka.strimzi.io/v1beta1 kind: KafkaConnect metadata: name: my-cluster spec: # ... bootstrapServers: my-cluster-kafka-bootstrap:9092 # ...
Create or update the resource.
This can be done using
oc apply:oc apply -f your-file
3.3.3. Connecting to Kafka brokers using TLS
By default, Kafka Connect tries to connect to Kafka brokers using a plain text connection. If you prefer to use TLS, additional configuration is required.
3.3.3.1. TLS support in Kafka Connect
TLS support is configured in the tls property in KafkaConnect.spec and KafkaConnectS2I.spec. The tls property contains a list of secrets with key names under which the certificates are stored. The certificates must be stored in X509 format.
An example showing TLS configuration with multiple certificates
apiVersion: kafka.strimzi.io/v1beta1
kind: KafkaConnect
metadata:
  name: my-cluster
spec:
  # ...
  tls:
    trustedCertificates:
      - secretName: my-secret
        certificate: ca.crt
      - secretName: my-other-secret
        certificate: certificate.crt
  # ...
When multiple certificates are stored in the same secret, it can be listed multiple times.
An example showing TLS configuration with multiple certificates from the same secret
apiVersion: kafka.strimzi.io/v1beta1
kind: KafkaConnectS2I
metadata:
  name: my-cluster
spec:
  # ...
  tls:
    trustedCertificates:
      - secretName: my-secret
        certificate: ca.crt
      - secretName: my-secret
        certificate: ca2.crt
  # ...
3.3.3.2. Configuring TLS in Kafka Connect
Prerequisites
- An OpenShift cluster
- A running Cluster Operator
-
If they exist, the name of the
Secretfor the certificate used for TLS Server Authentication, and the key under which the certificate is stored in theSecret
Procedure
(Optional) If they do not already exist, prepare the TLS certificate used in authentication in a file and create a
Secret.NoteThe secrets created by the Cluster Operator for Kafka cluster may be used directly.
This can be done using
oc create:oc create secret generic my-secret --from-file=my-file.crt
Edit the
tlsproperty in theKafkaConnectorKafkaConnectS2Iresource. For example:apiVersion: kafka.strimzi.io/v1beta1 kind: KafkaConnect metadata: name: my-connect spec: # ... tls: trustedCertificates: - secretName: my-cluster-cluster-cert certificate: ca.crt # ...Create or update the resource.
This can be done using
oc apply:oc apply -f your-file
3.3.4. Connecting to Kafka brokers with Authentication
By default, Kafka Connect will try to connect to Kafka brokers without authentication. Authentication is enabled through the KafkaConnect and KafkaConnectS2I resources.
3.3.4.1. Authentication support in Kafka Connect
Authentication is configured through the authentication property in KafkaConnect.spec and KafkaConnectS2I.spec. The authentication property specifies the type of the authentication mechanisms which should be used and additional configuration details depending on the mechanism. The supported authentication types are:
- TLS client authentication
- SASL-based authentication using the SCRAM-SHA-512 mechanism
- SASL-based authentication using the PLAIN mechanism
- OAuth 2.0 token based authentication
3.3.4.1.1. TLS Client Authentication
To use TLS client authentication, set the type property to the value tls. TLS client authentication uses a TLS certificate to authenticate. The certificate is specified in the certificateAndKey property and is always loaded from an OpenShift secret. In the secret, the certificate must be stored in X509 format under two different keys: public and private.
TLS client authentication can be used only with TLS connections. For more details about TLS configuration in Kafka Connect see Section 3.3.3, “Connecting to Kafka brokers using TLS”.
An example TLS client authentication configuration
apiVersion: kafka.strimzi.io/v1beta1
kind: KafkaConnect
metadata:
  name: my-cluster
spec:
  # ...
  authentication:
    type: tls
    certificateAndKey:
      secretName: my-secret
      certificate: public.crt
      key: private.key
  # ...
3.3.4.1.2. SASL based SCRAM-SHA-512 authentication
To configure Kafka Connect to use SASL-based SCRAM-SHA-512 authentication, set the type property to scram-sha-512. This authentication mechanism requires a username and password.
-
Specify the username in the
usernameproperty. -
In the
passwordSecretproperty, specify a link to aSecretcontaining the password. ThesecretNameproperty contains the name of theSecretand thepasswordproperty contains the name of the key under which the password is stored inside theSecret.
Do not specify the actual password in the password field.
An example SASL based SCRAM-SHA-512 client authentication configuration
apiVersion: kafka.strimzi.io/v1beta1
kind: KafkaConnect
metadata:
  name: my-cluster
spec:
  # ...
  authentication:
    type: scram-sha-512
    username: my-connect-user
    passwordSecret:
      secretName: my-connect-user
      password: my-connect-password-key
  # ...
3.3.4.1.3. SASL based PLAIN authentication
To configure Kafka Connect to use SASL-based PLAIN authentication, set the type property to plain. This authentication mechanism requires a username and password.
The SASL PLAIN mechanism will transfer the username and password across the network in cleartext. Only use SASL PLAIN authentication if TLS encryption is enabled.
-
Specify the username in the
usernameproperty. -
In the
passwordSecretproperty, specify a link to aSecretcontaining the password. ThesecretNameproperty contains the name of such aSecretand thepasswordproperty contains the name of the key under which the password is stored inside theSecret.
Do not specify the actual password in the password field.
An example showing SASL based PLAIN client authentication configuration
apiVersion: kafka.strimzi.io/v1beta1
kind: KafkaConnect
metadata:
  name: my-cluster
spec:
  # ...
  authentication:
    type: plain
    username: my-connect-user
    passwordSecret:
      secretName: my-connect-user
      password: my-connect-password-key
  # ...
3.3.4.2. Configuring TLS client authentication in Kafka Connect
Prerequisites
- An OpenShift cluster
- A running Cluster Operator
-
If they exist, the name of the
Secretwith the public and private keys used for TLS Client Authentication, and the keys under which they are stored in theSecret
Procedure
(Optional) If they do not already exist, prepare the keys used for authentication in a file and create the
Secret.NoteSecrets created by the User Operator may be used.
This can be done using
oc create:oc create secret generic my-secret --from-file=my-public.crt --from-file=my-private.key
Edit the
authenticationproperty in theKafkaConnectorKafkaConnectS2Iresource. For example:apiVersion: kafka.strimzi.io/v1beta1 kind: KafkaConnect metadata: name: my-connect spec: # ... authentication: type: tls certificateAndKey: secretName: my-secret certificate: my-public.crt key: my-private.key # ...Create or update the resource.
This can be done using
oc apply:oc apply -f your-file
3.3.4.3. Configuring SCRAM-SHA-512 authentication in Kafka Connect
Prerequisites
- An OpenShift cluster
- A running Cluster Operator
- Username of the user which should be used for authentication
-
If they exist, the name of the
Secretwith the password used for authentication and the key under which the password is stored in theSecret
Procedure
(Optional) If they do not already exist, prepare a file with the password used in authentication and create the
Secret.NoteSecrets created by the User Operator may be used.
This can be done using
oc create:echo -n '<password>' > <my-password.txt> oc create secret generic <my-secret> --from-file=<my-password.txt>
Edit the
authenticationproperty in theKafkaConnectorKafkaConnectS2Iresource. For example:apiVersion: kafka.strimzi.io/v1beta1 kind: KafkaConnect metadata: name: my-connect spec: # ... authentication: type: scram-sha-512 username: <my-username> passwordSecret: secretName: <my-secret> password: <my-password.txt> # ...Create or update the resource.
On OpenShift this can be done using
oc apply:oc apply -f your-file
3.3.5. Kafka Connect configuration
AMQ Streams allows you to customize the configuration of Apache Kafka Connect nodes by editing certain options listed in Apache Kafka documentation.
Configuration options that cannot be configured relate to:
- Kafka cluster bootstrap address
- Security (Encryption, Authentication, and Authorization)
- Listener / REST interface configuration
- Plugin path configuration
These options are automatically configured by AMQ Streams.
3.3.5.1. Kafka Connect configuration
Kafka Connect is configured using the config property in KafkaConnect.spec and KafkaConnectS2I.spec. This property contains the Kafka Connect configuration options as keys. The values can be one of the following JSON types:
- String
- Number
- Boolean
You can specify and configure the options listed in the Apache Kafka documentation with the exception of those options that are managed directly by AMQ Streams. Specifically, configuration options with keys equal to or starting with one of the following strings are forbidden:
-
ssl. -
sasl. -
security. -
listeners -
plugin.path -
rest. -
bootstrap.servers
When a forbidden option is present in the config property, it is ignored and a warning message is printed to the Cluster Operator log file. All other options are passed to Kafka Connect.
The Cluster Operator does not validate keys or values in the config object provided. When an invalid configuration is provided, the Kafka Connect cluster might not start or might become unstable. In this circumstance, fix the configuration in the KafkaConnect.spec.config or KafkaConnectS2I.spec.config object, then the Cluster Operator can roll out the new configuration to all Kafka Connect nodes.
Certain options have default values:
-
group.idwith default valueconnect-cluster -
offset.storage.topicwith default valueconnect-cluster-offsets -
config.storage.topicwith default valueconnect-cluster-configs -
status.storage.topicwith default valueconnect-cluster-status -
key.converterwith default valueorg.apache.kafka.connect.json.JsonConverter -
value.converterwith default valueorg.apache.kafka.connect.json.JsonConverter
These options are automatically configured in case they are not present in the KafkaConnect.spec.config or KafkaConnectS2I.spec.config properties.
Use the three allowed ssl configuration options to run external listeners with a specific cipher suite for a TLS version. A cipher suite combines algorithms for secure connection and data transfer.
Example Kafka Connect configuration
apiVersion: kafka.strimzi.io/v1beta1
kind: KafkaConnect
metadata:
name: my-connect
spec:
# ...
config:
group.id: my-connect-cluster
offset.storage.topic: my-connect-cluster-offsets
config.storage.topic: my-connect-cluster-configs
status.storage.topic: my-connect-cluster-status
key.converter: org.apache.kafka.connect.json.JsonConverter
value.converter: org.apache.kafka.connect.json.JsonConverter
key.converter.schemas.enable: true
value.converter.schemas.enable: true
config.storage.replication.factor: 3
offset.storage.replication.factor: 3
status.storage.replication.factor: 3
ssl.cipher.suites: "TLS_ECDHE_RSA_WITH_AES_256_GCM_SHA384" 1
ssl.enabled.protocols: "TLSv1.2" 2
ssl.protocol: "TLSv1.2" 3
# ...
- 1
- The cipher suite for TLS using a combination of
ECDHEkey exchange mechanism,RSAauthentication algorithm,AESbulk encyption algorithm andSHA384MAC algorithm. - 2
- The SSl protocol
TLSv1.2is enabled. - 3
- Specifies the
TLSv1.2protocol to generate the SSL context. Allowed values areTLSv1.1andTLSv1.2.
3.3.5.2. Kafka Connect configuration for multiple instances
If you are running multiple instances of Kafka Connect, you have to change the default configuration of the following config properties:
apiVersion: kafka.strimzi.io/v1beta1
kind: KafkaConnect
metadata:
name: my-connect
spec:
# ...
config:
group.id: connect-cluster 1
offset.storage.topic: connect-cluster-offsets 2
config.storage.topic: connect-cluster-configs 3
status.storage.topic: connect-cluster-status 4
# ...
# ...
Values for the three topics must be the same for all Kafka Connect instances with the same group.id.
Unless you change the default settings, each Kafka Connect instance connecting to the same Kafka cluster is deployed with the same values. What happens, in effect, is all instances are coupled to run in a cluster and use the same topics.
If multiple Kafka Connect clusters try to use the same topics, Kafka Connect will not work as expected and generate errors.
If you wish to run multiple Kafka Connect instances, change the values of these properties for each instance.
3.3.5.3. Configuring Kafka Connect
Prerequisites
- An OpenShift cluster
- A running Cluster Operator
Procedure
Edit the
configproperty in theKafkaConnectorKafkaConnectS2Iresource. For example:apiVersion: kafka.strimzi.io/v1beta1 kind: KafkaConnect metadata: name: my-connect spec: # ... config: group.id: my-connect-cluster offset.storage.topic: my-connect-cluster-offsets config.storage.topic: my-connect-cluster-configs status.storage.topic: my-connect-cluster-status key.converter: org.apache.kafka.connect.json.JsonConverter value.converter: org.apache.kafka.connect.json.JsonConverter key.converter.schemas.enable: true value.converter.schemas.enable: true config.storage.replication.factor: 3 offset.storage.replication.factor: 3 status.storage.replication.factor: 3 # ...Create or update the resource.
This can be done using
oc apply:oc apply -f your-file- If authorization is enabled for Kafka Connect, configure the Kafka Connect user to enable access to the Kafka Connect consumer group and topics.
3.3.6. Kafka Connect user authorization
If authorization is enabled for Kafka Connect, the Kafka Connect user must be configured to provide read/write access rights to the Kafka Connect consumer group and internal topics.
The properties for the consumer group and internal topics are automatically configured by AMQ Streams, or they can be specified explicitly in the spec for the KafkaConnect or KafkaConnectS2I configuration.
The following example shows the configuration of the properties in the KafkaConnect resource, which need to be represented in the Kafka Connect user configuration.
apiVersion: kafka.strimzi.io/v1beta1
kind: KafkaConnect
metadata:
name: my-connect
spec:
# ...
config:
group.id: my-connect-cluster 1
offset.storage.topic: my-connect-cluster-offsets 2
config.storage.topic: my-connect-cluster-configs 3
status.storage.topic: my-connect-cluster-status 4
# ...
# ...3.3.6.1. Configuring Kafka Connect user authorization
This procedure describes how to authorize user access to Kafka Connect.
When any type of authorization is being used in Kafka, a Kafka Connect user requires access rights to the consumer group and the internal topics of Kafka Connect.
This procedure shows how access is provided when simple authorization is being used.
Simple authorization uses ACL rules, handled by the Kafka SimpleAclAuthorizer plugin, to provide the right level of access. For more information on configuring a KafkaUser resource to use simple authorization, see Kafka User resource.
The default values for the consumer group and topics will differ when running multiple instances.
Prerequisites
- An OpenShift cluster
- A running Cluster Operator
Procedure
Edit the
authorizationproperty in theKafkaUserresource to provide access rights to the user.In the following example, access rights are configured for the Kafka Connect topics and consumer group using
literalname values:Property Name offset.storage.topicconnect-cluster-offsetsstatus.storage.topicconnect-cluster-statusconfig.storage.topicconnect-cluster-configsgroupconnect-clusterapiVersion: kafka.strimzi.io/v1beta1 kind: KafkaUser metadata: name: my-user labels: strimzi.io/cluster: my-cluster spec: # ... authorization: type: simple acls: # access to offset.storage.topic - resource: type: topic name: connect-cluster-offsets patternType: literal operation: Write host: "*" - resource: type: topic name: connect-cluster-offsets patternType: literal operation: Create host: "*" - resource: type: topic name: connect-cluster-offsets patternType: literal operation: Describe host: "*" - resource: type: topic name: connect-cluster-offsets patternType: literal operation: Read host: "*" # access to status.storage.topic - resource: type: topic name: connect-cluster-status patternType: literal operation: Write host: "*" - resource: type: topic name: connect-cluster-status patternType: literal operation: Create host: "*" - resource: type: topic name: connect-cluster-status patternType: literal operation: Describe host: "*" - resource: type: topic name: connect-cluster-status patternType: literal operation: Read host: "*" # access to config.storage.topic - resource: type: topic name: connect-cluster-configs patternType: literal operation: Write host: "*" - resource: type: topic name: connect-cluster-configs patternType: literal operation: Create host: "*" - resource: type: topic name: connect-cluster-configs patternType: literal operation: Describe host: "*" - resource: type: topic name: connect-cluster-configs patternType: literal operation: Read host: "*" # consumer group - resource: type: group name: connect-cluster patternType: literal operation: Read host: "*"Create or update the resource.
oc apply -f your-file
3.3.7. CPU and memory resources
For every deployed container, AMQ Streams allows you to request specific resources and define the maximum consumption of those resources.
AMQ Streams supports two types of resources:
- CPU
- Memory
AMQ Streams uses the OpenShift syntax for specifying CPU and memory resources.
3.3.7.1. Resource limits and requests
Resource limits and requests are configured using the resources property in the following resources:
-
Kafka.spec.kafka -
Kafka.spec.kafka.tlsSidecar -
Kafka.spec.zookeeper -
Kafka.spec.entityOperator.topicOperator -
Kafka.spec.entityOperator.userOperator -
Kafka.spec.entityOperator.tlsSidecar -
Kafka.spec.KafkaExporter -
KafkaConnect.spec -
KafkaConnectS2I.spec -
KafkaBridge.spec
Additional resources
- For more information about managing computing resources on OpenShift, see Managing Compute Resources for Containers.
3.3.7.1.1. Resource requests
Requests specify the resources to reserve for a given container. Reserving the resources ensures that they are always available.
If the resource request is for more than the available free resources in the OpenShift cluster, the pod is not scheduled.
Resources requests are specified in the requests property. Resources requests currently supported by AMQ Streams:
-
cpu -
memory
A request may be configured for one or more supported resources.
Example resource request configuration with all resources
# ...
resources:
requests:
cpu: 12
memory: 64Gi
# ...
3.3.7.1.2. Resource limits
Limits specify the maximum resources that can be consumed by a given container. The limit is not reserved and might not always be available. A container can use the resources up to the limit only when they are available. Resource limits should be always higher than the resource requests.
Resource limits are specified in the limits property. Resource limits currently supported by AMQ Streams:
-
cpu -
memory
A resource may be configured for one or more supported limits.
Example resource limits configuration
# ...
resources:
limits:
cpu: 12
memory: 64Gi
# ...
3.3.7.1.3. Supported CPU formats
CPU requests and limits are supported in the following formats:
-
Number of CPU cores as integer (
5CPU core) or decimal (2.5CPU core). -
Number or millicpus / millicores (
100m) where 1000 millicores is the same1CPU core.
Example CPU units
# ...
resources:
requests:
cpu: 500m
limits:
cpu: 2.5
# ...
The computing power of 1 CPU core may differ depending on the platform where OpenShift is deployed.
Additional resources
- For more information on CPU specification, see the Meaning of CPU.
3.3.7.1.4. Supported memory formats
Memory requests and limits are specified in megabytes, gigabytes, mebibytes, and gibibytes.
-
To specify memory in megabytes, use the
Msuffix. For example1000M. -
To specify memory in gigabytes, use the
Gsuffix. For example1G. -
To specify memory in mebibytes, use the
Misuffix. For example1000Mi. -
To specify memory in gibibytes, use the
Gisuffix. For example1Gi.
An example of using different memory units
# ...
resources:
requests:
memory: 512Mi
limits:
memory: 2Gi
# ...
Additional resources
- For more details about memory specification and additional supported units, see Meaning of memory.
3.3.7.2. Configuring resource requests and limits
Prerequisites
- An OpenShift cluster
- A running Cluster Operator
Procedure
Edit the
resourcesproperty in the resource specifying the cluster deployment. For example:apiVersion: kafka.strimzi.io/v1beta1 kind: Kafka spec: kafka: # ... resources: requests: cpu: "8" memory: 64Gi limits: cpu: "12" memory: 128Gi # ... zookeeper: # ...Create or update the resource.
This can be done using
oc apply:oc apply -f your-file
Additional resources
- For more information about the schema, see {K8sResourceRequirementsAPI}.
3.3.8. Kafka Connect with S2I loggers
Kafka Connect with Source2Image support has its own configurable loggers:
-
connect.root.logger.level -
log4j.logger.org.reflections
Kafka Connect uses the Apache log4j logger implementation.
Use the logging property to configure loggers and logger levels.
You can set the log levels by specifying the logger and level directly (inline) or use a custom (external) ConfigMap. If a ConfigMap is used, you set logging.name property to the name of the ConfigMap containing the external logging configuration. Inside the ConfigMap, the logging configuration is described using log4j.properties.
Here we see examples of inline and external logging.
Inline logging
apiVersion: kafka.strimzi.io/v1beta1
kind: KafkaConnectS2I
spec:
# ...
logging:
type: inline
loggers:
connect.root.logger.level: "INFO"
# ...
External logging
apiVersion: kafka.strimzi.io/v1beta1
kind: KafkaConnectS2I
spec:
# ...
logging:
type: external
name: customConfigMap
# ...
Additional resources
- Garbage collector (GC) logging can also be enabled (or disabled). For more information about GC logging, see Section 3.1.18.1, “JVM configuration”
- For more information about log levels, see Apache logging services.
3.3.9. Healthchecks
Healthchecks are periodical tests which verify the health of an application. When a Healthcheck probe fails, OpenShift assumes that the application is not healthy and attempts to fix it.
OpenShift supports two types of Healthcheck probes:
- Liveness probes
- Readiness probes
For more details about the probes, see Configure Liveness and Readiness Probes. Both types of probes are used in AMQ Streams components.
Users can configure selected options for liveness and readiness probes.
3.3.9.1. Healthcheck configurations
Liveness and readiness probes can be configured using the livenessProbe and readinessProbe properties in following resources:
-
Kafka.spec.kafka -
Kafka.spec.kafka.tlsSidecar -
Kafka.spec.zookeeper -
Kafka.spec.entityOperator.tlsSidecar -
Kafka.spec.entityOperator.topicOperator -
Kafka.spec.entityOperator.userOperator -
Kafka.spec.KafkaExporter -
KafkaConnect.spec -
KafkaConnectS2I.spec -
KafkaMirrorMaker.spec -
KafkaBridge.spec
Both livenessProbe and readinessProbe support the following options:
-
initialDelaySeconds -
timeoutSeconds -
periodSeconds -
successThreshold -
failureThreshold
For more information about the livenessProbe and readinessProbe options, see Section B.40, “Probe schema reference”.
An example of liveness and readiness probe configuration
# ... readinessProbe: initialDelaySeconds: 15 timeoutSeconds: 5 livenessProbe: initialDelaySeconds: 15 timeoutSeconds: 5 # ...
3.3.9.2. Configuring healthchecks
Prerequisites
- An OpenShift cluster
- A running Cluster Operator
Procedure
Edit the
livenessProbeorreadinessProbeproperty in theKafka,KafkaConnectorKafkaConnectS2Iresource. For example:apiVersion: kafka.strimzi.io/v1beta1 kind: Kafka metadata: name: my-cluster spec: kafka: # ... readinessProbe: initialDelaySeconds: 15 timeoutSeconds: 5 livenessProbe: initialDelaySeconds: 15 timeoutSeconds: 5 # ... zookeeper: # ...Create or update the resource.
This can be done using
oc apply:oc apply -f your-file
3.3.10. Prometheus metrics
AMQ Streams supports Prometheus metrics using Prometheus JMX exporter to convert the JMX metrics supported by Apache Kafka and ZooKeeper to Prometheus metrics. When metrics are enabled, they are exposed on port 9404.
For more information about setting up and deploying Prometheus and Grafana, see Introducing Metrics to Kafka.
3.3.10.1. Metrics configuration
Prometheus metrics are enabled by configuring the metrics property in following resources:
-
Kafka.spec.kafka -
Kafka.spec.zookeeper -
KafkaConnect.spec -
KafkaConnectS2I.spec
When the metrics property is not defined in the resource, the Prometheus metrics will be disabled. To enable Prometheus metrics export without any further configuration, you can set it to an empty object ({}).
Example of enabling metrics without any further configuration
apiVersion: kafka.strimzi.io/v1beta1
kind: Kafka
metadata:
name: my-cluster
spec:
kafka:
# ...
metrics: {}
# ...
zookeeper:
# ...
The metrics property might contain additional configuration for the Prometheus JMX exporter.
Example of enabling metrics with additional Prometheus JMX Exporter configuration
apiVersion: kafka.strimzi.io/v1beta1
kind: Kafka
metadata:
name: my-cluster
spec:
kafka:
# ...
metrics:
lowercaseOutputName: true
rules:
- pattern: "kafka.server<type=(.+), name=(.+)PerSec\\w*><>Count"
name: "kafka_server_$1_$2_total"
- pattern: "kafka.server<type=(.+), name=(.+)PerSec\\w*, topic=(.+)><>Count"
name: "kafka_server_$1_$2_total"
labels:
topic: "$3"
# ...
zookeeper:
# ...
3.3.10.2. Configuring Prometheus metrics
Prerequisites
- An OpenShift cluster
- A running Cluster Operator
Procedure
Edit the
metricsproperty in theKafka,KafkaConnectorKafkaConnectS2Iresource. For example:apiVersion: kafka.strimzi.io/v1beta1 kind: Kafka metadata: name: my-cluster spec: kafka: # ... zookeeper: # ... metrics: lowercaseOutputName: true # ...Create or update the resource.
This can be done using
oc apply:oc apply -f your-file
3.3.11. JVM Options
The following components of AMQ Streams run inside a Virtual Machine (VM):
- Apache Kafka
- Apache ZooKeeper
- Apache Kafka Connect
- Apache Kafka MirrorMaker
- AMQ Streams Kafka Bridge
JVM configuration options optimize the performance for different platforms and architectures. AMQ Streams allows you to configure some of these options.
3.3.11.1. JVM configuration
JVM options can be configured using the jvmOptions property in following resources:
-
Kafka.spec.kafka -
Kafka.spec.zookeeper -
KafkaConnect.spec -
KafkaConnectS2I.spec -
KafkaMirrorMaker.spec -
KafkaBridge.spec
Only a selected subset of available JVM options can be configured. The following options are supported:
-Xms and -Xmx
-Xms configures the minimum initial allocation heap size when the JVM starts. -Xmx configures the maximum heap size.
The units accepted by JVM settings such as -Xmx and -Xms are those accepted by the JDK java binary in the corresponding image. Accordingly, 1g or 1G means 1,073,741,824 bytes, and Gi is not a valid unit suffix. This is in contrast to the units used for memory requests and limits, which follow the OpenShift convention where 1G means 1,000,000,000 bytes, and 1Gi means 1,073,741,824 bytes
The default values used for -Xms and -Xmx depends on whether there is a memory request limit configured for the container:
- If there is a memory limit then the JVM’s minimum and maximum memory will be set to a value corresponding to the limit.
-
If there is no memory limit then the JVM’s minimum memory will be set to
128Mand the JVM’s maximum memory will not be defined. This allows for the JVM’s memory to grow as-needed, which is ideal for single node environments in test and development.
Setting -Xmx explicitly requires some care:
-
The JVM’s overall memory usage will be approximately 4 × the maximum heap, as configured by
-Xmx. -
If
-Xmxis set without also setting an appropriate OpenShift memory limit, it is possible that the container will be killed should the OpenShift node experience memory pressure (from other Pods running on it). -
If
-Xmxis set without also setting an appropriate OpenShift memory request, it is possible that the container will be scheduled to a node with insufficient memory. In this case, the container will not start but crash (immediately if-Xmsis set to-Xmx, or some later time if not).
When setting -Xmx explicitly, it is recommended to:
- set the memory request and the memory limit to the same value,
-
use a memory request that is at least 4.5 × the
-Xmx, -
consider setting
-Xmsto the same value as-Xmx.
Containers doing lots of disk I/O (such as Kafka broker containers) will need to leave some memory available for use as operating system page cache. On such containers, the requested memory should be significantly higher than the memory used by the JVM.
Example fragment configuring -Xmx and -Xms
# ... jvmOptions: "-Xmx": "2g" "-Xms": "2g" # ...
In the above example, the JVM will use 2 GiB (=2,147,483,648 bytes) for its heap. Its total memory usage will be approximately 8GiB.
Setting the same value for initial (-Xms) and maximum (-Xmx) heap sizes avoids the JVM having to allocate memory after startup, at the cost of possibly allocating more heap than is really needed. For Kafka and ZooKeeper pods such allocation could cause unwanted latency. For Kafka Connect avoiding over allocation may be the most important concern, especially in distributed mode where the effects of over-allocation will be multiplied by the number of consumers.
-server
-server enables the server JVM. This option can be set to true or false.
Example fragment configuring -server
# ... jvmOptions: "-server": true # ...
When neither of the two options (-server and -XX) is specified, the default Apache Kafka configuration of KAFKA_JVM_PERFORMANCE_OPTS will be used.
-XX
-XX object can be used for configuring advanced runtime options of a JVM. The -server and -XX options are used to configure the KAFKA_JVM_PERFORMANCE_OPTS option of Apache Kafka.
Example showing the use of the -XX object
jvmOptions:
"-XX":
"UseG1GC": true
"MaxGCPauseMillis": 20
"InitiatingHeapOccupancyPercent": 35
"ExplicitGCInvokesConcurrent": true
"UseParNewGC": false
The example configuration above will result in the following JVM options:
-XX:+UseG1GC -XX:MaxGCPauseMillis=20 -XX:InitiatingHeapOccupancyPercent=35 -XX:+ExplicitGCInvokesConcurrent -XX:-UseParNewGC
When neither of the two options (-server and -XX) is specified, the default Apache Kafka configuration of KAFKA_JVM_PERFORMANCE_OPTS will be used.
3.3.11.1.1. Garbage collector logging
The jvmOptions section also allows you to enable and disable garbage collector (GC) logging. GC logging is disabled by default. To enable it, set the gcLoggingEnabled property as follows:
Example of enabling GC logging
# ... jvmOptions: gcLoggingEnabled: true # ...
3.3.11.2. Configuring JVM options
Prerequisites
- An OpenShift cluster
- A running Cluster Operator
Procedure
Edit the
jvmOptionsproperty in theKafka,KafkaConnect,KafkaConnectS2I,KafkaMirrorMaker, orKafkaBridgeresource. For example:apiVersion: kafka.strimzi.io/v1beta1 kind: Kafka metadata: name: my-cluster spec: kafka: # ... jvmOptions: "-Xmx": "8g" "-Xms": "8g" # ... zookeeper: # ...Create or update the resource.
This can be done using
oc apply:oc apply -f your-file
3.3.12. Container images
AMQ Streams allows you to configure container images which will be used for its components. Overriding container images is recommended only in special situations, where you need to use a different container registry. For example, because your network does not allow access to the container repository used by AMQ Streams. In such a case, you should either copy the AMQ Streams images or build them from the source. If the configured image is not compatible with AMQ Streams images, it might not work properly.
3.3.12.1. Container image configurations
You can specify which container image to use for each component using the image property in the following resources:
-
Kafka.spec.kafka -
Kafka.spec.kafka.tlsSidecar -
Kafka.spec.zookeeper -
Kafka.spec.entityOperator.topicOperator -
Kafka.spec.entityOperator.userOperator -
Kafka.spec.entityOperator.tlsSidecar -
KafkaConnect.spec -
KafkaConnectS2I.spec -
KafkaBridge.spec
3.3.12.1.1. Configuring the image property for Kafka, Kafka Connect, and Kafka MirrorMaker
Kafka, Kafka Connect (including Kafka Connect with S2I support), and Kafka MirrorMaker support multiple versions of Kafka. Each component requires its own image. The default images for the different Kafka versions are configured in the following environment variables:
-
STRIMZI_KAFKA_IMAGES -
STRIMZI_KAFKA_CONNECT_IMAGES -
STRIMZI_KAFKA_CONNECT_S2I_IMAGES -
STRIMZI_KAFKA_MIRROR_MAKER_IMAGES
These environment variables contain mappings between the Kafka versions and their corresponding images. The mappings are used together with the image and version properties:
-
If neither
imagenorversionare given in the custom resource then theversionwill default to the Cluster Operator’s default Kafka version, and the image will be the one corresponding to this version in the environment variable. -
If
imageis given butversionis not, then the given image is used and theversionis assumed to be the Cluster Operator’s default Kafka version. -
If
versionis given butimageis not, then the image that corresponds to the given version in the environment variable is used. -
If both
versionandimageare given, then the given image is used. The image is assumed to contain a Kafka image with the given version.
The image and version for the different components can be configured in the following properties:
-
For Kafka in
spec.kafka.imageandspec.kafka.version. -
For Kafka Connect, Kafka Connect S2I, and Kafka MirrorMaker in
spec.imageandspec.version.
It is recommended to provide only the version and leave the image property unspecified. This reduces the chance of making a mistake when configuring the custom resource. If you need to change the images used for different versions of Kafka, it is preferable to configure the Cluster Operator’s environment variables.
3.3.12.1.2. Configuring the image property in other resources
For the image property in the other custom resources, the given value will be used during deployment. If the image property is missing, the image specified in the Cluster Operator configuration will be used. If the image name is not defined in the Cluster Operator configuration, then the default value will be used.
For Kafka broker TLS sidecar:
-
Container image specified in the
STRIMZI_DEFAULT_TLS_SIDECAR_KAFKA_IMAGEenvironment variable from the Cluster Operator configuration. -
registry.redhat.io/amq7/amq-streams-kafka-25-rhel7:1.5.0container image.
-
Container image specified in the
For Topic Operator:
-
Container image specified in the
STRIMZI_DEFAULT_TOPIC_OPERATOR_IMAGEenvironment variable from the Cluster Operator configuration. -
registry.redhat.io/amq7/amq-streams-rhel7-operator:1.5.0container image.
-
Container image specified in the
For User Operator:
-
Container image specified in the
STRIMZI_DEFAULT_USER_OPERATOR_IMAGEenvironment variable from the Cluster Operator configuration. -
registry.redhat.io/amq7/amq-streams-rhel7-operator:1.5.0container image.
-
Container image specified in the
For Entity Operator TLS sidecar:
-
Container image specified in the
STRIMZI_DEFAULT_TLS_SIDECAR_ENTITY_OPERATOR_IMAGEenvironment variable from the Cluster Operator configuration. -
registry.redhat.io/amq7/amq-streams-kafka-25-rhel7:1.5.0container image.
-
Container image specified in the
For Kafka Exporter:
-
Container image specified in the
STRIMZI_DEFAULT_KAFKA_EXPORTER_IMAGEenvironment variable from the Cluster Operator configuration. -
registry.redhat.io/amq7/amq-streams-kafka-25-rhel7:1.5.0container image.
-
Container image specified in the
For Kafka Bridge:
-
Container image specified in the
STRIMZI_DEFAULT_KAFKA_BRIDGE_IMAGEenvironment variable from the Cluster Operator configuration. -
registry.redhat.io/amq7/amq-streams-bridge-rhel7:1.5.0container image.
-
Container image specified in the
For Kafka broker initializer:
-
Container image specified in the
STRIMZI_DEFAULT_KAFKA_INIT_IMAGEenvironment variable from the Cluster Operator configuration. -
registry.redhat.io/amq7/amq-streams-rhel7-operator:1.5.0container image.
-
Container image specified in the
Overriding container images is recommended only in special situations, where you need to use a different container registry. For example, because your network does not allow access to the container repository used by AMQ Streams. In such case, you should either copy the AMQ Streams images or build them from source. In case the configured image is not compatible with AMQ Streams images, it might not work properly.
Example of container image configuration
apiVersion: kafka.strimzi.io/v1beta1
kind: Kafka
metadata:
name: my-cluster
spec:
kafka:
# ...
image: my-org/my-image:latest
# ...
zookeeper:
# ...
3.3.12.2. Configuring container images
Prerequisites
- An OpenShift cluster
- A running Cluster Operator
Procedure
Edit the
imageproperty in theKafka,KafkaConnectorKafkaConnectS2Iresource. For example:apiVersion: kafka.strimzi.io/v1beta1 kind: Kafka metadata: name: my-cluster spec: kafka: # ... image: my-org/my-image:latest # ... zookeeper: # ...Create or update the resource.
This can be done using
oc apply:oc apply -f your-file
3.3.13. Configuring pod scheduling
When two applications are scheduled to the same OpenShift node, both applications might use the same resources like disk I/O and impact performance. That can lead to performance degradation. Scheduling Kafka pods in a way that avoids sharing nodes with other critical workloads, using the right nodes or dedicated a set of nodes only for Kafka are the best ways how to avoid such problems.
3.3.13.1. Scheduling pods based on other applications
3.3.13.1.1. Avoid critical applications to share the node
Pod anti-affinity can be used to ensure that critical applications are never scheduled on the same disk. When running Kafka cluster, it is recommended to use pod anti-affinity to ensure that the Kafka brokers do not share the nodes with other workloads like databases.
3.3.13.1.2. Affinity
Affinity can be configured using the affinity property in following resources:
-
Kafka.spec.kafka.template.pod -
Kafka.spec.zookeeper.template.pod -
Kafka.spec.entityOperator.template.pod -
KafkaConnect.spec.template.pod -
KafkaConnectS2I.spec.template.pod -
KafkaBridge.spec.template.pod
The affinity configuration can include different types of affinity:
- Pod affinity and anti-affinity
- Node affinity
The format of the affinity property follows the OpenShift specification. For more details, see the Kubernetes node and pod affinity documentation.
3.3.13.1.3. Configuring pod anti-affinity in Kafka components
Prerequisites
- An OpenShift cluster
- A running Cluster Operator
Procedure
Edit the
affinityproperty in the resource specifying the cluster deployment. Use labels to specify the pods which should not be scheduled on the same nodes. ThetopologyKeyshould be set tokubernetes.io/hostnameto specify that the selected pods should not be scheduled on nodes with the same hostname. For example:apiVersion: kafka.strimzi.io/v1beta1 kind: Kafka spec: kafka: # ... template: pod: affinity: podAntiAffinity: requiredDuringSchedulingIgnoredDuringExecution: - labelSelector: matchExpressions: - key: application operator: In values: - postgresql - mongodb topologyKey: "kubernetes.io/hostname" # ... zookeeper: # ...Create or update the resource.
This can be done using
oc apply:oc apply -f your-file
3.3.13.2. Scheduling pods to specific nodes
3.3.13.2.1. Node scheduling
The OpenShift cluster usually consists of many different types of worker nodes. Some are optimized for CPU heavy workloads, some for memory, while other might be optimized for storage (fast local SSDs) or network. Using different nodes helps to optimize both costs and performance. To achieve the best possible performance, it is important to allow scheduling of AMQ Streams components to use the right nodes.
OpenShift uses node affinity to schedule workloads onto specific nodes. Node affinity allows you to create a scheduling constraint for the node on which the pod will be scheduled. The constraint is specified as a label selector. You can specify the label using either the built-in node label like beta.kubernetes.io/instance-type or custom labels to select the right node.
3.3.13.2.2. Affinity
Affinity can be configured using the affinity property in following resources:
-
Kafka.spec.kafka.template.pod -
Kafka.spec.zookeeper.template.pod -
Kafka.spec.entityOperator.template.pod -
KafkaConnect.spec.template.pod -
KafkaConnectS2I.spec.template.pod -
KafkaBridge.spec.template.pod
The affinity configuration can include different types of affinity:
- Pod affinity and anti-affinity
- Node affinity
The format of the affinity property follows the OpenShift specification. For more details, see the Kubernetes node and pod affinity documentation.
3.3.13.2.3. Configuring node affinity in Kafka components
Prerequisites
- An OpenShift cluster
- A running Cluster Operator
Procedure
Label the nodes where AMQ Streams components should be scheduled.
This can be done using
oc label:oc label node your-node node-type=fast-networkAlternatively, some of the existing labels might be reused.
Edit the
affinityproperty in the resource specifying the cluster deployment. For example:apiVersion: kafka.strimzi.io/v1beta1 kind: Kafka spec: kafka: # ... template: pod: affinity: nodeAffinity: requiredDuringSchedulingIgnoredDuringExecution: nodeSelectorTerms: - matchExpressions: - key: node-type operator: In values: - fast-network # ... zookeeper: # ...Create or update the resource.
This can be done using
oc apply:oc apply -f your-file
3.3.13.3. Using dedicated nodes
3.3.13.3.1. Dedicated nodes
Cluster administrators can mark selected OpenShift nodes as tainted. Nodes with taints are excluded from regular scheduling and normal pods will not be scheduled to run on them. Only services which can tolerate the taint set on the node can be scheduled on it. The only other services running on such nodes will be system services such as log collectors or software defined networks.
Taints can be used to create dedicated nodes. Running Kafka and its components on dedicated nodes can have many advantages. There will be no other applications running on the same nodes which could cause disturbance or consume the resources needed for Kafka. That can lead to improved performance and stability.
To schedule Kafka pods on the dedicated nodes, configure node affinity and tolerations.
3.3.13.3.2. Affinity
Affinity can be configured using the affinity property in following resources:
-
Kafka.spec.kafka.template.pod -
Kafka.spec.zookeeper.template.pod -
Kafka.spec.entityOperator.template.pod -
KafkaConnect.spec.template.pod -
KafkaConnectS2I.spec.template.pod -
KafkaBridge.spec.template.pod
The affinity configuration can include different types of affinity:
- Pod affinity and anti-affinity
- Node affinity
The format of the affinity property follows the OpenShift specification. For more details, see the Kubernetes node and pod affinity documentation.
3.3.13.3.3. Tolerations
Tolerations can be configured using the tolerations property in following resources:
-
Kafka.spec.kafka.template.pod -
Kafka.spec.zookeeper.template.pod -
Kafka.spec.entityOperator.template.pod -
KafkaConnect.spec.template.pod -
KafkaConnectS2I.spec.template.pod -
KafkaBridge.spec.template.pod
The format of the tolerations property follows the OpenShift specification. For more details, see the Kubernetes taints and tolerations.
3.3.13.3.4. Setting up dedicated nodes and scheduling pods on them
Prerequisites
- An OpenShift cluster
- A running Cluster Operator
Procedure
- Select the nodes which should be used as dedicated.
- Make sure there are no workloads scheduled on these nodes.
Set the taints on the selected nodes:
This can be done using
oc adm taint:oc adm taint node your-node dedicated=Kafka:NoScheduleAdditionally, add a label to the selected nodes as well.
This can be done using
oc label:oc label node your-node dedicated=KafkaEdit the
affinityandtolerationsproperties in the resource specifying the cluster deployment. For example:apiVersion: kafka.strimzi.io/v1beta1 kind: Kafka spec: kafka: # ... template: pod: tolerations: - key: "dedicated" operator: "Equal" value: "Kafka" effect: "NoSchedule" affinity: nodeAffinity: requiredDuringSchedulingIgnoredDuringExecution: nodeSelectorTerms: - matchExpressions: - key: dedicated operator: In values: - Kafka # ... zookeeper: # ...Create or update the resource.
This can be done using
oc apply:oc apply -f your-file
3.3.14. Using external configuration and secrets
Connectors are created, reconfigured, and deleted using the Kafka Connect HTTP REST interface, or by using KafkaConnectors. For more information on these methods, see Section 2.3.3, “Creating and managing connectors”. The connector configuration is passed to Kafka Connect as part of an HTTP request and stored within Kafka itself.
ConfigMaps and Secrets are standard OpenShift resources used for storing configurations and confidential data. Whichever method you use to manage connectors, you can use ConfigMaps and Secrets to configure certain elements of a connector. You can then reference the configuration values in HTTP REST commands (this keeps the configuration separate and more secure, if needed). This method applies especially to confidential data, such as usernames, passwords, or certificates.
3.3.14.1. Storing connector configurations externally
You can mount ConfigMaps or Secrets into a Kafka Connect pod as volumes or environment variables. Volumes and environment variables are configured in the externalConfiguration property in KafkaConnect.spec and KafkaConnectS2I.spec.
3.3.14.1.1. External configuration as environment variables
The env property is used to specify one or more environment variables. These variables can contain a value from either a ConfigMap or a Secret.
The names of user-defined environment variables cannot start with KAFKA_ or STRIMZI_.
To mount a value from a Secret to an environment variable, use the valueFrom property and the secretKeyRef as shown in the following example.
Example of an environment variable set to a value from a Secret
apiVersion: kafka.strimzi.io/v1beta1
kind: KafkaConnect
metadata:
name: my-connect
spec:
# ...
externalConfiguration:
env:
- name: MY_ENVIRONMENT_VARIABLE
valueFrom:
secretKeyRef:
name: my-secret
key: my-key
A common use case for mounting Secrets to environment variables is when your connector needs to communicate with Amazon AWS and needs to read the AWS_ACCESS_KEY_ID and AWS_SECRET_ACCESS_KEY environment variables with credentials.
To mount a value from a ConfigMap to an environment variable, use configMapKeyRef in the valueFrom property as shown in the following example.
Example of an environment variable set to a value from a ConfigMap
apiVersion: kafka.strimzi.io/v1beta1
kind: KafkaConnect
metadata:
name: my-connect
spec:
# ...
externalConfiguration:
env:
- name: MY_ENVIRONMENT_VARIABLE
valueFrom:
configMapKeyRef:
name: my-config-map
key: my-key
3.3.14.1.2. External configuration as volumes
You can also mount ConfigMaps or Secrets to a Kafka Connect pod as volumes. Using volumes instead of environment variables is useful in the following scenarios:
- Mounting truststores or keystores with TLS certificates
- Mounting a properties file that is used to configure Kafka Connect connectors
In the volumes property of the externalConfiguration resource, list the ConfigMaps or Secrets that will be mounted as volumes. Each volume must specify a name in the name property and a reference to ConfigMap or Secret.
Example of volumes with external configuration
apiVersion: kafka.strimzi.io/v1beta1
kind: KafkaConnect
metadata:
name: my-connect
spec:
# ...
externalConfiguration:
volumes:
- name: connector1
configMap:
name: connector1-configuration
- name: connector1-certificates
secret:
secretName: connector1-certificates
The volumes will be mounted inside the Kafka Connect containers in the path /opt/kafka/external-configuration/<volume-name>. For example, the files from a volume named connector1 would appear in the directory /opt/kafka/external-configuration/connector1.
The FileConfigProvider has to be used to read the values from the mounted properties files in connector configurations.
3.3.14.2. Mounting Secrets as environment variables
You can create an OpenShift Secret and mount it to Kafka Connect as an environment variable.
Prerequisites
- A running Cluster Operator.
Procedure
Create a secret containing the information that will be mounted as an environment variable. For example:
apiVersion: v1 kind: Secret metadata: name: aws-creds type: Opaque data: awsAccessKey: QUtJQVhYWFhYWFhYWFhYWFg= awsSecretAccessKey: Ylhsd1lYTnpkMjl5WkE=
Create or edit the Kafka Connect resource. Configure the
externalConfigurationsection of theKafkaConnectorKafkaConnectS2Icustom resource to reference the secret. For example:apiVersion: kafka.strimzi.io/v1beta1 kind: KafkaConnect metadata: name: my-connect spec: # ... externalConfiguration: env: - name: AWS_ACCESS_KEY_ID valueFrom: secretKeyRef: name: aws-creds key: awsAccessKey - name: AWS_SECRET_ACCESS_KEY valueFrom: secretKeyRef: name: aws-creds key: awsSecretAccessKeyApply the changes to your Kafka Connect deployment.
Use
oc apply:oc apply -f your-file
The environment variables are now available for use when developing your connectors.
Additional resources
-
For more information about external configuration in Kafka Connect, see Section B.84, “
ExternalConfigurationschema reference”.
3.3.14.3. Mounting Secrets as volumes
You can create an OpenShift Secret, mount it as a volume to Kafka Connect, and then use it to configure a Kafka Connect connector.
Prerequisites
- A running Cluster Operator.
Procedure
Create a secret containing a properties file that defines the configuration options for your connector configuration. For example:
apiVersion: v1 kind: Secret metadata: name: mysecret type: Opaque stringData: connector.properties: |- dbUsername: my-user dbPassword: my-passwordCreate or edit the Kafka Connect resource. Configure the
FileConfigProviderin theconfigsection and theexternalConfigurationsection of theKafkaConnectorKafkaConnectS2Icustom resource to reference the secret. For example:apiVersion: kafka.strimzi.io/v1beta1 kind: KafkaConnect metadata: name: my-connect spec: # ... config: config.providers: file config.providers.file.class: org.apache.kafka.common.config.provider.FileConfigProvider #... externalConfiguration: volumes: - name: connector-config secret: secretName: mysecretApply the changes to your Kafka Connect deployment.
Use
oc apply:oc apply -f your-fileConfigure your connector
If you are using the Kafka Connect HTTP REST interface, use the values from the mounted properties file in your JSON payload with connector configuration. For example:
{ "name":"my-connector", "config":{ "connector.class":"MyDbConnector", "tasks.max":"3", "database": "my-postgresql:5432", "username":"${file:/opt/kafka/external-configuration/connector-config/connector.properties:dbUsername}", "password":"${file:/opt/kafka/external-configuration/connector-config/connector.properties:dbPassword}", # ... } }If you are using a
KafkaConnectorresource, use the values from the mounted properties file in thespec.configsection of your custom resource. For example:apiVersion: kafka.strimzi.io/v1beta1 kind: KafkaConnector metadata: name: my-connector # ... spec: class: "MyDbConnector" tasksMax: 3 config: database: "my-postgresql:5432" username: "${file:/opt/kafka/external-configuration/connector-config/connector.properties:dbUsername}" password: "${file:/opt/kafka/external-configuration/connector-config/connector.properties:dbPassword}"
Additional resources
-
For more information about external configuration in Kafka Connect, see Section B.84, “
ExternalConfigurationschema reference”.
3.3.15. Enabling KafkaConnector resources
To enable KafkaConnectors for a Kafka Connect cluster, add the strimzi.io/use-connector-resources annotation to the KafkaConnect or KafkaConnectS2I custom resource.
Prerequisites
- A running Cluster Operator
Procedure
Edit the
KafkaConnectorKafkaConnectS2Iresource. Add thestrimzi.io/use-connector-resourcesannotation. For example:apiVersion: kafka.strimzi.io/v1beta1 kind: KafkaConnect metadata: name: my-connect-cluster annotations: strimzi.io/use-connector-resources: "true" spec: # ...Create or update the resource using
oc apply:oc apply -f kafka-connect.yaml
3.3.16. List of resources created as part of Kafka Connect cluster with Source2Image support
The following resources will created by the Cluster Operator in the OpenShift cluster:
- connect-cluster-name-connect-source
- ImageStream which is used as the base image for the newly-built Docker images.
- connect-cluster-name-connect
- BuildConfig which is responsible for building the new Kafka Connect Docker images.
- connect-cluster-name-connect
- ImageStream where the newly built Docker images will be pushed.
- connect-cluster-name-connect
- DeploymentConfig which is in charge of creating the Kafka Connect worker node pods.
- connect-cluster-name-connect-api
- Service which exposes the REST interface for managing the Kafka Connect cluster.
- connect-cluster-name-config
- ConfigMap which contains the Kafka Connect ancillary configuration and is mounted as a volume by the Kafka broker pods.
- connect-cluster-name-connect
- Pod Disruption Budget configured for the Kafka Connect worker nodes.
3.3.17. Integrating with Debezium for change data capture
Red Hat Debezium is a distributed change data capture platform. It captures row-level changes in databases, creates change event records, and streams the records to Kafka topics. Debezium is built on Apache Kafka. You can deploy and integrate Debezium with AMQ Streams. Following a deployment of AMQ Streams, you deploy Debezium as a connector configuration through Kafka Connect. Debezium passes change event records to AMQ Streams on OpenShift. Applications can read these change event streams and access the change events in the order in which they occurred.
Debezium has multiple uses, including:
- Data replication
- Updating caches and search indexes
- Simplifying monolithic applications
- Data integration
- Enabling streaming queries
To capture database changes, deploy Kafka Connect with a Debezium database connector . You configure a KafkaConnector resource to define the connector instance.
For more information on deploying Debezium with AMQ Streams, refer to the product documentation. The Debezium documentation includes a Getting Started with Debezium guide that guides you through the process of setting up the services and connector required to view change event records for database updates.
3.4. Kafka MirrorMaker configuration
This chapter describes how to configure a Kafka MirrorMaker deployment in your AMQ Streams cluster to replicate data between Kafka clusters.
You can use AMQ Streams with MirrorMaker or MirrorMaker 2.0. MirrorMaker 2.0 is the latest version, and offers a more efficient way to mirror data between Kafka clusters.
If you are using MirrorMaker, you configure the KafkaMirrorMaker resource.
The following procedure shows how the resource is configured:
Supported properties are also described in more detail for your reference:
The full schema of the KafkaMirrorMaker resource is described in the KafkaMirrorMaker schema reference.
Labels applied to a KafkaMirrorMaker resource are also applied to the OpenShift resources comprising Kafka MirrorMaker. This provides a convenient mechanism for resources to be labeled as required.
3.4.1. Configuring Kafka MirrorMaker
Use the properties of the KafkaMirrorMaker resource to configure your Kafka MirrorMaker deployment.
You can configure access control for producers and consumers using TLS or SASL authentication. This procedure shows a configuration that uses TLS encryption and authentication on the consumer and producer side.
Prerequisites
- AMQ Streams and Kafka is deployed
- Source and target Kafka clusters are available
Procedure
Edit the
specproperties for theKafkaMirrorMakerresource.The properties you can configure are shown in this example configuration:
apiVersion: kafka.strimzi.io/v1beta1 kind: KafkaMirrorMaker metadata: name: my-mirror-maker spec: replicas: 3 1 consumer: bootstrapServers: my-source-cluster-kafka-bootstrap:9092 2 groupId: "my-group" 3 numStreams: 2 4 offsetCommitInterval: 120000 5 tls: 6 trustedCertificates: - secretName: my-source-cluster-ca-cert certificate: ca.crt authentication: 7 type: tls certificateAndKey: secretName: my-source-secret certificate: public.crt key: private.key config: 8 max.poll.records: 100 receive.buffer.bytes: 32768 ssl.cipher.suites: "TLS_ECDHE_RSA_WITH_AES_256_GCM_SHA384" 9 ssl.enabled.protocols: "TLSv1.2" ssl.protocol: "TLSv1.2" producer: bootstrapServers: my-target-cluster-kafka-bootstrap:9092 abortOnSendFailure: false 10 tls: trustedCertificates: - secretName: my-target-cluster-ca-cert certificate: ca.crt authentication: type: tls certificateAndKey: secretName: my-target-secret certificate: public.crt key: private.key config: compression.type: gzip batch.size: 8192 ssl.cipher.suites: "TLS_ECDHE_RSA_WITH_AES_256_GCM_SHA384" 11 ssl.enabled.protocols: "TLSv1.2" ssl.protocol: "TLSv1.2" whitelist: "my-topic|other-topic" 12 resources: 13 requests: cpu: "1" memory: 2Gi limits: cpu: "2" memory: 2Gi logging: 14 type: inline loggers: mirrormaker.root.logger: "INFO" readinessProbe: 15 initialDelaySeconds: 15 timeoutSeconds: 5 livenessProbe: initialDelaySeconds: 15 timeoutSeconds: 5 metrics: 16 lowercaseOutputName: true rules: - pattern: "kafka.server<type=(.+), name=(.+)PerSec\\w*><>Count" name: "kafka_server_$1_$2_total" - pattern: "kafka.server<type=(.+), name=(.+)PerSec\\w*, topic=(.+)><>Count" name: "kafka_server_$1_$2_total" labels: topic: "$3" jvmOptions: 17 "-Xmx": "1g" "-Xms": "1g" image: my-org/my-image:latest 18 template: 19 pod: affinity: podAntiAffinity: requiredDuringSchedulingIgnoredDuringExecution: - labelSelector: matchExpressions: - key: application operator: In values: - postgresql - mongodb topologyKey: "kubernetes.io/hostname" connectContainer: 20 env: - name: JAEGER_SERVICE_NAME value: my-jaeger-service - name: JAEGER_AGENT_HOST value: jaeger-agent-name - name: JAEGER_AGENT_PORT value: "6831" tracing: 21 type: jaeger
- 1
- The number of replica nodes.
- 2
- Bootstrap servers for consumer and producer.
- 3
- Group ID for the consumer.
- 4
- The number of consumer streams.
- 5
- The offset auto-commit interval in milliseconds.
- 6
- TLS encryption with key names under which TLS certificates are stored in X.509 format for consumer or producer. For more details see
KafkaMirrorMakerTlsschema reference. - 7
- Authentication for consumer or producer, using the TLS mechanism, as shown here, using OAuth bearer tokens, or a SASL-based SCRAM-SHA-512 or PLAIN mechanism.
- 8
- Kafka configuration options for consumer and producer.
- 9
- 10
- If set to
true, Kafka MirrorMaker will exit and the container will restart following a send failure for a message. - 11
- 12
- Topics mirrored from source to target Kafka cluster.
- 13
- Requests for reservation of supported resources, currently
cpuandmemory, and limits to specify the maximum resources that can be consumed. - 14
- Specified loggers and log levels added directly (
inline) or indirectly (external) through a ConfigMap. A custom ConfigMap must be placed under thelog4j.propertiesorlog4j2.propertieskey. MirrorMaker has a single logger calledmirrormaker.root.logger. You can set the log level to INFO, ERROR, WARN, TRACE, DEBUG, FATAL or OFF. - 15
- Healthchecks to know when to restart a container (liveness) and when a container can accept traffic (readiness).
- 16
- Prometheus metrics, which are enabled with configuration for the Prometheus JMX exporter in this example. You can enable metrics without further configuration using
metrics: {}. - 17
- JVM configuration options to optimize performance for the Virtual Machine (VM) running Kafka MirrorMaker.
- 18
- ADVANCED OPTION: Container image configuration, which is recommended only in special situations.
- 19
- Template customization. Here a pod is scheduled based with anti-affinity, so the pod is not scheduled on nodes with the same hostname.
- 20
- Environment variables are also set for distributed tracing using Jaeger.
- 21
WarningWith the
abortOnSendFailureproperty set tofalse, the producer attempts to send the next message in a topic. The original message might be lost, as there is no attempt to resend a failed message.Create or update the resource:
oc apply -f <your-file>
3.4.2. Kafka MirrorMaker configuration properties
Use the spec configuration properties of the KafkaMirrorMaker resource to set up your MirrorMaker deployment.
Supported properties are described here for your reference.
3.4.2.1. Replicas
Use the replicas property to configure replicas.
You can run multiple MirrorMaker replicas to provide better availability and scalability. When running Kafka MirrorMaker on OpenShift it is not absolutely necessary to run multiple replicas of the Kafka MirrorMaker for high availability. When the node where the Kafka MirrorMaker has deployed crashes, OpenShift will automatically reschedule the Kafka MirrorMaker pod to a different node. However, running Kafka MirrorMaker with multiple replicas can provide faster failover times as the other nodes will be up and running.
3.4.2.2. Bootstrap servers
Use the consumer.bootstrapServers and producer.bootstrapServers properties to configure lists of bootstrap servers for the consumer and producer.
Kafka MirrorMaker always works together with two Kafka clusters (source and target). The source and the target Kafka clusters are specified in the form of two lists of comma-separated list of <hostname>:<port> pairs. Each comma-separated list contains one or more Kafka brokers or a Service pointing to Kafka brokers specified as a <hostname>:<port> pairs.
The bootstrap server lists can refer to Kafka clusters that do not need to be deployed in the same OpenShift cluster. They can even refer to a Kafka cluster not deployed by AMQ Streams, or deployed by AMQ Streams but on a different OpenShift cluster accessible outside.
If on the same OpenShift cluster, each list must ideally contain the Kafka cluster bootstrap service which is named <cluster-name>-kafka-bootstrap and a port of 9092 for plain traffic or 9093 for encrypted traffic. If deployed by AMQ Streams but on different OpenShift clusters, the list content depends on the approach used for exposing the clusters (routes, nodeports or loadbalancers).
When using Kafka MirrorMaker with a Kafka cluster not managed by AMQ Streams, you can specify the bootstrap servers list according to the configuration of the given cluster.
3.4.2.3. Whitelist
Use the whitelist property to configure a list of topics that Kafka MirrorMaker mirrors from the source to the target Kafka cluster.
The property allows any regular expression from the simplest case with a single topic name to complex patterns. For example, you can mirror topics A and B using "A|B" or all topics using "*". You can also pass multiple regular expressions separated by commas to the Kafka MirrorMaker.
3.4.2.4. Consumer group identifier
Use the consumer.groupId property to configure a consumer group identifier for the consumer.
Kafka MirrorMaker uses a Kafka consumer to consume messages, behaving like any other Kafka consumer client. Messages consumed from the source Kafka cluster are mirrored to a target Kafka cluster. A group identifier is required, as the consumer needs to be part of a consumer group for the assignment of partitions.
3.4.2.5. Consumer streams
Use the consumer.numStreams property to configure the number of streams for the consumer.
You can increase the throughput in mirroring topics by increasing the number of consumer threads. Consumer threads belong to the consumer group specified for Kafka MirrorMaker. Topic partitions are assigned across the consumer threads, which consume messages in parallel.
3.4.2.6. Offset auto-commit interval
Use the consumer.offsetCommitInterval property to configure an offset auto-commit interval for the consumer.
You can specify the regular time interval at which an offset is committed after Kafka MirrorMaker has consumed data from the source Kafka cluster. The time interval is set in milliseconds, with a default value of 60,000.
3.4.2.7. Abort on message send failure
Use the producer.abortOnSendFailure property to configure how to handle message send failure from the producer.
By default, if an error occurs when sending a message from Kafka MirrorMaker to a Kafka cluster:
- The Kafka MirrorMaker container is terminated in OpenShift.
- The container is then recreated.
If the abortOnSendFailure option is set to false, message sending errors are ignored.
3.4.2.8. Kafka producer and consumer
Use the consumer.config and producer.config properties to configure Kafka options for the consumer and producer.
The config property contains the Kafka MirrorMaker consumer and producer configuration options as keys, with values set in one of the following JSON types:
- String
- Number
- Boolean
Exceptions
You can specify and configure standard Kafka consumer and producer options:
However, there are exceptions for options automatically configured and managed directly by AMQ Streams related to:
- Kafka cluster bootstrap address
- Security (encryption, authentication, and authorization)
- Consumer group identifier
Specifically, all configuration options with keys equal to or starting with one of the following strings are forbidden:
-
ssl. -
sasl. -
security. -
bootstrap.servers -
group.id
When a forbidden option is present in the config property, it is ignored and a warning message is printed to the Cluster Operator log file. All other options are passed to Kafka MirrorMaker.
The Cluster Operator does not validate keys or values in the provided config object. When an invalid configuration is provided, the Kafka MirrorMaker might not start or might become unstable. In such cases, the configuration in the KafkaMirrorMaker.spec.consumer.config or KafkaMirrorMaker.spec.producer.config object should be fixed and the Cluster Operator will roll out the new configuration for Kafka MirrorMaker.
3.4.2.9. CPU and memory resources
Use the reources.requests and resources.limits properties to configure resource requests and limits.
For every deployed container, AMQ Streams allows you to request specific resources and define the maximum consumption of those resources.
AMQ Streams supports requests and limits for the following types of resources:
-
cpu -
memory
AMQ Streams uses the OpenShift syntax for specifying these resources.
For more information about managing computing resources on OpenShift, see Managing Compute Resources for Containers.
Resource requests
Requests specify the resources to reserve for a given container. Reserving the resources ensures that they are always available.
If the resource request is for more than the available free resources in the OpenShift cluster, the pod is not scheduled.
A request may be configured for one or more supported resources.
Resource limits
Limits specify the maximum resources that can be consumed by a given container. The limit is not reserved and might not always be available. A container can use the resources up to the limit only when they are available. Resource limits should be always higher than the resource requests.
A resource may be configured for one or more supported limits.
Supported CPU formats
CPU requests and limits are supported in the following formats:
-
Number of CPU cores as integer (
5CPU core) or decimal (2.5CPU core). -
Number or millicpus / millicores (
100m) where 1000 millicores is the same1CPU core.
The computing power of 1 CPU core may differ depending on the platform where OpenShift is deployed.
For more information on CPU specification, see the Meaning of CPU.
Supported memory formats
Memory requests and limits are specified in megabytes, gigabytes, mebibytes, and gibibytes.
-
To specify memory in megabytes, use the
Msuffix. For example1000M. -
To specify memory in gigabytes, use the
Gsuffix. For example1G. -
To specify memory in mebibytes, use the
Misuffix. For example1000Mi. -
To specify memory in gibibytes, use the
Gisuffix. For example1Gi.
For more details about memory specification and additional supported units, see Meaning of memory.
3.4.2.10. Kafka MirrorMaker loggers
Kafka MirrorMaker has its own configurable logger:
-
mirrormaker.root.logger
MirrorMaker uses the Apache log4j logger implementation.
Use the logging property to configure loggers and logger levels.
You can set the log levels by specifying the logger and level directly (inline) or use a custom (external) ConfigMap. If a ConfigMap is used, you set logging.name property to the name of the ConfigMap containing the external logging configuration. Inside the ConfigMap, the logging configuration is described using log4j.properties.
Here we see examples of inline and external logging:
apiVersion: kafka.strimzi.io/v1beta1
kind: KafkaMirrorMaker
spec:
# ...
logging:
type: inline
loggers:
mirrormaker.root.logger: "INFO"
# ...apiVersion: kafka.strimzi.io/v1beta1
kind: KafkaMirrorMaker
spec:
# ...
logging:
type: external
name: customConfigMap
# ...Additional resources
- Garbage collector (GC) logging can also be enabled (or disabled). For more information about GC logging, see Section 3.1.18.1, “JVM configuration”
- For more information about log levels, see Apache logging services.
3.4.2.11. Healthchecks
Use the livenessProbe and readinessProbe properties to configure healthcheck probes supported in AMQ Streams.
Healthchecks are periodical tests which verify the health of an application. When a Healthcheck probe fails, OpenShift assumes that the application is not healthy and attempts to fix it.
For more details about the probes, see Configure Liveness and Readiness Probes.
Both livenessProbe and readinessProbe support the following options:
-
initialDelaySeconds -
timeoutSeconds -
periodSeconds -
successThreshold -
failureThreshold
An example of liveness and readiness probe configuration
# ... readinessProbe: initialDelaySeconds: 15 timeoutSeconds: 5 livenessProbe: initialDelaySeconds: 15 timeoutSeconds: 5 # ...
For more information about the livenessProbe and readinessProbe options, see Probe schema reference.
3.4.2.12. Prometheus metrics
Use the metrics property to enable and configure Prometheus metrics.
The metrics property can also contain additional configuration for the Prometheus JMX exporter. AMQ Streams supports Prometheus metrics using Prometheus JMX exporter to convert the JMX metrics supported by Apache Kafka and ZooKeeper to Prometheus metrics.
To enable Prometheus metrics export without any further configuration, you can set it to an empty object ({}).
When metrics are enabled, they are exposed on port 9404.
When the metrics property is not defined in the resource, the Prometheus metrics are disabled.
For more information about setting up and deploying Prometheus and Grafana, see Introducing Metrics to Kafka.
3.4.2.13. JVM Options
Use the jvmOptions property to configure supported options for the JVM on which the component is running.
Supported JVM options help to optimize performance for different platforms and architectures.
For more information on the supported options, see JVM configuration.
3.4.2.14. Container images
Use the image property to configure the container image used by the component.
Overriding container images is recommended only in special situations where you need to use a different container registry or a customized image.
For example, if your network does not allow access to the container repository used by AMQ Streams, you can copy the AMQ Streams images or build them from the source. However, if the configured image is not compatible with AMQ Streams images, it might not work properly.
A copy of the container image might also be customized and used for debugging.
For more information see Container image configurations.
3.4.3. List of resources created as part of Kafka MirrorMaker
The following resources are created by the Cluster Operator in the OpenShift cluster:
- <mirror-maker-name>-mirror-maker
- Deployment which is responsible for creating the Kafka MirrorMaker pods.
- <mirror-maker-name>-config
- ConfigMap which contains ancillary configuration for the the Kafka MirrorMaker, and is mounted as a volume by the Kafka broker pods.
- <mirror-maker-name>-mirror-maker
- Pod Disruption Budget configured for the Kafka MirrorMaker worker nodes.
3.5. Kafka MirrorMaker 2.0 configuration
This section describes how to configure a Kafka MirrorMaker 2.0 deployment in your AMQ Streams cluster.
MirrorMaker 2.0 is used to replicate data between two or more active Kafka clusters, within or across data centers.
Data replication across clusters supports scenarios that require:
- Recovery of data in the event of a system failure
- Aggregation of data for analysis
- Restriction of data access to a specific cluster
- Provision of data at a specific location to improve latency
If you are using MirrorMaker 2.0, you configure the KafkaMirrorMaker2 resource.
MirrorMaker 2.0 introduces an entirely new way of replicating data between clusters.
As a result, the resource configuration differs from the previous version of MirrorMaker. If you choose to use MirrorMaker 2.0, there is currently no legacy support, so any resources must be manually converted into the new format.
How MirrorMaker 2.0 replicates data is described here:
The following procedure shows how the resource is configured for MirrorMaker 2.0:
The full schema of the KafkaMirrorMaker2 resource is described in the KafkaMirrorMaker2 schema reference.
3.5.1. MirrorMaker 2.0 data replication
MirrorMaker 2.0 consumes messages from a source Kafka cluster and writes them to a target Kafka cluster.
MirrorMaker 2.0 uses:
- Source cluster configuration to consume data from the source cluster
- Target cluster configuration to output data to the target cluster
MirrorMaker 2.0 is based on the Kafka Connect framework, connectors managing the transfer of data between clusters. A MirrorMaker 2.0 MirrorSourceConnector replicates topics from a source cluster to a target cluster.
The process of mirroring data from one cluster to another cluster is asynchronous. The recommended pattern is for messages to be produced locally alongside the source Kafka cluster, then consumed remotely close to the target Kafka cluster.
MirrorMaker 2.0 can be used with more than one source cluster.
Figure 3.1. Replication across two clusters

3.5.2. Cluster configuration
You can use MirrorMaker 2.0 in active/passive or active/active cluster configurations.
- In an active/passive configuration, the data from an active cluster is replicated in a passive cluster, which remains on standby, for example, for data recovery in the event of system failure.
- In an active/active configuration, both clusters are active and provide the same data simultaneously, which is useful if you want to make the same data available locally in different geographical locations.
The expectation is that producers and consumers connect to active clusters only.
3.5.2.1. Bidirectional replication
The MirrorMaker 2.0 architecture supports bidirectional replication in an active/active cluster configuration. A MirrorMaker 2.0 cluster is required at each target destination.
Each cluster replicates the data of the other cluster using the concept of source and remote topics. As the same topics are stored in each cluster, remote topics are automatically renamed by MirrorMaker 2.0 to represent the source cluster.
Figure 3.2. Topic renaming
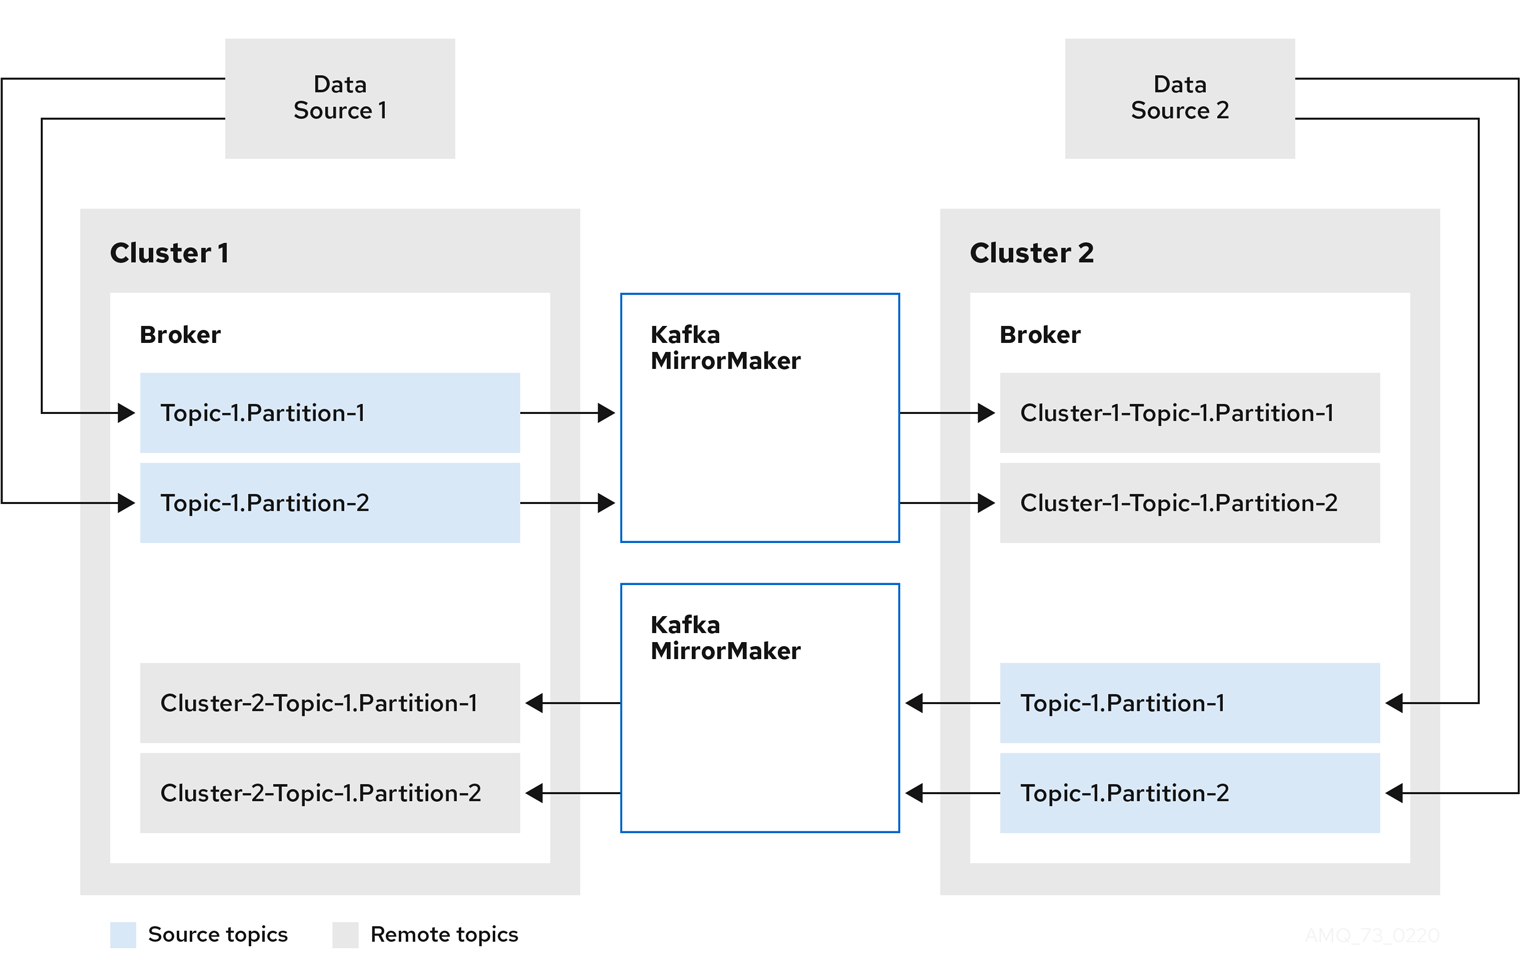
By flagging the originating cluster, topics are not replicated back to that cluster.
The concept of replication through remote topics is useful when configuring an architecture that requires data aggregation. Consumers can subscribe to source and remote topics within the same cluster, without the need for a separate aggregation cluster.
3.5.2.2. Topic configuration synchronization
Topic configuration is automatically synchronized between source and target clusters. By synchronizing configuration properties, the need for rebalancing is reduced.
3.5.2.3. Data integrity
MirrorMaker 2.0 monitors source topics and propagates any configuration changes to remote topics, checking for and creating missing partitions. Only MirrorMaker 2.0 can write to remote topics.
3.5.2.4. Offset tracking
MirrorMaker 2.0 tracks offsets for consumer groups using internal topics.
- The offset sync topic maps the source and target offsets for replicated topic partitions from record metadata
- The checkpoint topic maps the last committed offset in the source and target cluster for replicated topic partitions in each consumer group
Offsets for the checkpoint topic are tracked at predetermined intervals through configuration. Both topics enable replication to be fully restored from the correct offset position on failover.
MirrorMaker 2.0 uses its MirrorCheckpointConnector to emit checkpoints for offset tracking.
3.5.2.5. Connectivity checks
A heartbeat internal topic checks connectivity between clusters.
The heartbeat topic is replicated from the source cluster.
Target clusters use the topic to check:
- The connector managing connectivity between clusters is running
- The source cluster is available
MirrorMaker 2.0 uses its MirrorHeartbeatConnector to emit heartbeats that perform these checks.
3.5.3. ACL rules synchronization
ACL access to remote topics is possible if you are not using the User Operator.
If SimpleAclAuthorizer is being used, without the User Operator, ACL rules that manage access to brokers also apply to remote topics. Users that can read a source topic can read its remote equivalent.
OAuth 2.0 authorization does not support access to remote topics in this way.
3.5.4. Synchronizing data between Kafka clusters using MirrorMaker 2.0
Use MirrorMaker 2.0 to synchronize data between Kafka clusters through configuration.
The configuration must specify:
- Each Kafka cluster
- Connection information for each cluster, including TLS authentication
The replication flow and direction
- Cluster to cluster
- Topic to topic
Use the properties of the KafkaMirrorMaker2 resource to configure your Kafka MirrorMaker 2.0 deployment.
The previous version of MirrorMaker continues to be supported. If you wish to use the resources configured for the previous version, they must be updated to the format supported by MirrorMaker 2.0.
MirrorMaker 2.0 provides default configuration values for properties such as replication factors. A minimal configuration, with defaults left unchanged, would be something like this example:
apiVersion: kafka.strimzi.io/v1alpha1
kind: KafkaMirrorMaker2
metadata:
name: my-mirror-maker2
spec:
version: 2.5.0
connectCluster: "my-cluster-target"
clusters:
- alias: "my-cluster-source"
bootstrapServers: my-cluster-source-kafka-bootstrap:9092
- alias: "my-cluster-target"
bootstrapServers: my-cluster-target-kafka-bootstrap:9092
mirrors:
- sourceCluster: "my-cluster-source"
targetCluster: "my-cluster-target"
sourceConnector: {}You can configure access control for source and target clusters using TLS or SASL authentication. This procedure shows a configuration that uses TLS encryption and authentication for the source and target cluster.
Prerequisites
- AMQ Streams and Kafka is deployed
- Source and target Kafka clusters are available
Procedure
Edit the
specproperties for theKafkaMirrorMaker2resource.The properties you can configure are shown in this example configuration:
apiVersion: kafka.strimzi.io/v1alpha1 kind: KafkaMirrorMaker2 metadata: name: my-mirror-maker2 spec: version: 2.5.0 1 replicas: 3 2 connectCluster: "my-cluster-target" 3 clusters: 4 - alias: "my-cluster-source" 5 authentication: 6 certificateAndKey: certificate: source.crt key: source.key secretName: my-user-source type: tls bootstrapServers: my-cluster-source-kafka-bootstrap:9092 7 tls: 8 trustedCertificates: - certificate: ca.crt secretName: my-cluster-source-cluster-ca-cert - alias: "my-cluster-target" 9 authentication: 10 certificateAndKey: certificate: target.crt key: target.key secretName: my-user-target type: tls bootstrapServers: my-cluster-target-kafka-bootstrap:9092 11 config: 12 config.storage.replication.factor: 1 offset.storage.replication.factor: 1 status.storage.replication.factor: 1 ssl.cipher.suites: "TLS_ECDHE_RSA_WITH_AES_256_GCM_SHA384" 13 ssl.enabled.protocols: "TLSv1.2" ssl.protocol: "TLSv1.2" tls: 14 trustedCertificates: - certificate: ca.crt secretName: my-cluster-target-cluster-ca-cert mirrors: 15 - sourceCluster: "my-cluster-source" 16 targetCluster: "my-cluster-target" 17 sourceConnector: 18 config: replication.factor: 1 19 offset-syncs.topic.replication.factor: 1 20 sync.topic.acls.enabled: "false" 21 heartbeatConnector: 22 config: heartbeats.topic.replication.factor: 1 23 checkpointConnector: 24 config: checkpoints.topic.replication.factor: 1 25 topicsPattern: ".*" 26 groupsPattern: "group1|group2|group3" 27 resources: 28 requests: cpu: "1" memory: 2Gi limits: cpu: "2" memory: 2Gi logging: 29 type: inline loggers: connect.root.logger.level: "INFO" readinessProbe: 30 initialDelaySeconds: 15 timeoutSeconds: 5 livenessProbe: initialDelaySeconds: 15 timeoutSeconds: 5 jvmOptions: 31 "-Xmx": "1g" "-Xms": "1g" image: my-org/my-image:latest 32 template: 33 pod: affinity: podAntiAffinity: requiredDuringSchedulingIgnoredDuringExecution: - labelSelector: matchExpressions: - key: application operator: In values: - postgresql - mongodb topologyKey: "kubernetes.io/hostname" connectContainer: 34 env: - name: JAEGER_SERVICE_NAME value: my-jaeger-service - name: JAEGER_AGENT_HOST value: jaeger-agent-name - name: JAEGER_AGENT_PORT value: "6831" tracing: type: jaeger 35 externalConfiguration: 36 env: - name: AWS_ACCESS_KEY_ID valueFrom: secretKeyRef: name: aws-creds key: awsAccessKey - name: AWS_SECRET_ACCESS_KEY valueFrom: secretKeyRef: name: aws-creds key: awsSecretAccessKey
- 1
- The Kafka Connect version.
- 2
- The number of replica nodes.
- 3
- The cluster alias for Kafka Connect.
- 4
- Specification for the Kafka clusters being synchronized.
- 5
- The cluster alias for the source Kafka cluster.
- 6
- Authentication for the source cluster, using the TLS mechanism, as shown here, using OAuth bearer tokens, or a SASL-based SCRAM-SHA-512 or PLAIN mechanism.
- 7
- Bootstrap server for connection to the source Kafka cluster.
- 8
- TLS encryption with key names under which TLS certificates are stored in X.509 format for the source Kafka cluster. For more details see
KafkaMirrorMaker2Tlsschema reference. - 9
- The cluster alias for the target Kafka cluster.
- 10
- Authentication for the target Kafka cluster is configured in the same way as for the source Kafka cluster.
- 11
- Bootstrap server for connection to the target Kafka cluster.
- 12
- Kafka Connect configuration. Standard Apache Kafka configuration may be provided, restricted to those properties not managed directly by AMQ Streams.
- 13
- 14
- TLS encryption for the target Kafka cluster is configured in the same way as for the source Kafka cluster.
- 15
- MirrorMaker 2.0 connectors.
- 16
- The alias of the source cluster used by the MirrorMaker 2.0 connectors.
- 17
- The alias of the target cluster used by the MirrorMaker 2.0 connectors.
- 18
- The configuration for the
MirrorSourceConnectorthat creates remote topics. Theconfigoverrides the default configuration options. - 19
- The replication factor for mirrored topics created at the target cluster.
- 20
- The replication factor for the
MirrorSourceConnectoroffset-syncsinternal topic that maps the offsets of the source and target clusters. - 21
- When enabled, ACLs are applied to synchronized topics. The default is
true. - 22
- The configuration for the
MirrorHeartbeatConnectorthat performs connectivity checks. Theconfigoverrides the default configuration options. - 23
- The replication factor for the heartbeat topic created at the target cluster.
- 24
- The configuration for the
MirrorCheckpointConnectorthat tracks offsets. Theconfigoverrides the default configuration options. - 25
- The replication factor for the checkpoints topic created at the target cluster.
- 26
- Topic replication from the source cluster defined as regular expression patterns. Here we request all topics.
- 27
- Consumer group replication from the source cluster defined as regular expression patterns. Here we request three consumer groups by name. You can use comma-separated lists.
- 28
- Requests for reservation of supported resources, currently
cpuandmemory, and limits to specify the maximum resources that can be consumed. - 29
- Specified loggers and log levels added directly (
inline) or indirectly (external) through a ConfigMap. A custom ConfigMap must be placed under thelog4j.propertiesorlog4j2.propertieskey. Kafka Connect has a single logger calledconnect.root.logger.level. You can set the log level to INFO, ERROR, WARN, TRACE, DEBUG, FATAL or OFF. - 30
- Healthchecks to know when to restart a container (liveness) and when a container can accept traffic (readiness).
- 31
- JVM configuration options to optimize performance for the Virtual Machine (VM) running Kafka MirrorMaker.
- 32
- ADVANCED OPTION: Container image configuration, which is recommended only in special situations.
- 33
- Template customization. Here a pod is scheduled based with anti-affinity, so the pod is not scheduled on nodes with the same hostname.
- 34
- Environment variables are also set for distributed tracing using Jaeger.
- 35
- 36
- OpenShift Secret mounted to Kafka MirrorMaker as an environment variable.
Create or update the resource:
oc apply -f <your-file>
3.6. Kafka Bridge configuration
The full schema of the KafkaBridge resource is described in the Section B.115, “KafkaBridge schema reference”. All labels that are applied to the desired KafkaBridge resource will also be applied to the OpenShift resources making up the Kafka Bridge cluster. This provides a convenient mechanism for resources to be labeled as required.
3.6.1. Replicas
Kafka Bridge can run multiple nodes. The number of nodes is defined in the KafkaBridge resource. Running a Kafka Bridge with multiple nodes can provide better availability and scalability. However, when running Kafka Bridge on OpenShift it is not absolutely necessary to run multiple nodes of Kafka Bridge for high availability.
If a node where Kafka Bridge is deployed to crashes, OpenShift will automatically reschedule the Kafka Bridge pod to a different node. In order to prevent issues arising when client consumer requests are processed by different Kafka Bridge instances, addressed-based routing must be employed to ensure that requests are routed to the right Kafka Bridge instance. Additionally, each independent Kafka Bridge instance must have a replica. A Kafka Bridge instance has its own state which is not shared with another instances.
3.6.1.1. Configuring the number of nodes
The number of Kafka Bridge nodes is configured using the replicas property in KafkaBridge.spec.
Prerequisites
- An OpenShift cluster
- A running Cluster Operator
Procedure
Edit the
replicasproperty in theKafkaBridgeresource. For example:apiVersion: kafka.strimzi.io/v1alpha1 kind: KafkaBridge metadata: name: my-bridge spec: # ... replicas: 3 # ...
Create or update the resource.
oc apply -f your-file
3.6.2. Bootstrap servers
A Kafka Bridge always works in combination with a Kafka cluster. A Kafka cluster is specified as a list of bootstrap servers. On OpenShift, the list must ideally contain the Kafka cluster bootstrap service named cluster-name-kafka-bootstrap, and a port of 9092 for plain traffic or 9093 for encrypted traffic.
The list of bootstrap servers is configured in the bootstrapServers property in KafkaBridge.kafka.spec. The servers must be defined as a comma-separated list specifying one or more Kafka brokers, or a service pointing to Kafka brokers specified as a hostname:_port_ pairs.
When using Kafka Bridge with a Kafka cluster not managed by AMQ Streams, you can specify the bootstrap servers list according to the configuration of the cluster.
3.6.2.1. Configuring bootstrap servers
Prerequisites
- An OpenShift cluster
- A running Cluster Operator
Procedure
Edit the
bootstrapServersproperty in theKafkaBridgeresource. For example:apiVersion: kafka.strimzi.io/v1alpha1 kind: KafkaBridge metadata: name: my-bridge spec: # ... bootstrapServers: my-cluster-kafka-bootstrap:9092 # ...
Create or update the resource.
oc apply -f your-file
3.6.3. Connecting to Kafka brokers using TLS
By default, Kafka Bridge tries to connect to Kafka brokers using a plain text connection. If you prefer to use TLS, additional configuration is required.
3.6.3.1. TLS support for Kafka connection to the Kafka Bridge
TLS support for Kafka connection is configured in the tls property in KafkaBridge.spec. The tls property contains a list of secrets with key names under which the certificates are stored. The certificates must be stored in X509 format.
An example showing TLS configuration with multiple certificates
apiVersion: kafka.strimzi.io/v1alpha1
kind: KafkaBridge
metadata:
name: my-bridge
spec:
# ...
tls:
trustedCertificates:
- secretName: my-secret
certificate: ca.crt
- secretName: my-other-secret
certificate: certificate.crt
# ...
When multiple certificates are stored in the same secret, it can be listed multiple times.
An example showing TLS configuration with multiple certificates from the same secret
apiVersion: kafka.strimzi.io/v1alpha1
kind: KafkaBridge
metadata:
name: my-bridge
spec:
# ...
tls:
trustedCertificates:
- secretName: my-secret
certificate: ca.crt
- secretName: my-secret
certificate: ca2.crt
# ...
3.6.3.2. Configuring TLS in Kafka Bridge
Prerequisites
- An OpenShift cluster
- A running Cluster Operator
-
If they exist, the name of the
Secretfor the certificate used for TLS Server Authentication, and the key under which the certificate is stored in theSecret
Procedure
(Optional) If they do not already exist, prepare the TLS certificate used in authentication in a file and create a
Secret.NoteThe secrets created by the Cluster Operator for Kafka cluster may be used directly.
oc create secret generic my-secret --from-file=my-file.crt
Edit the
tlsproperty in theKafkaBridgeresource. For example:apiVersion: kafka.strimzi.io/v1alpha1 kind: KafkaBridge metadata: name: my-bridge spec: # ... tls: trustedCertificates: - secretName: my-cluster-cluster-cert certificate: ca.crt # ...
Create or update the resource.
oc apply -f your-file
3.6.4. Connecting to Kafka brokers with Authentication
By default, Kafka Bridge will try to connect to Kafka brokers without authentication. Authentication is enabled through the KafkaBridge resources.
3.6.4.1. Authentication support in Kafka Bridge
Authentication is configured through the authentication property in KafkaBridge.spec. The authentication property specifies the type of the authentication mechanisms which should be used and additional configuration details depending on the mechanism. The currently supported authentication types are:
- TLS client authentication
- SASL-based authentication using the SCRAM-SHA-512 mechanism
- SASL-based authentication using the PLAIN mechanism
- OAuth 2.0 token based authentication
3.6.4.1.1. TLS Client Authentication
To use TLS client authentication, set the type property to the value tls. TLS client authentication uses a TLS certificate to authenticate. The certificate is specified in the certificateAndKey property and is always loaded from an OpenShift secret. In the secret, the certificate must be stored in X509 format under two different keys: public and private.
TLS client authentication can be used only with TLS connections. For more details about TLS configuration in Kafka Bridge see Section 3.6.3, “Connecting to Kafka brokers using TLS”.
An example TLS client authentication configuration
apiVersion: kafka.strimzi.io/v1alpha1
kind: KafkaBridge
metadata:
name: my-bridge
spec:
# ...
authentication:
type: tls
certificateAndKey:
secretName: my-secret
certificate: public.crt
key: private.key
# ...
3.6.4.1.2. SCRAM-SHA-512 authentication
To configure Kafka Bridge to use SASL-based SCRAM-SHA-512 authentication, set the type property to scram-sha-512. This authentication mechanism requires a username and password.
-
Specify the username in the
usernameproperty. -
In the
passwordSecretproperty, specify a link to aSecretcontaining the password. ThesecretNameproperty contains the name of theSecretand thepasswordproperty contains the name of the key under which the password is stored inside theSecret.
Do not specify the actual password in the password field.
An example SASL based SCRAM-SHA-512 client authentication configuration
apiVersion: kafka.strimzi.io/v1alpha1
kind: KafkaBridge
metadata:
name: my-bridge
spec:
# ...
authentication:
type: scram-sha-512
username: my-bridge-user
passwordSecret:
secretName: my-bridge-user
password: my-bridge-password-key
# ...
3.6.4.1.3. SASL-based PLAIN authentication
To configure Kafka Bridge to use SASL-based PLAIN authentication, set the type property to plain. This authentication mechanism requires a username and password.
The SASL PLAIN mechanism will transfer the username and password across the network in cleartext. Only use SASL PLAIN authentication if TLS encryption is enabled.
-
Specify the username in the
usernameproperty. -
In the
passwordSecretproperty, specify a link to aSecretcontaining the password. ThesecretNameproperty contains the name theSecretand thepasswordproperty contains the name of the key under which the password is stored inside theSecret.
Do not specify the actual password in the password field.
An example showing SASL based PLAIN client authentication configuration
apiVersion: kafka.strimzi.io/v1alpha1
kind: KafkaBridge
metadata:
name: my-bridge
spec:
# ...
authentication:
type: plain
username: my-bridge-user
passwordSecret:
secretName: my-bridge-user
password: my-bridge-password-key
# ...
3.6.4.2. Configuring TLS client authentication in Kafka Bridge
Prerequisites
- An OpenShift cluster
- A running Cluster Operator
-
If they exist, the name of the
Secretwith the public and private keys used for TLS Client Authentication, and the keys under which they are stored in theSecret
Procedure
(Optional) If they do not already exist, prepare the keys used for authentication in a file and create the
Secret.NoteSecrets created by the User Operator may be used.
oc create secret generic my-secret --from-file=my-public.crt --from-file=my-private.key
Edit the
authenticationproperty in theKafkaBridgeresource. For example:apiVersion: kafka.strimzi.io/v1alpha1 kind: KafkaBridge metadata: name: my-bridge spec: # ... authentication: type: tls certificateAndKey: secretName: my-secret certificate: my-public.crt key: my-private.key # ...Create or update the resource.
oc apply -f your-file
3.6.4.3. Configuring SCRAM-SHA-512 authentication in Kafka Bridge
Prerequisites
- An OpenShift cluster
- A running Cluster Operator
- Username of the user which should be used for authentication
-
If they exist, the name of the
Secretwith the password used for authentication and the key under which the password is stored in theSecret
Procedure
(Optional) If they do not already exist, prepare a file with the password used in authentication and create the
Secret.NoteSecrets created by the User Operator may be used.
echo -n '<password>' > <my-password.txt>
oc create secret generic <my-secret> --from-file=<my-password.txt>
Edit the
authenticationproperty in theKafkaBridgeresource. For example:apiVersion: kafka.strimzi.io/v1alpha1 kind: KafkaBridge metadata: name: my-bridge spec: # ... authentication: type: scram-sha-512 username: <my-username> passwordSecret: secretName: <my-secret> password: <my-password.txt> # ...Create or update the resource.
oc apply -f your-file
3.6.5. Kafka Bridge configuration
AMQ Streams allows you to customize the configuration of Apache Kafka Bridge nodes by editing certain options listed in Apache Kafka configuration documentation for consumers and Apache Kafka configuration documentation for producers.
Configuration options that can be configured relate to:
- Kafka cluster bootstrap address
- Security (Encryption, Authentication, and Authorization)
- Consumer configuration
- Producer configuration
- HTTP configuration
3.6.5.1. Kafka Bridge Consumer configuration
Kafka Bridge consumer is configured using the properties in KafkaBridge.spec.consumer. This property contains the Kafka Bridge consumer configuration options as keys. The values can be one of the following JSON types:
- String
- Number
- Boolean
Users can specify and configure the options listed in the Apache Kafka configuration documentation for consumers with the exception of those options which are managed directly by AMQ Streams. Specifically, all configuration options with keys equal to or starting with one of the following strings are forbidden:
-
ssl. -
sasl. -
security. -
bootstrap.servers -
group.id
When one of the forbidden options is present in the config property, it will be ignored and a warning message will be printed to the Cluster Operator log file. All other options will be passed to Kafka
The Cluster Operator does not validate keys or values in the config object provided. When an invalid configuration is provided, the Kafka Bridge cluster might not start or might become unstable. In this circumstance, fix the configuration in the KafkaBridge.spec.consumer.config object, then the Cluster Operator can roll out the new configuration to all Kafka Bridge nodes.
Use the three allowed ssl configuration options to run external listeners with a specific cipher suite for a TLS version. A cipher suite combines algorithms for secure connection and data transfer.
Example Kafka Bridge consumer configuration
apiVersion: kafka.strimzi.io/v1alpha1
kind: KafkaBridge
metadata:
name: my-bridge
spec:
# ...
consumer:
config:
auto.offset.reset: earliest
enable.auto.commit: true
ssl.cipher.suites: "TLS_ECDHE_RSA_WITH_AES_256_GCM_SHA384" 1
ssl.enabled.protocols: "TLSv1.2" 2
ssl.protocol: "TLSv1.2" 3
# ...
- 1
- The cipher suite for TLS using a combination of
ECDHEkey exchange mechanism,RSAauthentication algorithm,AESbulk encyption algorithm andSHA384MAC algorithm. - 2
- The SSl protocol
TLSv1.2is enabled. - 3
- Specifies the
TLSv1.2protocol to generate the SSL context. Allowed values areTLSv1.1andTLSv1.2.
3.6.5.2. Kafka Bridge Producer configuration
Kafka Bridge producer is configured using the properties in KafkaBridge.spec.producer. This property contains the Kafka Bridge producer configuration options as keys. The values can be one of the following JSON types:
- String
- Number
- Boolean
Users can specify and configure the options listed in the Apache Kafka configuration documentation for producers with the exception of those options which are managed directly by AMQ Streams. Specifically, all configuration options with keys equal to or starting with one of the following strings are forbidden:
-
ssl. -
sasl. -
security. -
bootstrap.servers
The Cluster Operator does not validate keys or values in the config object provided. When an invalid configuration is provided, the Kafka Bridge cluster might not start or might become unstable. In this circumstance, fix the configuration in the KafkaBridge.spec.producer.config object, then the Cluster Operator can roll out the new configuration to all Kafka Bridge nodes.
Use the three allowed ssl configuration options to run external listeners with a specific cipher suite for a TLS version. A cipher suite combines algorithms for secure connection and data transfer.
Example Kafka Bridge producer configuration
apiVersion: kafka.strimzi.io/v1alpha1
kind: KafkaBridge
metadata:
name: my-bridge
spec:
# ...
producer:
config:
acks: 1
delivery.timeout.ms: 300000
ssl.cipher.suites: "TLS_ECDHE_RSA_WITH_AES_256_GCM_SHA384" 1
ssl.enabled.protocols: "TLSv1.2" 2
ssl.protocol: "TLSv1.2" 3
# ...
- 1
- The cipher suite for TLS using a combination of
ECDHEkey exchange mechanism,RSAauthentication algorithm,AESbulk encyption algorithm andSHA384MAC algorithm. - 2
- The SSl protocol
TLSv1.2is enabled. - 3
- Specifies the
TLSv1.2protocol to generate the SSL context. Allowed values areTLSv1.1andTLSv1.2.
3.6.5.3. Kafka Bridge HTTP configuration
Kafka Bridge HTTP configuration is set using the properties in KafkaBridge.spec.http.
As well as enabling HTTP access to a Kafka cluster, HTTP properties provide the capability to enable and define access control for the Kafka Bridge through Cross-Origin Resource Sharing (CORS). CORS is a HTTP mechanism that allows browser access to selected resources from more than one origin. To configure CORS, you define a list of allowed resource origins and HTTP methods to access them. Additional HTTP headers in requests describe the origins that are permitted access to the Kafka cluster.
Example Kafka Bridge HTTP configuration
apiVersion: kafka.strimzi.io/v1alpha1
kind: KafkaBridge
metadata:
name: my-bridge
spec:
# ...
http:
port: 8080 1
cors:
allowedOrigins: "https://strimzi.io" 2
allowedMethods: "GET,POST,PUT,DELETE,OPTIONS,PATCH" 3
# ...
3.6.5.4. Configuring Kafka Bridge
Prerequisites
- An OpenShift cluster
- A running Cluster Operator
Procedure
Edit the
kafka,http,consumerorproducerproperty in theKafkaBridgeresource. For example:apiVersion: kafka.strimzi.io/v1alpha1 kind: KafkaBridge metadata: name: my-bridge spec: # ... bootstrapServers: my-cluster-kafka:9092 http: port: 8080 consumer: config: auto.offset.reset: earliest producer: config: delivery.timeout.ms: 300000 # ...Create or update the resource.
oc apply -f your-file
3.6.6. CPU and memory resources
For every deployed container, AMQ Streams allows you to request specific resources and define the maximum consumption of those resources.
AMQ Streams supports two types of resources:
- CPU
- Memory
AMQ Streams uses the OpenShift syntax for specifying CPU and memory resources.
3.6.6.1. Resource limits and requests
Resource limits and requests are configured using the resources property in the following resources:
-
Kafka.spec.kafka -
Kafka.spec.kafka.tlsSidecar -
Kafka.spec.zookeeper -
Kafka.spec.entityOperator.topicOperator -
Kafka.spec.entityOperator.userOperator -
Kafka.spec.entityOperator.tlsSidecar -
Kafka.spec.KafkaExporter -
KafkaConnect.spec -
KafkaConnectS2I.spec -
KafkaBridge.spec
Additional resources
- For more information about managing computing resources on OpenShift, see Managing Compute Resources for Containers.
3.6.6.1.1. Resource requests
Requests specify the resources to reserve for a given container. Reserving the resources ensures that they are always available.
If the resource request is for more than the available free resources in the OpenShift cluster, the pod is not scheduled.
Resources requests are specified in the requests property. Resources requests currently supported by AMQ Streams:
-
cpu -
memory
A request may be configured for one or more supported resources.
Example resource request configuration with all resources
# ...
resources:
  requests:
    cpu: 12
    memory: 64Gi
# ...
3.6.6.1.2. Resource limits
Limits specify the maximum resources that can be consumed by a given container. The limit is not reserved and might not always be available. A container can use the resources up to the limit only when they are available. Resource limits should be always higher than the resource requests.
Resource limits are specified in the limits property. Resource limits currently supported by AMQ Streams:
-
cpu -
memory
A resource may be configured for one or more supported limits.
Example resource limits configuration
# ...
resources:
  limits:
    cpu: 12
    memory: 64Gi
# ...
3.6.6.1.3. Supported CPU formats
CPU requests and limits are supported in the following formats:
-
Number of CPU cores as integer (
5CPU core) or decimal (2.5CPU core). -
Number or millicpus / millicores (
100m) where 1000 millicores is the same1CPU core.
Example CPU units
# ...
resources:
  requests:
    cpu: 500m
  limits:
    cpu: 2.5
# ...
The computing power of 1 CPU core may differ depending on the platform where OpenShift is deployed.
Additional resources
- For more information on CPU specification, see the Meaning of CPU.
3.6.6.1.4. Supported memory formats
Memory requests and limits are specified in megabytes, gigabytes, mebibytes, and gibibytes.
-
To specify memory in megabytes, use the
Msuffix. For example1000M. -
To specify memory in gigabytes, use the
Gsuffix. For example1G. -
To specify memory in mebibytes, use the
Misuffix. For example1000Mi. -
To specify memory in gibibytes, use the
Gisuffix. For example1Gi.
An example of using different memory units
# ...
resources:
  requests:
    memory: 512Mi
  limits:
    memory: 2Gi
# ...
Additional resources
- For more details about memory specification and additional supported units, see Meaning of memory.
3.6.6.2. Configuring resource requests and limits
Prerequisites
- An OpenShift cluster
- A running Cluster Operator
Procedure
Edit the
resourcesproperty in the resource specifying the cluster deployment. For example:apiVersion: kafka.strimzi.io/v1beta1 kind: Kafka spec: kafka: # ... resources: requests: cpu: "8" memory: 64Gi limits: cpu: "12" memory: 128Gi # ... zookeeper: # ...Create or update the resource.
This can be done using
oc apply:oc apply -f your-file
Additional resources
- For more information about the schema, see {K8sResourceRequirementsAPI}.
3.6.7. Kafka Bridge loggers
Kafka Bridge has its own configurable loggers:
-
log4j.logger.io.strimzi.kafka.bridge -
log4j.logger.http.openapi.operation.<operation-id>
You can replace <operation-id> in the log4j.logger.http.openapi.operation.<operation-id> logger to set log levels for specific operations:
-
createConsumer -
deleteConsumer -
subscribe -
unsubscribe -
poll -
assign -
commit -
send -
sendToPartition -
seekToBeginning -
seekToEnd -
seek -
healthy -
ready -
openapi
Each operation is defined according OpenAPI specification, and has a corresponding API endpoint through which the bridge receives requests from HTTP clients. You can change the log level on each endpoint to create fine-grained logging information about the incoming and outgoing HTTP requests.
Kafka Bridge uses the Apache log4j logger implementation. Loggers are defined in the log4j.properties file, which has the following default configuration for healthy and ready endpoints:
log4j.logger.http.openapi.operation.healthy=WARN, out log4j.additivity.http.openapi.operation.healthy=false log4j.logger.http.openapi.operation.ready=WARN, out log4j.additivity.http.openapi.operation.ready=false
The log level of all other operations is set to INFO by default.
Use the logging property to configure loggers and logger levels.
You can set the log levels by specifying the logger and level directly (inline) or use a custom (external) ConfigMap. If a ConfigMap is used, you set logging.name property to the name of the ConfigMap containing the external logging configuration. Inside the ConfigMap, the logging configuration is described using log4j.properties.
Here we see examples of inline and external logging.
Inline logging
apiVersion: kafka.strimzi.io/v1beta1
kind: KafkaBridge
spec:
# ...
logging:
type: inline
loggers:
log4j.logger.io.strimzi.kafka.bridge: "INFO"
# ...
External logging
apiVersion: kafka.strimzi.io/v1beta1
kind: KafkaBridge
spec:
# ...
logging:
type: external
name: customConfigMap
# ...
Additional resources
- Garbage collector (GC) logging can also be enabled (or disabled). For more information about GC logging, see Section 3.1.18.1, “JVM configuration”
- For more information about log levels, see Apache logging services.
3.6.8. JVM Options
The following components of AMQ Streams run inside a Virtual Machine (VM):
- Apache Kafka
- Apache ZooKeeper
- Apache Kafka Connect
- Apache Kafka MirrorMaker
- AMQ Streams Kafka Bridge
JVM configuration options optimize the performance for different platforms and architectures. AMQ Streams allows you to configure some of these options.
3.6.8.1. JVM configuration
JVM options can be configured using the jvmOptions property in following resources:
-
Kafka.spec.kafka -
Kafka.spec.zookeeper -
KafkaConnect.spec -
KafkaConnectS2I.spec -
KafkaMirrorMaker.spec -
KafkaBridge.spec
Only a selected subset of available JVM options can be configured. The following options are supported:
-Xms and -Xmx
-Xms configures the minimum initial allocation heap size when the JVM starts. -Xmx configures the maximum heap size.
The units accepted by JVM settings such as -Xmx and -Xms are those accepted by the JDK java binary in the corresponding image. Accordingly, 1g or 1G means 1,073,741,824 bytes, and Gi is not a valid unit suffix. This is in contrast to the units used for memory requests and limits, which follow the OpenShift convention where 1G means 1,000,000,000 bytes, and 1Gi means 1,073,741,824 bytes
The default values used for -Xms and -Xmx depends on whether there is a memory request limit configured for the container:
- If there is a memory limit then the JVM’s minimum and maximum memory will be set to a value corresponding to the limit.
-
If there is no memory limit then the JVM’s minimum memory will be set to
128Mand the JVM’s maximum memory will not be defined. This allows for the JVM’s memory to grow as-needed, which is ideal for single node environments in test and development.
Setting -Xmx explicitly requires some care:
-
The JVM’s overall memory usage will be approximately 4 × the maximum heap, as configured by
-Xmx. -
If
-Xmxis set without also setting an appropriate OpenShift memory limit, it is possible that the container will be killed should the OpenShift node experience memory pressure (from other Pods running on it). -
If
-Xmxis set without also setting an appropriate OpenShift memory request, it is possible that the container will be scheduled to a node with insufficient memory. In this case, the container will not start but crash (immediately if-Xmsis set to-Xmx, or some later time if not).
When setting -Xmx explicitly, it is recommended to:
- set the memory request and the memory limit to the same value,
-
use a memory request that is at least 4.5 × the
-Xmx, -
consider setting
-Xmsto the same value as-Xmx.
Containers doing lots of disk I/O (such as Kafka broker containers) will need to leave some memory available for use as operating system page cache. On such containers, the requested memory should be significantly higher than the memory used by the JVM.
Example fragment configuring -Xmx and -Xms
# ... jvmOptions: "-Xmx": "2g" "-Xms": "2g" # ...
In the above example, the JVM will use 2 GiB (=2,147,483,648 bytes) for its heap. Its total memory usage will be approximately 8GiB.
Setting the same value for initial (-Xms) and maximum (-Xmx) heap sizes avoids the JVM having to allocate memory after startup, at the cost of possibly allocating more heap than is really needed. For Kafka and ZooKeeper pods such allocation could cause unwanted latency. For Kafka Connect avoiding over allocation may be the most important concern, especially in distributed mode where the effects of over-allocation will be multiplied by the number of consumers.
-server
-server enables the server JVM. This option can be set to true or false.
Example fragment configuring -server
# ... jvmOptions: "-server": true # ...
When neither of the two options (-server and -XX) is specified, the default Apache Kafka configuration of KAFKA_JVM_PERFORMANCE_OPTS will be used.
-XX
-XX object can be used for configuring advanced runtime options of a JVM. The -server and -XX options are used to configure the KAFKA_JVM_PERFORMANCE_OPTS option of Apache Kafka.
Example showing the use of the -XX object
jvmOptions:
"-XX":
"UseG1GC": true
"MaxGCPauseMillis": 20
"InitiatingHeapOccupancyPercent": 35
"ExplicitGCInvokesConcurrent": true
"UseParNewGC": false
The example configuration above will result in the following JVM options:
-XX:+UseG1GC -XX:MaxGCPauseMillis=20 -XX:InitiatingHeapOccupancyPercent=35 -XX:+ExplicitGCInvokesConcurrent -XX:-UseParNewGC
When neither of the two options (-server and -XX) is specified, the default Apache Kafka configuration of KAFKA_JVM_PERFORMANCE_OPTS will be used.
3.6.8.1.1. Garbage collector logging
The jvmOptions section also allows you to enable and disable garbage collector (GC) logging. GC logging is disabled by default. To enable it, set the gcLoggingEnabled property as follows:
Example of enabling GC logging
# ... jvmOptions: gcLoggingEnabled: true # ...
3.6.8.2. Configuring JVM options
Prerequisites
- An OpenShift cluster
- A running Cluster Operator
Procedure
Edit the
jvmOptionsproperty in theKafka,KafkaConnect,KafkaConnectS2I,KafkaMirrorMaker, orKafkaBridgeresource. For example:apiVersion: kafka.strimzi.io/v1beta1 kind: Kafka metadata: name: my-cluster spec: kafka: # ... jvmOptions: "-Xmx": "8g" "-Xms": "8g" # ... zookeeper: # ...Create or update the resource.
This can be done using
oc apply:oc apply -f your-file
3.6.9. Healthchecks
Healthchecks are periodical tests which verify the health of an application. When a Healthcheck probe fails, OpenShift assumes that the application is not healthy and attempts to fix it.
OpenShift supports two types of Healthcheck probes:
- Liveness probes
- Readiness probes
For more details about the probes, see Configure Liveness and Readiness Probes. Both types of probes are used in AMQ Streams components.
Users can configure selected options for liveness and readiness probes.
3.6.9.1. Healthcheck configurations
Liveness and readiness probes can be configured using the livenessProbe and readinessProbe properties in following resources:
-
Kafka.spec.kafka -
Kafka.spec.kafka.tlsSidecar -
Kafka.spec.zookeeper -
Kafka.spec.entityOperator.tlsSidecar -
Kafka.spec.entityOperator.topicOperator -
Kafka.spec.entityOperator.userOperator -
Kafka.spec.KafkaExporter -
KafkaConnect.spec -
KafkaConnectS2I.spec -
KafkaMirrorMaker.spec -
KafkaBridge.spec
Both livenessProbe and readinessProbe support the following options:
-
initialDelaySeconds -
timeoutSeconds -
periodSeconds -
successThreshold -
failureThreshold
For more information about the livenessProbe and readinessProbe options, see Section B.40, “Probe schema reference”.
An example of liveness and readiness probe configuration
# ...
readinessProbe:
  initialDelaySeconds: 15
  timeoutSeconds: 5
livenessProbe:
  initialDelaySeconds: 15
  timeoutSeconds: 5
# ...
3.6.9.2. Configuring healthchecks
Prerequisites
- An OpenShift cluster
- A running Cluster Operator
Procedure
Edit the
livenessProbeorreadinessProbeproperty in theKafka,KafkaConnectorKafkaConnectS2Iresource. For example:apiVersion: kafka.strimzi.io/v1beta1 kind: Kafka metadata: name: my-cluster spec: kafka: # ... readinessProbe: initialDelaySeconds: 15 timeoutSeconds: 5 livenessProbe: initialDelaySeconds: 15 timeoutSeconds: 5 # ... zookeeper: # ...Create or update the resource.
This can be done using
oc apply:oc apply -f your-file
3.6.10. Container images
AMQ Streams allows you to configure container images which will be used for its components. Overriding container images is recommended only in special situations, where you need to use a different container registry. For example, because your network does not allow access to the container repository used by AMQ Streams. In such a case, you should either copy the AMQ Streams images or build them from the source. If the configured image is not compatible with AMQ Streams images, it might not work properly.
3.6.10.1. Container image configurations
You can specify which container image to use for each component using the image property in the following resources:
-
Kafka.spec.kafka -
Kafka.spec.kafka.tlsSidecar -
Kafka.spec.zookeeper -
Kafka.spec.entityOperator.topicOperator -
Kafka.spec.entityOperator.userOperator -
Kafka.spec.entityOperator.tlsSidecar -
KafkaConnect.spec -
KafkaConnectS2I.spec -
KafkaBridge.spec
3.6.10.1.1. Configuring the image property for Kafka, Kafka Connect, and Kafka MirrorMaker
Kafka, Kafka Connect (including Kafka Connect with S2I support), and Kafka MirrorMaker support multiple versions of Kafka. Each component requires its own image. The default images for the different Kafka versions are configured in the following environment variables:
-
STRIMZI_KAFKA_IMAGES -
STRIMZI_KAFKA_CONNECT_IMAGES -
STRIMZI_KAFKA_CONNECT_S2I_IMAGES -
STRIMZI_KAFKA_MIRROR_MAKER_IMAGES
These environment variables contain mappings between the Kafka versions and their corresponding images. The mappings are used together with the image and version properties:
-
If neither
imagenorversionare given in the custom resource then theversionwill default to the Cluster Operator’s default Kafka version, and the image will be the one corresponding to this version in the environment variable. -
If
imageis given butversionis not, then the given image is used and theversionis assumed to be the Cluster Operator’s default Kafka version. -
If
versionis given butimageis not, then the image that corresponds to the given version in the environment variable is used. -
If both
versionandimageare given, then the given image is used. The image is assumed to contain a Kafka image with the given version.
The image and version for the different components can be configured in the following properties:
-
For Kafka in
spec.kafka.imageandspec.kafka.version. -
For Kafka Connect, Kafka Connect S2I, and Kafka MirrorMaker in
spec.imageandspec.version.
It is recommended to provide only the version and leave the image property unspecified. This reduces the chance of making a mistake when configuring the custom resource. If you need to change the images used for different versions of Kafka, it is preferable to configure the Cluster Operator’s environment variables.
3.6.10.1.2. Configuring the image property in other resources
For the image property in the other custom resources, the given value will be used during deployment. If the image property is missing, the image specified in the Cluster Operator configuration will be used. If the image name is not defined in the Cluster Operator configuration, then the default value will be used.
For Kafka broker TLS sidecar:
-
Container image specified in the
STRIMZI_DEFAULT_TLS_SIDECAR_KAFKA_IMAGEenvironment variable from the Cluster Operator configuration. -
registry.redhat.io/amq7/amq-streams-kafka-25-rhel7:1.5.0container image.
-
Container image specified in the
For Topic Operator:
-
Container image specified in the
STRIMZI_DEFAULT_TOPIC_OPERATOR_IMAGEenvironment variable from the Cluster Operator configuration. -
registry.redhat.io/amq7/amq-streams-rhel7-operator:1.5.0container image.
-
Container image specified in the
For User Operator:
-
Container image specified in the
STRIMZI_DEFAULT_USER_OPERATOR_IMAGEenvironment variable from the Cluster Operator configuration. -
registry.redhat.io/amq7/amq-streams-rhel7-operator:1.5.0container image.
-
Container image specified in the
For Entity Operator TLS sidecar:
-
Container image specified in the
STRIMZI_DEFAULT_TLS_SIDECAR_ENTITY_OPERATOR_IMAGEenvironment variable from the Cluster Operator configuration. -
registry.redhat.io/amq7/amq-streams-kafka-25-rhel7:1.5.0container image.
-
Container image specified in the
For Kafka Exporter:
-
Container image specified in the
STRIMZI_DEFAULT_KAFKA_EXPORTER_IMAGEenvironment variable from the Cluster Operator configuration. -
registry.redhat.io/amq7/amq-streams-kafka-25-rhel7:1.5.0container image.
-
Container image specified in the
For Kafka Bridge:
-
Container image specified in the
STRIMZI_DEFAULT_KAFKA_BRIDGE_IMAGEenvironment variable from the Cluster Operator configuration. -
registry.redhat.io/amq7/amq-streams-bridge-rhel7:1.5.0container image.
-
Container image specified in the
For Kafka broker initializer:
-
Container image specified in the
STRIMZI_DEFAULT_KAFKA_INIT_IMAGEenvironment variable from the Cluster Operator configuration. -
registry.redhat.io/amq7/amq-streams-rhel7-operator:1.5.0container image.
-
Container image specified in the
Overriding container images is recommended only in special situations, where you need to use a different container registry. For example, because your network does not allow access to the container repository used by AMQ Streams. In such case, you should either copy the AMQ Streams images or build them from source. In case the configured image is not compatible with AMQ Streams images, it might not work properly.
Example of container image configuration
apiVersion: kafka.strimzi.io/v1beta1
kind: Kafka
metadata:
  name: my-cluster
spec:
  kafka:
    # ...
    image: my-org/my-image:latest
    # ...
  zookeeper:
    # ...
3.6.10.2. Configuring container images
Prerequisites
- An OpenShift cluster
- A running Cluster Operator
Procedure
Edit the
imageproperty in theKafka,KafkaConnectorKafkaConnectS2Iresource. For example:apiVersion: kafka.strimzi.io/v1beta1 kind: Kafka metadata: name: my-cluster spec: kafka: # ... image: my-org/my-image:latest # ... zookeeper: # ...Create or update the resource.
This can be done using
oc apply:oc apply -f your-file
3.6.11. Configuring pod scheduling
When two applications are scheduled to the same OpenShift node, both applications might use the same resources like disk I/O and impact performance. That can lead to performance degradation. Scheduling Kafka pods in a way that avoids sharing nodes with other critical workloads, using the right nodes or dedicated a set of nodes only for Kafka are the best ways how to avoid such problems.
3.6.11.1. Scheduling pods based on other applications
3.6.11.1.1. Avoid critical applications to share the node
Pod anti-affinity can be used to ensure that critical applications are never scheduled on the same disk. When running Kafka cluster, it is recommended to use pod anti-affinity to ensure that the Kafka brokers do not share the nodes with other workloads like databases.
3.6.11.1.2. Affinity
Affinity can be configured using the affinity property in following resources:
-
Kafka.spec.kafka.template.pod -
Kafka.spec.zookeeper.template.pod -
Kafka.spec.entityOperator.template.pod -
KafkaConnect.spec.template.pod -
KafkaConnectS2I.spec.template.pod -
KafkaBridge.spec.template.pod
The affinity configuration can include different types of affinity:
- Pod affinity and anti-affinity
- Node affinity
The format of the affinity property follows the OpenShift specification. For more details, see the Kubernetes node and pod affinity documentation.
3.6.11.1.3. Configuring pod anti-affinity in Kafka components
Prerequisites
- An OpenShift cluster
- A running Cluster Operator
Procedure
Edit the
affinityproperty in the resource specifying the cluster deployment. Use labels to specify the pods which should not be scheduled on the same nodes. ThetopologyKeyshould be set tokubernetes.io/hostnameto specify that the selected pods should not be scheduled on nodes with the same hostname. For example:apiVersion: kafka.strimzi.io/v1beta1 kind: Kafka spec: kafka: # ... template: pod: affinity: podAntiAffinity: requiredDuringSchedulingIgnoredDuringExecution: - labelSelector: matchExpressions: - key: application operator: In values: - postgresql - mongodb topologyKey: "kubernetes.io/hostname" # ... zookeeper: # ...Create or update the resource.
This can be done using
oc apply:oc apply -f your-file
3.6.11.2. Scheduling pods to specific nodes
3.6.11.2.1. Node scheduling
The OpenShift cluster usually consists of many different types of worker nodes. Some are optimized for CPU heavy workloads, some for memory, while other might be optimized for storage (fast local SSDs) or network. Using different nodes helps to optimize both costs and performance. To achieve the best possible performance, it is important to allow scheduling of AMQ Streams components to use the right nodes.
OpenShift uses node affinity to schedule workloads onto specific nodes. Node affinity allows you to create a scheduling constraint for the node on which the pod will be scheduled. The constraint is specified as a label selector. You can specify the label using either the built-in node label like beta.kubernetes.io/instance-type or custom labels to select the right node.
3.6.11.2.2. Affinity
Affinity can be configured using the affinity property in following resources:
-
Kafka.spec.kafka.template.pod -
Kafka.spec.zookeeper.template.pod -
Kafka.spec.entityOperator.template.pod -
KafkaConnect.spec.template.pod -
KafkaConnectS2I.spec.template.pod -
KafkaBridge.spec.template.pod
The affinity configuration can include different types of affinity:
- Pod affinity and anti-affinity
- Node affinity
The format of the affinity property follows the OpenShift specification. For more details, see the Kubernetes node and pod affinity documentation.
3.6.11.2.3. Configuring node affinity in Kafka components
Prerequisites
- An OpenShift cluster
- A running Cluster Operator
Procedure
Label the nodes where AMQ Streams components should be scheduled.
This can be done using
oc label:oc label node your-node node-type=fast-networkAlternatively, some of the existing labels might be reused.
Edit the
affinityproperty in the resource specifying the cluster deployment. For example:apiVersion: kafka.strimzi.io/v1beta1 kind: Kafka spec: kafka: # ... template: pod: affinity: nodeAffinity: requiredDuringSchedulingIgnoredDuringExecution: nodeSelectorTerms: - matchExpressions: - key: node-type operator: In values: - fast-network # ... zookeeper: # ...Create or update the resource.
This can be done using
oc apply:oc apply -f your-file
3.6.11.3. Using dedicated nodes
3.6.11.3.1. Dedicated nodes
Cluster administrators can mark selected OpenShift nodes as tainted. Nodes with taints are excluded from regular scheduling and normal pods will not be scheduled to run on them. Only services which can tolerate the taint set on the node can be scheduled on it. The only other services running on such nodes will be system services such as log collectors or software defined networks.
Taints can be used to create dedicated nodes. Running Kafka and its components on dedicated nodes can have many advantages. There will be no other applications running on the same nodes which could cause disturbance or consume the resources needed for Kafka. That can lead to improved performance and stability.
To schedule Kafka pods on the dedicated nodes, configure node affinity and tolerations.
3.6.11.3.2. Affinity
Affinity can be configured using the affinity property in following resources:
-
Kafka.spec.kafka.template.pod -
Kafka.spec.zookeeper.template.pod -
Kafka.spec.entityOperator.template.pod -
KafkaConnect.spec.template.pod -
KafkaConnectS2I.spec.template.pod -
KafkaBridge.spec.template.pod
The affinity configuration can include different types of affinity:
- Pod affinity and anti-affinity
- Node affinity
The format of the affinity property follows the OpenShift specification. For more details, see the Kubernetes node and pod affinity documentation.
3.6.11.3.3. Tolerations
Tolerations can be configured using the tolerations property in following resources:
-
Kafka.spec.kafka.template.pod -
Kafka.spec.zookeeper.template.pod -
Kafka.spec.entityOperator.template.pod -
KafkaConnect.spec.template.pod -
KafkaConnectS2I.spec.template.pod -
KafkaBridge.spec.template.pod
The format of the tolerations property follows the OpenShift specification. For more details, see the Kubernetes taints and tolerations.
3.6.11.3.4. Setting up dedicated nodes and scheduling pods on them
Prerequisites
- An OpenShift cluster
- A running Cluster Operator
Procedure
- Select the nodes which should be used as dedicated.
- Make sure there are no workloads scheduled on these nodes.
Set the taints on the selected nodes:
This can be done using
oc adm taint:oc adm taint node your-node dedicated=Kafka:NoScheduleAdditionally, add a label to the selected nodes as well.
This can be done using
oc label:oc label node your-node dedicated=KafkaEdit the
affinityandtolerationsproperties in the resource specifying the cluster deployment. For example:apiVersion: kafka.strimzi.io/v1beta1 kind: Kafka spec: kafka: # ... template: pod: tolerations: - key: "dedicated" operator: "Equal" value: "Kafka" effect: "NoSchedule" affinity: nodeAffinity: requiredDuringSchedulingIgnoredDuringExecution: nodeSelectorTerms: - matchExpressions: - key: dedicated operator: In values: - Kafka # ... zookeeper: # ...Create or update the resource.
This can be done using
oc apply:oc apply -f your-file
3.6.12. List of resources created as part of Kafka Bridge cluster
The following resources are created by the Cluster Operator in the OpenShift cluster:
- bridge-cluster-name-bridge
- Deployment which is in charge to create the Kafka Bridge worker node pods.
- bridge-cluster-name-bridge-service
- Service which exposes the REST interface of the Kafka Bridge cluster.
- bridge-cluster-name-bridge-config
- ConfigMap which contains the Kafka Bridge ancillary configuration and is mounted as a volume by the Kafka broker pods.
- bridge-cluster-name-bridge
- Pod Disruption Budget configured for the Kafka Bridge worker nodes.
3.7. Using OAuth 2.0 token-based authentication
AMQ Streams supports the use of OAuth 2.0 authentication using the SASL OAUTHBEARER mechanism.
OAuth 2.0 enables standardized token-based authentication and authorization between applications, using a central authorization server to issue tokens that grant limited access to resources.
You can configure OAuth 2.0 authentication, then OAuth 2.0 authorization. OAuth 2.0 authentication can also be used in conjunction with ACL-based Kafka authorization regardless of the authorization server used.
Using OAuth 2.0 token-based authentication, application clients can access resources on application servers (called resource servers) without exposing account credentials.
The application client passes an access token as a means of authenticating, which application servers can also use to determine the level of access to grant. The authorization server handles the granting of access and inquiries about access.
In the context of AMQ Streams:
- Kafka brokers act as OAuth 2.0 resource servers
- Kafka clients act as OAuth 2.0 application clients
Kafka clients authenticate to Kafka brokers. The brokers and clients communicate with the OAuth 2.0 authorization server, as necessary, to obtain or validate access tokens.
For a deployment of AMQ Streams, OAuth 2.0 integration provides:
- Server-side OAuth 2.0 support for Kafka brokers
- Client-side OAuth 2.0 support for Kafka Mirror Maker, Kafka Connect and the Kafka Bridge
Additional resources
3.7.1. OAuth 2.0 authentication mechanism
The Kafka SASL OAUTHBEARER mechanism is used to establish authenticated sessions with a Kafka broker.
A Kafka client initiates a session with the Kafka broker using the SASL OAUTHBEARER mechanism for credentials exchange, where credentials take the form of an access token.
Kafka brokers and clients need to be configured to use OAuth 2.0.
3.7.2. OAuth 2.0 Kafka broker configuration
Kafka broker configuration for OAuth 2.0 involves:
- Creating the OAuth 2.0 client in the authorization server
- Configuring OAuth 2.0 authentication in the Kafka custom resource
In relation to the authorization server, Kafka brokers and Kafka clients are both regarded as OAuth 2.0 clients.
3.7.2.1. OAuth 2.0 client configuration on an authorization server
To configure a Kafka broker to validate the token received during session initiation, the recommended approach is to create an OAuth 2.0 client definition in an authorization server, configured as confidential, with the following client credentials enabled:
-
Client ID of
kafka(for example) - Client ID and Secret as the authentication mechanism
You only need to use a client ID and secret when using a non-public introspection endpoint of the authorization server. The credentials are not typically required when using public authorization server endpoints, as with fast local JWT token validation.
3.7.2.2. OAuth 2.0 authentication configuration in the Kafka cluster
To use OAuth 2.0 authentication in the Kafka cluster, you specify for example a TLS listener configuration for your Kafka cluster custom resource with the authentication method oauth:
Assigining the authentication method type for OAuth 2.0
apiVersion: kafka.strimzi.io/v1beta1
kind: Kafka
spec:
kafka:
listeners:
tls:
authentication:
type: oauth
#...
You can configure plain, tls and external listeners, as described in Kafka broker listeners, but it is recommended not to use plain listeners or external listeners with disabled TLS encryption with OAuth 2.0 as this creates a vulnerability to network eavesdropping and unauthorized access through token theft.
You configure an external listener with type: oauth for a secure transport layer to communicate with the client.
Using OAuth 2.0 with an external listener
# ...
listeners:
tls:
authentication:
type: oauth
external:
type: loadbalancer
tls: true
authentication:
type: oauth
#...
The tls property is true by default, so it can be left out.
When you’ve defined the type of authentication as OAuth 2.0, you add configuration based on the type of validation, either as fast local JWT validation or token validation using an introspection endpoint.
The procedure to configure OAuth 2.0 for listeners, with descriptions and examples, is described in Configuring OAuth 2.0 support for Kafka brokers.
3.7.2.3. Fast local JWT token validation configuration
Fast local JWT token validation checks a JWT token signature locally.
The local check ensures that a token:
-
Conforms to type by containing a (typ) claim value of
Bearerfor an access token - Is valid (not expired)
-
Has an issuer that matches a
validIssuerURI
You specify a validIssuerUrI attribute when you configure the listener, so that any tokens not issued by the authorization server are rejected.
The authorization server does not need to be contacted during fast local JWT token validation. You activate fast local JWT token validation by specifying a jwksEndpointUri attribute, the endpoint exposed by the OAuth 2.0 authorization server. The endpoint contains the public keys used to validate signed JWT tokens, which are sent as credentials by Kafka clients.
All communication with the authorization server should be performed using TLS encryption.
You can configure a certificate truststore as an OpenShift Secret in your AMQ Streams project namespace, and use a tlsTrustedCertificates attribute to point to the OpenShift Secret containing the truststore file.
You might want to configure a userNameClaim to properly extract a username from the JWT token. If you want to use Kafka ACL authorization, you need to identify the user by their username during authentication. (The sub claim in JWT tokens is typically a unique ID, not a username.)
Example configuration for fast local JWT token validation
apiVersion: kafka.strimzi.io/v1beta1
kind: Kafka
spec:
kafka:
listeners:
tls:
authentication:
type: oauth
validIssuerUri: <https://<auth-server-address>/auth/realms/tls>
jwksEndpointUri: <https://<auth-server-address>/auth/realms/tls/protocol/openid-connect/certs>
userNameClaim: preferred_username
tlsTrustedCertificates:
- secretName: oauth-server-cert
certificate: ca.crt
3.7.2.4. OAuth 2.0 introspection endpoint configuration
Token validation using an OAuth 2.0 introspection endpoint treats a received access token as opaque. The Kafka broker sends an access token to the introspection endpoint, which responds with the token information necessary for validation. Importantly, it returns up-to-date information if the specific access token is valid, and also information about when the token expires.
To configure OAuth 2.0 introspection-based validation, you specify an introspectionEndpointUri attribute rather than the jwksEndpointUri attribute specified for fast local JWT token validation. Depending on the authorization server, you typically have to specify a clientId and clientSecret, because the introspection endpoint is usually protected.
Example configuration for an introspection endpoint
apiVersion: kafka.strimzi.io/v1beta1
kind: Kafka
spec:
kafka:
listeners:
tls:
authentication:
type: oauth
clientId: kafka-broker
clientSecret:
secretName: my-cluster-oauth
key: clientSecret
validIssuerUri: <https://<auth-server-address>/auth/realms/tls>
introspectionEndpointUri: <https://<auth-server-address>/auth/realms/tls/protocol/openid-connect/token/introspect>
userNameClaim: preferred_username
tlsTrustedCertificates:
- secretName: oauth-server-cert
certificate: ca.crt
3.7.3. OAuth 2.0 Kafka client configuration
A Kafka client is configured with either:
- The credentials required to obtain a valid access token from an authorization server (client ID and Secret)
- A valid long-lived access token or refresh token, obtained using tools provided by an authorization server
The only information ever sent to the Kafka broker is an access token. The credentials used to authenticate with the authorization server to obtain the access token are never sent to the broker.
When a client obtains an access token, no further communication with the authorization server is needed.
The simplest mechanism is authentication with a client ID and Secret. Using a long-lived access token, or a long-lived refresh token, adds more complexity because there is an additional dependency on authorization server tools.
If you are using long-lived access tokens, you may need to configure the client in the authorization server to increase the maximum lifetime of the token.
If the Kafka client is not configured with an access token directly, the client exchanges credentials for an access token during Kafka session initiation by contacting the authorization server. The Kafka client exchanges either:
- Client ID and Secret
- Client ID, refresh token, and (optionally) a Secret
3.7.4. OAuth 2.0 client authentication flow
In this section, we explain and visualize the communication flow between Kafka client, Kafka broker, and authorization server during Kafka session initiation. The flow depends on the client and server configuration.
When a Kafka client sends an access token as credentials to a Kafka broker, the token needs to be validated.
Depending on the authorization server used, and the configuration options available, you may prefer to use:
- Fast local token validation based on JWT signature checking and local token introspection, without contacting the authorization server
- An OAuth 2.0 introspection endpoint provided by the authorization server
Using fast local token validation requires the authorization server to provide a JWKS endpoint with public certificates that are used to validate signatures on the tokens.
Another option is to use an OAuth 2.0 introspection endpoint on the authorization server. Each time a new Kafka broker connection is established, the broker passes the access token received from the client to the authorization server, and checks the response to confirm whether or not the token is valid.
Kafka client credentials can also be configured for:
- Direct local access using a previously generated long-lived access token
- Contact with the authorization server for a new access token to be issued
An authorization server might only allow the use of opaque access tokens, which means that local token validation is not possible.
3.7.4.1. Example client authentication flows
Here you can see the communication flows, for different configurations of Kafka clients and brokers, during Kafka session authentication.
- Client using client ID and secret, with broker delegating validation to authorization server
- Client using client ID and secret, with broker performing fast local token validation
- Client using long-lived access token, with broker delegating validation to authorization server
- Client using long-lived access token, with broker performing fast local validation
Client using client ID and secret, with broker delegating validation to authorization server
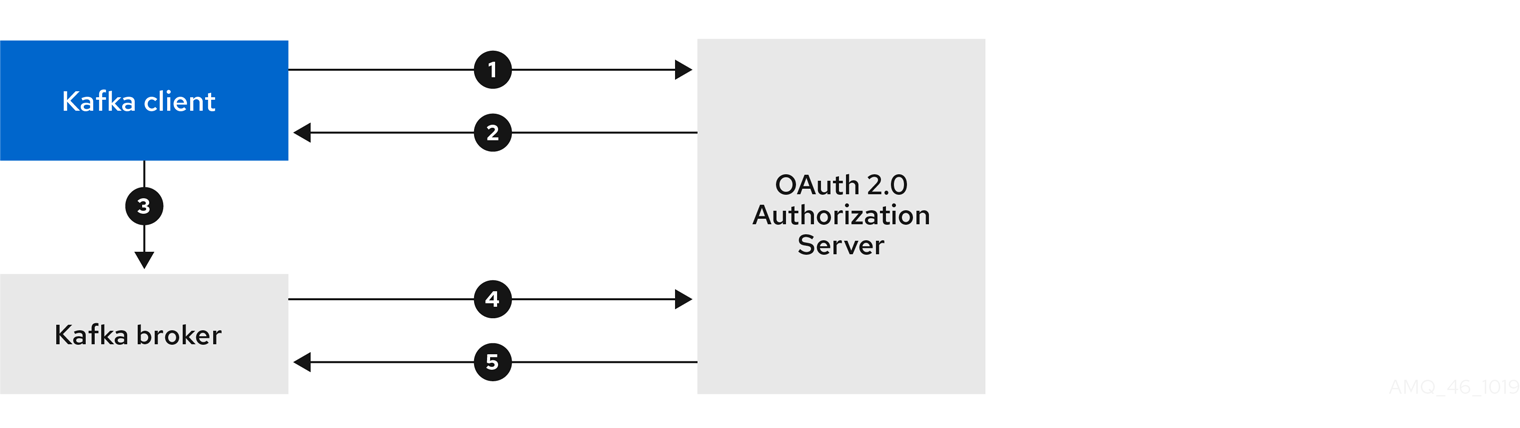
- Kafka client requests access token from authorization server, using client ID and secret, and optionally a refresh token.
- Authorization server generates a new access token.
- Kafka client authenticates with the Kafka broker using the SASL OAUTHBEARER mechanism to pass the access token.
- Kafka broker validates the access token by calling a token introspection endpoint on authorization server, using its own client ID and secret.
- Kafka client session is established if the token is valid.
Client using client ID and secret, with broker performing fast local token validation
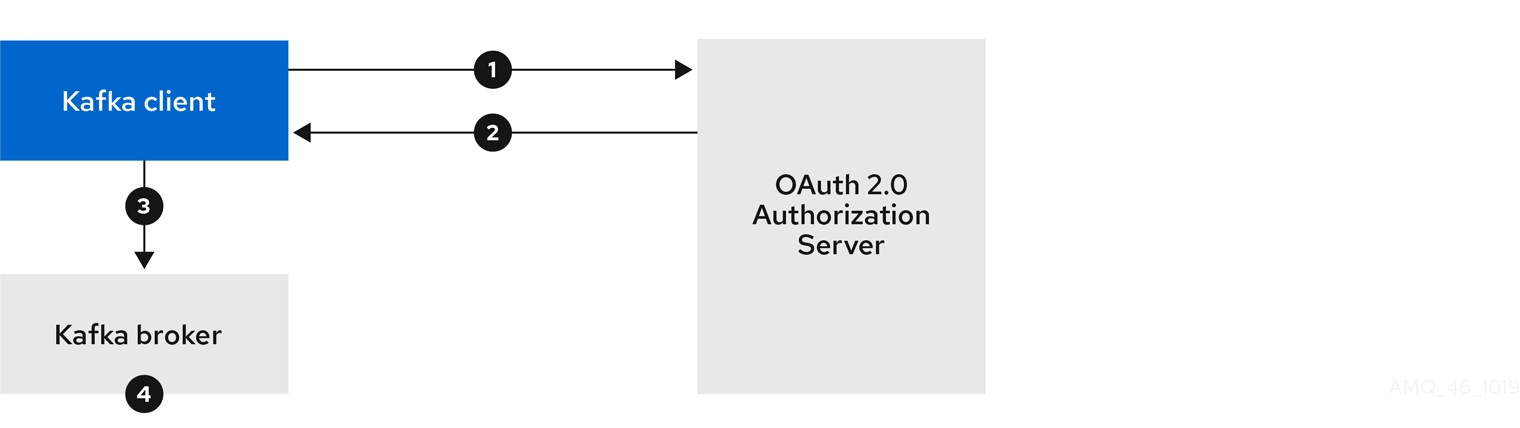
- Kafka client authenticates with authorization server from the token endpoint, using a client ID and secret, and optionally a refresh token.
- Authorization server generates a new access token.
- Kafka client authenticates with the Kafka broker using the SASL OAUTHBEARER mechanism to pass the access token.
- Kafka broker validates the access token locally using a JWT token signature check, and local token introspection.
Client using long-lived access token, with broker delegating validation to authorization server
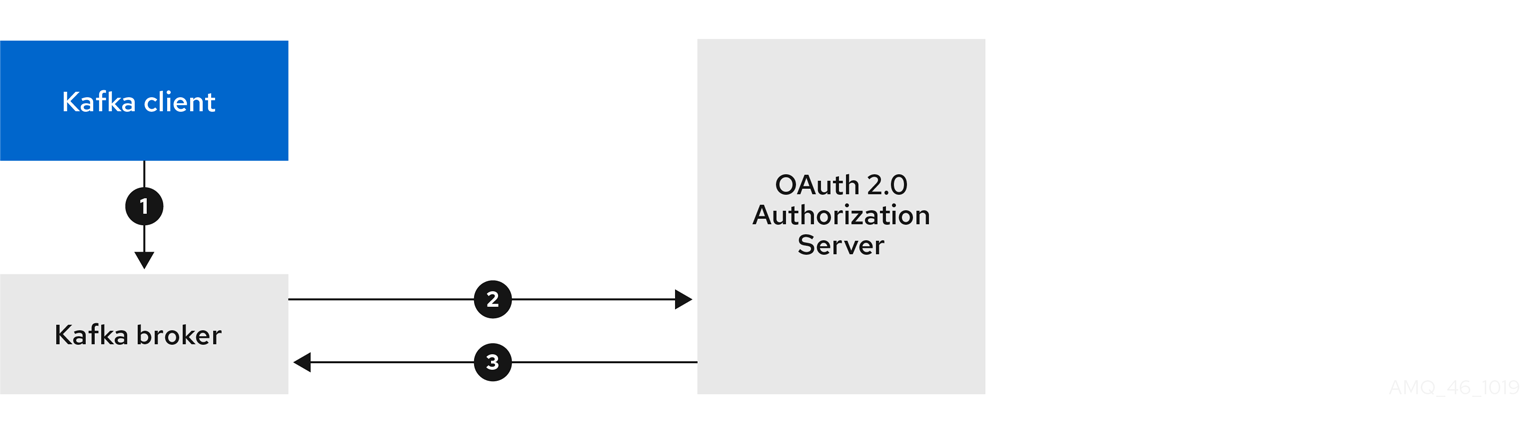
- Kafka client authenticates with the Kafka broker using the SASL OAUTHBEARER mechanism to pass the long-lived access token.
- Kafka broker validates the access token by calling a token introspection endpoint on authorization server, using its own client ID and secret.
- Kafka client session is established if the token is valid.
Client using long-lived access token, with broker performing fast local validation
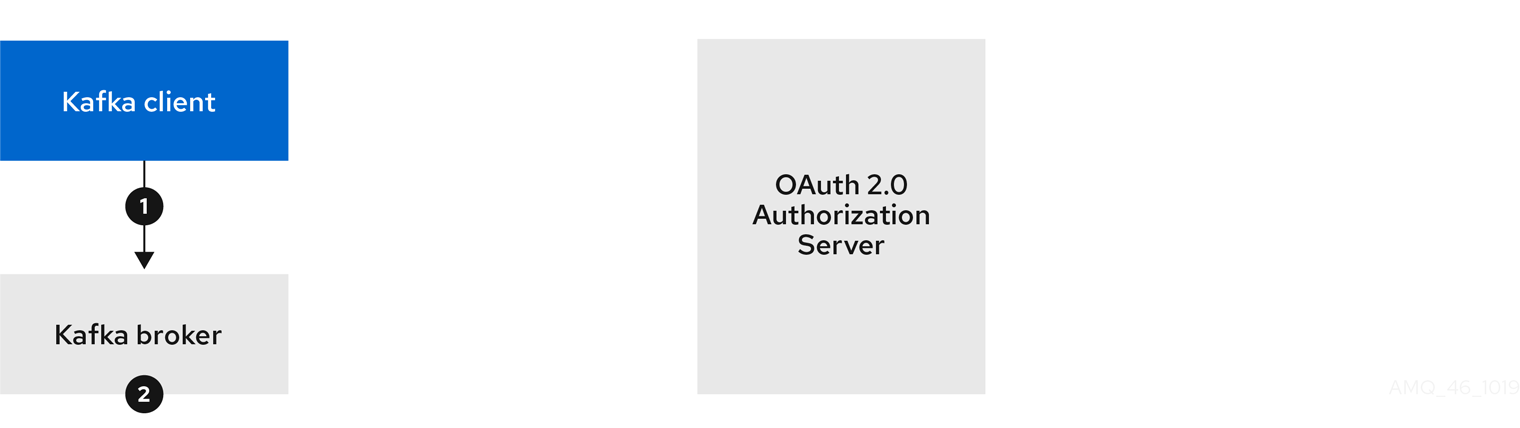
- Kafka client authenticates with the Kafka broker using the SASL OAUTHBEARER mechanism to pass the long-lived access token.
- Kafka broker validates the access token locally using JWT token signature check, and local token introspection.
Fast local JWT token signature validation is suitable only for short-lived tokens as there is no check with the authorization server if a token has been revoked. Token expiration is written into the token, but revocation can happen at any time, so cannot be accounted for without contacting the authorization server. Any issued token would be considered valid until it expires.
3.7.5. Configuring OAuth 2.0 authentication
OAuth 2.0 is used for interaction between Kafka clients and AMQ Streams components.
In order to use OAuth 2.0 for AMQ Streams, you must:
3.7.5.1. Configuring Red Hat Single Sign-On as an OAuth 2.0 authorization server
This procedure describes how to deploy Red Hat Single Sign-On as an authorization server and configure it for integration with AMQ Streams.
The authorization server provides a central point for authentication and authorization, and management of users, clients, and permissions. Red Hat Single Sign-On has a concept of realms where a realm represents a separate set of users, clients, permissions, and other configuration. You can use a default master realm, or create a new one. Each realm exposes its own OAuth 2.0 endpoints, which means that application clients and application servers all need to use the same realm.
To use OAuth 2.0 with AMQ Streams, you use a deployment of Red Hat Single Sign-On to create and manage authentication realms.
If you already have Red Hat Single Sign-On deployed, you can skip the deployment step and use your current deployment.
Before you begin
You will need to be familiar with using Red Hat Single Sign-On.
For deployment and administration instructions, see:
Prerequisites
- AMQ Streams and Kafka is running
For the Red Hat Single Sign-On deployment:
- Check the Red Hat Single Sign-On Supported Configurations
- Installation requires a user with a cluster-admin role, such as system:admin
Procedure
Deploy Red Hat Single Sign-On to your OpenShift cluster.
Check the progress of the deployment in your OpenShift web console.
Log in to the Red Hat Single Sign-On Admin Console to create the OAuth 2.0 policies for AMQ Streams.
Login details are provided when you deploy Red Hat Single Sign-On.
Create and enable a realm.
You can use an existing master realm.
- Adjust the session and token timeouts for the realm, if required.
-
Create a client called
kafka-broker. From the tab, set:
-
Access Type to
Confidential -
Standard Flow Enabled to
OFFto disable web login for this client -
Service Accounts Enabled to
ONto allow this client to authenticate in its own name
-
Access Type to
- Click Save before continuing.
- From the tab, take a note of the secret for using in your AMQ Streams Kafka cluster configuration.
Repeat the client creation steps for any application client that will connect to your Kafka brokers.
Create a definition for each new client.
You will use the names as client IDs in your configuration.
What to do next
After deploying and configuring the authorization server, configure the Kafka brokers to use OAuth 2.0.
3.7.5.2. Configuring OAuth 2.0 support for Kafka brokers
This procedure describes how to configure Kafka brokers so that the broker listeners are enabled to use OAuth 2.0 authentication using an authorization server.
We advise use of OAuth 2.0 over an encrypted interface through configuration of TLS listeners. Plain listeners are not recommended.
If the authorization server is using certificates signed by the trusted CA and matching the OAuth 2.0 server hostname, TLS connection works using the default settings. Otherwise, you have two connection options for your listener configuration when delegating token validation to the authorization server:
Before you start
For more information on the configuration of OAuth 2.0 authentication for Kafka broker listeners, see:
Prerequisites
- AMQ Streams and Kafka are running
- An OAuth 2.0 authorization server is deployed
Procedure
Update the Kafka broker configuration (
Kafka.spec.kafka) of yourKafkaresource in an editor.oc edit kafka my-cluster
Configure the Kafka broker
listenersconfiguration.The configuration for each type of listener does not have to be the same, as they are independent.
The examples here show the configuration options as configured for external listeners.
Example 1: Configuring fast local JWT token validation
external: type: loadbalancer authentication: type: oauth 1 validIssuerUri: <https://<auth-server-address>/auth/realms/external> 2 jwksEndpointUri: <https://<auth-server-address>/auth/realms/external/protocol/openid-connect/certs> 3 userNameClaim: preferred_username 4 tlsTrustedCertificates: 5 - secretName: oauth-server-cert certificate: ca.crt disableTlsHostnameVerification: true 6 jwksExpirySeconds: 360 7 jwksRefreshSeconds: 300 8 enableECDSA: "true" 9- 1
- Listener type set to
oauth. - 2
- URI of the token issuer used for authentication.
- 3
- URI of the JWKS certificate endpoint used for local JWT validation.
- 4
- The token claim (or key) that contains the actual user name in the token. The user name is the principal used to identify the user. The
userNameClaimvalue will depend on the authentication flow and the authorization server used. - 5
- (Optional) Trusted certificates for TLS connection to the authorization server.
- 6
- (Optional) Disable TLS hostname verification. Default is
false. - 7
- The duration the JWKs certificates are considered valid before they expire. Default is
360seconds. If you specify a longer time, consider the risk of allowing access to revoked certificates. - 8
- The period between refreshes of JWKs certificates. The interval must be at least 60 seconds shorter than the expiry interval. Default is
300seconds. - 9
- (Optional) If ECDSA is used for signing JWT tokens on authorization server, then this needs to be enabled. It installs additional crypto providers using BouncyCastle crypto library. Default is
false.
Example 2: Configuring token validation using an introspection endpoint
external: type: loadbalancer authentication: type: oauth validIssuerUri: <https://<auth-server-address>/auth/realms/external> introspectionEndpointUri: <https://<auth-server-address>/auth/realms/external/protocol/openid-connect/token/introspect> 1 clientId: kafka-broker 2 clientSecret: 3 secretName: my-cluster-oauth key: clientSecret userNameClaim: preferred_username 4- 1
- URI of the token introspection endpoint.
- 2
- Client ID to identify the client.
- 3
- Client Secret and client ID is used for authentication.
- 4
- The token claim (or key) that contains the actual user name in the token. The user name is the principal used to identify the user. The
userNameClaimvalue will depend on the authorization server used.
Depending on how you apply OAuth 2.0 authentication, and the type of authorization server, there are additional (optional) configuration settings you can use:
# ... authentication: type: oauth # ... checkIssuer: false 1 fallbackUserNameClaim: client_id 2 fallbackUserNamePrefix: client-account- 3 validTokenType: bearer 4 userInfoEndpointUri: https://OAUTH-SERVER-ADDRESS/auth/realms/external/protocol/openid-connect/userinfo 5- 1
- If your authorization server does not provide an
issclaim, it is not possible to perform an issuer check. In this situation, setcheckIssuertofalseand do not specify avalidIssuerUri. Default istrue. - 2
- An authorization server may not provide a single attribute to identify both regular users and clients. When a client authenticates in its own name, the server might provide a client ID. When a user authenticates using a username and password, to obtain a refresh token or an access token, the server might provide a username attribute in addition to a client ID. Use this fallback option to specify the username claim (attribute) to use if a primary user ID attribute is not available.
- 3
- In situations where
fallbackUserNameClaimis applicable, it may also be necessary to prevent name collisions between the values of the username claim, and those of the fallback username claim. Consider a situation where a client calledproducerexists, but also a regular user calledproducerexists. In order to differentiate between the two, you can use this property to add a prefix to the user ID of the client. - 4
- (Only applicable when using
introspectionEndpointUri) Depending on the authorization server you are using, the introspection endpoint may or may not return the token type attribute, or it may contain different values. You can specify a valid token type value that the response from the introspection endpoint has to contain. - 5
- (Only applicable when using
introspectionEndpointUri) The authorization server may be configured or implemented in such a way to not provide any identifiable information in an Introspection Endpoint response. In order to obtain the user ID, you can configure the URI of theuserinfoendpoint as a fallback. TheuserNameClaim,fallbackUserNameClaim, andfallbackUserNamePrefixsettings are applied to the response ofuserinfoendpoint.
- Save and exit the editor, then wait for rolling updates to complete.
Check the update in the logs or by watching the pod state transitions:
oc logs -f ${POD_NAME} -c ${CONTAINER_NAME} oc get po -wThe rolling update configures the brokers to use OAuth 2.0 authentication.
What to do next
3.7.5.3. Configuring Kafka Java clients to use OAuth 2.0
This procedure describes how to configure Kafka producer and consumer APIs to use OAuth 2.0 for interaction with Kafka brokers.
Add a client callback plugin to your pom.xml file, and configure the system properties.
Prerequisites
- AMQ Streams and Kafka are running
- An OAuth 2.0 authorization server is deployed and configured for OAuth access to Kafka brokers
- Kafka brokers are configured for OAuth 2.0
Procedure
Add the client library with OAuth 2.0 support to the
pom.xmlfile for the Kafka client:<dependency> <groupId>io.strimzi</groupId> <artifactId>kafka-oauth-client</artifactId> <version>0.5.0.redhat-00001</version> </dependency>
Configure the system properties for the callback:
For example:
System.setProperty(ClientConfig.OAUTH_TOKEN_ENDPOINT_URI, “https://<auth-server-address>/auth/realms/master/protocol/openid-connect/token”); 1 System.setProperty(ClientConfig.OAUTH_CLIENT_ID, "<client-name>"); 2 System.setProperty(ClientConfig.OAUTH_CLIENT_SECRET, "<client-secret>"); 3
Enable the SASL OAUTHBEARER mechanism on a TLS encrypted connection in the Kafka client configuration:
For example:
props.put("sasl.jaas.config", "org.apache.kafka.common.security.oauthbearer.OAuthBearerLoginModule required;"); props.put("security.protocol", "SASL_SSL"); 1 props.put("sasl.mechanism", "OAUTHBEARER"); props.put("sasl.login.callback.handler.class", "io.strimzi.kafka.oauth.client.JaasClientOauthLoginCallbackHandler");- 1
- Here we use
SASL_SSLfor use over TLS connections. UseSASL_PLAINTEXTover unencrypted connections.
- Verify that the Kafka client can access the Kafka brokers.
What to do next
3.7.5.4. Configuring OAuth 2.0 for Kafka components
This procedure describes how to configure Kafka components to use OAuth 2.0 authentication using an authorization server.
You can configure authentication for:
- Kafka Connect
- Kafka MirrorMaker
- Kafka Bridge
In this scenario, the Kafka component and the authorization server are running in the same cluster.
Before you start
For more information on the configuration of OAuth 2.0 authentication for Kafka components, see:
Prerequisites
- AMQ Streams and Kafka are running
- An OAuth 2.0 authorization server is deployed and configured for OAuth access to Kafka brokers
- Kafka brokers are configured for OAuth 2.0
Procedure
Create a client secret and mount it to the component as an environment variable.
For example, here we are creating a client
Secretfor the Kafka Bridge:apiVersion: kafka.strimzi.io/v1beta1 kind: Secret metadata: name: my-bridge-oauth type: Opaque data: clientSecret: MGQ1OTRmMzYtZTllZS00MDY2LWI5OGEtMTM5MzM2NjdlZjQw 1- 1
- The
clientSecretkey must be in base64 format.
Create or edit the resource for the Kafka component so that OAuth 2.0 authentication is configured for the authentication property.
For OAuth 2.0 authentication, you can use:
- Client ID and secret
- Client ID and refresh token
- Access token
- TLS
KafkaClientAuthenticationOAuth schema reference provides examples of each.
For example, here OAuth 2.0 is assigned to the Kafka Bridge client using a client ID and secret, and TLS:
apiVersion: kafka.strimzi.io/v1beta1 kind: KafkaBridge metadata: name: my-bridge spec: # ... authentication: type: oauth 1 tokenEndpointUri: https://<auth-server-address>/auth/realms/master/protocol/openid-connect/token 2 clientId: kafka-bridge clientSecret: secretName: my-bridge-oauth key: clientSecret tlsTrustedCertificates: 3 - secretName: oauth-server-cert certificate: tls.crtDepending on how you apply OAuth 2.0 authentication, and the type of authorization server, there are additional configuration options you can use:
# ... spec: # ... authentication: # ... disableTlsHostnameVerification: true 1 checkAccessTokenType: false 2 accessTokenIsJwt: false 3 scope: any 4- 1
- (Optional) Disable TLS hostname verification. Default is
false. - 2
- If the authorization server does not return a
typ(type) claim inside the JWT token, you can applycheckAccessTokenType: falseto skip the token type check. Default istrue. - 3
- If you are using opaque tokens, you can apply
accessTokenIsJwt: falseso that access tokens are not treated as JWT tokens. - 4
- (Optional) The
scopefor requesting the token from the token endpoint. An authorization server may require a client to specify the scope. In this case it isany.
Apply the changes to the deployment of your Kafka resource.
oc apply -f your-file
Check the update in the logs or by watching the pod state transitions:
oc logs -f ${POD_NAME} -c ${CONTAINER_NAME} oc get pod -wThe rolling updates configure the component for interaction with Kafka brokers using OAuth 2.0 authentication.
3.8. Using OAuth 2.0 token-based authorization
OAuth 2.0 authorization is a Technology Preview only. Technology Preview features are not supported with Red Hat production service-level agreements (SLAs) and might not be functionally complete. Red Hat does not recommend implementing any Technology Preview features in production environments. This Technology Preview feature provides early access to upcoming product innovations, enabling you to test functionality and provide feedback during the development process. For more information about the support scope of Red Hat Technology Preview features, see Technology Preview Features Support Scope.
Authorizing access to Kafka brokers
AMQ Streams supports the use of OAuth 2.0 token-based authorization through Red Hat Single Sign-On Authorization Services, which allows you to manage security policies and permissions centrally.
Security policies and permissions defined in Red Hat Single Sign-On are used to grant access to resources on Kafka brokers. Users and clients are matched against policies that permit access to perform specific actions on Kafka brokers.
Kafka allows all users full access to brokers by default, and also provides the SimpleACLAuthorizer plugin to configure authorization based on Access Control Lists (ACLs). ZooKeeper stores ACL rules that grant or deny access to resources based on username. However, OAuth 2.0 token-based authorization with Red Hat Single Sign-On offers far greater flexibility on how you wish to implement access control to Kafka brokers. In addition, you can configure your Kafka brokers to use OAuth 2.0 authorization and ACLs.
Additional resources
3.8.1. OAuth 2.0 authorization mechanism
OAuth 2.0 authorization in AMQ Streams uses Red Hat Single Sign-On server Authorization Services REST endpoints to extend token-based authentication with Red Hat Single Sign-On by applying defined security policies on a particular user, and providing a list of permissions granted on different resources for that user. Policies use roles and groups to match permissions to users. OAuth 2.0 authorization enforces permissions locally based on the received list of grants for the user from Red Hat Single Sign-On Authorization Services.
3.8.1.1. Kafka broker custom authorizer
A Red Hat Single Sign-On authorizer (KeycloakRBACAuthorizer) is provided with AMQ Streams. To be able to use the Red Hat Single Sign-On REST endpoints for Authorization Services provided by Red Hat Single Sign-On, you configure a custom authorizer on the Kafka broker.
The authorizer fetches a list of granted permissions from the authorization server as needed, and enforces authorization locally on the Kafka Broker, making rapid authorization decisions for each client request.
3.8.2. Configuring OAuth 2.0 authorization support
This procedure describes how to configure Kafka brokers to use OAuth 2.0 authorization using Red Hat Single Sign-On Authorization Services.
Before you begin
Consider the access you require or want to limit for certain users. You can use a combination of Red Hat Single Sign-On groups, roles, clients, and users to configure access in Red Hat Single Sign-On.
Typically, groups are used to match users based on organizational departments or geographical locations. And roles are used to match users based on their function.
With Red Hat Single Sign-On, you can store users and groups in LDAP, whereas clients and roles cannot be stored this way. Storage and access to user data may be a factor in how you choose to configure authorization policies.
Super users always have unconstrained access to a Kafka broker regardless of the authorization implemented on the Kafka broker.
Prerequisites
- AMQ Streams must be configured to use OAuth 2.0 with Red Hat Single Sign-On for token-based authentication. You use the same Red Hat Single Sign-On server endpoint when you set up authorization.
- You need to understand how to manage policies and permissions for Red Hat Single Sign-On Authorization Services, as described in the Red Hat Single Sign-On documentation.
Procedure
- Access the Red Hat Single Sign-On Admin Console or use the Red Hat Single Sign-On Admin CLI to enable Authorization Services for the Kafka broker client you created when setting up OAuth 2.0 authentication.
- Use Authorization Services to define resources, authorization scopes, policies, and permissions for the client.
- Bind the permissions to users and clients by assigning them roles and groups.
Configure the Kafka brokers to use Red Hat Single Sign-On authorization by updating the Kafka broker configuration (
Kafka.spec.kafka) of yourKafkaresource in an editor.oc edit kafka my-cluster
Configure the Kafka broker
kafkaconfiguration to usekeycloakauthorization, and to be able to access the authorization server and Authorization Services.For example:
apiVersion: kafka.strimzi.io/v1beta1 kind: Kafka metadata: name: my-cluster spec: kafka # ... authorization: type: keycloak 1 tokenEndpointUri: <https://<auth-server-address>/auth/realms/external/protocol/openid-connect/token> 2 clientId: kafka 3 delegateToKafkaAcls: false 4 disableTlsHostnameVerification: false 5 superUsers: 6 - CN=fred - sam - CN=edward tlsTrustedCertificates: 7 - secretName: oauth-server-cert certificate: ca.crt #...- 1
- Type
keycloakenables Red Hat Single Sign-On authorization. - 2
- URI of the Red Hat Single Sign-On token endpoint. For production, always use HTTPs.
- 3
- The client ID of the OAuth 2.0 client definition in Red Hat Single Sign-On that has Authorization Services enabled. Typically,
kafkais used as the ID. - 4
- (Optional) Delegate authorization to Kafka
SimpleACLAuthorizerif access is denied by Red Hat Single Sign-On Authorization Services policies. The default isfalse. - 5
- (Optional) Disable TLS hostname verification. Default is
false. - 6
- (Optional) Designated super users.
- 7
- (Optional) Trusted certificates for TLS connection to the authorization server.
- Save and exit the editor, then wait for rolling updates to complete.
Check the update in the logs or by watching the pod state transitions:
oc logs -f ${POD_NAME} -c kafka oc get po -wThe rolling update configures the brokers to use OAuth 2.0 authorization.
- Verify the configured permissions by accessing Kafka brokers as clients or users with specific roles, making sure they have the necessary access, or do not have the access they are not supposed to have.
3.9. Customizing deployments
AMQ Streams creates several OpenShift resources, such as Deployments, StatefulSets, Pods, and Services, which are managed by OpenShift operators. Only the operator that is responsible for managing a particular OpenShift resource can change that resource. If you try to manually change an operator-managed OpenShift resource, the operator will revert your changes back.
However, changing an operator-managed OpenShift resource can be useful if you want to perform certain tasks, such as:
-
Adding custom labels or annotations that control how
Podsare treated by Istio or other services; -
Managing how
Loadbalancer-type Services are created by the cluster.
You can make these types of changes using the template property in the AMQ Streams custom resources.
3.9.1. Template properties
You can use the template property to configure aspects of the resource creation process. You can include it in the following resources and properties:
-
Kafka.spec.kafka -
Kafka.spec.zookeeper -
Kafka.spec.entityOperator -
Kafka.spec.kafkaExporter -
KafkaConnect.spec -
KafkaConnectS2I.spec -
KafkaMirrorMakerSpec -
KafkaBridge.spec
In the following example, the template property is used to modify the labels in a Kafka broker’s StatefulSet:
apiVersion: kafka.strimzi.io/v1beta1
kind: Kafka
metadata:
name: my-cluster
labels:
app: my-cluster
spec:
kafka:
# ...
template:
statefulset:
metadata:
labels:
mylabel: myvalue
# ...3.9.1.1. Supported template properties for a Kafka cluster
statefulset-
Configures the
StatefulSetused by the Kafka broker. pod-
Configures the Kafka broker
Podscreated by theStatefulSet. bootstrapService- Configures the bootstrap service used by clients running within OpenShift to connect to the Kafka broker.
brokersService- Configures the headless service.
externalBootstrapService- Configures the bootstrap service used by clients connecting to Kafka brokers from outside of OpenShift.
perPodService- Configures the per-Pod services used by clients connecting to the Kafka broker from outside OpenShift to access individual brokers.
externalBootstrapRoute-
Configures the bootstrap route used by clients connecting to the Kafka brokers from outside of OpenShift using OpenShift
Routes. perPodRoute-
Configures the per-Pod routes used by clients connecting to the Kafka broker from outside OpenShift to access individual brokers using OpenShift
Routes. podDisruptionBudget-
Configures the Pod Disruption Budget for Kafka broker
StatefulSet. kafkaContainer- Configures the container used to run the Kafka broker, including custom environment variables.
tlsSidecarContainer- Configures the TLS sidecar container, including custom environment variables.
initContainer- Configures the container used to initialize the brokers.
persistentVolumeClaim-
Configures the metadata of the Kafka
PersistentVolumeClaims.
Additional resources
3.9.1.2. Supported template properties for a ZooKeeper cluster
statefulset-
Configures the ZooKeeper
StatefulSet. pod-
Configures the ZooKeeper
Podscreated by theStatefulSet. clientsService- Configures the service used by clients to access ZooKeeper.
nodesService- Configures the headless service.
podDisruptionBudget-
Configures the Pod Disruption Budget for ZooKeeper
StatefulSet. zookeeperContainer- Configures the container used to run the ZooKeeper Node, including custom environment variables.
tlsSidecarContainer- Configures the TLS sidecar container, including custom environment variables.
persistentVolumeClaim-
Configures the metadata of the ZooKeeper
PersistentVolumeClaims.
Additional resources
3.9.1.3. Supported template properties for Entity Operator
deployment- Configures the Deployment used by the Entity Operator.
pod-
Configures the Entity Operator
Podcreated by theDeployment. topicOperatorContainer- Configures the container used to run the Topic Operator, including custom environment variables.
userOperatorContainer- Configures the container used to run the User Operator, including custom environment variables.
tlsSidecarContainer- Configures the TLS sidecar container, including custom environment variables.
Additional resources
3.9.1.4. Supported template properties for Kafka Exporter
deployment- Configures the Deployment used by Kafka Exporter.
pod-
Configures the Kafka Exporter
Podcreated by theDeployment. services- Configures the Kafka Exporter services.
container- Configures the container used to run Kafka Exporter, including custom environment variables.
Additional resources
3.9.1.5. Supported template properties for Kafka Connect and Kafka Connect with Source2Image support
deployment-
Configures the Kafka Connect
Deployment. pod-
Configures the Kafka Connect
Podscreated by theDeployment. apiService- Configures the service used by the Kafka Connect REST API.
podDisruptionBudget-
Configures the Pod Disruption Budget for Kafka Connect
Deployment. connectContainer- Configures the container used to run Kafka Connect, including custom environment variables.
Additional resources
3.9.1.6. Supported template properties for Kafka MirrorMaker
deployment-
Configures the Kafka MirrorMaker
Deployment. pod-
Configures the Kafka MirrorMaker
Podscreated by theDeployment. podDisruptionBudget-
Configures the Pod Disruption Budget for Kafka MirrorMaker
Deployment. mirrorMakerContainer- Configures the container used to run Kafka MirrorMaker, including custom environment variables.
Additional resources
3.9.2. Labels and Annotations
For every resource, you can configure additional Labels and Annotations. Labels and Annotations are used to identify and organize resources, and are configured in the metadata property.
For example:
# ...
template:
statefulset:
metadata:
labels:
label1: value1
label2: value2
annotations:
annotation1: value1
annotation2: value2
# ...
The labels and annotations fields can contain any labels or annotations that do not contain the reserved string strimzi.io. Labels and annotations containing strimzi.io are used internally by AMQ Streams and cannot be configured.
For Kafka Connect, annotations on the KafkaConnect resource are used to enable the creation and management of connectors using KafkaConnector resources. For more information, see Section 3.2.15, “Enabling KafkaConnector resources”.
The metadata property is not applicable to container templates, such as the kafkaContainer.
3.9.3. Customizing Pods
In addition to Labels and Annotations, you can customize some other fields on Pods. These fields are described in the following table and affect how the Pod is created.
| Field | Description |
|---|---|
|
|
Defines the period of time, in seconds, by which the Pod must have terminated gracefully. After the grace period, the Pod and its containers are forcefully terminated (killed). The default value is NOTE: You might need to increase the grace period for very large Kafka clusters, so that the Kafka brokers have enough time to transfer their work to another broker before they are terminated. |
|
| Defines a list of references to OpenShift Secrets that can be used for pulling container images from private repositories. For more information about how to create a Secret with the credentials, see Pull an Image from a Private Registry.
NOTE: When the |
|
| Configures pod-level security attributes for containers running as part of a given Pod. For more information about configuring SecurityContext, see Configure a Security Context for a Pod or Container. |
|
| Configures the name of the Priority Class which will be used for given a Pod. For more information about Priority Classes, see Pod Priority and Preemption. |
|
|
The name of the scheduler used to dispatch this |
These fields are effective on each type of cluster (Kafka and ZooKeeper; Kafka Connect and Kafka Connect with S2I support; and Kafka MirrorMaker).
The following example shows these customized fields on a template property:
# ...
template:
pod:
metadata:
labels:
label1: value1
imagePullSecrets:
- name: my-docker-credentials
securityContext:
runAsUser: 1000001
fsGroup: 0
terminationGracePeriodSeconds: 120
# ...Additional resources
-
For more information, see Section B.51, “
PodTemplateschema reference”.
3.9.4. Customizing containers with environment variables
You can set custom environment variables for a container by using the relevant template container property. The following table lists the AMQ Streams containers and the relevant template configuration property (defined under spec) for each custom resource.
Table 3.1. Table Container environment variable properties
| AMQ Streams Element | Container | Configuration property |
|---|---|---|
| Kafka | Kafka Broker |
|
| Kafka | Kafka Broker TLS Sidecar |
|
| Kafka | Kafka Initialization |
|
| Kafka | ZooKeeper Node |
|
| Kafka | ZooKeeper TLS Sidecar |
|
| Kafka | Topic Operator |
|
| Kafka | User Operator |
|
| Kafka | Entity Operator TLS Sidecar |
|
| KafkaConnect | Connect and ConnectS2I |
|
| KafkaMirrorMaker | MirrorMaker |
|
| KafkaBridge | Bridge |
|
The environment variables are defined under the env property as a list of objects with name and value fields. The following example shows two custom environment variables set for the Kafka broker containers:
# ...
kind: Kafka
spec:
kafka:
template:
kafkaContainer:
env:
- name: TEST_ENV_1
value: test.env.one
- name: TEST_ENV_2
value: test.env.two
# ...
Environment variables prefixed with KAFKA_ are internal to AMQ Streams and should be avoided. If you set a custom environment variable that is already in use by AMQ Streams, it is ignored and a warning is recorded in the log.
Additional resources
-
For more information, see Section B.55, “
ContainerTemplateschema reference”.
3.9.5. Customizing external Services
When exposing Kafka outside of OpenShift using loadbalancers or node ports, you can use additional customization properties in addition to labels and annotations. The properties for external services are described in the following table and affect how a Service is created.
| Field | Description |
|---|---|
|
|
Specifies whether the service routes external traffic to node-local or cluster-wide endpoints. |
|
|
A list of CIDR ranges (for example For more information, see https://kubernetes.io/docs/tasks/access-application-cluster/configure-cloud-provider-firewall/. |
These properties are available for externalBootstrapService and perPodService. The following example shows these customized properties for a template:
# ...
template:
externalBootstrapService:
externalTrafficPolicy: Local
loadBalancerSourceRanges:
- 10.0.0.0/8
- 88.208.76.87/32
perPodService:
externalTrafficPolicy: Local
loadBalancerSourceRanges:
- 10.0.0.0/8
- 88.208.76.87/32
# ...Additional resources
-
For more information, see Section B.53, “
ExternalServiceTemplateschema reference”.
3.9.6. Customizing the image pull policy
AMQ Streams allows you to customize the image pull policy for containers in all pods deployed by the Cluster Operator. The image pull policy is configured using the environment variable STRIMZI_IMAGE_PULL_POLICY in the Cluster Operator deployment. The STRIMZI_IMAGE_PULL_POLICY environment variable can be set to three different values:
Always- Container images are pulled from the registry every time the pod is started or restarted.
IfNotPresent- Container images are pulled from the registry only when they were not pulled before.
Never- Container images are never pulled from the registry.
The image pull policy can be currently customized only for all Kafka, Kafka Connect, and Kafka MirrorMaker clusters at once. Changing the policy will result in a rolling update of all your Kafka, Kafka Connect, and Kafka MirrorMaker clusters.
Additional resources
- For more information about Cluster Operator configuration, see Section 4.1, “Cluster Operator”.
- For more information about Image Pull Policies, see Disruptions.
3.9.7. Customizing Pod Disruption Budgets
AMQ Streams creates a pod disruption budget for every new StatefulSet or Deployment. By default, these pod disruption budgets only allow a single pod to be unavailable at a given time by setting the maxUnavailable value in the PodDisruptionBudget.spec resource to 1. You can change the amount of unavailable pods allowed by changing the default value of maxUnavailable in the pod disruption budget template. This template applies to each type of cluster (Kafka and ZooKeeper; Kafka Connect and Kafka Connect with S2I support; and Kafka MirrorMaker).
The following example shows customized podDisruptionBudget fields on a template property:
# ...
template:
podDisruptionBudget:
metadata:
labels:
key1: label1
key2: label2
annotations:
key1: label1
key2: label2
maxUnavailable: 1
# ...Additional resources
-
For more information, see Section B.54, “
PodDisruptionBudgetTemplateschema reference”. - The Disruptions chapter of the OpenShift documentation.
3.9.8. Customizing deployments
This procedure describes how to customize Labels of a Kafka cluster.
Prerequisites
- An OpenShift cluster.
- A running Cluster Operator.
Procedure
Edit the
templateproperty in theKafka,KafkaConnect,KafkaConnectS2I, orKafkaMirrorMakerresource. For example, to modify the labels for the Kafka brokerStatefulSet, use:apiVersion: kafka.strimzi.io/v1beta1 kind: Kafka metadata: name: my-cluster labels: app: my-cluster spec: kafka: # ... template: statefulset: metadata: labels: mylabel: myvalue # ...Create or update the resource.
Use
oc apply:oc apply -f your-fileAlternatively, use
oc edit:oc edit Resource ClusterName
3.10. External logging
When setting the logging levels for a resource, you can specify them inline directly in the spec.logging property of the resource YAML:
spec:
# ...
logging:
type: inline
loggers:
kafka.root.logger.level: "INFO"Or you can specify external logging:
spec:
# ...
logging:
type: external
name: customConfigMap
With external logging, logging properties are defined in a ConfigMap. The name of the ConfigMap is referenced in the spec.logging.name property.
The advantages of using a ConfigMap are that the logging properties are maintained in one place and are accessible to more than one resource.
3.10.1. Creating a ConfigMap for logging
To use a ConfigMap to define logging properties, you create the ConfigMap and then reference it as part of the logging definition in the spec of a resource.
The ConfigMap must contain the appropriate logging configuration.
-
log4j.propertiesfor Kafka components, ZooKeeper, and the Kafka Bridge -
log4j2.propertiesfor the Topic Operator and User Operator
The configuration must be placed under these properties.
Here we demonstrate how a ConfigMap defines a root logger for a Kafka resource.
Procedure
Create the ConfigMap.
You can create the ConfigMap as a YAML file or from a properties file using
ocat the command line.ConfigMap example with a root logger definition for Kafka:
kind: ConfigMap apiVersion: kafka.strimzi.io/v1beta1 metadata: name: logging-configmap data: log4j.properties: kafka.root.logger.level="INFO"From the command line, using a properties file:
oc create configmap logging-configmap --from-file=log4j.properties
The properties file defines the logging configuration:
# Define the root logger kafka.root.logger.level="INFO" # ...
Define external logging in the
specof the resource, setting thelogging.nameto the name of the ConfigMap.spec: # ... logging: type: external name: logging-configmapCreate or update the resource.
oc apply -f kafka.yaml