
Chapter 16. Setting up a broker cluster
A cluster consists of multiple broker instances that have been grouped together. Broker clusters enhance performance by distributing the message processing load across multiple brokers. In addition, broker clusters can minimize downtime through high availability.
You can connect brokers together in many different cluster topologies. Within the cluster, each active broker manages its own messages and handles its own connections.
You can also balance client connections across the cluster and redistribute messages to avoid broker starvation.
16.1. Understanding broker clusters
Before creating a broker cluster, you should understand some important clustering concepts.
16.1.1. How broker clusters balance message load
When brokers are connected to form a cluster, AMQ Broker automatically balances the message load between the brokers. This ensures that the cluster can maintain high message throughput.
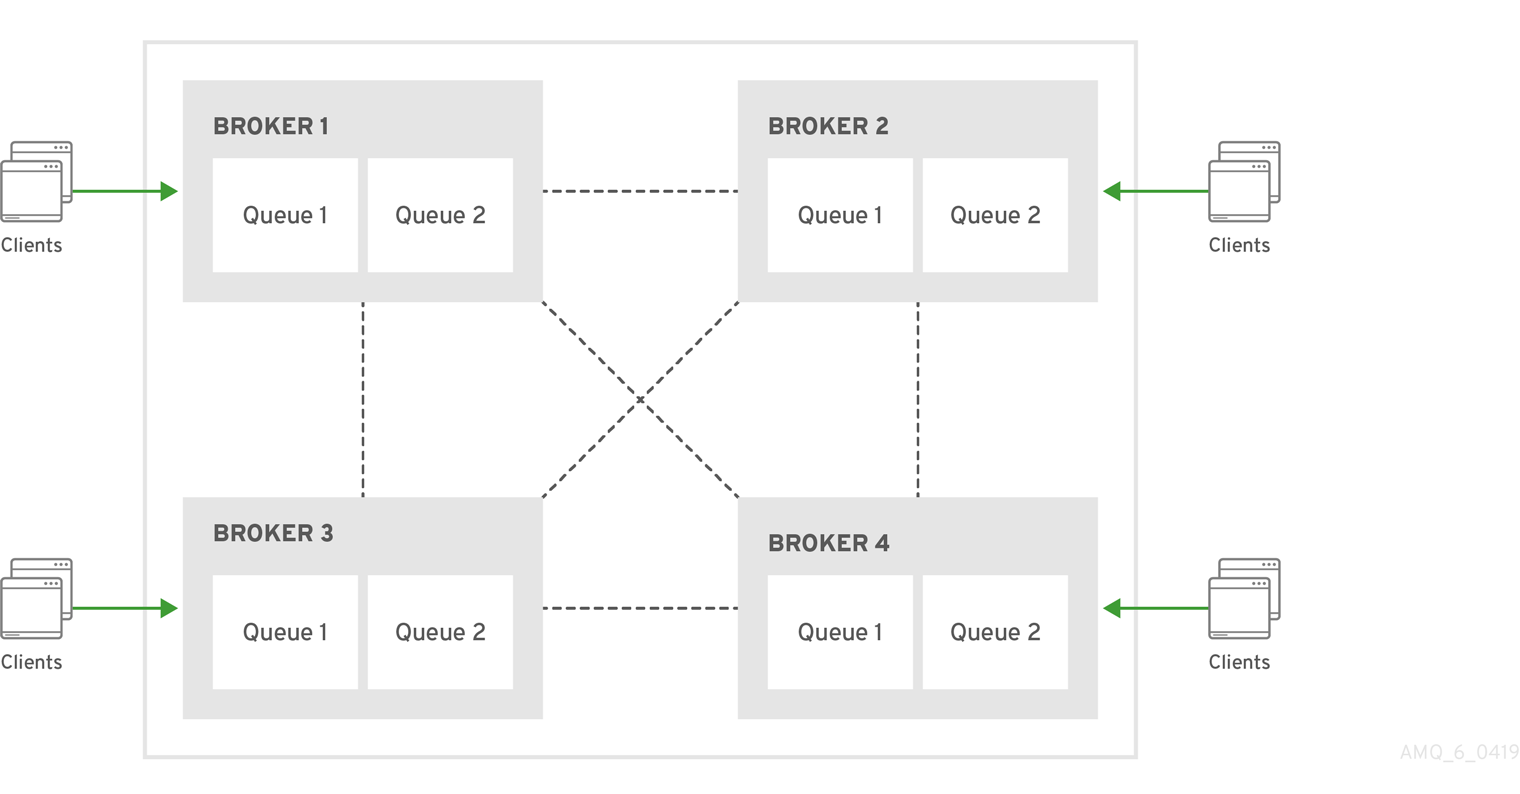
Consider a symmetric cluster of four brokers. Each broker is configured with a queue named OrderQueue. The OrderProducer client connects to Broker1 and sends messages to OrderQueue. Broker1 forwards the messages to the other brokers in round-robin fashion. The OrderConsumer clients connected to each broker consume the messages. The exact order depends on the order in which the brokers started.
Figure 16.1. Message load balancing

Without message load balancing, the messages sent to Broker1 would stay on Broker1 and only OrderConsumer1 would be able to consume them.
While AMQ Broker automatically load balances messages by default, you can configure the cluster to only load balance messages to brokers that have a matching consumer. You can also configure message redistribution to automatically redistribute messages from queues that do not have any consumers to queues that do have consumers.
Additional resources
-
The message load balancing policy is configured with the
message-load-balancingproperty in each broker’s cluster connection. For more information, see Appendix C, Cluster Connection Configuration Elements. - For more information about message redistribution, see Section 16.4, “Enabling message redistribution”.
16.1.2. How broker clusters improve reliability
Broker clusters make high availability and failover possible, which makes them more reliable than standalone brokers. By configuring high availability, you can ensure that client applications can continue to send and receive messages even if a broker encounters a failure event.
With high availability, the brokers in the cluster are grouped into live-backup groups. A live-backup group consists of a live broker that serves client requests, and one or more backup brokers that wait passively to replace the live broker if it fails. If a failure occurs, the backup brokers replaces the live broker in its live-backup group, and the clients reconnect and continue their work.
16.1.3. Common broker cluster topologies
You can connect brokers to form either a symmetric or chain cluster topology. The topology you implement depends on your environment and messaging requirements.
Symmetric clusters
In a symmetric cluster, every broker is connected to every other broker. This means that every broker is no more than one hop away from every other broker.
Figure 16.2. Symmetric cluster
Each broker in a symmetric cluster is aware of all of the queues that exist on every other broker in the cluster and the consumers that are listening on those queues. Therefore, symmetric clusters are able to load balance and redistribute messages more optimally than a chain cluster.
Symmetric clusters are easier to set up than chain clusters, but they can be difficult to use in environments in which network restrictions prevent brokers from being directly connected.
Chain clusters
In a chain cluster, each broker in the cluster is not connected to every broker in the cluster directly. Instead, the brokers form a chain with a broker on each end of the chain and all other brokers just connecting to the previous and next brokers in the chain.
Figure 16.3. Chain cluster

Chain clusters are more difficult to set up than symmetric clusters, but can be useful when brokers are on separate networks and cannot be directly connected. By using a chain cluster, an intermediary broker can indirectly connect two brokers to enable messages to flow between them even though the two brokers are not directly connected.
16.1.4. Broker discovery methods
Discovery is the mechanism by which brokers in a cluster propagate their connection details to each other. AMQ Broker supports both dynamic discovery and static discovery.
Dynamic discovery
Each broker in the cluster broadcasts its connection settings to the other members through either UDP multicast or JGroups. In this method, each broker uses:
- A broadcast group to push information about its cluster connection to other potential members of the cluster.
- A discovery group to receive and store cluster connection information about the other brokers in the cluster.
Static discovery
If you are not able to use UDP or JGroups in your network, or if you want to manually specify each member of the cluster, you can use static discovery. In this method, a broker "joins" the cluster by connecting to a second broker and sending its connection details. The second broker then propagates those details to the other brokers in the cluster.
16.1.5. Cluster sizing considerations
Before creating a broker cluster, consider your messaging throughput, topology, and high availability requirements. These factors affect the number of brokers to include in the cluster.
After creating the cluster, you can adjust the size by adding and removing brokers. You can add and remove brokers without losing any messages.
Messaging throughput
The cluster should contain enough brokers to provide the messaging throughput that you require. The more brokers in the cluster, the greater the throughput. However, large clusters can be complex to manage.
Topology
You can create either symmetric clusters or chain clusters. The type of topology you choose affects the number of brokers you may need.
For more information, see Section 16.1.3, “Common broker cluster topologies”.
High availability
If you require high availability (HA), consider choosing an HA policy before creating the cluster. The HA policy affects the size of the cluster, because each master broker should have at least one slave broker.
For more information, see Section 16.3, “Implementing high availability”.
16.2. Creating a broker cluster
You create a broker cluster by configuring a cluster connection on each broker that should participate in the cluster. The cluster connection defines how the broker should connect to the other brokers.
You can create a broker cluster that uses static discovery or dynamic discovery (either UDP multicast or JGroups).
Prerequisites
You should have determined the size of the broker cluster.
For more information, see Section 16.1.5, “Cluster sizing considerations”.
16.2.1. Creating a broker cluster with static discovery
You can create a broker cluster by specifying a static list of brokers. Use this static discovery method if you are unable to use UDP multicast or JGroups on your network.
Procedure
-
Open the
<broker-instance-dir>/etc/broker.xmlconfiguration file. Within the
<core>element, add the following connectors:- A connector that defines how other brokers can connect to this one
- One or more connectors that define how this broker can connect to other brokers in the cluster
<configuration> <core> ... <connectors> <connector name="netty-connector">tcp://localhost:61617</connector> 1 <connector name="broker2">tcp://localhost:61618</connector> 2 <connector name="broker3">tcp://localhost:61619</connector> </connectors> ... </core> </configuration>- 1
- This connector defines connection information that other brokers can use to connect to this one. This information will be sent to other brokers in the cluster during discovery.
- 2
- The
broker2andbroker3connectors define how this broker can connect to two other brokers in the cluster, one of which will always be available. If there are other brokers in the cluster, they will be discovered by one of these connectors when the initial connection is made.
For more information about connectors, see Section 2.2, “About Connectors”.
Add a cluster connection and configure it to use static discovery.
By default, the cluster connection will load balance messages for all addresses in a symmetric topology.
<configuration> <core> ... <cluster-connections> <cluster-connection name="my-cluster"> <connector-ref>netty-connector</connector-ref> <static-connectors> <connector-ref>broker2-connector</connector-ref> <connector-ref>broker3-connector</connector-ref> </static-connectors> </cluster-connection> </cluster-connections> ... </core> </configuration>cluster-connection-
Use the
nameattribute to specify the name of the cluster connection. connector-ref- The connector that defines how other brokers can connect to this one.
static-connectors- One or more connectors that this broker can use to make an initial connection to another broker in the cluster. After making this initial connection, the broker will discover the other brokers in the cluster. You only need to configure this property if the cluster uses static discovery.
Configure any additional properties for the cluster connection.
These additional cluster connection properties have default values that are suitable for most common use cases. Therefore, you only need to configure these properties if you do not want the default behavior. For more information, see Appendix C, Cluster Connection Configuration Elements.
Create the cluster user and password.
AMQ Broker ships with default cluster credentials, but you should change them to prevent unauthorized remote clients from using these default credentials to connect to the broker.
ImportantThe cluster password must be the same on every broker in the cluster.
<configuration>
    <core>
        ...
        <cluster-user>cluster_user</cluster-user>
        <cluster-password>cluster_user_password</cluster-password>
        ...
    </core>
</configuration>
Repeat this procedure on each additional broker.
You can copy the cluster configuration to each additional broker. However, do not copy any of the other AMQ Broker data files (such as the bindings, journal, and large messages directories). These files must be unique among the nodes in the cluster or the cluster will not form properly.
Additional resources
-
For an example of a broker cluster that uses static discovery, see the
clustered-static-discoveryAMQ Broker example program.
16.2.2. Creating a broker cluster with UDP-based dynamic discovery
You can create a broker cluster in which the brokers discover each other dynamically through UDP multicast.
Procedure
-
Open the
<broker-instance-dir>/etc/broker.xmlconfiguration file. Within the
<core>element, add a connector.This connector defines connection information that other brokers can use to connect to this one. This information will be sent to other brokers in the cluster during discovery.
<configuration>
    <core>
        ...
        <connectors>
            <connector name="netty-connector">tcp://localhost:61617</connector>
        </connectors>
        ...
    </core>
</configuration>
Add a UDP broadcast group.
The broadcast group enables the broker to push information about its cluster connection to the other brokers in the cluster. This broadcast group uses UDP to broadcast the connection settings:
<configuration>
    <core>
        ...
        <broadcast-groups>
            <broadcast-group name="my-broadcast-group">
                <local-bind-address>172.16.9.3</local-bind-address>
                <local-bind-port>-1</local-bind-port>
                <group-address>231.7.7.7</group-address>
                <group-port>9876</group-port>
                <broadcast-period>2000</broadcast-period>
                <connector-ref>netty-connector</connector-ref>
            </broadcast-group>
        </broadcast-groups>
        ...
    </core>
</configuration>
The following parameters are required unless otherwise noted:
broadcast-group-
Use the
nameattribute to specify a unique name for the broadcast group. local-bind-address- The address to which the UDP socket is bound. If you have multiple network interfaces on your broker, you should specify which one you want to use for broadcasts. If this property is not specified, the socket will be bound to an IP address chosen by the operating system. This is a UDP-specific attribute.
local-bind-port-
The port to which the datagram socket is bound. In most cases, use the default value of
-1, which specifies an anonymous port. This parameter is used in connection withlocal-bind-address. This is a UDP-specific attribute. group-address-
The multicast address to which the data will be broadcast. It is a class D IP address in the range
224.0.0.0-239.255.255.255inclusive. The address224.0.0.0is reserved and is not available for use. This is a UDP-specific attribute. group-port- The UDP port number used for broadcasting. This is a UDP-specific attribute.
broadcast-period(optional)- The interval in milliseconds between consecutive broadcasts. The default value is 2000 milliseconds (2 seconds).
connector-ref- The previously configured cluster connector that should be broadcasted.
Add a UDP discovery group.
The discovery group defines how this broker receives connector information from other brokers. The broker maintains a list of connectors (one entry for each broker). As it receives broadcasts from a broker, it updates its entry. If it does not receive a broadcast from a broker for a length of time, it removes the entry.
This discovery group uses UDP to discover the brokers in the cluster:
<configuration>
    <core>
        ...
        <discovery-groups>
            <discovery-group name="my-discovery-group">
                <local-bind-address>172.16.9.7</local-bind-address>
                <group-address>231.7.7.7</group-address>
                <group-port>9876</group-port>
                <refresh-timeout>10000</refresh-timeout>
            </discovery-group>
        <discovery-groups>
        ...
    </core>
</configuration>
The following parameters are required unless otherwise noted:
discovery-group-
Use the
nameattribute to specify a unique name for the discovery group. local-bind-address(optional)- If the machine on which the broker is running uses multiple network interfaces, you can specify the network interface to which the discovery group should listen. This is a UDP-specific attribute.
group-address-
The multicast address of the group on which to listen. It should match the
group-addressin the broadcast group that you want to listen from. This is a UDP-specific attribute. group-port-
The UDP port number of the multicast group. It should match the
group-portin the broadcast group that you want to listen from. This is a UDP-specific attribute. refresh-timeout(optional)The amount of time in milliseconds that the discovery group waits after receiving the last broadcast from a particular broker before removing that broker’s connector pair entry from its list. The default is 10000 milliseconds (10 seconds).
Set this to a much higher value than the
broadcast-periodon the broadcast group. Otherwise, brokers might periodically disappear from the list even though they are still broadcasting (due to slight differences in timing).
Create a cluster connection and configure it to use dynamic discovery.
By default, the cluster connection will load balance messages for all addresses in a symmetric topology.
<configuration> <core> ... <cluster-connections> <cluster-connection name="my-cluster"> <connector-ref>netty-connector</connector-ref> <discovery-group-ref discovery-group-name="my-discovery-group"/> </cluster-connection> </cluster-connections> ... </core> </configuration>cluster-connection-
Use the
nameattribute to specify the name of the cluster connection. connector-ref- The connector that defines how other brokers can connect to this one.
discovery-group-ref- The discovery group that this broker should use to locate other members of the cluster. You only need to configure this property if the cluster uses dynamic discovery.
Configure any additional properties for the cluster connection.
These additional cluster connection properties have default values that are suitable for most common use cases. Therefore, you only need to configure these properties if you do not want the default behavior. For more information, see Appendix C, Cluster Connection Configuration Elements.
Create the cluster user and password.
AMQ Broker ships with default cluster credentials, but you should change them to prevent unauthorized remote clients from using these default credentials to connect to the broker.
ImportantThe cluster password must be the same on every broker in the cluster.
<configuration>
    <core>
        ...
        <cluster-user>cluster_user</cluster-user>
        <cluster-password>cluster_user_password</cluster-password>
        ...
    </core>
</configuration>
Repeat this procedure on each additional broker.
You can copy the cluster configuration to each additional broker. However, do not copy any of the other AMQ Broker data files (such as the bindings, journal, and large messages directories). These files must be unique among the nodes in the cluster or the cluster will not form properly.
Additional resources
-
For an example of a broker cluster configuration that uses dynamic discovery with UDP, see the
clustered-queueAMQ Broker example program.
16.2.3. Creating a broker cluster with JGroups-based dynamic discovery
If you are already using JGroups in your environment, you can use it to create a broker cluster in which the brokers discover each other dynamically.
Prerequisites
JGroups must be installed and configured.
For an example of a JGroups configuration file, see the
clustered-jgroupsAMQ Broker example program.
Procedure
-
Open the
<broker-instance-dir>/etc/broker.xmlconfiguration file. Within the
<core>element, add a connector.This connector defines connection information that other brokers can use to connect to this one. This information will be sent to other brokers in the cluster during discovery.
<configuration>
    <core>
        ...
        <connectors>
            <connector name="netty-connector">tcp://localhost:61617</connector>
        </connectors>
        ...
    </core>
</configuration>
Within the
<core>element, add a JGroups broadcast group.The broadcast group enables the broker to push information about its cluster connection to the other brokers in the cluster. This broadcast group uses JGroups to broadcast the connection settings:
<configuration>
    <core>
        ...
        <broadcast-groups>
            <broadcast-group name="my-broadcast-group">
                <jgroups-file>test-jgroups-file_ping.xml</jgroups-file>
                <jgroups-channel>activemq_broadcast_channel</jgroups-channel>
                <broadcast-period>2000</broadcast-period>
                <connector-ref>netty-connector</connector-ref>
            </broadcast-group>
        </broadcast-groups>
        ...
    </core>
</configuration>
The following parameters are required unless otherwise noted:
broadcast-group-
Use the
nameattribute to specify a unique name for the broadcast group. jgroups-file- The name of JGroups configuration file to initialize JGroups channels. The file must be in the Java resource path so that the broker can load it.
jgroups-channel- The name of the JGroups channel to connect to for broadcasting.
broadcast-period(optional)- The interval in milliseconds between consecutive broadcasts. The default value is 2000 milliseconds (2 seconds).
connector-ref- The previously configured cluster connector that should be broadcasted.
Add a JGroups discovery group.
The discovery group defines how connector information is received. The broker maintains a list of connectors (one entry for each broker). As it receives broadcasts from a broker, it updates its entry. If it does not receive a broadcast from a broker for a length of time, it removes the entry.
This discovery group uses JGroups to discover the brokers in the cluster:
<configuration>
    <core>
        ...
        <discovery-groups>
            <discovery-group name="my-discovery-group">
                <jgroups-file>test-jgroups-file_ping.xml</jgroups-file>
                <jgroups-channel>activemq_broadcast_channel</jgroups-channel>
                <refresh-timeout>10000</refresh-timeout>
            </discovery-group>
        <discovery-groups>
        ...
    </core>
</configuration>
The following parameters are required unless otherwise noted:
discovery-group-
Use the
nameattribute to specify a unique name for the discovery group. jgroups-file- The name of JGroups configuration file to initialize JGroups channels. The file must be in the Java resource path so that the broker can load it.
jgroups-channel- The name of the JGroups channel to connect to for receiving broadcasts.
refresh-timeout(optional)The amount of time in milliseconds that the discovery group waits after receiving the last broadcast from a particular broker before removing that broker’s connector pair entry from its list. The default is 10000 milliseconds (10 seconds).
Set this to a much higher value than the
broadcast-periodon the broadcast group. Otherwise, brokers might periodically disappear from the list even though they are still broadcasting (due to slight differences in timing).
Create a cluster connection and configure it to use dynamic discovery.
By default, the cluster connection will load balance messages for all addresses in a symmetric topology.
<configuration> <core> ... <cluster-connections> <cluster-connection name="my-cluster"> <connector-ref>netty-connector</connector-ref> <discovery-group-ref discovery-group-name="my-discovery-group"/> </cluster-connection> </cluster-connections> ... </core> </configuration>cluster-connection-
Use the
nameattribute to specify the name of the cluster connection. connector-ref- The connector that defines how other brokers can connect to this one.
discovery-group-ref- The discovery group that this broker should use to locate other members of the cluster. You only need to configure this property if the cluster uses dynamic discovery.
Configure any additional properties for the cluster connection.
These additional cluster connection properties have default values that are suitable for most common use cases. Therefore, you only need to configure these properties if you do not want the default behavior. For more information, see Appendix C, Cluster Connection Configuration Elements.
Create the cluster user and password.
AMQ Broker ships with default cluster credentials, but you should change them to prevent unauthorized remote clients from using these default credentials to connect to the broker.
ImportantThe cluster password must be the same on every broker in the cluster.
<configuration>
    <core>
        ...
        <cluster-user>cluster_user</cluster-user>
        <cluster-password>cluster_user_password</cluster-password>
        ...
    </core>
</configuration>
Repeat this procedure on each additional broker.
You can copy the cluster configuration to each additional broker. However, do not copy any of the other AMQ Broker data files (such as the bindings, journal, and large messages directories). These files must be unique among the nodes in the cluster or the cluster will not form properly.
Additional resources
-
For an example of a broker cluster that uses dynamic discovery with JGroups, see the
clustered-jgroupsAMQ Broker example program.
16.3. Implementing high availability
After creating a broker cluster, you can improve its reliability by implementing high availability (HA). With HA, the broker cluster can continue to function even if one or more brokers go offline.
Implementing HA involves several steps:
Understand how HA works in AMQ Broker.
You should understand what live-backup groups are, and choose an HA policy that best meets your requirements.
- Configure the HA policy on each broker in the cluster.
- Configure your client applications to use failover.
16.3.1. Understanding high availability
In AMQ Broker, you implement high availability (HA) by grouping the brokers in the cluster into live-backup groups. In a live-backup group, a live broker is linked to a backup broker, which can take over for the live broker if it fails. AMQ Broker also provides several different strategies for failover (called HA policies) within a live-backup group.
16.3.1.1. How live-backup groups provide high availability
In AMQ Broker, you implement high availability (HA) by linking together the brokers in your cluster to form live-backup groups. Live-backup groups provide failover, which means that if one broker fails, another broker can take over its message processing.
A live-backup group consists of one live broker (sometimes called the master broker) linked to one or more backup brokers (sometimes called slave brokers). The live broker serves client requests, while the backup brokers wait in passive mode. If the live broker fails, a backup broker replaces the live broker, enabling the clients to reconnect and continue their work.
16.3.1.2. High availability policies
A high availability (HA) policy defines how failover happens in a live-backup group. AMQ Broker provides several different HA policies:
- Shared store (recommended)
The live and backup brokers store their messaging data in a single directory on a shared file system (typically a storage area network, or SAN). If the live broker fails, the backup broker loads the messaging data from the shared file system and takes over for the failed live broker.
In most cases, you should use shared store instead of replication. Because shared store does not replicate data over the network, it typically provides better performance than replication. Shared store also avoids network isolation (also called "split brain") issues in which a live broker and its backup become live at the same time.

- Replication
The live and backup brokers continuously synchronize their messaging data over the network. If the live broker fails, the backup broker loads the synchronized data and takes over for the failed live broker.
Data synchronization between the live and backup brokers ensures that no messaging data is lost if the live broker fails. When the live and backup brokers initially join together, the live broker replicates all of its existing data to the backup broker over the network. Once this initial phase is complete, the live broker replicates persistent data to the backup broker as the live broker receives it. This means that if the live broker drops off the network, the backup broker has all of the persistent data that the live broker has received up to that point.
Because replication synchronizes data over the network, network failures can result in network isolation in which a live broker and its backup become live at the same time.

- Live-only (limited HA)
When a live broker is stopped gracefully, it copies its messages and transaction state to another live broker and then shuts down. Clients can then reconnect to the other broker to continue sending and receiving messages.
Additional resources
- For more information about the persistent message data that is shared between brokers in a live-backup group, see Section 7.1, “About Journal-based Persistence”.
16.3.1.3. Replication policy limitations
Network isolation (sometimes called "split brain") is a limitation of the replication high availability (HA) policy. You should understand how it occurs, and how to avoid it.
Network isolation can happen if a live broker and its backup lose their connection. In this situation, both a live broker and its backup can become active at the same time. Specifically, if the backup broker can still connect to more than half of the live brokers in the cluster, it also becomes active. Because there is no message replication between the brokers in this situation, they each serve clients and process messages without the other knowing it. In this case, each broker has a completely different journal. Recovering from this situation can be very difficult and in some cases, not possible.
To avoid network isolation, consider the following:
- To eliminate any possibility of network isolation, use the shared store HA policy.
- If you do use the replication HA policy, you can reduce (but not eliminate) the chance of encountering network isolation by using at least three live-backup pairs.
16.3.2. Configuring high availability
After choosing a high availability (HA) policy, configure the policy on each broker in the cluster.
You can configure HA in any of the following ways:
- Shared store HA
- Replication HA
- Limited HA with live-only
- Colocated backups (using either shared store or replication as the HA policy)
Prerequisites
You must have chosen the HA policy that best fits your requirements.
For more information, see Section 16.3.1.2, “High availability policies”.
16.3.2.2. Configuring replication high availability
You can use the replication high availability (HA) policy to implement HA in a broker cluster. With replication, persistent data is synchronized between the live and backup brokers. If a live broker encounters a failure, message data is synchronized to the backup broker and it takes over for the failed live broker.
You should use replication as an alternative to shared store, if you do not have a shared file system. However, replication can result in network isolation in which a live broker and its backup become live at the same time.
Because the live and backup brokers must synchronize their messaging data over the network, replication adds a performance overhead. This synchronization process blocks journal operations, but it does not block clients.
You can configure the maximum amount of time that journal operations can be blocked for data synchronization.
The following procedure describes how to configure HA for a six-broker cluster. In this topology, the six brokers are grouped into three live-backup pairs: each of the three live brokers is paired with a dedicated backup broker.
Replication requires at least three live-backup pairs to lessen (but not eliminate) the risk of network isolation.
Prerequisites
You must have a broker cluster with at least six brokers.
The six brokers will be configured into three live-backup pairs. For more information about adding brokers to a cluster, see Chapter 16, Setting up a broker cluster.
Procedure
Group the brokers in your cluster into live-backup groups.
In most cases, a live-backup group should consist of two brokers: a live broker and a backup broker. If you have six brokers in your cluster, you would need three live-backup groups.
Create the first live-backup group consisting of one live broker and one backup broker.
-
Open the live broker’s
<broker-instance-dir>/etc/broker.xmlconfiguration file. Configure the live broker to use replication for its HA policy.
<configuration> <core> ... <ha-policy> <replication> <master> <check-for-live-server>true</check-for-live-server> <group-name>my-group-1</group-name> ... </master> </replication> </ha-policy> ... </core> </configuration>check-for-live-serverIf the live broker fails, this property controls whether clients should fail back to it when it restarts.
If you set this to
true, when the broker restarts, it searches for another broker in the cluster with the same cluster node ID. If it finds one, it synchronizes its data with it and then requests that the other broker shut down. The live broker then resumes its active role, and clients reconnect to it.WarningIf you restart a live broker after failover has occurred, then the value for
check-for-live-servermust be set totrue. Otherwise, the live broker restarts and processes the same messages that its backup broker has already handled, causing duplicates.group-name- A name for this live-backup group. To form a live-backup group, the live and backup brokers must be configured with the same group name.
Configure any additional HA properties for the live broker.
These additional HA properties have default values that are suitable for most common use cases. Therefore, you only need to configure these properties if you do not want the default behavior. For more information, see Appendix F, Replication High Availability Configuration Elements.
-
Open the backup broker’s
<broker-instance-dir>/etc/broker.xmlconfiguration file. Configure the backup broker to use replication for its HA policy.
<configuration> <core> ... <ha-policy> <replication> <slave> <allow-failback>true</allow-failback> <group-name>my-group-1</group-name> ... </slave> </replication> </ha-policy> ... </core> </configuration>allow-failbackIf failover has occurred and the backup broker has taken over for the live broker, this property controls whether the backup broker should fail back to the original live broker when it restarts and reconnects to the cluster.
NoteFailback is intended for a live-backup pair (one live broker paired with a single backup broker). If the live broker is configured with multiple backups, then failback will not occur. Instead, if a failover event occurs, the backup broker will become live, and the next backup will become its backup. When the original live broker comes back online, it will not be able to initiate failback, because the broker that is now live already has a backup.
group-name- The group name of the live broker to which this backup should connect. A backup broker connects only to a live broker that shares the same group name.
Configure any additional HA properties for the backup broker.
These additional HA properties have default values that are suitable for most common use cases. Therefore, you only need to configure these properties if you do not want the default behavior. For more information, see Appendix F, Replication High Availability Configuration Elements.
-
Open the live broker’s
Repeat Step 2 for each additional live-backup group in the cluster.
If there are six brokers in the cluster, you would repeat this procedure two more times: once for each remaining live-backup group.
Additional resources
- For examples of broker clusters that use replication for HA, see the HA example programs.
16.3.2.3. Configuring limited high availability with live-only
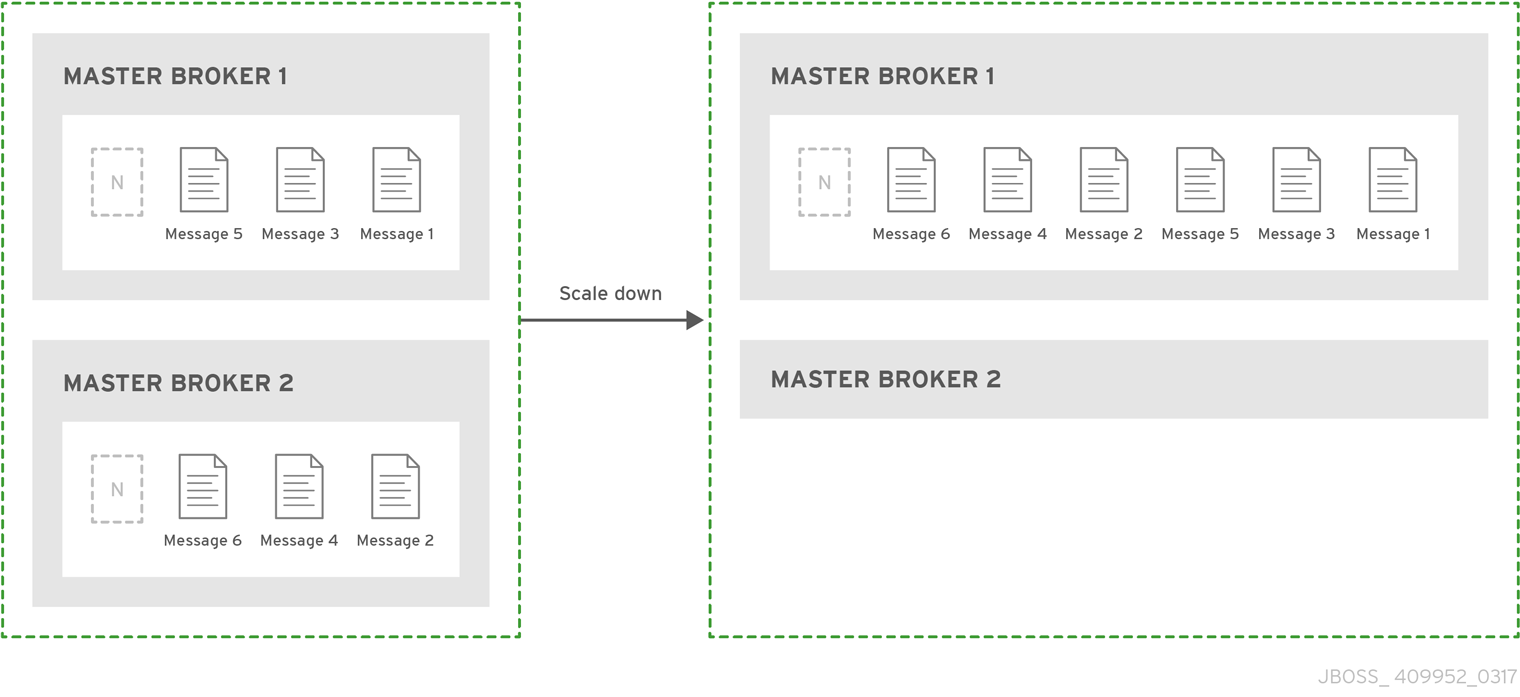
The live-only HA policy enables you to shut down a broker in a cluster without losing any messages. With live-only, when a live broker is stopped gracefully, it copies its messages and transaction state to another live broker and then shuts down. Clients can then reconnect to the other broker to continue sending and receiving messages.
The live-only HA policy only handles cases when the broker is stopped gracefully. It does not handle unexpected broker failures.
While live-only HA prevents message loss, it may not preserve message order. If a broker configured with live-only HA is stopped, its messages will be appended to the ends of the queues of another broker.
When a broker is preparing to scale down, it sends a message to its clients before they are disconnected informing them which new broker is ready to process their messages. However, clients should reconnect to the new broker only after their initial broker has finished scaling down. This ensures that any state, such as queues or transactions, is available on the other broker when the client reconnects. The normal reconnect settings apply when the client is reconnecting, so you should set these high enough to deal with the time needed to scale down.
This procedure describes how to configure each broker in the cluster to scale down. After completing this procedure, whenever a broker is stopped gracefully, it will copy its messages and transaction state to another broker in the cluster.
Procedure
-
Open the first broker’s
<broker-instance-dir>/etc/broker.xmlconfiguration file. Configure the broker to use the live-only HA policy.
<configuration>
    <core>
        ...
        <ha-policy>
            <live-only>
            </live-only>
        </ha-policy>
        ...
    </core>
</configuration>
Configure a method for scaling down the broker cluster.
Specify the broker or group of brokers to which this broker should scale down.
To scale down to… Do this… A specific broker in the cluster
Specify the connector of the broker to which you want to scale down.
<live-only>
    <scale-down>
        <connectors>
            <connector-ref>broker1-connector</connector-ref>
        </connectors>
    </scale-down>
</live-only>
Any broker in the cluster
Specify the broker cluster’s discovery group.
<live-only>
    <scale-down>
        <discovery-group-ref discovery-group-name="my-discovery-group"/>
    </scale-down>
</live-only>
A broker in a particular broker group
Specify a broker group.
<live-only> <scale-down> <group-name>my-group-name</group-name> </scale-down> </live-only>- Repeat this procedure for each remaining broker in the cluster.
Additional resources
- For an example of a broker cluster that uses live-only to scale down the cluster, see the scale-down example programs.
16.3.2.4. Configuring high availability with colocated backups
Rather than configure live-backup groups, you can colocate backup brokers in the same JVM as another live broker. In this configuration, each live broker is configured to request another live broker to create and start a backup broker in its JVM.
Figure 16.4. Colocated live and backup brokers
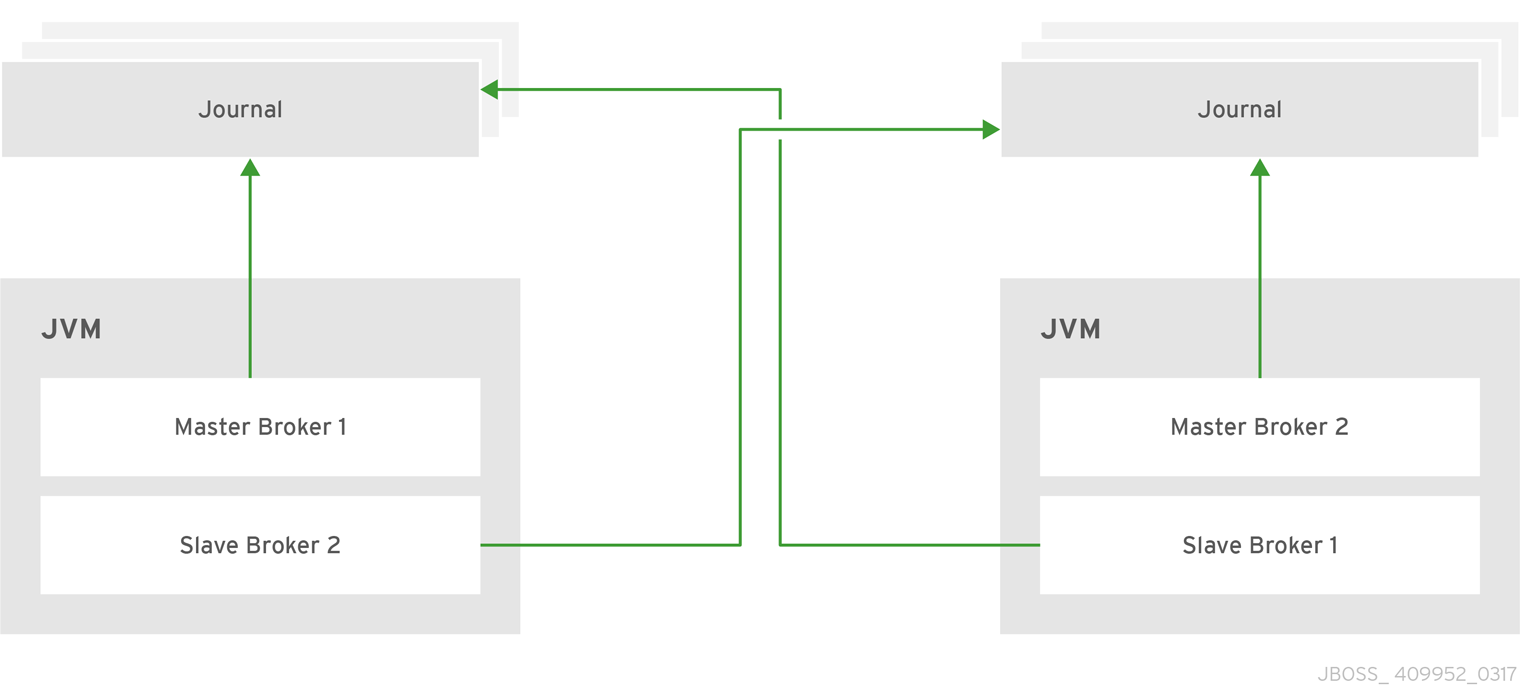
You can use colocation with either shared store or replication as the high availability (HA) policy. The new backup broker inherits its configuration from the live broker that creates it. The name of the backup is set to colocated_backup_n where n is the number of backups the live broker has created.
In addition, the backup broker inherits the configuration for its connectors and acceptors from the live broker that creates it. By default, port offset of 100 is applied to each. For example, if the live broker has an acceptor for port 61616, the first backup broker created will use port 61716, the second backup will use 61816, and so on.
Directories for the journal, large messages, and paging are set according to the HA policy you choose. If you choose shared store, the requesting broker notifies the target broker which directories to use. If replication is chosen, directories are inherited from the creating broker and have the new backup’s name appended to them.
This procedure configures each broker in the cluster to use shared store HA, and to request a backup to be created and colocated with another broker in the cluster.
Procedure
-
Open the first broker’s
<broker-instance-dir>/etc/broker.xmlconfiguration file. Configure the broker to use an HA policy and colocation.
In this example, the broker is configured with shared store HA and colocation.
<configuration> <core> ... <ha-policy> <shared-store> <colocated> <request-backup>true</request-backup> <max-backups>1</max-backups> <backup-request-retries>-1</backup-request-retries> <backup-request-retry-interval>5000</backup-request-retry-interval/> <backup-port-offset>150</backup-port-offset> <excludes> <connector-ref>remote-connector</connector-ref> </excludes> <master> <failover-on-shutdown>true</failover-on-shutdown> </master> <slave> <failover-on-shutdown>true</failover-on-shutdown> <allow-failback>true</allow-failback> </slave> </colocated> </shared-store> </ha-policy> ... </core> </configuration>request-backup-
By setting this property to
true, this broker will request a backup broker to be created by another live broker in the cluster. max-backups-
The number of backup brokers that this broker can create. If you set this property to
0, this broker will not accept backup requests from other brokers in the cluster. backup-request-retries-
The number of times this broker should try to request a backup broker to be created. The default is
-1, which means unlimited tries. backup-request-retry-interval-
The amount of time in milliseconds that the broker should wait before retrying a request to create a backup broker. The default is
5000, or 5 seconds. backup-port-offset-
The port offset to use for the acceptors and connectors for a new backup broker. If this broker receives a request to create a backup for another broker in the cluster, it will create the backup broker with the ports offset by this amount. The default is
100. excludes(optional)-
Excludes connectors from the backup port offset. If you have configured any connectors for external brokers that should be excluded from the backup port offset, add a
<connector-ref>for each of the connectors. master- The shared store or replication failover configuration for this broker.
slave- The shared store or replication failover configuration for this broker’s backup.
- Repeat this procedure for each remaining broker in the cluster.
Additional resources
- For examples of broker clusters that use colocated backups, see the HA example programs.
16.3.3. Configuring clients to fail over
After configuring high availability in a broker cluster, you configure your clients to fail over. Client failover ensures that if a broker fails, the clients connected to it can reconnect to another broker in the cluster with minimal downtime.
In the event of transient network problems, AMQ Broker automatically reattaches connections to the same broker. This is similar to failover, except that the client reconnects to the same broker.
You can configure two different types of client failover:
- Automatic client failover
- The client receives information about the broker cluster when it first connects. If the broker to which it is connected fails, the client automatically reconnects to the broker’s backup, and the backup broker re-creates any sessions and consumers that existed on each connection before failover.
- Application-level client failover
- As an alternative to automatic client failover, you can instead code your client applications with your own custom reconnection logic in a failure handler.
Procedure
Use AMQ Core Protocol JMS to configure your client application with automatic or application-level failover.
For more information, see Using the AMQ Core Protocol JMS Client.
16.4. Enabling message redistribution
If your broker cluster uses on-demand message load balancing, you should enable message redistribution to prevent messages from being "stuck" in a queue that does not have a consumer to consume them.
Broker clusters use load balancing to distribute the message load across the cluster. When configuring load balancing in the cluster connection, if you set message-load-balancing to ON_DEMAND, the broker will only forward messages to other brokers that have matching consumers. This ensures that messages are not moved to queues that do not have any consumers to consume them. However, if the consumers attached to a queue close after the messages are forwarded to the broker, those messages will be "stuck" in the queue and not consumed. This issue is sometimes called starvation.
Message redistribution prevents starvation by automatically redistributing the messages from queues that have no consumers to brokers in the cluster that do have matching consumers.
Procedure
-
Open the
<broker-instance-dir>/etc/broker.xmlconfiguration file. In the
<cluster-connection>element, verify that<message-load-balancing>is set to<ON_DEMAND>.<configuration> <core> ... <cluster-connections> <cluster-connection name="my-cluster"> ... <message-load-balancing>ON_DEMAND</message-load-balancing> ... </cluster-connection> </cluster-connections> </core> </configuration>Within the
<address-settings>element, set the redistribution delay for a queue or set of queues.In this example, messages load balanced to
my.queuewill be redistributed 5000 milliseconds (5 seconds) after the last consumer closes.<configuration> <core> ... <address-settings> <address-setting match="my.queue"> <redistribution-delay>5000</redistribution-delay> </address-setting> </address-settings> ... </core> </configuration>address-setting-
Set the
matchattribute to be the name of the queue for which you want messages to be redistributed. You can use the broker wildcard syntax to specify a range of queues. For more information, see the section called “AMQ Broker Wildcard Syntax”. redistribution-delay-
The amount of time (in milliseconds) that the broker should wait after this queue’s final consumer closes before redistributing messages to other brokers in the cluster. If you set this to
0, messages will be redistributed immediately. However, you should typically set a delay before redistributing - it is common for a consumer to close but another one to be quickly created on the same queue.
- Repeat this procedure on each additional broker.
Additional resources
-
For an example of a broker cluster configuration that redistributes messages, see the
queue-message-redistributionAMQ Broker example program.
16.5. Configuring clustered message grouping
Message grouping enables clients to send groups of messages of a particular type to be processed serially by the same consumer. By adding a grouping handler to each broker in the cluster, you ensure that clients can send grouped messages to any broker in the cluster and still have those messages consumed in the correct order by the same consumer.
There are two types of grouping handlers: local handlers and remote handlers. They enable the broker cluster to route all of the messages in a particular group to the appropriate queue so that the intended consumer can consume them in the correct order.
Prerequisites
There should be at least one consumer on each broker in the cluster.
When a message is pinned to a consumer on a queue, all messages with the same group ID will be routed to that queue. If the consumer is removed, the queue will continue to receive the messages even if there are no consumers.
Procedure
Configure a local handler on one broker in the cluster.
If you are using high availability, this should be a master broker.
-
Open the broker’s
<broker-instance-dir>/etc/broker.xmlconfiguration file. Within the
<core>element, add a local handler:The local handler serves as an arbiter for the remote handlers. It stores route information and communicates it to the other brokers.
<configuration> <core> ... <grouping-handler name="my-grouping-handler"> <type>LOCAL</type> <timeout>10000</timeout> </grouping-handler> ... </core> </configuration>grouping-handler-
Use the
nameattribute to specify a unique name for the grouping handler. type-
Set this to
LOCAL. timeoutThe amount of time to wait (in milliseconds) for a decision to be made about where to route the message. The default is 5000 milliseconds (5 seconds). If the timeout is reached before a routing decision is made, an exception is thrown, which ensures strict message ordering.
When the broker receives a message with a group ID, it proposes a route to a queue to which the consumer is attached. If the route is accepted by the grouping handlers on the other brokers in the cluster, then the route is established: all brokers in the cluster will forward messages with this group ID to that queue. If the broker’s route proposal is rejected, then it proposes an alternate route, repeating the process until a route is accepted.
-
Open the broker’s
If you are using high availability, copy the local handler configuration to the master broker’s slave broker.
Copying the local handler configuration to the slave broker prevents a single point of failure for the local handler.
On each remaining broker in the cluster, configure a remote handler.
-
Open the broker’s
<broker-instance-dir>/etc/broker.xmlconfiguration file. Within the
<core>element, add a remote handler:<configuration> <core> ... <grouping-handler name="my-grouping-handler"> <type>REMOTE</type> <timeout>5000</timeout> </grouping-handler> ... </core> </configuration>grouping-handler-
Use the
nameattribute to specify a unique name for the grouping handler. type-
Set this to
REMOTE. timeout- The amount of time to wait (in milliseconds) for a decision to be made about where to route the message. The default is 5000 milliseconds (5 seconds). Set this value to at least half of the value of the local handler.
-
Open the broker’s
Additional resources
-
For an example of a broker cluster configured for message grouping, see the
clustered-groupingAMQ Broker example program.
16.6. Connecting clients to a broker cluster
You can use the AMQ JMS clients to connect to the cluster. By using JMS, you can configure your messaging clients to discover the list of brokers dynamically or statically. You can also configure client-side load balancing to distribute the client sessions created from the connection across the cluster.
Procedure
Use AMQ Core Protocol JMS to configure your client application to connect to the broker cluster.
For more information, see Using the AMQ Core Protocol JMS Client.