
Deploying AMQ Broker on OpenShift Container Platform
For Use with AMQ Broker 7.3
Abstract
Chapter 1. Introduction
Red Hat AMQ Broker 7.3 is available as a containerized image that is provided for use with OpenShift Container Platform 3.11 (AMQ Broker on OCP).
AMQ Broker is based on Apache ActiveMQ Artemis. It provides a message broker that is JMS-compliant. After you have set up the initial broker pod, you can quickly deploy duplicates by using OpenShift Container Platform features.
AMQ Broker on OCP provides similar functionality to Red Hat AMQ Broker, but some aspects of the functionality need to be configured specifically for use with OpenShift Container Platform.
1.1. Version compatibility and support
For details about OpenShift Container Platform 3.11 image version compatibility, see the OpenShift and Atomic Platform Tested Integrations page.
1.2. Unsupported features
Master-slave-based high availability
High availability (HA) achieved by configuring master and slave pairs is not supported. Instead, when pods are scaled down, HA is provided in OpenShift by using the scaledown controller, which enables message migration.
External Clients that connect to a cluster of brokers, either through the OpenShift proxy or by using bind ports, may need to be configured for HA accordingly. In a clustered scenario, a broker will inform certain clients of the addresses of all the broker’s host and port information. Since these are only accessible internally, certain client features either will not work or will need to be disabled.
Client Configuration Core JMS Client
Because external Core Protocol JMS clients do not support HA or any type of failover, the connection factories must be configured with
useTopologyForLoadBalancing=false.AMQP Clients
AMQP clients do not support failover lists
Durable subscriptions in a cluster
When a durable subscription is created, this is represented as a durable queue on the broker to which a client has connected. When a cluster is running within OpenShift the client does not know on which broker the durable subscription queue has been created. If the subscription is durable and the client reconnects there is currently no method for the load balancer to reconnect it to the same node. When this happens, it is possible that the client will connect to a different broker and create a duplicate subscription queue. For this reason, using durable subscriptions with a cluster of brokers is not recommended.
Chapter 2. Installing AMQ Broker on OpenShift Container Platform
2.1. Installing the AMQ Broker image streams and application templates
The AMQ Broker on OpenShift Container Platform image streams and application templates are not available in the OpenShift Container Platform service catalog by default. You must manually install them using the procedure in this section. When you have completed the manual installation, you can then use the OpenShift Container Platform web console to instantiate a template that automatically deploys the image for a chosen broker configuration on your OpenShift cluster. For examples of creating various broker configurations in this way, see Deploying AMQ Broker on OpenShift Container Platform and Tutorials.
Prerequisites
Starting in AMQ Broker 7.3, you use a new version of the Red Hat Container Registry to access container images. This new version of the registry requires you to become an authenticated user before you can access images. Before you can follow the procedure in this section, you must first complete the steps described in Red Hat Container Registry Authentication.
Procedure
At the command line, log in to OpenShift as a cluster administrator (or as a user that has project administrator access to the global
openshiftproject), for example:$ oc login -u system:admin
NoteUsing the
openshiftproject makes the image stream and application templates that you install later in this procedure globally available to all projects in your OpenShift cluster.As an alternative to using the
openshiftproject (e.g., if a cluster administrator is unavailable), you can log in to a specific OpenShift project to which you have administrator access and in which you want to create a broker deployment, for example:$ oc login -u <USERNAME> $ oc project <PROJECT_NAME>
Logging into a specific project means that the image stream and templates that you install later in this procedure are available only in that project’s namespace.
- In your web browser, navigate to the Red Hat Container Catalog.
-
In the search box, enter
AMQ Broker. Click Search. -
In the search results, click Red Hat AMQ Broker 7.3. The
amq-broker-7/amq-broker-73-openshiftrepository opens with the most recent image version automatically selected. If you want to change to an earlier image version, click the Tags tab and choose another version tag. - Click the Get This Image tab.
Under Authentication with registry tokens, follow the on-page instructions in the Using OpenShift secrets section. This section describes how to add references to your OpenShift secret name and the AMQ Broker 7.3 image repository to your pod configuration file.
NoteIf Podman or Docker is installed in your OpenShift cluster, you can also follow the instructions in the Using Podaman Login or Using Docker Login sections, with equivalent results.
At the command line, run the following commands to import the AMQ Broker on OpenShift Container Platform image streams and latest image version to your project namespace. Using the
--forceoption with theoc replacecommand updates the resources or creates them if they don’t already exist.$ oc replace --force -f \ https://raw.githubusercontent.com/jboss-container-images/jboss-amq-7-broker-openshift-image/73-7.3.0.GA/amq-broker-7-image-streams.yaml $ oc import-image amq-broker-7/amq-broker-73-openshift --from=registry.redhat.io/amq-broker-7/amq-broker-73-openshift --confirm
Run the following command to update the AMQ Broker application templates.
$ for template in amq-broker-73-basic.yaml \
amq-broker-73-ssl.yaml \
amq-broker-73-custom.yaml \
amq-broker-73-persistence.yaml \
amq-broker-73-persistence-ssl.yaml \
amq-broker-73-persistence-clustered.yaml \
amq-broker-73-persistence-clustered-ssl.yaml;
 do
 oc replace --force -f \
https://raw.githubusercontent.com/jboss-container-images/jboss-amq-7-broker-openshift-image/73-7.3.0.GA/templates/${template}
 done
AMQ Broker on OpenShift Container Platform leverages StatefulSet resources for use with all *-persistence*.yaml templates. For templates that are not *-persistence*.yaml, AMQ Broker uses Deployments resources. Both types of resources are Kubernetes-native resources that can consume image streams only from a local namespace, not the shared openshift namespace. This is because the image streams must be created in the same namespace where the template will be instantiated. Also, -n openshift is an optional parameter to use if you need to create a template in the shared namespace.
Chapter 3. Deploying AMQ Broker on OpenShift Container Platform
The procedures in this section show how to prepare a broker deployment and an example of using the OpenShift Container Platform web console to deploy a basic broker instance. For examples of deploying other broker configurations, see Tutorials.
The following procedures assume that the broker image and application templates you installed in Installing AMQ Broker on OpenShift Container Platform are available in the global openshift project. If you installed the image and application templates in a specific project namespace, then continue to use that project instead of creating a new project such as amq-demo.
3.1. Preparing an AMQ Broker deployment
Procedure
Use the command prompt to create a new project:
$ oc new-project amq-demo
Create a service account to be used for the AMQ Broker deployment:
$ echo '{"kind": "ServiceAccount", "apiVersion": "v1", "metadata": {"name": "amq-service-account"}}' | oc create -f -Add the view role to the service account. The view role enables the service account to view all the resources in the amq-demo namespace, which is necessary for managing the cluster when using the OpenShift dns-ping protocol for discovering the mesh endpoints.
$ oc policy add-role-to-user view system:serviceaccount:amq-demo:amq-service-account
AMQ Broker requires a broker keystore, a client keystore, and a client truststore that includes the broker keystore. This example uses Java Keytool, a package included with the Java Development Kit, to generate dummy credentials for use with the AMQ Broker installation.
Generate a self-signed certificate for the broker keystore:
$ keytool -genkey -alias broker -keyalg RSA -keystore broker.ks
Export the certificate so that it can be shared with clients:
$ keytool -export -alias broker -keystore broker.ks -file broker_cert
Generate a self-signed certificate for the client keystore:
$ keytool -genkey -alias client -keyalg RSA -keystore client.ks
Create a client truststore that imports the broker certificate:
$ keytool -import -alias broker -keystore client.ts -file broker_cert
Use the broker keystore file to create the AMQ Broker secret:
$ oc create secret generic amq-app-secret --from-file=broker.ks
Add the secret to the service account created earlier:
$ oc secrets add sa/amq-service-account secret/amq-app-secret
3.2. Deploying a basic broker
Deploy a basic broker that is ephemeral and does not support SSL. This tutorial covers how to create transports, addresses, and queues.
This broker does not support SSL and is not accessible to external clients. Only clients running internally on the OpenShift cluster can connect to the broker. For examples of creating broker configurations that support SSL, see Tutorials.
Prequisites
3.2.1. Deploy the image and template
Procedure
- Navigate to the OpenShift web console and log in.
-
Select the
amq-demoproject space, or another, existing project in which you want to deploy a broker. - Click Add to Project > Browse Catalog to list all of the default image streams and templates.
-
Use the Filter search bar to find results that match
amq. You might need to click See all to show the desired application template. -
Select the
amq-broker-73-basictemplate, which is labeledRed Hat AMQ Broker 7.3 (Ephemeral, no SSL). Set the following environment variables in the configuration and click Create.
Table 3.1. Example template
Environment variable Display Name Value Description AMQ_PROTOCOL
AMQ Protocols
openwire,amqp,stomp,mqtt,hornetq
The protocols to be accepted by the broker
AMQ_QUEUES
Queues
demoQueue
Creates an anycast queue called demoQueue
AMQ_ADDRESSES
Addresses
demoTopic
Creates a multicast address (or topic) called demoTopic
AMQ_USER
AMQ Username
amq-demo-user
The username the client uses
AMQ_PASSWORD
AMQ Password
password
The password the client uses with the username
You can also deploy the image from the command line:
$ oc new-app --template=amq-broker-73-basic \
   -e AMQ_PROTOCOL=openwire,amqp,stomp,mqtt,hornetq \
   -e AMQ_QUEUES=demoQueue \
   -e AMQ_ADDRESSES=demoTopic \
   -e AMQ_USER=amq-demo-user \
   -e ADMIN_PASSWORD=password \
3.2.2. Deploy the application
After the application is created, you need to deploy it. Deploying the application creates a pod and starts the broker.
Procedure
- After the deployment has been created, choose Deployments from the Applications menu.
- Click the broker-amq deployment.
Click Deploy to deploy the application.
NoteIf the application does not deploy, you can check the configuration by clicking the Events tab. If something is incorrect, edit the configuration by clicking the Action button.
- After the deployment has appeared on the list, click on it to view the state of the pods. Click on the pod and then click the Logs tab to view the broker logs and verify its state. You should see the queue previously created.
Click the Terminal tab to access a shell where you can use the CLI to test sending and consuming messages.
sh-4.2$ ./broker/bin/artemis producer
Producer ActiveMQQueue[TEST], thread=0 Started to calculate elapsed time ...

Producer ActiveMQQueue[TEST], thread=0 Produced: 1000 messages
Producer ActiveMQQueue[TEST], thread=0 Elapsed time in second : 4 s
Producer ActiveMQQueue[TEST], thread=0 Elapsed time in milli second : 4584 milli seconds
sh-4.2$ ./broker/bin/artemis consumer
Consumer:: filter = null
Consumer ActiveMQQueue[TEST], thread=0 wait until 1000 messages are consumed
Received 1000
Consumer ActiveMQQueue[TEST], thread=0 Consumed: 1000 messages
Consumer ActiveMQQueue[TEST], thread=0 Consumer thread finished
You can also use the OpenShift client to access the shell by using the pod name, as shown in the following example.
oc rsh broker-amq-1-9x89r
Chapter 4. Upgrading AMQ Broker on OpenShift Container Platform
To upgrade AMQ Broker on OpenShift Container Platform, you must have an existing broker deployment, similar to those described in Deploying a basic broker and Tutorials.
4.1. Upgrading non-persistent broker deployments
The procedure in this section shows you how upgrade a non-persistent broker deployment. In the previous version of AMQ Broker, the non-persistent broker templates in the OpenShift Container Platform service catalog were labeled as follows:
- Red Hat AMQ Broker 7.2 (Ephemeral, no SSL)
- Red Hat AMQ Broker 7.2 (Ephemeral, with SSL)
- Red Hat AMQ Broker 7.2 Custom Config (Ephemeral, no SSL)
Prerequisites
-
To upgrade your existing non-persistent broker deployment, you must have a new image version available in the global
openshiftproject, or in a specific local project namespace. For more information, see Installing the AMQ Broker image streams and application templates.
Procedure
- Navigate to the OpenShift Container Platform web console and log in.
- Click the project in which you want to upgrade a non-persistent broker deployment.
In the Deployment Config section of your broker deployment, click Edit.
The Edit Deployment Config page opens.
-
In the Deployment Strategy section, in the Strategy Type drop-down list, select
Rolling. In the Images section, specify an
Image Stream Tagas follows.- In the Namespace drop-down list, select the project namespace in which you installed your AMQ Broker 7.3 image.
-
In the Image Stream drop-down list, select the AMQ Broker 7.3 on OpenShift Container Platform image stream,
amq-broker-73-openshift. In the Tag drop-down list, select a tag for the image to which you want to upgrade. To specify the latest available version, select
latest. Otherwise, select a specific image version.NoteIn AMQ Broker 7.3, image tags follow the naming convention
7.3-1,7.3-2, and so on. These numbers increment by1for each new version of the image added to the Red Hat image registry. In the Tag drop-down list, if you specify a tag of7.3, this tag is known as afloating tag. When you specify a floating tag, OpenShift Container Platform automatically identifies the most recent image available in your specified project namespace (that is, the 7.3 image with the highest final number) and uses this image to upgrade your broker deployment.
Click Save.
Based on your selection of a rolling upgrade strategy, if you select an image that is newer than the one currently installed, OpenShift Container Platform automatically upgrades your broker deployment. To do this, OpenShift stops the existing pod and then starts a new pod that uses the new broker container image.
4.2. Upgrading persistent broker deployments
The procedure in this section shows you how to upgrade a persistent broker deployment. In the previous version of AMQ Broker, the persistent broker templates in the OpenShift Container Platform service catalog were labeled as follows:
- Red Hat AMQ Broker 7.2 (Persistence, clustered, no SSL)
- Red Hat AMQ Broker 7.2 (Persistence, clustered, with SSL)
- Red Hat AMQ Broker 7.2 (Persistence, with SSL)
Prerequisites
- To upgrade an existing persistent broker deployment, you must first complete the steps described in Red Hat Container Registry Authentication.
Procedure
- Navigate to the OpenShift Container Platform web console and log in.
- Click the project in which you want to upgrade a persistent broker deployment.
In the Stateful Set section of your broker deployment, click Edit YAML.
The Edit Stateful Set page opens with your YAML file in an editable mode.
Edit the
imageattribute to reference an AMQ Broker 7.3 image tag in the Red Hat image registry, as shown below:... image: 'registry.redhat.io/amq-broker-7/amq-broker-73-openshift:7.3' ...
NoteIf you have a scaledown controller configured in your project namespace, the YAML file for your StatefulSet contains an embedded template representing the scaledown controller. This template is labeled
statefulsets.kubernetes.io/drainer-pod-template. The scaledown controller template also contains animageattribute that you must update to reference the new broker image version. Edit this additionalimageattribute exactly as shown in the preceding step.To ensure that you have at least one running pod, set the
replicasattribute to a value of1or greater, as shown below.If replicas is currently set to… Do this… 0Set
replicasto a value of1or greater.1or greater-
Set replicas to
0. - Click Save.
-
Set
replicasback to the original value.
-
Set replicas to
Click Save.
If you specified an image that is newer than the one currently installed, OpenShift Container Platform automatically initiates an upgrade by stopping the existing pod and then starting a new one for the upgraded broker deployment.
Chapter 5. Configuring SSL for AMQ Broker on OpenShift Container Platform
5.1. Configuring SSL
For a minimal SSL configuration to allow connections outside of OpenShift Container Platform, AMQ Broker requires a broker keystore, a client keystore, and a client truststore that includes the broker keystore. The broker keystore is also used to create a secret for the AMQ Broker on OpenShift Container Platform image, which is added to the service account.
The following example commands use Java KeyTool, a package included with the Java Development Kit, to generate the necessary certificates and stores.
For a more complete example of deploying a broker instance that supports SSL, see Deploying a basic broker with SSL.
Procedure
Generate a self-signed certificate for the broker keystore:
$ keytool -genkey -alias broker -keyalg RSA -keystore broker.ks
Export the certificate so that it can be shared with clients:
$ keytool -export -alias broker -keystore broker.ks -file broker_cert
Generate a self-signed certificate for the client keystore:
$ keytool -genkey -alias client -keyalg RSA -keystore client.ks
Create a client truststore that imports the broker certificate:
$ keytool -import -alias broker -keystore client.ts -file broker_cert
Export the client’s certificate from the keystore:
$ keytool -export -alias client -keystore client.ks -file client_cert
Import the client’s exported certificate into a broker SERVER truststore:
$ keytool -import -alias client -keystore broker.ts -file client_cert
5.2. Generating the AMQ Broker secret
The broker keystore can be used to generate a secret for the namespace, which is also added to the service account so that the applications can be authorized.
Procedure
At the command line, run the following commands:
$ oc create secret generic <secret-name> --from-file=<broker-keystore> --from-file=<broker-truststore>
$ oc secrets add sa/<service-account-name> secret/<secret-name>
5.3. Creating an SSL route
After the AMQ Broker on OpenShift Container Platform image has been deployed, you need to create an SSL route for the AMQ Broker transport protocol port to allow connections to AMQ Broker outside of OpenShift. You can only expose SSL routes because the OpenShift router requires SNI to send traffic to the correct service.
Selecting Passthrough for TLS Termination relays all communication to AMQ Broker without the OpenShift router decrypting and resending it.
Regular HTTP traffic does not require a TLS passthrough route because the OpenShift router uses HAProxy, which is a HTTP proxy.
External clients for AMQ Broker on OpenShift Container Platform must specify the OpenShift router port (443, by default) when setting the broker URL for SSL connections. Otherwise, AMQ Broker attempts to use the default SSL port (61617).
By default, the OpenShift router uses port 443. However, the router might be configured to use a different port number, based on the value specified for the ROUTER_SERVICE_HTTPS_PORT environment variable. For more information, see OpenShift Container Platform 3.11 Routes.
Also, including the failover protocol in the URL preserves the client connection in case the pod is restarted or upgraded, or a disruption occurs on the router. Both of these settings are shown below.
...
factory.setBrokerURL("failover://ssl://<route-to-broker-pod>:443");
...External clients do not support HA.
The default ports for the various AMQ Broker transport protocols are shown in the table.
Table 5.1. Default ports for AMQ Broker transport protocols
| AMQ Broker transport protocol | Default port |
|---|---|
| All protocols (OpenWire, AMQP, STOMP, MQTT, and HornetQ) | 61616 |
| All protocols -SSL (OpenWire AMQP, STOMP, MQTT, and HornetQ) | 61617 |
| AMQP | 5672 |
| AMQP -SSL | 5671 |
| MQTT | 1883 |
| MQTT -SSL | 8883 |
| STOMP | 61613 |
| STOMP -SSL | 61612 |
Additional resources
- For more information on cluster networking, see Secured Routes.
Chapter 6. Customizing AMQ Broker configuration files for deployment
If you are using a template from an alternative repository, AMQ Broker configuration files such as artemis-users.properties can be included. When the image is downloaded for deployment, these files are copied from <amq-home>/conf/ to the <broker-instance-dir>/etc/ directory on AMQ Broker, which is committed to the container and pushed to the OpenShift registry.
If using this method, ensure that the placeholders in the configuration files (such as AUTHENTICATION) are not removed. The placeholders are necessary for building the AMQ Broker on OpenShift Container Platform image.
Chapter 7. High availability
7.1. High availability overview
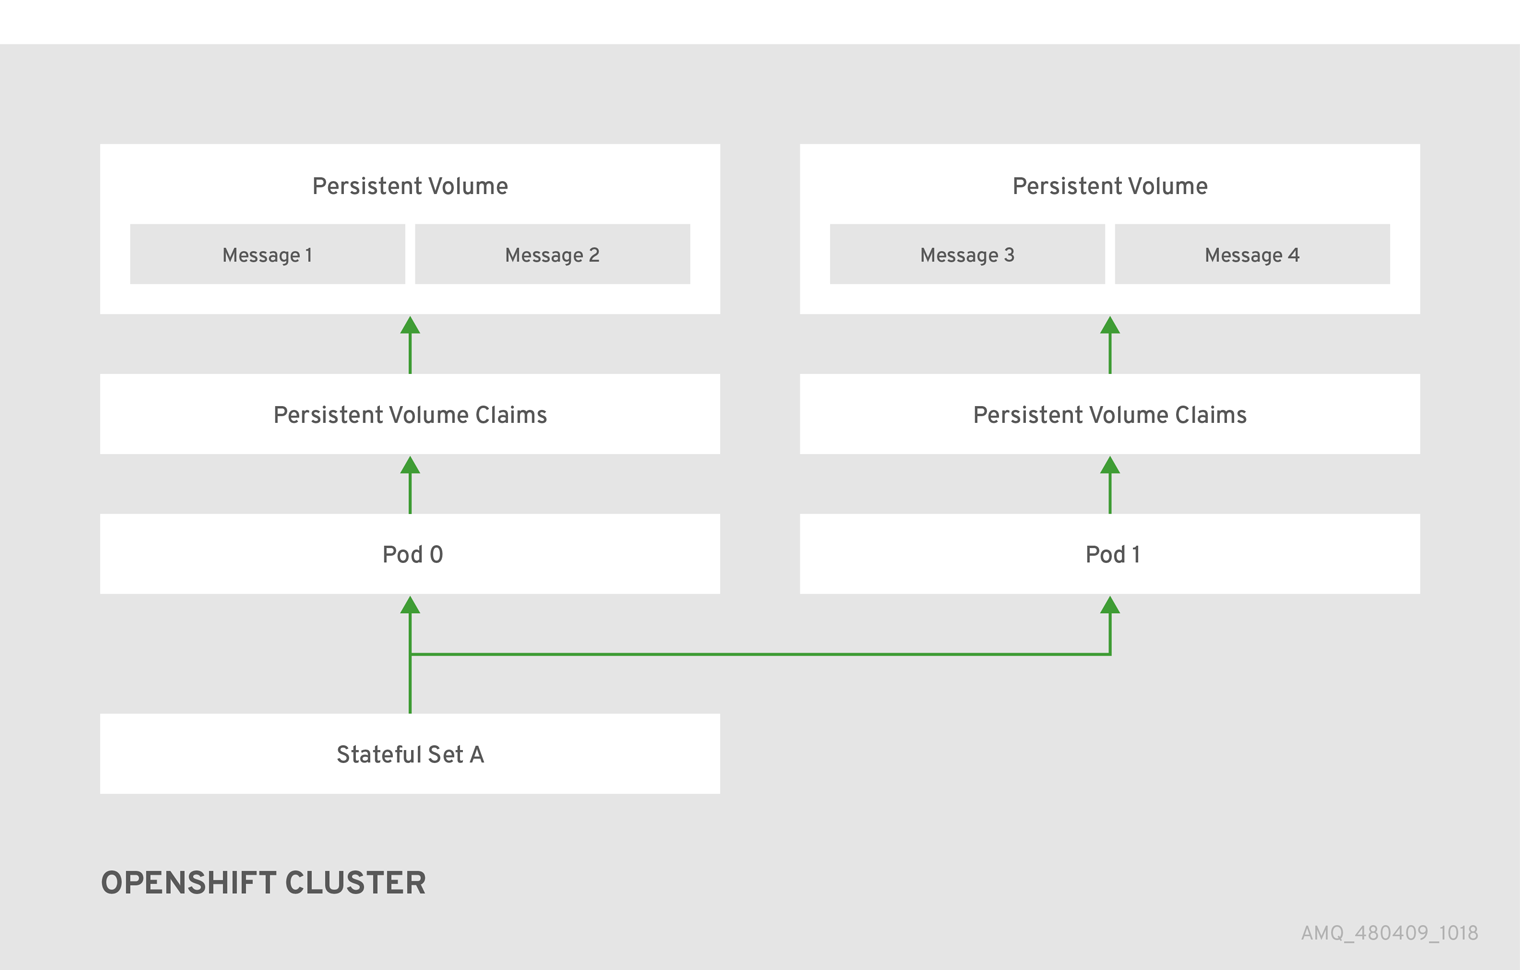
The term high availability refers to a system that is capable of remaining operational, even when part of that system fails or is taken offline. With Broker on OCP, specifically, HA refers to both maintaining the availability of brokers and the integrity of the messaging data if a broker fails.
In an HA configuration on AMQ Broker on OpenShift Container Platform, you run multiple instances of a broker pod simultaneously. Each individual broker pod writes its message data to a persistent volume (PVs), which logically define the storage volumes in the system. If a broker pod fails or is taken offline, the message data stored in that PV is redistributed to an alternative available broker, which then stores it in its own PV.
Figure 7.1. StatefulSet working normally
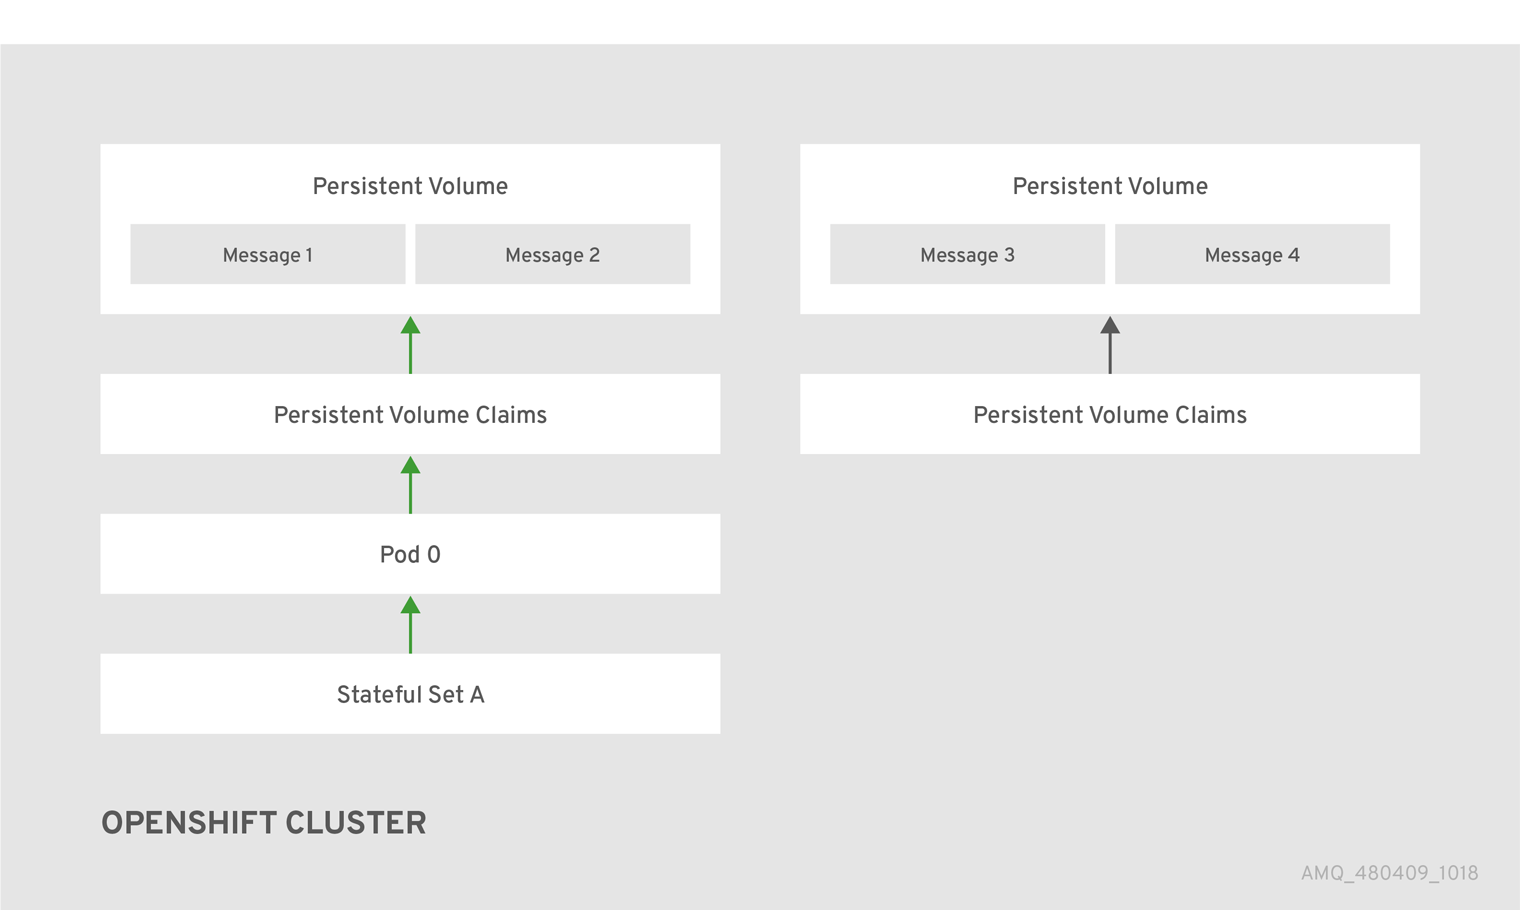
When you take a broker pod offline, the StatefulSet is scaled down and you must manage what happens to the message data in the unattached PV. To migrate the messages held in the PV associated with the now-offline pod, you use the scaledown controller. The process of migrating message data in this fashion is sometimes referred to as pod draining.
Additional resources
- To enable High Availability on AMQ Broker on OpenShift Container Platform, use the StatefulSets tutorial.
7.2. Message migration
Pod draining is the method used to manage the integrity of messaging data in a Kubernetes StatefulSet. Pod draining is used for message migration, which refers to the removal and redistribution of "orphaned" messages from a persistent volume, due to broker pod failure or intentional scale down.
Figure 7.2. One of the brokers has gone down
7.3. How does pod draining and message migration work?
A Kubernetes StatefulSet scaledown controller image exists for AMQ Broker on OpenShift Container Platform. It runs within the same project namespace as the broker pods.
The scaledown controller registers itself and listens for Kubernetes events that are related to persistent volume claims (PVCs) in the project (openshift) namespace.
The scaledown controller checks for PVCs that have been orphaned by looking at the ordinal on the volume claim. The ordinal on the volume claim is compared to the ordinal on the existing broker pods, which are part of the StatefulSet in the project namespace.
If the ordinal on the volume claim is greater than the ordinal on the existing broker pods, then the pod at that ordinal has been terminated and the data must be migrated to another broker.
When these conditions are met, a drainer pod is started. The drainer pod runs the broker and executes the message migration. Then the drainer pod identifies an alternative broker pod to which the orphaned PVC messages can be migrated.
Figure 7.3. The scaledown controller registers itself, deletes the PVC, and redistributes messages on the PersistentVolume.
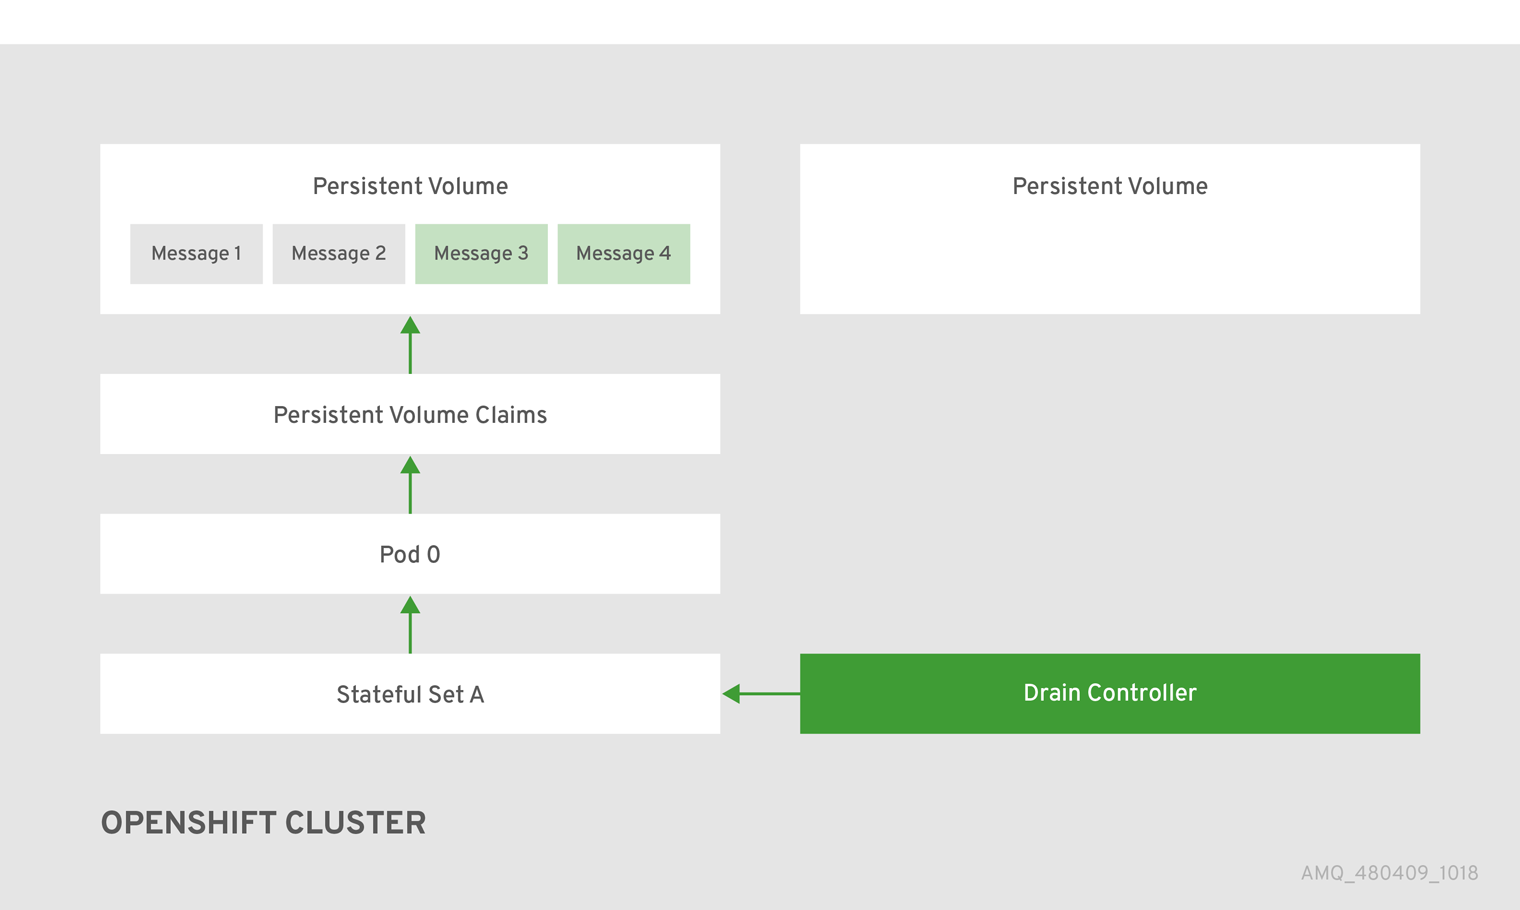
After the messages are successfully migrated to an operational broker pod, the drainer pod shuts down and the scaledown controller removes the orphaned PVC.
Chapter 8. Message migration when scaling down pods
Message migration, which is enabled by the use of the scaledown controller, is currently a Technology Preview feature. Technology Preview features are not supported with Red Hat production service-level agreements (SLAs) and might not be functionally complete. Red Hat does not recommend using them for production. For more information about technology preview at Red Hat, see Technology Preview Support Scope.
When a persistent template is used to deploy a broker pod that uses a StatefulSet, that broker pod has its own external file system, which remains intact, even if the pod stops or restarts. However, if pods are scaled down and not restarted, data and information such as messages, destinations, or transactions are no longer available to clients.
Message migration addresses the issue of unavailable data and can be obtained by applying the scaledown controller image, which monitors each broker pod. If a broker pod is scaled down or stopped, the scaledown controller recovers the messages by transferring its contents to another broker running in the cluster.
If broker pods are scaled down to 0 (zero), message migration does not occur, since there is no running broker pod to which the message data can be migrated.
8.1. Installing the scaledown controller
AMQ Broker on OCP message migration capabilites are packaged in the scaledown controller container image. This section describes how to enable the broker message migration capabilities on OpenShift Container Platform image streams and application templates.
Procedure
At the command line, log in to OpenShift as a cluster administrator (or as a user that has project administrator access to the global
openshiftproject), for example:$ oc login -u system:admin
NoteUsing the
openshiftproject makes the image files that you install later in this procedure globally available to all projects in your OpenShift cluster.As an alternative to using the
openshiftproject (e.g., if a cluster administrator is unavailable), you can log in to a specific OpenShift project to which you have administrator access and in which you want to configure a scaledown controller, for example:$ oc login -u <USERNAME> $ oc project <PROJECT_NAME>
Logging into a specific project means that the image files that you install later in this procedure are available only in that project’s namespace.
Run the following commands to install the scaledown controller images files and template:
$ oc replace --force -f \
https://raw.githubusercontent.com/jboss-container-images/jboss-amq-7-broker-openshift-image/73-7.3.0.GA/amq-broker-7-scaledown-controller-image-streams.yaml
$ oc replace --force -f \
https://raw.githubusercontent.com/jboss-container-images/jboss-amq-7-broker-openshift-image/73-7.3.0.GA/templates/amq-broker-73-persistence-clustered-controller.yaml
$ oc import-image amq-broker-72-scaledown-controller-openshift:1.0
8.2. Using the scaledown controller
To deploy the scaledown controller to migrate messages and drain pods, run the the StatefulSet scaledown controller at the broker pod namespace level. The StatefulSet scaledown controller must be deployed in the same namespace as the stateful applications (in this case, broker pods). It operates only on StatefulSets in that namespace.
You do not need cluster-level privileges to complete this procedure. You must run the StatefulSet scaledown controller at the namespace level.
Prerequisites
- An understanding of Kubernetes StatefulSets definition and processing.
Procedure
- Configure the Broker on OCP StatefulSet controller template in your namespace.
Configure the scaledown controller template in your StatefulSet definition. The following code example represents the drainer pod definition:
apiVersion: apps/v1
kind: StatefulSet
metadata:
  name: my-statefulset
  annotations:
    statefulsets.kubernetes.io/drainer-pod-template: |
      {
        "metadata": {
          "labels": {
            "app": "datastore-drainer"
          }
        },
        "spec": {
          "containers": [
            {
              "name": "drainer",
              "image": "my-drain-container",
              "volumeMounts": [
                {
                  "name": "data",
                  "mountPath": "/var/data"
                }
              ]
            }
          ]
        }
      }
spec:
Chapter 9. Tutorials
These procedures assume an OpenShift Container Platform 3.11 instance similar to that created in OpenShift Container Platform 3.11 Getting Started.
The following procedures example how to create various deployments of brokers.
9.1. Deploying a basic broker with SSL
Deploy a basic broker that is ephemeral and supports SSL. This tutorial covers how to create transports, addresses, and queues.
9.1.1. Deploying the image and template
Prerequisites
- This tutorial builds upon Preparing a Broker.
- Completion of the Deploying a Basic Broker tutorial is recommended.
Procedure
- Navigate to the OpenShift web console and log in.
-
Select the
amq-demoproject space. - Click Add to Project > Browse Catalog to list all of the default image streams and templates.
-
Use the Filter search bar to limit the list to those that match
amq. You might need to click See all to show the desired application template. -
Select the
amq-broker-73-ssltemplate which is labeledRed Hat AMQ Broker 7.3 (Ephemeral, with SSL). Set the following values in the configuration and click Create.
Table 9.1. Example template
Environment variable Display Name Value Description AMQ_PROTOCOL
AMQ Protocols
openwire,amqp,stomp,mqtt,hornetq
The protocols to be accepted by the broker
AMQ_QUEUES
Queues
demoQueue
Creates an anycast queue called demoQueue
AMQ_ADDRESSES
Addresses
demoTopic
Creates a multicast address (or topic) called demoTopic
AMQ_USER
AMQ Username
amq-demo-user
The username the client uses
AMQ_PASSWORD
AMQ Password
password
The password the client uses with the username
AMQ_TRUSTSTORE
Trust Store Filename
broker.ts
The SSL truststore file name
AMQ_TRUSTSTORE_PASSWORD
Truststore Password
password
The password used when creating the Truststore
AMQ_KEYSTORE
AMQ Keystore Filename
broker.ks
The SSL keystore file name
AMQ_KEYSTORE_PASSWORD
AMQ Keystore Password
password
The password used when creating the Keystore
9.1.2. Deploying the application
After creating the application, deploy it to create a pod and start the broker.
Procedure
- Choose Deployments from the Applications menu.
- Click the broker-amq deployment.
- Click Deploy to deploy the application.
9.1.3. Creating a route
Create a route for the broker so that clients outside of OpenShift Container Platform can connect using SSL. By default, all broker protocols are available through the 61617/TCP port.
Only one broker can be scaled up. You cannot scale up multiple brokers.
Procedure
- From the Services menu choose broker-amq-tcp-ssl
- From the Action menu and choose Create Route.
- Select the Secure route check box to display the TLS parameters.
- From the TLS Termination drop-down menu, choose Passthrough. This selection relays all communication to AMQ Broker without the OpenShift router decrypting and resending it.
View the route by going to the routes menu. For example:
https://broker-amq-tcp-amq-demo.router.default.svc.cluster.local
This hostname will be used by external clients to connect to the broker using SSL with SNI.
Additional resources
- For more information on routes in the OpenShift Container Platform, see Routes.
9.2. Deploying a basic broker with persistence and SSL
Deploy a persistent broker that supports SSL. When a broker needs persistence it is deployed as a StatefulSet and has an attached storage device that it uses for its journal. When a broker pod is created, it is allocated storage that remains in the event the pod crashes or restarts. This means messages are not lost, as they would be with a standard deployment.
Prerequisites
- This tutorial builds upon Preparing a broker.
- Completion of the Deploying a basic broker tutorial is recommended.
9.2.1. Deploy the image and template
Procedure
- Navigate to the OpenShift web console and log in.
-
Select the
amq-demoproject space. - Click Add to Project > Browse catalog to list all of the default image streams and templates.
-
Use the Filter search bar to limit the list to those that match
amq. You might need to click See all to show the desired application template. -
Select the
amq-broker-73-persistence-ssltemplate which is labelledRed Hat AMQ Broker 7.3(Persistence, with SSL). Set the following values in the configuration and click create.
Table 9.2. Example template
Environment variable Display Name Value Description AMQ_PROTOCOL
AMQ Protocols
openwire,amqp,stomp,mqtt,hornetq
The protocols to be accepted by the broker
AMQ_QUEUES
Queues
demoQueue
Creates an anycast queue called demoQueue
AMQ_ADDRESSES
Addresses
demoTopic
Creates a multicast address (or topic) called demoTopic
VOLUME_CAPACITY
AMQ Volume Size
1Gi
The persistent volume size created for the journal
AMQ_USER
AMQ Username
amq-demo-user
The username the client uses
AMQ_PASSWORD
AMQ Password
password
The password the client uses with the username
AMQ_TRUSTSTORE
Trust Store Filename
broker.ts
The SSL truststore file name
AMQ_TRUSTSTORE_PASSWORD
Truststore Password
password
The password used when creating the Truststore
AMQ_KEYSTORE
AMQ Keystore Filename
broker.ks
The SSL keystore file name
AMQ_KEYSTORE_PASSWORD
AMQ Keystore Password
password
The password used when creating the Keystore
9.2.2. Deploy the application
Once the application has been created it needs to be deployed. Deploying the application creates a pod and starts the broker.
Procedure
- Once the deployment has been created, choose StatefulSets from the Applications menu
- Click broker-amq deployment.
- Click deploy to deploy the application.
- Click the deployment to see the state of the pods.
- Click the pod and then click the log tab to see the brokers logs to verify its state. You should see the queue we pre created via the template get deployed.
Click the Terminal tab to access a shell where you can use the CLI to send some messages.
sh-4.2$ ./broker/bin/artemis producer --destination queue://demoQueue
Producer ActiveMQQueue[TEST], thread=0 Started to calculate elapsed time ...

Producer ActiveMQQueue[TEST], thread=0 Produced: 1000 messages
Producer ActiveMQQueue[TEST], thread=0 Elapsed time in second : 4 s
Producer ActiveMQQueue[TEST], thread=0 Elapsed time in milli second : 4584 milli seconds
sh-4.2$ ./broker/bin/artemis consumer
Consumer:: filter = null
Consumer ActiveMQQueue[TEST], thread=0 wait until 1000 messages are consumed
Received 1000
Consumer ActiveMQQueue[TEST], thread=0 Consumed: 1000 messages
Consumer ActiveMQQueue[TEST], thread=0 Consumer thread finished
You can also use the OpenShift client to access the shell by using the pod name
oc rsh broker-amq-1-9x89r
Now scale down the broker using the oc command.
sh-4.2$ oc scale statefulset broker-amq --replicas=0
statefulset "broker-amq" scaled
You can use the console to check that the pod count is 0
Now scale the broker back up to 1.
sh-4.2$ oc scale statefulset broker-amq --replicas=1
statefulset "broker-amq" scaled
Consume the messages again by using the terminal, for example:
sh-4.2$ broker/bin/artemis consumer --destination queue://demoQueue
Consumer:: filter = null
Consumer ActiveMQQueue[TEST], thread=0 wait until 1000 messages are consumed
Received 1000
Consumer ActiveMQQueue[TEST], thread=0 Consumed: 1000 messages
Consumer ActiveMQQueue[TEST], thread=0 Consumer thread finished
Additional resources
- For more information on managing stateful applications, see StatefulSets.
9.2.3. Creating a route
Create a route for the broker so that clients outside of OpenShift Container Platform can connect using SSL. By default, the broker protocols are available through the 61617/TCP port.
Only one broker can be scaled up. You cannot scale up multiple brokers.
Procedure
- From the Services menu choose broker-amq-tcp-ssl
- From the Action menu and choose Create a route .
- Select the Secure route check box to display the TLS parameters.
- From the TLS Termination drop-down menu, choose Passthrough. This selection relays all communication to AMQ Broker without the OpenShift router decrypting and resending it.
View the route by going to the routes menu. For example:
https://broker-amq-tcp-amq-demo.router.default.svc.cluster.local
This hostname will be used by external clients to connect to the broker using SSL with SNI.
Additional resources
- For more information on routes in the OpenShift Container Platform, see Routes.
9.3. Deploying a set of clustered brokers
Deploy a clustered set of brokers where each broker runs in its own pod.
9.3.1. Distributing messages
Message distribution is configured to use ON_DEMAND. This means that when messages arrive at a clustered broker it is distributed in a round-robin fashion to any broker that has consumers.
This safeguards against messages getting stuck on a specific broker while a consumer, connected either directly or through the OpenShift router, is connected to a different broker.
The redistribution delay is zero by default. If a message is on a queue that has no consumers, it will be redistributed to another broker.
When redistribution is enabled, messages can be delivered out of order.
9.3.2. Deploy the image and template
Prerequisites
- This procedure builds upon Preparing a broker.
- Completion of the Deploying a basic broker tutorial is recommended.
Procedure
- Navigate to the OpenShift web console and log in.
-
Select the
amq-demoproject space. - Click Add to Project > Browse catalog to list all of the default image streams and templates
-
Use the Filter search bar to limit the list to those that match
amq. Click See all to show the desired application template. -
Select the
amq-broker-73-persistence-clusteredtemplate which is labeledRed Hat AMQ Broker 7.3(no SSL, clustered). Set the following values in the configuration and click create.
Table 9.3. Example template
Environment variable Display Name Value Description AMQ_PROTOCOL
AMQ Protocols
openwire,amqp,stomp,mqtt,hornetq
The protocols to be accepted by the broker
AMQ_QUEUES
Queues
demoQueue
Creates an anycast queue called demoQueue
AMQ_ADDRESSES
Addresses
demoTopic
Creates a multicast address (or topic) called demoTopic
VOLUME_CAPACITY
AMQ Volume Size
1Gi
The persistent volume size created for the journal
AMQ_CLUSTERED
Clustered
true
This needs to be true to ensure the brokers cluster
AMQ_CLUSTER_USER
cluster user
generated
The username the brokers use to connect with each other
AMQ_CLUSTER_PASSWORD
cluster password
generated
The password the brokers use to connect with each other
AMQ_USER
AMQ Username
amq-demo-user
The username the client uses
AMQ_PASSWORD
AMQ Password
password
The password the client uses with the username
9.3.3. Deploying the application
Once the application has been created it needs to be deployed. Deploying the application creates a pod and starts the broker.
Procedure
- Once the deployment has been created choose Stateful Sets from the Applications menu.
- Click on the broker-amq deployment.
Click on the deploy button to deploy the application.
NoteThe default number of replicas for a clustered template is 0. You should not see any pods.
Scale up the pods to three to create a cluster of brokers.
sh-4.2$ oc scale statefulset broker-amq --replicas=3
statefulset "broker-amq" scaled
Check that there are three pods running.
sh-4.2$ jboss-amq-7-broker-openshift-image]$ oc get pods
NAME           READY     STATUS    RESTARTS   AGE
broker-amq-0   1/1       Running   0          33m
broker-amq-1   1/1       Running   0          33m
broker-amq-2   1/1       Running   0          29m
Verify that the brokers have clustered with the new pod by checking the logs.
sh-4.2$ jboss-amq-7-broker-openshift-image]$ oc logs broker-amq-2
This shows the logs of the new broker and an entry for a clustered bridge created between the brokers:
2018-08-29 07:43:55,779 INFO [org.apache.activemq.artemis.core.server] AMQ221027: Bridge ClusterConnectionBridge@1b0e9e9d [name=$.artemis.internal.sf.my-cluster.4333c830-ab5f-11e8-afb8-0a580a82006e, queue=QueueImpl[name=$.artemis.internal.sf.my-cluster.4333c830-ab5f-11e8-afb8-0a580a82006e, postOffice=PostOfficeImpl [server=ActiveMQServerImpl::serverUUID=9cedb69d-ab5e-11e8-87a4-0a580a82006c], temp=false]@5e0c0398 targetConnector=ServerLocatorImpl (identity=(Cluster-connection-bridge::ClusterConnectionBridge@1b0e9e9d [name=$.artemis.internal.sf.my-cluster.4333c830-ab5f-11e8-afb8-0a580a82006e, queue=QueueImpl[name=$.artemis.internal.sf.my-cluster.4333c830-ab5f-11e8-afb8-0a580a82006e, postOffice=PostOfficeImpl [server=ActiveMQServerImpl::serverUUID=9cedb69d-ab5e-11e8-87a4-0a580a82006c], temp=false]@5e0c0398 targetConnector=ServerLocatorImpl [initialConnectors=[TransportConfiguration(name=artemis, factory=org-apache-activemq-artemis-core-remoting-impl-netty-NettyConnectorFactory) ?port=61616&host=10-130-0-110], discoveryGroupConfiguration=null]]::ClusterConnectionImpl@806813022[nodeUUID=9cedb69d-ab5e-11e8-87a4-0a580a82006c, connector=TransportConfiguration(name=artemis, factory=org-apache-activemq-artemis-core-remoting-impl-netty-NettyConnectorFactory) ?port=61616&host=10-130-0-108, address=, server=ActiveMQServerImpl::serverUUID=9cedb69d-ab5e-11e8-87a4-0a580a82006c])) [initialConnectors=[TransportConfiguration(name=artemis, factory=org-apache-activemq-artemis-core-remoting-impl-netty-NettyConnectorFactory) ?port=61616&host=10-130-0-110], discoveryGroupConfiguration=null]] is connected
9.3.4. Creating a route for the management console
The clustering templates do not expose the console by default. This is because the the OpenShift proxy would load balance around each broker in the cluster and it would not be possible to control which broker console is connected.
In future releases each pod will have its own integrated console available through the use of the pod. It uses wildcard routing to expose each broker on its own hostname.
Procedure
- Choose import YAML/JSON from Add to Project drop down
Enter the following and click create:
apiVersion: v1 kind: Route metadata: labels: app: broker-amq application: broker-amq name: console-jolokia spec: port: targetPort: console-jolokia to: kind: Service name: broker-amq-headless weight: 100 wildcardPolicy: Subdomain host: star.broker-amq-headless.amq-demo.svcNoteThe important configuration here is host: star.broker-amq-headless.amq-demo.svc. This is the hostname used for each pod in the broker. The star is replaced by the pod name, so if the pod name is broker-amq-0 , the hostname is broker-amq-0.broker-amq-headless.amq-demo.svc
Add entries into the /etc/hosts file to map the route names onto the IP address of the OpenShift cluster. For example, if you have three pods, then add entries as shown below.
10.0.0.1 broker-amq-0.broker-amq-headless.amq-demo.svc
10.0.0.1 broker-amq-1.broker-amq-headless.amq-demo.svc
10.0.0.1 broker-amq-2.broker-amq-headless.amq-demo.svc
-
Navigate to the console using the address
http://broker-amq-0.broker-amq-headless.amq-demo.svcin a browser.
Additional resources
- For more information on the clustering of brokers see Enabling Message Redistribution.
9.4. Deploying a set of clustered SSL brokers
Deploy a clustered set of brokers, where each broker runs in its own pod and the broker is configured to accept connections using SSL.
9.4.1. Distributing messages
Message distribution is configured to use ON_DEMAND. This means that when a message arrives at a clustered broker, it is distributed in a round-robin fashion to any broker that has consumers.
This safeguards against messages getting stuck on a specific broker while a consumer, connected either directly or through the OpenShift router, is connected to a different broker.
The redistribution delay is non-zero by default. If a message is on a queue that has no consumers, it will be redistributed to another broker.
When redistribution is enabled, messages can be delivered out of order.
9.4.2. Deploying the image and template
Prerequisites
- This procredure builds upon Preparing a broker.
- Completion of the Deploying a basic broker example is recommended.
Procedure
- Navigate to the OpenShift web console and log in.
-
Select the
amq-demoproject space. - Click Add to Project > Browse catalog to list all of the default image streams and templates.
-
Use the Filter search bar to limit the list to those that match
amq. Click See all to show the desired application template. -
Select the
amq-broker-73-persistence-clustered-ssltemplate which is labeledRed Hat AMQ Broker 7.3(no SSL, clustered). Set the following values in the configuration and click create.
Table 9.4. Example template
Environment variable Display Name Value Description AMQ_PROTOCOL
AMQ Protocols
openwire,amqp,stomp,mqtt,hornetq
The protocols to be accepted by the broker
AMQ_QUEUES
Queues
demoQueue
Creates an anycast queue called demoQueue
AMQ_ADDRESSES
Addresses
demoTopic
Creates a multicast address (or topic) called demoTopic
VOLUME_CAPACITY
AMQ Volume Size
1Gi
The persistent volume size created for the journal
AMQ_CLUSTERED
Clustered
true
This needs to be true to ensure the brokers cluster
AMQ_CLUSTER_USER
cluster user
generated
The username the brokers use to connect with each other
AMQ_CLUSTER_PASSWORD
cluster password
generated
The password the brokers use to connect with each other
AMQ_USER
AMQ Username
amq-demo-user
The username the client uses
AMQ_PASSWORD
AMQ Password
password
The password the client uses with the username
AMQ_TRUSTSTORE
Trust Store Filename
broker.ts
The SSL truststore file name
AMQ_TRUSTSTORE_PASSWORD
Truststore Password
password
The password used when creating the Truststore
AMQ_KEYSTORE
AMQ Keystore Filename
broker.ks
The SSL keystore file name
AMQ_KEYSTORE_PASSWORD
AMQ Keystore Password
password
The password used when creating the Keystore
9.4.3. Deploying the application
Deploy after creating the application. Deploying the application creates a pod and starts the broker.
Procedure
- Choose StatefulSets from the Applications menu, once the deployment has been created.
- Click on the broker-amq deployment.
Click on the deploy button to deploy the application.
NoteThe default number of replicas for a clustered template is 0, so you will not see any pods.
Scale up the pods to three to create a cluster of brokers.
sh-4.2$ oc scale statefulset broker-amq --replicas=3
statefulset "broker-amq" scaled
Check that there are three pods running.
sh-4.2$ jboss-amq-7-broker-openshift-image]$ oc get pods
NAME           READY     STATUS    RESTARTS   AGE
broker-amq-0   1/1       Running   0          33m
broker-amq-1   1/1       Running   0          33m
broker-amq-2   1/1       Running   0          29m
Verify the brokers have clustered with the new pod by checking the logs.
sh-4.2$ jboss-amq-7-broker-openshift-image]$ oc logs broker-amq-2
This shows all the logs of the new broker and an entry for a clustered bridge created between the brokers, for example:
2018-08-29 07:43:55,779 INFO [org.apache.activemq.artemis.core.server] AMQ221027: Bridge ClusterConnectionBridge@1b0e9e9d [name=$.artemis.internal.sf.my-cluster.4333c830-ab5f-11e8-afb8-0a580a82006e, queue=QueueImpl[name=$.artemis.internal.sf.my-cluster.4333c830-ab5f-11e8-afb8-0a580a82006e, postOffice=PostOfficeImpl [server=ActiveMQServerImpl::serverUUID=9cedb69d-ab5e-11e8-87a4-0a580a82006c], temp=false]@5e0c0398 targetConnector=ServerLocatorImpl (identity=(Cluster-connection-bridge::ClusterConnectionBridge@1b0e9e9d [name=$.artemis.internal.sf.my-cluster.4333c830-ab5f-11e8-afb8-0a580a82006e, queue=QueueImpl[name=$.artemis.internal.sf.my-cluster.4333c830-ab5f-11e8-afb8-0a580a82006e, postOffice=PostOfficeImpl [server=ActiveMQServerImpl::serverUUID=9cedb69d-ab5e-11e8-87a4-0a580a82006c], temp=false]@5e0c0398 targetConnector=ServerLocatorImpl [initialConnectors=[TransportConfiguration(name=artemis, factory=org-apache-activemq-artemis-core-remoting-impl-netty-NettyConnectorFactory) ?port=61616&host=10-130-0-110], discoveryGroupConfiguration=null]]::ClusterConnectionImpl@806813022[nodeUUID=9cedb69d-ab5e-11e8-87a4-0a580a82006c, connector=TransportConfiguration(name=artemis, factory=org-apache-activemq-artemis-core-remoting-impl-netty-NettyConnectorFactory) ?port=61616&host=10-130-0-108, address=, server=ActiveMQServerImpl::serverUUID=9cedb69d-ab5e-11e8-87a4-0a580a82006c])) [initialConnectors=[TransportConfiguration(name=artemis, factory=org-apache-activemq-artemis-core-remoting-impl-netty-NettyConnectorFactory) ?port=61616&host=10-130-0-110], discoveryGroupConfiguration=null]] is connected
9.4.4. Creating a route for the management console
The clustering templates do not expose the console by default. This is because the OpenShift proxy would load balance around each broker in the cluster and it would not be possible to control which broker console is connected.
In future releases each pod will have its own integrated console available through the pod details page. This is resolved by using wildcard routing to expose each broker on its own hostname.
Procedure
- Choose Import YAML/JSON from Add to Project drop down.
Enter the following and click create.
apiVersion: v1 kind: Route metadata: labels: app: broker-amq application: broker-amq name: console-jolokia spec: port: targetPort: console-jolokia tls: termination: passthrough to: kind: Service name: broker-amq-headless weight: 100 wildcardPolicy: Subdomain host: star.broker-amq-headless.amq-demo.svcNoteThe important configuration here is host: star.broker-amq-headless.amq-demo.svc. This is the hostname used for each pod in the broker. The star is replaced by the pod name. For instance, if the pod name is broker-amq-0, its hostname is broker-amq-0.broker-amq-headless.amq-demo.svc.
Add entries into the /etc/hosts file to map the route names onto the IP address of the OpenShift cluster. For example, if you have three pods, then add entries as shown below.
10.0.0.1 broker-amq-0.broker-amq-headless.amq-demo.svc
10.0.0.1 broker-amq-1.broker-amq-headless.amq-demo.svc
10.0.0.1 broker-amq-2.broker-amq-headless.amq-demo.svc
NoteThe /etc/hosts entries do not point directly to the brokers, as the brokers running in the pods have IP addresses in the range of the pod-range for a given node (e.g. 10.128.x.y or 10.130.u.v). In the case of a nodePort configuration you can point the hostname to either of the node IP addresses and the name will get routed appropriately to the correct broker pod. In the case of having a headless service with a SSL route, point each of the names to the IP address of the node running the OpenShift router (i.e. haproxy instance).
-
Navigate to the console by using the address
https://broker-amq-0.broker-amq-headless.amq-demo.svcin a browser.
Additional resources
- For more information on messaging, see Enabling Message Redistribution.
9.5. Deploying a broker with custom configuration
Deploy a broker with custom configuration. Although functionality can be obtained by using templates, broker configuration can be customized if needed.
When using this method, ensure that the placeholders in the configuration files (such as AUTHENTICATION) are not removed. These placeholders are necessary for building the AMQ Broker on OpenShift Container Platform image.
Prerequisites
- This tutorial builds upon Preparing a broker.
- Completion of the Deploying a basic broker tutorial is recommended.
9.5.1. Deploy the image and template
Procedure
- Navigate to the OpenShift web console and log in.
-
Select the
amq-demoproject space. - Click Add to Project > Browse catalog to list all of the default image streams and templates.
-
Use the Filter search bar to limit results to those that match
amq. Click See all to show the desired application template. -
Select the
amq-broker-73-customtemplate which is labeledRed Hat AMQ Broker 7.3(Ephemeral, no SSL). In the configuration, update
broker.xmlwith the custom configuration you would like to use. Click Create.NoteUse a text editor to create the broker’s XML configuration. Then, cut and paste confguration details into the
broker.xmlfield.NoteOpenShift Container Platform does not use a
ConfigMapobject to store the custom configuration that you specify in thebroker.xmlfield, as is common for many applications deployed on this platform. Instead, OpenShift temporarily stores the specified configuration in an environment variable, before transferring the configuration to a standalone file when the broker container starts.
9.5.2. Deploy the application
Once the application has been created it needs to be deployed. Deploying the application creates a pod and starts the broker.
Procedure
- Once the deployment has been created choose Deployments from the Applications menu
- Click on the broker-amq deployment
- Click on the deploy button to deploy the application.
9.6. Basic SSL client example
Implement a client that sends and receives messages from a broker configured to use SSL, using the Qpid JMS client.
Prerequisites
- This tutorial builds upon Preparing a Broker.
- Completion of the Deploying a Basic Broker with SSL tutorial is recommended.
- AMQ JMS Examples
9.6.1. Configuring the client
Create a sample client that can be updated to connect to the SSL broker. The following procedure builds upon AMQ JMS Examples.
Procedure
Add an entry into your /etc/hosts file to map the route name onto the IP address of the OpenShift cluster:
10.0.0.1 broker-amq-tcp-amq-demo.router.default.svc.cluster.local
Update the jndi.properties configuration file to use the route, truststore and keystore created previously, for example:
connectionfactory.myFactoryLookup = amqps://broker-amq-tcp-amq-demo.router.default.svc.cluster.local:8443?transport.keyStoreLocation=<keystore-path>client.ks&transport.keyStorePassword=password&transport.trustStoreLocation=<truststore-path>/client.ts&transport.trustStorePassword=password&transport.verifyHost=false
Update the jndi.properties configuration file to use the queue created earlier.
queue.myDestinationLookup = demoQueue
- Execute the sender client to send a text message.
Execute the receiver client to receive the text message. You should see:
Received message: Message Text!
9.7. External clients using sub-domains example
Expose a clustered set of brokers through a node port and connect to it using the core JMS client. This enables clients to connect to a set of brokers which are configured using the amq-broker-73-persistence-clustered-ssl template.
9.7.1. Exposing the brokers
Configure the brokers so that the cluster of brokers are externally available and can be connected to directly, bypassing the OpenShift router. This is done by creating a route that exposes each pod using its own hostname.
Prerequisites
Procedure
- Choose import YAML/JSON from Add to Project drop down
Enter the following and click create.
apiVersion: v1 kind: Route metadata: labels: app: broker-amq application: broker-amq name: tcp-ssl spec: port: targetPort: ow-multi-ssl tls: termination: passthrough to: kind: Service name: broker-amq-headless weight: 100 wildcardPolicy: Subdomain host: star.broker-ssl-amq-headless.amq-demo.svcNoteThe important configuration here is the wildcard policy of
Subdomain. This allows each broker to be accessible through its own hostname.
9.7.2. Connecting the clients
Create a sample client that can be updated to connect to the SSL broker. The steps in this procedure build upon the AMQ JMS Examples.
Procedure
Add entries into the /etc/hosts file to map the route name onto the actual IP addresses of the brokers:
10.0.0.1 broker-amq-0.broker-ssl-amq-headless.amq-demo.svc broker-amq-1.broker-ssl-amq-headless.amq-demo.svc broker-amq-2.broker-ssl-amq-headless.amq-demo.svc
Update the jndi.properties configuration file to use the route, truststore, and keystore created previously, for example:
connectionfactory.myFactoryLookup = amqps://broker-amq-0.broker-ssl-amq-headless.amq-demo.svc:443?transport.keyStoreLocation=/home/ataylor/projects/jboss-amq-7-broker-openshift-image/client.ks&transport.keyStorePassword=password&transport.trustStoreLocation=/home/ataylor/projects/jboss-amq-7-broker-openshift-image/client.ts&transport.trustStorePassword=password&transport.verifyHost=false
Update the jndi.properties configuration file to use the queue created earlier.
queue.myDestinationLookup = demoQueue
- Execute the sender client code to send a text message.
Execute the receiver client code to receive the text message. You should see:
Received message: Message Text!
Additional resources
- For more information on using the AMQ JMS client, see AMQ JMS Examples.
9.8. External clients using port binding example
Expose a clustered set of brokers through a NodePort and connect to it using the core JMS client. This enables clients that do not support SNI or SSL. It is used with clusters configured using the amq-broker-73-persistence-clustered template.
9.8.1. Exposing the brokers
Configure the brokers so that the cluster of brokers are externally available and can be connected to directly, bypassing the OpenShift router. This is done by creating a service that uses a NodePort to load balance around the clusters.
Prerequisites
Procedure
- Choose import YAML/JSON from Add to Project drop down.
Enter the following and click create.
apiVersion: v1 kind: Service metadata: annotations: description: The broker's OpenWire port. service.alpha.openshift.io/dependencies: >- [{"name": "broker-amq-amqp", "kind": "Service"},{"name": "broker-amq-mqtt", "kind": "Service"},{"name": "broker-amq-stomp", "kind": "Service"}] creationTimestamp: '2018-08-29T14:46:33Z' labels: application: broker template: amq-broker-73-statefulset-clustered xpaas: 1.4.12 name: broker-external-tcp namespace: amq-demo resourceVersion: '2450312' selfLink: /api/v1/namespaces/amq-demo/services/broker-amq-tcp uid: 52631fa0-ab9a-11e8-9380-c280f77be0d0 spec: externalTrafficPolicy: Cluster ports: - nodePort: 30001 port: 61616 protocol: TCP targetPort: 61616 selector: deploymentConfig: broker-amq sessionAffinity: None type: NodePort status: loadBalancer: {}NoteThe NodePort configuration is important. The NodePort is the port in which the client will access the brokers and the type is NodePort.
9.8.2. Connecting the clients
Create consumers that are round-robinned around the brokers in the cluster using the AMQ broker CLI.
Procedure
In a terminal create a consumer and attach it to the IP address where OpenShift is running.
artemis consumer --url tcp://<IP_ADDRESS>:30001 --message-count 100 --destination queue://demoQueue
Repeat step 1 twice to start another two consumers.
NoteYou should now have three consumers load balanced across the three brokers.
Create a producer to send messages.
artemis producer --url tcp://<IP_ADDRESS>:30001 --message-count 300 --destination queue://demoQueue
Verify each consumer receives messages.
Consumer:: filter = null
Consumer ActiveMQQueue[demoQueue], thread=0 wait until 100 messages are consumed
Consumer ActiveMQQueue[demoQueue], thread=0 Consumed: 100 messages
Consumer ActiveMQQueue[demoQueue], thread=0 Consumer thread finished
9.9. Monitoring AMQ Broker
This tutorial demonstrates how to monitor AMQ Broker.
Prerequisites
- This tutorial builds upon Preparing a broker.
- Completion of the Deploying a basic broker tutorial is recommended.
Procedure
Get the list of running pods:
$ oc get pods

NAME                 READY     STATUS    RESTARTS   AGE
broker-amq-1-ftqmk   1/1       Running   0          14d
Run the
oc logscommand:oc logs -f broker-amq-1-ftqmk Running /amq-broker-71-openshift image, version 1.3-5 INFO: Loading '/opt/amq/bin/env' INFO: Using java '/usr/lib/jvm/java-1.8.0/bin/java' INFO: Starting in foreground, this is just for debugging purposes (stop process by pressing CTRL+C) ... INFO | Listening for connections at: tcp://broker-amq-1-ftqmk:61616?maximumConnections=1000&wireFormat.maxFrameSize=104857600 INFO | Connector openwire started INFO | Starting OpenShift discovery agent for service broker-amq-tcp transport type tcp INFO | Network Connector DiscoveryNetworkConnector:NC:BrokerService[broker-amq-1-ftqmk] started INFO | Apache ActiveMQ 5.11.0.redhat-621084 (broker-amq-1-ftqmk, ID:broker-amq-1-ftqmk-41433-1491445582960-0:1) started INFO | For help or more information please see: http://activemq.apache.org WARN | Store limit is 102400 mb (current store usage is 0 mb). The data directory: /opt/amq/data/kahadb only has 9684 mb of usable space - resetting to maximum available disk space: 9684 mb WARN | Temporary Store limit is 51200 mb, whilst the temporary data directory: /opt/amq/data/broker-amq-1-ftqmk/tmp_storage only has 9684 mb of usable space - resetting to maximum available 9684 mb.
Run your query to monitor your broker for
MaxConsumers:$ curl -k -u admin:admin http://console-broker.amq-demo.apps.example.com/console/jolokia/read/org.apache.activemq.artemis:broker=%22broker%22,component=addresses,address=%22TESTQUEUE%22,subcomponent=queues,routing-type=%22anycast%22,queue=%22TESTQUEUE%22/MaxConsumers {"request":{"mbean":"org.apache.activemq.artemis:address=\"TESTQUEUE\",broker=\"broker\",component=addresses,queue=\"TESTQUEUE\",routing-type=\"anycast\",subcomponent=queues","attribute":"MaxConsumers","type":"read"},"value":-1,"timestamp":1528297825,"status":200}
Chapter 10. Reference
10.1. Application template parameters
Configuration of the AMQ Broker on OpenShift Container Platform image is performed by specifying values of application template parameters. You can configure the following parameters:
Table 10.1. Application template parameters
| Parameter | Description |
|---|---|
|
| Specifies the addresses available by default on the broker on its startup, in a comma-separated list. |
|
| Specifies the password used for authentication to the broker. If no value is specified, a random password is generated. |
|
| Specifies the user name used as an administrator authentication to the broker. If no value is specified, a random user name is generated. |
|
| Specifies the anycast prefix applied to the multiplexed protocol ports 61616 and 61617. |
|
| Enables clustering. |
|
| Specifies the password to use for clustering. If no value is specified, a random password is generated. |
|
| Specifies the cluster user to use for clustering. If no value is specified, a random user name is generated. |
|
| Specifies the directory for the data. Used in stateful sets. |
|
| Specifies the directory for the data directory logging. |
|
|
Specifies additional arguments to pass to |
|
| Specifies the maximum amount of memory that message data can consume. If no value is specified, half of the system’s memory is allocated. |
|
| Specifies the SSL keystore file name. If no value is specified, a random password is generated but SSL will not be configured. |
|
| (Optional) Specifies the password used to decrypt the SSL keystore. |
|
|
Specifies the directory where the secrets are mounted. The default value is |
|
| For SSL only, specifies the maximum number of connections that an acceptor will accept. |
|
| Specifies the multicast prefix applied to the multiplexed protocol ports 61616 and 61617. |
|
| Specifies the name of the broker instance. |
|
| Specifies the password used for authentication to the broker. If no value is specified, a random password is generated. |
|
| Specifies the queues available by default on the broker on its startup, in a comma-separated list. |
|
|
If set to |
|
|
If set to |
|
|
Specifies the name for the role created. The default value is |
|
|
Specifies the messaging protocols used by the broker in a comma-separated list. Available options are |
|
| Specifies the SSL truststore file name. If no value is specified, a random password is generated but SSL will not be configured. |
|
| (Optional) Specifies the password used to decrypt the SSL truststore. |
|
| Specifies the user name used for authentication to the broker. If no value is specified, a random user name is generated. |
|
| Specifies the name of the application used internally within OpenShift. It is used in names of services, pods, and other objects within the application. |
|
|
Specifies the image. Used in the |
|
|
Specifies the image stream name space. Used in the |
|
| Specifies the port number for the OpenShift DNS ping. |
|
| Specifies the size of the persistent storage for database volumes. |
If you use broker.xml for a custom configuration, any values specified in that file for the following parameters will override values specified for the same parameters in the your application templates.
- AMQ_NAME
- AMQ_ROLE
- AMQ_CLUSTER_USER
- AMQ_CLUSTER_PASSWORD
10.2. Security
Only SSL connections can connect from outside of the OpenShift instance. The non-SSL version of the protocols can only be used inside the OpenShift instance.
For security reasons, using the default keystore and truststore generated by the system is discouraged. Generate your own keystore and truststore and supply them to the image by using the OpenShift secrets mechanism.
10.3. Logging
In addition to viewing the OpenShift logs, you can troubleshoot a running AMQ Broker on OpenShift Container Platform image by viewing the AMQ logs that are output to the container’s console.
Procedure
- At the command line, run the following command:
$ oc logs -f <pass:quotes[<pod-name>]> <pass:quotes[<container-name>]>
Revised on 2019-05-07 15:49:55 UTC