
Chapter 12. Managing AMQ Streams
This chapter covers tasks to maintain a deployment of AMQ Streams.
12.1. Working with custom resources
You can use oc commands to retrieve information and perform other operations on AMQ Streams custom resources.
Using oc with the status subresource of a custom resource allows you to get the information about the resource.
12.1.1. Performing oc operations on custom resources
Use oc commands, such as get, describe, edit, or delete, to perform operations on resource types. For example, oc get kafkatopics retrieves a list of all Kafka topics and oc get kafkas retrieves all deployed Kafka clusters.
When referencing resource types, you can use both singular and plural names: oc get kafkas gets the same results as oc get kafka.
You can also use the short name of the resource. Learning short names can save you time when managing AMQ Streams. The short name for Kafka is k, so you can also run oc get k to list all Kafka clusters.
oc get k

NAME         DESIRED KAFKA REPLICAS   DESIRED ZK REPLICAS
my-cluster   3                        3
Table 12.1. Long and short names for each AMQ Streams resource
| AMQ Streams resource | Long name | Short name |
|---|---|---|
| Kafka | kafka | k |
| Kafka Topic | kafkatopic | kt |
| Kafka User | kafkauser | ku |
| Kafka Connect | kafkaconnect | kc |
| Kafka Connect S2I | kafkaconnects2i | kcs2i |
| Kafka Connector | kafkaconnector | kctr |
| Kafka Mirror Maker | kafkamirrormaker | kmm |
| Kafka Mirror Maker 2 | kafkamirrormaker2 | kmm2 |
| Kafka Bridge | kafkabridge | kb |
| Kafka Rebalance | kafkarebalance | kr |
12.1.1.1. Resource categories
Categories of custom resources can also be used in oc commands.
All AMQ Streams custom resources belong to the category strimzi, so you can use strimzi to get all the AMQ Streams resources with one command.
For example, running oc get strimzi lists all AMQ Streams custom resources in a given namespace.
oc get strimzi

NAME                                   DESIRED KAFKA REPLICAS DESIRED ZK REPLICAS
kafka.kafka.strimzi.io/my-cluster      3                      3

NAME                                   PARTITIONS REPLICATION FACTOR
kafkatopic.kafka.strimzi.io/kafka-apps 3          3

NAME                                   AUTHENTICATION AUTHORIZATION
kafkauser.kafka.strimzi.io/my-user     tls            simple
The oc get strimzi -o name command returns all resource types and resource names. The -o name option fetches the output in the type/name format
oc get strimzi -o name

kafka.kafka.strimzi.io/my-cluster
kafkatopic.kafka.strimzi.io/kafka-apps
kafkauser.kafka.strimzi.io/my-user
You can combine this strimzi command with other commands. For example, you can pass it into a oc delete command to delete all resources in a single command.
oc delete $(oc get strimzi -o name)

kafka.kafka.strimzi.io "my-cluster" deleted
kafkatopic.kafka.strimzi.io "kafka-apps" deleted
kafkauser.kafka.strimzi.io "my-user" deleted
Deleting all resources in a single operation might be useful, for example, when you are testing new AMQ Streams features.
12.1.1.2. Querying the status of sub-resources
There are other values you can pass to the -o option. For example, by using -o yaml you get the output in YAML format. Usng -o json will return it as JSON.
You can see all the options in oc get --help.
One of the most useful options is the JSONPath support, which allows you to pass JSONPath expressions to query the Kubernetes API. A JSONPath expression can extract or navigate specific parts of any resource.
For example, you can use the JSONPath expression {.status.listeners[?(@.type=="tls")].bootstrapServers} to get the bootstrap address from the status of the Kafka custom resource and use it in your Kafka clients.
Here, the command finds the bootstrapServers value of the tls listeners.
oc get kafka my-cluster -o=jsonpath='{.status.listeners[?(@.type=="tls")].bootstrapServers}{"\n"}'

my-cluster-kafka-bootstrap.myproject.svc:9093
By changing the type condition to @.type=="external" or @.type=="plain" you can also get the address of the other Kafka listeners.
oc get kafka my-cluster -o=jsonpath='{.status.listeners[?(@.type=="external")].bootstrapServers}{"\n"}'

192.168.1.247:9094
You can use jsonpath to extract any other property or group of properties from any custom resource.
12.1.2. AMQ Streams custom resource status information
Several resources have a status property, as described in the following table.
Table 12.2. Custom resource status properties
| AMQ Streams resource | Schema reference | Publishes status information on… |
|---|---|---|
|
| The Kafka cluster. | |
|
| The Kafka Connect cluster, if deployed. | |
|
| The Kafka Connect cluster with Source-to-Image support, if deployed. | |
|
| KafkaConnector resources, if deployed. | |
|
| The Kafka MirrorMaker tool, if deployed. | |
|
| Kafka topics in your Kafka cluster. | |
|
| Kafka users in your Kafka cluster. | |
|
| The AMQ Streams Kafka Bridge, if deployed. |
The status property of a resource provides information on the resource’s:
-
Current state, in the
status.conditionsproperty -
Last observed generation, in the
status.observedGenerationproperty
The status property also provides resource-specific information. For example:
-
KafkaStatusprovides information on listener addresses, and the id of the Kafka cluster. -
KafkaConnectStatusprovides the REST API endpoint for Kafka Connect connectors. -
KafkaUserStatusprovides the user name of the Kafka user and theSecretin which their credentials are stored. -
KafkaBridgeStatusprovides the HTTP address at which external client applications can access the Bridge service.
A resource’s current state is useful for tracking progress related to the resource achieving its desired state, as defined by the spec property. The status conditions provide the time and reason the state of the resource changed and details of events preventing or delaying the operator from realizing the resource’s desired state.
The last observed generation is the generation of the resource that was last reconciled by the Cluster Operator. If the value of observedGeneration is different from the value of metadata.generation, the operator has not yet processed the latest update to the resource. If these values are the same, the status information reflects the most recent changes to the resource.
AMQ Streams creates and maintains the status of custom resources, periodically evaluating the current state of the custom resource and updating its status accordingly. When performing an update on a custom resource using oc edit, for example, its status is not editable. Moreover, changing the status would not affect the configuration of the Kafka cluster.
Here we see the status property specified for a Kafka custom resource.
Kafka custom resource with status
apiVersion: kafka.strimzi.io/v1beta2
kind: Kafka
metadata:
spec:
  # ...
status:
  conditions: 1
  - lastTransitionTime: 2021-07-23T23:46:57+0000
    status: "True"
    type: Ready 2
  observedGeneration: 4 3
  listeners: 4
  - addresses:
    - host: my-cluster-kafka-bootstrap.myproject.svc
      port: 9092
    type: plain
  - addresses:
    - host: my-cluster-kafka-bootstrap.myproject.svc
      port: 9093
    certificates:
    - |
      -----BEGIN CERTIFICATE-----
      ...
      -----END CERTIFICATE-----
    type: tls
  - addresses:
    - host: 172.29.49.180
      port: 9094
    certificates:
    - |
      -----BEGIN CERTIFICATE-----
      ...
      -----END CERTIFICATE-----
    type: external
  clusterId: CLUSTER-ID 5
# ...
- 1
- Status
conditionsdescribe criteria related to the status that cannot be deduced from the existing resource information, or are specific to the instance of a resource. - 2
- The
Readycondition indicates whether the Cluster Operator currently considers the Kafka cluster able to handle traffic. - 3
- The
observedGenerationindicates the generation of theKafkacustom resource that was last reconciled by the Cluster Operator. - 4
- The
listenersdescribe the current Kafka bootstrap addresses by type. - 5
- The Kafka cluster id.Important
The address in the custom resource status for external listeners with type
nodeportis currently not supported.
The Kafka bootstrap addresses listed in the status do not signify that those endpoints or the Kafka cluster is in a ready state.
Accessing status information
You can access status information for a resource from the command line. For more information, see Section 12.1.3, “Finding the status of a custom resource”.
12.1.3. Finding the status of a custom resource
This procedure describes how to find the status of a custom resource.
Prerequisites
- An OpenShift cluster.
- The Cluster Operator is running.
Procedure
Specify the custom resource and use the
-o jsonpathoption to apply a standard JSONPath expression to select thestatusproperty:oc get kafka <kafka_resource_name> -o jsonpath='{.status}'This expression returns all the status information for the specified custom resource. You can use dot notation, such as
status.listenersorstatus.observedGeneration, to fine-tune the status information you wish to see.
Additional resources
- Section 12.1.2, “AMQ Streams custom resource status information”
- For more information about using JSONPath, see JSONPath support.
12.2. Pausing reconciliation of custom resources
Sometimes it is useful to pause the reconciliation of custom resources managed by AMQ Streams Operators, so that you can perform fixes or make updates. If reconciliations are paused, any changes made to custom resources are ignored by the Operators until the pause ends.
If you want to pause reconciliation of a custom resource, set the strimzi.io/pause-reconciliation annotation to true in its configuration. This instructs the appropriate Operator to pause reconciliation of the custom resource. For example, you can apply the annotation to the KafkaConnect resource so that reconciliation by the Cluster Operator is paused.
You can also create a custom resource with the pause annotation enabled. The custom resource is created, but it is ignored.
Prerequisites
- The AMQ Streams Operator that manages the custom resource is running.
Procedure
Annotate the custom resource in OpenShift, setting
pause-reconciliationtotrue:oc annotate KIND-OF-CUSTOM-RESOURCE NAME-OF-CUSTOM-RESOURCE strimzi.io/pause-reconciliation="true"
For example, for the
KafkaConnectcustom resource:oc annotate KafkaConnect my-connect strimzi.io/pause-reconciliation="true"
Check that the status conditions of the custom resource show a change to
ReconciliationPaused:oc describe KIND-OF-CUSTOM-RESOURCE NAME-OF-CUSTOM-RESOURCE
The
typecondition changes toReconciliationPausedat thelastTransitionTime.Example custom resource with a paused reconciliation condition type
apiVersion: kafka.strimzi.io/v1beta2
kind: KafkaConnect
metadata:
  annotations:
    strimzi.io/pause-reconciliation: "true"
    strimzi.io/use-connector-resources: "true"
  creationTimestamp: 2021-03-12T10:47:11Z
  #...
spec:
  # ...
status:
  conditions:
  - lastTransitionTime: 2021-03-12T10:47:41.689249Z
    status: "True"
    type: ReconciliationPaused
Resuming from pause
-
To resume reconciliation, you can set the annotation to
false, or remove the annotation.
Additional resources
12.3. Manually starting rolling updates of Kafka and ZooKeeper clusters
AMQ Streams supports the use of annotations on StatefulSet and Pod resources to manually trigger a rolling update of Kafka and ZooKeeper clusters through the Cluster Operator. Rolling updates restart the pods of the resource with new ones.
Manually performing a rolling update on a specific pod or set of pods from the same StatefulSet is usually only required in exceptional circumstances. However, rather than deleting the pods directly, if you perform the rolling update through the Cluster Operator you ensure that:
- The manual deletion of the pod does not conflict with simultaneous Cluster Operator operations, such as deleting other pods in parallel.
- The Cluster Operator logic handles the Kafka configuration specifications, such as the number of in-sync replicas.
12.3.1. Prerequisites
To perform a manual rolling update, you need a running Cluster Operator and Kafka cluster.
See the Deploying and Upgrading AMQ Streams on OpenShift guide for instructions on running a:
12.3.2. Performing a rolling update using a StatefulSet annotation
This procedure describes how to manually trigger a rolling update of an existing Kafka cluster or ZooKeeper cluster using an OpenShift StatefulSet annotation.
Procedure
Find the name of the
StatefulSetthat controls the Kafka or ZooKeeper pods you want to manually update.For example, if your Kafka cluster is named my-cluster, the corresponding
StatefulSetnames are my-cluster-kafka and my-cluster-zookeeper.Annotate the
StatefulSetresource in OpenShift.Use
oc annotate:oc annotate statefulset cluster-name-kafka strimzi.io/manual-rolling-update=true oc annotate statefulset cluster-name-zookeeper strimzi.io/manual-rolling-update=true
-
Wait for the next reconciliation to occur (every two minutes by default). A rolling update of all pods within the annotated
StatefulSetis triggered, as long as the annotation was detected by the reconciliation process. When the rolling update of all the pods is complete, the annotation is removed from theStatefulSet.
12.3.3. Performing a rolling update using a Pod annotation
This procedure describes how to manually trigger a rolling update of an existing Kafka cluster or ZooKeeper cluster using an OpenShift Pod annotation. When multiple pods from the same StatefulSet are annotated, consecutive rolling updates are performed within the same reconciliation run.
Procedure
Find the name of the Kafka or ZooKeeper
Podyou want to manually update.For example, if your Kafka cluster is named my-cluster, the corresponding
Podnames are my-cluster-kafka-index and my-cluster-zookeeper-index. The index starts at zero and ends at the total number of replicas.Annotate the
Podresource in OpenShift.Use
oc annotate:oc annotate pod cluster-name-kafka-index strimzi.io/manual-rolling-update=true oc annotate pod cluster-name-zookeeper-index strimzi.io/manual-rolling-update=true
-
Wait for the next reconciliation to occur (every two minutes by default). A rolling update of the annotated
Podis triggered, as long as the annotation was detected by the reconciliation process. When the rolling update of a pod is complete, the annotation is removed from thePod.
12.4. Discovering services using labels and annotations
Service discovery makes it easier for client applications running in the same OpenShift cluster as AMQ Streams to interact with a Kafka cluster.
A service discovery label and annotation is generated for services used to access the Kafka cluster:
- Internal Kafka bootstrap service
- HTTP Bridge service
The label helps to make the service discoverable, and the annotation provides connection details that a client application can use to make the connection.
The service discovery label, strimzi.io/discovery, is set as true for the Service resources. The service discovery annotation has the same key, providing connection details in JSON format for each service.
Example internal Kafka bootstrap service
apiVersion: v1
kind: Service
metadata:
  annotations:
    strimzi.io/discovery: |-
      [ {
        "port" : 9092,
        "tls" : false,
        "protocol" : "kafka",
        "auth" : "scram-sha-512"
      }, {
        "port" : 9093,
        "tls" : true,
        "protocol" : "kafka",
        "auth" : "tls"
      } ]
  labels:
    strimzi.io/cluster: my-cluster
    strimzi.io/discovery: "true"
    strimzi.io/kind: Kafka
    strimzi.io/name: my-cluster-kafka-bootstrap
  name: my-cluster-kafka-bootstrap
spec:
  #...
Example HTTP Bridge service
apiVersion: v1
kind: Service
metadata:
  annotations:
    strimzi.io/discovery: |-
      [ {
        "port" : 8080,
        "tls" : false,
        "auth" : "none",
        "protocol" : "http"
      } ]
  labels:
    strimzi.io/cluster: my-bridge
    strimzi.io/discovery: "true"
    strimzi.io/kind: KafkaBridge
    strimzi.io/name: my-bridge-bridge-service
12.4.1. Returning connection details on services
You can find the services by specifying the discovery label when fetching services from the command line or a corresponding API call.
oc get service -l strimzi.io/discovery=true
The connection details are returned when retrieving the service discovery label.
12.5. Recovering a cluster from persistent volumes
You can recover a Kafka cluster from persistent volumes (PVs) if they are still present.
You might want to do this, for example, after:
- A namespace was deleted unintentionally
- A whole OpenShift cluster is lost, but the PVs remain in the infrastructure
12.5.1. Recovery from namespace deletion
Recovery from namespace deletion is possible because of the relationship between persistent volumes and namespaces. A PersistentVolume (PV) is a storage resource that lives outside of a namespace. A PV is mounted into a Kafka pod using a PersistentVolumeClaim (PVC), which lives inside a namespace.
The reclaim policy for a PV tells a cluster how to act when a namespace is deleted. If the reclaim policy is set as:
- Delete (default), PVs are deleted when PVCs are deleted within a namespace
- Retain, PVs are not deleted when a namespace is deleted
To ensure that you can recover from a PV if a namespace is deleted unintentionally, the policy must be reset from Delete to Retain in the PV specification using the persistentVolumeReclaimPolicy property:
apiVersion: v1
kind: PersistentVolume
# ...
spec:
  # ...
  persistentVolumeReclaimPolicy: Retain
Alternatively, PVs can inherit the reclaim policy of an associated storage class. Storage classes are used for dynamic volume allocation.
By configuring the reclaimPolicy property for the storage class, PVs that use the storage class are created with the appropriate reclaim policy. The storage class is configured for the PV using the storageClassName property.
apiVersion: v1
kind: StorageClass
metadata:
  name: gp2-retain
parameters:
  # ...
# ...
reclaimPolicy: Retain
apiVersion: v1
kind: PersistentVolume
# ...
spec:
  # ...
storageClassName: gp2-retainIf you are using Retain as the reclaim policy, but you want to delete an entire cluster, you need to delete the PVs manually. Otherwise they will not be deleted, and may cause unnecessary expenditure on resources.
12.5.2. Recovery from loss of an OpenShift cluster
When a cluster is lost, you can use the data from disks/volumes to recover the cluster if they were preserved within the infrastructure. The recovery procedure is the same as with namespace deletion, assuming PVs can be recovered and they were created manually.
12.5.3. Recovering a deleted cluster from persistent volumes
This procedure describes how to recover a deleted cluster from persistent volumes (PVs).
In this situation, the Topic Operator identifies that topics exist in Kafka, but the KafkaTopic resources do not exist.
When you get to the step to recreate your cluster, you have two options:
Use Option 1 when you can recover all
KafkaTopicresources.The
KafkaTopicresources must therefore be recovered before the cluster is started so that the corresponding topics are not deleted by the Topic Operator.Use Option 2 when you are unable to recover all
KafkaTopicresources.In this case, you deploy your cluster without the Topic Operator, delete the Topic Operator topic store metadata, and then redeploy the Kafka cluster with the Topic Operator so it can recreate the
KafkaTopicresources from the corresponding topics.
If the Topic Operator is not deployed, you only need to recover the PersistentVolumeClaim (PVC) resources.
Before you begin
In this procedure, it is essential that PVs are mounted into the correct PVC to avoid data corruption. A volumeName is specified for the PVC and this must match the name of the PV.
For more information, see:
The procedure does not include recovery of KafkaUser resources, which must be recreated manually. If passwords and certificates need to be retained, secrets must be recreated before creating the KafkaUser resources.
Procedure
Check information on the PVs in the cluster:
oc get pv
Information is presented for PVs with data.
Example output showing columns important to this procedure:
NAME                                         RECLAIMPOLICY CLAIM
pvc-5e9c5c7f-3317-11ea-a650-06e1eadd9a4c ... Retain ...    myproject/data-my-cluster-zookeeper-1
pvc-5e9cc72d-3317-11ea-97b0-0aef8816c7ea ... Retain ...    myproject/data-my-cluster-zookeeper-0
pvc-5ead43d1-3317-11ea-97b0-0aef8816c7ea ... Retain ...    myproject/data-my-cluster-zookeeper-2
pvc-7e1f67f9-3317-11ea-a650-06e1eadd9a4c ... Retain ...    myproject/data-0-my-cluster-kafka-0
pvc-7e21042e-3317-11ea-9786-02deaf9aa87e ... Retain ...    myproject/data-0-my-cluster-kafka-1
pvc-7e226978-3317-11ea-97b0-0aef8816c7ea ... Retain ...    myproject/data-0-my-cluster-kafka-2
- NAME shows the name of each PV.
- RECLAIM POLICY shows that PVs are retained.
- CLAIM shows the link to the original PVCs.
Recreate the original namespace:
oc create namespace myprojectRecreate the original PVC resource specifications, linking the PVCs to the appropriate PV:
For example:
apiVersion: v1
kind: PersistentVolumeClaim
metadata:
  name: data-0-my-cluster-kafka-0
spec:
  accessModes:
  - ReadWriteOnce
  resources:
    requests:
      storage: 100Gi
  storageClassName: gp2-retain
  volumeMode: Filesystem
  volumeName: pvc-7e1f67f9-3317-11ea-a650-06e1eadd9a4c
Edit the PV specifications to delete the
claimRefproperties that bound the original PVC.For example:
apiVersion: v1
kind: PersistentVolume
metadata:
  annotations:
    kubernetes.io/createdby: aws-ebs-dynamic-provisioner
    pv.kubernetes.io/bound-by-controller: "yes"
    pv.kubernetes.io/provisioned-by: kubernetes.io/aws-ebs
  creationTimestamp: "<date>"
  finalizers:
  - kubernetes.io/pv-protection
  labels:
    failure-domain.beta.kubernetes.io/region: eu-west-1
    failure-domain.beta.kubernetes.io/zone: eu-west-1c
  name: pvc-7e226978-3317-11ea-97b0-0aef8816c7ea
  resourceVersion: "39431"
  selfLink: /api/v1/persistentvolumes/pvc-7e226978-3317-11ea-97b0-0aef8816c7ea
  uid: 7efe6b0d-3317-11ea-a650-06e1eadd9a4c
spec:
  accessModes:
  - ReadWriteOnce
  awsElasticBlockStore:
    fsType: xfs
    volumeID: aws://eu-west-1c/vol-09db3141656d1c258
  capacity:
    storage: 100Gi
  claimRef:
    apiVersion: v1
    kind: PersistentVolumeClaim
    name: data-0-my-cluster-kafka-2
    namespace: myproject
    resourceVersion: "39113"
    uid: 54be1c60-3319-11ea-97b0-0aef8816c7ea
  nodeAffinity:
    required:
      nodeSelectorTerms:
      - matchExpressions:
        - key: failure-domain.beta.kubernetes.io/zone
          operator: In
          values:
          - eu-west-1c
        - key: failure-domain.beta.kubernetes.io/region
          operator: In
          values:
          - eu-west-1
  persistentVolumeReclaimPolicy: Retain
  storageClassName: gp2-retain
  volumeMode: Filesystem
In the example, the following properties are deleted:
claimRef:
  apiVersion: v1
  kind: PersistentVolumeClaim
  name: data-0-my-cluster-kafka-2
  namespace: myproject
  resourceVersion: "39113"
  uid: 54be1c60-3319-11ea-97b0-0aef8816c7ea
Deploy the Cluster Operator.
oc create -f install/cluster-operator -n my-projectRecreate your cluster.
Follow the steps depending on whether or not you have all the
KafkaTopicresources needed to recreate your cluster.Option 1: If you have all the
KafkaTopicresources that existed before you lost your cluster, including internal topics such as committed offsets from__consumer_offsets:Recreate all
KafkaTopicresources.It is essential that you recreate the resources before deploying the cluster, or the Topic Operator will delete the topics.
Deploy the Kafka cluster.
For example:
oc apply -f kafka.yaml
Option 2: If you do not have all the
KafkaTopicresources that existed before you lost your cluster:Deploy the Kafka cluster, as with the first option, but without the Topic Operator by removing the
topicOperatorproperty from the Kafka resource before deploying.If you include the Topic Operator in the deployment, the Topic Operator will delete all the topics.
Delete the internal topic store topics from the Kafka cluster:
oc run kafka-admin -ti --image=registry.redhat.io/amq7/amq-streams-kafka-28-rhel8:1.8.4 --rm=true --restart=Never -- ./bin/kafka-topics.sh --bootstrap-server localhost:9092 --topic __strimzi-topic-operator-kstreams-topic-store-changelog --delete && ./bin/kafka-topics.sh --bootstrap-server localhost:9092 --topic __strimzi_store_topic --delete
The command must correspond to the type of listener and authentication used to access the Kafka cluster.
Enable the Topic Operator by redeploying the Kafka cluster with the
topicOperatorproperty to recreate theKafkaTopicresources.For example:
apiVersion: kafka.strimzi.io/v1beta2
kind: Kafka
metadata:
  name: my-cluster
spec:
  #...
  entityOperator:
    topicOperator: {} 1
    #...
- 1
- Here we show the default configuration, which has no additional properties. You specify the required configuration using the properties described in Section 13.2.45, “
EntityTopicOperatorSpecschema reference”.
Verify the recovery by listing the
KafkaTopicresources:oc get KafkaTopic
12.6. Setting limits on brokers using the Kafka Static Quota plugin
The Kafka Static Quota plugin is a Technology Preview only. Technology Preview features are not supported with Red Hat production service-level agreements (SLAs) and might not be functionally complete. Red Hat does not recommend implementing any Technology Preview features in production environments. This Technology Preview feature provides early access to upcoming product innovations, enabling you to test functionality and provide feedback during the development process. For more information about the support scope of Red Hat Technology Preview features, see Technology Preview Features Support Scope.
Use the Kafka Static Quota plugin to set throughput and storage limits on brokers in your Kafka cluster. You enable the plugin and set limits by configuring the Kafka resource. You can set a byte-rate threshold and storage quotas to put limits on the clients interacting with your brokers.
You can set byte-rate thresholds for producer and consumer bandwidth. The total limit is distributed across all clients accessing the broker. For example, you can set a byte-rate threshold of 40 MBps for producers. If two producers are running, they are each limited to a throughput of 20 MBps.
Storage quotas throttle Kafka disk storage limits between a soft limit and hard limit. The limits apply to all available disk space. Producers are slowed gradually between the soft and hard limit. The limits prevent disks filling up too quickly and exceeding their capacity. Full disks can lead to issues that are hard to rectify. The hard limit is the maximum storage limit.
For JBOD storage, the limit applies across all disks. If a broker is using two 1 TB disks and the quota is 1.1 TB, one disk might fill and the other disk will be almost empty.
Prerequisites
- The Cluster Operator that manages the Kafka cluster is running.
Procedure
Add the plugin properties to the
configof theKafkaresource.The plugin properties are shown in this example configuration.
Example Kafka Static Quota plugin configuration
apiVersion: kafka.strimzi.io/v1beta2 kind: Kafka metadata: name: my-cluster spec: kafka: # ... config: client.quota.callback.class: io.strimzi.kafka.quotas.StaticQuotaCallback 1 client.quota.callback.static.produce: 1000000 2 client.quota.callback.static.fetch: 1000000 3 client.quota.callback.static.storage.soft: 400000000000 4 client.quota.callback.static.storage.hard: 500000000000 5 client.quota.callback.static.storage.check-interval: 5 6- 1
- Loads the Kafka Static Quota plugin.
- 2
- Sets the producer byte-rate threshold. 1 MBps in this example.
- 3
- Sets the consumer byte-rate threshold. 1 MBps in this example.
- 4
- Sets the lower soft limit for storage. 400 GB in this example.
- 5
- Sets the higher hard limit for storage. 500 GB in this example.
- 6
- Sets the interval in seconds between checks on storage. 5 seconds in this example. You can set this to 0 to disable the check.
Update the resource.
oc apply -f KAFKA-CONFIG-FILE
Additional resources
12.7. Tuning Kafka configuration
Use configuration properties to optimize the performance of Kafka brokers, producers and consumers.
A minimum set of configuration properties is required, but you can add or adjust properties to change how producers and consumers interact with Kafka brokers. For example, you can tune latency and throughput of messages so that clients can respond to data in real time.
You might start by analyzing metrics to gauge where to make your initial configurations, then make incremental changes and further comparisons of metrics until you have the configuration you need.
Additional resources
12.7.1. Kafka broker configuration tuning
Use configuration properties to optimize the performance of Kafka brokers. You can use standard Kafka broker configuration options, except for properties managed directly by AMQ Streams.
12.7.1.1. Basic broker configuration
Certain broker configuration options are managed directly by AMQ Streams, driven by the Kafka custom resource specification:
-
broker.idis the ID of the Kafka broker -
log.dirsare the directories for log data -
zookeeper.connectis the configuration to connect Kafka with ZooKeeper -
listenerexposes the Kafka cluster to clients -
authorizationmechanisms allow or decline actions executed by users -
authenticationmechanisms prove the identity of users requiring access to Kafka
Broker IDs start from 0 (zero) and correspond to the number of broker replicas. Log directories are mounted to /var/lib/kafka/data/kafka-logIDX based on the spec.kafka.storage configuration in the Kafka custom resource. IDX is the Kafka broker pod index.
As such, you cannot configure these options through the config property of the Kafka custom resource. For a list of exclusions, see the KafkaClusterSpec schema reference.
However, a typical broker configuration will include settings for properties related to topics, threads and logs.
Basic broker configuration properties
# ...
num.partitions=1
default.replication.factor=3
offsets.topic.replication.factor=3
transaction.state.log.replication.factor=3
transaction.state.log.min.isr=2
log.retention.hours=168
log.segment.bytes=1073741824
log.retention.check.interval.ms=300000
num.network.threads=3
num.io.threads=8
num.recovery.threads.per.data.dir=1
socket.send.buffer.bytes=102400
socket.receive.buffer.bytes=102400
socket.request.max.bytes=104857600
group.initial.rebalance.delay.ms=0
zookeeper.connection.timeout.ms=6000
# ...
12.7.1.2. Replicating topics for high availability
Basic topic properties set the default number of partitions and replication factor for topics, which will apply to topics that are created without these properties being explicitly set, including when topics are created automatically.
# ...
num.partitions=1
auto.create.topics.enable=false
default.replication.factor=3
min.insync.replicas=2
replica.fetch.max.bytes=1048576
# ...
The auto.create.topics.enable property is enabled by default so that topics that do not already exist are created automatically when needed by producers and consumers. If you are using automatic topic creation, you can set the default number of partitions for topics using num.partitions. Generally, however, this property is disabled so that more control is provided over topics through explicit topic creation For example, you can use the AMQ Streams KafkaTopic resource or applications to create topics.
For high availability environments, it is advisable to increase the replication factor to at least 3 for topics and set the minimum number of in-sync replicas required to 1 less than the replication factor. For topics created using the KafkaTopic resource, the replication factor is set using spec.replicas.
For data durability, you should also set min.insync.replicas in your topic configuration and message delivery acknowledgments using acks=all in your producer configuration.
Use replica.fetch.max.bytes to set the maximum size, in bytes, of messages fetched by each follower that replicates the leader partition. Change this value according to the average message size and throughput. When considering the total memory allocation required for read/write buffering, the memory available must also be able to accommodate the maximum replicated message size when multiplied by all followers.
The delete.topic.enable property is enabled by default to allow topics to be deleted. In a production environment, you should disable this property to avoid accidental topic deletion, resulting in data loss. You can, however, temporarily enable it and delete topics and then disable it again. If delete.topic.enable is enabled, you can delete topics using the KafkaTopic resource.
# ...
auto.create.topics.enable=false
delete.topic.enable=true
# ...
12.7.1.3. Internal topic settings for transactions and commits
If you are using transactions to enable atomic writes to partitions from producers, the state of the transactions is stored in the internal __transaction_state topic. By default, the brokers are configured with a replication factor of 3 and a minimum of 2 in-sync replicas for this topic, which means that a minimum of three brokers are required in your Kafka cluster.
# ...
transaction.state.log.replication.factor=3
transaction.state.log.min.isr=2
# ...
Similarly, the internal __consumer_offsets topic, which stores consumer state, has default settings for the number of partitions and replication factor.
# ...
offsets.topic.num.partitions=50
offsets.topic.replication.factor=3
# ...
Do not reduce these settings in production. You can increase the settings in a production environment. As an exception, you might want to reduce the settings in a single-broker test environment.
12.7.1.4. Improving request handling throughput by increasing I/O threads
Network threads handle requests to the Kafka cluster, such as produce and fetch requests from client applications. Produce requests are placed in a request queue. Responses are placed in a response queue.
The number of network threads should reflect the replication factor and the levels of activity from client producers and consumers interacting with the Kafka cluster. If you are going to have a lot of requests, you can increase the number of threads, using the amount of time threads are idle to determine when to add more threads.
To reduce congestion and regulate the request traffic, you can limit the number of requests allowed in the request queue before the network thread is blocked.
I/O threads pick up requests from the request queue to process them. Adding more threads can improve throughput, but the number of CPU cores and disk bandwidth imposes a practical upper limit. At a minimum, the number of I/O threads should equal the number of storage volumes.
# ...
num.network.threads=3 1
queued.max.requests=500 2
num.io.threads=8 3
num.recovery.threads.per.data.dir=1 4
# ...
Configuration updates to the thread pools for all brokers might occur dynamically at the cluster level. These updates are restricted to between half the current size and twice the current size.
Kafka broker metrics can help with working out the number of threads required. For example, metrics for the average time network threads are idle (kafka.network:type=SocketServer,name=NetworkProcessorAvgIdlePercent) indicate the percentage of resources used. If there is 0% idle time, all resources are in use, which means that adding more threads might be beneficial.
If threads are slow or limited due to the number of disks, you can try increasing the size of the buffers for network requests to improve throughput:
# ...
replica.socket.receive.buffer.bytes=65536
# ...
And also increase the maximum number of bytes Kafka can receive:
# ...
socket.request.max.bytes=104857600
# ...
12.7.1.5. Increasing bandwidth for high latency connections
Kafka batches data to achieve reasonable throughput over high-latency connections from Kafka to clients, such as connections between datacenters. However, if high latency is a problem, you can increase the size of the buffers for sending and receiving messages.
# ...
socket.send.buffer.bytes=1048576
socket.receive.buffer.bytes=1048576
# ...
You can estimate the optimal size of your buffers using a bandwidth-delay product calculation, which multiplies the maximum bandwidth of the link (in bytes/s) with the round-trip delay (in seconds) to give an estimate of how large a buffer is required to sustain maximum throughput.
12.7.1.6. Managing logs with data retention policies
Kafka uses logs to store message data. Logs are a series of segments associated with various indexes. New messages are written to an active segment, and never subsequently modified. Segments are read when serving fetch requests from consumers. Periodically, the active segment is rolled to become read-only and a new active segment is created to replace it. There is only a single segment active at a time. Older segments are retained until they are eligible for deletion.
Configuration at the broker level sets the maximum size in bytes of a log segment and the amount of time in milliseconds before an active segment is rolled:
# ...
log.segment.bytes=1073741824
log.roll.ms=604800000
# ...
You can override these settings at the topic level using segment.bytes and segment.ms. Whether you need to lower or raise these values depends on the policy for segment deletion. A larger size means the active segment contains more messages and is rolled less often. Segments also become eligible for deletion less often.
You can set time-based or size-based log retention and cleanup policies so that logs are kept manageable. Depending on your requirements, you can use log retention configuration to delete old segments. If log retention policies are used, non-active log segments are removed when retention limits are reached. Deleting old segments bounds the storage space required for the log so you do not exceed disk capacity.
For time-based log retention, you set a retention period based on hours, minutes and milliseconds. The retention period is based on the time messages were appended to the segment.
The milliseconds configuration has priority over minutes, which has priority over hours. The minutes and milliseconds configuration is null by default, but the three options provide a substantial level of control over the data you wish to retain. Preference should be given to the milliseconds configuration, as it is the only one of the three properties that is dynamically updateable.
# ...
log.retention.ms=1680000
# ...
If log.retention.ms is set to -1, no time limit is applied to log retention, so all logs are retained. Disk usage should always be monitored, but the -1 setting is not generally recommended as it can lead to issues with full disks, which can be hard to rectify.
For size-based log retention, you set a maximum log size (of all segments in the log) in bytes:
# ...
log.retention.bytes=1073741824
# ...
In other words, a log will typically have approximately log.retention.bytes/log.segment.bytes segments once it reaches a steady state. When the maximum log size is reached, older segments are removed.
A potential issue with using a maximum log size is that it does not take into account the time messages were appended to a segment. You can use time-based and size-based log retention for your cleanup policy to get the balance you need. Whichever threshold is reached first triggers the cleanup.
If you wish to add a time delay before a segment file is deleted from the system, you can add the delay using log.segment.delete.delay.ms for all topics at the broker level or file.delete.delay.ms for specific topics in the topic configuration.
# ...
log.segment.delete.delay.ms=60000
# ...
12.7.1.7. Removing log data with cleanup policies
The method of removing older log data is determined by the log cleaner configuration.
The log cleaner is enabled for the broker by default:
# ...
log.cleaner.enable=true
# ...
You can set the cleanup policy at the topic or broker level. Broker-level configuration is the default for topics that do not have policy set.
You can set policy to delete logs, compact logs, or do both:
# ...
log.cleanup.policy=compact,delete
# ...
The delete policy corresponds to managing logs with data retention policies. It is suitable when data does not need to be retained forever. The compact policy guarantees to keep the most recent message for each message key. Log compaction is suitable where message values are changeable, and you want to retain the latest update.
If cleanup policy is set to delete logs, older segments are deleted based on log retention limits. Otherwise, if the log cleaner is not enabled, and there are no log retention limits, the log will continue to grow.
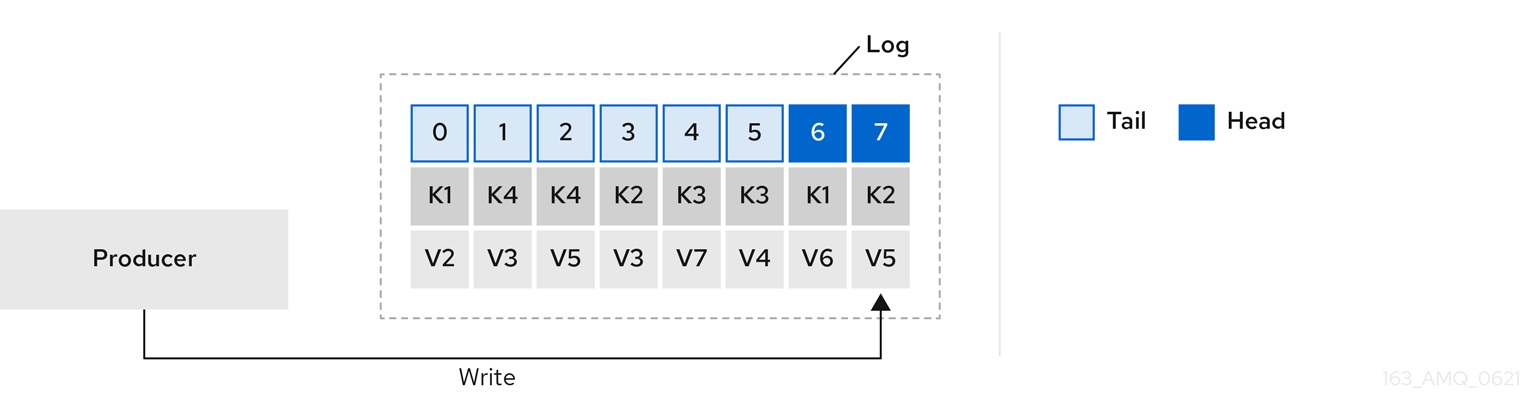
If cleanup policy is set for log compaction, the head of the log operates as a standard Kafka log, with writes for new messages appended in order. In the tail of a compacted log, where the log cleaner operates, records will be deleted if another record with the same key occurs later in the log. Messages with null values are also deleted. If you’re not using keys, you can’t use compaction because keys are needed to identify related messages. While Kafka guarantees that the latest messages for each key will be retained, it does not guarantee that the whole compacted log will not contain duplicates.
Figure 12.1. Log showing key value writes with offset positions before compaction
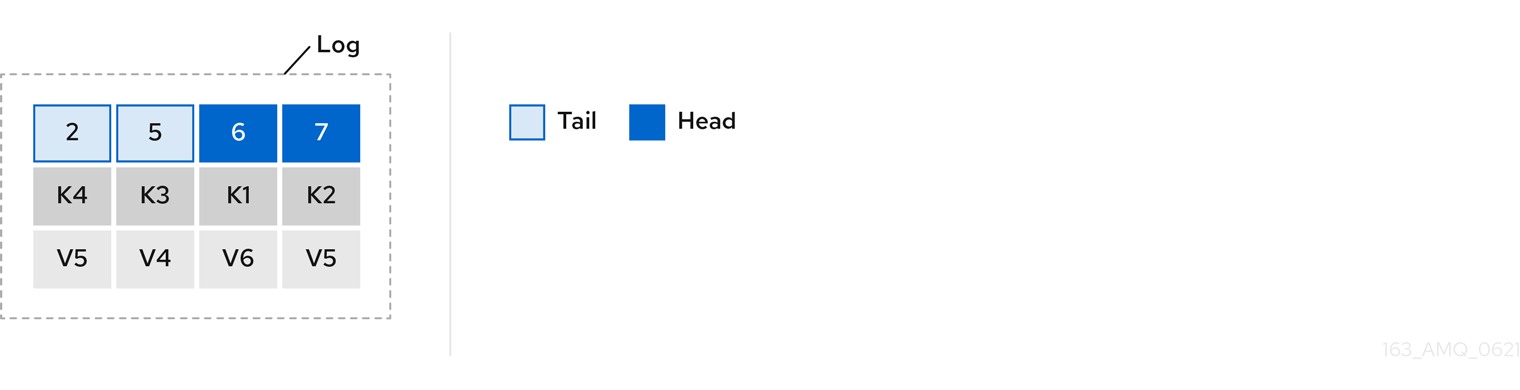
Using keys to identify messages, Kafka compaction keeps the latest message (with the highest offset) for a specific message key, eventually discarding earlier messages that have the same key. In other words, the message in its latest state is always available and any out-of-date records of that particular message are eventually removed when the log cleaner runs. You can restore a message back to a previous state.
Records retain their original offsets even when surrounding records get deleted. Consequently, the tail can have non-contiguous offsets. When consuming an offset that’s no longer available in the tail, the record with the next higher offset is found.
Figure 12.2. Log after compaction
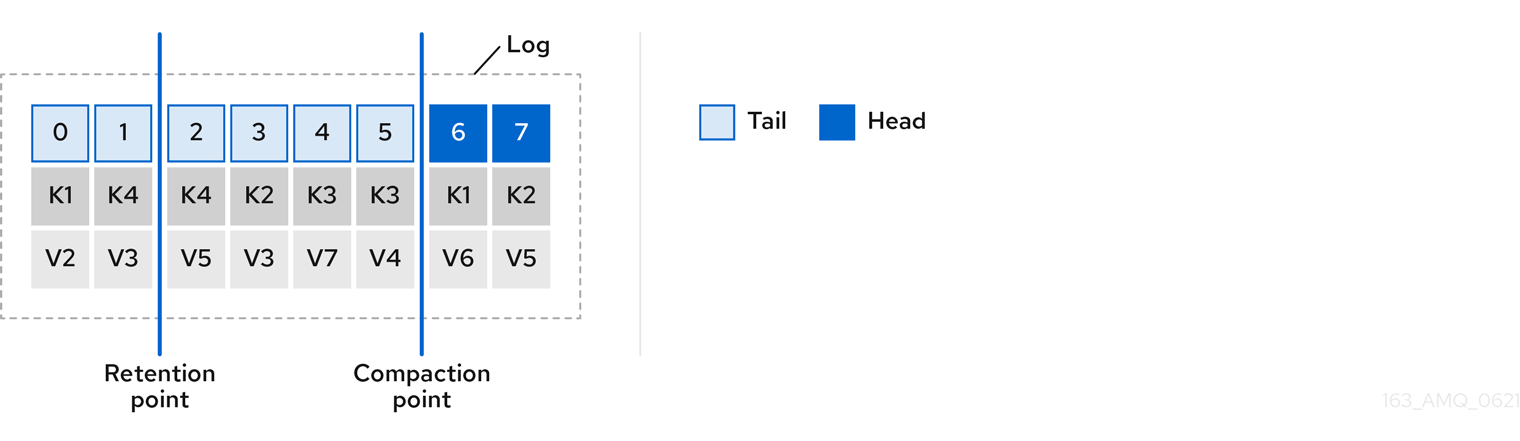
If you choose only a compact policy, your log can still become arbitrarily large. In which case, you can set policy to compact and delete logs. If you choose to compact and delete, first the log data is compacted, removing records with a key in the head of the log. After which, data that falls before the log retention threshold is deleted.
Figure 12.3. Log retention point and compaction point
You set the frequency the log is checked for cleanup in milliseconds:
# ...
log.retention.check.interval.ms=300000
# ...
Adjust the log retention check interval in relation to the log retention settings. Smaller retention sizes might require more frequent checks.
The frequency of cleanup should be often enough to manage the disk space, but not so often it affects performance on a topic.
You can also set a time in milliseconds to put the cleaner on standby if there are no logs to clean:
# ...
log.cleaner.backoff.ms=15000
# ...
If you choose to delete older log data, you can set a period in milliseconds to retain the deleted data before it is purged:
# ...
log.cleaner.delete.retention.ms=86400000
# ...
The deleted data retention period gives time to notice the data is gone before it is irretrievably deleted.
To delete all messages related to a specific key, a producer can send a tombstone message. A tombstone has a null value and acts as a marker to tell a consumer the value is deleted. After compaction, only the tombstone is retained, which must be for a long enough period for the consumer to know that the message is deleted. When older messages are deleted, having no value, the tombstone key is also deleted from the partition.
12.7.1.8. Managing disk utilization
There are many other configuration settings related to log cleanup, but of particular importance is memory allocation.
The deduplication property specifies the total memory for cleanup across all log cleaner threads. You can set an upper limit on the percentage of memory used through the buffer load factor.
# ...
log.cleaner.dedupe.buffer.size=134217728
log.cleaner.io.buffer.load.factor=0.9
# ...
Each log entry uses exactly 24 bytes, so you can work out how many log entries the buffer can handle in a single run and adjust the setting accordingly.
If possible, consider increasing the number of log cleaner threads if you are looking to reduce the log cleaning time:
# ...
log.cleaner.threads=8
# ...
If you are experiencing issues with 100% disk bandwidth usage, you can throttle the log cleaner I/O so that the sum of the read/write operations is less than a specified double value based on the capabilities of the disks performing the operations:
# ...
log.cleaner.io.max.bytes.per.second=1.7976931348623157E308
# ...
12.7.1.9. Handling large message sizes
The default batch size for messages is 1MB, which is optimal for maximum throughput in most use cases. Kafka can accommodate larger batches at a reduced throughput, assuming adequate disk capacity.
Large message sizes are handled in four ways:
- Producer-side message compression writes compressed messages to the log.
- Reference-based messaging sends only a reference to data stored in some other system in the message’s value.
- Inline messaging splits messages into chunks that use the same key, which are then combined on output using a stream-processor like Kafka Streams.
- Broker and producer/consumer client application configuration built to handle larger message sizes.
The reference-based messaging and message compression options are recommended and cover most situations. With any of these options, care must be take to avoid introducing performance issues.
Producer-side compression
For producer configuration, you specify a compression.type, such as Gzip, which is then applied to batches of data generated by the producer. Using the broker configuration compression.type=producer, the broker retains whatever compression the producer used. Whenever producer and topic compression do not match, the broker has to compress batches again prior to appending them to the log, which impacts broker performance.
Compression also adds additional processing overhead on the producer and decompression overhead on the consumer, but includes more data in a batch, so is often beneficial to throughput when message data compresses well.
Combine producer-side compression with fine-tuning of the batch size to facilitate optimum throughput. Using metrics helps to gauge the average batch size needed.
Reference-based messaging
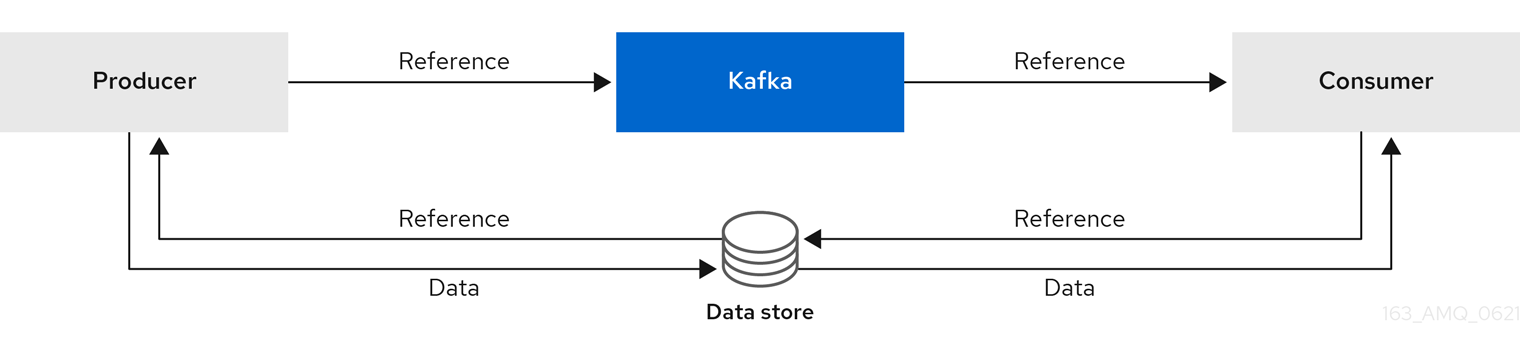
Reference-based messaging is useful for data replication when you do not know how big a message will be. The external data store must be fast, durable, and highly available for this configuration to work. Data is written to the data store and a reference to the data is returned. The producer sends a message containing the reference to Kafka. The consumer gets the reference from the message and uses it to fetch the data from the data store.
Figure 12.4. Reference-based messaging flow
As the message passing requires more trips, end-to-end latency will increase. Another significant drawback of this approach is there is no automatic clean up of the data in the external system when the Kafka message gets cleaned up. A hybrid approach would be to only send large messages to the data store and process standard-sized messages directly.
Inline messaging
Inline messaging is complex, but it does not have the overhead of depending on external systems like reference-based messaging.
The producing client application has to serialize and then chunk the data if the message is too big. The producer then uses the Kafka ByteArraySerializer or similar to serialize each chunk again before sending it. The consumer tracks messages and buffers chunks until it has a complete message. The consuming client application receives the chunks, which are assembled before deserialization. Complete messages are delivered to the rest of the consuming application in order according to the offset of the first or last chunk for each set of chunked messages. Successful delivery of the complete message is checked against offset metadata to avoid duplicates during a rebalance.
Figure 12.5. Inline messaging flow

Inline messaging has a performance overhead on the consumer side because of the buffering required, particularly when handling a series of large messages in parallel. The chunks of large messages can become interleaved, so that it is not always possible to commit when all the chunks of a message have been consumed if the chunks of another large message in the buffer are incomplete. For this reason, the buffering is usually supported by persisting message chunks or by implementing commit logic.
Configuration to handle larger messages
If larger messages cannot be avoided, and to avoid blocks at any point of the message flow, you can increase message limits. To do this, configure message.max.bytes at the topic level to set the maximum record batch size for individual topics. If you set message.max.bytes at the broker level, larger messages are allowed for all topics.
The broker will reject any message that is greater than the limit set with message.max.bytes. The buffer size for the producers (max.request.size) and consumers (message.max.bytes) must be able to accommodate the larger messages.
12.7.1.10. Controlling the log flush of message data
Log flush properties control the periodic writes of cached message data to disk. The scheduler specifies the frequency of checks on the log cache in milliseconds:
# ...
log.flush.scheduler.interval.ms=2000
# ...
You can control the frequency of the flush based on the maximum amount of time that a message is kept in-memory and the maximum number of messages in the log before writing to disk:
# ...
log.flush.interval.ms=50000
log.flush.interval.messages=100000
# ...
The wait between flushes includes the time to make the check and the specified interval before the flush is carried out. Increasing the frequency of flushes can affect throughput.
Generally, the recommendation is to not set explicit flush thresholds and let the operating system perform background flush using its default settings. Partition replication provides greater data durability than writes to any single disk as a failed broker can recover from its in-sync replicas.
If you are using application flush management, setting lower flush thresholds might be appropriate if you are using faster disks.
12.7.1.11. Partition rebalancing for availability
Partitions can be replicated across brokers for fault tolerance. For a given partition, one broker is elected leader and handles all produce requests (writes to the log). Partition followers on other brokers replicate the partition data of the partition leader for data reliability in the event of the leader failing.
Followers do not normally serve clients, though rack configuration allows a consumer to consume messages from the closest replica when a Kafka cluster spans multiple datacenters. Followers operate only to replicate messages from the partition leader and allow recovery should the leader fail. Recovery requires an in-sync follower. Followers stay in sync by sending fetch requests to the leader, which returns messages to the follower in order. The follower is considered to be in sync if it has caught up with the most recently committed message on the leader. The leader checks this by looking at the last offset requested by the follower. An out-of-sync follower is usually not eligible as a leader should the current leader fail, unless unclean leader election is allowed.
You can adjust the lag time before a follower is considered out of sync:
# ...
replica.lag.time.max.ms=30000
# ...
Lag time puts an upper limit on the time to replicate a message to all in-sync replicas and how long a producer has to wait for an acknowledgment. If a follower fails to make a fetch request and catch up with the latest message within the specified lag time, it is removed from in-sync replicas. You can reduce the lag time to detect failed replicas sooner, but by doing so you might increase the number of followers that fall out of sync needlessly. The right lag time value depends on both network latency and broker disk bandwidth.
When a leader partition is no longer available, one of the in-sync replicas is chosen as the new leader. The first broker in a partition’s list of replicas is known as the preferred leader. By default, Kafka is enabled for automatic partition leader rebalancing based on a periodic check of leader distribution. That is, Kafka checks to see if the preferred leader is the current leader. A rebalance ensures that leaders are evenly distributed across brokers and brokers are not overloaded.
You can use Cruise Control for AMQ Streams to figure out replica assignments to brokers that balance load evenly across the cluster. Its calculation takes into account the differing load experienced by leaders and followers. A failed leader affects the balance of a Kafka cluster because the remaining brokers get the extra work of leading additional partitions.
For the assignment found by Cruise Control to actually be balanced it is necessary that partitions are lead by the preferred leader. Kafka can automatically ensure that the preferred leader is being used (where possible), changing the current leader if necessary. This ensures that the cluster remains in the balanced state found by Cruise Control.
You can control the frequency, in seconds, of the rebalance check and the maximum percentage of imbalance allowed for a broker before a rebalance is triggered.
#...
auto.leader.rebalance.enable=true
leader.imbalance.check.interval.seconds=300
leader.imbalance.per.broker.percentage=10
#...
The percentage leader imbalance for a broker is the ratio between the current number of partitions for which the broker is the current leader and the number of partitions for which it is the preferred leader. You can set the percentage to zero to ensure that preferred leaders are always elected, assuming they are in sync.
If the checks for rebalances need more control, you can disable automated rebalances. You can then choose when to trigger a rebalance using the kafka-leader-election.sh command line tool.
The Grafana dashboards provided with AMQ Streams show metrics for under-replicated partitions and partitions that do not have an active leader.
12.7.1.12. Unclean leader election
Leader election to an in-sync replica is considered clean because it guarantees no loss of data. And this is what happens by default. But what if there is no in-sync replica to take on leadership? Perhaps the ISR (in-sync replica) only contained the leader when the leader’s disk died. If a minimum number of in-sync replicas is not set, and there are no followers in sync with the partition leader when its hard drive fails irrevocably, data is already lost. Not only that, but a new leader cannot be elected because there are no in-sync followers.
You can configure how Kafka handles leader failure:
# ...
unclean.leader.election.enable=false
# ...
Unclean leader election is disabled by default, which means that out-of-sync replicas cannot become leaders. With clean leader election, if no other broker was in the ISR when the old leader was lost, Kafka waits until that leader is back online before messages can be written or read. Unclean leader election means out-of-sync replicas can become leaders, but you risk losing messages. The choice you make depends on whether your requirements favor availability or durability.
You can override the default configuration for specific topics at the topic level. If you cannot afford the risk of data loss, then leave the default configuration.
12.7.1.13. Avoiding unnecessary consumer group rebalances
For consumers joining a new consumer group, you can add a delay so that unnecessary rebalances to the broker are avoided:
# ...
group.initial.rebalance.delay.ms=3000
# ...
The delay is the amount of time that the coordinator waits for members to join. The longer the delay, the more likely it is that all the members will join in time and avoid a rebalance. But the delay also prevents the group from consuming until the period has ended.
Additional resources
12.7.2. Kafka producer configuration tuning
Use a basic producer configuration with optional properties that are tailored to specific use cases.
Adjusting your configuration to maximize throughput might increase latency or vice versa. You will need to experiment and tune your producer configuration to get the balance you need.
12.7.2.1. Basic producer configuration
Connection and serializer properties are required for every producer. Generally, it is good practice to add a client id for tracking, and use compression on the producer to reduce batch sizes in requests.
In a basic producer configuration:
- The order of messages in a partition is not guaranteed.
- The acknowledgment of messages reaching the broker does not guarantee durability.
Basic producer configuration properties
# ...
bootstrap.servers=localhost:9092 1
key.serializer=org.apache.kafka.common.serialization.StringSerializer 2
value.serializer=org.apache.kafka.common.serialization.StringSerializer 3
client.id=my-client 4
compression.type=gzip 5
# ...
- 1
- (Required) Tells the producer to connect to a Kafka cluster using a host:port bootstrap server address for a Kafka broker. The producer uses the address to discover and connect to all brokers in the cluster. Use a comma-separated list to specify two or three addresses in case a server is down, but it’s not necessary to provide a list of all the brokers in the cluster.
- 2
- (Required) Serializer to transform the key of each message to bytes prior to them being sent to a broker.
- 3
- (Required) Serializer to transform the value of each message to bytes prior to them being sent to a broker.
- 4
- (Optional) The logical name for the client, which is used in logs and metrics to identify the source of a request.
- 5
- (Optional) The codec for compressing messages, which are sent and might be stored in compressed format and then decompressed when reaching a consumer. Compression is useful for improving throughput and reducing the load on storage, but might not be suitable for low latency applications where the cost of compression or decompression could be prohibitive.
12.7.2.2. Data durability
You can apply greater data durability, to minimize the likelihood that messages are lost, using message delivery acknowledgments.
# ...
acks=all 1
# ...- 1
- Specifying
acks=allforces a partition leader to replicate messages to a certain number of followers before acknowledging that the message request was successfully received. Because of the additional checks,acks=allincreases the latency between the producer sending a message and receiving acknowledgment.
The number of brokers which need to have appended the messages to their logs before the acknowledgment is sent to the producer is determined by the topic’s min.insync.replicas configuration. A typical starting point is to have a topic replication factor of 3, with two in-sync replicas on other brokers. In this configuration, the producer can continue unaffected if a single broker is unavailable. If a second broker becomes unavailable, the producer won’t receive acknowledgments and won’t be able to produce more messages.
Topic configuration to support acks=all
# ...
min.insync.replicas=2 1
# ...
- 1
- Use
2in-sync replicas. The default is1.
If the system fails, there is a risk of unsent data in the buffer being lost.
12.7.2.3. Ordered delivery
Idempotent producers avoid duplicates as messages are delivered exactly once. IDs and sequence numbers are assigned to messages to ensure the order of delivery, even in the event of failure. If you are using acks=all for data consistency, enabling idempotency makes sense for ordered delivery.
Ordered delivery with idempotency
# ...
enable.idempotence=true 1
max.in.flight.requests.per.connection=5 2
acks=all 3
retries=2147483647 4
# ...
- 1
- Set to
trueto enable the idempotent producer. - 2
- With idempotent delivery the number of in-flight requests may be greater than 1 while still providing the message ordering guarantee. The default is 5 in-flight requests.
- 3
- Set
ackstoall. - 4
- Set the number of attempts to resend a failed message request.
If you are not using acks=all and idempotency because of the performance cost, set the number of in-flight (unacknowledged) requests to 1 to preserve ordering. Otherwise, a situation is possible where Message-A fails only to succeed after Message-B was already written to the broker.
Ordered delivery without idempotency
# ...
enable.idempotence=false 1
max.in.flight.requests.per.connection=1 2
retries=2147483647
# ...
12.7.2.4. Reliability guarantees
Idempotence is useful for exactly once writes to a single partition. Transactions, when used with idempotence, allow exactly once writes across multiple partitions.
Transactions guarantee that messages using the same transactional ID are produced once, and either all are successfully written to the respective logs or none of them are.
# ...
enable.idempotence=true
max.in.flight.requests.per.connection=5
acks=all
retries=2147483647
transactional.id=UNIQUE-ID 1
transaction.timeout.ms=900000 2
# ...
The choice of transactional.id is important in order that the transactional guarantee is maintained. Each transactional id should be used for a unique set of topic partitions. For example, this can be achieved using an external mapping of topic partition names to transactional ids, or by computing the transactional id from the topic partition names using a function that avoids collisions.
12.7.2.5. Optimizing throughput and latency
Usually, the requirement of a system is to satisfy a particular throughput target for a proportion of messages within a given latency. For example, targeting 500,000 messages per second with 95% of messages being acknowledged within 2 seconds.
It’s likely that the messaging semantics (message ordering and durability) of your producer are defined by the requirements for your application. For instance, it’s possible that you don’t have the option of using acks=0 or acks=1 without breaking some important property or guarantee provided by your application.
Broker restarts have a significant impact on high percentile statistics. For example, over a long period the 99th percentile latency is dominated by behavior around broker restarts. This is worth considering when designing benchmarks or comparing performance numbers from benchmarking with performance numbers seen in production.
Depending on your objective, Kafka offers a number of configuration parameters and techniques for tuning producer performance for throughput and latency.
- Message batching (
linger.msandbatch.size) -
Message batching delays sending messages in the hope that more messages destined for the same broker will be sent, allowing them to be batched into a single produce request. Batching is a compromise between higher latency in return for higher throughput. Time-based batching is configured using
linger.ms, and size-based batching is configured usingbatch.size. - Compression (
compression.type) -
Message compression adds latency in the producer (CPU time spent compressing the messages), but makes requests (and potentially disk writes) smaller, which can increase throughput. Whether compression is worthwhile, and the best compression to use, will depend on the messages being sent. Compression happens on the thread which calls
KafkaProducer.send(), so if the latency of this method matters for your application you should consider using more threads. - Pipelining (
max.in.flight.requests.per.connection) - Pipelining means sending more requests before the response to a previous request has been received. In general more pipelining means better throughput, up to a threshold at which other effects, such as worse batching, start to counteract the effect on throughput.
Lowering latency
When your application calls KafkaProducer.send() the messages are:
- Processed by any interceptors
- Serialized
- Assigned to a partition
- Compressed
- Added to a batch of messages in a per-partition queue
At which point the send() method returns. So the time send() is blocked is determined by:
- The time spent in the interceptors, serializers and partitioner
- The compression algorithm used
- The time spent waiting for a buffer to use for compression
Batches will remain in the queue until one of the following occurs:
-
The batch is full (according to
batch.size) -
The delay introduced by
linger.mshas passed - The sender is about to send message batches for other partitions to the same broker, and it is possible to add this batch too
- The producer is being flushed or closed
Look at the configuration for batching and buffering to mitigate the impact of send() blocking on latency.
# ...
linger.ms=100 1
batch.size=16384 2
buffer.memory=33554432 3
# ...
- 1
- The
lingerproperty adds a delay in milliseconds so that larger batches of messages are accumulated and sent in a request. The default is0'. - 2
- If a maximum
batch.sizein bytes is used, a request is sent when the maximum is reached, or messages have been queued for longer thanlinger.ms(whichever comes sooner). Adding the delay allows batches to accumulate messages up to the batch size. - 3
- The buffer size must be at least as big as the batch size, and be able to accommodate buffering, compression and in-flight requests.
Increasing throughput
Improve throughput of your message requests by adjusting the maximum time to wait before a message is delivered and completes a send request.
You can also direct messages to a specified partition by writing a custom partitioner to replace the default.
# ...
delivery.timeout.ms=120000 1
partitioner.class=my-custom-partitioner 2

# ...
12.7.3. Kafka consumer configuration tuning
Use a basic consumer configuration with optional properties that are tailored to specific use cases.
When tuning your consumers your primary concern will be ensuring that they cope efficiently with the amount of data ingested. As with the producer tuning, be prepared to make incremental changes until the consumers operate as expected.
12.7.3.1. Basic consumer configuration
Connection and deserializer properties are required for every consumer. Generally, it is good practice to add a client id for tracking.
In a consumer configuration, irrespective of any subsequent configuration:
- The consumer fetches from a given offset and consumes the messages in order, unless the offset is changed to skip or re-read messages.
- The broker does not know if the consumer processed the responses, even when committing offsets to Kafka, because the offsets might be sent to a different broker in the cluster.
Basic consumer configuration properties
# ...
bootstrap.servers=localhost:9092 1
key.deserializer=org.apache.kafka.common.serialization.StringDeserializer  2
value.deserializer=org.apache.kafka.common.serialization.StringDeserializer  3
client.id=my-client 4
group.id=my-group-id 5
# ...
- 1
- (Required) Tells the consumer to connect to a Kafka cluster using a host:port bootstrap server address for a Kafka broker. The consumer uses the address to discover and connect to all brokers in the cluster. Use a comma-separated list to specify two or three addresses in case a server is down, but it is not necessary to provide a list of all the brokers in the cluster. If you are using a loadbalancer service to expose the Kafka cluster, you only need the address for the service because the availability is handled by the loadbalancer.
- 2
- (Required) Deserializer to transform the bytes fetched from the Kafka broker into message keys.
- 3
- (Required) Deserializer to transform the bytes fetched from the Kafka broker into message values.
- 4
- (Optional) The logical name for the client, which is used in logs and metrics to identify the source of a request. The id can also be used to throttle consumers based on processing time quotas.
- 5
- (Conditional) A group id is required for a consumer to be able to join a consumer group.
12.7.3.2. Scaling data consumption using consumer groups
Consumer groups share a typically large data stream generated by one or multiple producers from a given topic. Consumers are grouped using a group.id property, allowing messages to be spread across the members. One of the consumers in the group is elected leader and decides how the partitions are assigned to the consumers in the group. Each partition can only be assigned to a single consumer.
If you do not already have as many consumers as partitions, you can scale data consumption by adding more consumer instances with the same group.id. Adding more consumers to a group than there are partitions will not help throughput, but it does mean that there are consumers on standby should one stop functioning. If you can meet throughput goals with fewer consumers, you save on resources.
Consumers within the same consumer group send offset commits and heartbeats to the same broker. So the greater the number of consumers in the group, the higher the request load on the broker.
# ...
group.id=my-group-id 1
# ...- 1
- Add a consumer to a consumer group using a group id.
12.7.3.3. Message ordering guarantees
Kafka brokers receive fetch requests from consumers that ask the broker to send messages from a list of topics, partitions and offset positions.
A consumer observes messages in a single partition in the same order that they were committed to the broker, which means that Kafka only provides ordering guarantees for messages in a single partition. Conversely, if a consumer is consuming messages from multiple partitions, the order of messages in different partitions as observed by the consumer does not necessarily reflect the order in which they were sent.
If you want a strict ordering of messages from one topic, use one partition per consumer.
12.7.3.4. Optimizing throughput and latency
Control the number of messages returned when your client application calls KafkaConsumer.poll().
Use the fetch.max.wait.ms and fetch.min.bytes properties to increase the minimum amount of data fetched by the consumer from the Kafka broker. Time-based batching is configured using fetch.max.wait.ms, and size-based batching is configured using fetch.min.bytes.
If CPU utilization in the consumer or broker is high, it might be because there are too many requests from the consumer. You can adjust fetch.max.wait.ms and fetch.min.bytes properties higher so that there are fewer requests and messages are delivered in bigger batches. By adjusting higher, throughput is improved with some cost to latency. You can also adjust higher if the amount of data being produced is low.
For example, if you set fetch.max.wait.ms to 500ms and fetch.min.bytes to 16384 bytes, when Kafka receives a fetch request from the consumer it will respond when the first of either threshold is reached.
Conversely, you can adjust the fetch.max.wait.ms and fetch.min.bytes properties lower to improve end-to-end latency.
# ...
fetch.max.wait.ms=500 1
fetch.min.bytes=16384 2
# ...
- 1
- The maximum time in milliseconds the broker will wait before completing fetch requests. The default is
500milliseconds. - 2
- If a minimum batch size in bytes is used, a request is sent when the minimum is reached, or messages have been queued for longer than
fetch.max.wait.ms(whichever comes sooner). Adding the delay allows batches to accumulate messages up to the batch size.
Lowering latency by increasing the fetch request size
Use the fetch.max.bytes and max.partition.fetch.bytes properties to increase the maximum amount of data fetched by the consumer from the Kafka broker.
The fetch.max.bytes property sets a maximum limit in bytes on the amount of data fetched from the broker at one time.
The max.partition.fetch.bytes sets a maximum limit in bytes on how much data is returned for each partition, which must always be larger than the number of bytes set in the broker or topic configuration for max.message.bytes.
The maximum amount of memory a client can consume is calculated approximately as:
NUMBER-OF-BROKERS * fetch.max.bytes and NUMBER-OF-PARTITIONS * max.partition.fetch.bytes
If memory usage can accommodate it, you can increase the values of these two properties. By allowing more data in each request, latency is improved as there are fewer fetch requests.
# ...
fetch.max.bytes=52428800 1
max.partition.fetch.bytes=1048576 2
# ...
12.7.3.5. Avoiding data loss or duplication when committing offsets
The Kafka auto-commit mechanism allows a consumer to commit the offsets of messages automatically. If enabled, the consumer will commit offsets received from polling the broker at 5000ms intervals.
The auto-commit mechanism is convenient, but it introduces a risk of data loss and duplication. If a consumer has fetched and transformed a number of messages, but the system crashes with processed messages in the consumer buffer when performing an auto-commit, that data is lost. If the system crashes after processing the messages, but before performing the auto-commit, the data is duplicated on another consumer instance after rebalancing.
Auto-committing can avoid data loss only when all messages are processed before the next poll to the broker, or the consumer closes.
To minimize the likelihood of data loss or duplication, you can set enable.auto.commit to false and develop your client application to have more control over committing offsets. Or you can use auto.commit.interval.ms to decrease the intervals between commits.
# ...
enable.auto.commit=false 1
# ...- 1
- Auto commit is set to false to provide more control over committing offsets.
By setting to enable.auto.commit to false, you can commit offsets after all processing has been performed and the message has been consumed. For example, you can set up your application to call the Kafka commitSync and commitAsync commit APIs.
The commitSync API commits the offsets in a message batch returned from polling. You call the API when you are finished processing all the messages in the batch. If you use the commitSync API, the application will not poll for new messages until the last offset in the batch is committed. If this negatively affects throughput, you can commit less frequently, or you can use the commitAsync API. The commitAsync API does not wait for the broker to respond to a commit request, but risks creating more duplicates when rebalancing. A common approach is to combine both commit APIs in an application, with the commitSync API used just before shutting the consumer down or rebalancing to make sure the final commit is successful.
12.7.3.5.1. Controlling transactional messages
Consider using transactional ids and enabling idempotence (enable.idempotence=true) on the producer side to guarantee exactly-once delivery. On the consumer side, you can then use the isolation.level property to control how transactional messages are read by the consumer.
The isolation.level property has two valid values:
-
read_committed -
read_uncommitted(default)
Use read_committed to ensure that only transactional messages that have been committed are read by the consumer. However, this will cause an increase in end-to-end latency, because the consumer will not be able to return a message until the brokers have written the transaction markers that record the result of the transaction (committed or aborted).
# ...
enable.auto.commit=false
isolation.level=read_committed 1
# ...- 1
- Set to
read_committedso that only committed messages are read by the consumer.
12.7.3.6. Recovering from failure to avoid data loss
Use the session.timeout.ms and heartbeat.interval.ms properties to configure the time taken to check and recover from consumer failure within a consumer group.
The session.timeout.ms property specifies the maximum amount of time in milliseconds a consumer within a consumer group can be out of contact with a broker before being considered inactive and a rebalancing is triggered between the active consumers in the group. When the group rebalances, the partitions are reassigned to the members of the group.
The heartbeat.interval.ms property specifies the interval in milliseconds between heartbeat checks to the consumer group coordinator to indicate that the consumer is active and connected. The heartbeat interval must be lower, usually by a third, than the session timeout interval.
If you set the session.timeout.ms property lower, failing consumers are detected earlier, and rebalancing can take place quicker. However, take care not to set the timeout so low that the broker fails to receive a heartbeat in time and triggers an unnecessary rebalance.
Decreasing the heartbeat interval reduces the chance of accidental rebalancing, but more frequent heartbeats increases the overhead on broker resources.
12.7.3.7. Managing offset policy
Use the auto.offset.reset property to control how a consumer behaves when no offsets have been committed, or a committed offset is no longer valid or deleted.
Suppose you deploy a consumer application for the first time, and it reads messages from an existing topic. Because this is the first time the group.id is used, the __consumer_offsets topic does not contain any offset information for this application. The new application can start processing all existing messages from the start of the log or only new messages. The default reset value is latest, which starts at the end of the partition, and consequently means some messages are missed. To avoid data loss, but increase the amount of processing, set auto.offset.reset to earliest to start at the beginning of the partition.
Also consider using the earliest option to avoid messages being lost when the offsets retention period (offsets.retention.minutes) configured for a broker has ended. If a consumer group or standalone consumer is inactive and commits no offsets during the retention period, previously committed offsets are deleted from __consumer_offsets.
# ...
heartbeat.interval.ms=3000 1
session.timeout.ms=10000 2
auto.offset.reset=earliest 3
# ...
- 1
- Adjust the heartbeat interval lower according to anticipated rebalances.
- 2
- If no heartbeats are received by the Kafka broker before the timeout duration expires, the consumer is removed from the consumer group and a rebalance is initiated. If the broker configuration has a
group.min.session.timeout.msandgroup.max.session.timeout.ms, the session timeout value must be within that range. - 3
- Set to
earliestto return to the start of a partition and avoid data loss if offsets were not committed.
If the amount of data returned in a single fetch request is large, a timeout might occur before the consumer has processed it. In this case, you can lower max.partition.fetch.bytes or increase session.timeout.ms.
12.7.3.8. Minimizing the impact of rebalances
The rebalancing of a partition between active consumers in a group is the time it takes for:
- Consumers to commit their offsets
- The new consumer group to be formed
- The group leader to assign partitions to group members
- The consumers in the group to receive their assignments and start fetching
Clearly, the process increases the downtime of a service, particularly when it happens repeatedly during a rolling restart of a consumer group cluster.
In this situation, you can use the concept of static membership to reduce the number of rebalances. Rebalancing assigns topic partitions evenly among consumer group members. Static membership uses persistence so that a consumer instance is recognized during a restart after a session timeout.
The consumer group coordinator can identify a new consumer instance using a unique id that is specified using the group.instance.id property. During a restart, the consumer is assigned a new member id, but as a static member it continues with the same instance id, and the same assignment of topic partitions is made.
If the consumer application does not make a call to poll at least every max.poll.interval.ms milliseconds, the consumer is considered to be failed, causing a rebalance. If the application cannot process all the records returned from poll in time, you can avoid a rebalance by using the max.poll.interval.ms property to specify the interval in milliseconds between polls for new messages from a consumer. Or you can use the max.poll.records property to set a maximum limit on the number of records returned from the consumer buffer, allowing your application to process fewer records within the max.poll.interval.ms limit.
# ...
group.instance.id=_UNIQUE-ID_ 1
max.poll.interval.ms=300000 2
max.poll.records=500 3
# ...
12.8. Uninstalling AMQ Streams
This procedure describes how to uninstall AMQ Streams and remove resources related to the deployment.
Prerequisites
In order to perform this procedure, identify resources created specifically for a deployment and referenced from the AMQ Streams resource.
Such resources include:
- Secrets (Custom CAs and certificates, Kafka Connect secrets, and other Kafka secrets)
-
Logging
ConfigMaps(of typeexternal)
These are resources referenced by Kafka, KafkaConnect, KafkaConnectS2I, KafkaMirrorMaker, or KafkaBridge configuration.
Procedure
Delete the Cluster Operator
Deployment, relatedCustomResourceDefinitions, andRBACresources:oc delete -f install/cluster-operator
WarningDeleting
CustomResourceDefinitionsresults in the garbage collection of the corresponding custom resources (Kafka,KafkaConnect,KafkaConnectS2I,KafkaMirrorMaker, orKafkaBridge) and the resources dependent on them (Deployments, StatefulSets, and other dependent resources).- Delete the resources you identified in the prerequisites.