
Chapter 4. Creating a standalone broker
You can get started quickly with AMQ Broker by creating a standalone broker instance on your local machine, starting it, and producing and consuming some test messages.
Prerequisites
AMQ Broker must be installed.
For more information, see Chapter 3, Installing AMQ Broker.
4.1. Creating a broker instance
A broker instance is a directory containing the configuration and runtime data for a broker. To create a new broker instance, you first create a directory for the broker instance, and then use the artemis create command to create the broker instance.
This procedure demonstrates how to create a simple, standalone broker on your local machine. The broker uses a basic, default configuration, and accepts connections from clients using any of the supported messaging protocols.
Procedure
Create a directory for the broker instance.
If you are using… Do this… Red Hat Enterprise Linux
Create a new directory to serve as the location for the broker instance.
$ sudo mkdir /var/opt/amq-broker
Assign the user that you created during installation.
$ sudo chown -R amq-broker:amq-broker /var/opt/amq-broker
Windows
Use Windows Explorer to create a new folder to serve as the location for the broker instance.
Use the
artemis createcommand to create the broker.If you are using… Do this… Red Hat Enterprise Linux
Switch to the user account you created during installation.
$ su - amq-broker
Change to the directory you just created for the broker instance.
$ cd /var/opt/amq-broker
From the broker instance’s directory, create the broker instance.
$ <install-dir>/bin/artemis create mybroker
Windows
- Open a command prompt from the directory you just created for the broker instance.
From the broker instance’s directory, create the broker instance.
> <install-dir>\bin\artemis.cmd create mybroker
Follow the
artemis createprompts to configure the broker instance.Example 4.1. Configuring a broker instance using
artemis create$ /opt/redhat/amq-broker/bin/artemis create mybroker Creating ActiveMQ Artemis instance at: /var/opt/amq-broker/mybroker --user: is mandatory with this configuration: Please provide the default username: admin --password: is mandatory with this configuration: Please provide the default password: --role: is mandatory with this configuration: Please provide the default role: amq --allow-anonymous | --require-login: is mandatory with this configuration: Allow anonymous access? (Y/N): Y Auto tuning journal ... done! Your system can make 19.23 writes per millisecond, your journal-buffer-timeout will be 52000 You can now start the broker by executing: "/var/opt/amq-broker/mybroker/bin/artemis" run Or you can run the broker in the background using: "/var/opt/amq-broker/mybroker/bin/artemis-service" start
4.2. Starting the broker instance
After the broker instance is created, you use the artemis run command to start it.
Procedure
Switch to the user account you created during installation.
$ su - amq-broker
Use the
artemis runcommand to start the broker instance.$ /var/opt/amq-broker/mybroker/bin/artemis run __ __ ____ ____ _ /\ | \/ |/ __ \ | _ \ | | / \ | \ / | | | | | |_) |_ __ ___ | | _____ _ __ / /\ \ | |\/| | | | | | _ <| '__/ _ \| |/ / _ \ '__| / ____ \| | | | |__| | | |_) | | | (_) | < __/ | /_/ \_\_| |_|\___\_\ |____/|_| \___/|_|\_\___|_| Red Hat JBoss AMQ 7.2.1.GA 10:53:43,959 INFO [org.apache.activemq.artemis.integration.bootstrap] AMQ101000: Starting ActiveMQ Artemis Server 10:53:44,076 INFO [org.apache.activemq.artemis.core.server] AMQ221000: live Message Broker is starting with configuration Broker Configuration (clustered=false,journalDirectory=./data/journal,bindingsDirectory=./data/bindings,largeMessagesDirectory=./data/large-messages,pagingDirectory=./data/paging) 10:53:44,099 INFO [org.apache.activemq.artemis.core.server] AMQ221012: Using AIO Journal ...The broker starts and displays log output with the following information:
- The location of the transaction logs and cluster configuration.
- The type of journal being used for message persistence (AIO in this case).
The URI(s) that can accept client connections.
By default, port 61616 can accept connections from any of the supported protocols (CORE, MQTT, AMQP, STOMP, HORNETQ, and OPENWIRE). There are separate, individual ports for each protocol as well.
- The web console is available at http://localhost:8161.
- The Jolokia service (JMX over REST) is available at http://localhost:8161/jolokia.
4.3. Producing and consuming test messages
After starting the broker, you should verify that it is running properly. This involves producing a few test messages, sending them to the broker, and then consuming them.
Procedure
Use the
artemis producercommand to produce a few test messages and send them to the broker.This command sends 100 messages to the
helloworldaddress, which is created automatically on the broker. The producer connects to the broker by using the default port 61616, which accepts all supported messaging protocols.$ /opt/redhat/amq-broker/amq-broker-7.2.0/bin/artemis producer --destination helloworld --message-count 100 --url tcp://localhost:61616 Producer ActiveMQQueue[helloworld], thread=0 Started to calculate elapsed time ... Producer ActiveMQQueue[helloworld], thread=0 Produced: 100 messages Producer ActiveMQQueue[helloworld], thread=0 Elapsed time in second : 1 s Producer ActiveMQQueue[helloworld], thread=0 Elapsed time in milli second : 1289 milli seconds
Use the web console to see the messages stored in the broker.
- In a web browser, navigate to http://localhost:8161.
Log into the console using the default username and default password that you created when you created the broker instance.
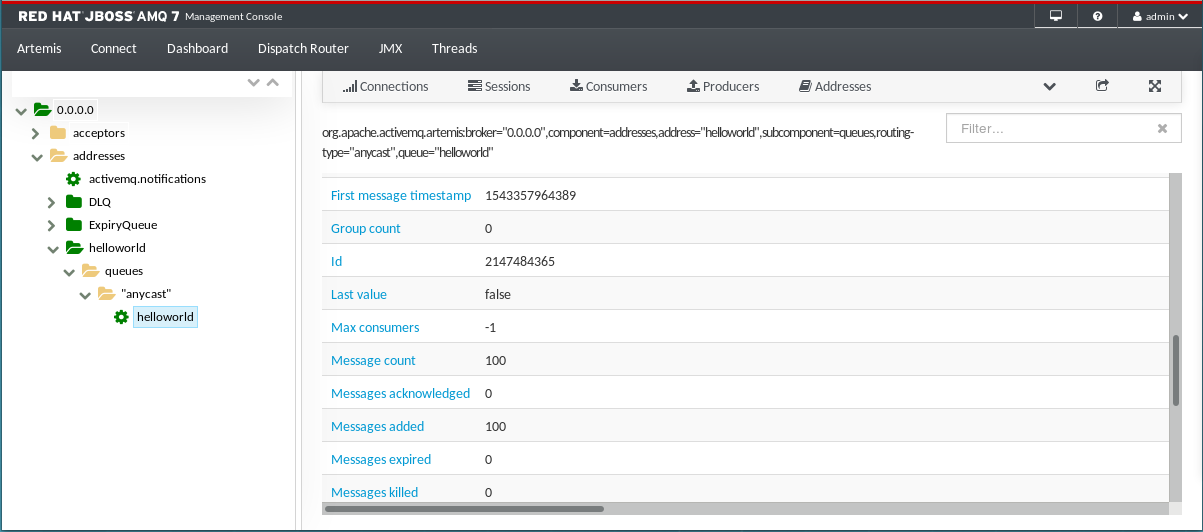
The
Attributestab is displayed.On the
Attributestab, navigate to menu:[addresses > helloworld > queues > "anycast" > helloworld].In the previous step, you sent messages to the
helloworldaddress. This created a new anycasthelloworldaddress with a queue (also namedhelloworld). TheMessage countattribute shows that all 100 messages that were sent tohelloworldare currently stored in this queue.Figure 4.1. Message count
Use the
artemis consumercommand to consume 50 of the messages stored on the broker.This command consumes 50 of the messages that you sent to the broker previously.
$ /opt/redhat/amq-broker/amq-broker-7.2.0/bin/artemis consumer --destination helloworld --message-count 50 --url tcp://localhost:61616

Consumer:: filter = null
Consumer ActiveMQQueue[helloworld], thread=0 wait until 50 messages are consumed
Consumer ActiveMQQueue[helloworld], thread=0 Consumed: 50 messages
Consumer ActiveMQQueue[helloworld], thread=0 Consumer thread finished
In the web console, verify that the
Message countis now 50.50 of the messages were consumed, which leaves 50 messages stored in the
helloworldqueue.Stop the broker and verify that the 50 remaining messages are still stored in the
helloworldqueue.- In the terminal in which the broker is running, press Ctrl+C to stop the broker.
Restart the broker.
$ /var/opt/amq-broker/mybroker/bin/artemis run
-
In the web console, navigate back to the
helloworldqueue and verify that there are still 50 messages stored in the queue.
Consume the remaining 50 messages.
$ /opt/redhat/amq-broker/amq-broker-7.2.0/bin/artemis consumer --destination helloworld --message-count 50 --url tcp://localhost:61616

Consumer:: filter = null
Consumer ActiveMQQueue[helloworld], thread=0 wait until 50 messages are consumed
Consumer ActiveMQQueue[helloworld], thread=0 Consumed: 50 messages
Consumer ActiveMQQueue[helloworld], thread=0 Consumer thread finished
In the web console, verify that the
Message countis 0.All of the messages stored in the
helloworldqueue were consumed, and the queue is now empty.
4.4. Stopping the broker instance
After creating the standalone broker and producing and consuming test messages, you can stop the broker instance.
This procedure manually stops the broker, which forcefully closes all client connections. In a production environment, you should configure the broker to stop gracefully so that client connections can be closed properly.
Procedure
Use the
artemis stopcommand to stop the broker instance:$ /var/opt/amq-broker/mybroker/bin/artemis stop 2018-12-03 14:37:30,630 INFO [org.apache.activemq.artemis.core.server] AMQ221002: Apache ActiveMQ Artemis Message Broker version 2.6.1.amq-720004-redhat-1 [b6c244ef-f1cb-11e8-a2d7-0800271b03bd] stopped, uptime 35 minutes Server stopped!