
Clusters
Read more to learn how to create, import, and manage clusters across cloud providers.
Abstract
Chapter 1. Managing your clusters
Learn how to create, import, and manage clusters across cloud providers by using the Red Hat Advanced Cluster Management for Kubernetes console.
Learn how to manage clusters across cloud providers in the following topics:
- Supported clouds
- Resizing a cluster
- Release images
- Creating and modifying bare metal assets
- Creating an infrastructure environment
- Managing credentials overview
- Creating a cluster
- Importing a target managed cluster to the hub cluster
- Creating a cluster in a proxy environment
- Enabling cluster proxy add-ons
- Configuring a specific cluster management role
- Managing cluster labels
- Creating and managing ManagedClusterSets (Technology Preview)
- Using ManagedClustersSets with Placement
- Managing cluster pools (Technology Preview)
- Configuring Ansible Tower tasks to run on managed clusters
- Claiming clusters from cluster pools
- Discovery introduction (Technology Preview)
- Upgrading your cluster
- Removing a cluster from management
- Cluster backup and restore operator (Technology Preview)
- Replicating persistent volumes with VolSync (Technology Preview)
1.1. Cluster lifecycle architecture
Red Hat Advanced Cluster Management for Kubernetes has two main types of clusters: hub clusters and managed clusters.
The hub cluster is the main cluster with Red Hat Advanced Cluster Management for Kubernetes installed on it. You can create, manage and monitor other Kubernetes clusters with the hub cluster.
The managed clusters are Kubernetes clusters that are managed by the hub cluster. You can create some clusters by using the Red Hat Advanced Cluster Management hub cluster, while you can also import existing clusters to be managed by the hub cluster.
When you create a managed cluster using Red Hat Advanced Cluster Management, the cluster is created using the Red Hat OpenShift Container Platform cluster installer with the Hive resource. You can find more information about the process of installing clusters with the OpenShift Container Platform installer by reading OpenShift Container Platform installation overview in the OpenShift Container Platform documentation.
The following diagram shows the components that are installed with Red Hat Advanced Cluster Management for cluster management:
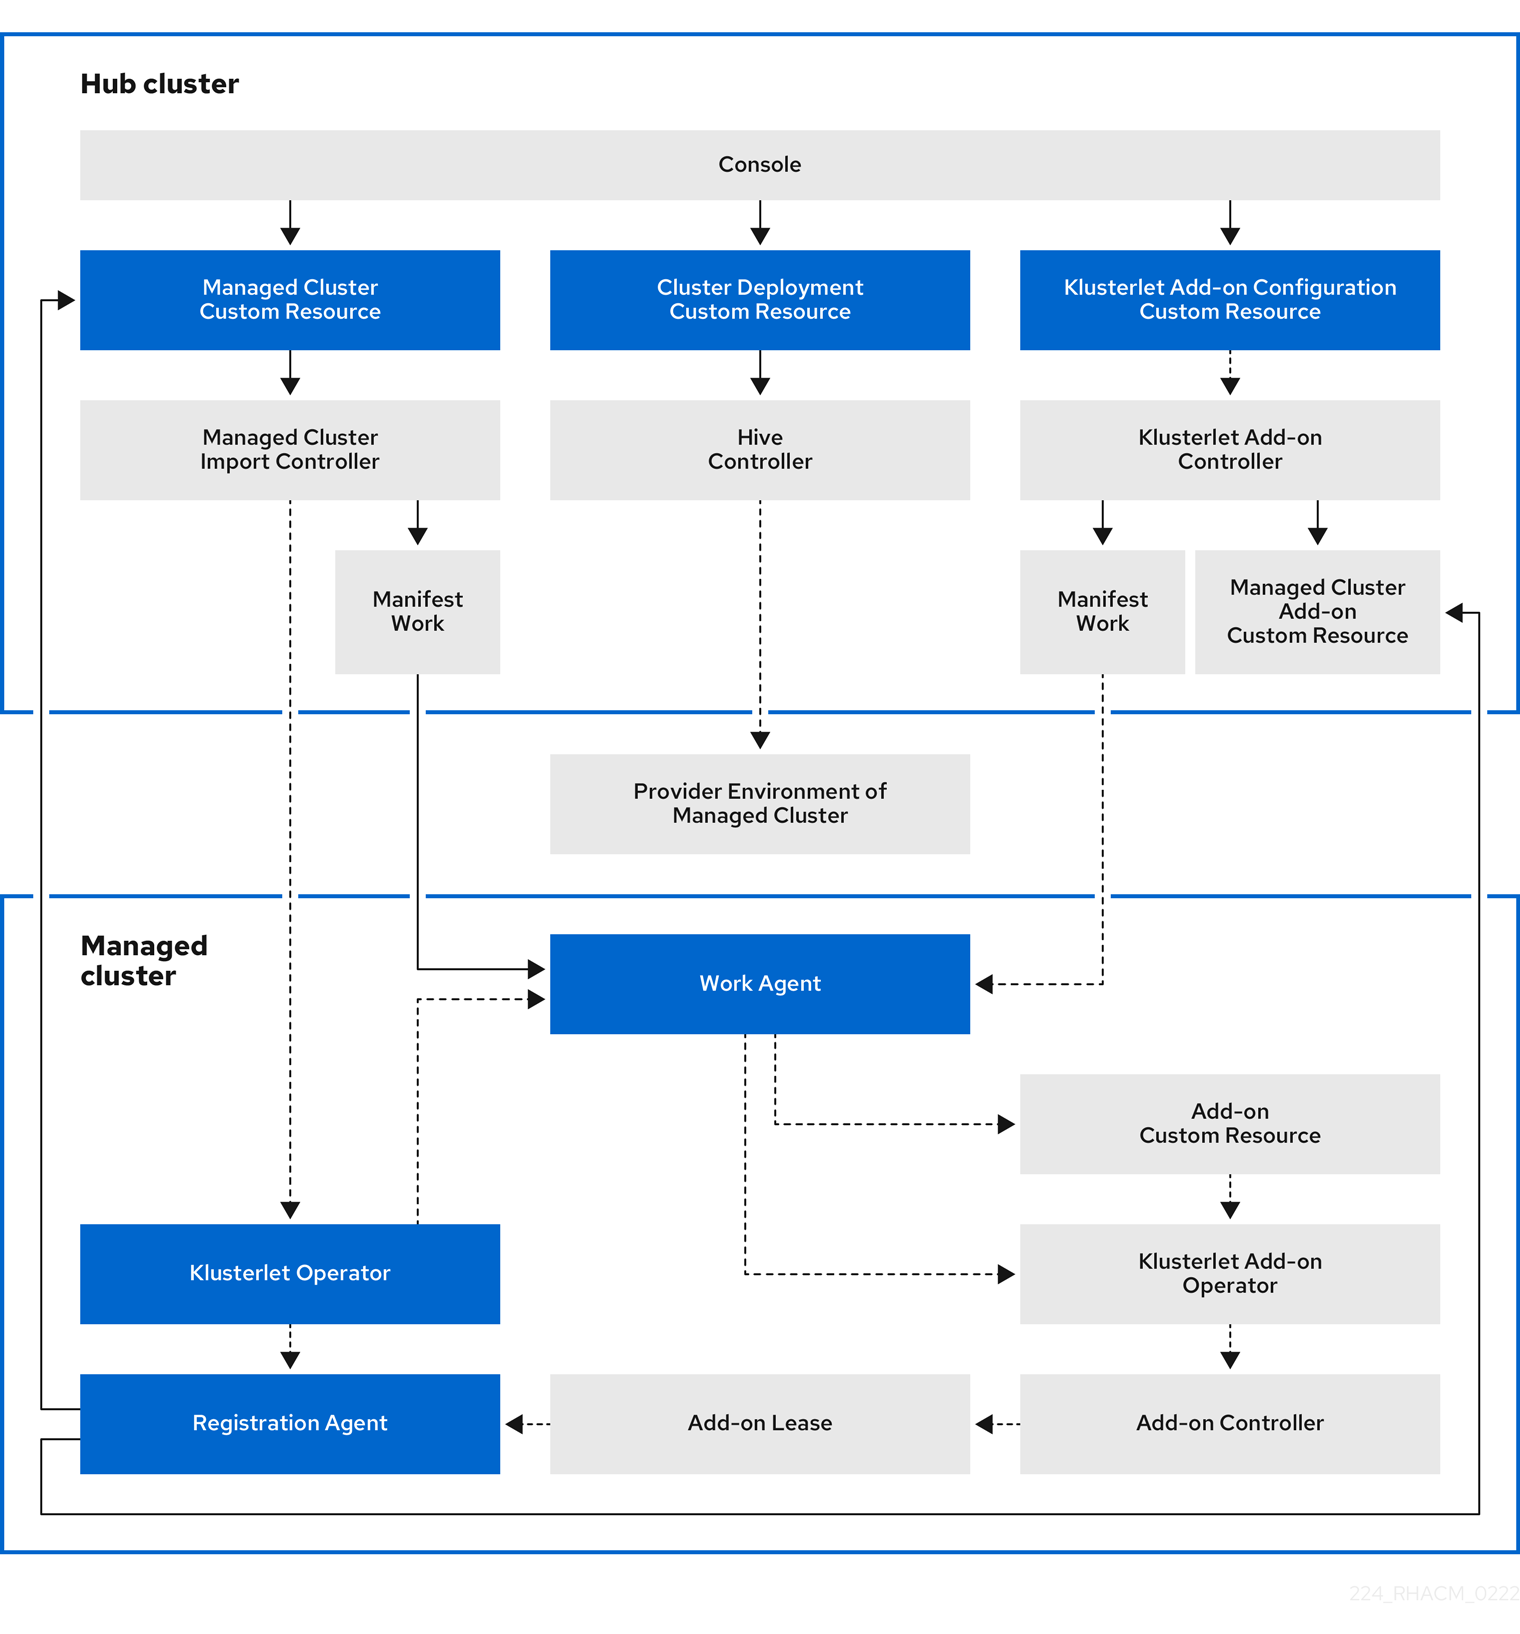
The components of the cluster lifecycle management architecture include the following items:
Components on the hub cluster:
- Console: Provides a web-based interface to manage the cluster lifecycle of the Red Hat Advanced Cluster Management managed clusters.
- Hive Controller: Provisions the clusters that you create with Red Hat Advanced Cluster Management. The Hive Controller also detaches and destroys managed clusters that were created by Red Hat Advanced Cluster Management.
- Managed Cluster Import Controller: Deploys the klusterlet operator to the managed clusters.
- Klusterlet Add-on Controller: Deploys the klusterlet add-on operator to managed clusters.
Components on the managed cluster:
- Klusterlet Operator: Deploys the registration and work controllers on the managed cluster.
Registration Agent: Registers the managed cluster with the hub cluster. The following permissions are automatically created to allow the managed cluster to access the hub cluster:
Clusterrole
- Allows the agent to rotate its certificate
-
Allows the agent to
get/list/update/watchthe clusters that the hub cluster manages - Allows the agent to update the status of the clusters that the hub cluster manages
Role created in the hub cluster namespace of the hub cluster
-
Allows the managed cluster Registration Agent to
getorupdatethecoordination.k8s.iolease -
Allows the agent to
get/list/watchthe managed cluster add-on - Allows the agent to update the status of managed cluster add-ons
-
Allows the managed cluster Registration Agent to
Work Agent: Applies the manifest work to the managed cluster. The following permission is automatically created to allow the managed cluster to access the hub cluster:
Role created in the hub cluster namespace of the hub cluster
- Allows the Work Agent to send events to the hub cluster
-
Allows the agent to
get/list/watch/updatethemanifestworksresource -
Allows the agent to update the status of
manifestworksresource
- Klusterlet Add-on Operator: Deploys the add-on components.
1.2. Supported clouds
Learn about the cloud providers that are available with Red Hat Advanced Cluster Management for Kubernetes. Also, find the documented managed providers that are available. See the Support matrix for more information about supported clouds.
Best practice: For managed cluster providers, use the latest version of Kubernetes.
1.2.1. Supported hub cluster providers
Red Hat OpenShift Container Platform versions 4.6.1 or later, are supported for the hub cluster.
- See Red Hat OpenShift Container Platform on Amazon Web Services.
- See Red Hat OpenShift Container Platform on Microsoft Azure.
- See Red Hat OpenShift Container Platform on Google Cloud Platform.
- See Red Hat OpenShift Dedicated (OSD).
- See Red Hat OpenShift Container Platform on IBM Cloud (ROKS).
- See Azure for Red Hat OpenShift (ARO).
- See Red Hat OpenShift Container Platform on VMware vSphere.
- See Red Hat OpenShift Container Platform on OpenStack.
- See OpenShift on Amazon Web Services (ROSA).
- See OpenShift Container Platform on IBM Power systems.
- See Installing with z/VM on IBM Z and LinuxONE.
1.2.2. Supported managed cluster providers
Red Hat OpenShift Container Platform versions 3.11.200 or later, and 4.6.1 or later, are supported for the managed clusters.
See the available managed cluster options and documentation:
- See Red Hat OpenShift Container Platform on Amazon Web Services.
- See Red Hat OpenShift Container Platform on Microsoft Azure.
- See Red Hat OpenShift Container Platform on Google Cloud Platform.
- See Red Hat OpenShift Dedicated (OSD).
- See Red Hat OpenShift Container Platform on IBM Cloud (ROKS).
- See Azure Red Hat OpenShift (ARO).
- See Red Hat OpenShift Container Platform on VMware vSphere.
- See Red Hat OpenShift Container Platform on OpenStack.
- See OpenShift on Amazon Web Services (ROSA).
- See About Red Hat OpenShift Kubernetes Engine.
- See Amazon Elastic Kubernetes Service (Kubernetes 1.21, and later).
- See Google Kubernetes Engine (Kubernetes 1.22.2, and later).
- See Getting started with IBM Cloud Kubernetes Service (Kubernetes 1.22.3, and later).
- See Azure Kubernetes Service (Kubernetes 1.22.2, and later).
- See Red Hat OpenShift Container Platform 4.6.1, and later, on IBM Z.
- See OpenShift Container Platform on IBM Power systems.
1.2.3. Configuring kubectl
From vendor documentation previously listed, you might need to learn how configure your kubectl. You must have kubectl installed when you import a managed cluster to a hub cluster. See Importing a target managed cluster to the hub cluster for details.
1.3. Resizing a cluster (Technology Preview)
You can customize your managed cluster specifications, such as virtual machine sizes and number of nodes.
Many clusters that are managed by Red Hat Advanced Cluster Management for Kubernetes can be scaled by using Red Hat Advanced Cluster Management console or command line, and the MachinePool resource. A MachinePool resource is a Kubernetes resource on the Hub cluster that groups the MachineSet resources together on the managed cluster. The MachinePool resource uniformly configures a set of machine resources, including zone configurations, instance type, and root storage. It also helps you manually configure the desired number of nodes or configure auto-scaling of nodes on the managed cluster.
1.3.1. Scaling managed clusters created by Red Hat Advanced Cluster Management
Scaling clusters that were created by Red Hat Advanced Cluster Management using the MachinePool resource is a Technology Preview feature that is not supported for bare metal clusters that were created by Red Hat Advanced Cluster Management.
1.3.1.1. Autoscaling
Configuring autoscaling provides the flexibility of your cluster to scale as needed to lower your cost of resources by scaling down when traffic is low, and by scaling up to ensure that there are enough resources when there is a higher demand for resources.
1.3.1.1.1. Enabling autoscaling
To enable autoscaling on your
MachinePoolresources using the Red Hat Advanced Cluster Management console, complete the following steps:- In the Red Hat Advanced Cluster Management navigation, select Infrastructure > Clusters.
- Click the name of your target cluster to view the details about the cluster.
- Select the Machine pools tab to view the machine pool information.
- From the machine pools page, select Enable autoscale from the Options menu for the target machine pool.
- Select the minimum and maximum number of machine set replicas. A machine set replica maps directly to a node on the cluster.
Click Scale to submit the changes.
The changes might take several minutes to reflect on the console. You can view the status of the scaling operation by clicking View machines if the notification of the Machine pools tab.
To enable autoscaling on your
MachinePoolresources using the command line, complete the following steps:Enter the following command to view your list of machine pools:
oc get machinepools -n <managed-cluster-namespace>
Replace
managed-cluster-namespacewith the namespace of your target managed cluster.Enter the following command to edit the YAML file for the machine pool:
oc edit machinepool <name-of-MachinePool-resource> -n <namespace-of-managed-cluster>
Replace
name-of-MachinePool-resourcewith the name of yourMachinePoolresource.Replace
namespace-of-managed-clusterwith the name of the namespace of your managed cluster.-
Delete the
spec.replicasfield from the YAML file. -
Add the
spec.autoscaling.minReplicassetting andspec.autoscaling.maxReplicasfields to the resource YAML. -
Add the minimum number of replicas to the
minReplicassetting. -
Add the maximum number of replicas into the
maxReplicassetting. - Save the file to submit the changes.
Autoscaling is enabled for the machine pool.
1.3.1.1.2. Disabling autoscaling
You can disable autoscaling by using the console or the command line.
To disable autoscaling by using the Red Hat Advanced Cluster Management console, complete the following steps:
- In the Red Hat Advanced Cluster Management navigation, select Infrastructure > Clusters.
- Click the name of your target cluster to view the details about the cluster.
- Select the Machine pools tab to view the machine pool information.
- From the machine pools page, select Disable autoscale from the Options menu for the target machine pool.
- Select the number of machine set replicas that you want. A machine set replica maps directly with a node on the cluster.
- Click Scale to submit the changes. It might take several minutes to display in the console.
- Click View machines in the notification on the Machine pools tab to view the status of the scaling.
To disable autoscaling by using the command line, complete the following steps:
Enter the following command to view your list of machine pools:
oc get machinepools -n <managed-cluster-namespace>
Replace
managed-cluster-namespacewith the namespace of your target managed cluster.Enter the following command to edit the YAML file for the machine pool:
oc edit machinepool <name-of-MachinePool-resource> -n <namespace-of-managed-cluster>
Replace
name-of-MachinePool-resourcewith the name of yourMachinePoolresource.Replace
namespace-of-managed-clusterwith the name of the namespace of your managed cluster.-
Delete the
spec.autoscalingfield from the YAML file. -
Add the
spec.replicasfield to the resource YAML. -
Add the number of replicas to the
replicassetting. - Save the file to submit the changes.
Autoscaling is disabled.
1.3.1.2. Manually scaling your cluster
If you do not want to enable autoscaling of your cluster, you can use the Red Hat Advanced Cluster Management console or the command line to change the static number of replicas that you want your cluster to maintain. This can help to increase or decrease the size, as needed.
1.3.1.2.1. Manually scaling clusters by using the console
To scale your MachinePool resources using the Red Hat Advanced Cluster Management console, complete the following steps:
- In the Red Hat Advanced Cluster Management navigation, select Infrastructure > Clusters.
- Click the name of your target cluster to view the details about the cluster.
Select the Machine pools tab to view the machine pool information.
Note: If the value in the Autoscale field is
Enabledyou must first disable the autoscaling feature by completing the steps in Disabling autoscaling before continuing.- From the Options menu for the machine pool, select Scale machine pool.
- Adjust the number of machine set replicas to scale the machine pool.
- Select Scale to implement the change.
1.3.1.2.2. Manually scaling clusters by using the command line
To scale your MachinePool resources using the command line, complete the following steps:
Enter the following command to view your list of machine pools:
oc get machinepools -n <managed-cluster-namespace>
Replace
managed-cluster-namespacewith the namespace of your target managed cluster.Enter the following command to edit the YAML file for the machine pool:
oc edit machinepool <name-of-MachinePool-resource> -n <namespace-of-managed-cluster>
Replace
name-of-MachinePool-resourcewith the name of yourMachinePoolresource.Replace
namespace-of-managed-clusterwith the name of the namespace of your managed cluster.-
Update the
spec.replicasconfiguration in the YAML to the number of replicas. - Save the file to submit the changes.
Your cluster is using the new size settings.
1.3.2. Scaling imported managed clusters
Imported managed clusters do not have the same resources as clusters that were created by Red Hat Advanced Cluster Management. For that reason, the procedures for scaling the clusters is different. The documentation for the provider contains information about how to scale the clusters for imported clusters.
See the following list of recommended settings for each available provider, but also see the documentation for more specific information:
1.3.2.1. OpenShift Container Platform clusters
See Recommended cluster scaling practices and Manually scaling a MachineSet in the OpenShift Container Platform documentation that applies to the version that you are using.
1.3.2.2. Amazon Elastic Kubernetes Services
If you are changing the number of nodes of an Amazon EKS cluster that you imported, see Cluster autoscaler for information about scaling the cluster.
1.3.2.3. Google Kubernetes Engine
If you are changing the number of nodes of a Google Kubernetes Engine cluster that you imported, see Resizing a cluster for information about scaling the cluster.
1.3.2.4. Microsoft Azure Kubernetes Service
If you are changing the number of nodes of an Azure Kubernetes Services cluster that you imported, see Scaling a cluster for information about scaling the cluster.
1.3.2.5. VMware vSphere
If you are changing the number of nodes of a VMware vSphere cluster that you imported, see Edit cluster settings for information about scaling the cluster.
1.3.2.6. Red Hat OpenStack Platform
If you are changing the number of nodes of a Red Hat OpenStack Platform cluster that you imported, see Auto scaling for instances for information about scaling the cluster.
1.3.2.7. Bare metal cluster
If you are changing the number of nodes of a bare metal cluster that you imported, see Expanding the cluster for information about scaling the cluster.
Note: Bare metal clusters are only supported when the hub cluster is OpenShift Container Platform version 4.6, and later.
1.3.2.8. IBM Kubernetes Service
If you are changing the number of nodes of an IBM Kubernetes Service cluster that you imported, see Adding worker nodes and zones to clusters for information about scaling the cluster.
1.3.2.9. IBM Power systems
If you are changing the number of nodes of an IBM Power systems cluster that you imported, see need link for information about scaling the cluster.
1.3.2.10. IBM Z and LinuxONE
If you are changing the number of nodes of an IBM Z and LinuxONE systems cluster that you imported, see need link for information about scaling the cluster.
1.4. Release images
When you create a cluster on a provider by using Red Hat Advanced Cluster Management for Kubernetes, you must specify a release image to use for the new cluster. The release image specifies which version of Red Hat OpenShift Container Platform is used to build the cluster.
The files that reference the release images are YAML files that are maintained in the acm-hive-openshift-releases GitHub repository. Red Hat Advanced Cluster Management uses those files to create the list of the available release images in the console. This includes the latest fast channel images from OpenShift Container Platform. The console only displays the latest release images for the three latest versions of OpenShift Container Platform. For example, you might see the following release images displayed in the console options:
- quay.io/openshift-release-dev/ocp-release:4.6.23-x86_64
- quay.io/openshift-release-dev/ocp-release:4.9.0-x86_64
Note: Only release images with the label of: visible: 'true' are available to select when creating clusters in the console. An example of this label in a ClusterImageSet resource is provided in the following content:
apiVersion: config.openshift.io/v1
kind: ClusterImageSet
metadata:
  labels:
    channel: fast
    visible: 'true'
  name: img4.9.8-x86-64-appsub
spec:
  releaseImage: quay.io/openshift-release-dev/ocp-release:4.9.8-x86_64
Additional release images are stored, but are not visible in the console. To view all of the available release images, run kubectl get clusterimageset in your CLI. Only the latest versions are in the console to encourage the creation of clusters with the latest release images. In some cases, you might need to create a cluster that is a specific version, which is why the older versions are available. Red Hat Advanced Cluster Management uses those files to create the list of the available release images in the console. This includes the latest fast channel images from OpenShift Container Platform.
The repository contains the clusterImageSets directory and the subscription directory, which are the directories that you use when working with the release images.
The repository contains the clusterImageSets directory and the subscription directory, which are the directories that you use when working with the release images.
The clusterImageSets directory contains the following directories:
- Fast: Contains files that reference the latest versions of the release images for each OpenShift Container Platform version that is supported. The release images in this folder are tested, verified, and supported.
- Releases: Contains files that reference all of the release images for each OpenShift Container Platform version (stable, fast, and candidate channels) Note: These releases have not all been tested and determined to be stable.
- Stable: Contains files that reference the latest two stable versions of the release images for each OpenShift Container Platform version that is supported.
Note: By default, the current list of release images is updated one time an hour. After upgrading the product, it may take up to an hour for the list to reflect the recommended release image versions for the new version of the product.
You can curate your own ClusterImageSets in three ways:
The first step for any of the three ways is to disable the included subscription that automatically updates the latest fast channel images. The automatic curation of the latest fast ClusterImageSets can be disabled by using an installer parameter on the multiclusterhub resource. By toggling the spec.disableUpdateClusterImageSets parameter between true and false, the subscription installed with Red Hat Advanced Cluster Management is disabled or enabled, respectively. If you want to curate your own images, set the spec.disableUpdateClusterImageSets to true to disable the subscription.
Option 1: Specify the image reference for the specific ClusterImageSet that you want to use in the console when creating a cluster. Each new entry you specify persists and is available for all future cluster provisions. An example of an entry is: quay.io/openshift-release-dev/ocp-release:4.6.8-x86_64.
Option 2: Manually create and apply a ClusterImageSets YAML file from the acm-hive-openshift-releases GitHub repository.
Option 3: Follow the README.md in the acm-hive-openshift-releases GitHub repository to enable automatic updates of ClusterImageSets from a forked GitHub repository.
The subscription directory contains files that specify where the list of release images is pulled from.
The default release images for Red Hat Advanced Cluster Management are provided in a Quay.io directory.
The images are referenced by the files in the acm-hive-openshift-releases GitHub repository for release 2.4.
1.4.1. Synchronizing available release images
The release images are updated frequently, so you might want to synchronize the list of release images to ensure that you can select the latest available versions. The release images are available in the acm-hive-openshift-releases GitHub repository for release 2.4.
There are three levels of stability of the release images:
Table 1.1. Stability levels of release images
| Category | Description |
| stable | Fully tested images that are confirmed to install and build clusters correctly. |
| fast | Partially tested, but likely less stable than a stable version. |
| candidate | Not tested, but the most current image. Might have some bugs. |
Complete the following steps to refresh the list:
-
If the installer-managed
acm-hive-openshift-releasessubscription is enabled, disable the subscription by setting the value ofdisableUpdateClusterImageSetstotruein themulticlusterhubresource. - Clone the acm-hive-openshift-releases GitHub repository for release 2.4.
Remove the subscription by entering a command that is similar to the following command:
oc delete -f subscribe/subscription-fast
Connect to the stable release images and synchronize your Red Hat Advanced Cluster Management for Kubernetes hub cluster by entering the following command:
make subscribe-stable
Note: You can only run this
makecommand when you are using the Linux or MacOS operating system.After about one minute, the latest list of
stablerelease images is available.To synchronize and display the fast release images, enter the following command:
make subscribe-fast
Note: You can only run this
makecommand when you are using the Linux or MacOS operating system.About one minute after running the command, the list of available
stableandfastrelease images updates with the currently available images.To synchronize and display the
candidaterelease images, enter the following command:make subscribe-candidate
Note: You can only run this
makecommand when you are using the Linux or MacOS operating system.About one minute after running the command, the list of available
stable,fast, andcandidaterelease images updates with the currently available images.
- View the list of currently available release images in the Red Hat Advanced Cluster Management console when you are creating a cluster.
You can unsubscribe from any of these channels to stop viewing the updates by entering a command in the following format:
oc delete -f subscribe/subscription-fast
1.4.1.1. Maintaining a custom list of release images when connected
You might want to ensure that you use the same release image for all of your clusters. To simplify, you can create your own custom list of release images that are available when creating a cluster. Complete the following steps to manage your available release images:
-
If the installer-managed
acm-hive-openshift-releasessubscription is enabled, disable it by setting the value ofdisableUpdateClusterImageSetstotruein themulticlusterhubresource. - Fork the acm-hive-openshift-releases GitHub repository 2.4 branch.
Update the
./subscribe/channel.yamlfile by changing thespec: pathnameto access your the GitHub name for your forked repository, instead ofstolostron. This step specifies where the hub cluster retrieves the release images. Your updated content should look similar to the following example:spec: type: Git pathname: https://github.com/<forked_content>/acm-hive-openshift-releases.git
Replace
forked_contentwith the path to your forked repository.- Add the YAML files for the images that you want available when you create a cluster by using the Red Hat Advanced Cluster Management for Kubernetes console to the ./clusterImageSets/stable/ or ./clusterImageSets/fast/* directory. *Tip: You can retrieve the available YAML files from the main repository by merging changes into your forked repository.
- Commit and merge your changes to your forked repository.
To synchronize your list of fast release images after you have cloned the
acm-hive-openshift-releasesrepository, enter the following command to update the fast images:make subscribe-fast
Note: You can only run this
makecommand when you are using the Linux or MacOS operating system.After running this command, the list of available fast release images updates with the currently available images in about one minute.
By default, only the fast images are listed. To synchronize and display the stable release images, enter the following command:
make subscribe-stable
Note: You can only run this
makecommand when you are using the Linux or MacOS operating system.After running this command, the list of available stable release images updates with the currently available images in about 1 minute.
By default, Red Hat Advanced Cluster Management pre-loads a few ClusterImageSets. You can use the following commands to list what is available and remove the defaults.
oc get clusterImageSets
oc delete clusterImageSet <clusterImageSet_NAME>
Note: If you have not disabled the installer-managed automatic updates of the
ClusterImageSetsby setting the value ofdisableUpdateClusterImageSetstotruein themulticlusterhubresource, any images that you delete are recreated automatically.- View the list of currently available release images in the Red Hat Advanced Cluster Management console when you are creating a cluster.
1.4.1.2. Maintaining a custom list of release images while disconnected
In some cases, you need to maintain a custom list of release images when the hub cluster has no Internet connection. You can create your own custom list of release images that are available when creating a cluster. Complete the following steps to manage your available release images while disconnected:
- While you are on a connected system, navigate to the acm-hive-openshift-releases GitHub repository to access the cluster image sets that are available for version 2.4.
-
Copy the
clusterImageSetsdirectory to a system that can access the disconnected Red Hat Advanced Cluster Management for Kubernetes hub cluster. Add the mapping between the managed cluster and the disconnected repository with your cluster image sets by completing the following steps that fits your managed cluster:
-
For an OpenShift Container Platform managed cluster, see Configuring image registry repository mirroring for information about using your
ImageContentSourcePolicyobject to complete the mapping. -
For a managed cluster that is not an OpenShift Container Platform cluster, use the
ManageClusterImageRegistryCRD to override the location of the image sets. See Importing a cluster with a custom ManagedClusterImageRegistry CRD for information about how to override the cluster for the mapping.
-
For an OpenShift Container Platform managed cluster, see Configuring image registry repository mirroring for information about using your
-
Add the YAML files for the images that you want available when you create a cluster by using the Red Hat Advanced Cluster Management console by manually adding the
clusterImageSetYAML content. Modify the
clusterImageSetYAML files for the remaining OpenShift Container Platform release images to reference the correct offline repository where you store the images. Your updates should resemble the following example:apiVersion: hive.openshift.io/v1 kind: ClusterImageSet metadata: name: img4.4.0-rc.6-x86-64 spec: releaseImage: IMAGE_REGISTRY_IPADDRESS_or_DNSNAME/REPO_PATH/ocp-release:4.4.0-rc.6-x86_64Ensure that the images are loaded in the offline image registry that is referenced in the YAML file.
Create each of the
clusterImageSetsby entering the following command for each YAML file:oc create -f <clusterImageSet_FILE>
Replace
clusterImageSet_FILEwith the name of the cluster image set file. For example:oc create -f img4.9.9-x86_64.yaml
After running this command for each resource you want to add, the list of available release images will be available.
- Alternately you can paste the image URL directly in the create cluster console in Red Hat Advanced Cluster Management. Adding the image URL creates new clusterImageSets if they do not exist.
- View the list of currently available release images in the Red Hat Advanced Cluster Management console when you are creating a cluster.
1.5. Creating and modifying bare metal assets
Bare metal assets are virtual or physical servers that you configure to run your OpenShift Container Platform clusters. Red Hat Advanced Cluster Management for Kubernetes connects to a bare metal asset that your administrator creates. Then you can deploy the bare metal asset in a managed cluster.
The hub cluster inventory controller defines a custom resource definition (CRD) called BareMetalAsset, that holds the bare metal asset inventory record. When provisioning a managed cluster, the inventory controller reconciles BareMetalAsset inventory records with corresponding BareMetalHost resources in the managed cluster.
Red Hat Advanced Cluster Management uses BareMetalAsset CRs to provision cluster hardware based on records entered in a configuration management database (CMDB), or similar system. An external tool or automation polls the CMDB and uses the Red Hat Advanced Cluster Management API to create corresponding BareMetalAsset and corresponding Secret resources in a hub cluster for subsequent deployment in a managed cluster.
Use the following procedures to create and manage bare metal assets for clusters managed by Red Hat Advanced Cluster Management.
1.5.1. Prerequisites
You need the following prerequisites before creating a bare metal asset:
- A deployed Red Hat Advanced Cluster Management hub cluster on OpenShift Container Platform version 4.6, or later.
- Access for your Red Hat Advanced Cluster Management hub cluster to connect to the bare metal asset.
A configured bare metal asset, and log in credentials with the required permissions to log in and manage it.
Note: Credentials for your bare metal asset include the following items for the asset that are provided by your administrator: user name password Baseboard Management Controller (BMC) Address boot NIC MAC address
1.5.2. Creating a bare metal asset with the console
To create a bare metal asset using the Red Hat Advanced Cluster Management for Kubernetes console, complete the following steps:
- From the navigation menu, navigate to Infrastructure > Bare metal assets.
- On the Bare metal assets page, click Create bare metal asset.
- Enter a name for your asset that identifies it when you create a cluster.
Enter the namespace where you want to create the bare metal asset.
Note: The bare metal asset, managed bare metal cluster, and its related secret must be in the same namespace.
Users who have access to this namespace can associate this asset to the cluster when creating a cluster.
Enter the BMC address. This is the controller that enables communication with the host. The following protocols are supported:
- IPMI, see IPMI 2.0 Specification for more information.
- iDRAC, see Support for Integrated Dell Remote Access Controller 9 (iDRAC9) for more information.
- iRMC, see Data Sheet: FUJITSU Software ServerView Suite integrated Remote Management Controller - iRMC S5 for more information.
- Redfish, see Redfish specification for more information.
- Enter the username and password for the bare metal asset.
- Add the boot NIC MAC address for the bare metal asset. This is the MAC address of the host’s network-connected NIC that is used to provision the host on the bare metal asset.
You can continue with Creating a cluster on bare metal.
1.5.3. Creating a bare metal asset using the CLI
Use a BareMetalAsset CR to create a bare metal asset for a particular namespace in the cluster. Each BareMetalAsset also has a corresponding Secret that contains the Baseboard Management Controller (BMC) credentials and the secret name in the same namespace.
1.5.3.1. Prerequisites
- Install Red Hat Advanced Cluster Management for Kubernetes on a hub cluster.
- Install the Red Hat OpenShift CLI (oc).
-
Log in as a user with
cluster-adminprivileges.
1.5.3.2. Create the bare metal asset
- Install and provision a bare metal asset in your environment.
- Power on the BMC, and note the IPMI or Redfish BMC address and MAC address for the hardware.
Create the following
BareMetalAssetandSecretCR, and save the file asbaremetalasset-cr.yaml:apiVersion: inventory.open-cluster-management.io/v1alpha1 kind: BareMetalAsset metadata: name: <baremetalasset-machine> namespace: <baremetalasset-namespace> spec: bmc: address: ipmi://<out_of_band_ip>:<port> credentialsName: baremetalasset-machine-secret bootMACAddress: "00:1B:44:11:3A:B7" hardwareProfile: "hardwareProfile" role: "<role>" clusterName: "<cluster name>" --- apiVersion: v1 kind: Secret metadata: name: baremetalasset-machine-secret type: Opaque data: username: <username> password: <password>-
Replace
baremetalasset-machinewith the name of the machine where the bare metal asset is located. When created, theBareMetalHoston the managed cluster gets the same name as the correspondingBareMetalAsseton the hub cluster. TheBareMetalHostname should always match the correspondingBareMetalAssetname. -
Replace
baremetalasset-namespacewith the cluster namespace where the bare metal asset is created. -
Replace
out_of_band_ipandportwith the address and port for your bare metal asset. For Redfish addressing, use the following address format:redfish://<out-of-band-ip>/redfish/v1/Systems/1. -
Replace
rolewithworker,master, or leave it empty, depending on the machine role type. Therolesetting is used to match a bare metal asset to specific machine role types in the cluster.BareMetalAssetresources with a specified machine role type should not be used to fill another role. Therolevalue is used as the value for a label with keyinventory.open-cluster-management.io/role. This enables a cluster management application or user to query for inventory that is intended for a particular role. -
Replace
cluster_namewith the name of your cluster, which is used by the cluster management application or user to query for inventory that is associated with a particular cluster. Leave this value empty to create the bare metal asset without adding it to a cluster deployment. -
Replace
usernamewith the username for your secret. -
Replace
passwordwith the password for your secret.
-
Replace
Run the following command to create the
BareMetalAssetCR:$ oc create -f baremetalasset-cr.yaml
Check that the
BareMetalAssetis created successfully:$ oc get baremetalassets -A
Example output
NAMESPACE   		    NAME                              AGE
ocp-example-bm      baremetalasset-machine   			    2m
ocp-example-bm      csv-f24-h27-000-r630-master-1-1   4d21h
1.5.4. Bulk importing bare metal assets with the console
You can import bare metal assets in bulk using the Red Hat Advanced Cluster Management for Kubernetes console using a CSV formatted list.
1.5.4.1. Prerequisites
- Install Red Hat Advanced Cluster Management on a hub cluster that manages one or more spoke clusters.
- Install the OpenShift Container Platform CLI (oc).
-
Log in as a user with
cluster-adminprivileges.
1.5.4.2. Import the assets
To import a set of bare metal assets, complete the following steps:
- From the Red Hat Advanced Cluster Management console, select Cluster management > Bare metal assets in the navigation menu.
Select Import assets, and import the CSV file that contains the bare metal assets data. The CSV file must have the following header columns:
hostName, hostNamespace, bmcAddress, macAddress, role (optional), username, password
1.5.5. Modifying a bare metal asset
If you need to modify the settings for a bare metal asset, complete the following steps:
- In the Red Hat Advanced Cluster Management for Kubernetes console navigation, select: Infrastructure > Bare metal assets.
- Select the options menu for the asset that you want to modify in the table.
- Select Edit asset.
1.5.6. Removing a bare metal asset
When a bare metal asset is no longer used for any of the clusters, you can remove it from the list of available bare metal assets. Removing unused assets both simplifies your list of available assets, and prevents the accidental selection of that asset.
To remove a bare metal asset in the console, complete the following steps:
- In the Red Hat Advanced Cluster Management for Kubernetes console navigation, select: Infrastructure > Bare metal assets.
- Select the options menu for the asset that you want to remove in the table.
- Select Delete asset.
1.5.7. Using the REST API to create a bare metal asset
You can use the OpenShift Container Platform REST API to manage bare metal assets for use in your Red Hat Advanced Cluster Management cluster. This is useful when you have a separate CMDB application or database to manage the bare metal assets in your environment.
1.5.7.1. Prerequisites
- Install Red Hat Advanced Cluster Management for Kubernetes on a hub cluster.
- Install the OpenShift Container Platform CLI (oc).
-
Log in as a user with
cluster-adminprivileges.
1.5.7.2. Create the bare metal asset
To use the REST API to create a bare metal asset, do the following:
Obtain a login token for your hub cluster, and login to the cluster at the command line. For example:
$ oc login --token=<login_token> --server=https://<hub_cluster_api_url>:6443
Modify the following curl command with the details of the bare metal asset that you want to add to the cluster, and run the command.
$ curl --location --request POST '<hub_cluster_api_url>:6443/apis/inventory.open-cluster-management.io/v1alpha1/namespaces/<bare_metal_asset_namespace>/baremetalassets?fieldManager=kubectl-create' \ --header 'Authorization: Bearer <login_token>' \ --header 'Content-Type: application/json' \ --data-raw '{ "apiVersion": "inventory.open-cluster-management.io/v1alpha1", "kind": "BareMetalAsset", "metadata": { "name": "<baremetalasset_name>", "namespace": "<bare_metal_asset_namespace>" }, "spec": { "bmc": { "address": "ipmi://<ipmi_address>", "credentialsName": "<credentials-secret>" }, "bootMACAddress": "<boot_mac_address>", "clusterName": "<cluster_name>", "hardwareProfile": "hardwareProfile", "role": "worker" } }'-
Replace
baremetalasset-namewith the name of the bare metal asset. When created, theBareMetalHoston the managed cluster gets the same name as the correspondingBareMetalAsseton the hub cluster. TheBareMetalHostname should always match the correspondingBareMetalAssetname. -
Replace
baremetalasset-namespacewith the cluster namespace where the bare metal asset is created. -
Replace
out_of_band_ipandportwith the address and port for your bare metal asset. For Redfish addressing, use the following address format:redfish://<out-of-band-ip>/redfish/v1/Systems/1. -
Replace
rolewithworker,master, or leave it empty, depending on the machine role type. Therolesetting is used to match a bare metal asset to specific machine role types in the cluster.BareMetalAssetresources with a specified machine role type should not be used to fill another role. Therolevalue is used as the value for a label with keyinventory.open-cluster-management.io/role. This enables a cluster management application or user to query for inventory that is intended for a particular role. Replace
cluster_namewith the name of your cluster, which is used by the cluster management application or user to query for inventory that is associated with a particular cluster. Leave this value empty to create the bare metal asset without adding it to a cluster deployment.Note: For the previous curl command, it is assumed that the API server is served over HTTPS and is accessed securely. In a development or test environment, you can pass the
--insecureparameter.
-
Replace
Tip: You can append --v=9 to an oc command to see the raw output of the resulting action. This can be useful for ascertaining the REST API route for an oc command.
1.6. Creating an infrastructure environment
You can use the Red Hat Advanced Cluster Management for Kubernetes console to create an infrastructure environment to manage your hosts and create clusters on those hosts.
Infrastructure environments support the following features:
- Zero-touch provisioning of clusters: Deploy clusters using a script. See Deploying distributed units at scale in a disconnected environment in the Red Hat OpenShift Container Platform documentation for more information.
- Late binding: Enable the host to be booted by an infrastructure administrator, and the creator of a cluster can bind a cluster to that host at a later time. The cluster creator does not have to have administrator privileges to the infrastructure when using late binding.
-
Dual stack: Deploy clusters that have both IPv4 and IPv6 addresses. Dual stack uses the
OVN-Kubernetesnetworking implementation to support multiple subnets. - Add remote worker nodes: Add remote worker nodes to your clusters after they are created and running, which provides flexibility of adding nodes in other locations for backup purposes.
- Static IP using NMState: Use the NMState API to define static IP addresses for your environment.
- Upgrade Red Hat Advanced Cluster Management version 2.3 to Red Hat Advanced Cluster Management 2.4 with Assisted Installer static IP addressing: Upgrading Red Hat Advanced Cluster Management on the hub cluster from version 2.3 to 2.4 upgrades the infrastructure operator and infrastructure operand, or the assisted service, on the hub cluster from version 2.3 to the 2.4 bundled version. The managed clusters are not automatically upgraded.
1.6.1. Prerequisites
You need the following prerequisites before creating an infrastructure environment:
- A deployed Red Hat Advanced Cluster Management hub cluster on OpenShift Container Platform version 4.9 or later.
- Internet access for your Red Hat Advanced Cluster Management hub cluster (connected), or a connection to an internal or mirror registry that has a connection to the Internet (disconnected) to retrieve the required images for creating the environment.
- A configured instance of the Central Infrastructure Management (CIM) feature on your hub cluster. See Enabling the Central Infrastructure Management service for the procedure.
- Your OpenShift Container Platform pull secret. See Using image pull secrets for more information.
-
Your SSH key that is in your
~/.ssh/id_rsa.pubfile, by default. - A configured storage class.
- Disconnected environment only: Complete the procedure for Preparing the disconnected environment in the OpenShift Container Platform documentation.
1.6.2. Enabling the Central Infrastructure Management service
The CIM service is provided with Red Hat Advanced Cluster Management and deploys OpenShift Container Platform clusters. CIM is deployed when you enable the MultiClusterHub Operator on the Red Hat Advanced Cluster Management hub cluster, but must be enabled.
To enable the CIM service, complete the following steps:
For Red Hat Advanced Cluster Management version 2.4.0 only. Skip this step if you are running Red Hat Advanced Cluster Management version 2.4.1 or later. Modify the
HiveConfigresource to enable the feature gate for the CIM service by running the following command:oc patch hiveconfig hive --type merge -p '{"spec":{"targetNamespace":"hive","logLevel":"debug","featureGates":{"custom":{"enabled":["AlphaAgentInstallStrategy"]},"featureSet":"Custom"}}}'Modify the
Provisioningresource to allow the Bare Metal Operator to watch all namespaces by running the following command:oc patch provisioning provisioning-configuration --type merge -p '{"spec":{"watchAllNamespaces": true }}'Create the
AgentServiceConfigCR by completing the following steps:Save the following
YAMLcontent in theagent_service_config.yamlfile:apiVersion: agent-install.openshift.io/v1beta1 kind: AgentServiceConfig metadata: name: agent spec: databaseStorage: accessModes: - ReadWriteOnce resources: requests: storage: <db_volume_size> filesystemStorage: accessModes: - ReadWriteOnce resources: requests: storage: <fs_volume_size> osImages: - openshiftVersion: "<ocp_version>" version: "<ocp_release_version>" url: "<iso_url>" rootFSUrl: "<root_fs_url>" cpuArchitecture: "x86_64"Replace
db_volume_sizewith the volume size for thedatabaseStoragefield, for example50M. This value specifies how much storage is is allocated for storing files like database tables and database views for the clusters. You might need to use a higher value if there are many clusters.Replace
fs_volume_sizewith the size of the volume for thefilesystemStoragefield, for example50M. This value specifies how much storage is allocated for storing logs, manifests, andkubeconfigfiles for the clusters. You might need to use a higher value if there are many clusters.Replace
ocp_versionwith the OpenShift Container Platform version to install, for example,4.9.Replace
ocp_release_versionwith the specific install version, for example,49.83.202103251640-0.Replace
iso_urlwith the ISO url, for example,https://mirror.openshift.com/pub/openshift-v4/x86_64/dependencies/rhcos/4.10/4.10.3/rhcos-4.10.3-x86_64-live.x86_64.iso. You can find other values at: https://mirror.openshift.com/pub/openshift-v4/x86_64/dependencies/rhcos/4.10/4.10.3/.Replace
root_fs_urlwith the root FS image URL, for example,https://mirror.openshift.com/pub/openshift-v4/x86_64/dependencies/rhcos/4.10/4.10.3/rhcos-4.10.3-x86_64-live-rootfs.x86_64.img. You can find other values at: https://mirror.openshift.com/pub/openshift-v4/x86_64/dependencies/rhcos/4.10/4.10.3/.Create the AgentServiceConfig CR by running the following command:
oc create -f agent_service_config.yaml
The output might resemble the following example:
agentserviceconfig.agent-install.openshift.io/agent created
Your CIM service is configured. You can verify that it is healthy by checking the assisted-service and assisted-image-service deployments and ensuring that their pods are ready and running. Continue with Creating your infrastructure environment with the console.
1.6.3. Creating your infrastructure environment with the console
To create an infrastructure environment from the Red Hat Advanced Cluster Management console, complete the following steps:
- From the navigation menu, navigate to Infrastructure > Infrastructure environments.
- On the Infrastructure environments page, Click Create infrastructure environment.
Add the following information to your infrastructure environment settings:
Name: A unique name for your environment.
Important: To prevent accidentally deleting this infrastrucure environment when you delete a cluster, the name of this infrastructure environment cannot be the same as the name of a cluster in your environment.
- Network type: Specifies which types of hosts can be added to your environment. You can only use the static IP option when you are using bare metal hosts.
- Location: Specifies the geographic location of the host. The geographic location can be used to easily determine where your data on a cluster is stored when you are creating the cluster.
- Labels: Optional field where you can add labels to the infrastructure environment so you can more easily find and group the environment with other environments that share a characteristic. The selections that you made for the network type and location are automatically added to the list of labels.
- Pull secret: Your OpenShift Container Platform pull secret that enables you to access the OpenShift Container Platform resources.
-
SSH public key: The SSH key that enables the secure communication with the hosts. This is generally in your
~/.ssh/id_rsa.pubfile, by default. If you want to enable proxy settings across all of your clusters, select the setting to enable it. This requires that you enter the following information:
- HTTP Proxy URL: The URL that should be used when accessing the discovery service.
-
HTTPS Proxy URL: The secure proxy URL that should be used when accessing the discovery service. Note that the format must be
http, ashttpsis not yet supported. - No Proxy domains: A comma-separated list of domains that should bypass the proxy. Begin a domain name with a period (.) to include all of the subdomains that are in that domain. Add and asterisk (*) to bypass the proxy for all destinations.
You can now continue by adding hosts to your infrastructure environment.
1.6.4. Accessing an infrastructure environment
To access an infrastructure environment, select Infrastructure > Infrastructure environments in the Red Hat Advanced Cluster Management console. Select your infrastructure environment from the list to view the details and hosts for that infrastructure environment.
1.6.5. Adding hosts to an infrastructure environment
You can use the Red Hat Advanced Cluster Management for Kubernetes console to add hosts to an infrastructure environment. Adding the hosts makes it easier to select the already-configured hosts when you are creating a cluster.
Complete the following steps to add a host:
- From the Red Hat Advanced Cluster Management navigation, select Infrastructure > Infrastructure environments.
- Select the infrastructure environment where you want to add the host to view its settings.
- Select the Hosts tab to view the hosts that are already added to that environment. Available hosts might take a few minutes to appear in the table.
- Select Add host to add a host to the infrastructure environment.
- Select Discovery ISO or Baseboard Management Controller (BMC) to enter the information for your host.
If you select the Discovery ISO option, complete the following steps:
- Copy the command that is provided in the console to download the ISO or select Download Discovery ISO.
- Run the command on a bootable device to start each host.
- For added security, you must select Approve host for each of the discovered hosts. This additional step offers some protection in case your ISO file is changed and run by an unauthorized person.
-
Rename the hosts that are named,
localhostto unique names.
If you select Baseboard Management Controller (BMC) option, complete the following steps:
Note: The BMC option for adding hosts can only be used when your hub cluster is running on a bare metal platform.
- Add the connection details for the BMC of your host.
Select Add host to start the boot process. The host is automatically booted by using the discovery ISO image, and is added to the list of hosts when it is started.
When you add a host by using the BMC option, the host is automatically approved.
You can now create an on-premises cluster on this infrastructure environment. See Creating a cluster in an on-premises environment for more information about creating a cluster.
1.7. Creating a cluster
Learn how to create Red Hat OpenShift Container Platform clusters across cloud providers with Red Hat Advanced Cluster Management for Kubernetes.
- Configuring additional manifests during cluster creation
- Creating a cluster on Amazon Web Services
- Creating a cluster on Microsoft Azure
- Creating a cluster on Google Cloud Platform
- Creating a cluster on VMware vSphere
- Creating a cluster on Red Hat OpenStack Platform
- Creating a cluster on bare metal
- Creating a cluster in an on-premises environment
1.7.1. Configuring additional manifests during cluster creation
You can configure additional Kubernetes resource manifests during the installation process of creating your cluster. This can help if you need to configure additional manifests for scenarios such as configuring networking or setting up a load balancer.
Before you create your cluster, you need to add a reference to the ClusterDeployment resource that specifies a ConfigMap that contains the additional resource manifests.
Note: The ClusterDeployment resource and the ConfigMap must be in the same namespace. The following examples show how your content might look.
ConfigMap with resource manifests
ConfigMapthat contains a manifest with anotherConfigMapresource. The resource manifestConfigMapcan contain multiple keys with resource configurations added in adata.<resource_name>\.yamlpattern.kind: ConfigMap apiVersion: v1 metadata: name: <my-baremetal-cluster-install-manifests> namespace: <mynamespace> data: 99_metal3-config.yaml: | kind: ConfigMap apiVersion: v1 metadata: name: metal3-config namespace: openshift-machine-api data: http_port: "6180" provisioning_interface: "enp1s0" provisioning_ip: "172.00.0.3/24" dhcp_range: "172.00.0.10,172.00.0.100" deploy_kernel_url: "http://172.00.0.3:6180/images/ironic-python-agent.kernel" deploy_ramdisk_url: "http://172.00.0.3:6180/images/ironic-python-agent.initramfs" ironic_endpoint: "http://172.00.0.3:6385/v1/" ironic_inspector_endpoint: "http://172.00.0.3:5150/v1/" cache_url: "http://192.168.111.1/images" rhcos_image_url: "https://releases-art-rhcos.svc.ci.openshift.org/art/storage/releases/rhcos-4.3/43.81.201911192044.0/x86_64/rhcos-43.81.201911192044.0-openstack.x86_64.qcow2.gz"ClusterDeployment with resource manifest
ConfigMapreferencedThe resource manifest
ConfigMapis referenced underspec.provisioning.manifestsConfigMapRef.apiVersion: hive.openshift.io/v1 kind: ClusterDeployment metadata: name: <my-baremetal-cluster> namespace: <mynamespace> annotations: hive.openshift.io/try-install-once: "true" spec: baseDomain: test.example.com clusterName: <my-baremetal-cluster> controlPlaneConfig: servingCertificates: {} platform: baremetal: libvirtSSHPrivateKeySecretRef: name: provisioning-host-ssh-private-key provisioning: installConfigSecretRef: name: <my-baremetal-cluster-install-config> sshPrivateKeySecretRef: name: <my-baremetal-hosts-ssh-private-key> manifestsConfigMapRef: name: <my-baremetal-cluster-install-manifests> imageSetRef: name: <my-clusterimageset> sshKnownHosts: - "10.1.8.90 ecdsa-sha2-nistp256 AAAAE2VjZHNhLXvVVVKUYVkuyvkuygkuyTCYTytfkufTYAAAAIbmlzdHAyNTYAAABBBKWjJRzeUVuZs4yxSy4eu45xiANFIIbwE3e1aPzGD58x/NX7Yf+S8eFKq4RrsfSaK2hVJyJjvVIhUsU9z2sBJP8=" pullSecretRef: name: <my-baremetal-cluster-pull-secret>
1.7.2. Creating a cluster on Amazon Web Services
You can use the Red Hat Advanced Cluster Management for Kubernetes console to create a Red Hat OpenShift Container Platform cluster on Amazon Web Services (AWS).
When you create a cluster, the creation process uses the OpenShift Container Platform installer with the Hive resource. If you have questions about cluster creation after completing this procedure, see Installing on AWS in the OpenShift Container Platform documentation for more information about the process.
1.7.2.1. Prerequisites
You must have the following prerequisites before creating a cluster on AWS:
- A deployed Red Hat Advanced Cluster Management for Kubernetes hub cluster
- Internet access for your Red Hat Advanced Cluster Management for Kubernetes hub cluster so it can create the Kubernetes cluster on Amazon Web Services
- AWS credential. See Creating a credential for Amazon Web Services for more information.
- A configured domain in AWS. See Configuring an AWS account for instructions on how to configure a domain.
- Amazon Web Services (AWS) login credentials, which include user name, password, access key ID, and secret access key. See Understanding and Getting Your Security Credentials.
- A OpenShift Container Platform image pull secret. See Using image pull secrets.
Note: If you change your cloud provider access key, you must manually update the provisioned cluster access key. For more information, see the known issue, Automatic secret updates for provisioned clusters is not supported.
1.7.2.2. Creating your cluster with the console
To create clusters from the Red Hat Advanced Cluster Management for Kubernetes console, complete the following steps:
- From the navigation menu, navigate to Infrastructure > Clusters.
On the Clusters page, Click Create cluster.
Note: This procedure is for creating a cluster. If you have an existing cluster that you want to import, see Importing a target managed cluster to the hub cluster for those steps.
- Select your Kubernetes distribution and Amazon Web Services for the infrastructure provider. The remaining steps are based on your selections.
- Select your infrastructure provider credential from the available credentials on the list. If you do not have one configured, or if you want to configure a new one, select Add credential. See Creating a credential for Amazon Web Services for more information about creating a credential.
Add the details for your cluster:
Enter a name for your cluster. This name is used in the hostname of the cluster.
Tip: You can view the
yamlcontent updates as you enter the information in the console by setting the YAML switch to ON.-
Specify a Cluster set, if you want to add it to an existing cluster set. If you do not have
cluster-adminprivileges when you are creating the cluster, you must select a cluster set on which you haveclusterset-adminpermissions to create the cluster. If you do not select a cluster set, the cluster creation fails. Contact your cluster administrator to provide you withclusterset-adminpermissions to a cluster set if you do not have cluster set options to select. - Specify the Base DNS domain information that you configured for your AWS account. If there is already a base domain associated with the selected credential, that value is populated in that field. You can change the value by overwriting it. See Configuring an AWS account for more information. This name is used in the hostname of the cluster.
- Specify a Release image that you want to use for the cluster. This identifies the version of the OpenShift Container Platform image that is used to create the cluster. If the version that you want to use is available, you can select the image from the list of images. If the image that you want to use is not a standard image, you can enter the url to the image that you want to use. See Release images for more information about release images.
- Add the Additional Labels that you want to associate with your cluster. These labels help to identify the cluster and limit search results.
Enter details about the control plane pool. There are three control plane nodes that are created for your cluster in the control plane pool. The control plane nodes share the management of the cluster activity. The optional information includes the following fields:
- Specify one or more Zones where you want to run your control plane pools. You can select multiple zones within the region for a more distributed group of control plane nodes. A closer zone might provide faster performance, but a more distant zone might be more distributed.
- Specify an Instance type for your control plane node. You can change the type and size of your instance after it is created. The default value is mx5.xlarge - 4 vCPU, 16 GiB RAM - General Purpose.
- Enter your Root storage allocation. The default value is 100 GiB of root storage.
Enter details about your worker pools. You can create zero or more worker nodes in a worker pool to run the container workloads for the cluster. They can be in a single worker pool, or distributed across multiple worker pools. If zero worker nodes are specified, the control plane nodes also function as worker nodes. The optional information includes the following fields:
- Add a name for your worker pool.
- Specify one or more Zones where you want to run your worker pools. You can select multiple zones within the region for a more distributed group of nodes. A closer zone might provide faster performance, but a more distant zone might be more distributed.
- Specify an Instance type for your worker pools. You can change the type and size of your instance after it is created. The default value is mx5.xlarge - 4 vCPU, 16 GiB RAM - General Purpose.
- Enter a Node count for your worker pool. This setting is required when you define a worker pool.
Enter your Root storage allocation. The default value is 100 GiB of root storage. This setting is required when you define a worker pool.
You can define additional worker pools by clicking Add worker pool.
Enter the networking details for your cluster. This information is required. Multiple networks are required for using IPv6.
-
Select your Network type. The default value is
OpenShiftSDN. OVNKubernetes is the required setting for using IPv6. -
Select a Cluster network CIDR. This is a number and list of IP addresses that can be used for the pod IP addresses. This block must not overlap another network block. The default value is
10.128.0.0/14. -
Specify the Network host prefix, which sets the subnet prefix length for each node. The default value is
23. -
Specify the Service network CIDR, which provides a block of IP addresses for services. This block must not overlap another network block. The default value is
172.30.0.0/16. Specify the Machine CIDR, which provides a block of IP addresses that are used by the OpenShift Container Platform hosts. This block must not overlap another network block. The default value is
10.0.0.0/16.You can add an additional network by clicking Add network. You must have more than one network if you are using IPv6 addresses.
-
Select your Network type. The default value is
- Add your proxy information, if you want to enable a proxy.
Add an optional Ansible Automation Template to run either before or after your cluster installs or upgrades.
You can click Add automation template to create a template.
Review your information and optionally customize it.
-
Click the YAML slider to On to view the
install-config.yamlfile content in the panel. - Edit the YAML file with your custom settings.
-
Click the YAML slider to On to view the
Select Create to create the cluster.
Note: You do not have to run the
kubectlcommand that is provided with the cluster details to import the cluster. When you create the cluster, it is automatically configured under the management of Red Hat Advanced Cluster Management.
1.7.2.3. Accessing your cluster
To access a cluster that is managed by Red Hat Advanced Cluster Management for Kubernetes, complete the following steps:
- From the Red Hat Advanced Cluster Management navigation menu, navigate to Infrastructure > Clusters.
- Select the name of the cluster that you created or want to access. The cluster details are displayed.
- Select Reveal credentials to view the user name and password for the cluster. Note these values to use when you log in to the cluster.
- Select Console URL to link to the cluster.
- Log in to the cluster by using the user ID and password that you found in step 3.
1.7.3. Creating a cluster on Microsoft Azure
You can use the Red Hat Advanced Cluster Management for Kubernetes console to deploy a Red Hat OpenShift Container Platform cluster on Microsoft Azure or on Microsoft Azure Government.
When you create a cluster, the creation process uses the OpenShift Container Platform installer with the Hive resource. If you have questions about cluster creation after completing this procedure, see Installing on Azure in the OpenShift Container Platform documentation for more information about the process.
1.7.3.1. Prerequisites
You must have the following prerequisites before creating a cluster on Azure:
- A deployed Red Hat Advanced Cluster Management for Kubernetes hub cluster.
- Internet access for your Red Hat Advanced Cluster Management for Kubernetes hub cluster so it can create the Kubernetes cluster on Azure or Azure Government.
Azure credential.
See Creating a credential for Microsoft Azure for more information.
A configured domain in Azure or Azure Government.
See Configuring a custom domain name for an Azure cloud service for instructions on how to configure a domain.
- Azure login credentials, which include user name and password. See Microsoft Azure Portal.
Azure service principals, which include
clientId,clientSecret, andtenantId.See azure.microsoft.com.
An OpenShift Container Platform image pull secret.
Note: If you change your cloud provider access key, you must manually update the provisioned cluster access key. For more information, see the known issue, Automatic secret updates for provisioned clusters is not supported.
1.7.3.2. Creating your cluster with the console
To create clusters from the Red Hat Advanced Cluster Management for Kubernetes console, complete the following steps:
- From the navigation menu, navigate to Infrastructure > Clusters.
On the Clusters page, Click Create cluster.
Note: This procedure is for creating a cluster. If you have an existing cluster that you want to import, see Importing a target managed cluster to the hub cluster for those steps.
- Select your Kubernetes distribution and Microsoft Azure for the infrastructure provider. The remaining steps are based on your selections.
- Select your infrastructure provider credential from the available credentials on the list. If you do not have one configured, or if you want to configure a new one, select Add credential. See Creating a credential for Microsoft Azure for more information about creating a credential.
Add the details for your cluster:
Enter a name for your cluster. This name is used in the hostname of the cluster.
Tip: You can view the
yamlcontent updates as you enter the information in the console by setting the YAML switch to ON.-
Specify a Cluster set, if you want to add it to an existing cluster set. If you do not have
cluster-adminprivileges when you are creating the cluster, you must select a cluster set on which you haveclusterset-adminpermissions to create the cluster. If you do not select a cluster set, the cluster creation fails. Contact your cluster administrator to provide you withclusterset-adminpermissions to a cluster set if you do not have cluster set options to select. - Specify the Base DNS domain information that you configured for your Azure account. If there is already a base domain that is associated with the selected credential, that value is populated in that field. You can change the value by overwriting it. See Configuring a custom domain name for an Azure cloud service for more information. This name is used in the hostname of the cluster.
- Specify a Release image that you want to use for the cluster. This identifies the version of the OpenShift Container Platform image that is used to create the cluster. If the version that you want to use is available, you can select the image from the list of images. If the image that you want to use is not a standard image, you can enter the URL to the image that you want to use. See Release images for more information about release images.
- Add the Additional Labels that you want to associate with your cluster. These labels help to identify the cluster and limit search results.
Enter details about the control plane pool. There are three control plane nodes that are created for your cluster in the control plane pool. The control plane nodes share the management of the cluster activity. The optional information includes the following fields:
- Specify a Region where you want to run your control plane pools. You can select multiple zones within the region for a more distributed group of control plane nodes. A closer zone might provide faster performance, but a more distant zone might be more distributed.
- Specify an Instance type for your control plane node. You can change the type and size of your instance after it is created. The default value is Standard_D4s_v3 - 4 vCPU, 16 GiB RAM - General Purpose.
- Enter your Root storage allocation. The default value is 128 GiB of root storage.
Enter details about your worker pools. You can create zero or more worker nodes in a worker pool to run the container workloads for the cluster. They can be in a single worker pool, or distributed across multiple worker pools. If zero worker nodes are specified, the control plane nodes also function as worker nodes. The optional information includes the following fields:
- Add a name for your worker pool.
- Specify one or more Zones where you want to run your worker pools. You can select multiple zones within the region for a more distributed group of nodes. A closer zone might provide faster performance, but a more distant zone might be more distributed.
- Specify an Instance type for your worker pools. You can change the type and size of your instance after it is created. The default value is Standard_D2s_v3 - 2 vCPU, 8 GiB - General Purpose.
- Enter a Node count for your worker pool. This setting is required when you define a worker pool.
Enter your Root storage allocation. The default value is 128 GiB of root storage. This setting is required when you define a worker pool.
You can define additional worker pools by clicking Add worker pool.
Enter the networking details for your cluster. This information is required. Multiple networks are required for using IPv6.
-
Select your Network type. The default value is
OpenShiftSDN. OVNKubernetes is the required setting for using IPv6. -
Select a Cluster network CIDR. This is a number and list of IP addresses that can be used for the pod IP addresses. This block must not overlap another network block. The default value is
10.128.0.0/14. -
Specify the Network host prefix, which sets the subnet prefix length for each node. The default value is
23. -
Specify the Service network CIDR, which provides a block of IP addresses for services. This block must not overlap another network block. The default value is
172.30.0.0/16. Specify the Machine CIDR, which provides a block of IP addresses that are used by the OpenShift Container Platform hosts. This block must not overlap another network block. The default value is
10.0.0.0/16.You can add an additional network by clicking Add network. You must have more than one network if you are using IPv6 addresses.
-
Select your Network type. The default value is
- Add your proxy information, if you want to enable a proxy.
Add an optional Ansible Automation Template to run either before or after your cluster installs or upgrades.
You can click Add automation template to create a template.
Review your information and optionally customize it.
-
Click the YAML slider to On to view the
install-config.yamlfile content in the panel. - Edit the YAML file with your custom settings.
-
Click the YAML slider to On to view the
Select Create to create the cluster.
Note: You do not have to run the
kubectlcommand that is provided with the cluster details to import the cluster. When you create the cluster, it is automatically configured under the management of Red Hat Advanced Cluster Management.
1.7.3.3. Accessing your cluster
To access a cluster that is managed by Red Hat Advanced Cluster Management for Kubernetes, complete the following steps:
- From the Red Hat Advanced Cluster Management for Kubernetes navigation menu, navigate to Infrastructure > Clusters.
- Select the name of the cluster that you created or want to access. The cluster details are displayed.
- Select Reveal credentials to view the user name and password for the cluster. Note these values to use when you log in to the cluster.
- Select Console URL to link to the cluster.
- Log in to the cluster by using the user ID and password that you found in step three.
1.7.4. Creating a cluster on Google Cloud Platform
Follow the procedure to create a Red Hat OpenShift Container Platform cluster on Google Cloud Platform (GCP). For more information about Google Cloud Platform, see Google Cloud Platform.
When you create a cluster, the creation process uses the OpenShift Container Platform installer with the Hive resource. If you have questions about cluster creation after completing this procedure, see Installing on GCP in the OpenShift Container Platform documentation for more information about the process.
1.7.4.1. Prerequisites
You must have the following prerequisites before creating a cluster on GCP:
- A deployed Red Hat Advanced Cluster Management for Kubernetes hub cluster
- Internet access for your Red Hat Advanced Cluster Management for Kubernetes hub cluster so it can create the Kubernetes cluster on GCP
- GCP credential. See Creating a credential for Google Cloud Platform for more information.
- A configured domain in GCP. See Setting up a custom domain for instructions on how to configure a domain.
- GCP login credentials, which include user name and password.
- A OpenShift Container Platform image pull secret. See Using image pull secrets.
Note: If you change your cloud provider access key, you must manually update the provisioned cluster access key. For more information, see the known issue, Automatic secret updates for provisioned clusters is not supported.
1.7.4.2. Creating your cluster with the console
To create clusters from the Red Hat Advanced Cluster Management for Kubernetes console, complete the following steps:
- From the navigation menu, navigate to Infrastructure > Clusters.
On the Clusters page, select Create cluster.
Note: This procedure is for creating a cluster. If you have an existing cluster that you want to import, see Importing a target managed cluster to the hub cluster for those steps.
- Select your Kubernetes distribution and Google Cloud for the infrastructure provider. The remaining steps are based on your selections.
- Select your credential from the available credentials on the list. If you do not have one configured, or want to configure a new one, select Add credential. See Creating a credential for Google Cloud Platform for more information about creating a credential.
Add the details for your cluster:
Enter a name for your cluster. This name is used in the hostname of the cluster. There are some restrictions that apply to naming your GCP cluster. These restrictions include not beginning the name with
googor containing a group of letters and numbers that resemblegoogleanywhere in the name. See Bucket naming guidelines for the complete list of restrictions.Tip: You can view the
yamlcontent updates as you enter the information in the console by setting the YAML switch to ON.-
Specify a Cluster set, if you want to add it to an existing cluster set. If you do not have
cluster-adminprivileges when you are creating the cluster, you must select a cluster set on which you haveclusterset-adminpermissions to create the cluster. If you do not select a cluster set, the cluster creation fails. Contact your cluster administrator to provide you withclusterset-adminpermissions to a cluster set if you do not have cluster set options to select. - Specify the Base DNS domain information that you configured for your GCP account. If there is already a base domain associated with the selected credential, that value is populated in that field. You can change the value by overwriting it. This name is used in the hostname of the cluster. See Setting up a custom domain for more information.
- Specify a Release image that you want to use for the cluster. This identifies the version of the OpenShift Container Platform image that is used to create the cluster. If the version that you want to use is available, you can select the image from the list of images. If the image that you want to use is not a standard image, you can enter the url to the image that you want to use. See Release images for more information about release images.
- Add the Additional Labels that you want to associate with your cluster. These labels help to identify the cluster and limit search results.
Enter details about the control plane pool. There are three control plane nodes that are created for your cluster in the control plane pool. The control plane nodes share the management of the cluster activity. The optional information includes the following fields:
- Specify a Region where you want to run your control plane pools. A closer region might provide faster performance, but a more distant region might be more distributed.
- Specify an Instance type for your control plane node. You can change the type and size of your instance after it is created. The default values are n1-standard-1 - n1-standard-1 1 vCPU - General Purpose.
Enter details about your worker pools. You can create zero or more worker nodes in a worker pool to run the container workloads for the cluster. They can be in a single worker pool, or distributed across multiple worker pools. If zero worker nodes are specified, the control plane nodes also function as worker nodes. The optional information includes the following fields:
- Add a name for your worker pool.
- Specify an Instance type for your worker pools. You can change the type and size of your instance after it is created. The default values are n1-standard-4 - 4 vCPU 15 GiB RAM - General Purpose.
Enter a Node count for your worker pool. This setting is required when you define a worker pool.
You can define additional worker pools by clicking Add worker pool.
Enter the networking details for your cluster. This information is required. Multiple networks are required for using IPv6.
-
Select your Network type. The default value is
OpenShiftSDN. OVNKubernetes is the required setting for using IPv6. -
Select a Cluster network CIDR. This is a number and list of IP addresses that can be used for the pod IP addresses. This block must not overlap another network block. The default value is
10.128.0.0/14. -
Specify the Network host prefix, which sets the subnet prefix length for each node. The default value is
23. -
Specify the Service network CIDR, which provides a block of IP addresses for services. This block must not overlap another network block. The default value is
172.30.0.0/16. Specify the Machine CIDR, which provides a block of IP addresses that are used by the OpenShift Container Platform hosts. This block must not overlap another network block. The default value is
10.0.0.0/16.You can add an additional network by clicking Add network. You must have more than one network if you are using IPv6 addresses.
-
Select your Network type. The default value is
- Add your proxy information, if you want to enable a proxy.
Add an optional Ansible Automation Template to run either before or after your cluster installs or upgrades.
You can click Add automation template to create a template.
Review your information and optionally customize it.
-
Click the YAML slider to On to view the
install-config.yamlfile content in the panel. - Edit the YAML file with your custom settings.
-
Click the YAML slider to On to view the
Select Create to create the cluster.
Note: You do not have to run the
kubectlcommand that is provided with the cluster details to import the cluster. When you create the cluster, it is automatically configured under the management of Red Hat Advanced Cluster Management.
1.7.4.3. Accessing your cluster
To access a cluster that is managed by Red Hat Advanced Cluster Management for Kubernetes, complete the following steps:
- From the Red Hat Advanced Cluster Management for Kubernetes navigation menu, navigate to Infrastructure > Clusters.
- Select the name of the cluster that you created or want to access. The cluster details are displayed.
- Select Reveal credentials to view the user name and password for the cluster. Note these values to use when you log in to the cluster.
- Select Console URL to link to the cluster.
- Log in to the cluster by using the user ID and password that you found in step 3.
1.7.5. Creating a cluster on VMware vSphere
You can use the Red Hat Advanced Cluster Management for Kubernetes console to deploy a Red Hat OpenShift Container Platform cluster on VMware vSphere.
When you create a cluster, the creation process uses the OpenShift Container Platform installer with the Hive resource. If you have questions about cluster creation after completing this procedure, see Installing on vSphere in the OpenShift Container Platform documentation for more information about the process.
1.7.5.1. Prerequisites
You must have the following prerequisites before creating a cluster on vSphere:
- A Red Hat Advanced Cluster Management hub cluster that is deployed on OpenShift Container Platform version 4.6 or later.
- Internet access for your Red Hat Advanced Cluster Management hub cluster so it can create the Kubernetes cluster on vSphere.
- vSphere credential. See Creating a credential for VMware vSphere for more information.
- An OpenShift Container Platform image pull secret. See Using image pull secrets.
The following information for the VMware instance where you are deploying:
- Required static IP addresses for API and Ingress instances.
DNS records for:
-
api.<cluster_name>.<base_domain>which must point to the static API VIP. -
*.apps.<cluster_name>.<base_domain>which must point to the static IP address for Ingress VIP.
-
1.7.5.2. Creating your cluster with the console
To create clusters from the Red Hat Advanced Cluster Management console, complete the following steps:
- From the navigation menu, navigate to Infrastructure > Clusters.
On the Clusters page, Click Create cluster.
Note: This procedure is for creating a cluster. If you have an existing cluster that you want to import, see Importing a target managed cluster to the hub cluster for those steps.
- Select your Kubernetes distribution and VMware vSphere for the infrastructure provider. The remaining steps are based on your selections.
- Select your infrastructure provider credential from the available credentials on the list. If you do not have one configured, or if you want to configure a new one, select Add credential. See Creating a credential for VMware vSphere for more information about creating a credential.
Add the details for your cluster:
Enter a name for your cluster. This value must match the name that you used to create the DNS records listed in the credential prerequisites section. This name is used in the hostname of the cluster.
Tip: You can view the
yamlcontent updates as you enter the information in the console by setting the YAML switch to ON.-
Specify a Cluster set, if you want to add it to an existing cluster set. If you do not have
cluster-adminprivileges when you are creating the cluster, you must select a cluster set on which you haveclusterset-adminpermissions to create the cluster. If you do not select a cluster set, the cluster creation fails. Contact your cluster administrator to provide you withclusterset-adminpermissions to a cluster set if you do not have cluster set options to select. - Specify the Base DNS domain information that you configured for your VMware vSphere account. This value must match the name that you used to create the DNS records listed in the prerequisites section. This name is used in the hostname of the cluster. If there is already a base domain associated with the selected credential, that value is populated in that field. You can change the value by overwriting it. See Configuring an AWS account for more information. This name is used in the hostname of the cluster.
Specify a Release image that you want to use for the cluster. This identifies the version of the OpenShift Container Platform image that is used to create the cluster. If the version that you want to use is available, you can select the image from the list of images. If the image that you want to use is not a standard image, you can enter the url to the image that you want to use. See Release images for more information about release images.
Note: Only release images for OpenShift Container Platform versions 4.5.x and higher are supported.
- Add the Additional Labels that you want to associate with your cluster. These labels help to identify the cluster and limit search results.
Enter details about the control plane pool. There are three control plane nodes that are created for your cluster in the control plane pool. The control plane nodes share the management of the cluster activity. The required information includes the following fields:
- Specify one or more Cores per socket that you want to allocate for your cluster.
- Specify a number of CPUs to allocate for your control plane node.
- Specify the amount of Memory, in MB, that you want to allocate.
- Add the Disk size that you want to create for your control plane node.
Enter details about your worker pools. You can create zero or more worker nodes in a worker pool to run the container workloads for the cluster. They can be in a single worker pool, or distributed across multiple worker pools. If zero worker nodes are specified, the control plane nodes also function as worker nodes. The information includes the following fields:
- Add a name for your worker pool.
- Specify one or more Cores per socket that you want to allocate for your cluster.
- Specify a number of CPUs to allocate.
- Specify the amount of Memory, in MB, that you want to allocate.
- Add the Disk size, in GiB, that you want to create.
Add a Node count to specify the number of worker nodes in your cluster.
You can define additional worker pools by clicking Add worker pool.
Configure the cluster networking options. This information is required. Multiple networks are required for using IPv6.
- vSphere network name - The VMware vSphere network name.
API VIP - The IP address to use for internal API communication.
Note: This value must match the name that you used to create the DNS records listed in the prerequisites section. If not provided, the DNS must be pre-configured so that
api.resolves correctly.Ingress VIP - The IP address to use for ingress traffic.
Note: This value must match the name that you used to create the DNS records listed in the prerequisites section. If not provided, the DNS must be pre-configured so that
test.apps.resolves correctly.You can add an additional network by clicking Add network. You must have more than one network if you are using IPv6 addresses.
- Add your proxy information, if you want to enable a proxy.
Add an optional Ansible Automation Template to run either before or after your cluster installs or upgrades.
You can click Add automation template to create a template.
Review your information and optionally customize it.
-
Click the YAML slider to On to view the
install-config.yamlfile content in the panel. - Edit the YAML file with your custom settings.
-
Click the YAML slider to On to view the
Select Create to create the cluster.
Note: You do not have to run the
kubectlcommand that is provided with the cluster details to import the cluster. When you create the cluster, it is automatically configured under the management of Red Hat Advanced Cluster Management.
1.7.5.3. Accessing your cluster
To access a cluster that is managed by Red Hat Advanced Cluster Management, complete the following steps:
- From the Red Hat Advanced Cluster Management navigation menu, navigate to Infrastructure > Clusters.
- Select the name of the cluster that you created or want to access. The cluster details are displayed.
- Select Reveal credentials to view the user name and password for the cluster. Use these values when you log in to the cluster.
- Select Console URL to link to the cluster.
- Log in to the cluster by using the user ID and password that you found in step 3.
1.7.6. Creating a cluster on Red Hat OpenStack Platform
You can use the Red Hat Advanced Cluster Management for Kubernetes console to deploy a Red Hat OpenShift Container Platform cluster on Red Hat OpenStack Platform.
When you create a cluster, the creation process uses the OpenShift Container Platform installer with the Hive resource. If you have questions about cluster creation after completing this procedure, see Installing on OpenStack in the OpenShift Container Platform documentation for more information about the process.
1.7.6.1. Prerequisites
You must have the following prerequisites before creating a cluster on Red Hat OpenStack Platform:
- A Red Hat Advanced Cluster Management hub cluster that is deployed on OpenShift Container Platform version 4.6, or later.
- Internet access for your Red Hat Advanced Cluster Management hub cluster so it can create the Kubernetes cluster on Red Hat OpenStack Platform.
- A Red Hat OpenStack Platform credential. See Creating a credential for Red Hat OpenStack Platform for more information.
- A OpenShift Container Platform image pull secret. See Using image pull secrets.
The following information for the Red Hat OpenStack Platform instance where you are deploying:
- Flavor name for the control plane and worker instances. For example, m1.xlarge.
- Network name for the external network to provide the floating IP addresses.
- Required floating IP addresses for API and ingress instances.
DNS records for:
-
api.<cluster_name>.<base_domain>, which must point to the floating IP address for the API. -
*.apps.<cluster_name>.<base_domain>, which must point to the floating IP address for ingress.
-
1.7.6.2. Creating your cluster with the console
To create clusters from the Red Hat Advanced Cluster Management console, complete the following steps:
- From the navigation menu, navigate to Infrastructure > Clusters.
On the Clusters page, click Create cluster.
Note: This procedure is for creating a cluster. If you have an existing cluster that you want to import, see Importing a target managed cluster to the hub cluster for those steps.
- Select your Kubernetes distribution and Red Hat OpenStack for the infrastructure provider. The remaining steps are based on your selections.
- Select your infrastructure provider credential from the available credentials on the list. If you do not have one configured, or if you want to configure a new one, select Add credential. See Creating a credential for Red Hat OpenStack Platform for more information about creating a credential.
Add the details for your cluster:
Enter a name for your cluster. This name is used in the hostname of the cluster. The name must contain fewer than 15 characters.
Note: This value must match the name that you used to create the DNS records listed in the credential prerequisites section.
Tip: You can view the
yamlcontent updates as you enter the information in the console by setting the YAML switch to ON.-
Specify a Cluster set, if you want to add it to an existing cluster set. If you do not have
cluster-adminprivileges when you are creating the cluster, you must select a cluster set on which you haveclusterset-adminpermissions to create the cluster. If you do not select a cluster set, the cluster creation fails. Contact your cluster administrator to provide you withclusterset-adminpermissions to a cluster set if you do not have cluster set options to select. Specify the Base DNS domain information that you configured for your Red Hat OpenStack Platform account. If there is already a base domain associated with the selected credential, that value is populated in that field. You can change the value by overwriting it. This value must match the name that you used to create the DNS records listed in the prerequisites section.
See Managing domains in the Red Hat OpenStack Platform documentation for more information. This name is used in the hostname of the cluster.
Specify a Release image that you want to use for the cluster. This identifies the version of the OpenShift Container Platform image that is used to create the cluster. If the version that you want to use is available, you can select the image from the list of images. If the image that you want to use is not a standard image, you can enter the url to the image that you want to use. See Release images for more information about release images.
Note: Only release images for OpenShift Container Platform versions 4.6.x and higher are supported.
- Add the Additional Labels that you want to associate with your cluster. These labels help to identify the cluster and limit search results.
Enter details about the control plane node. There are three control plane nodes that are created for your cluster in the control plane pool. The control plane nodes share the management of the cluster activity. The optional information includes the following fields:
- Specify an Instance type for your control plane node. You can change the type and size of your instance after it is created. The default value is m1.xlarge.
Enter details about your worker pools. You can create one or more worker nodes in a worker pool to run the container workloads for the cluster. They can be in a single worker pool, or distributed across multiple worker pools. If zero worker nodes are specified, the control plane nodes also function as worker nodes. The optional information includes the following fields:
- Add a name for your worker pool.
- Specify an Instance type for your worker pools. You can change the type and size of your instance after it is created. The default value is m1.xlarge.
Enter a Node count for your worker pool. This setting is required when you define a worker pool.
You can define additional worker pools by clicking Add worker pool.
Enter the networking details for your cluster. You must provide the values for one or more networks for an IPv4 network. For an IPv6 network, you must define more than one network.
- Add the External network name, which is the name of the external Red Hat OpenStack Platform network.
- Add the API floating IP address. The existing floating IP address is for the the external network for the OpenShift Container Platform API. This value must match the name that you used to create the DNS records listed in the prerequisites section.
- Add the Ingress floating IP address. The existing floating IP address is on the external network for the ingress port. This value must match the name that you used to create the DNS records listed in the prerequisites section. The existing floating IP address is on the external network for the ingress port.
- Add the External DNS IP addresses supports name resolution on the private network.
-
Select your Network type, which specifies the pod network provider plug-in to deploy. The possible values are
OVNKubernetesorOpenShiftSDN. The default value isOpenShiftSDN. OVNKubernetes is the required setting for using IPv6. -
Select a Cluster network CIDR. The group of IP addresses that are reserved for use by the cluster. Ensure that you specify enough for your cluster, and that they do not include the IP addresses of other clusters in the range. The default value is
10.128.0.0/14. -
Specify the Network host prefix, which sets the prefix length to assign to each individual node. The default value is
23. -
Specify the Service network CIDR, which provides a block of IP addresses for services. This block must not overlap another network block. The default value is
172.30.0.0/16. Specify the Machine CIDR, which provides a block of IP addresses that are used by the OpenShift Container Platform hosts. This block must not overlap another network block. The default value is
10.0.0.0/16.You can add an additional network by clicking Add network. You must have more than one network if you are using IPv6 addresses.
- Add your proxy information, if you want to enable a proxy.
Add an optional Ansible Automation Template to run either before or after your cluster installs or upgrades.
You can click Add automation template to create a template.
Review your information and optionally customize it.
-
Click the YAML slider to On to view the
install-config.yamlfile content in the panel. - Edit the YAML file with your custom settings.
-
Click the YAML slider to On to view the
Select Create to create the cluster.
Note: You do not have to run the
kubectlcommand that is provided with the cluster details to import the cluster. When you create the cluster, it is automatically configured under the management of Red Hat Advanced Cluster Management.
1.7.6.3. Accessing your cluster
To access a cluster that is managed by Red Hat Advanced Cluster Management, complete the following steps:
- From the Red Hat Advanced Cluster Management navigation menu, navigate to Infrastructure > Clusters.
- Select the name of the cluster that you created or want to access. The cluster details are displayed.
- Select Reveal credentials to view the user name and password for the cluster. Use these values when you log in to the cluster.
- Select Console URL to link to the cluster.
- Log in to the cluster by using the user ID and password that you found in step 3.
1.7.7. Creating a cluster on bare metal
You can use the Red Hat Advanced Cluster Management for Kubernetes console to create a Red Hat OpenShift Container Platform cluster in a bare metal environment.
When you create a cluster, the creation process uses the OpenShift Container Platform installer with the Hive resource. If you have questions about cluster creation after completing this procedure, see Installing on bare metal in the OpenShift Container Platform documentation for more information about the process.
1.7.7.1. Prerequisites
You need the following prerequisites before creating a cluster in a bare metal environment:
- A deployed Red Hat Advanced Cluster Management for Kubernetes hub cluster on OpenShift Container Platform version 4.6 or later.
- Internet access for your Red Hat Advanced Cluster Management for Kubernetes hub cluster (connected) or a connection to an internal or mirror registry that has a connection to the Internet (disconnected) to retrieve the required images for creating the cluster.
- A temporary external KVM host that runs a bootstrap virtual machine, which is used to create a Hive cluster. See Preparing a provisioning host for more information.
- The deployed Red Hat Advanced Cluster Management for Kubernetes hub cluster must be able to route to the provisioning network.
- Your bare metal server login credentials, which includes the libvirt URI from the bootstrap virtual machine in the previous item, the SSH Private Key, and a list of SSH known hosts. See Setting up the environment for an OpenShift installation for more information.
- A configured bare metal credential. See Creating a credential for bare metal for more information.
- Login credentials for your bare metal environment, which include user name, password, and Baseboard Management Controller Address.
- A configured bare metal asset, if you are are enabling certificate verification. See Creating and modifying bare metal assets for more information.
A OpenShift Container Platform image pull secret; see Using image pull secrets.
Notes:
- The bare metal asset, managed bare metal cluster, and its related secret must be in the same namespace.
- If you change your cloud provider access key, you must manually update the provisioned cluster access key. For more information, see the known issue, Automatic secret updates for provisioned clusters is not supported.
1.7.7.2. Creating your cluster with the console
To create clusters from the Red Hat Advanced Cluster Management console, complete the following steps:
- From the navigation menu, navigate to Infrastructure > Clusters.
On the Clusters page, Click Create cluster.
Note: This procedure is for creating a cluster. If you have an existing cluster that you want to import, see Importing a target managed cluster to the hub cluster for those steps.
- Select your Kubernetes distribution and Bare Metal for the infrastructure provider. The remaining steps are based on your selections.
- Select your credential from the available credentials on the list. If you do not have one configured, or want to configure a new one, select Add credential. See Creating a credential for bare metal for more information about creating a credential.
Add the details for your cluster:
Enter a name for your cluster. For a bare metal cluster, this name cannot be an arbitrary name. It is associated with the cluster URL. Make sure that the cluster name that you use is consistent with your DNS and network setup.
Tip: You can view the
yamlcontent updates as you enter the information in the console by setting the YAML switch to ON.-
Specify a Cluster set, if you want to add it to an existing cluster set. If you do not have
cluster-adminprivileges when you are creating the cluster, you must select a cluster set on which you haveclusterset-adminpermissions to create the cluster. If you do not select a cluster set, the cluster creation fails. Contact your cluster administrator to provide you withclusterset-adminpermissions to a cluster set if you do not have cluster set options to select. - Specify the Base DNS domain information that you configured for your bare metal provider account. The base domain of your provider is used to create routes to your Red Hat OpenShift Container Platform cluster components. It is configured in your cluster provider’s DNS as a Start of Authority (SOA) record. If there is already a base domain associated with the selected credential, that value is populated in that field. You can change the value by overwriting it, but this setting cannot be changed after the cluster is created. See Installing on bare metal in the OpenShift Container Platform documentation for more information. This name is used in the hostname of the cluster.
- Specify a Release image that you want to use for the cluster. This identifies the version of the OpenShift Container Platform image that is used to create the cluster. If the version that you want to use is available, you can select the image from the list of images. If the image that you want to use is not a standard image, you can enter the URL to the image that you want to use. See Release images for more information about release images.
- Add the Additional Labels that you want to associate with your cluster. These labels help to identify the cluster and limit search results.
Select your hosts from the list of hosts that are associated with your credential. Select a minimum of three bare metal assets that are on the same bridge networks as the hypervisor.
The list of hosts is compiled from the existing bare metal assets. Ensure that you are running the latest firmware on the bare metal hosts, or the provision might fail. If you do not have any bare metal assets created, then you can create or import them before you continue with the creation process by selecting Import assets. For more information about creating bare metal assets, see Creating and modifying bare metal assets. Alternatively, you can select Disable certificate verification to bypass the requirement.
Configure the cluster networking options. The following tables shows the networking options and their descriptions:
Parameter Description Required or Optional Provisioning network CIDR
The CIDR for the network to use for provisioning. The example format is: 172.30.0.0/16.
Required
Provisioning network interface
The name of the network interface on the control plane nodes that are connected to the provisioning network.
Required
Provisioning network bridge
The name of the bridge on the hypervisor that is attached to the provisioning network.
Required
External network bridge
The name of the bridge of the hypervisor that is attached to the external network.
Required
API VIP
The Virtual IP to use for internal API communication. The DNS must be pre-configured with an A/AAAA or CNAME record so the
api.<cluster_name>.<Base DNS domain>path resolves correctly.Required
Ingress VIP
The Virtual IP to use for ingress traffic. The DNS must be pre-configured with an A/AAAA or CNAME record so the
*.apps.<cluster_name>.<Base DNS domain>path resolves correctly.Optional
Network type
The pod network provider plug-in to deploy. Only the OpenShiftSDN plug-in is supported on OpenShift Container Platform 4.3. The OVNKubernetes plug-in is available as a technical preview on OpenShift Container Platform versions 4.3, 4.4, and 4.5. It is generally available on OpenShift Container Platform version 4.6, and later. OVNKubernetes must be used with IPv6. The default value is
OpenShiftSDN.Required
Cluster network CIDR
A block of IP addresses from which pod IP addresses are allocated. The OpenShiftSDN network plug-in supports multiple cluster networks. The address blocks for multiple cluster networks must not overlap. Select address pools large enough to fit your anticipated workload. The default value is 10.128.0.0/14.
Required
Network host prefix
The subnet prefix length to assign to each individual node. For example, if hostPrefix is set to 23, then each node is assigned a /23 subnet out of the given CIDR, allowing for 510 (2^(32-23)-2) pod IP addresses. The default is 23.
Required
Service network CIDR
A block of IP addresses for services. OpenShiftSDN allows only one serviceNetwork block. The address must not overlap any other network block. The default value is 172.30.0.0/16.
Required
Machine CIDR
A block of IP addresses used by the OpenShift Container Platform hosts. The address block must not overlap any other network block. The default value is 10.0.0.0/16.
Required
You can add an additional network by clicking Add network. You must have more than one network if you are using IPv6 addresses.
- Add your proxy information, if you want to enable a proxy.
Add an optional Ansible Automation Template to run either before or after your cluster installs or upgrades.
You can click Add automation template to create a template.
Review your information and optionally customize it.
-
Click the YAML slider to On to view the
install-config.yamlfile content in the panel. - Edit the YAML file with your custom settings.
-
Click the YAML slider to On to view the
Select Create to create the cluster.
Note: You do not have to run the
kubectlcommand that is provided with the cluster details to import the cluster. When you create the cluster, it is automatically configured under the management of Red Hat Advanced Cluster Management.
1.7.7.3. Accessing your cluster
To access a cluster that is managed by Red Hat Advanced Cluster Management for Kubernetes, complete the following steps:
- From the Red Hat Advanced Cluster Management for Kubernetes navigation menu, navigate to Infrastructure > Clusters.
- Select the name of the cluster that you created or want to access. The cluster details are displayed.
- Select Reveal credentials to view the user name and password for the cluster. Note these values to use when you log in to the cluster.
- Select Console URL to link to the cluster.
- Log in to the cluster by using the user ID and password that you found in step three.
1.7.8. Creating a cluster in an on-premises environment (Technology Preview)
You can use the Red Hat Advanced Cluster Management for Kubernetes console to create an on-premises Red Hat OpenShift Container Platform cluster.
Note: The Red Hat Advanced Cluster Management on-premises deployment is a Technology Preview feature, but the resulting single node OpenShift (SNO) cluster is fully supported on OpenShift Container Platform version 4.9 only for bare metal deployments.
1.7.8.1. Prerequisites
You need the following prerequisites before creating a cluster in an on-premises environment:
- A deployed Red Hat Advanced Cluster Management hub cluster on OpenShift Container Platform version 4.9, or later.
- A configured infrastructure environment with configured hosts.
- Internet access for your Red Hat Advanced Cluster Management for Kubernetes hub cluster (connected), or a connection to an internal or mirror registry that has a connection to the Internet (disconnected) to retrieve the required images for creating the cluster.
- A configured on-premises credential. See Creating a credential for an on-premises environment for more information.
- A OpenShift Container Platform image pull secret; see Using image pull secrets.
1.7.8.2. Creating your cluster with the console
To create clusters from the Red Hat Advanced Cluster Management console, complete the following steps:
- From the navigation menu, navigate to Infrastructure > Clusters.
- On the Clusters page, click Create cluster.
- Select On-premises for the infrastructure provider. The remaining steps are based on your selection.
- Select your credential from the available credentials on the list. If you do not have one configured, or want to configure a new one, select Add credential. See Creating a credential for an on-premises environment for more information about creating a credential.
Add the details for your cluster:
Enter a name for your cluster.
Tip: You can view the
yamlcontent updates as you enter the information in the console by setting the YAML switch to ON.-
Specify a Cluster set, if you want to add it to an existing cluster set. If you do not have
cluster-adminprivileges when you are creating the cluster, you must select a cluster set on which you haveclusterset-adminpermissions to create the cluster. If you do not select a cluster set, the cluster creation fails. Contact your cluster administrator to provide you withclusterset-adminpermissions to a cluster set if you do not have cluster set options to select. - Specify the Base DNS domain information that you configured for your provider account. The base domain of your provider is used to create routes to your Red Hat OpenShift Container Platform cluster components. It is configured in your cluster provider’s DNS as a Start of Authority (SOA) record. If there is already a base domain associated with the selected credential, that value is populated in that field. You can change the value by overwriting it, but this setting cannot be changed after the cluster is created.
- If you want your cluster to be a SNO cluster, select the SNO option. A SNO cluster only creates one node, rather than the three nodes that are created by a standard cluster.
- Add the Additional Labels that you want to associate with your cluster. These labels help to identify the cluster and limit search results.
- Configure any Automation templates that you want to run during creation or upgrade of the cluster.
Review and save your cluster.
Tip: After you review and save the cluster at this point, your cluster is saved as a draft cluster. You can close the creation process and finish the process later by selecting the cluster name on the Clusters page.
Select whether you want to select the hosts yourself, or if you want them to be selected automatically. The number of hosts is based on the number of nodes that you selected. For example, a SNO cluster only requires one host, while a standard three-node cluster requires three hosts.
The locations of the available hosts that meet the requirements for this cluster are displayed in the list of Host locations. For distribution of the hosts and a more high-availability configuration, select multiple locations.
-
After your hosts finish binding and display a
Boundstatus, select a subnet for your cluster from the list of options for the bound host. Add the following IP addresses:
API VIP: The IP address to use for internal API communication.
Note: This value must match the name that you used to create the DNS records listed in the prerequisites section. If not provided, the DNS must be pre-configured so that
api.resolves correctly.Ingress VIP: The IP address to use for ingress traffic.
Note: This value must match the name that you used to create the DNS records listed in the prerequisites section. If not provided, the DNS must be pre-configured so that
test.apps.resolves correctly.
- Review your information.
- Select Create to create the cluster.
Your cluster is installing. You can view the status of the installation on the Clusters navigation page.
1.7.8.3. Accessing your cluster
To access a cluster that is managed by Red Hat Advanced Cluster Management, complete the following steps:
- From the Red Hat Advanced Cluster Management navigation menu, navigate to Infrastructure > Clusters.
- Select the name of the cluster that you created or want to access. The cluster details are displayed.
- Select Reveal credentials to view the user name and password for the cluster. Copy these values to use when you log in to the cluster.
- Select Console URL to link to the cluster.
- Log in to the cluster by using the user ID and password that you found in step three.
1.7.9. Hibernating a created cluster (Technology Preview)
You can hibernate a cluster that was created using Red Hat Advanced Cluster Management for Kubernetes to conserve resources. A hibernating cluster requires significantly fewer resources than one that is running, so you can potentially lower your provider costs by moving clusters in and out of a hibernating state. This feature only applies to clusters that were created by Red Hat Advanced Cluster Management in the following environments:
- Amazon Web Services
- Microsoft Azure
- Google Cloud Platform
1.7.9.1. Hibernate a cluster by using the console
To use the Red Hat Advanced Cluster Management console to hibernate a cluster that was created by Red Hat Advanced Cluster Management, complete the following steps:
- From the Red Hat Advanced Cluster Management navigation menu, select Infrastructure > Clusters. Ensure that the Manage clusters tab is selected.
- Find the cluster that you want to hibernate.
- Select Hibernate cluster from the the Options menu for that cluster. Note: If the Hibernate cluster option is not available, you cannot hibernate the cluster. This can happen when the cluster is imported, and not created by Red Hat Advanced Cluster Management.
- Select Hibernate in the confirmation dialog box to hibernate the cluster.
The status for the cluster on the Clusters page is Hibernating when the process completes.
Tip: You can hibernate multiple clusters by selecting the clusters that you want to hibernate on the Clusters page, and selecting Actions > Hibernate clusters.
Your selected cluster is hibernating.
1.7.9.2. Hibernate a cluster by using the CLI
To use the CLI to hibernate a cluster that was created by Red Hat Advanced Cluster Management, complete the following steps:
Enter the following command to edit the settings for the cluster that you want to hibernate:
oc edit clusterdeployment <name-of-cluster> -n <namespace-of-cluster>
Replace
name-of-clusterwith the name of the cluster that you want to hibernate.Replace
namespace-of-clusterwith the namespace of the cluster that you want to hibernate.-
Change the value for
spec.powerStatetoHibernating. Enter the following command to view the status of the cluster:
oc get clusterdeployment <name-of-cluster> -n <namespace-of-cluster> -o yaml
Replace
name-of-clusterwith the name of the cluster that you want to hibernate.Replace
namespace-of-clusterwith the namespace of the cluster that you want to hibernate.When the process of hibernating the cluster is complete, the value of the type for the cluster is
type=Hibernating.
Your selected cluster is hibernating.
1.7.9.3. Resuming normal operation of a hibernating cluster by using the console
To resume normal operation of a hibernating cluster by using the Red Hat Advanced Cluster Management console, complete the following steps:
- From the Red Hat Advanced Cluster Management navigation menu, select Infrastructure > Clusters. Ensure that the Manage clusters tab is selected.
- Find the cluster that is hibernating and you want to resume.
- Select Resume cluster from the the Options menu for that cluster.
- Select Resume in the confirmation dialog box to resume the function of the cluster.
The status for the cluster on the Clusters page is Ready when the process completes.
Tip: You can resume multiple clusters by selecting the clusters that you want to resume on the Clusters page, and selecting Actions > Resume clusters.
Your selected cluster is resuming normal operation.
1.7.9.4. Resuming normal operation of a hibernating cluster by using the CLI
To resume normal operation of a hibernating cluster by using the CLI, complete the following steps:
Enter the following command to edit the settings for the cluster:
oc edit clusterdeployment <name-of-cluster> -n <namespace-of-cluster>
Replace
name-of-clusterwith the name of the cluster that you want to hibernate.Replace
namespace-of-clusterwith the namespace of the cluster that you want to hibernate.-
Change the value for
spec.powerStatetoRunning. Enter the following command to view the status of the cluster:
oc get clusterdeployment <name-of-cluster> -n <namespace-of-cluster> -o yaml
Replace
name-of-clusterwith the name of the cluster that you want to hibernate.Replace
namespace-of-clusterwith the namespace of the cluster that you want to hibernate.When the process of resuming the cluster is complete, the value of the type for the cluster is
type=Running.
Your selected cluster is resuming normal operation.
1.8. Importing a target managed cluster to the hub cluster
You can import clusters from different Kubernetes cloud providers. After you import, the targeted cluster becomes a managed cluster for the Red Hat Advanced Cluster Management for Kubernetes hub cluster. Unless otherwise specified, complete the import tasks anywhere where you can access the hub cluster and the targeted managed cluster.
A hub cluster cannot manage any other hub cluster, but can manage itself. The hub cluster is configured to automatically be imported and self-managed. You do not need to manually import the hub cluster.
However, if you remove a hub cluster and try to import it again, you need to add the local-cluster:true label.
Choose from the following instructions to set up your managed cluster, either from the console or from the CLI:
Required user type or access level: Cluster administrator
1.8.1. Importing an existing cluster with the console
After you install Red Hat Advanced Cluster Management for Kubernetes, you are ready to import a cluster to manage. You can import from both the console and the CLI. Follow this procedure to import from the console. You need your terminal for authentication during this procedure.
1.8.1.1. Prerequisites
- You need a Red Hat Advanced Cluster Management for Kubernetes hub cluster that is deployed. If you are importing bare metal clusters, you must have the hub cluster installed on Red Hat OpenShift Container Platform version 4.6 or later.
- You need a cluster that you want to manage and Internet connectivity.
-
Install
kubectl. To installkubectl, see Install and Set Up kubectl in the Kubernetes documentation. - You need a cluster that you want to manage and Internet connectivity.
-
You need the
base64command line tool. -
If you are importing a cluster that was not created by Red Hat OpenShift Container Platform, you need a
multiclusterhub.spec.imagePullSecretdefined. This secret might have been created when Red Hat Advanced Cluster Management for Kubernetes was installed. See Installing from the OperatorHub for more information about defining the secret. -
Ensure the agent is deleted on the cluster that you want to import. The
open-cluster-management-agentandopen-cluster-management-agent-addonnamespaces must not exist. For importing in a Red Hat OpenShift Dedicated environment, see the following:
- You must have the hub cluster deployed in a Red Hat OpenShift Dedicated environment.
-
The default permission in Red Hat OpenShift Dedicated is dedicated-admin, but that does not contain all of the permissions to create a namespace. You must have
cluster-adminpermissions to import and manage a cluster with Red Hat Advanced Cluster Management for Kubernetes.
Required user type or access level: Cluster administrator
1.8.1.2. Importing a cluster
You can import existing clusters from the Red Hat Advanced Cluster Management for Kubernetes console for each of the available cloud providers.
Note: A hub cluster cannot manage a different hub cluster. A hub cluster is set up to automatically import and manage itself, so you do not have to manually import a hub cluster to manage itself.
- From the navigation menu, select Infrastructure > Clusters.
- Click Add a cluster.
- Click Import an existing cluster.
- Provide a name for the cluster. By default, the namespace is used for the cluster name and namespace.
Optional: Add any Additional labels.
Note: If you import a Red Hat OpenShift Dedicated cluster and do not specify a vendor by adding a label for
vendor=OpenShiftDedicated, or if you add a label forvendor=auto-detect, amanaged-by=platformlabel is automatically added to the cluster. You can use this added label to identify the cluster as a Red Hat OpenShift Dedicated cluster and retrieve the Red Hat OpenShift Dedicated clusters as a group.Select the import mode that you want to use to identify the cluster that you are importing from the following options:
Run import commands manually: Generate import commands that you can copy and run, based on the information that you provided. Click Save import and generate code to generate the command that you use to deploy the
open-cluster-management-agent-addon. A confirmation message is displayed.In the Import an existing cluster window, select Copy command to copy the generated command and token to the clipboard.
Important: The command contains pull secret information that is copied to each of the imported clusters. Anyone who can access the imported clusters can also view the pull secret information. Consider creating a secondary pull secret at https://cloud.redhat.com/ or create a service account to protect your personal credentials. See Using image pull secrets or Understanding and creating service accounts for more information about pull secrets.
- Log in to the managed cluster that you want to import.
For the Red Hat OpenShift Dedicated environment only Complete the following steps:
-
Create the
open-cluster-management-agentandopen-cluster-managementnamespaces or projects on the managed cluster. - Find the klusterlet operator in the OpenShift Container Platform catalog.
Install it in the
open-cluster-managementnamespace or project that you created.Important: Do not install the operator in the
open-cluster-management-agentnamespace.Extract the bootstrap secret from the import command by completing the following steps:
Generate the import command:
- Select Infrastructure > Clusters from the Red Hat Advanced Cluster Management console main navigation.
- Select Add a cluster > Import an existing cluster.
- Add the cluster information, and select Save import and generate code.
- Copy the import command.
-
Paste the import command into a file that you create named
import-command. Run the following command to insert the content into the new file:
cat import-command | awk '{split($0,a,"&&"); print a[3]}' | awk '{split($0,a,"|"); print a[1]}' | sed -e "s/^ echo //" | base64 -d-
Find and copy the secret with the name
bootstrap-hub-kubeconfigin the output. -
Apply the secret to the
open-cluster-management-agentnamespace on the managed cluster. Create the klusterlet resource using the example in the installed operator, the clusterName should be changed the same name as cluster name that was set during the import.
Note: When the
managedclusterresource is successfully registered to the hub, there are two klusterlet operators installed. One klusterlet operator is in theopen-cluster-managementnamespace, and the other is in theopen-cluster-management-agentnamespace. Multiple operators does not affect the function of the klusterlet.
-
Create the
For cluster imports that are not in the Red Hat OpenShift Dedicated environment Complete the following steps:
If necessary, configure your
kubectlcommands for your managed cluster.See Supported clouds to learn how to configure your
kubectlcommand line interface.-
To deploy the
open-cluster-management-agent-addonto the managed cluster, run the command and token that you copied.
- Select View cluster to view a summary of your cluster in the Overview page.
- Enter your server URL and API token for the existing cluster: Provide the server URL and API token of the cluster that you are importing.
-
Kubeconfig: Copy and paste the content of the
kubeconfigfile of the cluster that you are importing.
Optional: Configure the Cluster API address that is on the cluster details page by configuring the URL that is displayed in the table when you run the
oc get managedclustercommand.-
Log in to your hub cluster with an ID that has
cluster-adminpermissions. Configure your
kubectlfor your targeted managed cluster.See Supported clouds to learn how to configure your
kubectl.Edit the managed cluster entry for the cluster that you are importing by entering the following command:
oc edit managedcluster <cluster-name>
Replace
cluster-namewith the name of the managed cluster.Add the
ManagedClusterClientConfigssection to theManagedClusterspec in the YAML file, as shown in the following example:spec: hubAcceptsClient: true managedClusterClientConfigs: - url: https://multicloud-console.apps.new-managed.dev.redhat.com
Replace the value of the URL with the URL that provides external access to the managed cluster that you are importing.
-
Log in to your hub cluster with an ID that has
Your cluster is imported. You can import another by selecting Import another.
1.8.1.3. Removing an imported cluster
Complete the following procedure to remove an imported cluster and the open-cluster-management-agent-addon that was created on the managed cluster.
- From the Clusters page, find your imported cluster in the table.
- Click Actions > Detach cluster to remove your cluster from management.
Note: If you attempt to detach the hub cluster, which is named local-cluster, be aware that the default setting of disableHubSelfManagement is false. This setting causes the hub cluster to reimport itself and manage itself when it is detached and it reconciles the MultiClusterHub controller. It might take hours for the hub cluster to complete the detachment process and reimport. If you want to reimport the hub cluster without waiting for the processes to finish, you can enter the following command to restart the multiclusterhub-operator pod and reimport faster:
oc delete po -n open-cluster-management `oc get pod -n open-cluster-management | grep multiclusterhub-operator| cut -d' ' -f1`
You can change the value of the hub cluster to not import automatically by changing the disableHubSelfManagement value to true. For more information, see the disableHubSelfManagement topic.
1.8.2. Importing a managed cluster with the CLI
After you install Red Hat Advanced Cluster Management for Kubernetes, you are ready to import a cluster to manage by using the Red Hat OpenShift Container Platform CLI. You can import a cluster using the kubeconfig file of the cluster that you are importing, or you can run import commands manually on the cluster you are importing. Both procedures are documented.
Important: A hub cluster cannot manage a different hub cluster. A hub cluster is set up to automatically import and manage itself. You do not have to manually import a hub cluster to manage itself.
However, if you remove a hub cluster and try to import it again, you need to add the local-cluster:true label.
1.8.2.1. Prerequisites
- You need a Red Hat Advanced Cluster Management for Kubernetes hub cluster that is deployed. If you are importing bare metal clusters, you must have the hub cluster installed on Red Hat OpenShift Container Platform version 4.6 or later.
- You need a separate cluster that you want to manage that has Internet connectivity.
-
You need the Red Hat OpenShift Container Platform CLI version 4.6 or later, to run
occommands. See Getting started with the OpenShift CLI for information about installing and configuring the Red Hat OpenShift Container Platform CLI,oc. You need to install the Kubernetes CLI,
kubectl. To installkubectl, see Install and Set Up kubectl in the Kubernetes documentation.Note: Download the installation file for CLI tools from the console.
-
If you are importing a cluster that was not created by OpenShift Container Platform, you need a
multiclusterhub.spec.imagePullSecretdefined. This secret might have been created when Red Hat Advanced Cluster Management for Kubernetes was installed. See Installing from the OperatorHub for more information about defining the secret.
1.8.2.2. Supported architectures
- Linux (x86_64, s390x, ppc64le)
- macOS
1.8.2.3. Prepare for import
Log in to your hub cluster by running the following command:
oc login
Run the following commands on the hub cluster to create the project and namespace: Note: The cluster name that is defined in
CLUSTER_NAMEis also used as the cluster namespace in the YAML file and commands:oc new-project ${CLUSTER_NAME} oc label namespace ${CLUSTER_NAME} cluster.open-cluster-management.io/managedCluster=${CLUSTER_NAME}Create a file named
managed-cluster.yamlwith the following example content:apiVersion: cluster.open-cluster-management.io/v1 kind: ManagedCluster metadata: name: ${CLUSTER_NAME} labels: cloud: auto-detect vendor: auto-detect spec: hubAcceptsClient: trueWhen the values for
cloudandvendorare set toauto-detect, Red Hat Advanced Cluster Management detects the cloud and vendor types automatically from the cluster that you are importing. You can optionally replace the values forauto-detectwith with the cloud and vendor values for your cluster. See the following example:cloud: Amazon vendor: OpenShift
Apply the YAML file to the
ManagedClusterresource by entering the following command:oc apply -f managed-cluster.yaml
Continue with Importing the cluster with the auto import secret or Importing the cluster with the manual commands.
1.8.2.4. Importing the cluster with the auto import secret
To import with the auto import secret, you must create a secret that contains either a reference to the kubeconfig file of the cluster or the kube API server and token pair of the cluster.
-
Retrieve the
kubeconfigfile or the kube API server and token of the cluster that you are importing. See the documentation for your Kubernetes cluster to learn where to locate yourkubeconfigfile or your kube API server and token. Create the
auto-import-secret.yamlfile in the ${CLUSTER_NAME} namespace.Create a YAML file named
auto-import-secret.yamlthat contains content that is similar to the following template:apiVersion: v1 kind: Secret metadata: name: auto-import-secret namespace: <cluster_name> stringData: autoImportRetry: "5" # If you are using the kubeconfig file, add the following value for the kubeconfig file # that has the current context set to the cluster to import: kubeconfig: |- <kubeconfig_file> # If you are using the token/server pair, add the following two values instead of # the kubeconfig file: token: <Token to access the cluster> server: <cluster_api_url> type: Opaque
Apply the YAML file in the ${CLUSTER_NAME} namespace with the following command:
oc apply -f auto-import-secret.yaml
Note: By default, the auto-import secret is used one time and deleted when the import process completes. If you want to keep the auto import secret, add
managedcluster-import-controller.open-cluster-management.io/keeping-auto-import-secretto the secret. You can add it by running the following command:
Validate the
JOINEDandAVAILABLEstatus for your imported cluster. Run the following command from the hub cluster:oc get managedcluster ${CLUSTER_NAME}Log in to the managed cluster by running the following command on the managed cluster:
oc login
Run the following command to validate the pod status on the cluster that you are importing:
oc get pod -n open-cluster-management-agent
Continue with Importing the klusterlet.
1.8.2.5. Importing the cluster with the manual commands
Important: The import command contains pull secret information that is copied to each of the imported clusters. Anyone who can access the imported clusters can also view the pull secret information.
Obtain the
klusterlet-crd.yamlfile that was generated by the import controller on your hub cluster by running the following command:oc get secret ${CLUSTER_NAME}-import -n ${CLUSTER_NAME} -o jsonpath={.data.crds\\.yaml} | base64 --decode > klusterlet-crd.yamlObtain the
import.yamlfile that was generated by the import controller on your hub cluster by running the following command:oc get secret ${CLUSTER_NAME}-import -n ${CLUSTER_NAME} -o jsonpath={.data.import\\.yaml} | base64 --decode > import.yamlProceed with the following steps in the cluster that you are importing:
Log in to the managed cluster that you are importing by entering the following command:
oc login
Apply the
klusterlet-crd.yamlthat you generated in step 1 by running the following command:oc apply -f klusterlet-crd.yaml
Apply the
import.yamlfile that you previously generated by running the following command:oc apply -f import.yaml
Validate
JOINEDandAVAILABLEstatus for the cluster that you are importing. From the hub cluster, run the following command:oc get managedcluster ${CLUSTER_NAME}
Continue with Importing the klusterlet.
1.8.2.6. Importing the klusterlet
You can create and apply the klusterlet add-on configuration file by completing the following procedure:
Create a YAML file that is similar to the following example:
apiVersion: agent.open-cluster-management.io/v1 kind: KlusterletAddonConfig metadata: name: <cluster_name> namespace: <cluster_name> spec: applicationManager: enabled: true certPolicyController: enabled: true iamPolicyController: enabled: true policyController: enabled: true searchCollector: enabled: true-
Save the file as
klusterlet-addon-config.yaml. Apply the YAML by running the following command:
oc apply -f klusterlet-addon-config.yaml
The ManagedCluster-Import-Controller will generate a secret named
${CLUSTER_NAME}-import. The${CLUSTER_NAME}-importsecret contains theimport.yamlthat the user applies to a managed cluster to install klusterlet.Add-ons are installed after the cluster you are importing is
AVAILABLE.Validate the pod status of add-ons on the cluster you are importing by running the following command:
oc get pod -n open-cluster-management-agent-addon
Your cluster is now imported.
1.8.2.7. Removing an imported cluster with the CLI
To remove a cluster, run the following command:
oc delete managedcluster ${CLUSTER_NAME}
Replace cluster_name with the name of the cluster.
Your cluster is now removed.
1.8.3. Importing a cluster with a custom ManagedClusterImageRegistry CRD
There might be times when you need to override the registry images on the managed clusters that you are importing. You can do this by creating a ManagedClusterImageRegistry custom resource definition (CRD).
The ManagedClusterImageRegistry CRD is a namespace-scoped resource.
The ManagedClusterImageRegistry CRD specifies a set of managed clusters for a Placement to select, but need different images from the custom image registry. After the managed clusters are updated with the new images, the following label is added to each managed cluster for identification: open-cluster-management.io/image-registry=<namespace>.<managedClusterImageRegistryName>.
The following example shows a ManagedClusterImageRegistry CRD:
apiVersion: imageregistry.open-cluster-management.io/v1alpha1
kind: ManagedClusterImageRegistry
metadata:
  name: <imageRegistryName>
  namespace: <namespace>
spec:
  placementRef:
    group: cluster.open-cluster-management.io
    resource: placements
    name: <placementName>
  pullSecret:
    name: <pullSecretName>
  registry: <registryAddress>
In the spec section:
-
Replace
placementRefwith a Placement in the same namespace that selects a set of managed clusters. -
Replace
pullSecretwith the name of the pull secret that is used to pull images from the custom image registry. -
Replace
registrywith the custom registry address.
1.8.3.1. Importing a cluster with a ManagedClusterImageRegistry CRD
Complete the following steps to import a cluster with a ManagedClusterImageRegistry CRD:
Create a pull secret in the namespace where you want your cluster to be imported. For these steps, it is
myNamespace.$ kubectl create secret docker-registry myPullSecret \ --docker-server=<your-registry-server> \ --docker-username=<my-name> \ --docker-password=<my-password>
Create a Placement in the namespace that you created.
apiVersion: cluster.open-cluster-management.io/v1beta1
kind: Placement
metadata:
  name: myPlacement
  namespace: myNamespace
spec:
  clusterSets:
  - myClusterSet
Create a
ManagedClusterSetresource and bind it to your namespace.apiVersion: cluster.open-cluster-management.io/v1beta1 kind: ManagedClusterSet metadata: name: myClusterSet --- apiVersion: cluster.open-cluster-management.io/v1beta1 kind: ManagedClusterSetBinding metadata: name: myClusterSet namespace: myNamespace spec: clusterSet: myClusterSet
Create the
ManagedClusterImageRegistryCRD in your namespace.apiVersion: imageregistry.open-cluster-management.io/v1alpha1 kind: ManagedClusterImageRegistry metadata: name: myImageRegistry namespace: myNamespace spec: placementRef: group: cluster.open-cluster-management.io resource: placements name: myPlacement pullSecret: name: myPullSecret registry: myRegistryAddress- Import a managed cluster from the Red Hat Advanced Cluster Management console and add it to a managed cluster set.
-
Copy and run the import commands on the managed cluster after the label
open-cluster-management.io/image-registry=myNamespace.myImageRegistryis added to the managed cluster.
1.8.4. Modifying the klusterlet add-ons settings of your cluster
You can modify the settings of KlusterletAddonConfig to change your configuration using the hub cluster.
The KlusterletAddonConfig controller manages the functions that are enabled and disabled according to the settings in the klusterletaddonconfigs.agent.open-cluster-management.io Kubernetes resource. View the following example of the KlusterletAddonConfig:
apiVersion: agent.open-cluster-management.io/v1
kind: KlusterletAddonConfig
metadata:
  name: <cluster-name>
  namespace: <cluster-name>
spec:
  clusterName: <cluster-name>
  clusterNamespace: <cluster-name>
  clusterLabels:
    cloud: auto-detect
    vendor: auto-detect
  applicationManager:
    enabled: true
  certPolicyController:
    enabled: true
  iamPolicyController:
    enabled: true
  policyController:
    enabled: true
  searchCollector:
    enabled: false
  version: 2.4.0
1.8.4.1. Description of klusterlet add-ons settings
The following settings can be updated in the klusterletaddonconfigs.agent.open-cluster-management.io Kubernetes resource:
Table 1.2. Table list of klusterlet add-ons settings
| Setting name | Value | Description |
|---|---|---|
| applicationmanager |
| This controller manages the application subscription lifecycle on the managed cluster. |
| certPolicyController |
| This controller enforces certificate-based policies on the managed cluster. |
| iamPolicyController |
| This controller enforces the IAM-based policy lifecycle on the managed cluster. |
| policyController |
| This controller enforces all other policy rules on the managed cluster. |
| searchCollector |
| This controller is used to periodically push the resource index data back to the hub cluster. |
1.8.4.2. Modify using the console on the hub cluster
You can modify the settings of the klusterletaddonconfigs.agent.open-cluster-management.io resource by using the hub cluster. Complete the following steps to change the settings:
- Log in to the Red Hat Advanced Cluster Management for Kubernetes console of the hub cluster.
- From the header menu of the hub cluster console, select the Search icon.
-
In the search parameters, enter the following value:
kind:klusterletaddonconfigs - Select the endpoint resource that you want to update.
-
Find the
specsection and select Edit to edit the content. - Modify your settings.
- Select Save to apply your changes.
1.8.4.3. Modify using the command line on the hub cluster
You must have access to the cluster-name namespace to modify your settings by using the hub cluster. Complete the following steps:
- Log in to the hub cluster.
Enter the following command to edit the resource:
kubectl edit klusterletaddonconfigs.agent.open-cluster-management.io <cluster-name> -n <cluster-name>
-
Find the
specsection. - Modify your settings, as necessary.
1.9. Creating a cluster in a proxy environment
You can create a Red Hat OpenShift Container Platform cluster when your hub cluster is connected through a proxy server.
One of the following situations must be true for the cluster creation to succeed:
- Red Hat Advanced Cluster Management for Kubernetes has a private network connection with the managed cluster that you are creating, but the Red Hat Advanced Cluster Management and managed cluster access the Internet using a proxy.
- The managed cluster is on a infrastructure provider, but the firewall ports enable communication from the managed cluster to the hub cluster.
To create a cluster that is configured with a proxy, complete the following steps:
Configure the cluster-wide-proxy setting on the hub cluster by adding the following information to your
install-config.yamlfile:apiVersion: v1 kind: Proxy baseDomain: <domain> proxy: httpProxy: http://<username>:<password>@<proxy.example.com>:<port> httpsProxy: https://<username>:<password>@<proxy.example.com>:<port> noProxy: <wildcard-of-domain>,<provisioning-network/CIDR>,<BMC-address-range/CIDR>
Replace
usernamewith the username for your proxy server.Replace
passwordwith the password to access your proxy server.Replace
proxy.example.comwith the path of your proxy server.Replace
portwith the communication port with the proxy server.Replace
wildcard-of-domainwith an entry for domains that should bypass the proxy.Replace
provisioning-network/CIDRwith the IP address of the provisioning network and the number of assigned IP addresses, in CIDR notation.Replace
BMC-address-range/CIDRwith the BMC address and the number of addresses, in CIDR notation.After you add the previous values, the settings are applied to your clusters.
- Provision the cluster by completing the procedure for creating a cluster. See Creating a cluster to select your provider.
1.9.1. Enabling cluster-wide proxy on existing cluster add-ons
You can configure the KlusterletAddonConfig in the cluster namespace to add the proxy environment variables to all of the klusterlet add-on pods of the Red Hat OpenShift Container Platform clusters that are managed by the hub cluster.
Complete the following steps to configure the KlusterletAddonConfig to add the 3 environment variables to the pods of the klusterlet add-ons:
-
Open the
KlusterletAddonConfigfile that is in the namespace of the cluster that needs the proxy added. Edit the
.spec.proxyConfigsection of the file so it resembles the following example:spec proxyConfig: httpProxy: "<proxy_not_secure>" httpsProxy: "<proxy_secure>" noProxy: "<no_proxy>"Replace
proxy_not_securewith the address of the proxy server forhttprequests. For example,http://192.168.123.145:3128.Replace
proxy_securewith the address of the proxy server forhttpsrequests. For example,https://192.168.123.145:3128.Replace
no_proxywith a comma delimited list of IP addresses, hostnames, and domain names where traffic will not be routed through the proxy. For example,.cluster.local,.svc,10.128.0.0/14,example.com.The
spec.proxyConfigis an optional section. If the OpenShift Container Platform cluster is created with cluster wide proxy configured on the Red Hat Advanced Cluster Management hub cluster, the cluster wide proxy configuration values are added to the pods of the klusterlet add-ons as environment variables when the following conditions are met:-
The
.spec.policyController.proxyPolicyin theaddonsection is enabled and set toOCPGlobalProxy The
.spec.applicationManager.proxyPolocyis enabled and set toCustomProxy.Note: The default value of
proxyPolicyin theaddonsection isDisabled.See the following example:
apiVersion: agent.open-cluster-management.io/v1
    kind: KlusterletAddonConfig
    metadata:
      name: clusterName
      namespace: clusterName
    spec:
      proxyConfig:
        httpProxy: http://pxuser:12345@10.0.81.15:3128
        httpsProxy: http://pxuser:12345@10.0.81.15:3128
        noProxy: .cluster.local,.svc,10.128.0.0/14, example.com
      applicationManager:
        enabled: true
        proxyPolicy: CustomProxy
      policyController:
        enabled: true
        proxyPolicy: OCPGlobalProxy
      searchCollector:
        enabled: true
        proxyPolicy: Disabled
      certPolicyController:
        enabled: true
        proxyPolicy: Disabled
      iamPolicyController:
        enabled: true
        proxyPolicy: Disabled
-
The
Proxy is configured on your cluster add-ons.
Important: Global proxy settings do not impact alert forwarding. To set up alert forwarding for Red Hat Advanced Cluster Management hub clusters with a cluster-wide proxy, see Forwarding alerts for more details.
1.10. Enabling cluster proxy add-ons
In some environments, a managed cluster is behind a firewall and cannot be accessed directly by the hub cluster. To gain access, you can set up a proxy add-on to access the kube-api server of the managed cluster to provide a more secure connection.
Required access: Editor
To configure a cluster proxy add-on for a hub cluster and a managed cluster, complete the following steps:
Enable the cluster proxy add-on on Red Hat Advanced Cluster Management for Kubernetes hub cluster by entering the following command to add an entry for
enableClusterProxyAddonwith a value oftrueto yourmulticlusterhub.yamlfile:oc patch -n open-cluster-management multiclusterhub multiclusterhub --type merge -p '{"spec":{"enableClusterProxyAddon":true}}'As indicated by the command, this file is in the
open-cluster-managementnamespace.Deploy the cluster proxy add-on to the target managed cluster by applying it to your target managed cluster by entering the following command:
cat <<EOF | oc apply -f -
apiVersion: addon.open-cluster-management.io/v1alpha1
kind: ManagedClusterAddOn
metadata:
  name: cluster-proxy
  namespace: <target_managed_cluster>
spec:
  installNamespace: open-cluster-management-agent-addon
EOF
Replace
target_managed_clusterwith the name of the managed cluster to which you are applying the cluster proxy add-on.Configure the
kubeconfigfile to access the managed clusterkube-apiserverby completing the following steps:Provide a valid access token for the managed cluster. You can use the corresponding token of the service account, assuming the default service account is in the default namespace.
-
Make sure that you are using the context of the managed cluster. Assume the file named
managed-cluster.kubeconfigis thekubeconfigfile of the managed cluster. Tip: Commands with--kubeconfig=managed-cluster.kubeconfigrun on the managed cluster, and all of the commands in this procedure should run in the same console. Do not run commands in different consoles. Add a role to your service account that allows it to access pods by running the following commands:
oc create role -n default test-role --verb=list,get --resource=pods --kubeconfig=managed-cluster.kubeconfig
oc create rolebinding -n default test-rolebinding --serviceaccount=default:default --role=test-role --kubeconfig=managed-cluster.kubeconfig
Run the following command to locate the secret of the service account token:
oc get secret -n default --kubeconfig=managed-cluster.kubeconfig | grep default-token
Run the following command to copy the token:
export MANAGED_CLUSTER_TOKEN=$(kubectl --kubeconfig=managed-cluster.kubeconfig -n default get secret <default-token> -o jsonpath={.data.token} | base64 -d)Replace
default-tokenwith the name of your secret.
-
Make sure that you are using the context of the managed cluster. Assume the file named
Configure the
kubeconfigfile on the Red Hat Advanced Cluster Management hub cluster.Export the current
kubeconfigfile on the hub cluster by running the following command:oc config view --minify --raw=true > cluster-proxy.kubeconfig
Modify the
serverfile with your editor. This example uses commands when usingsed. Runalias sed=gsed, if you are using OSX.export TARGET_MANAGE_CLUSTER=<cluster1> export NEW_SERVER=https://$(oc get route -n open-cluster-management cluster-proxy-addon-user -o=jsonpath='{.spec.host}')/$TARGET_MANAGE_CLUSTER sed -i'' -e '/server:/c\ server: '"$NEW_SERVER"'' cluster-proxy.kubeconfigReplace
cluster1with a managed cluster name that you want to access.Delete the original user credentials by entering the following commands:
sed -i'' -e '/client-certificate-data/d' cluster-proxy.kubeconfig
sed -i'' -e '/client-key-data/d' cluster-proxy.kubeconfig
sed -i'' -e '/token/d' cluster-proxy.kubeconfig
Add the token of the service account:
sed -i'' -e '$a\ token: '"$MANAGED_CLUSTER_TOKEN"'' cluster-proxy.kubeconfig
List all of the pods on the target namespace of the target managed cluster by running the following command:
oc get pods --kubeconfig=cluster-proxy.kubeconfig -n <default>
Replace the
defaultnamespace with the namespace that you want to use.
Your hub cluster is now communicating with the kube-api of your managed cluster.
1.11. Configuring a specific cluster management role
When you install Red Hat Advanced Cluster Management for Kubernetes, the default configuration provides the cluster-admin role on the Red Hat Advanced Cluster Management hub cluster. This permission enables you to create, manage, and import managed clusters on the hub cluster. In some situations, you might want to limit the access to certain managed clusters that are managed by the hub cluster, rather than providing access to all of the managed clusters on the hub cluster.
You can limit access to certain managed clusters by defining a cluster role and applying it to a user or group. Complete the following steps to configure and apply a role:
Define the cluster role by creating a YAML file with the following content:
apiVersion: rbac.authorization.k8s.io/v1
kind: ClusterRole
metadata:
  name: <clusterrole-name>
rules:
- apiGroups:
  - cluster.open-cluster-management.io
  resources:
  - managedclusters
  resourceNames:
  - <managed-cluster-name>
  verbs:
  - get
  - list
  - watch
  - update
  - delete
  - deletecollection
  - patch
- apiGroups:
  - cluster.open-cluster-management.io
  resources:
  - managedclusters
  verbs:
  - create
- apiGroups:
  - ""
  resources:
  - namespaces
  resourceNames:
  - <managed-cluster-name>
  verbs:
  - create
  - get
  - list
  - watch
  - update
  - delete
  - deletecollection
  - patch
- apiGroups:
  - register.open-cluster-management.io
  resources:
  - managedclusters/accept
  resourceNames:
  - <managed-cluster-name>
  verbs:
  - update
Replace
clusterrole-namewith the name of the cluster role that you are creating.Replace
managed-cluster-namewith the name of the managed cluster that you want the user to have access to.Apply the
clusterroledefinition by entering the following command:oc apply <filename>
Replace
filenamewith the name of the YAML file that you created in the previous step.Enter the following command to bind the
clusterroleto a specified user or group:oc adm policy add-cluster-role-to-user <clusterrole-name> <username>
Replace
clusterrole-namewith the name of the cluster role that you applied in the previous step. Replaceusernamewith the username to which you want to bind the cluster role.
1.12. Managing cluster labels
Add a label to your cluster to select group resources. See Labels and Selectors for more information.
You can add new labels, remove existing labels, and edit existing labels for your clusters. Complete the following steps to manage your labels:
- From the navigation menu, click Infrastructure > Clusters.
- Find your cluster in the Clusters table.
- Click Options to see the options in the menu.
- Select Edit labels.
-
In the Edit labels dialog box, enter a label. Your entry might resemble the following content:
Key=Value. - Press enter, add a comma, or add a space to add additional labels.
- Click Save when you enter your last one. Labels are only saved after you click Save.
Close the Edit labels pane, when you are finished.
- If you want to remove an existing label, click the Remove icon for the label that you want to remove in the list.
-
If you want to update an existing label, you can reassign its key to a new value by adding a new label using the same key with a different value. For example, you can change
Key=Valueby enteringKey=NewValueto update the value ofKey.
Tip: You can also edit a cluster label from the cluster details page. In the navigation menu, click Infrastructure > Clusters. From the Clusters page, access the details page for the cluster by clicking the name of the cluster. Select the Edit icon in the Labels section. The Edit labels dialog box is displayed.
1.13. Configuring Ansible Tower tasks to run on managed clusters
Red Hat Advanced Cluster Management is integrated with Ansible Tower automation so that you can create prehook and posthook AnsibleJob instances that occur before or after creating or upgrading your clusters. Configuring prehook and posthook jobs for cluster destroy, and cluster scale actions are not supported.
Required access: Cluster administrator
1.13.1. Prerequisites
You must meet the following prerequisites to run Ansible templates on your Red Hat Advanced Cluster Management clusters:
- OpenShift Container Platform 4.6 or later
- Install the Ansible Automation Platform Resource Operator to connect Ansible jobs to the lifecycle of Git subscriptions. For best results when using the AnsibleJob to launch Ansible Tower jobs, the Ansible Tower job template should be idempotent when it is run. You can find the Ansible Automation Platform Resource Operator in the OpenShift Container Platform OperatorHub.
For more information about installing and configuring Ansible Tower automation, see Setting up Ansible tasks.
1.13.2. Configuring an AnsibleJob template to run on a cluster by using the console
You must specify the Ansible job template that you want to use for a cluster when you create the cluster. To specify the template when creating a cluster, select the Ansible template that you want to apply to the cluster in the Automation step. If there are no Ansible templates, click Add automation template to create one.
1.13.3. Creating an AnsibleJob template
To initiate an Ansible job with a cluster installation or upgrade, you must create an Ansible job template to specify when you want the jobs to run. They can be configured to run before or after the cluster installs or upgrades.
To specify the details about running the Ansible template while creating a template, complete the following steps:
- Select Infrastructure > Automation from the Red Hat Advanced Cluster Management navigation. The existing Ansible templates are displayed.
Select the appropriate path for your situation:
- If you want to create a new template, click Create Ansible template and continue with step 3.
- If you want to modify an existing template, click Edit template from the Options menu of the template that you want to modify and continue with step 5.
- Enter a name for your template. It must be a unique name that contains lowercase, alphanumeric characters or a hyphen (-).
Select the credential that you want to use for the new template. To link an Ansible credential to an Ansible template, complete the following steps:
- From the Red Hat Advanced Cluster Management navigation, select Automation. Any template in the list of templates that is not linked to a credential contains a Link to credential icon that you can use to link the template to an existing credential.
- Select Link to credential to find and link to an existing credential.
- Select an available credential from the menu in the Ansible Automation Platform credential field. Only the credentials in the same namespace as the template are displayed.
- If there are no credentials that you can select, or if you do not want to use an existing credential, select Edit template from the Options menu for the template that you want to link.
- Click Add credential to create a credential for your template.
- Complete the procedure in Creating a credential for Ansible Automation Platform if you have to create your credential.
- After you create your credential in the same namespace as the template, select the credential in the Ansible Automation Platform credential field when you edit the template.
- Click Save to commit the link between the credential and the template.
- If you want to initiate any Ansible jobs before the cluster is installed, select Add an Ansible job template in the Pre-install Ansible job templates section.
Select or enter the name of the prehook and posthook Ansible jobs to add to the installation or upgrade of the cluster.
Note: The Ansible job template name must match the name of the Ansible job on the Ansible Tower.
- Enter any Extra variables that are required by the Ansible Tower job, if there are any.
- Drag the Ansible jobs to change the order, if necessary.
- Click Save to commit your information.
- Repeat steps 5 - 9 for any Ansible job templates that you want to initiate after the cluster is installed in the Post-install Ansible job templates section.
- Click Save to commit your information.
- Click Next to begin specifying the Ansible jobs for the Upgrading initiations.
- Complete steps 5 - 9 for any Ansible job templates that you want to initiate before the cluster is upgraded in the Pre-upgrade Ansible job templates section.
- Click Save to commit your information.
- Complete steps 5 - 9 for any Ansible job templates that you want to initiate after the cluster is upgraded in the Post-upgrade Ansible job templates section.
- Click Save to commit your information.
- Click Next to review the Ansible jobs that you added.
- Select Add to add the Ansible job configuration information to your template.
Your Ansible template is configured to run on clusters that specify this template when the designated actions occur.
1.13.4. Configuring an AnsibleJob template to run on a managed cluster by using labels
You can create an AnsibleJob that is bound to a cluster when the cluster is created by Red Hat Advanced Cluster Management for Kubernetes or imported to be managed by Red Hat Advanced Cluster Management by using labels.
Complete the following procedure to create an Ansible job and configure it with a cluster that is not yet managed by Red Hat Advanced Cluster Management:
Create the definition file for the Ansible job in one of the channels that are supported by the application function. Only Git channels are supported.
Use
AnsibleJobas the value ofkindin the definition.Your definition file contents might resemble the following example:
apiVersion: apiVersion: tower.ansible.com/v1alpha1
kind: AnsibleJob
metadata:
  name: hive-cluster-gitrepo
spec:
  tower_auth_secret: my-toweraccess
  job_template_name: my-tower-template-name
  extra_vars:
    variable1: value1
    variable2: value2
By storing the file in the prehook or posthook directory, it creates a list of cluster names that match the placement rule. The list of cluster names can be passed as a value of
extra_varsto theAnsibleJobkindresource. When this value is passed to theAnsibleJobresource, the Ansible job can determine the new cluster name and use it in the automation.- Log on to your Red Hat Advanced Cluster Management hub cluster.
Using the Red Hat Advanced Cluster Management console, create an application with a Git subscription that references the channel where you stored the definition file that you just created. See Managing application resources for more information about creating an application and subscription.
When you create the subscription, specify a label that you can add to the cluster that you create or import later to connect this subscription with the cluster. This can be an existing label, like
vendor=OpenShift, or a unique label that you create and define.Note: If you select a label that is already in use, the Ansible job automatically runs. It is best practice to include a resource in your application that is not part of the prehooks or posthooks.
The default placement rule runs the job when it detects the cluster with the label that matches the label of the
AnsibleJob. If you want the automation to run on all of your running clusters that are managed by the hub cluster, add the following content to the placement rule:clusterConditions: - type: ManagedClusterConditionAvailable status: "True"You can either paste this into the YAML content of the placement rule or you can select the option to Deploy to all online clusters and local cluster on the Application create page of the Red Hat Advanced Cluster Management console.
Create or import your cluster by following the instructions in Creating a cluster or Importing a target managed cluster to the hub cluster, respectively.
When you create or import the cluster, use the same label that you used when you created the subscription, and the
AnsibleJobis automatically configured to run on the cluster.
Red Hat Advanced Cluster Management automatically injects the cluster name into the AnsibleJob.extra_vars.target_clusters path. You can dynamically inject the cluster name into the definition. Complete the following procedure to create an AnsibleJob and configure it with a cluster that is already managed by Red Hat Advanced Cluster Management:
Create the definition file for the AnsibleJob in the prehook or posthook directory of your Git Channel.
Use
AnsibleJobas the value ofkindin the definition.Your definition file contents might resemble the following example:
apiVersion: tower.ansible.com/v1alpha1
kind: AnsibleJob
metadata:
  name: hive-cluster-gitrepo
spec:
  tower_auth_secret: my-toweraccess
  job_template_name: my-tower-template-name
  extra_vars:
    variable1: value1
    variable2: value2
Replace
my-toweraccesswith the authentication secret to access your Ansible Tower.Replace
my-tower-template-namewith the template name from your Ansible Tower.
Each time a cluster that is controlled by the Ansible job is removed or added, the AnsibleJob automatically runs and updates the extra_vars.target_clusters variable. This updating provides the ability to specify cluster names with a specific automation, or apply the automation to a group of clusters.
1.13.5. Viewing the status of an Ansible job
You can view the status of a running Ansible job to ensure that it started, and is running successfully. To view the current status of a running Ansible job, complete the following steps:
- In the Red Hat Advanced Cluster Management menu, select Infrastructure > Clusters to access the Clusters page.
- Select the name of the cluster to view its details.
View the status of the last run of the Ansible job on the cluster information. The entry shows one of the following statuses:
-
When an install prehook or posthook job fails, the cluster status shows
Failed. When an upgrade prehook or posthook job fails, a warning is displayed in the Distribution field that the upgrade failed.
Tip: You can retry an upgrade from the Clusters page if the cluster prehook or posthook failed.
-
When an install prehook or posthook job fails, the cluster status shows
1.14. Creating and managing ManagedClusterSets (Technology Preview)
A ManagedClusterSet is a group of managed clusters. With a managed cluster set, you can manage access to all of the managed clusters in the group together. You can also create a ManagedClusterSetBinding resource to bind a ManagedClusterSet resource to a namespace.
1.14.1. Creating a ManagedClusterSet
You can group managed clusters together in a managed cluster set to limit the user access on managed clusters.
Required access: Cluster administrator
A ManagedClusterSet is a cluster-scoped resource, so you must have cluster administration permissions for the cluster where you are creating the ManagedClusterSet. A managed cluster cannot be included in more than one ManagedClusterSet. You can create a managed cluster set from either the Red Hat Advanced Cluster Management for Kubernetes console or from the command-line interface.
1.14.1.1. Creating a ManagedClusterSet by using the console
Complete the following steps to create a managed cluster set by using the Red Hat Advanced Cluster Management console:
- In the main console navigation, select Infrastructure > Clusters.
- Select the Cluster sets tab.
- Select Create cluster set.
- Enter the name of the cluster set that you want to create.
- Select Create to create the cluster set resource.
1.14.1.2. Creating a ManagedClusterSet by using the command line
Add the following definition of the managed cluster set to your yaml file to create a managed cluster set by using the command line:
apiVersion: cluster.open-cluster-management.io/v1beta1
kind: ManagedClusterSet
metadata:
  name: <clusterset1>
Replace clusterset1 with the name of your managed cluster set.
1.14.2. Assigning users or groups Role-Based Access Control permissions to your ManagedClusterSet
You can assign users or groups to your cluster set that are provided by the configured identity providers on the hub cluster.
Required access: Cluster administrator
The ManagedClusterSet API offers two levels of RBAC permissions:
Cluster set
admin- Full access permissions to all of the cluster and cluster pool resources that are assigned to the managed cluster set.
- Permission to create clusters, import clusters, and create cluster pools. The permissions must be assigned to the managed cluster set when the managed cluster set is created.
Cluster set
view- Read only permissions to all of the cluster and cluster pool resources that are assigned to the managed cluster set.
- No permission to create clusters, import clusters, or create cluster pools.
Complete the following steps to assign users or groups to your managed cluster set from the Red Hat Advanced Cluster Management console:
- From the main navigation menu of the console, select Infrastructure > Clusters.
- Select the Cluster sets tab.
- Select your target cluster set.
- Select the Access management tab.
- Select Add user or group.
- Search for, and select the user or group that you want to provide access.
- Select the Cluster set admin or Cluster set view role to give to the selected user or user group. See Overview of roles for more information about the role permissions.
- Select Add to submit the changes.
Your user or group is displayed in the table. It might take a few seconds for the permission assignments for all of the managed cluster set resources to be propagated to your user or group.
For more information about role-based actions, see Role-based access control.
See Using ManagedClustersSets with Placement for placement information.
1.14.2.1. Creating a ManagedClusterSetBinding resource
Create a ManagedClusterSetBinding resource to bind a ManagedClusterSet resource to a namespace. Applications and policies that are created in the same namespace can only access managed clusters that are included in the bound managed cluster set resource.
Access permissions to the namespace automatically apply to a managed cluster set that is bound to that namespace. If you have access permissions to access the namespace to which the managed cluster set is bound, you automatically have permissions to access any managed cluster set that is bound to that namespace. However, if you only have permissions to access the managed cluster set, you do not automatically have permissions to access other managed cluster sets on the namespace. If you do not see a managed cluster set, you might not have the required permissions to view it.
You can create a managed cluster set binding by using the console or the command line.
1.14.2.1.1. Creating a ManagedClusterSetBinding by using the console
Complete the following steps to remove a cluster from a managed cluster set by using the Red Hat Advanced Cluster Management console:
- Access the cluster page by selecting Infrastructure > Clusters in the main navigation.
- Select the Cluster sets tab to view the available cluster sets.
- Select the name of the cluster set that you want to create a binding for to view the cluster set details.
- Select Actions > Edit namespace bindings.
- On the Edit namespace bindings page, select the namespace to which you want to bind the cluster set from the drop-down menu. The existing namespaces that have bindings to the cluster set are already selected.
- Select Save to submit your changes.
1.14.2.1.2. Creating a ManagedClusterSetBinding by using the command line
To create a managed cluster set binding by using the command line, complete the following steps:
Create the
ManagedClusterSetBindingresource in youryamlfile. When you create a managed cluster set binding, the name of the managed cluster set binding must match the name of the managed cluster set to bind. YourManagedClusterSetBindingresource might resemble the following information:apiVersion: cluster.open-cluster-management.io/v1beta1 kind: ManagedClusterSetBinding metadata: namespace: project1 name: clusterset1 spec: clusterSet: clusterset1
Ensure that you have the bind permission on the target managed cluster set. View the following example of a
ClusterRoleresource, which contains rules that allow the user to bind toclusterset1:apiVersion: rbac.authorization.k8s.io/v1 kind: ClusterRole metadata: name: clusterrole1 rules: - apiGroups: ["cluster.open-cluster-management.io"] resources: ["managedclustersets/bind"] resourceNames: ["clusterset1"] verbs: ["create"]
1.14.3. Adding a cluster to a ManagedClusterSet
After you create your ManagedClusterSet, you must add one or more managed clusters. You can add managed clusters to your managed cluster set by using either the console or the command line.
1.14.3.1. Adding clusters to a ManagedClusterSet by using the console
Complete the following steps to add a cluster to a managed cluster set by using the Red Hat Advanced Cluster Management console:
- If you just created your managed cluster set, select Manage resource assignments to go directly to the Manage resource assignments page. Continue with step 6 of this procedure.
- If your cluster already exists, access the cluster page by selecting Infrastructure > Clusters in the main navigation.
- Select the Cluster sets tab to view the available cluster sets.
- Select the name of the cluster set that you want to add to the managed cluster sets to view the cluster set details.
- Select Actions > Manage resource assignments.
- On the Manage resource assignments page, select the checkbox for the resources that you want to add to the cluster set.
- Select Review to review your changes.
Select Save to save your changes.
Note: If you move a managed cluster from one managed cluster set to another, you must have the required RBAC permission available on both managed cluster sets.
1.14.3.2. Adding clusters to a ManagedClusterSet by using the command line
Complete the following steps to add a cluster to a managed cluster set by using the command line:
Ensure that there is an RBAC
ClusterRoleentry that allows you to create on a virtual subresource ofmanagedclustersets/join. Without this permission, you cannot assign a managed cluster to aManagedClusterSet.If this entry does not exist, add it to your
yamlfile. A sample entry resembles the following content:kind: ClusterRole apiVersion: rbac.authorization.k8s.io/v1 metadata: name: clusterrole1 rules: - apiGroups: ["cluster.open-cluster-management.io"] resources: ["managedclustersets/join"] resourceNames: ["<clusterset1>"] verbs: ["create"]Replace
clusterset1with the name of yourManagedClusterSet.Note: If you are moving a managed cluster from one
ManagedClusterSetto another, you must have that permission available on both managed cluster sets.Find the definition of the managed cluster in the
yamlfile. The section of the managed cluster definition where you add a label resembles the following content:apiVersion: cluster.open-cluster-management.io/v1 kind: ManagedCluster metadata: name: cluster1 spec: hubAcceptsClient: true
In this example,
cluster1is the name of the managed cluster.Add a label that specifies the name of the
ManagedClusterSetin the format:cluster.open-cluster-management.io/clusterset: clusterset1.Your code resembles the following example:
apiVersion: cluster.open-cluster-management.io/v1
kind: ManagedCluster
metadata:
  name: cluster1
  labels:
    cluster.open-cluster-management.io/clusterset: clusterset1
spec:
  hubAcceptsClient: true
In this example,
cluster1is the cluster that is added to the managed cluster set namesclusterset1.Note: If the managed cluster was previously assigned to a managed cluster set that was deleted, the managed cluster might have a managed cluster set already specified to a cluster set that does not exist. If so, replace the name with the new one.
1.14.4. Removing a managed cluster from a ManagedClusterSet
You might want to remove a managed cluster from a managed cluster set to move it to a different managed cluster set, or remove it from the management settings of the set. You can remove a managed cluster from a managed cluster set by using the console or the command-line interface.
1.14.4.1. Removing a managed cluster from a ManagedClusterSet by using the console
Complete the following steps to remove a cluster from a managed cluster set by using the Red Hat Advanced Cluster Management console:
- If you just created your managed cluster set, select Manage resource assignments to go directly to the Manage resource assignments page. Continue with step 6 of this procedure.
- If your cluster already exists, access the cluster page by selecting Infrastructure > Clusters in the main navigation.
- Select the Cluster sets tab to view the available cluster sets.
- Select the name of the cluster set that you want to remove from the managed cluster set to view the cluster set details.
- Select Actions > Manage resource assignments.
On the Manage resource assignments page, select the checkbox for the resources that you want to remove from the cluster set.
This step removes a resource that is already a member of the cluster set, or adds a resource that is not already a member of the cluster set. You can see if the resource is already a member of a cluster set by viewing the details of the managed cluster.
-
Select
Reviewand review your changes, then selectSave.
Note: If you are moving a managed cluster from one managed cluster set to another, you must have the required RBAC permissions on both managed cluster sets.
1.14.4.2. Removing clusters from a ManagedClusterSet by using the command line
To remove a managed cluster from a managed cluster set by using the command line, complete the following steps:
Run the following command to display a list of managed clusters in the managed cluster set:
oc get managedclusters -l cluster.open-cluster-management.io/clusterset=<clusterset1>
Replace
clusterset1with the name of the managed cluster set.- Locate the entry for the cluster that you want to remove.
Remove the label from the the
yamlentry for the cluster that you want to remove. See the following code for an example of the label:labels: cluster.open-cluster-management.io/clusterset: clusterset1
Note: If you are moving a managed cluster from one managed cluster set to another, you must have the required RBAC permission available on both managed cluster sets.
1.14.5. Using ManagedClusterSets with Placement
A Placement resource is a namespace-scoped resource that defines a rule to select a set of ManagedClusters from the ManagedClusterSets, which are bound to the placement namespace.
Required access: Cluster administrator, Cluster set administrator
1.14.5.1. Placement overview
See the following information about how placement with managed clusters works:
-
Kubernetes clusters are registered with the hub cluster as cluster-scoped
ManagedClusters. -
The
ManagedClustersare organized into cluster-scopedManagedClusterSets. -
The
ManagedClusterSetsare bound to workload namespaces. -
The namespace-scoped
Placementsspecify a portion ofManagedClusterSetsthat select a working set of the potentialManagedClusters. Placementsselect from that working set by using label and claim selectors.Important:
Placementdoes not select aManagedClusterif there is noManagedClusterSetbound to the placement namespace.
The Placement specification includes the following fields:
ClusterSetsrepresents theManagedClusterSetsfrom which theManagedClustersare selected.-
If not specified,
ManagedClustersis selected from theManagedClusterSetsthat are bound to the placement namespace. -
If specified,
ManagedClustersis selected from the intersection of this set and theManagedClusterSetsthat are bound to the placement namespace.
-
If not specified,
NumberOfClustersrepresents the desired number ofManagedClustersto be selected, which meet the placement requirements.If not specified, all
ManagedClustersthat meet the placement requirements are selected.-
Predicatesrepresents a slice of predicates to selectManagedClusterswith label and claim selector. The predicates are ORed. prioritizerPolicyrepresents the policy of prioritizers.modeis eitherExact,Additive, or""where""is Additive by default.-
In
Additivemode, any prioritizer that is not specifically provided with configuration values is enabled with its default configurations. In the current default configuration, the Steady and Balance prioritizers have the weight of 1, while the other prioritizers have the weight of 0. The default configurations might change in the future, which might change the prioritization.Additivemode does not require that you configure all of the prioritizers. -
In
Exactmode, any prioritizer that is not specifically provided with configuration values has the weight of zero.Exactmode requires that you input the full set of prioritizers that you want, but avoids behavior changes between releases.
-
In
configurationsrepresents the configuration of prioritizers.nameis the name of a prioritizer. See the following list of valid names of the prioritizers:-
Balance: Balances the decisions among the clusters -
Steady: Ensures that the existing decision is stabilized -
ResourceAllocatableCPU&ResourceAllocatableMemory: sort clusters based on the allocatable
-
-
weightdefines the weight of prioritizer. The value must be in the range of [0,10]. Each prioritizer calculates an integer score of a cluster in the range of [-100, 100]. The final score of a cluster is determined by the following formulasum(weight * prioritizer_score). A higher weight indicates that the prioritizer receives a higher weight in the cluster selection, while 0 weight indicate thats the prioritizer is disabled.
1.14.5.2. Placement examples
You need to bind at least one ManagedClusterSet to a namespace by creating a ManagedClusterSetBinding in that namespace. Note: You need role-based access to CREATE on the virtual sub-resource of managedclustersets/bind. See the following examples:
You can select
ManagedClusterswith thelabelSelector. See the following sample where thelabelSelectoronly matches clusters with labelvendor: OpenShift:apiVersion: cluster.open-cluster-management.io/v1alpha1 kind: Placement metadata: name: placement1 namespace: ns1 spec: predicates: - requiredClusterSelector: labelSelector: matchLabels: vendor: OpenShiftYou can select
ManagedClusterswithclaimSelector. See the following sample whereclaimSelectoronly matches clusters withregion.open-cluster-management.iowithus-west-1:apiVersion: cluster.open-cluster-management.io/v1alpha1 kind: Placement metadata: name: placement2 namespace: ns1 spec: predicates: - requiredClusterSelector: claimSelector: matchExpressions: - key: region.open-cluster-management.io operator: In values: - us-west-1You can select
ManagedClustersfrom particularclusterSets. See the following sample whereclaimSelectoronly matchesclusterSets:clusterset1clusterset2:apiVersion: cluster.open-cluster-management.io/v1alpha1 kind: Placement metadata: name: placement3 namespace: ns1 spec: clusterSets: - clusterset1 - clusterset2 predicates: - requiredClusterSelector: claimSelector: matchExpressions: - key: region.open-cluster-management.io operator: In values: - us-west-1Select desired number of
ManagedClusters. See the following sample wherenumberOfClustersis3:apiVersion: cluster.open-cluster-management.io/v1alpha1 kind: Placement metadata: name: placement4 namespace: ns1 spec: numberOfClusters: 3 predicates: - requiredClusterSelector: labelSelector: matchLabels: vendor: OpenShift claimSelector: matchExpressions: - key: region.open-cluster-management.io operator: In values: - us-west-1Select a cluster with the largest allocatable memory.
Note: Similar to Kubernetes Node Allocatable, 'allocatable' here is defined as the amount of compute resources that are available for pods on each cluster.
apiVersion: cluster.open-cluster-management.io/v1alpha1
kind: Placement
metadata:
  name: placement6
  namespace: ns1
spec:
  numberOfClusters: 1
  prioritizerPolicy:
    configurations:
      - name: ResourceAllocatableMemory
Select a cluster with the largest allocatable CPU and memory, and make placement sensitive to resource changes.
apiVersion: cluster.open-cluster-management.io/v1alpha1
kind: Placement
metadata:
  name: placement7
  namespace: ns1
spec:
  numberOfClusters: 2
  prioritizerPolicy:
    configurations:
      - name: ResourceAllocatableCPU
        weight: 2
      - name: ResourceAllocatableMemory
        weight: 2
Select a cluster with the largest allocatable memory and pin the placementdecisions.
apiVersion: cluster.open-cluster-management.io/v1alpha1
kind: Placement
metadata:
  name: placement8
  namespace: ns1
spec:
  numberOfClusters: 4
  prioritizerPolicy:
    mode: Exact
    configurations:
      - name: ResourceAllocatableMemory
      - name: Steady
        weight: 3
1.14.5.3. Placement decision
One or multiple PlacementDecisions with label cluster.open-cluster-management.io/placement={placement name} are created to represent the ManagedClusters selected by a Placement.
If a ManagedCluster is selected and added to a PlacementDecision, components that consume this Placement might apply the workload on this ManagedCluster. After the ManagedCluster is no longer selected and it is removed from the PlacementDecisions, the workload that is applied on this ManagedCluster should be removed accordingly.
See the following PlacementDecision sample:
apiVersion: cluster.open-cluster-management.io/v1alpha1
kind: PlacementDecision
metadata:
  labels:
    cluster.open-cluster-management.io/placement: placement1
  name: placement1-kbc7q
  namespace: ns1
  ownerReferences:
    - apiVersion: cluster.open-cluster-management.io/v1alpha1
      blockOwnerDeletion: true
      controller: true
      kind: Placement
      name: placement1
      uid: 05441cf6-2543-4ecc-8389-1079b42fe63e
status:
  decisions:
    - clusterName: cluster1
      reason: ''
    - clusterName: cluster2
      reason: ''
    - clusterName: cluster3
      reason: ''
1.14.5.4. Add-on status
You might want to select managed clusters for your placements according to the status of the add-ons that are deployed on them. For example, you want to select a managed cluster for your placement only if there is a specific add-on that is enabled on the cluster.
You can do this by specifying the label for the add-on, as well as its status, if necessary, when you create the Placement. A label is automatically created on a ManagedCluster resource if an add-on is enabled on the cluster. The label is automatically removed if the add-on is disabled.
Each add-on is represented by a label in the format of feature.open-cluster-management.io/addon-<addon_name>=<status_of_addon>.
Replace addon_name with the name of the add-on that should be enabled on the managed cluster that you want to select.
Replace status_of_addon with the status that the add-on should have if the cluster is selected. The possible values of status_of_addon are in the following list:
-
available: The add-on is enabled and available. -
unhealthy: The add-on is enabled, but the lease is not updated continuously. -
unreachable: The add-on is enabled, but there is no lease found for it. This can also be caused when the managed cluster is offline.
For example, an available application-manager add-on is represented by a label on the managed cluster that reads:
feature.open-cluster-management.io/addon-application-manager: available
See the following examples of creating placements based on add-ons and their status:
You can create a placement that includes all managed clusters that have
application-managerenabled on them by adding the following YAML content:apiVersion: cluster.open-cluster-management.io/v1alpha1 kind: Placement metadata: name: placement1 namespace: ns1 spec: predicates: - requiredClusterSelector: labelSelector: matchExpressions: - key: feature.open-cluster-management.io/addon-application-manager operator: ExistsYou can create a placement that includes all managed clusters that have
application-managerenabled with anavailablestatus by adding the following YAML content:apiVersion: cluster.open-cluster-management.io/v1alpha1 kind: Placement metadata: name: placement2 namespace: ns1 spec: predicates: - requiredClusterSelector: labelSelector: matchLabels: "feature.open-cluster-management.io/addon-application-manager": "available"You can create a placement that includes all managed clusters that have
application-managerdisabled by adding the following YAML content:apiVersion: cluster.open-cluster-management.io/v1alpha1 kind: Placement metadata: name: placement3 namespace: ns1 spec: predicates: - requiredClusterSelector: labelSelector: matchExpressions: - key: feature.open-cluster-management.io/addon-application-manager operator: DoesNotExist
1.15. Managing cluster pools (Technology preview)
Cluster pools provide rapid and cost-effective access to configured Red Hat OpenShift Container Platform clusters on-demand and at scale. Cluster pools maintain a configurable and scalable number of OpenShift Container Platform clusters on Amazon Web Services, Google Cloud Platform, or Microsoft Azure in a hibernating state that can be claimed when they are needed. They are especially useful when providing or replacing cluster environments for development, continuous integration, and production scenarios.
ClusterClaim resources are used to check out clusters from cluster pools. After a cluster is checked out from a cluster pool, the checked out cluster is resumed and brought to a ready state. The cluster pool automatically creates a hibernated cluster in the cluster pool, to replace the claimed one.
Note: When a cluster that was claimed from the cluster pool is no longer needed and is destroyed, the resources are deleted. The cluster does not return to the cluster pool.
Required access: Administrator
The procedure for creating a cluster pool is similar to the procedure for creating a cluster. Clusters in a cluster pool are not created for immediate use.
1.15.1. Prerequisites
See the following prerequisites before creating a cluster pool:
- You need to deploy a Red Hat Advanced Cluster Management for Kubernetes hub cluster.
- You need Internet access for your Red Hat Advanced Cluster Management for Kubernetes hub cluster so that it can create the Kubernetes cluster on the provider environment.
- You need an AWS, GCP, or Microsoft Azure provider credential. See Managing credentials overview for more information.
- You need a configured domain in your provider environment. See your provider documentation for instructions about how to configure a domain.
- You need provider login credentials.
- You need your OpenShift Container Platform image pull secret. See Using image pull secrets.
Note: Adding a cluster pool with this procedure configures it so it automatically imports the cluster to be managed by Red Hat Advanced Cluster Management when you claim a cluster from the pool. If you would like to create a cluster pool that does not automatically import the claimed cluster for management with the cluster claim, add the following annotation to your clusterClaim resource:
kind: ClusterClaim
metadata:
  annotations:
    cluster.open-cluster-management.io/createmanagedcluster: "false"
The word "false" must be surrounded by quotation marks to indicate that it is a string.
1.15.2. Creating a cluster pool
To create a cluster pool, complete the following steps:
- From the navigation menu, click Infrastructure > Clusters.
- Select the Cluster pools tab to view cluster pools that you can access.
- Select Create cluster pool.
- Select the infrastructure provider for your cluster pool.
- Select the infrasctructure credential that you want to use for the cluster pool. You can create one by selecting Add credential, if it is not available in the list.
- Select Next to continue to the cluster pool details.
- Enter a name for your cluster pool.
Enter the namespace where you want to create your cluster pool. You can select an existing namespace from the list, or type the name of a new one to create one. The cluster pool does not have to be in the same namespace as the clusters.
When you create a cluster pool in a cluster set, the
namespace adminpermission is applied to all of the users withclusterset adminpermissions for the namespace where you add the cluster pool. Similarly, thenamespace viewpermission is applied to the users withclusterset viewpermissions.Optional: Select a cluster set name if you want the RBAC roles for your cluster pool to share the role assignments of an existing cluster set. The cluster set for the clusters in the cluster pool can only be set when you create the cluster pool. You cannot change the cluster set association for the cluster pool or for the clusters in the cluster pool after you create the cluster pool. Any cluster that you claim from the cluster pool is automatically added to the same cluster set as the cluster pool.
Note: If you do not have
cluster adminpermissions, you must select a cluster set. The request to create a cluster set is rejected with a forbidden error if you do not include the cluster set name in this situation. If no cluster sets are available for you to select, contact your cluster administrator to create a cluster set and give youclusterset adminpermissions to it.- Enter the number of clusters that you want available in your cluster pool by adding the number to the cluster pool size.
- Select Next.
Enter the required information in the remaining steps to complete to provision your cluster pool. The procedure from this point on is the same as the procedure for creating clusters.
For specific information about the information that is required for your provider, see the following information:
- After all of the information is entered, select Create to create the cluster pool. After at least one cluster is available in the pool, a Claim cluster button appears.
1.15.3. Claiming clusters from cluster pools
ClusterClaim resources are used to check out clusters from cluster pools. After a cluster is checked out from a cluster pool, the checked out cluster is brought to a ready state. The cluster pool automatically creates a new hibernated cluster in the cluster pool to replace the claimed one.
Note: When a cluster that was claimed from the cluster pool is no longer needed and is destroyed, the resources are deleted. The cluster does not return to the cluster pool.
Required access: Administrator
1.15.3.1. Prerequisite
You must have the following available before claiming a cluster from a cluster pool:
A cluster pool with available clusters to claim. See Creating a cluster pool for information about how to create a cluster pool. If there are no available clusters to claim, the Claim cluster button is not displayed.
1.15.3.2. Claim the cluster from the cluster pool
To checkout a cluster from the cluster pool, resume the cluster and claim it as one of your managed clusters. Complete the following steps to claim a cluster:
- From the navigation menu, click Infrastructure > Clusters.
- Select the Cluster pools tab.
- Find the name of the cluster pool you want to claim a cluster from and select Claim cluster.
- Enter a cluster claim name to help identify the cluster.
- Select Claim.
The claimed cluster comes out of hibernation and appears in the Managed Cluster tab with a status of Resuming. After the cluster reaches a status of Ready, the cluster is available for use.
The claimed cluster remains a member of the cluster set that it was associated with when it was in the cluster pool. You cannot change the cluster set of the claimed cluster when you claim it.
1.15.4. Scaling cluster pools
You can change the size of the cluster pool by increasing or decreasing the number of hibernating clusters in the cluster pool.
Required access: Cluster administrator
Complete the following steps to change the number of clusters in your cluster pool:
- From the navigation menu, click Infrastructure > Clusters.
- Select the Cluster pools tab.
- Find the name of the cluster pool in the Cluster pools table.
- In the Options menu for the cluster pool that you want to change, select Scale cluster pool.
- Increase or decrease the pool size by changing the value of the pool size.
- Select Scale to commit the change.
Your cluster pools are scaled to reflect your new values.
1.15.5. Updating the cluster pool release image
When the clusters in your cluster pool remain in hibernation for some time, the Red Hat OpenShift Container Platform release image of the clusters might become backlevel. If this happens, you can upgrade the version of the release image of the clusters that are in your cluster pool.
Required access: Edit
Complete the following steps to update the OpenShift Container Platform release image for the clusters in your cluster pool:
Note: This procedure does not update clusters from the cluster pool that are already claimed in the cluster pool. After you complete this procedure, the updates to the release images only apply to the following clusters that are related to the cluster pool:
- Clusters that are created by the cluster pool after updating the release image with this procedure.
- Clusters that are hibernating in the cluster pool. The existing hibernating clusters with the old release image are destroyed, and new clusters with the new release image replace them.
- From the navigation menu, click Infrastructure > Clusters.
- Select the Cluster pools tab.
- Find the name of the cluster pool that you want to update in the Cluster pools table.
- Click the Options menu to see the available options.
- Select Update release image.
- Select a new release image to use for future cluster creations from this cluster pool.
- Select Update to apply the selected release image.
- The cluster pool release image is updated.
Tip: You can update the release image for multiple cluster pools with one action by selecting the box for each of the the cluster pools and using the Actions menu to update the release image for the selected cluster pools.
1.15.6. Destroying a cluster pool
If you created a cluster pool and determine that you no longer need it, you can destroy the cluster pool. When you destroy a cluster pool, all of the unclaimed hibernating clusters are destroyed and their resources are released.
Required access: Cluster administrator
To destroy a cluster pool, complete the following steps:
- From the navigation menu, click Infrastructure > Clusters.
- Select the Cluster pools tab.
- Find the name of the cluster pool in the Cluster pools table.
- Click the Options menu to view the options for the cluster pool.
- Select Destroy cluster pool.
- Enter the name of the cluster pool to confirm.
Select Destroy to remove the cluster pool. Any unclaimed clusters in the cluster pool are destroyed. It might take some time for all of the resources to be deleted, and the cluster pool remains visible in the console until all of the resources are deleted.
The namespace that contained the ClusterPool will not be deleted. Deleting the namespace will destroy any clusters that have been claimed from the ClusterPool, since the ClusterClaim resources for these clusters are created in the same namespace.
Tip: You can destroy multiple cluster pools with one action by selecting the box for each of the the cluster pools and using the Actions menu to destroy the selected cluster pools.
Your cluster pool is deleted.
1.16. ClusterClaims
A ClusterClaim is a cluster-scoped custom resource definition (CRD) on a managed cluster. A ClusterClaim represents a piece of information that a managed cluster claims. The following example shows a claim that is identified in the YAML file:
apiVersion: cluster.open-cluster-management.io/v1alpha1
kind: ClusterClaim
metadata:
  name: id.openshift.io
spec:
  value: 95f91f25-d7a2-4fc3-9237-2ef633d8451c
The following table shows the defined ClusterClaims that might be on a cluster that Red Hat Advanced Cluster Management for Kubernetes manages:
| Claim name | Reserved | Mutable | Description |
|---|---|---|---|
|
| true | false | ClusterID defined in upstream proposal |
|
| true | true | Kubernetes version |
|
| true | false | Platform the managed cluster is running on, like AWS, GCE, and Equinix Metal |
|
| true | false | Product name, like OpenShift, Anthos, EKS and GKE |
|
| false | false | OpenShift Container Platform external ID, which is only available for an OpenShift Container Platform cluster |
|
| false | true | URL of the management console, which is only available for an OpenShift Container Platform cluster |
|
| false | true | OpenShift Container Platform version, which is only available for an OpenShift Container Platform cluster |
If any of the previous claims are deleted or updated on managed cluster, they are restored or rolled back to a previous version automatically.
After the managed cluster joins the hub, the ClusterClaims that are created on a managed cluster are synchronized with the status of the ManagedCluster resource on the hub. A managed cluster with ClusterClaims might look similar to the following example:
apiVersion: cluster.open-cluster-management.io/v1
kind: ManagedCluster
metadata:
  labels:
    cloud: Amazon
    clusterID: 95f91f25-d7a2-4fc3-9237-2ef633d8451c
    installer.name: multiclusterhub
    installer.namespace: open-cluster-management
    name: cluster1
    vendor: OpenShift
  name: cluster1
spec:
  hubAcceptsClient: true
  leaseDurationSeconds: 60
status:
  allocatable:
    cpu: '15'
    memory: 65257Mi
  capacity:
    cpu: '18'
    memory: 72001Mi
  clusterClaims:
    - name: id.k8s.io
      value: cluster1
    - name: kubeversion.open-cluster-management.io
      value: v1.18.3+6c42de8
    - name: platform.open-cluster-management.io
      value: AWS
    - name: product.open-cluster-management.io
      value: OpenShift
    - name: id.openshift.io
      value: 95f91f25-d7a2-4fc3-9237-2ef633d8451c
    - name: consoleurl.openshift.io
      value: 'https://console-openshift-console.apps.xxxx.dev04.red-chesterfield.com'
    - name: version.openshift.io
      value: '4.5'
  conditions:
    - lastTransitionTime: '2020-10-26T07:08:49Z'
      message: Accepted by hub cluster admin
      reason: HubClusterAdminAccepted
      status: 'True'
      type: HubAcceptedManagedCluster
    - lastTransitionTime: '2020-10-26T07:09:18Z'
      message: Managed cluster joined
      reason: ManagedClusterJoined
      status: 'True'
      type: ManagedClusterJoined
    - lastTransitionTime: '2020-10-30T07:20:20Z'
      message: Managed cluster is available
      reason: ManagedClusterAvailable
      status: 'True'
      type: ManagedClusterConditionAvailable
  version:
    kubernetes: v1.18.3+6c42de8
1.16.1. List existing ClusterClaims
You can use the kubectl command to list the ClusterClaims that apply to your managed cluster. This is helpful when you want to compare your ClusterClaim to an error message.
Note: Make sure you have list permission on resource clusterclaims.cluster.open-cluster-management.io.
Run the following command to list all existing ClusterClaims that are on the managed cluster:
kubectl get clusterclaims.cluster.open-cluster-management.io
1.16.2. Create custom ClusterClaims
You can create ClusterClaims with custom names on a managed cluster, which makes it easier to identify them. The custom ClusterClaims are synchronized with the status of the ManagedCluster resource on the hub cluster. The following content shows an example of a definition for a customized ClusterClaim:
apiVersion: cluster.open-cluster-management.io/v1alpha1
kind: ClusterClaim
metadata:
  name: <custom_claim_name>
spec:
  value: <custom_claim_value>
The max length of field spec.value is 1024. The create permission on resource clusterclaims.cluster.open-cluster-management.io is required to create a ClusterClaim.
1.17. Discovery service introduction (Technology Preview)
You can discover OpenShift 4 clusters that are available from OpenShift Cluster Manager. After discovery, you can import your clusters to manage. The Discovery services uses the Discover Operator for back-end and console usage.
You must have an OpenShift Cluster Manager credential. See Creating a credential for Red Hat OpenShift Cluster Manager if you need to create a credential.
Required access: Administrator
1.17.1. Configure Discovery with the console (Technology Preview)
Use the product console to enable Discovery.
Required access: Access to the namespace where the credential is created.
1.17.1.1. Prerequisites
- You need a credential. See Creating a credential for Red Hat OpenShift Cluster Manager to connect to OpenShift Cluster Manager.
1.17.1.2. Configure Discovery
Configure Discovery in the console to find clusters. You can create multiple DiscoveryConfig resources with separate credentials.
See the following procedure if you are using Discovery for the first time:
- Click Clusters in the console navigation.
- Click Configure Discovery to configure discovery settings.
Select a namespace and a credential.
- Select the namespace that contains your credentials.
- Select a credential within that namespace.
Set filters to discover relevant clusters.
- Choose the filter for the latest active clusters. For example, if you choose seven days, then you are searching for clusters that were active within the previous seven days.
- Choose the Red Hat OpenShift version.
- Click Add.
- View your discovered clusters in the console from the Clusters page.
- Optional: Create more clusters by clicking the Create discovery settings.
- Optional: Change or delete discovery settings by clicking the Configure discovery settings.
1.17.2. Enable Discovery using the CLI (Technology Preview)
Enable discovery using the CLI to find clusters that are available from Red Hat OpenShift Cluster Manager (link).
Required access: Administrator
1.17.2.1. Prerequisites
- Create a credential to connect to Red Hat OpenShift Cluster Manager.
1.17.2.2. Discovery set up and process
Note: The DiscoveryConfig must be named discovery and must be created in the same namespace as the selected credential. See the following DiscoveryConfig sample:
apiVersion: discovery.open-cluster-management.io/v1alpha1
kind: DiscoveryConfig
metadata:
  name: discovery
  namespace: <NAMESPACE_NAME>
spec:
  credential: <SECRET_NAME>
  filters:
    lastActive: 7
    openshiftVersions:
    - "4.8"
    - "4.7"
    - "4.6"
- "4.5"-
Replace
SECRET_NAMEwith the credential that you previously set up. -
Replace
NAMESPACE_NAMEwith the namespace ofSECRET_NAME. -
Enter the maximum time since last activity of your clusters (in days) to discover. For example,
lastActive: 7means only clusters active in the last 7 days are discovered. -
Enter the versions of Red Hat OpenShift clusters to discover as a list of strings. Note: Every entry in the
openshiftVersionslist specifies an OpenShift major and minor version. For example, specifying"4.7"will include all patch releases for the OpenShift version4.7(4.7.1,4.7.2, etc.).
1.17.2.3. View discovered clusters
View discovered clusters by running oc get discoveredclusters -n <namespace> where namespace is the namespace where the discovery credential exists.
1.17.2.3.1. DiscoveredClusters
Objects are created by the Discovery controller. These DiscoveredClusters represent the clusters that are found in OpenShift Cluster Manager by using the filters and credentials that are specified in the DiscoveryConfig discoveredclusters.discovery.open-cluster-management.io API. The value for name is the cluster external ID:
apiVersion: discovery.open-cluster-management.io/v1alpha1
kind: DiscoveredCluster
metadata:
  name: fd51aafa-95a8-41f7-a992-6fb95eed3c8e
  namespace: <NAMESPACE_NAME>
spec:
  activity_timestamp: "2021-04-19T21:06:14Z"
  cloudProvider: vsphere
  console: https://console-openshift-console.apps.qe1-vmware-pkt.dev02.red-chesterfield.com
  creation_timestamp: "2021-04-19T16:29:53Z"
  credential:
    apiVersion: v1
    kind: Secret
    name: <SECRET_NAME>
    namespace: <NAMESPACE_NAME>
  display_name: qe1-vmware-pkt.dev02.red-chesterfield.com
  name: fd51aafa-95a8-41f7-a992-6fb95eed3c8e
  openshiftVersion: 4.6.22
  status: Stale
1.17.3. View discovered clusters (Technology Preview)
After you set up your credentials and discover your clusters for import, you can view them in the console.
- Click Cluster > Discovered clusters
View the populated table with the following information:
- Name is the display name that is designated in OpenShift Cluster Manager. If the cluster does not have a display name, a generated name based on the cluster console URL is displayed. If the console URL is missing or was modified manually in OpenShift Cluster Manager, the cluster external ID is displayed.
- Namespace is the namespace where you created the credential and discovered clusters.
- Type is the discovered cluster Red Hat OpenShift type.
- Distribution version is the discovered cluster Red Hat OpenShift version.
- Infrastructure provider is the cloud provider of the discovered cluster.
- Last active is the last time the discovered cluster was active.
- Created when the discovered cluster was created.
- Discovered when the discovered cluster was discovered.
- You can search for any information in the table, as well. For example, to show only Discovered clusters in a particular namespace, search for that namespace.
- You can now click Import cluster to create managed clusters. See Import discovered clusters.
1.17.4. Import discovered clusters (Technology Preview)
After you discover clusters, you can import clusters that appear in the Discovered clusters tab of the console.
1.17.4.1. Prerequisites
You need access to the namespaces that were used to configure Discovery.
1.17.4.2. Import Discovered clusters
- Navigate to the existing Clusters page and click on the Discovered clusters tab.
- From the Discovered clusters table, find the cluster that you want to import.
- From the options menu, choose Import cluster.
- For discovered clusters, you can import manually using the documentation, or you can choose Import clusters automatically.
- To import automatically with your credentials or Kubeconfig file, copy and paste the content.
- Click Import.
1.18. Upgrading your cluster
After you create Red Hat OpenShift Container Platform clusters that you want to manage with Red Hat Advanced Cluster Management for Kubernetes, you can use the Red Hat Advanced Cluster Management for Kubernetes console to upgrade those clusters to the latest minor version that is available in the version channel that the managed cluster uses.
In a connected environment, the updates are automatically identified with notifications provided for each cluster that requires an upgrade in the Red Hat Advanced Cluster Management console.
Important: The process for upgrading your clusters in a disconnected environment requires some additional steps to configure and mirror the required release images. It uses the operator for Red Hat OpenShift Update Service to identify the upgrades. If you are in a disconnected environment, see Upgrading disconnected clusters for the required steps.
Notes:
To upgrade to a major version, you must verify that you meet all of the prerequisites for upgrading to that version. You must update the version channel on the managed cluster before you can upgrade the cluster with the console.
After you update the version channel on the managed cluster, the Red Hat Advanced Cluster Management for Kubernetes console displays the latest versions that are available for the upgrade.
This method of upgrading only works for OpenShift Container Platform managed clusters that are in a Ready state.
Important: You cannot upgrade Red Hat OpenShift Kubernetes Service managed clusters or OpenShift Container Platform managed clusters on Red Hat OpenShift Dedicated by using the Red Hat Advanced Cluster Management for Kubernetes console.
To upgrade your cluster in a connected environment, complete the following steps:
- From the navigation menu, navigate to Infrastructure > Clusters. If an upgrade is available, it is shown in the Distribution version column.
- Select the clusters in Ready state that you want to upgrade. A cluster must be andcluster to be upgraded with the console.
- Select Upgrade.
- Select the new version of each cluster.
- Select Upgrade.
If your cluster upgrade fails, the Operator generally retries the upgrade a few times, stops, and reports the status of the failing component. In some cases, the upgrade process continues to cycle through attempts to complete the process. Rolling your cluster back to a previous version following a failed upgrade is not supported. Contact Red Hat support for assistance if your cluster upgrade fails.
1.18.1. Selecting a channel
You can use the Red Hat Advanced Cluster Management console to select a channel for your cluster upgrades on OpenShift Container Platform version 4.6, or later. After selecting a channel, you are automatically reminded of cluster upgrades that are available for both Errata versions (4.8.1 > 4.8.2 > 4.8.3, and so on) and release versions (4.8 > 4.9, and so on).
To select a channel for your cluster, complete the following steps:
- From the Red Hat Advanced Cluster Management navigation, select Infrastructure > Clusters.
- Select the name of the cluster that you want to change to view the Cluster details page. If a different channel is available for the cluster, an edit icon is displayed in the Channel field.
- Click the edit icon to modify the setting in the field.
- Select a channel in the New channel field.
- Click Save to commit your change.
You can find the reminders for the available channel updates in the Cluster details page of the cluster.
1.18.2. Upgrading disconnected clusters
You can use Red Hat OpenShift Update Service with Red Hat Advanced Cluster Management for Kubernetes to upgrade your clusters in a disconnected environment.
In some cases, security concerns prevent clusters from being connected directly to the Internet. This makes it difficult to know when upgrades are available, and how to process those upgrades. Configuring OpenShift Update Service can help.
OpenShift Update Service is a separate operator and operand that monitors the available versions of your managed clusters in a disconnected environment, and makes them available for upgrading your clusters in a disconnected environment. After OpenShift Update Service is configured, it can perform the following actions:
- Monitor when upgrades are available for your disconnected clusters.
- Identify which updates are mirrored to your local site for upgrading by using the graph data file.
Notify you that an upgrade is available for your cluster by using the Red Hat Advanced Cluster Management console.
- Prerequisites
- Prepare your disconnected mirror registry
- Deploy the operator for OpenShift Update Service
- Build the graph data init container
- Configure certificate for the mirrored registry
- Deploy the OpenShift Update Service instance
- Deploy a policy to override the default registry (optional)
- Deploy a policy to deploy a disconnected catalog source
- Deploy a policy to change the managed cluster parameter
- Viewing available upgrades
- Selecting a channel
- Upgrading the cluster
1.18.2.1. Prerequisites
You must have the following prerequisites before you can use OpenShift Update Service to upgrade your disconnected clusters:
A deployed Red Hat Advanced Cluster Management hub cluster that is running on Red Hat OpenShift Container Platform version 4.6 or later with restricted OLM configured. See Using Operator Lifecycle Manager on restricted networks for details about how to configure restricted OLM.
Tip: Make a note of the catalog source image when you configure restricted OLM.
- An OpenShift Container Platform cluster that is managed by the Red Hat Advanced Cluster Management hub cluster
Access credentials to a local repository where you can mirror the cluster images. See Mirroring images for a disconnected installation for more information about how to create this repository.
Note: The image for the current version of the cluster that you upgrade must always be available as one of the mirrored images. If an upgrade fails, the cluster reverts back to the version of the cluster at the time that the upgrade was attempted.
1.18.2.2. Prepare your disconnected mirror registry
You must mirror both the image that you want to upgrade to and the current image that you are upgrading from to your local mirror registry. Complete the following steps to mirror the images:
Create a script file that contains content that resembles the following example:
UPSTREAM_REGISTRY=quay.io
PRODUCT_REPO=openshift-release-dev
RELEASE_NAME=ocp-release
OCP_RELEASE=4.5.2-x86_64
LOCAL_REGISTRY=$(hostname):5000
LOCAL_SECRET_JSON=/path/to/pull/secret

oc adm -a ${LOCAL_SECRET_JSON} release mirror \
--from=${UPSTREAM_REGISTRY}/${PRODUCT_REPO}/${RELEASE_NAME}:${OCP_RELEASE} \
--to=${LOCAL_REGISTRY}/ocp4 \
--to-release-image=${LOCAL_REGISTRY}/ocp4/release:${OCP_RELEASE}
Replace
/path/to/pull/secretwith the path to your OpenShift Container Platform pull secret.- Run the script to mirror the images, configure settings, and separate the release images from the release content.
Tip: You can use the output of the last line of this script when you create your ImageContentSourcePolicy.
1.18.2.3. Deploy the operator for OpenShift Update Service
To deploy the operator for OpenShift Update Service in your OpenShift Container Platform environment, complete the following steps:
- On the hub cluster, access the OpenShift Container Platform operator hub.
-
Deploy the operator by selecting
Red Hat OpenShift Update Service Operator. Update the default values, if necessary. The deployment of the operator creates a new project namedopenshift-cincinnati. Wait for the installation of the operator to finish.
Tip: You can check the status of the installation by entering the
oc get podscommand on your OpenShift Container Platform command line. Verify that the operator is in therunningstate.
1.18.2.4. Build the graph data init container
OpenShift Update Service uses graph data information to determine the available upgrades. In a connected environment, OpenShift Update Service pulls the graph data information for available upgrades directly from the Cincinnati graph data GitHub repository. Because you are configuring a disconnected environment, you must make the graph data available in a local repository by using an init container. Complete the following steps to create a graph data init container:
Clone the graph data Git repository by entering the following command:
git clone https://github.com/openshift/cincinnati-graph-data
Create a file that contains the information for your graph data
init. You can find this sample Dockerfile in thecincinnati-operatorGitHub repository. The contents of the file is shown in the following sample:FROM registry.access.redhat.com/ubi8/ubi:8.1 RUN curl -L -o cincinnati-graph-data.tar.gz https://github.com/openshift/cincinnati-graph-data/archive/master.tar.gz RUN mkdir -p /var/lib/cincinnati/graph-data/ CMD exec /bin/bash -c "tar xvzf cincinnati-graph-data.tar.gz -C /var/lib/ cincinnati/graph-data/ --strip-components=1"
In this example:
-
The
FROMvalue is the external registry where OpenShift Update Service finds the images. -
The
RUNcommands create the directory and package the upgrade files. -
The
CMDcommand copies the package file to the local repository and extracts the files for an upgrade.
-
The
Run the following commands to build the
graph data init container:podman build -f <path_to_Dockerfile> -t ${DISCONNECTED_REGISTRY}/cincinnati/cincinnati-graph-data-container:latest podman push ${DISCONNECTED_REGISTRY}/cincinnati/cincinnati-graph-data-container:latest --authfile=/path/to/pull_secret.jsonReplace path_to_Dockerfile with the path to the file that you created in the previous step.
Replace ${DISCONNECTED_REGISTRY}/cincinnati/cincinnati-graph-data-container with the path to your local graph data init container.
Replace /path/to/pull_secret with the path to your pull secret file.
Note: You can also replace
podmanin the commands withdocker, if you don’t havepodmaninstalled.
1.18.2.5. Configure certificate for the mirrored registry
If you are using a secure external container registry to store your mirrored OpenShift Container Platform release images, OpenShift Update Service requires access to this registry to build an upgrade graph. Complete the following steps to configure your CA certificate to work with the OpenShift Update Service pod:
Find the OpenShift Container Platform external registry API, which is located in
image.config.openshift.io. This is where the external registry CA certificate is stored.See Configuring additional trust stores for image registry access in the OpenShift Container Platform documentation for more information.
-
Create a ConfigMap in the
openshift-confignamespace. Add your CA certificate under the key
updateservice-registry. OpenShift Update Service uses this setting to locate your certificate:apiVersion: v1 kind: ConfigMap metadata: name: trusted-ca data: updateservice-registry: | -----BEGIN CERTIFICATE----- ... -----END CERTIFICATE-----Edit the
clusterresource in theimage.config.openshift.ioAPI to set theadditionalTrustedCAfield to the name of the ConfigMap that you created.oc patch image.config.openshift.io cluster -p '{"spec":{"additionalTrustedCA":{"name":"trusted-ca"}}}' --type mergeReplace
trusted-cawith the path to your new ConfigMap.
The OpenShift Update Service Operator watches the image.config.openshift.io API and the ConfigMap you created in the openshift-config namespace for changes, then restart the deployment if the CA cert has changed.
1.18.2.6. Deploy the OpenShift Update Service instance
When you finish deploying the OpenShift Update Service instance on your hub cluster, this instance is located where the images for the cluster upgrades are mirrored and made available to the disconnected managed cluster. Complete the following steps to deploy the instance:
If you do not want to use the default namespace of the operator, which is
openshift-cincinnati, create a namespace for your OpenShift Update Service instance:- In the OpenShift Container Platform hub cluster console navigation menu, select Administration > Namespaces.
- Select Create Namespace.
- Add the name of your namespace, and any other information for your namespace.
- Select Create to create the namespace.
- In the Installed Operators section of the OpenShift Container Platform console, select Red Hat OpenShift Update Service Operator.
- Select Create Instance in the menu.
Paste the contents from your OpenShift Update Service instance. Your YAML instance might resemble the following manifest:
apiVersion: cincinnati.openshift.io/v1beta2
kind: Cincinnati
metadata:
  name: openshift-update-service-instance
  namespace: openshift-cincinnati
spec:
  registry: <registry_host_name>:<port>
  replicas: 1
  repository: ${LOCAL_REGISTRY}/ocp4/release
  graphDataImage: '<host_name>:<port>/cincinnati-graph-data-container'
Replace the
spec.registryvalue with the path to your local disconnected registry for your images.Replace the
spec.graphDataImagevalue with the path to your graph data init container. Tip: This is the same value that you used when you ran thepodman pushcommand to push your graph data init container.- Select Create to create the instance.
-
From the hub cluster CLI, enter the
oc get podscommand to view the status of the instance creation. It might take a while, but the process is complete when the result of the command shows that the instance and the operator are running.
1.18.2.7. Deploy a policy to override the default registry (optional)
Note: The steps in this section only apply if you have mirrored your releases into your mirrored registry.
OpenShift Container Platform has a default image registry value that specifies where it finds the upgrade packages. In a disconnected environment, you can create a policy to replace that value with the path to your local image registry where you mirrored your release images.
For these steps, the policy is named ImageContentSourcePolicy. Complete the following steps to create the policy:
- Log in to the OpenShift Container Platform environment of your hub cluster.
- In the OpenShift Container Platform navigation, select Administration > Custom Resource Definitions.
- Select the Instances tab.
- Select the name of the ImageContentSourcePolicy that you created when you set up your disconnected OLM to view the contents.
-
Select the YAML tab to view the content in
YAMLformat. - Copy the entire contents of the ImageContentSourcePolicy.
- From the Red Hat Advanced Cluster Management console, select Governance > Create policy.
-
Set the
YAMLswitch to On to view the YAML version of the policy. -
Delete all of the content in the
YAMLcode. Paste the following
YAMLcontent into the window to create a custom policy:apiVersion: policy.open-cluster-management.io/v1 kind: Policy metadata: name: policy-pod namespace: default annotations: policy.open-cluster-management.io/standards: policy.open-cluster-management.io/categories: policy.open-cluster-management.io/controls: spec: disabled: false policy-templates: - objectDefinition: apiVersion: policy.open-cluster-management.io/v1 kind: ConfigurationPolicy metadata: name: policy-pod-sample-nginx-pod spec: object-templates: - complianceType: musthave objectDefinition: apiVersion: v1 kind: Pod metadata: name: sample-nginx-pod namespace: default status: phase: Running remediationAction: inform severity: low remediationAction: enforce --- apiVersion: policy.open-cluster-management.io/v1 kind: PlacementBinding metadata: name: binding-policy-pod namespace: default placementRef: name: placement-policy-pod kind: PlacementRule apiGroup: apps.open-cluster-management.io subjects: - name: policy-pod kind: Policy apiGroup: policy.open-cluster-management.io --- apiVersion: apps.open-cluster-management.io/v1 kind: PlacementRule metadata: name: placement-policy-pod namespace: default spec: clusterConditions: - status: "True" type: ManagedClusterConditionAvailable clusterSelector: matchExpressions: [] # selects all clusters if not specifiedReplace the content inside the
objectDefinitionsection of the template with content that is similar to the following content to add the settings for your ImageContentSourcePolicy:apiVersion: operator.openshift.io/v1alpha1 kind: ImageContentSourcePolicy metadata: name: <your-local-mirror-name> spec: repositoryDigestMirrors: - mirrors: - <your-registry> source: registry.redhat.io-
Replace
your-local-mirror-namewith the name of your local mirror repository. Replace
your-registrywith the path to your local mirror repository.Tip: You can find your path to your local mirror by entering the
oc adm release mirrorcommand.
-
Replace
- Select the box for Enforce if supported.
- Select Create to create the policy.
1.18.2.8. Deploy a policy to deploy a disconnected catalog source
Push the Catalogsource policy to the managed cluster to change the default location from a connected location to your disconnected local registry.
- In the Red Hat Advanced Cluster Management console, select Infrastructure > Clusters.
- Find the managed cluster to receive the policy in the list of clusters.
-
Note the value of the
namelabel for the managed cluster. The label format isname=managed-cluster-name. This value is used when pushing the policy. - In the Red Hat Advanced Cluster Management console menu, select Governance > Create policy.
- Set the YAML switch to On to view the YAML version of the policy.
- Delete all of the content in the YAML code.
Paste the following YAML content into the window to create a custom policy:
apiVersion: policy.open-cluster-management.io/v1 kind: Policy metadata: name: policy-pod namespace: default annotations: policy.open-cluster-management.io/standards: policy.open-cluster-management.io/categories: policy.open-cluster-management.io/controls: spec: disabled: false policy-templates: - objectDefinition: apiVersion: policy.open-cluster-management.io/v1 kind: ConfigurationPolicy metadata: name: policy-pod-sample-nginx-pod spec: object-templates: - complianceType: musthave objectDefinition: apiVersion: v1 kind: Pod metadata: name: sample-nginx-pod namespace: default status: phase: Running remediationAction: inform severity: low remediationAction: enforce --- apiVersion: policy.open-cluster-management.io/v1 kind: PlacementBinding metadata: name: binding-policy-pod namespace: default placementRef: name: placement-policy-pod kind: PlacementRule apiGroup: apps.open-cluster-management.io subjects: - name: policy-pod kind: Policy apiGroup: policy.open-cluster-management.io --- apiVersion: apps.open-cluster-management.io/v1 kind: PlacementRule metadata: name: placement-policy-pod namespace: default spec: clusterConditions: - status: "True" type: ManagedClusterConditionAvailable clusterSelector: matchExpressions: [] # selects all clusters if not specifiedAdd the following content to the policy:
apiVersion: config.openshift.io/vi kind: OperatorHub metadata: name: cluster spec: disableAllDefaultSources: true
Add the following content:
apiVersion: operators.coreos.com/v1alpha1 kind: CatalogSource metadata: name: my-operator-catalog namespace: openshift-marketplace spec: sourceType: grpc image: <registry_host_name>:<port>/olm/redhat-operators:v1 displayName: My Operator Catalog publisher: grpc
Replace the value of spec.image with the path to your local restricted catalog source image.
-
In the Red Hat Advanced Cluster Management console navigation, select Infrastructure > Clusters to check the status of the managed cluster. When the policy is applied, the cluster status is
ready.
1.18.2.9. Deploy a policy to change the managed cluster parameter
Push the ClusterVersion policy to the managed cluster to change the default location where it retrieves its upgrades.
From the managed cluster, confirm that the ClusterVersion upstream parameter is currently the default public OpenShift Update Service operand by entering the following command:
oc get clusterversion -o yaml
The returned content might resemble the following content:
apiVersion: v1 items: - apiVersion: config.openshift.io/v1 kind: ClusterVersion [..] spec: channel: stable-4.4 upstream: https://api.openshift.com/api/upgrades_info/v1/graphFrom the hub cluster, identify the route URL to the OpenShift Update Service operand by entering the following command:
oc get routes.Tip: Note this value for later steps.
- In the hub cluster Red Hat Advanced Cluster Management console menu, select Governance > Create a policy.
-
Set the
YAMLswitch to On to view the YAML version of the policy. -
Delete all of the content in the
YAMLcode. Paste the following YAML content into the window to create a custom policy:
apiVersion: policy.open-cluster-management.io/v1
kind: Policy
metadata:
  name: policy-pod
  namespace: default
  annotations:
    policy.open-cluster-management.io/standards:
    policy.open-cluster-management.io/categories:
    policy.open-cluster-management.io/controls:
spec:
  disabled: false
  policy-templates:
    - objectDefinition:
        apiVersion: policy.open-cluster-management.io/v1
        kind: ConfigurationPolicy
        metadata:
          name: policy-pod-sample-nginx-pod
        spec:
          object-templates:
            - complianceType: musthave
              objectDefinition:
                apiVersion: v1
                kind: Pod
                metadata:
                  name: sample-nginx-pod
                  namespace: default
                status:
                  phase: Running
          remediationAction: inform
          severity: low
  remediationAction: enforce
---
apiVersion: policy.open-cluster-management.io/v1
kind: PlacementBinding
metadata:
  name: binding-policy-pod
  namespace: default
placementRef:
  name: placement-policy-pod
  kind: PlacementRule
  apiGroup: apps.open-cluster-management.io
subjects:
- name: policy-pod
  kind: Policy
  apiGroup: policy.open-cluster-management.io
---
apiVersion: apps.open-cluster-management.io/v1
kind: PlacementRule
metadata:
  name: placement-policy-pod
  namespace: default
spec:
  clusterConditions:
  - status: "True"
    type: ManagedClusterConditionAvailable
  clusterSelector:
    matchExpressions:
      []  # selects all clusters if not specified
Add the following content to
policy.specin the policy section:apiVersion: config.openshift.io/v1 kind: ClusterVersion metadata: name: version spec: channel: stable-4.4 upstream: https://example-cincinnati-policy-engine-uri/api/upgrades_info/v1/graphReplace the value of spec.upstream with the path to your hub cluster OpenShift Update Service operand.
Tip: You can complete the following steps to determine the path to the operand:
-
Run the
oc get get routes -Acommand on the hub cluster. -
Find the route to
cincinnati. + The path to the operand is the value in theHOST/PORTfield.
-
Run the
In the managed cluster CLI, confirm that the upstream parameter in the
ClusterVersionis updated with the local hub cluster OpenShift Update Service URL by entering:oc get clusterversion -o yaml
Verify that the results resemble the following content:
apiVersion: v1
items:
- apiVersion: config.openshift.io/v1
  kind: ClusterVersion
[..]
  spec:
    channel: stable-4.4
    upstream: https://<hub-cincinnati-uri>/api/upgrades_info/v1/graph
1.18.2.10. Viewing available upgrades
You can view a list of available upgrades for your managed cluster by completing the following steps:
- Log in to your Red Hat Advanced Cluster Management console.
- In the navigation menu, select Infrastructure > Clusters.
- Select a cluster that is in the Ready state.
- From the Actions menu, select Upgrade cluster.
Verify that the optional upgrade paths are available.
Note: No available upgrade versions are shown if the current version is not mirrored into the local image repository.
1.18.2.11. Selecting a channel
You can use the Red Hat Advanced Cluster Management console to select a channel for your cluster upgrades on OpenShift Container Platform version 4.6, or later. Those versions must be available on the mirror registry. Complete the steps in Selecting a channel to specify a channel for your upgrades.
1.18.2.12. Upgrading the cluster
After configuring the disconnected registry, Red Hat Advanced Cluster Management and OpenShift Update Service use the disconnected registry to determine if upgrades are available. If no available upgrades are displayed, make sure that you have the release image of the current level of the cluster and at least one later level mirrored in the local repository. If the release image for the current version of the cluster is not available, no upgrades are available.
Complete the following steps to upgrade:
- In the Red Hat Advanced Cluster Management console, select Infrastructure > Clusters.
- Find the cluster that you want to determine if there is an available upgrade.
- If there is an upgrade available, the Distribution version column for the cluster indicates that there is an upgrade available.
- Select the Options menu for the cluster, and select Upgrade cluster.
- Select the target version for the upgrade, and select Upgrade.
The managed cluster is updated to the selected version.
If your cluster upgrade fails, the Operator generally retries the upgrade a few times, stops, and reports the status of the failing component. In some cases, the upgrade process continues to cycle through attempts to complete the process. Rolling your cluster back to a previous version following a failed upgrade is not supported. Contact Red Hat support for assistance if your cluster upgrade fails.
1.19. Removing a cluster from management
When you remove an OpenShift Container Platform cluster from management that was created with Red Hat Advanced Cluster Management for Kubernetes, you can either detach it or destroy it.
Detaching a cluster removes it from management, but does not completely delete it. You can import it again if you want to manage it. This is only an option when the cluster is in a Ready state.
These procedures remove a cluster from management in either of the following situations:
- You already deleted the cluster and want to remove the deleted cluster from Red Hat Advanced Cluster Management.
- You want to remove the cluster from management, but have not deleted the cluster.
Important:
- Destroying a cluster removes it from management and deletes the components of the cluster.
When you detach a managed cluster, the related namespace is automatically deleted. Do not place custom resources in this namespace.
1.19.1. Removing a cluster by using the console
- From the navigation menu, navigate to Infrastructure > Clusters.
- Select the option menu beside the cluster that you want to remove from management.
Select Destroy cluster or Detach cluster.
Tip: You can detach or destroy multiple clusters by selecting the check boxes of the clusters that you want to detach or destroy. Then select Detach or Destroy.
Note: If you attempt to detach the hub cluster while it is managed, which is called a local-cluster, check to see if the default setting of disableHubSelfManagement is false. This setting causes the hub cluster to reimport itself and manage itself when it is detached, and it reconciles the MultiClusterHub controller. It might take hours for the hub cluster to complete the detachment process and reimport. If you want to reimport the hub cluster without waiting for the processes to finish, you can enter the following command to restart the multiclusterhub-operator pod and reimport faster:
oc delete po -n open-cluster-management `oc get pod -n open-cluster-management | grep multiclusterhub-operator| cut -d' ' -f1`
You can change the value of the hub cluster to not import automatically by changing the disableHubSelfManagement value to true, as described in Installing while connected online.
1.19.2. Removing a cluster by using the command line
To detach a managed cluster by using the command line of the hub cluster, run the following command:
oc delete managedcluster $CLUSTER_NAME
To delete the managed cluster after detaching, run the following command:
oc delete clusterdeployment <CLUSTER_NAME> -n $CLUSTER_NAME
Note: If you attempt to detach the hub cluster, which is named local-cluster, be aware that the default setting of disableHubSelfManagement is false. This setting causes the hub cluster to reimport itself and manage itself when it is detached and it reconciles the MultiClusterHub controller. It might take hours for the hub cluster to complete the detachment process and reimport. If you want to reimport the hub cluster without waiting for the processes to finish, you can enter the following command to restart the multiclusterhub-operator pod and reimport faster:
oc delete po -n open-cluster-management `oc get pod -n open-cluster-management | grep multiclusterhub-operator| cut -d' ' -f1`
You can change the value of the hub cluster to not import automatically by changing the disableHubSelfManagement value to true, as described in Installing while connected online.
1.19.3. Removing remaining resources after removing a cluster
If there are remaining resources on the managed cluster that you removed, there are additional steps that are required to ensure that you remove all of the remaining components. Situations when these extra steps are required include the following examples:
-
The managed cluster was detached before it was completely created, and components like the
klusterletremain on the managed cluster. - The hub that was managing the cluster was lost or destroyed before detaching the managed cluster, and there is no way to detach the managed cluster from the hub.
- The managed cluster was not in an online state when it was detached.
If one of these situations apply to your attempted detachment of a managed cluster, there are some resources that cannot be removed from managed cluster. Complete the following steps to detach the managed cluster:
-
Make sure you have the
occommand line interface configured. Make sure you have
KUBECONFIGconfigured on your managed cluster.If you run
oc get ns | grep open-cluster-management-agent, you should see two namespaces:open-cluster-management-agent Active 10m open-cluster-management-agent-addon Active 10m
Run the following command to remove the remaining resources:
oc delete namespaces open-cluster-management-agent open-cluster-management-agent-addon --wait=false
oc get crds | grep open-cluster-management.io | awk '{print $1}' | xargs oc delete crds --wait=false
oc get crds | grep open-cluster-management.io | awk '{print $1}' | xargs oc patch crds --type=merge -p '{"metadata":{"finalizers": []}}'
Run the following command to ensure that both namespaces and all open cluster management
crdsare removed:oc get crds | grep open-cluster-management.io | awk '{print $1}' oc get ns | grep open-cluster-management-agent
1.19.4. Defragmenting the etcd database after removing a cluster
Having many managed clusters can affect the size of the etcd database in the hub cluster. In OpenShift Container Platform 4.8, when you delete a managed cluster, the etcd database in the hub cluster is not automatically reduced in size. In some scenarios, the etcd database can run out of space. An error etcdserver: mvcc: database space exceeded is displayed. To correct this error, reduce the size of the etcd database by compacting the database history and defragmenting the etcd database.
Note: For OpenShift Container Platform version 4.9 and later, the etcd Operator automatically defragments disks and compacts the etcd history. No manual intervention is needed. The following procedure is for OpenShift Container Platform version 4.8 and earlier.
Compact the etcd history and defragment the etcd database in the hub cluster by completing the following procedure.
1.19.4.1. Prerequisites
-
Install the OpenShift CLI (
oc). -
Log in as a user with
cluster-adminprivileges.
1.19.4.2. Procedure
Compact the
etcdhistory.Open a remote shell session to the
etcdmember, for example:$ oc rsh -n openshift-etcd etcd-control-plane-0.example.com etcdctl endpoint status --cluster -w table
Run the following command to compact the
etcdhistory:sh-4.4#etcdctl compact $(etcdctl endpoint status --write-out="json" | egrep -o '"revision":[0-9]*' | egrep -o '[0-9]*' -m1)
Example output
$ compacted revision 158774421
-
Defragment the
etcddatabase and clear anyNOSPACEalarms as outlined in Defragmentingetcddata.
1.20. Cluster backup and restore operator (Technology Preview)
The cluster backup and restore operator runs on the hub cluster, and depends on the OADP Operator to install Velero on the Red Hat Advanced Cluster Management for Kubernetes hub cluster; Velero is used to backup and restore Red Hat Advanced Cluster Management hub cluster resources.
For a list of supported storage providers for Velero, see S3-Compatible object store providers.
1.20.1. Prerequisites
- You must install the latest version of the OADP Operator. See the Install OADP Operator using OperatorHub documentation.
- Be sure to complete the steps to Create credentials secret for the cloud storage where the backups are saved.
- Use the created secret when you Create the Velero Custom Resource.
Note: The cluster backup and restore operator resources must be created in the same namespace where the OADP Operator is installed.
1.20.2. Backup and restore operator architecture
The operator defines the backupSchedule.cluster.open-cluster-management.io resource, which is used to set up Red Hat Advanced Cluster Management backup schedules, and restore.cluster.open-cluster-management.io resource, which is used to process and restore these backups. The operator creates corresponding Velero resources, and defines the options needed to backup remote clusters and any other hub cluster resources that need to be restored. View the following diagram:
1.20.3. Schedule a cluster backup
After you create a backupschedule.cluster.open-cluster-management.io resource you can run the following command to get the status of the scheduled cluster backups: oc get bsch -n <oadp-operator-ns>. The <oadp-operator-ns> is the namespace where BackupSchedule is created and must be in the same namespace where the OADP Operator is installed.
The backupSchedule.cluster.open-cluster-management.io resource creates the following three schedule.velero.io resources:
acm-managed-clusters-schedule: This resource is used to schedule backups for the managed cluster resources, including managed clusters, cluster pools, and cluster sets.Notes:
-
Only managed clusters created using the
hiveAPI are automatically imported when the backup is restored on another hub cluster. All other managed clusters show up as Pending Import and must be manually imported back on the new hub cluster. - When you restore a backup on a new hub cluster, make sure that the previous hub cluster, where the backup was created, is shut down. If it is running, the previous hub cluster tries to reimport the managed clusters as soon as the managed cluster reconciliation finds that the managed clusters are no longer available.
The following resources are being retrieved by this backup; they are required for restoring all managed clusters information on the new hub cluster:
-
Secrets and ConfigMaps from the
hiveandopenshift-operator-lifecycle-managernamespaces, and from all of theManagedClusters resourcesnamespaces created on the hub cluster. -
Cluster-level
ManagedClusterresource. -
Other namespace-scoped resources used to restore the managed cluster details, such as
ServiceAccount,ManagedClusterInfo,ManagedClusterSet,ManagedClusterSetBindings,KlusterletAddonConfig,ManagedClusterView,ClusterPool,ClusterProvision,ClusterDeployment,ClusterSyncLease,ClusterSync, andClusterCurator.
-
Secrets and ConfigMaps from the
-
Only managed clusters created using the
acm-credentials-schedule: This resource is used to schedule backups for the user created credentials and any copy of those credentials. These credentials are identified by thecluster.open-cluster-management.io/typelabel selector; all secrets that define the label selector are included in the backup.Note: If you have any user-defined private channels, you can include the channel secrets in this credentials backup if you set the
cluster.open-cluster-management.io/typelabel selector to this secret. Without thecluster.open-cluster-management.io/typelabel selector, channel secrets are not identified by theacm-credentials-schedulebackup and need to be manually recreated on the restored cluster.acm-resources-schedule: This resource is used to schedule backups for theApplicationsandPolicyresources, including any required resources, such as:Applications:Channels,Subscriptions,DeployablesandPlacementRulesPolicy:PlacementBindings,Placement, andPlacementDecisionsThere are no resources being collected from the
local-clusteroropen-cluster-managementnamespaces.
1.20.4. Restore a backup
In a disaster scenario, the hub cluster where the backups are run becomes unavailable, and the backed up data needs to be moved to a new hub cluster. This is done by running the cluster restore operation on the new hub cluster. In this case, the restore operation runs on a different hub cluster than the one where the backup is created.
There are also cases where you want to restore the data on the same hub cluster where the backup was collected, so the data from a previous snapshot can be recovered. In this case, both restore and backup operations are run on the same hub cluster.
After you create a restore.cluster.open-cluster-management.io resource on the hub cluster, you can run the following command to get the status of the restore operation: oc get restore -n <oadp-operator-ns>. You should also be able to verify that the backed up resources that are contained by the backup file are created.
Note: The restore.cluster.open-cluster-management.io resource is run once. If you want to run the same restore operation again after the restore operation is complete, you have to create a new restore.cluster.open-cluster-management.io resource with the same spec options.
The restore operation is used to restore all three backup types that are created by the backup operation. However, you can choose to install only a certain type of backup (only managed clusters, only user credentials, or only hub cluster resources).
The restore defines the following three required spec properties, where the restore logic is defined for the types of backed up files:
-
veleroManagedClustersBackupNameis used to define the restore option for the managed clusters. -
veleroCredentialsBackupNameis used to define the restore option for the user credentials. veleroResourcesBackupNameis used to define the restore option for the hub cluster resources (ApplicationsandPolicy).The valid options for the previously mentioned properties are following values:
-
latest- This property restores the last available backup file for this type of backup. -
skip- This property does not attempt to restore this type of backup with the current restore operation. -
<backup_name>- This property restores the specified backup pointing to it by name.
-
The name of the restore.velero.io resources that are created by the restore.cluster.open-cluster-management.io is generated using the following template rule, <restore.cluster.open-cluster-management.io name>-<velero-backup-resource-name>. View the following descriptions:
-
restore.cluster.open-cluster-management.io nameis the name of the currentrestore.cluster.open-cluster-management.ioresource, which initiates the restore. velero-backup-resource-nameis the name of the Velero backup file that is used for restoring the data. For example, therestore.cluster.open-cluster-management.ioresource namedrestore-acmcreatesrestore.velero.iorestore resources. View the following examples for the format:-
restore-acm-acm-managed-clusters-schedule-20210902205438is used for restoring managed cluster backups. In this sample, thebackup.velero.iobackup name used to restore the resource isacm-managed-clusters-schedule-20210902205438. -
restore-acm-acm-credentials-schedule-20210902206789is used for restoring credential backups. In this sample, thebackup.velero.iobackup name used to restore the resource isacm-managed-clusters-schedule-20210902206789. restore-acm-acm-resources-schedule-20210902201234is used for restoring application and policy backups. In this sample, thebackup.velero.iobackup name used to restore the resource isacm-managed-clusters-schedule-20210902201234.Note: If
skipis used for a backup type,restore.velero.iois not created.
-
View the following YAML sample of the cluster Restore resource. In this sample, all three types of backed up files are being restored, using the latest available backed up files:
apiVersion: cluster.open-cluster-management.io/v1beta1
kind: Restore
metadata:
  name: restore-acm
spec:
  veleroManagedClustersBackupName: latest
  veleroCredentialsBackupName: latest
  veleroResourcesBackupName: latest
Learn how to enable and manage the cluster backup and restore operator, see Enable the backup and restore operator.
1.20.5. Enable the backup and restore operator (Technology Preview)
Enable the cluster backup and restore operator to schedule back up and restore for your cluster resources. Red Hat Advanced Cluster Management for Kubernetes offers the cluster backup operator as a Technology Preview that is disabled by default.
Required access: Cluster administrator
1.20.5.1. Prerequisites
- You must install the latest version of the OADP Operator. See the Install OADP Operator using OperatorHub documentation.
Note: Be sure to follow the OADP Operator installation instructions to create the Velero resource, and to create a valid connection to a backup storage location, where the backups are stored. View the Installation and setup steps from the oadp-operator repository.
1.20.5.2. Enabling the backup and restore operator
The cluster backup and restore operator can be enabled when the MultiClusterHub resource is created for the first time. From the OpenShift Container Platform console, select the Enable Cluster Backup switch to enable the operator. The enableClusterBackup parameter is set to true. When the operator is enabled, the operator resources are installed.
If the MultiClusterHub resource is already created, you can install or uninstall the cluster backup operator by editing the MultiClusterHub resource. Set enableClusterBackup to false, if you want to uninstall the cluster backup operator.
When the backup and restore operator is enabled, your MultiClusterHub resource might resemble the following YAML file:
apiVersion: operator.open-cluster-management.io/v1
  kind: MultiClusterHub
  metadata:
    name: multiclusterhub
    namespace: open-cluster-management
  spec:
    availabilityConfig: High
    enableClusterBackup: true <-----
    imagePullSecret: multiclusterhub-operator-pull-secret
    ingress:
      sslCiphers:
      - ECDHE-ECDSA-AES256-GCM-SHA384
      - ECDHE-RSA-AES256-GCM-SHA384
      - ECDHE-ECDSA-AES128-GCM-SHA256
      - ECDHE-RSA-AES128-GCM-SHA256
    separateCertificateManagement: false
1.20.5.3. Using the backup and restore operator
Complete the following steps to schedule and restore backups:
Use the backup and restore operator,
backupschedule.cluster.open-cluster-management.ioandrestore.cluster.open-cluster-management.ioresources, to create abackupschedule.cluster.open-cluster-management.ioresource using thecluster_v1beta1_backupschedule.yamlsample file. See thecluster-backup-operatorsamples. Run the following command to create abackupschedule.cluster.open-cluster-management.ioresource using thecluster_v1beta1_backupschedule.yamlsample file:kubectl create -n <oadp-operator-ns> -f config/samples/cluster_v1beta1_backupschedule.yaml
Your resource might resemble the following file:
apiVersion: cluster.open-cluster-management.io/v1beta1
kind: BackupSchedule
metadata:
  name: schedule-acm
spec:
  maxBackups: 10 # maximum number of backups after which old backups should be removed
  veleroSchedule: 0 */6 * * * # Create a backup every 6 hours
  veleroTtl: 72h # deletes scheduled backups after 72h; optional, if not specified, the maximum default value set by velero is used - 720h
View the following descriptions of the
backupschedule.cluster.open-cluster-management.iospecproperties:-
maxBackupis a required property and represents the maximum number of backups after previous backups are removed. -
veleroScheduleis a required property and defines a cron job for scheduling the backups. -
veleroTtlis an optional property and defines the expiration time for a scheduled backup resource. If not specified, the maximum default value set by Velero is used, which is720h.
-
Check the status of your
backupschedule.cluster.open-cluster-management.ioresource, which displays the definition for the threeschedule.velero.ioresources. Run the following command:oc get bsch -n <oadp-operator-ns>
As a reminder, the restore operation is run on a different hub cluster for restore scenarios. To initiate a restore operation, create a
restore.cluster.open-cluster-management.ioresource on the hub cluster where you want to restore backups.You can use the cluster backup and restore operator,
backupschedule.cluster.open-cluster-management.ioandrestore.cluster.open-cluster-management.ioresources, to create a backup or restore resource. See thecluster-backup-operatorsamples.Run the following command to create a
restore.cluster.open-cluster-management.ioresource using thecluster_v1beta1_restore.yamlsample file. Be sure to replace theoadp-operator-nswith the namespace name used to install the OADP Operator. The default value for the OADP Operator install namespace isoadp-operator:kubectl create -n <oadp-operator-ns> -f config/samples/cluster_v1beta1_restore.yaml
Your resource might resemble the following file:
apiVersion: cluster.open-cluster-management.io/v1beta1
kind: Restore
metadata:
  name: restore-acm
spec:
  veleroManagedClustersBackupName: latest
  veleroCredentialsBackupName: latest
  veleroResourcesBackupName: latest
View the following description of the three required
specproperties forrestore.cluster.open-cluster-management.io:-
veleroManagedClustersBackupNameis used to define the restore option for the managed clusters. -
veleroCredentialsBackupNameis used to define the restore option for the user credentials. veleroResourcesBackupNameis used to define the restore option for the hub cluster resources (ApplicationsandPolicy).The valid options for the previously mentioned properties are following values:
-
latest- This property restores the last available backup file for this type of backup. -
skip- This property does not attempt to restore this type of backup with the current restore operation. -
backup_name- This property restores the specified backup by referencing the name.
-
View the Velero
Restoreresource by running the following command:oc get restore.velero.io -n <oadp-operator-ns>
View the following YAML examples to restore different types of backed up files:
Restore all three types of backed up resources:
apiVersion: cluster.open-cluster-management.io/v1beta1
kind: Restore
metadata:
  name: restore-acm
spec:
  veleroManagedClustersBackupSchedule: latest
  veleroCredentialsBackupSchedule: latest
  veleroResourcesBackupSchedule: latest
Restore only managed cluster resources:
apiVersion: cluster.open-cluster-management.io/v1beta1
kind: Restore
metadata:
  name: restore-acm
spec:
  veleroManagedClustersBackupName: latest
  veleroCredentialsBackupName: skip
  veleroResourcesBackupName: skip
Restore the resources for managed clusters only, using the
acm-managed-clusters-schedule-20210902205438backup:apiVersion: cluster.open-cluster-management.io/v1beta1 kind: Restore metadata: name: restore-acm spec: veleroManagedClustersBackupName: acm-managed-clusters-schedule-20210902205438 veleroCredentialsBackupName: skip veleroResourcesBackupName: skip
See Restore a backup for a description of the required specification properties and the valid options. Note: The restore.cluster.open-cluster-management.io resource is run once. After the restore operation is completed, you can optionally run another restore operation on the same hub cluster. You must create a new restore.cluster.open-cluster-management.io resource to run a new restore operation.
1.21. Replicating persistent volumes with VolSync (Technology Preview)
VolSync is a Kubernetes operator that enables asynchronous replication of persistent volumes within a cluster, or across clusters with storage types that are not otherwise compatible for replication. It uses the Container Storage Interface (CSI) to overcome the compatibility limitation. After deploying the VolSync operator in your environment, you can leverage it to create and maintain copies of your persistent data.
Note: VolSync does not meet the requirements of the FIPS standard.
There are three methods that you can use to replicate when you use VolSync, which depend on the number of synchronization locations that you have. The Rsync method is used for this example. For information about the other methods and more information about Rsync, see Usage in the VolSync documentation.
Rsync replication is a one-to-one replication of persistent volumes, and is likely to be the most commonly used. This is used for replicating data to a remote site.
1.21.1. Prerequisites
Before installing VolSync on your clusters, you must have the following requirements:
- A configured Red Hat OpenShift Container Platform environment running a Red Hat Advanced Cluster Management version 2.4, or later, hub cluster.
- At least two configured clusters that are managed by the same Red Hat Advanced Cluster Management hub cluster.
-
Network connectivity between the clusters that you are configuring with VolSync. If the clusters are not on the same network, you can configure the Submariner network service and use the
ClusterIPvalue forServiceTypeto network the clusters or use a load balancer with theLoadBalancervalue forServiceType. - The storage driver that you use for your source persistent volume must be CSI-compatible and able to support snapshots.
1.21.2. Installing VolSync on the managed clusters
To enable VolSync on two clusters in your environment, you must install it on both the source and the target managed clusters. Complete the following steps to leverage the policy template in Red Hat Advanced Cluster Management to install VolSync:
Download the policy-persistent-data-management policy template from the GitHub repository. In its current format, this policy starts an installation of VolSync on the hub cluster. After it is installed on the hub cluster, it automatically installs the required VolSync components on all of the managed clusters of the hub.
Note: If you downloaded and used this policy before Red Hat Advanced Cluster Management version 2.4.2, download the file again. The path has changed for the file and some of its references.
You can specify a different label to identify which clusters will have VolSync installed by modifying the following section of the policy file:
spec:
  clusterSelector:
    matchLabels:
      vendor: OpenShift
Note: Do not modify the content for the
clusterSelectorlater in the file that applies to thelocal-cluster.Apply the policy while you are logged in to your hub cluster by entering the following command:
oc -n <namespace> apply -f ./policy-persistent-data-management.yaml
Replace
namespacewith a namespace on your hub cluster.
1.21.3. Configuring Rsync replication across managed clusters
For Rsync-based replication, configure custom resources on the source and destination clusters. The custom resources use the address value to connect the source to the destination, and the sshKeys to ensure that the transferred data is secure.
Note: You must copy the values for address and sshKeys from the destination to the source, so configure the destination before you configure the source.
This example provides the steps to configure an Rsync replication from a persistent volume claim on the source cluster in the source-ns namespace to a persistent volume claim on a destination cluster in the destination-ns namespace. You can replace those values with other values, if necessary.
Configure your destination cluster.
Run the following command on the destination cluster to create the namespace:
$ kubectl create ns <destination-ns>
Replace
destination-nswith a name for the namespace that will contain your destination persistent volume claim.Copy the following YAML content to create a new file called
replication_destination.yaml:--- apiVersion: volsync.backube/v1alpha1 kind: ReplicationDestination metadata: name: <destination> namespace: <destination-ns> spec: rsync: serviceType: LoadBalancer copyMethod: Snapshot capacity: 2Gi accessModes: [ReadWriteOnce] storageClassName: gp2-csi volumeSnapshotClassName: csi-aws-vscNote: The
capacityvalue should match the capacity of the persistent volume claim that is being replicated.Replace
destinationwith the name of your replication destination CR.Replace
destination-nswith the name of the namespace where your destination is located.For this example, the
ServiceTypevalue ofLoadBalanceris used. The load balancer service is created by the source cluster to enable your source managed cluster to transfer information to a different destination managed cluster. You can useClusterIPas the service type if your source and destinations are on the same cluster, or if you have Submariner network service configured. Note the address and the name of the secret to refer to when you configure the source cluster.The
storageClassNameandvolumeSnapshotClassNameare optional parameters. Specify the values for your environment, particularly if you are using a storage class and volume snapshot class name that are different than the default values for your environment.Run the following command on the destination cluster to create the
replicationdestinationresource:$ kubectl create -n <destination-ns> -f replication_destination.yaml
Replace
destination-nswith the name of the namespace where your destination is located.After the
replicationdestinationresource is created, following parameters and values are added to the resource:Parameter Value .status.rsync.addressIP address of the destination cluster that is used to enable the source and destination clusters to communicate.
.status.rsync.sshKeysName of the SSH key file that enables secure data transfer from the source cluster to the destination cluster.
Run the following command to copy the value of
.status.rsync.addressto use on the source cluster:$ ADDRESS=`kubectl get replicationdestination <destination> -n <destination-ns> --template={{.status.rsync.address}}` $ echo $ADDRESSReplace
destinationwith the name of your replication destination CR.Replace
destination-nswith the name of the namespace where your destination is located.The output should appear similar to the following output, which is for an Amazon Web Services environment:
a831264645yhrjrjyer6f9e4a02eb2-5592c0b3d94dd376.elb.us-east-1.amazonaws.com
Run the following command to copy the name of the secret and the contents of the secret that are provided as the value of
.status.rsync.sshKeys.$ SSHKEYS=`kubectl get replicationdestination <destination> -n <destination-ns> --template={{.status.rsync.sshKeys}}` $ echo $SSHKEYSReplace
destinationwith the name of your replication destination CR.Replace
destination-nswith the name of the namespace where your destination is located.You will have to enter it on the source cluster when you configure the source. The output should be the name of your SSH keys secret file, which might resemble the following name:
volsync-rsync-dst-src-destination-name
Identify the source persistent volume claim that you want to replicate.
Note: The source persistent volume claim must be on a CSI storage class.
Create the
ReplicationSourceitems.Copy the following YAML content to create a new file called
replication_source.yamlon the source cluster:--- apiVersion: volsync.backube/v1alpha1 kind: ReplicationSource metadata: name: <source> namespace: <source-ns> spec: sourcePVC: <persistent_volume_claim> trigger: schedule: "*/3 * * * *" rsync: sshKeys: <mysshkeys> address: <my.host.com> copyMethod: Snapshot storageClassName: gp2-csi volumeSnapshotClassName: csi-aws-vscReplace
sourcewith the name for your replication source CR. See step 3-vi in this procedure for instructions on how to replace this automatically.Replace
source-nswith the namespace of the persistent volume claim where your source is located. See step 3-vi in this procedure for instructions on how to replace this automatically.Replace
persistent_volume_claimwith the name of your source persistent volume claim.Replace
mysshkeyswith the keys that you copied from the.status.rsync.sshKeysfield of theReplicationDestinationwhen you configured it.Replace
my.host.comwith the host address that you copied from the.status.rsync.addressfield of theReplicationDestinationwhen you configured it.If your storage driver supports cloning, using
Cloneas the value forcopyMethodmight be a more streamlined process for the replication.StorageClassNameandvolumeSnapshotClassNameare optional parameters. If you are using a storage class and volume snapshot class name that are different than the defaults for your environment, specify those values.You can now set up the synchronization method of the persistent volume.
Copy the SSH secret from the destination cluster by entering the following command against the destination cluster:
$ kubectl get secret -n <destination-ns> $SSHKEYS -o yaml > /tmp/secret.yaml
Replace
destination-nswith the namespace of the persistent volume claim where your destination is located.Open the secret file in the
vieditor by entering the following command:$ vi /tmp/secret.yaml
In the open secret file on the destination cluster, make the following changes:
-
Change the namespace to the namespace of your source cluster. For this example, it is
source-ns. -
Remove the owner references (
.metadata.ownerReferences).
-
Change the namespace to the namespace of your source cluster. For this example, it is
On the source cluster, create the secret file by entering the following command on the source cluster:
$ kubectl create -f /tmp/secret.yaml
On the source cluster, modify the
replication_source.yamlfile by replacing the value of theaddressandsshKeysin theReplicationSourceobject with the values that you noted from the destination cluster by entering the following commands:$ sed -i "s/<my.host.com>/$ADDRESS/g" replication_source.yaml $ sed -i "s/<mysshkeys>/$SSHKEYS/g" replication_source.yaml $ kubectl create -n <source> -f replication_source.yaml
Replace
my.host.comwith the host address that you copied from the.status.rsync.addressfield of theReplicationDestinationwhen you configured it.Replace
mysshkeyswith the keys that you copied from the.status.rsync.sshKeysfield of theReplicationDestinationwhen you configured it.Replace
sourcewith the name of the persistent volume claim where your source is located.Note: You must create the the file in the same namespace as the persistent volume claim that you want to replicate.
Verify that the replication completed by running the following command on the
ReplicationSourceobject:$ kubectl describe ReplicationSource -n <source-ns> <source>
Replace
source-nswith the namespace of the persistent volume claim where your source is located.Replace
sourcewith the name of your replication source CR.If the replication was successful, the output should be similar to the following example:
Status:
  Conditions:
    Last Transition Time:  2021-10-14T20:48:00Z
    Message:               Synchronization in-progress
    Reason:                SyncInProgress
    Status:                True
    Type:                  Synchronizing
    Last Transition Time:  2021-10-14T20:41:41Z
    Message:               Reconcile complete
    Reason:                ReconcileComplete
    Status:                True
    Type:                  Reconciled
  Last Sync Duration:      5m20.764642395s
  Last Sync Time:          2021-10-14T20:47:01Z
  Next Sync Time:          2021-10-14T20:48:00Z
If the
Last Sync Timehas no time listed, then the replication is not complete.
1.21.4. Converting a replicated image to a usable persistent volume claim
There might be a time when you need to use the replicated image to recover data or to create a new instance of a persistent volume claim. The copy of the image must be converted to a persistent volume claim before it can be used. To convert a replicated image to a persistent volume claim, complete the following steps:
When the replication is complete, identify the latest snapshot from the
ReplicationDestinationobject by entering the following command:$ kubectl get replicationdestination <destination> -n <destination-ns> --template={{.status.latestImage.name}}Note the value of the latest snapshot for when you create your persistent volume claim.
Replace
destinationwith the name of your replication destination.Replace
destination-nswith the namespace of your destination.Create a
pvc.yamlfile that resembles the following example:apiVersion: v1 kind: PersistentVolumeClaim metadata: name: <pvc-name> namespace: <destination-ns> spec: accessModes: - ReadWriteOnce dataSource: kind: VolumeSnapshot apiGroup: snapshot.storage.k8s.io name: <snapshot_to_replace> resources: requests: storage: 2GiReplace
pvc-namewith a name for your new persistent volume claim.Replace
destination-nswith the namespace where the persistent volume claim is located.Replace
snapshot_to_replacewith theVolumeSnapshotname that you found in the previous step.You can update
resources.requests.storagewith a different value, but it is best practice when the value is at least the same size as the initial source persistent volume claim.Validate that your persistent volume claim is running in the environment by entering the following command:
$ kubectl get pvc -n <destination-ns>
1.21.5. Scheduling your synchronization
You have a few options to select from when determining how you start your replications: always running, on a schedule, or manually. Scheduling your replications is an option that is the option that is often selected.
The Schedule option runs replications at scheduled times. A schedule is defined by a cronspec, so the schedule can be configured as intervals of time or as specific times. The order of the schedule values are:
"minute (0-59) hour (0-23) day-of-month (1-31) month (1-12) day-of-week (0-6)"
The replication starts when the scheduled time occurs. Your setting for this replication option might resemble the following content:
spec:
  trigger:
    schedule: "*/6 * * * *"
After enabling one of these methods, your synchronization schedule runs according to the method that you configured.
See the VolSync documentation for additional information and options.