
Chapter 4. Automating API lifecycle with 3scale toolbox
This topic explains the concepts of the API lifecycle with Red Hat 3scale API Management and shows how API providers can automate the deployment stage using Jenkins Continuous Integration/Continuous Deployment (CI/CD) pipelines with 3scale toolbox commands. It describes how to deploy the sample Jenkins CI/CD pipelines, how to create a custom Jenkins pipeline using the 3scale shared library, and how create a custom pipeline from scratch:
4.1. Overview of the API lifecycle stages
The API lifecycle describes all the required activities from when an API is created until it is deprecated. 3scale enables API providers to perform full API lifecycle management. This section explains each stage in the API lifecycle and describes its goal and expected outcome.
The following diagram shows the API provider-based stages on the left, and the API consumer-based stages on the right:
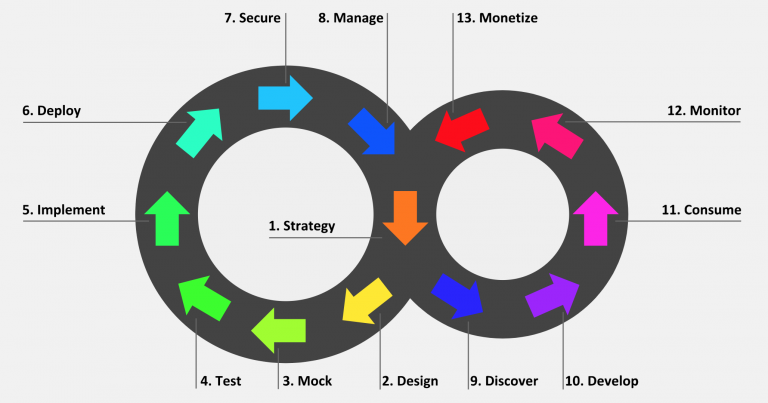
Red Hat currently supports the design, implement, deploy, secure, and manage phases of the API provider cycle, and all phases of the API consumer cycle.
4.1.1. API provider cycle
The API provider cycle stages are based on specifying, developing, and deploying your APIs. The following describes the goal and outcome of each stage:
Table 4.1. API provider lifecycle stages
| Stage | Goal | Outcome |
|---|---|---|
| 1. Strategy | Determine the corporate strategy for the APIs, including goals, resources, target market, timeframe, and make a plan. | The corporate strategy is defined with a clear plan to achieve the goals. |
| 2. Design | Create the API contract early to break dependencies between projects, gather feedback, and reduce risks and time to market (for example, using Apicurio Studio). | A consumer-focused API contract defines the messages that can be exchanged with the API. The API consumers have provided feedback. |
| 3. Mock | Further specify the API contract with real-world examples and payloads that can be used by API consumers to start their implementation. | A mock API is live and returns real-world examples. The API contract is complete with examples. |
| 4. Test | Further specify the API contract with business expectations that can be used to test the developed API. | A set of acceptance tests is created. The API documentation is complete with business expectations. |
| 5. Implement | Implement the API, using an integration framework such as Red Hat Fuse or a development language of your choice. Ensure that the implementation matches the API contract. | The API is implemented. If custom API management features are required, 3scale APIcast policies are also developed. |
| 6. Deploy | Automate the API integration, tests, deployment, and management using a CI/CD pipeline with 3scale toolbox. | A CI/CD pipeline integrates, tests, deploys, and manages the API to the production environment in an automated way. |
| 7. Secure | Ensure that the API is secure (for example, using secure development practices and automated security testing). | Security guidelines, processes, and gates are in place. |
| 8. Manage | Manage API promotion between environments, versioning, deprecation, and retirement at scale. | Processes and tools are in place to manage APIs at scale (for example, semantic versioning to prevent breaking changes to the API). |
4.1.2. API consumer cycle
The API consumer cycle stages are based on promoting, distributing, and refining your APIs for consumption. The following describes the goal and outcome of each stage:
Table 4.2. API consumer lifecycle stages
| Stage | Goal | Outcome |
|---|---|---|
| 9. Discover | Promote the API to third-party developers, partners, and internal users. | A developer portal is live and up-to-date documentation is continuously pushed to this developer portal (for example, using 3scale ActiveDocs). |
| 10. Develop | Guide and enable third-party developers, partners, and internal users to develop applications based on the API. | The developer portal includes best practices, guides, and recommendations. API developers have access to a mock and test endpoint to develop their software. |
| 11. Consume | Handle the growing API consumption and manage the API consumers at scale. | Staged application plans are available for consumption, and up-to-date prices and limits are continuously pushed. API consumers can integrate API key or client ID/secret generation from their CI/CD pipeline. |
| 12. Monitor | Gather factual and quantified feedback about API health, quality, and developer engagement (for example, a metric for Time to first Hello World!). | A monitoring system is in place. Dashboards show KPIs for the API (for example, uptime, requests per minute, latency, and so on). |
| 13. Monetize | Drive new incomes at scale (this stage is optional). | For example, when targeting a large number of small API consumers, monetization is enabled and consumers are billed based on usage in an automated way. |
4.2. Deploying the sample Jenkins CI/CD pipelines
API lifecycle automation with 3scale toolbox focuses on the deployment stage of the API lifecycle and enables you to use CI/CD pipelines to automate your API management solution. This topic explains how to deploy the sample Jenkins pipelines that call the 3scale toolbox:
- Section 4.2.1, “Sample Jenkins CI/CD pipelines”
- Section 4.2.2, “Setting up your 3scale Hosted environment”
- Section 4.2.3, “Setting up your 3scale On-premises environment”
- Section 4.2.4, “Deploying Red Hat Single Sign-On for OpenID Connect”
- Section 4.2.5, “Installing the 3scale toolbox and enabling access”
- Section 4.2.6, “Deploying the API backends”
- Section 4.2.7, “Deploying self-managed APIcast instances”
- Section 4.2.8, “Installing and deploying the sample pipelines”
- Section 4.2.9, “Limitations of API lifecycle automation with 3scale toolbox”
4.2.1. Sample Jenkins CI/CD pipelines
The following samples are provided in the Red Hat Integration repository as examples of how to create and deploy your Jenkins pipelines for API lifecycle automation:
Table 4.3. Sample Jenkins shared library pipelines
| Sample pipeline | Target environment | Security |
|---|---|---|
| 3scale Hosted | API key | |
| 3scale Hosted and 3scale On-premises with APIcast self-managed | None | |
| 3scale Hosted and 3scale On-premises with APIcast self-managed | OpenID Connect (OIDC) | |
| 3scale Hosted on development, test and production, with APIcast self-managed | API key | |
| 3scale Hosted on development, test and production, with APIcast self-managed | API key, none, OIDC |
These samples use a 3scale Jenkins shared library that calls the 3scale toolbox to demonstrate key API management capabilities. After you have performed the setup steps in this topic, you can install the pipelines using the OpenShift templates provided for each of the sample use cases in the Red Hat Integration repository.
The sample pipelines and applications are provided as examples only. The underlying APIs, CLIs, and other interfaces leveraged by the sample pipelines are fully supported by Red Hat. Any modifications that you make to the pipelines are not directly supported by Red Hat.
4.2.2. Setting up your 3scale Hosted environment
Setting up a 3scale Hosted environment is required by all of the sample Jenkins CI/CD pipelines.
The SaaS - API key, Multi-environment, and Semantic versioning sample pipelines use 3scale Hosted only. The Hybrid - open and Hybrid - OIDC pipelines also use 3scale On-premises. See also Setting up your 3scale On-premises environment.
Prerequisites
- You must have a Linux workstation.
- You must have a 3scale Hosted environment.
You must have an OpenShift 3.11 cluster. OpenShift 4 is currently not supported.
- For more information about supported configurations, see the Red Hat 3scale API Management Supported Configurations page.
- Ensure that wildcard routes have been enabled on the OpenShift router, as explained in the OpenShift documentation.
Procedure
- Log in to your 3scale Hosted Admin Portal console.
- Generate a new access token with write access to the Account Management API.
Save the generated access token for later use. For example:
export SAAS_ACCESS_TOKEN=123...456
Save the name of your 3scale tenant for later use. This is the string before
-admin.3scale.netin your Admin Portal URL. For example:export SAAS_TENANT=my_username
- Navigate to Audience > Accounts > Listing in the Admin Portal.
- Click Developer.
Save the Developer Account ID. This is the last part of the URL after
/buyers/accounts/. For example:export SAAS_DEVELOPER_ACCOUNT_ID=123...456
4.2.3. Setting up your 3scale On-premises environment
Setting up a 3scale on-premises environment is required by the Hybrid - open and Hybrid - OIDC sample Jenkins CI/CD pipelines only.
If you wish to use these Hybrid sample pipelines, you must set up a 3scale On-premises environment and a 3scale Hosted environment. See also Setting up your 3scale Hosted environment.
Prerequisites
- You must have a Linux workstation.
- You must have a 3scale on-premises environment. For details on installing 3scale on-premises using a template on OpenShift, see the 3scale installation documentation.
You must have an OpenShift 3.11 cluster. OpenShift 4 is currently not supported.
- For more information about supported configurations, see the Red Hat 3scale API Management Supported Configurations page.
- Ensure that wildcard routes have been enabled on the OpenShift router, as explained in the OpenShift documentation.
Procedure
- Log in to your 3scale On-premises Admin Portal console.
- Generate a new access token with write access to the Account Management API.
Save the generated access token for later use. For example:
export SAAS_ACCESS_TOKEN=123...456
Save the name of your 3scale tenant for later use:
export ONPREM_ADMIN_PORTAL_HOSTNAME="$(oc get route system-provider-admin -o jsonpath='{.spec.host}')"Define your wildcard routes:
export OPENSHIFT_ROUTER_SUFFIX=app.openshift.test # Replace me!

export APICAST_ONPREM_STAGING_WILDCARD_DOMAIN=onprem-staging.$OPENSHIFT_ROUTER_SUFFIX

export APICAST_ONPREM_PRODUCTION_WILDCARD_DOMAIN=onprem-production.$OPENSHIFT_ROUTER_SUFFIX
NoteYou must set the value of
OPENSHIFT_ROUTER_SUFFIXto the suffix of your OpenShift router (for example,app.openshift.test).Add the wildcard routes to your existing 3scale on-premises instance:
oc create route edge apicast-wildcard-staging --service=apicast-staging --hostname="wildcard.$APICAST_ONPREM_STAGING_WILDCARD_DOMAIN" --insecure-policy=Allow --wildcard-policy=Subdomain

oc create route edge apicast-wildcard-production --service=apicast-production --hostname="wildcard.$APICAST_ONPREM_PRODUCTION_WILDCARD_DOMAIN" --insecure-policy=Allow --wildcard-policy=Subdomain
- Navigate to Audience > Accounts > Listing in the Admin Portal.
- Click Developer.
Save the Developer Account ID. This is the last part of the URL after
/buyers/accounts/:export ONPREM_DEVELOPER_ACCOUNT_ID=5
4.2.4. Deploying Red Hat Single Sign-On for OpenID Connect
If you are using the Hybrid - OpenID Connect (OIDC) or Semantic versioning sample pipelines, perform the steps in this section to deploy Red Hat Single Sign-On (RH-SSO) with 3scale. This is required for OIDC authentication, which is used in both samples.
Procedure
Deploy RH-SSO 7.3 as explained in the RH-SSO documentation.
The following example commands provide a short summary:
oc replace -n openshift --force -f https://raw.githubusercontent.com/jboss-container-images/redhat-sso-7-openshift-image/sso73-dev/templates/sso73-image-stream.json

oc replace -n openshift --force -f https://raw.githubusercontent.com/jboss-container-images/redhat-sso-7-openshift-image/sso73-dev/templates/sso73-x509-postgresql-persistent.json

oc -n openshift import-image redhat-sso73-openshift:1.0

oc policy add-role-to-user view system:serviceaccount:$(oc project -q):default

oc new-app --template=sso73-x509-postgresql-persistent --name=sso -p DB_USERNAME=sso -p SSO_ADMIN_USERNAME=admin -p DB_DATABASE=sso
Save the host name of your RH-SSO installation for later use:
export SSO_HOSTNAME="$(oc get route sso -o jsonpath='{.spec.host}')"- Configure RH-SSO for 3scale as explained in the 3scale Developer Portal documentation.
Save the realm name, client ID, and client secret for later use:
export REALM=3scale

export CLIENT_ID=3scale-admin

export CLIENT_SECRET=123...456
4.2.5. Installing the 3scale toolbox and enabling access
This section describes how to install the toolbox, create your remote 3scale instance, and provision the secret used to access the Admin Portal.
Procedure
- Install the 3scale toolbox locally as explained in The 3scale toolbox.
Run the appropriate toolbox command to create your 3scale remote instance:
3scale Hosted
3scale remote add 3scale-saas "https://$SAAS_ACCESS_TOKEN@$SAAS_TENANT-admin.3scale.net/"
3scale On-premises
3scale remote add 3scale-onprem "https://$ONPREM_ACCESS_TOKEN@$ONPREM_ADMIN_PORTAL_HOSTNAME/"
Run the following OpenShift command to provision the secret containing your 3scale Admin Portal and access token:
oc create secret generic 3scale-toolbox -n "$TOOLBOX_NAMESPACE" --from-file="$HOME/.3scalerc.yaml"
4.2.6. Deploying the API backends
This section shows how to deploy the example API backends provided with the sample pipelines. You can substitute your own API backends as needed when creating and deploying your own pipelines
Procedure
Deploy the example Beer Catalog API backend for use with the following samples:
-
SaaS - API key -
Hybrid - open Hybrid - OIDCoc new-app -n "$TOOLBOX_NAMESPACE" -i openshift/redhat-openjdk18-openshift:1.4 https://github.com/microcks/api-lifecycle.git --context-dir=/beer-catalog-demo/api-implementation --name=beer-catalog oc expose -n "$TOOLBOX_NAMESPACE" svc/beer-catalog
-
Save the Beer Catalog API host name for later use:
export BEER_CATALOG_HOSTNAME="$(oc get route -n "$TOOLBOX_NAMESPACE" beer-catalog -o jsonpath='{.spec.host}')"Deploy the example Red Hat Event API backend for use with the following samples:
-
Multi-environment Semantic versioningoc new-app -n "$TOOLBOX_NAMESPACE" -i openshift/nodejs:10 'https://github.com/nmasse-itix/rhte-api.git#085b015' --name=event-api oc expose -n "$TOOLBOX_NAMESPACE" svc/event-api
-
Save the Event API host name for later use:
export EVENT_API_HOSTNAME="$(oc get route -n "$TOOLBOX_NAMESPACE" event-api -o jsonpath='{.spec.host}')"
4.2.7. Deploying self-managed APIcast instances
This section is for use with APIcast self-managed instances in 3scale Hosted environments. It applies to all of the sample pipelines except SaaS - API key.
Procedure
Define your wildcard routes:
export APICAST_SELF_MANAGED_STAGING_WILDCARD_DOMAIN=saas-staging.$OPENSHIFT_ROUTER_SUFFIX

export APICAST_SELF_MANAGED_PRODUCTION_WILDCARD_DOMAIN=saas-production.$OPENSHIFT_ROUTER_SUFFIX
Deploy the APIcast self-managed instances in your project:
oc create secret generic 3scale-tenant --from-literal=password=https://$SAAS_ACCESS_TOKEN@$SAAS_TENANT-admin.3scale.net

oc create -f https://raw.githubusercontent.com/3scale/apicast/v3.5.0/openshift/apicast-template.yml

oc new-app --template=3scale-gateway --name=apicast-staging -p CONFIGURATION_URL_SECRET=3scale-tenant -p CONFIGURATION_CACHE=0 -p RESPONSE_CODES=true -p LOG_LEVEL=info -p CONFIGURATION_LOADER=lazy -p APICAST_NAME=apicast-staging -p DEPLOYMENT_ENVIRONMENT=sandbox -p IMAGE_NAME=registry.redhat.io/3scale-amp2/apicast-gateway-rhel8:3scale2.9

oc new-app --template=3scale-gateway --name=apicast-production -p CONFIGURATION_URL_SECRET=3scale-tenant -p CONFIGURATION_CACHE=60 -p RESPONSE_CODES=true -p LOG_LEVEL=info -p CONFIGURATION_LOADER=boot -p APICAST_NAME=apicast-production -p DEPLOYMENT_ENVIRONMENT=production -p IMAGE_NAME=registry.redhat.io/3scale-amp2/apicast-gateway-rhel8:3scale2.9

oc scale dc/apicast-staging --replicas=1

oc scale dc/apicast-production --replicas=1

oc create route edge apicast-staging --service=apicast-staging --hostname="wildcard.$APICAST_SELF_MANAGED_STAGING_WILDCARD_DOMAIN" --insecure-policy=Allow --wildcard-policy=Subdomain

oc create route edge apicast-production --service=apicast-production --hostname="wildcard.$APICAST_SELF_MANAGED_PRODUCTION_WILDCARD_DOMAIN" --insecure-policy=Allow --wildcard-policy=Subdomain
4.2.8. Installing and deploying the sample pipelines
After you have set up the required environments, you can install and deploy the sample pipelines using the OpenShift templates provided for each of the sample use cases in the Red Hat Integration repository. For example, this section shows the SaaS - API Key sample only.
Procedure
Use the provided OpenShift template to install the Jenkins pipeline:
oc process -f saas-usecase-apikey/setup.yaml \
           -p DEVELOPER_ACCOUNT_ID="$SAAS_DEVELOPER_ACCOUNT_ID" \
           -p PRIVATE_BASE_URL="http://$BEER_CATALOG_HOSTNAME" \
           -p NAMESPACE="$TOOLBOX_NAMESPACE" |oc create -f -
Deploy the sample as follows:
oc start-build saas-usecase-apikey
Additional resource
4.2.9. Limitations of API lifecycle automation with 3scale toolbox
The following limitations apply in this release:
- OpenShift support
- The sample pipelines are supported on OpenShift 3.11 only. OpenShift 4 is currently not supported. For more information about supported configurations, see the Red Hat 3scale API Management Supported Configurations page.
- Updating applications
-
You can use the
3scale application applytoolbox command for applications to both create and update applications. Create commands support account, plan, service, and application key. - Update commands do not support changes to account, plan, or service. If changes are passed, the pipelines will be triggered, no errors will be shown, but those fields will not be updated.
-
You can use the
- Copying services
-
When using the
3scale copy servicetoolbox command to copy a service with custom policies, you must copy the custom policies first and separately.
4.3. Creating pipelines using the 3scale Jenkins shared library
This section provides best practices for creating a custom Jenkins pipeline that uses the 3scale toolbox. It explains how to write a Jenkins pipeline in Groovy that uses the 3scale Jenkins shared library to call the toolbox based on an example application. For more details, see Jenkins shared libraries.
Red Hat supports the Jenkins pipeline samples provided in the Red Hat Integration repository.
Any modifications made to these pipelines are not directly supported by Red Hat. Custom pipelines that you create for your environment are not supported.
Prerequisites
- Deploying the sample Jenkins CI/CD pipelines.
- You must have an OpenAPI specification file for your API. For example, you can generate this using Apicurio Studio.
Procedure
Add the following to the beginning of your Jenkins pipeline to reference the 3scale shared library from your pipeline:
#!groovy

library identifier: '3scale-toolbox-jenkins@master',
   retriever: modernSCM([$class: 'GitSCMSource',
     remote: 'https://github.com/rh-integration/3scale-toolbox-jenkins.git'])
Declare a global variable to hold the
ThreescaleServiceobject so that you can use it from the different stages of your pipeline.def service = null
Create the
ThreescaleServicewith all the relevant information:stage("Prepare") { service = toolbox.prepareThreescaleService( openapi: [ filename: "swagger.json" ], environment: [ baseSystemName: "my_service" ], toolbox: [ openshiftProject: "toolbox", destination: "3scale-tenant", secretName: "3scale-toolbox" ], service: [:], applications: [ [ name: "my-test-app", description: "This is used for tests", plan: "test", account: "<CHANGE_ME>" ] ], applicationPlans: [ [ systemName: "test", name: "Test", defaultPlan: true, published: true ], [ systemName: "silver", name: "Silver" ], [ artefactFile: "https://raw.githubusercontent.com/my_username/API-Lifecycle-Mockup/master/testcase-01/plan.yaml"], ] ) echo "toolbox version = " + service.toolbox.getToolboxVersion() }-
openapi.filenameis the path to the file containing the OpenAPI specification. -
environment.baseSystemNameis used to compute the finalsystem_name, based onenvironment.environmentNameand the API major version from the OpenAPI specificationinfo.version. -
toolbox.openshiftProjectis the OpenShift project in which Kubernetes jobs will be created. -
toolbox.secretNameis the name of the Kubernetes secret containing the 3scale toolbox configuration file, as shown in Installing the 3scale toolbox and enabling access. -
toolbox.destinationis the name of the 3scale toolbox remote instance. -
applicationPlansis a list of application plans to create by using a.yamlfile or by providing application plan property details.
-
Add a pipeline stage to provision the service in 3scale:
stage("Import OpenAPI") {
  service.importOpenAPI()
  echo "Service with system_name ${service.environment.targetSystemName} created !"
}
Add a stage to create the application plans:
stage("Create an Application Plan") {
  service.applyApplicationPlans()
}
Add a global variable and a stage to create the test application:
stage("Create an Application") {
  service.applyApplication()
}
Add a stage to run your integration tests. When using APIcast Hosted instances, you must fetch the proxy definition to extract the staging public URL:
stage("Run integration tests") {
  def proxy = service.readProxy("sandbox")
  sh """set -e +x
  curl -f -w "ListBeers: %{http_code}\n" -o /dev/null -s ${proxy.sandbox_endpoint}/api/beer -H 'api-key: ${service.applications[0].userkey}'
  curl -f -w "GetBeer: %{http_code}\n" -o /dev/null -s ${proxy.sandbox_endpoint}/api/beer/Weissbier -H 'api-key: ${service.applications[0].userkey}'
  curl -f -w "FindBeersByStatus: %{http_code}\n" -o /dev/null -s ${proxy.sandbox_endpoint}/api/beer/findByStatus/   available -H 'api-key: ${service.applications[0].userkey}'
  """
}
Add a stage to promote your API to production:
stage("Promote to production") {
  service.promoteToProduction()
}
Additional resources
4.4. Creating pipelines using a Jenkinsfile
This section provides best practices for writing a custom Jenkinsfile from scratch in Groovy that uses the 3scale toolbox.
Red Hat supports the Jenkins pipeline samples provided in the Red Hat Integration repository.
Any modifications made to these pipelines are not directly supported by Red Hat. Custom pipelines that you create for your environment are not supported. This section is provided for reference only.
Prerequisites
- Deploying the sample Jenkins CI/CD pipelines.
- You must have an OpenAPI specification file for your API. For example, you can generate this using Apicurio Studio.
Procedure
Write a utility function to call the 3scale toolbox. The following creates a Kubernetes job that runs the 3scale toolbox:
#!groovy

def runToolbox(args) {
  def kubernetesJob = [
    "apiVersion": "batch/v1",
    "kind": "Job",
    "metadata": [
      "name": "toolbox"
    ],
    "spec": [
      "backoffLimit": 0,
      "activeDeadlineSeconds": 300,
      "template": [
        "spec": [
          "restartPolicy": "Never",
          "containers": [
            [
             "name": "job",
             "image": "registry.redhat.io/3scale-amp2/toolbox-rhel7:3scale2.9",
             "imagePullPolicy": "Always",
             "args": [ "3scale", "version" ],
             "env": [
               [ "name": "HOME", "value": "/config" ]
             ],
             "volumeMounts": [
               [ "mountPath": "/config", "name": "toolbox-config" ],
               [ "mountPath": "/artifacts", "name": "artifacts" ]
              ]
            ]
          ],
          "volumes": [
            [ "name": "toolbox-config", "secret": [ "secretName": "3scale-toolbox" ] ],
            [ "name": "artifacts", "configMap": [ "name": "openapi" ] ]
          ]
        ]
      ]
    ]
  ]

  kubernetesJob.spec.template.spec.containers[0].args = args

  sh "rm -f -- job.yaml"
  writeYaml file: "job.yaml", data: kubernetesJob

  sh """set -e
  oc delete job toolbox --ignore-not-found
  sleep 2
  oc create -f job.yaml
  sleep 20 # Adjust the sleep duration to your server velocity
  """

  def logs = sh(script: "set -e; oc logs -f job/toolbox", returnStdout: true)
  echo logs
  return logs
}
Kubernetes object template
This function uses a Kubernetes object template to run the 3scale toolbox, which you can adjust to your needs. It sets the 3scale toolbox CLI arguments and writes the resulting Kubernetes job definition to a YAML file, cleans up any previous run of the toolbox, creates the Kubernetes job, and waits:
-
You can adjust the wait duration to your server velocity to match the time that a pod needs to transition between the
Createdand theRunningstate. You can refine this step using a polling loop. -
The OpenAPI specification file is fetched from a
ConfigMapnamedopenapi. -
The 3scale Admin Portal hostname and access token are fetched from a secret named
3scale-toolbox, as shown in Installing the 3scale toolbox and enabling access. -
The
ConfigMapwill be created by the pipeline in step 3. However, the secret was already provisioned outside the pipeline and is subject to Role-Based Access Control (RBAC) for enhanced security.
-
You can adjust the wait duration to your server velocity to match the time that a pod needs to transition between the
Define the global environment variables to use with 3scale toolbox in your Jenkins pipeline stages. For example:
3scale Hosted
def targetSystemName = "saas-apikey-usecase"
def targetInstance = "3scale-saas"
def privateBaseURL = "http://echo-api.3scale.net"
def testUserKey = "abcdef1234567890"
def developerAccountId = "john"
3scale On-premises
When using self-managed APIcast or an on-premises installation of 3scale, you must declare two more variables:
def publicStagingBaseURL = "http://my-staging-api.example.test"
def publicProductionBaseURL = "http://my-production-api.example.test"
The variables are described as follows:
-
targetSystemName: The name of the service to be created. -
targetInstance: This matches the name of the 3scale remote instance created in Installing the 3scale toolbox and enabling access. -
privateBaseURL: The endpoint host of your API backend. -
testUserKey: The user API key used to run the integration tests. It can be hardcoded as shown or generated from an HMAC function. -
developerAccountId: The ID of the target account in which the test application will be created. -
publicStagingBaseURL: The public staging base URL of the service to be created. -
publicProductionBaseURL: The public production base URL of the service to be created.
-
Add a pipeline stage to fetch the OpenAPI specification file and provision it as a
ConfigMapon OpenShift as follows:node() { stage("Fetch OpenAPI") { sh """set -e curl -sfk -o swagger.json https://raw.githubusercontent.com/microcks/api-lifecycle/master/beer-catalog-demo/api-contracts/beer-catalog-api-swagger.json oc delete configmap openapi --ignore-not-found oc create configmap openapi --from-file="swagger.json" """ }Add a pipeline stage that uses the 3scale toolbox to import the API into 3scale:
3scale Hosted
stage("Import OpenAPI") {
  runToolbox([ "3scale", "import", "openapi", "-d", targetInstance, "/artifacts/swagger.json", "--override-private-base-url=${privateBaseURL}", "-t", targetSystemName ])
}
3scale On-premises
When using self-managed APIcast or an on-premises installation of 3scale, you must also specify the options for the public staging and production base URLs:
stage("Import OpenAPI") {
  runToolbox([ "3scale", "import", "openapi", "-d", targetInstance, "/artifacts/swagger.json", "--override-private-base-url=${privateBaseURL}", "-t", targetSystemName, "--production-public-base-url=${publicProductionBaseURL}", "--staging-public-base-url=${publicStagingBaseURL}" ])
}
Add pipeline stages that use the toolbox to create a 3scale application plan and an application:
stage("Create an Application Plan") {
  runToolbox([ "3scale", "application-plan", "apply", targetInstance, targetSystemName, "test", "-n", "Test Plan", "--default" ])
}

stage("Create an Application") {
  runToolbox([ "3scale", "application", "apply", targetInstance, testUserKey, "--account=${developerAccountId}", "--name=Test Application", "--description=Created by Jenkins", "--plan=test", "--service=${targetSystemName}" ])
}
stage("Run integration tests") { def proxyDefinition = runToolbox([ "3scale", "proxy", "show", targetInstance, targetSystemName, "sandbox" ]) def proxy = readJSON text: proxyDefinition proxy = proxy.content.proxy sh """set -e echo "Public Staging Base URL is ${proxy.sandbox_endpoint}" echo "userkey is ${testUserKey}" curl -vfk ${proxy.sandbox_endpoint}/beer -H 'api-key: ${testUserKey}' curl -vfk ${proxy.sandbox_endpoint}/beer/Weissbier -H 'api-key: ${testUserKey}' curl -vfk ${proxy.sandbox_endpoint}/beer/findByStatus/available -H 'api-key: ${testUserKey}' """ }Add a stage that uses the toolbox to promote the API to your production environment.
stage("Promote to production") {
  runToolbox([ "3scale", "proxy", "promote", targetInstance,  targetSystemName ])
}
Additional resources